All Activity
- Yesterday
-
Introduction I’m sure by now that we are all aware of the coming changes to Secure boot certificates as documented by Microsoft here. To cut a long story short, when Secure Boot was introduced by Microsoft back in 2011 or so, they secured it with some default certificates which are set to expire in June 2026. Secure boot checks the bootloader and verifies it’s digital signature, if it’s trusted it allows it to run, otherwise it blocks it, which is a good way of blocking rootkits, bootkits and other low-level firmware attacks. Historically speaking Secure boot became part of UEFI 2.0 specification in January 2006, but Microsoft started rolling it out in 2011 including distributing the first Secure Boot signing certificates in 2011. These were later released to mainstream computers with the release of Windows 8 in October, 2012 where Microsoft required OEMs (Original Equipment Manufacturers) to enable Secure boot and ship systems with UEFI mode enabled. The original 2011 secure boot certificates were designed with a 15 year lifecycle, and in 2023 Microsoft introduced new 2023 certificate authorities. So here we are, all those years later, updating the bios (firmware) of modern laptops and desktops to ensure that they are capable of updating/supporting the new certificates prior to them expiring. There are plenty of good blog posts out there today showing you how to best deal with the Secure Boot certificate problem, but they are really focusing on supported, modern hardware, below are some examples. https://blog.mindcore.dk/2026/04/secure-boot-certificate-update-intune/ https://joymalya.com/intune-secure-boot-2023-certificate-update-rollout-part-1/ https://pureinfotech.com/windows-11-secure-boot-certificates-expiring-june-2026/ https://techcommunity.microsoft.com/blog/windows-itpro-blog/secure-boot-playbook-for-certificates-expiring-in-2026/4469235#community-4469235-_option2 What about older hardware ? But where does that leave older hardware that does support UEFI and secure boot, and should they be turned off/disposed of ? Security experts would most likely say yes to the latter question as they’d be wide open to rootkits/bootkits which is a painful reality when you consider the cost of new computers today thanks to the AI boom. I’m actually writing this article on an old Lenovo T570, which technically is old, it was released in 2017, but has been updated with Windows 11 25H2, and 32GB ram. It’s not the snappiest but it works fine for what I need. I looked at Microsoft Intune’s infamous secure boot status report and it showed me lots of red x’s for my older hardware even though I was already pushing out remediation scripts in my Intune lab to deal with the Secure boot certificates expiry mess. The following were looking sad: Lenovo T570 Dell Optiplex 9020 Microsoft Surface Pro 2 You can access this report in the Intune console by clicking on Reports, Windows Autopatch, Windows quality updates, Reports, and finally selecting the secure boot status report. You can see the details of the report that I ran below, the green arrow shows my Lenovo T570 is not up to date for any of the 4 certificates listed in the report. So I posted a tweet on Twitter (yeah, that’s what I call it) and got some instant feedback, which is the reason for this blog post. In the screenshot below you can see when the bios was last updated on my Lenovo (2024). Fellow MVP, Mike Terrill responded with some great advice. You should still be able to push the certs into the active db. However, the default db wouldn’t get the updated certs. If you did a factory restore of the bios, then the active ones would be replaced and need to be installed again. And he included some Powershell examples from his talk at MMS. I’m including his Powershell code below. All credit to Mike Terill and Gary Blok (I believe). $SecureBootRegPath = 'HKLM:\SYSTEM\CurrentControlSet\Control\SecureBoot' New-ItemProperty -path $SecureBootRegPath -name "AvailableUpdates" -PropertyType dword -Value 0x1844 -Force Start-ScheduledTask -taskname '\Microsoft\Windows\PI\Secure-Boot-Update' #verify get-securebootuefi -decoded -name DB | Where-Object {$_.Subject -match "2023"} | Select subject get-securebootuefi -decoded -name KEK | Where-Object {$_.Subject -match "2023"} | Select subject So basically I ran the code above on my Lenovo T570 (from an elevated prompt) and the results were interesting. Below we add a reg key and trigger a scheduled task. The registry value tells Windows to deploy all available certificate updates as documented here and/or here (thanks Jon). and reveal the certificate status after a reboot To my joy, the following day the secure boot status report looked much much better for my Lenovo. Success! thanks Mike! I also got info from another Twitter user and he advised me to look here for some additional advice for patching older systems. https://www.elevenforum.com/t/garlins-powershell-scripts-for-updating-secure-boot-ca-2023.43423/ I did of course try the same method on some other old computers (Microsoft Surface Pro 2, Dell Optiplex 9020) and while it had some success with some of the certs, it couldn’t update the Microsoft Corporation KEK 2K CA 2023 certificate. According to Copilot this was because the firmware on the Dell and Surface, was just too old. Perhaps, perhaps. But then why did my Surface Book 2, which has a firmware (bios) date of wait for it, 2015 update all of the 4 certificates without any issue. That remains to be seen. I’ll update this blog post as I learn more, I definitely don’t want to ‘trash’ some old computers just because their secure boot certificates can’t get updated, worst case scenario I’ll convert them to Linux. On My Surface Pro 2 it updates 3 out of 4, the 4th being the missing KEK certificate, just like on the Dell. Looking in the SYSTEM event viewer, Event ID 1803 is showing every time I trigger the scheduled task from the Powershell script. That links me to this: Understanding Secure Boot Events 1802 and 1803 – Microsoft Support Learn more Finally, if you want to learn more aboute this subject (better late than never) take a look at this Patch My PC webinar, or Johan Arwidmarks free training on the subject: https://patchmypc.com/events/secure-boot-2026-are-you-actually-covered/ https://academy.viamonstra.com/courses/mini-course-secure-boot-2026 Summary Windows Autopatch on it’s own is not enough for getting these systems up-to-date with regards to the Secure boot certificate expiry. There are remediation scripts which definetly help, but they are mostly aimed at modern hardware. Thankfully, you can update some older hardware by using the example script above, either manually or push it out via Intune/ConfigMgr after you have of course ensured that the bios version is the latest available and that Windows is up-to-date. Thanks again to Mike, the beer is on me at MMS in October
- Last week
-
 contact me on Teams, and i'll see if i have some time > niall@windowsnoob.com
 -
 Hi, my SCCM Server does not work fine like before many years. I want to building a new SCCM server from scratch can I still use the old container (called System Management) and delegate control by adding the new server without necessarily extending the AD schema? Could I let running it the old SCCM server and install a new one fresh instillation of SCCM Server? Regards Nick
 -
Hi Nail, I have a big issue with ADRs on the SCCM with monthly Windows updates. On the client machine the download does not work or stucking by 0% or waiting for install. I'm really desperate, do have time for a remote session? Thank you Nick
-
pros versus cons means what is positive about the solution (pros) and what is negative about it (cons)
-
Pros and Cons. It means, I do not to run Cons?
- Earlier
-
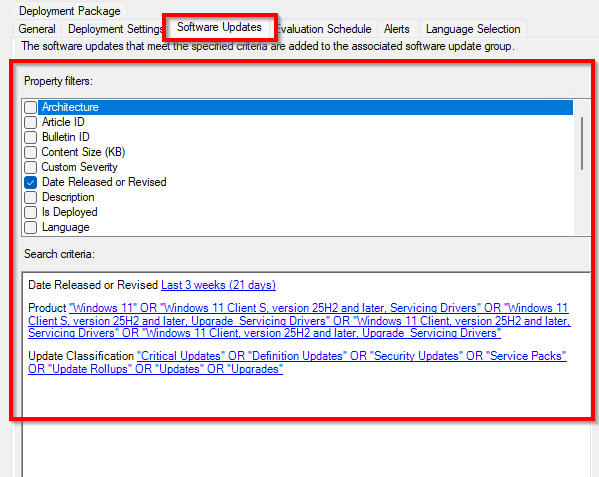
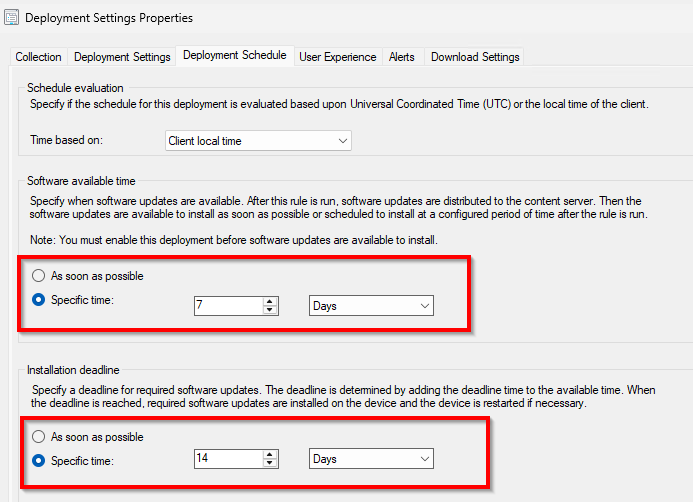
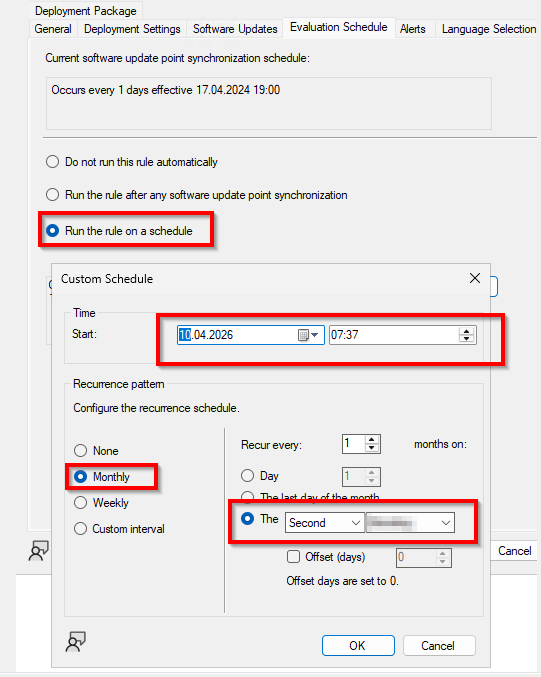
Hi, I have created some ADRs for Windows Server and Clients Updates with following settings Software Updates Deployment Schedule If I understand this option correctly, it should run automatically after 7 Days and deploy it to Distribution Server Evaluation Schedule, every month on second Tuesday Could you tell me please why it is not running automatically evey month? What is here wrong? Thank you Regards
-
only what i posted directly above, which explains it quite well.
-
Hi, I have created a ADR for Windows Defender to deploy every day the new security intelligence update on Windows Client and Windows Server. It works fine, but only one machine (windows server 2025) does not get the security intelligence update. But if I go the device and proprieties, I see on the Deployment, the security intelligence update is there, but not install. How and where check it why? Regards
-
Yes I want only have the WSUS Server to convert to HTTPS Do have a Guide step by step?
-
if you are only talking about the WSUS server then the following could be possible, but messy. Short answer: Yes, you can enable HTTPS on a WSUS server without a full PKI infrastructure, but you still need some form of certificate, and the approach has trade‑offs. 🔐 What WSUS requires for HTTPS WSUS itself doesn’t require a Microsoft AD CS / enterprise PKI. It only requires: An SSL certificate bound in IIS to the WSUS website Clients that trust that certificate So the real question is not “PKI or not,” but how you issue and trust the certificate. ✅ Your main options without PKI 1. Self-signed certificate (most common workaround) You can generate a self-signed cert directly on the WSUS server. Steps: New-SelfSignedCertificate -DnsName wsus.yourdomain.local -CertStoreLocation Cert:\LocalMachine\My Then: Bind it in IIS to the WSUS Administration site Configure WSUS to require SSL: & "C:\Program Files\Update Services\Tools\wsusutil.exe" configuressl wsus.yourdomain.local ✅ Pros No PKI needed at all Quick and simple ❌ Cons Clients won’t trust it automatically You must manually or via GPO: Export the cert Deploy it to Trusted Root Certification Authorities on all clients 2. Public certificate (rare for WSUS, but possible) If your WSUS server has a publicly resolvable name, you can use a certificate from a public CA (e.g., DigiCert, Let’s Encrypt). ✅ Pros Already trusted by clients No GPO distribution needed ❌ Cons Usually not practical (WSUS is internal) DNS + internet validation required 3. Private CA alternative (lightweight, not full PKI) If you don’t want “full PKI,” you can still: Stand up a minimal AD CS (even temporary) Or use tools like: OpenSSL CA Small internal CA solution This is technically “PKI,” but much lighter than a full enterprise deployment. ⚠️ Critical things people overlook 1. WSUS only secures metadata, not update binaries Even with HTTPS: Update content can still download over HTTP This is by design (Microsoft signs updates) So HTTPS mainly protects: Client ↔ WSUS communication Metadata integrity in transit 2. Required IIS configuration WSUS does not require SSL on all virtual directories. You should: Require SSL on: SimpleAuthWebService DSSAuthWebService ServerSyncWebService APIRemoting30 ClientWebService Do NOT require SSL on: Content Selfupdate 3. Group Policy must be updated After switching to HTTPS: Specify intranet Microsoft update service location Change: http://wsus:8530 To: https://wsus:8531 4. Firewall and ports Default WSUS HTTPS port: 8531 Ensure clients can reach it ✅ Recommended approach (real-world) If you truly don’t want a PKI: 👉 Use a self-signed certificate + GPO distribution This is the most common setup in smaller environments. 🧠 Bottom line ✅ You do NOT need a full PKI infrastructure ✅ You DO need a certificate ⚠️ The key requirement is certificate trust on clients
-
it is a lot of work, are you sure, I cannot convert only Wsus Server to HTTPS?
-
you can't convert from http to https without a pki infrastructure in place first. Moving to https means you need something to deliver and create those certificates, that's where the PKI infrastructure comes into play. There is something from Microsoft called enhanced http, but that's not the same thing, you can read about it here: https://learn.microsoft.com/en-us/intune/configmgr/core/plan-design/hierarchy/enhanced-http so if you truly want your SCCM and WSUS infrastructure and clients to operate in PKI (https) mode, then you'll need a PKI infrastructure in place, it's not that hard to setup if you follow my detailed guides. Test in a lab first !! below is the response from Copilot on this subject Short answer: No — you can’t properly convert SCCM (Configuration Manager) from HTTP to HTTPS without a PKI infrastructure. Why PKI is required SCCM’s HTTPS mode relies entirely on certificates for: Client authentication Site system role authentication (MP, DP, SUP, etc.) Encrypted communication between clients and site systems These certificates must come from a trusted Certification Authority (CA). That’s exactly what a PKI provides. Without it, SCCM has no trusted mechanism to validate identities. What happens if you try without PKI Clients won’t trust the management point Authentication will fail You’ll see certificate or communication errors (MP unreachable, client not approved, etc.) Core features like software deployment and inventory break Your realistic options ✅ Option 1 — Stay on HTTP (not recommended long-term) Works without PKI Less secure (deprecated in modern environments) Microsoft is pushing away from this model ✅ Option 2 — Use Enhanced HTTP (recommended middle ground) Does NOT require full PKI Uses self-signed certificates automatically managed by SCCM Provides encryption and improved security compared to HTTP Much easier to implement 👉 This is what most organizations do if they don’t have PKI. ✅ Option 3 — Build PKI and move to full HTTPS Requires: Active Directory Certificate Services (AD CS) Certificate templates (client auth, web server, etc.) Deployment of certs to clients and servers Most secure and fully featured option Recommendation If you currently have no PKI: Enable Enhanced HTTP first Plan PKI deployment separately Later transition to full HTTPS when ready Summary Mode Requires PKI Security Level Notes HTTP ❌ Low Deprecated direction Enhanced HTTP ❌ Medium Best without PKI Full HTTPS ✅ High Requires PKI
-
No I dont have pki infrastructure in place, I want only to convert or to change the WSUS Server from HTTP to HTTPS. An I have to be sure that after convert the WSUS and SCCM does work together for SUP and Windows Updates. What should I do for WSUS Server on the SCCM and for all Clients machine? Thank you for help
-
you haven't stated if you have a pki infrastructure in place, do you ? if not you'll need to set that up also, see > to convert SCCM and WSUS services to HTTPS i cover the process here, my recommendation is test this in a lab first and/or hire a pki consultant to assist with the job
-
Hi, I have a SCCM Server with WSUS Server on the same machine with Windows Server 2025. Now I want to change the WSUS Server from http to https. Is that easy or is there any step by step guide? I have to be 100% sure after change from HTTP to HTTPS, my SCCM and WSUS Server work fine Regards Keywan
-
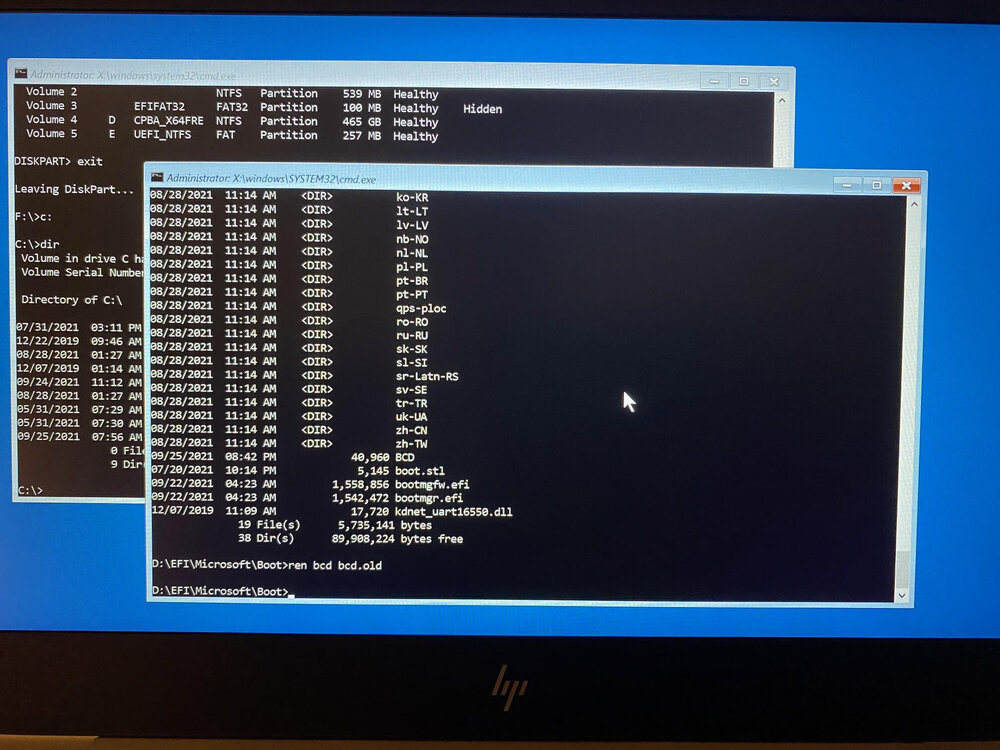
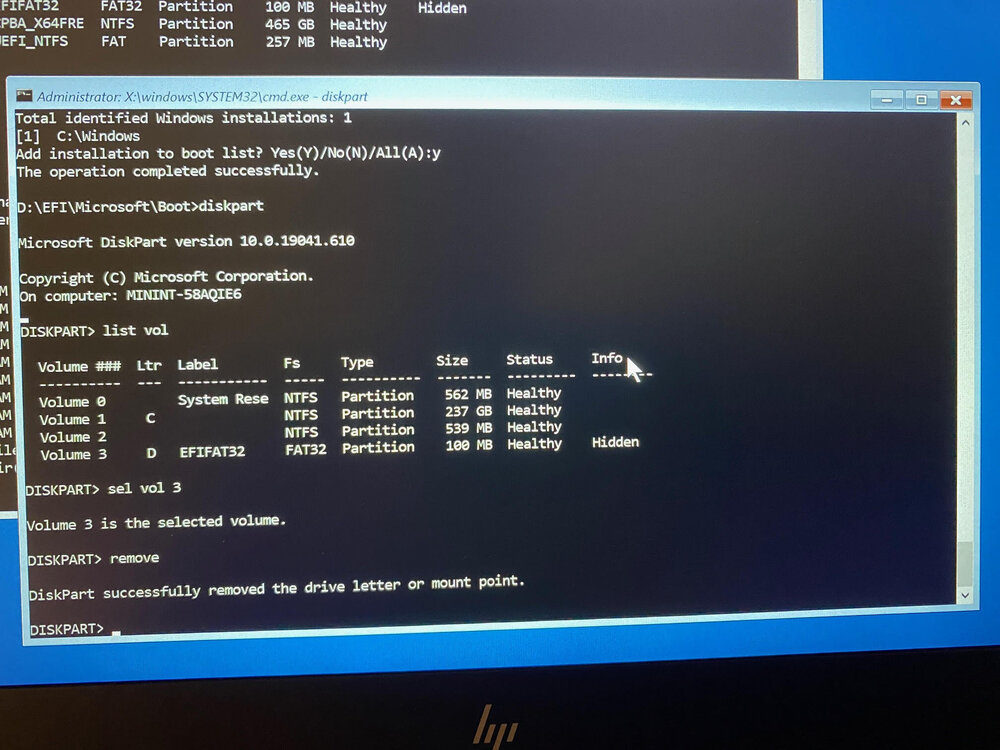
Introduction I bought a second hand replacement laptop for a mis-behaving Surface Pro 4 (jittery screen) and to save my time (the computer wasn’t mine) I decided to image it. Anyway, long story short, after I restored 82GB of data on the target laptop (HP 830 G5), I tried to boot it but got a HP bios error stating something like no operating system found, please reinstall the operating system. So I booted from some usb based Windows installation media and checked the partitions, all the data was there, Windows was there, it all looked good but obviously the boot loader was broken. I googled and found the following suggestions. Bootrec /fixmbr Bootrec /fixboot (Note: If this fails with access denied try BOOTSECT /NT60 SYS and then issue the command again) Bootrec /scanos Bootrec /rebuildbcd The problem however, is that after issuing Bootrec /rebuildbcd it stated “Total identified Windows installations: 0” which of course, didn’t leave me feeling super confident that this would work. The value should be 1 at a minimum. Another quick google and the advice out there all stated something like the following… bcdedit /export C:\BCD_Backup C: cd boot But that gave me the following error “The system cannot find the path specified” because there was no C:\boot folder. This folder doesn’t exist as this computer (Windows 10) is UEFI based and not legacy based as I guess the gazillion guides out there assumed. Due to the format change (legacy versus UEFI) this computer uses an EFI partition to store the boot files, but that partition doesn’t have a drive letter and the path to the BCD is different to all the guides out there, so how do you fix that ? To find the efi partition, boot from the Windows installation disc, and select Install. Next click on Repair your computer then select ->Advanced Options ->Troubleshoot ->Command Prompt. Once done, launch diskpart and then select the disk on your computer (most likely disk 0) like so diskpart sel disk 0 list vol that will show you the partitions on your computer. Then I selected each of the two SYSTEM partitions, and assigned a drive letter to them so I could view the files on them using sel vol x (where x is the volume number) assign After assigning a drive letter and exiting diskpart I could browse to that drive in another command prompt by typing it’s drive letter, for example: D: and view the files on it using: DIR I did this a few times to identify the correct drive, after I was done with that drive I removed the drive letter in the diskpart command prompt using: remove Once I identified the EFI partition I navigated to where the bcd files were located using: cd D:\EFI\Microsoft\Boot and that path was D:\EFI\Microsoft\Boot as shown below, note your EFI partition may end up on a different drive letter using the ASSIGN command. Now that I found the BCD, shown above, I removed the SYSTEM, READ ONLY and HIDDEN attributes from it before renaming it to bcd.old and then rebuilt the BCD. attrib bcd -s -h -r ren bcd bcd.old bootrec /RebuildBcd And that was it , all I had to do before rebooting was to un-assign the drive letter using the remove command. and finally, reboot the computer cleanly using wpeutil reboot I hope you found this useful, if you do please leave a comment and share this with others cheers niall
-

Hiding Apps in Software Center after Install
Abnrangerx67 replied to guyver78's topic in Configuration Manager 2012
I know this is old, but I think you can achieve what you want by using a query to populate the targeting collection for devices that do not have the application. Once the application is installed, and policy runs, the devices would no longer fit that criteria and should drop out of the collection. The other option is to just be vigilant that once installation completes, you manually remove them from the respective collections. -
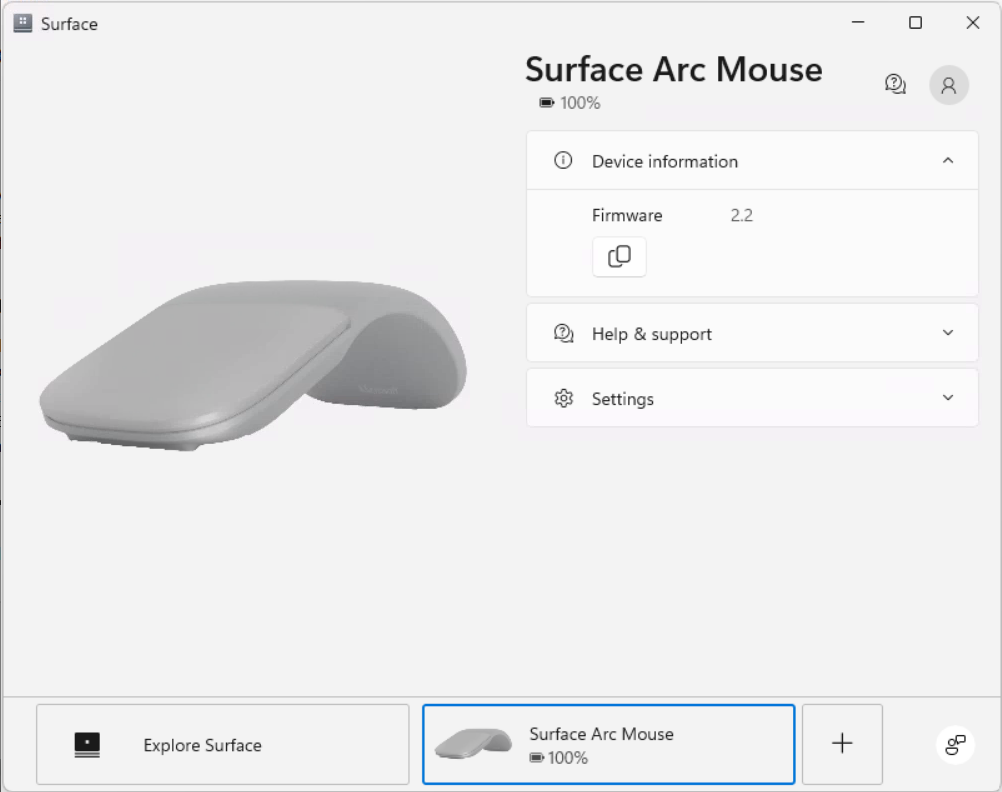
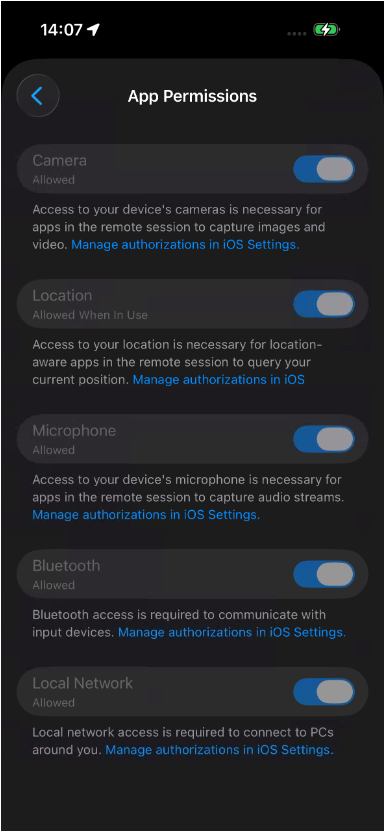
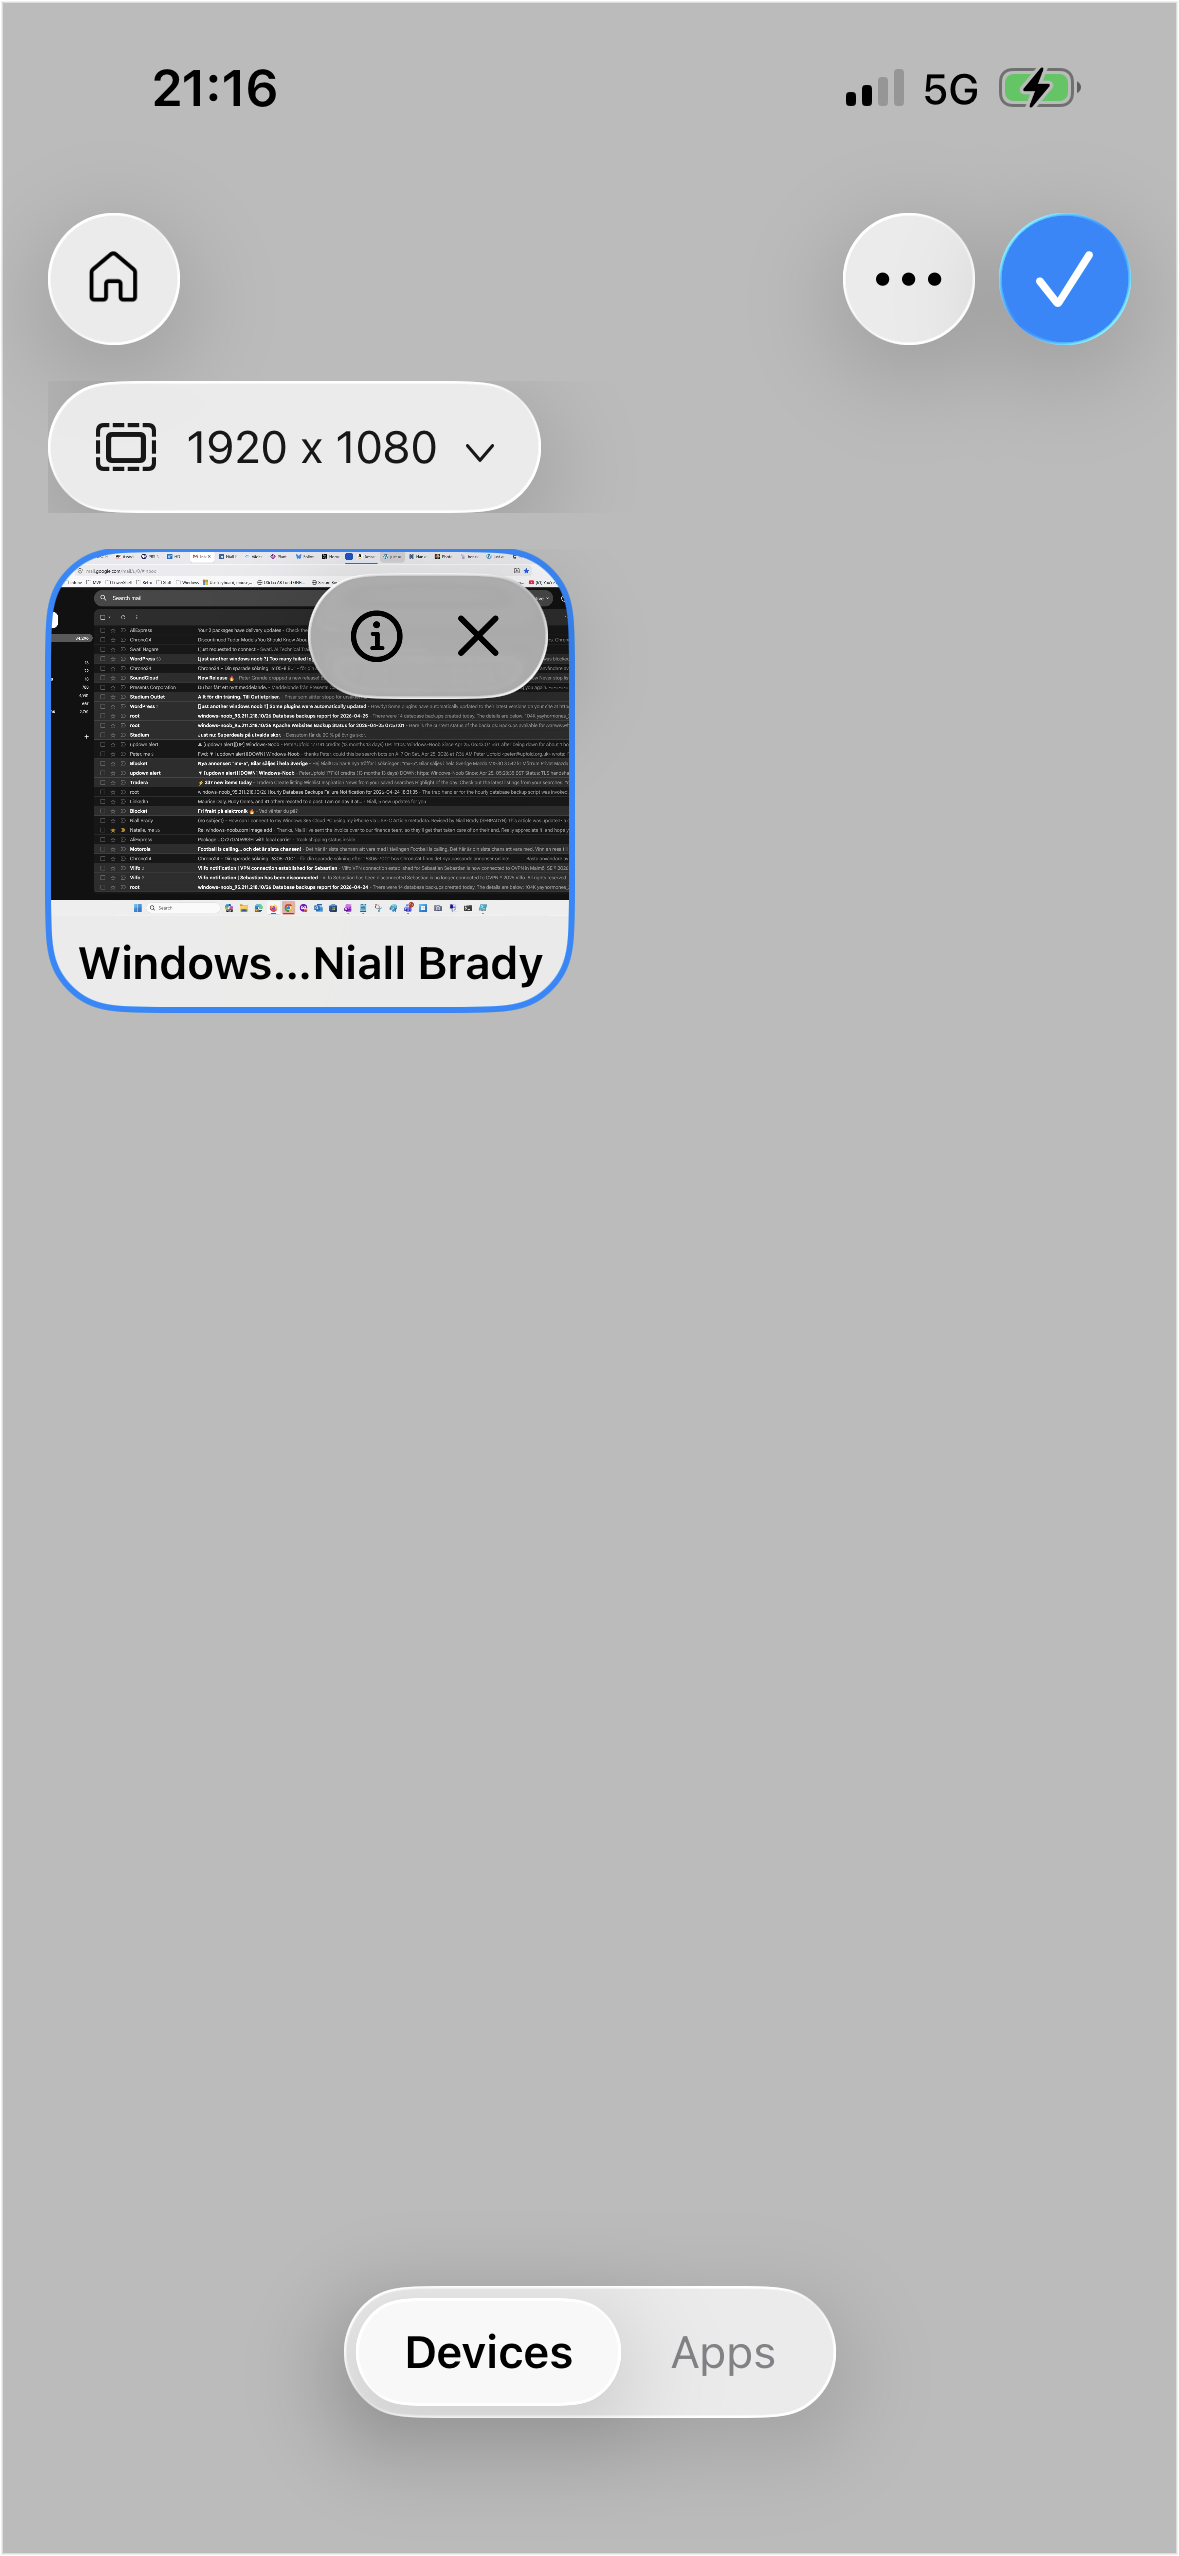
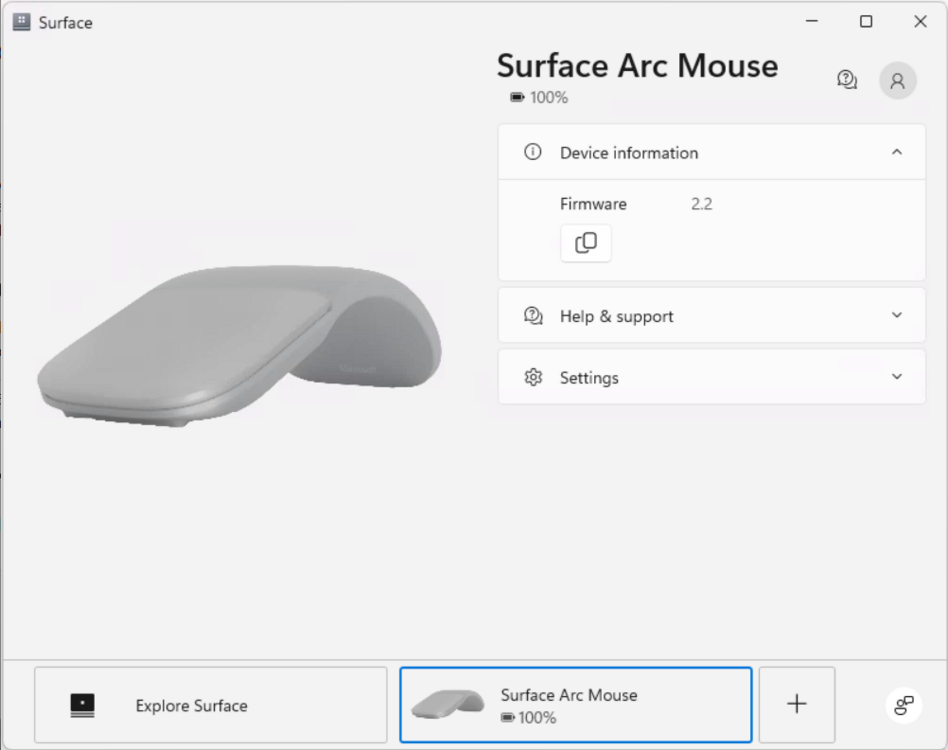
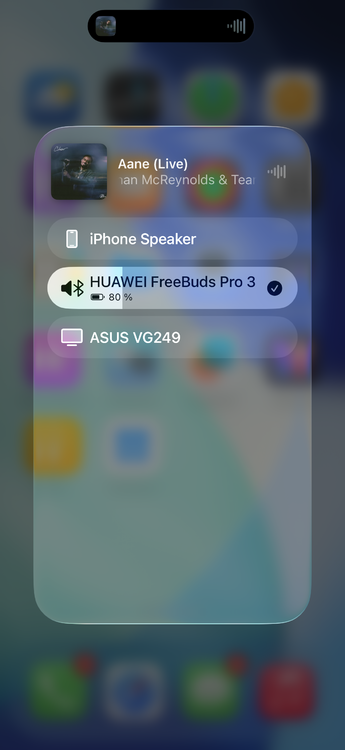
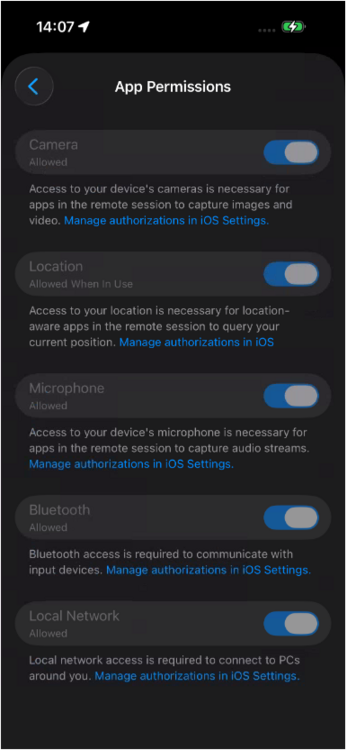
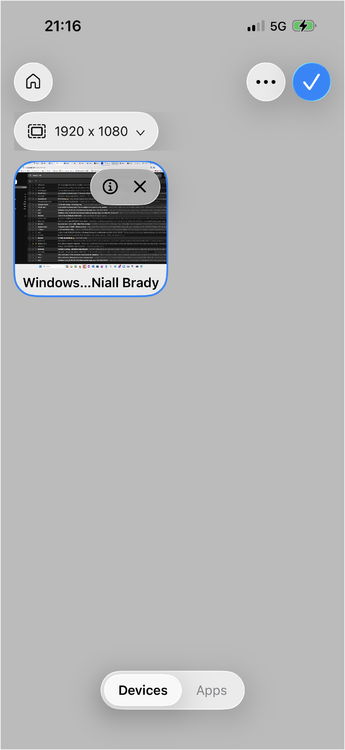
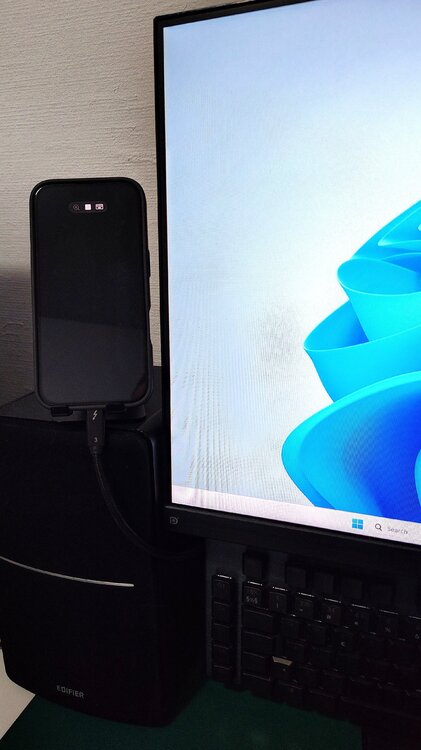
Introduction Microsoft released an update to Windows 365 recently that allows iPhone users to control the mouse via bluetooth when connected via a USB-C connected iPhone. In this blog post myself and my MVP buddy Paul Winstanley look at the new feature, review it’s capabilities, take it for a spin and give our thoughts. We previously tested accessing Cloud PC’s from a USB-C connected iPhone docked to a HP E-24M docking station/monitor combo, but the experience was not good as the only mouse support at that time was using the iPhone’s screen as a touchpad. Paired bluetooth mice did not work and neither did USB connected mice. Now however, Microsoft have solved that problem, at least if you use their mouse. This blog post is broken down into the following sections: Prerequisites Optional Extras Updating the firmware Pairing bluetooth devices Install the Windows app Configure Windows app permissions Configuring Auto-lock on the phone Connecting to your Cloud PC Video meetings Multi-monitor support Summary So let’s get started! Prerequisites As usual there are some prerequisites highlighted below: The Enterprise user must be licensed for Windows 365, Intune and Entra ID P1. Compatible Microsoft bluetooth mouse as documented here. Apple iPhone 15, 16 or 17 with USB-C support Optional extras to make the experience even better include: A monitor or docking solution capable of USB-C connection A bluetooth or USB connected keyboard A bluetooth headset A stand to support your iPhone while docked Updating the firmware Once you meet the prerequisites all you need to do is ensure the firmware of your supported Microsoft mouse is updated on a Windows PC to version 2.2 or later before starting. Download the firmware from here and verify the version of the firmware on a Windows PC via the Surface app. The strange thing about updating the firmware is you must first install the MSI (elevated), restart the computer then pair the mouse to the Windows computer, then wait 10 minutes for it to update. It’s all in the instructions. To verify the firmware version, install the Microsoft Surface app on that Windows computer, and you’ll see the firmware version in that app. If it doesn’t update, close and then re-open the app. Pairing bluetooth devices Now that the Microsoft Arc mouse firmware is up to date, simply pair it with your iPhone. Once done, you can optionally pair a bluetooth keyboard or use a USB keyboard plugged into the HP dock (monitor) and pair your bluetooth headset. Note: Even when you pair a bluetooth headset to your iPhone, when it’s connected via USB-C to a dock or external monitor it behaves differently and will always want to default to the audio capabilities of the docked monitor via USB-C. What this means in practice is that after you’ve docked to the HP monitor with your iPhone, and playback audio, the audio will come from the speakers in the monitor. To solve this, from the top right of the iPhone swipe down to show the widgets menu. Select the audio playback widget (top right of this screen). Click the speaker output option and finally, select your bluetooth headset. Install the Windows app At this point, install the Windows app from the Apple App Store if you haven’t already done so. Once installed click on + in the Windows app to add your work account, that will give you access to any Cloud PC’s provisioned for your account. After adding your work account, any Cloud PC’s made available to your account will show in the Windows app. Note: The notifications icon in the Windows app is useful to keep track of, click on it to see what it’s alerting you to. Configuring Windows app permissions In the newly installed Windows app, click on your username photo in the top left and select App permissions, flip the following settings to On. Camera Location Microphone Bluetooth Local network Configure Auto-lock on the iPhone On your phone, you may want to configure screen lock from the default 30 seconds to 5 minutes while using your Cloud PC, otherwise when your iPhone locks the screen you’ll be disconnected from your Cloud PC session. Below is what you’ll see when the iPhone screen locks. To configure it, open settings, Display and Brightness and scroll down to Auto-lock. Set it to your desired timeout and if necessary, but don’t forget to revert it after you are finished with the Cloud PC. For security reasons never leave your phone unattended when this is set this way. Connecting to your Cloud PC To connect to your cloud PC, once the above is done, simply plug in the USB-C cable from your docking solution/USB-C monitor. On your iPhone, open the Windows app, and click on your Cloud PC. It will appear on your HP monitor, but most likely in an incorrect resolution. To use the correct resolution, you’ll need to configure the resolution settings in your Windows app by clicking on the Windows icon and selecting the appropriate resolution, usually 1920×1080, or configure the desired resolution in the Windows app by clicking on your username photo, and selecting the option there. Video meetings To have a video meeting in Microsoft Teams, you must use the camera in your iPhone. Camera’s built into monitors or docking monitors are not supported, therefore you’ll probably want a stand to support your iPhone in a suitable location. Once the phone is placed in a suitable spot, you can use the phone's camera for Teams/Webex/Zoom meetings. Multimonitor support This solution only supports one monitor, the monitor that you are currently connected to. Dual monitors are not supported for this scenario. If you require dual or more monitors use a Windows computer with the Windows app, or macOS. Summary We were left very impressed, being able to work by simply bringing your iPhone to a desk that has a docking station with the Microsoft Arc mouse is actually a killer feature. You can absolutely work using this setup, and even receive phone calls on your phone while working on the Cloud PC. But while this is definitely a huge step forward for using your Cloud PC via an iPhone, there are still some gaps that hopefully will be solved in the future. We summarize them below: We would like to see the ability to use any popular bluetooth mouse (such as the Logitech MX Master) which allow connections from up to 3 different devices. The Microsoft Surface Arc mouse can only connect to one device and it does not feel as professional as the Logitech mice. We would also like to see better security or options regarding the auto-lock feature of the iPhone screen, in conjunction with the connection to your Cloud PC. Once the screen locks on your iPhone, it instantly disconnects your Windows 365 session which makes working hard/frustrating. Setting the timeout to 5 minutes or never helps, but it’s a security risk in an Enterprise. Also, why does the iPhone forget your chosen external resolution every time you connect, can’t we set that in the Windows app and make it stick? Thanks Microsoft for yet another update to Windows 365, this one really is well worth checking out. Highly recommended and a genuine use-case here! see you in the next one, Niall & Paul


-
Hi, I am not sure but since one month my ADR for monthly Windows update does not work. I see the KB deployed to the client machine, but on the Software Center tuck at Downloading (0% complete). All Applications can be downloaded and install it, only Windows Update does not work I restarted the IIS but not help. Can anybody help me? Regards
-
Introduction In a previous blog post I showed you how you can resize Enterprise Cloud PC’s, you can review that here. In this blog post myself and fellow MVP buddy Paul Winstanley teamed up again to look at the resize ability provided by Microsoft for Frontline Cloud PC’s and show you how you can use this new feature (new to Frontline). Microsoft announced this new ability a couple of weeks ago here. Admins can now resize Frontline Dedicated Cloud PCs after provisioning to adjust compute and storage configurations without reprovisioning. This capability provides greater operational flexibility when user requirements change and helps reduce the overhead of managing capacity. Admins can respond more easily to evolving performance needs while keeping existing Cloud PCs intact. For more information, see Resize Windows 365 Frontline Cloud PCs in dedicated mode. Why resize? Imagine you have a user that has a Frontline Dedicated Cloud PC assigned, with the following SKU. Cloud PC Frontline 2vCPU/8GB/128GB This may have been good enough for the tasks that that user was initially doing, but let’s imagine that they got access to new tasks that demanded more CPU/ram/storage, or that they simply noticed that the Cloud PC they were given was under powered. Sometimes you may find that a Cloud PC is not powerful enough for a user, or is too powerful and not being used to it’s full potential (low utilization). With this new ability you can resize low or high utilization Frontline Dedicated Cloud PCs on the fly. Identifying low utilization You can now identify low utilization on Windows 365 Cloud PCs in the Intune portal directly. In the Reports node, expand Windows 365, select Cloud PC Overview and then select Cloud PC recommendations. Unfortunately this report only seems to cover Enterprise Cloud PC’s and we are focusing on Frontline Dedicated in this blog post. But there’s another way, in Devices, expand Device Onboarding, select Windows 365 and select Resource performance. This brings up Endpoint analytics with lots of resource performance details. You could click on the highlighted Insights and recommendations or click on the Model performance or device performance tabs to get more details. And sure enough, there’s our Frontline Dedicated Cloud PC showing as needs attention due to CPU spike time and to a lesser degree, RAM spike time. Now that we’ve spotted the Frontline dedicated Cloud PC’s that need help, it’s time to fix the problem. Resizing So let’s take a look at the new feature. Take note of the role, ip address and other requirements as detailed here. To resize a Frontline Dedicated Cloud PC, locate it’s provisioning policy, and scroll down to Assignments, click Edit. Click on Cloud PC size highlighted in blue. This will bring up a Select Cloud PC size window where you can select from available sizes. From there, pick an option to fix the problem, in this case we’ll resize the current Frontline Cloud PC from one sku to another via the Available sizes drop down, as it’s only an example of the resize operation. Note: In reality, to fix this problem you’d want to resize to a vCPU with more power and possibly more RAM too based on the endpoint analytics report, however we don’t have either of those available in this tenant. Also to note, downsizing is not supported for lower storage or GPU. Take note of the warning, which states that All the Cloud PCs provisioned from this assignment will be resized to the selected size. Connected Cloud PCs will be disconnected, and unsaved changes might be lost. This is important and you should most likely only resize when your Frontline users are not actually using these Cloud PC’s if possible. Finally, click Next and click Update to update the provisioning policy assignment with the new resized SKU. You can see the entire operation in the GIF below. Job done! Read more Announcement – https://learn.microsoft.com/en-us/windows-365/enterprise/whats-new#week-of-march-2-2026 Frontline dedicated Cloud PC resize – https://learn.microsoft.com/en-us/windows-365/enterprise/resize-cloud-pc-frontline Summary Resizing Frontline Dedicated Cloud PC’s is now a reality and available today in the Intune console. You have to modify the provisioning policy to resize the Cloud PCs which can mean several Cloud PC’s being impacted from this change, rather than just one. Still, it’s a welcome change and we are glad to see it. See you in the next one!
-
Introduction The Remote Desktop client app is commonly used for connecting to a variety of devices including: Connecting to Azure Virtual Desktop (AVD) Accessing Windows 365 Cloud PCs Access Remote Desktop Services (RDS) Connecting to remote PCs (when configured for RDP) The app is popular due to the fact that it has multi device support including Windows, macOS, iOS and Android, but it’s interface looks dated to say the least. Below you can see how it looks today including the end of support message on the top. The app is soon to be end of support as of March 27th, 2026 and you are reminded of that in the banner on the app itself (shown above) and via the downloads webpage shown below. You should start migrating the app on any devices that have it installed to the new Windows app. The remote desktop client app does not automatically upgrade to the Windows app so migrating it is needed. Migrating from the remote desktop client to the Windows App can be complicated. It can be used as-is or modified to suit your individual needs. It performs the following actions: Installs the Windows App via MSIX package download Optionally uninstalls the legacy Remote Desktop client Sets registry keys to control auto-update behavior Logs all actions to a specified log file Myself and my fellow MVP buddy Paul Winstanley look at a migration tool provided by Microsoft and show you how you can set this up in your Intune tenant based on the instructions that come with it. Setting it up To set it up do as follows, in Microsoft Intune select Devices, Scripts and remediations and select Platform scripts. In there click on Create and give the script a suitable name such as Migrate from remote desktop client to Windows app. Click Next and in Configure script settings point to the downloaded Remote Desktop Client Migration script and set the following options: These settings force the script to run in SYSTEM context (required to set registry keys and install provisioned packages, in addition to uninstall system-level apps). Click Next and add a group of one or more targets to migrate from the Remote desktop client agent to the Windows app. You could also exclude a group containing devices that already have the Windows app. Monitor the results After deploying out the script you can check the results via the log. The log (on the target clients) is available at $env:windir\temp\RDC-Migration.log. Below is an example of that. Within Intune itself, you can look at the script results, if there are errors below are some common error codes. If the Windows app is shown as installed in the log but not actually installed on the device you can run the following two Powershell checks to see why it’s reporting this. # Check provisioned packages Get-AppxProvisionedPackage -Online | Where-Object {$_.DisplayName -like "*Windows365*"} # Check user installation Get-AppxPackage -Name *Windows365* -AllUsers In our case the Windows app was not available on the device any more (had been uninstalled prior to deploying the migration script). But still Windows thought it was installed even though we logged off/logged on again prior to the test. Related reading Download the Remote desktop client app – https://learn.microsoft.com/en-us/previous-versions/remote-desktop-client/connect-windows-cloud-services?tabs=windows-msrdc-msi Migrating to Windows app – https://learn.microsoft.com/en-us/previous-versions/remote-desktop-client/migrate-msrdc-windowsapp Remote Desktop Client Migration script – https://github.com/microsoft/Windows365-PSScripts/tree/main/Remote Desktop Client Migration Script Summary The impending end of support of the remote desktop client app is coming in less than 20 days, so it’s a good idea to migrate your install base to the new supported solution, the Windows app. Microsoft have been kind enough to provide a script, and it works as you’d expect a Powershell script from Intune. Powershell scripts however are limited when deployed this way and we think it would be better to deploy this migration tool as a Win32 app or even a remediation solution. For example, you might consider wrapping it with PSADT (Powershell application deployment toolkit) or similar and deploy it as a Win32 app to get better results, otherwise you might see issues relating to the Remote desktop client agent app being in use and thus not removed or that the user didn’t login yet. Most of the observed issues are listed in the troubleshooting section of the downloadable script. That’s it for this blog post we’ll see you in the next one!
-
OSD is looking for an old deleted boot image
anyweb replied to JayL's topic in Configuration Manager 2012
@JayL can you share the details of the fix with others so that they can get help ? -
OSD is looking for an old deleted boot image
Abnrangerx67 replied to JayL's topic in Configuration Manager 2012
Why do people do that? Post a question asking for help, then when it gets resolved from a solution not provided here, they don't share the fix.