-
Posts
9163 -
Joined
-
Last visited
-
Days Won
366
Everything posted by anyweb
-

Surface Laptop 7 (ARM)
anyweb replied to RobDrizz's topic in System Center Configuration Manager (Current Branch)
here's some info to assist you https://www.niallbrady.com/2023/12/03/arm64-support-for-osd-added-to-configuration-manager/ -

Surface Laptop 7 (ARM)
anyweb replied to RobDrizz's topic in System Center Configuration Manager (Current Branch)
did you add support for ARM pxe ? -

Migrate to the cloud - Part 1. Setup
anyweb replied to anyweb's topic in System Center Configuration Manager (Current Branch)
hi @RobsonM, thanks ! this tool does not migrate any of the users data, but ... it also doesn't delete anything so the users data (files apps etc) is still stored and hidden in their old profile located in C:\Users\<username.old> if you really want to migrate their data then you'll need to customize the scripts and/or use a 3rd party tool for that cheers niall -
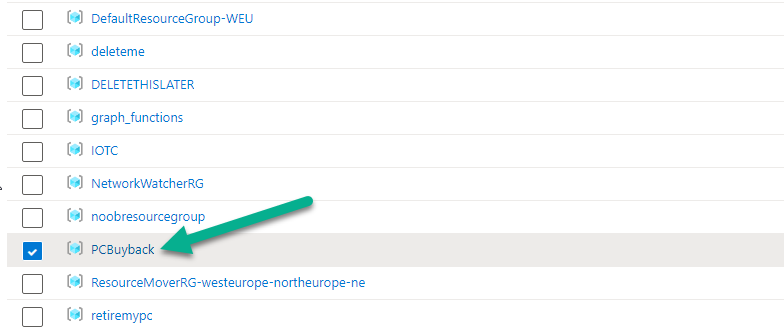
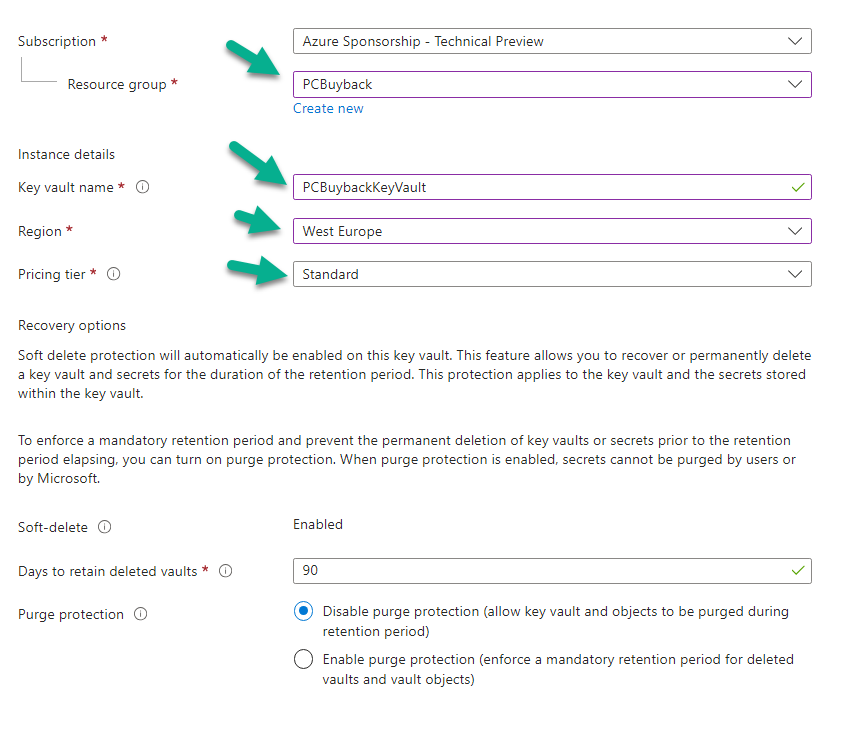
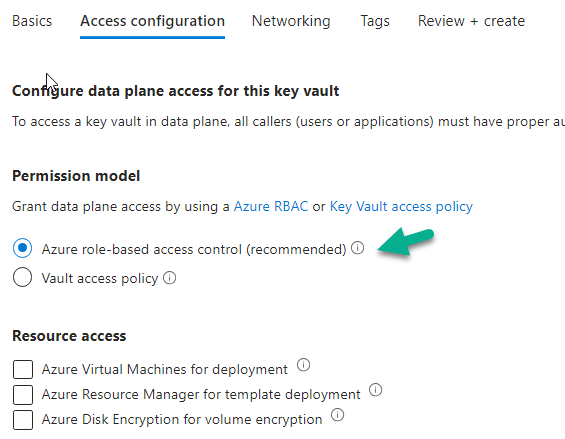
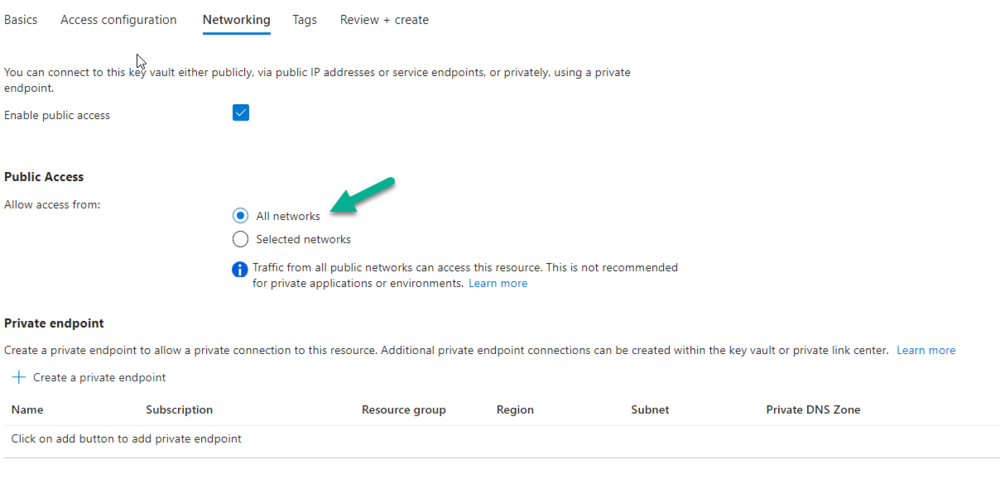
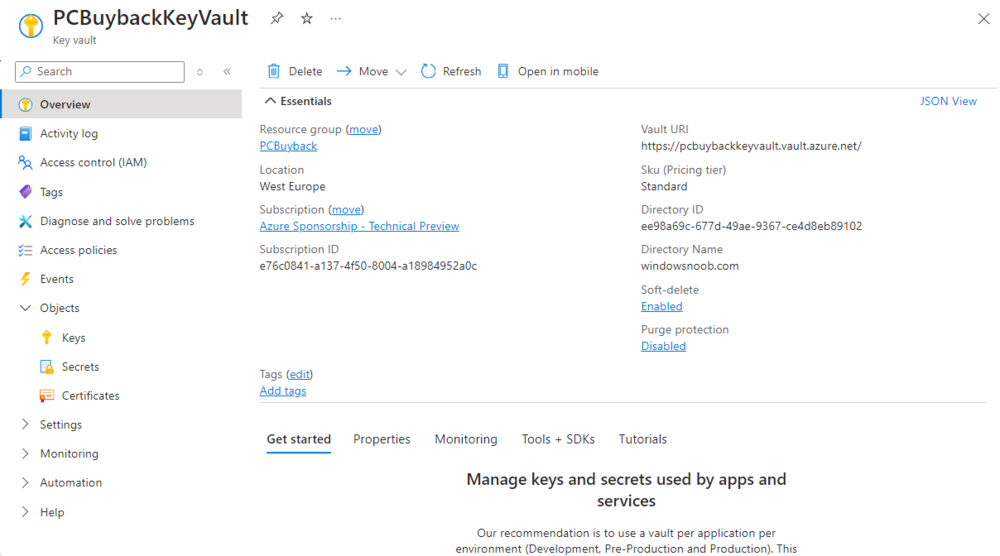
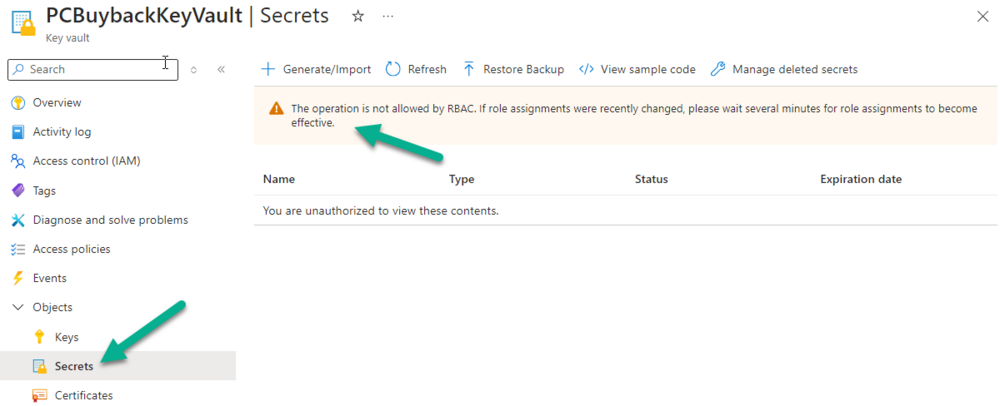
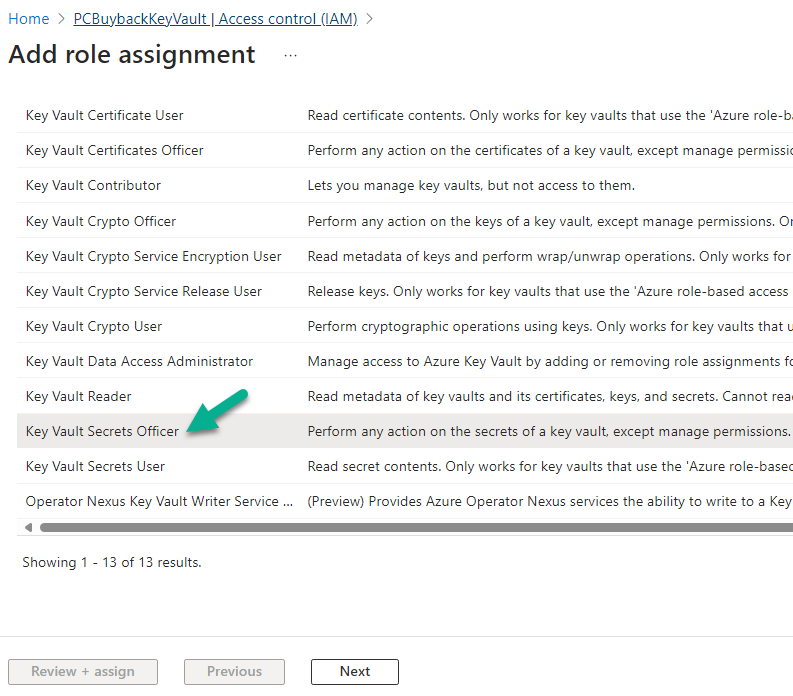
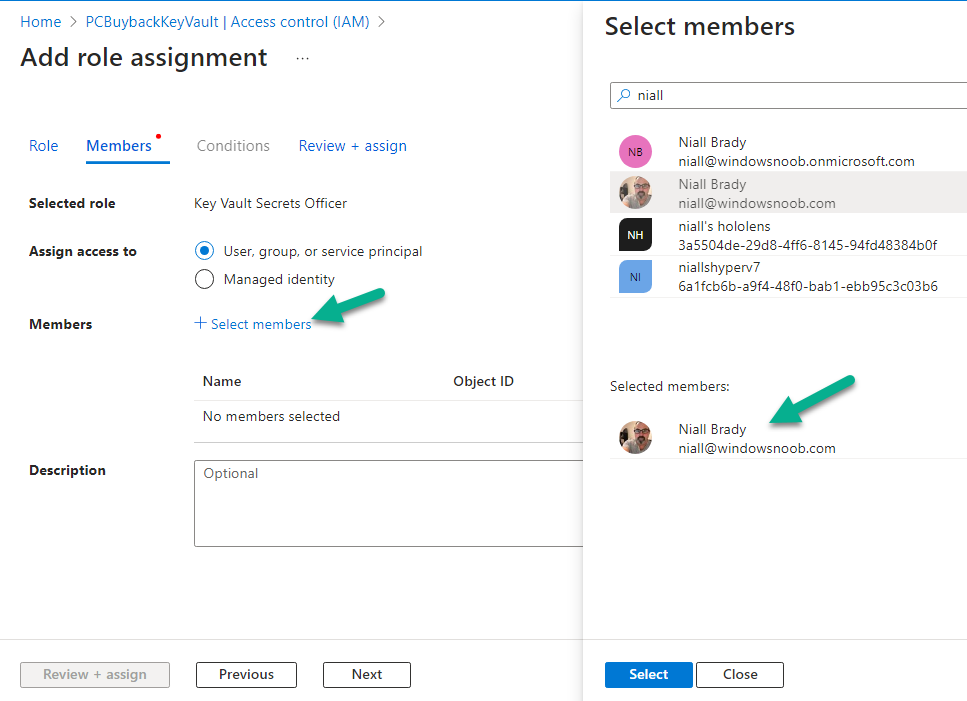
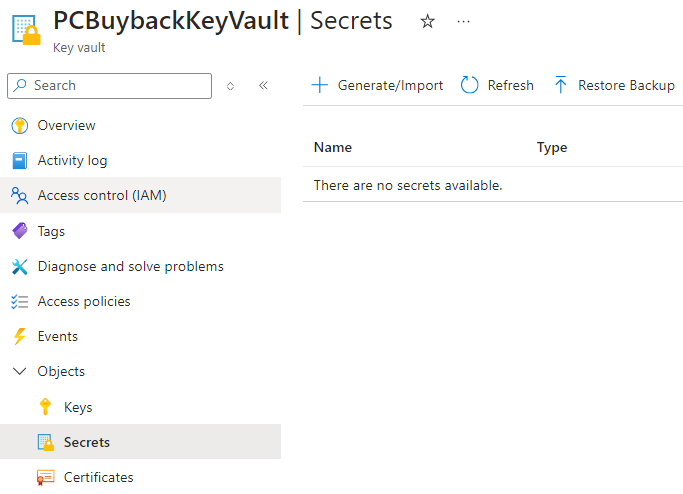
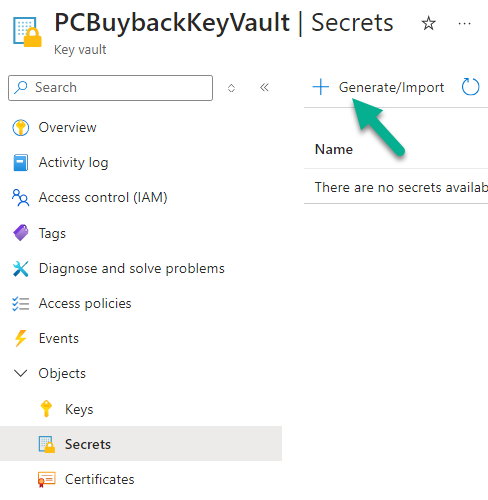
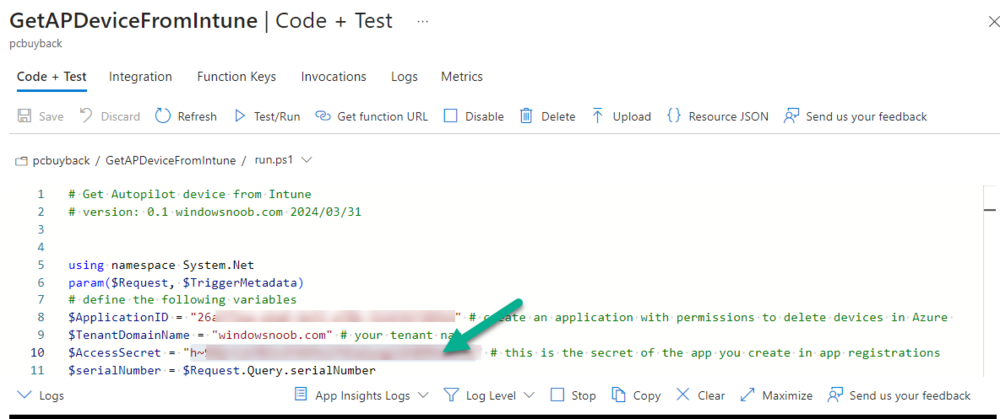
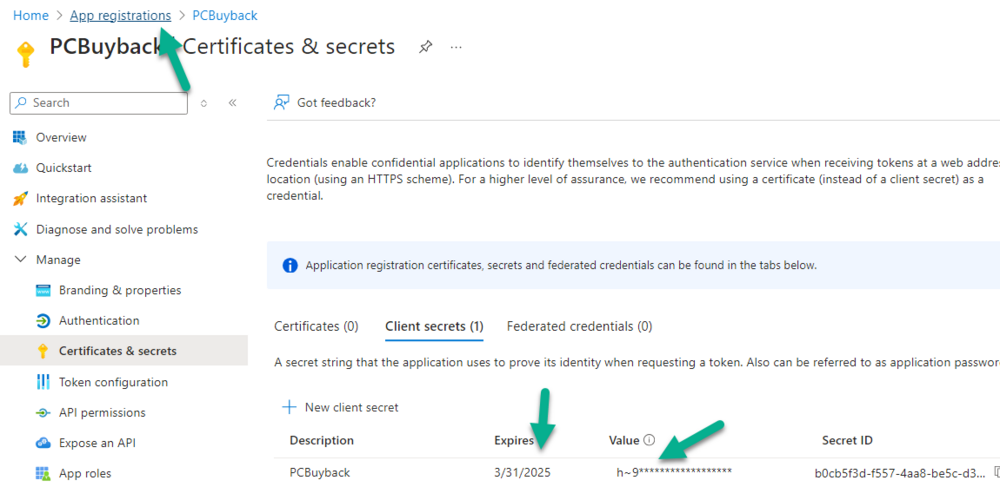
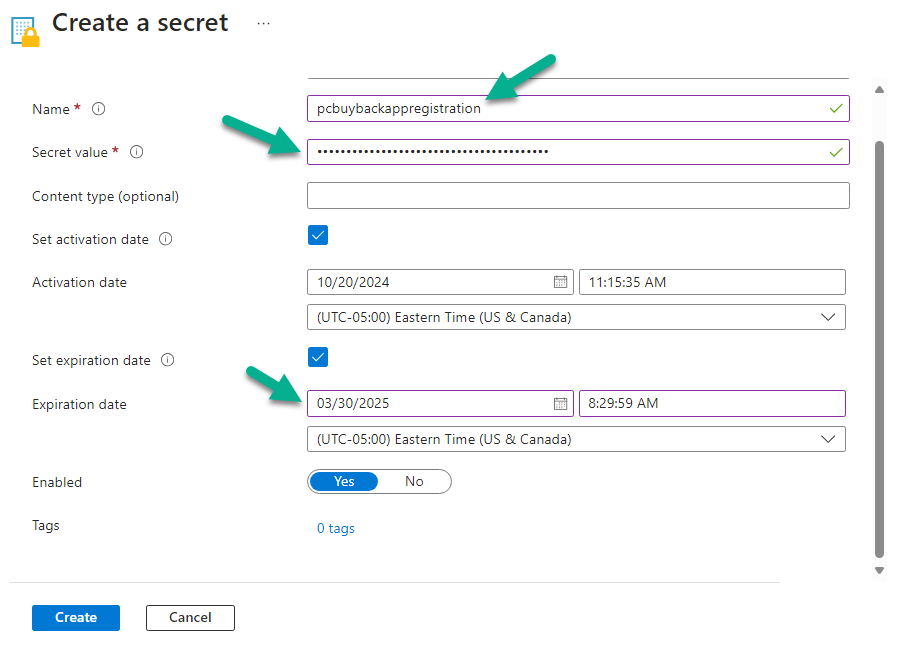
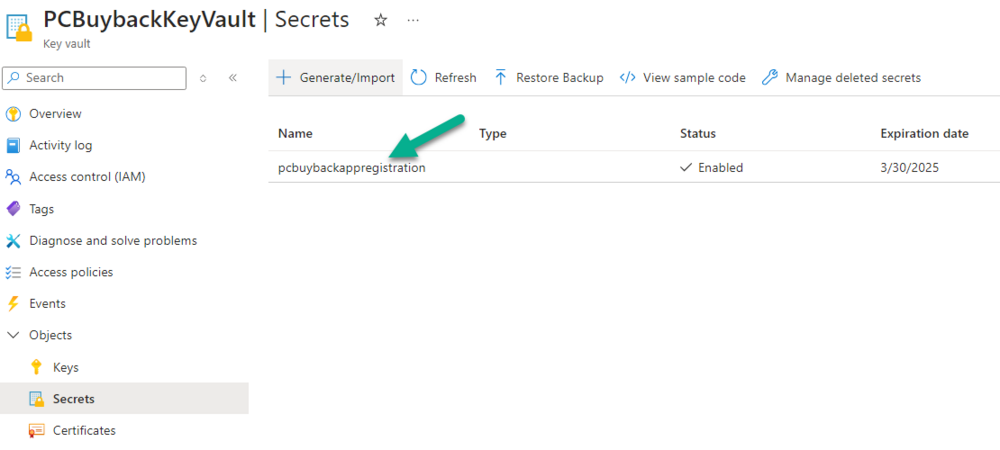
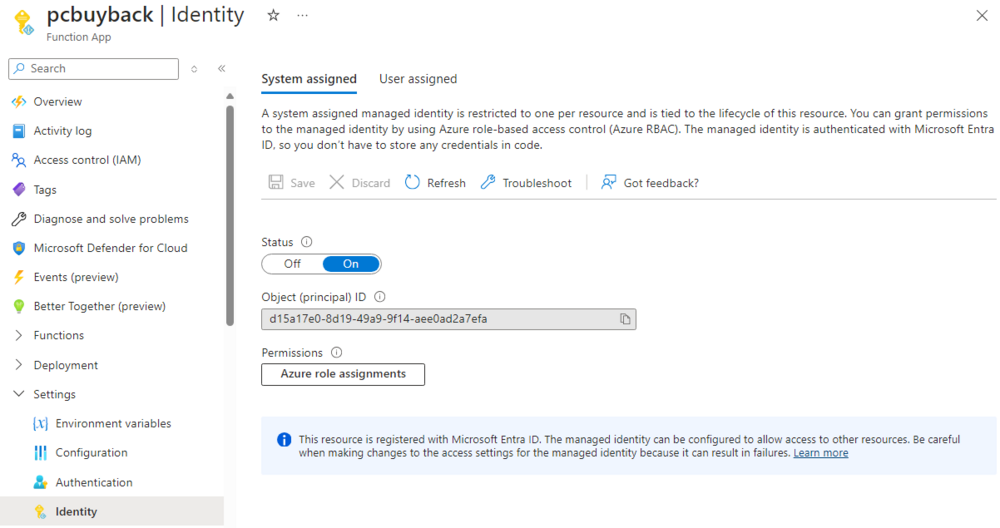
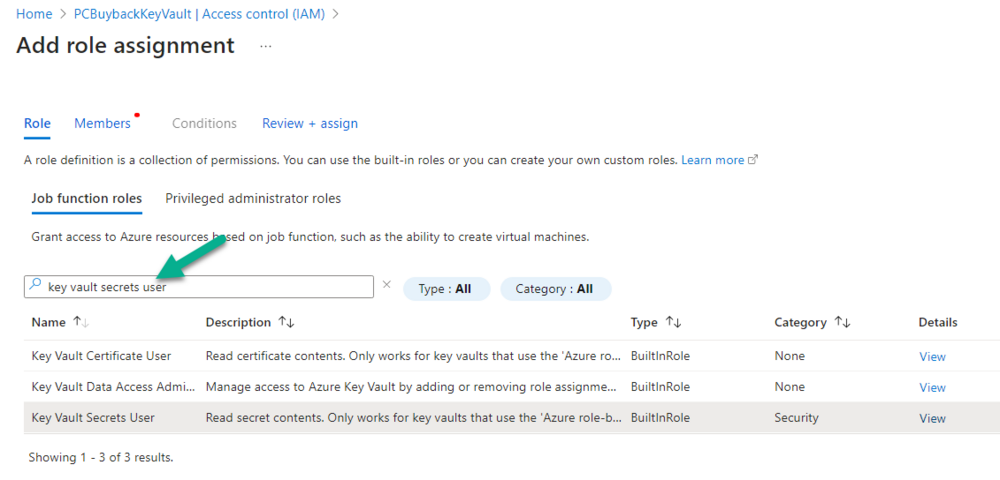
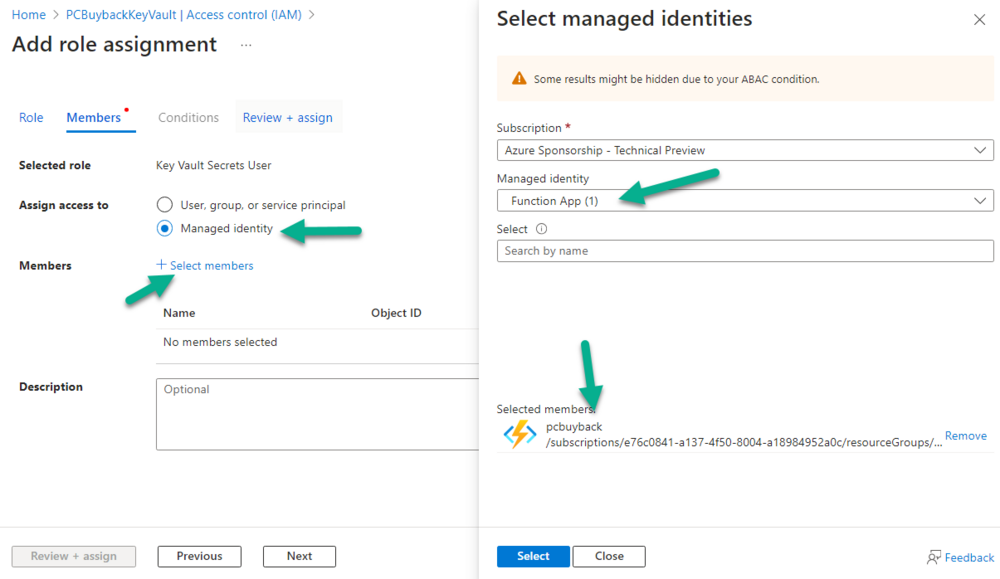
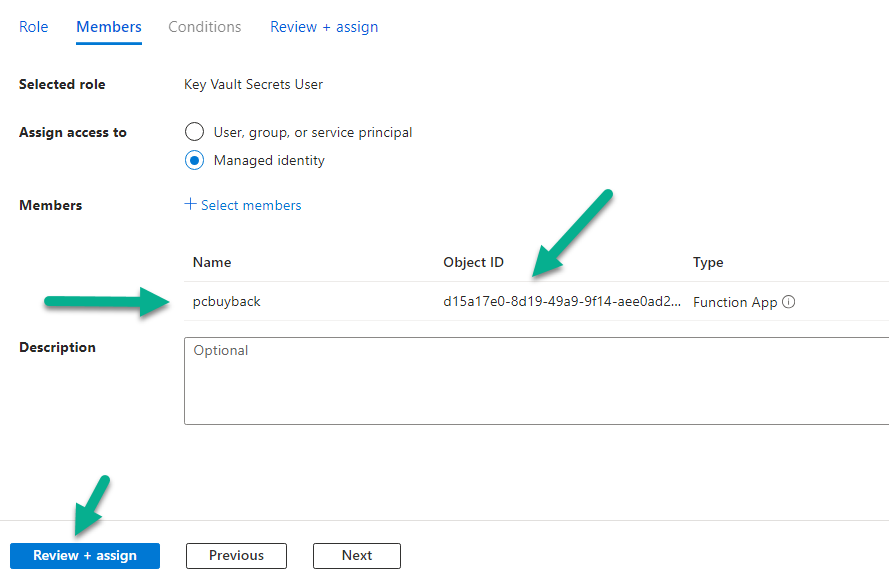
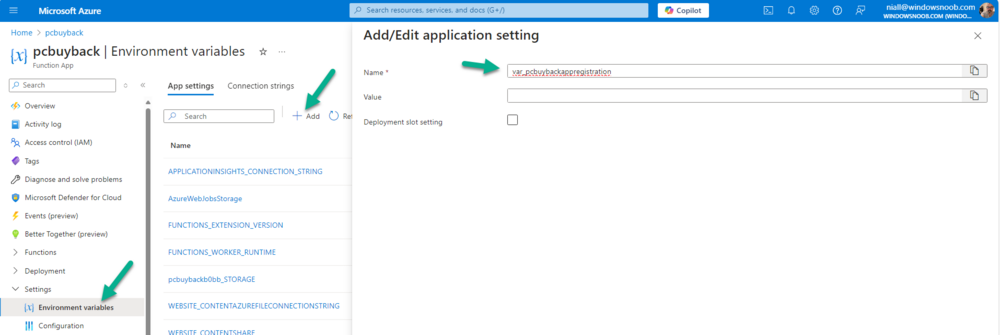
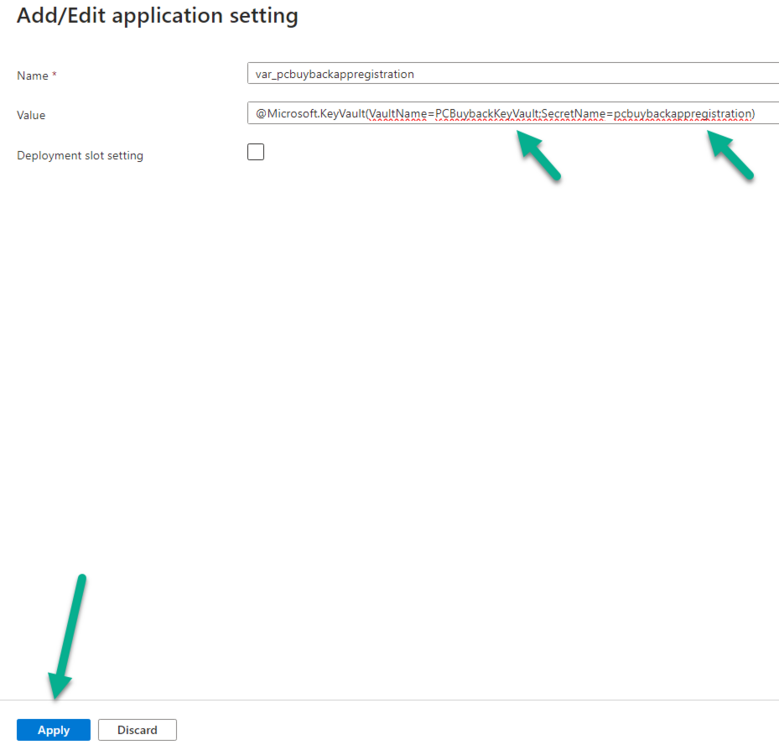
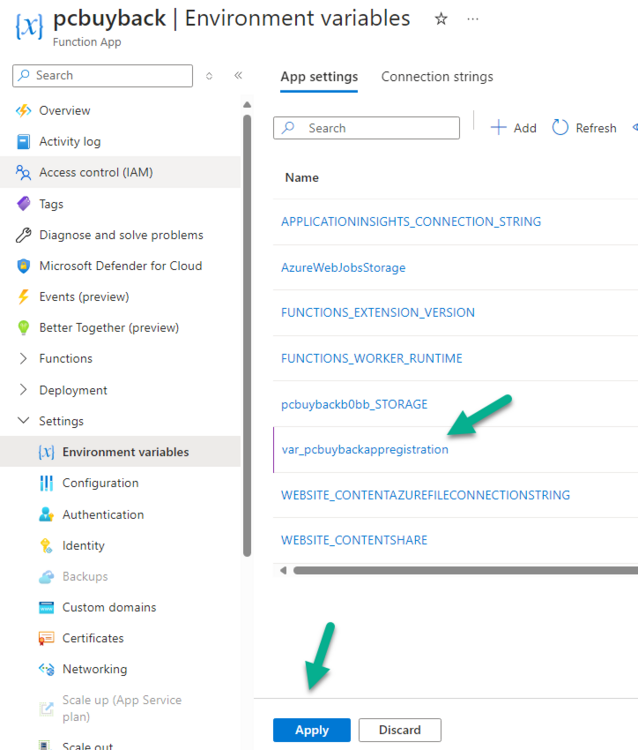
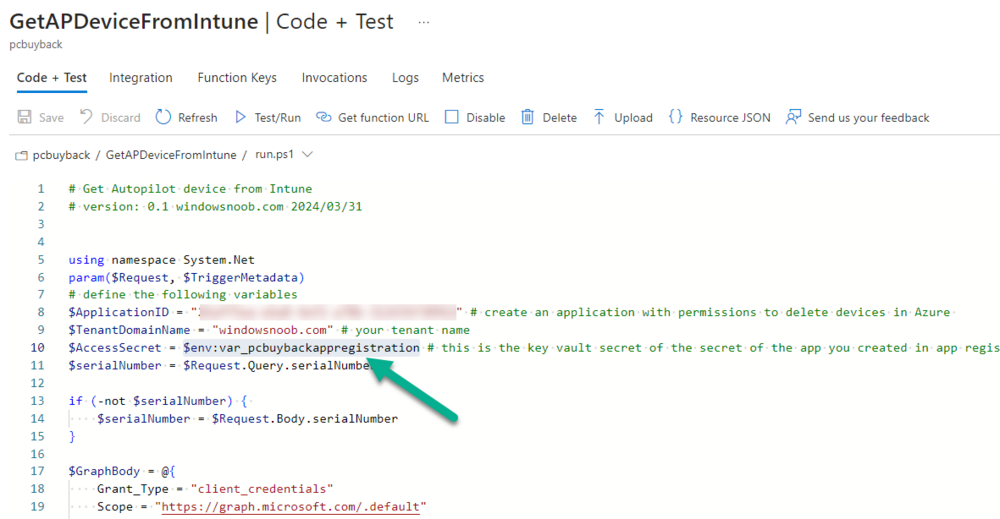
Introduction In previous blog posts such as this one, I've shown you how to create http triggers within Function apps in Azure to do magic with Intune managed devices, however in my examples for brevity I used secrets, and pointed out that the more secure method is to use Azure Key Vault. In this blog post I'll show you how to set that up so that your triggers are more secure. But first, let's see what Microsoft describes Azure key vault as and explains why it's important. In this blog post the scenario we are going to use is basically how to replace previously created app registration secrets used within your http triggers with Azure key vault secrets. Note: After spending a few days at MMS it was clear that there's an even better way of doing this and that is to use managed identities (step 5 onwards in this post) instead of app registrations to replace the need for expired secret renewals, I'll post an update as soon as I get a chance coming soon. Step 1. Create or reuse a resource group As we'll base this guide upon a previously created solution, we'll re-use our previously created resource group, but if you want you can go ahead and create a new one for this purpose. Resource groups are a way of grouping resources within Azure and to protect secrets within that resource group you'll use key vault. Below I'm highlighting the previously created PC Buyback resource group which we will reuse in the next step. Step 2. Create a key vault Now that we have a resource group, let's go ahead and create out Key Vault. In https://portal.azure.com search for key vaults, select the service from the list of services displayed. Next, click on + Create to create a key vault. In the UI that appears, the first screen is dedicated to the Basics or general information about your key vault. You'll need to select a valid Azure subscription and then select a previously created resource group (or create new). In this example we'll reuse the PC Buyback resource group. You also need to assign the key vault a name, so give it something descriptive (you cannot use spaces). Next select the region where this will be used, and that should match your Resource Group region. Finally select the pricing tier, in my example Standard is fine, you'll only need to use Premium if you need to avail of HSM capabilities (Hardware Security Module), for more info on the pricing plans see here. There are some additional options available relating to how long to key keep vaults after they are deleted and the default settings are good enough for us here. Click Next to see the Access Configuration screen. In here you can once again choose the defaults, as we'll be using RBAC (role based access control) in a later step. Click Next to proceed to the Networking screen. In the Networking screen you have the option to use All networks to allow access from your PowerShell scripts and more, or if in a locked down environment you can select Selected networks which may involve you setting up a virtual network with it's own private endpoint connection. In this example however we'll use the All networks setting. Note: These settings can be changed later in the Key Vaults Networking settings and some of the settings may be disallowed by your own internal policy if an initiative of Public network access should be disabled for PAAS services is enabled in your ARM policy. Click next through the Tags screen and review and create your key vault. After the deployment is complete, select it to see the properties. Step 3. Assign role permissions In your newly completed key vault, click on the secrets section highlighted below, and take note of the permissions error. So even though I'm a Global Admin in Azure I'm not authorized to review those secrets. To resolve this we need to click on Access control (IAM) and assign some roles. You could simplify things and assign the Key Vault Administrator role to your chosen user or group which would give you the access you need to create secrets, keys and certificates, but as we only care about secrets in this blog post we'll assign the following role. Key Vault Secrets Officer To assign these roles in Access control (IAM) clcik on + Add and select Add role assignment from the drop down. Next search for key vault in the search field, and select Key Vault Secrets Officer from the list. Click Next and then click on + Select Members and browse to your chosen user Finally click on Select and then select Review and Assign. At this point you can now select the Secrets option in your key vaults Objects node and no longer get permission errors. It will state that there are no secrets available but we'll get to that shortly. Next select Key Vault Security User from the list and repeat as above (add role assignment). Step 4. Create a key, secret or certificate Now that you've configured your key vault, it's time to create your first resource, this can be a key, secret or certificate. Note: As we are replacing previously created App registrations secrets with azure key vault secrets we'll select that option for this blog post. Therefore, you'll need to know your previously created secrets when you created them back in the PC Buyback tutorial, steps 7 and 8 here. In key vaults secrets, click on + Generate/Import to start that process. Give the secret a suitable name and paste in the value from the previously created app registration secret. We can see that secret taken from a http trigger within my PC Buyback functionapp. The contents are blurred. and paste in that value into your key vault secret creation. You should also configure the activation and expiration date and make the expiration date to one day before the actual secret expires to allow you time to recreate a new one. Below you can see the app registrations secret expiry details. and that is reflected (minus 1 day) in the key vault secret creation. after creation, your secret is listed in the key vault. Step 5. Grant functionapp permissions to consume the key vault Next we'll grant permissions to our previously create functionapp to allow it to consume the key vault. To do that, open up the PC Buyback functionapp and click on the Settings drop down, select Identity and change the Status to On. After clicking Save you'll get the following message. Click Yes to proceed. After clicking Yes the results are displayed. Step 6. Grant the key vault permission Next open your key vault and browse again to Access control (IAM). In the role assignments click on Add and add the Key Vault Secrets User role. Click Next and select Managed identity, then in the wizard that appears select function app from the managed identity field and select your PC Buyback function app. once done, click Select and your PC Buyback function app is added. Don't forget to click on Review + Assign. Step 7. Configure function app environment variables Open up the previously created PC Buyback function app and expand Settings, select Environment variables and click on + Add, give it a suitable name such as var_pcbuybackappregistration. paste in the following string in the value line @Microsoft.KeyVault(VaultName=mykeyvault;SecretName=mysecret) edit the VaultName and SecretName values to match your environment... click on Apply when done. and click Apply again once the environment variable is added. At this point you'll need to confirm the change as it needs to restart the function app. Step 8. edit the http triggers Now you are finally ready to apply the key vault secret variable to your previously created http triggers, so let's do that. Select a trigger and review the contents, find the line that pointed to the Access Secret and replace the with the new environment variable, like so: $env:var_pcbuybackappregistration when $env:var... is your environment variable created above. Below is the result, and after saving the code and doing a Test/Run we can see it's working just fine using Azure Key Vault, Summary Using app registration secrets in your http triggers is a bad idea, use Azure key vault to protect those resources, this blog post helps you to to just that. See you in the next one !
-

Old Software Center getting installed
anyweb replied to ETx13's topic in System Center Configuration Manager (Current Branch)
is there anything different OS wise with the 50 that have issues versus the rest that don't ? are they using the same client version ? -
you'd need to supply a lot more details about your issues to get some traction on this, thanks
-

SCCM 2007 SP2 prerequisites download
anyweb replied to EngiNerd's topic in Configuration Manager 2007
sure thing, done. -
personally I think those days are over and that it's better to deploy an up to date ISO/WIM of the latest OS version of Windows 11 available, how will you manage your clients ? how do you intend to get an 'image' on these clients ? will you use Windows Autopilot ? without knowing more it's hard to advise
-

Migrate to the cloud - Part 1. Setup
anyweb replied to anyweb's topic in System Center Configuration Manager (Current Branch)
hi @shintest, i'm working on it just now so plan on releasing yet another release soon, please stay tuned ! -
- 14 replies
-
in the blog post you'll see it's deployed to 'autopilot users' that can be whatever users you want, it's up to you who get's this behaviour (or not)
- 14 replies
-
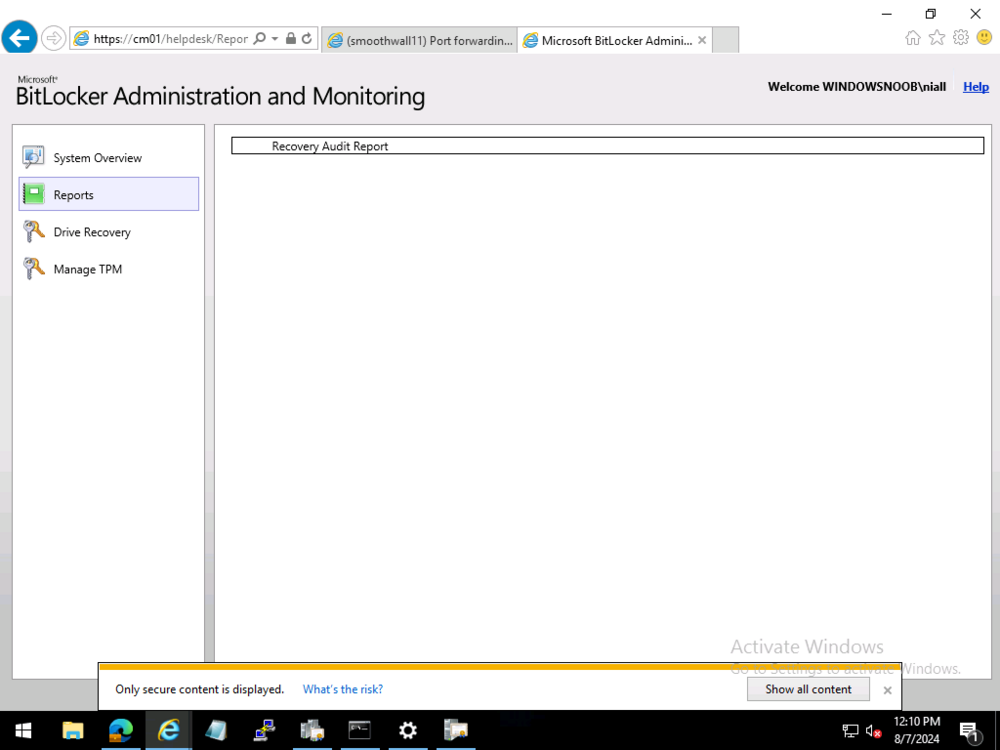
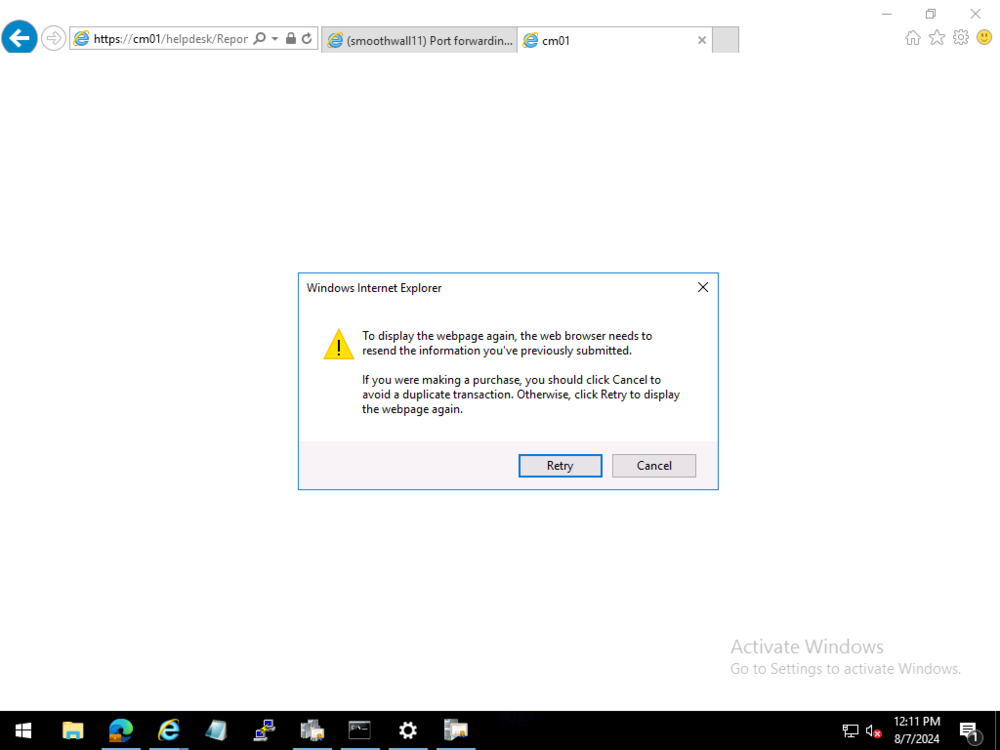
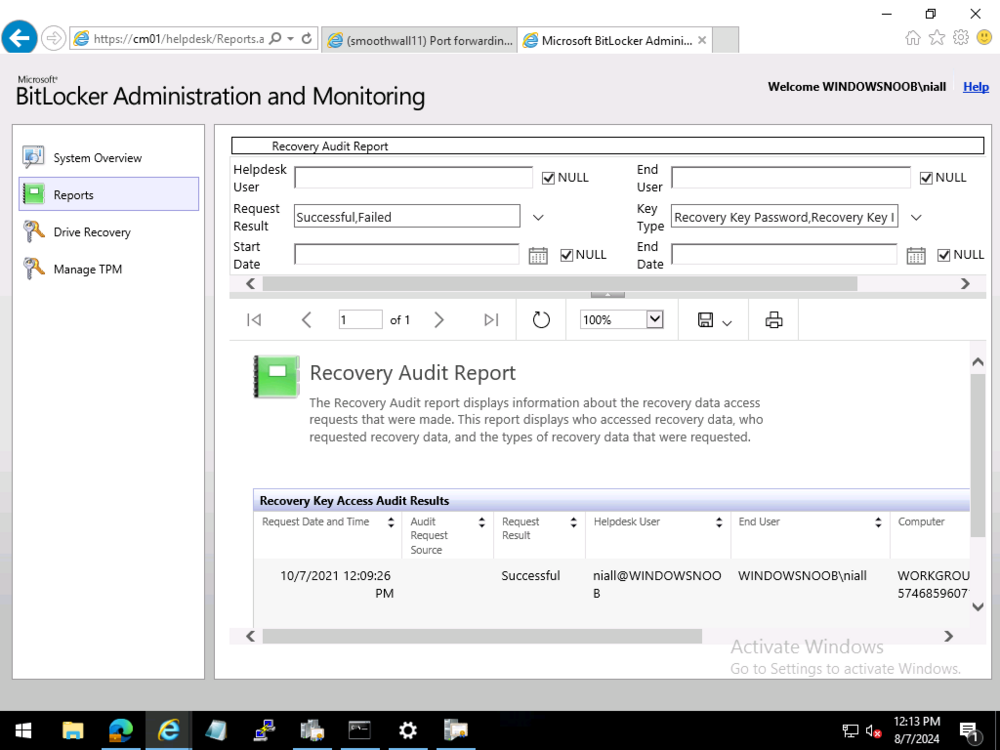
ok sorry for the delay in getting to the bottom of this, but after our Teams meeting I have a better understanding of your problem... first of all, in SCCM 2403 in my lab, i also do not see the Recovery Audit Report, and that is intentional as that report was moved out of SCCM in version 2002 see here > https://learn.microsoft.com/en-us/mem/configmgr/protect/deploy-use/bitlocker/view-reports#bkmk-audit and > https://www.reddit.com/r/SCCM/comments/pot0qu/bitlocker_management_recovery_audit_report_missing/?rdt=38888 so now that we know it shouldn't show up in SCCM versions greater than 2002, where do you find that report now ? the answer is below so go to your BitLocker Administration and Monitoring Website and click the Recovery Audit link, if that does nothing at all, then maybe we've found an issue. In my Technical Preview lab (2405) it does nothing. In my Current Branch 2403 lab, it does nothing in Edge, Chrome, Firefox, it looks like it trys but nada. So I tried IE. yeah I still have that installed on this server, and it prompted me with this > notice the 'only secure content is displayed' message ? after clicking Show all content I get this at this point, clicking Cancel, shows the actual report ! so i think this could be a bug, or at least an annoyance or a web browser setting that we need to 'change' to read the reports, i'll ping the Microsoft Product group and see what they say about it, if they reply i'll post back here cheers niall
-
did you look at part 2 of this blog series ? it's all there
- 14 replies


