


anyweb
-
Posts
9260 -
Joined
-
Last visited
-
Days Won
371
Everything posted by anyweb
-
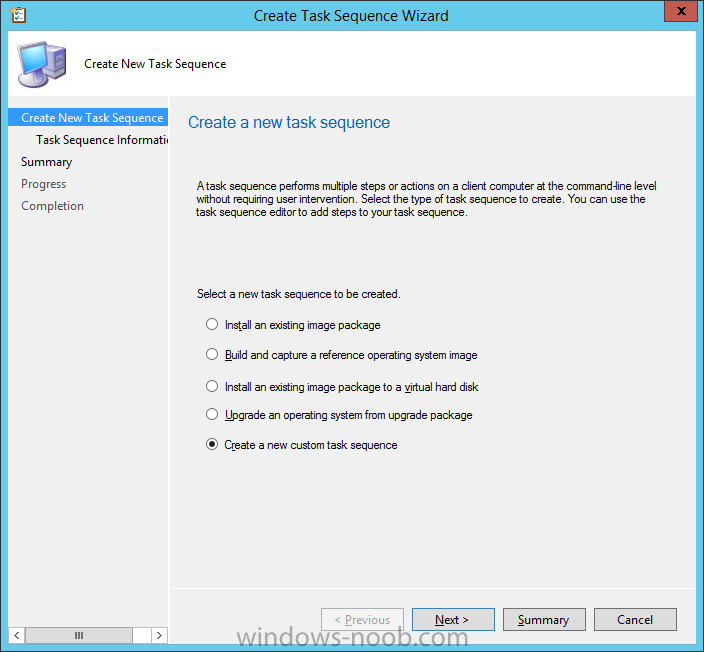
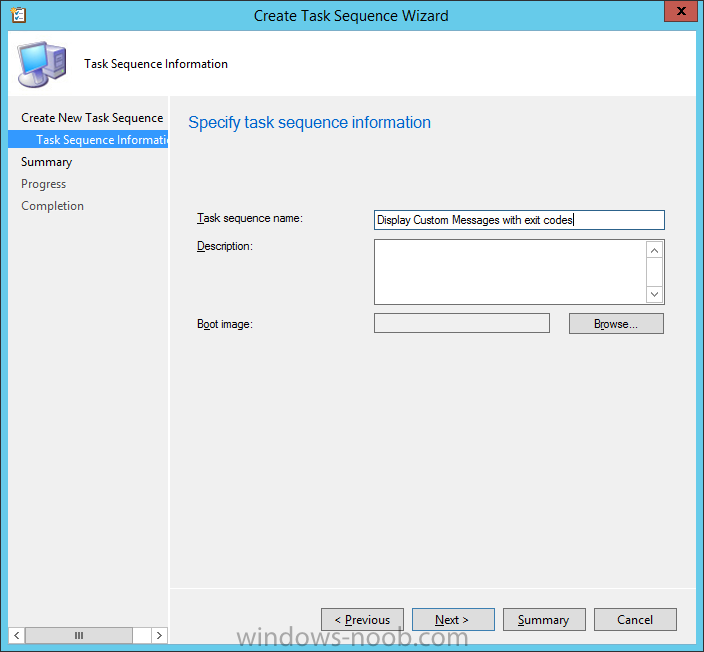
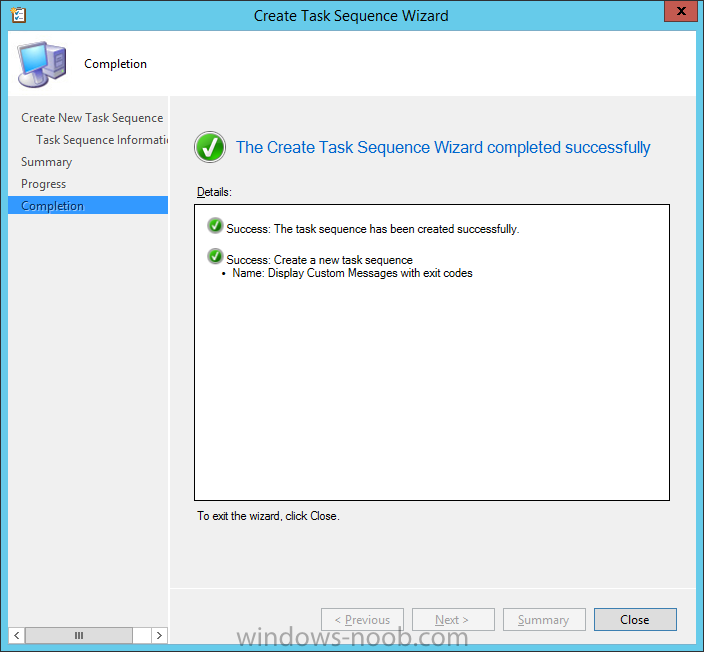
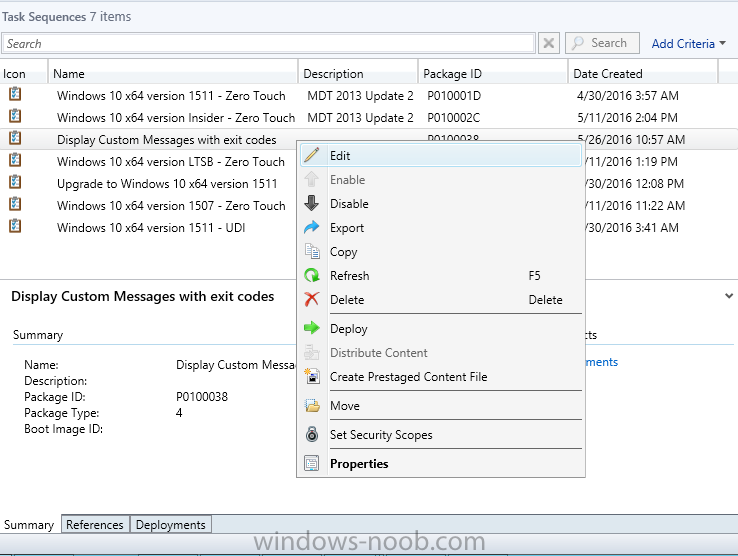
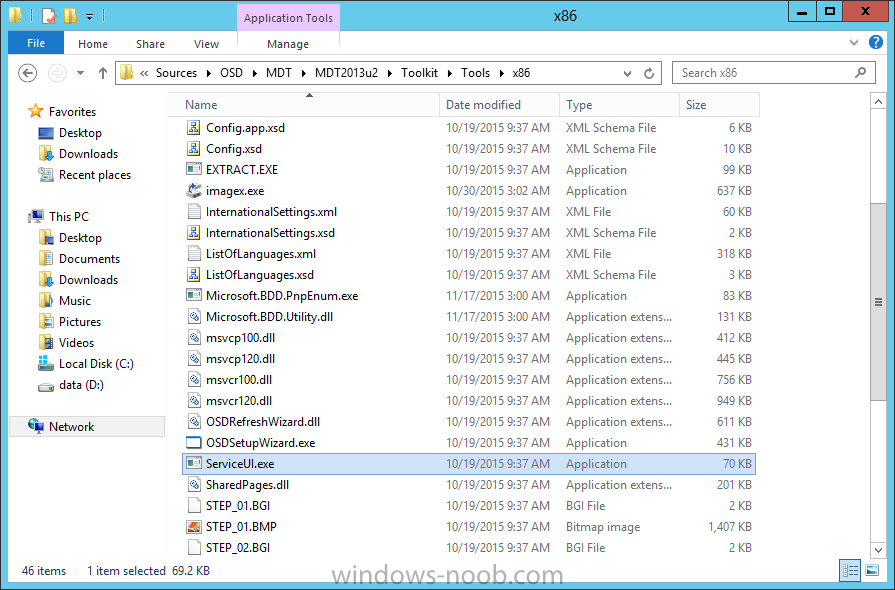
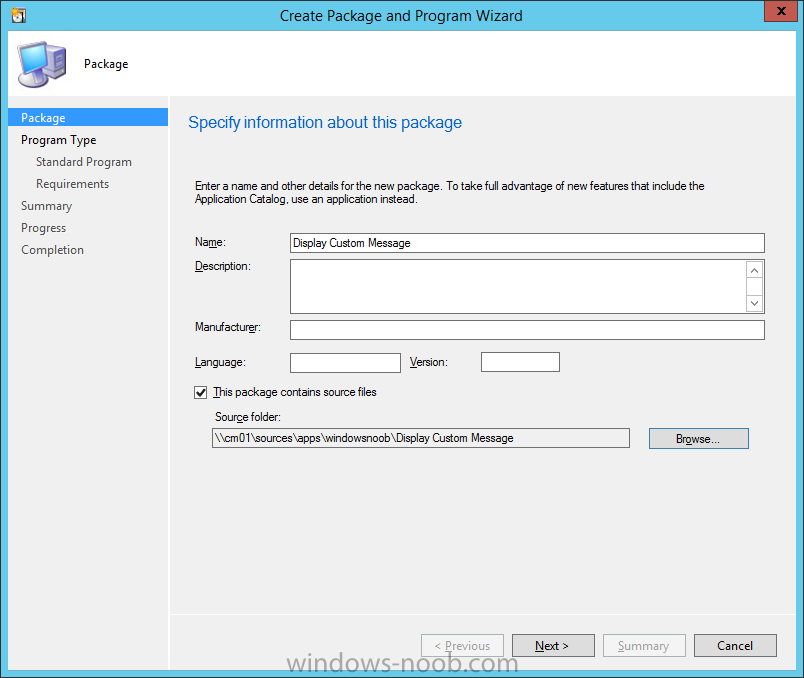
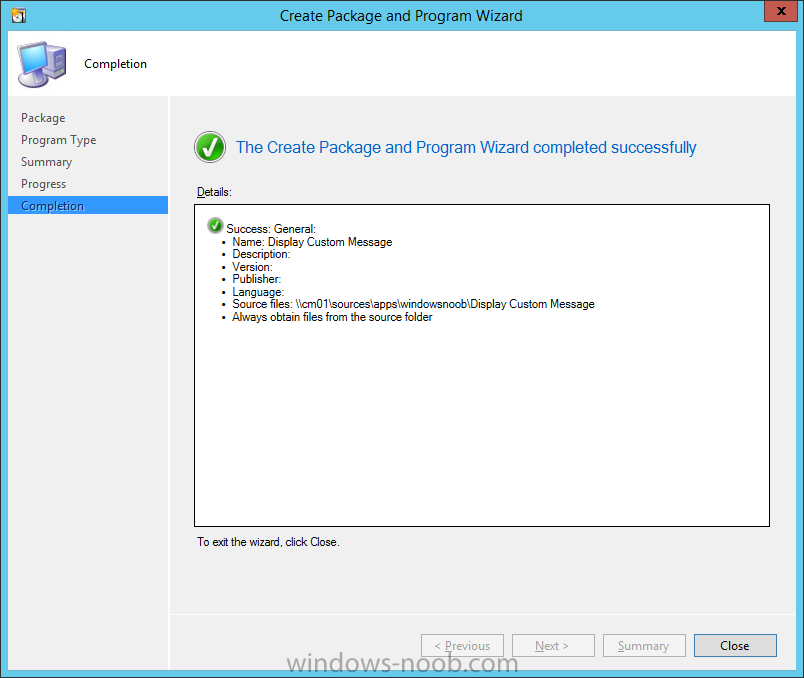
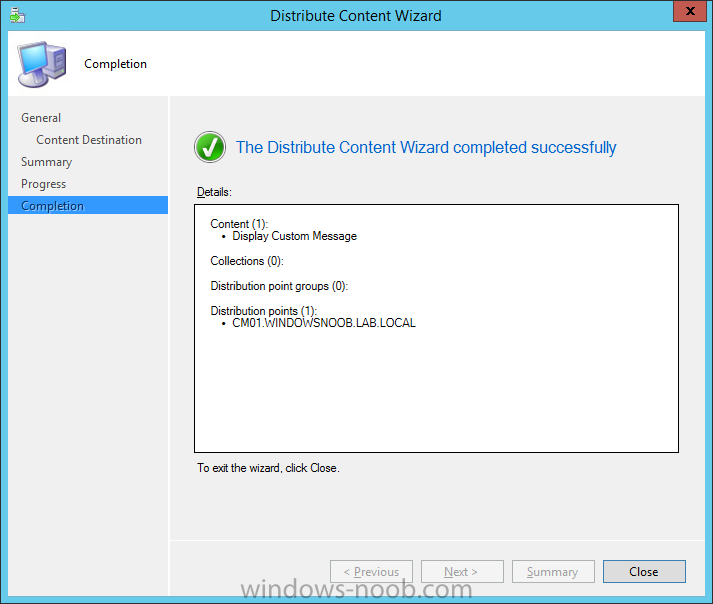
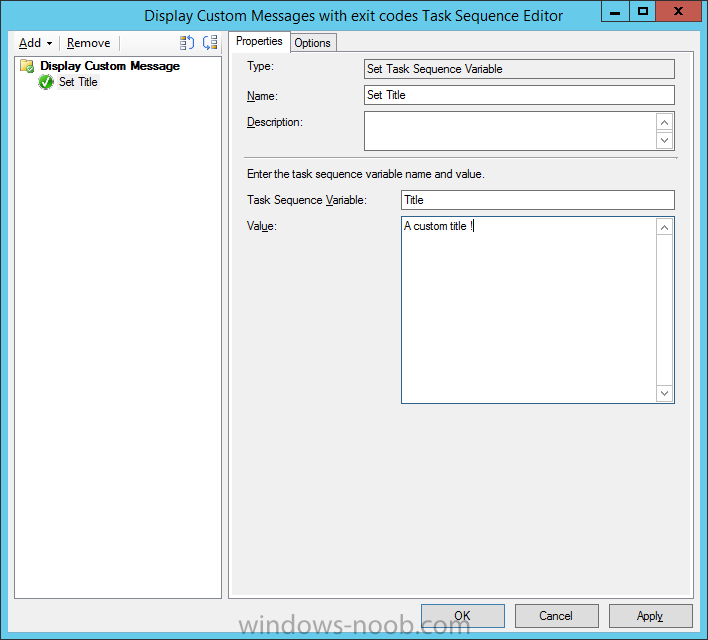
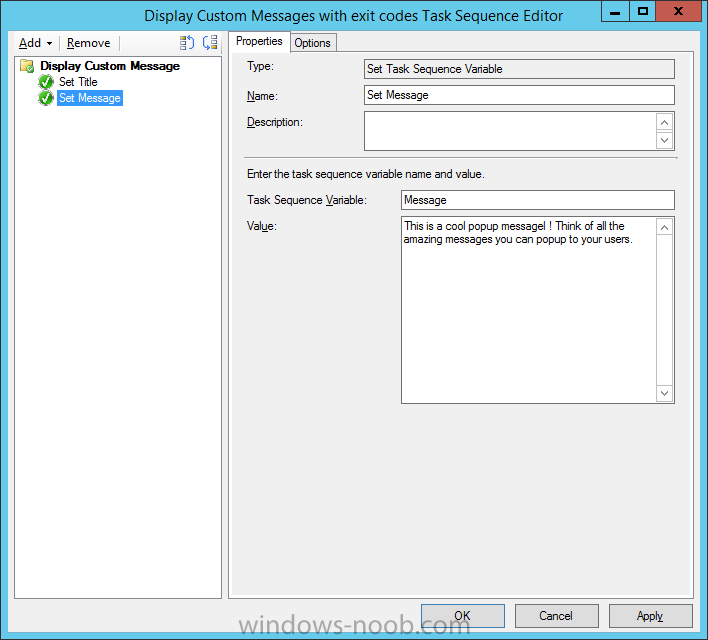
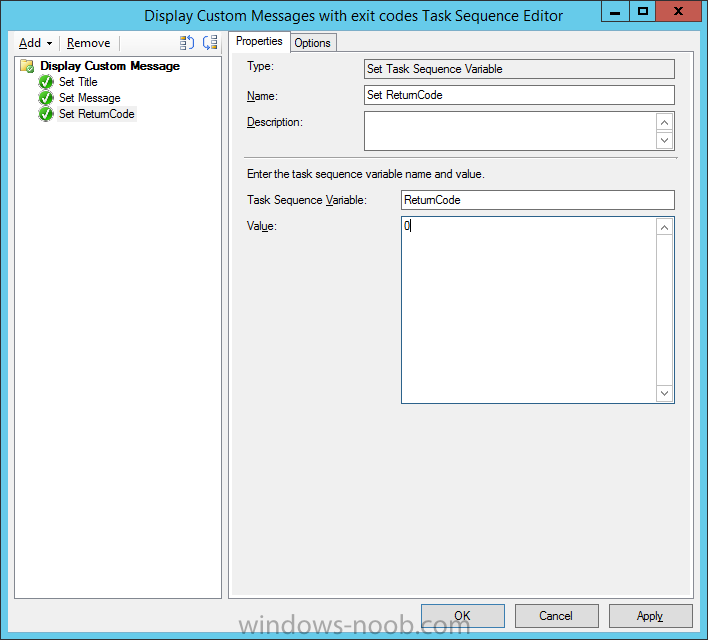
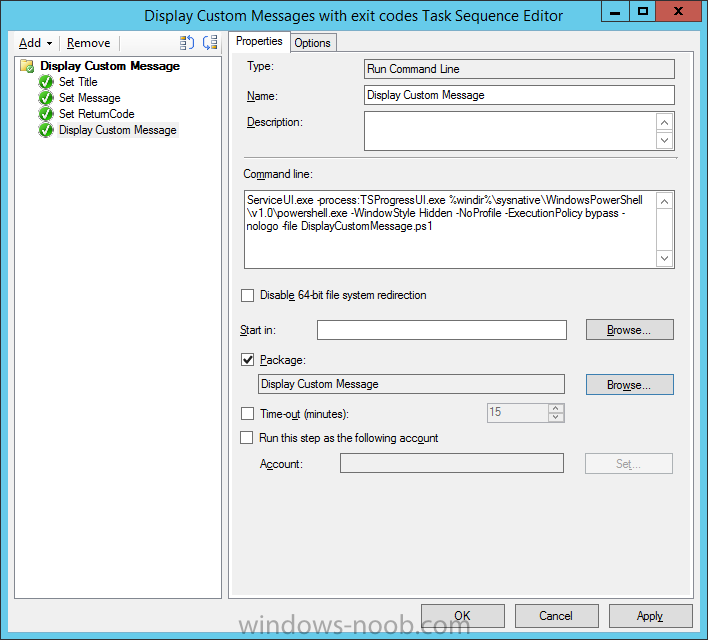
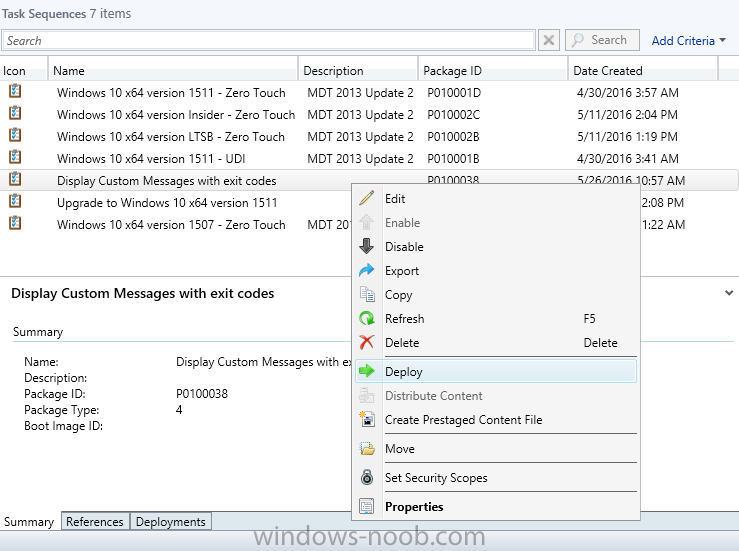
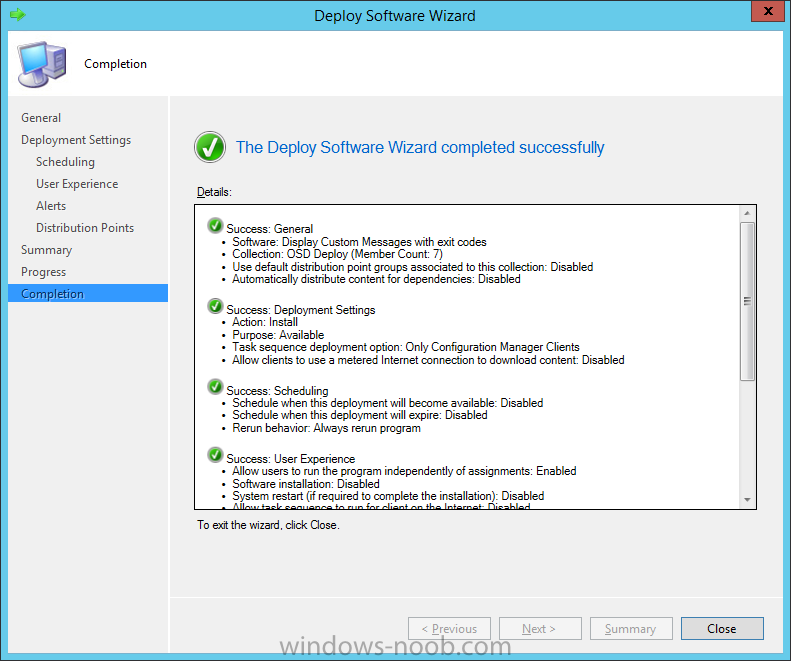
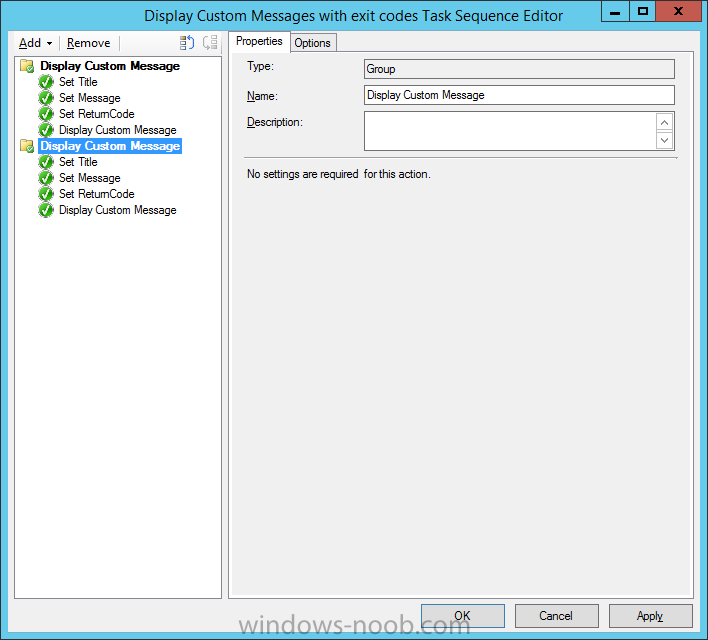
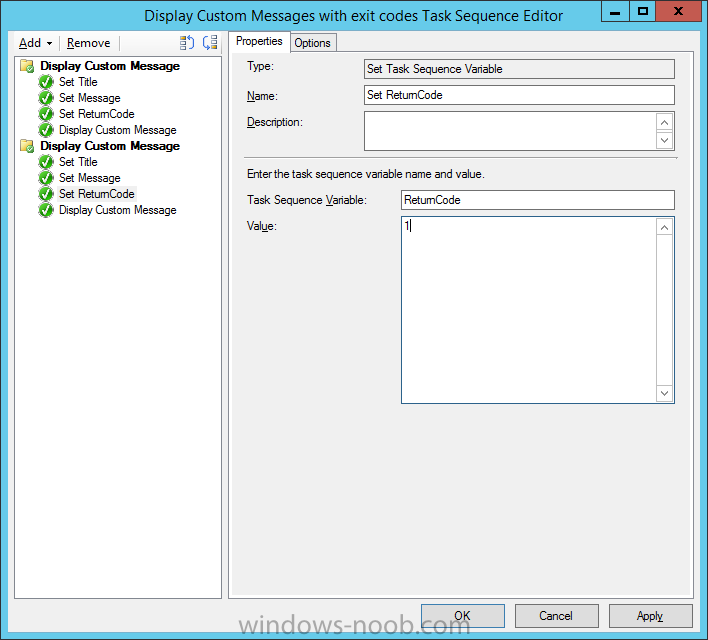
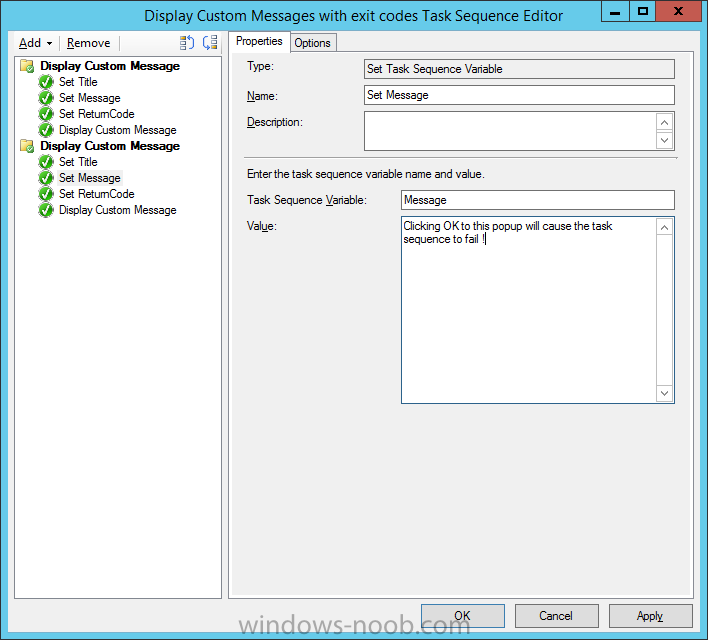
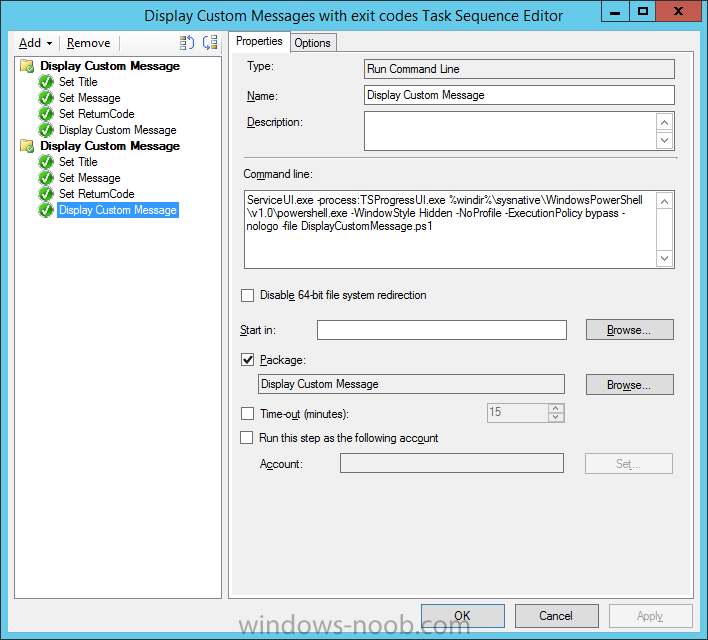
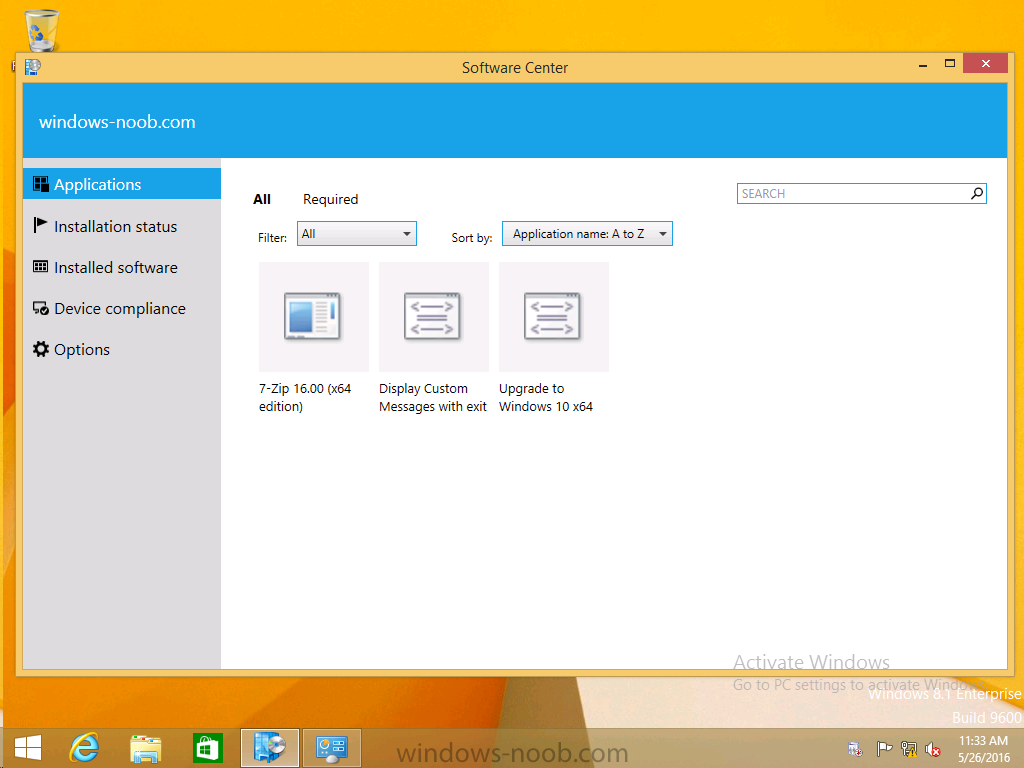
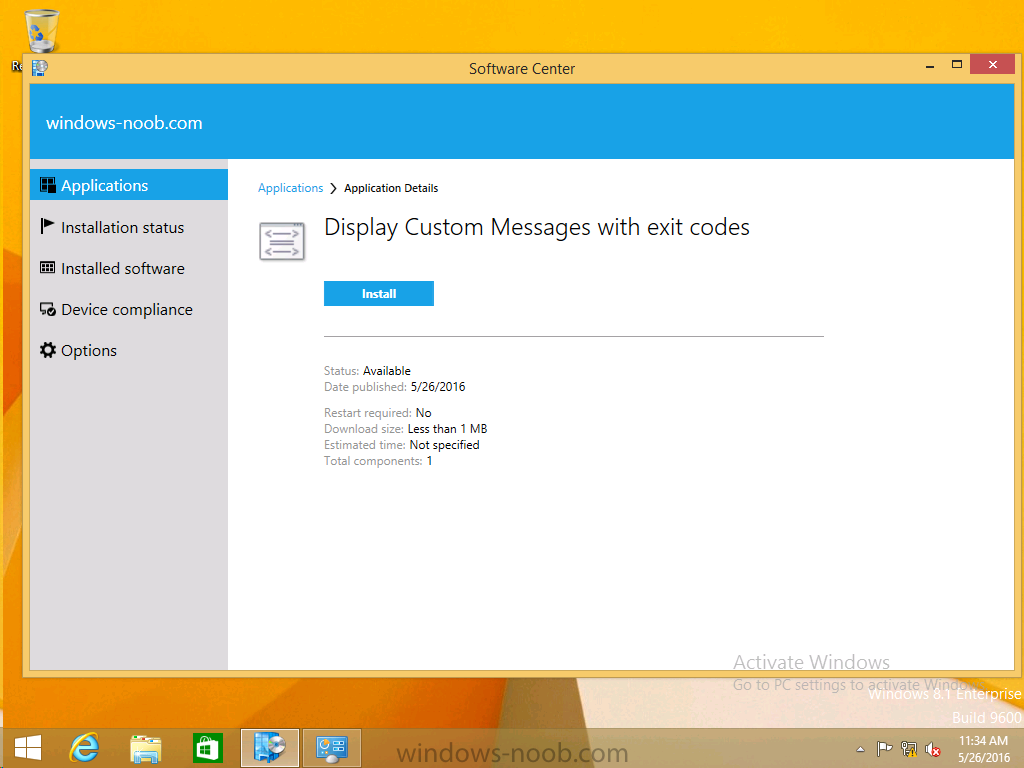
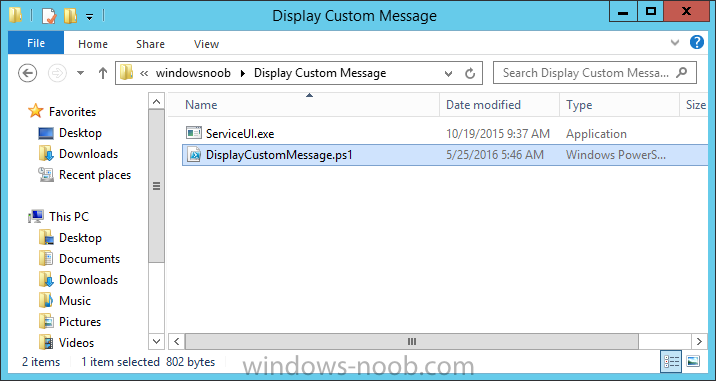
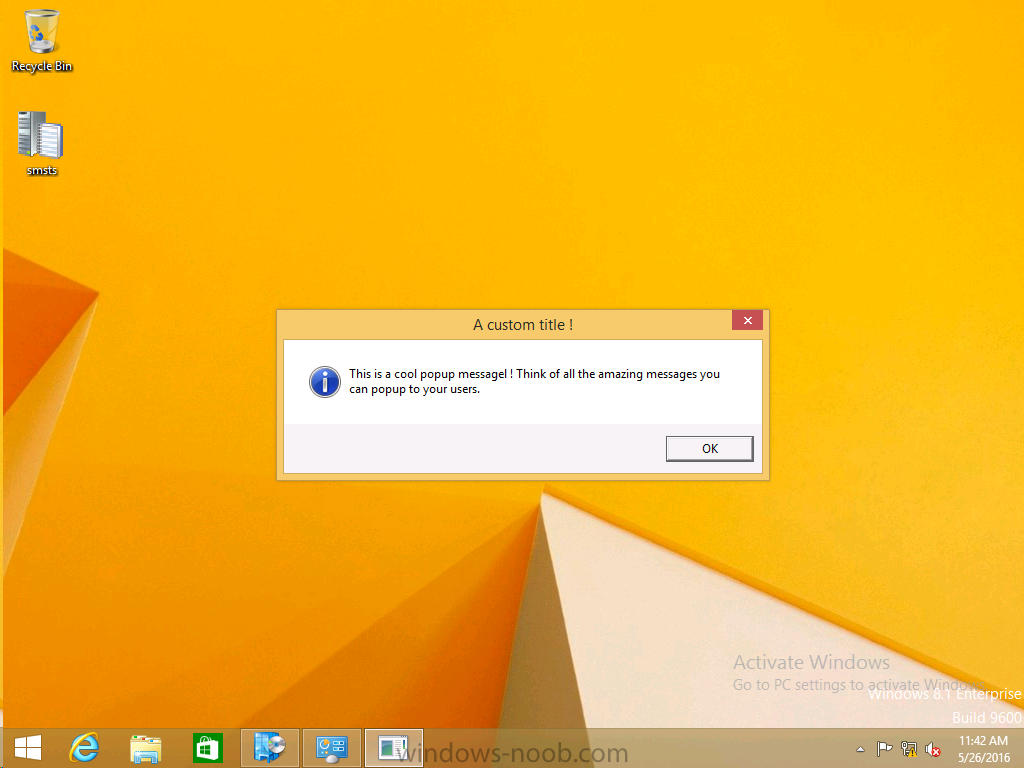
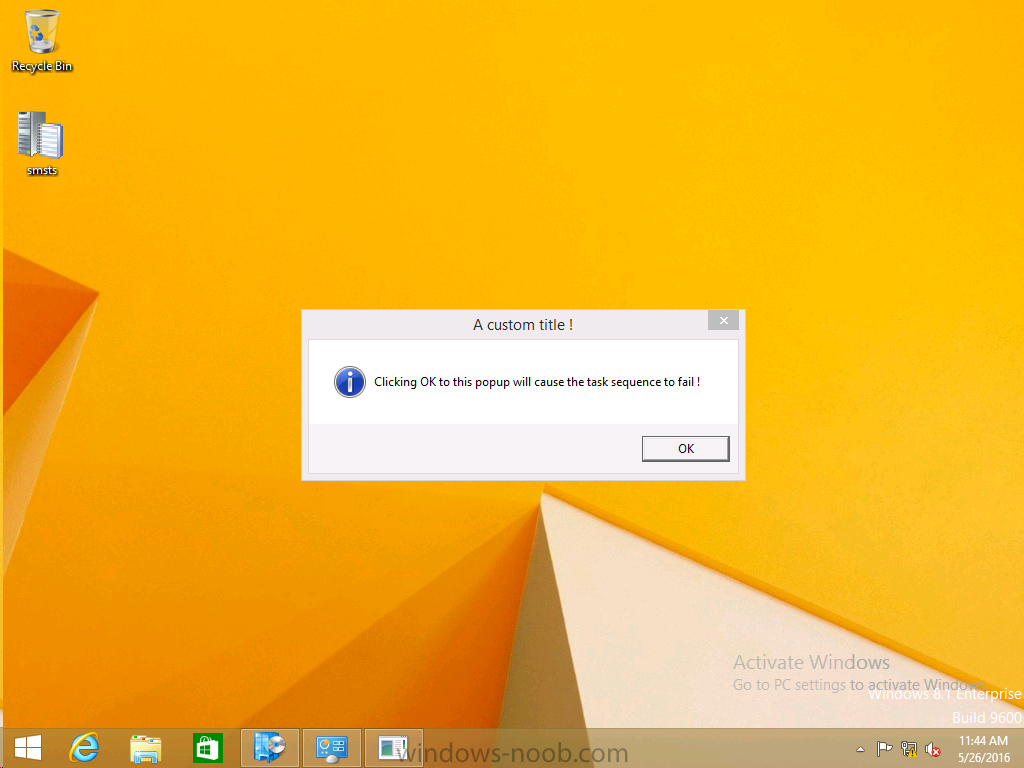
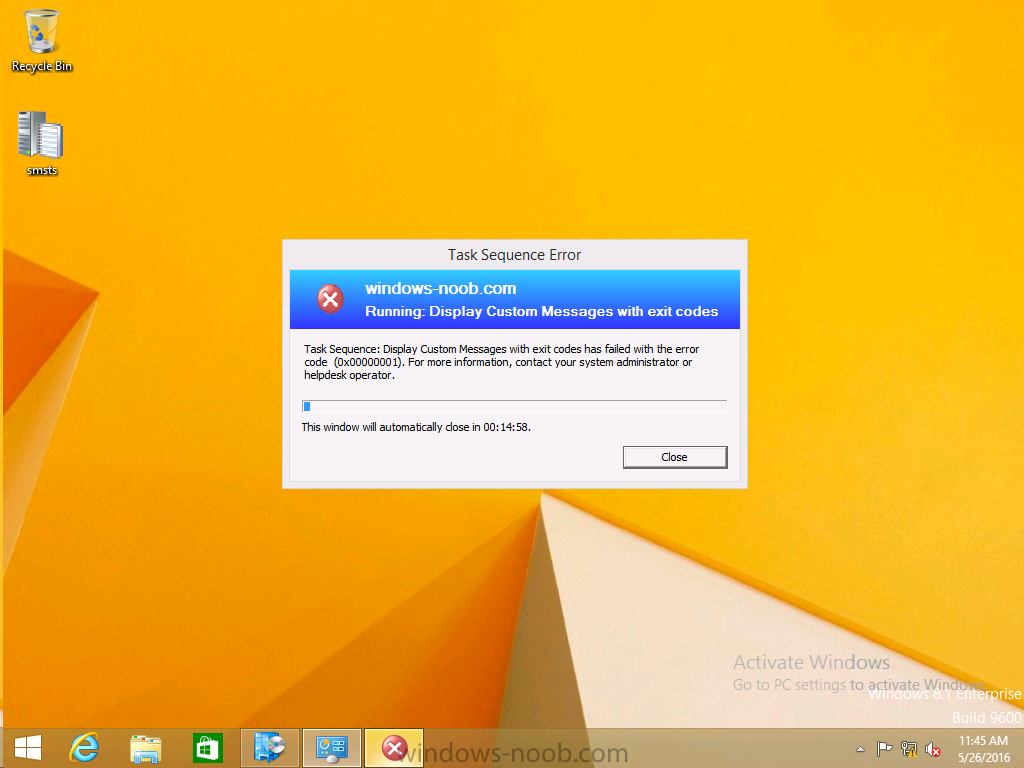
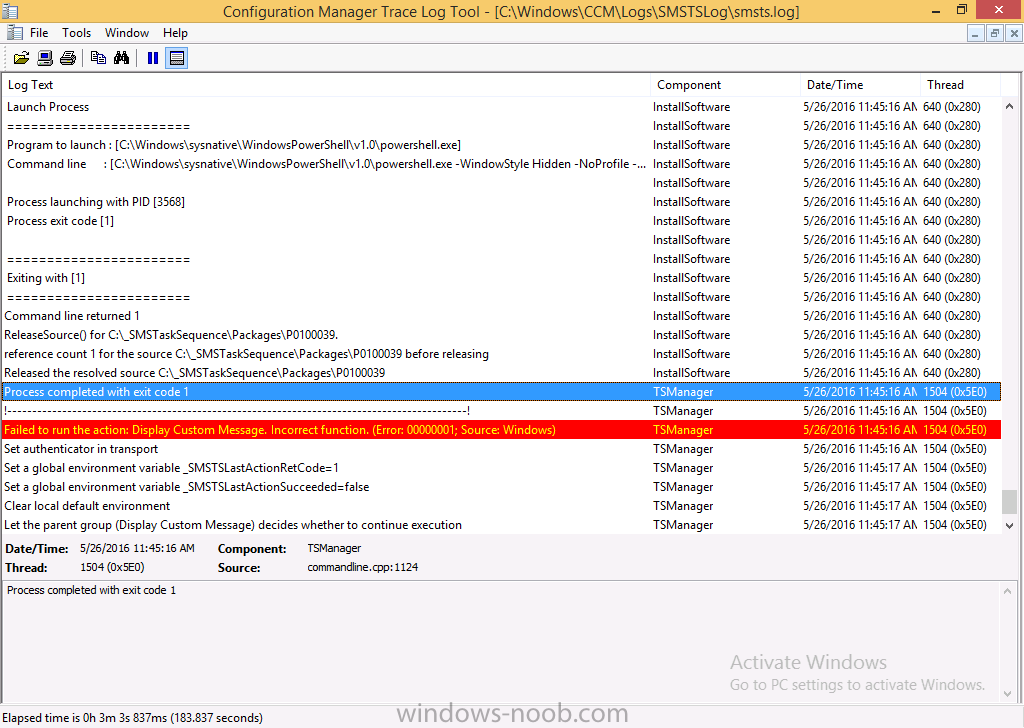
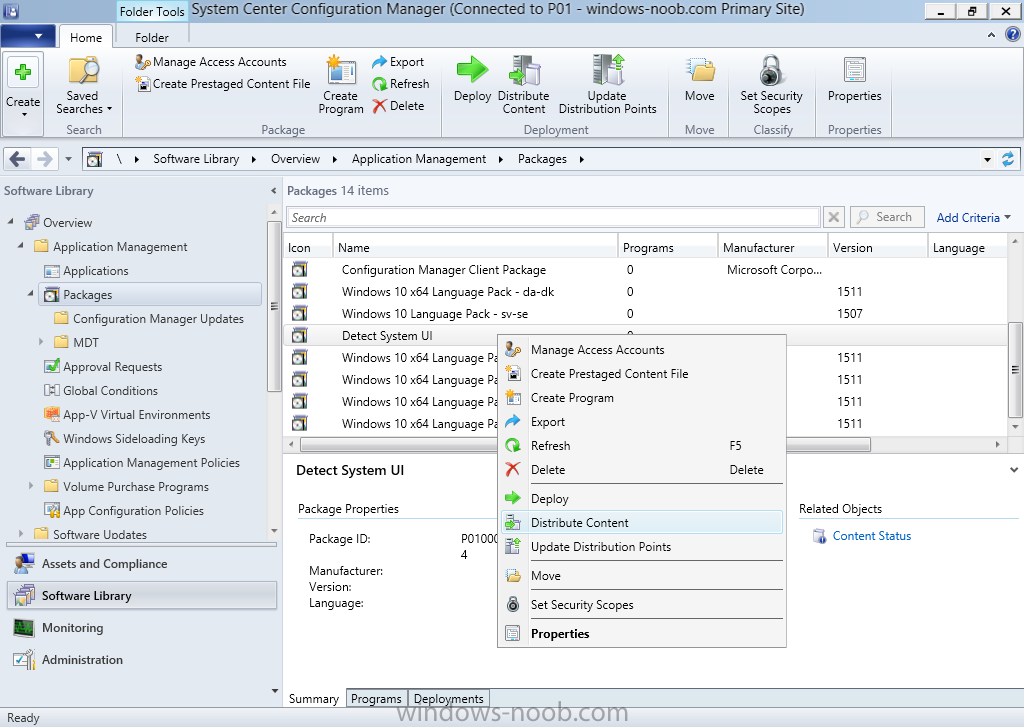
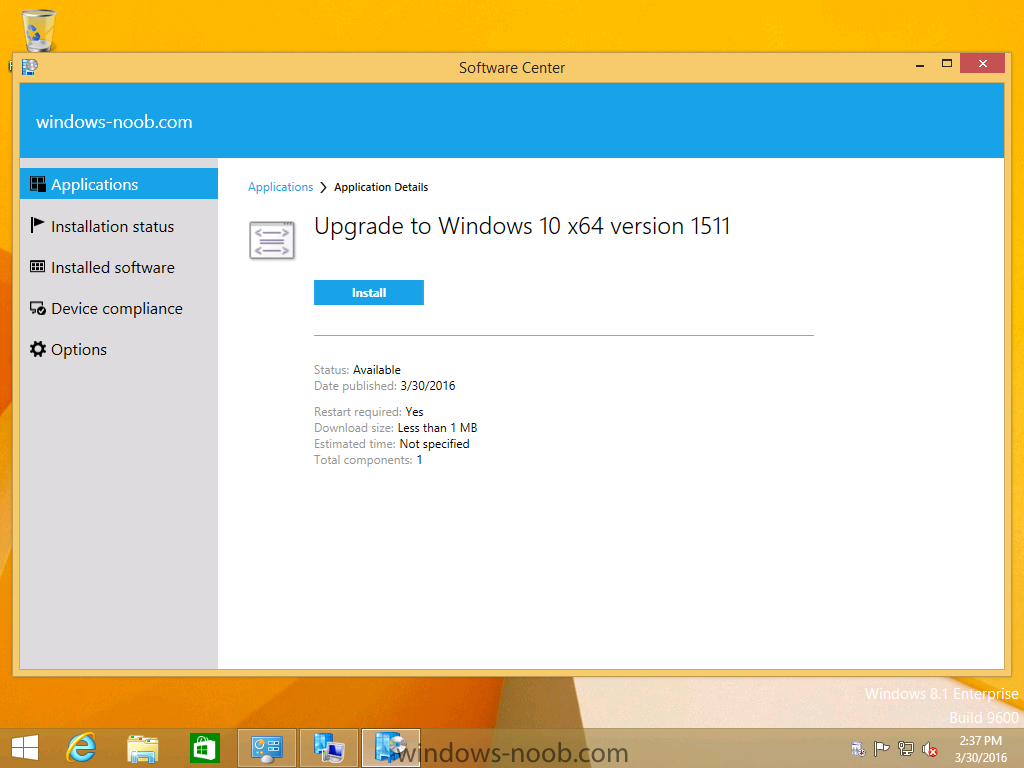
 Introduction At the start of this series of step by step guides you installed System Center Configuration Manager (Current Branch), then you configured discovery methods. Next you configured boundaries to get an understanding of how automatic site assignment and content location works. After that you learned how to update ConfigMgr with new features and fixes using a new ability called Updates and Servicing and you learned how to configure ConfigMgr to use Updates and Servicing in one of these two modes: Online mode Offline mode To prepare your environment for Windows 10 servicing (this guide) you learned how to setup Software Updates using an automated method (via a PowerShell script) or manually using the ConfigMgr console. Next you used a PowerShell script to prepare some device collections, then you configured client settings for your enterprise and finally you'll deployed the ConfigMgr client agent using the software updates method which is the least intensive method of deploying the Configuration Manager client agent. As System Center Configuration Manager (current branch) is being delivered as a service now, version 1602 was made available (March 11th, 2016) and you used Updates and Servicing to do an in-place upgrade to that version as explained here. Next you learned about how to use the Upgrade task sequence to upgrade your Windows 7, Windows 8 (and 8.1) and even your Windows 10 devices to a later build of Windows 10. You then learned about the new Windows 10 servicing features which use Servicing Plans in ConfigMgr (Current Branch). Next you integrated MDT 2013 update 2. MDT integration with ConfigMgr is useful as it provides additional functionality for operating system deployment scenarios such as Offline Language Package installation or User Driven Integration (UDI). Next you learned how to deploy Language Packs offline for Windows 10. To assist with Windows 10 servicing and for applying appropriate software updates to your Windows 10 devices, you used PowerShell to add queries to the various Windows 10 collections. Next you took a deeper look at the Windows 10 Upgrade task sequence, and learned one way of dealing with potential upgrade issues. While that method will flag a problem, such as determining the system UI language doesn't match the provided media, it won't allow you to continue with the upgrade. Next you learned how to upgrade the operating system when a language pack was installed, provided that the system UI language is from a 'list' of approved languages that you intend to support. This guide will show you how to display customized messages to a user during a task sequence, and how to set an exit code which could allow you to deliberately fail an action if necessary. All that's required is a few steps to set variables, a PowerShell script, and the serviceUI.exe executable from MDT 2013 Update 2. Step 1. Create a package On your ConfigMgr server, in the sources share, create a folder called Display Custom Message and place the DisplayCustomMessage.ps1 PowerShell script available in the downloads section of this guide, in the folder. Even though you might be deploying an X64 operating system, locate, select and copy the x86 architecture version of ServiceUI.exe from the Sources\OSD\MDT\MDT2013u2\Toolkit\Tools\x86 folder into the Display Custom Message folder as shown below. In the ConfigMgr console, Software Library, select Packages and right click, choose Create Package. Fill in the following details, Choose Do not create a program and then continue through the wizard until completion. Once the package is created, right click the package and choose Distribute Content. Distribute the package to your distribution points. Step 2. Create a custom task sequence In the ConfigMgr console, in Software Library, select Operating Systems and right click on Task Sequences, choose Create Task Sequence. select Create a new custom task sequence give the task sequence a suitable name such as Display Custom Messages with exit codes continue through that wizard until completion. Step 3. Edit the task sequence Right click on the newly created task sequence and choose edit It will appear blank, click on the Add Drop down and add a New Group called Display Custom Message Create a new Set Task Sequence Variable step called Set Title with a Task Sequence Variable called Title, with a suitable value as follows: Create a new Set Task Sequence Variable step called Set Message with a Task Sequence Variable called Message, with a suitable value as follows: Create a new Set Task Sequence Variable step called Set ReturnCode with a Task Sequence Variable called ReturnCode, with a suitable positive value as follows: Click Add and choose Run Command Line, name the step Display Custom Message and paste in the following based on what operating system the client is using: For Windows 8 ServiceUI.exe -process:TSProgressUI.exe %windir%\sysnative\WindowsPowerShell\v1.0\powershell.exe -WindowStyle Hidden -NoProfile -ExecutionPolicy bypass -nologo -file DisplayCustomMessage.ps1 For Windows 10 ServiceUI.exe -process:TSProgressUI.exe %SYSTEMROOT%\System32\WindowsPowerShell\v1.0\powershell.exe -windowstyle hidden -NoProfile -ExecutionPolicy bypass -File DisplayCustomMessage.ps1 For Package, select the Display Custom Message package created above. (screenshot below if for Windows 8 os) Copy the entire group and paste it below the first group Edit the Set Message step as below Edit the Set ReturnCode step, and choose a value that the Options tab on the Display Custom Message step is not going to expect such as 1, this will cause the next step to fail when it returns the return code. Apply your changes and exit the Task Sequence wizard. Step 4. Deploy the task sequence Right Click on the task sequence and choose Deploy Choose a suitable collection and use a purpose of Available. Step 5. Review the capabilities On a client computer that is in the collection that the task sequence was deployed to, open Software Center and select the Display Custom Message with exit codes task sequence. choose Install and after a few moments the first popup message appears ! As the ReturnCode for the first message was set to a value we expected (0 or 3010) it did not fail the task sequence. Click OK to continue... the next message appears, note the different text, and it's hinting towards what will happen Clicking OK will produce the failure Which is OK because we were expecting it, in fact, the ReturnCode we set (1) is listed in the failure message. In a real Production task sequence however, you'd take care of failures and deal with them in a professional way, I just want you to see that we can actually set the ReturnCode via the custom message. To get more proof of that refer to the SMSTS.log file, and you can see that it's setting the ReturnCode to the value we chose result ! Summary Popping up messages to users during a task sequence is sometimes necessary, and when things go wrong, you sometimes need to fail the task sequence or set a ReturnCode to do a planned action. This guide helps you do both of those things dynamically. Related Reading Task sequence steps in System Center Configuration Manager - https://technet.micr...y/mt629396.aspx If you'd like to send a notification message to users in Intune in Azure, try the following guide. Downloads You can download a Microsoft Word copy of this guide here dated 2016/05/26 How can I display custom messages to users during a task sequence in SCCM Current Branch.zip You can download the PowerShell script used above here: DisplayCustomMessage.zip\
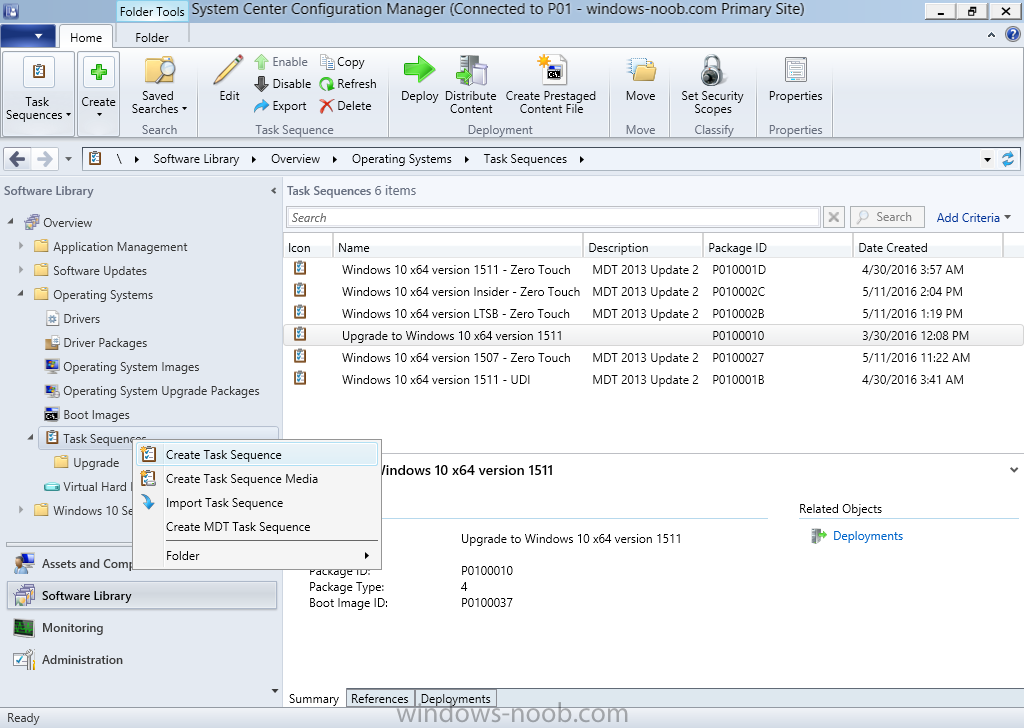

-
sounds like this problem
-
yes sorry, see this post
-
Dynamic Task Sequence selection frontend
anyweb replied to Bav's question in Frontends, HTA's and Web Services
you can use ad credentials with the adsi winpe plugin from Johan Arwidmark, please share the solution you come up with so others can benefit. -
Dynamic Task Sequence selection frontend
anyweb replied to Bav's question in Frontends, HTA's and Web Services
you could convert my devel mode task sequence logic to do that -
well done ! now you can update to 1602 and then you'll be running the latest and greatest version of System Center Configuration Manager (Current Branch) here's a guide. https://www.niallbrady.com/2016/03/11/now-available-update-1602-for-system-center-configuration-manager/
-
if you want to deploy and manage Windows 10 then you should move to SCCM version 1511 (Current Branch) as soon as possible (and then upgrade to 1602). The current release of System Center Configuration Manager 2012 R2 can only deploy and manage Windows 10 up to version 1511 and not beyond (i.e. Redstone)
-
this guide is for installing 1511 (current branch)... the Service Connection Point role is only available in 1511 and later
-
try it, it's a looooooooooong time since i did this post and i guess it was necessary for me then, however i'm always happy to be corrected
-
i didn't try the method you are referring to (this one ?), as i'm pretty sure it won't work with SCCM, but you are welcome to try it and let me know. This method occurs even before WinPEinit
-
did you install 1511 as a fresh install or upgrade from a previous version ?
-
what device are you trying to pxe boot with ? is it a virtual machine or a real computer ? did you add network drivers for it to the boot image ? it doesn't look like it
-
i've seen something similar before, possibly due to hash errors on the package, can you zip up some logs and we take a look...
-
hi Kacper how much system ram is in that T450 ?
-
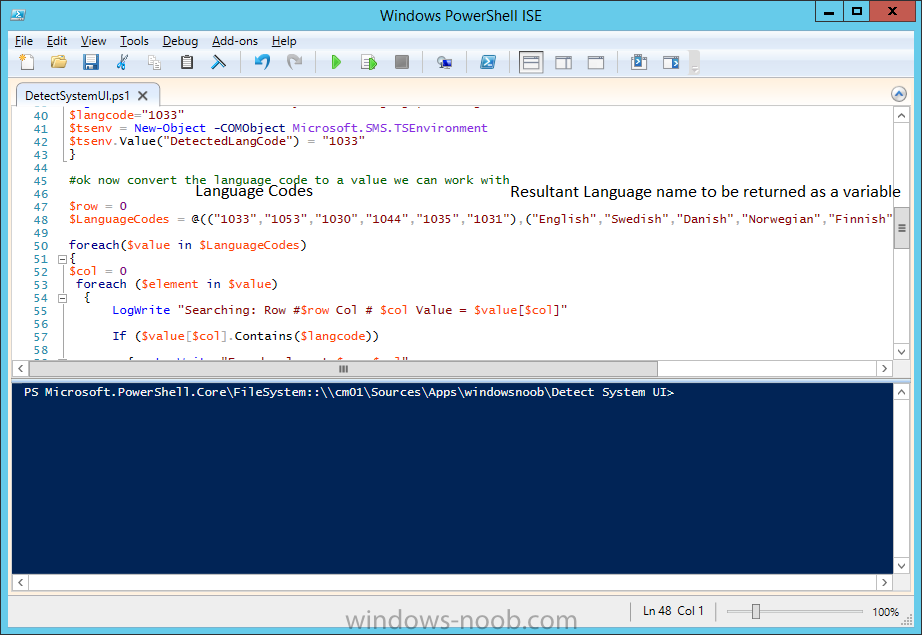
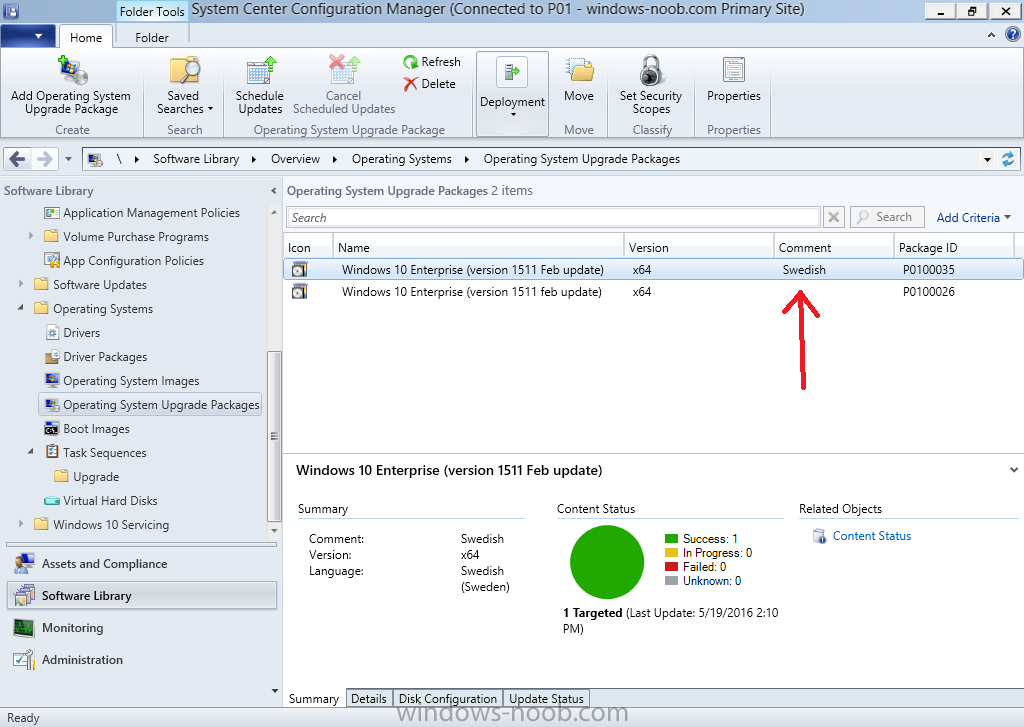
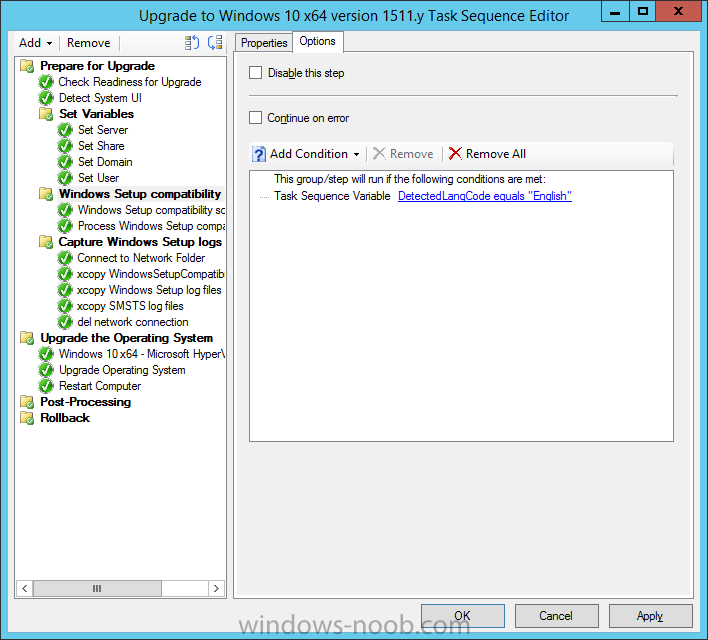
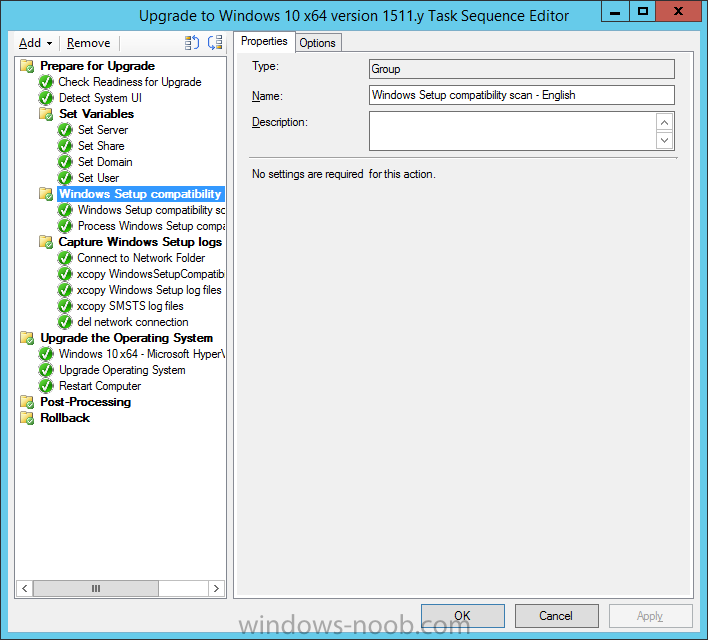
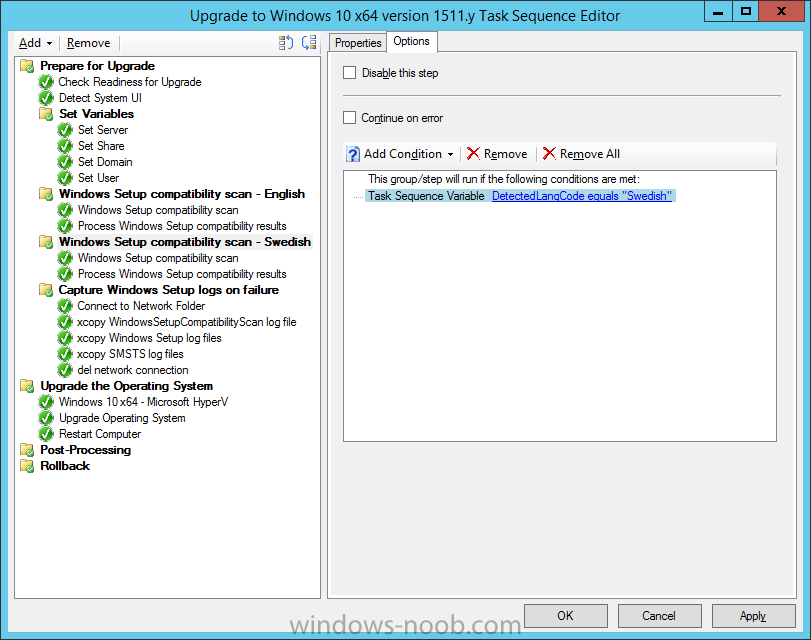
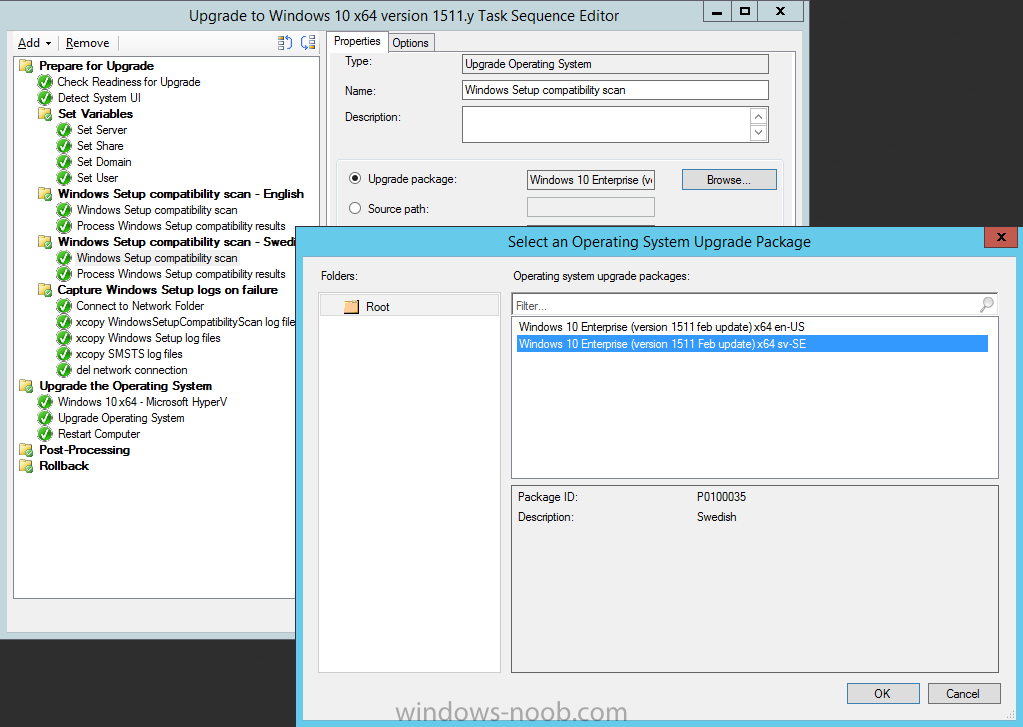
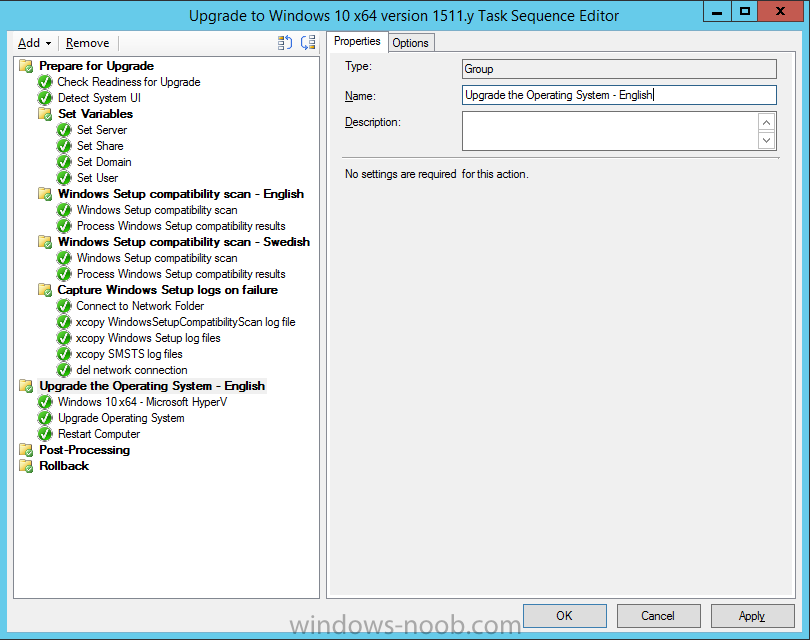
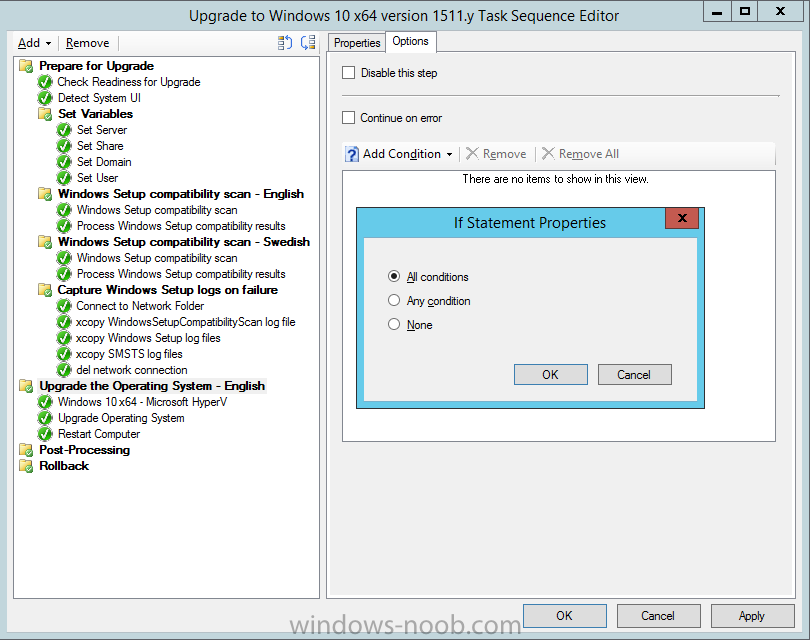
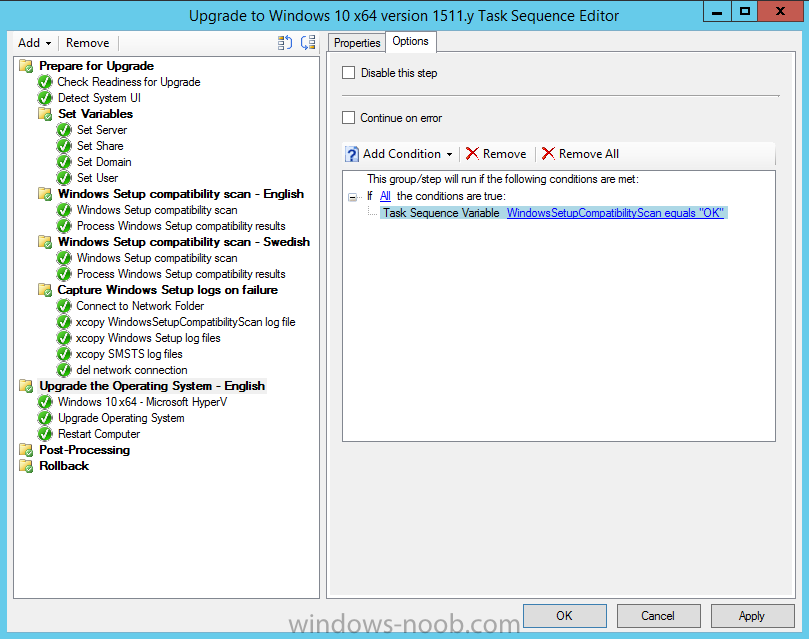
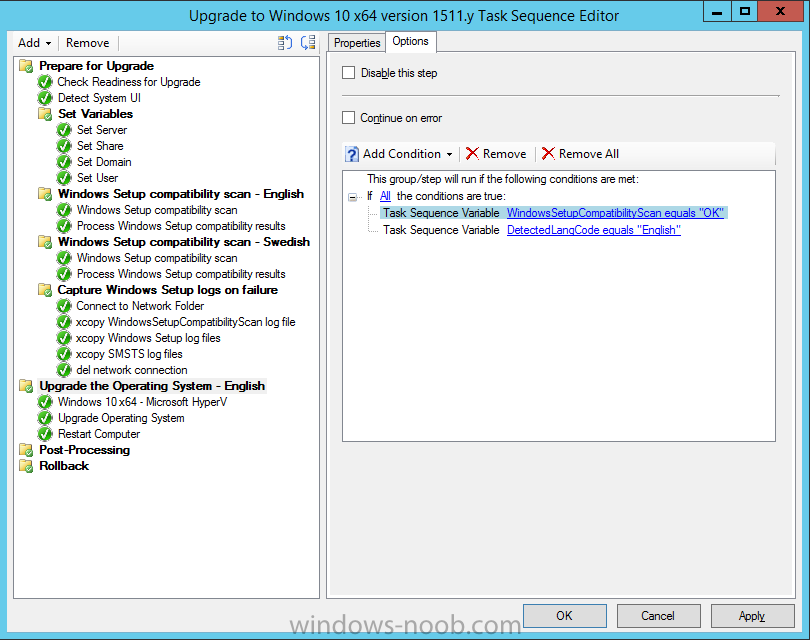
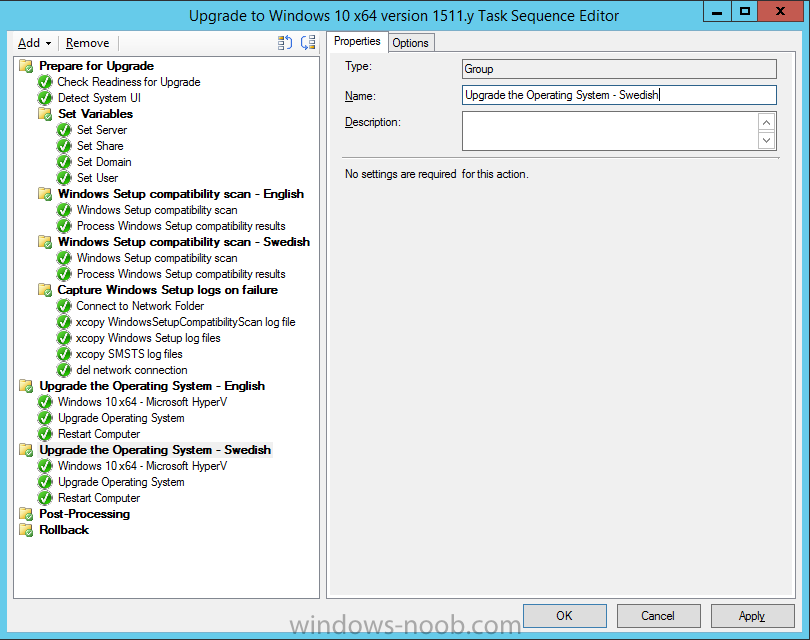
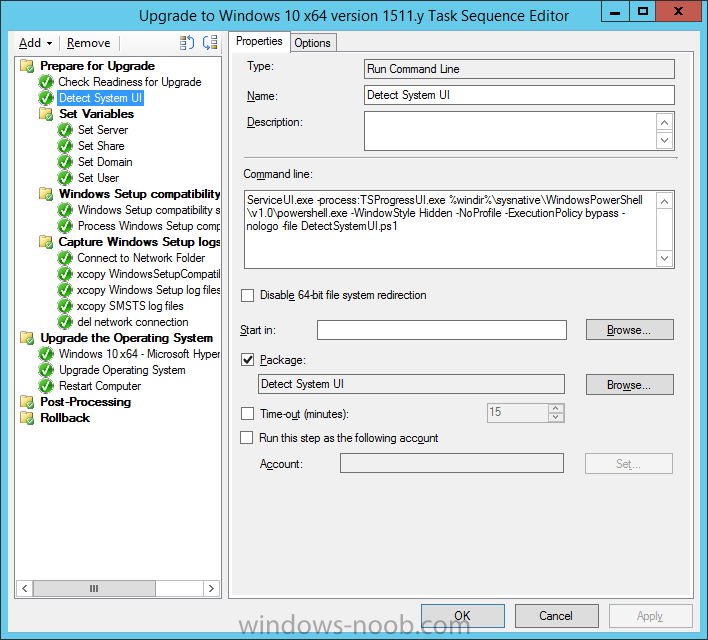
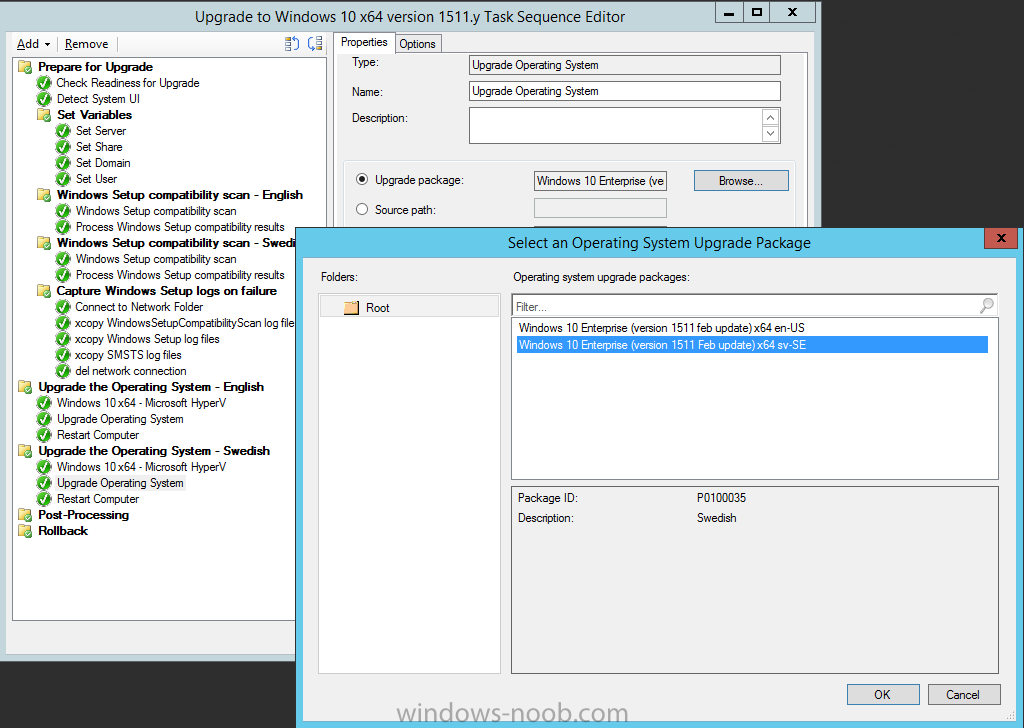
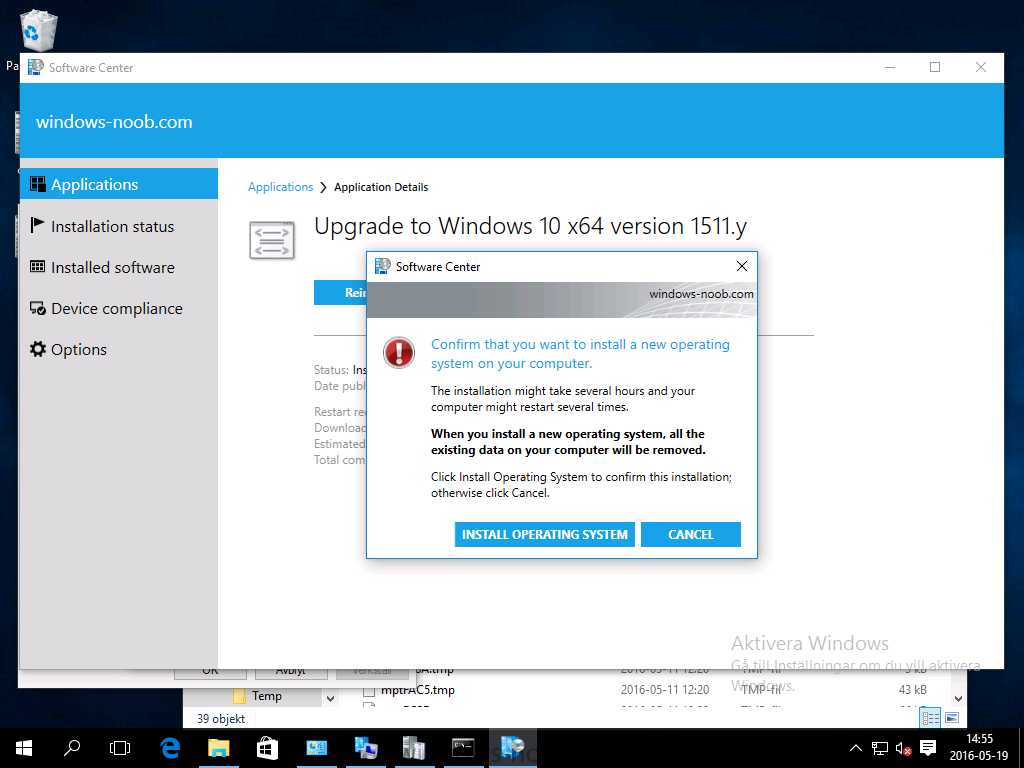
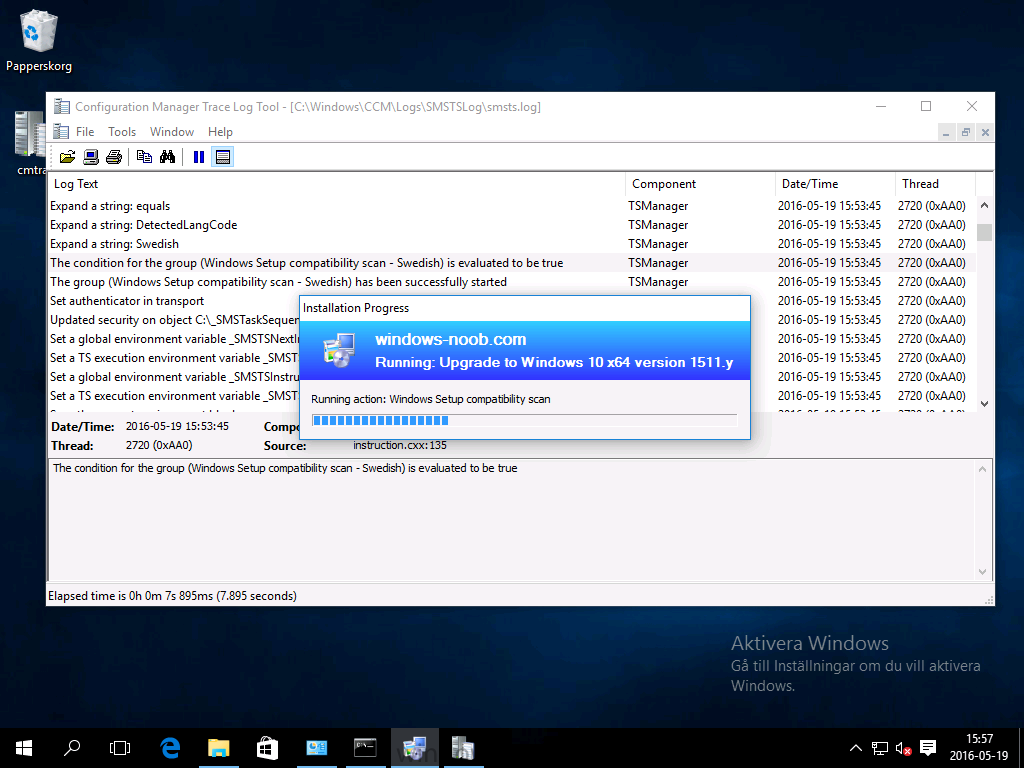
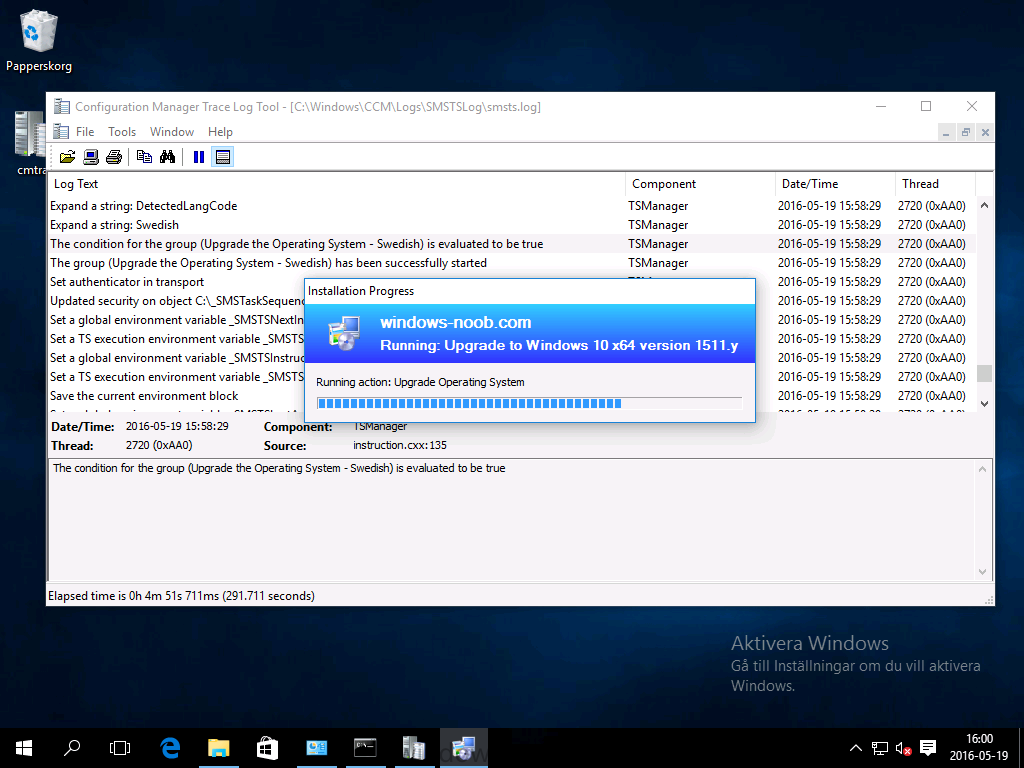
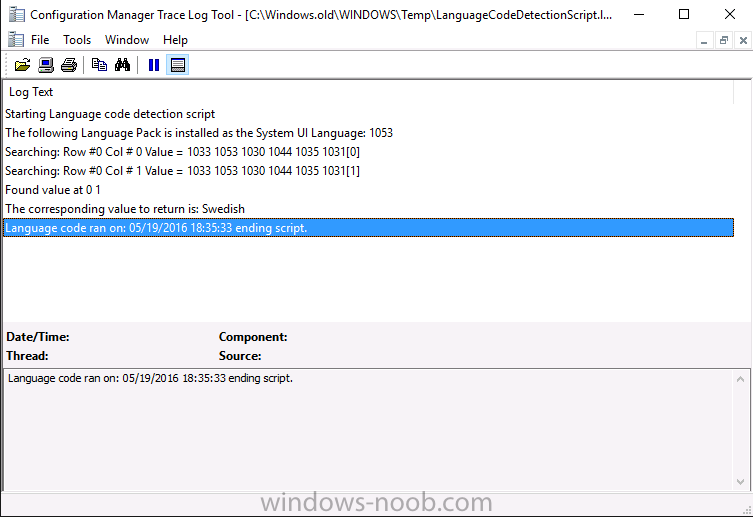
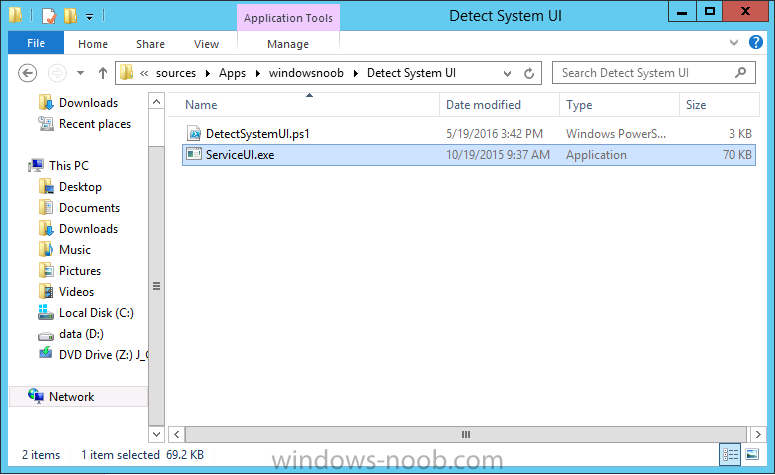
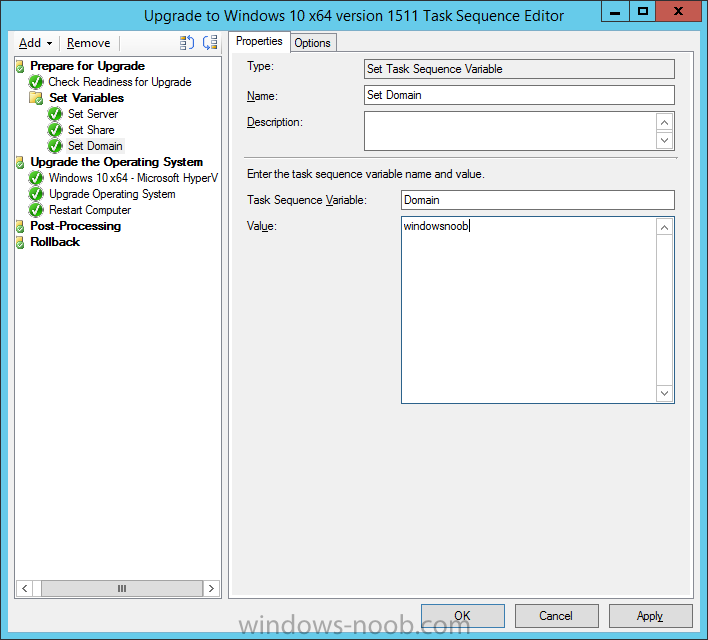
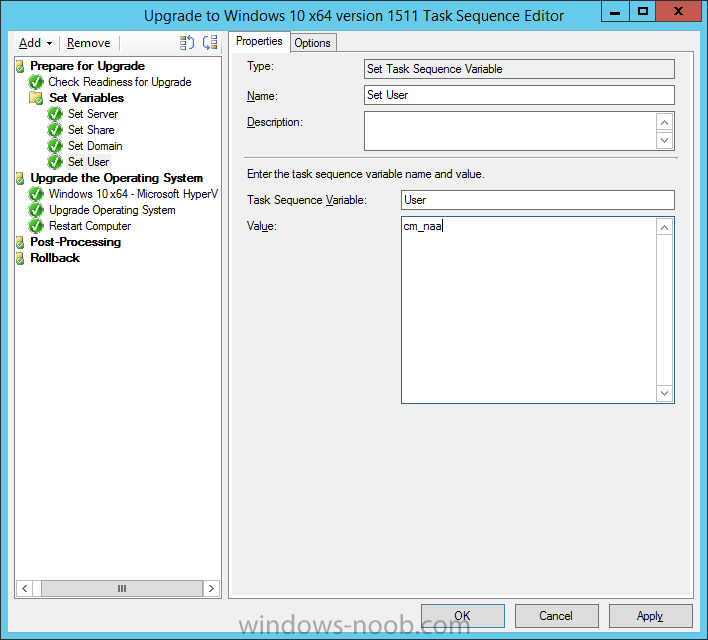
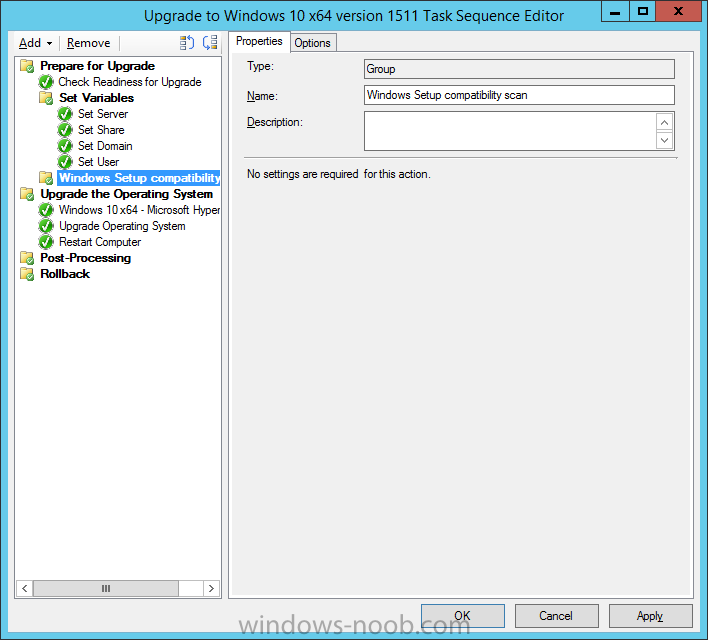
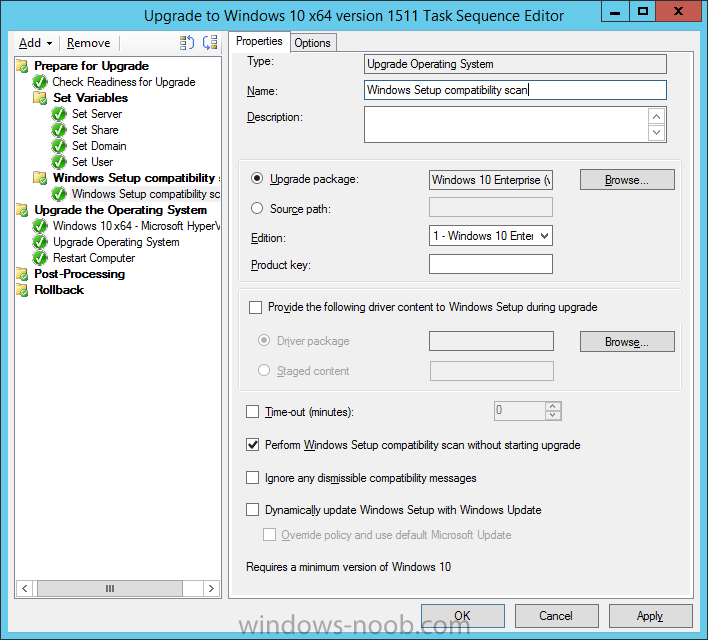
Introduction At the start of this series of step by step guides you installed System Center Configuration Manager (Current Branch), then you configured discovery methods. Next you configured boundaries to get an understanding of how automatic site assignment and content location works. After that you learned how to update ConfigMgr with new features and fixes using a new ability called Updates and Servicing and you learned how to configure ConfigMgr to use Updates and Servicing in one of these two modes: Online mode Offline mode To prepare your environment for Windows 10 servicing (this guide) you learned how to setup Software Updates using an automated method (via a PowerShell script) or manually using the ConfigMgr console. Next you used a PowerShell script to prepare some device collections, then you configured client settings for your enterprise and finally you'll deployed the ConfigMgr client agent using the software updates method which is the least intensive method of deploying the Configuration Manager client agent. As System Center Configuration Manager (current branch) is being delivered as a service now, version 1602 was made available (March 11th, 2016) and you used Updates and Servicing to do an in-place upgrade to that version as explained here. Next you learned about how to use the Upgrade task sequence to upgrade your Windows 7, Windows 8 (and 8.1) and even your Windows 10 devices to a later build of Windows 10. You then learned about the new Windows 10 servicing features which use Servicing Plans in ConfigMgr (Current Branch). Next you integrated MDT 2013 update 2. MDT integration with ConfigMgr is useful as it provides additional functionality for operating system deployment scenarios such as Offline Language Package installation or User Driven Integration (UDI). Next you learned how to deploy Language Packs offline for Windows 10. To assist with Windows 10 servicing and for applying appropriate software updates to your Windows 10 devices, you used PowerShell to add queries to the various Windows 10 collections. Next you took a deeper look at the Windows 10 Upgrade task sequence, and learned one way of dealing with potential upgrade issues. While that method will flag a problem, such as determining the system UI language doesn't match the provided media, it won't allow you to continue with the upgrade. This post will show you one method to upgrade the operating system, provided that the system UI language is from a 'list' of approved languages that you intend to support. This method uses a PowerShell script that runs the below query to check for the language installed ([wmi]"root\cimv2:win32_OperatingSystem=@").OSLanguage It then compares that result to your approved list of language codes (and resulting names, eg: 1033=English). The section of the PowerShell script that you can edit to expand/reduce this functionality is highlighted below. Just make sure that the Language Code listed on the left, matches the Language Variable name that you want to return to the task sequence as a variable, a full list of these potential values is here in the Language Codes section. Once the script has run, it will set a variable that can be checked for in the task sequence, the variable is called DetectedLangCode. Note: There are at least three methods dealing with Language Packs installed in Windows 10 for the Upgrade Task Sequence, this is one method. If i get time i'll blog the other methods too (however they are less supported than this method). The downside to this method is that you need one media step for each language installed (including an additional step if using the Windows setup compatibility scan). Step 1. Create a package On your ConfigMgr server, in the sources share, create a folder called Detect System UI and place the DetectSystemUI.ps1 PowerShell script in the folder. Even though you are deploying an X64 operating system, locate, select and copy ServiceUI.exe from the Sources\OSD\MDT\MDT2013u2\Toolkit\Tools\x86 folder into the Detect System UI folder as shown below. In the ConfigMgr console, Software Library, select Packages and right click, choose Create Package. Fill in the following details, Choose Do not create a program and then continue through the wizard until completion. Once the package is created, right click the package and choose Distribute Content. Distribute the package to your distribution points. Step 2. Create Windows 10 Upgrade Packages for the languages you intend to support. Logon to your Microsoft Volume License site and download the correct version of the Windows 10 1511 (Feb 2016 update) media that is available in each language that you intend to support, so if you have 10 languages to support, you need all 10 media isos. Once downloaded, add the media as a new Windows 10 Upgrade Package into ConfigMgr. To add Windows 10 version 1511 as an operating system upgrade package do as follows: In the Configuration Manager console, click Software Library and expand Operating Systems then click Operating System upgrade packages. Right click on Operating System upgrade packages and choose Add Operating System upgrade package. When the wizard appears fill in the UNC path to the media and click on next, make sure to fill in a comment to note the language of the media. Once done creating the package update it to your Distribution Points. Rinse and repeat for each language you intend to support. Step 3. Edit the task sequence to determine system UI language By default, after creating an upgrade task sequence you'll have one language media added (probably English). However, if you deploy Windows 10 language packs offline or install the language pack in such as way as to change the UILanguage in the unattend.xml, the installed language pack (for example Swedish) will be set as the system UI language even if the base operating system language was English. The PowerShell script at the bottom of this guide can be run to set a variable at the start of the task sequence and the task sequence will utilize this variable to allow the process to continue with the Upgrade task sequence without failing over. In this guide you will use the Upgrade task sequence created in the previous guide. In the Prepare for Upgrade group select the Check Readiness for upgrade step, click Add and choose Run Command Line, name the step Detect System UI and paste in the following: ServiceUI.exe -process:TSProgressUI.exe %windir%\sysnative\WindowsPowerShell\v1.0\powershell.exe -WindowStyle Hidden -NoProfile -ExecutionPolicy bypass -nologo -file DetectSystemUI.ps1 For Package, select the Detect System UI package created above. Step 4. Edit the task sequence to set the Windows Setup Compatibility scan languages Next, navigate to the Windows Setup compatibility scan group and Change the name of the group from Windows Setup compatibility scan to Windows Setup compatibility scan - English Next, select the options tab. Add a task sequence variable check for DetectedLangCode = English copy the group (right click copy, right click paste) and rename the copied group to Windows Setup compatibility scan - Swedish (or whatever language you intend to add support for) Click on the Options tab and change the variable from English to Swedish. select the Windows Setup compatibility scan step and change the media to point to the matching language that this group will support (eg: Swedish). Repeat the above for each language you intend to support. Step 5. Edit the task sequence to set the Upgrade the Operating System languages Next, select the Upgrade the Operating System group and rename it to Upgrade the Operating System - English Next, select the options tab. Remove the current variables added and then click on Add Condition, If statement, then All Conditions. next click on Add Condition, and add a set task sequence variable WindowsSetupCompatibilityScan = OK and...again click on Add Condition, and add a set task sequence variable DetectedLangCode = English copy the group (right click copy, right click paste) and rename the copied group to Upgrade the Operating System - Swedish (or whatever language you intend to add support for) Click on the Options tab and change the DetectedLangCode variable from English to the language you intend to support. Next select the Upgrade Operating System step and click on browse to change the media from English to the language you intend to support continue doing the above for each language you intend to support, apply the changes and close the task sequence editor. Step 6. Review the results On a computer that is running a language that was added as a language pack and which changed the System UI to match that language, run the Upgrade to Windows 10 task sequence. In this example we are attempting to upgrade a Swedish Windows 10 operating system to the next version of Windows 10. As you can see the login screen is in Swedish. In Software Center, select the task sequence and choose Install (or reinstall if needed), click on Install Operating System when prompted If you want to monitor the event live, then use CMTrace to monitor C:\Windows\CCM\Logs\SMSTSLOG\smsts.log you should see that it correctly identifies the language for the Windows Setup Compatibility scan group and indeed the Upgrade Operating System - Swedish should kick off without a hitch, and off it goes... Note: The log file generated by this script is stored in C:\Windows\Temp and contains info about the detected Language Code and the variable that DetectedLangCode will be set to. The name of the log file is LanguageCodeDetectionScript.log after a successful upgrade, Job done ! Summary In this guide you've applied steps and groups to the Upgrade Task Sequence to detect the System UI language, and apply the correct media where needed, both for the Windows Setup Compatibility scan and for the Upgrade Operating System steps. Dealing with different System UI languages in Windows 10 upgrade scenarios using the Upgrade task sequence isn't straight forward but at least there's way's to solve the problem. Related Reading A deeper look at the Upgrade task sequence in System Center Configuration Manager (Current Branch) - https://www.windows-noob.com/forums/topic/14118-a-deeper-look-at-the-upgrade-task-sequence-in-system-center-configuration-manager-current-branch/ How can I install Windows 10 language packs offline with an MDT Integrated Task Sequence in System Center Configuration Manager (Current Branch) - https://www.windows-noob.com/forums/topic/14059-how-can-i-install-windows-10-language-packs-offline-with-an-mdt-integrated-task-sequence-in-system-center-configuration-manager-current-branch/ Appendix F - Country/Region and Language Codes - https://technet.microsoft.com/en-us/library/dd346950.aspx Windows 10 MUI challenge - https://rzander.azurewebsites.net/how-to-change-the-welcome-screen-language-in-win10/ Downloads You can download a Microsoft Word copy of this guide here dated 2016/05/19 How can I detect the system ui in an upgrade task sequence.zip You can download the PowerShell script used above here. DetectSystemUI.zip


-
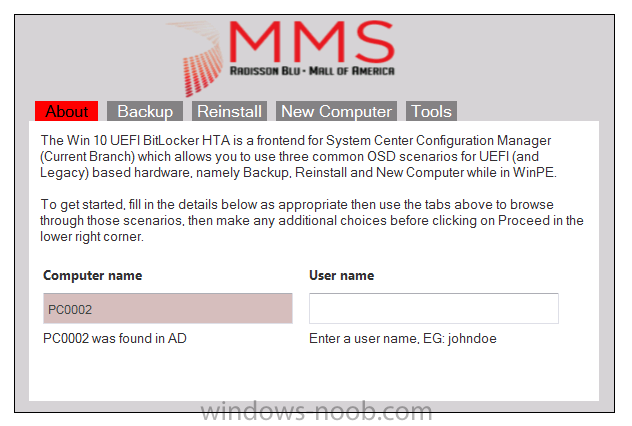
here are a bunch of links which cover many of the things i talked about in the last two days @ MMS: Introducing the Windows 10 UEFI BitLocker Frontend for System Center Configuration Manager (Current Branch) - https://www.niallbrady.com/2016/05/17/introducing-the-windows-10-uefi-bitlocker-frontend-for-system-center-configuration-manager-current-branch/ A deeper look at the Upgrade task sequence in System Center Configuration Manager (Current Branch) - https://www.niallbrady.com/2016/05/15/a-deeper-look-at-the-upgrade-task-sequence-in-system-center-configuration-manager-current-branch/ How can I use PowerShell to populate Windows 10 CB, CBB, LTSB and Insider Preview collections in System Center Configuration Manager (Current Branch) - https://www.niallbrady.com/2016/05/13/how-can-i-use-powershell-to-populate-windows-10-cb-cbb-ltsb-and-insider-preview-collections-in-system-center-configuration-manager-current-branch/ How can I use the Upgrade Task Sequence in System Center Configuration Manager (current branch) ? https://www.windows-noob.com/forums/topic/13917-how-can-i-use-the-upgrade-task-sequence-in-system-center-configuration-manager-current-branch/ How can I use servicing plans in System Center Configuration Manager (Current Branch) to upgrade Windows 10 devices ? - https://www.windows-noob.com/forums/topic/13968-how-can-i-use-servicing-plans-in-system-center-configuration-manager-current-branch-to-upgrade-windows-10-devices/ How can I use the Upgrade Task sequence to deal with languages in System Center Configuration Manager (Current Branch) - https://www.windows-noob.com/forums/topic/14141-how-can-i-use-the-upgrade-task-sequence-to-deal-with-languages-in-system-center-configuration-manager-current-branch/ cheers niall

-
the differences between 2.5 and 2.5sp1 are not so great, if you implement what's in the book then you can easily upgrade that to 2.5sp1 i did it in one of my labs...
-
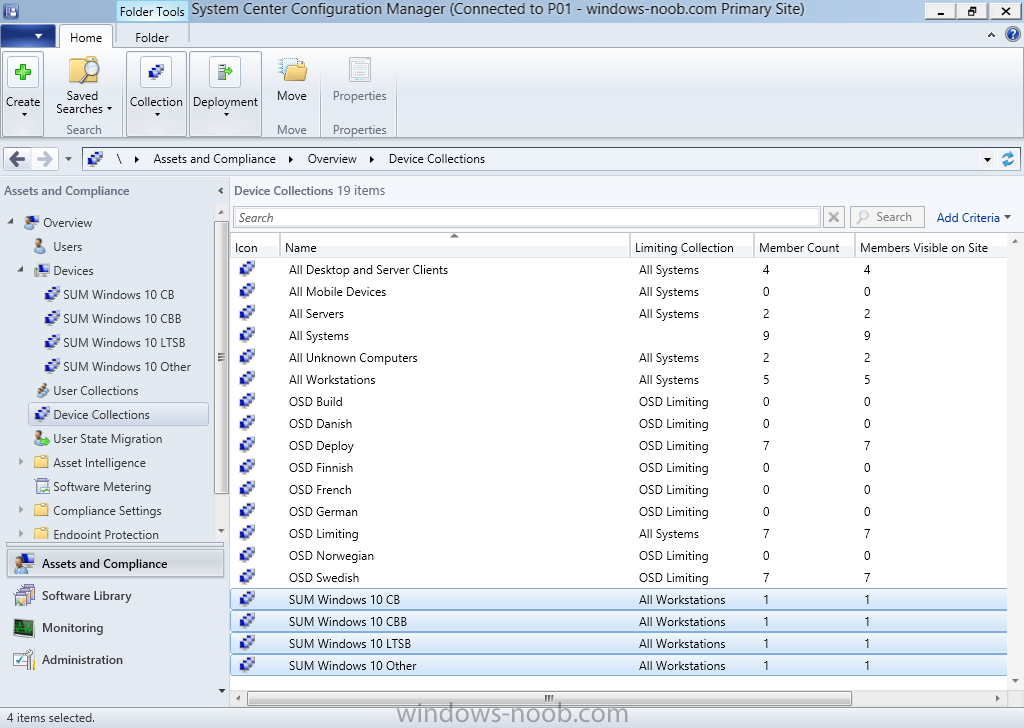
IntroductionIn a previous post I showed you how you could create a bunch of collections (for OSD and Software Update Management) that could be used for Windows 10 servicing. I’ve updated the script to add queries and exclude rules for the four Software Update Management collections. This will allow those collections to populate with the correct devices automatically. You can run this script even if you previously created the collections as it will not re-create them if found. The four collections used for Windows 10 servicing and software update management are as follows: SUM Windows 10 CB SUM Windows 10 CBB SUM Windows 10 LTSB SUM Windows 10 Other To define if a computer is Current Branch or Current Branch for Business, you can specify the group policy setting, Defer Upgrades and Updates. The GPO setting is found in Computer Configuration, Administrative Templates, Windows Components, Windows Update of the 1511 ADMX templates which you can import into Active Directory as described here. If the GPO is enabled then all appropriate Windows 10 computers targeted with it will become Current Branch for Business. The client properties (within ConfigMgr) for Operating System Readiness Branch of this Windows 10 device below reveal that it is running Windows 10 Current Branch for Business. If the GPO is not set, then Windows 10 will be shown as Current Branch with an Operating System Readiness Branch defined as Do not defer upgrades as below. If you are deploy Windows 10 using Windows 10 LTSB media then the Operating System Readiness Branch will be defined as LTSB as shown below. If you are using Windows Insider Preview releases then they can show up as if they were Current Branch or Current Branch for Business depending on the setting, therefore we exclude them from that collection. Also to note, Windows 8.1 devices will show up in your Current Branch collection if you only search for the Operating System Readiness Branch, therefore the queries also look for the Operating System name and version. This is most likely a bug. Running the ScriptOn the ConfigMgr server, start Windows PowerShell ISE as administrator and load the script. Adjust any variables to suit your needs prior to executing it. To run the script click on the green triangle. Sample output is shown below (you can run it over and over again). The collections will now auto populate with your respective Windows 10 devices Show me the queriesThe queries are based on the Operating System Readiness Branch device property. This device property is picked up via the Heartbeat discovery method. The queries used to populate the collections are shown below for your reference: SUM Windows 10 CB select SMS_R_SYSTEM.ResourceID,SMS_R_SYSTEM.ResourceType,SMS_R_SYSTEM.Name,SMS_R_SYSTEM.SMSUniqueIdentifier,SMS_R_SYSTEM.ResourceDomainORWorkgroup,SMS_R_SYSTEM.Client from SMS_R_System inner join SMS_G_System_OPERATING_SYSTEM on SMS_G_System_OPERATING_SYSTEM.ResourceId = SMS_R_System.ResourceId where SMS_R_System.OSBranch = 0 and SMS_R_System.OperatingSystemNameandVersion = “Microsoft Windows NT Workstation 10.0” SUM Windows 10 CBB select SMS_R_SYSTEM.ResourceID,SMS_R_SYSTEM.ResourceType,SMS_R_SYSTEM.Name,SMS_R_SYSTEM.SMSUniqueIdentifier,SMS_R_SYSTEM.ResourceDomainORWorkgroup,SMS_R_SYSTEM.Client from SMS_R_System inner join SMS_G_System_OPERATING_SYSTEM on SMS_G_System_OPERATING_SYSTEM.ResourceId = SMS_R_System.ResourceId where SMS_R_System.OSBranch = 1 and SMS_R_System.OperatingSystemNameandVersion = “Microsoft Windows NT Workstation 10.0” SUM Windows 10 LTSB select SMS_R_SYSTEM.ResourceID,SMS_R_SYSTEM.ResourceType,SMS_R_SYSTEM.Name,SMS_R_SYSTEM.SMSUniqueIdentifier,SMS_R_SYSTEM.ResourceDomainORWorkgroup,SMS_R_SYSTEM.Client from SMS_R_System inner join SMS_G_System_OPERATING_SYSTEM on SMS_G_System_OPERATING_SYSTEM.ResourceId = SMS_R_System.ResourceId where SMS_R_System.OSBranch = 2 and SMS_R_System.OperatingSystemNameandVersion = “Microsoft Windows NT Workstation 10.0” SUM Windows 10 Other select SMS_R_SYSTEM.ResourceID,SMS_R_SYSTEM.ResourceType,SMS_R_SYSTEM.Name,SMS_R_SYSTEM.SMSUniqueIdentifier,SMS_R_SYSTEM.ResourceDomainORWorkgroup,SMS_R_SYSTEM.Client from SMS_R_System inner join SMS_G_System_OPERATING_SYSTEM on SMS_G_System_OPERATING_SYSTEM.ResourceID = SMS_R_System.ResourceId where SMS_R_System.OperatingSystemNameandVersion = “Microsoft Windows NT Workstation 10.0” and (SMS_G_System_OPERATING_SYSTEM.BuildNumber != “10586” and SMS_G_System_OPERATING_SYSTEM.BuildNumber != “10240”) Note: The query used for SUM Windows 10 Other will show all Windows 10 releases releases that are neither Windows 10 version 1507 (build 10240) or Windows 10 version 1511 (build 10586). Once Windows 10 Redstone ships, you’ll want to update the script to include whatever build number it is. DownloadsYou can download the PowerShell script used to create the collections and populate the queries here, simply unzip it. CreateDeviceCollections Related Reading How can I use the Upgrade Task Sequence in System Center Configuration Manager (current branch) ? How can I use servicing plans in System Center Configuration Manager (Current Branch) to upgrade Windows 10 devices ? How can I deploy Windows 10 with MDT 2013 Update 2 integrated with System Center Configuration Manager (Current Branch) How can I install Windows 10 language packs offline with an MDT Integrated Task Sequence in System Center Configuration Manager (Current Branch)
-
hi there, answers below 1. Can the normal "Add driver package" sequence be used in coordination with a WMI query, or do you have to use the "Download Package Content" for every driver model you want to support? no, you must use the new method of applying drivers as this works differently 2. Does this support all Language packs installed, main or not? As I recall there was a bug in vNext (SCCM as a Service beta) it could only upgrade Win 10 en-US. I remeber I had to uninstall any language packs, upgrade, then reinstall a language pack, for it to work.. no it does not support any language packs and will fail, I will blog about this shortly (time willing), long story short you can support one language pack as long as you have the media in the task sequence, or switch language to english and apply the lp's after the fact... 3. After an upgrade, do all the default apps get reinstalled to default? F.ex. I do not want the app CandyCrush to be default for my Enterprise customers... does this get reinstalled after an upgrade? candycrush et al is controlled by Group Policy, see my post here to deal with it.
-
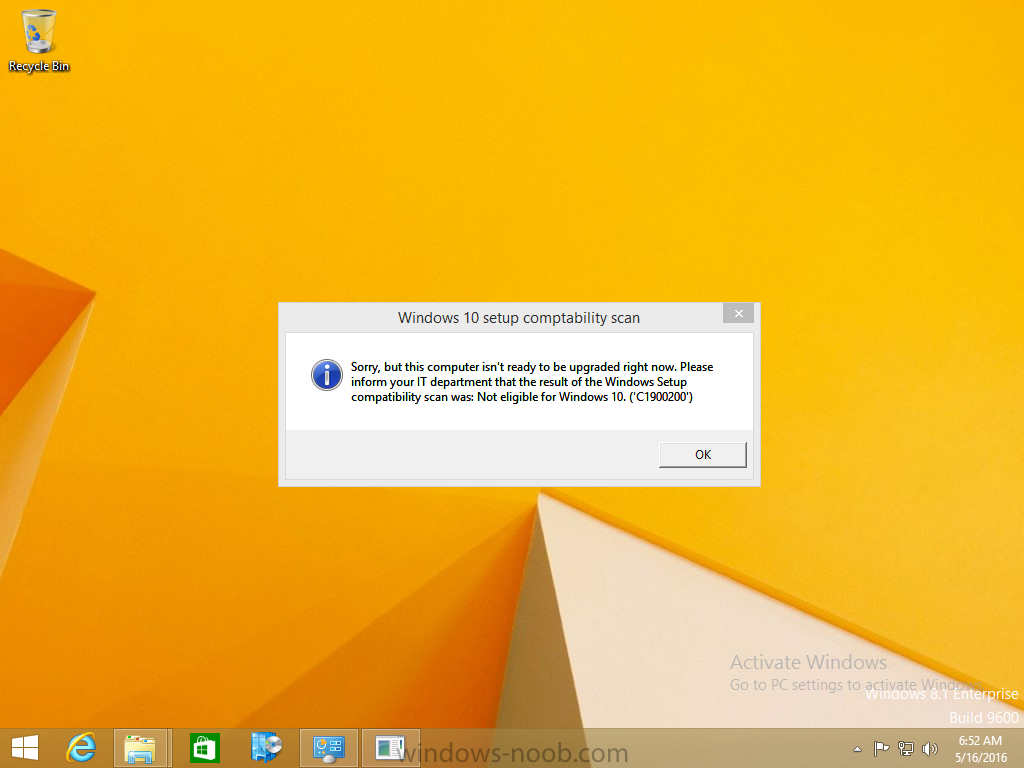
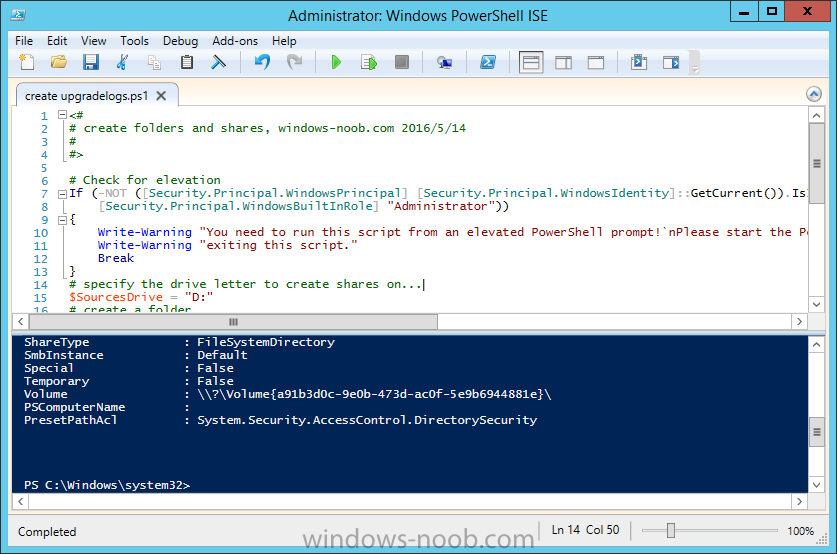
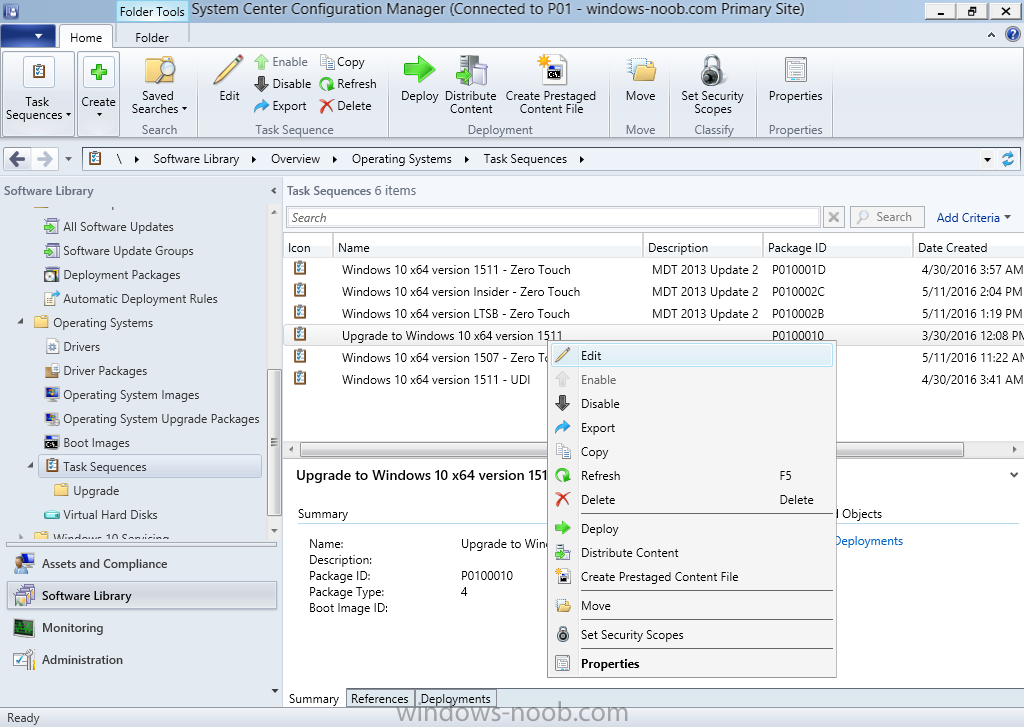
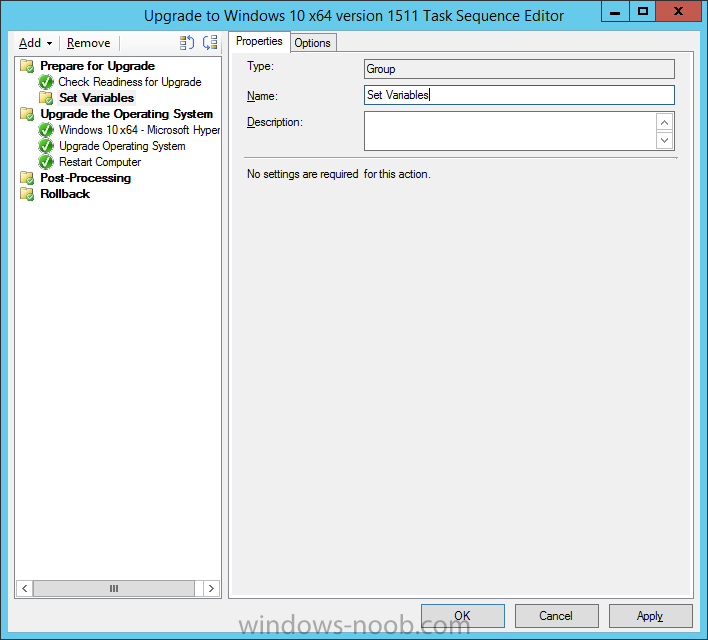
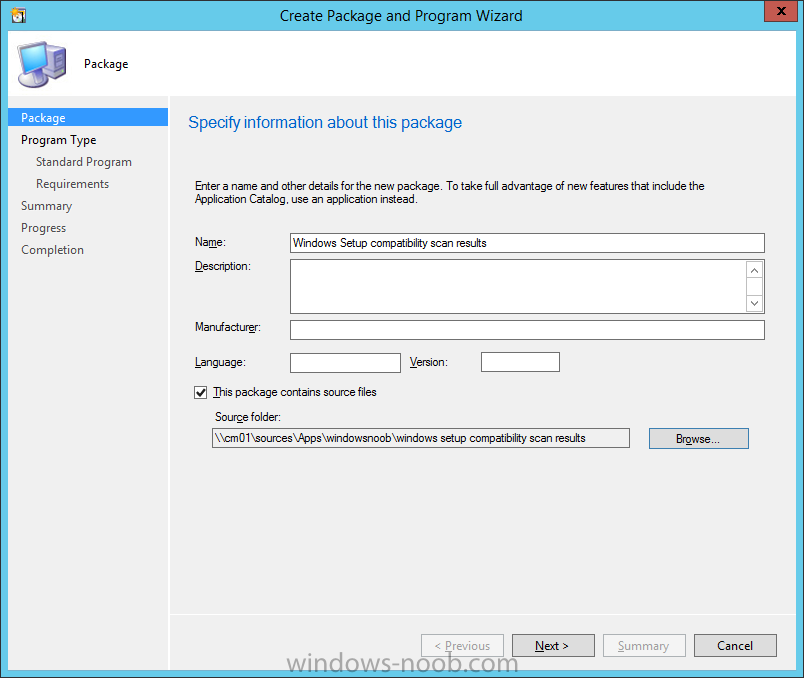
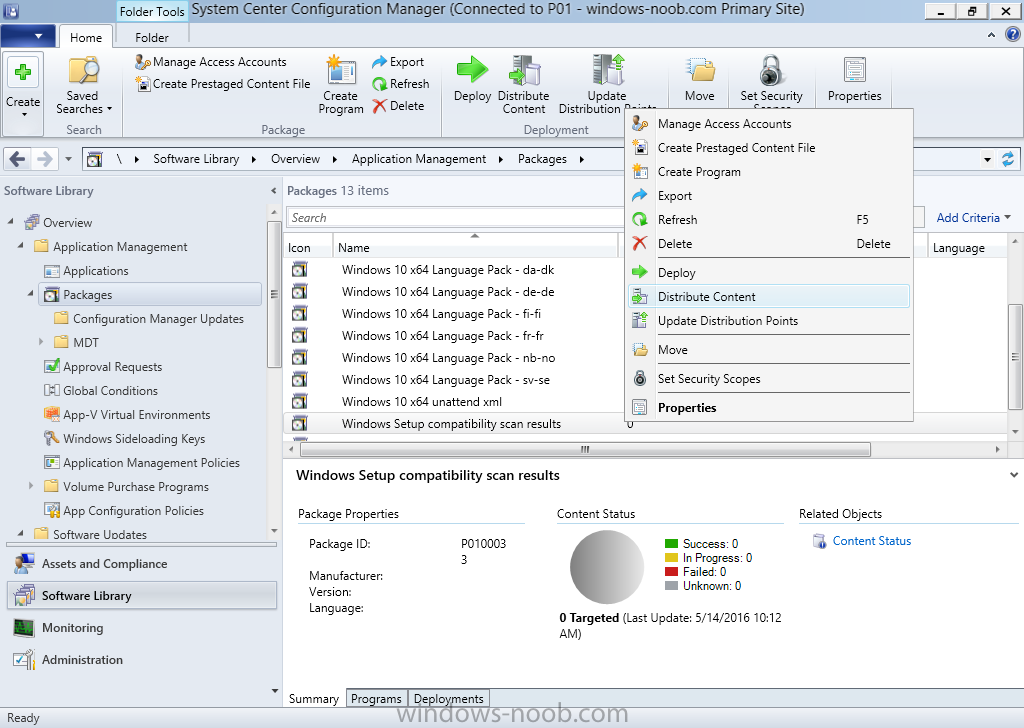
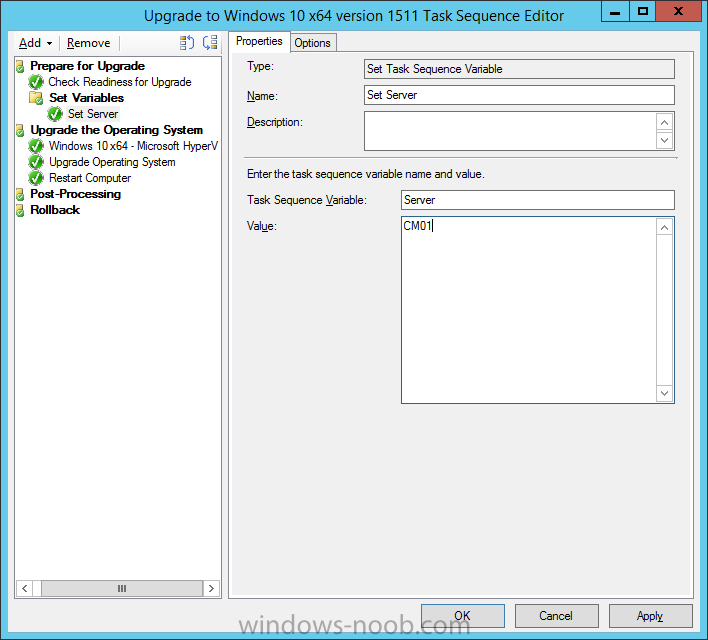
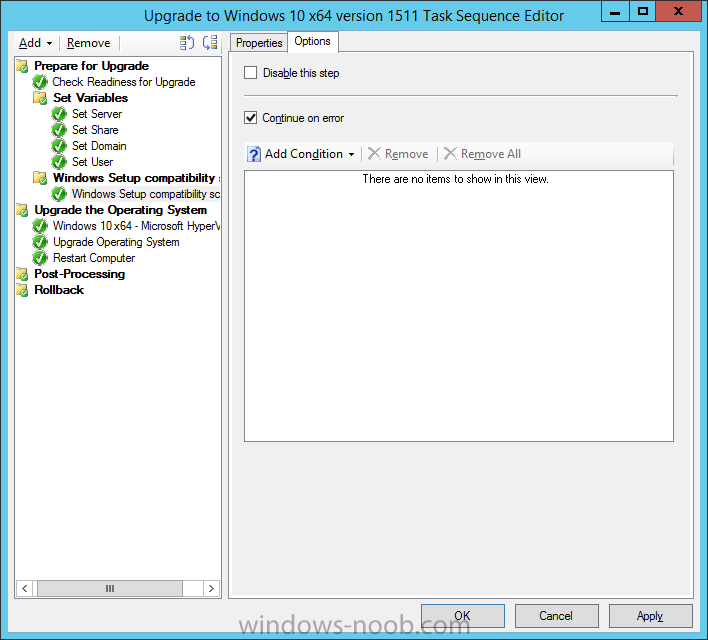
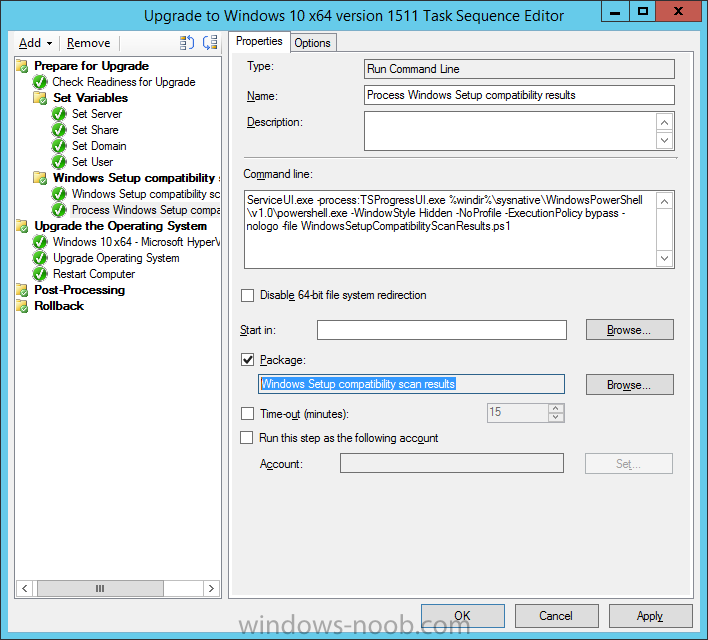
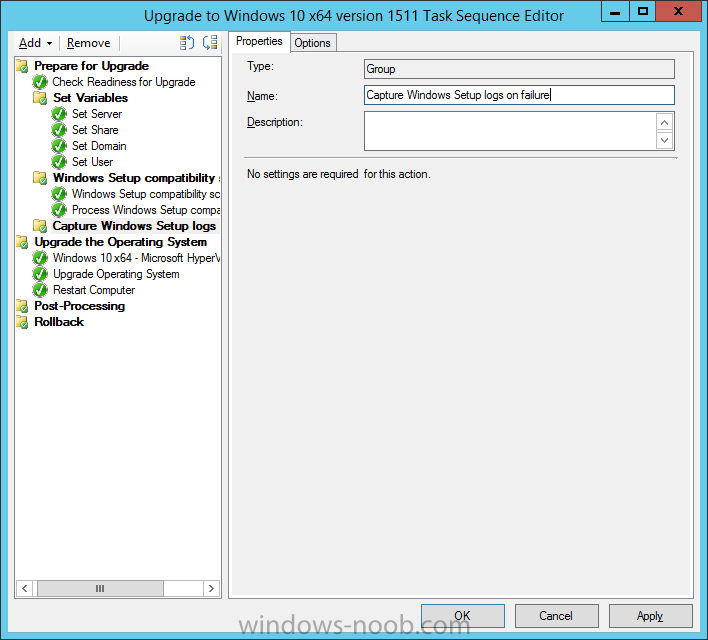
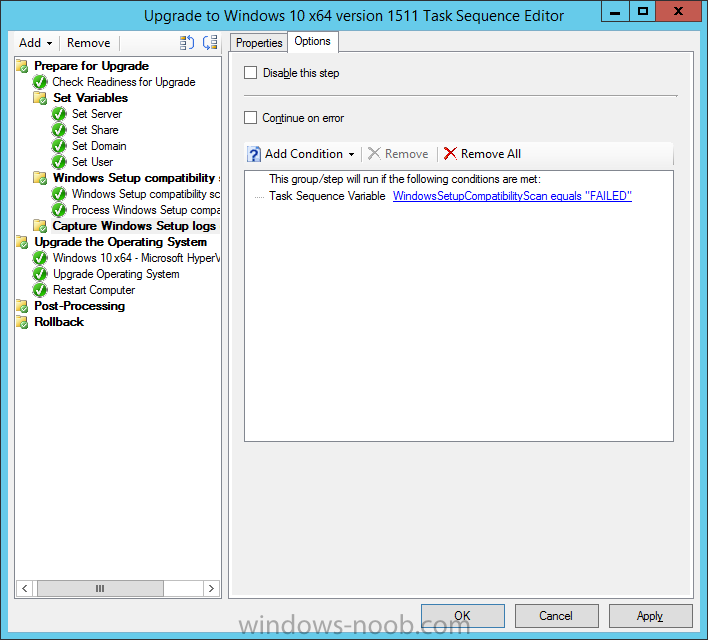
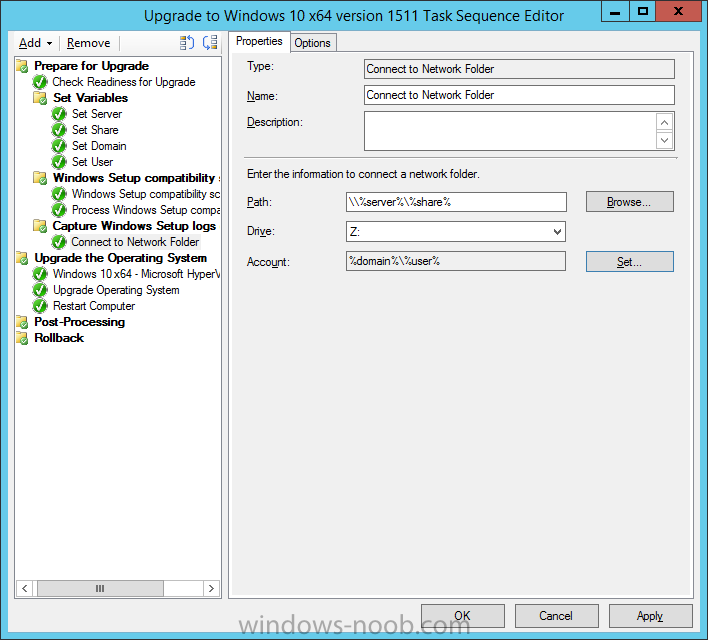
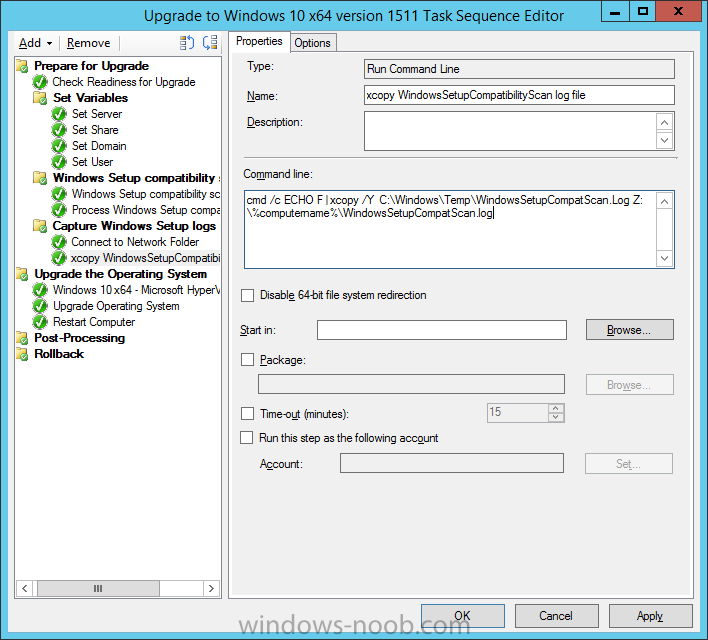
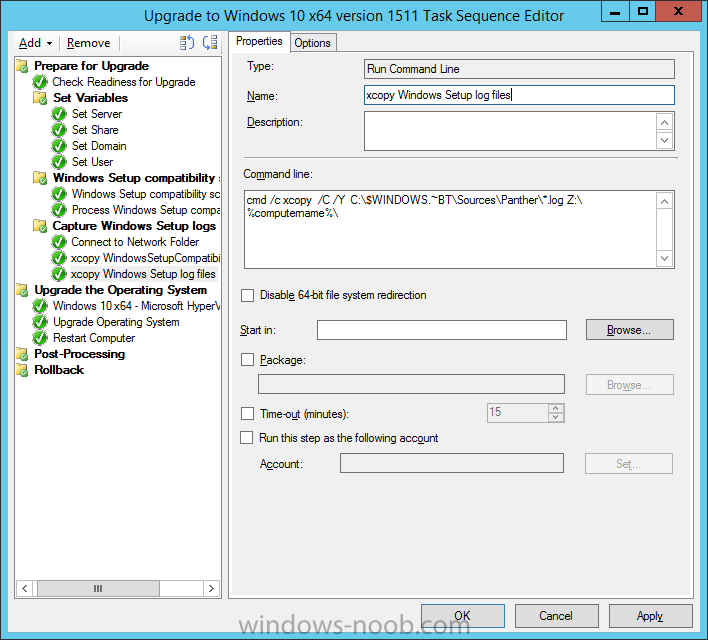
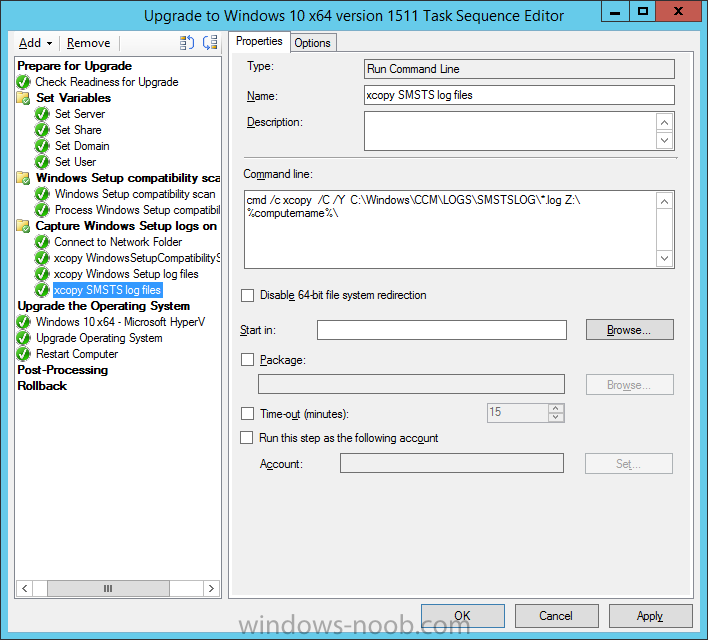
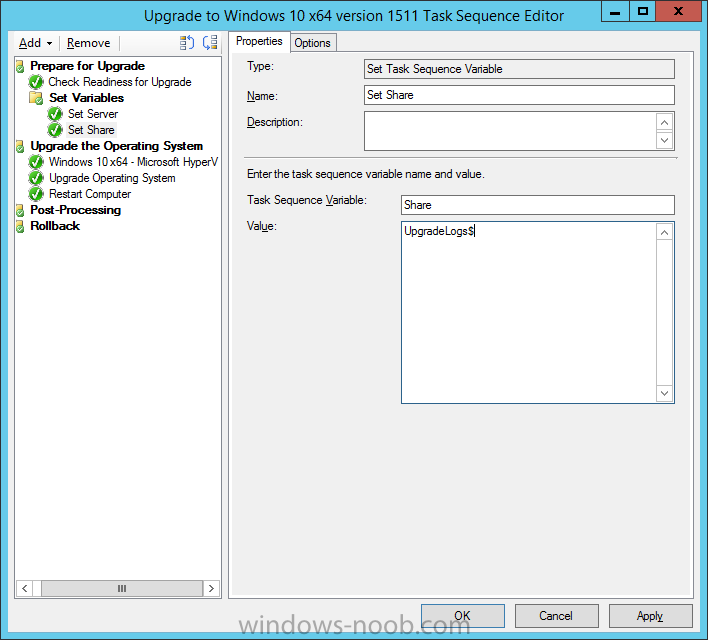
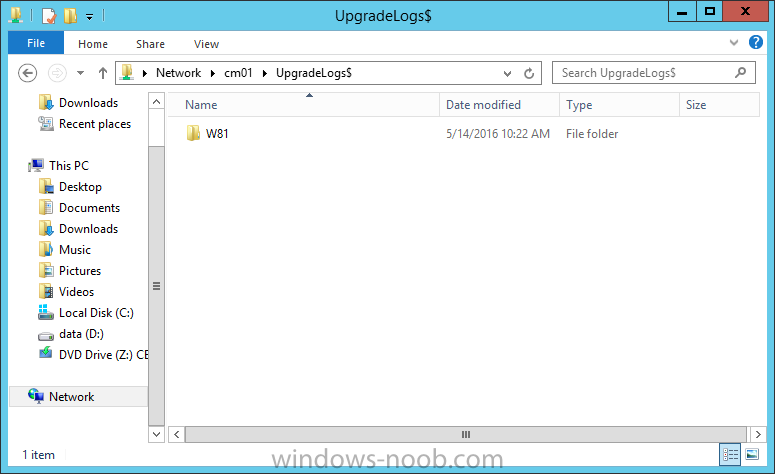
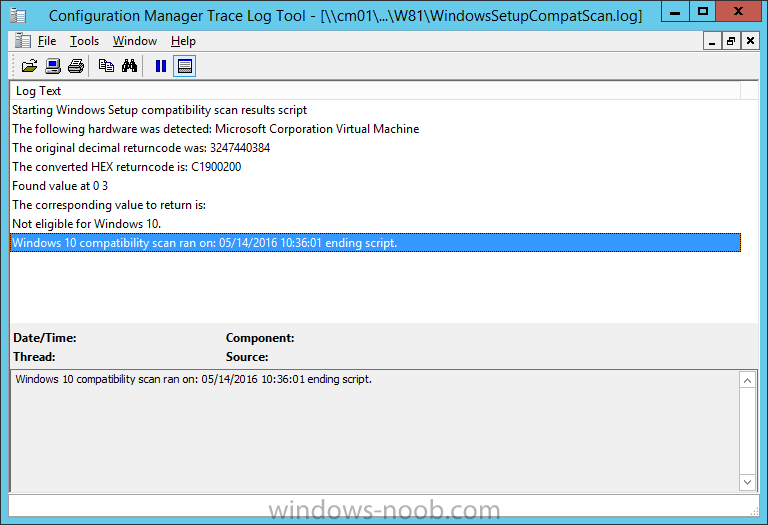
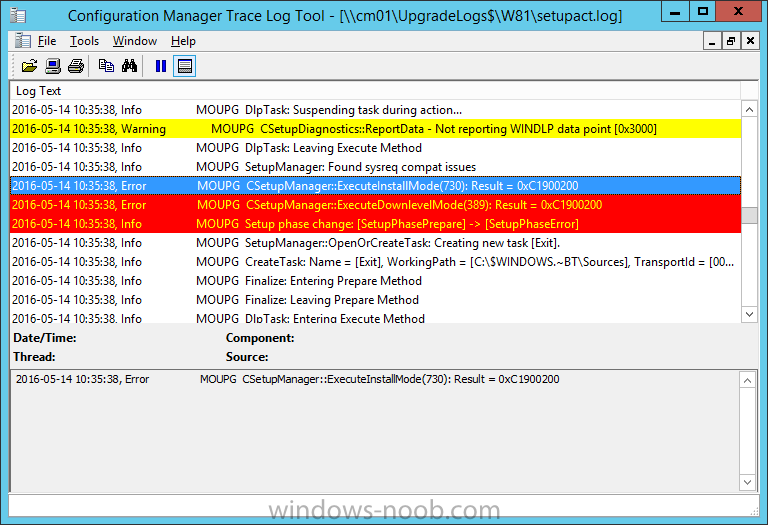
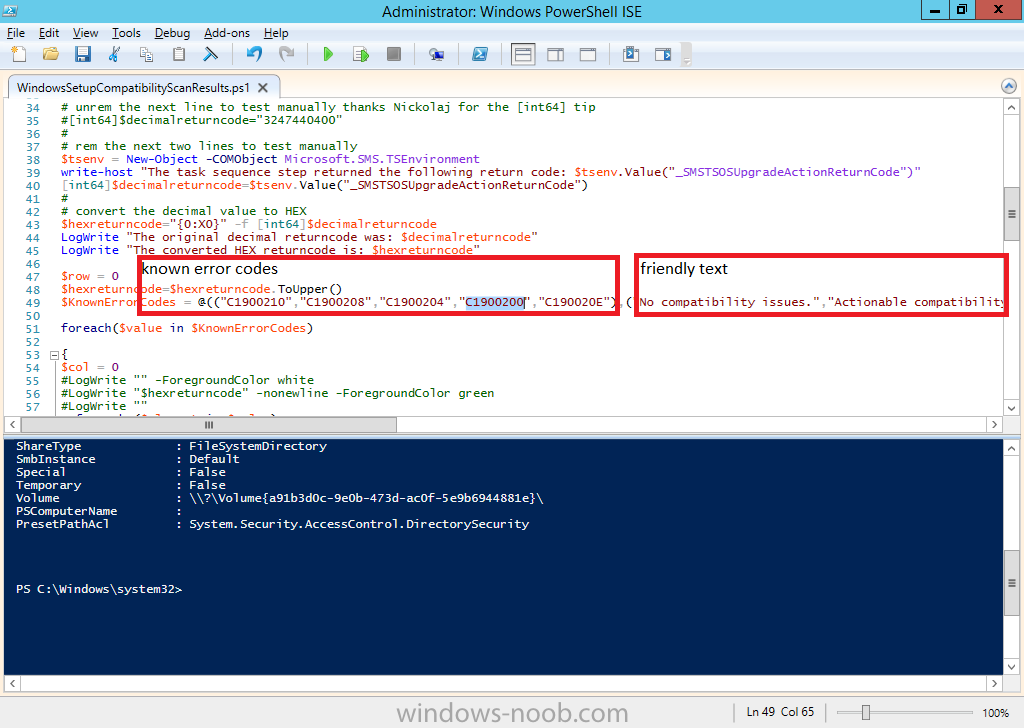
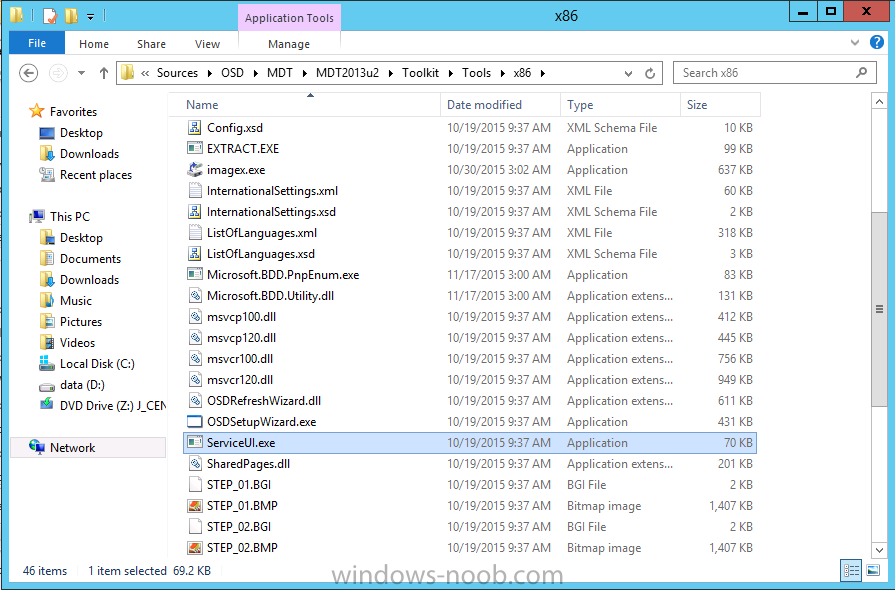
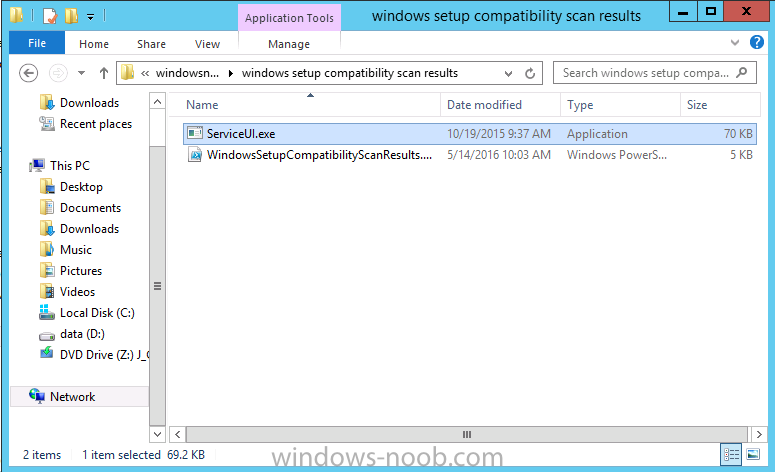
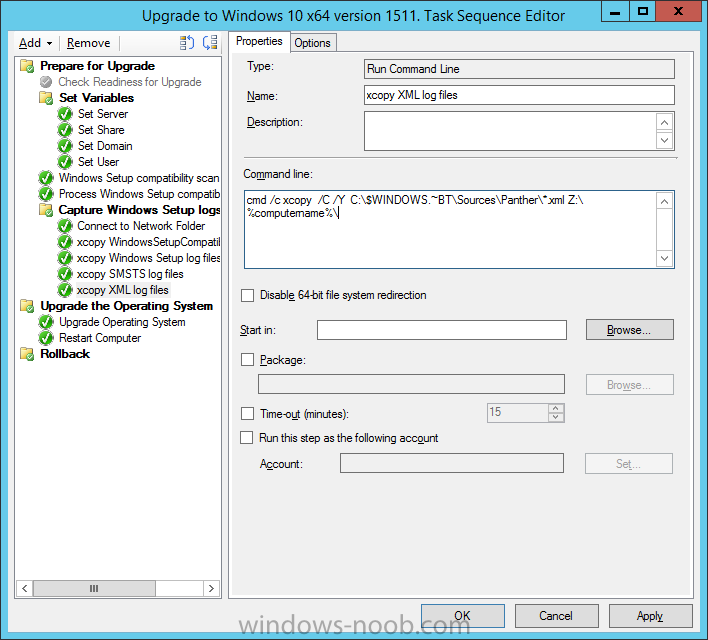
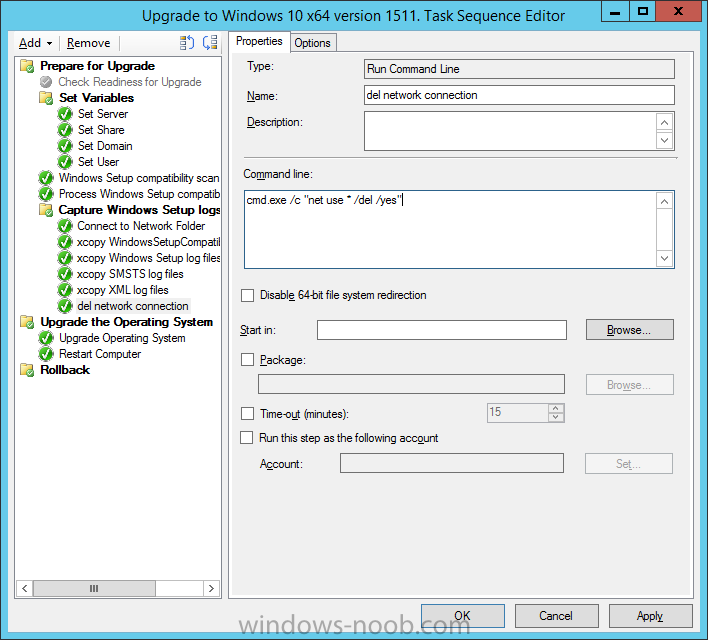
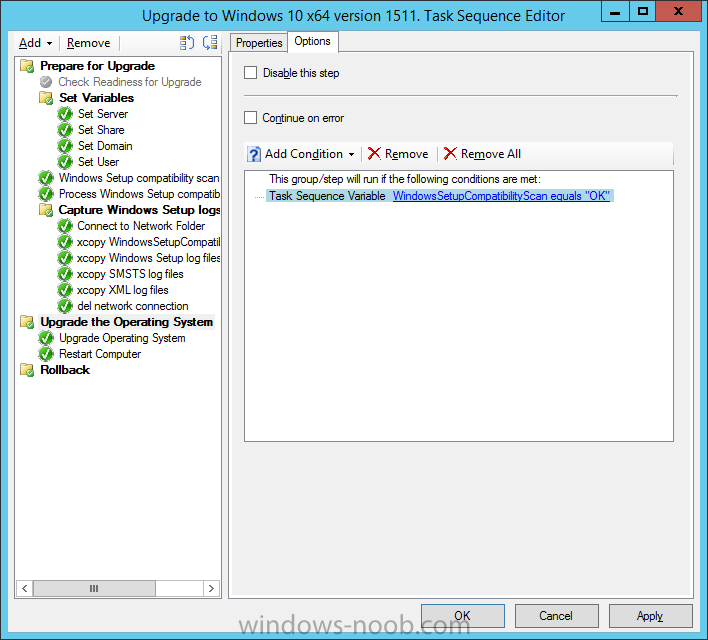
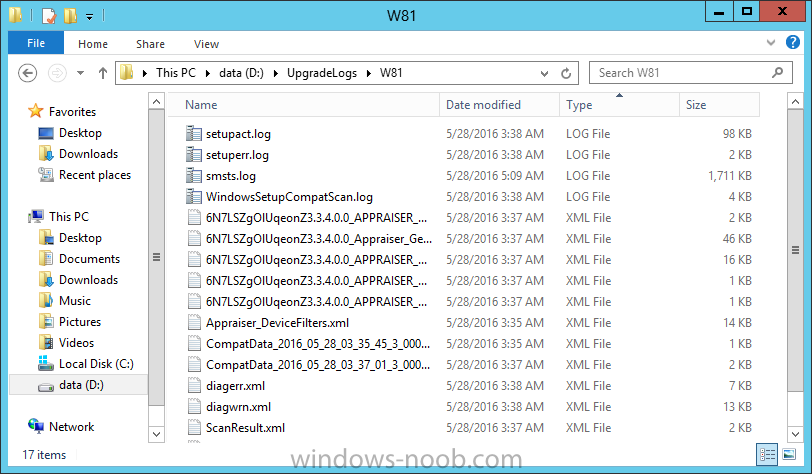
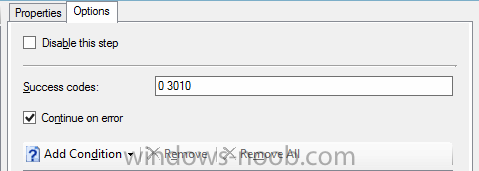
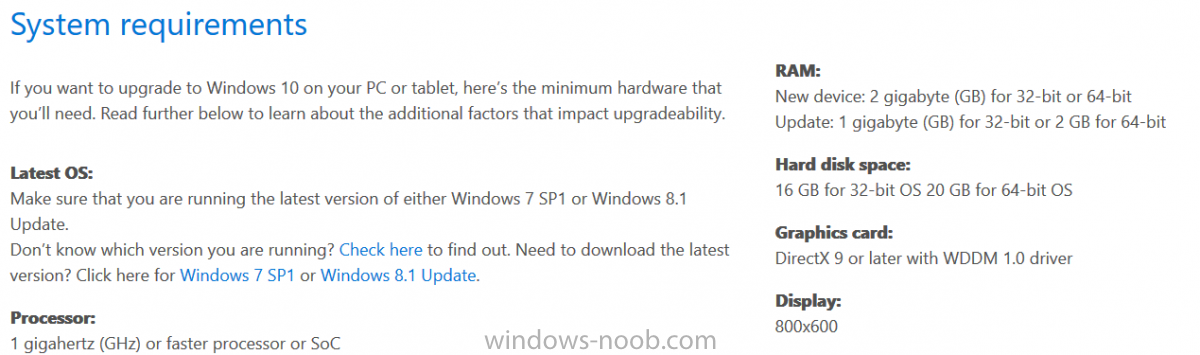
Introduction At the start of this series of step by step guides you installed System Center Configuration Manager (Current Branch), then you configured discovery methods. Next you configured boundaries to get an understanding of how automatic site assignment and content location works. After that you learned how to update ConfigMgr with new features and fixes using a new ability called Updates and Servicing and you learned how to configure ConfigMgr to use Updates and Servicing in one of these two modes: Online mode Offline mode To prepare your environment for Windows 10 servicing you learned how to setup Software Updates using an automated method (via a PowerShell script) or manually using the ConfigMgr console. Next you used a PowerShell script to prepare some device collections, then you configured client settings for your enterprise and finally you'll deployed the ConfigMgr client agent using the software updates method which is the least intensive method of deploying the Configuration Manager client agent. As System Center Configuration Manager (current branch) is being delivered as a service now, version 1602 was made available (March 11th, 2016) and you used Updates and Servicing to do an in-place upgrade to that version as explained here. Next you learned about how to use the Upgrade task sequence to upgrade your Windows 7, Windows 8 (and 8.1) and even your Windows 10 devices to a later build of Windows 10. You then learned about the new Windows 10 servicing features which use Servicing Plans in ConfigMgr (Current Branch). Next you integrated MDT 2013 update 2. MDT integration with ConfigMgr is useful as it provides additional functionality for operating system deployment scenarios such as Offline Language Package installation or User Driven Integration (UDI). Next you learned how to deploy Language Packs offline for Windows 10. To assist with Windows 10 servicing and for applying appropriate software updates to your Windows 10 devices, you used PowerShell to add queries to the various Windows 10 collections. In this post you'll take a deeper look at the Windows 10 Upgrade task sequence, and see one way of dealing with potential upgrade issues. The idea here is to keep track of any upgrade failures, capture the logs that matter, capture the computer name and hardware type. If you see repeated 'common' failures you can add those error codes to the Windows Setup compatibility scan PowerShell script. This way your users that do experience failures will not get cryptic error messages, and you'll have the logs to fix things. Step 1. Create a share to store failed upgrade log files As you'll want to keep track of potential problems, create a hidden share to store log files. On your configuration manager server, start Windows PowerShell ISE as Administrator, and run the create upgradelogs.ps1 PowerShell script available in the downloads section at the end of this guide. Step 2. Create a package On your ConfigMgr server, in the sources share, create a folder called Windows setup compatibility scan results and place the WindowsSetupCompatibilityScanResults.ps1 PowerShell script in the folder. Locate, select and copy ServiceUI.exe from the Sources\OSD\MDT\MDT2013u2\Toolkit\Tools\x86 folder as shown below. paste that into the Windows setup compatibility scan results folder. In the ConfigMgr console, Software Library, select Packages and right click, choose Create Package. Fill in the following details. Choose Do not create a program and then continue through the wizard until completion. Step 3. Distribute the package Right click the package and choose Distribute Content. Distribute the package to your distribution points. continue through that wizard until completion. Step 4. Edit the existing upgrade task sequence In a previous guide you created the Upgrade task sequence, now it's time to add additional functionality to that task sequence. In the ConfigMgr console, locate the Upgrade to Windows 10 x64 version 1511 task sequence, right click on it and choose Edit. In the Prepare for Upgrade group select the Check Readiness for Upgrade step and click on Add then select New Group, name the new group Set Variables. Create a new Set Task Sequence Variable step called Set Server as follows: Create a new Set Task Sequence Variable step called Set Share to UpgradeLogs$ as follows: Create a new Set Task Sequence Variable step called Set Domain (fill in your domain name) as follows: Create a new Set Task Sequence Variable step called Set User and enter a username that will be used to connect to the share as follows: Next create another New Group and call it Windows Setup compatibility scan Next click on Add, choose Images, then Upgrade Operating System and name the step Windows Setup compatibility scan. Select the Perform Windows Setup compatibility scan without starting upgrade option. On the Options tab, select the Continue on Error option. Click Add and choose Run Command Line, name the step Process Windows Setup compatibility results and paste in the following: ServiceUI.exe -process:TSProgressUI.exe %windir%\sysnative\WindowsPowerShell\v1.0\powershell.exe -WindowStyle Hidden -NoProfile -ExecutionPolicy bypass -nologo -file WindowsSetupCompatibilityScanResults.ps1 For Package, select the Windows Setup compatibility scan results package created above. Create a New Group called Capture Windows Setup logs on failure On the Options tab, check if the following Variable WindowsSetupCompatibilityScan = Failed as shown below Next create a Connect To Network Folder step and populate it as below when prompted for Windows User Account enter the Password for the account you added in the Set User step Create a new Run Command Line step called xcopy WindowsSetupCompatibilityScan log file and paste in the following: cmd /c ECHO F | xcopy /Y C:\Windows\Temp\WindowsSetupCompatScan.Log Z:\%computername%\WindowsSetupCompatScan.log On the Options tab of this step, place a checkmark in Continue on error Create a new Run Command Line step called xcopy Windows Setup log files and paste in the following: cmd /c xcopy /C /Y C:\$WINDOWS.~BT\Sources\Panther\*.log Z:\%computername%\ On the Options tab of this step, place a checkmark in Continue on error Create a new Run Command Line step called xcopy SMSTS log files and paste in the following: cmd /c xcopy /C /Y C:\Windows\CCM\LOGS\SMSTSLOG\*.log Z:\%computername%\ On the Options tab of this step, place a checkmark in Continue on error Create a new Run Command Line step called xcopy XML log files and paste in the following: cmd /c xcopy /C /Y C:\$WINDOWS.~BT\Sources\Panther\*.xml Z:\%computername%\ On the Options tab of this step, place a checkmark in Continue on error Create a new Run Command Line step called del network connection and paste in the following: cmd.exe /c "net use * /del /yes" On the Upgrade Operating System group, click on the Options tab and set the variable WindowsSetupCompatibilityScan = OK Apply the changes and close the Task Sequence editor. Step 5. Review the new functionality Tip: To induce a failure you can temporarily disable the Check Readiness for Upgrade step and use a Virtual Machine with only 1.5GB of RAM. This does not meet the requirements as stated here and will cause the Windows Setup compatibility scan step to report a failure. Here are the system requirements for updating to Windows 10 (as of 2017/1/5) Once an Upgrade failure takes place you'll see something similar to the following:- after clicking OK the task sequence will jump to the end without any further communication to the end user. At this point (or whenever it's convenient) check the UpgradeLogs$ share for new content. For every failure that occurs, a folder matching the Computer Name will be created. In that folder you'll find log files and bunch of XML files, these files will help you to troubleshoot the actual failure The WindowsSetupCompatScan.log file is generated by the Windows Setup compatibility scan results script and sample content is below. Note that it contains information about what the error was (including friendly text about the error) and the date/time and hardware that it occurred on. In addition to that log file you have the smsts.log file from C:\Windows\CCM\Logs\SMSTSLOG folder and two relevant Windows setup log files called setupact.log and setuperr.log from the C:\$WINDOWS.~BT\Sources\Panther\ folder. The failure highlighted in setupact.log is shown below (clear as mud right ?) The PowerShell script converts knownerrorcodes into meaningful text that won't give your end users a heart attack. You can add your own known error codes and friendly text by editing the PowerShell script in this section: Well that's it ! job done, I hope this helps you with your Windows 10 Upgrade Task Sequences. Tip: You can use the MailLog functionality described in the Windows-noob OSD Guides book to be notified of failures in real time. Summary Sometimes things don't go according to plan and the Windows 10 Upgrade task sequence can fail for a variety of reasons. Rather than having the task sequence fail during an actual upgrade, it makes sense to run a compatibility scan first and to assess the results of that scan before attempting the actual upgrade. If the compatibility scan does fail, you can notify your users with a helpful message and the task sequence will automatically capture the data you need to troubleshoot and resolve the upgrade issue. This guide helps you achieve that goal. Related Reading Windows 10 known error codes - https://support.microsoft.com/en-us/kb/3107983 Windows Setup /Compat ScanOnly - https://blogs.technet.microsoft.com/mniehaus/2015/08/23/windows-10-pre-upgrade-validation-using-setup-exe/ Create a task sequence to upgrade an operating system in System Center Configuration Manager - https://technet.micr...y/mt613172.aspx Task sequence steps in System Center Configuration Manager - https://technet.micr...y/mt629396.aspx Manage operating system upgrade packages with System Center Configuration Manager - https://technet.micr...echnet.10).aspx Downloads You can download a Microsoft Word copy of this guide here dated 2016/05/14. a deeper look at the Windows 10 Upgrade task sequence.zip You can download the PowerShell scripts used above here. WindowsSetupCompatibilityScanResults.zip


-
hi, you'd have to modify the task sequence and the script to accomodate more options
-
Windows 10 - mount WIM file to create Unattend file
anyweb replied to burnzdog's topic in Configuration Manager 2012
what version of Windows ADK are you using and what version of Windows 10 ? -
SCCM Bitlocker pre provision - Without format
anyweb replied to PH25's topic in Configuration Manager 2012
sounds like a big challenge, i'd just refresh them using the CM12 UEFI bitlocker task sequence which will take care of it all -
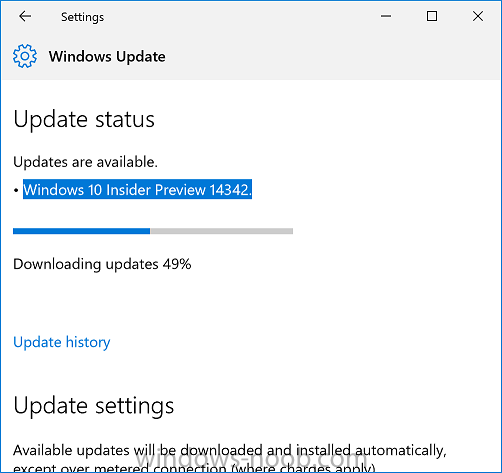
Microsoft has made another dent in my crippled ADSL internet connection and released Windows 10 Insider Preview 14342 Here’s what’s new in Build 14342Updates for Extensions in Microsoft Edge: Instead of extracting and loading extensions from a local folder, all available extensions can now be downloaded directly from the Windows Store. This change means that your currently installed extensions will be removed, and you’ll have to reinstall the ones you want from the Store. Then in future updates, your extensions will be automatically re-downloaded and installed. We also have some new extensions available for you to try out. We are excited to announce that starting with this build, both AdBlock and Adblock Plus are now available for download in the Windows Store in addition to Pin It Button, Mouse Gestures, Reddit Enhancement Suite, Microsoft Translator, and OneNote Web Clipper. It is recommended that you only install one of either AdBlock or Adblock Plus as having them both running at the same time can cause issues with viewing websites in Microsoft Edge. Important note: There is a bug in this build that occurs if you turn off all extensions without uninstalling them, you may not be able to close the browser or get context menus to work. To avoid this issue, uninstall any extensions you no longer want to use instead of turning them off. If you do hit this issue, to get out of this state you will need to turn on one or more extensions or uninstall all extensions, kill any Microsoft Edge processes running in Task Manager, and restart Microsoft Edge. Real-time web notifications in Microsoft Edge: Microsoft Edge now supports real-time web notifications, which allow participating websites to send notifications to you via Action Center, with your permission. For example, when your friend sends you a message on Skype for Web while you’re busy in the Xbox app, you won’t miss a thing. A notification from the website will appear in Windows, just like an app might send. Click on the notification and you’ll be right back in Microsoft Edge at the site that sent it! Swipe navigation in Microsoft Edge: Since the release of Windows 10 Mobile, our top feedback request for Microsoft Edge has been asking for the return of the swipe gesture to navigate back and forward. It’s also been one of our top 10 requests on PC. With this build, you can now swipe from anywhere on the page to get back to your previous page. This will be coming in the next Mobile build as well! Bash on Ubuntu on Windows Improvements: Symlinks within the Windows Subsystem for Linux are now functional on the mounted Windows directories. This fix helps support many scenarios including the npm installer. Users with non-Latin Windows usernames are now able to install Bash on Ubuntu on Windows. Many more improvements can be found in the WSL release notes here! Skype UWP Preview Update: The Skype UWP Preview app has been updated in response to your feedback. In this release, you have the ability to set a dark theme and can switch between different Skype accounts. You can expect mobile release in the next few weeks. Read more at https://blogs.windows.com/windowsexperience/2016/05/10/announcing-windows-10-insider-preview-build-14342/#dwfpU23FqVOiAmKw.99 for full details see > https://blogs.windows.com/windowsexperience/2016/05/10/announcing-windows-10-insider-preview-build-14342/
-
MDT deployment
anyweb replied to rookay's question in Deploying Windows 10, Windows 8.1, Windows 7 and more...
did you update the deployment share ?

