


anyweb
-
Posts
9182 -
Joined
-
Last visited
-
Days Won
366
Everything posted by anyweb
-
R2 simply enables features that are already in the product, however there are licensing implications to using R2, check if you are licensed to use it or not first
-
so for those of you who are not on R2 it would be something like this 2012 SP1 CU5 > 2012 SP2 > 2012 SP2 CU2 confusing, perhaps, here's some explanation hopefully https://www.niallbrady.com/2015/05/16/confused-about-the-system-center-2012-r2-configuration-manager-sp1-and-system-center-2012-configuration-manager-sp2/
-
not quite, I said this
-
 if the os completes successfully or not there will be an smsts.log look in C:\Windows\CCM\Logs do you see it there ? we need the smsts*.log in order to see why it's failing on the enable bitlocker step.
 -
have you tried backing up the db, then upgrade SQL from SQL 2008 to SQL 2014sp1, then do a new backup & do a restore to the new hardware/os.
-
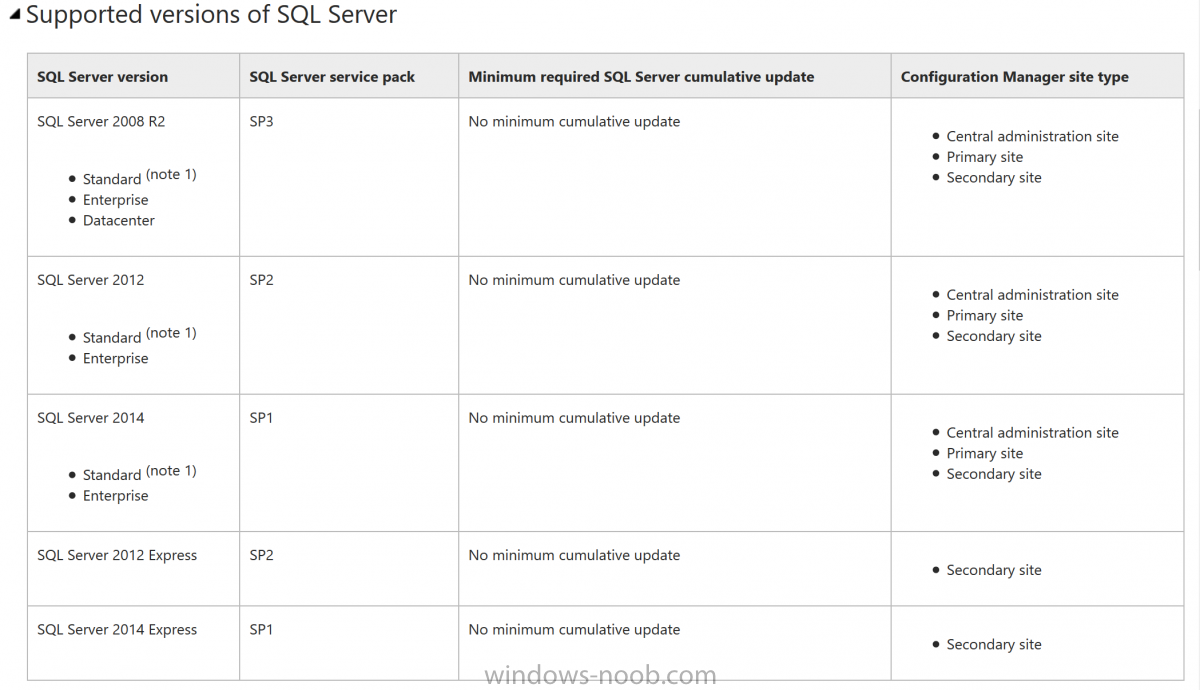
hi Keywan SQL Server 2014 SP1 is supported in current branch, see here https://technet.microsoft.com/en-us/library/mt589592.aspx
-
Sharp-eyed Insiders likely noted the big jump in build numbers from our last preview build (11102). Historically, the codebase for mobile had a different OS version than the codebase for PC because they were developed by different teams on different schedules. With Windows 10, we became one Windows team and brought these two codebases together. We started by changing the version string displayed in the UI to be consistent, which is why you saw similarly labeled builds over the past year for both Mobile and PC, but the underlying binary version numbers were still different. As part of our work getting the common codebase ready for the next release, we decided to complete that work and sync the build numbers between mobile and PC. Because the mobile codebase used higher build numbers than PC, we needed to jump ahead a bunch of build numbers to ensure updates to future builds will continue to work. So that’s why build numbers went from 11105, 11106, and 11107 to 14251. This build doesn’t have notable new features in it but I encourage you to check out the new Cortana improvements we released to Insiders earlier this week. The January update to the Xbox Beta app for Windows 10 is also now available with some really nice improvements for Insiders to try out and give us feedback. This build does contain some really good bug fixes that Insiders will appreciate: We fixed the issue where some PC games would crash switching from windowed mode to full screen, upon game resolution change, or upon launch due to a bug in Windows graphics stack. So play your games! If you run into any issues – please let us know by reporting in the Feedback app and include the game title. We fixed the issue where applications such as Narrator, Magnifier, and third-party assistive technologies may experience intermittent issues or crashes. We fixed an issue where File Explorer would crash frequently when DPI settings were at 175%. more info > https://blogs.windows.com/windowsexperience/2016/01/27/announcing-windows-10-insider-preview-build-14251/
-
Is SUP role needed in multiple locations?
anyweb replied to killiandw's question in Software Update Point
sounds like overkill to me and we have no idea of your infrastructure or how many clients it supports, i'd say start reading this https://technet.microsoft.com/en-us/library/gg712696.aspx#BKMK_SUPInfrastructure -
yep, if you read the post there were some instances where CU5 was needed to be installed before SP1
-
Script file is not present: 'C:\_SMSTaskSequence\Packages\MP7000B1\amd64\migdocs.xml'[gle=0x00000006] make sure that the xml file listed above is present in the MP7000B1 package cheers niall
-
can you try the following then ? if 3095113 is not installed... On the ConfigMgr server Install prerequisites for WSUS https://support.microsoft.com/en-us/kb/2919442 followed by https://support.microsoft.com/en-us/kb/2919355 Install WSUS update https://support.microsoft.com/en-us/kb/3095113 Uninstall SUP Uninstall WSUS server role Delete WSUS DB, and D:\WSUS Restart Reinstall WSUS Server Role Install SUP Sync Software Update On your client computer Stopped the services net stop wuauserv net stop cryptSvc net stop bits net stop msiserver Delete c:\Windows\Software Distribution Delete C:\Windows\System32\catroot2 Delete the folder contain .esd downloaded in ccmcache folder Delete C:\$Windows.~BT\Sources Restart the OS and run the upgrade again from software center
-
I install it as an application using a deployment type that runs setup.exe /i /s in your command line you could try cmd.exe /c
- 6 replies
-
- 1
-

-
- deployment
- sccm20120
- (and 1 more)
-
Applications failing in capture task sequence
anyweb replied to firstcom's topic in Configuration Manager 2012
applications are trickier to troubleshoot, but start with the following logs appenforce.log *.log for the application installer itself do you see anything in those two logs ? why are you not upgrading to R2 SP1 CU2 ? -
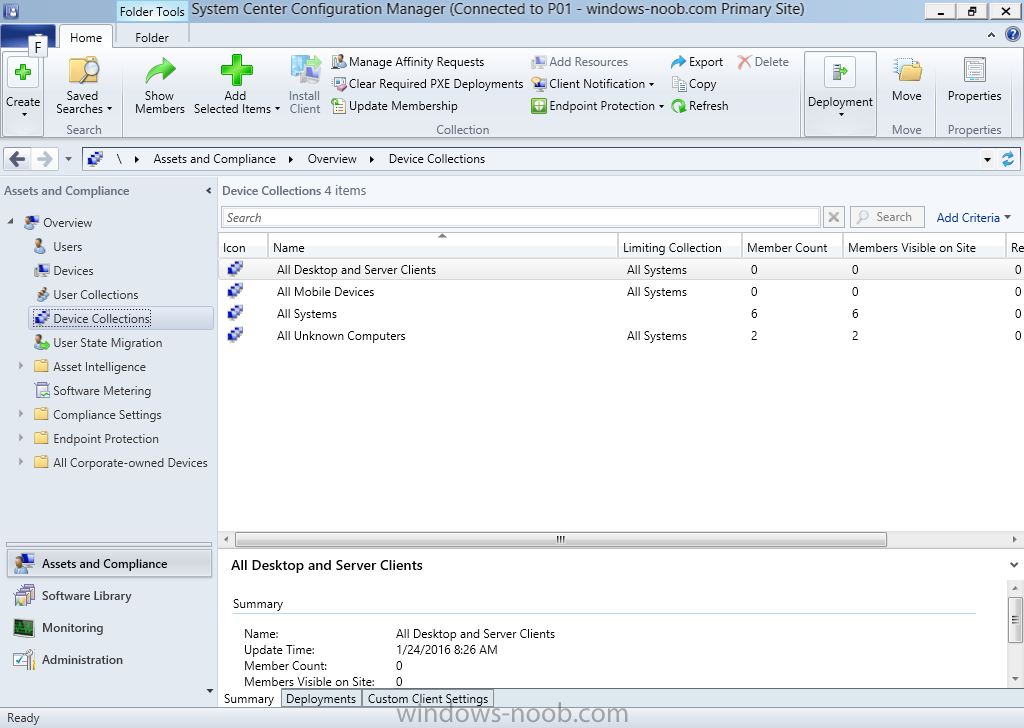
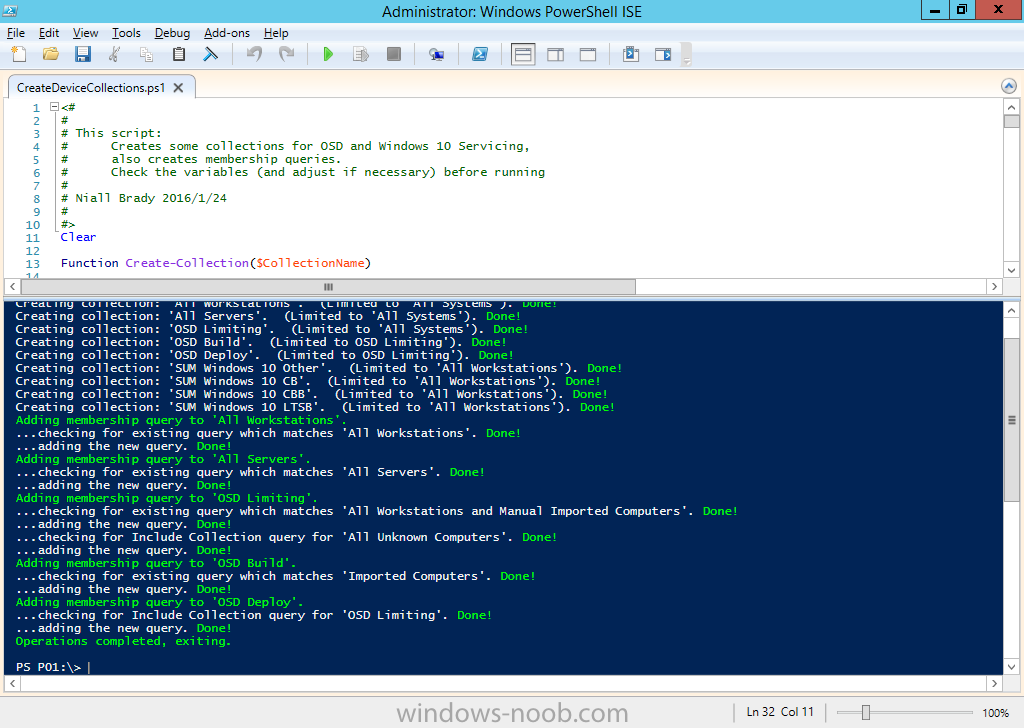
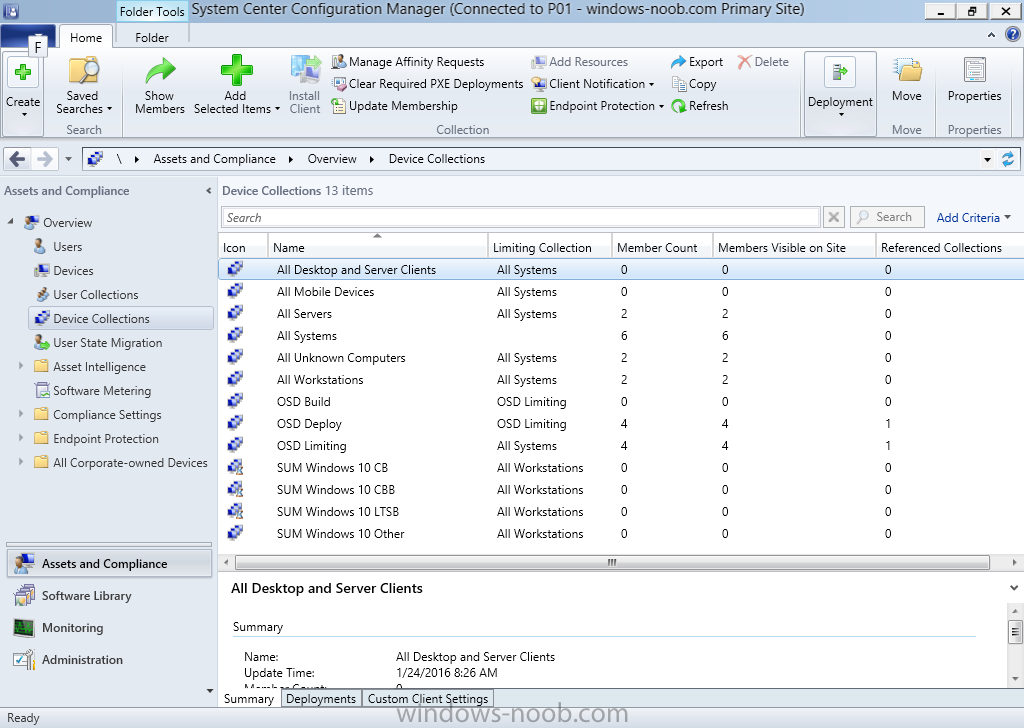
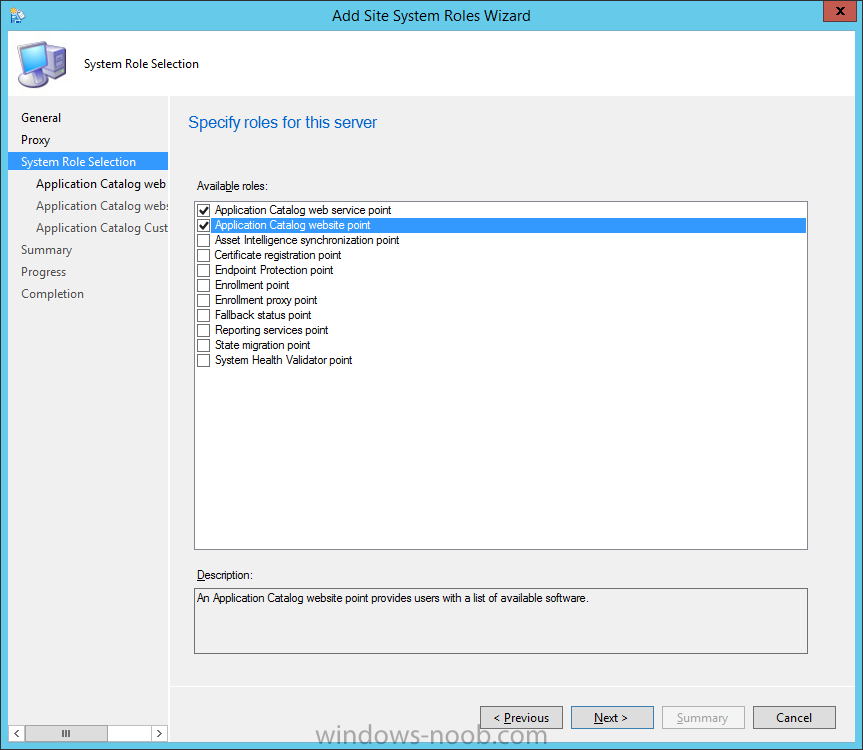
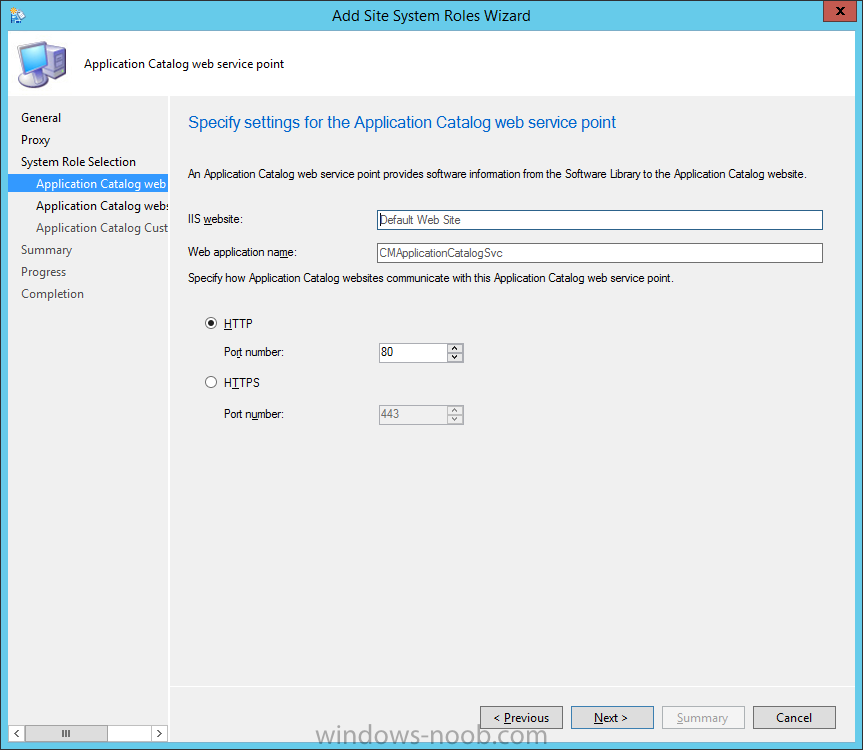
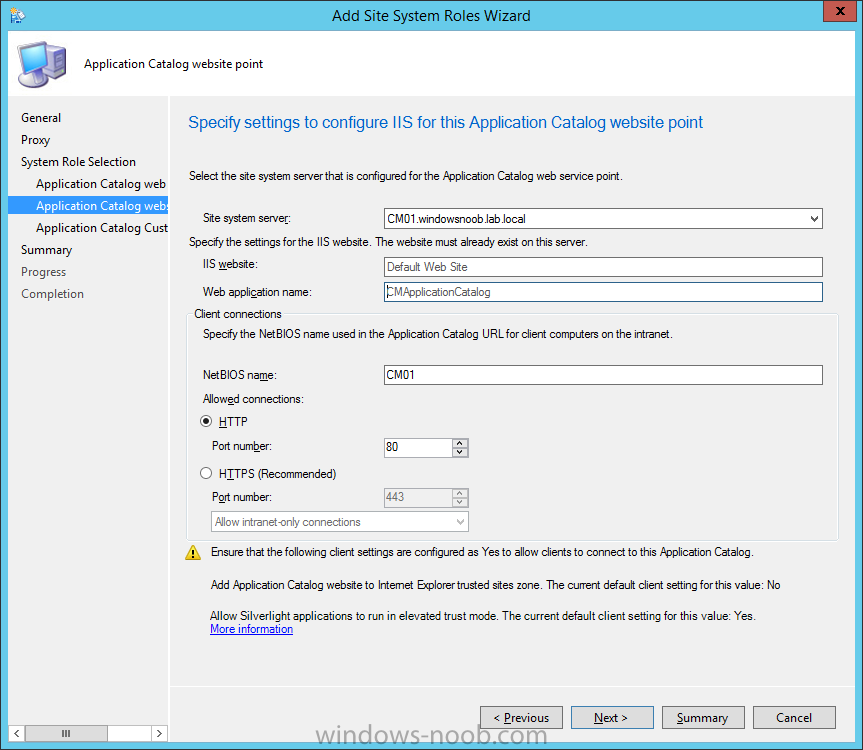
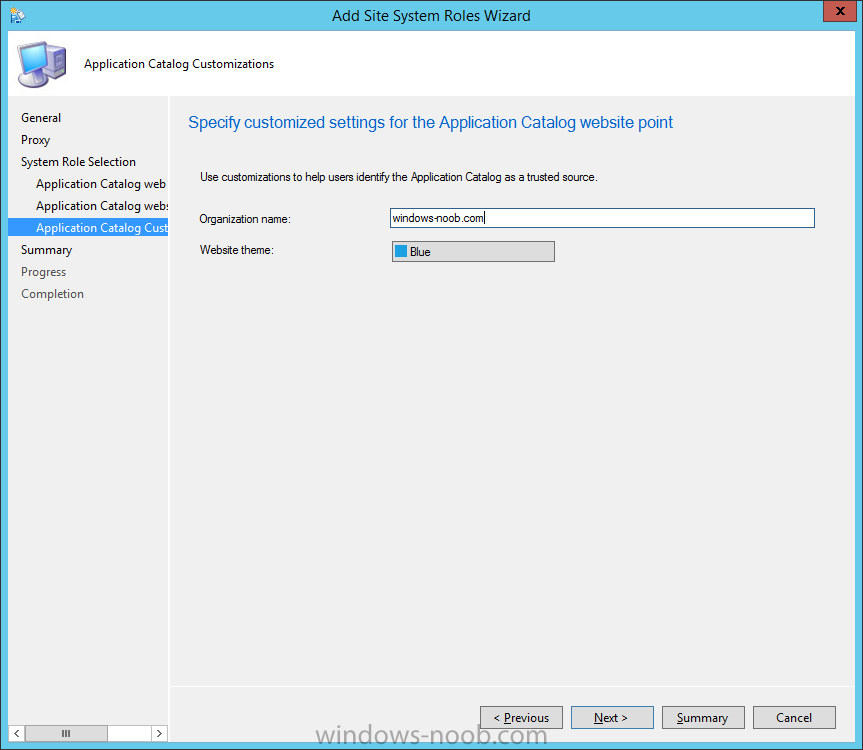
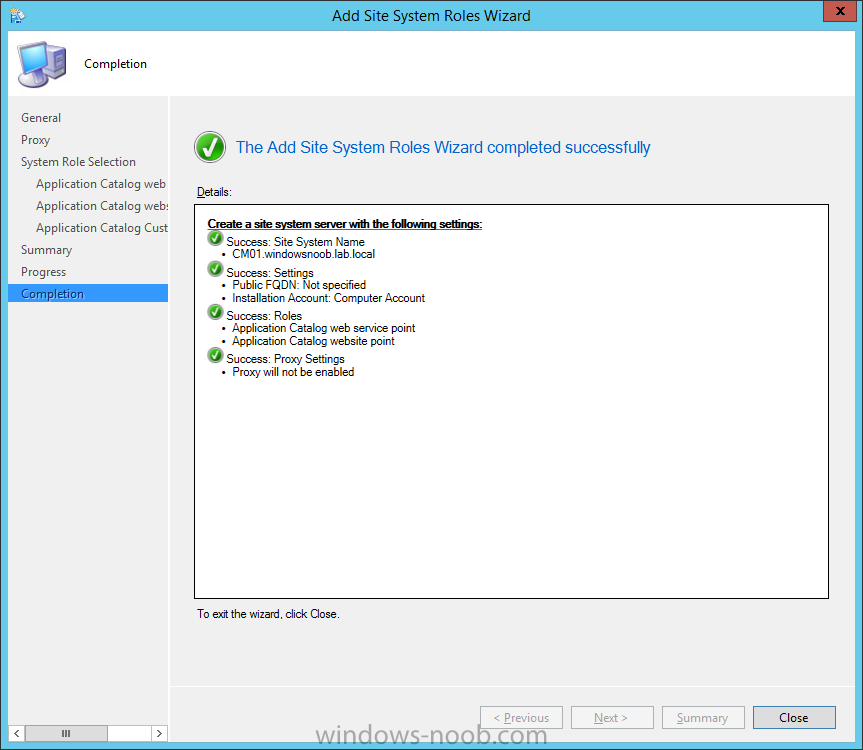
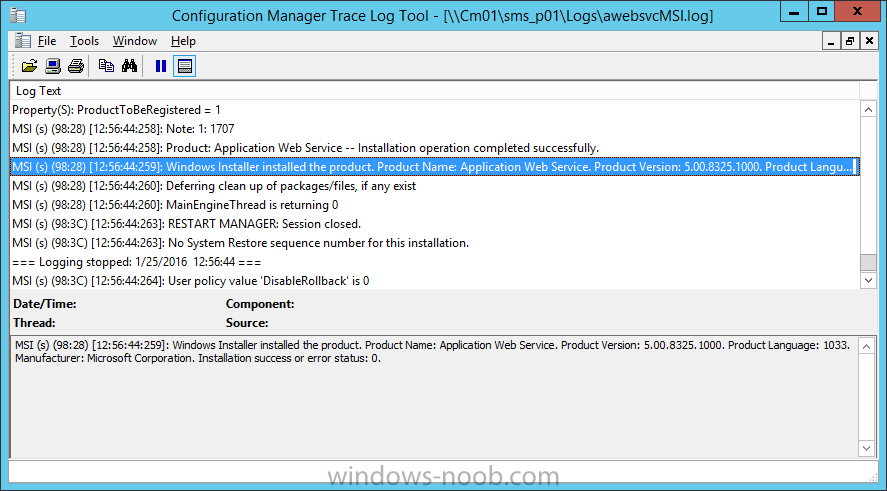
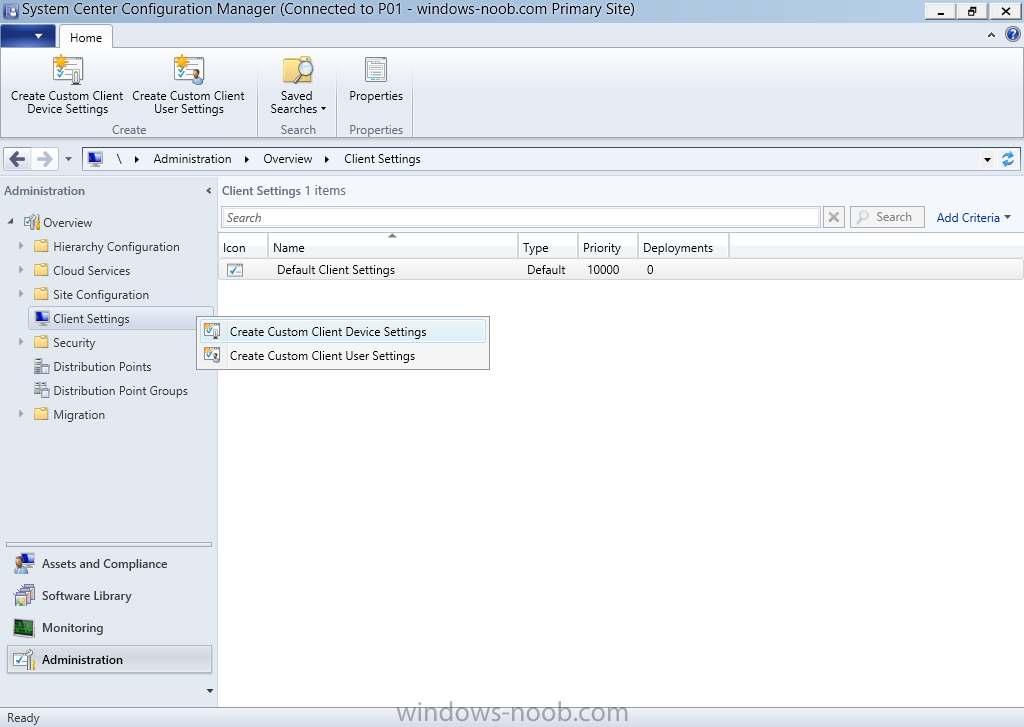
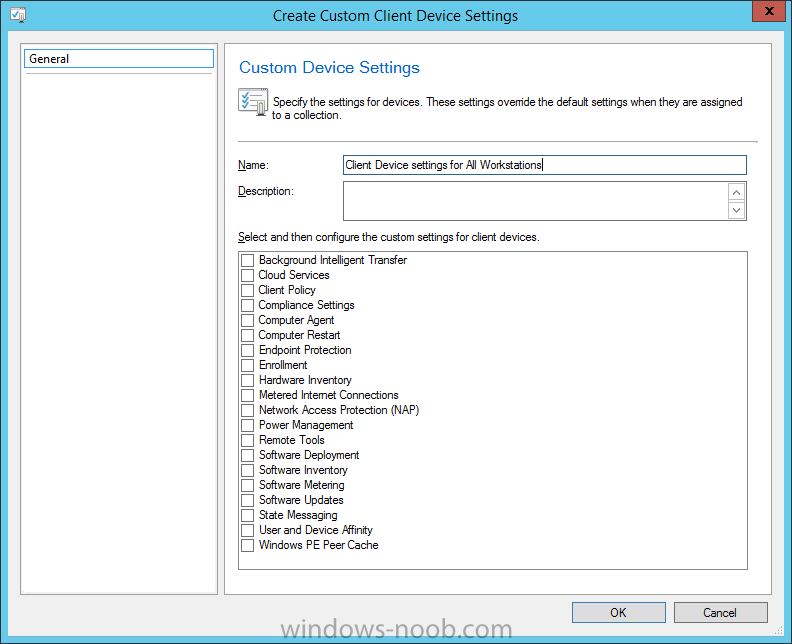
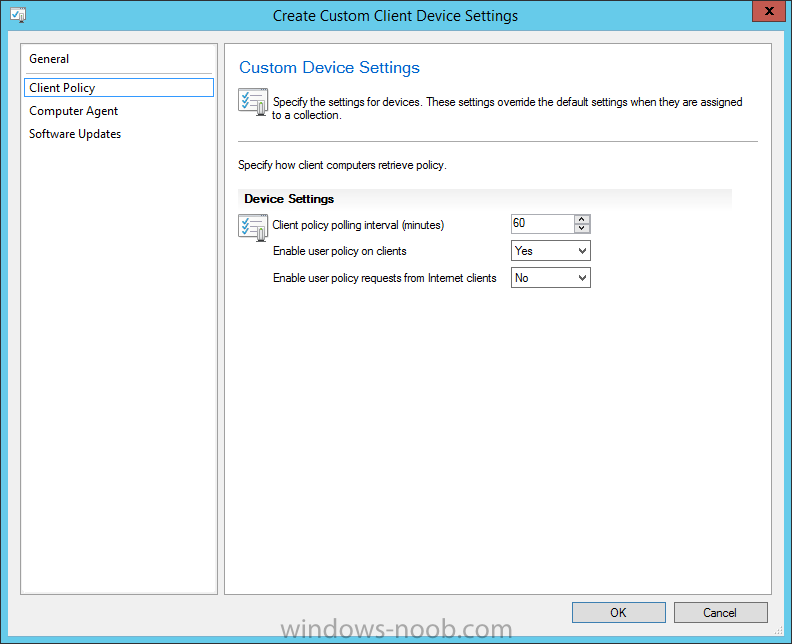
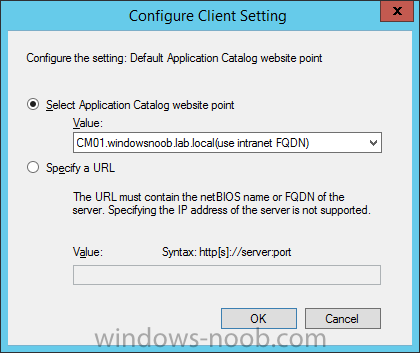
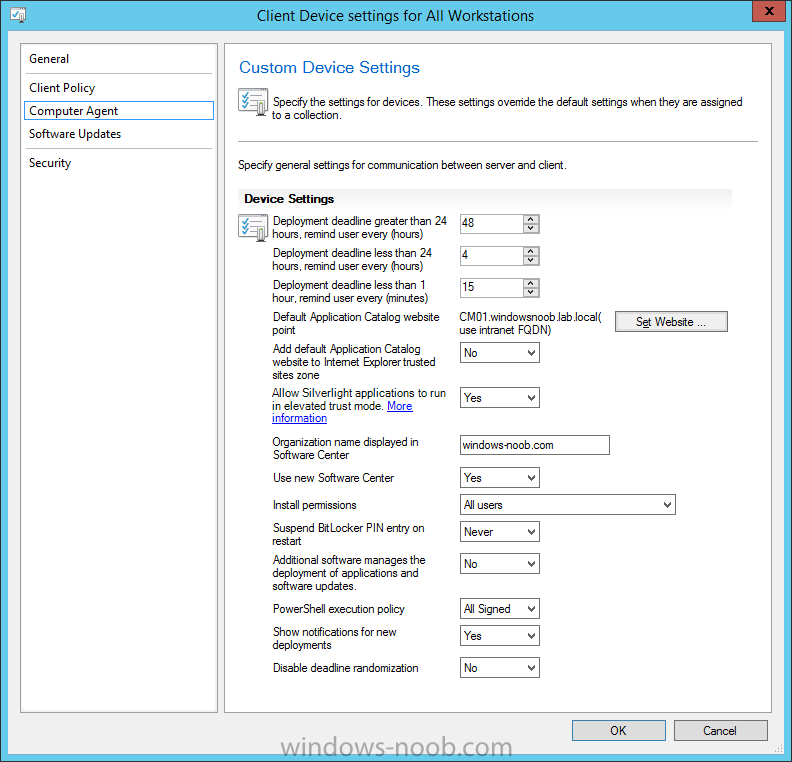
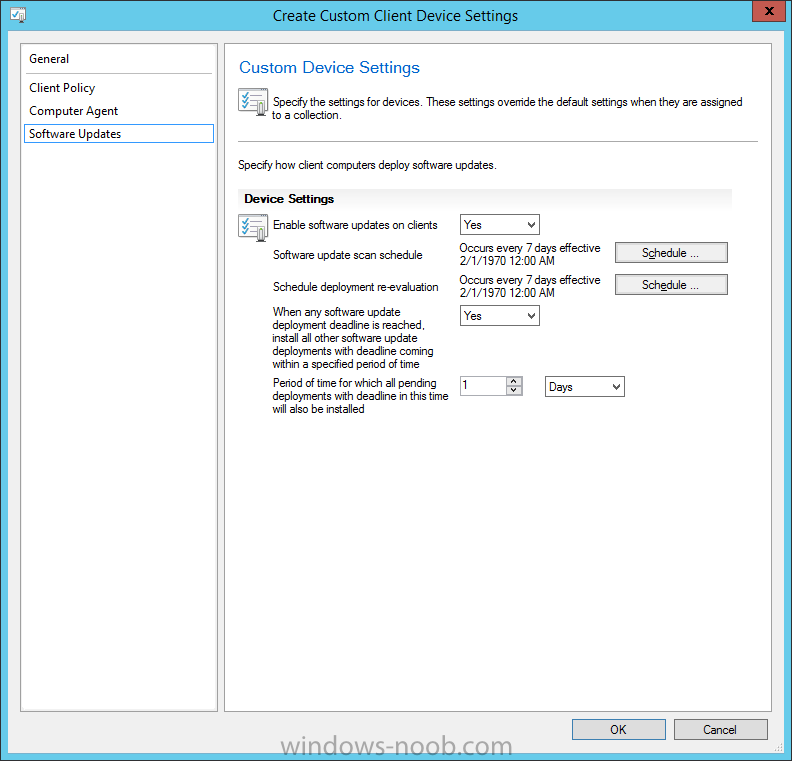
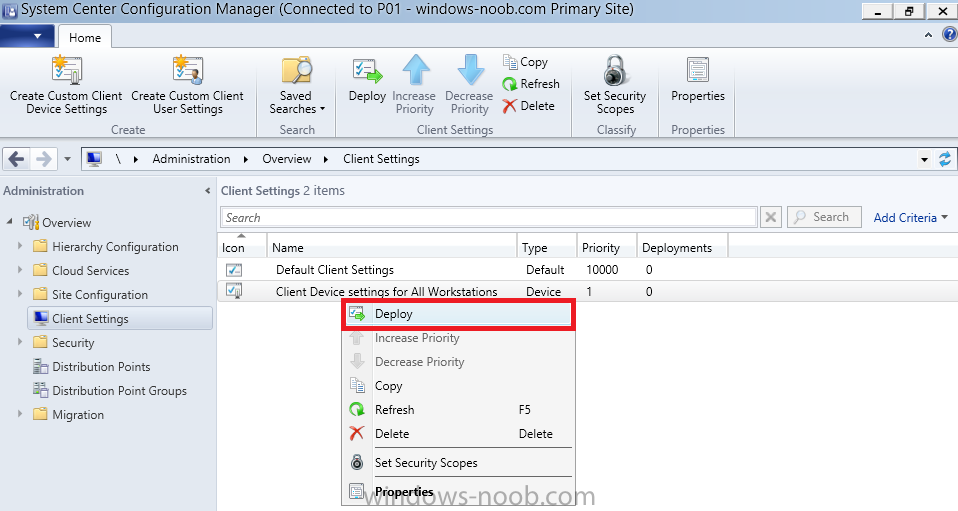
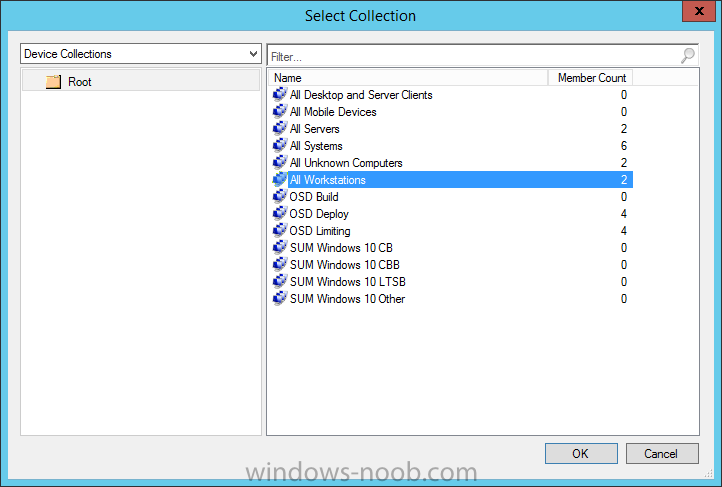
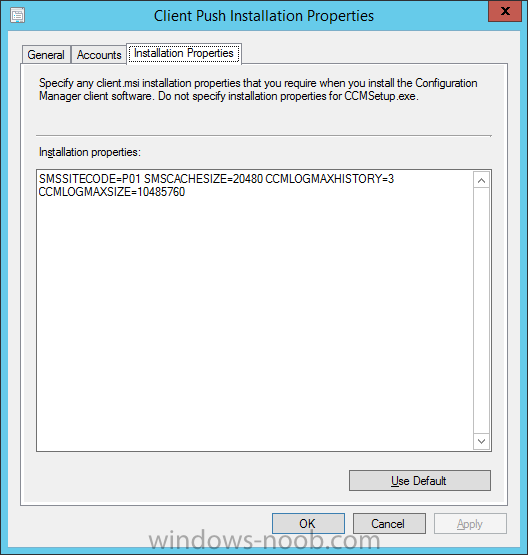
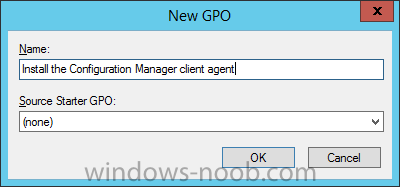
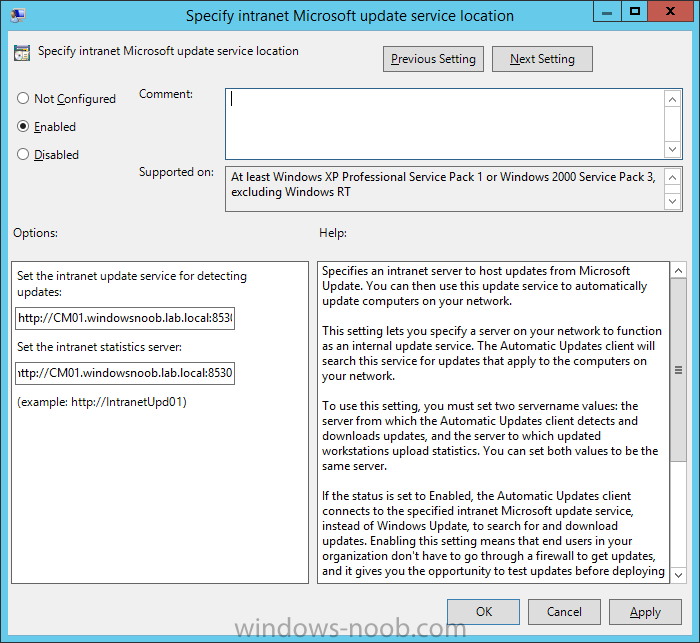
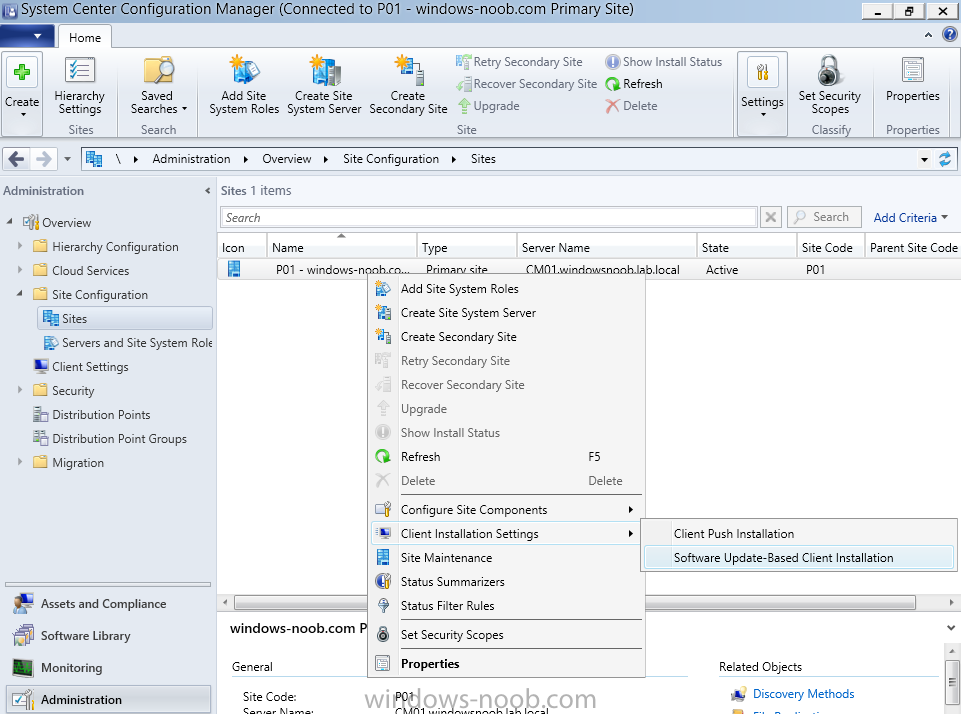
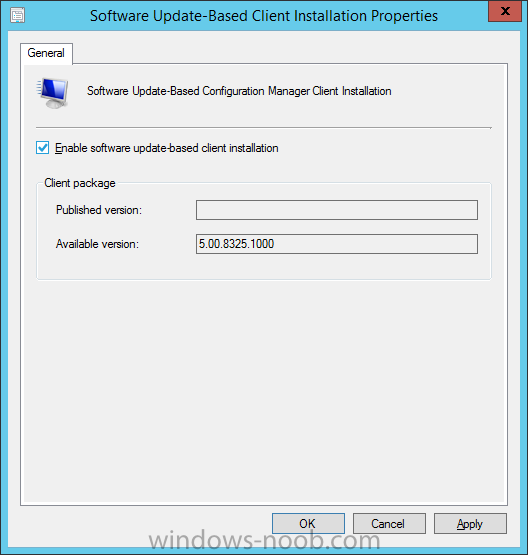
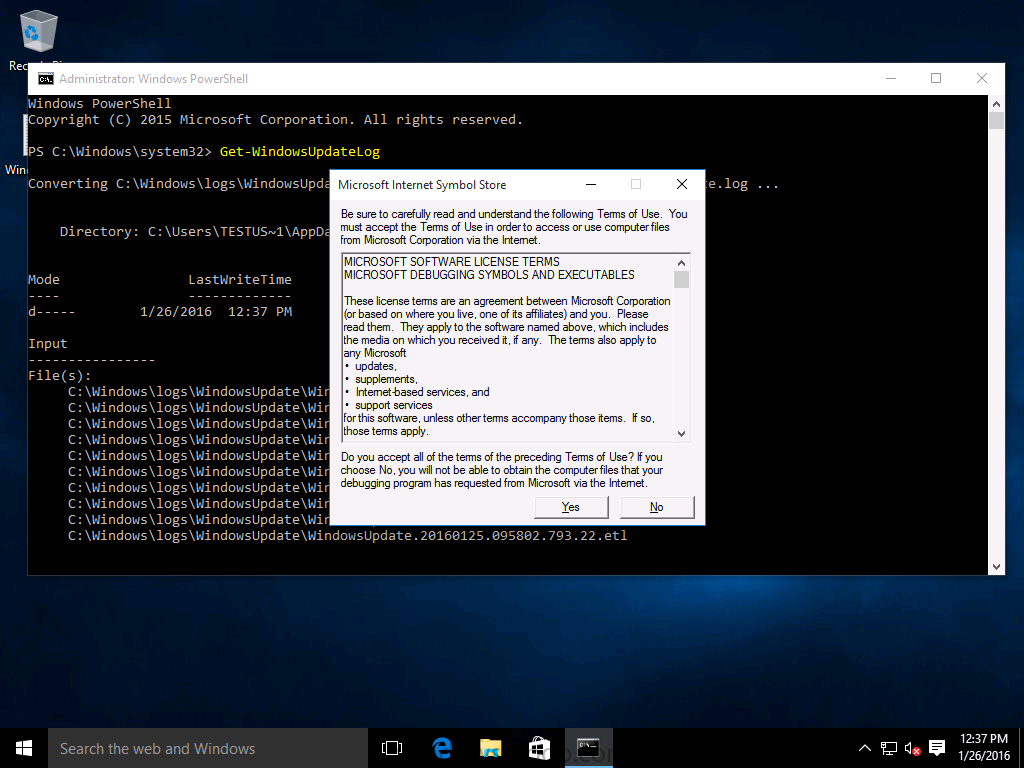
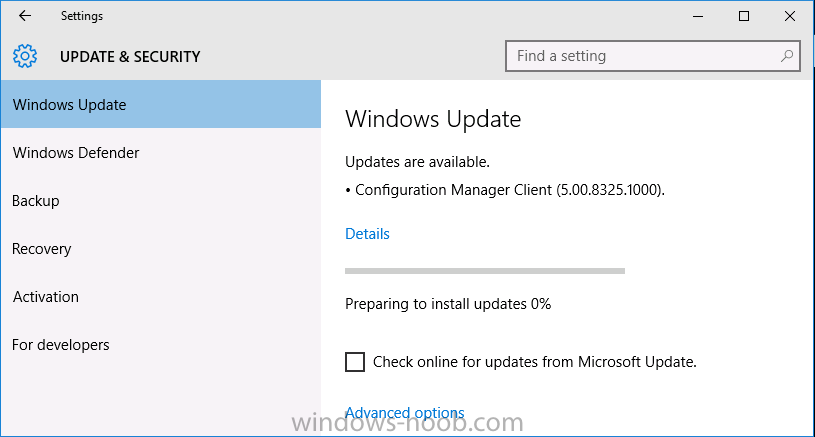
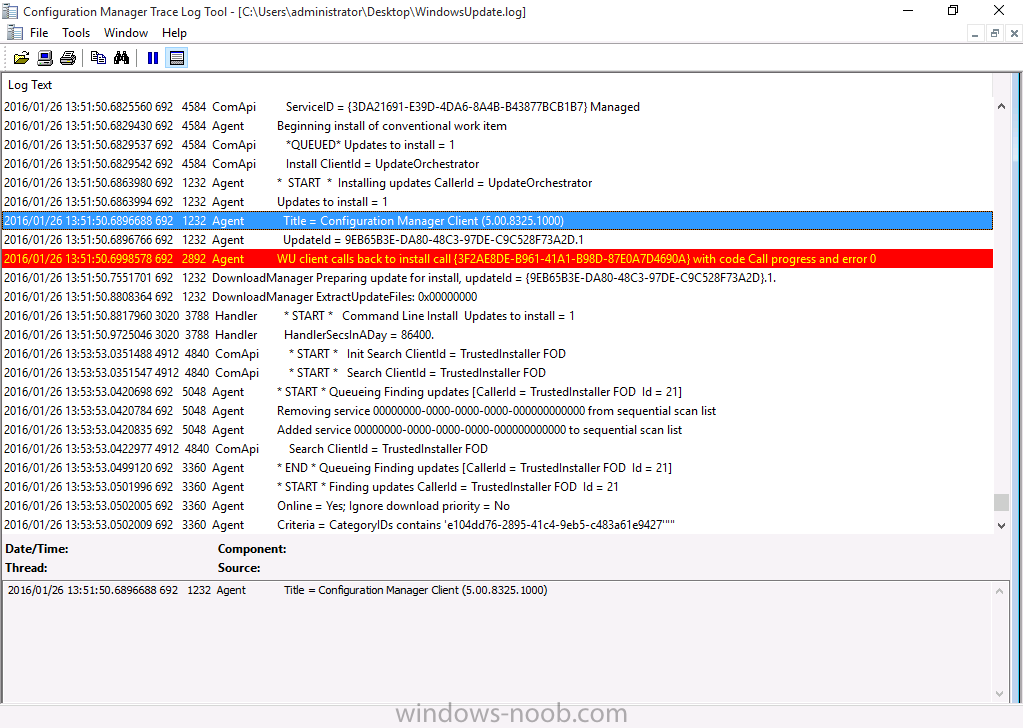
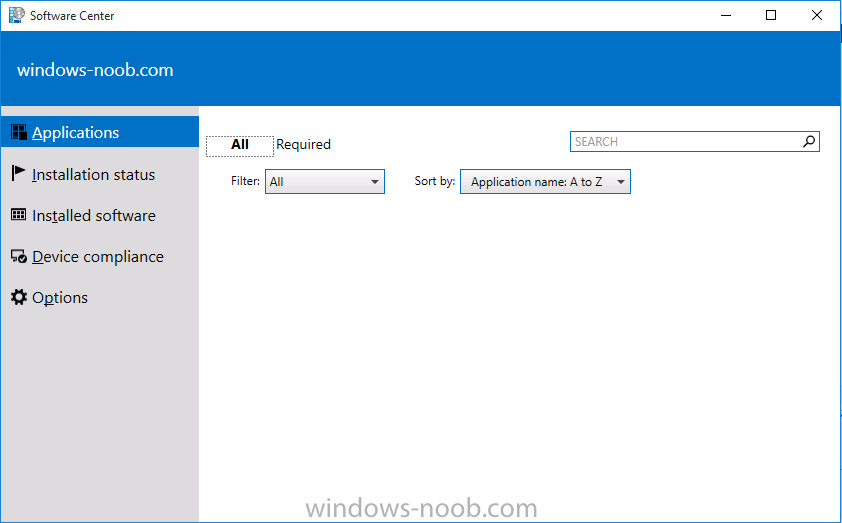
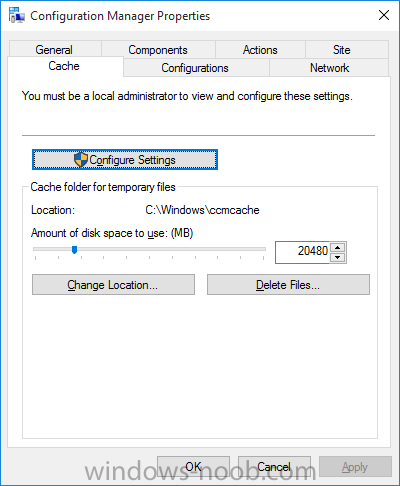
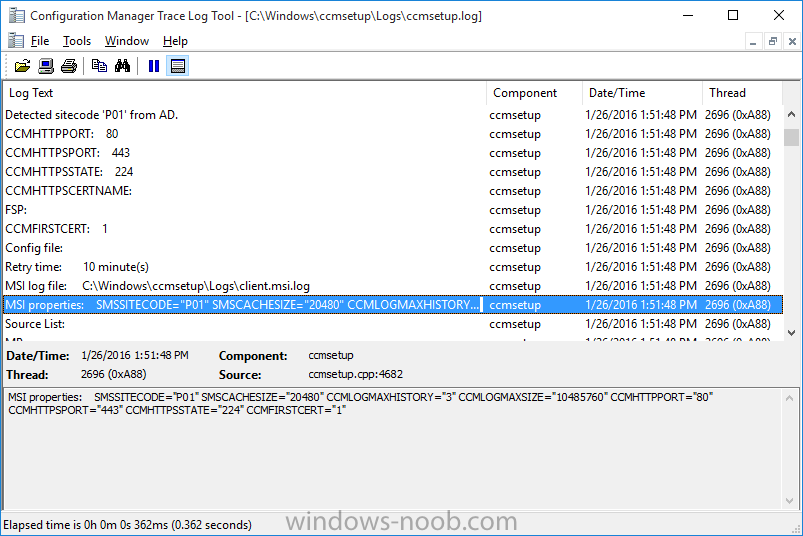
Introduction At the start of this series of step by step guides you installed System Center Configuration Manager (Current Branch), then you configured discovery methods. Next you configured boundaries to get an understanding of how automatic site assignment and content location works. After that you learned how to update ConfigMgr with new features and fixes using a new ability called Updates and Servicing and you learned how to configure ConfigMgr to use Updates and Servicing in one of these two modes: Online mode Offline mode To prepare your environment for Windows 10 servicing (coming in a later guide) you learned how to setup Software Updates using an automated method (via a PowerShell script) or manually using the ConfigMgr console. In this post you'll use a PowerShell script to prepare some device collections, then you'll configure client settings for your enterprise and finally you'll deploy the ConfigMgr client agent using the software updates method which is the least intensive method of deploying the Configuration Manager client agent. Step 1. Create collections using PowerShell Note: Perform this step using an account with full administrative permissions on the ConfigMgr server. Collections are used to group together users or devices into one place in ConfigMgr. Collections can either be a user based or device based but not both. After installing a brand new ConfigMgr infrastructure by default there are a few device collections as shown below. Those collections are useful but it's a good idea to create collections that separate servers from workstations and to create collections used for Operating System Deployment (OSD) and Software Update Management (SUM). This script will create a simple structure for you that is easy to implement. Note: This script does not add any membership queries for the Software Update Management (SUM) collections, you can decide yourself how to populate them. For example you could create Active Directory Security Groups in AD and query for them, and later add computers to those security groups in order to populate the collections. Any ADSG that you create will in turn need to be discovered by your discovery methods in order for ConfigMgr to discover resources. To create some device collections using PowerShell, download the CreateDeviceCollections.ps1 contained in a zip file in the Downloads section at the bottom of this guide and extract it to C:\Temp. On CM01, start Windows PowerShell ISE as Administrator and open the CreateDeviceCollections.ps1 script. Edit any variables in the script to match your environment before proceeding (for example if you want to rename the collections or define what drive ConfigMgr is on). The variables are found lines 74-83 as shown below. Save any changes, then run the script by pressing F5 or clicking on the Green arrow. Below you can see the script has completed. and the new device collections are present in the ConfigMgr console (in Assets and Compliance, Device Collections). Step 2. Add site roles required for user based apps System Center Configuration Manager (Current Branch) comes with a lot of new features including a new Software Center which is capable of showing user as well as device targeted applications. However in order to show user apps in the new software center you need the back-end infrastructure to be in place and that means you need to install the following site roles: Application catalog web service point Application catalog website point To install the roles do as follows. In the ConfigMgr console expand Administration and click on Servers and Site System Roles and right click on the Primary Site Server (P01), choose Add Site System Roles. When the add site system roles wizard appears click next and select both the above roles and click next. In the specify settings for the application catalog web service point, stay with the defaults (these are what will be displayed in IIS Manager) and next specify settings for configuring IIS for this application catalog website point, these are the settings that control the URL your users will see, so you might want to configure it to something useful or just leave it as default as I have here: You can customize the Application Catalog somewhat (although there's a bug open on Microsoft connect currently about the theme color) to a certain degree, enter your Organization name and choose a corresponding Website theme. and continue through that wizard until it is completed To confirm that the web service point role installed successfully review the awebsvcMSI.log file stored in <Configuration Manager Installation Path>\Logs\ and look for the following line - Product: Application Web Service -- Installation operation completed successfully. Step 3. Configure custom client device settings Note: Perform this step using an account with full administrative permissions on the ConfigMgr server. The default client settings apply to all devices in your enterprise. To target a smaller sub-set you can use custom client device settings to target devices within a collection. These settings will apply to all systems within the collection that they are deployed to on that site. You can configure multiple custom client device settings and target them to different collections to control how devices behave in your hierarchy. For a detailed explanation of what each setting does see the following page on Technet: https://technet.microsoft.com/en-us/library/gg682067.aspx Note: Custom client settings always take priority over default client settings. For information about Planning for client settings please see this link on Technet. If you want to configure settings that apply to all sites in your hierarchy create custom client agent settings on the CAS server. In the Administration workspace, right-click on Client Settings in Site Configuration and choose Create Custom Client Device Settings. Give the custom device settings a descriptive name which reveals what they are and the intended target, such as Client Device settings for All Workstations select the following custom settings from the list (you can add/configure more later) Client Policy Computer Agent Software Updates In the left pane, click on the first of the three selected above, Client Policy. This controls how often your ConfigMgr clients poll the management point looking for policy. Policy can be thought of as a list of instructions telling a client what to do (such as install an application or check for Windows update availability). The default of 60 minutes is fine for most production environments so let's leave it alone. Note: Lowering the client policy polling interval (minutes) value to something like 5, will mean you can test things much faster in a lab. That setting however, would not be suitable in a production environment due to the increased network traffic and server load. Next, select Computer Agent in the left pane and configure the default application catalog website by clicking on Set Website. Using the drop down menu select the URL you want to use. Next, add your organization name to the organization name displayed in Software Center field and then configure how the Software Center appears to your end users. You have two choices, the old default software center or the new one. Select Yes which will give you the ability to target User and Device applications using one UI, the Software Center. Note: Previously you had to use the application catalog for applications deployed to the user and the software center to show applications targeted to the device. The new software center can now show user based applications however it cannot do application approvals or allow the user to set their primary device. And finally set the Disable deadline randomization value to no. Note: This setting determines whether the client uses an activation delay of up to two hours to install required software updates when the deadline is reached. By default, the activation delay is disabled. Setting this value to no will mean that updates are not installed at the same time thus saving a distribution point from undesired behavior (slowing to a crawl). For Software Updates set "When any software update deadline is reached, install all other software update deployments with deadline coming within a specified period of time" to Yes to speed up software update installation, reduce system restarts and increase security. For more info see this page on Technet. Now that you've configured the client settings, you need to deploy them to a collection containing computers you want to target with these settings. To deploy the client settings, right click and choose Deploy. when prompted to select a collection, choose the previously created All Workstations collection. Click OK when done. Step 4. Configure client installation properties Note: Perform this step using an account with full administrative permissions on the ConfigMgr server. You can configure client.msi installation properties to specify certain preferences as these properties are published to Active Directory Domain Services and used during the client installation process. Note: When you extend the Active Directory schema for System Center 2012 Configuration Manager and the site is published to Active Directory Domain Services, many client installation properties are published to Active Directory Domain Services. If a computer can locate these client installation properties, it can use them during Configuration Manager client deployment. [source: Technet] To configure client.msi installation properties, in the ConfigMgr console select Administration and choose Site Configuration, Sites then right click on the primary server and choose Client Installation Settings, then Client Push Installation and finally click on the Client Installation Properties tab. Enter some installation properties such as those added below to increase the cache size to 20gb and the log file size to 10mb. SMSCACHESIZE=20480 CCMLOGMAXHISTORY=3 CCMLOGMAXSIZE=10485760 Step 5. Configure a GPO Note: Perform the following on the Active Directory Domain Controller server (AD1) as Local Administrator To distribute the Configuration Manager client agent as a software update requires a GPO in place. Start the Group Policy Management tool (GPMC.MSC) and create a new GPO. Note: In the preceding screenshot I link the GPO to the domain GPO however you should consider creating an OU specifically for computers you want to target and apply this GPO only to that OU. Give the GPO a name such as Install the Configuration Manager client agent. When done, right click on the GPO and choose Edit. Select and expand Computer Configuration, select Policies then expand Administrative Templates, expand Windows Components, and then scroll down to Windows Update. Next select Specify intranet Microsoft update service location, and set it to Enabled, and enter the fully qualified domain name (FQDN) and port of your ConfigMgr primary server Software Update Point as per the screenshot below: Click Apply and click OK. Step 6. Enable Software Update based client installation Note: Perform this step using an account with full administrative permissions on the ConfigMgr server. In order for on-premise devices to be managed by ConfigMgr they need the ConfigMgr client agent installed. There are several ways to install the client as listed below, each method has its' advantages and disadvantages, take a look at this post on Technet for a summary. Client push installation Software update point-based installation Group Policy installation Logon script installation Manual Installation In this step you will use the Software update point based installation method which is listed as a Best Practise method of deploying the client. Navigate to the Administration workspace, select Site Configuration, Sites, and select the P01 site, right click and choose Client Installation Settings and then Software Update based client installation and now comes the really hard part, place a check mark in the Enable software update based client installation box. Done. Click Apply and then OK. Step 7. Monitor client installation On a computer that is joined to the domain check windowsupdate.log to see what is happening, if that computer happens to run Windows 10 then you'll need to use the following PowerShell cmdlet to generate a readable windowsupdate.log file. Get-WindowsUpdateLog If prompted to accept Microsoft Internet Symbol Store answer Yes and after a while it's done processing the ETL files and creates your logfile on the Desktop (if you have administrative permssions on that computer, otherwise it's copied to the Administrators desktop). Using CMTrace, open the WindowsUpdate.log file and review it, below you can see the ConfigMgr client is referenced in the WindowsUpdate.log Once the update becomes available it will install Once the client is installed and has retrieved it's policy you can review the new Software Center, cool huh ! and check out the ConfigMgr client cache size which we set in Step 4 above and the MSI properties are revealed in the CCMSetup.log file Job done ! Summary In this guide you created device collections using PowerShell and learned about configuring custom device client settings and deploying them to a collection called All Workstations. You then deployed the ConfigMgr client agent using Software Updates. Related Reading Client Settings - https://technet.microsoft.com/en-us/library/gg682067.aspx Fundamentals of System Center Configuration Manager - https://technet.microsoft.com/en-us/library/mt622643.aspx How to configure client settings in System Center Configuration Manager - https://technet.microsoft.com/en-us/library/mt627896.aspx#BKMK_DefaultClientSettings Best practices for client deployment in System Center Configuration Manager - https://technet.microsoft.com/en-us/library/mt627892.aspx Downloads You can download a Microsoft Word copy of this guide here dated 2016/1/26 how to configure client settings and the client agent.zip You can download the PowerShell script used above here CreateDeviceCollections.zip


-
i'd suggest you all raise a bug on microsoft connect (or search for already created ones) to get some impetus on this
-
it depends on policy contained within the steps and how much ram is allocated to your task sequence and that depends on what version of sccm you are using. here's the official statement from Technet however - https://technet.microsoft.com/en-us/library/gg712685.aspx General limitations for task sequence variables: Task sequence variable values cannot exceed 4,000 characters. You cannot create or override a read-only task sequence variable. Read-only variables are designated by names that start with an underscore character (_). You can access the value of read-only task sequence variables in your task sequence; however, you cannot change their associated values. Task sequence variable values can be case sensitive depending on the usage of the value. In most cases, task sequence variable values are not case sensitive. However, some values can be case sensitive such as a variable that contains a password. There is no limit to how many task sequence variables can be created. However, the number of variables is limited by the size of the task sequence environment. For Configuration Manager with no service pack and Configuration Manager SP1, the total size of the task sequence environment cannot exceed 10 MB. Starting in System Center 2012 R2 Configuration Manager, the client uses available memory more efficiently and total size limit for the task sequence environment was increased to 32 MB.
-
here's the solution apparently https://social.technet.microsoft.com/Forums/en-US/182478a7-36bb-4ef5-8419-e794d2999e9a/strange-error-and-no-1511-upgrades-with-code-filterinappropriateosupgrade-failed-hr80240fff?forum=winserverwsus
-
forget about 'everyone', can the ConfigMgr server computer account access \\ops-titanx1\f$\MDT2013u2 Toolkit ?
-
what do the logs reveal on the client ?
-
can it access \\ops-titanx1\f$\MDT2013u2 Toolkit and could any AV software be blocking it ? what about that space ?
-
when i install language packs I do it offline as part of the installation, works fine you should also look for a blog post by Mikael Nystrom about cleaning up images, there are some tips in it
-
WinPe 10 - Virtual Machine Harddisk not recognized (Driver)
anyweb replied to NeoXQ's question in boot images
did you try adding storage drivers for vmware esxi to the boot image ? -
that error means The specified module could not be found. Source: Windows ----- have you checked the setupact.log and setuperr.log in C:\$Windows.~BT\sources\panther\ they'll reveal more info
-
are you only having this issue with one package on one dp or not, please elaborate,
-
without seeing the whole log it's hard to determine the extent of the problem, however maybe you need to inject drivers for whatever vmware you are using, i use HyperV and don't have such problems or need drivers