


anyweb
-
Posts
9182 -
Joined
-
Last visited
-
Days Won
366
Everything posted by anyweb
-
 thanks and welcome! as to your problem can you attach your smsts*.log files please so we can see what happens during the enable bitlocker step ? also here's an older post but goes into detail about getting your TPM ready for the enable bitlocker step on Dell computers
 -
sending with winhttp failed; 80072ee7 TSManager 22-1-2016 18:43:29 2404 (0x0964) is usually no network or dns failure, so are you sure it's got a network during this time ?
-
TechNet Virtual Lab: Learning App-V Basics
anyweb replied to anyweb's question in Application Virtualization
i'll check it out but in the meantime did you see this https://www.windows-noob.com/forums/index.php?/topic/6848-how-can-i-sequence-applications-using-app-v-version-5-for-configuration-manager-2012-sp1/ -
Microsoft released yet another Redstone build to Insiders, read about that below. more info > https://blogs.windows.com/windowsexperience/2016/01/21/announcing-windows-10-insider-preview-build-11102/
-
Applications failing in capture task sequence
anyweb replied to firstcom's topic in Configuration Manager 2012
what version of configmgr are you runnning and at what CU level ? -
that task sequence is for Configuration Manager 2012 R2, the same functionality (and better) is built into Configuration Manager Current Branch (version 1511),
-
the issue with the older Windows 10 ADK is that powershell scripts might fail in WinPE, the workaround is don't use PowerShell scripts in WinPE until a newer ADK fixes that and the newer refresh issue, actually the newer ADK fixes the PowerShell issue but introduced a refresh issue, so it's safer to use the older adk 10.
-
looks like you are missing network drivers for whatever hardware you are using
-
hi, thanks ! actually in the book it links to the URL which shows you a list of those double reboots, it is this bit...
-
does it perform a sync at all (successfully) ?
-
W10 Ent Upgrade to build 10586
anyweb replied to Siroj's topic in System Center Configuration Manager (Current Branch)
yes i'm testing it right now, mixed results so far, if you want to test it only deploy one update, the servicing plan is not working as expected unless you expire all un-needed updates in WSUS console first. -
Steveakash, sure try it !
-
OSD issues - Windows 10 - Surface Pro 4
anyweb replied to tompsmith's topic in Configuration Manager 2012
looks like it's failing after it installs the configmgr client, can you check the ccmsetup.log file and see does it give you any clues, also is there another smsts*.log file still in C:\_SMSTasksequence\logs ? -
I would go from R2 > CU5 > R2SP1 > R2SP1CU2 I've a guide for most of it here.
-
have you tried searching ? here's one post about it https://social.technet.microsoft.com/Forums/en-US/b193583d-cb02-46c4-93c8-76646b2261ec/sccm-application-to-change-user-desktop-wallpaper?forum=configmanagergeneral
-
does it work if you specify a normal user account (and not a microsoft email account)
-
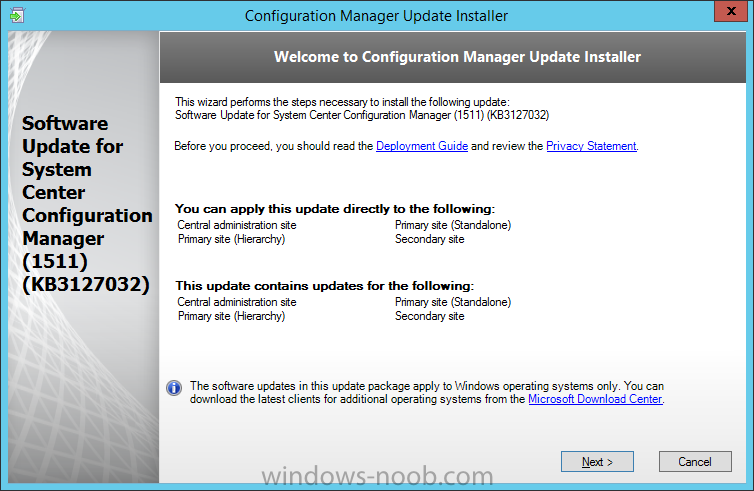
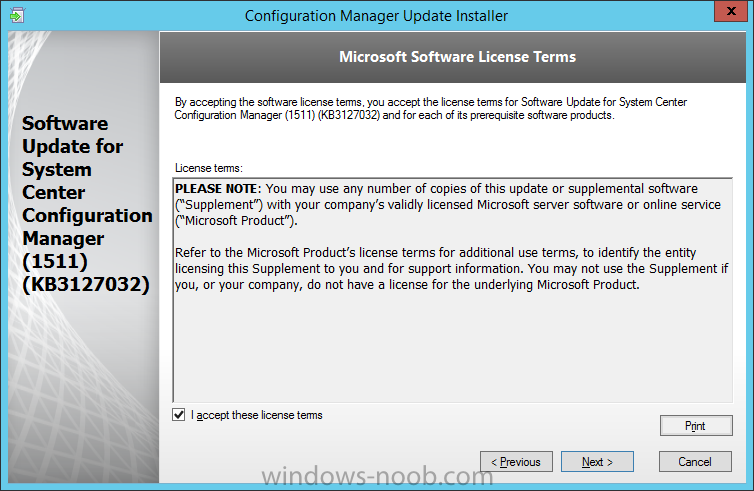
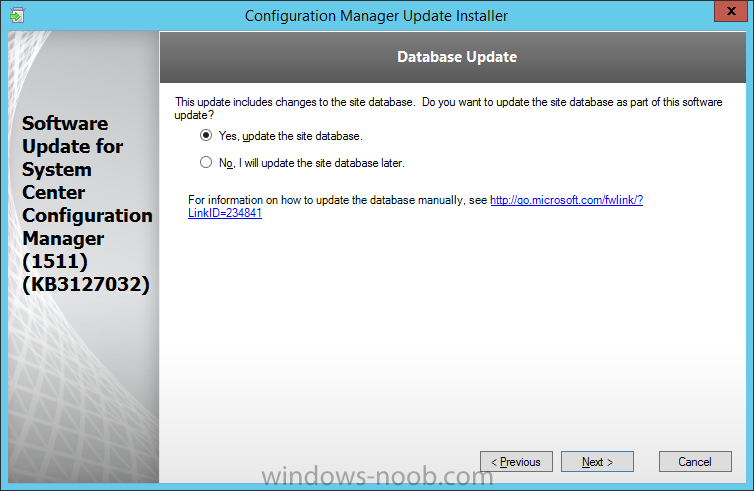
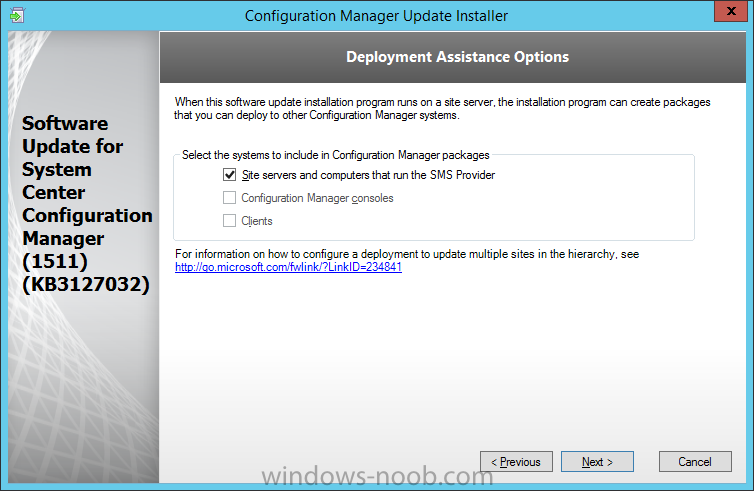
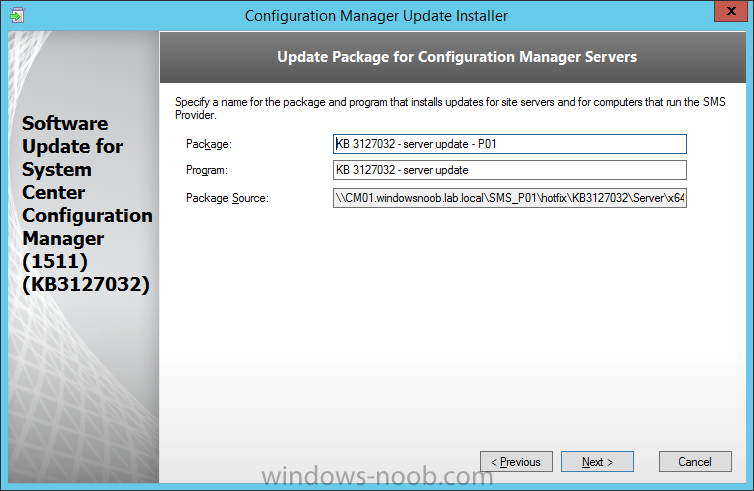
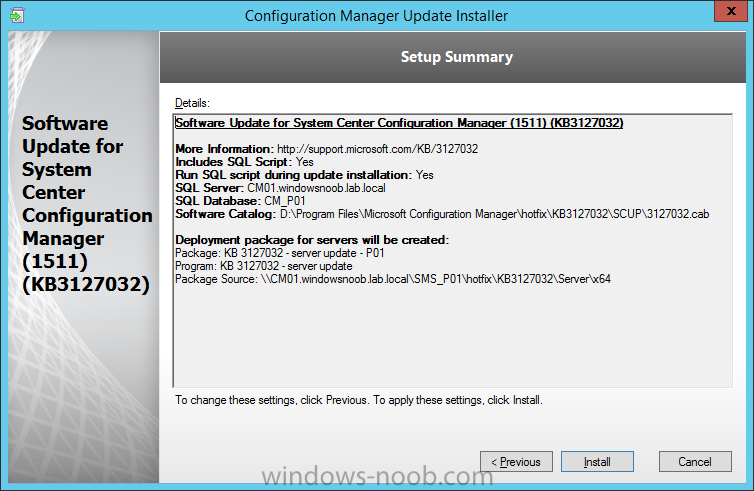
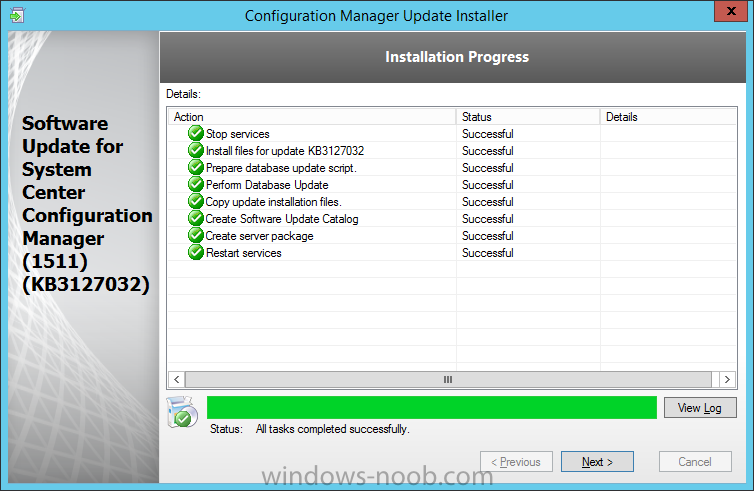
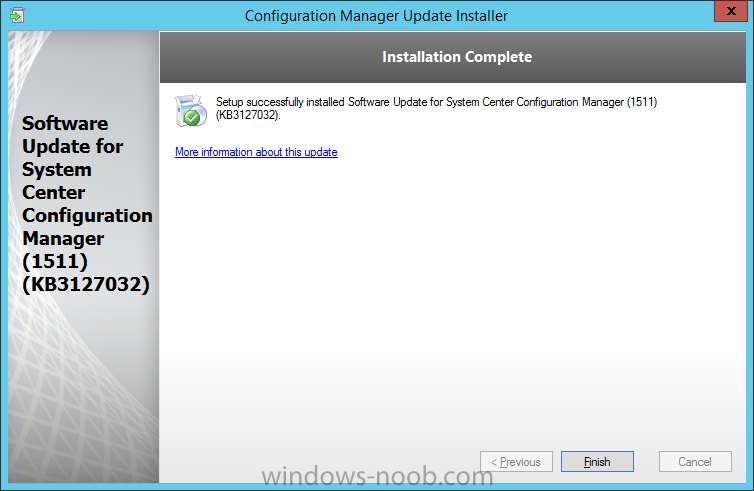
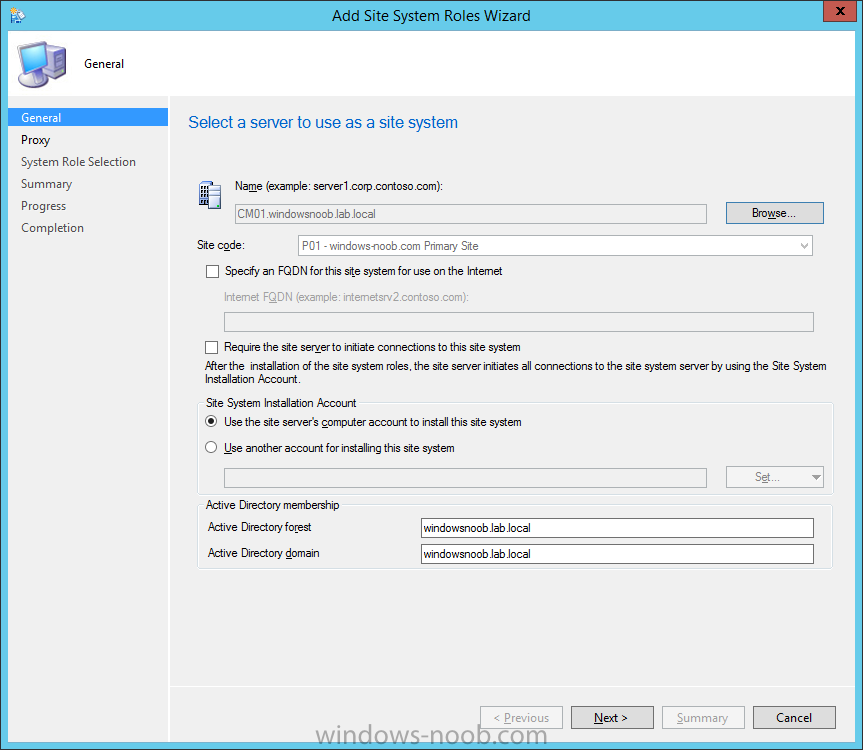
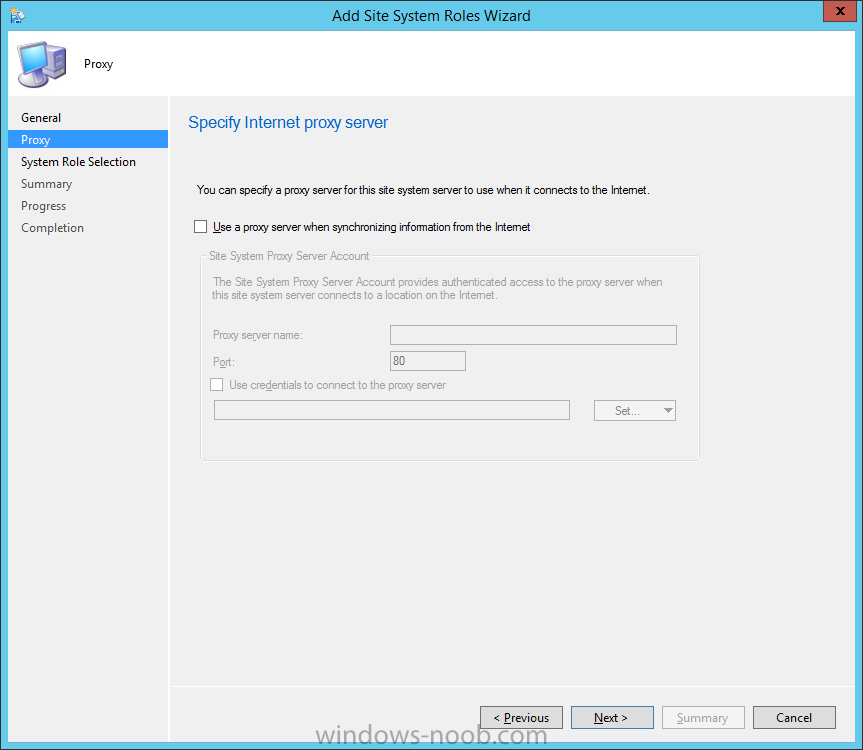
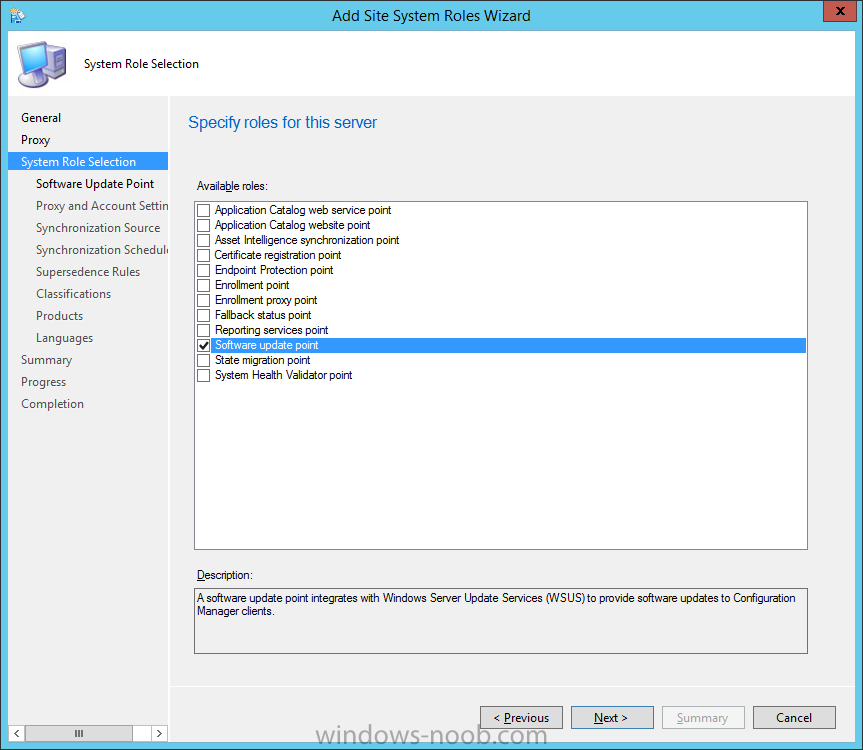
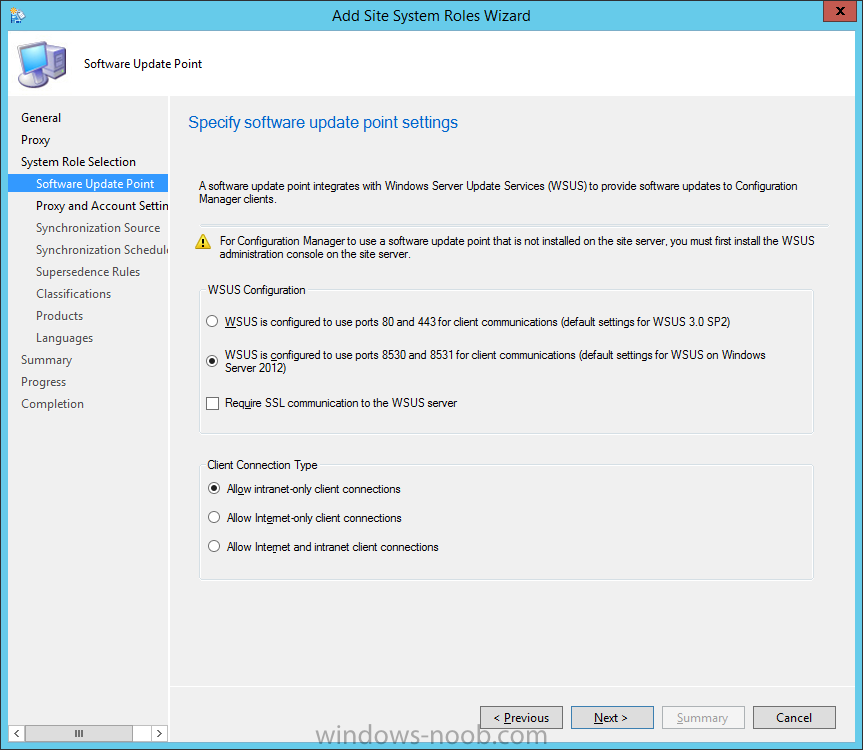
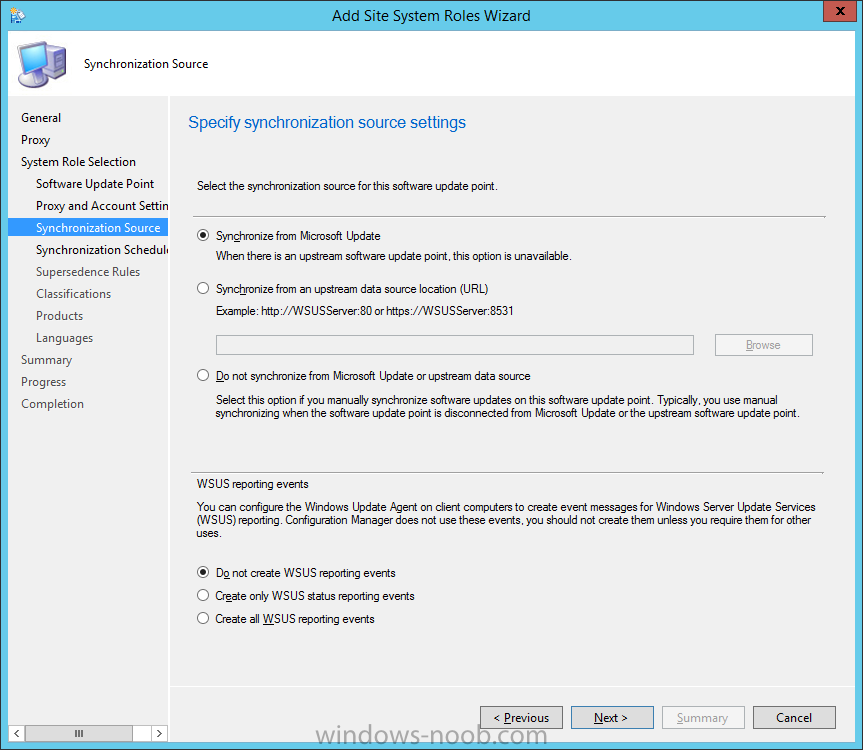
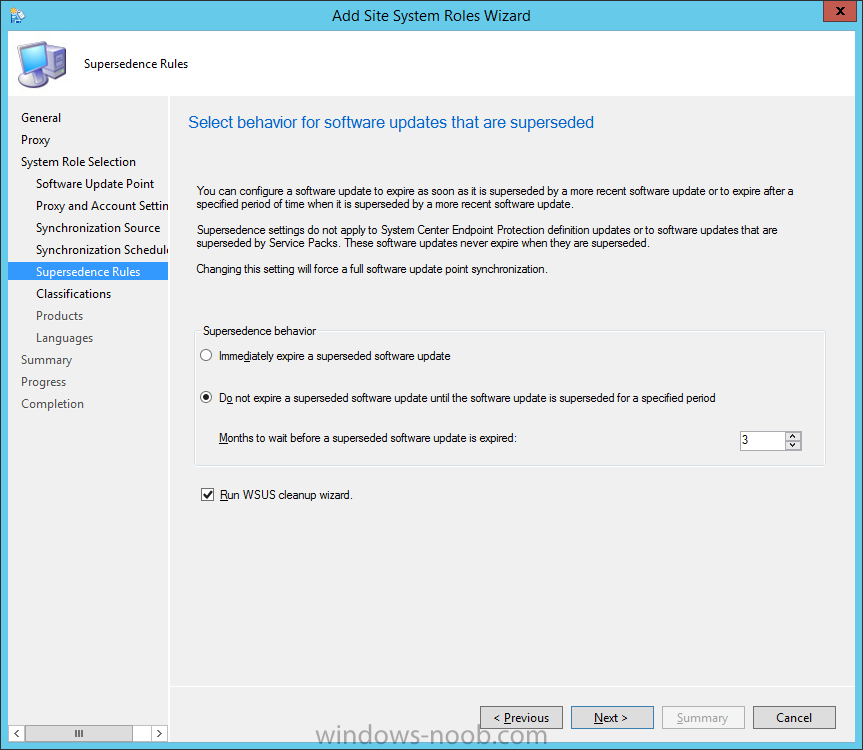
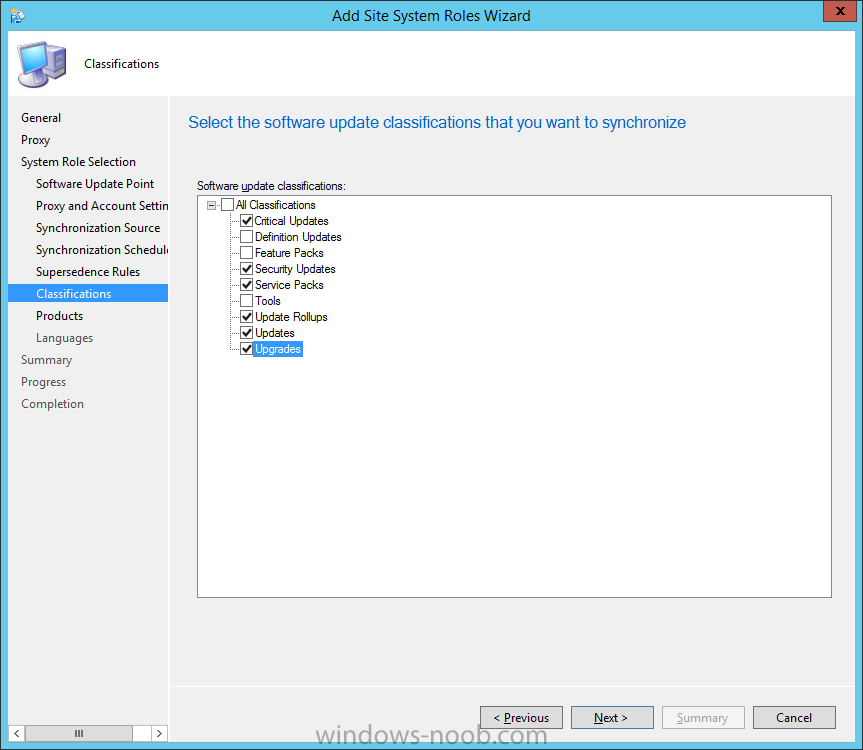
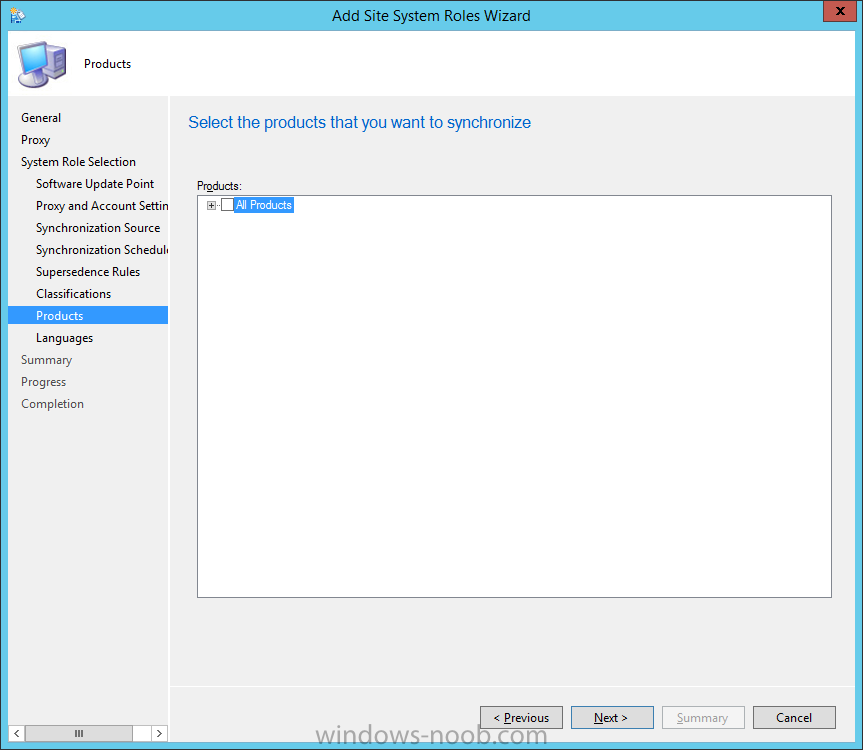
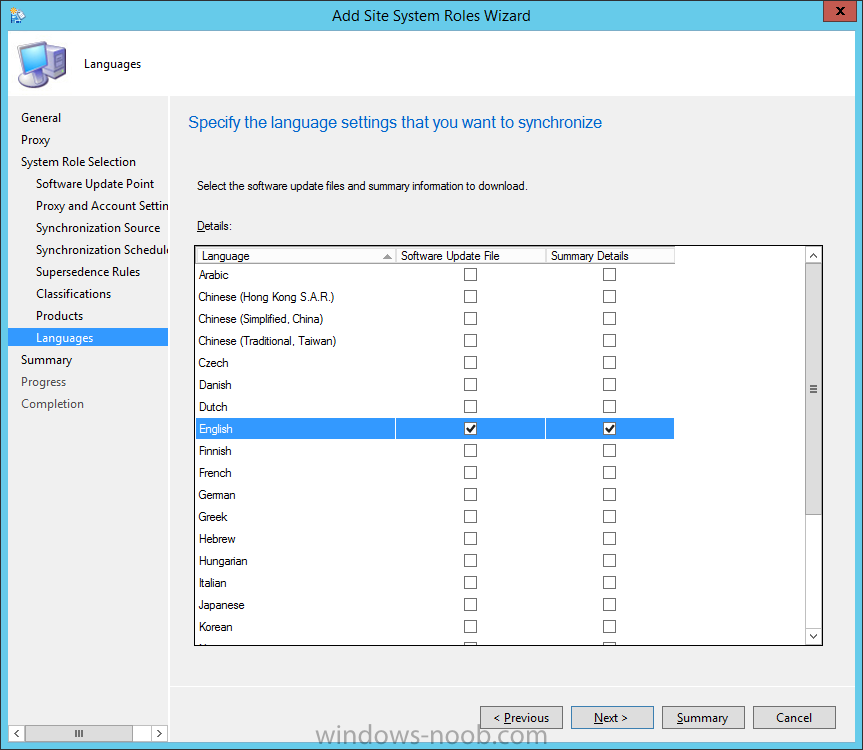
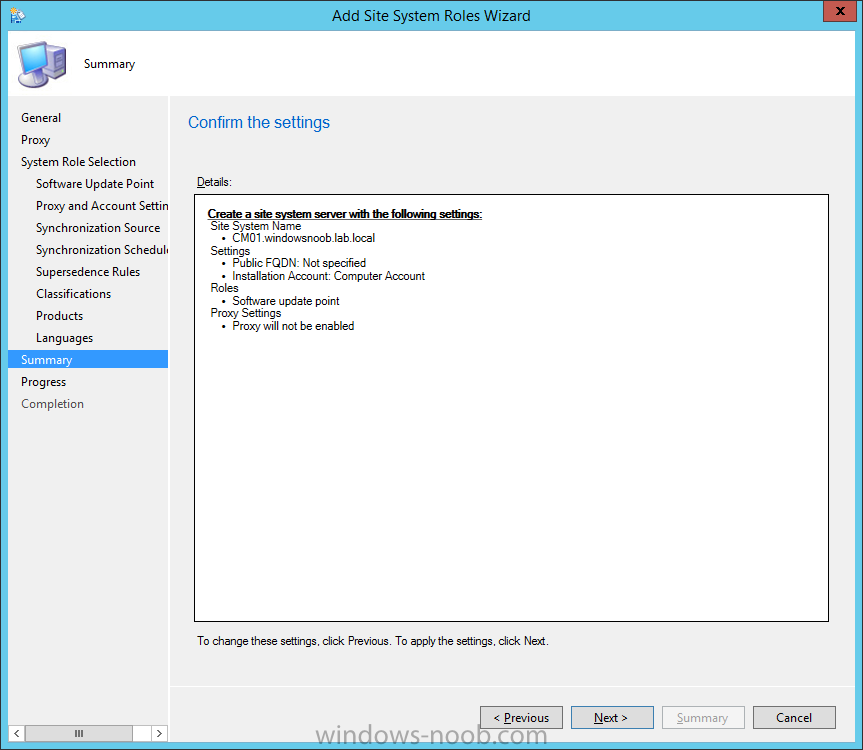
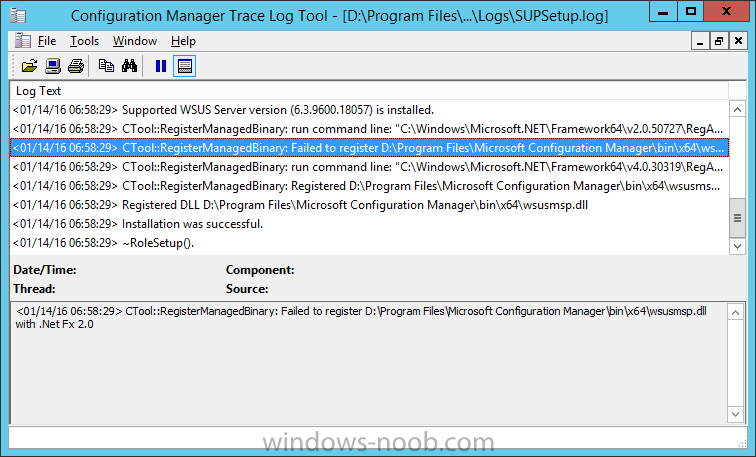
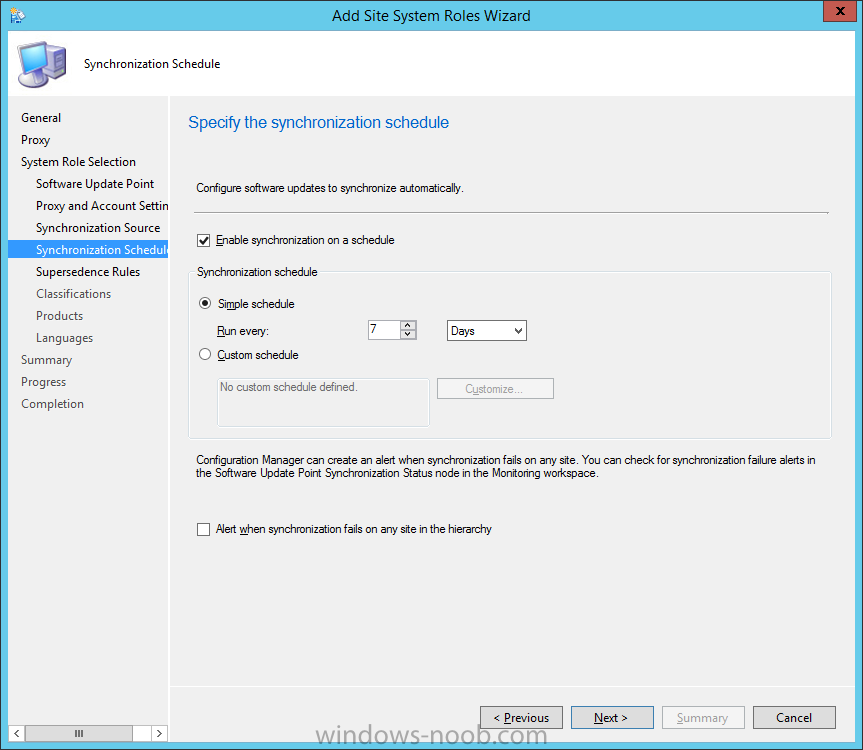
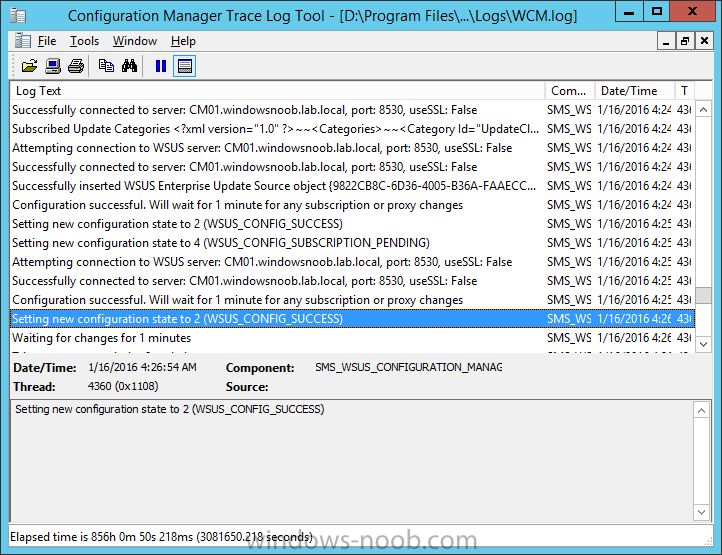
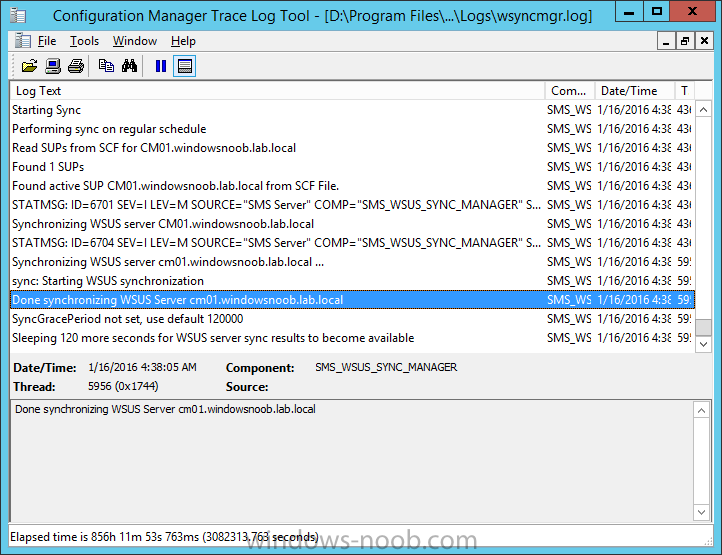
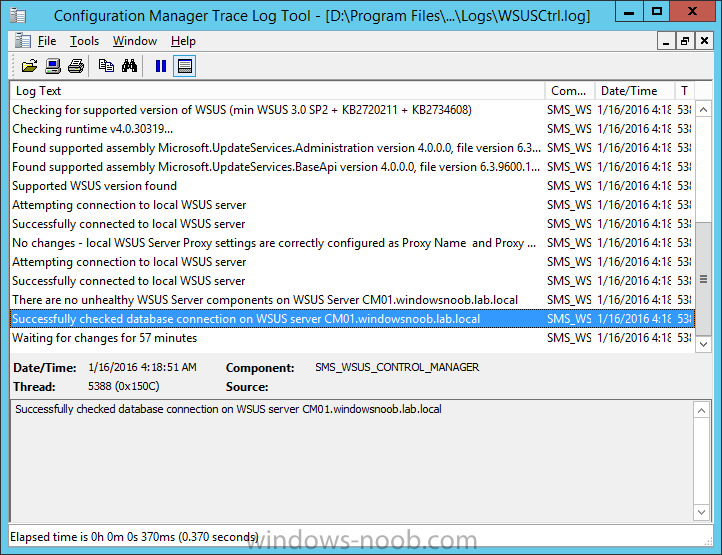
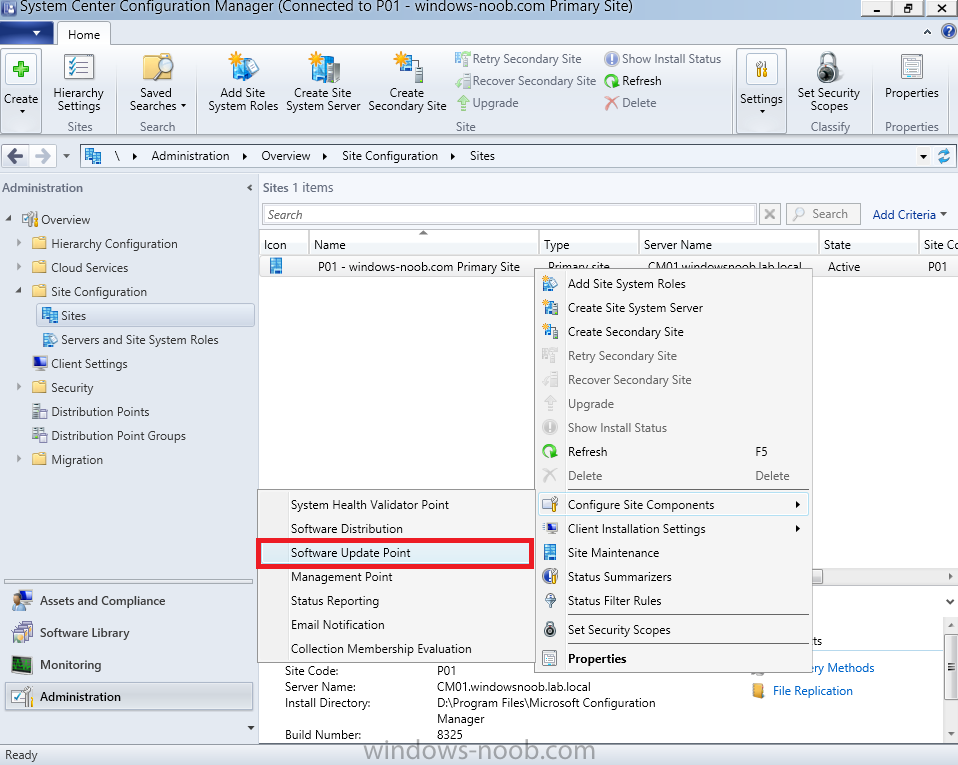
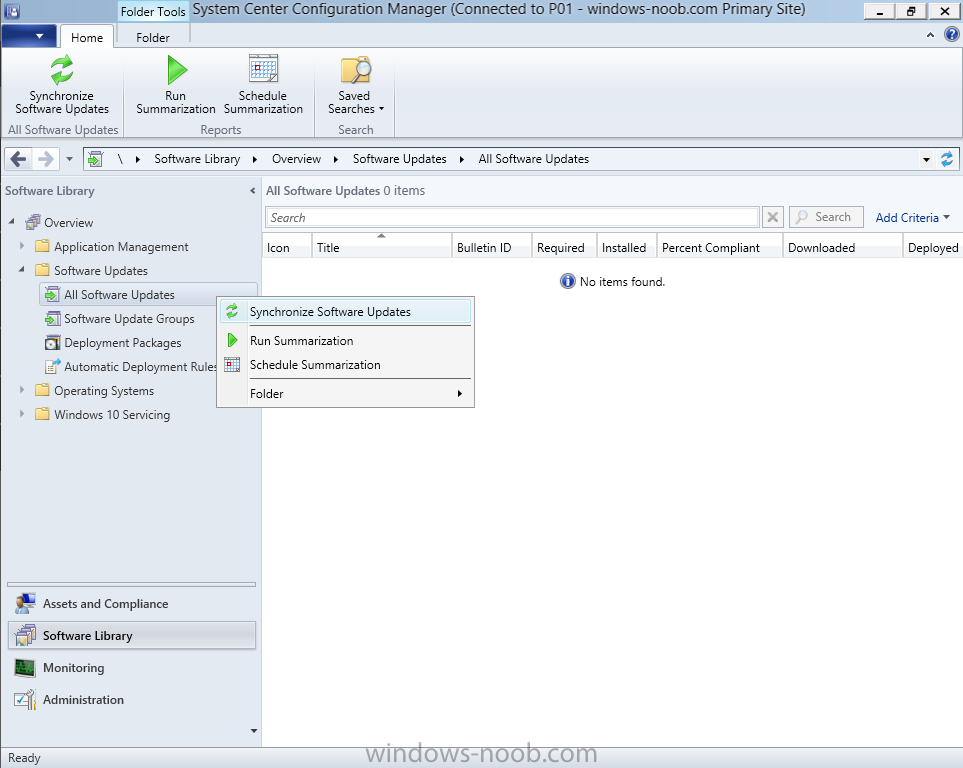
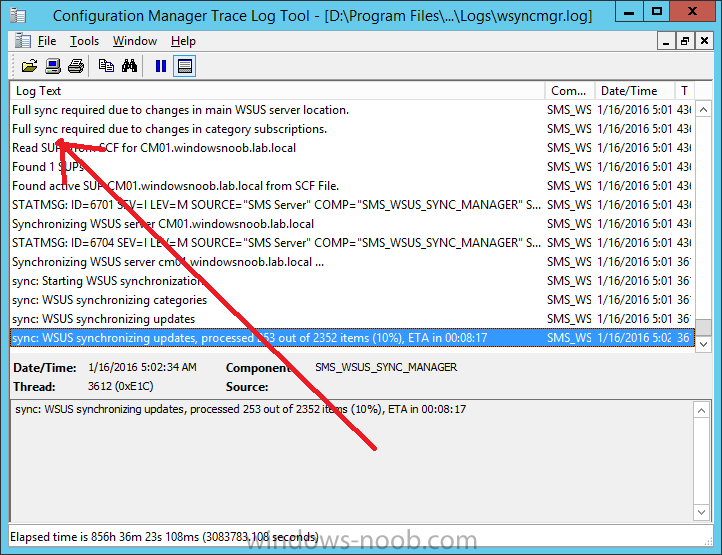
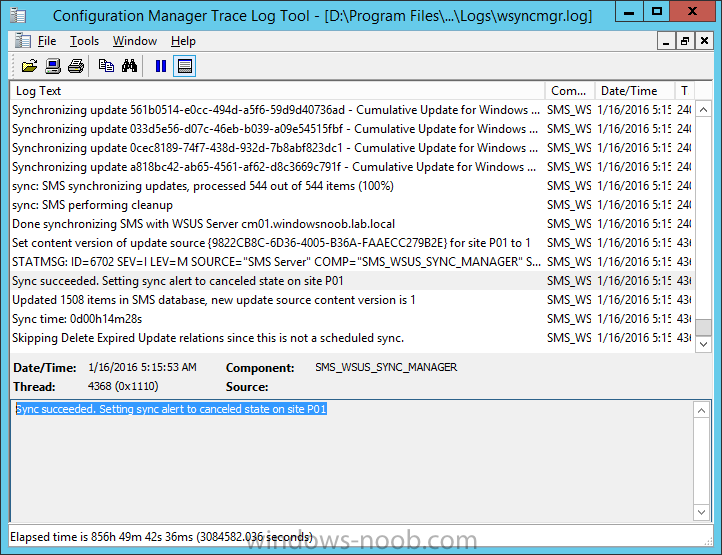
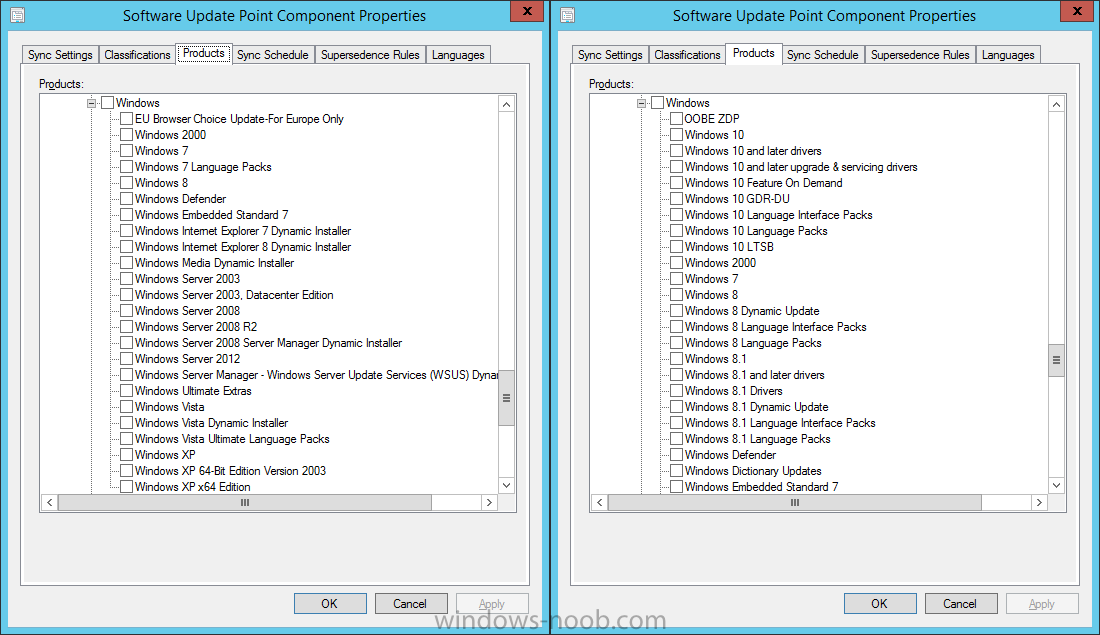
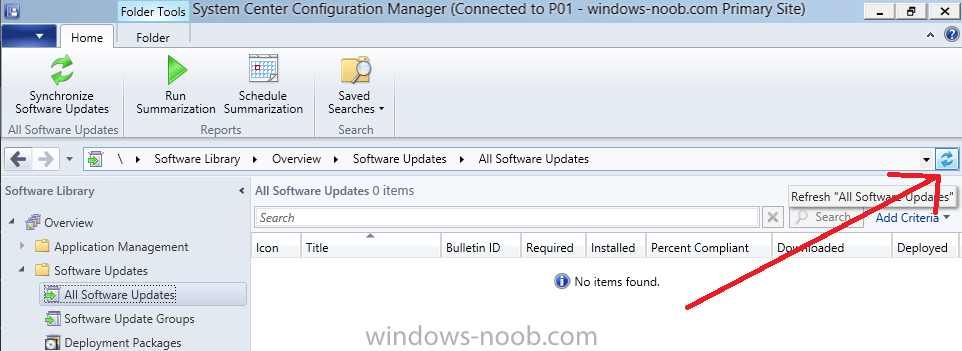
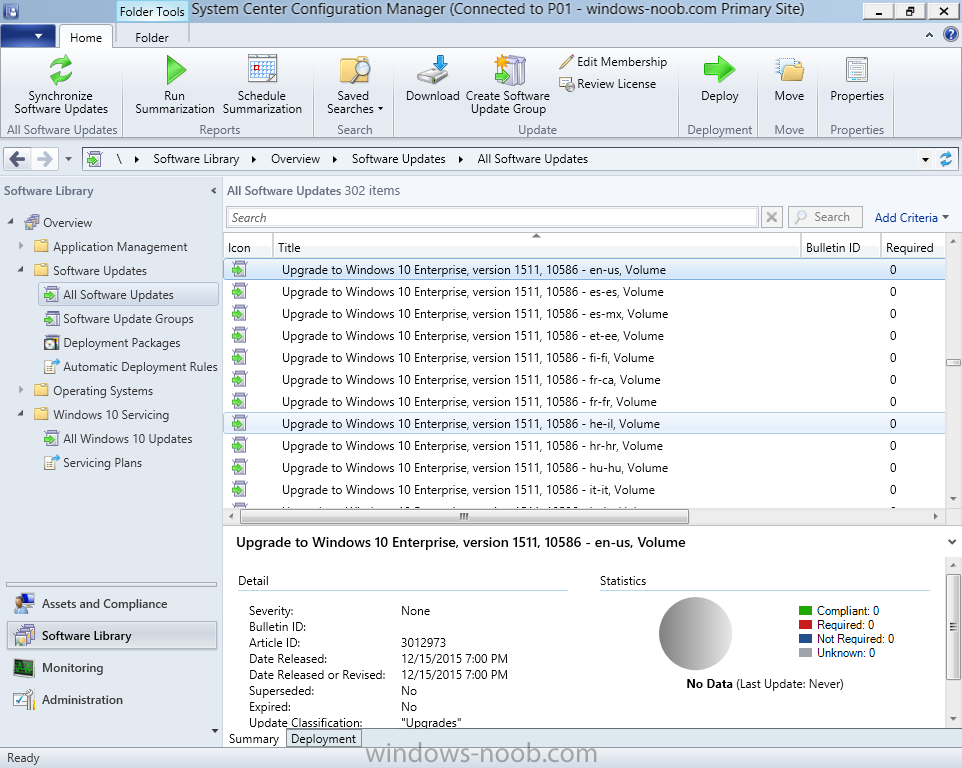
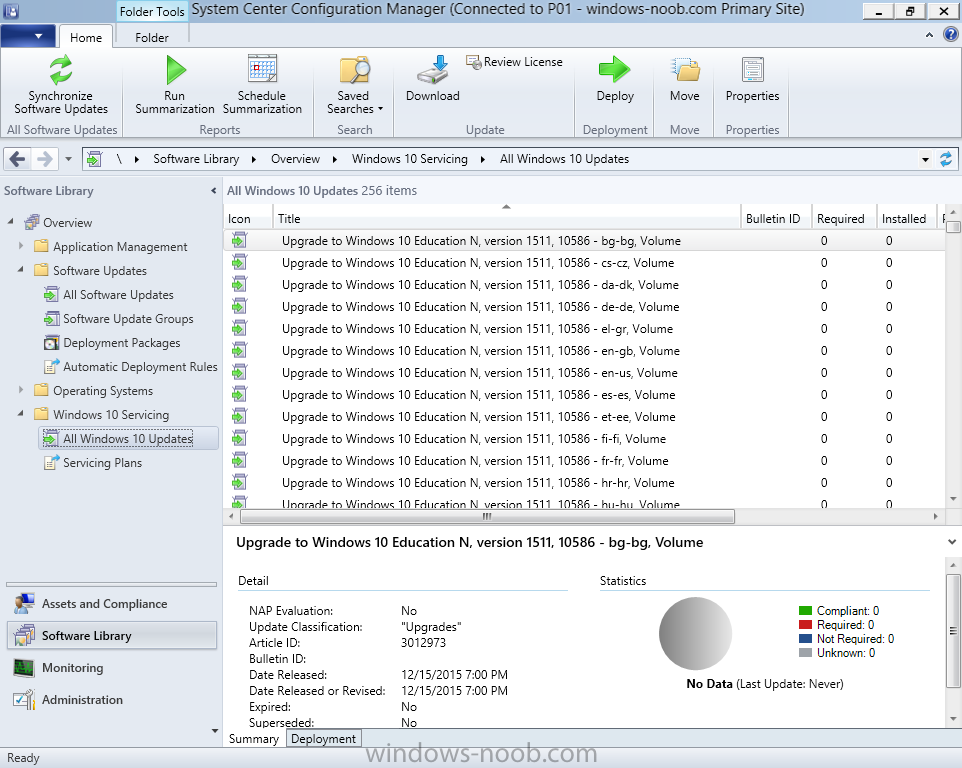
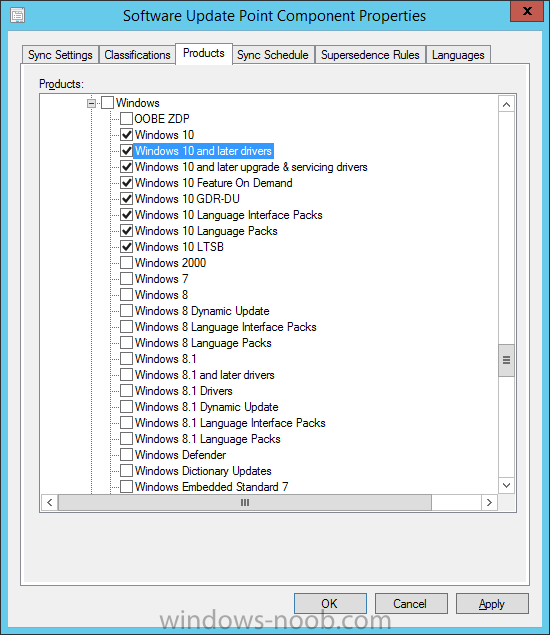
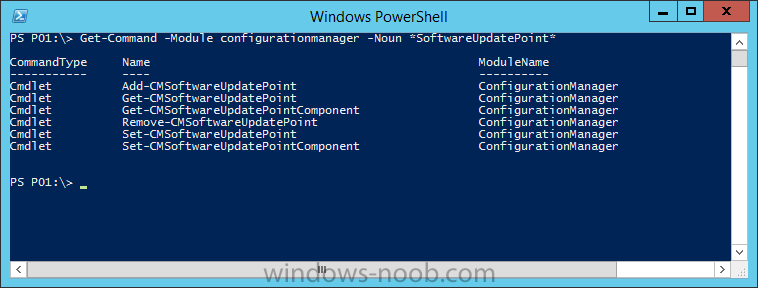
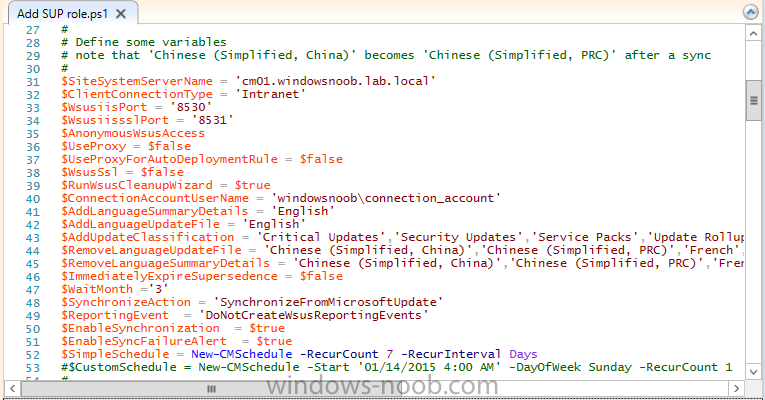
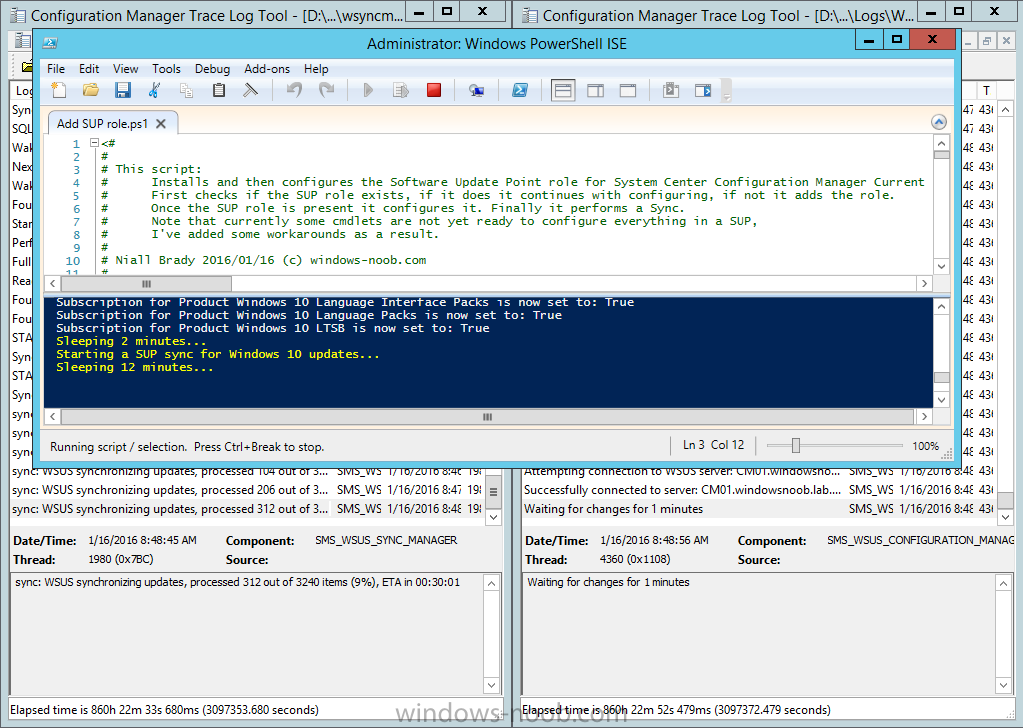
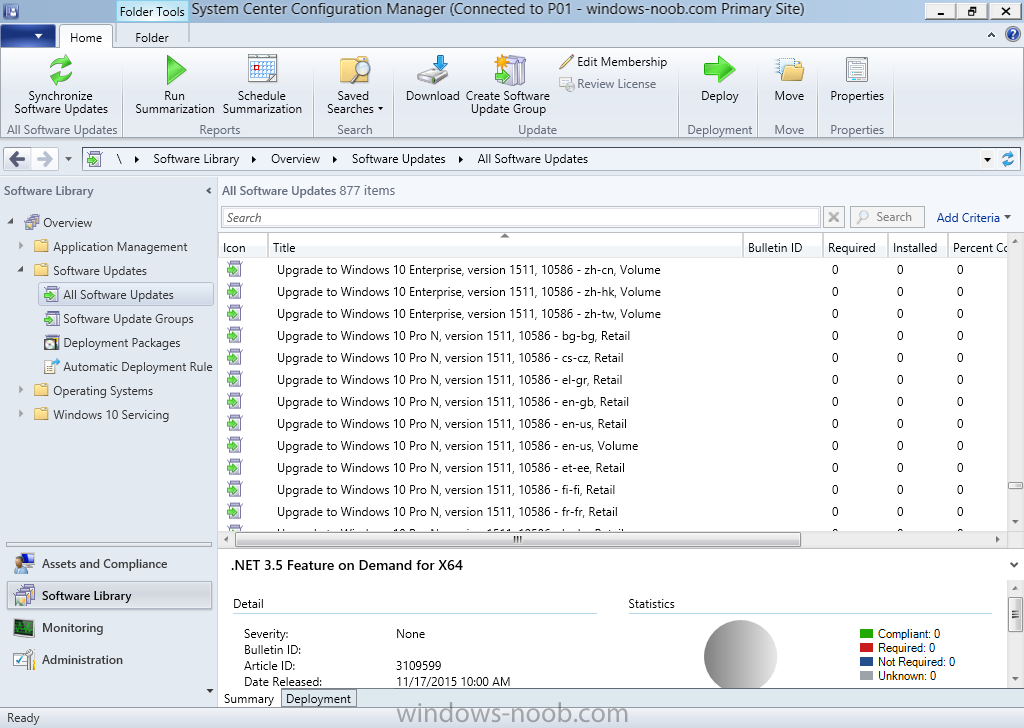
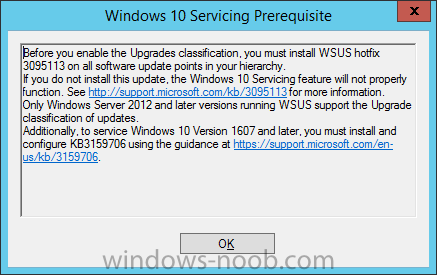
Introduction At the start of this series of step by step guides you installed System Center Configuration Manager (Current Branch), then you configured discovery methods. Next you configured boundaries to get an understanding of how automatic site assignment and content location works. After that you learned how to update ConfigMgr with new features and fixes using a new ability called Updates and Servicing and you learned how to configure ConfigMgr to use Updates and Servicing in one of these two modes: Online mode Offline mode In this post you will learn how to setup Software Updates which is a necessary step in preparing your environment for Windows 10 servicing. You can setup the Software Update Point manually using the ConfigMgr console or fully automated using the supplied PowerShell script in the Downloads section of this guide. What's new in Software Updates ? The following points explain what's new in Software Updates for System Center Configuration Manager Current Branch [source:Technet] System Center Configuration Manager now has the ability to differentiate a Windows 10 computer that connects to Windows Update for Business (WUfB) for software update management versus the computers connected to WSUS for software update management. The UseWUServer attribute is new and specifies whether the computer is manage with WUfB. You can use this setting in a collection to remove these computers from software update management. For more information, see Integration with Windows Update for Business in Windows 10. You can now schedule and run the WSUS clean up task from the Configuration Manager console. You can now manually run the WSUS cleanup task from in Software Update Point Component properties. When you select to run the WSUS cleanup task, it will run at the next software updates synchronization. The expired software updates will be set to a status of declined on the WSUS server and the Windows Update Agent on computers will no longer scan these software updates. For more information, see Schedule and run the WSUS clean up task. Step 1. Install a hotfix (recommended) If you are impacted by either of the issues below or if you installed ConfigMgr before the hotfix was released then you'll need to install the hotfix. Microsoft released a hotfix (KB3127032) January 9th, 2016 to address the following issues: The "Upgrades" entry is missing from the list of classifications in the Software Update Point Component Properties. This issue occurs even after the following Windows Server Update Services (WSUS) update is applied: 3095113 Update to enable WSUS support for Windows 10 feature upgrades Windows 10 upgrades cannot be downloaded by using the Download Software Updates Wizard. Errors that resemble the following appear on the Completion page of the wizard Before installing the hotfix though, restart the server via the following command in an administrative command prompt: shutdown /r After downloading the hotfix, run it by double clicking on the CM1511RTM-QFE-KB3127032-X64-ENU.exe file. The wizard will appear. Click next and accept the License terms Click next and the prerequisite checker will run. Click next and when prompted to upgrade the database answer yes. if you'd like the Deployment Assistance options to create a package, leave the default settings and click next click next at the Update Package for Configuration Manager Servers screen and click Install at the summary screen and review the progress before clicking Next at the Installation Complete screen click Finish. Even though it's not a requirement, i'd suggest you reboot the server again as I've seen reports of it being necessary. Step 2. Add and configure the SUP role using ConfigMgr Console Note: If you want to automate this instead using PowerShell, please skip to Step 4. Using the ConfigMgr console, in the Administration workspace, expand Site Configuration and select Sites. On the ribbon, select Add Site System Roles, the Add Site System Roles Wizard appears, click next, On the Specify internet proxy server enteryour proxy details before clicking next on the Specify Roles for this server screen, select Software Update Point In the Specify Software Update Point properties, select the following options: WSUS Configuration: WSUS is configured to use ports 8530 and 8531 Client Connection Type: Allow intranet-only client connections on the Specify Proxy and Account settings for the software update point configure it as appropriate for your environment and click next on the Specify Synchronization Sources page, as this is a standalone Primary, use the defaults. If you have a CAS in an hierarchy then point it to the upstream server as appropriate. and on the Specify a synchronization schedule page place a check mark in Enable synchronization on a schedule and leave it at the default of every 7 days. Note: If you want to have precise control over the time, day and frequency when the SUP synchronizes with Microsoft Update, then you should select the Custom Schedule option and configure it as appropriate. If you also intend to update Endpoint Protection definition updates then you should configure the sync to run at least daily in order to get the latest definition updates and Endpoint Protection engine updates as soon as they are released. On the Select behavior for software updates that are superseded page, select Do not expire..., leave the default of 3 months and then place a check mark in Run WSUS cleanup Wizard as shown below: Note: When you select to run the WSUS cleanup task, it will run at the next software updates synchronization. The expired software updates will be set to a status of declined on the WSUS server and the Windows Update Agent on computers will no longer scan these software updates. This task does not replace normal WSUS cleanup activities, to do them you should review this post. On the Select the software update classifications that you want to synchronize screen select those that are shown below, you'll see the following popup when you select the Upgrades Classification Note: If the Upgrades classification is not listed review Step 1. On the Select the products that you want to synchronize screen place a check mark in All Products and then remove it again, this will deselect everything before the first synchronization (recommended). On the Specify the language settings that you want to synchronize screen, deselect everything except English (don't forget to scroll down as some languages are hidden from view) review the Summary Note: Using CMTrace, review the SUPSetup.log on the server hosting the Software Update Point (SUP) role in <ConfigMgr Installation Path>\Logs to confirm that the installation of the SUP role succeeded. Look for a line that states "Installation was successful" as shown below. At this point you can close the Add Site System Roles wizard. The first sync from the SUP will take some time, and you should monitor the following logs to verify that the sync is in progress and working as expected. <ConfigMgr Installation Path>\Logs\WCM.log - Provides information about the software update point configuration and connecting to the WSUS server for subscribed update categories, classifications, and languages <ConfigMgr Installation Path>\Logs\WSUSCtrl.log - Provides information about the configuration, database connectivity, and health of the WSUS server for the site <ConfigMgr Installation Path>\Logs\Wsyncmgr.log - Provides information about the software updates synchronization process Here you can see the WCM.log file showing that WSUS was sucessfully configured Here you can see the wsyncmgr.log file showing that the sync was successful Here you can see the WSUSctrl.log file showing information about the configuration Step 3. Selecting Windows 10 as a product After the first successful sync, the SUP should now have updated the list of Products available. Below you can see the Windows Products listed before (on the left) and after (on the right) the first SUP sync takes place. You will not see the updated products until the WCM.log states the following "Successfully refreshed categories from WSUS server" As you want Windows 10 to be secure and up to date, you'll need to re-configure the SUP role and specify Windows 10 from the list of available products. Using the ConfigMgr console, in the Administration workspace, expand Site Configuration and select Sites. Select the P01 Primary site, right click and choose Configure Site Components and then select Software Update Point In the Software Update Point Component Properties screen select the Products tab and scroll down to Windows 10, make selections appropriate to your organization, click Apply and OK when done to apply and close the Software Update Point Component Properties. Now that you've made a change to the Products, perform a sync. To perform a sync do as follows. In the ConfigMgr console select the Software Library workspace, select Software Updates, right click on All Software Updates and choose Synchronize Software Updates. Answer Yes to the popup. Using CMTrace, monitor the sync progress in <ConfigMgr Installation Path>\Logs\Wsyncmgr.log. This sync will take some time as you've changed the list of Products to sync and therefore a Full sync is required and noted in the log file. Look for the Sync succeeded. Setting sync alert to canceled state on site P01 text in the log file to notify you of a successful sync. Now that the sync is completed it's time to refresh the All Software Updates view in the console. In the ConfigMgr console select the Software Library workspace, select Software Updates, select All Software Updates and press the Refresh All Software Updates button. And you should see a whole bunch of updates (and upgrades) listed for Windows 10. To see the Windows 10 Upgrade updates listed in the Windows 10 servicing section, in the ConfigMgr console select the Software Library workspace, select Windows 10 Servicing, select All Windows 10 Updates. Note: I will cover servicing Windows 10 in a later post. Step 4. Add and configure the SUP role using PowerShell The above steps show how you can configure the SUP role using the ConfigMgr console, however you could script it all using PowerShell. The ConfigMgr PowerShell cmdlets for Software Update Point can be listed with the below command once you've connected to PowerShell in ConfigMgr. Get-Command -Module configurationmanager -Noun *SoftwareUpdatePoint* To add the Software Update Point (SUP) role using PowerShell do as follows. Download the Add SUP Role.ps1 contained in a zip file in the Downloads section at the bottom of this guide and extract it to C:\Temp. Start Windows PowerShell ISE as Administrator and open Add SUP Role.ps1 script. Edit any variables in the script to match your environment before proceeding, and then save your changes. When you are happy with the variables, consider changing which Products to sync. Check line number 192 and remove anything you are not interested in (for example, Windows 10 Language Packs). If you want to add Products to the script, do so here but make sure you specify it correctly or it will fail. Save any changes, then run the script by pressing F5 or clicking on the Green arrow. Below you can see the script is running, don't worry about that warning in Orange, it's benign (safe to ignore). The script will perform two SUP syncs, the first is used to update the index (classifications, products etc) and the second sync actually syncs the Windows 10 updates which are appropriate to the Windows 10 products selected. Note: Depending on the number of products you select, you may want to adjust the sleep settings of the second sync to work with your environment. After the script is completed (it takes about 30 minutes for syncing All Windows 10 updates available, over 3240 items..) check the All Software Updates section of the ConfigMgr console. You might have to wait even longer for the console to display everything. Job done ! Isn't PowerShell automation amazing. Note: The observant amongst you will notice different languages listed even though we only specified English. This is a bug (either in SCCM or WSUS, not sure which yet) and Microsoft is working on it. Summary In this guide you learned about configuring the Software Update Point role in ConfigMgr to get it ready for deploying security updates and to perform Windows 10 servicing in your enterprise and you were shown how to do it manually and full automated using PowerShell. Thanks for reading my guides ! Related Reading Installation of Current Branch - How can I install System Center Configuration Manager (Current Branch) Configuring Discovery - How can I configure discovery for System Center Configuration Manager (Current Branch) Configuring Boundaries - How can I configure boundaries in System Center Configuration Manager (Current Branch) ? Using Updates and Servicing in Offline mode - How can I use Updates and Servicing in Offline mode in System Center Configuration Manager (Current Branch) ? Updates and Servicing in Online mode - How can I use Updates and Servicing in Online mode in System Center Configuration Manager (Current Branch) ? Downloads You can download a Microsoft Word copy of this guide here dated 2016/01/16 Setting up Software Updates with System Center Configuration Manager Current Branch.zip You can download the PowerShell script used above here. Add SUP role.zip Next Post > Installing the Client Agent


-
try removing some of the language packs ! are any apps installed ? is it windows 7 or windows 7sp1 (the media i mean)
-
Microsoft has released Windows 10 Build 11099 to Windows Insiders. This build is part of the Redstone releases and comes hot on the heels of Build 11082. Windows 10 previously released the following major releases: Threshold 1 (Build 10240, July 2015) Threshold 2 (Build 10586, November 2015) This build fixes the following problem in 11082 "progress dialog when copying or deleting files via File Explorer now shows up as expected." more info > https://blogs.windows.com/windowsexperience/2016/01/13/announcing-windows-10-insider-preview-build-11099/
-
that's not free is it ?
-
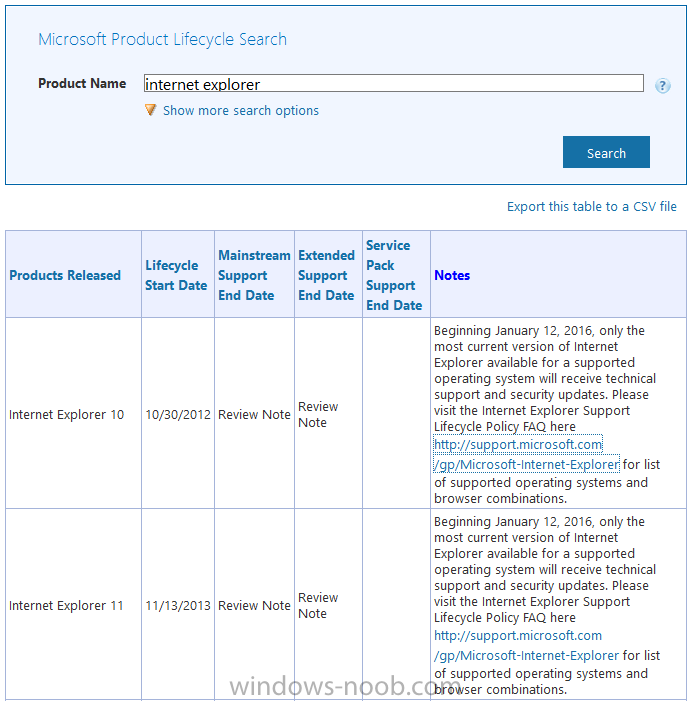
Microsoft no longer supports Internet Explorer versions prior to IE11 as of January 12th 2016 as detailed here. That page contains a faq explaining what versions are supported (IE11 !) and how to move to it. In addition, it covers Enterprise mode (the ability to use and render websites designed for older versions of IE in IE11). The moral of the story, use a supported Microsoft browser (IE11 or Edge) or use a competitors product (FireFox or Chrome) cheers niall
-
Microsoft have stopped releasing Security updates and patches for Windows 8.0, so if you are using that platform it's time to upgrade it to at least 8.1 or Windows 10. To get details about this support see the following statement on their Lifecycle page here https://support.microsoft.com/en-us/gp/lifecycle-windows81-faq I've bolded the relevant text cheers niall
-
Best Method to Allow User Initiated Upgrades
anyweb replied to MagnumVP's topic in Configuration Manager 2012
no problem, and by the way Configuration Manager 1511 has the Upgrade Task sequence built in, i'll cover it in a few weeks cheers niall -
Best Method to Allow User Initiated Upgrades
anyweb replied to MagnumVP's topic in Configuration Manager 2012
and as you see there's no driver handling in it, when you upgrade a computer that DOES require windows 10 drivers, you'll understand the issue cheers niall -
ThinInstaller with sccm 2012 r2 sp1 problem
anyweb replied to ruffsense's topic in Configuration Manager 2012
can you manually run cmd /c X:\WINDOWS\Microsoft.NET\Framework\v4.0.30319\CasPol.exe –pp off –m –ag 1.2 –url file://\\10.160.14.25\Sources\os_drivers\Laptops\E550\ FullTrust is it intended to be running in WinPE or windows ?
