anyweb
-
Posts
9271 -
Joined
-
Last visited
-
Days Won
371
Everything posted by anyweb
-

Site System Design Verification - Am I Crazy?
anyweb replied to BzowK's topic in Configuration Manager 2012
you can also prestage the content and send a hard disc (usb or whatever) by traditional methods to stage the content on your remote dp's, just a thought. -
reference image - Windows 7 x64
anyweb replied to ZeZe's topic in System Center Configuration Manager (Current Branch)
ah I forgot you are using CM1511 ? that's a bug.... as explained here -
this should give you some ideas CM12 in a lab - Part 16. Integrating MDT 2013 with Configuration Manager 2012 CM12 in a lab - Part 17. Using MDT 2013 with Configuration Manager 2012 CM12 in a lab - Part 18. Deploying a UDI Client Task Sequence
-
WDS 2012 won't initiate Windows 7 setup with UEFI PXE boot
anyweb replied to marc.l's question in Windows Deployment Services (WDS)
UEFI network boot does not like any DHCP scope options at all, use IP Helpers for that instead. any reason you are not using MDT for this ? -
reference image - Windows 7 x64
anyweb replied to ZeZe's topic in System Center Configuration Manager (Current Branch)
have you checked your boundaries ? -
those are the wrong logs, we need to see the SMSTS*.log files (which are what is generated during OSD)
-
"i tried already existing OSD and new ones but all fails" can you expand on this, what does it mean exactly, and be precise
-
well done Garth !
-
having the database remote only opens you up to more possibilities of failure, (eg: replication), keeping it local minimizes those problems.
-
are any of the users in the Full Adminstrator role ? are you having problems with RBAC ? have you defined any roles ?
-
Microsoft released build 14257 yesterday to Windows Insiders on the fast ring, and here's some info about that more > https://blogs.windows.com/windowsexperience/2016/02/03/announcing-windows-10-insider-preview-build-14257/
-
I would keep sql on the same server as SCCM, having it remote just causes problems.
-
Task sequence fails at Apply Operating System
anyweb replied to afishyfella's topic in Configuration Manager 2012
from the logs <![LOG[CLibSMSMessageWinHttpTransport::Send: URL: SCCM-A-1.bsd.local:80 PROPFIND /SMS_DP_SMSPKG$/BSD0006B]LOG]!><time="16:00:12.891+360" date="02-02-2016" component="ApplyOperatingSystem" context="" type="1" thread="1868" file="libsmsmessaging.cpp:8778"> <![LOG[Error. Status code 404 returned]LOG]!><time="16:00:12.907+360" date="02-02-2016" component="ApplyOperatingSystem" context="" type="0" thread="1868" file="libsmsmessaging.cpp:9141"> <![LOG[dwHttpResultCode >= 200 && dwHttpResultCode <= 299, HRESULT=80190194 (e:\nts_sccm_release\sms\framework\tscore\downloadcontent.cpp,832)]LOG]!><time="16:00:12.907+360" date="02-02-2016" component="ApplyOperatingSystem" context="" type="0" thread="1868" file="downloadcontent.cpp:832"> <![LOG[Http result: 404]LOG]!><time which basically means "not found" so it can't find what it's looking for, are you sure things are distributed to the dp(s) and that you have network at this point / -
sure attach them, but did you launch PowerShell from the ConfigMgr console before doing this ?
-
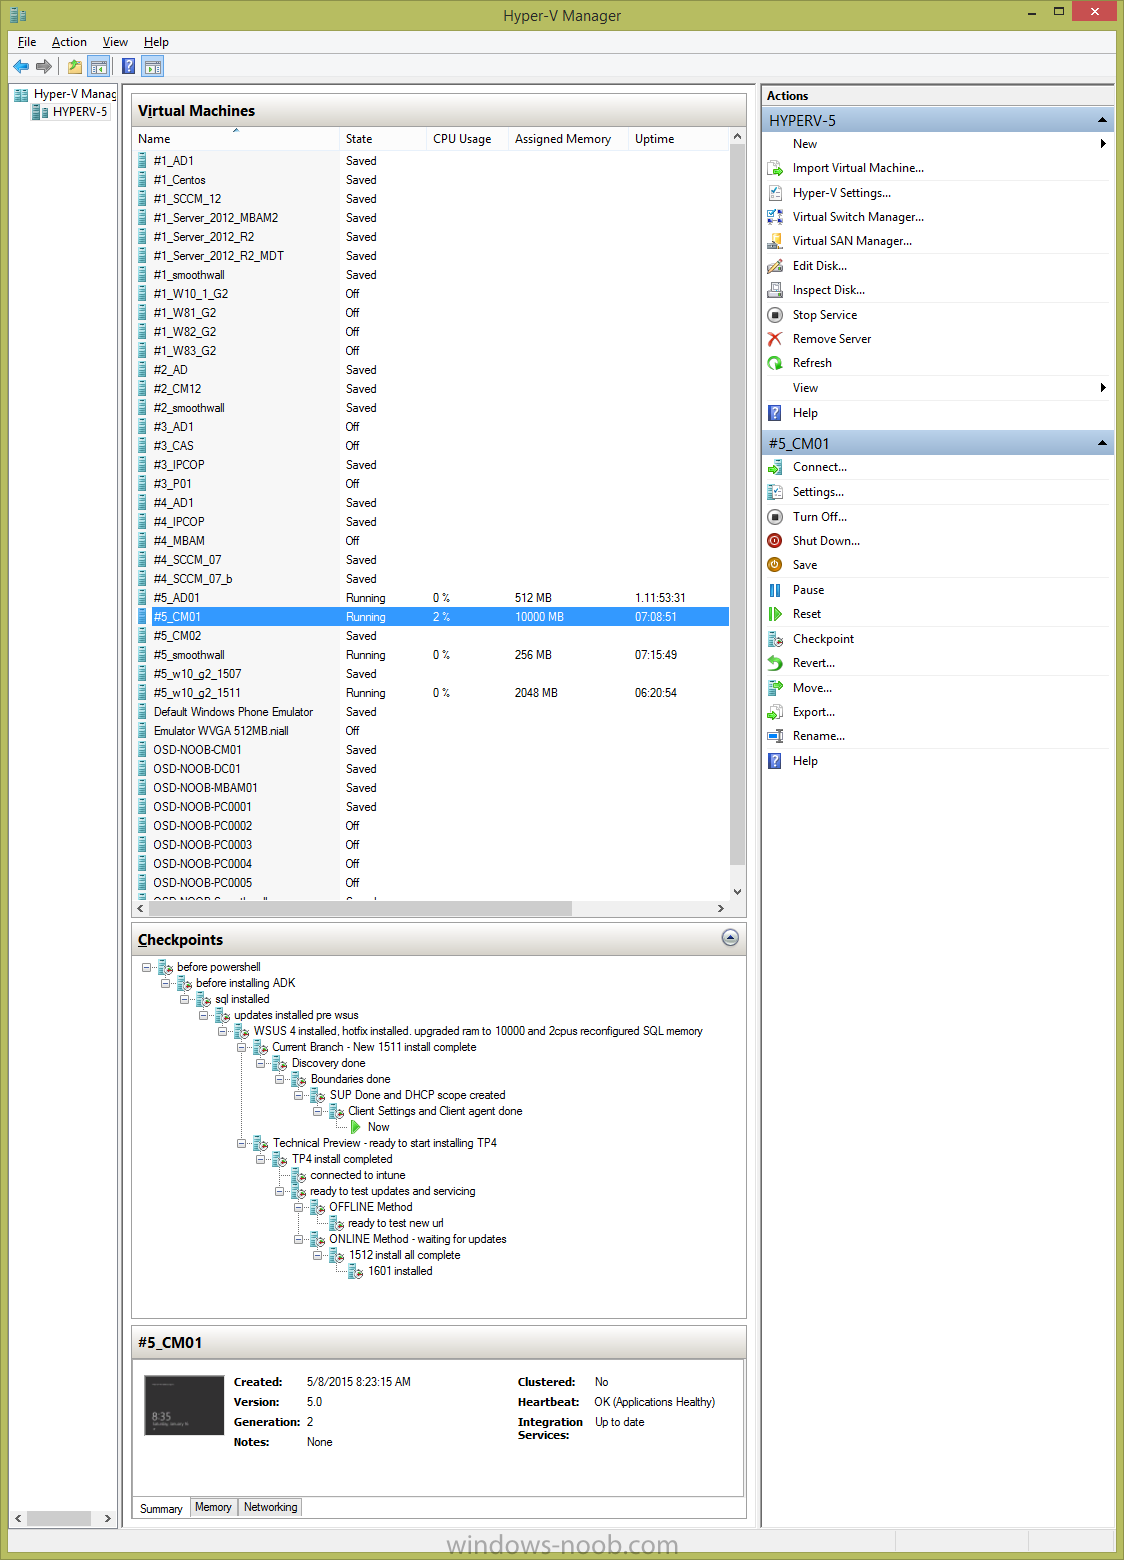
welcome ! 1.What specs do I need for my DNS/DHCP/AD server VM, and can I run all these roles on one vm. you can install them all on one server as I explain in this guide, i do all that on a gen 1 hyperV vm running server 2012r2 with only (gasp) 512mb ram, 127gb hdd. 2.How about the SCCM server? what are the hardware specs. 2cpu's, 10GB ram, 127gb hdd 3.Did you install your SQL on the same vm server as the sccm? and why? What were the specs for your SQL server. absolutely, explained how here 4.The goal is to build a robust SCCM Lab with 5 windows XP, 5 windows 7, 5 Windows 10 at the bottom of my heirachy. 2 Primary servers, 2 secondary servers and a CAS. Even though I mgiht not fully use all of this, I just want to build them in my lab to learn as much as I can, you can let me know if this also advisable or maybe one Primary with several secondaries under them is good. the only thing that's limiting you achieving that goal is hard disc space and RAM as long as the hyperv is a decent i7 CPU or better, i run all my labs on a now aging Dell E6530 with only 16GB ram (it's an i7). The key to the storage is you want fast SSD's otherwise your lab will be a slow and painful experience, try and go for a host with 32GB ram or more if you can and lots of SSD discs ! here's a look at my hyperV host on that laptop

-
take a look at the following link, it references System Center Configuration Manager 2012 but the same rules apply here "For the best performance, place each object on a separate, dedicated RAID volume. For all data volumes (Configuration Manager and its database files), use RAID 10 for the best performance."
-
can you reboot the machine and using a winpe USB key or pxe boot manually open up the unattend.xml file stored on the hard drive and see what's in it ?
-
Manually enable command line support in WinPE image
anyweb replied to dunkel's topic in Configuration Manager 2012
after making the change and 'saving' it you still need to update the boot wim to the dp's otherwise you'll be using the boot image that doesn't have f8 support added. -
SCCM 2012 MDT - Task Sequece Question
anyweb replied to deletejunkemail's topic in Configuration Manager 2012
welcome ! 1. yes, but it should be an mdt integrated task sequence. The only time you'd want to recreate the mdt boot images is when changing MDT version (mdt 2013 update 1 to update 2 for example) or changing ADK version or when wanting to revert the mdt boot images to how they were before they got bloated with drivers or scripts. 2. when you create new task sequences you absolutely can re-use the MDT Toolkit and MDT Settings packages, as regards the naming convention something like this is what I use \\sources\os\mdt\mdt 2013 update 2\ _____________________________\MDT Toolkit _____________________________\MDT Settings as described here but it's entirely up to you how they should be created. 3. use the default one if you are not using any of the facilities it provides, otherwise download many sample customsettings.ini from the MDT pro's like Mikael Nystrom and Johan Arwidmark, they have plenty of example blog posts to help you with that -
Surface Pro 3 Driver/Firmware Update Help
anyweb replied to pvr02's topic in Configuration Manager 2012
you can deploy the driver pack (msi) as an application via the Application Catalog, have you tried that ?\ here's some info https://msdn.microsoft.com/en-us/library/mt210838.aspx -
Windows 10 Surface Pro 4 deployment SCCM 2012 R2 CU2
anyweb replied to amakusa007's topic in Configuration Manager 2012
here's one guide but it is for MDT 2013 Update 1 https://www.windows-noob.com/forums/topic/13190-how-can-i-deploy-windows-10-x64-to-the-microsoft-surface-pro-4-using-mdt-2013-update-1/ basically this guide is all you need for deploying Windows 10 in SCCM 2012 R2, the only difference for Surface Pro 4 is that you'll need the nic drivers injected into the boot wim, the exact same drivers and method as in this guide, the only thing you'd have to change is the WMI query to point it to Surface Pro 4 instead of Surface Pro 3 -
yup it works the same, it just looks different in windows 10 (more polished)
-
have either of you asked Dell which NIC is supported for UEFI network boot ?
-
Surface pro 4 does not PXE boot
anyweb replied to jack_SCCM's question in Deploying Operating Systems
well for UEFI network boot to work you need to have dhcp scope options 66/67 removed if they are set and configure iphelpers to point to the ip address of the distribution point hosting the WDS server. Can you video the PXE boot attempt ? what does the smspxe.log (on the dp) reveal ? do any UEFI only devices PXE boot and if they do are they booting from the x64 boot wim or an x86 one.... -
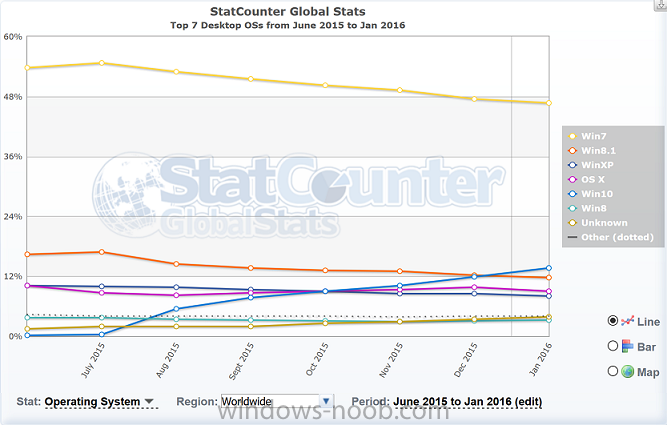
According to statcounter.com Windows 10 has overtaken Windows 8.1 usage cross the world. from the graph above it looks like this occurred last December. Interesting to note is that Windows 7 tops the usage at approx 46%. Based on this graph it looks like Windows 10 still has an uphill battle before it becomes the dominant Operating System more info > http://gs.statcounter.com/#desktop-os-ww-monthly-201506-201601