


anyweb
-
Posts
9273 -
Joined
-
Last visited
-
Days Won
371
Everything posted by anyweb
-

Surface pro 4 does not PXE boot
anyweb replied to jack_SCCM's question in Deploying Operating Systems
well for UEFI network boot to work you need to have dhcp scope options 66/67 removed if they are set and configure iphelpers to point to the ip address of the distribution point hosting the WDS server. Can you video the PXE boot attempt ? what does the smspxe.log (on the dp) reveal ? do any UEFI only devices PXE boot and if they do are they booting from the x64 boot wim or an x86 one.... -
According to statcounter.com Windows 10 has overtaken Windows 8.1 usage cross the world. from the graph above it looks like this occurred last December. Interesting to note is that Windows 7 tops the usage at approx 46%. Based on this graph it looks like Windows 10 still has an uphill battle before it becomes the dominant Operating System more info > http://gs.statcounter.com/#desktop-os-ww-monthly-201506-201601

-
did you click next ?
-
probably because the drivers are already imported and therefore duplicates, you can use jason sandys duplicate script to create a txt file in each folder of the driver pack before importing
-
7b is usually storage driver related, are you adding any storage drivers for that model ?
-
what do you get ?
-
Windows 10 Surface Pro 4 deployment SCCM 2012 R2 CU2
anyweb replied to amakusa007's topic in Configuration Manager 2012
works fine for me, can you please describe exactly what issues you are having and attach logs where appropriate -
thanks ! show me a screenshot of yours with the ribbon, you are probably just looking in a different place to me
-
sccm client 5.00.7958.100 installed on window 10
anyweb replied to mohd aamir's topic in Configuration Manager 2012
are you asking how to do client push ? -
Manually enable command line support in WinPE image
anyweb replied to dunkel's topic in Configuration Manager 2012
well that's how it's done, so are you saying your boot image doesn't respond to F8 ? -
SCCM 1511 DRIVER MIGRATION FAILS
anyweb replied to crossan007's topic in System Center Configuration Manager (Current Branch)
interesting, have you raised a bug on connect about it so Microsoft can fix it ? -
Manually enable command line support in WinPE image
anyweb replied to dunkel's topic in Configuration Manager 2012
yup, you can do it using wbemtest as described here (step 9) https://www.niallbrady.com/2013/10/09/how-can-i-manually-add-winpe-5-boot-images-to-system-center-2012-configuration-manager-sp1-cu3/ -
what version of configmgr are you using ? what version of the adk ? what version of windows 10 and lastly, can you attach some logs ?
-
SCCM 2012 R2 Task Sequence just doesn't cooperate
anyweb replied to JustSomeDude's topic in Configuration Manager 2012
well it sounds like it can't write to the hard disc, can you attach the entire SMSTS.log file please ? -
R2 simply enables features that are already in the product, however there are licensing implications to using R2, check if you are licensed to use it or not first
-
so for those of you who are not on R2 it would be something like this 2012 SP1 CU5 > 2012 SP2 > 2012 SP2 CU2 confusing, perhaps, here's some explanation hopefully https://www.niallbrady.com/2015/05/16/confused-about-the-system-center-2012-r2-configuration-manager-sp1-and-system-center-2012-configuration-manager-sp2/
-
not quite, I said this
-
if the os completes successfully or not there will be an smsts.log look in C:\Windows\CCM\Logs do you see it there ? we need the smsts*.log in order to see why it's failing on the enable bitlocker step.
-
have you tried backing up the db, then upgrade SQL from SQL 2008 to SQL 2014sp1, then do a new backup & do a restore to the new hardware/os.
-
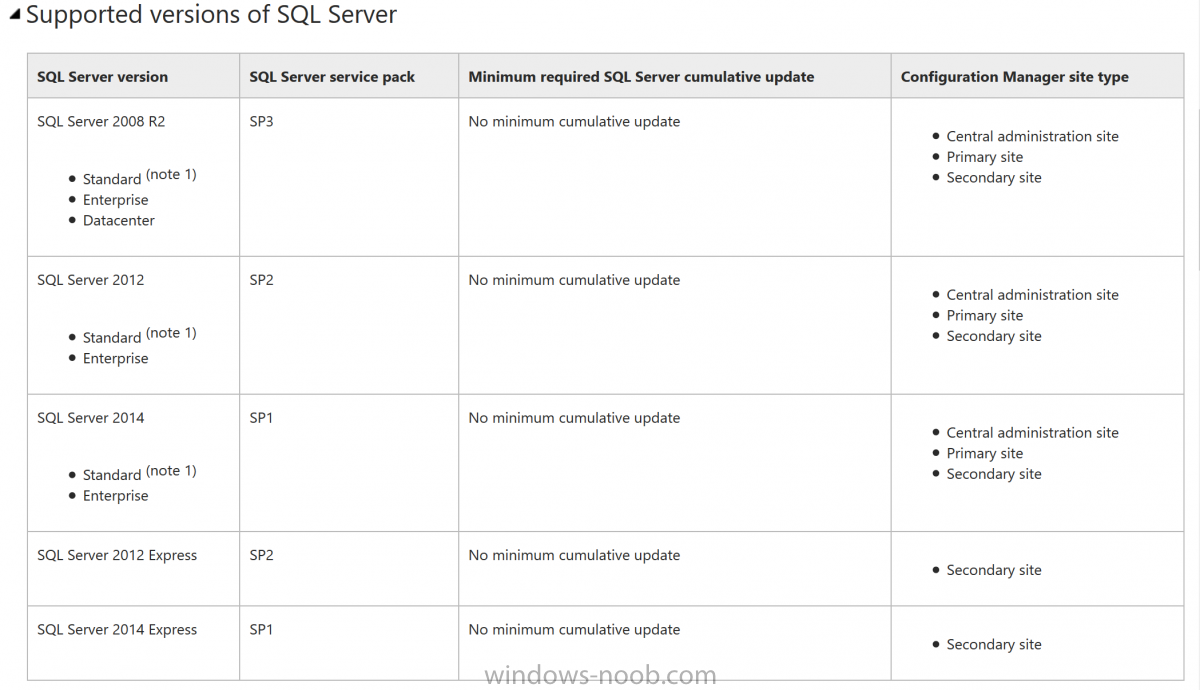
hi Keywan SQL Server 2014 SP1 is supported in current branch, see here https://technet.microsoft.com/en-us/library/mt589592.aspx
-
Sharp-eyed Insiders likely noted the big jump in build numbers from our last preview build (11102). Historically, the codebase for mobile had a different OS version than the codebase for PC because they were developed by different teams on different schedules. With Windows 10, we became one Windows team and brought these two codebases together. We started by changing the version string displayed in the UI to be consistent, which is why you saw similarly labeled builds over the past year for both Mobile and PC, but the underlying binary version numbers were still different. As part of our work getting the common codebase ready for the next release, we decided to complete that work and sync the build numbers between mobile and PC. Because the mobile codebase used higher build numbers than PC, we needed to jump ahead a bunch of build numbers to ensure updates to future builds will continue to work. So that’s why build numbers went from 11105, 11106, and 11107 to 14251. This build doesn’t have notable new features in it but I encourage you to check out the new Cortana improvements we released to Insiders earlier this week. The January update to the Xbox Beta app for Windows 10 is also now available with some really nice improvements for Insiders to try out and give us feedback. This build does contain some really good bug fixes that Insiders will appreciate: We fixed the issue where some PC games would crash switching from windowed mode to full screen, upon game resolution change, or upon launch due to a bug in Windows graphics stack. So play your games! If you run into any issues – please let us know by reporting in the Feedback app and include the game title. We fixed the issue where applications such as Narrator, Magnifier, and third-party assistive technologies may experience intermittent issues or crashes. We fixed an issue where File Explorer would crash frequently when DPI settings were at 175%. more info > https://blogs.windows.com/windowsexperience/2016/01/27/announcing-windows-10-insider-preview-build-14251/
-
Is SUP role needed in multiple locations?
anyweb replied to killiandw's question in Software Update Point
sounds like overkill to me and we have no idea of your infrastructure or how many clients it supports, i'd say start reading this https://technet.microsoft.com/en-us/library/gg712696.aspx#BKMK_SUPInfrastructure -
yep, if you read the post there were some instances where CU5 was needed to be installed before SP1
-
Script file is not present: 'C:\_SMSTaskSequence\Packages\MP7000B1\amd64\migdocs.xml'[gle=0x00000006] make sure that the xml file listed above is present in the MP7000B1 package cheers niall
-
can you try the following then ? if 3095113 is not installed... On the ConfigMgr server Install prerequisites for WSUS https://support.microsoft.com/en-us/kb/2919442 followed by https://support.microsoft.com/en-us/kb/2919355 Install WSUS update https://support.microsoft.com/en-us/kb/3095113 Uninstall SUP Uninstall WSUS server role Delete WSUS DB, and D:\WSUS Restart Reinstall WSUS Server Role Install SUP Sync Software Update On your client computer Stopped the services net stop wuauserv net stop cryptSvc net stop bits net stop msiserver Delete c:\Windows\Software Distribution Delete C:\Windows\System32\catroot2 Delete the folder contain .esd downloaded in ccmcache folder Delete C:\$Windows.~BT\Sources Restart the OS and run the upgrade again from software center