


anyweb
-
Posts
9259 -
Joined
-
Last visited
-
Days Won
371
Everything posted by anyweb
-
 you need to look at the smsts.log file to determine what step is failing (and why it's failing)
 -
apps not installing in UDI task sequence
anyweb replied to eddyballs's topic in Configuration Manager 2012
they should work, ,can you attach your smsts.log so we can see what's failing and why -
apps not installing in UDI task sequence
anyweb replied to eddyballs's topic in Configuration Manager 2012
when you say 'sideload' are you referring to Windows Store apps, or are you just calling it 'sideloading' and they are normal apps/packages ? sideloading is normally the term provided for installing Windows store apps. -
I'm very happy to say that I was once again awarded as an Enterprise Client Management MVP this year, that's 6 years in a row :-) Awesome ! thanks to my family for putting up with me blogging, writing, researching all the time and you (the windows-noob.com members) for reading and telling others about the content here and thank you to Microsoft for awarding me this prestigious title, THANKS !!!!!!!!!!!!! cheers niall !
-
apps not installing in UDI task sequence
anyweb replied to eddyballs's topic in Configuration Manager 2012
hi Eddy, what are these applications exactly ? are they actual store apps that your company has created or apps available in the Windows store ? -
sure look at this post
-
Surface Pro 3 Windows 10 Imaging?
anyweb replied to Grasty's question in Deploying Operating Systems
awesome result, and yes the SP3 won't be able to boot from that boot image as it's x64 can you do me a favor and video the boot sequence up until your error so i can see where it's failing with that error ? -
can you show screenshots of what you are seeing (before/after)
-
I'm not using copyprofile, however have you checked for the file mentioned in the post to see if it's in the C:\Users\Default\AppData\Local\Microsoft\Windows\Shell location after logging in ?
-
Surface Pro 3 Windows 10 Imaging?
anyweb replied to Grasty's question in Deploying Operating Systems
I'm PXE booting the SP3 no problem here, can you share your smspxe.log and a screenshot of the error you see please -
to add to Peter's comment, simply upgrade configmgr to CM12 R2 SP1 or later and you'll be able to deploy drivers to Windows 10 in a supported way, anything prior to that version is not supported (but can work),
-
Deploying Bitlocker - Windows 10
anyweb replied to Silencer001's question in Deploying Windows 10, Windows 8.1, Windows 7 and more...
I havn't tried it specifically but i'd imagine it should work, try it and let us know -
what version of Windows 10 media are you using ? i'll do the taskbar post when I get it working the way I want...
-
Deploying Bitlocker - Windows 10
anyweb replied to Silencer001's question in Deploying Windows 10, Windows 8.1, Windows 7 and more...
Microsoft have made the scripts free to use (MDT) so why can't the customer use them ? re-inventing the wheel seems counterintuative -
Capturing an image - Nothing runs after Capture wizard
anyweb replied to welshslider's topic in Configuration Manager 2012
assuming you are using capture media to do this search for the smsts.log file and attach it here, why are you not building the image using MDT or ConfigMgr build and capture process ? -
hmm looks ok, and this is the file that you verified was copied into C:\Windows\Temp before the next bit (importing it...), i.e. did you verify the file is present in C:\Windows\Temp and it's the one above ?
-
can you attach the layout file from C:\Windows\Temp please ?
-
Microsoft yesterday released Office 2016 for Windows. This marks a milestone in delivering new value for Office 365 subscribers with a focus on collaboration, apps that work for you, a perfect pairing with Windows 10, and security features businesses will love. It also marks a new model for delivery, where subscribers can expect to get more frequent updates with new features and improvements. Along with Office 2016 for Windows, today we are also releasing Office 2016 for Mac as a one-time purchase option, along with several new and enhanced Office 365 services. for details about the release see the official post here
-
Drivers not installing during TS deployment
anyweb replied to Siroj's topic in Configuration Manager 2012
yes it should install all applicable firmware updates, you can check the versions in device manager (Firmware) and compare it against the versions in the drivers released -
complete the deployment and after it's done, edit it to back date the schedule
-
great to hear it ~!
-
what is OfficeScan, is it AV software ? how did you resolve the problem.
-
Deploying Bitlocker - Windows 10
anyweb replied to Silencer001's question in Deploying Windows 10, Windows 8.1, Windows 7 and more...
so to understand your question you want to pre-provision bitlocker AFTER the os has laid down ? normally you pre-provision bitlocker at the beginning of the task sequence after formatting the disk to save time, why not use the built-in steps in a ConfigMgr task sequence for achieving this ? see screenshot below...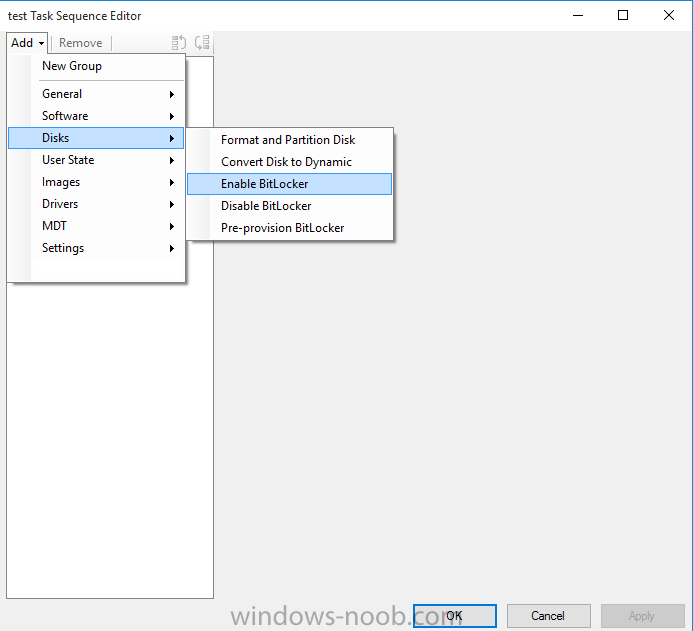
-
you didnt mention what version of ConfigMgr you are using, if it's SCCM 2012 R2 SP1 then you've hit a bug that means the deployment needs to be rescheduled to a day before, if not, then can you post your smsts.log file pls
-
Deploying Bitlocker - Windows 10
anyweb replied to Silencer001's question in Deploying Windows 10, Windows 8.1, Windows 7 and more...
i'm deploying windows 10 with bitlocker right now, no need for the mbam client unless you want those features later, you can use pre-provision bitlocker and the enable bitlocker built in steps to do what you need
