anyweb
-
Posts
9194 -
Joined
-
Last visited
-
Days Won
367
Everything posted by anyweb
-

The deployment system cannot be started using PXE
anyweb replied to zhangyongcheng's topic in Configuration Manager 2012
after you deploy that one device it will no longer be unknown, as it is now a known computer, so if you pxe boot that same computer it won't 'see' the task sequence, you'd have to add this computer to a collection where the task sequence is deployed to, -
The deployment system cannot be started using PXE
anyweb replied to zhangyongcheng's topic in Configuration Manager 2012
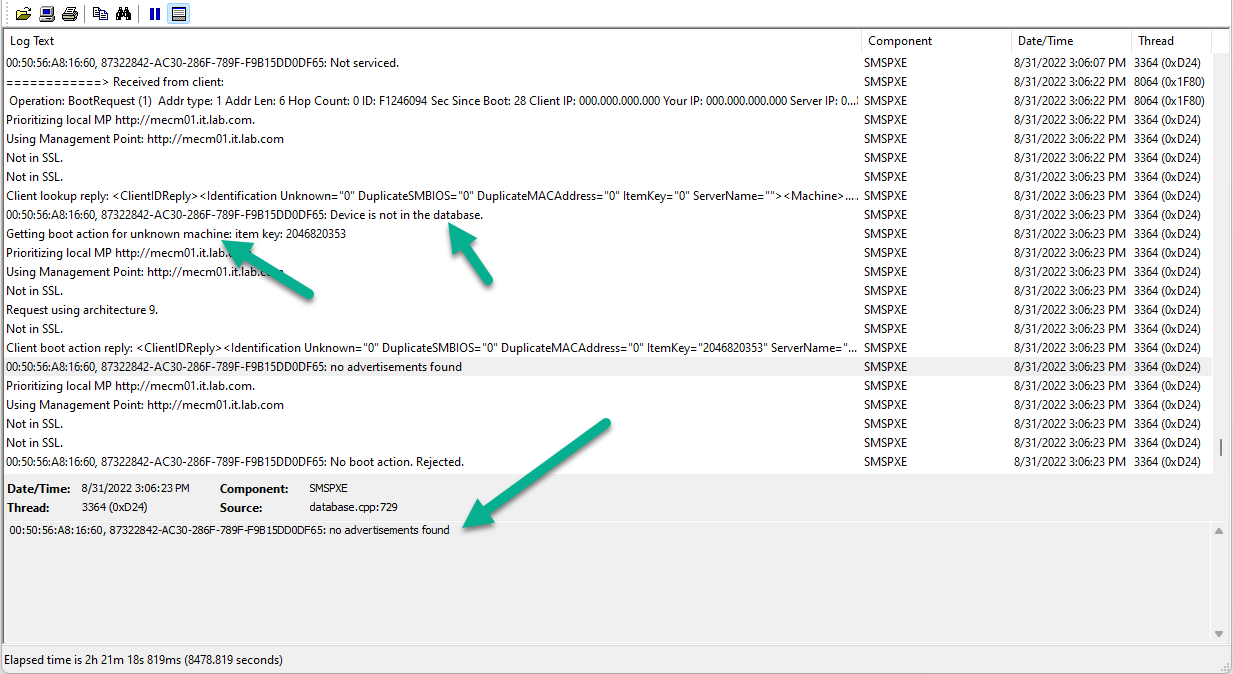
unfortunately I cannot read Chinese so your screenshot does not help, when I look at your smspxe log, the unknown device is not seeing any deployment according to this, so please double check that you've deployed a task sequence (as available) to All Unknown Computers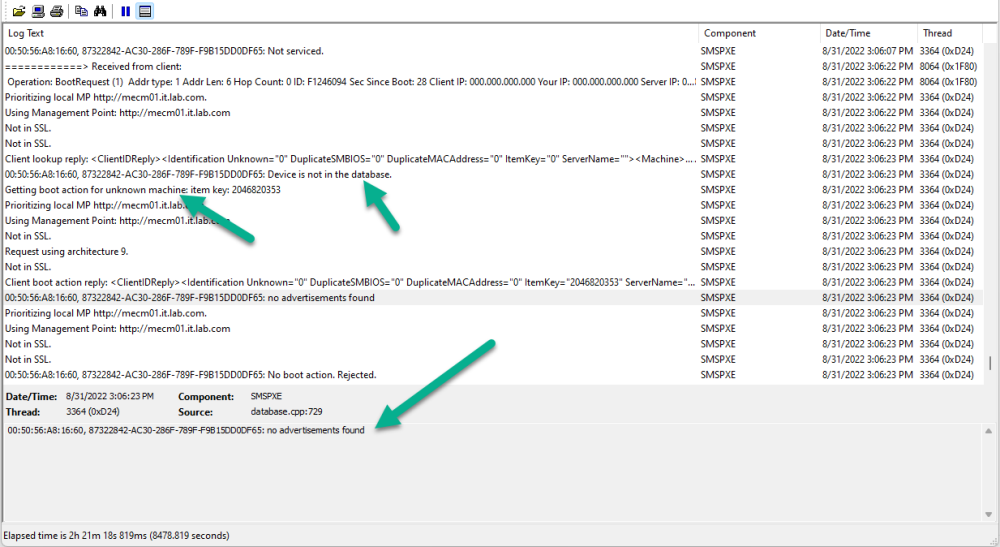
-
The deployment system cannot be started using PXE
anyweb replied to zhangyongcheng's topic in Configuration Manager 2012
how is the task sequence deployed, is it deployed to All Unknown Computers ? -
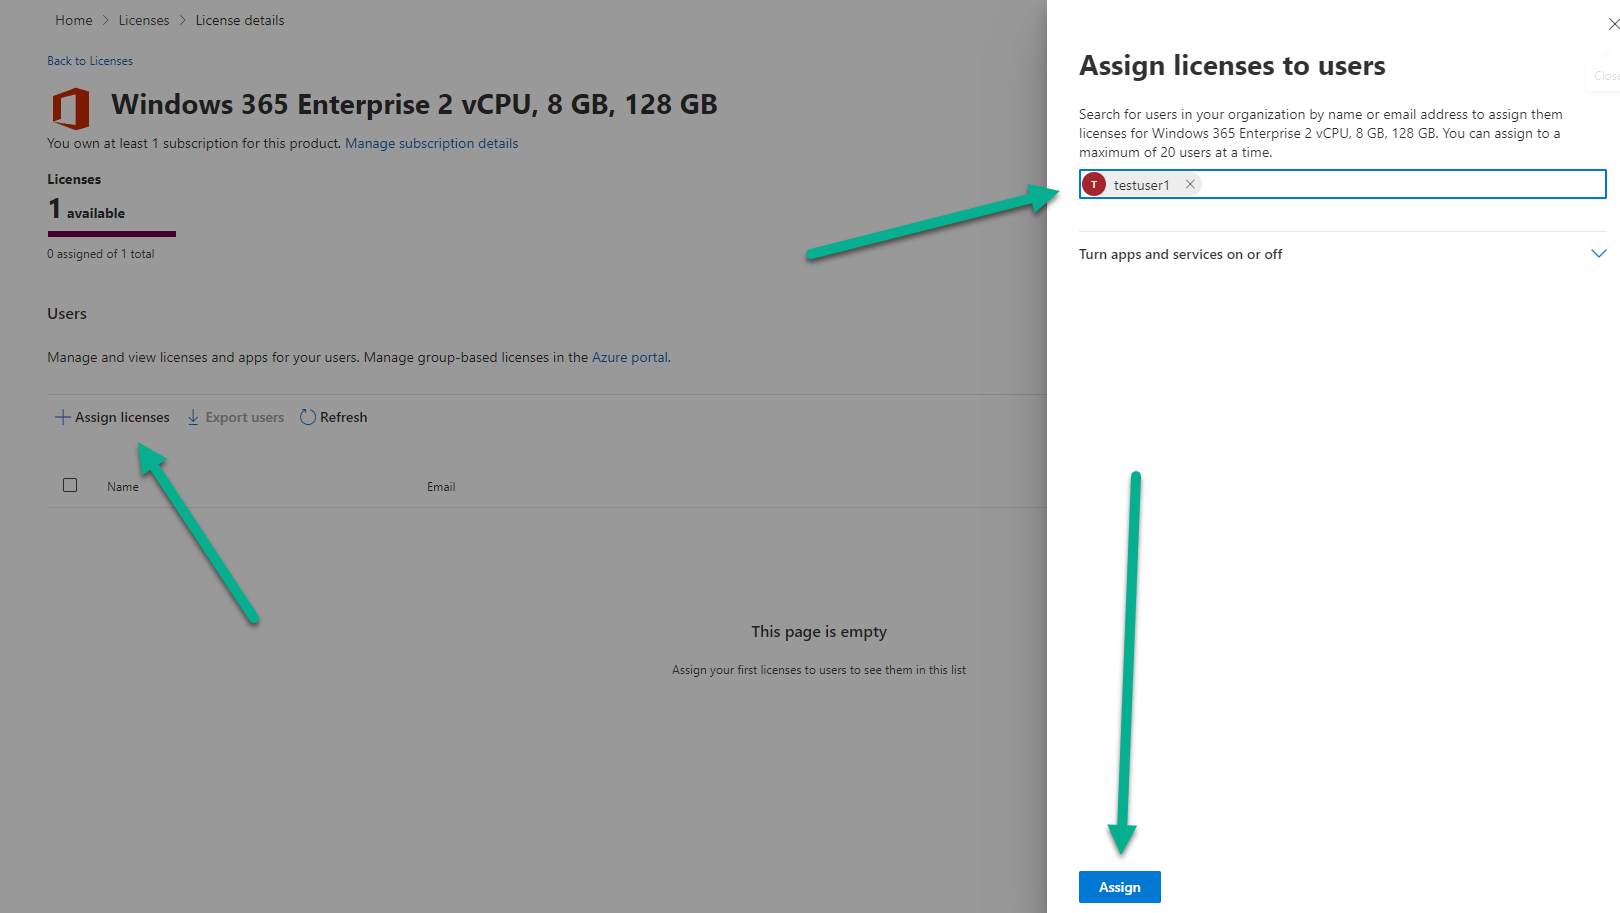
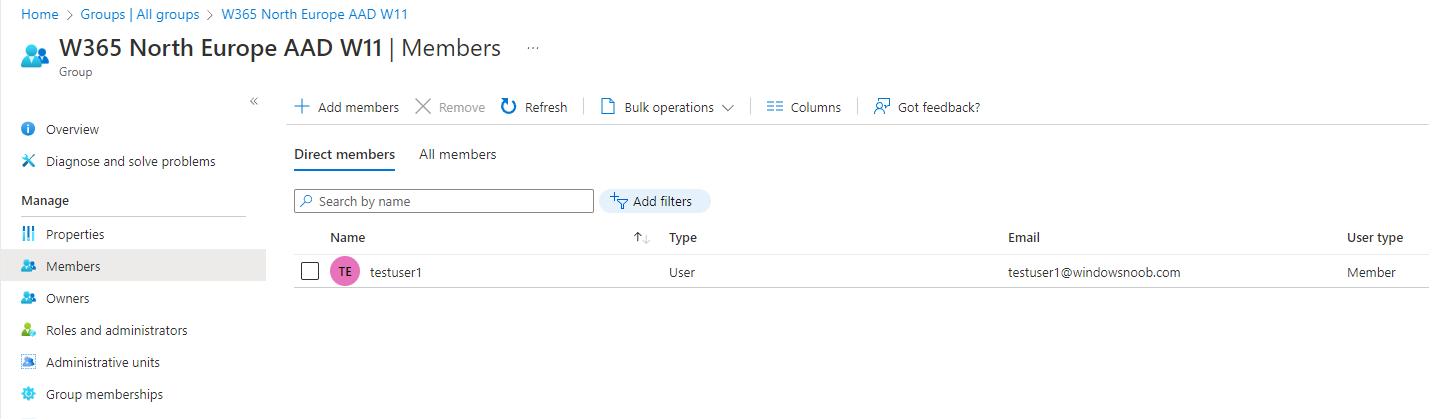
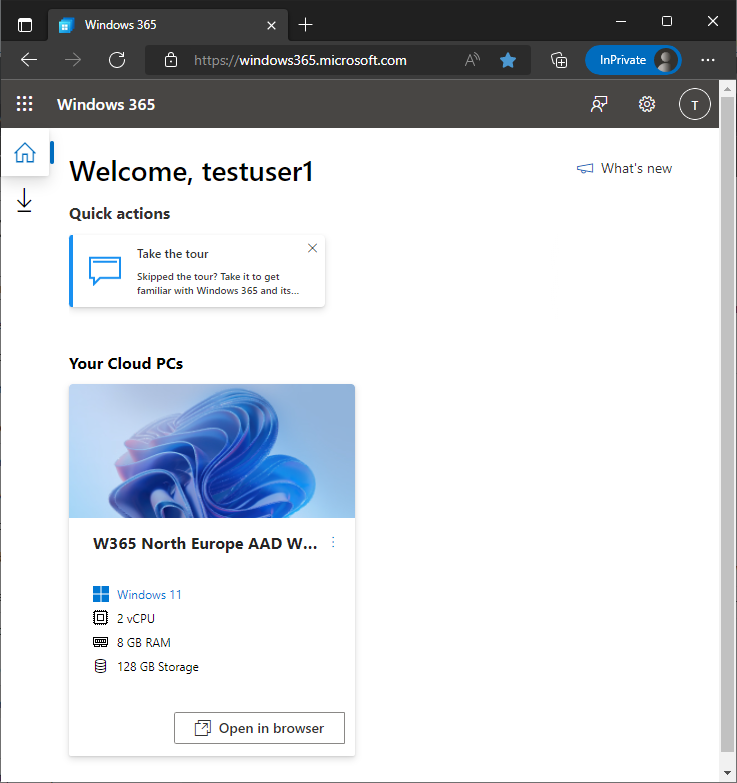
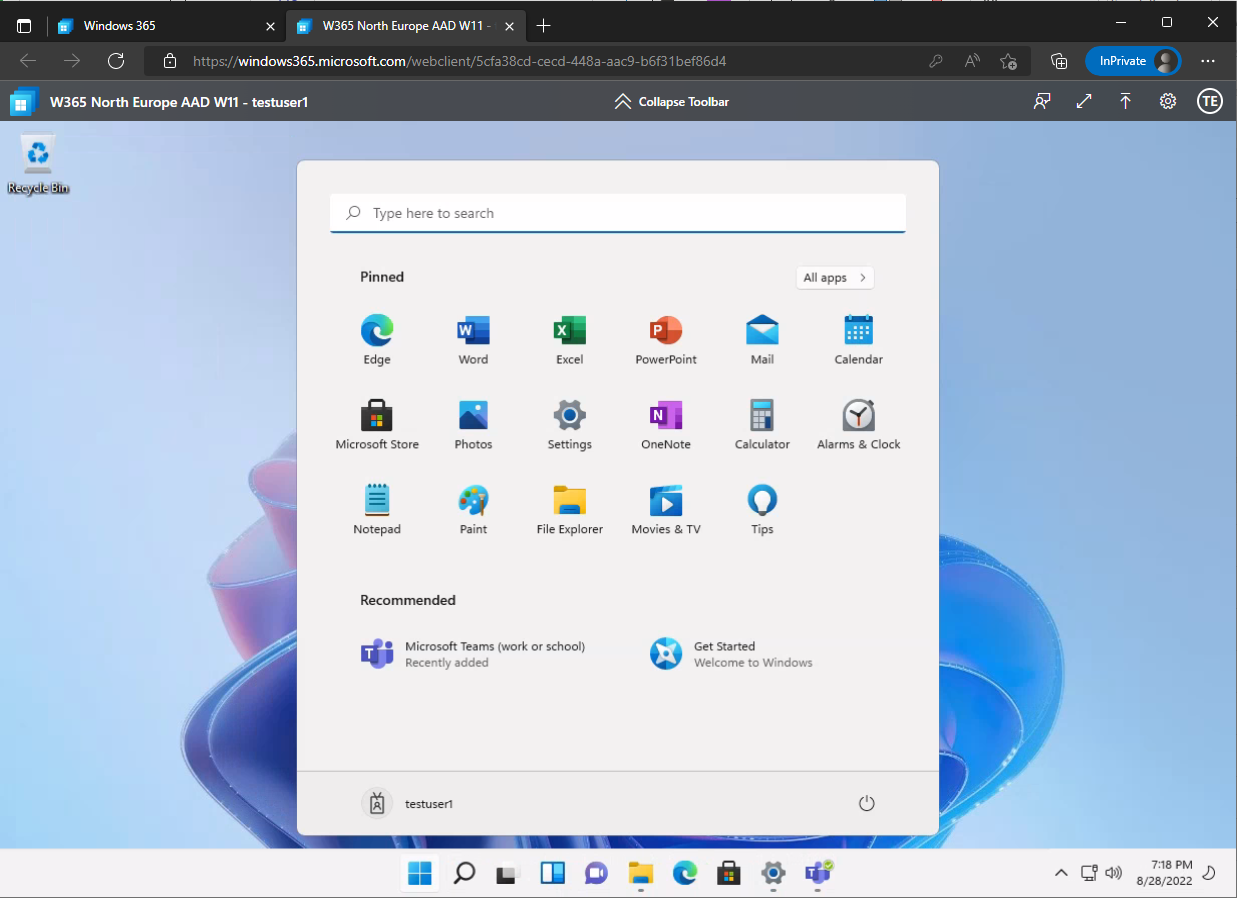
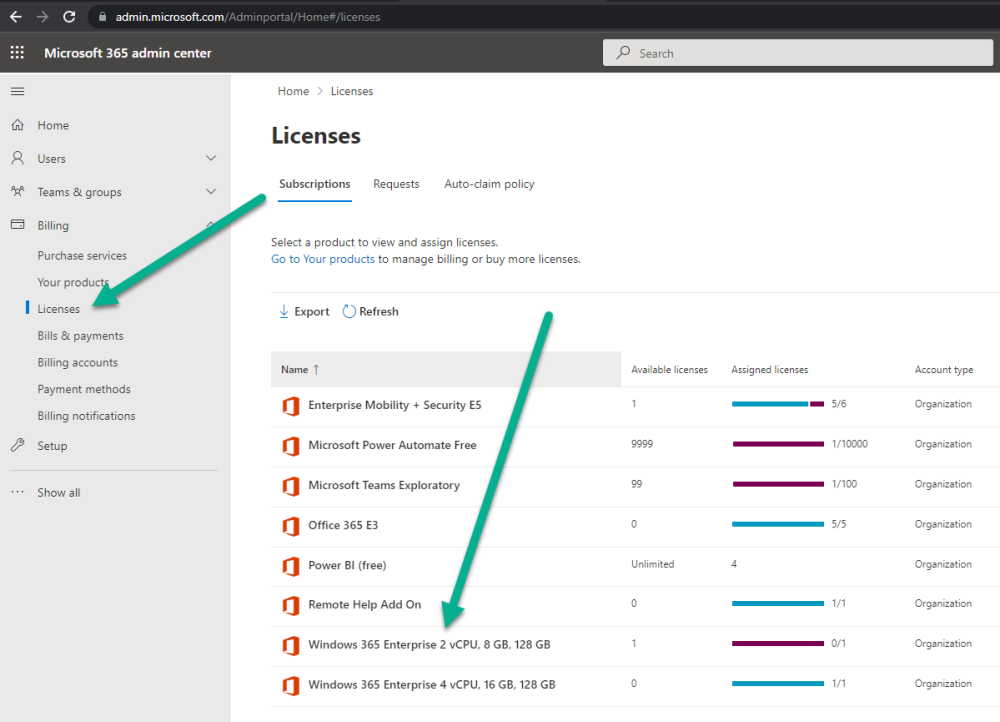
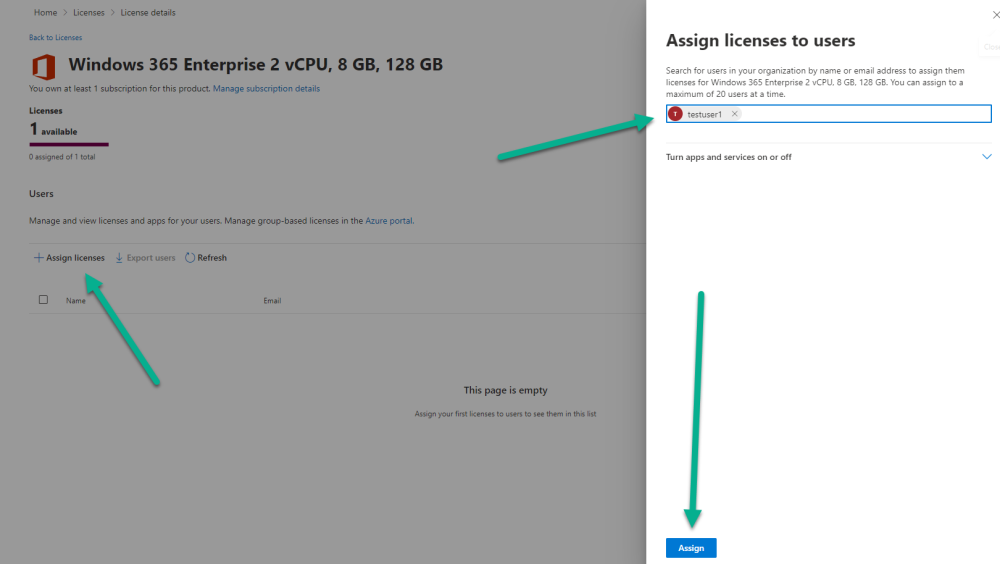
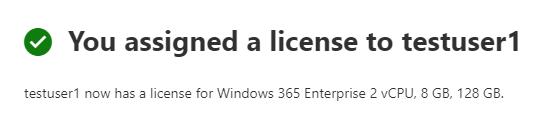
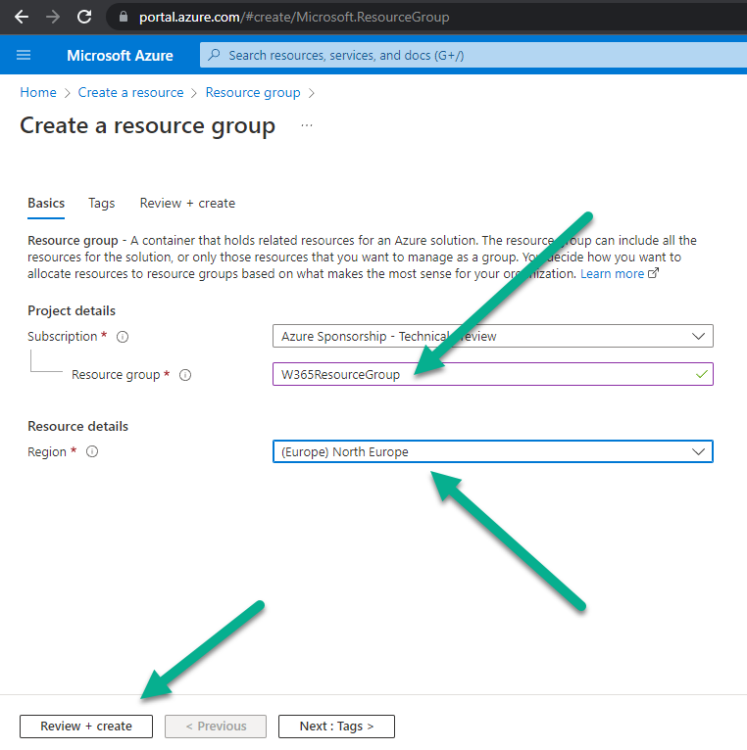
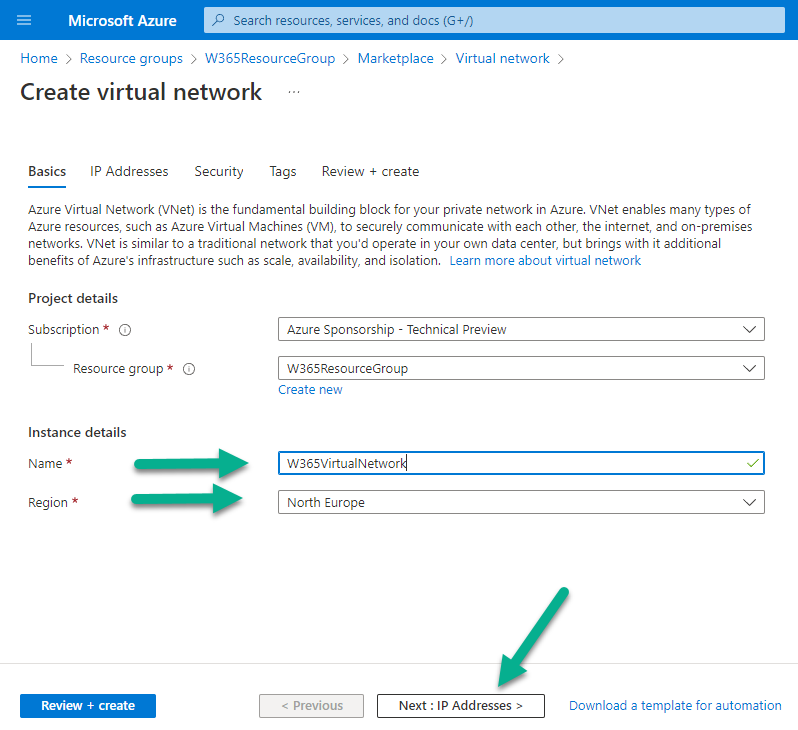
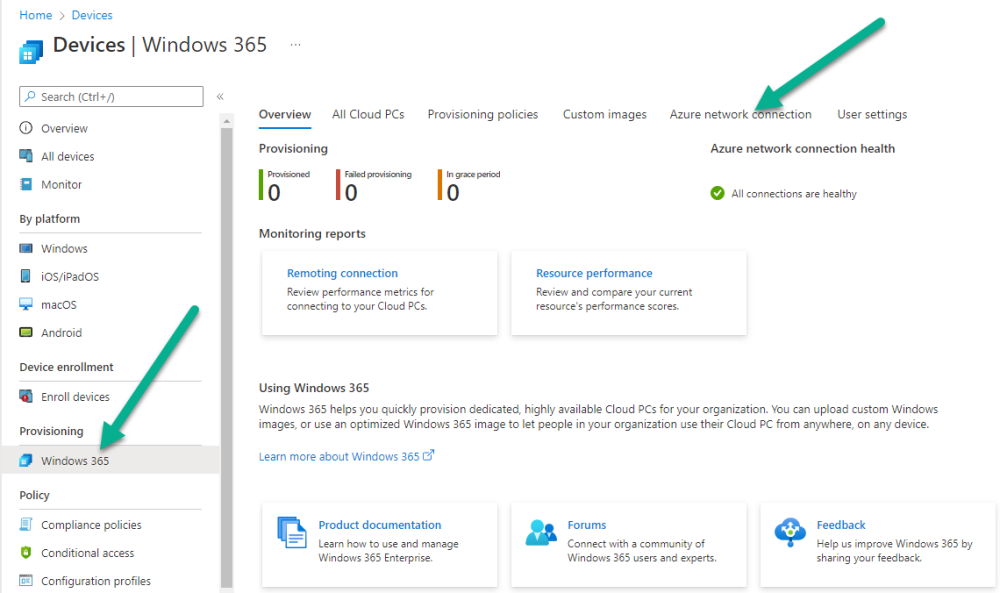
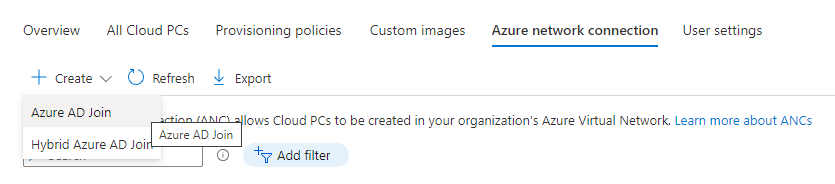
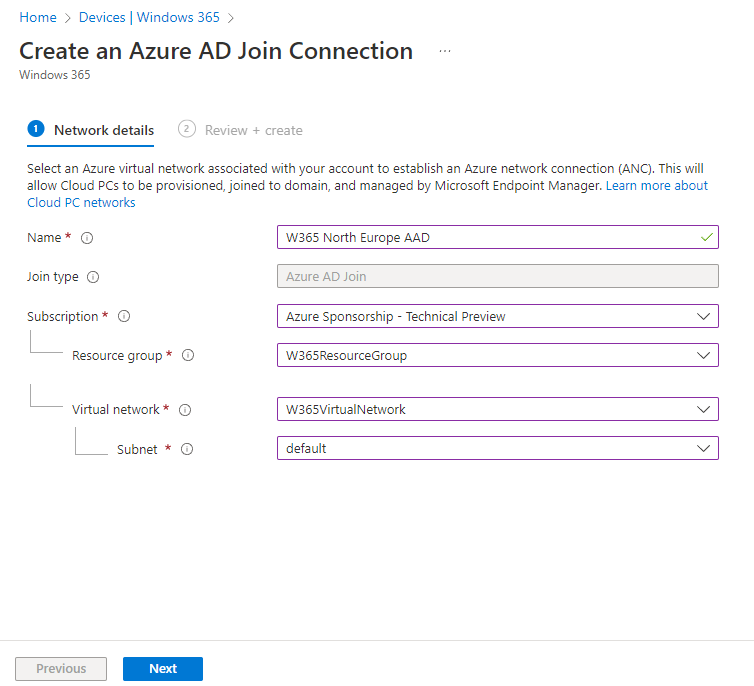
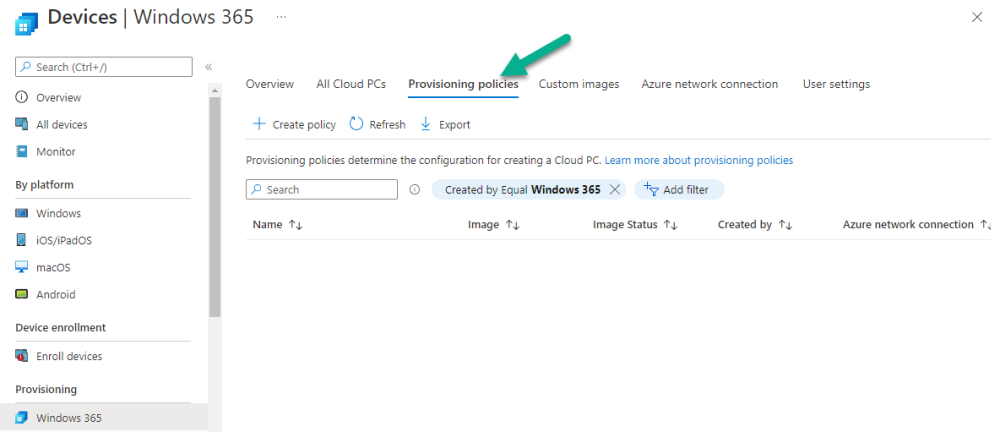
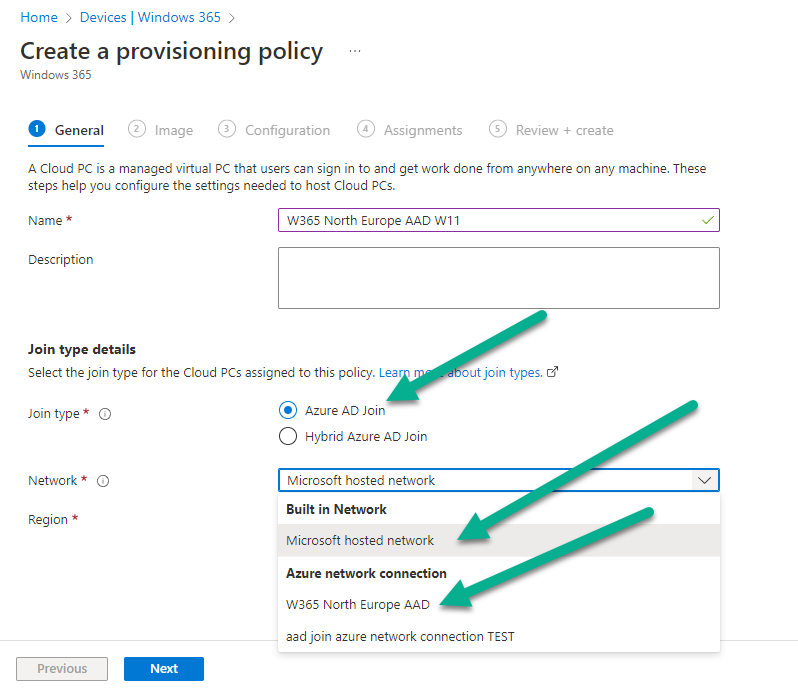
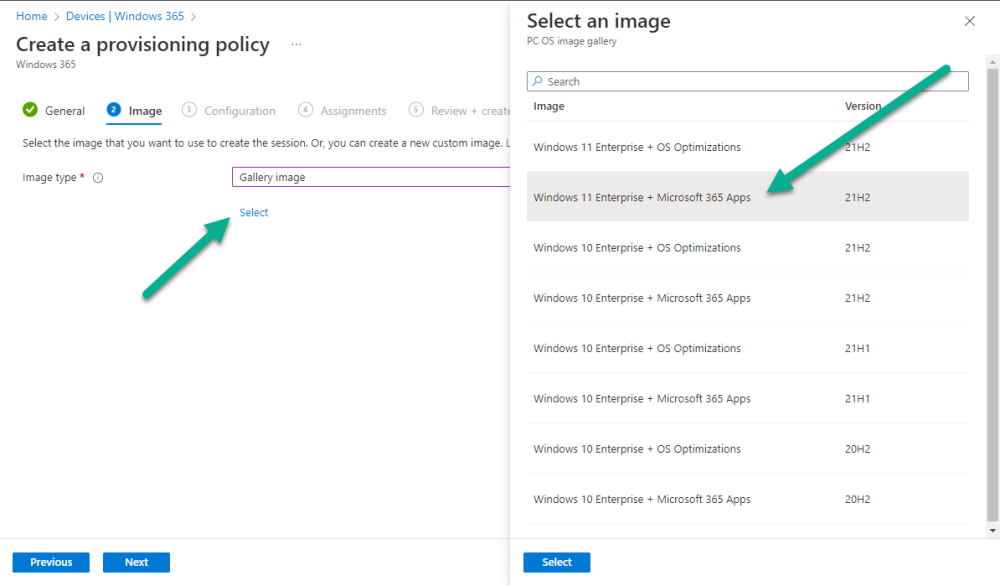
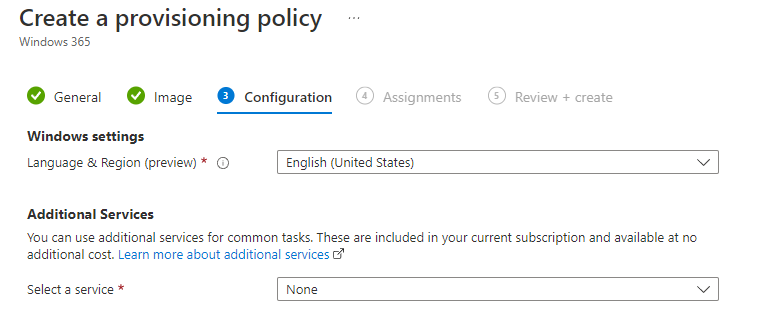
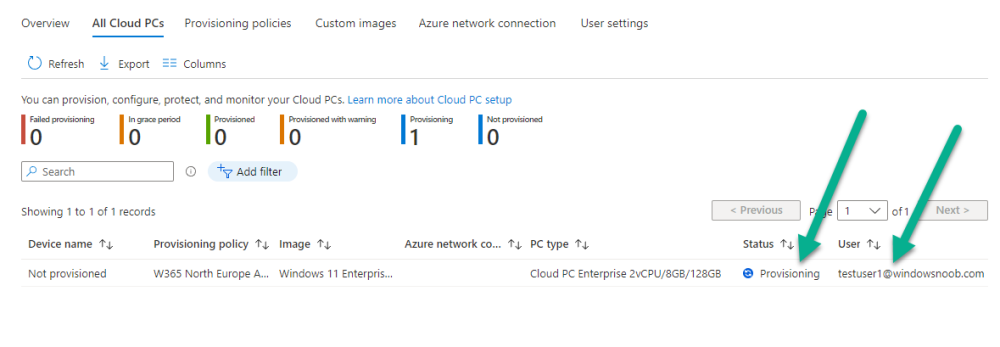
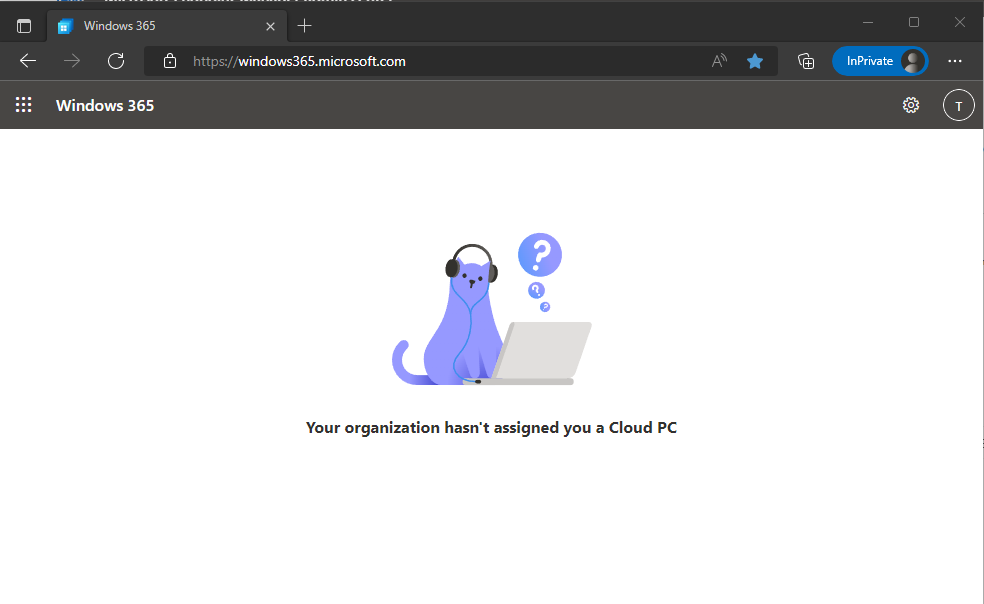
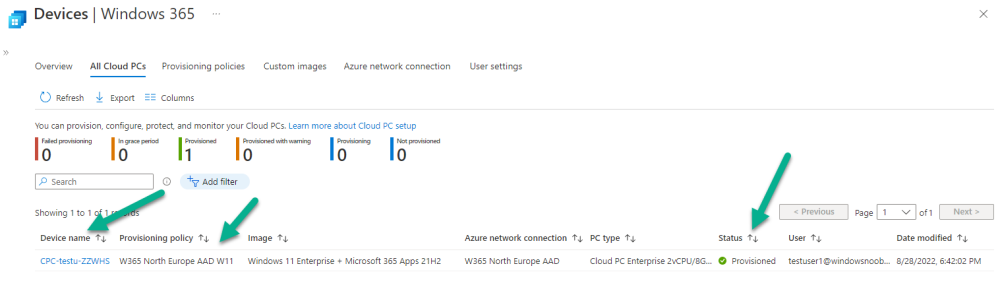
Introduction This is Part 2 in a new series of guides about getting started with Windows 365. This series of guides will help you to learn all about Windows 365 in a clear and insightful way. This series is co-written by Niall & Paul, both of whom are Enterprise Mobility MVP’s with broad experience in the area of modern management. At the time of writing, Paul is a 6 times Enterprise Mobility MVP based in the UK and Niall is a 12 times Enterprise Mobility MVP based in Sweden. In this series we aim to cover everything we learn about Windows 365 and share it with you to help you to deploy it safely and securely within your own organization. In Part 1, we introduced you to what Windows 365 actually is, selecting the right edition with the level of management that you need, choosing the plan that suits your users needs at a cost you can afford, or modifying the configuration to make it more suited to your individual needs, purchasing licenses and saving money for your organization via the Windows Hybrid Benefit. In this part, we'll learn how to provision an Azure Ad joined Cloud PC and take a look at the different network options available when provisioning an Azure Ad joined Cloud PC. Below you can find all parts in this series: Getting started with Windows 365 - Part 1. Introduction Getting started with Windows 365 - Part 2. Provisioning an Azure Ad Joined Cloud PC <- you are here Getting started with Windows 365 - Part 3. Provisioning a Hybrid Azure Ad Joined Cloud PC Getting started with Windows 365 - Part 4. Connecting to your Cloud PC Getting started with Windows 365 - Part 5. Managing your Cloud PC Getting started with Windows 365 - Part 6. Point in time restore Getting started with Windows 365 - Part 7. Patching your Cloud PCs with Windows Autopatch Getting started with Windows 365 - Part 8. Windows 365 boot Getting started with Windows 365 - Part 9. Windows 365 switch Getting started with Windows 365 - Part 10. Windows 365 offline In this part we'll cover the following: Azure AD join capabilities for Windows 365 Cloud PCs Assigning licenses to users Adding licensed users to an Azure AD group Decide which network your Azure AD Joined Cloud PCs will use Create or reuse resource group (optional) Create or reuse a virtual network (optional) Create azure network connection (optional) Create provisioning policy Azure ad join capabilities for Windows 365 Cloud PCs When Windows 365 was originally released (July 2021), it initially supported the Hybrid Azure AD join scenario. Based on customer feedback, Microsoft announced support for Azure AD joined Cloud PCs in Windows 365 Enterprise November 2021 and that went through a private preview before it was initially released in February 14th, 2022, and Globally Available in May 2022. Note: Azure AD Join doesn't require connectivity to a Windows Server Active Directory (AD) domain unlike Hybrid Azure AD Join, which does require that connectivity. Azure ad joined Cloud PCs have the following benefits: You can create Azure AD joined Cloud PCs without bringing any additional Azure infrastructure. You can create Azure AD joined Cloud PCs on your own network, by using an on-premises network connection. You can provide Cloud PCs for cloud-only users in your organization. Gain more flexibility to sign in to your Cloud PC using Windows Hello for Business. Assigning licenses to users You need to assign a Windows 365 license to your user(s) in order for them to use the service, much as you would with any Microsoft 365 product. To do this, open the Microsoft 365 admin center and expand the Billing node, select Licenses, and choose the appropriate Windows 365 product from those you've purchased. Next click on + Assign licenses and select the user(s) you wish to apply the license to in the Assign licenses to users window. Finally click on Assign. You will get a confirmation of the action showing the type of Windows 365 license. Adding licensed users to an Azure AD group Next, you need to add the licensed user(s) to an Azure AD group, you can name the group whatever you want but it would be a good idea to match the name of your Azure AD group to the Provisioning policy that we will create later in this guide by using a naming convention. In this example, we have created an Azure AD group called W365 North Europe AAD W11 and we've added the licensed user(s) to that group. That way we can quickly determine that members of this group will get a Windows 365 Cloud PC configured for Northern Europe, using Azure AD Join and running Windows 11. Decide which network your Azure AD joined Cloud PCs will use You need to decide which network type your Cloud PC's will use for the Azure AD Join scenario. There are 2 choices listed below. A Microsoft-hosted network Your own network (using an Azure network connection) Tip: If you want your Azure AD Joined Windows 365 Cloud PCs to be 100% Cloud Only then select the built-in Microsoft-hosted network. If you select that choice then you can skip the next three optional steps. If however you want to control the region where your network is located (in relation to your users) and which DNS settings your Cloud PC's will use plus many other additional network settings, then you should configure the next three steps. Create or reuse a Resource Group (optional) Windows 365 uses Resource Groups in Azure to store certain resources, such as Virtual networking. When creating a provisioning policy for a Cloud PC you can select to use the Microsoft hosted network (cloud only) or use a previously created Azure network connection (ANC). If you choose the option to use your own network via an Azure network connection, that ANC needs to be in a Resource Group. To prepare for that, we'll create a new Resource Group in Azure. Note: If you want your Azure AD Join based Windows 365 Cloud PC's to be cloud only you can skip this step. Login to https://portal.azure.com and click on Create a resource, select Resource Groups, select Create and create a new resource group in an Azure region close to you. Click Review + create to complete the wizard. Create or reuse a Virtual Network (optional) Windows 365 in an Azure AD Join scenario can use a Microsoft Hosted Network to be completely cloud only, or can use Virtual Networks to allow your Cloud PC's to use specific network settings that you define. Note: If you want your Azure AD Join based Windows 365 Cloud PC's to be cloud only you can skip this step. To use your own network and provision Azure AD joined Cloud PCs, you must meet the following requirements: Azure virtual network: You must have a virtual network (vNET) in your Azure subscription in the same region as where the Windows 365 desktops are created. Network bandwidth: See Azure’s Network guidelines. A subnet within the vNet and available IP address space. In your newly created Resource Group, click on Create and select Virtual Network. Here you can define the ip addresses to use if that's your preference. define the IP Addresses and additional network info for the virtual network, followed by Create. Create Azure network connection (optional) Windows 365 in an Azure AD Join scenario can use a Microsoft Hosted Network to be completely cloud only, or can use an Azure network connection to allow your Cloud PC's to access your on-premises network resources. Note: If you want your Azure AD Join based Windows 365 Cloud PC's to be cloud only you can skip this step. To create your own Azure Network connection, open the Microsoft Endpoint Manager console, select the Windows 365 node, and then select Azure network connection. Keep in mind that each tenant has a limit of 10 Azure network connections, if you need more than that you must contact Microsoft support. Next, click on + Create and select Azure AD Join from the two available options. Next give the Azure network connection (ANC) a suitable name, before selecting the Resource Group (that you created above) and the Virtual Network (that you also created above). Click on Next and then click on Review + Create. The ANC status will initially be running checks and if all goes well it'll change status to Checks Successful after approximately 30 minutes. Create provisioning policy Next you need to create a provisioning policy. In the Windows 365 node, click on the Provisioning policies tab. Click on + Create policy and start filling in the details. In the General screen once you select Azure AD Join as Join type,that you'll have the choice of selecting the Microsoft hosted network or to use an Azure network connection (ANC) that you created previously. If you want your Windows 365 Cloud PC's to be cloud only select the Microsoft hosted network, otherwise select the ANC that is applicable to your region. On the Image screen, you can select the type of image from built-in images provided by Microsoft (Gallery image) to using one you make yourself (Custom image). If you select Gallery image you'll need to click on Select to select from a list of created images. In this example we'll go with the Windows 11 Enterprise + Microsoft 365 apps image On the Configuration screen, select your desired Language + Region (preview) and whether or not you want to use the new Windows Autopatch feature. On the Assignments screen, select one or more groups that you want to target with this Provisioning Policy. We'll use the previously created W365 North Europe AAD W11 Azure AD Group for this purpose. when done click on Review + Create and your provisioning policy is complete. At this point all the hard work is done and you can select the All Cloud PCs tab. This will reveal the status of any Windows 365 licensed users targeted by the provisioning policy. This process can take some time to deploy the actual Cloud PC, so you'll have to refresh this view in order to see when everything is complete. While you are waiting, please up-vote the following Windows 365 feedback so that we can get an email notification once the provisioning process is completed. Note that if the licensed user(s) opens the Windows 365 web page https://windows365.microsoft.com at this point, they'll see something liked the following (after satisfying MFA). This is another reason why an email notification to both the Admin and the User would be great. Note: During this process we did not create any User settings to define Local administrator settings, or Point in time restore options. If you need to configure them, then do so in the User settings tab. You can always add those settings after provisioning a Cloud PC, just ensure that the Cloud PC restarts to get the new policy. After some time, the Cloud PC will be provisioned and you can see that in the MEM console, in addition to details of its provisioning policy, the device name, PC Type, Azure network connection and image. At this point, the licensed user(s) can access their Cloud PC directly at the Windows 365 web page. After clicking on Open in browser, the user will be prompted for credentials, MFA prompt and they are in. Job done ! That's it for this part, please join us in Part 3 where we'll learn how to provision a Hybrid Azure AD Join Cloud PC. Recommended reading Windows 365 networking deployment options- https://learn.microsoft.com/en-us/windows-365/enterprise/deployment-options?WT.mc_id=windowsnoob.com Windows 365 requirements - https://docs.microsoft.com/en-us/windows-365/enterprise/requirements Azure Virtual Network requirements - https://docs.microsoft.com/en-us/windows-365/enterprise/requirements-network Azure Network guidelines - https://docs.microsoft.com/en-us/windows-server/remote/remote-desktop-services/network-guidance Azure network connections (ANC) - https://docs.microsoft.com/en-us/windows-365/enterprise/azure-network-connections


-
WDS and two deployments simultaneously problem computername
anyweb replied to Lancaster41's question in Windows Deployment Services (WDS)
the chances of two computers with the same name joining the domain at exactly the same time are slim surely, have you had problems with this or ? -
MECM 2203 task sequence problem
anyweb replied to zhangyongcheng's topic in Configuration Manager 2012
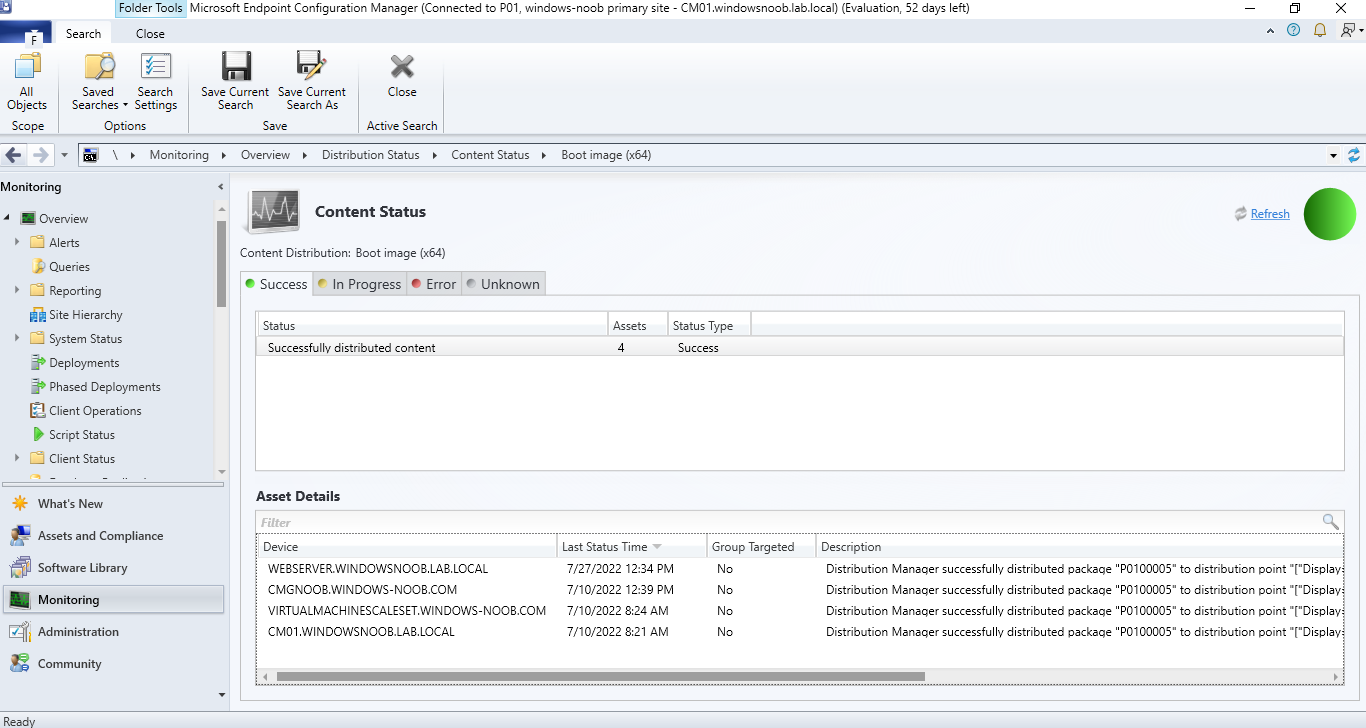
did you verify that the source version 3 of the package is on your dp(s) ? did you distribute BOTH the x86 and x64 boot images to your dp(s) ? if not, please do that before assuming something is wrong with your site, let's rule out one thing at a time, cheers niall -
Migrate to the cloud - Part 1. Setup
anyweb replied to anyweb's topic in System Center Configuration Manager (Current Branch)
the mail function is used when a failure occurs to send logs to a shared email inbox, you can search the script and rem it out however you will need it sooner or later, that's why it's there i think it's in the somethingfailed function (not looking at the scripts right now) -
Migrate to the cloud - Part 1. Setup
anyweb replied to anyweb's topic in System Center Configuration Manager (Current Branch)
if you are not using SCCM, then you need to rem out the RemoveSCCMClient call, I think it's in the takeaction function, just place a # in front of it and that'll help, otherwise it will fail, start with that, then try again -
I'll have to investigate that, have you tried first of all verifying the version of Azure AD connect you are using and update to the latest, see does that resolve things if not, look into adding a pass-through auth agent, if that works great, if not, uninstall it
-
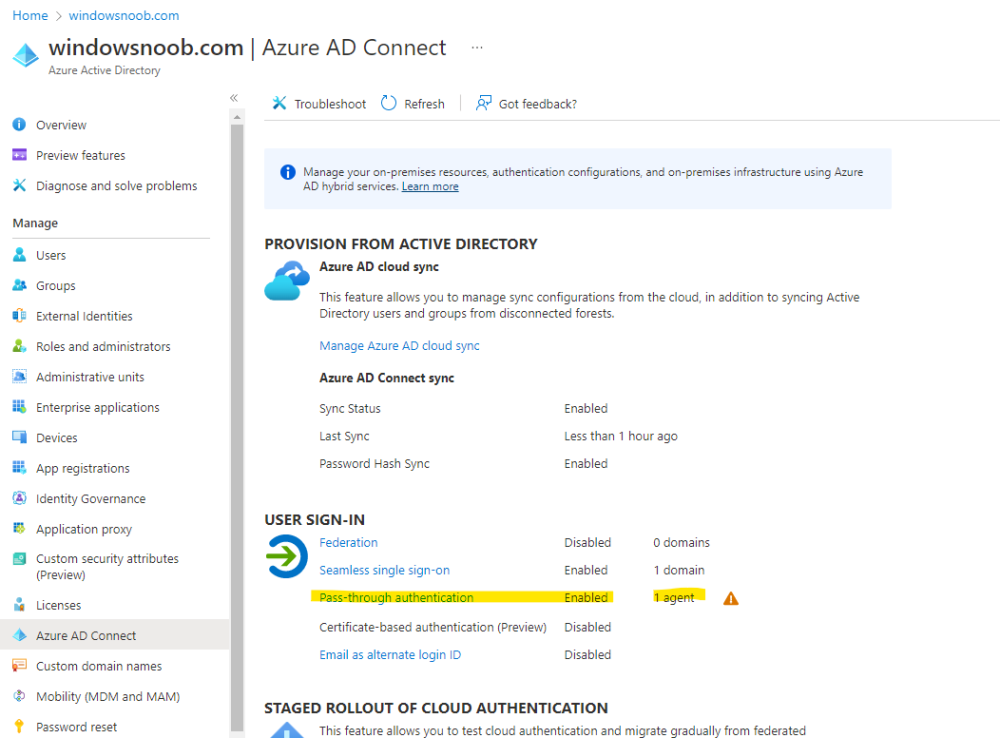
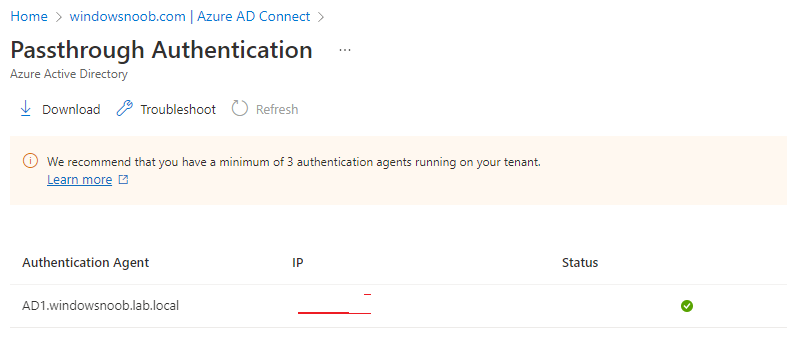
I noticed a change with Azure AD Connect sync recently in one of my labs, password sync also failed, after looking in AAD in the Azure AD Connect node, I saw that it also wants agents installed, i've highlighted it here, you can check the status in Azure Active Directory, if you have none of these agents installed, then install at least one and verify it's listed in AAD, once I had done this my passwords synced correctly you can download the agent required via the Pass-through authentication download link here
-
MECM 2203 task sequence problem
anyweb replied to zhangyongcheng's topic in Configuration Manager 2012
normally you should always have both the X64 and X86 versions of the boot image on your PXE enabled Distribution Point. you can also check the source version, you can add that column to your SCCM view, for package RPI00002:3, RPI00002 is the packageID, 3 is the source version, you need to confirm that the source version 3 is indeed on the dp's mentioned in the log

-
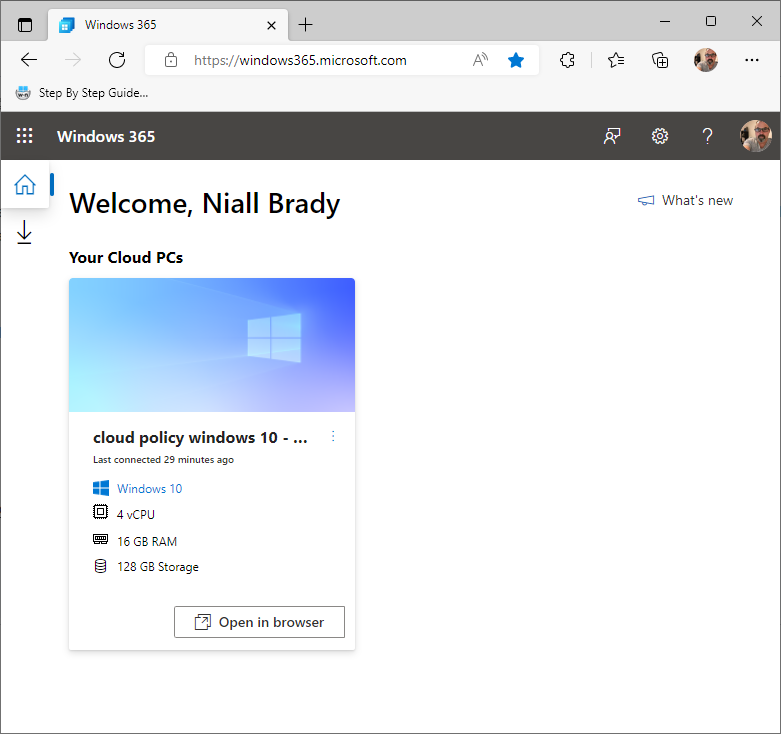
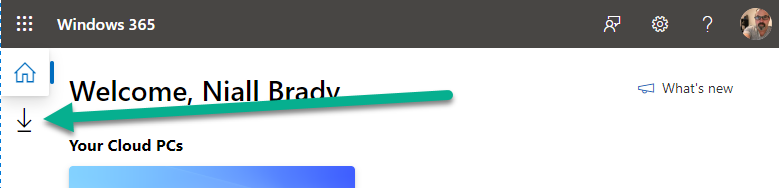
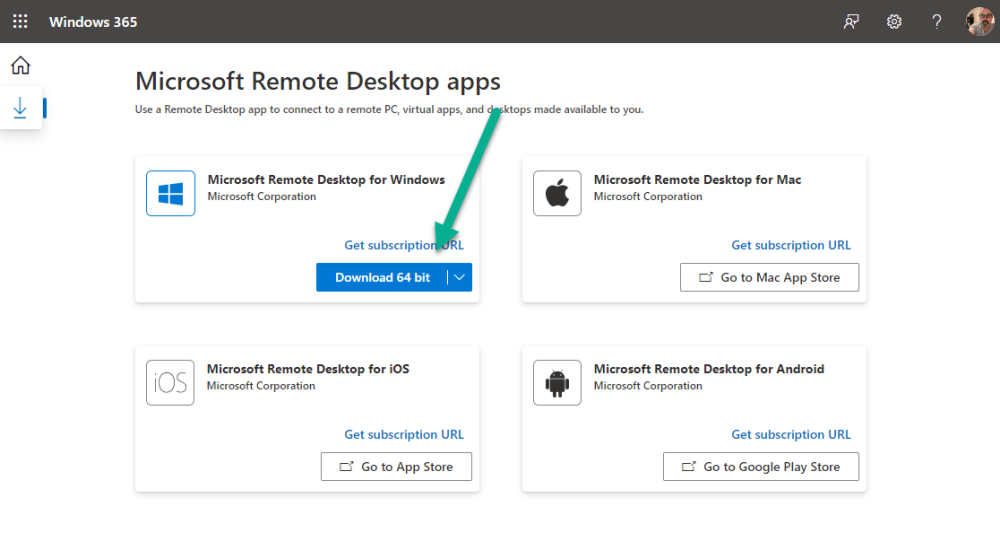
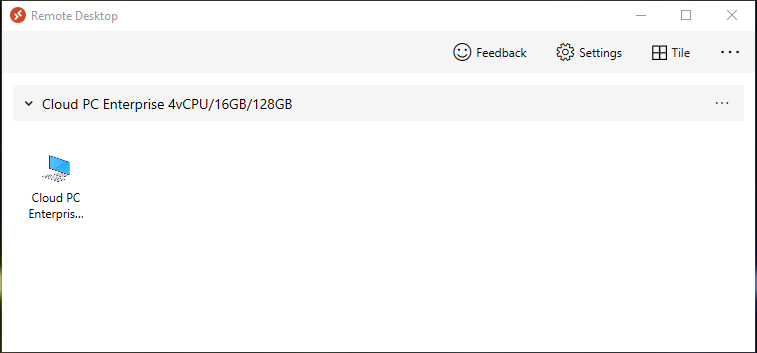
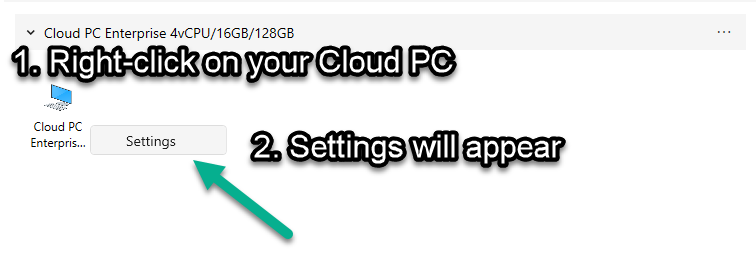
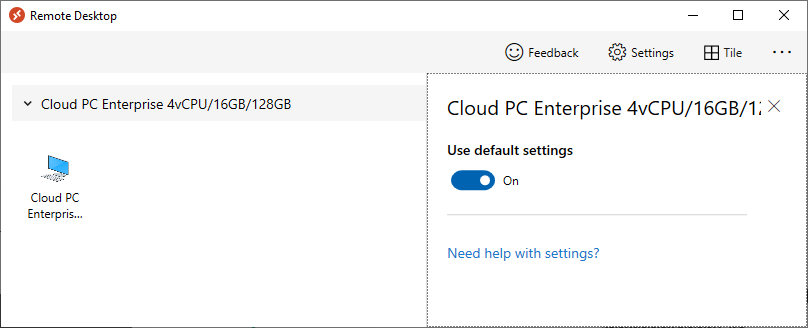
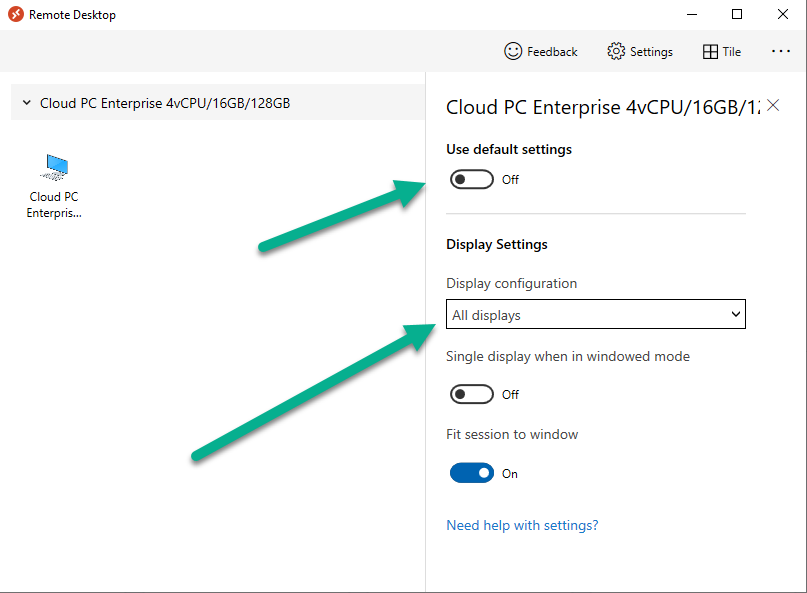
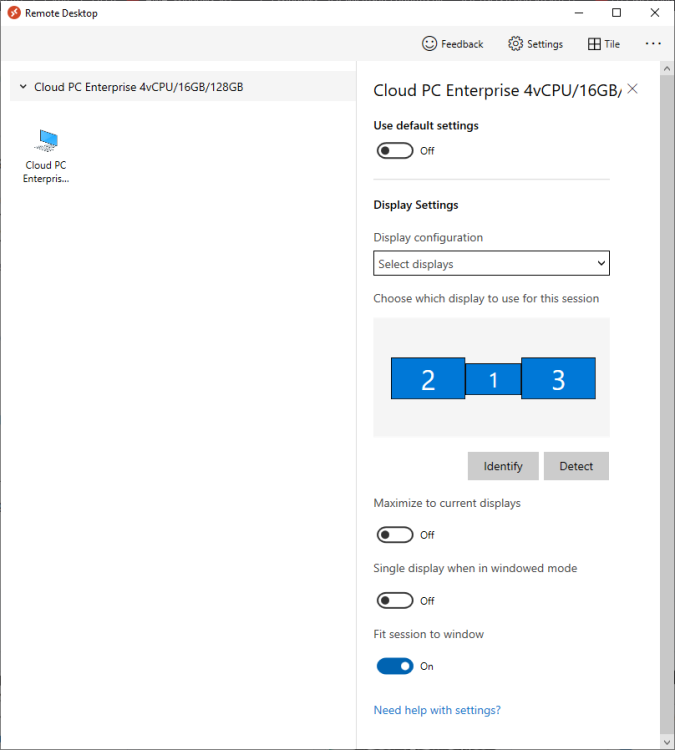
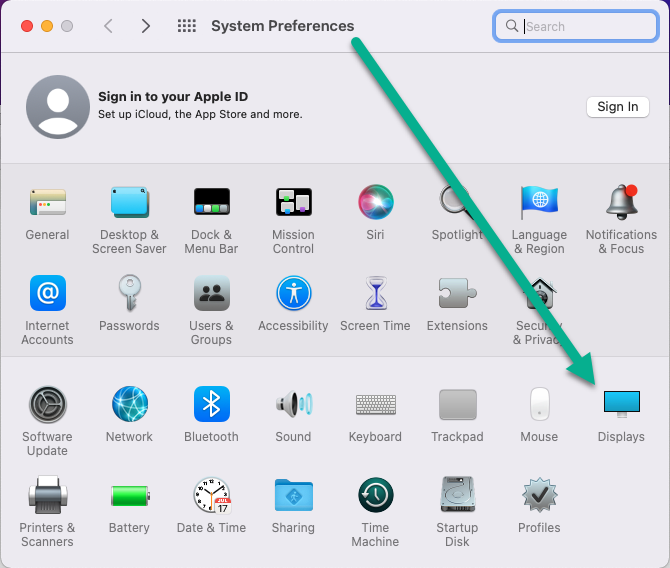
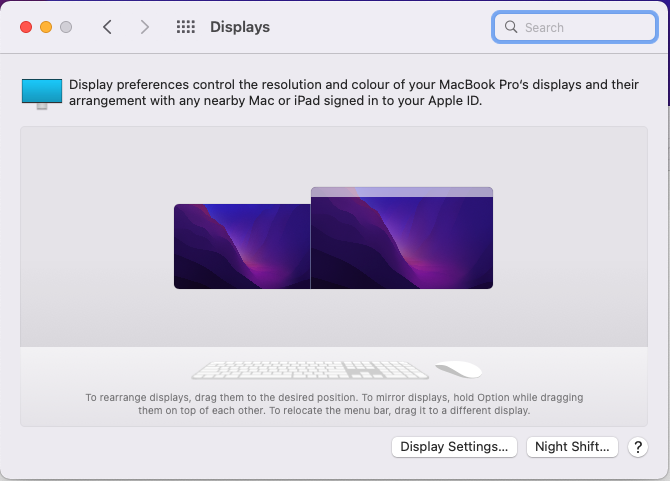
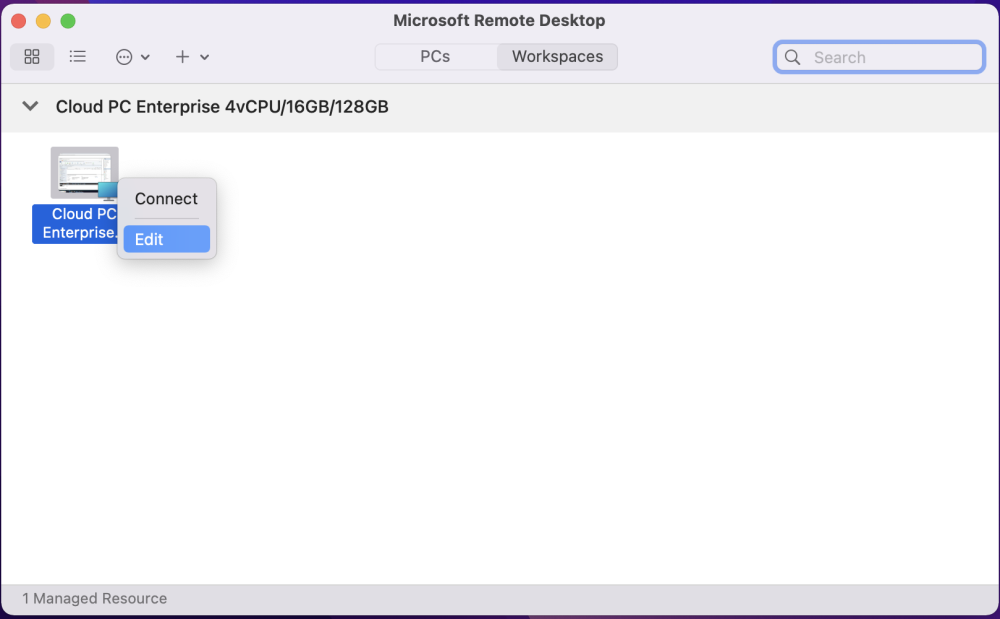
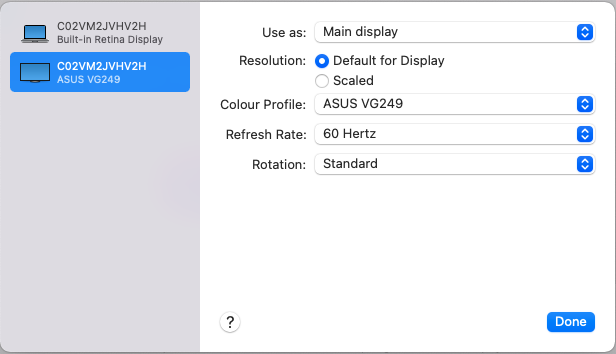
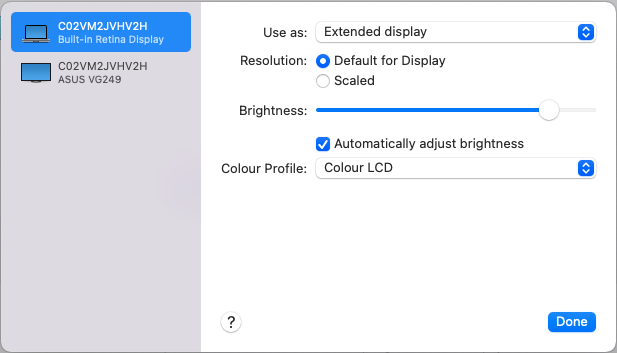
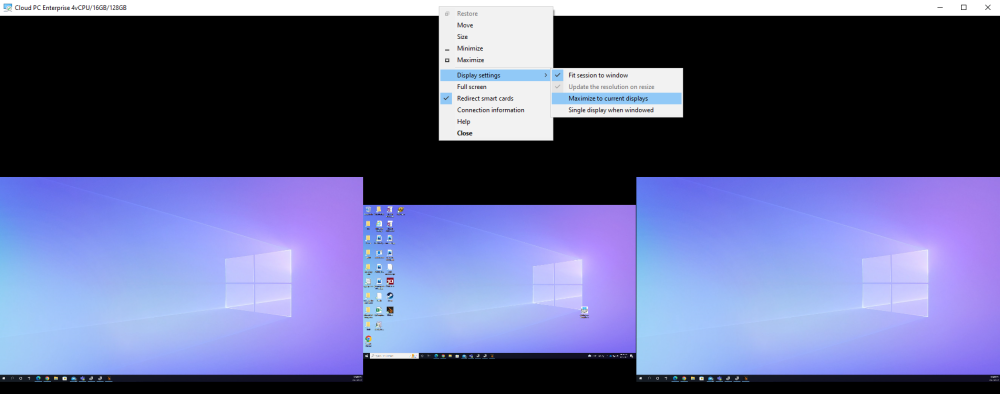
Introduction Windows 365 gives you the power to do your job anywhere, and when you install the Remote Desktop app (available for Windows, iOS, Android, Mac) you'll be able to get your job done using multiple monitors. I'm a great believer in multiple monitor setups and like to use 3 monitors when working from home. In this blog post you'll see how you can use multiple monitors with Windows 365 whether you are using Windows or an Apple Mac as the base OS that you connect from. Step 1. Get the Remote Desktop app When you login to https://windows365.microsoft.com you'll be presented with a web page similar to below showing one or more Cloud PC's assigned to you. Click on the download icon. Next, select the Remote Desktop app download that matches your operating system and architecture, in this example I download the 64 bit Windows Remote Desktop app. Step 2. Configuring remote desktop for Windows After downloading the app, install it. Once the app is installed (and subscribed), it will launch. You will then see your Cloud PCs in tiled format. You can change that to list format if you want to see the specs of each Cloud PC easily. To modify the display settings for the Windows version of the Remote Desktop app, right click on your Cloud PC and Settings will appear as shown below. By default the Use default settings is enabled. Turn if Off to see more options. After turning default settings Off, you will see some nice Display Settings options, click on the Display Configuration drop down menu. In my example, I want to use all three monitors and arrange them to my liking, so I select the Select Displays option, from there i can identify the order of my monitors and select how many I wish to use, I selected all 3. After enabling this, I close the settings option and launch the remote desktop app. Here is the result, my Windows 365 Cloud PC is using all 3 monitors. Awesome or what ! If you take the display out of full screen you can right click the Remote Desktop toolbar and you'll have some additional options with Display Settings. Step 3. Configuring remote desktop for Apple Mac On an Intel based Macbook Pro with DisplayLink drivers installed, the experience is similar except you first have to have configured your desired display settings in Mac System Preferences by clicking on the Display icon. And then configure your desired preferences there. Next, open the Windows 365 Remote Desktop app and on your selected Cloud PC, use the 2 finger click on the touchpad and then select Edit. Make your desired choice for how you want the monitors to display things by clicking on both the Apple Mac and the External monitors listed. Once you are happy with the configured settings close that window by clicking on Done and launch your Cloud PC, here's a view of the same thing via the Mac. So there you have it, you can really maximise the benifit of multiple monitors when using your Cloud PC as long as you are using either a Windows PC with the app or an Apple Mac + Displaylink + the RD app and a compatible USB-C docking solution. Currently (at the time of writing) Linux doesn't have an app that works with Windows 365 and multiple monitors. Android does have an app as does iOS but I don't have a docking solution available for either platform to test multiple monitors with them. cheers niall Related reading Get started with the Windows Desktop client | Microsoft Docs


-
what version of SCCM is this ? are you using Configuration Manager to manage bitlocker or MBAM on another server ?
-
MECM 2203 task sequence problem
anyweb replied to zhangyongcheng's topic in Configuration Manager 2012
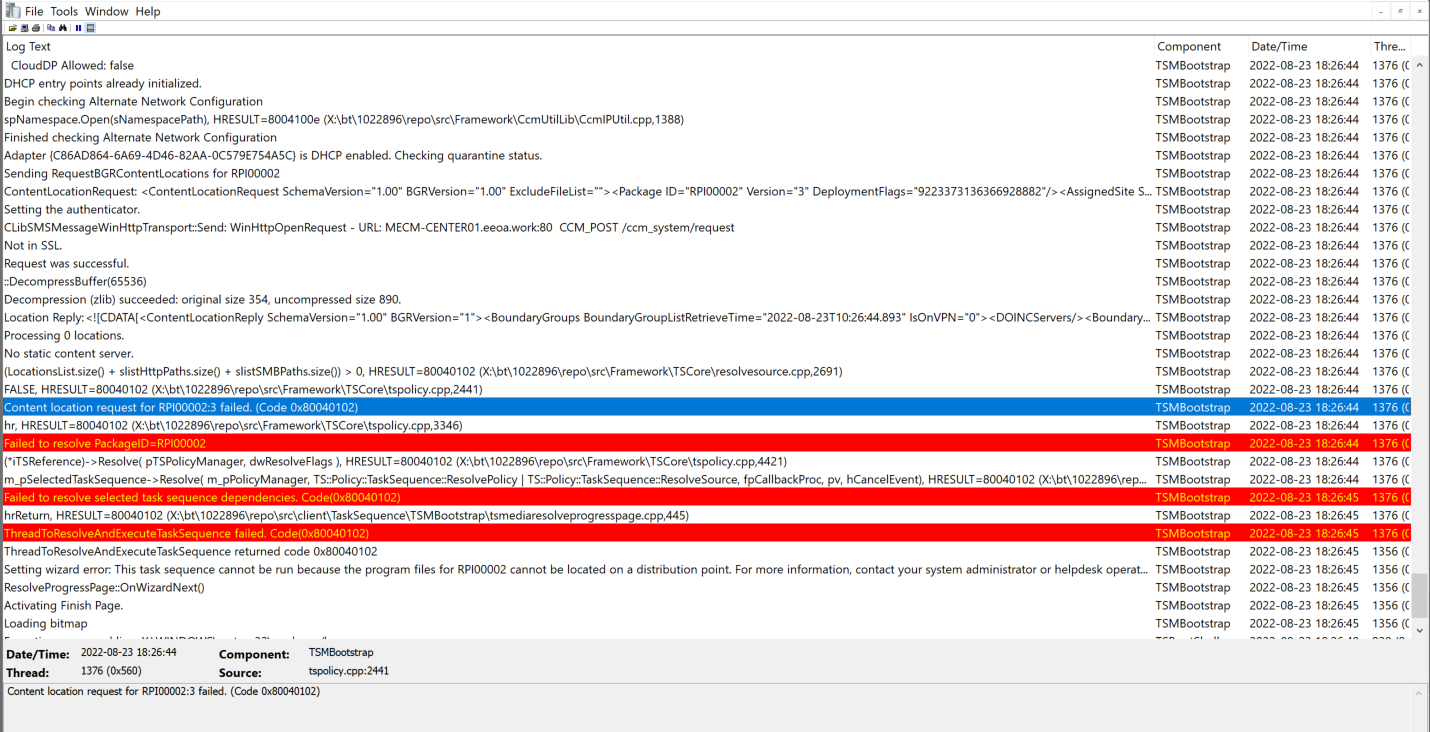
it's failing due to this package missing on the dp Content location request for RPI00002:3 failed. (Code 0x80040102)
-
Migrate to the cloud - Part 1. Setup
anyweb replied to anyweb's topic in System Center Configuration Manager (Current Branch)
yours is bombing out very early, in the prerequisites check, you can try remming out the call to 'fixing odbf' function, it's at line 587, it's not needed (for my work environment only) # fix odbf computer name before continuing LogWrite "Fixing ODBF" FixODBF fix it like so (place # in front of those 2 lines) # fix odbf computer name before continuing #LogWrite "Fixing ODBF" #FixODBF once done, save the changes and test again please -
good idea and thanks for the thanks !
-
if this is a lab i'd suggest you rebuild the lab (doesn't take long) and before converting the lab to PKI take snapshots of the virtual machines, so you have different states (http/https/e-http) if you cannot do that then you'll have to experiment with removing bindings in IIS for https, removing the certificates to the dp role and more, and removing certificate services, quite a mess, you could basically undo all the settings where you switched to HTTPS back to HTTP
-
Migrate to the cloud - Part 1. Setup
anyweb replied to anyweb's topic in System Center Configuration Manager (Current Branch)
i guess you modified the script ? did you look at part 3 the troubleshooting part it gives you some ideas to help with troubleshooting -
Migrate to the cloud - Part 1. Setup
anyweb replied to anyweb's topic in System Center Configuration Manager (Current Branch)
the intune policies will hit as soon as the device becomes managed by Intune which usually occurs after we join Azure AD, why do you want to disable Windows Hello For Business ? -
Introduction If you are testing Windows 365 and want to delete your Cloud PC in order to start over again from scratch, the process is (currently) not that straightforward, but that's what I'll cover in this blog post. Note that Delete is not the same as re-provisioning a Cloud PC (which I'll cover in another blog post). If you are new to Windows 365 then checkout this blog post series where myself and Paul explain what it is and how to get started. Step 1. Verify the current status of the Cloud PC Once you've provisioned one or more Cloud PC's they'll show up in Microsoft Endpoint Manager in the Windows 365 node as shown below. If the Cloud PC is in use and all is OK the Status will be listed as Provisioned. Once you've decided that you want to delete a Cloud PC, the first thing to do is to remove the assigned license from the user of that resource. In the screenshot above we can see that the user is testuser1@windowsnoob.com. Step 2. Remove the Windows 365 license from the target user Log in to the Office Admin portal and expand the billing node (1), then select licenses (2) and then select the Windows 365 License type (3), as shown here. After selecting the appropriate Windows 365 license type, select the checkbox beside the user you wish to remove the assignment from and then select Unassign licenses. You will be asked to confirm that you want to Unassign X licenses (depending on how many users you are removing the license from), click Unassign to continue. After clicking Unassign the screen will be updated to reveal that fact. Step 3. Check the new status of the Cloud PC Back in MEM, check the status of the Cloud PC that you have just removed the license from. Hit Refresh to update the status. It will most likely show No Results, if so, remove the filter (red arrow). After removing the Status Equal filter, you should see your Cloud PC in a Status of In Grace Period. Step 4. End the grace period To delete the Cloud PC as quickly as possible, click on the In grace period status. This grace period normally allows the Cloud PC to remain in this state for up to 7 days. Click on End grace period confirm your action by clicking Yes to the destructive action warning. After clicking yes the following occurs... The Cloud PC will start deprovisioning. The user loses access to the Cloud PC. The operating system and data are deleted from the Cloud PC. The Cloud PC is no longer available. If the original provisioning policy was replaced with a different policy, the Cloud PC will be reprovisioned with the settings in the new policy. In the MEM portal, the status of the Cloud PC will change to deprovisioning. Step 5. The user experience In the Windows 365 web portal, the user would be notified that their Cloud PC will be de-provisioned within that time limit. However, no such notification is sent to the (same) user logged on to the Cloud PC that I am aware of. After some minutes when the policy syncs to the Cloud PC the end user will see the screen 'shutting down' and the following message will appear. At this point, there is no point reconnecting as the device has been deleted. If however they do click on Reconnect they'll see the following. If the user tries to go back to the Windows 365 portal, they'll see the following. While the above process does indeed delete the Windows 365 Cloud PC, it does not remove any of the following: Associated Resource Group Associated Provisioning policies Associated Azure Network Connections Custom Image(s) User Settings If you really want everything removed then you'll have to delete those manually in MEM/Azure also. I hope you found this useful, until next time, adios. Related reading End Grace Period https://docs.microsoft.com/en-us/windows-365/enterprise/end-grace-period
-
Migrate to the cloud - Part 1. Setup
anyweb replied to anyweb's topic in System Center Configuration Manager (Current Branch)
yes you can run it without ConfigMgr, it's just a Powershell script after all, the ServiceUI.exe file make's it run in SYSTEM context, however, how do you intend to deploy this script to your devices ? -
you can upgrade to 2207 now, it's available and it should not have this problem
-
things have changed since i wrote those blog posts, the most recent article on language packs is here, please take a look at it I don't capture images any more, I always make any changes that are needed via the SCCM task sequence as the computer is being deployed
-
thanks for reporting it !
-
yes it's a bug, will be fixed in 2207