anyweb
-
Posts
9181 -
Joined
-
Last visited
-
Days Won
366
Everything posted by anyweb
-
 Microsoft have released a new build for Windows 10 TP, this one has Spartan enabled. Here are some issues we fixed in this build We’ve fixed the issue from Build 10041 for when the Photos app on your PC crashes when you tap on the circular icon (your camera roll – thanks Rafael) at the top left to view the photo you just took. We’ve also fixed the issue from Build 10041 where you might end up in a state where windows open on your desktop are accidentally visible behind the Start Screen, Task View, Snap Assist, and when rearranging windows in Tablet Mode. You will no longer get stuck when you manually lock your PC (Windows Key + L) during the initial out-of-box experience. Here are some known issues for this build After logging in, you may see a blue screen instead of your desktop. To work around this issue, lock your PC (with the hardware button or by pressing the Windows Key + L) and try logging in again. You can also try Ctrl + Shift + Esc to open Task Manager. Indexing of new email in Outlook is not working, so search results will be limited to when the last index was built. If you have Virtual Machines hosted in Hyper-V on your PC running Windows 10, you will want to move to the Slow ring and wait for the next build as this build breaks the ability to run VMs. There are 2 issues using Visual Studio 2015 preview on this build: The emulators will not boot and you won’t be able to deploy a Windows Universal app to the Mobile emulator. The XAML designer in VS and Blend will crash when opened. If you are a developer using these tools today to develop Windows Universal apps and need this functionality to work – we recommend switching to the Slow ring until we release a patch to fix these issues. This build is pretty much all about Project Spartan, so we hope you enjoy getting your hands on it for the first time. As with all other new features we’ve introduced, we have a ton of work left to do with Spartan so expect to see some bugs and rough edges in this first preview. As always, we look forward to hearing your feedback via the Windows Feedback App. via > http://blogs.windows.com/bloggingwindows/2015/03/30/windows-10-technical-preview-build-10049-now-available/
 -
verify if you have a connection to the deployment share in winpe, if not something went wrong with the driver injection into the boot wim, check the powershell logs in ISE, scroll back and look for any red errors thanks !
-
press F8 and open a cmd prompt, look for the smsts.log file what does it reveal, most likely you have no correctly defined the deployment share connection credentials and it's rebooting as a result, or you have no network...
-
How Does Large-Scale Data Migration Work with SCCM 2012?
anyweb replied to Steve G.'s topic in Configuration Manager 2012
do you have mdt 2013 integrated ? -
did either of you try restarting the windows deployment service ? do any other computers successfully UEFI network boot ? what does the smspxe.log file reveal ?
-
I just checked my lab and that's the way it appears
-
Microsoft have released the ISOs for build 10041. You can also download the ISO files for a clean installation of the operating system or if you want to do an upgrade, you can download them directly using the links below: Download ISO file for Windows 10 build 10041 64-bit (English) Download ISO file for Windows 10 build 10041 32-bit (English) Download all ISO files in all the languages and platforms available here cheers niall
-
i guess it depends on how you set your nic up, have you allowed it to be shared with the operating system ?
-
How Does Large-Scale Data Migration Work with SCCM 2012?
anyweb replied to Steve G.'s topic in Configuration Manager 2012
the task sequence below backs up data just fine to mapped shares CM12 in a Lab - The CM12 UEFI BitLocker FrontEnd HTA - Part 2. Installation CM12 in a Lab - The CM12 UEFI BitLocker Frontend HTA - Part 1. The features. -
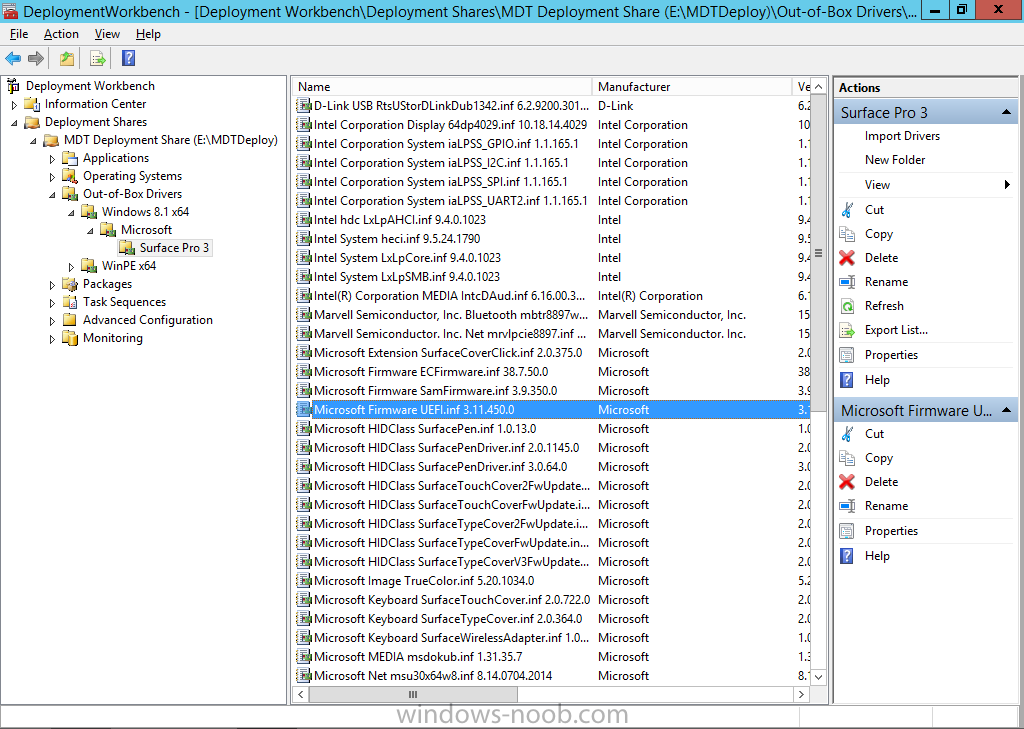
Microsoft has recently released new updated drivers for the Surface Pro 3 (March 2015). Here's a breakdown of what those drivers are, the README below describes the versions of the components found in the Surface Pro 3 cumulative firmware and driver update package, released in March 2015. Firmware EC 38.7.50.0 ECFirmware.inf SAM 3.9.350.0 SamFirmware.inf TOUCH 426.27.66.0 TouchFirmware.inf UEFI 3.11.450.0 UEFI.inf Drivers Accessory SurfaceAccessoryDevice 2.0.1012.0 SurfaceAccessoryDevice.inf Accessory SurfaceCoverAudio 2.0.722.0 SurfaceCoverAudio.inf Accessory SurfaceCoverClick 2.0.375.0 SurfaceCoverClick.inf Accessory SurfaceCoverTelemetry 2.0.722.0 SurfaceCoverTelemetry.inf Accessory SurfaceTouchCover 2.0.722.0 SurfaceTouchCover.inf Accessory SurfaceTouchCover2FwUpdate 2.0.722.0 SurfaceTouchCover2FwUpdate.inf Accessory SurfaceTouchCoverFwUpdate 2.0.722.0 SurfaceTouchCoverFwUpdate.inf Accessory SurfaceTypeCover 2.0.364.0 SurfaceTypeCover.inf Accessory SurfaceTypeCover2FwUpdate 2.0.722.0 SurfaceTypeCover2FwUpdate.inf Accessory SurfaceTypeCoverFwUpdate 2.0.722.0 SurfaceTypeCoverFwUpdate.inf Accessory SurfaceTypeCoverV3FwUpdate 2.0.1021.0 SurfaceTypeCoverV3FwUpdate.inf Accessory SurfaceWirelessAdapter 1.0.1.0 SurfaceWirelessAdapter.inf Audio DockingStationAudioDevice 1.31.35.7 msdokub.inf Audio HdAudio 6.0.1.7198 HDXMSSDS1.inf Camera LifeCam 5.20.1034.0 TrueColor.inf Display DisplayAudio 6.16.00.3161 IntcDAud.inf Display Graphics 10.18.14.4029 64dp4029.inf Display SurfaceDisplayCalibration 2.0.1002.0 SurfaceDisplayCalibration.inf Network Bluetooth 15.68.3073.151 mbtr8897w81x64.inf Network SurfaceEthernetAdapter 8.10.0830.2013 msu64w8.inf Network SurfaceGigabitEthernetAdapter 8.14.0704.2014 msu30x64w8.inf Network WiFi 15.68.3073.151 mrvlpcie8897.inf Pen SurfacePen 1.0.13.0 SurfacePen.inf Pen SurfacePenSettingsDriver 3.0.64.0 SurfacePenDriver.inf System CapacitiveHomeButton 2.0.1179.0 SurfaceCapacitiveHomeButton.inf System CardReader 6.2.9200.30164 RtsUStor.inf System GPIO 1.1.165.1 iaLPSS_GPIO.inf System I2C 1.1.165.1 iaLPSS_I2C.inf System LowPinCount 9.4.0.1023 LxLpCore.inf System ManagementEngine 9.5.24.1790 heci.inf System SATA_AHCI 9.4.0.1023 LxLpAHCI.inf System SMBus 9.4.0.1023 LxLpSMB.inf System SurfaceIntegrationDriver 2.0.1182.0 SurfaceIntegrationDriver.inf System SurfacePciController 2.0.1151.0 SurfacePciController.inf About the script This script is totally automated and builds a complete MDT 2013 deployment solution for deploying the Surface Pro 3 with all drivers included from Microsoft right up to March 2015, all you have to provide is Windows 8.1 x64 Update source files and optionally Office 365. Download it ! Note: If you haven't restarted your server in a while, then i'd recommend restarting it before running the script otherwise the installation of .NET may require a restart and that can have a knock-on effect on the installation of Windows Deployment Services. Here's the new updated script. Setup MDT 2013 for Microsoft Surface Pro 3 - March 2015.zip Download it, unzip and run the script as Administrator in Windows PowerShell ISE, for the best experience try this on a new server with only the Operating System copied to the source specified in the variables. I've added some minor tweaks in the script so that you can run it on a previously setup Surface Pro 3 MDT Lab (for example if you created it with say the January version of this script). If any step fails it will simply fail over to the next step, in other words, not pretty but it works. Once the script has run you should see this start up Deployment Workbench and review the new drivers...below i've highlighted the new UEFI firmware driver all that's left to do is UEFI network boot a Surface Pro 3 and see the script in action, awesome ! to get an idea of what this script does see the original post here. have fun, please try it out and give me some feedback ! cheers niall


-
the iso is bootable, what software did you use to burn it with ?
-
to add to the above and to explain further think of it like this UEFI devices must boot from a boot image architecture which matches the architecture of the device, so if the UEFI device is 64bit, then the boot image that answers first (lifo rule) must be 64bit otherwise you'll get an error during network boot, this is not a problem if you don't have different architecture hardware, for example if your entire estate is 64bit, then use a 64bit boot wim attached to your task sequence, infact that is what we do where I work, we are using a 64bit boot wim as the LAST task sequence deployed to our deploy collection, this works for all operating systems we are deploying except where the architecture of the os requires an x86 boot wim, and for those devices we stage the boot wim (as they are legacy) unfortunately with UEFI you can't stage so the first boot wim that answers must match the architecture of the UEFI device or it will fail, this is ok if all your UEFI devices are 64bit, but that's not always the case, in the case where they are 32bit, either image them differently (usb media for example) or setup a collection infrastructure that allows only 32bit UEFI devices to boot with a 32bit boot image .... to complicate matters even further, traditionally people have been deploying both 64bit and 32bit operating systems in ConifMgr using a 32bit boot wim, this no longer works with the UEFI mix as described above, so if you want to cover most UEFI and Legacy hardware, move to 64bit boot wims and deal with the 32bit hardware and 32bit operating systems as exceptions. i.e. a 32bit boot image can deploy both a 32bit and 64bit operating system (legacy) however a 64bit boot wim can only deploy a 64bit operating system...
-
Introducing the windows-noob.com FrontEnd HTA ver 1.0
anyweb replied to anyweb's question in Frontends, HTA's and Web Services
this one does that functionality, read the features, then checkout the install guide CM12 in a Lab - The CM12 UEFI BitLocker FrontEnd HTA - Part 2. Installation CM12 in a Lab - The CM12 UEFI BitLocker Frontend HTA - Part 1. The features. -
yes you can try this one or this one, both are designed to work with Configuration Manager 2012
-
did you look again at the smsprov.log, try updating the boot wim again and monitor it closely
-
there will be more than that, trust me, look again
-
Finally.... Microsoft is rolling out Build 10041 for PCs to the Fast ring. Like all of the previous preview builds this one comes with a collection of new functionality and bug fixes. The build will only be available through Windows Update for systems already running a previous Windows 10 build. Once downloaded, you can install it... Microsoft intend to release ISOs for builds that go to the Slow ring, but Fast ring builds will be direct downloads only. Microsoft is working hard to bring you a new build of Windows 10 for phones as well but they need a bit more time for that one, and they still expect to support additional phones when they release it. more info > http://blogs.windows.com/bloggingwindows/2015/03/18/windows-10-technical-preview-build-10041-now-available/


-
- 1
-

-
take a look at the smsprov.log around the same time as the failure, it should tell you what went wrong
-
The CM12 UEFI BitLocker Frontend HTA - Part 1. The features.
anyweb replied to anyweb's question in Frontends, HTA's and Web Services
here's how I do it in another task sequence i'm working on, basically i force the user to choose a backup, you can modify this to work with the regional drop down variables instead... and change NORESTORE to None which is what those two drop down's are currently set to if no one makes a choice... { var oEnvironment = new ActiveXObject("Microsoft.SMS.TSEnvironment"); var usmtdrop = document.getElementById('shareDropDown'); //alert ('usmtdrop ='+usmtdrop.options[usmtdrop.selectedIndex].value); if (usmtdrop.options[usmtdrop.selectedIndex].value == "NORESTORE") { alert ('You need to select a previous backup file before clicking continue.'); return; } else { //alert ('restore file seems to be selected'); } usmtvalue = usmtdrop.options[usmtdrop.selectedIndex].value; oEnvironment("RESTORE_FILE") = usmtvalue; } -
After a Windows 10 news slump comes this exciting news, Windows 10 is set to release this summer ! and Microsoft has revealed how they are partnering with many different Chinese OEM companies to offer free upgrades to Windows 10. Lenovo, one of the world’s leading PC manufacturers, announced they will offer Windows 10 upgrade services at 2,500 service centers and select retail stores in China when the Windows 10 upgrade is available. This will help customers quickly and easily upgrade their new or existing Windows devices to Windows 10. Lenovo also announced their commitment to build Windows phones, to be available in mid-year 2015 via China Mobile. Tencent, the leading social networking and gaming services company in China, announced it will offer Windows 10 as a free upgrade to its customers on Windows 7 and Windows 8.1 in China, and include QQ, Tencent Video and Tencent PC Manager in the Windows 10 free upgrade pack. Tencent will create a Windows 10 universal app for their flagship QQ app, which has over 800 million customers in China, and bring their most popular PC games, such as “League of Legends,” “Cross Fire” and “Dungeon & Fighter” to Windows 10 and the new Windows store. Qihu 360, a leading internet security company in China, announced it will bring Windows 10 for free to their customers in China through seamless upgrades. Qihu 360, with over 500 million customers on Windows PCs, will enable the Windows 10 upgrade with just a few clicks with accelerated download speeds. Through a new program with Xiaomi, one of the top smartphone distributors in the world, a select group of Xiaomi Mi 4 power users will be invited to help test Windows 10 and contribute to its future release later this year. These power users will have the opportunity to download the Windows 10 Technical Preview – installing it and providing their feedback to Microsoft. Microsoft also announced that they will release a free version of Windows 10 for IoT devices (Internet of Things) of a certain size..., to cater for the 25 billion IoT devices which will be around us by 2020 more on these announcements here > http://blogs.windows.com/bloggingwindows/2015/03/17/windows-10-launching-this-summer-in-190-countries-and-111-languages/

-
The CM12 UEFI BitLocker Frontend HTA - Part 1. The features.
anyweb replied to anyweb's question in Frontends, HTA's and Web Services
you'd need to change the validation.js to check for those values and if null prompt the end user, check the format and partition disk steps, the variable is used there, however if you change it you will need to look through the other steps where it is also used -
it will work during WinPE or Windows stages of the task sequence as long as it's not during Windows setup (device driver detection stage)
-
Question about the build and capture Task Sequence
anyweb replied to dooty22's topic in Configuration Manager 2012
you can deploy updates during the task sequence, however in the case of say Windows 7 which has hundreds of updates, your deploy task sequence would take forever, so not a nice way to deliver OSD, for that reason you'd want to capture a 'gold' image once every quarter or so with as many windows updates bundled into it -
no, as that will happen too late in the process, ie it will have already failed at that point, so we have to do it this way
-
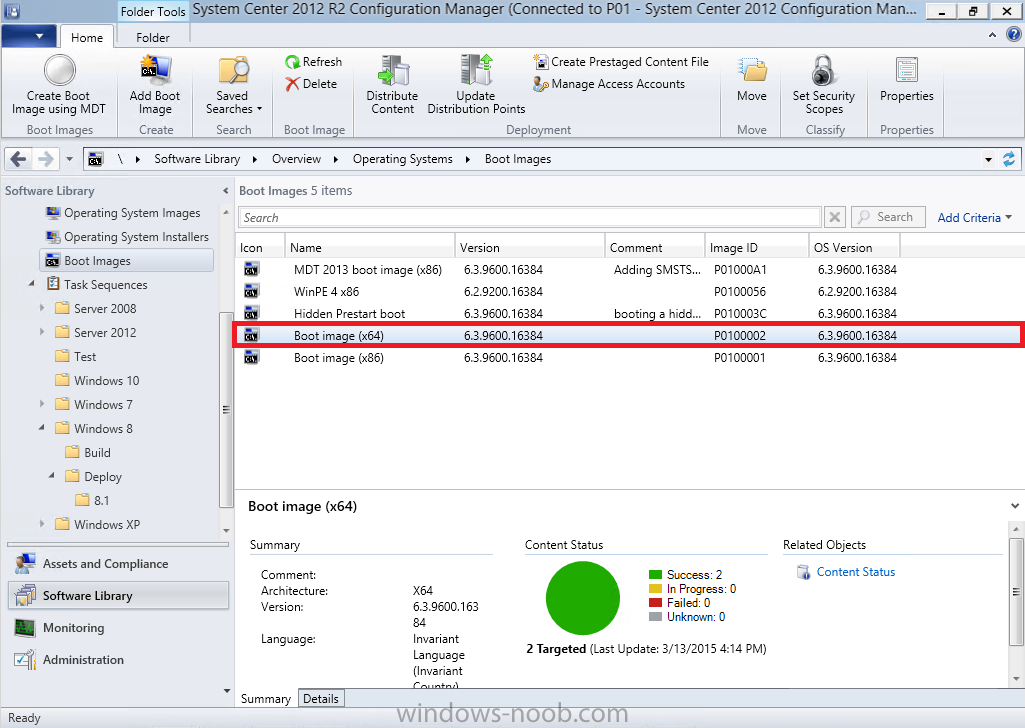
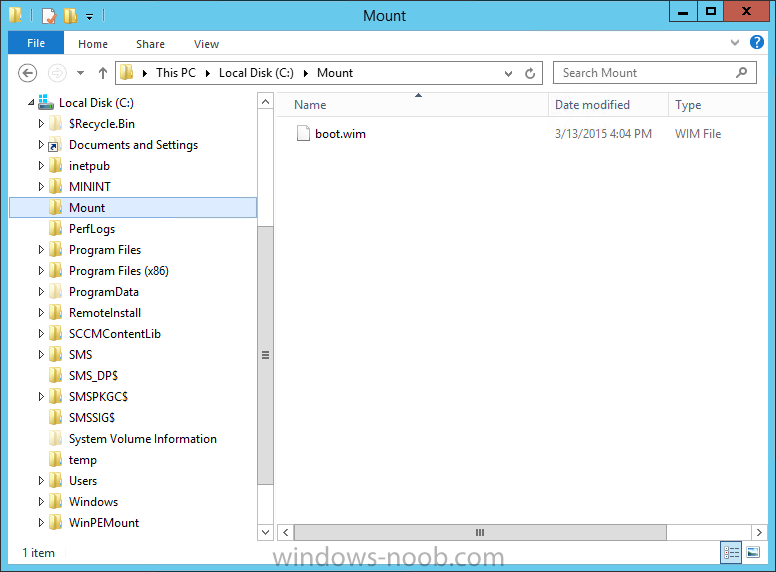
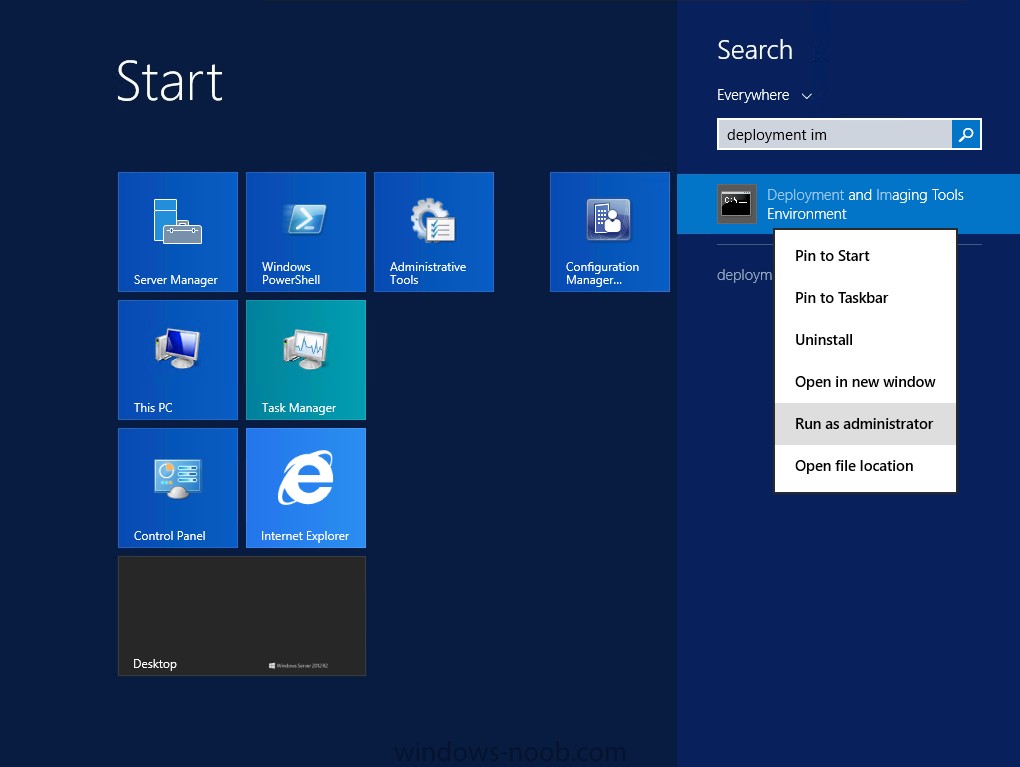
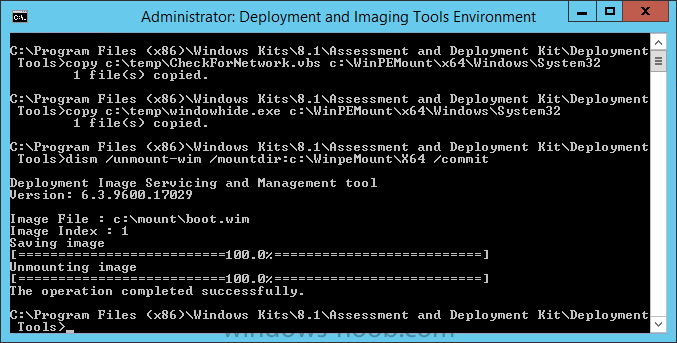
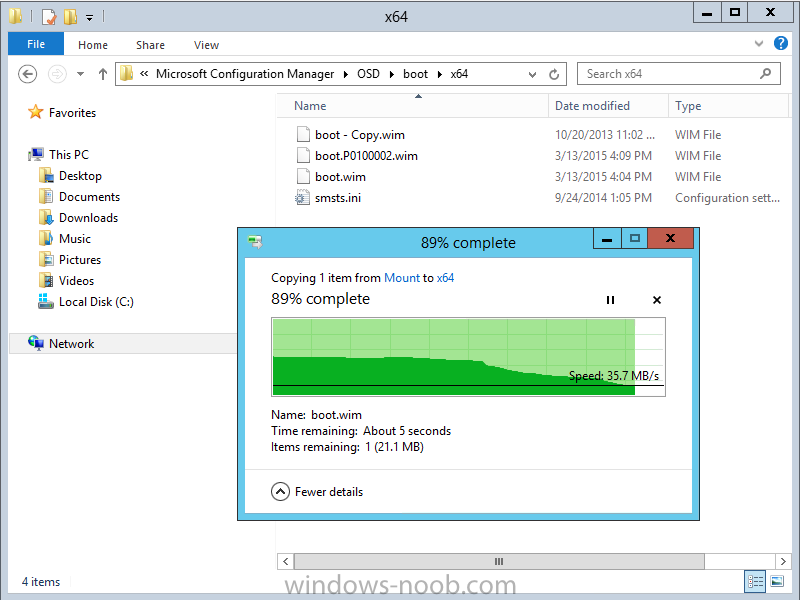
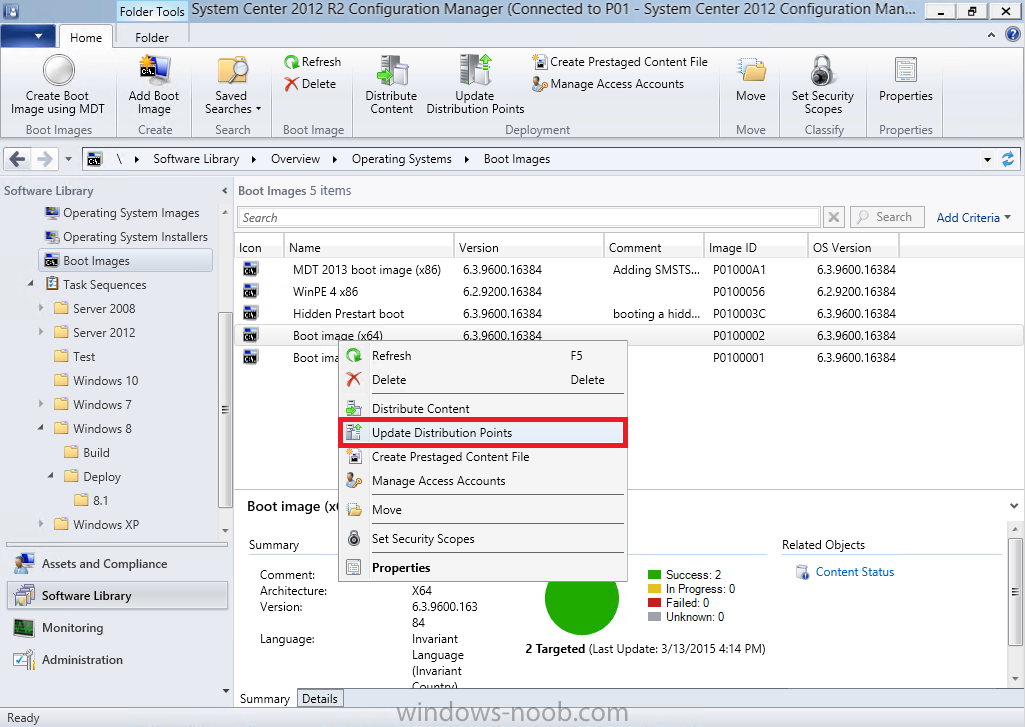
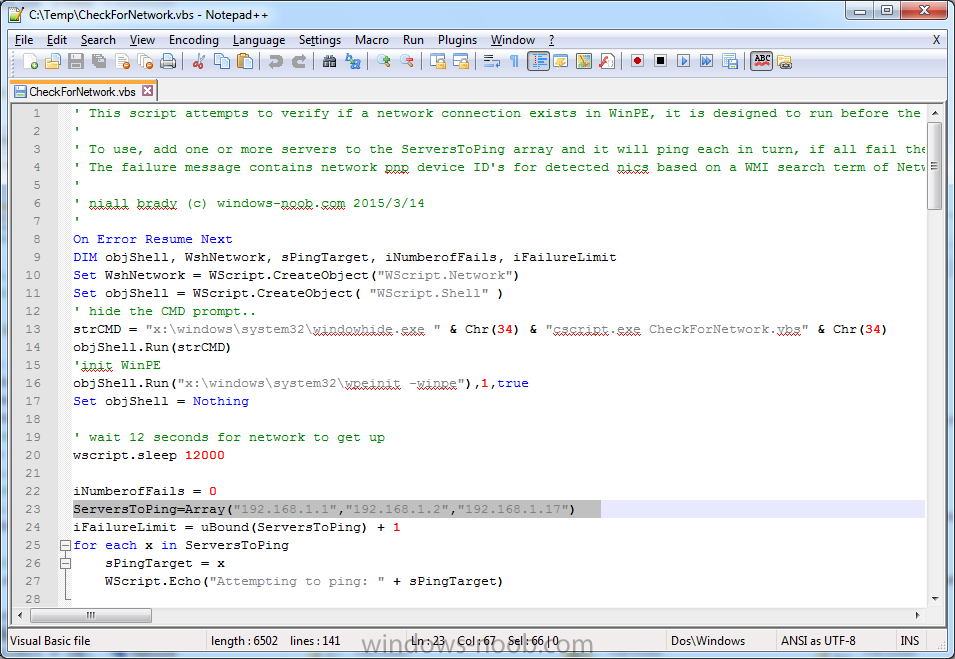
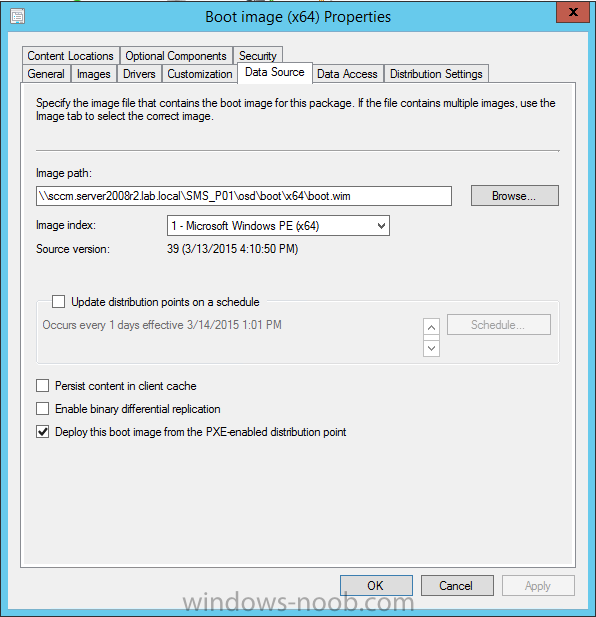
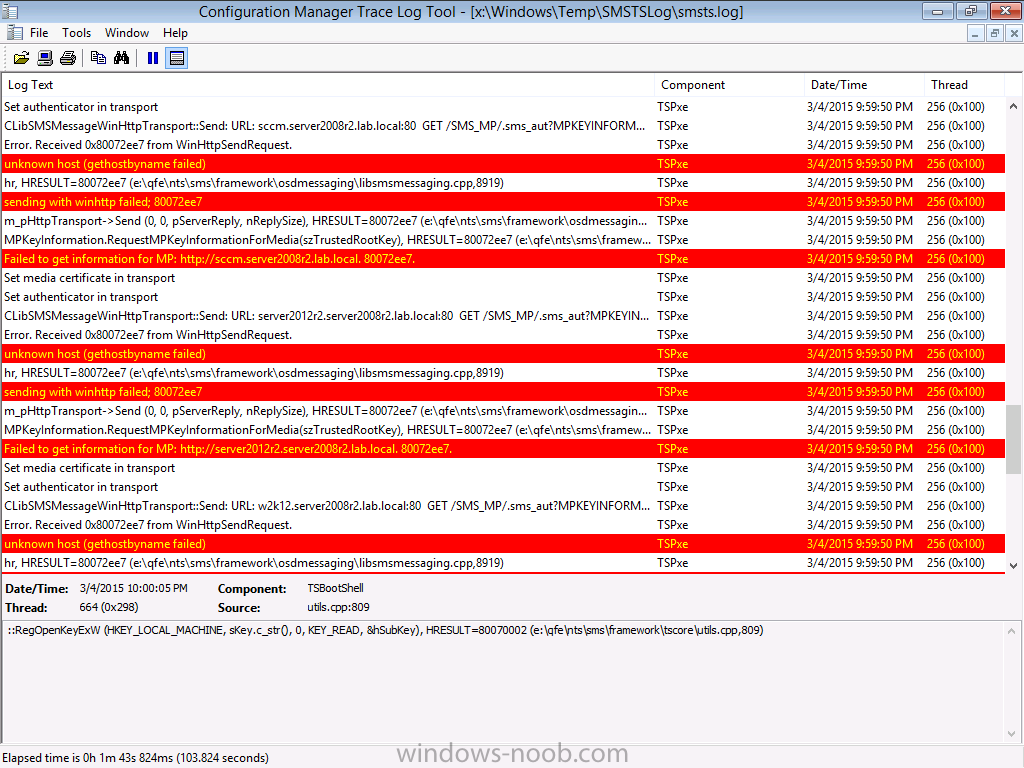
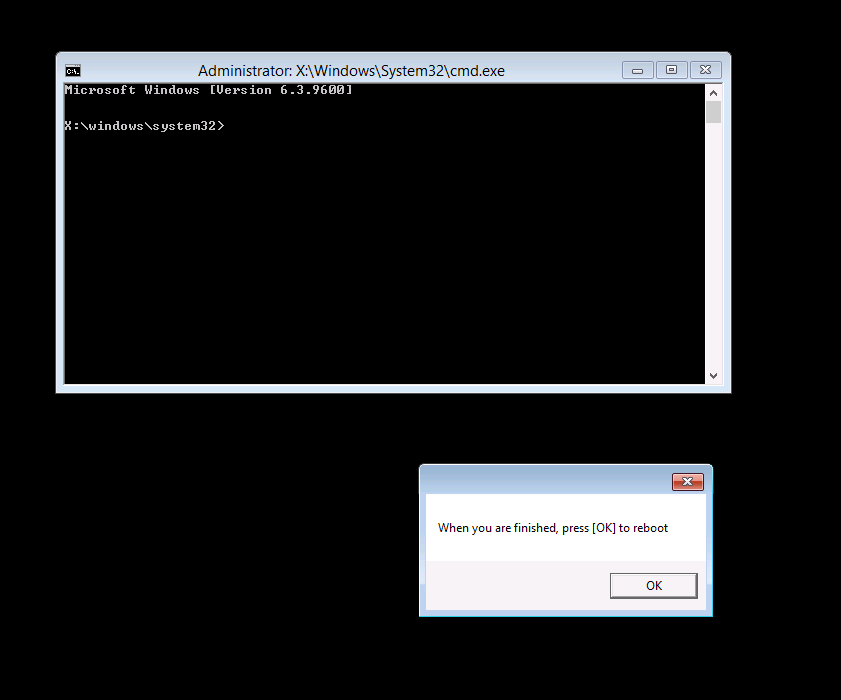
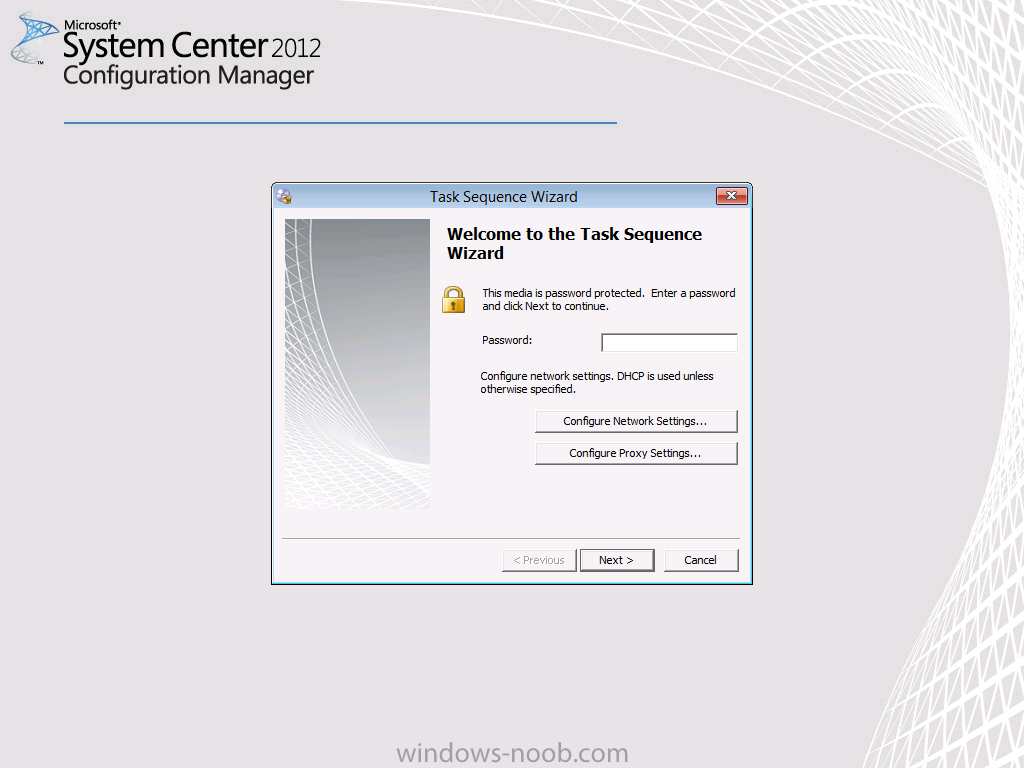
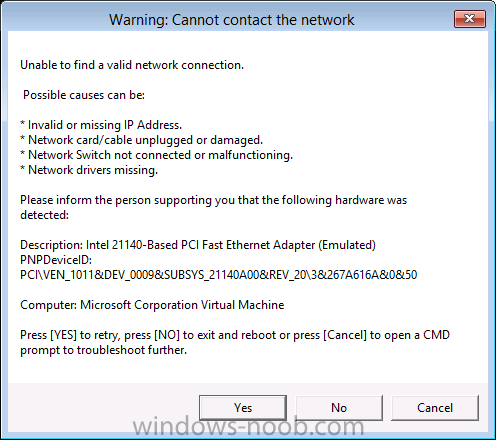
Introduction I've been thinking about doing something with this issue for some time now and finally got around to implementing it, however credit where credit is due I've based this on a method developed by a colleague of mine (Magnus Mourujärvi) to work with a 3rd party's custom boot wims. Basically that method is a registry hack which takes place in the boot wim. Problem We've all seen this happening, you get new hardware, you PXE boot, it pulls down the boot wim but as you don't have network drivers in your boot wim the task sequence won't run, or worse it just reboots without telling you why. checking the SMSTSLog will give you clues as to the problem... Troubleshooting it further would involve doing some clever use of wbemtest to find out what the network card pnp device id is in order to identify what the right driver is to be added into your boot wim. It was this process that I wanted to simplify, making it easy to identify the problem and the helping the user identify the Network card in question. Solution Add two files to your boot wim, update them to the distribution points and sit back and watch the show. Well ok, not quite that easy, there are some steps to do, documented below. Step 1. Get the script Note: there is a newer version of the script here which also checks for SATA connections (storage) Download the CheckForNetwork.vbs script here. Yeah it's a vbs, if I get time I'll convert it to PowerShell. CheckForNetwork.zip Extract it to C:\Temp In the script locate the ServersToPing array and edit it to match one or more servers you want to ping in your address, and save the script. Step 2. Copy a file from the MDT 2013 Toolkit Locate your MDT Toolkit files package and browse to the folder matching the architecture of the boot image you intend to edit, for example if you plan on editing the x64 boot wim then use a path similar to below: \\sccm\d$\sources\os\MDT 2013\Toolkit\Tools\x64 Locate a file called windowhide.exe and copy it to C:\Temp Step 3. Create some temp folders On the C:\ of your chosen server, create the following folder structure C:\Mount C:\WinPEMount\ C:\WinPEMount\X64 C:\WinPEMount\X86 Step 4. Make a copy of your boot wim Identify your target boot wim in the Configuration Manager console as shown below, this will be the boot wim we are going to make changes to... Right click the boot wim and select the data source folder, make a note of the Image Path Make a backup copy of the boot wim (ctrl+c and then ctrl+v) and then copy the boot.wim file (or WinPE.wim if it's a MDT created boot wim) to C:\Mount as shown below. Step 5. Mount the boot wim and make some changes Using Run as Administrator, start the Deployment Imaging and Tools Environment cmd prompt as shown below In the CMD Prompt that opens, mount the boot wim by issuing the following command: dism /mount-wim /wimfile:c:\mount\boot.wim /index:1 /mountdir:c:\winpemount\x64 Tip: In the above command i'm mounting a Configuration Manager boot image called boot.wim, if this was a MDT Created boot image it would be named WinPE.wim. Now that the boot image is mounted, we can make our modifications. First we will edit a registry key but to do that, we need to mount it. Using REG.exe mount the SYSTEM hive of the mounted boot wim REG.EXE load HKEY_LOCAL_MACHINE\Mount\ "C:\WinPEMount\X64\Windows\System32\Config\SYSTEM" Once done, change the current value for CmdLine in the mounted registry hive to run our script instead reg add "HKEY_LOCAL_MACHINE\Mount\Setup" /v CmdLine /t REG_SZ /d "cscript.exe CheckForNetwork.vbs" /f Next we commit those changes to the mounted registry REG.EXE unload HKEY_LOCAL_MACHINE\Mount and now we copy two files from C:\Temp to C:\WinPEMount\X64\Windows\System32 (assuming you are editing the x64 boot image) copy c:\temp\CheckForNetwork.vbs c:\WinPEMount\x64\Windows\System32 copy c:\temp\windowhide.exe c:\WinPEMount\x64\Windows\System32 Now that we've made our changes, we want to commit them to the boot wim (write the changes) dism /unmount-wim /mountdir:c:\WinpeMount\X64 /commit as shown below Step 6. Copy the modified boot wim back to the Image Path in Step 4. Now that we've made the changes we need, copy the modified boot wim from C:\Mount back to it's original location Step 7. Update your boot image to the distribution points In the Configuration Manager console, locate your boot image, right click and update it to the distribution points as shown below Once done you are ready to test the new functionality in the boot image. Step 8. Review the changes If the network works ok in WinPE, the task sequence will load as normal and you won't see any popup, or notice anything other than an additional 12 seconds added to your boot time. However, in the event that you have no network and cannot ping any server in the array of server IP's listed in the script, you will see the following warning popup after WinPE starts (before the PXE password and before a task sequence is selected). Note: The script try's to hide Wireless nics from being displayed in the results as we don't use wireless nics for OSD, yet. As you can see from the message it provides the following info a reason for the popup (no network connectivity) lists the detected Network Card lists the PNP Device ID identifies the Computer model and gives the user some options click YES to retry (for example if the network cable was not connected) click CANCEL to open a CMD prompt if further troubleshooting is needed click OK to reboot. Below you can see what happens when the user clicks on Cancel well that's it ! have fun :-) cheers niall