anyweb
-
Posts
9181 -
Joined
-
Last visited
-
Days Won
366
Everything posted by anyweb
-
 and did you copy the operating system source files to the required path before running the script above ?
 -
sorry, what problem do you have exactly ?
-
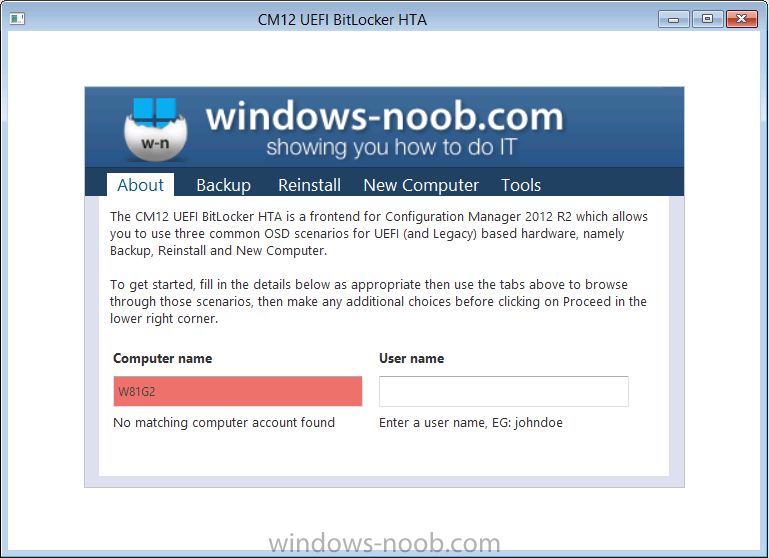
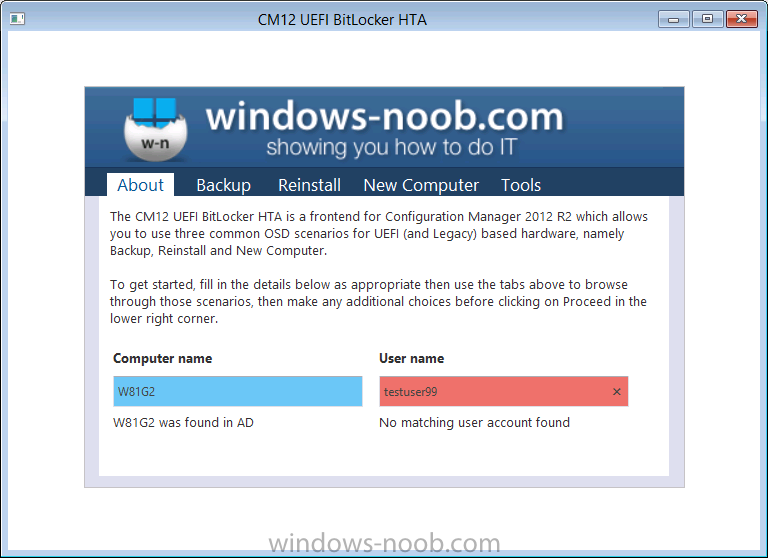
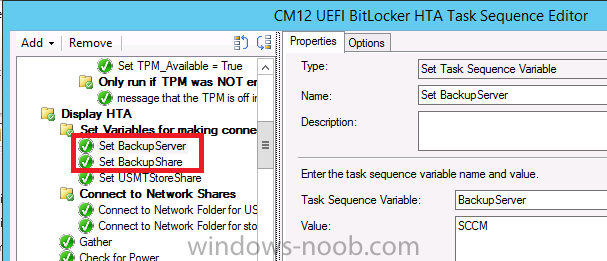
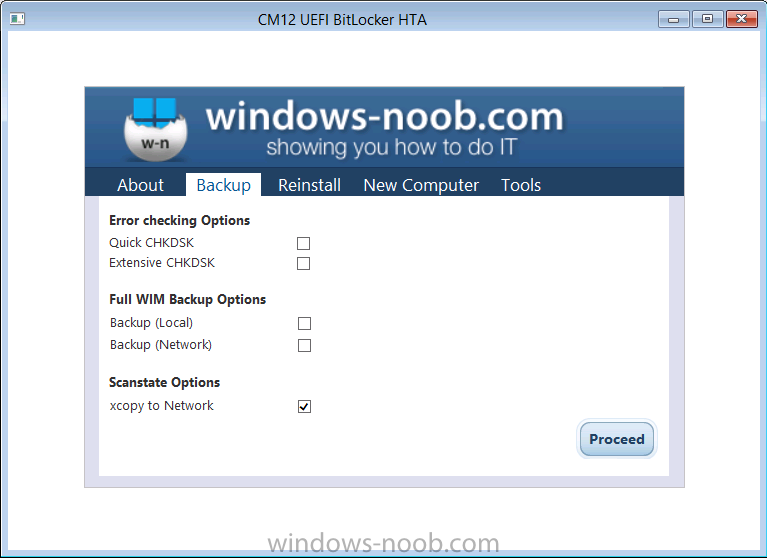
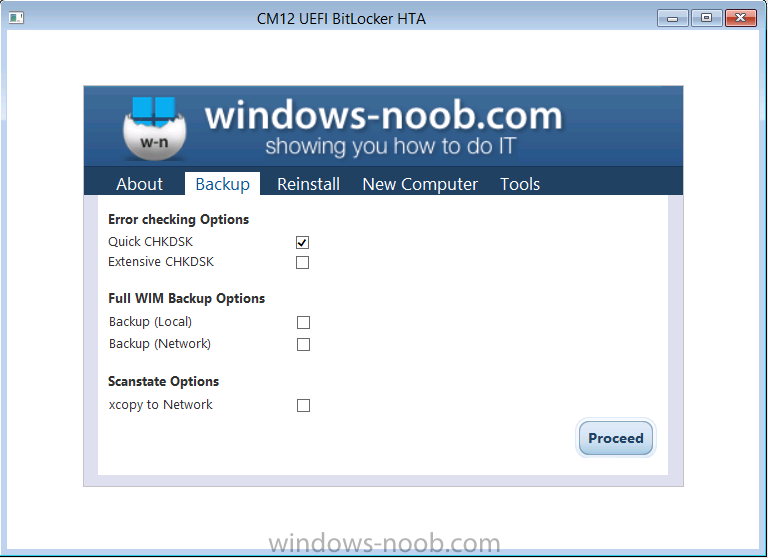
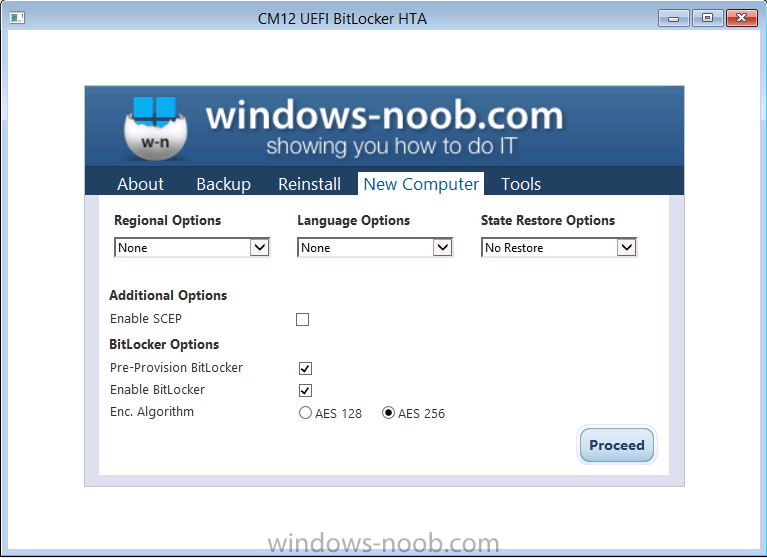
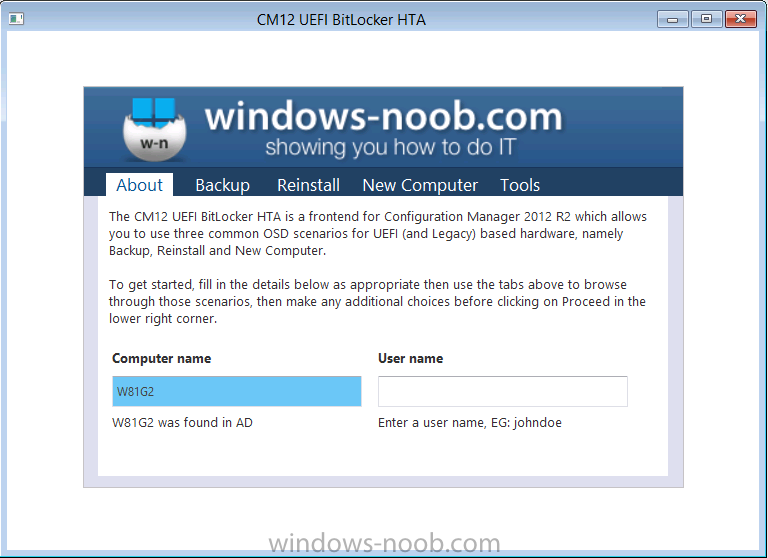
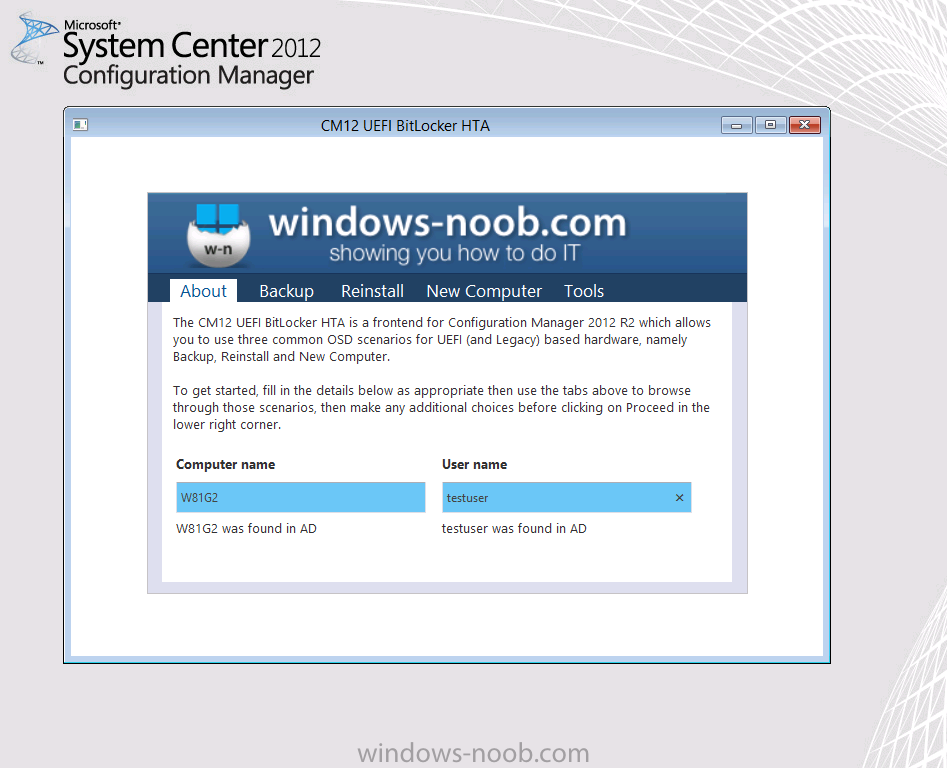
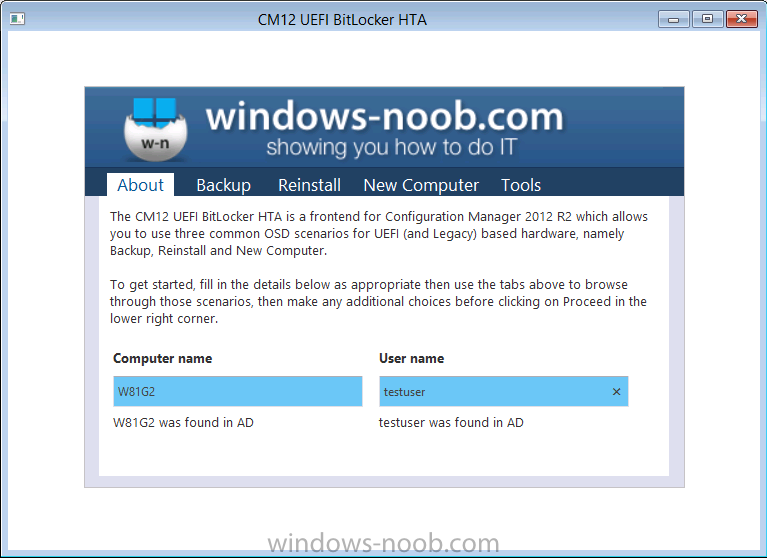
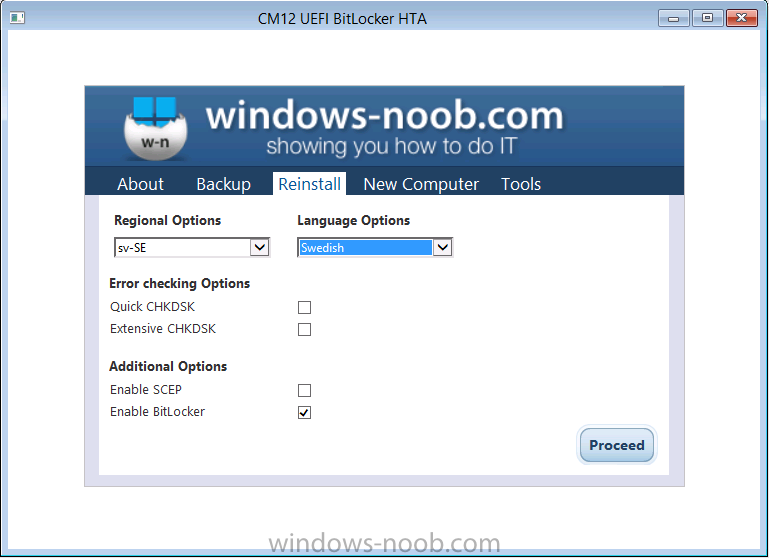
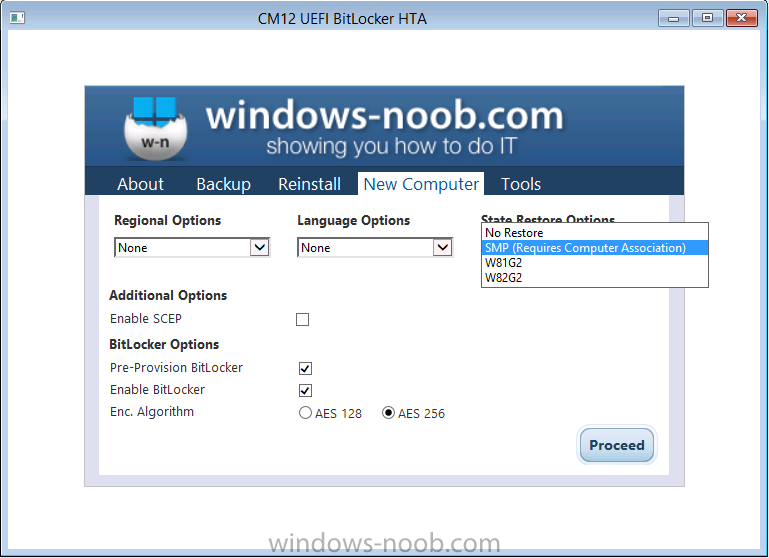
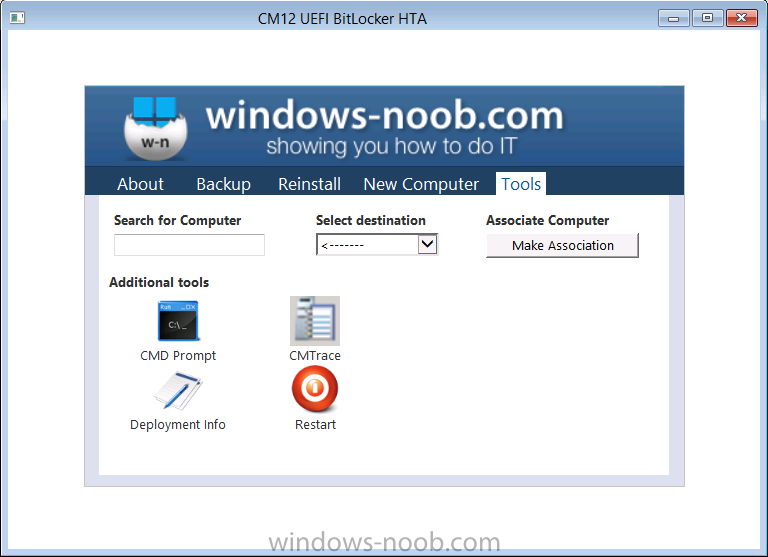
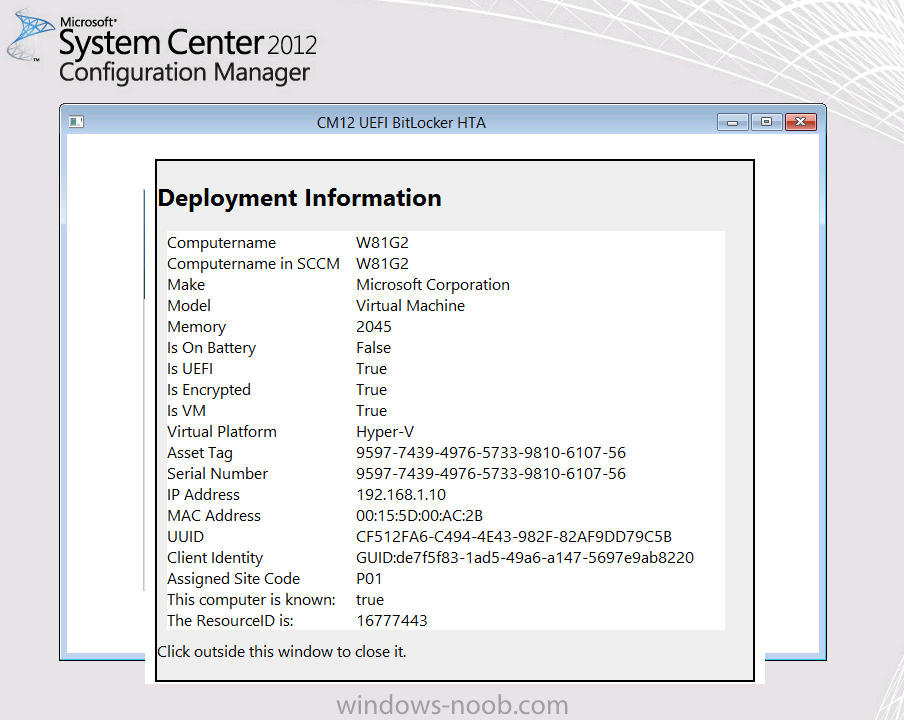
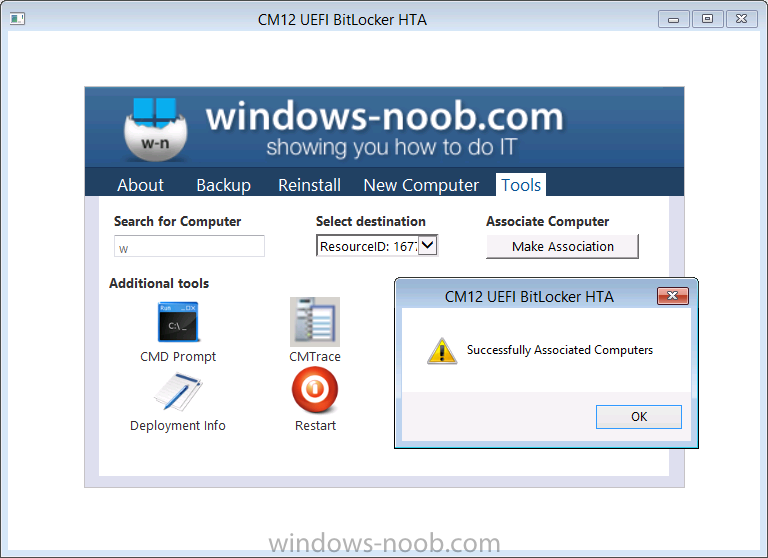
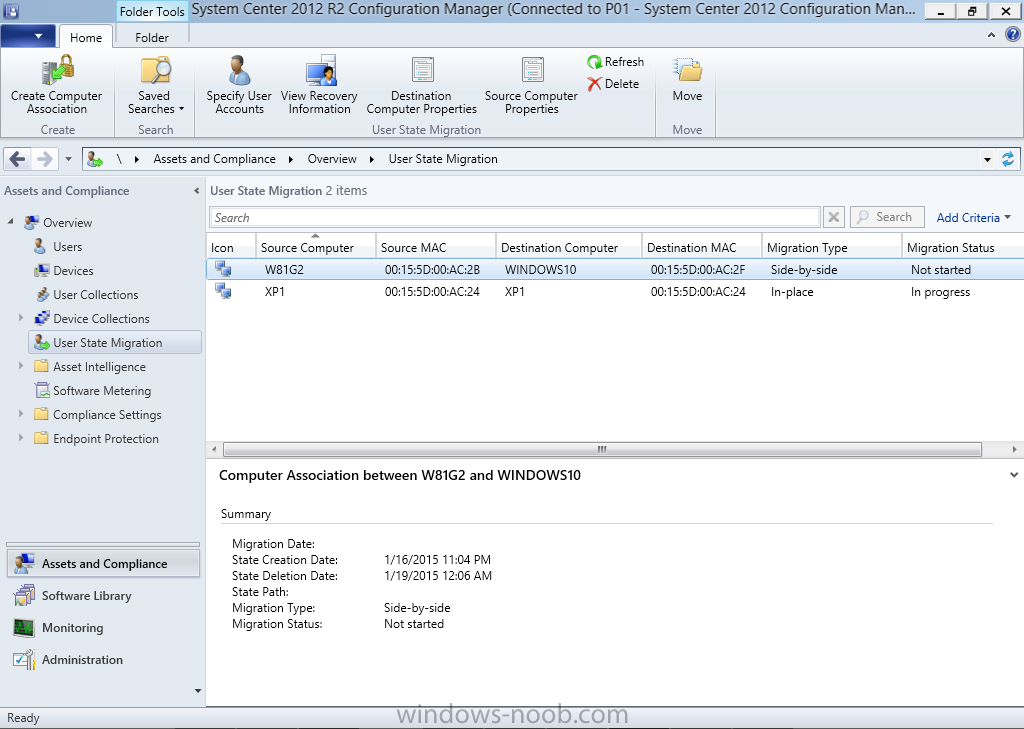
This is version 4.0 of the original windows-noob FrontEnd HTA, and this time it has evolved to support System Center 2012 R2 Configuration Manager using UEFI (or legacy capable) hardware running Windows 8.1 Enterprise with Update. For the purpose of documenting the history of this HTA I'll list the previous versions below and which version of Configuration Manager with MDT Integration they were designed to work with: Ver 1. - windows-noob FrontEnd HTA (Configuration Manager 2007 R2 & MDT 2010 update 1) Ver 2. - The BitLocker FrontEnd HTA (Configuration Manager 2007 R2 & MDT 2010 update 1) Ver 3. - The CM12 BitLocker FrontEnd HTA (Configuration Manager 2012 R2 & MDT 2012 update 1) The key point of this FrontEnd that makes it stand out from others is that it allows you to Backup, Reinstall or do New Computer scenarios on BitLocker encrypted UEFI computers while still in WinPE. Update: June 25th, 2015. I've added the ability to BitLocker Hyper-V Virtual Machines (Generation 2) during a New Computer scenario, see this post for details. Let's take a look at the main features. The FrontEnd has tabs to allow you to easily navigate through the options. In each tab are further options which can be enabled via checkboxes or via drop down menus or other clickable buttons. The About tab In the About tab (default view) you get to see some information about the frontend itself, and if the computer name (detected by the webservice) is already in AD, if it is it will be highlighted in blue as shown below. If the computer is not in AD then you'll be informed of the fact with a nice red colour and a message as shown below. In addition you can optionally enter a username which will also be checked against AD membership via a web service. The username entered must be entered as simply the username, do not specify a domain name or \ infront of the username as this will generate an error. Below you can see what happens when the user name provided is not detected in AD. and below you can see when the user is detected in AD The username entered here will become the Primary user of the computer and if enabled in the task sequence, they will become the local administrator of that computer. The Backup tab The backup tab allows you to perform quick or extensive disc checking on the disc in cases where you feel there may be problems with the disc that you'd like to be fixed before backing it up. You have the ability to do a Full WIM backup of the computer which can either be stored locally on that computer or on a network share, the network share (and sub folder) are defined in the task sequence in the following steps: Finally, you can backup the User state to a network share called USMTStores by choosing the last option, xcopy to network. Once this user state is backed up to the network you'll be informed of the progress and then the task sequence will shutdown the computer. This captured state can be restored later on another computer using the New Computer tab via the State Restore Options drop down menu. The Reinstall tab The Reinstall tab allows you to reinstall the computer with Windows 8.1 with update while retaining the users data using hard linking. In addition, you can choose to change the regional and language options via the two drop down menus. In addition to the above, you can select to install the System Center Endpoint Protection antivirus client agent and enable BitLocker. The New Computer tab The New Computer tab is where you'll want to do your New Computer installations, and it offers you the same options as the Reinstall scenario, but in addition, you can specify the encryption level (algorithm) that BitLocker uses. In addition, you can use the State Restore Options drop down menu to select the type of restore you want to achieve, if you select SMP (State Migration Point) then you should have backed up (captured) user data to the SMP from a source computer beforehand. In addition to restoring from the SMP, you can choose to restore previously backed up User state (via the xcopy to network backup option) by selecting the profile name listed. The tools tab This tab provides some tools to help the operator view useful information about the computer they are working on, or to for example open up SMSTS.LOG via the CMTrace tool, or to open a cmd prompt for troubleshooting. In addition you can click on the Deployment Info icon to see detailed information about the computer, including whether it is in an encrypted state or not. Finally, you can use the top three boxes to search for computer names, which if found will be shown in the drop down menu, and from there you can select one, and then click on Make Association button, this will make an association with the computer you are currently using and the target you selected. Tip: you can verify this association via the User State Migration node in Assets and Compliance in the System Center 2012 R2 Configuration Manager console as shown below. Note: If you like to experiment, then after making an association above, go back to the Backup tab, and without selecting anything in Backup options, click on Proceed. This is an experimental feature still in development so your results may vary. What about the rest of the features The task sequence and associated scripts do more than the above, and below I've listed the main features. detects if there is no power cord plugged in to your laptop and alerts you of the fact. detects if the hardware is Surface Pro 3 and installs the driver package if no TPM is found it disables the BitLocker capability in the HTA allows you to do Reinstall computer scenarios on Hyperv enabled Gen 2 virtual machines with BitLocker. allows you to Notify the end user if the task sequence was successful or unsuccessful creates a REG key upon successful task sequence completion and adds it to the registry creates a text file in c:\ with the DATE and TIME to demonstrate successful task sequence copies CMTrace.exe to the Windows\ of the OS drive. Download the HTA Ok now that you've seen the above you'll no-doubt want to try it, trust me it's worth it, but it's not for the faint hearted. For that reason I'll produce a Part 2 of this guide which will help you with installation of the bits and pieces. The CM12 UEFI BitLocker HTA.zip Unzip the contents, you'll find a ZIP file within, you should import that as a Task Sequence in System Center 2012 R2 Configuration Manager. Once done you cannot save the task sequence until you satisfy all the missing packages it references and they are listed in the rough guide. You will need the following in place before trying to use the HTA to it's full potential. * Configuration Manager 2012 R2 * MDT 2013 integrated with Configuration Manager 2012 * Language packs for the Appropriate Operating System * Maik Kosters Web Services (version 7.3) * MBAM Server 2.0 (or greater) to store and manage the BitLocker encryption recovery keys The other two folders should be used as packages that are referenced in the task sequence. Please review Part 2 for installation and setup instructions or if you cant wait, review the Rough Guide (it's rough, trust me) text file included in the download zip. Related Reading The CM12 UEFI BitLocker Frontend HTA - Part 2. Installation - https://www.windows-noob.com/forums/topic/11900-the-cm12-uefi-bitlocker-frontend-hta-part-2-installation/ CM12 in a Lab - How can I Enable BitLocker on Hyper-v Gen 2 virtual machines during OSD using System Center 2012 R2 Configuration Manager ? CM12 in a Lab - How can I reinstall BitLockered UEFI computers using network boot and System Center 2012 R2 Configuration Manager ? Thanks ! I want to say thanks to my beta testers Eswar Koneti, Peter van Der Woude and Paul Winstanley for their support during this development.


-
it all depends on your applications detection method as to whether it will redeploy or not on those systems that already have it, so why are you using the legacy package model instead of the application model
-
do you mean you created a task sequence and deployed it to the collection or you deployed a package to the collection or you deployed an application to the collection either way, as long as the deployment settings don't somehow exclude the new computers, then they should also get the package once added to the collection.
-
you will need to start customizing your USMT xml files to capture the data that you want and test and verify it on virtual machines before doing the migration.
-
hi bruno can you link to the sript in question or post it here
-
the msi is something called Surface Platform Support and it shows up in Programs and Features after being installed, but apart from that I'm not sure what it does and yes you can install it using a standard package method, it's just a msiexec /i bla.msi /q
-
The next chapter of Windows 10 will be streamed live on January 21st and I'm sure we are all looking forward to seeing what is coming next and what has changed. Microsoft has already tweeted this screenshot to get us alerted to how you can separate work and play with Windows 10 and this one to show how you can keep tabs on your apps don't forget the date, January 21st. Be there, or be square ! http://news.microsoft.com/windows10story/


-
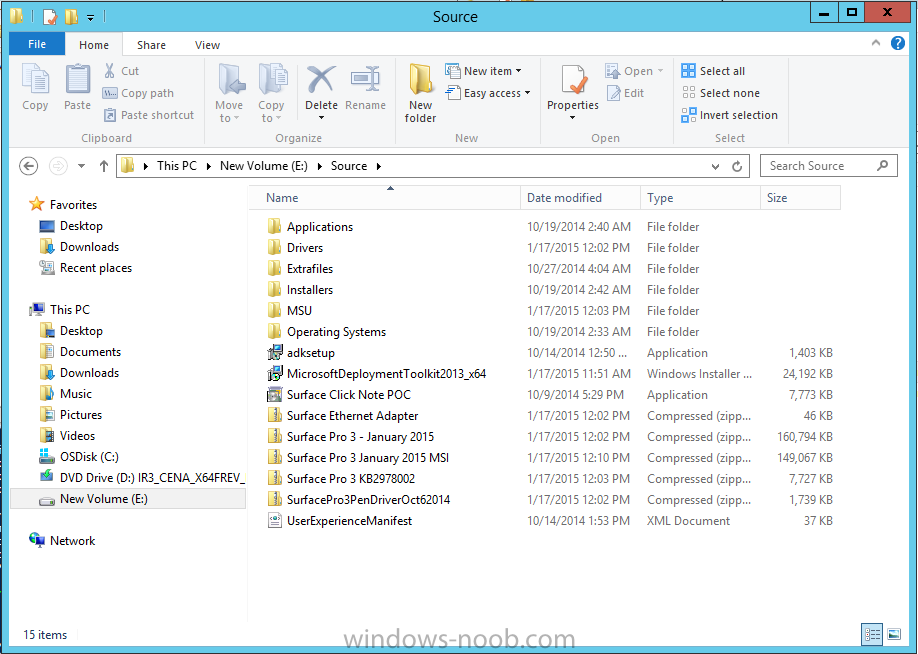
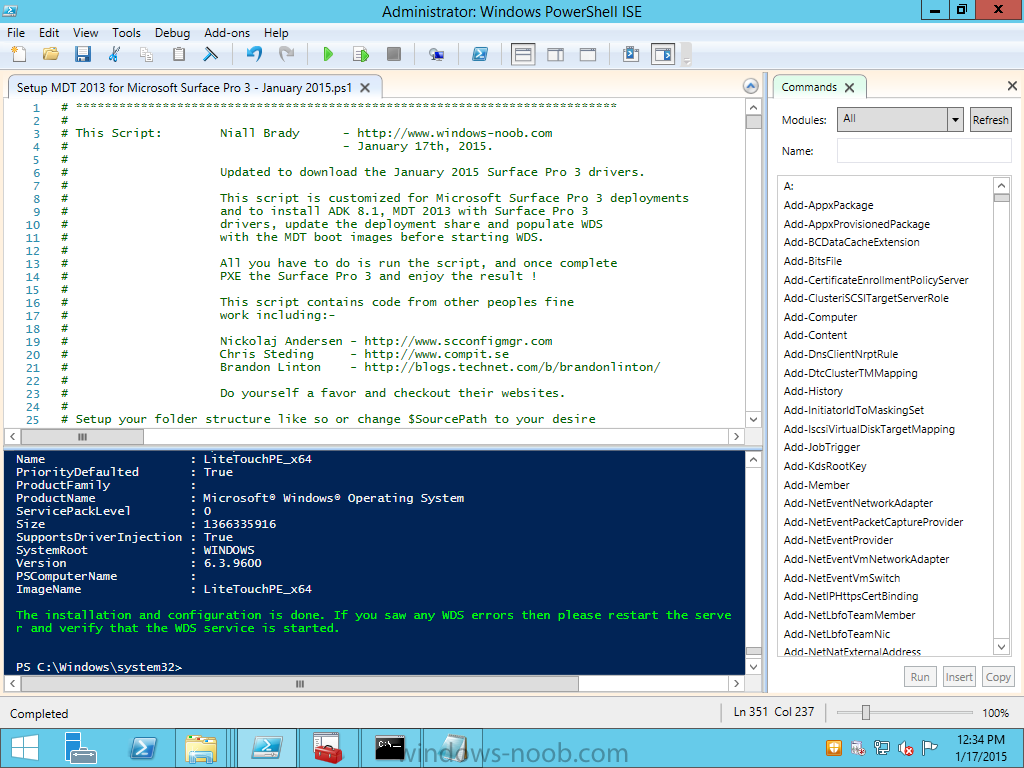
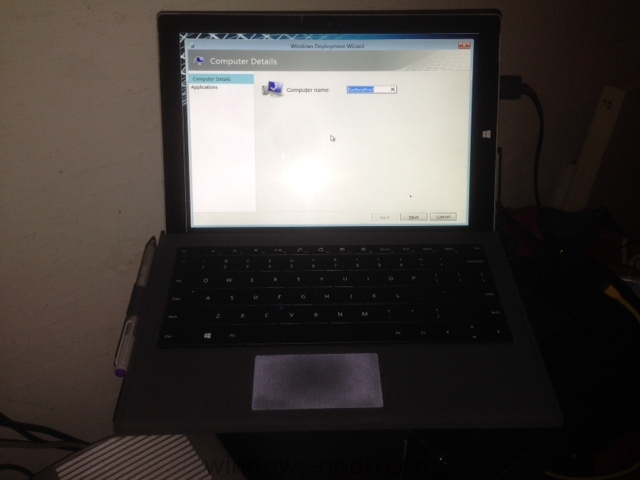
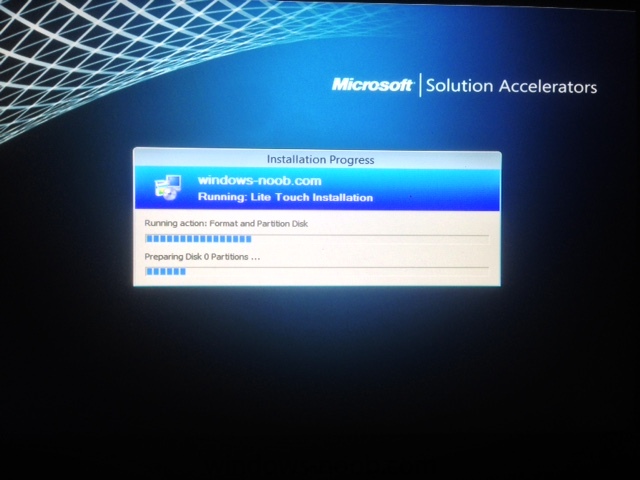
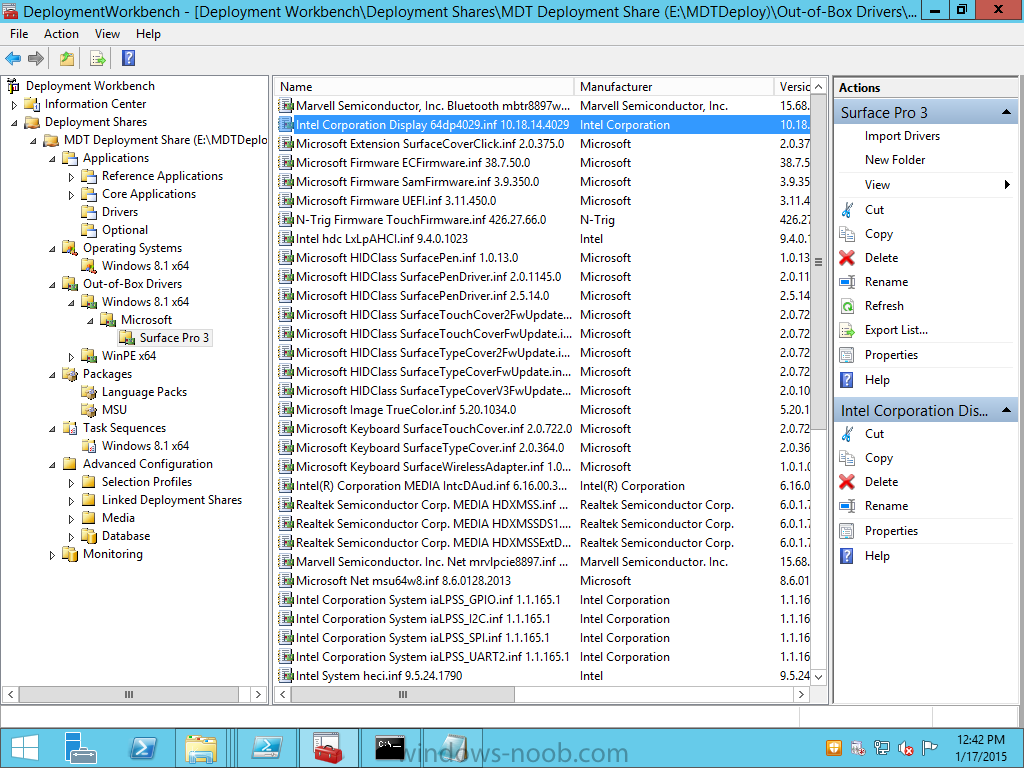
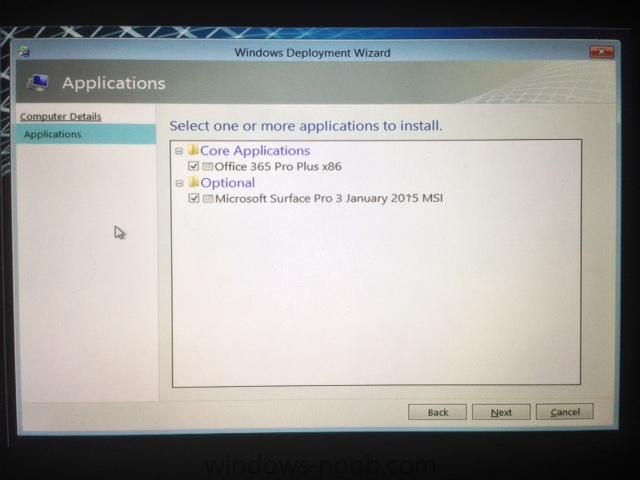
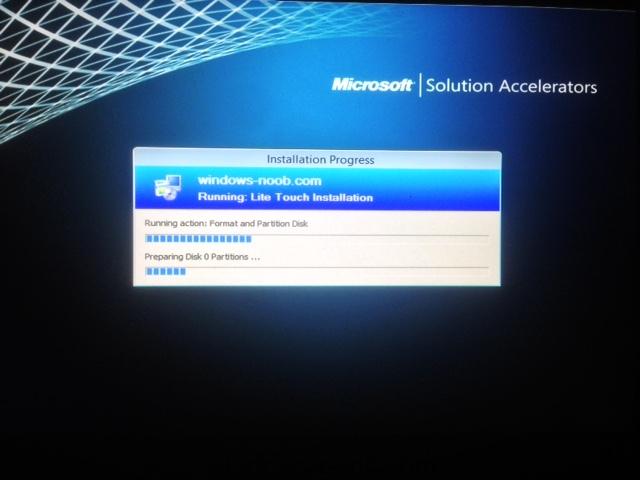
Introduction Microsoft released new updated drivers for the Surface Pro 3 yesterday and you can read about what those driver updates contained here. Here's a breakdown of what those driver versions are: Surface Pro UEFI update (v3.11.450.0) adds support for updated HD Graphics Family driver. HD Graphics Family driver update (v10.18.14.4029) enhances display stability and performance, improves user experience when using Miracast adapters. Improves compatibility with DisplayPort monitors and daisy chaining. Wireless Network Controller and Bluetooth driver update (v15.68.3073.151) addresses connectivity issues while Hyper-V is enabled. Adds an advanced feature to control the 2.4Ghz and 5Ghz band preference. Surface Home Button driver update (v2.0.1179.0) ensures compatibility with the Surface Hub app. Microsoft Docking Station Audio Device driver update (v1.31.35.7) improves the user experience while using the Surface Pro 3 Docking Station so that sound is available when a speaker is not connected to the docking station. Last year I blogged about automating the deployment of the Microsoft Surface Pro 3 using MDT 2013 and PowerShell, the original blogpost is here and I updated it in November with a newer version of the script here. Now that there are new drivers available, I've modified the PowerShell script to download and install them including the new MSI file. It creates the deployment share with a new name (MDTDeploy) instead of the default, you can always configure it as you wish. For those of you that don't know, this script is totally automated and builds a complete MDT 2013 deployment solution for deploying the Surface Pro 3 with all drivers included from Microsoft right up to January 2015, all you have to provide is Windows 8.1 x64 Update source files and optionally Office 365. Here's the new updated script. Setup MDT 2013 for Microsoft Surface Pro 3 - January 2015.zip This is what it looks like when running Once complete, it should look like this, scroll up to see if there are any errors in red, if so, fix them, The script will have downloaded several new drivers to your source path And those drivers are automatically imported into the Deployment Workbench. Below you can see the updated Intel HD Graphics driver is shown. and below is what you'll see when you UEFI network boot your Surface Pro 3 computers Prompted to change the name Prompted whether you want the optional Applications or not and off it goes with the automated deployment Please test this out and let me know how it went ! cheers niall


-
i'd suggest a call to Microsoft CSS assuming you are already on R2 CU3
-
look at the smsts.log on the client computer that failed, you cannot restart a failed task sequence, you have to fix the issue then start again
- 1 reply
-
- 1
-

-
Here’s a quick post to let you know that I’ll be speaking at a System Center Configuration Manager event in Zurich, February 9th, for the Switzerland User Group, the details are here. There are other cool speakers like Kenny Buntinx and Tim De Keukelaere amongst others. The sessions I’ll host are shown below:- 10.15-11.15 Migrating bitlockered uefi devices Security related Settings Migrating BitLockered UEFI computers using network boot and System Center 2012 R2 Configuration Manager – See more at: http://configmgr.ch/cmce-r2/#sthash.kpvMGRkD.dpuf 14.45-15.45 Deploying Windows 8.1 x64 to the Microsoft Surface Pro 3 with Configuration Manager 2012 R2 and MDT 2013 Deploying Windows 8.1 x64 to the Microsoft Surface Pro 3 with Configuration Manager 2012 R2 and MDT 2013 – See more at: http://configmgr.ch/cmce-r2/#sthash.kpvMGRkD.dpuf 16.00-17.00 Interview about Windows Noob and the Website Behind. Interview with Niall abut his awesome Windows-noob.com website the Forum and the Guides – See more at: http://configmgr.ch/cmce-r2/#sthash.kpvMGRkD.dpuf If you are interested in the content above, and are in the area on the 9th of February then do please sign up now ! cheers niall
-
not mine, did you see how I added the drivers in this video ? http://channel9.msdn.com/Series/Surface-Pro-3-Deployment
-
the hint is in the error message it can't find pnputil if you are using a 64 bit os (and the SP3 is 64bit) then use C:\Windows\Sysnative\pnputil.exe as the path cheers niall
-
look for the ccmsetup.log, it probably logs the error, attach it here
-
also, take a look at the CM12 BitLocker Frontend HTA, it has way many more things than you need in the task sequence and associated scripts, however it also deals with auto computer naming and it might be worth your while taking a look at it CM12 in a Lab - The CM12 BitLocker FrontEnd HTA
-
have a read of this old post, it should help you with your task in Configuration Manager at least, if you are using MDT its as easy as editing your customsettings.ini as described here.
-
Trying to add OU selection to the CM2012 Bitlocker FrontEnd HTA
anyweb replied to kkonovalov's question in Frontends, HTA's and Web Services
sure thing http://www.windows-noob.com/forums/index.php?/topic/8846-how-can-i-pause-a-task-sequence-in-system-center-2012-configuration-manager/ from the index here http://www.windows-noob.com/forums/index.php?/topic/4045-system-center-2012-configuration-manager-step-by-step-guides/ -
are you using configuration manager or not ?
-
yes you can deploy as many operating systems as the version of MDT you are using will support, speaking of which, XP is no longer supported by Microsoft.
- 1 reply
-
- 1
-
-
hi there, i've made the change
- 1 reply
-
- 1
-
-
Using Powershell to apply Task Sequence variables
anyweb replied to AaronBISSELL's topic in Configuration Manager 2012
glad you got it sorted -
Trying to add OU selection to the CM2012 Bitlocker FrontEnd HTA
anyweb replied to kkonovalov's question in Frontends, HTA's and Web Services
simply monitor the smsts.log and review the success or failure of the step setting the variable, also check the dumpvars step, it allows you to view variables that are set in winpe. to do all this, use the pause functionality built into the task sequence -
Trying to add OU selection to the CM2012 Bitlocker FrontEnd HTA
anyweb replied to kkonovalov's question in Frontends, HTA's and Web Services
did you edit the hta/javascript backend too ? what happens when you select an ou, did you confirm that it's set before the task sequence starts