anyweb
-
Posts
9273 -
Joined
-
Last visited
-
Days Won
371
Everything posted by anyweb
-
 it must be because Configuration Manager 2012 SP1 doesn't support Windows 8.1 and most of those drivers are for Windows 8.1 here's the release notes for R2 in relation to OSD: The following items are new or have changed for operation system deployment in System Center 2012 R2 Configuration Manager: Support for Windows Server 2012 R2 and Windows 8.1. For more information about supported operating system versions, see Prerequisites For Deploying Operating Systems in Configuration Manager. Support for boot images created by using the Windows Automated Installation Kit (Windows AIK) for Windows 7 SP1 and based on Windows PE 3.1. For more information about customizing and adding boot images to Configuration Manager, see How to Customize Windows PE Boot Images to Use in Configuration Manager. Added support for PXE boot of IA32 UEFI computers. For more information about operating system requirement for a PXE-enabled distribution point, see the Operating System Requirements for Typical Site System Roles section of the Supported Configurations for Configuration Manager topic. Ability to create prestaged content files for task sequence content. The Create Prestaged Content action creates a compressed, prestaged content file that contains the files and associated metadata for the content in the task sequence. By default, Configuration Manager detects and adds the dependencies associated with the task sequence to the prestaged content file. You can then manually import the content at a site server, secondary site, or distribution point. For more information about prestaged content, see the Determine Whether To Prestage Content section in the Planning for Content Management in Configuration Manager topic. Added virtual hard disk management from the Configuration Manager console. You can create and modify virtual hard disks, and upload them to Virtual Machine Manager. New task sequence steps: Run PowerShell Script: This task sequence step runs the specified Windows PowerShell script on the target computer. Check Readiness: This task sequence step verifies that the target computer meets the specified deployment prerequisite conditions. Set Dynamic Variables: This task sequence step gathers information and sets specific task sequence variables with the information. Then, it evaluates defined rules and sets task sequence variables based on the variables and values configured for rules that evaluate to true. Note For more information about task sequence steps, see Task Sequence Steps in Configuration Manager. New task sequence built-in variables: SMSTSDownloadRetryCount: Use this variable to specify the number of times that Configuration Manager attempts to download content from a distribution point. SMSTSDownloadRetryDelay: Use this variable to specify the number of seconds that Configuration Manager waits before it retries to download content from a distribution point. TSErrorOnWarning: Use this variable to specify whether the task sequence engine treats the requirements not met warning from an application as a fatal error. You can set this variable to True or False. False is the default behavior. SMSTSMPListRequestTimeout: Use this variable to specify how much time a task sequence waits before it retries to install an application after it fails to retrieve the management point list from location services. By default, the task sequence waits one minute before it retries the step. This variable is applicable only to the Install Application task sequence step. _TSAppInstallStatus: The task sequence sets the _TSAppInstallStatus variable with the installation status for the application during the Install Application task sequence step. The task sequence sets the variable with one of the following values: Undefined: Set when the Install Application task sequence step has not been run. Error: Set when at least one application failed because of an error during the Install Application task sequence step. Warning: Set when no errors occur during the Install Application task sequence step, but one or more applications, or a required dependency, did not install because a requirement was not met. Success: Set when there are no errors or warning detected during the Install Application task sequence step. Note For more information about built-in task sequence variables, see Task Sequence Built-in Variables in Configuration Manager. For more information, see the Introduction to Operating System Deployment in Configuration Manager topic in the Deploying Software and Operating Systems in System Center 2012 Configuration Manager guide.
 -
I need Exchange Server 2010 and 2013 Step By Step Guides
anyweb replied to Mohamed Tawfik's question in Exchange
have you seen here http://www.windows-noob.com/forums/index.php?/topic/3075-exchange-guides/ -
can you show a screenshot of the error, or include the relevant error from smsprov.log, it could be just a monitor .inf file it's complaining about in which case it's nothing to worry about, also i've created an automated MDT setup for the Surface Pro 3 which could tie you over until you upgrade to Configuration Manager 2012 R2 it's available here. http://www.windows-noob.com/forums/index.php?/topic/11479-how-can-i-deploy-windows-81-x64-to-the-microsoft-surface-pro-3-using-mdt-2013/
-
Executing an .hta (Not in a OSD)
anyweb replied to clausjuhl_p's topic in Configuration Manager 2012
it does trust me, here's how serviceui works, http://www.windows-noob.com/forums/index.php?/topic/8846-how-can-i-pause-a-task-sequence-in-system-center-2012-configuration-manager/ substitute it to work with your hta here's a guide for that http://t3chn1ck.wordpress.com/2011/09/30/displaying-front-end-htas-within-an-sccm-task-sequence/ -
At TechEd Europe, we announced that new features would be coming soon to Microsoft Intune. In follow up, the Intune team will be rolling out a service update between November 17, 2014 and November 19, 2014 that introduces new capabilities to Intune standalone (cloud only). During this update, you may not be able to login to the Intune administration console. To see the specific timeframe for when your access to the service may be interrupted, please visit the Microsoft Intune status page. New Intune standalone features that will be released as part of this service update include: Enhanced user interface for Intune administration console Ability to restrict access to Exchange on-premises email based upon device enrollment Bulk enrollment of devices using a single service account Lockdown of Supervised iOS devices and devices using Samsung KNOX with Kiosk mode Targeting of policies and apps by device groups Ability to report on and allow or block a specific set of applications Enforcement of application install or uninstall Deployment of certificates, email, VPN and WiFi profiles Ability to push free store apps to iOS devices More convenient access to internal corporate resources using per-app VPN configurations for iOS devices Remote pin reset for Windows Phone 8.1 devices Multi-factor authentication at enrollment for Windows 8.1 and Windows Phone 8.1 devices Ability to restrict administrator access to a specific set of user and device groups Updated Company Portal apps to support customizable terms and conditions Also, as part of this service update, you’ll notice that all references to Windows Intune have been updated to Microsoft Intune. This name more accurately represents Intune’s cloud-based mobile device management (MDM) and mobile application management (MAM) capabilities across iOS and Android platforms, as well as Windows. You can read more about the rebrand on Intune blog here. We are rapidly adding new capabilities to the Intune service, and we have a lot of exciting new capabilities currently under development, so you can expect additional features to be made available over the next few months. Stay tuned to this blog for further information on upcoming Intune service updates, in-depth blog posts that will cover the new features, and additional information on when these new Intune standalone features will be made available to customers using System Center Configuration Manager integrated with Intune. To stay up-to-date, be sure to also follow us on Twitter and Facebook. Additionally, don’t forget to register for today’s 30 minute webinar starting at 10:00AM PT to learn more about how to protect corporate data by restricting access to Exchange email on unenrolled or non-compliant devices using Intune. Related resources: Find technical resources in the TechNet library Sign up for a free trial of Microsoft Intune Please Note: To identify the Service Instance that your Intune subscription is running on, open your Intune administration console, click on the Admin tab and then select View Service Status. Your Service Instance will be displayed at the top of this page.
-
do you mean you want to migrate from Configuration Manager 2007 to Configuration Manager 2012 ? if so yes, follow this guide for ideas. http://www.windows-noob.com/forums/index.php?/topic/4926-using-sccm-2012-rc-in-a-lab-part-14-performing-a-side-by-side-migration-from-configuration-manager-2007/
-
check if the file in that package actually is ok, maybe the EXE is blocked (right click it see is it blocked) or maybe your AntiVirus solution is causing issues.
-
great to hear it !
-
I didn't say it was practical, I was only offering you a choice of what to do based on your problem, if you think the console would need the functionality you desire then i'd suggest you raise a DCR (desired configuration request) for the new feature on connect.microsoft.com and who knows, based on popularity it may make it into the next version of Configuration Manager
-
Installing Windows Intune as Part of Task Sequence
anyweb replied to TheWes's topic in Configuration Manager 2012
do explain exactly what permissions you changed just so others can learn, thanks -
Executing an .hta (Not in a OSD)
anyweb replied to clausjuhl_p's topic in Configuration Manager 2012
it's not hanging it's actually running the HTA as a system process so you don't see it, the user doesn't see it. If you open task manager and look at the processes do you see MSHTA.exe running ? kill it and the task sequence will continue, use serviceUI.exe instead to display the hta -
SCCM 2012 Can't Boot from PXE 0xC0000001
anyweb replied to smmb's topic in Configuration Manager 2012
enable command support in your boot wim, then redistribute your boot images to the dp, once done, pxe boot again, and immediatly after pressing F12, once WinPE loads, press F8, then grab the logs from x:\windows\temp\smstslog\smsts.log -
i didnt spend any time figuring out how many hours off will cause an issue, but it's really the date that's the clincher as far as i could see, in other words if your date is off, it will fail to retrieve policy, the policy it's failing to retrieve is Machine Policy from Configuration Manager, not Group Policy from AD, if you want to check how many hours make it also fail, feel free to do so
-
correct, you'd have to go back into your task sequences and replace the old image with the new one, it's the only supported way I can think of to start with a clean slate so to speak
-
Clientreplace (Capture) UEFI
anyweb replied to zophar's question in Microsoft Deployment Toolkit (MDT)
are you starting the capture within Windows ? -
more than likely one or more of your updates is causing a double reboot or rebooting when the task sequence doesnt expect it check this link for details. http://support2.microsoft.com/kb/2894518
-
have you seen this ? http://technet.microsoft.com/en-us/library/jj553405.aspx The following three groups in Configuration Manager can be updated: System Center 2012 Configuration Manager server roles, which include: Central administration site Primary site Secondary site Remote SMS Provider Note Updates for site system roles, including updates for the site database, are installed as part of the update for site servers. Beginning with Configuration Manager SP1, updates for site system roles include updates that apply to cloud-based distribution points. However, updates that apply to a pull-distribution point, install as an update for the Configuration Manager client and not as an update for site system roles.
-
Image not deploying to task sequence
anyweb replied to AndyCompanyZ's topic in Configuration Manager 2012
the error translates to: so is there some quota configured ? -
I would imagine removing the wim from the console, and then adding it back would produce a 'clean' result, have you tried that
-
hmm are some of those UEFI devices x86 ? if so they REQUIRE an x86 boot wim, the surface is native x64 hardware so requires a x64 bit boot wim, please attach the smspxe.log file here please and tell me what mac address you are using on the Surface, also remember the last task sequence deployed to a collection will be the boot wim that 'answers' the pxe request (LIFO)
-
have you followed my guide exactly ? are you sure it's pulling down a 64bit boot wim ? what happens when you UEFI network boot, what do you see before it fails...
-
what i mean is to update the firmware BEFORE the build, as there were issues with some docking stations having issues with PXE boot and those issues are resolved with the updated firmware. Here's the process of updating the firmware offline, I'd suggest you try it. http://blogs.technet.com/b/askpfeplat/archive/2014/10/20/how-to-update-the-surface-pro-3-firmware-offline-using-a-usb-drive.aspx
-
thanks ! have you tried updating the firmware (offline or online) on the troublesome Surface Pro 3's ?
-
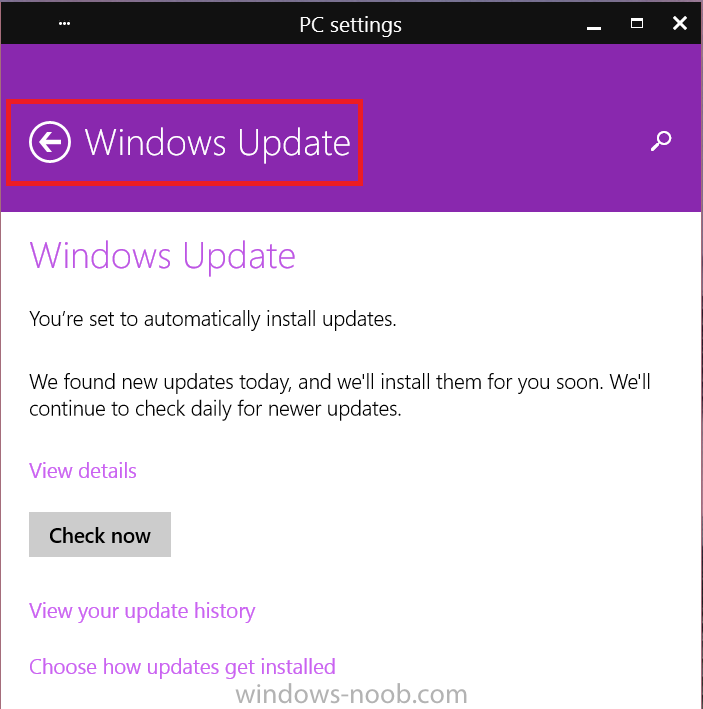
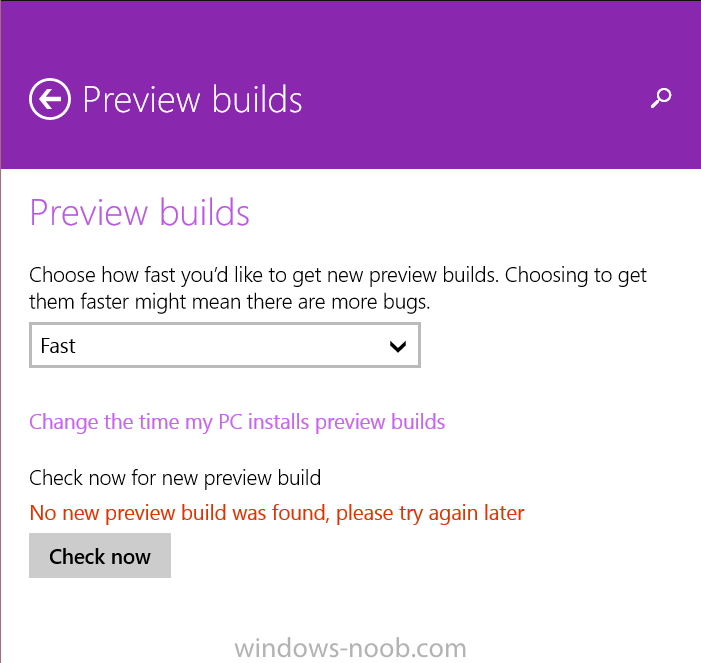
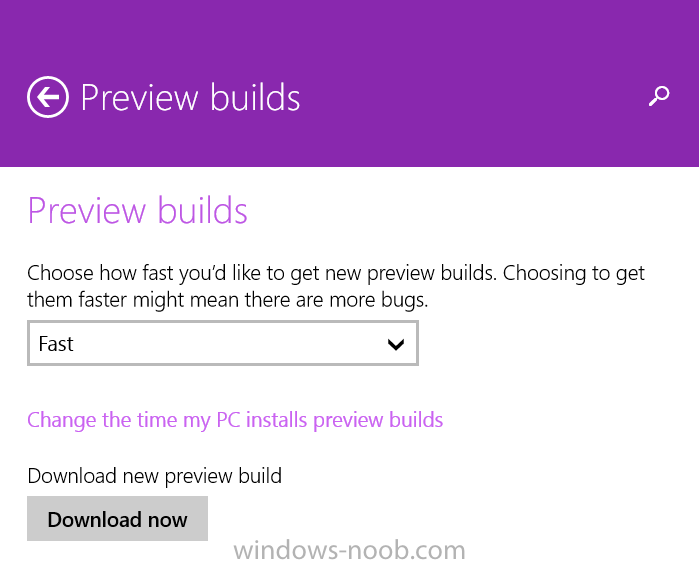
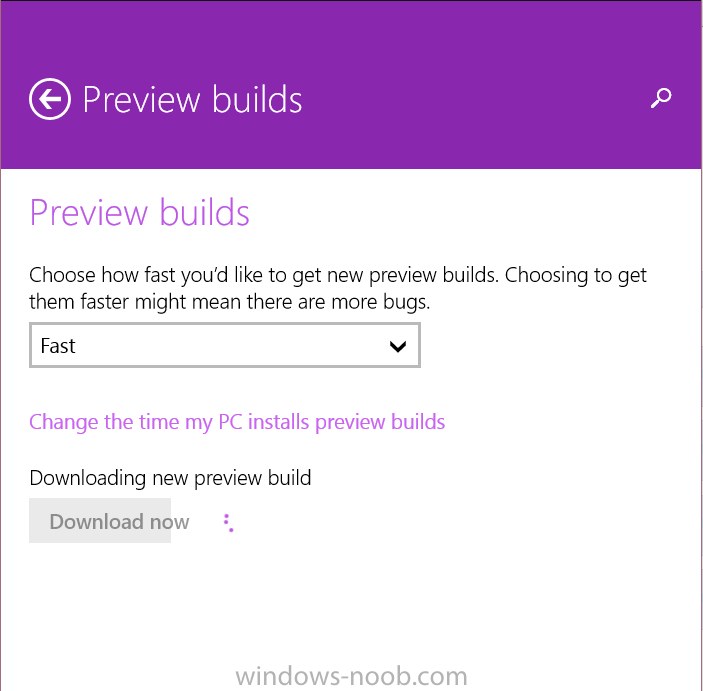
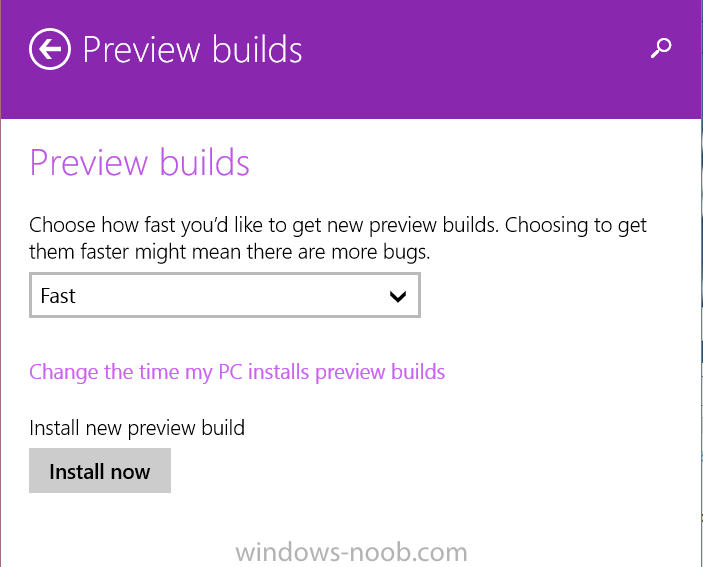
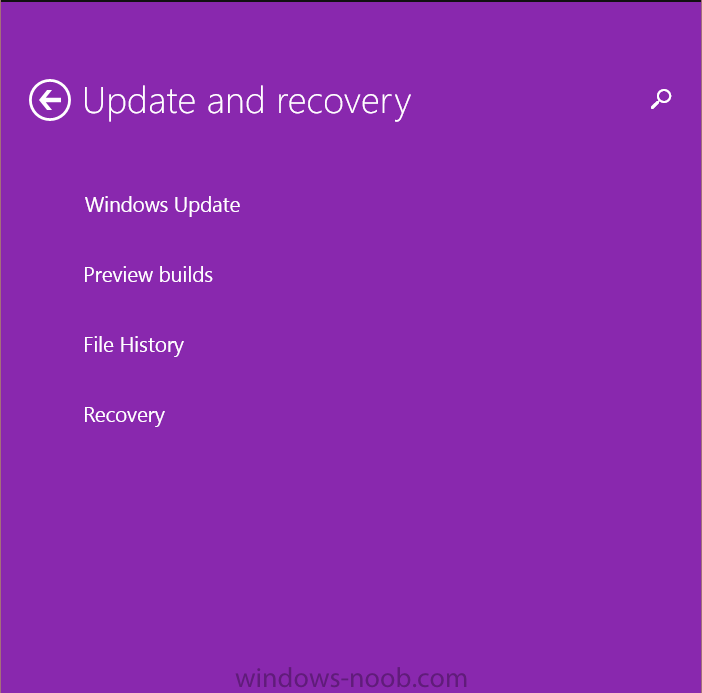
Microsoft has released a new build of Windows 10 to the insiders, you can get it by updating Windows 10 by clicking on the Start menu and type Windows Update Settings which will bring up the below when Windows Update Settings opens up, click the Windows Update back arrow as shown above, then select Preview Builds change from Slow to Fast to get builds quicker than normal if you don't mind more bugs then click on Check Now followed by Download Now and off it goes downloading... click on Install Now when it's finished downloading


-
Deploy OS to Distribution Point _ PLS Help (Desperate here :s)
anyweb replied to V1k45's topic in Configuration Manager 2012
have you seen this post ?