anyweb
-
Posts
9277 -
Joined
-
Last visited
-
Days Won
371
Everything posted by anyweb
-
 smsts.log will tell you why, please attach it
 -
did you redistribute the boot wim and then recreate the media after adding hta support to the boot wim ? the HTA component is shown below, is that the one you added ?
-
it's FVE, or Full Volume Encryption, so you can have one volume bitlockered and another not.
-
will this work from inside Windows PE? absolutely ! that's how it's designed to run, you probably have a spelling mistake or an other problem, attach your smsts.log and i'll be able to determine what the issue is my guess is you have no HTA support in your boot wim optional components and therefore it cannot display the HTA.
-
i do believe a .local will not work with iOS devices.
-
hard to tell without your smsts.log file, can you attach it please
-
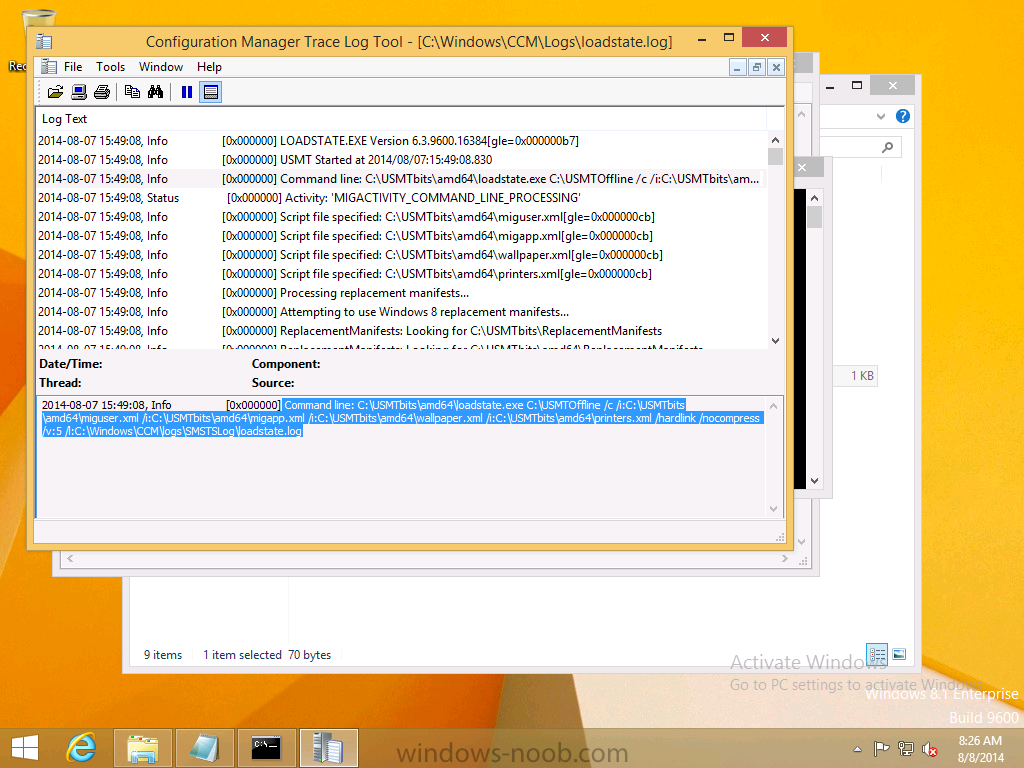
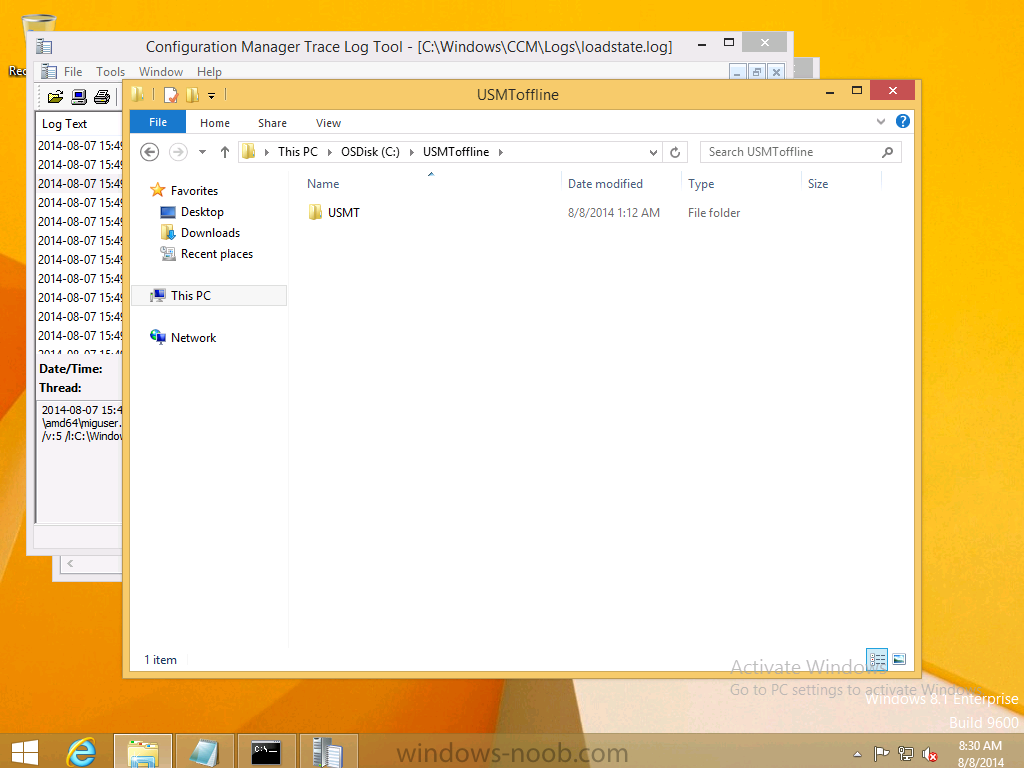
to recover users data from a failed restore you can try the following copy the users statestore data to c:\statestore copy the USMT folder to c:\tmp cd to c:\tmp\usmt\x64 open a command prompt as Local Administrator (administrative command prompt) paste in the following line loadstate.exe c:\StateStore /c /hardlink /lac:PASSWORD123 /i:MigApp.xml /i:miguser.xml /nocompress /v:13 /l:c:\windows\temp\loadstate2.log with SMP (state migration Point) cmd /c loadstate.exe %OSDStateStorePath% /i:miguser.xml /ui:DOMAIN\* /v:1 /l:c:\temp\loadstate.log /decrypt /key:"{C05E32DA-43A9-48F7-99F2-8BA89B89946E}" replace the lac password with your own, and replace the SMP key with that of the State that was stored on the SMP.
-
Invalid store path; check the store parameter and/or file system permissions did you check that ? here's my loadstate command which i completed yesterday successfully for you to compare with and C:\USMTOffline does indeed exist

-
that's one day off, was it taken today ?
-
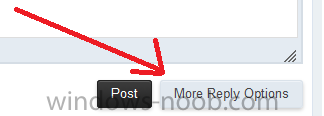
dont paste, just ATTACH the picture by clicking on More Reply options and adding it that way then click on Attach files...

-
hi all, i've setup a windows-noob.com facebook group where from now on I will post a link to every new Guide I write on windows-noob.com if you use facebook then please join the group ! cheers niall

- 1 reply
-
- 1
-

-
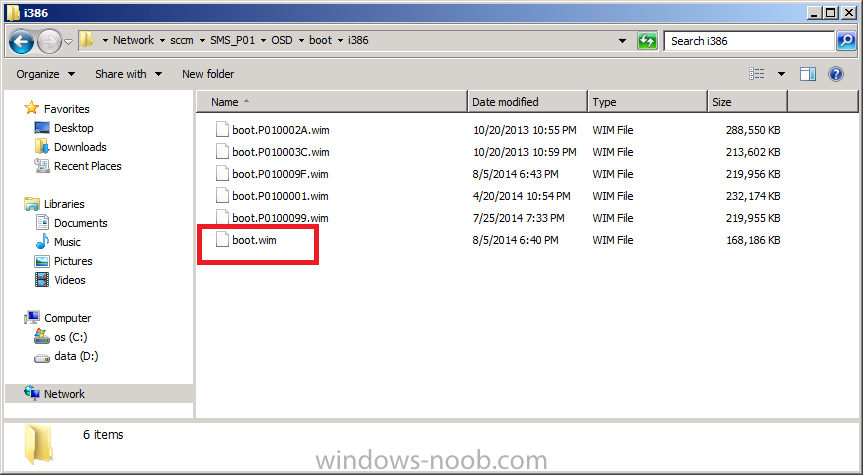
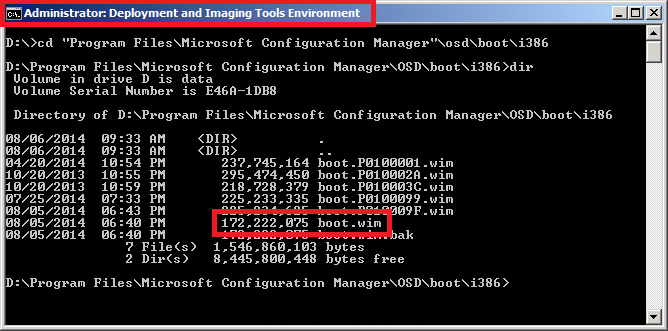
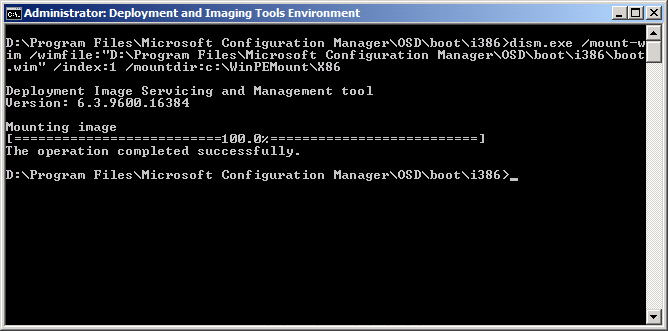
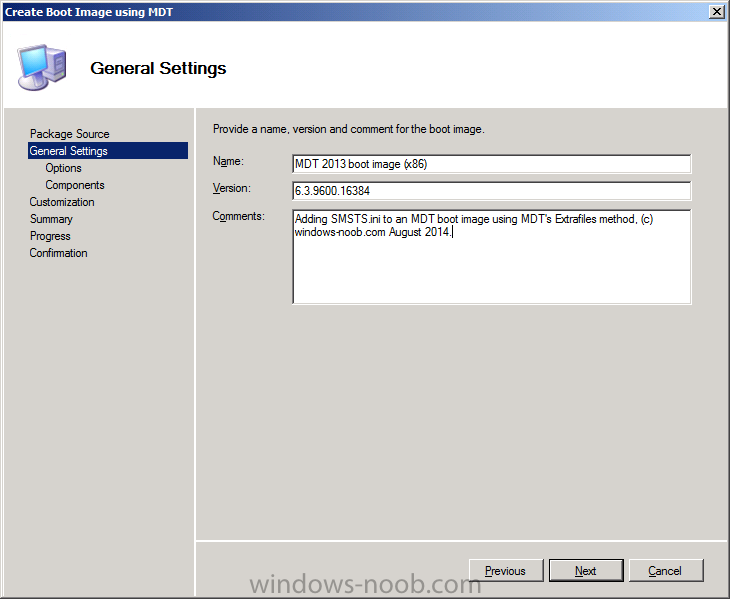
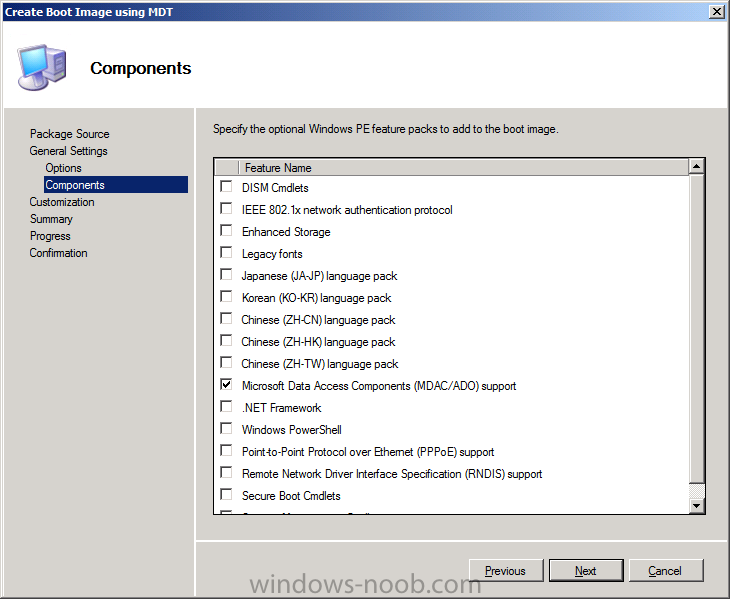
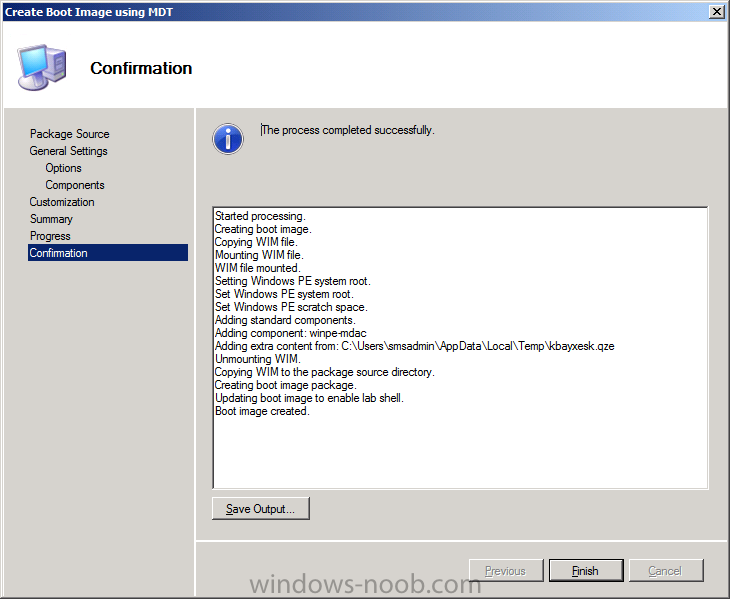
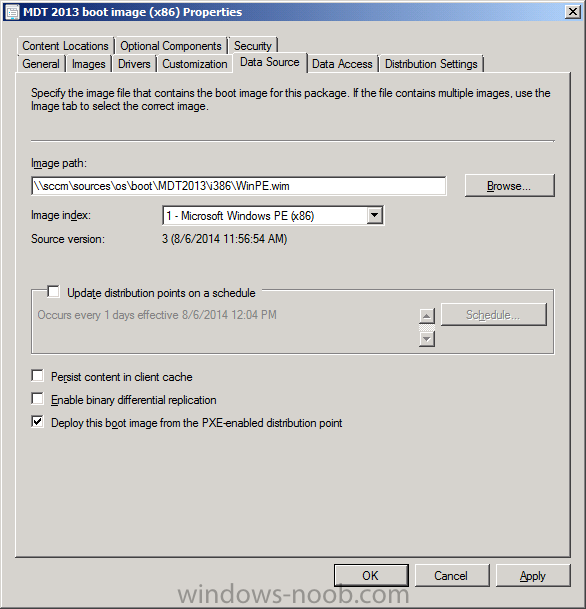
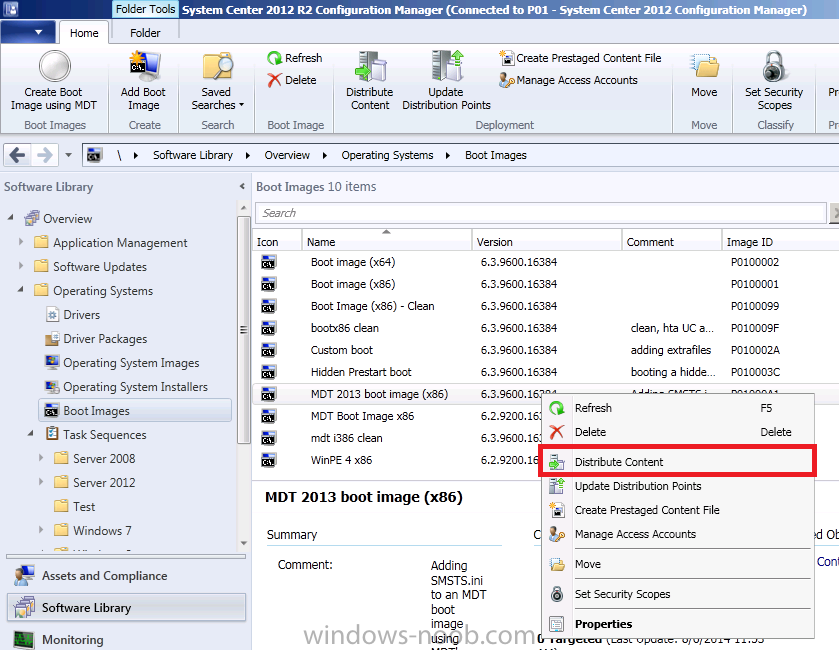
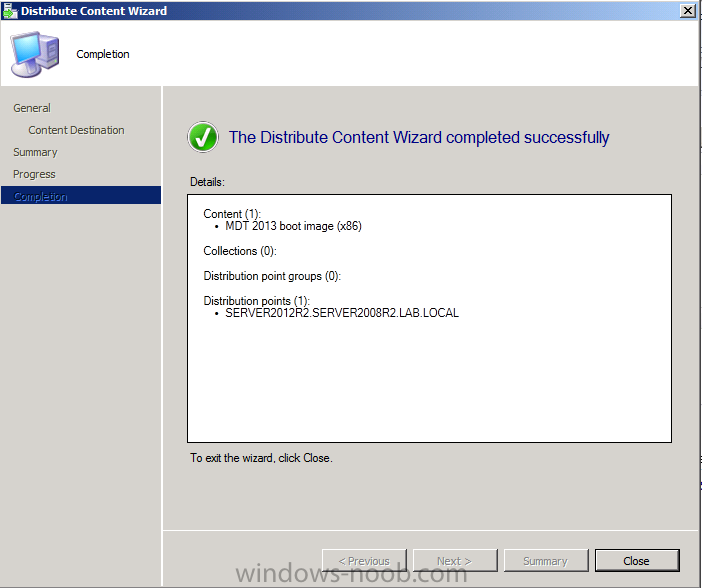
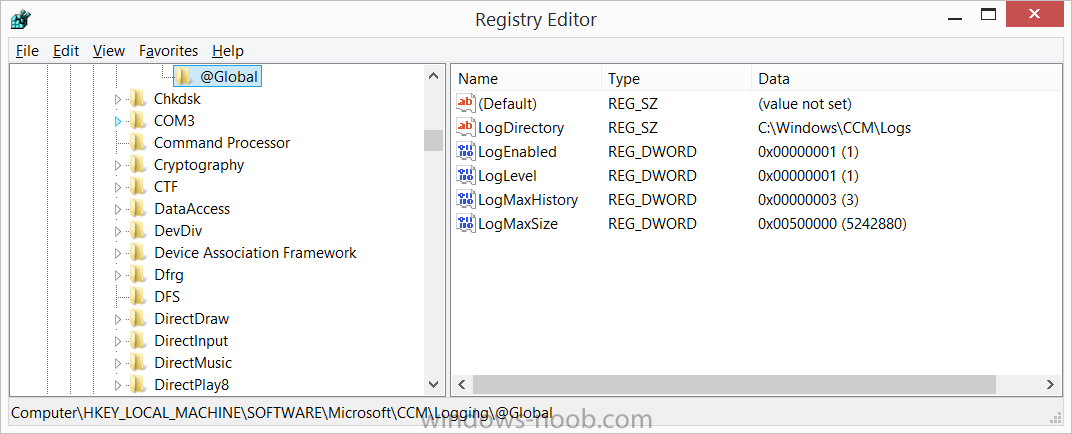
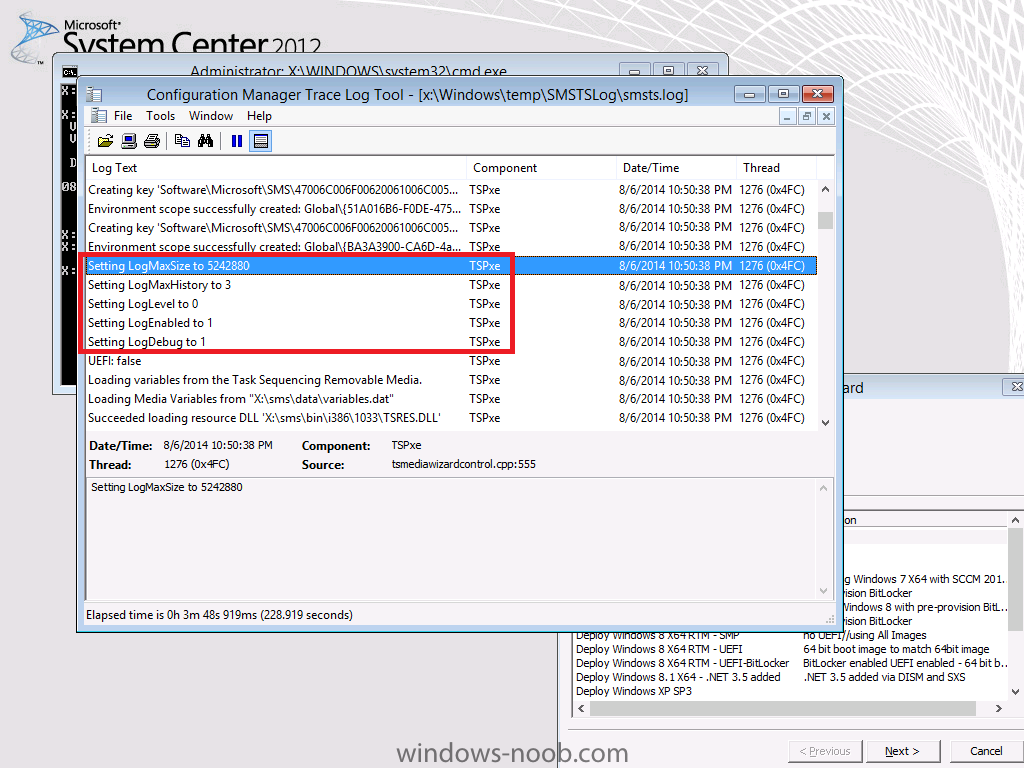
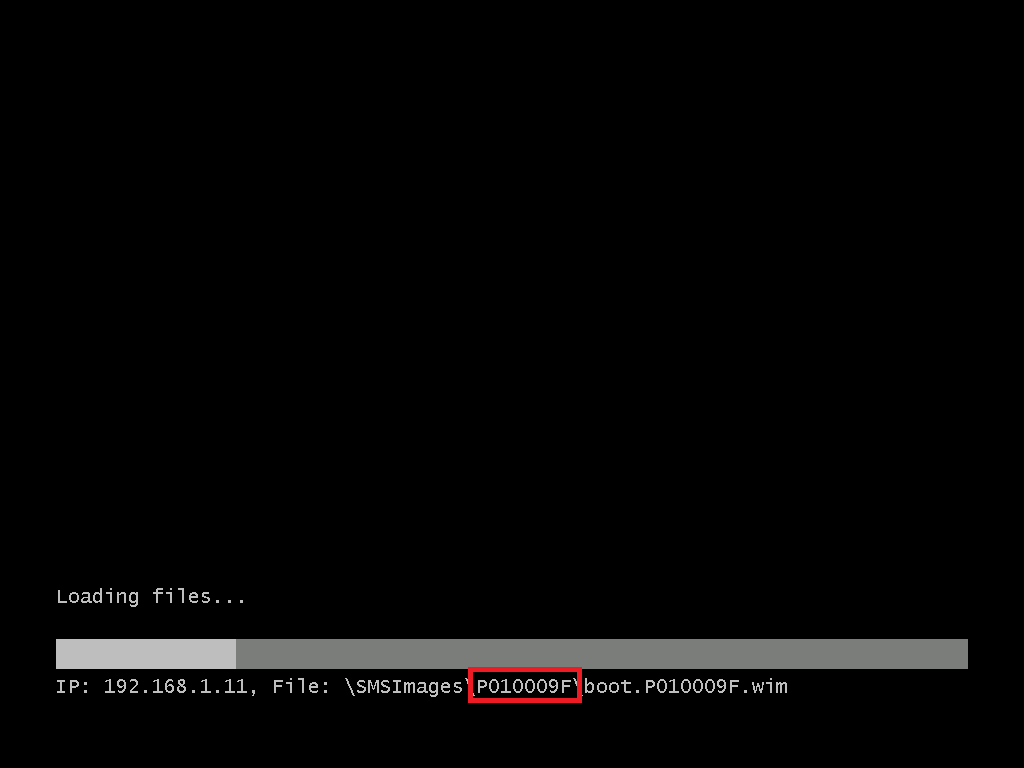
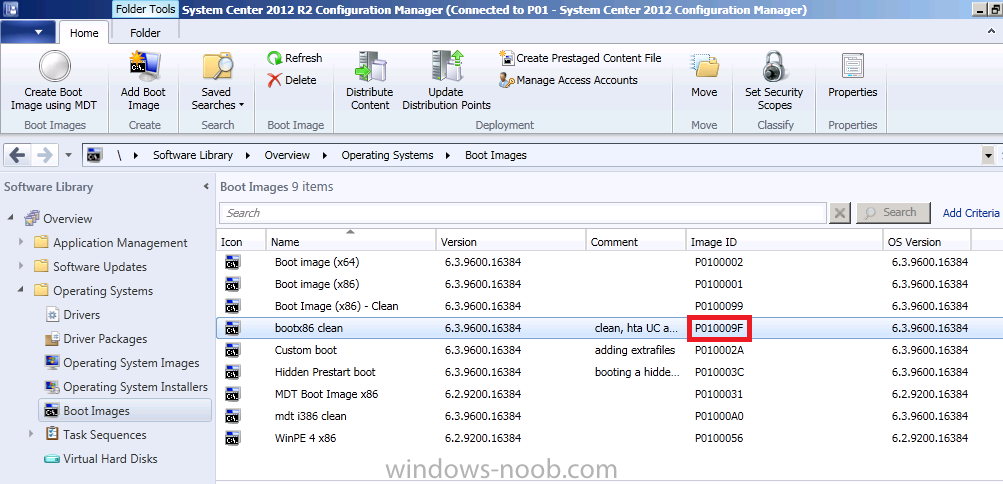
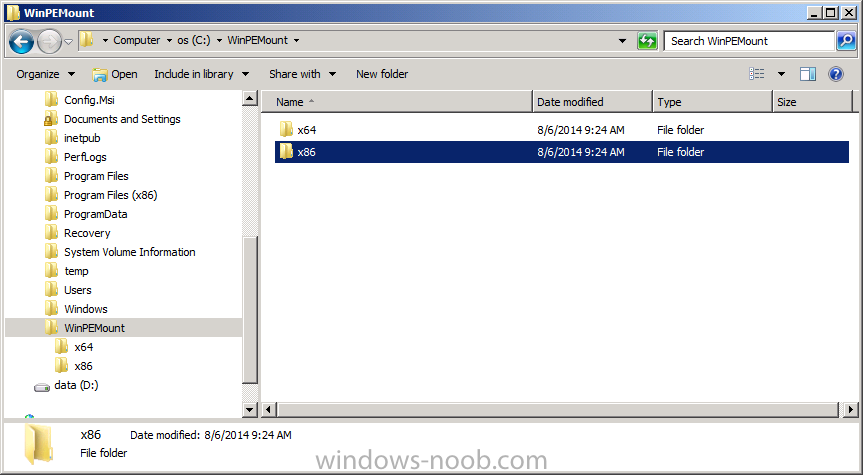
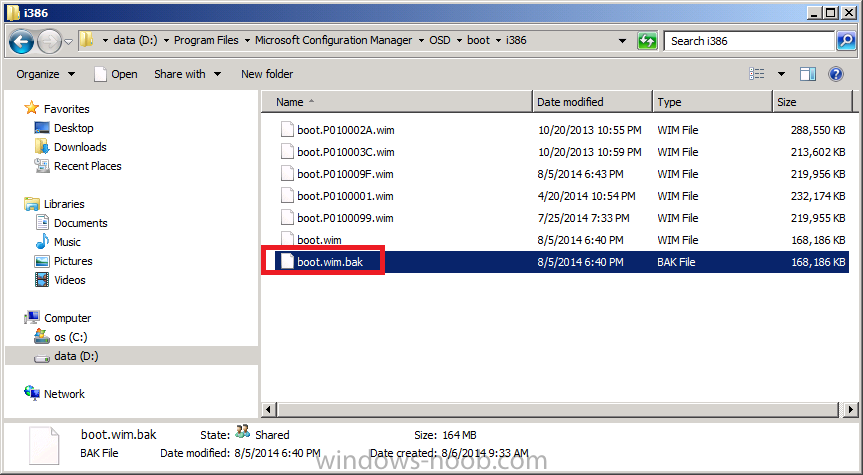
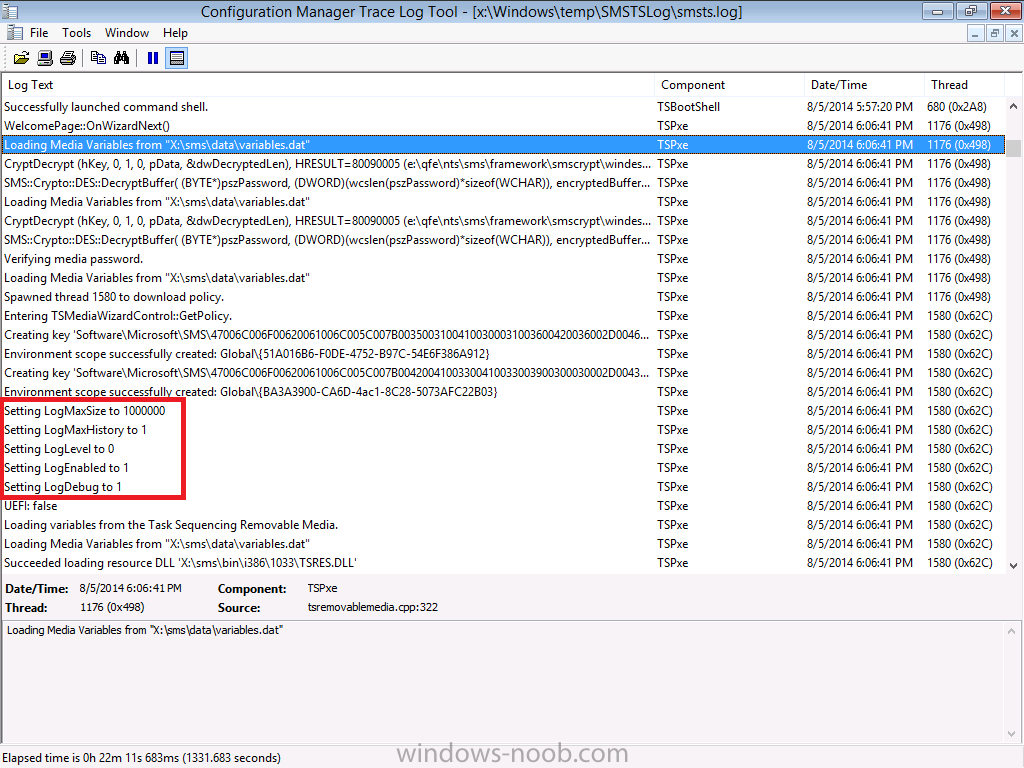
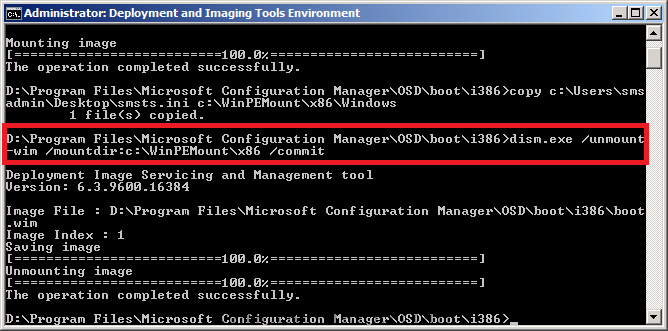
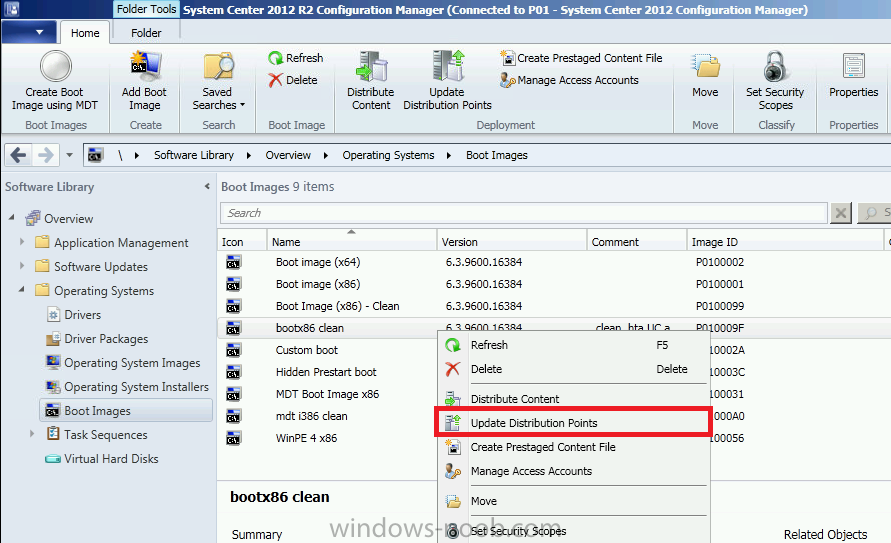
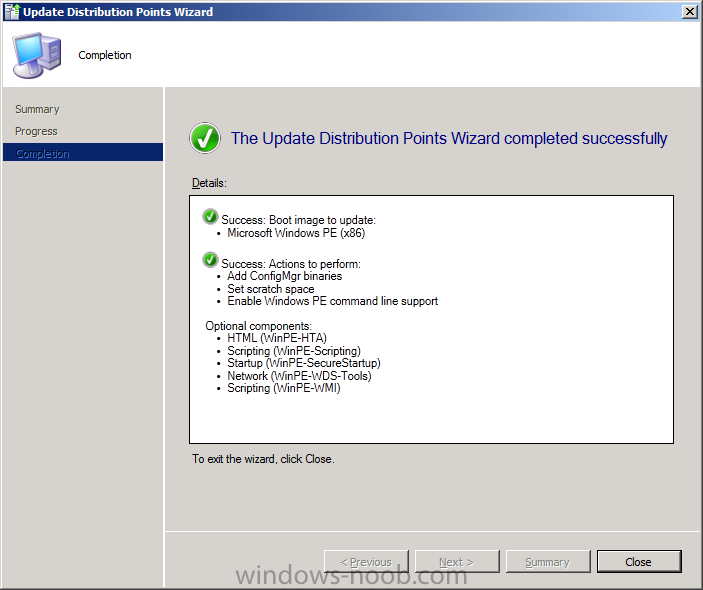
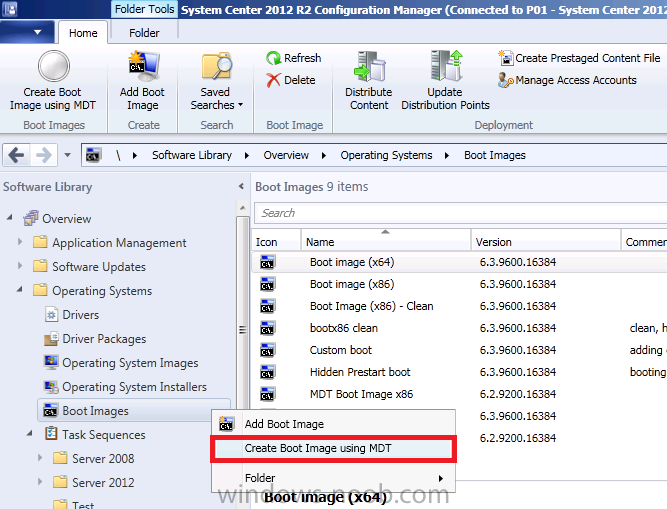
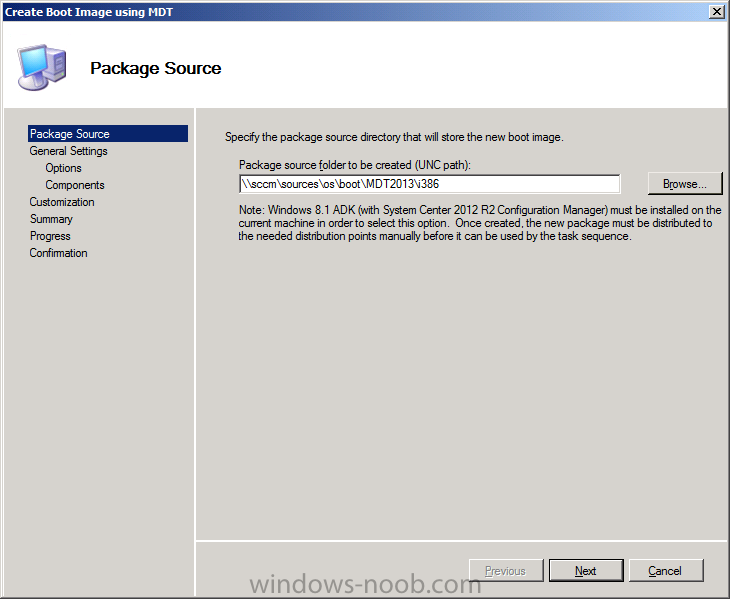
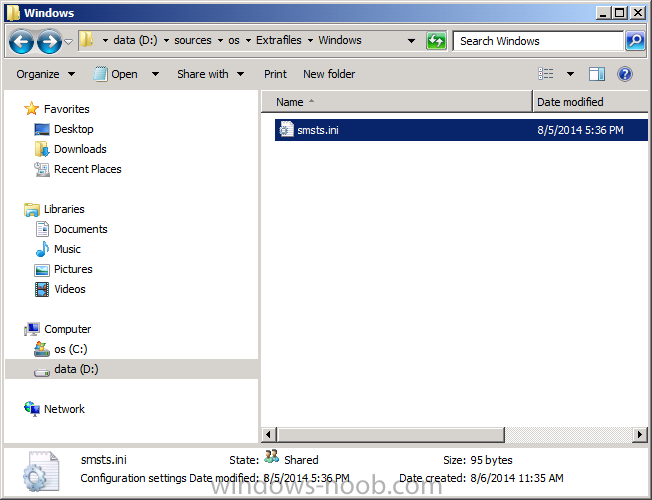
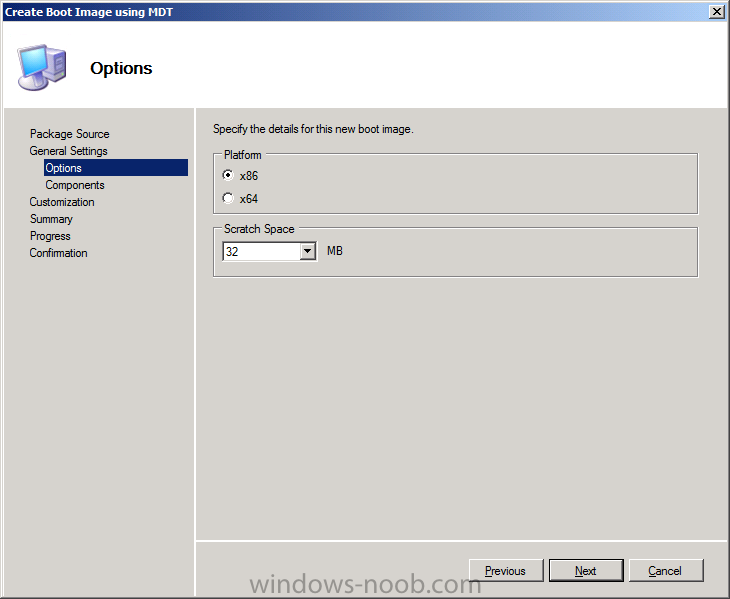
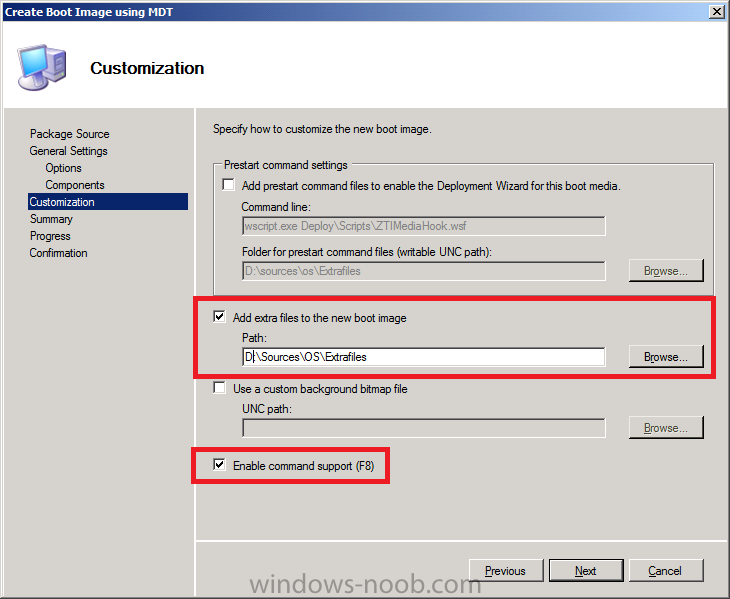
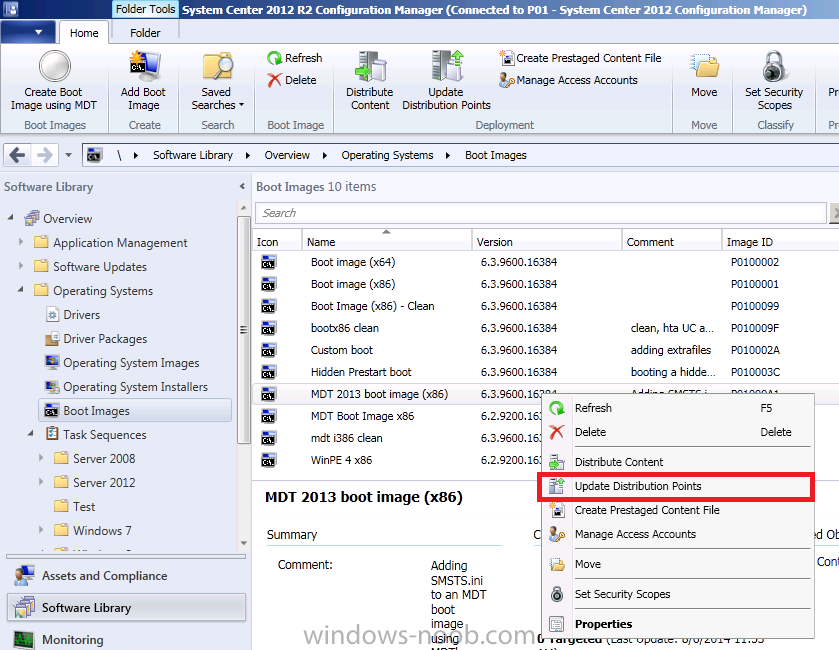
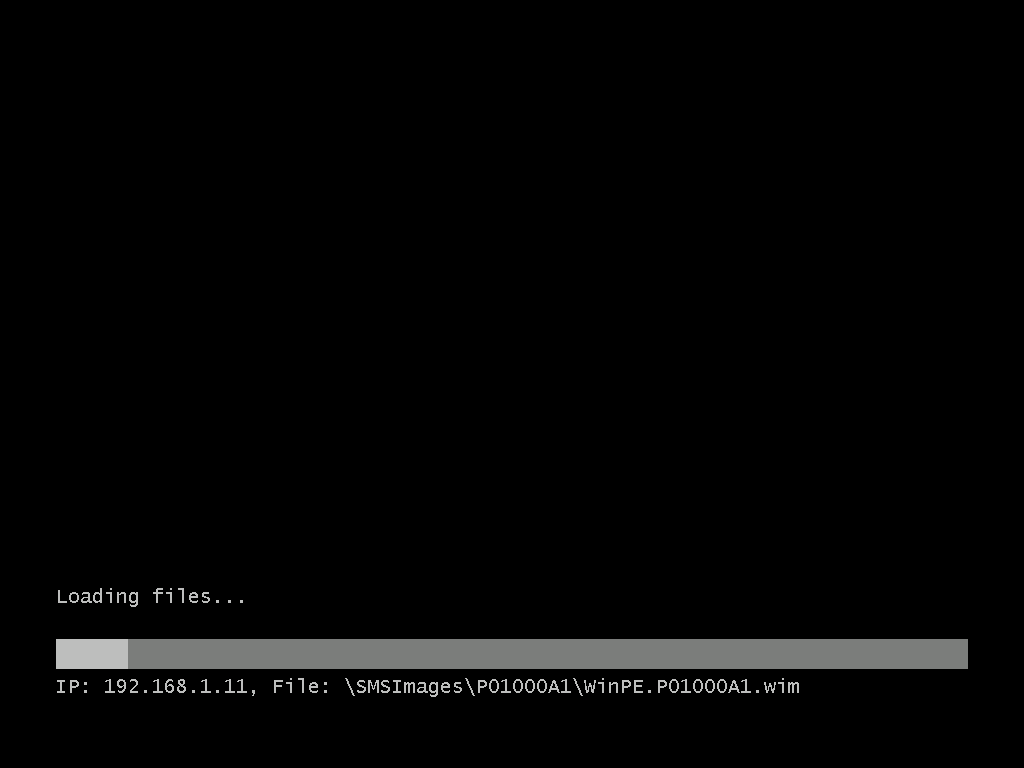
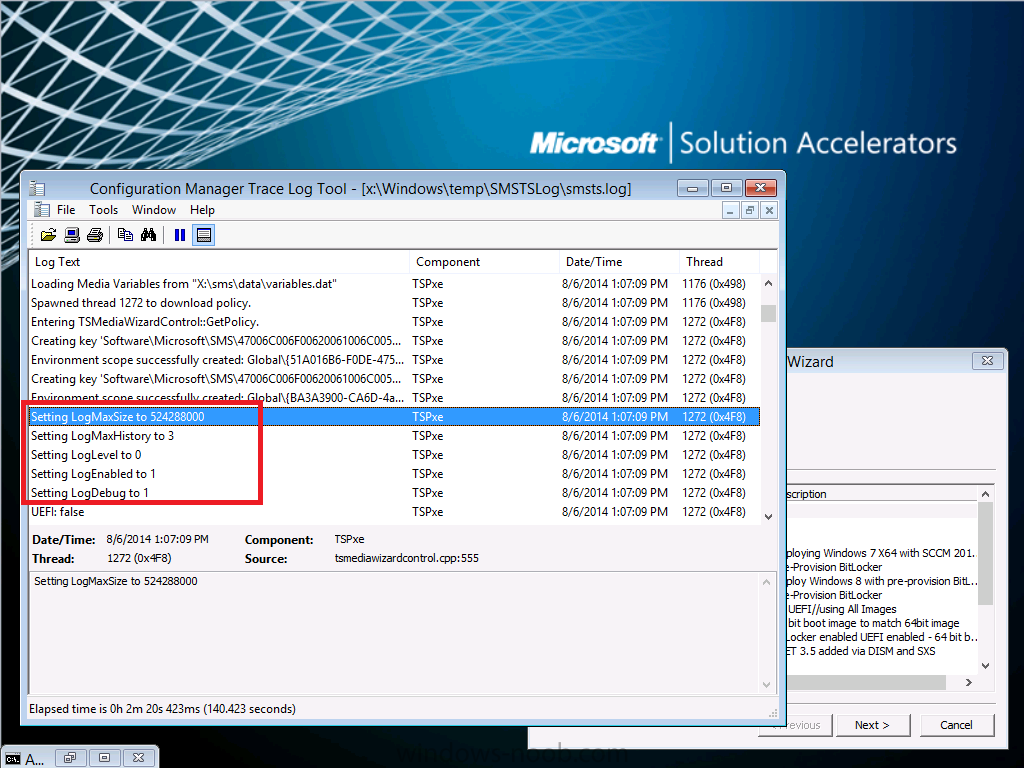
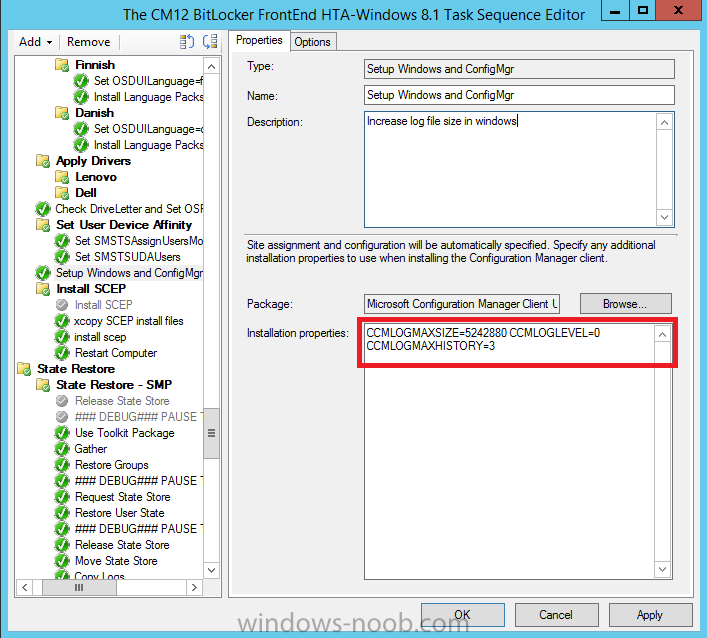
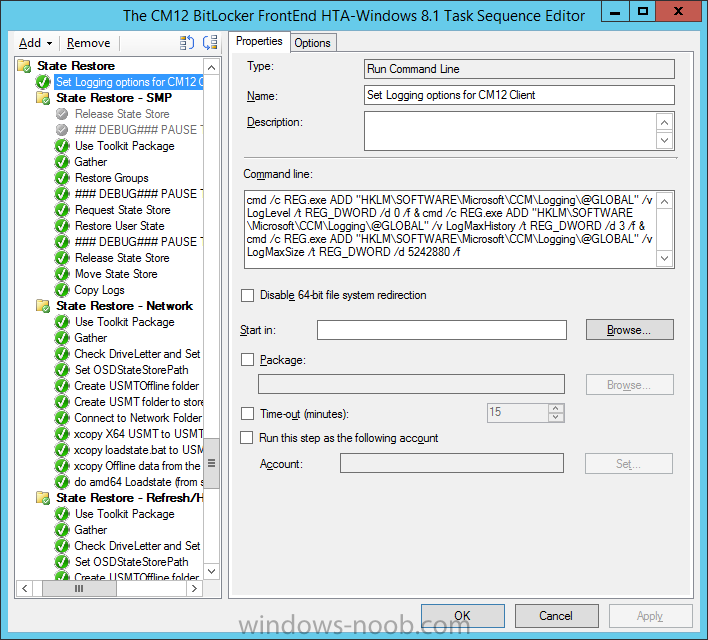
Introduction I've seen a lot of questions about how you can increase the log file size for PXE based Operating System Deployments using System Center 2012 R2 Configuration Manager so hopefully the 2 different methods below will clear things up. Note: The two methods below make changes which only impact logging during the WinPE Phase of OSD (which is usually where most problems occur). If you want to increase the log file size within the rest of the task sequence, i.e. the Windows portion, then depending on the installation type use the following methods. For a new computer scenario, to increase the log file size of all logs, add CCMLOGMAXSIZE=5242880 CCMLOGLEVEL=0 CCMLOGMAXHISTORY=3 to your Setup Windows and ConfigMgr step, whereas for a refresh (reinstallation) computer scenario, add the registry keys below. For more details see the What about the logs in Windows ? section at the end of this guide. Problem When PXE booting (network boot) the default log file size in WinPE is a rather pathetic 1MB or so as seen by the text highlighted in red from the SMSTS.log file below. As a direct result of this default size, the log file for OSD (primarily the SMSTS.log) will get overwritten if you have any large policy to download or if for example you have MDT integrated (because of all the files downloaded in the MDT Toolkit and associated steps), or if for example you are downloading several files in one or more packages. The knock on effect of rolling over the log file is you will most likely miss seeing errors in the log file as they are overwritten by default. In other words, the log file is too small. To cut a long story short, if you want to increase the size of your log file during Operating System Deployment then a file called SMSTS.INI must be present in the Windows directory of the boot image you are booting from and it should contain options to specify the new size of logfile you desire. You cannot set the logfile size using a prestart command as that process happens after the logfile size options are set. Method #1. Inject SMSTS.ini into the boot wim file via dism. Step 1. Download or create a SMSTS.INI file Note: This guide assumes you have not yet added the SMSTS.ini file to your boot wim and that you want to add the file to the x86 boot wim. Making the change to the source boot wim file of one architecture (x86 or x64 boot wim) will make the change for all boot images based on that source boot wim however these changes will not come into effect until they have been re-distributed to their distribution points. You can create a new text file called SMSTS.ini in notepad with the following text, make sure it is not saved as SMSTS.ini.txt, if it is, rename it to SMSTS.INI. The settings below are what I use, you might want to change those values to suit your environment. [Logging] LOGLEVEL=0 LOGMAXSIZE=5242880 LOGMAXHISTORY=3 DEBUGLOGGING=1 ENABLELOGGING=True or use the sample below. smsts.ini Save this file somewhere useful. Step 2. Identify your current boot image You can do this in a variety of ways, the easiest is to simply see which boot wim is used during PXE boot as long as another one is not staged after selecting your task sequence. To identify the boot wim look at the Package ID shown in the screenshot below Now that you've got the package ID of your boot image, locate it in the console, note that the Package ID is actually under the ImageID column in the Configuration Manager console under boot images. Step 3. Locate the boot wim file Right click on the boot image and choose properties, select the Data Source tab to identify where the boot image source file wim is located, this is listed in the Image Path. Using Windows Explorer, browse to the data source listed in the properties and you’ll probably see a few wim files listed in there,however the file we are interested in is called boot.wim. Every time your boot image is updated (for example by adding drivers or optional components), this file (boot.wim) is used as the source for all changes, so making changes to this file will insure that your boot image has that changed locked in place going forward. We need to locate the local copy of the file shown above. By default this file will be present locally on our Configuration Manager primary server in the following path D:\Program Files\Microsoft Configuration Manager\OSD\boot\i386\boot.wim assuming Configuration Manager is installed on D:\ and assuming you are using an x86 boot image. Note: Make a backup copy of the file before making any changes to it. Give the backup file a name that is useful like boot.wim.bak. Step 4. Create some temp storage for mounting To mount the boot wim we need some temporary storage so create some folders on C:\ like so C:\WinPEMount C:\WinPEMount\X86 C:\WinPEMount\X64 as shown in the screenshot below Step 5. Mount the boot wim We will modify the boot wim file in the local path. To inject files we first need to mount the file with DISM. Use the version of DISM that comes with System Center 2012 R2 Configuration Manager, the correct version is included in ADK 8.1 and the correct version of DISM is 6.3.9600.16384. To start the correct version of DISM locate it in your start menu and right click on the Deployment Imaging Tools and Environment cmd prompt, choose Run as Administrator as shown below and change directory to the directory that has your boot wim file. You can check the contents of the directory to verify that the boot wim file is present by issuing a DIR command. Use the following command to mount your boot wim file (you may need to adjust the path to match your boot wim architecture and source path). dism.exe /mount-wim /wimfile:"D:\Program Files\Microsoft Configuration Manager\OSD\boot\i386\boot.wim" /index:1 /mountdir:c:\WinPEMount\X86 It should mount the boot wim successfully as shown below Step 6. Copy the SMSTS.INI file to the Windows directory Copy the SMSTS.INI file created above to the Windows folder in your temporary storage mount directory as shown below copy smsts.ini c:\WinPEMount\x86\Windows and here's the copy taking place in our DISM cmd prompt Step 7. Commit the changes Now that the file is in place, we need to instruct DISM to commit our changes (save the changes) to the boot wim file. dism.exe /unmount-wim /mountdir:c:\WinPEMount\x86 /commit as shown in the screenshot below Step 8.Update Distribution Points right click on your boot image in the Configuration Manager console, and choose Update Distribution Points continue through that wizard until completion. Tip: All boot images that use this boot wim file as the source can now make use of this change in logging ability, however that will not be present until they are also updated to their respective distribution points. Step 9. Test the updated boot image Boot a computer using PXE. Assuming that the task sequence containing this boot image was deployed as the last task sequence to a collection that our computer is a member of, then even before the PXE password box is used you can check for the presence of the smsts.ini file, by pressing F8. If the SMSTS.ini file is present in the Windows directory then the new log file size ability should be in affect for that boot image. After entering the PXE password and before selecting a task sequence, the increased log file size is registered in the SMSTS.log file as shown below: Success ! Method #2. Copy SMSTS.ini into MDT boot images using Extrafiles. Note: in Method #1 above, we've already modified the boot.wim source for i386 architecture. As a result it already contains the smsts.ini file, so for the purpose of this guide I'll revert that boot wim to it's backed up state (no smsts.ini file injected) before completing this guide. If you are using MDT boot images you can avail of the ExtraFiles ability to do the same thing. Here's how it's done. Step 1. Create an Extrafiles folder On your Configuration Manager sources structure (eg: \\sccm\sources\), create a folder called Extrafiles Next, within the Extrafiles folder, create another folder called Windows, and copy the SMSTS.ini file from above into the Windows folder so that it looks like so Step 2. Create a MDT boot image In a MDT Integrated Configuration Manager console, right click on boot images and choose Create boot image using MDT as shown below: enter the package source path (create the necessary empty folder structure before clicking next, eg: create \\sccm\sources\os\boot\mdt2013\i386) fill in some useful info about the boot image select the appropriate options (x86 versus x64) and scratch space... select any additional Optional Components enter the path to the Extrafiles folder and also make sure F8 support is enabled as shown below continue through that wizard until completion. The AppData temp folder it refers to is where it does the ExtraFiles copying (amongst other things). Step 3. Enable the new MDT boot image for PXE Right click your newly created MDT boot image, make sure it's enabled for PXE as shown below by enabling the deploy this boot image from the PXE enabled distribution point option on the Data Source tab Step 4. Distribute the MDT boot image Right click the MDT boot image and choose Distribute content. Select whatever distribution points you want it distributed to, continue through that wizard. Step 5. Update Distribution Points for the boot image Nearly done, right click the MDT boot image again, and choose Update Distribution points, continue through that wizard. Step 6. PXE boot and test the new MDT boot image Now that you've made the changes you'll want to see the results, make sure the new MDT boot image is attached to a live task sequence that is deployed to a collection your computer is a member of. Notice that the package id of the MDT boot wim while PXE booting is different to the boot wim used in Method 1 above. Once WinPE has loaded, enter the PXE password and then check the SMSTS.log file, as you can see the change is logged here also Success ! What about the logs in Windows ? Finally, you have bigger log files while in WinPE but what about the rest of the task sequence (i.e. while in Windows). Well to increase the log files in Windows you first need to identify if you are doing a New Computer installation or a Refresh (a reinstallation). Once you know which you are doing follow the advice below. New Computer Scenario For the New computer scenario, you need to edit the Setup Windows and ConfigMgr step as shown below CCMLOGMAXSIZE=5242880 CCMLOGLEVEL=0 CCMLOGMAXHISTORY=3 This will affect more than your SMSTS.log file however, but more detail is always good especially for troubleshooting, and you can adjust the values above to suit your needs. Refresh Computer Scenario For the Refresh Computer Scenario, apply the following registry keys via a REG.exe command line. Global CCM logging options CM12.reg.txt The registry keys are shown below and attached here. Download the file and remove the .txt extension before use. To set these registry keys, create a run command line step in the refresh part of the task sequence, which includes the following statement cmd /c REG.exe ADD "HKLM\SOFTWARE\Microsoft\CCM\Logging\@GLOBAL" /v LogLevel /t REG_DWORD /d 0 /f & cmd /c REG.exe ADD "HKLM\SOFTWARE\Microsoft\CCM\Logging\@GLOBAL" /v LogMaxHistory /t REG_DWORD /d 3 /f & cmd /c REG.exe ADD "HKLM\SOFTWARE\Microsoft\CCM\Logging\@GLOBAL" /v LogMaxSize /t REG_DWORD /d 5242880 /f as shown below Summary Changing the size of the smsts.log file for PXE based OSD deployments isn't exactly straightforward but hopefully this guide brings some clarity to the process. Related Reading How To Change Logging Options For SMSTS.log in System Center Configuration Manager - http://blogs.technet.com/b/system_center_configuration_manager_operating_system_deployment_support_blog/archive/2011/10/12/how-to-change-logging-options-for-smsts-log-in-system-center-configuration-manager.aspx About Client Installation Properties in Configuration Manager - http://technet.microsoft.com/en-us/library/gg699356.aspx Downloads You can download a Microsoft Word copy of this guide here. How can I increase the size of the SMSTS log file in PXE based OSD deployments using System Center 2012 R2 Configuration Manager.zip


-
i mean use your own domain name, so for example @windowsintunenoob.com is a domain name i own, so if your domain name is @something.com then use a user for that domain (assuming you've carried out the steps I highlighted in Part 1 of this series)
-
OSD not working after upgrading to SCCM 2012 R2
anyweb replied to Texasit's question in Troubleshooting, Tools, Hints and Tips
can you post the other one, this one is the rollover log -
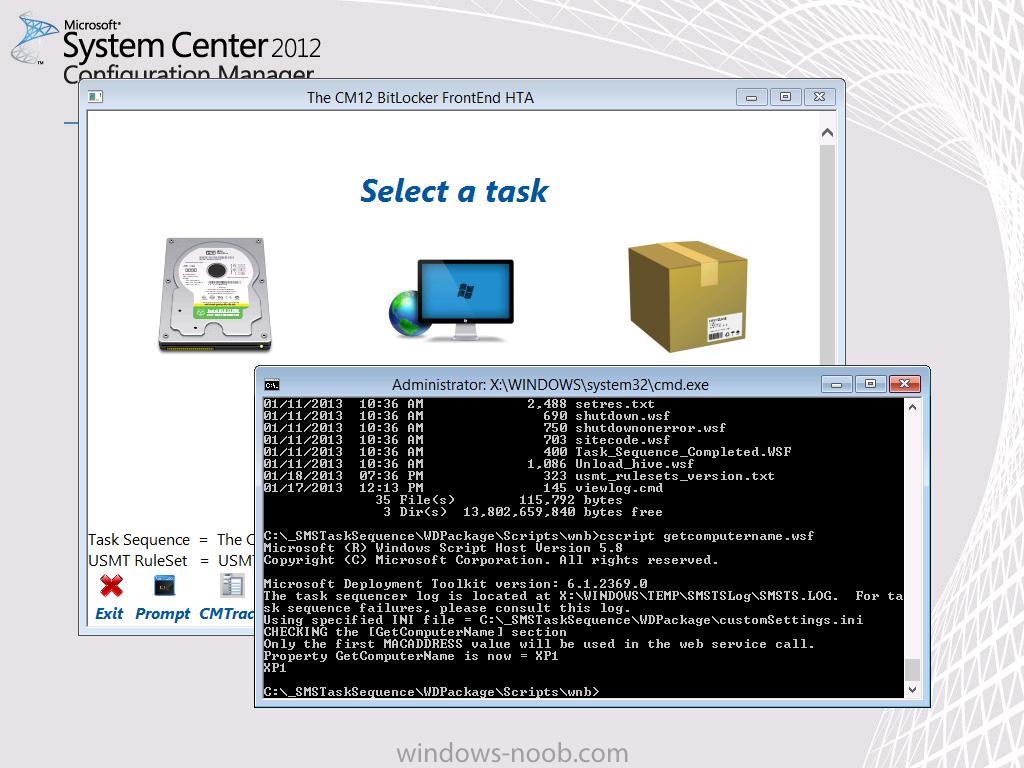
The CM12 BitLocker FrontEnd HTA
anyweb replied to anyweb's question in Frontends, HTA's and Web Services
ok great -
The CM12 BitLocker FrontEnd HTA
anyweb replied to anyweb's question in Frontends, HTA's and Web Services
well either your customSettings.ini file is wrong or the webservice is wrong, check both -
the username is as I've shown above, it's not an onmicrosoft.com account as you've setup dirsync as described in Part 1 here
-
have you tried creating an ISO from within the configuration manager console and booting from that ? it's described here..except instead of choosing capture media, select boot media (if you have no access to PXE)
-
yes it's possible to use a task sequence for this, however you can only deploy it to a Device collection (not a user collection).
-
The CM12 BitLocker FrontEnd HTA
anyweb replied to anyweb's question in Frontends, HTA's and Web Services
ok open a command prompt and do cscript.exe getcomputername.wsf do you see similar output to me below ?
-
The CM12 BitLocker FrontEnd HTA
anyweb replied to anyweb's question in Frontends, HTA's and Web Services
hard to tell without logs, can you zip em up and attach them ? -
how can i remove any application which created????
anyweb replied to mohd.S.H's topic in Configuration Manager 2012
highlght the application and look at the deployments tab, you'll see the deployments there which you can either delete or retain. -
when you pxe boot do you see the prompt to press F12 ? or are you seeing something else ? have you tried pressing F8 once the boot.wim loads or does it not get that far ?
-
no idea, but interesting story :-)
-
you mean controlling what boot wim get's used ? that's decided by the task sequence it is attached to, and the order of when it was deployed, so for example if i deploy a task sequence with a x86 boot wim to All Unknown Computers, and then PXE boot an unknown computer, it will download that x86 boot wim