anyweb
-
Posts
9181 -
Joined
-
Last visited
-
Days Won
366
Everything posted by anyweb
-
 and it's covered here, look at the 'install programs' section of Part 18 CM12 in a lab - Part 16. Integrating MDT 2012 RC1 with Configuration Manager 2012 CM12 in a lab - Part 17. Using MDT 2012 RC1 with Configuration Manager 2012 CM12 in a lab - Part 18. Deploying a UDI Client Task Sequence
 -
your capture is failing because you have dns or network issues, look at the following lines repeated over and over.... verify you have a valid ip address when trying to capture (press f8, do ipconfig), if not, add the network drivers for your hardware to your boot wim and try again.
-
What is the upgrade path for SCCM 2012 RTM -> R2 CU1
anyweb replied to nhottinger's topic in Configuration Manager 2012
I would say that you need to go first to SP1, and then to R2 and finally CU1 which is a hotfix for R2, the following should help http://www.windows-noob.com/forums/index.php?/topic/7437-using-system-center-2012-configuration-manager-part-11-upgrading-the-hierarchy-to-service-pack-1 http://www.windows-noob.com/forums/index.php?/topic/8451-how-can-i-install-system-center-2012-r2-configuration-manager/ http://blogs.technet.com/b/configmgrteam/archive/2014/03/24/configuration-manager-servicing-update.aspx http://www.niallbrady.com/2014/03/31/system-center-2012-r2-cu1-hotfix-available/ -
I've added an update to explain the change and added info about OSDPreserveDriveLetter variable in Step 8a
-
so basically you are having issues with Windows on D: after build and capture ? that's a well known problem solved with Set OSDPreserveDriveLetter to False before the Apply Operating System step in your build and capture task sequence, this variable wasn't present until SP1 but i'll update the guide to reflect this. update: i've updated the original guide and added Step 8a. hope this helps.
-
start with this list and if you still have questions ask away ! http://www.windows-noob.com/forums/index.php?/topic/4045-system-center-2012-configuration-manager-guides/
-
sure thing, try it
-
which smsts.log are you looking at ? post it here
-
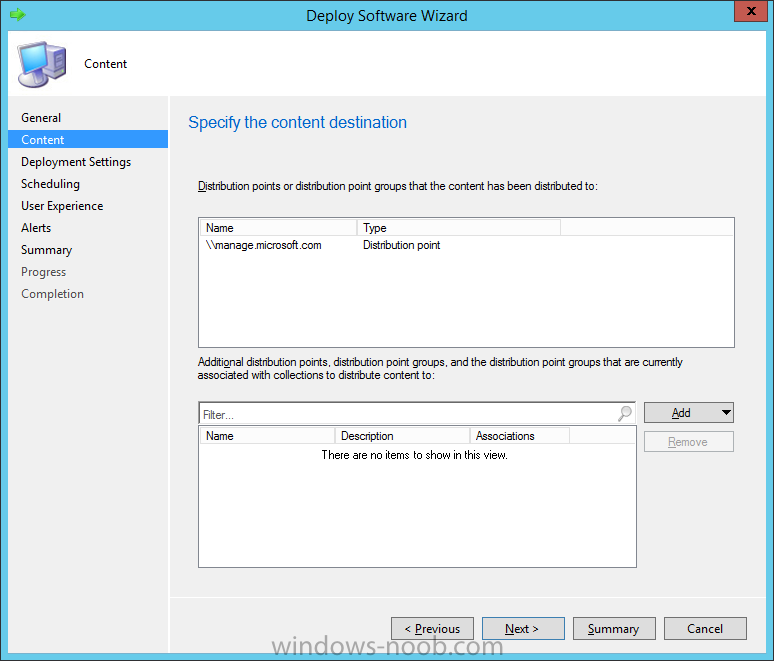
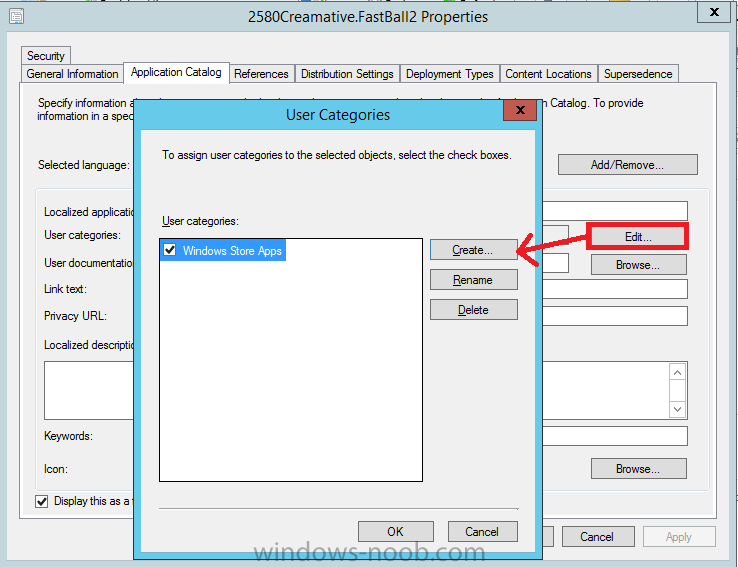
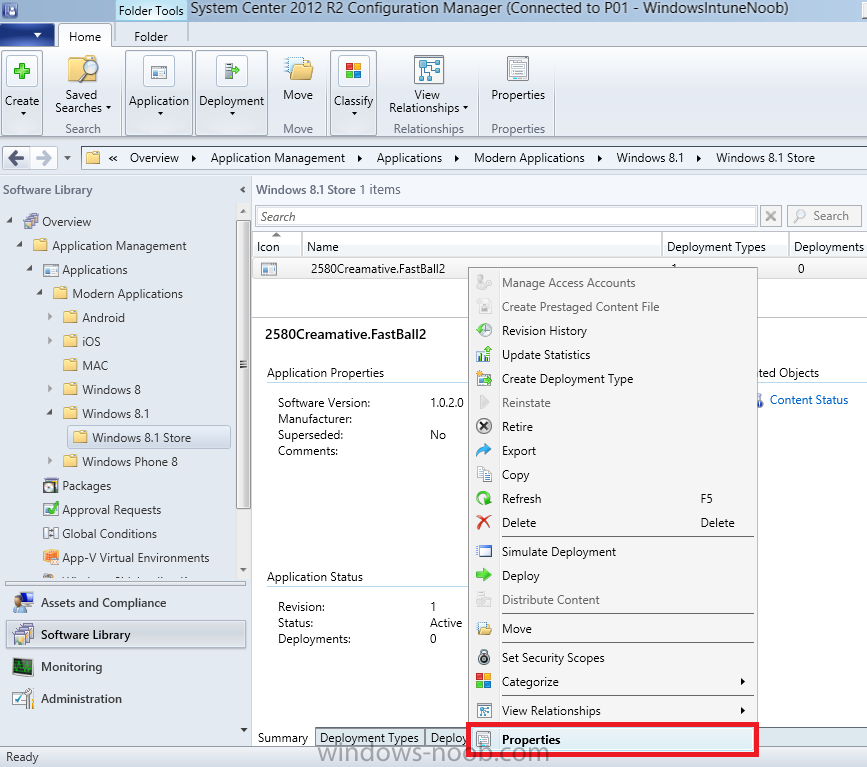
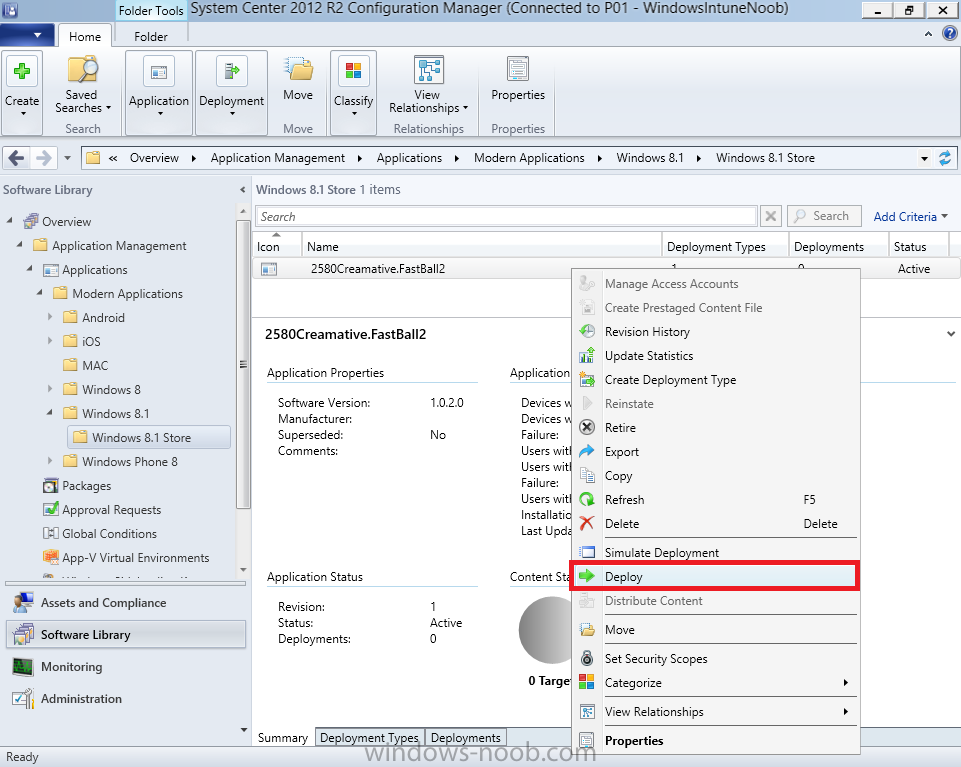
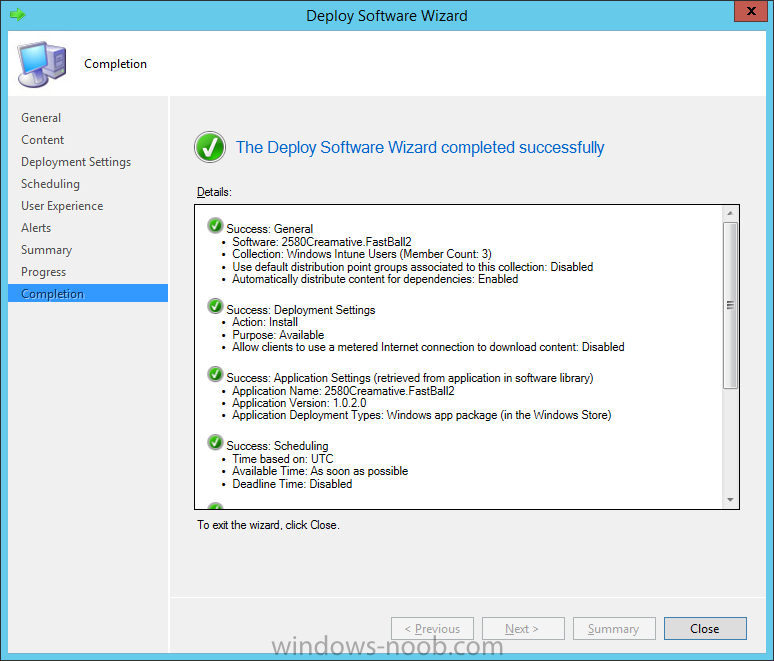
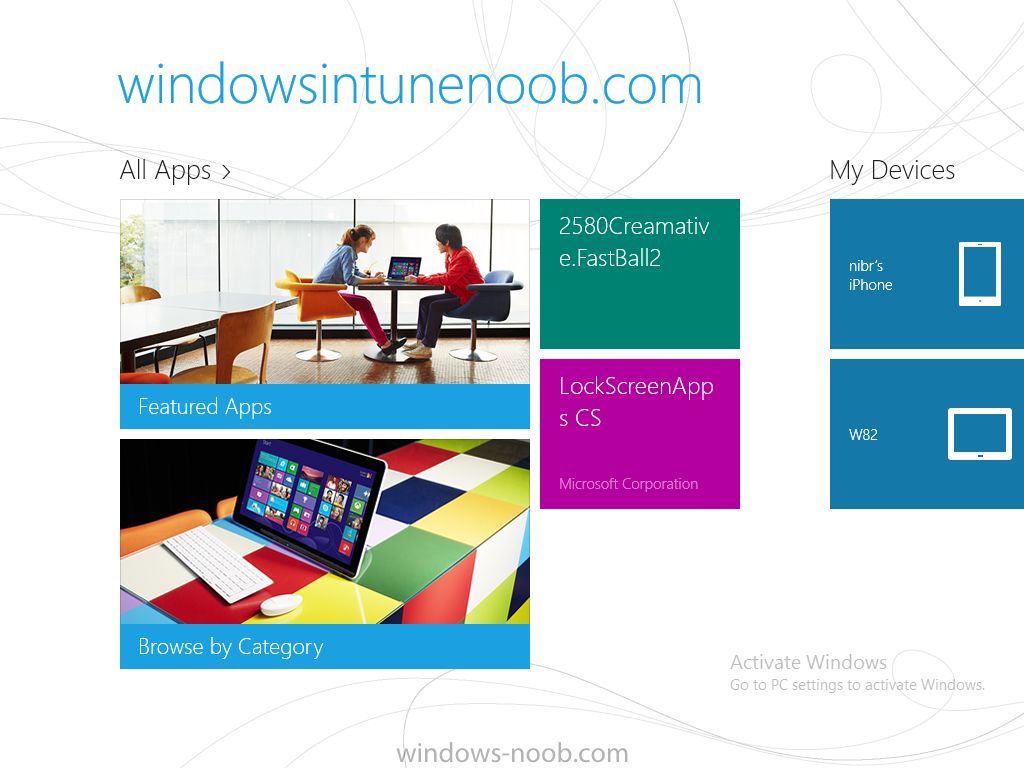
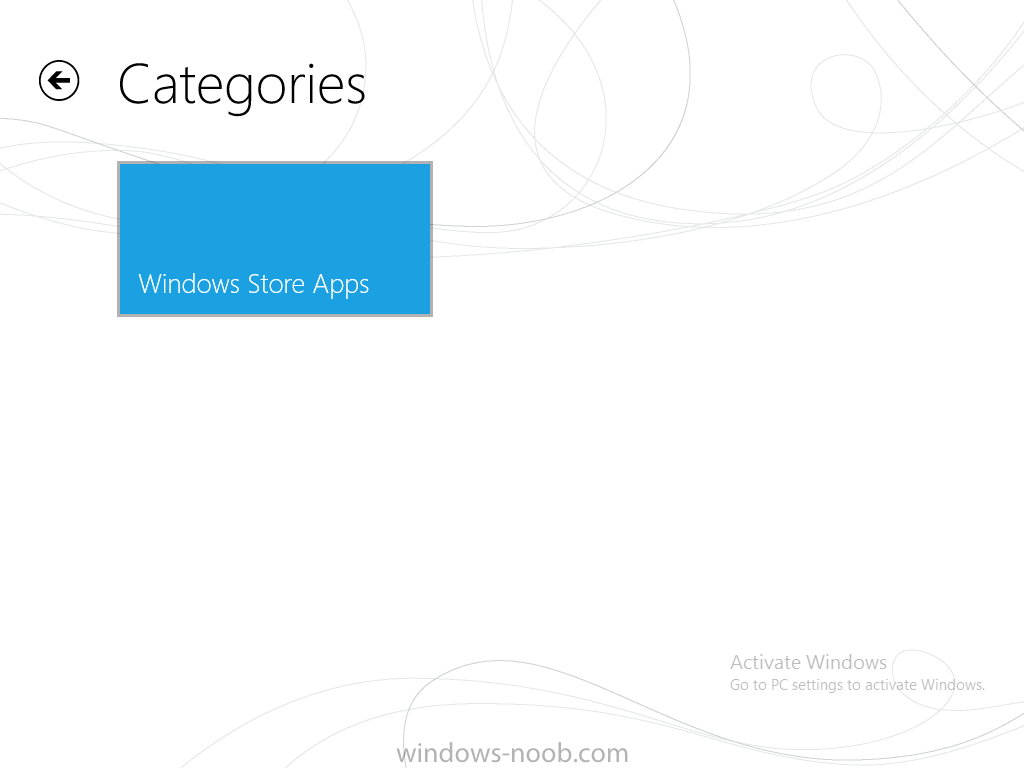
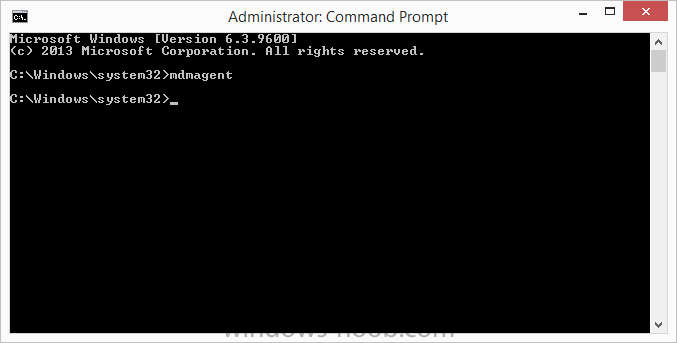
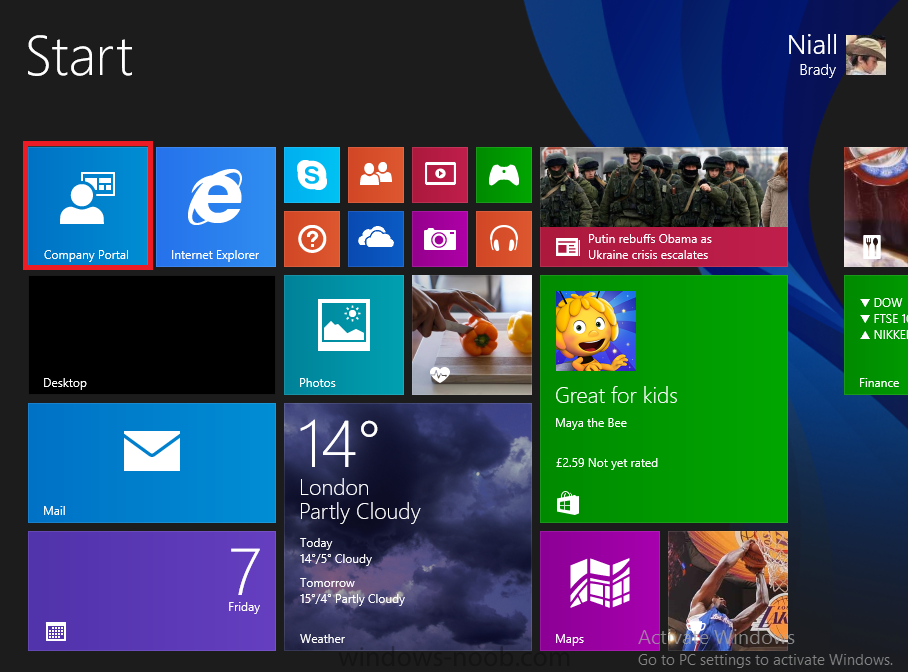
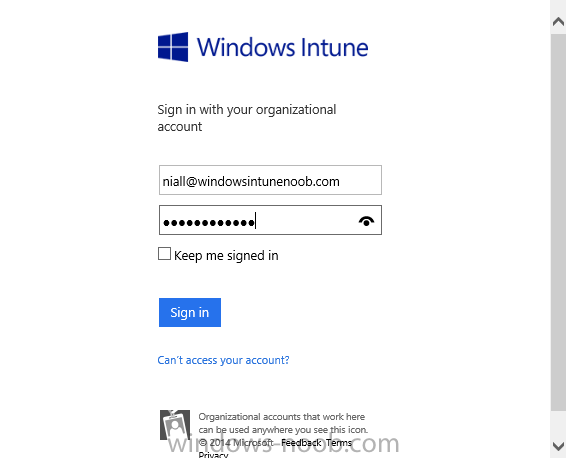
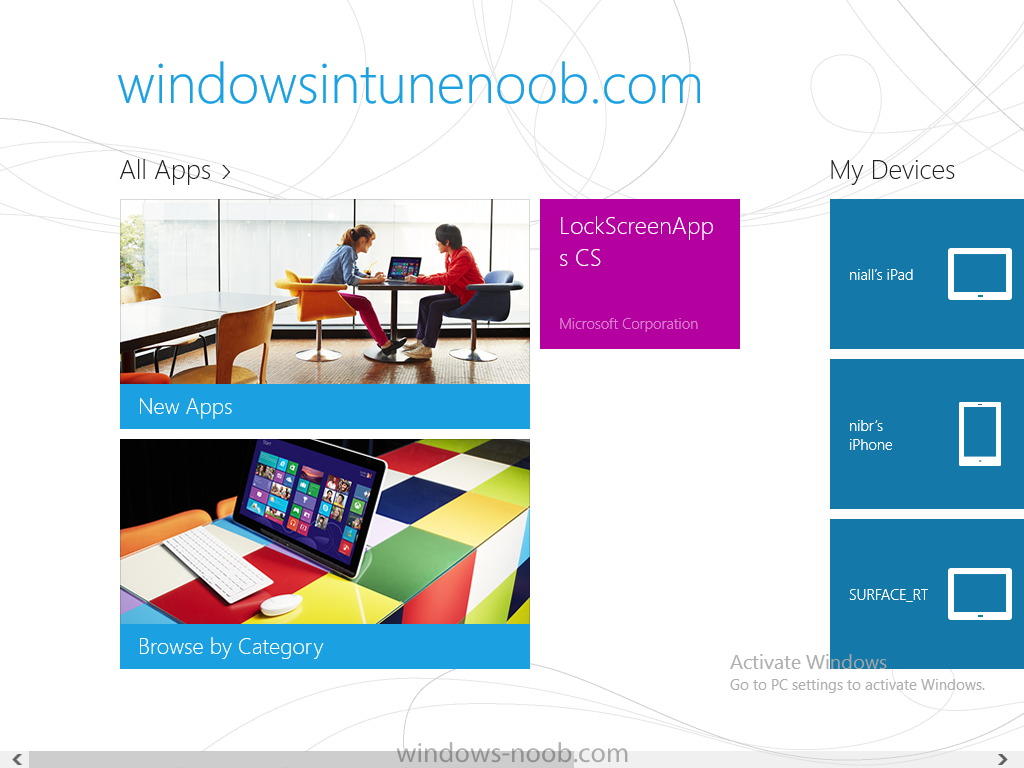
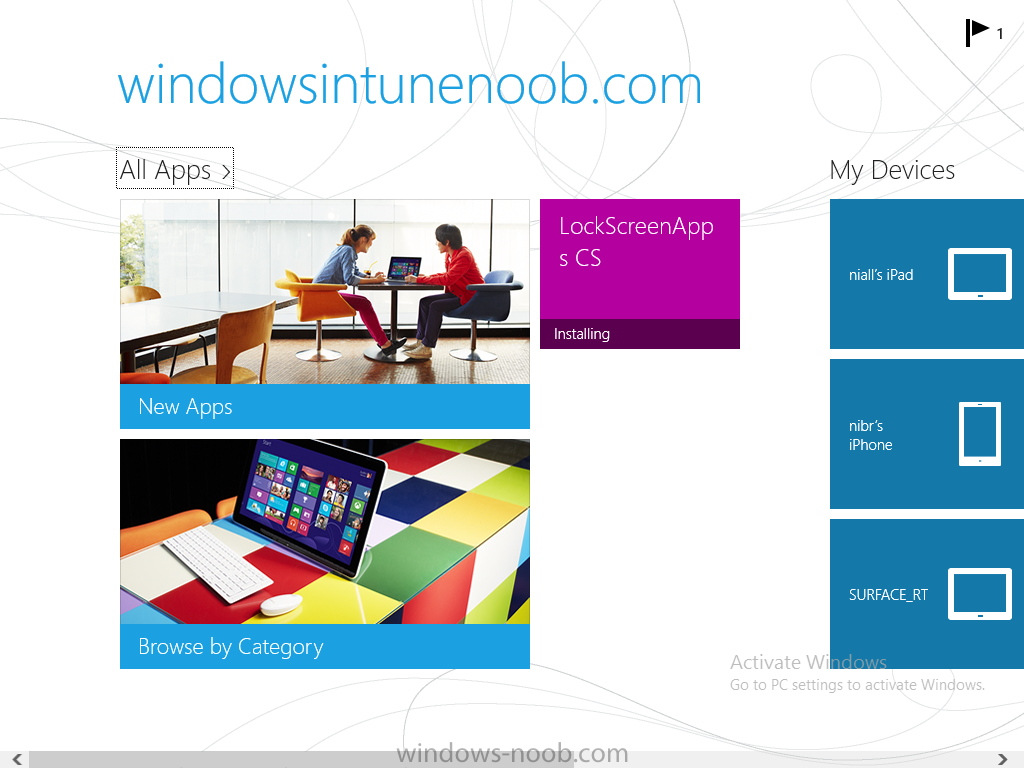
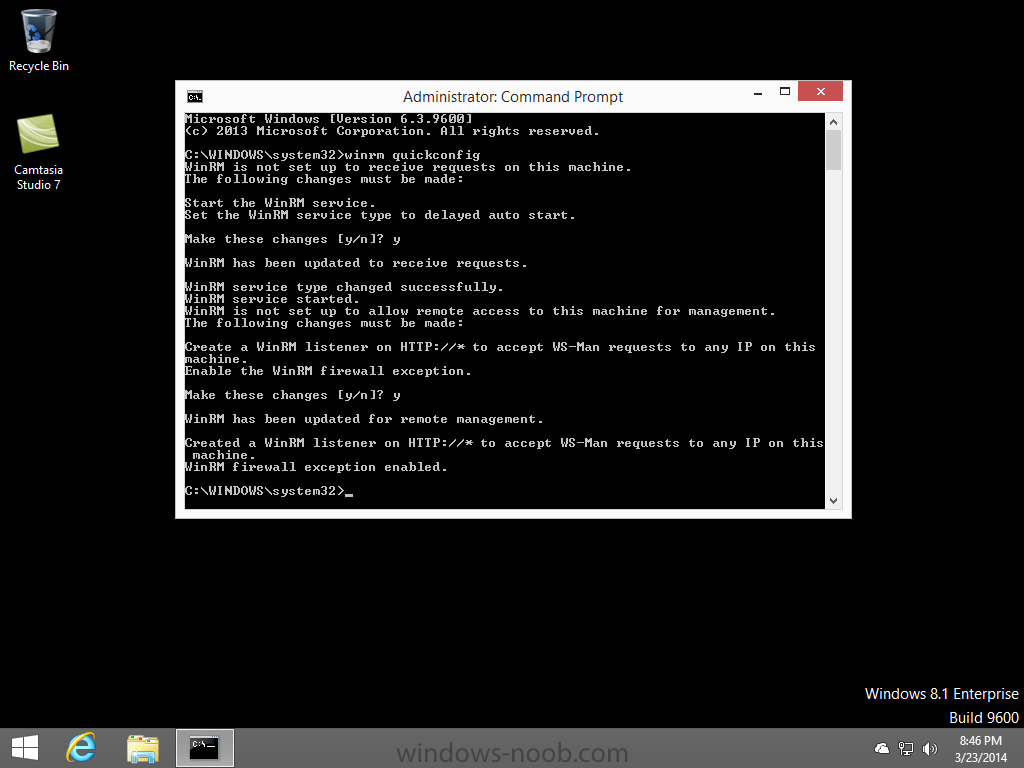
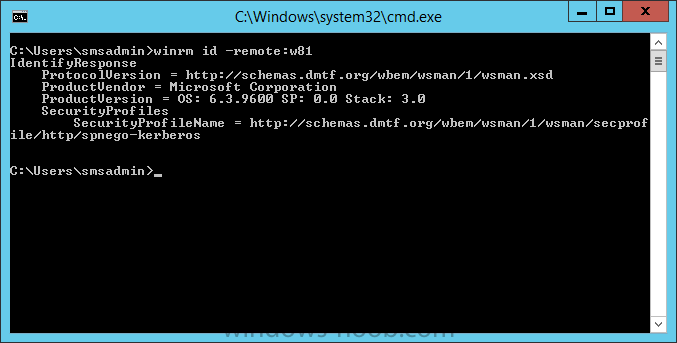
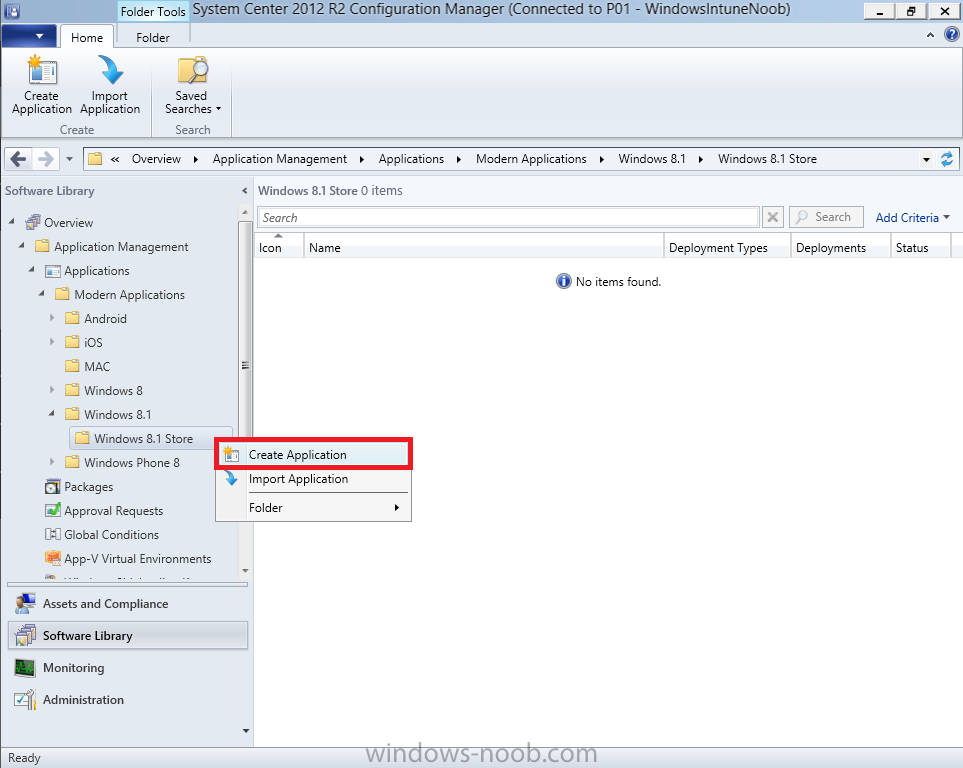
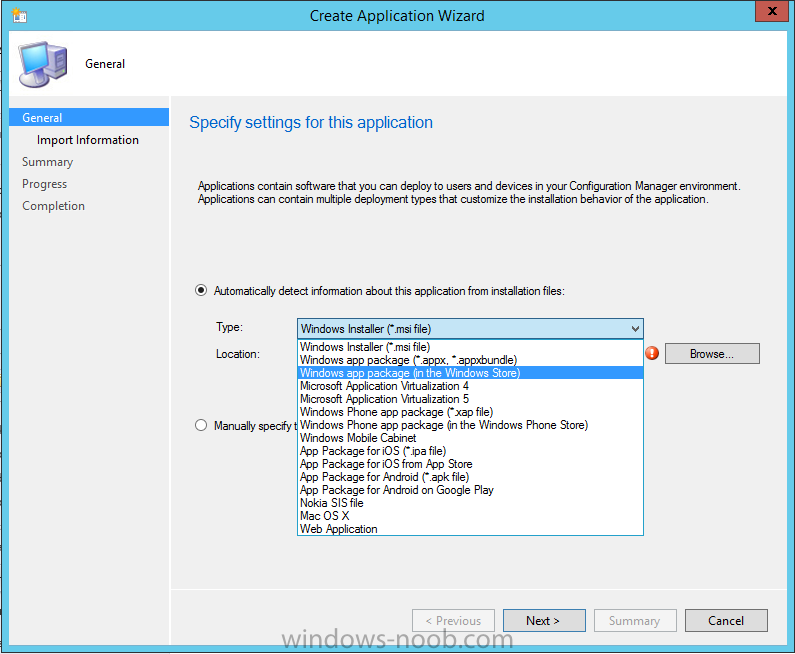
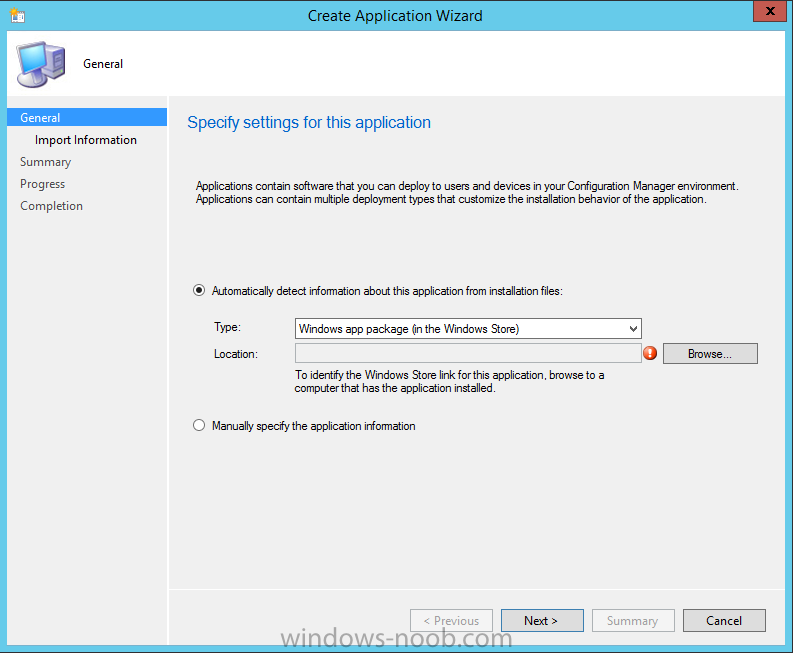
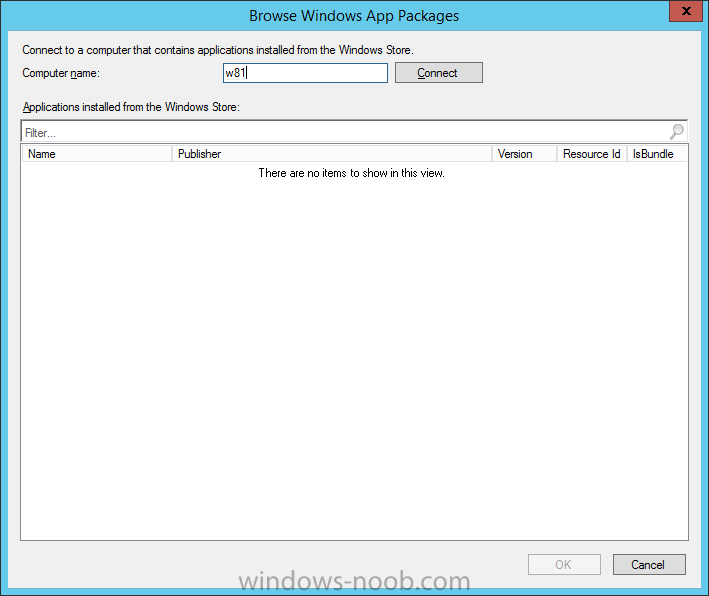
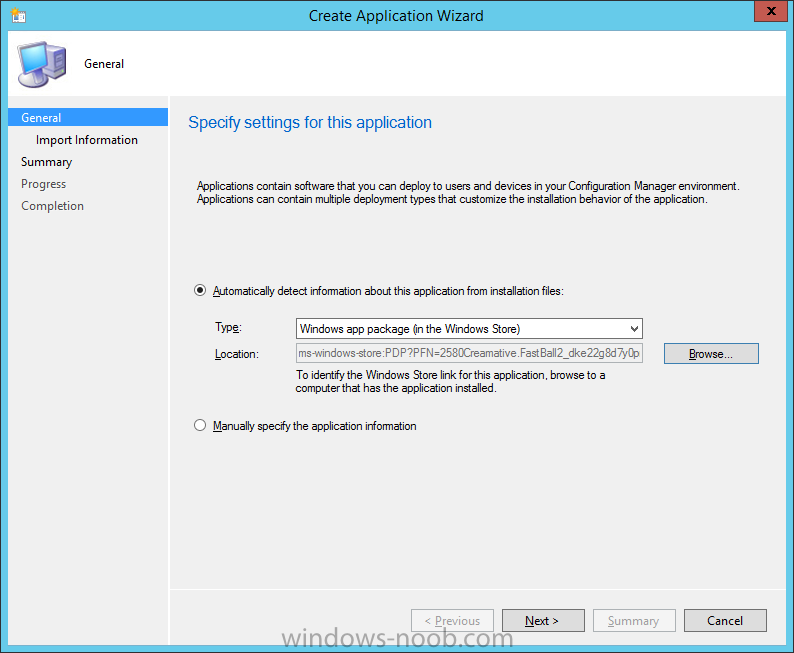
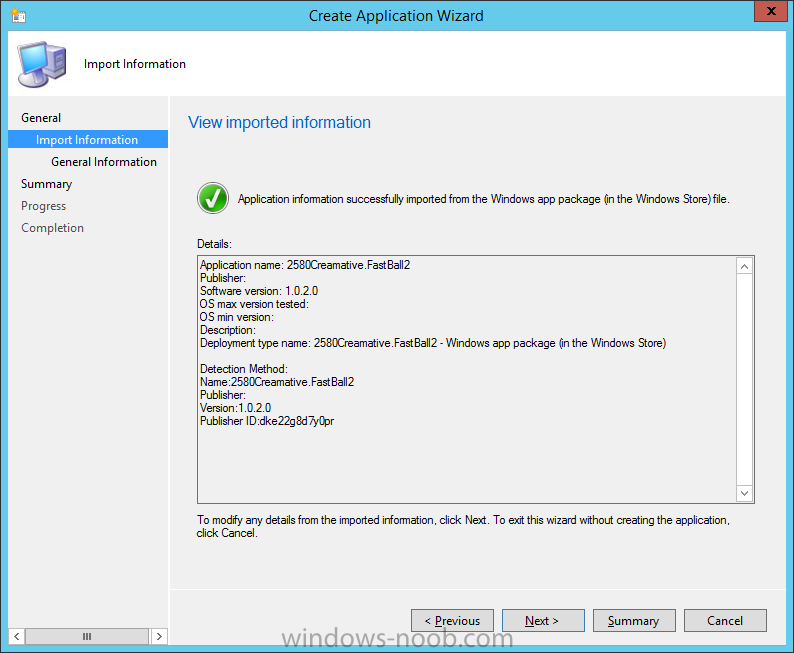
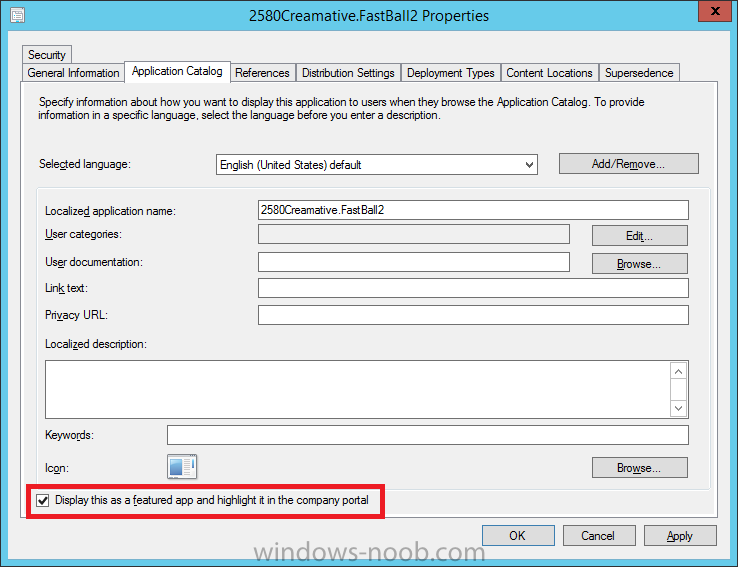
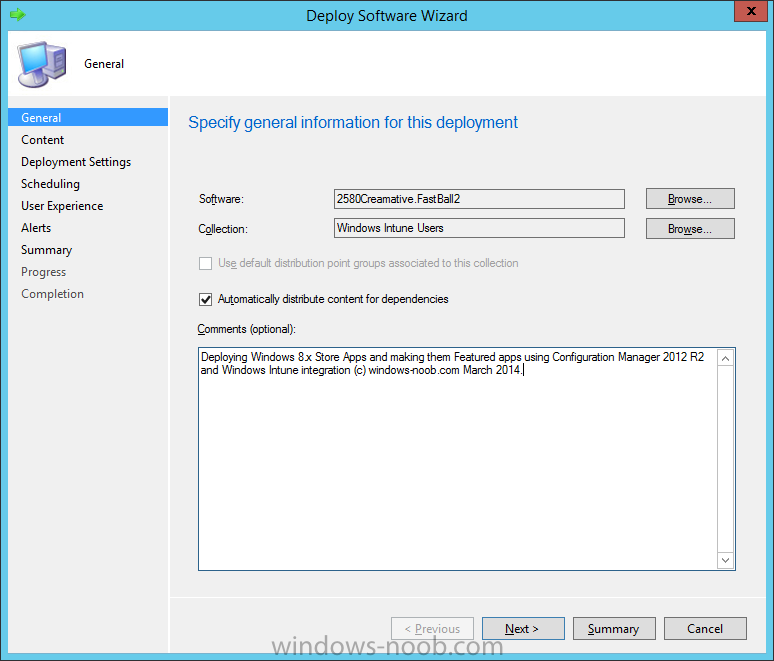
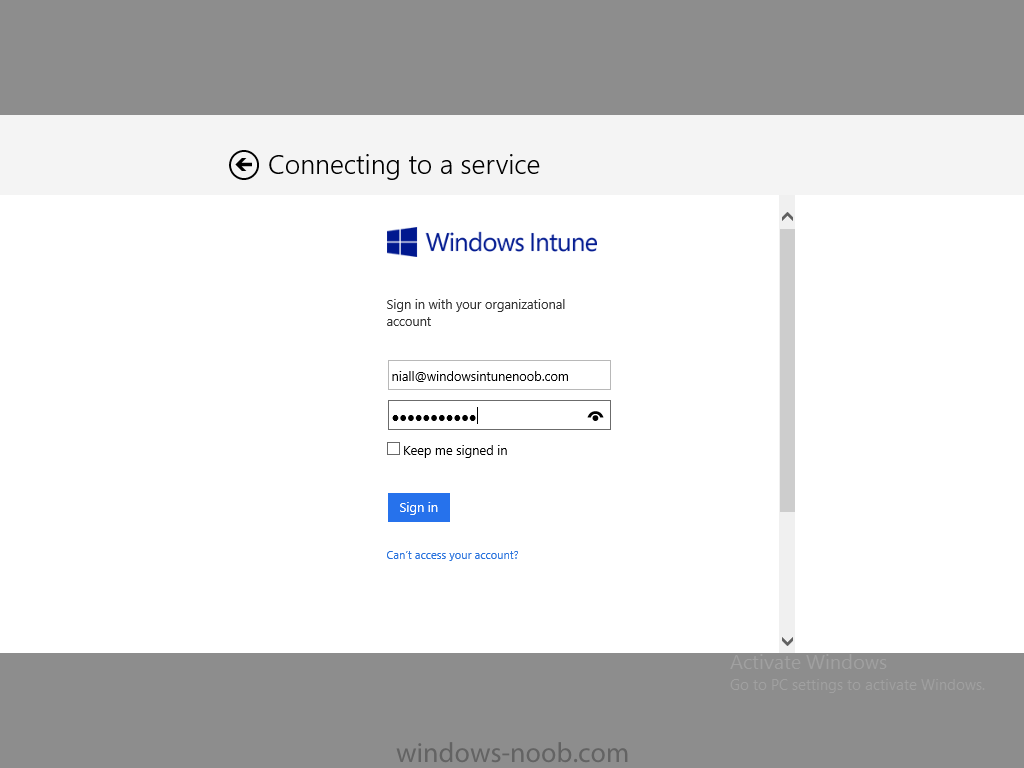
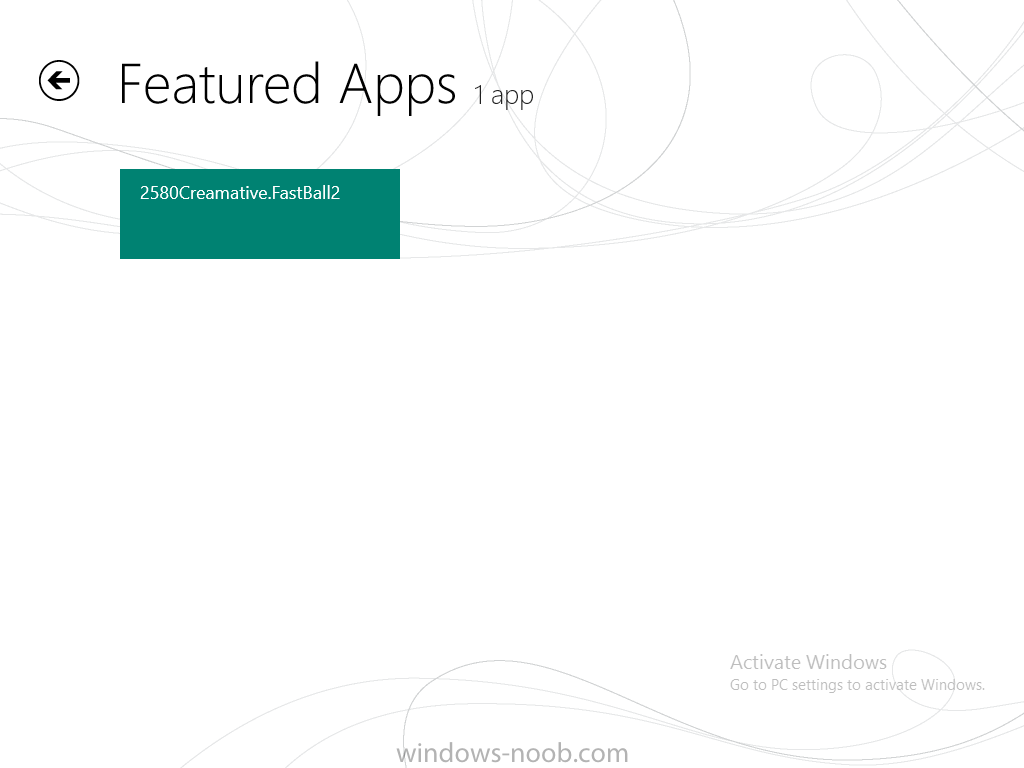
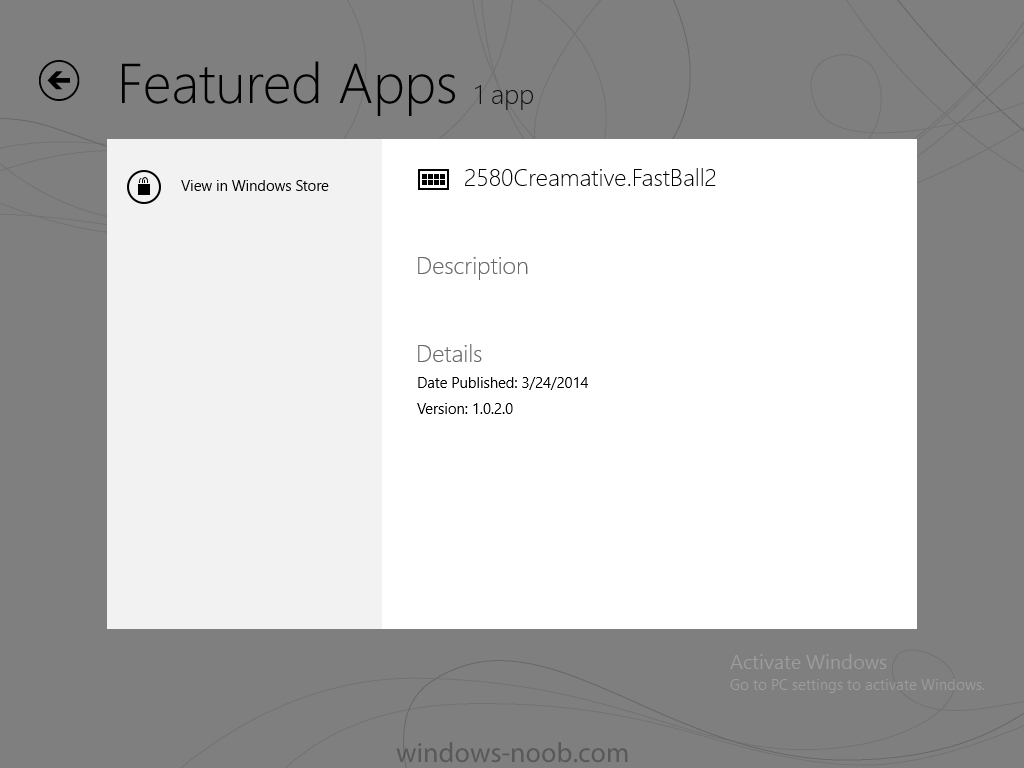
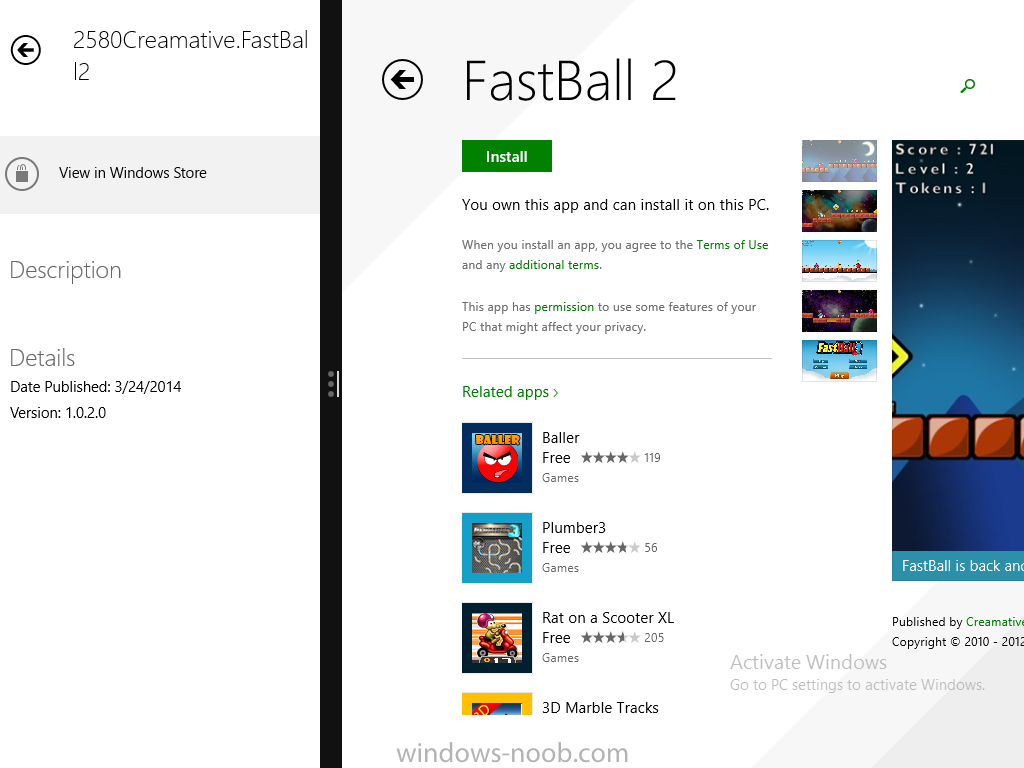
In Part 1 of this mini series we integrated Windows Intune with System Center 2012 R2 Configuration Manager. In Part 2 we added Support for iOS devices (Iphone, iPad). In Part 3 we learned the difference between App Package for iOS (*.ipa file) and applications from the Apple App Store. We learned how to deploy them to iOS devices and configured the deployment type so that the applications were made available to the user based on the iPhone or Ipad operating system version, in addition we also checked device Ownership information and deployed the application based on those requirements. In Part 4 we learned how to use and configure compliance settings in order to enable or disable certain configurable features on iOS devices. We enforced a Password requirement and enforced a minimum password length as this is a common requirement for organizations. In Part 5 we enabled support for Windows 8.1 devices (both Windows RT 8.1 and Windows 8.1 Enterprise) so that they could be managed via System Center 2012 R2 Configuration Manager integrated with Windows Intune. In Part 6 we deployed Windows 8.1 apps (appx) to Windows 8.1 devices. Now we will look at how to make Windows 8.1 store apps available in the Company Portal and how to make them featured apps with their own categories. Step 1. Enable Windows Remote Management on a device In order to add links to Windows 8.1 Store apps we need to be able to browse a Windows 8.1 device from the console using Windows Remote Management (WinRM) and that device should have the source Windows store app installed that you want to make a link available for in the Company Portal. The easiest way you can achieve this is by using a domain joined Windows 8.1 device and then enabling the Windows Remote Management service on that device by opening an Administrative command prompt and typing the following command:- WinRM quickconfig Answer yes to the questions provided as in the screenshot below. Next, add the user (for example, SMSadmin) you are running the CM12 console with to the administrators group on the remote machine like in the screenshot below Finally test the connection from your CM12 server to the remote machine by typing the following in a command prompt winrm id -remote:w81 the output should look like below, if it doesn't make sure you've run the steps above. Step 2. Add a link to a Windows Store app In the Configuration Manager 2012 R2 console, select Software Library, Application Management, Applications and expand our previously created folder structure, expand to Windows 8.1 Store and right click, choose Create Application in the Specify settings for this application screen choose Windows App Package (in the Windows Store) as per the screenshot below for Location click on Browse In the Browse Windows App Packages screen, enter the computer name of the computer you used in Step 1 above and click on Connect After some moments you should see a screen filled with the Windows App Packages installed on that remote computer , select the Application you want to make available in the Company Portal as a link to the Windows store and click Ok. In the example below I have selected an App called FastBall, it's a free Windows store game with excellent music. The select app appears in the location field, notice that it is greyed out and that ms-windows-store is the prefix to the app. click next to view the imported information now you can enter details to your liking or continue through the wizard by pressing next, next. Interestingly you can see that the detection method, requirement rules, and content options are automatically filled in by the wizard close the wizard Step 3. Make the Application a Featured App and categorize it Featured apps can be highlighted in the Company Portal to hopefully catch the attention of your users. In this guide, we will make this Windows Store App a featured app. To do so, right click on the application and choose Properties select the Application Catalog tab and place a checkmark in the checkbox beside Display this as a featured app and highlight it in the Company Portal In addition to making our app Featured, you might want to apply a category to it such as Windows Store Apps. To create a category, click on User Categories, then select Edit, then choose create to create a category click on Ok and Apply and Ok. Step 4. Deploy the App In order for your Windows Intune users to get the app via the Company Portal it needs to be deployed to a collection that they are in. Right click on the app and choose Deploy select a suitable collection such as Windows Intune Users As this is only a link to an app (for example like this -ms-windows-store:PDP?PFN=2580Creamative.FastBall2_dke22g8d7y0pr) there is no content to distribute, therefore the Content options are greyed out, continue through the rest of the wizard to completion. Step 5. Sign in to the Company Portal On a Windows 8.1 device that has been enrolled, login to the Company Portal by signing in. the Company Portal appears, if your featured app doesn't show up, try running mdmagent via a command prompt to speed up policy retrieval or you could wait a day or so for your Windows 8.1 device to refresh policy by itself, once it has the new policy it should look something like this click on Featured Apps to see what that looks like Click back and then click on Browse by Category to see how it was categorized, and you should see your Windows Store Apps category as per the screenshot below Step 6. Install the Windows Store App Start the installation process by clicking on the app itself notice the text View in Windows Store in the top left, click on that, that will open up a split screen, Company Portal on the Left, Windows Store on the right, and our Featured Windows Store app is listed, click on Install and it installs You'll probably want to verify that the app installed successfully by testing it, job done !, well nearly done, click on Play and tell me what you think of the music, cool isn't it ? Recommended Reading Planning to Deploy Windows 8 Apps in Configuration Manager - http://technet.microsoft.com/en-us/library/jj822984.aspx WinRM (Windows Remote Management) Troubleshooting - http://blogs.technet.com/b/jonjor/archive/2009/01/09/winrm-windows-remote-management-troubleshooting.aspx WinRM in mixed environments - http://www.thecodeking.co.uk/2011/02/winrm-with-mixed-domain-environments.html#.Uy9PhIUZNaQ Installation and Configuration for Windows Remote Management - http://msdn.microsoft.com/en-us/library/aa384372%28v=vs.85%29.aspx Summary In this guide we've learned how to deploy links to Windows Store apps to our modern mobile Windows 8.1 devices using Windows Intune Integration in Configuration Manager 2012 R2. In addition, we've learned how to make the app a featured app and how to categorize apps to make them easier to find. Downloads For Offline reading you can download a Microsoft Word copy of this guide below. How can I manage modern devices using System Center 2012 R2 Configuration Manager Part 7.zip Continue on to Part 8.


-
check where it's storing the boot image, more than likely it's placing it in the bdedrive partition which by default is approx 300mb, we have resized ours to between 1 and 2gb to get around this because refresh (reinstallation) scenarios where it has to disable bitlocker and reboot involve just this procedure, post your smsts.log and we'll take a look to confirm
-
upgrading sccm 2012 to 2012 r2
anyweb replied to ravinder reddy's topic in Configuration Manager 2012
also one from right here ;-) CM12 in a Lab - How can I install System Center 2012 R2 Configuration Manager ? -
define your boundaries and boundary groups correctly and add dp's to the correct groups
-
and presumably you resta\rted the WDS service after making any changes ? what does your smspxe.log file tell you
-
ok, take a look at Jorgen's post here does it help ?
-
Failed to run the action: Capture the Reference Machine.
anyweb replied to jgtran's topic in Configuration Manager 2007
check if it actually has a valid IP Address before the capture as i see this in the log which usually translates to no ip address or network/dns issues. -
Secondary not remove from console
anyweb replied to learningmode's topic in Configuration Manager 2012
try this -
you can offload management point roles easily with CM12, a primary site can have up to 10 management point roles. More info here > http://technet.microsoft.com/en-us/library/gg712282.aspx
-
i'd say start looking at your logs to see if it's processing policy at all or is it complaining, is the client agent definitely the R2 version of the client (5.00.7958.1000)
-
basically it's trying to boot over the network using UEFI network boot and it expects that your PXE enabled distribution point is working with UEFI network boot, so tell us about your PXE enabled dp, what os is running on it ?
-
How can I change a HKCU setting within Windows during an OSD deployment
anyweb replied to roshanbhavsar04's question in How do I ?
correct and i've updated the typo ! -
are you installing Visual C++ 2010 Redistributables KB2565063 x64 directly after the Setup Windows and ConfigMgr step ?
-
by far the easiest way (for me) is to use the standalone media capture media as I describe here. Take a snapshot (checkpoint) of your virtual machine before running it.
-
it all depends on the captured WIM File, if you don't need the apply data image step, don't use it, I don't use it for my production windows 8.x task sequences with only one index in the captured wim.
-
why are you installing the RTM version of Configuration Manager 2012, it's already at R2 level now which includes many hotfixes and additional functionality
-
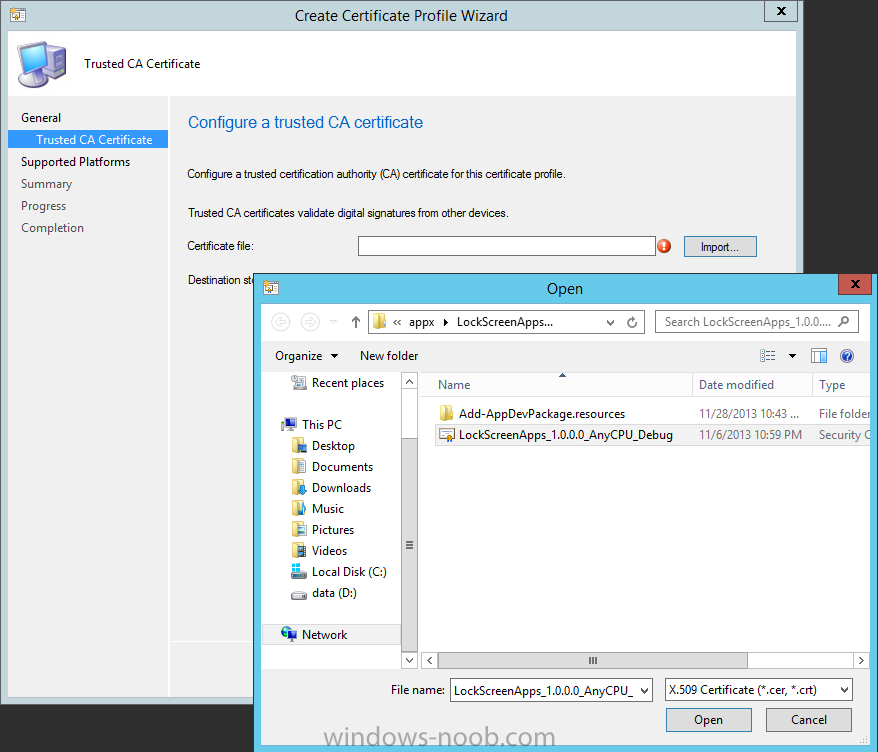
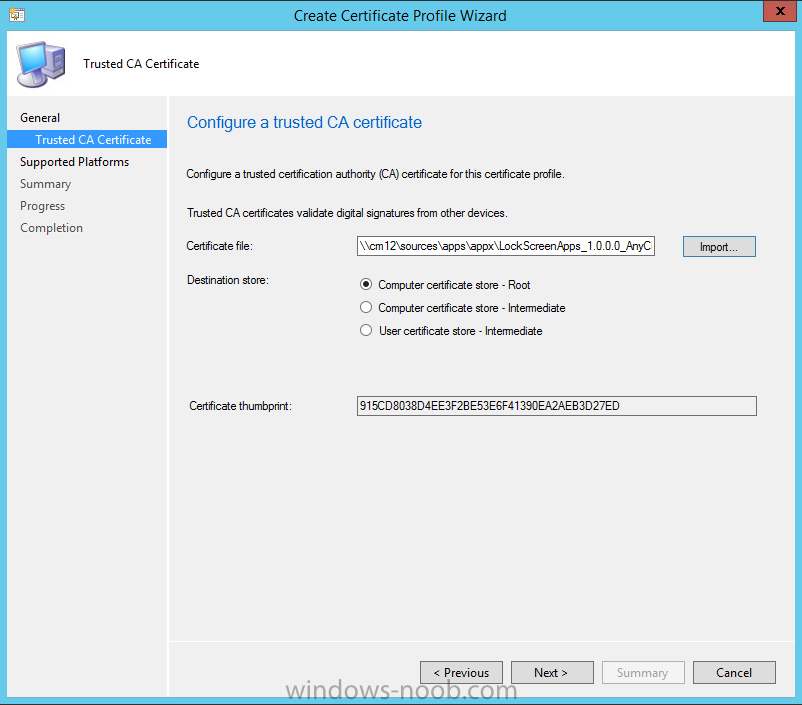
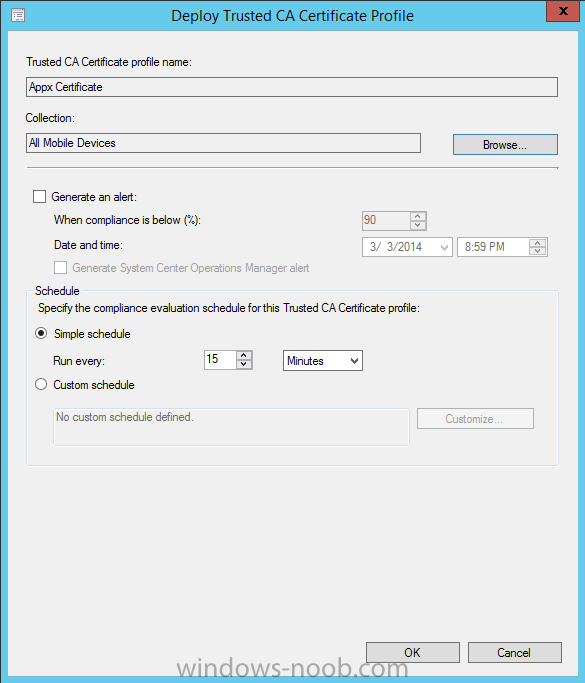
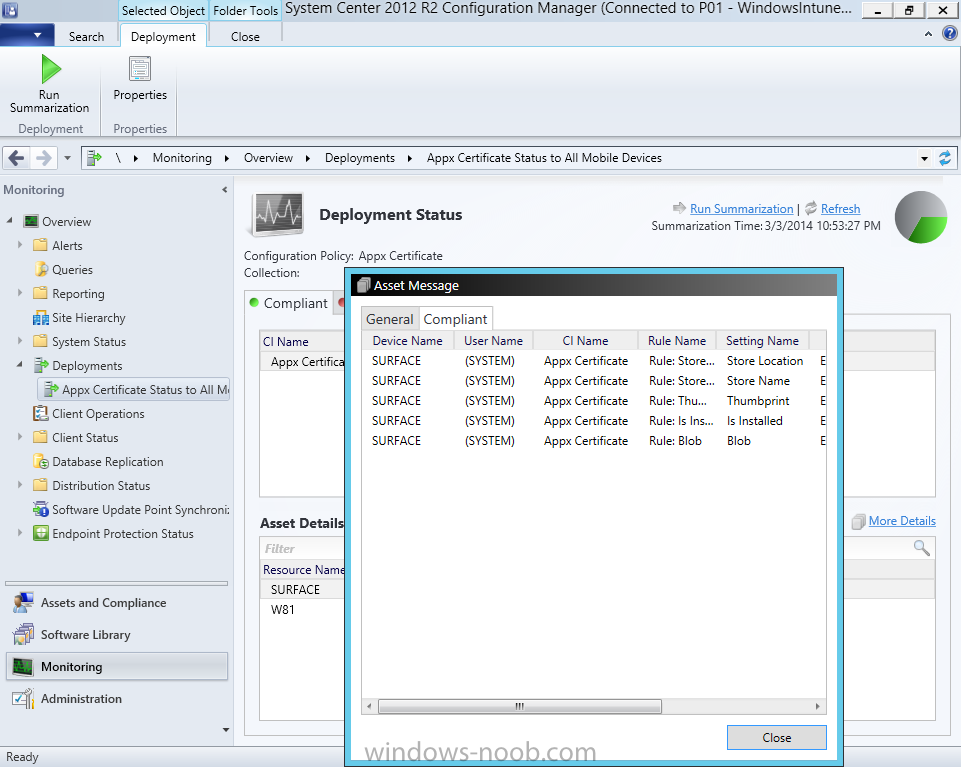
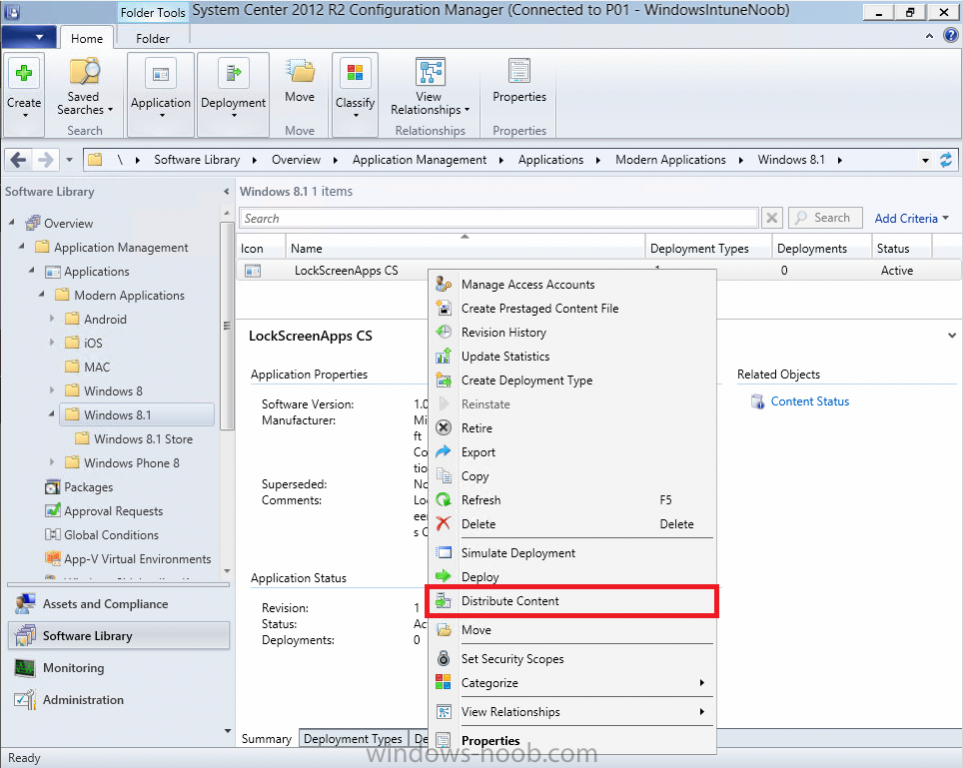
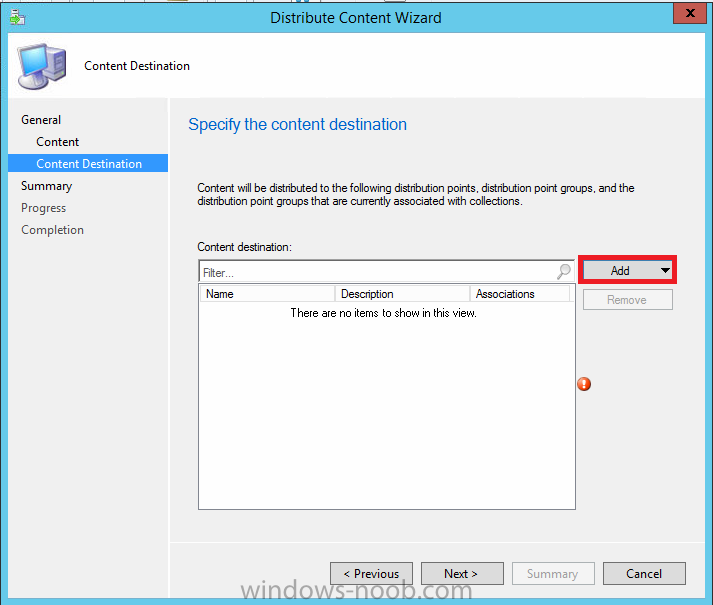
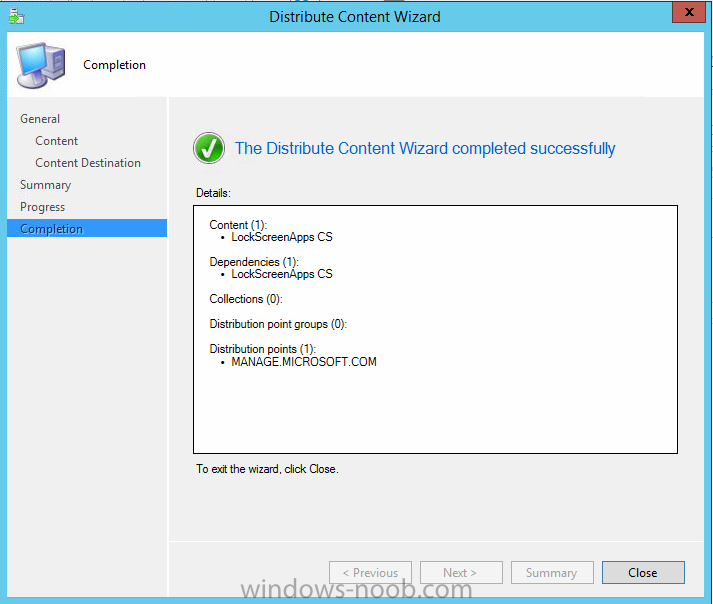
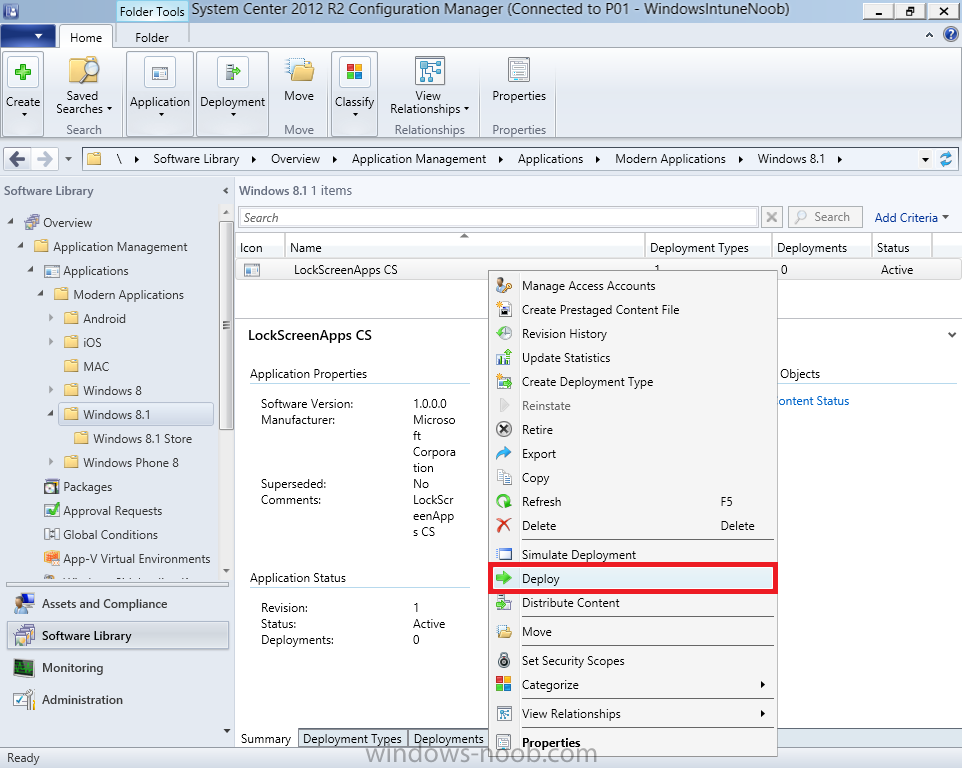
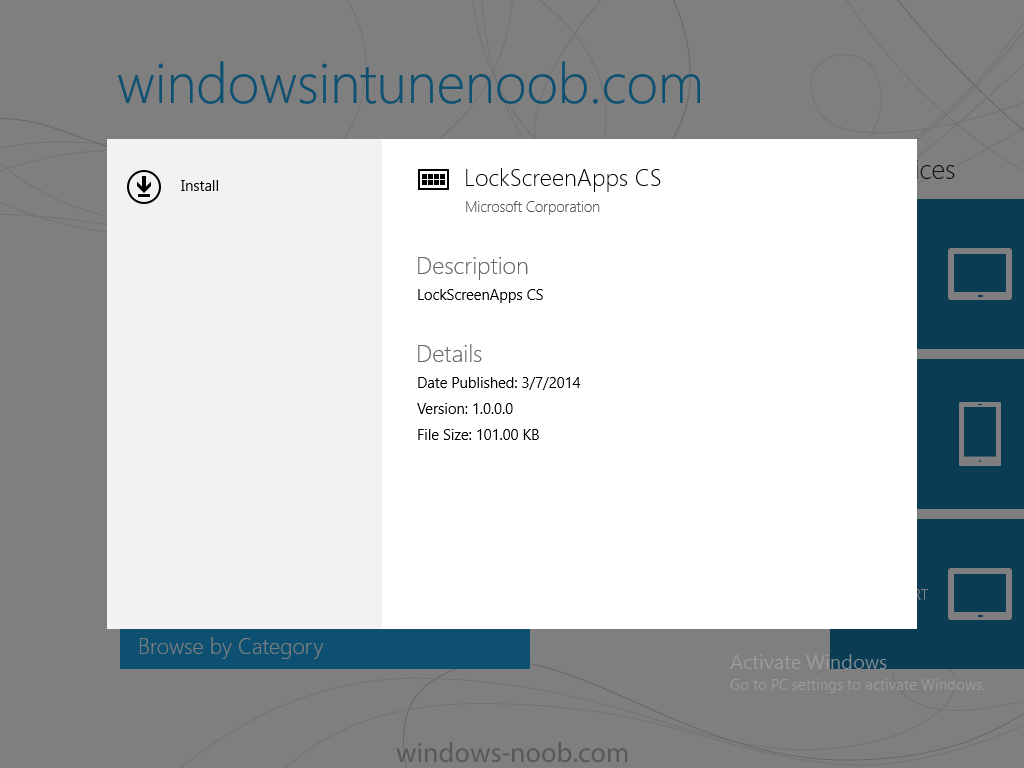
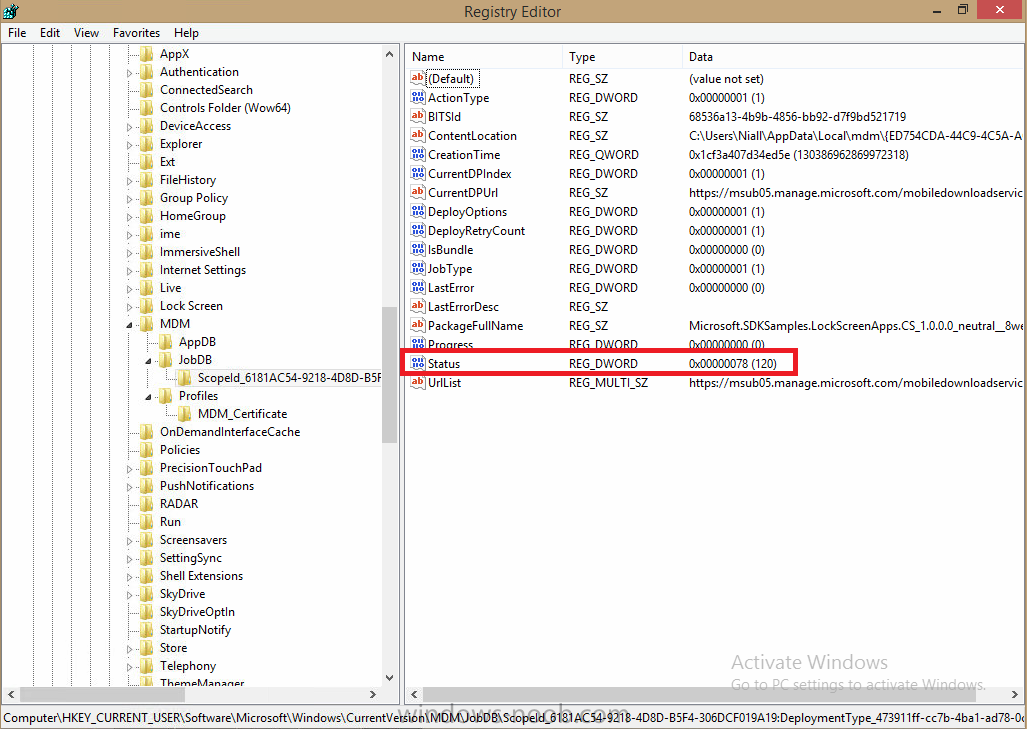
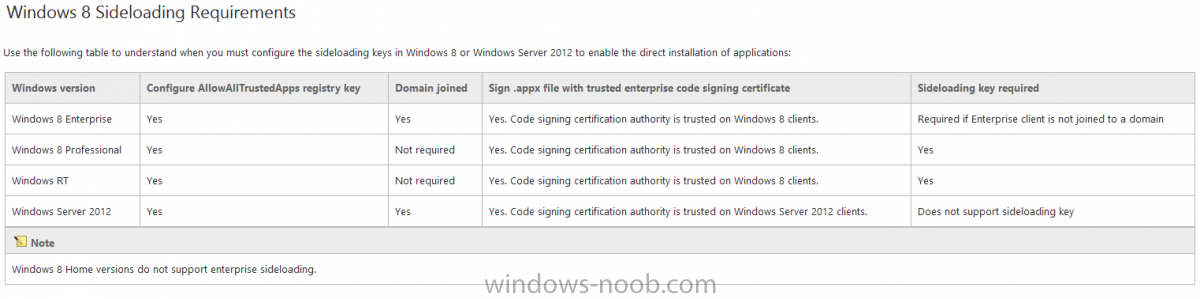
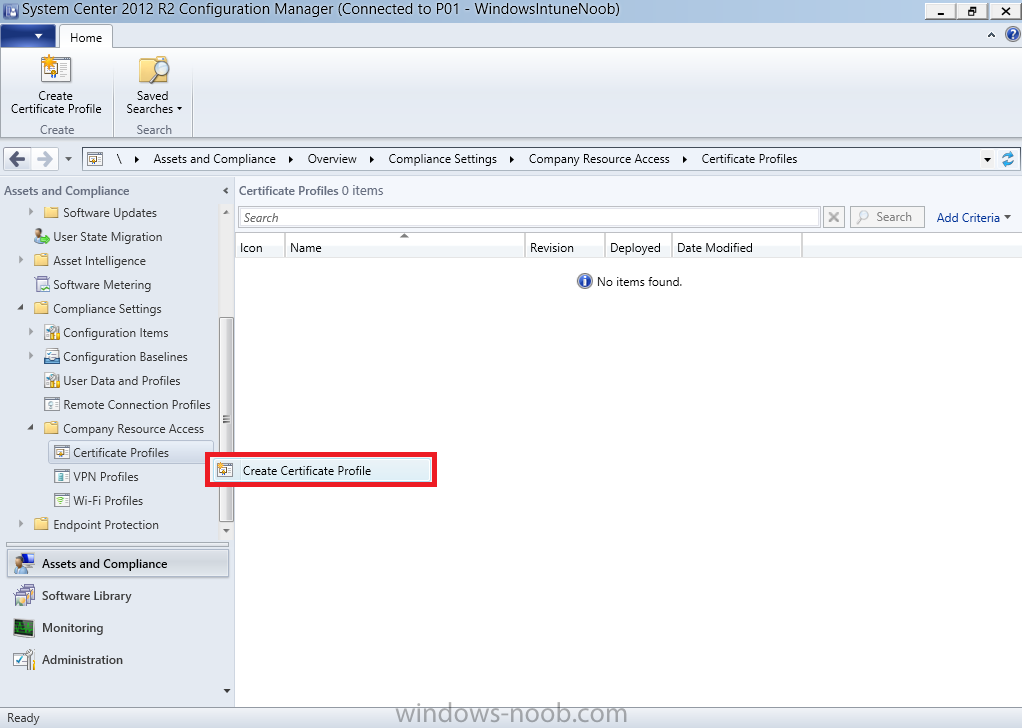
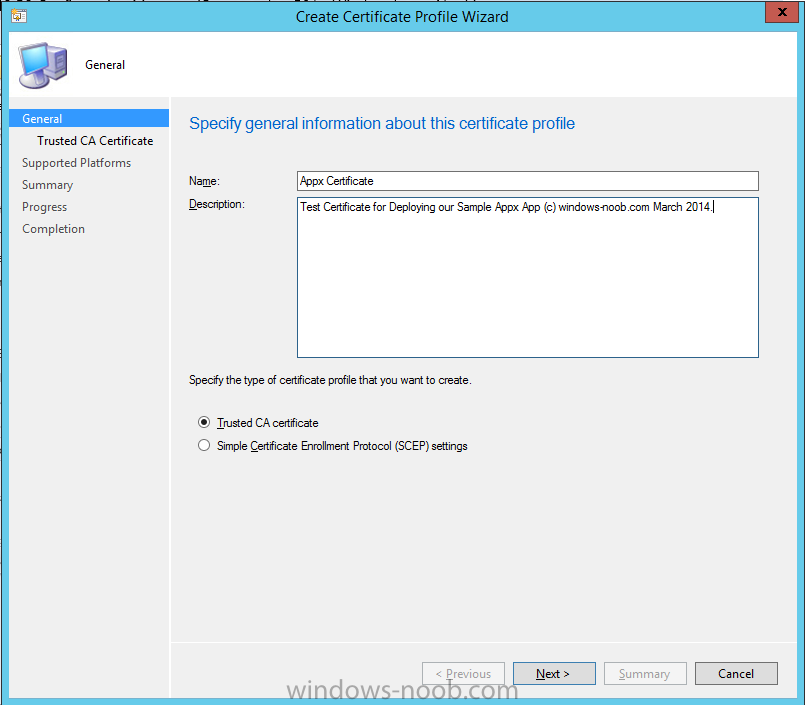
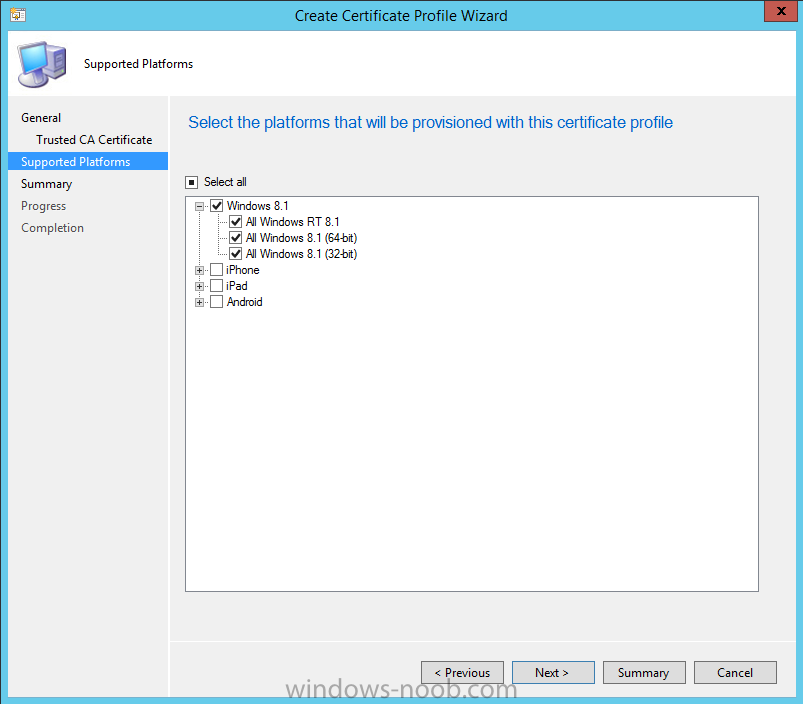
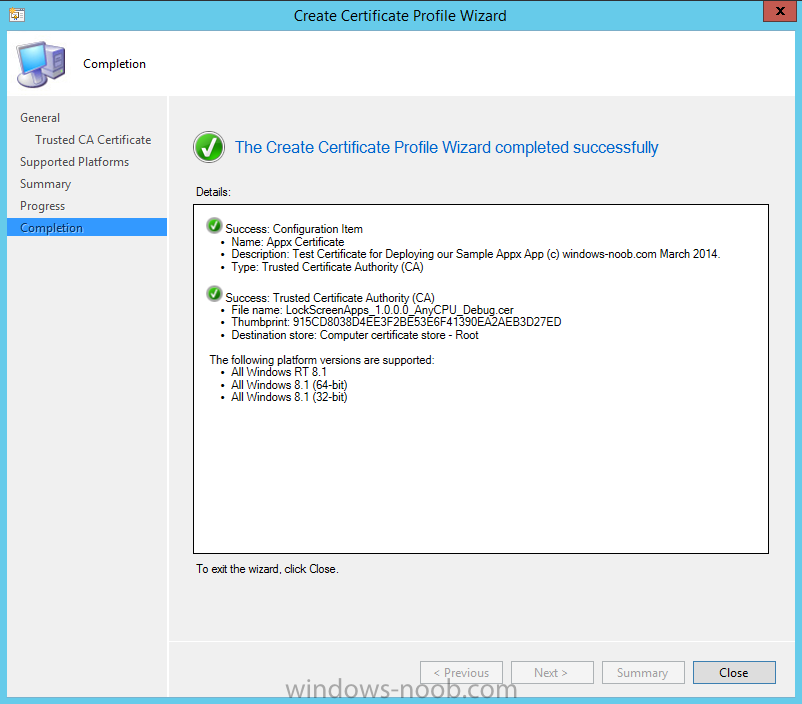
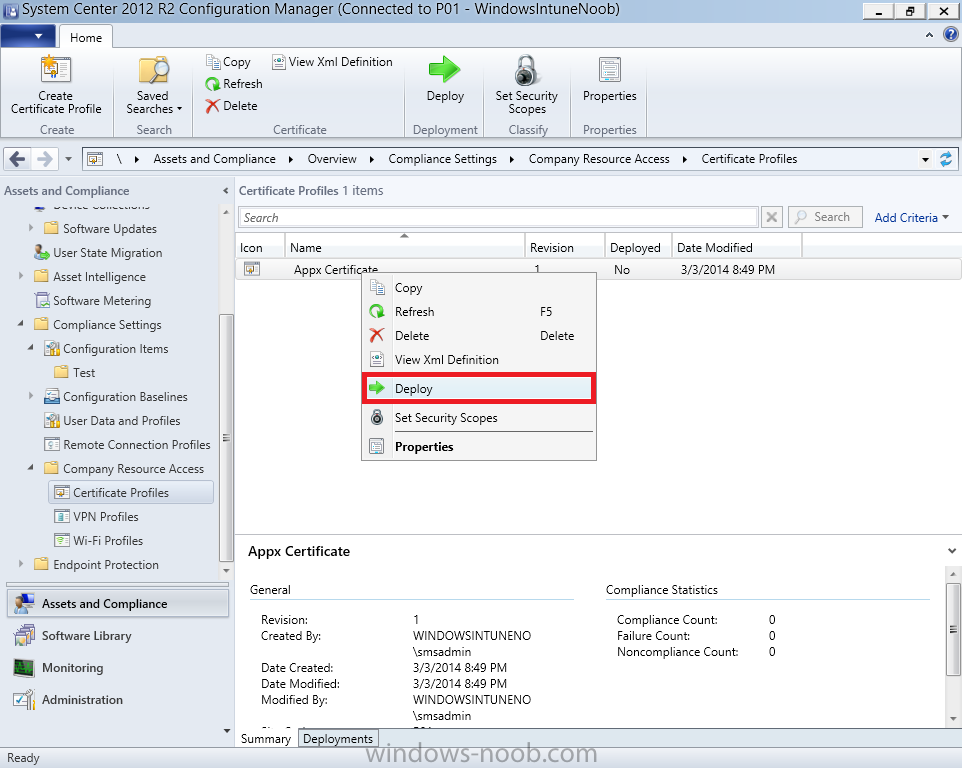
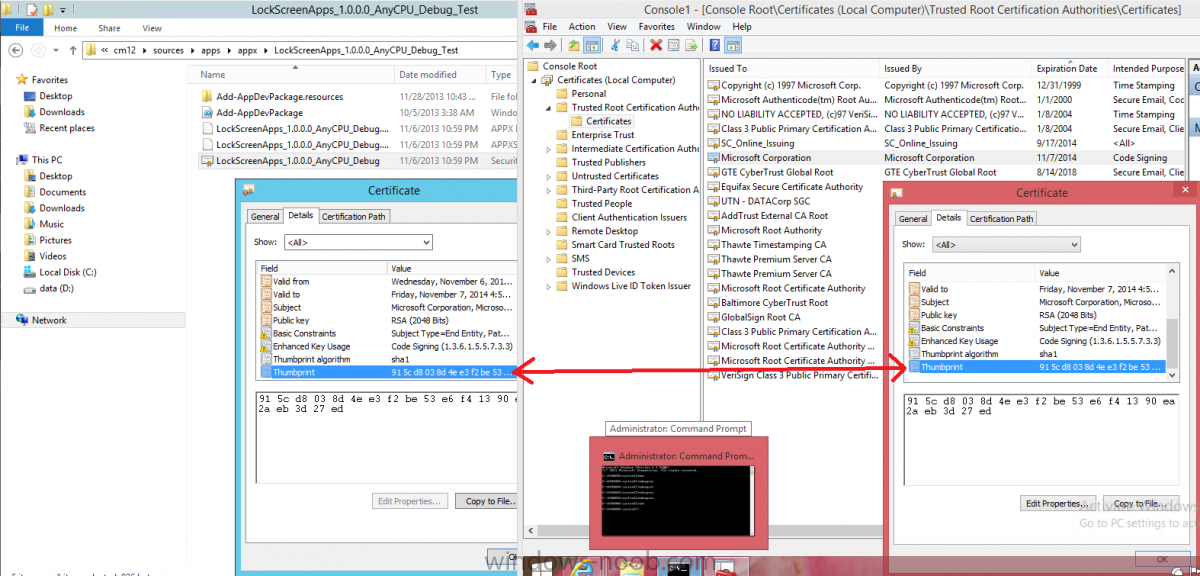
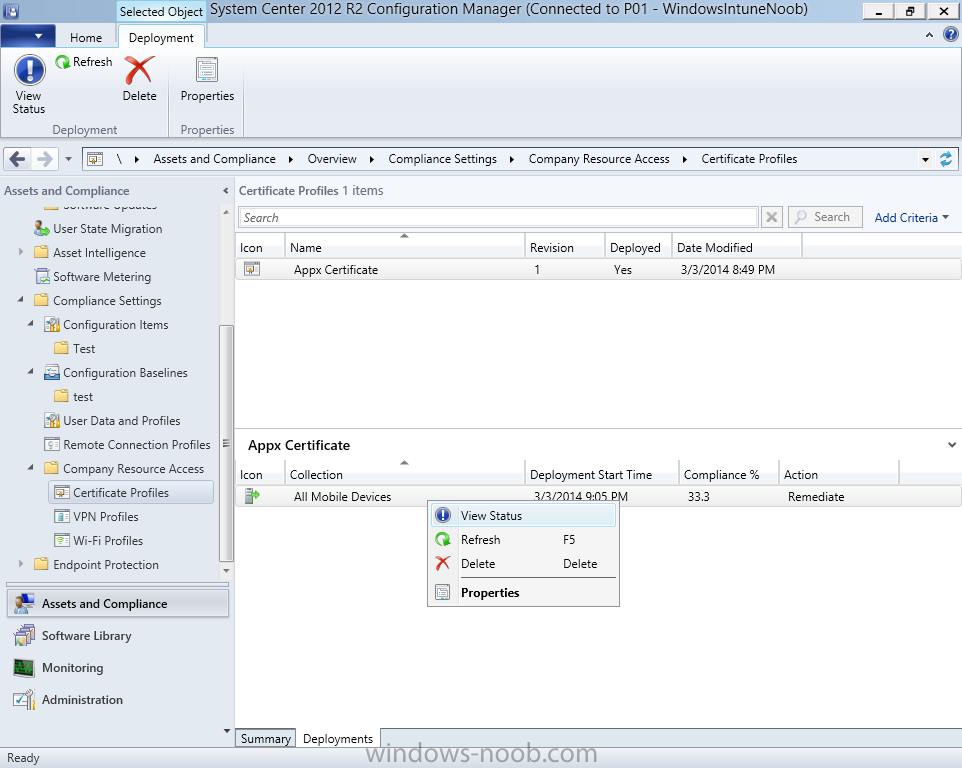
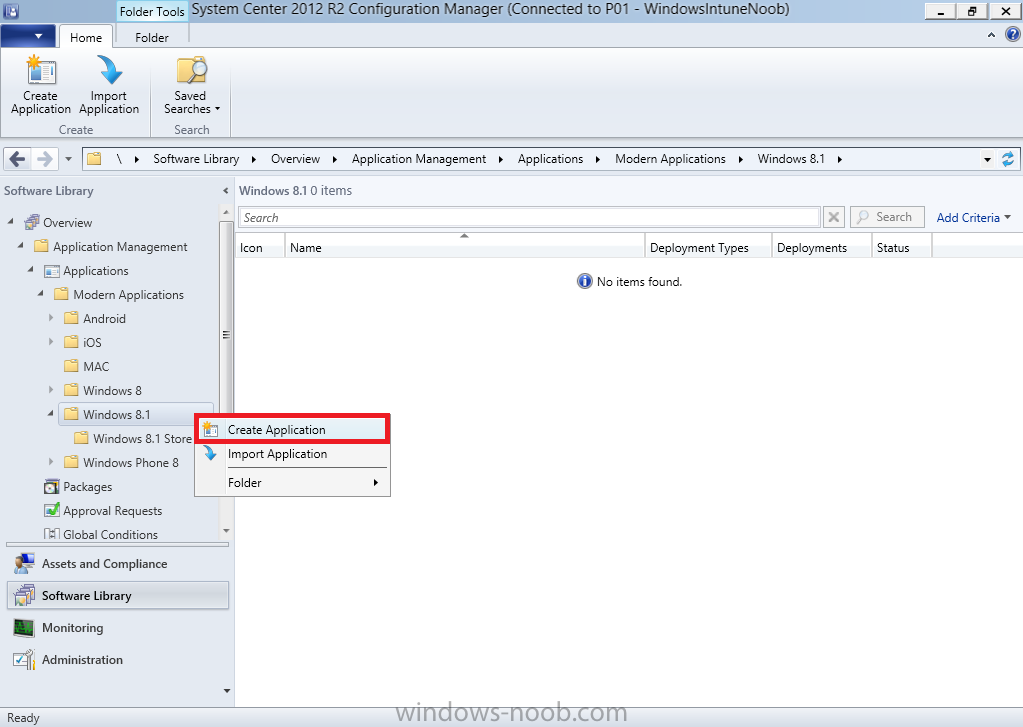
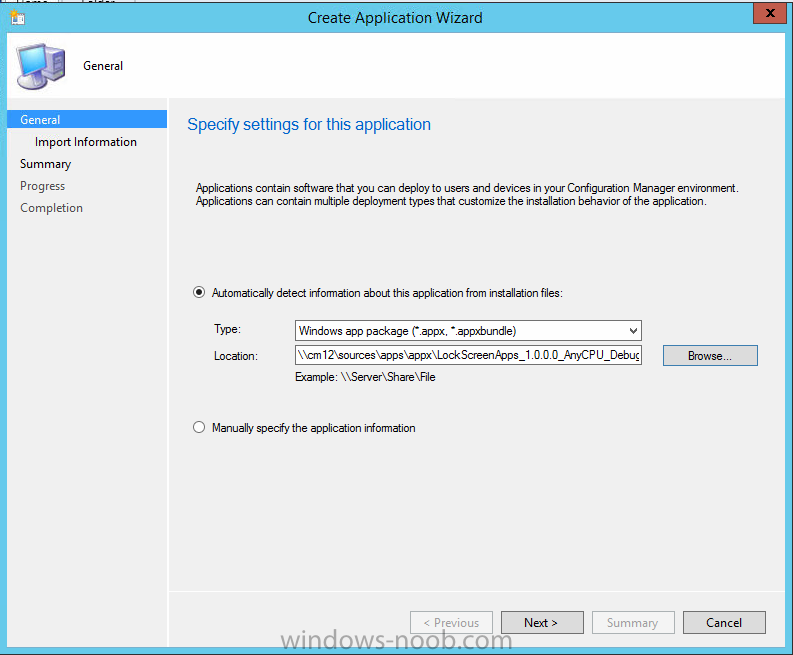
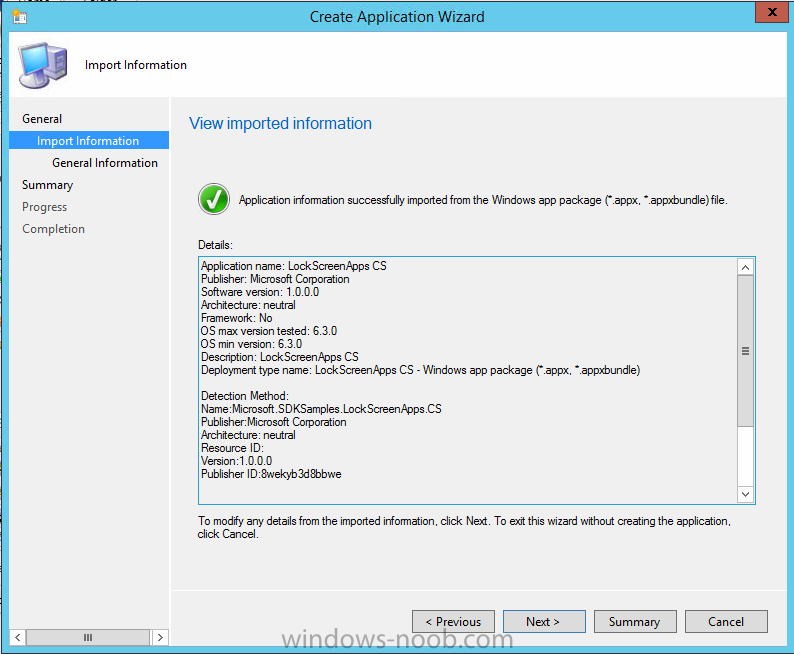
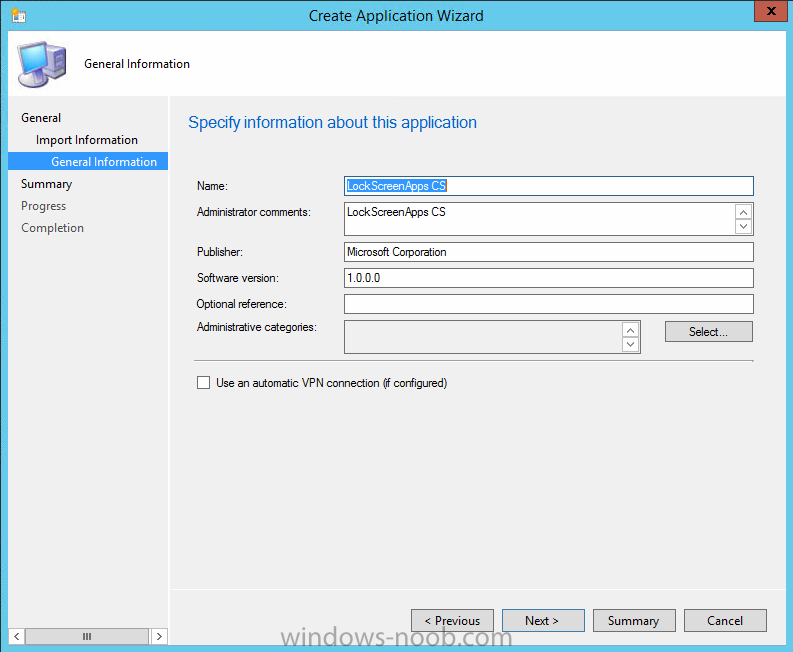
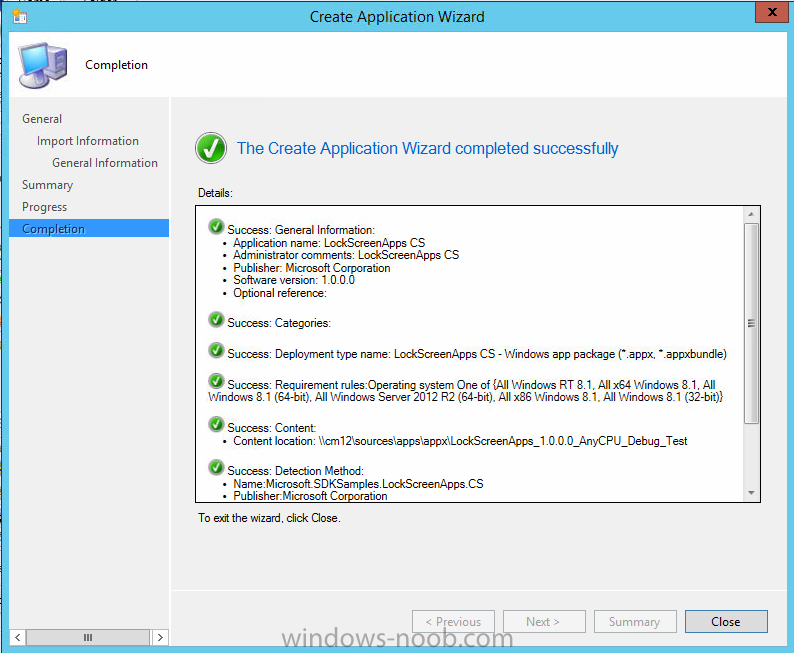
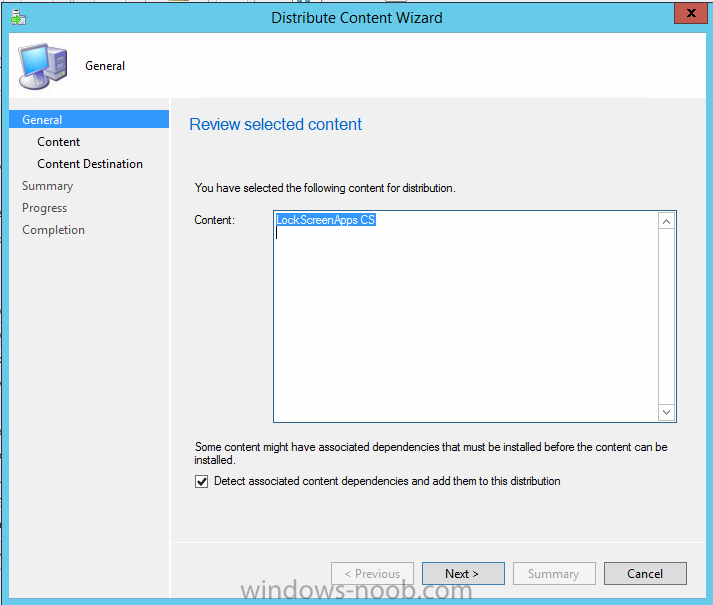
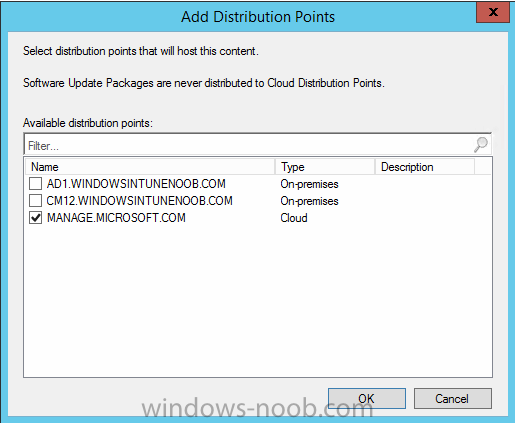
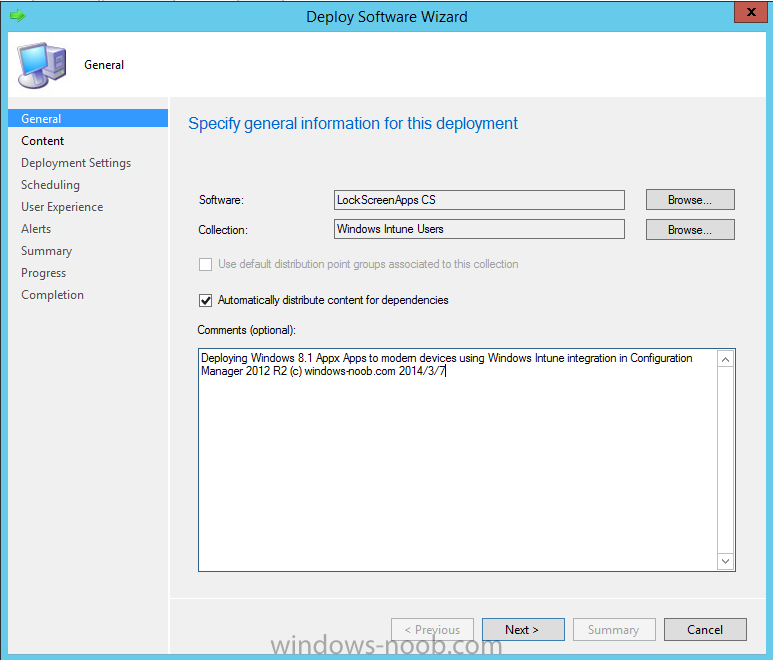
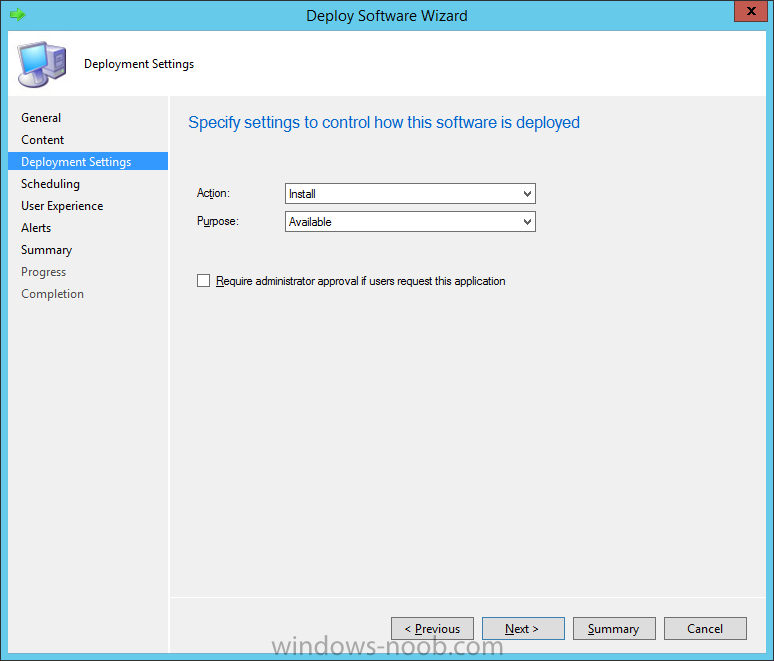
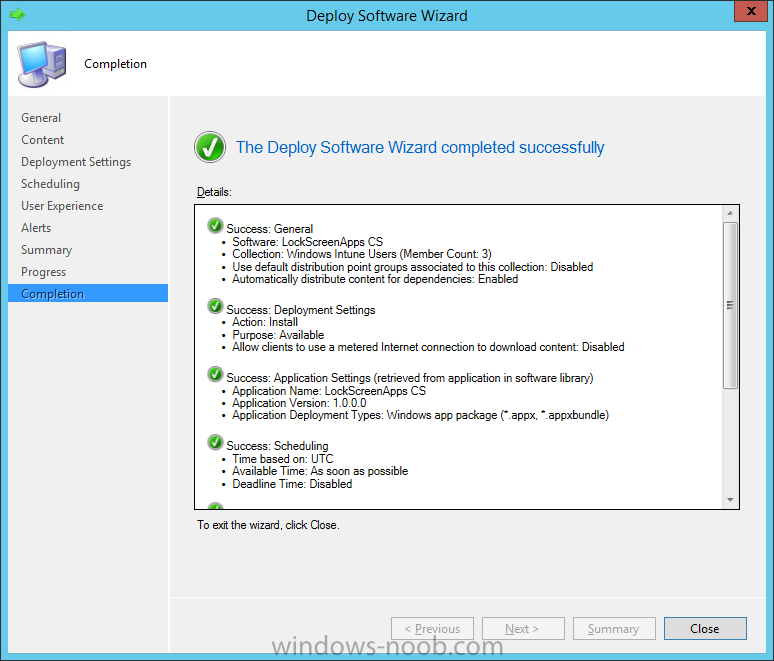
In Part 1 of this mini series we integrated Windows Intune with System Center 2012 R2 Configuration Manager. In Part 2 we added Support for iOS devices (Iphone, iPad). In Part 3 we learned the difference between App Package for iOS (*.ipa file) and applications from the Apple App Store. We learned how to deploy them to iOS devices and configured the deployment type so that the applications were made available to the user based on the iPhone or Ipad operating system version, in addition we also checked device Ownership information and deployed the application based on those requirements. In Part 4 we learned how to use and configure compliance settings in order to enable or disable certain configurable features on iOS devices. We enforced a Password requirement and enforced a minimum password length as this is a common requirement for organizations. In Part 5 we enabled support for Windows 8.1 devices (both Windows RT 8.1 and Windows 8.1 Enterprise) so that they could be managed via System Center 2012 R2 Configuration Manager integrated with Windows Intune. Now we will look at deploying Windows 8.1 apps (appx) to Windows 8.1 devices. Mobile apps that are deployed using Configuration Manager appear in the company portal on mobile devices. You can deploy sideloaded apps or links to application stores to enrolled devices. Client computers that run different versions of Windows 8 have different requirements for enabling the sideloading of apps. For example, you must configure the sideloading key on a computer that runs Windows 8 Enterprise if the computer is not joined to a domain. For more information about these requirements, see the following section in Technet:- Windows 8 Sideloading Requirements. Note: In case it's not clear in the table below, if you want to sideload apps you need a sideloading key. To create a sideloading key expand Software Library, Application Management, Windows Sideloading Keys and right click, choose Create SideLoading key and enter the details. For the purposes of this guide I will assume that you have entered your sideloading key(s) prior to commencing the steps below. You can enable sideloading for this scenario by installing a sideloading product key on the computers. For more information about sideloading product activation keys, see Microsoft Volume Licensing. Additionally, the article How to Add and Remove Apps describes how to use the Windows Software Licensing Management Tool (Slmgr.vbs) to add and activate the sideloading product key. Step 1. Create a Reg key to allow Appx installation First of all we need to configure Windows 8 computers to allow direct installation of Windows 8 apps (appx apps). To do so, you would normally use group policy to configure the following sideloading registry settings, however our Windows 8.1 devices are not domain joined so Group Policy is out of the question. As we cannot currently deploy registry entries via Windows Intune integrated with Configuration Manager you'll need to do this step manually or use a script. As our (modern) Windows 8.1 devices are workgroup joined we need to manually create the following registry key, so please save the text below into a file called AllowAllTrustedApps.reg and then run it on your Windows 8.1 clients. Windows Registry Editor Version 5.00 [HKEY_LOCAL_MACHINE\SOFTWARE\Policies\Microsoft\Windows\Appx] "AllowAllTrustedApps"=dword:00000001 Step 2. Create and deploy a Certificate Profile A Certificate is required to ensure that the app is trusted. Without the correct certificate, you can't sideload apps. As we will be installing an Appx app using the Company Portal we therefore need the certificate in place. Tip: Sideloading of apps is when you install them using a method other than the via the Store (sideloading is appropriate for other platforms as well, such as iOS, Windows Phone, Android). This certificate does not have to be rooted to a trusted certification authority; it just has to be trusted by your PCs. The Publisher Name in the package manifest must match the Publisher Name in the certificate that is used to sign the app package. Windows trusts many Certificate Authorities without any additional configuration. If the certificate is from one of these already trusted authorities, you don’t need to deploy and manage additional certificates to the targeted PCs. You also can use your company's internal Certificate Authority to sign the app, as long as you ensure that the CA certificate is installed in the Windows images of the targeted PCs. Note: Visual Studio provides a self-signing test certificate that you can use to test apps internally. Microsoft recommends that you use these self-signed certificates for internal testing only and that you do not use them on production networks for enterprise deployment. We can use a new feature in Configuration Manager 2012 R2 to deploy Certificate Profiles. Certificate profiles in System Center 2012 Configuration Manager works with Active Directory Certificate Services and the Network Device Enrollment Service role to provision authentication certificates for managed devices so that users can seamlessly access company resources. For example, you can create and deploy certificate profiles to provide the necessary certificates for users to initiate VPN and wireless connections. In Assets and Compliance expand Compliance Settings, then expand Company Resources and finally select Certificate Profiles. Right click and choose Create Certificate Profile Give it a suitable name and description, In this blog post you are learning how to Deploy Appx apps to modern (mobile) devices and this example will be sufficient for our needs, we can use the certificate we created when we created out sample Appx app in this post. Browse to the folder where you've got your Appx certificate (or to the folder where you have a Windows 8.1 appx app source files plus the self signed certificate) and select the certificate and then choose open. We can use the default Computer Certificate Store (Root) Next we want to select the Operating Systems we want to provision with this certificate profile, so select Windows 8.1 The certificate profile is created, click close. Step 3. Deploy the Certificate Now that we've created our test appx certificate profile, we will deploy it to our Windows 8.1 modern devices. Right click the certificate profile and choose Deploy. and select the All Mobile devices Device collection. Note: In the screenshot below I have not changed the compliance evaluation schedule from the default setting of 15 minutes, which in a lab is ok, however in production you'd want to set it to something more realistic like once a week. Step 4. Verify the Certificate is deployed Now that the Certificate is deployed it's a waiting game, the device must receive it's policy which by default is once every 24 hours. Once it has received policy you can verify that the certificate is actually deployed by bringing up the Certificates MMC on one of your Windows 8.1 devices. In the screenshot below we are viewing a certificate on two separate computers, the one on the left is on the CM12 server and the one on the right is on a Windows 8.1 client. On the left side you can see the Certificate properties of the self signed certificate in the sample Appx app highlighted, you can bring up the Certificate Properties by double clicking on the certificate in the sample Appx folder, and on the right side we have the Certificate Properties of the Certificate we Deployed to our Windows 8.1 device in Step 3 above. If you look closely, they match. Additionally you can browse to the Deployments tab of our Appx Certificate deployment, and right click and choose View Status which will bring you to the monitoring node and allow you to dig deeper in terms of successful deployments etc, the screenshot below shows the successful deployment of the certificate used above on one of the 3 Windows 8.1 devices used in this lab. Step 5. Create an Appx App In Application Management, Applications, section browse to our previously created folder layout and select Windows 8.1, right click and choose Create Application, select Windows Appx package from the type menu (the default is MSI) point it to our sample app that we created earlier and fill the UNC location of the appx app the import information is shown On the General Information screen add any changes you need or just click next to continue, note that you can also select to Use an Automatic VPN connection (if configured), this feature is explained here. continue through to completion and then close the wizard Step 6. Distribute The Content Modern devices (and other clients too) won't be able to get Appx apps unless the content is actually present in the 'cloud' so we need to distribute it to our Windows Intune managed distribution point. Right click on the newly added Appx app and choose Distribute Content click next click through to the Content Distribution screen and click on Add to Add a distribution point select the MANAGE.MICROSOFT.COM distribution point (Cloud) and click your way through the rest of the wizard, you can review the distmgr.log to verify it has distributed the content. Step 7. Deploy the Appx application The next step is to Deploy the Appx application in order for our modern device users to see it in the company portal, so right click it and choose Deploy fill in the relevant info and choose the Windows Intune Users collection next you'll see which distribution points the content is on, we want the deployment to be of an Available purpose (optional) click your way through to the end of the Wizard Step 8. Test the Appx Deployment Login to a Windows 8.1 computer that you've enrolled exactly as described in Part 5. We will speed up policy retrieval by opening a command prompt and issuing a command called mdmagent Bring up the Start menu and select the Company Portal and sign in with your credentials the Lockscreen Appx app appears, click on it to start the installation process and select Install in the top left corner it should say Installing and if everything is ok it will install. Note: I do not have any sideloading keys and therefore cannot show you the completion of this appx installation. Troubleshooting Check the following registry key on your Windows 8.1 device to see the status of your Appx installation HKEY_Current_User\Software\Microsoft\Windows\CurrrentVersion\MDM\JobDB and verify the status such as in the screenshot below, the status of 78(120) means SideLoading key is required, to get a list of what these status codes mean see this post. You can also check that the .appx application has been signed by the correct authority. To do this, make a copy of the appx app, and rename the copied .appx file to .zip and unzip the files. Open the AppxManifest.xml within the extracted files using notepad and check both the Identity parameter and Publisher value. Recommended Reading How to Create and Deploy Applications for Mobile Devices in Configuration Manager - http://technet.microsoft.com/en-us/library/dn469410 Windows 8 Licensing Guide - http://download.microsoft.com/download/9/4/3/9439A928-A0D1-44C2-A099-26A59AE0543B/Windows_8_Licensing_Guide.pdf Try It Out: Sideload Windows Store Apps - http://technet.microsoft.com/en-us/windows/jj874388.aspx Planning to Deploy Windows 8 Apps in Configuration Manager - http://technet.microsoft.com/en-us/library/jj822984.aspx Introduction to Certificate Profiles in Configuration Manager - http://technet.microsoft.com/en-us/library/dn248971.aspx Configuring Certificate Profiles in Configuration Manager - http://technet.microsoft.com/en-us/library/dn270539.aspx Deploying enterprise apps - http://msdn.microsoft.com/en-us/library/windows/apps/jj657971.aspx Introduction to VPN Profiles in Configuration Manager - http://technet.microsoft.com/en-us/library/dn261208.aspx Troubleshooting Windows RT Client Software Distribution Issues - http://blogs.technet.com/b/configmgrteam/archive/2013/03/13/troubleshooting-windows-rt-client-software-distribution-issues.aspx Signing an app package (Windows Store apps) - http://msdn.microsoft.com/en-us/library/windows/apps/br230260%28v=vs.110%29.aspx Summary Installing Appx apps on Windows 8.1 devices using Windows Intune Integration in Configuration Manager 2012 R2 is not as straightforward as you would think, there are quite a few requirements on the client which in some cases need to be resolved outside of Configuration Manager/Windows Intune due to current capabilities. However once those requirements are in place you can use the Company Portal as your online 'store' in the cloud and manage everything via System Center 2012 R2 Configuration Manager. Special thanks to Wally and Panu for their advice on this guide. until next time, cheers niall. Continue on to Part 7. Downloads You can download a Microsoft Word copy of this guide here: How can I manage modern devices in System Center 2012 R2 Configuration Manager Part 6 Deploying Windows 8.1 apps.zip