


anyweb
-
Posts
9277 -
Joined
-
Last visited
-
Days Won
371
Everything posted by anyweb
-
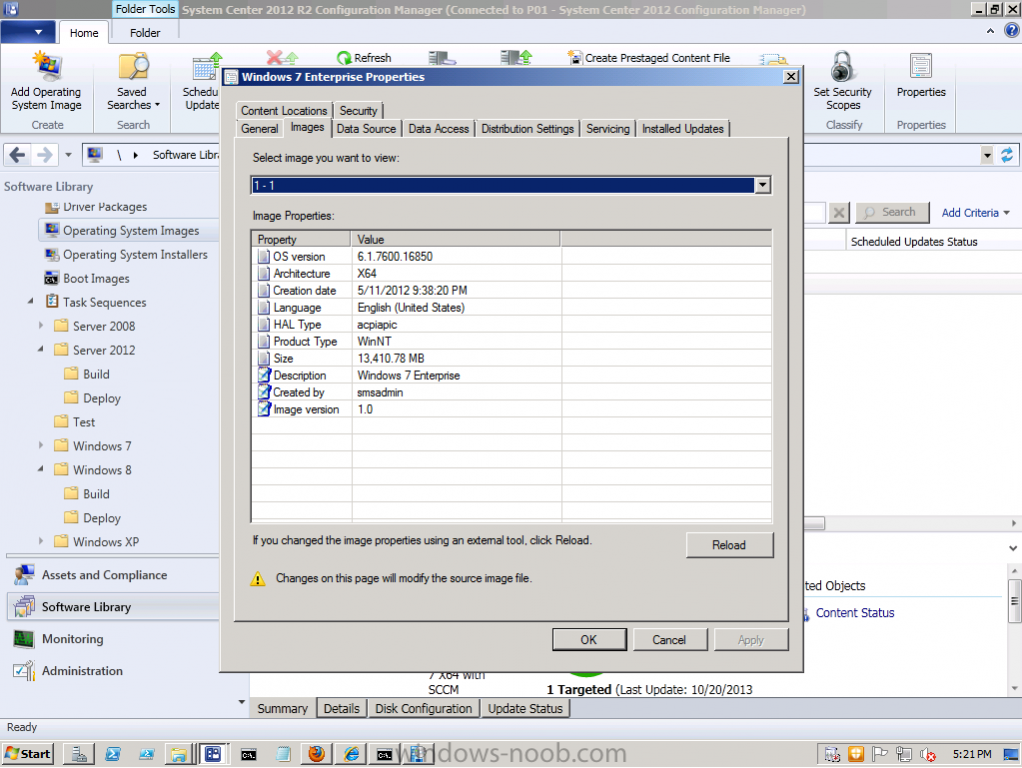
just looked, right click on your WIM file in the console and you'll be able to see the properties of it, and figure out which of the index's to use, it's likely it's index 2:2, in my screenshot below i'm showing a captured wim with only one index,
-
 ok, do you have the possibility of doing a remote session via teamviewer and i can take a look ?
 -
look at the OPTIONS tab of the format and partition disk 6.1 step that it's failing on, see anything interesting ? the screenshots you showed above seem to be from a UDI task sequence can you guide me through the exact steps you've taken when starting the ts, did you specify to capture any user data ?
-
no that's not the issue, do you have a StateStore folder on any of your drives ? what MDT task sequence template did you use when you created your new MDT task sequence, I can recreate one here and step through it.
-
it see's a folder called StateStore on D:\, and denys the format because of the presence of that folder, so, does that folder exist and why ? were you doing some 'refresh/reinstallation' tests prior to this, can you manually delete that folder in windows and try again >?
-
ok odd, can you please attach your SMSTS.log file here from this failed deployment, that should reveal the reason behind the failure
-
Microsoft has decided to issue a patch for the recent Zero Day for XP users after all, read below for more info We have made the decision to issue a security update for Windows XP users. Windows XP is no longer supported by Microsoft, and we continue to encourage customers to migrate to a modern operating system, such as Windows 7 or 8.1. Additionally, customers are encouraged to upgrade to the latest version of Internet Explorer, IE 11. more info > http://blogs.technet.com/b/msrc/archive/2014/05/01/out-of-band-release-to-address-microsoft-security-advisory-2963983.aspx
-
I can't imagine why it wouldn't work, i mean it's just a collection after all, so go ahead, and try it
-
how re you kicking it off, in WinPE or in Windows ?
-
it's failing to format the disc because d:\statestore exists, so, are you attempting a refresh (reinstallation with user data migration) or a new computer scenario here ? can you show us what your task sequence looks like (screenshot of this step)
-
I haven't tried it, please do and let us know the results
-
well who knows what this means, we all hope for the best however
-
Today, Cireson announces the major news that Wally Mead, the foremost authority on System Center Configuration Manager and a leading figure within the community, will join Cireson as a Principal Program Manager after spending over 22 years with Microsoft. Mead began his work at Microsoft with Systems Management Server 1.0 and since that time has immersed himself in training, community support, MVP collaboration, as well as user groups and conference speaking engagements around the globe. Wally was also the MVP lead for the Enterprise Client Management MVPs and acted as the community lead Program Manager at Microsoft. Considered one of the top global industry experts on System Center Configuration Manager, Wally now makes the move to Cireson with eager anticipation of what he can bring to the agile company that continually strives to be the pioneers in the System Center space. In commenting on this huge move, Mead explains, “I'm really excited to be joining Cireson, a company that specializes in System Center, and values the community. Cireson's commitment to the community is a large reason that I chose to come to Cireson, and work with an exceptional group of individuals who make a great team and creates software for, and provides services about, System Center.” He also adds, “To offset the first question everyone will ask, yes, I am still going to TechEd and delivering my Configuration Manager labs!” Wally joins Cireson at a time of record growth as a leading Microsoft System Center Partner. His new role will be focused on helping further enhance Cireson’s System Center expertise: The continued development of Cireson’s offerings in Configuration Manager for both professional services and training. Driving further innovation between Microsoft’s Configuration Manager and Cireson’s market leading Asset Management app for System Center. Remaining a central focal point for evangelizing Configuration Manager to the global community. Remarking on the new addition, partner Paul Sutton elaborates on this milestone, saying, “Wally is an exceptional talent who has an amazing passion for opening the eyes of thousands of people to the power of System Center.” Adding to Sutton’s enthusiasm, partner Shaun Ericson, who has led the Cireson development team on the enterprise Asset Management app for System Center comments, “This is a great day for System Center customers as a whole who are looking to leverage their Configuration Manager investments and are interested in taking Asset Management to the next level with Cireson.” This announcement further solidifies the forward progress Cireson is making in becoming the world’s leading voice in the System Center space. Now, with the true pioneer of Configuration Manager on the team, the organization looks to expanded capabilities and creating products that amaze. Additionally, Cireson will be attending this year’s Microsoft TechEd conference in Houston May 12th – 15th, 2014 as a silver sponsor. As part of Cireson’s community commitment, they will be hosting a number of Experts Live sessions at their booth (#309), which will showcase many leading System Center partners, such Inovativ, Concurrency, itnetx, Infront, Lumagate, Rod Trent, and other special guests. About Cireson: Cireson was founded on a simple, powerful idea: to be the forward thinkers on all things surrounding Microsoft System Center. As a world-leading authority on Microsoft System Center with 100% focus on this leading IT platform, their team of experts deliver full-service System Center and Asset Management solutions. From expert-class Smart Deploy Services™ and specialized Service Manager apps in the Cireson Store™, to ongoing education and community engagements, everything they do is designed to push the platform forward and deliver a System Center experience that is unparalleled. Cireson’s headquarters are located in San Diego with offices throughout North America and the United Kingdom. They proudly boast some of the brightest and most fanatical IT professionals in the industry. To learn more about Cireson’s expert-class apps and services, visit cireson.com and join the conversation on Twitter @teamcireson, as well as on Facebook, and LinkedIn. http://www.prweb.com/releases/wallymead/cireson/prweb11810342.htm
-
are you specifying anything in the Domain OU field, in the Apply Network Settings step ?
-
have you looked through the below, do they help ? Recommended Reading: Introduction to Endpoint Protection in Configuration Manager - http://technet.micro...y/hh508781.aspx Planning for Endpoint Protection in Configuration Manager - http://technet.micro...y/hh508763.aspx Configuring Endpoint Protection in Configuration Manager - http://technet.micro...y/hh508764.aspx Prerequisites for Endpoint Protection in Configuration Manager - http://technet.micro...y/hh508780.aspx Best Practices for Endpoint Protection in Configuration Manager - http://technet.micro...y/hh508771.aspx Administrator Workflow for Endpoint Protection in Configuration Manager - http://technet.micro...y/hh526775.aspx
-
Microsoft is scrambling to repair a security hole in its widely used Internet Explorer web browser, saying it had detected attempts to exploit the flaw. The US software giant said in a blog post the coding problem affected versions six through 11 of its flagship browser, noting it was aware of "limited, targeted attacks" taking advantage of the newly discovered flaw. The exploit uses Flash and a technique called heap feng shui, which Microsoft says can allow an attacker who successfully exploits the vulnerability to gain the same user rights as a user. "The vulnerability may corrupt memory in a way that could allow an attacker to execute arbitrary code in the context of the current user within Internet Explorer," Microsoft said on its security website on Saturday. "An attacker could host a specially crafted website that is designed to exploit this vulnerability through Internet Explorer and then convince a user to view the website." Cybersecurity firm FireEye, which took credit for identifying the flaw, said hackers were exploiting the bug in a campaign nicknamed "Operation Clandestine Fox." Users still relying on Windows XP could be especially vulnerable because Microsoft stopped earlier this month supporting the older operating system with security patches and other software updates. read more @ ZDnet > http://www.zdnet.com/xp-users-set-to-miss-out-on-ie-patch-7000028820/
-
sure
-
is the hardware UEFI ? are you deploying a UEFI capable task sequence ? if not, diskpart it first and try again
-
verify that the date/time on this computer is correct (in the bios)
-
to silently uninstall SCEP it's just scepinstall.exe /u /s create a package/program to do that, easy. But try the above first
-
Deploying Win 8.1 with two languages causing problems...
anyweb replied to DTH's topic in Configuration Manager 2012
it would be interesting to see what happens when you use the EN-US version of the ISO, -
it's covered here Automatically remove previously installed antimalware software before Endpoint Protection is installed Select True or Yes to attempt to uninstall existing antimalware software. Note Endpoint Protection attempts to uninstall the following antimalware software only: Symantec AntiVirus Corporate Edition version 10 Symantec Endpoint Protection version 11 Symantec Endpoint Protection Small Business Edition version 12 McAfee VirusScan Enterprise version 8 Trend Micro OfficeScan Microsoft Forefront Codename Stirling Beta 2 Microsoft Forefront Codename Stirling Beta 3 Microsoft Forefront Client Security v1 Microsoft Security Essentials v1 Microsoft Security Essentials 2010 Microsoft Forefront Endpoint Protection 2010 Microsoft Security Center Online v1 If you try to install the Endpoint Protection client on a computer and the uninstall of an existing antimalware solution is not supported, then the Endpoint Protection client installation will fail. In this case, you can use application management to uninstall the existing antimalware solution, install the Endpoint Protection client and then use the Manage Endpoint Protection client on client computers client setting to let Configuration Manager manage the newly installed Endpoint Protection client. I would recommend testing first on a test computer (or three) to verify the behaviour matches your expectations
-
sorry but with the current zero day reported and linked to Adobe products I won't be clicking on the pdf, can you post your screenshots instead here
-
try re-deploying whatever task sequence it is to a collection, the last task sequence deployed will contain the boot wim that all successive task sequences on that collection will use for first boot (and then they'll stage their respective boot wim)
-
does this post help you ?


