anyweb
-
Posts
9233 -
Joined
-
Last visited
-
Days Won
368
Everything posted by anyweb
-

how to sequencing office 2013 with appv 5.0
anyweb replied to JUN0S's question in Application Virtualization
and http://www.niallbrady.com/2012/11/12/how-can-i-sequence-applications-using-app-v-version-5-for-configuration-manager-2012-sp1/ -
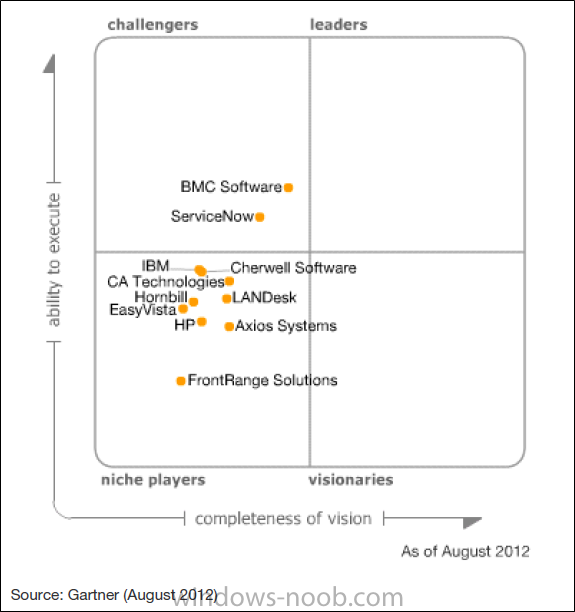
Another year has passed, and another year Microsoft System Center 2012 Service Manager (SCSM) is still not on the Gartner Magic Quadrant for “IT Service Support Management Tools”. Now granted I am referring to the Magic Quadrant dated for August 2012, as seen here: …and we still do not know what is to come for 2013, but as someone who is vested in the System Center space complimented by the fact that customers constantly ask our team about this positioning, I find it absolutely interesting why Microsoft is left off. Not to establish credibility, but more importantly to frame my acute perception on the other vendors, let me also theme the next few talking points around the fact that I have worked for HP (well Peregrine back in the day), BMC Software (well Remedy back in the day), Altiris, LANDesk, Axios Systems and have extensive experience with FrontRange, CA Technologies and ServiceNow. All of these products in their own right are very good, but in comparison to these competitors – come on – SCSM should absolutely be at least an orange blip somewhere on this radar. With all that said, let’s break down what we are really looking at! Here are some raw themed bullet points from the “Market Definition/Description” for the IT Service Support Management Tools Gartner Report: Tighter integration of functions that correlate with the activities of the broader IT support organization Leverage a business view of IT services, allowing to quickly resolve or escalate issues and problems, improving root cause isolation, and provide higher levels of business user satisfaction Using this business view, manage Incidents, problems, changes, releases and request management Enables tools to provide modules that enable business end users to find knowledge to support/resolve their computer related issues So effectively a basic ticketing system, which aligns you with ITIL best-practice and mixed in with some ITSM common sense qualifies you for this quadrant. Fair enough, have to keep it broad to include most likely the 200+ Service Desk vendors to have a fighting chance at being in this mix. Again, as I have worked for other vendors that are on this Magic Quadrant, let me passionately say all qualify and should be part of this conversation. There is no doubt in my mind that every single vendor deserves their recognition, however there is 1 very large, huge, and most important item left out of this Market Definition/Description: Business Process Automation I mean, at the end of the day what are we trying to do here? What every CIO on the planet should be trying to do is leverage a Service Desk solution to measure their business activity, understand operational cost and in an attempt to save the company a lot of money automate as much as humanly possible. Some key examples include: Password Reset Automate New Hire / Termination Processes Hardware / Software Procurement Processes Server Provisioning Access Requests The list goes on… Again, as I have worked for other vendors some of them on this Quadrant have the capabilities to do these as a platform to complement their Service Desk story. There are however a few on this quadrant that don’t even come close, remotely close, and in their attempts to do so just introduce more hassle to their customers then needed. The reality is Microsoft System Center is the only platform that can automate any tactical IT process, all from its own product eco-system, with the ability to reach out of its product eco-system and interact with other enterprise solutions. This is a very strong story, and really wish this reality was strongly interpreted inside of this Magic Quadrant evaluation. The one other startling reality that flat out should put SCSM somewhere on the Gartner Magic Quadrant is in its few years of existence, SCSM has garnered more customers than some of these other vendors combined! That in itself should shake up the perspective. I will leave you with one last thought, coming back to the “raw themed bullet points” from above: Mr. CIO, what would you rather have: A Service Desk solution that can manage a Service Request, giving your team the ability to know when someone is asking for Software? A Service Desk solution that can manage a Service Request, giving your team the ability to know when someone is asking for Software and with the simple introduction of an automated business process have that piece of software automatically be deployed to the requesting customer based upon a business approval? If I were a CIO with 500 software requests annually, and I could automate 80% – 90% of those requests freeing up my team to do much more business aligned strategic initiatives – then my decision would be made for me. Let’s no longer measure a Service Desk solution by feature function any more, but as a business solution that aligns with the simple reality of saving $$$. The key theme we should walk away with is: System Center Service Manager is not a Service Desk solution, it is a gateway into understanding, measuring and automating your business. Disclaimer: The article is from a windows-noob recommends partner.

-
have a look at the USMT section here
-
have you installed Windows ADK prior to running setup ?
-
is this problem only happening after upgrading to CM12SP1 or is this fresh installs ? have you verified that no antivirus solution is blocking creation of these files/folders ?
-
try adding just two updates, does it work ?
-
and now it is
-
if you followed the guide 100% then you would not have this problem, you most likely installed Configuration Manager as the Local administrator account (Administrator) and then later logged on as SMSadmin. as you can logon as Administrator and start the configuration manager console, you can grant the SMSadmin user (or group of configuration manager admins) the Full Administrator rights, thos rights are listed below
-
haha, that guy looks like the dude from the office
-
OSD TS: Single policy fails: "Failed to download Policy {XX...}
anyweb replied to arezz's topic in Configuration Manager 2012
have you seen this post ? http://www.niallbrady.com/2013/05/17/after-selecting-a-task-sequence-in-configuration-manager-2012-sp1-you-receive-threadtoresolveandexecutetasksequence-failed-code0x8007000e-in-smsts-log/ it's not exactly the same issue but similar, please check it and see if any of the advice contained within helps. -
Deploying win7 Ent via SCCM stuck on last task
anyweb replied to nthulke's topic in Configuration Manager 2012
i'd suggest you start using a Pause ability in your task sequences when troubleshooting, i guarantee it will help to make problems easier to solve and to identify the issues. -
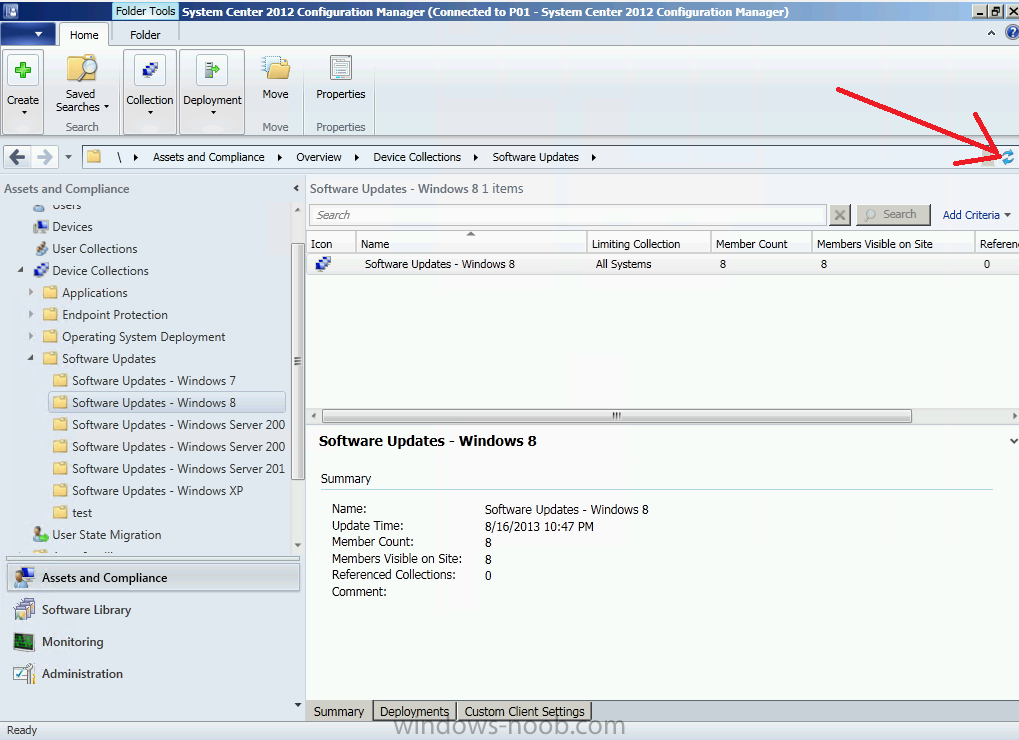
no, you are not looking in the right place, look at my screenshot, and then yours. hint: assets and compliance.
-
End Point definitions
anyweb replied to PDX_Packers_Fan's question in Deploy software, applications and drivers
can you check your client settings, then computer agent, and then install permissions, what is it set to ? -
are you sure you are looking in the right part of the console ? have you tried refreshing the view ? i've just rechecked the script on a Configuration Manager 2012 SP1 primary and the collections appeared after I refreshed the console after the script ran.
-
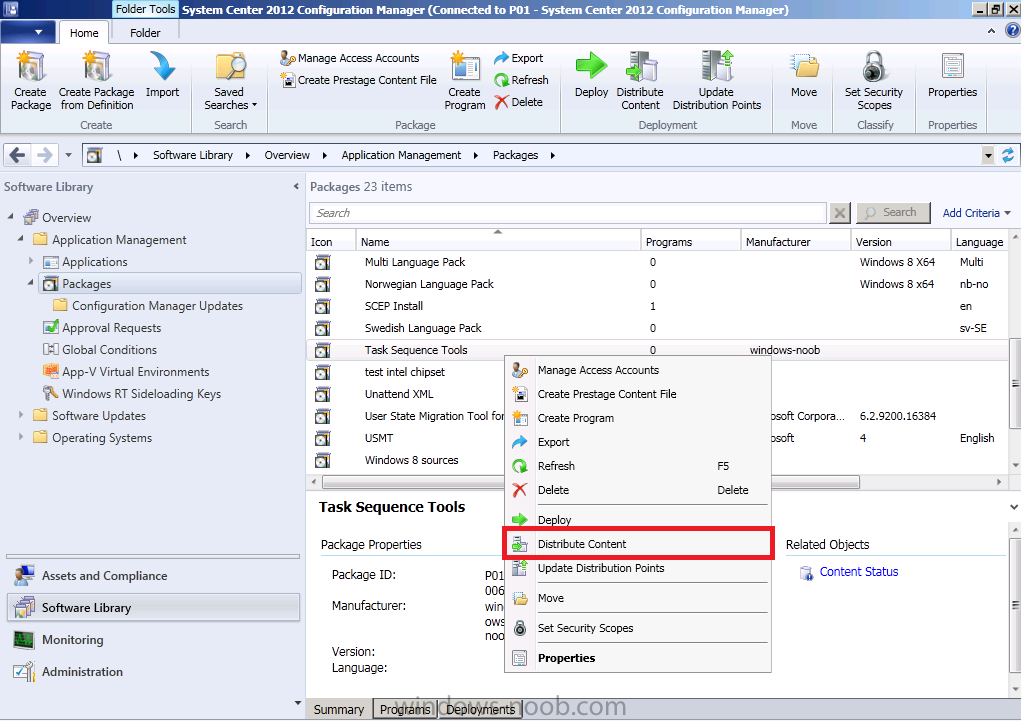
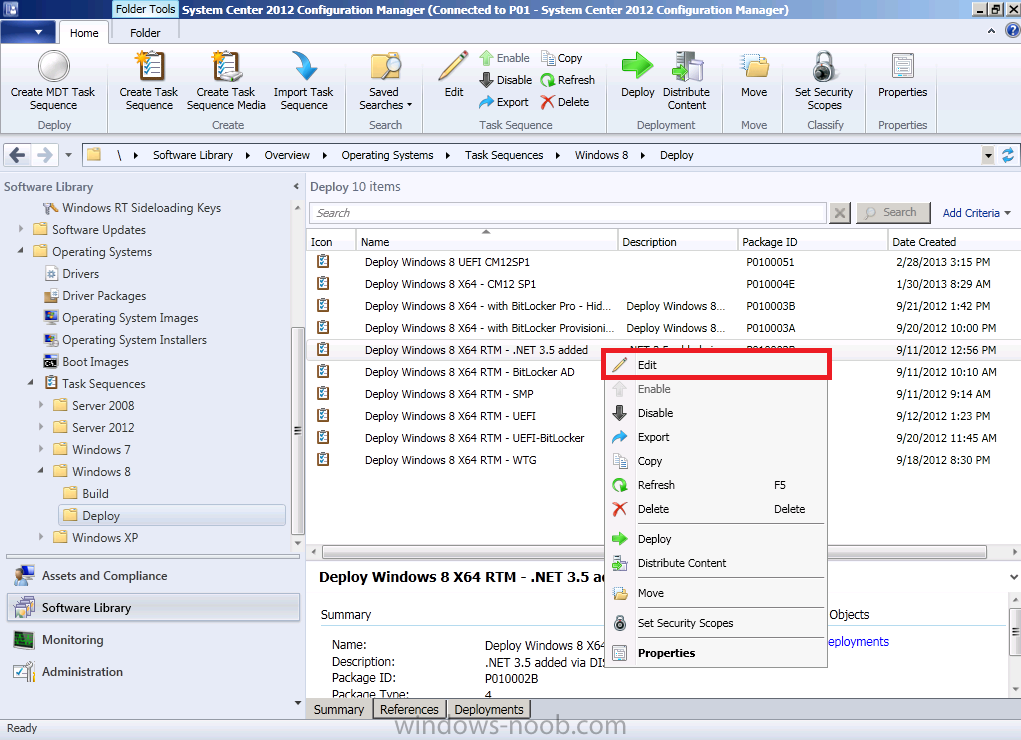
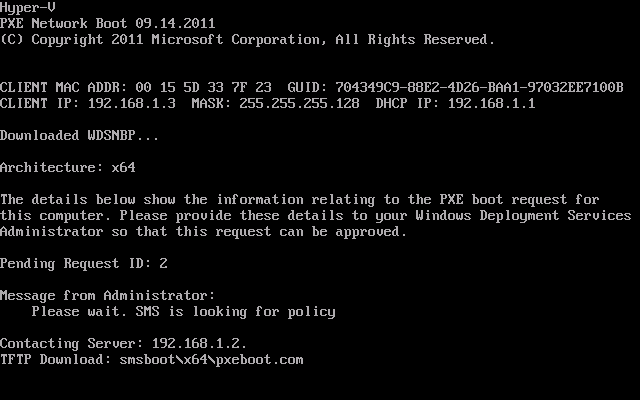
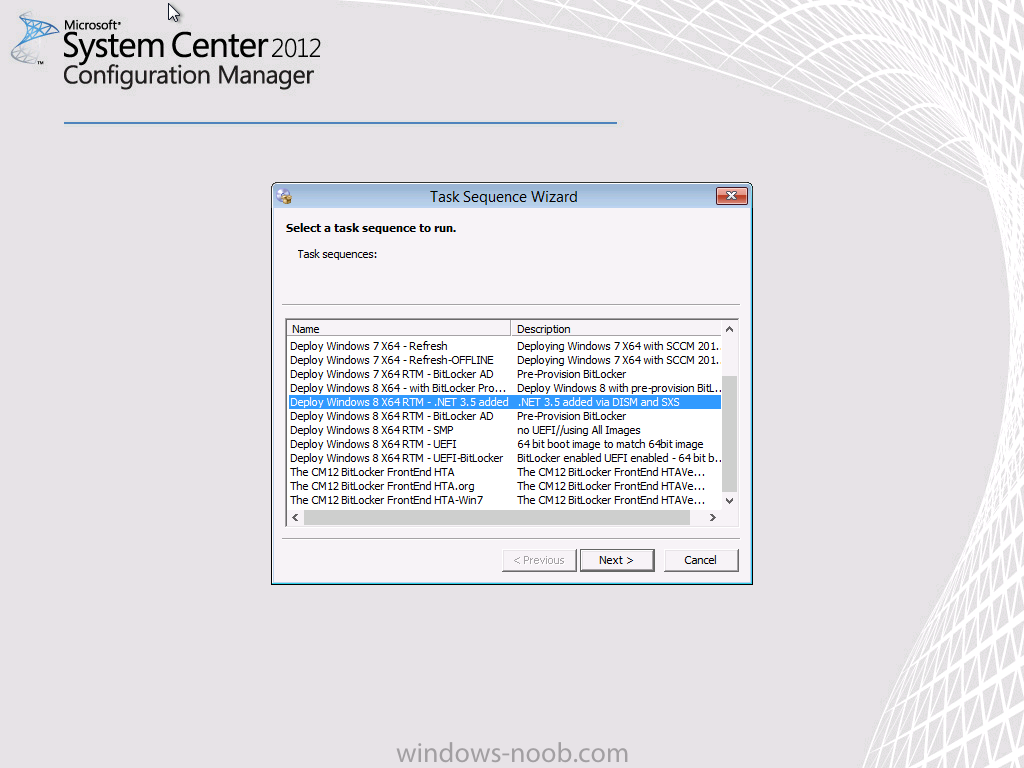
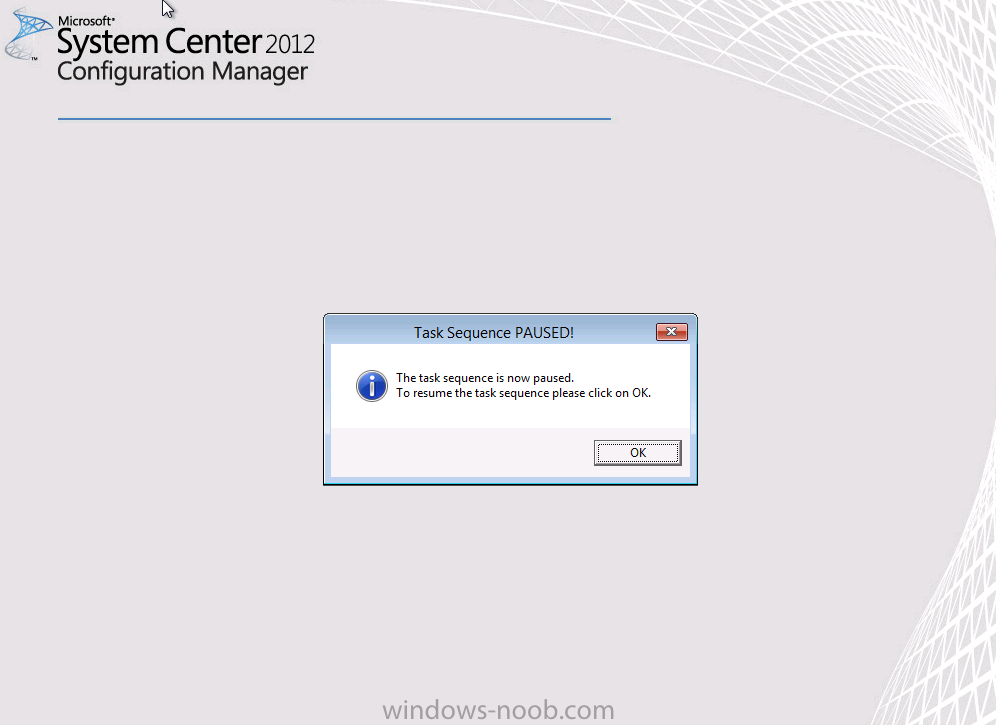
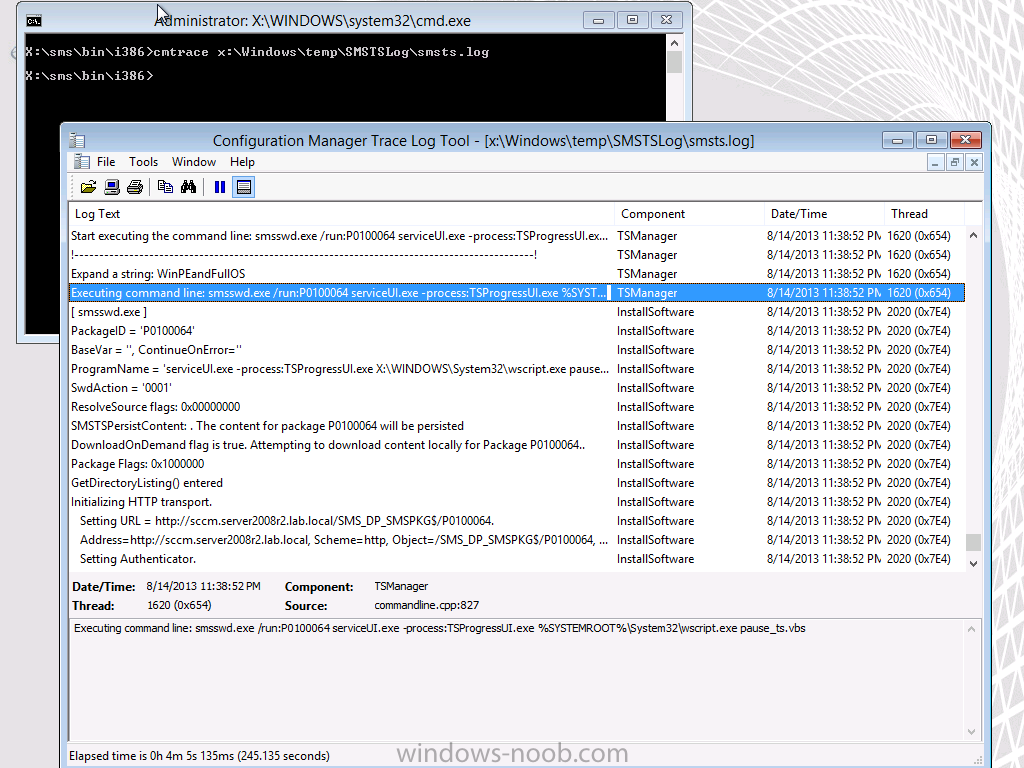
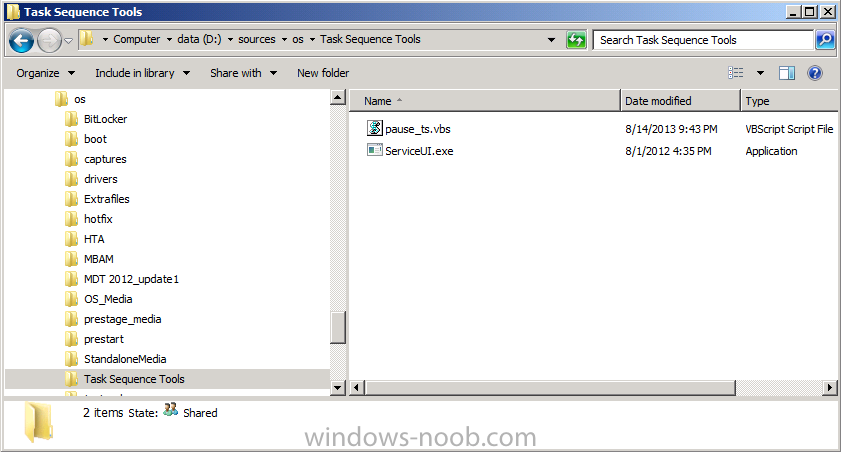
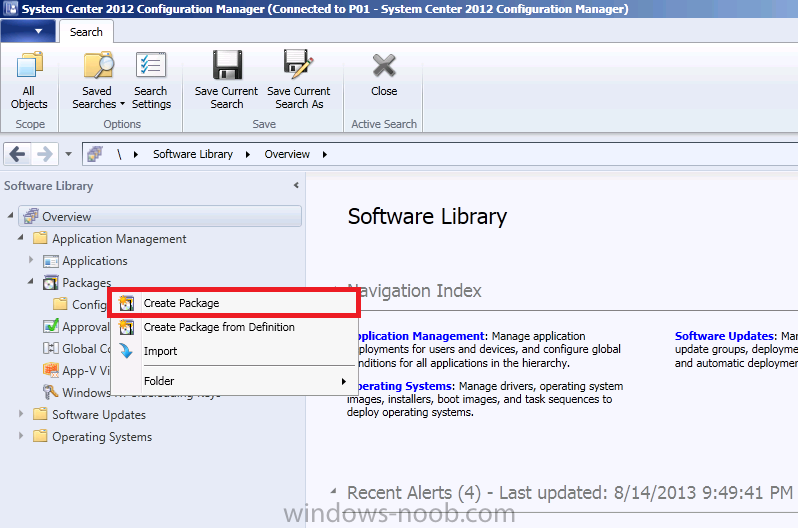
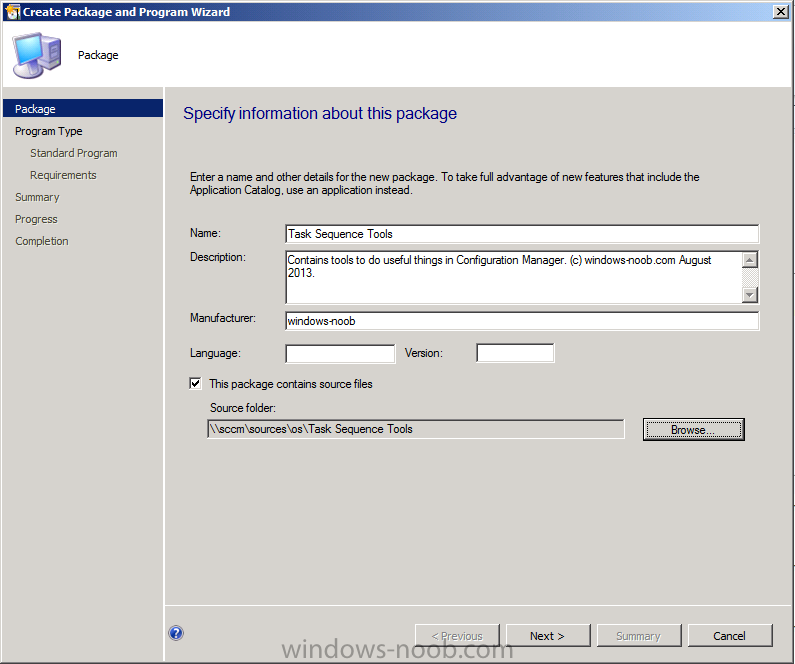
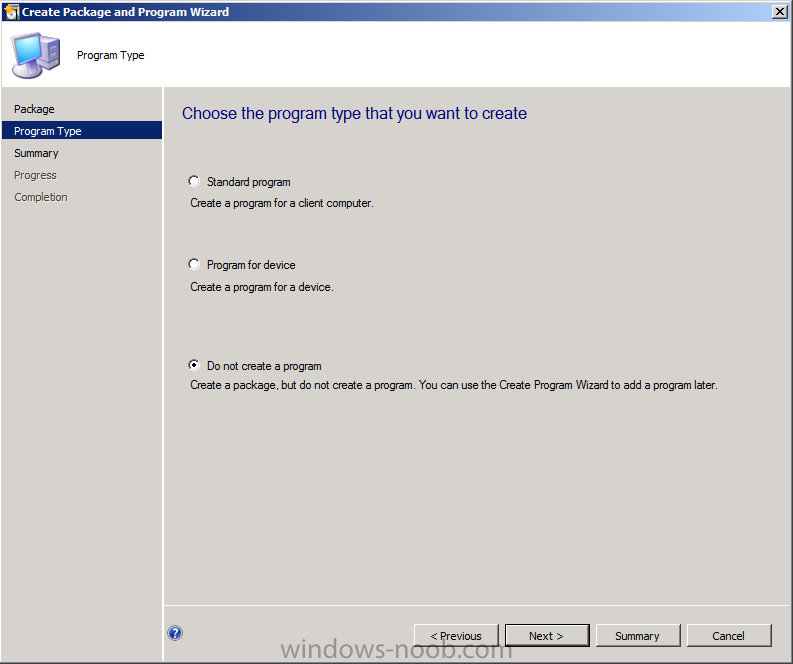
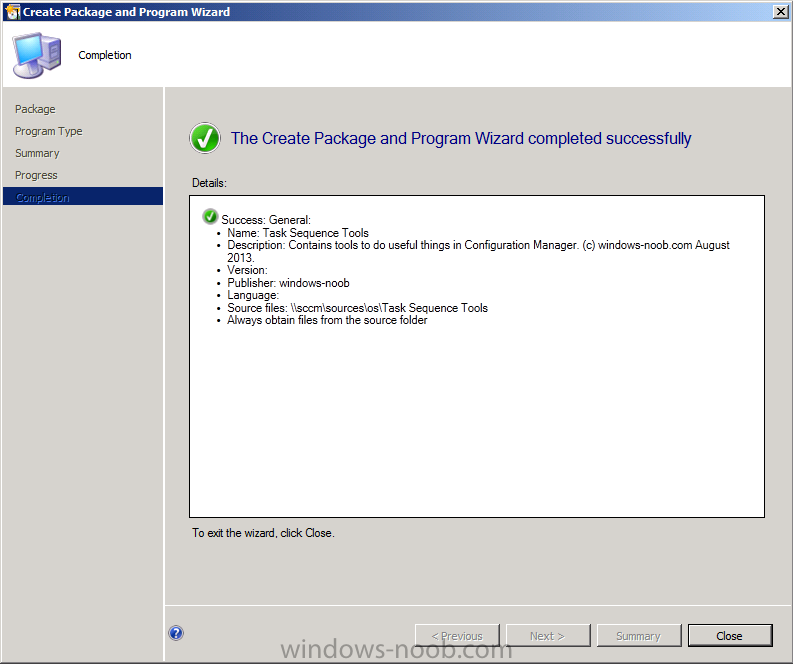
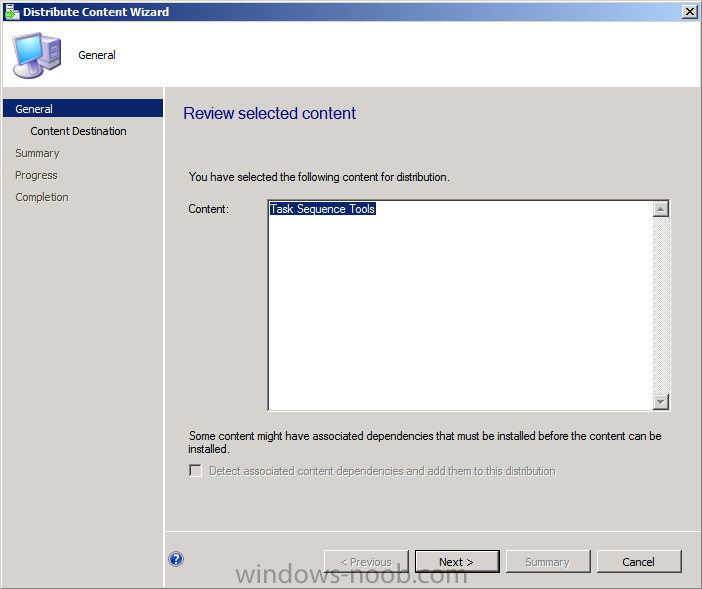
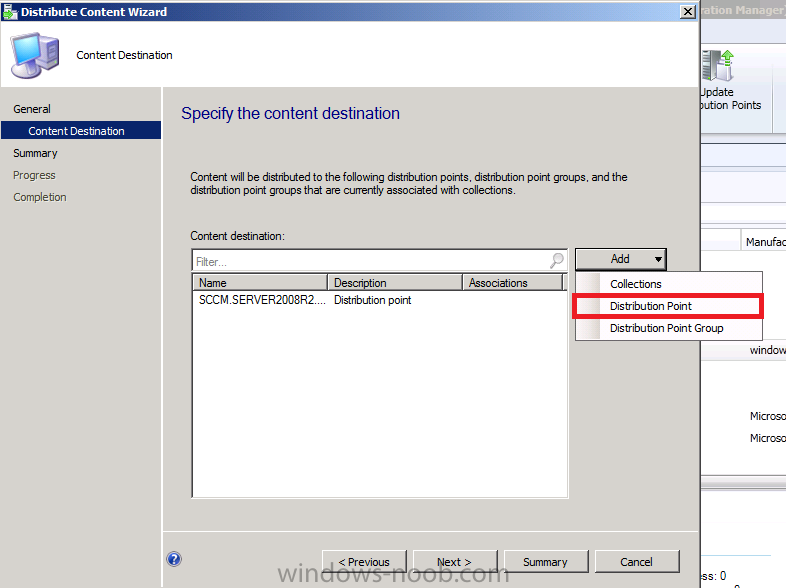
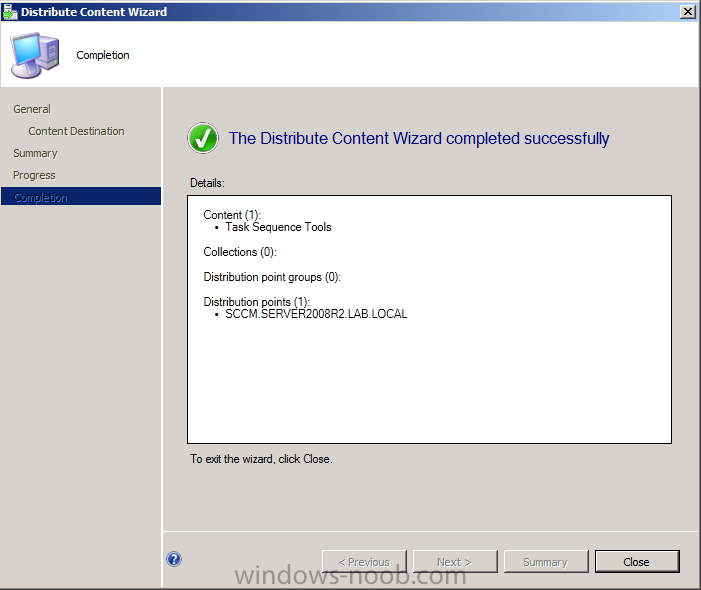
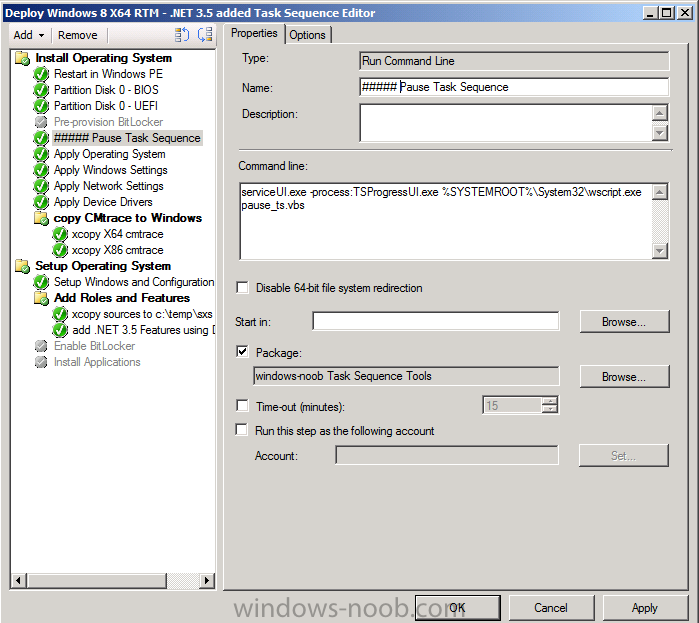
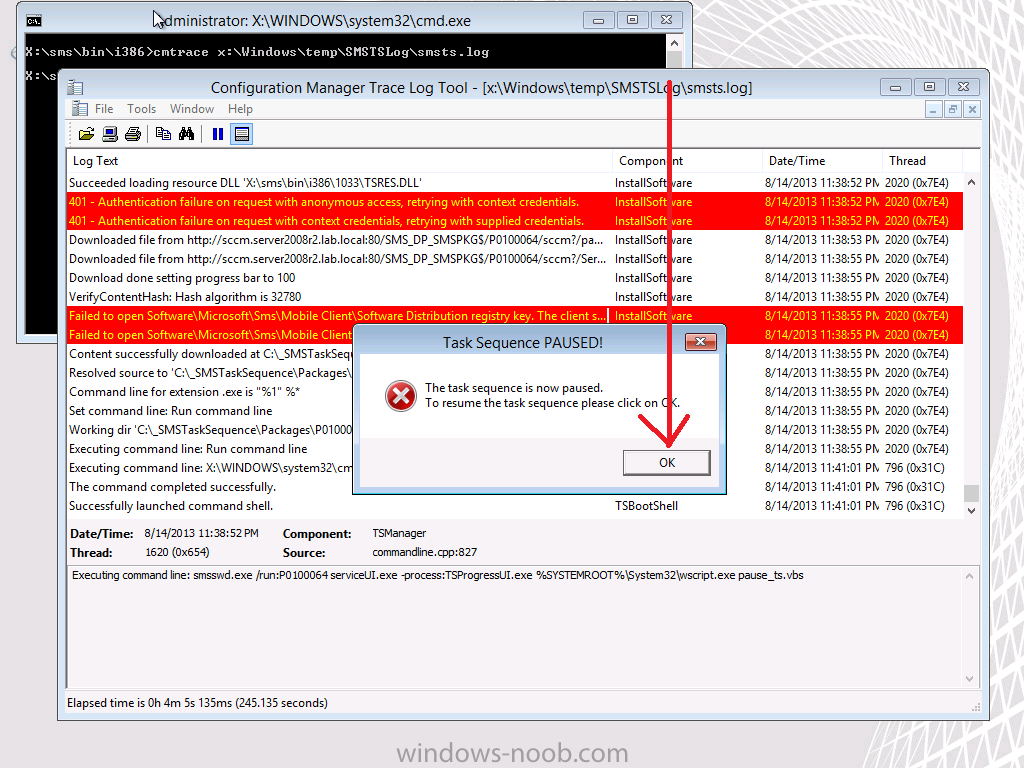
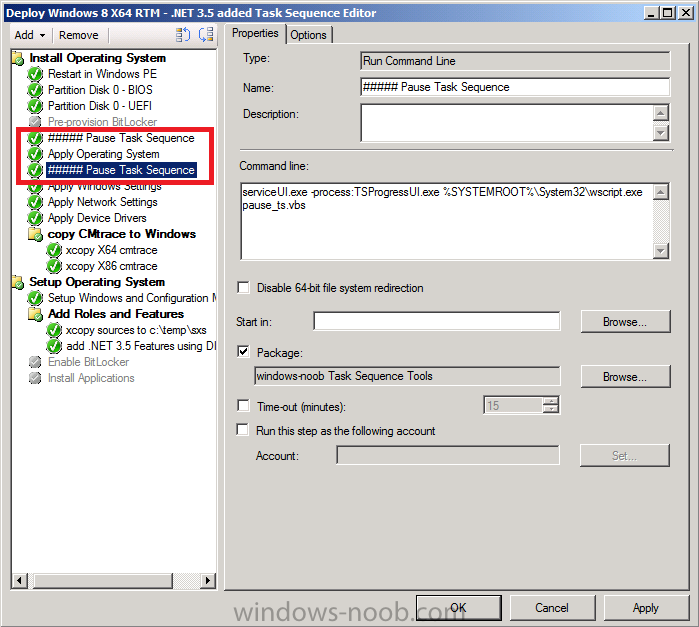
Introduction Sometimes things don't go as planned, you are deploying an operating system to a computer and the task sequence fails. You can use normal troubleshooting methods such as press F8 and review the smsts.log in CMTrace review a report of the task sequence progress review other OSD related logs review application or package content status or you can take things one step further and add the ability to pause everything in your task sequence (much like debuggers can step through commands on a compiler).The ability to pause a task sequence gives you the power to perform diagnosis during a deployment and also means that you can monitor a step while it's happening (to check how variables are being set/read/or whatever) rather than reviewing the logs after the event (sometimes the logs will roll over and you'll miss the failure altogether). This method uses serviceUI.exe from the Microsoft Deployment Toolkit. You do not need to use MDT or have MDT integrated with Configuration Manager to use this method. Step 1. Prepare a package containing the required files In this guide we'll use ServiceUI.exe from the MDT 2012 Update 1 files package. This file allows us to popup messages and run interactive actions with users while in SYSTEM context. Simply locate the exe (found by default in C:\ProgramFiles\Microsoft Deployment Toolkit\Templates\Distribution\Tools\X86) and copy it into a new folder called Task Sequence Tools. Note: There are two versions of ServiceUI.exe, one is 32 bit (in the X86 folder) and the other is 64 bit (in the X64 folder). The boot image attached to your task sequence will decide which version of ServiceUI.exe you need to use, so if you are using a 32 bit boot image, you must use the X86 version of ServiceUI.exe otherwise you'll get an error when trying to run it. Download pause_ts.vbs.txt and copy it into our Task Sequence Tools folder. Rename the file from pause_ts.vbs.txt to pause_ts.vbs so that our folder looks like this Step 2. Add our package to Configuration Manager In the software library, expand Application Management, Applications, Packages, right click and choose Create Package. fill in some info about the package and set the UNC path of the source of the Task Sequence Tools folder choose Do Not Create a Program and continue through the wizard until completion. Step 3. Distribute our package Locate the package you just created, right click it and choose Distribute Content. click next when the wizard appears add one or more Distribution Points by clicking on Add and selecting Distribution Point and continue that wizard until it is completed. Step 4. Add the Pause Task Sequence step to a task sequence In Operating Systems, browse to Task Sequences and locate a task sequence you want to troubleshoot, and right click on it and choose Edit. in the task sequence editor, locate a section of the task sequence that you want to troubleshoot and click on the drop down menu Add, then select General, and Run Command Line. give the step a suitable name like ##### Pause Task Sequence, the ##### makes the line stand out in a big task sequence which makes it easier to find later (so that you can remove it once you've fixed the problem). Tip: you should place a Pause Task Sequence step directly before and directly after the step (or Group) you want to monitor, and that step should also have the option 'continue on error' selected during troubleshooting. This will mean that the task sequence will pause before and after the section of the task sequence that you are having trouble with, allowing you time to review logs, gather files, determine the issue. and in the command line paste in the following serviceUI.exe -process:TSProgressUI.exe %SYSTEMROOT%\System32\wscript.exe pause_ts.vbs then browse and select our Task Sequence Tools package as in the screenshot below (the screenshot below has two pause steps, this is so that you can check logs before and after the step that is causing you trouble in the task sequence) Step 5. PXE boot a client to test the Pause task sequence step. PXE a virtual machine and select and then start our recently edited task sequence you can either wait until it gets to the pause task sequence step or go away and do some other chores (that's the beauty of this, you can go away and when you come back the task sequence is paused waiting for you to troubleshoot.) When you get back, the task sequence will be paused and you'll see this and that of course means that you can press F8 and do some deep diving (with CMTrace showing smsts.log live) to find out why your step is failing. Once you are ready to continue the task sequence, press ALT/TAB to flick through windows on your virtual machine, click on OK on our pause task sequence step and watch the action live in CMTrace! Summary You can pause a task sequence using a simple script in conjunction with ServiceUI.exe (or by using a script in MDT Files and access that script directly after a Use toolkit Package step). Pausing a task sequence allows you to quickly get real time results and data in a failing task sequence, once you enable this ability in a task sequence you'll never look back ! have fun, cheers niall.


-
Microsoft have just announced officially the date when Windows 8.1 is coming out and it's October the 18th. so now we know ! if you'd like to start test deploying it then make sure to checkout windows-noob's guide right here. more info > http://blogs.windows.com/windows/b/bloggingwindows/archive/2013/08/14/mark-your-calendars-for-windows-8-1.aspx

-
well R2 is coming out shortly but I don't think that it will make it into the exams.
-
post some logs so we can see what is happening.
-
Problem with OSD on white label laptops with SSD
anyweb replied to CNY-IT-Guy's topic in Configuration Manager 2012
what do you mean UEFI set to GPT and bios set to MBR ? it's one or the other with deployments, you can't have the bios in legacy mode (mbr) and deploy a UEFI task sequence to it. I'm deploying to SSD's no problem here at all and no need to add any drivers to the boot image (for storage) at what point are you seeing the failure exactly ? have you tried manually diskparting (clean) the hdd before running the ts ? -
Help: How to add DotNet Framework 3.5 to Windows 8 during OSD Task sequence
anyweb replied to gvlaarho's question in How do I ?
did you try this method ? it's working 100% here everytime -
have you seen this
-
SCCM OSD to UEFI laptop with PXE boot crashes - winload.efi
anyweb replied to gleep52's topic in Configuration Manager 2012
UEFI boot is supported, however you have to have uefi hardware, it has to be configured to boot to UEFI network boot and your task sequence should be setup to deal with UEFI, lastly WDS must be of a version that supports UEFI boot and your task sequence should have a 64bit boot wim as described below http://www.windows-noob.com/forums/index.php?/topic/11135-why-do-i-get-a-winloadefi-status-0xc0000359-error-when-using-uefi-network-boot-in-system-center-2012-r2-configuration-manager -
did you do multiple offline servicing attempts for this or just one ? can you show me a screenshot of what the updates appear like in the operating system
-
not here, but go ahead and follow the guide here except substitute Server 2012 for Server 2008r2, and substitude SQL 2012 SP1 with SQL 2008R2
-
Whether you love or loathe Windows 8, there’s no doubt that Microsoft’s attempt to reimagine Windows has gotten off to a slow start. The confirmation this week that Surface tablets have not sold well only serves to put an exclamation point on this. Later this month Microsoft will take a mulligan with the release of Windows 8.1. By John Morris Microsoft released the public consumer preview on June 26 at its Build developer conference, and in the the last few days it rolled out a preview of the enterprise version. Windows 8.1 is scheduled to be released to manufacturing in August and it will be available to all Windows 8 and Windows RT users as a free update in the Windows Store. Windows 8.110 advantages Windows 8 tablets have over the iPad and Android Windows 8, one year later: 10 mistakes Microsoft made Goodbye Windows 8, hello Windows 8.1 The point-release branding is meant to set expectations. Windows 8.1 is more than just a service pack with lots of little big fixes. But it is less than a new operating system. At Build CEO Steve Ballmer described it as a “more refined blend” of Windows 8. This branding also reflects Microsoft’s shift to a more rapid development cycle with new releases like this expected every year. For the past few weeks I’ve been using the Windows 8.1 preview on two very different Acer systems. The first, the Aspire S7 Ultrabook, which has a a Full HD touchscreen, is one of my favorite Windows 8 laptops. The second, the Iconia Tab W3, is notable as the first Windows 8 tablet with a small display (and low price), though it hasn’t received great reviews. One of the bigger changes in Windows 8.1 is that it is specifically designed to scale down to tablets and convertibles with smaller displays and lower price tags in order to better compete with Android and iOS. Better from the Start The first thing that you’ll notice about Windows 8.1 Preview is that the Start screen looks different. In Windows 8, as you add more applications you quickly end up with a sea of large Live Tiles--many of which don’t display much useful information--that leaves you doing lots of horizontal scrolling to find the right app. Also, it isn’t easy to move the tiles around and group them to make things easier. Microsoft is clearly trying to address all of this in Windows 8.1. The tiles can now be arranged in four different sizes (Small, Medium, Wide and Large). The “Small” size is useful for launching apps that don’t really require Live Tiles such as Microsoft Office programs; the “Large” format, conversely, is great for apps that display lots of useful information on tiles such as Weather, Finance and Sports. You can now switch quickly between the tiles and All Apps by swiping up and down (or clicking on the up and down arrows) rather than swiping up from the edge or right-clicking on the Start screen background and choosing All Apps. The latter now brings up a Customize button that lets you name groups of tiles. I created groups for Office 2013, Bing apps, News, Games, etc. When viewing All apps, you can sort them by name, category, most used or date installed. Speaking of groups, you can now select multiples tiles to move around; resize; pin or unpin from the Start screen and task bar; or uninstall. If you still want to skip the Start screen altogether, you can boot directly into the desktop. Despite the enhancements in Windows 8.1, I suspect many users without touchscreens, especially business users, will choose this option. And, as nearly everyone knows by now, the desktop will now include a Start button. This isn’t a true Start menu--it simply toggles back and forth between the two environments like the Windows keyboard button--but if you right-click on it, you get a menu that is even more powerful than the Windows 7 Start menu (it’s the same menu you get in Windows 8 by pressing the Windows-X key combination, but few users even knew it was there). Better integration of services Some key services now work better across all of Windows. The PC settings in Windows 8.1 are more extensive so that you won’t need to hunt around for the old Control Panel to change system settings. Rather than searching in Apps, Settings or Files, Windows 8.1 has a universal Search feature that displays results across Bing Web searches, files stored locally or on SkyDrive, relevant content in Xbox Music and Video apps, and other apps and settings. Finally SkyDrive no longer requires a separate utility to synchronize files and settings (you select these options when you create a new account and can update them in PC settings). When you put a document in one of SkyDrive’s “placeholder” folders it is automatically uploaded and if you can make these files available offline too. This week Microsoft announced some more new features on SkyDrive.com including high-resolution thumbnails and photos for displays that support it, photo rotation, the ability to select and share groups of files regardless of where they are stored in SkyDrive and a built-in text editor. New Apps and smarter Snap One of the biggest issues with Windows 8 is that the apps feel half-baked. The rudimentary Microsoft apps seemed rushed--with lots of important features missing--and many key third-party apps were missing at launch. Windows 8.1 starts to correct this with several new and upgraded Microsoft apps, new capabilities for third-party apps and an over-hauled Windows Store. New Microsoft apps include Reading List, Alarms and Bing apps for Food & Drink and Health & Fitness to go with the existing ones (News, Sports, Finance and Travel). Reading List is a useful little utility that uses the Share charm to quickly save links to content from other apps or Web sites, but it isn’t a full-feature Web clipper like Evernote or OneNote. The Alarms app has a nice design, and it also includes a timer and stopwatch, but the alarms don’t seem to work if the system is asleep, which makes it largely useless. Microsoft has also updated Photos and Xbox Music--two apps that badly needed reworking. Photos has new editing features that let you rotate, crop and retouch photos. There’s a nice selection of editing tools and I found them easy to use even on small touchscreens. The only drawback is that it is now designed to work with photos stored locally and the links to Facebook, SkyDrive and Flickr have disappeared (hopefully these will be be restored by the time Windows 8.1 is finalized). The current version of Xbox Music is basically a chromeless app designed largely to highlight selections from the store and let you build custom radio stations around an artist a la Pandora. In Windows 8.1, Xbox Music has a new menu pane that makes it much easier to manage your own music collection, create and manage radio stations, explore new music and build playlists. Most important, the Mail app is getting a major update that brings over a lot of the popular features from Outlook.com. This isn’t included in the preview, but Microsoft has shown some of the features including the ability to drag and drop mail into folders, automatically filter incoming e-mail such as newsletters and social media updates into folders, sweep certain types of messages, such as Groupons for example, into the trash while keeping only the most recent ones; pin folders or favorite people to the lefthand pane to quickly view all messages from them; and initiate Skype calls or messages by clicking on a contact within a message. The version of Office with Windows RT 8.1 will also include Outlook 2013 RT. Unfortunately there’s still no clear timetable for the touch-optimized Windows 8 versions of Office 2013 apps with the exception of OneNote. One of the biggest knocks against Windows 8 has been the lack of third-party apps, and these have been slow in coming, but Microsoft is making progress. New third-party apps include Foursquare, OpenTable, Rockmelt and Rhapsody with Facebook and Flipboard apparently on the way. The Windows Store, itself, has been completely redesigned with a better layout that places more emphasis on the most popular apps and user reviews. It supposedly provides personalized recommendations, as well, but most of the apps it suggested were already installed on my system and in use, so I’m not sure this is really working all that well. Still it’s a big improvement and Microsoft is also catching up with Windows Store gift cards so users can load their accounts to purchase apps, books, games and content. Windows 8.1 also delivers a laundry list of new features for developers. One of my favorite new features in Windows 8.1 is the improved Snap feature for viewing multiple applications at once. You can now view up to four applications side-by-side and resize the windows however you like. What’s even better is that apps can automatically take advantage of Snap. For example, click on a photo in an e-mail message, and Mail slides over the side and the photo opens in your default viewer. Or click on a link in Twitter or the new Readling List app, and the app shifts over and the relevant page opens in Internet Explorer 11. Because the original app remains open and viewable on the side, you never lose the context of what you were doing last. This sounds simple, but it turns out to be a big usability enhancement and third-party developers can leverage it to do interesting things with their own apps. Windows 8 was primarily designed to appeal to consumers. Windows 8.1 doesn’t really change that, but it does include several new enterprise features. Microsoft mentioned a few of these at Tech Ed in June, but it announced more features with the release of the Windows 8.1 Enterprise preview this week. On its own, none of these new features is a game changer (not even the over -hyped return of the Start button). It still feels like two operating environments (though moving between them is more seamless now), and Microsoft and third-party developers still need to demonstrate that they can deliver robust, touch-optimized apps starting with Office. But taken together the many enhancements in Windows 8.1 add up to a significant improvement in the user experience. via ZDnet > http://www.zdnet.com/microsoft-takes-a-mulligan-with-windows-8-1-7000018872/