anyweb
-
Posts
9176 -
Joined
-
Last visited
-
Days Won
366
Everything posted by anyweb
-

Linking Task Sequences
anyweb replied to Vancouverite's question in Deploy software, applications and drivers
try this method http://blogs.msdn.com/b/vinpa/archive/2010/09/01/how-to-add-a-known-unknown-computer-to-a-specified-collection-during-os-deployment.aspx -
WIndows 8 Languages not applying automatically
anyweb replied to Jeff K's topic in Configuration Manager 2012
well if does it have a valid ip address and can you ping the fqdn of the mp during osd ? if not you need to fix that issue first, before worrying about languages. if you want to troubleshoot this effectively then place pause steps between the Apply operating system step and apply windows settings step and the Setup Windows and configmgr step, you should see your unattend.xml file change a few times during those three steps (before the reboot) to pause the tasks sequence use a run command line step which runs a vbscript/windows script file to prompt the enduser with a msgbox to click OK to. the task sequence will 'pause' until you click the ok in the msgbox cscript.exe pause_ts.wsf -
OSDComputerName for "already known computers"
anyweb replied to InigoMontoya's topic in Configuration Manager 2012
1. x:\windows\temp\smstslog\smsts.log 2. yes and then redistribute the boot image to your dp's, press F8 to enable the command prompt in WinPE and get the log above 3. looks ok, but to be honest I wouldn't change any dhcp options unless I had to. I assume you are testing this in a lab ? and it's failing ? -
WIndows 8 Languages not applying automatically
anyweb replied to Jeff K's topic in Configuration Manager 2012
are you sure it's reading the xml file ? how do you know it's not being used ? have you tried pressing f8 before the apply operating system step and monitoring that file by re-opening it multiple times until the first reboot after apply operating system step. -
WIndows 8 Languages not applying automatically
anyweb replied to Jeff K's topic in Configuration Manager 2012
yes you can automate it, you can use computer or collection variables, or use a frontend HTA like this one that HTA allows you to select language and regional settings or even multiple languages.. -
thanks ! you do need sp1 to support Windows 8 Deployments
-
if you dont need a cas (and you don't) then instead of choosing to install a CAS install a standalone primary instead, so follow everything else that the guide covers and you'll be fine.
-
I thought you might find this interesting, below are the top 10 search items that get people to windows-noob.com for April 2013, as of 14th of April, 2013 Top 20 of 19906 Total Search Strings # Hits Search String 1 142 0.52% windows noob 2 74 0.27% sccm 2007 3 46 0.17% kms server 4 35 0.13% powershell download 5 29 0.11% windows-noob 6 27 0.10% failed to get dp locations as the expected version from mp 7 27 0.10% windows noob sccm 2012 8 23 0.08% windows powershell download 9 20 0.07% 4.00.6487.2000 10 20 0.07% mp control manager detected management point is not responding

-
Monitoring Enpoint Protection in Operation Manager
anyweb replied to sweprs's question in System Center Operations Manager
it looks like you need the SCOM agent installed, see here http://technet.microsoft.com/en-US/library/gg412487.aspx The FEP 2010 Security Management Pack supports agent-managed monitoring. Agent-managed computers have an Operations Manager service installed. This service, which appears as HealthService in the Services list in Computer Management, is the Operations Manager agent. Monitoring computers via agents allows access to all Operations Manager options and functionality; therefore, the vast majority of monitoring is performed this way. In order to monitor FEP 2010 clients, each client must have the Operations Manager agent installed in addition to the FEP 2010 client. Note: In order to monitor FEP 2010 clients, each client must have the Operations Manager agent installed in addition to the FEP 2010 client. For information about deploying FEP 2010 clients, see Client Deployment. Deploying Agents The first step in monitoring your environment is to deploy agents. You can use any of the following ways to deploy Operations Manager agents: The Discovery Wizard (through the Operations console) The Agent Setup Wizard The MOMAgent.msi program, from the command line Active Directory®, to assign agents to a management group For more information about working with Operations Manager agents, see Working with Agents (http://go.microsoft.com/fwlink/?LinkId=204242). For more information about Deploying agents, see Deploying Windows Agents (http://go.microsoft.com/fwlink/?LinkId=204243). -
if you installed a CAS on this server and if you want to install a primary site then you must do that on ANOTHER server by running setup on that other server if you have only one server then you should probably not be installing a CAS but install a standalone primary instead, are you setting up a lab or production ? cheers
-
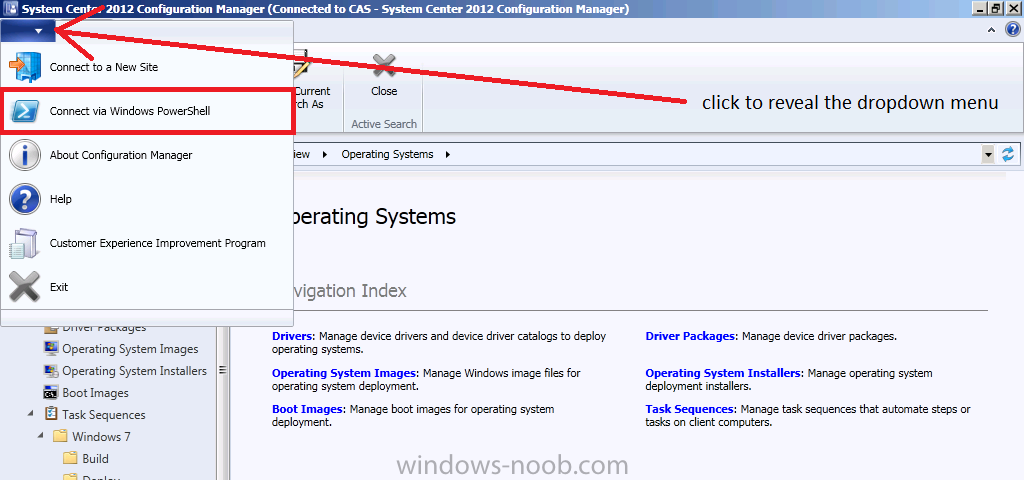
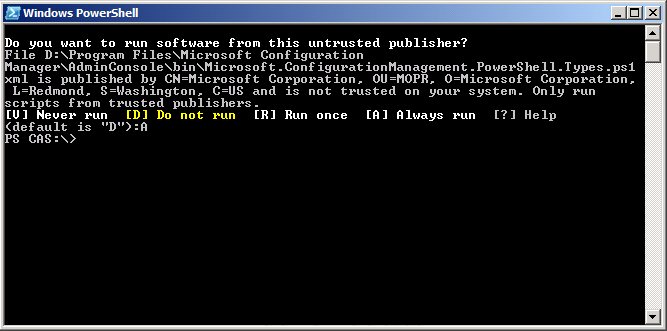
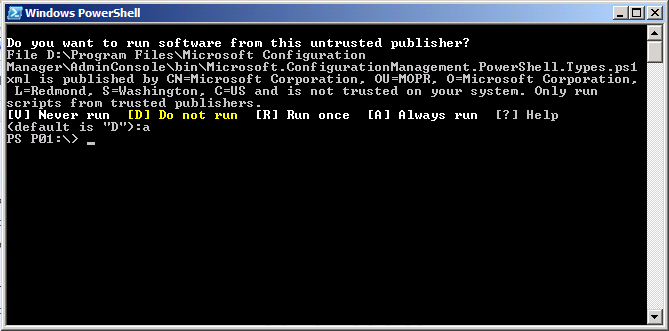
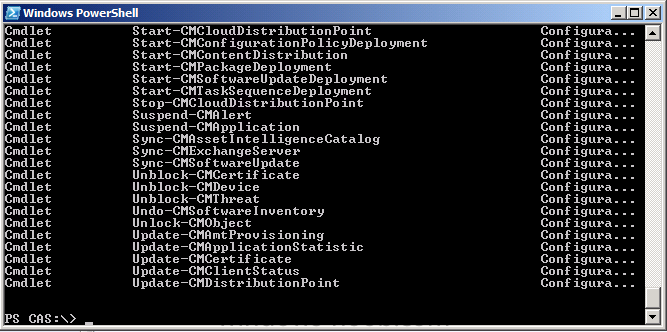
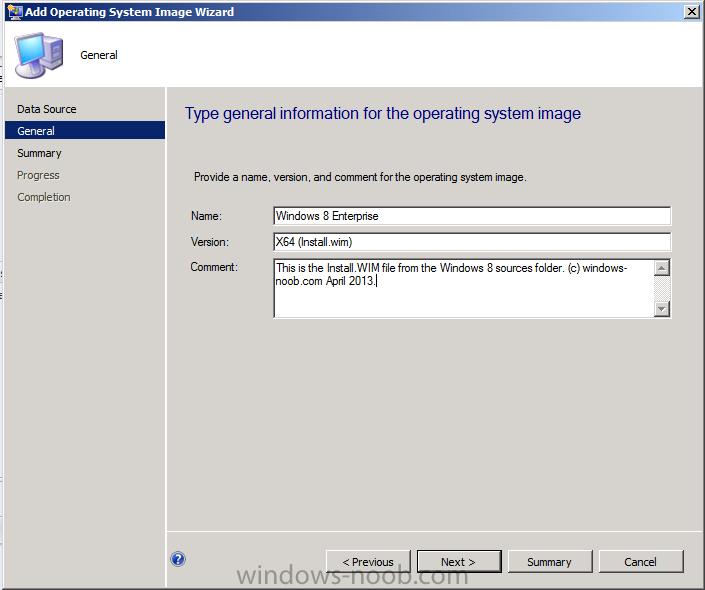
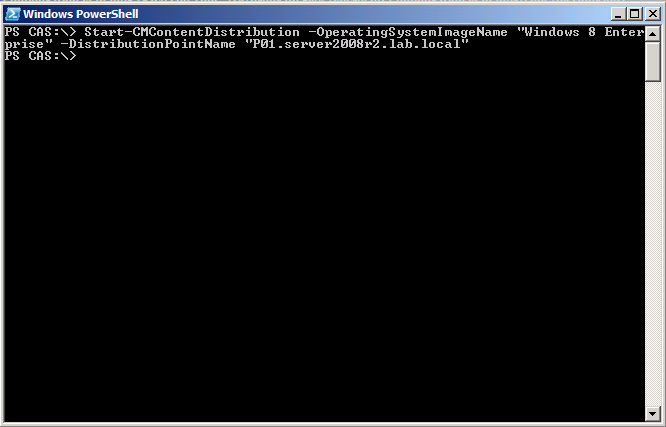
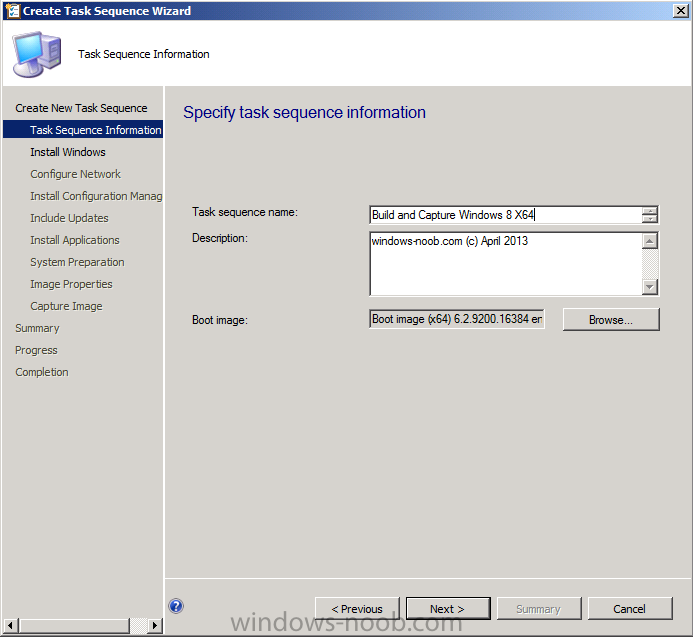
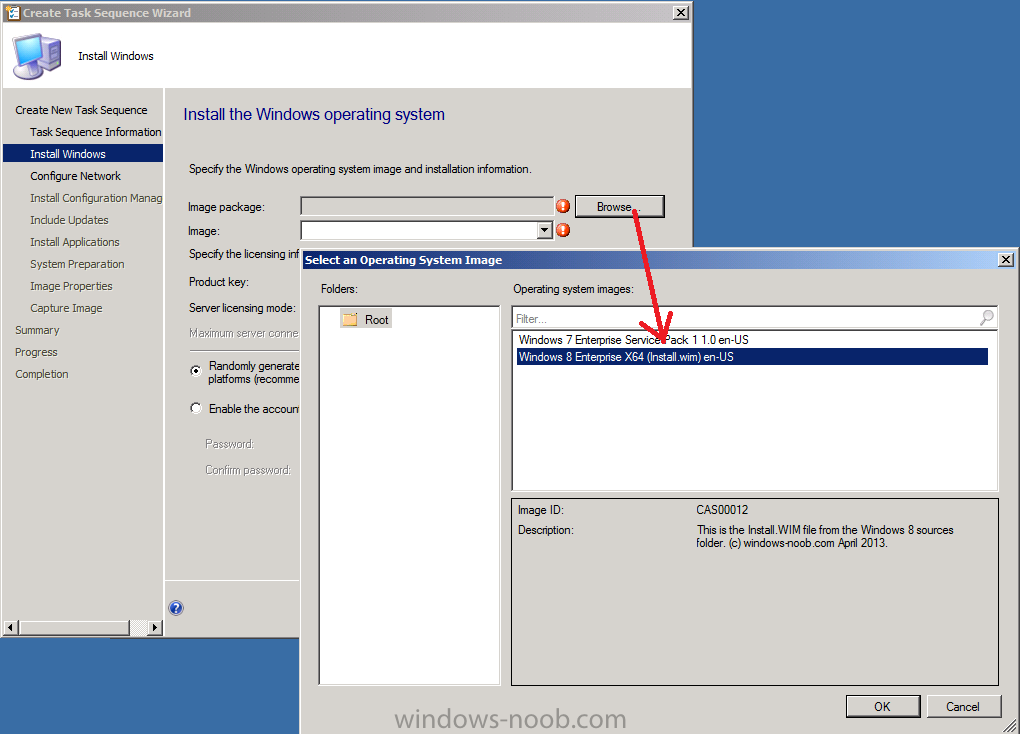
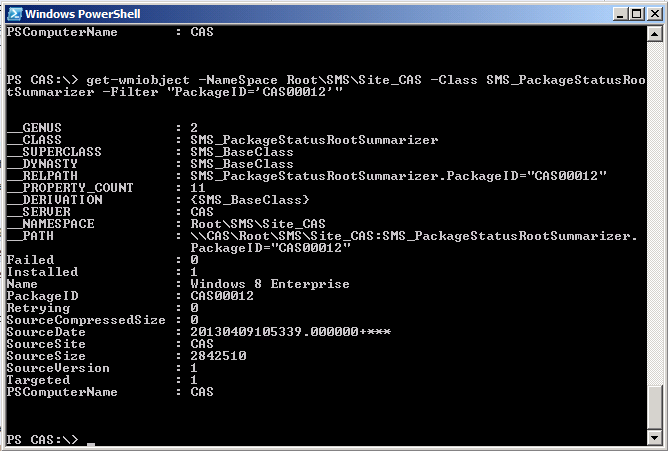
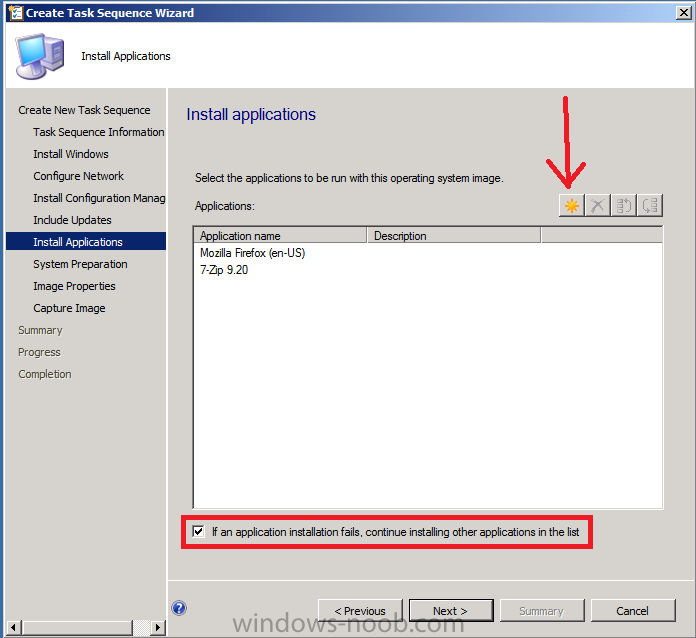
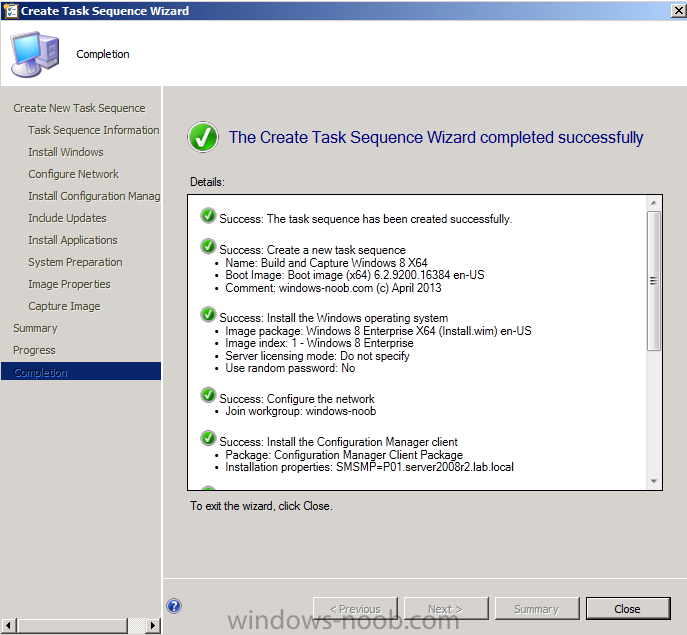
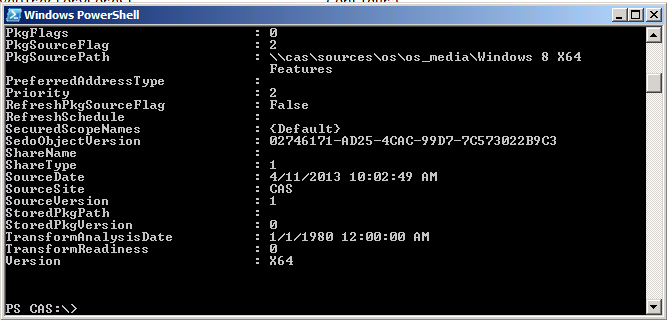
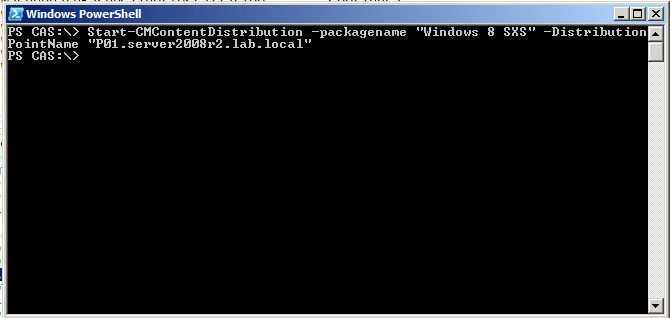
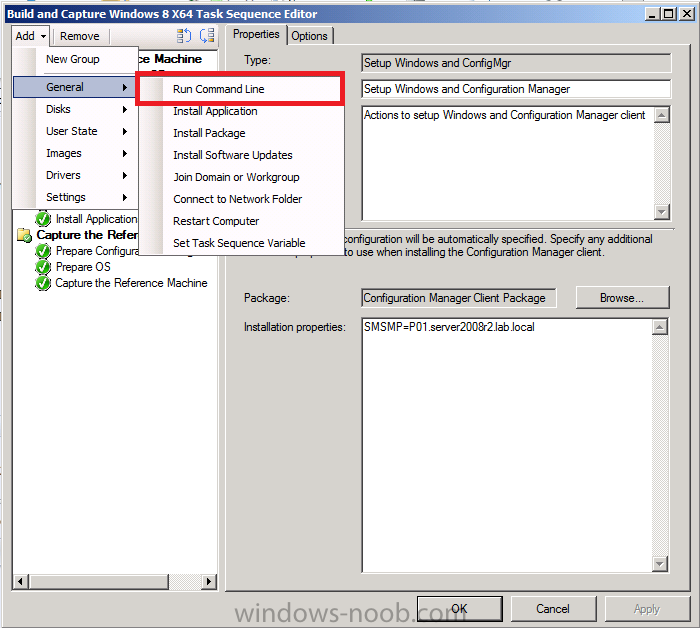
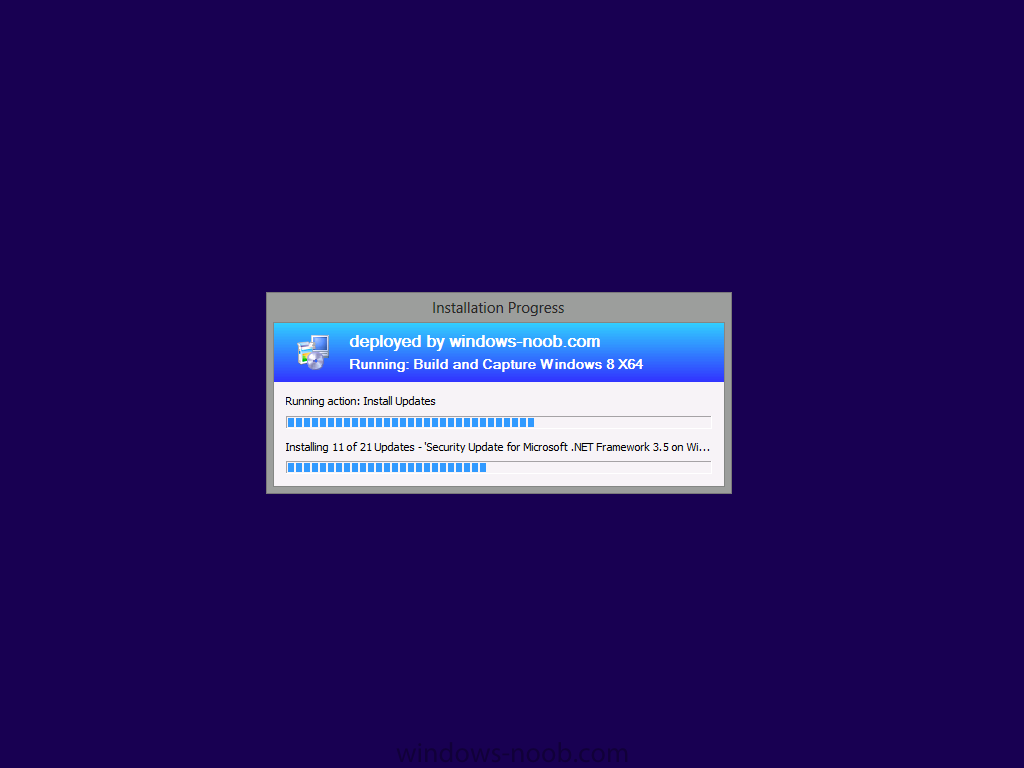
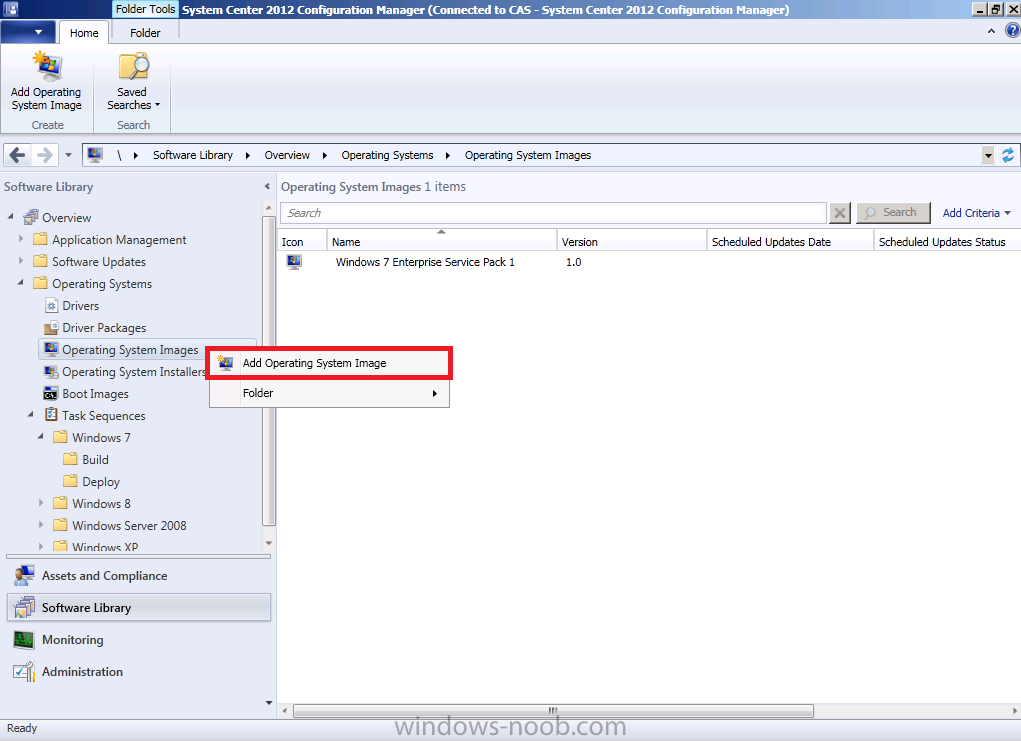
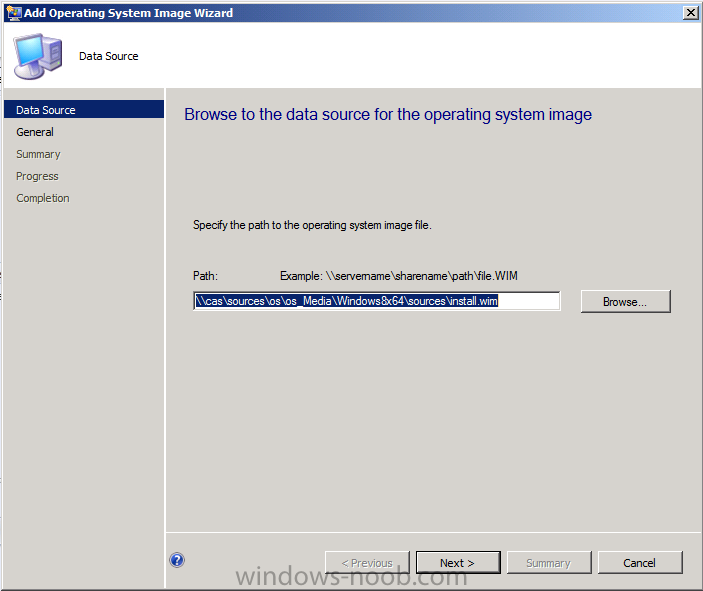
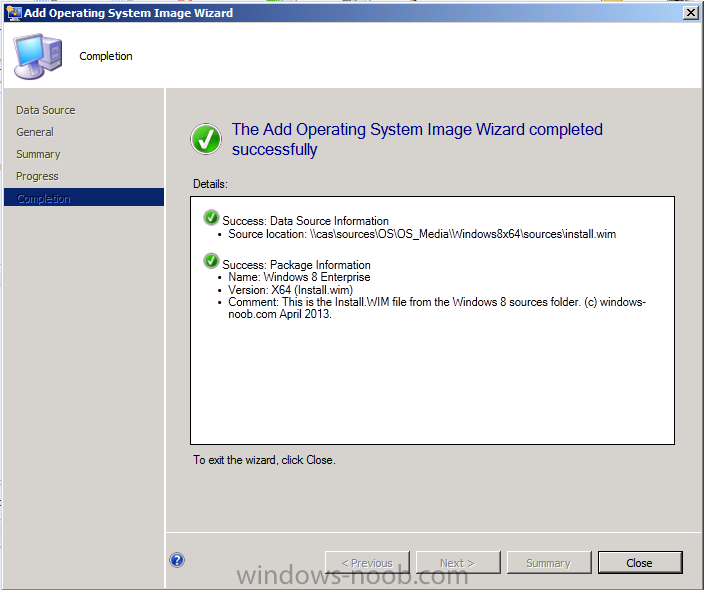
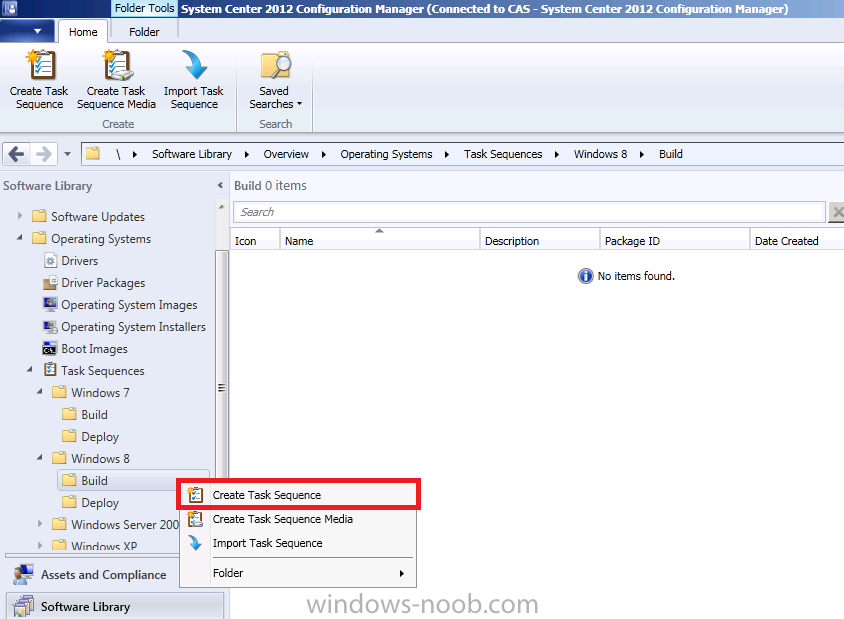
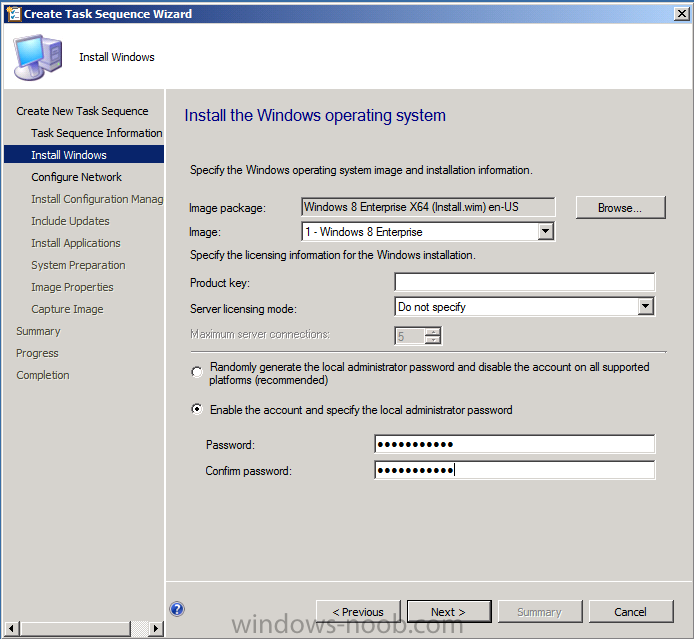
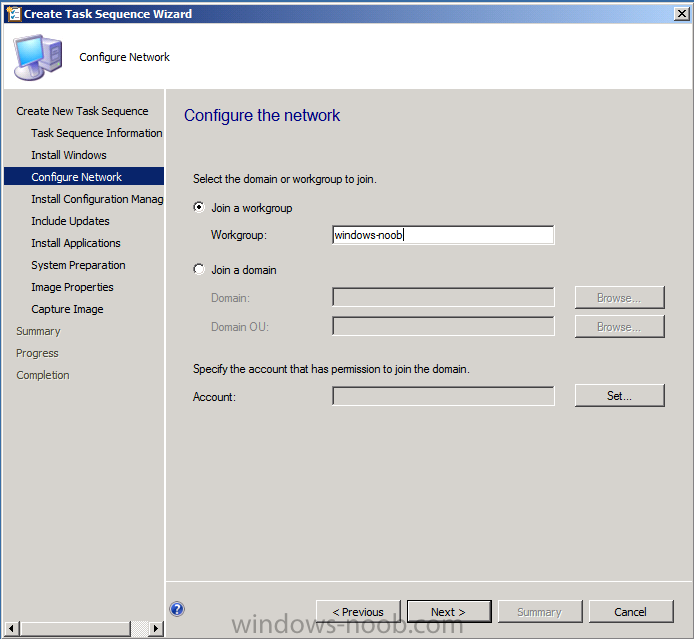
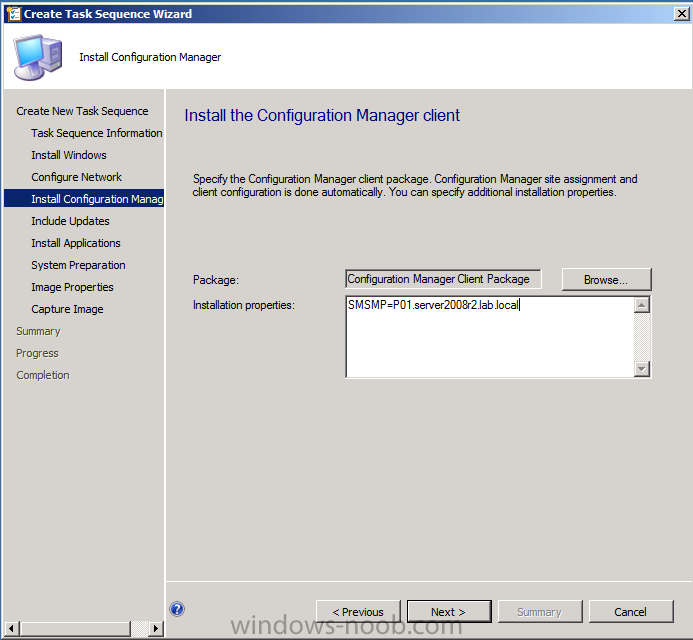
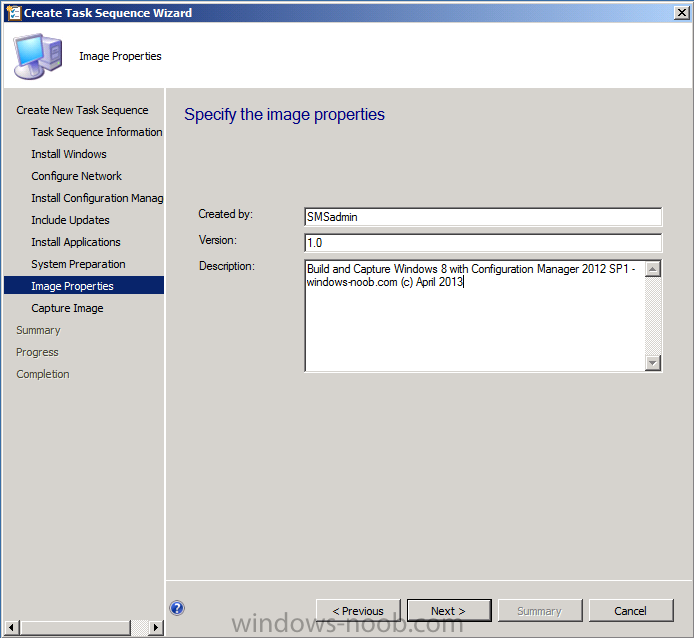
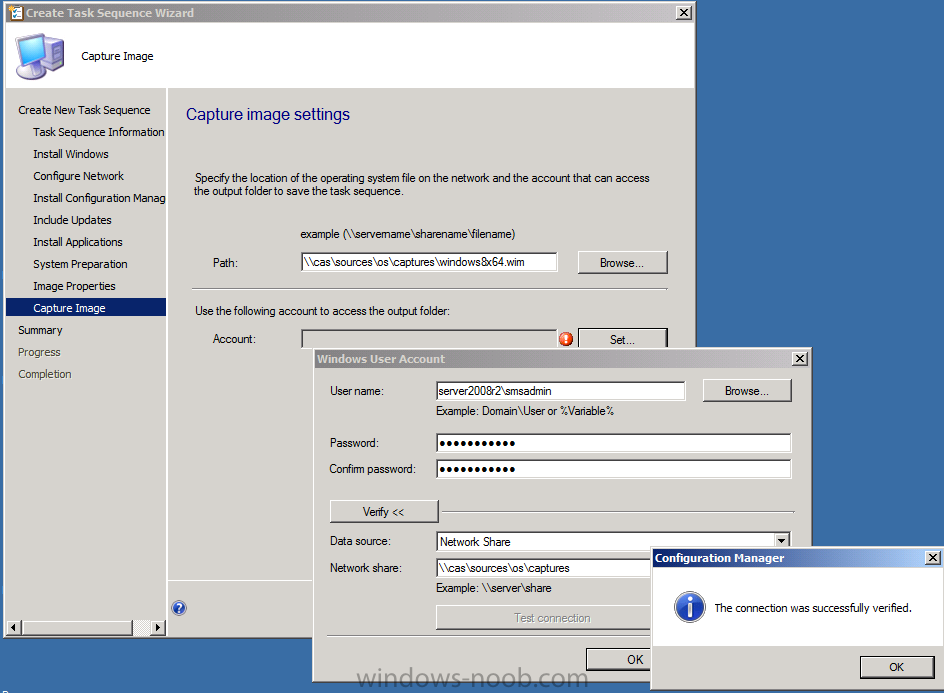
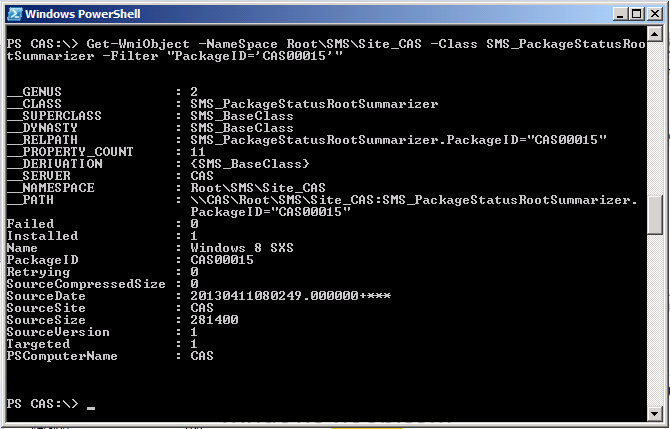
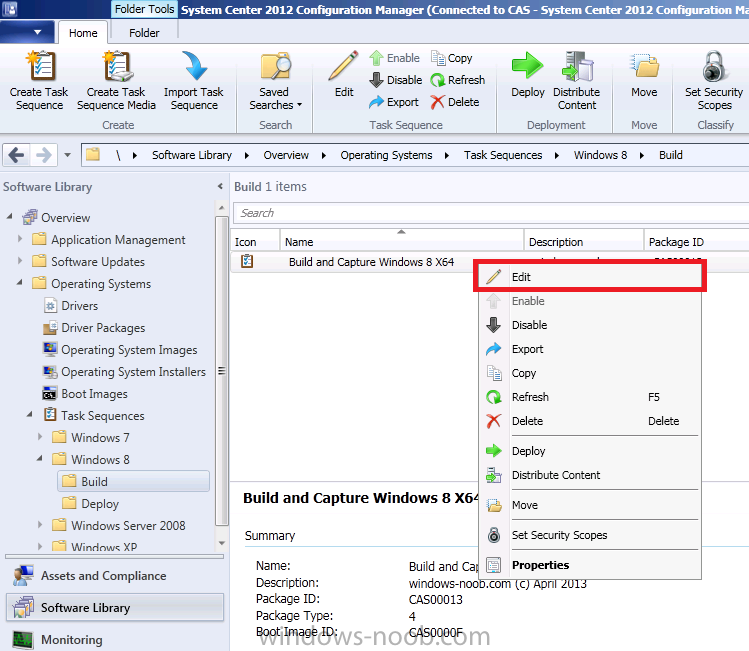
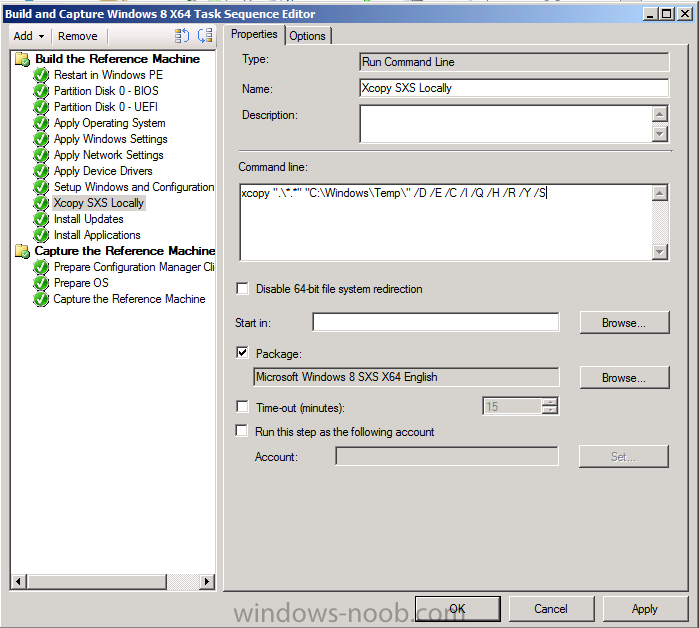
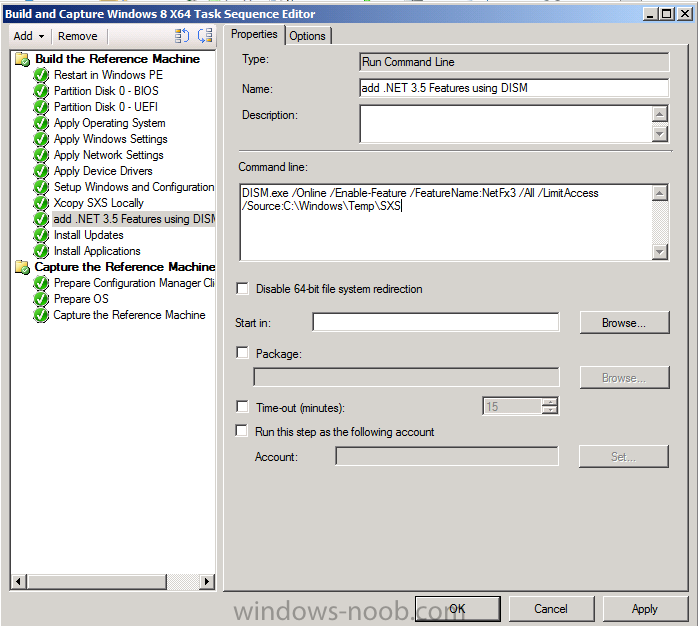
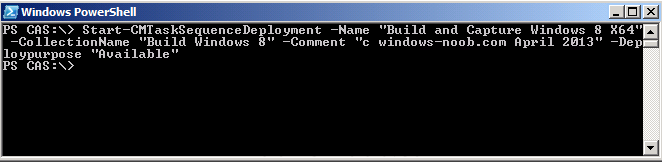
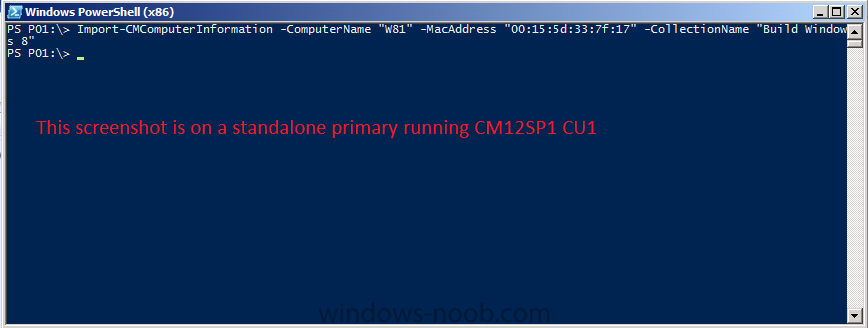
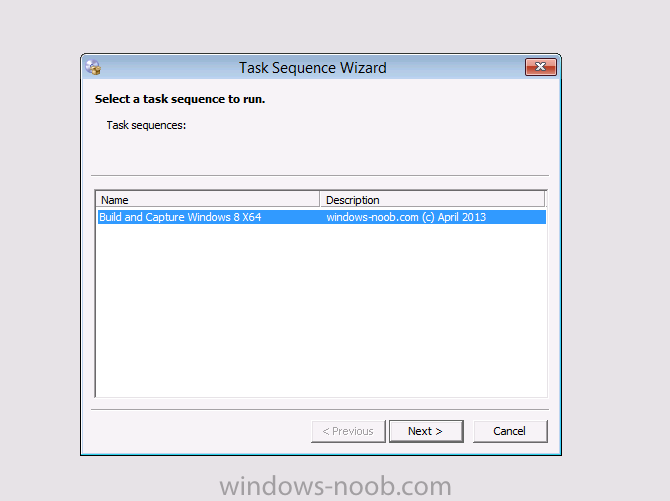
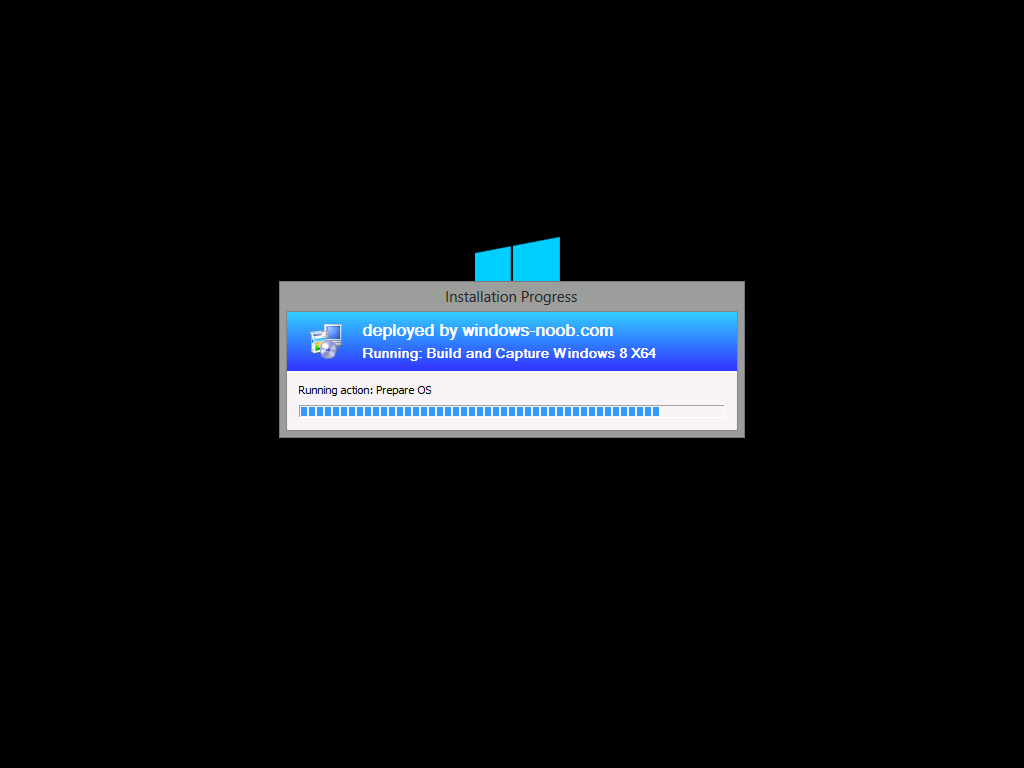
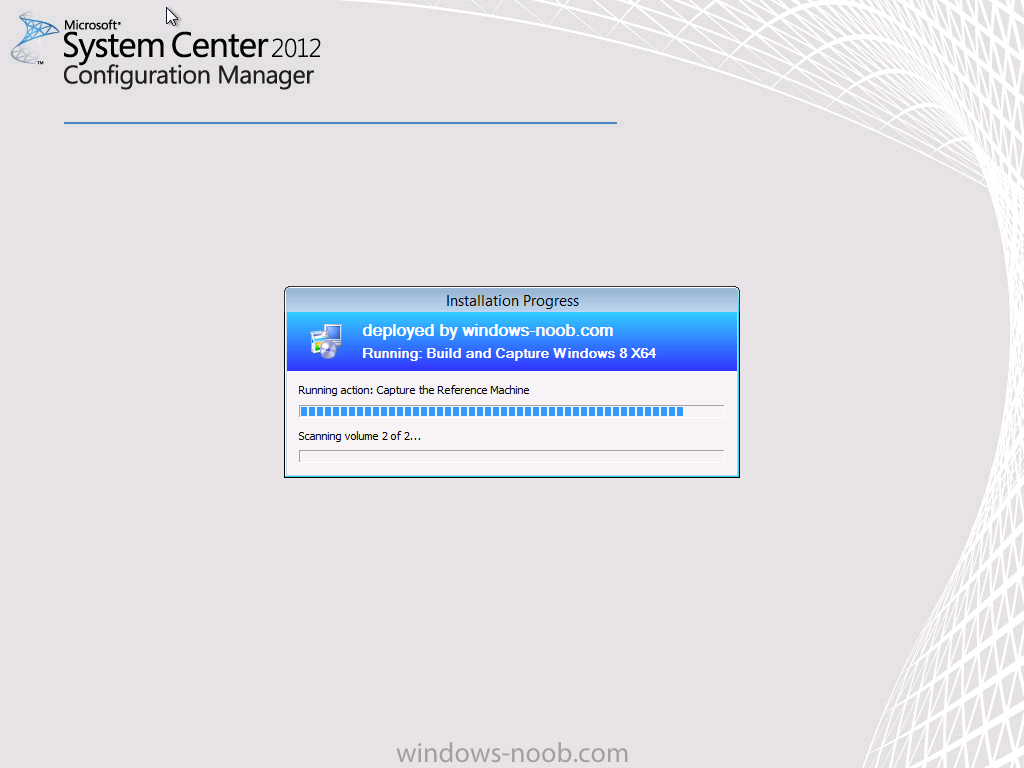
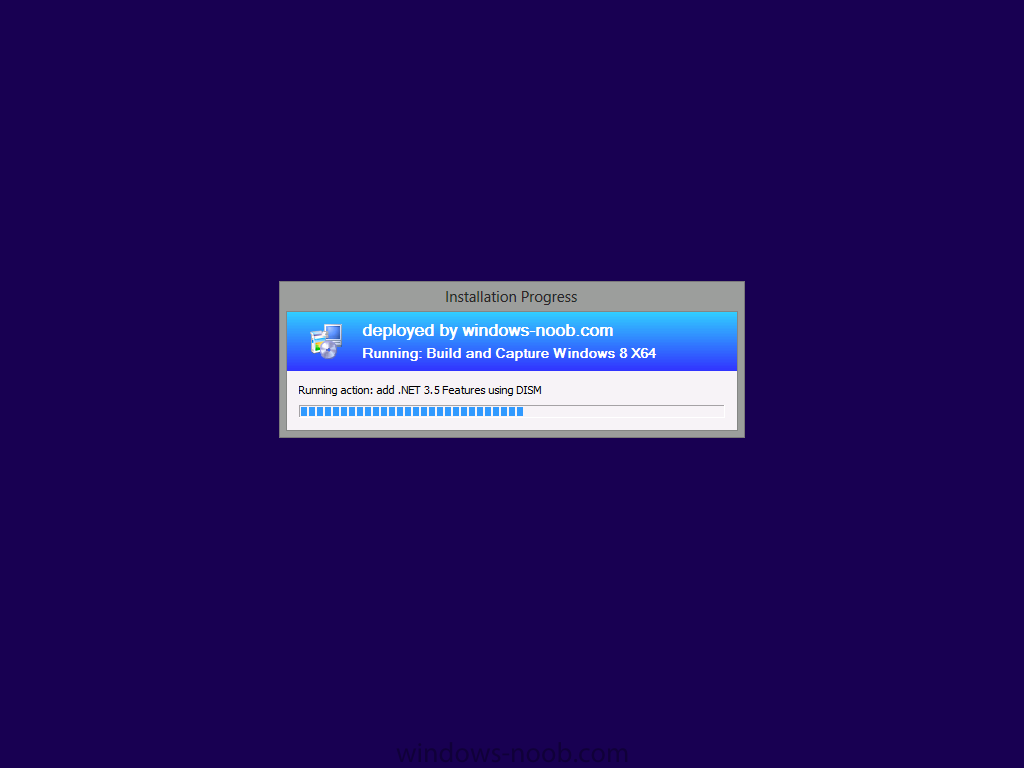
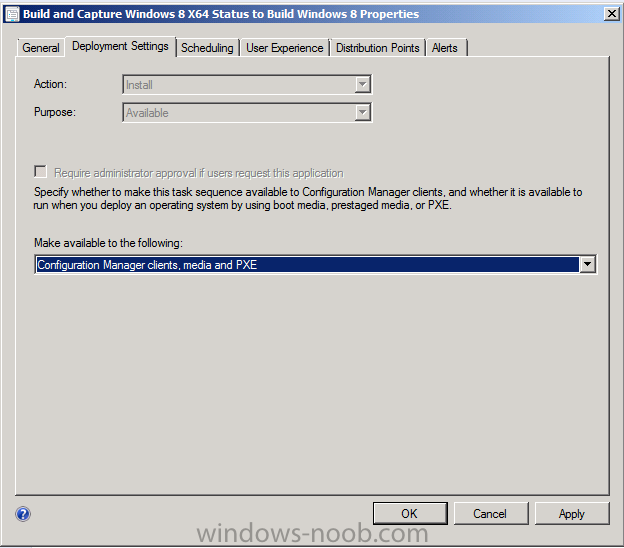
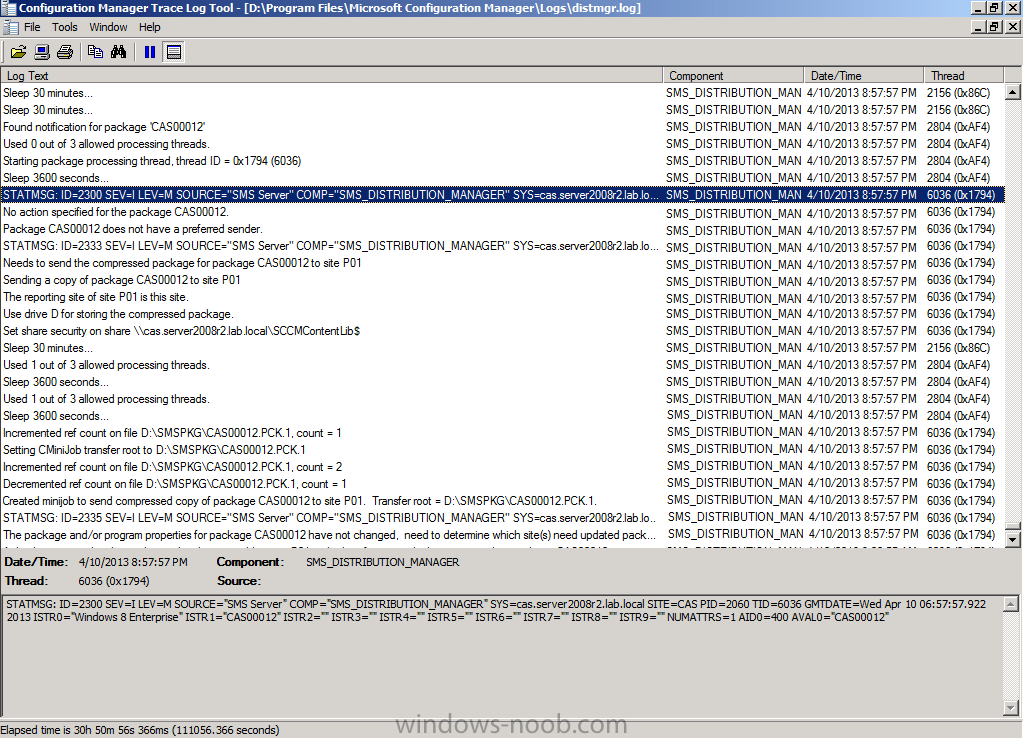
In Part 1 of this series we created our new LAB, we got the System Center 2012 Configuration Manager ISO and extracted it, then copied it to our Active Directory server. We then created the System Management container in AD, delegated permissions to the container, extended the Schema for Configuration Manager. We then opened TCP ports 1433 and 4022 for SQL replication between sites, installed some prerequisites like .NET Framework 4.0, added some features and then downloaded and installed SQL Server 2008 R2 SP1 CU6. We then configured SQL Server using SQL Server Management Studio for security and memory configurations prior to running the Configuration Manager 2012 setup to assess server readiness. Finally we installed a central administration site (CAS). In Part 2 we setup our Primary server with SQL Server 2008 R2 SP1 CU6. We then installed Configuration Manager 2012 on our primary server (P01) and verified that it was replicating to our central administration site (CAS) server. Then we configured Discovery methods for our Hierarchy and then configure Boundaries and Boundary Groups. In Part 3 we configured Discovery methods and configured boundaries and created a boundary group, we then configured them for Automatic Site Assignment and Content Location. In Part 4 we added the Application Catalog roles to our Hierarchy. We then configured Custom Client Device Settings and then deployed those settings to the All Systems collection on site P01. After that we created Custom Client User Settings and deployed them to the All Users collection in order to allow users to define their own User and Device affinity settings. In Part 5 we installed the WSUS server role (it is required for the Software Update Point role). We then installed the Software Update Point role on our CAS and Primary servers and we configured the SUP to support ConfigMgr Client Agent deployment which is a recommended Best Practice method of deploying the Configuration Manager Client Agent. In Part 6 we prepared our server for the Endpoint Protection Point role, and installed that role before configuring custom client device settings and custom antimalware policies. We then deployed those custom client device settings and custom antimalware policies to our newly created Endpoint Protection collections. In Part 7 we added operating system deployment ability to our hierarchy by adding Windows 7 X64. We used the Build and Capture process to capture a WIM image which we can later deploy to targeted computers using network boot (PXE). PXE boot requires specific settings on our distribution points and the boot images used to deliver the operating system WIM images were therefore also enabled for PXE support. In Part 8 we added Applications to our Software Library and configured the requirements in the Deployment Type to add new abilities to the application delivery process. We monitored the approval process of our applications and saw how requirements can influence whether an application is installed or not and we noted the difference between deploying to Users versus Devices. Now we will take a look at how Automatic Deployment Rules can be used to automate the deployment of windows updates on Patch Tuesday using a recurring schedule to patch your infrastructure using Software Updates. In Part 9 we created some folders and collections using a PowerShell script to make targeting of Windows Updates easier, we then performed a full synchronization of our Software Update Point before creating an Automatic Deployment Rule (ADR) for Windows 7 monthly updates for Patch Tuesday. In Part 10 we monitored our previously created ADR and monitored the downloading and deployment of those updates both to the distribution points and finally to our Windows 7 client computers. We reviewed the process in fine detail in order to understand the sequence of events when an ADR is run on a schedule. In Part 11 we upgraded our Hierarchy to System Center 2012 Configuration Manager Service Pack 1 and now we shall begin using some of the new features that Service Pack 1 provides, one of which is the ability to Deploy Windows 8 and another is the PowerShell integration. Introduction System Center Configuration Manager 2012 Service Pack 1 has changed the method used to create and deploy operating systems, the first major change is in the build and capture task sequence itself, previous to SP1 you would select the operating system installation files (setup.exe) however now you can point to the install.wim file directly from the DVD in the build and capture task sequence. Indeed you don't even need to use a build and capture process anymore (if that's what you prefer), you could go straight to creating the deploy task sequence and deploy Windows 8 using the install.wim from the original media. Most organizations however will want to customize their Corporate image somewhat and using the build and capture process still allows us to do that. One of the features that is notably missing in Windows 8 is .Net 3.5, so we’ll add that in our Build and Capture process. In this post we'll create a new Windows 8 image using the Build and Capture method and later deploy that image with the .Net 3.5 feature pre-installed, we will also see how we can accomplish some of these steps using Powershell CMDLets that are built into the product, so be warned there will be a lot of PowerShell used in this post and from this point onwards, so you may as well get used to it . Trust me, if you feel afraid of PowerShell, don't be, go through every step in this guide and you'll feel much better once it's all complete. Note: Throughout this post I provide sample PowerShell commands for you to execute, unless otherwise mentioned these have only been tested on Configuration Manager 2012 Service Pack 1, in other words, Cumulative Update 1 is not installed unless I directly refer to it. Step 1. Connect to Windows PowerShell In this post we will familiarize ourselves with some of the Configuration Manager PowerShell integration provided in System Center 2012 Configuration Manager Service Pack 1. PowerShell gives you the ability to automate many functions and this ability is now integrated in the console. To enable Powershell integration from within the console click on the blue drop down menu in the top left corner of the console and select Connect via Windows PowerShell. A PowerShell command window should appear, select [A] Always run when prompted, note that the site code of your Configuration Manager site that you are connected to (in this case the CAS) is listed. In the screenshot below you can see the same action performed on our Primary site P01, notice the difference in display output. ok Now that we've connected to Powershell, in the CAS PowerShell console let's list the commands available. Get-Command -Module ConfigurationManager That will scroll off screen as there are so many commands available you may want to output that to a text file so that you can scroll through it at your leisure or search for a command. To create a list of available PowerShell commands, we will use PowerShell's Out-File command. Create a folder on D:\ called D:\Temp and then do the following: Get-Command -Module ConfigurationManager | Out-File D:\temp\CM12_PowerShell_Commands.txt This list is specifically for Configuration Manager 2012 SP1, if you install Cumulative Update 1 (I have not on this lab, however I've installed it on a separate non-CAS hierarchy) then you’ll get access to even more PowerShell CMDLets. Here's a list I created using the command above. CM12_PowerShell_Commands.txt if you want to get help on any PowerShell cmdlet try using get-help command eg: get-help Update-CMDistributionPoint Tip: you can also use the PowerShell cmdlets without opening the console, change directory to the adminsconsole\bin folder and start up a powershell console and then use the following line Import-Module "D:\Program Files (x86)\Microsoft Configuration Manager\AdminConsole\bin\ConfigurationManager.psd1" and lastly if you want to search for commands that have a certain name you can do so like this: get-command -Name *Computer* which should return a list of any command with computer in the name. Now that you know how to use the PowerShell integration we’ll return to it later in this guide. Step 2. Copy the Windows 8 media Perform the following on the CAS server as SMSadmin Mount your Windows 8 ISO and copy the entire contents to an appropriately named folder in the sources folder structure on the CAS server, for example I've copied mine to \\cas\sources\os\os_media\windows8x64 Step 3. Add the Windows 8 X64 Install.WIM file Perform the following on the CAS server as SMSadmin In the Operating System Deployment section of the Software Library workspace, select Operating System Images and right click, choose Add Operating System Image Point the wizard to the Install.WIM file in the sources folder of your extracted media files, eg: \\cas\sources\os\os_media\windows8x64\sources\install.wim. Tip: Prior to SP1 you would not use the Install.WIM file directly from the media as Windows would end up on D:\, however Service Pack 1 has the ability to deal with this natively and adds a new Configuration Manager variable called OSDPreserveDriveLetter On the General screen, fill in information about the Windows 8 image you are adding and edit the version or description info so that it clearly points out that this is the Install.WIM file that you are using (to make it clear later when adding Windows 8 images to any Deploy Windows 8 task sequences). and continue the wizard through to completion. Note: You would of course want to do the step above using Powershell, and there is a cmdlet provided to do that however at present (29/4/2013) it does not work correctly in that you cannot distribute the image created. The command used to create the image above is New-CMoperatingSystemImage -Name "Windows 8 Enterprise" -path "\\cas\sources\os\os_media\windows8x64\sources\install.wim" -Version "X64 (Install.WIM)" -Description "This is the Install.wim file from the Windows 8 sources folder. (c) windows-noob.com April 2013" Remember, the command above does not work as you cannot distribute the image, for now create the image manually. Step 4. Distribute the Windows 8 X64 image Perform the following on the CAS server as SMSadmin We could update our content to our distribution points by selecting the image just added, right clicking and choose Distribute Content, however we want to use PowerShell in this instance to update the WIM file to our distribution point. Enter the following command in your PowerShell console (use the one started in Step 1.) Start-CMContentDistribution –OperatingSystemImageName "Windows 8 Enterprise" –DistributionPointName "P01.server2008r2.lab.local" Obviously replace the OperatingSystemImageName with the name you used and replace DistributionPointName with the FQDN of your Distribution Point. Once done, open the distmgr.log in CMTrace on your CAS server to monitor the status of the content distribution Once distributed you can verify it’s status via the Configuration Manager console or via PowerShell using Get-WmiObject –NameSpace Root\SMS\Site_CAS –Class SMS_PackageStatusRootSummarizer –Filter "PackageID='CAS00012'" The output should look similar to below, look for Installed=1 and Targeted=1 this means that the package is distributed successfully. Tip: You can get detailed information about these WMI classes on MSDN here http://msdn.microsoft.com/en-us/library/hh949534.aspx Step 5. Create a Build and Capture Task Sequence Perform the following on the CAS server as SMSadmin A build and capture task sequence is normally used to create a custom WIM file containing your Operating System and some key applications used in your organization, those applications would normally be referred to as ‘FAT’ applications as they are usually big in size (think Office 2013 or SAP). The image generated by this process can later be used in a separate Deploy Task Sequence and in that task sequence you can have several custom steps and smaller applications such as WinZip. Creating a custom wim file this way does allow for greater flexibility and reduced installation time, however you may have to update this reference image once every quarter or so to include updates to your applications and of course Windows Updates themselves. Navigate to the Windows 8 Build folder in Task Sequences, right click and choose Create Task Sequence. When the wizard appears choose the second option, Build and Capture a reference operating system. Give it an appropriate task sequence name and make sure to choose an X64 boot image when building an X64 operating system otherwise the Capture process will fail. Click next when done. For the Install Windows step, click on browse and select our Install.WIM file we added earlier. The only images you’ll be able to select here are either previously added WIM files or previously captured WIM files. Note: You can not select Operating System Installers in this step. If you want to select an Operating System Installer (setup.exe) complete the task sequence wizard and then edit the task sequence and edit the step after it’s created to point to an Operating System Installer (for example for Windows XP). Enter the local administrator password which is useful if your Build and Capture task sequence fails for whatever reason In the Configure Network step, join a workgroup, do not join the domain (keep the image clean) The Install Configuration Manager client step should point to the FQDN of your site server hosting the Software Update Point role (if you followed this series of guides that will be our Primary server, P01) if you want to install updates during the task sequence, in that case use the following SMSMP=P01.server2008r2.lab.local for installation properties In the next step select All Software Updates Install some applications that you’d like included in your reference image, this is just a lab so I don’t have much, you would typically want to install FAT applications like Office or SAP here Fill in some details about the image Fill in a the details for a Capture account and verify that they work before continuing Continue through the wizard until completion. Step 6. Create a SXS package for adding Windows Features Perform the following on the CAS server as SMSadmin We want to add the .NET 3.5 Windows 8 feature to our reference image and to do so we’ll create a package with the source files required for adding roles and features to Windows 8. As the reference image will not be domain joined (it will join a workgroup) we cannot use a Run Command Line step with the Run As User option to specify a Domain User, instead we’ll create a package (using PowerShell) and copy that locally on our Windows 8 reference computer and install the feature using DISM. Browse to the location where you copied the Windows 8 DVD and locate the sources\sxs folder, copy that folder (and all it’s subfolders and files) to a new location. Such as in the screenshot below, this will be the source files for our SXS package. Once done, open up our PowerShell connection again, and issue the following command to create our package (change it to suit the path of your SXS package): New-CMPackage –Name "Windows 8 SXS" –Version "X64" –Description "Windows 8 SXS files needed for adding features, © windows-noob.com April 2013." –Language "English" –Manufacturer "Microsoft" –Path "\\cas\sources\os\os_media\Windows 8 X64 Features" Ok now that we’ve created the package using PowerShell, the next job is to distribute it to our distribution point P01, so issue the following command Start-CMContentDistribution –PackageName "Windows 8 SXS" –DistributionPointName "P01.server2008r2.lab.local" Once again you can monitor distmgr.log for details of the package distribution or use PowerShell to see its status Get-WmiObject –NameSpace Root\SMS\Site_CAS –Class SMS_PackageStatusRootSummarizer –Filter "PackageID='CAS00015'" Like in the screenshot below Or you can do it the old fashioned way and verify in the console itself Step 7. Edit the task sequence Perform the following on the CAS server as SMSadmin Next we will add two steps to our Build and Capture task sequence, locate the task sequence in the console, right click and choose Edit The task sequence opens, select the Setup windows and Configuration manager step and choose the Add drop down menu, General, Run Command Line and edit it so that it corresponds with the screenshot below Next create another Run Command Line step called add .NET 3.5 Features using DISM and use the following command line: And that’s our editing done, Apply the changes and close the task sequence editor. Step 8. Deploy the task sequence Perform the following on the CAS server as SMSadmin Next we want to deploy our Build and Capture Windows 8 X64 Enterprise task sequence to our Build Windows 8 collection (if you have not yet created that collection do so now, it should be a device collection with no members). We will use the following PowerShell CMDLet: Start-CMTaskSequenceDeployment –Name "Build and Capture Windows 8 X64" –CollectionName "Build Windows 8" –Comment "© windows-noob.com April 2013" –Deploypurpose "Available" Side note: After doing this you’ll have to manually edit the deployment to make it available to Configuration manager clients, media and PXE as per the screenshot below, currently in Configuration Manager 2012 SP1. This has been automated in the Powershell updates from CU1 however the command to install is different Note: the command below will NOT work on Configuration Manager 2012 SP1 without the CU1 update installed (and the resulting MSP file for the Powershell cmdlets run in order to give you access to the new PowerShell updates...). Start-CMTaskSequenceDeployment –TaskSequencePackageId "CAS00013" –CollectionName "Build Windows 8" –Comment "© windows-noob.com April 2013" –Deploypurpose "Available" –MakeAvailableTo "ClientsMediaAndPXE" Step 9. Import a computer and PXE boot Perform the following on the CAS server as SMSadmin Now we are ready to import computer object into Configuration Manager’s database, we do this because the computer is not yet known to Configuration Manager. To do this we need to know the Mac address and computername, lets call the computername W81. If you are using CU1 you can use PowerShell to import your new computer object (the command below returns an error in SP1, the error implies that your collection “Build Windows 8” does not exist, ignore the error, it just doesn’t work in SP1. If you don't need or want to update to CU1 then import the computer object using computer association.) Import-CMComputerInformation –ComputerName = "W81" –MacAddress= "00:11:22:33:44:55" –CollectionName= "Build Windows 8" If you are not using CU1 then import the computer information manually (as the Powershell CMDLet doesn’t work currently) as described in this post. Once the computer has been imported, wait a few minutes before verifying that it shows up in the collection, do not continue until it is present in the collection. Once it appears PXE boot the virtual machine Press F12 when prompted and select our task sequence and off it goes...eventually it will get around to installing the .NET 3.5 feature it will then install any updates applicable which are targeted to the collection it's in during deployment which is the Build Windows 8 collection, so to recap if you want to get updates installed you'll need to deploy a software update group containing updates for windows 8 to the build windows 8 collection and it will reboot before installing the applications, if your applications don't install check the Deployment Type(s) associated with the applications and make sure that any conditions you've set in there are not stopping the deployment of that application, the SMSTS.log file will help you with any problems here. then and then it will continue before preparing the OS running Sysprep and then rebooting to capture the image and that is it for this post, you've learned how to Build a reference image of Windows 8 X64 Enterprise, you've installed some apps and enabled the .NET 3.5 feature and finally you've captured it for later installation in a Deploy Task Sequence (the next part of this series will cover that.) In addition, you've done many of the steps above using PowerShell, how awesome is that ! cheers niall. Here is the next part Part 13. Deploying Windows 8 X64 with custom Start screen. Recommended Reading Cmdlets in System Center 2012 Configuration Manager SP1 - http://technet.microsoft.com/en-us/library/jj849987.aspx Description of Cumulative Update 1 for System Center 2012 Configuration Manager Service Pack 1 - http://support.microsoft.com/kb/2817245/en-us PowerShell Basics - http://blogs.technet.com/b/configmgrteam/archive/2013/03/13/powershell-basics.aspx Windows PowerShell: Scripting Crash Course - http://technet.microsoft.com/en-us/magazine/hh551144.aspx Cmdlets in System Center 2012 Configuration Manager SP1 - http://technet.microsoft.com/en-us/library/jj849987.aspx PowerShell/Configuration Manager Blogs Kaido Järvemets - http://cm12sdk.net/?page_id=10 Raphael - http://cm12automation.codeplex.com/ Greg Ramsey - http://gregramsey.net/category/powershell-2/ Johan Arwidmark - http://www.deploymentresearch.com/Research.aspx?Search=powershell&SearchType=Keyword David O Brien - http://www.david-obrien.net/


-
Does SCCM 2012 support .iso as Operating System Installers
anyweb replied to AhmedElfa's topic in Configuration Manager 2012
attach the smsts.log files for us here please -
you should be able to install both provided that you havnt installed one (a CAS) before, can you show me what you are seeing (screenshot)
-
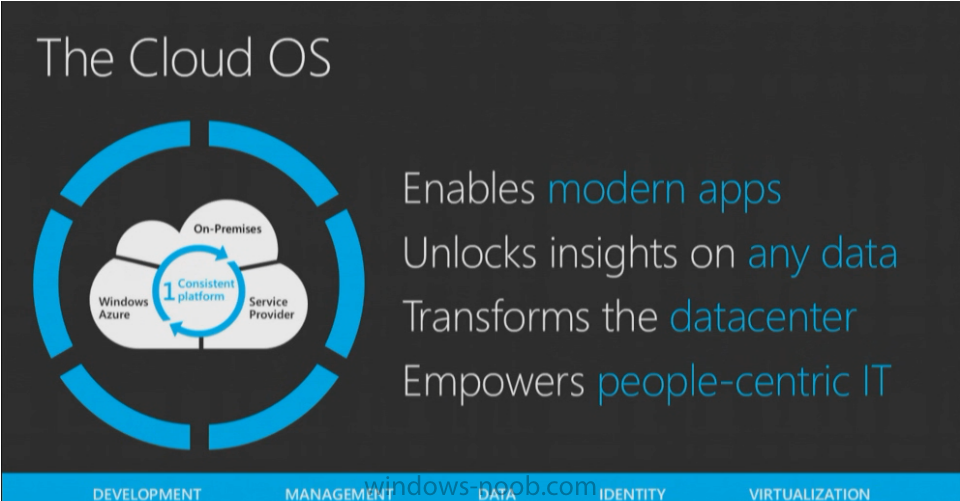
MMS 2013 is well underway in Las Vegas and those lucky enough to be there got to see the usual Keynote from Microsoft Corporate Vice President Brad Anderson. There were plenty of buzzwords in the keynote from Brad, but before he spoke there were a few snippets from Microsoft customers explaining how IT is growing faster than ever before and how it's adapting to change in order to get closer to business. Live demos He kicked off the keynote by announcing the delays was due to no internet in that part of the building and therefore every demo would be live, I guess that would mean previous demo's in previous MMS events were done by streaming over the internet :-) Brad then went on to say that every organization will benefit from participating in and using the cloud. He talked about the great releases of the last year including Windows Intune, System Center 2012 SP1, Windows 8, Server 2012, and went on to say it's our best work right now, delivering work that is forward looking. Transformational Trends These transformation changes will be brought about by The Cloud OS. This cloud OS contains transformations to advance your business. Windows Server is the foundation of the cloud OS, Windows Azure is the Public cloud OS and Windows Server is the Private cloud OS. Microsoft operates over 200 unique cloud based services (like Skype, Outlook.com or Office365). He went on to explain how some big-name customers saved millions of dollars and reduced downtime by switching to HyperV and the cloud, speaking of HyperV and Enterprise scale he mentioned a 64 node cluster in HyperV supporting 8000 virtual machines which is twice what the other guys can offer. Next he went on to say that he solutions that we are delivering from Microsoft are Enterprise grade, Enterprise scale, and Enterprise ready today. The whole reason why we deploy these infrastructures (transforming the data center into a cloud solution) is to support Apps. MMS 2013 is only using 10% of the physical servers it had before in 2009 (574 or so) for the virtual machines that people use to do their labs on, this if due to utilizing the cloud infrastructure from Microsoft. Dominos Pizza (one of Microsoft's customers highlighted during the keynote) migrated to Hyperv from the other guys and saw a 99% reduction in help desk calls. If you are using multiple clouds what types of decisions should you be making. Microsoft has great assets in both the public cloud and the private cloud. Over 99% of SQL servers can be virtualized. SMB multichannel and SMB direct will get performance out of remote file storage. Enabling People Centric IT Most companies don't allow end users to bring their own devices, Brads advice is to embrace this trend that users bring their own devices. Happy users are more productive ! Use Windows Intune to enable these devices within your Organization. Users can be presented with a seemless experience to install apps from a common interface using Windows Intune with Configuration Manager. You can also define what type of devices they are allowed to use in order to access internal documents. cool stuff ! see the keynote for yourself here cheers niall


-
what logs are telling you this ?
-
OSDComputerName for "already known computers"
anyweb replied to InigoMontoya's topic in Configuration Manager 2012
can you attach your smsts.log file for examination ? -
did you add the operating system image as described in the guide ? if not you cannot add one
-
does this have anything to do with Installing a CAS ? if not please raise a NEW topic thanks
-
System Center 2012 Configuration Manager SP1 is released
anyweb replied to anyweb's topic in Configuration Manager 2012
your english is fine my point was that you are asking about workgroup computers in a post dedicated to SP1 being released....in other words nothing to do with this topic do you see my point ? -
what did you enter for those values ?
-
App-V 5.0 Client Install using Setup.exe and MSI
anyweb replied to ramlan's topic in Configuration Manager 2012
have you seen this yet ? -
System Center 2012 Configuration Manager SP1 is released
anyweb replied to anyweb's topic in Configuration Manager 2012
try posting that as a separate post please (keep on topic) -
using SCCM 2012 in a LAB - Part 2. Add SUP and WDS
anyweb replied to anyweb's topic in Configuration Manager 2012
did you check the firewall and proxy settings ? -
the task sequences for Configuration Manager 2012 are in a different format than for Cm2007, which are you using ?
-
I'd like to know why you want to remove the management point and why you don't uninstall the secondary ?