


anyweb
-
Posts
9277 -
Joined
-
Last visited
-
Days Won
371
Everything posted by anyweb
-

Multiple Windows Boot Manager entries under UEFI Section
anyweb replied to BrentL's topic in Configuration Manager 2012
are you doing a new computer scenario or refresh ? -
SCCM 2012 sp1 setup issue with sql 2008 R2
anyweb replied to nguil's topic in Configuration Manager 2012
and how are you specifying the remote SQL server and instance in the dialog ? -
Cannot select Operating system installer
anyweb replied to LimeLover's topic in Configuration Manager 2012
no you don't need to do a build and capture unless you want to use a captured wim with some settings and applications changed, and windows updates applied (for example) -
Multiple Windows Boot Manager entries under UEFI Section
anyweb replied to BrentL's topic in Configuration Manager 2012
did you see my post on installing the Surface here ? it works fine for me and no duplicate entries in the BCD menu... -
Summary: Microsoft appears ready to roll out the set of expected updates to its full set of core, Microsoft-developed Windows 8 applications, as rumored earlier this month. By Mary Jo Foley t looks like Microsoft is poised to update almost all of its core Microsoft-developed apps that shipped with Windows 8. At the start of this month, I posted that Microsoft was expected to provide updates to everything, from Windows Mail to Xbox Music, some time in March. On March 22, Windows SuperSite editor Paul Thurrott discovered a stack of updates that are "installation ready" for Windows 8. These include: Microsoft.BingTravel Microsoft.Camera Microsoft.Bing Microsoft.Reader Microsoft.BingNews microsoft.windowsphotos (Photos) Microsoft.BingFinance microsoft.microsoftskydrive Microsoft.XboxLIVEGames Microsoft.ZuneVideo Microsoft.BingWeather Microsoft.ZuneMusic (Xbox Music) microsoft.windowscommunicationsapps (Mail, Calendar, People, Messaging) Microsoft.BingMaps Microsoft.BingSports My original tipster said these apps would also be updated and made available for Windows RT this month. I've tried to find mention of pending updates on my Surface RT and so far cannot. (Wondering if anyone out there with a Windows RT device can see these. Chime in if so.) Update: It appears this same batch of updates is also coming to Windows RT. Brad Pelletier (@bardo77n) just sent me this screen shot from his Surface RT. I asked Microsoft again today for comment on when/if these major updates are going to be rolled out. I got a fresh, new "no comment." Microsoft officials have acknowledged publicly that the Windows team is aware that the first-party apps on Windows 8 and Windows RT have room for improvement. Many users have been especially disappointed in the Mail and Music apps for the product, claiming they feel more like betas than full, featured, polished products. Even though they're free, many of us Windows 8/Windows RT users feel that these apps, developed by the Windows team, just aren't very good. (The Windows 8/Windows RT apps built by the Bing AppEx team, on the other hand, have been quite solid and usable.) Microsoft is expected to deliver another set of major updates to all its core apps when it rolls out the Blue update for Windows 8 and Windows RT late this summer. via > http://www.zdnet.com/microsoft-expected-to-update-its-full-suite-of-built-in-windows-8-apps-7000013004/
-
Multiple Windows Boot Manager entries under UEFI Section
anyweb replied to BrentL's topic in Configuration Manager 2012
those are not BIOS options they are BCD options, To remove a boot entry option, use the BCDEdit /deletevalue command, more info http://msdn.microsoft.com/en-us/library/windows/hardware/ff542202(v=vs.85).aspx how are you imaging your Surface Pro ? -
when booting from USB does the led on the USB key flash repeatedly ?
-
azure dp - clients stuck at 0 %
anyweb replied to Jaekt's question in Troubleshooting, Tools, Hints and Tips
can the clients convert the cloud dp FQDN to an ip ? see Kent's post about that here -
SCCM 2012 sp1 setup issue with sql 2008 R2
anyweb replied to nguil's topic in Configuration Manager 2012
is SQL on the primary or remote, is it using the default instance or another one ? -
check your ccmsetup.log and client.msi.log files to see why it failed, nothing will work when the client is not installing correctly
-
attach the smsts.log file from your new failure so i can see what the messages are
-
How can I change a HKCU setting within Windows during an OSD deployment
anyweb replied to roshanbhavsar04's question in How do I ?
use the workaround i already explained or try this. -
you need to install applications AFTER the setup windows and configmgr step, and you also have a problem with your network drivers see verify the computer actually has an ip and can ping the FQDN of the management point
-
or recreate the deployment type
-
How can I change a HKCU setting within Windows during an OSD deployment
anyweb replied to roshanbhavsar04's question in How do I ?
the reg file with Defuser references will only work as part of the workaround i provided. when you manually run your file it works because you are a user and it's running it in user context, when you run it as a package it's running in system context and therefore failing. -
no it will not change the version of SQL on your CAS or Primary servers.
-
How can I change a HKCU setting within Windows during an OSD deployment
anyweb replied to roshanbhavsar04's question in How do I ?
if you are sending a package to a computer then that is a different case altogether, is a user logged on ? yes/no are you running the package as a user or as a computer, if running in system context (computer) then only the HKLM changes will apply (as in your case) you need to run it in User Context or use the workaround i've explained already... (you can run it in user context by deploying it to a device collection, with an Available purpose, and set the program to run as the current logged on user) have you tried doing this via a task sequence only (you can create a custom task sequence to do these steps...) -
How can I change a HKCU setting within Windows during an OSD deployment
anyweb replied to roshanbhavsar04's question in How do I ?
are you using the steps in a task sequence or just sending out a package 'job' to your computers.... -
How can I change a HKCU setting within Windows during an OSD deployment
anyweb replied to roshanbhavsar04's question in How do I ?
userprefs.reg is just an example file name using the example registry file i posted above, simply replace the file name userprefs.reg with your OWN registry file, you can create your own registry file by making the changes on your desired computer, and then exporting that registry key to a REG file. Once you have the reg file edit it and replace all lines that begin with [HKEY_CURRENT_USER\ with the following [HKEY_LOCAL_MACHINE\Defuser\ below is an example of that.... I've created a Registry file in notepad called visualFXsetting.reg containing the following... Windows Registry Editor Version 5.00 [HKEY_LOCAL_MACHINE\Defuser\Software\Microsoft\Windows\CurrentVersion\Explorer\VisualEffects] "VisualFXSetting"=dword:00000002 save that file and in the following step, refer to the new registry file which is simply ONE file in a package cmd.exe /c reg.exe import "visualFXsetting.reg" like below... as this question is frequently asked and misunderstood i've changed the Topic title to be more descriptive of the actual problem.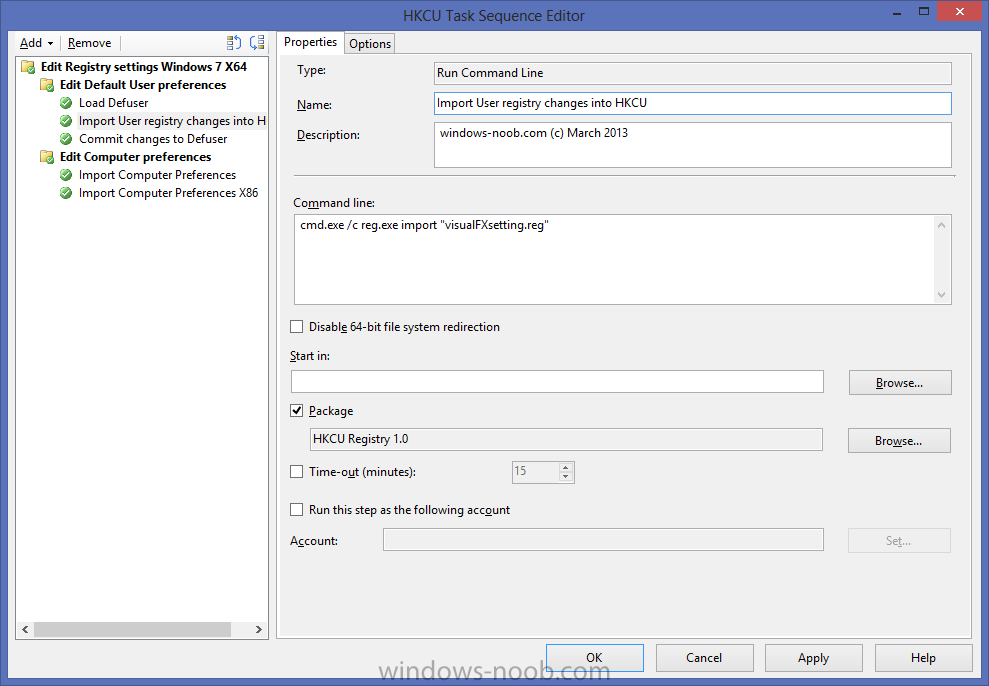
-
How can I change a HKCU setting within Windows during an OSD deployment
anyweb replied to roshanbhavsar04's question in How do I ?
you are trying to apply settings to the Current User section of the registry which won't work during a task sequence as the task sequence runs for Computers not users, you can get around this by mounting the registry hive for the Default User, making the changes using your chosen registry file which is pointing to this mount point, then commit the changes, what this will mean is that All new user profiles on that computer will get the change, here's an example of that for a Windows 7 deployment (you will need to adjust accordingly for Windows XP so that C:\Users becomes C:\Documents and Settings\) Below is an example for modifying HKCU settings for Windows 7 the first step will Load the Default User registry hive into a mountpoint called Defuser using a Run Command Line step like so cmd.exe /c reg.exe load HKEY_LOCAL_MACHINE\defuser c:\users\default\ntuser.dat in the next step we import the Registry file in another Run Command Line step this Registry file can be a file in a package. cmd.exe /c reg.exe import "Userprefs.reg" the important thing here is that the registry file refers to the mountpoint referenced in our first step, below is an example of that Windows Registry Editor Version 5.00 [HKEY_LOCAL_MACHINE\SOFTWARE\Microsoft\MediaPlayer\Preferences] "AcceptedEULA"=dword:00000001 "FirstTime"=dword:00000001 [HKEY_LOCAL_MACHINE\SOFTWARE\Policies\Microsoft\WindowsMediaPlayer] "GroupPrivacyAcceptance"=dword:00000001 ;Change start Page to windows-noob [HKEY_LOCAL_MACHINE\defuser\Software\Microsoft\Internet Explorer\Main] "Start Page"="http://www.windows-noob.com" "Default_Page_URL"="http://www.windows-noob.com" ;Add documents on desktop add My computer [HKEY_LOCAL_MACHINE\defuser\Software\Microsoft\Windows\CurrentVersion\Explorer\HideDesktopIcons\NewStartPanel] "{20D04FE0-3AEA-1069-A2D8-08002B30309D}"=dword:00000000 "{59031a47-3f72-44a7-89c5-5595fe6b30ee}"=dword:00000000 "{871C5380-42A0-1069-A2EA-08002B30309D}"=dword:00000000 ;Adds recent docs on startmenu [HKEY_LOCAL_MACHINE\defuser\Software\Microsoft\Windows\CurrentVersion\Explorer\Advanced] "Start_ShowRecentDocs"=dword:00000001 ;Intellimenus [HKEY_LOCAL_MACHINE\defuser\Software\Microsoft\Windows\CurrentVersion\Policies\Explorer] "Intellimenus"=dword:00000001 ; Remove Accept Eula for Adobe reader [HKEY_LOCAL_MACHINE\defuser\SOFTWARE\Adobe\Acrobat Reader\9.0\AdobeViewer] "EULA"=dword:00000001 "Launched"=dword:00000001 ; Remove Accept Eula for Adobe svg reader [HKEY_LOCAL_MACHINE\defuser\SOFTWARE\Adobe\Adobe SVG Viewer\3.03\EULA] "3.03x94"="accepted" ;set blank screensaver with a ten minute timeout [HKEY_LOCAL_MACHINE\defuser\Control Panel\Desktop] "ScreenSaveActive"="1" "SCRNSAVE.EXE"="C:\\Windows\\system32\\scrnsave.scr" "ScreenSaveTimeOut"="600" "ScreenSaverIsSecure"="1" ;Show extension for files [HKEY_LOCAL_MACHINE\defuser\Software\Microsoft\Windows\CurrentVersion\Explorer\Advanced] "HideFileExt"=dword:00000000 "SuperHidden"=dword:00000001 [HKEY_LOCAL_MACHINE\defuser\Software\Microsoft\Communicator] "AutoRunWhenLogonToWindows"=dword:00000000 "FirstTimeUser"=dword:00000000 "TourPlayed"=dword:00000001 and finally we commit the changes in another Run Command Line step cmd.exe /c reg.exe unload HKEY_LOCAL_MACHINE\defuser and that's all there is to it, using this methodology you can set any HKCU keys you want to be applied during an OSD task sequence cheers niall -
as long as the PXE providers are not on the same vlan you won't have an issue, if they are on the same vlan then you'll need to use timing or some other method to control which one answers first.
-
ok are you sure you are doing as follows: letting the device power off fully via shutdown in windows booting from a FAT 32 USB key ? can't boot from NTFS usb keys....
-
IntroductionI’ve seen reports about problems with PXE boot specifically related to the boot images not getting properly upgraded during the upgrade to Service Pack 1, and I came across this problem yesterday, the suggested fix’s published by others online however did not resolve the problem I had therefore I decided to post this in case others run into the issue. Symptoms of the problem When PXE booting a computer after the upgrade to System Center 2012 Configuration Manager SP1 you receive an error like PXE-E53: No boot filename received, this means that PXE boot fails and you cannot image computer via network boot. The boot images on your Configuration Manager server (in my case, the Primary site server in a hierarchy) look good, and the boot images are reported as being the correct version for SP1 (6.2.9200.16384). Redistributing the content makes no difference to this issue. Checking the SMSPXE.log file on your PXE enabled distribution point shows errors repeating over and over which reference the inability to copy files (in my case it was font files). See screenshot below: As a result, the boot images are never finalized and therefore PXE boot fails. The files referenced are fonts that should be present in the Windows Deployment Services Fonts folder, and if you check the location(s) listed you will probably see that the font files (and folders in some cases) do not exist. Failed to copy D:\RemoteInstall\SMSTempBootFiles\CAS00004\WINDOWS\Boot\Fonts\segmono_boot.ttf to D:\RemoteInstall\Boot\Fonts\segmono_boot.ttf There are some suggested workarounds for the above problem (listed at the bottom of this post in the related reading section) but none I tried worked and as a result I still could not PXE boot. I did not want to simply manually copy the required font files in the Fonts folder, I wanted the Configuration Manager server to place them there (that would mean that the correct ACL were applied). I needed a method that guaranteed to work every time and that would restore PXE boot ability, the method involved deleting the built-in images and replacing them with new ones. This process places the missing files back in the RemoteInstall folder (WDS) and allows the boot images to finalize. Step 1. Remove the built in boot images from distribution pointsAs our current boot images don’t work we’ll remove them from our distribution points. Right click a boot image and choose properties select the Content Locations tab, and highlight the distribution point you want to remove the boot image from, select Remove and continue with the wizard, click ok when prompted. You may see delete failure messages in distrmgr.log, ignore them. Repeat the above process for each boot image you want to remove. Step 2. Delete the boot images from the ConfigMgr console In a hierarchy, do the following process on your CAS. In a Standalone Primary, do the process on that Primary servers console. In the Operating Systems workspace, select boot images, then select a boot image to delete, right click and choose Delete a Delete Boot Image wizard will appear, if the boot image is used in one or more task sequences you’ll see those details listed by clicking on the Show Detail button Take note of the name(s) of any task sequences listed and the boot image architecture (x86 or x64) as you’ll need to add the respective boot images back to those task sequences later in this process otherwise they will not work. Repeat the above process for all boot images. Step 3. Adding boot images to Configuration Manager Now that your boot images are gone, we need to replace them with working boot images, so in the ConfigMgr console click on Add Boot Image. Browse to the UNC (network) location of the X64 WinPE.wim file located in your Assessment and Deployment Kit installation folder on the server in question, in my example I’m adding boot images from the CAS server, if you have a standalone server add the boot images from the ADK installation on that primary server, the UNC path will probably be something like the following:- \\CAS\C$\Program Files (x86)\Windows Kits\8.0\Assessment and Deployment Kit\Windows Preinstallation Environment\amd64\en-us\winpe.wim the drop down menu will list your winpe wim image as in the screenshot below Give the boot image a name that is descriptive of the boot image architecture eg: Boot image (x64) and the version should be 6.2.9200.16384 for this version of WinPE. complete the wizard And repeat the above for the X86 boot image, obviously pointing to the UNC path of the X86 winpe.wim file. Step 4. Edit the boot image properties Now that we’ve added both architecture boot images we need to make sure they can be used for PXE boot. So right click on your boot image, choose properties click on the Customization tab, place a check mark in the Enable command support (testing only) option, this allows us to press F8 during deployments to bring up a command prompt to troubleshoot using cmtrace and the SMSTS.log file. Next click on the Data Source tab and ensure that the Deploy this boot image from the PXE enabled distribution point is selected otherwise we cannot use this boot image in PXE deployed Task sequences Make any other changes you want (such as optional components, prestart files, drivers) and then click Apply and answer NO when prompted to distribute the boot image, we will distribute the boot images in our next step. Note: don’t forget to repeat the above process for your X86 boot image. Step 5. Distribute our Boot images Now that our boot images are added and customized, we need to distribute them to our distribution points, select both boot images, right click and choose distribute content review the review content screen, click next select your distribution points(s) by clicking on the Add drop down menu and continue through the wizard until completion. Step 6. Adjust your task sequences to use the new boot images Now everything is in place for using the new boot images, so right click on your task sequences individually, choose properties, advanced and point the boot image to the appropriate boot image by placing a checkmark in Use a boot image and browsing to the correct architecture of your new boot image Step 7. Boot a client computer Now that the changes are complete, boot a client computer and enjoy the working PXE boot process once more, notice also that the Fonts folder(s) are now correctly populated in your RemoteInstall directory structure on your server (P01) that hosts the PXE enabled distribution point. Summary Hopefully the above process will highlight how you can replace the default boot images in Configuration Manager 2012 after upgrading to Service Pack 1. Related reading The following links provide additional information about issues with boot images after upgrading to Service Pack 1 or suggestions to resolve the problems once identified. http://www.windows-noob.com/forums/index.php?/topic/7437-using-system-center-2012-configuration-manager-part-11-upgrading-the-hierarchy-to-service-pack-1 http://social.technet.microsoft.com/Forums/en-US/configmanagerosd/thread/c7b2cdfb-ce0c-4726-bba4-0c0d1a7dba6e/ http://blog.coretech.dk/rja/post-sccm-2012-sp1-failure-to-update-boot-images/ http://blogs.technet.com/b/systemcenterpfe/archive/2013/01/11/updated-system-center-2012-configuration-manager-antivirus-exclusions-with-more-details.aspx http://scug.be/sccm/2008/06/10/pxe-in-sccm-issues-amp-bugs/ http://social.technet.microsoft.com/Forums/en-US/configmanagerdeployment/thread/a1dfee53-9c0f-41a6-9c0f-1ad5b49ead30/ http://jackychuasce.blogspot.se/2012/07/how-to-troubleshooting-pxe-service.html http://social.technet.microsoft.com/Forums/en-US/configmanagerosd/thread/c7b2cdfb-ce0c-4726-bba4-0c0d1a7dba6e/ Until next time, adios cheers niall
-
did you capture the image before SP1 was applied to Configuration Manager 2012 ?
-
if you are deploying Windows XP only then don't use the WADK, if you are deploying Windows 7 then all is ok, if you are migrating to Windows 7 then you should be ok as long as your hardware is supported via WinPE 4 (which is part of WADK) cheers niall

