anyweb
-
Posts
9277 -
Joined
-
Last visited
-
Days Won
371
Everything posted by anyweb
-

Help: How to add DotNet Framework 3.5 to Windows 8 during OSD Task sequence
anyweb replied to gvlaarho's question in How do I ?
ok thanks for the update and i'm glad it's working -
Help: How to add DotNet Framework 3.5 to Windows 8 during OSD Task sequence
anyweb replied to gvlaarho's question in How do I ?
what version of Windows 8 are you using ? and are you using the SXS folder from the same media that was used to install Windows 8 -
ok i've changed the link fyi
-
i'll change the link in the article to point there, i just wanted it easy for others to find but i have no problem sending traffic the right way as regards the partitions, i absolutely let the task sequence do the partitioning and yes it removes the recovery partition, which is a good thing as it frees up 10gb
-
thanks for posting the solution to your problem and i'm glad it's working for you now, what driver did you end up using ? broadcoms ? or Dells, please include the link (for others with the same issue)
-
Help: How to add DotNet Framework 3.5 to Windows 8 during OSD Task sequence
anyweb replied to gvlaarho's question in How do I ?
ok here's how I do it xcopy the files locally then install the .net feature
-
Help: How to add DotNet Framework 3.5 to Windows 8 during OSD Task sequence
anyweb replied to gvlaarho's question in How do I ?
i copy the files to a local temp folder and then install from there, i'll post the steps when i get home and get access to my lab -
ok did you experiment with secure boot and the other boot options in the firmware screen (bios), to access it, shutdown then press Volume Up while holding the power button
-
SCCM with Active Directory
anyweb replied to Ray-Tube's question in Troubleshooting, Tools, Hints and Tips
can you elaborate on what do your component logs on the configuration manager server tell you ? -
the built in step should work fine, have you tried doing the pause BEFORE the enable bitlocker step, and directly after ? that way you can see (in the smsts.log) exactly what the cause of your issue is
-
try booting that usb key on another computer, does it boot ?
-
you should pause the task sequence before that step and bring up the command prompt, then open smsts.log in cmtrace you can download the pause script in this HTA download, the included task sequence also contains the step to pause if you want to see how its done...
-
yup it should work just fine,
-
well the logs should reveal why it's failing to enable bitlocker so what does the smsts.log file say ? also, please re-review the guide here as it explains what you need setup in AD prior to starting the deployment.
-
System Center 2012 Configuration Manager SP1 is released
anyweb replied to anyweb's topic in Configuration Manager 2012
are you doing a clean install or upgrade ? please post a screenshot of what you are seeing -
did you shutdown prior to attempting to boot from USB ? what happened when you did try to boot from USB ?
-
Password Protect a Task Sequence?
anyweb replied to thadkew's question in Frontends, HTA's and Web Services
of course, simply copy the files you need into a folder and create a new package containing those files only, however MDT Toolkit and settings are still needed for MDT integrated task sequences. -
SCCM Zero touch, pick task sequence to run
anyweb replied to gscherrer's topic in Configuration Manager 2012
you can do what you want by using computer association in Configuration Manager to import the mac address and name of a computer to a collection, that collection will have a task sequence deployed to it with a required (mandatory) purpose once done, you pxe boot the computer and it will automagically run the required task sequence in Zero Touch with no choice involved. -
ah, nope, but you need to read this post to fix that
-
my step looks like so, and it works just fine, your logs should reveal what your issue really is, have you tried a bios upgrade on the dell ?

-
i don't see any prompts for user customization you can configure GPO's to hide most of that like so http://www.niallbrady.com/2012/09/24/how-can-i-disable-the-while-we-are-getting-things-ready-animation-for-all-users-in-windows-8/
-
can you post a screenshot of where you had the issue please and i'll check it against mine
-
the clients won't get upgraded until you upgrade the client software (ccm client and scep client) see http://technet.microsoft.com/en-us/library/gg712298.aspx
-
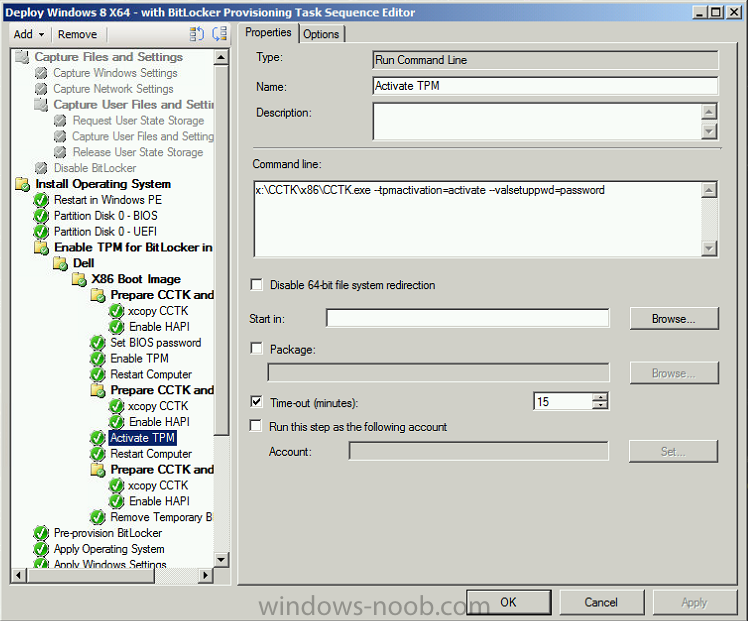
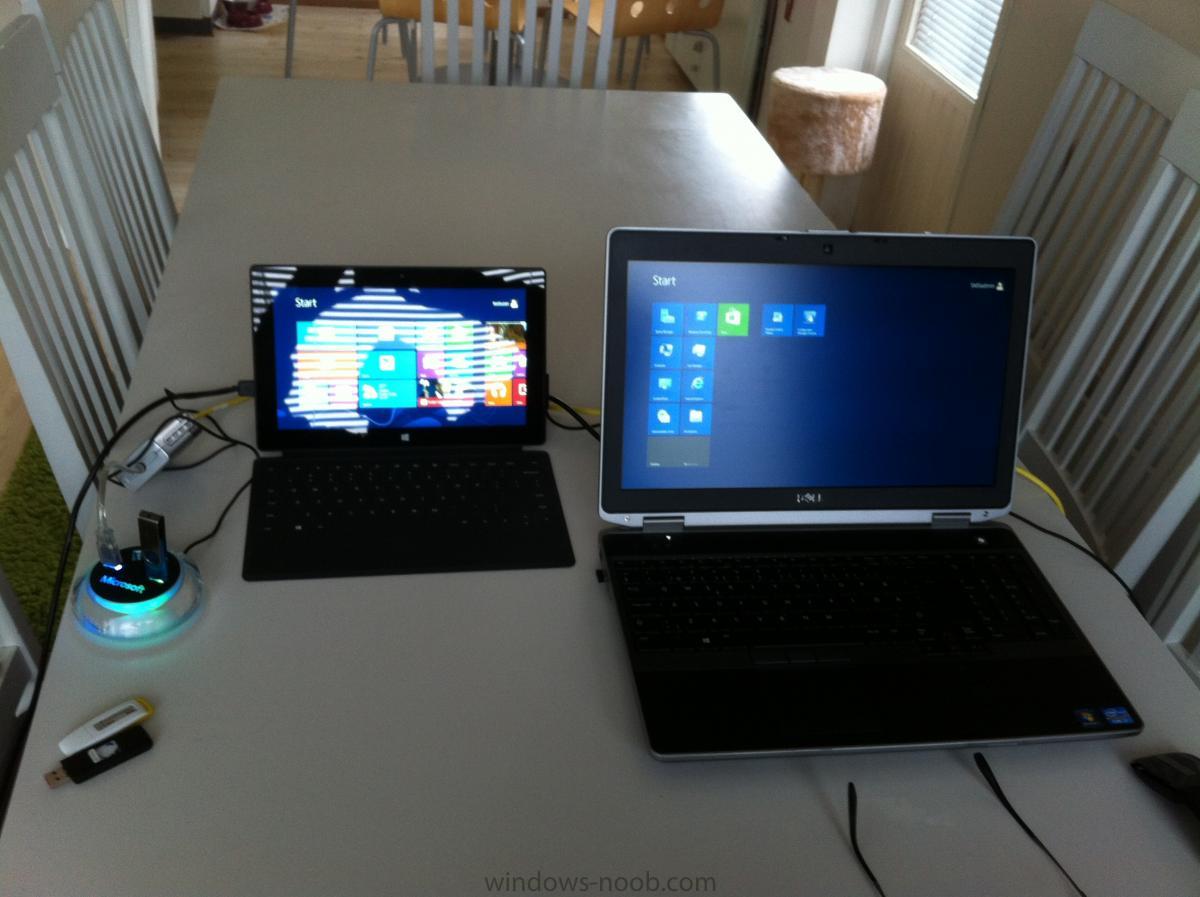
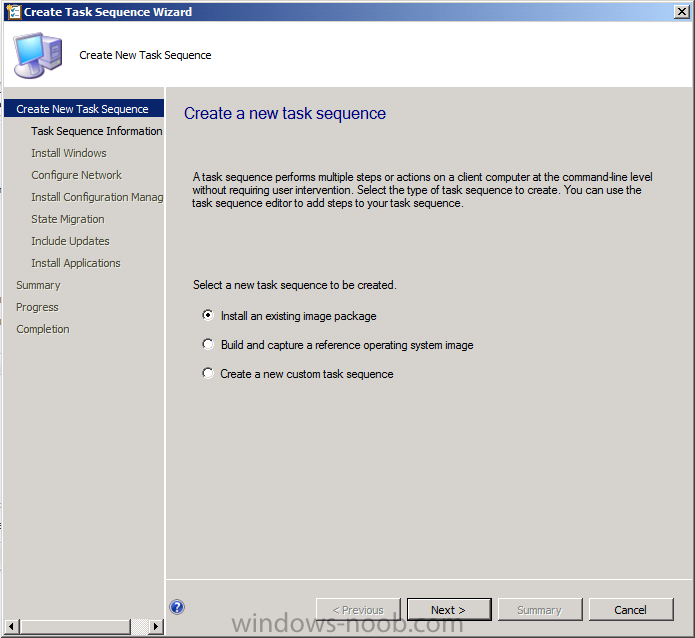
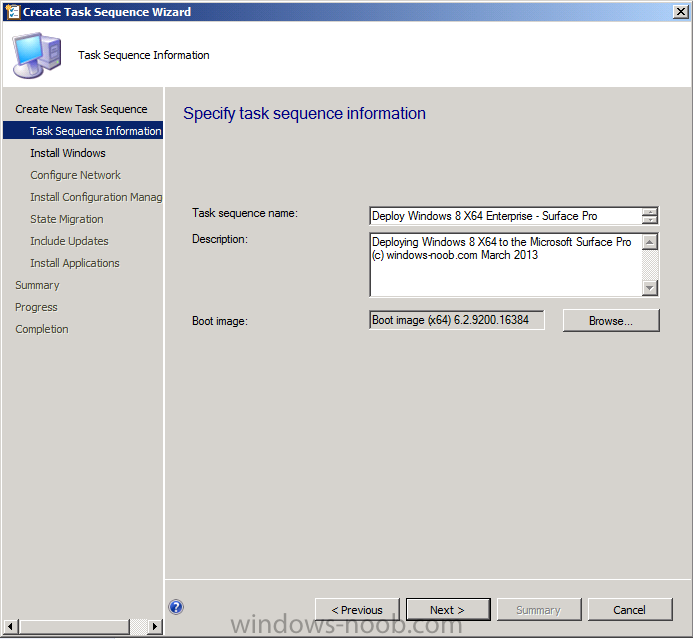
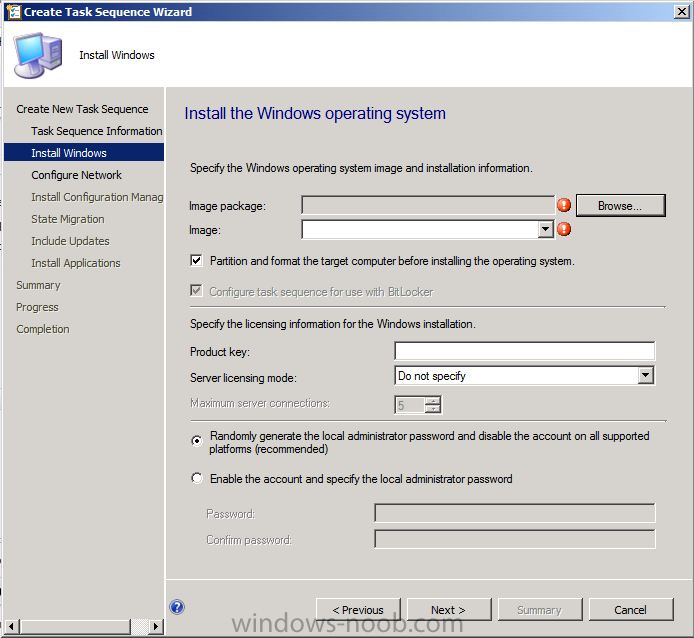
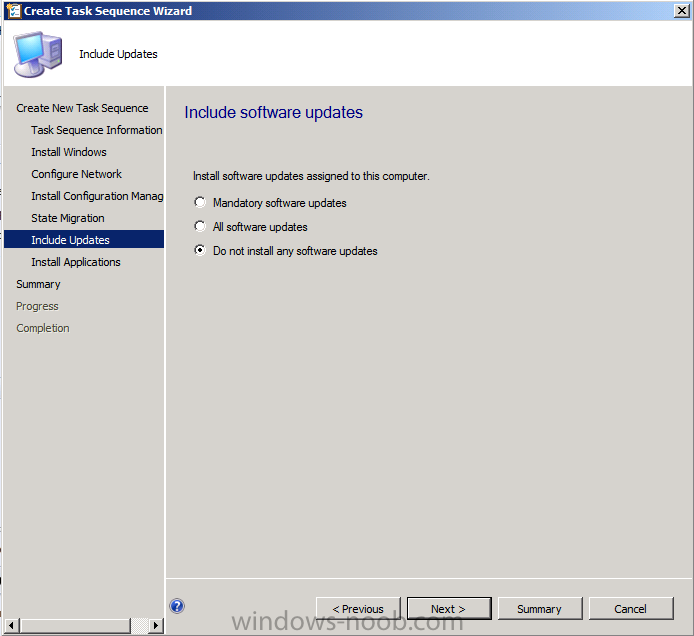
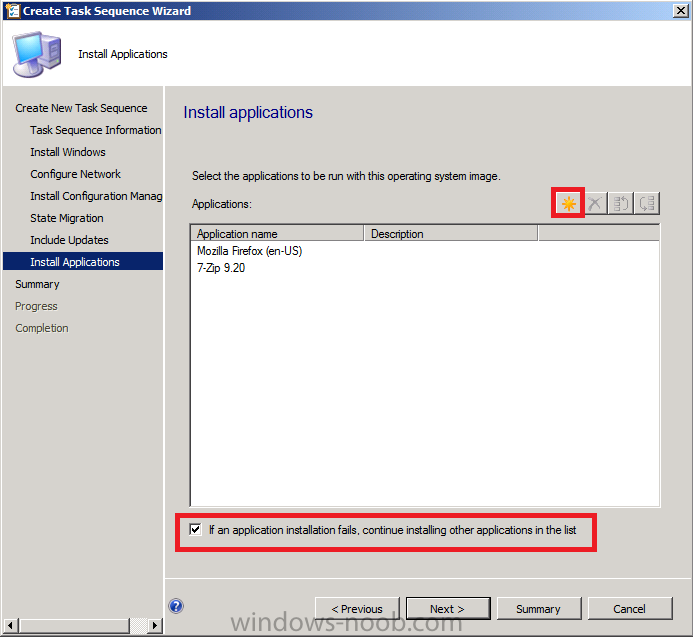
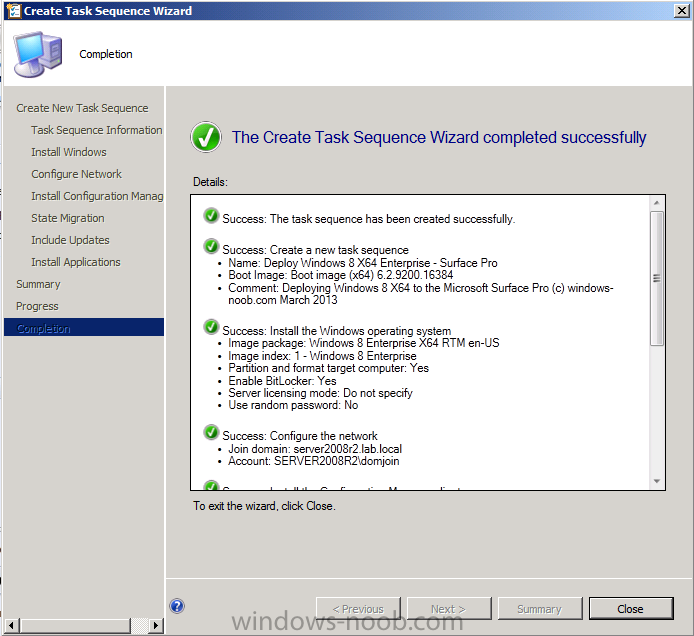
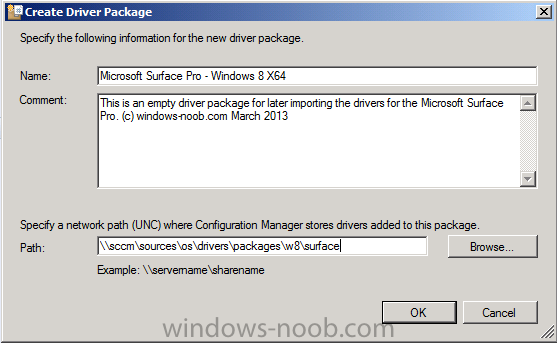
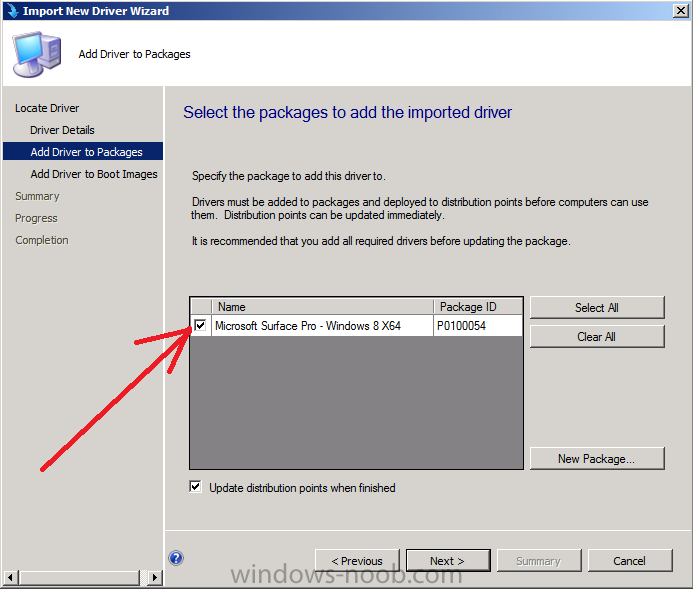
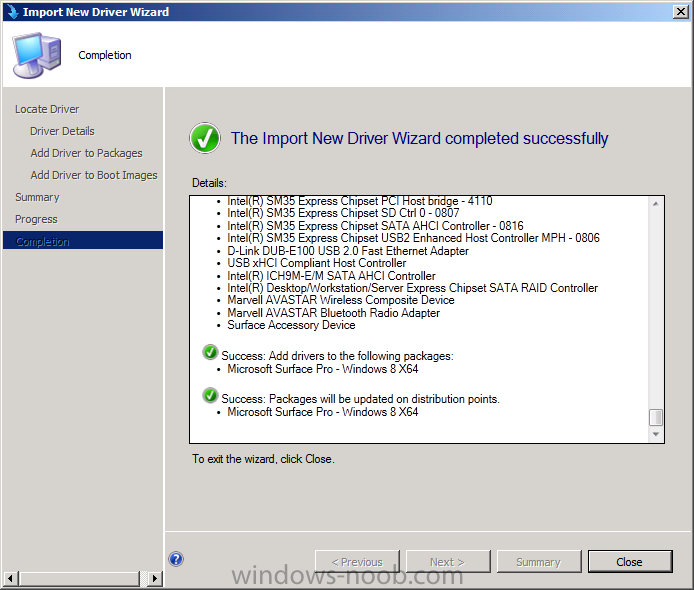
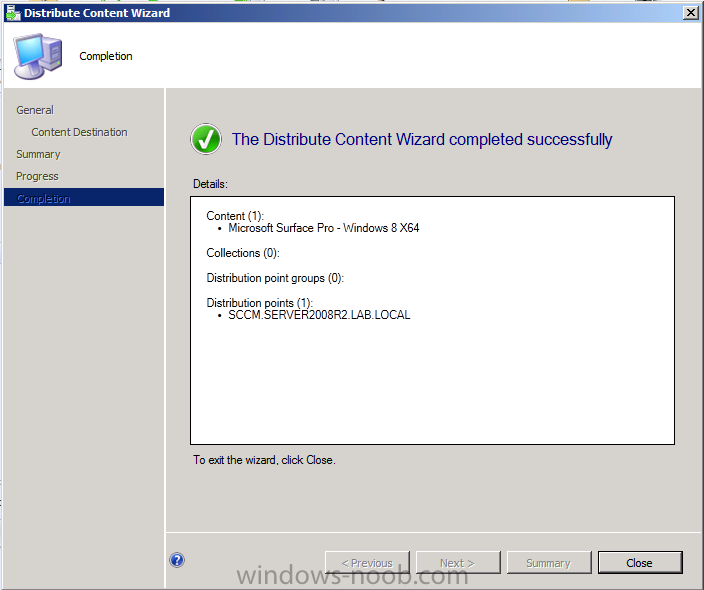
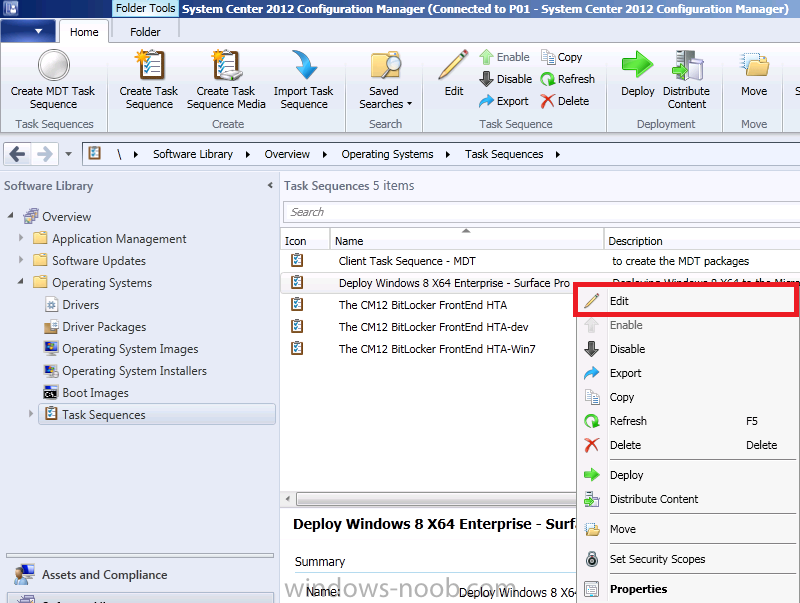
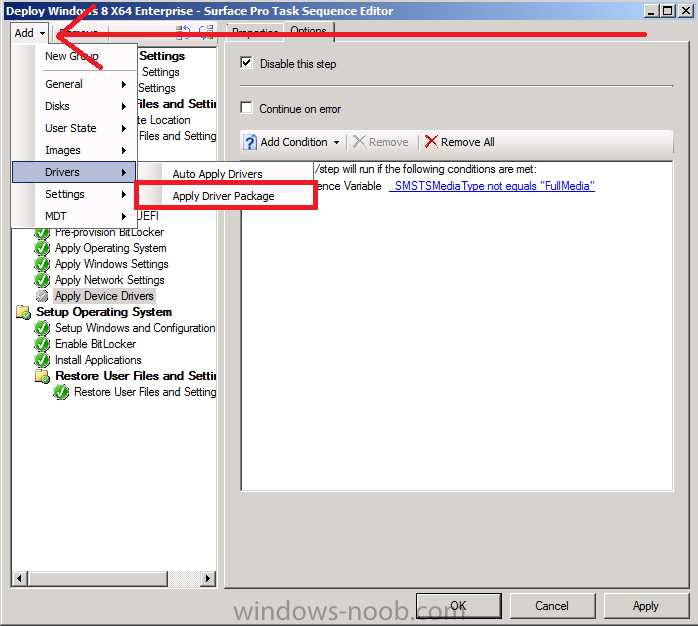
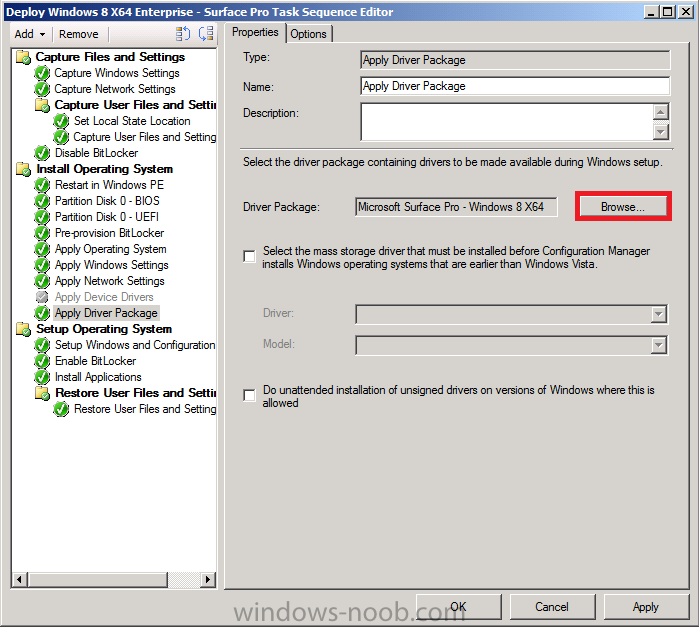
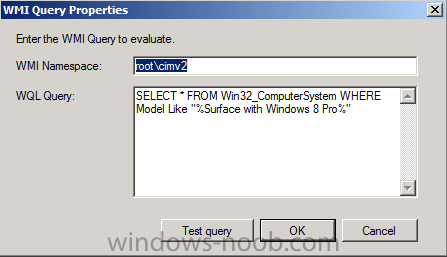
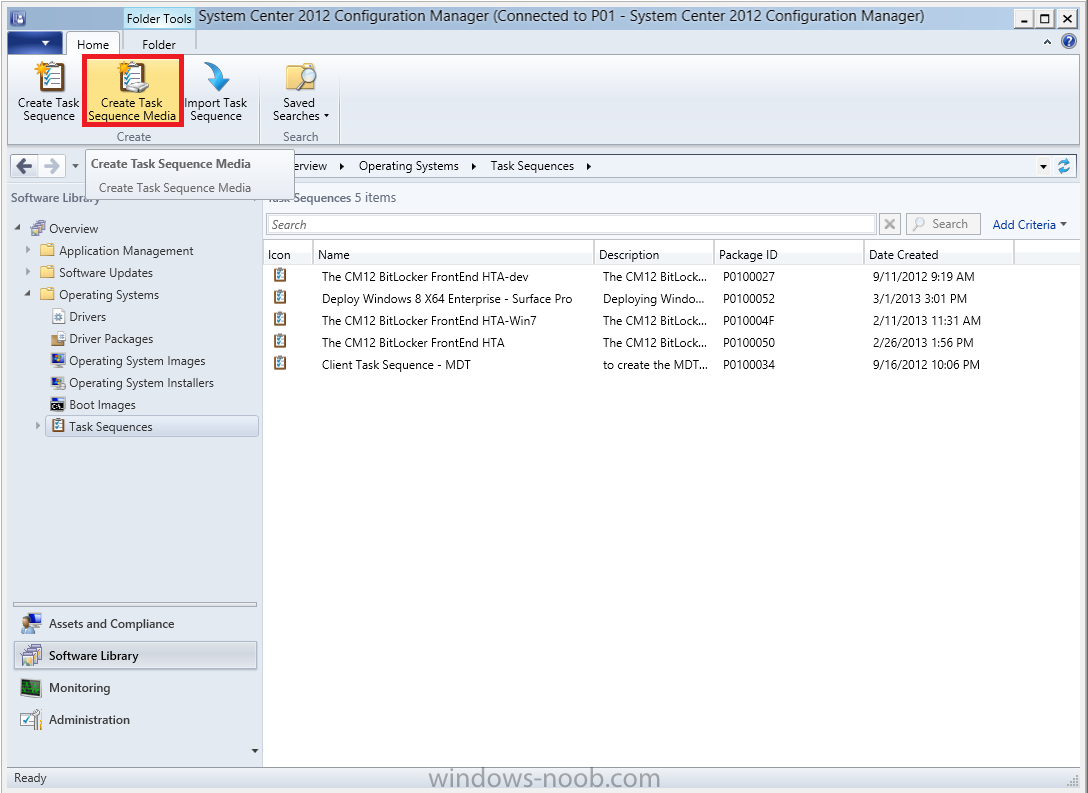
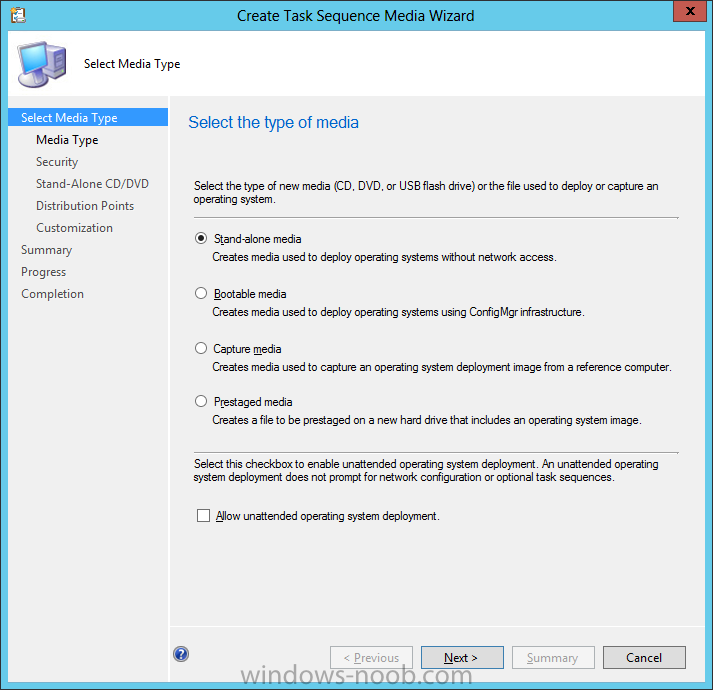
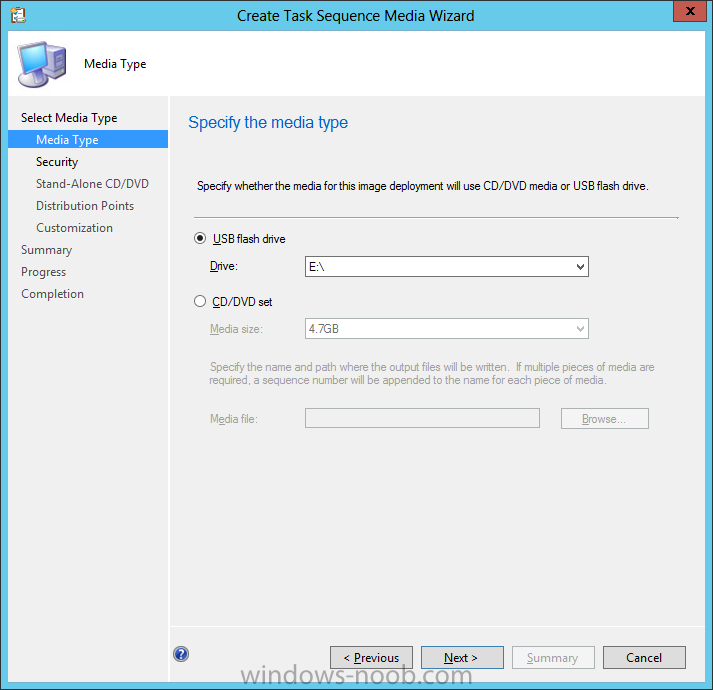
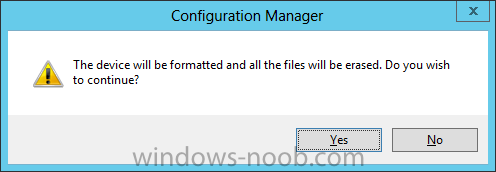
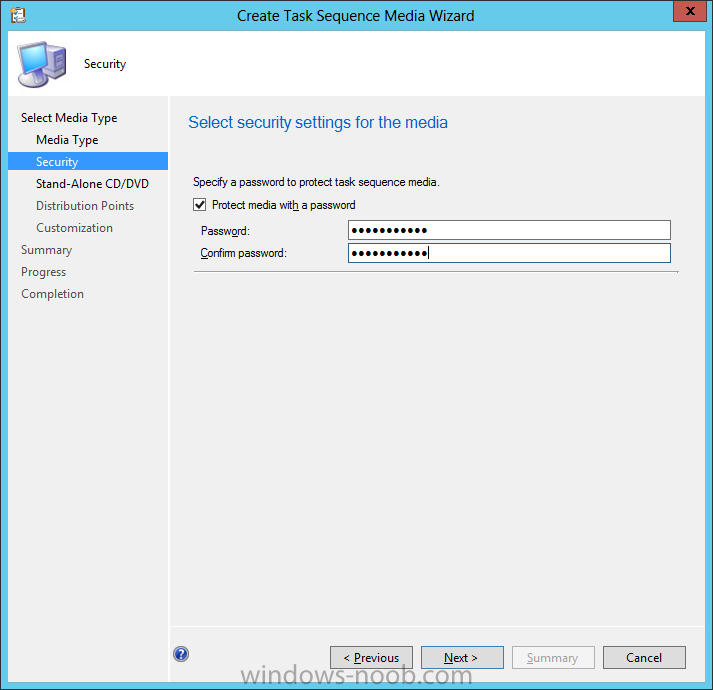
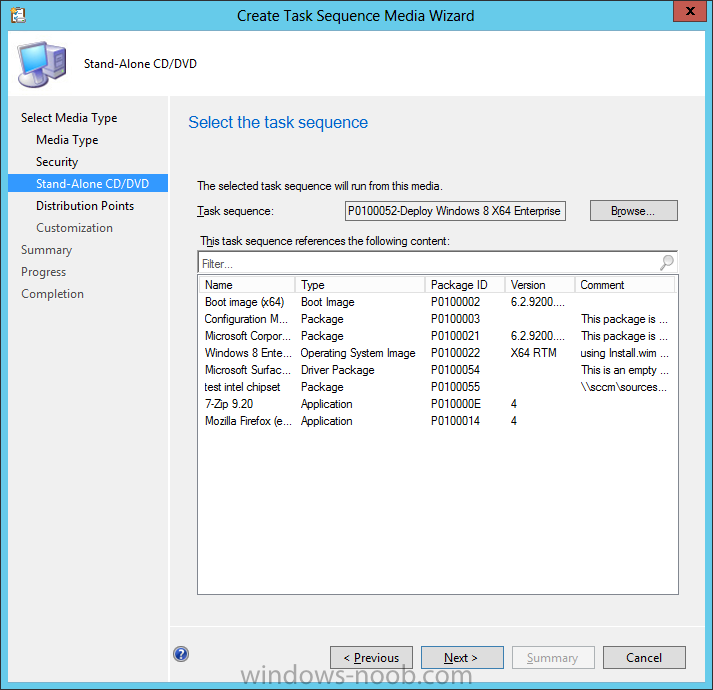
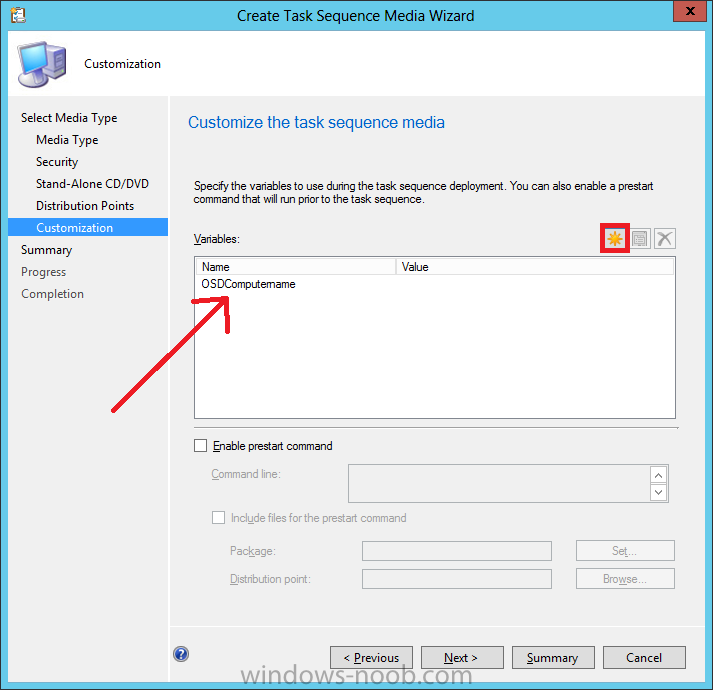
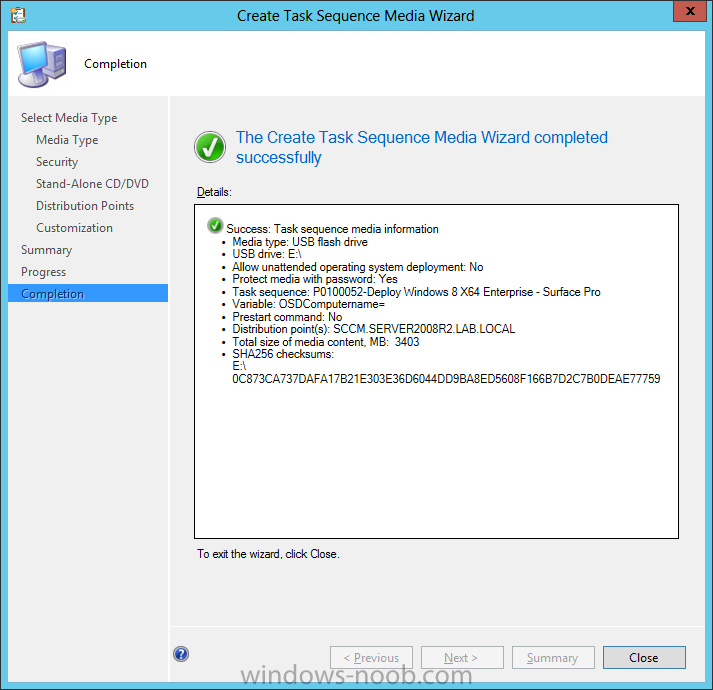
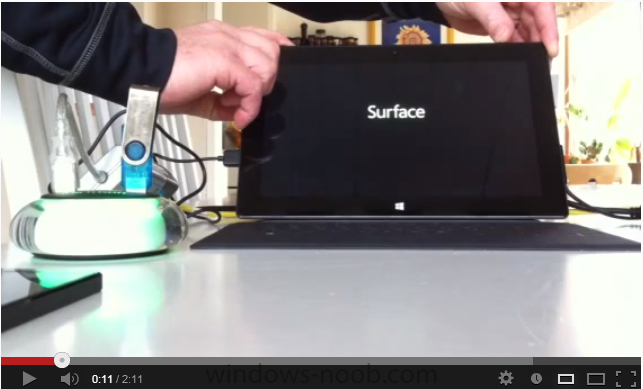
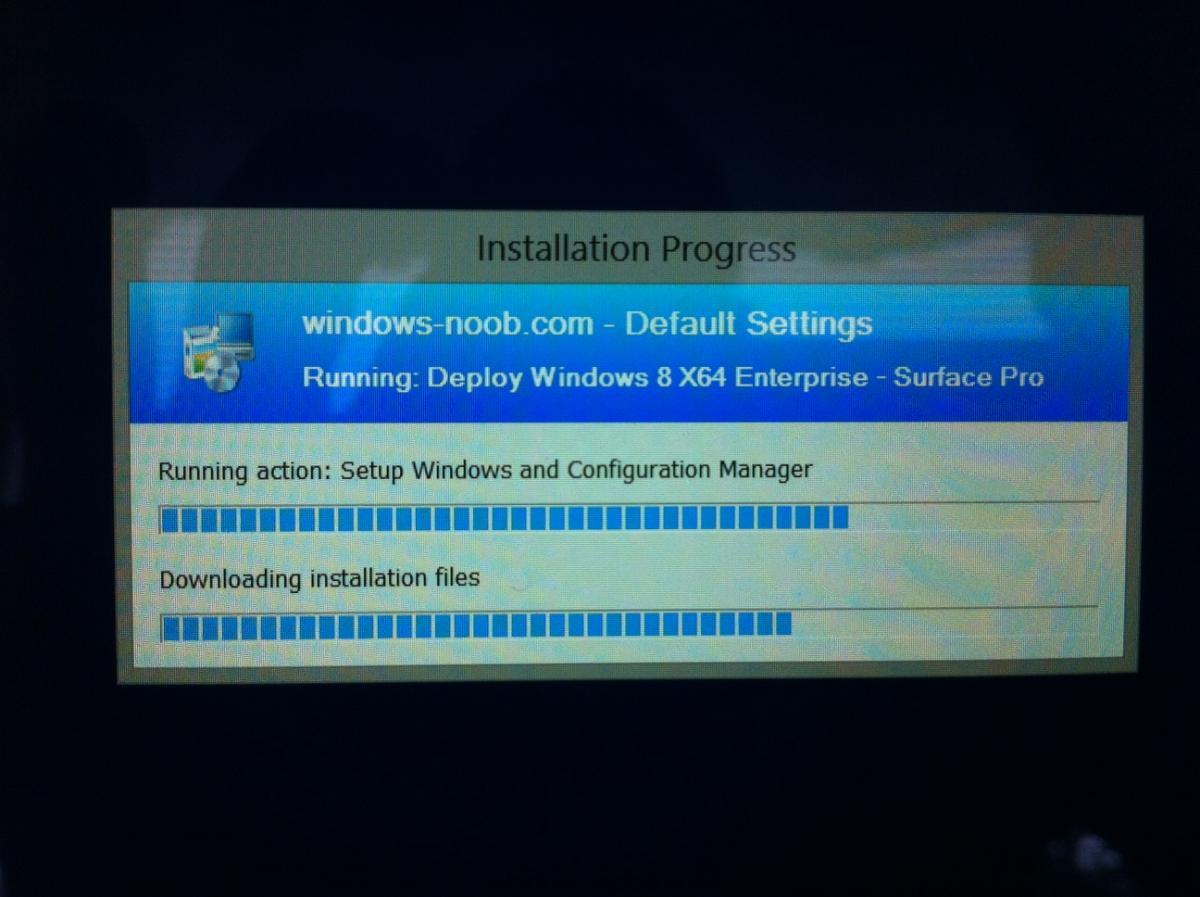
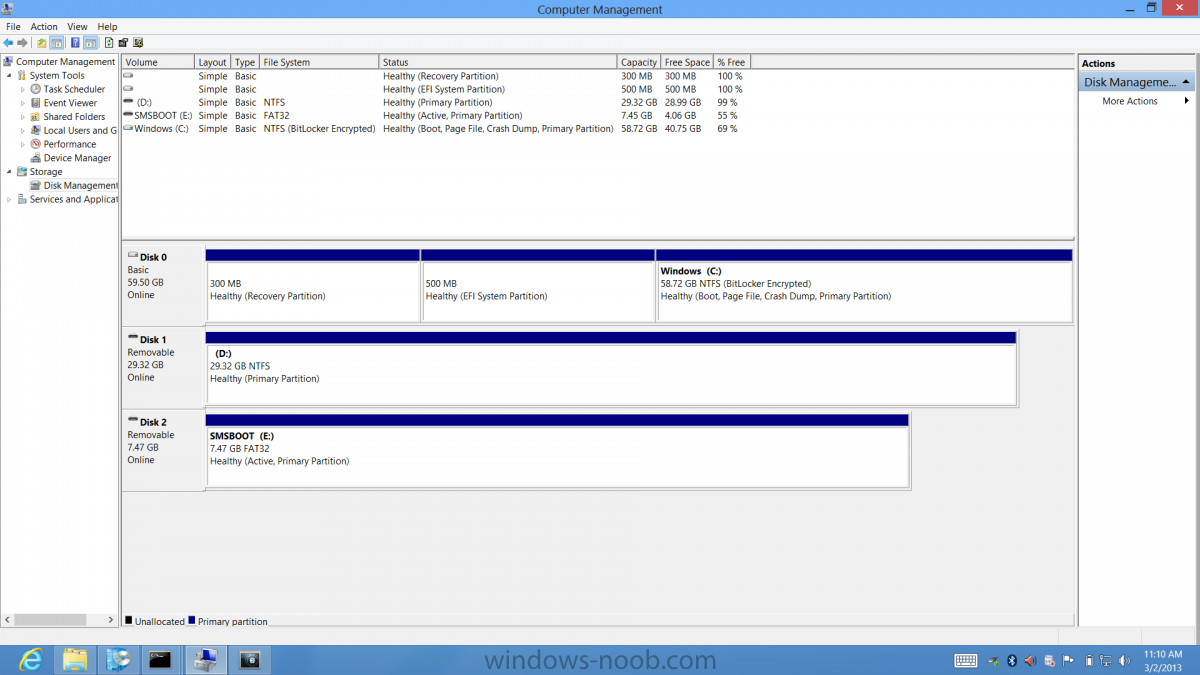
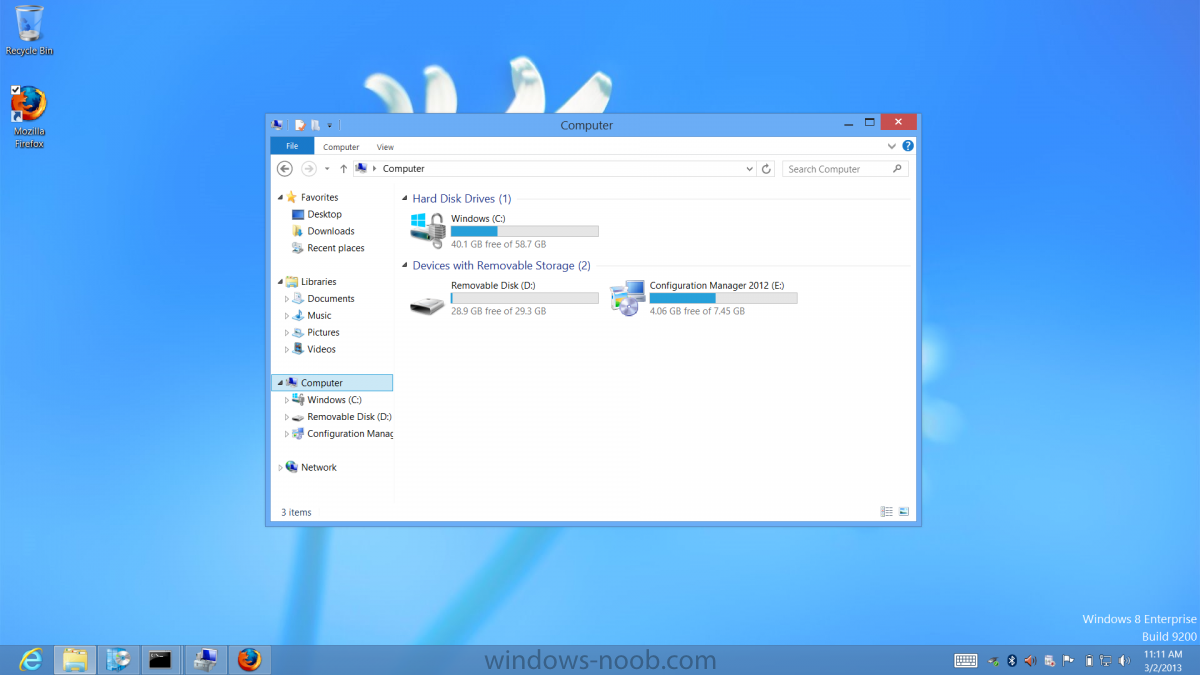
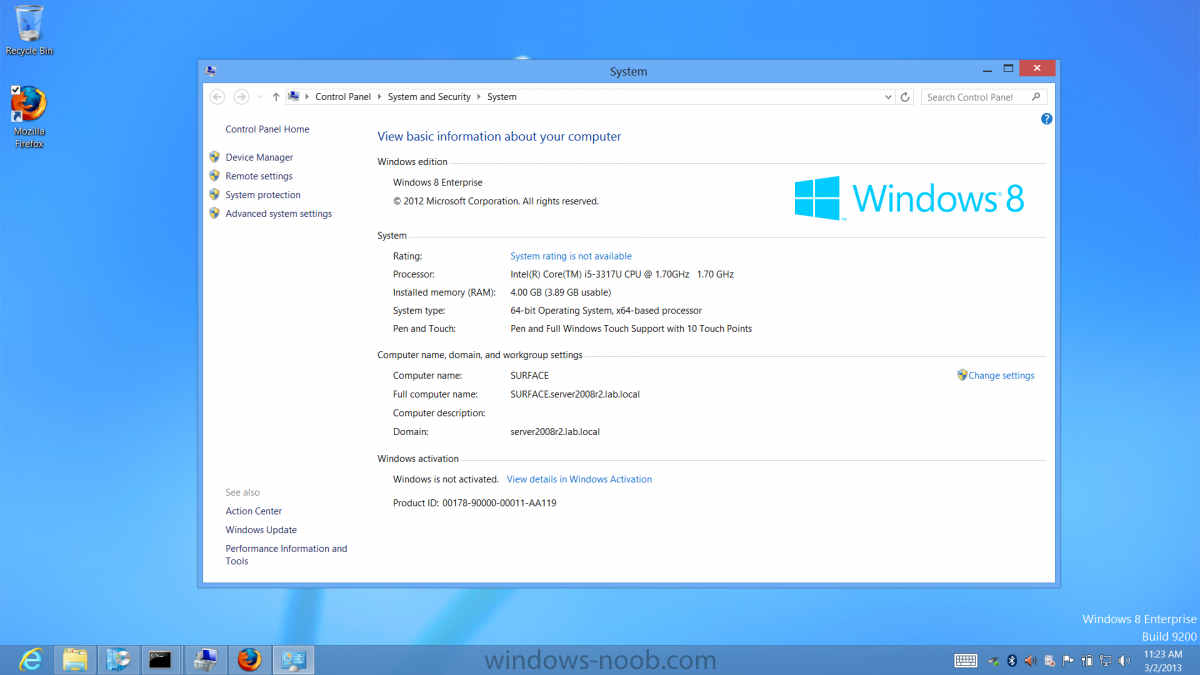
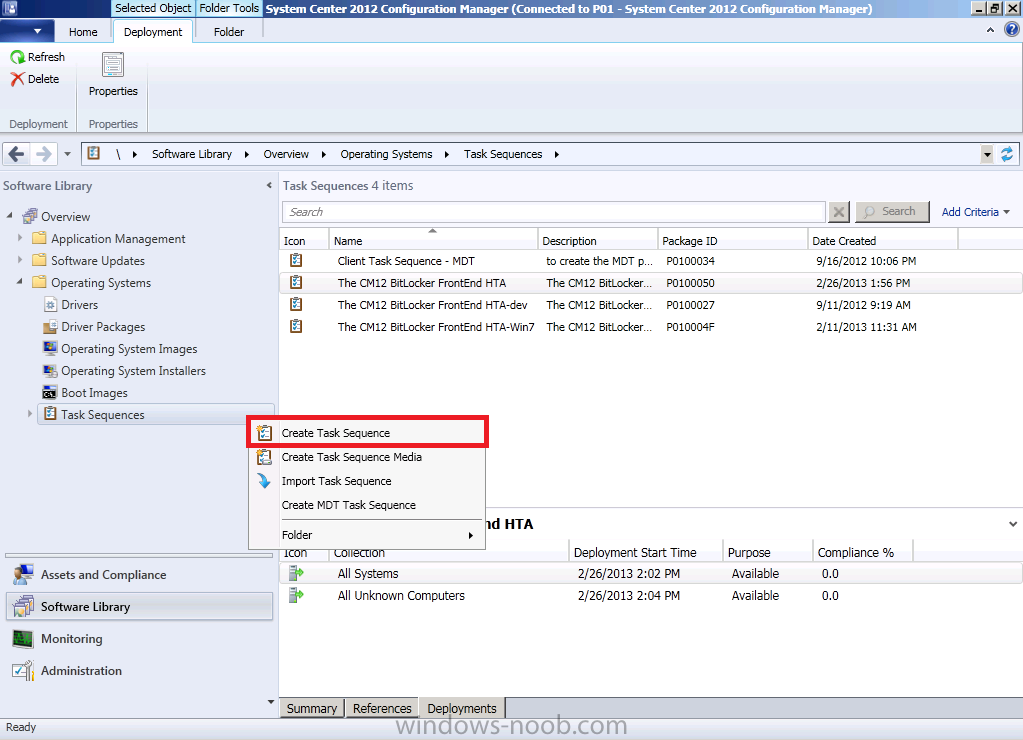
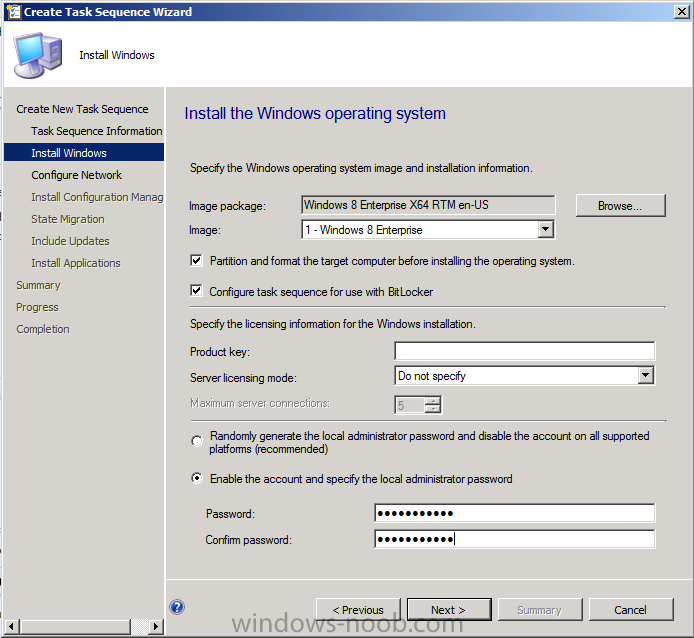
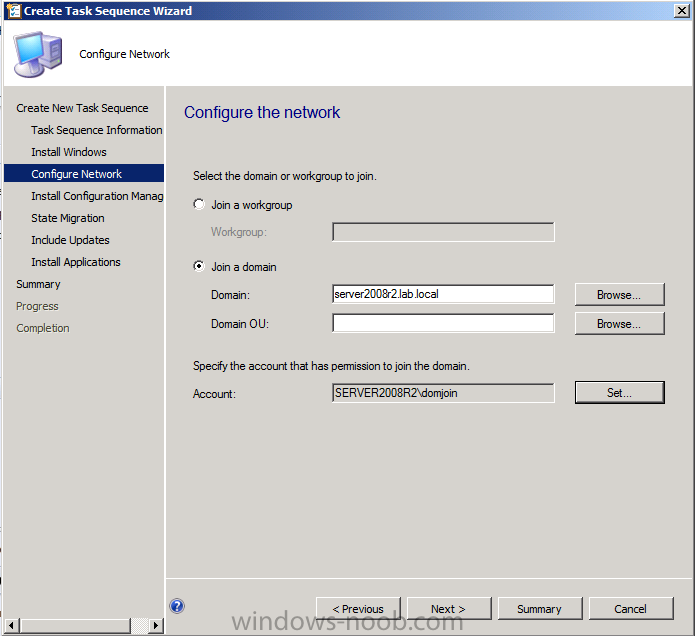
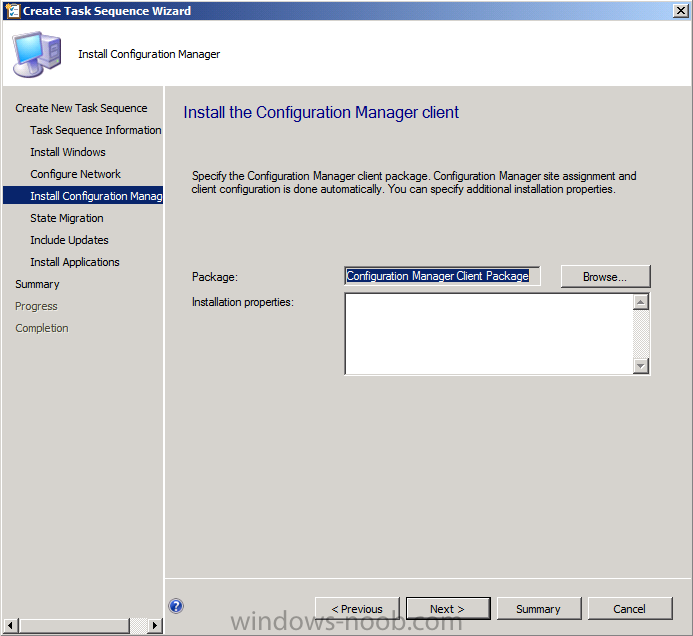
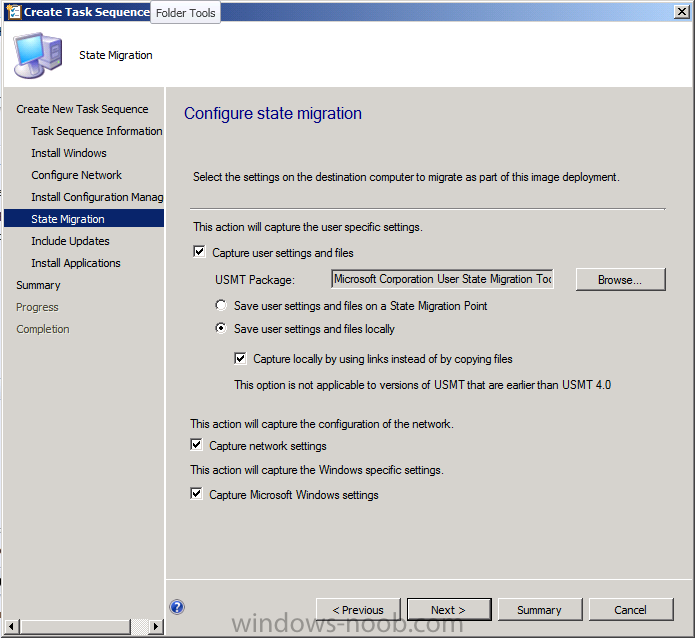
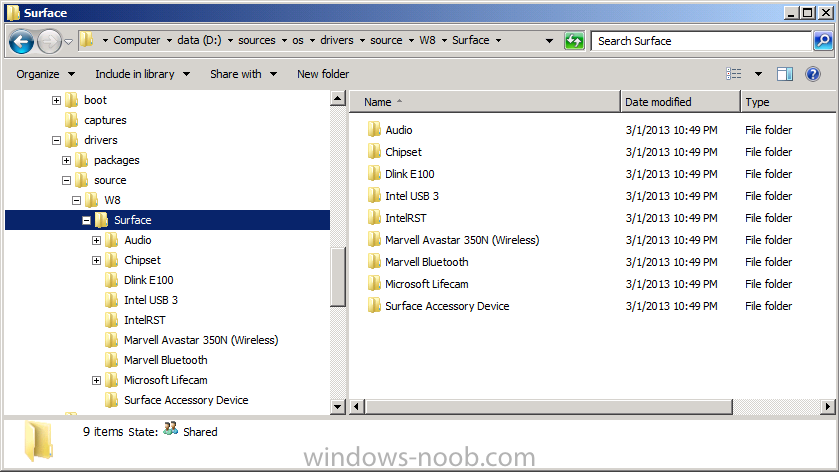
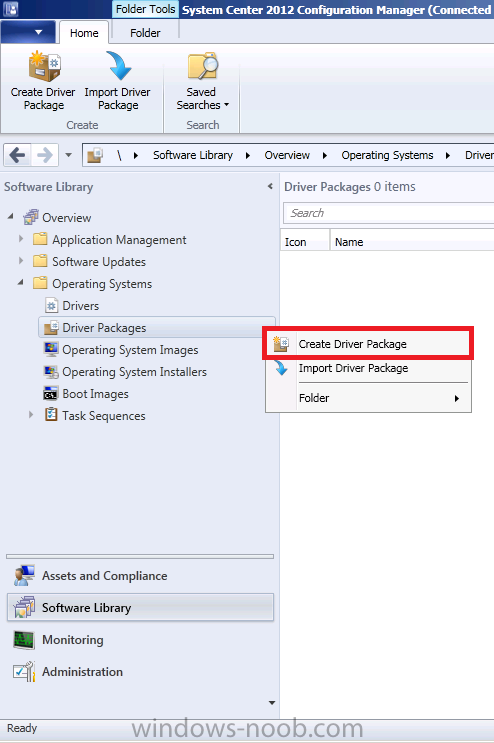
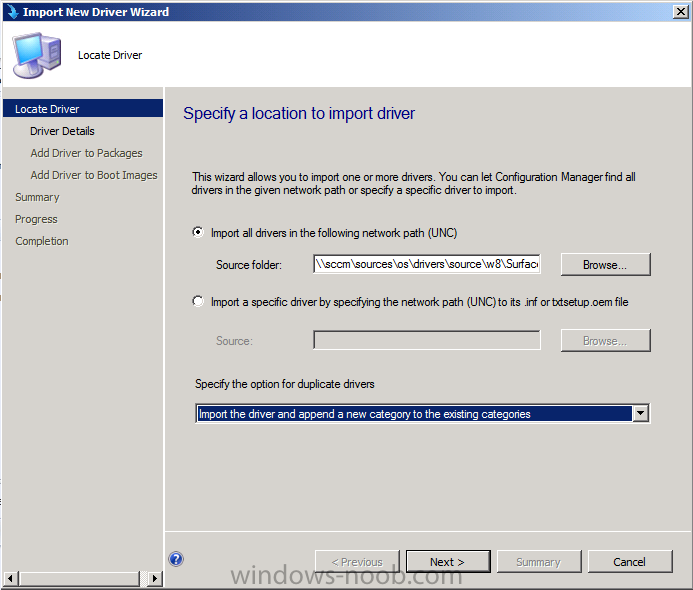
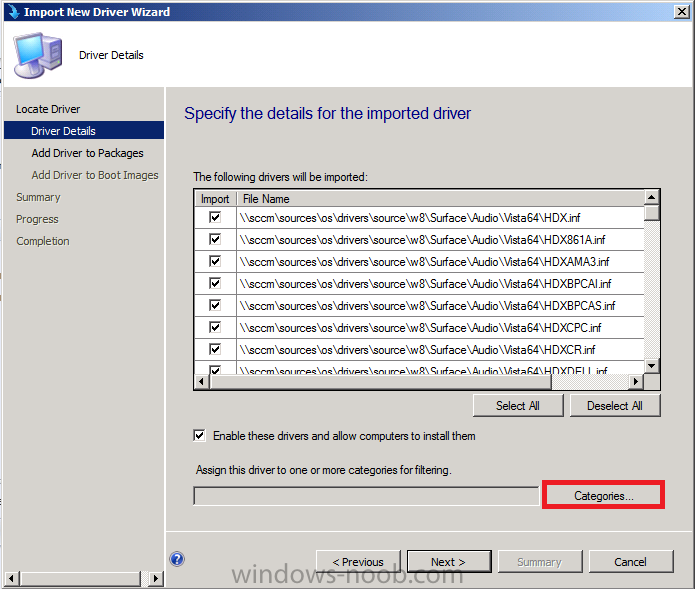
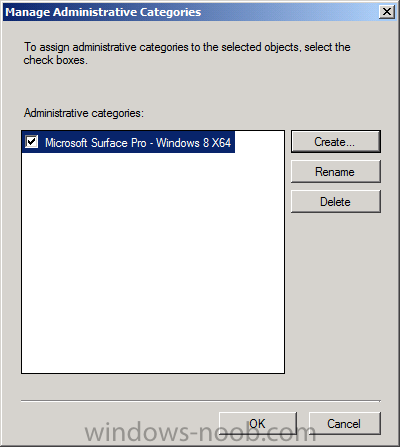
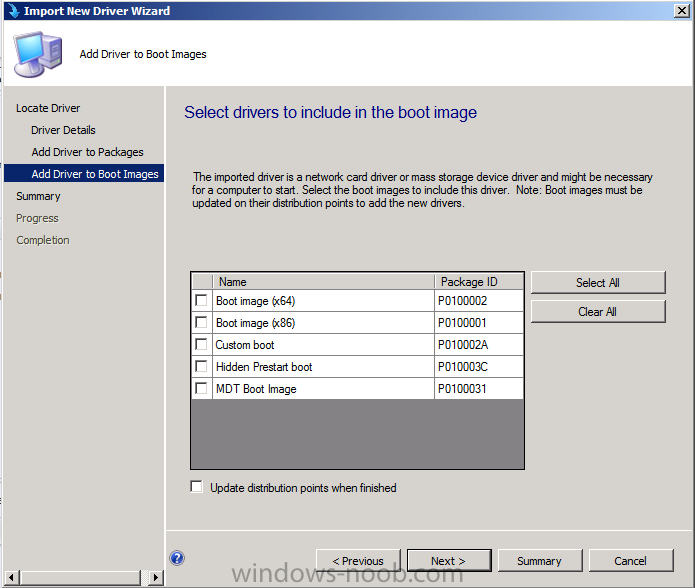
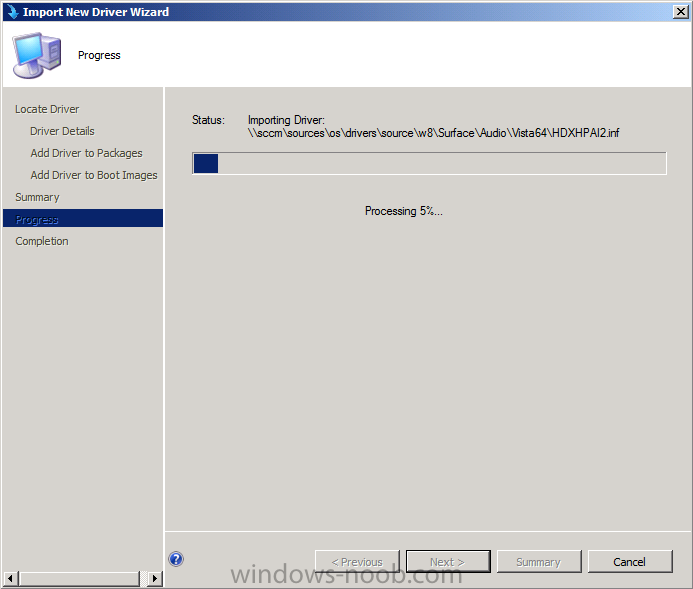
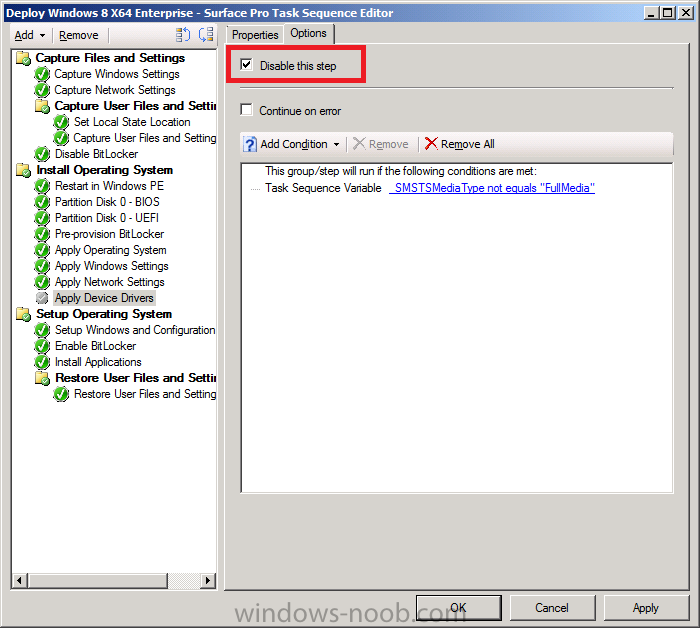
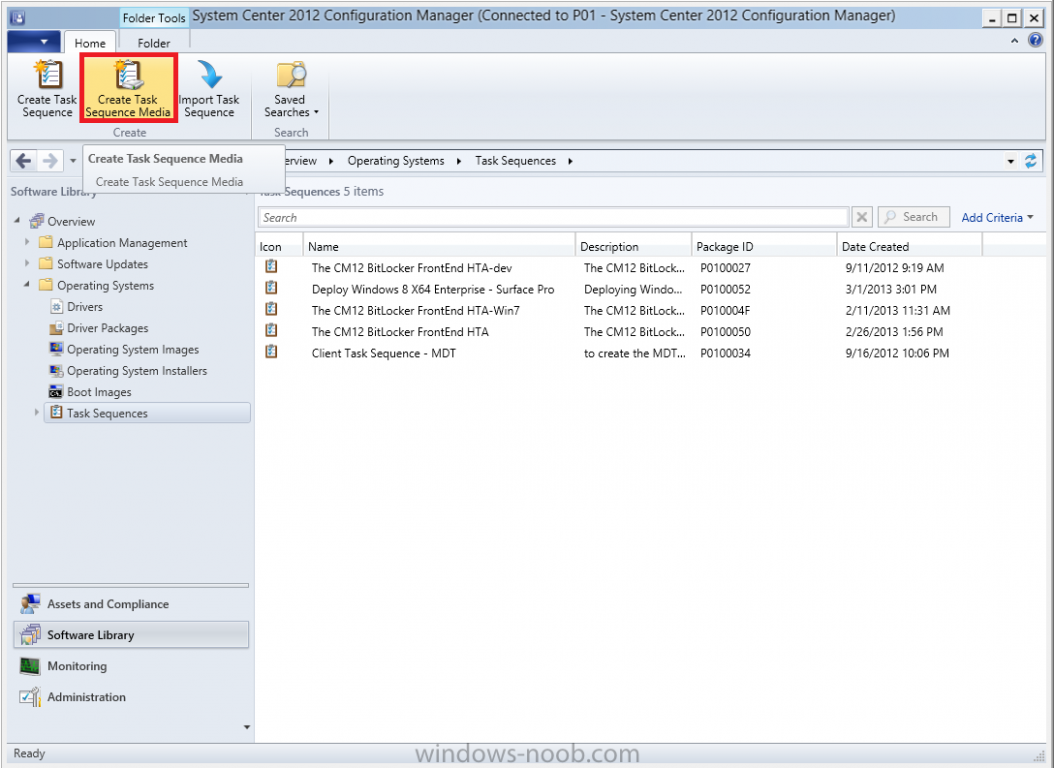
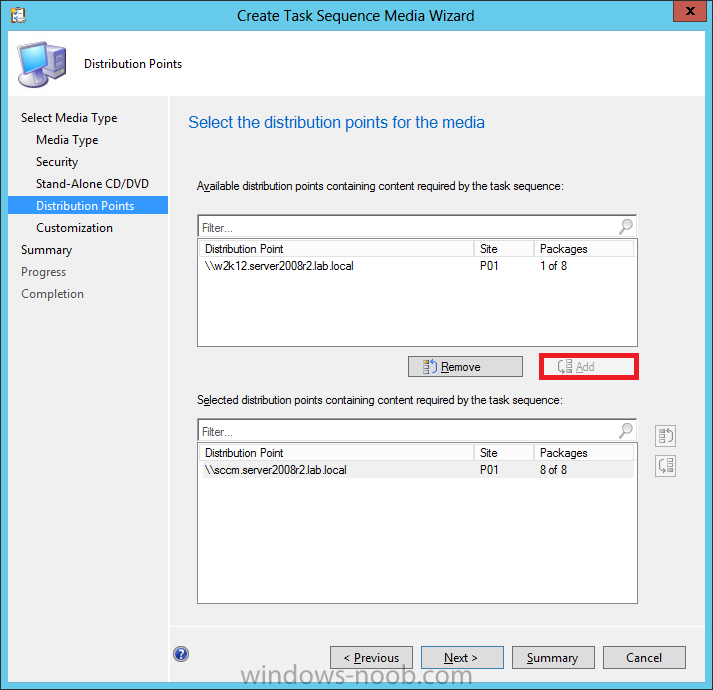
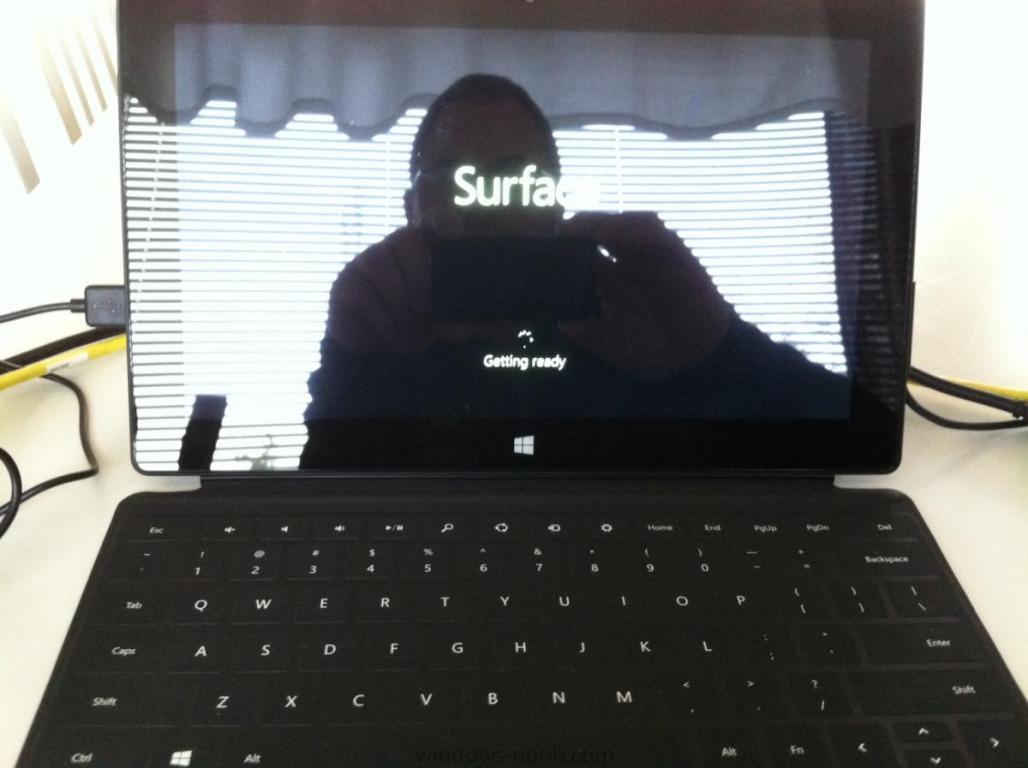
Introduction Now that the Microsoft Surface Pro is available organizations are buying it and re-imaging the default Windows 8 Professional installation with their own corporate install (usually means installing an Enterprise edition of Windows 8). In this post I'll show you how to install Windows 8 X64 Enterprise in UEFI mode, with BitLocker enabled using USB based Standalone media created using Configuration Manager 2012 SP1. Note: Use this guide with care, it is provided to assist you with imaging your Surface Pro in an automated way. windows-noob.com will not be held responsible for any problems that may arise as a result of deploying Windows 8 X64 to your Surface Pro using the methods described below. First of all, re-imaging the Surface Pro is not that straight forward given the fact that the device has no external facing network card (RJ-45), however it does however have a USB 3 port so you can connect USB devices and use them accordingly. Secondly, the Surface Pro is UEFI only and 64 Bit so you can only install a 64bit UEFI capable operating system on it. Thirdly, the Surface Pro has only got one USB 3 port, and we are going to use this port to do our imaging, however we want to connect both a USB flash key and a USB network dongle at the same time, as a result we will use a USB 4-port hub to split one USB port into many. Lastly, and more importantly there is no ability in the current Surface Pro firmware to boot over the network, (it's rumored to be available in a later firmware release from Microsoft, no ETA on that however) therefore we'll use USB Standalone media to install our corporate image. (Update, see the note below about PXE boot). For the purpose of this guide i've used some additional hardware listed below: USB network dongle model dlink Dub E-100 8GB USB key USB 4-port hub So, in the photo below you can see the Surface Pro is connected to a USB 4-port hub, and that hub has a USB key and USB Network dongle attached, that is in turn connected to my Configuration Manager 2012 SP1 Server environment running on HyperV (it's a LAB). Update: After writing this guide, Microsoft have released a PXE capable Network adaptor for the Surface Pro available from here. I don't have access to one but if you'd like me to test it, feel free to send one my way. Step 1. Create the task sequence In the System Center 2012 Configuration Manager SP1 console navigate to Software Library, select operating systems and right click on task sequences, select Create Task Sequence The Create New Task Sequence wizard appears, choose Install an existing image package On the Specify Task Sequence information screen give the task sequence a suitable name like Deploy Windows 8 X64 Enterprise - Surface Pro and choose the X64 boot image (this is very important as it will not boot with the x86 boot image) Note: For UEFI deployments, you must use the boot image matching the architecture of the system being deployed. So for x86 only hardware it must be an x86 boot image and for x64 hardware it must be an x64 boot image. The Surface Pro is X64 hardware therefore you must use a 64 bit boot image. for the Install the windows operating system step click on Browse and select the Windows 8 Install.wim file (from the sources folder on your Windows 8 media) which has been previously added as an Operating System Image and distributed to your distribution points, fill in the product key and change the administrator password so if your deployment fails for any reason and it's not domain joined you'll at least be able to login and troubleshoot. Note that the BitLocker ability is now available and you can select or deselect it if you wish, if you do select it then keep in mind that you may need to extend the Active Directory Schema to support Bitlocker. fill in the domain join details in the Configure the Network step and verify your domain join account settings by clicking on verify before continuing point to your Configuration Manager Client package in the Install the configuration manager client step if you want to migrate users data then make your appropriate choices in the Configure State Migration step on the include software updates screen, it's not selected by default so leave it like that and then add some applications by clicking on the Yellow starburst and selecting your application, to continue installing applications if one fails, select the appropriate checkbox and click next through to completion Step 2. Import drivers for the Surface Pro into Configuration Manager We need to install drivers for the Surface Pro during installation of Windows 8 otherwise certain functionality won't work (like wireless for example), you could use something like Driver Genius to extract the drivers stored on your Surface Pro before you wipe it or use the drivers that someone else has already extracted, I like using ready made drivers so head on over to this site, and download those drivers and extract them to your Configuration Manager server somewhere like \\sccm\sources\os\drivers\source\W8\Surface Update: Microsoft has released a driver pack for the Surface Pro here. The extracted drivers should look something like this: Once done, create a new empty driver package by right clicking on Driver Packages and choose Create Driver Package give the package a suitable name like Microsoft Surface Pro - Windows 8 X64 and note that the path is for the driver package itself and not the drivers we extracted above, so keep them separate, in this case use \\sccm\sources\os\drivers\packages\w8\Surface Next wee need to import the drivers (into the package), so In the configuration Manager console select Drivers, right click and choose Import driver point to the UNC path where you copied the extracted files eg: \\sccm\sources\os\drivers\source\w8\surface on the specify the details for the imported driver step click on Categories and click create, give the category a name like Microsoft Surface Pro - Windows 8 X64 so our driver details now looks like this on the Add drivers to packages screen select our Microsoft Surface Pro - Windows 8 X64 package we will not be adding any drivers to any boot images so click next through that step and click next through the wizard and it will start importing the drivers (warning, can take some time....) After a (long) while the driver import should complete Lastly, don't forget to select the Driver Package and distribute it to your distribution points by right-clicking the driver package and choosing Distribute content. Step 3. Edit the Task Sequence Now we want to edit the task sequence to change how it applies drivers, so right click on the Task Sequence and choose Edit Disable the Apply Device Drivers step by selecting it, clicking on the options tab and selecting disable this step once done, click on Add then Drivers then Apply Driver Package like in the screenshot below select the Microsoft Surface Pro - Windows 8 X64 driver package by clicking on browse then click on the Options tab and click on add condition then query wmi, use the following WMI query SELECT * FROM Win32_ComputerSystem WHERE Model Like "%Surface with Windows 8 Pro%" Tip: If you want to set the DPI (dots per inch) on the Surface Pro display then please see this post. Step 4. Create the Task Sequence standalone media Now everything is in place to create the Standalone media, so insert a USB key into your computer running a Configuration Manager console and browse to Task Sequences in the Operating System Deployment section. In the ribbon click on Create Task Sequence media when the Select the type of media screen appears, choose Stand-alone media on the Specify the media type screen select USB (first option) and select the drive letter corresponding to your USB key answer yes to the format prompt enter a security password (to ensure that no one accidently wipes a device) and click on browse to select our previously created Task Sequence next you'll see what packages are on distribution points, select the ones appropriate for your environment (if you forgot to distribute a package exit the wizard and fix that, then start this process again), in the example below i've clicked on Add and added 8 of 8 next you can add any computer variables or a prestart command, i've covered those elsewhere but for this task sequence i'll add the OSDComputername variable and leave it blank to forcefully prompt for a computername during deployment otherwise we'll get the MININT-xxxxxx name. click next at the summary and accept any UAC prompt, it will begin creating the USB media and after a while it will complete. Step 5. Boot from the USB stand-alone media Shutdown the Surface Pro and when it is powered off, make sure the USB 4 port hub with the USB stand-alone media and USB Network dongle is connected, then press and hold the volume down key on the left side of the Surface Pro and press the power button once. If you do the combination correctly, the system will attempt to boot from the USB stand-alone media. Below you can see the boot process (YouTube video with no narration sorry) and I also enter the ComputerName as part of that process, yes you can even see one of our cats, called Trauma in the background. Ok once the process kicks off you can sit back and admire the automation via Configuration Manager 2012 SP1, it will install all the drivers included in your Driver Package and join the domain, then it will Setup windows and Configuration Manager, reboot and enable BitLocker install your Applications and eventually present you with the login screen. Login and you'll see the Surface Pro is installed with Windows 8 X64 Enterprise, it has BitLocker Enabled, it's paritioned for UEFI and it's managed by Configuration Manager 2012 SP1. Now is that cool or what ? oh yeah ! some more screenshots below Troubleshooting notes You can enter the bios/firmware screen by shutting down the OS, then press and hold Volume UP and then press the power button. The bios/firmware screen allows you to enable or disable secure boot amongst other things. Secure Boot is a feature that helps prevent unauthorized firmware, operating systems, or UEFI drivers (also known as Option ROMs) from running at boot time. For further details please see http://technet.microsoft.com/en-us/library/hh824987.aspx You can bring up the command prompt during the task sequence deployment provided that you've enabled command support in the boot image and press the FN key plus the Settings key (which corresponds to F8) Summary Imaging the Surface Pro does present some technical challenges given it's current firmware and lack of a physical RJ-45 network port, and the fact that it is 64 bit hardware in UEFI mode, however it's possible to image the Surface Pro with an UEFI compatible 64bit Operating System using standalone media from Configuration Manager 2012 SP1. Update. PXE boot has become available since the time of writing this guide but only if you use the official network adapter supplied from Microsoft.


-
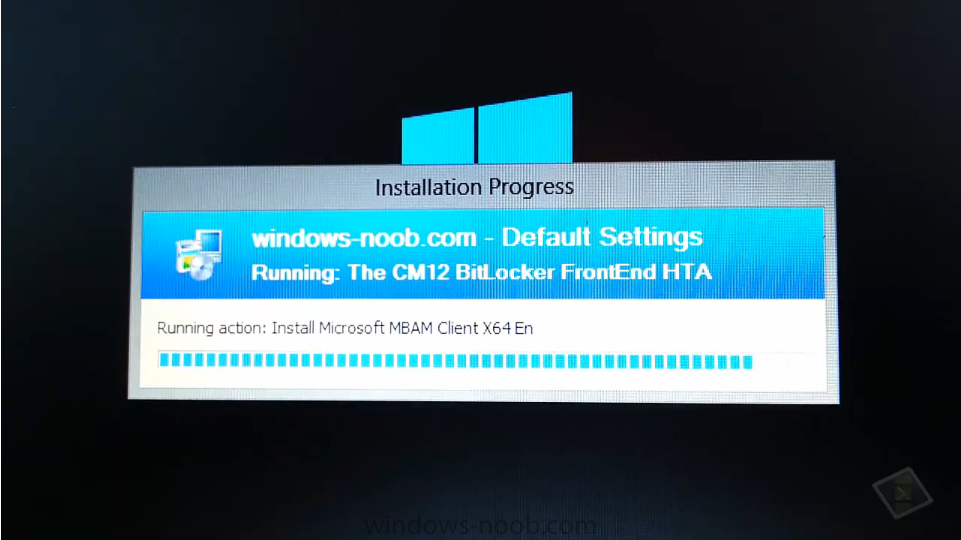
here's a live demo I did in Seattle during the 2013 Global MVP summit, I demo'd the CM12 BitLocker FrontEnd HTA to a few other Configuration Manager MVP's and Rob Marshall decided to video it ! so here's the result, the lighting quality is a bit low (video'd with a mobile phone.), apologies for that and we were both tired after a long day attending sessions, however it was an on-the-spur-of-the-moment thing and we wanted to share the experience In this demo I did a refresh from Windows 8 BitLockered to Windows 8 BitLockered using an MBAM 2.0 backend and of course using Configuration Manager 2012 Service Pack 1 cheers ! niall