


anyweb
-
Posts
9271 -
Joined
-
Last visited
-
Days Won
371
Everything posted by anyweb
-
 it's best practise to use Virtual Hardware for Building and Capturing images, that way the images remain driver free and hardware agnostic, there are plenty of free alternatives out there for virtualising, that said, are you PXE booting a computer that is in the same VLAN (network) as the network that your Configuration Manager PXE enabled distribution point ?
 -
using vNext in a LAB - Part 5. Deploying Applications
anyweb replied to anyweb's topic in Configuration Manager 2012
this guide was for configuration manager 2012 BETA 1, in other words a build that was released some years ago and which has been replaced with beta 2, release candidate 1, and RTM..... -
i add this feature using a dism command line after copying the SXS files first, if you want i'll post a howto to explain the methodology
-
just tested it and it works in Windows 7 deployments also see screenshot :-)
-
The CopyProfile and DisableFirstRunWizard statements not work
anyweb replied to balubeto's question in unattended installs
there's a post here that explains the right way to do it, here it is -
yeah i was going to take them in Amsterdam during Teched Europe but ran out of time, perhaps I'll try and do some of them soon
-
thanks ! can you attach the windowsupdate.log file from that client ?
-
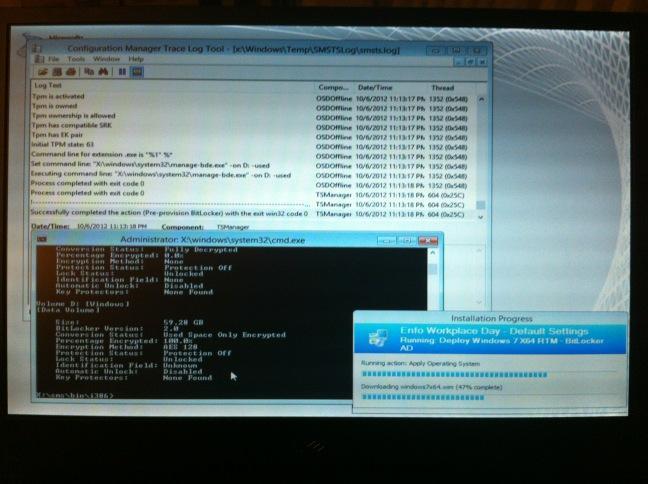
actually it's a WinPE4 feature and as such you should be able to pre-provision BitLocker for windows 7 deployments also, I just have not tested it yet, cheers niall
-
SCCM 2012 Problem with Build and Capture
anyweb replied to Wizarden's topic in Configuration Manager 2012
if windows is ending up on D: then you are using install.wim from the Windows media (this probelm is resolved in Configuration Manager 2012 Service Pack 1). -
Task Sequence appears to be partitioning my USB drive (the boot media)?
anyweb replied to Dsbloom's question in Deploying Operating Systems
yeah see if your notebook has a usb 2 port, does it ? -
here's a guide explaining how to setup a Virtual Machine (Step 3. Create New hyperV virtual Machine) which you can use in the guide above.
-
Software Updates not installing in Build & Capture TS
anyweb replied to rkh's topic in Configuration Manager 2012
all you need for the setup windows and configmgr step is SMSMP=FQDN.OF.YOUR.SERVER and as it's build and capture, don't join the DOMAIN join a WORKGROUP instead -
SCCM 2012 Problem with Build and Capture
anyweb replied to Wizarden's topic in Configuration Manager 2012
and add it as an attachment instead of pasting the entire log in a quote -
if the pxe client is on a separate vlan to the dhcp server/pxe server then you'll need to configure ip helpers
-
update: to save you time i've exported the Task Sequence used above and uploaded the ZIP file, it's available for download now at the end of Step 4 above.
-
problems upgrading configuration manager...
anyweb replied to ogeccut's topic in Configuration Manager 2012
hi there, i had to moderate your post as it was attached to a unrelated post about BitLocker provisioning, please raise new topics when you have problems and only reply to relevant threads anyway, are you trying to upgrade your LAB or a production environment ? SP1 beta is NOT for use in production... -
when you created the virtual machine in hyperv, did you set the network card to Legacy Adaptor ? it wont work for PXE boot otherwise
-
today I received the following mail from Microsoft, it was a very welcome mail indeed and I'm very proud to share the contents with you thanks to Microsoft for re-awarding me, I'm very grateful indeed, thanks to my family for supporting me through this, thanks to the members of windows-noob.com and niallbrady.com for following me and motivating me to keep on writing content, cheers niall
-
SCCM 2012 Problem with Build and Capture
anyweb replied to Wizarden's topic in Configuration Manager 2012
post the smsts.log file from your build and capture and we'll take a look,. any issues should be logged in there, you shouldn't be joining the domain during Build and Capture (join a workgroup instead) -
very cool indeed, once you get the hang of UEFI it's very straightforward, next you need to try UEFI and pre-provisioning of bitlocker together ! by the way the Dell E6430 has Network UEFI boot capability
-
currently SP1 BETA is NOT supported in production, so only do this in your LAB, or use the supported OS and you'll be just fine.
-
we are not using Wake on Lan in this setup therefore you need to manually start up the virtual machine, I hope that explains it for you
-
so is your primary server running Server 2012 ?
-
using Multiple Task Sequences via PXE
anyweb replied to anyweb's question in Troubleshooting, Tools, Hints and Tips
standalone media only supports one task sequence. -
you do not need MDT, you need up to three components from the Windows Assessment and Deployment Kit all described in great detail here. The requirement for the ADK is in order to deploy Windows 8 and Windows Server 2012. Side note: while you do not need MDT (Microsoft Deployment Toolkit) it is a very useful addition to any Configuration Manager deployment.

