anyweb
-
Posts
9175 -
Joined
-
Last visited
-
Days Won
366
Everything posted by anyweb
-
 did you follow my guide exactly ? is it in a boundary that is already assigned to your SCCM 2007 clients ?
 -
for a primary you shouldn't be using "SQL server 2008 Express" try SQL server 2005 or 2008 and see what happens
-
task sequences themselves are just a bunch of instructions defined by policies, when you for example pxe boot a computer and select a task sequence it pulls down the policies (instructions) that it needs to carry out from it's management point. if you want to be sure that you are using the modified task sequence simply change it's name for example, if the task sequence is called "deploy windows 7 x64" change it to "deploy windows 7 x64 v1.0" then pxe boot your computer, and which task sequence do you see ? you do not need to re-advertise the task sequence after changing steps in it
-
try re-installing it on http instead, and post the log here.
-
can you please explain how you are manually enabling the client ? and why ? are you talking about during OSD deployment ?
-
although for configuration manager 2007, this should work fine, have you tried it ? How can I password Protect a Task Sequence ? Password Protecting a Task Sequence
-
take a look at the previous part (Part 17) here, it covers adding those two applications
-
what does your smsts.log file reveal ? how are you defining the variables and how are you running the Run Command Line step ?
-
no you don't have to extend the schema, it's optional and workgroup computers cannot use the schema anyway,
-
SCCM 2012 Installation Issues - Cannot Find Solution - HELP!
anyweb replied to BzowK's topic in Configuration Manager 2012
hiya Ben, you never did attach your log file, could be a glitch, or a bug. -
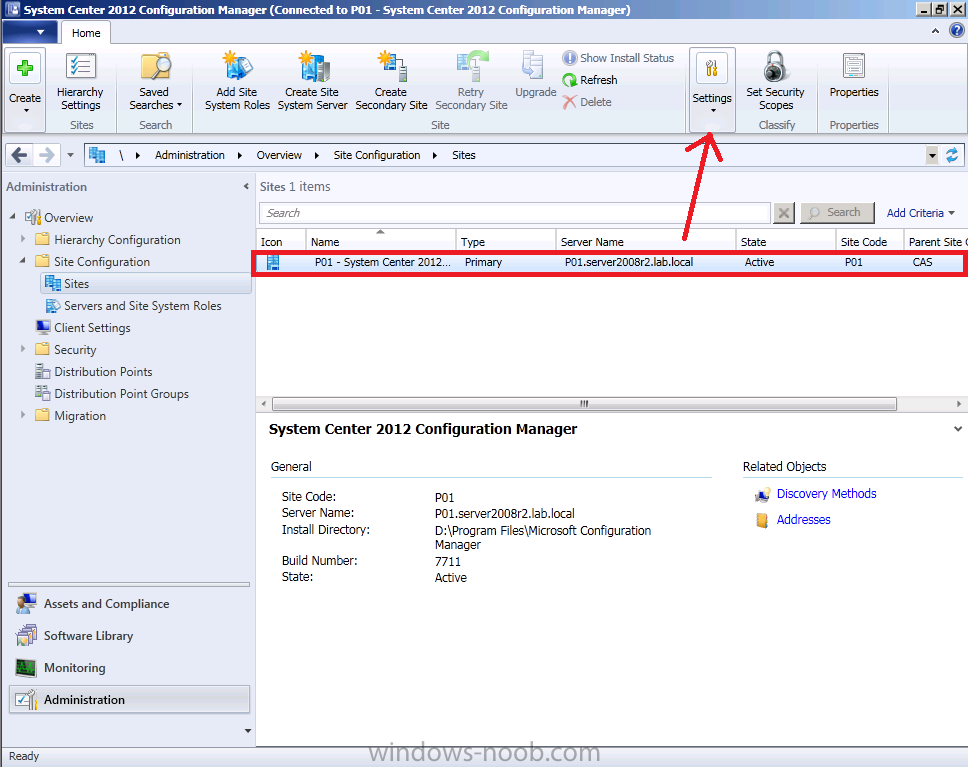
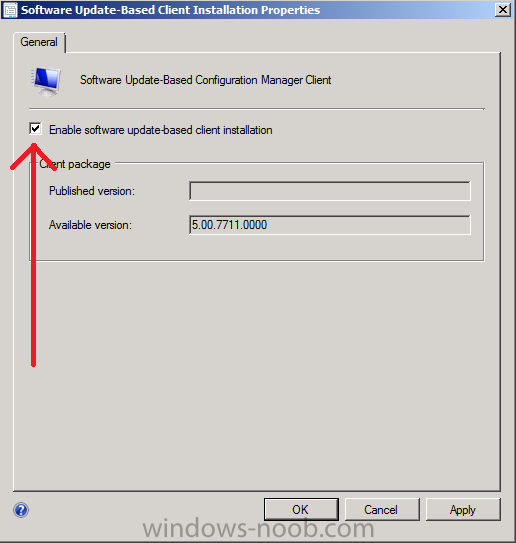
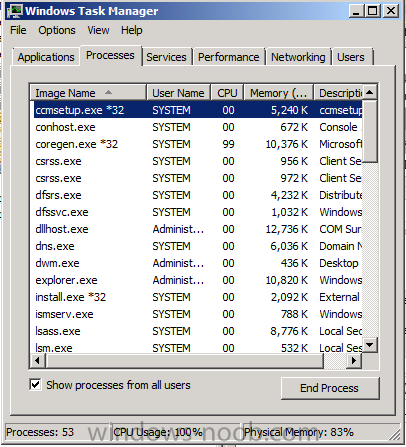
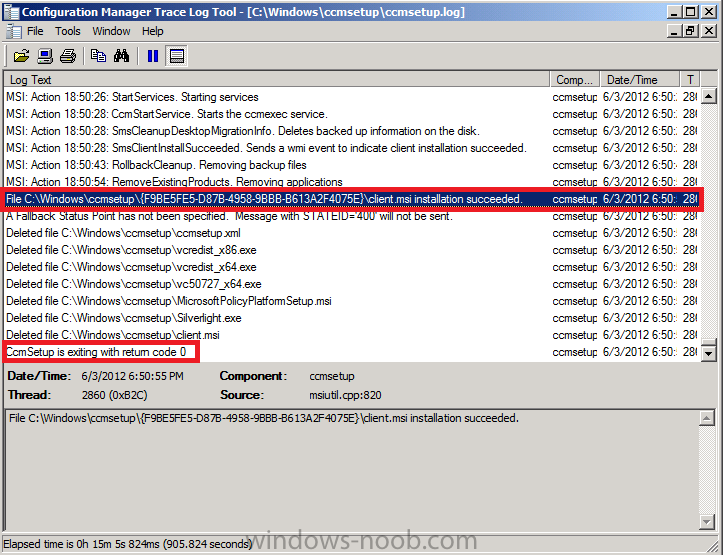
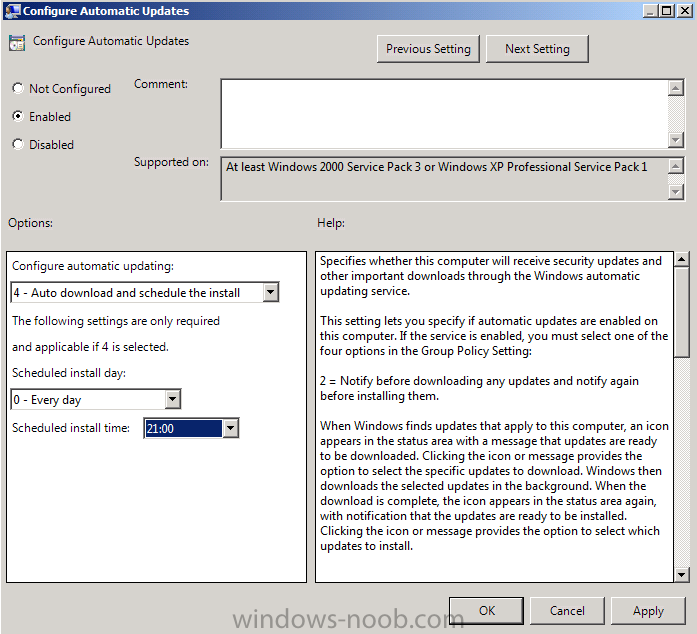
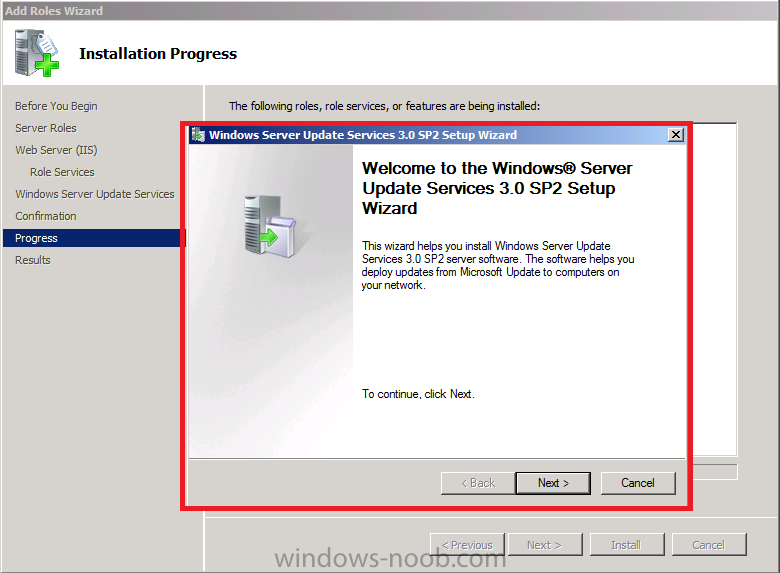
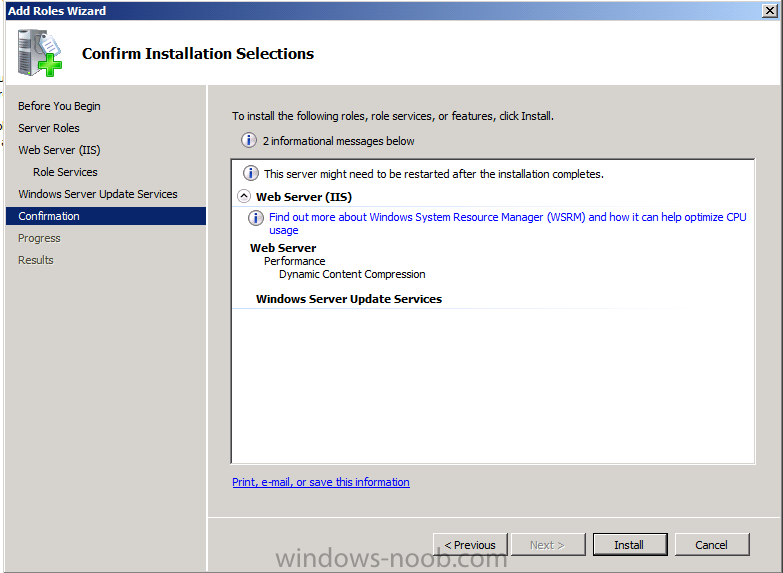
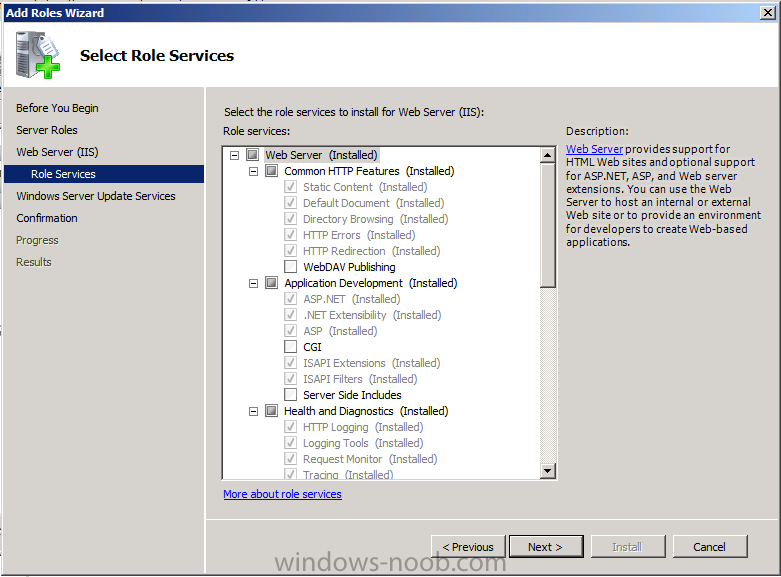
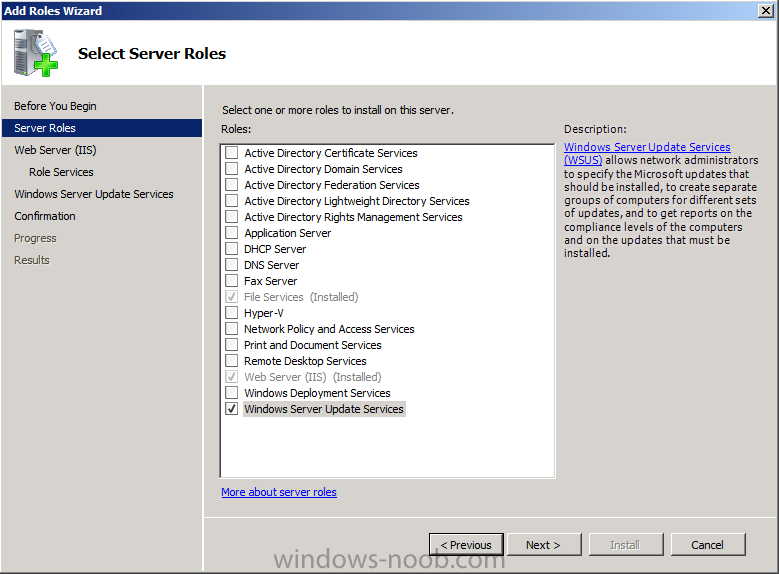
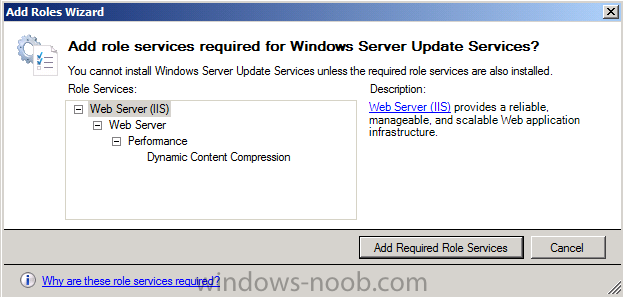
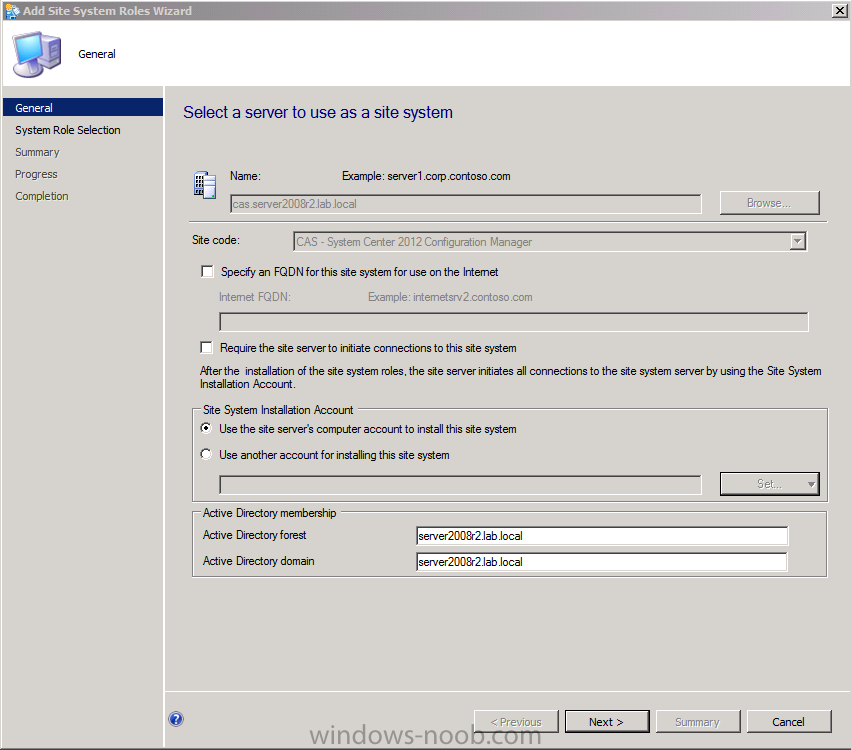
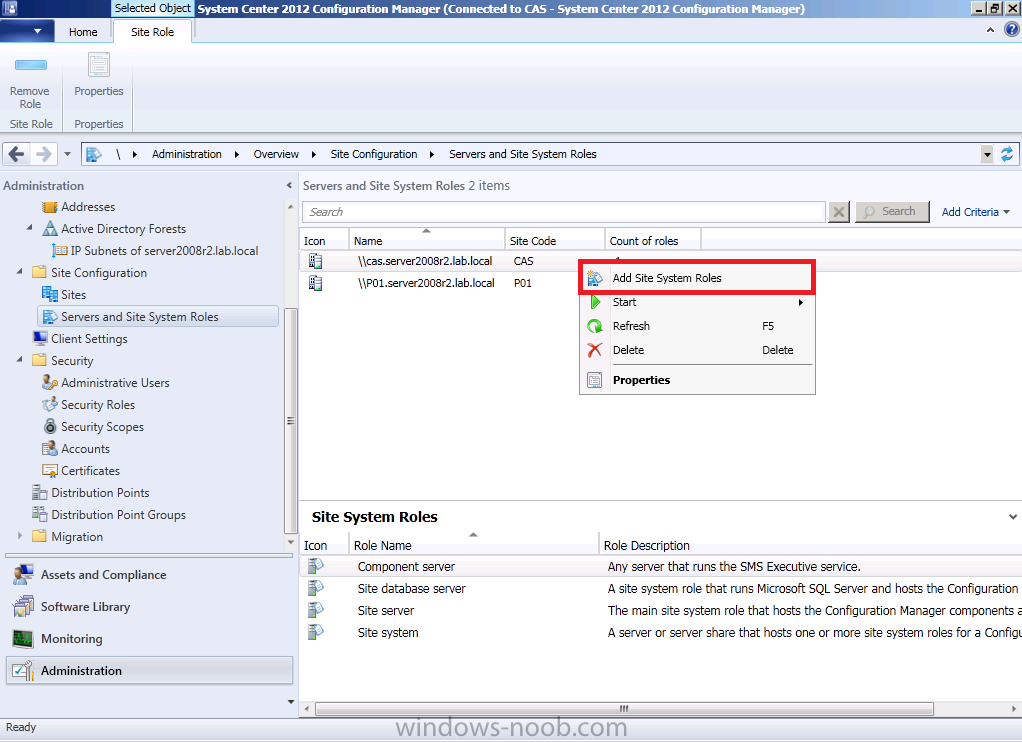
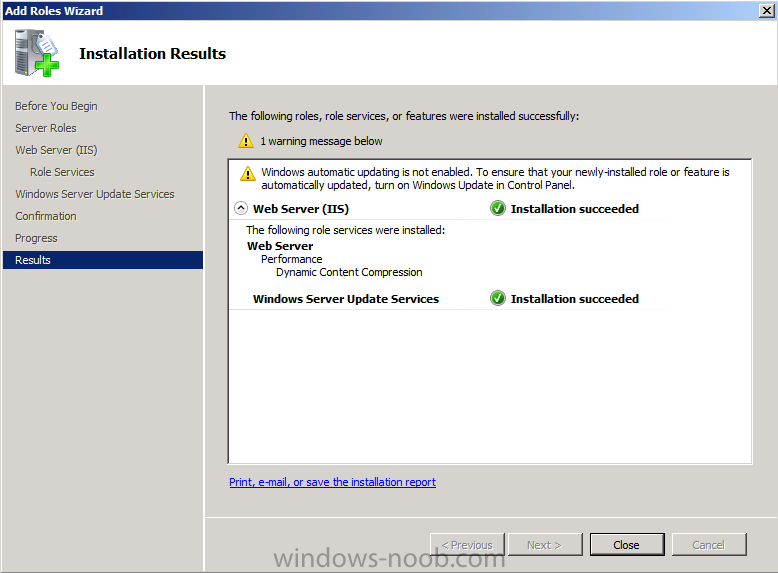
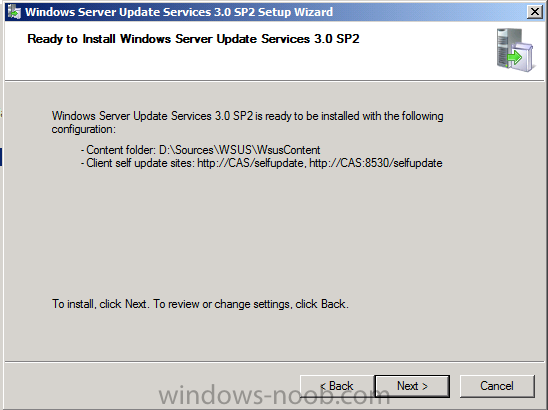
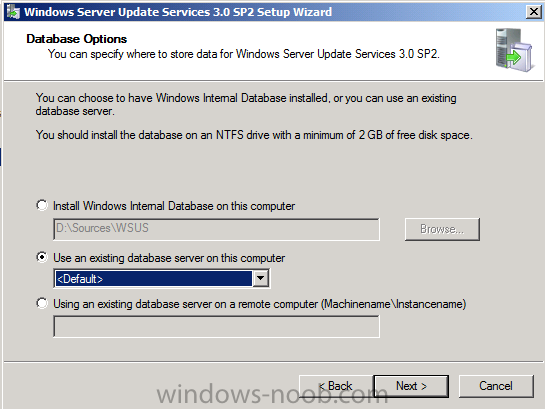
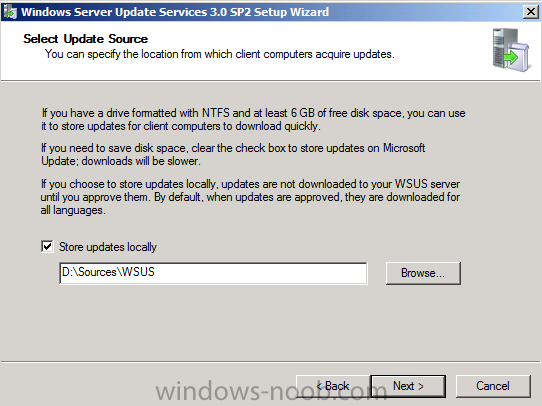
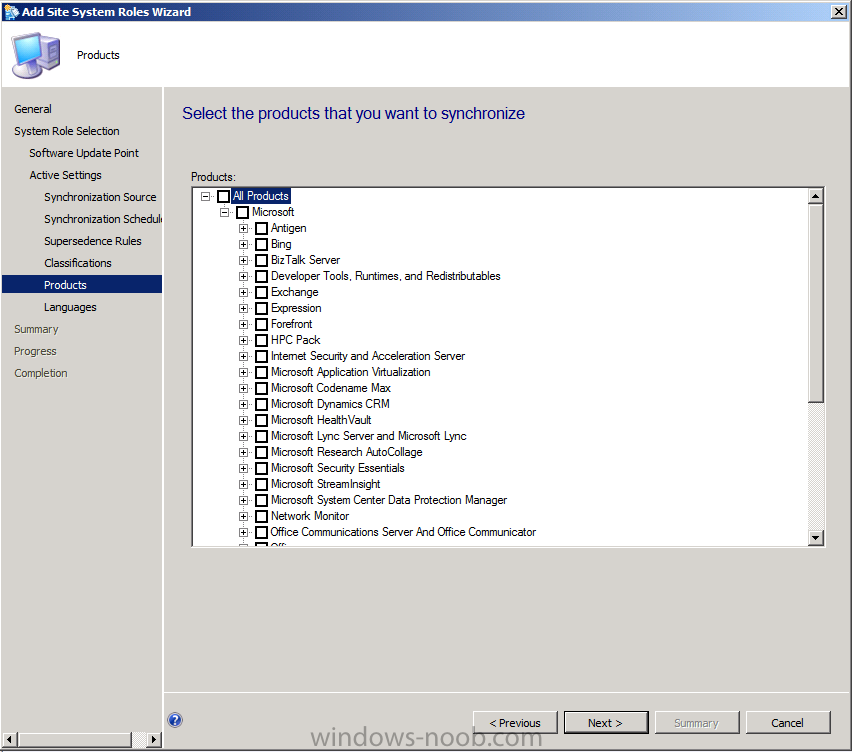
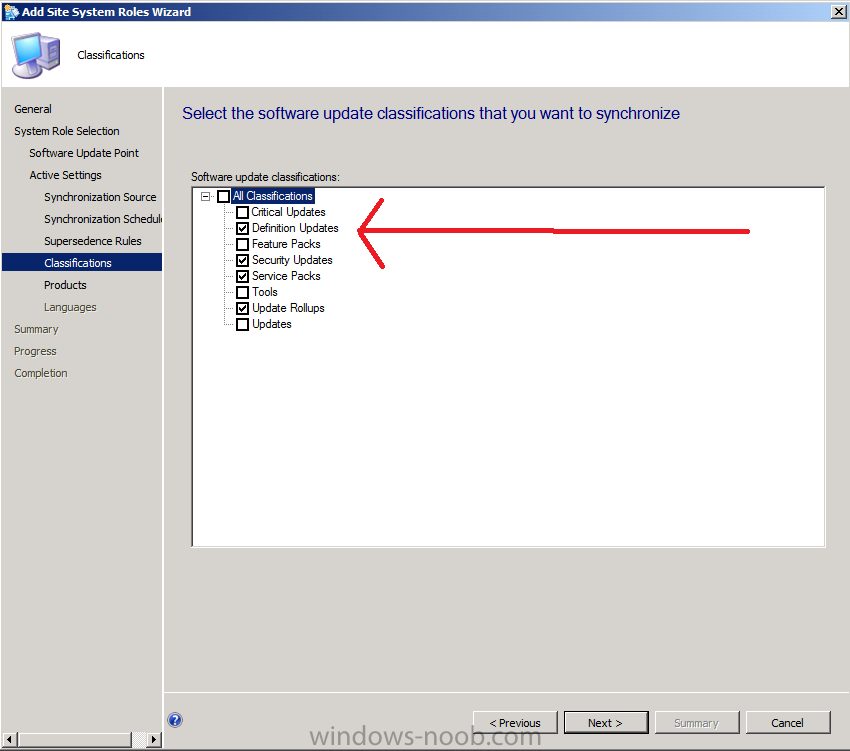
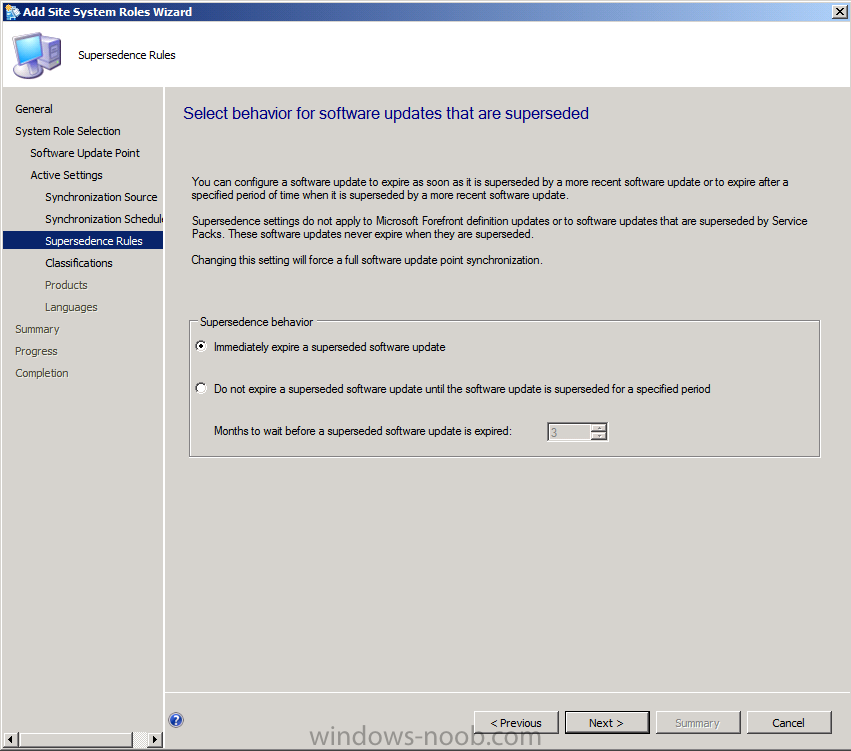
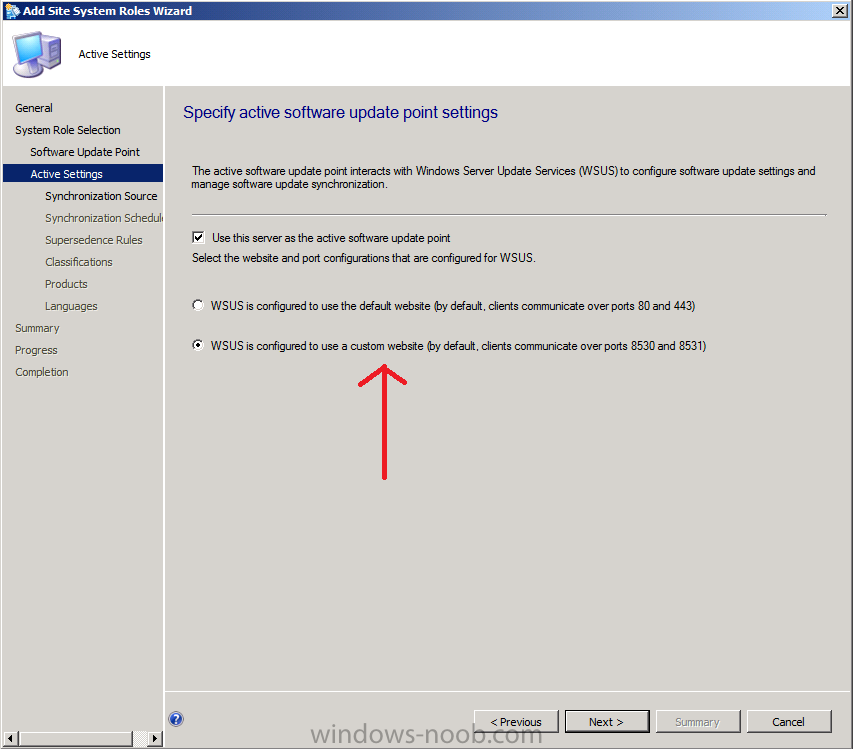
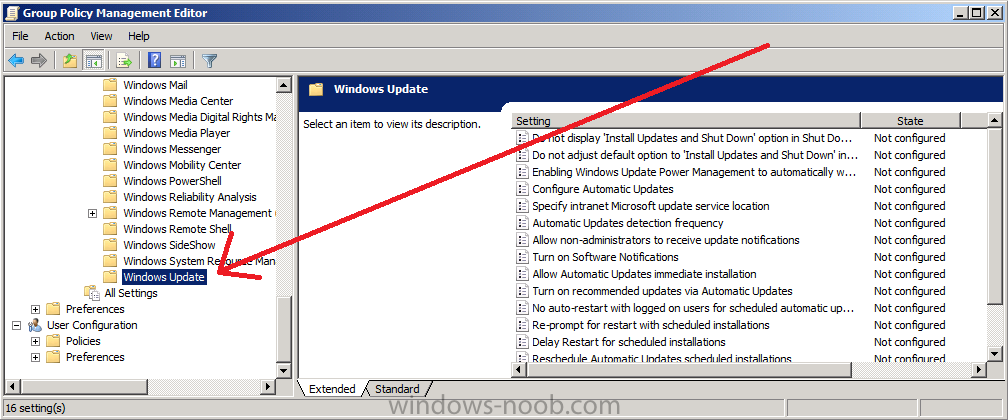
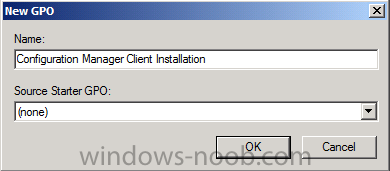
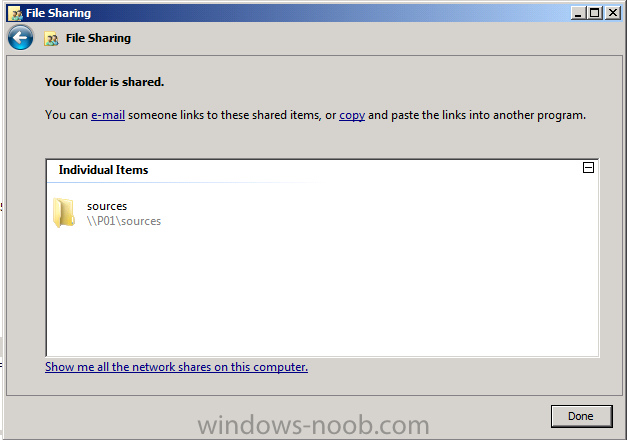
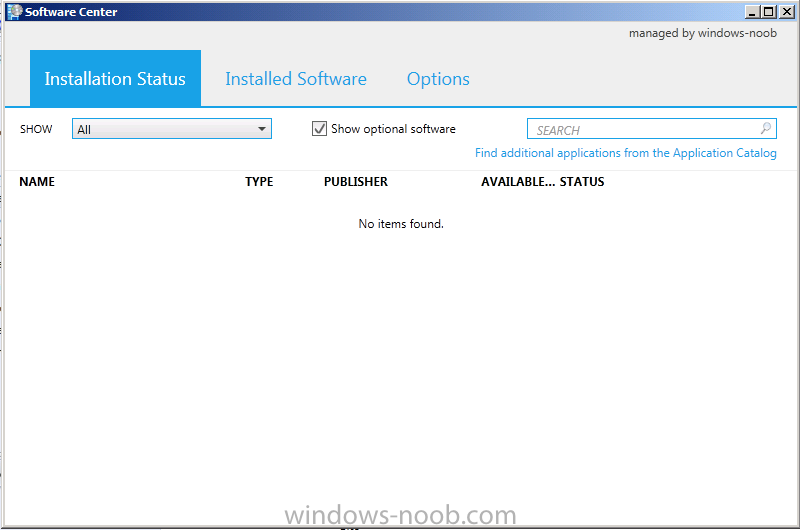
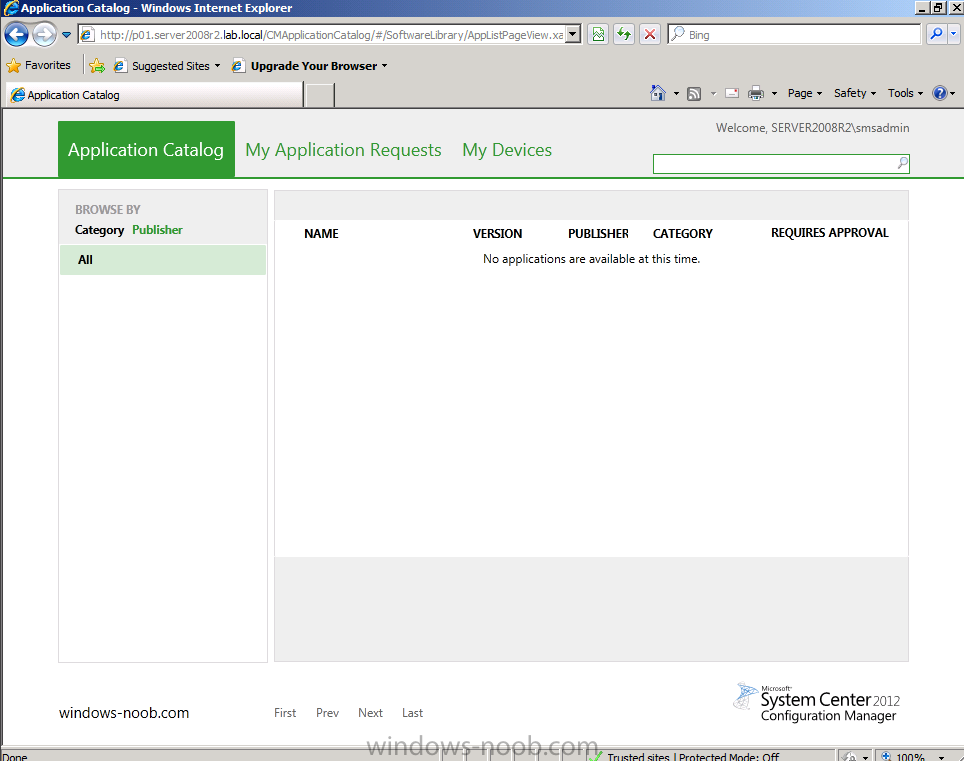
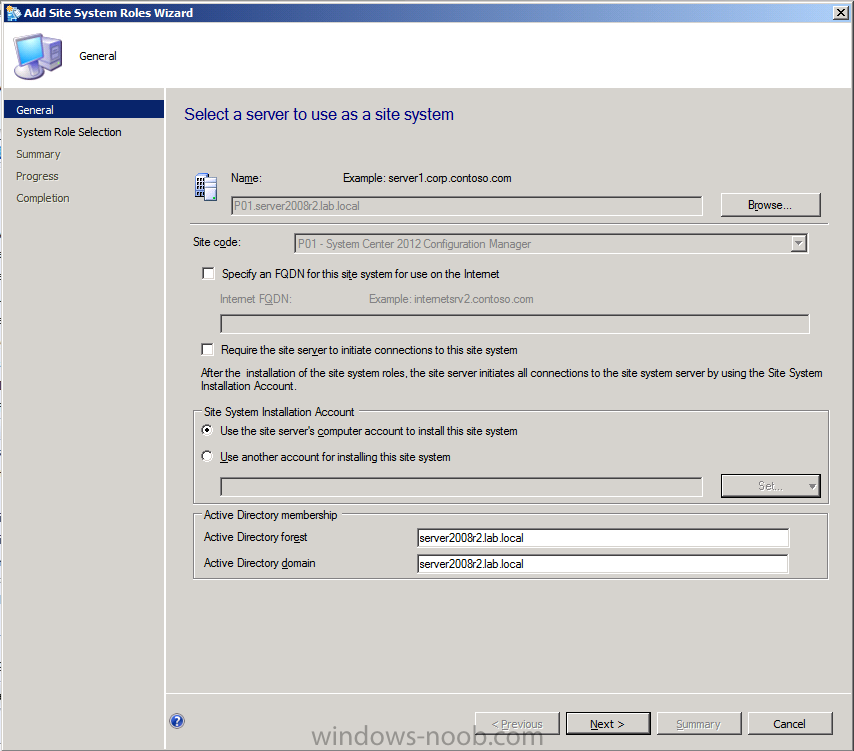
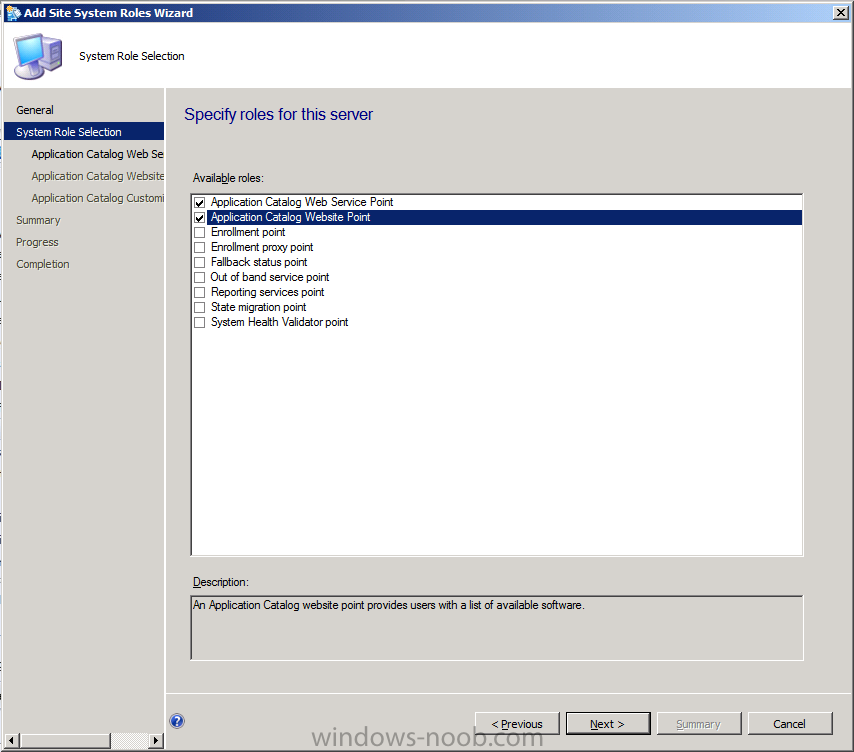
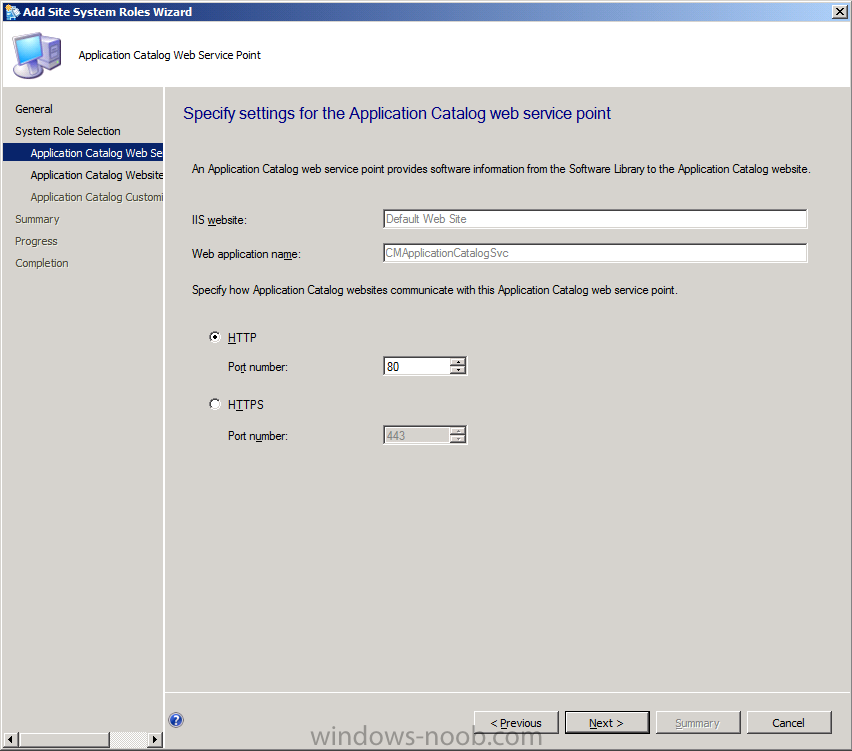
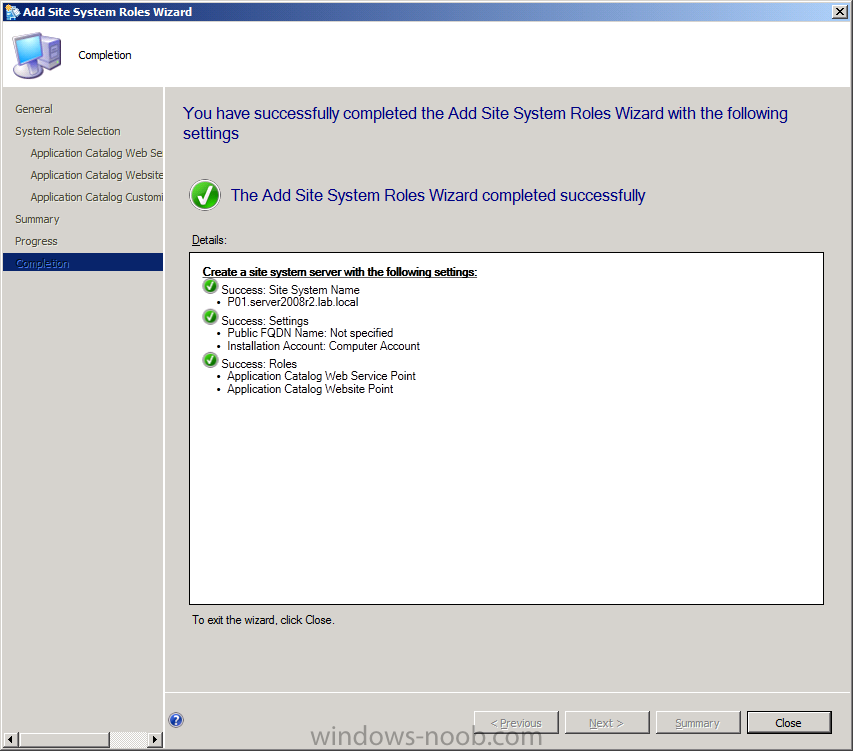
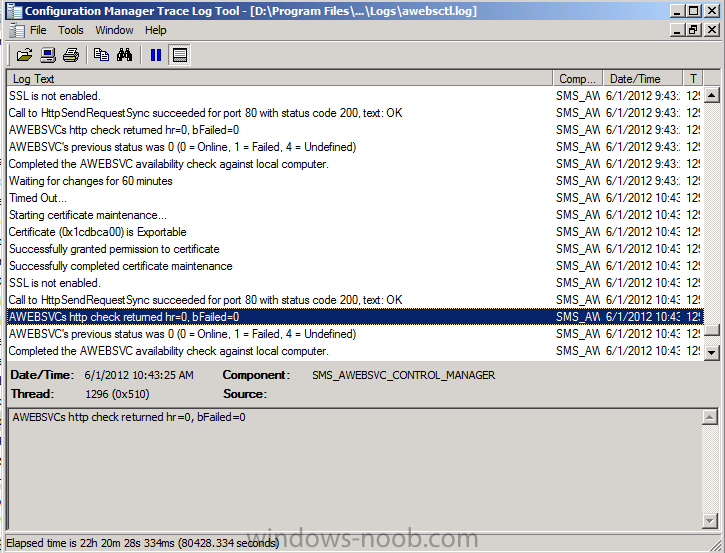
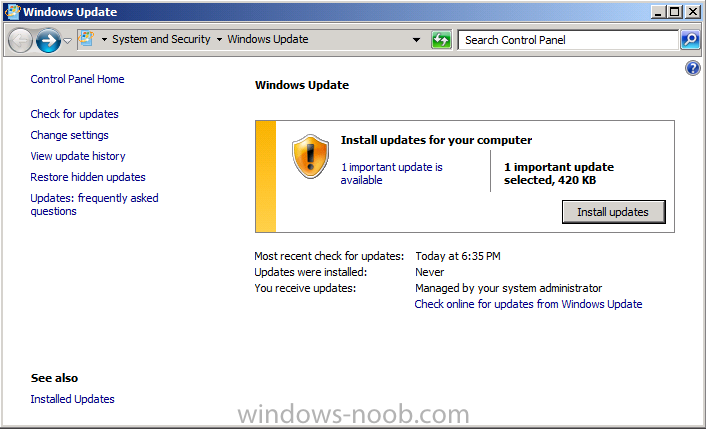
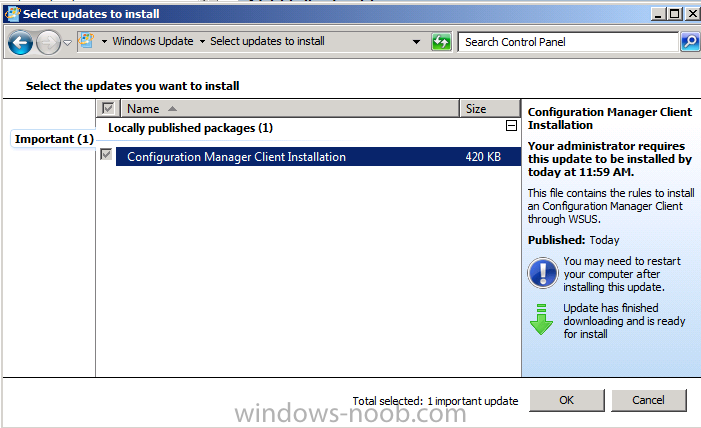
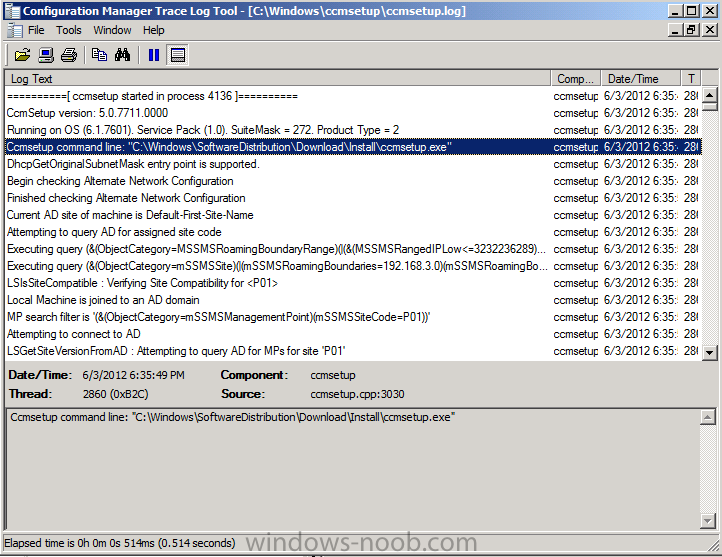
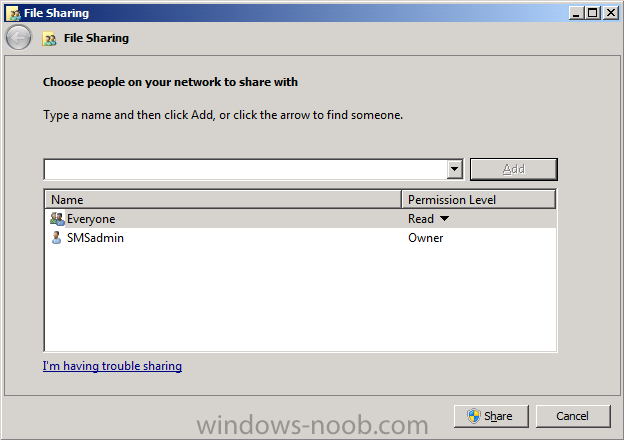
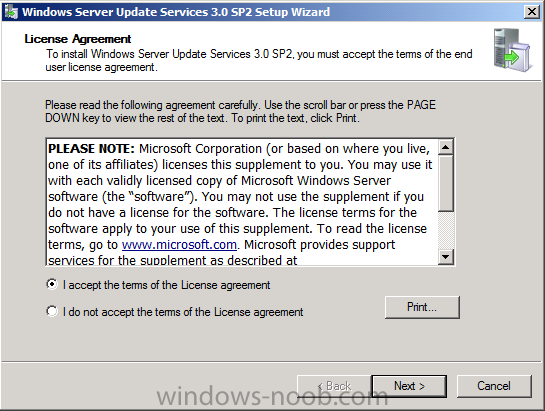
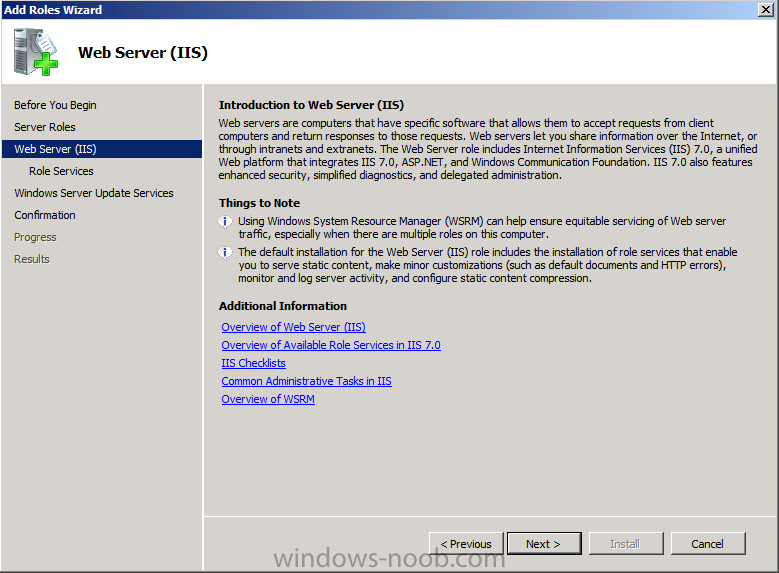
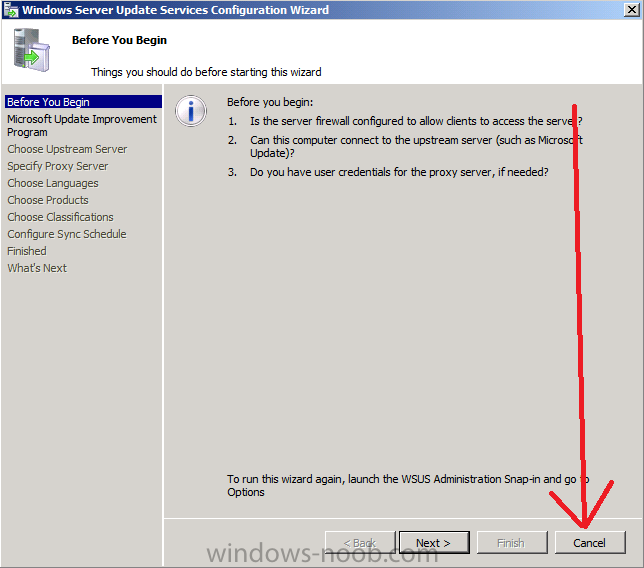
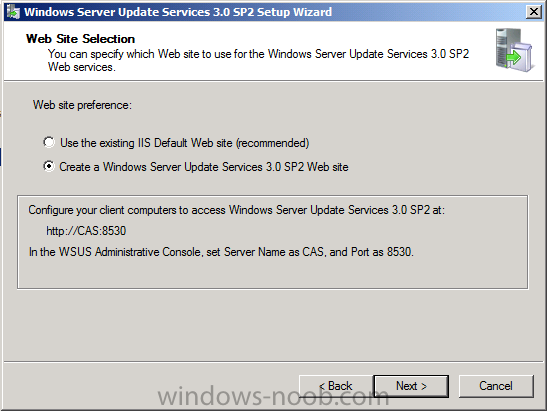
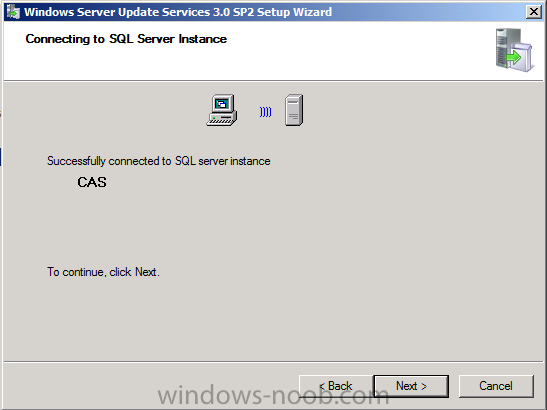
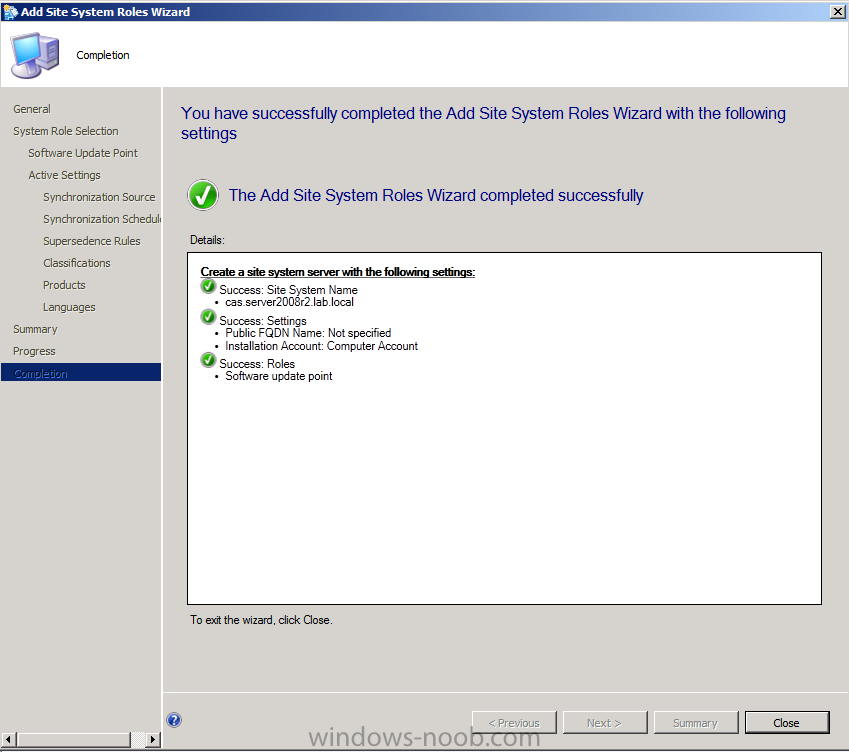
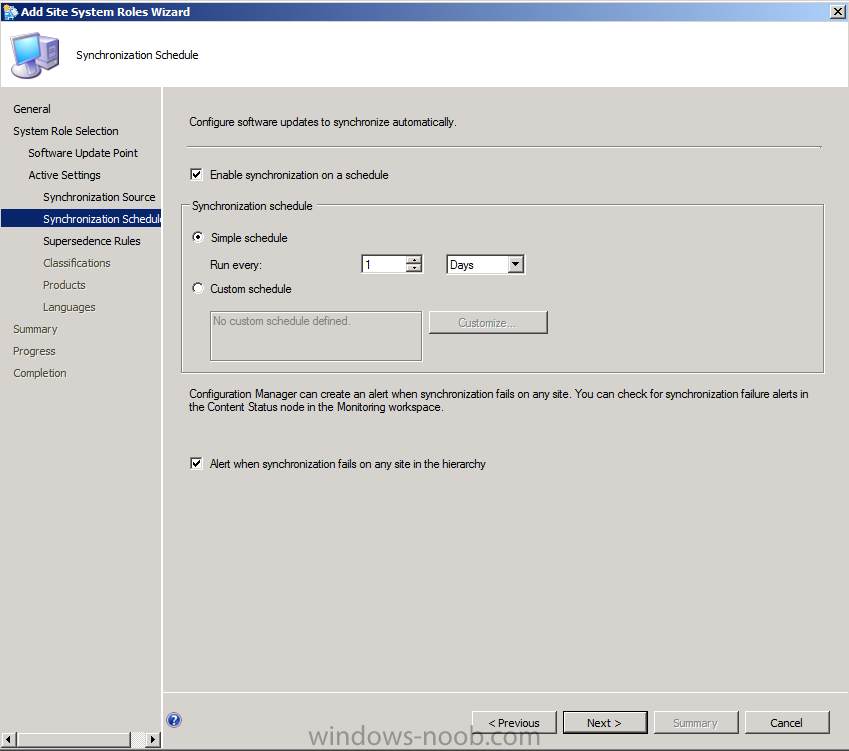
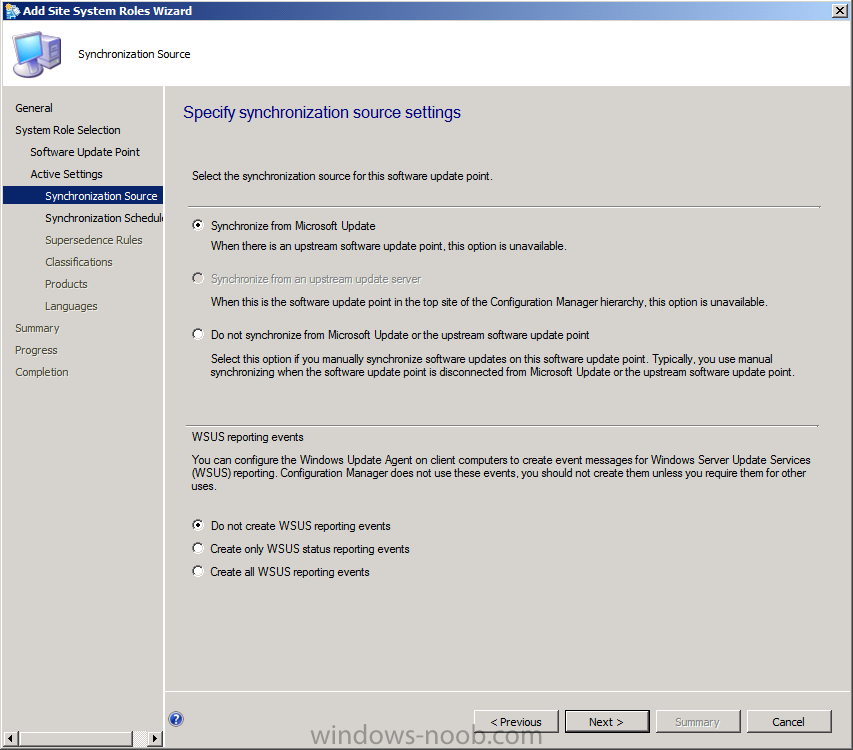
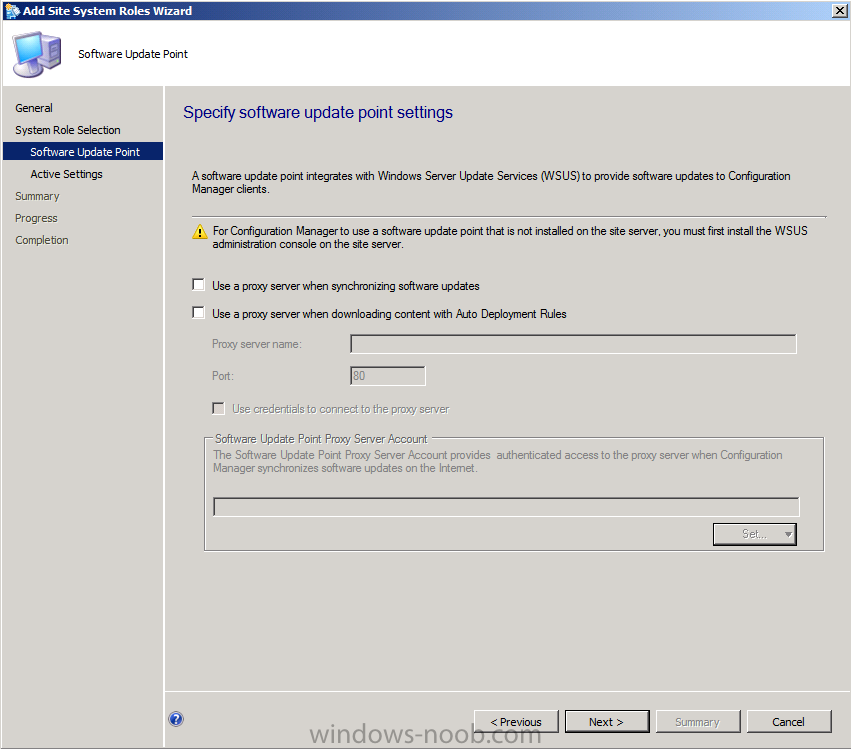
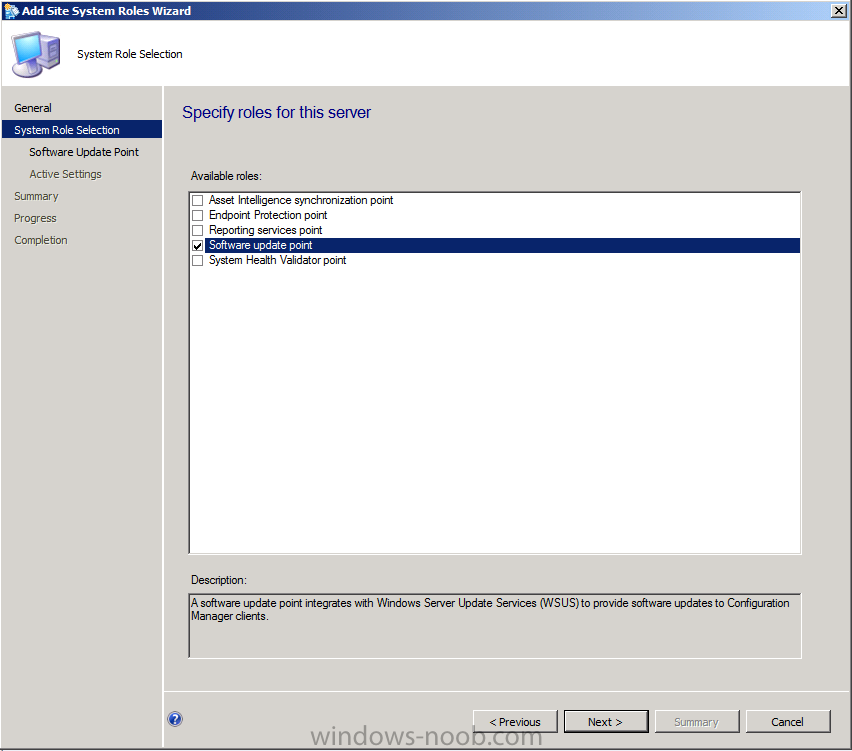
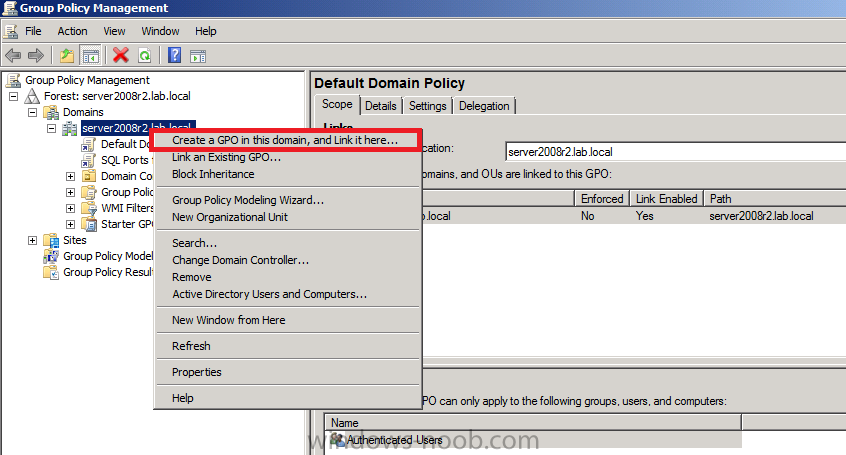
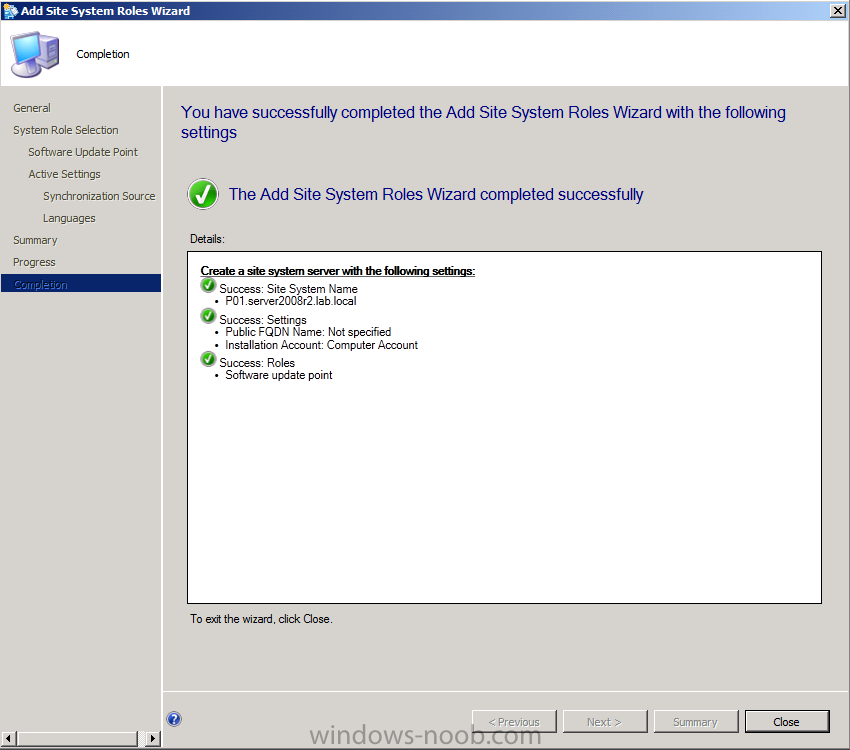
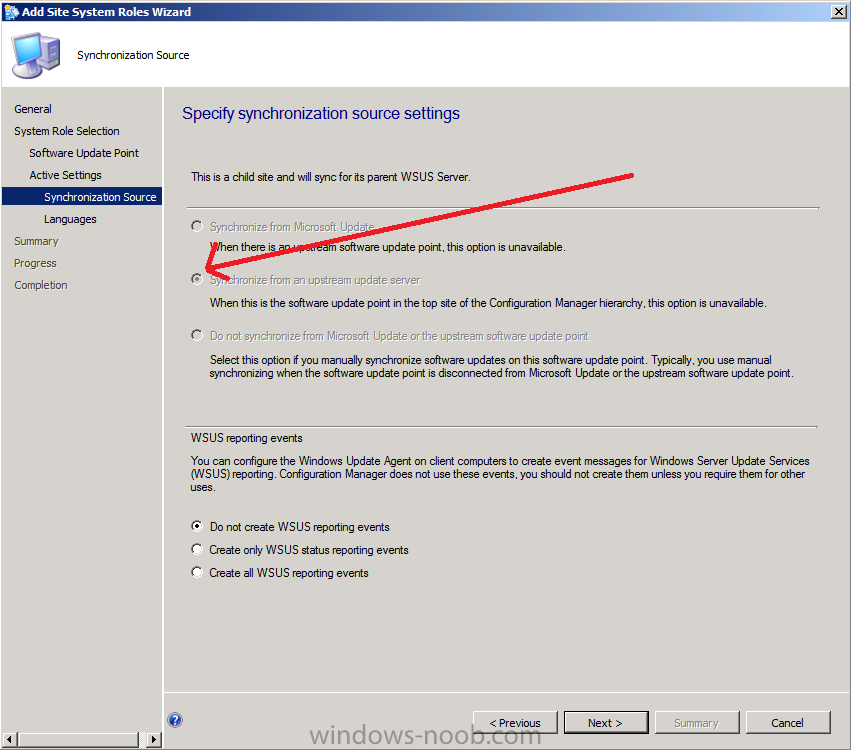
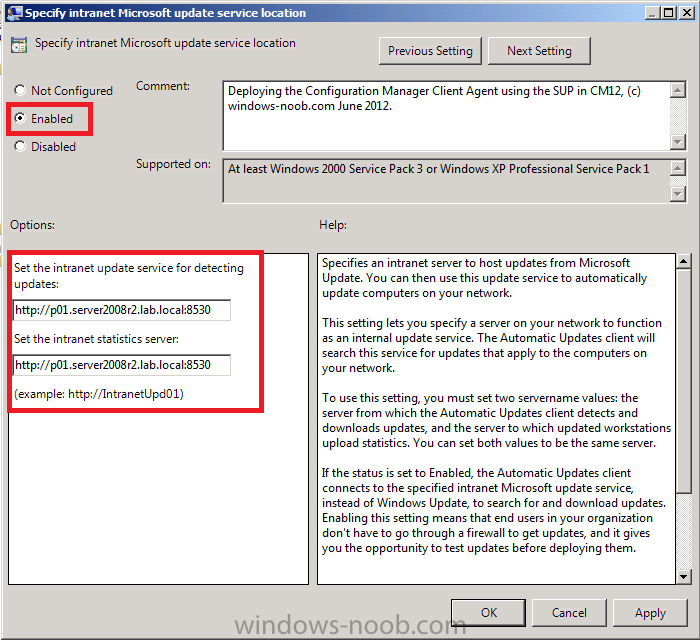
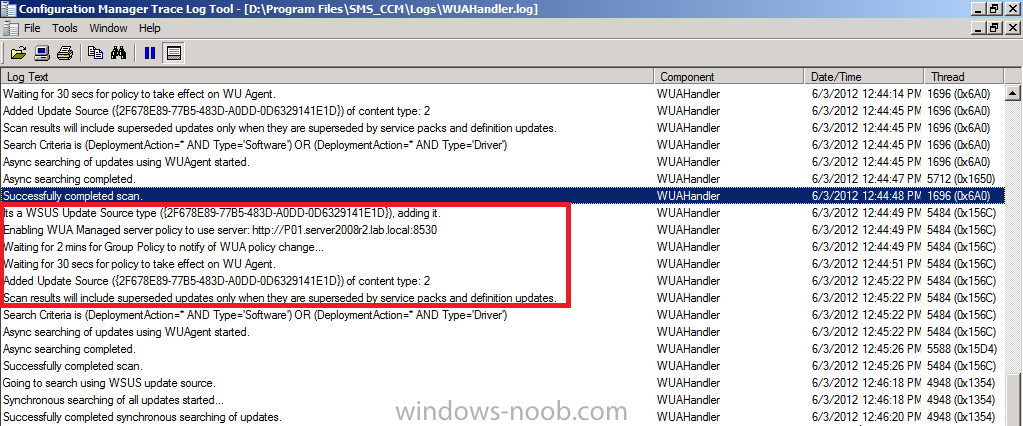
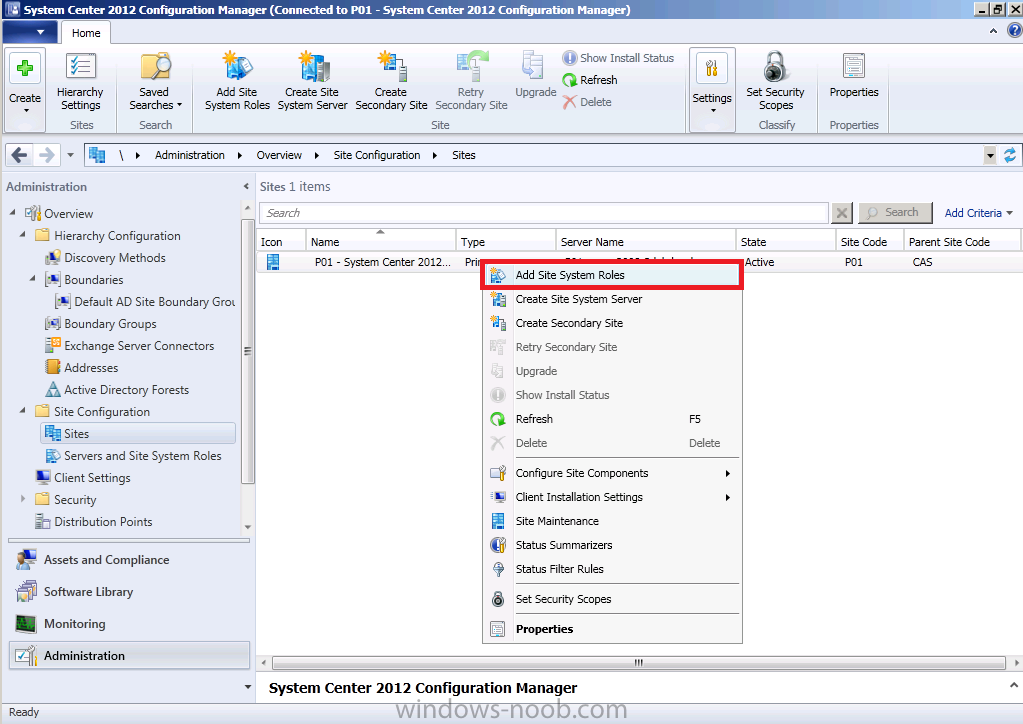
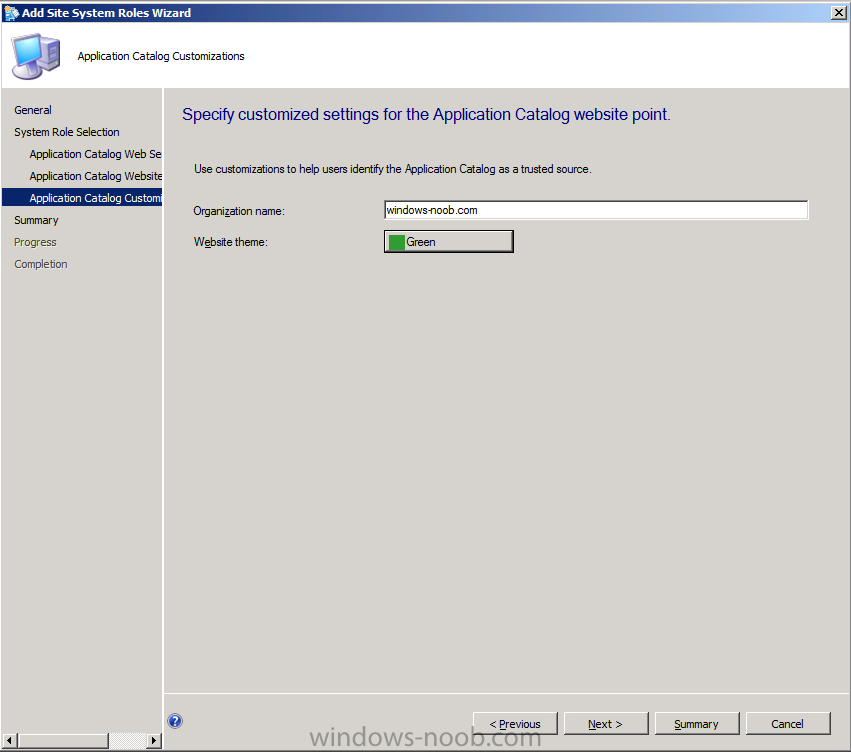
In Part 1 of this series we created our new LAB, we got the System Center 2012 Configuration Manager ISO and extracted it, then copied it to our Active Directory server. We then created the System Management container in AD, delegated permissions to the container, extended the Schema for Configuration Manager. We then opened TCP ports 1433 and 4022 for SQL replication between sites, installed some prerequisites like .NET Framework 4.0, added some features and then downloaded and installed SQL Server 2008 R2 SP1 CU6. We then configured SQL Server using SQL Server Management Studio for security and memory configurations prior to running the Configuration Manager 2012 setup to assess server readiness. Finally we installed a central administration site (CAS). In Part 2 we setup our Primary server with SQL Server 2008 R2 SP1 CU6. We then installed Configuration Manager 2012 on our primary server (P01) and verified that it was replicating to our central administration site (CAS) server. Then we configured Discovery methods for our Hierarchy and then configure Boundaries and Boundary Groups. In Part 3 we configured Discovery methods and configured boundaries and created a boundary group, we then configured them for Automatic Site Assignment and Content Location.In Part 4 we added the Application Catalog roles to our Hierarchy. We then configured Custom Client Device Settings and then deployed those settings to the All Systems collection on site P01. After that we created Custom Client User Settings and deployed them to the All Users collection in order to allow users to define their own User and Device affinity settings. Now we will install the WSUS server role (it is required for the Software Update Point role). We will then install the Software Update Point role on our CAS and Primary servers and we will configure the SUP to support ConfigMgr Client Agent deployment which is a recommended Best Practice method of deploying the Configuration Manager Client Agent. Recommended Reading Planning for Software Updates in Configuration Manager - http://technet.micro...y/gg712696.aspx Prerequisites for Software Updates in Configuration Manager - http://technet.micro...y/hh237372.aspx Configuring Software Updates in Configuration Manager - http://technet.micro...y/gg712312.aspx Planning for Client Deployment in Configuration Manager - http://technet.micro...y/gg682136.aspx Prerequisites for Client Deployment in Configuration Manager - http://technet.micro...y/gg682042.aspx Best Practices for Client Deployment in Configuration Manager - http://technet.microsoft.com/en-us/library/gg681994.aspx Step 1. Add the WSUS Update Services 3.0 SP2 role Note: Perform the following on the CAS server as SMSadmin Before starting this step create a folder on D:\ called sources and share it as sources, give Everyone Read access. The share is created, click done when ready. Note: Repeat the above on the Primary server P01. Start Server Manager and click on Roles. Click on Add Roles to Add the WSUS Server Role. the Select Server Roles wizard appears, place a checkmark in Windows Server Update Services (WSUS) when prompted to add role services required for Windows Server Update Services click on Add Required Role Services to continue now you can see WSUS is selected, click next.. click next at the introduction to Web Server (IIS) the IIS Role services will already be selected, click next click next through the wizard and click Install to start installing the WSUS role, the role will be downloaded from the Internet so make sure you are connected to the internet before doing this step. Tip: If you cannot connect to the Internet then try downloading WSUS30-KB972455-x64 from here and installing that instead. after downloading the role, the Welcome to the Windows Server Update Services 3.0 SP2 Setup Wizard appears click next to start install the role, accept the EULA to continue when prompted to Select Update Source, change the path to D:\Sources\WSUS, also make sure the Store Updates Locally option is selected. Tip: In Production, as a best practice, select Store updates locally so that license terms that are associated with software updates are downloaded during the synchronization process and stored on the local hard drive for the WSUS server. When this setting is not selected, client computers might fail to scan for software updates compliance for software updates that have license terms. When you install the active software update point, WSUS Synchronization Manager verifies that this setting is enabled every 60 minutes, by default. change the database option to Use and Existing Database on this computer and click next click next and watch it connecting to SQL Server Instance Tip: In Production, as a best practice consider using a different SQL Server instance for the Configuration Manager database and WSUS database. This will make It easier to troubleshoot and diagnose resource usage issues that might occur for each application. In web site selection select Create a Windows Server Update Services 3.0 SP2 Web Site Tip: In Production, as a best practice, select Create a Windows Server Update Services 3.0 Web site so that IIS hosts the WSUS 3.0 services in a dedicated website instead of sharing the same website with other Configuration Manager site systems or other software applications. When you use a custom website for WSUS 3.0, WSUS configures port 8530 for HTTP and port 8531 for HTTP and you must configure your Active Software Update Point accordingly. click next at the ready to install screen Click Finish when done. The Windows Server Update Services Configuration Wizard will appear after a few moments, Cancel it. and then you can finally close the add roles wizard Note: Repeat the above (installation of the WSUS server role) on your Primary server P01. Step 2. Add the Software Update Point role Note: Perform the following on the CAS server as SMSadmin In a Configuration Manager hierarchy, install and configure the software update point on the central administration site before you install it on any other site. The software update point at the central administration site is typically configured to synchronize with Microsoft Update, retrieving the software updates metadata based on the criteria that you specify in the software update point properties. Before you install the software update point site system role, you must verify that the server meets required dependencies and determine the software update point infrastructure on the site. For more information about planning for software updates and to determine your software update point infrastructure, see Planning for Software Updates in Configuration Manager. In the Administration workspace, select Site Configuration and select our CAS site server, right click and choose Add Site System roles. The Add Site System Roles Wizard appears, if you want to change accounts do so now otherwise click next on the Specify Roles for this server screen, select Software Update Point on the specify software update point settings screen you can specify a proxy and connection account if you are using one. select Use this server as the Active Software Update Point and then select WSUS is configured to use a custom website as per the screenshot below select Synchronize from Microsoft Update set the Synchronization Schedule to Run every 1 days as you want to synchronize daily for Endpoint Protection definition updates, and select the Alert checkbox as per the screenshot below. set your Supersedence Rules as you wish choose your Classifications, if you want to use Endpoint Protection then select Definition Updates otherwise none will appear when you synchronize select the Products you wish to support, don't worry about making any choices here at this point as some products won't appear in this list until after you've completed your first successful sync. Tip: you may want to remove all current selections in Products like Operating System and Office versions otherwise your first sync will take quite some time to complete. select your Languages and click through to completion of the wizard. Note: Repeat the above on the Primary Site server P01 Tip: the difference you'll note when adding the SUP role on the Primary is that you cannot select to synchronize from Microsoft Update as it will automatically select to synchronize from an upstream server. This is expected as it will synchronize from the CAS server. Step 3. Configure Active Directory GPO Note: Perform the following on the Active directory server AD1 as a Domain Admininstrator Software update-based client installation publishes the System Center 2012 Configuration Manager client to a software update point as an additional software update. This method of client installation can be used to install the System Center 2012 Configuration Manager client on computers that do not already have the client installed or to upgrade existing System Center 2012 Configuration Manager clients. Note: To use software update-based installation, you must use the same Windows Server Update Services (WSUS) server for client installation and software updates. This server must be the active software update point in a primary site (in other words, our Primary site P01). For more information, see Configuring Software Updates in Configuration Manager. Tip: If you would prefer to use Client Push to install the Configuration Manager client agent, see Step 3 of this post. Open Group Policy Managment, right click and choose create a GPO in this domain and link it here give it a suitable name like Configuration Manager Client Installation Right click your newly created GPO, select Edit, select and expand Computer Configuration, expand Administrative Templates, expand Windows Components, and then click on Windows Update select Specify intranet Microsoft update service location, and set it to Enabled, and enter the fully qualified domain name (FQDN) and port of our primary server Software Update Point (SUP) as per the screenshot below: Step 4. Configure Client Installation Settings on P01 Note: Perform the following on the Primary server P01 as SMSAdmin Navigate to the Administration workspace, select Site Configuration, Sites, and select the P01 site, click on Settings in the ribbon. Select Client Installation Settings and then select Software Update-Based Client Installation place a checkmark in Enable software update based client installation and click apply Step 5. Monitor Client installation on your computers Note: Perform the following on your LAB computers as SMSAdmin Now everything is in place for receiving the ConfigMgr client installation via the Software Update Point, except that your computers will probably have Windows Update disabled if they are servers. How you enable that is up to you (GPO etc). Below is a sample setting for configuring Automatic Updates via a GPO. Once you have enabled Windows Update you'll see the following appear on your clients, 1 important update is available:- if you wait it will get installed via the schedule set in your GPO or if you are impatient you can click on Install Updates and you'll see what the locally published packages actually is, it's the Configuration Manager Client. if you check task manager you'll see CCMSETUP.EXE is running, you can also monitor the C:\Windows\CCMSetup\ccmsetup.log file to see how the installation is progressing.. Tip: The Ccmsetup command line used to install is revealed in the ccmsetup.log file at the beginning of the LOG, and should reveal that the ccmsetup.exe file was started from C:\Windows\SoftwareDistribution\Download\Install\ccmsetup.exe, and this is because it was a Critical Windows Update. and after a while you should see that CCMSetup installation succeeded and that means you can open Software Center via the start menu and it'll appear like this click on the Application Catalog link in Software Center and you'll see the Application Catalog appear ! job done ! Troubleshooting Once you have configured the above correctly, and your clients are installed the WUAHandler.log file on each client computer should reveal the following, look for a line that reads If there is any misconfiguration of your GPO or SUP address then you'll see a lot of RED error warnings in that log, and you'll find the following lines repeated over and over, in the screenshot below the FQDN is not defined and this causes failures In addition, verify that the client is assigned to the site. Software Update installs will not work for systems that are not assigned to the site (you will see Error code 1 when it try's to install the client). If you get this error, verify your boundaries for the client and for site assignment. Further troubleshooting can be done via System log in Event Viewer and windowsupdate.log on the client. The next part in this series is: Part 6. Adding the Endpoint Protection role, configure Alerts and custom Antimalware Policies.


-
SCCM 2012 Installation Issues - Cannot Find Solution - HELP!
anyweb replied to BzowK's topic in Configuration Manager 2012
are you sure you are logged on with a domain user account ? -
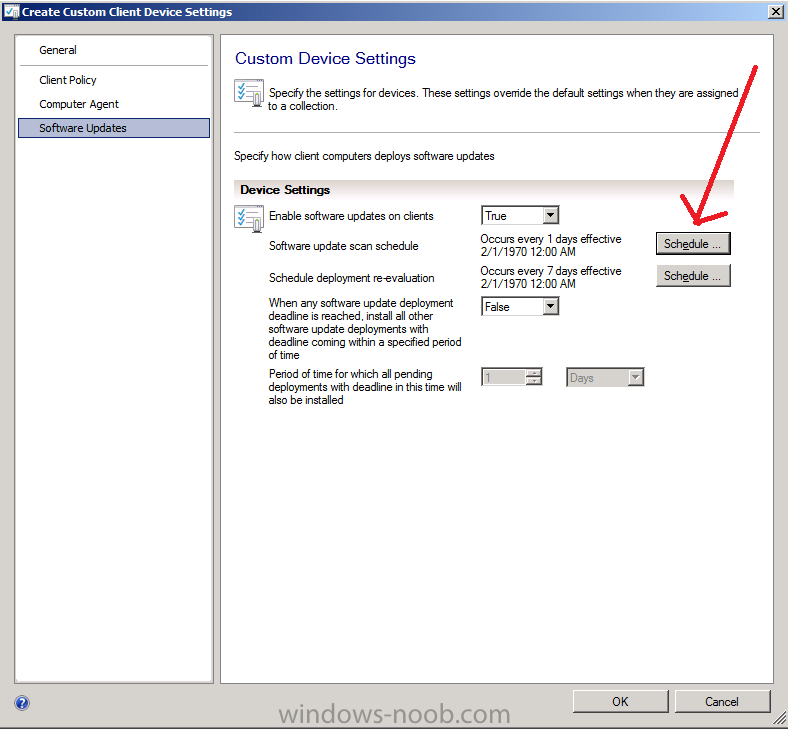
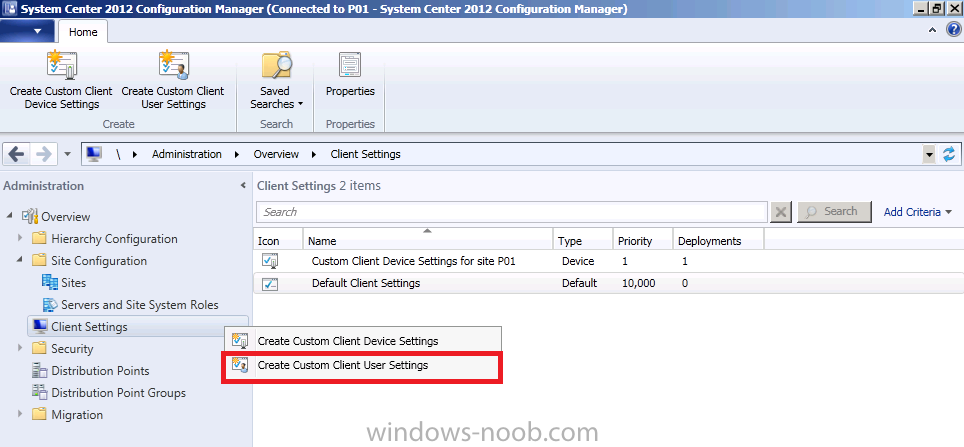
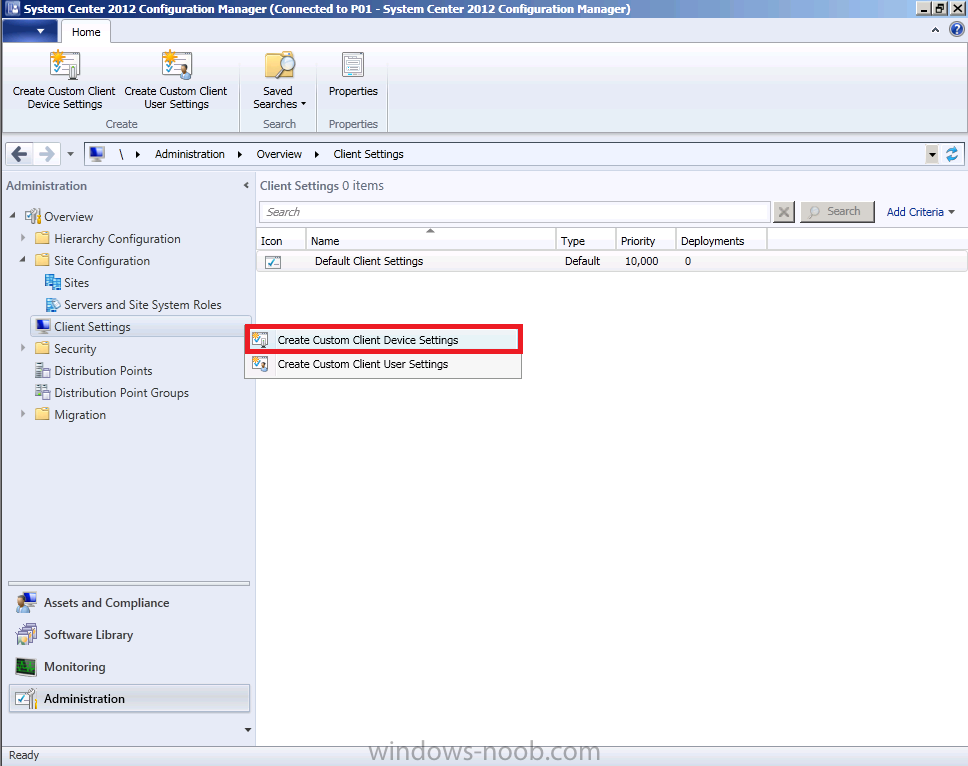
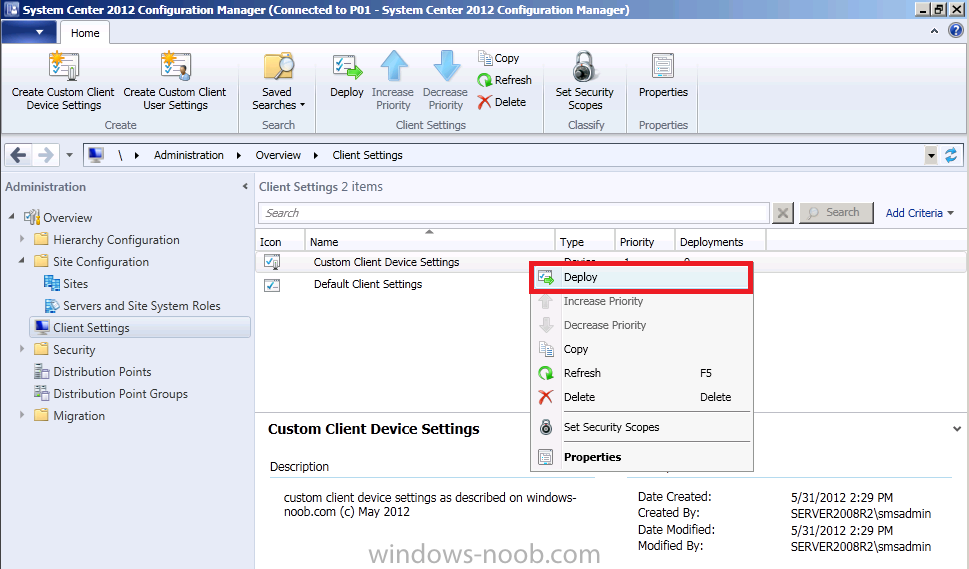
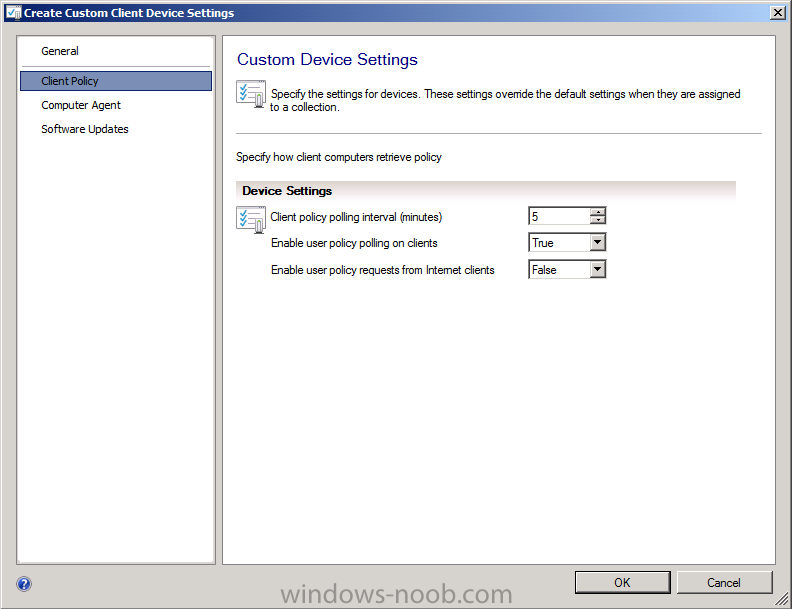
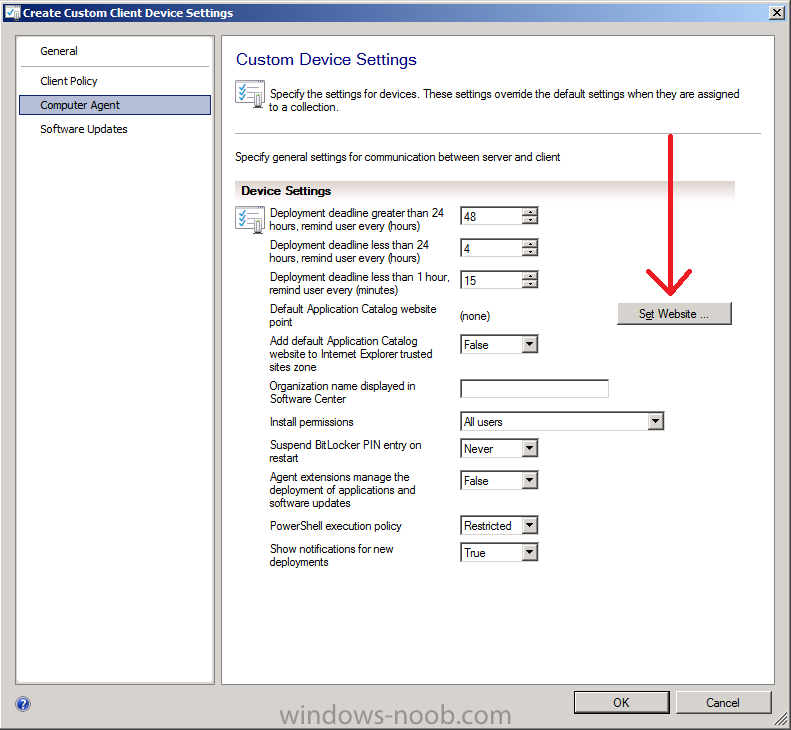
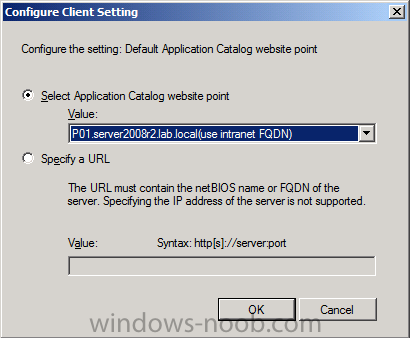
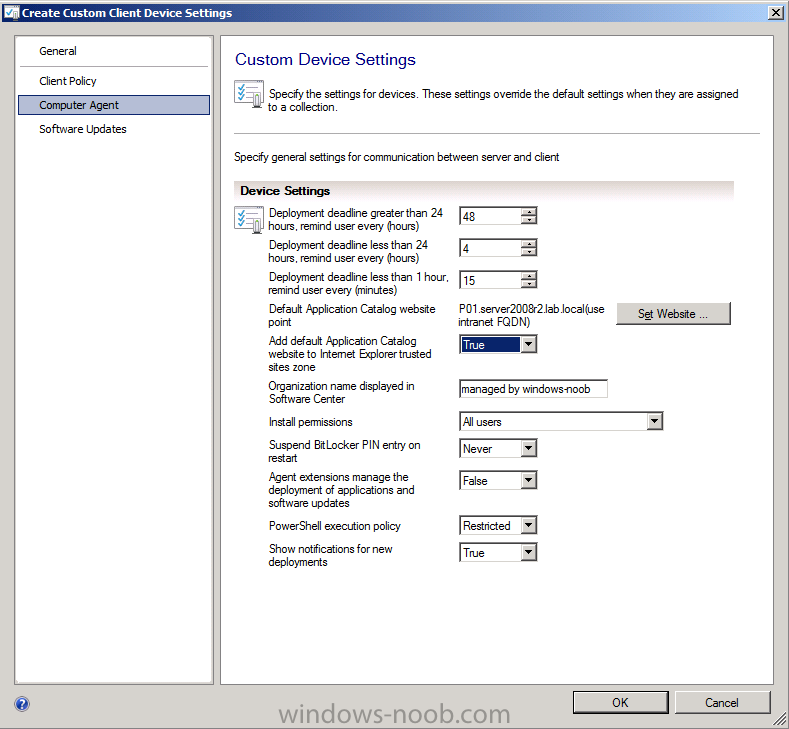
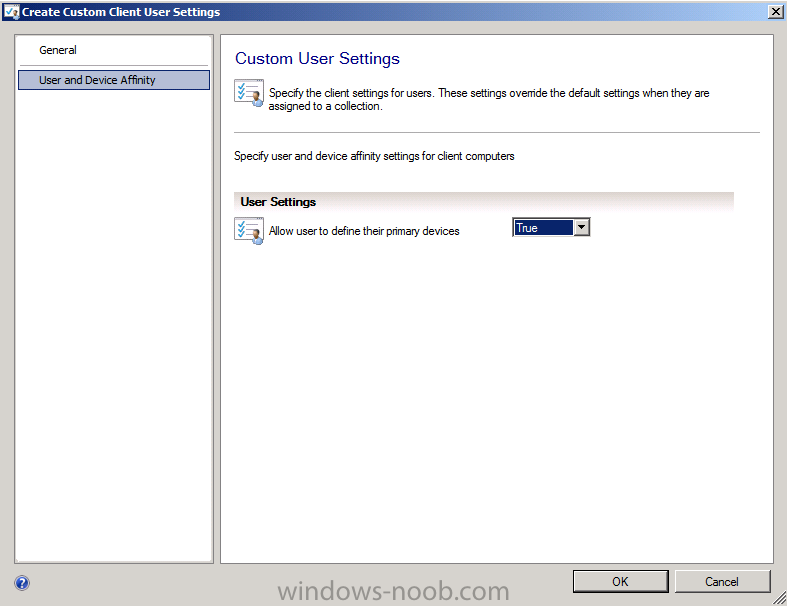
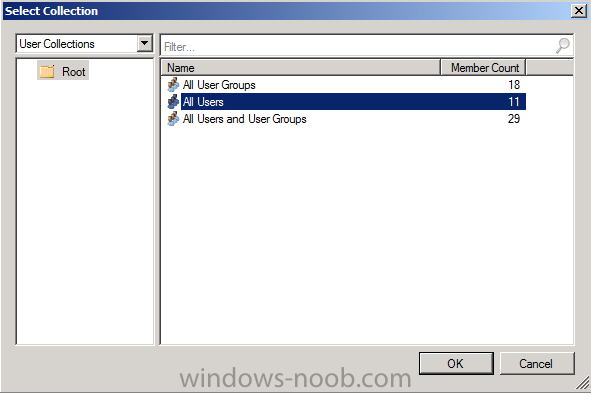
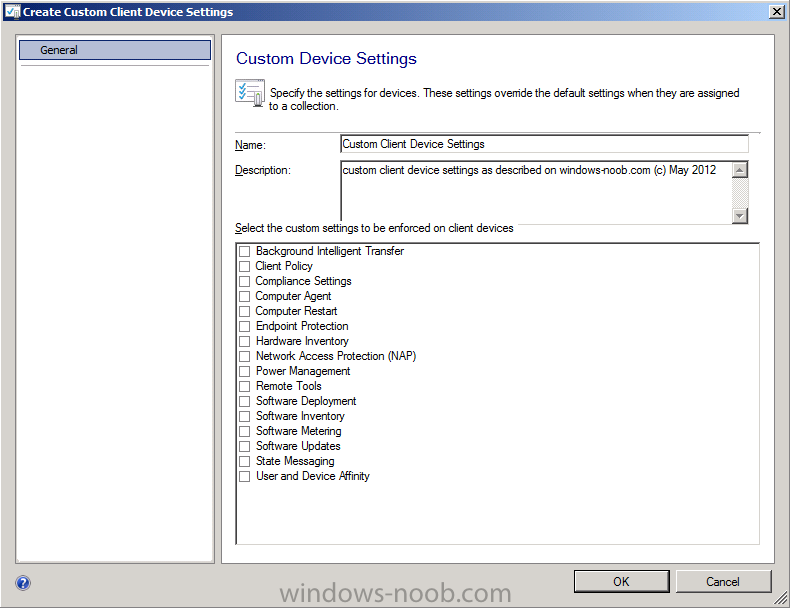
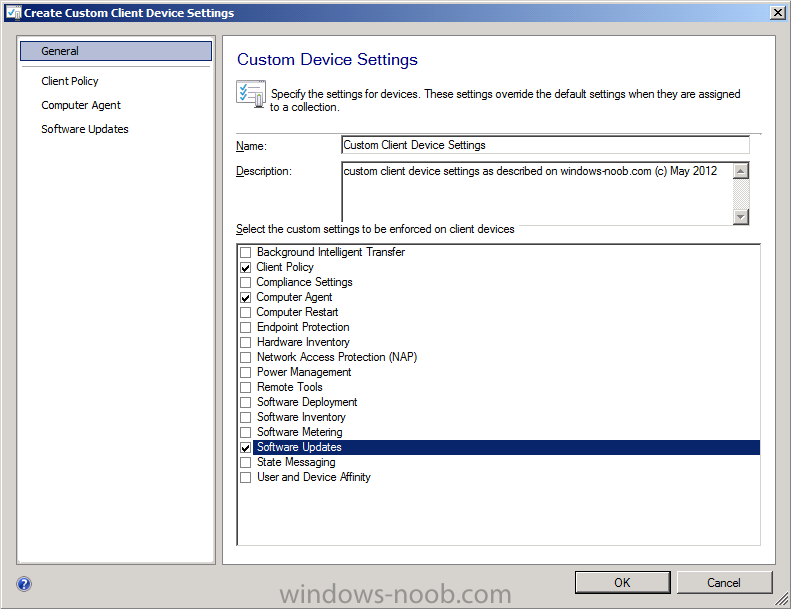
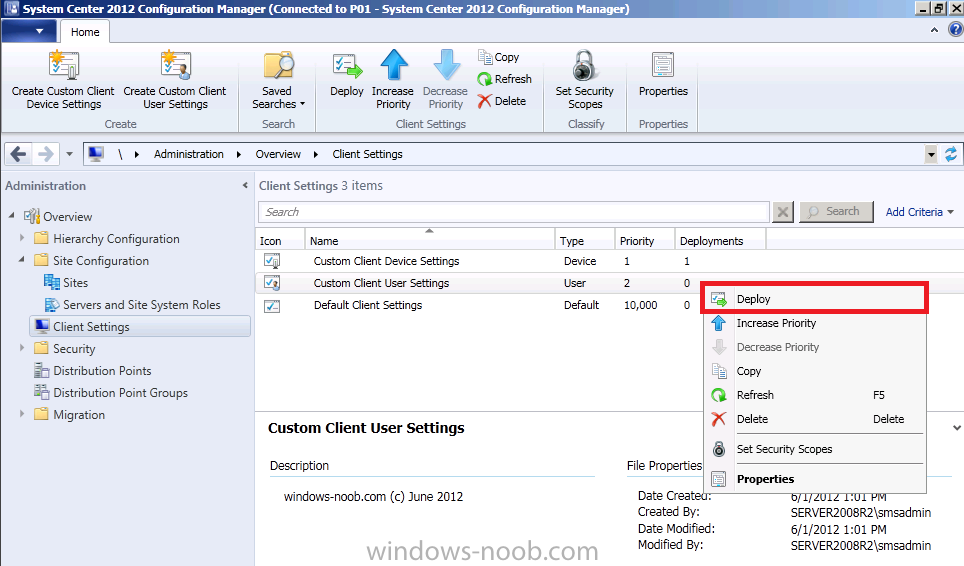
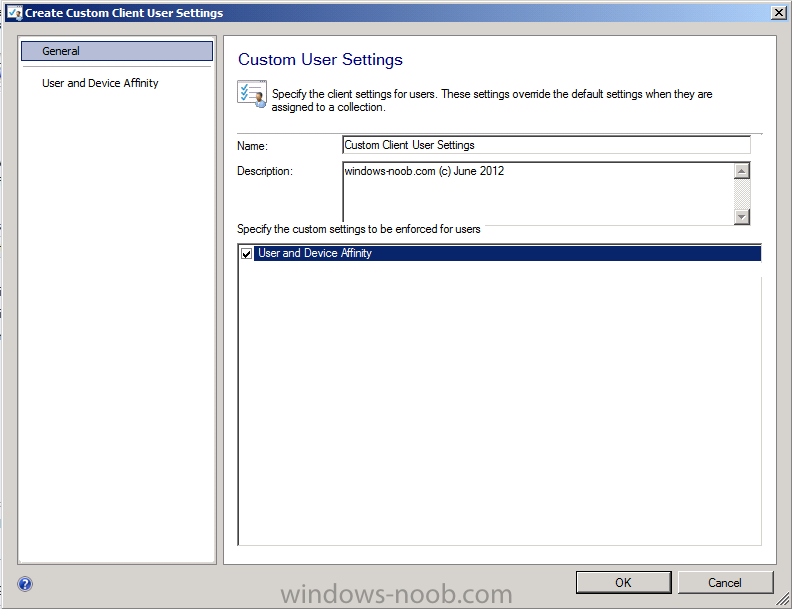
In Technet. In the Administration workspace, right-click on Client Settings in Site Configuration and choose Create Custom Client Device Settings. give the custom device settings a suitable name, we will call them Custom Client Device Settings select the following custom settings from the list (we can add/configure more later) Client Policy Computer Agent Software Updates in the left pane, click on the first selected, Client Policy, this is a LAB so lets be more aggresive than the Default setting of 60 minutes in the client policy polling interval, we will set it to 5 minutes in the LAB. This means that once every 5 minutes the Client will contact it's Management Point for any new policy. It's probably best not to set it this aggressively in production as you could generate a lot of traffic from the clients to your Management Point and that will mean two things, increased network load and increased load on the Management Point server, and we all know that the more you load your servers, the slower they get (usually). Next we will configure the Computer Agent settings from the options in the left pane. The first thing you'll want to configure is the Default Application Catalog Website (which we installed above !), so click on Set Website. in the select application catalog website point drop down menu select your choice Set Add default Application Catalog website to Internet Explorer trusted sites zone to True and fill in the Organization Name you want displayed in Software Center (the modern day equivalent of Run Advertised Programs which we had in Configuration Manager 2007) In the left pane select Software Updates and set the Software updates scan schedule from 7 days to 1 day, this will be because we want to synchronize Endpoint Protection definition updates on a daily basis. We will be configuring Endpoint Protection fully in a later part of this series. Apply your changes by clicking OK. Step 3. Deploy our Custom Client Device Settings. Note: Perform the following on the Primary Site server (P01) as SMSadmin. Creating custom client device settings will not take effect until they are deployed to a collection. Right click on our newly created Custom Client Device settings and click Deploy. Select the All Systems Collection and click OK. By doing this action you are applying the Custom Client Device settings to all devices in the All Systems collection. As this is a LAB we don't have many computers in there but that will grow over time. Tip: Now that you have created and deployed our Custom Client Device Settings you can go ahead and create more Custom Client Device Settings with different options as appropriate and then Deploy them to different collections. In addition you can change the priority of the Custom Client Device Settings so that one takes priority over another (highest priority wins). Step 4. Configure Custom Client User Settings Note: Perform the following on the Primary Site server (P01) as SMSadmin. Now that we have our Custom Client Device settings done, let's turn our attention to creating Custom Client User Settings, there are not so many options in these settings but they are useful none-the-less and they are also user specific. They allow you to define whether users can define their Mobile devices and also allow users to set their own User Device Affinity. In the Administration workspace, right-click on Client Settings in Site Configuration and choose Create Custom Client User Settings . Give the new Custom Client User Settings a suitable name and select User and Device Affinity as per the screenshot below for User and Device Affinity, set the drop down menu to True as per the screenshot below, this allows users to decide for themselves if the computer they are using is their primary device (in the My Devices section within the Application Catalog) Click ok to apply the changes. Step 5. Deploy our Custom Client User Settings. Note: Perform the following on the Primary Site server (P01) as SMSadmin. Right click on our newly created Custom Client User settings for site P01 and click Deploy. As these are custom Client User settings you need to deploy them to a User Collection, as this is a LAB we don't have to be fussy so we will select the All Users collection, in production you'll probably want to have more than one Custom Client User Settings defined with different settings for different User Collections. In the Next part of this series we will add the Software Update Point role and use it to deploy the Configuration Manager Client to our computers and then we will verify that they are receiving the Custom Client Device Settings and Custom Client User Settings we've defined above.


-
you are probably thinking about Forefront Endpoint Protection in Configuration Manager 2007, that was totally different, the only Endpoint Protection Program is scepinstall.exe which is included in the Configuration Manager 2012 client, so once you enable Endpoint Protection and add client computers to a collection targetted with custom client settings which enable Endpoint Protection, they will install the Endpoint Protection Client, try the above and you'll see what i mean
-
Office 2007 via OSD ends in error 0x80070001
anyweb replied to hans.swolfs's question in Deploy software, applications and drivers
can you post the full error and step from the smsts.log file pls ? -
REDMOND, Wash. — May 31, 2012 — Microsoft Corp. today announced the availability of the Windows 8 Release Preview, the next milestone of the highly anticipated Windows 8 operating system. Available for download today in 14 languages at http://preview.windows.com, the Windows 8 Release Preview delivers a fast and fluid experience, along with a new user interface that responds equally well to touch as it does to keyboard and mouse. Since the February release of Windows 8 Consumer Preview, which was downloaded more than 1 million times in the first 24 hours, Windows 8 has become the most tested Microsoft operating system of all time, and with today’s release, it enters its final phase of development before it releases to manufacturing. “We’re thrilled to be at this milestone with the Windows 8 Release Preview,” said Steven Sinofsky, president of the Windows and Windows Live Division at Microsoft. New Apps Provide an Even Richer Experience Windows 8 Release Preview delivers new apps from Microsoft and partners. Highlights include Bing Travel, News and Sports apps, as well as Gaming and Music Xbox apps that integrate with your Zune pass. The Windows 8 Release Preview also features notable improvements to the Mail, Photos and People apps that initially debuted with the Windows 8 Consumer Preview. In addition, Microsoft has worked closely with its partners to deliver apps from around the world through the Windows Store. Beyond the new apps from Microsoft and partners, customers testing the Windows 8 Release Preview will also experience tens of thousands of refinements across the product, such as increased personalization options for the Start screen, improved multimonitor support, refinements to the way people find and download apps through the Windows Store, and new Family Safety features. The new Internet Explorer 10 redefines browsing, particularly for touch-enabled devices. The Web is as fast and fluid as any app, and with new capabilities in the Windows 8 Release Preview such as “flip ahead,” it is just as intuitive. A touch-friendly and power-optimized Adobe Flash Player is now integrated into Internet Explorer 10, and it is also the first browser to feature Do Not Track “on” by default, giving customers more choice and control over their privacy. The Path to Windows 8 Beginning June 2, 2012, Microsoft will roll out the Windows Upgrade Offer in 131 markets, including the U.S. and Canada. Consumers who buy eligible Windows 7-based PCs through Jan. 31, 2013, can purchase an upgrade to Windows 8 Pro for an estimated retail price of $14.99 (U.S.) during the time of the promotion. More information about the Windows Upgrade Offer will be available June 1. In addition to the Windows Upgrade Offer designed for consumers buying new Windows 7-based PCs, Microsoft will also announce other offers in the coming months that will help consumers with existing Windows 7-based PCs upgrade to Windows 8 when it is generally available. In the next month, Microsoft will further detail the value Windows 8 brings to businesses at TechEd North America. More information about Windows 8 and how to download the Windows 8 Release Preview is available at http://preview.windows.com. Founded in 1975, Microsoft (Nasdaq “MSFT”) is the worldwide leader in software, services and solutions that help people and businesses realize their full potential. Some information relates to a prerelease product, which may be substantially modified before it is commercially released. Microsoft makes no warranties, express or implied, with respect to the information provided here. Note to editors: For more information, news and perspectives from Microsoft, please visit the Microsoft News Center at http://www.microsoft.com/news. Web links, telephone numbers and titles were correct at time of publication, but may have changed. For additional assistance, journalists and analysts may contact Microsoft’s Rapid Response Team or other appropriate contacts listed at http://www.microsoft.../contactpr.mspx.

-
what os do you want to Deploy ?
-
Microsoft appears to be taking steps to remove legacy code from its Windows 8 operating system that will prevent modifications and hacks to re-enable the Start button and Start Menu. Windows watcher Paul Thurrott reports that the company has been "furiously ripping out" legacy code in Windows 8 recently that lets third parties bring back the Start button, Start Menu, and other legacy parts of the desktop interface. Thurrott claims that several well-known UI hacks that enabled the Start Button in the Consumer Preview do not work on the Release Preview. Despite a growing debate over Metro on desktop PCs, Microsoft doesn't appear to be willing to offer a choice of traditional desktop or Metro with its upcoming Windows 8 release, opting to continue to fuse the pair together. Thurrott claims there will not be an option to boot directly into the desktop for business or power users, and that Windows Server 12 will also boot into Metro. Microsoft's approach will anger some who prefer the traditional desktop over the new fullscreen Metro world, but the focus is on convincing developers to build Metro style apps. The Windows 8 Release Preview will debut today, where we're expecting to see some improvements for multi monitor setups and tweaks to some of the core Metro style applications, but Microsoft has already revealed that it plans to drop the Aero UI before RTM so there's clearly room for additional changes before the operating system ships later this year. source > http://www.theverge.com/2012/5/31/3054348/microsoft-windows-8-start-button-legacy-code-removal?utm_source=twitterfeed&utm_medium=twitter&utm_campaign=Feed%3A+WinRumors+%28WinRumors%29
-
it was released in April, and the interest about this product is clear to see on windows-noob.com, so let everyone know are you using System Center 2012 Configuration Manager yet ?
-
yesterday Neowin blogged about a post that was made on the MSDN blogs about the release of Windows 8 Release Preview today, May 31st. In anticipation of the availability of those files later today, i'm posting the download links here: Windows 8 Release Preview: Download here Windows 8 Driver Kit: Download here Visual Studio 2012 Professional: Download here cheers niall
-
FEP 2012 Installation & WSUS Problem
anyweb replied to Naveed_786's topic in Configuration Manager 2012
it's all explained in the guides, to install the SCEP client you do so via custom client agent settings and custom client antimalware settings, have you configured these ? is the ConfigMgr client installed on your clients yet ? once your systems end up in a collection targetted with the Custom Client settings (for enabling Endpoint Protection) and Custom Antimalware policies, they'll get SCEP installed and configured. -
just noticed this now, sorry for missing it, you should take a look at the following post (and recording if you want), the powerpoint contains notes in the slide notes which will help you in choosing how to build and capture and then later deploy,
-
FEP 2012 Installation & WSUS Problem
anyweb replied to Naveed_786's topic in Configuration Manager 2012
if you follow the guides you'll see theres an option of deploying the client via Client Push, however that is one of many ways to deploy it. -
FEP 2012 Installation & WSUS Problem
anyweb replied to Naveed_786's topic in Configuration Manager 2012
did you select Definition Updates in Classsifications ? you need the ConfigMgr client installed on the computers before you can implement Endpoint Protection, the machines above say 'client =no' so do they have the client installed, or not -
you can set the variables in many ways such as via collection variables computer variables HTA sets the variables steps in the task sequence a script glad to hear you got it working