-
Posts
9251 -
Joined
-
Last visited
-
Days Won
369
Everything posted by anyweb
-
are you migrating from Windows XP to Windows XP or Windows XP to Windows 7 ? please confirm
-

Capture image for Windows 7 64 bits computer
anyweb replied to lcusson's topic in Configuration Manager 2007
you must take this one step at a time, the red arrow in your screenshot is indeed important, you can verify this by pressing F8 during deployment and checking ipconfig to see that you are getting a valid ip and that you can ping the FQDN of your configmgr server. if no network card is found then you need to add network drivers for the hardware you are deploying on has the user you use to join the domain been given the correct rights to join computers to the domain, check c:\windows\debug\netsetup.log for domain join failures., also it's best to post logs etc here in the forum post so others can join in, I get many mails from people asking for help and i don't always have time to respond to them all -

Setup a primary site in an trusted forest
anyweb replied to sattler's topic in Configuration Manager 2012
hi there Magnus have you seen the following on Technet ? from here - http://technet.microsoft.com/en-us/library/hh696543.aspx -

Making sense of Microsoft's confusing Windows activation rules
anyweb posted a topic in Windows News
Last week, Microsoft cut the number of Windows and Office product keys it includes for TechNet subscribers. Readers tell me that doesn’t matter, because every key is good for multiple activations. But is that really true? My investigation says yes, although exact details are murky. Over the years, I have written tens of thousands of words about the mysterious workings of Microsoft’s Windows activation technology in XP, Vista, and Windows 7. It might be one of the most arcane and misunderstood technologies of the PC era. Last week, the topic came up again when I published details about Microsoft’s decision to cut the number of Windows and Office product keys it includes with TechNet subscriptions. (See “Microsoft slashes product key allowances for TechNet subscribers.”) Two years ago, a TechNet subscription included 10 product keys for each version of Windows and Office. That number was cut to five in late 2010, and to three earlier this month. A half-dozen readers left Talkback comments and sent emails telling me that it’s “well known” that each TechNet product key can be activated 10 times. Several quoted Paul Thurrott, who wrote in 2010, without citing a source, “Each product key can be used to install up to 10 versions of the OS or application, for the most part.” So, they say, no big deal—three product keys equals 30 installations per Windows and Office version. But is that true? I’ve fact-checked this issue several times over the years and have never been able to track down a definitive answer. This policy is not documented on any official Microsoft site. I have found unofficial statements on Microsoft’s public support forums and in private emails, like this example from a front-line tech on a support forum: You have 2 product keys for most products, and for Windows Retail keys, each of these keys will let you activate at least 10 times (it depends on the key type). Another customer got this message from a support rep last week, via email: Smoking gun? Well, I’m always suspicious of information that comes from front-line support reps, who often are well meaning but not fully in the loop. In addition, these two messages are actually contradictory. One says each key is worth at least 10 activations, the other says up to 10. Is either statement true? If so which is it? I asked a few official and unofficial sources at Microsoft. It took 48 hours and much hemming and hawing, but I finally got a Microsoft spokesperson to confirm that 10 activations per subscription key “is not the official policy across all products.” She went on to note that “different products call for different activation parameters.” That’s something more than a non-denial denial, but it’s still far from clear. And that, as it turns out, is the crux of the problem. The official policy for retail Windows product keys is that you are allowed one activation, with an unlimited number of reactivations on hardware that is substantially the same as the system on which the OS was originally installed. But the activation servers, which do the grunt work of processing activations over the Internet, aren’t so rigid. There are, in fact, business rules designed to flag unusual behavior and allow or block activations based on those rules. For example, if you activate a retail copy of Windows on a PC and then, 18 months later, try to activate that same key on a different PC, your activation will probably complete without error. Why? Because that’s the behavior of an enthusiast getting a new PC, not a pirate. If, on the other hand, the same key is used to try to activate Windows on six different PCs in widely scattered geographical locations over a short period, that key is likely to be flagged as stolen. Microsoft doesn’t like to go into detail about those business rules, because doing so makes it easier for pirates to figure out how to game the system. Crooks who have to guess about how the system works are more likely to screw up and get caught. In the case of TechNet keys, there isn’t a literal 10-activations-per-key algorithm on the activation servers. Instead, the business rules are set to recognize the way that TechNet subscribers—who are typically enthusiasts and IT pros—are likely to use those licenses. They play with it, reinstall on multiple hardware configurations to test compatibility, and try to see if it breaks things. The upshot is that those TechNet subscribers behave far differently from typical retail customers. As a result, the business rules flag TechNet keys as special. They are indeed able to qualify for more activations than an equivalent retail key would get. And if your legitimately obtained keys fail to activate, you should be able to resolve the issue with a phone call or email to Microsoft support. Sources at Microsoft adamantly refused to talk on or off the record about specific numbers used as activation guidelines. But they did confirm that the rules are relaxed: My experience with TechNet downloads and product keys over the years bears that out. I keep good records about which keys are used where, and I can’t remember ever being denied activation because a key had been used too many times. The lack of transparency in the process is frustrating, but it’s also understandable. Software pirates have proven, time and again, that they’re willing to treat each unique key as an asset that can be resold against the TechNet terms of service. Reducing the number of keys in a subscription means there are fewer of those assets to bootleg. As long as legitimate subscribers find a relaxed and tolerant attitude when activation time comes around, this might turn out to be a non-issue. In the wake of the TechNet product key reduction, I’m interested in hearing firsthand reports about your experience with Microsoft’s activation servers. If you’ve had recent experience that can help make sense of how this activation works, please send me an email or leave a comment below. via > http://www.zdnet.com...h-results-river -

Capture image for Windows 7 64 bits computer
anyweb replied to lcusson's topic in Configuration Manager 2007
great stuff ! good job -

Capture image for Windows 7 64 bits computer
anyweb replied to lcusson's topic in Configuration Manager 2007
you can capture an image using capture media then, the following guide is for Configuration Manager 2012 but the main concepts are unchanged - have a look and see does it help you http://www.windows-noob.com/forums/index.php?/topic/5070-how-can-i-capture-an-image-using-capture-media-in-configmgr-2012/ the "0x00000032" error means unsupported, ie: you are trying to do something that should be done in windows PE or vice versa... "0x80004005" error usually means 'access denied' so check permissions. cheers niall -

Capture image for Windows 7 64 bits computer
anyweb replied to lcusson's topic in Configuration Manager 2007
hi Lucie have you checked if the computer you are trying to build and capture has a readable C:\ drive ? press F8 and see can you browse C:\ if not use diskpart to partition it like so diskpart select disk 0 clean create partition primary select partition 1 active format fs=ntfs quick assign once done, try pxe booting again, does it work ? as regards the media player shortcut, anything like that can be removed via separate steps in your Deploy Task Sequence, for more details of build and capture versus Deploy please look at this powerpoint I did and look at the slide notes. -
is there any switch in between your configmgr server and the computer above ?
-

using SCCM 2012 in a LAB - Part 2. Add SUP and WDS
anyweb replied to anyweb's topic in Configuration Manager 2012
have you tried installing the distribution point (which hosts the PXE stuff) on that server ? -
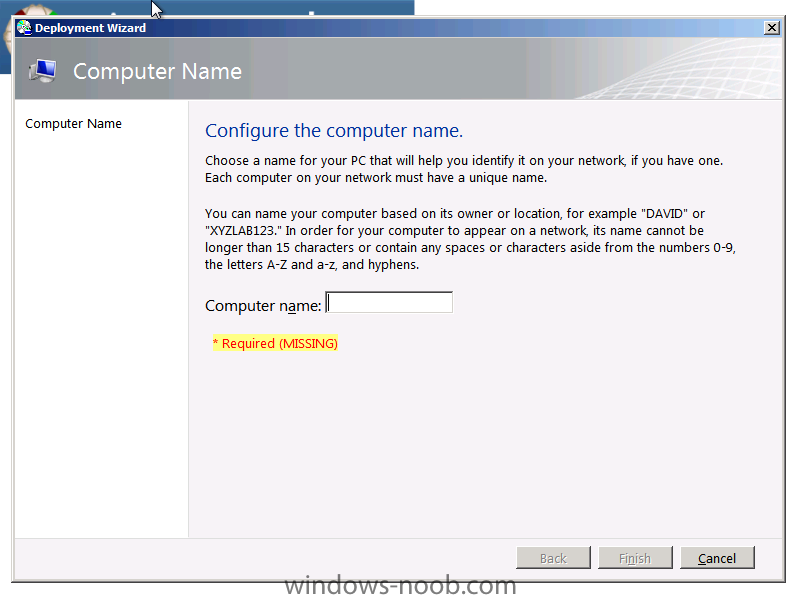
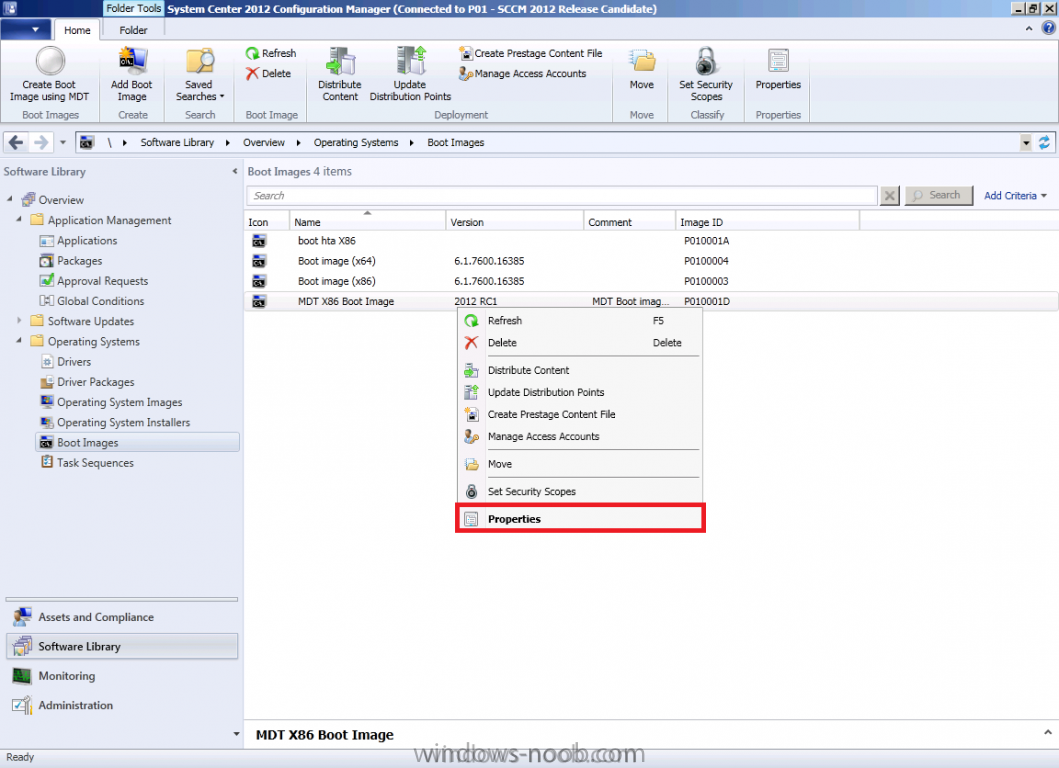
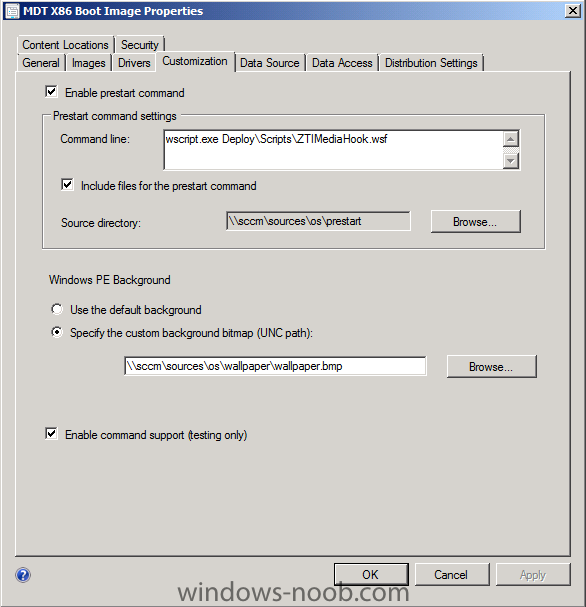
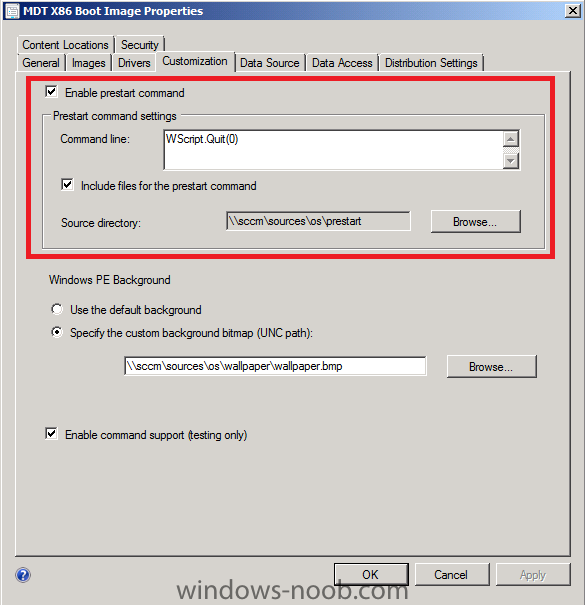
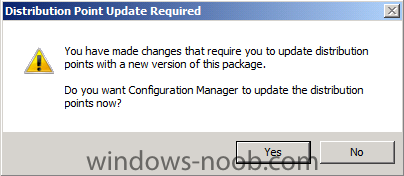
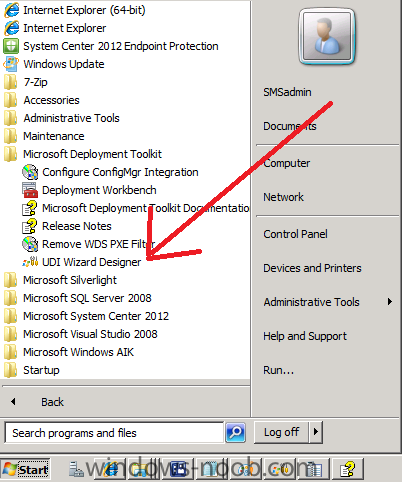
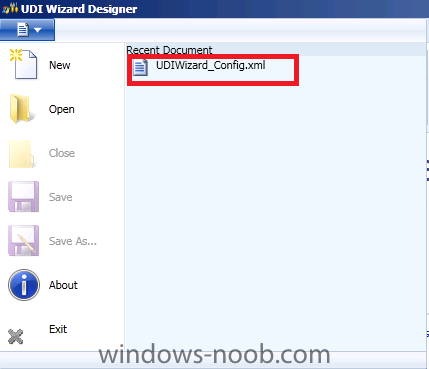
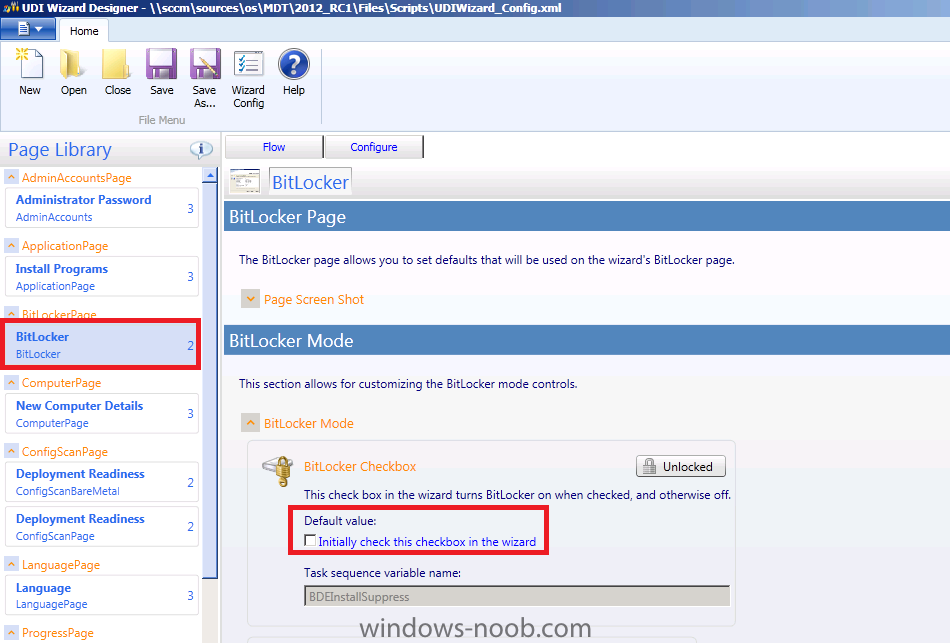
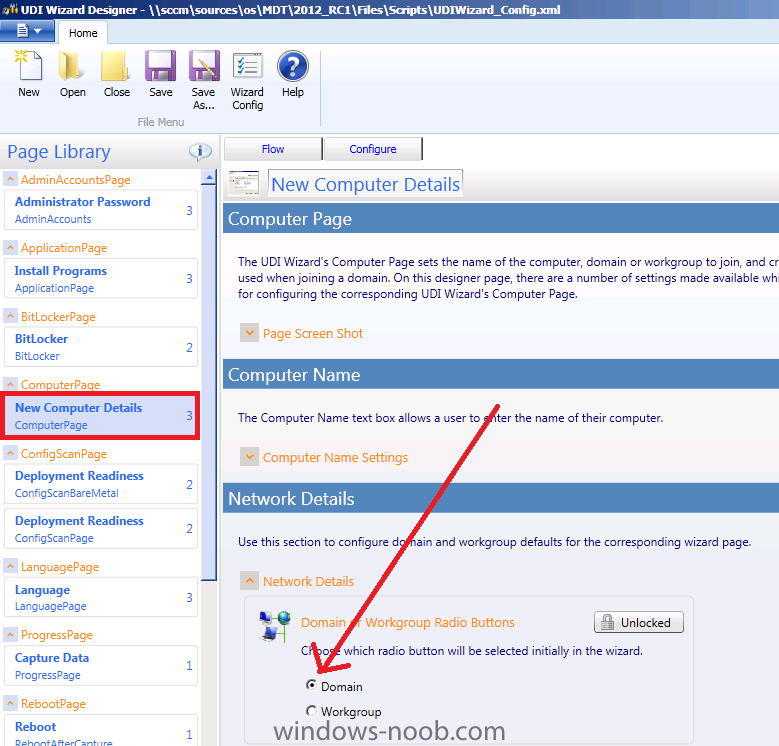
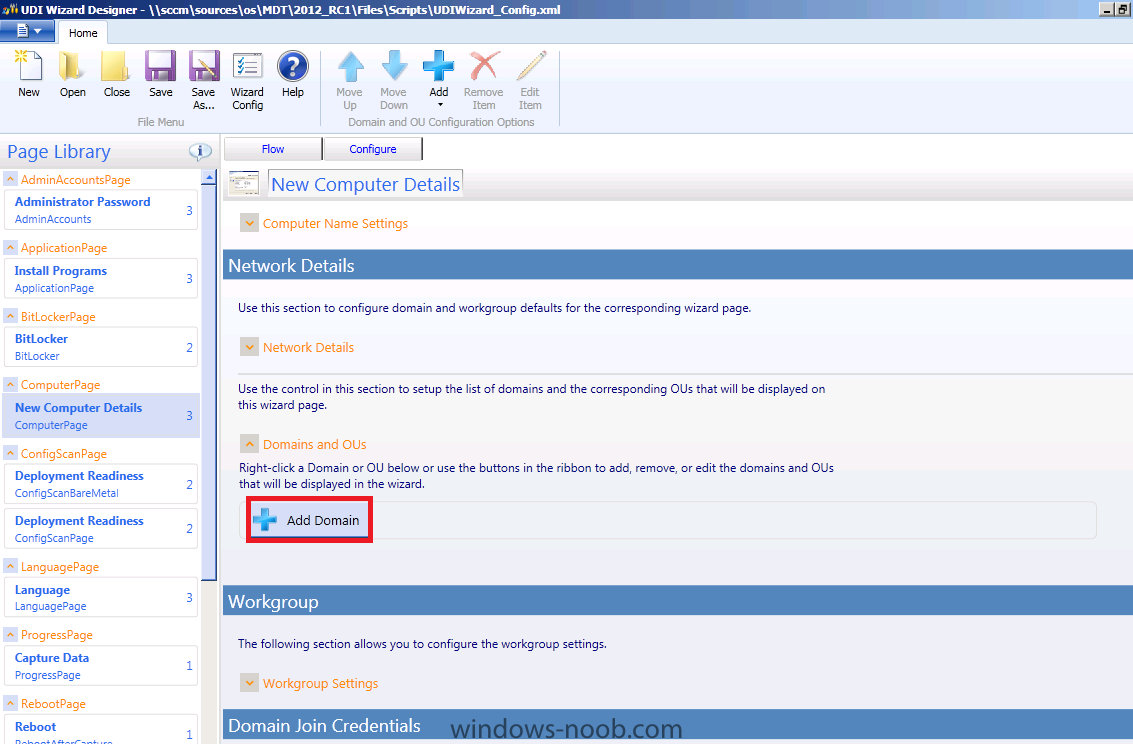
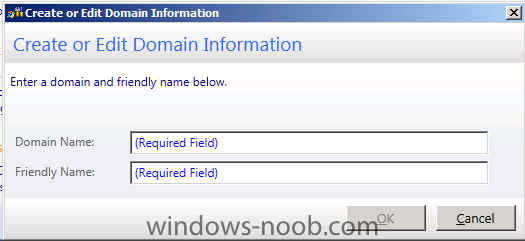
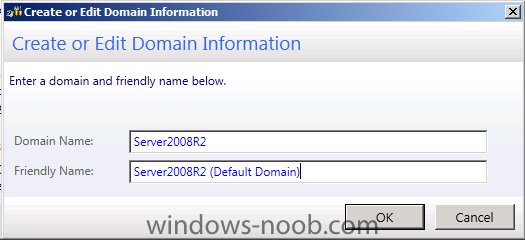
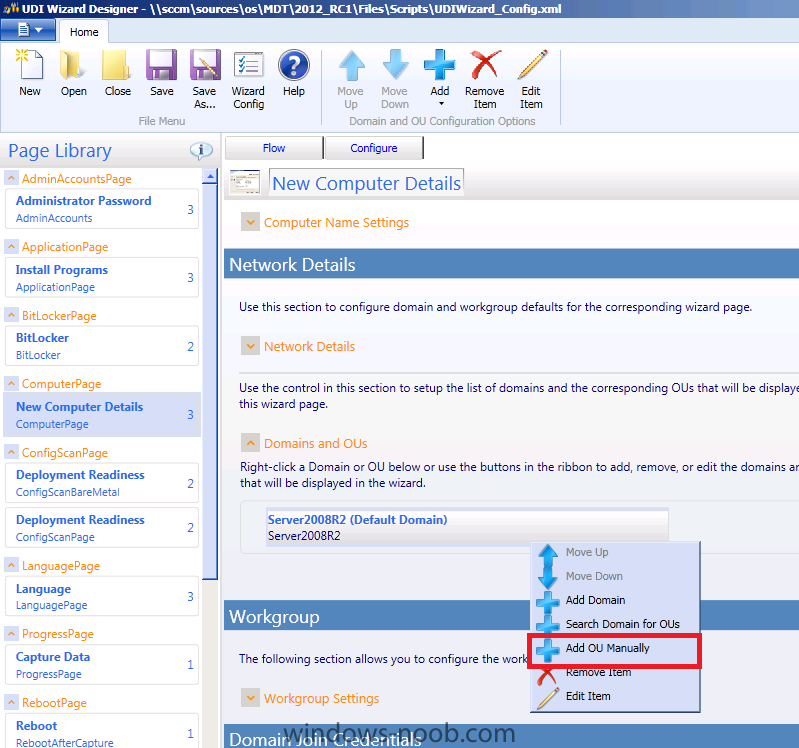
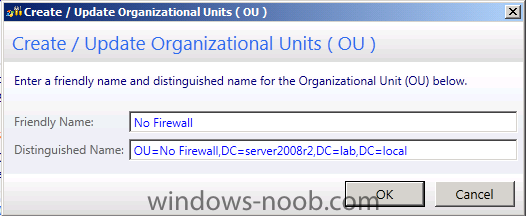
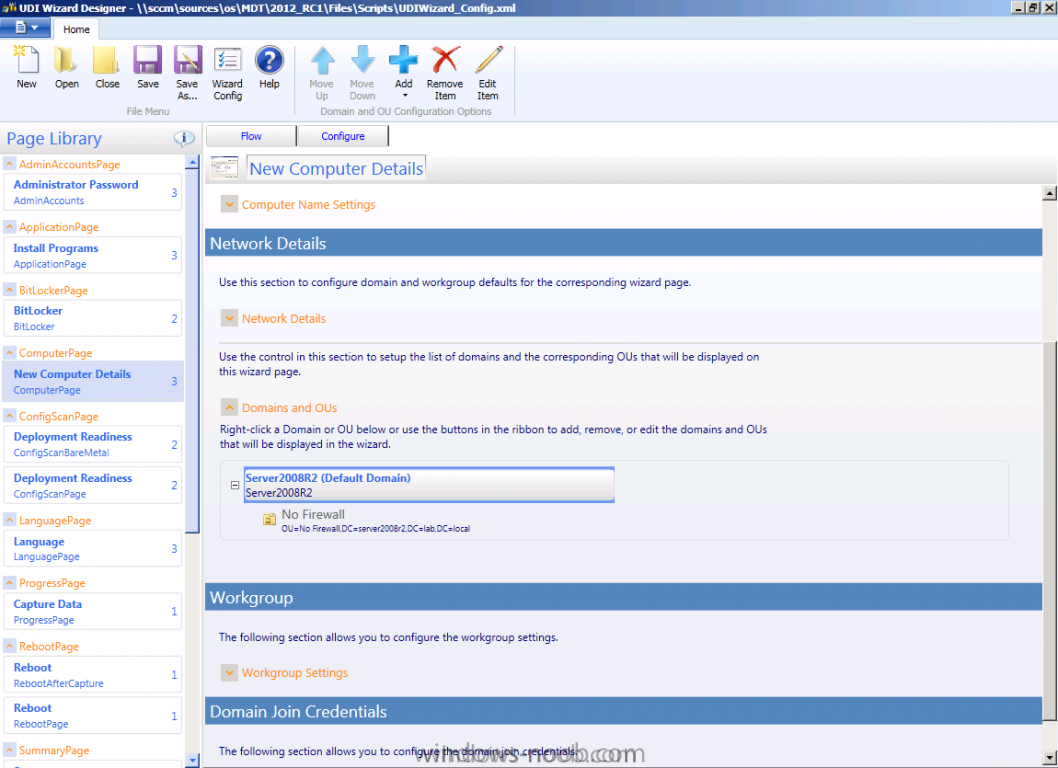
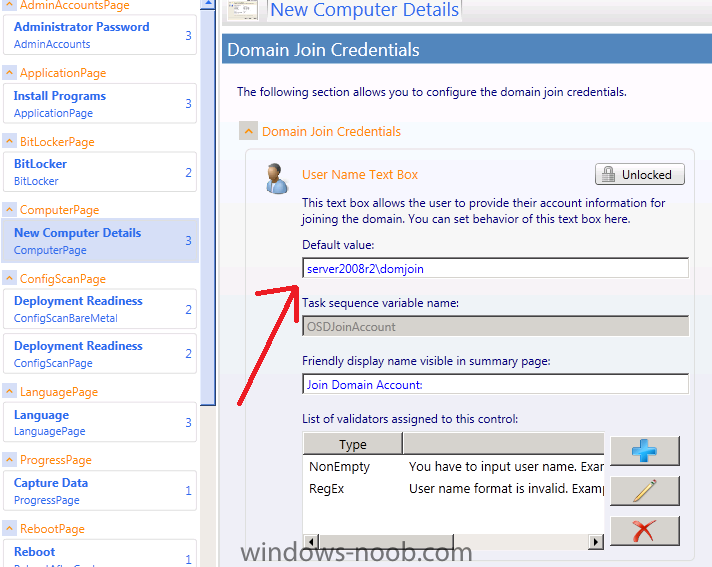
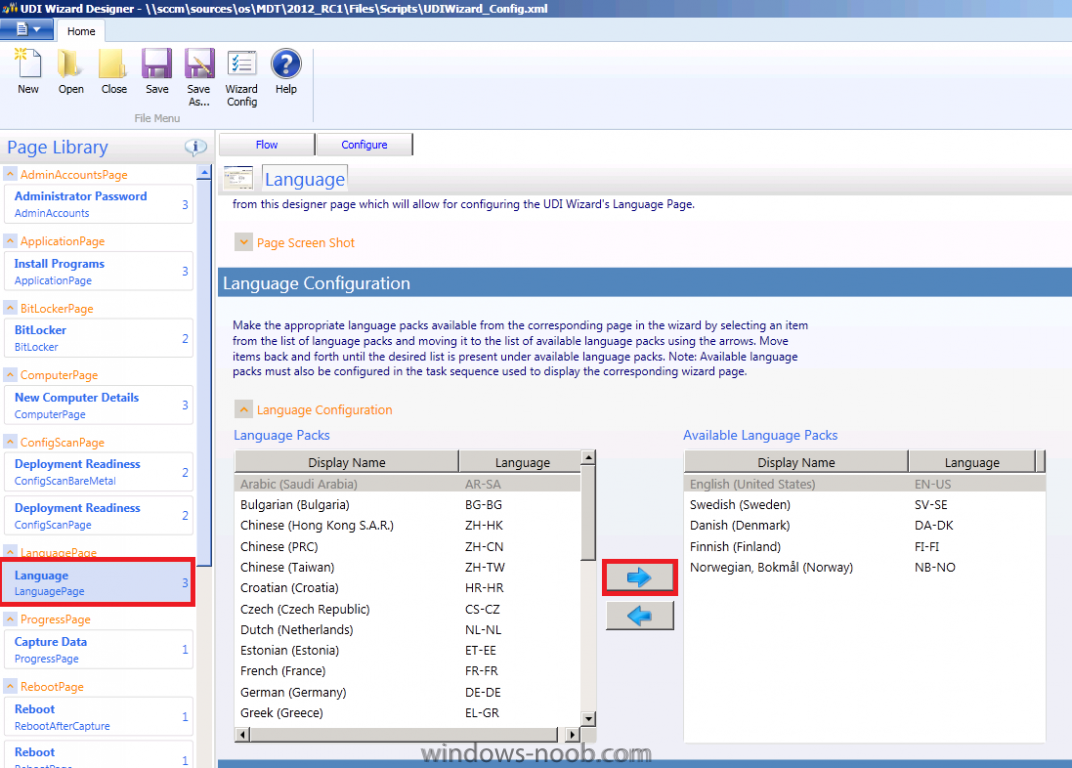
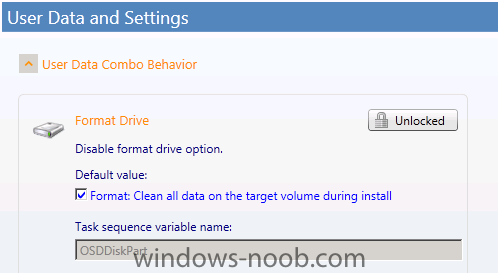
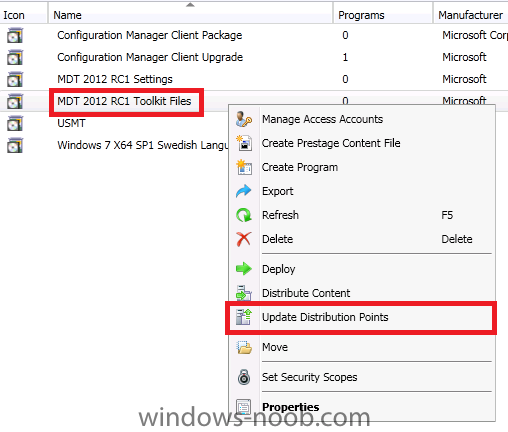
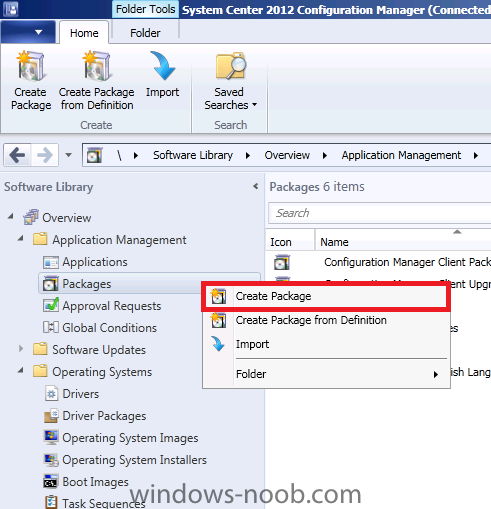
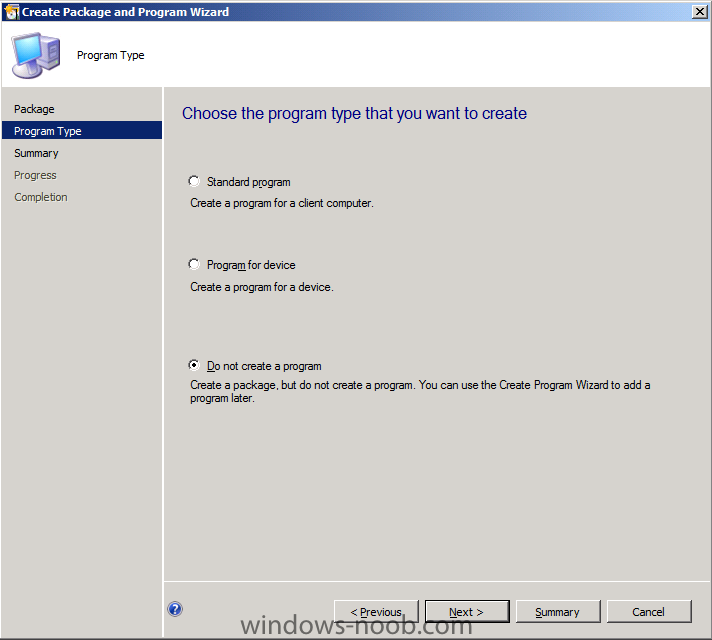
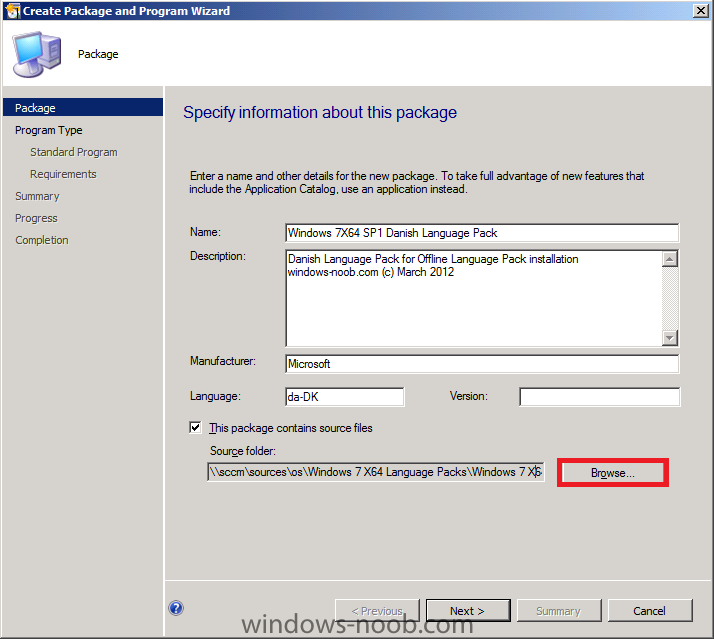
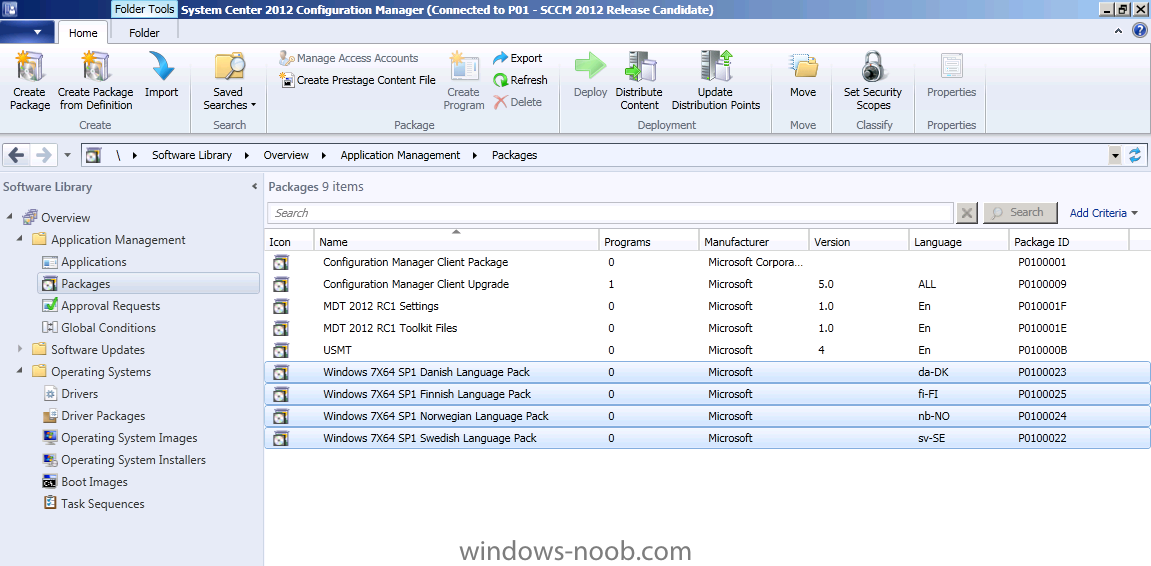
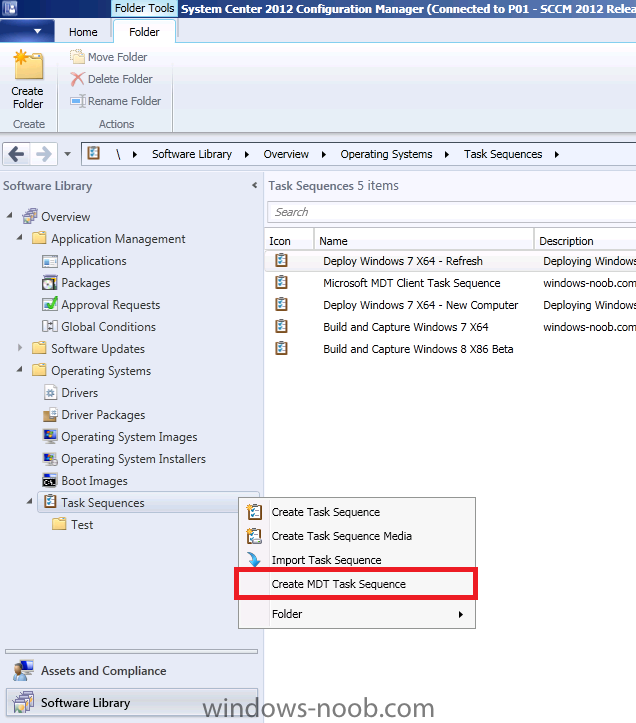
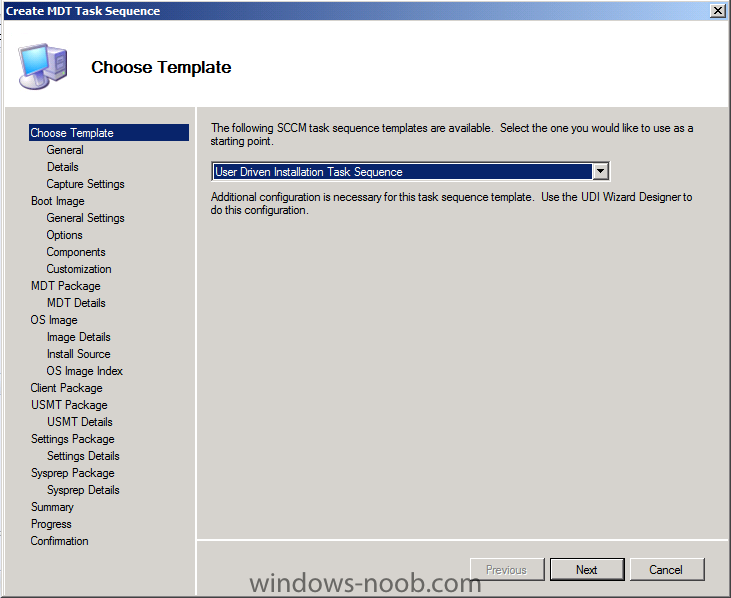
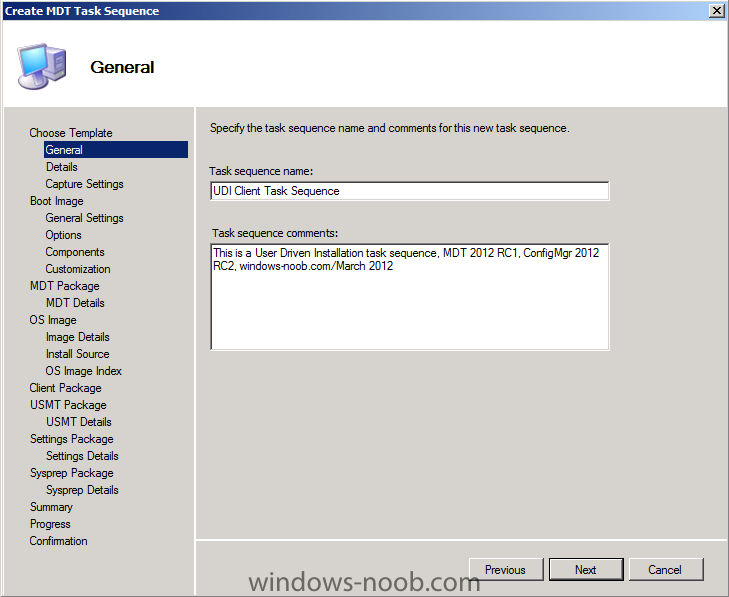
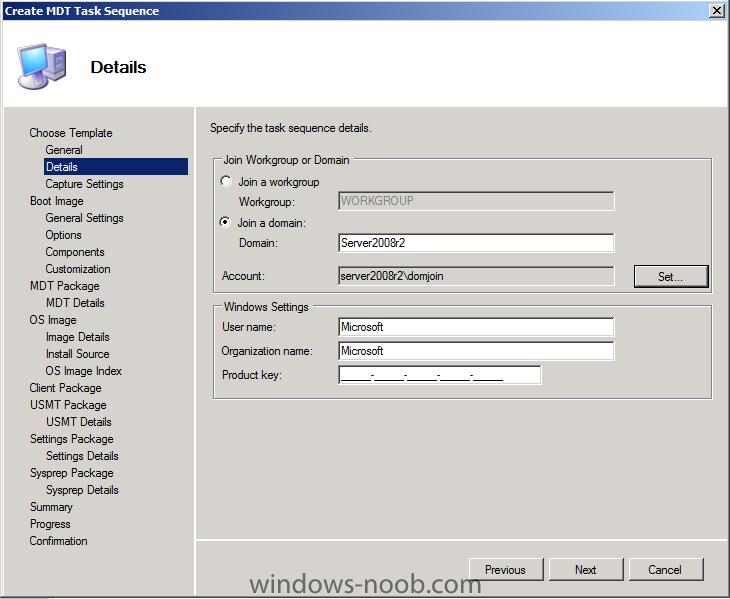
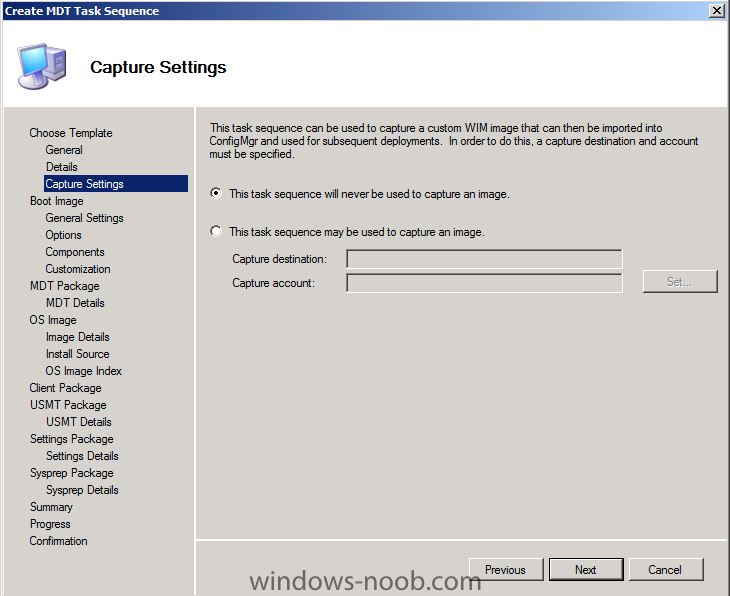
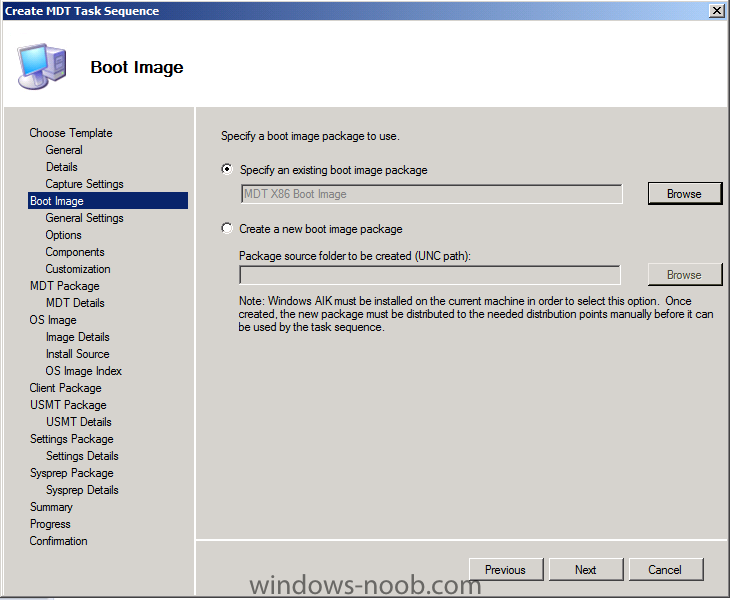
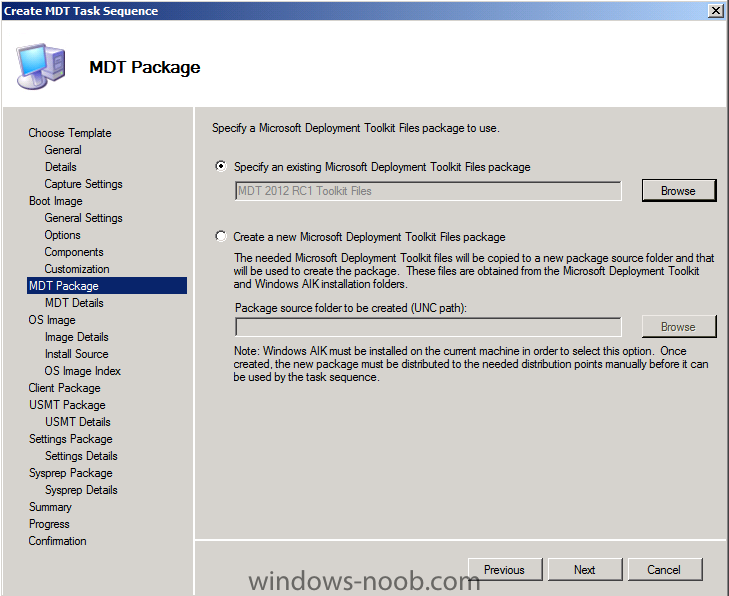
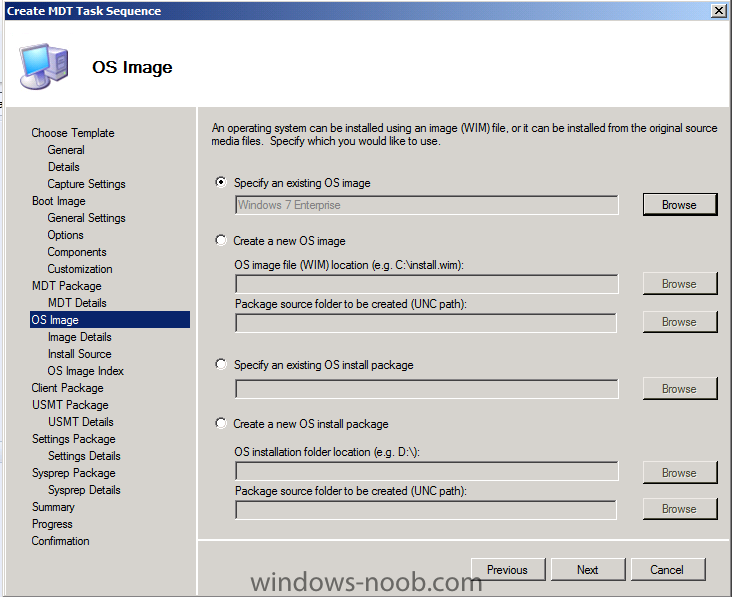
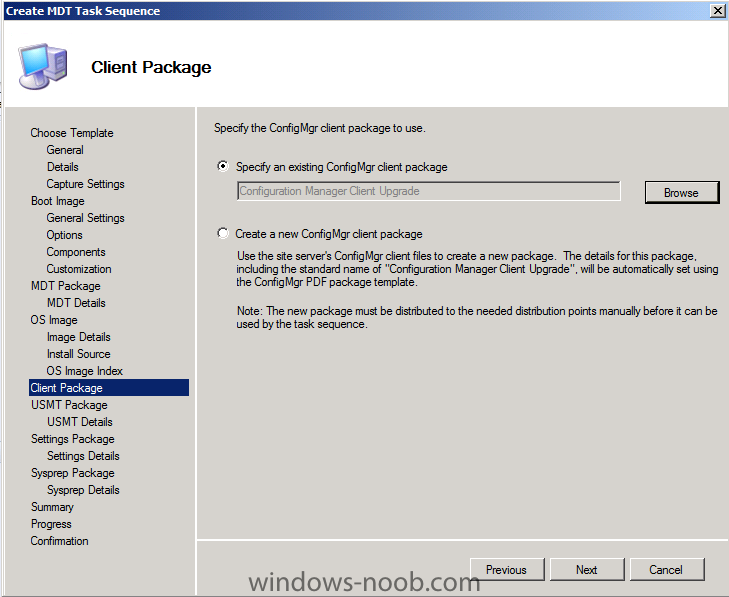
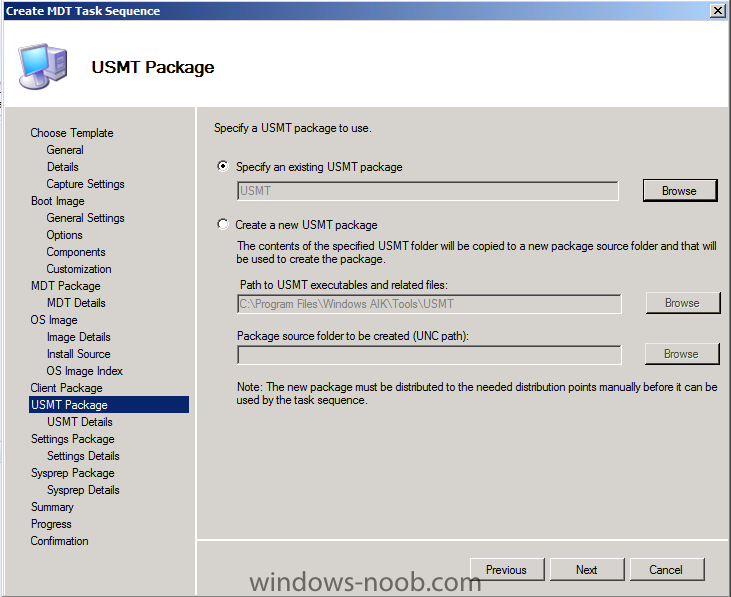
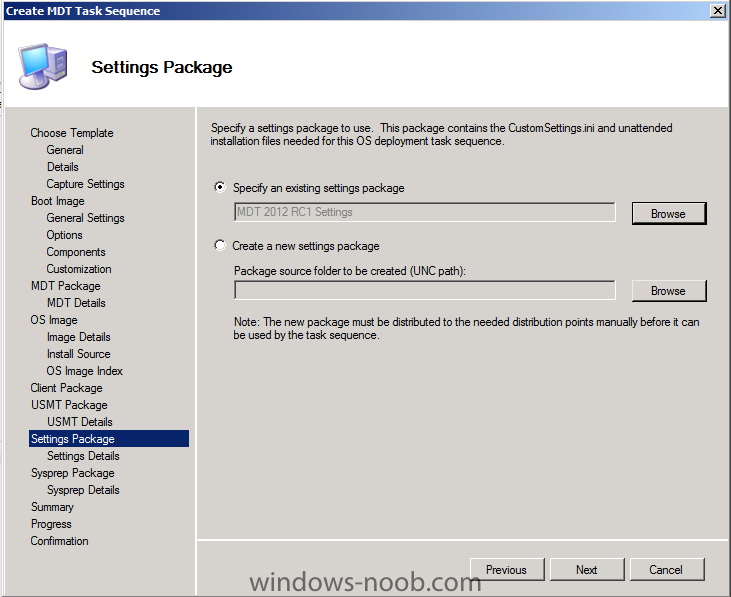
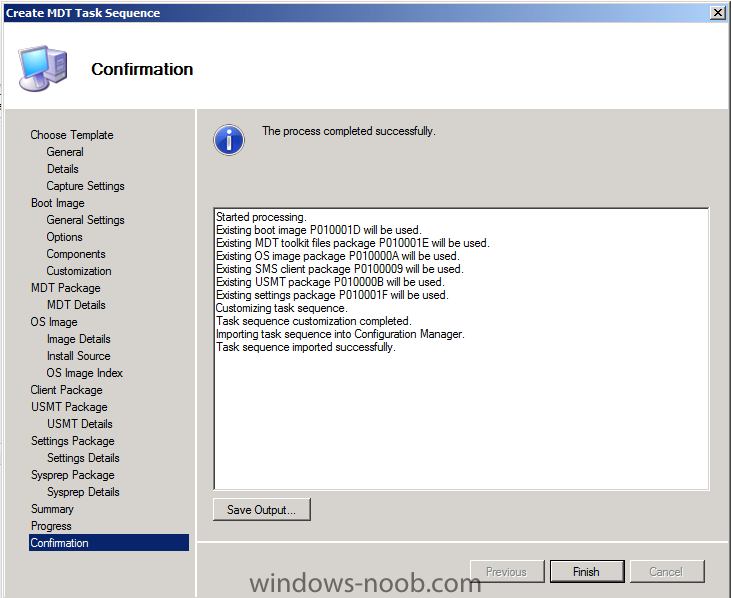
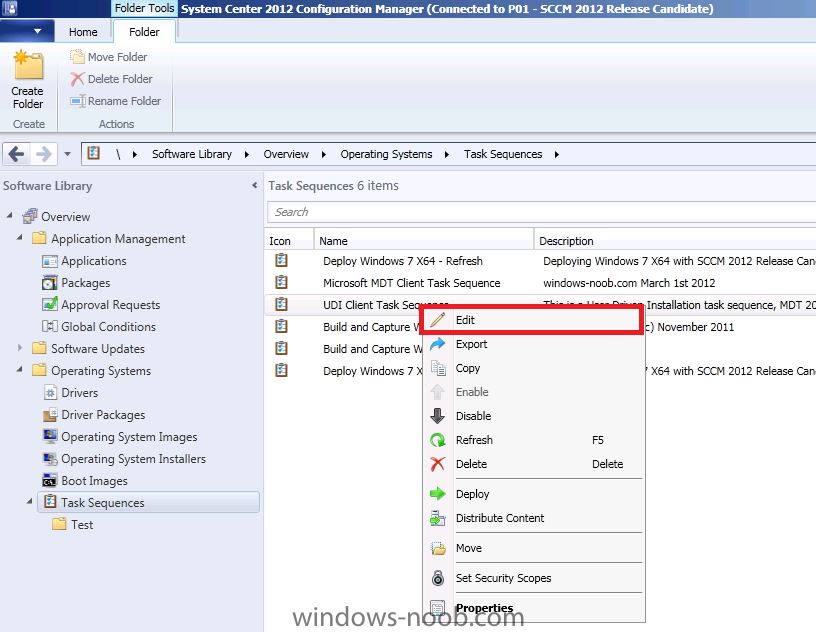
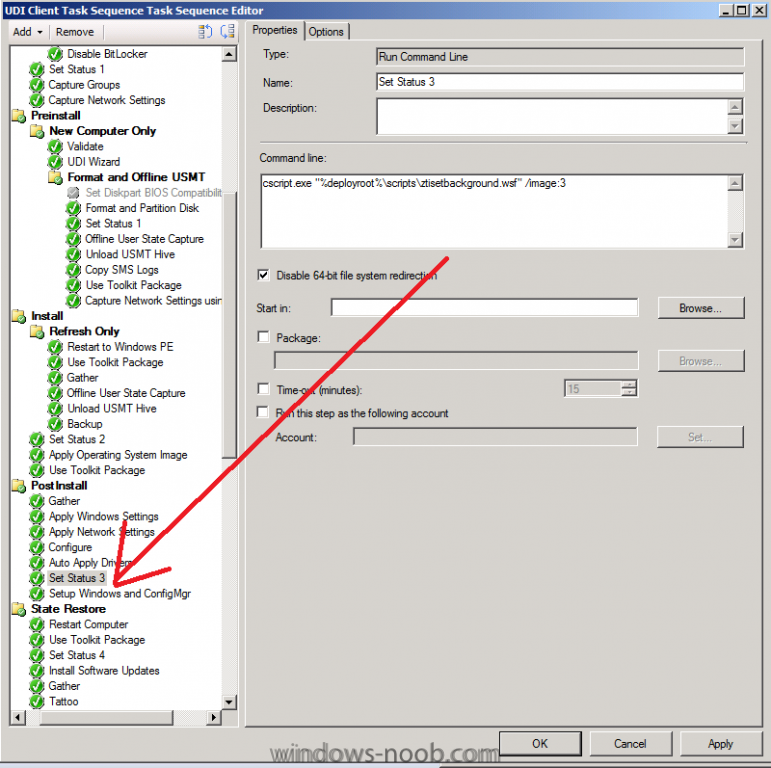
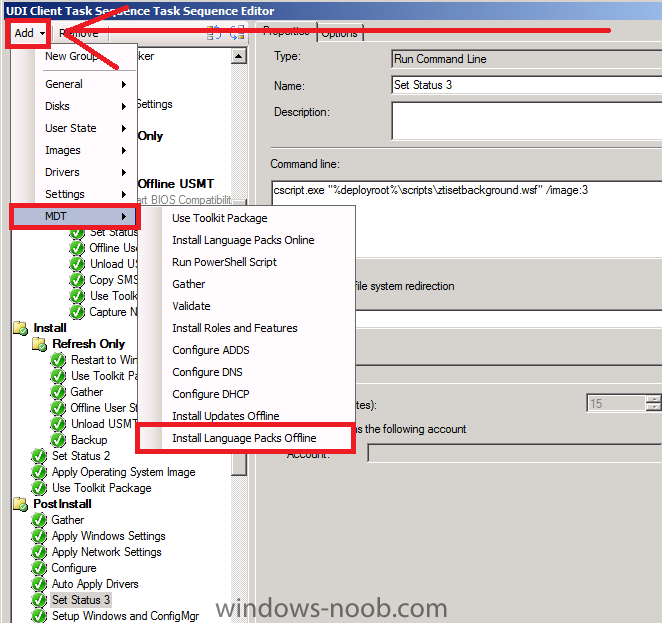
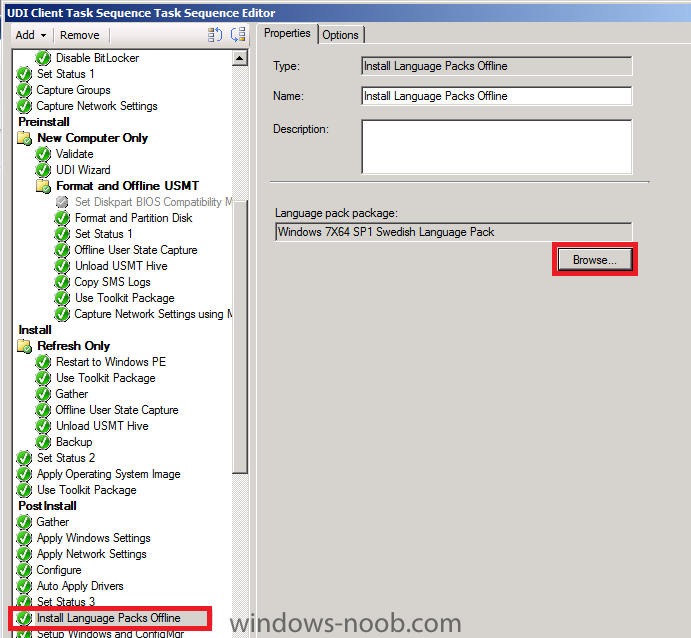
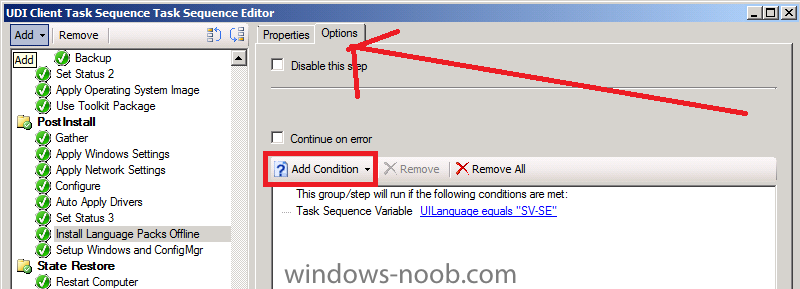
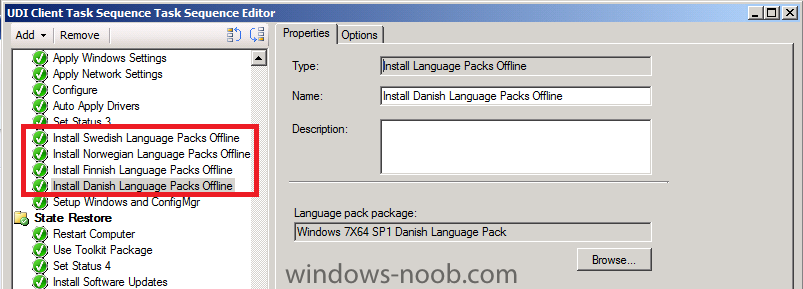
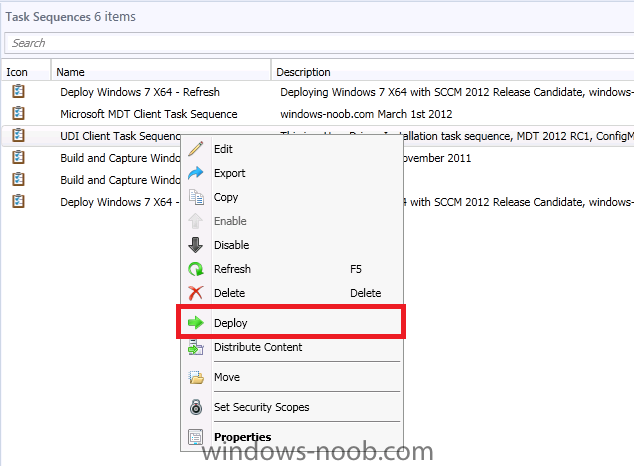
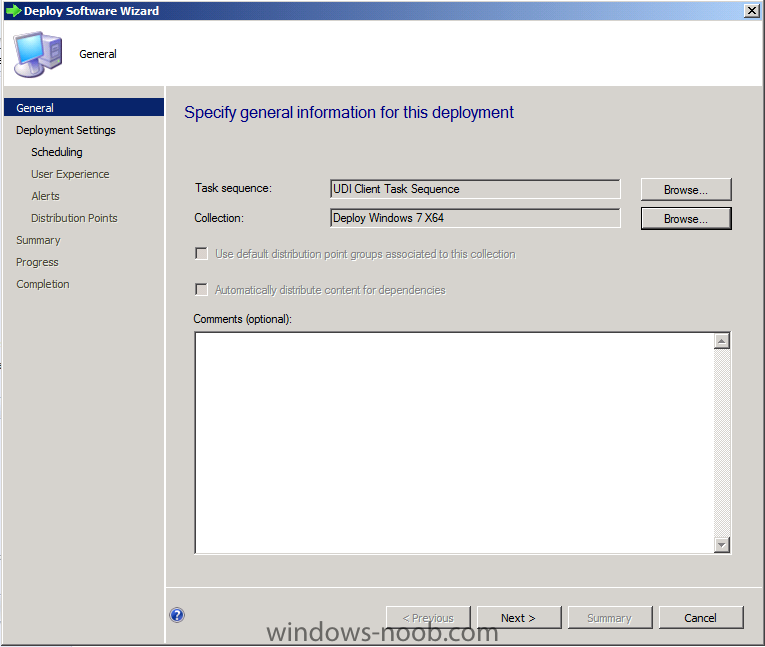
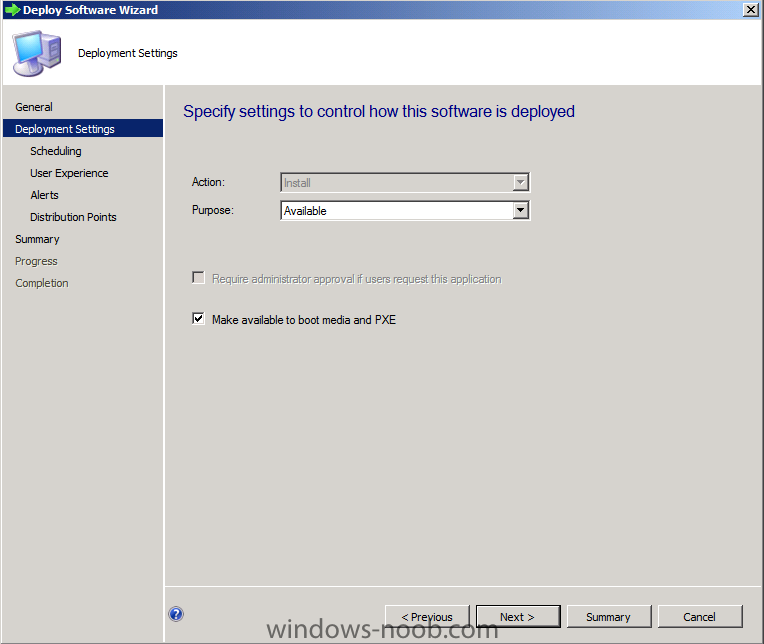
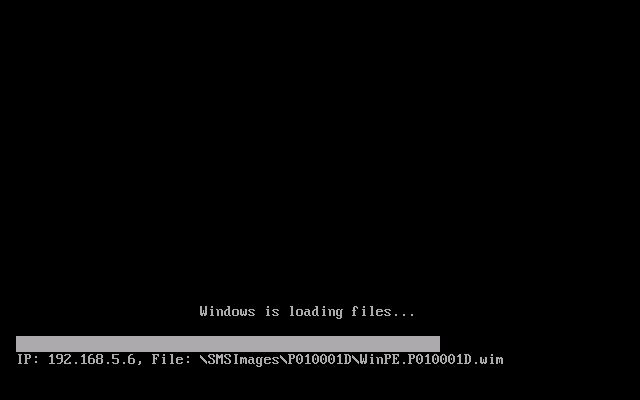
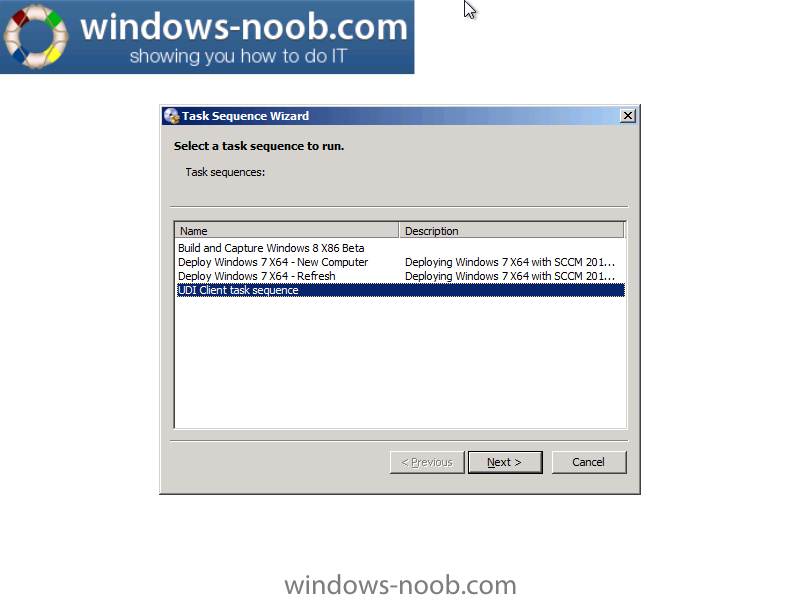
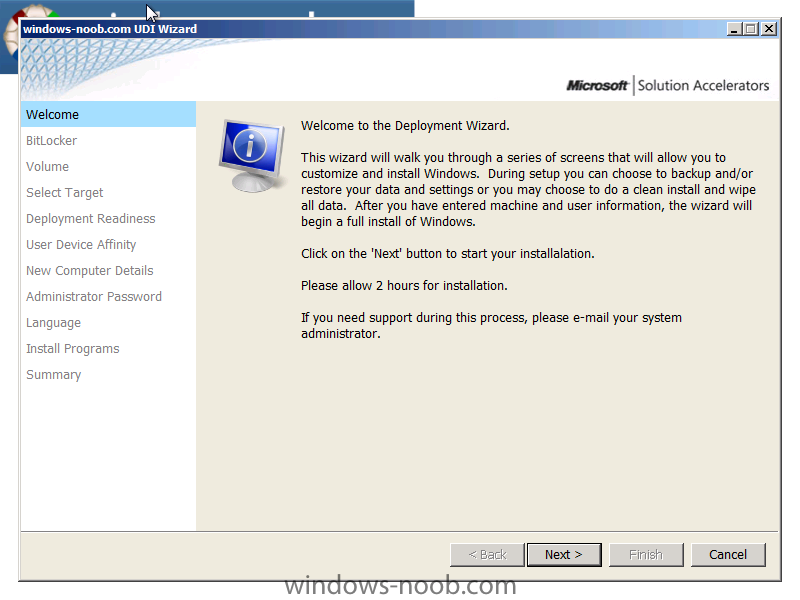
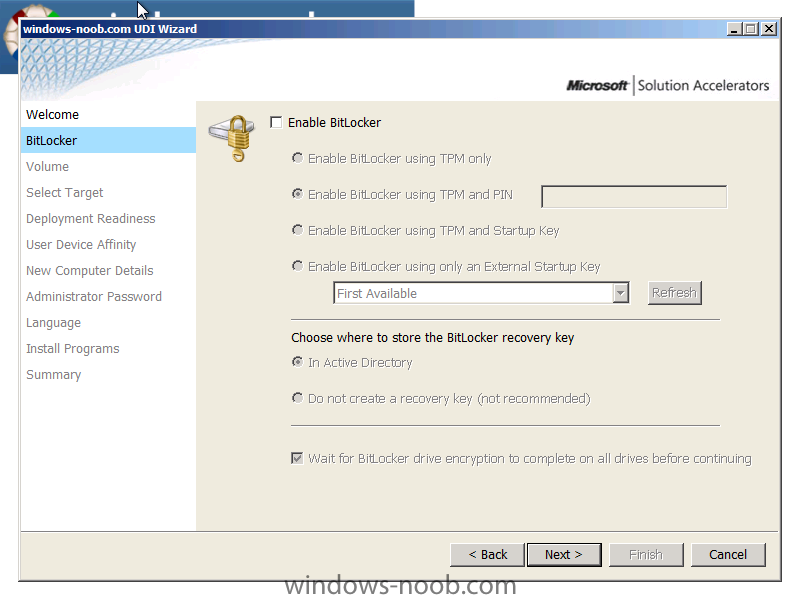
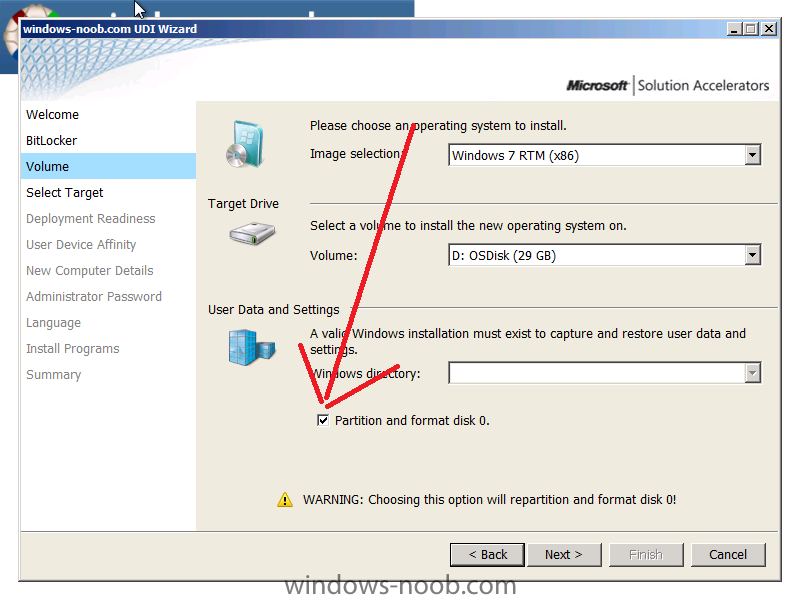
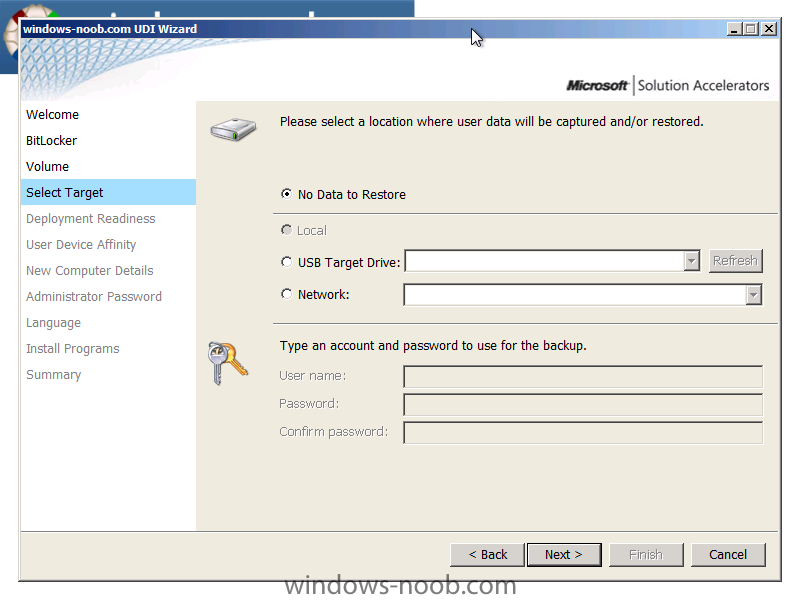
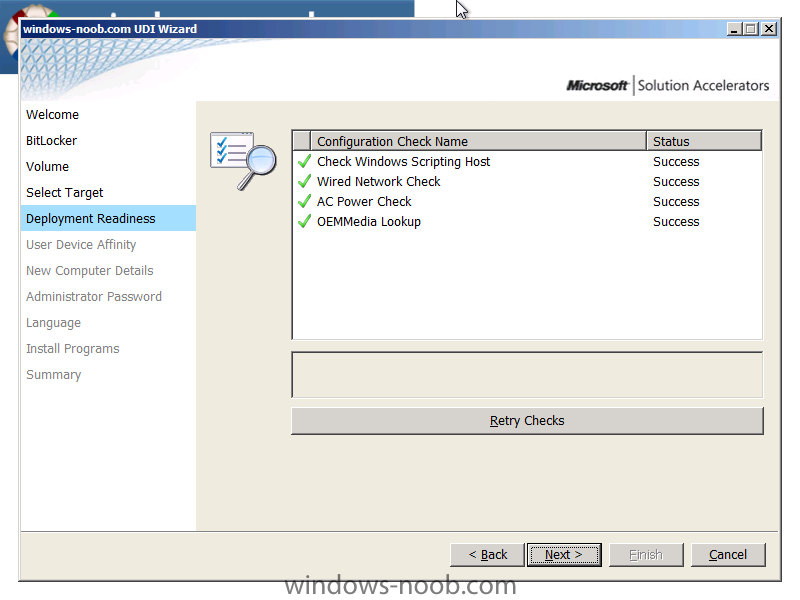
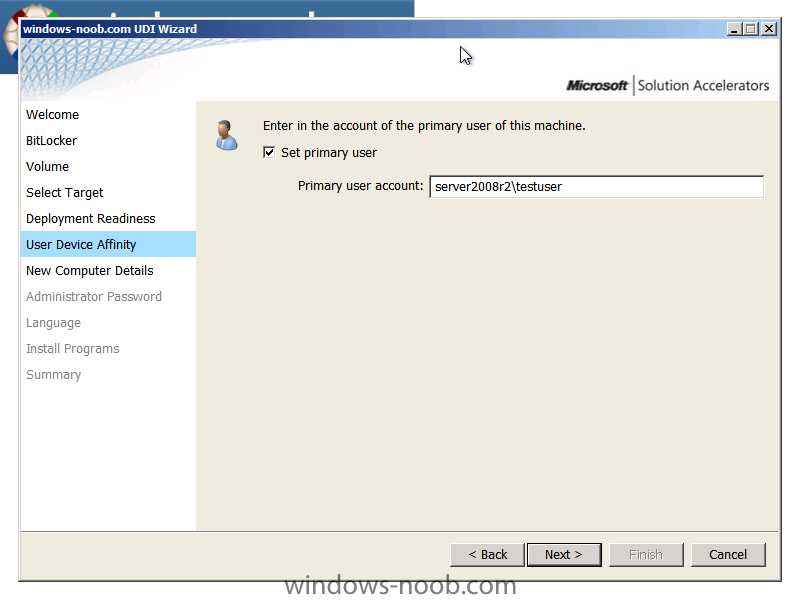
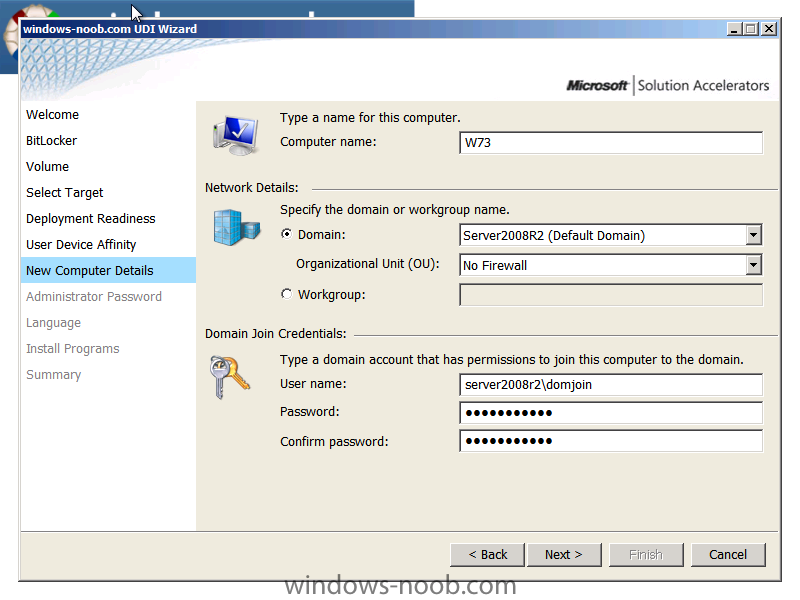
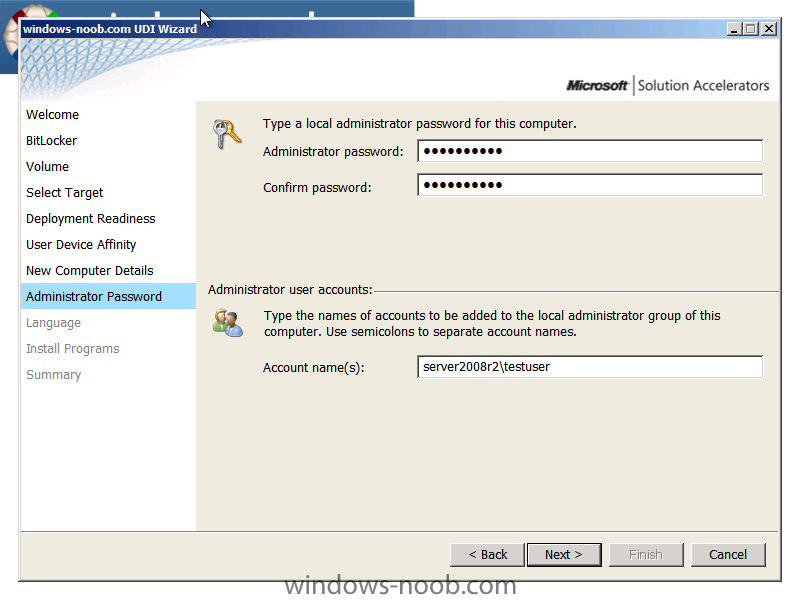
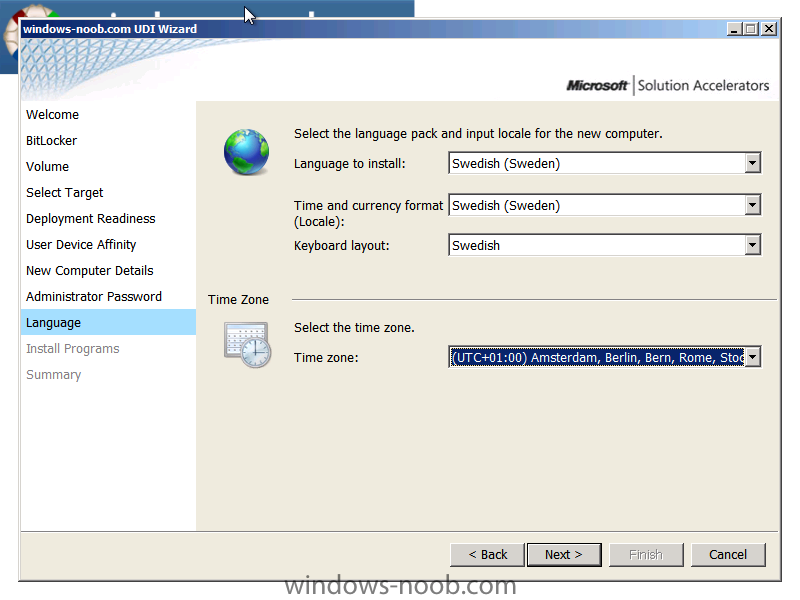
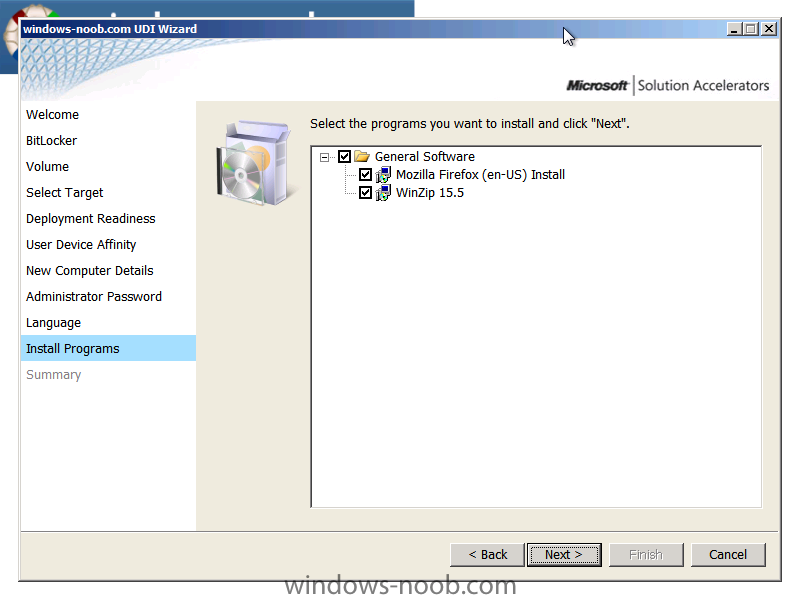
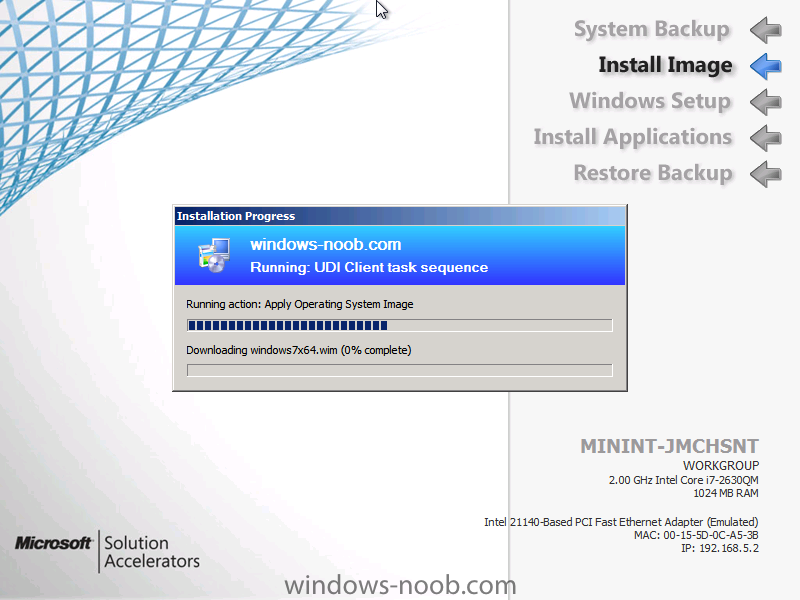
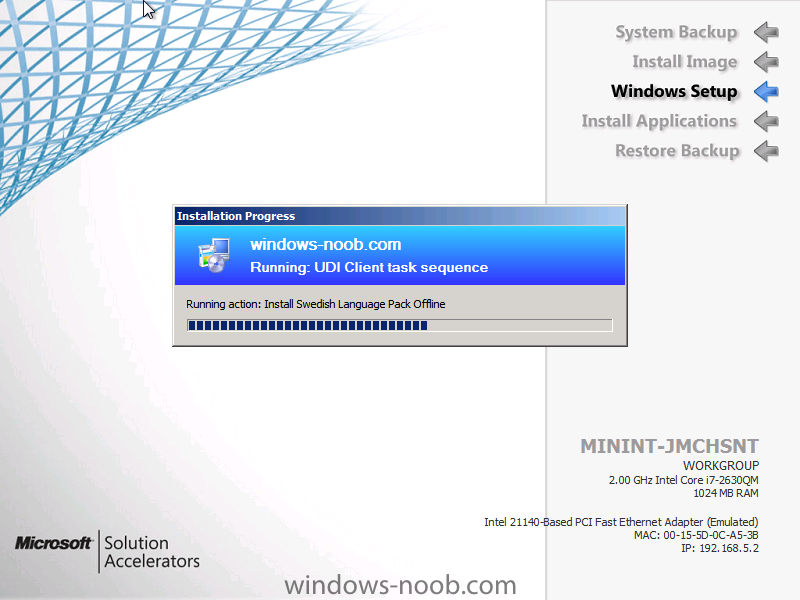
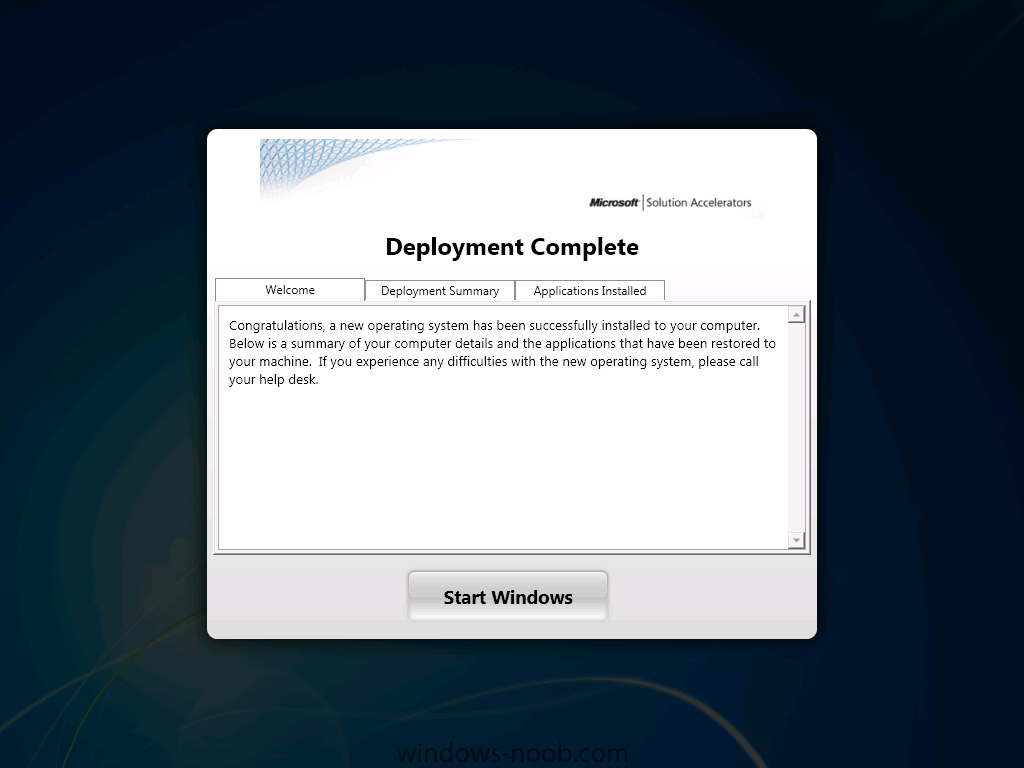
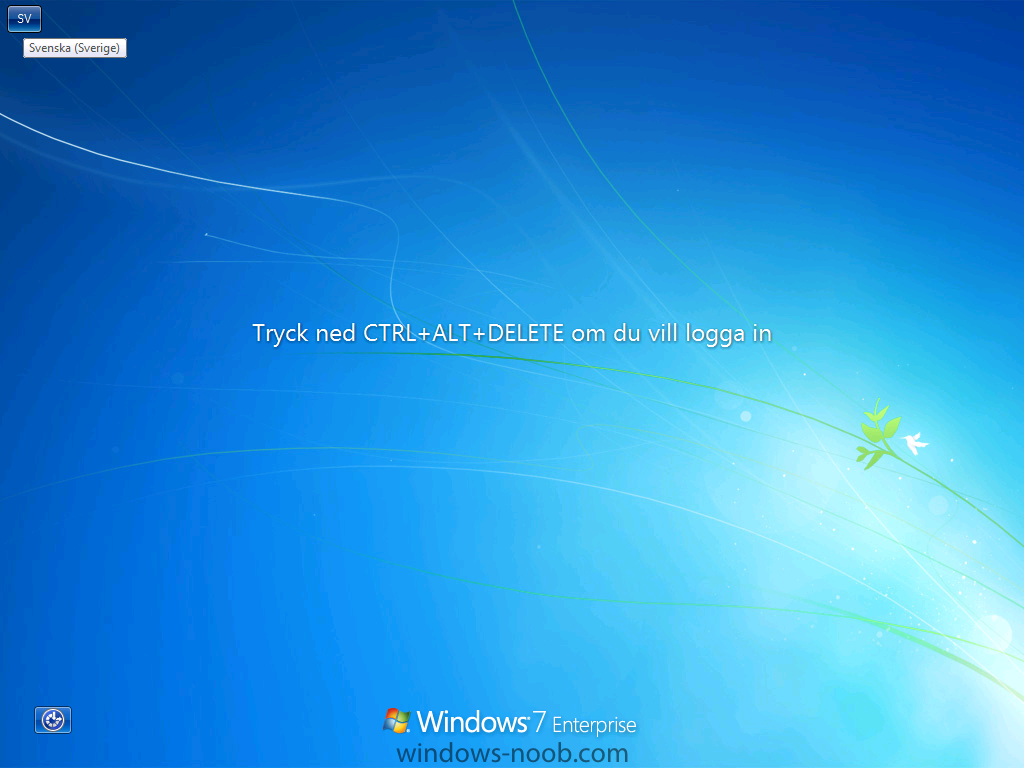
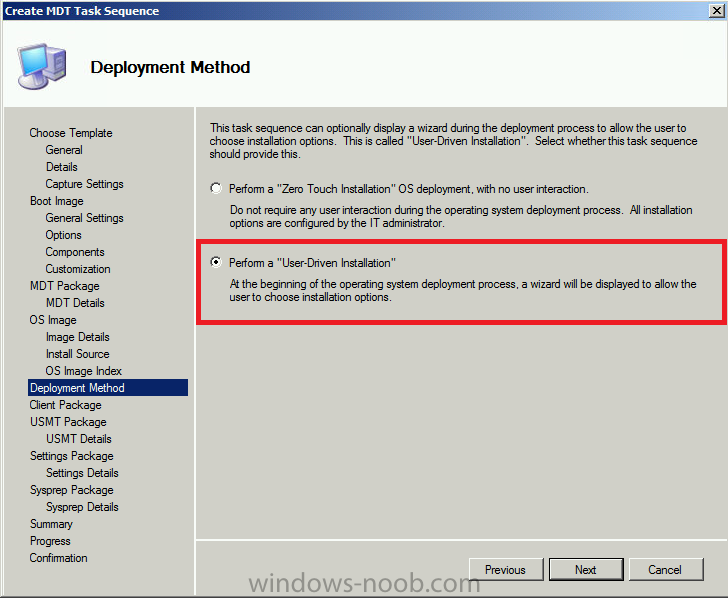
In Part 1 of this series we got our AD and SCCM servers ready, and then we installed System Center 2012 Configuration Manager as a standalone Primary site. In Part 2 we configured the SCCM server further by adding some Windows Server roles necessary for the following Configuration Manager 2012 functionality, Software Update Point (SUP) and Operating System Deployment. In Part 3 we configured the server further by Enabling Discovery methods and creating Boundary's and Boundary Groups. In Part 4 we configured Client Settings, Added roles and Distributed the Configmgr Client to our Computers within the LAB, then in Part 5 we enabled the Endpoint Protection Role and configured Endpoint Protection settings and targeted a collection called All Windows 7 Computers with these settings and policies. In Part 6 we configured our SUP further to Deploy software updates to our All Windows 7 Computers and Build Windows 7 X64 collections. In Part 7 we used the Build and Capture process to create our Base Windows 7 X64 wim image. In Part 8 we created a USMT 4 package to migrate the users data using hardlinking and then we imported the captured image into ConfigMgr and created a Deploy Windows 7 X64 task sequence. We created a Deploy Windows 7 X64 Collection and set some User Device Affinity collection variables. In Part 9 we created an Application, and created a deployment type for that application to only install if the Primary User was True for that device (User Device Affinity), we then copied our Task Sequence (duplicated it), deployed the new Task Sequence, added a computer to the new collection and then PXE booted the computer to the Deployment Menu. In Part 10 we monitored the Deployment process in a lot of detail to how UDA sent state messages and we verified that our application installed on the users Primary Device, in addition we modified our collection variables, and added a prestart command to our boot image to prompt for the SMSTSUdaUsers. In Part 11 we setup the Reporting Services Point Role and verified that reporting was working. In Part 12 we demonstrated a new feature in ConfigMgr which allows us to Patch operating system WIM images using Offline Servicing. This means that you can apply Windows Updates by using Component-Based Servicing (CBS) to update the your previously captured WIM images. In Part 13 we looked at how Role Based Administration is used within ConfigMgr and we created a new custom role to allow a user (or users within a Security Group) to view Software Update Reports. This is useful because you will probably want one team to take care of configuring and deploying software updates, and to grant another (Management etc) the capability of reviewing Compliance Reports. In Part 14 we performed a side-by-side migration from Configuration Manager 2007. In Part 15, we deployed Windows 8 Consumer Preview to see if it was possible, and indeed it was (it's not supported by Microsoft however). In Part 16 we integrated MDT 2012 RC1 with Configuration Manager 2012 RC2. In Part 17 we configured MDT 2012 and used the UDI Wizard designer to configure the default Custom XML file used in a UDI task sequence. Now we will configure that XML file some more before creating a new MDT Task sequence to Deploy a User Driven Installation Client Task Sequence. We will then edit that task sequence to add Offline Language support and finally deploy it and monitor a client progress. Tip: This post is long and may take you some time to complete so do please give yourself plenty of time to go through it all. Step 1. Remove the prompt for Computername in our MDT boot image Note: Perform the following on the ConfigMgr 2012 server as SMSadmin In it's current state, when we boot our MDT boot image it will prompt the end user to enter a computername as you can see in the screenshot below we don't need this functionality as we will use the computer naming ability within the UDI wizard itself, so let's disable this. To remove the prompt locate your MDT Boot image in the boot images node, right click and choose properties Click on the Customization tab,the prestart command will look like this edit it so that it just reads WScript.Quit(0) then click apply as in this screenshot answer yes to update the boot image to your distribution points, continue through that wizard to completion. Step 2. use the UDI Wizard Designer to configure network settings and other changes Note: Perform the following on the ConfigMgr 2012 server as SMSadmin We already edited our UDIWizard_Config.XML file in the previous part but we need to make some additional changes to make it more user friendly and functional, so let's start up the UDI Wizard Designer again (start, programs, Microsoft Deployment Toolkit, UDI Wizard Designer). when the UDI Wizard Designer starts, click on the file ribbon and select our recently edited UDIWizard_Config.XML file. Select the BitLockerPage and remove the checkmark so that we are not prompted to enter any BitLocker info Next, double click on the New Computer Details Page and expand Network Details, select Domain scroll down further to Domains and OUs, click on the blue Plus symbol to add a domain when the Create or edit Domain Information window pops up enter your domain info and friendly text something like below.. click ok when done, to add a default OU right click on the added domain and choose Add OU Manually now you get the chance to add your OU information, so add it using the Distinguished name (which you can get from Active Directory) click ok when done, it should now appear something like this scroll down to Domain Join Credentials and add your domain join user account (I use one called Domjoin) Next open the Languages Page and add a few more languages (i'm using the scandinavian ones...) if you want, and then scroll down to the Volume page and select the User data and settings option, place a checkmark in the Format box... ok that's us done in the UDI Wizard designer so save your UDIWizard_Config.XML file to the Scripts folder of your MDT Toolkit Files package, and once done don't forget to Update your distribution points for the MDT Toolkit Files package. Step 3. Create Language Packs Note: Perform the following on the ConfigMgr 2012 server as SMSadmin If you have read my Customizing Windows 7 series you'll have seen that we added language packages offline using MDT 2010 update 1 in Configuration Manager 2007, we will use similar functionality here in Configuration Manager 2012 RC2 but with MDT 2012 RC1. But before we do, we need some language packages added. I will add Danish here and I expect you to add whatever languages you are interested in. In the ConfigMgr console click on Packages , select Create Pacakge from the ribbon or right click and select Create Package. give the language pack some useful name like Windows 7 X64 SP1 Danish Language Pack and details so that it's easy to find in the task sequence later on...click on Browse and select the folder where you have your Danish langauge pack (eg: \\sccm\sources\os\Windows 7 X64 Language packs\Windows 7 X64 - Danish) click next and then select Do not create a program click your way through the rest of that wizard. Note: when the package is created add it to your distribution points and update it to the dp's. Repeat the above for all language packs you intend to use in your UDI task sequence. once done we should have all the Language Packages we need and intend to use created and distributed like below:- Step 4. Create a MDT based UDI Client Task Sequence Note: Perform the following on the ConfigMgr 2012 server as SMSadmin We need to create a new MDT Task Sequence which leverages a User Driven Installation template, we will then edit it slightly before deploying to a Deploy Windows 7 X64 collection. So right click on Task Sequences and choose Create MDT Task Sequence when prompted to choose a template, select User Driven Installation Task Sequence from the drop down menu Note: In later versions of Configuration Manager 2012/MDT 2012 the wording in the template is changed from the screenshot above from User Driven Installation Task Sequence to Client Task Sequence and the option to select a User Driven Installation comes from within the Create MDT Task Sequence wizard, specifically when you get to the Deployment Method screen, choose User Driven Installation at that point to get a true UDI task sequence. See screenshot below for that setting. give the task sequence a name like UDI Client Task Sequence Enter domain details and Windows settings, nothing new here in fact we'll be using our UDI xml file to replace the network settings later... Select This task sequence will never be used to capture an image... select our previously created MDT boot image and our previously created MDT Toolkit Files package Next you get to specify the Windows 7 X64 image we captured in Part 7. specify the Configuration Manager Client upgrade package which we also created in Part 7 (Step 5.). and then specify the USMT 4 package and next we specify our MDT Settings package, have patience we are getting there :-) click next through to the confirmation message click Finish Step 5. Edit the Task Sequence to add Language packs Note: Perform the following on the ConfigMgr 2012 server as SMSadmin Language pack installation steps are not included in our UDI task sequence, so we have to add those steps, to do so right click on our newly created task sequence and choose Edit scroll down to the Post Install stage and to the Set Status 3 step (which occurs just before the Setup windows and configmgr step). This is where we need to add our new step(s) to install language packs offline. In the top left corner of your task sequence, click on Add, scroll down to MDT and choose Install Language Pack offline, these options are only available after MDT is integrated with ConfigMgr click on Browse and select your Swedish Language pack (or whatever language you are adding) click on the options tab for that step and add the following options, Task Sequence variable UIlanguage equals SV-SE Note: repeat the above process to add a new Install Language Pack Offline step for each Language you want to add, rename each step to correspond to the language you are installing and obviously the SV-SE task sequence variable in the options tab will have to correspond to the correct language, eg DA-DK for Danish etc.. click Apply and then ok the save the changes to your Task Sequence. Step 6. Deploy the Task Sequence Note: Perform the following on the ConfigMgr 2012 server as SMSadmin Right click the Task Sequence, choose Deploy choose the Deploy Windows 7 X64 collection set it to Available and make it available to boot media and PXE, continue through the rest of the wizard. once done, add a new virtual machine to your Deploy Windows 7 X64 collection, you can use this process if you wish. Step 7. PXE Boot a client and review the UDI process Note: Perform the following on virtual machine as a testuser After PXE booting our new virtual machine we get to see the list of available task sequences, note the really cool background ;-) after some moments of downloading the MDT Toolkit package, the UDI wizard appears ! and you can click your way (as a user driven installation is supposed to be done, by the end-user) through the wizard, the first screen after the welcome screen is the BItlocker screen, it's not enabled as we removed that option next we see the Volume screen, notice that Partition and format disk is selected already, we did that in the UDI Wizard Designer above. This is a new computer so we are not restoring any data, so click next at that screen the Deployment Readiness screen appears, this changes depending on New computer or refresh scenario and just lists the checks it performs you can retry checks in the event that you forgot to connect power to a laptop or whatever.. next you get the User Device Affinity screen, enter a primary user if you wish and click next, i guess you could call this the UDI UDA user screen and we can choose domain/OU based on what we entered in our UDI Wizard designer, enter the Domain Join credentials (password) to continue.. enter the local administrator password and specify a user (or users) to add to the local administrators group select your language and regional settings, notice how there are as many languages *listed to install* as you added in the UDI Wizard designer for the Install programs screen, you can see the apps we added earlier, you can select or deselect them and click next to continue, cool huh ? click next at the summary and let the installation begin, note how it shows you what stage it's on via a changing background picture and after some time the language pack you selected is installed and finally when the Deployment is complete you see the following, click on start windows to logon to windows Swedish Windows :-) job done.. cheers ! niall
-
is your country listed ? this is taken from March 2012 Usage by Country for March 2012 Top 30 of 178 Total Countries # Hits Files KBytes Country 1 2186036 31.60% 1790928 32.24% 50594111 32.76% unresolved 2 1620069 23.42% 1200078 21.61% 28303283 18.33% commercial (.com) 3 987088 14.27% 864127 15.56% 25497285 16.51% network (.net) 4 184719 2.67% 90309 1.63% 2324481 1.51% Finland 5 144909 2.09% 120070 2.16% 3297446 2.14% India 6 129285 1.87% 111082 2.00% 3113063 2.02% Netherlands 7 128647 1.86% 103723 1.87% 3307272 2.14% Australia 8 114454 1.65% 96277 1.73% 2590607 1.68% United Kingdom 9 108606 1.57% 88841 1.60% 2904985 1.88% Germany 10 96751 1.40% 80476 1.45% 2321391 1.50% US educational (.edu) 11 88675 1.28% 74407 1.34% 2139024 1.39% Canada 12 81960 1.18% 67755 1.22% 2302600 1.49% Sweden 13 67343 0.97% 50834 0.92% 1463209 0.95% organizations (.org) 14 60342 0.87% 48703 0.88% 1674073 1.08% France 15 57015 0.82% 38385 0.69% 905353 0.59% US Military (.mil) 16 52285 0.76% 45137 0.81% 1478218 0.96% Belgium 17 49034 0.71% 36509 0.66% 973421 0.63% US governmental (.gov) 18 45768 0.66% 39615 0.71% 1428353 0.92% Switzerland 19 42375 0.61% 39861 0.72% 1125681 0.73% Poland 20 42293 0.61% 37492 0.67% 1364988 0.88% Norway 21 39773 0.57% 20633 0.37% 599382 0.39% Ukraine 22 36579 0.53% 32576 0.59% 820926 0.53% Italy 23 36192 0.52% 31696 0.57% 1148682 0.74% Denmark 24 35069 0.51% 29702 0.53% 675484 0.44% United States of America 25 34465 0.50% 31827 0.57% 1198510 0.78% Russia 26 31012 0.45% 27415 0.49% 961093 0.62% Brazil 27 26385 0.38% 20038 0.36% 507175 0.33% Turkey 28 24930 0.36% 17756 0.32% 586414 0.38% New Zealand 29 23330 0.34% 19246 0.35% 603962 0.39% South Africa 30 21492 0.31% 18793 0.34% 540264 0.35% Austria
-
- 3
-

-
did you follow the guide exactly as it is ? if so you won't have issues. verify that the installation account for the clientinstall is a member of the local administrators group try disabling the firewall to see if that helps the ccmsetup.log will be present on the computer you are installing the client on
-

using SCCM 2012 in a LAB - Part 1. Installation
anyweb replied to anyweb's topic in Configuration Manager 2012
good info, did you not see this though, see the Note: ? -
just adding the following to this post - http://blogs.technet.com/b/oob/archive/2011/01/05/troubleshooting-the-pxe-service-point-and-wds-in-configuration-manager-2007.aspx
-

VBScript and HTA to associate computer and add to specific collections
anyweb replied to JCA's question in Frontends, HTA's and Web Services
for the cleartext part, look at this post -

SCCM 2012 FEP Collections are missing
anyweb replied to yukis1's topic in Configuration Manager 2012
you can create a package/program to uninstall the SCEP client as follows:- scepinstall.exe /u /s deploy that to a collection when you want to uninstall the SCEP client. -

Enrolled Mobile devices not showing in the SCCM console
anyweb replied to jad3fox81's topic in Configuration Manager 2012
what steps did you undertake so far ? what did you do on the client side and on the server side.. here's a summary from Technet - http://technet.microsoft.com/en-us/library/gg699359.aspx Enrollment for mobile devices in System Center 2012 Configuration Manager is now natively supported by using the two new enrollment site system roles (the enrollment point and the enrollment proxy point) and a Microsoft enterprise certification authority. For more information about how to configure enrollment for mobile devices by using System Center 2012 Configuration Manager, see How to Install Clients on Mobile Devices and Enroll Them by Using Configuration Manager. After the mobile devices are enrolled, you can manage their settings by creating mobile device configuration items and then deploy them in a configuration baseline. For more information, see How to Create Mobile Device Configuration Items for Compliance Settings in Configuration Manager. For more information, see the Deploying the Configuration Manager Client to Mobile Devices section in the Introduction to Client Deployment in Configuration Manager topic in the Deploying Clients for System Center 2012 Configuration Manager guide. -

SCCM 2012 FEP Collections are missing
anyweb replied to yukis1's topic in Configuration Manager 2012
there are no collections for FEP anymore as they are not required, there are no programs either, the SCEP client is now part and parcel of the ConfigMgr client. Please carry out all the steps in part 5 here to get a better understanding of how it works, and if you want to know even more, I'd recommend you purchase the System Center 2012 Configuration Manager Unleashed book when it ships and look at Chapter 16 which covers Endpoint Protection in great detail. -
first things first, ConfigMgr 2012 is in release candidate you should NOT be rolling it out in production, period. MIcrosoft will not support you. secondly if you want updates from WSUS then it's all or nothing, so forget about using ADR's for the updates as ADR's require a working SUP and a working SUP wants to have full control of your WSUS infratstructure. Or, let Configmgr deliver all the updates, why use WSUS for software updates when you have a ConfigMgr infrastructure it makes no sense. SCEP can get updates in many ways have you reviewed all of them ?
-
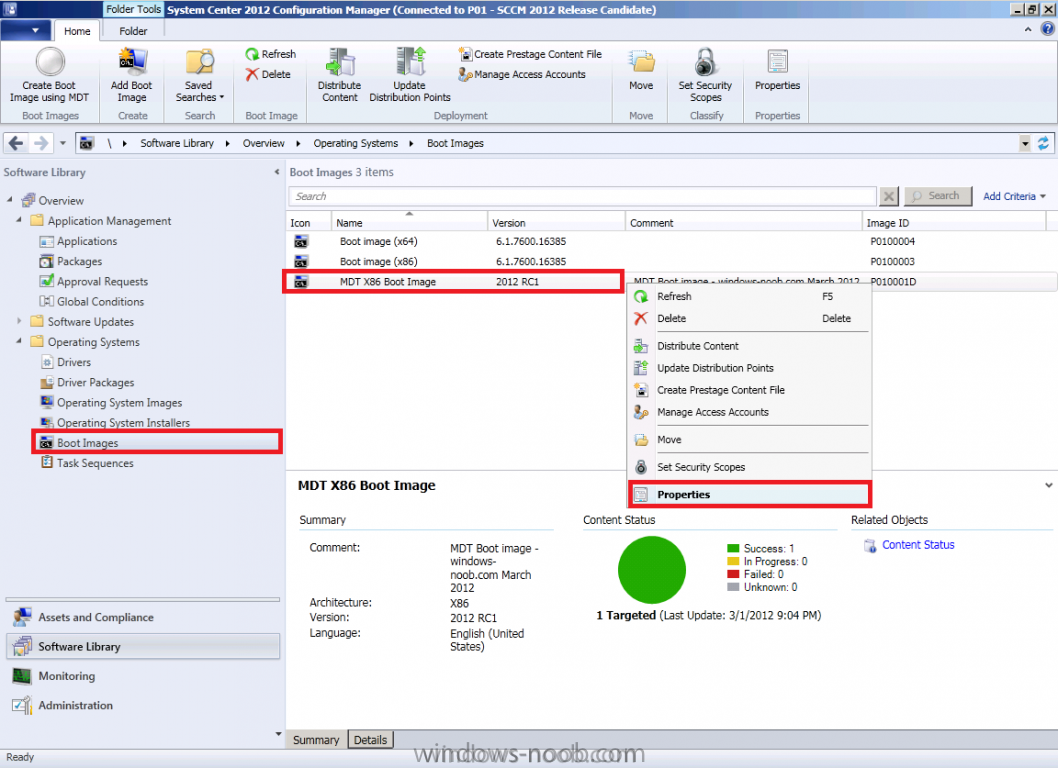
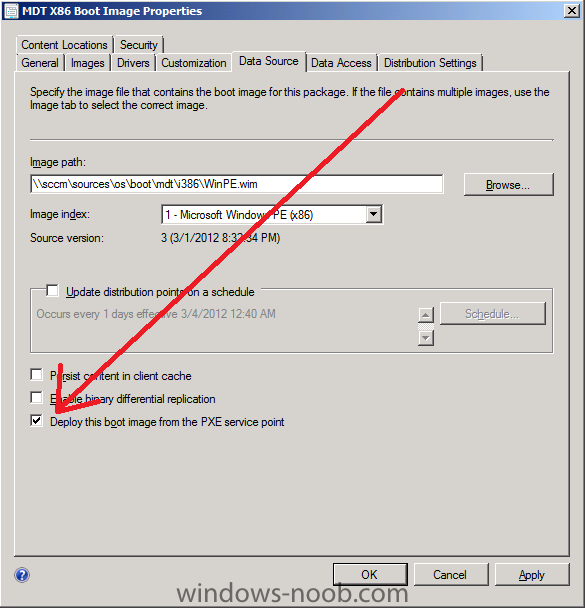
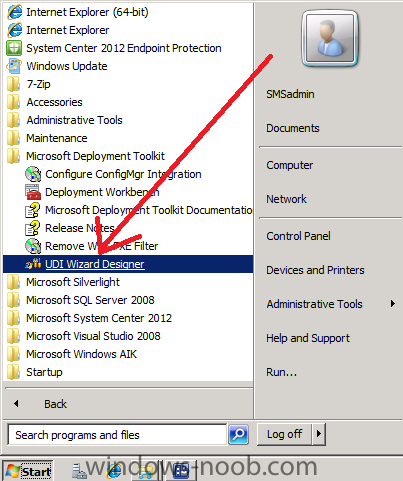
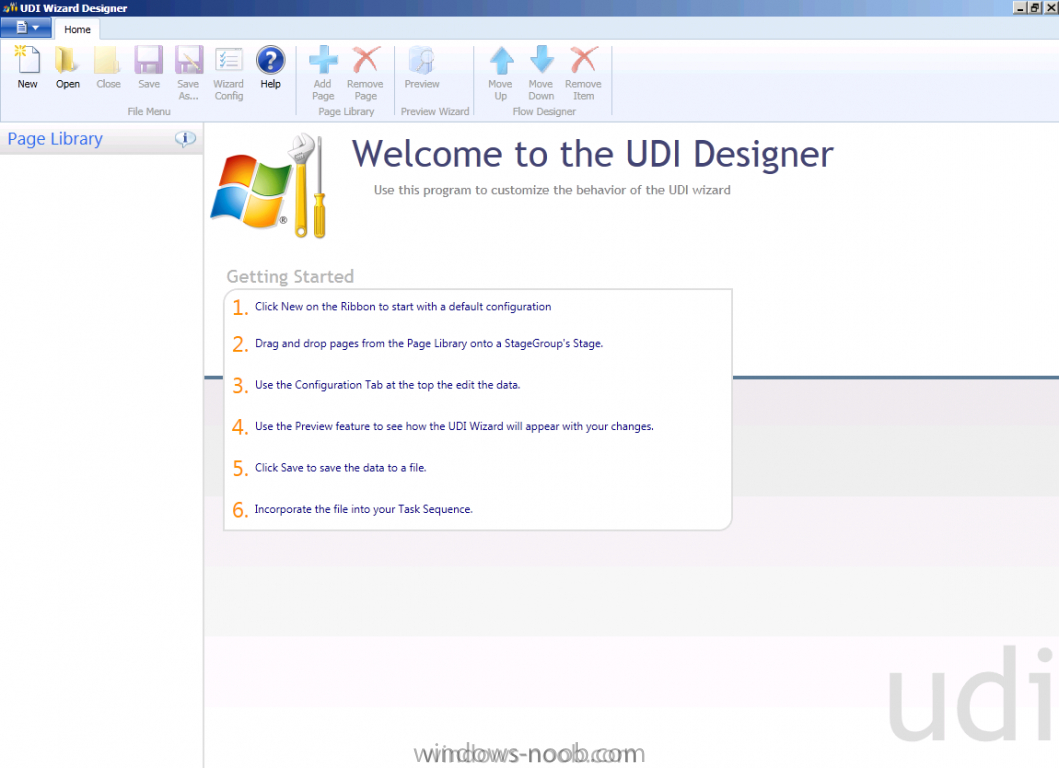
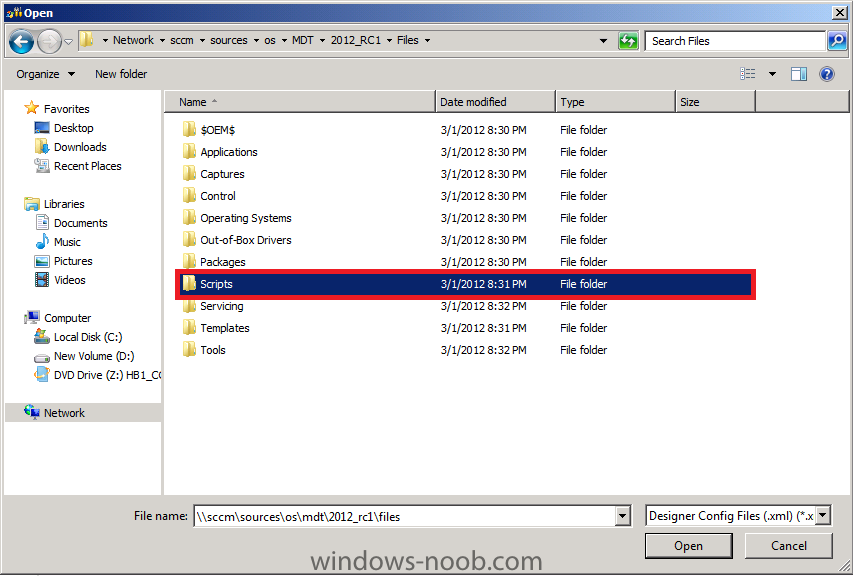
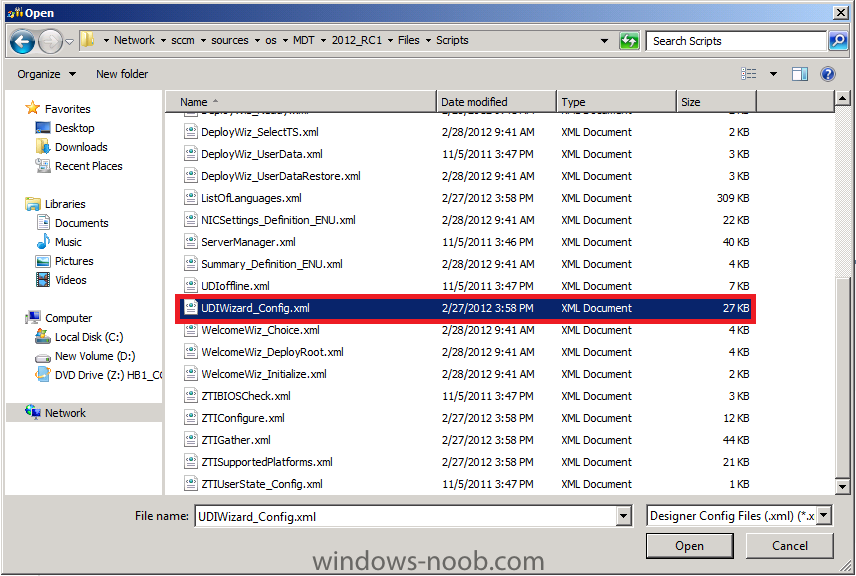
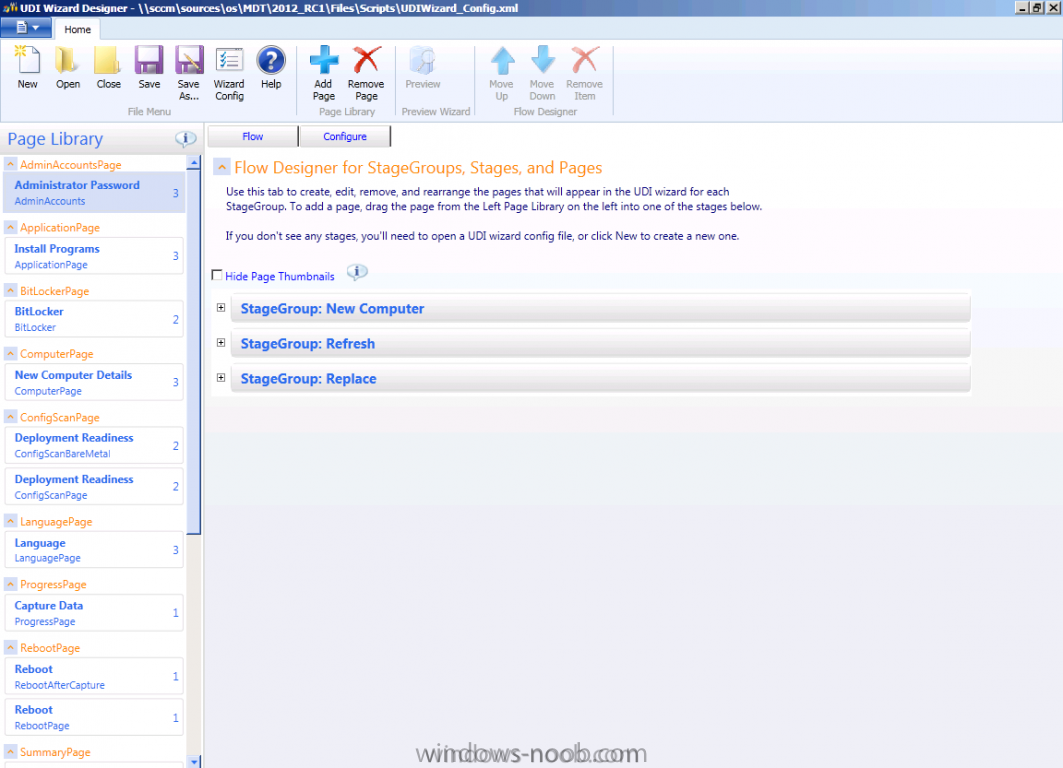
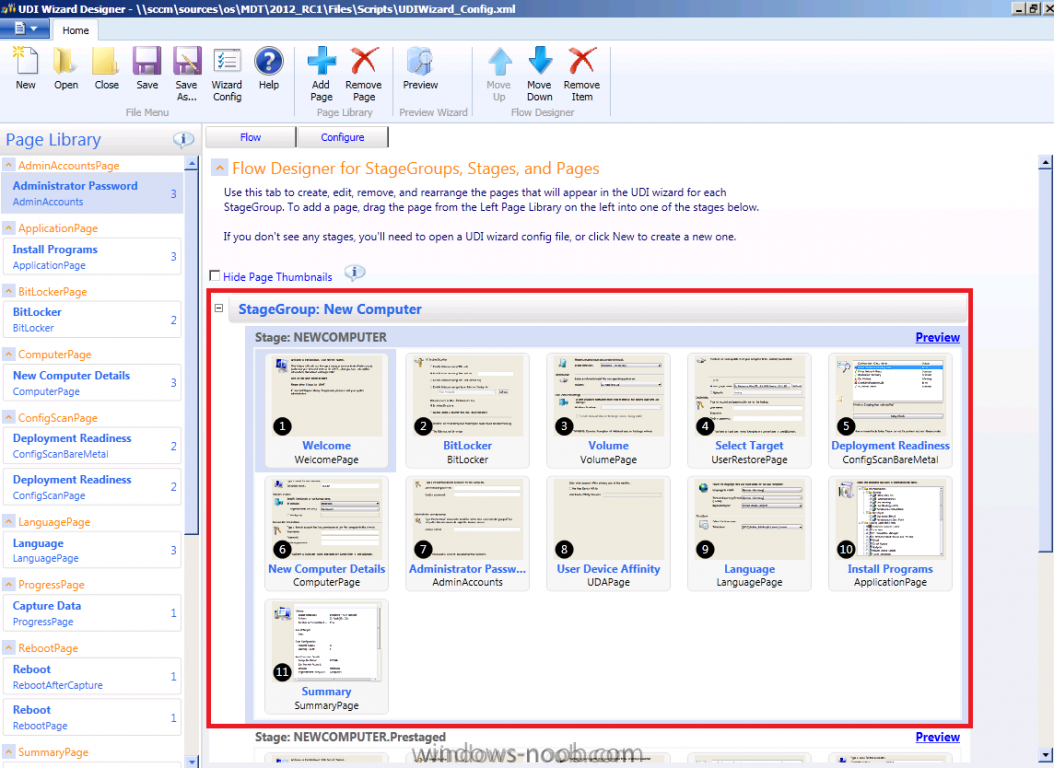
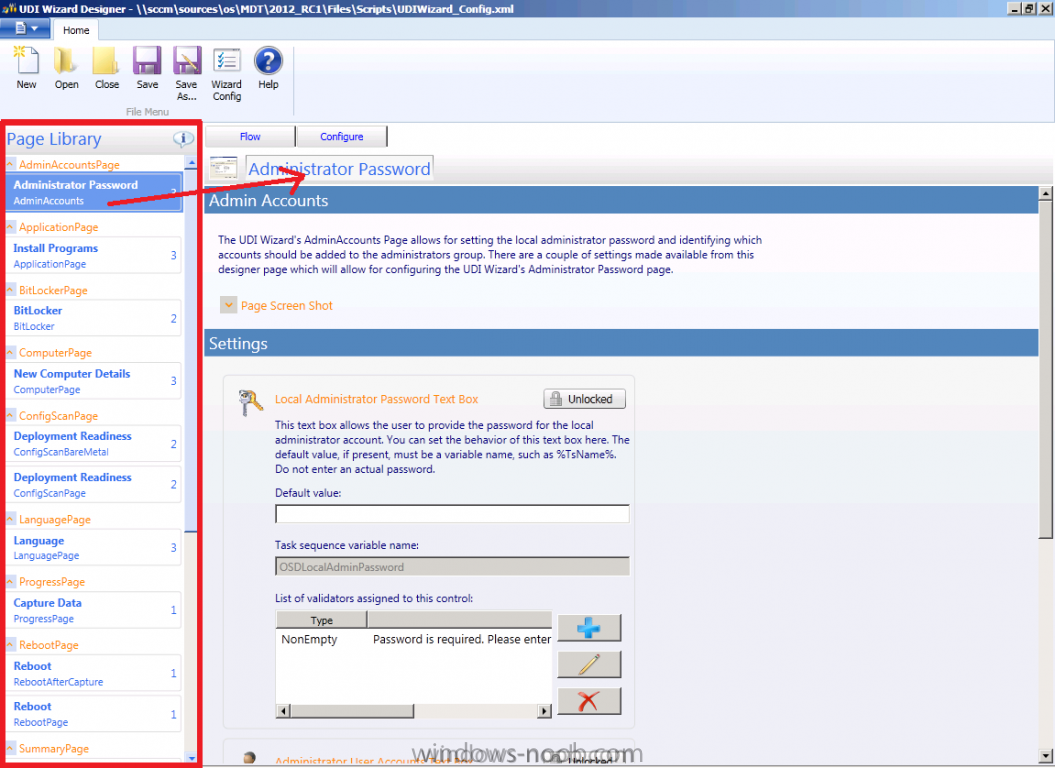
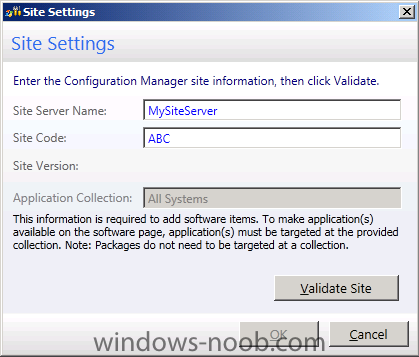
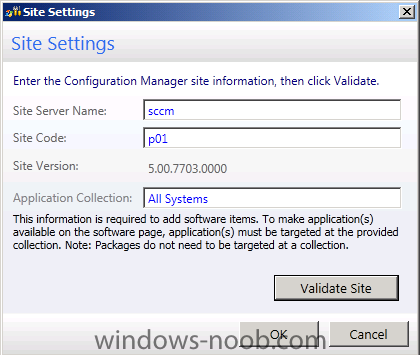
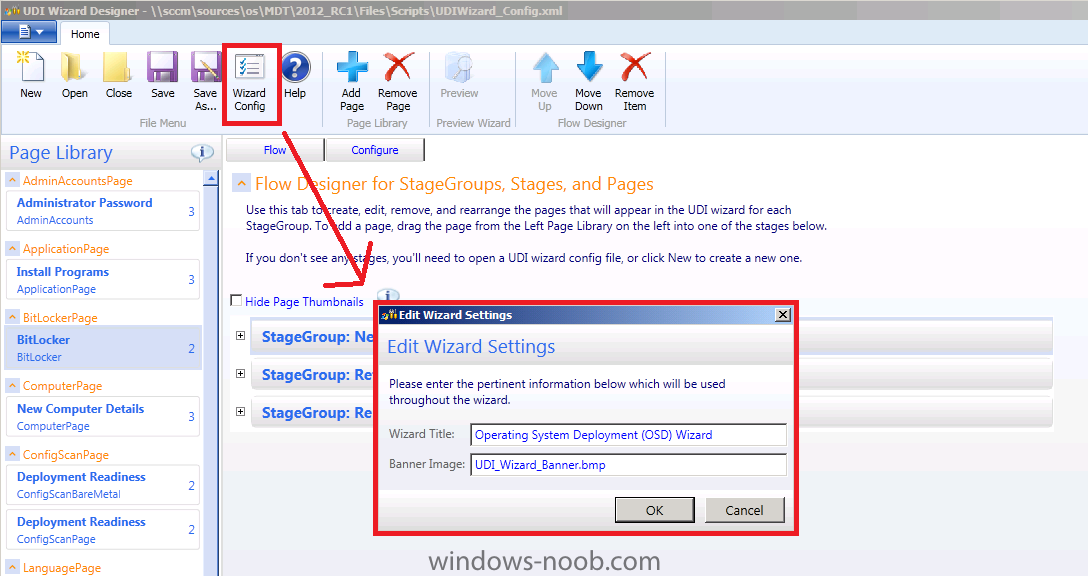
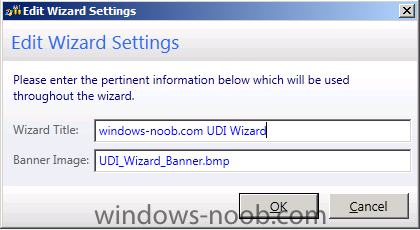
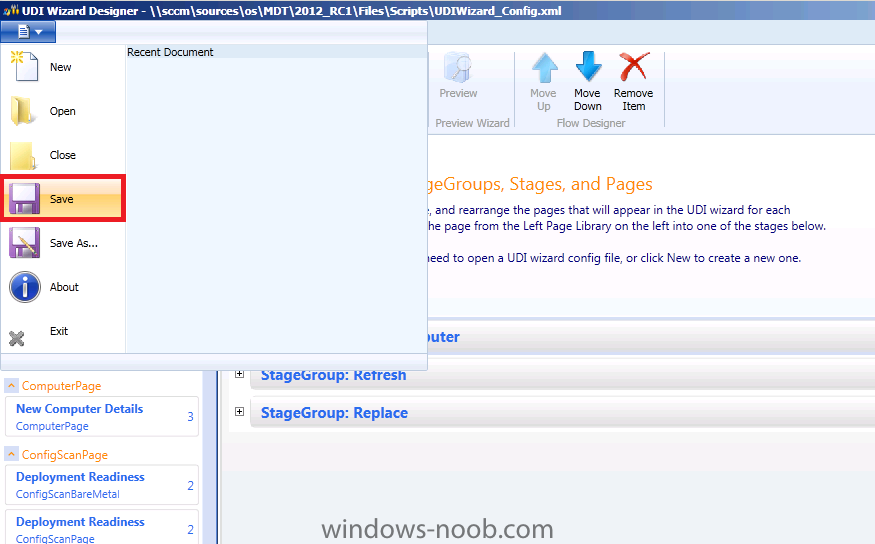
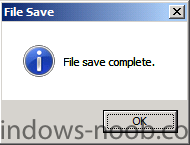
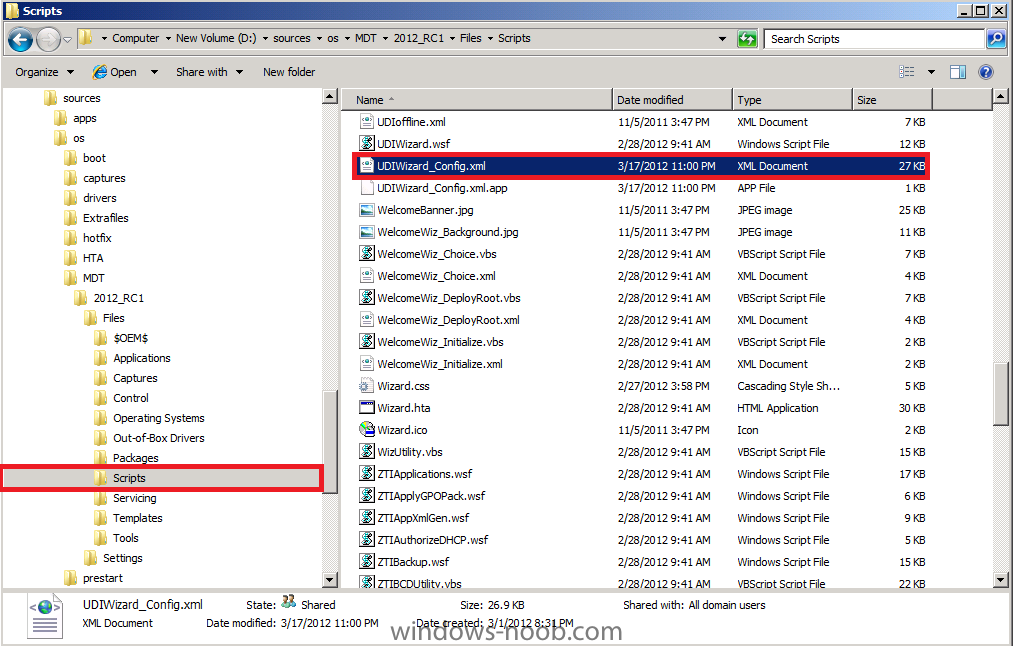
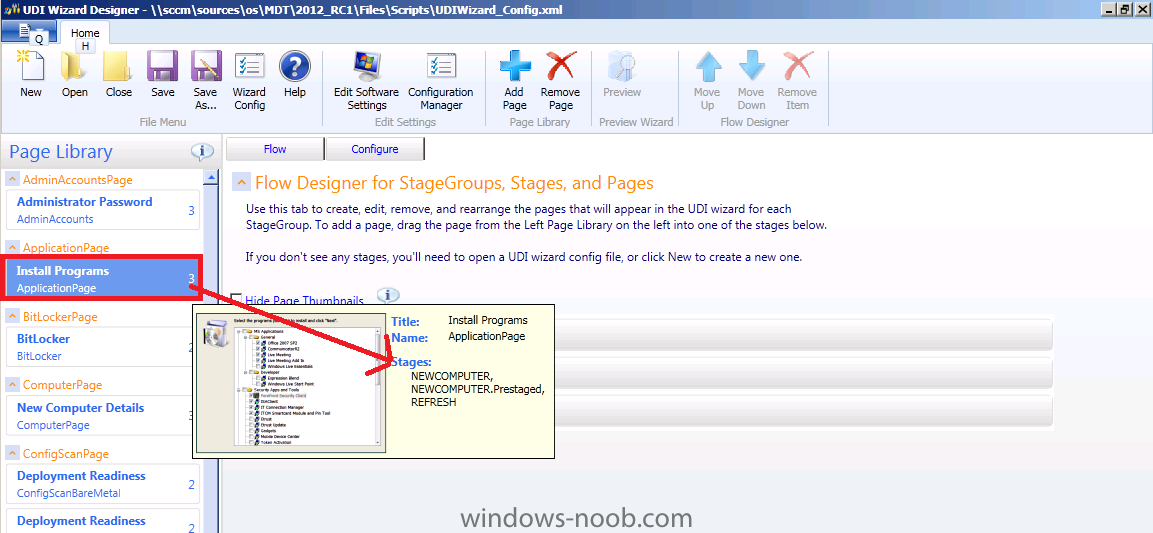
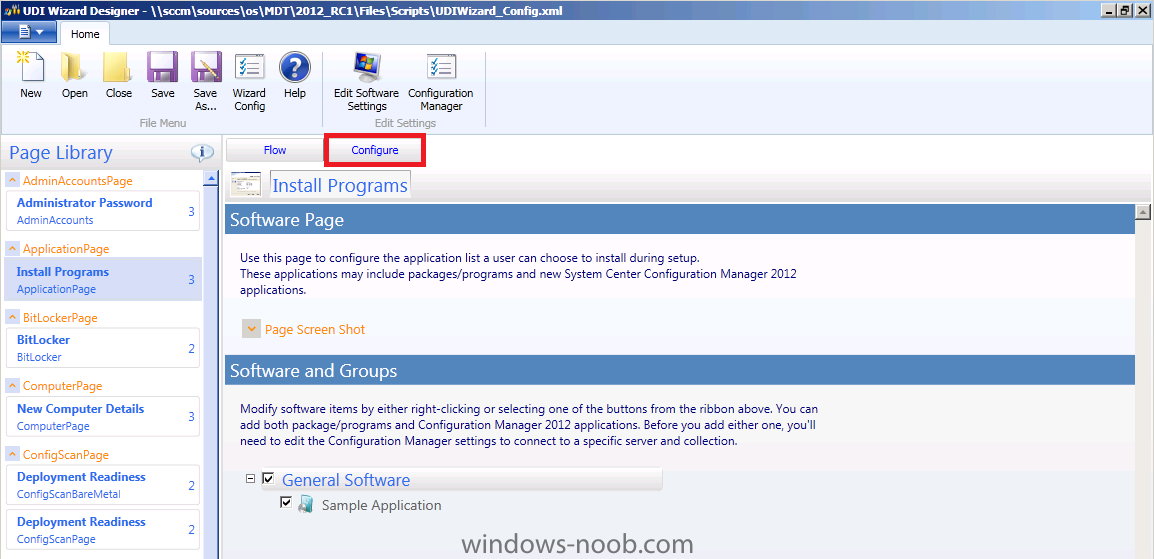
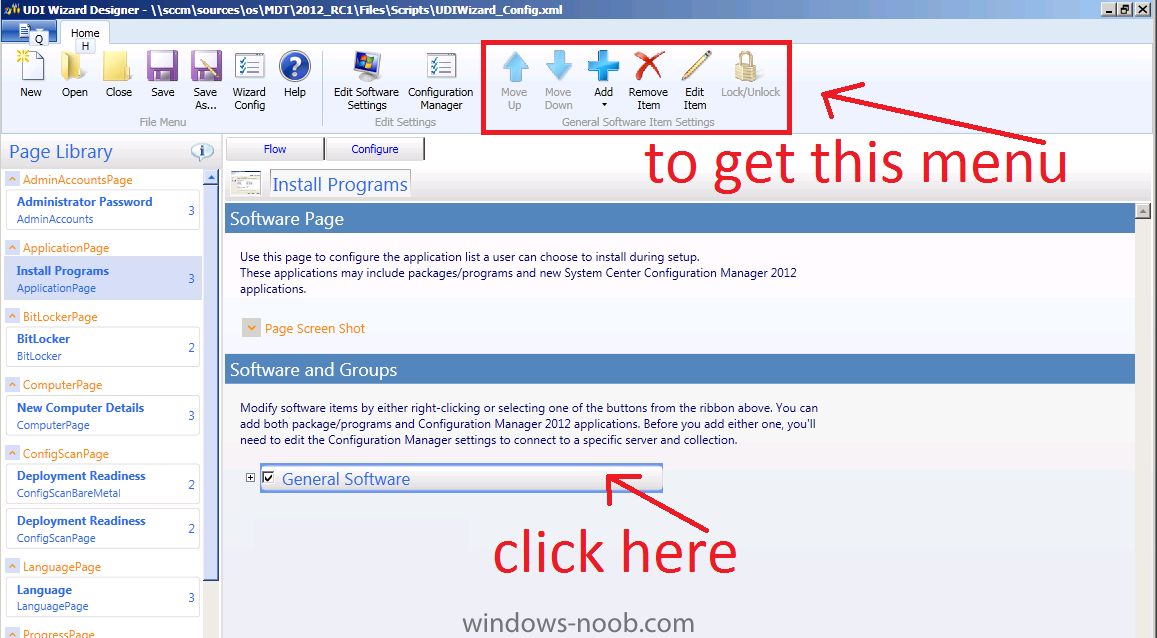
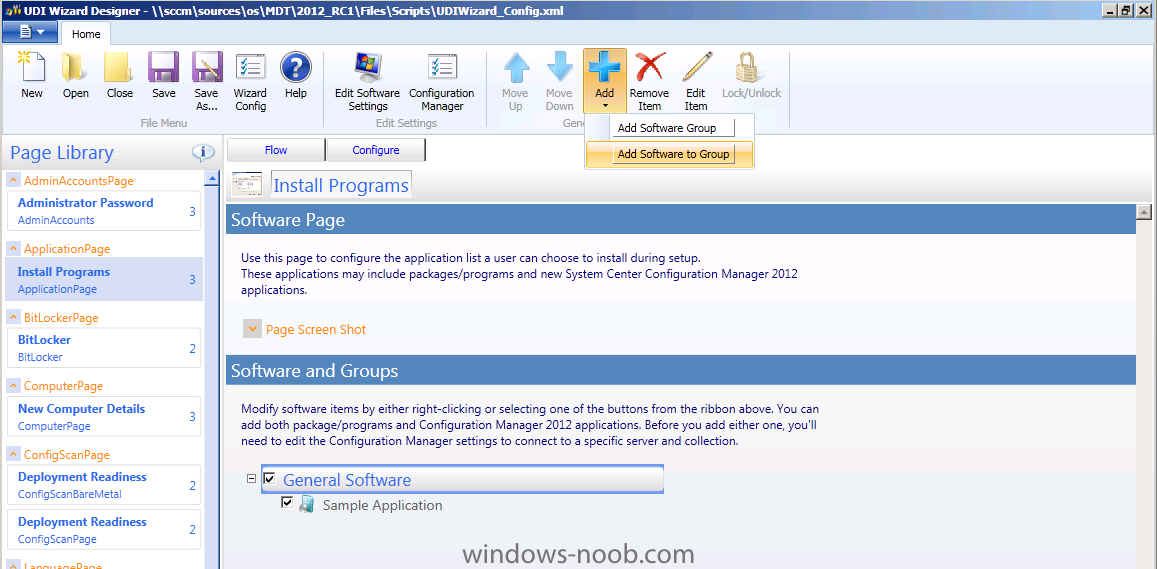
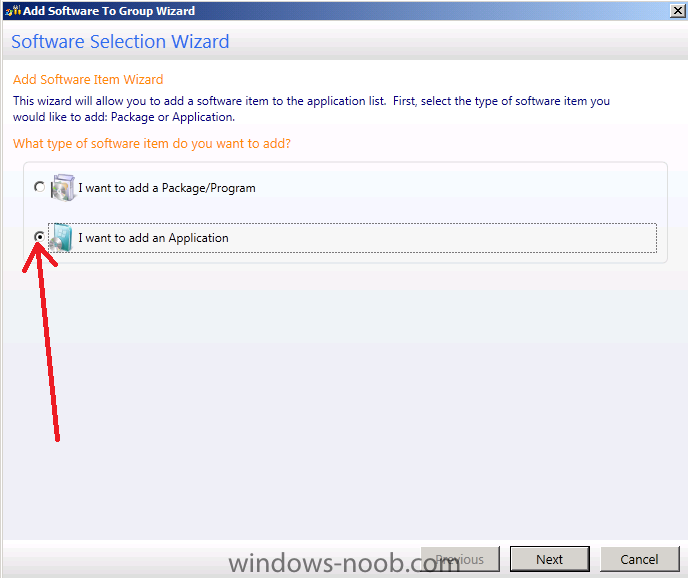
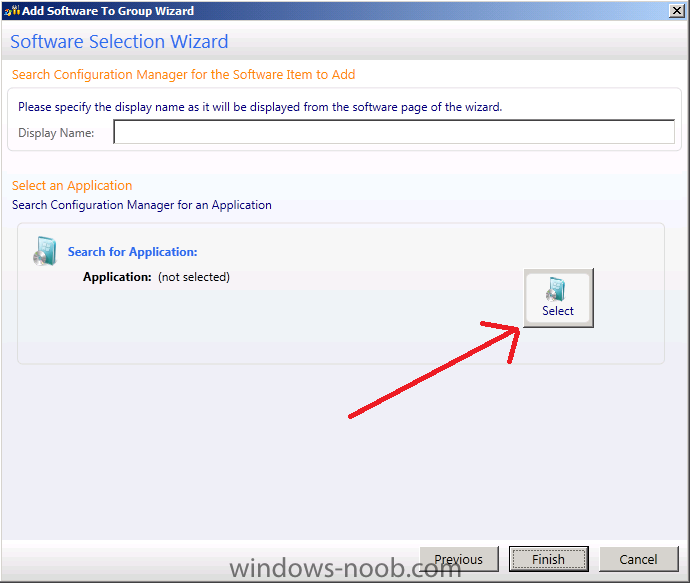
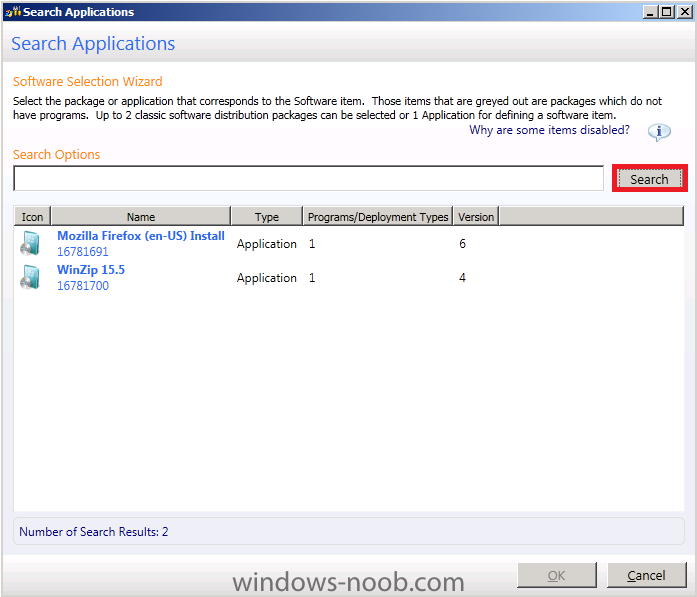
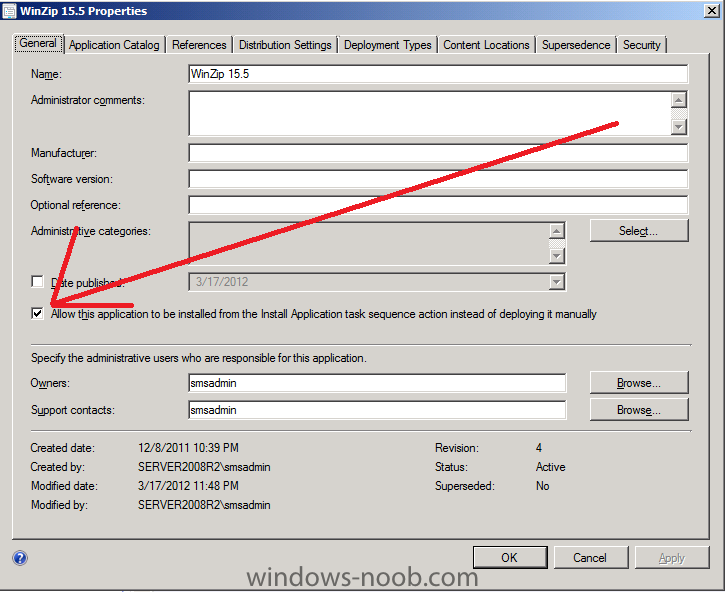
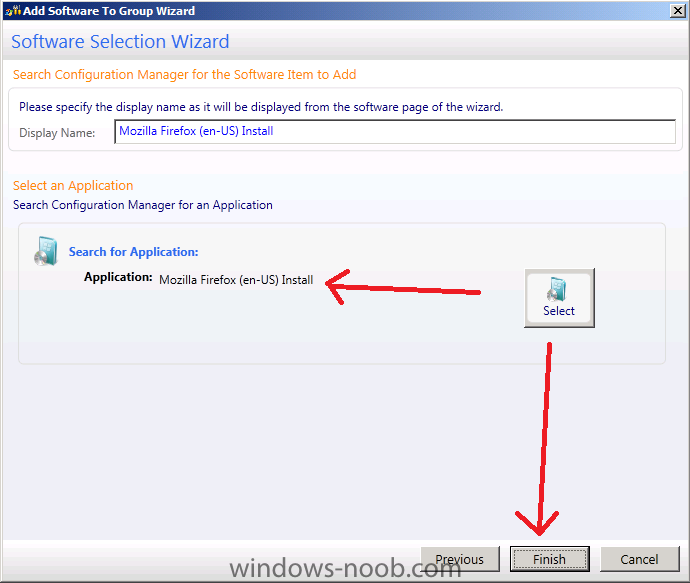
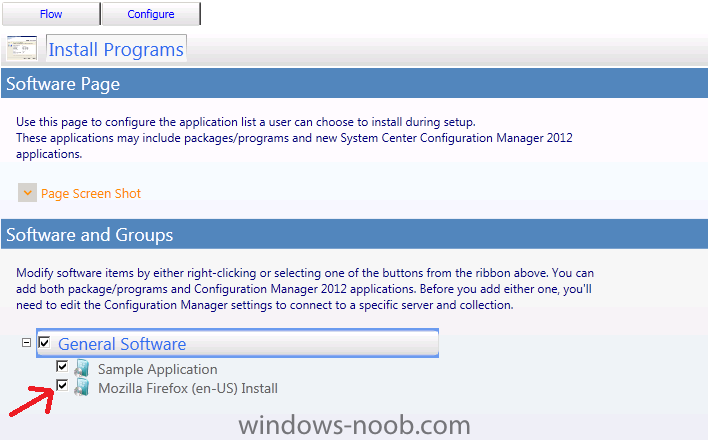
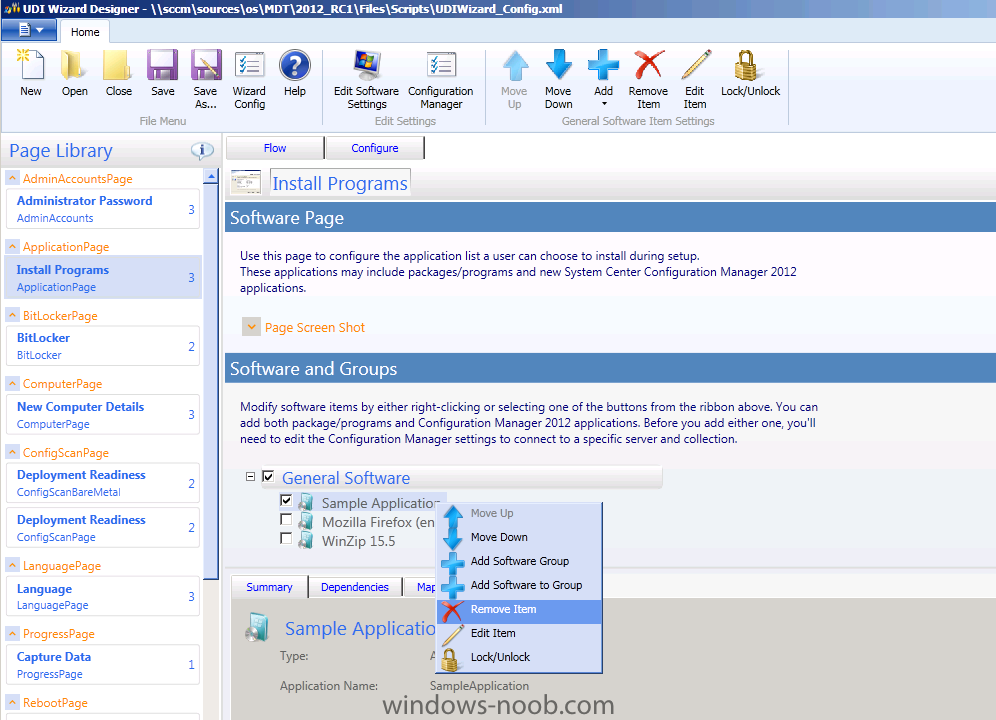
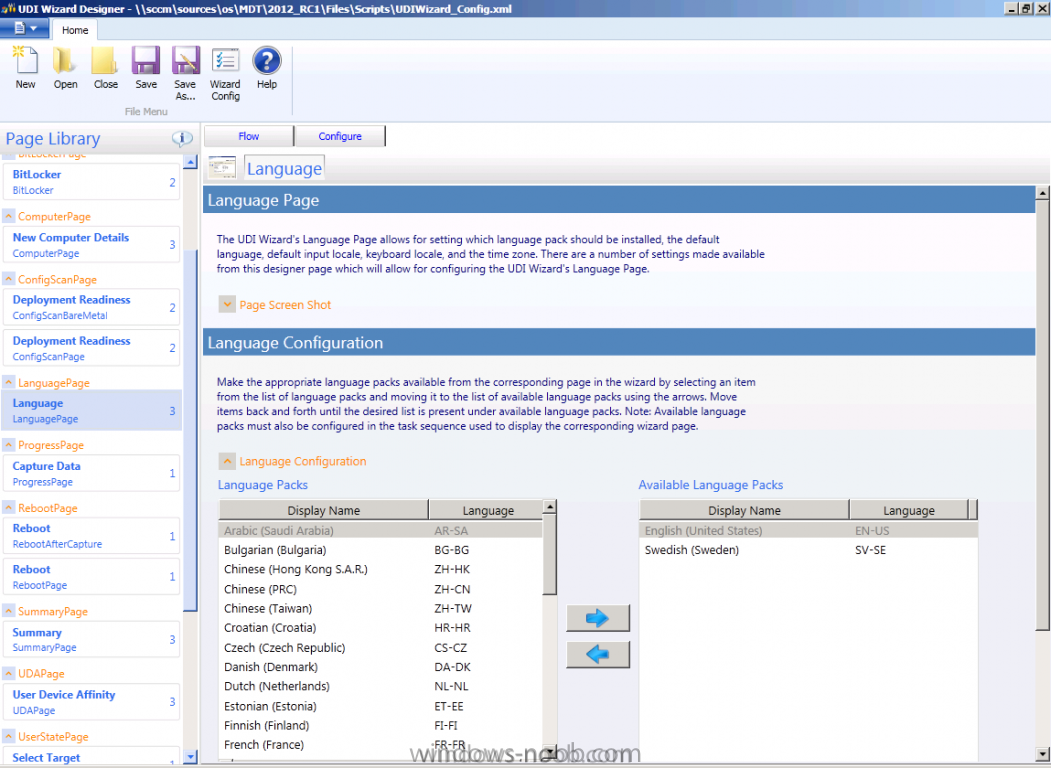
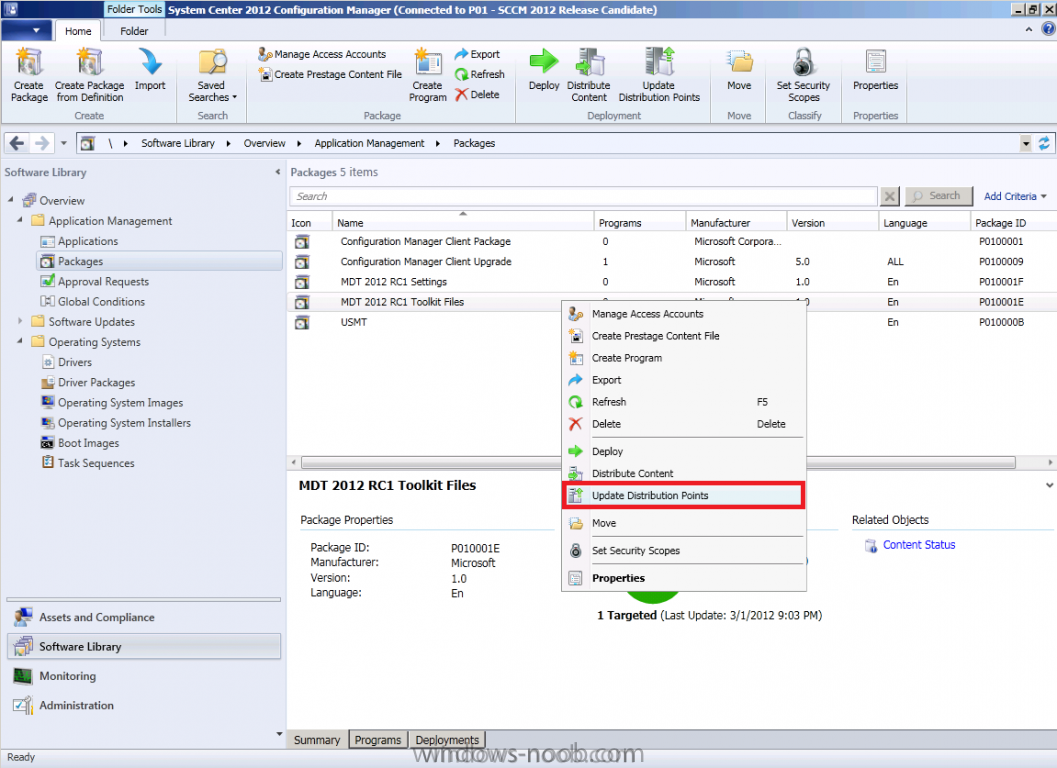
In Part 1 of this series we got our AD and SCCM servers ready, and then we installed System Center 2012 Configuration Manager as a standalone Primary site. In Part 2 we configured the SCCM server further by adding some Windows Server roles necessary for the following Configuration Manager 2012 functionality, Software Update Point (SUP) and Operating System Deployment. In Part 3 we configured the server further by Enabling Discovery methods and creating Boundary's and Boundary Groups. In Part 4 we configured Client Settings, Added roles and Distributed the Configmgr Client to our Computers within the LAB, then in Part 5 we enabled the Endpoint Protection Role and configured Endpoint Protection settings and targeted a collection called All Windows 7 Computers with these settings and policies. In Part 6 we configured our SUP further to Deploy software updates to our All Windows 7 Computers and Build Windows 7 X64 collections. In Part 7 we used the Build and Capture process to create our Base Windows 7 X64 wim image. In Part 8 we created a USMT 4 package to migrate the users data using hardlinking and then we imported the captured image into ConfigMgr and created a Deploy Windows 7 X64 task sequence. We created a Deploy Windows 7 X64 Collection and set some User Device Affinity collection variables. In Part 9 we created an Application, and created a deployment type for that application to only install if the Primary User was True for that device (User Device Affinity), we then copied our Task Sequence (duplicated it), deployed the new Task Sequence, added a computer to the new collection and then PXE booted the computer to the Deployment Menu. In Part 10 we monitored the Deployment process in a lot of detail to how UDA sent state messages and we verified that our application installed on the users Primary Device, in addition we modified our collection variables, and added a prestart command to our boot image to prompt for the SMSTSUdaUsers. In Part 11 we setup the Reporting Services Point Role and verified that reporting was working. In Part 12 we demonstrated a new feature in ConfigMgr which allows us to Patch operating system WIM images using Offline Servicing. This means that you can apply Windows Updates by using Component-Based Servicing (CBS) to update the your previously captured WIM images. In Part 13 we looked at how Role Based Administration is used within ConfigMgr and we created a new custom role to allow a user (or users within a Security Group) to view Software Update Reports. This is useful because you will probably want one team to take care of configuring and deploying software updates, and to grant another (Management etc) the capability of reviewing Compliance Reports. In Part 14 we performed a side-by-side migration from Configuration Manager 2007. In Part 15, we deployed Windows 8 Consumer Preview to see if it was possible, and indeed it was (it's not supported by Microsoft however). In Part 16 we integrated MDT 2012 RC1 with Configuration Manager 2012 RC2 and now we will configure it to see what it can do with that integration by using the UDI Wizard designer to configure the default Custom XML file used in a UDI task sequence namely UDIWizard_Config.xml. Step 1. make the MDT boot image PXE bootable Note: Perform the following on the ConfigMgr 2012 server as SMSadmin After integrating MDT with ConfigMgr we created a MDT Task Sequence and as part of that wizard we created a MDT Boot image. This boot image gives us additional power and functionality over a standard ConfigMgr boot image (for example, we can display HTA's with this boot image without having to mount/unmount the boot.wim file and add additional support). Locate your MDT boot image in Software Library, Operating Systems, Boot Images, right click on it and choose Properties When the properties screen appears, click on the Data Source tab, place a check-mark in Deploy this boot image from the PXE service point. click OK when done. Step 2. Modify the UDIWizard_Config xml file using the UDI Designer Wizard. Note: Perform the following on the ConfigMgr 2012 server as SMSadmin As we will be creating a User Driven Installation Task Sequence in the next part, we first want to customise what our users will see when that wizard appears and to do so we need to use the UDI Designer Wizard. So click on Start, Programs, Microsoft Deployment Toolkit, and select the UDI Wizard Designer from the menu. The UDI Wizard Designer starts and you'll be presented with the new gui, we can use this gui to make changes to the built in UDI templates, they are simply XML files stored in the scripts folder of our MDT Files package. We could click on New to create a new XML file but let's import that one that the standard UDI Task Sequence uses namely UDIWizard_Config.xml. So let's load up that file from the copy we have in our MDT Files package, if you remember in Part 16 we created that package in \\sccm\sources\os\mdt\2012_rc1\files so let's click on Open in the UDI Wizard ribbon to browse to that location. type in the path to our MDT Files package namely \\sccm\sources\os\mdt\2012_rc1\files and click on the Scripts folder highlighted in the screenshot below a long list of xml files appears, scroll down to UDIWizard_Config.xml and click on it then click on open once the xml file is loaded you'll notice the wizard changes look, this is an overview of each page that the User Driven Installation task sequence wizard is capable of showing and here is where we configure them. But first, how do we make sense of this gui, i'll try and explain it briefly, in the Red box below you have the three main scenarios that we'll encounter during deployments sorted into StageGroups New Computer Refresh Replace If you expand New Computer you'll see a whole bunch of thumbnails for that StageGroup (and you'll also see New Computer.Prestaged below it), those thumbnails are what the User will see when the wizard kicks off later... note that depending on the scenario you are in, you'll be presented with different pages of the wizard. In the Left pane of the wizard you'll see the available pages listed alphabetically in the page library (not in the same order as they are presented to the end-user). Double click on one and you'll see the configurable options for that page (you can single click and you might see those options depending on whether or not you are in Flow or Configure mode, that's those two tabs in the right pane...) Click on Install Programs in the Left Pane, the number 3 in the right is the number of stages this Page is available in (you can hover your mouse over it to see what they are). Notice there is a Configuration Manager button in the ribbon, click on it. This brings up the Site Settings box, fill in your Configuration Manager site server name and site code and click on Validate Site. Note: The message states that this is required to add software items. To make application(s) available on the software page, applications must be targetted at the provided collection namely All Systems. The All Systems collection is a Device collection (for your computers..) so please deploy a few applications to that collection. Double click on Install Programs or click on the Configure tab next, click on General Software in order to see a menu we need (you can also right click on General Software to see a menu) Now that we have these extra options let's click on the big blue plus sign to add software to group the Add Software to Group wizard appears, select I want to add an application and click next now the Software Selection Wizard appears (another wizard within a wizard), click on Select to search for an application (why not call it search..?) and that brings up another wizard to search applications.. if you know the name of your application type it in here or click on search, after clicking on search, any applications deployed to the All Systems collection and with the Allow this application to be installed from the Install Application task sequence action instead of deploying it manually setting set in the applications properties will appear in the list. The application setting is here... select one application from the list and click on Finish you're newly added application appears in the list repeat the above process until you've added all your cool apps... and finally right click on the Sample Application from the list and click on Remove Item Next, Click on the LanguagePage in the left pane and add the Swedish Language (or whatever language(s) you want) and finally configure our Wizard config by clicking on Wizard Config in the ribbon. The Edit Wizard settings diaglouge box appears, you can customize the name and the background (banner), the default bmp file itself is located in the path where you installed Microsoft Deployment Toolkit in the Templates\Disitribution\Tools\X64 or X86 folders. make your changes and click ok. Ok now that we've done some basic configuration of our UDI template let's save it. if all went well you'll see File Save Complete. you can verify that the XML file itself has changed by it's date/time Step 3. Update your MDT Files package. Note: Perform the following on the ConfigMgr 2012 server as SMSadmin now that you've made changes to your UDIWizard_Config.xml you will want to update the MDT Files package so that we have access to those changes in the next part of this series where we'll create and deploy a User Driven Installation Task Sequence. In Software Library click on Packages and locate your MDT Files package. Right click on it and choose Update Distribution Points thats it for this part, see you next time when we will create a UDI task sequence and deploy it ! and see what happens on the client side.


