anyweb
-
Posts
9261 -
Joined
-
Last visited
-
Days Won
371
Everything posted by anyweb
-

using SCCM 2012 in a LAB - Part 1. Installation
anyweb replied to anyweb's topic in Configuration Manager 2012
good info, did you not see this though, see the Note: ? -
ok i've modifed the ruleset to exclude system as well as user context, please try it again (the new rules..)
-
just adding the following to this post - http://blogs.technet.com/b/oob/archive/2011/01/05/troubleshooting-the-pxe-service-point-and-wds-in-configuration-manager-2007.aspx
-
VBScript and HTA to associate computer and add to specific collections
anyweb replied to JCA's question in Frontends, HTA's and Web Services
for the cleartext part, look at this post -
SCCM 2012 FEP Collections are missing
anyweb replied to yukis1's topic in Configuration Manager 2012
you can create a package/program to uninstall the SCEP client as follows:- scepinstall.exe /u /s deploy that to a collection when you want to uninstall the SCEP client. -
Enrolled Mobile devices not showing in the SCCM console
anyweb replied to jad3fox81's topic in Configuration Manager 2012
what steps did you undertake so far ? what did you do on the client side and on the server side.. here's a summary from Technet - http://technet.microsoft.com/en-us/library/gg699359.aspx Enrollment for mobile devices in System Center 2012 Configuration Manager is now natively supported by using the two new enrollment site system roles (the enrollment point and the enrollment proxy point) and a Microsoft enterprise certification authority. For more information about how to configure enrollment for mobile devices by using System Center 2012 Configuration Manager, see How to Install Clients on Mobile Devices and Enroll Them by Using Configuration Manager. After the mobile devices are enrolled, you can manage their settings by creating mobile device configuration items and then deploy them in a configuration baseline. For more information, see How to Create Mobile Device Configuration Items for Compliance Settings in Configuration Manager. For more information, see the Deploying the Configuration Manager Client to Mobile Devices section in the Introduction to Client Deployment in Configuration Manager topic in the Deploying Clients for System Center 2012 Configuration Manager guide. -
sounds to me like your capture iso is faulty, can you try making it again please, how did you burn it to CD ?
-
SCCM 2012 FEP Collections are missing
anyweb replied to yukis1's topic in Configuration Manager 2012
there are no collections for FEP anymore as they are not required, there are no programs either, the SCEP client is now part and parcel of the ConfigMgr client. Please carry out all the steps in part 5 here to get a better understanding of how it works, and if you want to know even more, I'd recommend you purchase the System Center 2012 Configuration Manager Unleashed book when it ships and look at Chapter 16 which covers Endpoint Protection in great detail. -
first things first, ConfigMgr 2012 is in release candidate you should NOT be rolling it out in production, period. MIcrosoft will not support you. secondly if you want updates from WSUS then it's all or nothing, so forget about using ADR's for the updates as ADR's require a working SUP and a working SUP wants to have full control of your WSUS infratstructure. Or, let Configmgr deliver all the updates, why use WSUS for software updates when you have a ConfigMgr infrastructure it makes no sense. SCEP can get updates in many ways have you reviewed all of them ?
-
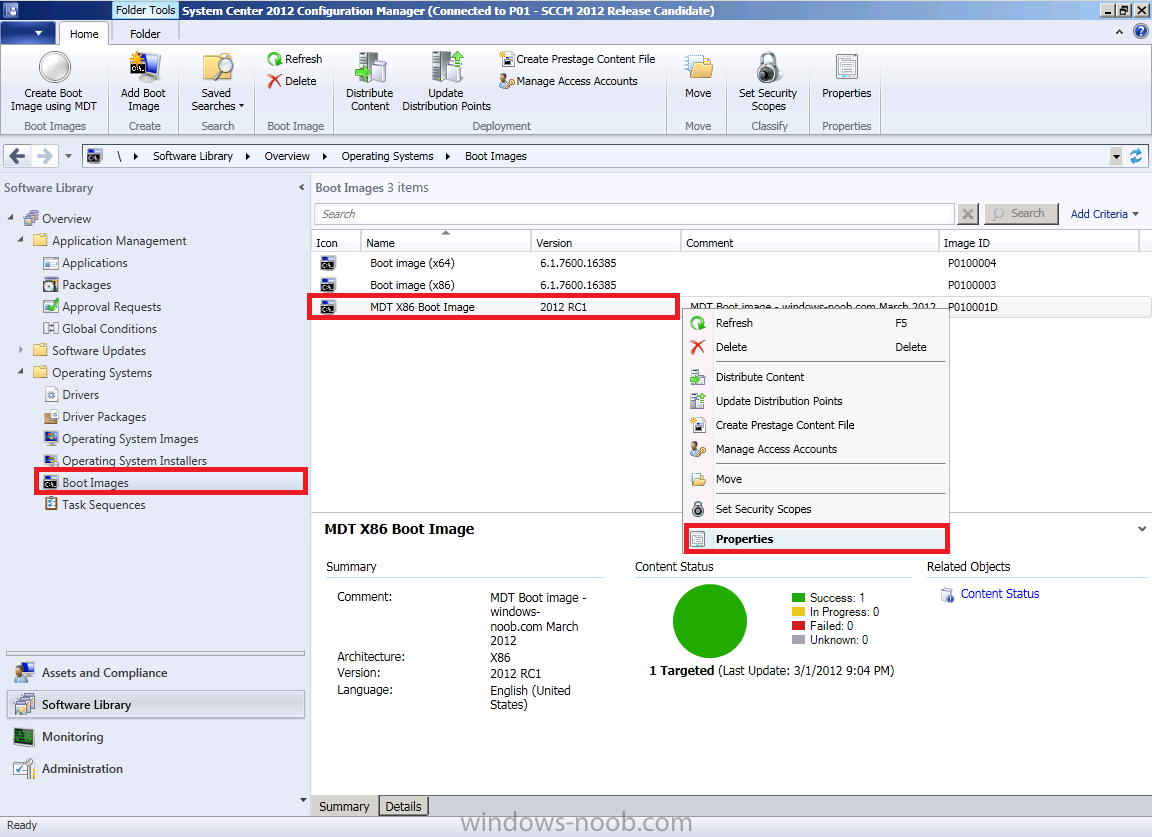
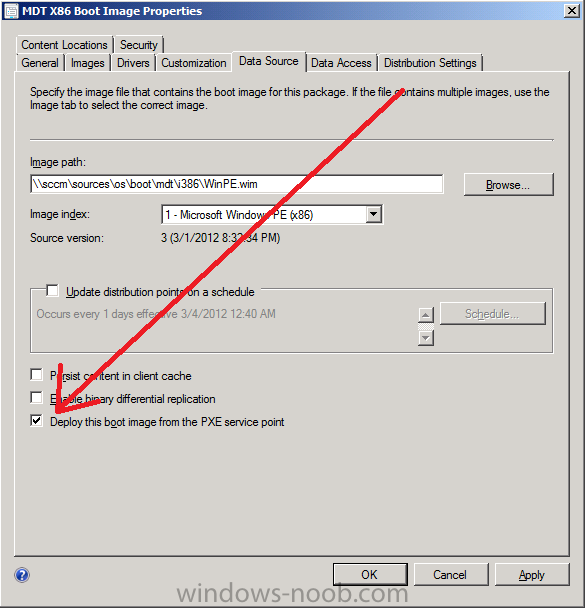
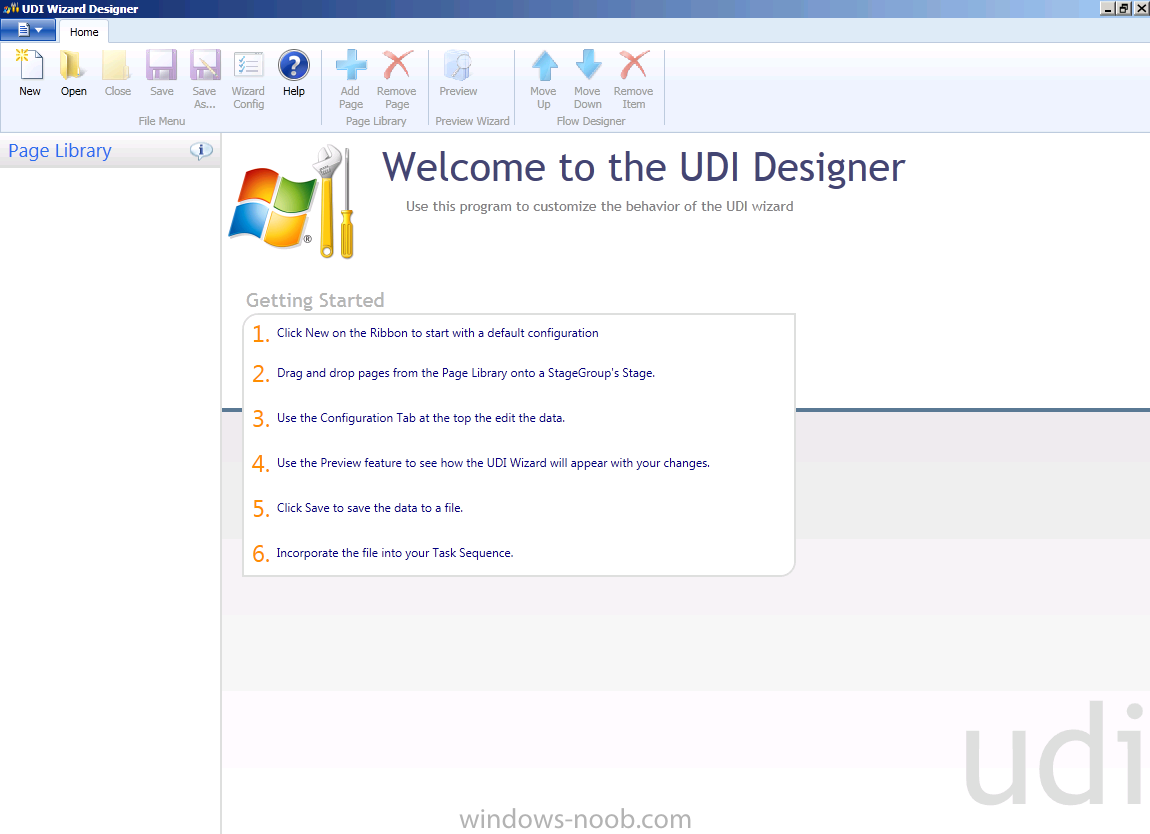
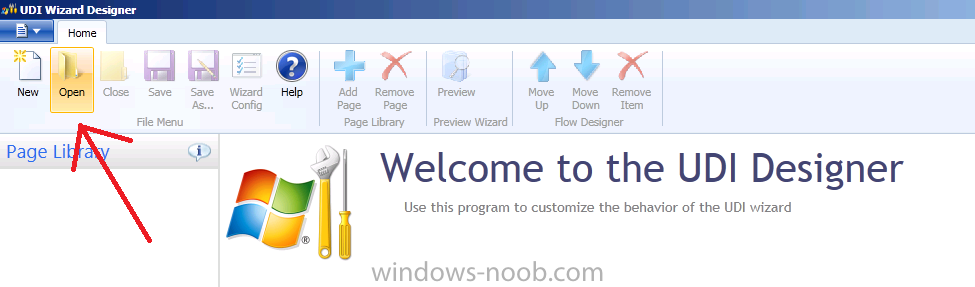
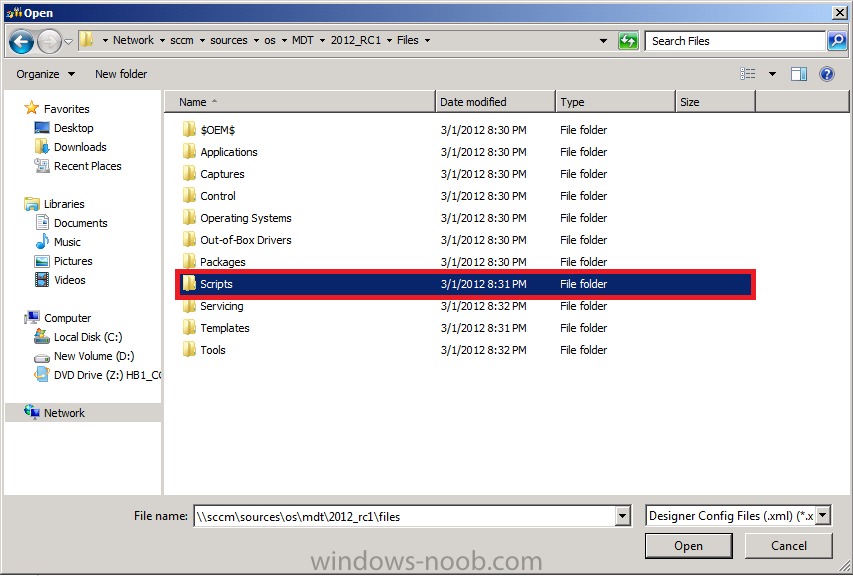
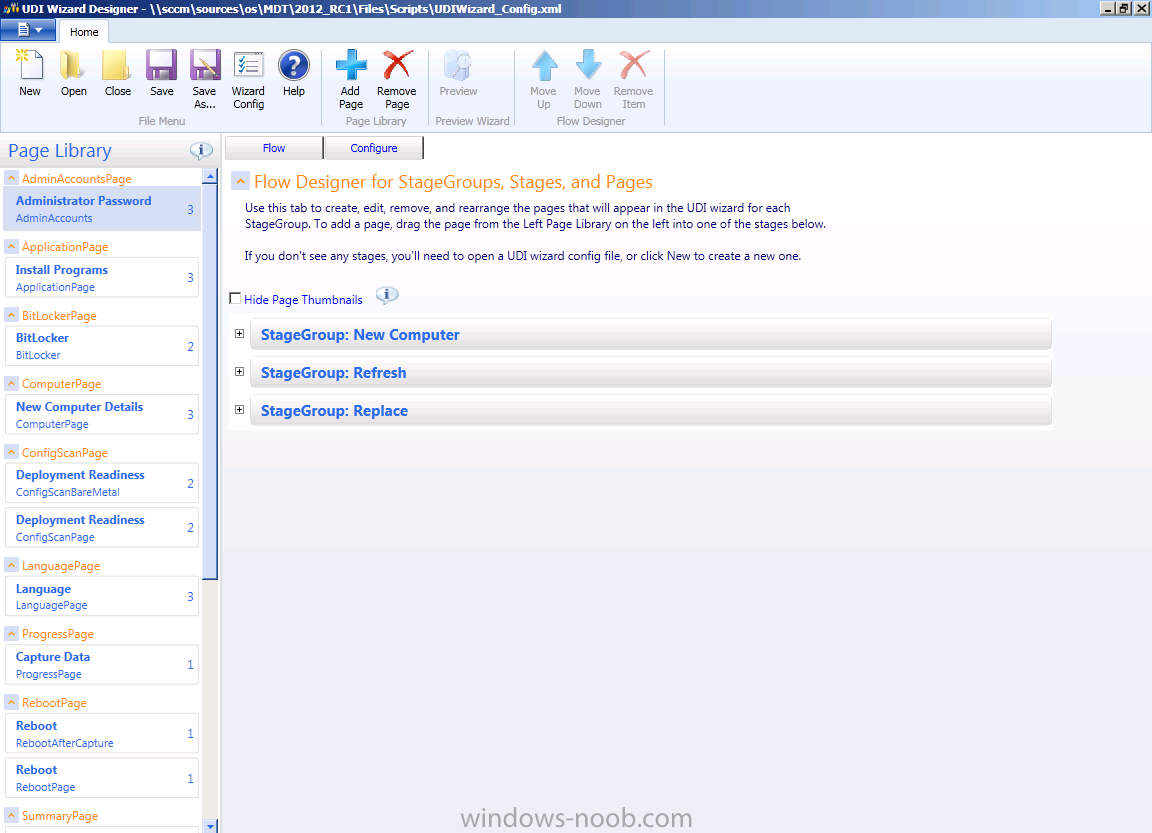
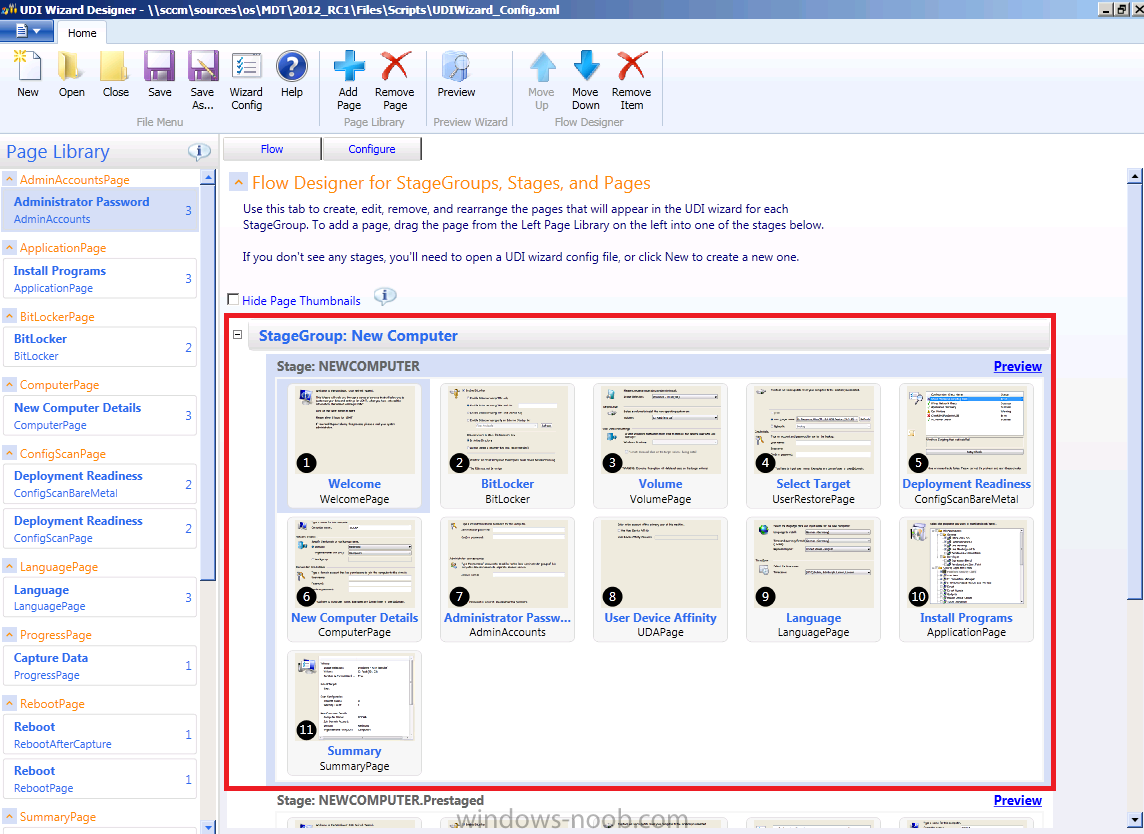
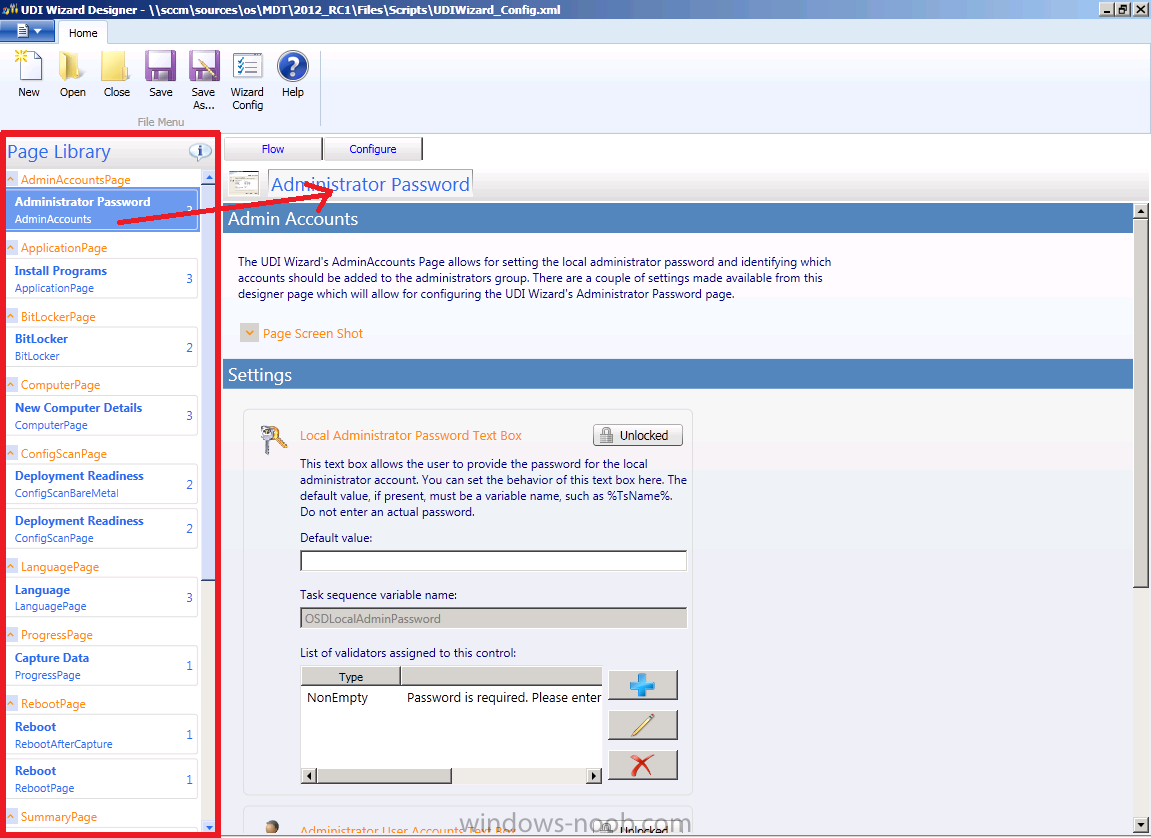
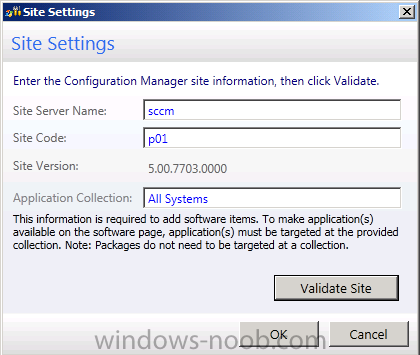
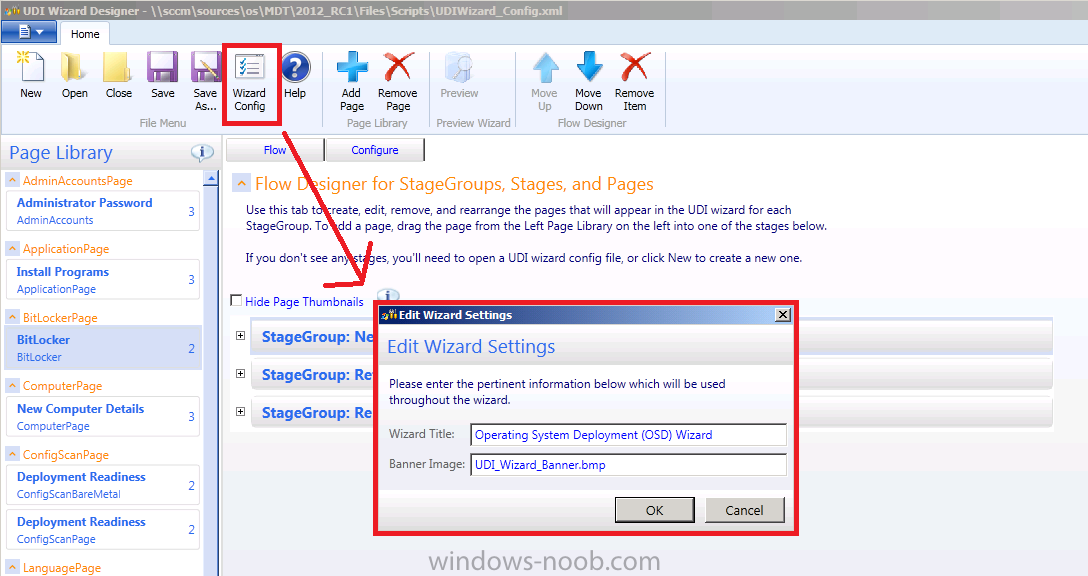
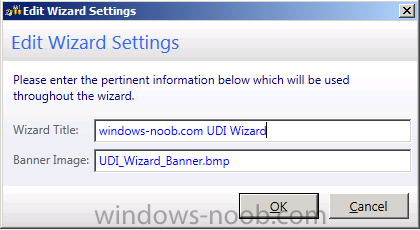
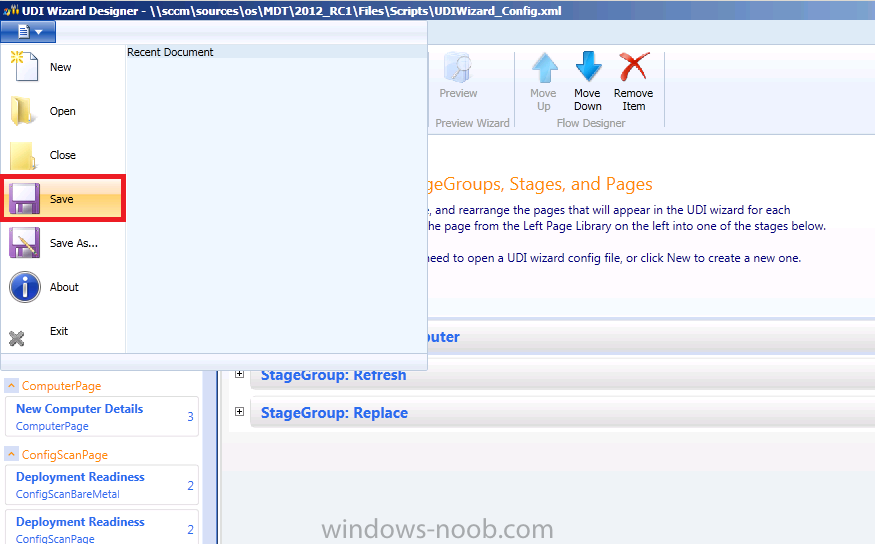
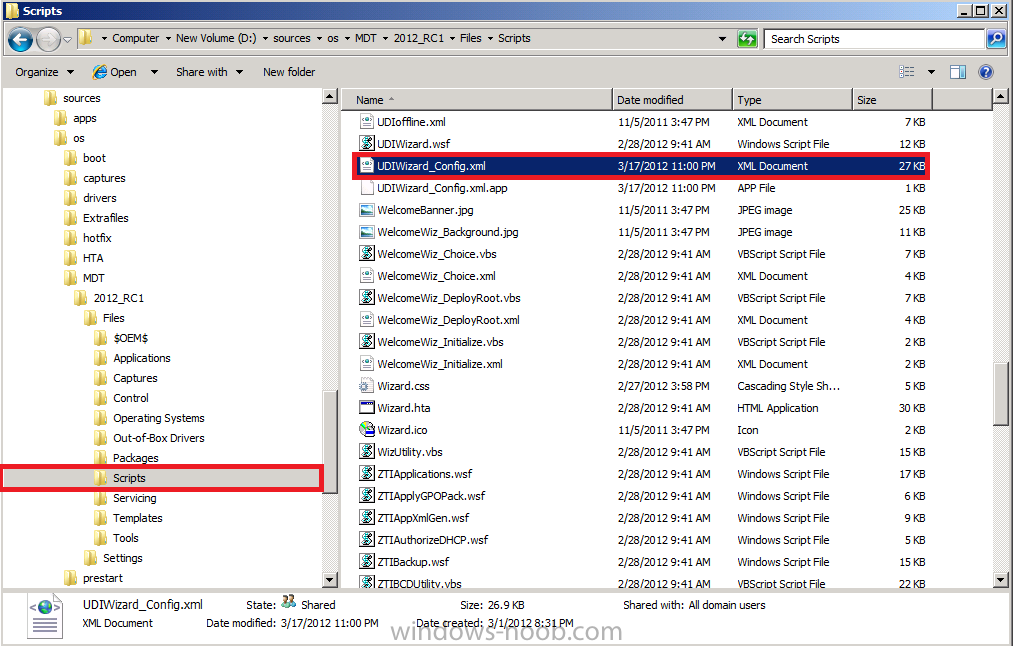
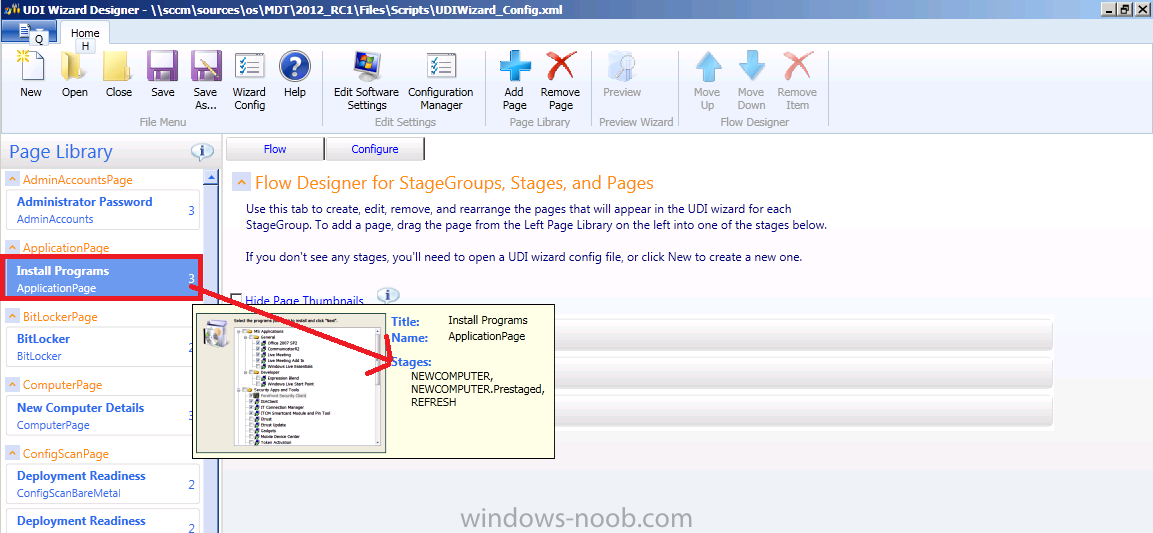
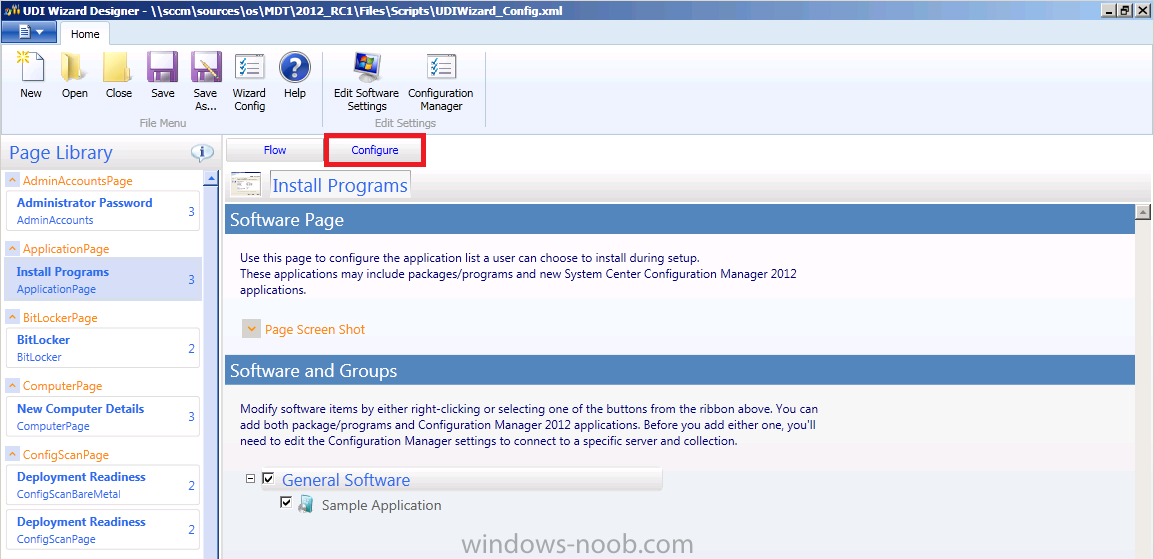
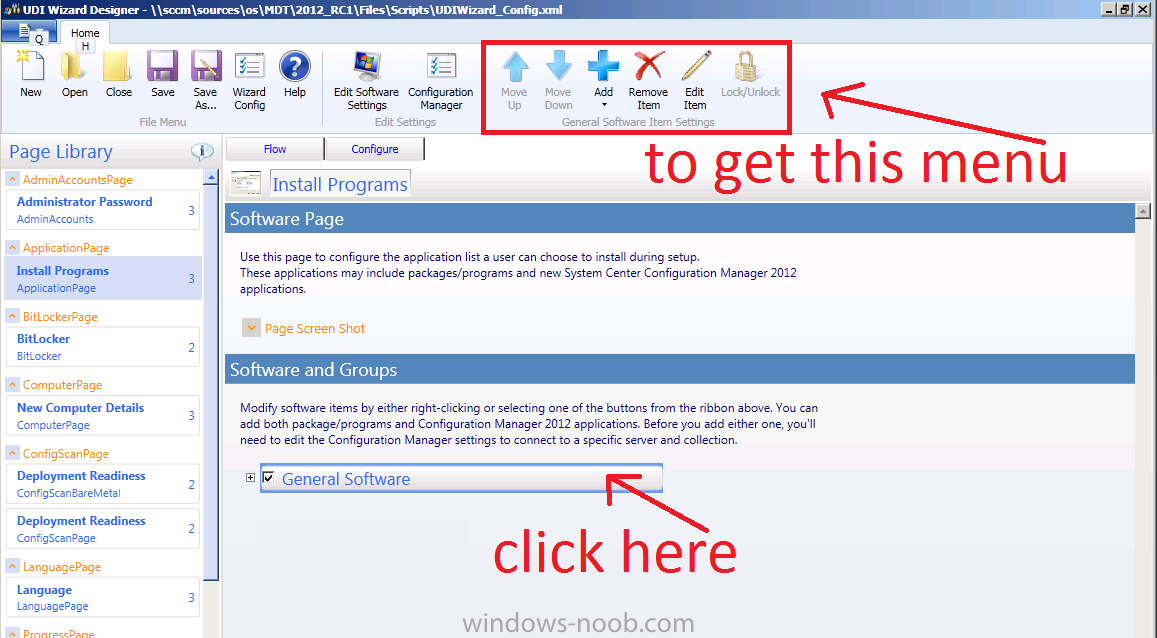
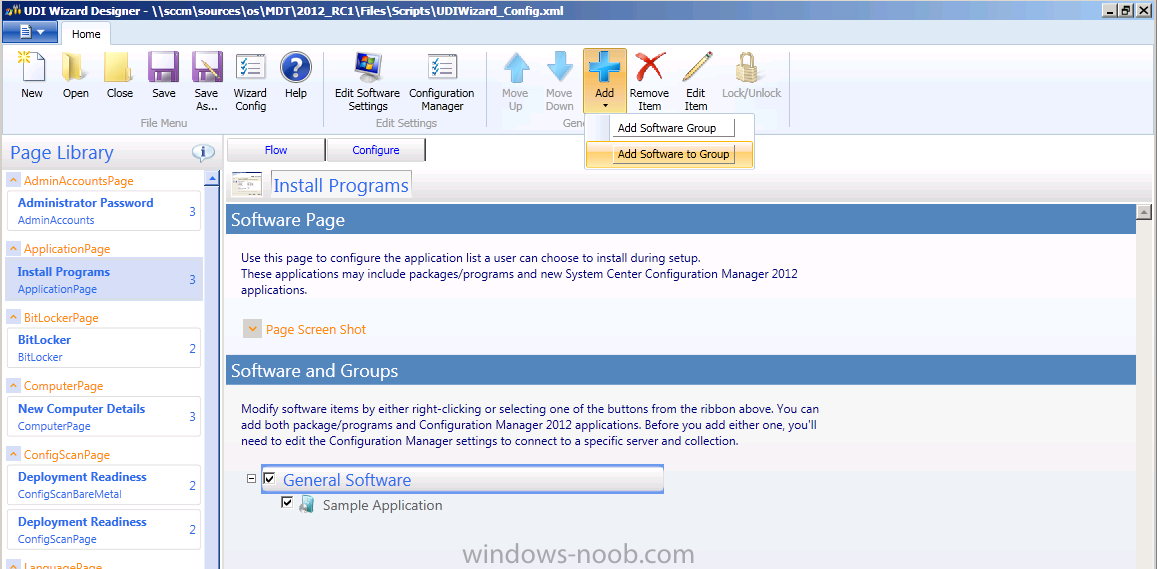
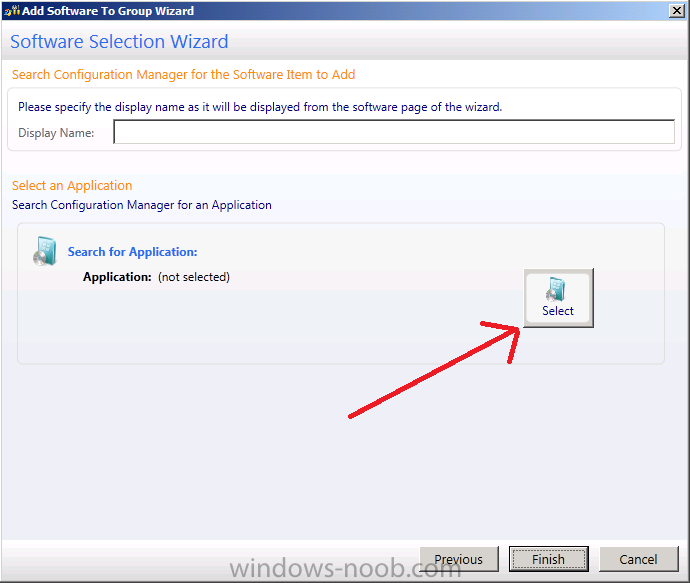
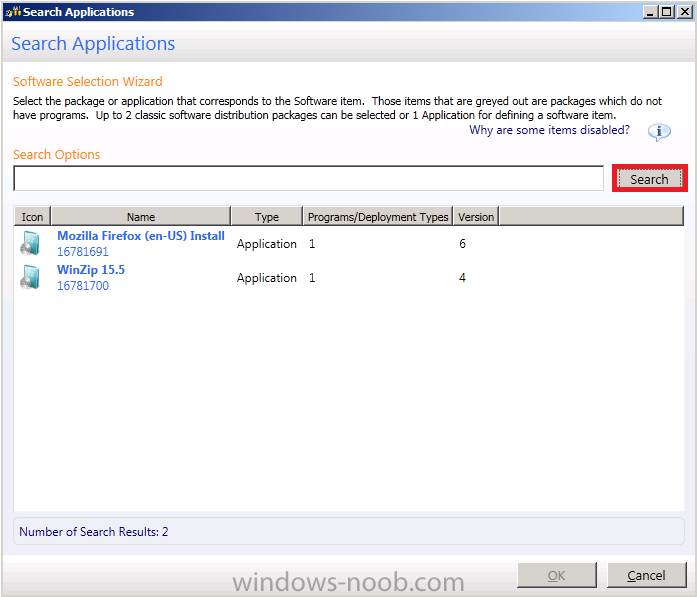
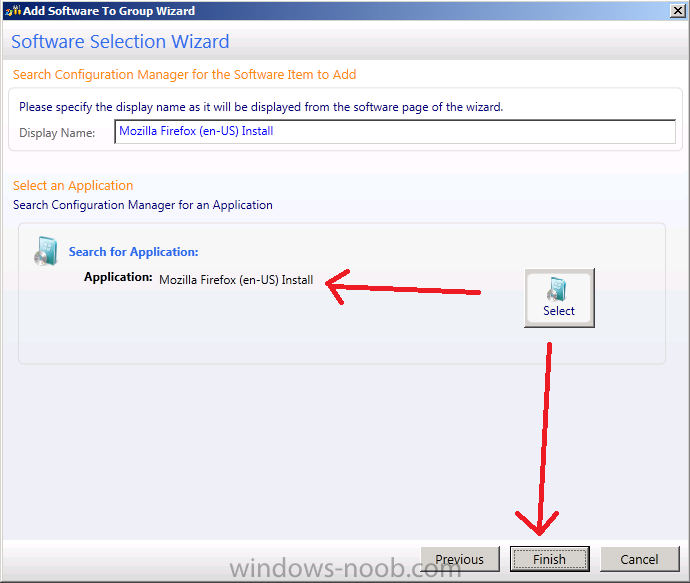
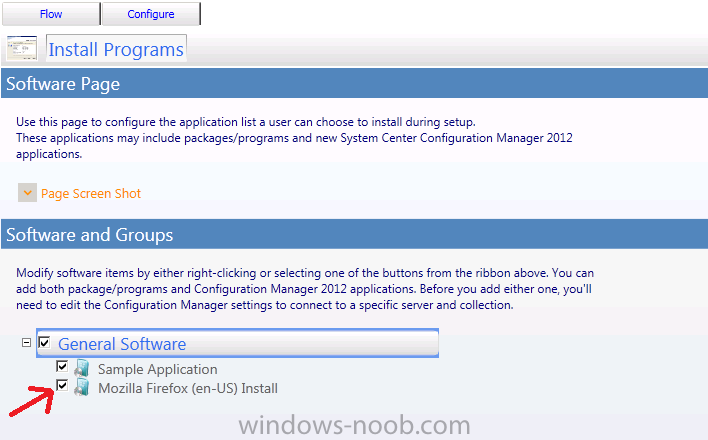
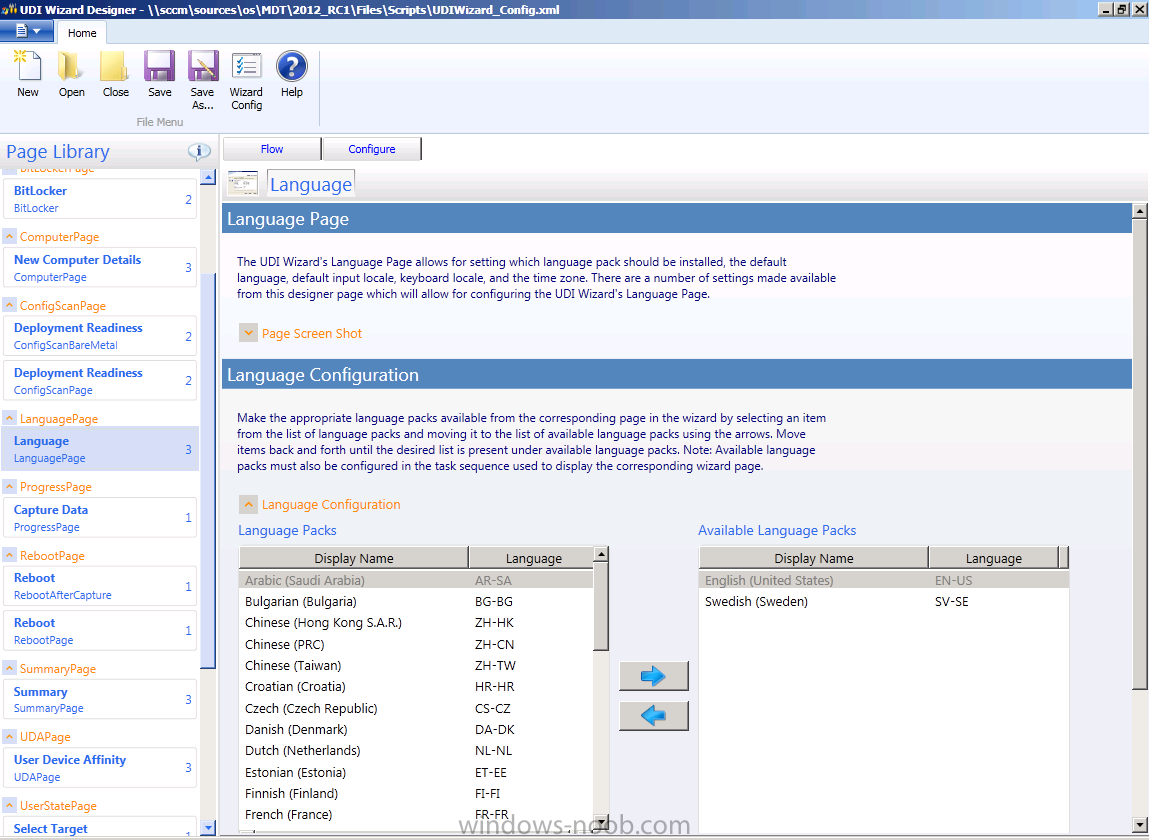
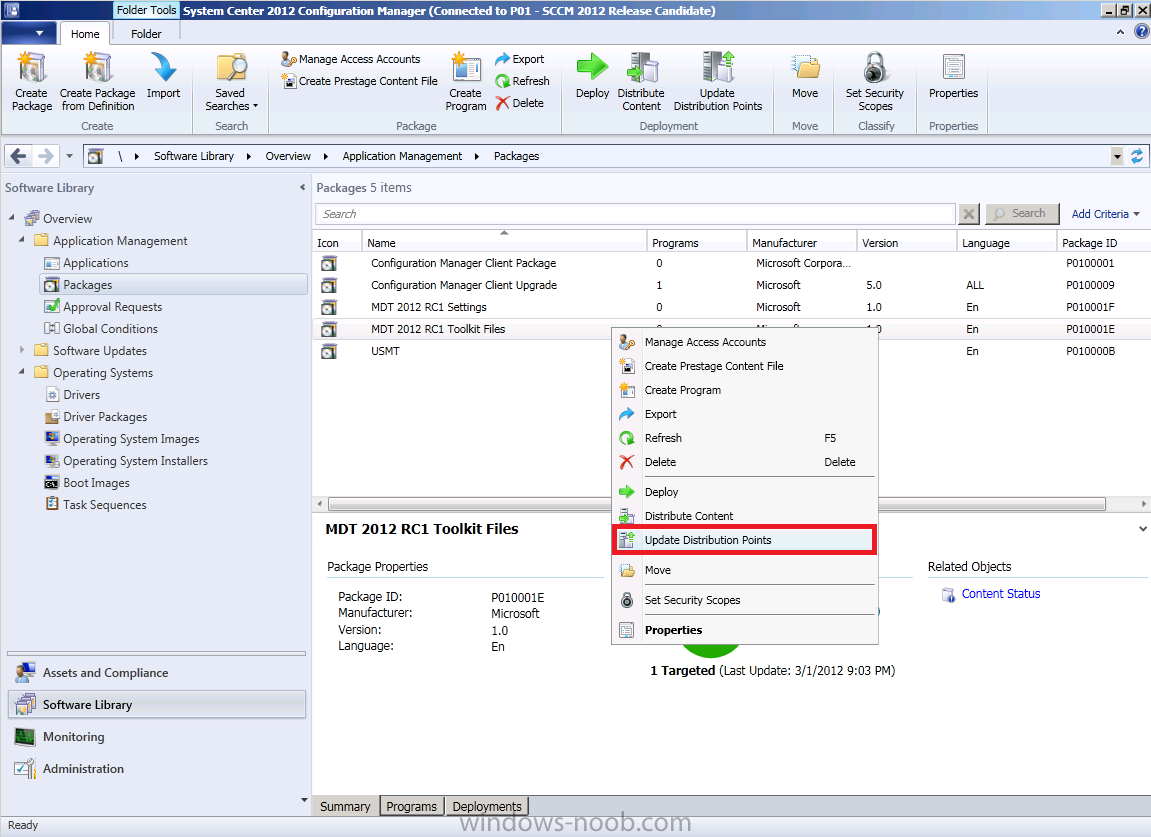
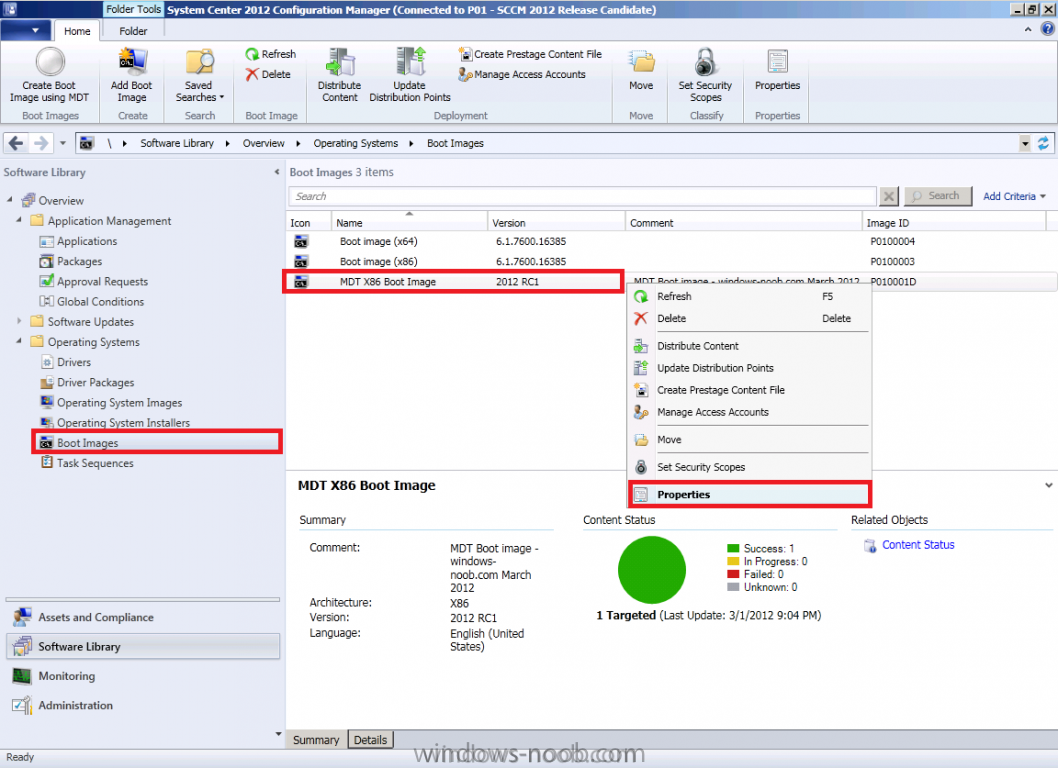
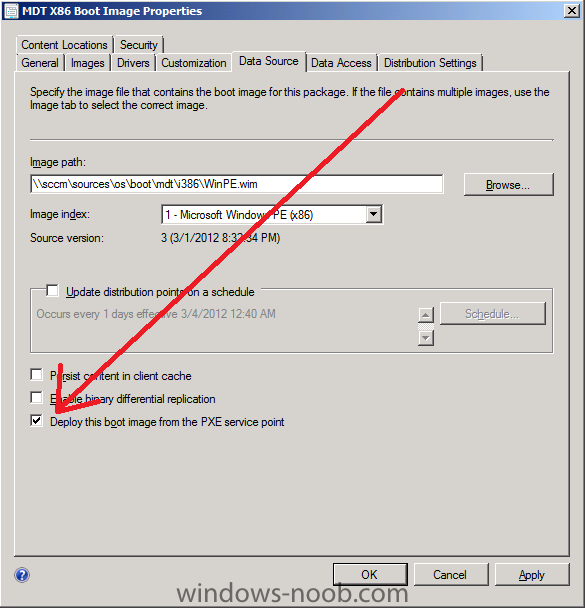
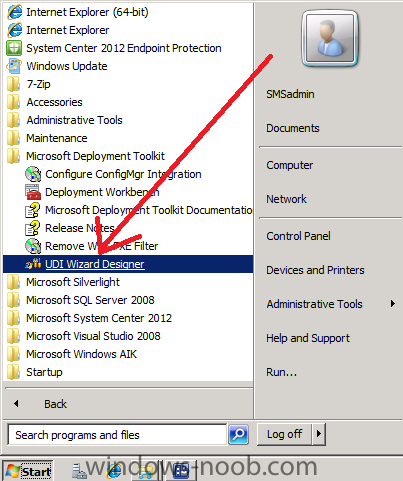
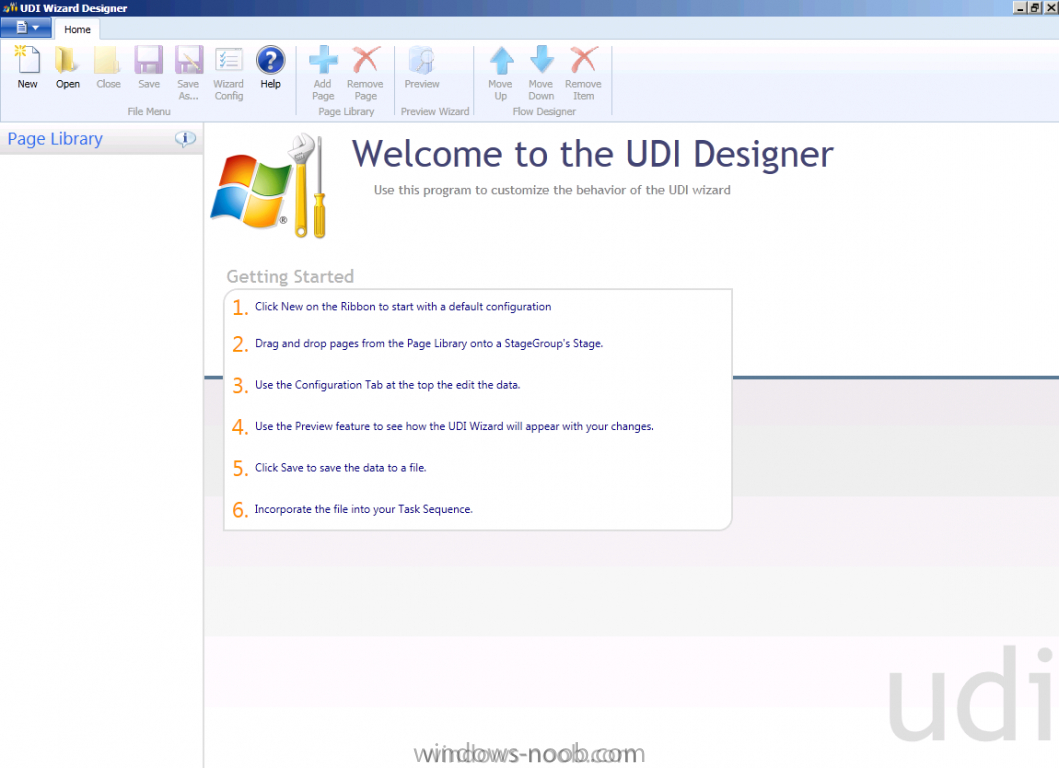
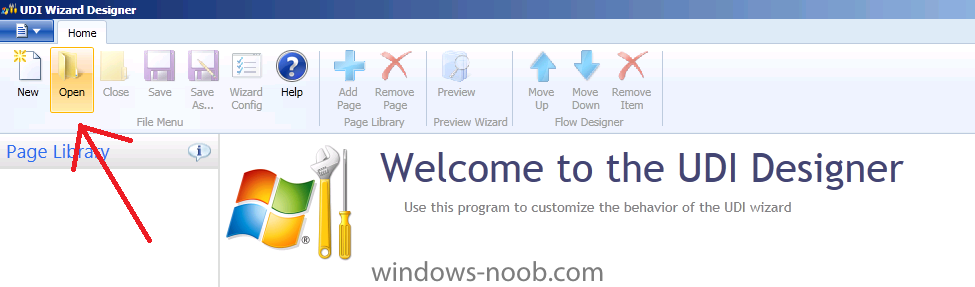
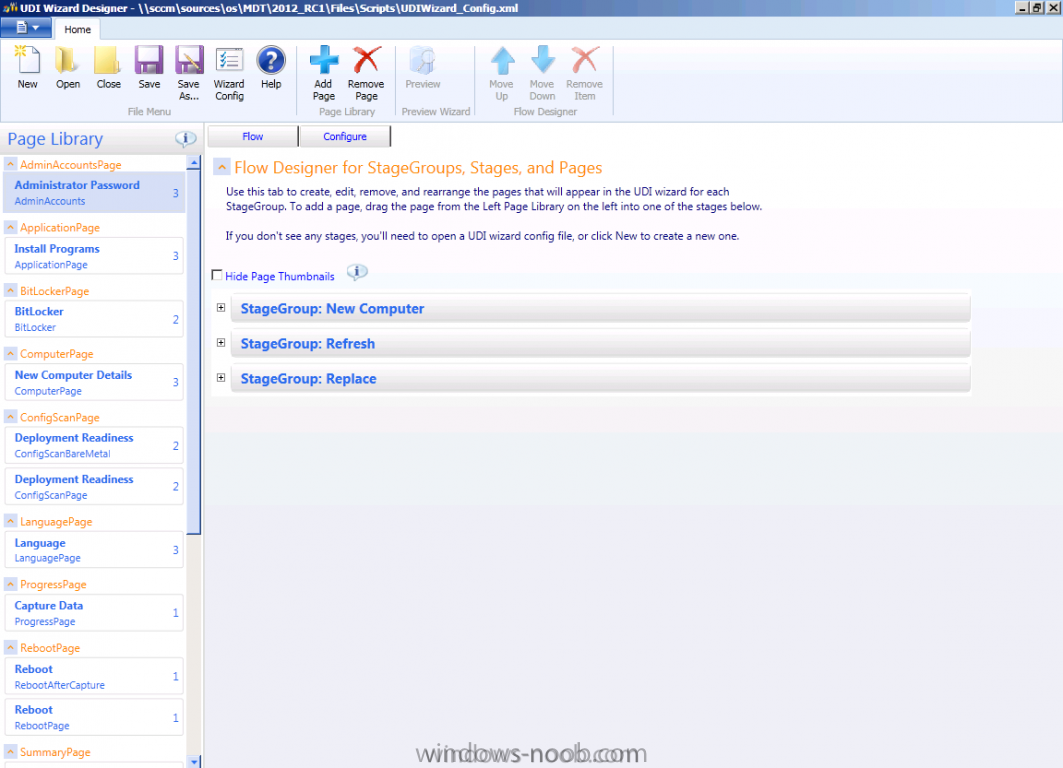
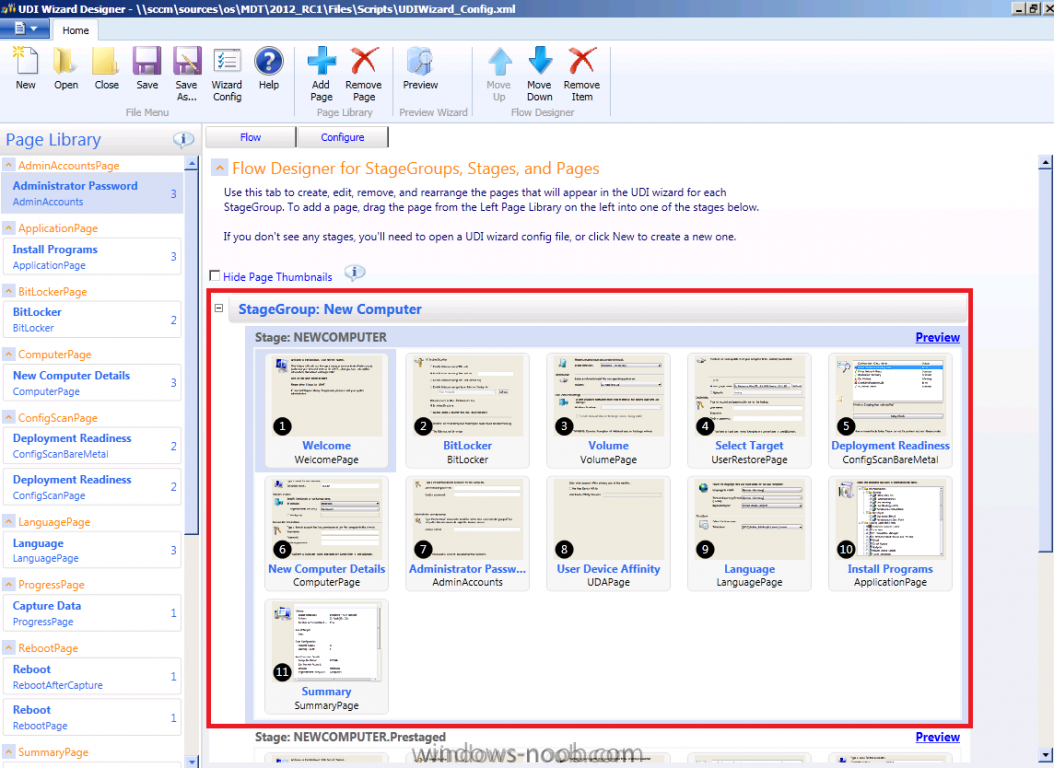
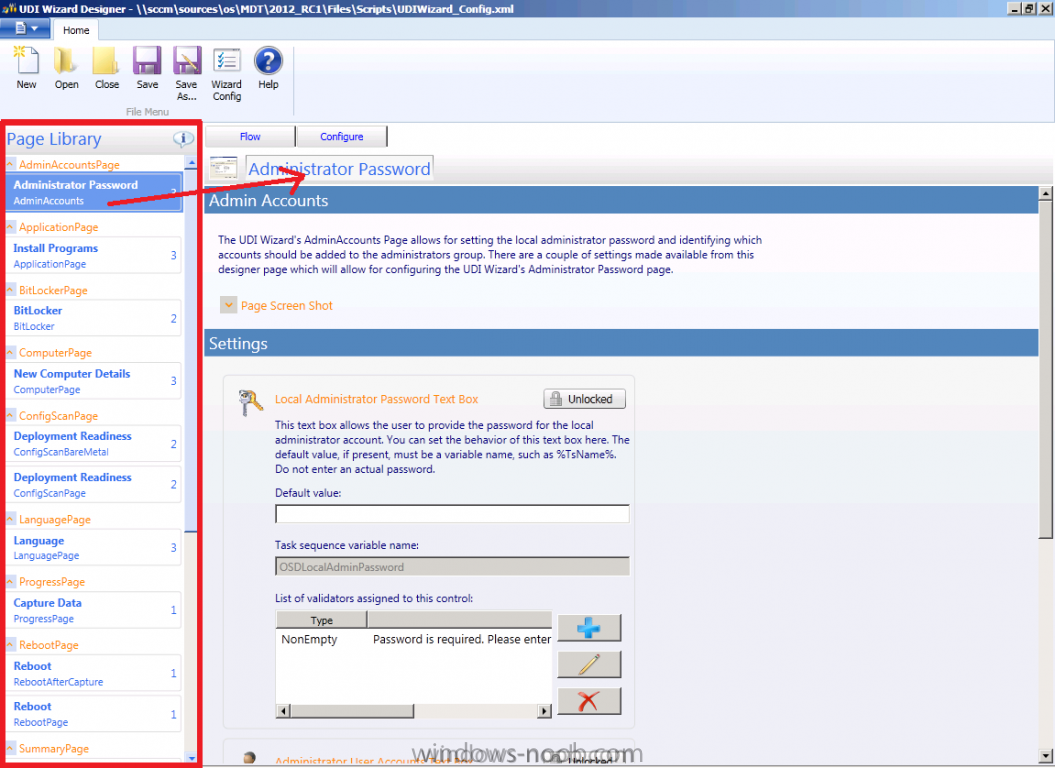
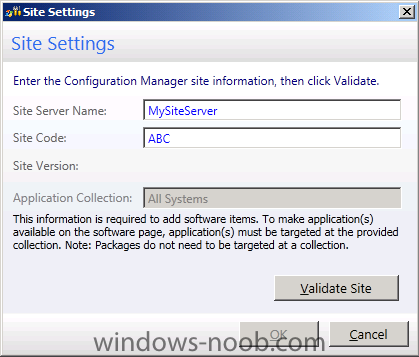
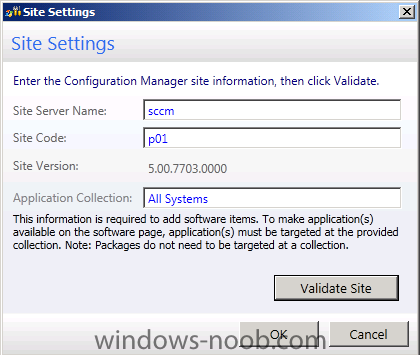
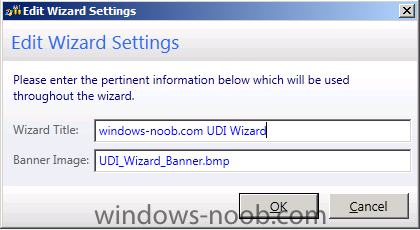
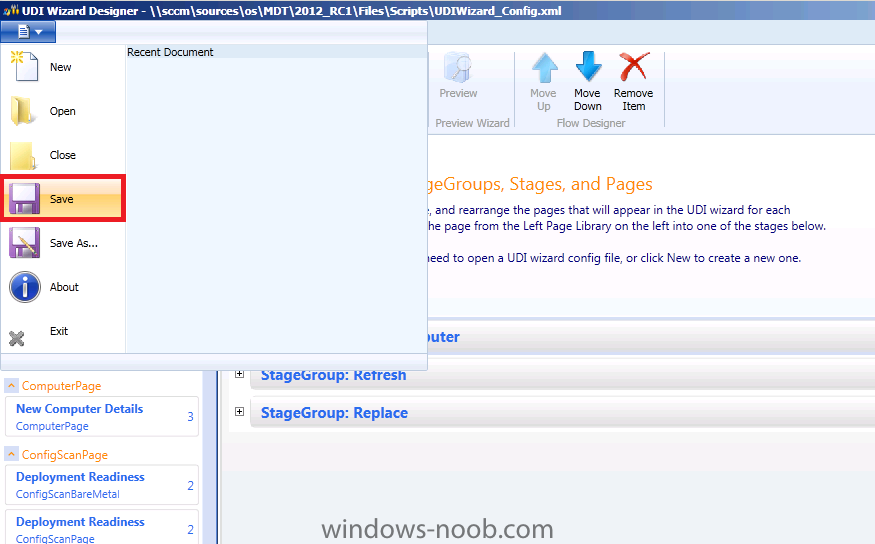
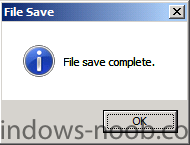
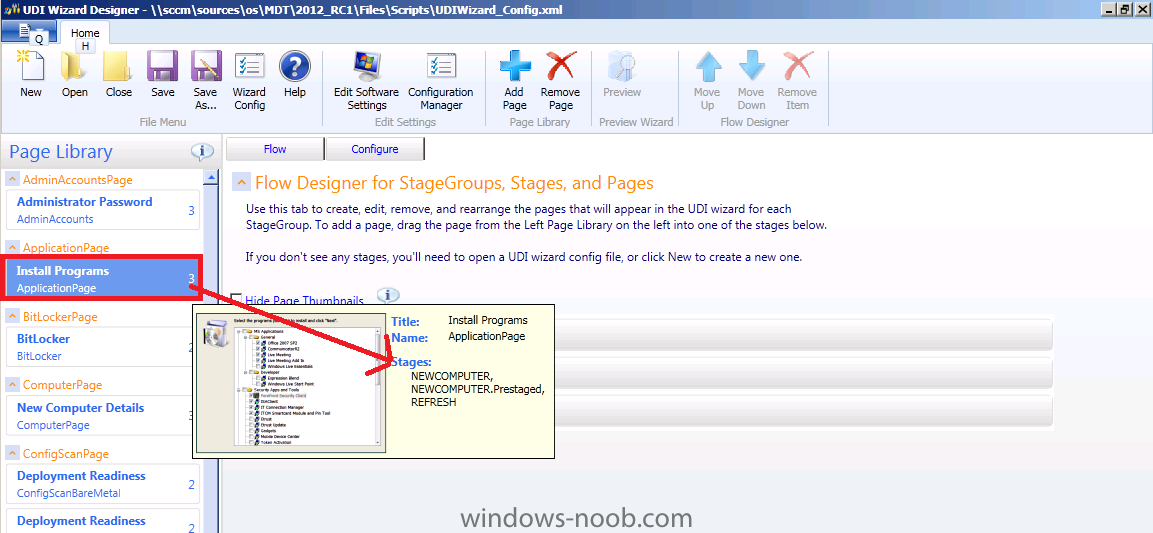
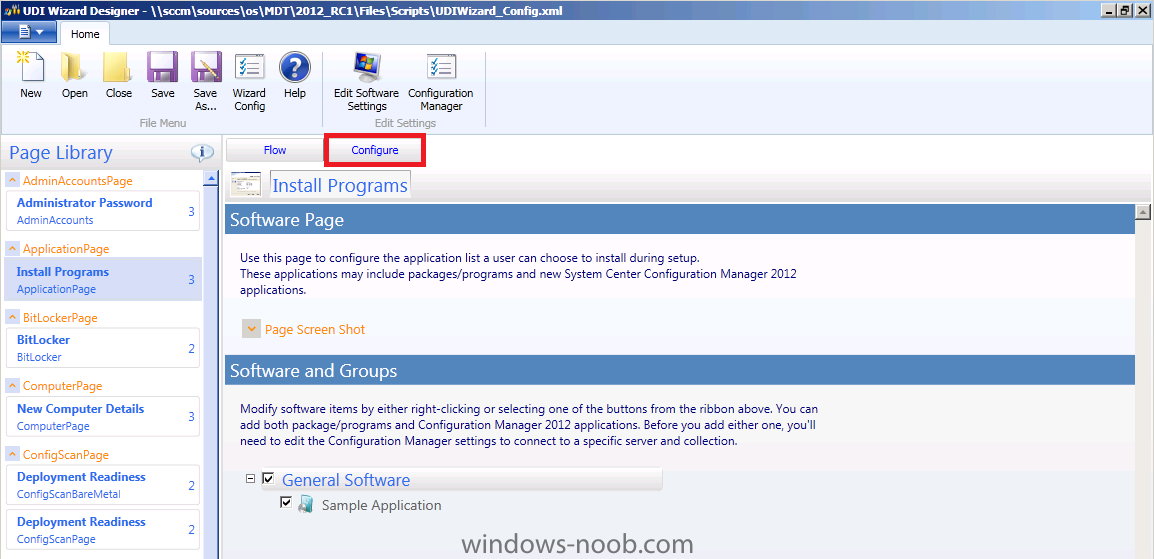
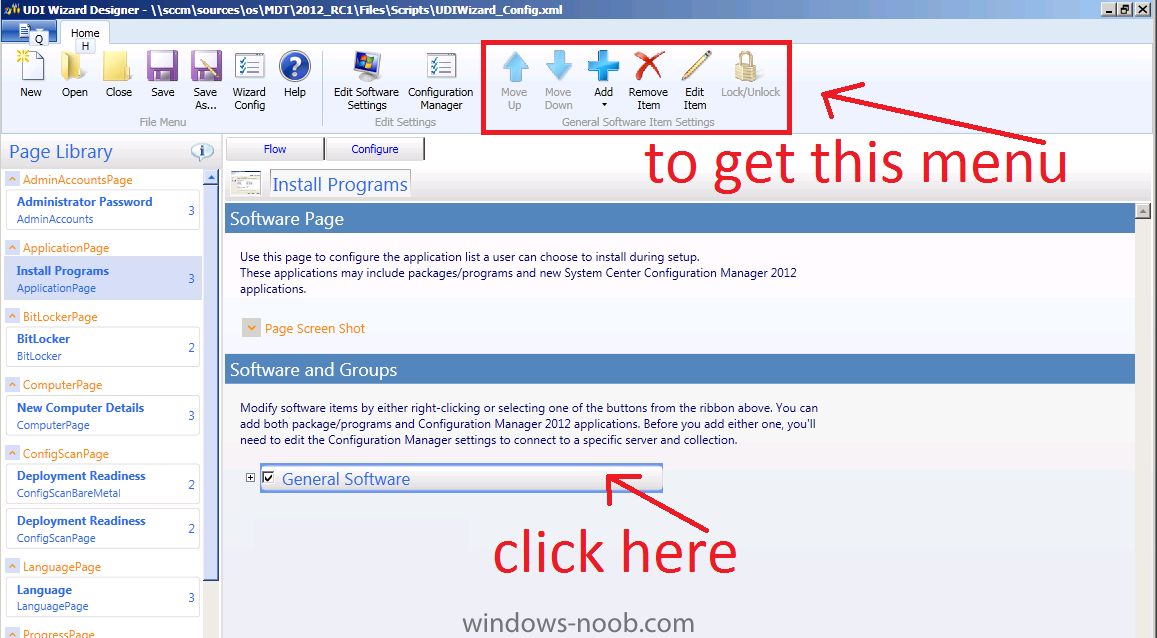
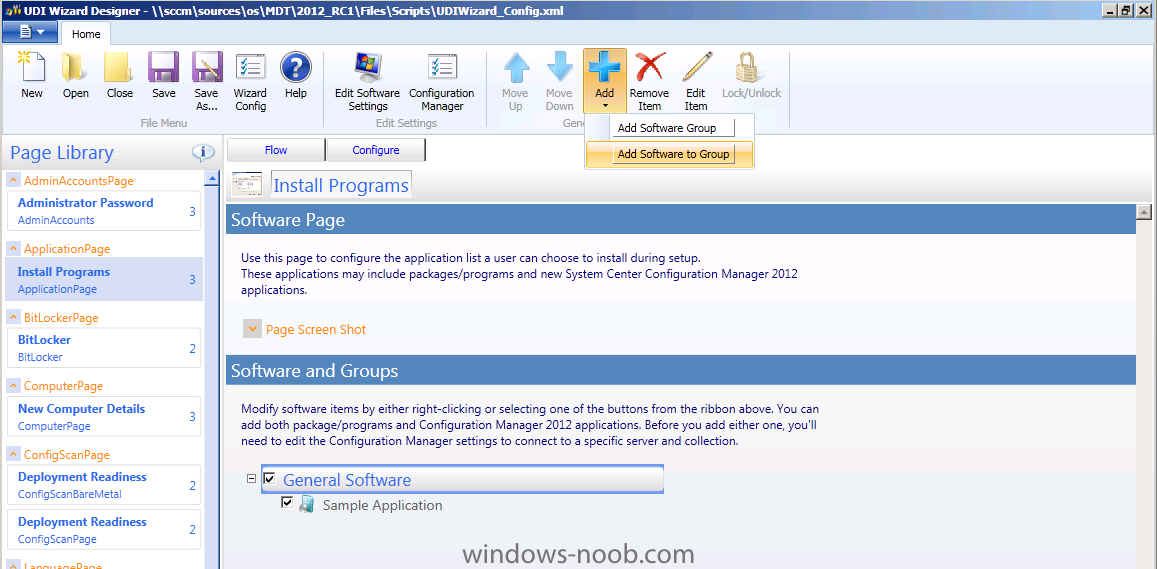
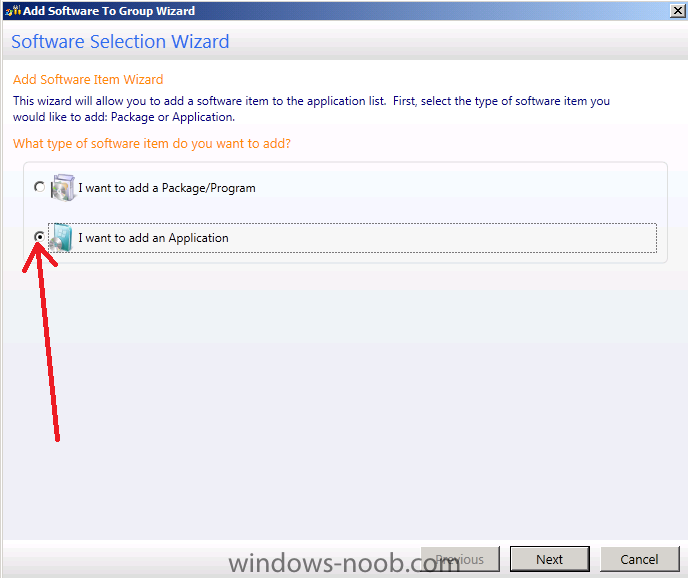
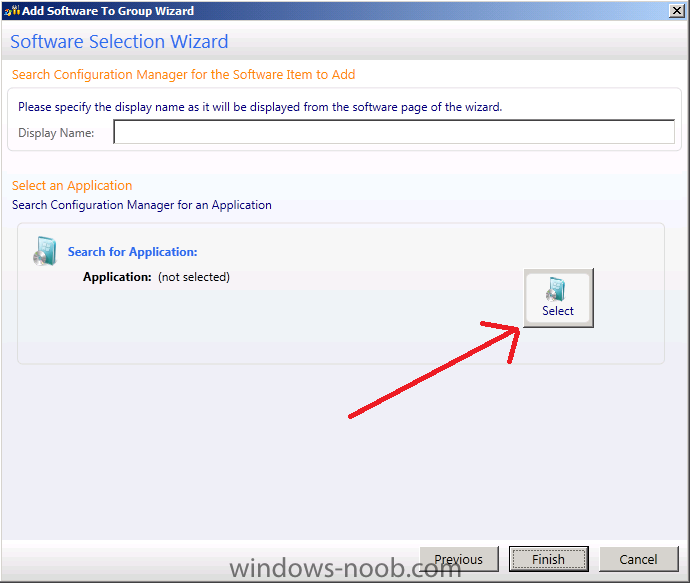
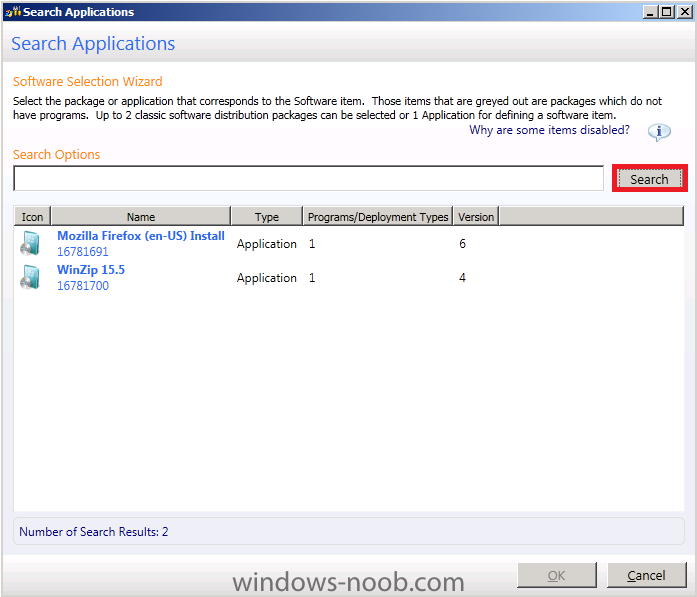
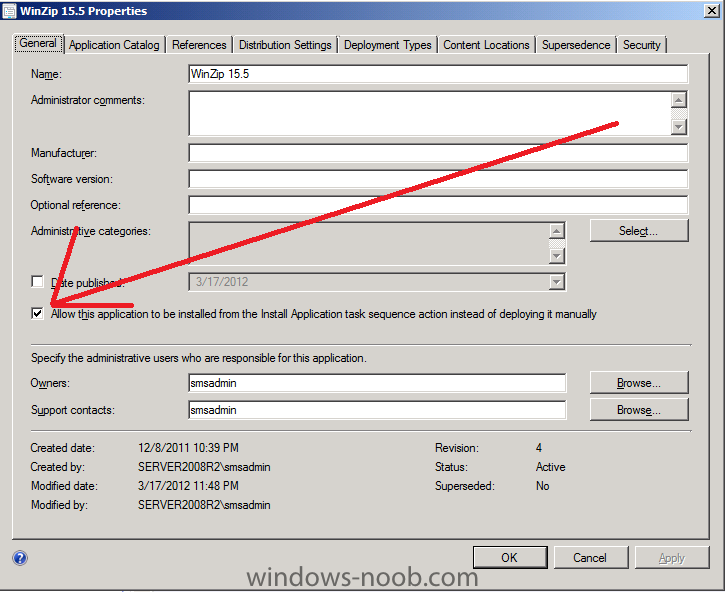
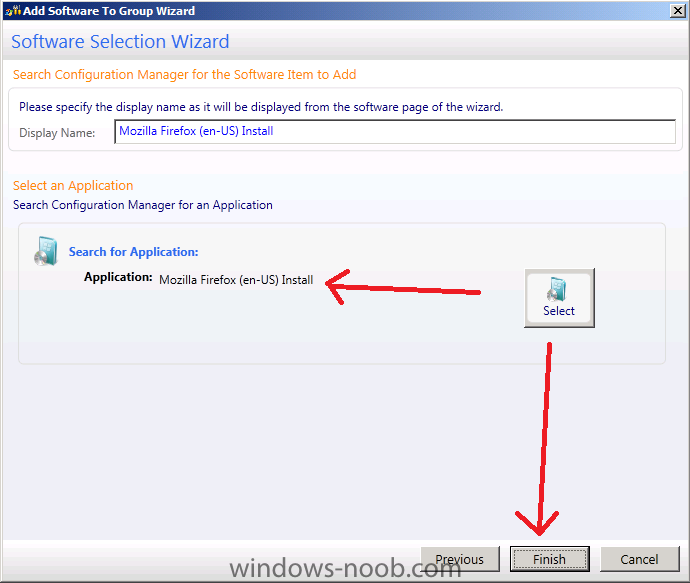
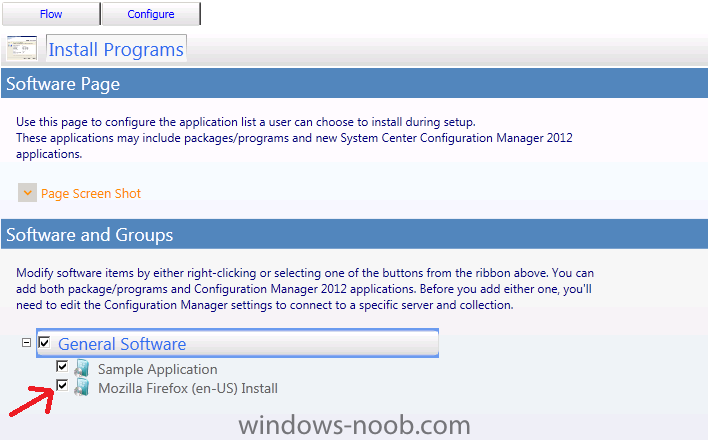
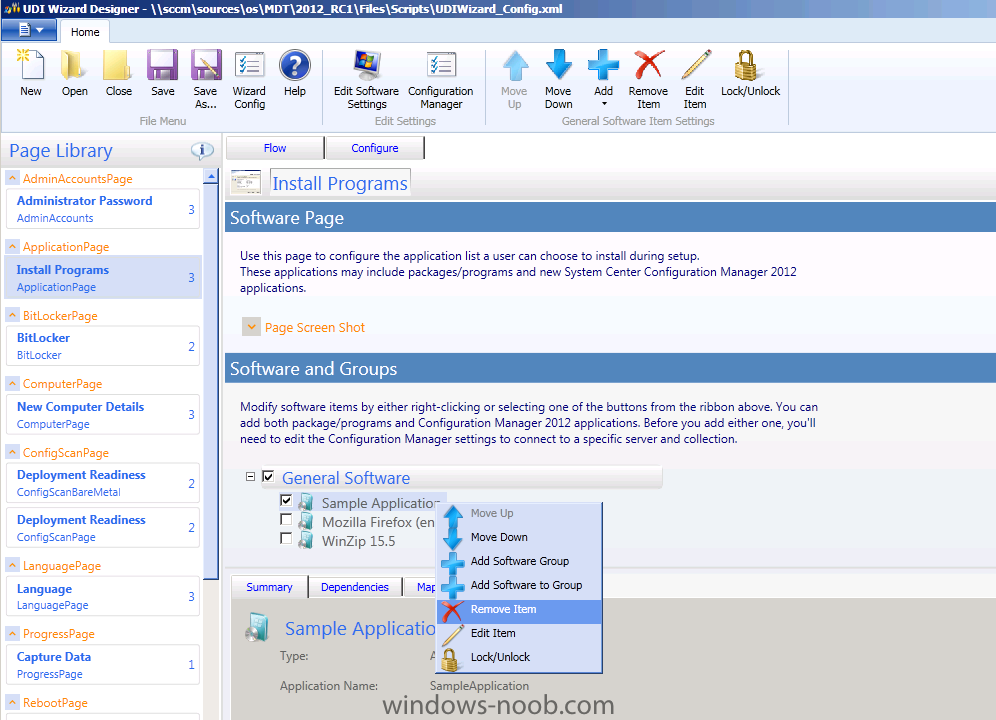
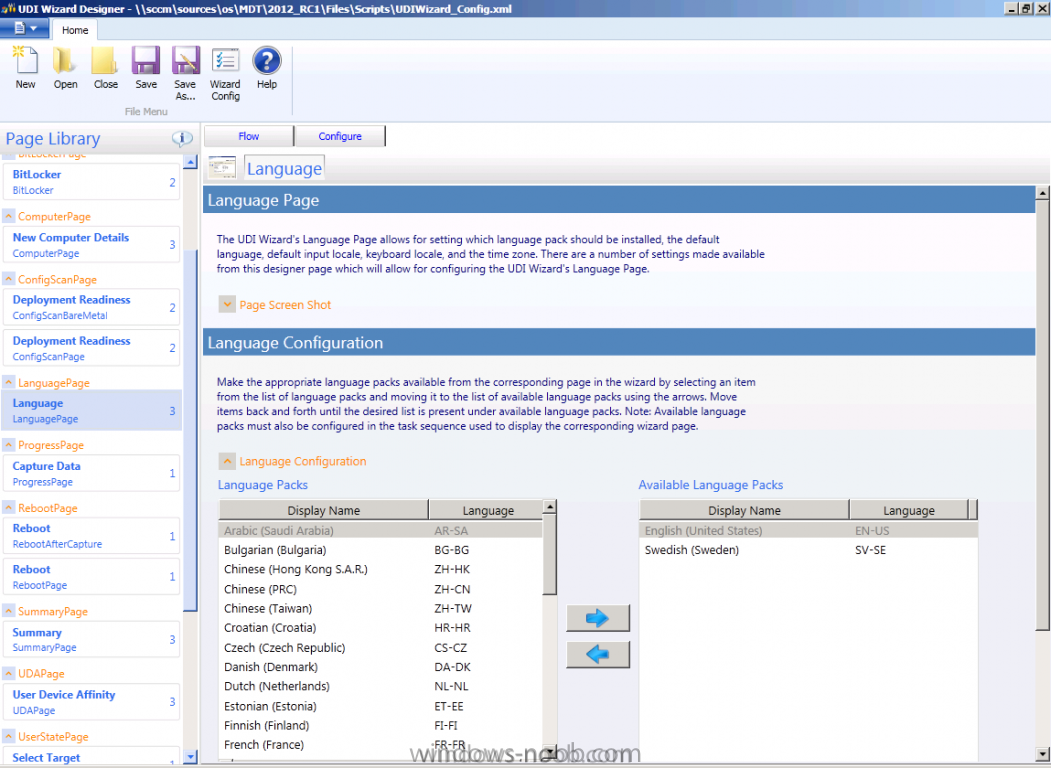
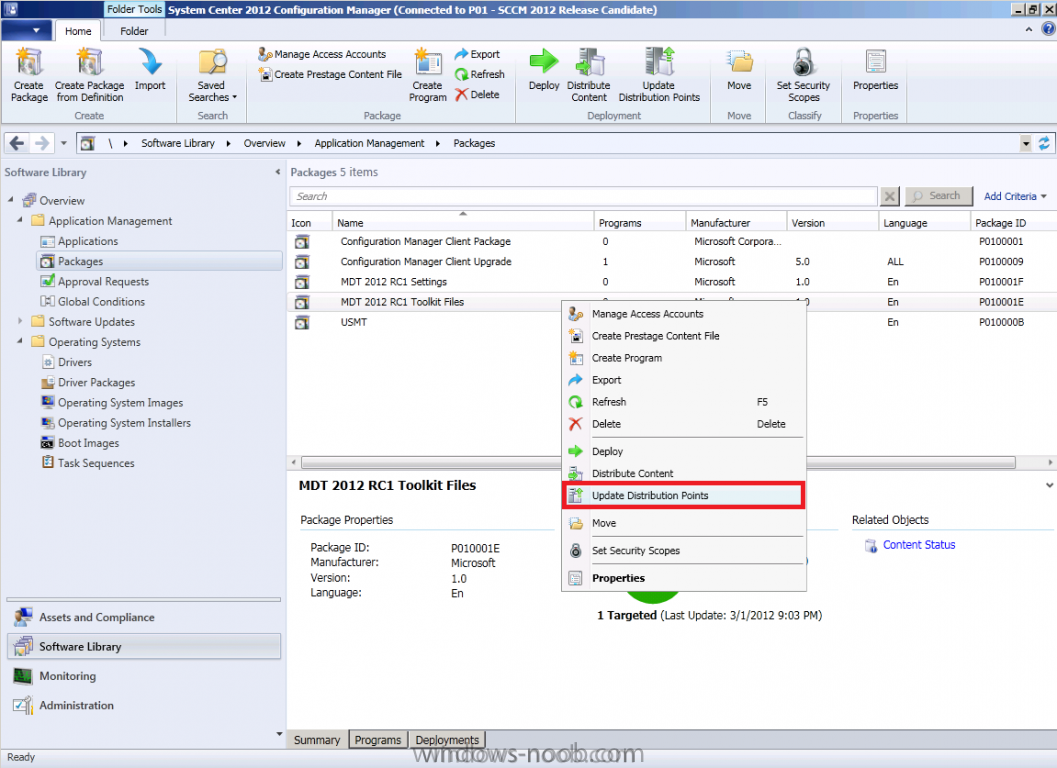
In Part 1 of this series we got our AD and SCCM servers ready, and then we installed System Center 2012 Configuration Manager as a standalone Primary site. In Part 2 we configured the SCCM server further by adding some Windows Server roles necessary for the following Configuration Manager 2012 functionality, Software Update Point (SUP) and Operating System Deployment. In Part 3 we configured the server further by Enabling Discovery methods and creating Boundary's and Boundary Groups. In Part 4 we configured Client Settings, Added roles and Distributed the Configmgr Client to our Computers within the LAB, then in Part 5 we enabled the Endpoint Protection Role and configured Endpoint Protection settings and targeted a collection called All Windows 7 Computers with these settings and policies. In Part 6 we configured our SUP further to Deploy software updates to our All Windows 7 Computers and Build Windows 7 X64 collections. In Part 7 we used the Build and Capture process to create our Base Windows 7 X64 wim image. In Part 8 we created a USMT 4 package to migrate the users data using hardlinking and then we imported the captured image into ConfigMgr and created a Deploy Windows 7 X64 task sequence. We created a Deploy Windows 7 X64 Collection and set some User Device Affinity collection variables. In Part 9 we created an Application, and created a deployment type for that application to only install if the Primary User was True for that device (User Device Affinity), we then copied our Task Sequence (duplicated it), deployed the new Task Sequence, added a computer to the new collection and then PXE booted the computer to the Deployment Menu. In Part 10 we monitored the Deployment process in a lot of detail to how UDA sent state messages and we verified that our application installed on the users Primary Device, in addition we modified our collection variables, and added a prestart command to our boot image to prompt for the SMSTSUdaUsers. In Part 11 we setup the Reporting Services Point Role and verified that reporting was working. In Part 12 we demonstrated a new feature in ConfigMgr which allows us to Patch operating system WIM images using Offline Servicing. This means that you can apply Windows Updates by using Component-Based Servicing (CBS) to update the your previously captured WIM images. In Part 13 we looked at how Role Based Administration is used within ConfigMgr and we created a new custom role to allow a user (or users within a Security Group) to view Software Update Reports. This is useful because you will probably want one team to take care of configuring and deploying software updates, and to grant another (Management etc) the capability of reviewing Compliance Reports. In Part 14 we performed a side-by-side migration from Configuration Manager 2007. In Part 15, we deployed Windows 8 Consumer Preview to see if it was possible, and indeed it was (it's not supported by Microsoft however). In Part 16 we integrated MDT 2012 RC1 with Configuration Manager 2012 RC2 and now we will configure it to see what it can do with that integration by using the UDI Wizard designer to configure the default Custom XML file used in a UDI task sequence namely UDIWizard_Config.xml. Step 1. make the MDT boot image PXE bootable Note: Perform the following on the ConfigMgr 2012 server as SMSadmin After integrating MDT with ConfigMgr we created a MDT Task Sequence and as part of that wizard we created a MDT Boot image. This boot image gives us additional power and functionality over a standard ConfigMgr boot image (for example, we can display HTA's with this boot image without having to mount/unmount the boot.wim file and add additional support). Locate your MDT boot image in Software Library, Operating Systems, Boot Images, right click on it and choose Properties When the properties screen appears, click on the Data Source tab, place a check-mark in Deploy this boot image from the PXE service point. click OK when done. Step 2. Modify the UDIWizard_Config xml file using the UDI Designer Wizard. Note: Perform the following on the ConfigMgr 2012 server as SMSadmin As we will be creating a User Driven Installation Task Sequence in the next part, we first want to customise what our users will see when that wizard appears and to do so we need to use the UDI Designer Wizard. So click on Start, Programs, Microsoft Deployment Toolkit, and select the UDI Wizard Designer from the menu. The UDI Wizard Designer starts and you'll be presented with the new gui, we can use this gui to make changes to the built in UDI templates, they are simply XML files stored in the scripts folder of our MDT Files package. We could click on New to create a new XML file but let's import that one that the standard UDI Task Sequence uses namely UDIWizard_Config.xml. So let's load up that file from the copy we have in our MDT Files package, if you remember in Part 16 we created that package in \\sccm\sources\os\mdt\2012_rc1\files so let's click on Open in the UDI Wizard ribbon to browse to that location. type in the path to our MDT Files package namely \\sccm\sources\os\mdt\2012_rc1\files and click on the Scripts folder highlighted in the screenshot below a long list of xml files appears, scroll down to UDIWizard_Config.xml and click on it then click on open once the xml file is loaded you'll notice the wizard changes look, this is an overview of each page that the User Driven Installation task sequence wizard is capable of showing and here is where we configure them. But first, how do we make sense of this gui, i'll try and explain it briefly, in the Red box below you have the three main scenarios that we'll encounter during deployments sorted into StageGroups New Computer Refresh Replace If you expand New Computer you'll see a whole bunch of thumbnails for that StageGroup (and you'll also see New Computer.Prestaged below it), those thumbnails are what the User will see when the wizard kicks off later... note that depending on the scenario you are in, you'll be presented with different pages of the wizard. In the Left pane of the wizard you'll see the available pages listed alphabetically in the page library (not in the same order as they are presented to the end-user). Double click on one and you'll see the configurable options for that page (you can single click and you might see those options depending on whether or not you are in Flow or Configure mode, that's those two tabs in the right pane...) Click on Install Programs in the Left Pane, the number 3 in the right is the number of stages this Page is available in (you can hover your mouse over it to see what they are). Notice there is a Configuration Manager button in the ribbon, click on it. This brings up the Site Settings box, fill in your Configuration Manager site server name and site code and click on Validate Site. Note: The message states that this is required to add software items. To make application(s) available on the software page, applications must be targetted at the provided collection namely All Systems. The All Systems collection is a Device collection (for your computers..) so please deploy a few applications to that collection. Double click on Install Programs or click on the Configure tab next, click on General Software in order to see a menu we need (you can also right click on General Software to see a menu) Now that we have these extra options let's click on the big blue plus sign to add software to group the Add Software to Group wizard appears, select I want to add an application and click next now the Software Selection Wizard appears (another wizard within a wizard), click on Select to search for an application (why not call it search..?) and that brings up another wizard to search applications.. if you know the name of your application type it in here or click on search, after clicking on search, any applications deployed to the All Systems collection and with the Allow this application to be installed from the Install Application task sequence action instead of deploying it manually setting set in the applications properties will appear in the list. The application setting is here... select one application from the list and click on Finish you're newly added application appears in the list repeat the above process until you've added all your cool apps... and finally right click on the Sample Application from the list and click on Remove Item Next, Click on the LanguagePage in the left pane and add the Swedish Language (or whatever language(s) you want) and finally configure our Wizard config by clicking on Wizard Config in the ribbon. The Edit Wizard settings diaglouge box appears, you can customize the name and the background (banner), the default bmp file itself is located in the path where you installed Microsoft Deployment Toolkit in the Templates\Disitribution\Tools\X64 or X86 folders. make your changes and click ok. Ok now that we've done some basic configuration of our UDI template let's save it. if all went well you'll see File Save Complete. you can verify that the XML file itself has changed by it's date/time Step 3. Update your MDT Files package. Note: Perform the following on the ConfigMgr 2012 server as SMSadmin now that you've made changes to your UDIWizard_Config.xml you will want to update the MDT Files package so that we have access to those changes in the next part of this series where we'll create and deploy a User Driven Installation Task Sequence. In Software Library click on Packages and locate your MDT Files package. Right click on it and choose Update Distribution Points thats it for this part, see you next time when we will create a UDI task sequence and deploy it ! and see what happens on the client side.


-
so you are trying to say that you want to do a reinstall is that correct ? by BOX do you mean Computer ?
-
Help | Few questions & problems regarding SCCM 2012 RC2
anyweb replied to Davidsod's topic in Configuration Manager 2012
if no command prompt opens then you must check your boot image properties (right click on your boot image), look at the Customization tab, is command prompt support enabled in there ? did you update the boot wim images to your dps ? these steps are covered in the guides already if you followed them from Part 1. the new Application model uses Applications in the Software library, the old model (kept for legacy) uses Packages and Programs just like we did in Configuration Manager 2007 -
glad you found it :-)
-
using SCCM 2012 RC in a LAB - Part 8. Deploying Windows 7 X64
anyweb replied to anyweb's topic in Configuration Manager 2012
did you successfully PXE boot before this ? if so just delete the computer object, then re-import it -
did you re-distribute your boot images to your dp's after enabling the command prompt support?
-
just so i understand you correctly, you've enabled command prompt support as per this guide (it's an option on the boot image), you press F8 during WinPE and a command prompt appears, at the point you type cd %temp% then cd SMSTSlog then notepad SMSTS.log ?
-
x:\windows\temp\smstslog\ is a directory, it should have one or more files in it, namely SMSTS.log,. do you see that file in that directory ?
-
Require administrator approval if users request this
anyweb replied to ashridge uk's topic in Configuration Manager 2012
this question was already answered here fyi. -
that's not the whole screenshot, the deployments tab is listed at the bottom of the screen, do you see that ?
-
hi Dustin, did you follow my steps exactly ? please stay tuned for a coming post which will cover the next steps, but as a hint, you need to first of all make your MDT boot image PXE bootable.
-
Help | Few questions & problems regarding SCCM 2012 RC2
anyweb replied to Davidsod's topic in Configuration Manager 2012
first things first, ConfigMgr 2012 is in release candidate version right now, so i really hope you are not rolling it out in production. on to your questions... 8gb is not too much at all, more ram is always better, here's the supported hardware list from Microsoft on Technet - http://technet.microsoft.com/en-us/library/gg682077.aspx#BKMK_SupConfigSiteSystemReq Configmgr 2012 now has Active Directory Forest Discovery - read about it here - http://technet.microsoft.com/en-us/library/gg712308.aspx#BKMK_ADForestDisc tly do i need to do and configure in order to integrate the WSUS & the SCCM server? is it recommanded? where can i find information about it? ConfigMgr relies on WSUS to synchronise and download updates from Microsoft, - Software Updates in configmgr are described here on technet - http://technet.microsoft.com/en-us/library/gg682068.aspx error code 0x00000032 means unsupported meaning you tried to do something that you are not allowed to do, like capture while in windows when you should be in windows PE the smsts.log file will reveal what package is missing, you need to update that package to the dp's and then try again. you still have the legacy package/program model in ConfigMgr 2012 for just this purpose. -
it should work, can you check your spam inbox and see is there anything in there...
-
oh yes it has press F8 and browse to x:\windows\temp\smstslog\ what do you see in there ?
-
have you tried installing it at all ? did you get any errors ?
-
Setting computername during deployment
anyweb replied to anyweb's question in Troubleshooting, Tools, Hints and Tips
only thing to note is if you are using MDT integration to add scripts etc, then you'll need to use MDT 2012 Rc1 (currently)