anyweb
-
Posts
9277 -
Joined
-
Last visited
-
Days Won
371
Everything posted by anyweb
-

Problem upgrade W10 via SCCM
anyweb replied to adelgehier's topic in System Center Configuration Manager (Current Branch)
are there any differences on the clients that work, versus those that fail, for example are their language packs installed ? -
Problem upgrade W10 via SCCM
anyweb replied to adelgehier's topic in System Center Configuration Manager (Current Branch)
ok have you also deployed a Servicing Stack Update to those devices ? Download the SSU from: https://www.catalog.update.microsoft.com/Search.aspx?q=KB5005260 -
Problem upgrade W10 via SCCM
anyweb replied to adelgehier's topic in System Center Configuration Manager (Current Branch)
are you pushing a task sequence or some other method, more details would be useful -
whether you start again or not is up to you, are you doing this in a lab ? did you take snapshots/checkpoints ? did you see my comment about what the actual error referred to...
-
did you try contacting the author of that guide ? clearly it cannot download something, have you tried downloading/verifying the url it's referencing ? I'd also recommend you follow my guides instead, they work every time ? Setting up PKI Part 1 - Introduction and server setup Part 2 - Install and do initial configuration on the Standalone Offline Root CA Part 3 - Prepare the HTTP Web server for CDP and AIA Publication Part 4 - Post configuration on the Standalone Offline Root CA Part 5 - Installing the Enterprise Issuing CA Part 6 - Perform post installation tasks on the Issuing CA Part 7 - Install and configure the OCSP Responder role service Part 8 - Configure AutoEnroll and Verify PKI health
-
i'm not sure I understand your issue, so you can PXE boot but once you select the task sequence it fails ? can you attach the smsts.log file please
-
Attempting to deploy League of Legends via SCCM (.exe)
anyweb replied to coolsport00's question in Deploy software, applications and drivers
the thing is when you deploy apps during OSD they should be installing in SYSTEM context and that is something that the user cannot see or interact with, so.... once you know this, you have to look at the options in the app itself to get it to install without any user interaction, or... deploy it to USERS after OSD -
Attempting to deploy League of Legends via SCCM (.exe)
anyweb replied to coolsport00's question in Deploy software, applications and drivers
they must run silently, so figure out a way to do that and you'll be golden, OR bite the bullet and install the app AFTER the osd part is done, on the users first login, where they CAN click on stuff -
hi, what was difficult about signing up to this site, please explain (in detail) so we can look into it, secondly, I assume you are talking about Autopilot for existing devices for your task sequence ? what version of Windows 10 are you testing with ?
-
attach your cmupdate.log and we can take a look
-
If you have experience with the Windows Admin Center, you might already have deduced it is a powerhouse of functionality making light of important server management tasks. If you’re just adding it to your system administrator toolbox, welcome to the wonder of Windows Admin Center! With so much functionality, figuring out where to focus is key. Whether you’re just setting out with Windows Admin Center or wanting to realize its full potential, start with Altaro’s free 160+ page second edition eBook, How To Get The Most Of The Windows Admin Center. Written by Microsoft Cloud & Datacenter Management MVP Eric Siron, it covers the latest developments like the Control Azure Stack HCI, use of WinRM over HTTPs and integration with Azure Monitor, amongst others. It’s a comprehensive guide on everything from installation methods and security considerations to integrating Windows Admin Center into an existing environment. There is even a brief history lesson along with a comparison to alternatives so you should get a solid overview of Windows Admin Center, why chose it and how to work with it. An all-new server management experience when it was introduced, Windows Admin Center modernized administrative activities with a centralized HTML 5 web application. Just add servers, clusters, desktops, and Azure virtual machines into a personalized, persistent interface, and manage their roles, features, software, registry, PKI certificates, and more. And with Microsoft’s latest investment into the Windows Admin Center and new functionality, there is now even more server management power to work with. Learn to simplify and optimize your server management tasks - Download your free eBook now!
-
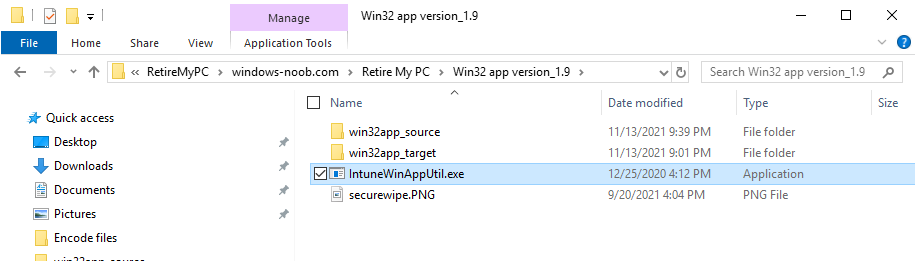
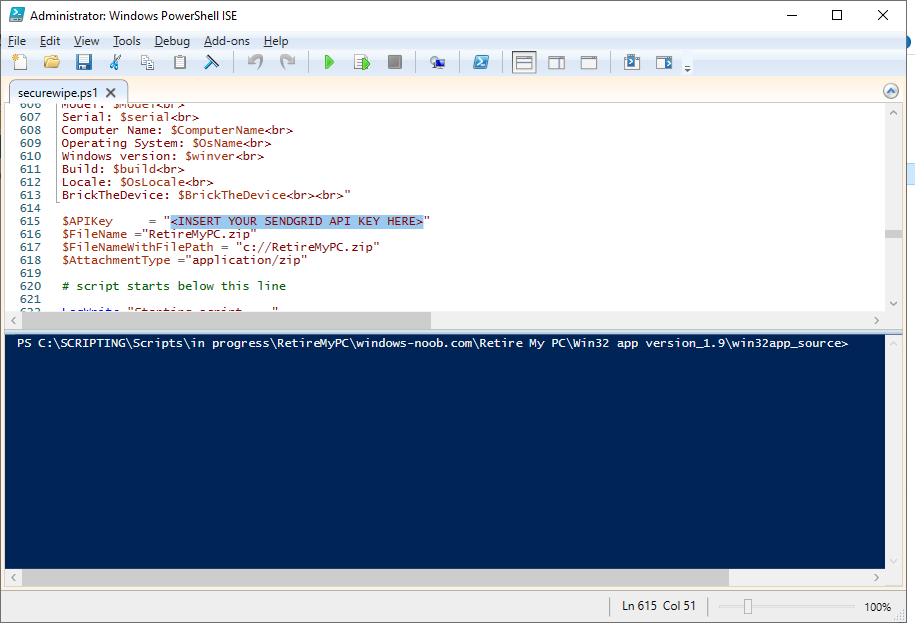
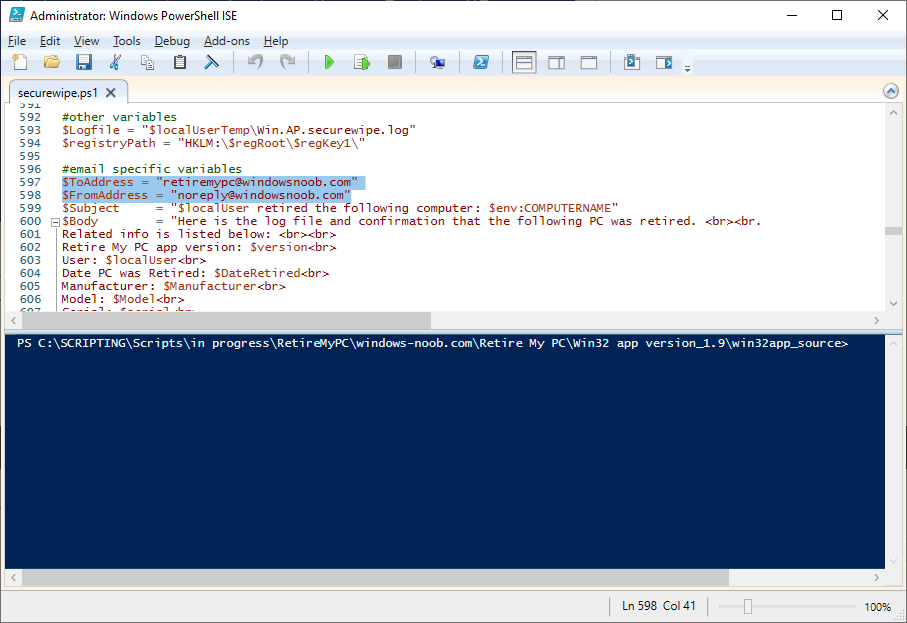
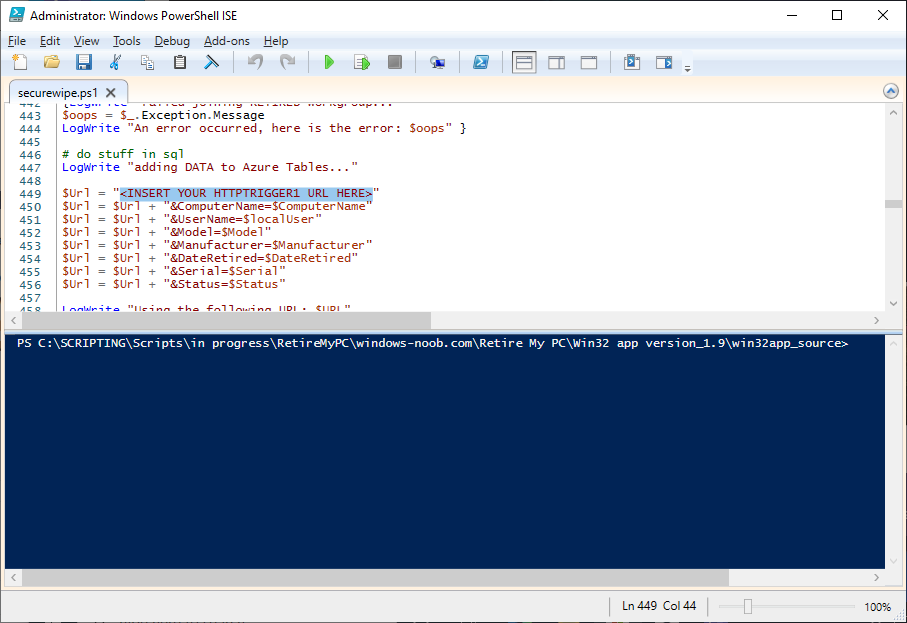
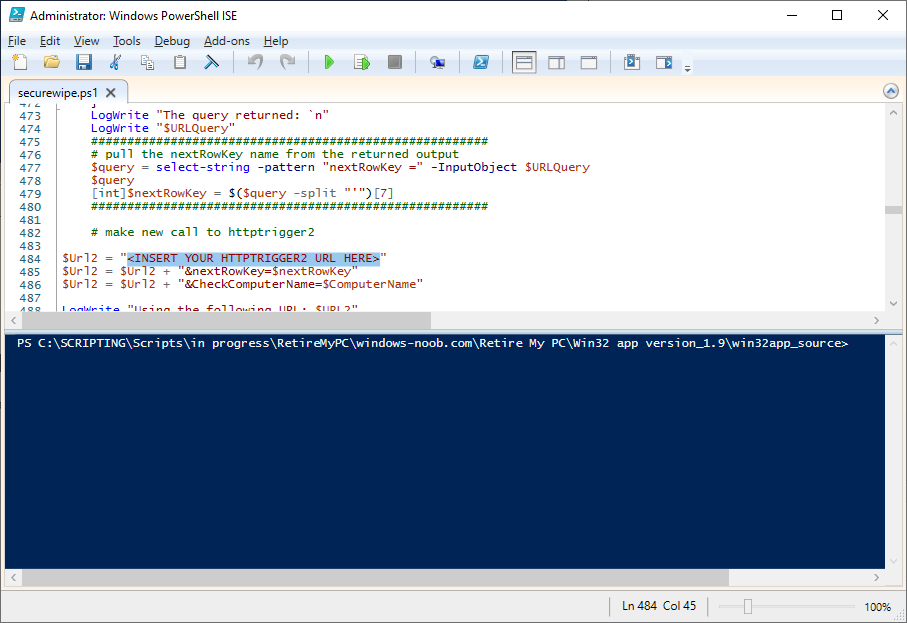
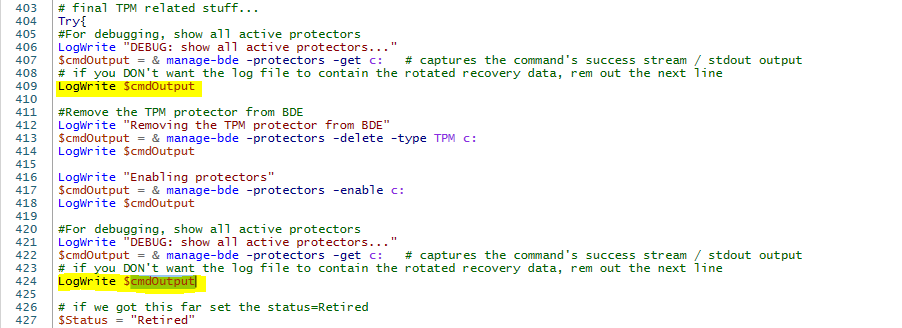
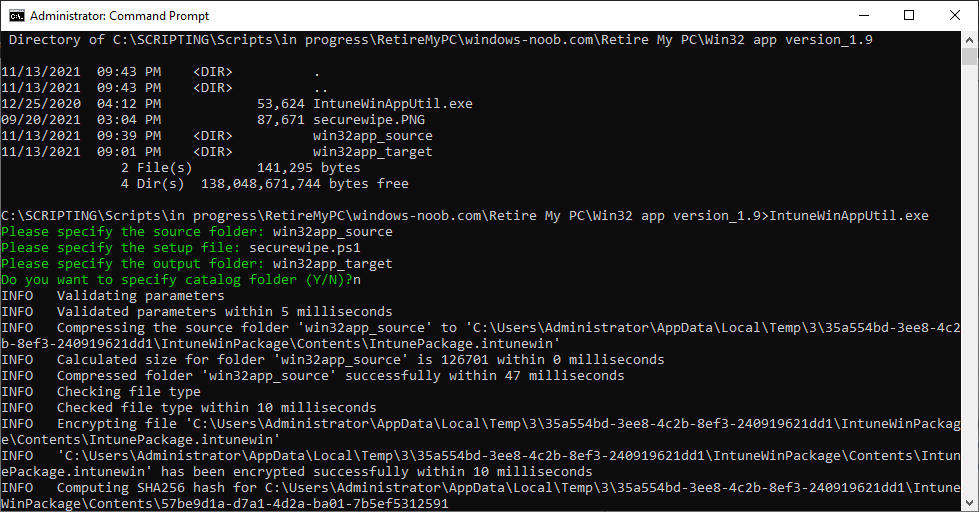
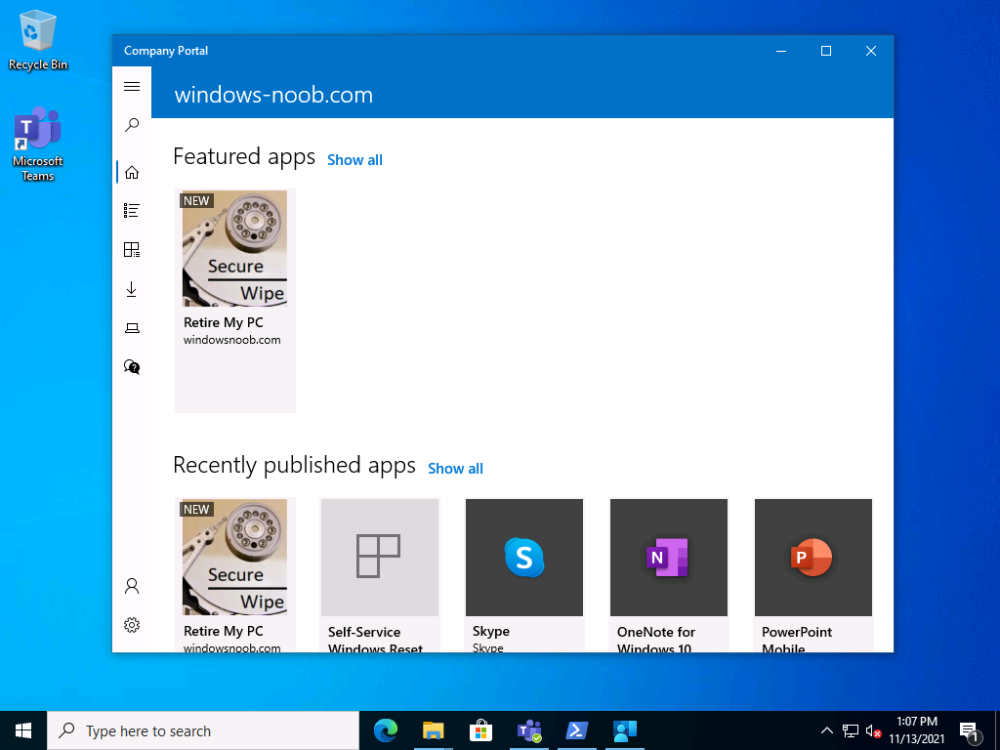
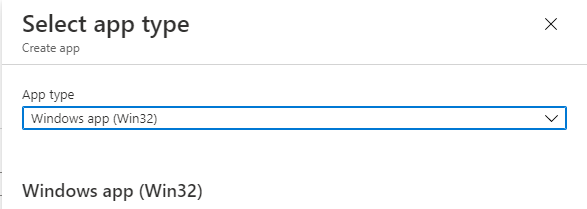
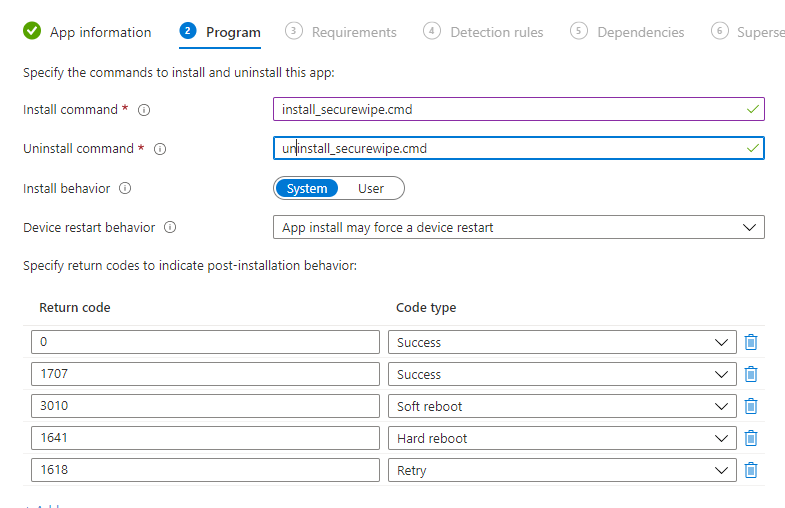
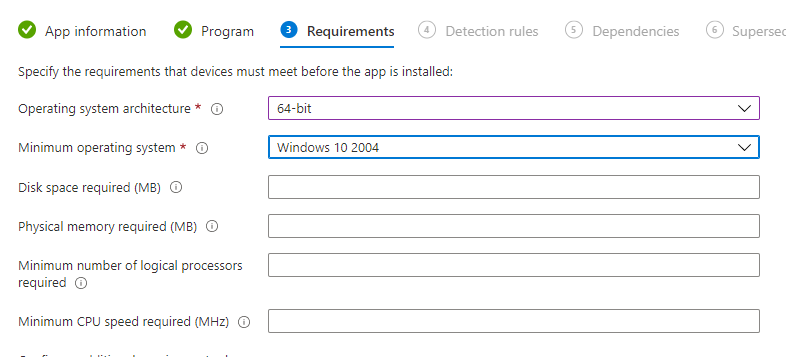
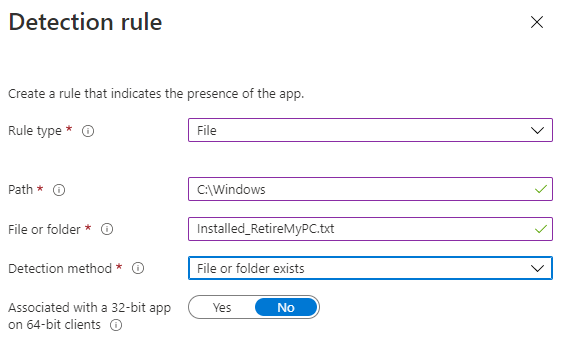
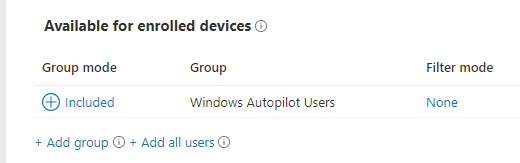
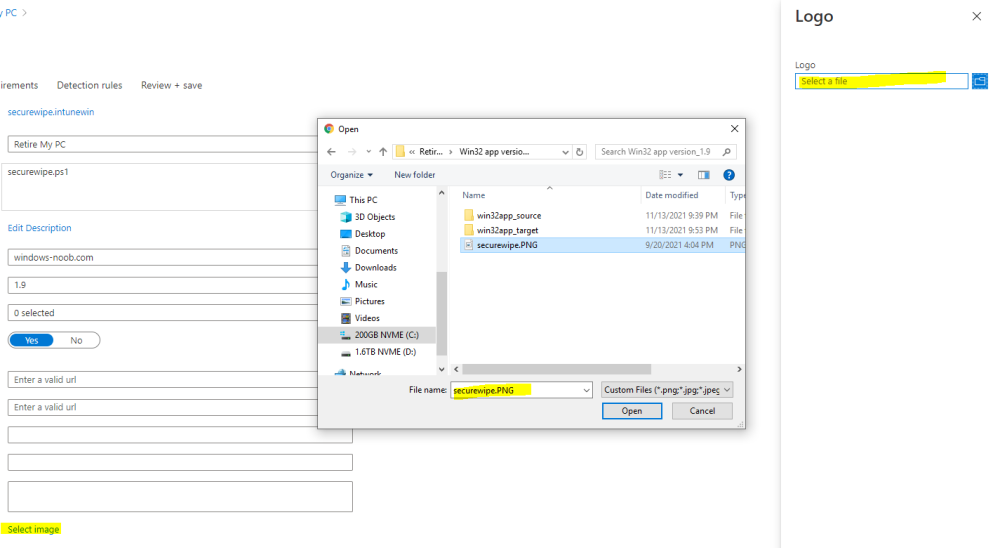
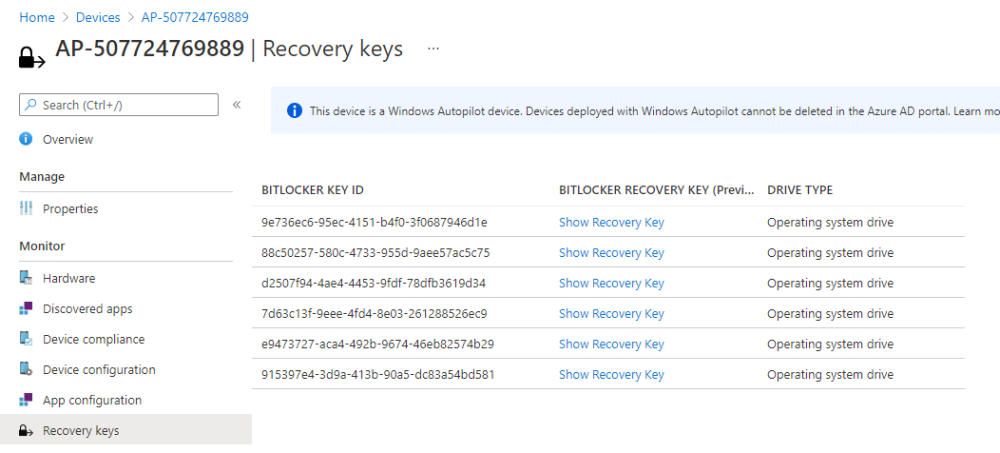
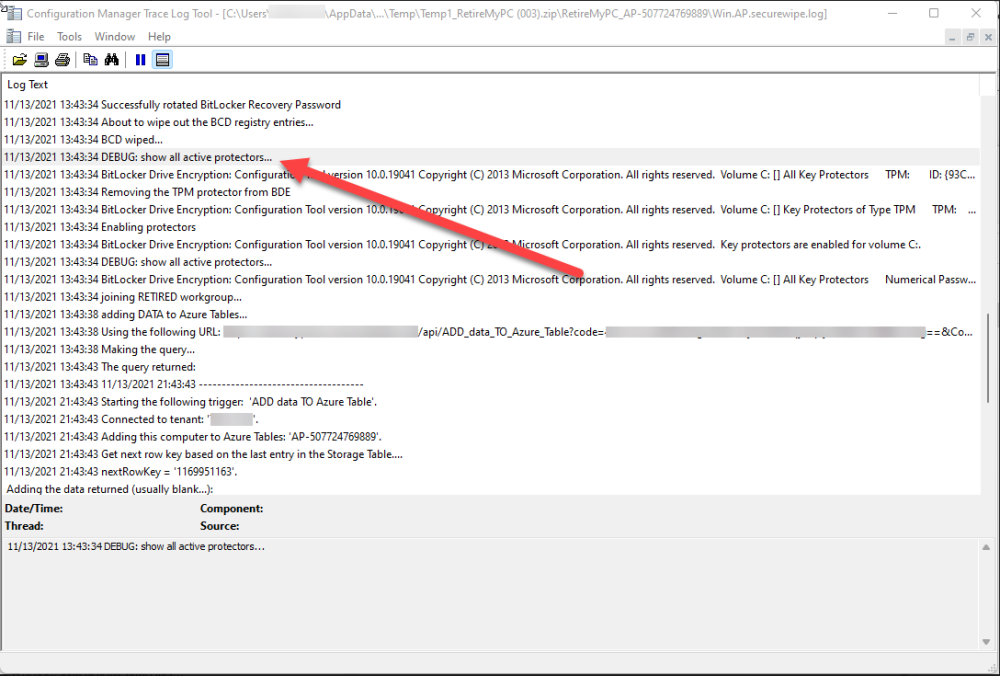
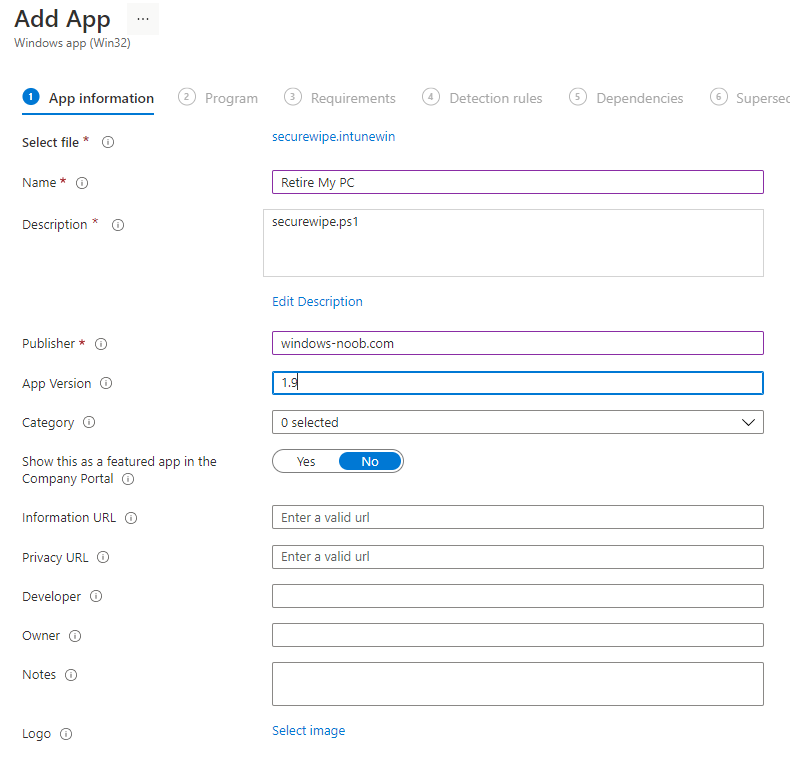
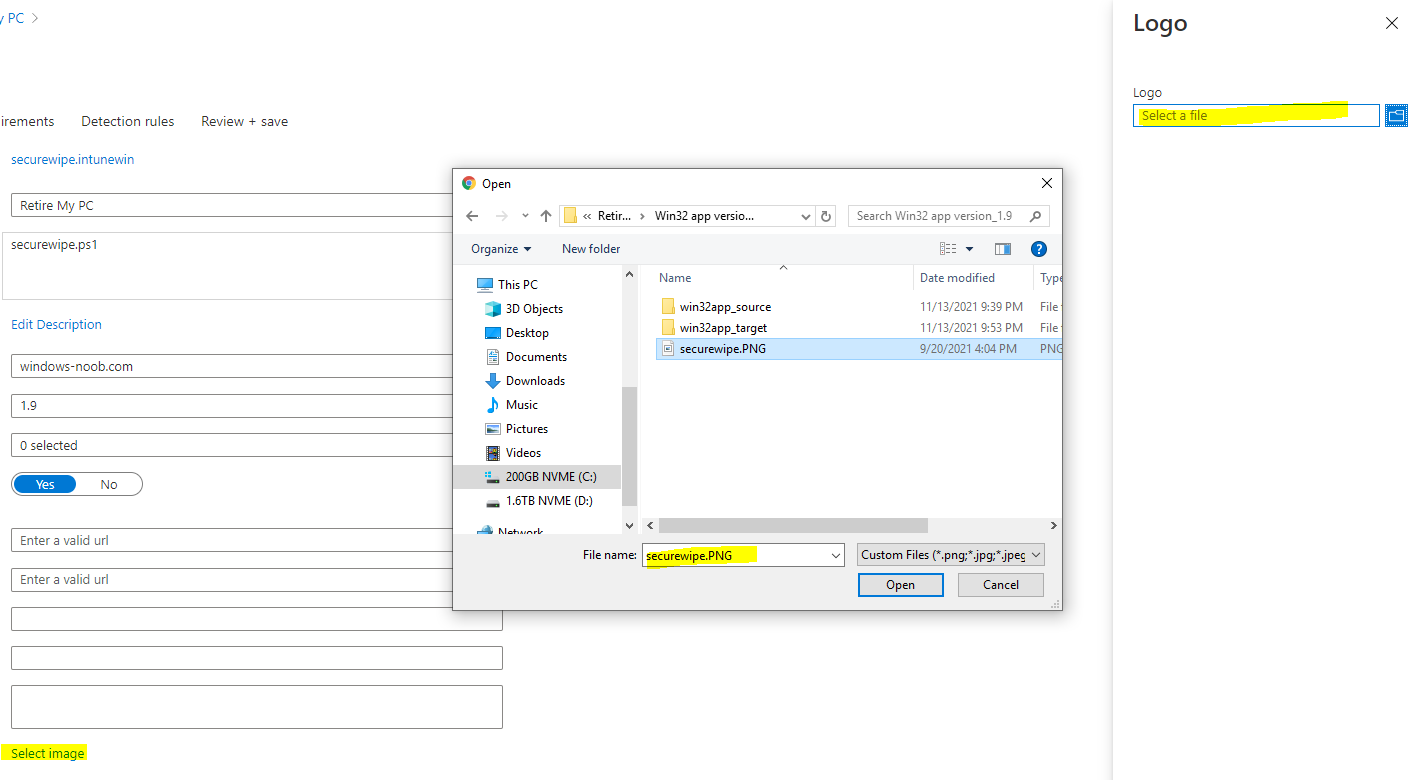
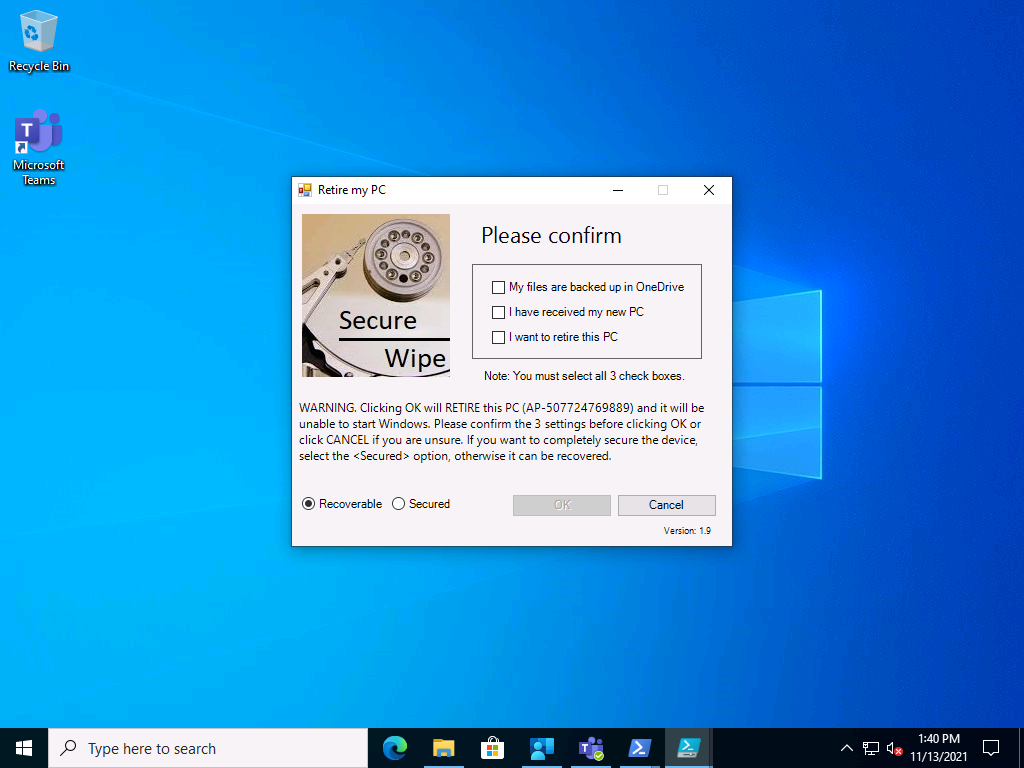
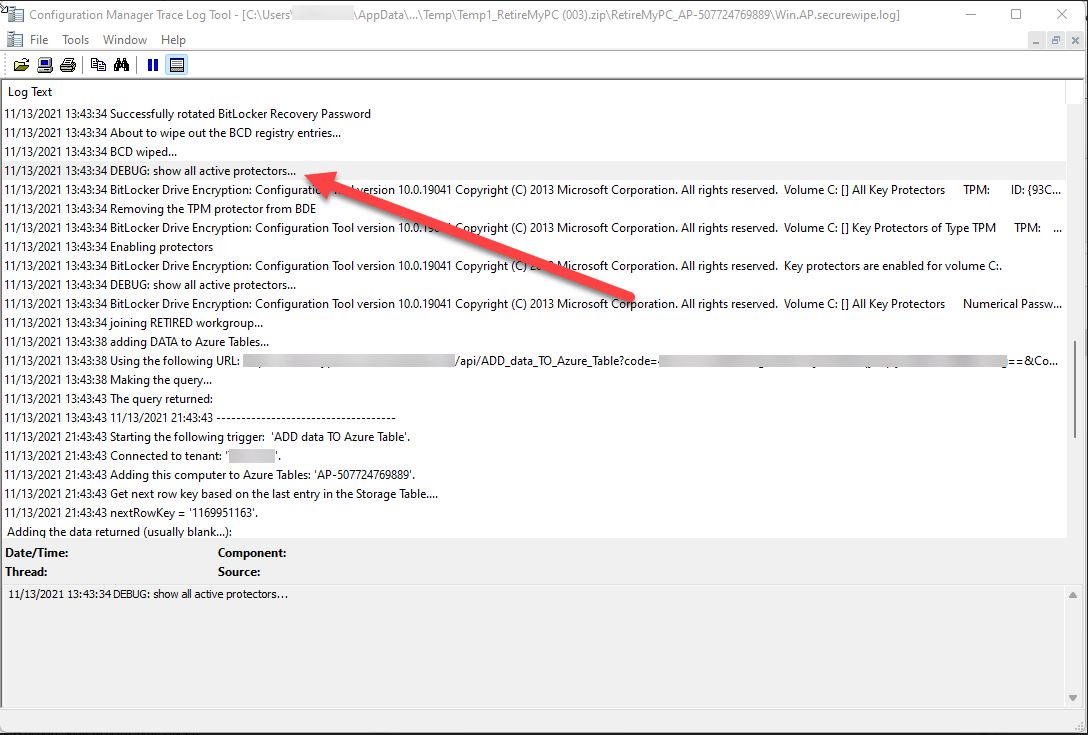
Introduction I previously posted a blog post showing you how your users can decommission their old domain joined PC using the Retire My PC app. I showed you how to create the app and deploy it via Software Center to your users' old computer. The reason why this app exists is to allow users to decommission their old PC when it suits them and not have to rely on onsite support staff or a third party service to secure company data stored on the old PC before it gets returned to the vendor or seller. This is achieved by ensuring the device is protected by Bitlocker and then deleting the Bitlocker protector from the TPM prior to shutting down the device. There is much more going on in the app, please see the list of original features below. stops the ConfigMgr client agent service (if one is running) stops the MBAM agent service (if one is running) rotates the BitLocker key (optional) WIPEs the BCD registry entries (optional) joins a workgroup clears the Bitlocker TPM protector adds a record of all this to Azure Tables emails the log to a support inbox In this blog post I'll show you how to deploy a newer, more secure version of the app via the Company Portal in Microsoft Endpoint Manager (Microsoft Intune) which can be used on Intune managed, Azure AD joined computers. This version of the app has some new abilities which are highlighted below. Available in Company Portal Allows the user to select the type of decommission (Recoverable or Secured) If the Recoverable option is selected, the Bitlocker protector is removed from the TPM. If a support technician or the end user has access to the recovery password info, they can enter it at the boot screen and therefore can boot back into Windows. If the Secured option is selected, not only is the Bitlocker protector removed from the TPM but the Bitlocker key is rotated and the new key is not uploaded to Azure AD, or ConfigMgr or MBAM. Therefore the admin and the end user will not have the recovery info needed to boot the computer. In addition, the BDE registry keys are completely wiped out, so even if they manage to get the rotated key (from the email sent to the configured support inbox, read the NOTE below) this would only allow file access, Windows will not boot. Regardless of which option the user chooses, the device will NOT boot into Windows after it's retired as it cannot due to the missing Bitlocker protector in the TPM, and this secures the PC from unwanted access. However, if the user selects cancel in the main UI, the detection method file is removed so they can reinstall the app on-demand via Company Portal. NOTE: You can also modify the script to not include the rotated recovery key information in the email making the device very secure indeed. If you do this, the device (and the data on it) can never be recovered as the rotated Bitlocker key is not stored anywhere. As this is so drastic, I've left this recovery info in the email. This email will never be seen by the end user and is sent to a shared help desk inbox. Once you are happy with the way things are going, you can optionally remove this info from the log to ensure company data is 100% secured on decommissioned devices. Before starting, please read the original Retire My PC blog post to get an understanding of how to set this all up. You can skip the creation of the app in ConfiMgr if you are using this in cloud only environments. Step 1. Get the scripts Note: You can only download these files when logged on to https://www.windows-noob.com Retire My PC.zip Download, unzip and extract the files. Step 2. Get ServiceUI.exe from MDT You'll need the ServiceUI.exe executable file to display user interfaces (UI) to end users when operating in SYSTEM context. To get the file, download and install MDT somewhere and navigate to C:\Program Files\Microsoft Deployment Toolkit\Templates\Distribution\Tools\x64. To download MDT click here. Copy the 64 bit version of ServiceUI.exe file to your extracted win32app_source folder so it looks like this. Step 3. Get the Win32 content prep tool Download the Win32 content prep tool from here. Copy the IntuneWinAppUtil.exe file to your Retire My PC source folder, it should look like this. Step 4. Modify the script Open the securewipe.ps1 script. Configure the $ToAddress and $FromAddress variables. Using your Sendgrid API key, paste your API key value (line 615 below). Add your httptrigger1 URL add your httptrigger2 url here If you want to completely remove the rotated key from the email, rem out the following lines marked in yellow Save the changes to the script. save your changes. Step 5. Create the Intunewin package Open a command prompt and browse to the reset-windows folder structure. Launch the IntuneWinAppUtil.exe file and answer the following. Please specify the source folder: win32app_source Please specify the setup file: securewipe.ps1 Please specify the output folder: win32app_target Do you want to specify catalog folder (Y/N)? n as shown here. After doing that you'll have the securewipe.intunewin file in the win32app_target folder. Step 6. Create the Win32 app in Endpoint Manager Log into https://endpoint.microsoft.com and add a new Win32 App. Below are some screenshots showing how I've configured the app. For Select app type, select Windows app (Win32) from the drop down menu Click on Select app package file and point it to the securewipe.intunewin file in the win32app_target folder. fill in some info about the app for the logo, click on Select image and point it here... fill in the install commands fill in the requirements and the detection rules.. finally deploy it to your users that should be retiring old pc's... and save the app. This is what the end user will see after launching the app from the Company Portal once they make their selections and clicking OK clicking OK to this warning will start the process and some seconds later the device will no longer be able to boot. The recovery key data stored in Microsoft Endpoint Manager will not contain the latest rotated key from the device if the user selected the <Secured> option. The only place you'll find the recovery key data, is in the email sent to the shared help desk inbox if you optionally decided to include that info. The app logs to C:\Users\<USERNAME>\AppData\Local\Temp\win.ap.securewipe.log and this log file is emailed to your shared help desk email inbox. Job done !


-
thanks for reporting the issue, I've been informed that this is fixed with the Hotfix for 2107 and in later releases
-
I would advise you to think long and hard about hybrid azure ad domain join, try and avoid it or you'll have lots of problems... guaranteed modern devices can be workgroup joined with no GPO's applied, and instead all settings and configurations come directly from Intune (or SCCM if co-managed)
-
just to be clear, you are trying to install Windows 10 LTSC 2019 on a computer with 3 physical hard discs, correct ? and when you try in that configuration, it fails ? does the same task sequence work correctly if there is only one hdd ?
-
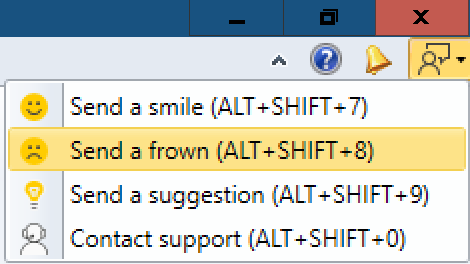
ok thanks for reporting this, can you please send a Frown from the console and attach the cmtrace screenshots to report this there ? if you want, please share the id with me, thanks
-
ok thanks, i've passed this information on to the Microsoft Product Group
-
my first question is why do you think you need to join the Windows Autopilot PC to an on-premise domain ?
-
just to be clear, you've tested both sccm 2103/2107 and the corresponding version of CMTrace included with it and it's not displaying chinese text correctly, is that it ?
-
if you clearly outline the steps taken to repro I can verify in my lab
-
that sounds like a bug, have you captured the logs and raised a case with microsoft ?
-
The previously published SysAdmin Horror Stories Vol.1 and Vol.2 highlighted some of SysAdmins’ funniest and most horrifying stories. They proved so successful, that Altaro decided to produce a third and final edition: they’ve gathered some more real-life stories to share with you, that are both funny and horrific! We all know that a SysAdmin’s job is no easy task, and apart from constantly having systems to update, bugs to fix and users to please, SysAdmins encounter all sorts of situations throughout their careers. From tech situations to funny anecdotes, terrible mishaps or incidents with colleagues, this eBook includes real stories of what SysAdmins go through on a daily basis. It’s very easy to download as no registration is required. Click on Download and it’s yours. It includes more than 20 short stories. I hope you’ll enjoy them as much as I did!
.thumb.png.1342c5b94592bf1e1960517f22f0da4e.png)
-
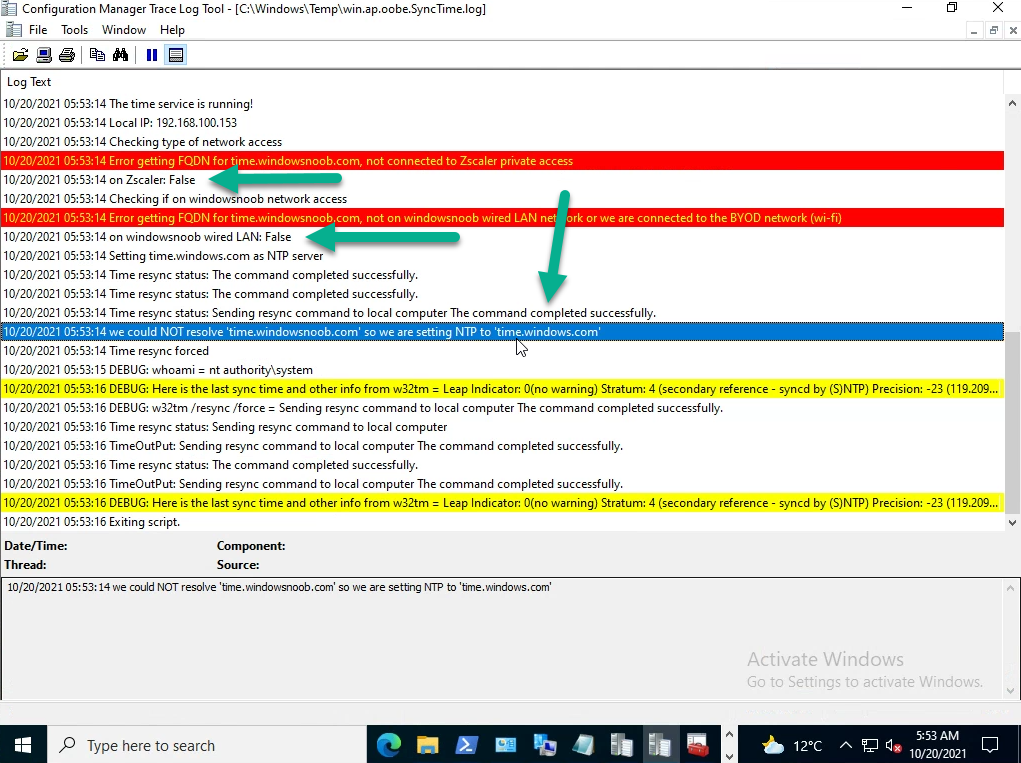
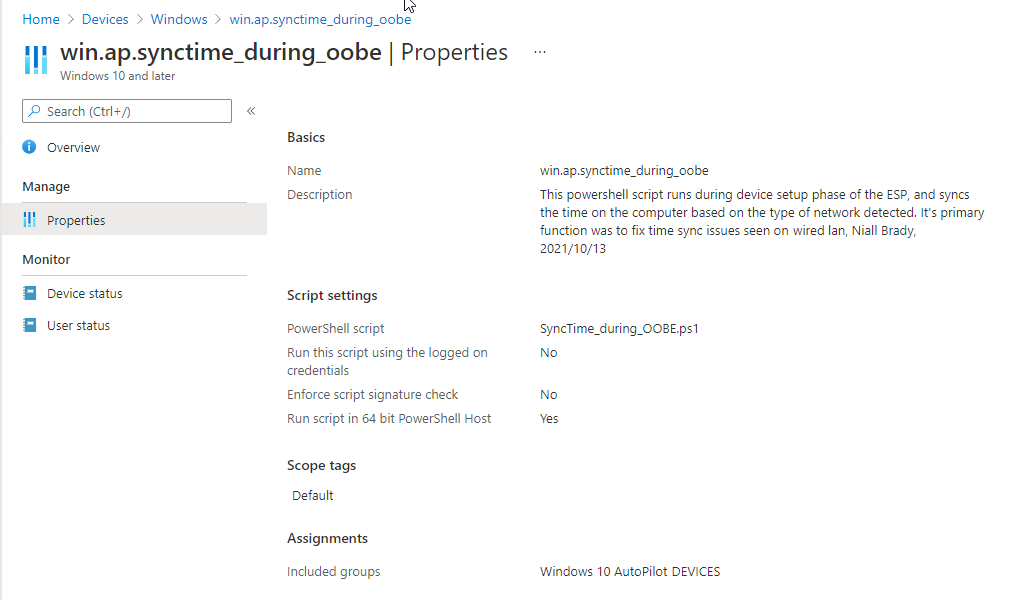
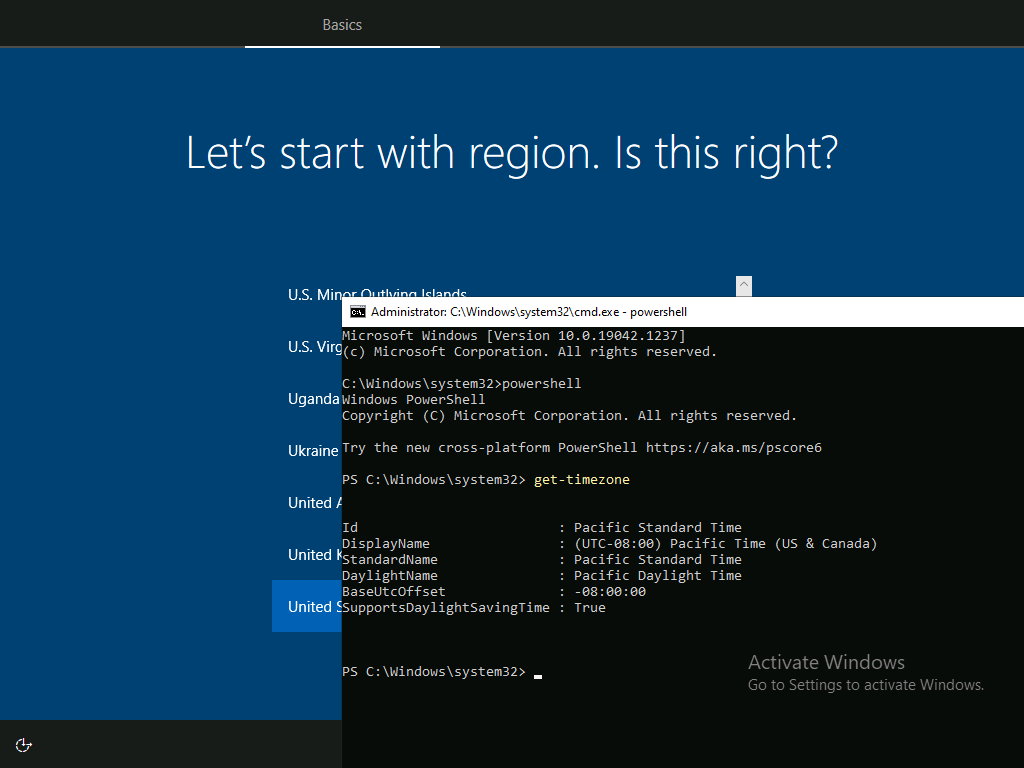
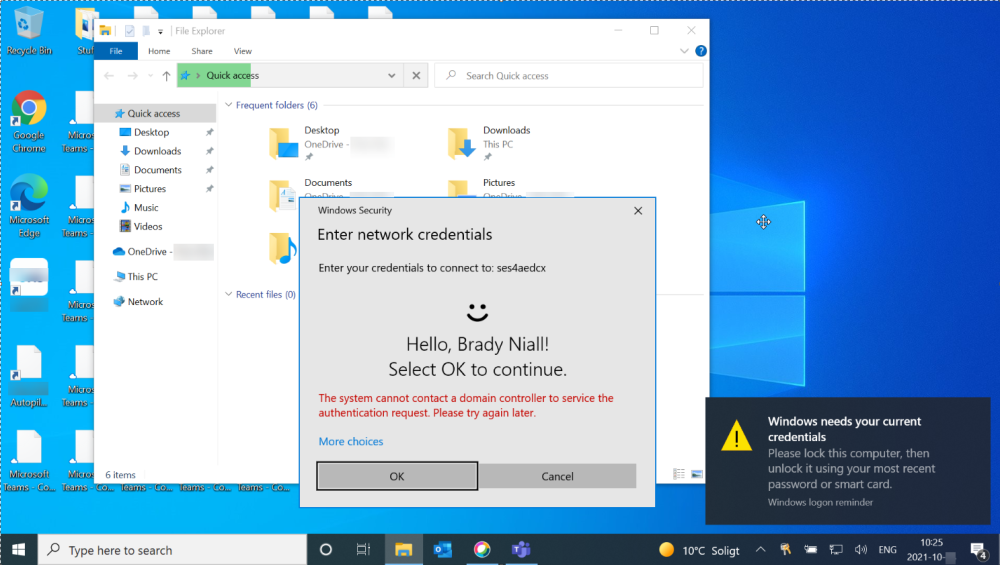
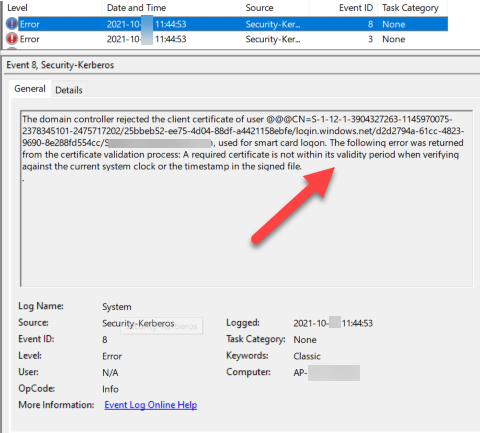
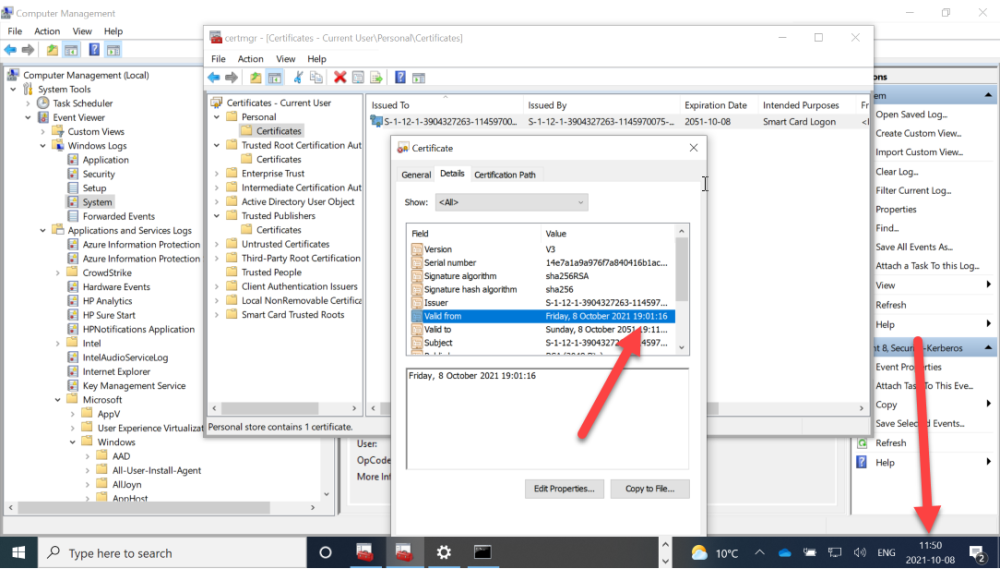
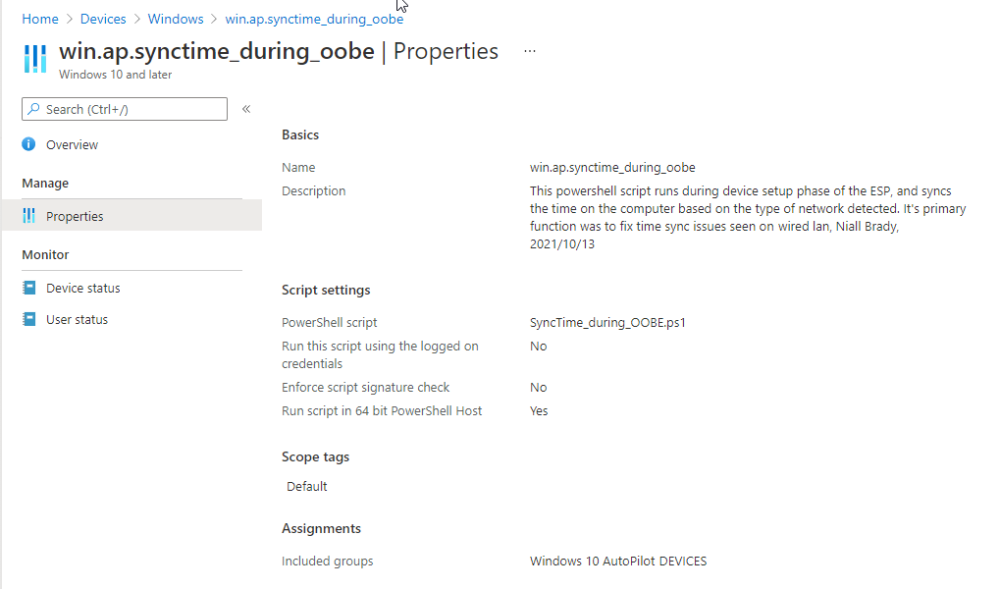
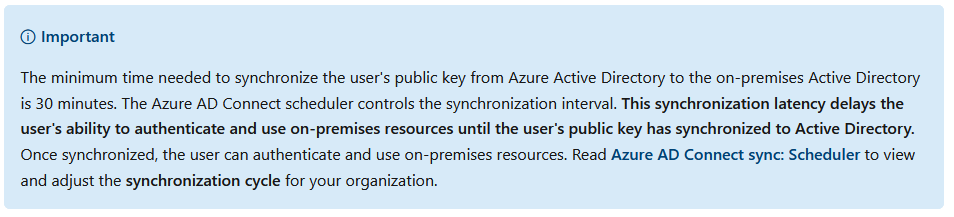
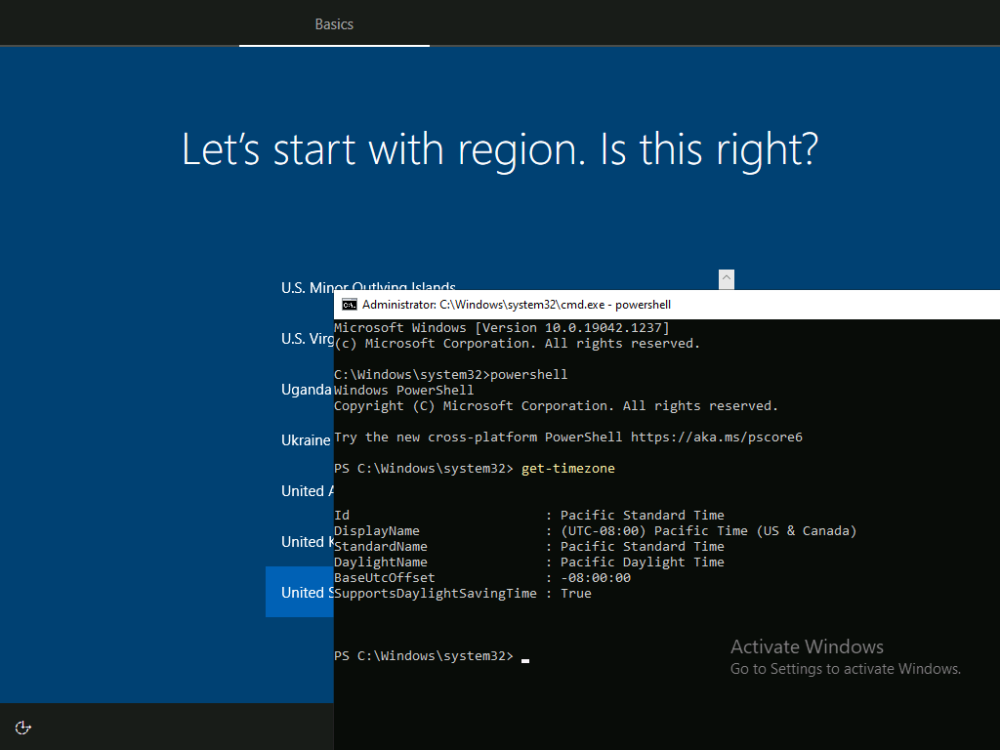
Introduction I recently encountered an issue when after Windows Autopilot enrollment was completed, the end user was unable to browse on-premises network resources such as file shares when logged on with using the Windows Hello for Business login method. The workaround was to lock the screen, and then login again using username and password as credentials. We did not see the same problem when Windows Autopilot enrollment on home WI-Fi or even when using the Enterprise WI-Fi connections. To add to the confusion, the problem fixed itself by the following day with no user or other changes. Troubleshooting the problem Troubleshooting the issue was complex and took time as we didn't understand the root cause, but eventually it all fell into place, and I'll summarize it here. In a nutshell, the reason it was failing was because when on the wired on-premises LAN network, outbound connections to time.windows.com (Windows default NTP server) were blocked. This wasn't obvious immediately, but became clear later. The issue showed itself as soon as you tried to browse a UNC path in Windows File Explorer. You would see a message in the task tray stating that Windows needs your current credentials, as shown below. Locking the screen, and unlocking using WHFB would not work, you had to lock the screen and enter the username+password to browse the on-premises resources without error. To assist with troubleshooting the following were useful. Enable Kerberos event logging - Windows Server | Microsoft Docs Error code 0x3E Definitions (eventsentry.com) https://tech.nicolonsky.ch/mastering-windows-hello-for-business-with-your-hybrid-identity/ Further analysis of the problem revealed the following events in event viewer. The first was 0x3e KDC_ERR_CLIENT_NOT_TRUSTED and another error in the Security-Kerberos event log made it even more clear as to what the problem was, event ID 8. During the third phase of the ESP, (Account Setup) we prompt the end-user to enable Windows Hello for Business as a login method. That process of setting up Windows Hello for Business in turn creates a self-signed certificate which is used to authenticate against on-premise resources, and as we found out, when Windows Autopilot enrollment was done on the wired on-premises LAN network, there was no ability to sync time against time.windows.com and therefore the Windows Hello for Business self-signed certificate was created in the Pacific Standard Timezone, and thus, in the future if you were doing enrollment in Sweden. This explained why WHFB credentials didn't work for on-premises resources and also explained why the problem would self heal itself after one day. To understand why this was happening we had to look at our Windows Autopilot PC's were delivered from the vendor. Windows Autopilot delivered computers come with a timezone of Pacific Standard Time, which is from Seattle, the home of Microsoft. If you press left-shift and F10 during the first screen in Windows Autopilot OOBE and run the Powershell command below, it would return this info. get-timezone If the computers system time (BIOS) was different to the configured timezone, then we'd have time sync issues which would show themselves later as the on-premises network disallowed access to time.windows.com. The solution The following PowerShell script detects the type of network we are on (Wired LAN, Zscaler VPN or Internet) and based on the type detected, attempt to sync time to the most appropriate NTP time server. This is a one time action during OOBE that takes place during the second phase of the ESP, namely Device Setup. This script was created to work with a Zscaler VPN solution so you might need to adapt it to work with your VPN. The logic is fairly simple. When the script runs it attempts to determine the IP address of your on-premise NTP time server, in this example that could be time.windowsnoob.com, and that would resolve to 192.x.x.x if on the WIRED lan, or 100.x.x.x if on Zscaler VPN. Note: Below is a mock up in my LAB of a wired LAN, everything works fine except the timesync to ads1.windowsnoob.lab.local. That is because an NTP server running on that fqdn doesn't exist. In a real production environment, this works just fine syncing against an on-premises NTP server whether on the Wired LAN or Zscaler VPN. If the FQDN of the on-premise NTP server could not be determined then we assume that we are on the internet and thus use time.windows.com as the NTP server, finally, we trigger a time sync and log the results. Below you can see the log on a device that syncs to time.windows.com To use the script replace the on-premise NTP server address(s) with one you have configured yourself, or use any on-premise FQDN that can only be reached when on the internal network. Next, replace the datacenter IP addresses and FQDN's with your own on-premise FQDN server addresses hosting a local NTP service. Finally, deploy the script like so and wave bye bye to timesync issues DURING Windows Autopilot enrollments ! <# .SYNOPSIS This script will sync time to on-premise or off-premise time servers based on what it detects .DESCRIPTION This script should be deployed to Windows Autopilot devices as required in SYSTEM context .PARAMETER [none] This script does not take any parameters. .EXAMPLE .NOTES Version: 0.1 2021/9/21 initial script creation Version: 0.2 2021/09/22 re-encoding after cleaning up Version: 0.3 2021/09/23 datacenter check and set ntp server accordingly Version: 0.4 2021/09/23 byod confirmation in logging Version: 0.5 2021/10/11 synctime during OOBE .LINK .Author Niall Brady 2021/9/21 #> Function LogWrite { Param ([string]$logstring) $a = Get-Date $logstring = $a,$logstring Try { Add-content $Logfile -value $logstring -ErrorAction silentlycontinue } Catch { $logstring="Invalid data encountered" Add-content $Logfile -value $logstring } write-host $logstring } Function Cleanup {# del the scheduled task so this won't run again... #$TaskName = "SetTimeZone" #$Delete = RemoveScheduledTask $TaskName #LogWrite "Was the scheduled task removed: $Delete" LogWrite "Exiting script." break} Function RemoveScheduledTask { try { LogWrite "About to remove scheduled task: $TaskName..." Unregister-ScheduledTask -TaskName $TaskName -TaskPath "\windowsnoob\" -Confirm:$false -ErrorAction Stop | Out-Null LogWrite "Successfully removed the scheduled task" return $true } catch { LogWrite "Couldn't remove scheduled task, please see the reason why in the debug line below this one." $ErrorMessage = $_.Exception.Message # Catch the error LogWrite "DEBUG: $ErrorMessage" return $false } } function Set-SystemTime { LogWrite "Time resync forced" $ServiceName = 'W32time' $arrService = Get-Service -Name $ServiceName while ($arrService.Status -ne 'Running') { Start-Service $ServiceName LogWrite $arrService.status LogWrite 'Service starting' Start-Sleep -seconds 15 $arrService.Refresh() if ($arrService.Status -eq 'Running') { LogWrite 'Service is now Running' } } $whoami= & whoami LogWrite "DEBUG: whoami = $whoami" $timeOutput = & 'w32tm' '/resync', '/force' # get last sync time and other info $cmdOutput = & {w32tm /query /status} LogWrite "DEBUG: Here is the last sync time and other info from w32tm = $cmdOutput" # now let's try to sync time... LogWrite "DEBUG: w32tm /resync /force = $timeOutput" foreach ($line in $timeOutput) { LogWrite "Time resync status: $line" $syncSuccess = ($line.contains('completed successfully')) LogWrite "TimeOutPut: $timeOutput" } # get last stync time and other info $cmdOutput = & {w32tm /query /status} LogWrite "DEBUG: Here is the last sync time and other info from w32tm = $cmdOutput" return $syncSuccess } function Set-NTPServer { param ( [Parameter(Mandatory=$true)]$Server ) LogWrite "Setting $Server as NTP server" $output = & 'w32tm' '/config', '/syncfromflags:manual', "/manualpeerlist:$Server" LogWrite "Time resync status: $output" $output = & 'w32tm' '/config', '/update' LogWrite "Time resync status: $output" $output = & 'w32tm' '/resync' LogWrite "Time resync status: $output" } ###################################################################################################################### # Script starts here... $Logfile = "$env:temp\win.ap.oobe.SyncTime.log" LogWrite "Starting the oobe synctime script..." LogWrite "Verifying if the time service is started..." $serviceName = 'W32Time' $service = Get-Service -Name $serviceName while ($service.Status -ne 'Running') { Start-Service -Name $serviceName LogWrite "$($service.DisplayName) service is: $($service.Status)" LogWrite "Starting $($service.DisplayName) service - Sleeping 15 seconds" Start-Sleep -Seconds 15 $service.Refresh() if ($service.Status -eq 'Running') { LogWrite "$($service.DisplayName) service is: $($service.Status)" } } if ($service.Status -eq 'Running') { LogWrite "The time service is running!" # Get active network connection $defaultRouteNic = Get-NetRoute -DestinationPrefix 0.0.0.0/0 | Sort-Object -Property RouteMetric | Select-Object -ExpandProperty ifIndex $ipv4 = Get-NetIPAddress -AddressFamily IPv4 -InterfaceIndex $defaultRouteNic | Select-Object -ExpandProperty IPAddress LogWrite "Local IP: $ipv4" # set vars... $ZscalerDetected = $false $CompanyNetworkDetected = $false $InternetDetected = $false $ips = $null $fqdn = "time.windowsnoob.com" # let's see are we on Zscaler... LogWrite "Checking type of network access" # are we on Zscaler private access ? try {$ips = [System.Net.Dns]::GetHostAddresses("$fqdn") #$ips.IPAddressToString if ($ips.IPAddressToString.StartsWith("100.64.")){ $ZscalerDetected = $true} } catch {LogWrite "Error getting FQDN for $fqdn, not connected to Zscaler private access" } LogWrite "on Zscaler: $ZscalerDetected " # are we on the windowsnoob LAN ? LogWrite "Checking if on windowsnoob network access" try {$ips = [System.Net.Dns]::GetHostAddresses("$fqdn") if ($ips.IPAddressToString.StartsWith("192.")){ $CompanyNetworkDetected = $true} } catch {LogWrite "Error getting FQDN for $fqdn, not on windowsnoob wired LAN network" } LogWrite "on windowsnoob wired LAN: $CompanyNetworkDetected " # if we are on windowsnoob LAN, let's determine the datacenter location... if ($CompanyNetworkDetected -or $ZscalerDetected){ LogWrite "windowsnoob LAN was detected, checking which datacenter now..." try {$ips = [System.Net.Dns]::GetHostAddresses("$fqdn") LogWrite "$fqdn ip address: $ips.IPAddressToString" if ($ips.IPAddressToString -eq "192.67.1.250" -or "100.64.1.1"){ $DataCenter = "Sweden" $NTPServer = "ads1.windowsnoob.lab.local"} if ($ips.IPAddressToString -eq "192.192.4.210"){ $DataCenter = "Seattle" $NTPServer = "ads2.windowsnoob.lab.local"} if ($ips.IPAddressToString -eq "192.138.1.12"){ $DataCenter = "Australia" $NTPServer = "ads3.windowsnoob.lab.local"} } catch { LogWrite "Error getting FQDN for $fqdn, could not determine Datacenter location" } LogWrite "dataCenter: $DataCenter "} #if ($ipv4.StartsWith('192.') -or $ZscalerDetected) {Set-NTPServer -Server 'time.windowsnoob.com' if ($CompanyNetworkDetected -or $ZscalerDetected) { Set-NTPServer -Server $NTPServer LogWrite "Looks like we are on a windowsnoob network so setting '$NTPServer'" if (Set-SystemTime) { cleanup } } else {Set-NTPServer 'time.windows.com' LogWrite "we could NOT resolve 'time.windowsnoob.com' so we are setting NTP to 'time.windows.com'" if (Set-SystemTime) { cleanup } } } LogWrite "SyncTime script completed." Lastly, keep in mind that you may still see access issues from Azure resources to on-premise resources as explained by Microsoft here, usually about 30 minutes. That is normal and nothing to do with the problem solved by this script. Conclusion Time sync issues during Windows Autopilot enrollment can be solved by using a PowerShell script deployed to all Windows Autopilot devices as long as the script can detect if on LAN, WAN or other network and flip to the corresponding NTP server(s). Related - https://docs.microsoft.com/en-us/mem/autopilot/networking-requirements


-
Introduction I’m currently blogging about a series of DEM in 20 webinars from 1E and I’ve linked each one that I’ve covered so far below for your perusal. In today’s blog post I’ll cover a topic that’s very relevant considering the printer patching mess that was so public recently, namely: Will Printer Audits continue to exist? Many companies had to deal with the recent PrintNightmare (CVE-2021-34527) problem and the patching mess that ensued. Today’s blog post will focus on the details of the vulnerability and based on those details and resolution advice learn how Tachyon can help you in real time search for registry keys, set registry keys to a specific value or disable services and thereby help to secure your enterprise. Companies everywhere print content. It’s a normal part of every day business and they’ve been doing that for years, but we do need to ask ourselves the question, do we really need a printer, or we should consider if we are going to move towards a more eco-friendly solution. Episode 1. How to find and fix Slow Endpoints Episode 2. That crashy app Episode 3. Dealing with annoying admin requests Episode 4. That Change Management Success Rate Struggle Episode 5. Will Printer Audits continue to exist? In this DEM in 20 video, guest Gary Edwards who is a Senior Solutions Engineer at 1E with 30 years of experience, talks us through how Tachyon can help solve this mess. What is PrintNightmare? Discovered by researchers at QiAnXin, PrintNightmare (CVE-2021-34527) is a vulnerability which affects the Microsoft Windows Print Spooler Service. It has the potential to enable cyber-attackers to gain complete control of an affected system. “PrintNightmare is a hot new target for ransomware groups. It will allow these groups to quickly go from a single compromised workstation, to access to the whole network. Thus far, Microsoft’s patches have failed to fully address the problem. As such, the consensus is that organisations should disable print services on all systems where it isn’t needed.” Lucas Gates Senior Vice President at Kroll Source:www.redscan.com When Microsoft releases a patch, you definetly want to patch your environment to keep your IT environment secure. In the case of PrintNightmare, the vulnerability all revolved around a service running on Windows computers (both desktop and servers) called the Spooler service. It’s been there in Windows for years, it’s always on by default and doesn’t interact with users, it just waits for a user to print and then it comes alive. A few months ago, the Microsoft Security Response center got word about cyber security researchers who identified a hole or bug, to allow you to exploit the print spooler service and gain full control of a computer, remotely. Responding to this on July 1st, Microsoft released the following CVE-2021-34527 explaining the implications of this security vulnerability. It included additional details about setting registry key values on the endpoint and it also added 2 workarounds, including disabling the print spool service. “In addition to installing the updates, in order to secure your system, you must confirm that the following registry settings are set to 0 (zero) or are not defined (Note: These registry keys do not exist by default, and therefore are already at the secure setting.), also that your Group Policy setting are correct (see FAQ):” HKEY_LOCAL_MACHINE\SOFTWARE\Policies\Microsoft\Windows NT\Printers\PointAndPrint NoWarningNoElevationOnInstall = 0 (DWORD) or not defined (default setting) UpdatePromptSettings = 0 (DWORD) or not defined (default setting) Unfortunately, not long after Microsoft released the patch, many tech blogs such as The Register were talking about the failure of the patch and the advice they offered was to instead, disable print services completely to avoid exploitation. But this advice was pretty severe, what would it mean for Enterprises, what would it mean for consumers, for schools. Also, how would you go about doing that quickly and safely in an Enterprise that had say 80,000 endpoints or more. Securing your network with Tachyon Tachyon has various capabilities to assist admins with this very problem, so let’s take a closer look at how you can solve and remediate these issues. We’ll start by using Tachyon Explorer to search for registry keys. Locating registry keys In Tachyon Explorer, in the I want to know search field, type the search term registry and then selecting what are all the keys under the registry key <hive> <subkey> from the list of choices. That brings up another option to enter the hive and subkey values and in this example finds results instantaneously on 22,886 endpoints out of 36,807 devices. Below is some of the data that is displayed for those 23,000 endpoints. It shows you the registry key on the device and more importantly in the Default Value column, that the registry key is not set, and that is critical information as that is the advice that Microsofts CVE explains needs to be resolved (setting those registry keys). Setting registry keys One of the requirements of the first part of the CVE was that we had to set registry keys on affected endpoints. With Tachyon, it’s easy. Here’s how to do it. In Tachyon Explorer, in the I want to know search field, type the search term registry and then select Set registry entry <hive> <subkey> <name> to <valuetype> <value> from the list of choices. That will bring up a new screen allowing you to set a registry entry as shown below. Fill in the values as recommended in the CVE. Alternative ways of doing this could involve using Tachyon Guaranteed State to set and maintain this state on all endpoints, creating a Group Policy incorporating PowerShell scripts or VBS scripts to set these keys on thousands of endpoints, or (if you have ConfigMgr) use Configuration Baselines to do it. Stopping services As explained in the CVE, there were 2 workarounds, one of which included disabling the print spooler service. Below you can see what the printer service looks like when it’s in a running state on an endpoint. So let’s look at how to do that. In Tachyon Explorer, in the I want to know search field, type the search term printers and then select List information about printers attached physically that may be shared from the list of choices available in the drop down menu shown. This allows you to audit what’s going on in your environment. This produces a list of vulnerable devices. In order to change the service state from running to stopped and disabled do as follows. In Tachyon Explorer search for servicename and in the results field select Change service <servicename> and its dependencies to <state> state. This in turn allows you to enter the spooler service name and select the startup type to Disabled from the options available. Not only that but you can set the current state to Stop to stop currently running services. An integral part of the Tachyon experience is the ability to enable the approval of admin actions, this is to avoid a rogue admin doing unwanted actions. After approval, we can see that the rule has run and that the actions are completed. A quick remote in to any of those devices will show the service is indeed stopped and the startup type is disabled. Maintaining desired state To stop people from coming in and starting the service on their own computer you’d want to have a policy to stop them from doing so. The easiest way would be to make sure users are all standard users but if you cannot do that, you can use Tachyon Guaranteed State to force compliance. Let’s take a look at that. In the dashboard below you can easily see the compliance or non-compliance in your enterprise. You can also create rules to maintain the state and startup value that you want, for example to force the spooler service to stopped. This particular rule is set to a rule type of Fix meaning it will continually resolve non-compliant endpoints. But setting a rule like this means no one can print in your network as the print spooler service will be disabled and stopped. To enable the ability to print when needed 1E have partnered with ServiceNow to enable users to request the ability to print on demand. Conclusion Security issues occur all the time in today’s digital landscape, and issues such as remote code execution and user elevation need to be addressed as soon as possible. The recent PrintNightmare issue highlighted how admins need to figure out which endpoints in their environment are affected and how to quickly resolve the problem. Tachyon Explorer gives admins the power to quickly verify registry settings, or to change them as appropriate, and do it all in real time with auditing and approval. Using Tachyon Guaranteed State they can enforce the desired policy so that the vulnerabilities are removed. DISCLAIMER: The contents of this article are the opinion of the author and have been written from an impartial standpoint; however, 1E may have reimbursed the author for time and expenses for undertaking the findings and conclusions detailed in the article.
-
Dmp_Downloader fails
anyweb replied to Kiran chandra B's topic in System Center Configuration Manager (Current Branch)
why do you have a CAS ? how many clients are you supporting ? start reading this docs to determine how to resolve your TLS problem https://docs.microsoft.com/en-us/mem/configmgr/core/plan-design/security/enable-tls-1-2-server


.png.e133648538cf3a48030245ba19d6f85f.png)