anyweb
-
Posts
9175 -
Joined
-
Last visited
-
Days Won
366
Everything posted by anyweb
-
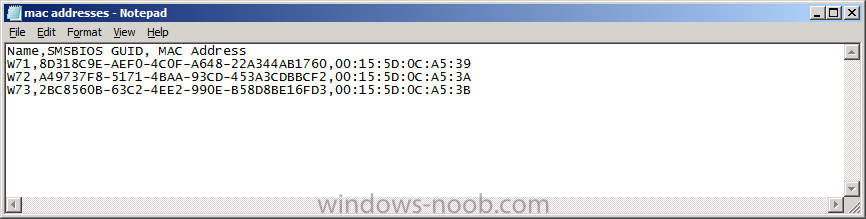
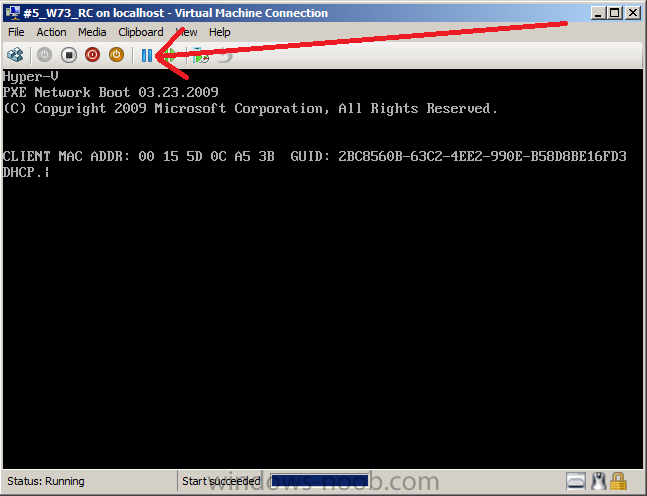
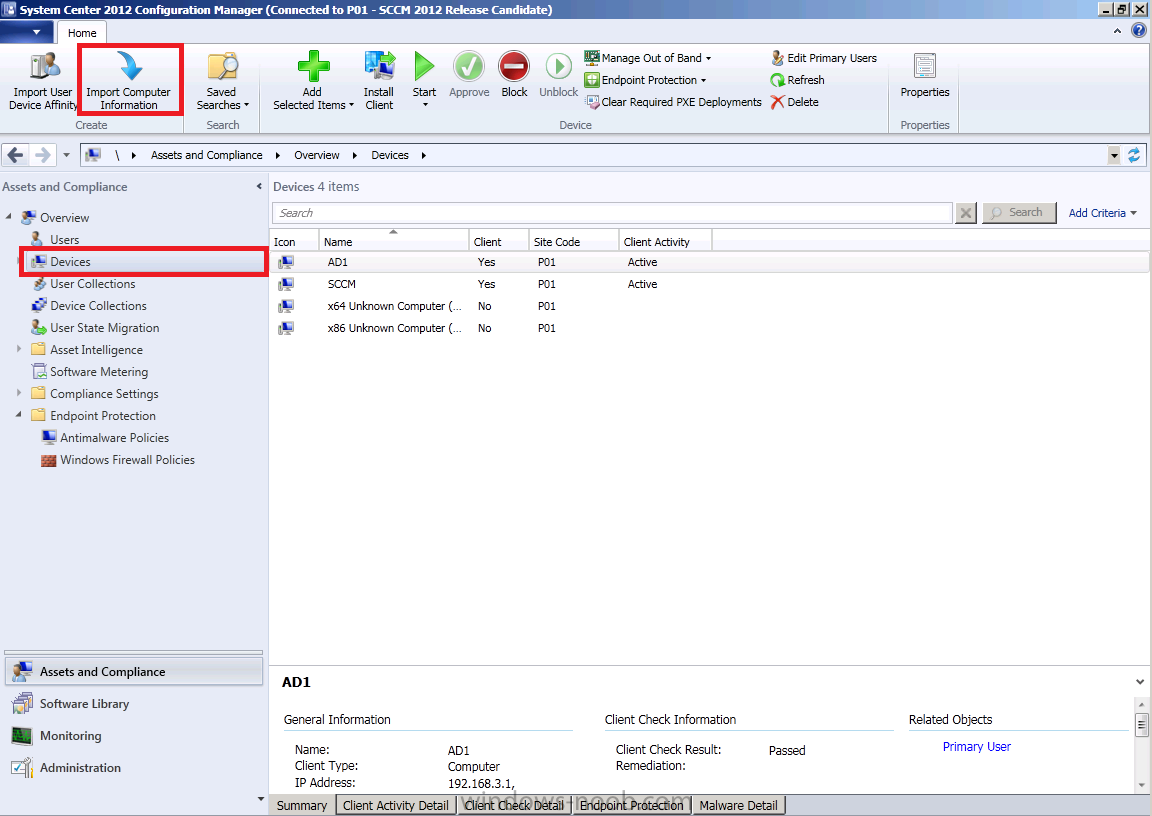
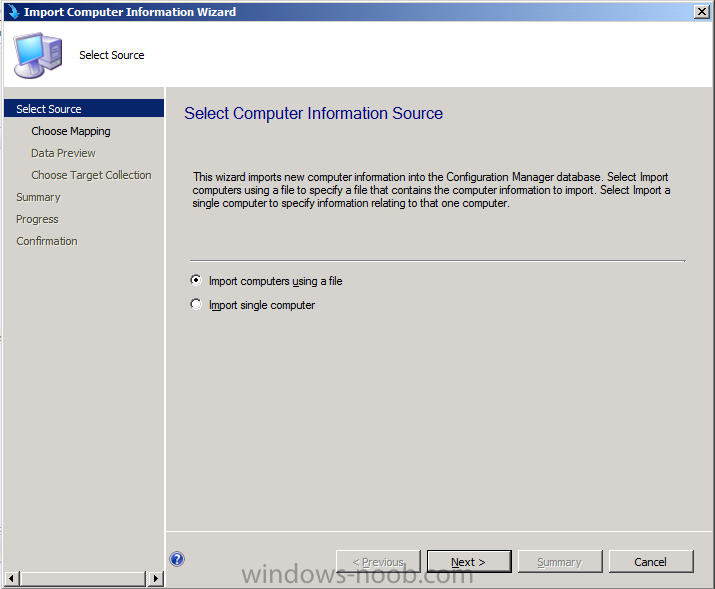
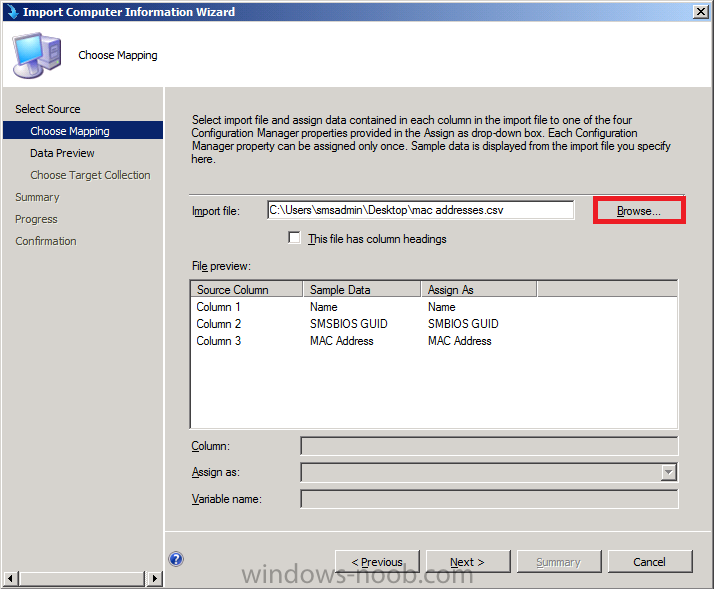
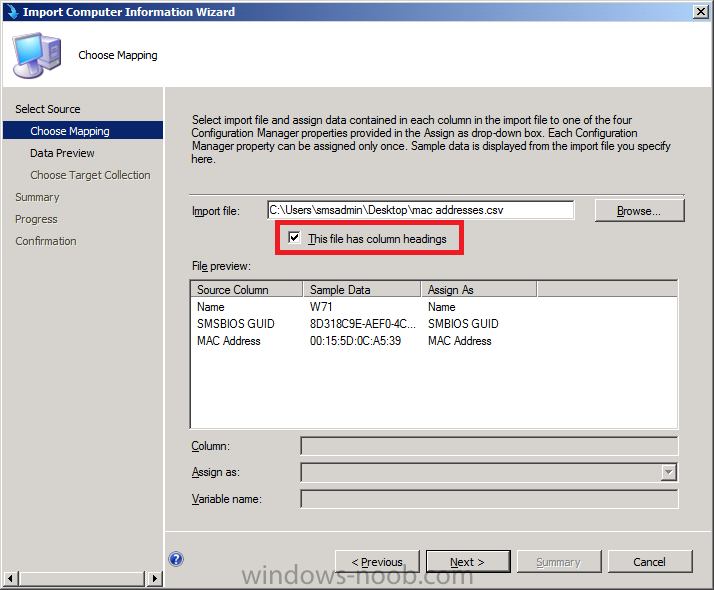
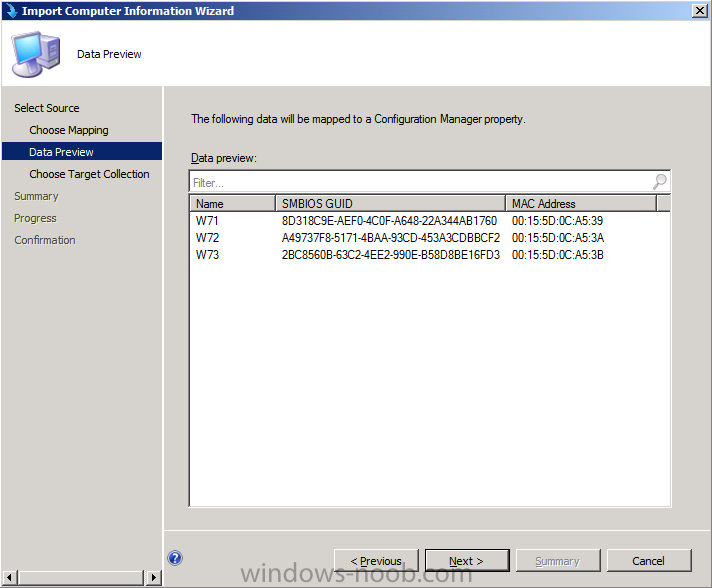
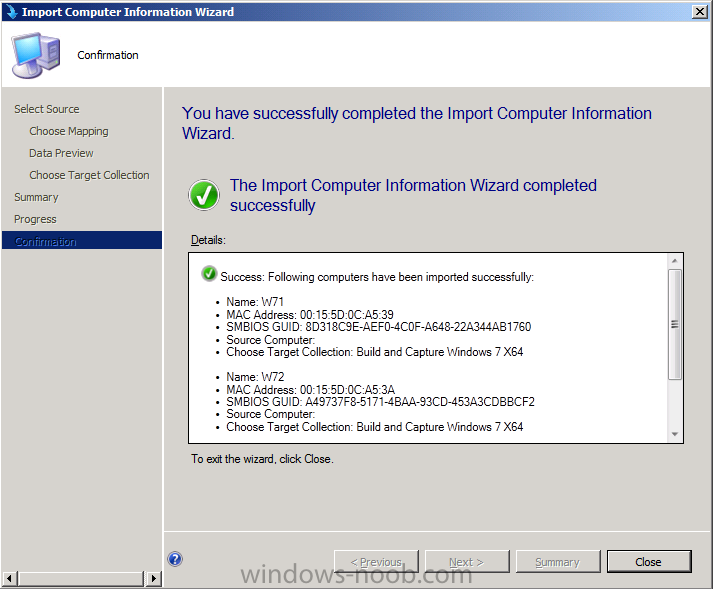
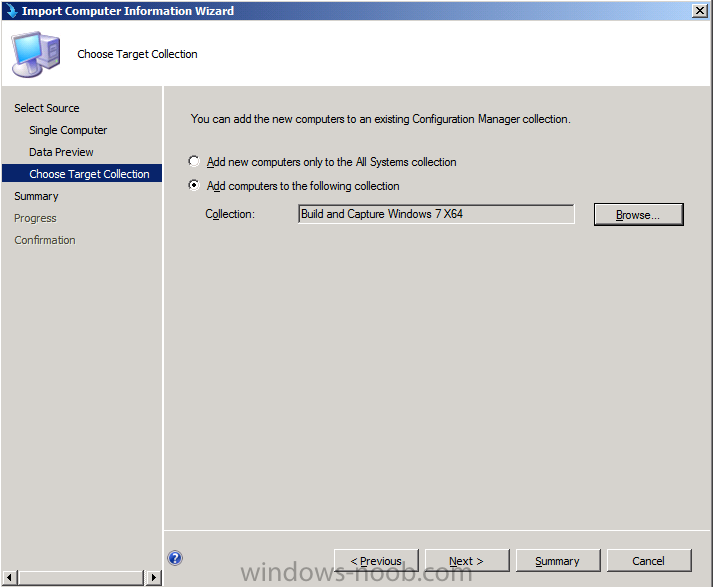
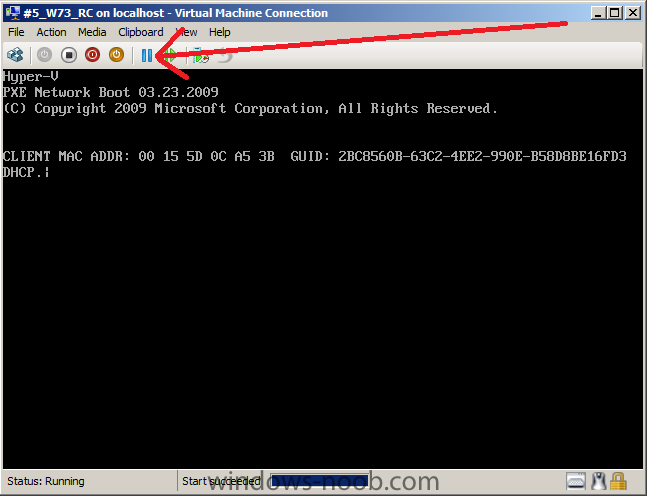
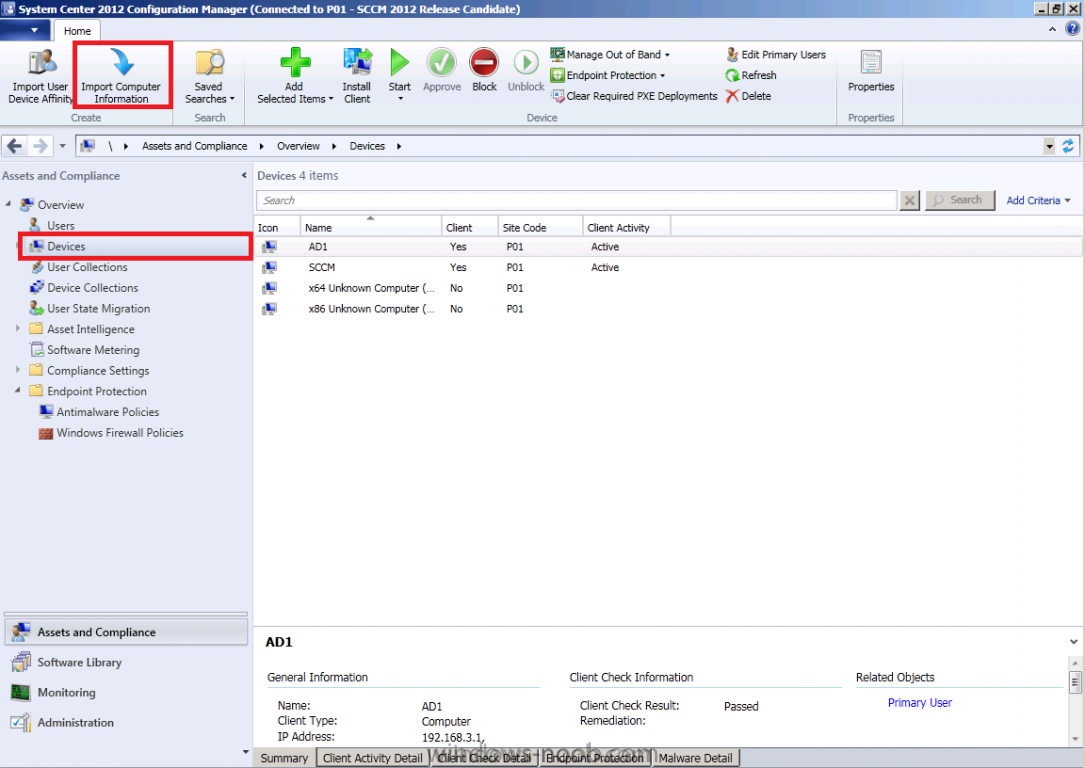
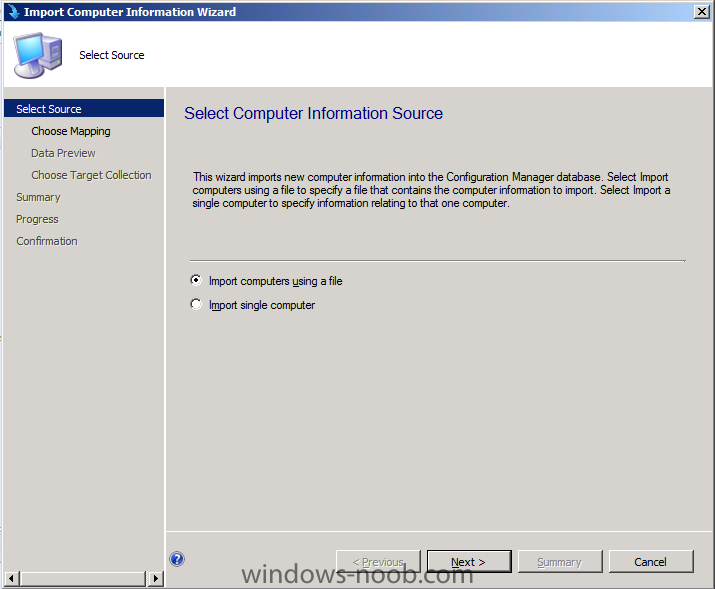
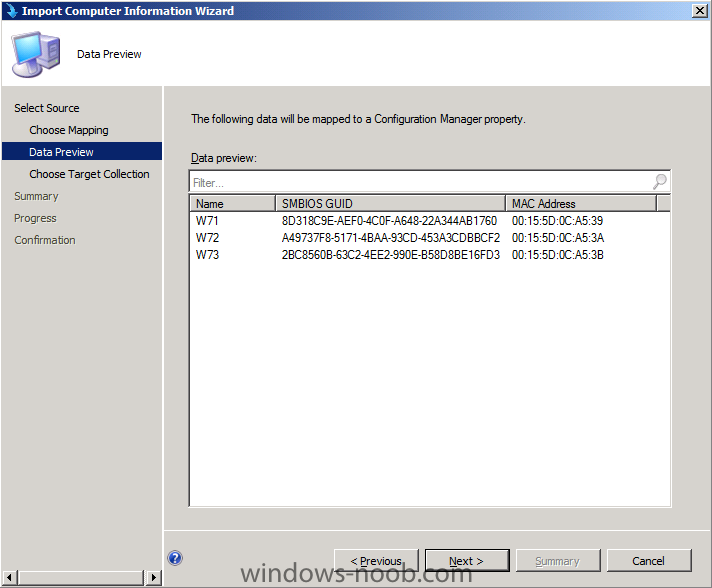
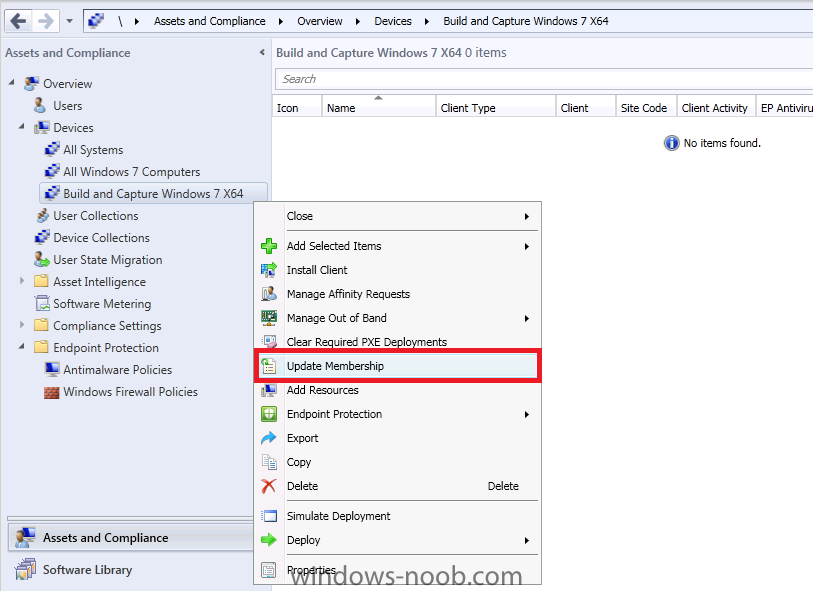
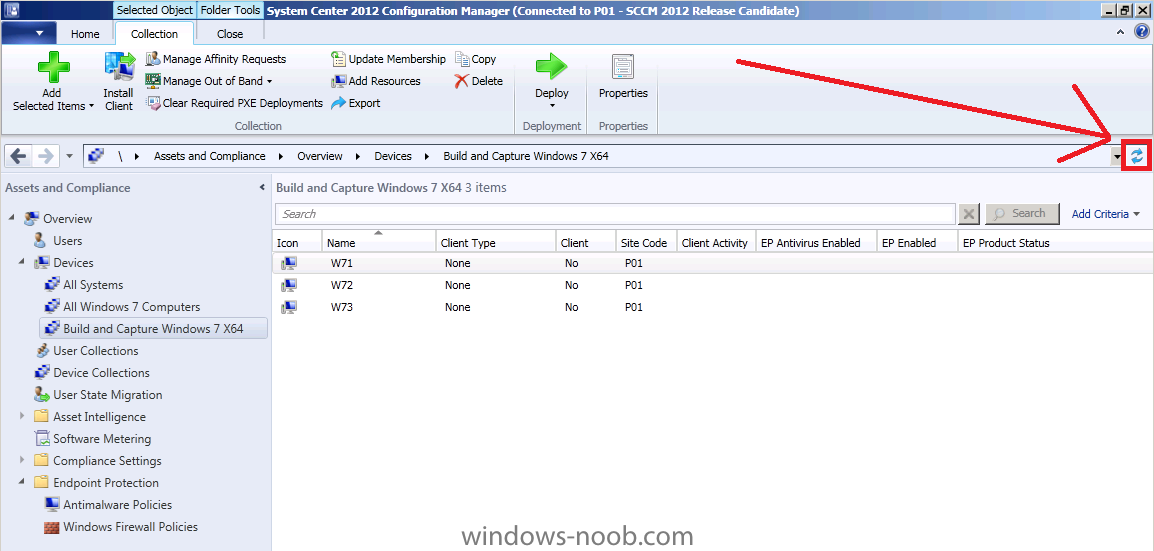
 if you want to import multiple computers in SCCM 2012 using a file then it's easy to do so, just make sure that your file is in CSV format and looks like so In the sample screenshot above I have three machines listed with the Computername first (name), followed by the SMSBIOS Guid and finally the MAC Address. You can get the SMSBIOS Guid and MAC Address simply booting your chosen computer and monitoring the PXE boot process look for the details below (press PAUSE on your keyboard to make note of the values or simply pause the VM by pressing the appropriate button as in the HyperV sample below). You could also ask your Hardware Manufacturer to provide you this information in CSV format. Now that you have the values add them to your MAC Addresses.CSV file (a text file in notepad or Microsoft Excel) open the ConfigMgr Console and click on Assets and Compliance, click on Devices, in the ribbon above select Import Computer Information select the first option, Import computers using a file point to your CSV file by clicking on browse, open if your CSV file has headings at the top of the file then place a check mark in This file has column headings and then click next look at the data preview, if anything looks incorrect you can go back or cancel, click next if it's all ok Note: you can have GUID plus Name, or MAC plus Name, or a combination of all three but you must have at least two and one of the values must be Name. next you can select the target collection, I want to add mine to the Build and Capture Windows 7 X64 collection so I click on Browse and select that collection, choose the one you wish click next through to completion you can then wait for normal discovery to pick up the new objects or force an update by choosing update membership on the chosen collection, answer yes whem prompted refresh the collection and the computers appear (if you've just imported them, give it a couple of minutes before they appear)
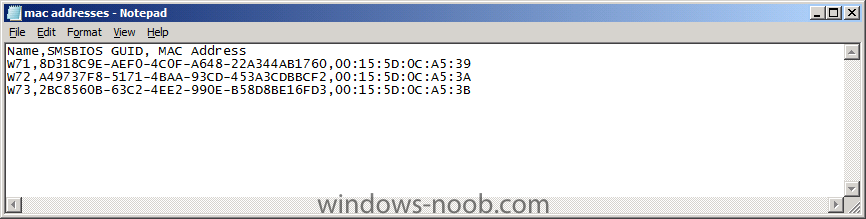


-
The latest version of MDT is now available on Connect (Join the MDT 2012 Beta 2 Connect program here!) MDT 2012 Beta 2 offers new User-Driven Installation components and extensibility for Configuration Manager 2007 and Configuration Manager 2012 as well as integration with the Microsoft Diagnostics and Recovery Toolkit (DaRT) for Lite Touch Installation remote control and diagnostics. Key benefits include: Full use of the capabilities provided by System Center Configuration Manager 2012 for OS deployment. Improved Lite Touch user experience and functionality. A smooth and simple upgrade process for all existing MDT users. New features For System Center Configuration Manager customers: Support for Configuration Manager 2012 (while still supporting Configuration Manager 2007) New User-Driven Installation components for Configuration Manager 2007 and Configuration Manager 2012 Extensible wizard and designer, additional integration with Configuration Manager to deliver a more customized OS experience, support for more imaging scenarios, and an enhanced end-user deployment experience [*]Ability to migrate MDT 2012 task sequences from Configuration Manager 2007 to Configuration Manager 2012 New features For Lite Touch Installation: Integration with the Microsoft Diagnostics and Recovery Toolkit (DaRT) for remote control and diagnostics New monitoring capabilities to see the progress of currently running deployments Support for deploying Windows to computers using UEFI Ability to deploy Windows 7 so that the computer will start from a new VHD file, “Deploy to VHD” Improved deployment wizard user experience MDT 2012 Beta 2 will be available for beta download through to January 2012. Already using the Microsoft Deployment Toolkit? the MDT team would like to hear about your experiences. Please send comments and suggestions to satfdbk@microsoft.com. This post was contributed by Richard Smith, a Principal Consultant with Microsoft Services UK Disclaimer: The information on this site is provided "AS IS" with no warranties, confers no rights, and is not supported by the authors or Microsoft Corporation. Use of included script samples are subject to the terms specified in the Terms of Use via http://blogs.technet.com/b/deploymentguys/archive/2011/11/11/mdt-2012-beta-2-released.aspx?utm_medium=windows-noob&utm_source=windows-noob.com
-
the CAS is NOT the same as today's Central site, for example, you cannot have a Management Point on a CAS, but you can on a Central site, if you want child sites in SCCM 2012 you can have one standalone primary with secondaries underneath but if you want more than one primary you'll need to install the CAS first, as you cannot install the CAS later, it's now or never. For more info see the links below:- Fundamentals of Configuration Manager - http://technet.micro...y/gg682106.aspx Supported Configurations for Configuration Manager - http://technet.micro...y/gg682077.aspx Planning for Configuration Manager Sites and Hierarchy - http://technet.micro...y/gg682075.aspx as ConfigMgr 2012 is still in Release Candidate phase, please go ahead and test CAS with an attached primary/secondary to see how it all works together in your Lab (not in Production).
-
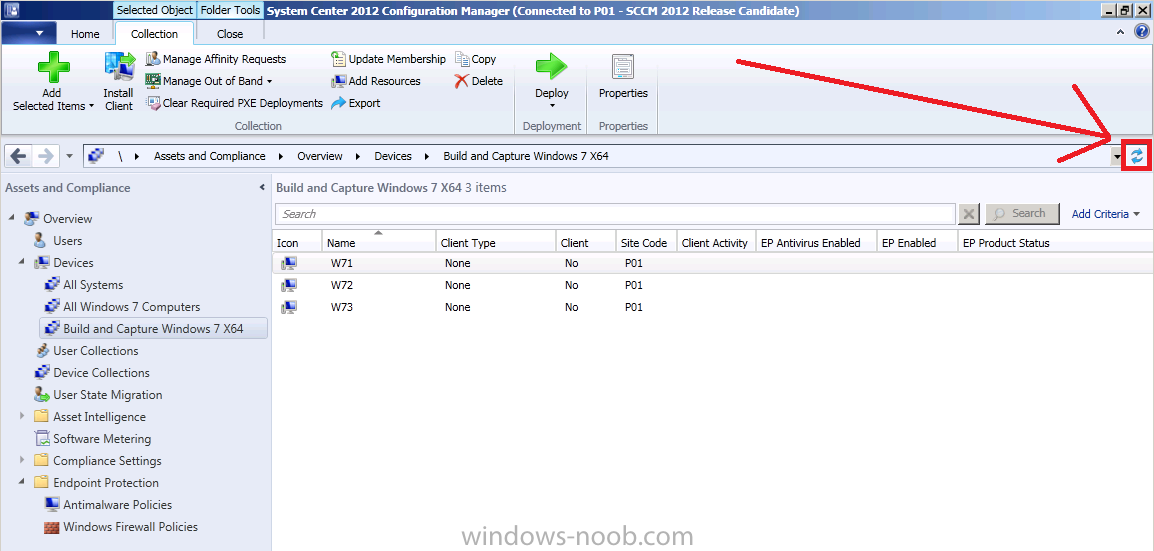
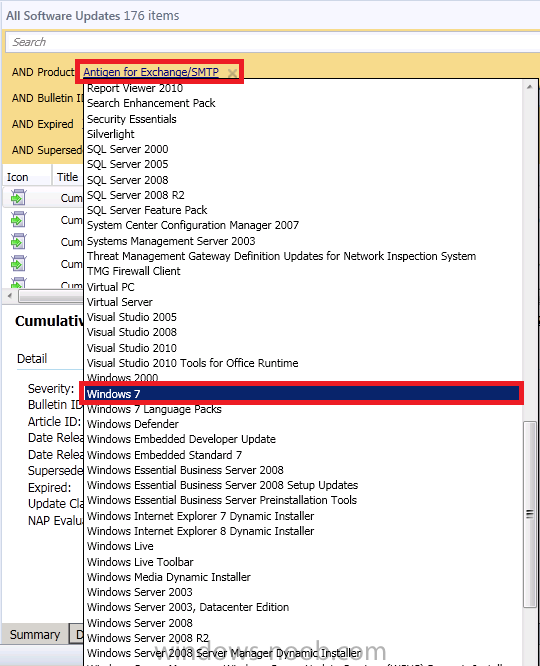
when searching for Software updates in SCCM 2012 release candidate you can add criteria for Title and enter X64, that gives you the desired result
-
don't configure WDS, configmgr will do it for you have you Deployed your task sequence to a collection and made sure that the computer you imported is in that collection ? did you find the smspxe.log file yet ?
-
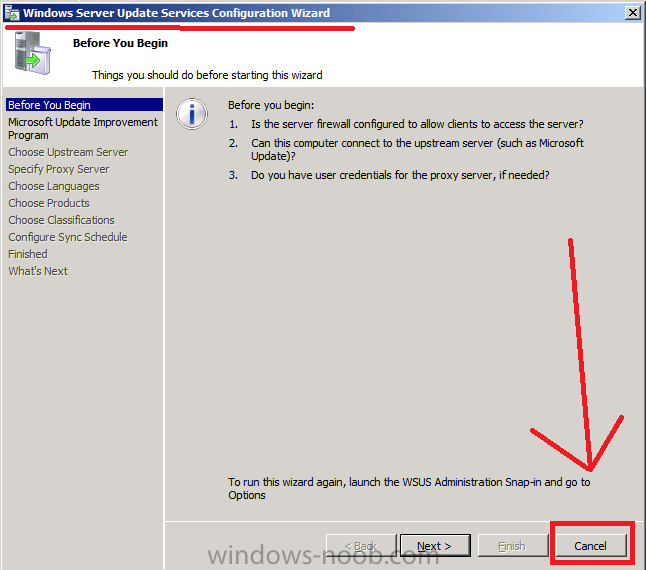
using SCCM 2012 in a LAB - Part 2. Add SUP and WDS
anyweb replied to anyweb's topic in Configuration Manager 2012
Endpoint protection is covered in Part 5 of this series - http://www.windows-noob.com/forums/index.php?/topic/4466-using-sccm-2012-rc-in-a-lab-part-5-enable-the-endpoint-protection-role-and-configure-endpoint-protection-settings/ -
using SCCM 2012 in a LAB - Part 1. Installation
anyweb replied to anyweb's topic in Configuration Manager 2012
thanks, and updated -
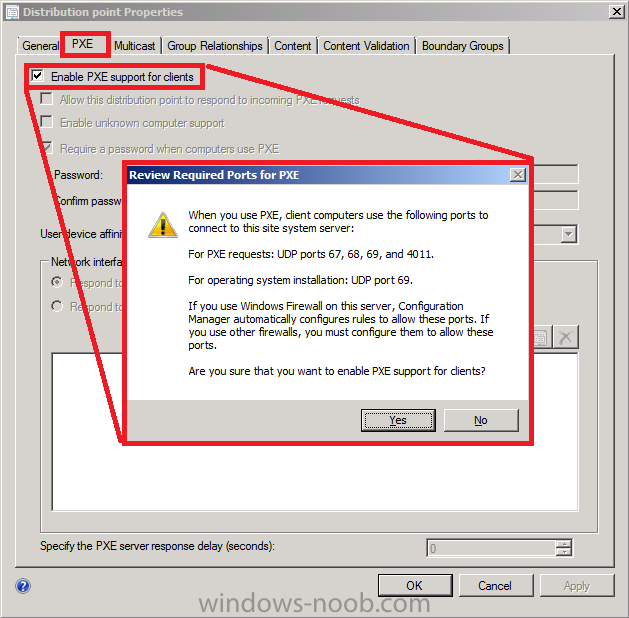
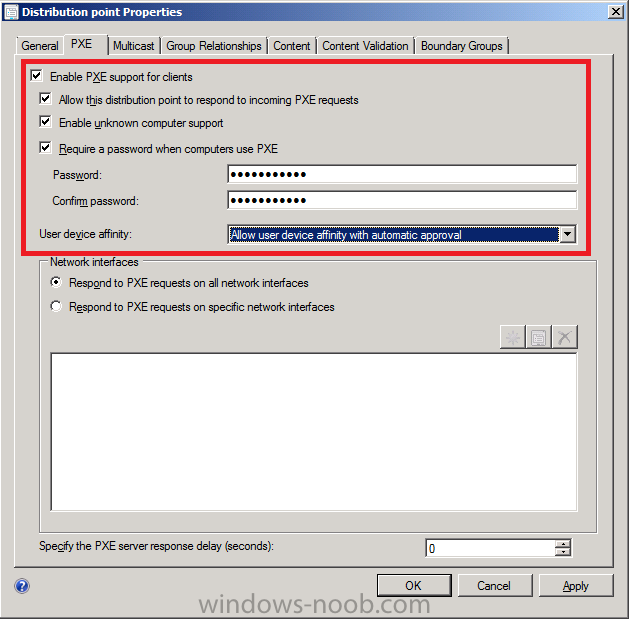
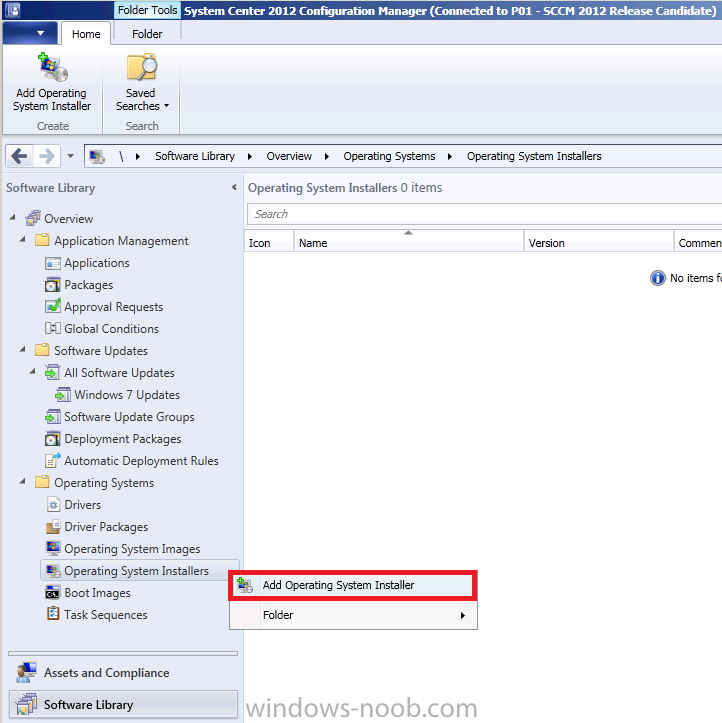
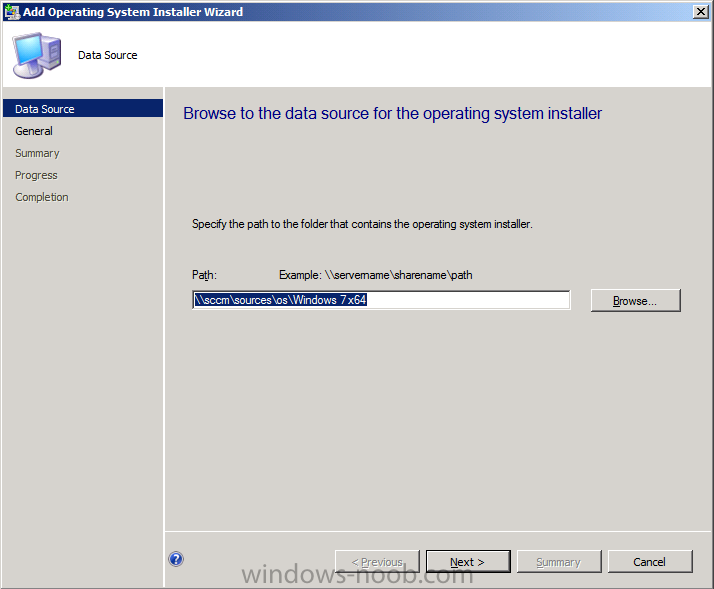
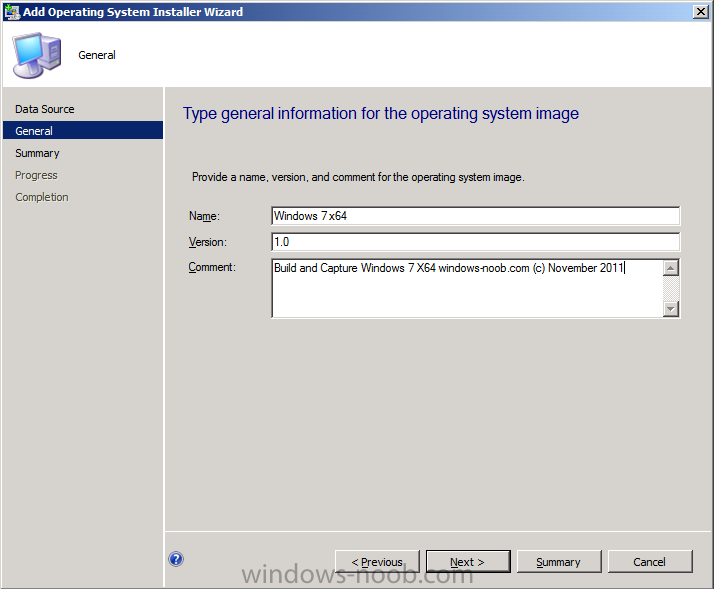
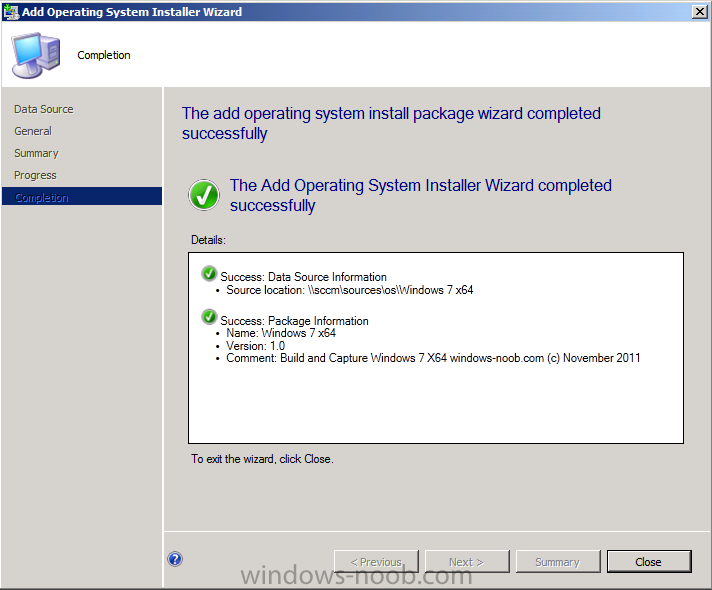
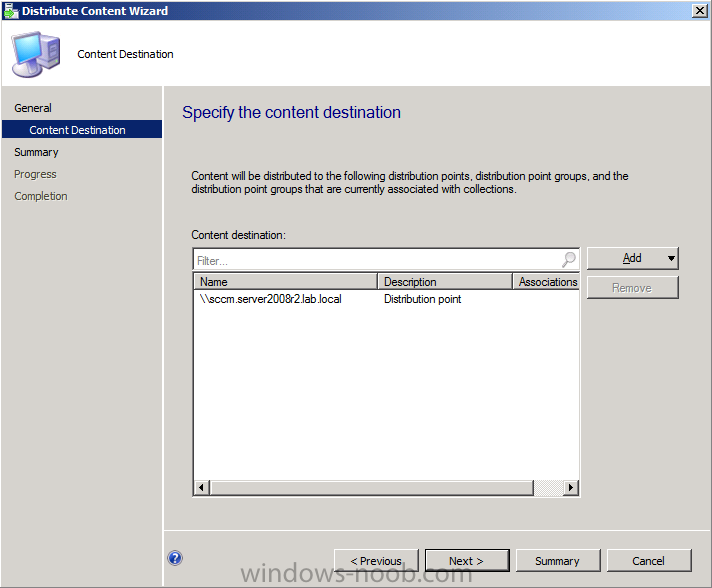
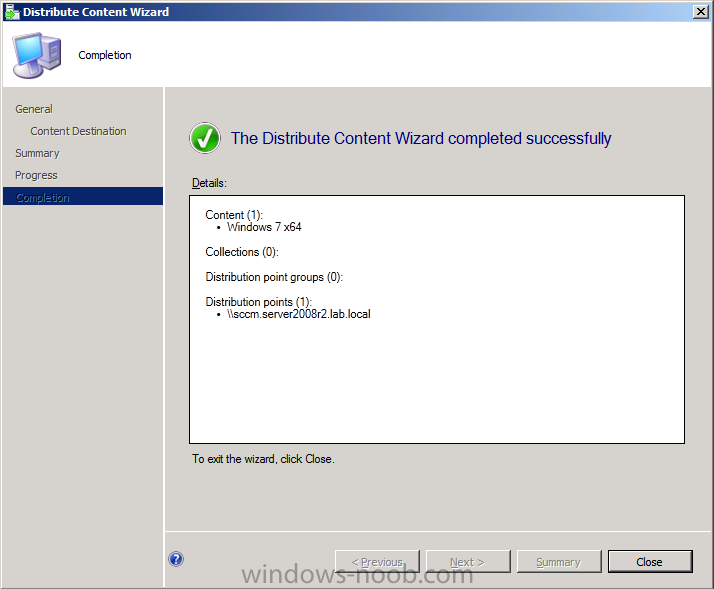
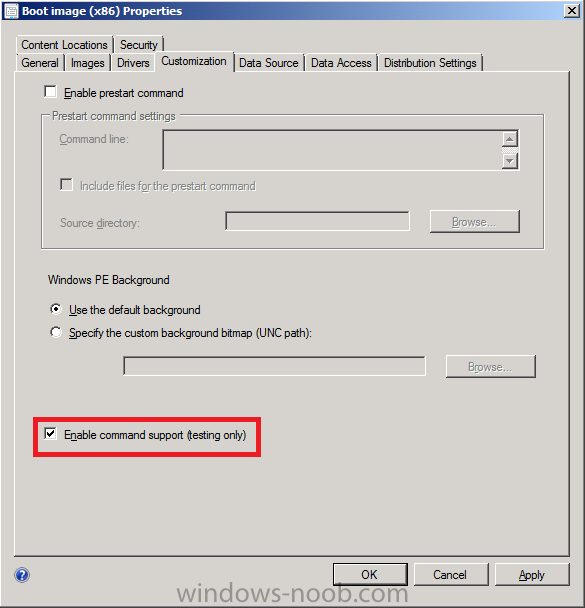
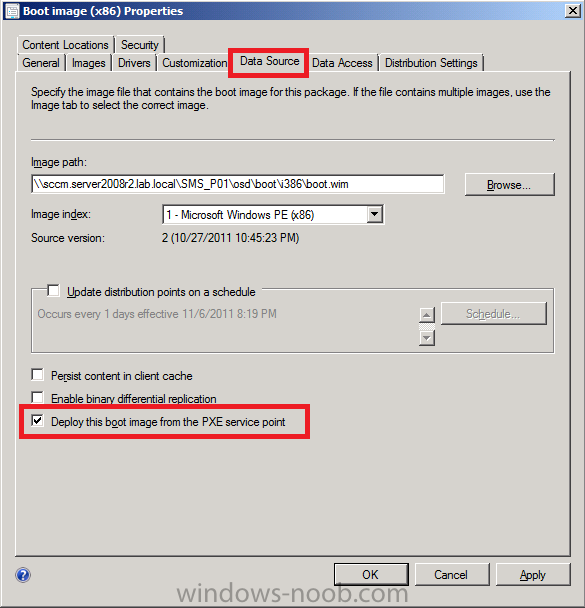
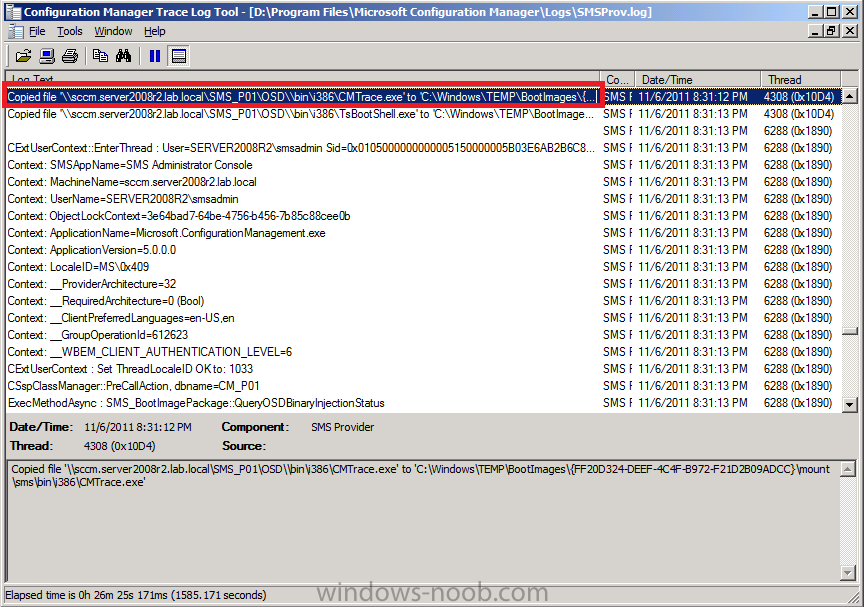
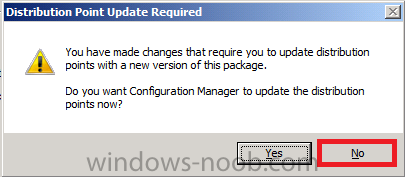
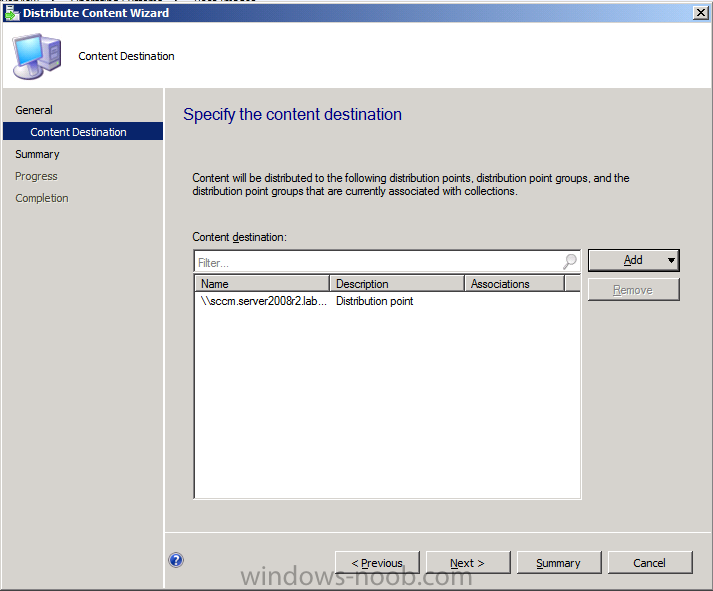
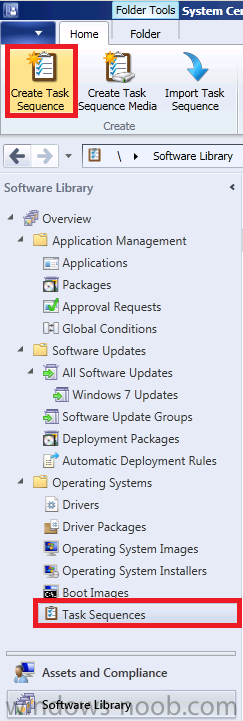
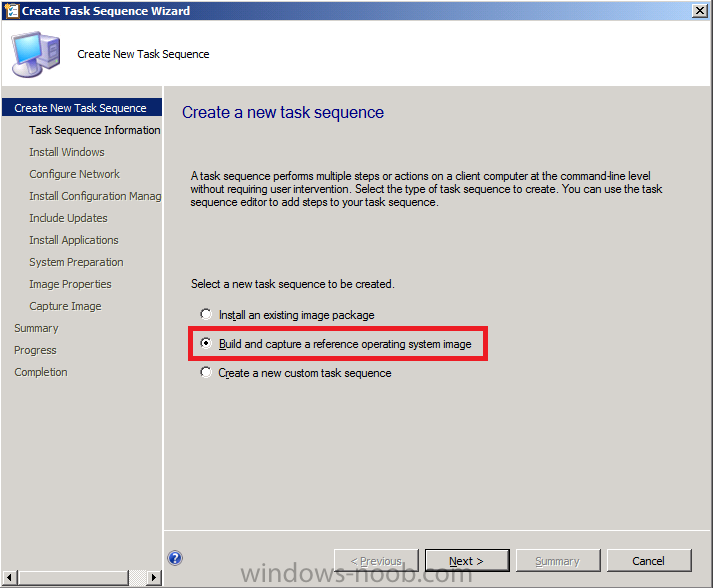
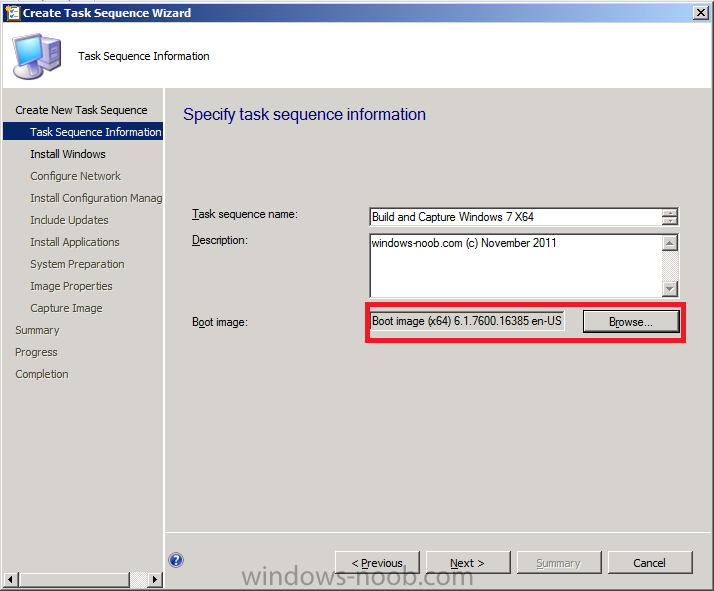
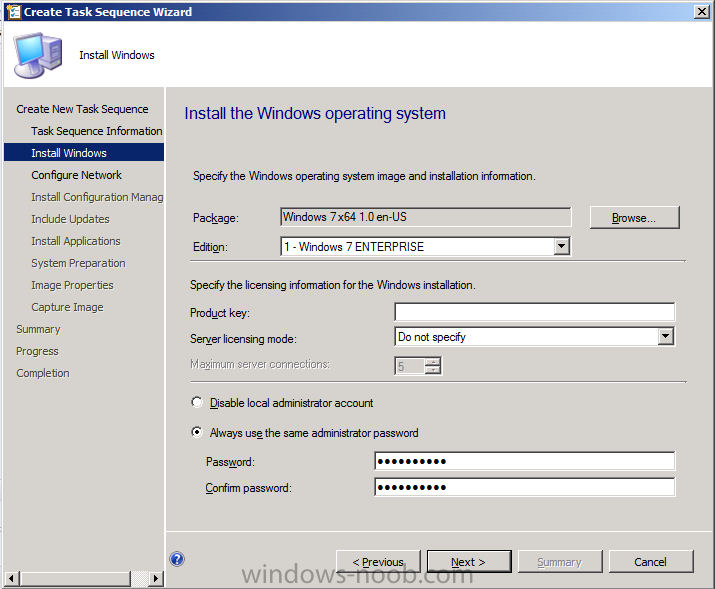
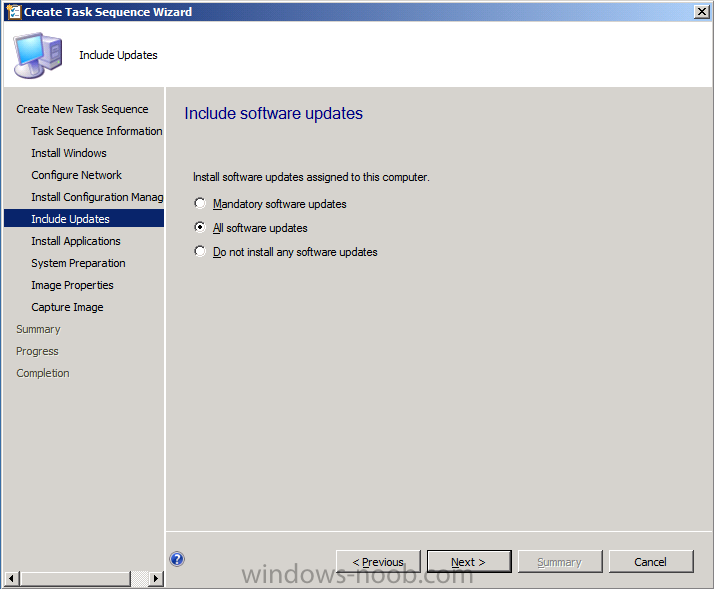
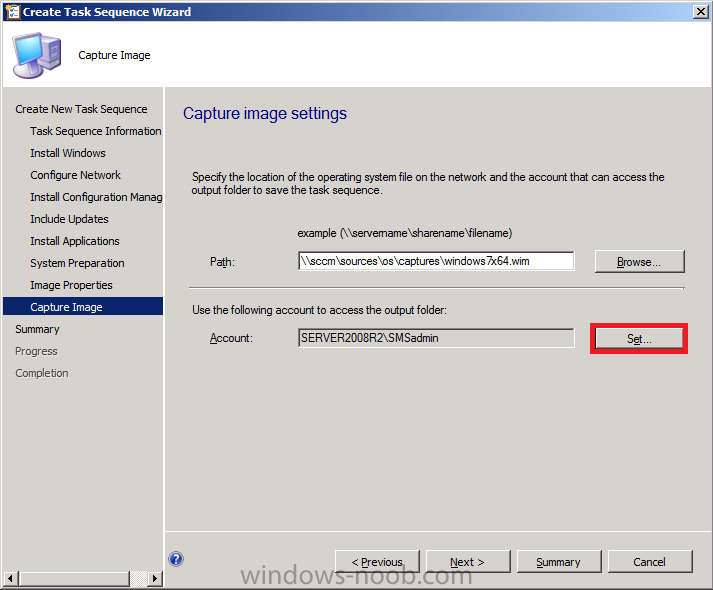
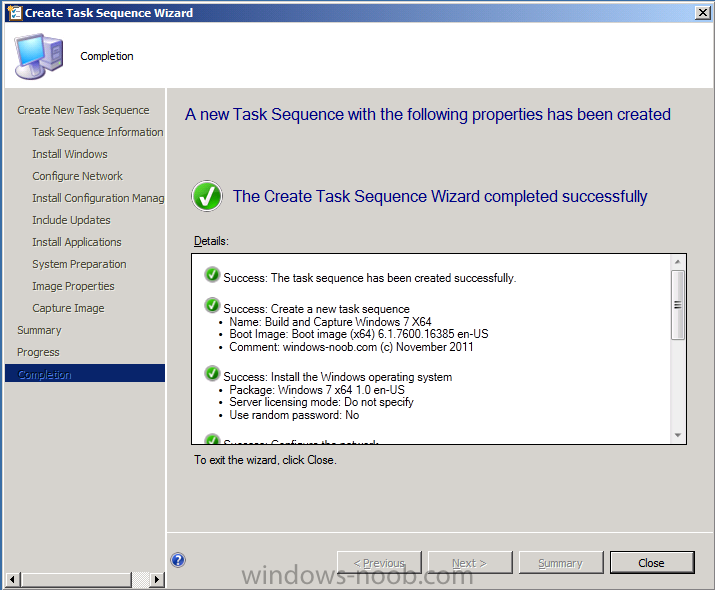
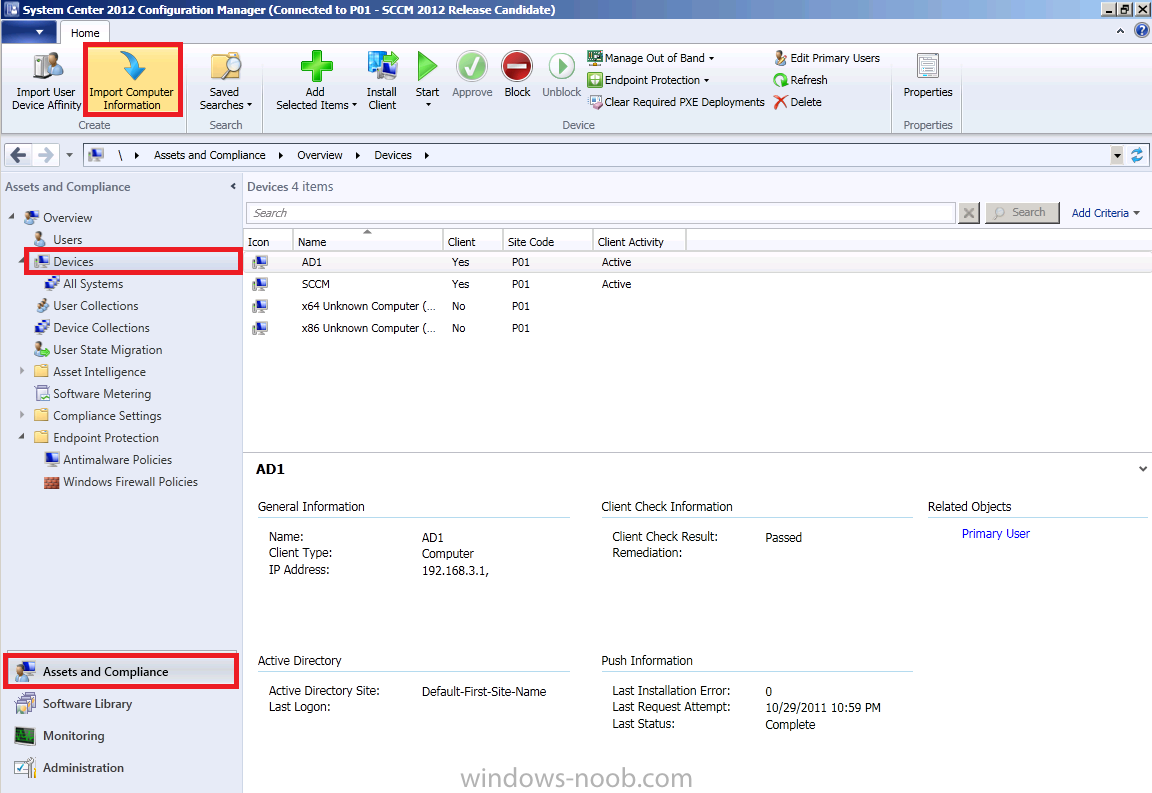
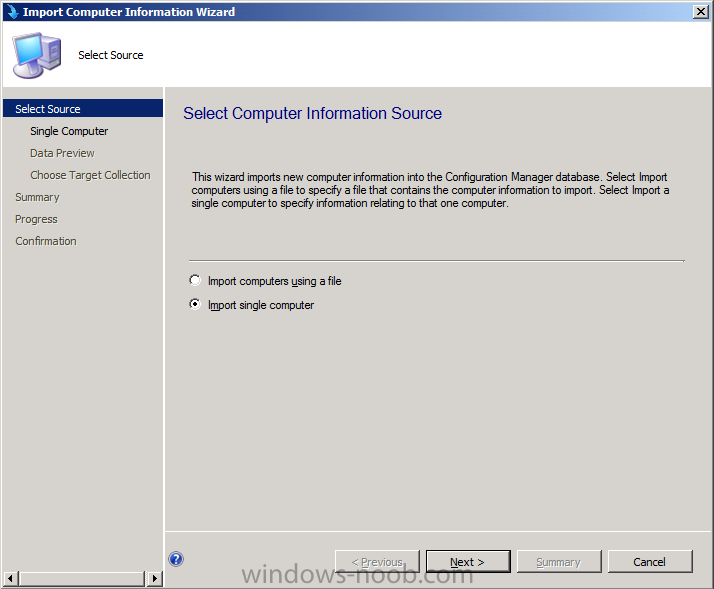
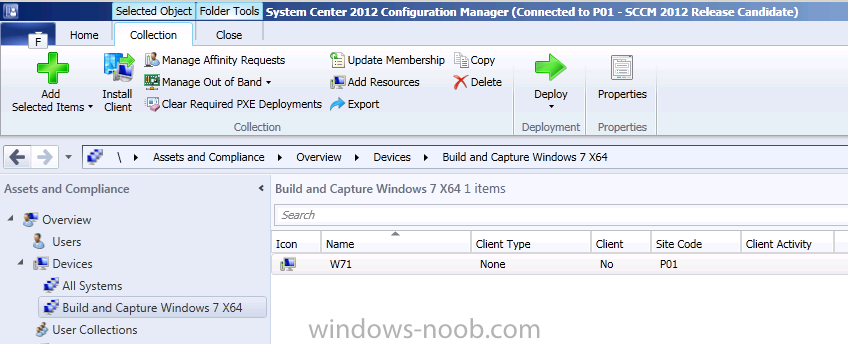
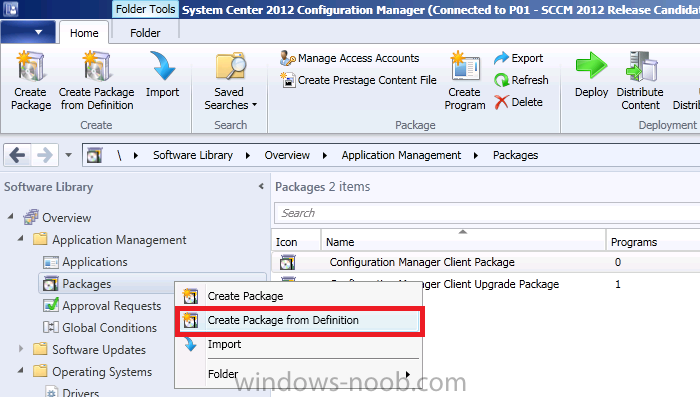
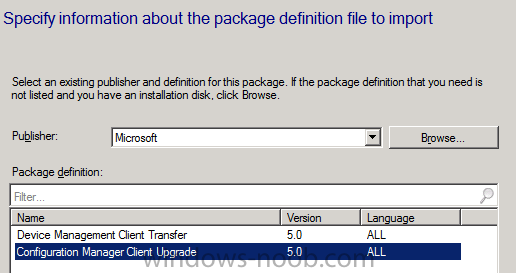
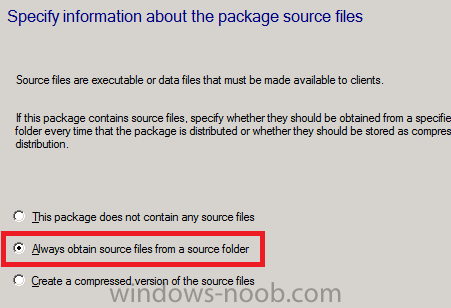
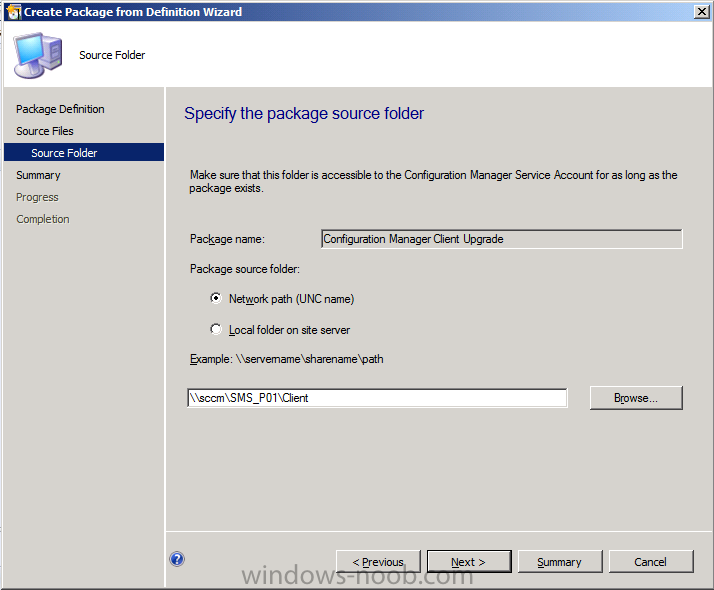
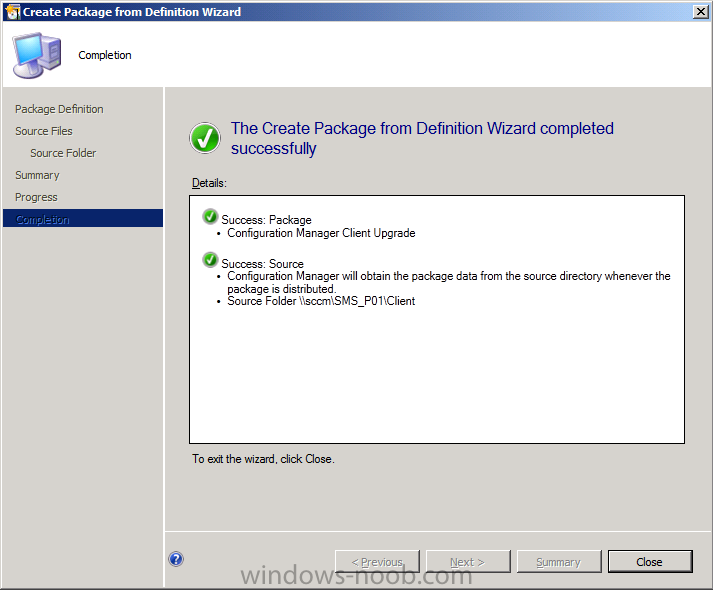
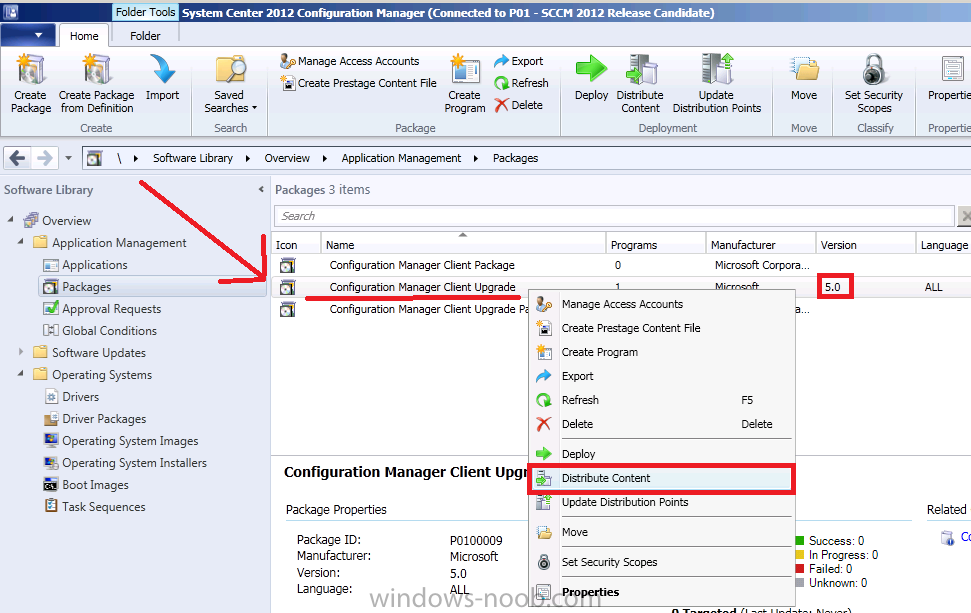
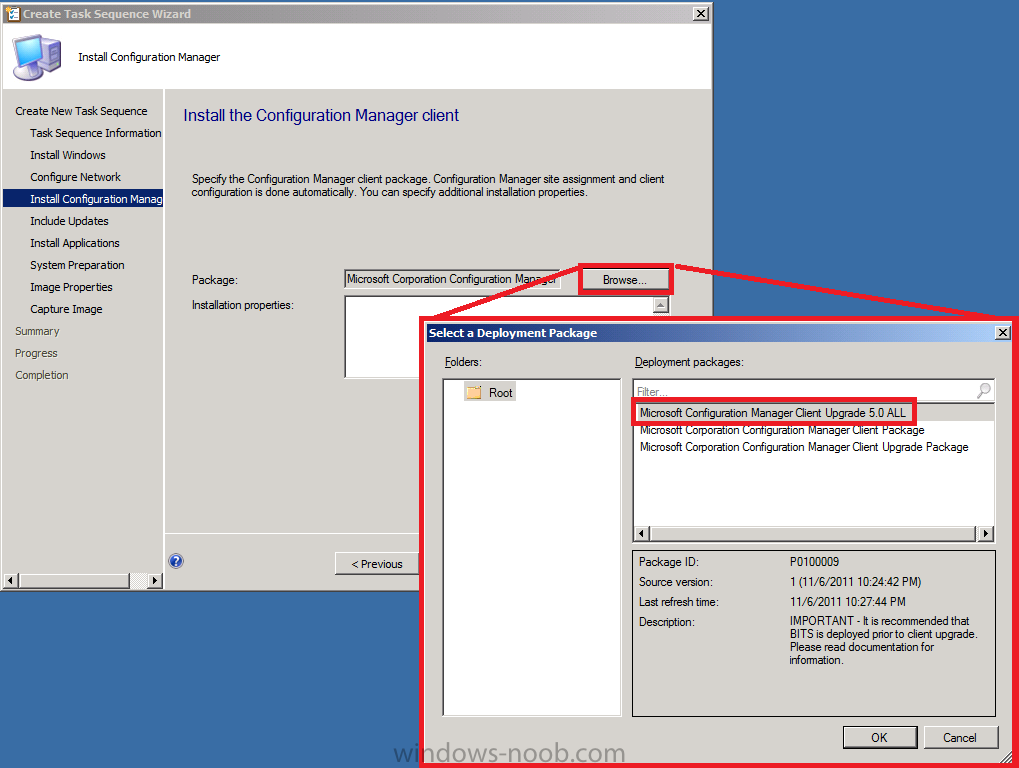
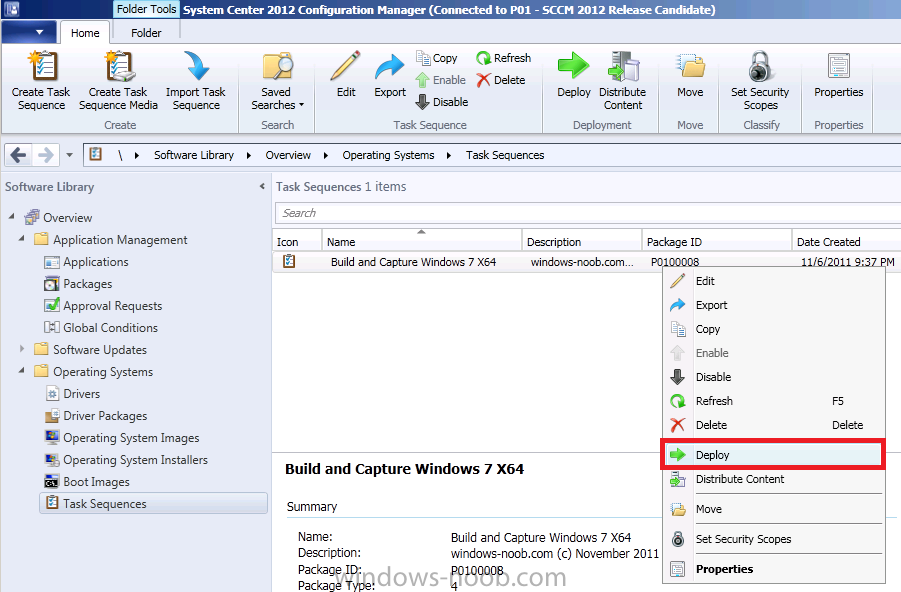
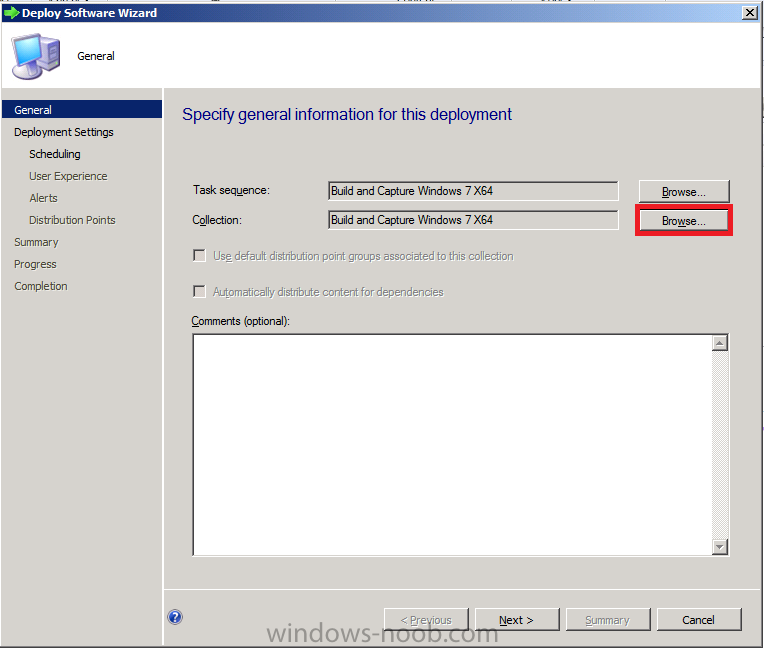
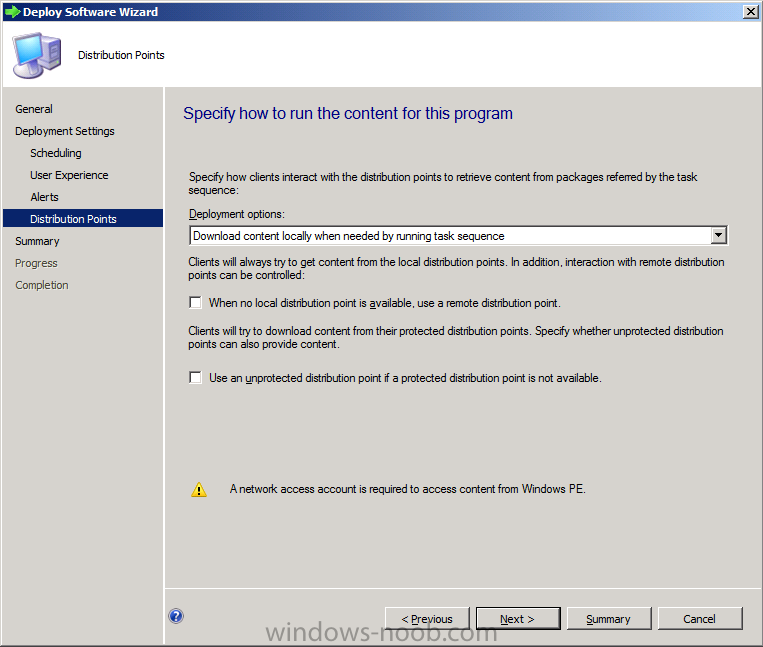
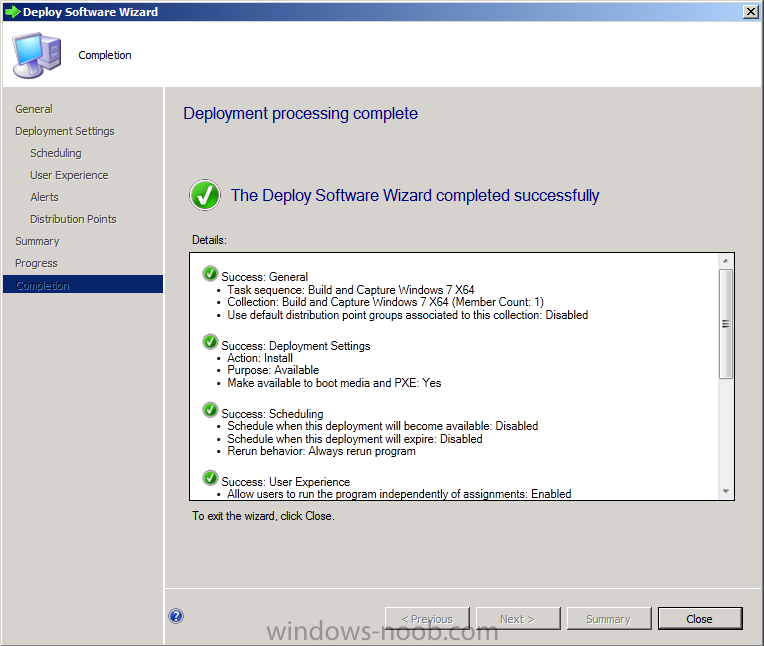
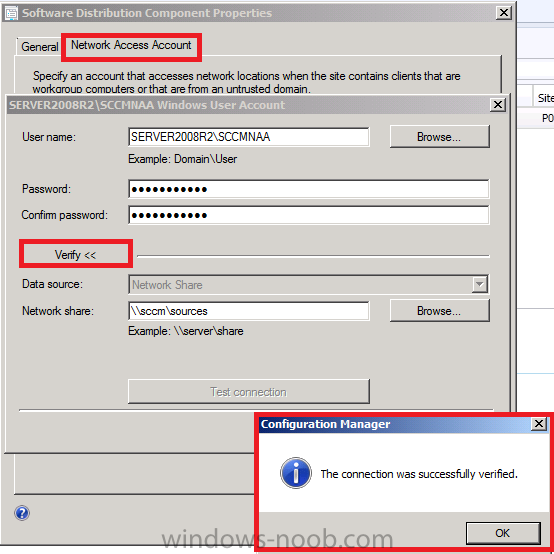
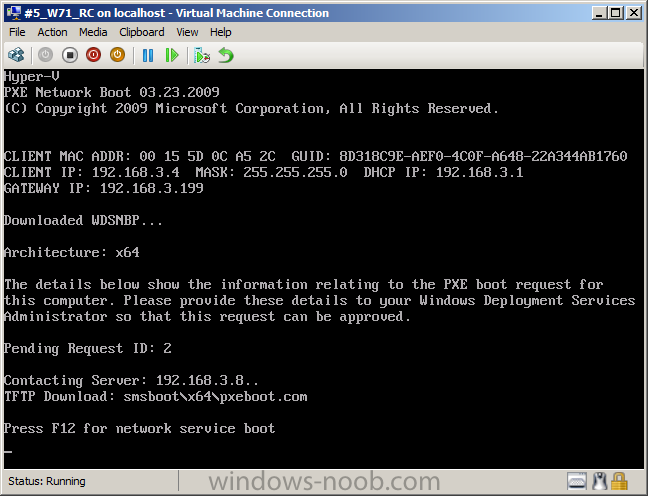
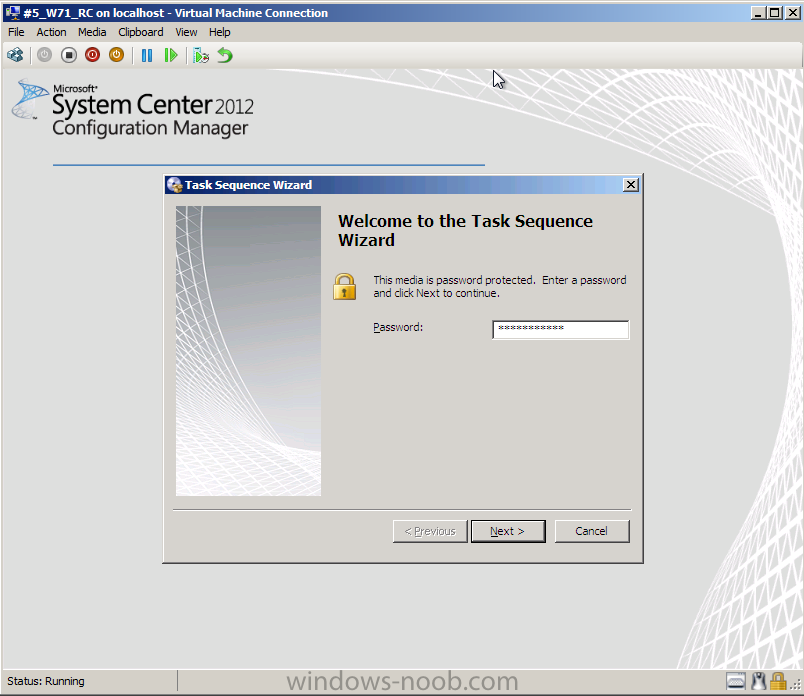
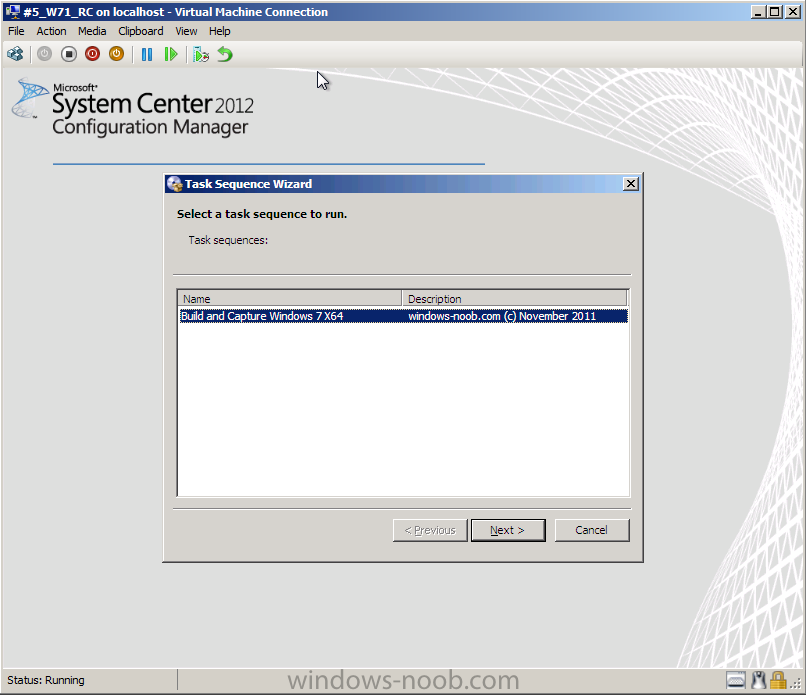
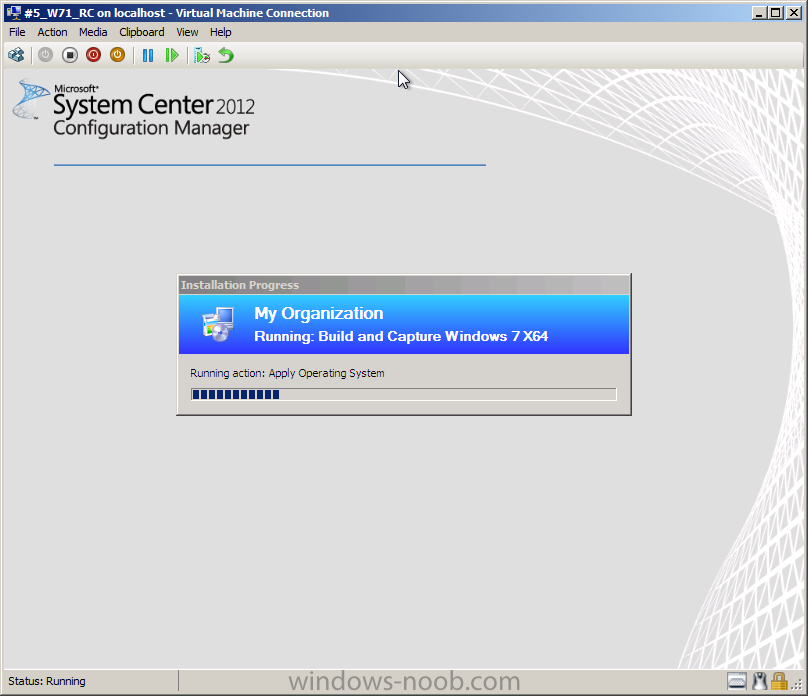
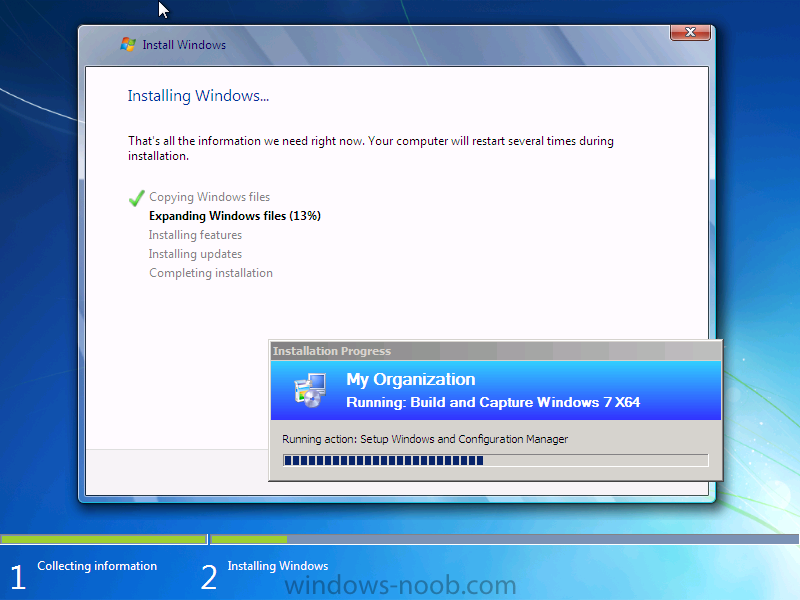
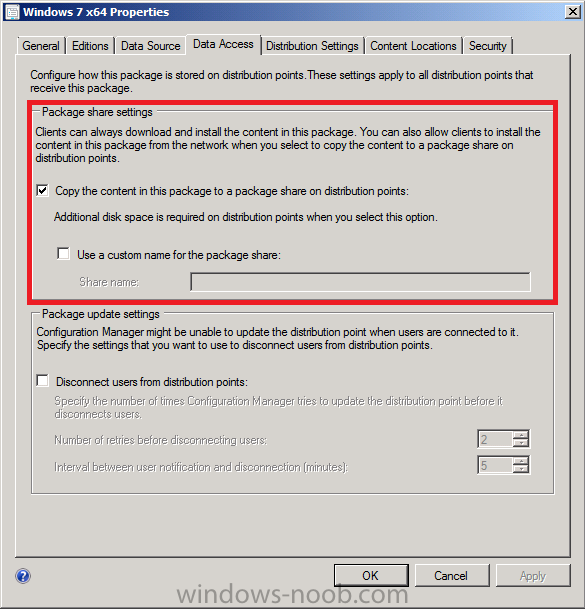
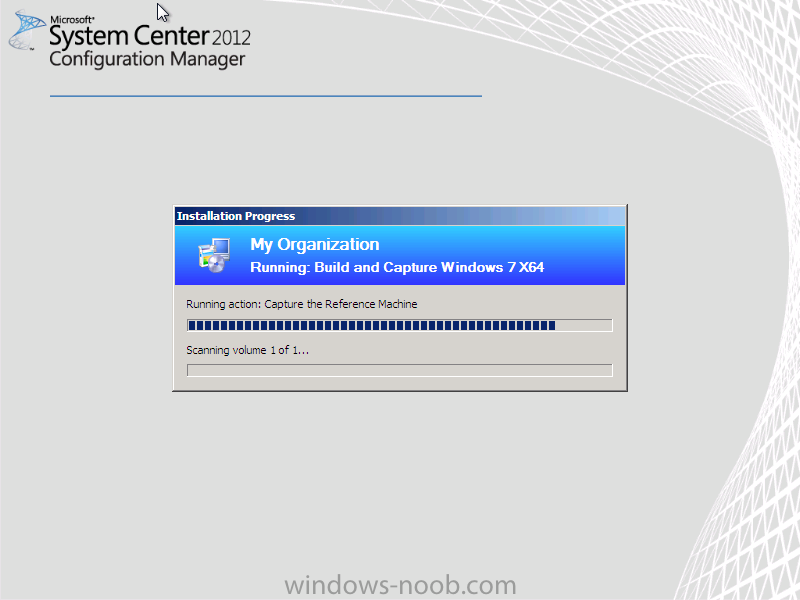
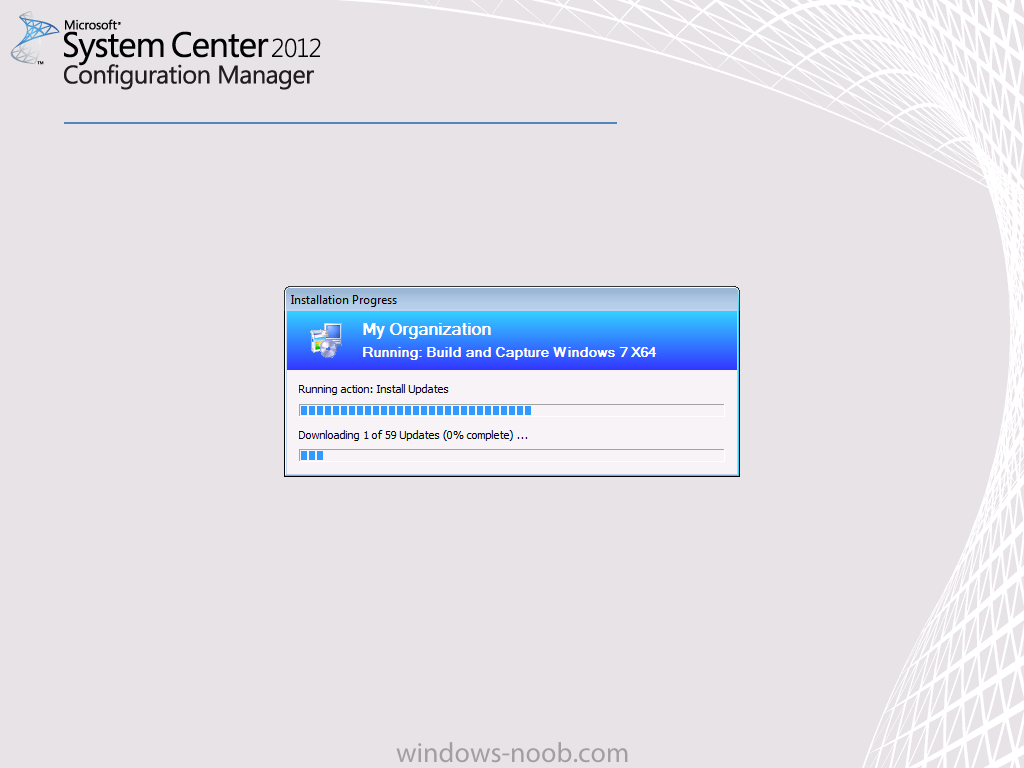
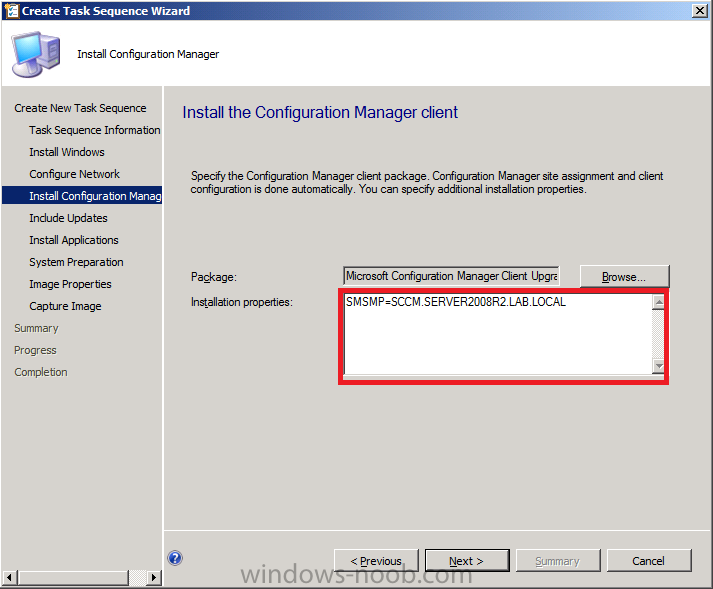
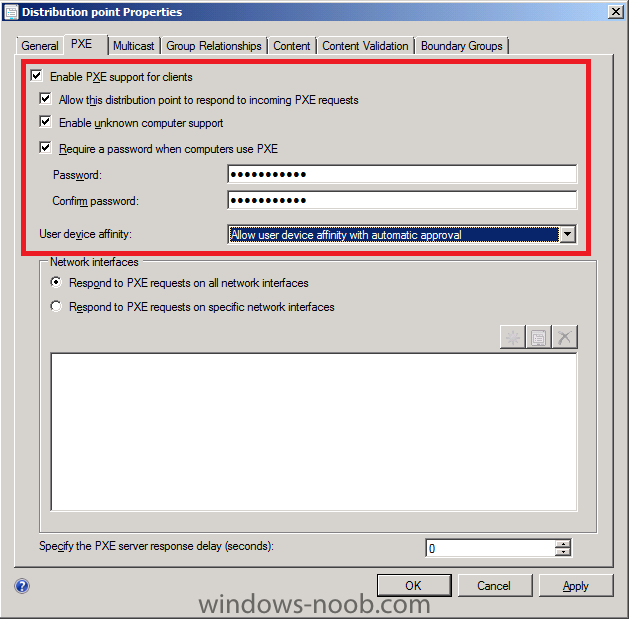
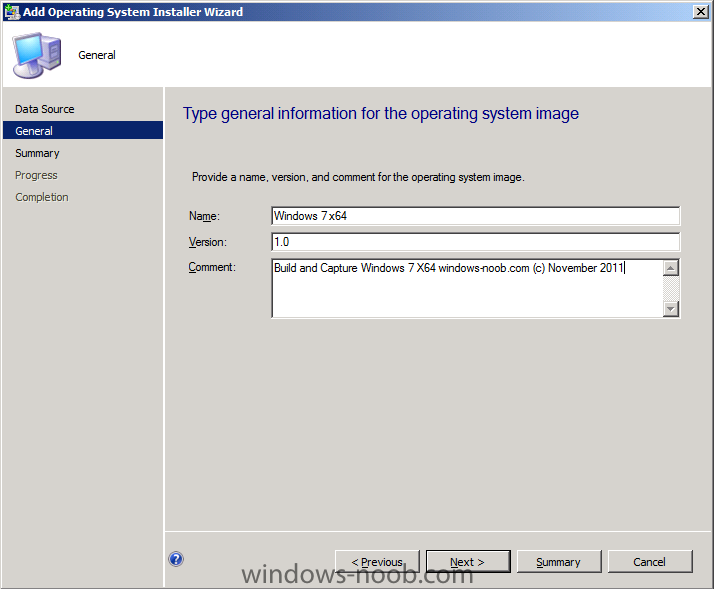
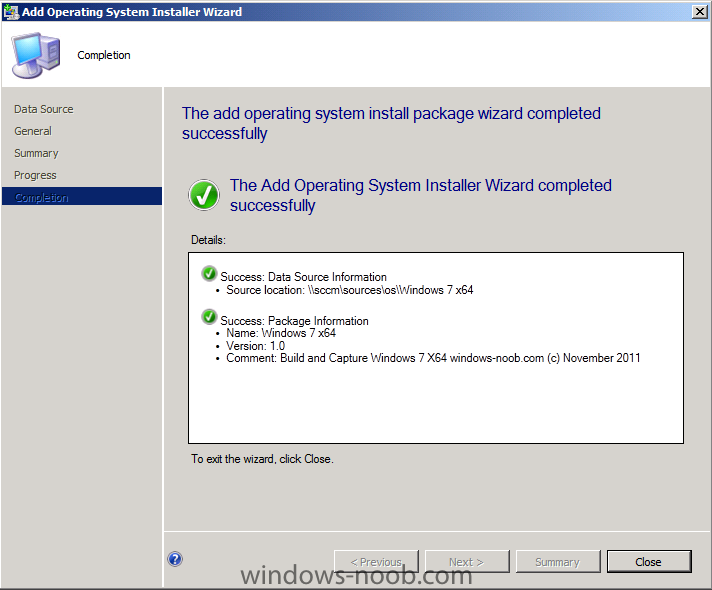
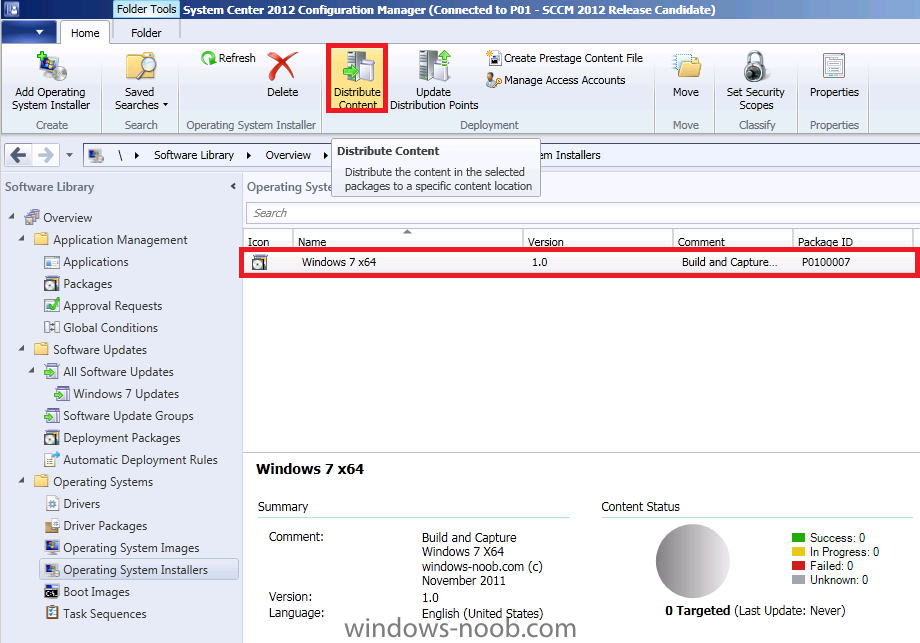
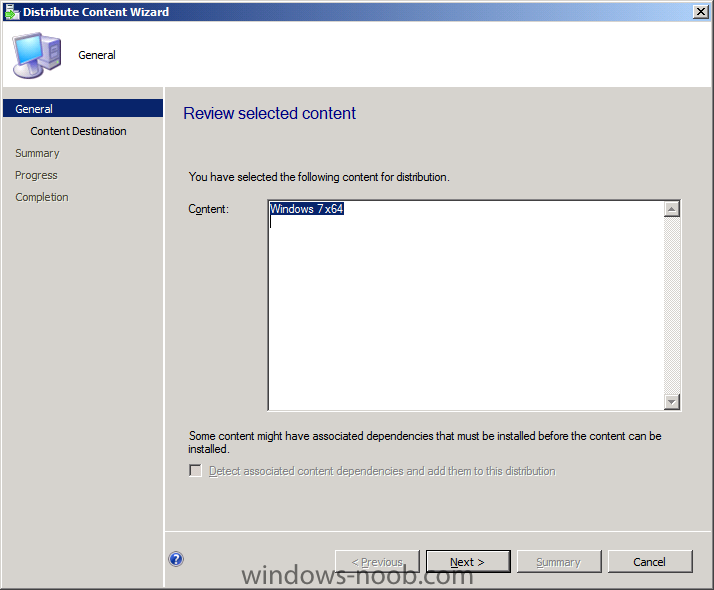
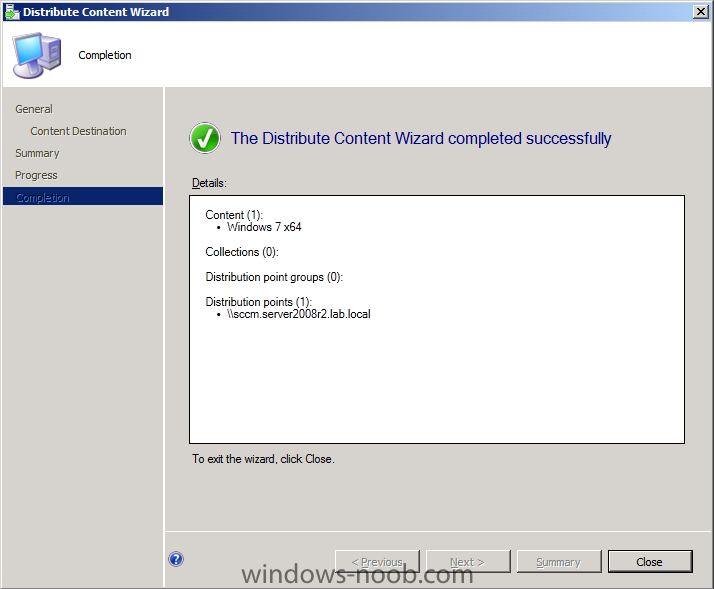
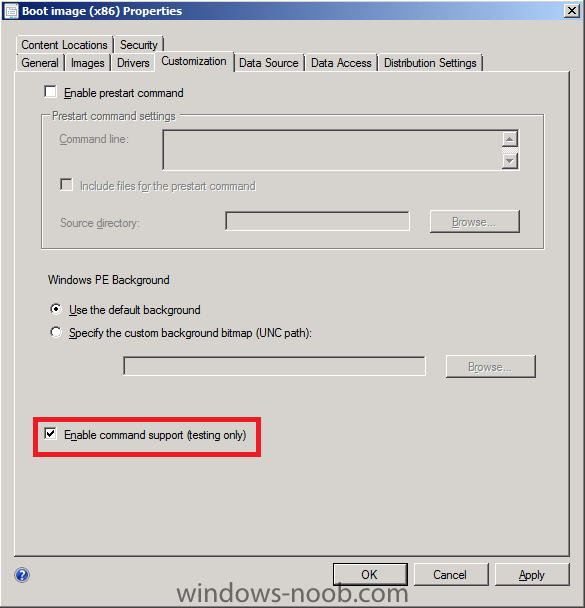
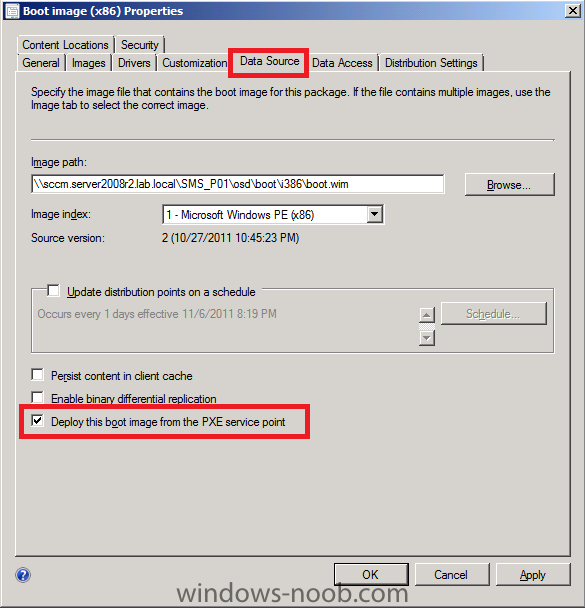
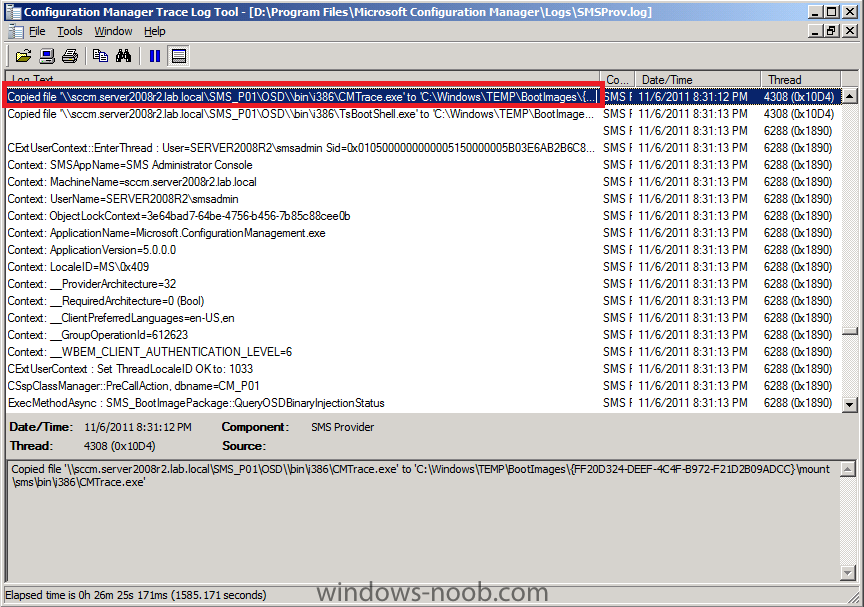
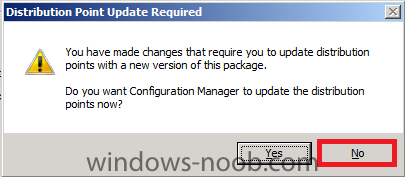
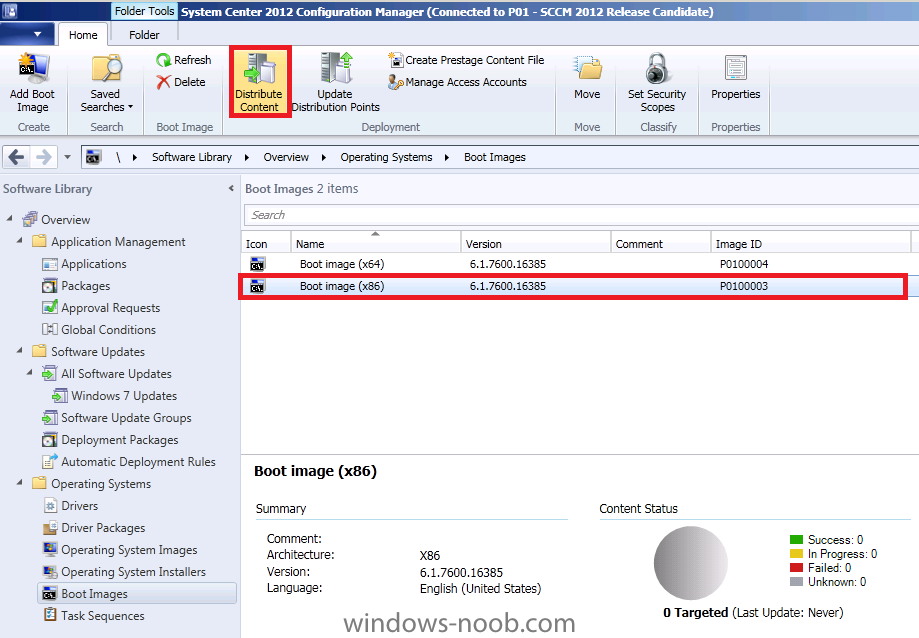
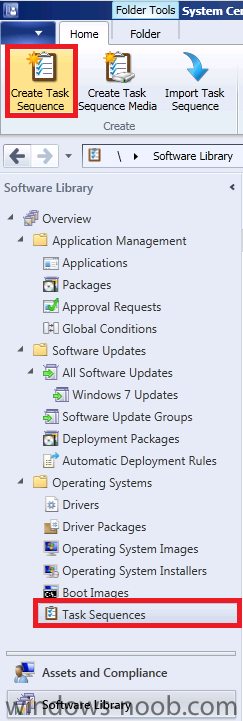
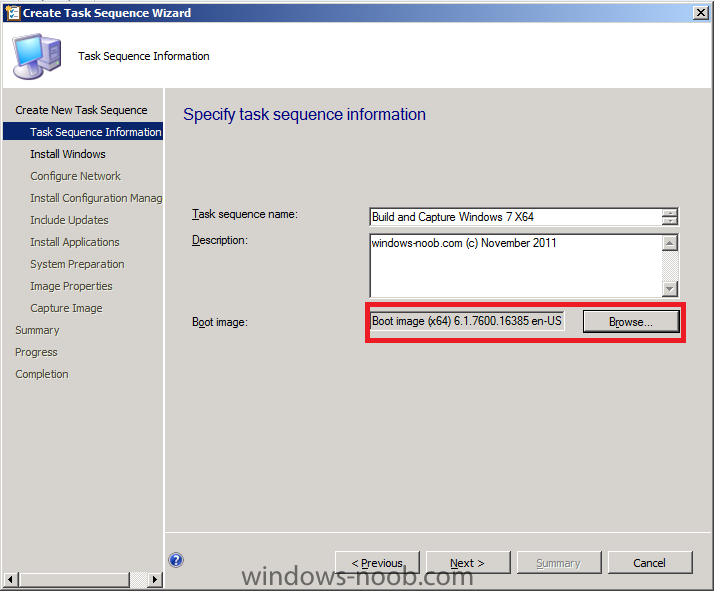
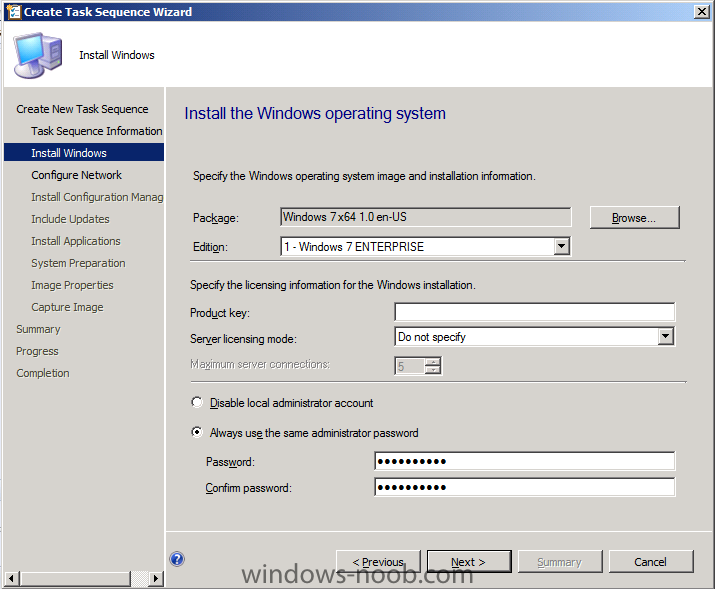
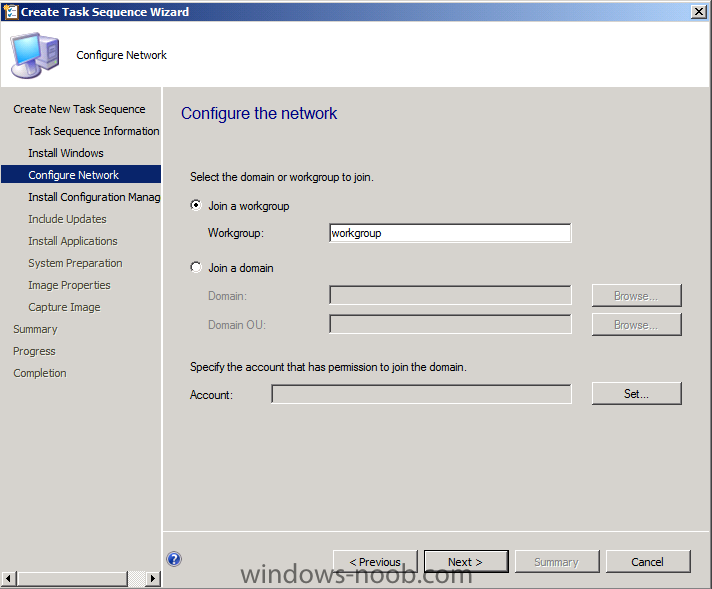
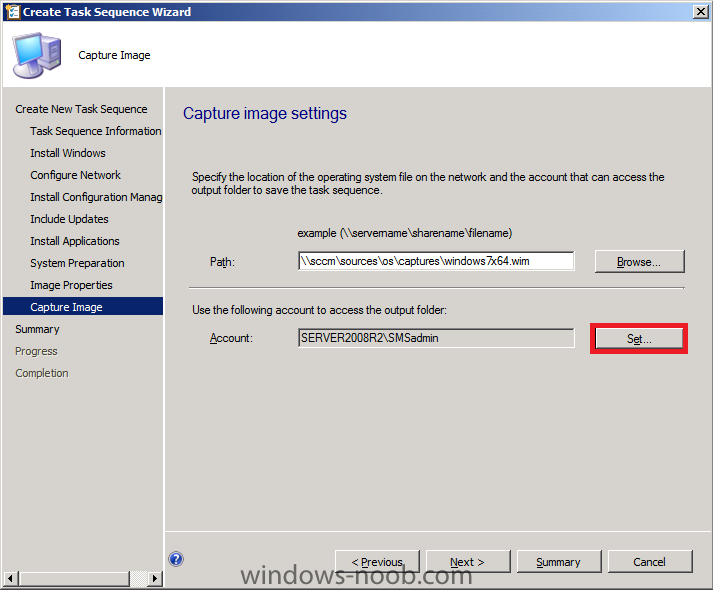
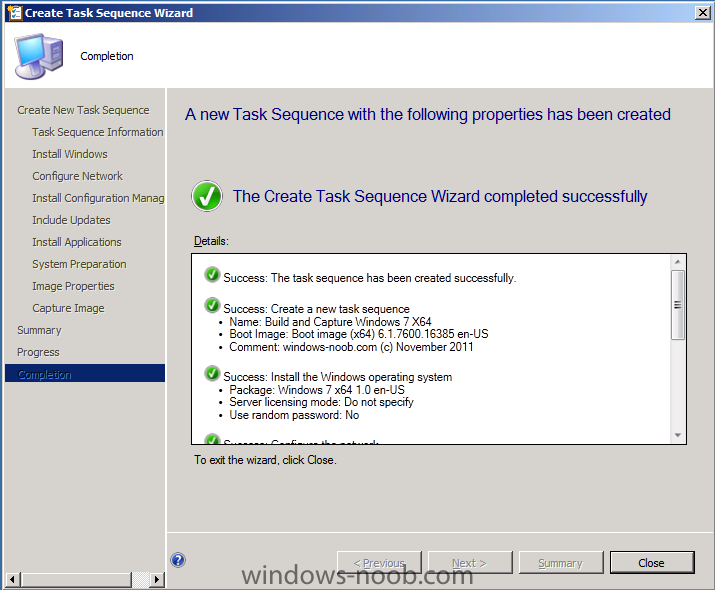
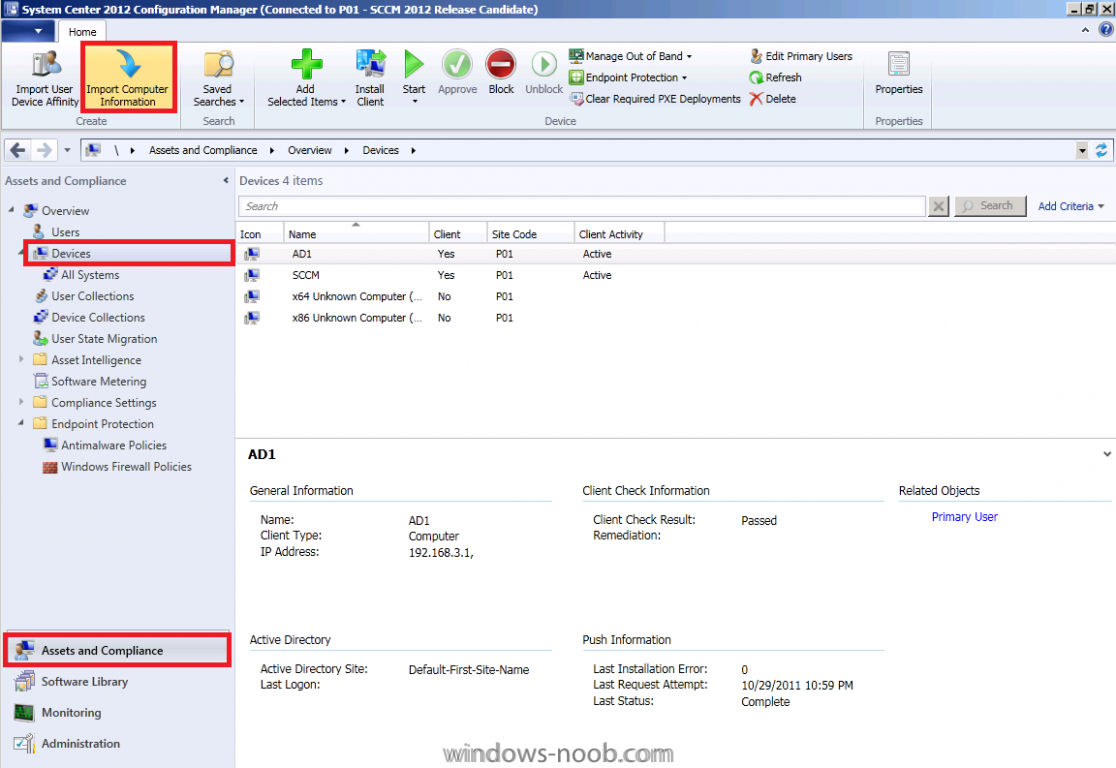
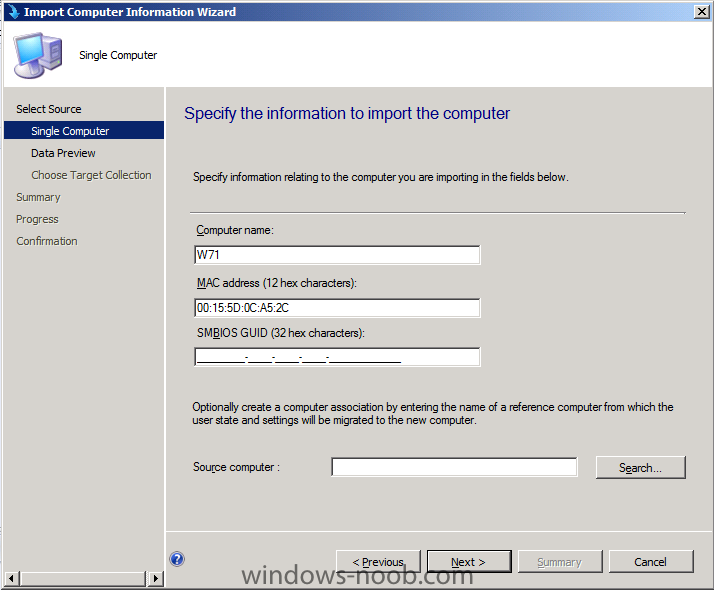
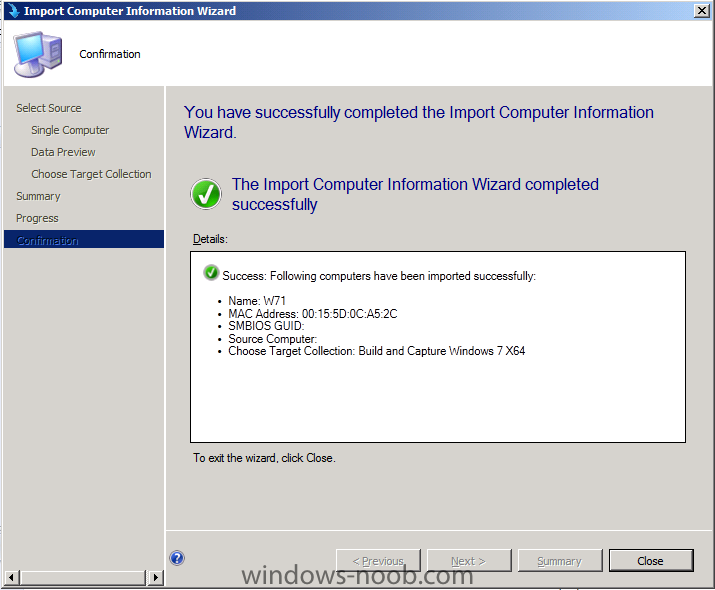
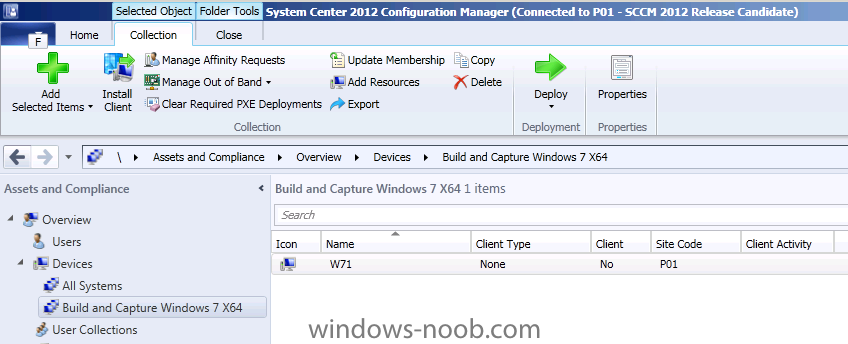
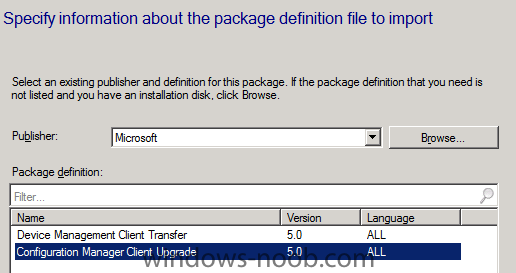
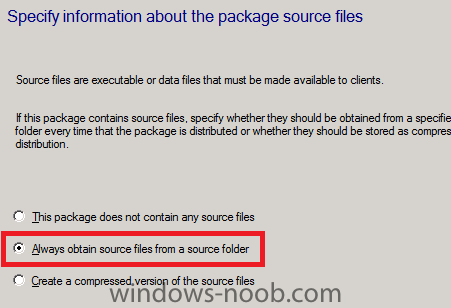
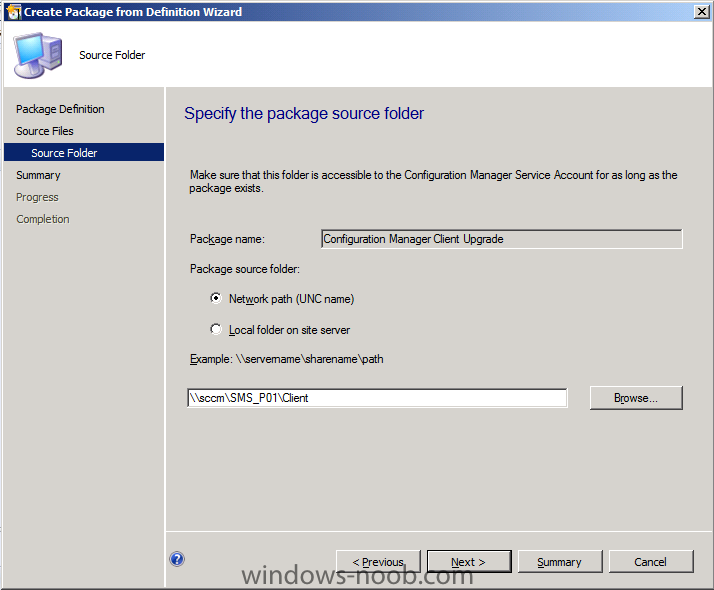
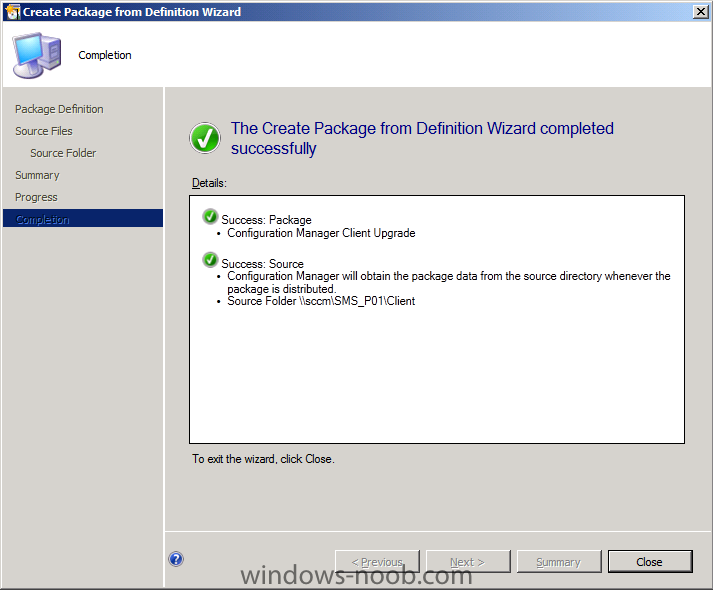
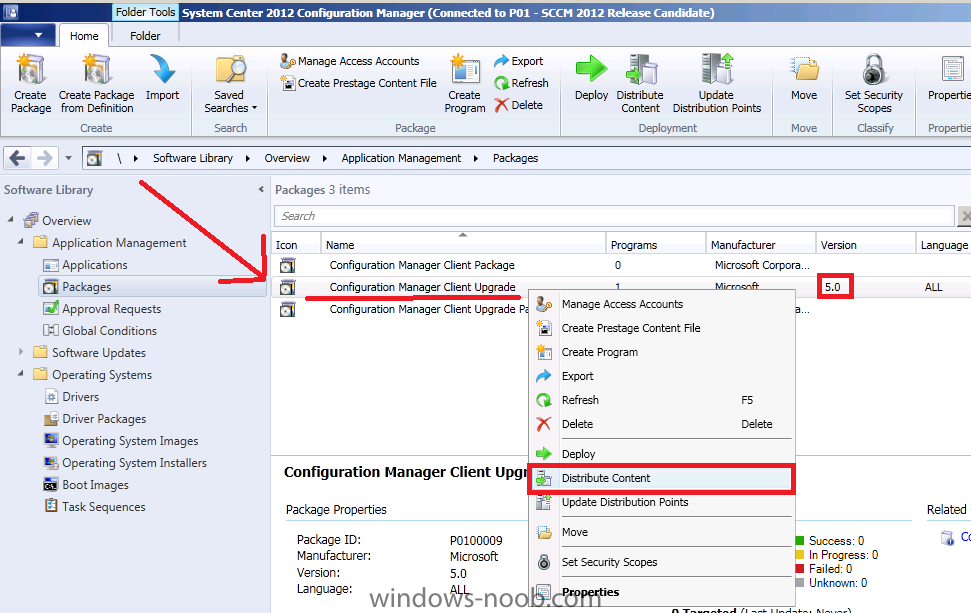
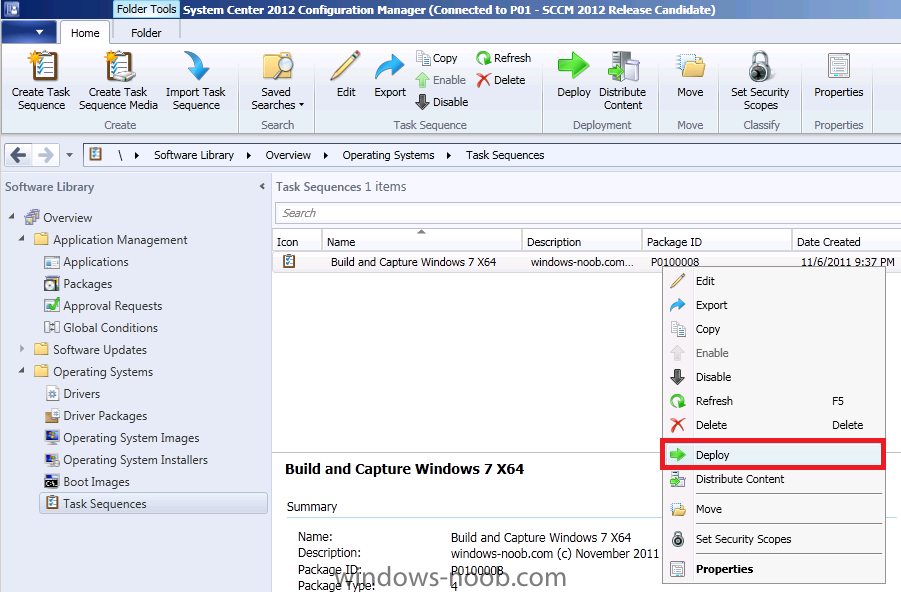
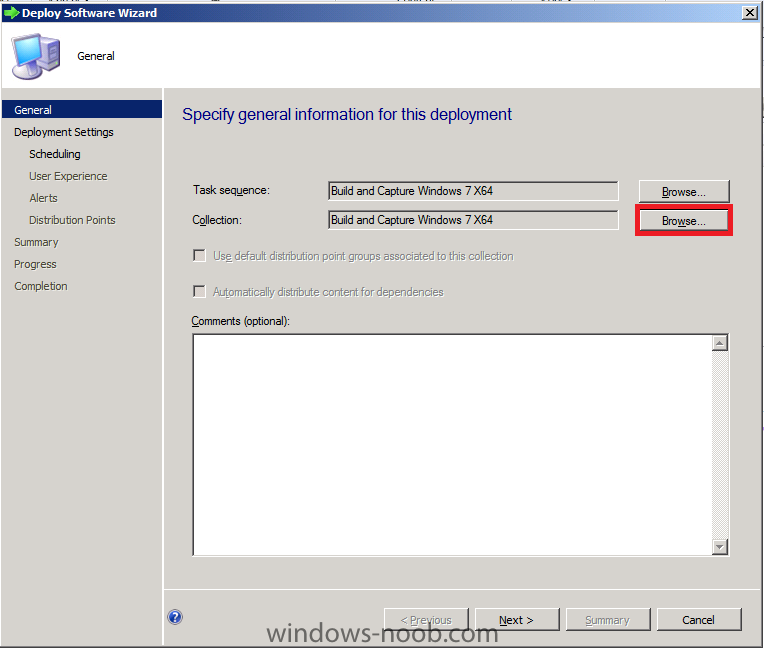
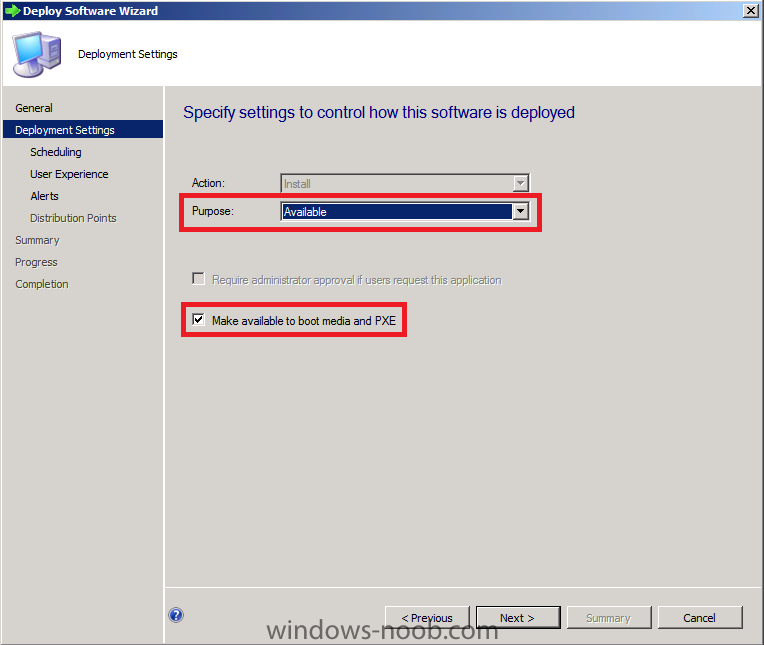
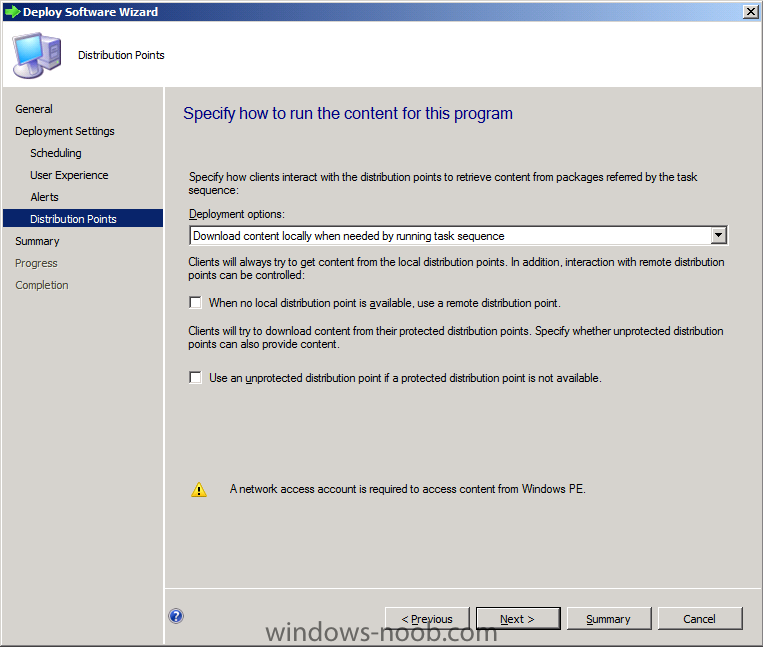
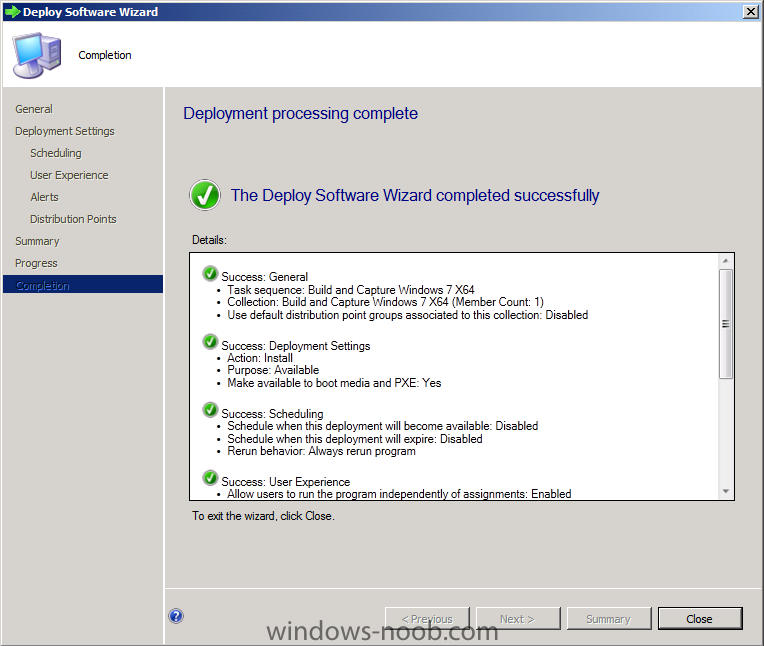
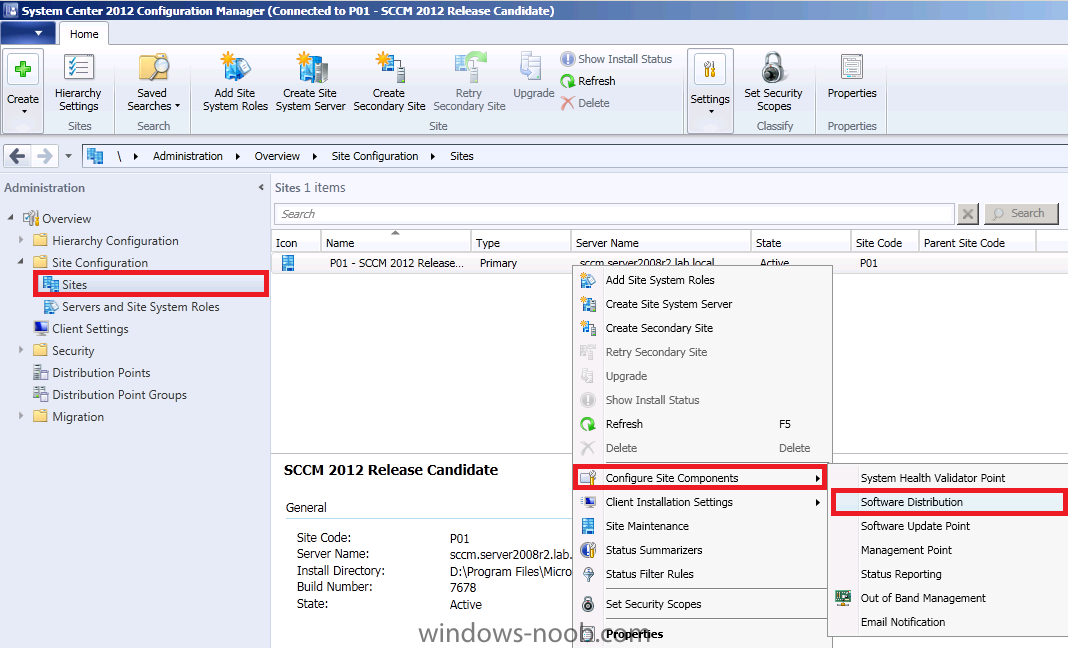
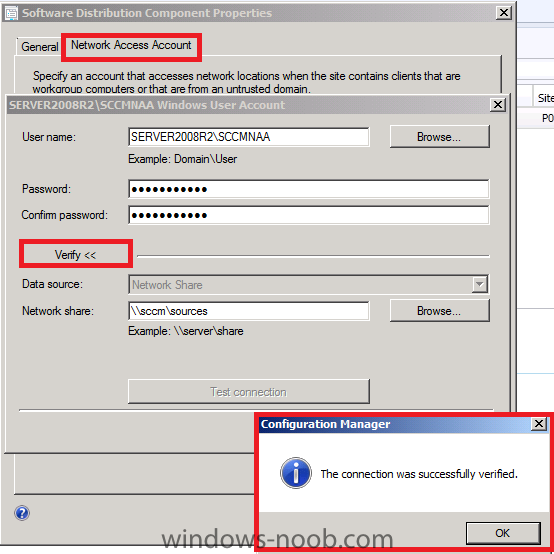
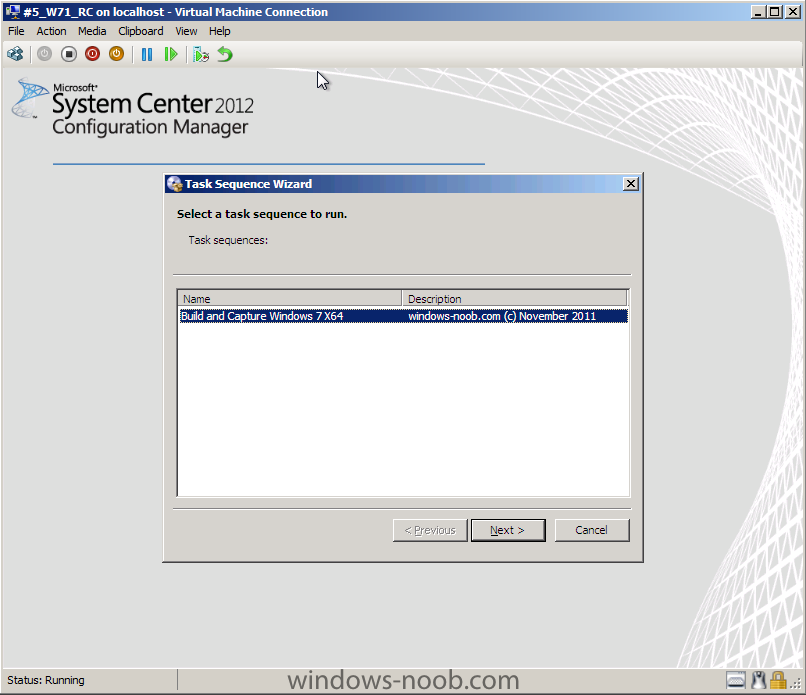
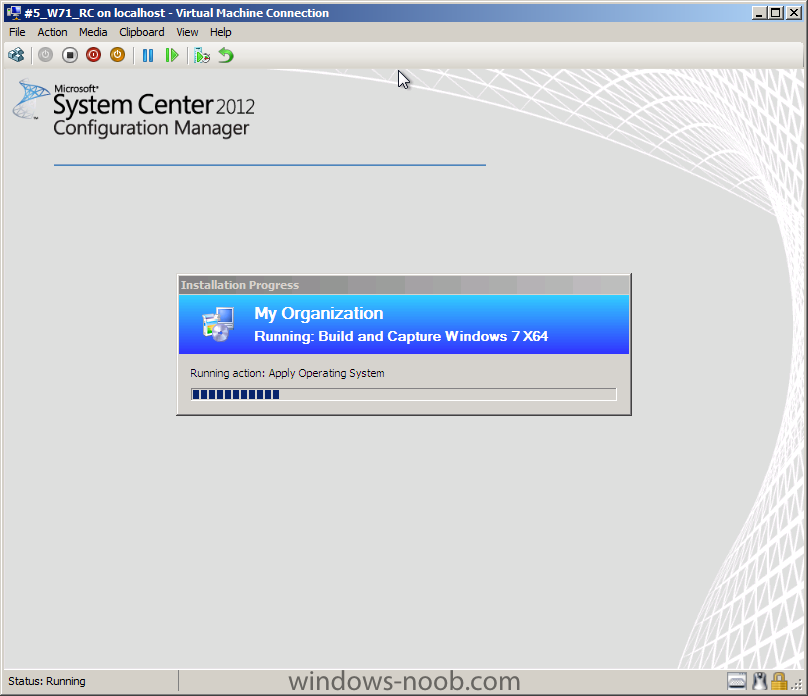
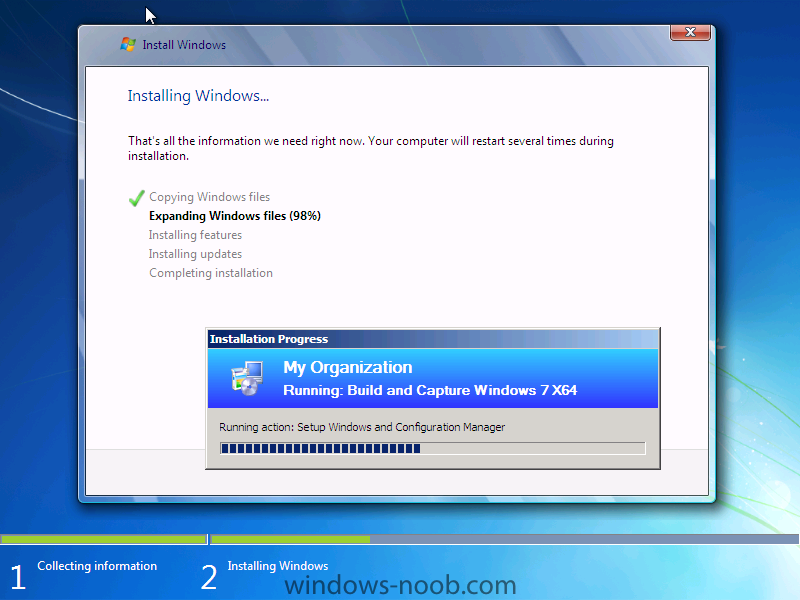
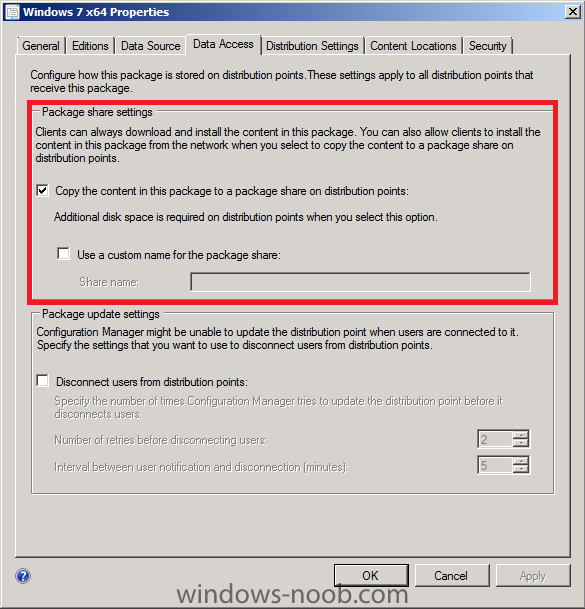
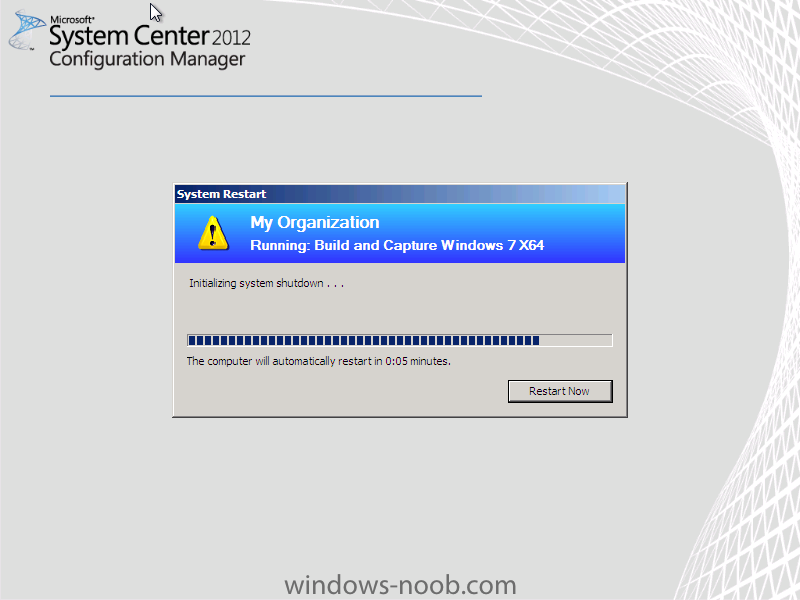
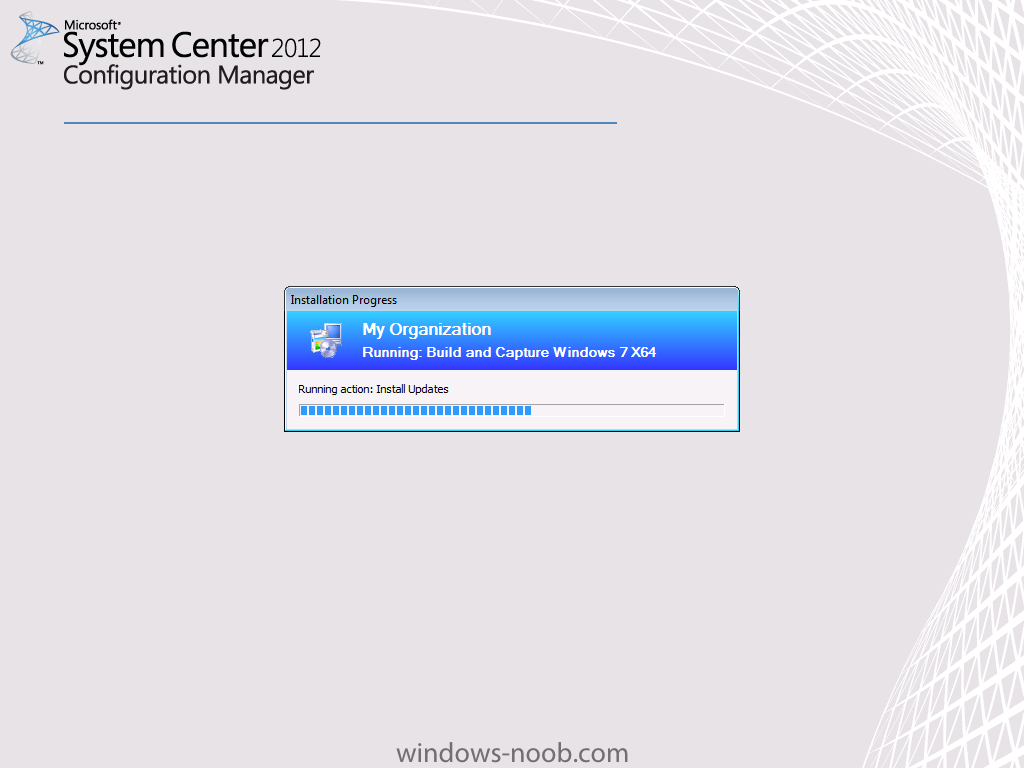
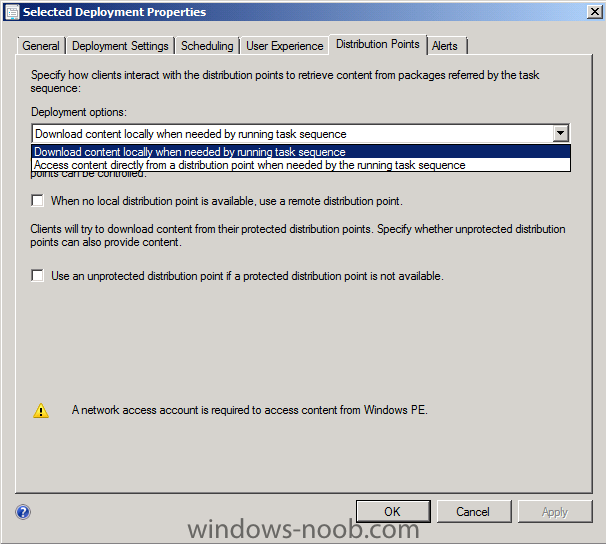
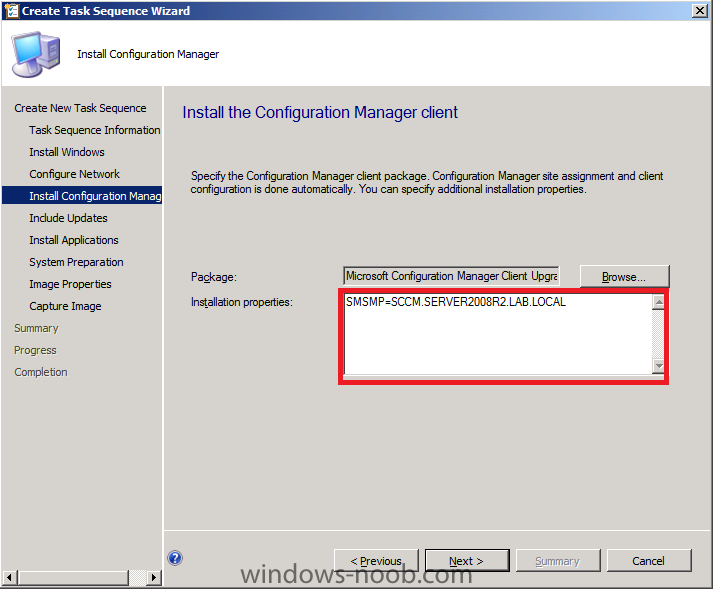
In Part 1 of this series we got our AD and SCCM servers ready, and then we installed System Center 2012 Configuration Manager as a standalone Primary site. In Part 2 we configured the SCCM server further by adding some Windows Server roles necessary for the following Configuration Manager 2012 functionality, Software Update Point (SUP) and Operating System Deployment. In Part 3 we configured the server further by Enabling Discovery methods and creating Boundary's and Boundary Groups. In Part 4 we configured Client Settings, Added roles and Distributed the Configmgr Client to our Computers within the LAB, then in Part 5 we enabled the Endpoint Protection Role and configured Endpoint Protection settings and targeted a collection called All Windows 7 Computers with these settings and policies. In Part 6 we configured our SUP further to Deploy software updates to our All Windows 7 Computers and Build Windows 7 X64 collections. Now we will use the Build and Capture process to create our Base Windows 7 X64 wim image, we'll use this image in the next part to Deploy Windows 7. Whats new in Configuration Manager 2012 for Operating System Deployment ? You can apply Windows Updates by using Component-Based Servicing (CBS) to update the Windows Imaging (.wim) file format images that are stored in the image node of the Software Library. The Task Sequence Media Wizard includes steps to add prestart command files (formerly pre-execution hooks) to prestaged media, bootable media, and stand-alone media. You can configure the Task Sequence Media Wizard to suppress the Configuration Manager Boot Media wizard during operating system installation. This configuration enables you to deploy operating systems without end user intervention. You can define a deployment in a prestart command that overrides existing deployments to the target computer. Use the SMSTSPreferredAdvertID task sequence variable to configure the task sequence to use the specific Offer ID that defines the conditions for the deployment. You can use the same task sequence media to deploy operating systems to computers anywhere in the hierarchy. The Capture User State task sequence action and the Restore User State task sequence action supports new features from the User State Migration Tool (USMT) version 4. You can use the Install Application task sequence action to deploy applications from the Software Library when you deploy an operating system. You can define user device affinity for a client computer during operating system deployment. The functionality of the PXE service point and its configuration is moved to the distribution point to increase scalability. Step 1. Enable PXE support for Clients Perform the following on the SCCM server as SMSadmin In the ConfigMgr console, click on Administration, Site Configuration, Servers and Site System Roles, and double click on the Distribution Point role listed, select the PXE tab and place a checkmark in Enable PXE support for Clients, answer Yes when prompted about firewall ports (UDP ports 67, 68, 69 and 4011 ). enable all options and click on the Drop down UDA option and set it to Allow User Device Affinity with Automatic Approval Step 2. Add the Windows 7 X64 operating system image Perform the following on the SCCM server as SMSadmin In the ConfigMgr console, select Software Library and expand Operating Systems, click on Operating System Installers and choose add operating system installer from the ribbon (alternatively right click to get the same option) browse to the UNC path where you have previously copied the extracted contents of your Windows 7 X64 Enterprise ISO (I extracted mine and then copied it to \\sccm\sources\os\Windows 7x64 prior to starting this step. fill in some general info about the image and complete that wizard. Step 3. Distribute the Operating System to our Distribution Points Perform the following on the SCCM server as SMSadmin Now that we've added the image, let's distribute it to our DP. Click on the image we just added and in the ribbon click on Distribute Content the Distribute Content wizard appears click next, select Add, select Distribution Point, select our SCCM server then ok click next through the wizard until completion Step 4. Customise our boot images and then Distribute the Boot images to DP's Perform the following on the SCCM server as SMSadmin Note: Even though Build and Capture of Windows 7 X64 only needs the X64 boot image, we will update both boot images as we'll need them to both have Command support enabled. Select boot images in the left navigational pane, select the X86 boot image, right click choose properties click on the Customization tab, enable Command support click on the Data Source tab, place a checkmark in Deploy this boot image from the PXE service Point click apply, and answer No when prompted to udpate the Distribution Points now as we have to add our DP first before updating the boot image to the DP's.. click Ok to close. Now we need to Distribute our Boot image to our Distribution Point, so select the image and choose Distribute Content from the ribbon add our Distribution Point and click through the wizard to completion Tip: you can open the SMSProv.log file in CMTrace to review the progress of the boot image changes being made, infact you can even see that the CMtrace tool itself is now being copied into our boot images by default ! excellent !! Note: you must repeat the above process for the X64 Boot image Step 5. Create and then Distribute the Configmgr Client Package to DP's Perform the following on the SCCM server as SMSadmin Currently there are two packages for Configuration Manager Client however neither are working in their current form, rather than use them let's create our own. In Software Library, right click on Packages and choose Create Package from Definition, choose Configuration Manager Client Upgrade, click next choose Always obtain source files from a source folder for source folder point to \\server\sms_xxx\client where xxx is your site code eg; P01 click next through the wizard until it completes select our newly created package and add it to our Distribution Points (right click it, choose Distribute Content, go through the wizard). Note: our Client package is the only one with version 5.0 so it's easy to see. Step 6. Create the Build and Capture Task Sequence Perform the following on the SCCM server as SMSadmin In the Configmgr Console click on Task Sequences under Software Library, Operating System Deployment. In the Ribbon click on Create Task Sequence select the Build and Capture a reference operating system image option fill in some details about the Task Sequence and select the X64 boot image which you distributed to the dp's above in the next screen we get to select our Operating System Installation source Image that we added above in addition to this i'd recommend you DON'T enter the Product Key and that you DO enter an Administrator Password next we should join a workgroup to keep the build and capture image clean of any changes that can be made via domain join next we get to include the Configmgr client package, use the one we created earlier, select the Microsoft Configuration Manager Client Upgrade 5.0 All Package Note: If you want windows updates to installed include SMSMP=sccm.server2008r2.lab.local in your Setup windows and configmgr step Installation Properties, the old switch SMSSLP is retired as is the Server Locator Point role. choose to install All Software Updates click next through the wizard through the application, sysprep and image info screens, for the Capture image settings screen fill in the capture account details and use a user that has rights to that UNC path (don't forget to create the \\server\sources\os\captures directory first..) make sure you type the capture account details correctly otherwise you'll have a long wait until the next Build and Capture is done and you get to see if your capture actually succeeds or not due to a typo) close the wizard Step 7. Import Computer Information Perform the following on the SCCM server as SMSadmin We need our Virtual Machine to be imported into ConfigMgr's database before we can add it to our Build and Capture Windows 7 X64 collection so lets do that. In the ConfigMgr console, click on Assets and Compliance, Devices, and in the Ribbon click on Import Computer Information. If you havn't already created a Virtual Machine do so now, we need one with 1 gig of Virtual Ram and we need to know it's MAC address. Note: If you want to import multiple computers via a file then see my separate post here We will import one computer into ConfigMgr's database so choose import single computer filll in the computername and mac address click next through data preview and for target collection choose our Build and Capture Windows 7 X64 collection we created in the previous part click next through the wizard to completion. and it appears in our collection after a few minutes Note: Do not continue with this part until the computer appears in the collection. Step 8. Deploy the Build and Capture Task Sequence Perform the following on the SCCM server as SMSadmin In Software Library, select Task Sequences, select our Build and Capture Task sequence and right click, choose Deploy, if Deploy is greyed out are you sure you created a new package from Definition for the Configuration Manager Client ? point it to our build and capture collection change the purpose from Required to Available, and set make available to boot media and PXE click next through the options until you get to distribution point, make a note of the Network Access Account note ! finish the wizard Step 9. Enable the Network Access Account Perform the following on the SCCM server as SMSadmin In the ConfigMgr console, select Site Configuration, Sites and right click on our P01 site, choose Configure Site Components, Software Distribution (alternatively in the ribbon click on Settings, Configure Site Components, Software Distribution) Click on the Network Access Account tab and specify your Network Access Account user, choose new user, input the details and test the connection (Note: this is New since Beta 2) click Apply and Ok. Step 10. PXE boot our new Virtual Machine Perform the following on the SCCM server as SMSadmin Note: Before PXE booting the Virtual Machine, verify that the Windows Deployment Service is started, if not, start it, monitor the SMSPXE.log during the process and during the PXE boot. Press F12 when prompted enter our PXE password click next and select our Build and Capture Windows 7 X64 task sequence and pat yourself on the back for a job well done as it goes through the process of Build and Capture if you get any errors about packages not being found then enable the following setting in Data Access for all packages in your task sequence including the boot image:- copy the contents in this package to a package share on distribution points Note: once you have enabled the setting above your Deployment distribution settings gets a new drop down menu choice, access content directly from a distribution point when needed by the running task sequence and then try again.. our client is being built Setup windows and configmgr... followed by a System Restart followed by the usual windows setup routines.. and another restart later and it's setup windows and configmgr (in windows) followed by Install Updates and after it's evaluated things, the updates will be downloaded and applied Note: the updates will not be found unless you have SMSMP=sccm.server2008r2.lab.local in your Setup windows and configmgr step after this there will be another restart followed by Sysprep, and then the moment you have been waiting for, Capture ! In the next part of this series, we will Deploy our captured WIM and continue learning about this fantastic product


-
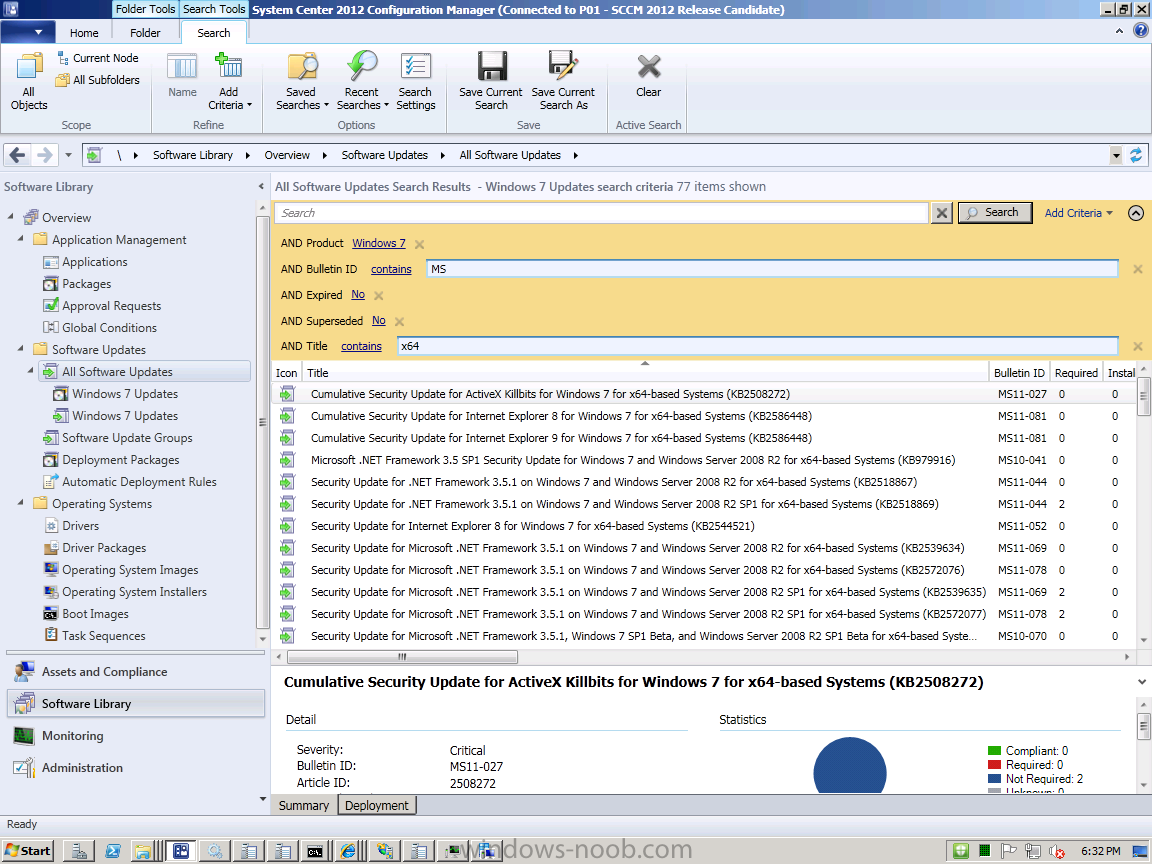
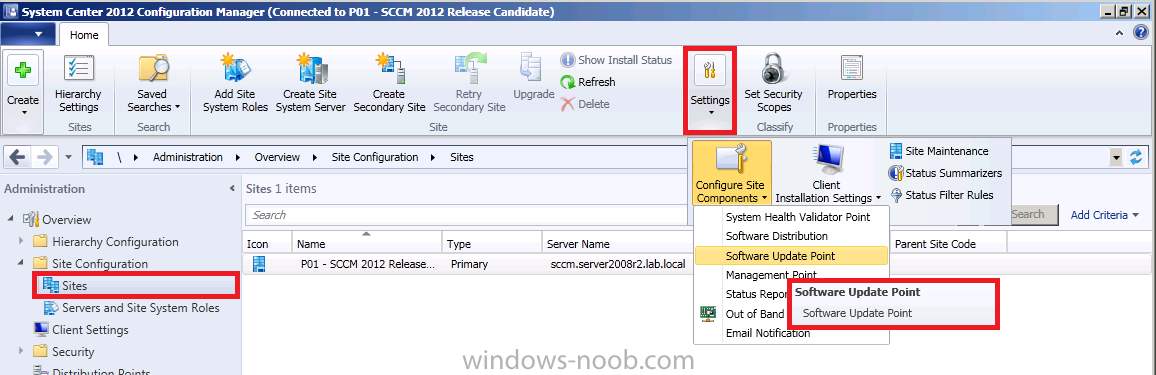
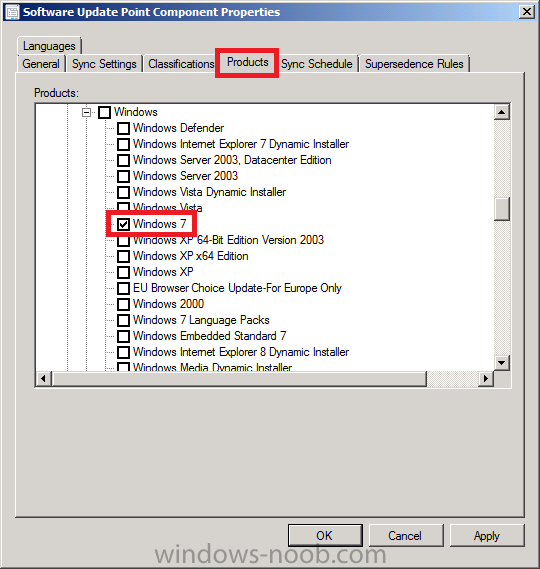
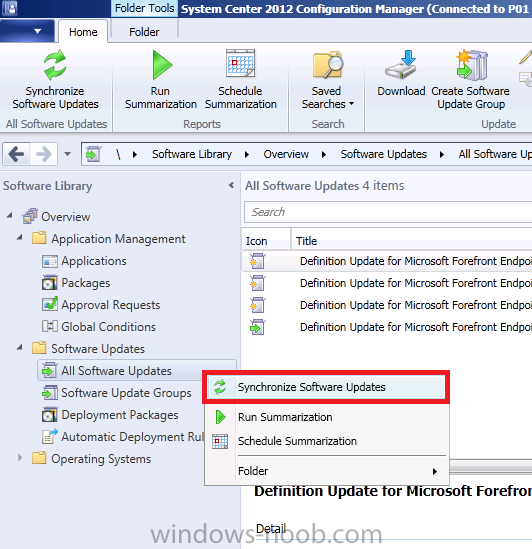
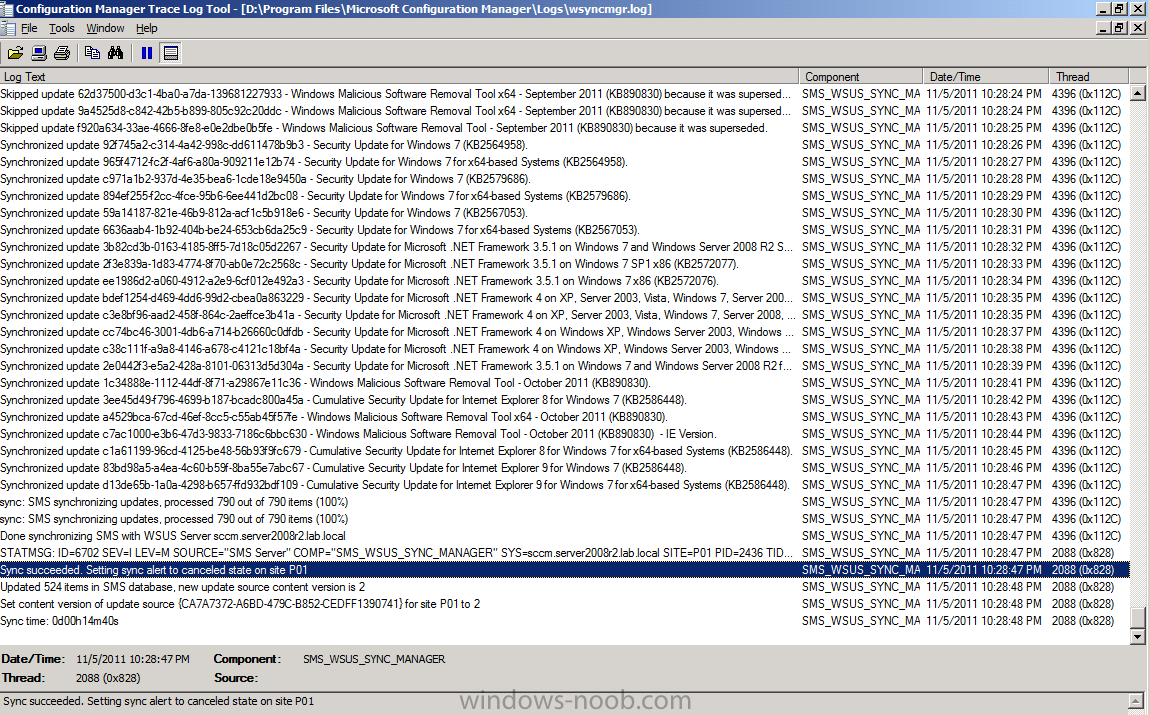
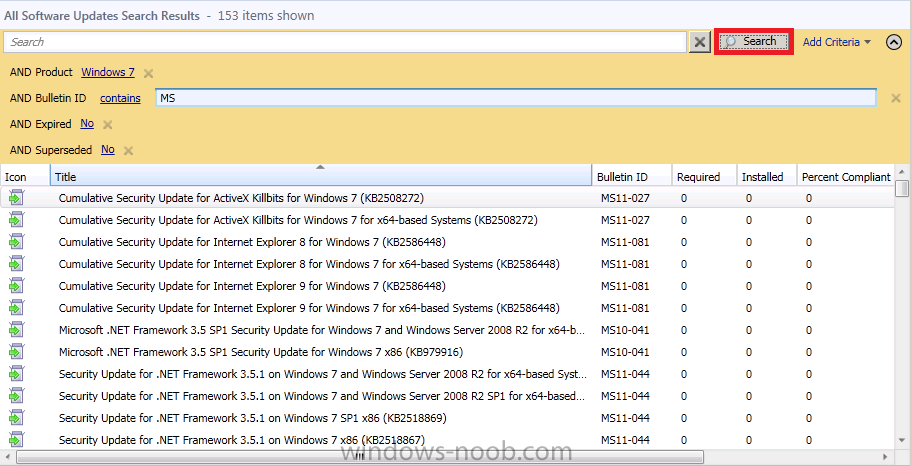
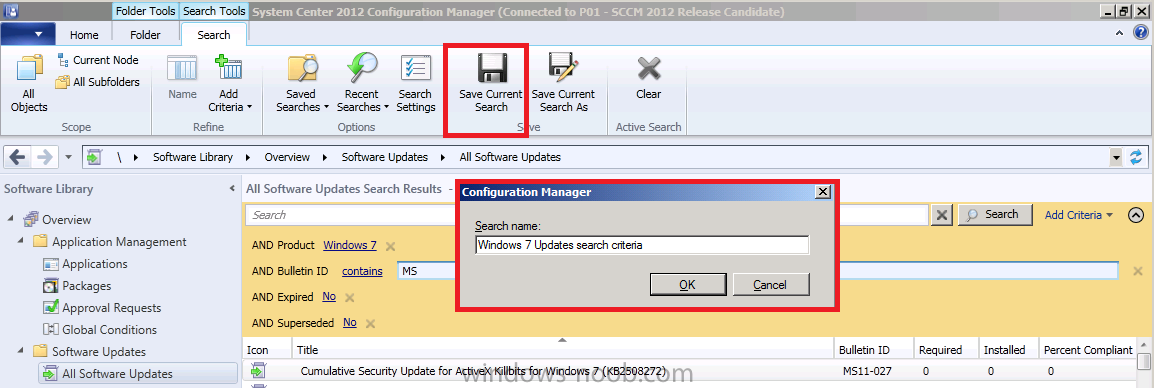
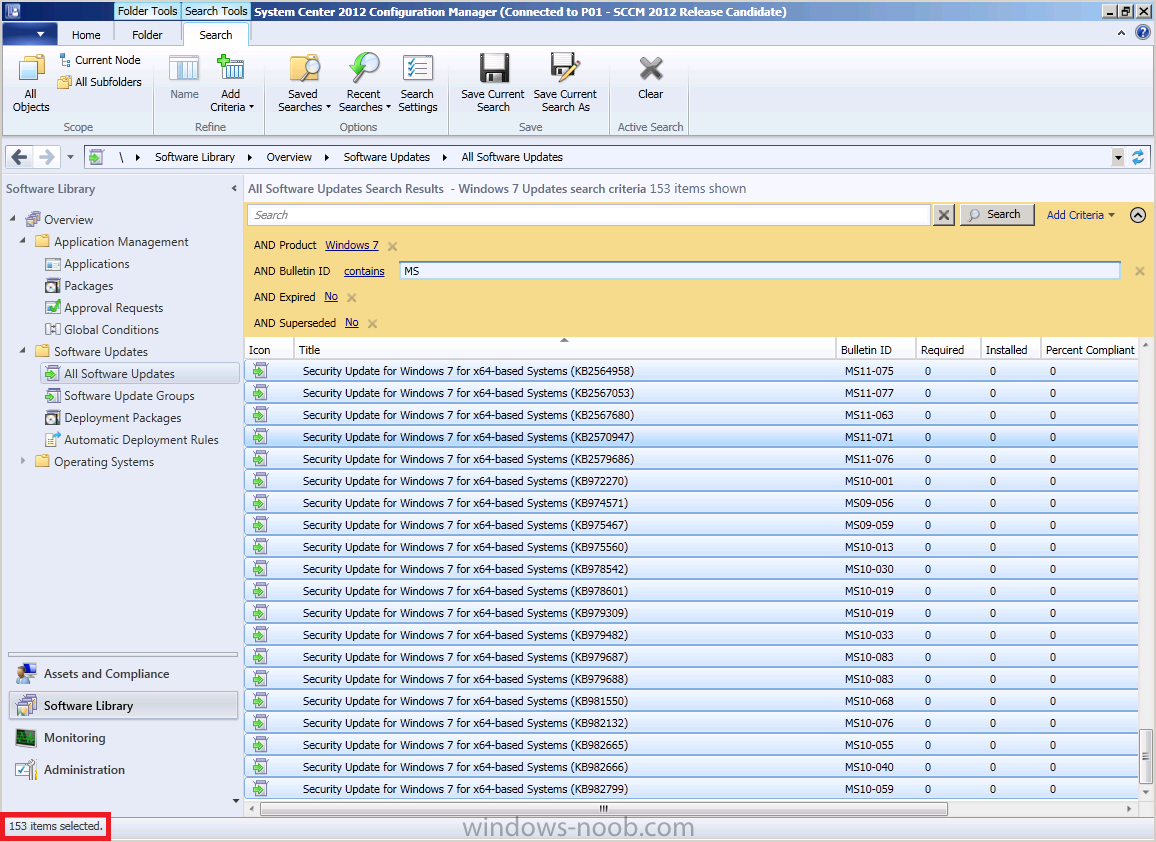
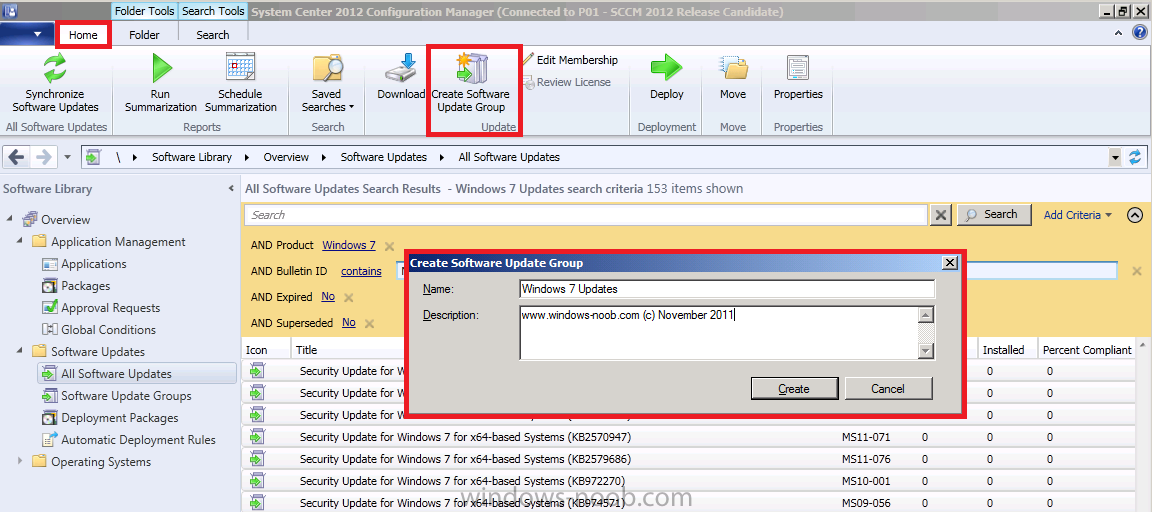
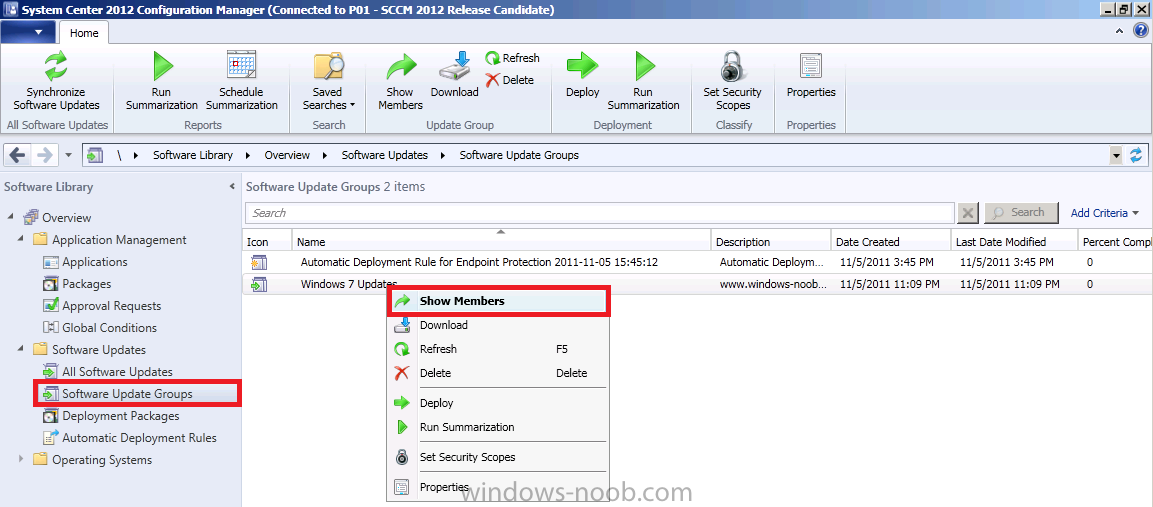
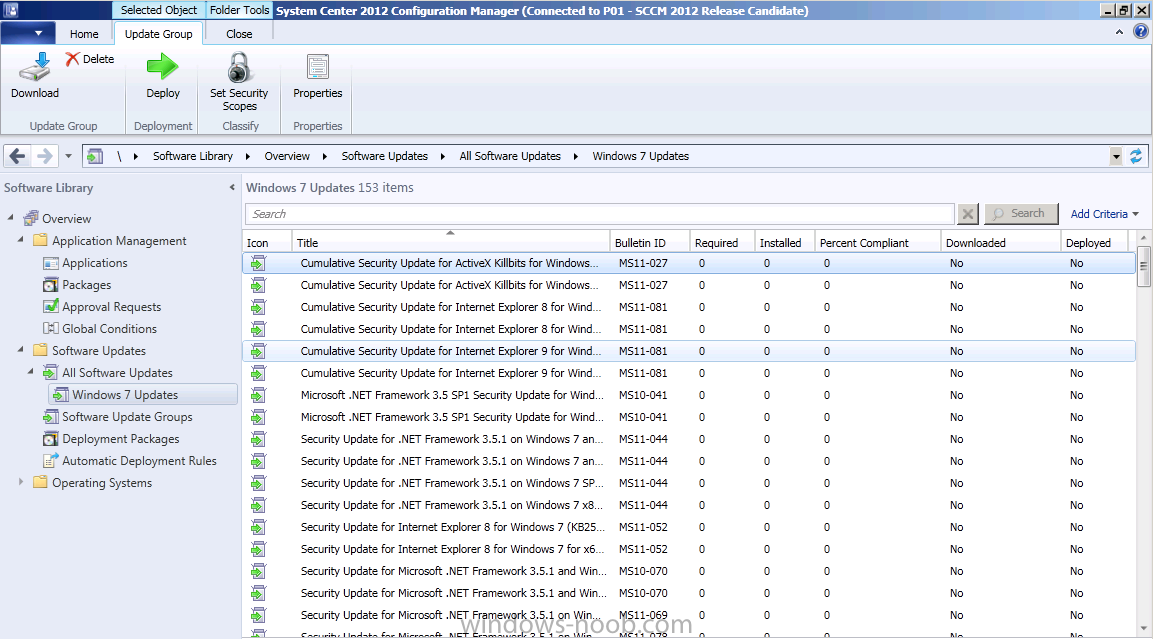
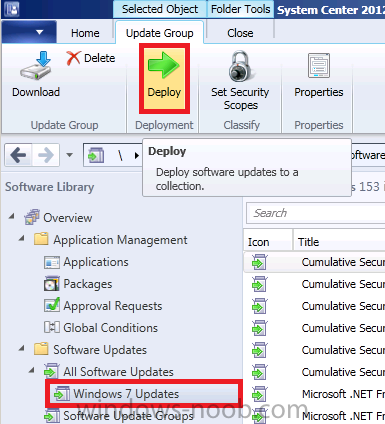
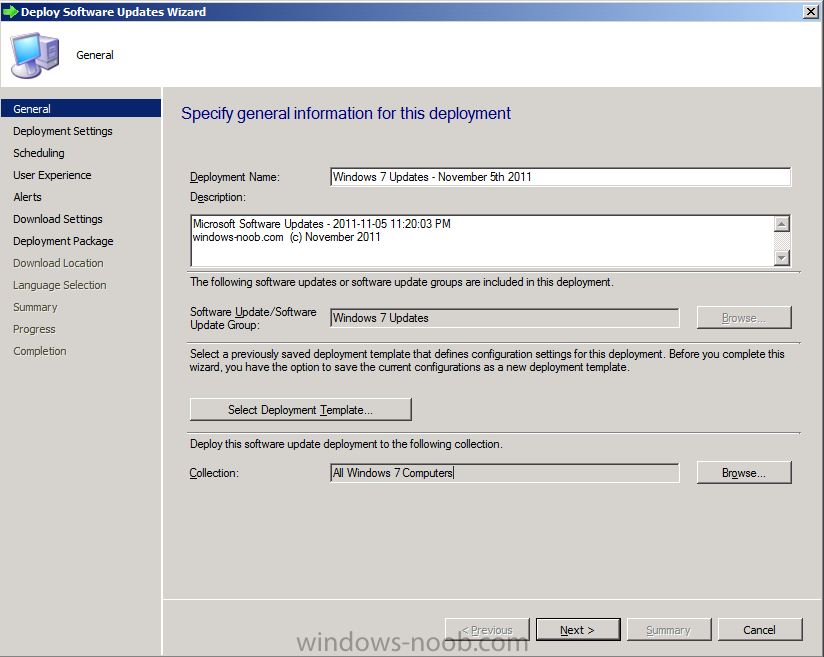
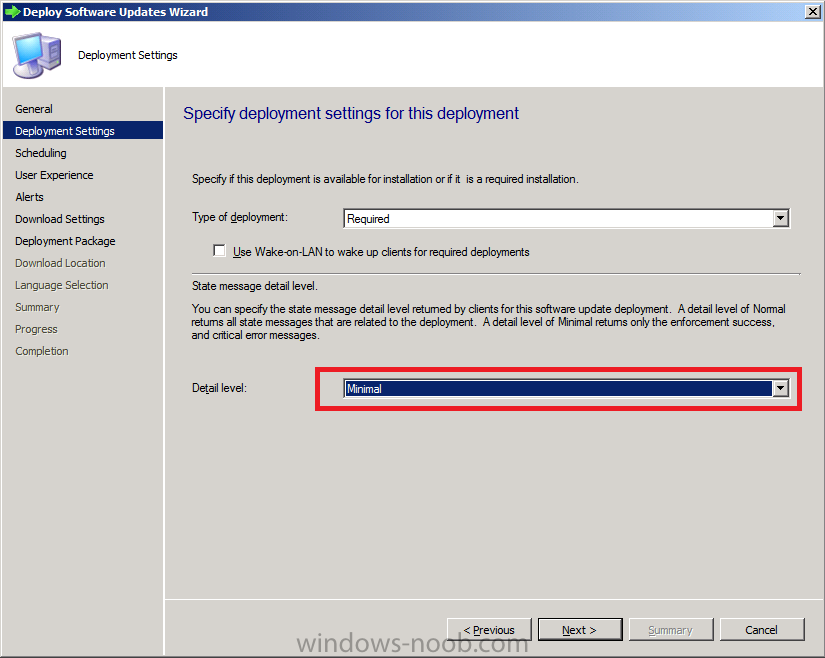
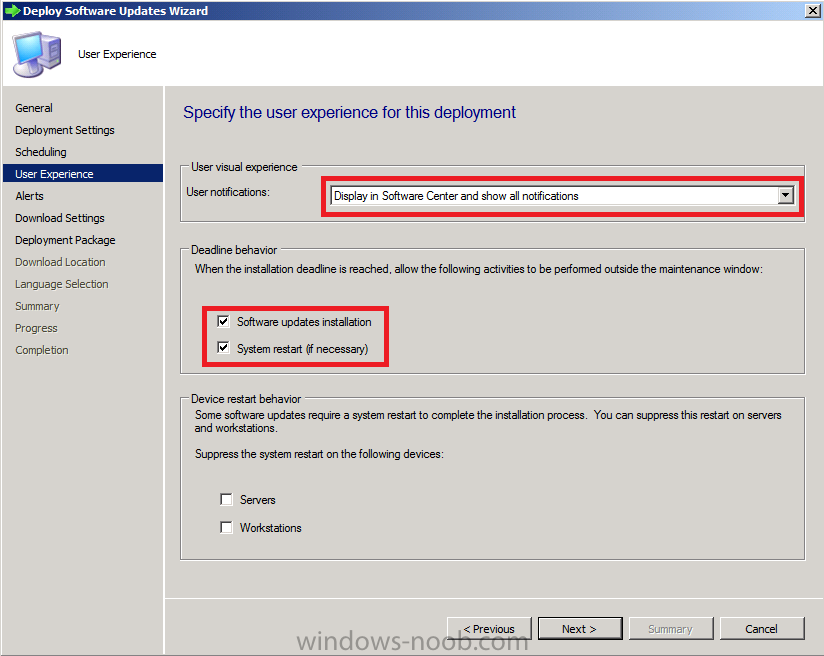
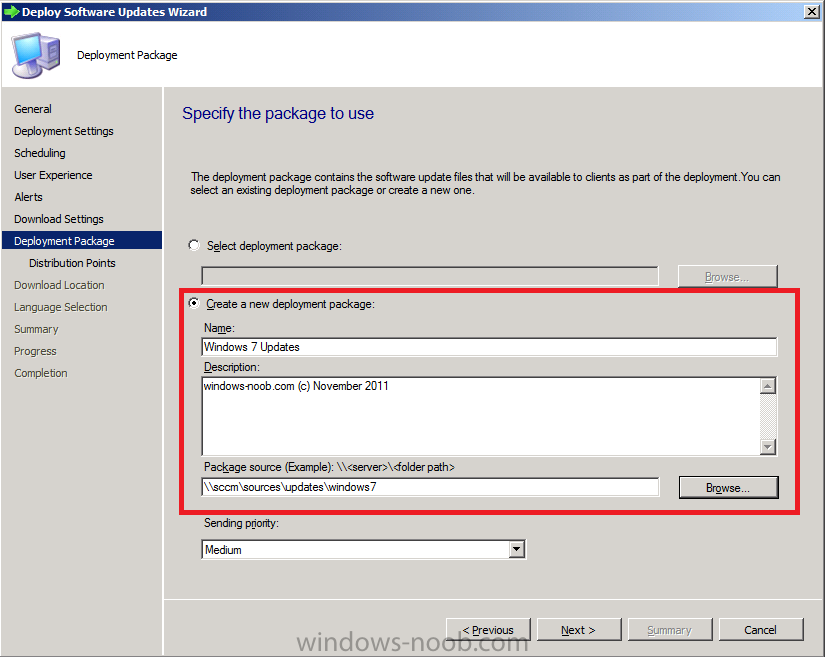
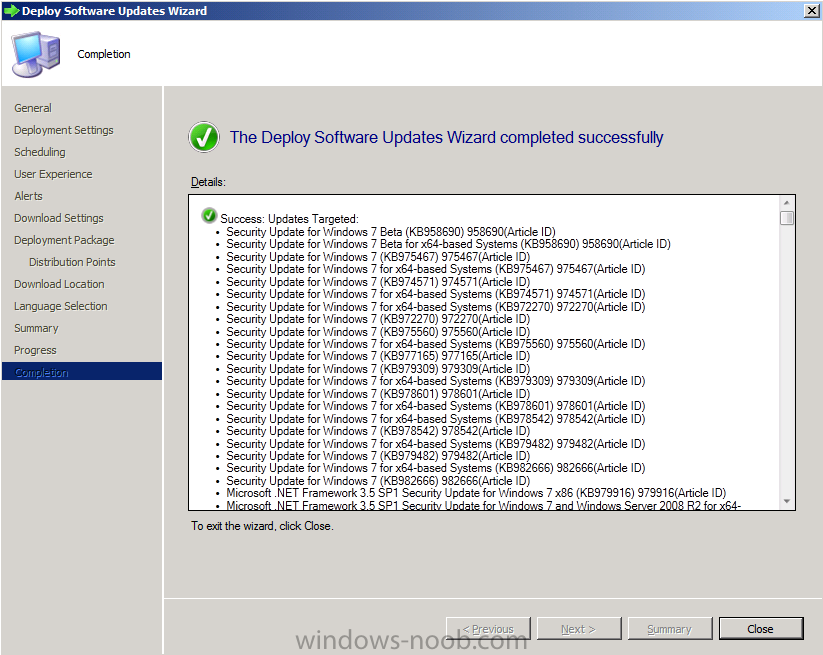
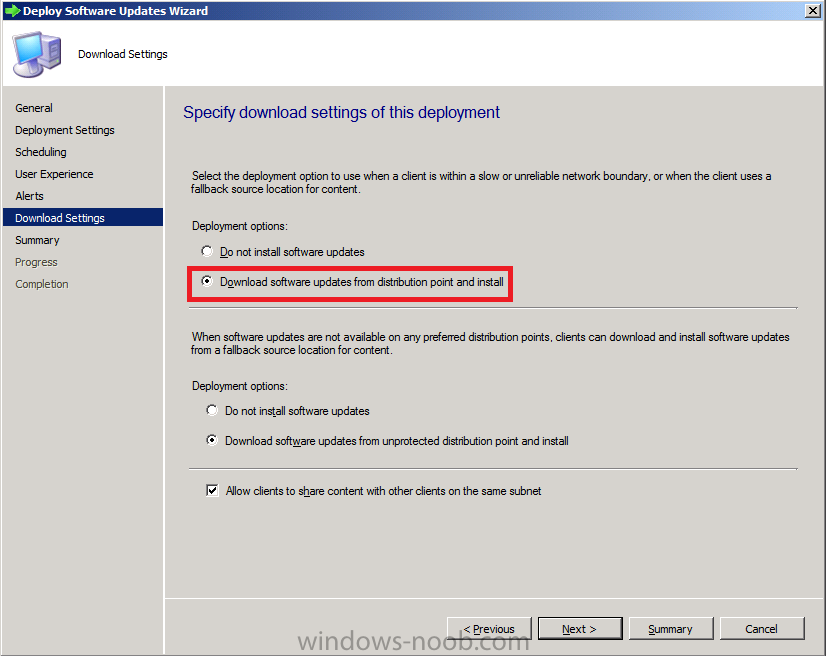
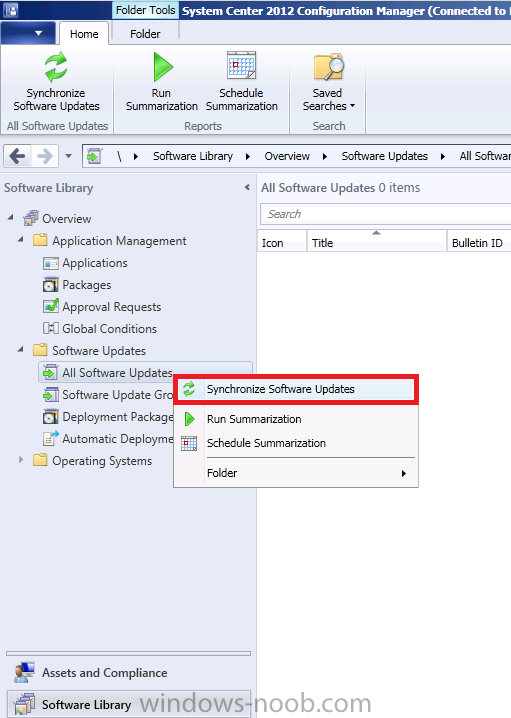
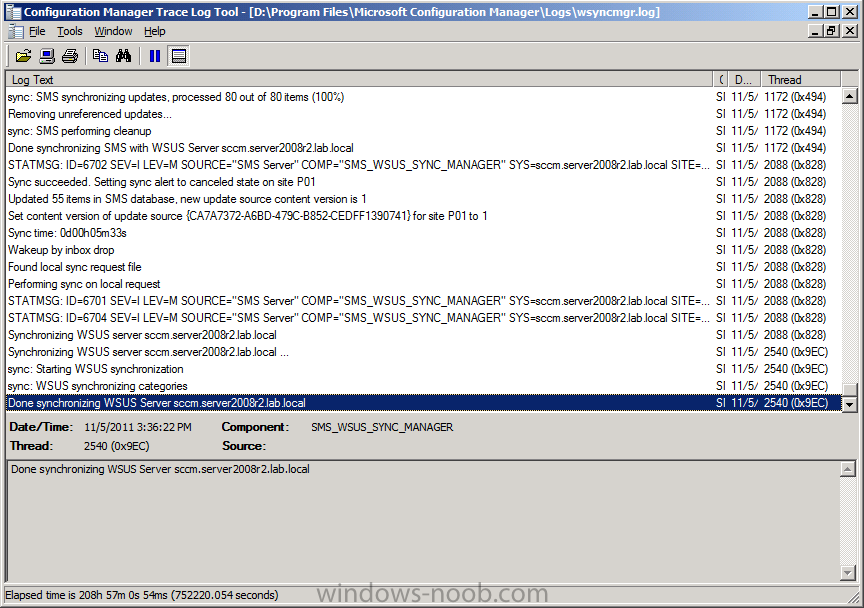
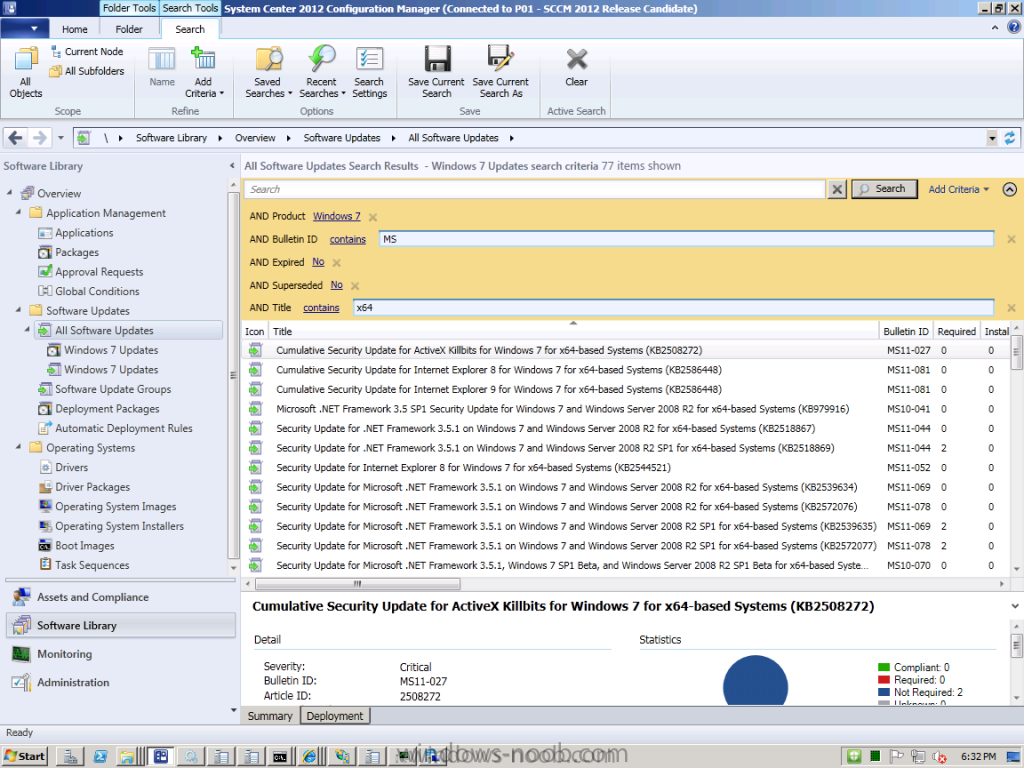
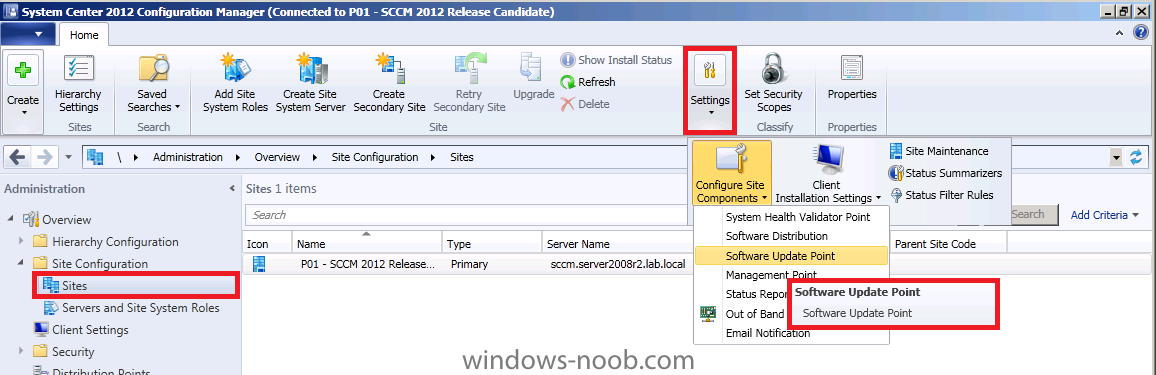
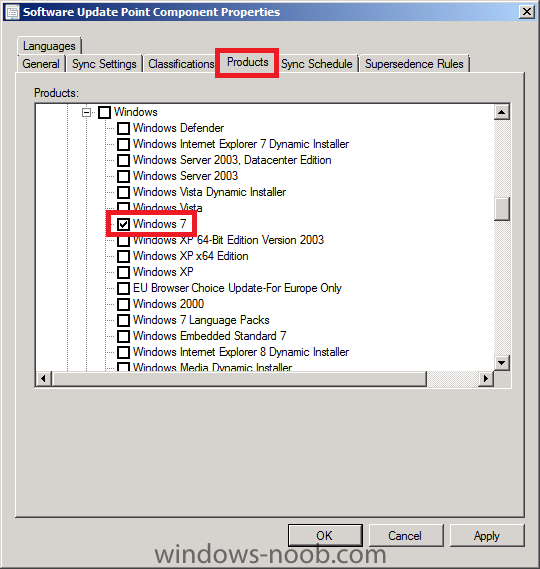
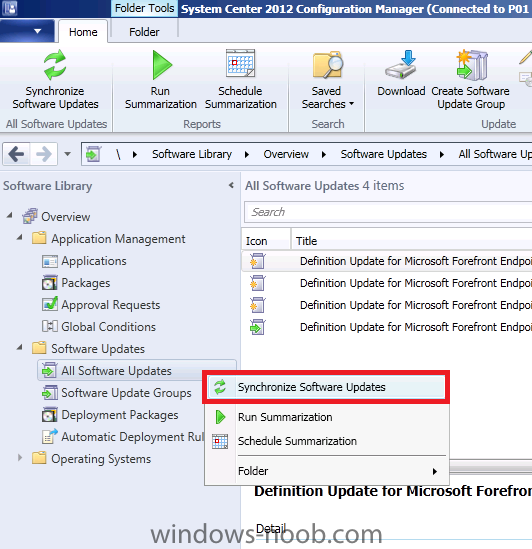
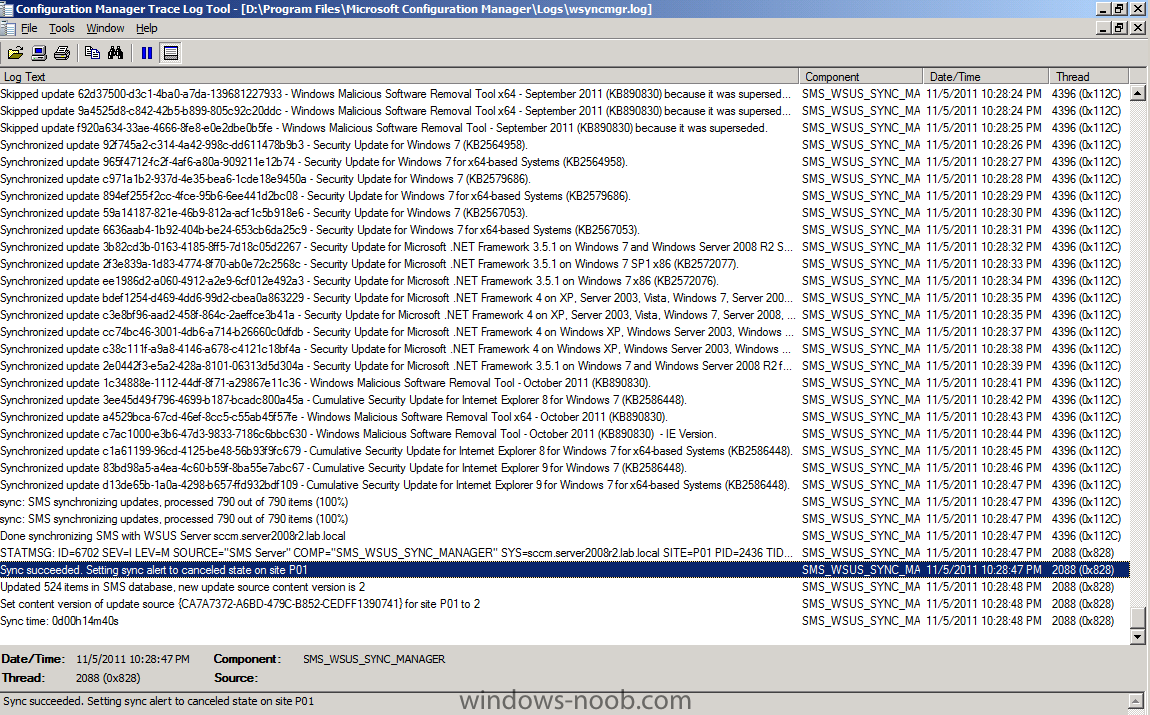
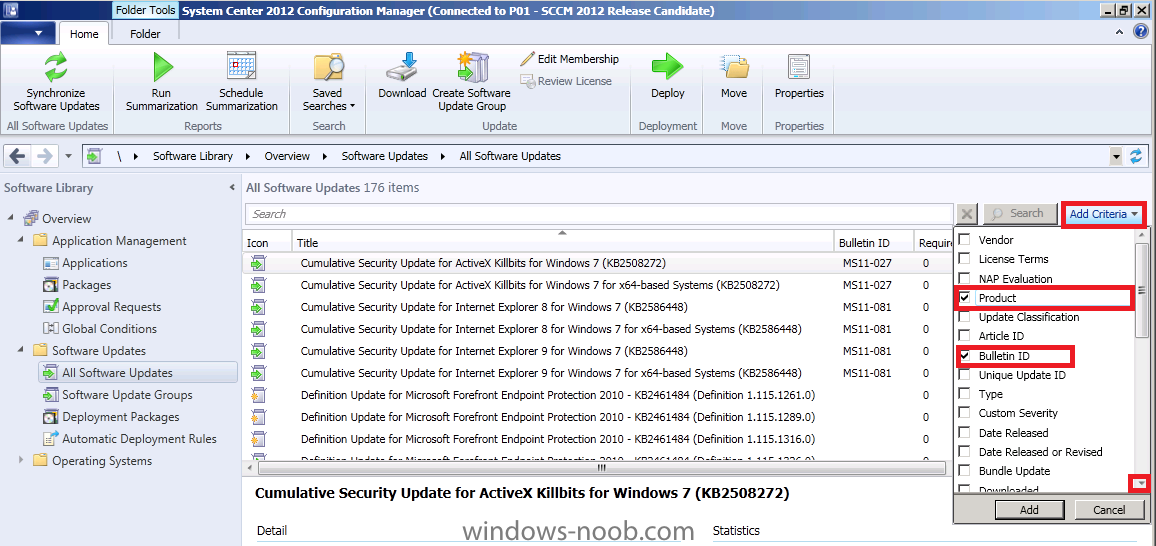
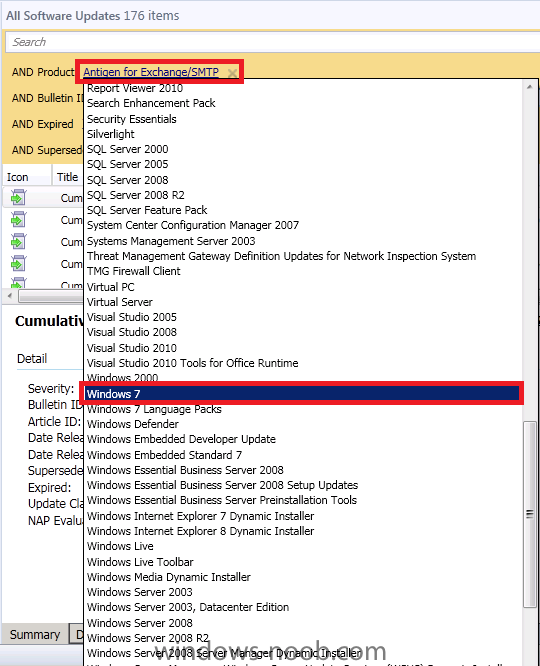
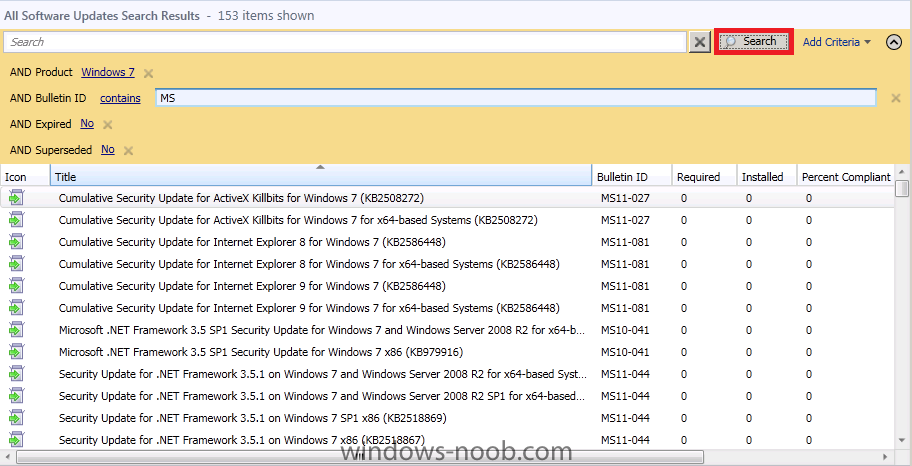
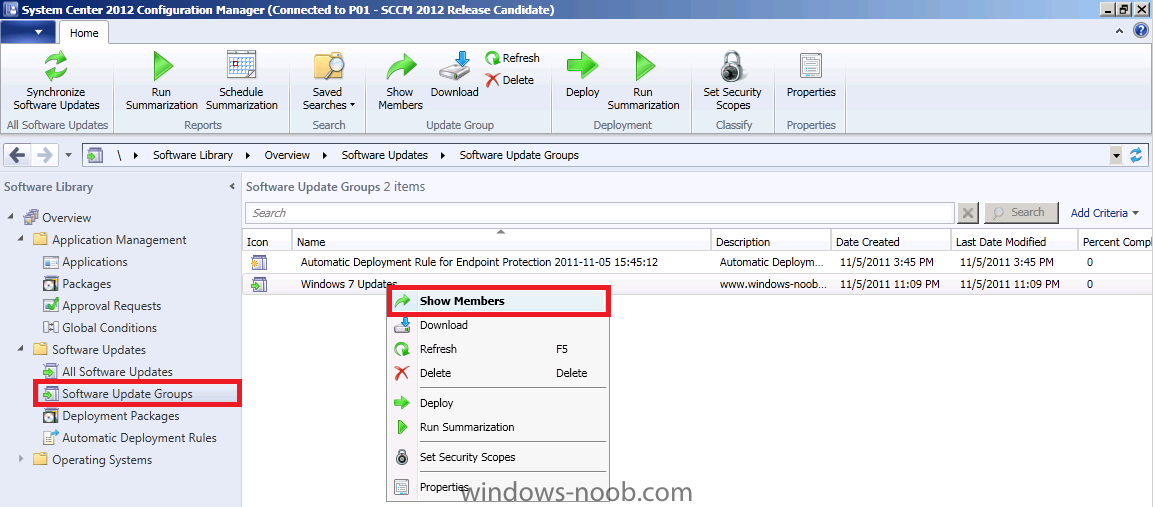
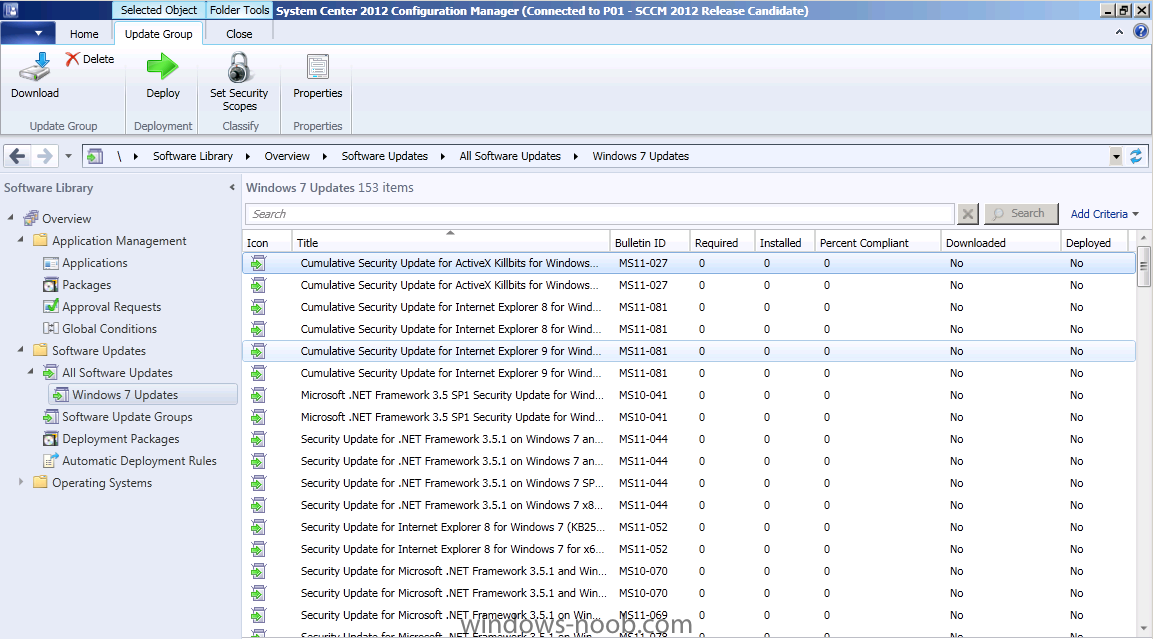
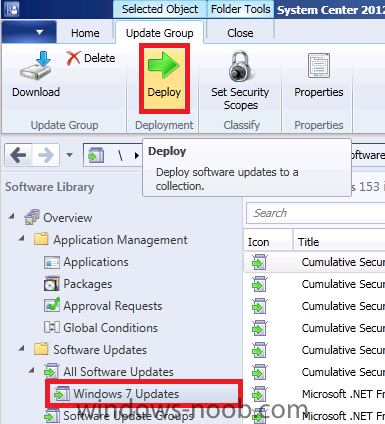
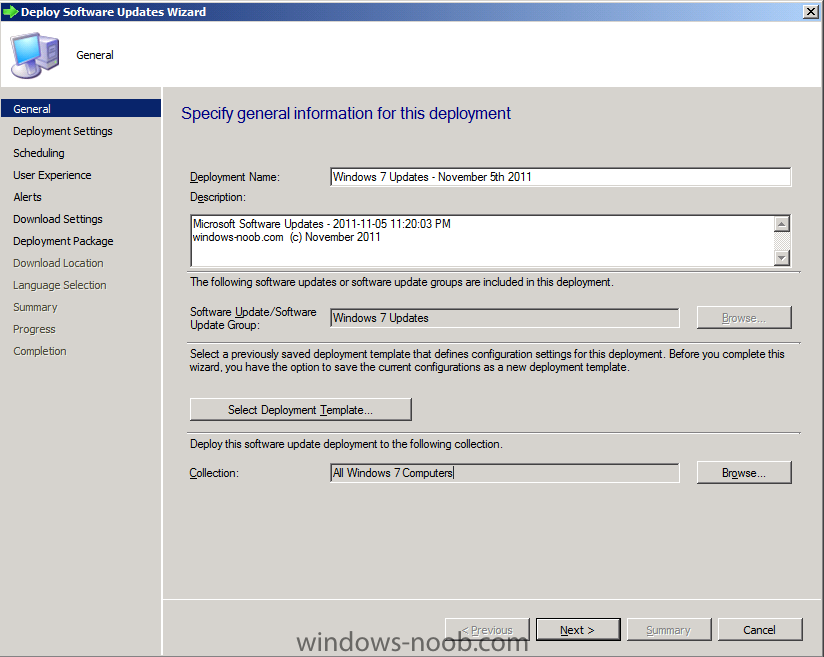
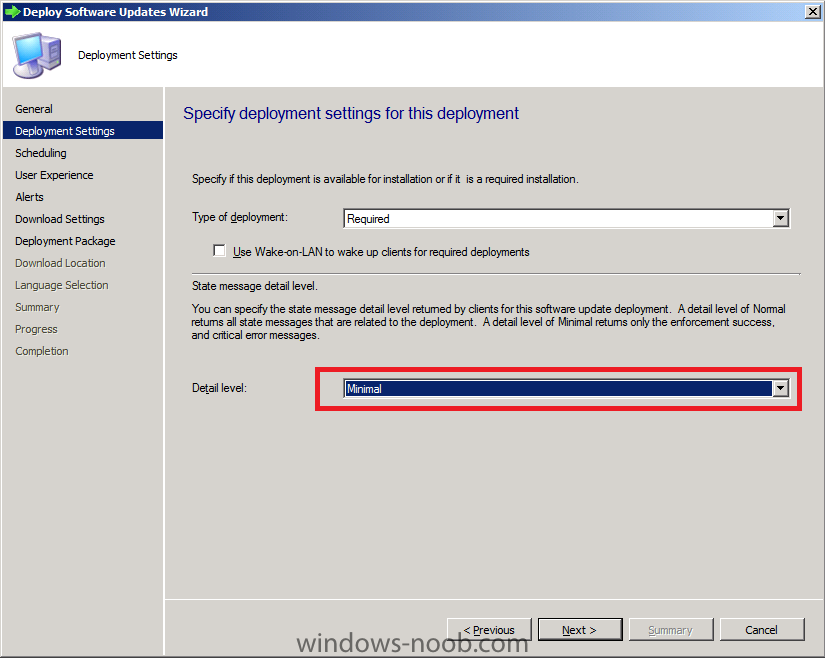
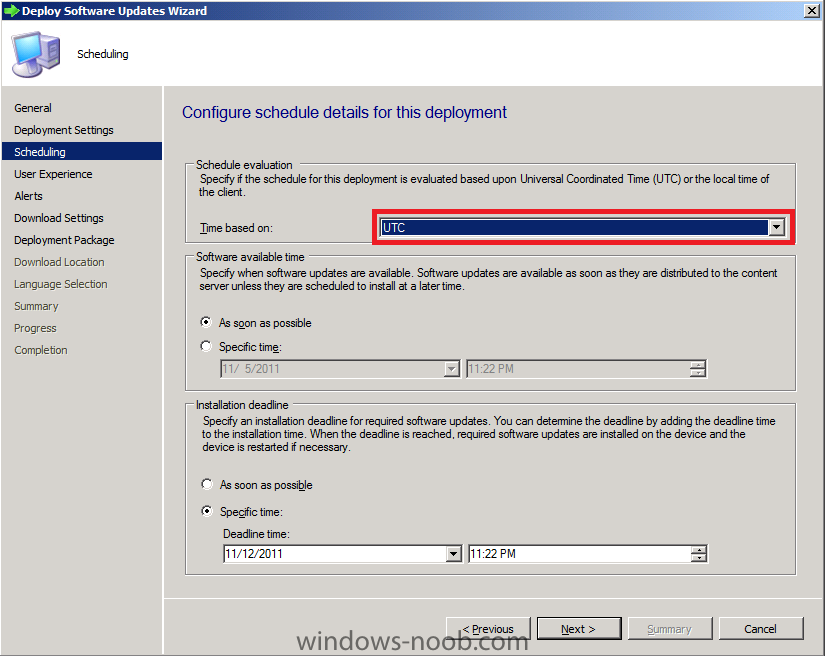
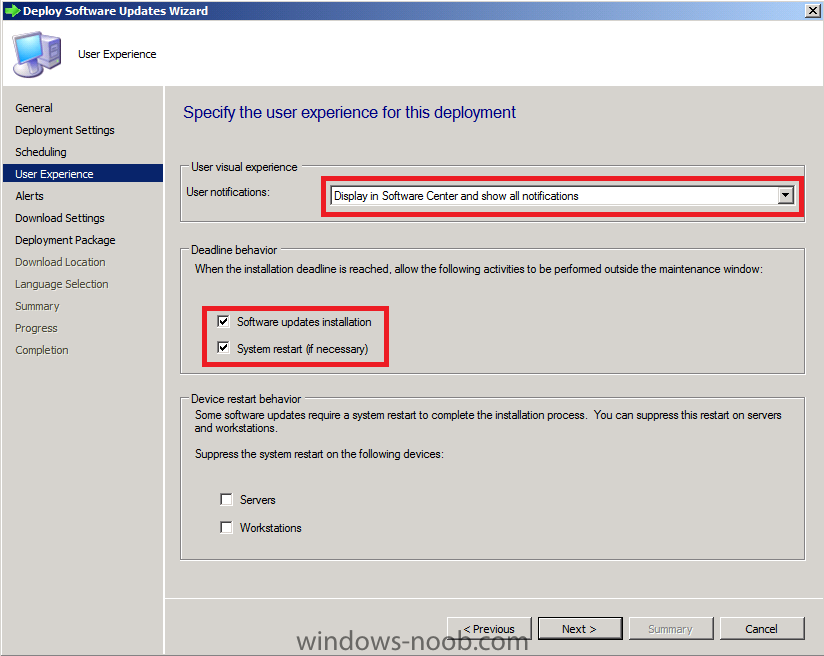
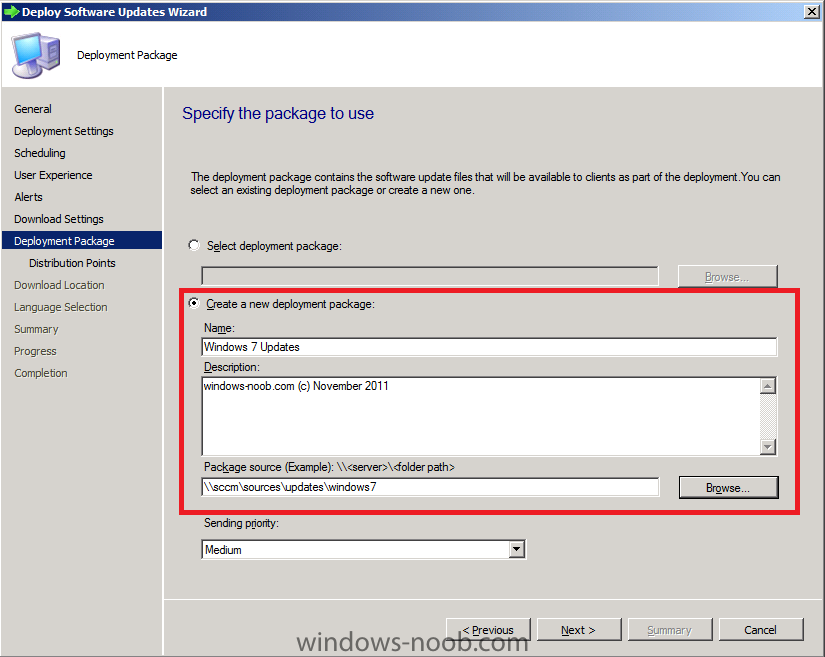
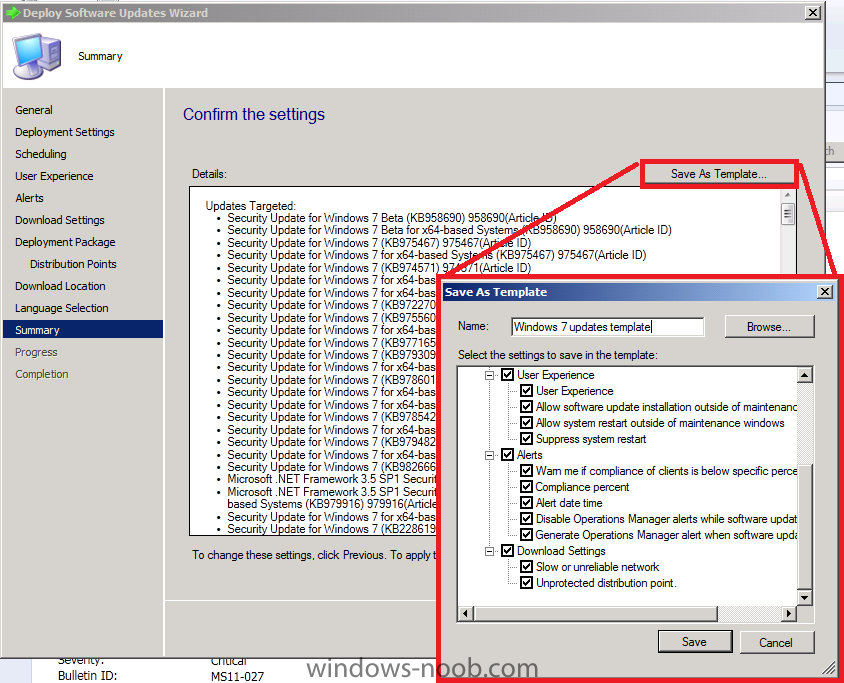
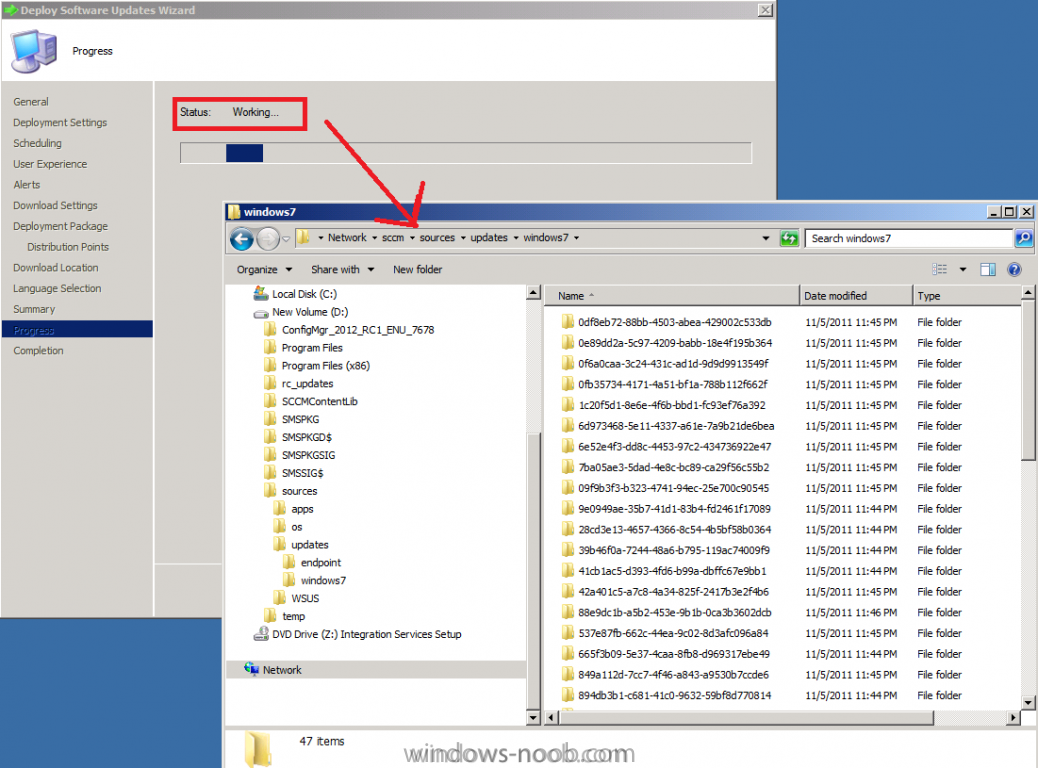
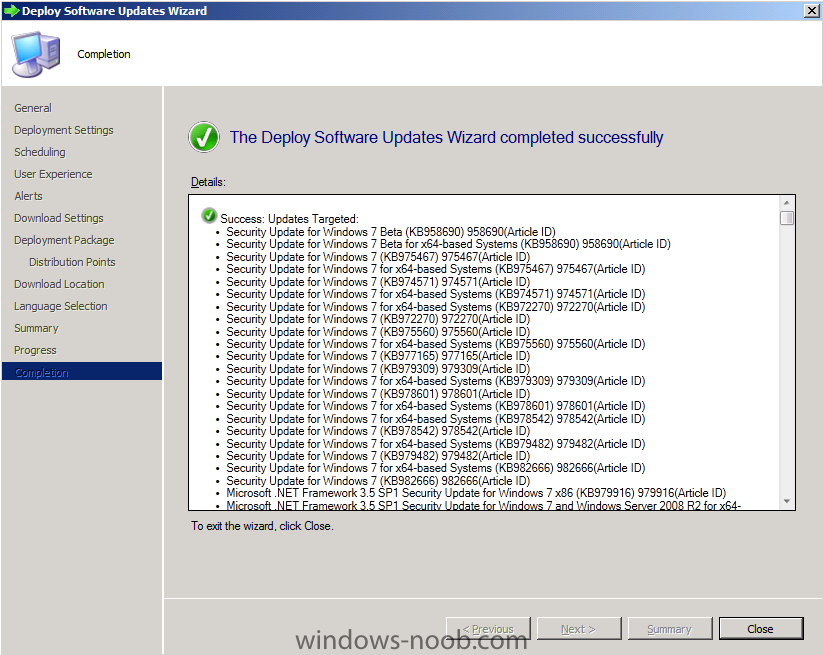
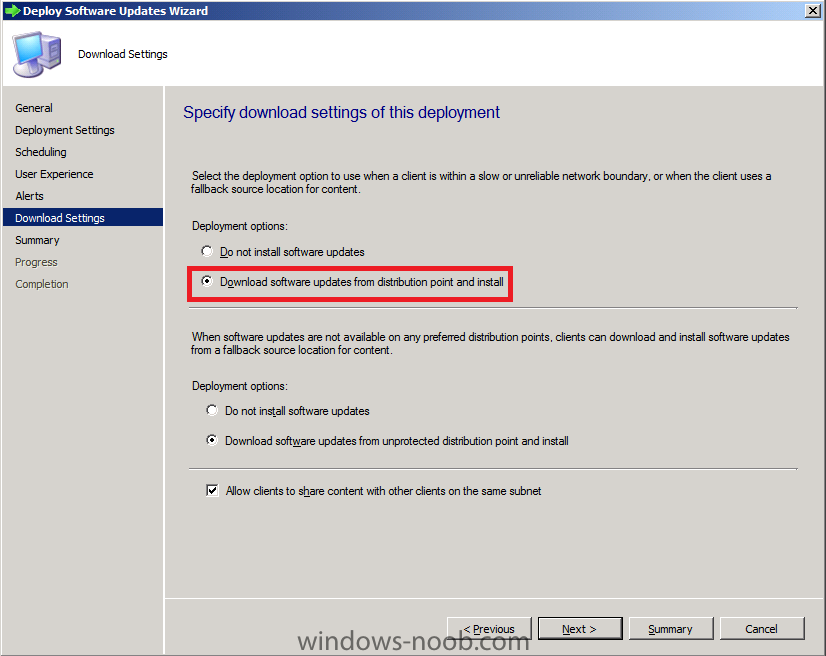
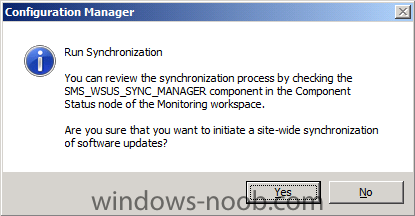
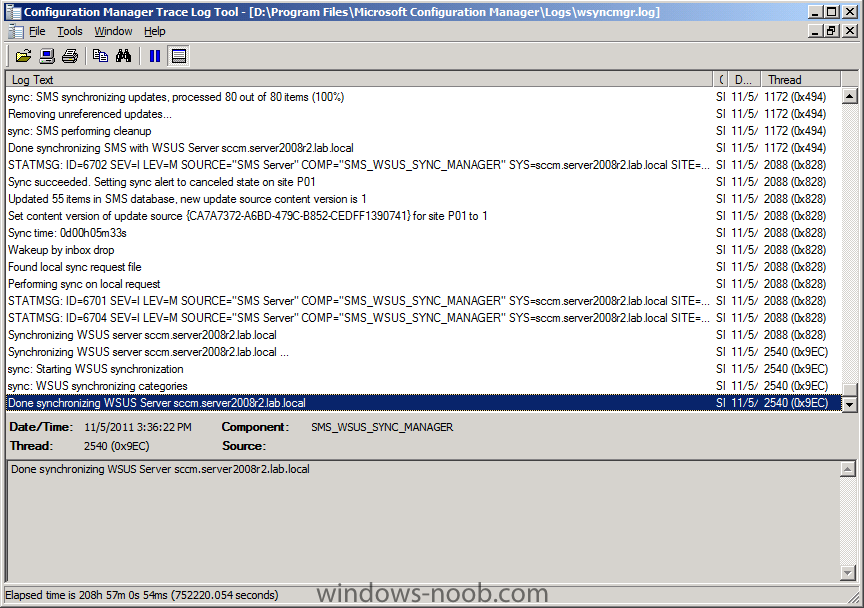
In Part 1 of this series we got our AD and SCCM servers ready, and then we installed System Center 2012 Configuration Manager as a standalone Primary site. In Part 2 we configured the SCCM server further by adding some Windows Server roles necessary for the following Configuration Manager 2012 functionality, Software Update Point (SUP) and Operating System Deployment. In Part 3 we configured the server further by Enabling Discovery methods and creating Boundary's and Boundary Groups. In Part 4 we configured Client Settings, Added roles and Distributed the Configmgr Client to our Computers within the LAB, then in Part 5 we enabled the Endpoint Protection Role and configured Endpoint Protection settings and targeted a collection called All Windows 7 Computers with these settings and policies. Now we will configure our SUP further to Deploy software updates to our All Windows 7 Computers and Build Windows 7 X64 collections. Recommended Reading:- Planning for Software Updates in Configuration Manager - http://technet.micro...y/gg712696.aspx Prerequisites for Software Updates in Configuration Manager - http://technet.micro...y/hh237372.aspx Configuring Software Updates in Configuration Manager - http://technet.micro...y/gg712312.aspx Step 1. Configure the SUP Products to Sync and Perform a Sync Perform the following on the SCCM server as SMSadmin Click on Administration, expand Overview and expand Site Configuration, select Sites and click on Settings in the ribbon and click on Configure Site Components and select Software Update Point. In the Products tab ensure that the product Windows 7 check box is selected. Click on Software Library, Software Updates, right click on All Software Updates and choose Synchronize Software Updates, answer Yes when prompted. Monitor the Sync process using the Wsyncmgr.log file in CMTrace. As we started the sync manually you should search for the following string "Performing Sync on local request", followed by the status of the sync and you know it's complete when you can see the following line "Sync Succeeded. Setting Sync alert to cancelled on Site P01." Step 2. Specify Search Criteria for Software Updates Perform the following on the SCCM server as SMSadmin In the console, click Software Library, expand it and select All Software Updates then click on Add Criteria in the top right of the search field. In the scrollable Add Criteria menu, select the following options Bulletin ID Expired Superseded Product then define the criteria using the drop down menus beside each option so that they look as follows:- Product = Windows 7 Bulletin ID =MS Expired = No Superseded = No then click on Search, you'll get a list of results like so let's save our Search criteria and call it Windows 7 Updates search criteria, you can return to this search later by clicking on saved searches and selecting your search from the list. Step 3. Create a Software Update Group that Contains the Software Updates Perform the following on the SCCM server as SMSadmin Note: Normally you'd want to look through all these updates and filter out (delete) the ones that are not applicable to you, such as Beta or Service Packs, Delete these from your list before continuing. After we've trimmed down out updates we'll select the remaining updates by selecting all the updates found in our search criteria above by clicking on one update and then pressing CTRL + A, it should say 153 (or similar) items selected in the bottom left corner, make sure you are still in the Search Criteria as in the picture below In the ribbon, click on Home and then in the Update click on Create Software Update Group, call it Windows 7 Updates and click on Create Now you can click on Software Update Groups in the console and you'll see your newly created Software Update Group, right click on it and choose Show Members to see the updates in this group. this lists the Sotware Updates contained in the Software Update Group Step 4. Deploy the Software Update Group Perform the following on the SCCM server as SMSadmin We could download the Content for the Software Update Group to verify that it's available before distributing it to our Distribution Points, but we'll skip that step and go ahead and deploy our Updates to our previously created All Windows 7 Computers collection. Select the Windows 7 Updates Software Update Group and in the Ribbon click on Deploy. give it a name and point it to our All Windows 7 Computers collection. Note: if you click on Select deployment Template, it will appear empty as you have no created any templates yet. for Deployment Settings set the type of deployment to Required (mandatory) and State message level to Minimal (to reduce Configuration Manager server load via state messages) For scheduling set the Time Based on to UTC for User Experience we want the user to see they are being updated, set Alerts client compliance is below the following to 80%, Set the Download Settings to download if a slow or unreliable connection detected, click next when you get to Deployment Package, choose create a new deployment package, Note: Make sure that \\sccm\sources\updates\windows7 (or whatever path you choose) exists otherwise the wizard will fail below when it tries to Download as the Network Path won't exist select your Distribution Point and click next, then for Download Location select Download Software Updates from the Internet, select the English language and at the summary screen click on Save As Template, call the template Windows 7 updates Template TIP: To review the progress of this task, while you are waiting for the wizard to complete you can browse the UNC on your server of your Deployment Package to see that it's actually filling up with updates, you should see something like this And that's it, after you complete the wizard the software updates in the software update group are deployed to computers in the target collection Finally, create a new collection called Build and Capture Windows 7 X64 and repeat the above Deployment for our Windows 7 Updates and target it to the Build and Capture Windows 7 X64 Collection as follows In the next two parts we will start adding clients to these collections and we will verify that the above is really working.


-
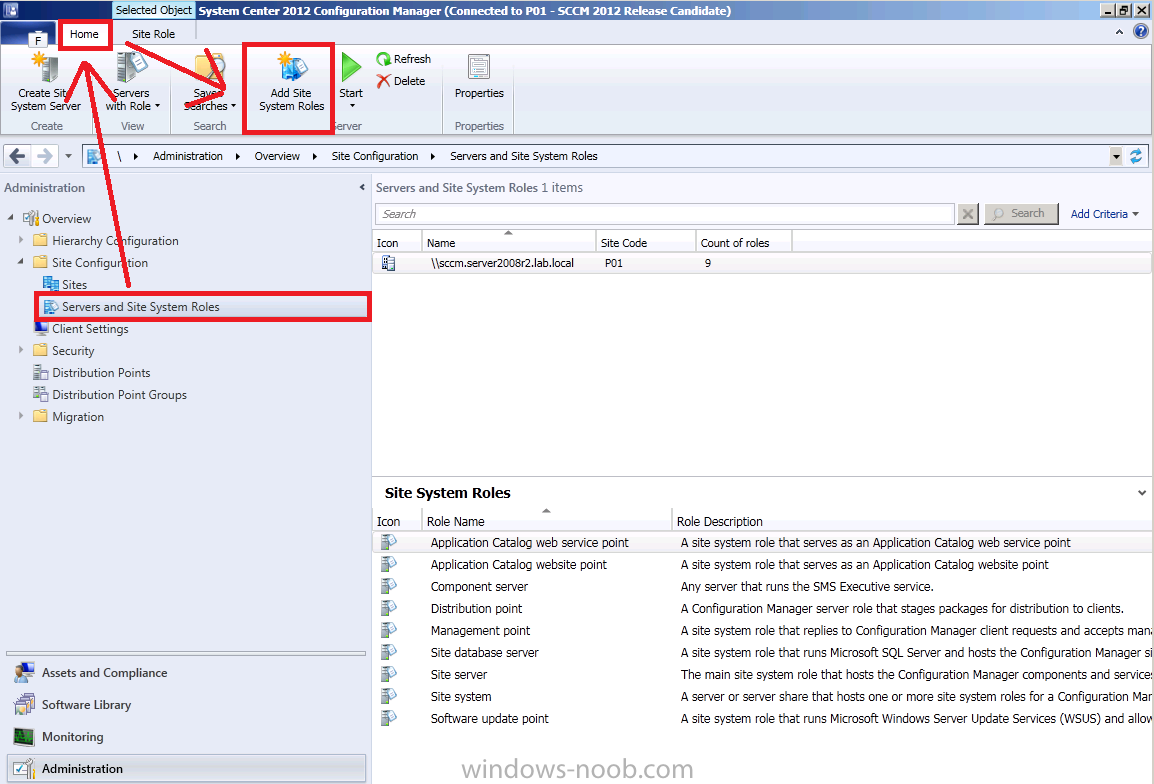
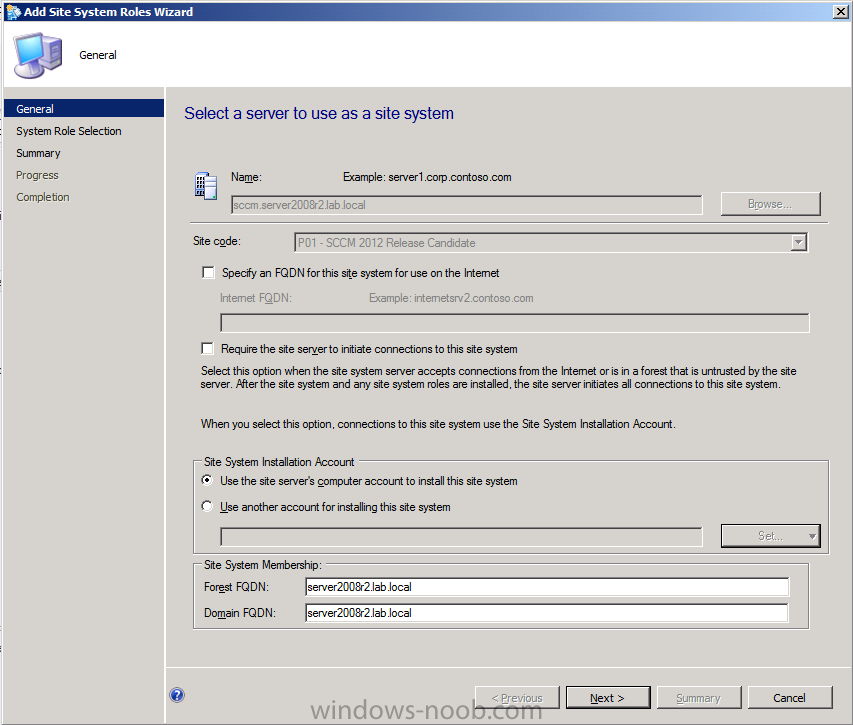
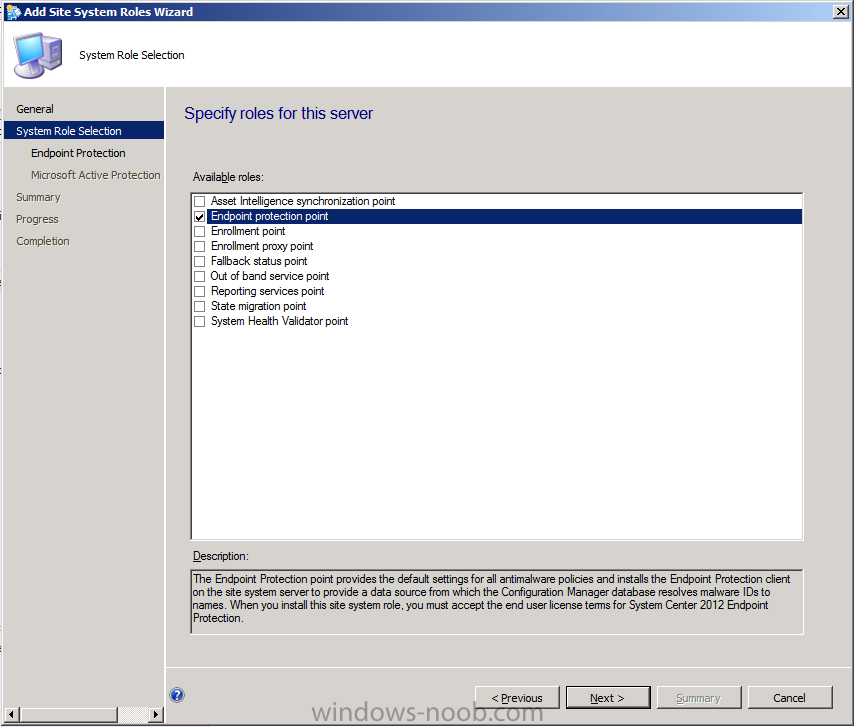
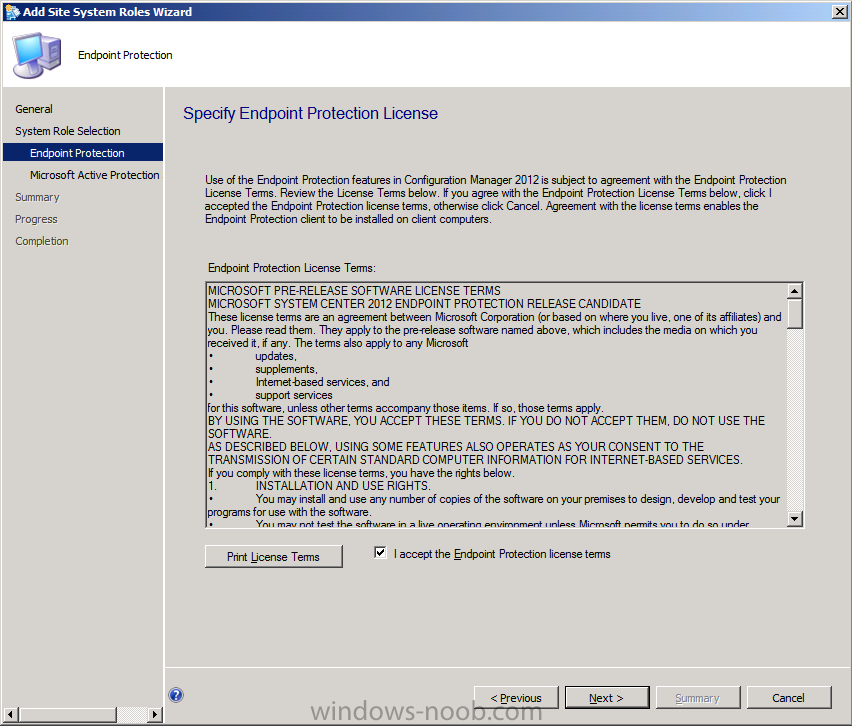
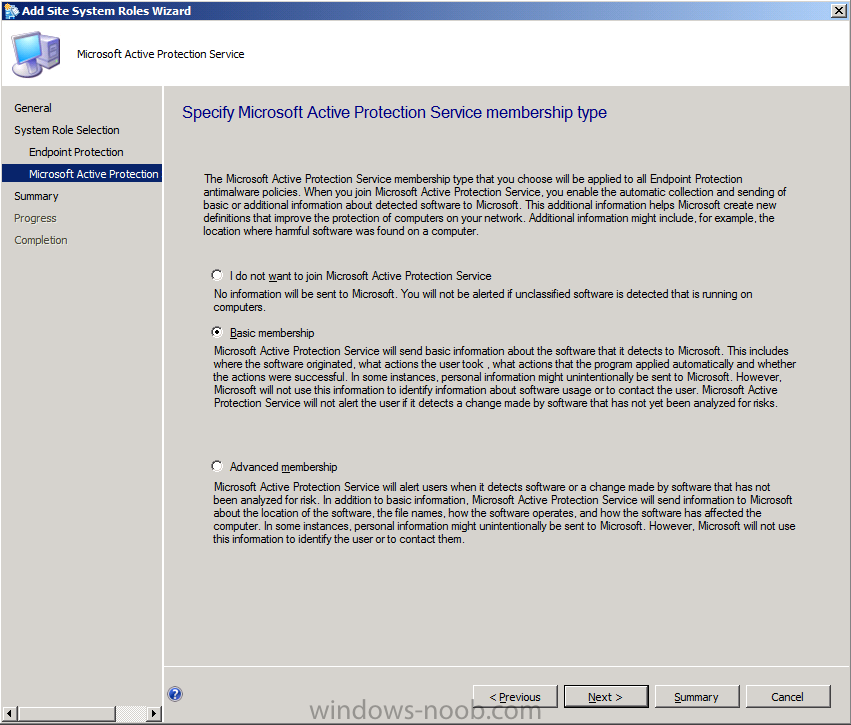
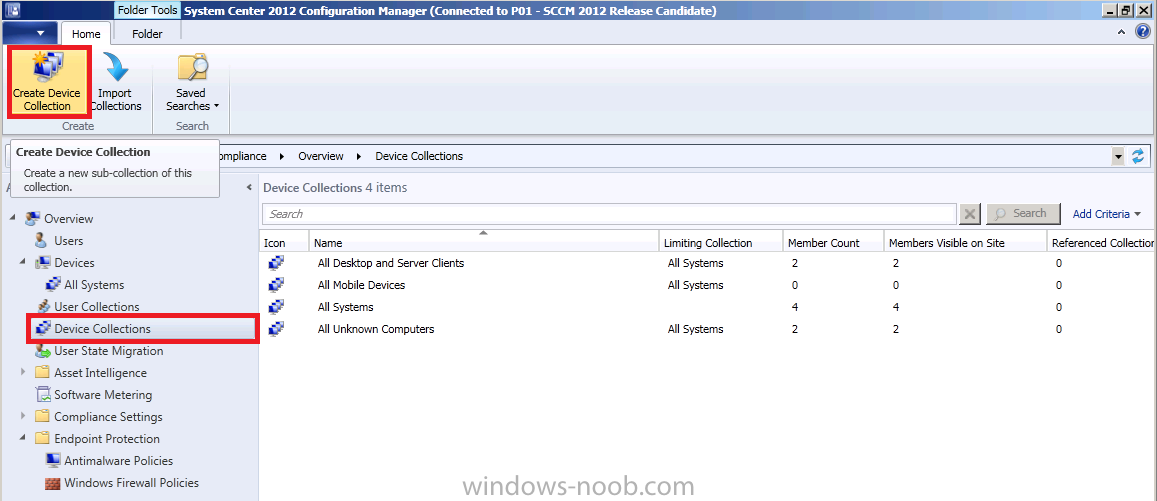
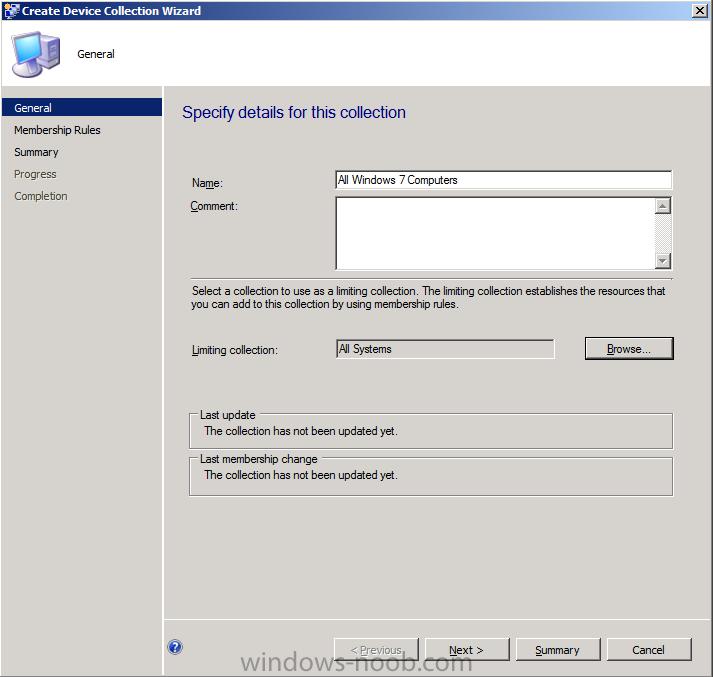
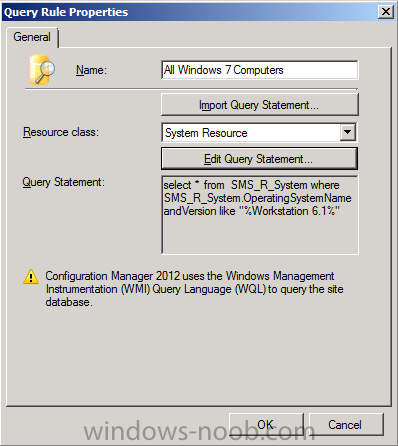
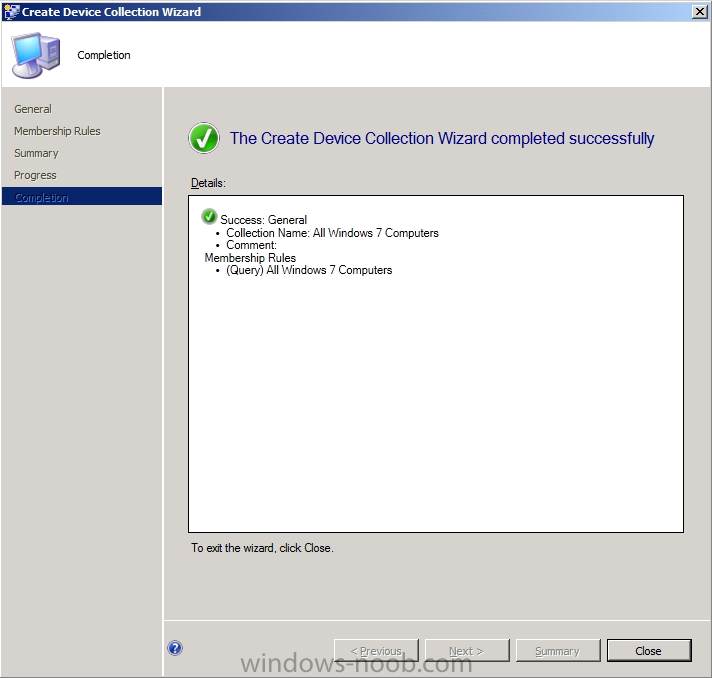
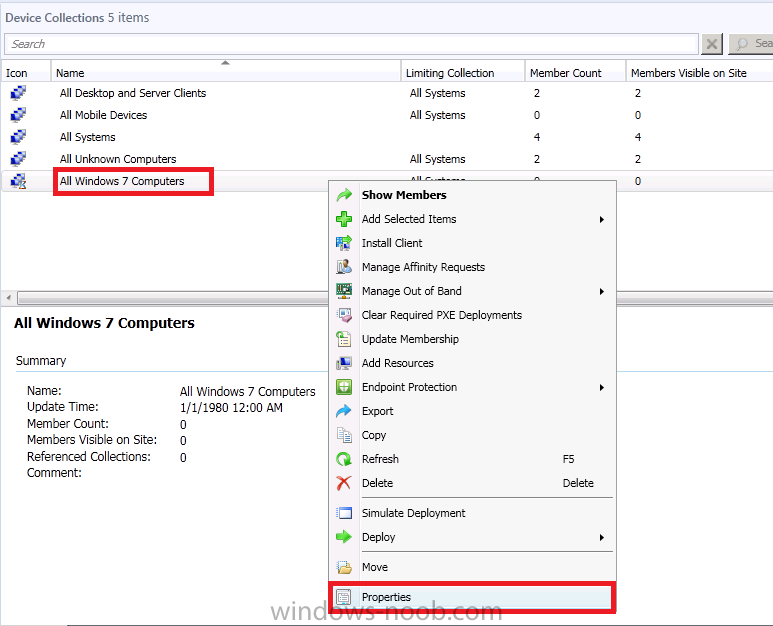
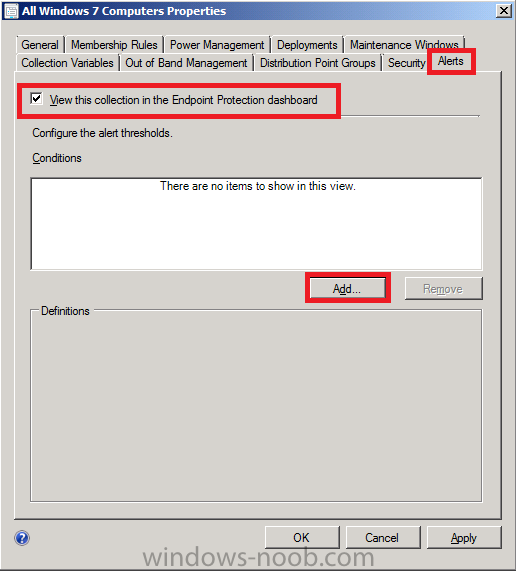
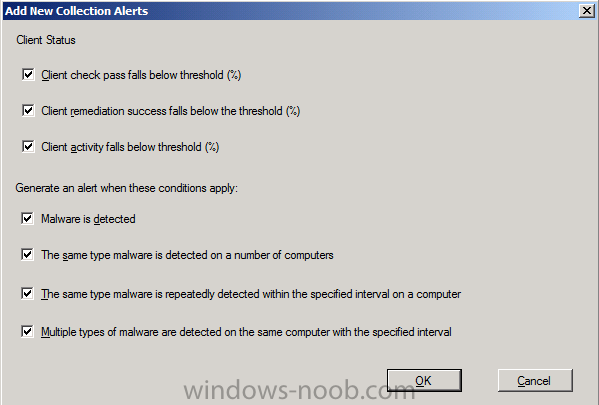
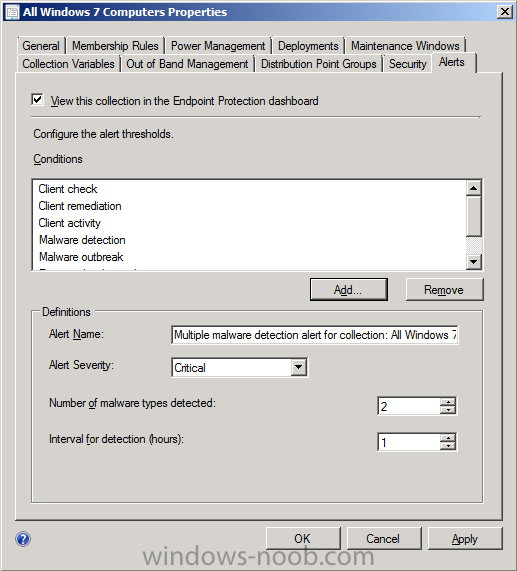
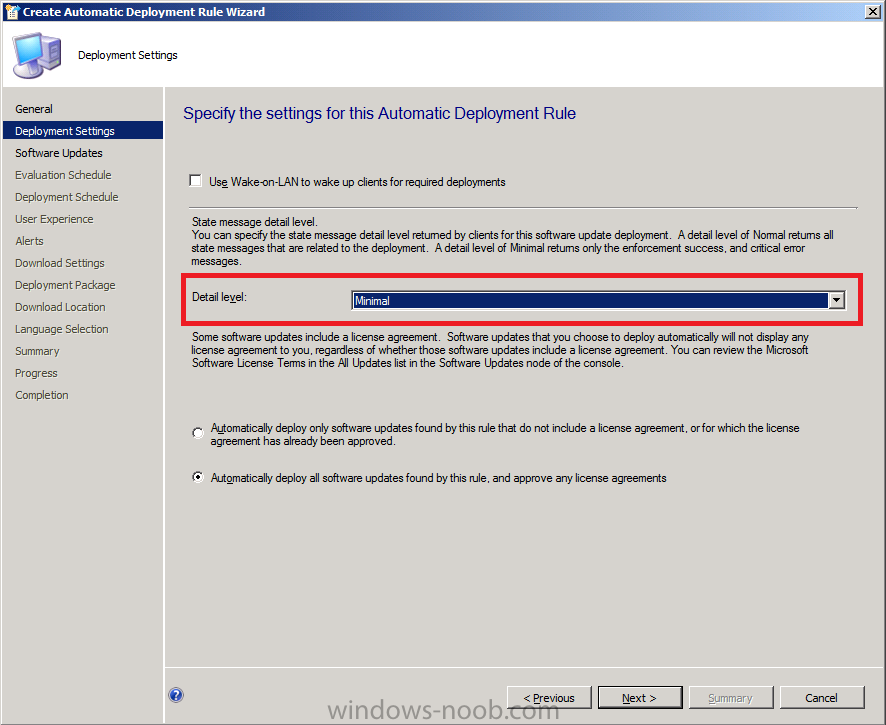
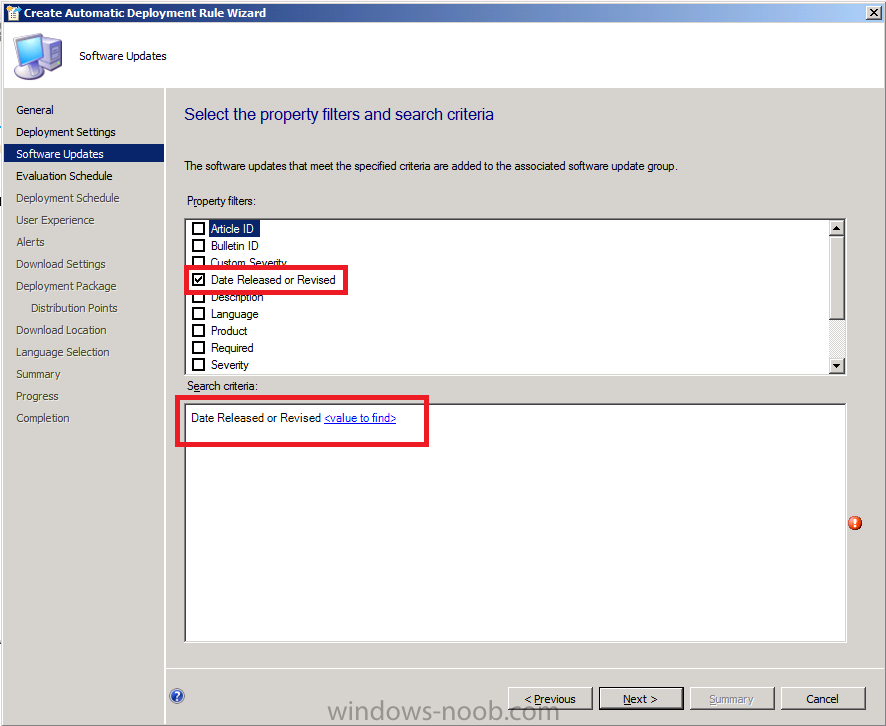
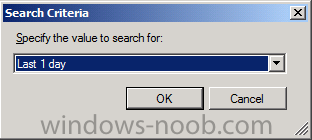
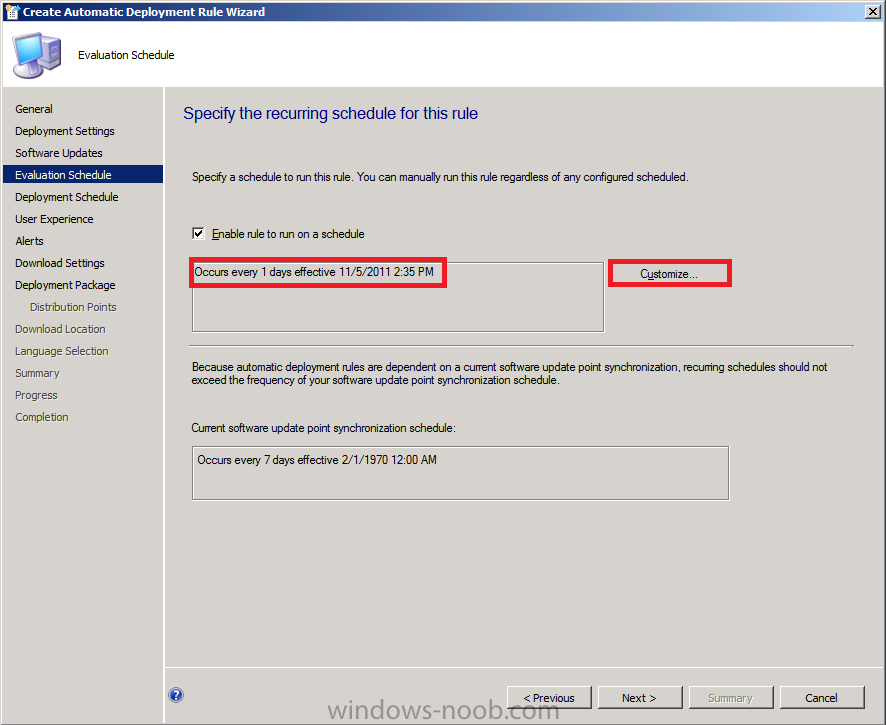
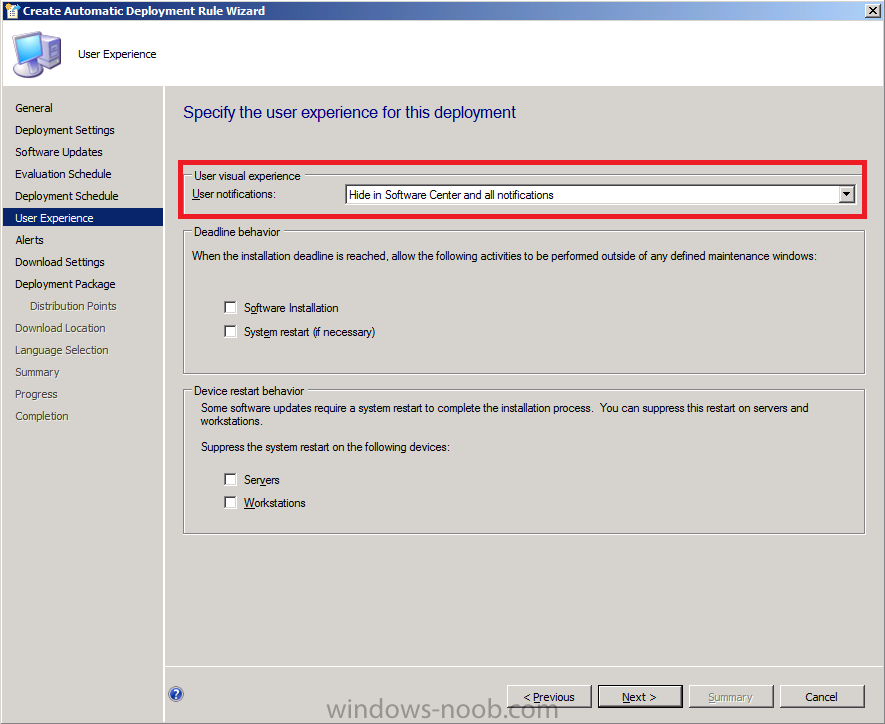
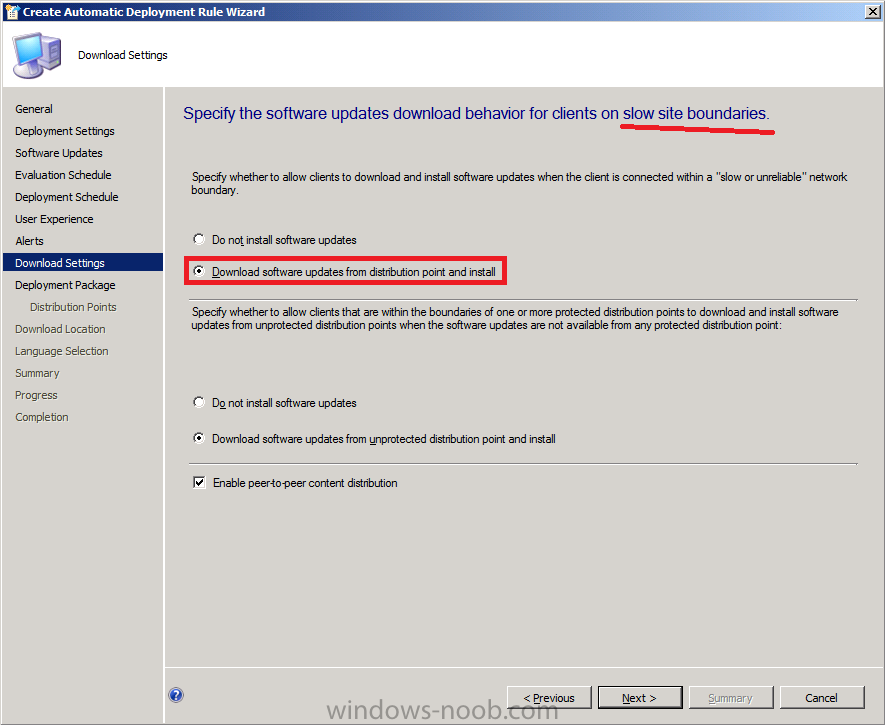
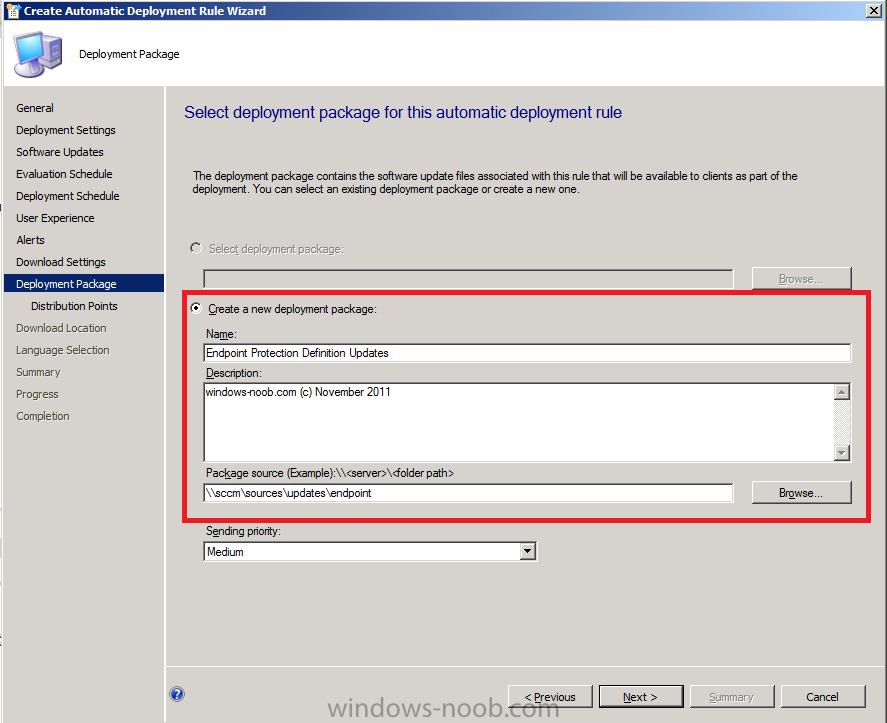
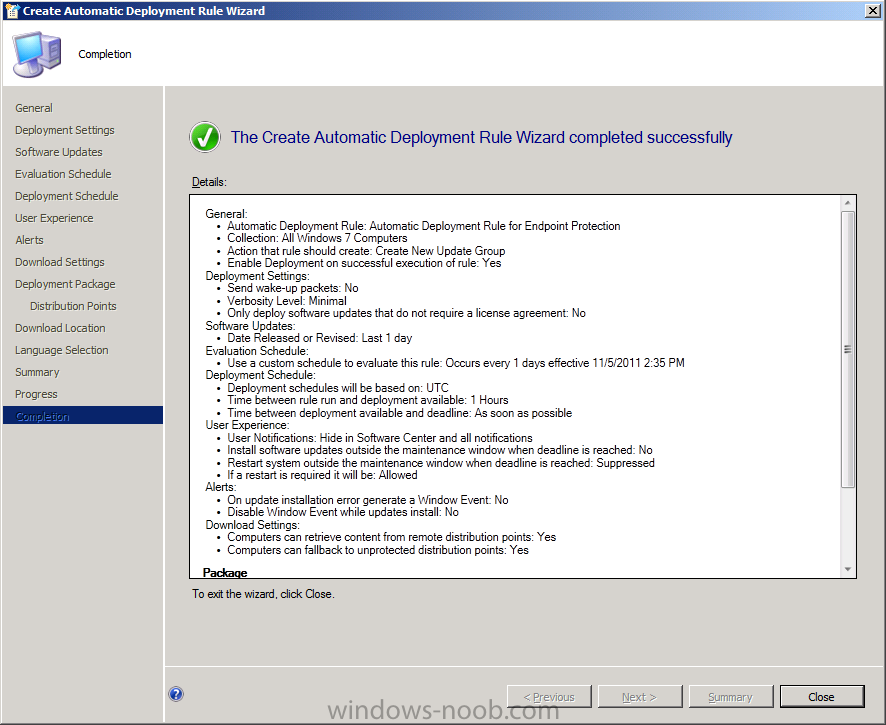
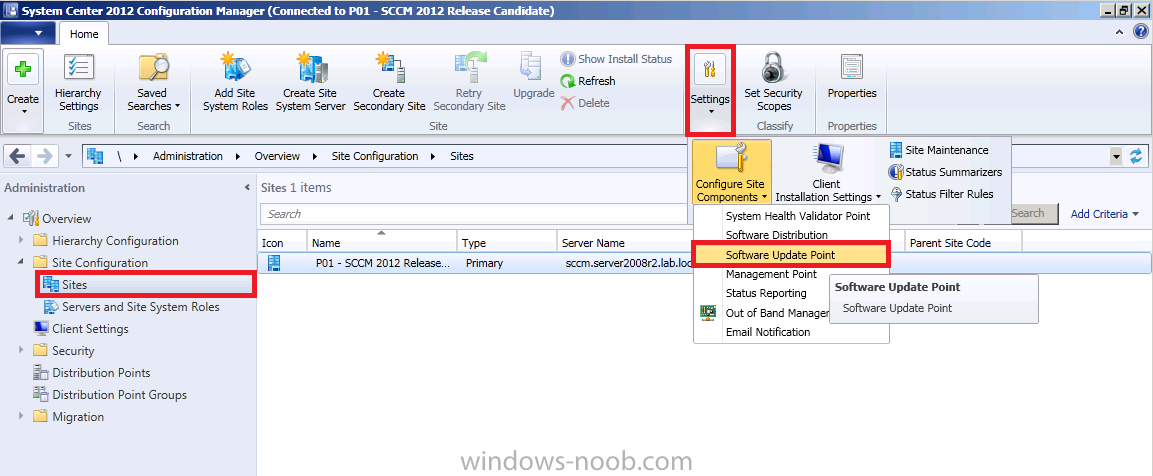
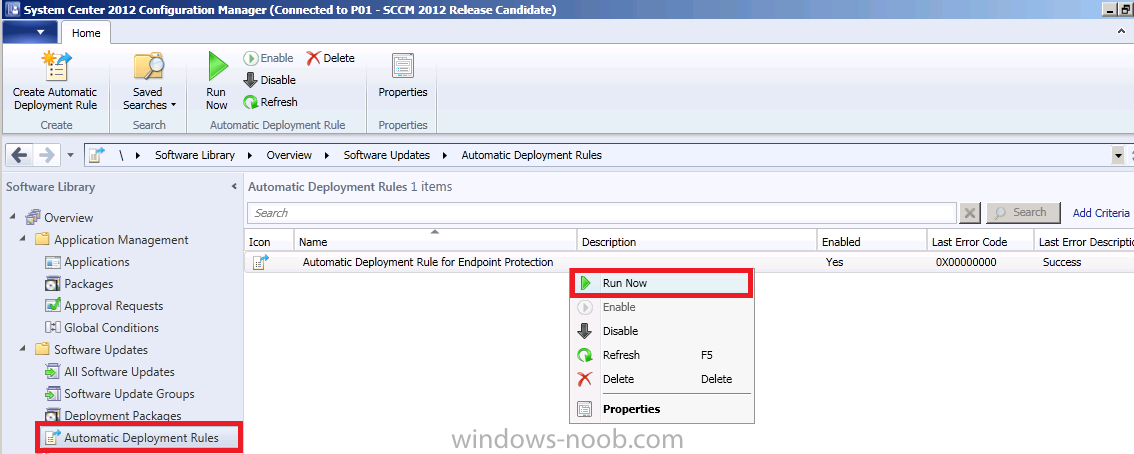
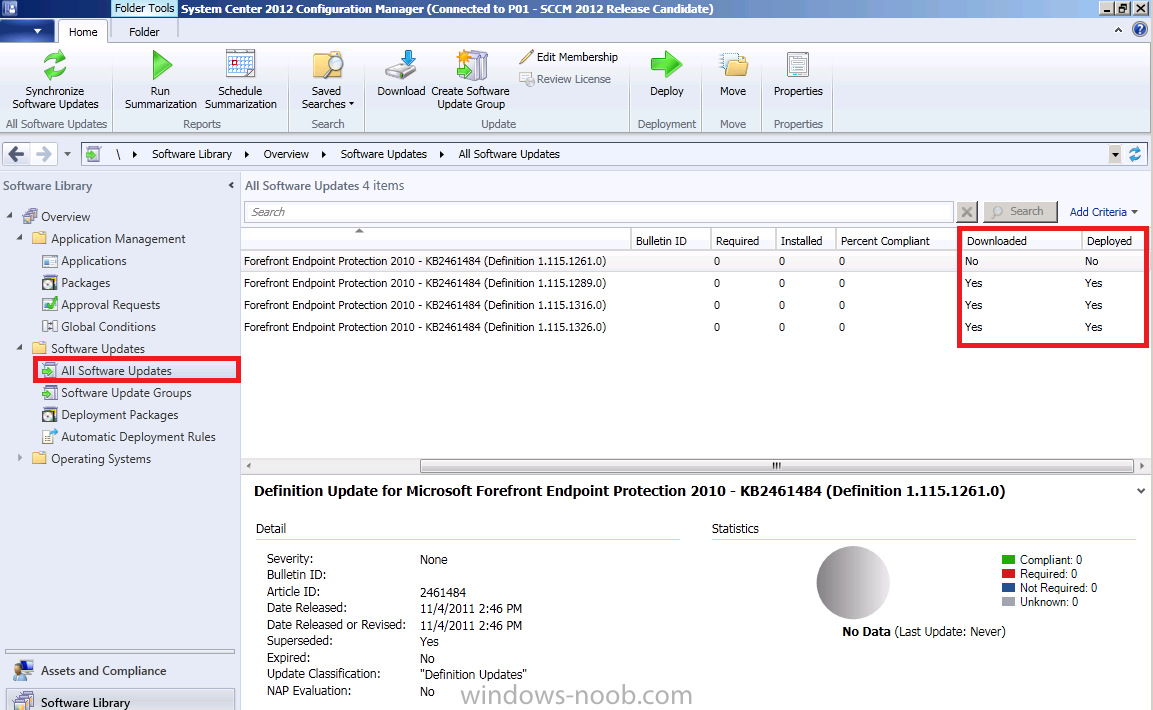
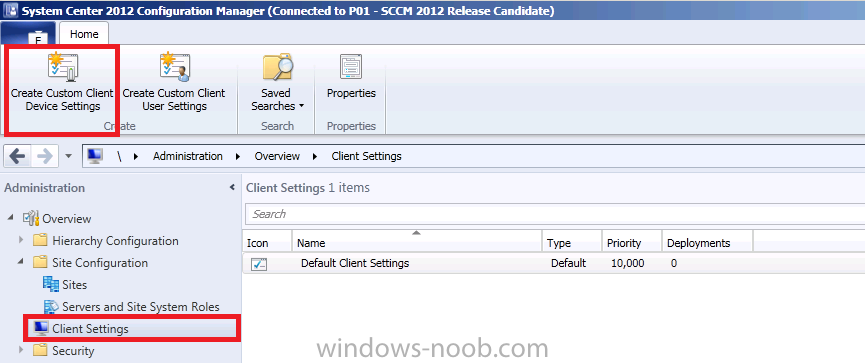
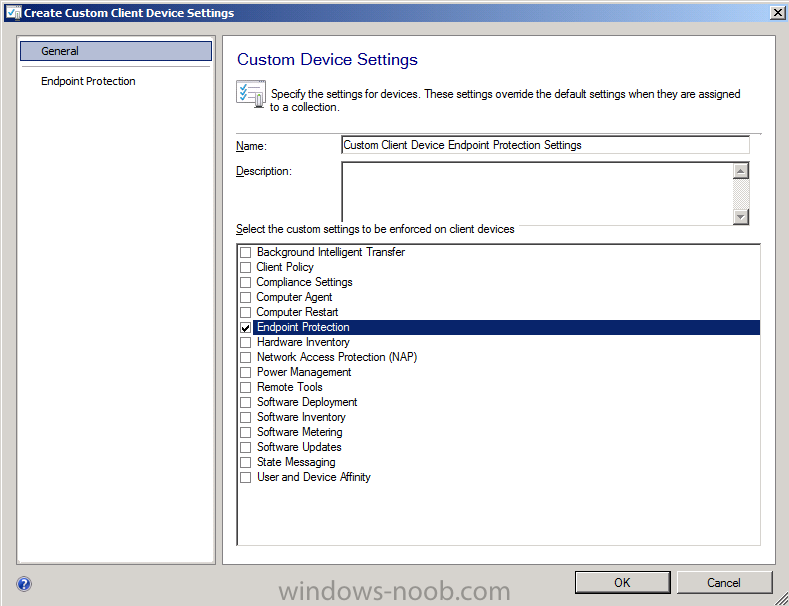
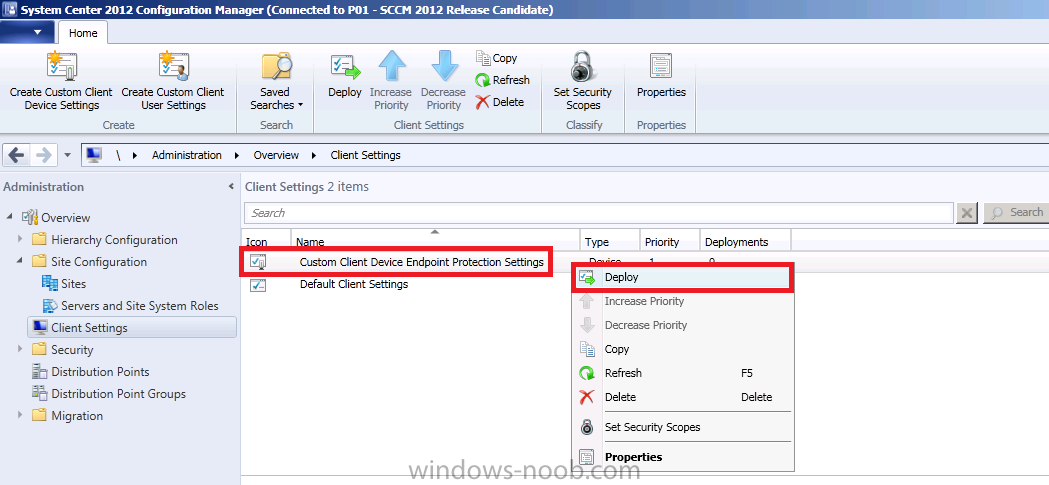
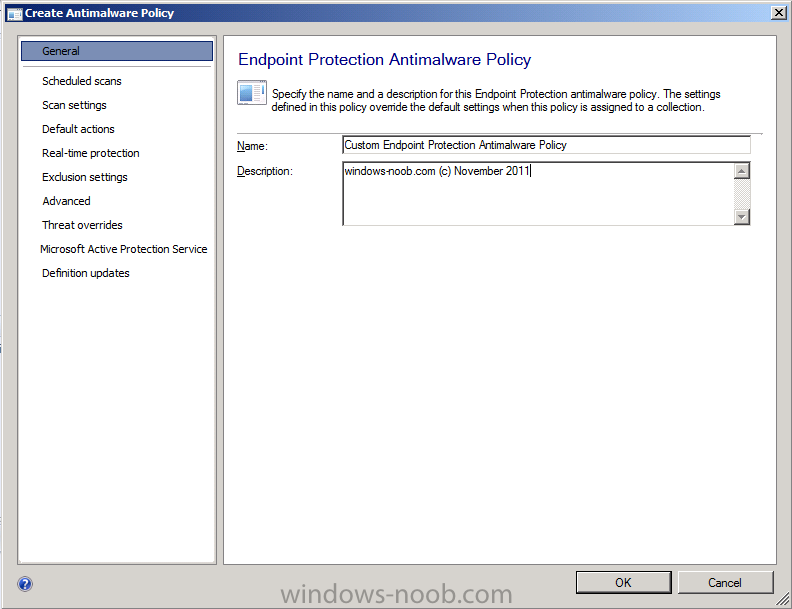
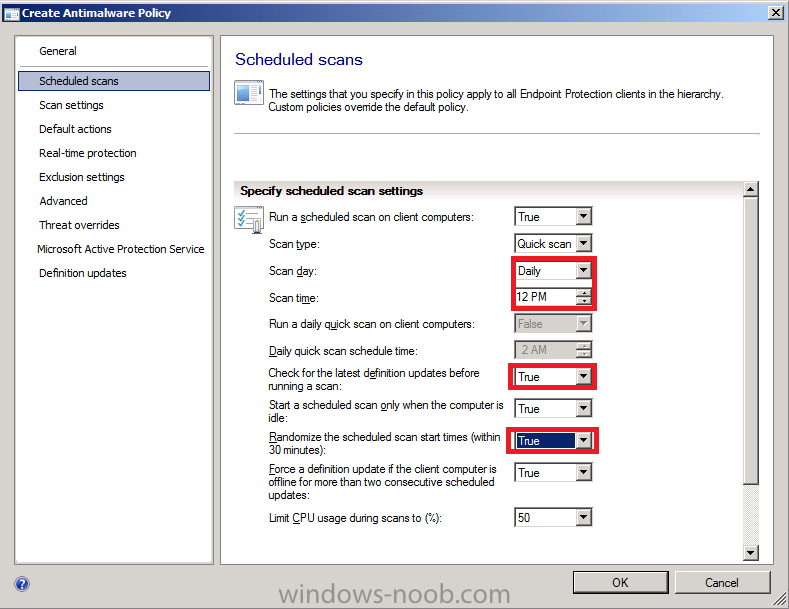
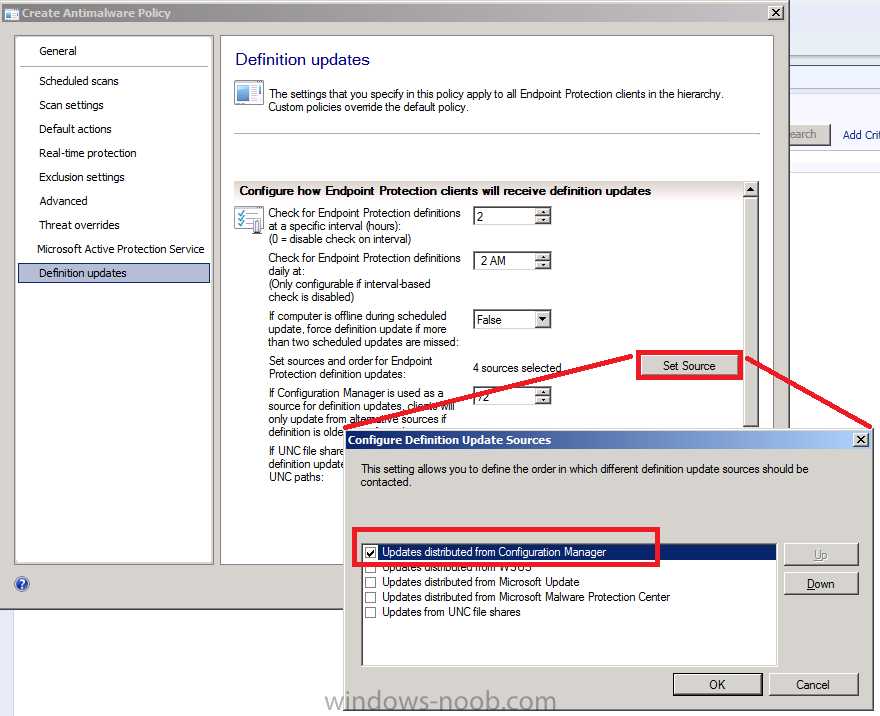
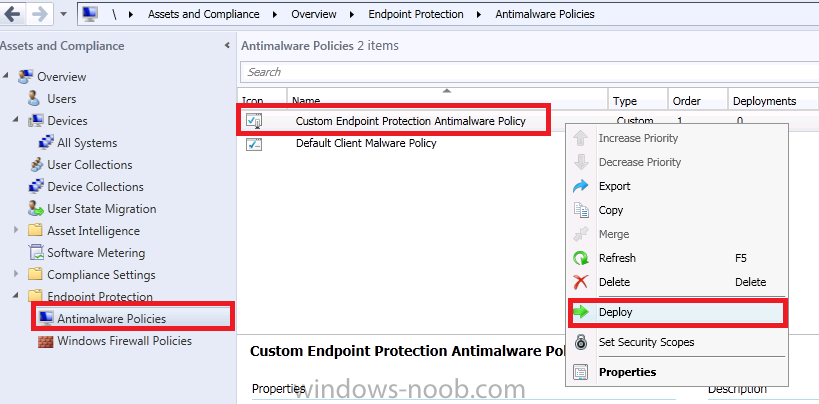
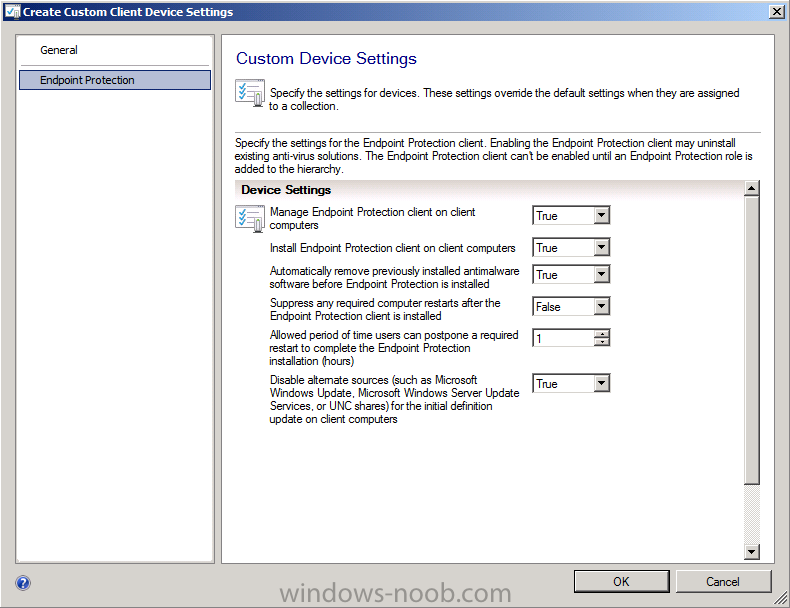
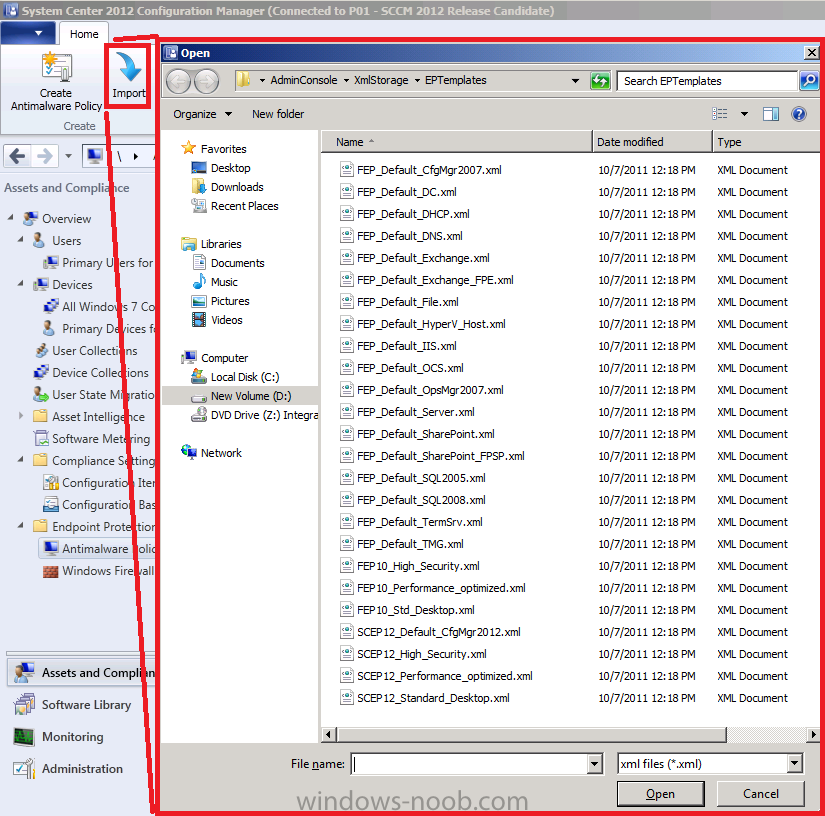
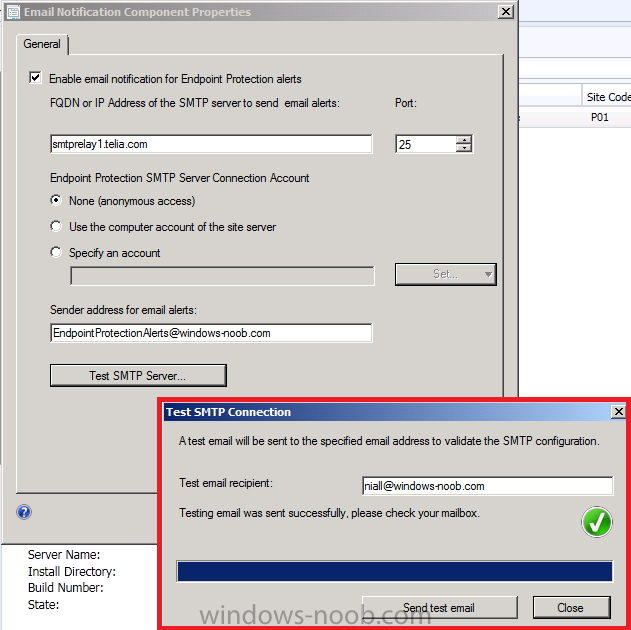
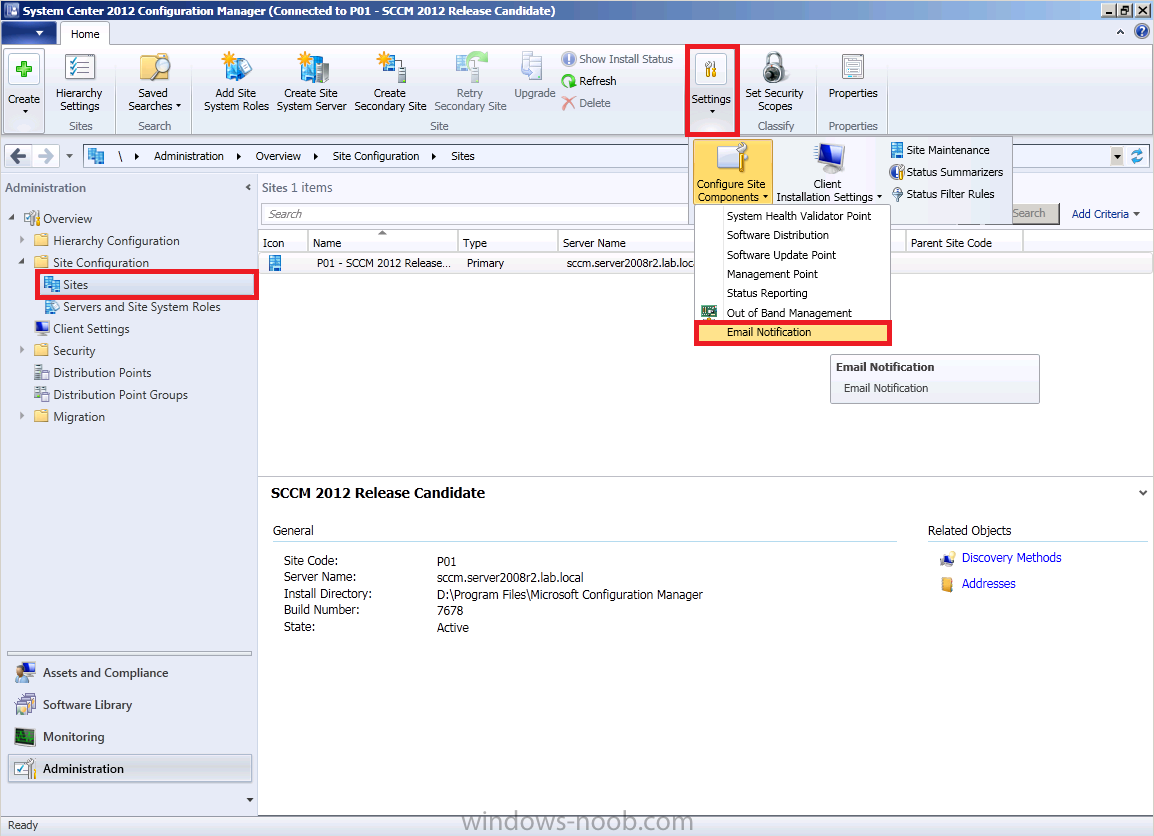
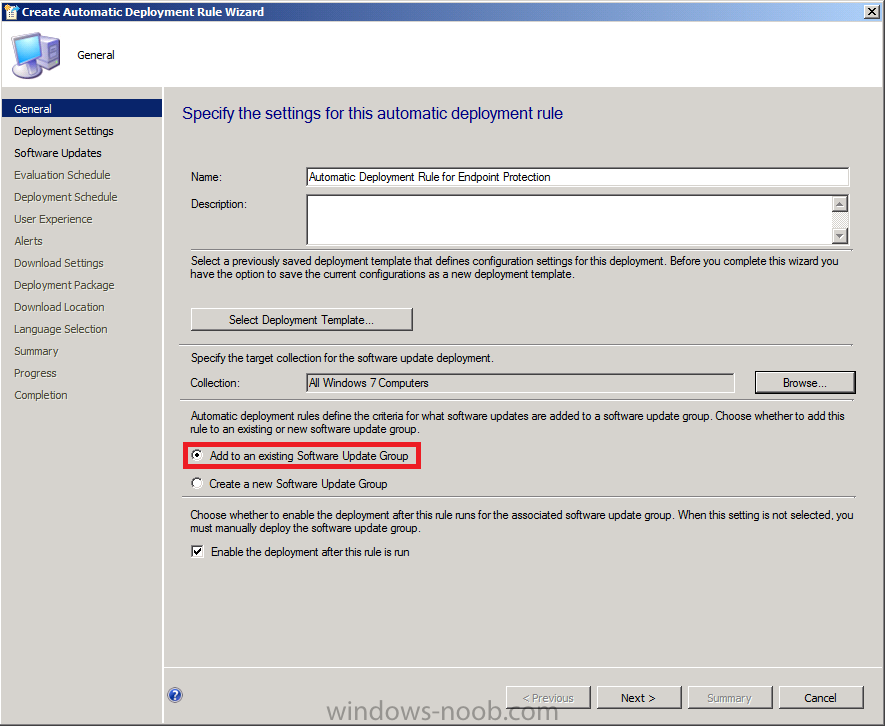
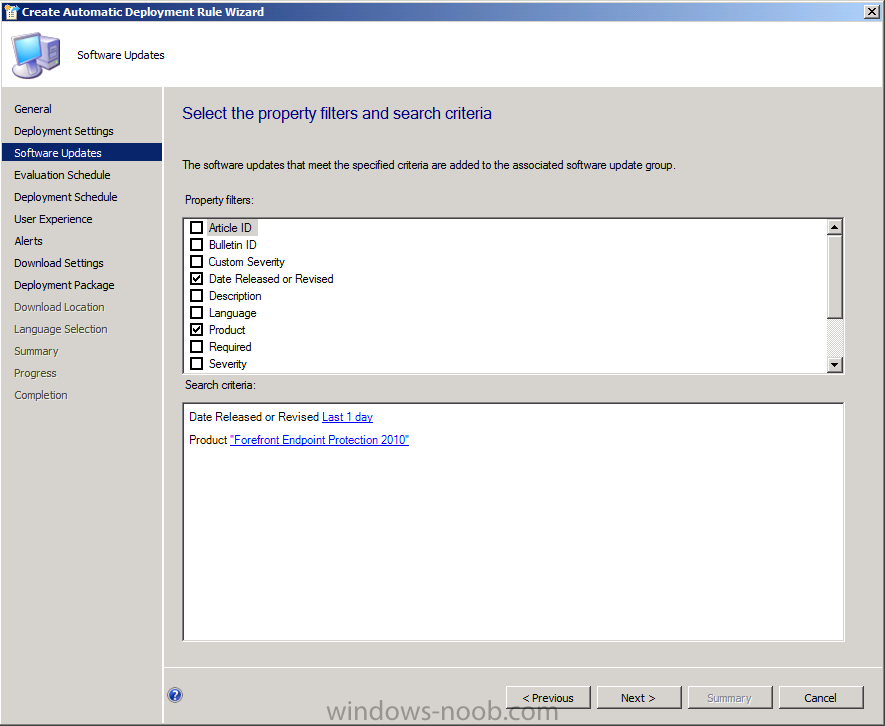
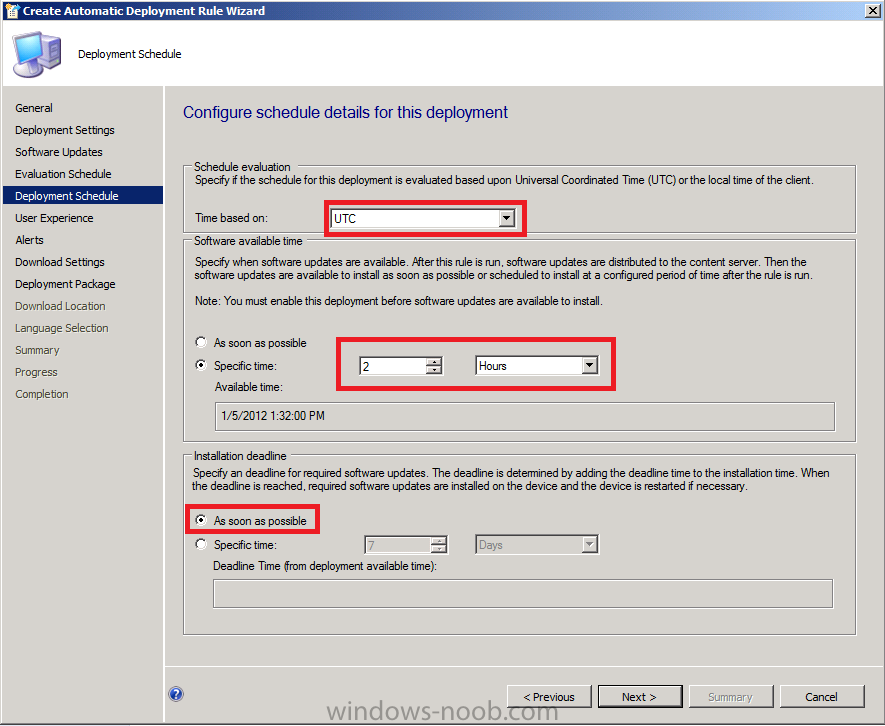
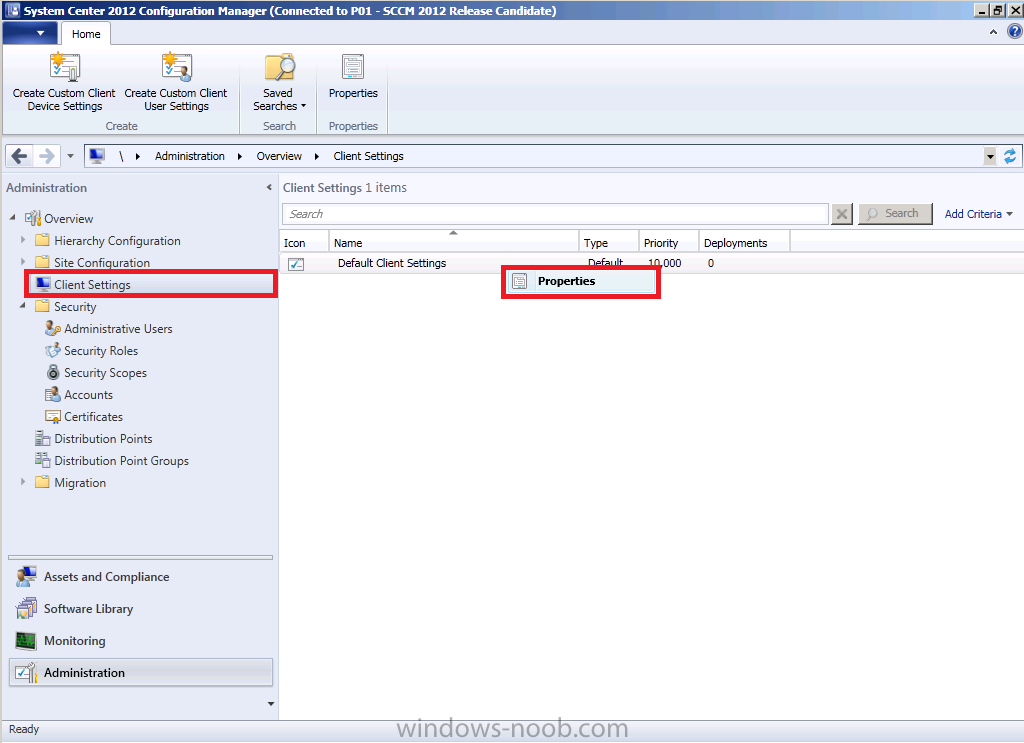
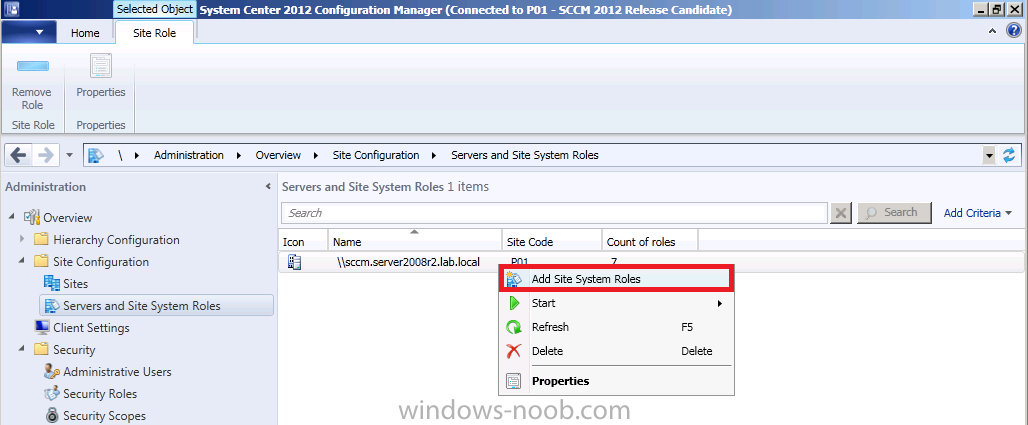
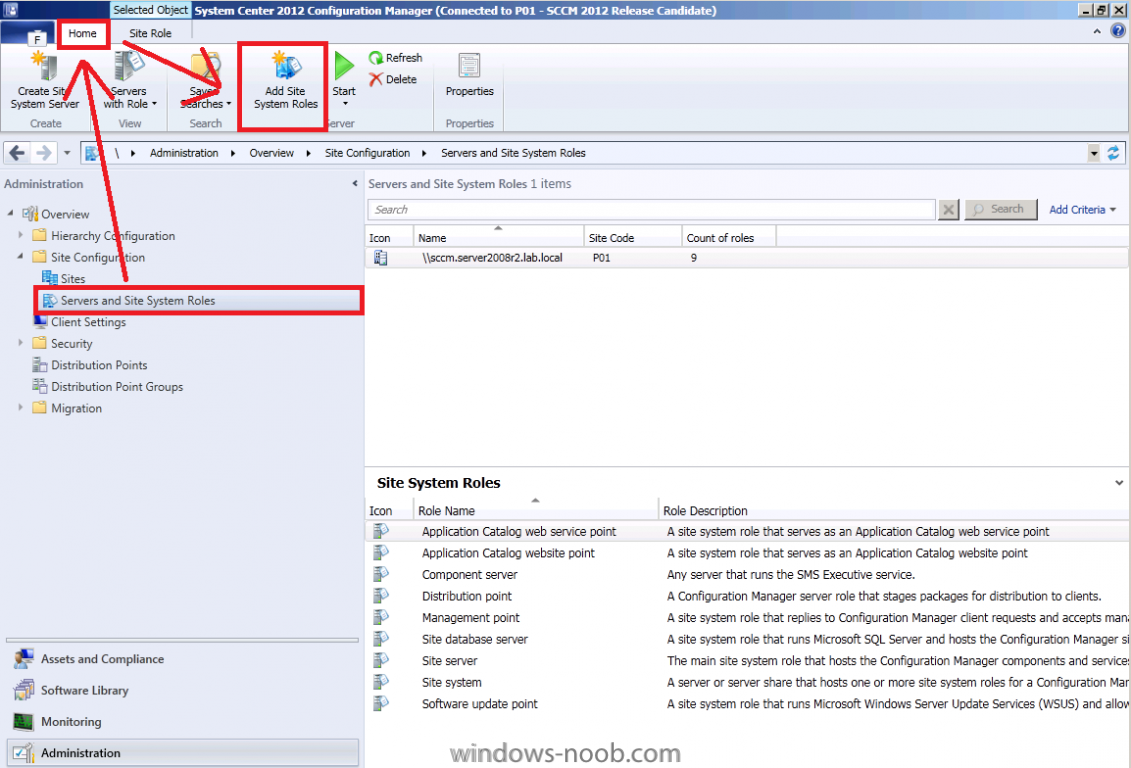
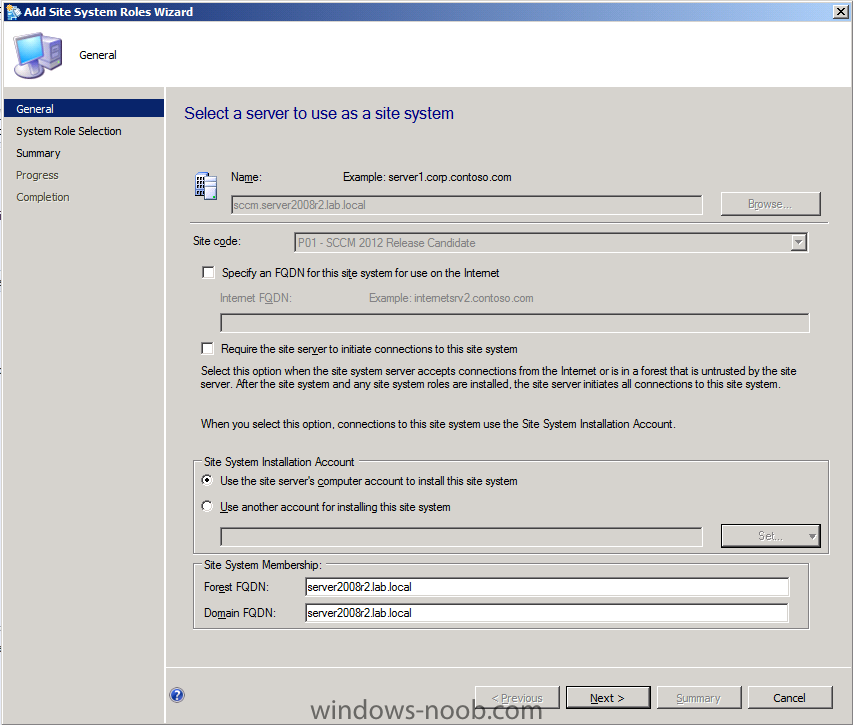
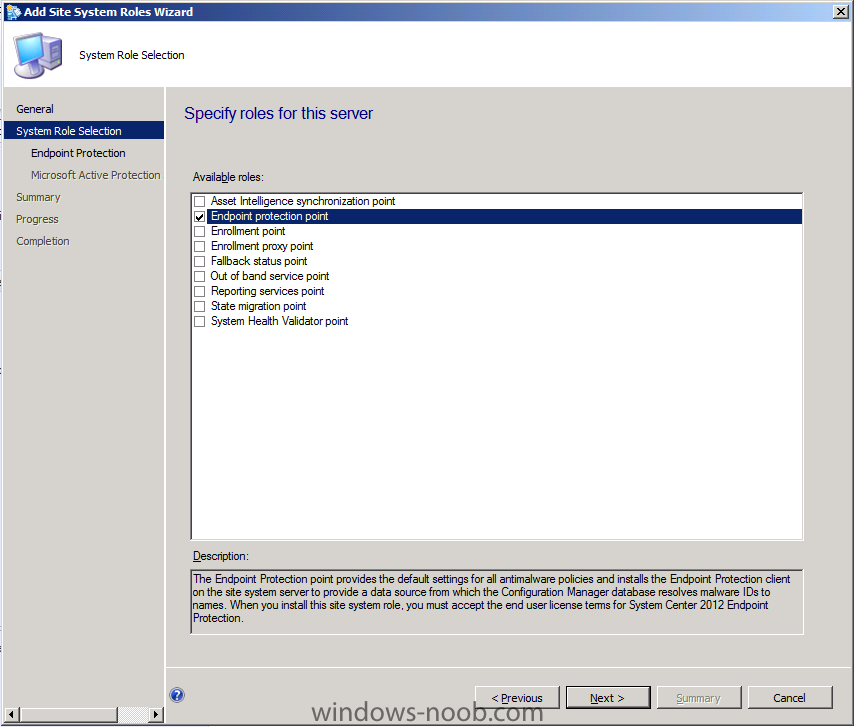
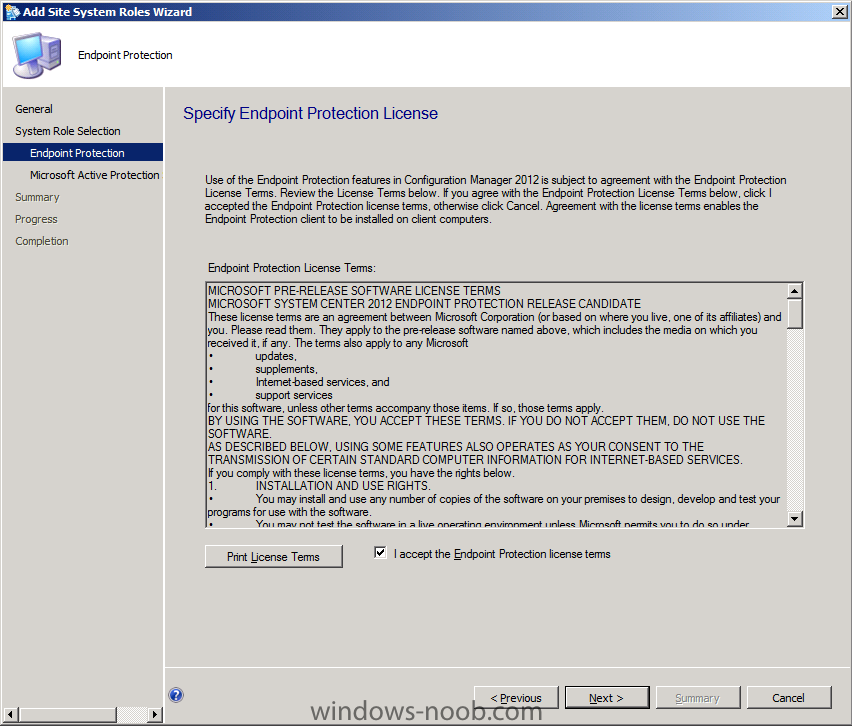
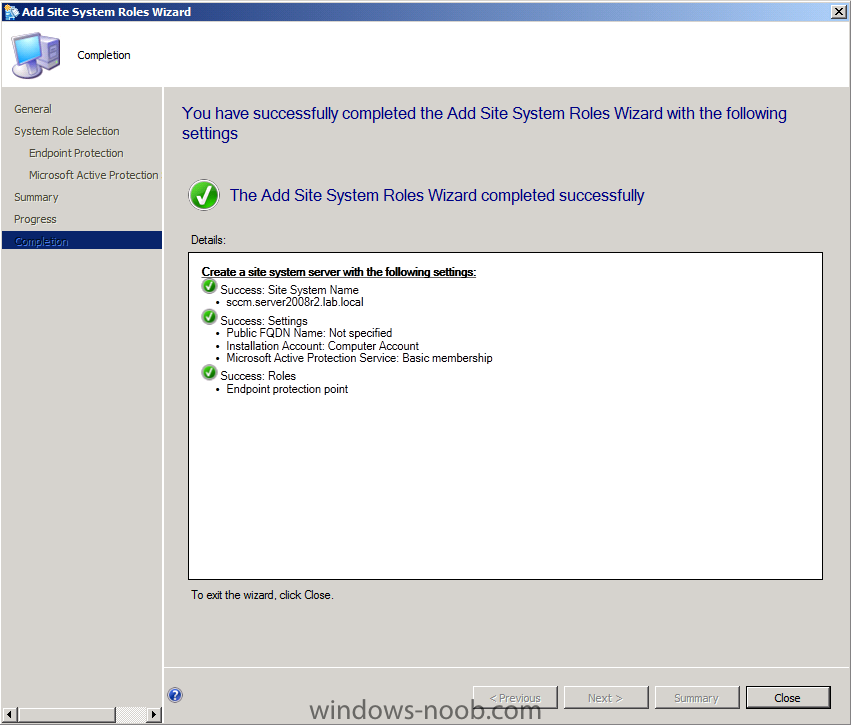
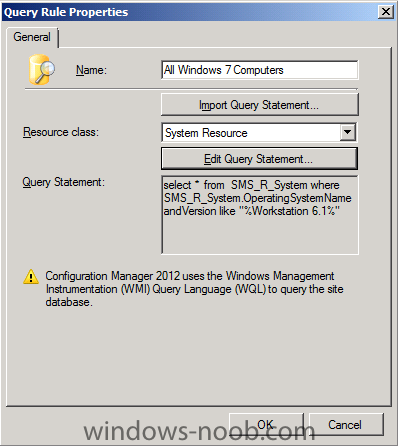
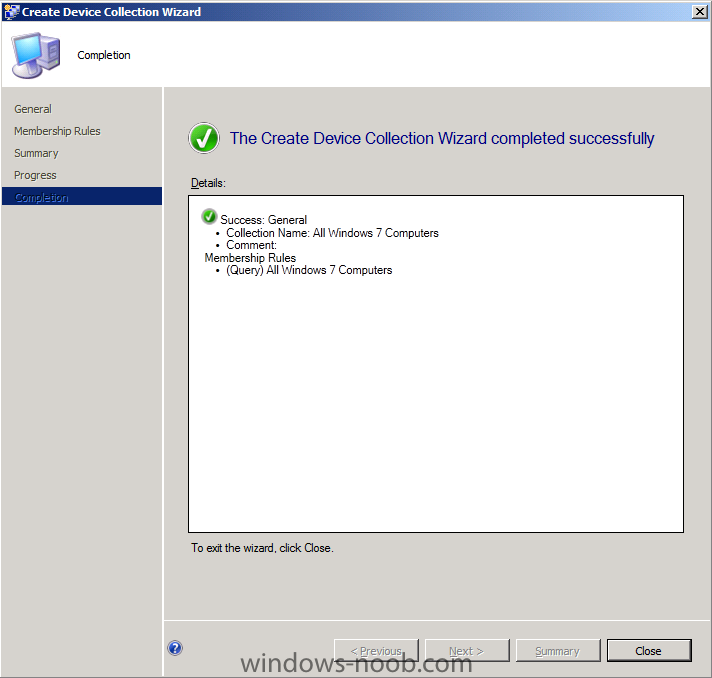
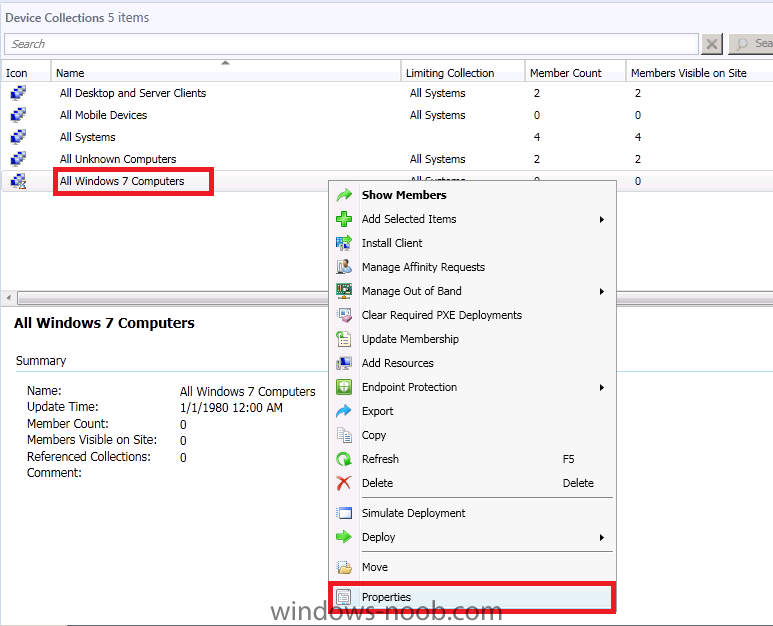
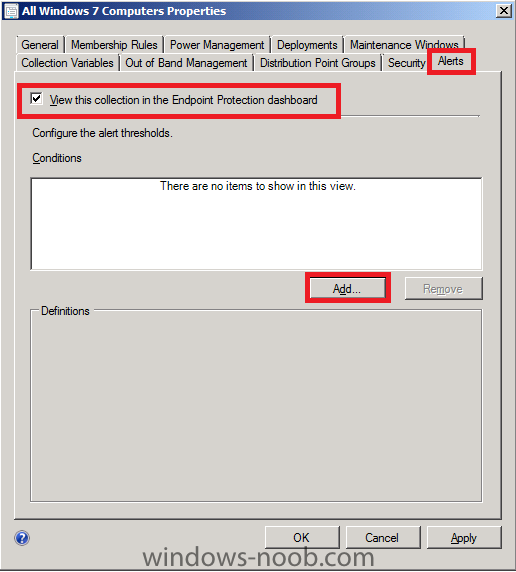
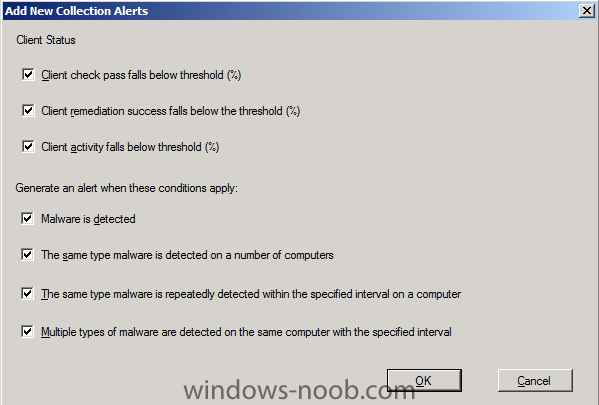
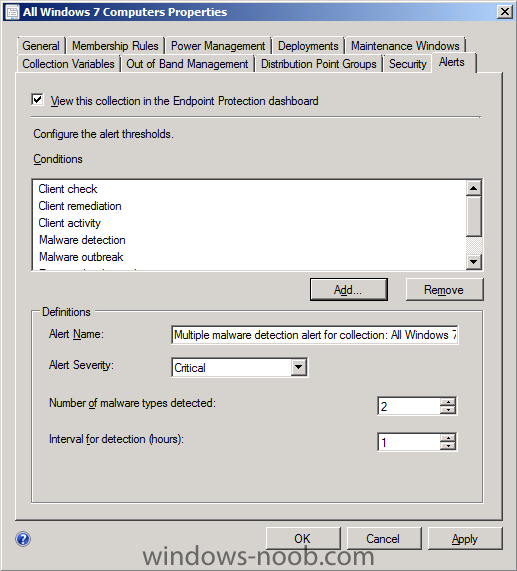
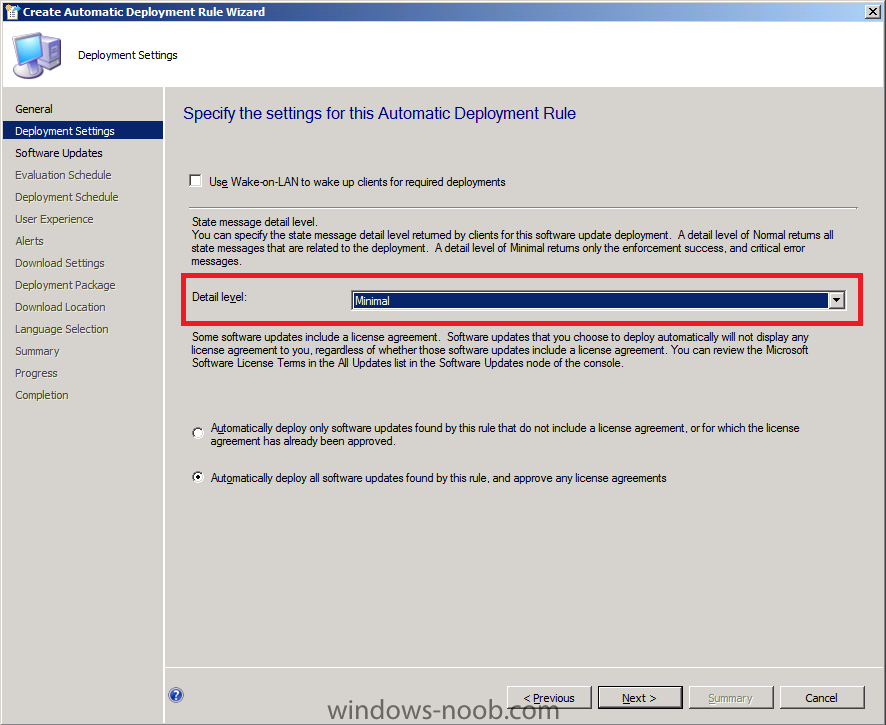
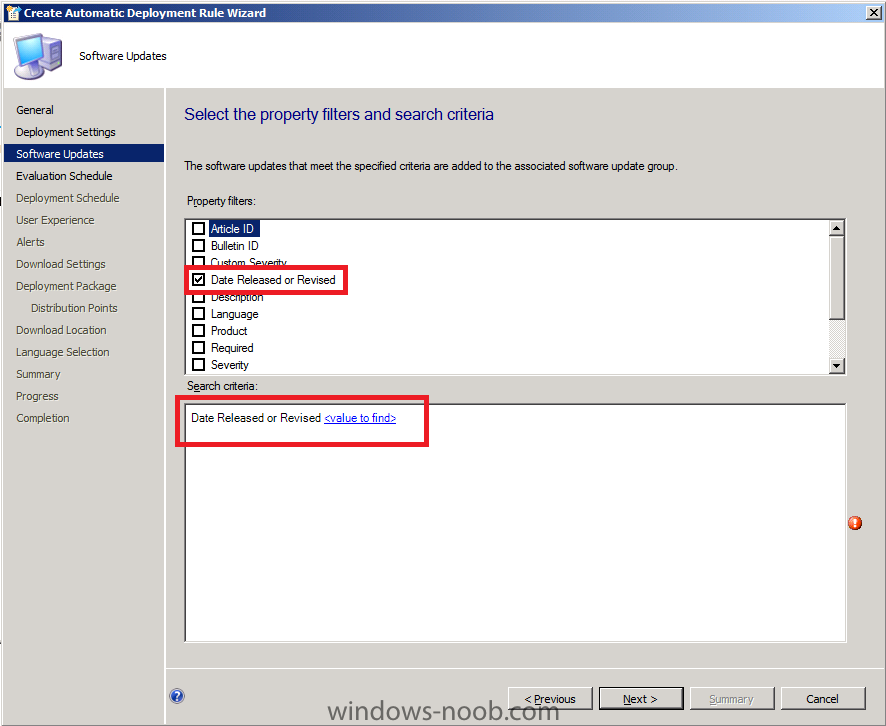
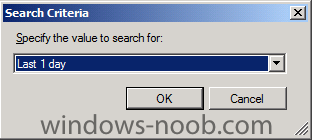
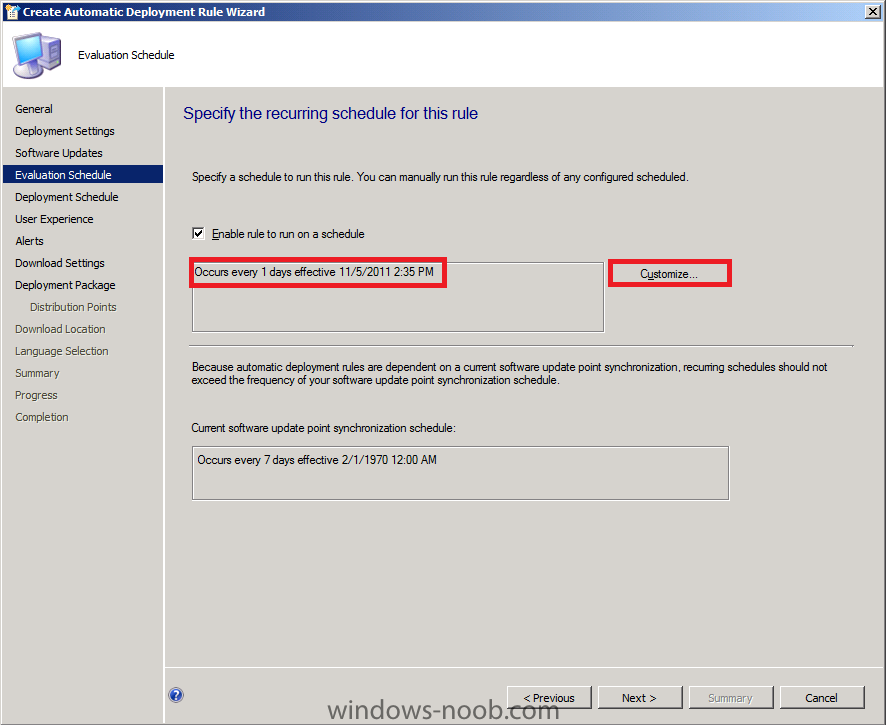
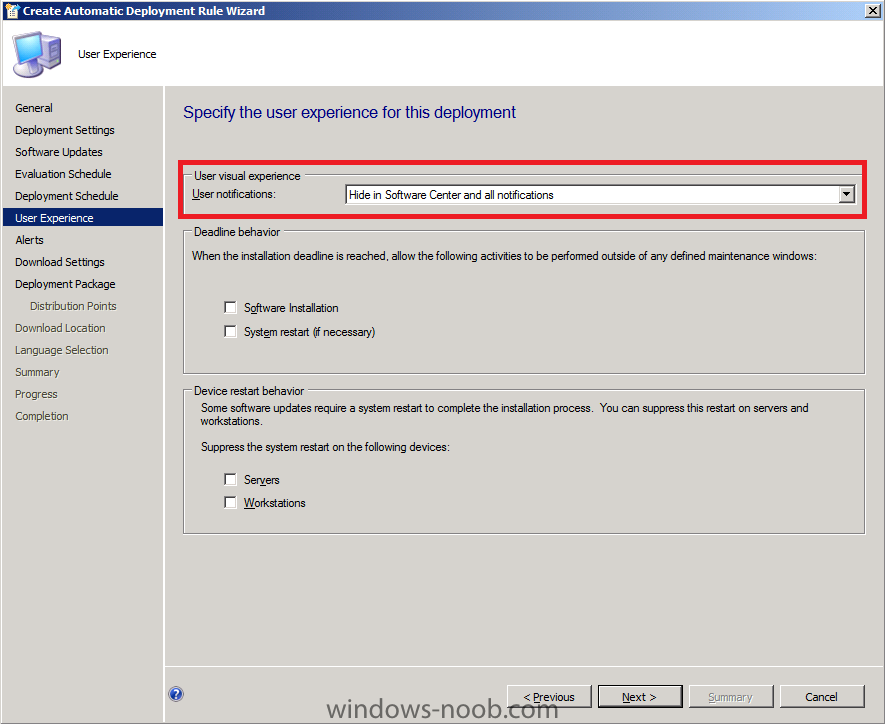
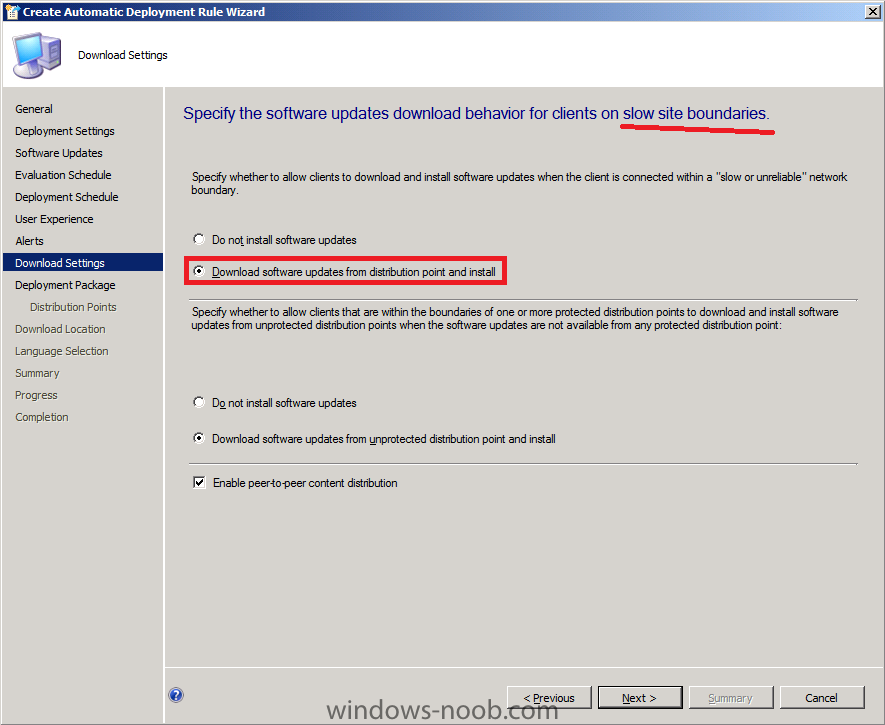
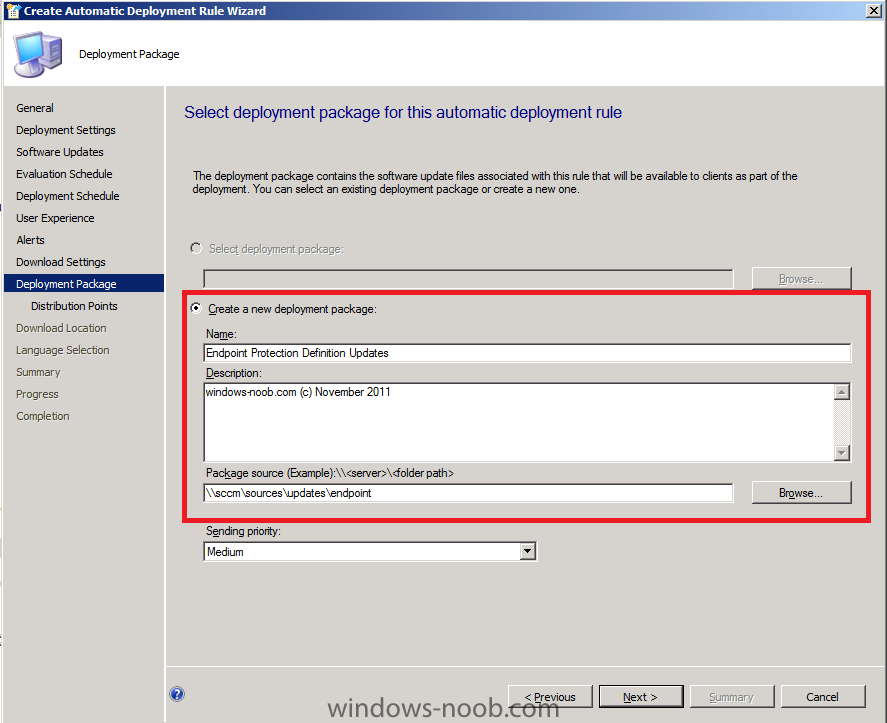
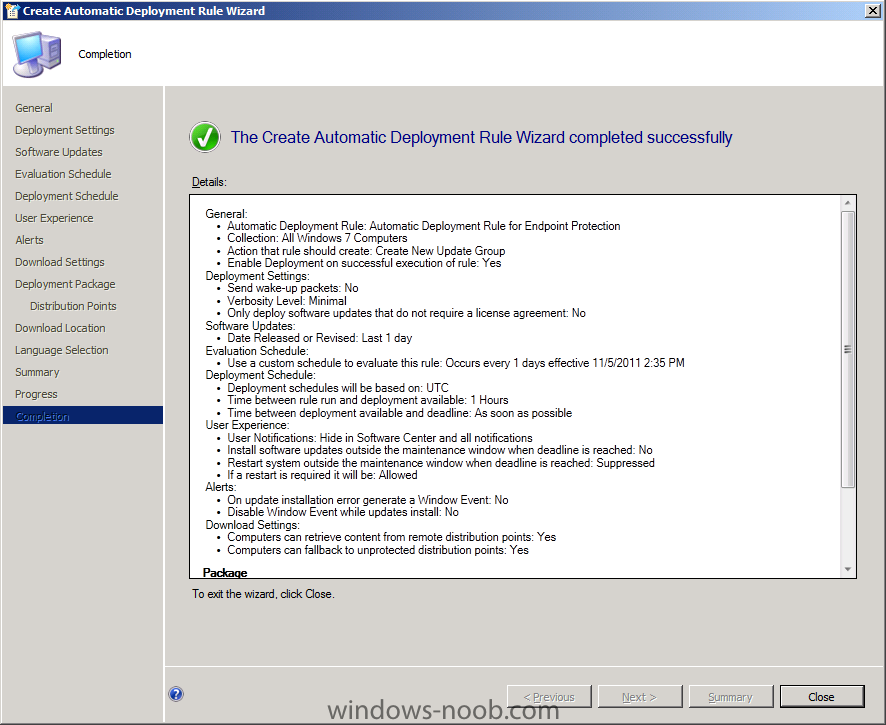
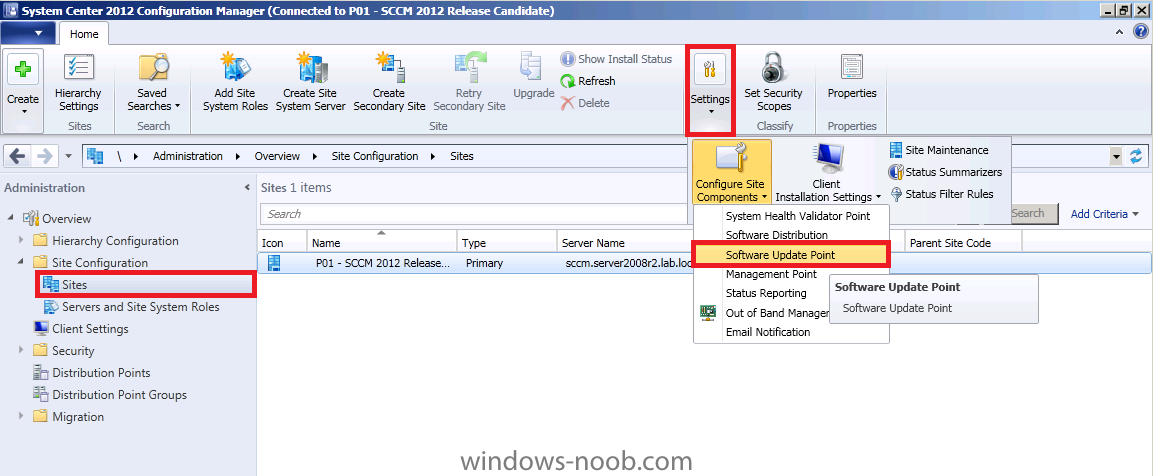
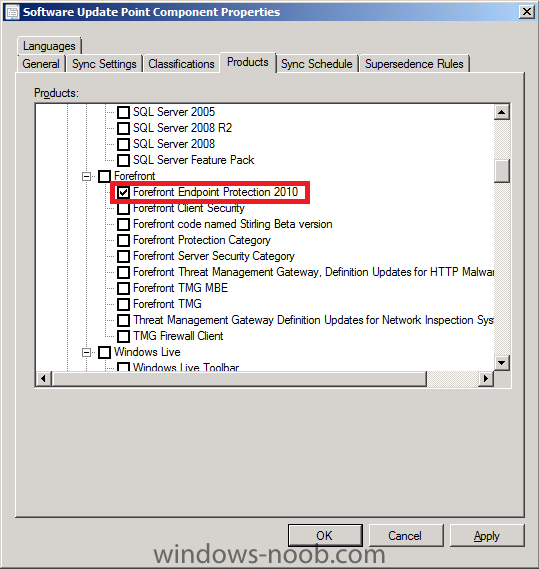
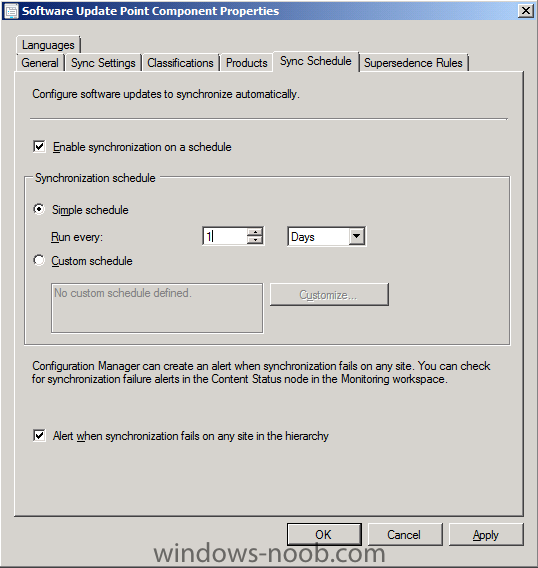
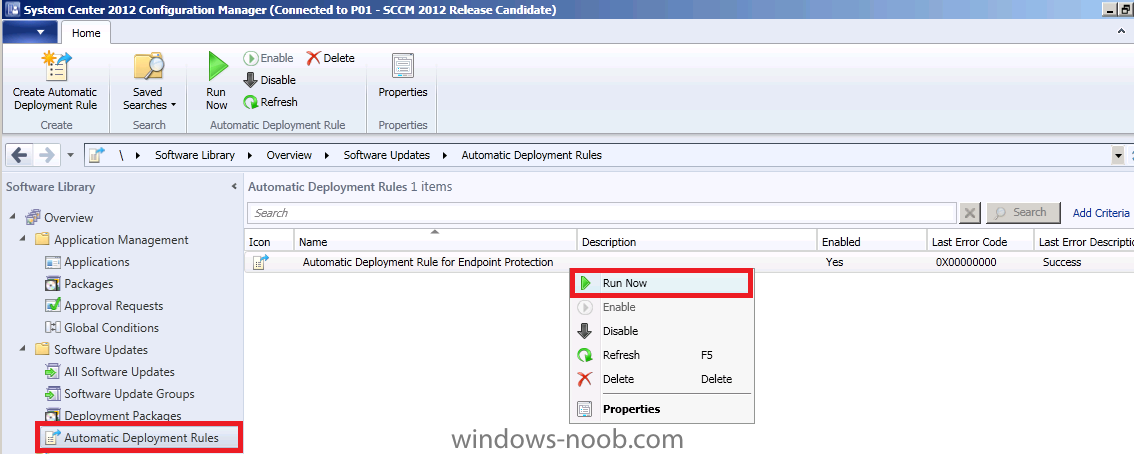
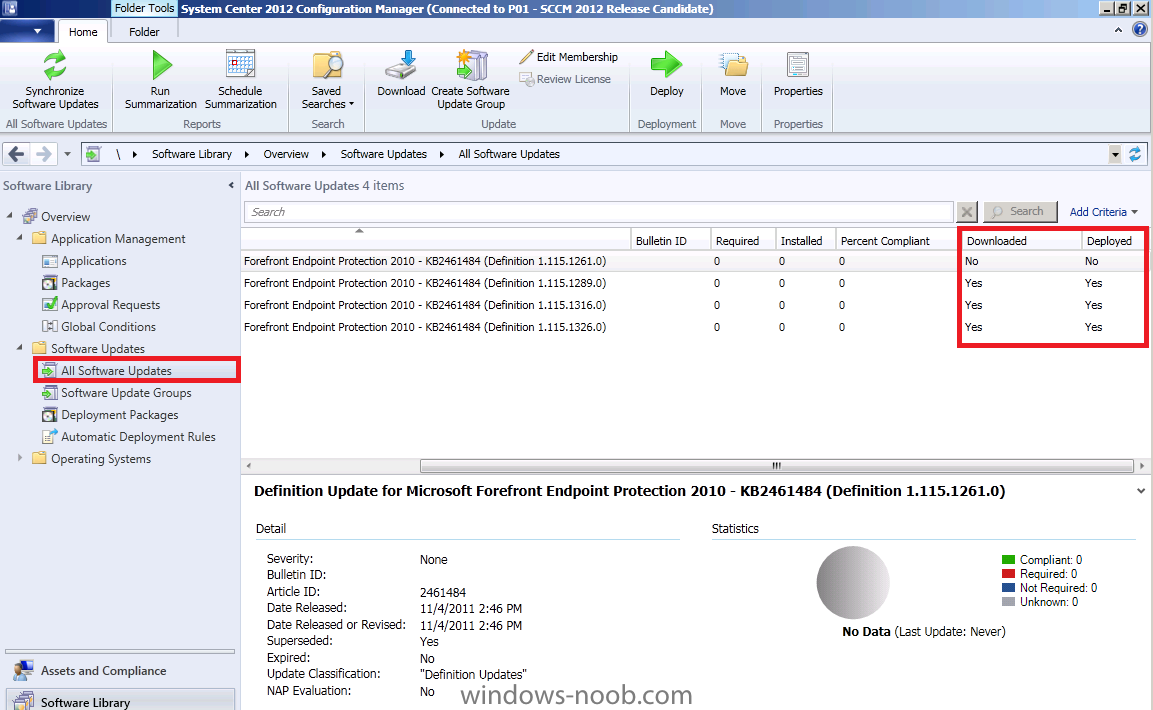
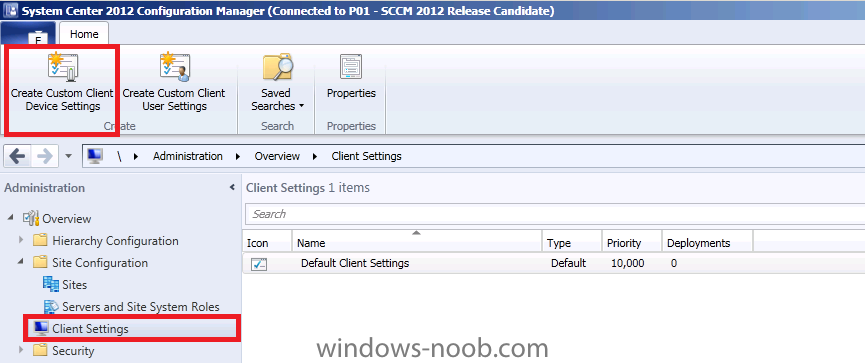
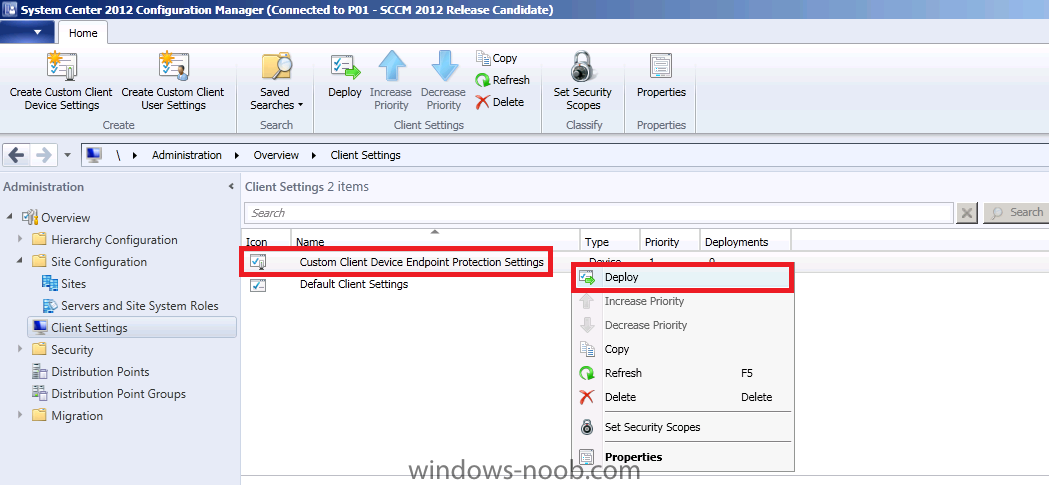
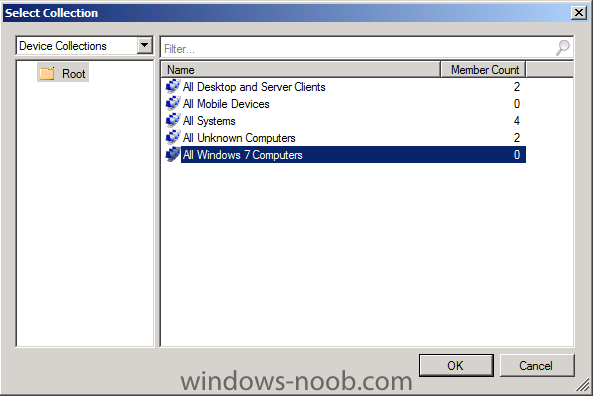
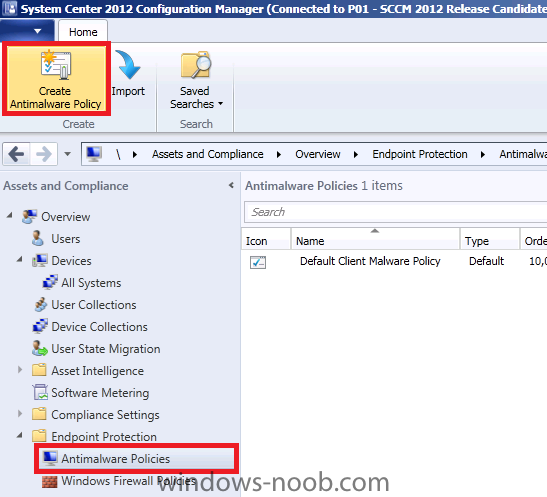
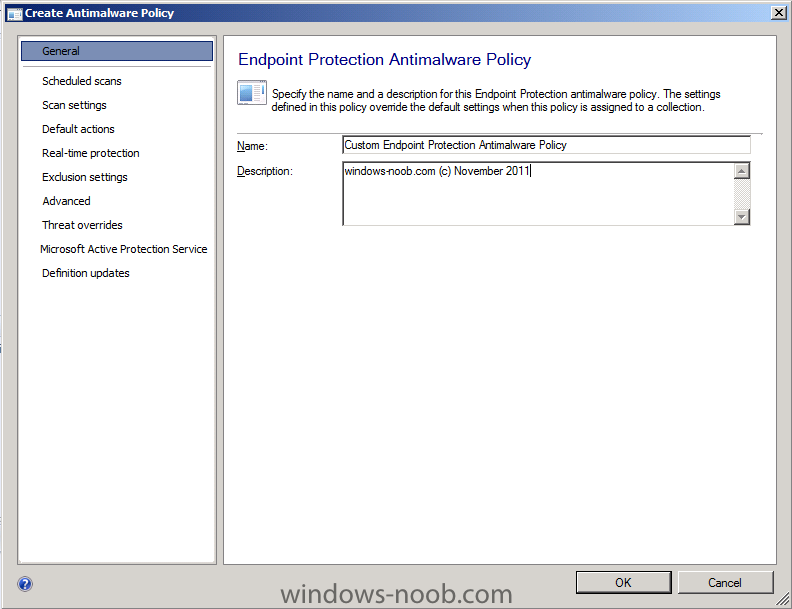
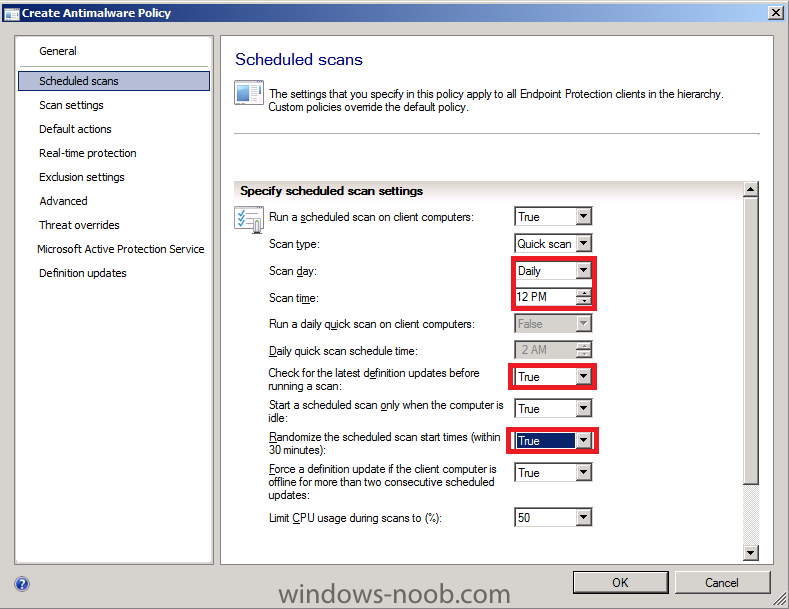
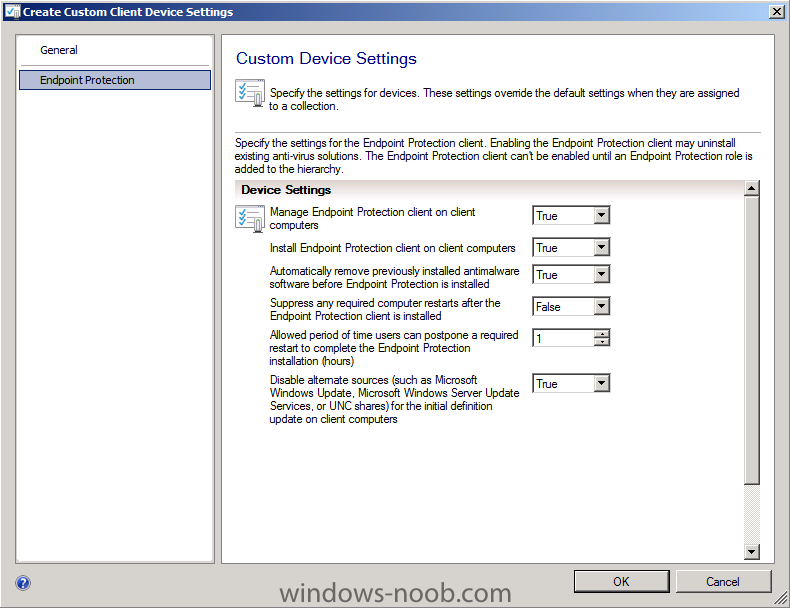
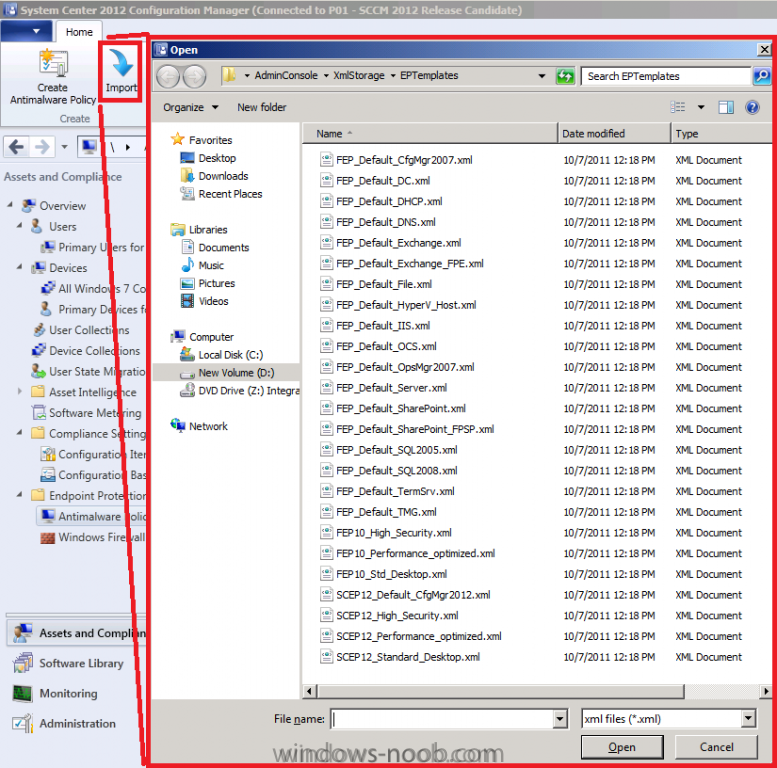
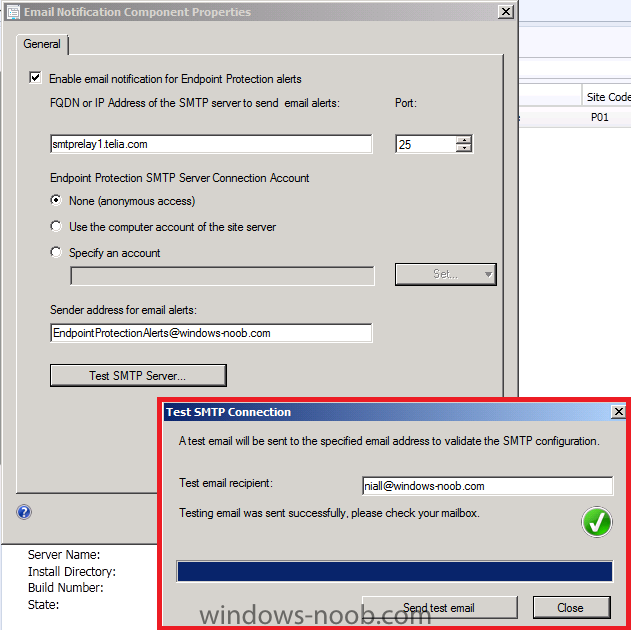
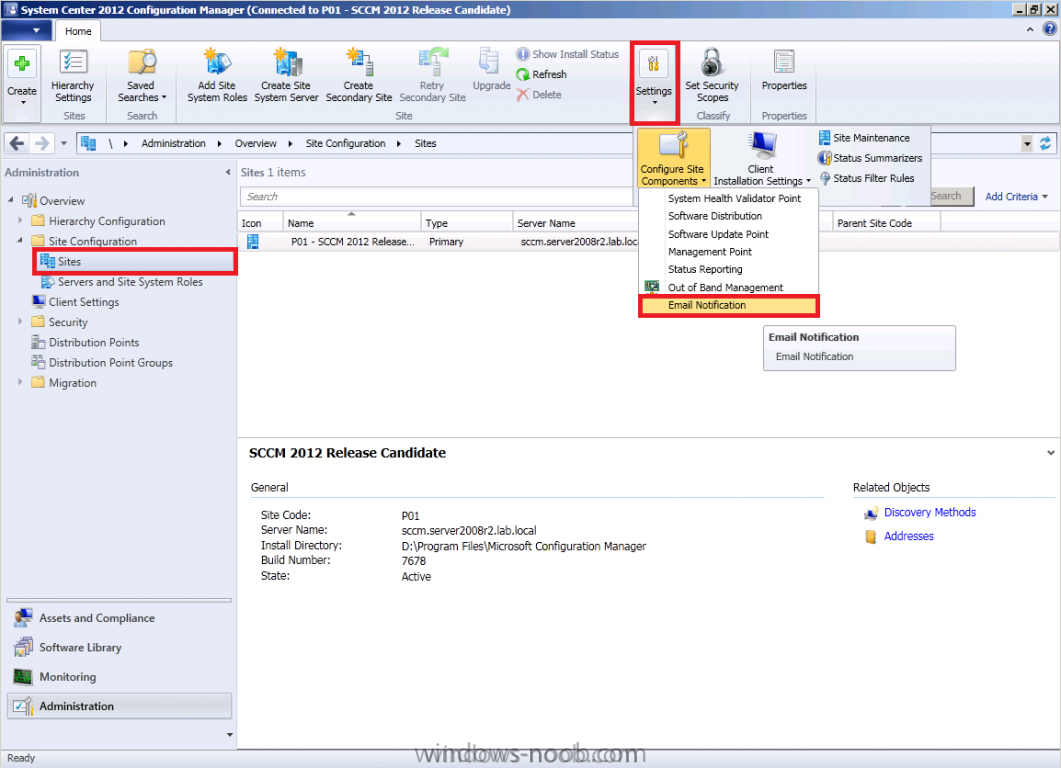
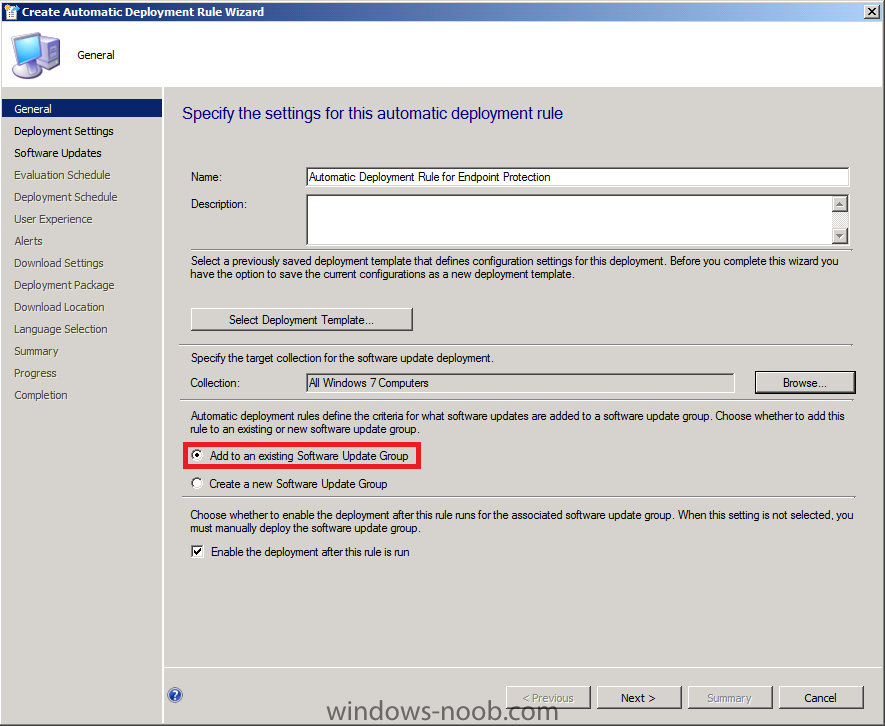
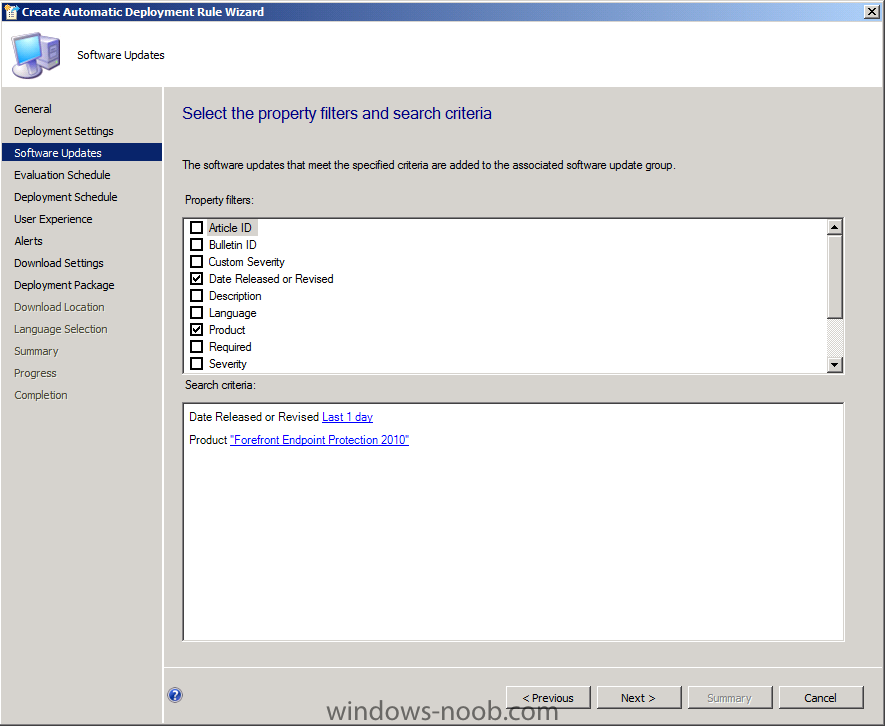
In Part 1 of this series we got our AD and SCCM servers ready, and then we installed System Center 2012 Configuration Manager as a standalone Primary site. In Part 2 we configured the SCCM server further by adding some Windows Server roles necessary for the following Configuration Manager 2012 functionality, Software Update Point (SUP) and Operating System Deployment. In Part 3 we configured the server further by Enabling some Discovery methods and creating Boundary's and Boundary Groups. In Part 4 we configured Client Settings, Added roles and Distributed the Configmgr Client to our Computers within the LAB, now we will enable the Endpoint Protection Role and configure Endpoint Protection settings and we will target All Windows 7 Computers with these settings and policies. Note: In Part 2 we selected Definition Updates in the Classifications screen to support Endpoint Protection as part of the SUP role setup, if you havn't completed that part then do so now before continuing. Below is an Introduction to Endpoint Protection in Configuration Manager, for more info see the following on Technet - http://technet.micro...y/hh508781.aspx When you use Endpoint Protection with Configuration Manager, you benefit from the following: You can configure antimalware policies and Windows Firewall settings to selected groups of computers, by using custom antimalware policies and client settings. You can use Configuration Manager software updates to download the latest antimalware definition files to keep client computers up-to-date. You can send email notifications, use in-console monitoring, and view reports to keep administrative users informed when malware is detected on client computers. Endpoint Protection installs its own client, which is in addition to the Configuration Manager client. The Endpoint Protection client has the following capabilities: Malware and Spyware detection and remediation. Rootkit detection and remediation. Critical vulnerability assessment and automatic definition and engine updates. Integrated Windows Firewall management. Network vulnerability detection via Network Inspection System. Recommended Reading:- Prerequisites for Endpoint Protection in Configuration Manager - http://technet.micro...y/hh508780.aspx Best Practices for Endpoint Protection in Configuration Manager - http://technet.micro...y/hh508771.aspx Administrator Workflow for Endpoint Protection in Configuration Manager - http://technet.micro...y/hh526775.aspx Step 1. Configure the Endpoint Protection Role Perform the following on the SCCM server as SMSadmin Note: The Endpoint Protection point site system role must be installed before you can use Endpoint Protection or before you can set EndPoint Protection client settings. It must be installed on one site system server only and it must be installed at the top of the hierarchy on a central administration site or a standalone primary site. In the configmgr console, click on Administration, expand Overview and expand Site Configuration, select Servers and Site System Roles and click on Home in the Ribbon and click on Add Site System Roles. when the wizard appears click next Select the Endpoint Protection Point role and click next Read and then accept the License Agreement terms Next you get some choices about Microsoft Active Protection service, you can opt in, or opt out, let's select Basic Membership. click next at the summary and review the status on the completion screen. within a few minutes you'll see the Endpoint Protection client appear in the System Tray of your ConfigMgr Server (this is normal behaviour and is expected, you must have the SCEP client installed on your ConfigMgr Server hosting the Endpoint Protection role). Note: you can review the EPSetup.log on the server to monitor role installation progress. Step 2. Configure alerts for Endpoint Protection Perform the following on the SCCM server as SMSadmin Note: Alerts inform the administrator when specific events have occurred, such as a malware infection. Alerts can be displayed in the Configuration Manager console, through reports, or optionally can be emailed to specified users. You can configure Endpoint Protection alerts in System Center 2012 Configuration Manager to notify administrative users when specific security events occur in your hierarchy. Notifications display in the Endpoint Protection dashboard in the Configuration Manager console, in reports, and you can configure them to be emailed to specified recipients. Configure Email Notification (Optional) If you have access to an SMTP server then you can optionally configure Email Notification Alerts. In the configmgr console, click on Administration, expand Overview and expand Site Configuration, select Sites and click on Settings in the ribbon and click on Configure Site Components and select Email Notification. enter your desired settings for SMTP and click Apply. Note that you can test your SMTP settings also. Configure Alerts for Collections Next let's configure Alerts for a Collection, but first let's create a collection called All Windows 7 Computers (in a LAB this is fine for what we want to do, in Production you should create EndPoint Protection specific Collections). Note:- You cannot configure alerts for User Collections.Click on Assets and Complicance in the console,click on Device Collections and in the ribbon click on Create Device Collection. Call the collection All Windows 7 Computers and limit it to All Systems click next, choose Query Rule from the drop down menu and fill in a Query like so (edit query statement, criteria, show query language and replace the code with the below) select * from SMS_R_System where SMS_R_System.OperatingSystemNameandVersion like "%Workstation 6.1%" set the schedule as follows (it's a LAB) click next through the wizard, the collection is now created. In Assets and Compliance select Devices and choose Device Collections, select the All Windows 7 Computers collection (we have no computers in this collection yet but we will have soon), choose properties Click on the Alerts tab and place a checkmark in View this collection in the Endpoint Protection Dashboard click on Add and select all the options click ok and leave the other Alert settings as they are Step 3. Configure the SUP Products to Sync and Perform a Sync Perform the following on the SCCM server as SMSadmin Click on Administration, expand Overview and expand Site Configuration, select Sites and click on Settings in the ribbon and click on Configure Site Components and select Software Update Point. In the Products tab ensure that the product Forefront Endpoint Protection 2010 check box is selected. change the Sync Schedule to 1 days Click on Software Library, Software Updates, right click on All Software Updates and choose Synchronize Software Updates answer Yes to the Sync at this point you can review the Wsyncmgr.log in CMtrace Step 4. Configure SUP to deliver Definition Updates using an Automatic Deployment Rule Perform the following on the SCCM server as SMSadmin In the Configuration Manager console, click Software Library, expand Software Updates and click on Automatic Deployment Rules in the Ribbon click on Create Automatic Deployment Rule and the wizard appears, give the rule a suitable name like Automatic Deployment Rule for Endpoint Protection and point it to our previously created All Windows 7 Computers collection, select add to an exisiting software update group On the Deployment Settings page of the wizard select Minimal from the Detail level drop-down list and then click Next this reduces State Messages returned and thus reduces Configuration Manager server load on the Software Updates page select Date Released or Revised in the Search Criteria pane, click on Value to find and select Last 1 day In the Products tab ensure that the product Forefront Endpoint Protection 2010 check box is selected. for Evaluation Schedule, click on Customize and set it to run every 1 days, Tip: notice that the Synchronization Schedule is listed below, make sure that this occurs at least 2 hours before you evaluate for Forefront Endpoint Protection definition updates, there is no point checking for updates if we haven't synchronized yet. for Deployment Schedule set Time based on: UTC (if you want all clients in the hierarchy to install the latest definitions at the same time. This setting is a recommended best practice.), for software available select 2 hours to allow sufficient time for the Deployment to reach all Distribution Points and select As soon as possible for the installation Deadline. for the User Visual Experience select Hide from the drop down menu for Alerts enable the option to generate an alert for download settings as the definition updates are important let's download them even if on slow networks For Deployment Package we are creating a new one so give it a suitable name like Endpoint Protection Definition Updates and point it to a previously created folder Note: Make sure that \\sccm\sources\updates\Endpoint (or whatever path you choose) exists otherwise the wizard will fail below when it tries to Download as the Network Path won't exist. In addition Everytime this ADR runs it will want to create a new deployment package as specified above, we do not want this to happen so after running the ADR once, retire it and create a new ADR except this time point the deployment package to the packaged which is now created called Endpoint Protection Definition Updates. click your way through the rest of the Wizard till completion if you scroll to the right you'll see nothing has been downloaded, yet...(because our Automatic Deployment Rule hasn't run yet since the sync) so let's force the Automatic Deployment Rule to run now, right click on our ADR and choose Run Now and after a few minutes look at our Definition Updates again, notice the difference ? Step 5. Configure Custom Client Settings for Endpoint Protection Perform the following on the SCCM server as SMSadmin Note: Do not configure the default Endpoint Protection client settings unless you are sure that you want these applied to all computers in your hierarchy. Below is an explanation of the EndPoint Protection settings available:- In the Configuration Manager console, click Administration, click Client Settings and on the Home tab in the Create group, click Create Custom Client Device Settings. Select Endpoint Protection and call it Custom Client Device Endpoint Protection Settings click on Endpoint Protection and review the settings, change them to as follows:- Manage Endpoint Protection Client on Client Computers = True Install Endpoint Protection Client on Client Computers = True Automatically remove previously installed antimalware software before Endpoint Protection is installed = True Suppress any required computer restart after the Endpoint Protection client installed = False Allowed period of time users can postpone a required restart to complete the Endpoint Protection installation (hours) = 1 Disable alternate sources (such as Windows Update, Microsoft Windows Server Update Services or UNC shares) for the initial definition update on client computers = True click ok when done, right click on the new custom settings and choose Deploy select our All Windows 7 Computers collection and choose Ok. Step 6. Configure Custom AntiMalware Policies Perform the following on the SCCM server as SMSadmin Note: Do not configure the default client Malware Policy unless you are sure that you want these applied to all computers in your hierarchy. There are several pre-created AntiMalware Policies available, to review/use them click on Import. (see screenshot below) We will create our own policy in this LAB so in the Configuration Manager console, click Assets and Compliance, click Endpoint Protection, select Antimalware Policies. In the ribbon select Create Antimalware Policy give the policy a name like Custom Endpoint Protection Antimalware Policy for Scheduled scans change to Daily at 12 pm (default was Saturday, 2am) and set it to check for latest definition updates before the scan and to randomize the scan start time for Definition Updates set the check to 2 hours and click on set source, only select Updates distributed from Configuration Manager (deselet the other options) Note: if your SCCM server has no internet access you can configure it to check for updates from UNC file shares Click Ok, Ok. Right click our Custom Endpoint Protection Antimalware Policy and select Deploy, choose our All Windows 7 Computers Collection as we did for the Device settings above. that's it we are done ! we have now created custom Client Device settings and a Custom Antimalware Policy for our All Windows 7 Computers collection, in further posts we will add some computers to that collection and verify our Endpoint Protection settings. Note: If you are having issues with the client installing or getting the Endpoint Protection role installed please refer to the following Endpoint Protection Log files. EndpointProtectionAgent.log - Records details about the installation of the Endpoint Protection client and the application of antimalware policy to that client.EPCtrlMgr.log - Records details about the synchronization of malware threat information from the Endpoint Protection role server into the Configuration Manager database.EPMgr.log - Monitors the status of the Endpoint Protection site system role.EPSetup.log - Provides information about the installation of the Endpoint Protection site system role.


-
Pending Request ID: 551
anyweb replied to Dewrath's question in Troubleshooting, Tools, Hints and Tips
have you distributed BOTH boot images to the dps ? x86 and x64 ? -
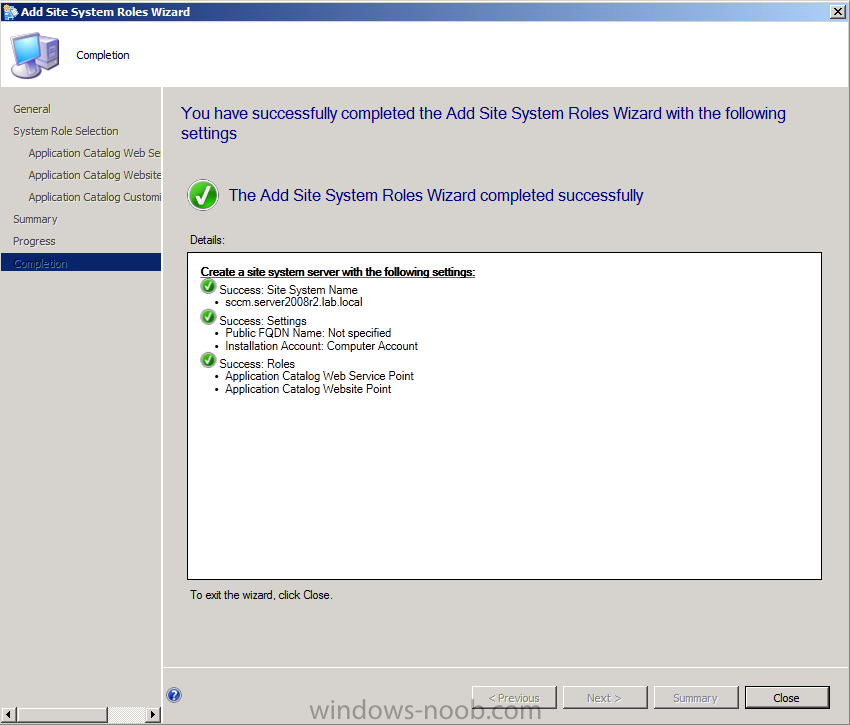
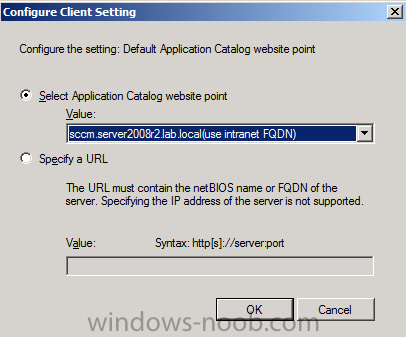
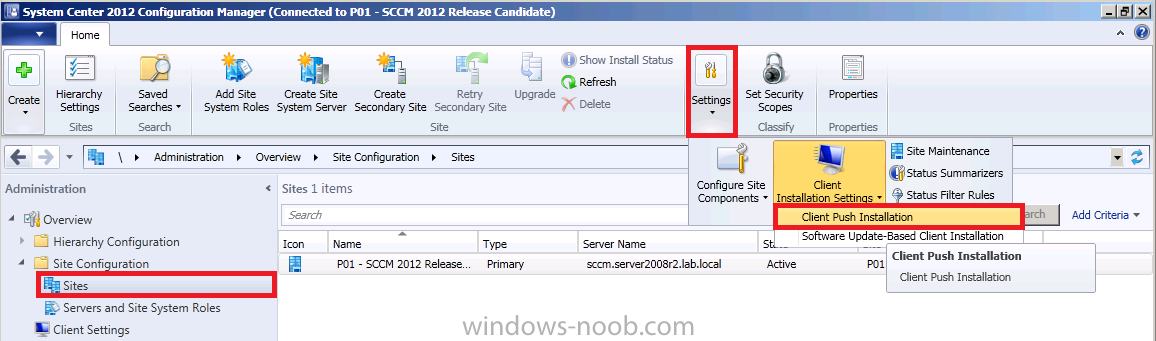
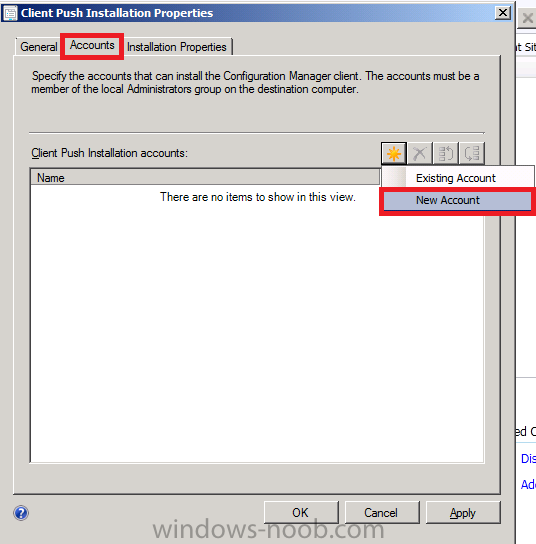
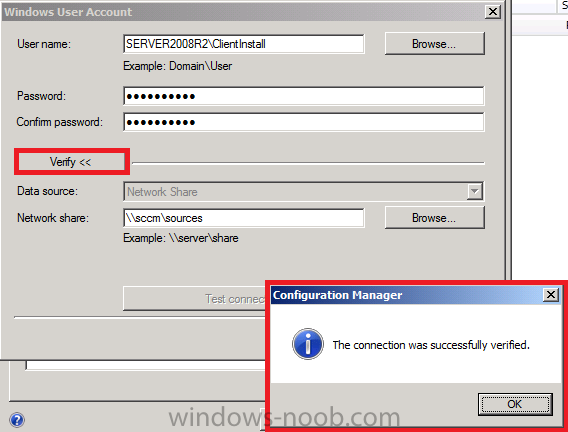
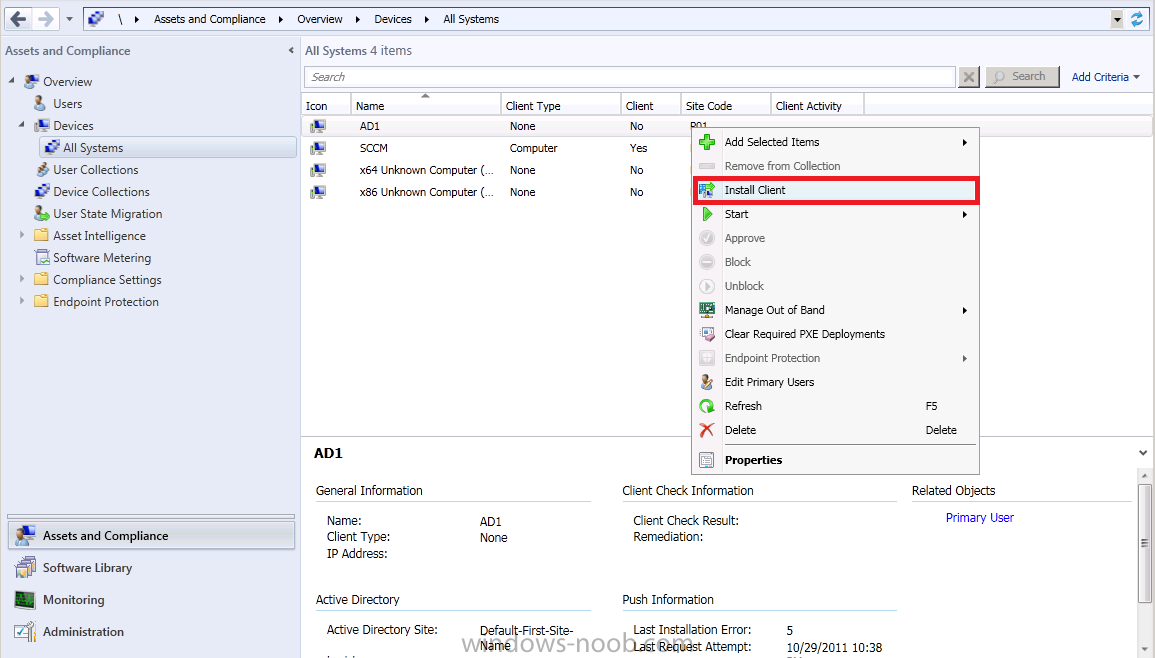
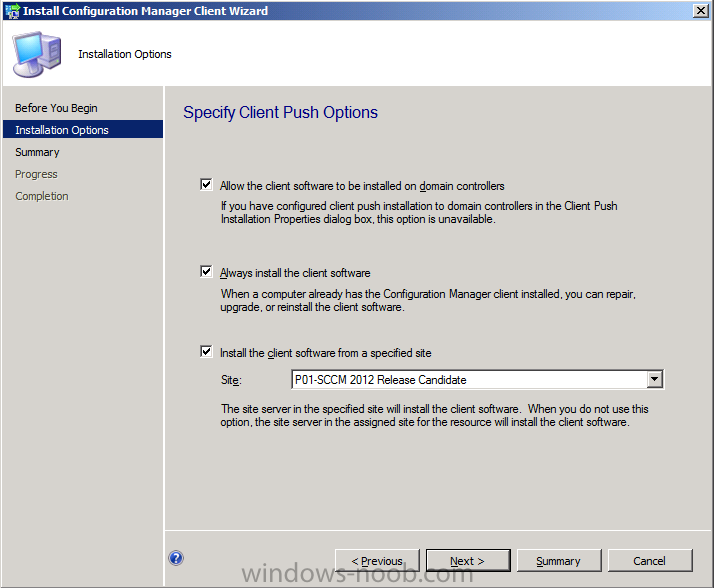
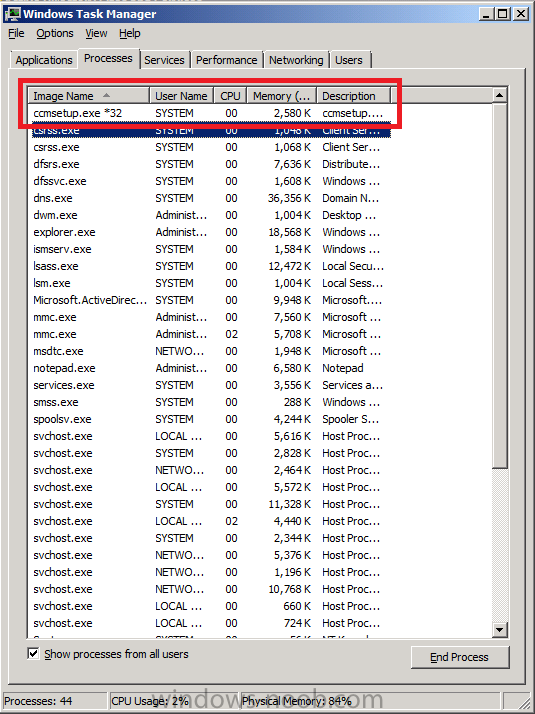
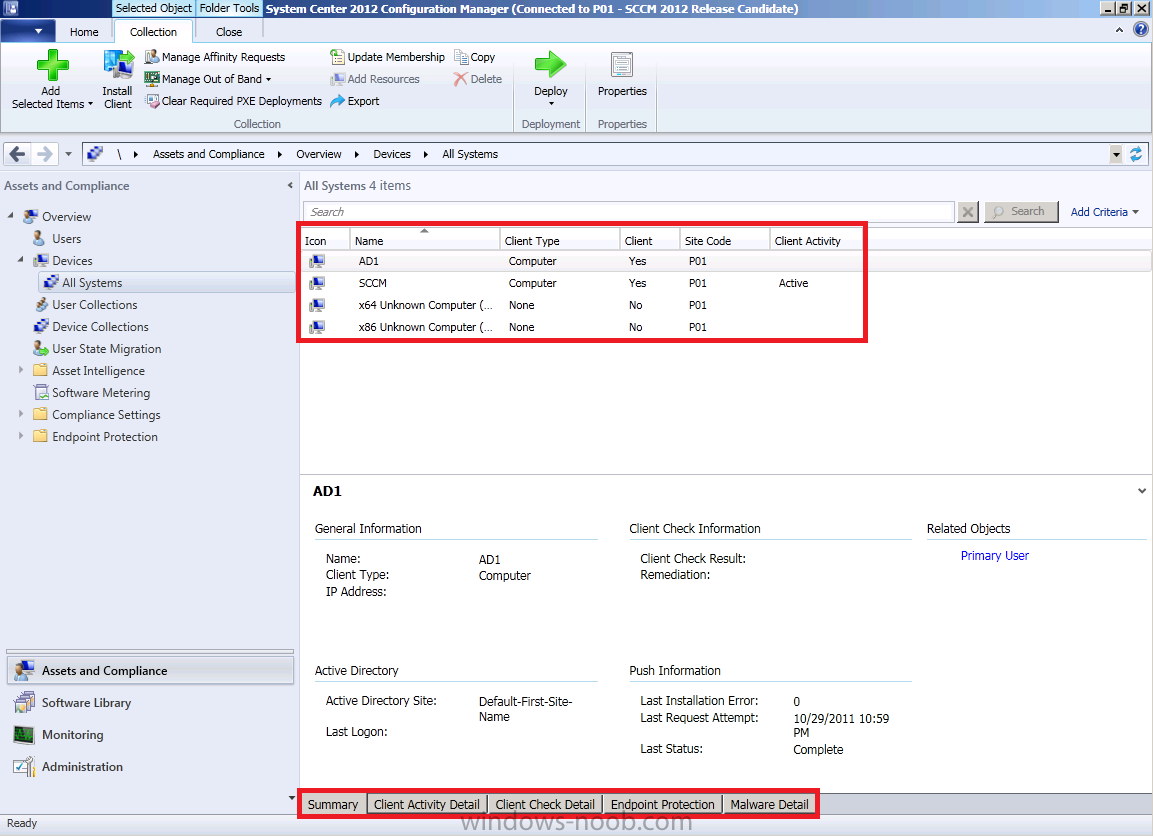
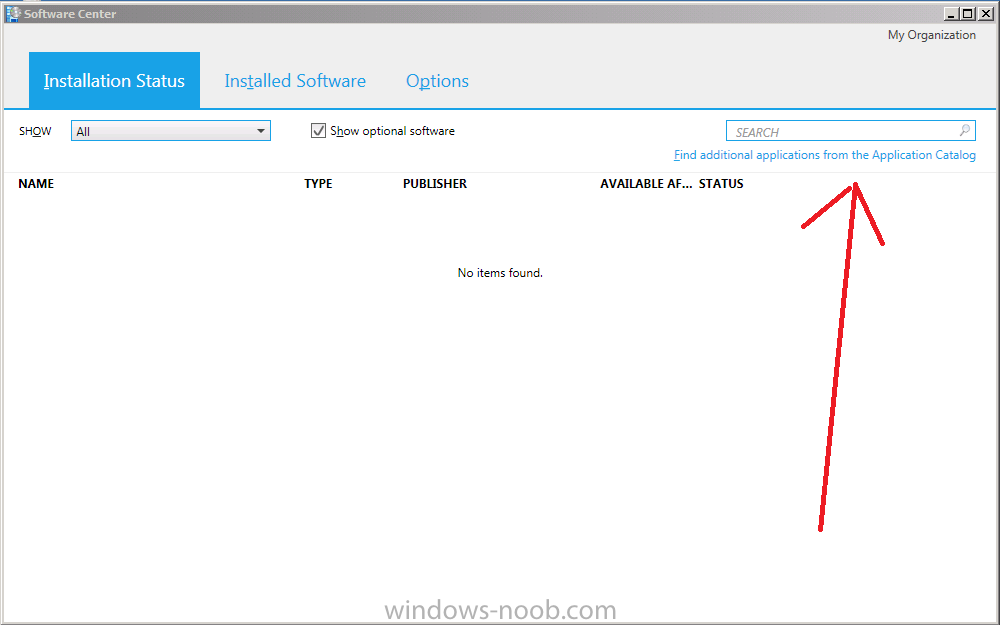
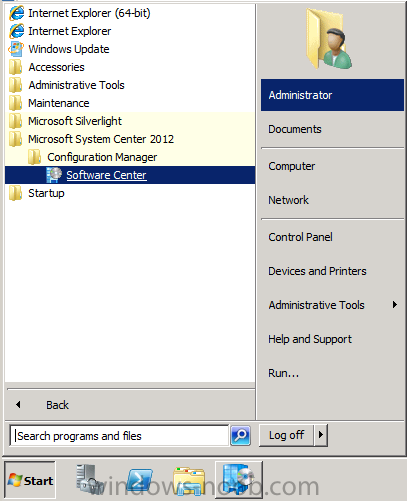
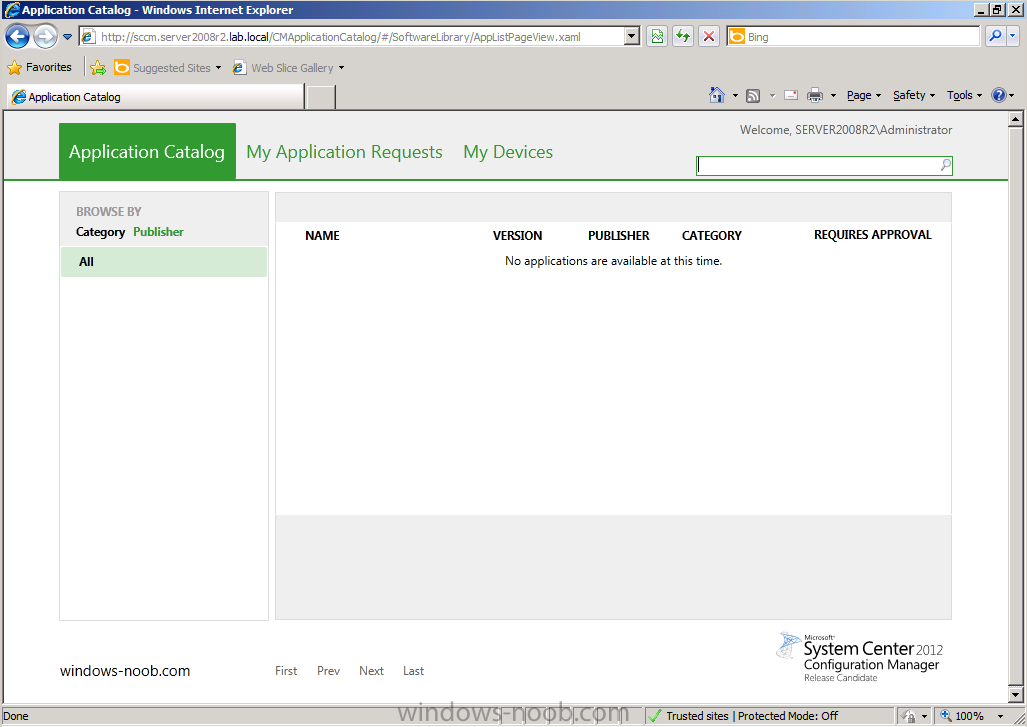
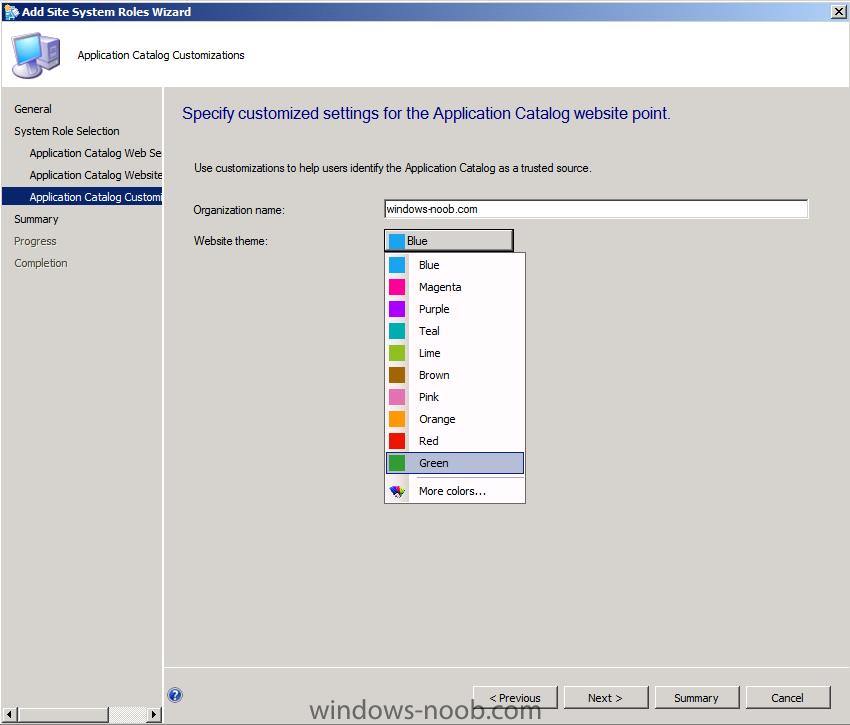
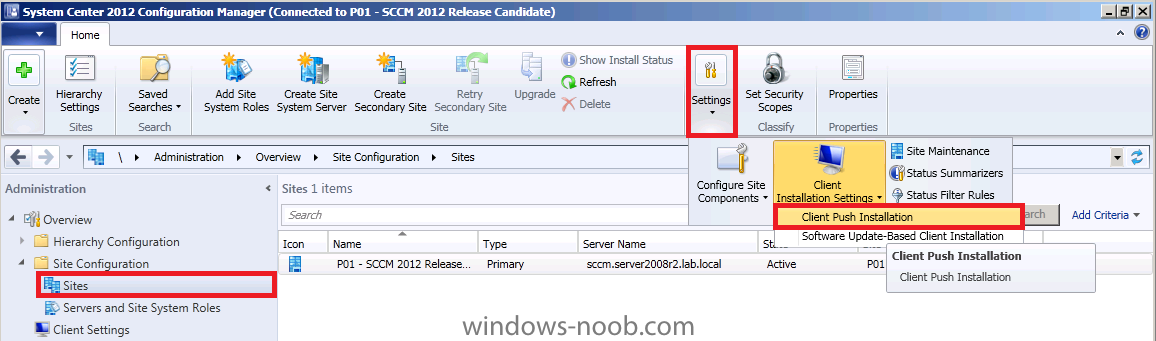
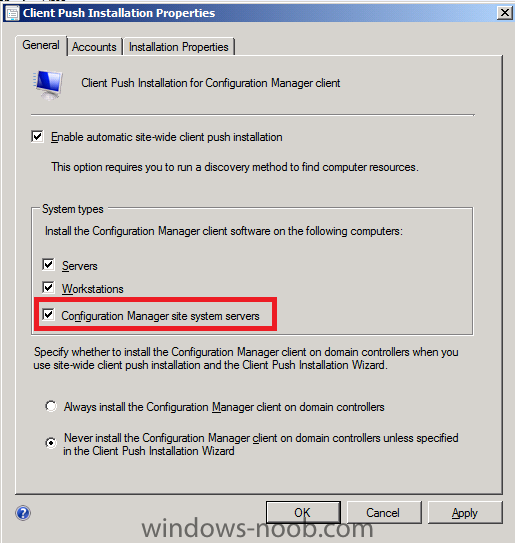
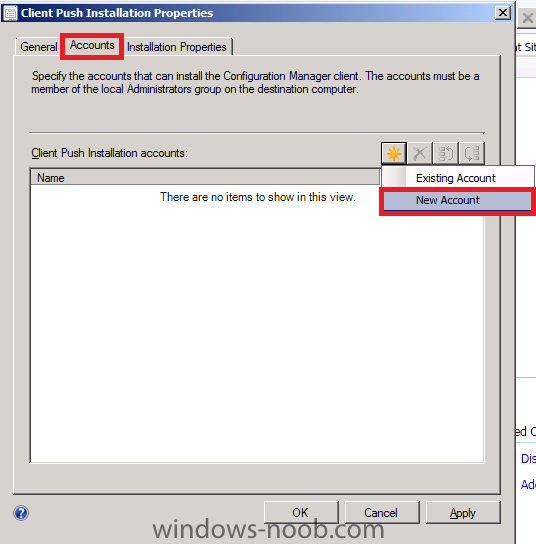
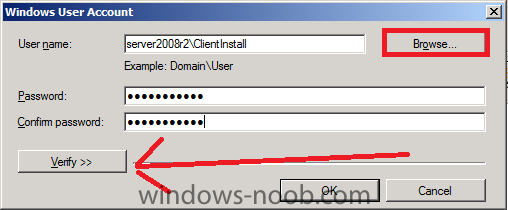
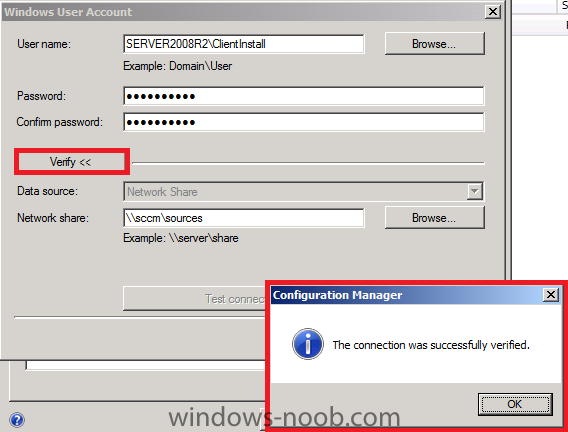
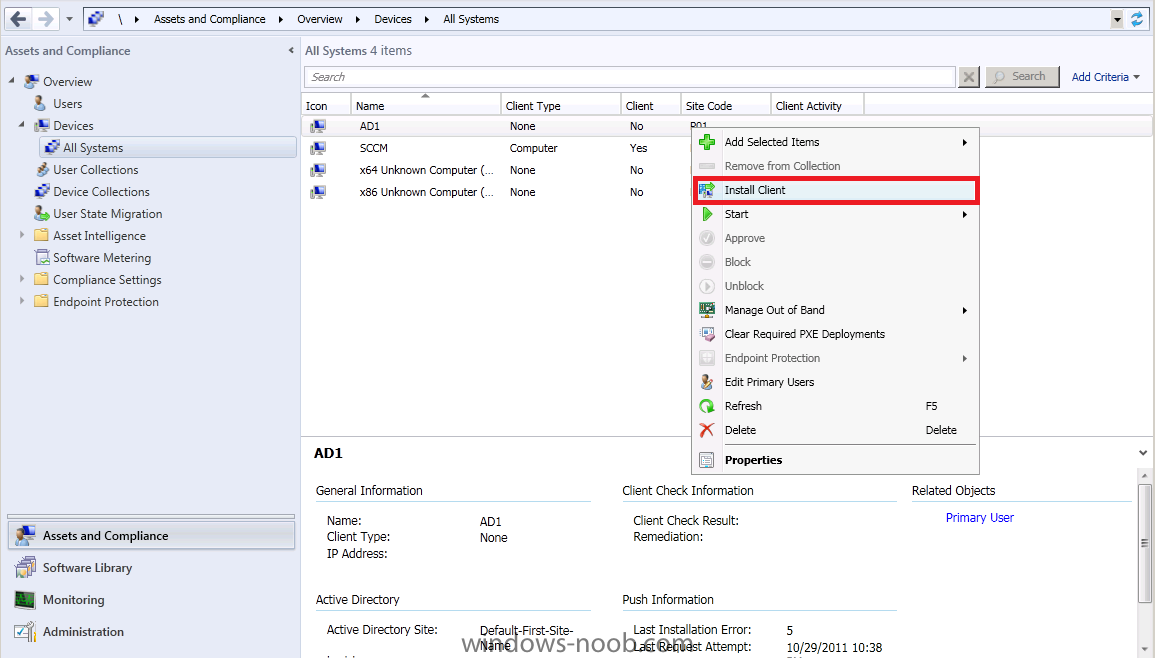
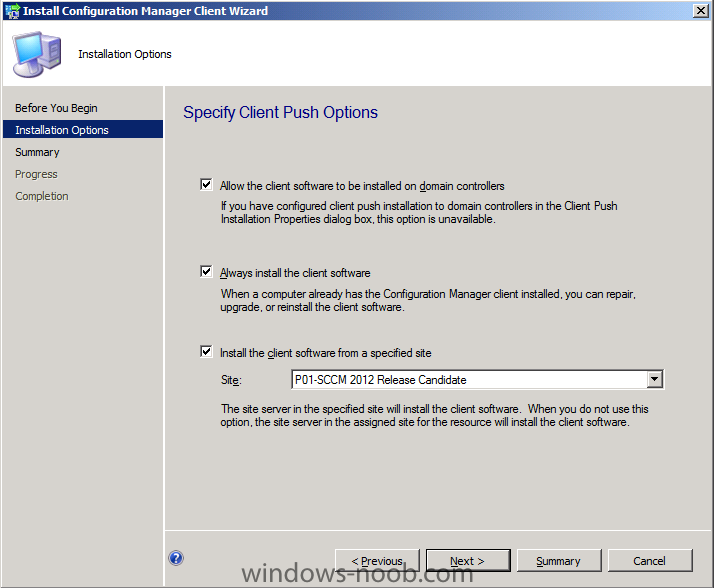
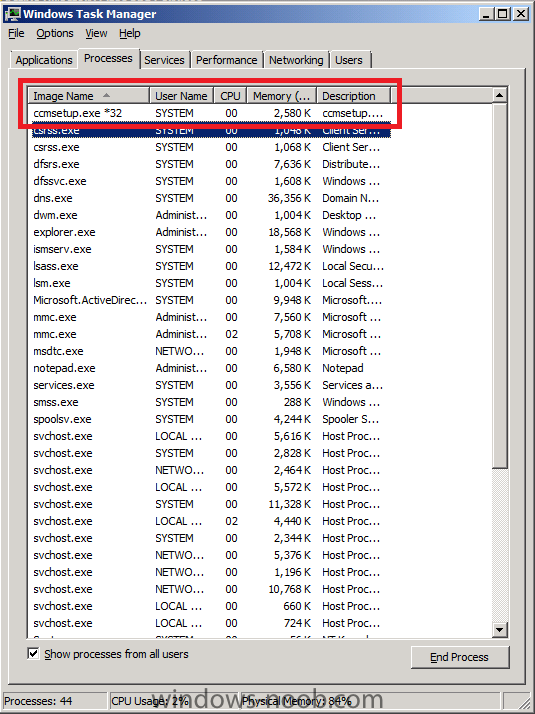
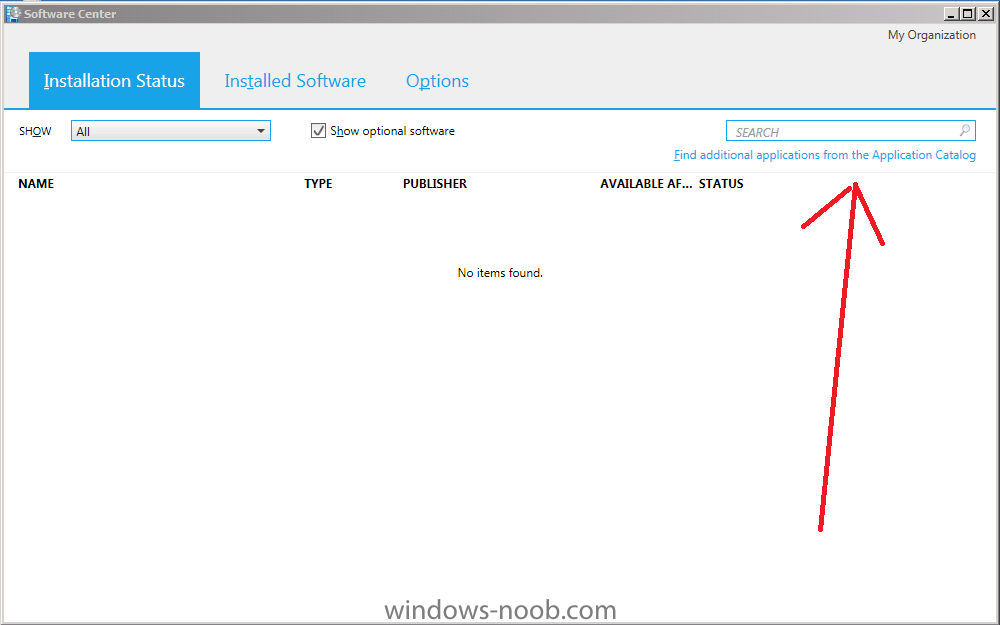
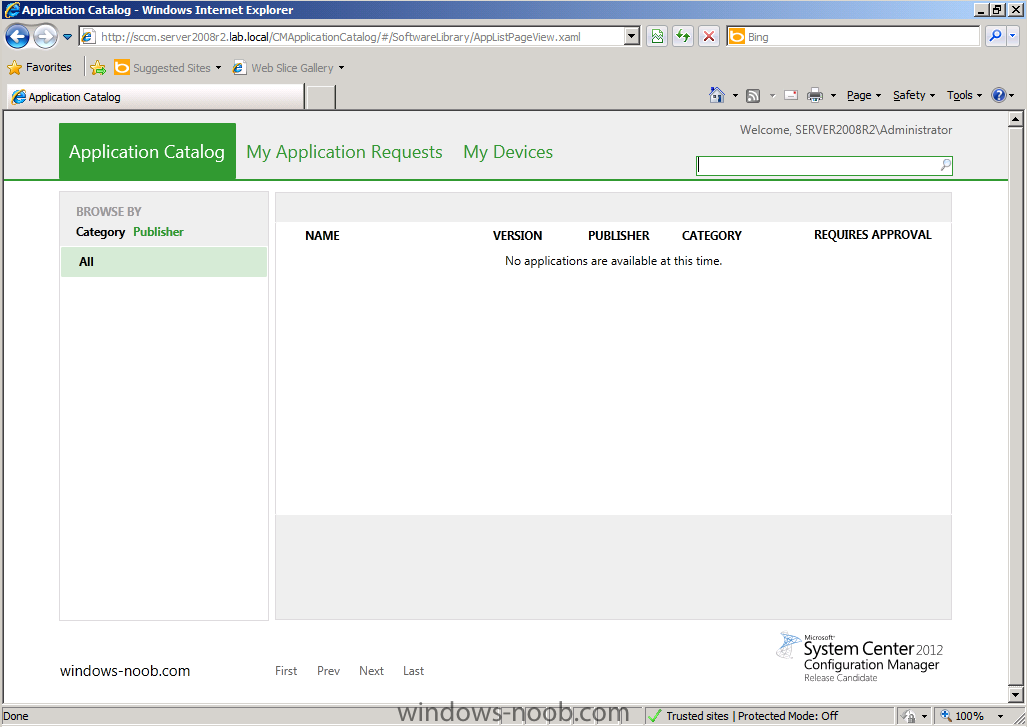
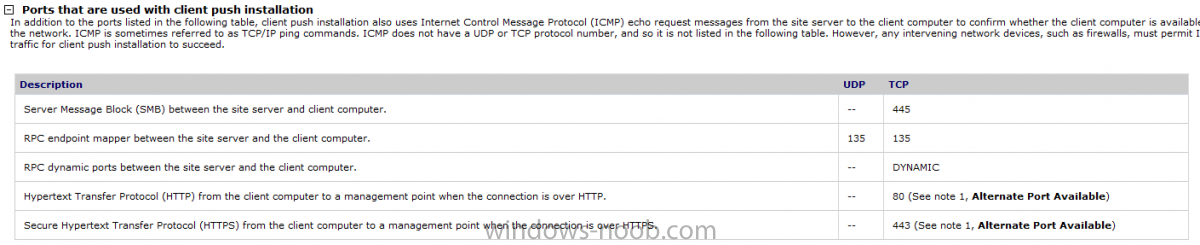
In Part 1 of this series we got our AD and SCCM servers ready, and then we installed System Center 2012 Configuration Manager as a standalone Primary site. In Part 2 we configured the SCCM server further by adding some Windows Server roles necessary for the following Configuration Manager 2012 functionality, Software Update Point (SUP) and Operating System Deployment. In Part 3 we configured the server further by Enabling some Discovery methods and creating Boundary's and Boundary Groups. In this part we will configure Client Settings, add roles and Distribute the Configmgr Client to our Computers within the LAB. In Firewall Ports used during client push installation. Note: we will use the ClientInstall account to install the configmgr client on our computers, make sure that this account is a local administrator on your target computers. In Administration, click on Site Configuration, Sites, select our site, in the ribbon above click on Settings, it will open a new menu, from that menu select Client Installation Settings and from there select Client Push Installation. On the general screen, place a checkmark in Enable Automatic site-wide client push installation Click on the Accounts tab, and select the yellow star, choose New Account type in (or browse to select the AD user) the Client Push account, use our ClientInstall account which we created in Active Directory in Part 1. Note the Verify button, this is new since Beta 2 and allows you to verify that the credentials can connect to your network resources, if you get your password wrong it will tell you ! Click on Verify and type in a Unc path to check. Click Ok. Click on Assets and Compliance and expand Devices, All Systems, you should see that our SCCM server has a client installed but our Domain Controller does not. Note: If the site server cannot contact the client computer or start the setup process, it automatically repeats the installation attempt every hour for up to 7 days until it succeeds. You can wait until Client push installs the client or manually install it right now by Right clicking on the Domain Controller and choose Install Client. set the Installation Options click next through the wizard, close. Meanwhile, on the DC (AD1-Domain Controller) check task manager, and you'll see ccmsetup starting...success after some minutes the client is installed and you can refresh the view, you'll notice is says Client=Yes on both our systems in the Lab and there are new tabs to look at since beta 2 on the bottom of the screen. We'll get to them in a later post. On your AD computer you can start Software Center click on Find applications from the application catalog and your Application Catalog will pop up in Green !


-
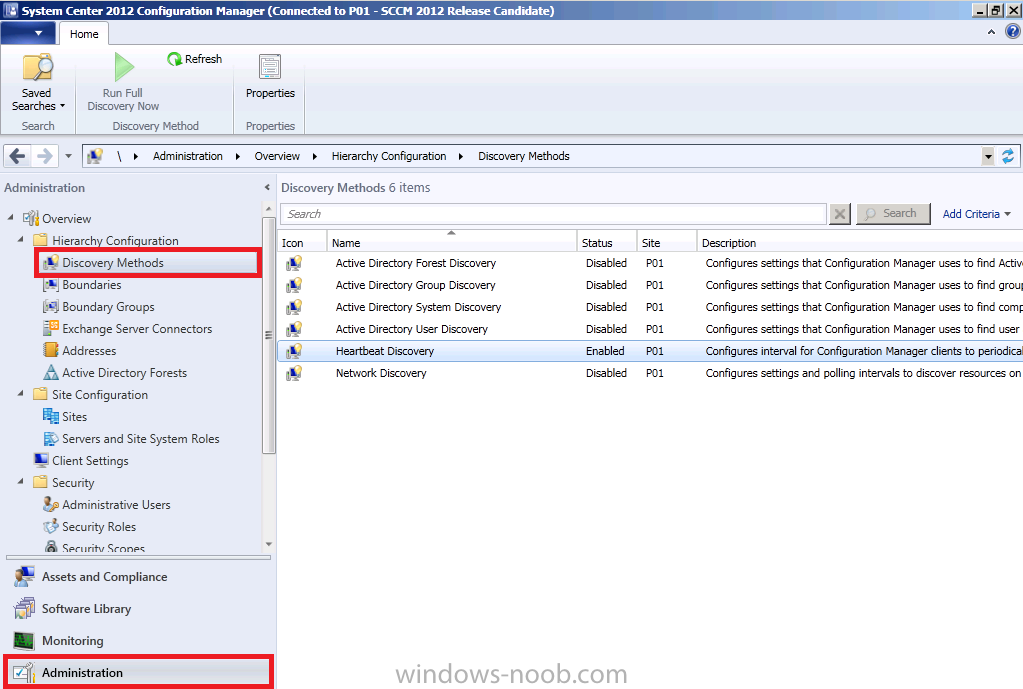
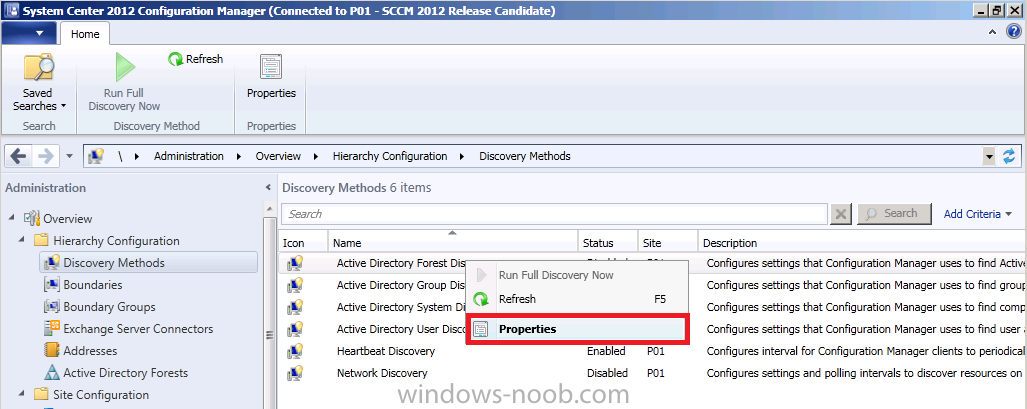
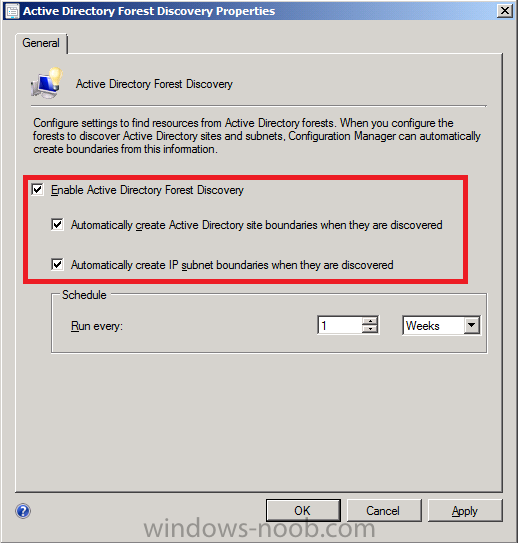
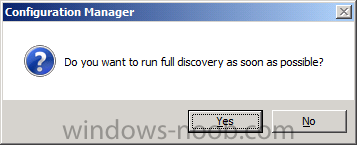
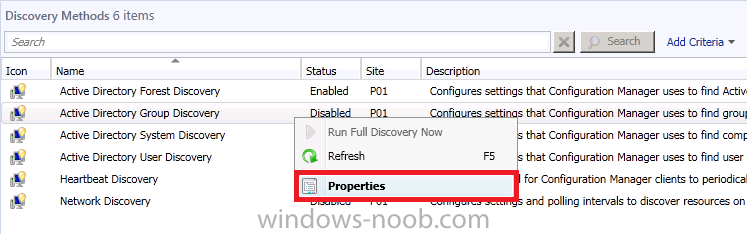
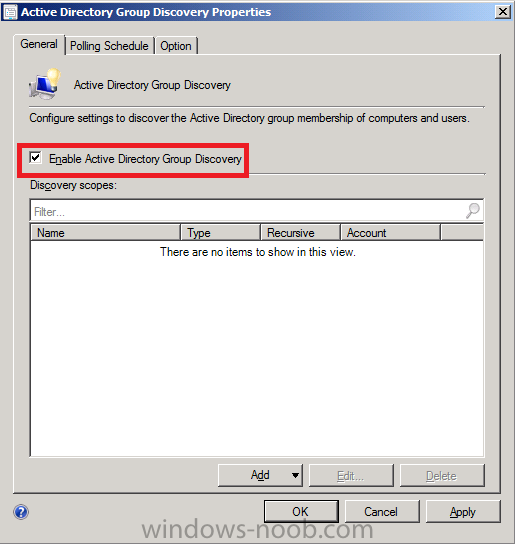
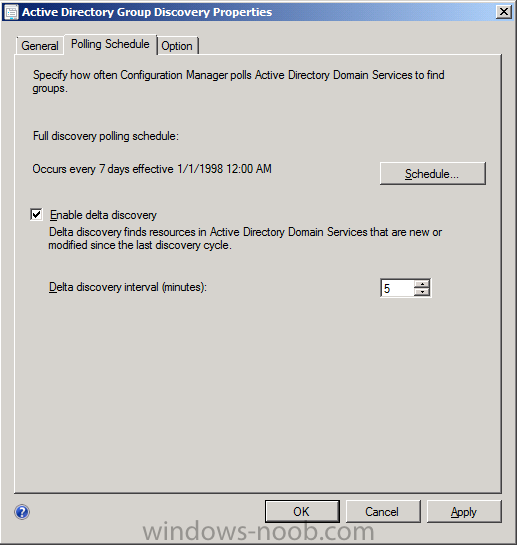
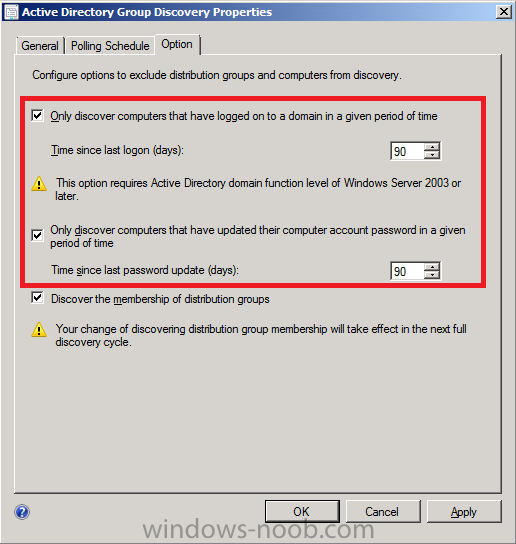
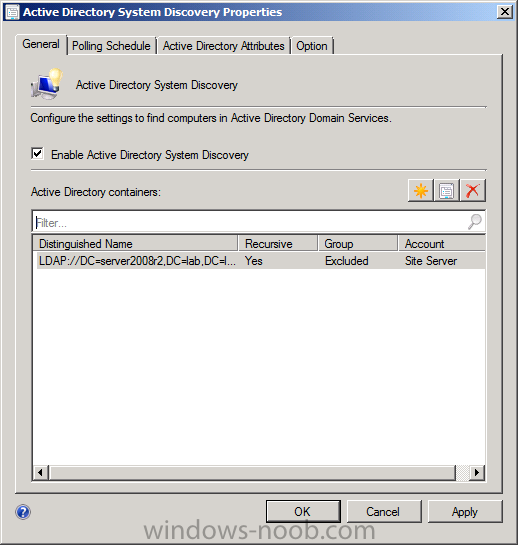
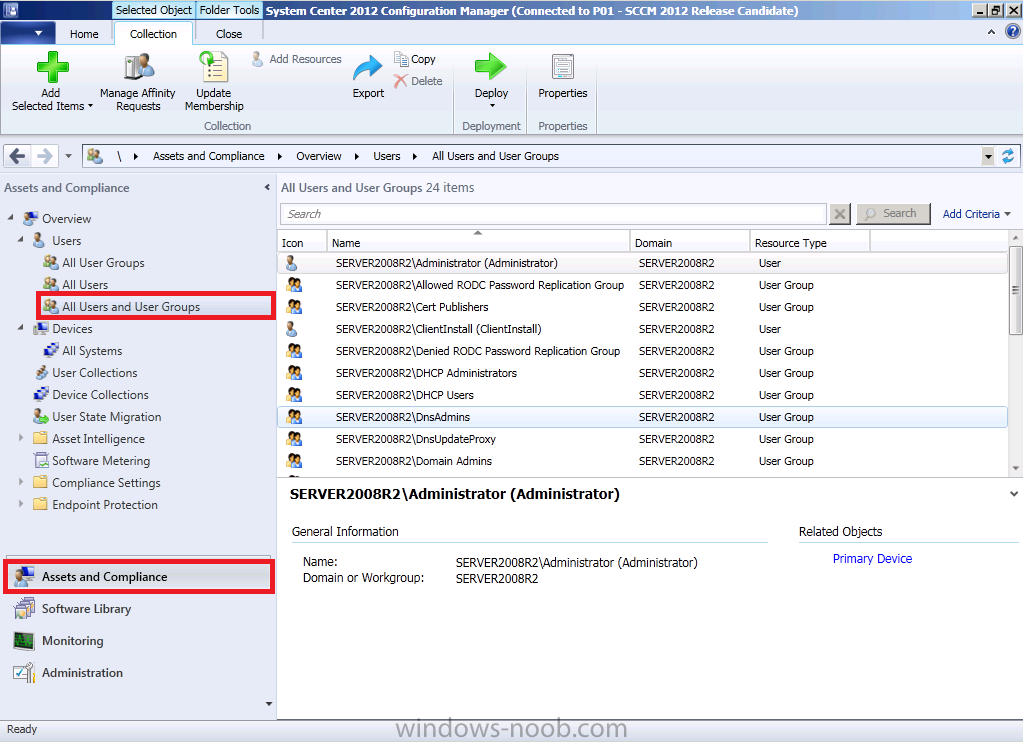
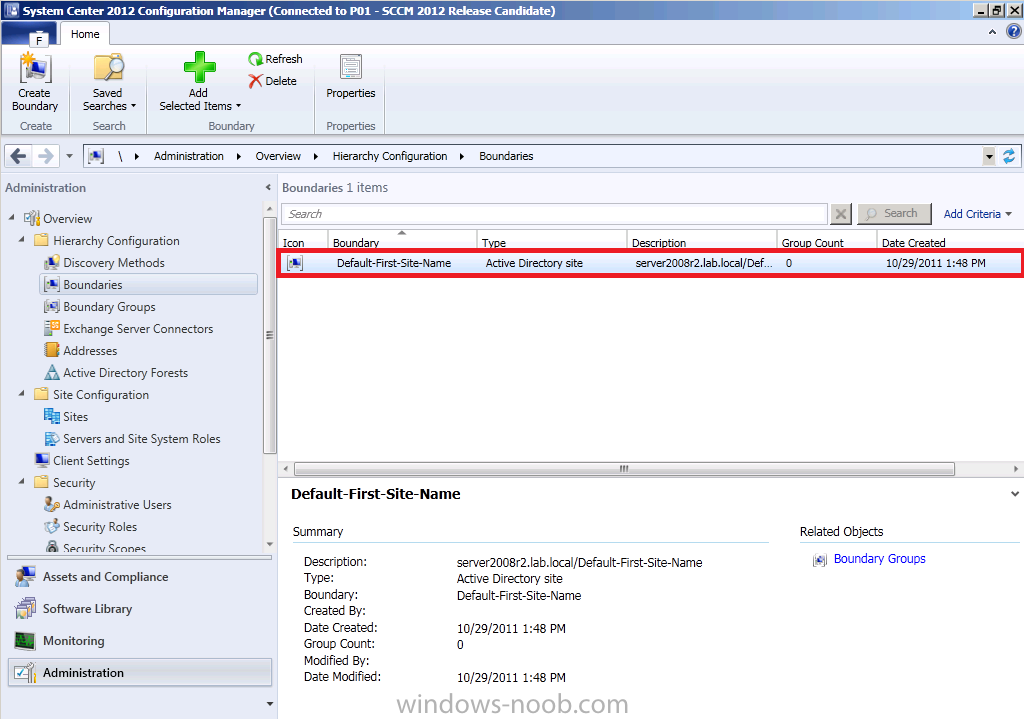
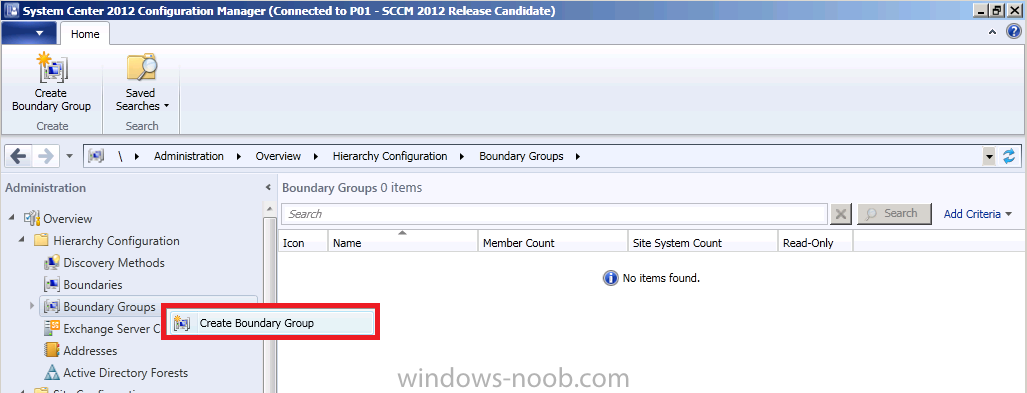
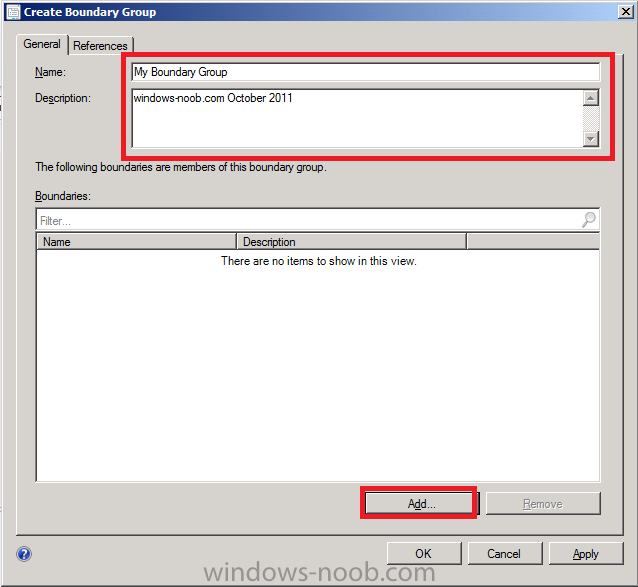
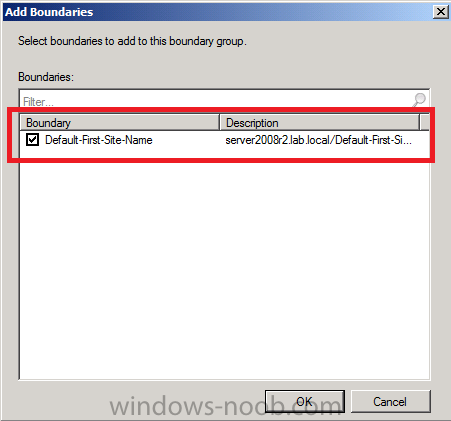
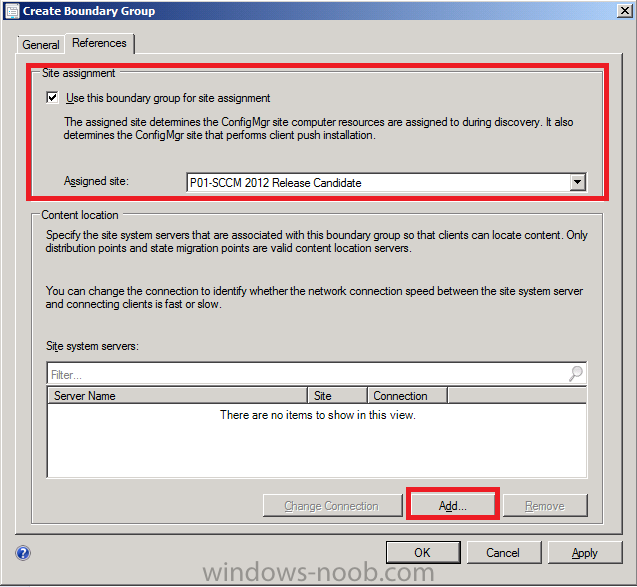
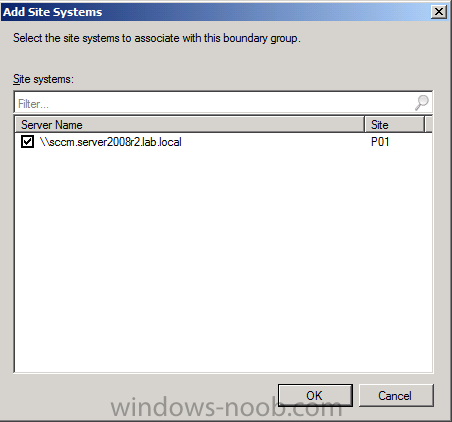
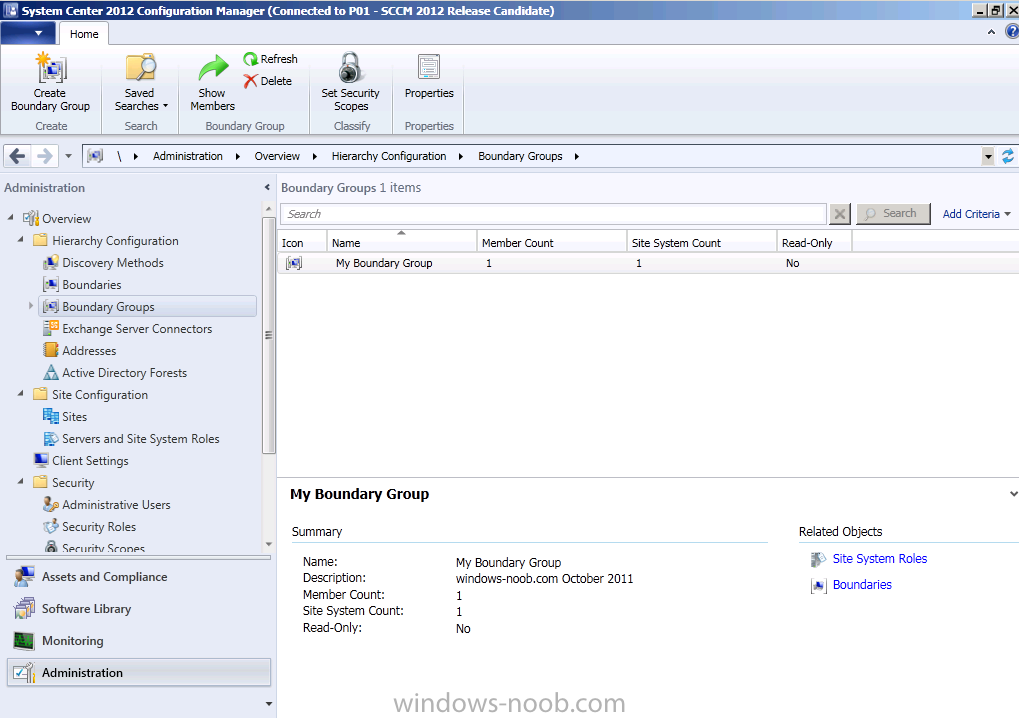
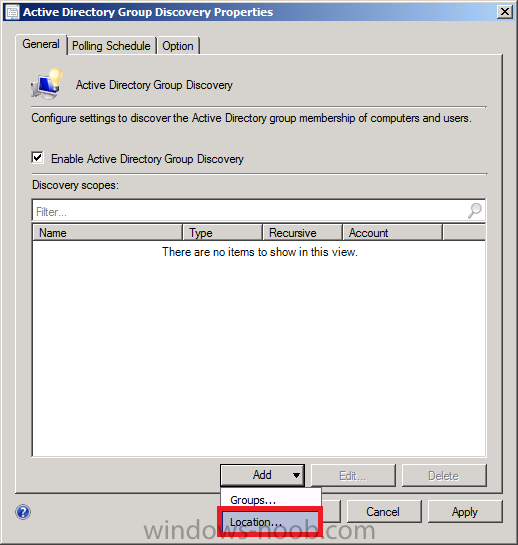
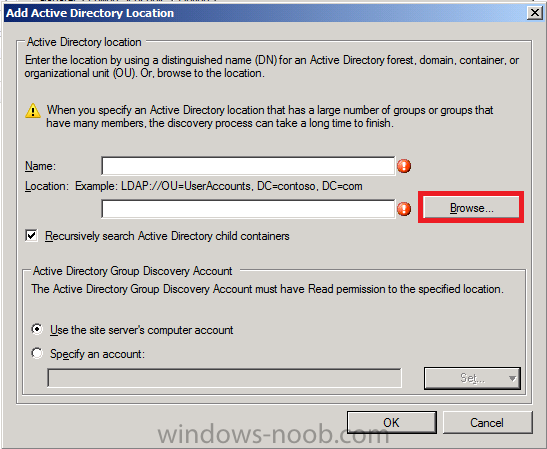
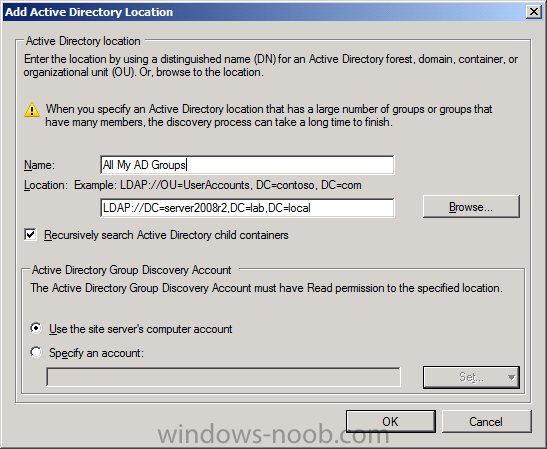
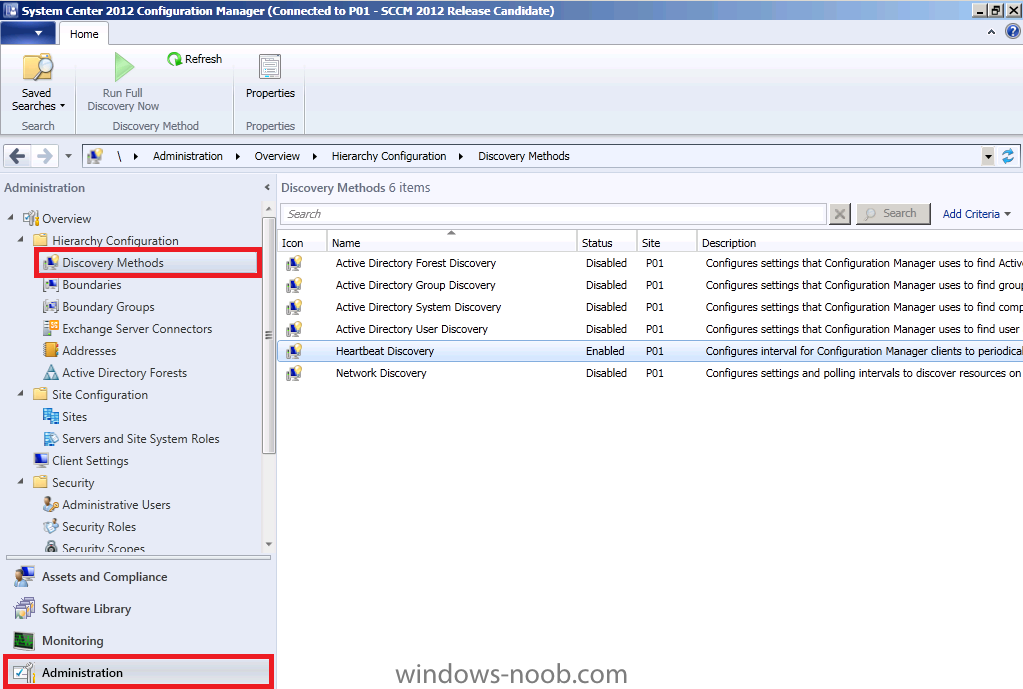
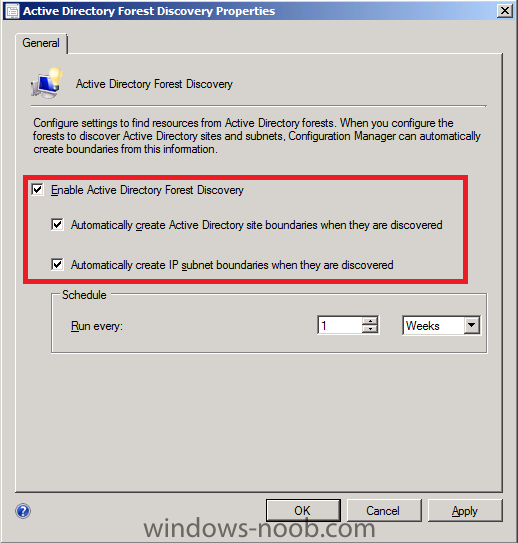
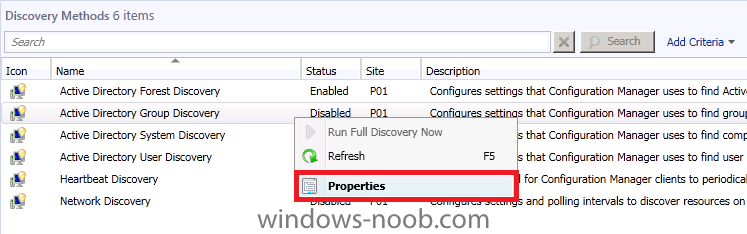
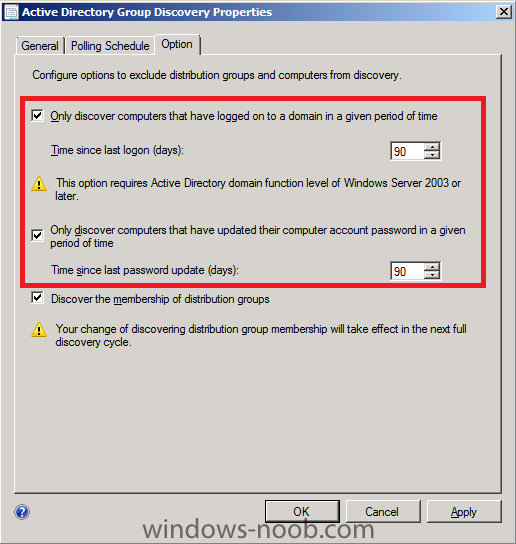
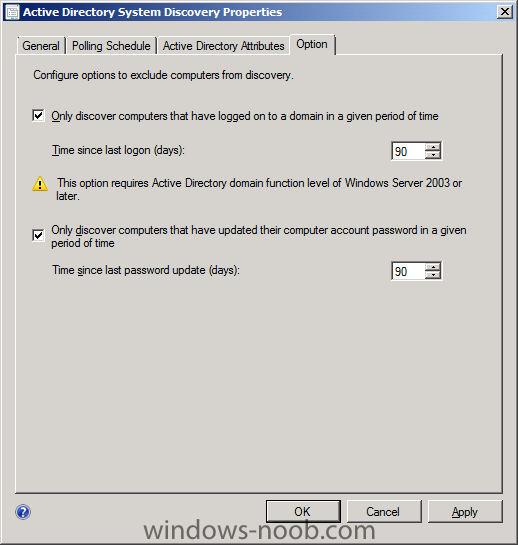
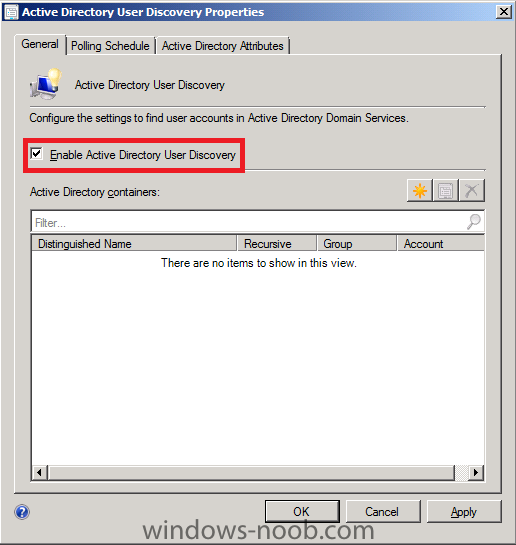
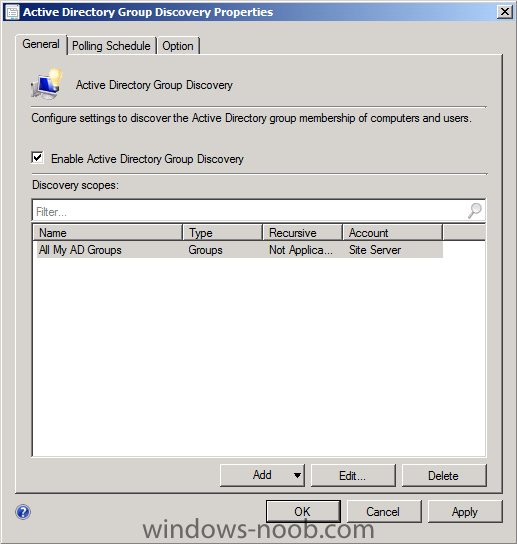
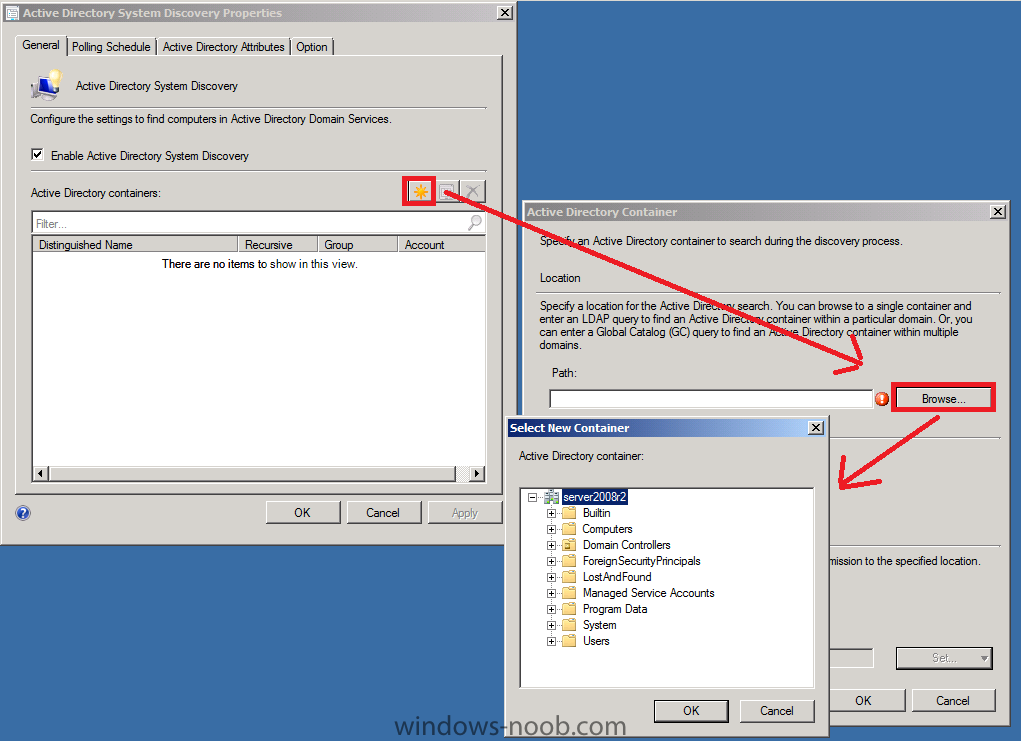
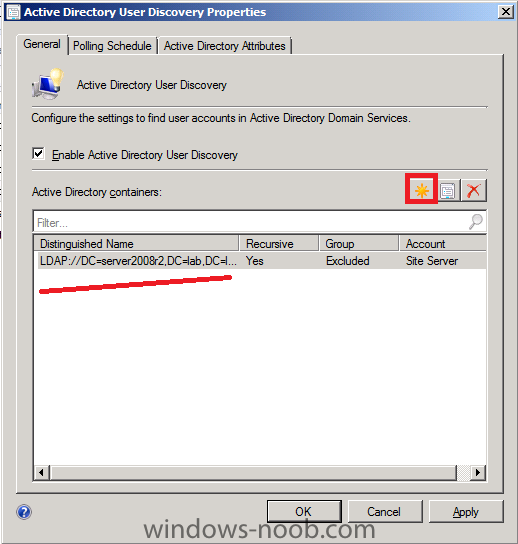
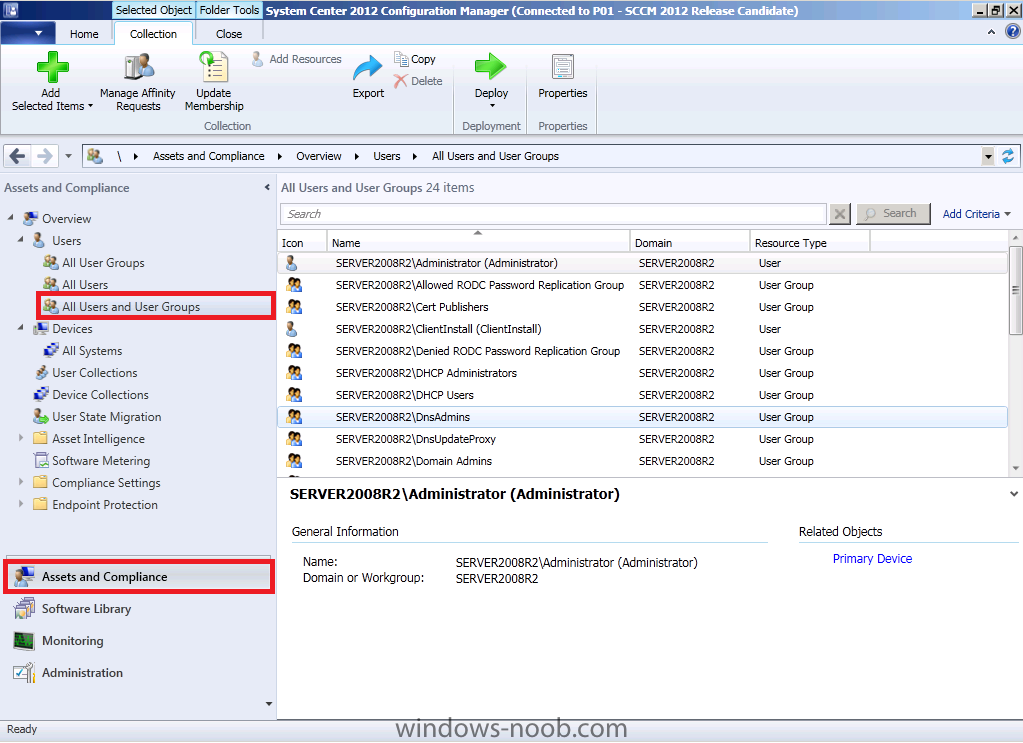
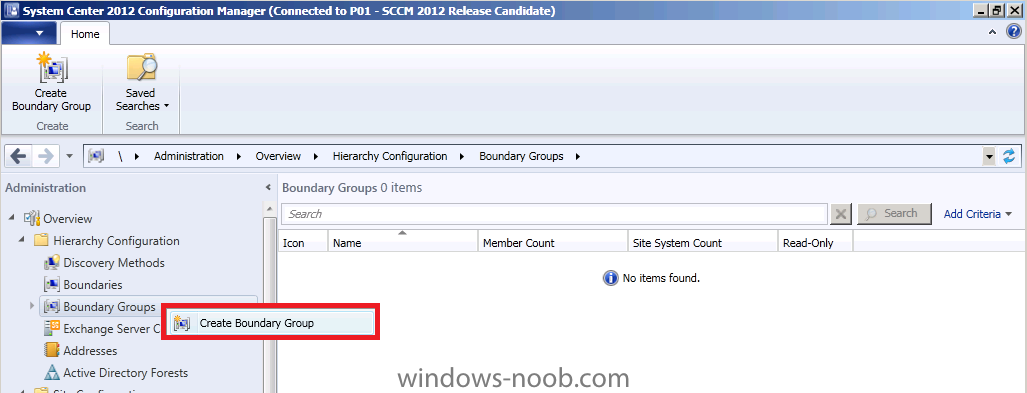
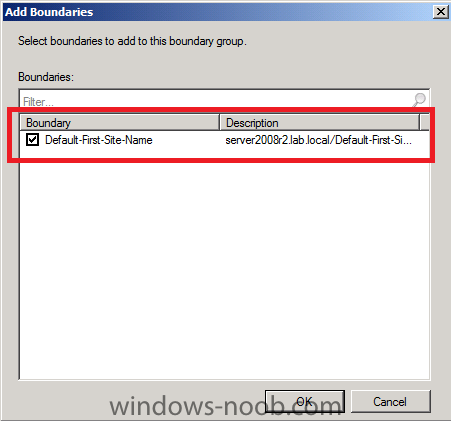
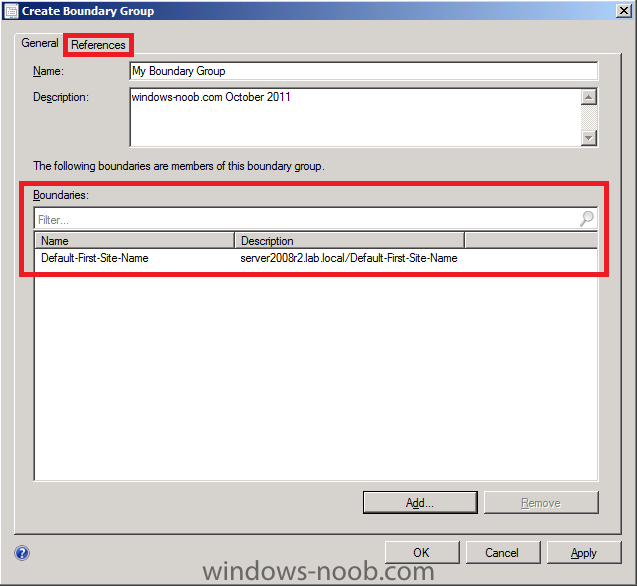
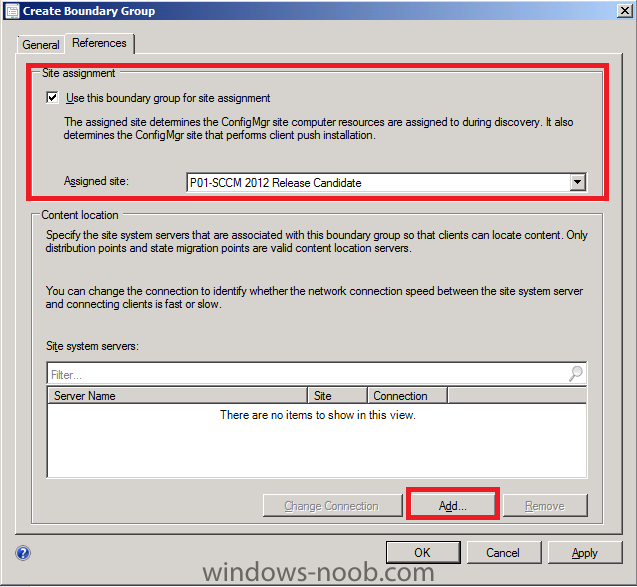
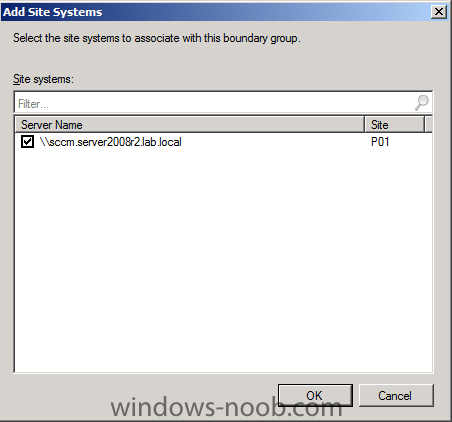
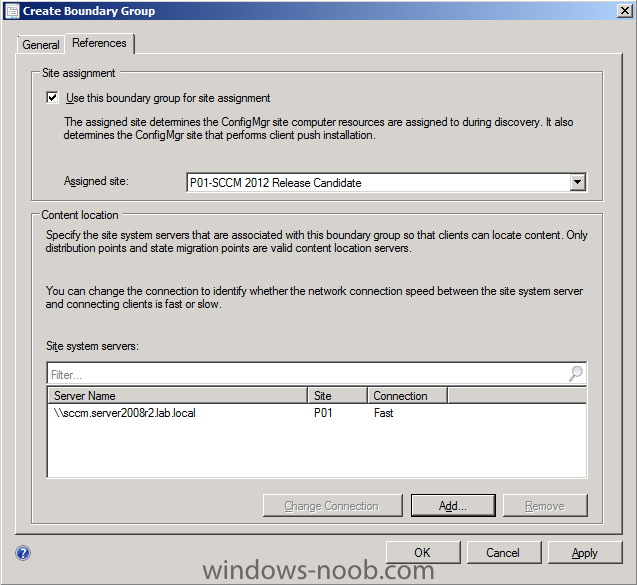
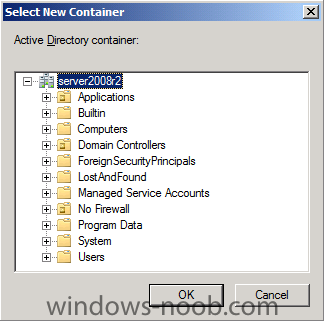
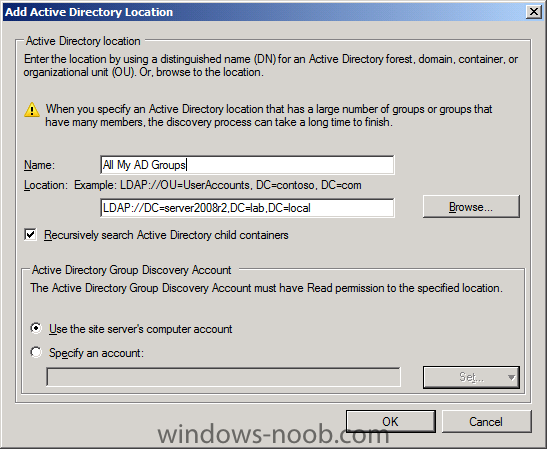
In Part 1 of this series we got our AD and SCCM servers ready, and then we installed System Center 2012 Configuration Manager as a standalone Primary site. In Part 2 we configured the SCCM server further by adding some Windows Server roles necessary for the following Configuration Manager 2012 functionality, Software Update Point (SUP) and Operating System Deployment. Now we will configure the server further by Enabling some Discovery methods and creating Boundary's and Boundary Groups. Configuring Discovery Methods. Active Directory Discovery Methods Configuration Manager 2012 Active Directory discovery methods can discover Active Directory sites, subnets, users, and computers that are stored in Active Directory Domain Services. To discover information from Active Directory, Configuration Manager requires access to the Active Directory locations that you specify and will use the computer account of the site server that runs the Active Directory discovery method. Or, you can specify a Windows account to run any Active Directory discovery method. For information on Planning Discovery methods for SCCM 2012, please refer to these pages on Technet:- Planning for Discovery in Configuration Manager 2012 - http://technet.micro...y/gg712308.aspx Decide which Discovery Methods to Use - http://technet.micro...K_DecideMethod_ Decide Which Discovery Methods to Use To discover possible Configuration Manager client computers or user resources, you must enable the appropriate discovery methods. You can use different combinations of discovery methods to locate different resources and to discover additional information about those resources. The discovery methods that you use determine the type of resources that are discovered and which Configuration Manager services and agents are used in the discovery process. They also determine the type of information about resources that you can discover. Discover Computers When you want to discover computers, you can use Active Directory System Discovery or Network Discovery. As an example, if you want to discover resources that can install the Configuration Manager client before you use Client Push Installation, you might run Active Directory System Discovery. Alternately you could run Network Discovery and use its options to discover the operating system of resources (required to later use push client installation). However, by using Active Directory System Discovery, you not only discover the resource, but discover basic information and can discover extended information about it from Active Directory Domain Services. This information might be useful in building complex queries and collections to use for the assignment of client settings or content deployment. Network Discovery, on the other hand, provides you information about your network topology that you are not able to acquire with other discovery methods, but Network Discovery does not provide you any information about your Active Directory environment. It is also possible to use only Heartbeat Discovery to force the discovery of clients that you installed by methods other than client push installation. However, unlike other discovery methods, Heartbeat Discovery cannot discover computers that do not have an active Configuration Manager client, and returns a limited set of information. It is intended to maintain an existing database record and not to be the basis of that record. Information submitted by Heartbeat Discovery might not be sufficient to build complex queries or collections. If you use Active Directory Group Discovery to discover the membership of a specified group, you can discover limited system or computer information. This does not replace a full discovery of computers but can provide basic information. This basic information is insufficient for client push installation. Discover Users When you want to discover information about users, you can use Active Directory User Discovery. Similar to Active Directory System Discovery, this method discovers users from Active Directory and includes basic information in addition to extended Active Directory information. You can use this information to build complex queries and collections similar to those for computers. Discover Group Information When you want to discover information about groups and group memberships, use Active Directory Group Discovery. This discovery method creates resource records for security groups. You can use this method to search a specific Active Directory group to identify the members of that group in addition to any nested groups within that group. You can also use this method to search an Active Directory location for groups, and recursively search each child container of that location in Active Directory Domain Services. This discovery method can also search the membership of distribution groups. This can identify the group relationships of both users and computers. When you discover a group, you can also discover limited information about its members. This does not replace Active Directory System or User Discovery and is usually insufficient to build complex queries and collections or serve as the bases of a client push installation. Discover Infrastructure There are two methods that you can use to discover infrastructure, Active Directory Forest Discovery and Network Discovery. You can use Active Directory Forest Discovery to search an Active Directory forest for information about subnets and Active Directory site configurations. These configurations can then be automatically entered into Configuration Manager as boundary locations. When you want to discover your network topology, use Network Discovery. While other discovery methods return information related to Active Directory Domain Services and can identify the current network location of a client, they do not provide infrastructure information based on the subnets and router topology of your network. Step 1. Enable Discovery Methods Perform the following on the SCCM server as SMSadmin Note:- Site Hierarchy and Site Operations have been renamed from Beta 2 to Hierarchy Configuration and Site Configuration. Click on the Administration workspace, expand Overview, Hierarchy Configuration and select Discovery Methods, you can see that Heartbeat Discovery is the only Method Enabled by Default. We want our LAB to discovery All Computers and Users so we will enable the following discovery methods Active Directory Forest Discovery Active Directory Group Discovery Active Directory System Discovery Active Directory User Discovery Right click on Active Directory Forest Discovery and choose Properties, place a checkmark in the three available options click Apply and answer yes to the Full Discovery question Now we will Enable Active Directory Group Discovery, so as before, right click on it, choose Properties when the properties screen appears, place a checkmark to Enable the discovery Method, Click on Add, select Location click on Browse Select your Active Directory Container and click ok click ok, Give the Name a descriptive name like All My AD Groups click ok, and it will now appear in the list of Discovery Scopes Click on the Polling Schedule Tab, note that Delta Discovery is enabled already, now click on the Option tab (this is new since Beta 2) Note:- There are three new options available in the interestingly named Option tab, select them if you wish, basically they allow us to NOT discovery stale objects in AD (no DDR will be created when they are detected), this is good as not all AD people remove stale accounts and this will help to improve our SLA's with more accurate information about what systems are live or not in our organisation. Next we will configure Active Directory System Discovery, so right click it and select Properties, the properties page will show, place a checkmark to Enable Active Directory System Discovery click on the Yellow StarBurst, then click on Browse and select your default Active Directory Container so it appears like so you can review the other tabs, including the new Option tab, select the options within there also. and finally we'll enable Active Directory User Discovery, right click on it, choose Properties, and enable it as below add the Active directory container discovery by clicking on the yellow starburst and adding the default container Once done you can click on Assets and Compliance to verify that your Users, Groups and Systems are being Discovered (in the screenshot below I'm showing users and user groups). Step 2. Configure Boundaries Perform the following on the SCCM server as SMSadmin In Configuration Manager 2012, a boundary is a network location that can contain one or more devices that you want to manage. Boundaries can be an IP subnet, Active Directory site name, IPv6 Prefix, or an IP address range, and it can include any combination of these elements. To use a boundary you must add the boundary to one or more boundary groups. Boundary groups are collections of boundaries and they allow clients to find an assigned site and to locate content when they need to install software, such as applications, software updates, and operating system images. Boundaries are no longer site-specific. Instead, you define them one time only for the hierarchy and they are available for all sites in the hierarchy. Each boundary must be a member of a boundary group before a device on that boundary can identify an assigned site or locate content on a distribution point. Each boundary represents a network location in Configuration Manager 2012 and it is available from every site in your hierarchy. A boundary does not enable you to manage clients at the network location. To manage a client, the boundary must be a member of a boundary group. Content Location You can associate one or more distribution points with each boundary group. You can also associate a distribution point with multiple boundary groups. When a client requests content for a deployment, Configuration Manager sends the client a list of distribution points that have the content and that are associated with a boundary group that includes the current network location of the client. Configuration Manager 2012 supports overlapping boundary configurations for content location. When a client requests content and the client network location belongs to multiple boundary groups, Configuration Manager sends the client a list of all distribution points that have the content. This behavior enables the client to select the nearest server from which to download the content. You can configure the network connection speed of each distribution point in a boundary group. Clients use this value when they connect to the distribution point. By default, the network connection speed is configured as Fast, but it can also be configured as Slow. The network connection speed and the deployment configuration determine whether a client can download content from a distribution point when the client is on an associated boundary. In the Administration section, select Boundaries, our previosly discovery Active Directory Site is listed. right click on Boundary Groups and choose Create Boundary Group give the Boundary Group a name (and a description if you wish), click on Add In the Add Boundaries window, place a checkmark in our Default-First-Site-Name Boundary. click ok, It now appears in our list of Boundaries which are a member of this Boundary Group, click on References place a checkmark in Use this Boundary Group for site assignment then click on Add select our site system then click ok click Apply Now we have defined which site our clients can get assigned to via the Boundary Group, and we have defined their content location In the next Part we will configure some more Site roles and configure Client Settings.


-
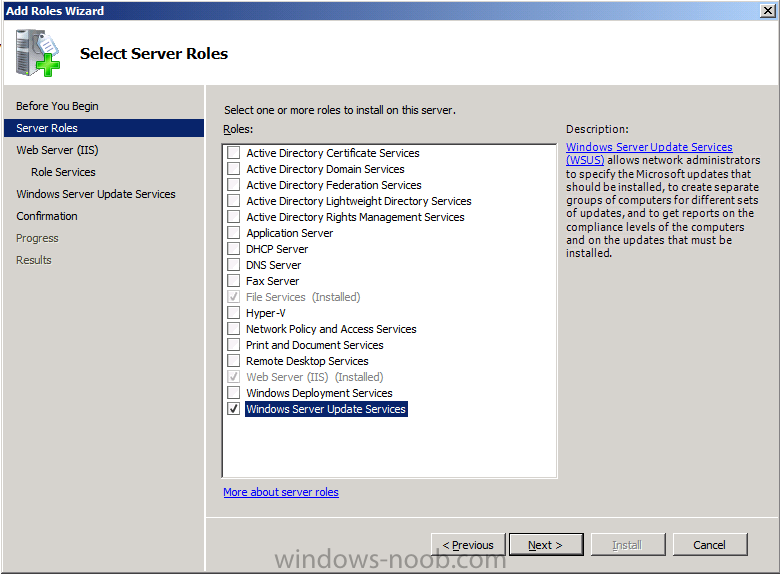
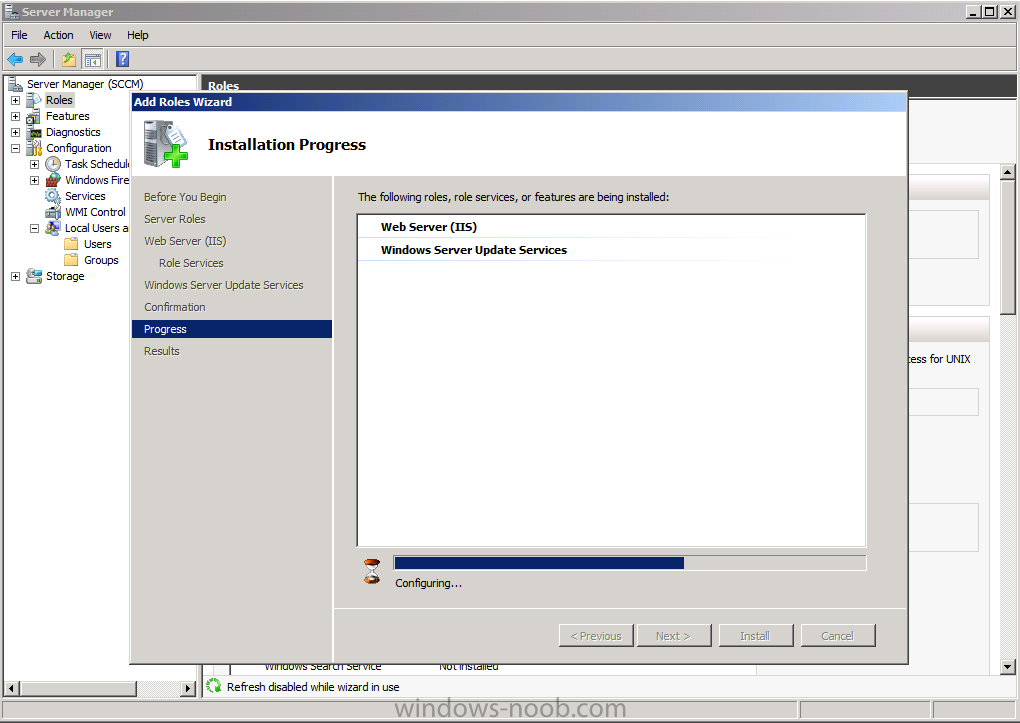
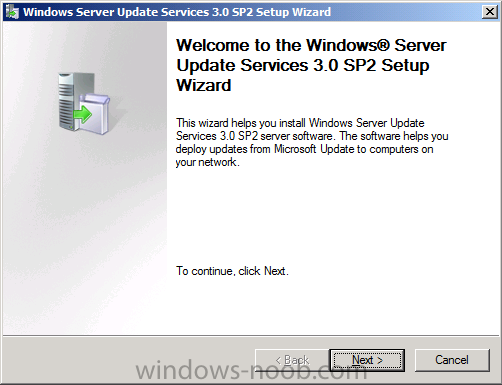
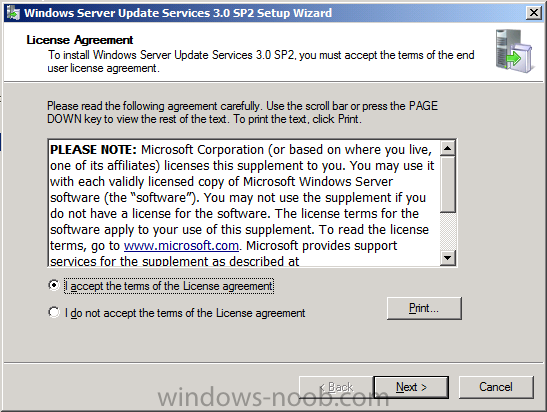
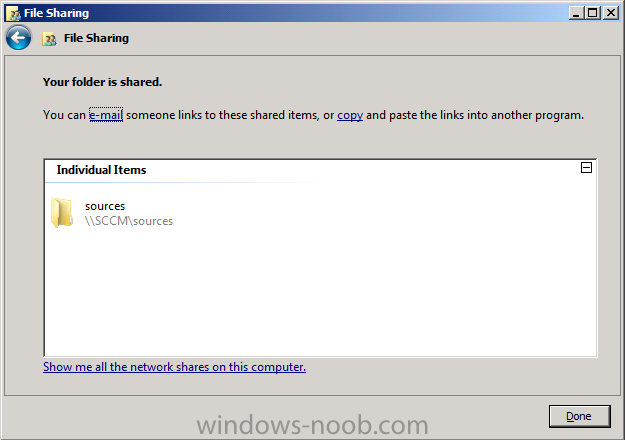
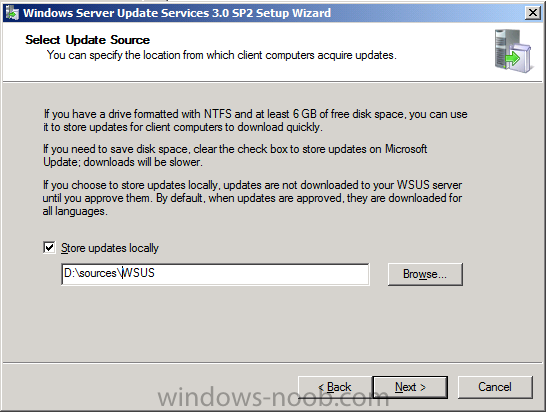
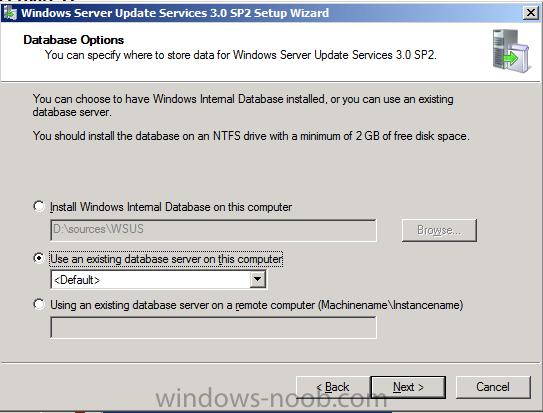
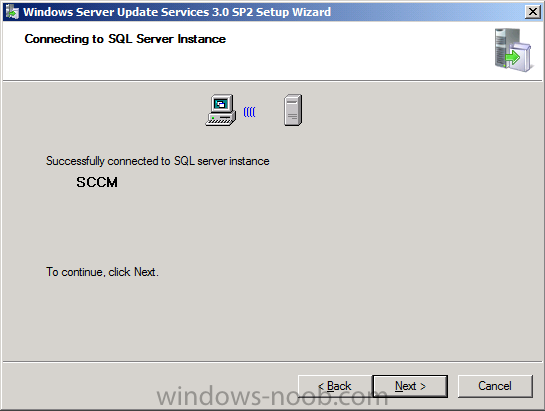
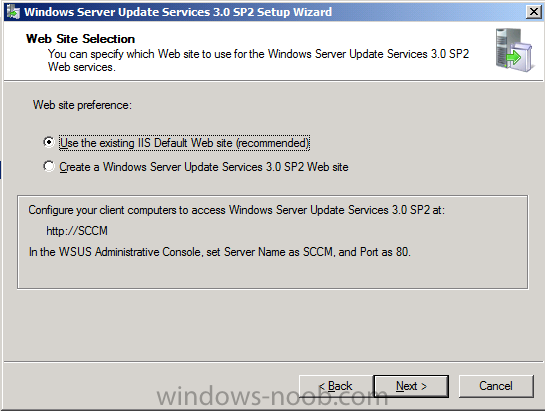
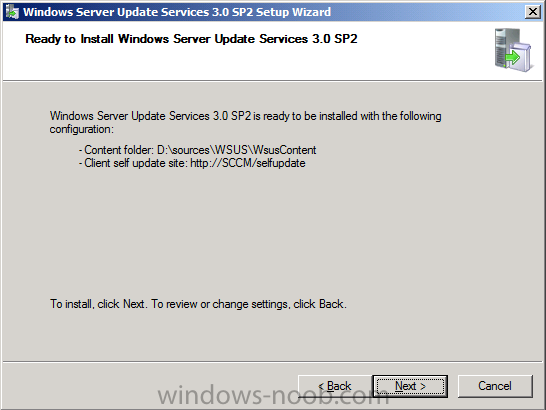
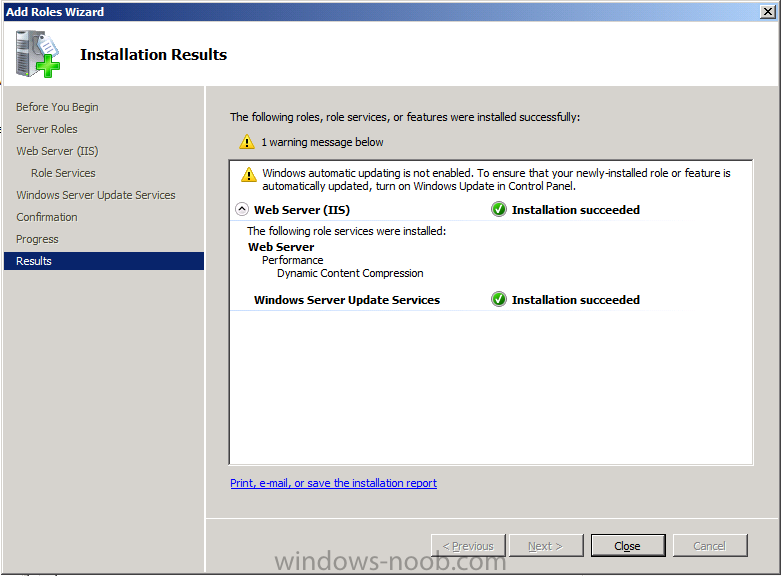
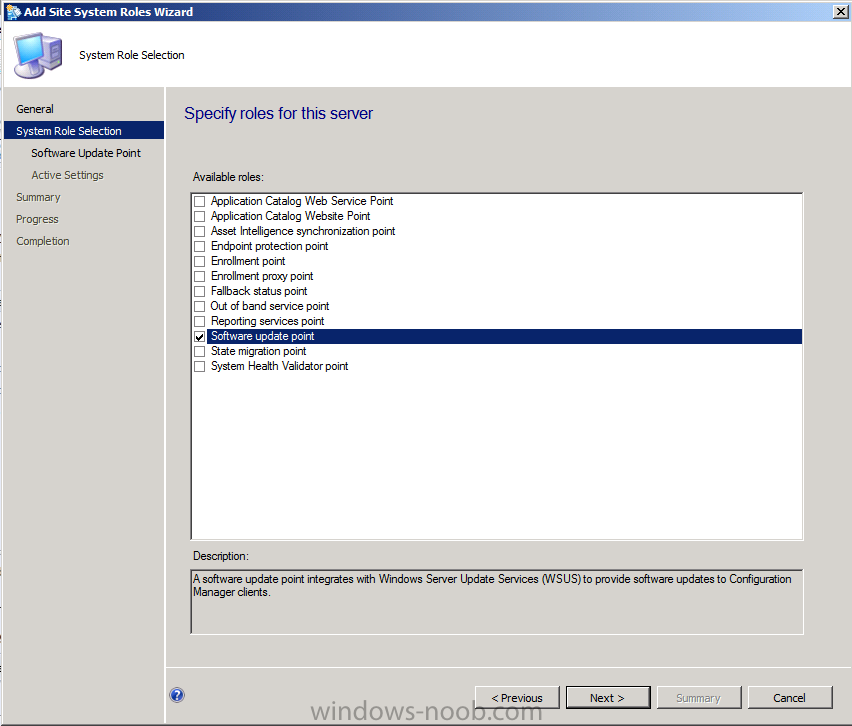
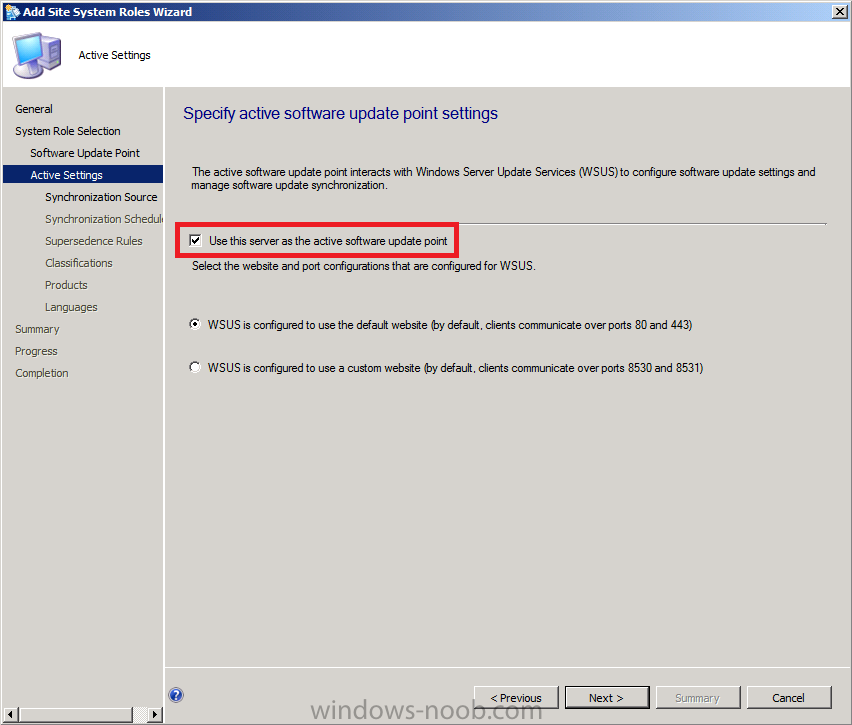
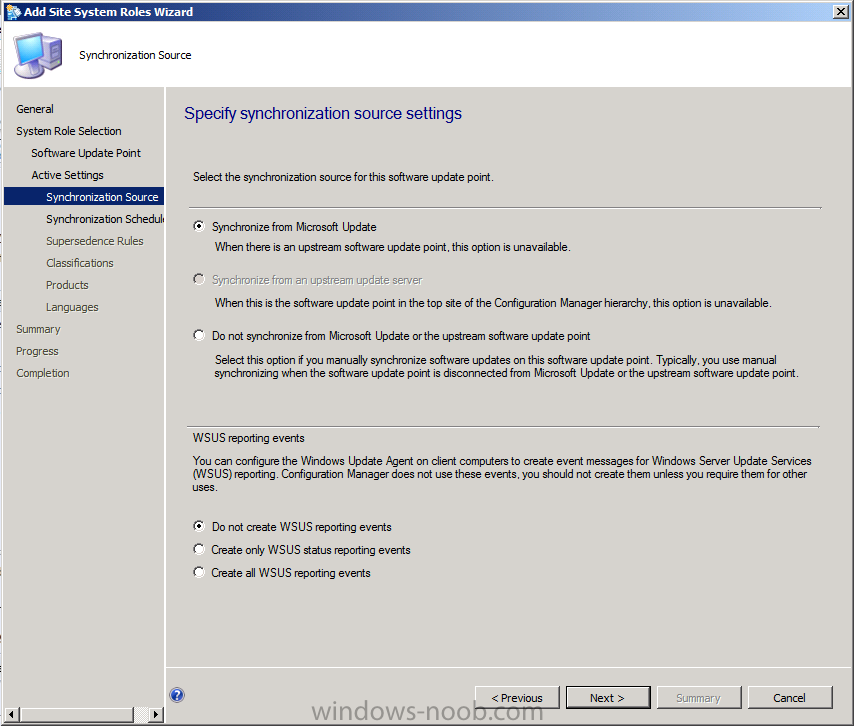
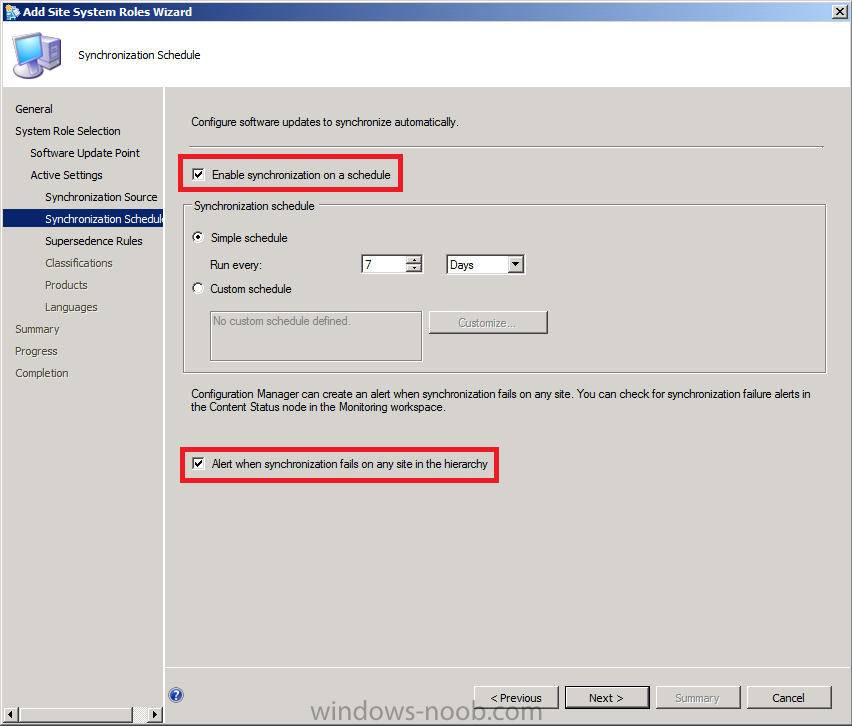
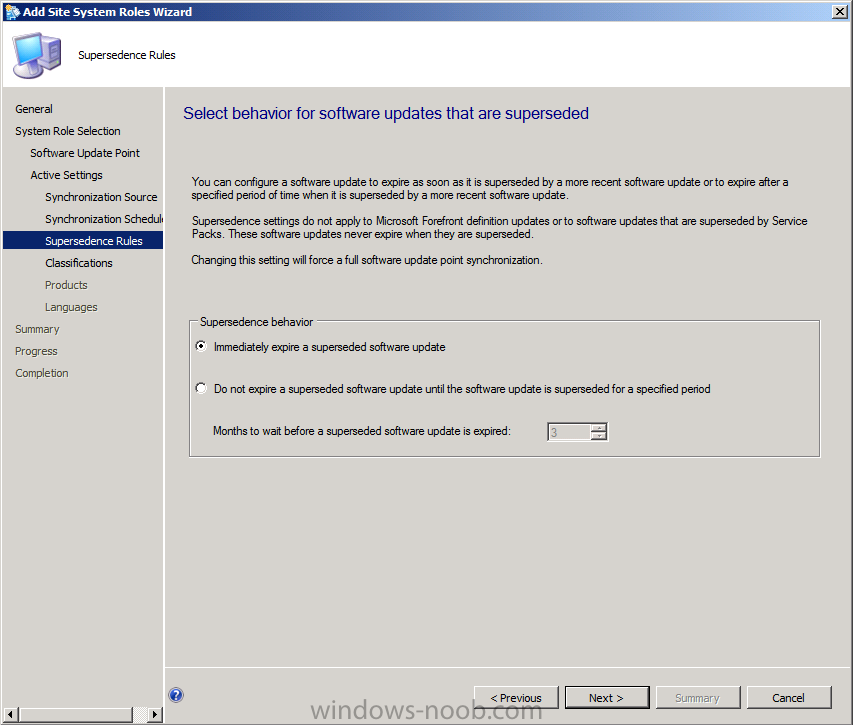
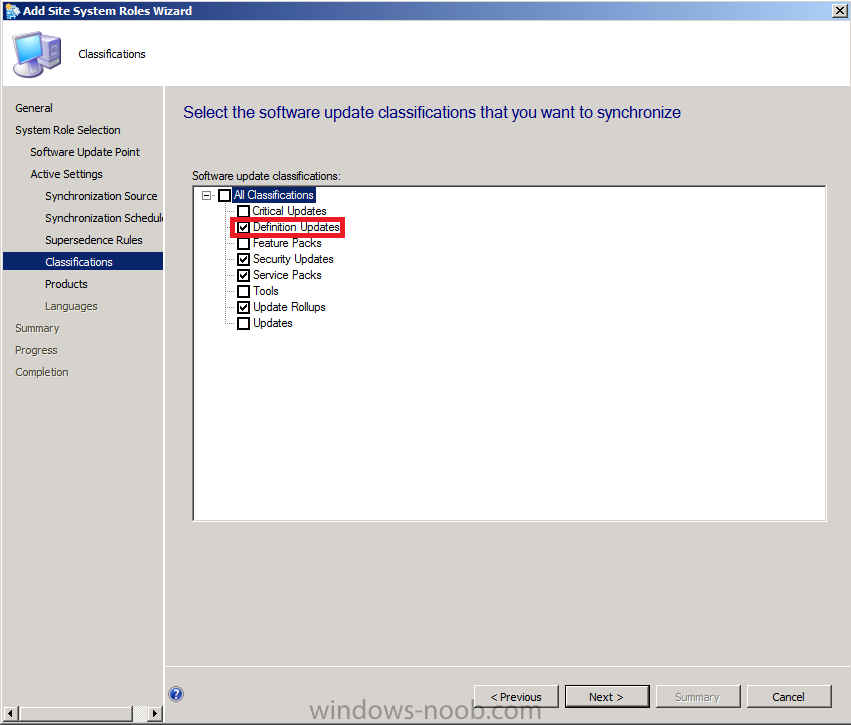
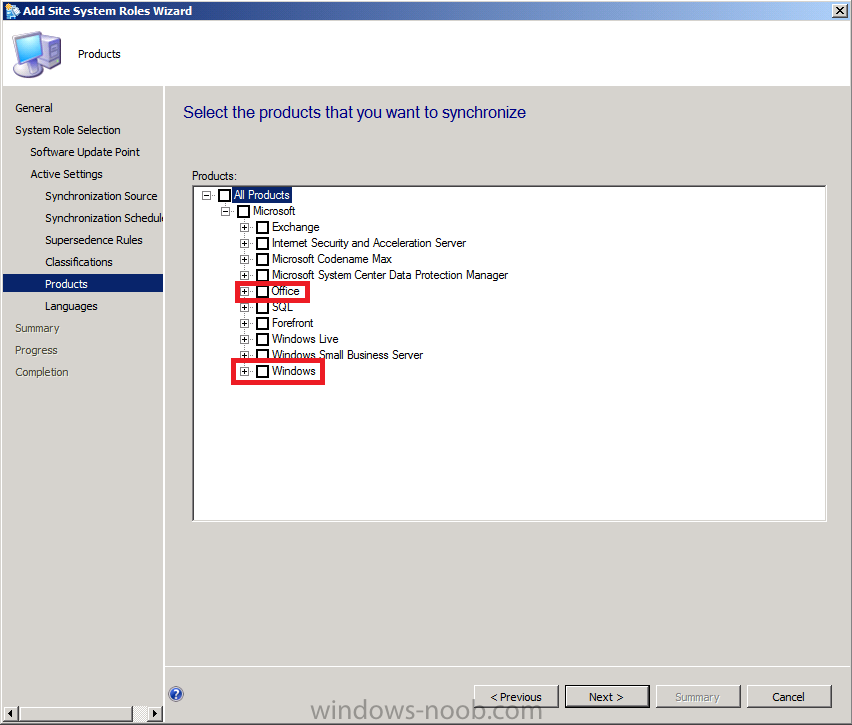
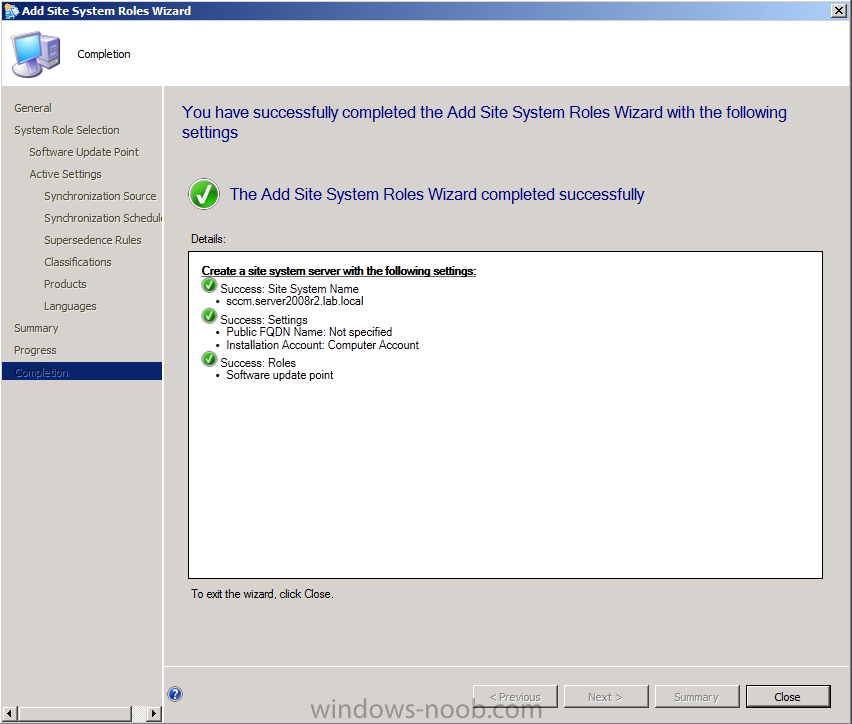
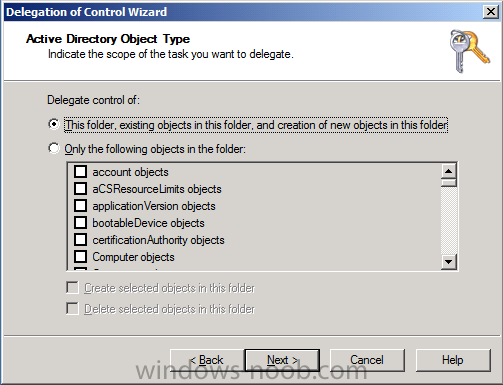
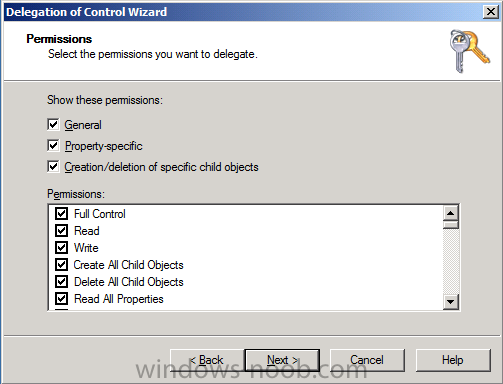
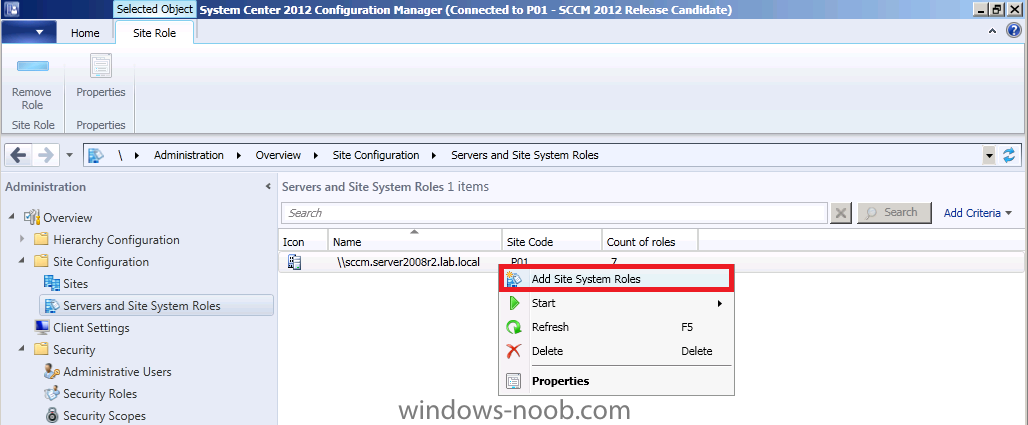
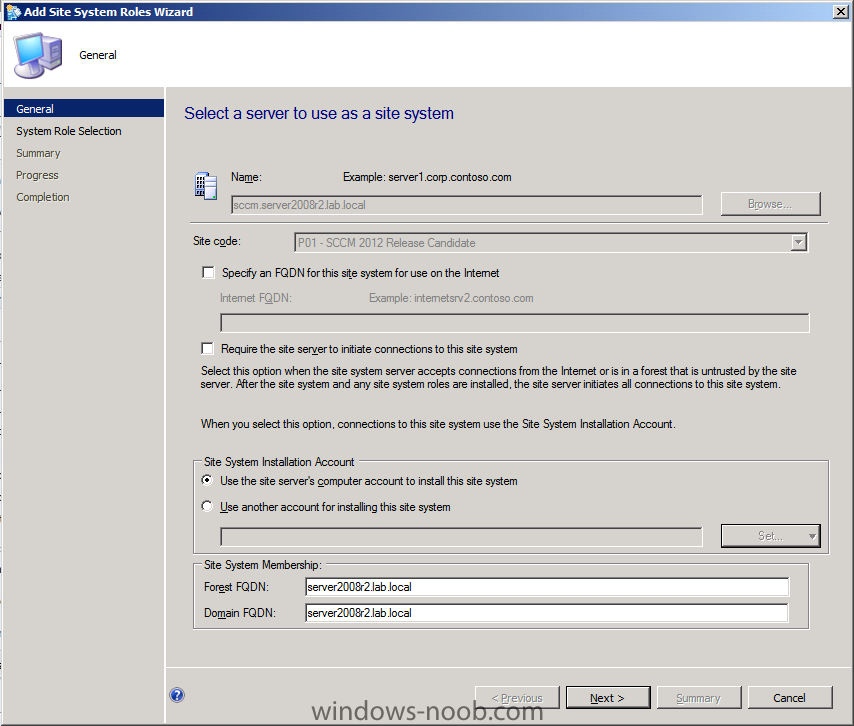
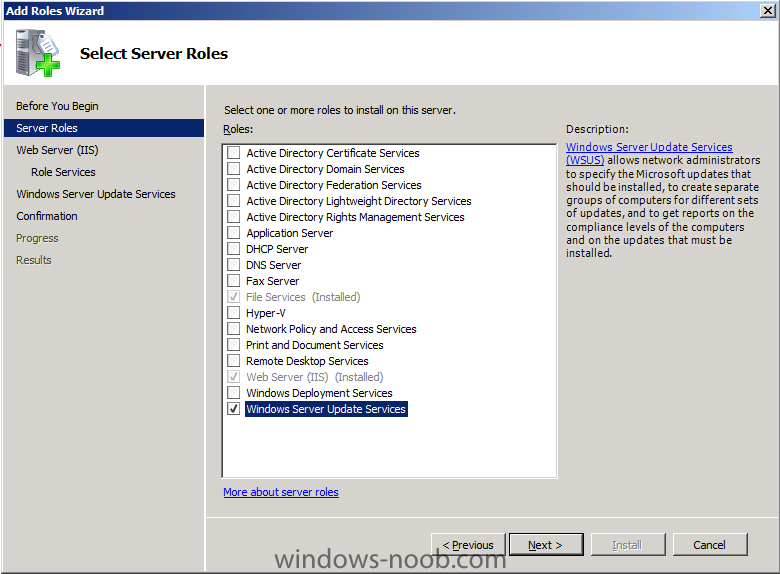
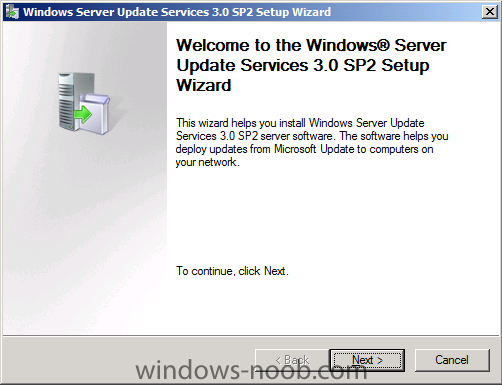
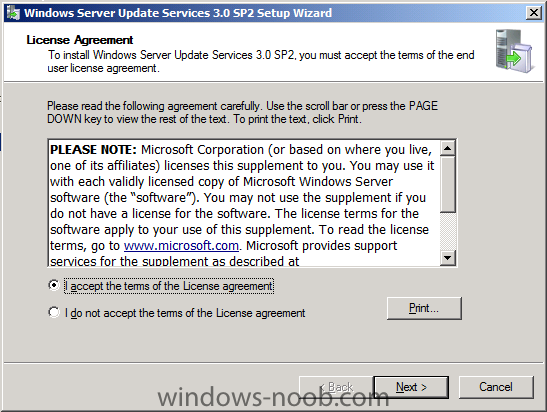
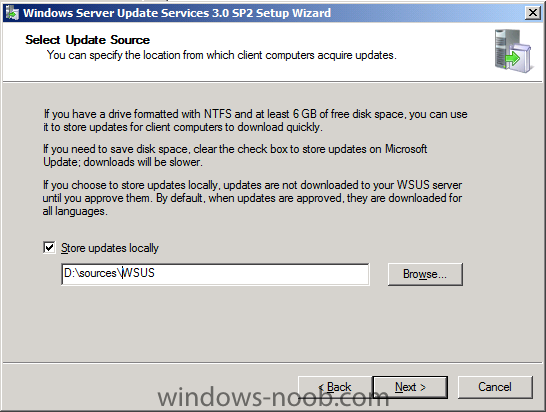
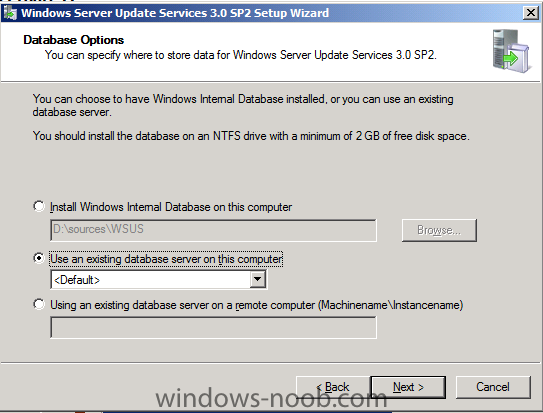
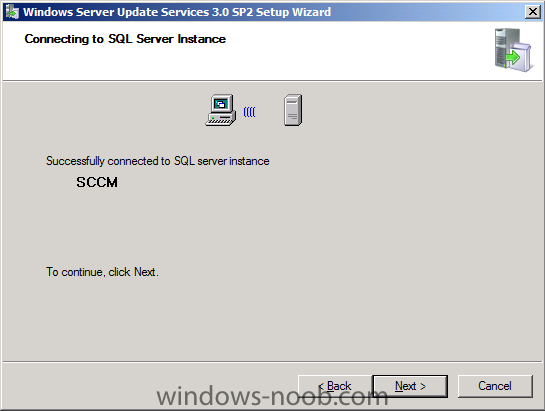
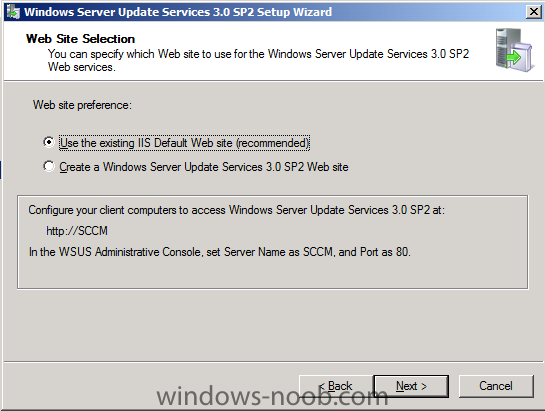
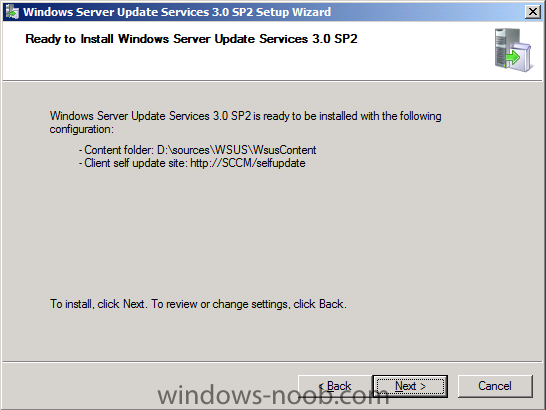
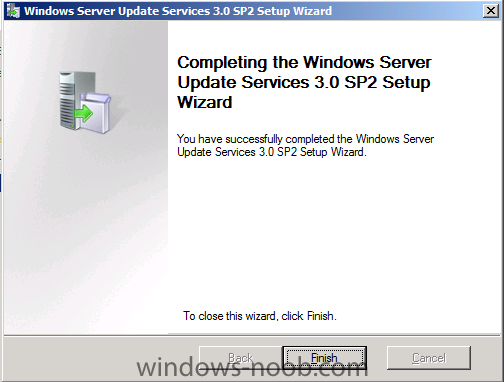
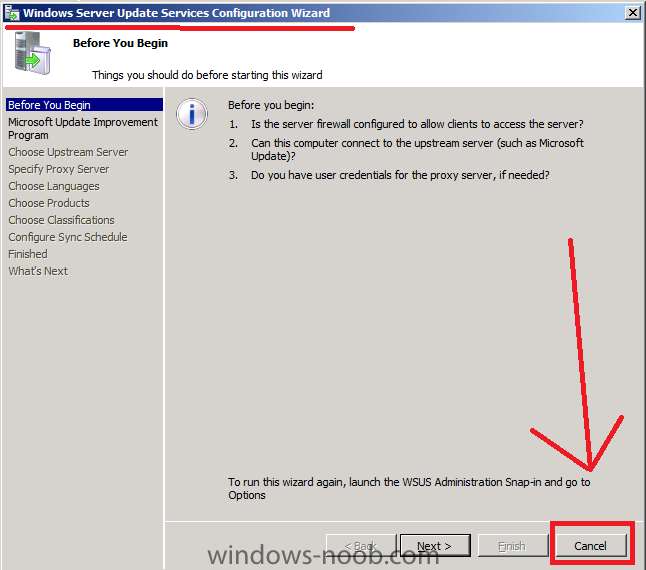
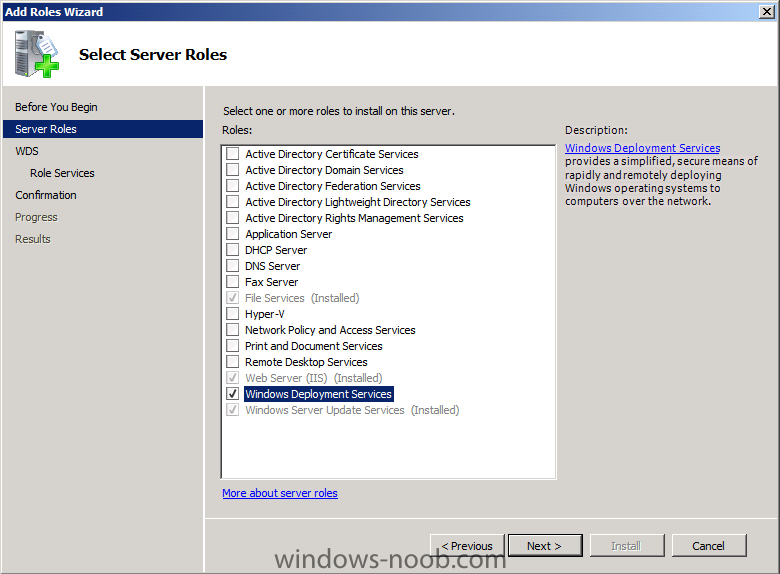
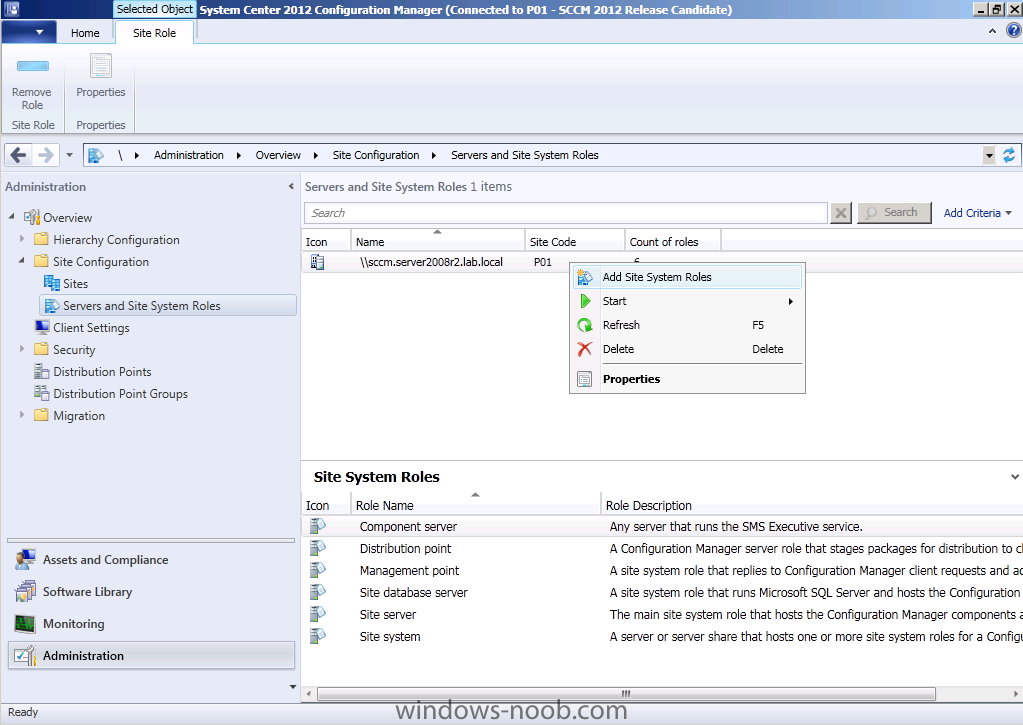
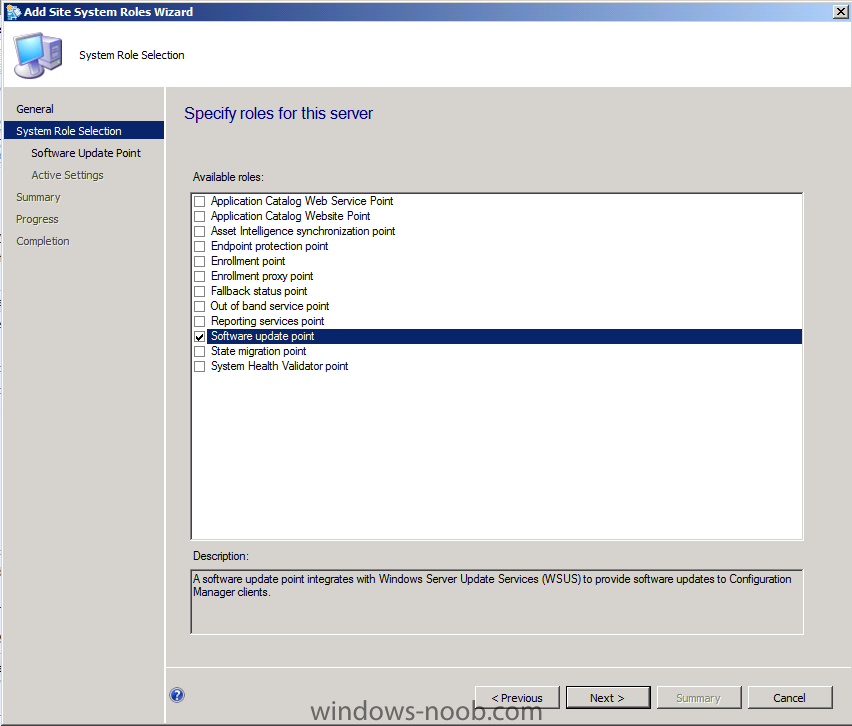
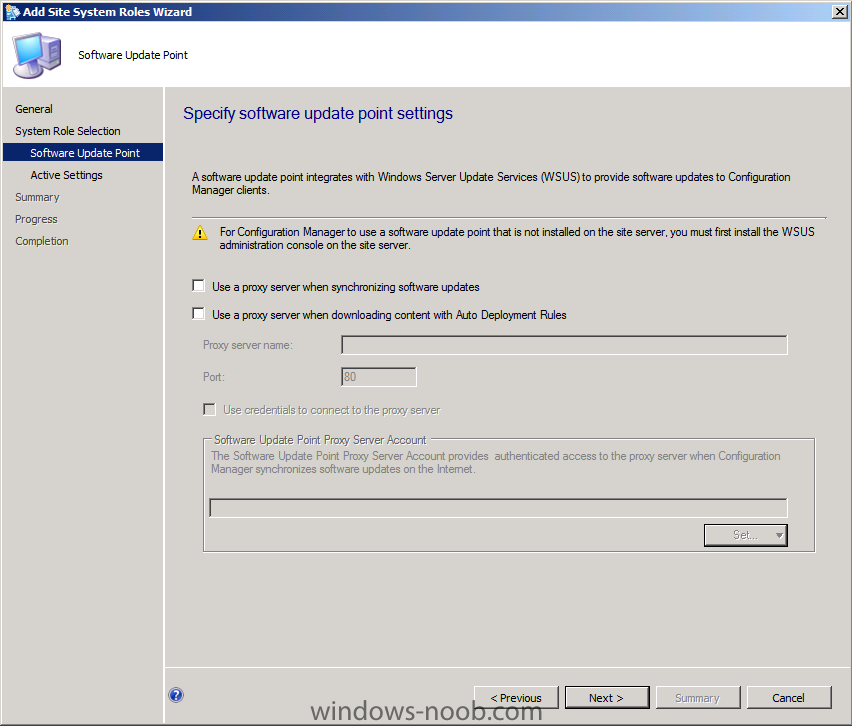
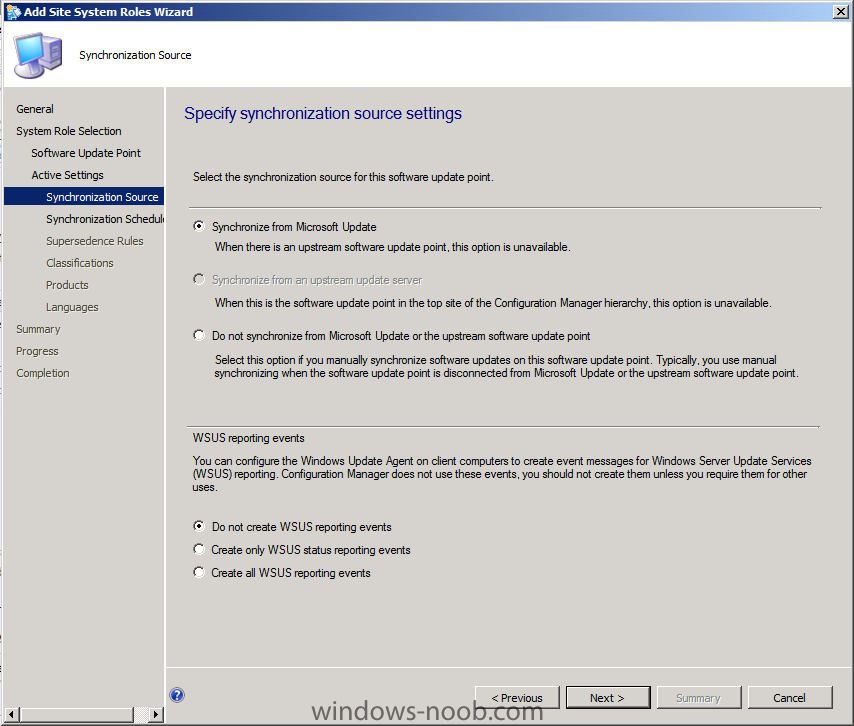
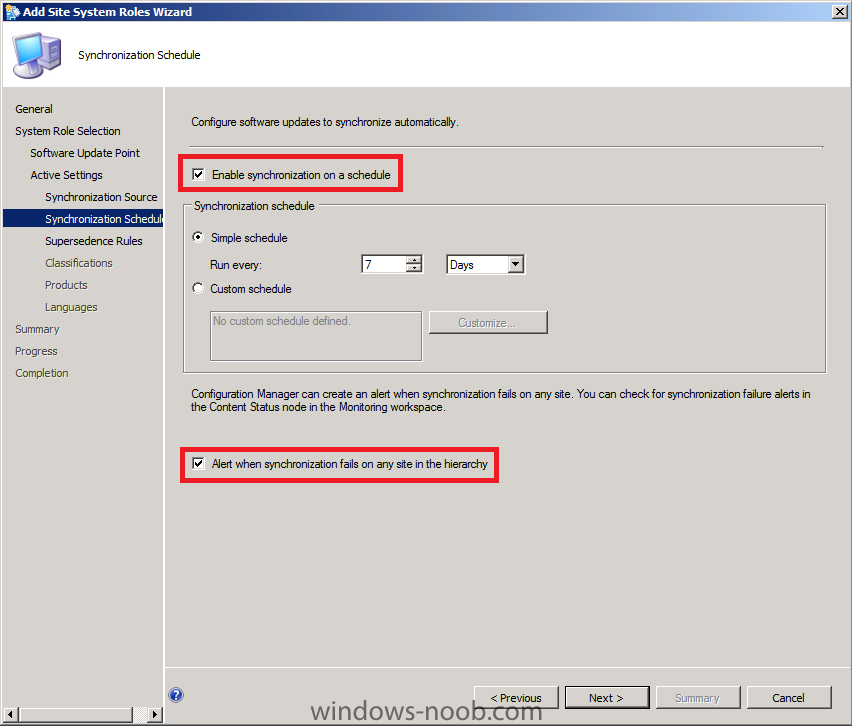
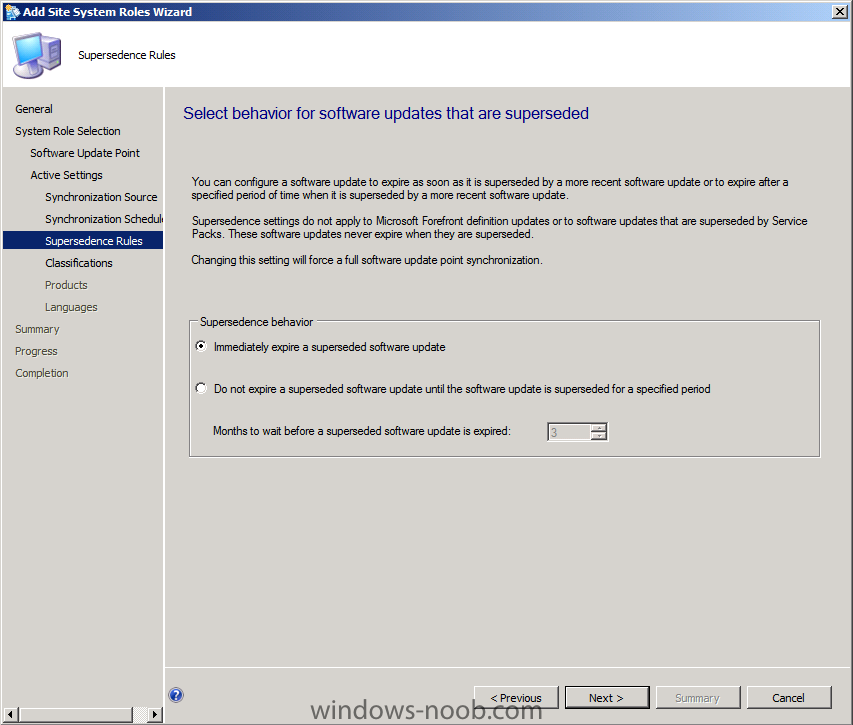
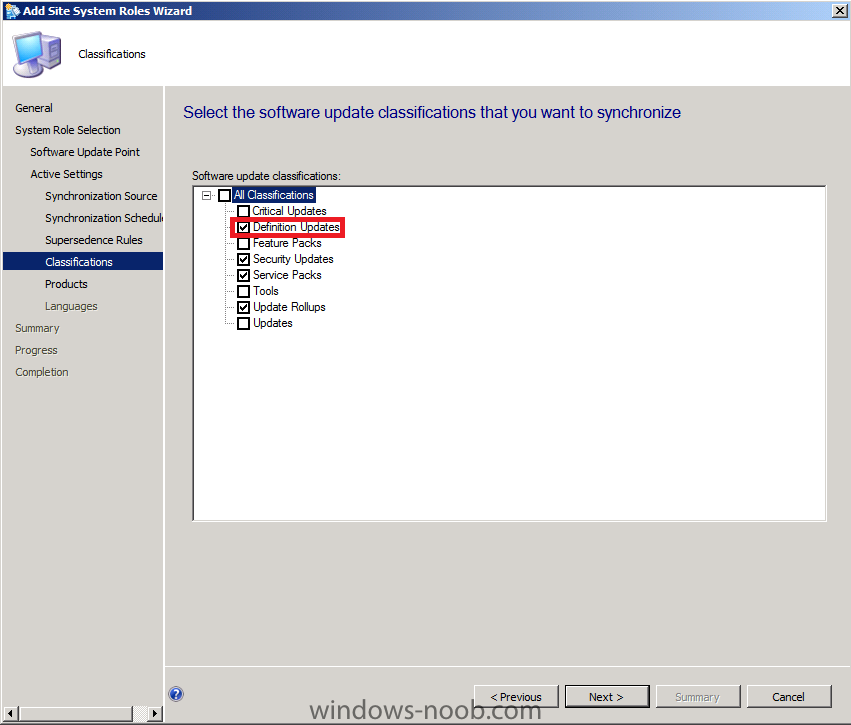
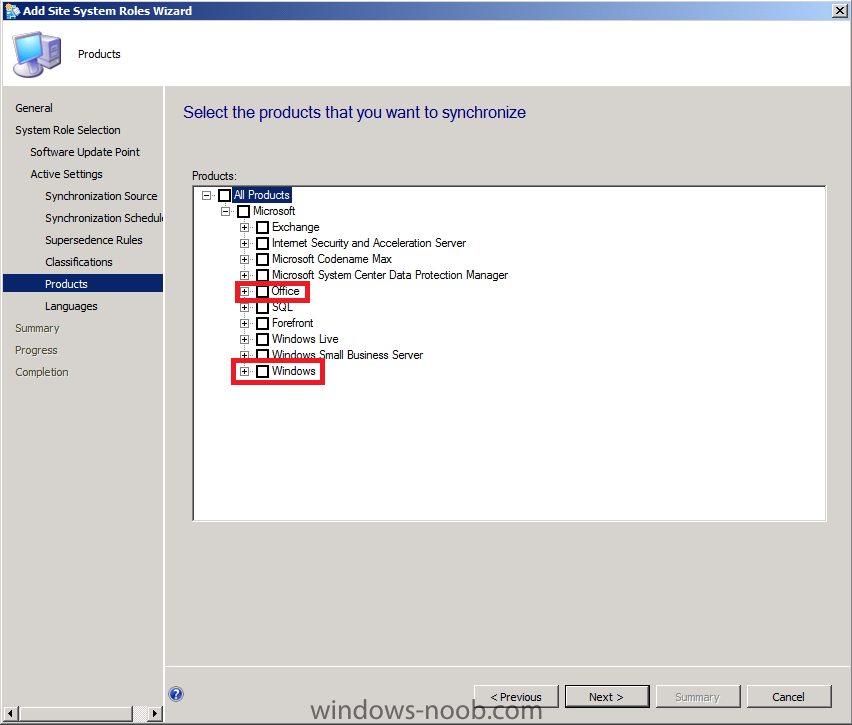
In Part 1 of this series we got our AD and SCCM servers ready, and then we installed System Center 2012 Configuration Manager as a standalone Primary site. Now we will configure the SCCM server further by adding some Windows Server roles necessary for the following Configuration Manager 2012 functionality, Software Update Point (SUP) and Operating System Deployment. Recommended Reading:- Planning for Software Updates in Configuration Manager - http://technet.micro...y/gg712696.aspx Prerequisites for Software Updates in Configuration Manager - http://technet.micro...y/hh237372.aspx Configuring Software Updates in Configuration Manager - http://technet.micro...y/gg712312.aspx Step 1. Add the WSUS Update Services 3.0 SP2 role Perform the following on the SCCM server as SMSadmin Before starting this step create a folder on D:\ called sources and share it as sources, give Everyone Read access. We'll need the WSUS role installed as part of the Software Update Point role installation in the next step, so start Server Manager and click on Roles, Add Roles. Select Windows Server Update Services and a window will pop up asking to add role services required for Windows Server Update Services (IIS Dynamic Content compression), click Add Required Role Services click next through the wizard, you'll see the Select Role Services window appear, click next again, at the confirmation click Install, the WSUS role will be downloaded (so you'll need a network connection to the Internet) after a while you'll see the Welcome to Windows Server Update Services 3.0 SP2 setup wizard appear click next (which is probably hidden behind the active window, so in your system tray find it and click on it to show the wizard otherwise you'll be twiddling your thumbs for a long time wondering whats going on) Accept the Eula and click next for Select Update Source, choose where to store the updates locally, select D:\sources\WSUS for database options choose Use an existing database server on this computer, click next it will connect to your SCCM SQL server instance, click next accept the web site preference, Use an existing Default website at the ready to install WSUS, click next click Finish when done. followed by cancelling the WSUS configuration Wizard. and close the Roles Wizard Step 2. Add Windows Deployment Services. Perform the following on the SCCM server as SMSadmin Update:- You no longer need to install the Windows Deployment Services Role because when you enable PXE support on the Distribution Point, the WDS Service will get installed (and configured) by ConfigMgr, so please skip this step unless you specifically want the RemoteInstall folder on a different drive. You can review this via the Distrmgr.log. In Server Manager, click Add roles select Windows Deployment Services and click next click Next, Next, and Install and click Close when done. Close Server Manager. Step 3. Add the SUP role Perform the following on the SCCM server as SMSadmin Note: In a Multi Hierarchy setup (CAS+Primaries+...) you must install a Top Level SUP on your CAS, and your Primaries and optionally on your Secondary site servers. In a standalone setup (such as we have here) we need to install the SUP on our Standalone Primary. In a multi Hierarchy the CAS SUP is the only SUP to sync directly with Microsoft Update to get the update catalog, all the SUPs on the Primaries sync with the CAS SUP. The Primary sites SUP is the only SUP which clients use to scan for Updates Compliance. Start up the ConfigMgr console, click on Administration in the Wunderbar, click on Site Configuration, and select Servers and Site System Roles, Right click on your server and choose Add Site System Role click next at the Add Site System Roles Wizard Select Software Update Point and click Next if you need to input proxy information, do it here next select Use this server as the Active Software Update Point and the wizard screen will expand as a result, leave the ports as they are (we didn't change them from the Default when we installed WSUS) to Specify Synchronization Settings, select Synchronize from Microsoft Update next we configure the Schedule and Alert settings, please enable both. leave the supersedence rules as they are, note the note about Service packs and Endpoint Protection updates. As we will be configuring System Center Endpoint Protection (SCEP) later in this series, let's add Definition Updates in the Classifications choice Remove the checkmarks from Office and Windows in the Products list, we will revisit this list after our first Sync. On the Languages screen, remove all checkmarks in all languages except English (well if you want other languages add them, but for me it's just English) click next at the summary and progress, review the completion message and click Close.


-
does it work if you deploy with windows 7 (not sp1) ?
-
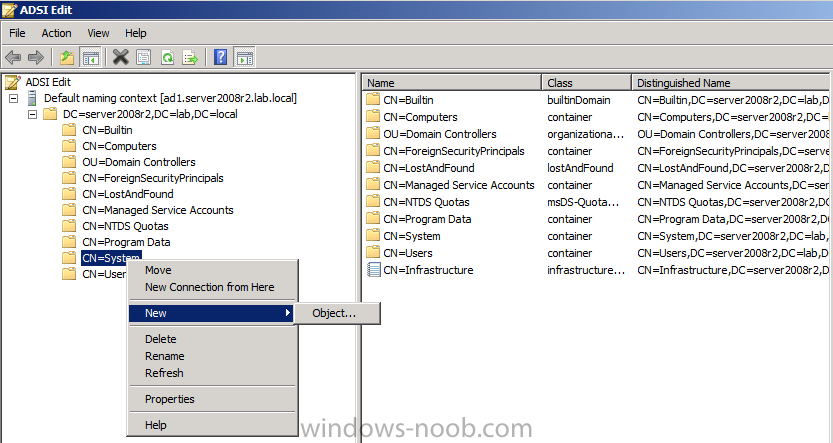
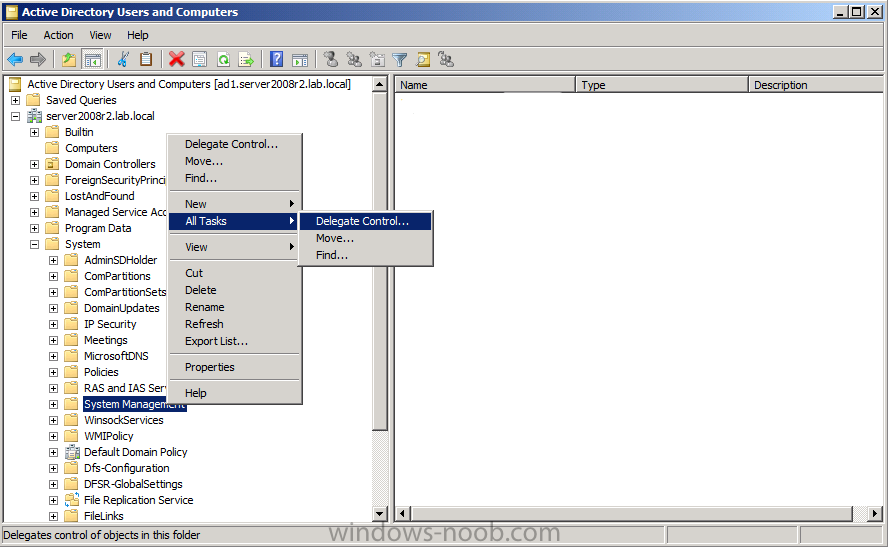
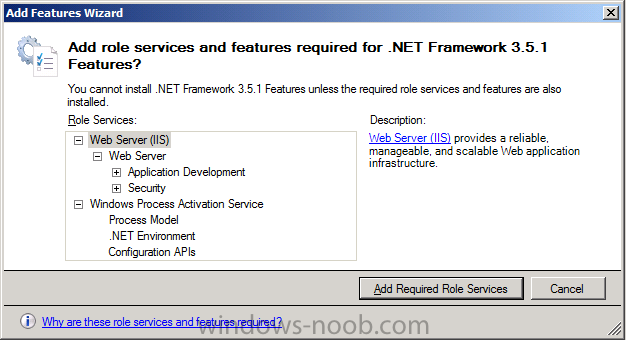
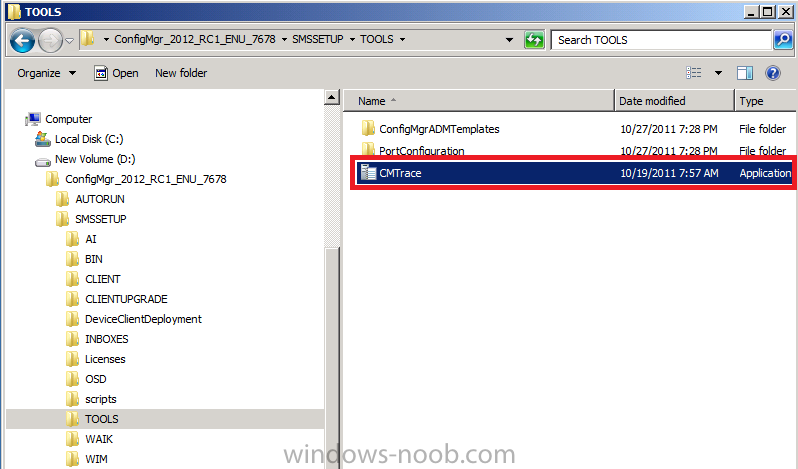
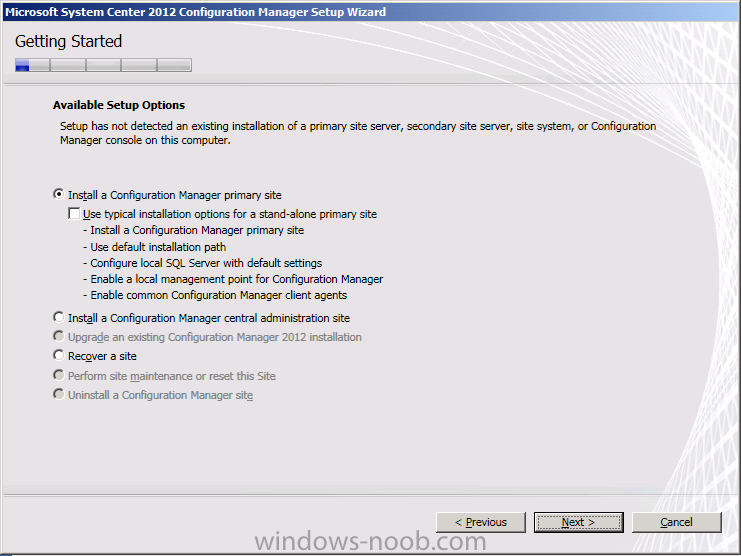
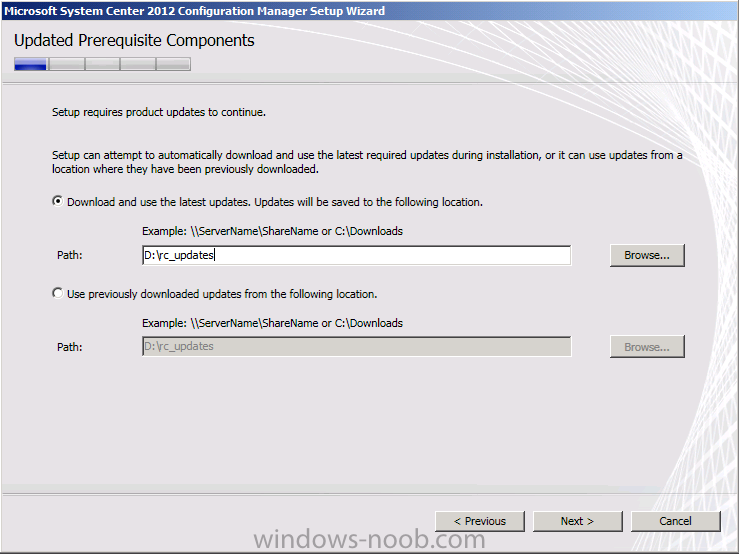
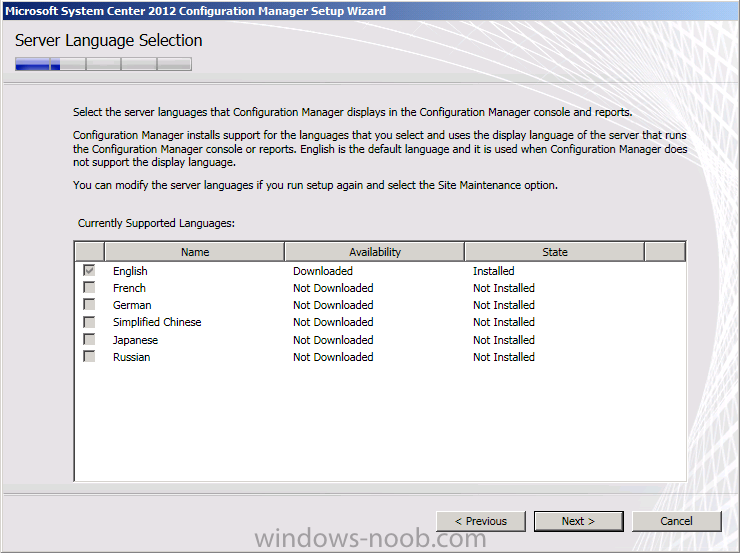
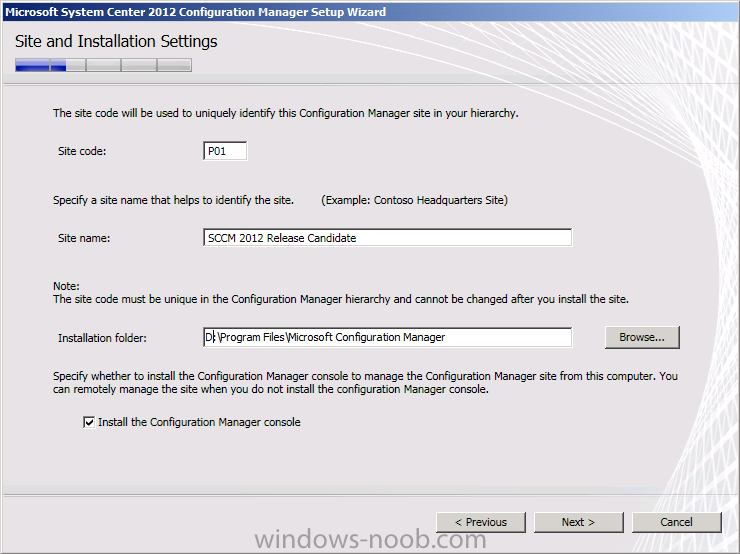
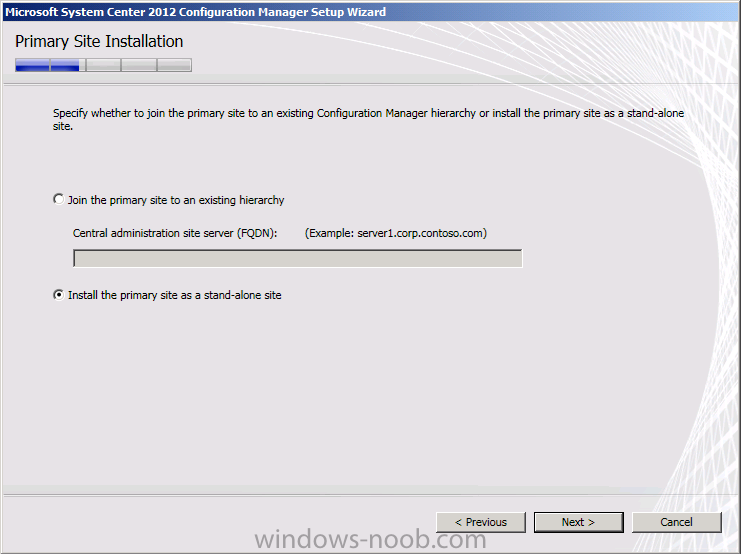
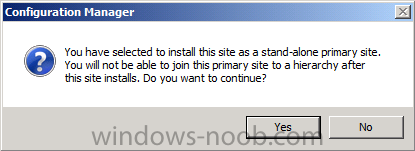
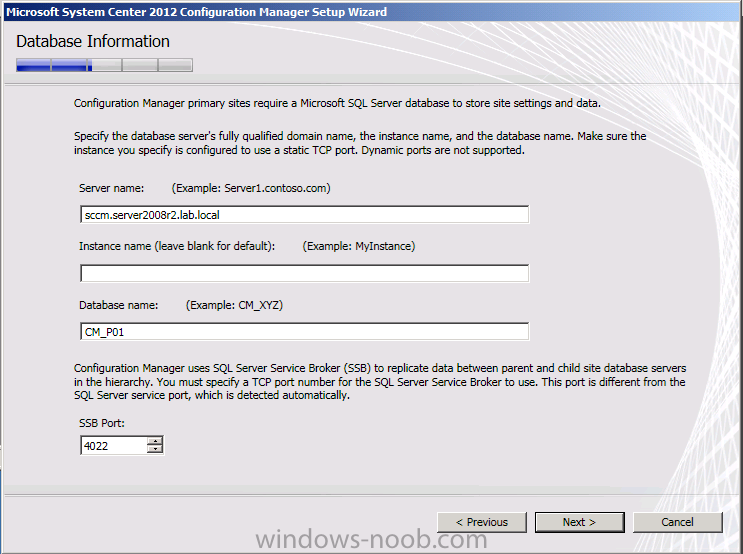
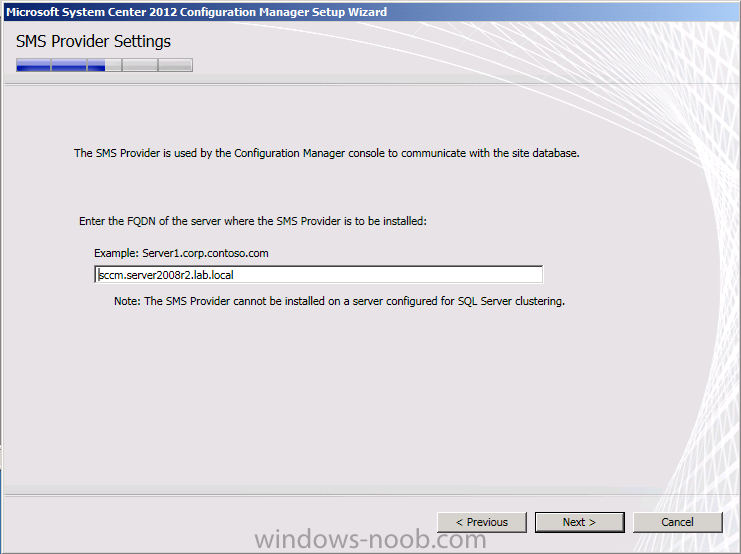
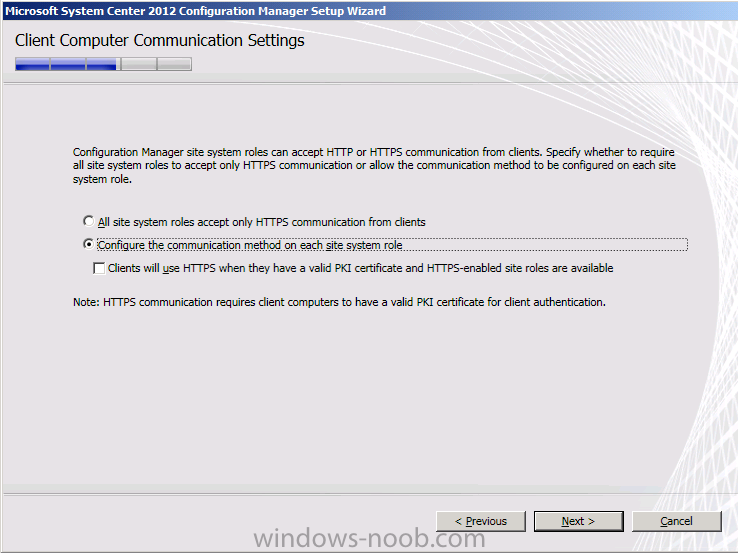
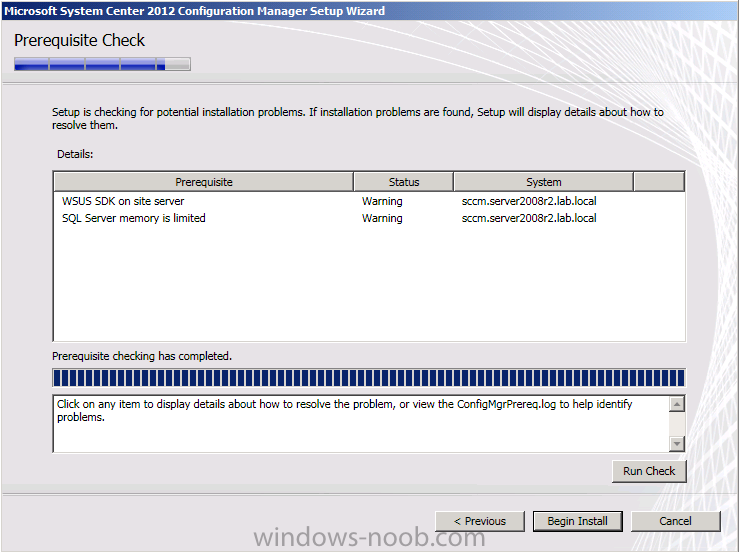
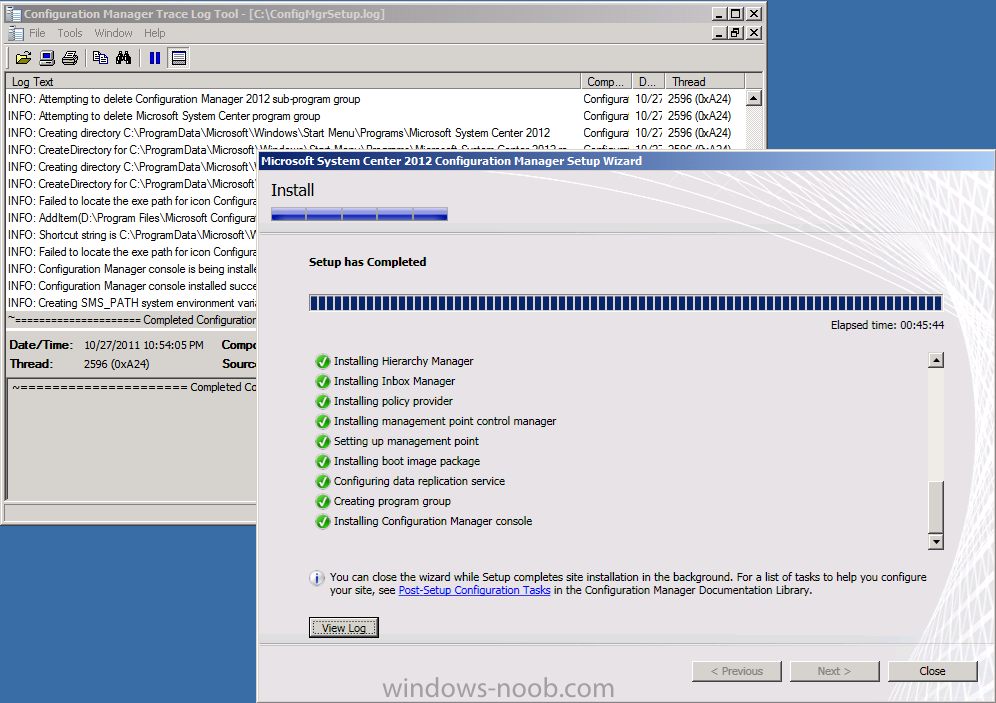
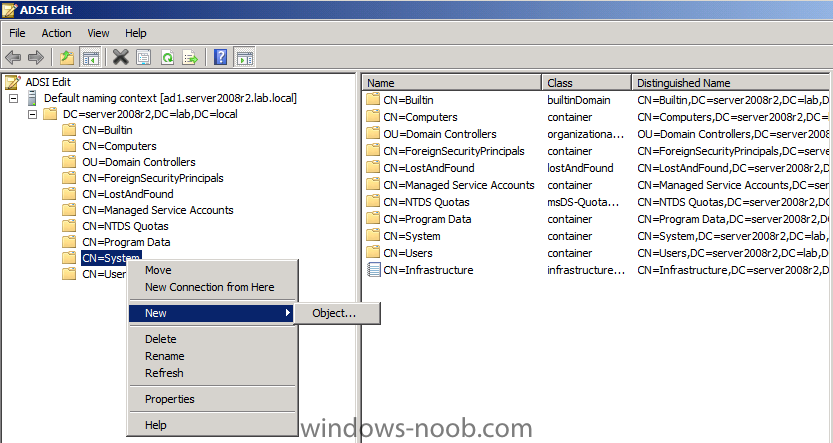
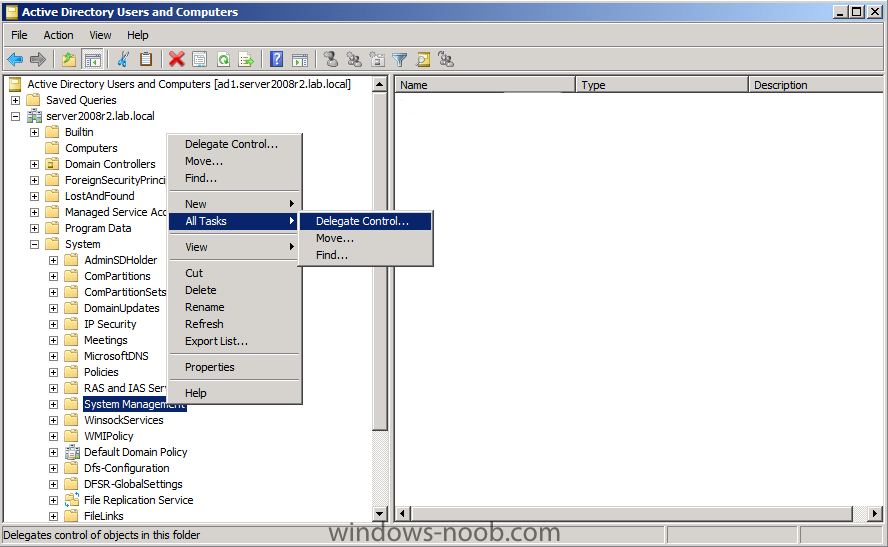
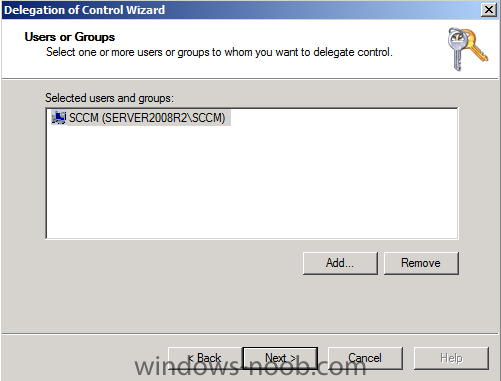
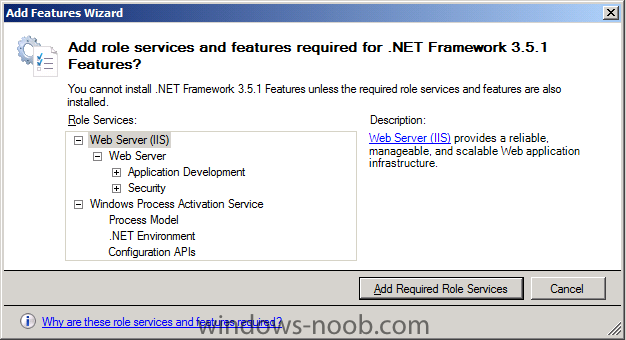
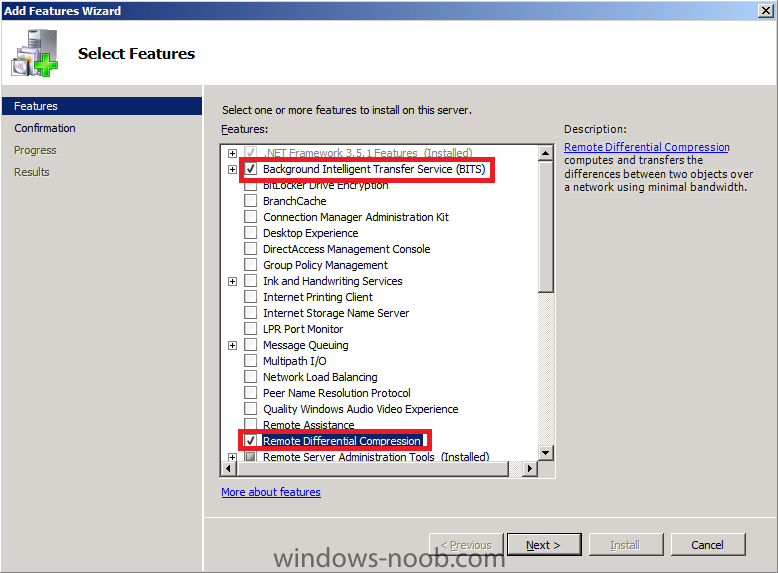
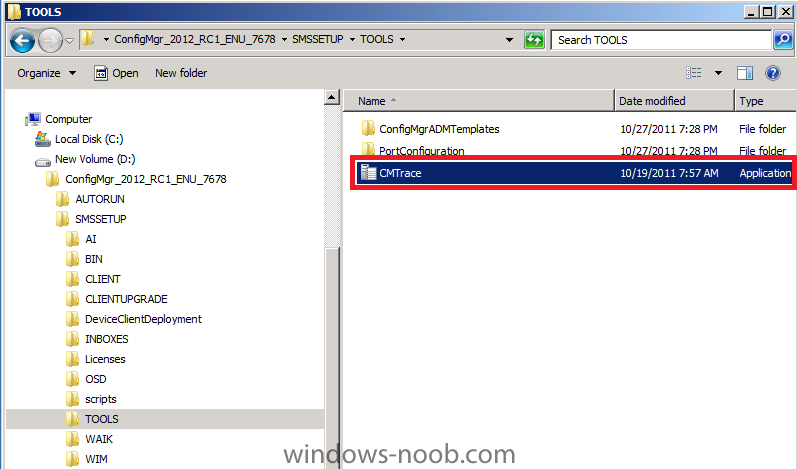
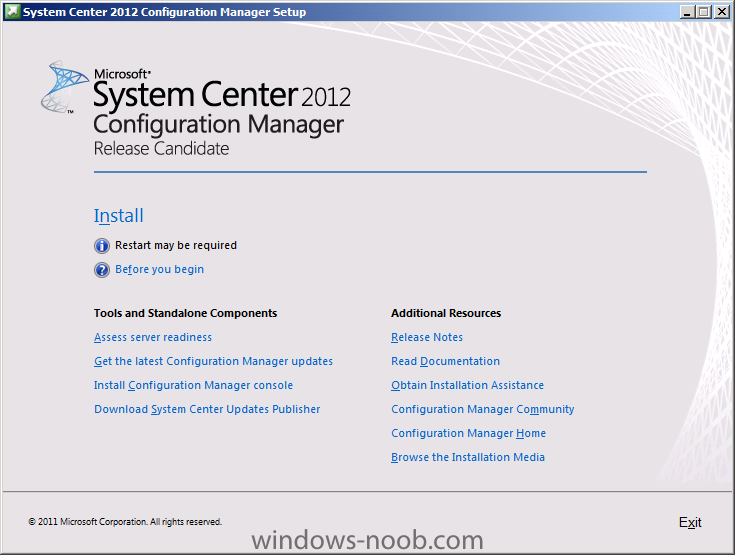
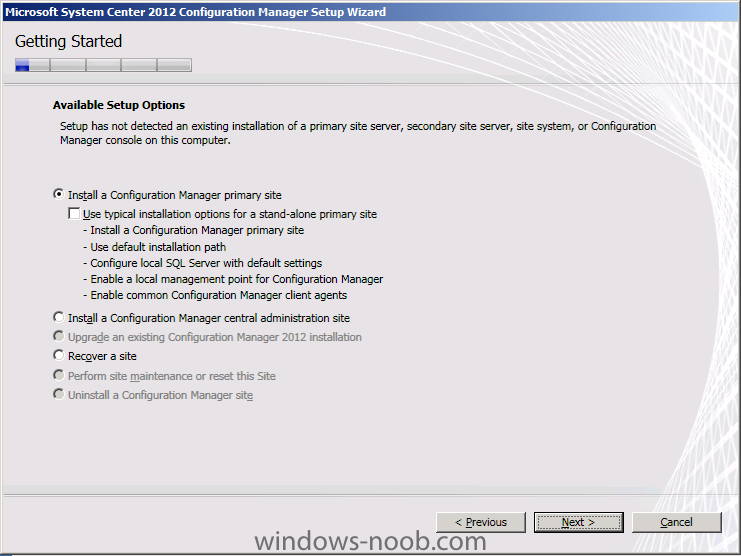
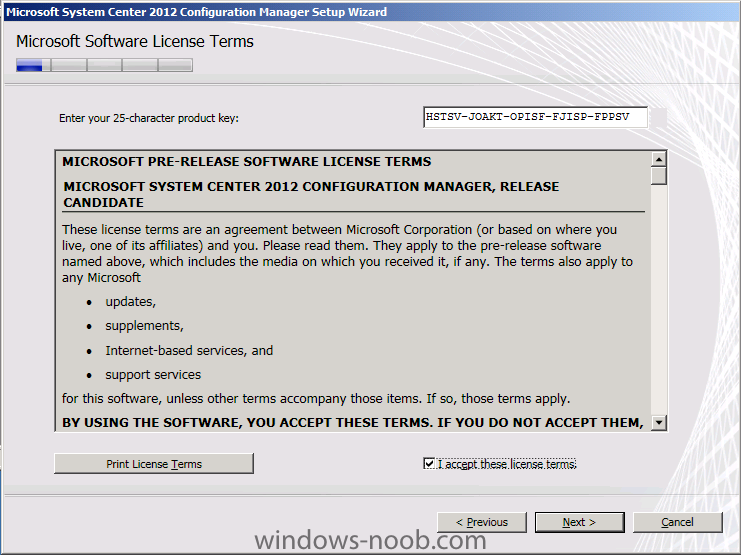
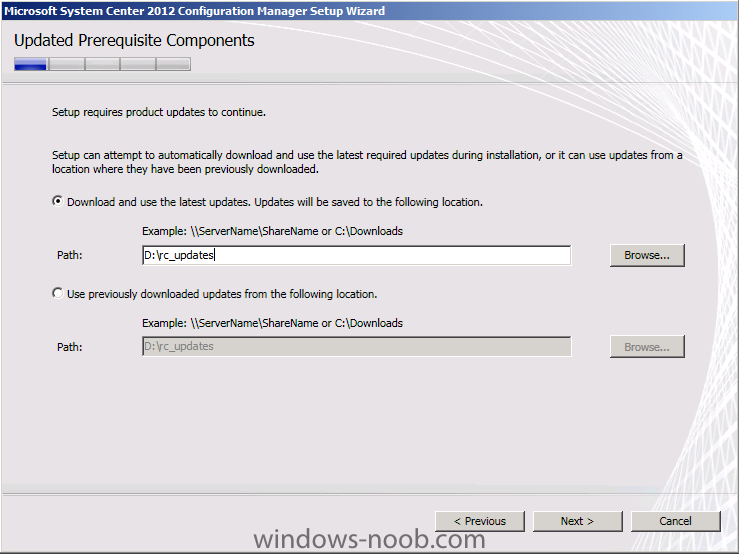
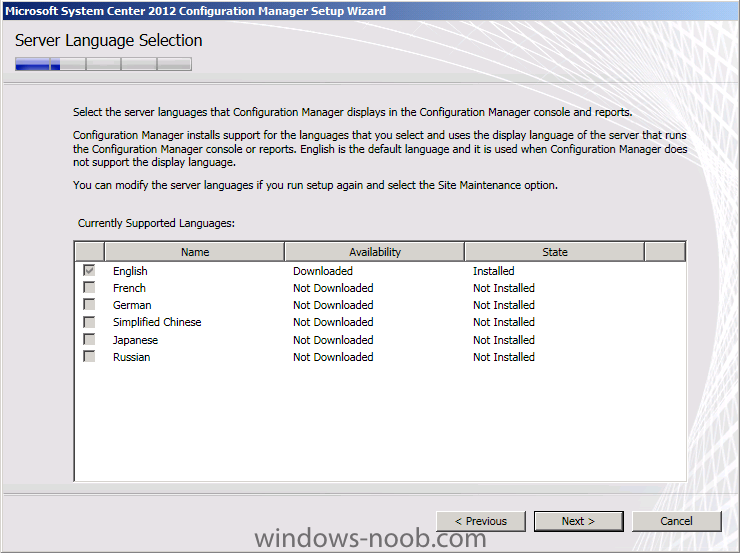
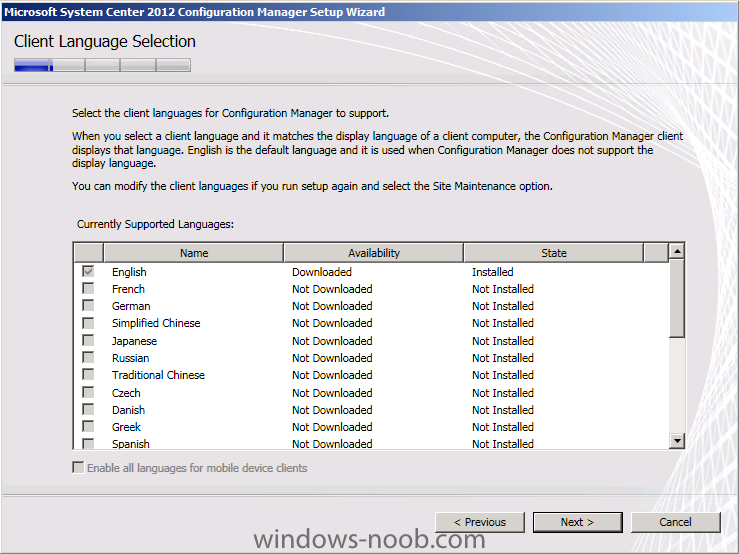
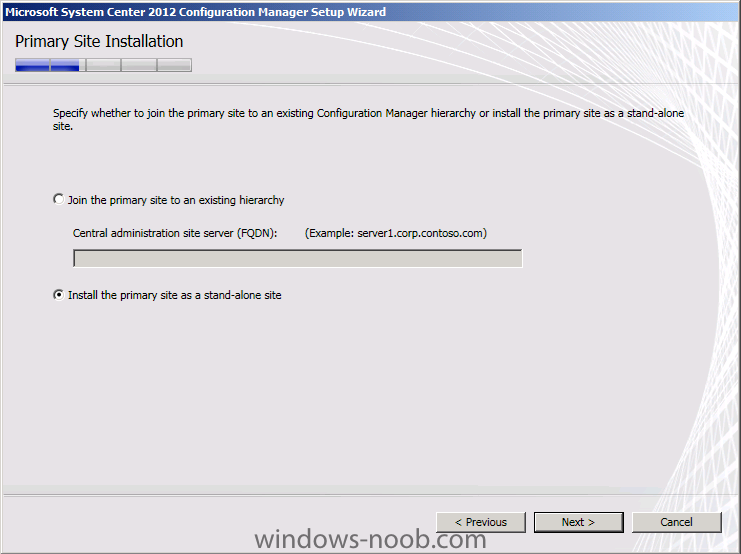
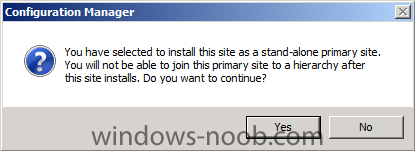
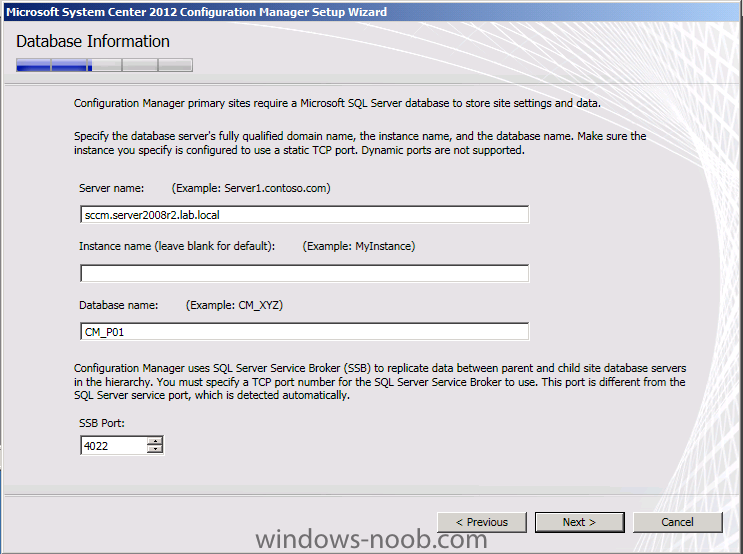
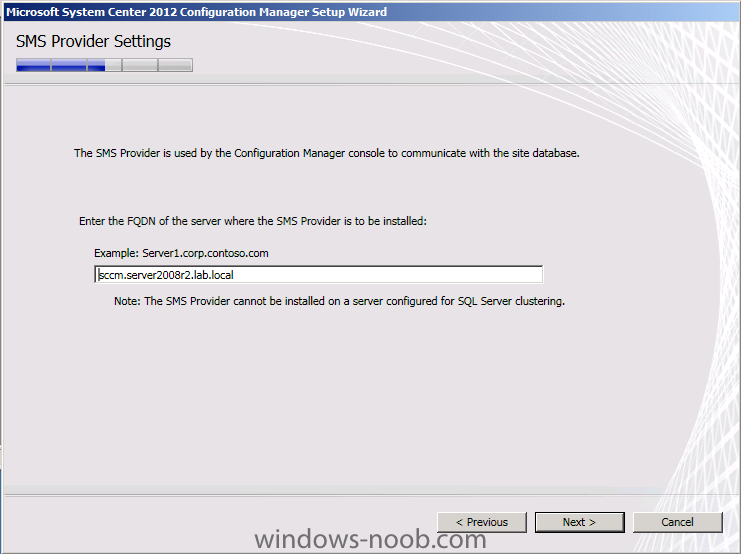
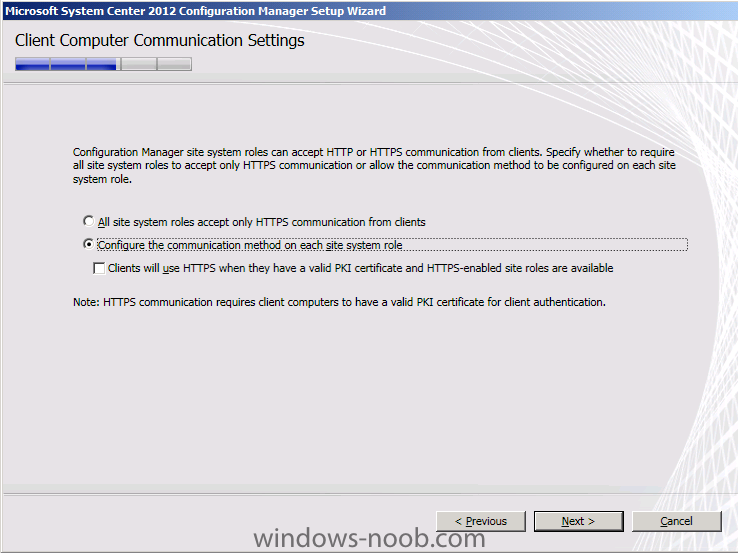
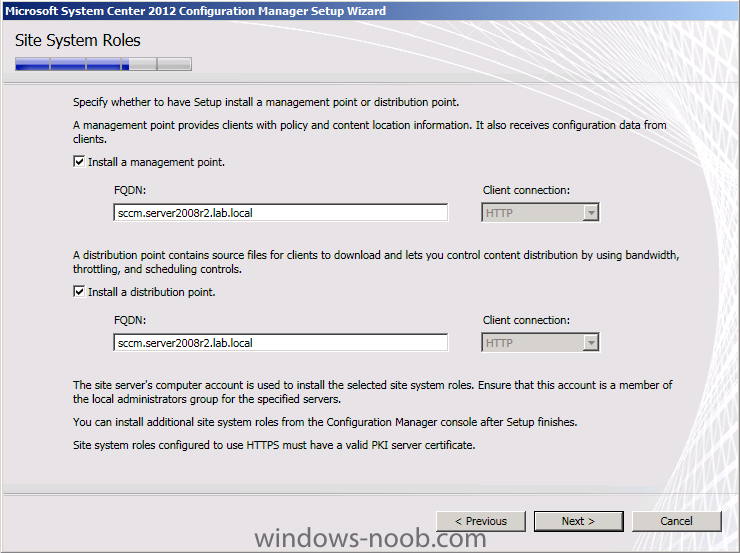
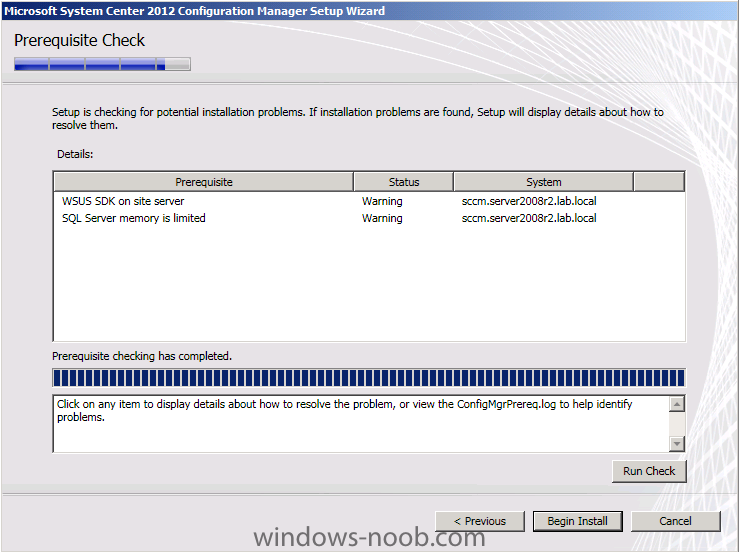
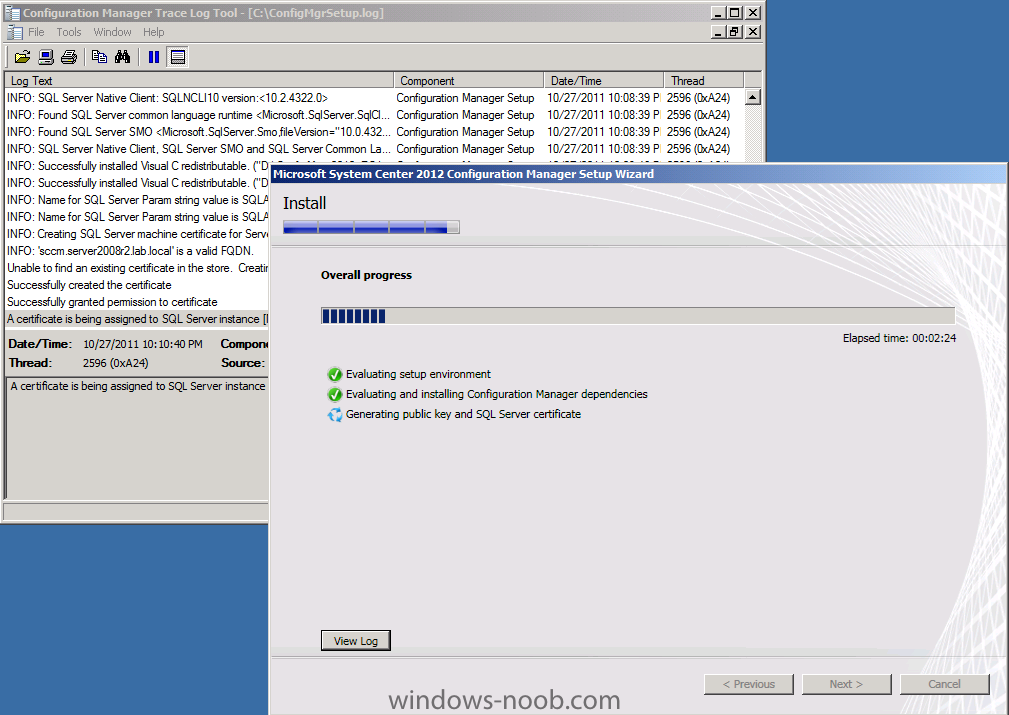
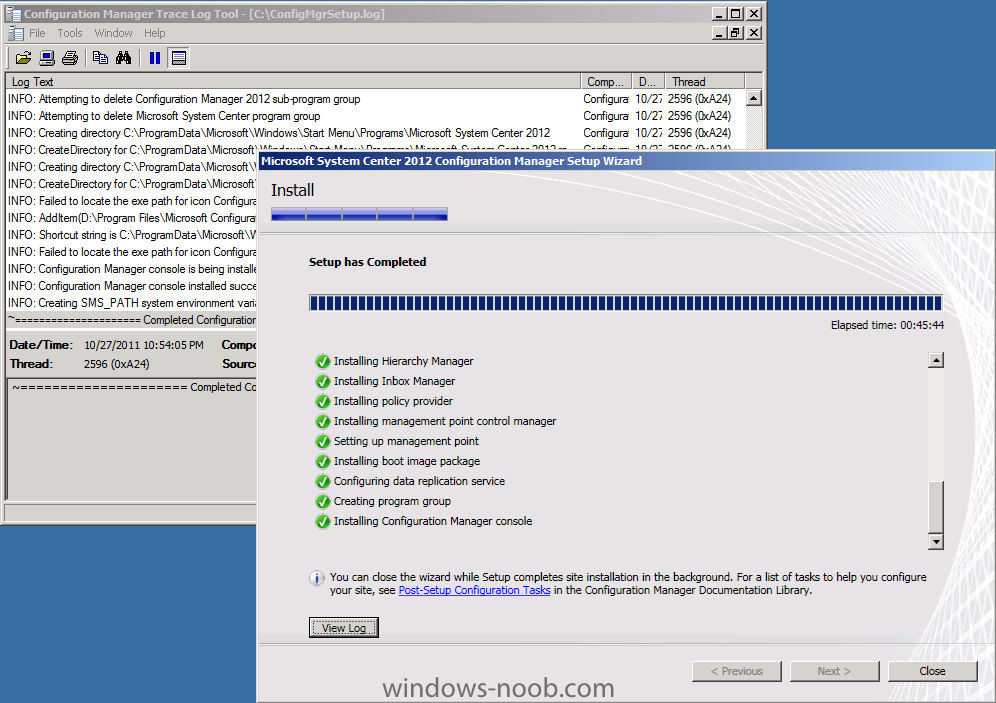
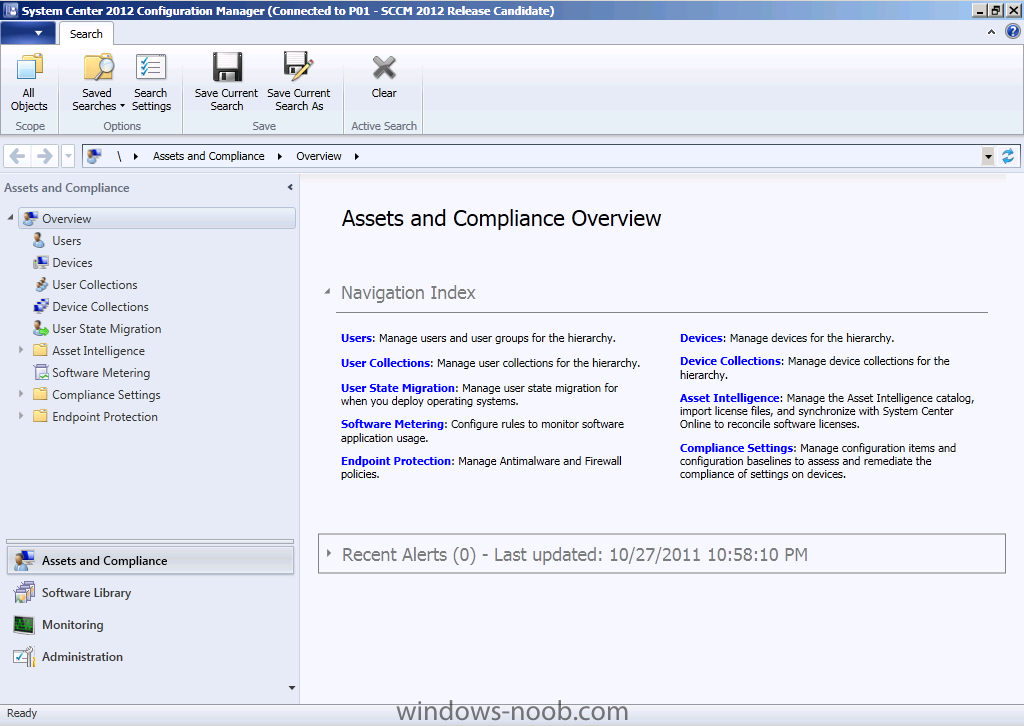
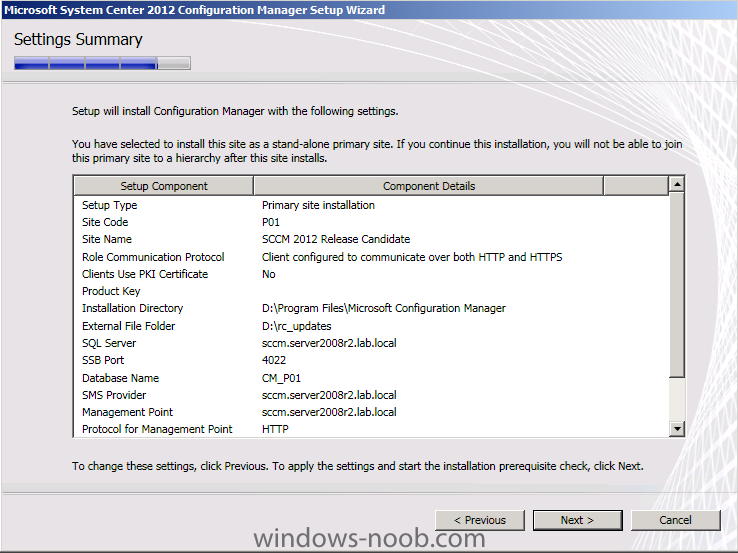
If you've been following my previous series of guides on System Center Configuration Manager 2012 Beta 1 and Beta 2, then you'll know where this is going, we are going to install System Center Configuration Manager 2012 from scratch and configure it, use it, test it, learn it. This is Part 1 of a series, to see the entire list please see this index. Technet Recommended Reading:- Release Notes for the System Center 2012 Configuration Manager - http://technet.micro...y/hh508784.aspx Fundamentals of Configuration Manager - http://technet.micro...y/gg682106.aspx Supported Configurations for Configuration Manager - http://technet.micro...y/gg682077.aspx Planning for Configuration Manager Sites and Hierarchy - http://technet.micro...y/gg682075.aspx Getting Started with Configuration Manager 2012 - http://technet.micro...y/gg682144.aspx What’s New in Configuration Manager - http://technet.micro...y/gg699359.aspx Planning for Site Systems in Configuration Manager - http://technet.micro...y/gg712282.aspx Install Sites and Create a Hierarchy for Configuration Manager - http://technet.micro...y/gg712320.aspx Technical Reference for Site Communications in Configuration Manager - http://technet.micro...y/gg712990.aspx Migrating from Configuration Manager 2007 to Configuration Manager 2012 - http://technet.micro...y/gg682006.aspx Frequently Asked Questions for Configuration Manager - http://technet.micro...y/gg682088.aspx Site Types Configuration Manager 2012 introduces the central administration site and some changes to primary and secondary sites. The following tables summaries these sites and how they compare to sites in Configuration Manager 2007. Central administration site The central administration site coordinates intersite data replication across the hierarchy by using Configuration Manager database replication. It also enables the administration of hierarchy-wide configurations for client agents, discovery, and other operations. Use this site for all administration and reporting for the hierarchy. Although this is the site at the top of the hierarchy in Configuration Manager 2012, it has the following differences from a central site in Configuration Manager 2007: Does not process client data. Does not accept client assignments. Does not support all site system roles. Participates in database replication Primary site Manages clients in well-connected networks. Primary sites in Configuration Manager 2012 have the following differences from primary sites in Configuration Manager 2007: Additional primary sites allow the hierarchy to support more clients. Cannot be tiered below other primary sites. No longer used as a boundary for client agent settings or security. Participates in database replication. Secondary site Controls content distribution for clients in remote locations across links that have limited network bandwidth. Secondary sites in Configuration Manager 2012 have the following differences from secondary sites in Configuration Manager 2007: SQL Server is required and SQL Server Express will be installed during site installation if required. A proxy management point and distribution point are automatically deployed during the site installation. Secondary sites can be tiered to support content distribution to remote locations. Participates in database replication. Hardware Requirements Note: The following page on Technet describes the recommended hardware requirements for a stand-alone Primary Server. Stand-alone primary site (SQL Server installed Locally) Up to 100,000 clients SQL Server is installed on the site server computer The following hardware requirements are recommended for a stand-alone Primary server. 8 cores (Intel Xeon E5504 or comparable CPU) 32 GB of RAM 550 GB hard disk space for the operating system, SQL Server, and all database files Step 1. Create the Lab Environment We are going to create a Standalone Primary Site in our LAB (creating a CAS and then another Primary is a bit more work, I may write up that process in the future), so let's get started, and to start off with I re-used/recycled my lab from Beta 2 by applying the day 1 snapshots effectively giving me a blank activated AD and blank SCCM 2012 server with the Operating System ready and activated. This is a huge advantage of doing labs in a virtual environment. The SCCM 2012 RC server for this lab has a C: partition (OS) and 150GB D: partition (DATA). The Domain Controller (AD1) is running Server 2008 R2, and is hosting the DHCP server and DNS roles. I chose to install Windows Server 2008 R2 standard as the server OS for SCCM 2012 RC. Once done I joined it to my domain (SERVER2008R2), verified DNS was working correctly via nslookup and was ready to begin the steps below. Create AD users: Note: Perform the following on the Active Directory Domain Controller server as Local Administrator In addition I created some accounts in AD, namely: * SMSadmin, a domain user * Testuser, a domain user * Testuser2, a domain user * Testuser3, a domain user * DomJoin, a domain user,(for joining computers to the domain) * ReportsUser, a domain user for reporting services. * ClientInstall, a domain user used when installing the Configuration Manager Client for Client Push. This user must be a local administrator on computers you want to install the Configuration Manager Client. * SCCMNAA, a domain user, (Network Access Account) used during OSD Create Local Administrator accounts: Note: Perform the following on the SCCM 2012 server as Local Administrator On the SCCM server add the SMSadmin user to the Local Administrators group (you can add the ClientInstall account also). Step 2. Download SCCM 2012 Release Candidate you can download it from Microsoft here. System requirements Supported Operating Systems: Windows Server 2003 R2 x64 editions, Windows Server 2008, Windows Server 2008 R2 Site System Requirements Site servers and site roles require 64-bit OS (distribution points are an exception)Branch Distribution Points Branch distribution points have been deprecated and replaced with standard distribution points that can be hosted on Configuration Manager 2012 client operating system platforms, with the exception of Windows XP Professional Service Pack 3 and Windows XP Tablet PC SP3 Standard DPs can run on Windows Server 32-bit but will not support advanced functionality Server Operating System Requirements Windows Server 2008 (64-bit) and Windows Server 2008 R2 Distribution points can run on Windows Server 2003 Client Operating System Requirements Windows XP professional SP3 – x86 and Windows XP SP2 pro for 64 bit systems Windows Vista SP2 (x86,x64) Windows Server 2003 R2 SP2 (x86,x64) Windows Server 2008 (x86,x64) Windows Server 2008 R2 (x86,x64) Windows 7 (x86,x64) Database Requirements SQL Server 2008 SP2 with CU 7 SQL Server 2008 R2 with SP1 and Cumulative Update 4 SQL Server Express 2008 r2 WITH SP1 and CU 3 is supported only on secondary sites SQL Reporting Services is ONLY reporting solution For Supported Configurations information, visit http://technet.microsoft.com/en-us/library/gg682077.aspx. Step 3. Create The System ManageMent Container Note: Perform the following on the Active Directory Domain Controller as a Domain Administrator Open ADSI Edit, click on Action, Connect To and click Ok, Double Click on Default Naming Context and the DC= that appears below it. Click on the + and scroll down to CN=System. Right Click on CN=System and choose New, Object Choose Container from the options, click Next and enter System Management as the value. Click Next and Finish. Press F5 to refresh ADSI Edit and you should now see the new System Management Container. Close ADSI Edit. Step 4. Delegate Permission to the System Management Container. Note: Perform the following on the Active Directory Domain Controller as a Domain Administrator Open Active Directory Users and Computers. Click on view, select Advanced Features. Select the System Management Container, and right click it, choose All Tasks and Delegate Control. When the Welcome to Delegation of Control Wizard appears click next, then click Add. click on Object Types, select Computers. Type in your SCCM server name and click on Check Names, it should resolve. Click Ok, then Next. Choose Create a Custom Task to Delegate, click next, make sure This folder, existing objects in this folder and creation of new objects in this folder is selected. click next, select the 3 permissions General, Property-Specific and Creation-deletion of specific child objects are selected then place a check mark in FULL CONTROL, and click next then Finish. Failure to do the above will mean that the System Management Container in AD will NOT POPULATE with ConfigMgr site info needed by the Clients and you will see many errors in your site status warning you of same. Note: Repeat the above for Each site server that you install in a Hierarchy. Step 5. Extend the Active Directory schema for Configuration Manager Note: Perform the following on the Active Directory Domain Controller as a Domain Administrator Note:- The Active Directory schema extensions for Configuration Manager 2012 are unchanged from those used by Configuration Manager 2007. If you extended the schema for Configuration Manager 2007, you do not need to extend the schema again for Configuration Manager 2012. Perform the below on your Active Directory server, simply browse the network to your sccm server \\sccm\d$ and locate the folder where you uncompressed SCCM 2012 and find \SMSSetup\Bin\x64\Extadsch.exe, right click and choose Run As Administrator. A command prompt window will appear briefly as the schema is extended, check in c:\ for a log file called ExtADSch.log it should look similar to this Step 6. Open TCP port 1433 and 4022 for SQL replication Note: Perform the following on the Active Directory Domain Controller as a Domain Administrator If you are setting up a hierarchy (CAS/Primary/etc) then on your AD server do the following, start Group Policy Management tool and create a new GPO, Select Computer Configuration, Policies, Windows Settings, Windows Firewall with Advanced Security and select Inbound Rules, choose New and follow the wizard for opening up TCP port 1433 as per this guide on Technet. Once done, repeat the above for Port 4022. Step 7. Install .NET 3.5.1 and WCF Activation Note: Perform the following on the SCCM 2012 server as SMSadmin In Server Manager select Features, Add Features, Select .NET Framework 3.5.1, also select WCF Activation and when prompted answer Add Required Role Services click next and next again Verify the following IIS components are installed in addition to the ones preselected by the wizard. answer yes to any additional prompts, then Click Next and Install and close when done. Step 8. Download and install .NET 4 Note: Perform the following on the SCCM 2012 server as SMSadmin Download .NET 4 from here (webinstall) or here (Standalone). Double click the file, After a while it will complete, Click Finish when done restart when prompted Note: In some scenarios, such as when IIS is installed or reconfigured after the .NET Framework version 4.0 is installed, you must explicitly enable ASP.NET version 4.0. For example, on a 64-bit computer that runs the .NET Framework version 4.0.30319, run the following command:%windir%\Microsoft.NET\Framework64\v4.0.30319\aspnet_regiis.exe –i –enable Step 9. Add BITS and Remote Differential Compression Note: Perform the following on the SCCM 2012 server as SMSadmin Finally, in Server Manager click on Add Features, place a selection mark in BITS and RDC. Step 10. Download Microsoft SQL Server 2008 SP2 CU7 (if you plan on using SQL Server 2008 R2 see 10.b below) Note: Perform the following on the SCCM 2012 server as SMSadmin The supported versions of SQL Server 2008 and SQL Server 2008 R2 are listed here on Technet:- http://technet.micro...nfigSQLDBconfig At the time of writing this guide I chose to use SQL Server 2008 SP2, CU6 with the hotfix mentioned below, that is fine for Release Candidate 1. If you are using RC2, then use CU7 instead of CU6 and the hotfix, or use SQL Server 2008 R2 SP1 CU4 as described in 10.b below). Be aware that If you use SQL Server Standard, your CAS will only be able to support 50k clients. Download SQL Server 2008 Standard (x86, x64) - DVD (English) from your provider (MSDN or Technet) the one I used was File Name: en_sql_server_2008_standard_x86_x64_dvd_x14-89155.iso Note: You can download the Trial version (180 days) from here. While you are at it download SQL Server 2008 SP2 from here - File Name: SQLServer2008SP2-KB2285068-x64-ENU.exe Next download CU7 , you can download CU7 from here. Next Download the CU6 from here Finally, you also need to Download 2603910 Step 10.b This step if you decide to use SQL Server 2008 R2. If you want to use this version then the supported version is SQL Server 2008 R2 SP1 CU4. Download the following from Technet:- File Name: en_sql_server_2008_r2_standard_x86_x64_ia64_dvd_521546.iso (4177 MB) Download Microsoft® SQL Server® 2008 R2 Service Pack 1 Download Cumulative update package 4 for SQL Server 2008 R2 Service Pack 1 Step 11. Install SQL Server 2008 Note: Perform the following on the SCCM 2012 server as SMSadmin Tip: If you use or plan on using a SQL named instance for your Configuration Manager 2012 installation you should configure the named instance with a static port since named instances are configured for dynamic ports by default during an SQL Installation. You can check this configuration by starting SQL Server Configuration Manager and by going to SQL Server Network Configuration, then check Protocols for Named_Instance (where Named_Instance is the instance you creade) and then check the details of the TCP/IP IP addresses of that Named Instance. For SQL Collation note that you must use (It is required whether you have a hierarchy of sites or a single site and regardless of the OS languages.):- SQL_Latin1_General_CP1_CI_AS To Install SQL server you can follow this guide but please install SQL on D:\Program Files... and when running setup.exe right click and choose Run as Administrator. After you install SQL Server 2008, you must install SP2 and then CU6 and finally install KB2603910. So install it in this order: SQL Server 2008 >> SQL Server 2008 SP2 >> SQL Server 2008 Cumulative Update 6 >> KB2603910 Note: CU7 is available and it's supposed to contain the above hotfix, however i have not tested it yet. Step 12. Install Configuration Manager 2012 Release Candidate. Note: Perform the following on the SCCM 2012 server as SMSadmin TIP: you can open C:\ConfigMgrSetup.log with Configuration Manager Trace Tool available in the extracted media to and review the contents of the file, it will inform you of any issues during installation. Uncompress the EXE by running it, then browse to where you uncompressed it and click on Splash.hta when the wizard appears, click on Install, click next at the warning and then select Install a Configuration Manager Primary Site at the EULA click accept Create a folder on D:\ called RC_Updates and then specify the path to download the updates Tip: If you don't have internet on your SCCM server then you can download the required updates on another computer by doing like so:- Open a command prompt with administrative permissions Navigate to .\Configuration Manager 2012 Install source\smssetup\bin\X64 Run SetupDL.exe target dir (in my example SetupDL.exe D:\RC_Updates) Click next at the Server Language screen and at the Client Language Screen enter your Site and Installation Settings, install the site on D:\ as per below screenshot select Standalone as the site type take note of the warning (ie: if will not be able to join it to an existing site heirarchy later) review the Database Information review the SMS provider settings review the Client computer communication settings, select Configure the Communication method on each site system role review the site system roles click next at the CEIP screen then review the summary take note of any warnings, if like mine (WSUS and SQL memory, we can fix them later, no problem) click on Begin Install now is a good time to look at the C:\ConfigMgrSetup.log with CMtrace, watch it for errors after a long install you should see the installer finish, click on Close reboot the SCCM server and then login again as SMSadmin start the Configmgr console congratulations, you've installed System Center 2012 Configuration Manager Note: This is Part 1 of a series of step-by-step Guides for Configuration Manager 2012. To view the entire list please see this index. This guide and all guides here are © windows-noob.com.


-
Hi All, We are extremely excited to announce the availability of the release candidates for System Center 2012 Configuration Manager and System Center 2012 Endpoint Protection (formerly known as Forefront Endpoint Protection 2012) today. Both releases are available through a single download package on the Microsoft Download Center. Special thanks to our Community Evaluation Program (CEP) and Technology Adoption Program customers, whose feedback was instrumental in achieving this important milestone. As the “Consumerization of IT” trend continues to grow, System Center 2012 Configuration Manager helps you deliver on the promise of empowering end users to be productive on any device, while still managing compliance of corporate assets. Its unified management infrastructure allows you to manage physical, virtual, and mobile environments – including the ability to deliver applications seamlessly across multiple devices for a single user. And with System Center 2012 Endpoint Protection built on that same infrastructure, you also get a single experience to distribute and update antimalware protection, monitor compliance, and remediate vulnerabilities. Configuration Manager, of course, also includes enhancements to administrative features that make you more efficient and effective, including the option to set automated discovery and remediation of non-compliant systems. In the Release Candidate, we’ve introduced some additional and enhanced capabilities, including: Improved endpoint protection functionality, with integrated setup, management and reporting for System Center 2012 Endpoint Protection. Improved application catalog design that provides a better, more responsive experience when requesting and downloading applications. New support for Windows Embedded devices, including Windows Embedded 7 SP1, POSReady 7, Windows 7 Think PC, and Windows Embedded Compact 7. Improved client status checks for Configuration Manager services and features. Improved compliance enforcement and tracking, with the ability to create dynamic collections of baseline compliance and the generation of hourly compliance summaries. Platform support for deep mobile device management of Nokia Symbian Belle devices. Pending a platform update by Nokia later this calendar year for these devices, customers will be able to try out the management of these Nokia devices with ConfigMgr. Additional scalability and performance improvements. In short, System Center 2012 Configuration Manager will help you achieve the right balance between minimizing risks and capitalizing on the benefits of consumer technologies. We have made some useful tools available for you to simplify the migration from System Center Configuration Manager 2007. For example, System Center 2012 Configuration Manager introduces a new way to manage applications. We call it the user-centric application model. (Take a look at this blog from Bill Anderson describing the benefits of this approach.) System Center Package Conversion Manager (PCM) will help you convert existing application packages in ConfigMgr 2007 to the new application model. PCM analyzes packages and programs to determine their readiness for conversion into the new application model. PCM will automatically convert many packages to applications, with deployment types and dependencies, as well as migrating collection properties to global settings and requirement rules. The Package Conversion Manager is available as a feature pack download here. A great way to start evaluating these releases is as part of a community of early adopters. Join our Community Evaluation Program (CEP) and you’ll get guidance from our product team and shared best practices from a community of peers. As always, you can find additional evaluation resources like How-to Videos, technical documentation, and blog articles on our TechCenter. Thanks and enjoy the RC! Adwait Joshi (AJ) Sr. Technical Product Manager Management and Security via > http://blogs.technet.com/b/server-cloud/archive/2011/10/25/system-center-2012-configuration-manager-release-candidate-is-here.aspx
-
Multiple warnings under Component Status
anyweb replied to Brazzz's topic in Configuration Manager 2007
If you right click one of these and view all messages, what do they tell you . -
Could be that the report isnt done yet (beta 2), what report was it i can check in my env and see do i have the same problem
-
Is the client push account a local administrator ?
-
Yes create a separate network for your testing with sccm 2012
-
try this, should work for configmgr 2012 too http://twitter.com/#!/HenkHoogendoorn/status/128476706049765376
-
go virtual, place the vm's in a virtual network separated from all others, its the way i do it, highly recommended
-
using SCCM 2012 beta 2 in a LAB - Part 1. Installation
anyweb replied to anyweb's topic in Configuration Manager 2012
are you sure you followed the steps exactly as i specify in the guide ? anything you did differently ? you are testing with beta 2 right ? -
Problem with SCCM 2012 system deployment
anyweb replied to night.walker's topic in Configuration Manager 2012
and the moral of the story is, DNS must be working before trying OSD or anything else with ConfigMgr