anyweb
-
Posts
9175 -
Joined
-
Last visited
-
Days Won
366
Everything posted by anyweb
-
did you add a boundary to a boundary group, and did you then assign a site to that boundary group ?
-
the System Center Configuration Manager SMSadmin user only needs to be a Local Administrator of the SCCM server itself, no need to be a domain admin, that's overkill and a security risk
-
 thanks for the kind words I'd say double check that the captured image is indeed the image you are deploying in your deploy task sequence, perhaps you didn't update your distribution points or something else ?
 -
have you tried restarting the WDS service itself, it has a registry timeout cache of 60 minutes by default..
-
double check that those applications are installed/not installed, look in the start menu/add remove programs what applications were they ?
-
and if you initiate a Machine policy (on the actions tab) what happens when you refresh the actions tab a few minutes later, does it populate with all the missing actions
-
are you trying to do this using Configuration Manager 2007 ? or Windows Deployment Services ? or Microsoft Deployment toolkit ?
-
did you use mdt 2012 beta 1 ? when integrating it with CM12 did you run the command in the start menu by right clicking it and choosing Run As Administrator ?
-
using SCCM 2012 beta 2 in a LAB - Part 1. Installation
anyweb replied to anyweb's topic in Configuration Manager 2012
we're here to help and it's easy to get it wrong, the hotfixes can be confusing -
or add exclusions to your collection queries that the updates are targetted to, so that it excludes these computers
-
thanks for the kind words ! i put the OS installation packages and pretty much everything in the following shared path \\sccmserver\sources\ sources is shared out, and within that share (folder) are subfolders such as os captures drivers wsus and so on so basically all you need to do is share out a folder called sources on your sccm server (or call it whatever you want, i've always stuck with sources) then create sub dirs from there for all your content
-
using SCCM 2012 beta 2 in a LAB - Part 1. Installation
anyweb replied to anyweb's topic in Configuration Manager 2012
correct, you are trying to install a hotfix for xxxIA64.exe (itanium) on 64 bit hardware (non-itanium) you selected the wrong hotfix download -
using SCCM 2012 beta 2 in a LAB - Part 1. Installation
anyweb replied to anyweb's topic in Configuration Manager 2012
what error do you get ? did you install CU14 as in the guide ? -
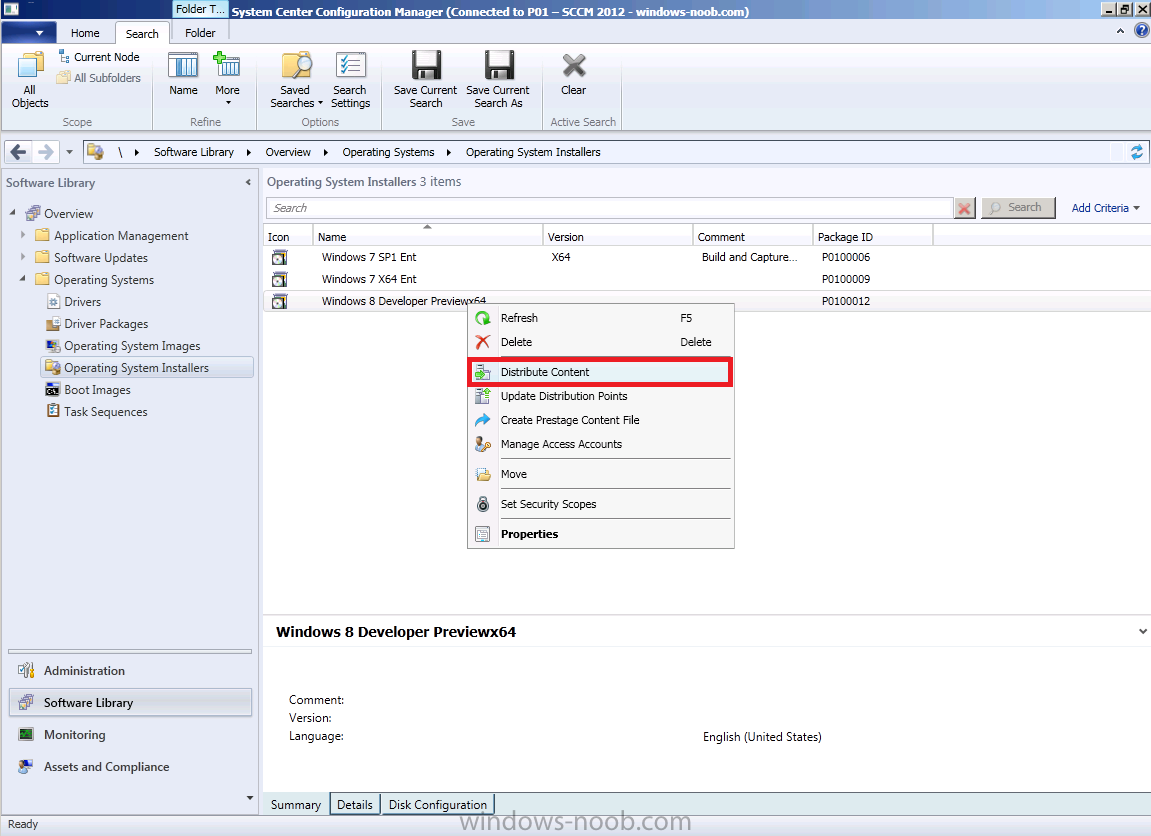
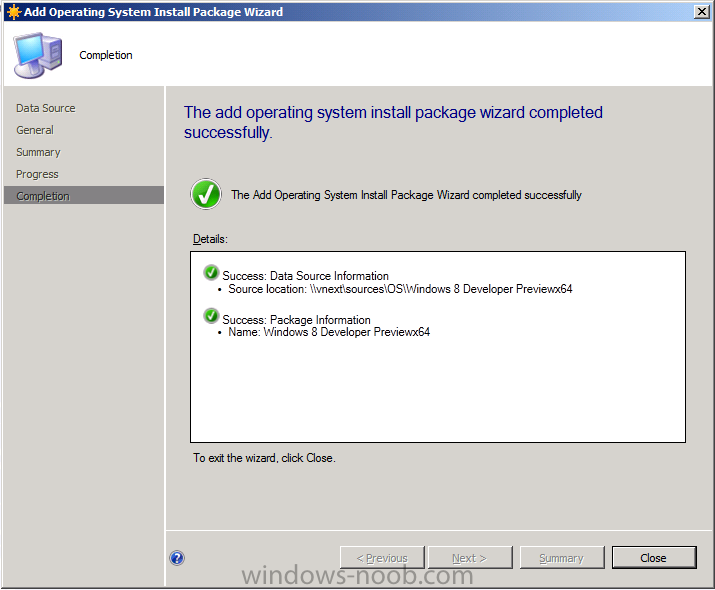
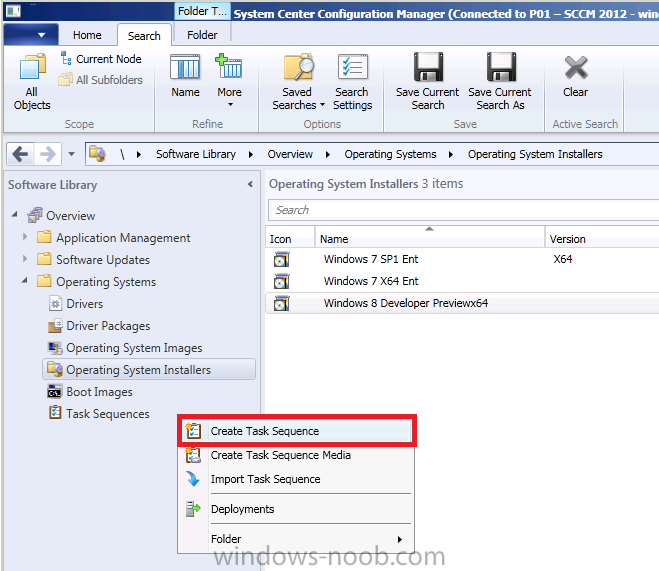
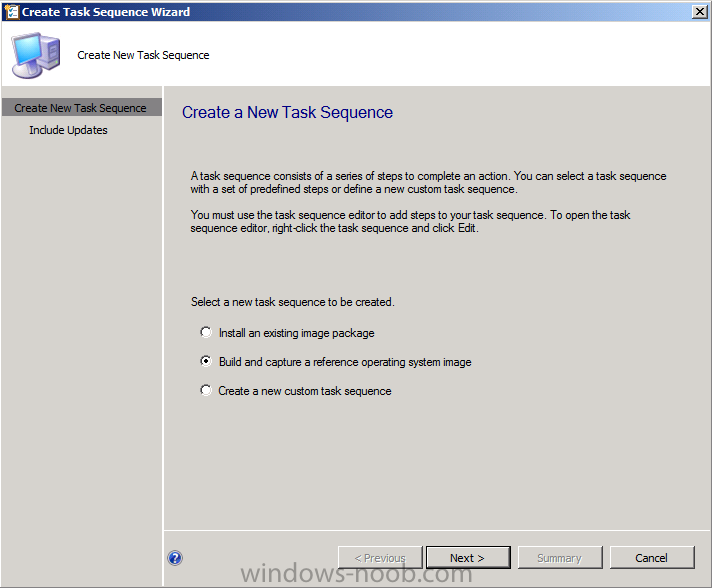
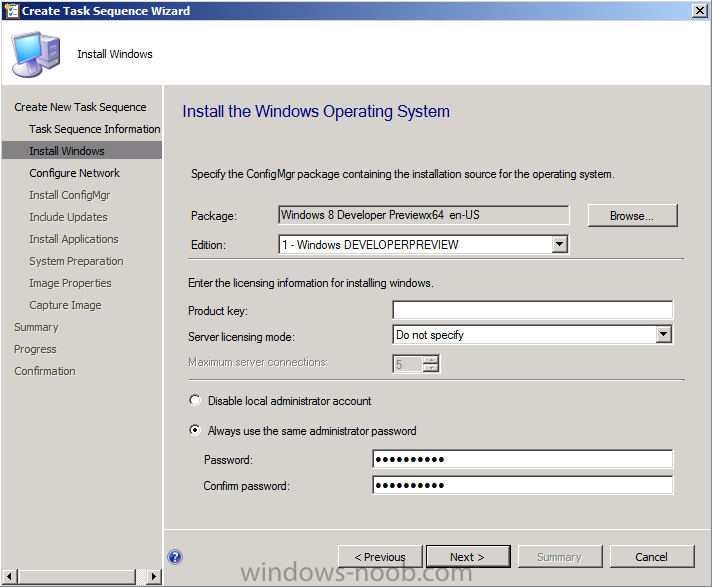
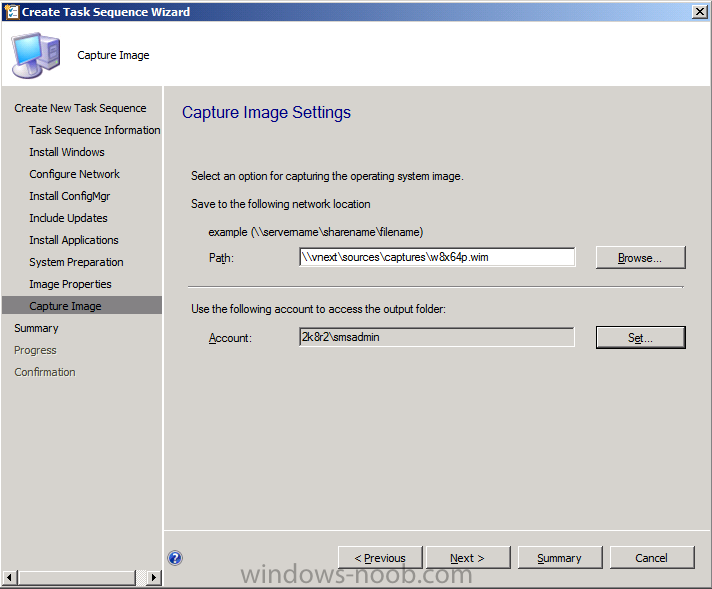
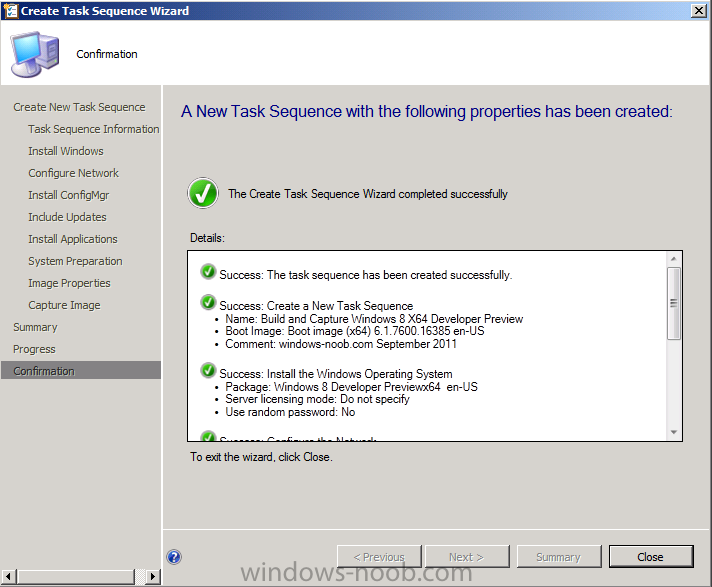
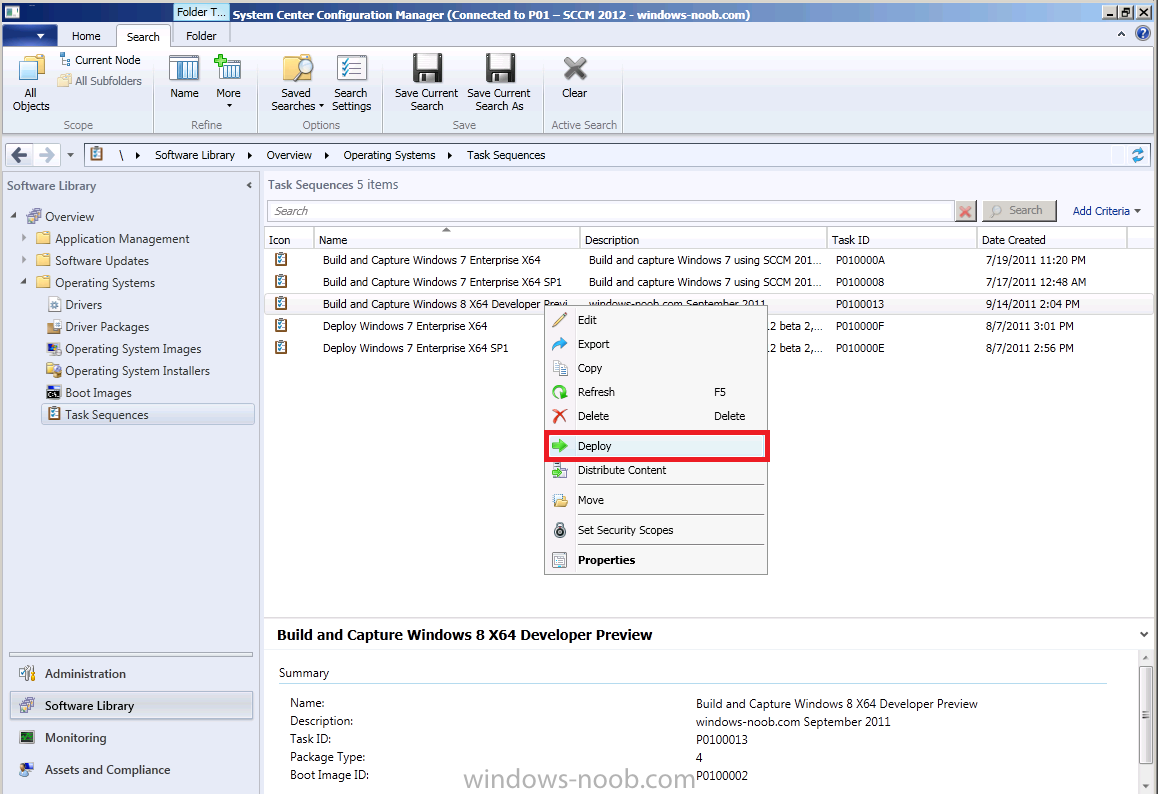
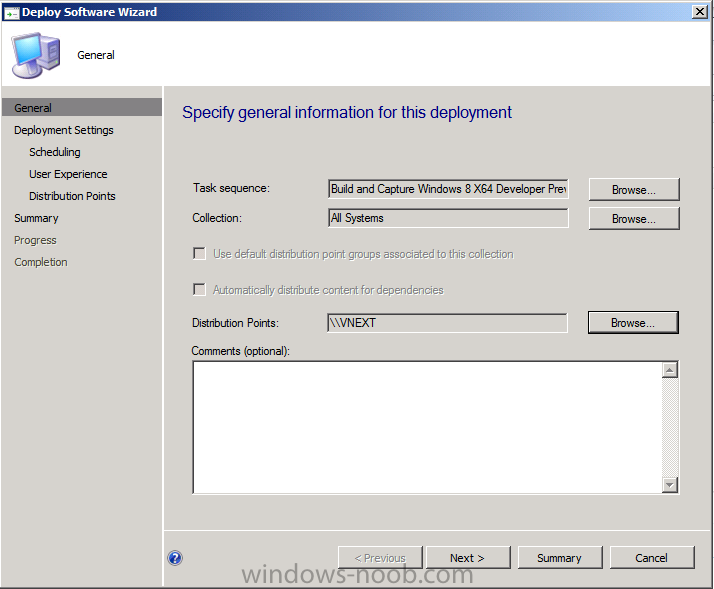
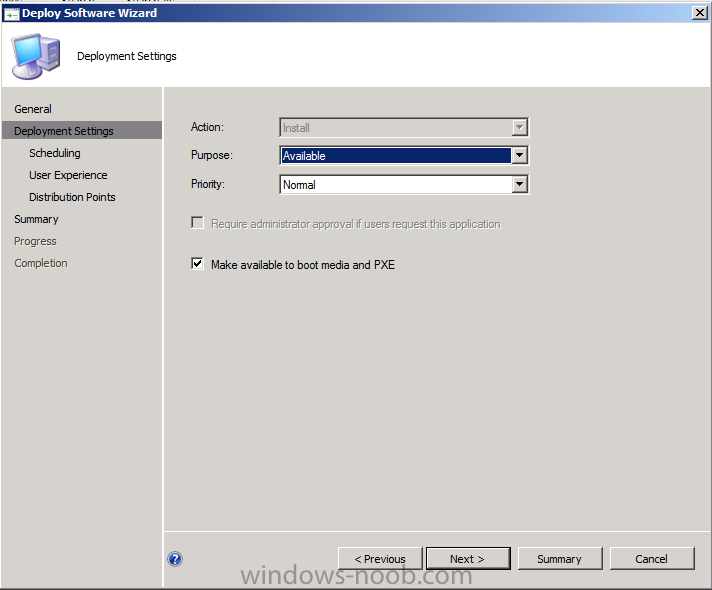
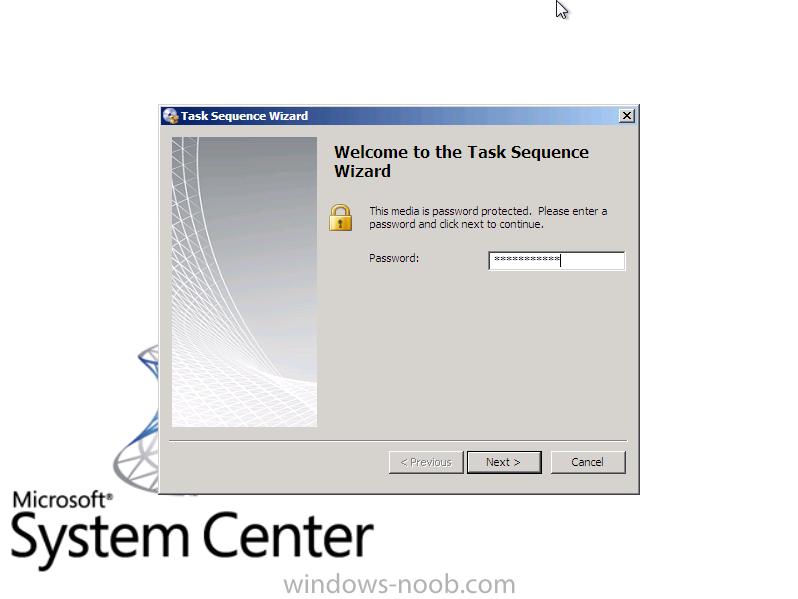
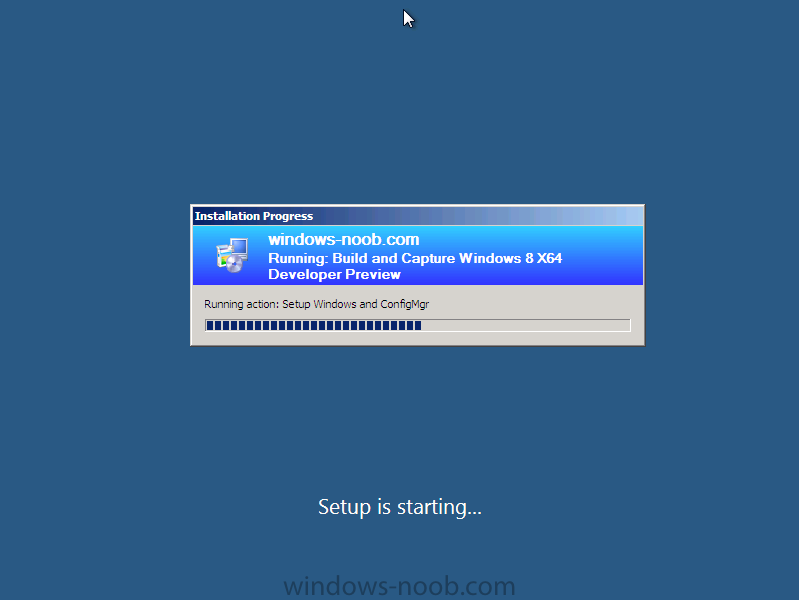
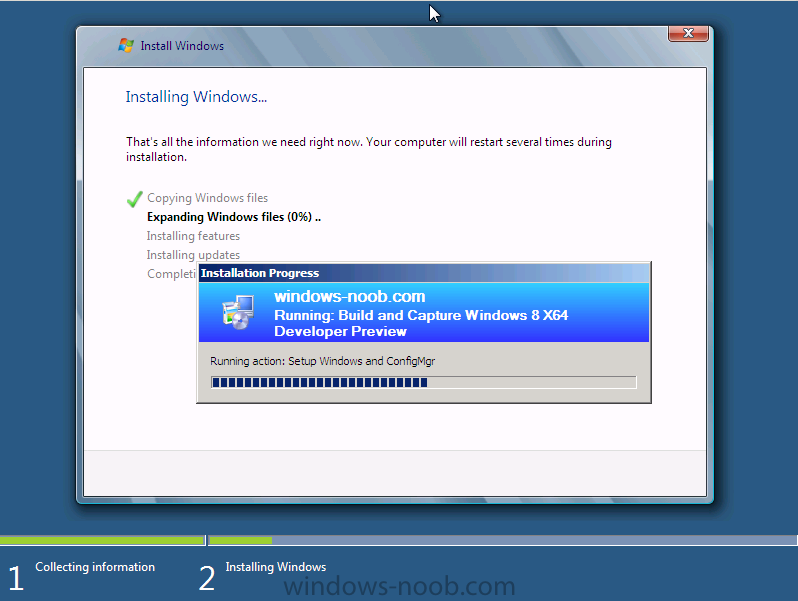
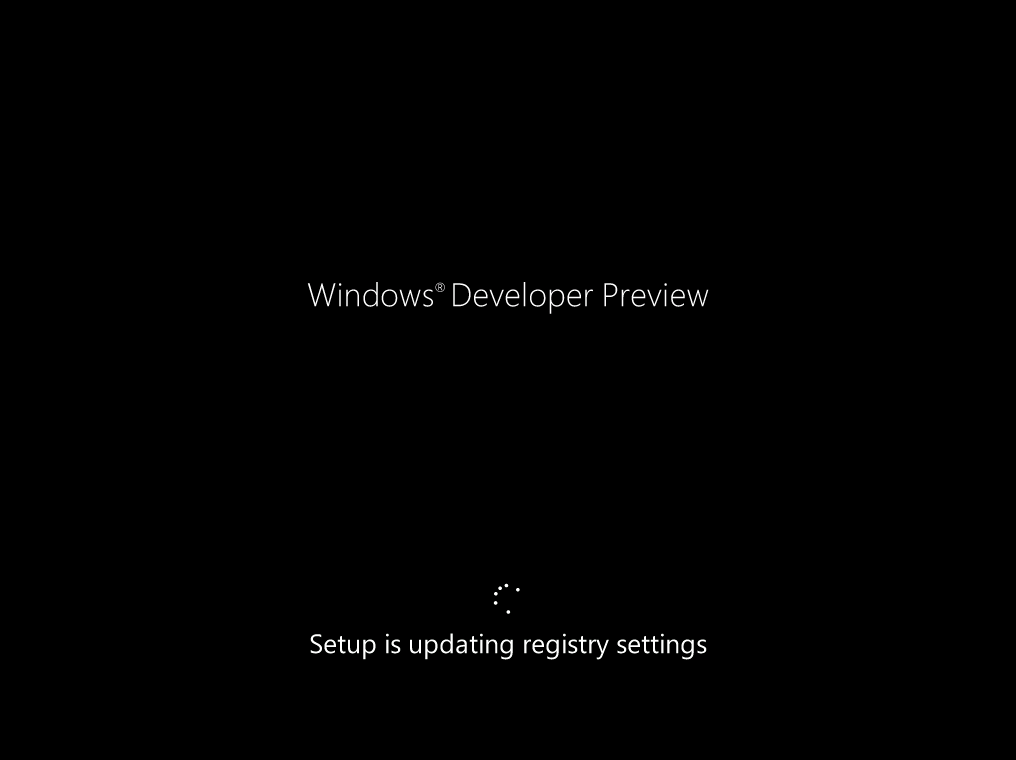
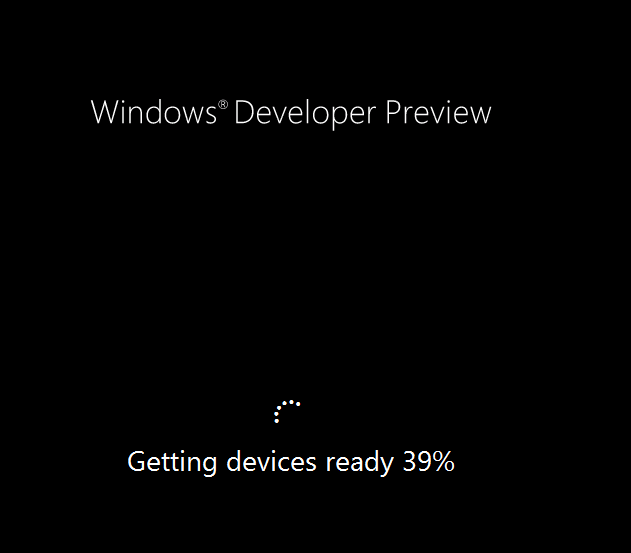
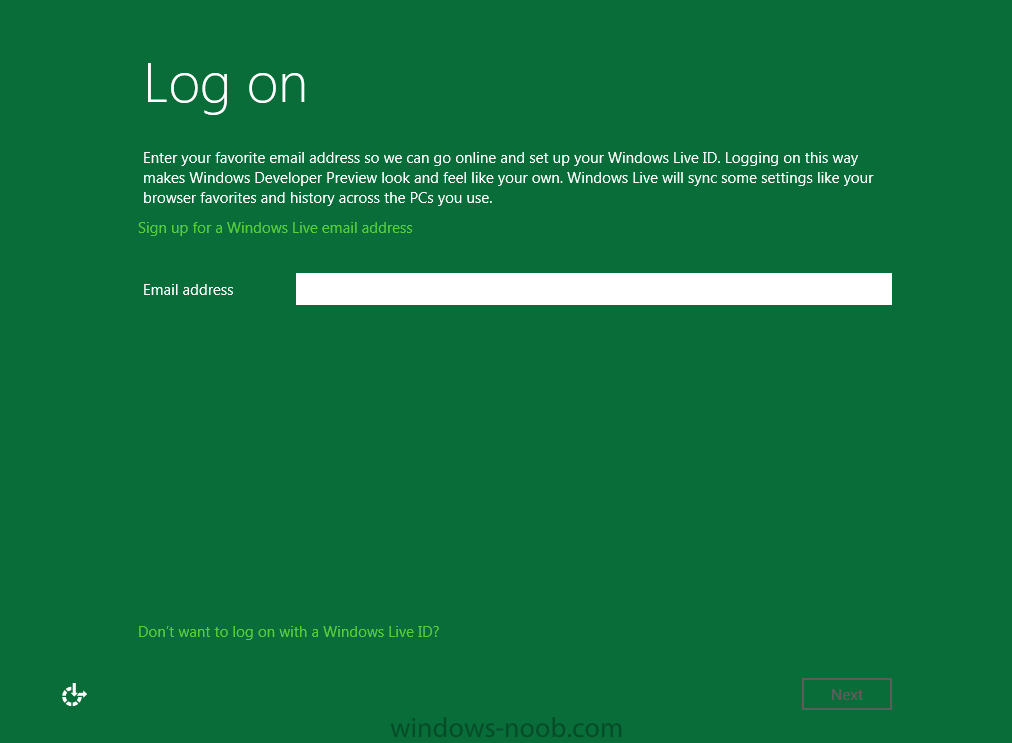
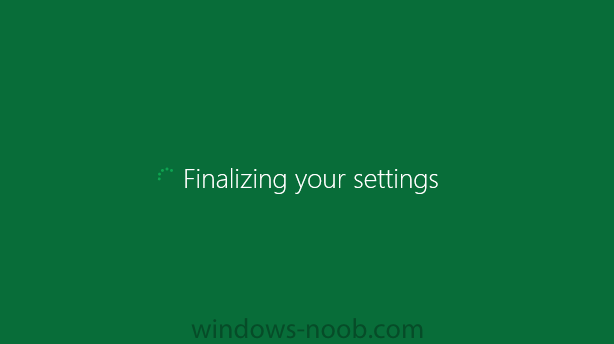
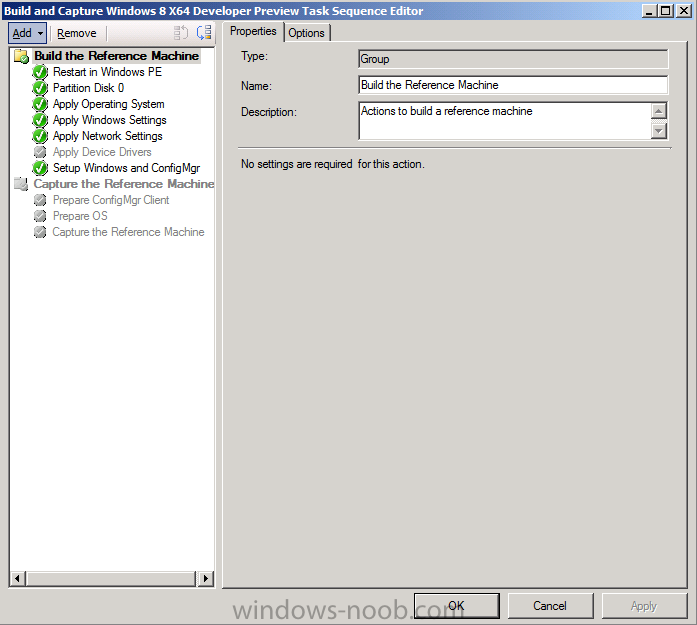
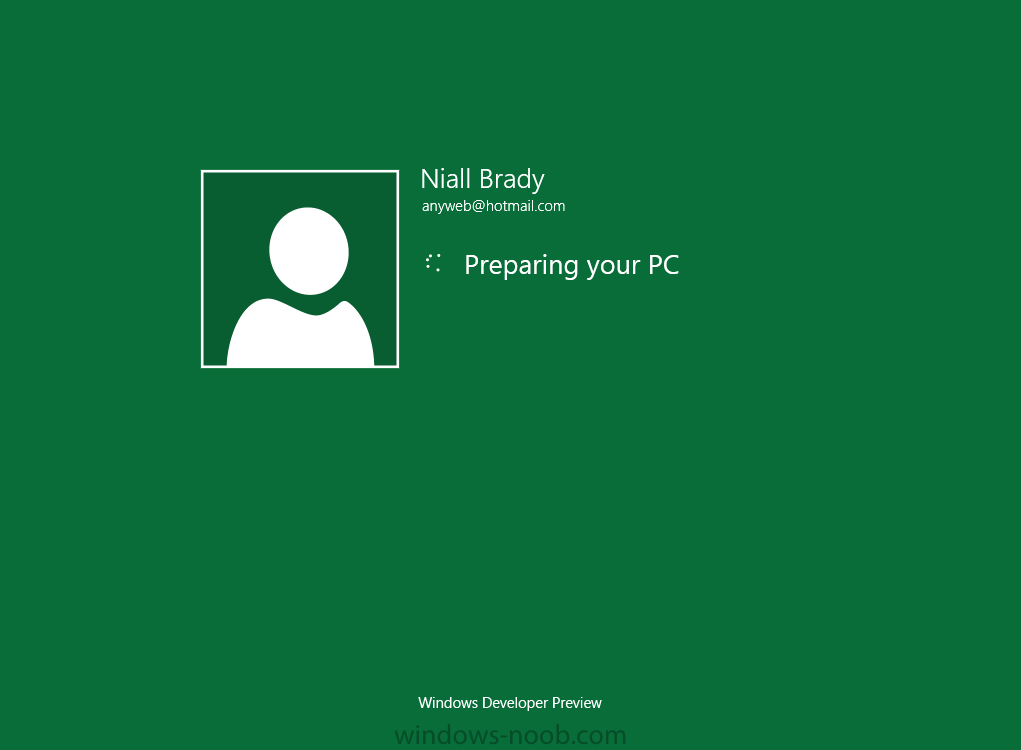
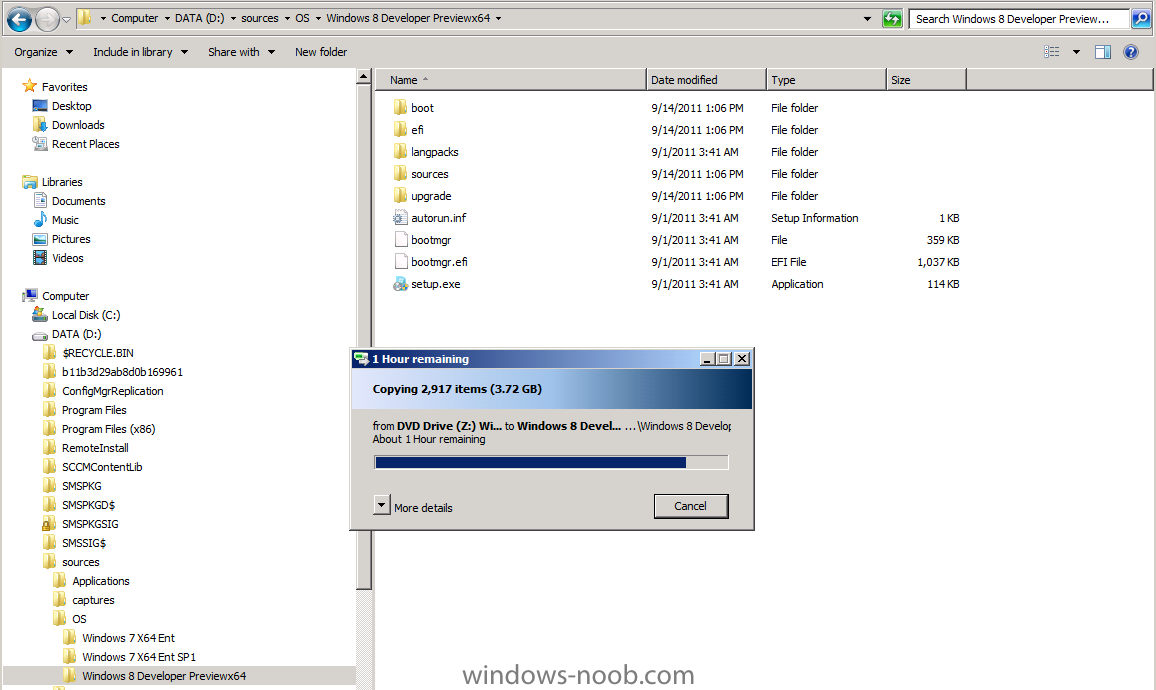
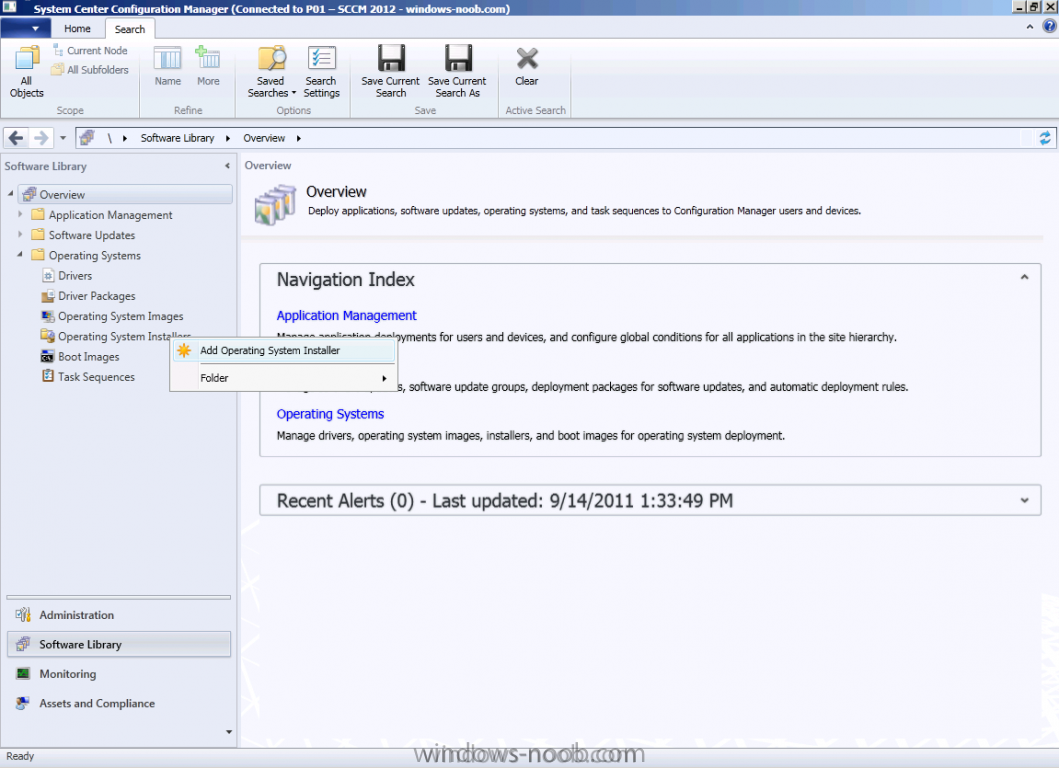
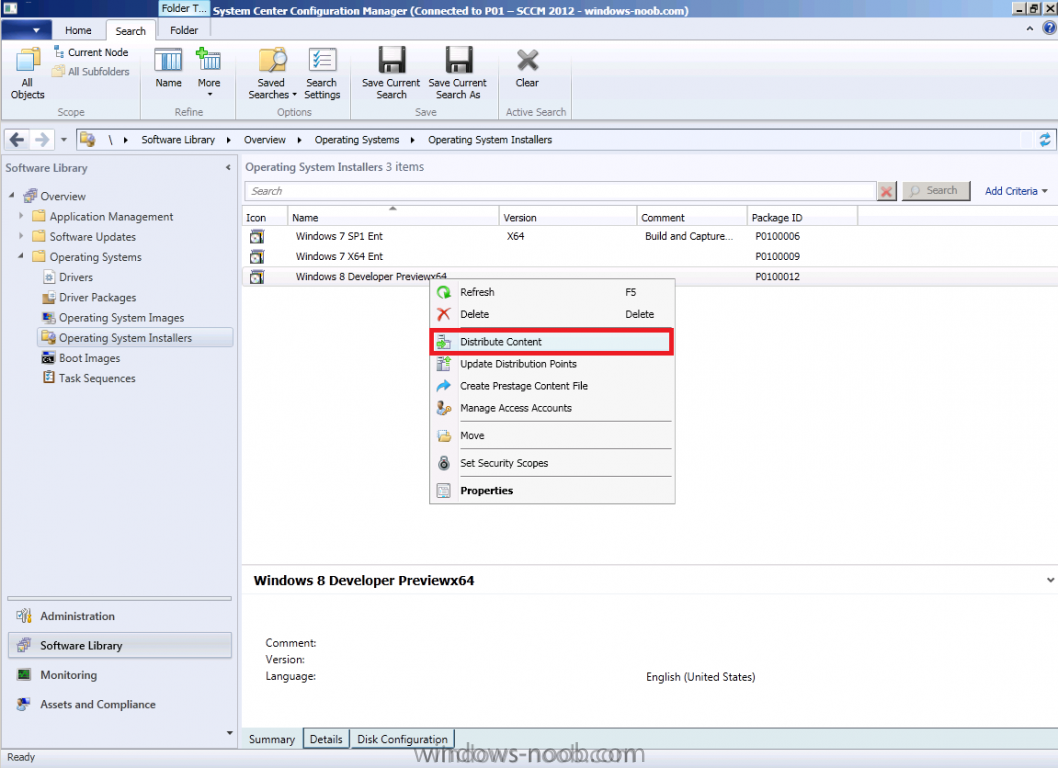
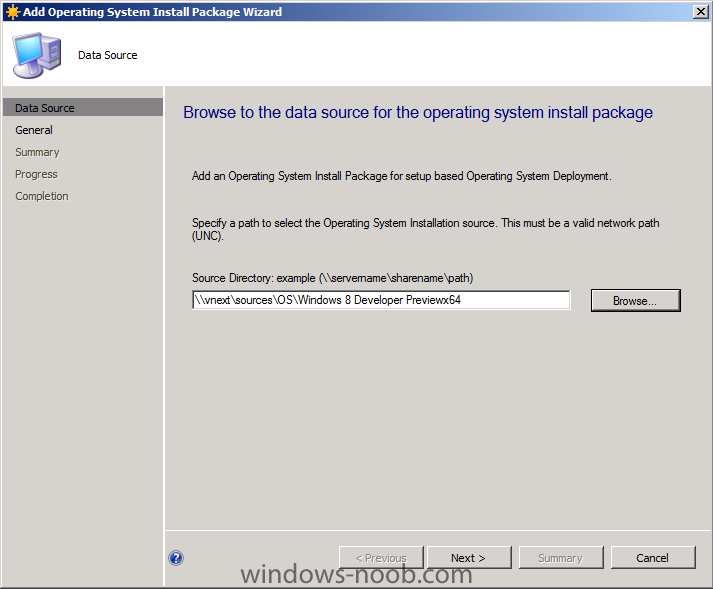
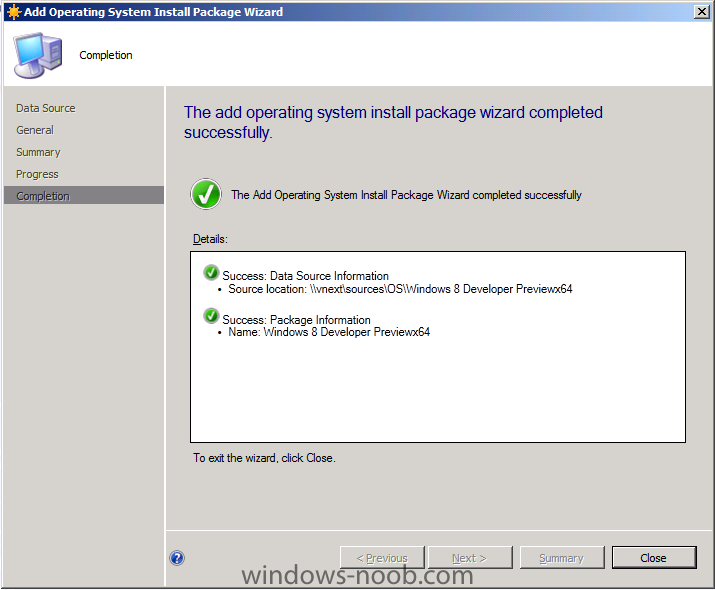
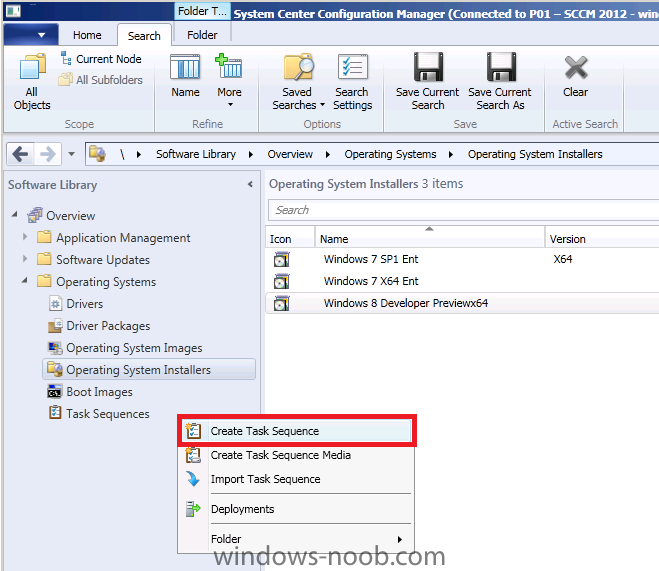
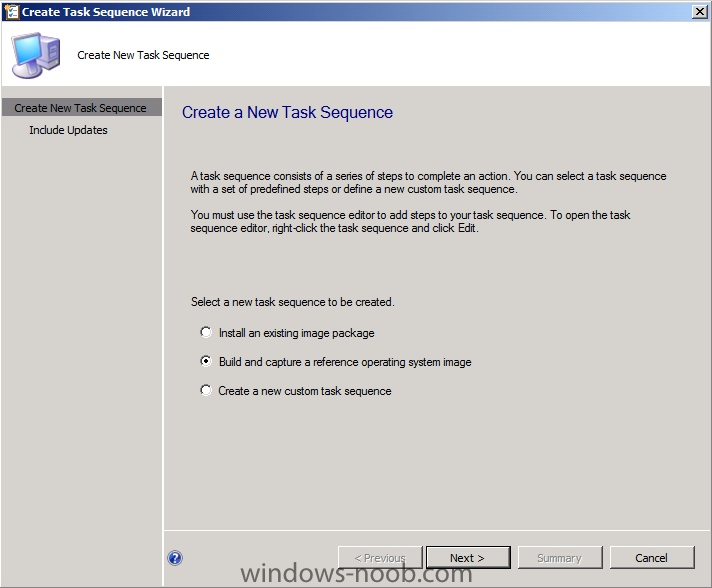
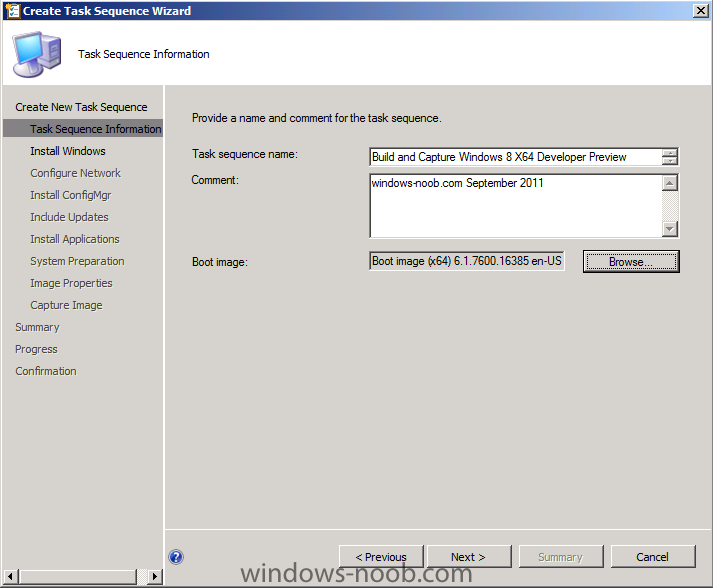
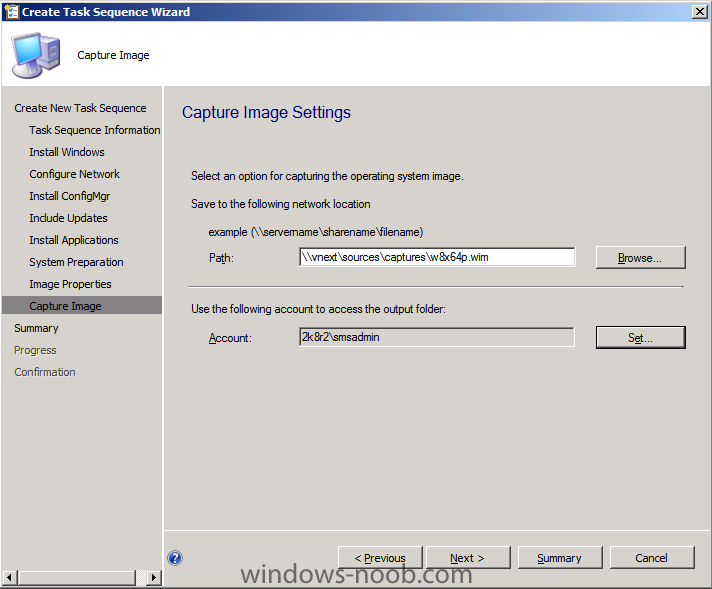
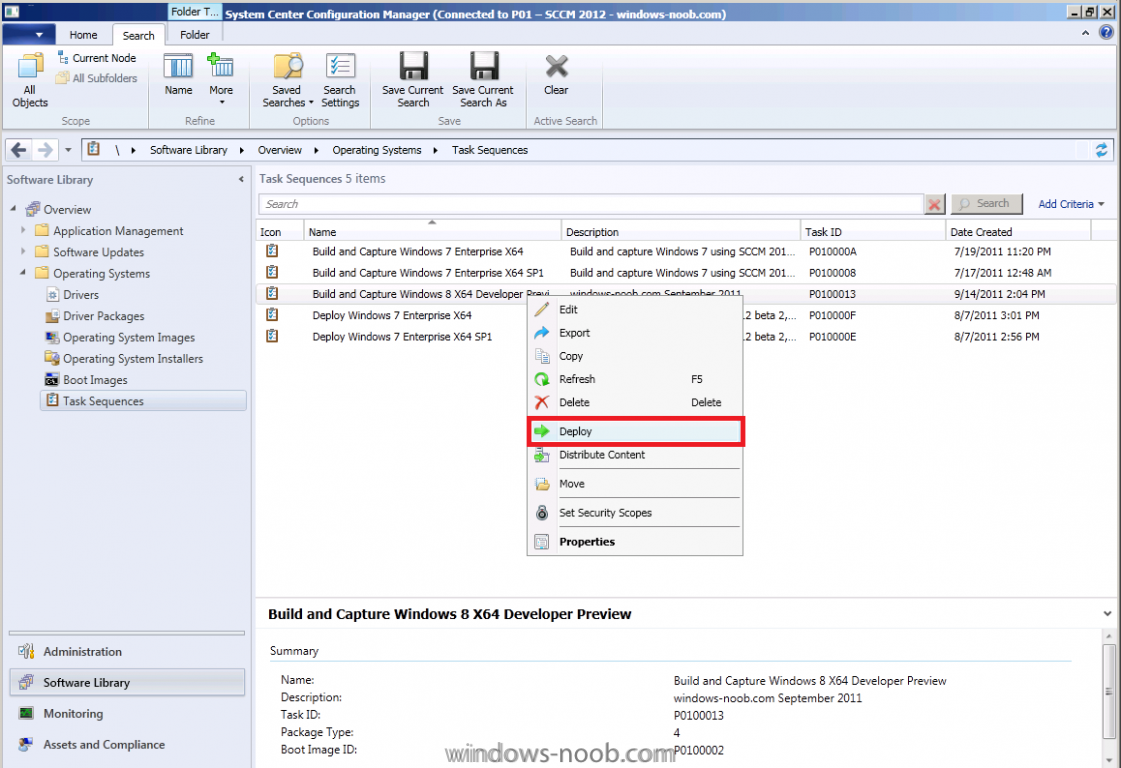
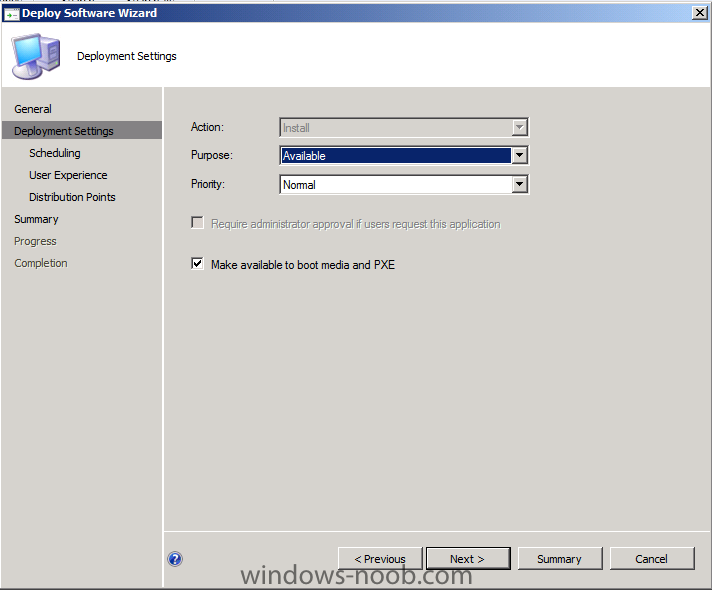
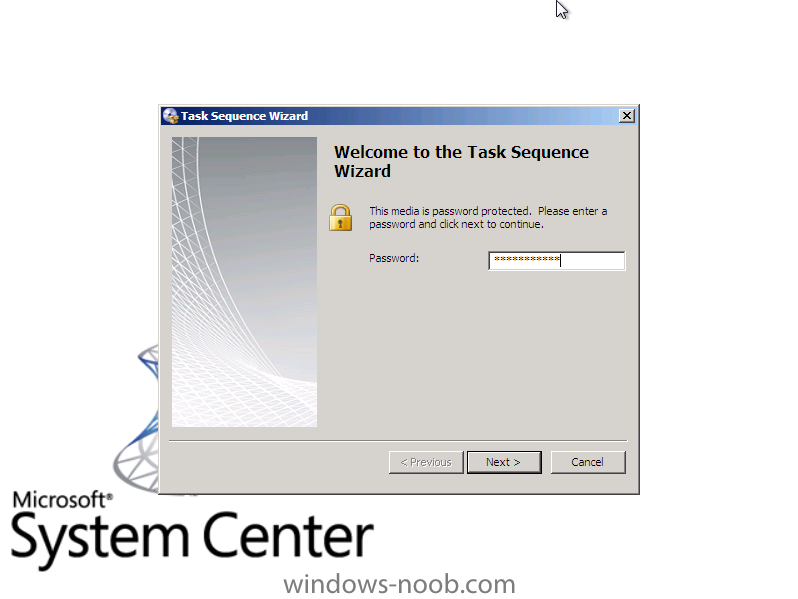
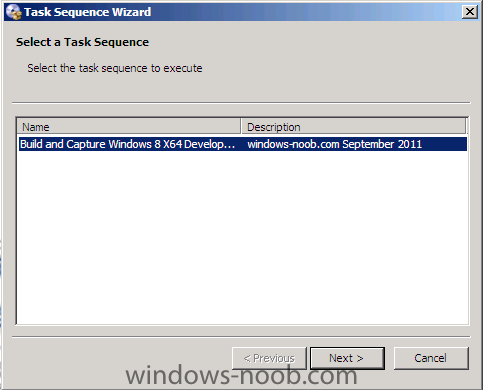
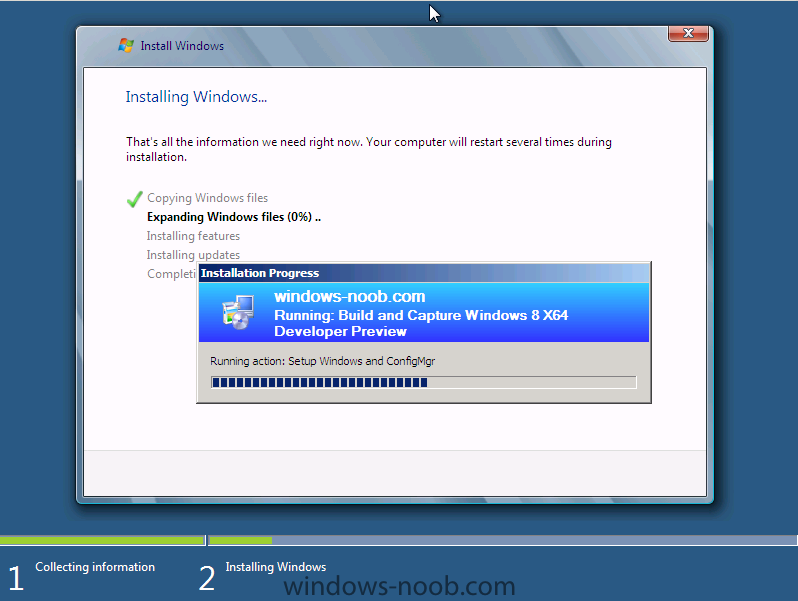
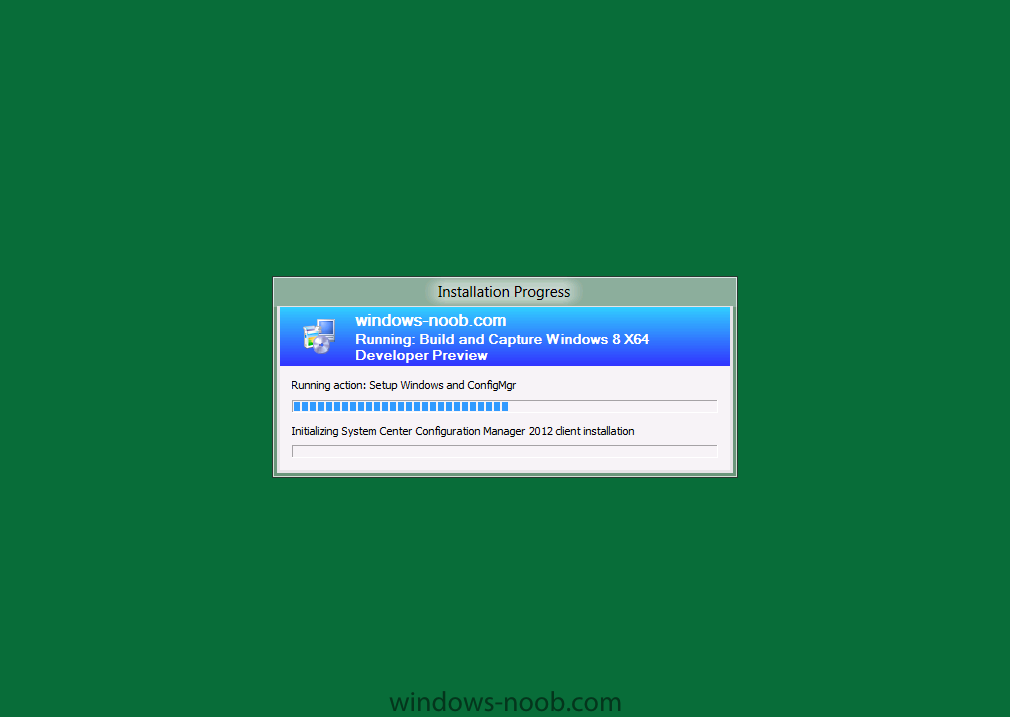
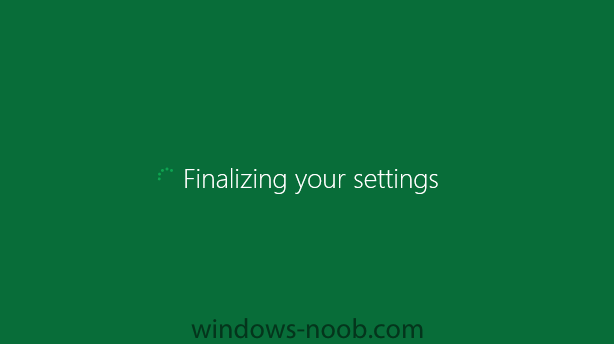
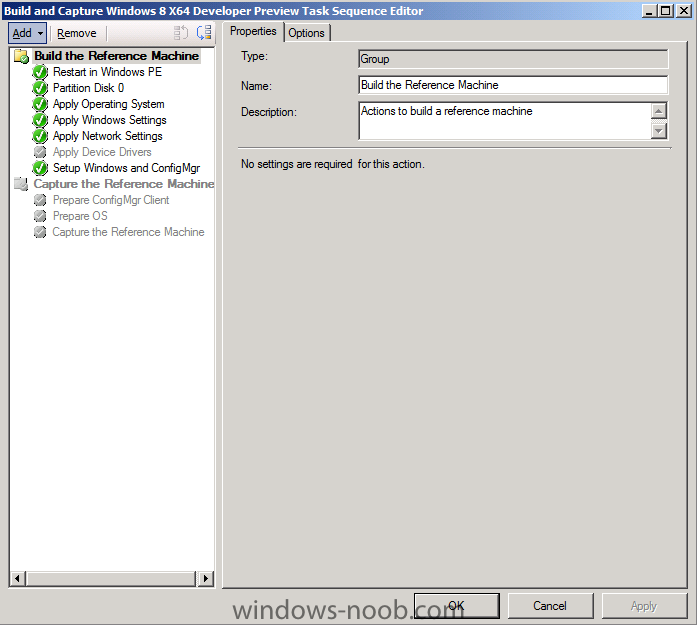
Side Note: This is a break from the normal LAB we've been doing. As the Build version of Windows 8 Developer Preview was released yesteday I wanted to test Deploying it, I will use the same Build and Capture Method as we used below in Parts 6-9 but not go into the same detail, in addition, we will disable the capture part as it just doesn't work.... right now. If I can workaround the issues then i'll post it. Remember: This is a Developer Preview OS being installed using a beta product so results may vary and of course it's not supported by Microsoft. In Part 1. of this series we Installed SCCM 2012, in Part 2 we started to configure it. In Part 3, we configured Beta 2 some more by enabling Active Directory discovery methods, adding some site system roles, configuring the computer client agent and client push settings and finally doing a manual client installation to verify it all worked, in Part 4 we looked at installing an application using Application Management and the Software Catalog and the Software Center features of SCCM 2012, and in Part 5, we added the FSP, SLP, SMP, SUP. In Part 6 we got our SCCM 2012 server ready for Deploying Windows 7 Enterprise SP1 so that we could start deploying some Windows 7 clients to enhance our LAB, then in Part 7 we created a Build and Capture Task Sequence and deployed it to our Build and Capture collection. In Part 8 we created our Network Access Account and captured our Windows 7 SP1 image (and Windows 7 RTM). We deployed that captured image to a new Virtual Machine in Part 9 by importing our captured images, creating a new Deploy Task Sequence and then Deployed Windows 7. In Part 10 we Synchronized Software Updates and verified that they were synchronising using logs, then in Part 11 we Deployed those Software Updates to our Windows 7 Computers. Step 1. Get the ISO and Extract the contents on your SCCM 2012 server Download Windows 8 Developer Preview from here, I used the WindowsDeveloperPreview-64bit-English.iso for my Guide. I then Mounted that ISO in my SCCM 2012 beta 2 Hyperv virtual Machine and extracted the contents to \\vnext\sources\os\Windows 7 Developer PreviewX64 Step 2. Add the Operating System Installer Image and Distribute Content In the Configmgr Console, expand Software Library, Operating Systems, Operating System Installers, right click and choose Add Operating System Installer browse to the path where we extracted it in Step 1 done Once added, distribute the content to your DP's by right clicking the image and choose Distribute Content. and continue through the wizard just like you've done before with Windows 7's installer image. Step 3. Create the Build and Capture Task Sequence In task sequences,right click and choose Create Task Sequence Choose the Build and Capture a reference operating system image option fill in the details and choose a X64 boot image as we are Build and Capturing the X64 Windows 8 image... for the Install Windows step, select the following options for Product key, use the key stored in PID.TXT from the sources folder on the ISO you downloaded otherwise the Setup Windows and Configmgr step will fail (error 31) later on in the process. select your Configmgr Client in the next step then next your way through on to the Capture image step fill in your capture details done.. Now right click the task sequence and choose Edit, Disable the Entire Capture Group (for now) and also disable the apply device drivers step. Step 4. Deploy the Build and Capture Task Sequence Right click on the task sequence and choose Deploy, point it to the All Systems and/or Unknown Computers Collection make it available to PXE Step 5. PXE boot a new virtual machine and start the process PXE boot your Virtual Machine (create a new one in hyperV) then you'll see the now familiar and very nice SCCM 2012 splash screen, enter your PXE password Select the Build and Capture Windows 8 X64 Developer ... task sequence the installation starts and finally Setup Windows and configmgr... and Windows setup starts oooh the excitement !! after a reboot we get our first look at Windows 8 setting up !! doesn't it look cool after another reboot... and it seems that obviously things are different in Windows 8, we see a few screens prompting for email address and password, but that's ok, as this is all beta and fun !!! enter your password... and then it returns to our Build and Capture process :-) and finalizing your settings which will then reboot the computer again into Windows to finish up our process.. finally, Windows 8 ! In later releases of SCCM 2012 I hope to document this process more thoroughly and using best practise of course, however this post, is just for fun ! cheers niall


-
NetAddConnection2 failed (LOGON32_LOGON_NEW_CREDENTIALS) usingaccount test\testuser could that be your issue ? actually i dont see it specifically failing to install, are you sure that is all of the ccmsetup.log file ?
-
what does your ccmsetup.log file say ? are you installing this as a user with local administrator permissions ?
-
Software Update Point Component Properties Products Tab missing os
anyweb replied to thegorre's question in Software Update Point
no, don't sync through the WSUS console, follow the guides here and you'll see the steps you need to take. -
the Server Locator Point will be removed in the next version and merged with the Management Point, you can see reference to that in this presentation from Michael Niehaus (well worth watching)
-
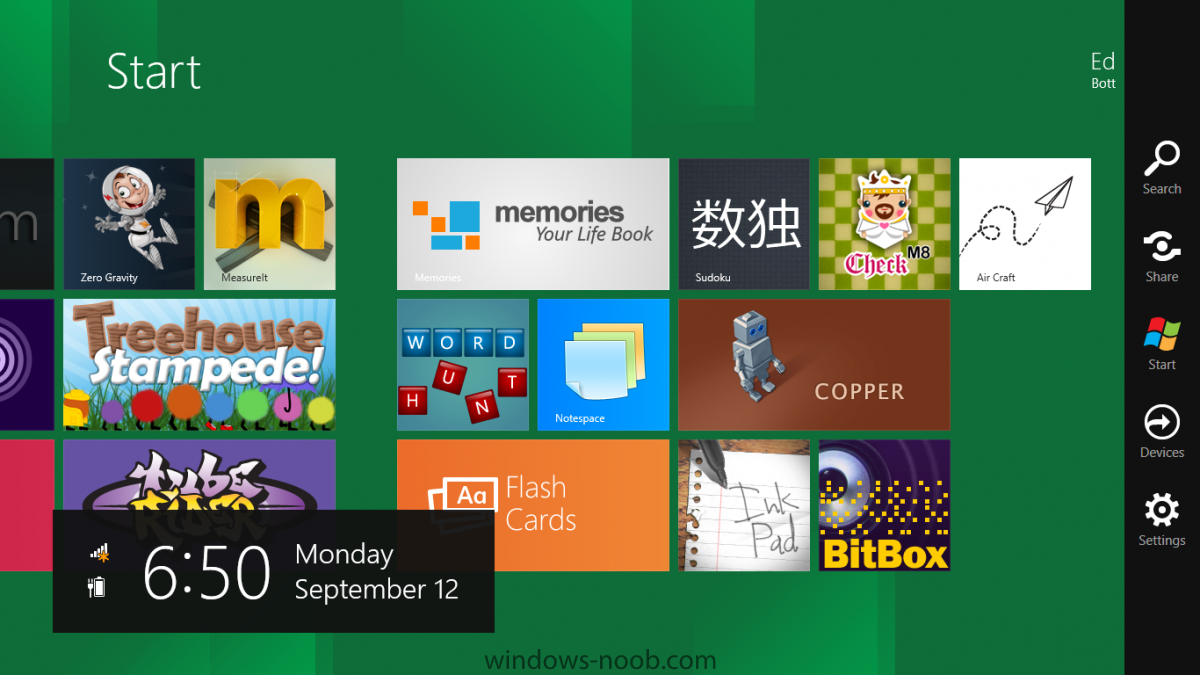
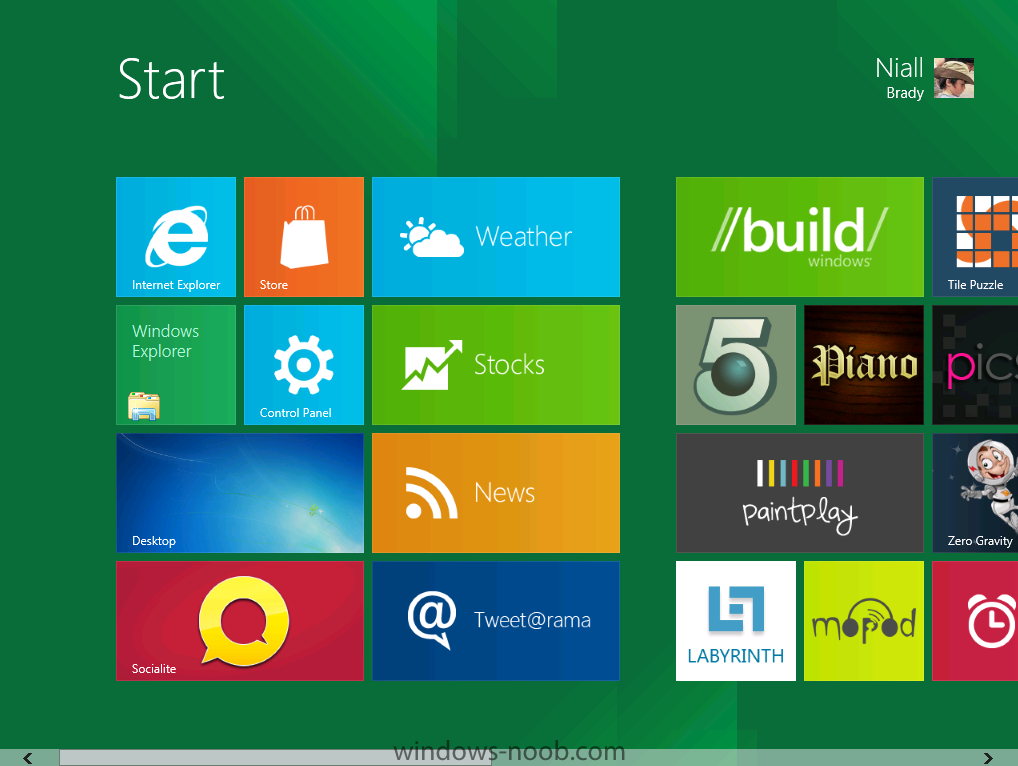
Summary: This morning, Microsoft officially took the wraps off of Windows 8, unveiling its radically revised new operating system in front af an audience of software developers. I had a chance to get my hands on the new system (literally) last night. Here’s what you can look forward to. If you think you know what to expect from Windows 8, just wait till you get your hands on it. I stayed up far too late last night, experimenting with the developer preview build that Microsoft will show off to the public for the first time today. I wanted to get a good night’s sleep, but I literally couldn’t keep my hands off the sleek Windows 8-powered tablet that I have on loan for the rest of this week. Screenshots: First look at Windows 8 The new OS has more than its share of rough edges, and the new “modern shell” is disorienting—at least initially. And Windows boss Steven Sinofsky took great pains to stress that this is not a launch but rather the initial availability of the platform for developers. Still, after a few hours of increasingly addictive hands-on experience, I am convinced that this new release will indeed be a very big deal. Although you can use Windows 8 with a mouse and keyboard, it’s at its best on a touchscreen-equipped tablet like the one I tested. The form factor is thin, but this compact PC is no lightweight; there’s a fully loaded PC under the hood, with an i5 processor, 4 GB of RAM, and a speedy solid-state drive. With a screen resolution of 1366 by 768, it’s capable of playing high-definition videos and meets the minimum spec to arrange two of the new Metro-style apps side-by-side. The Windows 8 difference is obvious from the moment you boot it up. As part of the setup process, I configured the system to use my Windows Live ID and password as the login, which automatically picked up my picture for the user tile on the Start page. Choosing this configuration also allows you to sync your personalized settings to the cloud so they can roam with you as you switch between devices. Getting around in the new shell via a touchscreen device tablet requires mastering a few gestures: Swipe in from the right side of the screen to display the vertical strip of “charms” (that’s the official name) shown here. The five icons replace the Windows Start menu and allow quick access to commonly used functions. A Windows button in the center returns to the Start screen (mimicking the action of the equivalent hardware key with the Windows logo on it). While the charms column is visible, the main screen also shows the date and time and provides quick visual indicators for battery life, WiFi status, and other useful details. Metro-style apps are borderless and occupy the full screen. If your display has a resolution of 1366 by 768 or better, you can snap a Metro-style app into a skinny strip along the side, with another one occupying the remainder of the screen. Ironically, the feature that gave the operating system its name is gone for new Metro-style apps—there’s no option for overlapping windows except on the traditional desktop. When a Metro-style app is running, you can swipe up from the bottom or down from the top to display commands that are available for that app, as shown here. This behavior provides uniform access to app-specific commands and options for any program written to use the new Metro style. read the whole story over at Zdnet > http://www.zdnet.com...nt;feature-roto
-
Upgraded from SCCM 2007 R2 to R3, stills hsows as R2
anyweb replied to BRO-T's question in Troubleshooting, Tools, Hints and Tips
did you close and then reopen the console after the upgrade ? -
don't worry about it !
-
in configmgr console click on Monitoring, expand it out so you can see system status/component status logs green=good, red=bad
-
how to delete the software updates list ?
anyweb replied to smallc's topic in Configuration Manager 2012
create a software update group, and delete the updates from the software update group by selecting an update in the Software Update Group and right click, choose Edit Membership, you can then remove it from the Software Update Group (or groups if it's in more than one) by deselecting each group, you can't delete them from All Software Updates, that's just a list of all available software updates -
thanks ! they do take time to put together so I appreciate that
-
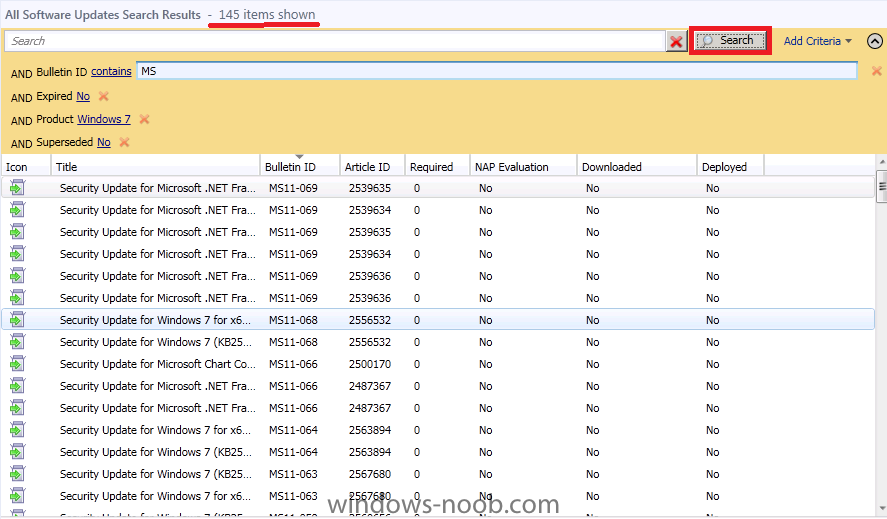
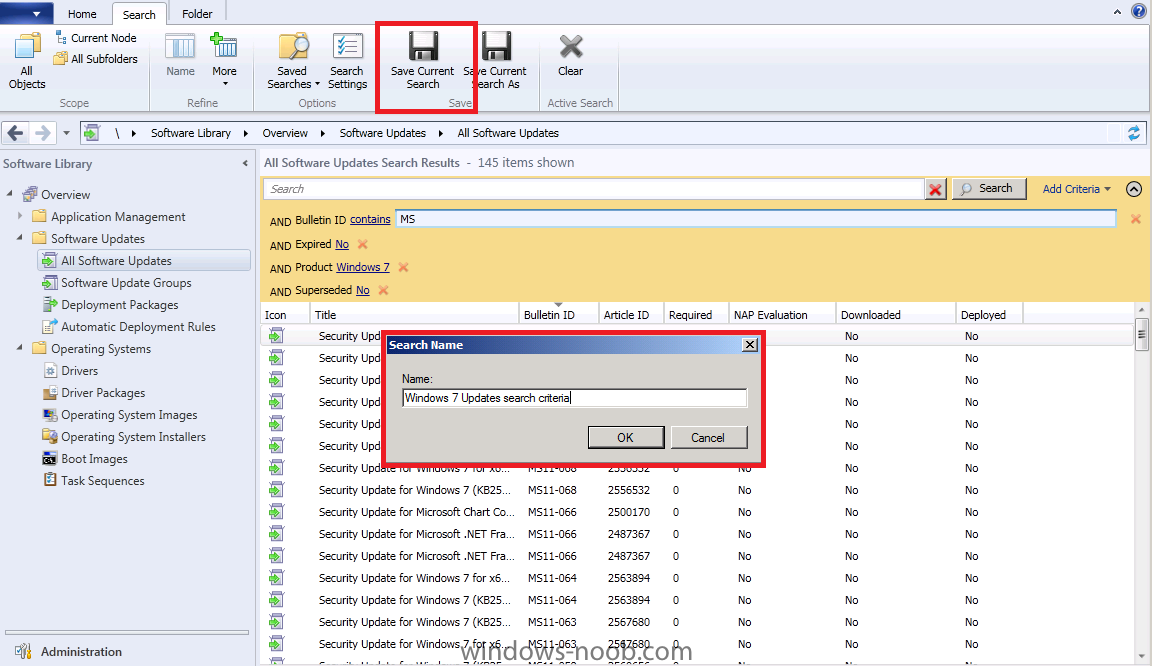
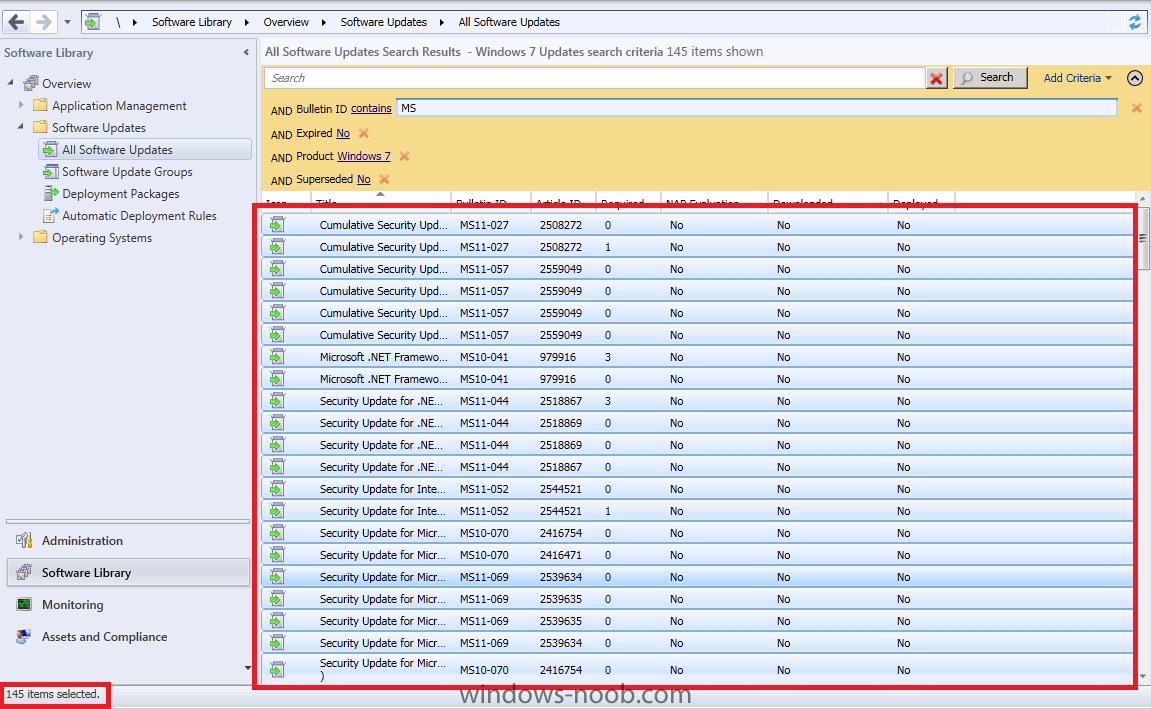
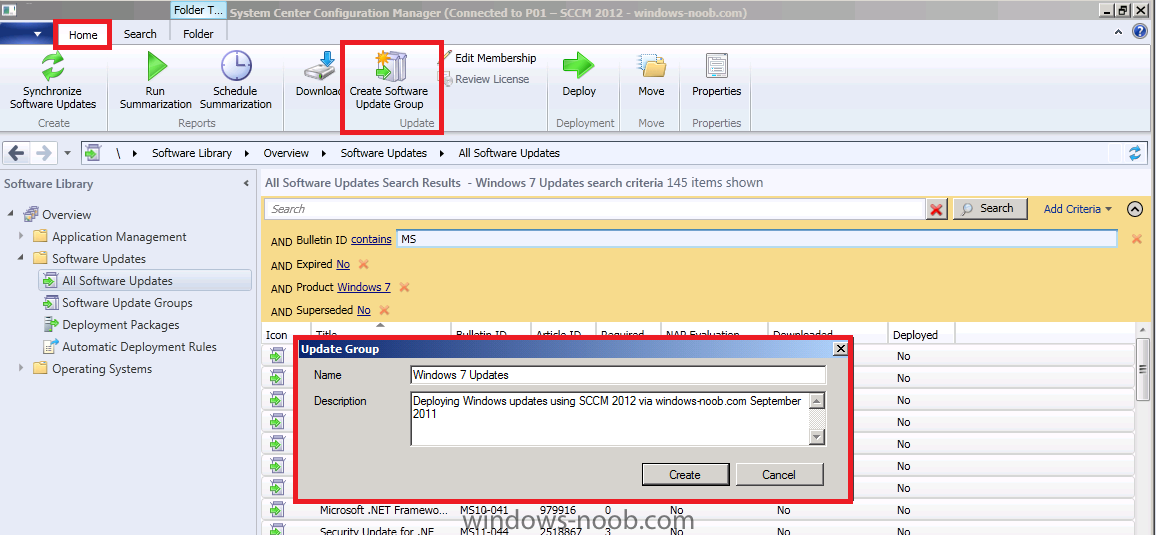
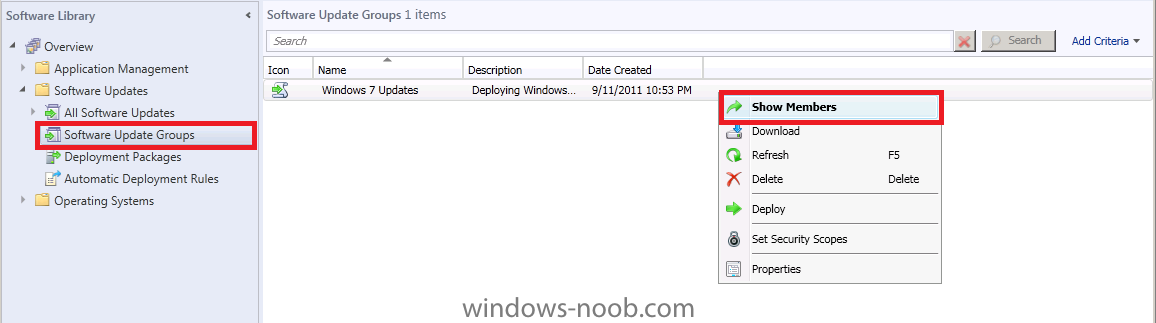
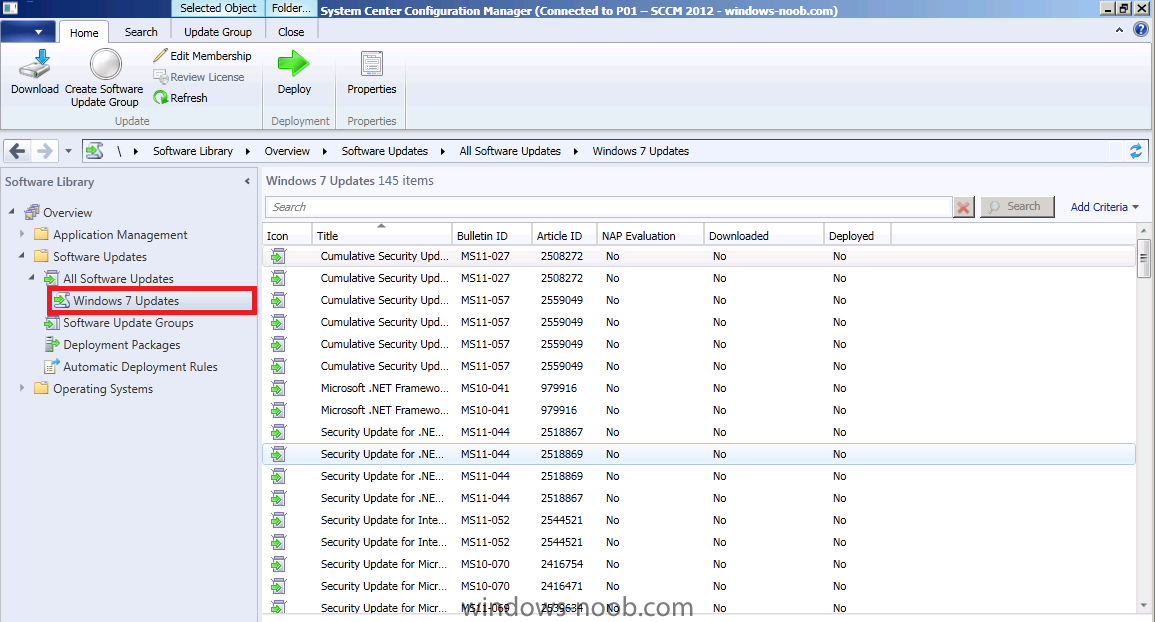
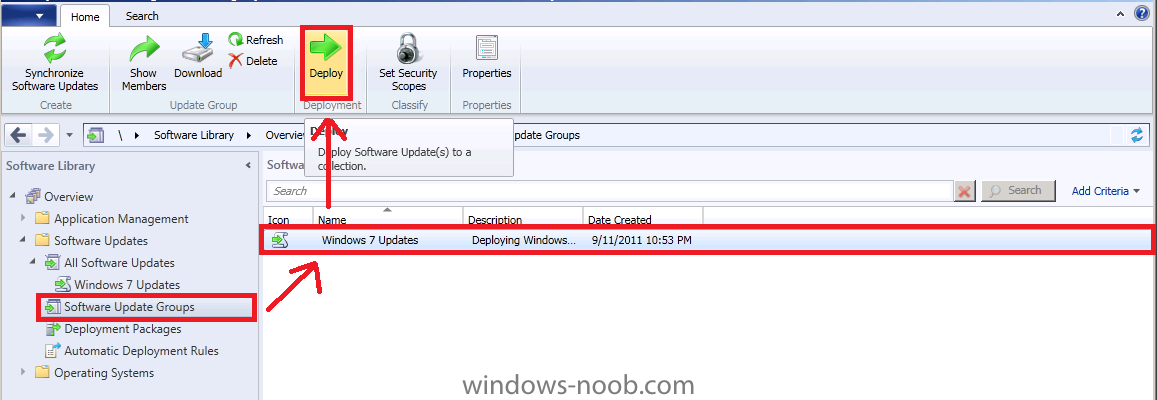
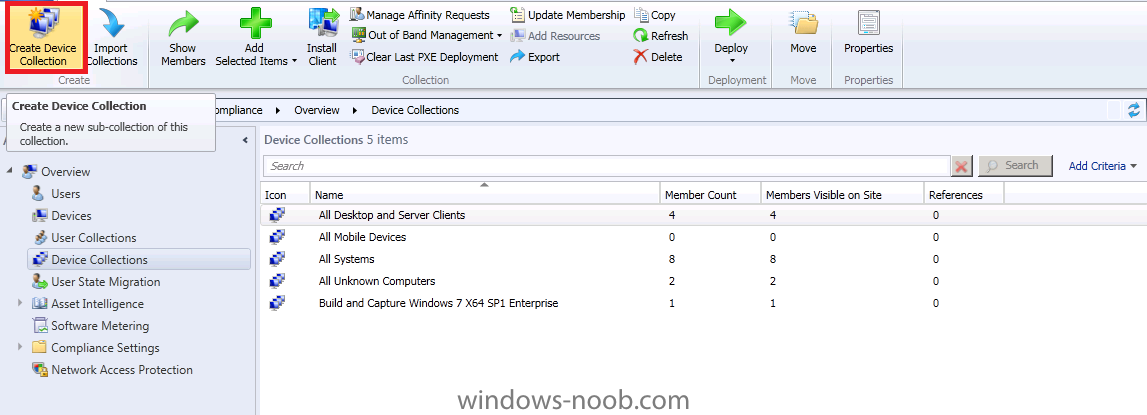
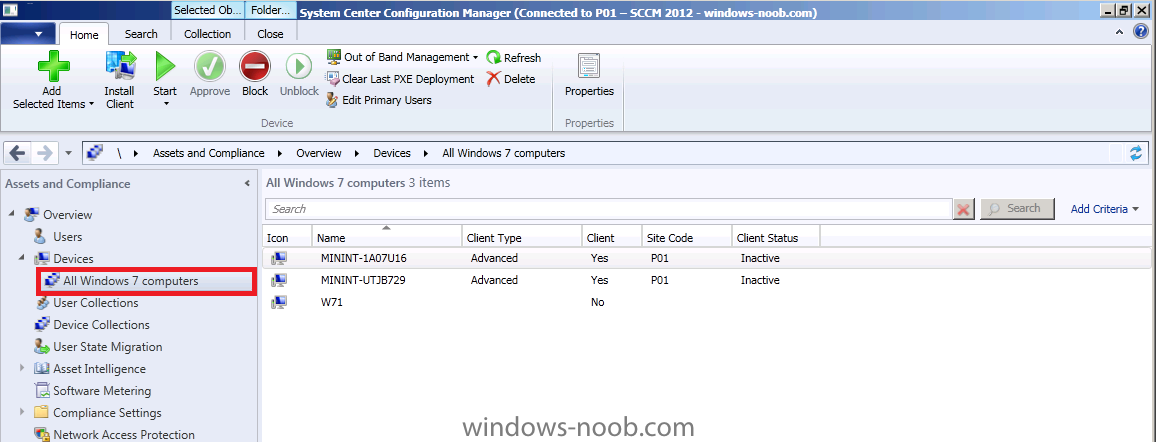
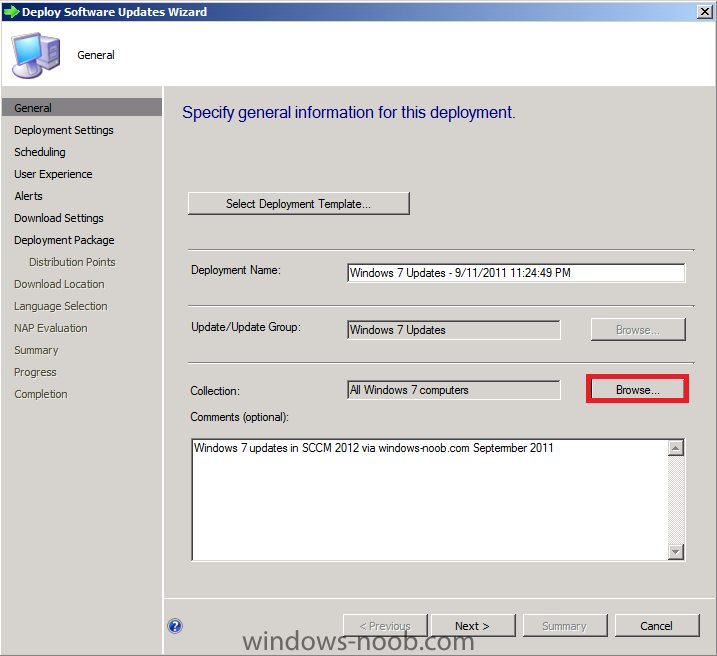
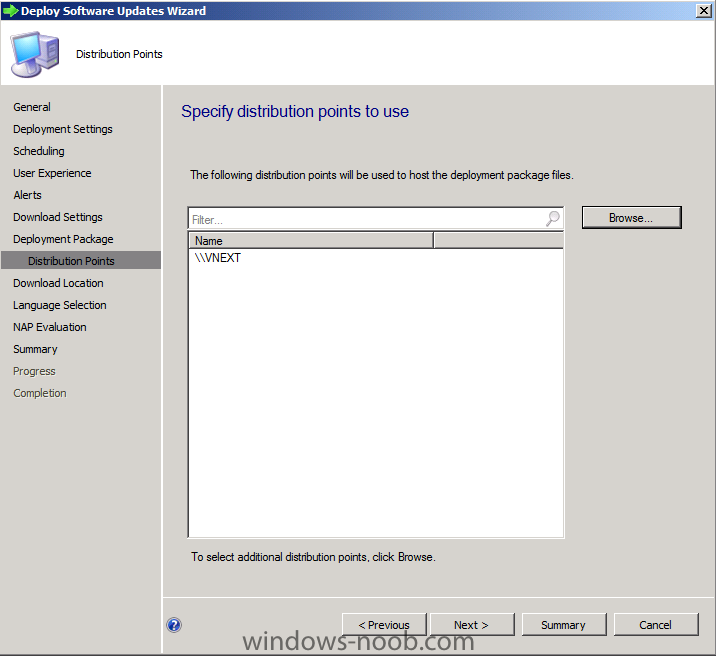
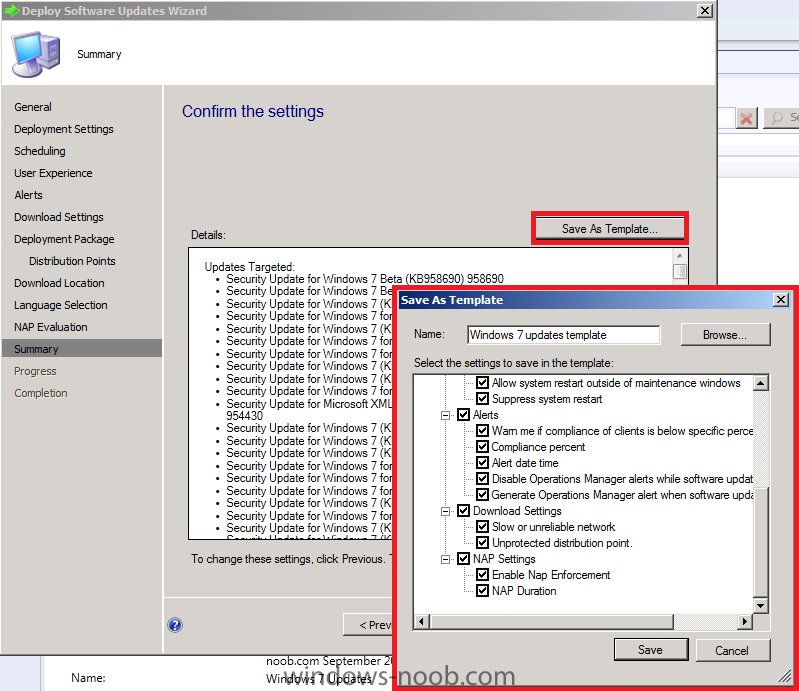
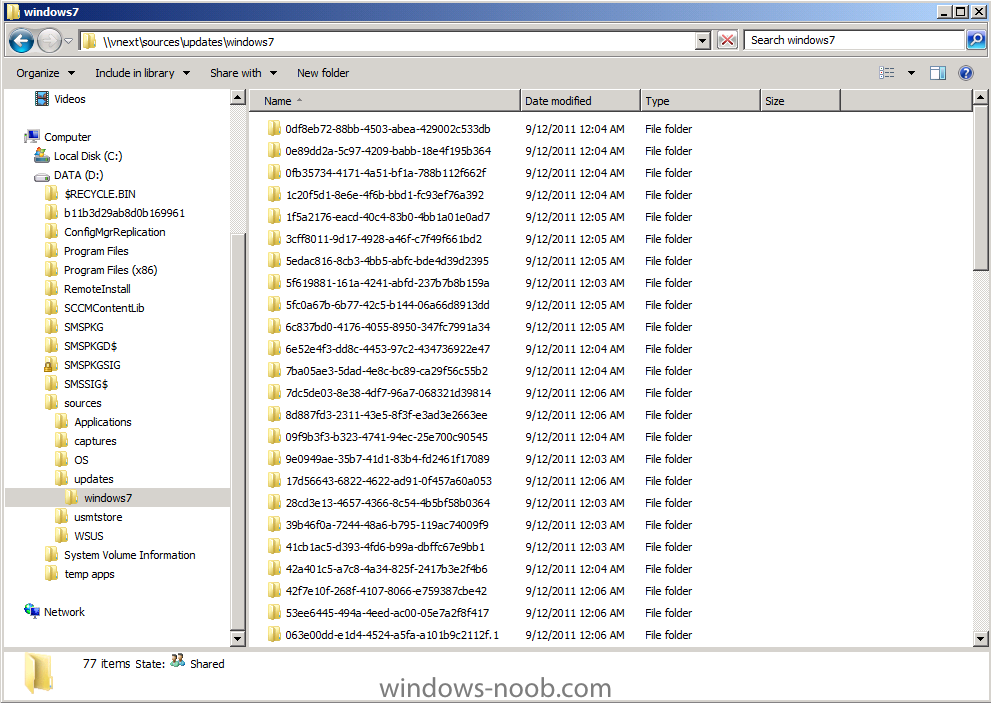
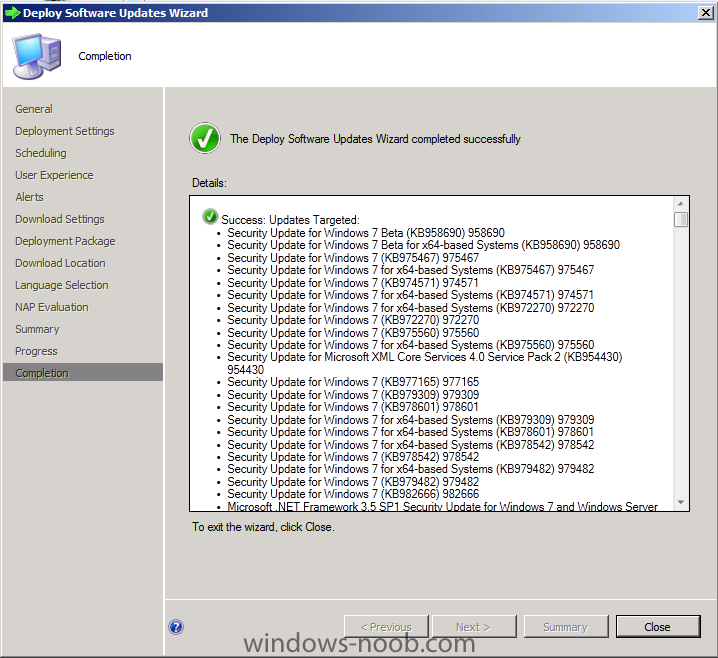
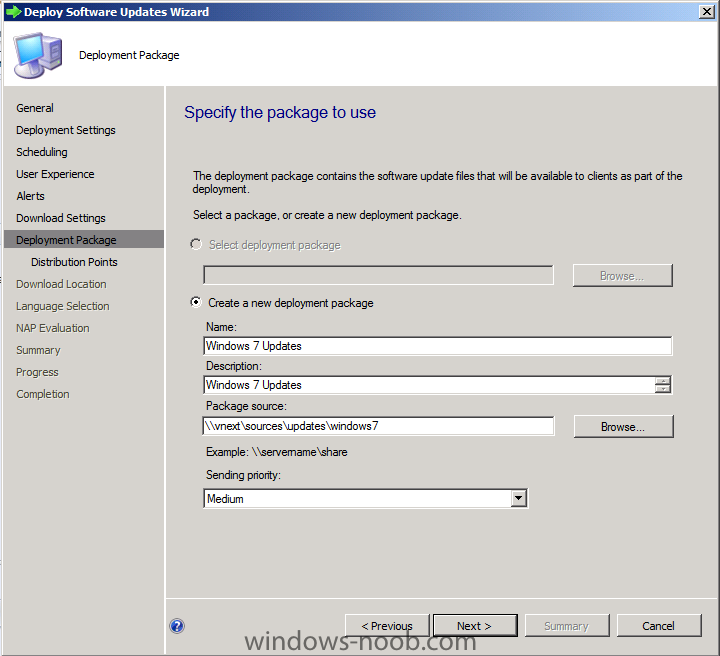
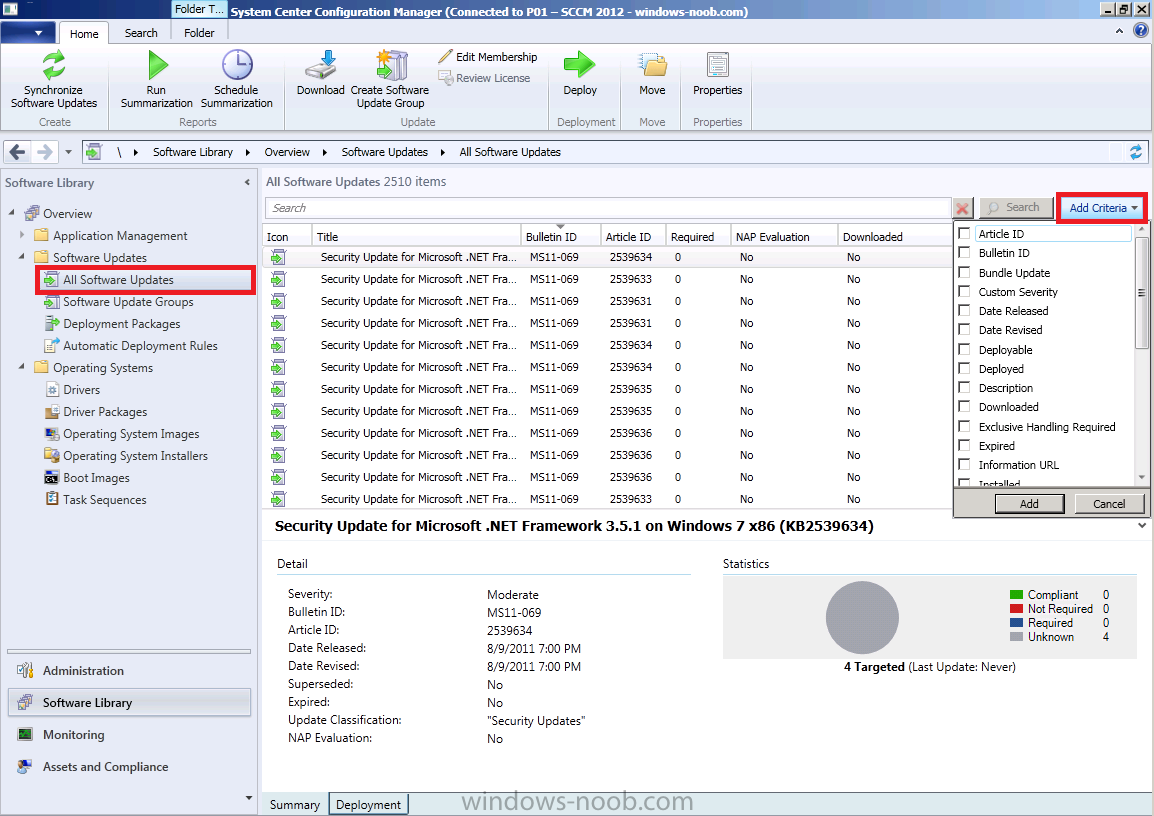
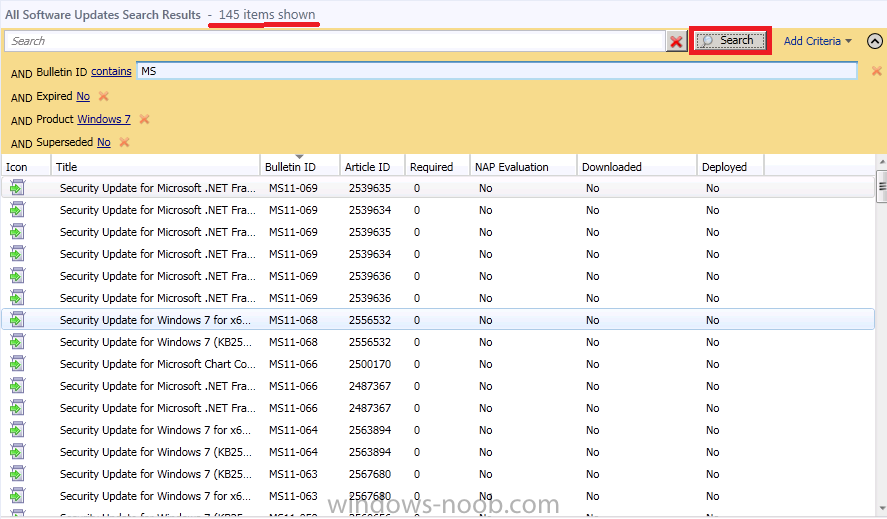
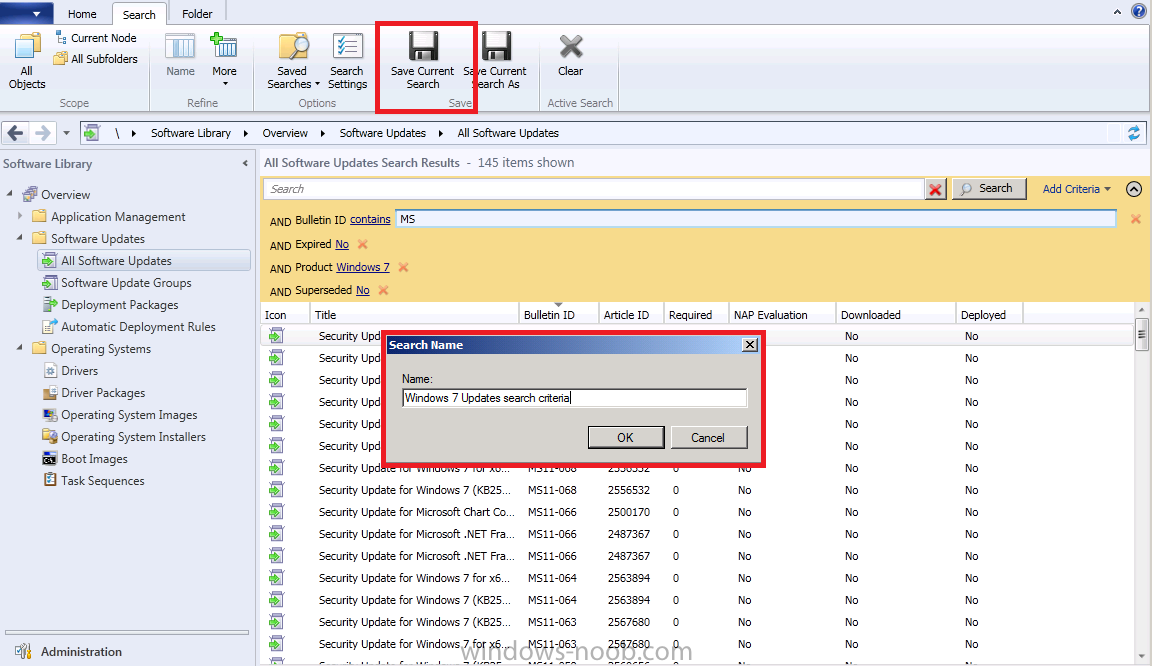
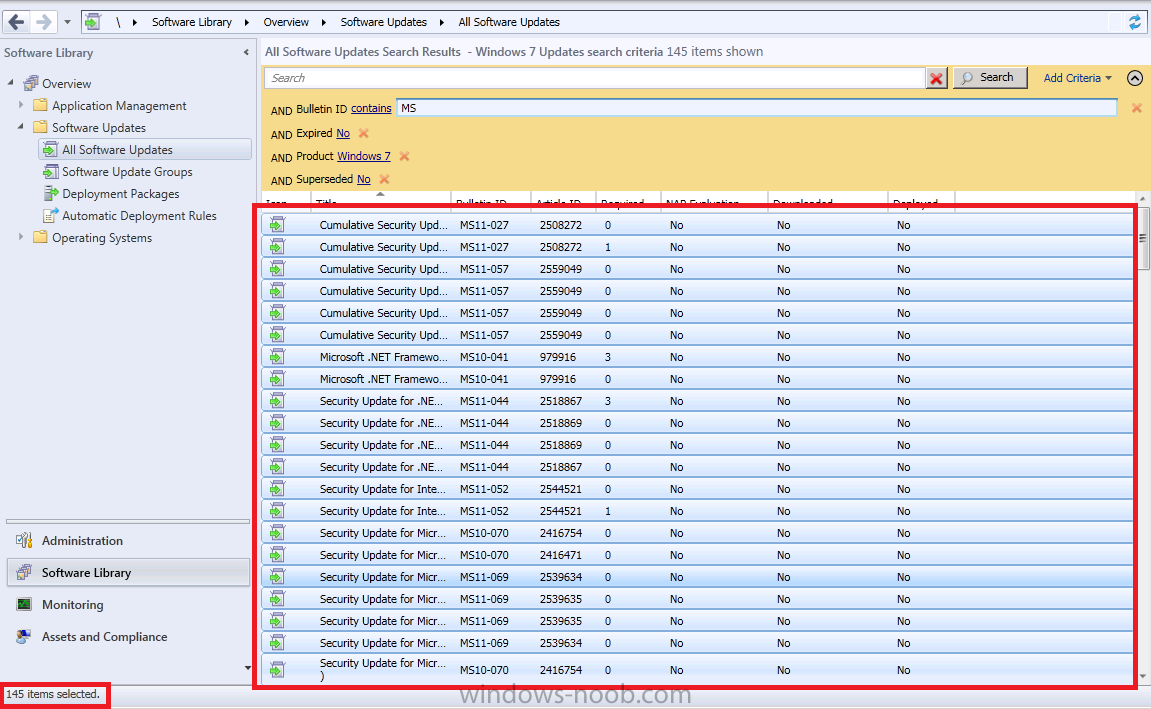
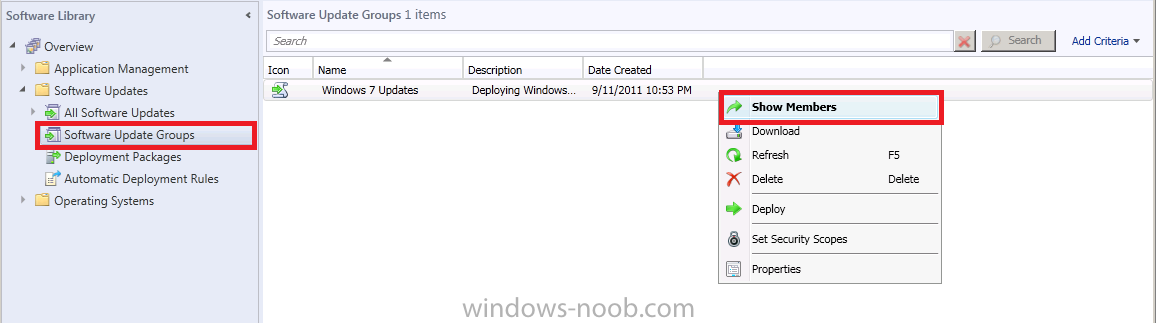
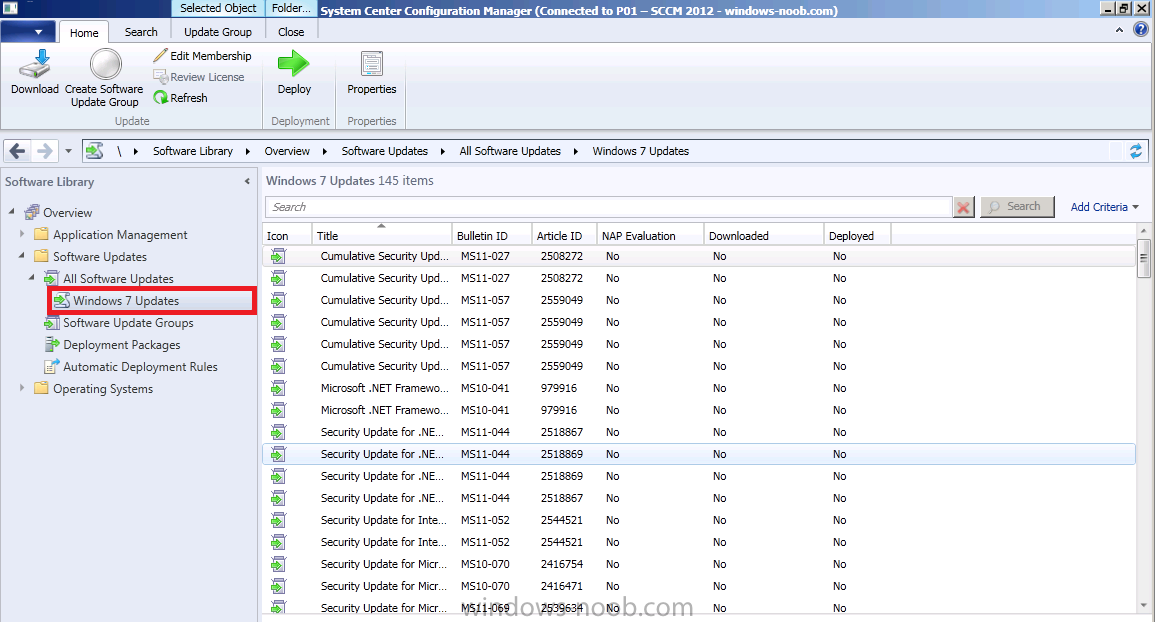
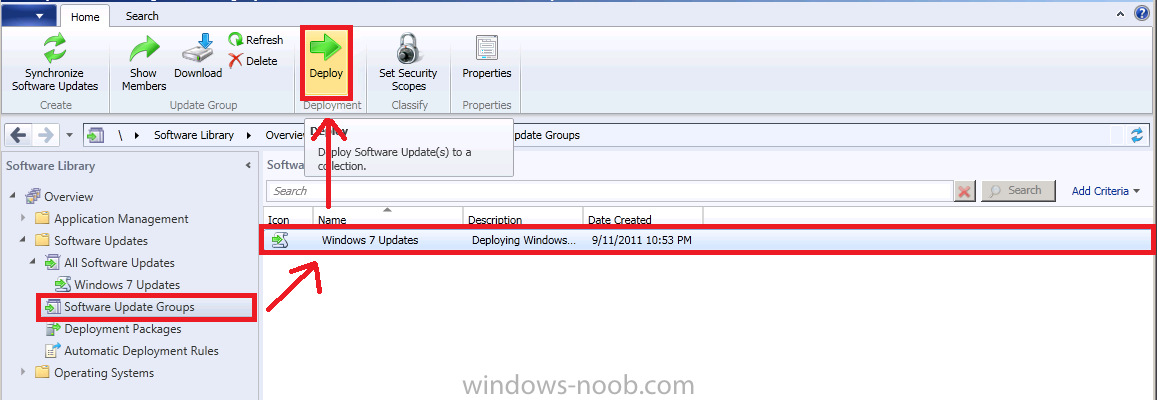
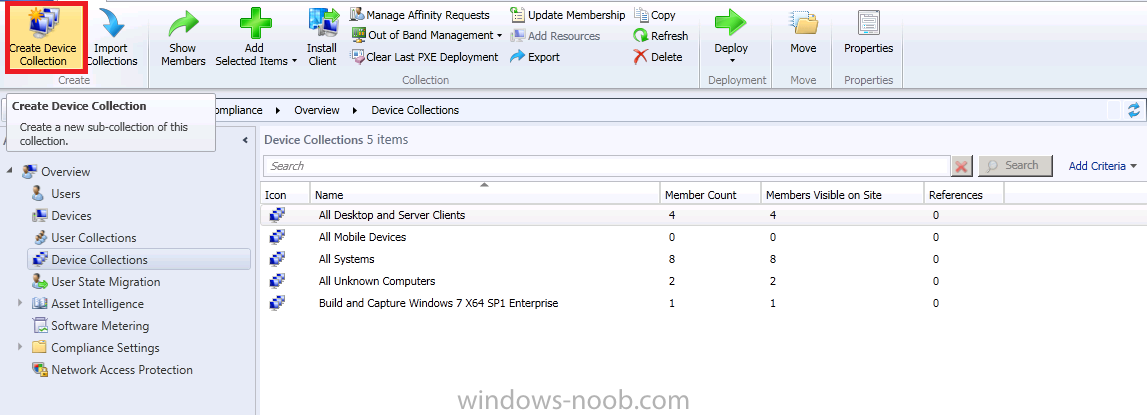
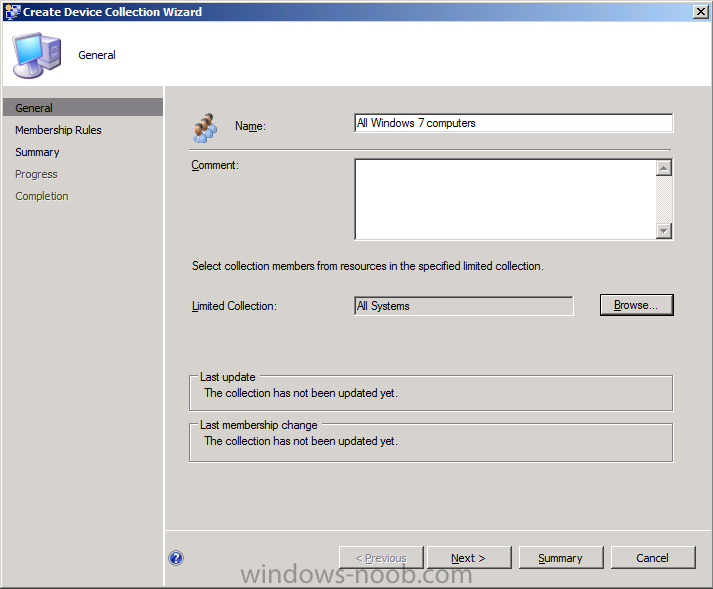
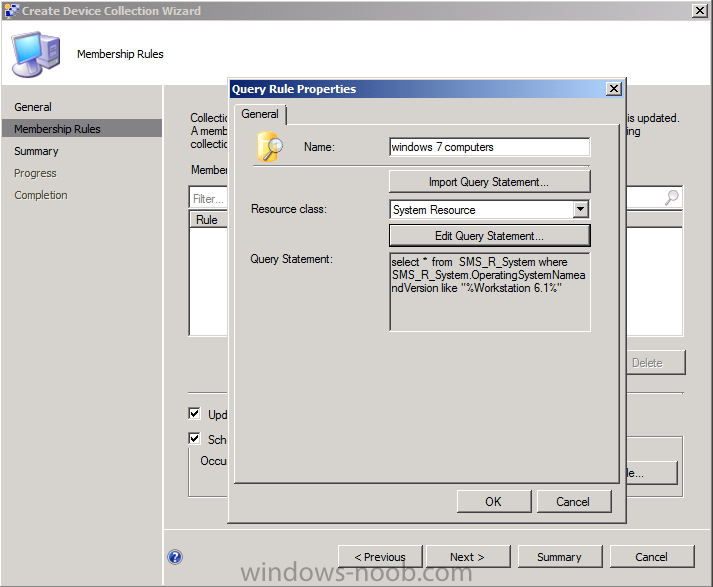
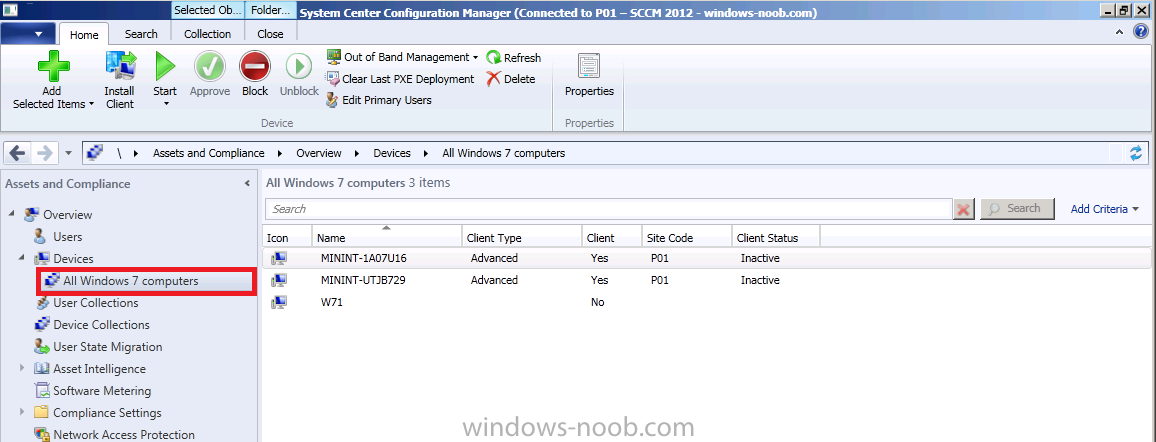
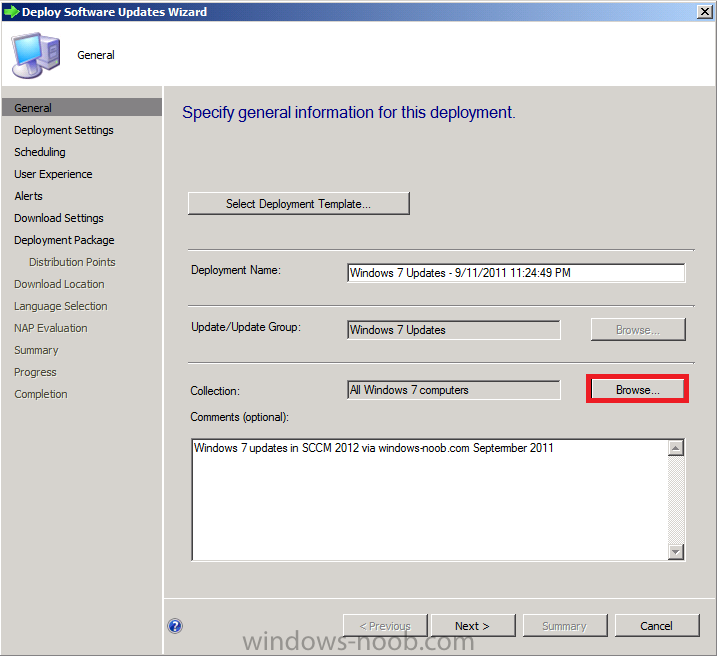
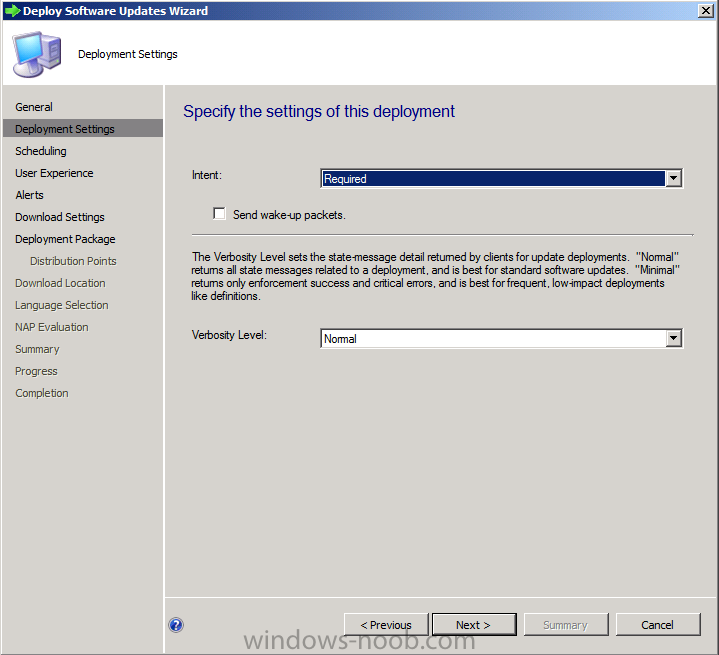
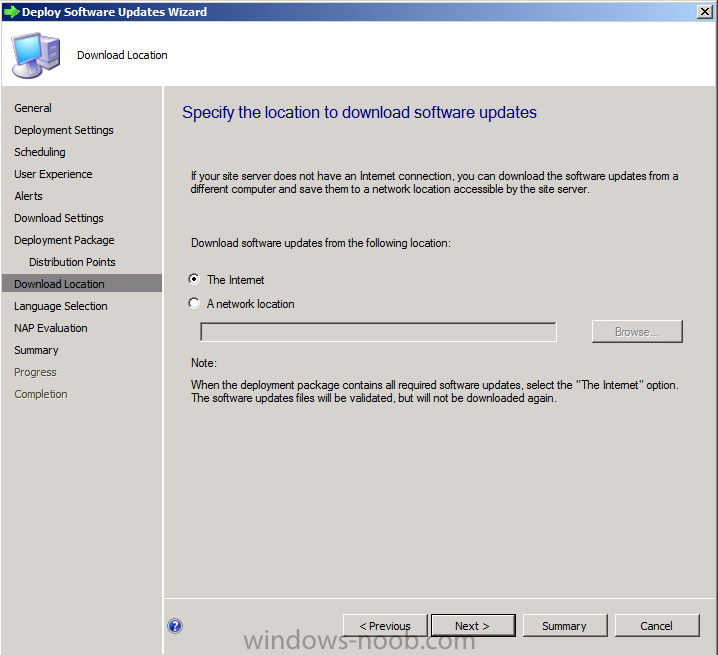
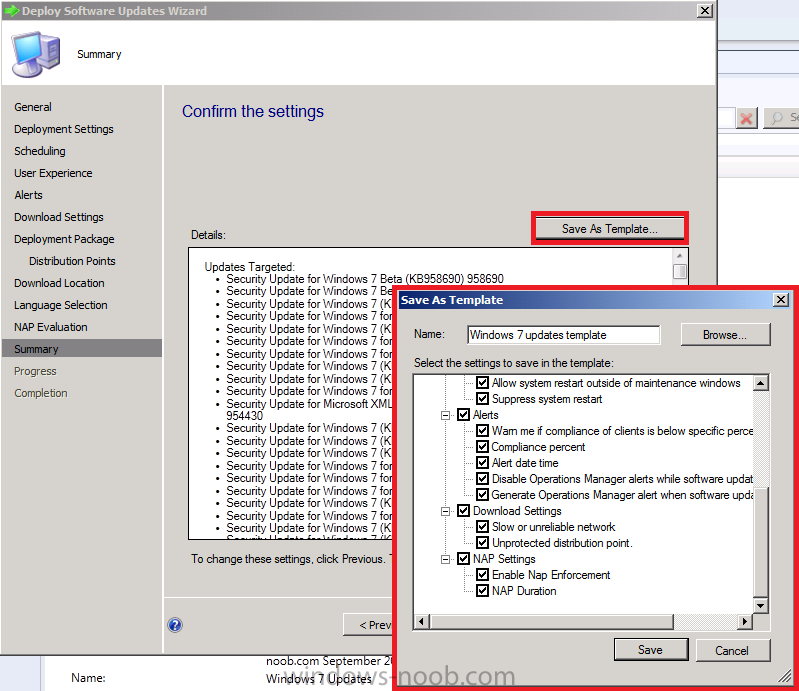
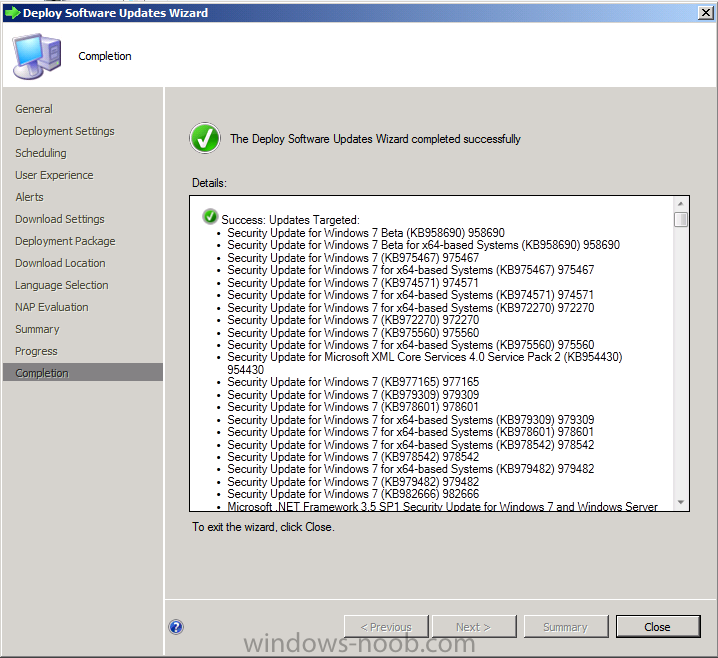
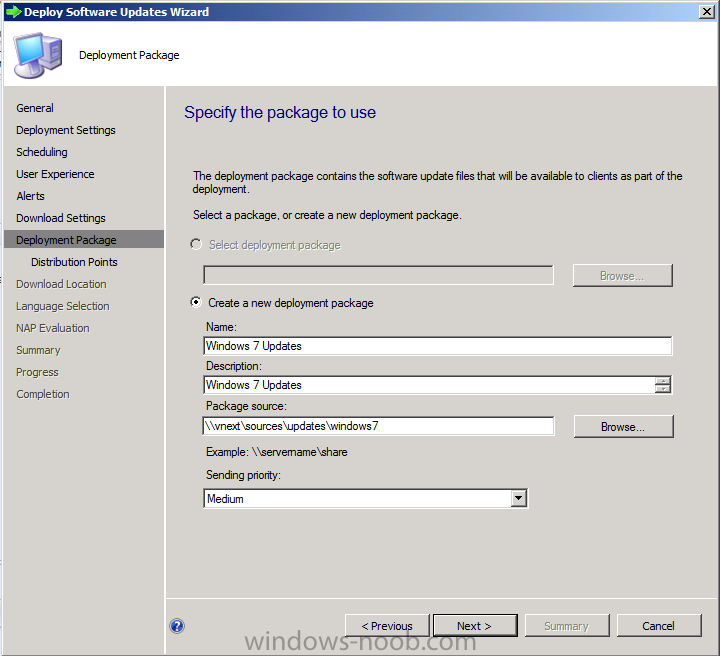
In Part 1. of this series we Installed SCCM 2012, in Part 2 we started to configure it. In Part 3, we configured Beta 2 some more by enabling Active Directory discovery methods, adding some site system roles, configuring the computer client agent and client push settings and finally doing a manual client installation to verify it all worked, in Part 4 we looked at installing an application using Application Management and the Software Catalog and the Software Center features of SCCM 2012, and in Part 5, we added the FSP, SLP, SMP, SUP. In Part 6 we got our SCCM 2012 server ready for Deploying Windows 7 Enterprise SP1 so that we could start deploying some Windows 7 clients to enhance our LAB, then in Part 7 we created a Build and Capture Task Sequence and deployed it to our Build and Capture collection. In Part 8 we created our Network Access Account and captured our Windows 7 SP1 image (and Windows 7 RTM). We deployed that captured image to a new Virtual Machine in Part 9 by importing our captured images, creating a new Deploy Task Sequence and then Deployed Windows 7. In Part 10 we Synchronized Software Updates and verified that they were synchronising using logs. Technet Recommended Reading: Operations and Maintenance for Software Updates in Configuration Manager - http://technet.micro....aspx#SUMDeploy Step 1 . Specify Search Criteria for Software Updates In the console, click Software Library, expand it and select All Software Updates then click on Add Criteria in the top right of the search field. In the scrollable Add Criteria menu, select the following options Bulletin ID Expired Superseded Product then define the criteria using the drop down menus beside each option so that they look like so click on Search to search for updates that match your specified criteria, It will filter down your results like so (previously there were over 25000 items now we are down to 145 items) let's save our Search criteria and call it Windows 7 Updates search criteria, you can return to this search later by clicking on saved searches and selecting your search from the list. Step 2. Create a Software Update Group that Contains the Software Updates Note: Normally you'd want to look through all these updates and filter out (delete) the ones that are not applicable to you, such as Beta or Service Packs, Delete these from your list before continuing. Now that we've trimmed down out updates we'll select the remaining updates by selecting all the updates found in our search criteria above by clicking on one update and then pressing CTRL + A, it should say 145 items selected in the bottom left corner In the ribbon, click on Home and then in the Update group click on Create Software Update Group, call it Windows 7 Updates and click on Create Now you can click on Software Update Groups in the console and you'll see your newly created Software Update Group, right click on it and choose Show Members to see the updates in this group. Our updates contained in the Software Update Group are listed Step 3. Deploy the Software Update Group We could download the Content for the Software Update Group to verify that it's available before distributing it to our Distribution Points, but we'll skip that step and go ahead and deploy our Updates. Before Doing so let's create a new Collection, so click on Assets and Complicance in the console,click on Device Collections and in the ribbon click on Create Device Collection. Call the collection All Windows 7 computers and limit it to All Systems click next, choose Query Rule from the drop down menu and fill in a Query like so (edit query statement, criteria, show query language and replace the code with the below) select * from SMS_R_System where SMS_R_System.OperatingSystemNameandVersion like "%Workstation 6.1%" click next, next, close. You can click on that collection now and look at it's members. In the console select Software Library and then Software Update Groups. We've already created our Software Update Group above so let's deploy it, select the Software Update Group and in the Ribbon click on Deploy. give the Deployment a name and suitable description, click on Browse beside collection and choose our newly created Windows 7 Computers collection We want the updates to be mandatory so select Required click next through the wizard until you get to Deployment Package, create a new deployment package, Note: Make sure that \\vnext\sources\updates\windows7 (or whatever path you choose) exists otherwise the wizard will fail below when it tries to Download as the Network Path won't exist select our distribution points (vnext) select The Internet as our download location click next until you get to the Summary, and on the summary screen if you want to save this template (and you do for later use) click on Save Template, call it Windows 7 updates Template click save, next and now the downloading starts...(time for coffee anyone ?) TIP: To review the progress of this task, while you are waiting for the wizard to complete you can browse the UNC on your server of your Deployment Package to see that it's actually filling up with updates, you should see something like this And that's it !, after you complete the wizard the software updates in the software update group are deployed to clients in the target collection. In the next part we'll verify that the clients are indeed getting the updates. cheers niall