anyweb
-
Posts
9270 -
Joined
-
Last visited
-
Days Won
371
Everything posted by anyweb
-
 the file referenced is nothing to do with any physical path on your server, are you sure your machine account SERVER$ has local admin rights on this computer, and that you are doing this as local administrator (user) ?
 -
Configuring Software Update Point within SCCM
anyweb replied to anyweb's question in Software Update Point
yes -
hi Niall (great name !) please do share how you sorted it so others can benefit and learn cheers niall
-
if you review the Status component logs on your Configmgr server, does anything look wrong ?
-
Site Status - Multiple items in critical or warning
anyweb replied to liquidcourage1's question in Troubleshooting, Tools, Hints and Tips
sort them by status so that you get a better overview of what is not working and what is, can you post that screenshot ? -
we are doing this in WinPE Nico hence the methods above have a read from Technet below:- http://technet.micro...y/bb632526.aspx and http://technet.micro...y/bb680745.aspx
-
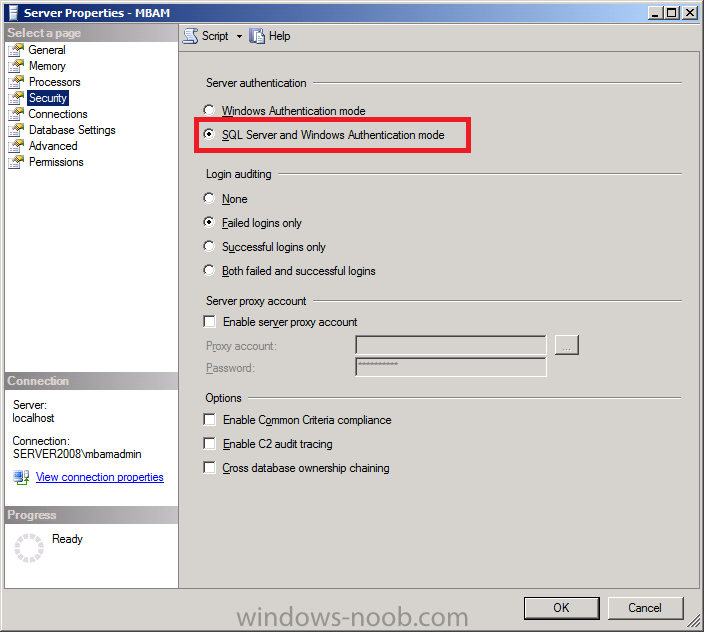
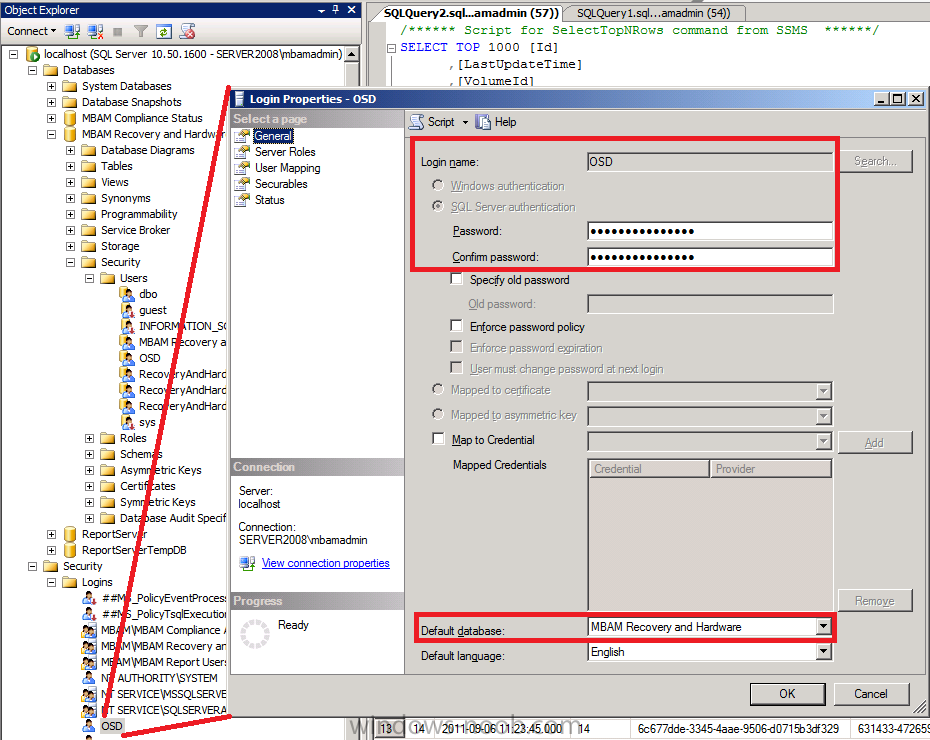
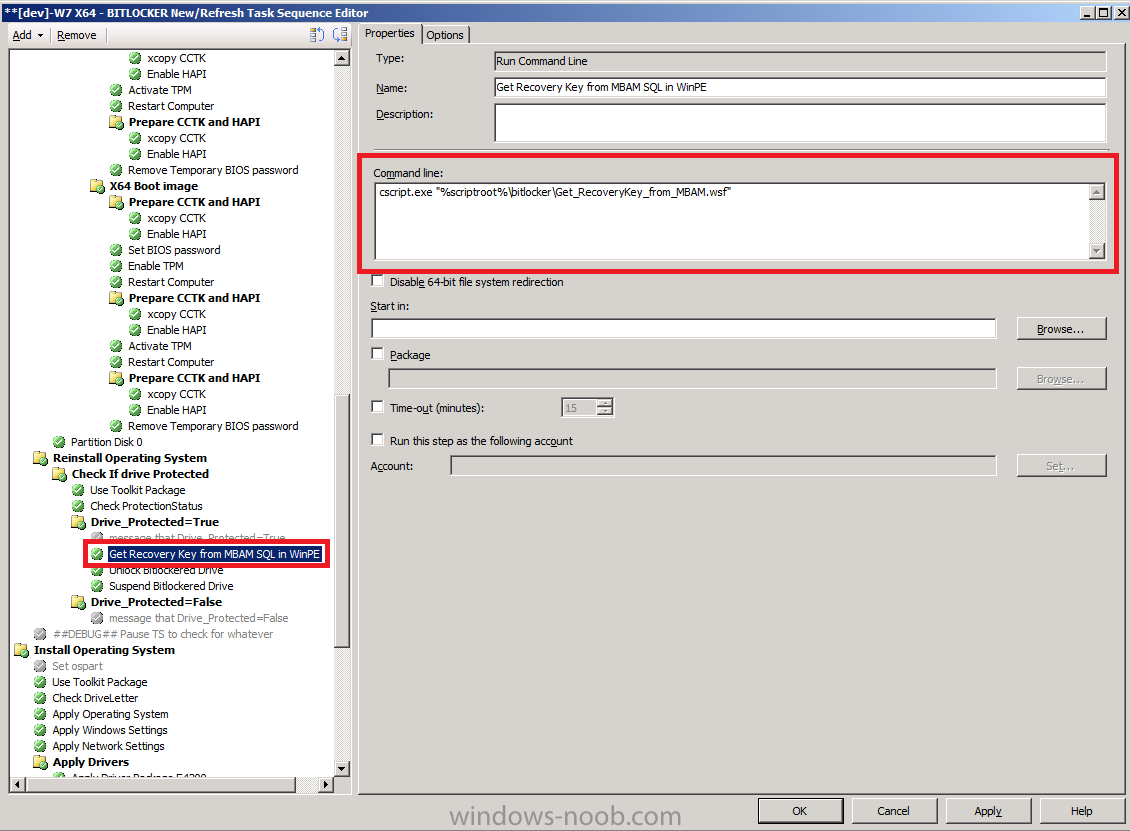
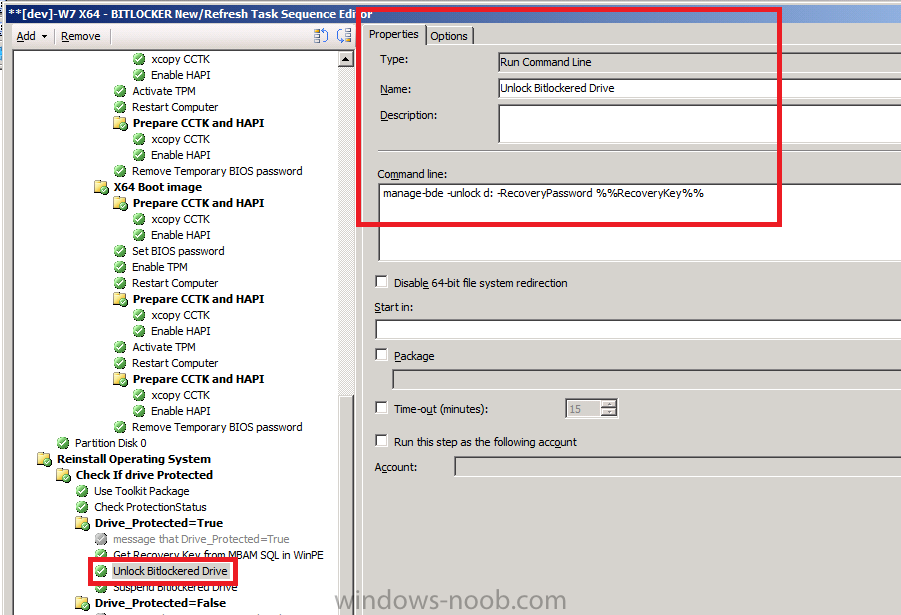
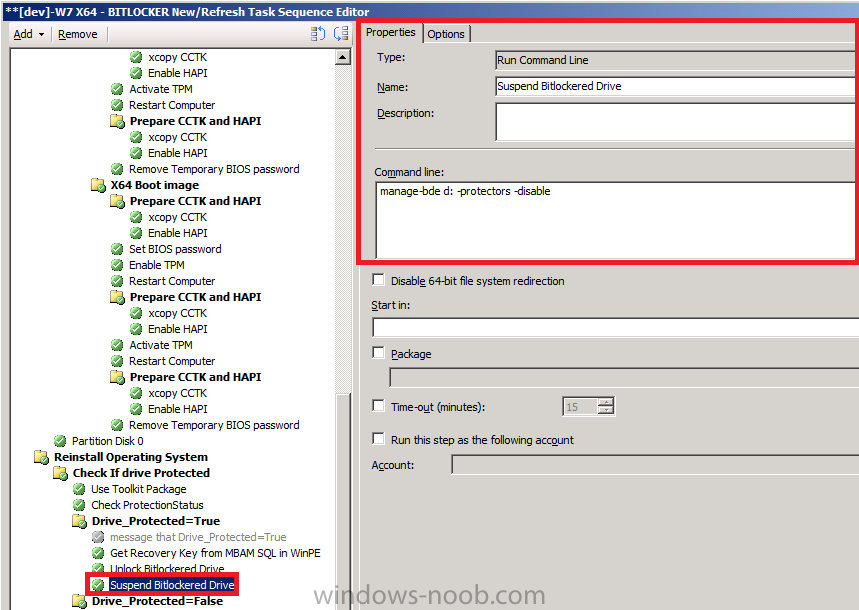
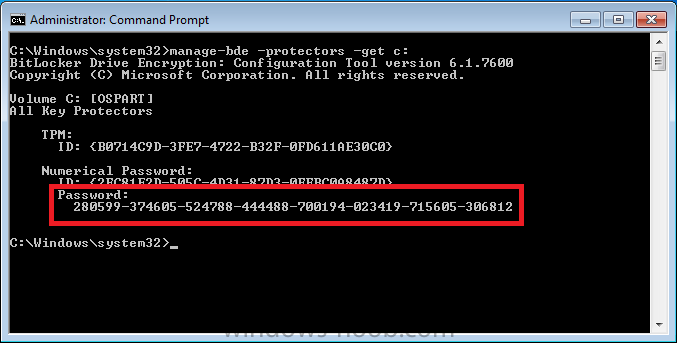
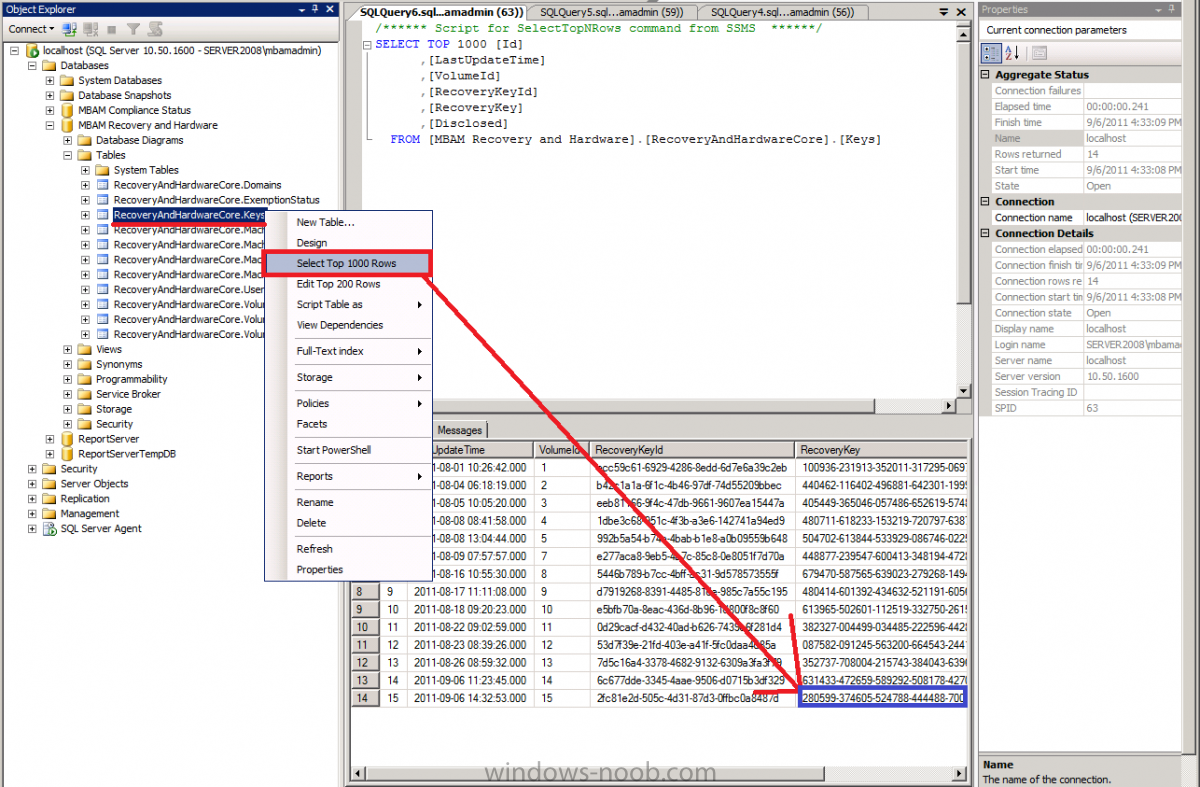
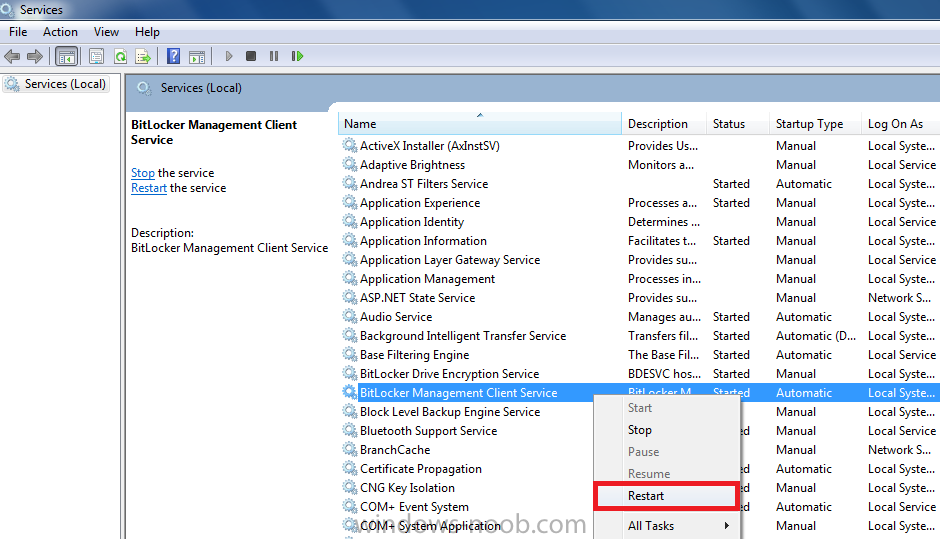
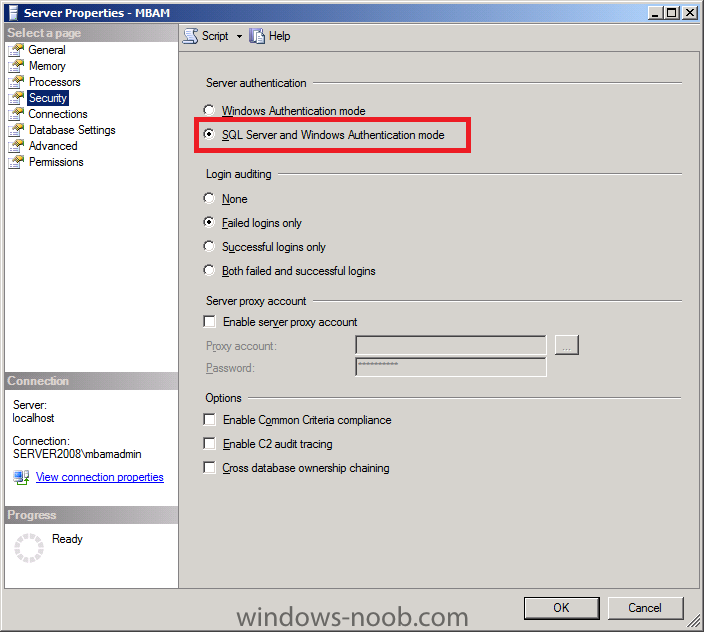
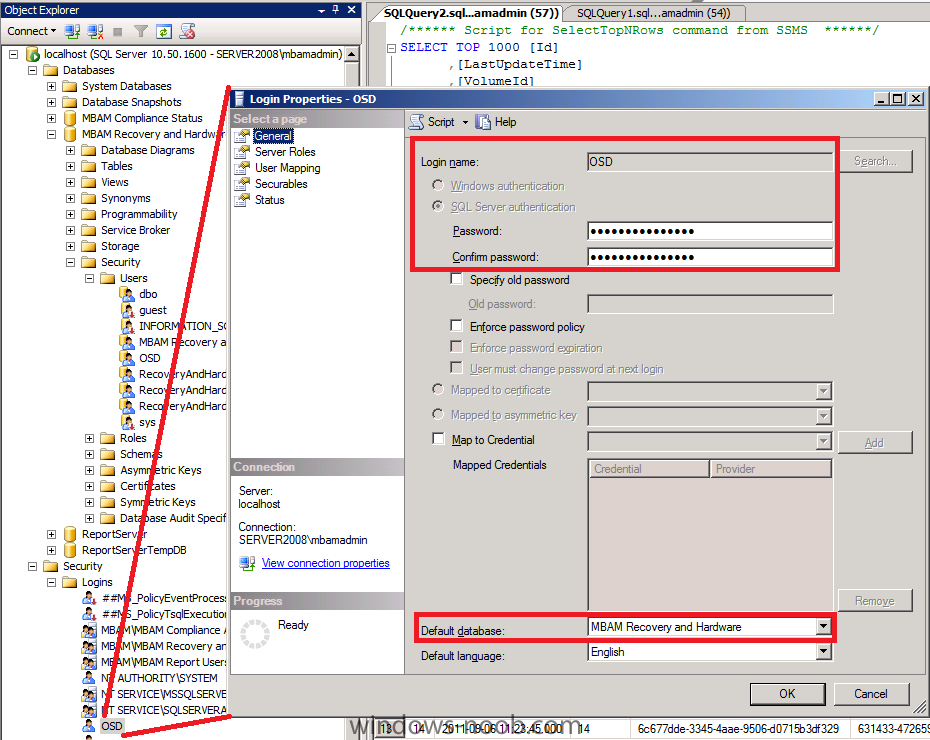
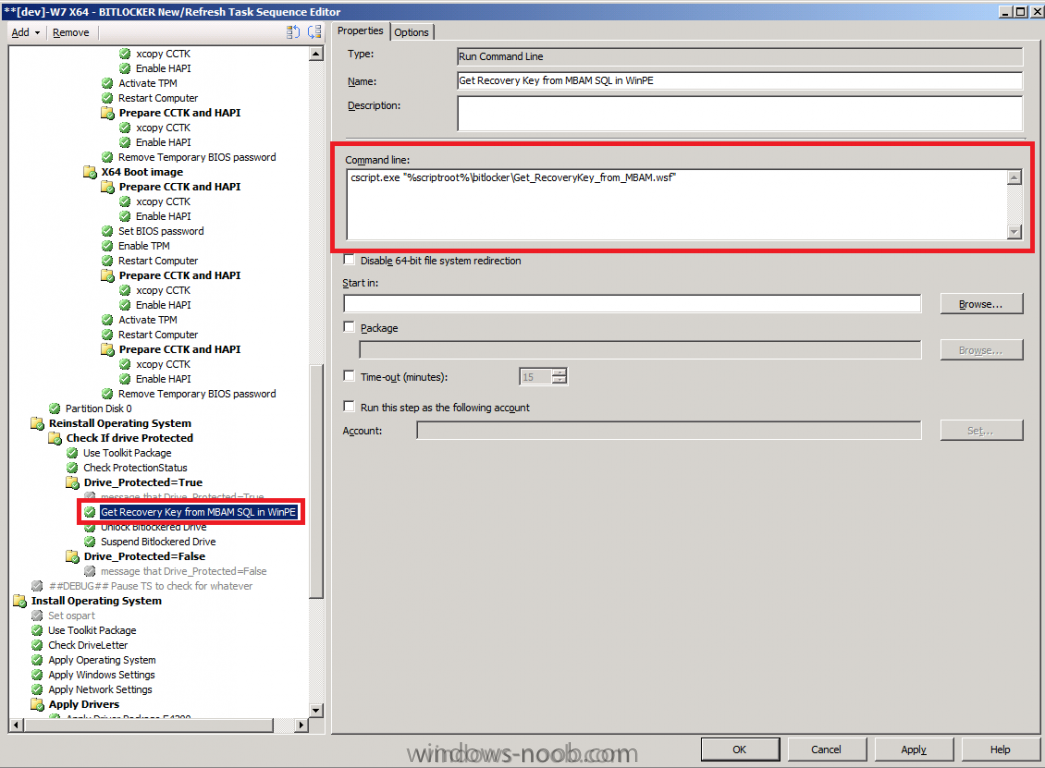
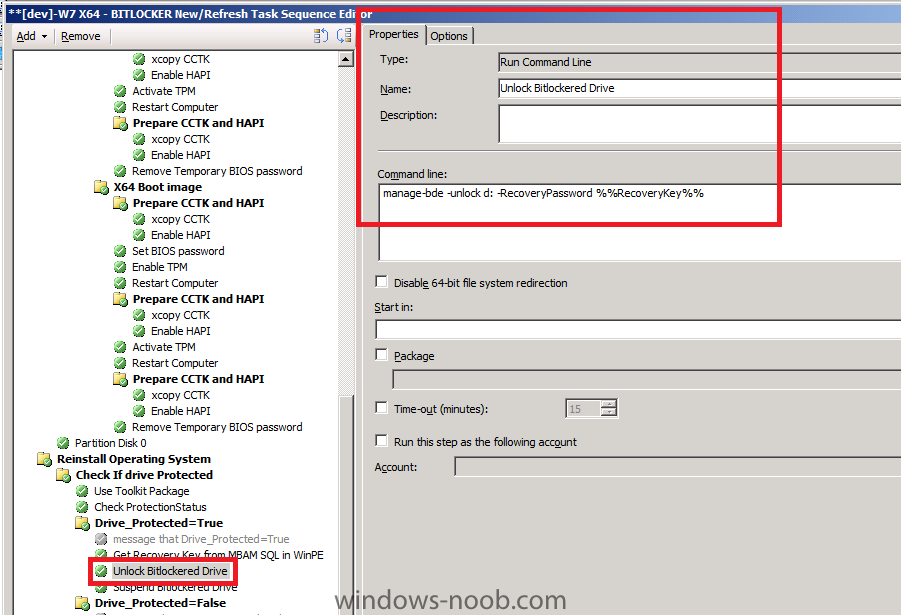
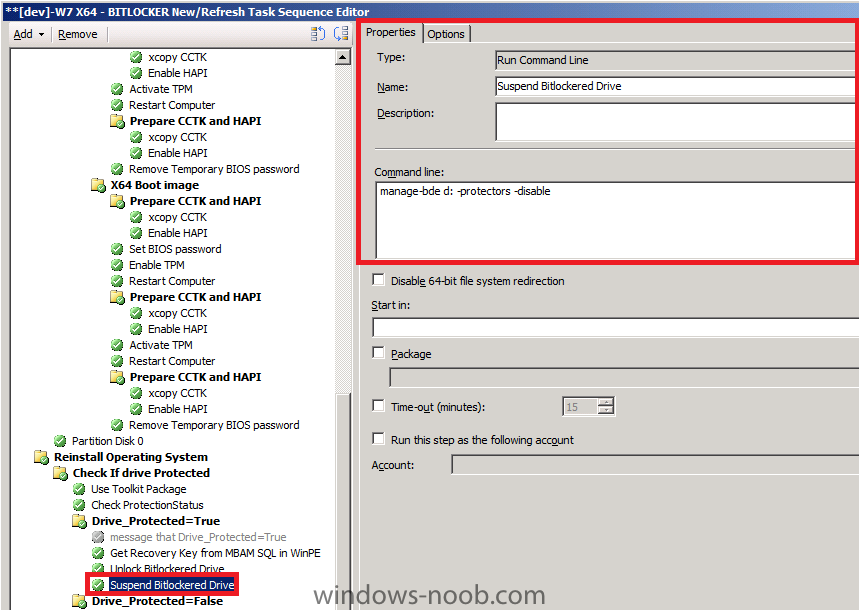
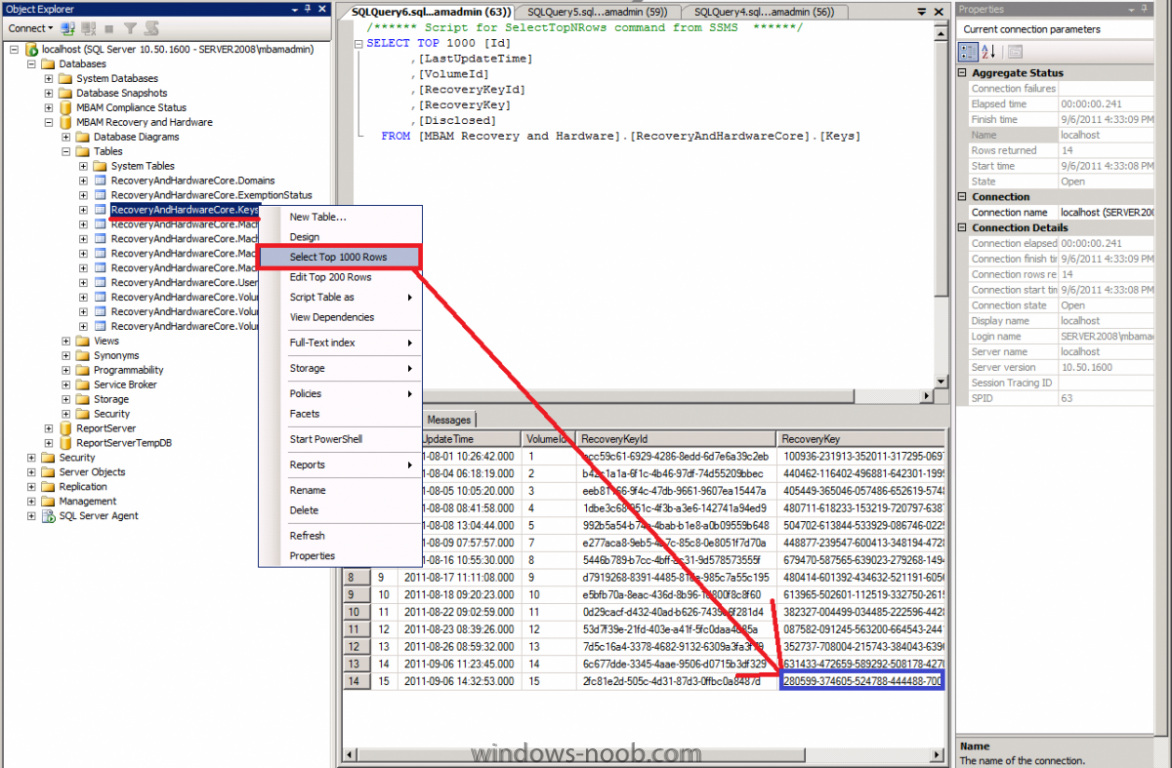
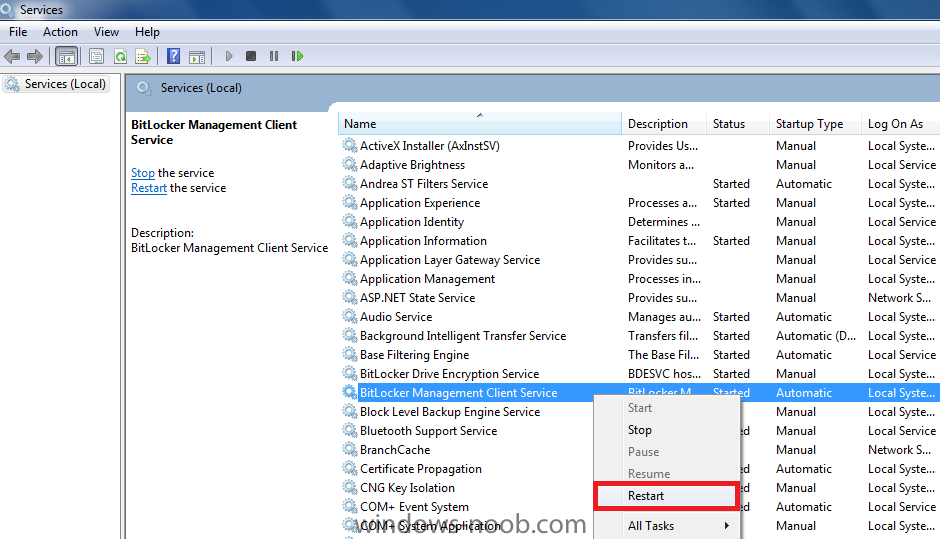
If you are using MDOP and BitLocker then you are more than likely aware of MBAM. Microsoft BitLocker Administration and Monitoring (MBAM) is a tool used amongst other things, for storing the BitLocker keys used in your Enterprise. This means that you can have a central repository for your MBAM client agents to talk to, and they do this via Group Policy settings. To make things simple, once your computers are BitLocker protected and have the MBAM client agent installed, and the MBAM Group Policy settings are pointing to your MBAM server, then the info (recovery key etc) will make their way up to the MBAM database. This means that we can use a script in Windows PE to connect to the SQL server and pull the needed information, why ? well during a Refresh (reinstallation of Windows) on your BitLockered computers, you need to unlock the BitLockered drive and then suspend it (so that you can read/write) and to do so you need to provide the recovery key. To get this key we make a connection to the SQL database on the MBAM server and request the information. Note: you'll need the ADO connector added to your boot image in order to make a connection in Windows PE to your SQL server, to do that, create a MDT boot image as described here and make sure 'ADO' is selected otherwise you'll get ADODB.connection errors in WinPE. First of all you'll need a script, let's call it Get_RecoveryKey_from_MBAM.wsf, place the script in a sub directory of your scripts dir in your MDT Toolkit Files package <job id="GetBitLockerKey"> <script language="VBScript" src="..\ZTIUtility.vbs"/> <script language="VBScript" src="..\ZTIDataAccess.vbs"/> <script language="VBScript"> Dim ConString Dim RsTemp Dim MachineID Dim RecoveryKey Dim oEnv Set oEnv=CreateObject("Microsoft.SMS.TSEnvironment") Set WShell=CreateObject("WScript.Shell") Set fso=CreateObject("Scripting.FileSystemObject") Wshell.Run "%comspec% /C manage-bde.exe -protectors -get d: > x:\BLInfo.txt",1,true Set InfoFile=fso.OpenTextFile("x:\BLInfo.txt") Do While Not InfoFile.AtEndOfStream Filerow=InfoFile.ReadLine If InStr(FileRow,"Password")<>0 Then'And InStr(FileRow,"Numerical Password")=0 Password=InfoFile.ReadLine ' msgbox "Numerical Password:" &Password Exit Do End If Loop Password=Mid(Password,12,36) 'PARAMETERS ConString="Provider=SQLOLEDB.1;Data Source=mbam,1433;Initial Catalog=MBAM Recovery and Hardware;User ID=OSD;Password=Password123" 'MAIN SQL="SELECT RecoveryKey FROM RecoveryAndHardwareCore.Keys WHERE RecoveryKeyID='" &Password &"'" Set RsTemp=GetRs(SQL) RecoveryKey=RsTemp("RecoveryKey") oEnv("RecoveryKey")=RecoveryKey msgbox "RecoveryKey retrieved from MBAM is:" &RecoveryKey Function GetRs(SQL) Dim Con Dim Rs Set Con=CreateObject("ADODB.Connection") Con.Open(ConString) Set Rs=Con.Execute(SQL) GetRs=Rs End Function </script> </job> ok so what does this script do ? the script makes a call to the SQL database on our MBAM server (Data Source=mbam) specifies the Database (MBAM Recovery and Hardware) and the user/password we need to connect with (User ID=OSD;Password=Password123) like so:- ConString="Provider=SQLOLEDB.1;Data Source=mbam,1433;Initial Catalog=;User ID=OSD;Password=Password123" This requires SQL Server Authentication to be setup in SQL Server and Windows authentication mode (mixed) so you'll need to configure this on your MBAM server (right click on your SQL server in SQL Management Studio, choose properties, security). and configure the OSD user in SQL like so with access to the MBAM Recovery and Hardware database In your Refresh task sequence you'll need to add a few new steps to get the key from your MBAM server, the first step is called Get Recovery Key from MBAM SQL in WinPE. Note:- We only try to get the key if a Protected Volume (Encrypted) is detected (Guide here), there's no need for us to get the key if the drive is already unlocked so checking that its Protected is an important step. Now that we have the key from MBAM it has been nicely placed in a variable for us called RecoveryKey, we unlock the drive using the following command in the next step called Unlock Bitlockered Drive manage-bde -unlock d: -RecoveryPassword %%RecoveryKey%% The next step simply Suspends the Bitlockered drive manage-bde d: -protectors -disable Ok that's the explanation, how can you test it ? First of all you'll need to Deploy a computer with Windows 7 and BitLocker encryption on it . Once done, install the MBAM client agent on the computer (see link 2 below or install it manually). In addition to the above you'll want MBAM configured (local group policies and MBAM server side).. Once done, login to your Windows 7 computer and start an Administrative Command Prompt. type the following:- manage-bde -protectors -get c: it will return something like the following if BitLockered the Password listed is our Recovery Key. To verify that this value is in our MBAM database simply login to the Database using SQL Management Studio and expand the MBAM Recovery and Hardware database. Expand it so that you can see the tables and choose the RecoveryAndHardwareCore.Keys table. Right click the Table and choose Select top 1000 Rows. Verify that the password revealed from our Windows 7 command prompt is present in our MBAM database. As you can see from the screenshot, the RecoveryKey is indeed listed and that means you are now ready to test the script in WinPE and to test a Refresh scenario ! If the key does NOT appear (and the MBAM client agent can take time to send this info, up to 90 minutes or more...) then simply restart the MBAM client agent service (BitLocker Management Client Service) on your Windows 7 client, wait a minute and try again. good luck ! Related reading: 1. Microsoft BitLocker Administration and Monitoring (MBAM) - http://www.microsoft.../mdop/mbam.aspx 2. Deploying the MBAM agent using ConfigMgr - http://technet.micro...indows/hh328534 3. How can I determine if the drive is Encrypted (Protected) or not during a BitLocker task sequence in WinPE ? http://myitforum.com...e-in-winpe.aspx 4. Is the TPM Chip Enabled or Disabled in the Bios on my Dell system ? http://myitforum.com...ell-system.aspx 5. How can I determine if there's a TPM chip on my Dell system needed for BitLocker ? http://myitforum.com...-bitlocker.aspx

-
Computername Migration when running OSD from USB
anyweb replied to pt0x's question in Deploying Operating Systems
have you seen the windows-noob.com Multipurpose HTA frontend ? -
well done on solving the issues !
-
Advertisement wont run after OSD TS
anyweb replied to kkontour's topic in Configuration Manager 2007
in the configmgr client on the windows 7 boxes, what actions are listed in the Actions tab ? does ccmsetup.log report any problems ? -
do you mean in the Configmgr console or on the Windows client computer ? if it's in the console select one update then scroll down to where you want the last update and click while holding shift, that will select all those updates (alternatively select all updates with ctrl_a)
-
using SCCM 2012 beta 2 in a LAB - Part 1. Installation
anyweb replied to anyweb's topic in Configuration Manager 2012
good info thanks for sharing -
Tips for Secondary site, Deploy OS, application etc.
anyweb replied to Sheik's topic in Configuration Manager 2007
why not use SP2 as SP1 is not supported anymore. to verify OSD is working simply setup a Virtual Machine at that site, and pxe boot the VM -
should be fine, are you sure it's not importing fine and you just havn't refreshed ?
-
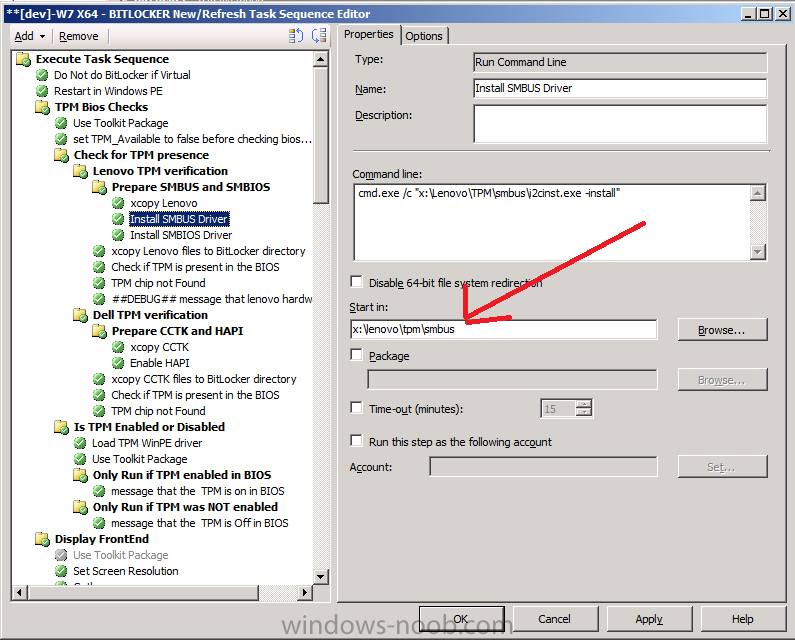
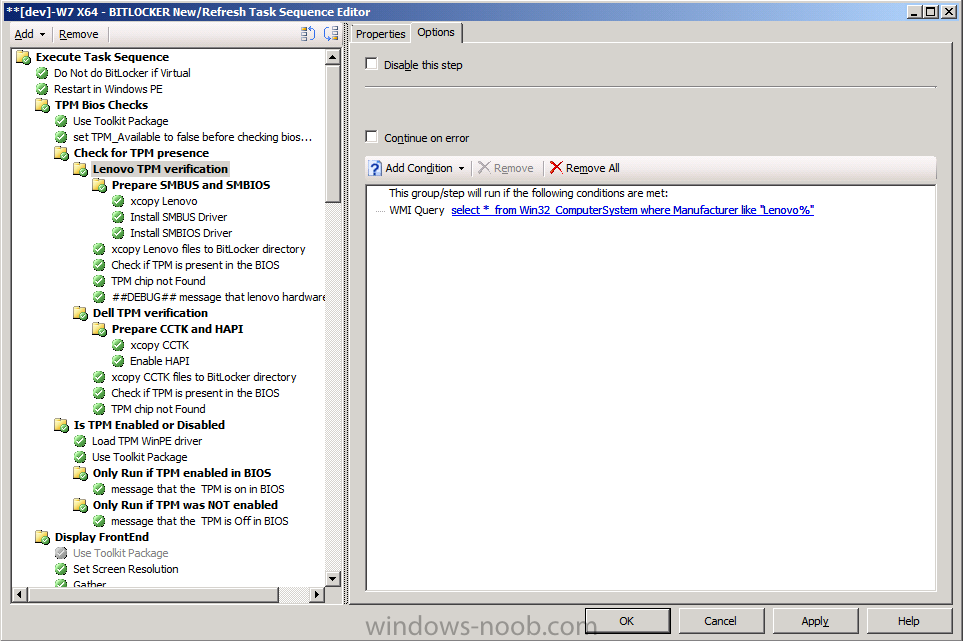
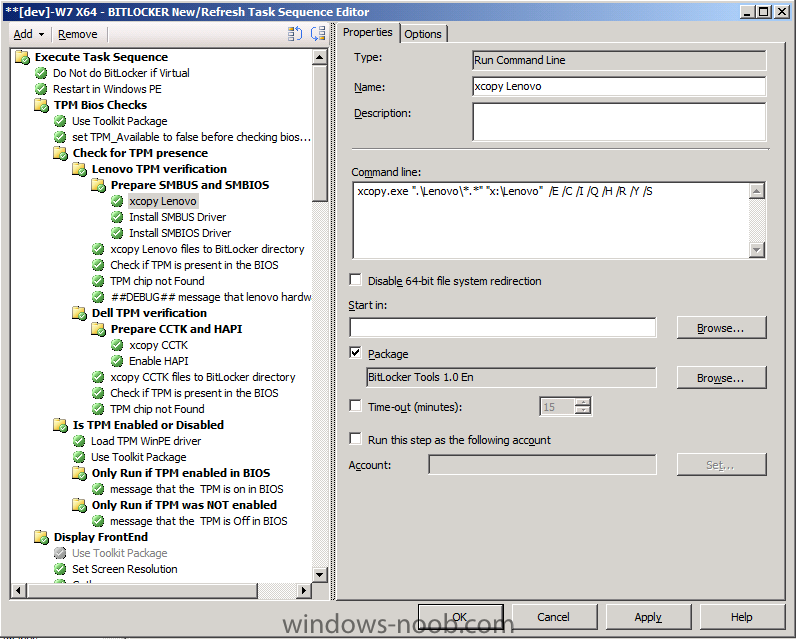
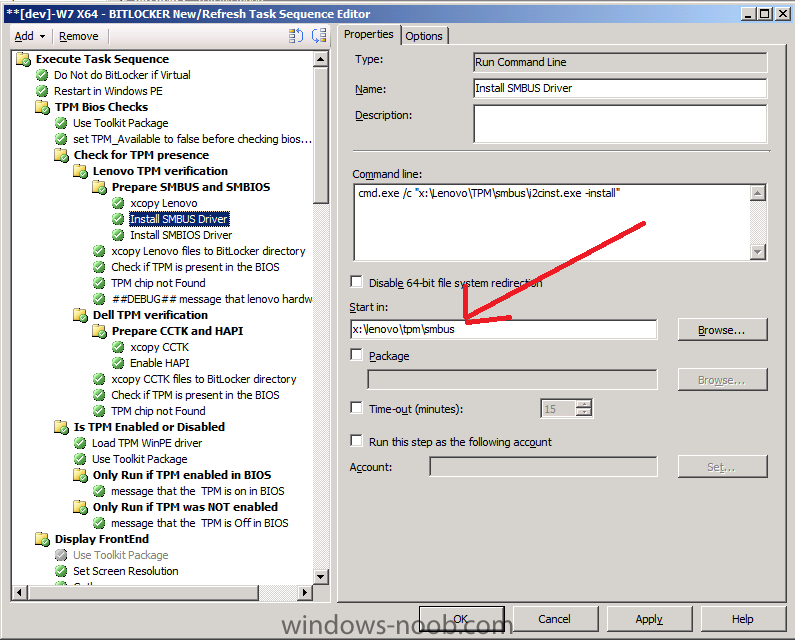
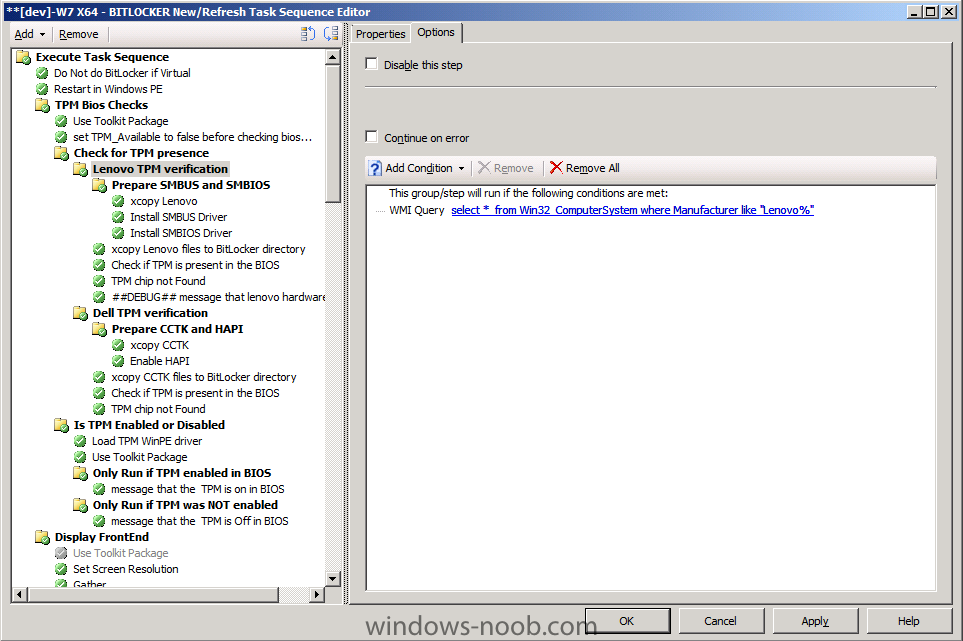
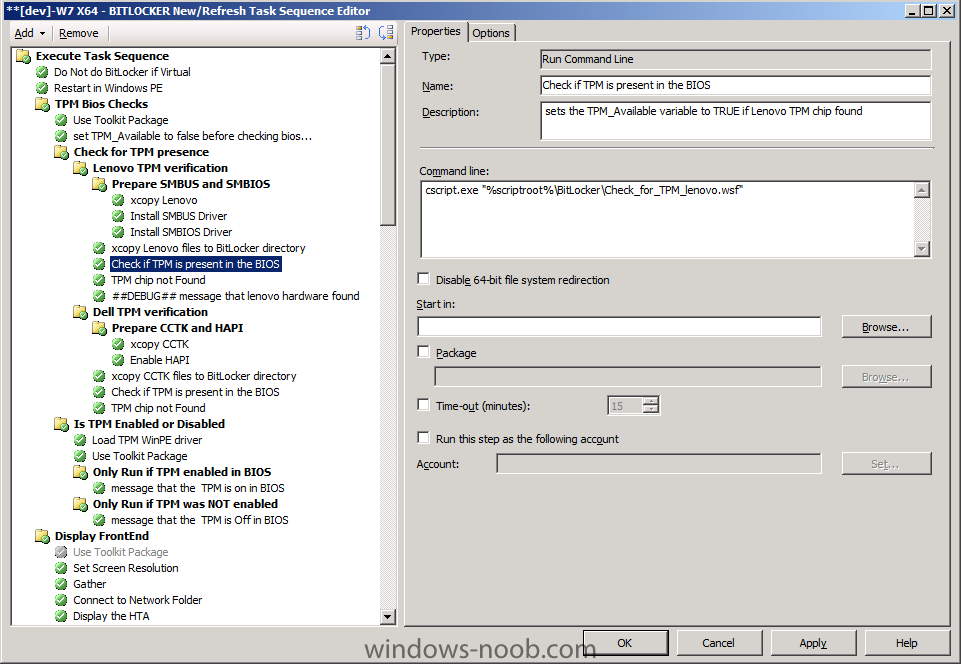
If you haven't don'e so already check out my similar post on verifying if there's a TPM present for Dell systems here. Using similar logic (it works after all :-)) I've changed the script to look for the Lenovo programmed response and edited my task sequence to load the required Lenovo drivers in the order they must be placed, the Lenovo Check for TPM group will only run based on a wmi query, the wmi query is as follow Select * from Win32_ComputerSystem where Manufacturer like "%Lenovo%" In this group we have a sub-group which plugs the needed drivers into our WinPE session (without the need for changing your boot images, cool huh ?) The sub-group is called Prepare SMBUS and SMBIOS (much like Prepare CCTK and HAPI on the Dell TPM check) and has three steps xcopy LenovoInstall SMBUS DriverInstall SMBIOS Driver Xcopy simply copies the Lenovo specific drivers *see screenshot* from our previously created BitLocker Tools package to where we want them, you'll need to download the SMBUS and SMBIOS drivers from Lenovo (ask your Lenovo TAM if you cannot find them) and the next two commands install the correct drivers from the xcopied source. Next we have the Install SMBUS Driver, which does just that, it installs the required SMBUS driver for Lenovo, note that this step will fail unless you specify the working directory, in our case it's x:\lenovo\tpm\smbus The Install SMBIOS Driver loads another driver but you must also specify the correct working directory for THAT driver otherwise once again it will fail. After successful completion of that group we xcopy the Lenovo files to a sub directory of our %scriptroot% before running the actual Check_for_TPM_Lenovo.WSF file, this will only set our TPM_Available variable=True if the correct string is found, otherwise the variable will be false. The remaining steps in this group will run/not run based on the result of that variable. here's the script <job id="checkTPM"> <script language="VBScript" src="..\ZTIUtility.vbs"/> <script language="VBScript"> Dim oShell Set oShell = CreateObject("WScript.Shell") oEnvironment.Item("TPM_AVAILABLE") = False retCode = oShell.Run("cmd /c " & Replace(WScript.ScriptFullName,WScript.ScriptName,"") & "tpm_activate_cmd.exe /verbose | find " & chr(34) & "TPM is present in this system" & chr(34) , 0, True) If(retCode = 0) Then oEnvironment.Item("TPM_AVAILABLE") = True End If WScript.Quit(0) </script> </job> have fun ! cheers niall Related Reading:- Customising Windows 7 deployments - part 5. Is the TPM Chip Enabled or Disabled in the Bios on my Dell system ? - http://myitforum.com...ell-system.aspx How can I determine if there's a TPM chip on my Dell system needed for BitLocker ? http://myitforum.com...-bitlocker.aspx BitLocker Hardware Requirements - http://windows.micro...rive-Encryption Microsoft Scripts to Enable Bitlocker - http://go.microsoft..../?LinkID=151997 BitLocker Info - a List of Resources - http://myitforum.com...-resources.aspx How can I determine if the drive is Encrypted (Protected) or not during a BitLocker task sequence in WinPE ? - http://www.windows-n...uence-in-winpe/


-
using SCCM 2012 beta 2 in a LAB - Part 1. Installation
anyweb replied to anyweb's topic in Configuration Manager 2012
if you dont have any SQL experience then why are you installing it on a separate server ? the guide assumes you are installing SQL on the same server as SCCM 2012 -
what does your unattend.xml look like ?
-
well they can have a configmgr console installed on their own computer without the need to login to the server
-
usually always means you don't have a valid ip address or incorrect or missing network driver, so press F8 during that process and verify that you have network connectivity after the apply driver package step
-
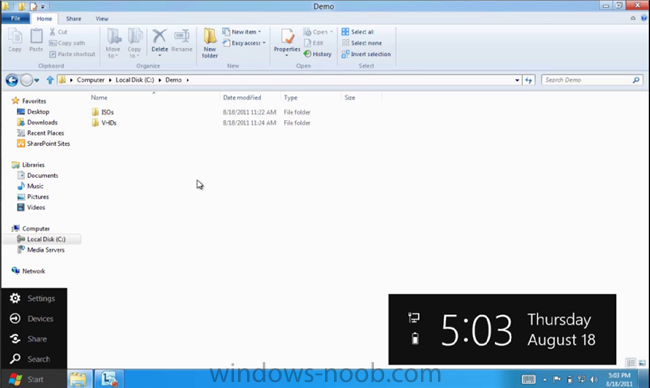
In a new post by Steven Sinofsky on the Building Windows 8 blog, we learn that Windows 8 will not only have native VHD, but also native ISO support in Explorer (finally!). Windows users can now rejoice at no longer having to use a third-party application to view ISOs. A video created by Rajeev Nagar, a group program manager on the Storage and File Systems team at Microsoft, explains the process and gives us another great glimpse of the new Ribbon UI in Windows 8, as well as the updated Taskbar — all this, after everything revealed in the previous videos: But there’s a catch (you knew there had to be): Creating ISOs is not something that will be handled natively. From Steven Sinofsky: In case you need a utility to create ISO images from existing optical media, there are many tools that give you that capability. One I use is the Oscdimg command line tool that is available as part of our automated deployment kit. Personally, I think they should just build the functionality to create ISOs into Explorer as well — or, at the very least, include the Oscdimg command line tool with Windows 8. I’m not much for creating ISOs these days and I know Microsoft is aiming for Windows 8 to exist mostly on portable devices sans disc drives, but it seems a bit halfhearted to make dealing with ISOs a one-way street. Regardless, I appreciate the effort put into at least providing native support to view them in Explorer. Touching back on the updated UI being shown in great detail, here’s a close-up screen shot (click on it for higher-res): via > http://www.zdnet.com/blog/btl/windows-finally-gets-native-iso-support-in-windows-8/56639

-
what CU did you load ? if you havnt installed CU14 then do so now
-
check the root of task sequences, refresh, do you see the imported task sequence now ?
-
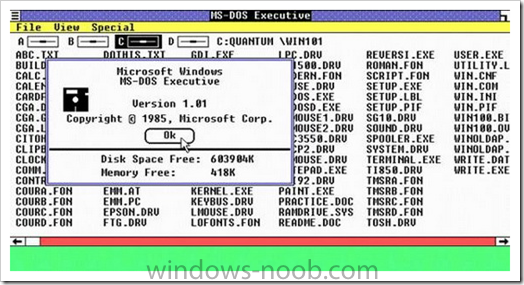
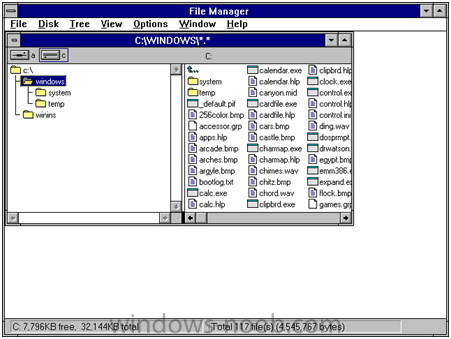
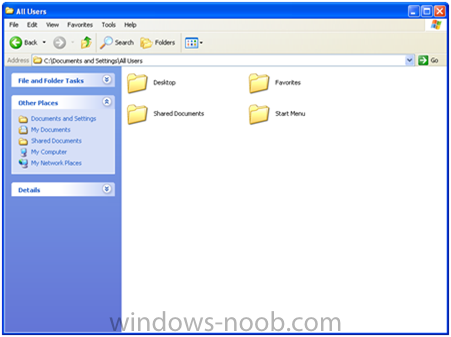
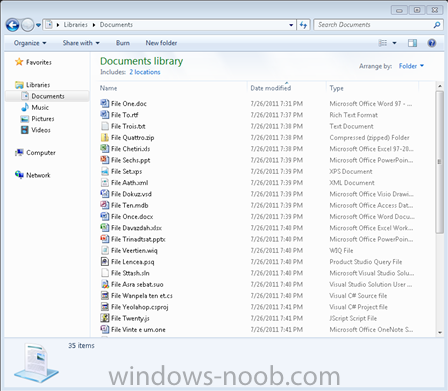
Windows Explorer is a foundation of the user experience of the Windows desktop and has undergone several design changes over the years, but has not seen a substantial change in quite some time. Windows 8 is about reimagining Windows, so we took on the challenge to improve the most widely used desktop tool (except maybe for Solitaire) in Windows. Alex Simons on the program management team authored this post with a detailed look at the evolution of Explorer and the major improvements to its interface and functionality for Windows 8. Judging by the passion on file operations and user interface design, we know this is an important subject so we expect a pretty engaged dialog on the topic. We put this in one lengthy post, will watch the comments and dialog, and down the road we'll continue the discussion. -- Steven It’s exciting to have this opportunity to share the improvements we’re making to the file management capabilities of Windows Explorer. Explorer is one of the most venerable parts of Windows with a heritage you can trace back to the “MS-DOS Executive” in Windows 1.0! MS-DOS Executive in Windows 1.0 Over the years, Explorer and its forerunners have gone through several major iterations: File Manager in Windows 3.1 Explorer in Windows XP Explorer in Windows 7 It’s a bit daunting but also pretty exciting to have the opportunity to revisit and rethink this cornerstone of our product. Many of you who are reading this (and most of us on the development team) are among the most extreme “power users” of the file management tools in Explorer and likely start from a different perspective than the broad base of customers. As we approach the work to improve file management in Windows, we do so knowing many of you have long ago "given up" on Explorer and are using some of the wide variety of add-ons or alternatives. As we mentioned in our post on improvements in the copy function, telemetry data indicates these add-ons and alternatives are mostly used by us power-users and we represent a small but influential group of people. The most popular add-ons and replacements (programs like TeraCopy, FastCopy, xplorer2 & QTTabBar) are installed (note that does not mean used) on about 0.45% of PC’s. Our goal is to improve the usage experience for a majority of customers while recognizing that, with such a long history and variety of depth usage, we cannot possibly provide all of the power everyone might want. We expect that there will be a vibrant third-party toolset for some time to come. Windows 8 is an opportunity to substantially improve the experience for everyone. read the rest > http://blogs.msdn.co...s-explorer.aspx


-
not that i'm aware of, that's what RBAC is for in SCCM 2012
-
Install Roles and Features
anyweb replied to Patrick.oliverson's question in Application Virtualization
I havn't tried it that way before...what does your smsts.log file say ?