anyweb
-
Posts
9182 -
Joined
-
Last visited
-
Days Won
366
Everything posted by anyweb
-

Capturing an image error.
anyweb replied to clivebuckwheat's question in Troubleshooting, Tools, Hints and Tips
can you post the smsts.log please ? -
A new build for Microsoft's upcoming Windows 8 operating system could be released to developers as early as next week if a Twitter message from a previously reliable source has its facts straight. The Twitter page for "@MSFTtm" claims that Microsoft will release a Community Technical Preview (or CTP for short) for Windows 8 next week at Microsoft's Worldwide Partner Conference. The conference is scheduled to be held on July 11-14. While there's no concrete proof that Microsoft will indeed release a CTP build of Windows 8 next week, it's a pretty safe bet that Microsoft will be discussing at least some aspects of Windows 8 at the Worldwide Partner Conference. WinRumors.com reports via unnamed sources that the conference will have "substantially" more info about the next version of the operating system. Microsoft might also release a new Building Windows 8 video. The first such video was released on June 1 that showed off the operating system's user interface. There are also rumors that Microsoft will release a full fledged beta version of Windows 8 in the next couple of months. That is supposed to happen during the company's BUILD developer conference that will be held in September. Windows 8 is slated to be released in its final form sometime in 2012 and will run not just on PCs but also on tablets and other devices. While Intel and AMD based processors will still be supported Windows 8 will also run on but chips based on designs from the ARM company as well. via Neowin > http://www.neowin.net/news/rumor-new-windows-8-build-to-be-released-next-week
-
Microsoft CEO Steve Ballmer has claimed that the company’s next-generation of Windows “will be pretty important.” Ballmer made his remarks at an Imagine Cup 2011 event in New York on Friday. The software giant brought together some of the brainiest students to showcase their work and efforts to solve real world problems using technology. Ballmer praised the various groups of students who are participating in the event. Over 300,000 students registered for the Imagine Cup 2011 and the winners will be announced next week. Ballmer spoke briefly about Windows 8 and the future of what Microsoft is doing. “As we take a look over the next several years, we’re certainly excited about what we’re doing,” said Ballmer. “What’s Windows 8? How do we drive it? What do we make happen? What are the key phenomena? When do we get to release it? How do we make it better, and better and better? Yes, there are some other guys we compete with. Boom we’ve got to do better, and better, and better, and better, and better. It’s pretty exciting, pretty exciting stuff.” Ballmer also spoke about Microsoft’s Xbox plans and how the company’s excitement and innovation is driving the Xbox into living rooms worldwide. Microsoft is moving to the cloud according to Ballmer. “We’re moving to the cloud. Everything is moving to the cloud,” he said. Ballmer also said he was excited by the company’s Bing service. “Bing. Bing is a service that is probably amongst the things I’m most excited about at Microsoft, most excited.” Ballmer rounded his speech off with a brief mention of Windows 8 again. He claimed that Windows 8 “will be pretty important,” echoing previous comments at a Gartner conference in late 2010 where he revealed that the next version of Windows will be the company’s riskiest product bet. “Whether you consider yourself a businessperson looking at technology, or a technology person looking at technology, the opportunities for you are really going to be pretty fantastic. There’s a lot coming in our own case I think the news, the things that we have to talk to you as a group of technologists over the next few months, Windows 8 will be pretty important. You’ll hear more about that at our developer conference Build in September. But, you’re going to see a stream of things from us.” The full transcript of Ballmer’s speech is available here. via winrumors.com

-
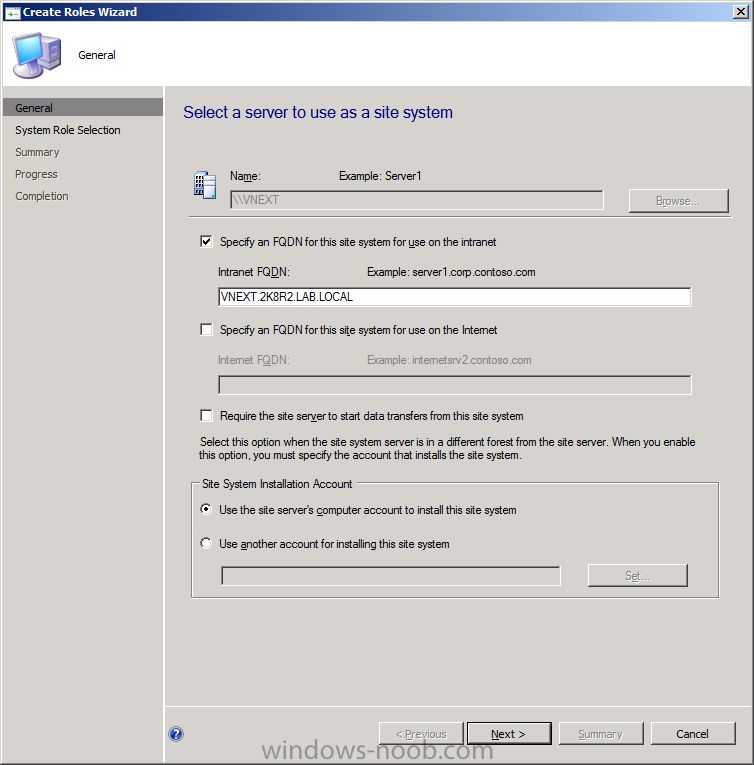
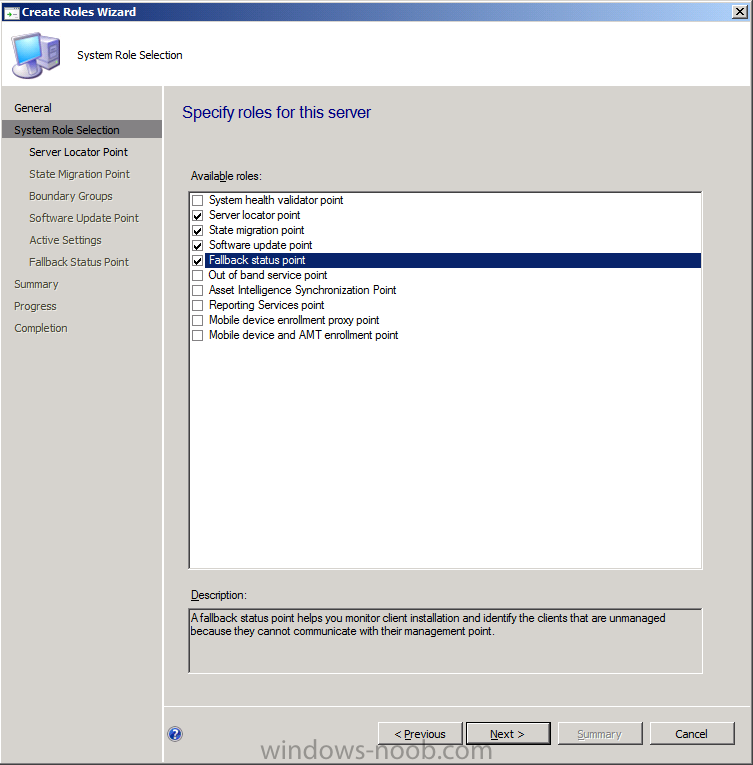
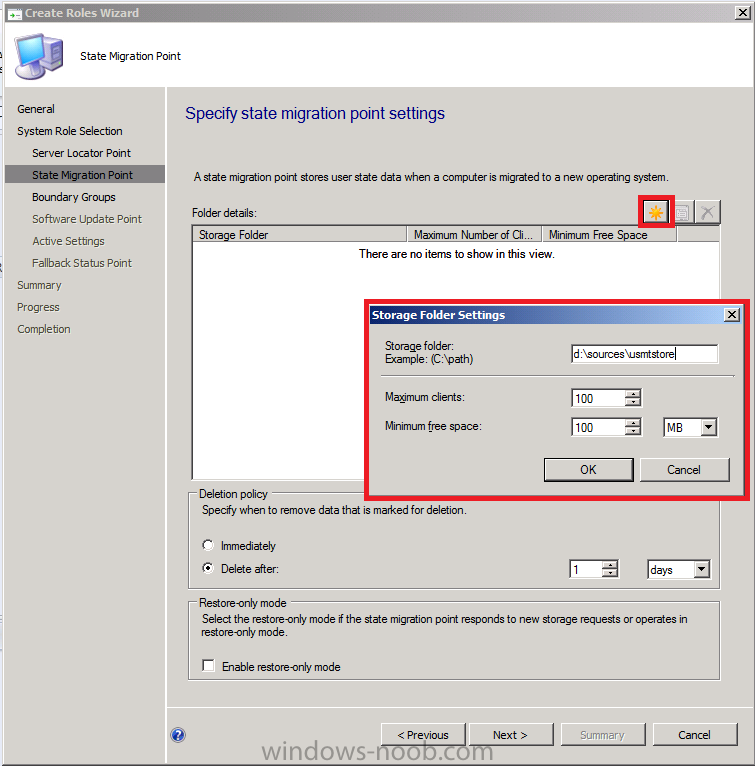
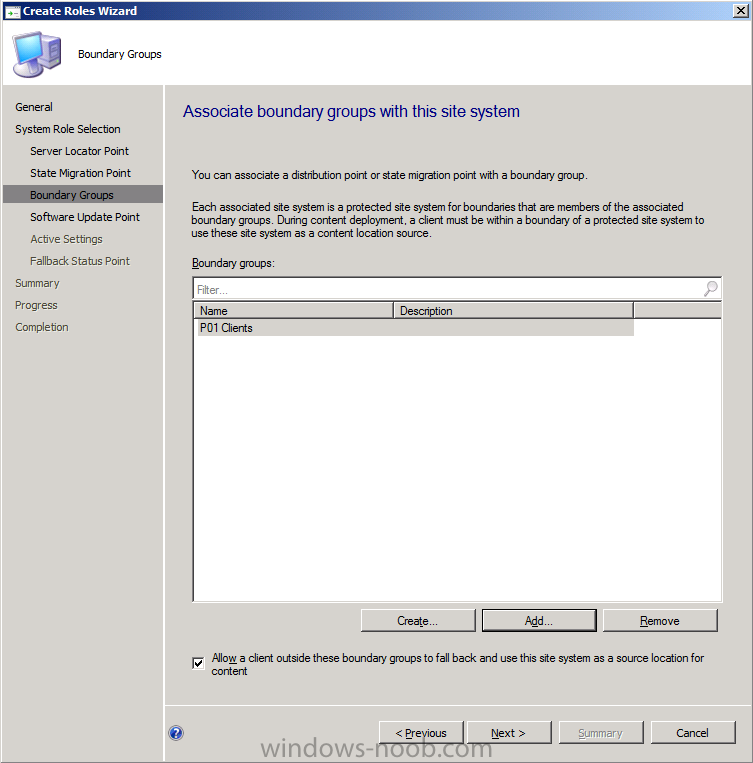
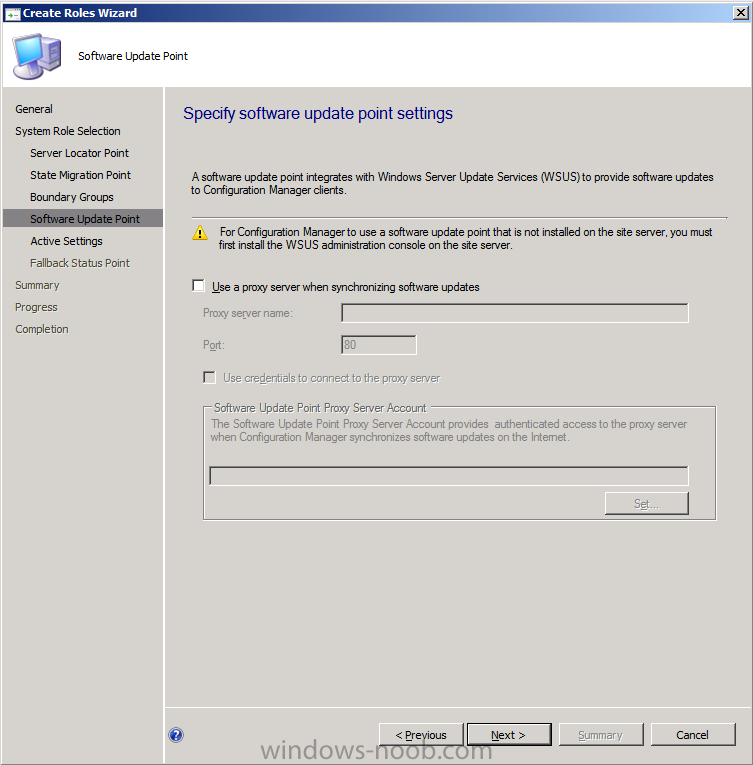
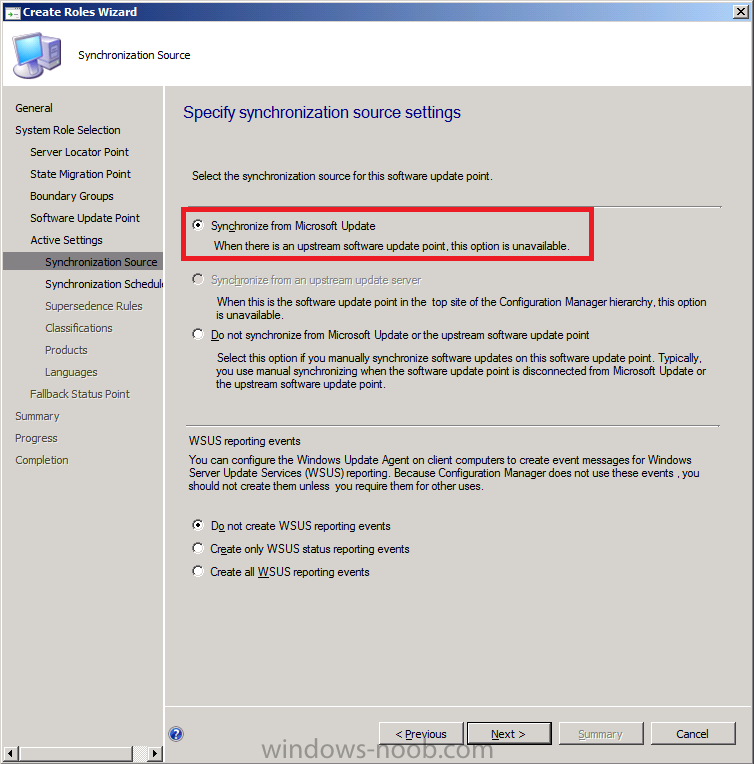
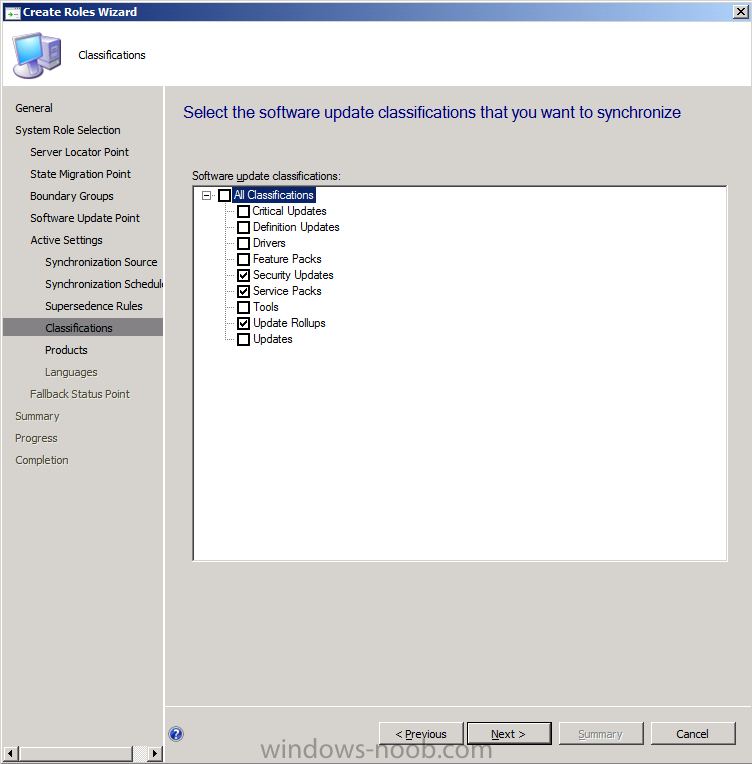
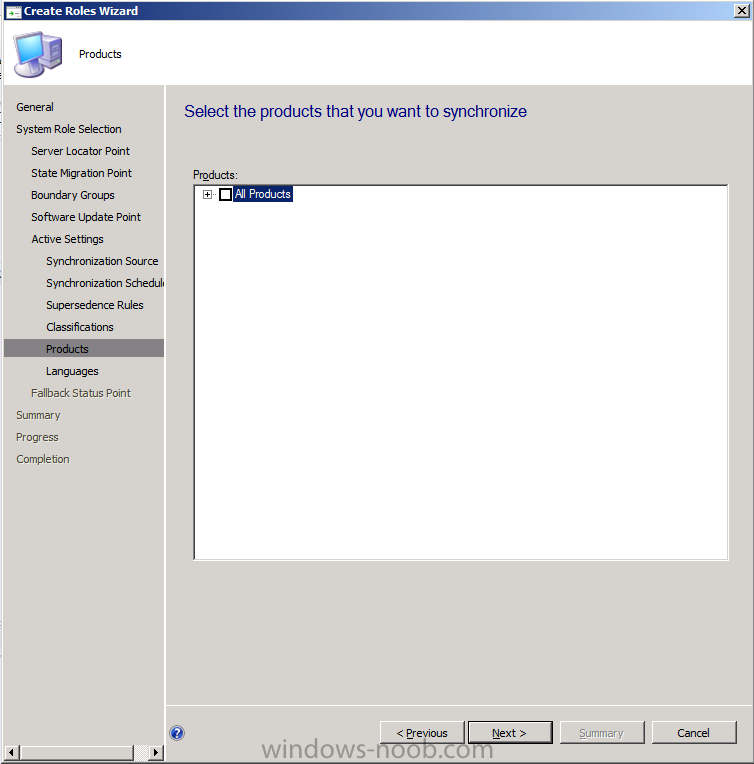
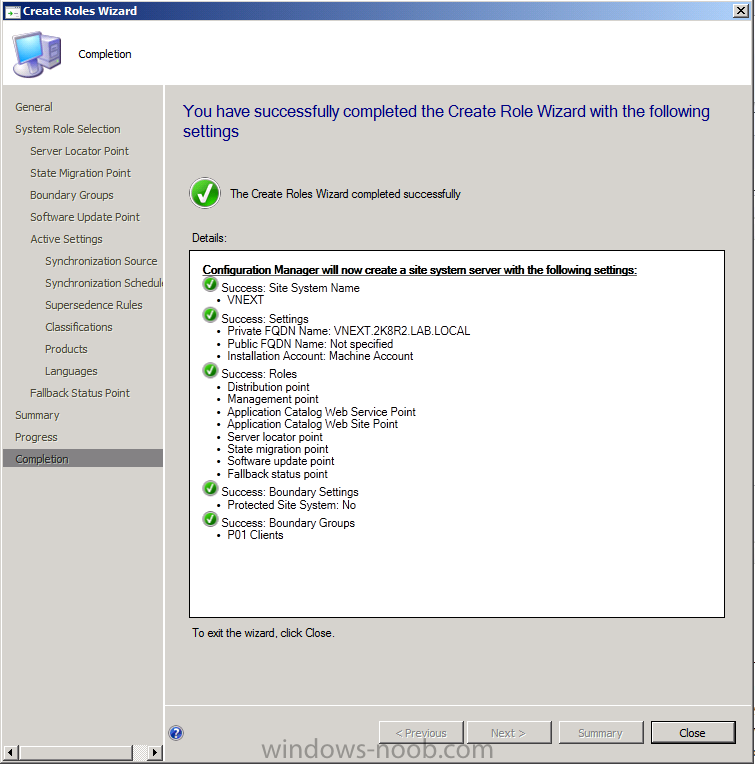
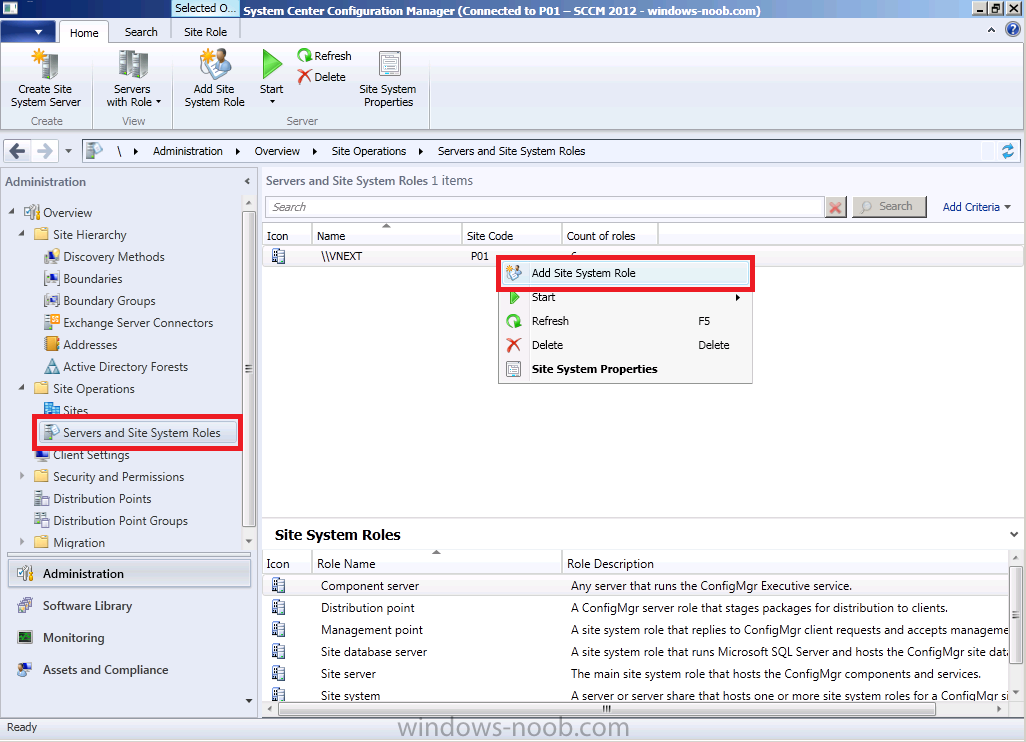
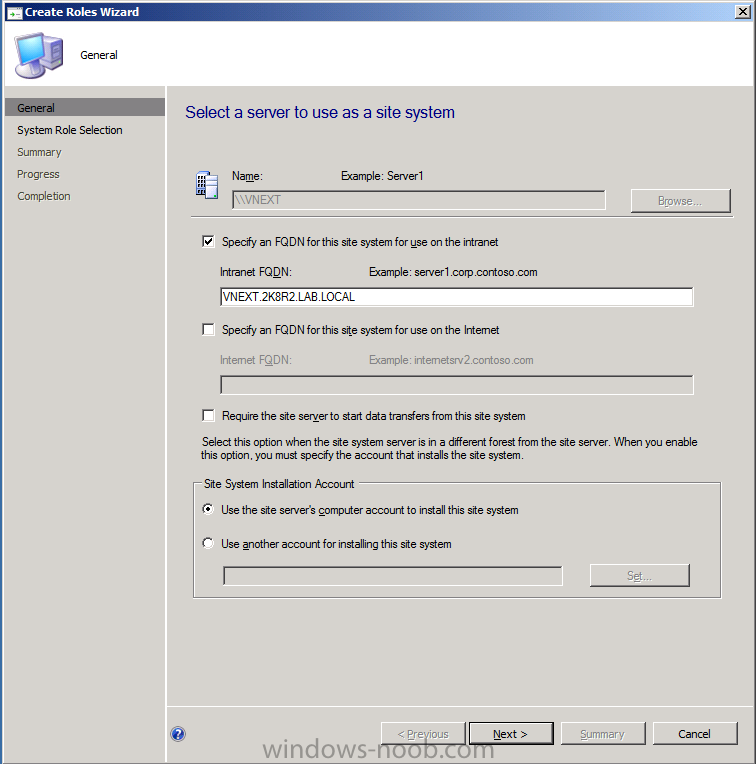
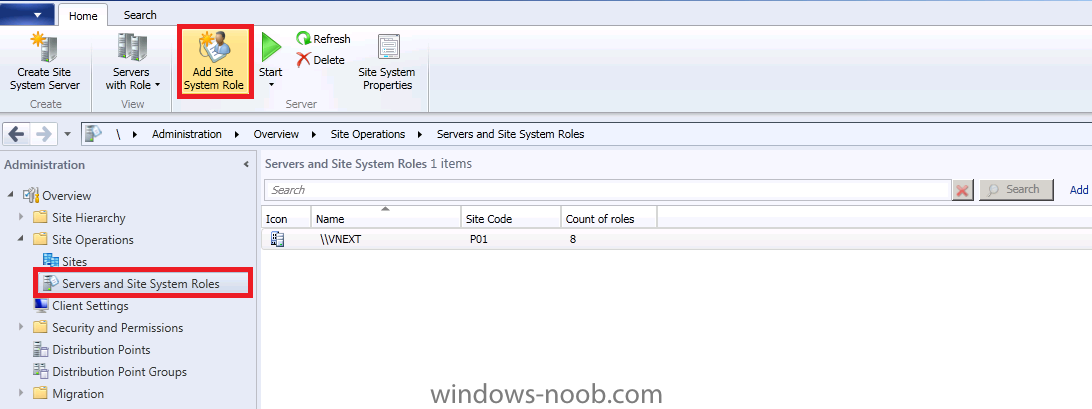
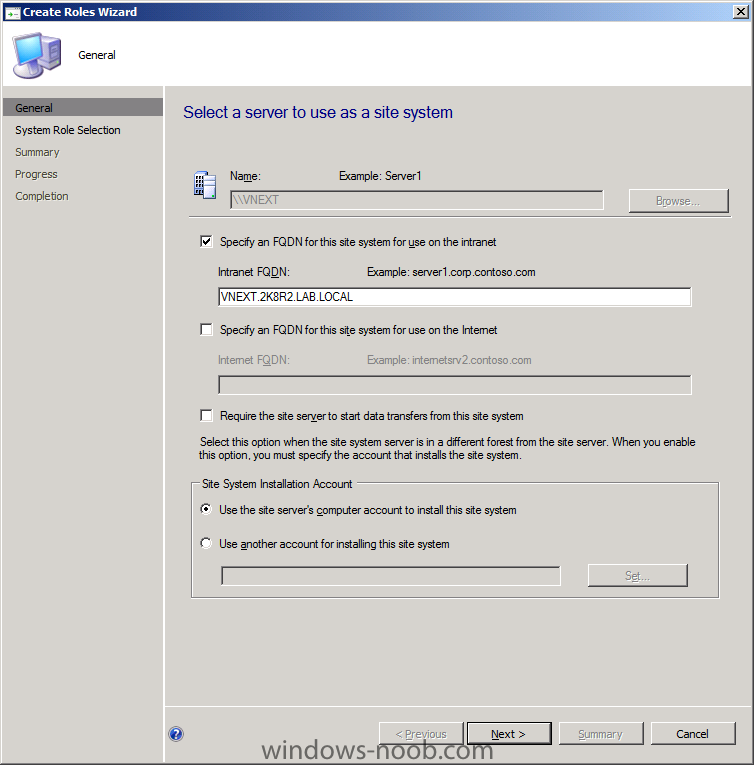
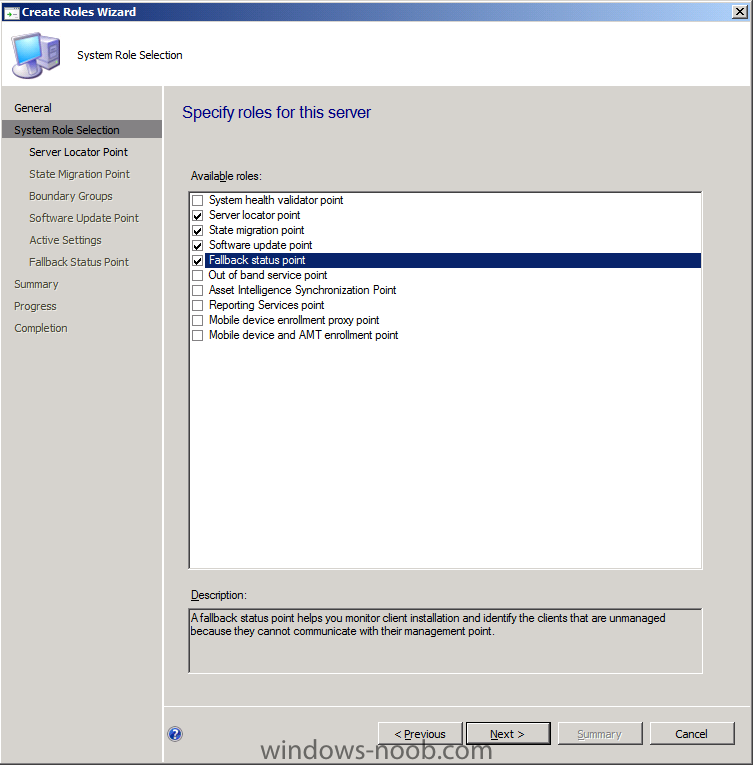
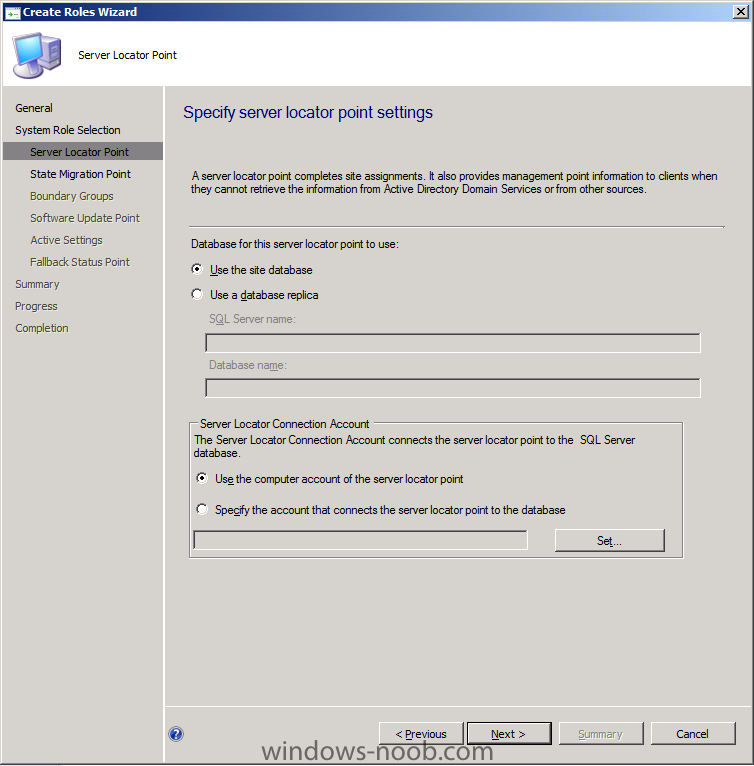
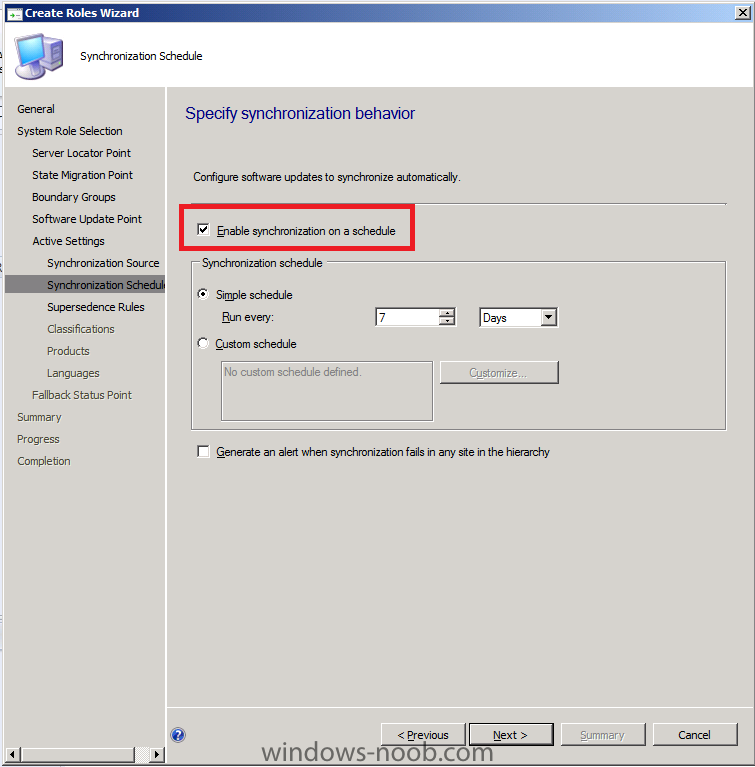
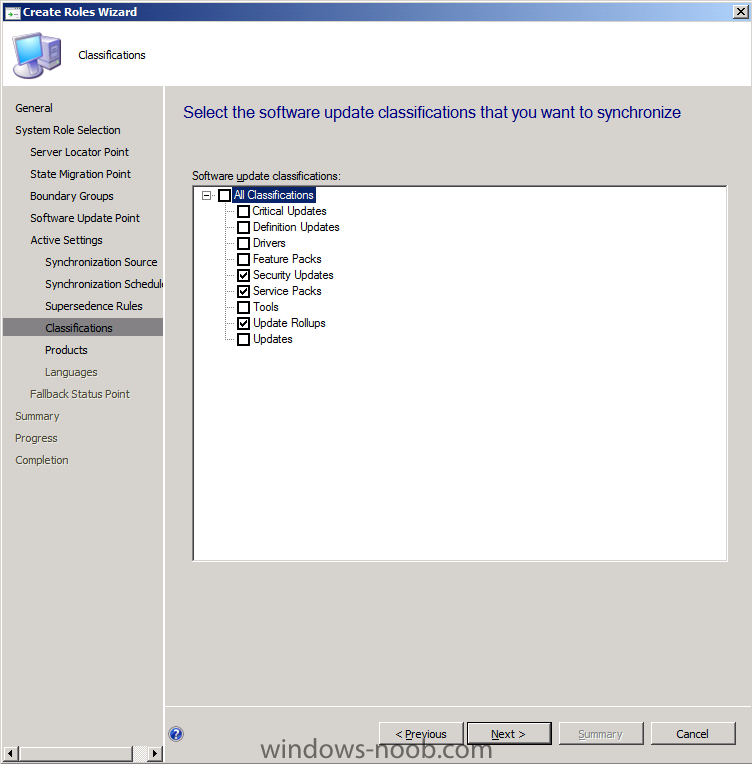
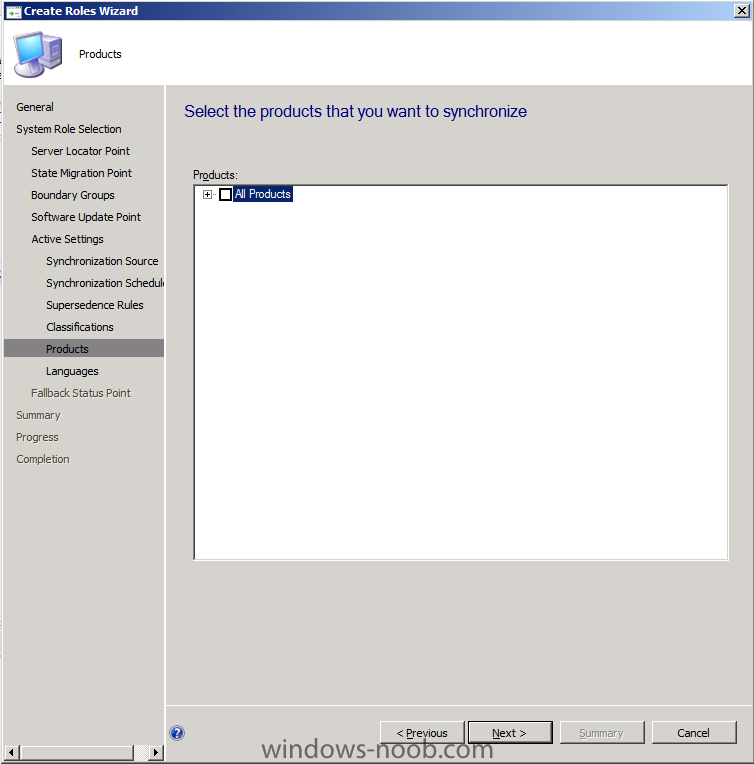
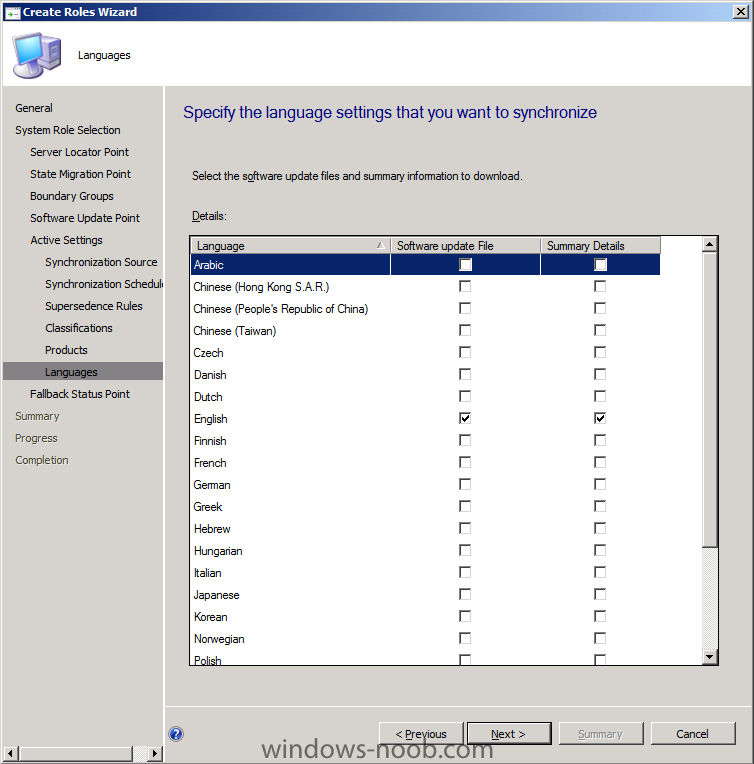
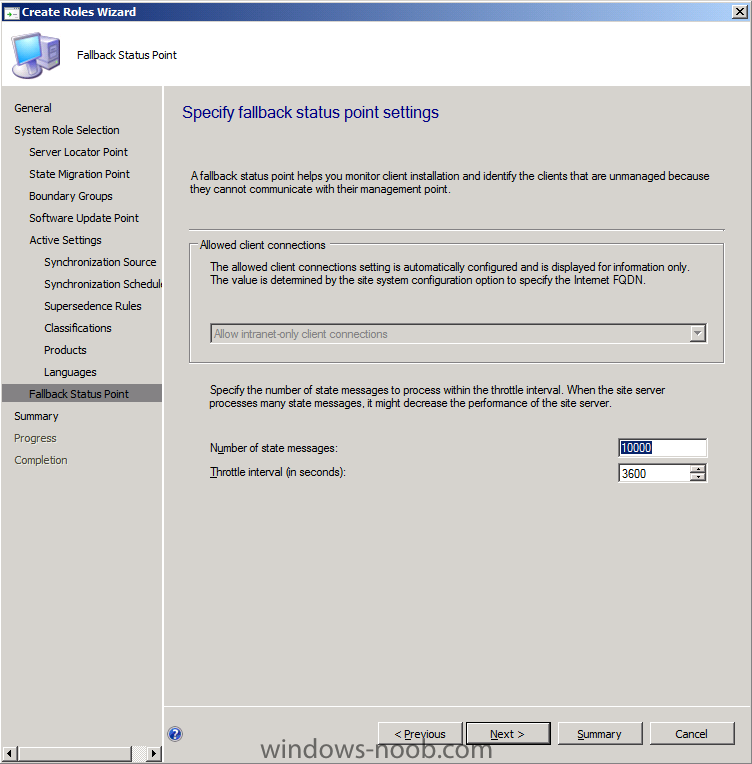
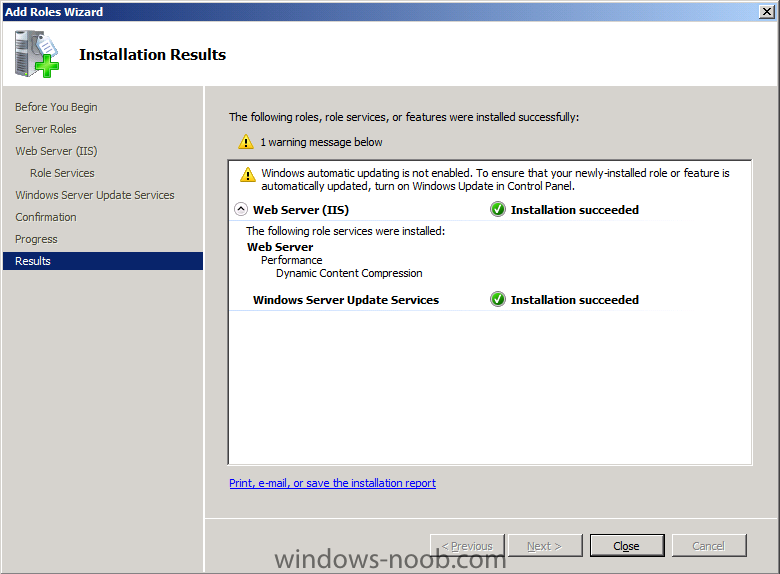
Step 2. Add the SLP, SMP, SUP and FSP roles We will be doing some DATA migration later and hope to install Windows Updates too, so as part of that let's add the following roles, Server Locator Point (SLP - to find the Site server when not joined to AD, eg: workgroup joined as in Build and Capture), State Migration Point (SMP, for storing our saved user data) and Software Update Point (SUP, software updates), Fallback status point (FSP). In Configmgr's console, click on Administration, Site Operations, Servers and Site System roles, in the Ribbon, click on Add Site System Role Click next on the Create Roles Wizard page select the 4 roles and click next and accept the settings for SLP for SMP, click on the yellow starburst and point the Storage folder to d:\sources\usmtstore, click ok and next when done our previously defined Boundary Group (P01 Clients) is listed, click next to continue, it's needed for the SMP click next at the specify software update point settings (we have no proxy) select this server as the active software update point and configure WSUS to listen on default website (ports 80 and 443) Synchronize from Microsoft Update enable Sync on a Schedule set it to Immediately Expire superseded updates leave classifications as it is, we'll come back to this later leave Products as it is, we'll come back to this later (after a sync...) and leave only English selected in Languages now that the SUP role questions are out of the way, for the FSP leave it as it is click next, next and review the successful completion That's it !


-
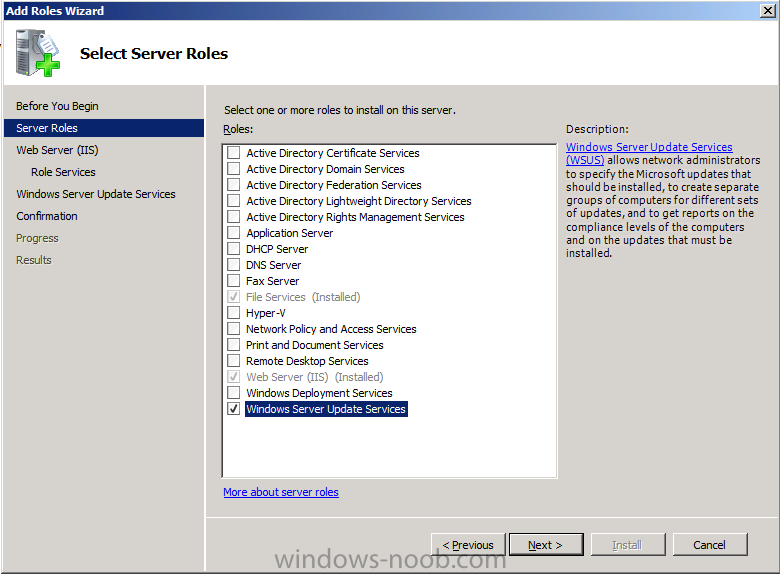
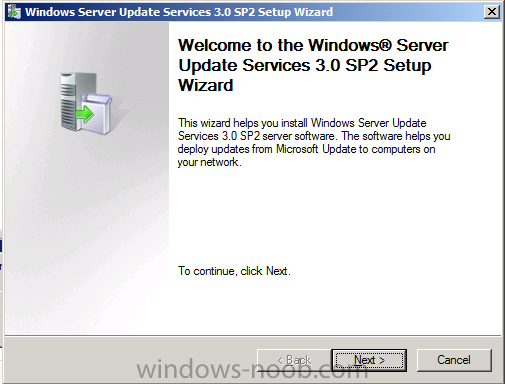
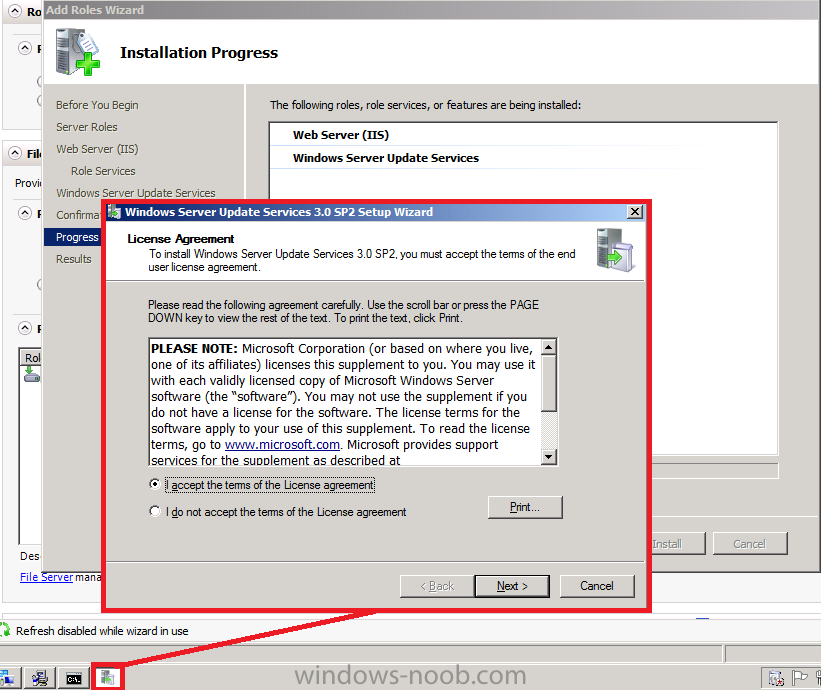
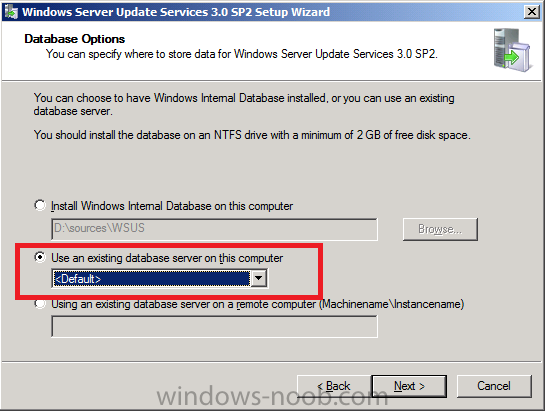
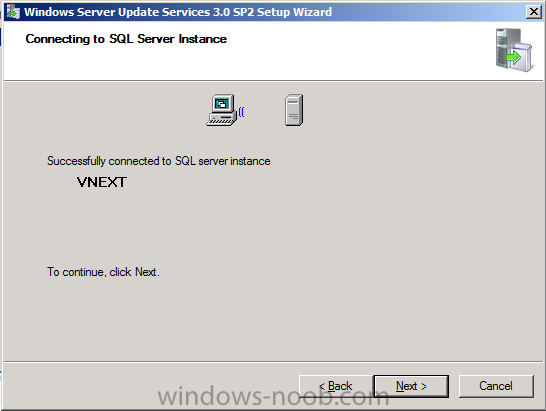
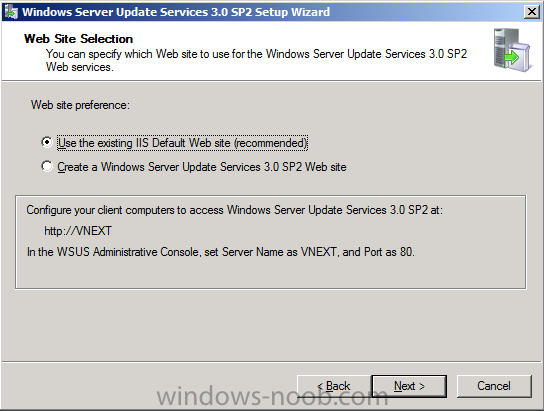
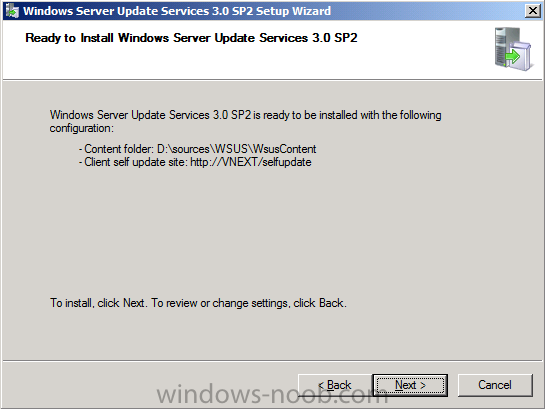
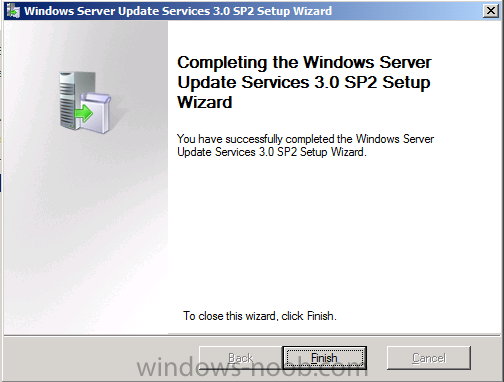
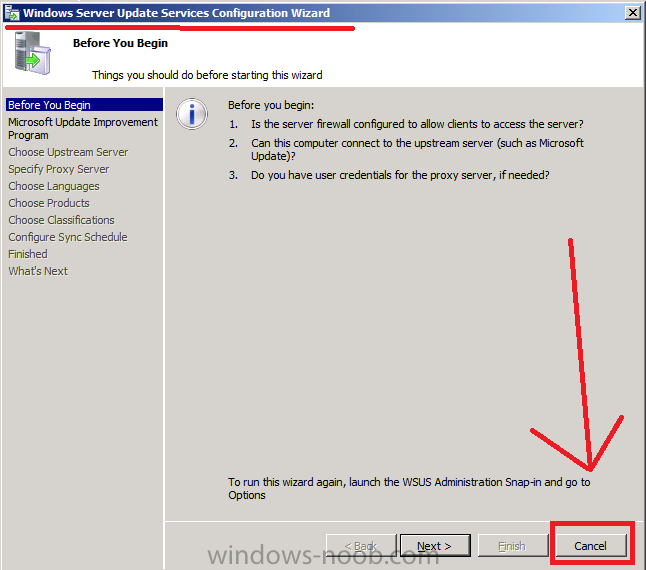
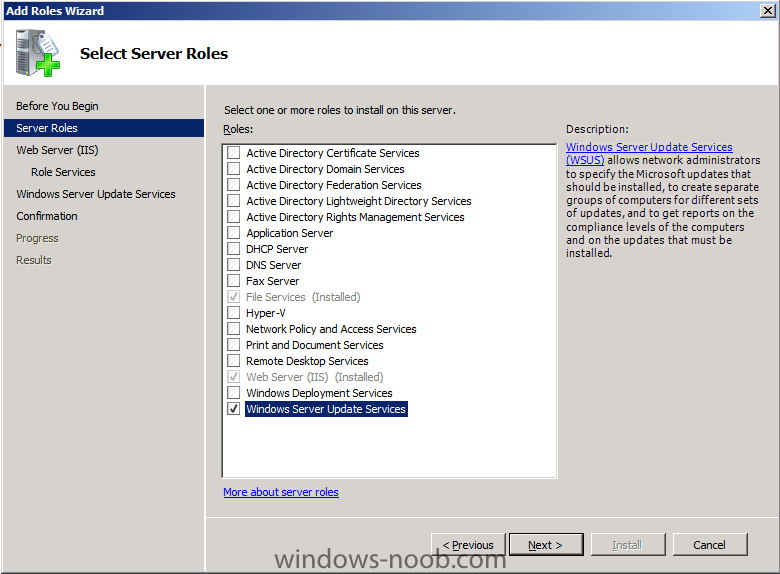
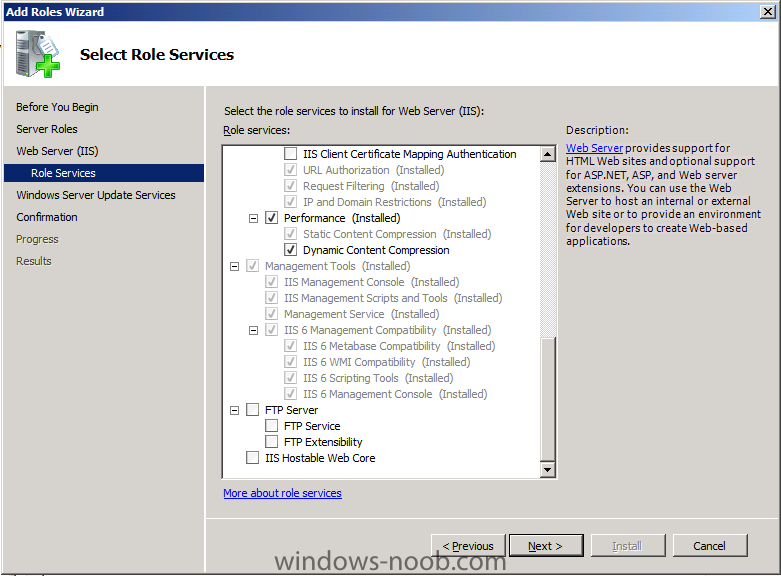
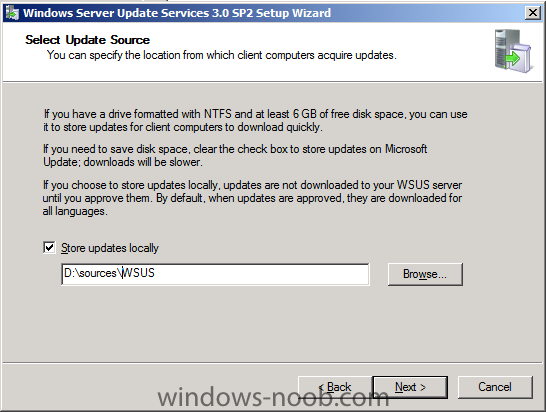
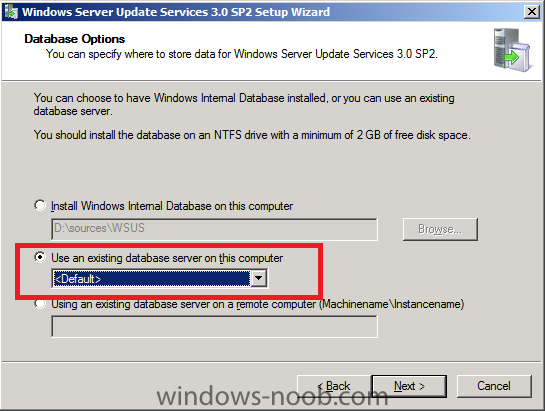
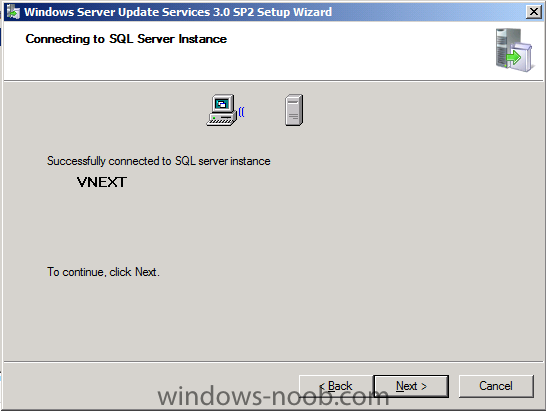
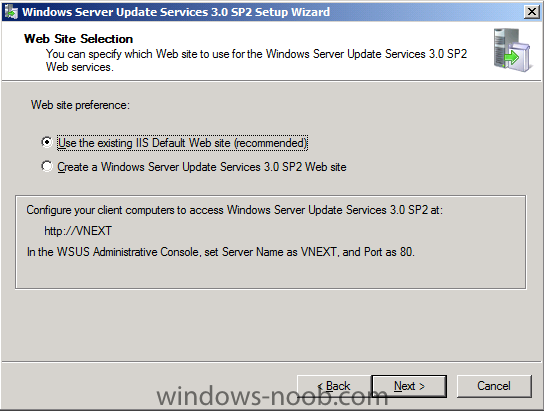
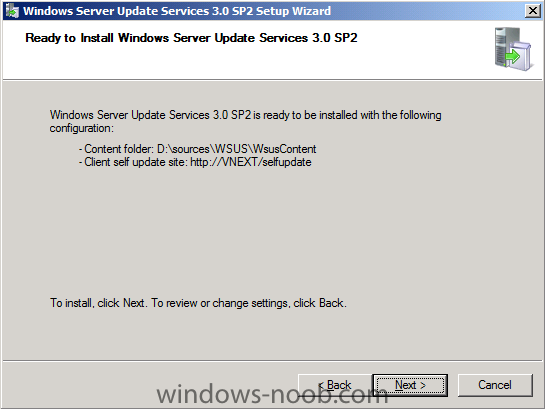
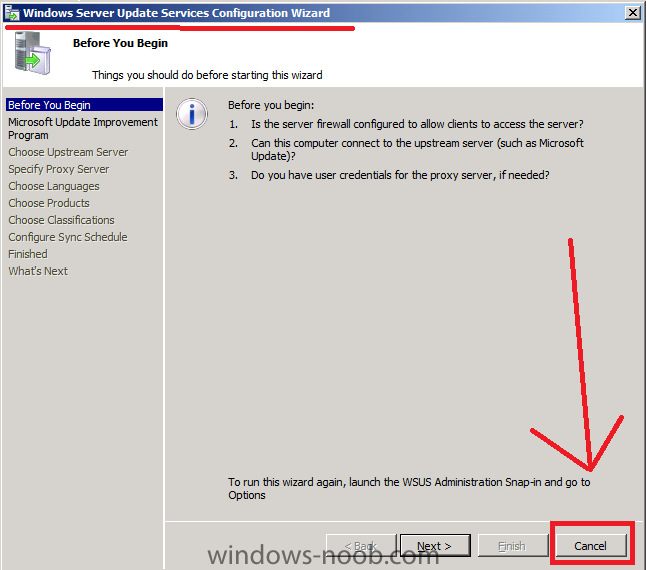
In Part 1. of this series we Installed vNext, in Part 2 we started to configure it. In Part 3, we configed Beta 2 some more by enabling Active Directory discovery methods, adding some site system roles, configuring the computer client agent and client push settings and finally doing a manual client installation to verify it all worked, in Part 4 we looked at installing an application using Application Management and the Software Catalog and Software Center features of SCCM 2012. Our next task is to add WSUS and then add some additional roles which we'll use later on in this series (Windows Updates and Data Migration in OSD). Perform the following on the vNext server as SMSadmin Step 1. Add the WSUS role We'll need the WSUS role installed as part of the Software Update Point role installation in the next step, so start Server Manager and click on Roles, Add Roles. Select Windows Server Update Services and a window will pop up asking to add role services required for Windows Server Update Services (IIS Dynamic Content compression), click Add Required Role Services click next through the wizard, you'll see the Select Role Services window appear, click next again at the confirmation click Install, the WSUS role will be downloaded and if you are on 3G like me that'll take a bit of time, so take a break and have a cup of coffee after a while you'll see the Welcome to Windows Server Update Services 3.0 SP2 setup wizard appear click next To install WSUS SP2 you must accept the terms of the EULA, which are probably hidden behind the active windows, so in your system tray find it and click on it to show the EULA otherwise you'll be twiddling your thumbs for a long time wondering whats going on... click accept and then choose where to store the updates locally, I selected D:\sources\WSUS for database options choose Use an existing database server on this computer, click next it will connect to your VNEXT sql server instance, click next accept the Use an existing Default website at the ready to install WSUS, click next click Finish when done. and close the Roles Wizard followed by Cancel you must cancel the Windows Server Update Services Configuration Wizard


- 1 reply
-
- 1
-

-
The software giant will unveil the SDK at the company’s Worldwide Partner Conference in Los Angeles next week. Microsoft’s latest Surface SDK will now run on WPF 4.0, XNA 4.0 and Windows 7. Surface developers will now be able to target physical Surface hardware and Windows 7 touch PCs with a single SDK. The Microsoft Surface team call this “write once – touch anywhere” and it may explain the company’s plans for Windows 8. Developers will be able to query the hardware capabilities of each device and design their applications accordingly. “We added a few APIs for you to query the capabilities of the hardware (maximum number of touches recognized by the hardware, whether the hardware can actually distinguish touches caused by fingers versus other touches, tag recognition support, tilt support, etc.),” explained Microsoft Surface team member Luis Cabrera in a blog post on Thursday. Microsoft’s Surface 2.0 SDK has been in private beta “for a few months” with some external partners according to the company. Cabrera briefly mentions that the company’s new visual style for Microsoft Surface is Metro design inspired. “It is consistent with other Microsoft Products such as Zune and Windows Phone,” says Cabrera. “The style is clean, simple yet elegant. Our goal was to create a visual style that would put Content first, a visual style that functional and was not distracting.” The same design is being adopted for Microsoft’s Windows 8 Start Screen, the replacement to the company’s long standing Start Menu. Judging by the fact Microsoft is positioning the Surface 2.0 SDK as a Windows Touch and Surface hardware combination, it should provide vital clues as to how developers can target Windows 8 touch tablets. Microsoft is also expected to further detail Windows 8 at its partner conference next week. The Surface 2.0 SDK timing lends weight to rumors that the company may release an early developer build of Windows 8 or detail some additional features of Windows 8. The Surface 2.0 SDK will be made available on July 12 at the company’s Surface Design and Development Center on MSDN.

-
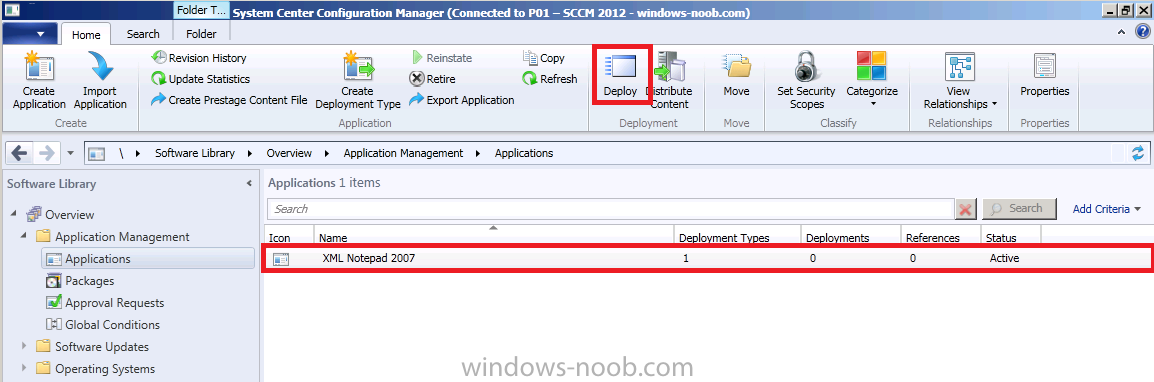
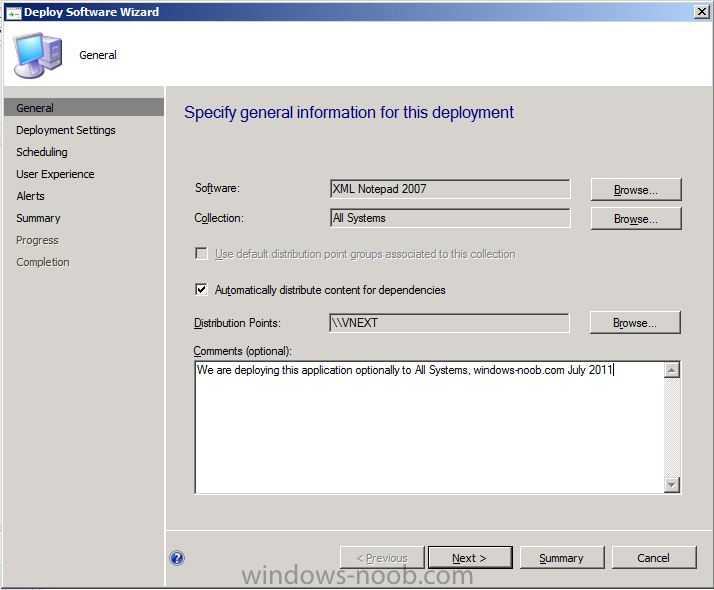
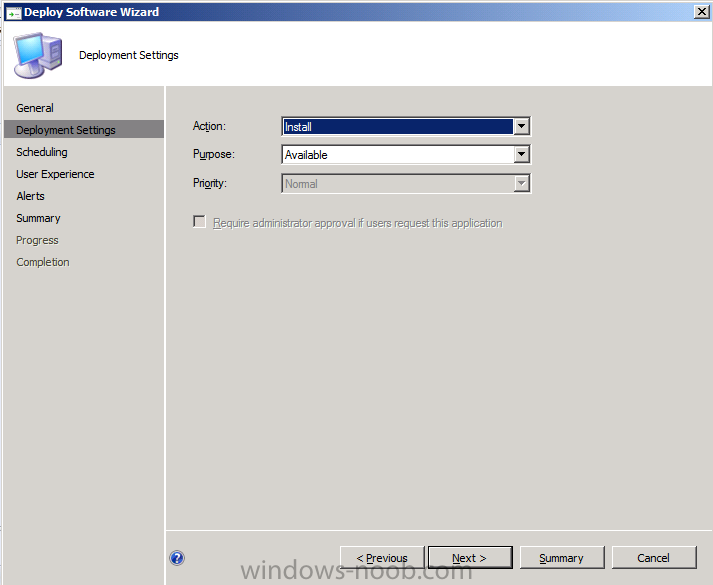
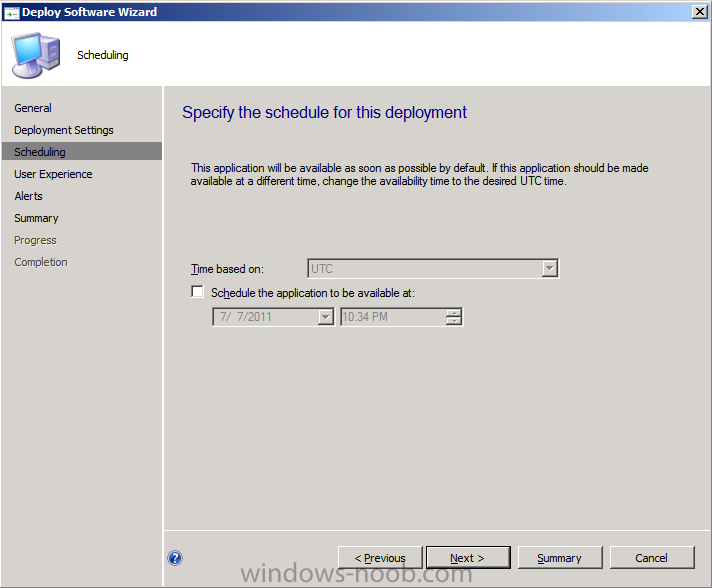
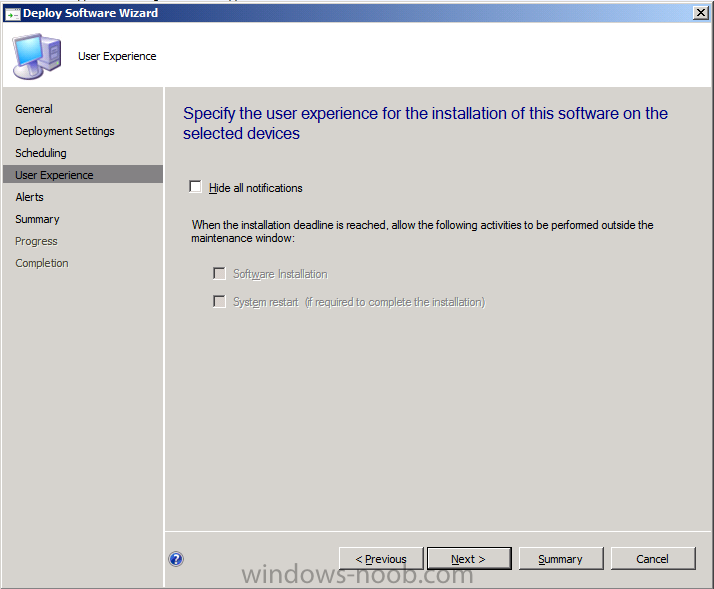
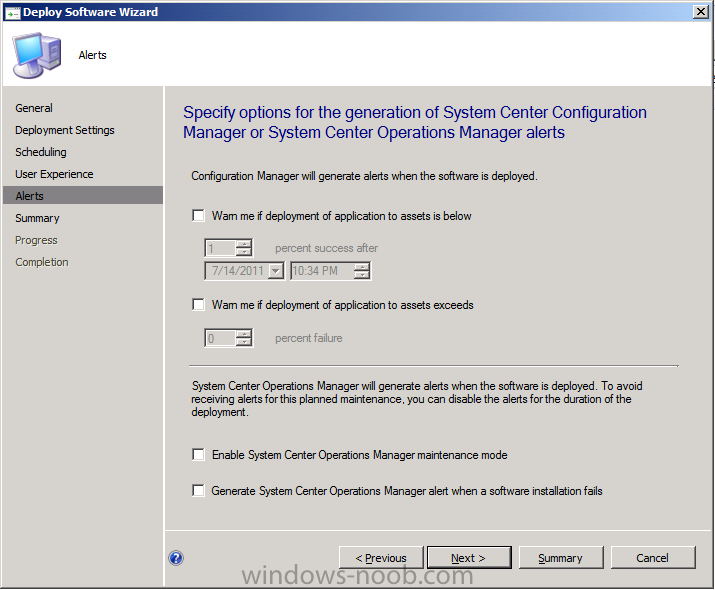
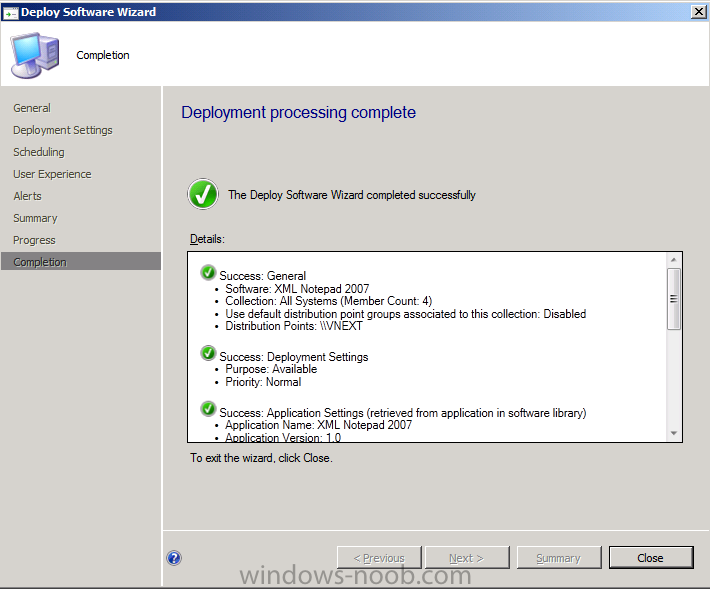
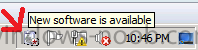
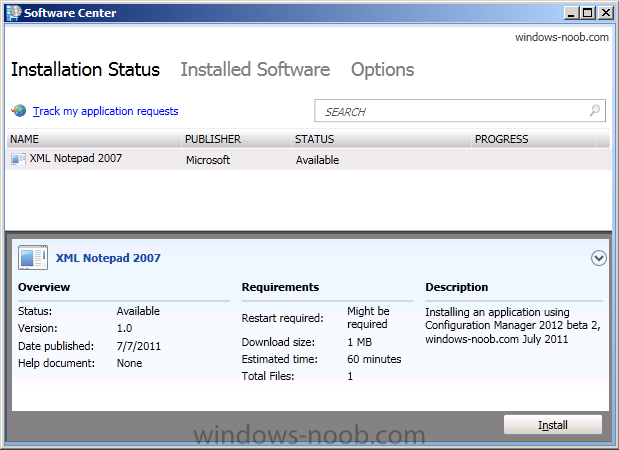
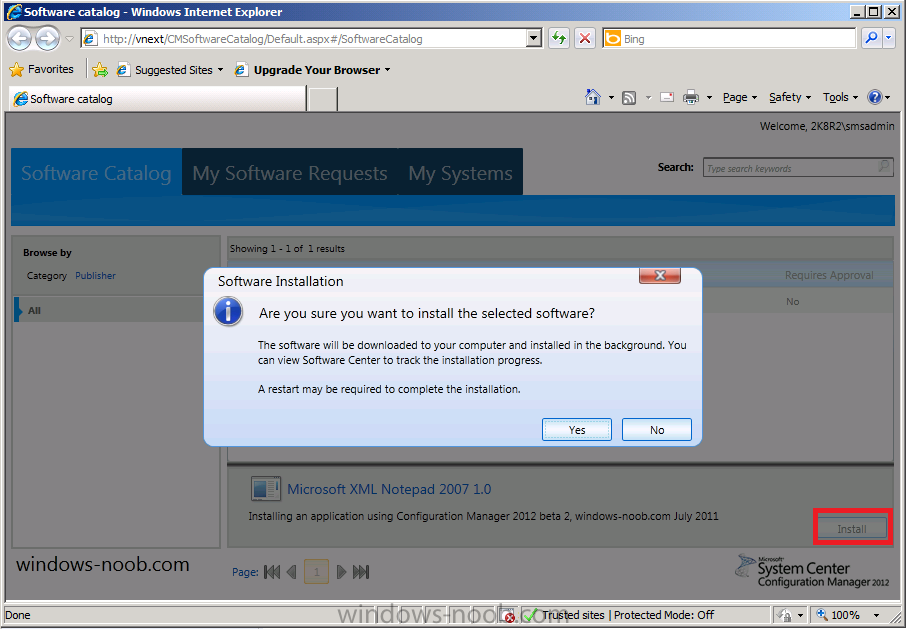
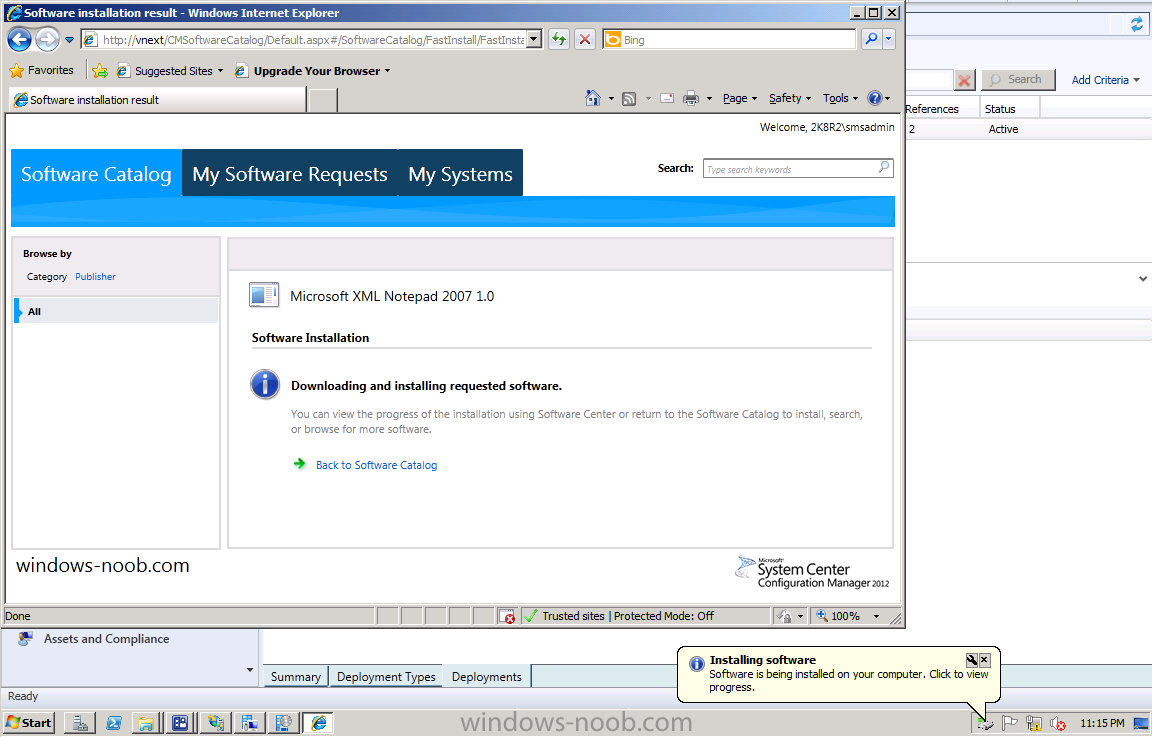
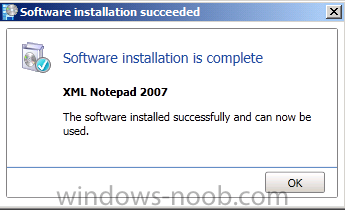
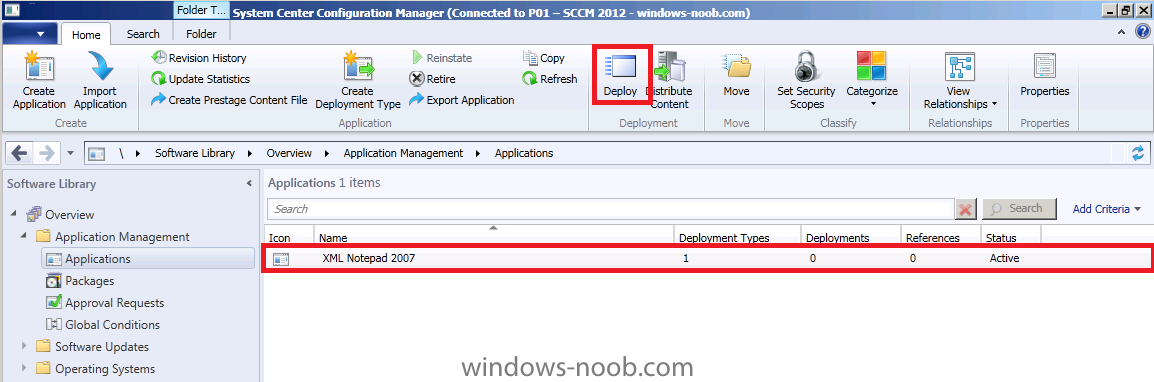
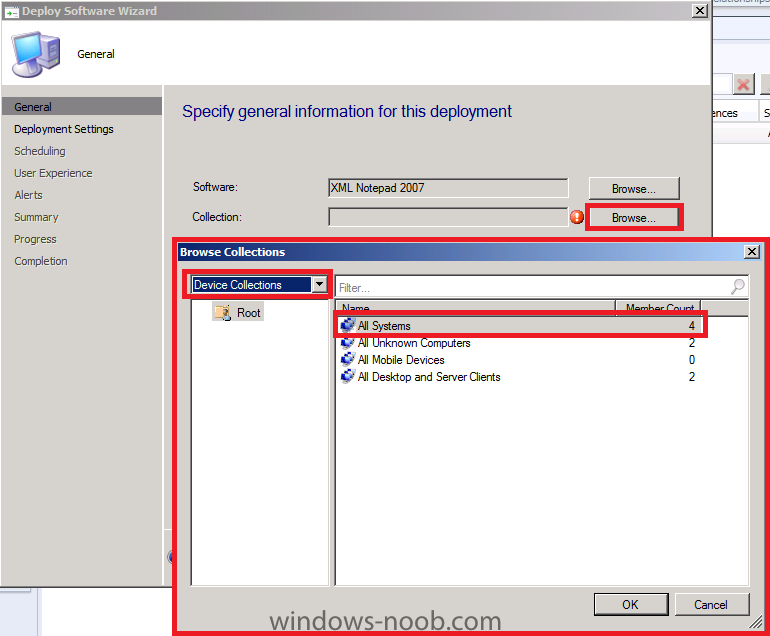
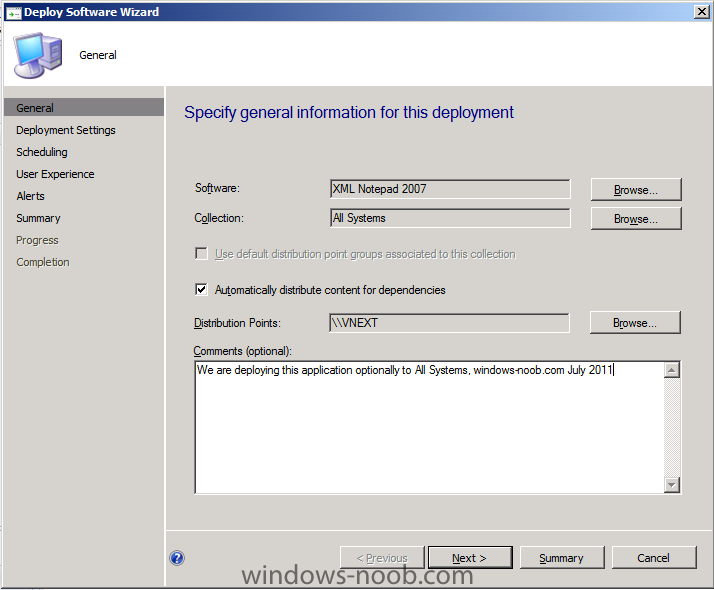
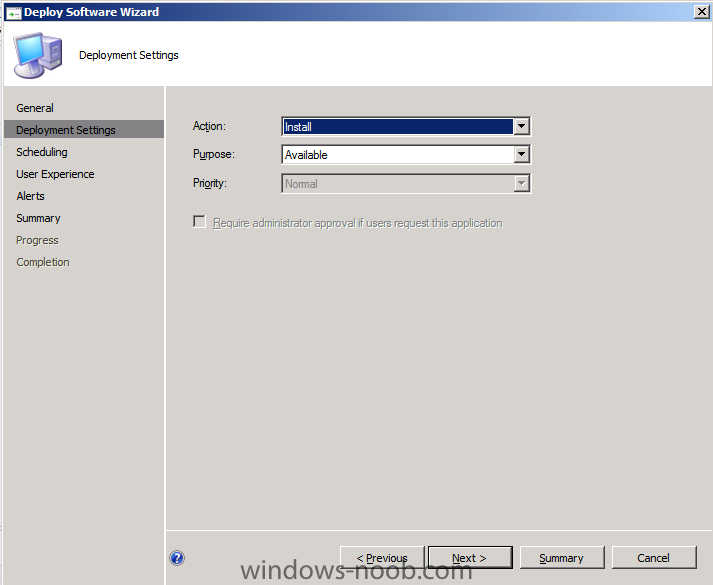
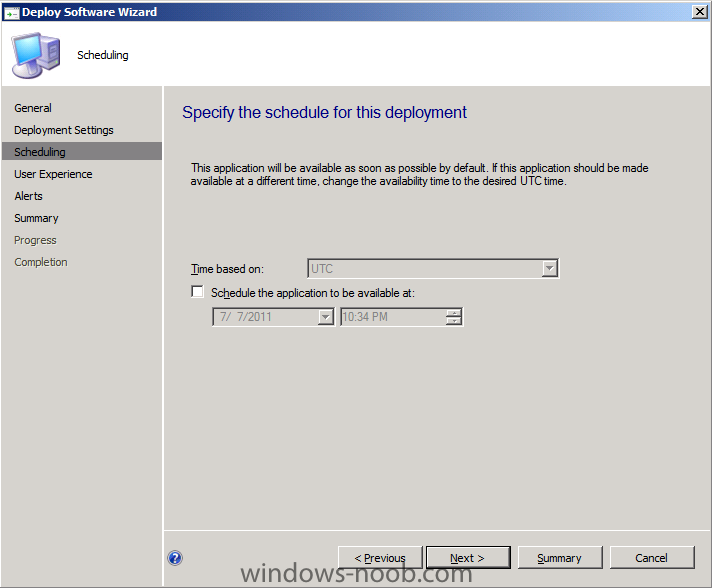
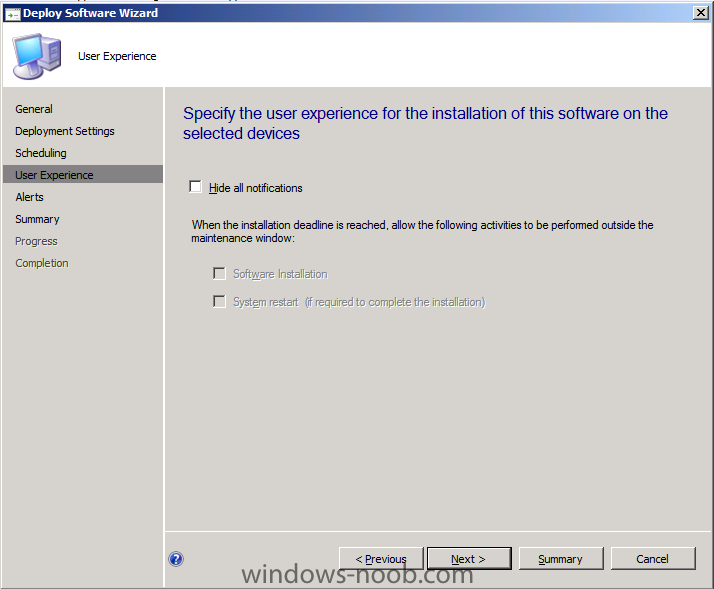
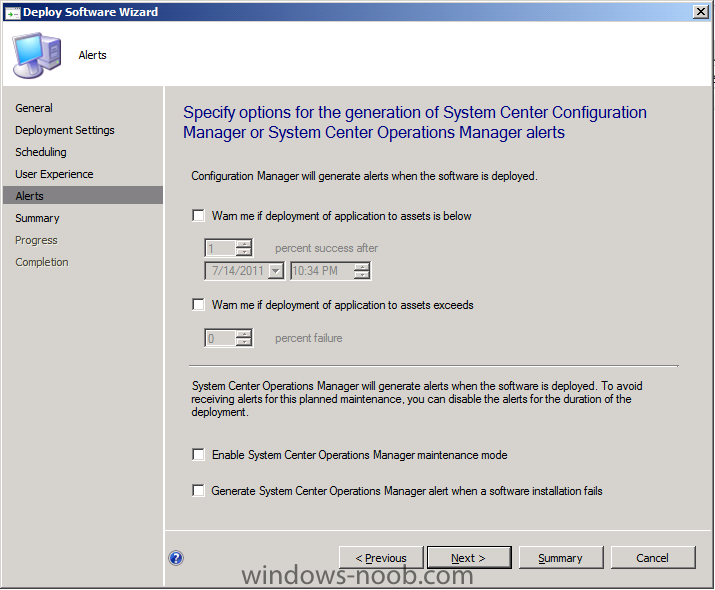
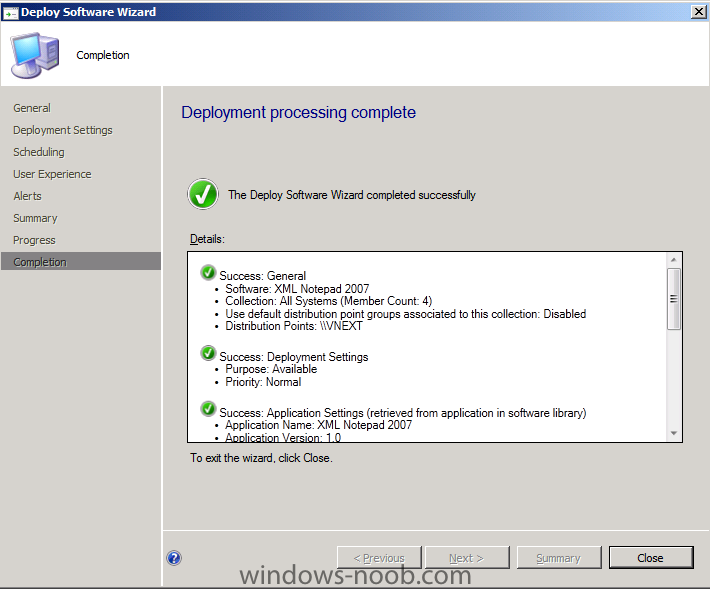
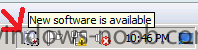
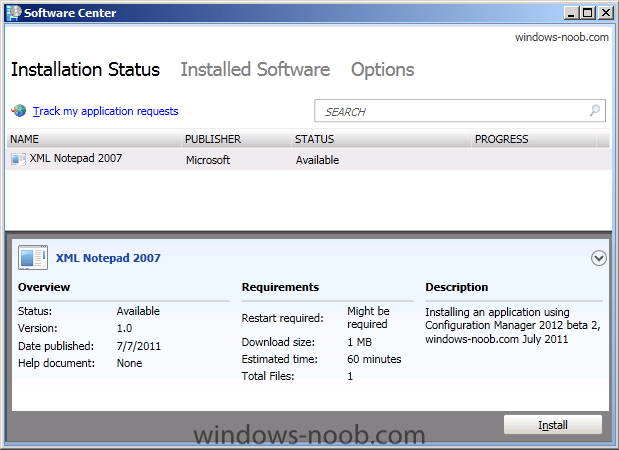
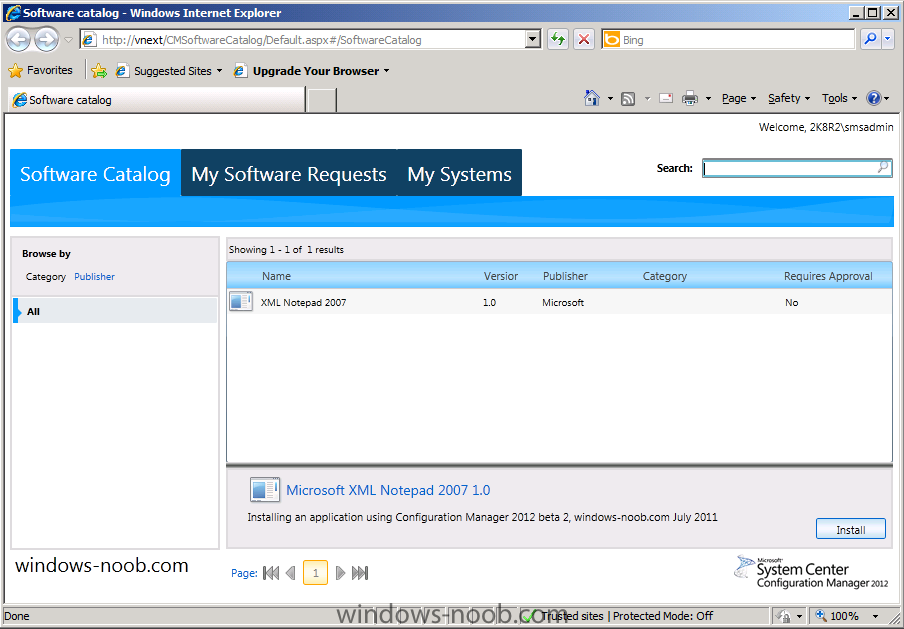
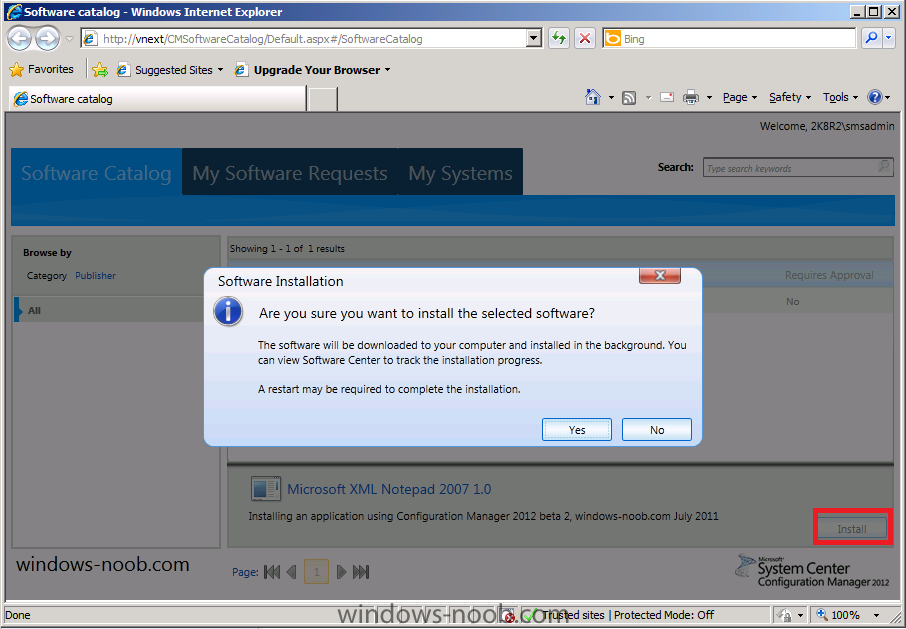
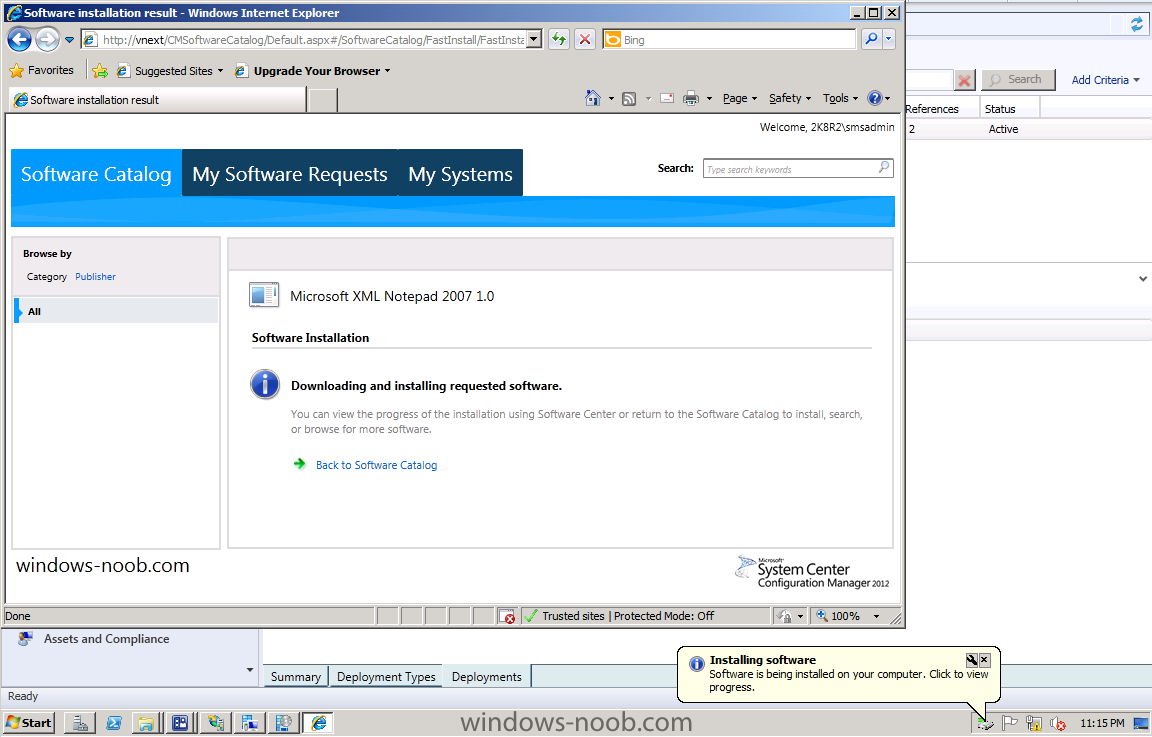
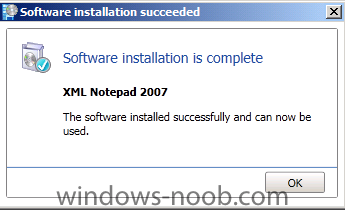
Step 3 Deploy your application Select your application and in the ribbon, click on Deploy when the wizard appears click on browse beside Collection, and choose Device Collections and then All Systems Note: We are doing this to show what works (in relation to applications showing up in the Software Catalog), and what doesn't. click ok and then click next (notice our distribution point we added above is listed) leave the Deployment Settings as they are (we want it to be optional so Available is the choice we need) leave all the remaining screens as they are (next), below is scheduling the User Experience you can configure alerts based on failure or success review the summary then proceed to the completion screen, click close. after a while you should see a new icon appear in the system tray, notifying you of new software available double click on it and it will open the Software Center, if you want a nice summary of what the software center does (it replaces RAP, remember RAP ?) then look here (thanks Trevor) If you open the Software Catalog, you will not see your application as we targetted it to All Systems (device collections). So let's create a new deployment using our guide above, except on the first step, lets choose User Collections and All Users as the target, click next to proceed through the wizard.. Open the Software Catalog, and refresh the page, notice anything Click on Install to install the application the software installs... job done ! Congratulations, you've installed your first application using SCCM 2012 beta 2 and the Software Catalog.

-
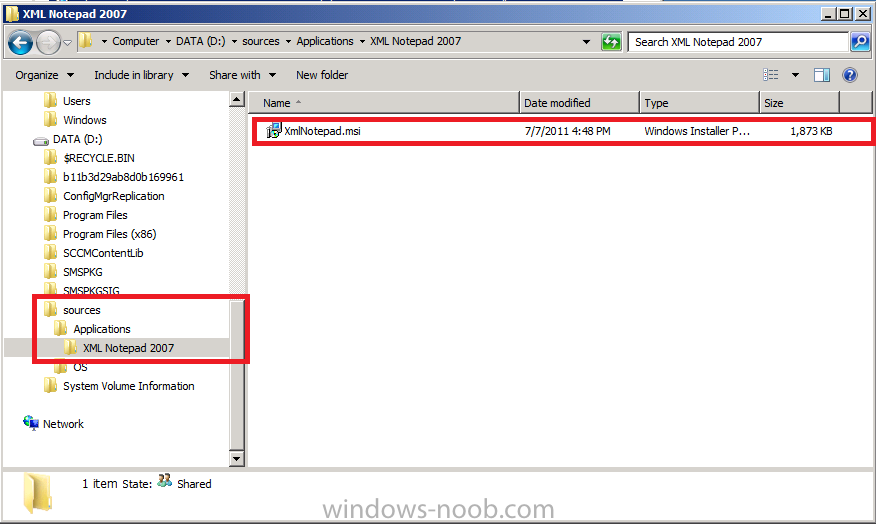
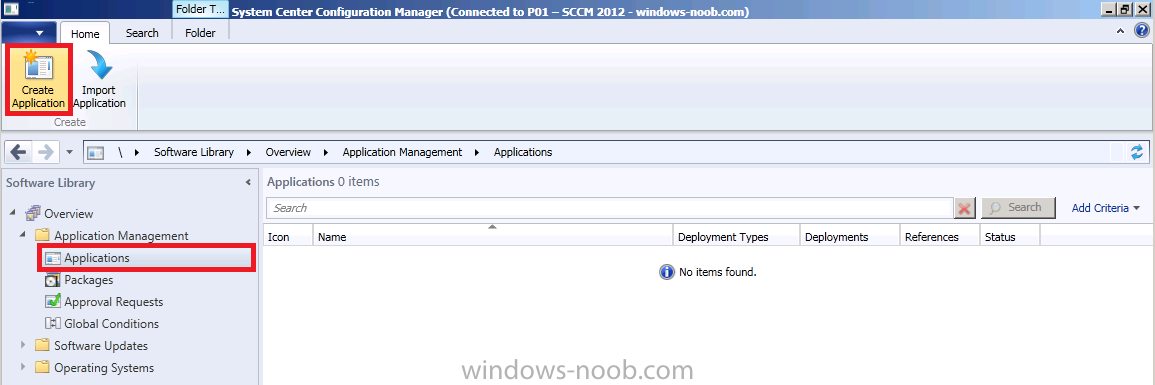
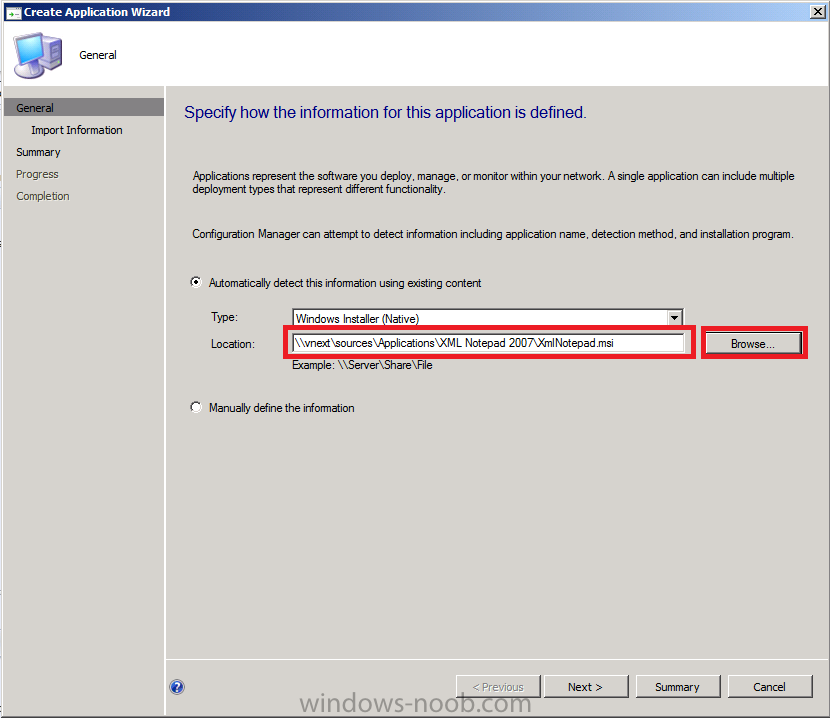
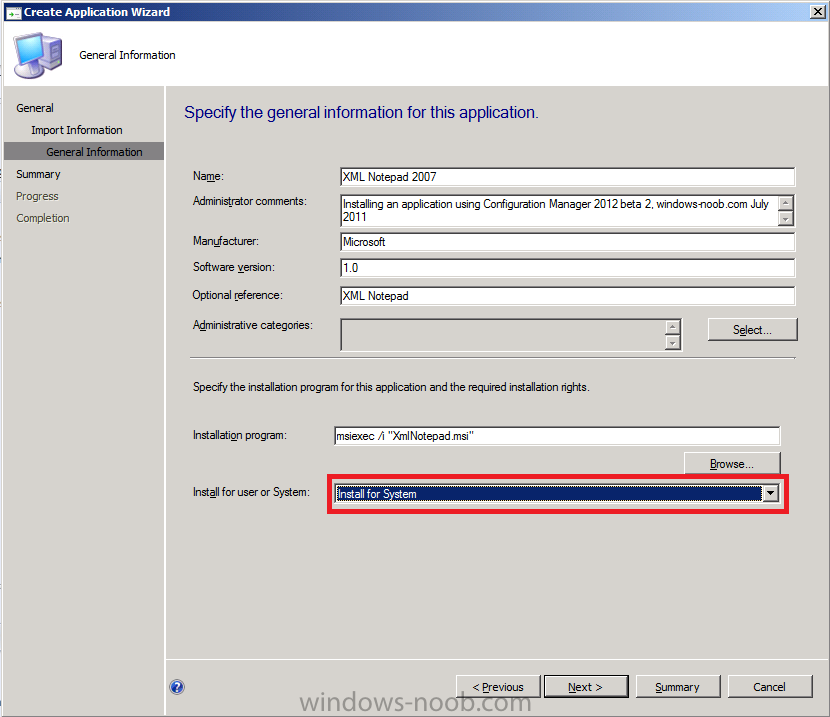
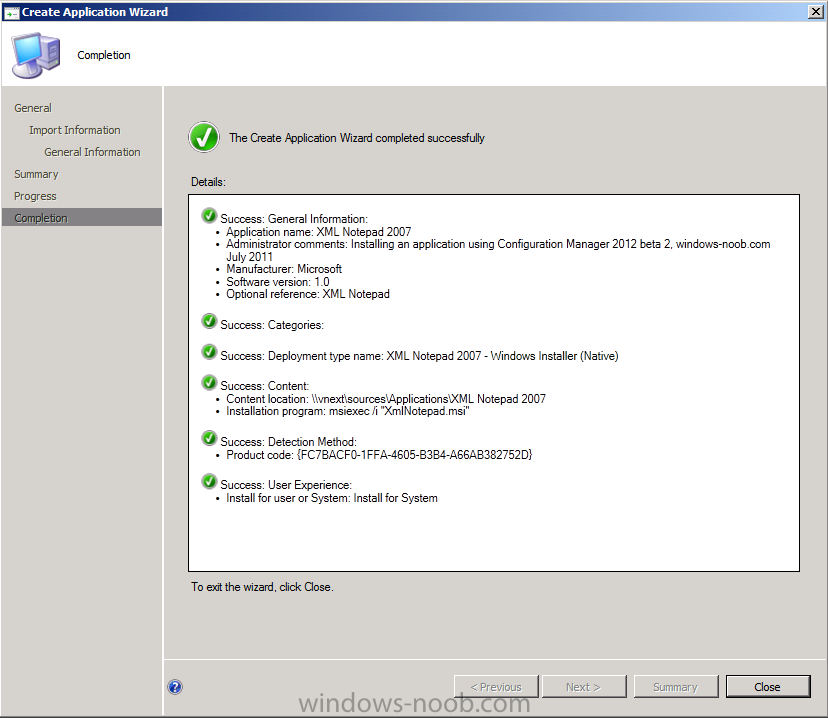
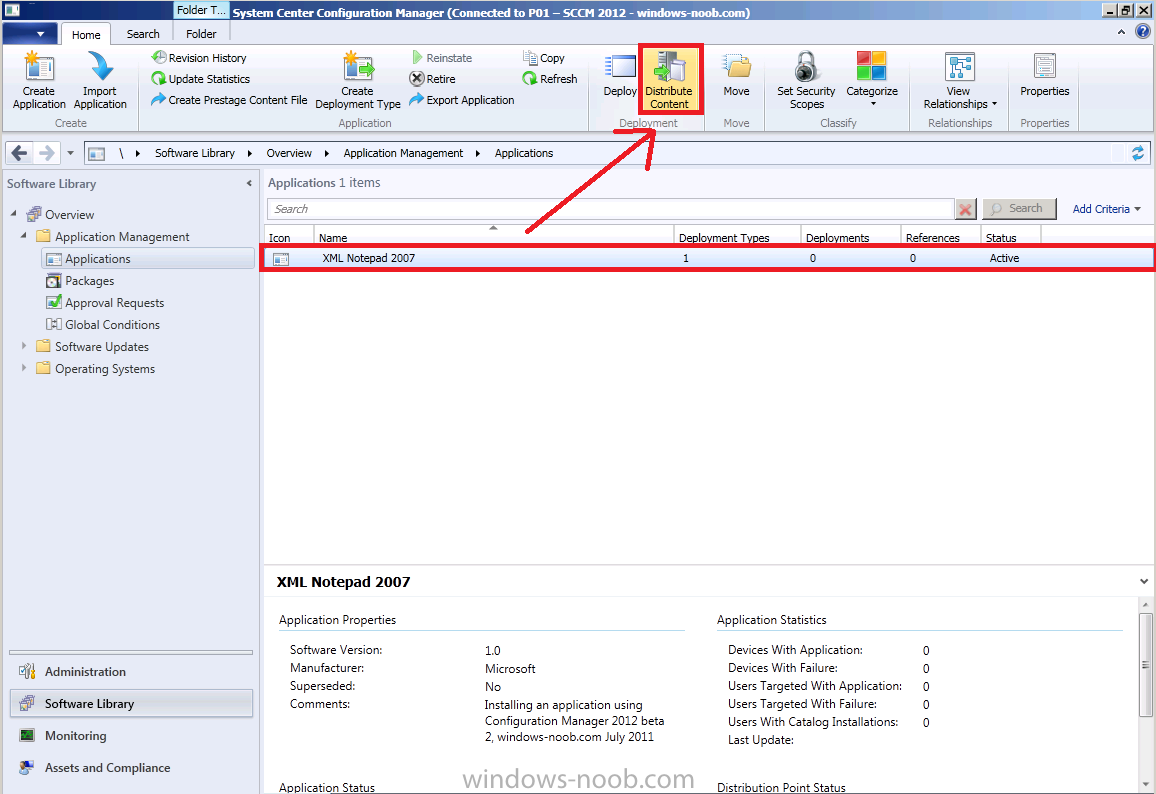
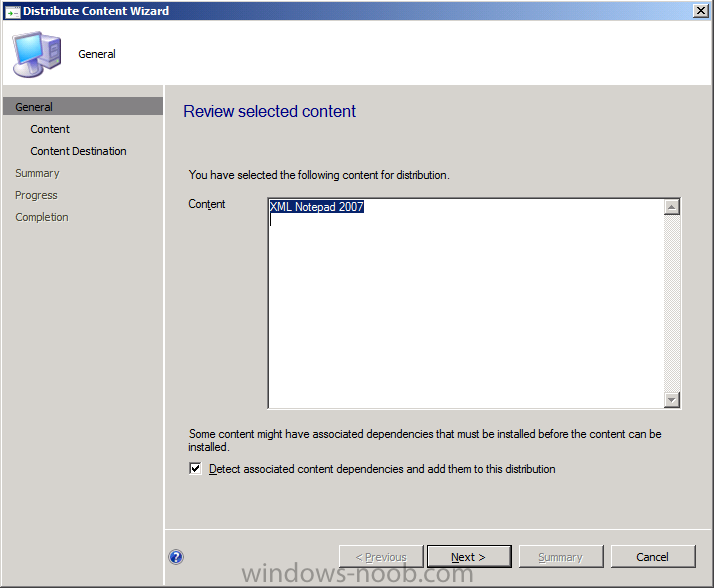
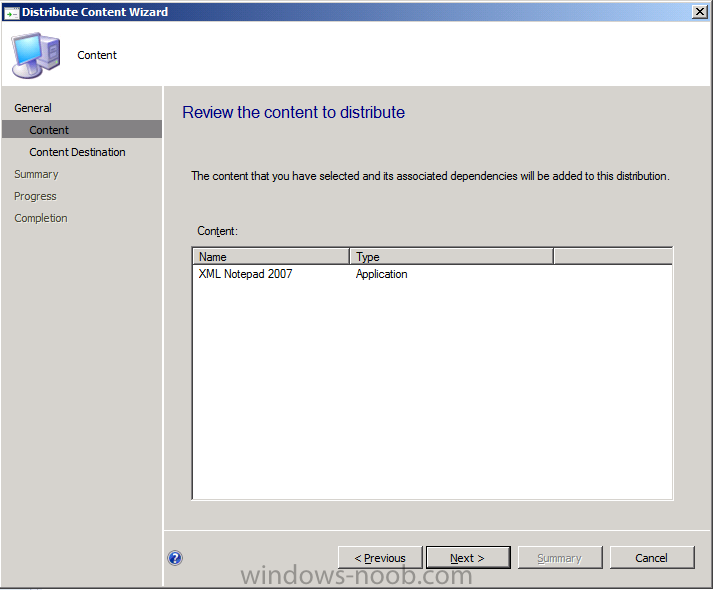
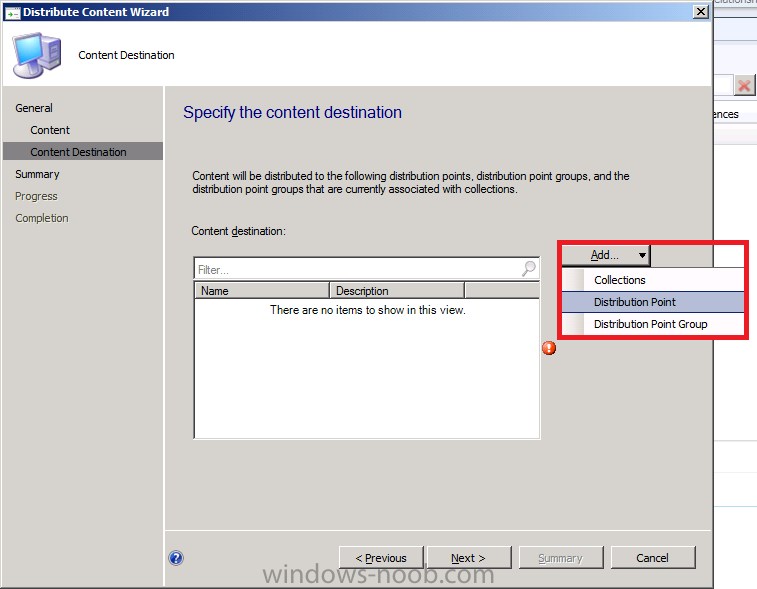
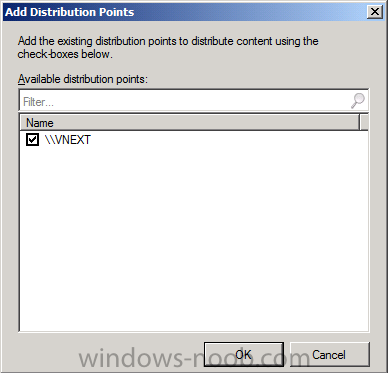
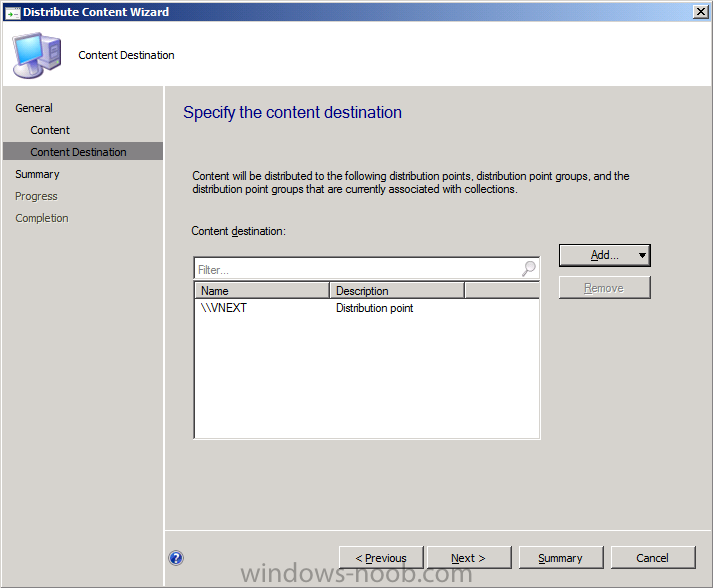
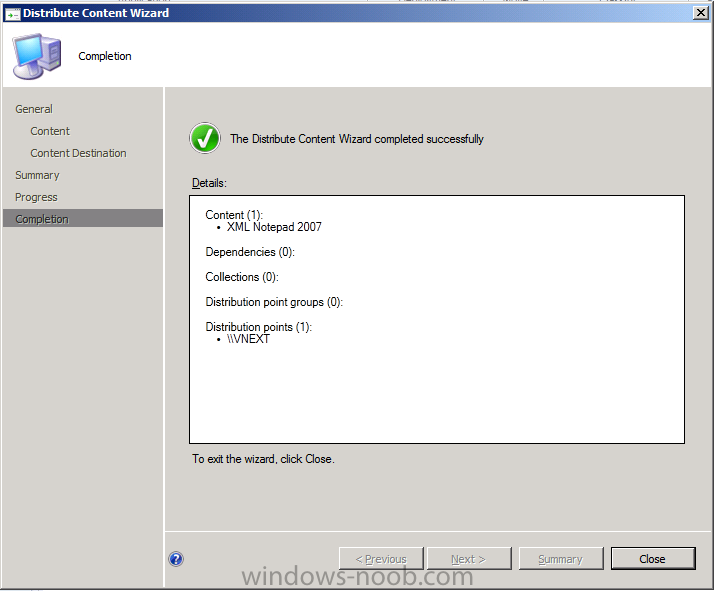
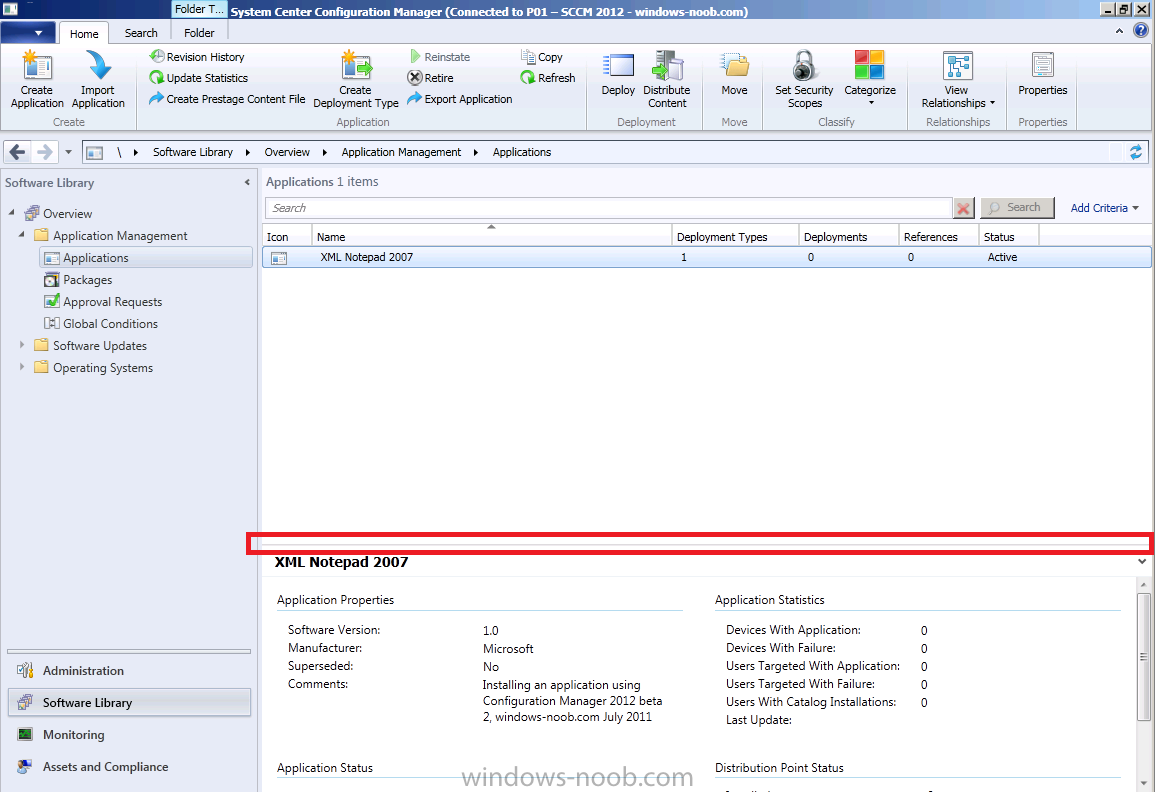
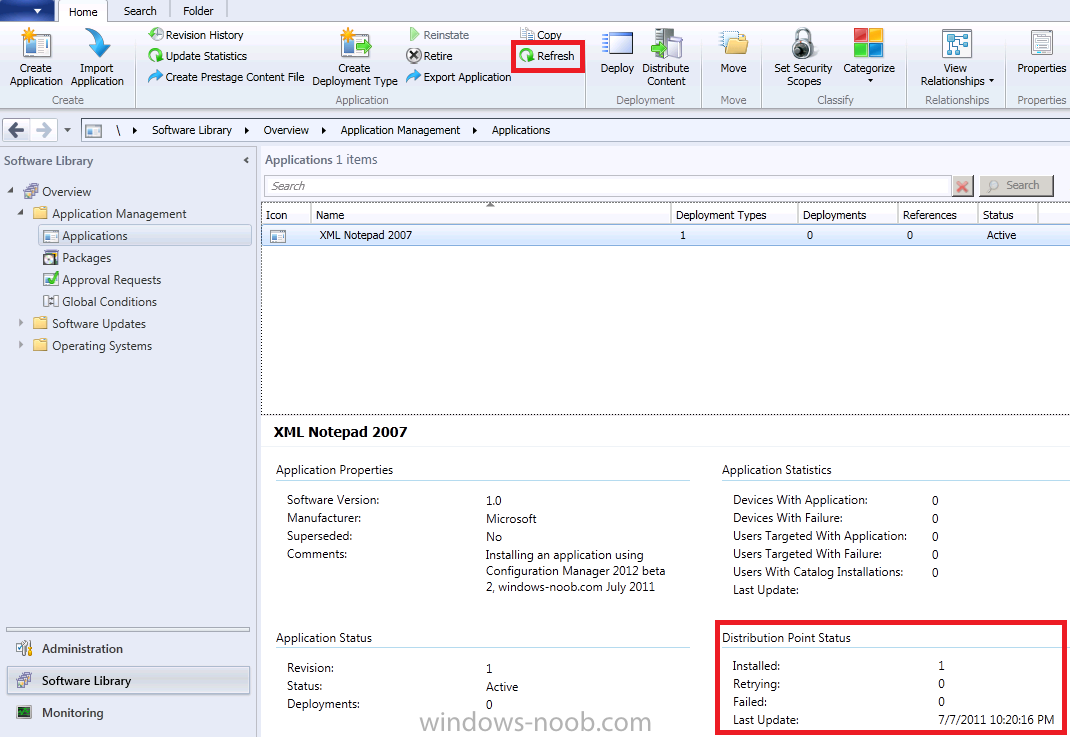
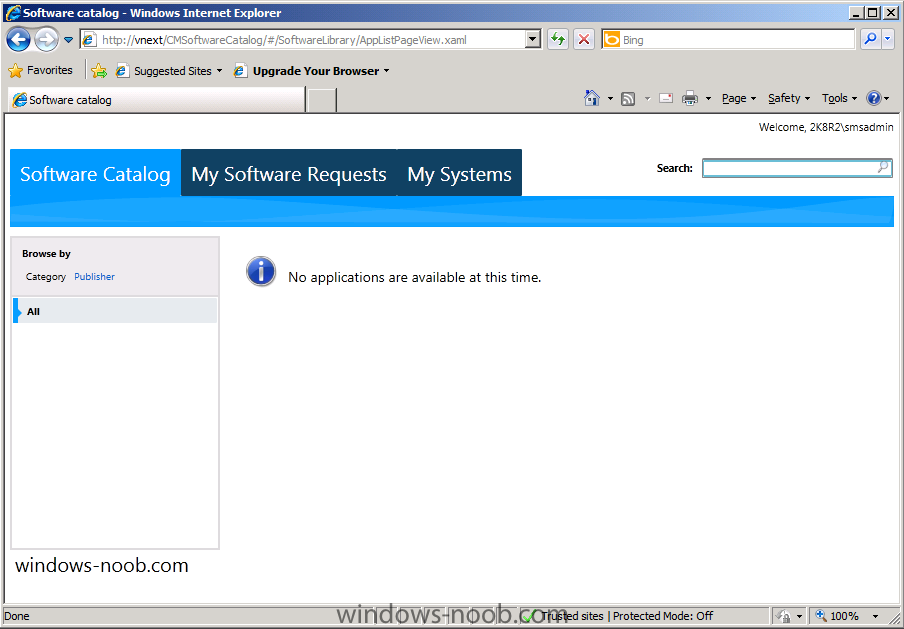
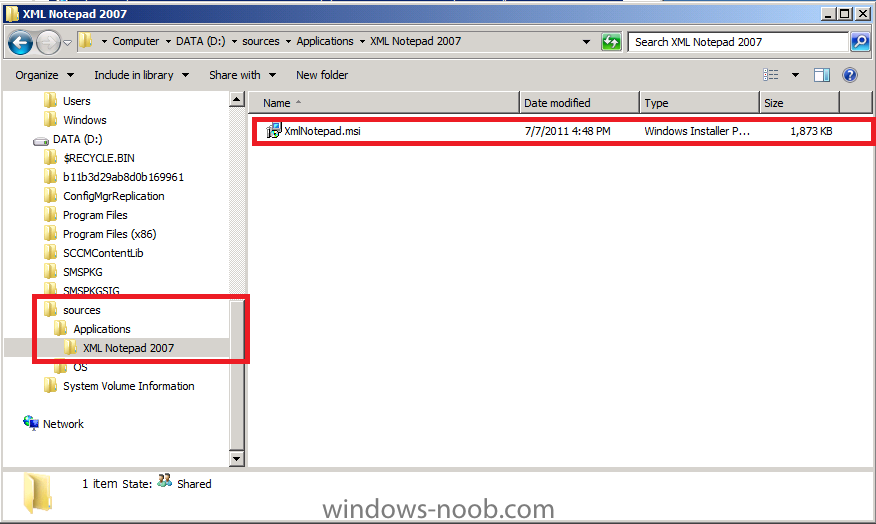
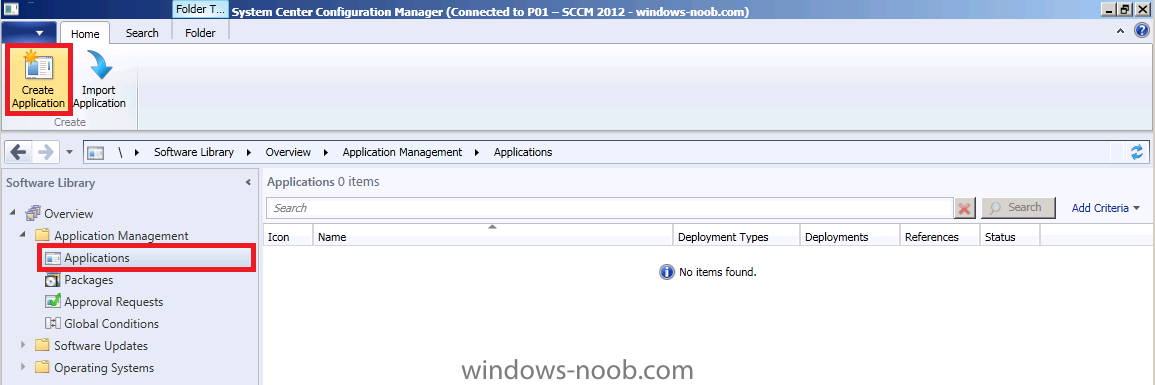
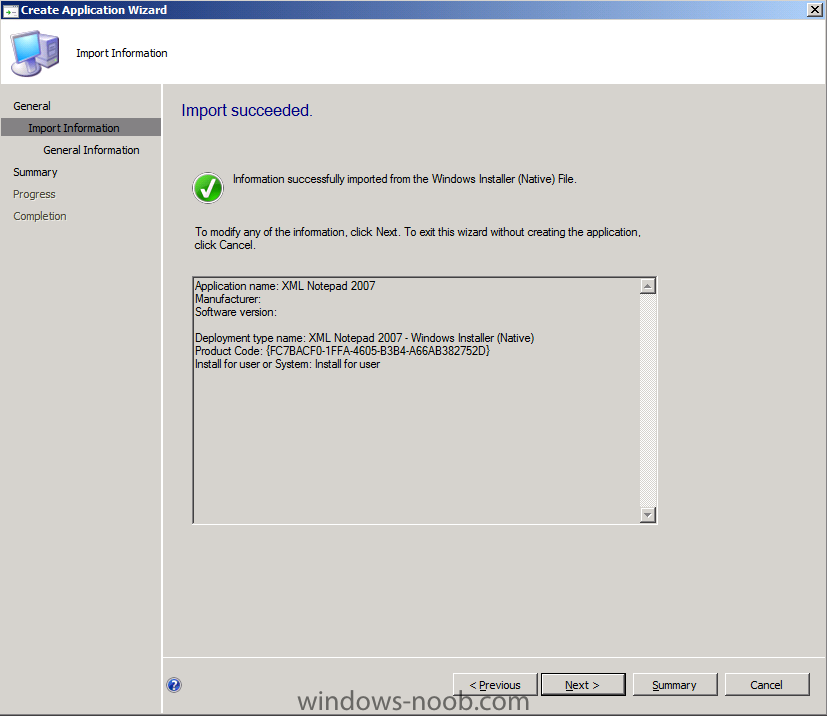
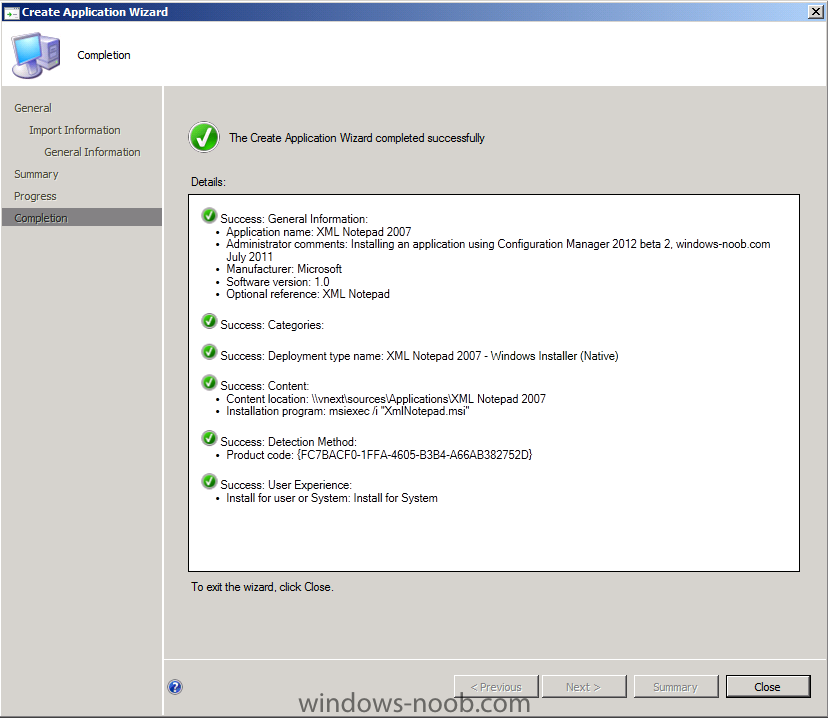
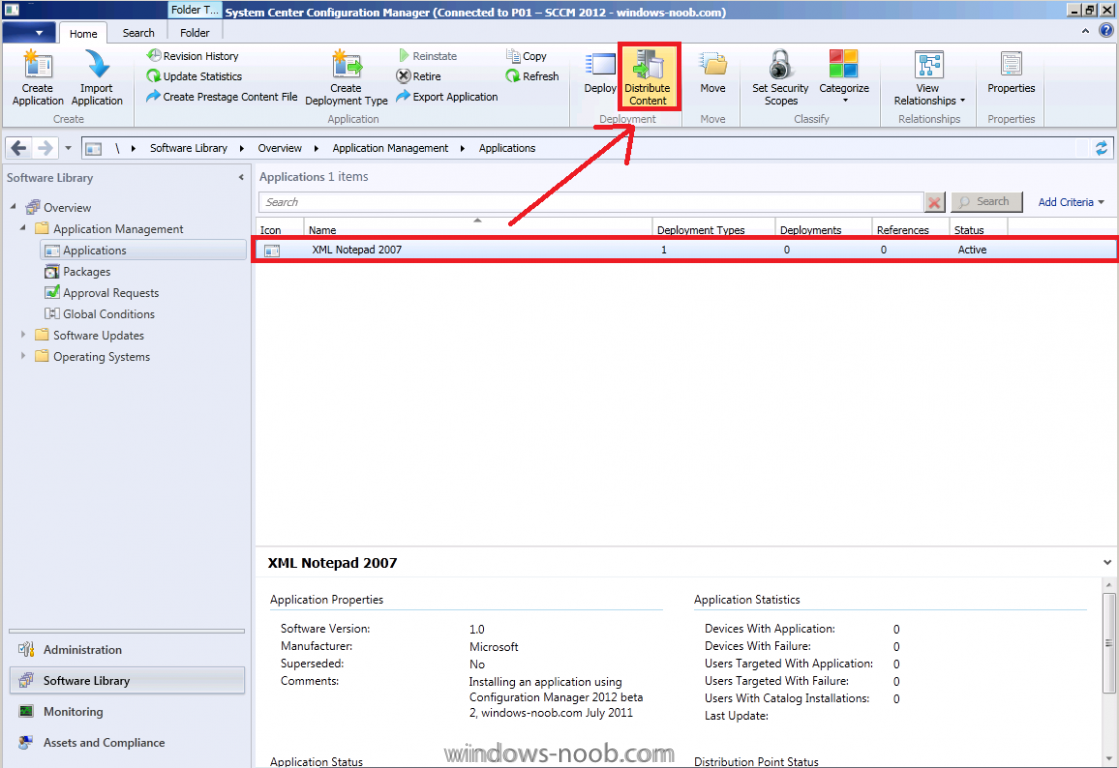
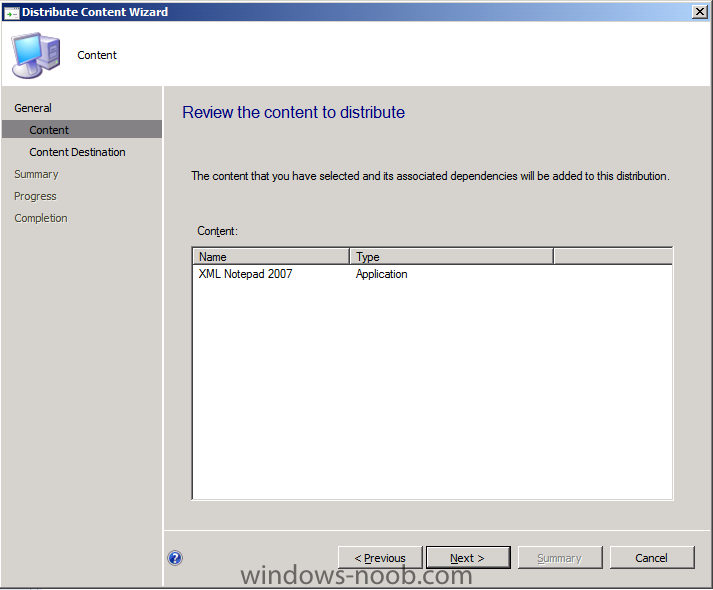
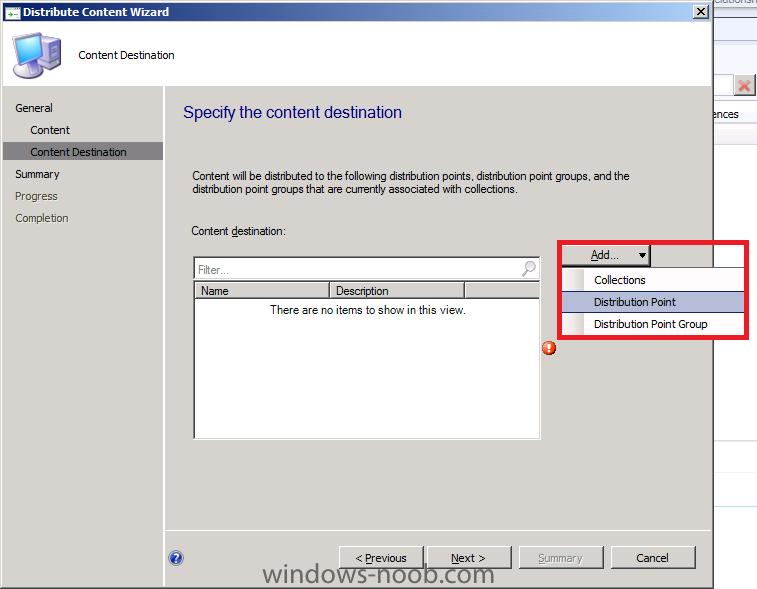
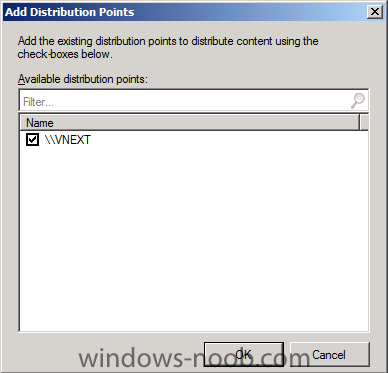
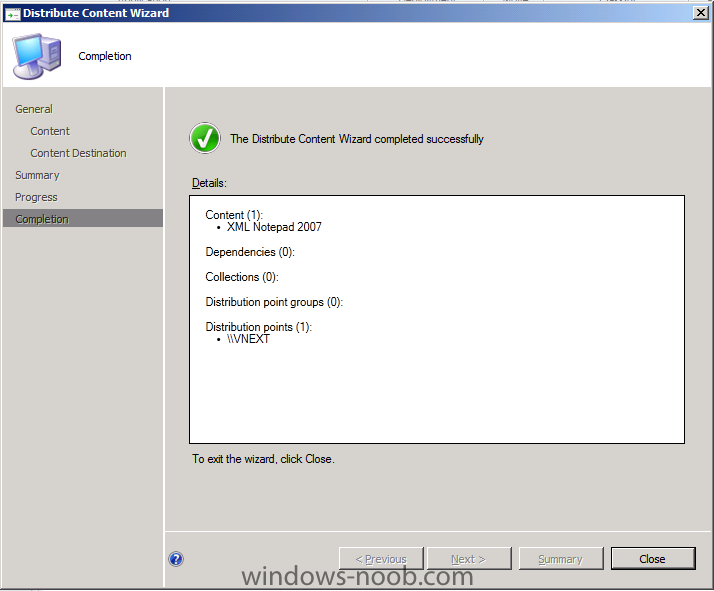
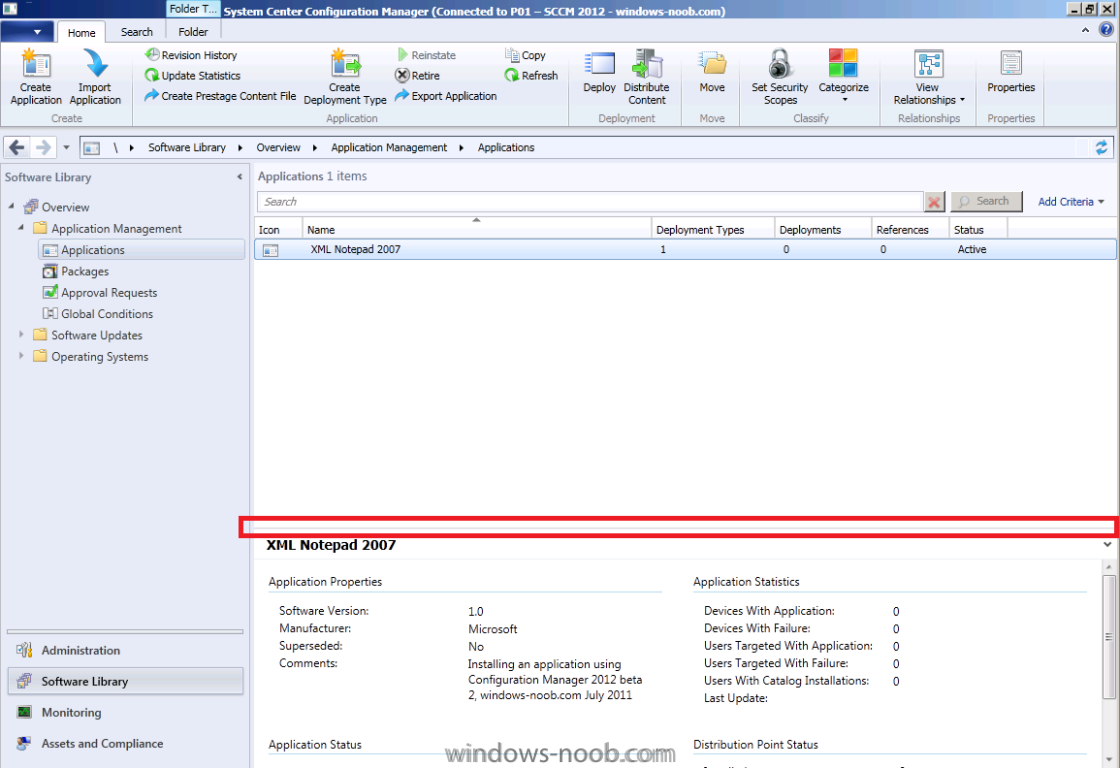
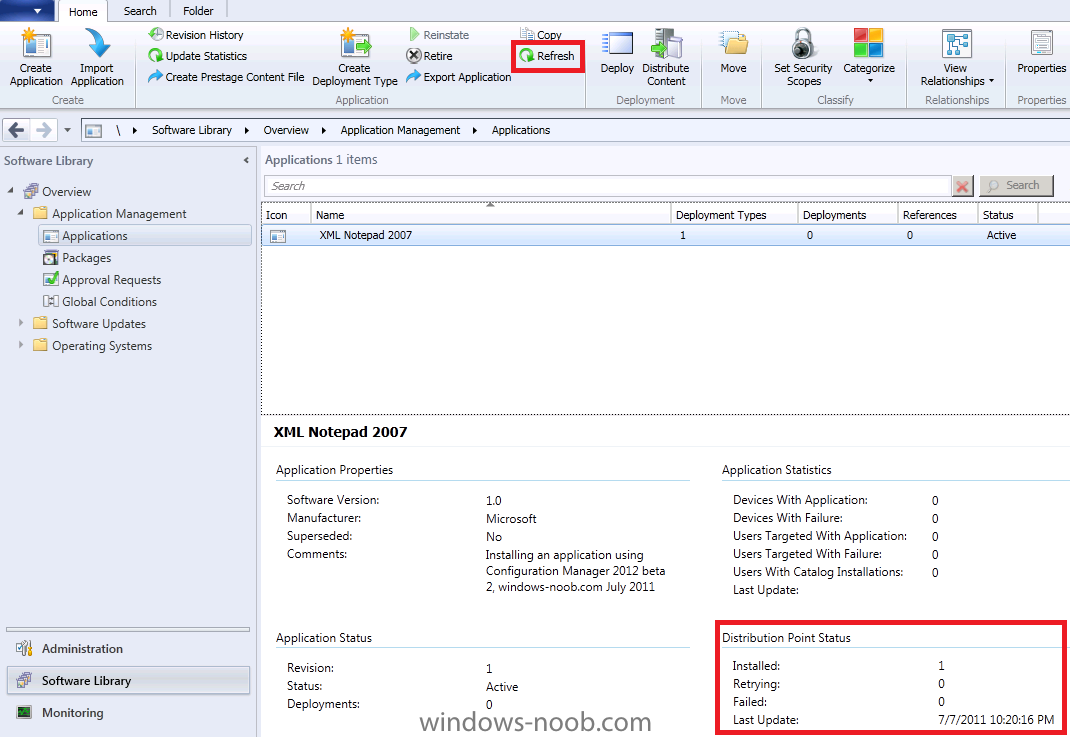
In Part 1. of this series we Installed vNext, in Part 2 we started to configure it. In Part 3, we configed Beta 2 some more by enabling Active Directory discovery methods, adding some site system roles, configuring the computer client agent and client push settings and finally doing a manual client installation to verify it all worked, now we will look at Application Installation and the Software Catalog and Software Center features of SCCM 2012. Application Management documentation is available already on Technet however not all the content is complete so some blank parts may appear - http://technet.micro...y/gg699373.aspx Heres a summary (from Technet) of whats new in Application Management in ConfigMgr 2012. Applications are new in Configuration Manager 2012 and have the following characteristics: Applications contain the files and information necessary to deploy a software package to a computer or a mobile device. Applications contain multiple deployment types that contain the files and commands necessary to install the software. For example, an application could contain deployment types for a local installation of a software package, a virtual application package or a version of the application for mobile devices. Requirement rules define conditions that specify how an application is deployed to client devices. For example, you can specify that the application should not be installed if the destination computer has less than 2GB RAM or you could specify that a virtual application deployment type is installed when the destination computer is not the primary device of the user. Global conditions are similar to requirement rules but can be reused with any deployment type. User device affinity allows you to associate a user with specified devices. This allows you to deploy software to a user rather than a device. For example, you could deploy an application so that it only installs on the primary device of the user. On devices that are not the primary device of the user, you could deploy a virtual application that is removed when the user logs out. Deployments are used to distribute applications. A deployment can have an action which specifies whether to install or uninstall the application and a purpose which specifies whether the application must be installed or whether the user can choose to install it. Configuration Manager 2012 can use detection methods to determine if a deployment type has already been installed on a device by using product information, or a script. Application management supports the new monitoring features in Configuration Manager 2012. The status of an application deployment can be monitored directly in the Configuration Manager console. Packages and programs from Configuration Manager 2007 are supported in Configuration Manager 2012 and can use some of the new deployment and monitoring features. Software center is a new client interface that allows users to request and install applications, control some client functionality and to access the application catalog which contains details about all available applications. Planning for Application Management in Configuration Manager<p class="MTPS_CollapsibleRegion"> The following topics help you plan for application management in System Center 2012 Configuration Manager: Prerequisites for Application Management in Configuration Manager Best Practices for Application Management in Configuration Manager Administrator Checklists for Application Management in Configuration Manager Perform the following on the vNext server as SMSadmin We want to verify that our Software Catalog is showing correctly so on the vNext server, start Internet Explorer and browse to http://vnext/CMSoftwareCatalog replace vnext with your server name, you should see the following If it does not appear like so verify the address is the same as the one you configured in Step 4 of Part 3. As you can see the Software Catalog allows a user to browse available Applications (remember Applications, not Packages, Packages won't be listed here..) so lets get started with adding an application. Step 1. Adding an Application We will download a simple MSI application called XML Notepad 2007. Save the application in your package sources share (I have shared a root folder on D:\ called Sources with sub folders within, one is called Applications). Copy the downloaded XML Notepad 2007 MSI file to a subdirectory of your sources\applications share just like I have done in the screenshot below. Open the ConfigMgr console and browse to Software Library, click on Appliction Management and finally click on Applications. In the Ribbon (top left) click on Create Application, the create application wizard appears, browse to the UNC of where we copied our XML 2007 application and select the MSI file (\\vnext\sources\applications\xml notepad 2007\xmlnotepad.msi) click next, review the Import Information screen, click next the next screen needs some input, fill in some details to make it meaningful and change the drop down menu to Install for System (default is Install for User) Click next at the summary and next again to confirm, click close to exit the wizard Step 2. Distribute Content Now that we've created our first application, let's distribute it to our DP, click on our listed application and in the ribbon above, click on Distribute Content (you can right click the application and select the same option from the choices listed). The distribute content wizard appears, click next review the content to distribute and for the next screen click on the drop down menu for Content destination, select Distribution Point select our vnext DP and click ok click next review the summary and click next, then you'll see the completion page click close In the console, select the line above your application, click it and drag up so you can see more info about your application In Distribution Point Status, our application should be listed as installed, if not click on Refresh in the Ribbon above.


-
No Software shown in Software Catalog
anyweb replied to snoeber's topic in Configuration Manager 2012
if they are still not working, uninstall the roles, then reinstall the roles as in Step 4 here pay close attention to how you decide http versus https, which did you choose and if http did you manually choose port 80, if not, it will fail -
hi all, Microsoft have very generously donated two sets of MMS 2011 DVD's to be given away to two lucky windows-noob.com members, you've got until July 22nd, 2011 to come up with the following, Answer the following three questions and send your answer to competition@windows-noob.com, two winners will be drawn at random from the replies received and the first two correct entries will get the DVD's shipped to them, here are the questions 1. In What State in U.S.A is Microsoft's HeadQuarters ? 2. System Center Configuration Manager 2012 was formally known as ? 3. when were the www.windows-noob.com forums first online ? send your answers to competition@windows-noob.com good luck ! cheers niall
-
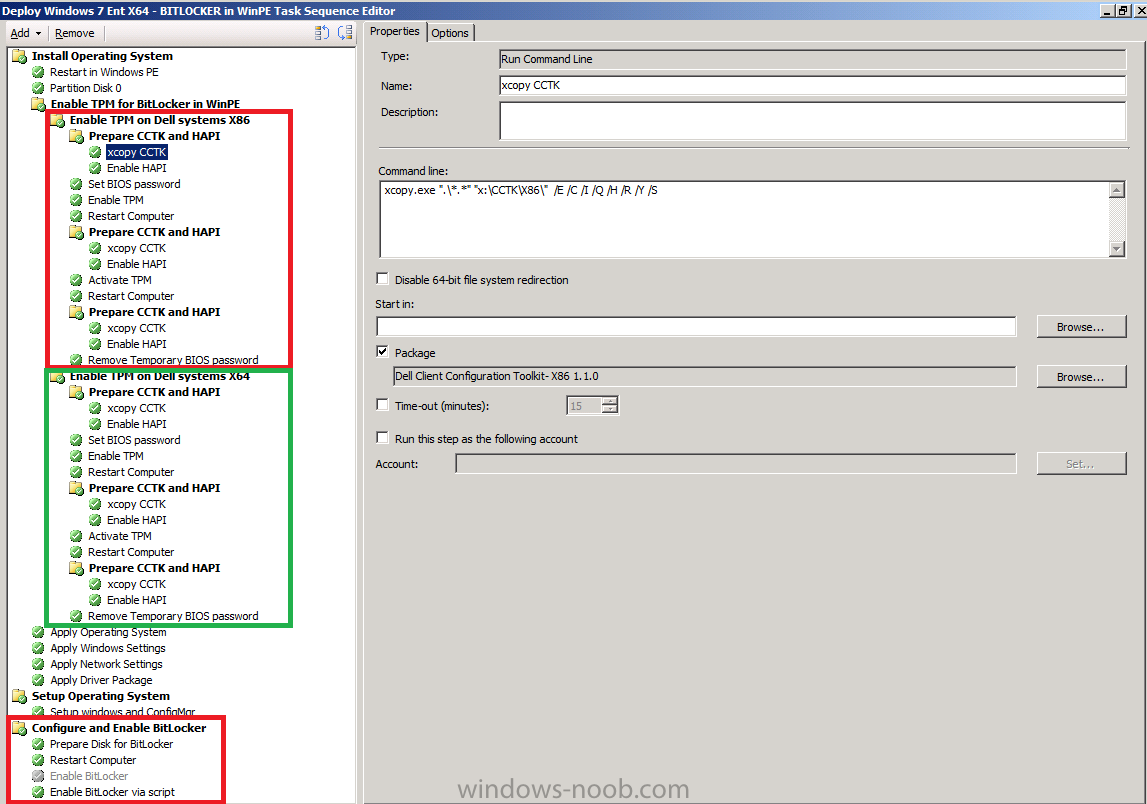
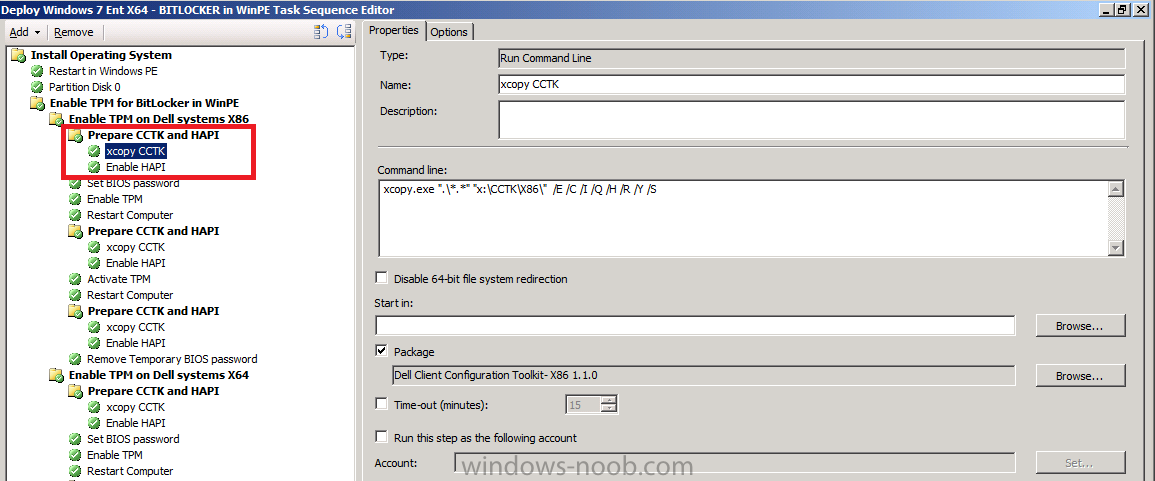
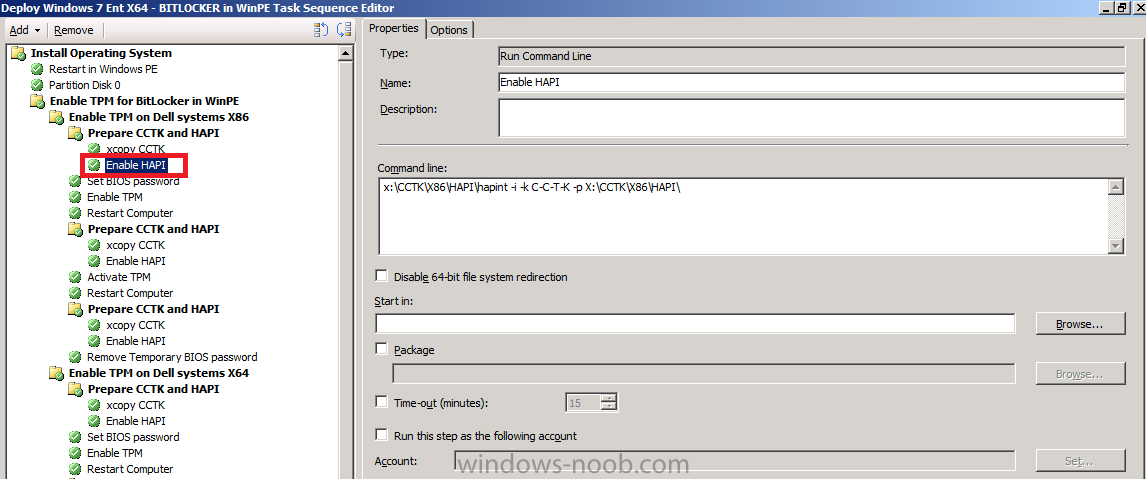
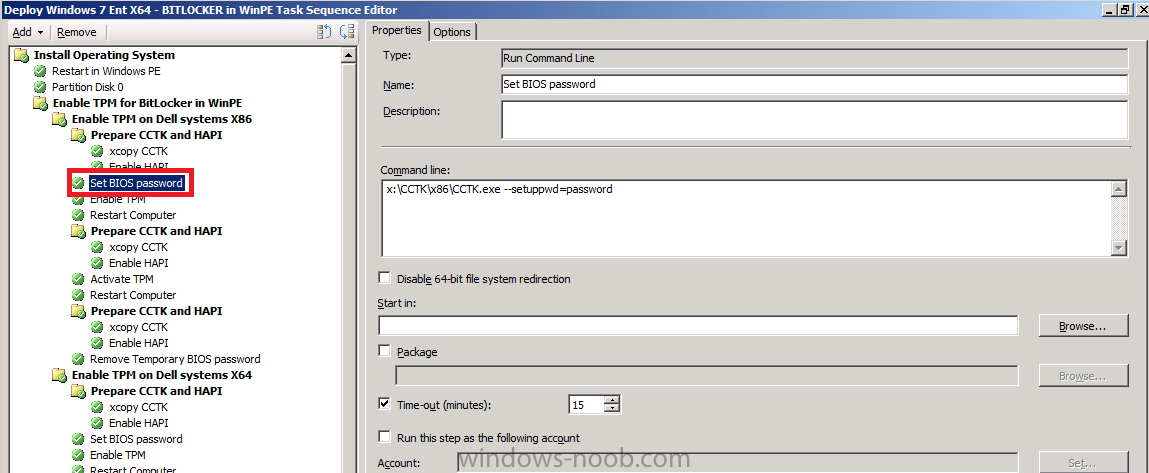
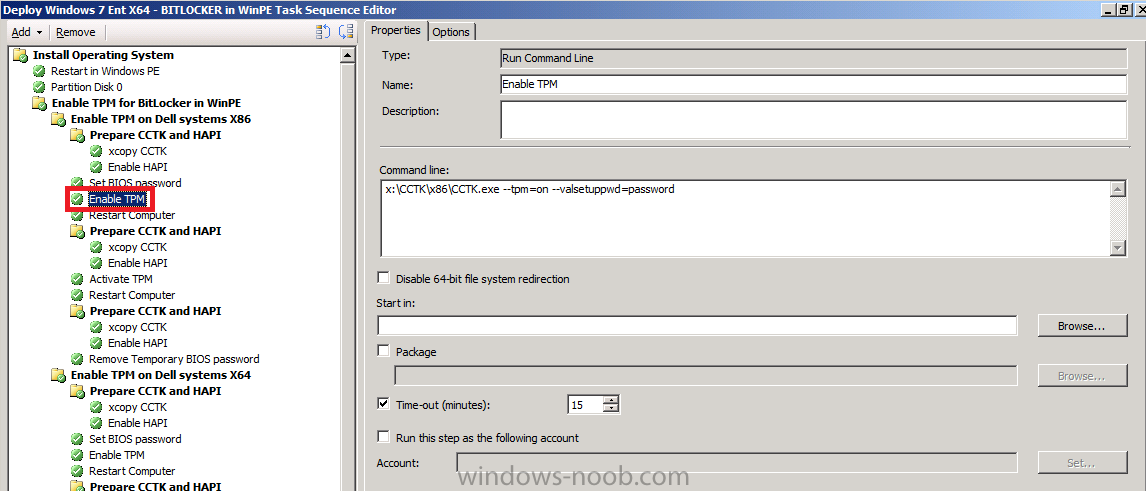
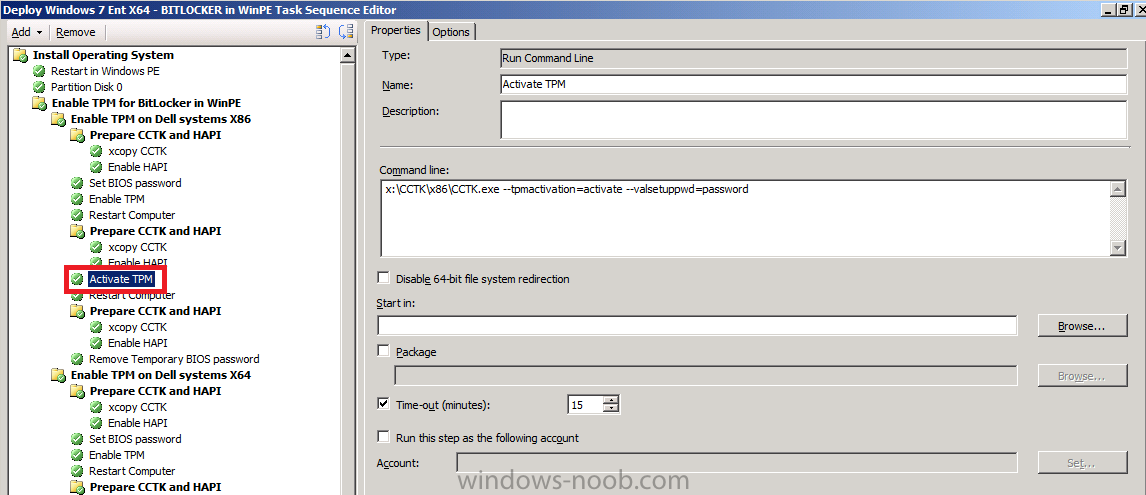
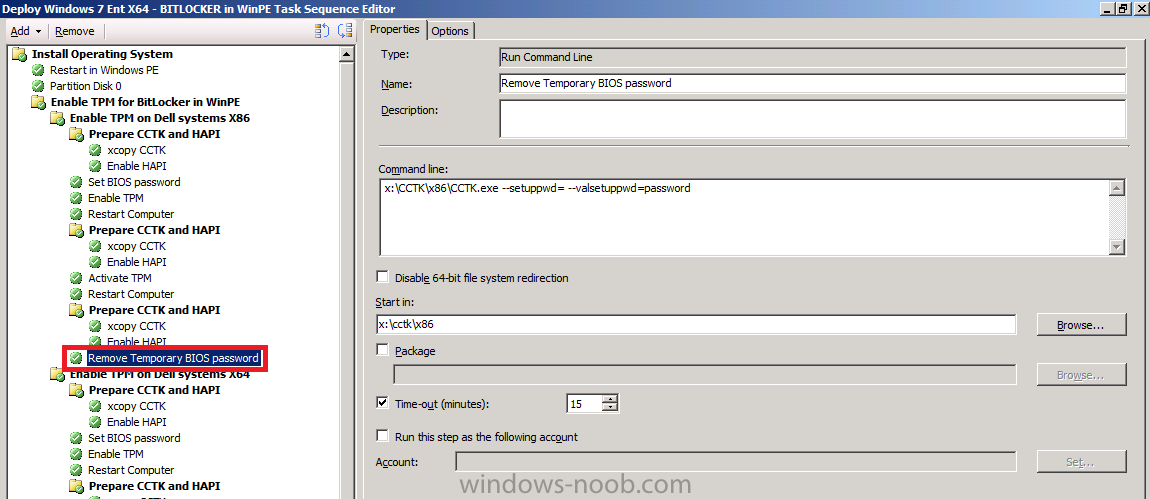
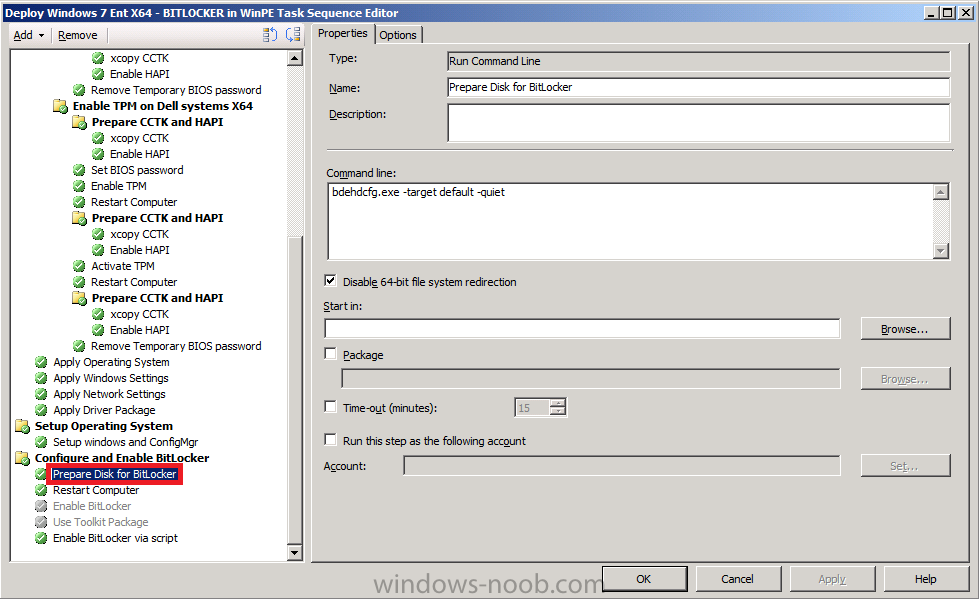
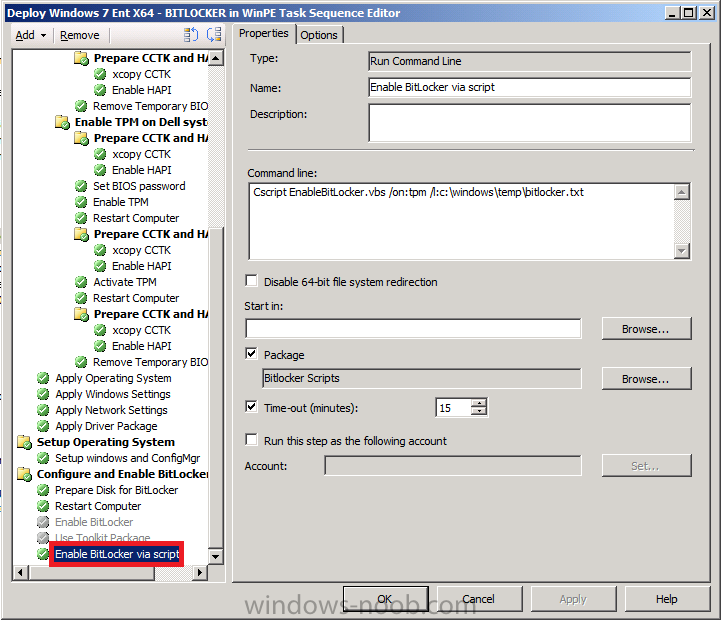
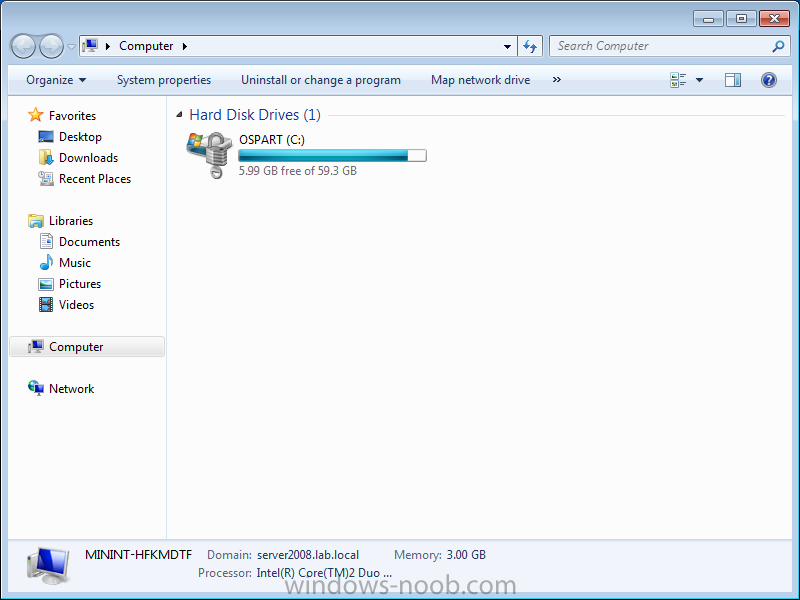
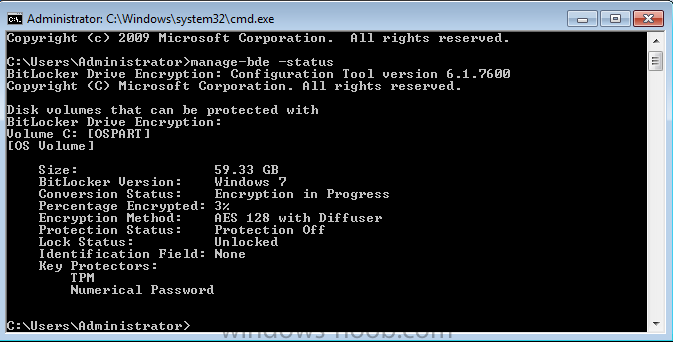
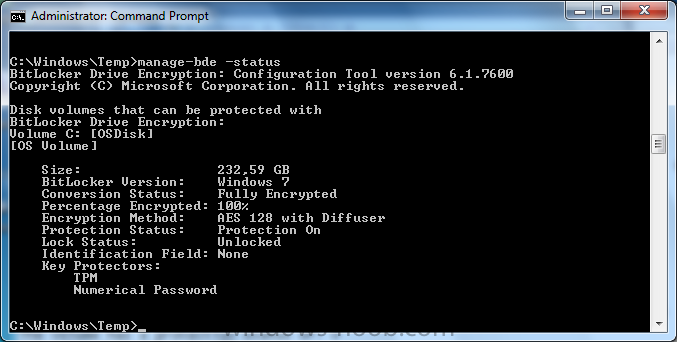
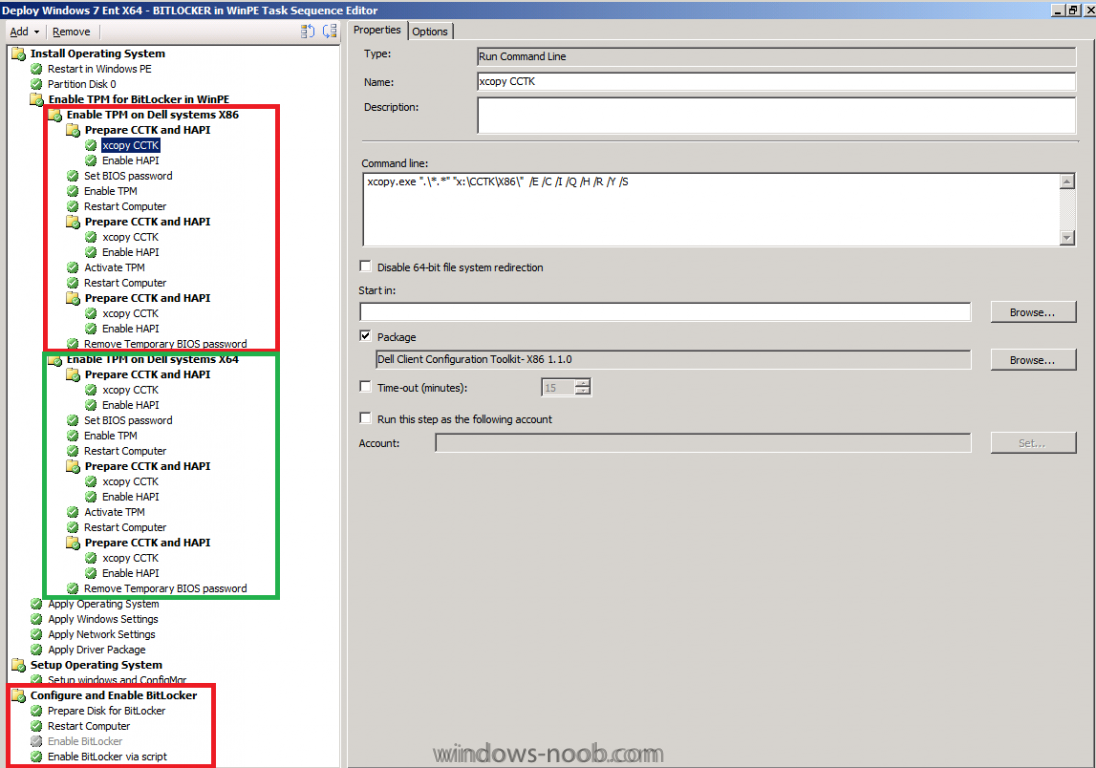
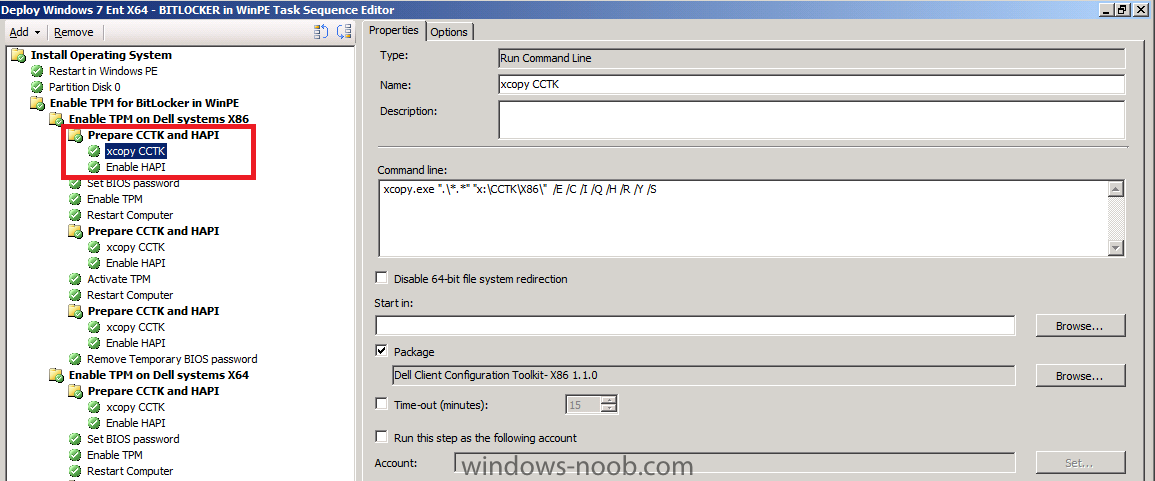
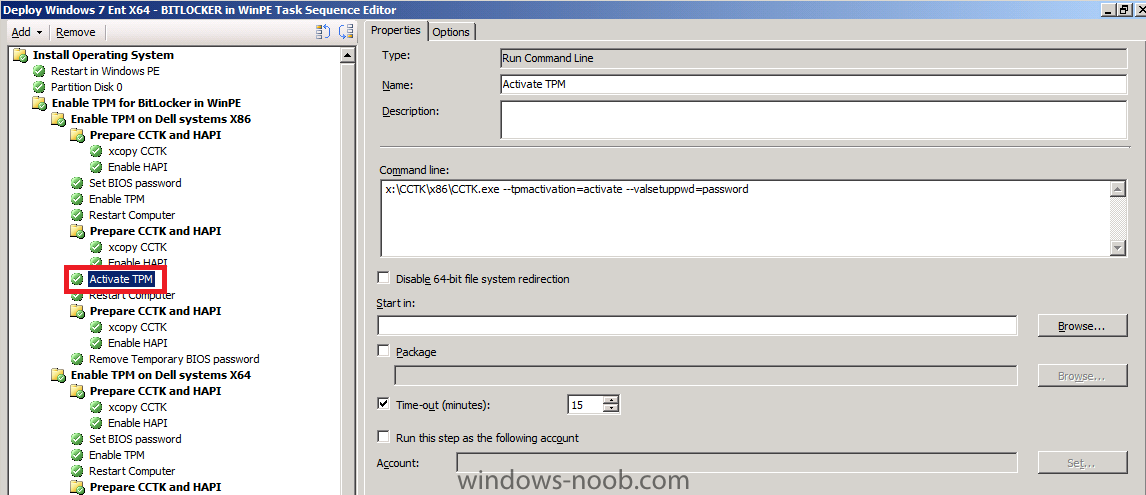
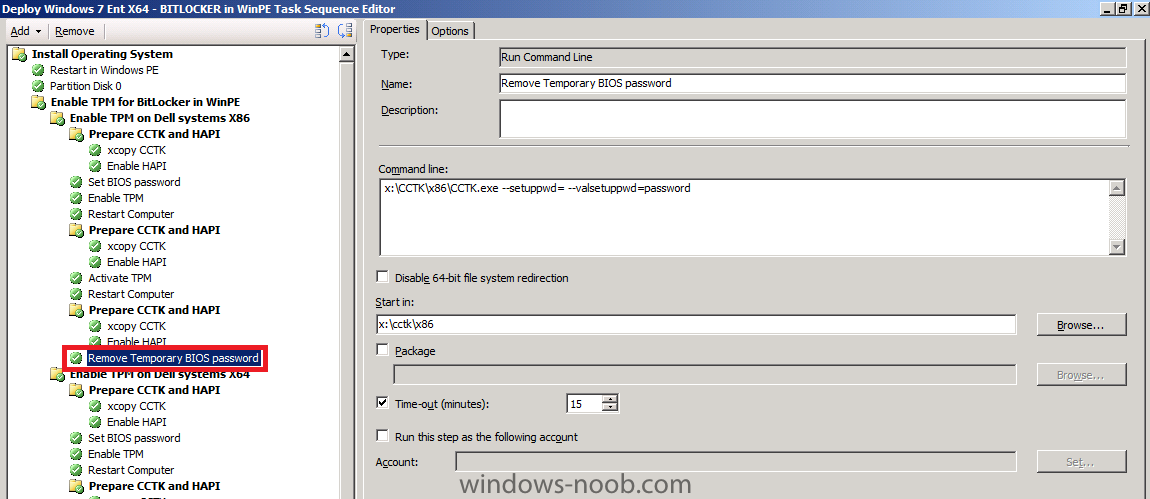
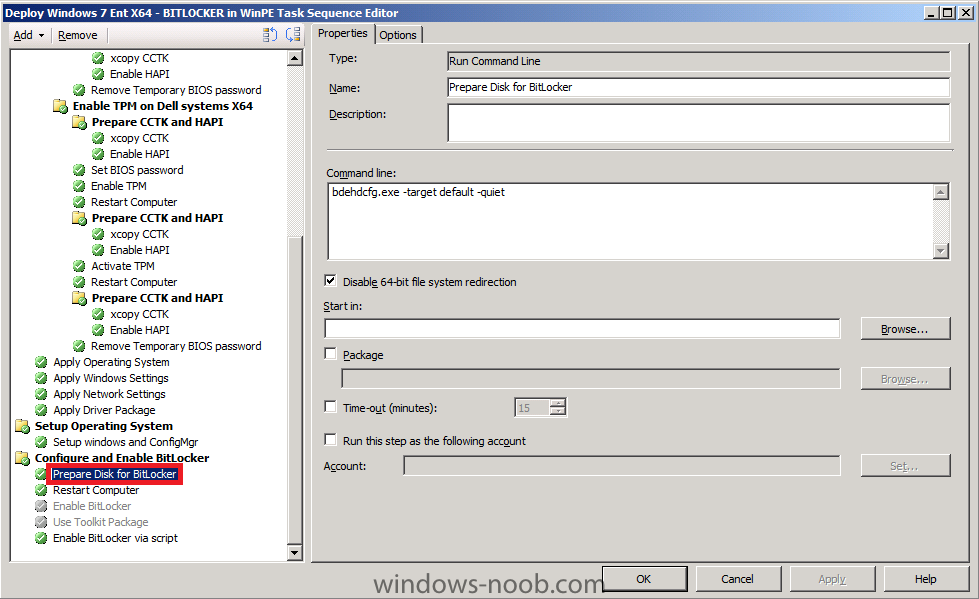
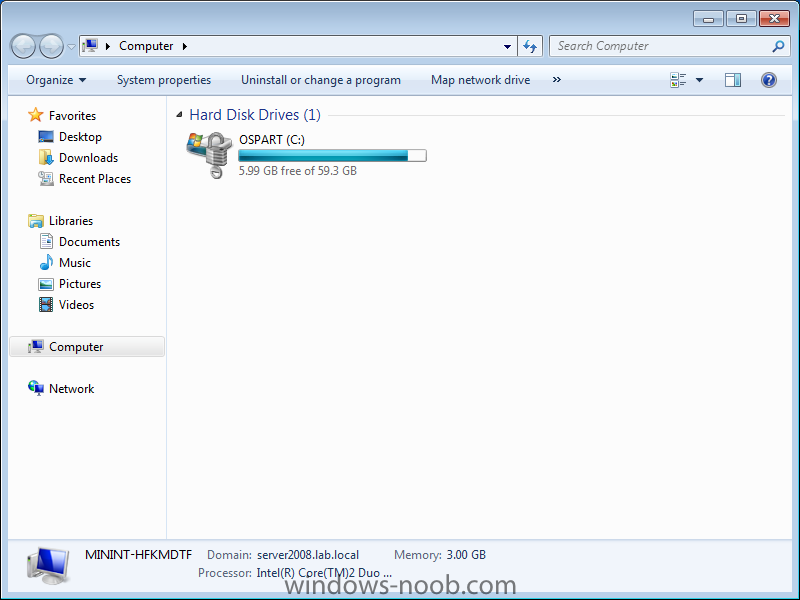
Bitlocker is a nice tool from Microsoft which allows you to Encrypt the hard disc, however enabling it isn't as simple as pressing a switch or simply adding a step to your task sequence, you will really have to spend some time reading about BitLocker before you decide what strategy you take with regards to deploying it in the Enterprise. BitLocker has some requirements and one of those is that the TPM (Trusted Platform Module) is set to ON and that it is Activated prior to Enabling BitLocker, in order to do this on Dell Systems we use the Dell CCTK (Client Configuration Tool Kit). You will need to decide if you are going to handle the TPM specific parts while in Windows or while in WinPE. I'd strongly recommend you test both scenarios in your test environment with real hardware (obviously, you'll want TPM ready Dell hardware). Dell also provides a page here which explains how to enable the TPM using the CCTK while in Windows (in the running OS), however what if you want to enable the TPM in WinPE ? to do that you've got the option of using batch files provided in the CCTK, these batch files require the Windows AIK installed and they create an ISO and new boot WIM for you to import into SCCM. Nice, except maybe you don't want to regenerate your boot.wim as it already has all your Extrafiles added and it's customised with your HTA scripts etc. Also, maybe you don't want the CCTK in your boot.wim images because you are a multi-vendor site with more than just Dell hardware. No problem, simply use the task sequence provided below and I'll guide you through how it all works, this task sequence doesn't care if your boot image is X86 or X64, it will determine that via WMI calls by checking for the presence of the SysWOW64 folder. What I'm providing here is a solution for you to Deploy Windows 7 Enterprise X64 on Dell hardware with Bitlocker Enabled so that when you login to the finished deployment, BitLocker is busy encrypting your drive. Note: This task sequence is for enabling BitLocker in Bare Metal (New Computer) scenarios, I will cover enabling BitLocker in a Refresh scenario in a later post. Step 1. Download the CCTK. The CCTK is available for download here. Once you've download it, install the MSI. We need the CCTK in order to communicate with the TPM chip in our Dell computers in Windows PE (using the HAPI drivers contained in the CCTK). Step 2. Create The CCTK packages We need to Create two new ConfigMgr Packages for X86 and X64 CCTK. Copy %ProgramFiles%\Dell\CCTK\* to a location that will be used for Configuration Manager. You will have two subfolders, x86, and x86_64 Create two ConfigMgr Packages, using the source directory for x86, and x86_64. Send these packages to your Distribution Points Step 3. Download BitLocker Scripts. In order to Enable Bitlocker in this example task sequence, we use a script, Microsoft has kindly provided us with the scripts we need right here Step 4. Create the BitLockers Scripts package Create a new package containing the bitlocker scripts you downloaded above and distribute it to your DP's. Step 5. Download the windows-noob sample BitLocker task sequence. Import this task sequence: Deploy Windows 7 Ent X64 - BITLOCKER in WinPE.xml into Configmgr and resolve the missing packages by pointing to the following packages where necessary:- Operating System Image (Windows 7 X64) Configuration Manager Client Package CCTK X86 Package CCTK X64 Package Bitlocker Scripts So how does it all work then ? The task sequence is broken down into Two main groups for TPM, one to deal with enabling TPM functions when using an X86 boot image, the other for X64 boot images As we haven't injected the HAPI drivers into WinPE (remember, we didn't want to have to generate new boot images, we wanted to keep our current process mostly untouched) we must manually inject them before each step (unless theres more than one step before the next Restart) this is done via an xcopy command which copies the CCTK architecture files to x:\ and then we inject the HAPI drivers in the next step Next we set the Bios Password (you can change the password to something else if you wish) and then we Enable the TPM chip after a restart of the computer (to let the bios make the changes) we have to redo the xcopy/enable HAPI drivers before the next step, Activating the TPM chip after another restart and CCTK xcopy/enable HAPI group and we then remove the bios password set earlier Once the steps above are done Windows will install as normal and then set windows settings etc, before finally getting to the Configure and Enable BitLocker group, this happens within Windows. This group is responsible for preparing the disc partition for BitLocker using bdehdcfg.exe and finally after another restart, we Enable BitLocker using the Enablebitlocker vbs script from Microsoft. That's it ! Windows will then end up at the familiar login screen but you may notice the HDD LED is very busy, this is because BitLocker is busy Encrypting the drive, How can I verify BitLocker is working ? simply open explorer and you'll see a new icon for C: and you can open a command prompt and type manage-bde -status after a few hours when the encryption process is done you'll see as follows (screenshot from another system where BitLocker has finished encrypting the drive) you can also verify what is logged in the c:\windows\temp\bitlocker.txt file, here's a sample attached here bitlocker.txt have fun and please let me know how you get on with this, cheers ! niall. Related Reading:- Is the TPM Chip Enabled or Disabled in the Bios on my Dell system ? - http://myitforum.com...ell-system.aspx How can I determine if there's a TPM chip on my Dell system needed for BitLocker ? http://myitforum.com...-bitlocker.aspx BitLocker Hardware Requirements - http://windows.micro...rive-Encryption Microsoft Scripts to Enable Bitlocker - http://go.microsoft..../?LinkID=151997 BitLocker Info - a List of Resources - http://myitforum.com...-resources.aspx How can I determine if the drive is Encrypted (Protected) or not during a BitLocker task sequence in WinPE ? - http://www.windows-n...uence-in-winpe/ How can I determine if there's a TPM chip on my Lenovo system needed for BitLocker ? - http://www.windows-n...-for-bitlocker/


-
Creating a folder using SCCM and copying files
anyweb replied to Damien's question in Deploy software, applications and drivers
be aware of the following though -
please take a read of this post by Ned Pyle, it explains it all very well
-
Can I upgrade from SCCM 2007 to 2012?
anyweb replied to skinnyzaz's topic in Configuration Manager 2012
the only path is to do a side by side migration, so no, you cannot upgrade, you must migrate. -
Consider the following scenario: - You build a three-tier Microsoft System Center Configuration Manager 2007 hierarchy. - The hierarchy has many distribution points. For example, the hierarchy has more than 5,000 distribution points. - You create a package at the central site for software distribution, and then you distribute the package to all distribution points. In this scenario, the sender component sends the packages to all distribution points after a delay of several hours. For all the details, including the cause and hotfix, see the following new Knowledge Base article: KB2559225 - Long delay when you distribute a package to a three-tier hierarchy in System Center Configuration Manager 2007 if the hierarchy has many distribution points J.C. Hornbeck | System Center Knowledge Engineer via - http://blogs.technet.com/b/configurationmgr/archive/2011/06/27/new-hotfix-long-delay-when-you-distribute-a-package-to-a-three-tier-hierarchy-in-system-center-configuration-manager-2007-if-the-hierarchy-has-many-distribution-points.aspx The App-V Team blog: http://blogs.technet.com/appv/ The WSUS Support Team blog: http://blogs.technet.com/sus/ The SCMDM Support Team blog: http://blogs.technet.com/mdm/ The ConfigMgr Support Team blog: http://blogs.technet.com/configurationmgr/ The SCOM 2007 Support Team blog: http://blogs.technet.com/operationsmgr/ The SCVMM Team blog: http://blogs.technet.com/scvmm/ The MED-V Team blog: http://blogs.technet.com/medv/ The DPM Team blog: http://blogs.technet.com/dpm/ The OOB Support Team blog: http://blogs.technet.com/oob/ The Opalis Team blog: http://blogs.technet.com/opalis The Service Manager Team blog: http: http://blogs.technet.com/b/servicemanager The AVIcode Team blog: http: http://blogs.technet.com/b/avicode The System Center Essentials Team blog: http: http://blogs.technet.com/b/systemcenteressentials The Server App-V Team blog: http: http://blogs.technet.com/b/serverappv
-
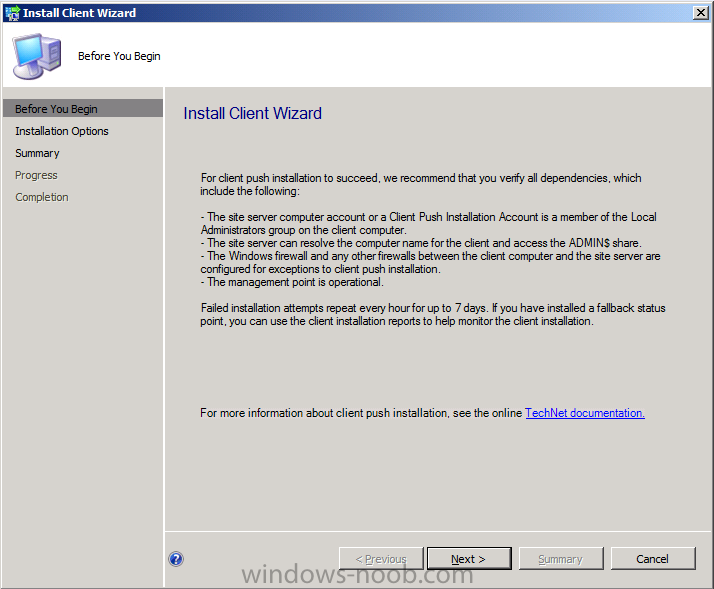
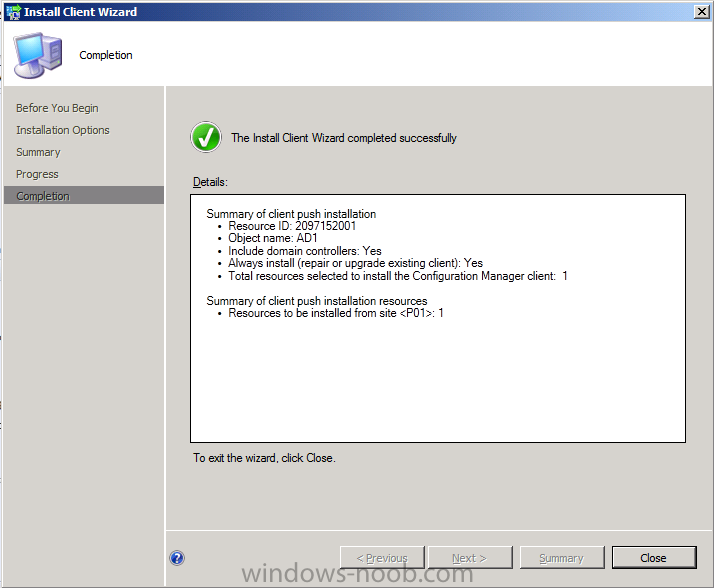
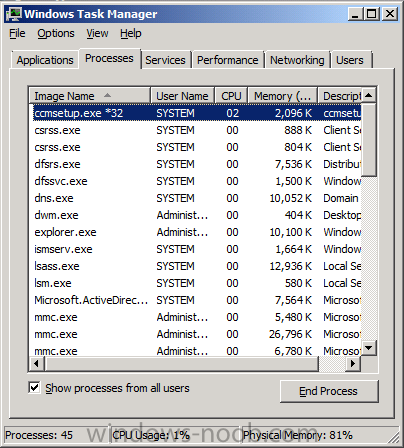
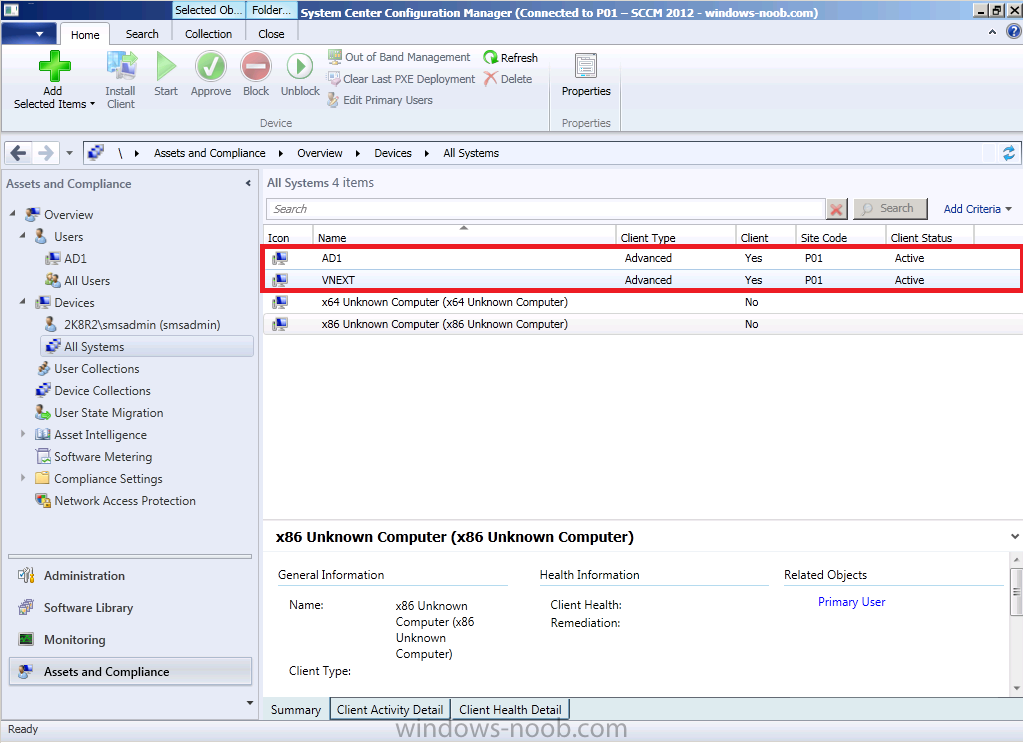
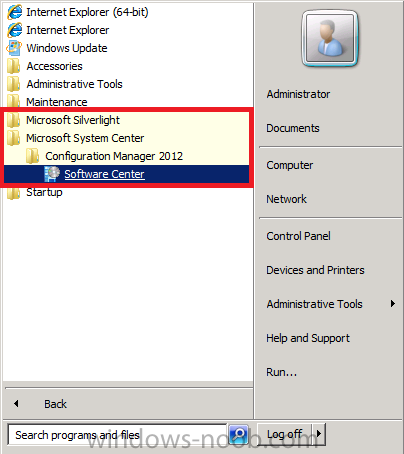
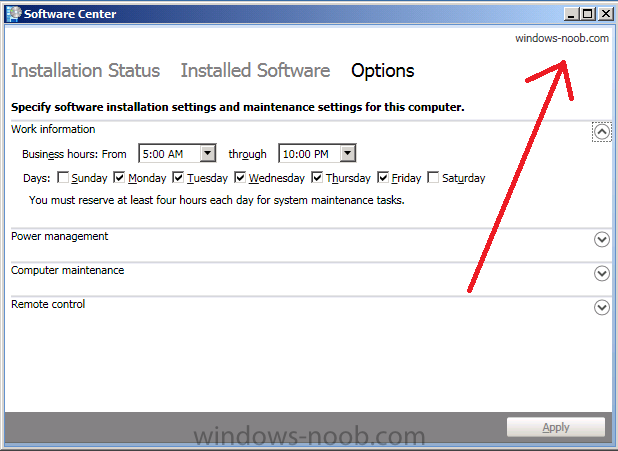
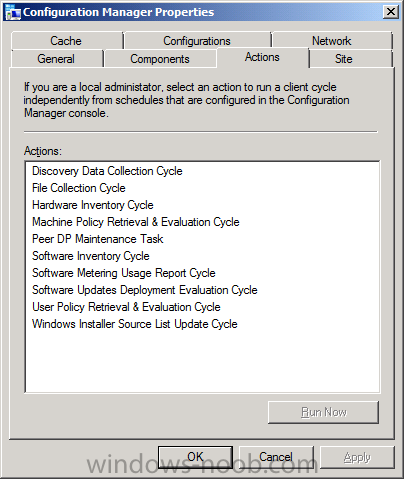
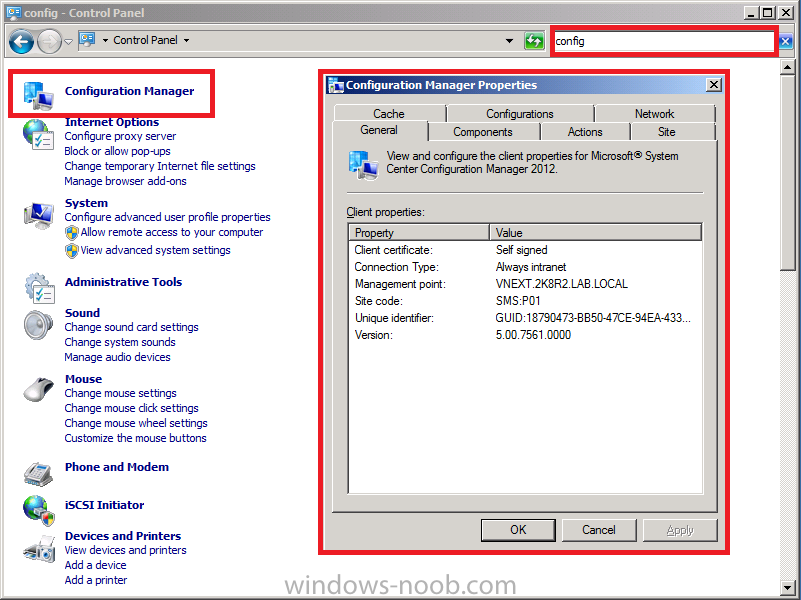
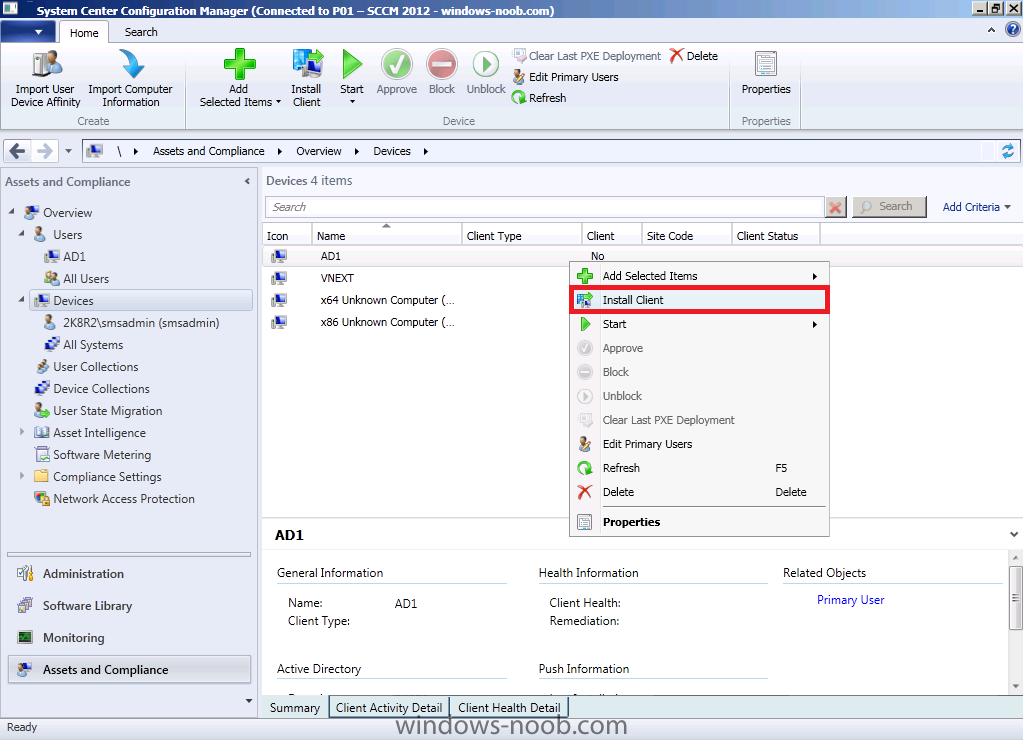
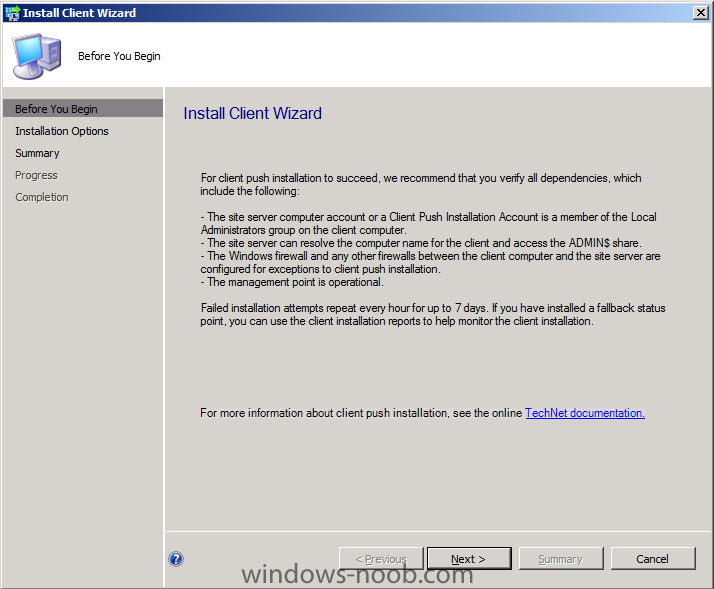
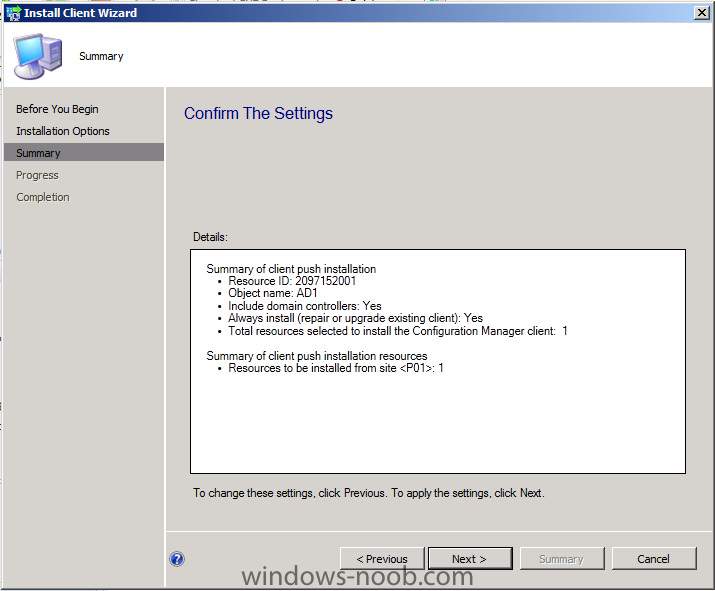
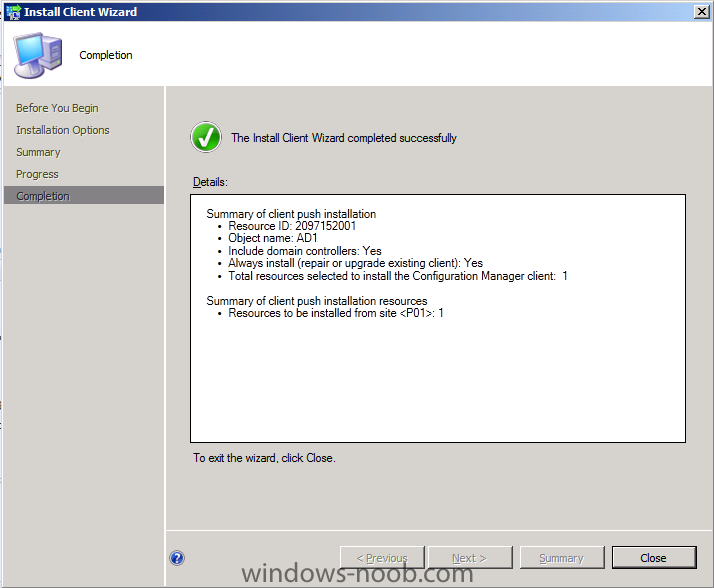
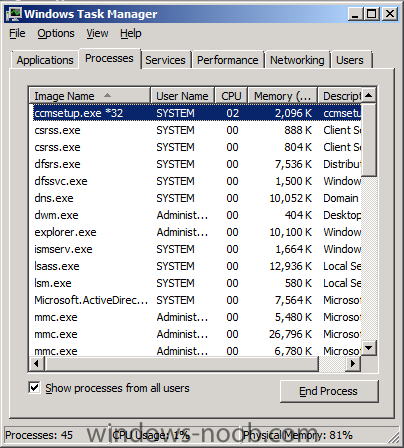
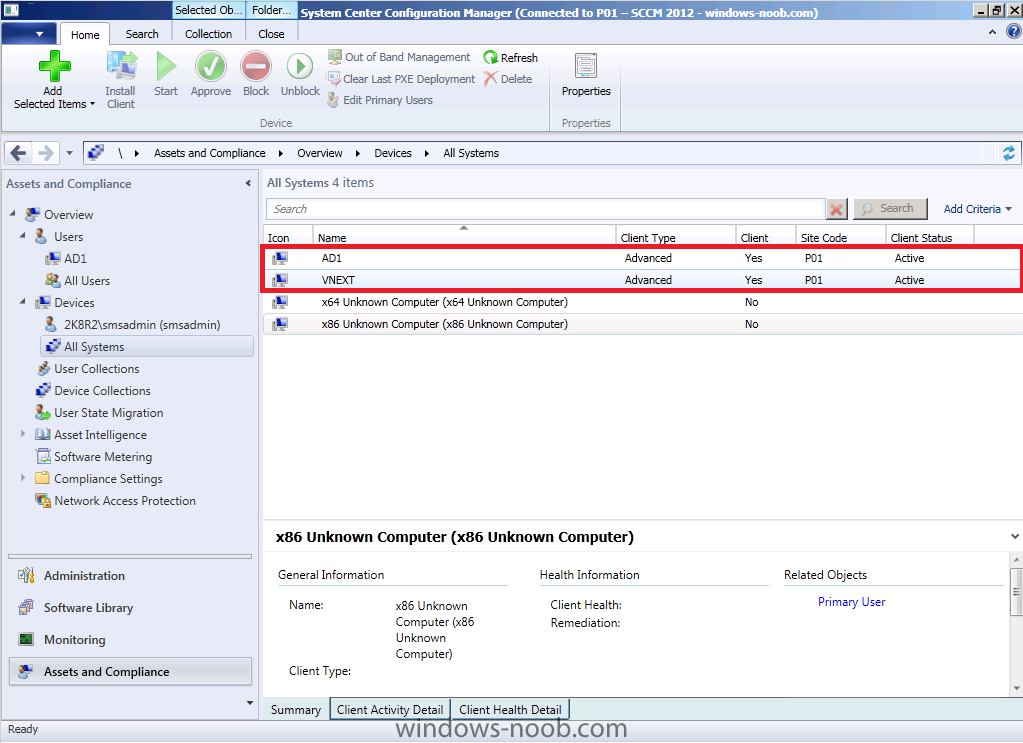
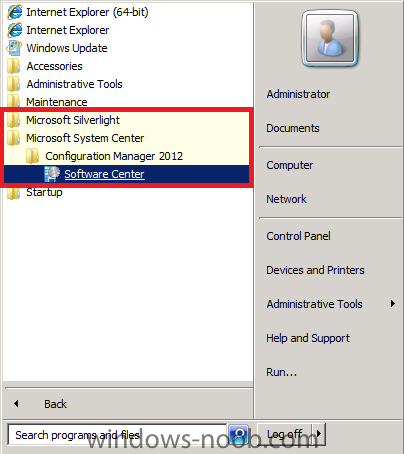
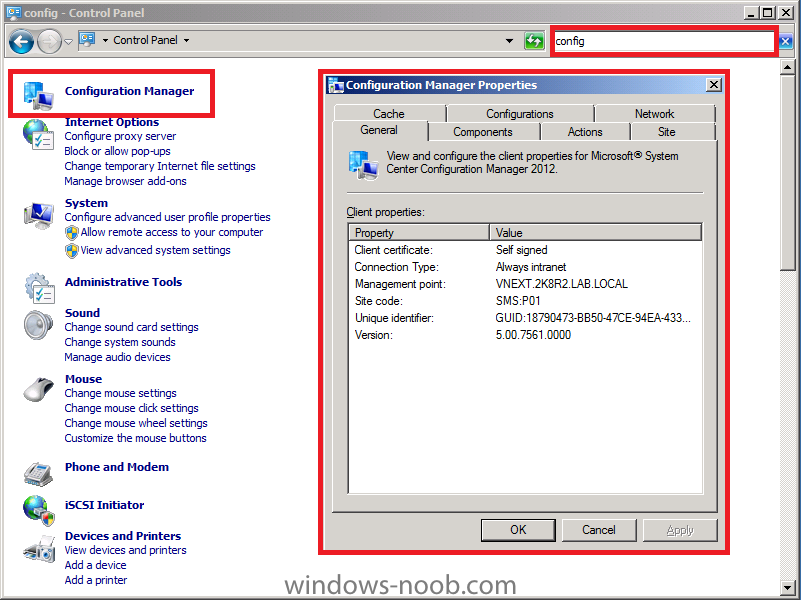
Step 7. Manually installing the client using the wizard In Assets and Compliance select our Domain Controller (AD1) right click and choose Install Client when the Install Client Wizard appears click Next select the first two options (allow the client software to be installed on domain controllers and Always install the client software) as we only have one site currently (P01) review the summary and completion Step 8. Verify client installation On the AD1 computer, you can open Task Manager and verify that Ccmsetup.exe is running, this means your Client software is installing. after some minutes the clients are installed and it is reflected in Assets and Compliance (client=Yes) and you'll see new software installed in your start menu, including Microsoft Silverlight and Microsoft System Center Configuration Manager 2012 Software Center and you can start Software Center and you'll see the IT Organization we configured earlier listed in the Top Right corner and finally you can view the client agent itself by opening up control panel, search for Config, and you'll see the Configuration Manager Client, click on it


-
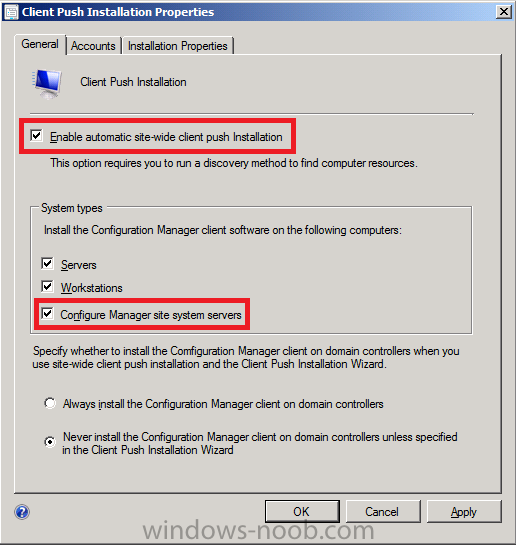
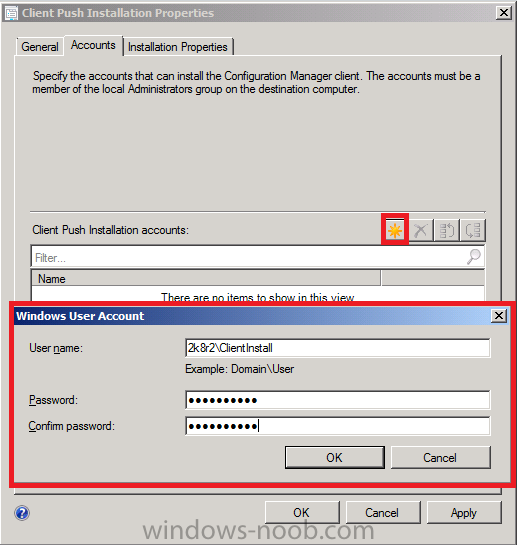
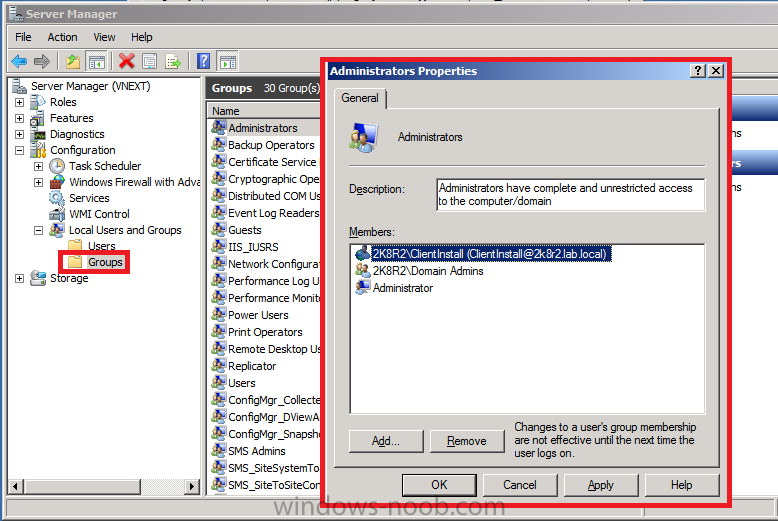
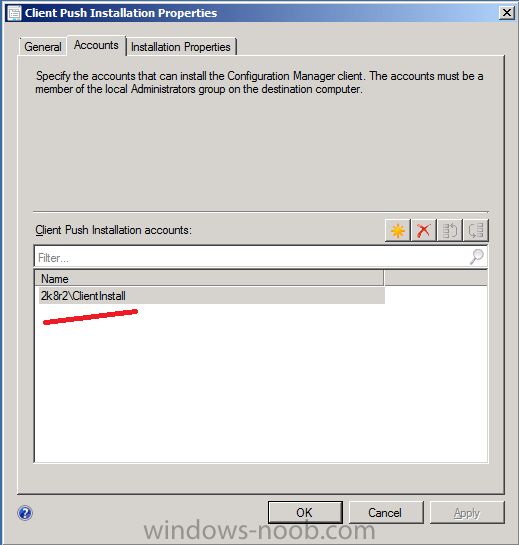
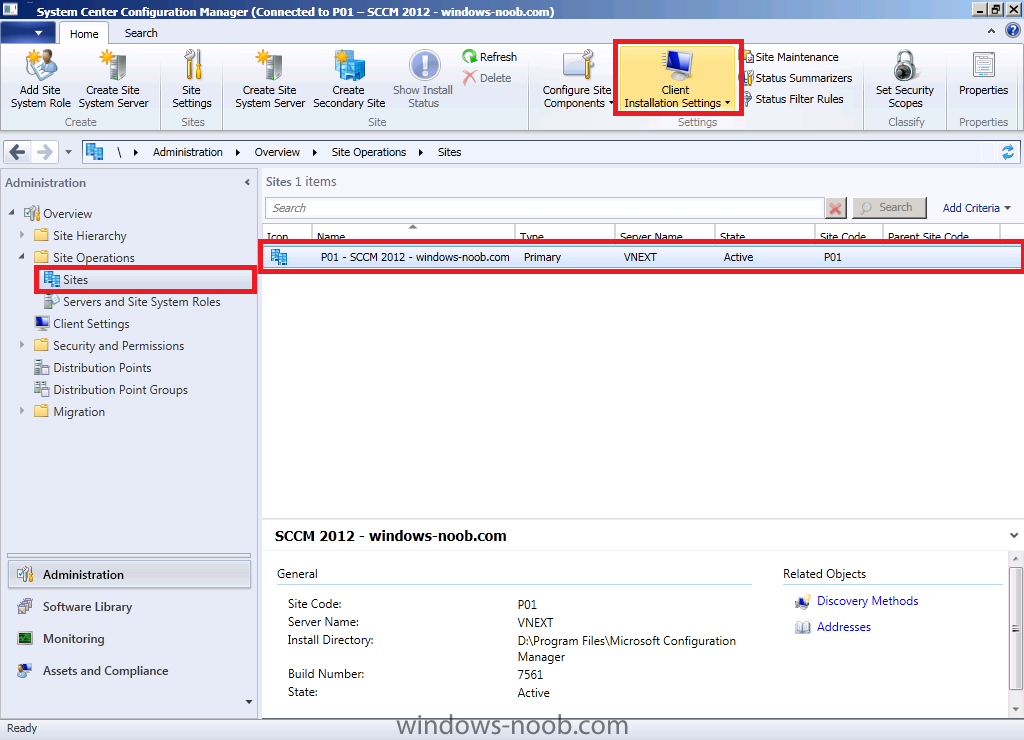
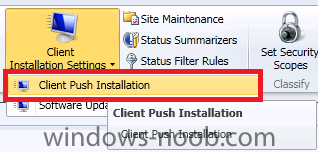
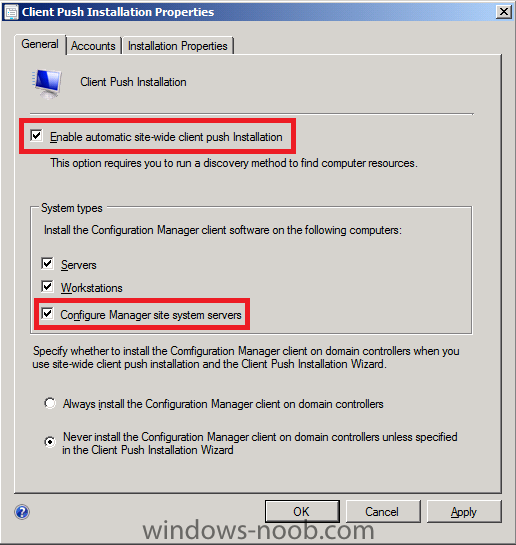
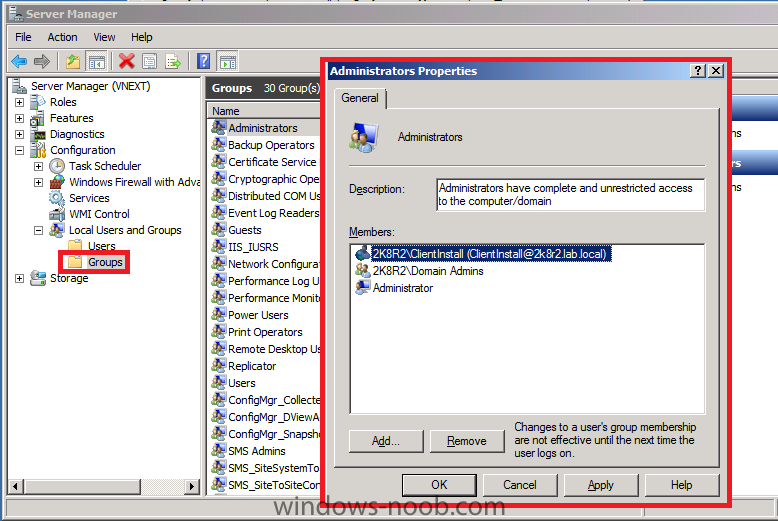
Deploying the Client Agent Now that we have made changes to the Default Client Agent settings, we want to deploy it to our clients. Before doing so we need to decide what method is appropriate for installing the client on our computers. The following methods are available Client Installation Method Description Client push installation - Automatically installs the client to assigned resources and manually installs the client to resources that are not assigned. Software update point installation - Installs the client by using the Configuration Manager 2012 software updates feature. Group Policy installation - Installs the client by using Windows Group Policy. Logon script installation - Installs the client by using a logon script. Manual installation - Manually installs the client software. Upgrade installation - Upgrades clients to a newer version by using Configuration Manager 2012 application management. You can also use Configuration Manager 2007 software distribution to upgrade clients to Configuration Manager 2012. Client Imaging - Prestages the client installation in an operating system image. Please refer to Technet to Determine the Client Installation Method to Use in Configuration Manager 2012. For the purposes of this LAB we will select Client Push Installation. Step 6. Enable Client Push Installation In Administration, expand Site Operations, Sites, select our site P01, choose Client Installation Settings in the Ribbon. select Client Push Installation from the drop down menu make sure that enable automatic site-wide client push installation and the Configuration Manager site system servers options are selected click on the Accounts tab and click on the yellow starburst, enter the user details of your ClientInstall account this user must be in the local adminstrators group on your destination computers click Ok


-
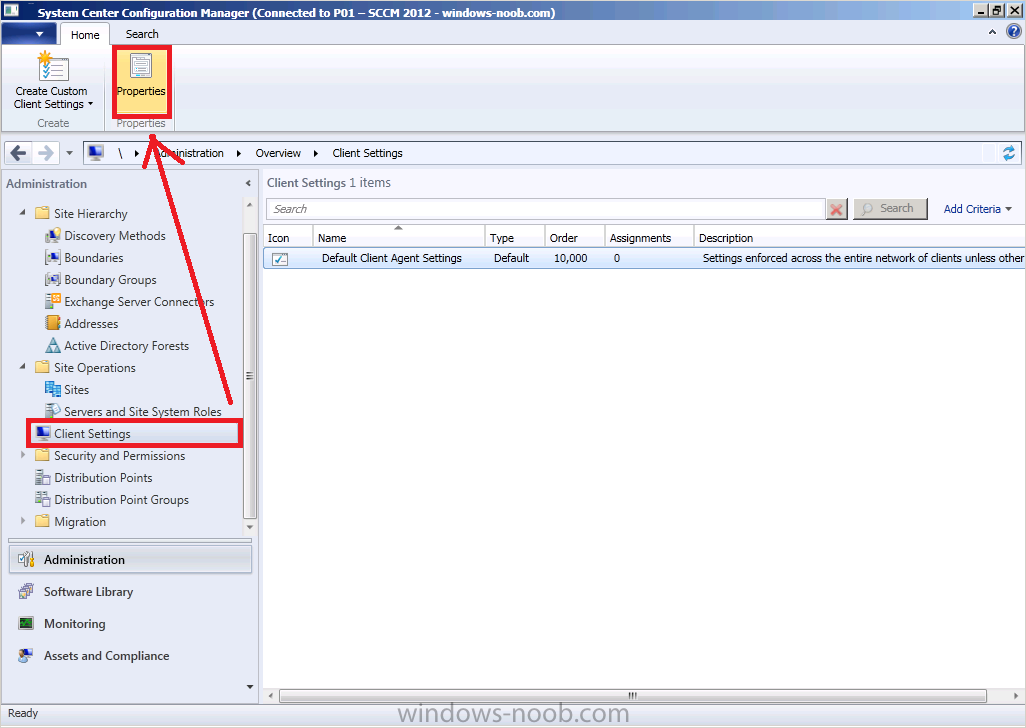
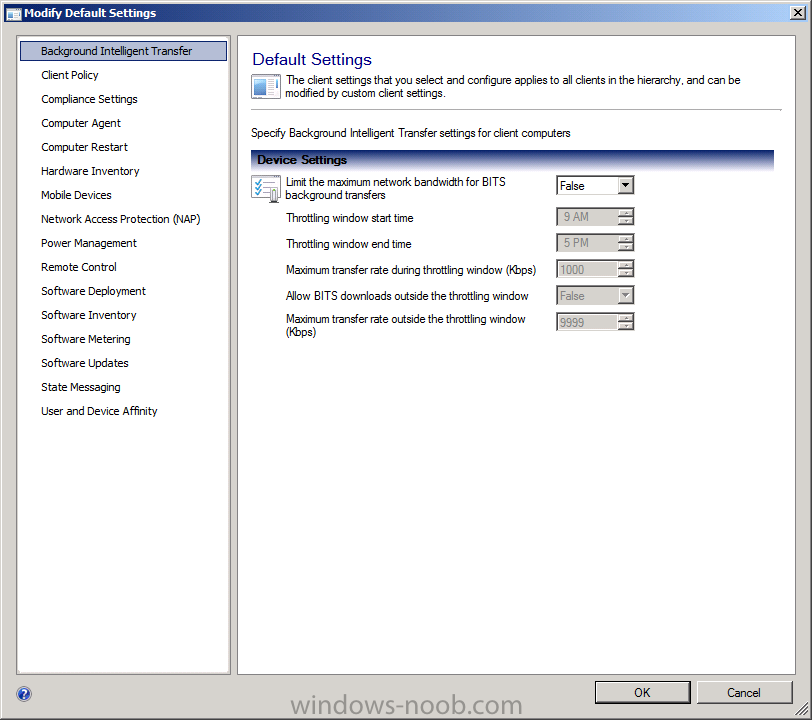
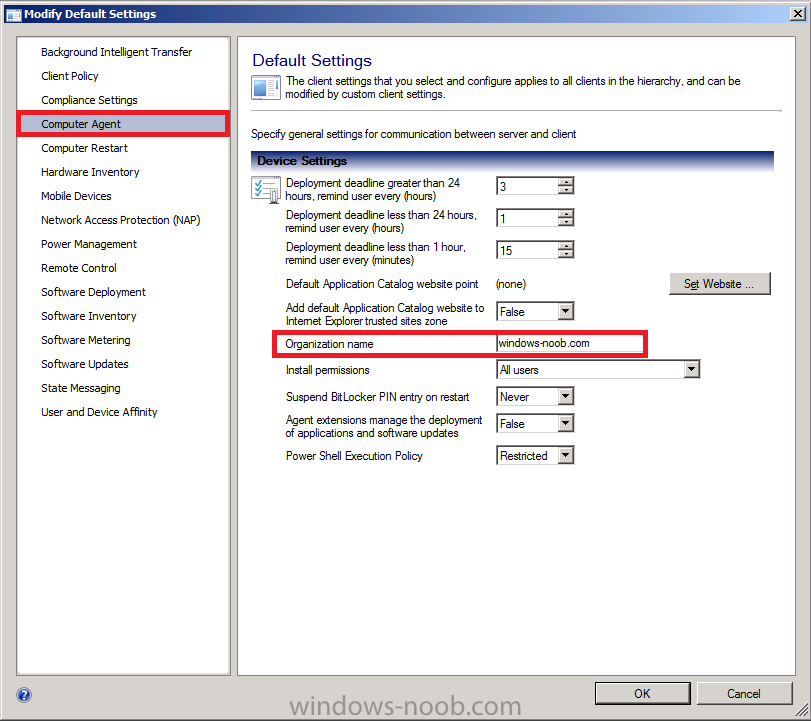
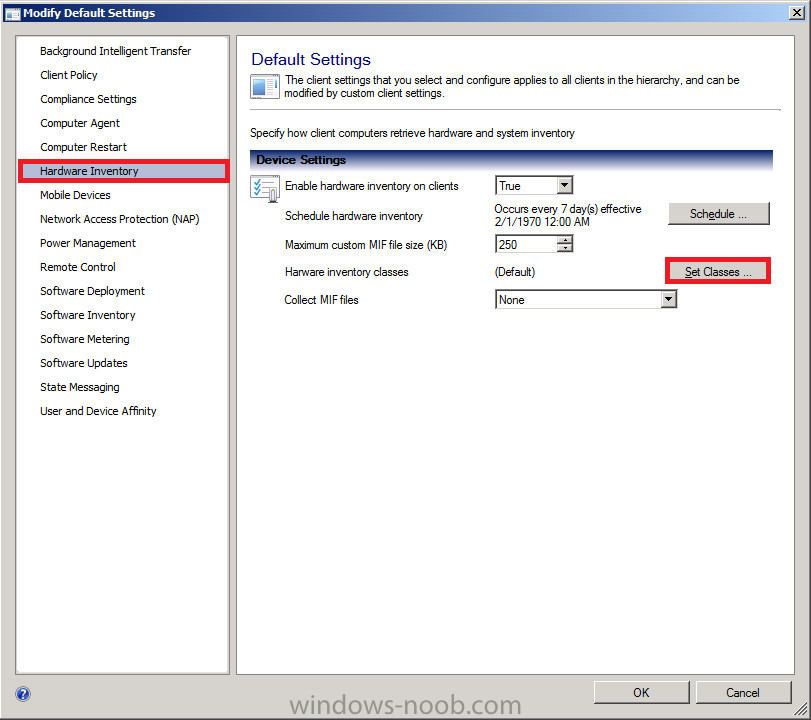
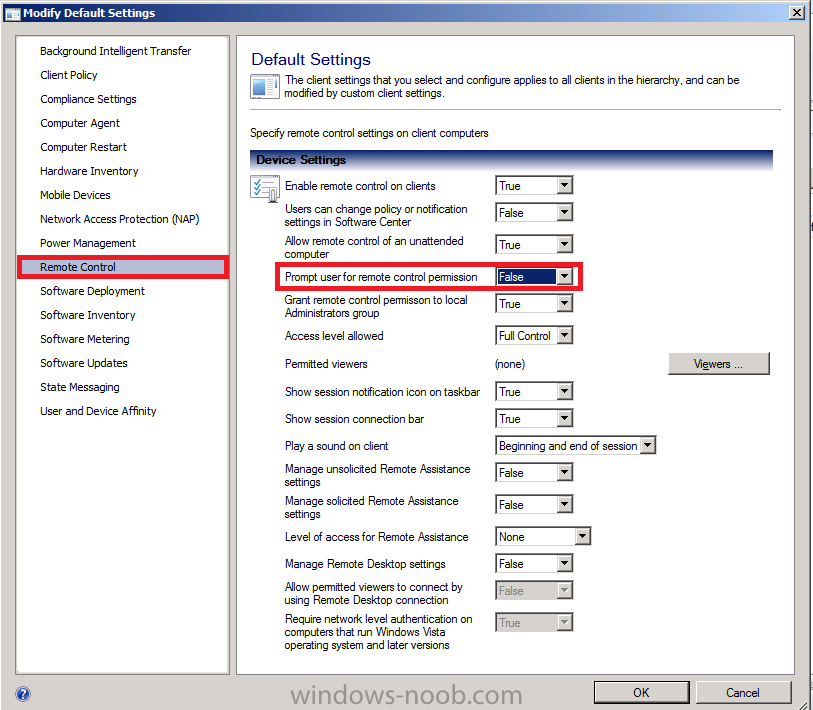
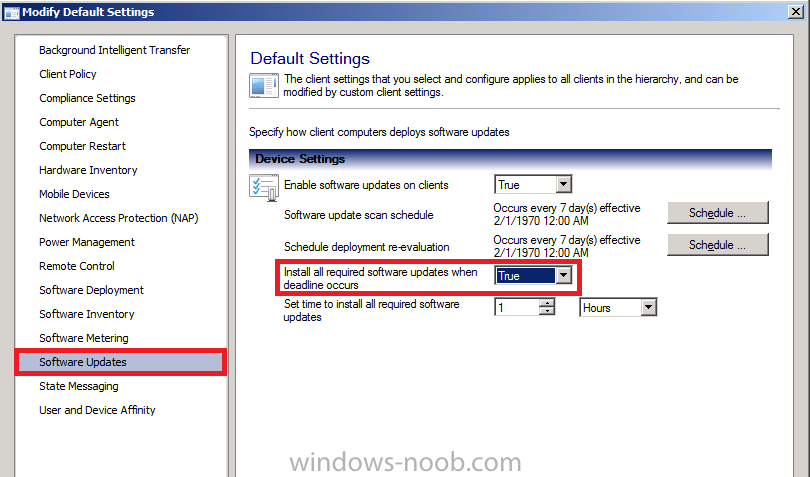
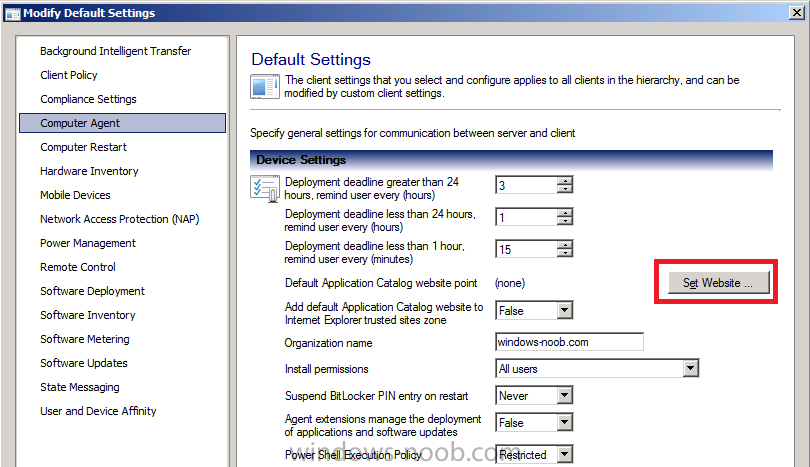
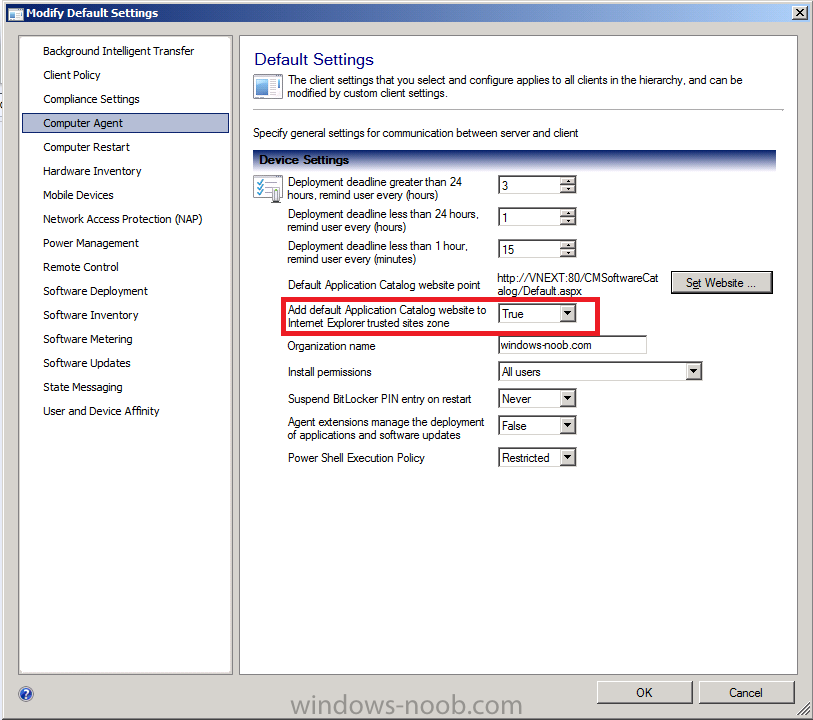
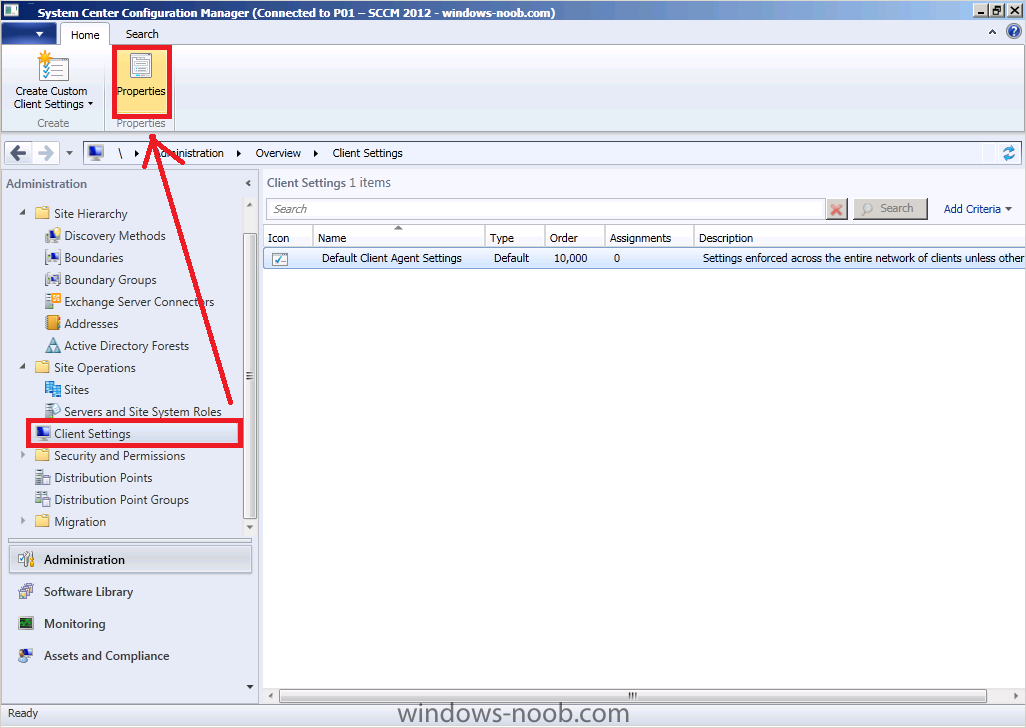
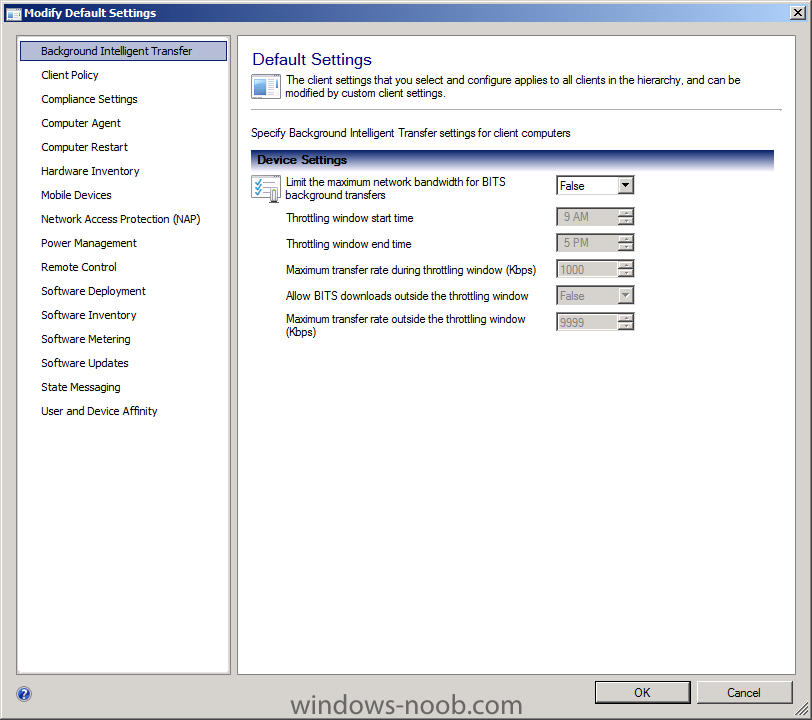
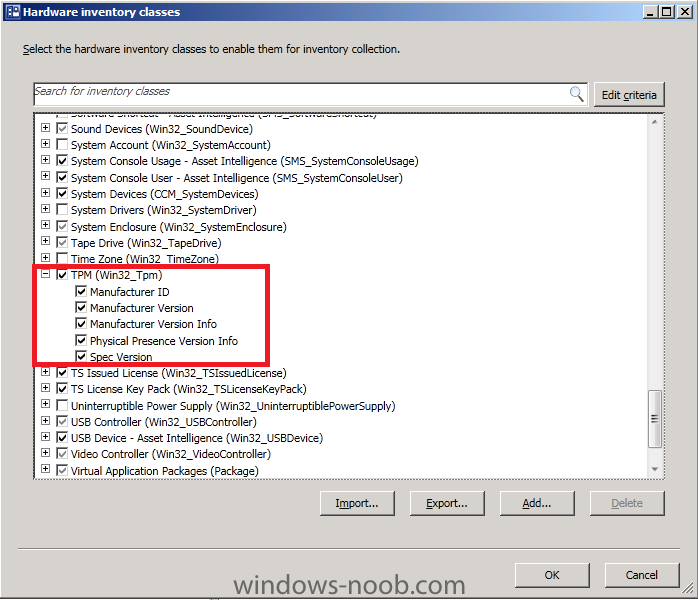
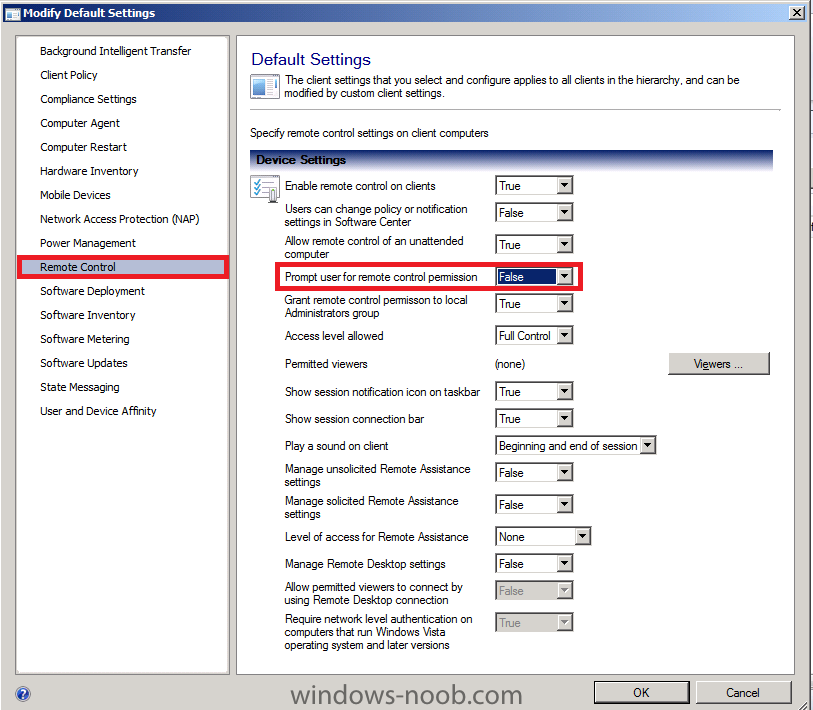
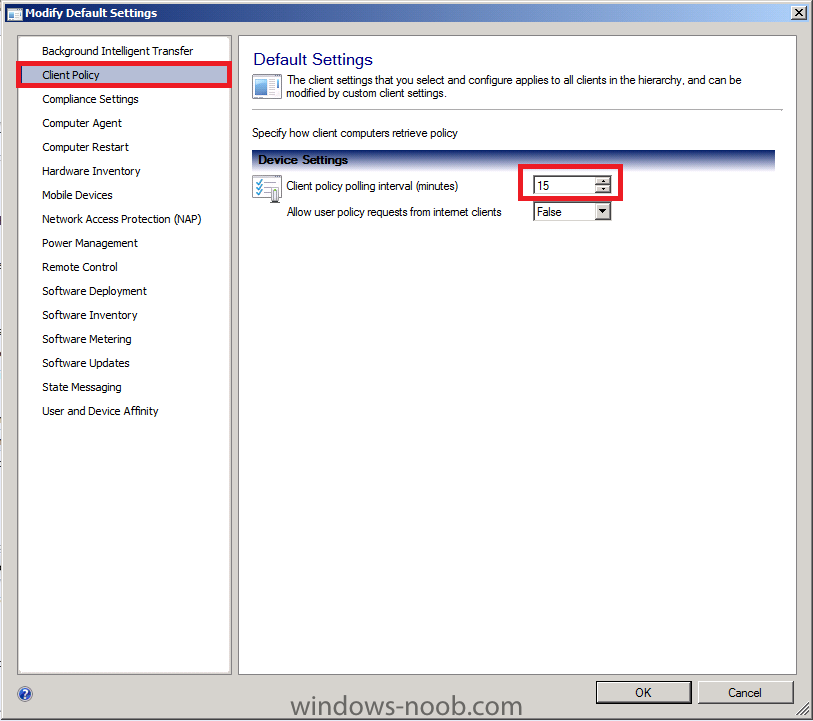
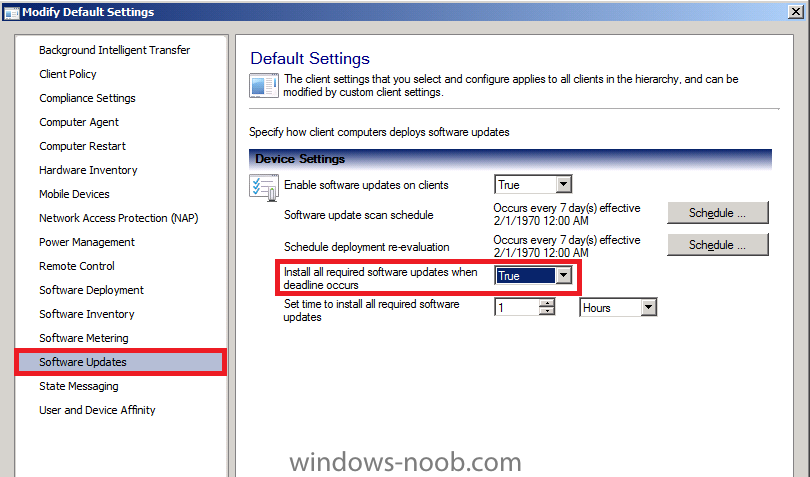
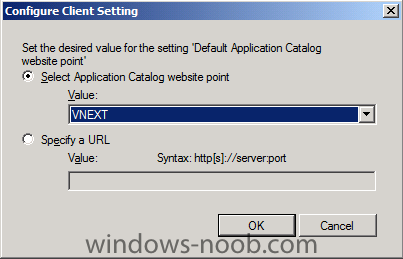
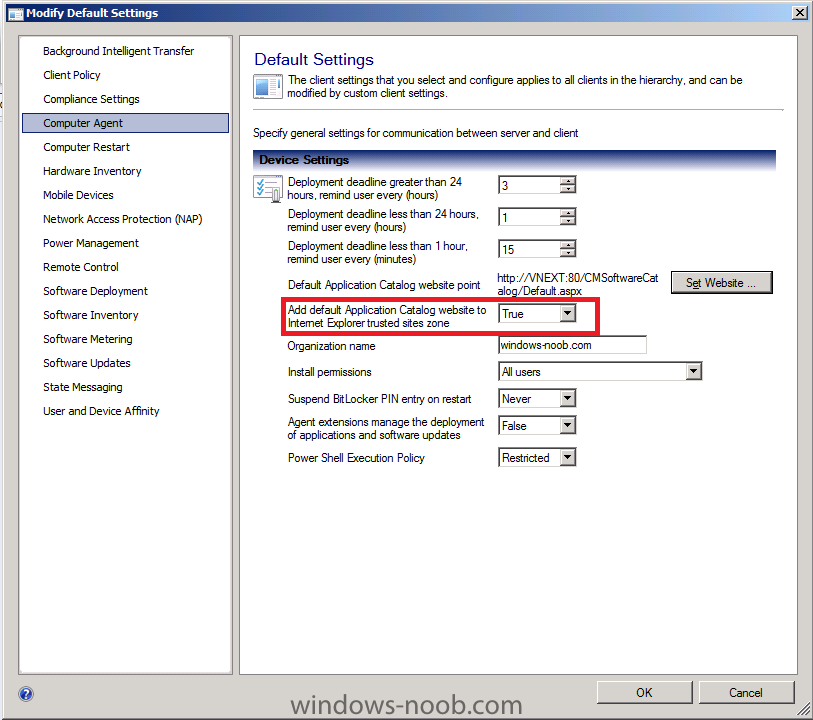
Configuring Client Agent Settings Please refer to Planning for Client Settings in Configuration Manager 2012 on Technet. More details from Technet available below:- How to Configure the Default Client Settings How to Create and Assign Custom Client Settings Step 5. Configure the Client Agent In the navigation pane, select Administration, then click Client Settings, select Properties from the ribbon. Currently there is only one client agent setting available – Default Client Agent Settings. the Default settings appear to start off with, let's configure the client Policy polling interval, select Client Policy in the left pane and change the value from 60 minutes (default) to 15 minutes as this is a LAB and we want our client to poll for changes in policy every 15 minutes. To change the Organization Name listed in the client agent, select Computer Agent in the left and type in your organization name to the right of Default Application Catalog website point, click on Set Website... select our VNEXT server from the drop down menu change Add default application catalog website to Internet Explorer trusted sites zone to True Now select Hardware Inventory on the left and then click on Set Classes select TPM from the list of available classes, this will be a class that is reported on in the site's sms_def.mof Now click on Remote Control in the left and set prompt user for remote control permission to false (useful when you want to remote to a Server) Select Software Updates and set the Install all required software updates when deadline occurs to True click ok to exit from modifying default settings.


-
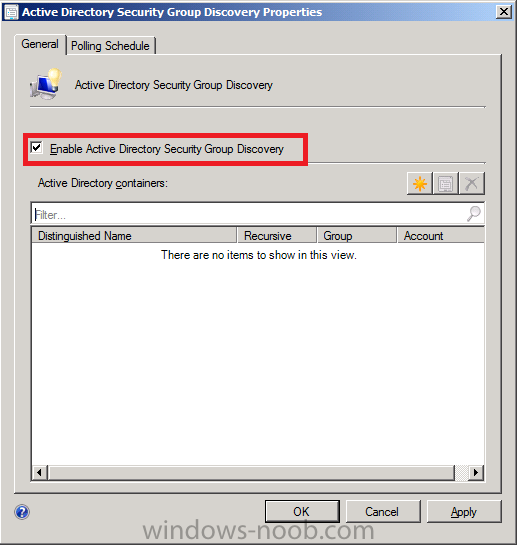
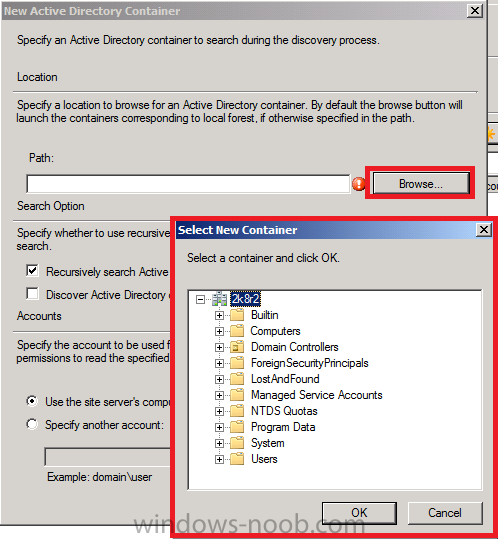
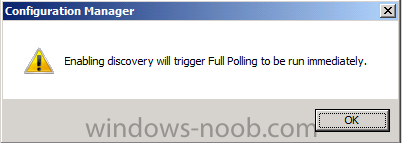
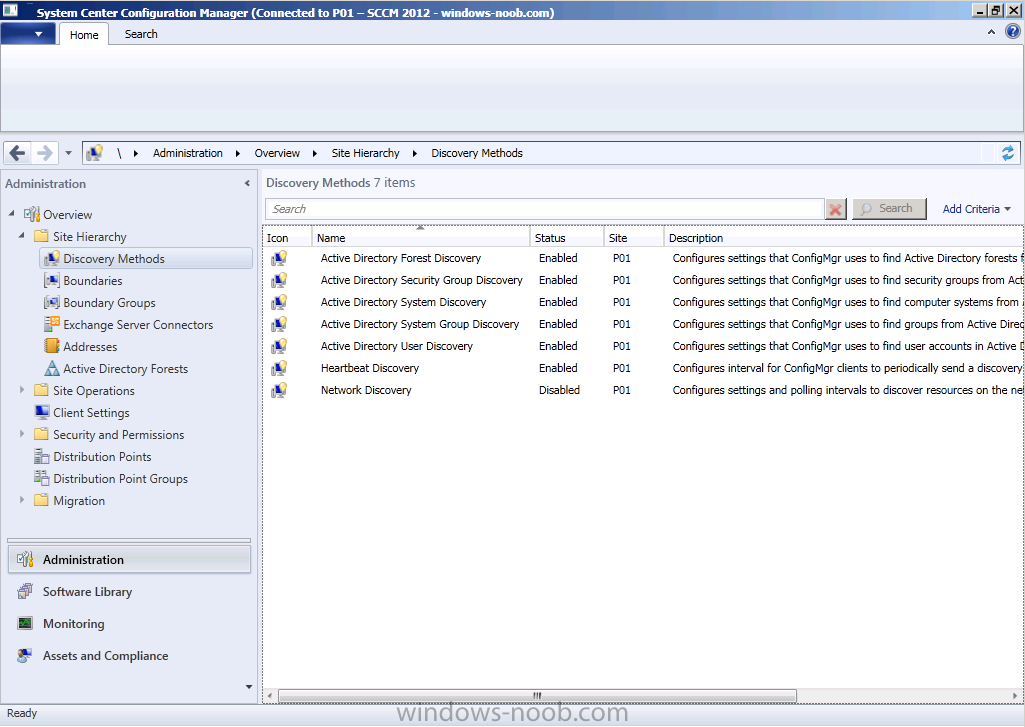
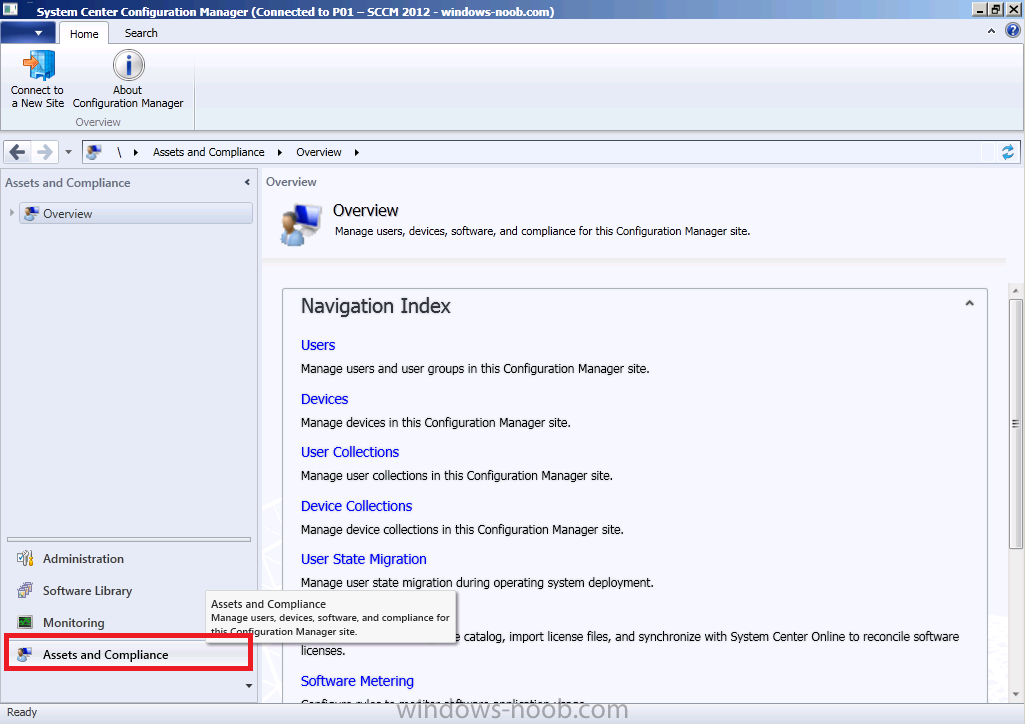
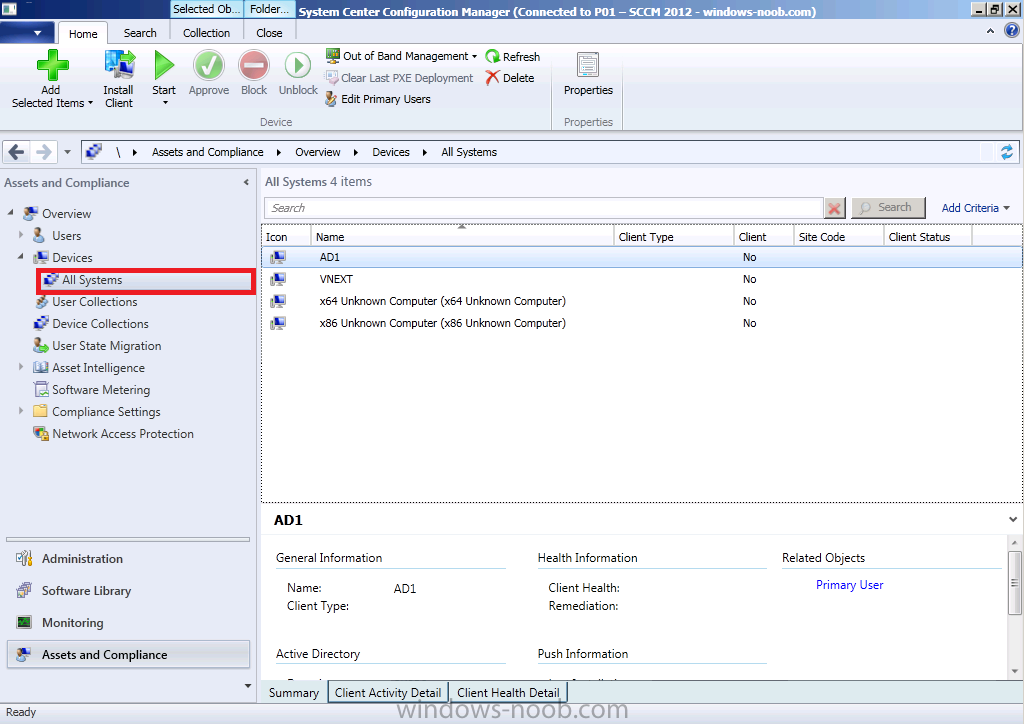
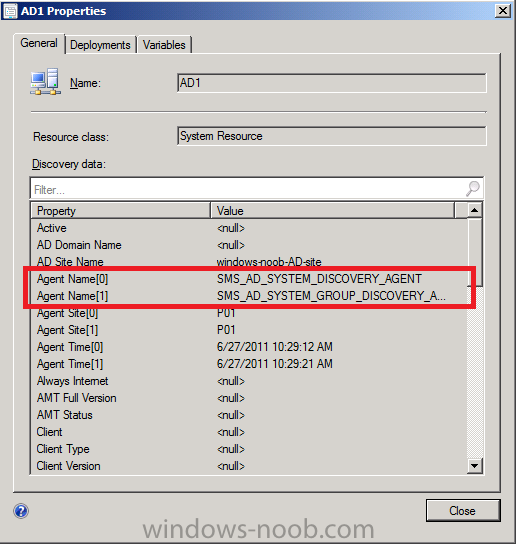
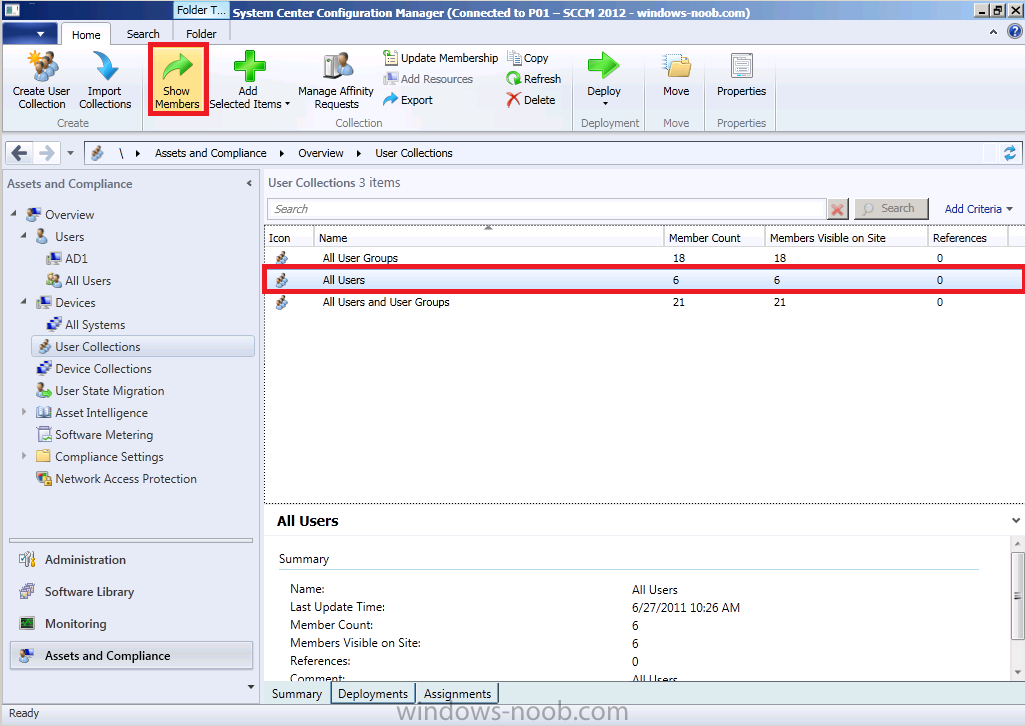
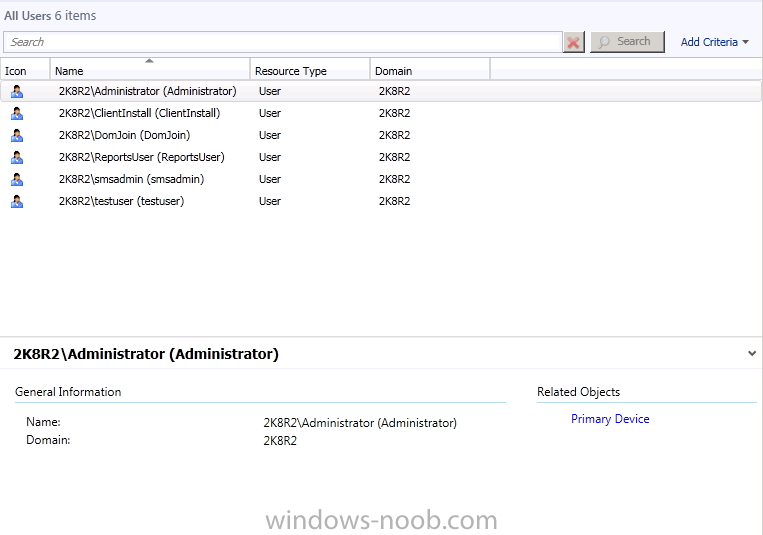
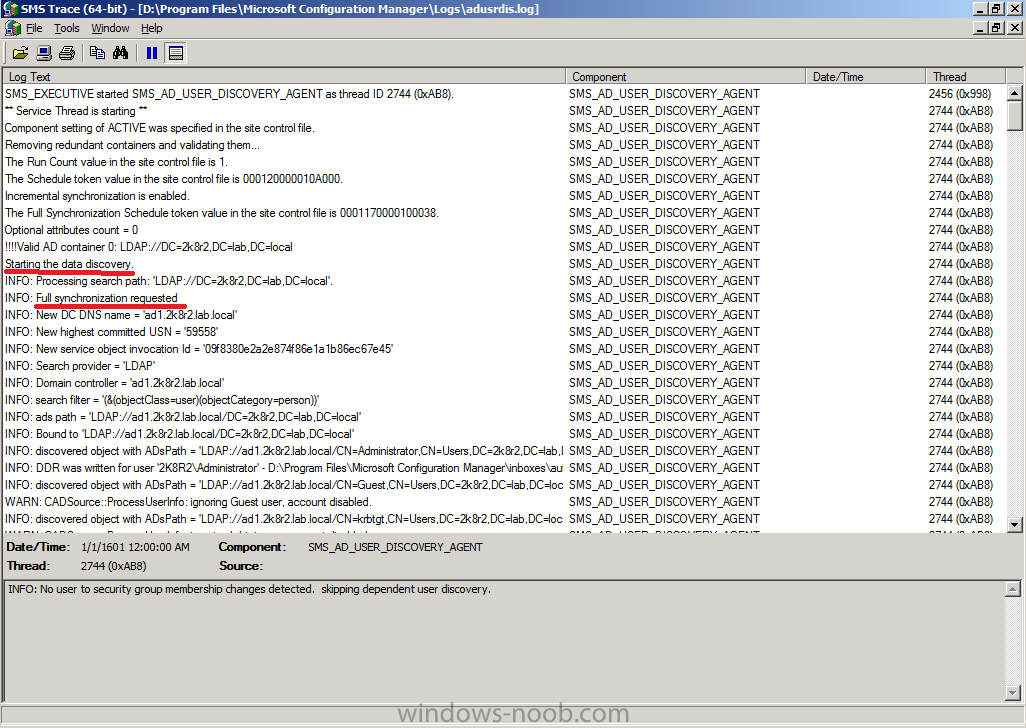
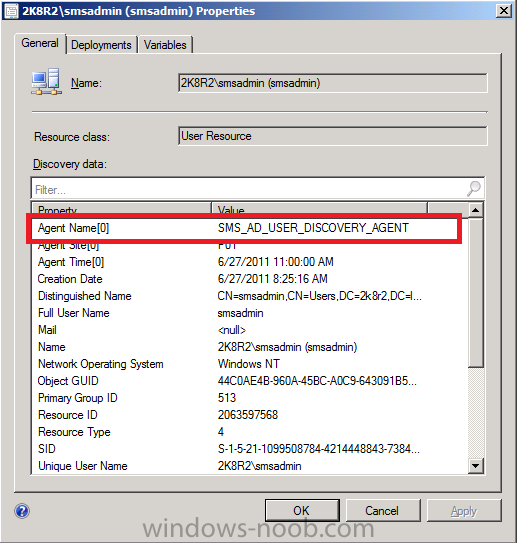
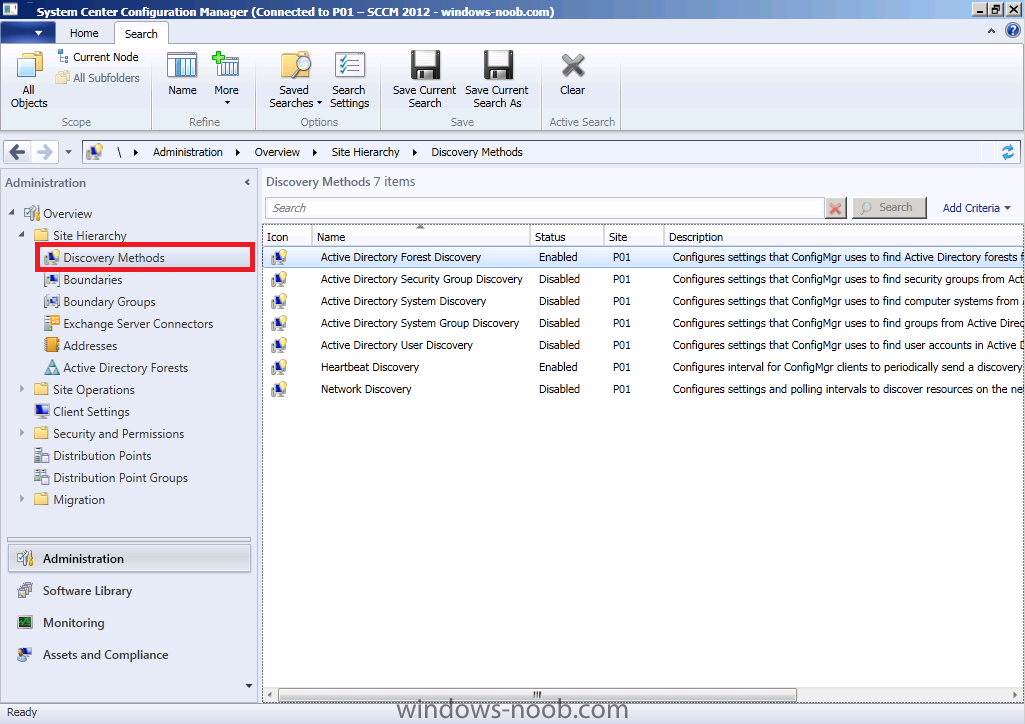
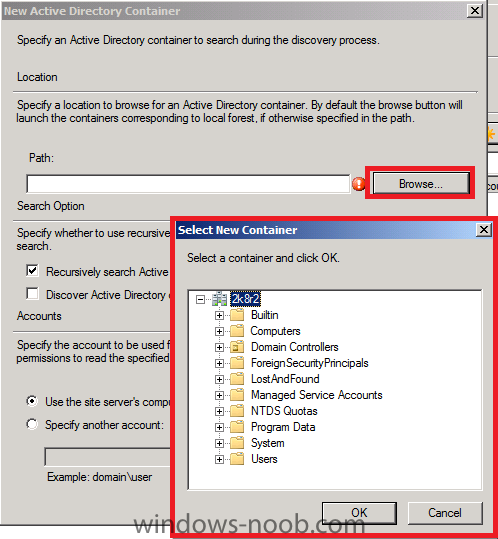
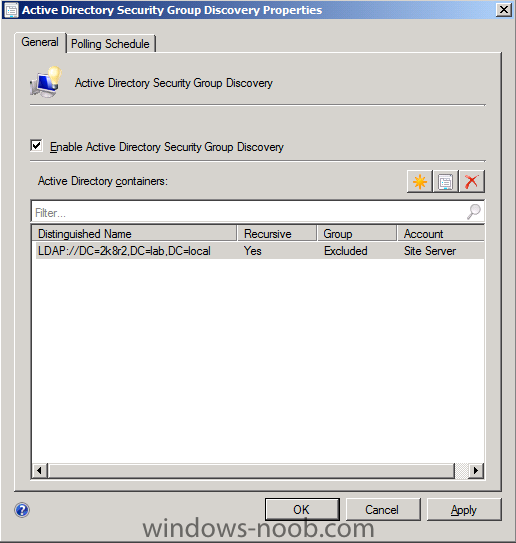
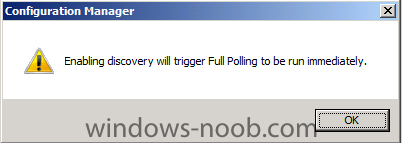
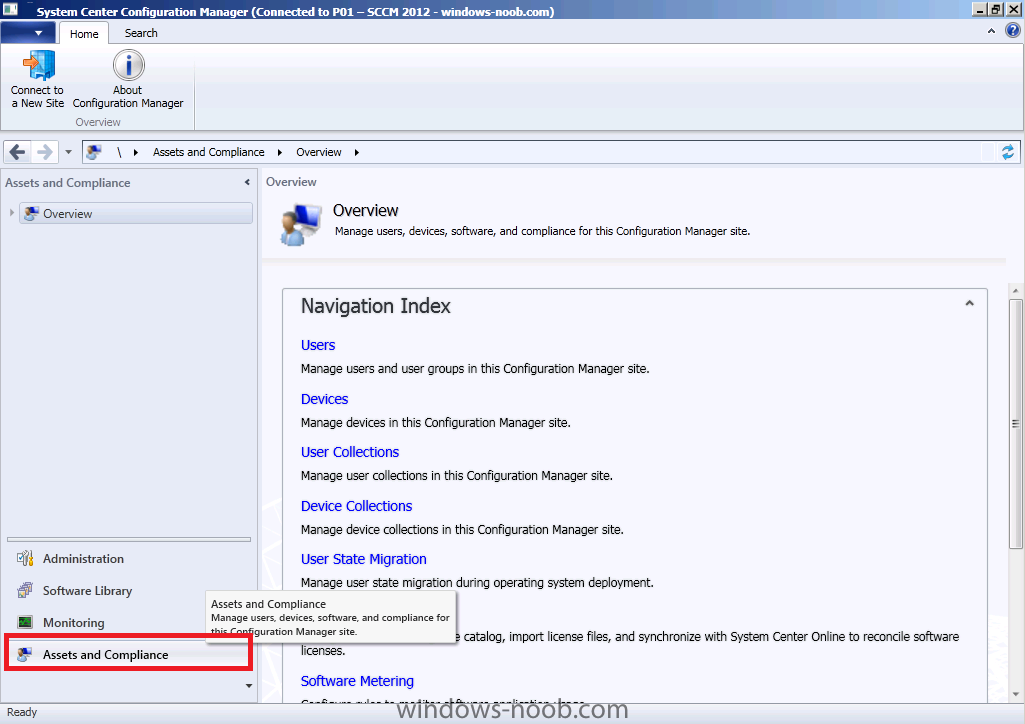
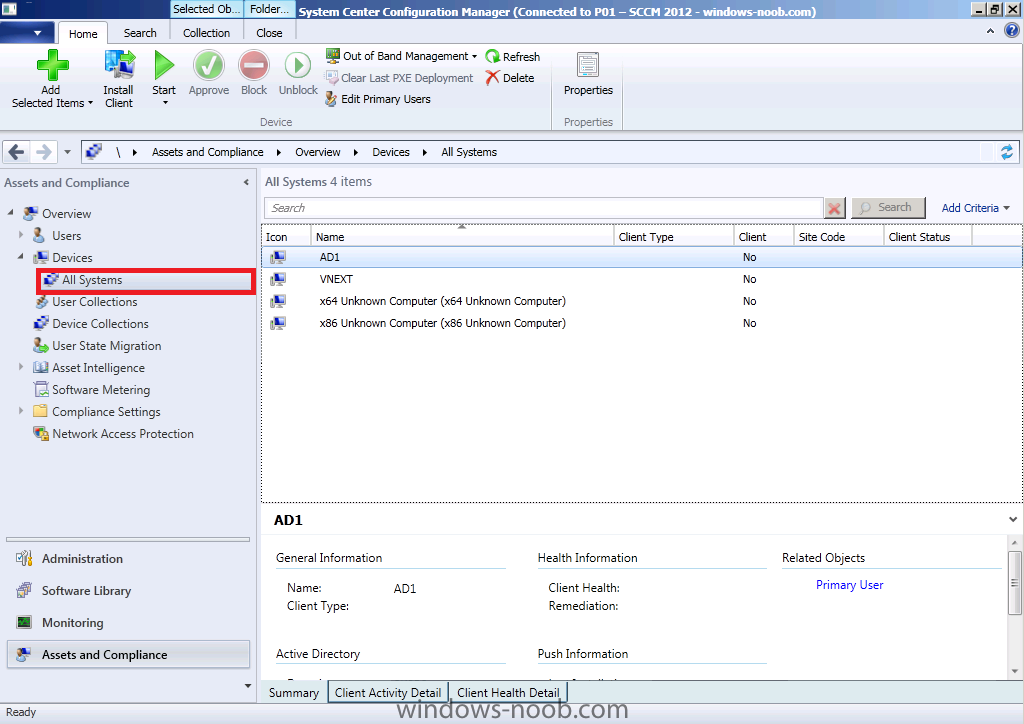
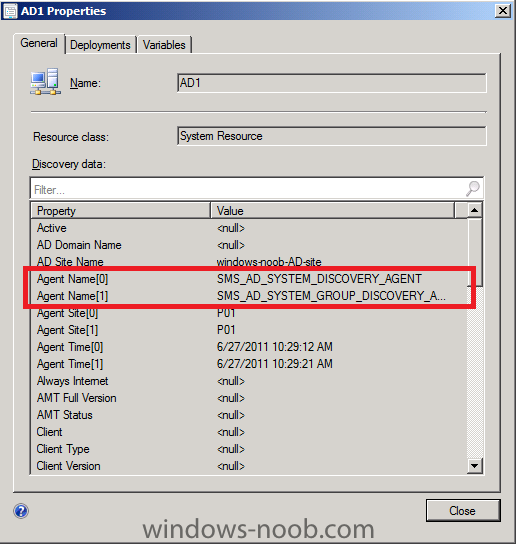
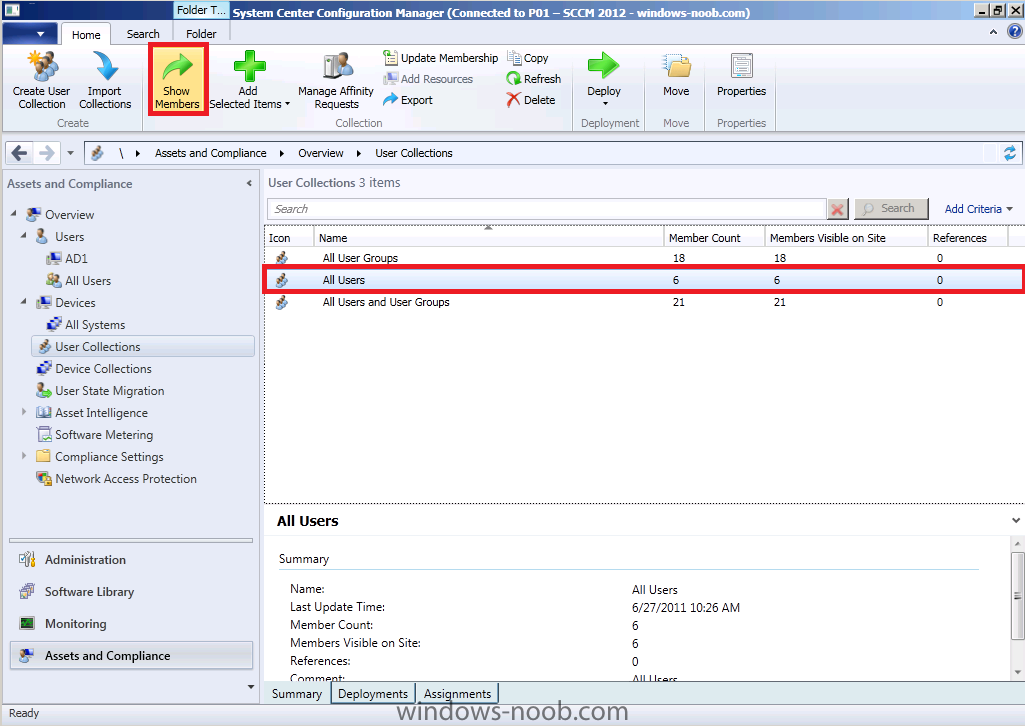
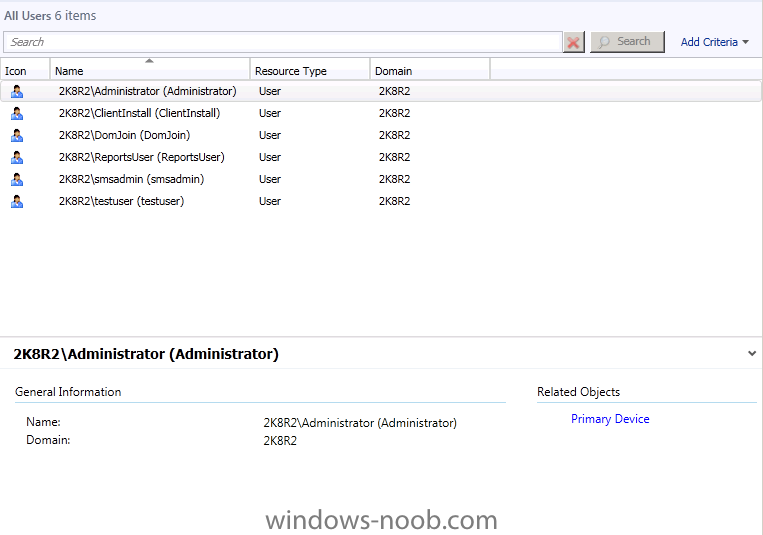
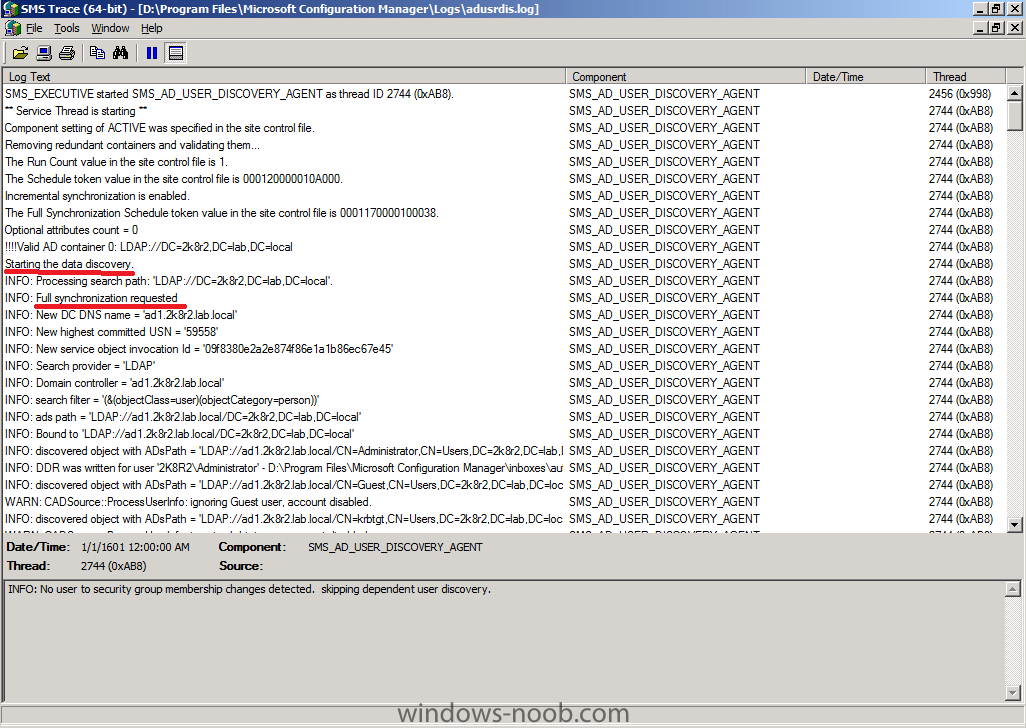
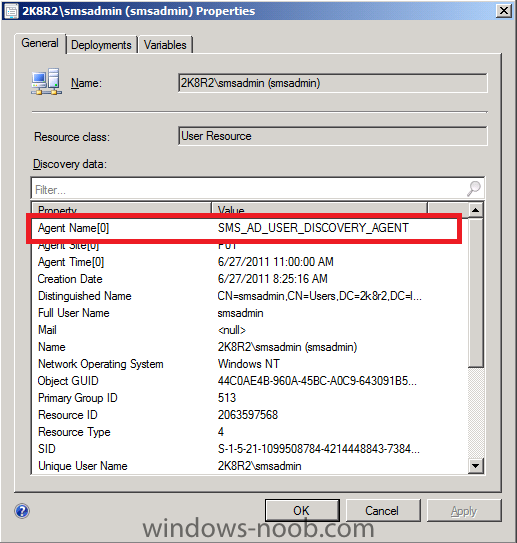
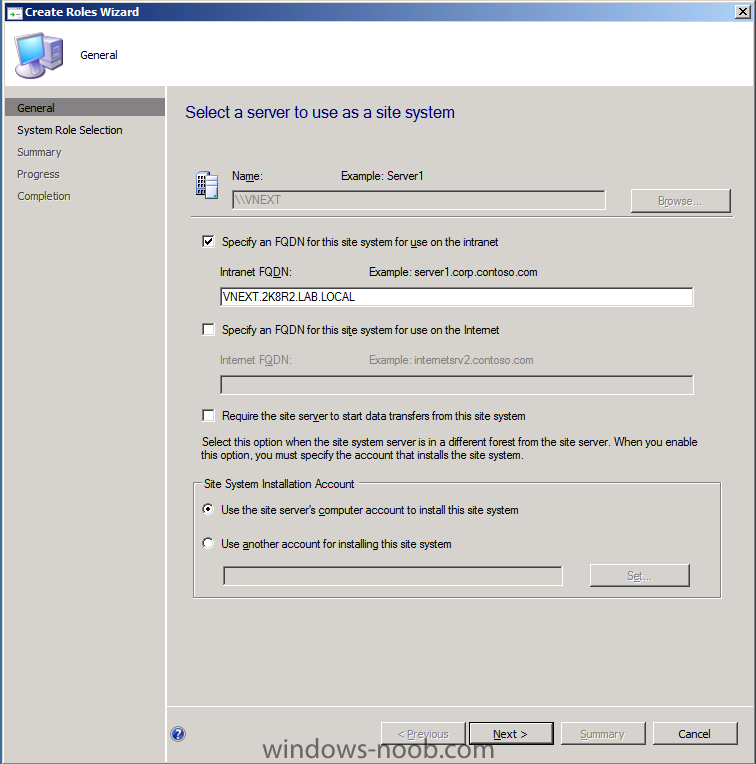
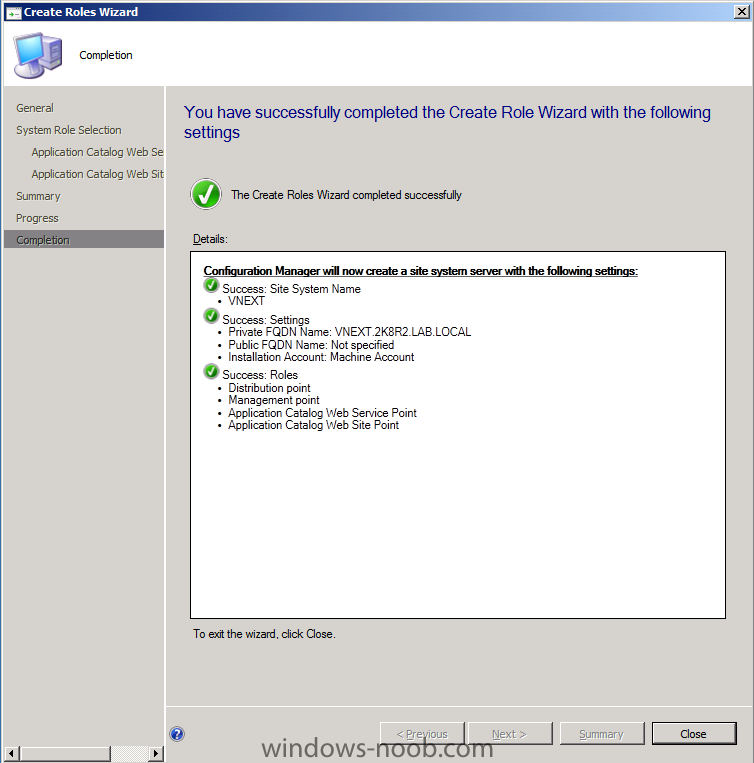
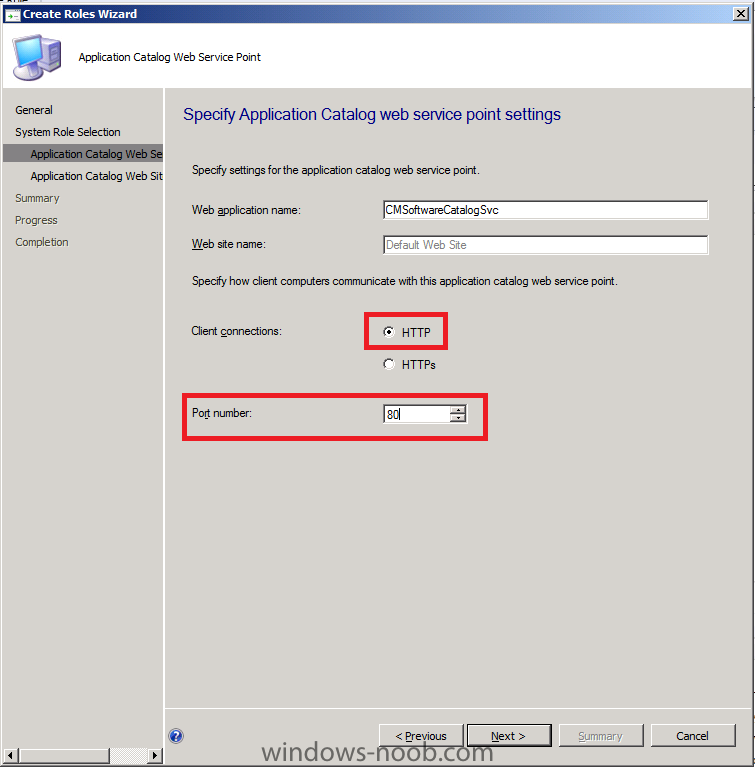
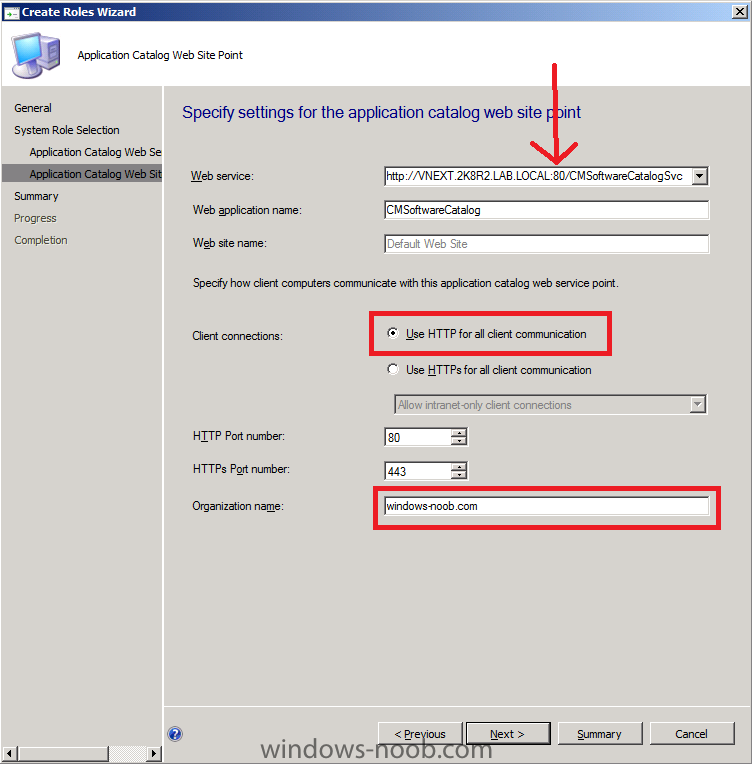
In Part 1. of this series we Installed vNext, in Part 2 we started to configure it. In this part we will continue configuring Beta 2 by enabling Active Directory discovery methods, adding some site system roles, configuring the computer client agent and client push settings and finally doing a manual client installation to verify it all works. Perform the following on the vNext server as SMSadmin Configuring Discovery Methods. For information of Planning Discovery methods for SCCM 2012, please refer to this page on Technet. Planning for Discovery in Configuration Manager 2012 - http://technet.microsoft.com/en-us/library/gg712308.aspx Active Directory Discovery Methods Step 1. Enable Active Directory Security Group Discovery Click on the Administration workspace, expand Overview, Site Hierarchy, Discovery Methods You can see that we have already enabled Active Directory Forest Discovery (Heartbeat Discovery is automatically enabled), so let's enable some additional discovery methods otherwise our computers (and users) will not appear in Assets and Compliance. Double click on Active Directory Security Group Discovery, place a checkmark in enable active directory security group discovery click on the yellow starburst to add an Active Directory container, once done click on Browse and select your chosen active directory container to search during the discovery process click Ok when done note that enabling discovery will trigger full polling to be run immediately Step 2. Enable the other three Active Directory discovery methods Repeat the above for the remaining discovery methods Active Directory System Discovery Active Directory System Group Discovery Active Directory User Discovery The following Discovery Methods should now be Enabled Step 3. Verify that discovery is working In the console, click on Assets and Compliance Discovery of Computers Click on Device Collections, then click on All Systems, you should now see both AD1 (was previously missing) and the vNext server listed. Double click on AD1 (your Domain controller computer) and you should see details about the system including discovery details (it was discovered using Active Directory System Discovery and Active Directory System Group Discovery). Click on Close. Discovery of Users Click on User Collections in the left pane, Click on All Users and in the Ribbon, click on Show Members the contents of All Users are displayed (these are the users we created in Part 1 of this guide) Double click on a user and you'll see the discovery information listed, including discovery type (sms_ad_user_discovery_agent) click ok to Close. Using logs to verify discovery In addtion to the visual verification we did above, you can browse the Logs folder of where you installed SCCM 2012, eg: D:\Program Files\Microsoft Configuration Manager\Logs and find the following discovery logs adforestdisc.log adsgdis.log adsysdis.log adsysgrp.log adusrdis.log these log files can be opened with Trace64 and you'll see lots of interesting info in there such as starting the discovery and what type of discovery it is (the below sample screenshot is from the first discovery after enabling Active Directory User Discovery from adusrdis.log) Step 4. Add the Catalog Web Service Point and Catalog Web Site Point roles We will be setting some options in the next step which require certain roles to be installed, so in Administration, expand Site Operations, Servers and Site System Roles, right click on our site and choose Add site system role create roles wizard appears, click next select the following roles Application Catalog Web Service Point Application Catalog Web Site Point and click next accept the following values for the application catalog web service point, make sure to manually change port 443 to port 80. add your organization name to the application catalog web site point, verify it says port 80 and not 443 click next at the summary and review the completion


-
SCCM configMgr Multicast service point. Critical.Help.
anyweb replied to clivebuckwheat's question in Troubleshooting, Tools, Hints and Tips
i'm curios what your component logs state look like, is the management point or anything else failing ? -
Client Agent Setttings
anyweb replied to Reddy's's question in Deploy software, applications and drivers
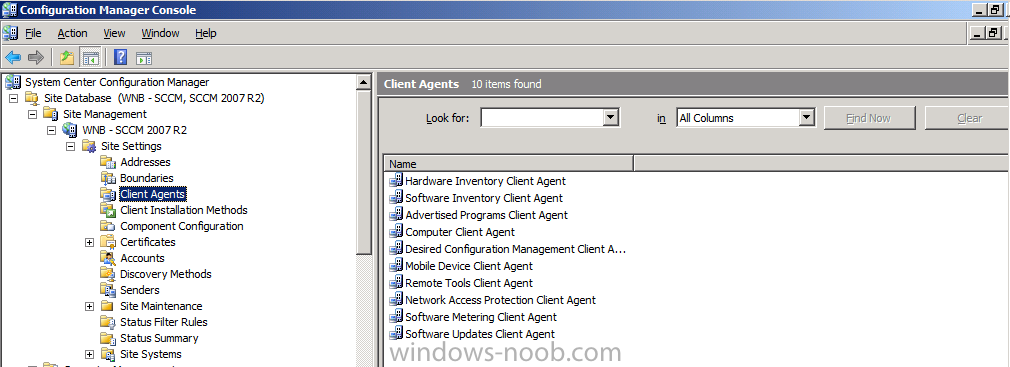
Assuming you are talking about SCCM 2007, expand your Site Database, Site Management, XXX site code, Site settings, Client Agents, you will see a list of each client agent in there and can configure each one separately.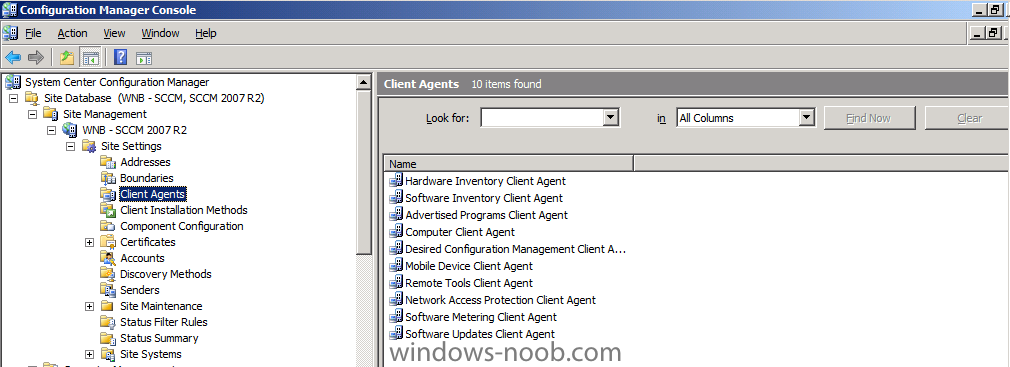
-
is R2 or R3 installed ? if so enabled Unknown Computer support and then advertise the same task sequence to the unknown computers collection, if not, you can use deploy collections and import the computer into the respective collection, is the computer getting an IP address in winpe ? check ipconfig and see what it says
-
please post the ccmsetup.log file
-
0x80070002 when deploying any software as OSD task
anyweb replied to glen8's question in Deploy software, applications and drivers
before it reboots press F8, bring up a command prompt and type ipconfig, do you have a valid ip address ?