anyweb
-
Posts
9276 -
Joined
-
Last visited
-
Days Won
371
Everything posted by anyweb
-
well sp2 is the level you need to be at to support deploying Windows 7 and Windows server 2008 R2, sp1 is no longer supported, sp2 contains the latest WAIK as part of the install also, cheers ! niall
-
What if I update my boot.wim images with CCTK ? for those of you wanting a task sequence to enable bitlocker on Dell's in a bare metal (new computer scenario) after updating your boot.wim images using the CCTK then use the following, bitlocker when using CCTK enabled boot wims.xml
-
what version of SCCM are you using ? and what version of WAIK is installed ?
-

Looking for MSI Packaging Tool
anyweb replied to Boggot's question in Deploy software, applications and drivers
I'd recommend you look at Wise Package Studio, but it's not free, cheers naill -
is this computer domain joined ? in the configmgr actions tab on the client how many actions are listed ? on your site server are the component logs complaining about anything in relation to awebsvc or portal ?
-
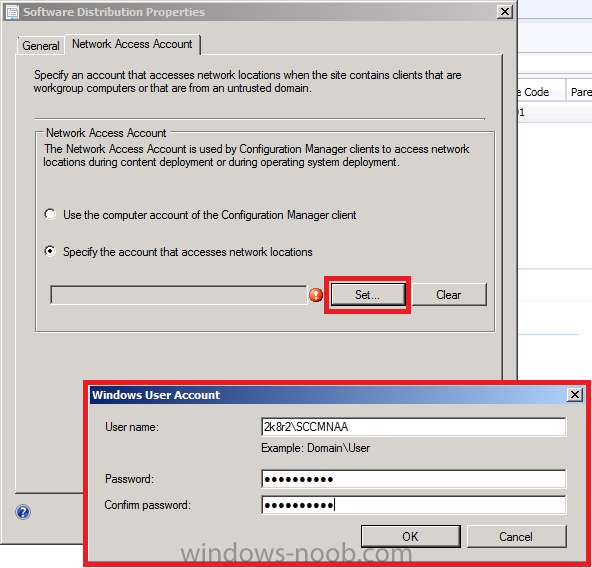
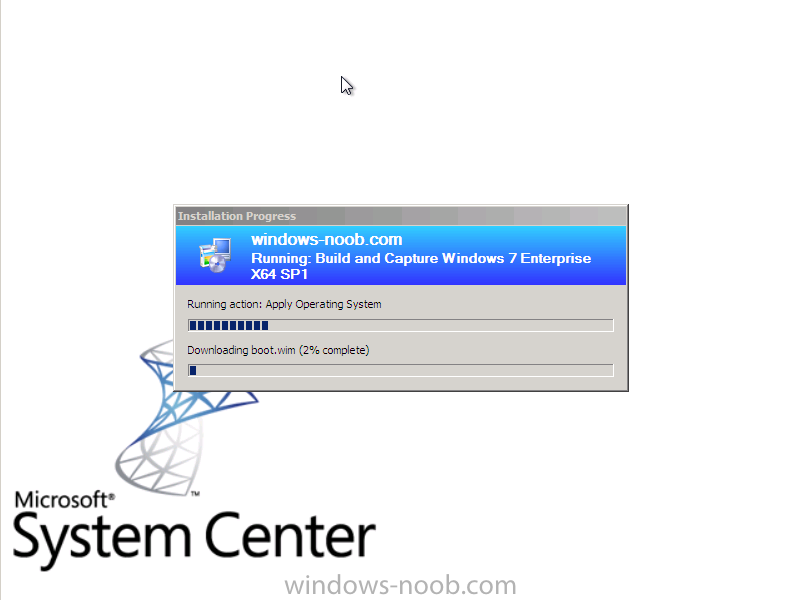
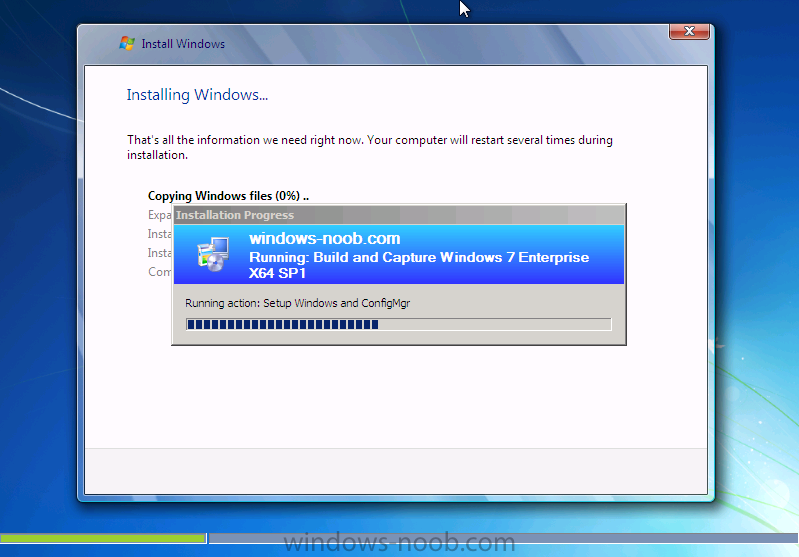
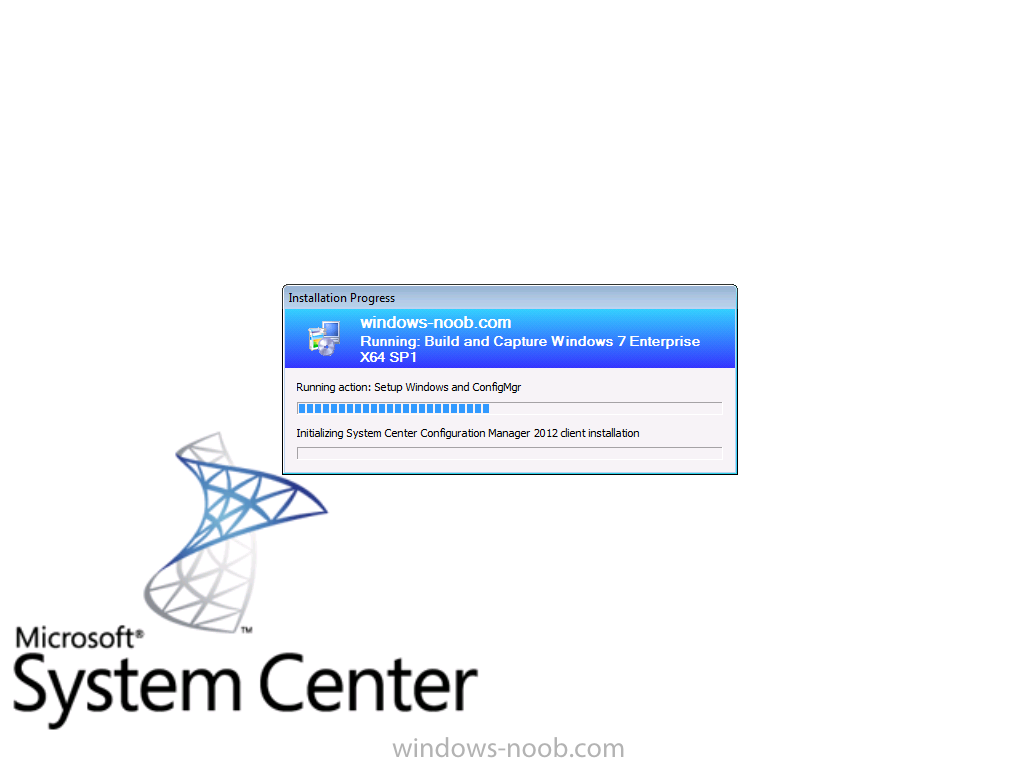
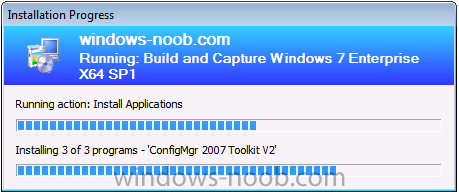
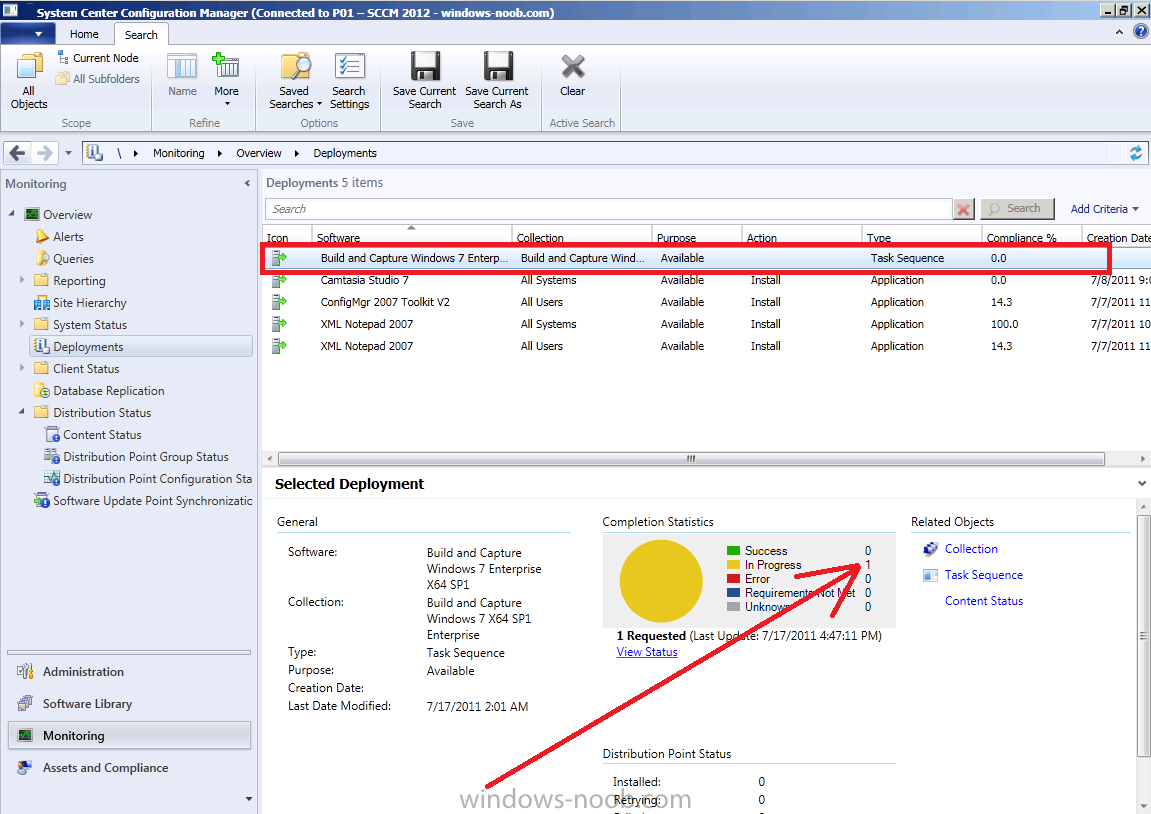
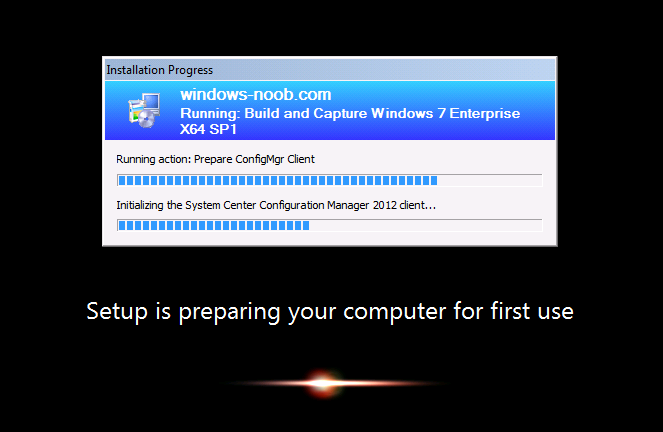
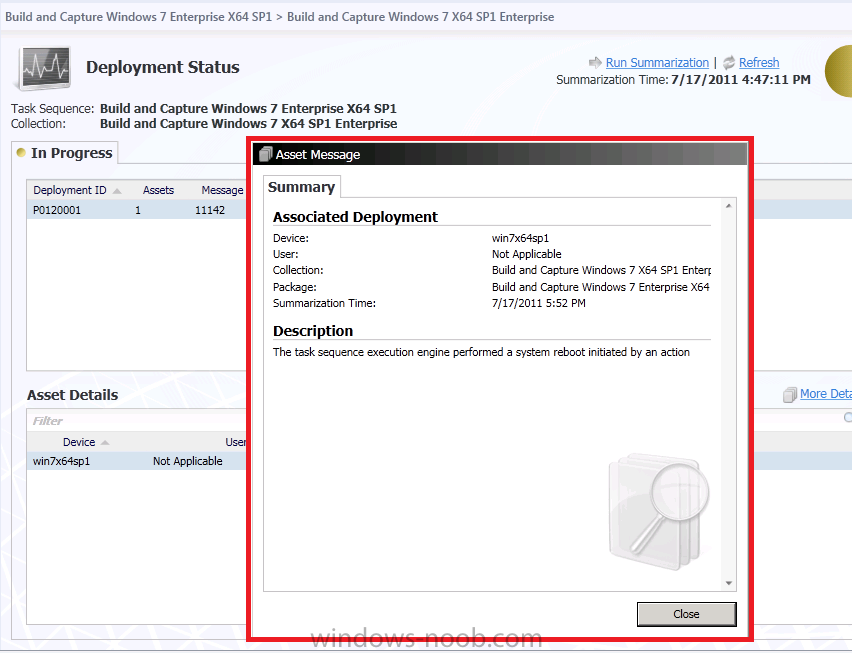
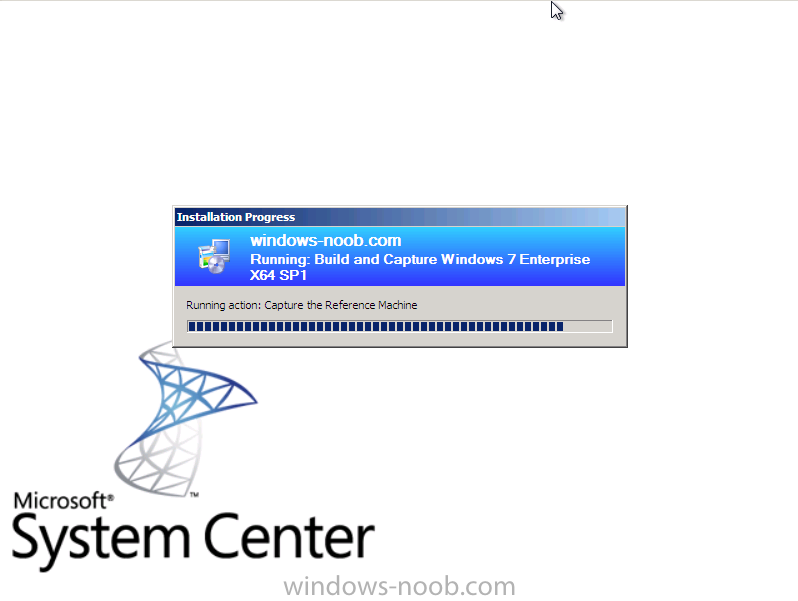
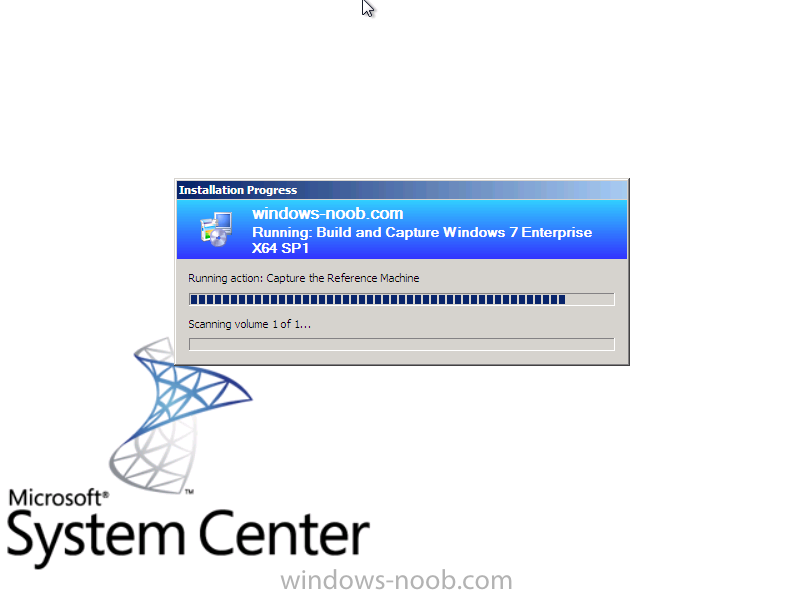
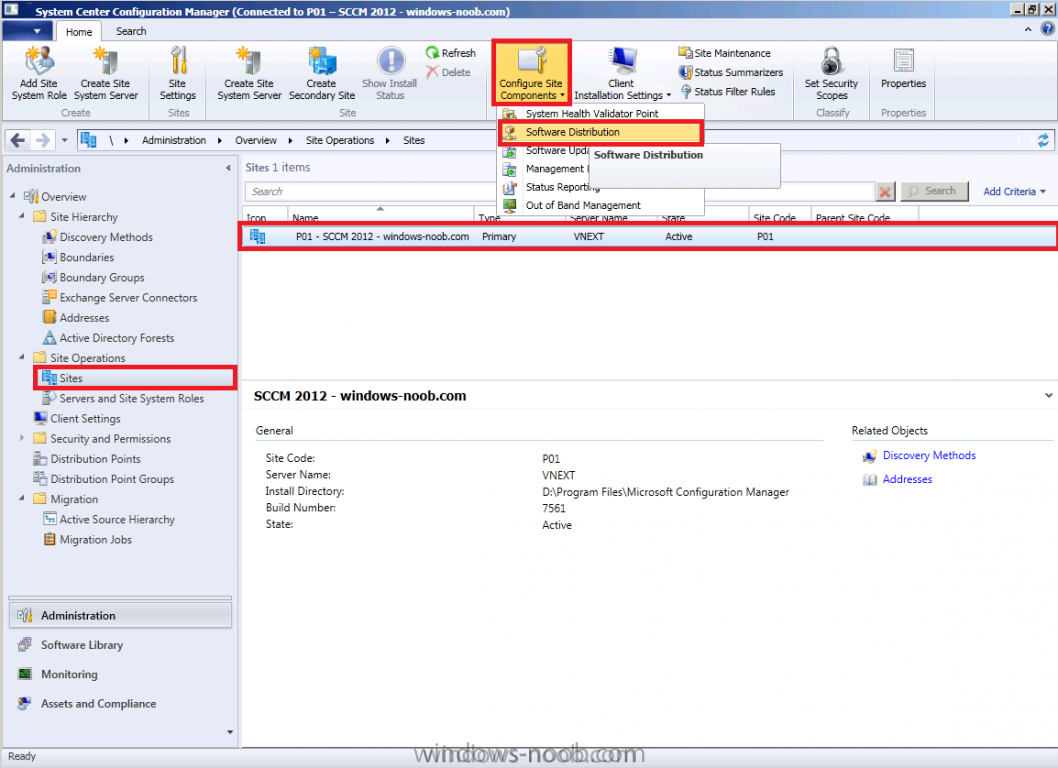
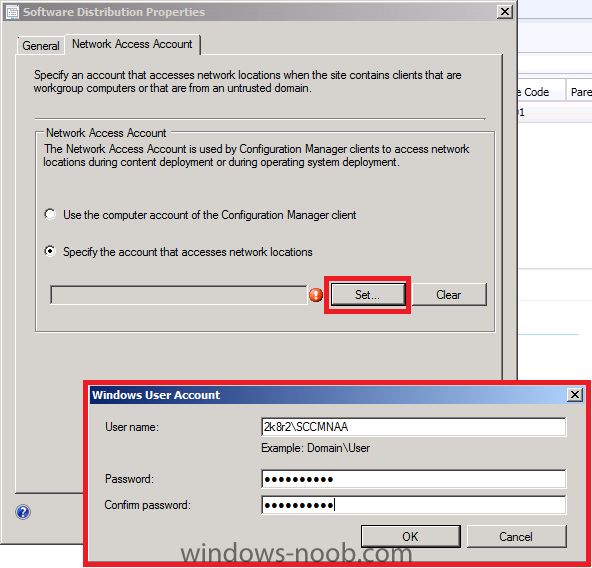
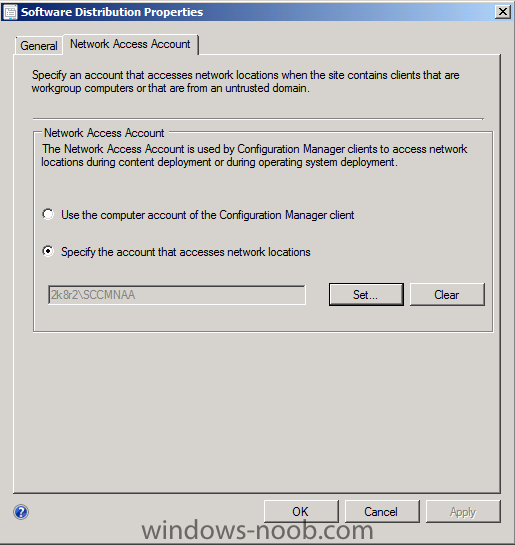
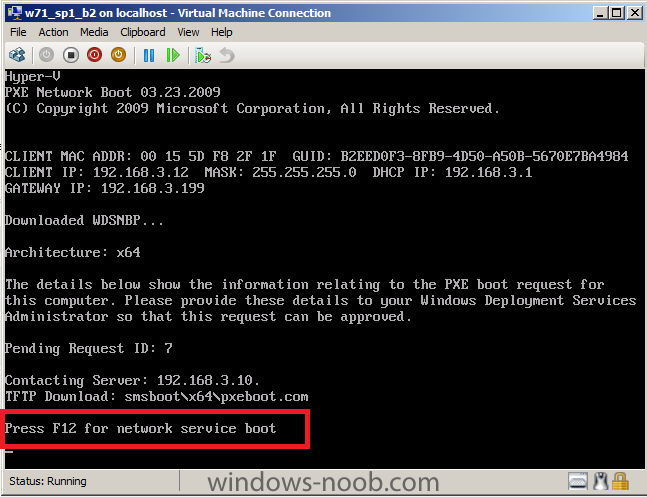
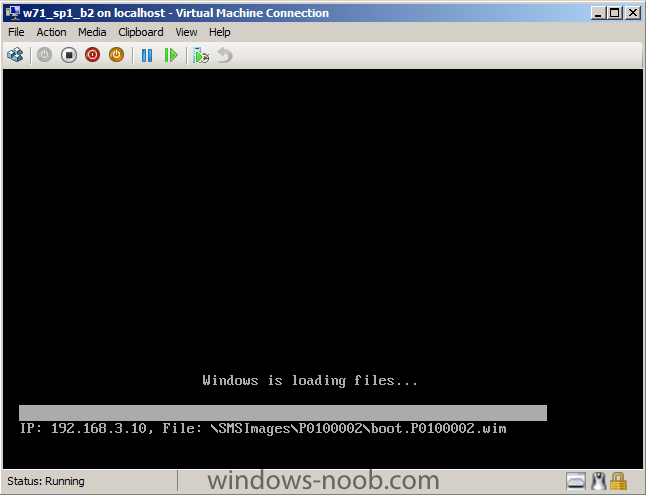
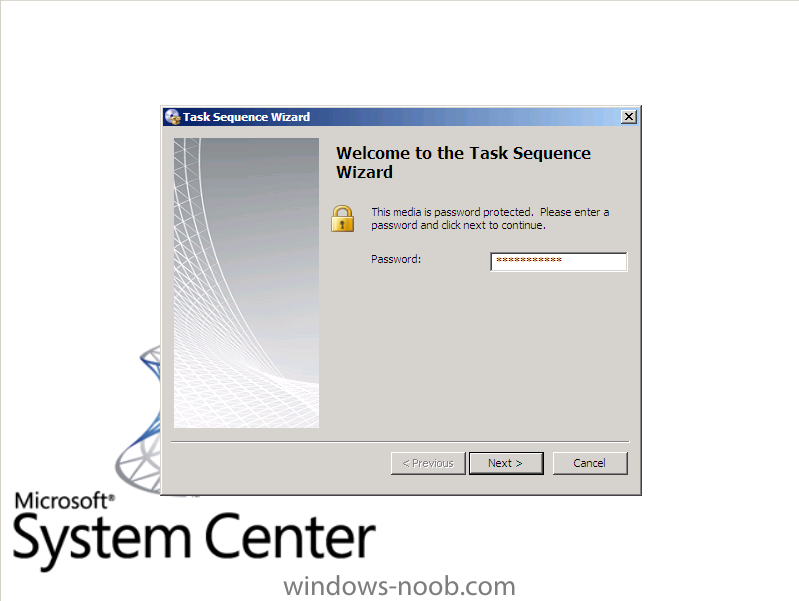
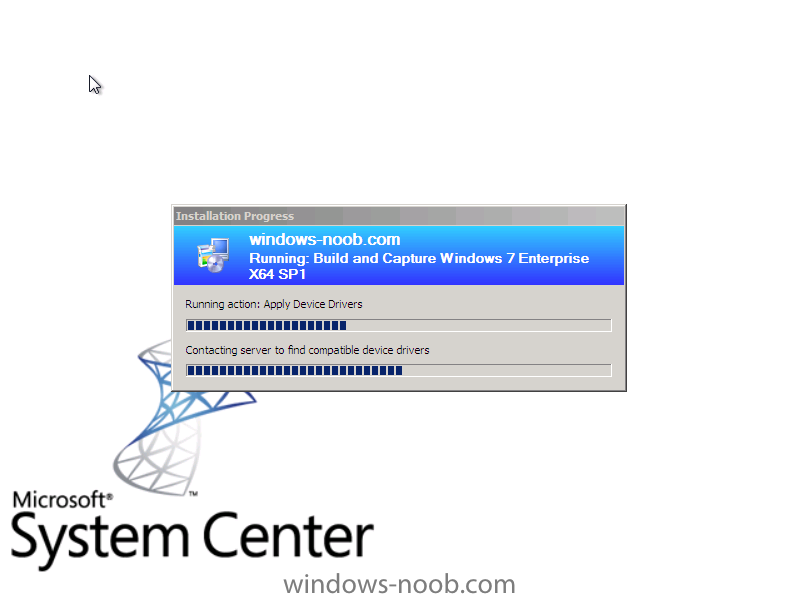
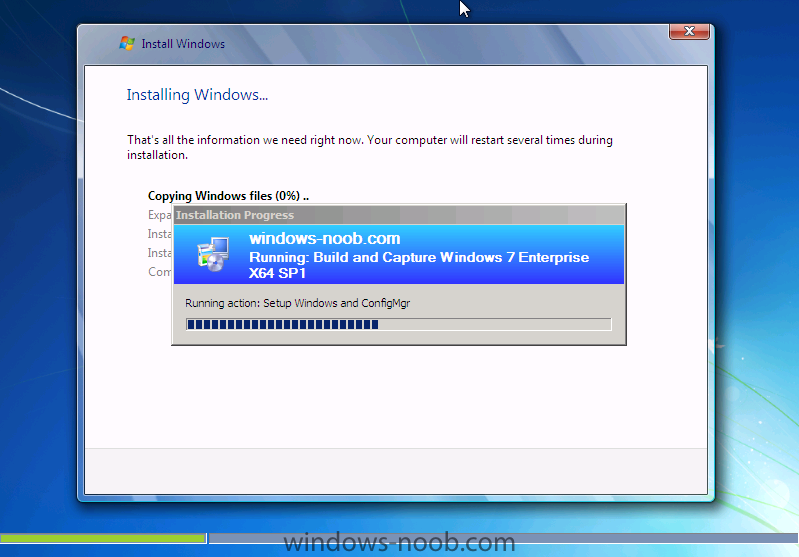
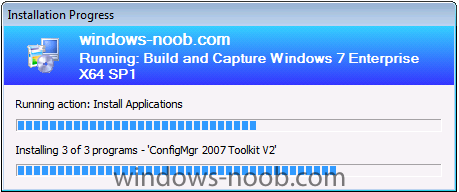
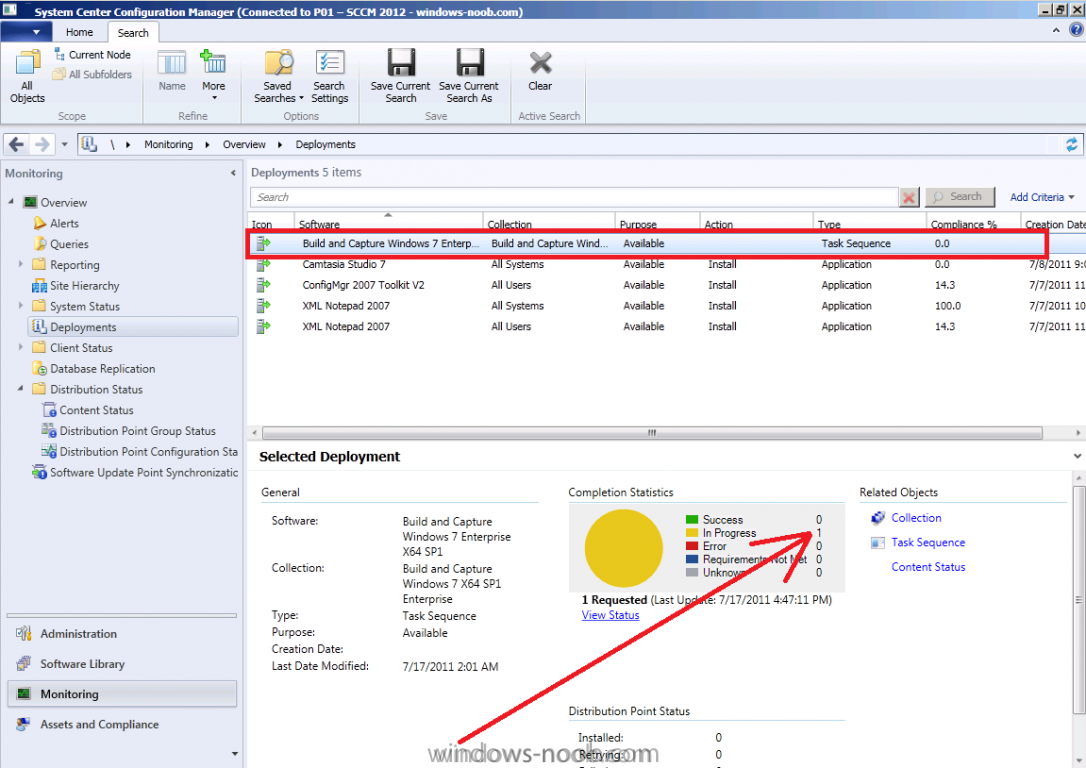
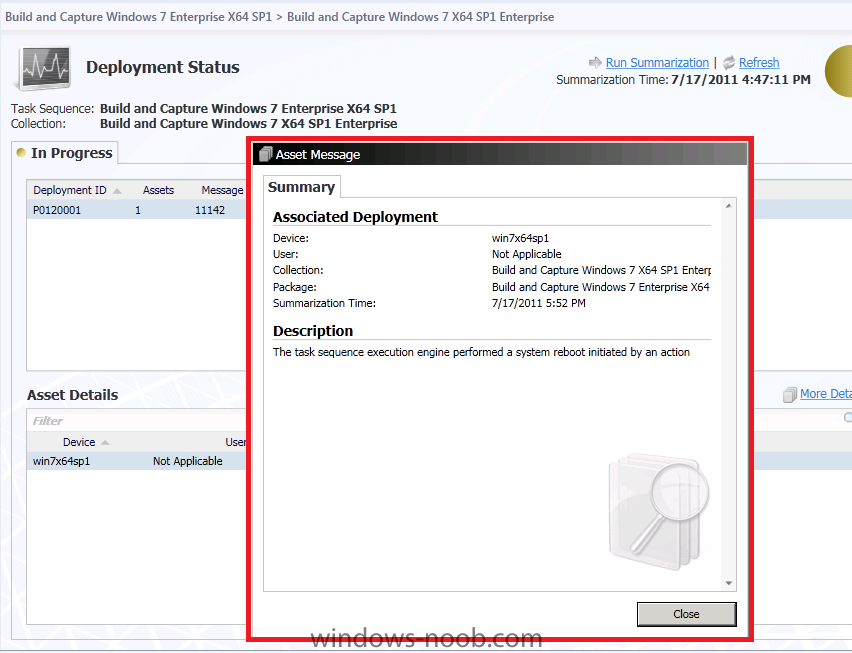
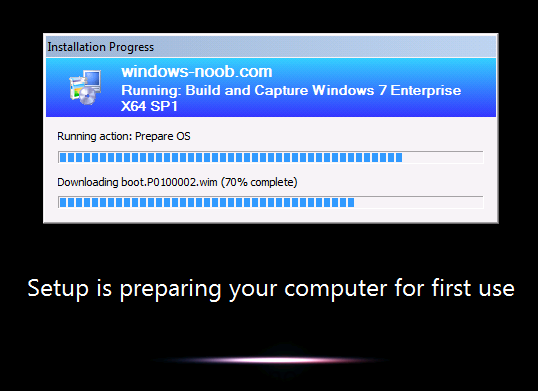
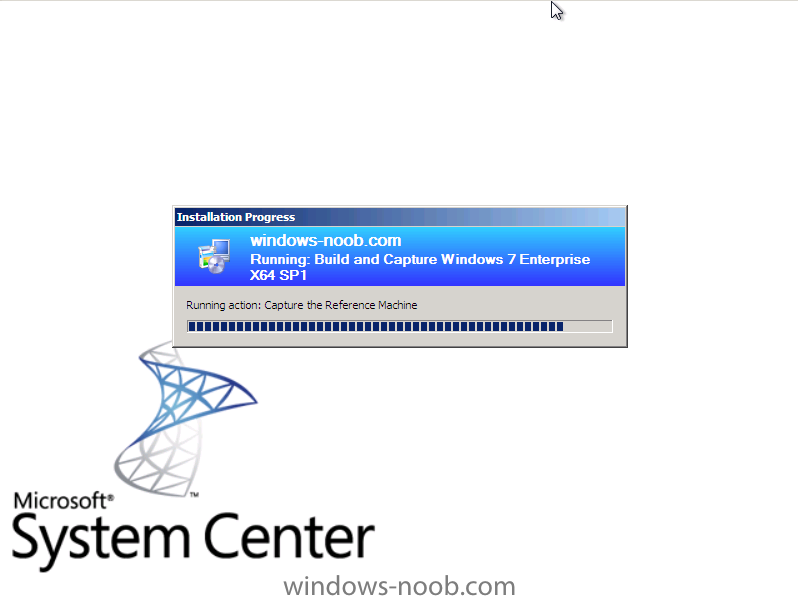
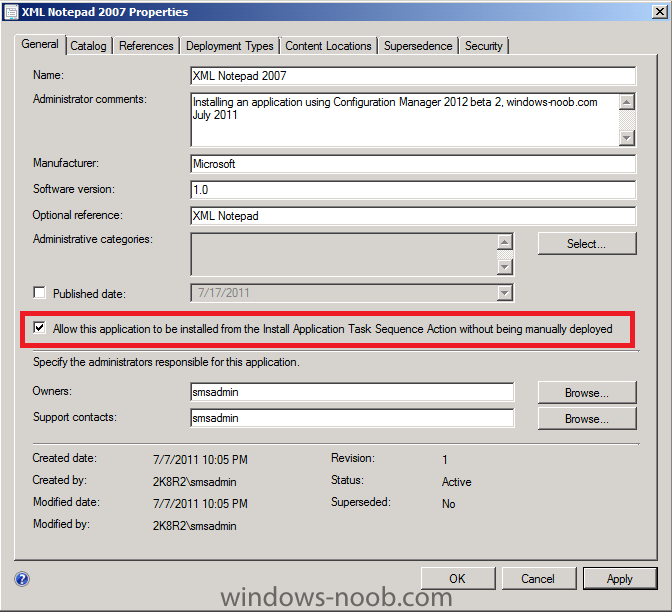
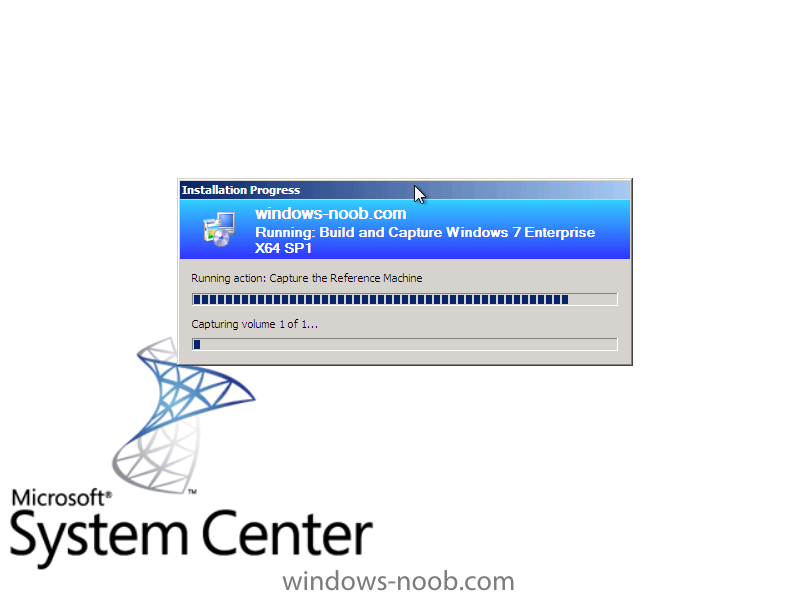
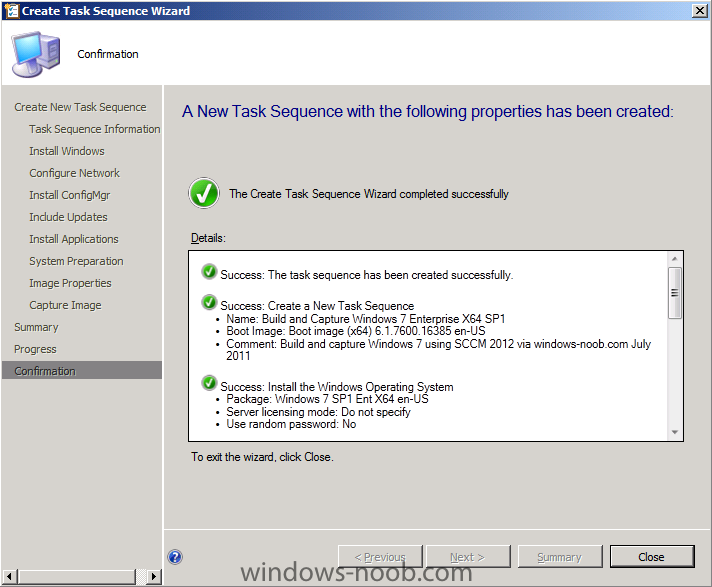
In Part 1. of this series we Installed SCCM 2012, in Part 2 we started to configure it. In Part 3, we configed Beta 2 some more by enabling Active Directory discovery methods, adding some site system roles, configuring the computer client agent and client push settings and finally doing a manual client installation to verify it all worked, in Part 4 we looked at installing an application using Application Management and the Software Catalog and the Software Center features of SCCM 2012, and in Part 5, we added the FSP, SLP, SMP, SUP. In Part 6 we got our SCCM 2012 server ready for Deploying Windows 7 Enterprise SP1 so that we can start deploying some Windows 7 clients to enhance our LAB, then in Part 7 we created a Build and Capture Task Sequence and deployed it to our Build and Capture collection. Now we will configure the Network Access Account because it is needed during the Build and Capture task sequence to access network resources (the Local System Account won't have access to these network resources and if you have not configured your Network Access Account you'll see Authentication failure 401 error messages in your SMSTS.log file). In addition to configuring the Network Access Account, we'll PXE boot our Virtual Machine and observe the Build and Capture process, we will also look at how we can monitor our Build and Capture Deployment while it's happening on our SCCM 2012 server. Step 1. Configure the Network Access Account Perform the following on our vNext server as SMSADMIN. In the ConfigMgr console, select Site Operations, Sites and right click on our P01 site, choose Software Distribution (alternatively in the ribbon click on Configure Site Components, Software Distribution) when the Software Distribution window appears, click on the Network Access Account tab, and input your Network access account credentials, we will use the user called SCCMNAA which we created in Part 1 of this series. click Apply Step 2. Boot our Virtual Machine We have already created a new VM for our Build and capture process, and now we will PXE boot it and observe the process. Press F12 when prompted the PXE boot process begins, windows is loading files... we get prompted for the PXE password click next, and the list of available task sequences appears select our previously created Build and capture task sequence and click next after partitioning and formatting the disc, the apply operating system step begins... Apply Windows Settings, Apply Network Settings, Apply Device Drivers... and it starts to Setup Windows the next step involves rebooting the computer which allows Windows setup to continue (adding drivers etc) before another reboot...and then setting up the Configmgr client, followed by installing updates and then applications TIP: If your applciations are not installing check the following setting in your application allow this application to be installed from the Install Application Task Sequence Action without being manually deployed We have not created any Update deployments so nothing will happen in the Install Updates step (we'll come back to that later in this series). After it's done with the Applications, it will continue on to another reboot Tip: while you are waiting you can click on Monitoring, Deployments, select our Build and Capture Task Sequence to see an overview of the Deployment in process, click on View Status followed by More Details to get more info about what is happening Meanwhile, the task sequence continues by Initializing the Configuration Manager 2012 client *slow* before doing the Prepare OS step and finally after rebooting into WinPE, we being capturing our Windows 7 X64 SP1 image, success ! if you entered your capture account correctly in the task sequence, then it'll start scanning volume one of one followed by the Capture itself, in the next part of this series, we'll deploy this captured image to another Virtual Machine. job done


-
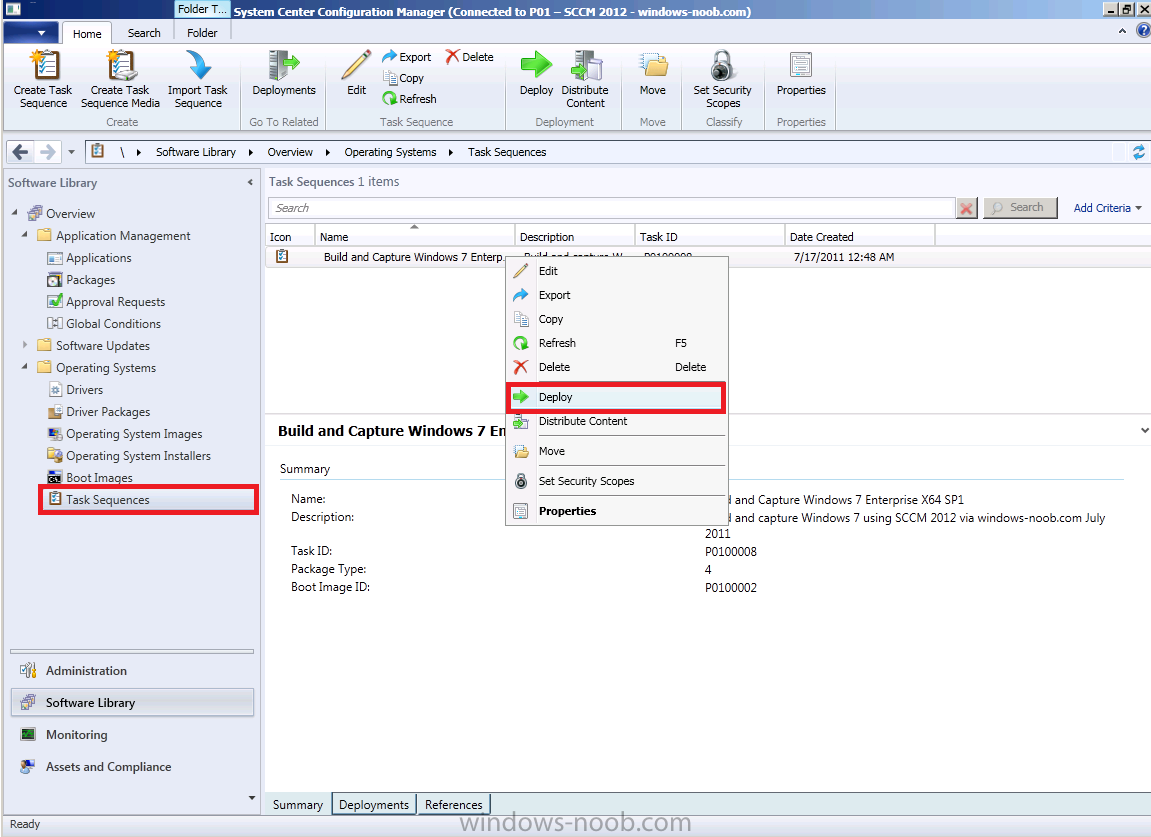
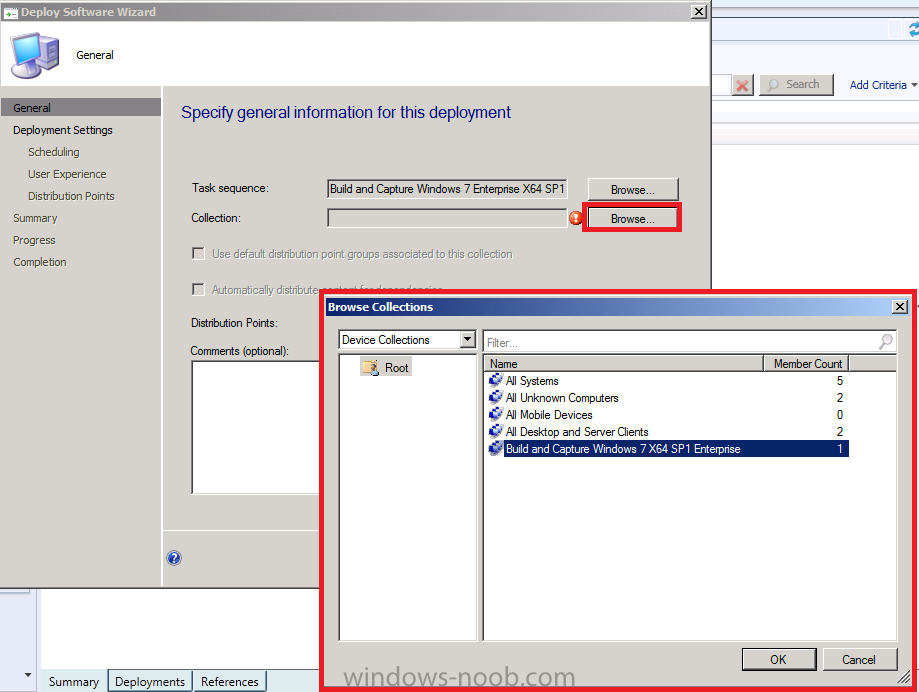
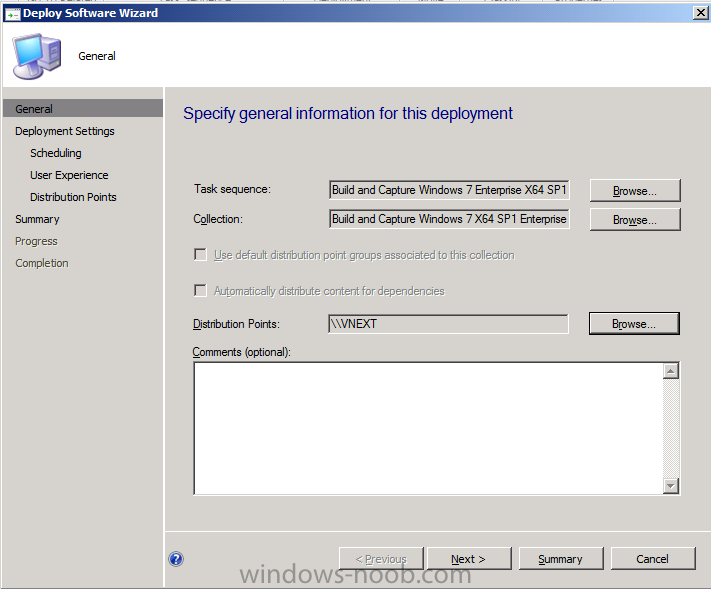
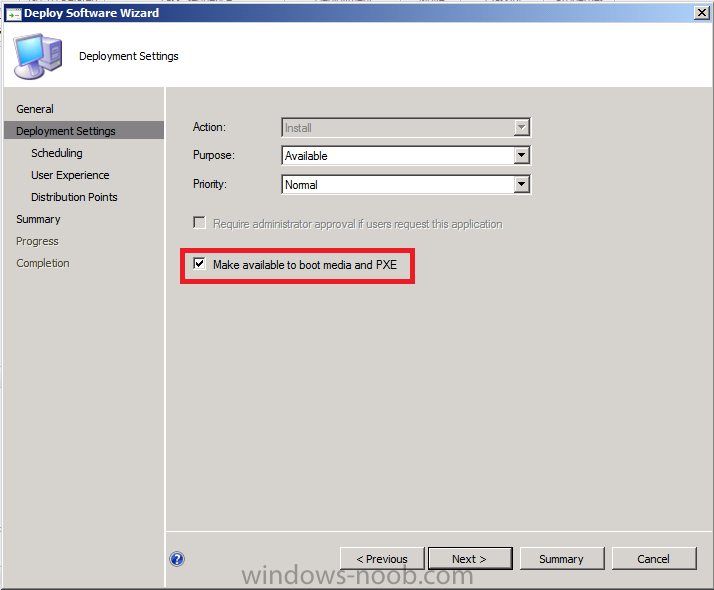
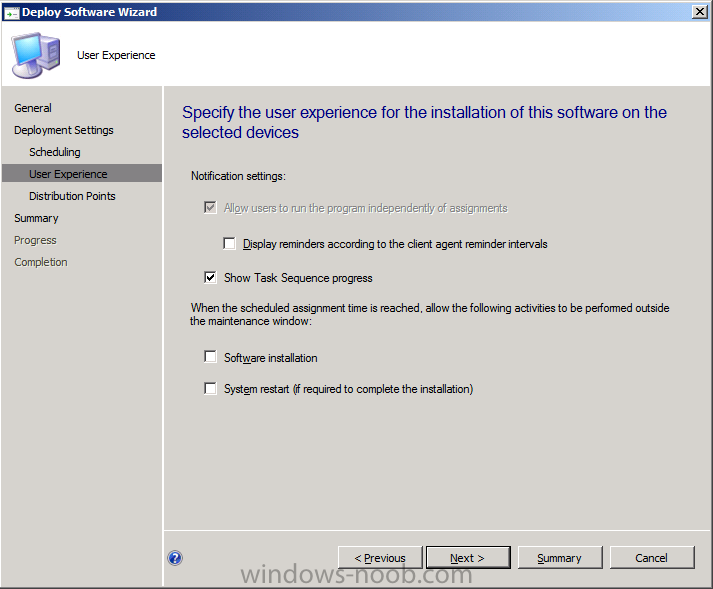
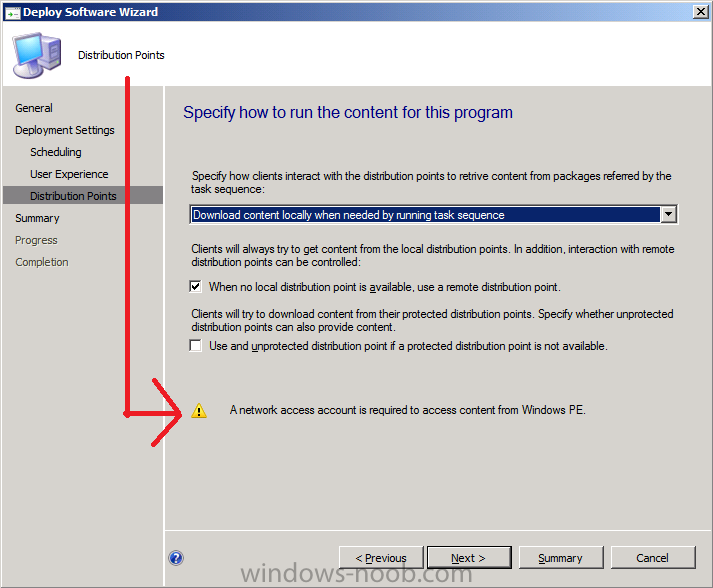
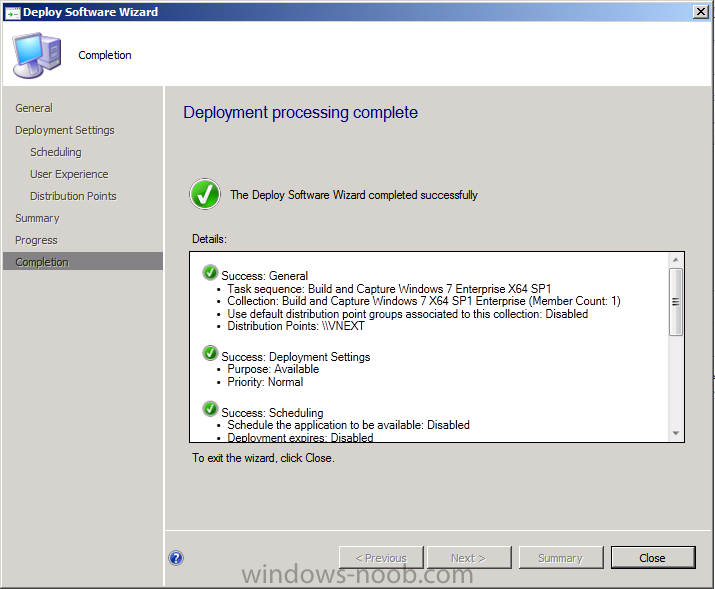
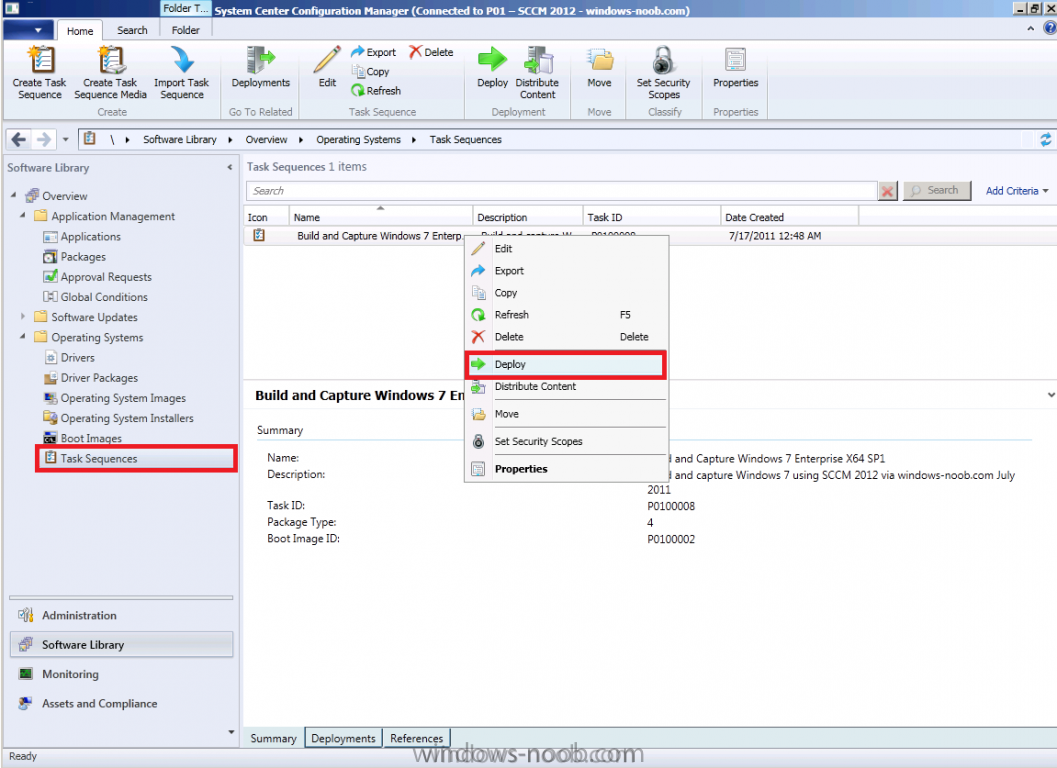
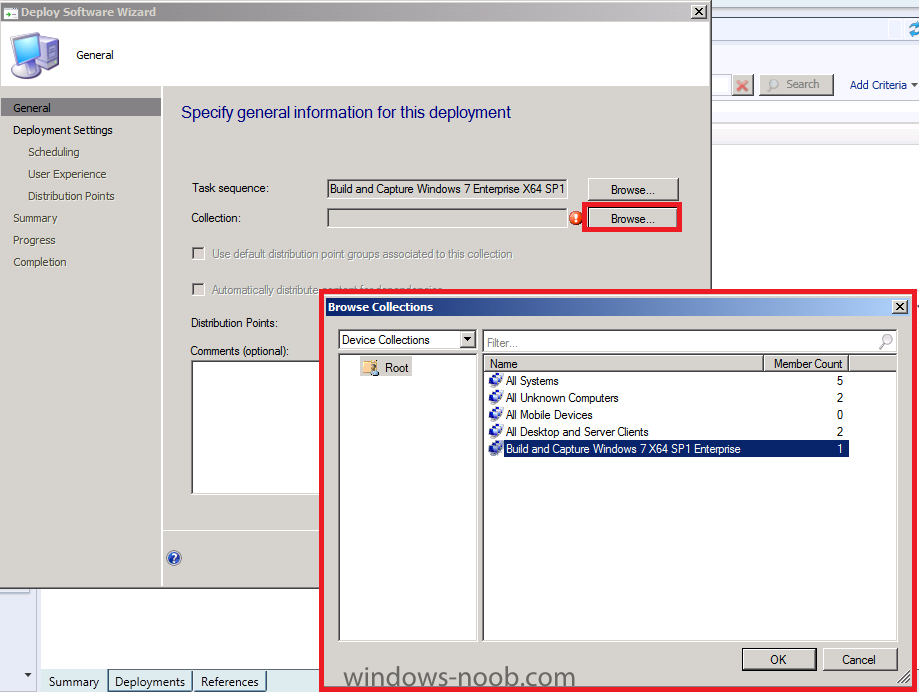
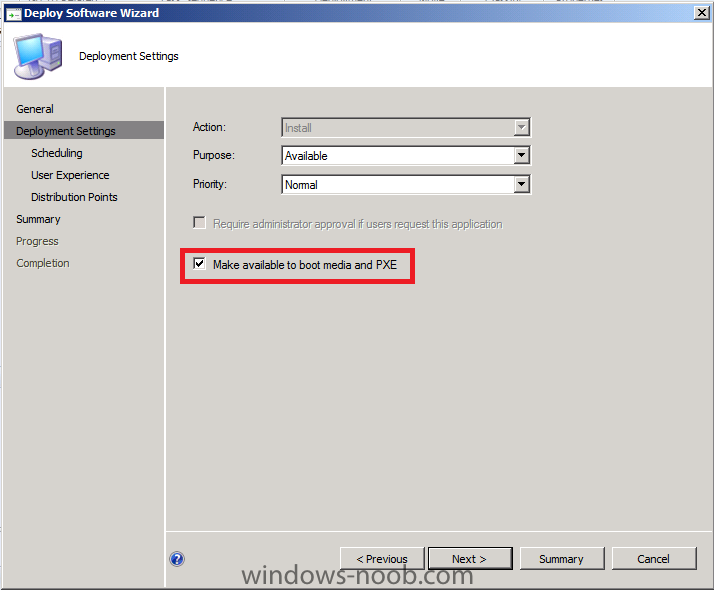
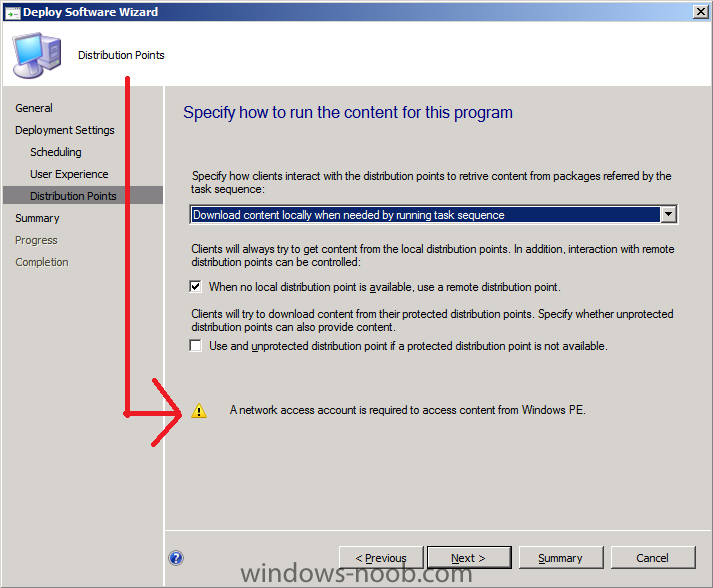
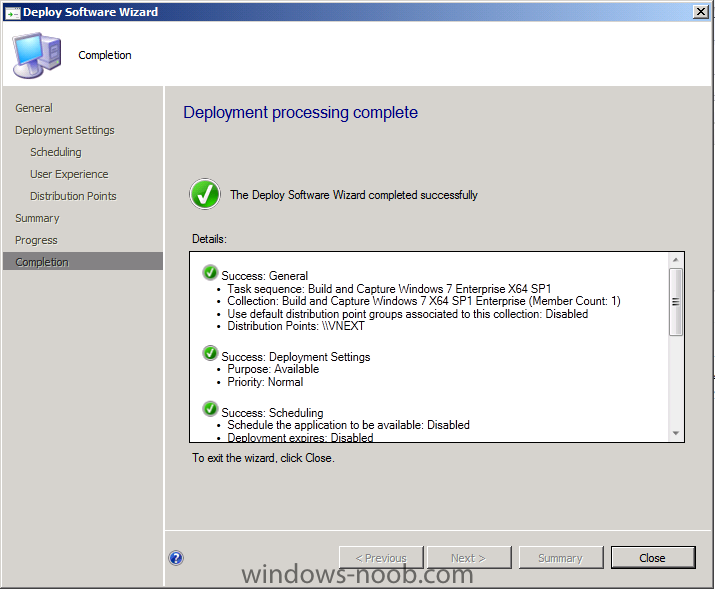
Step 4. Deploy the Build and Capture Task Sequence In Software Library, select Task Sequences, select our Build and Capture Task sequence and right click, choose Deploy when the Deploy Software wizard appears, click on browse beside collection and select our Build and Capture collection and select our VNEXT distribution points click next, and select Make available to boot media and PXE click next through the schedule (dont set anything), and at the User Experience window for Distribution Points note the warning in yellow (we'll come to that in the next part of this series) click next and review the confirmation, congrats ! we are getting places In the next Part, we'll create the Network Access Account and capture our Windows 7 X64 SP1 Enterprise image Note: Repeat the above steps (Step 1. onwards...) to create a Build and Capture Windows 7 Enterprise task sequence so we have both Windows 7 and Windows 7 SP1 images captured.

-
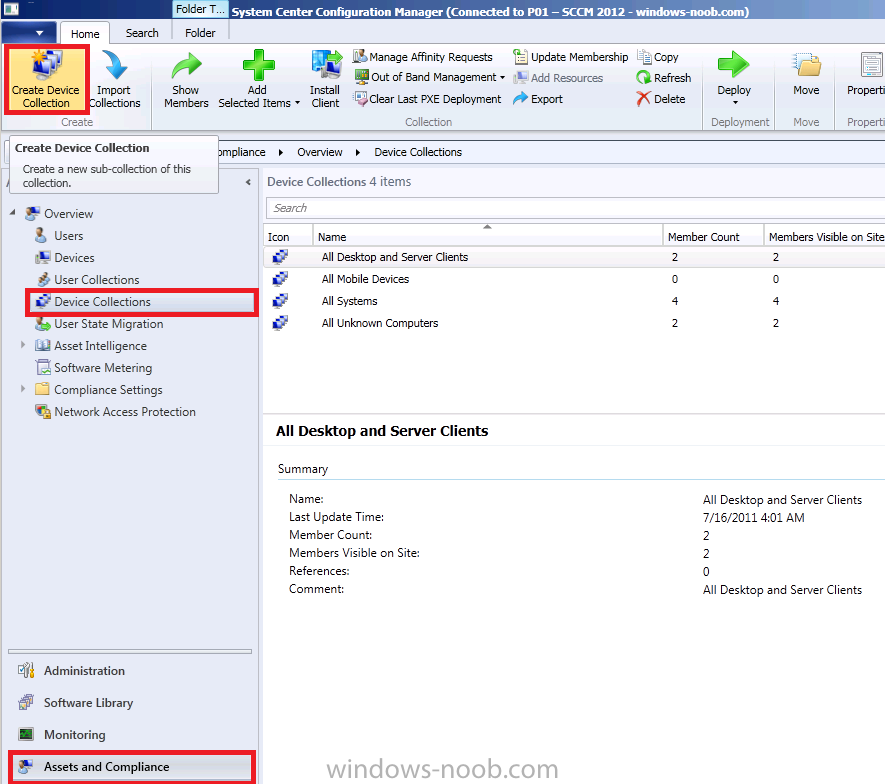
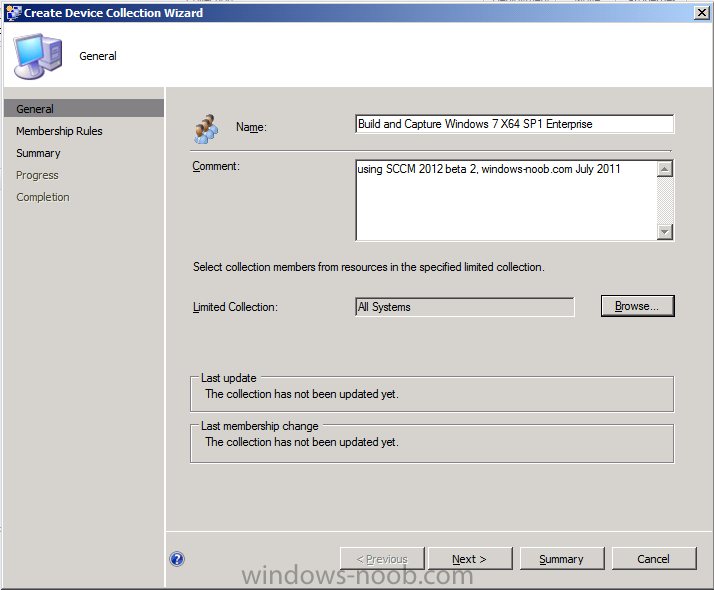
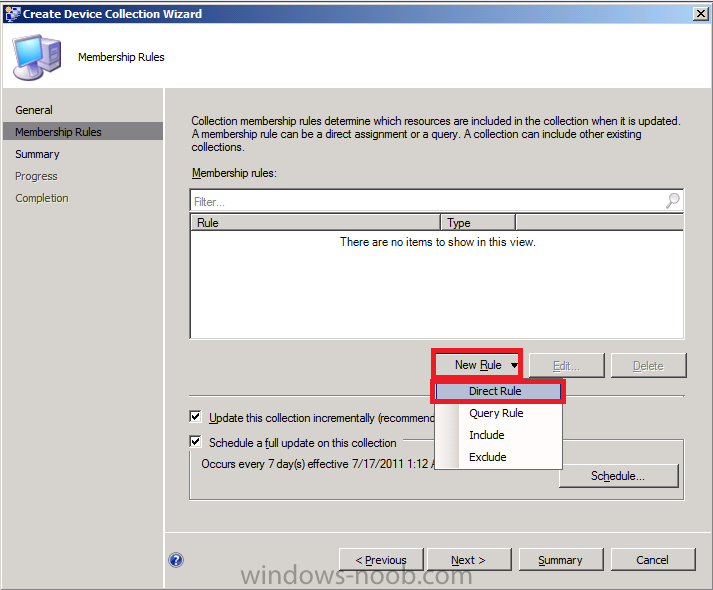
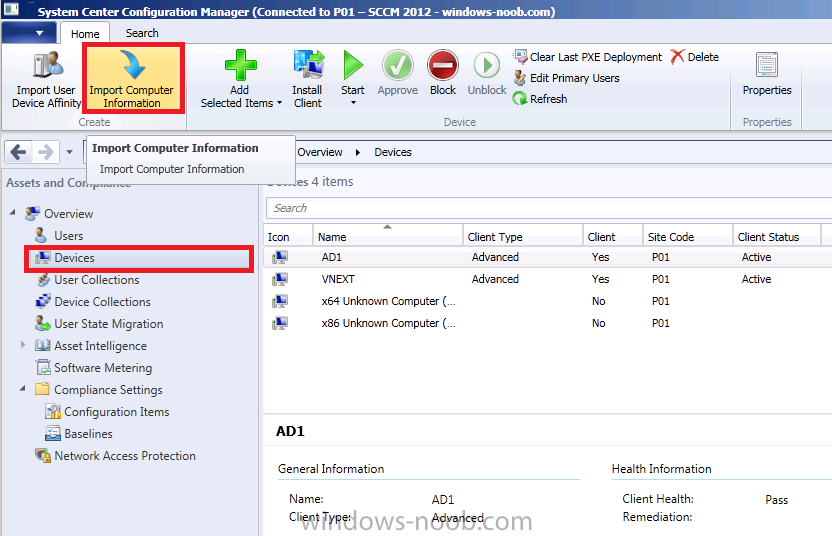
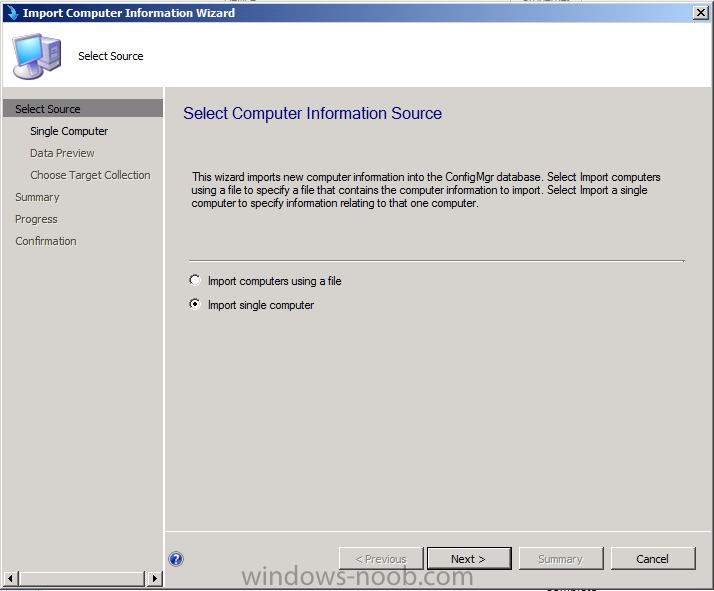
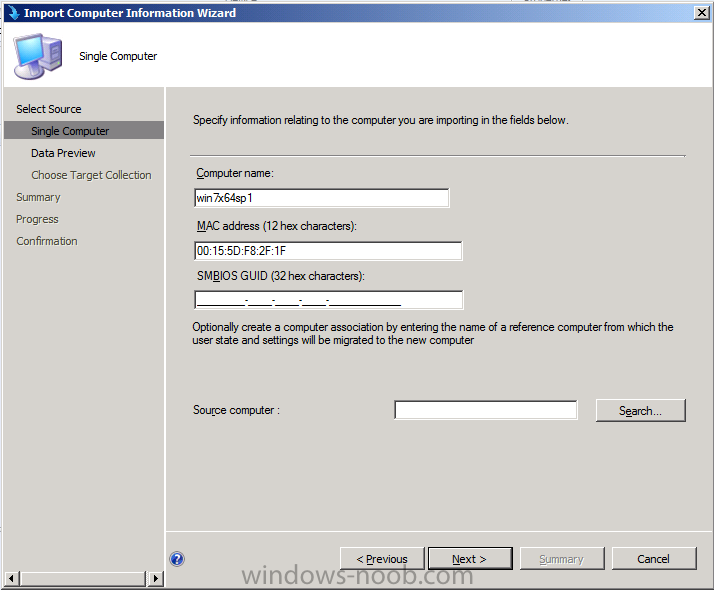
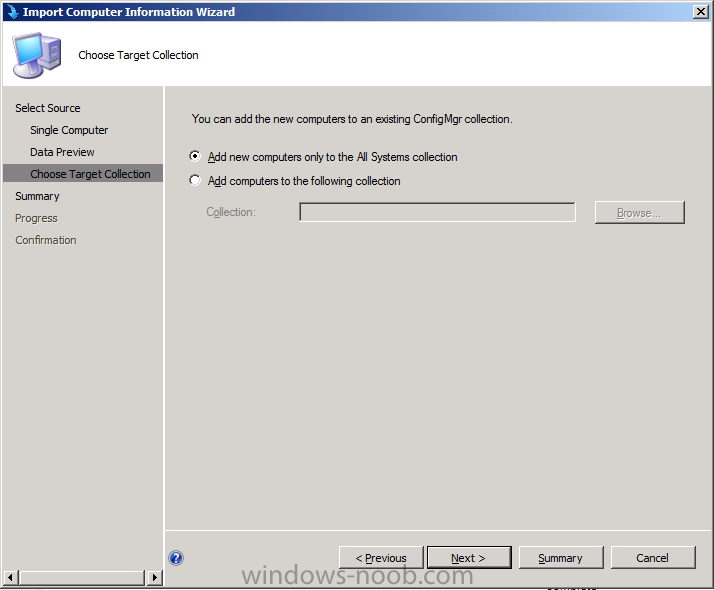
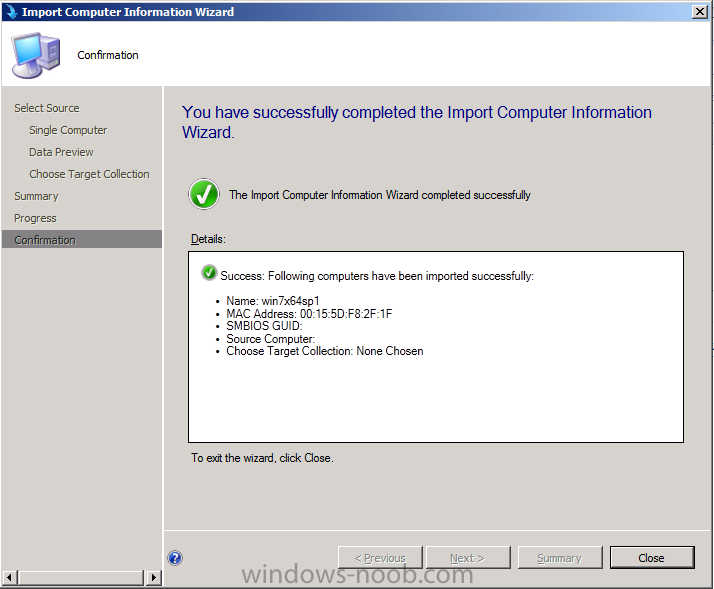
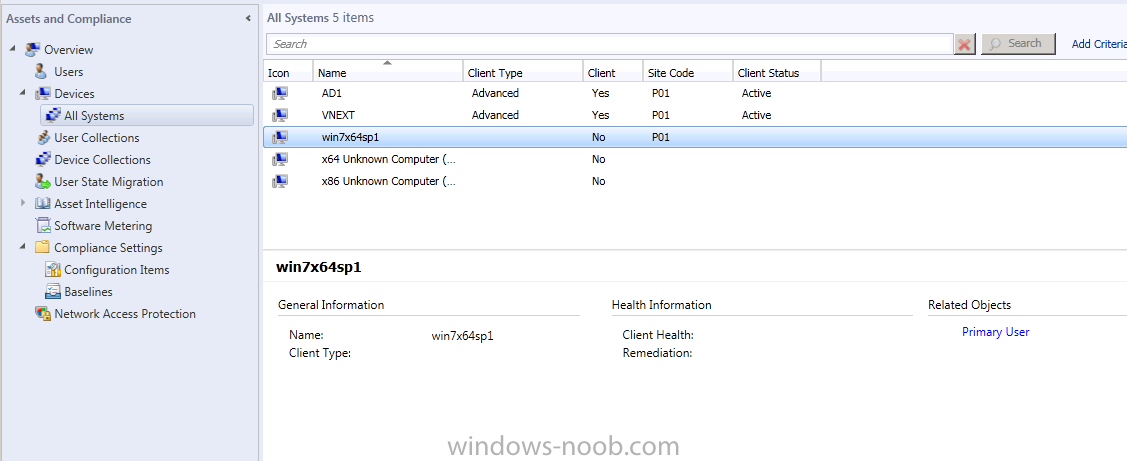
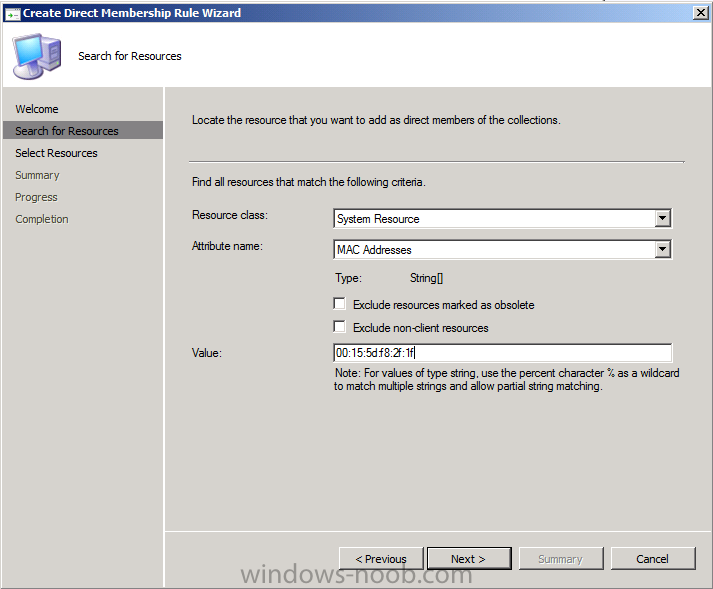
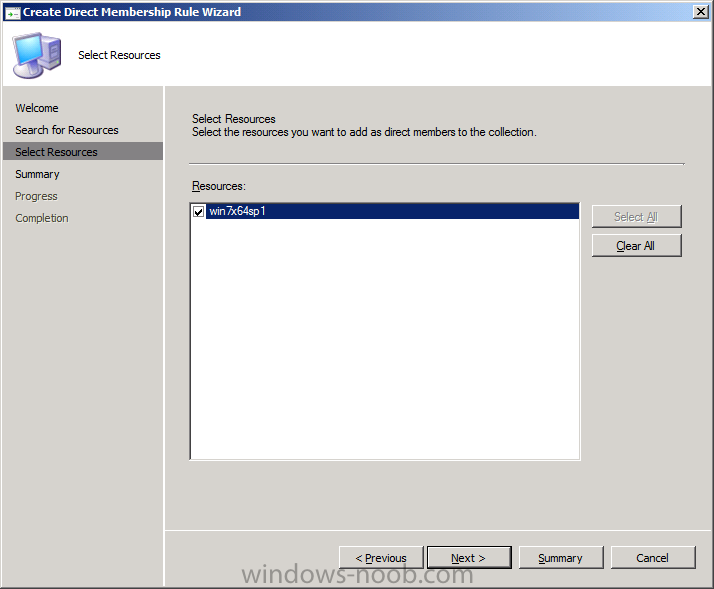
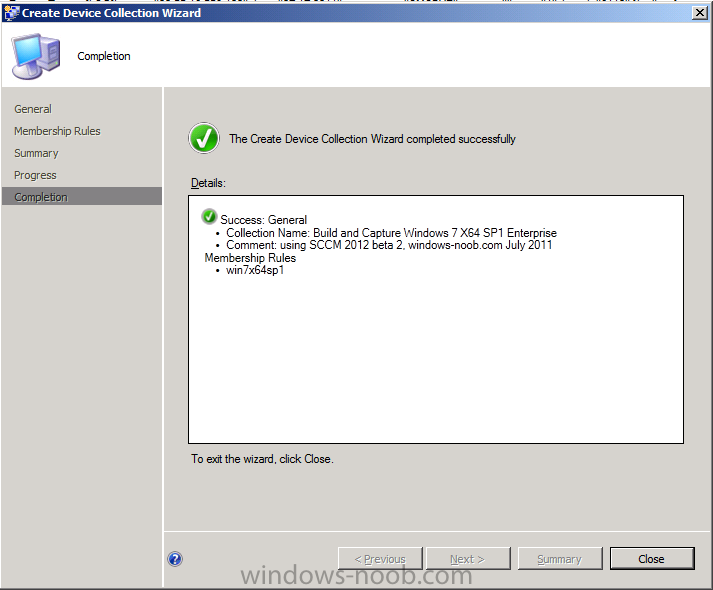
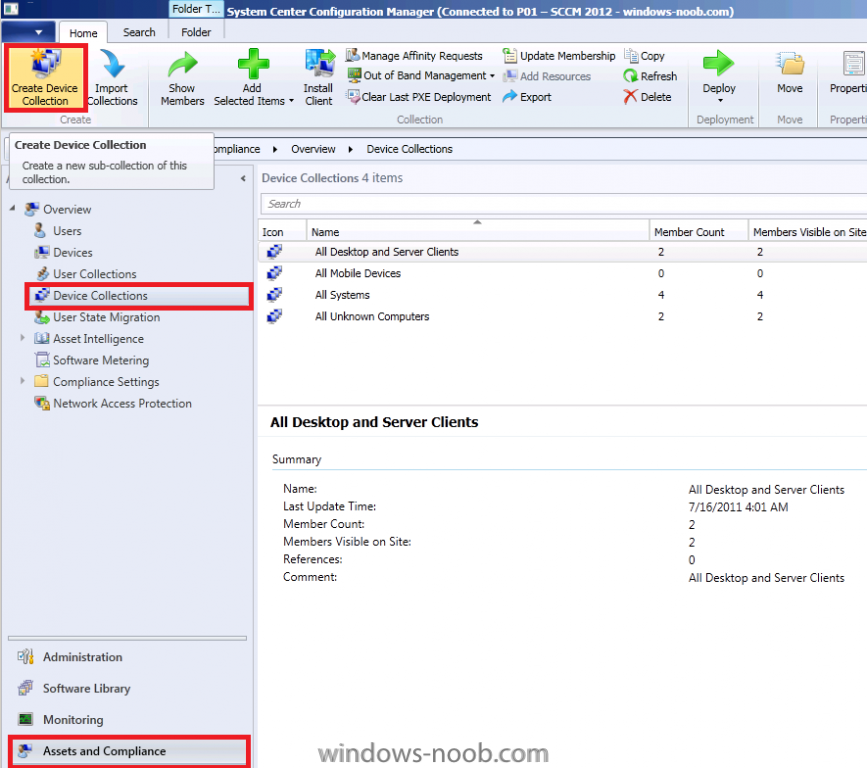
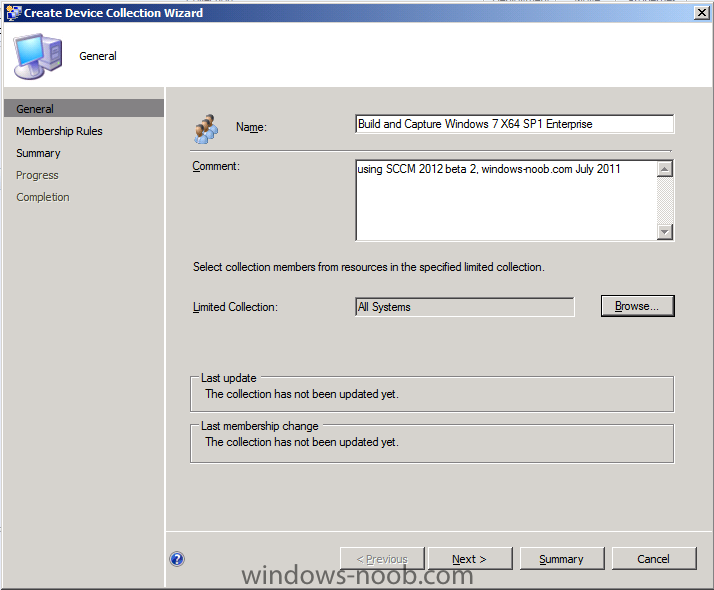
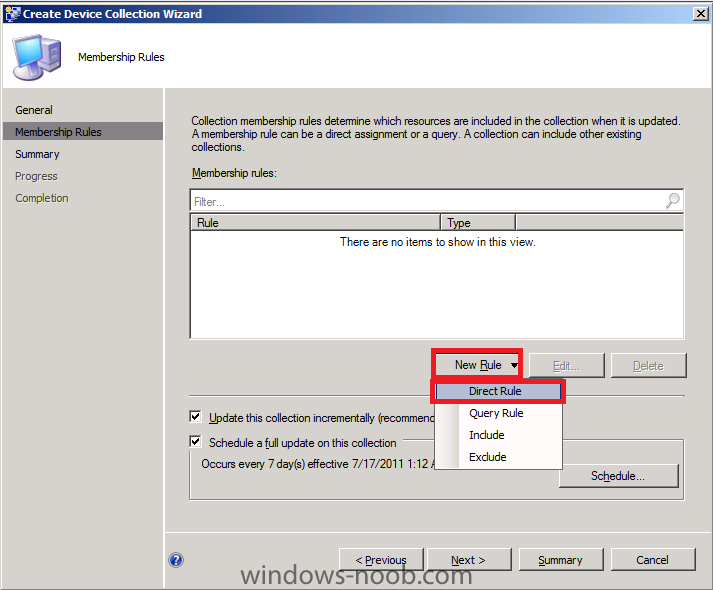
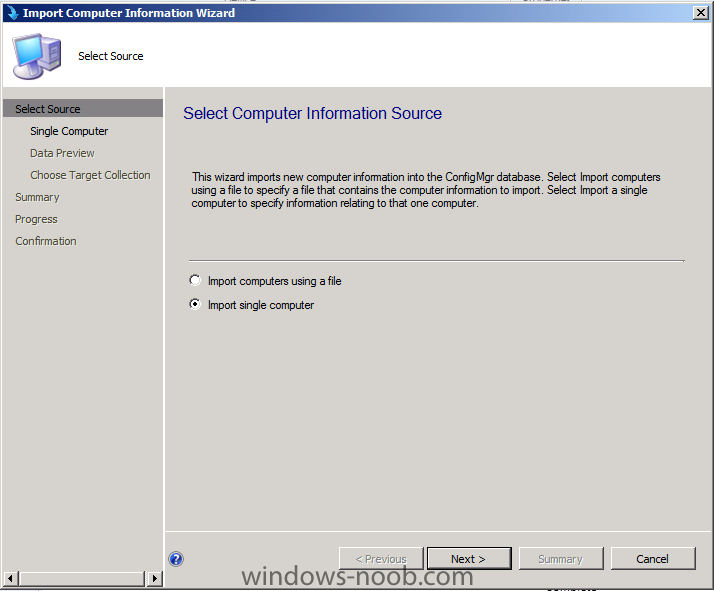
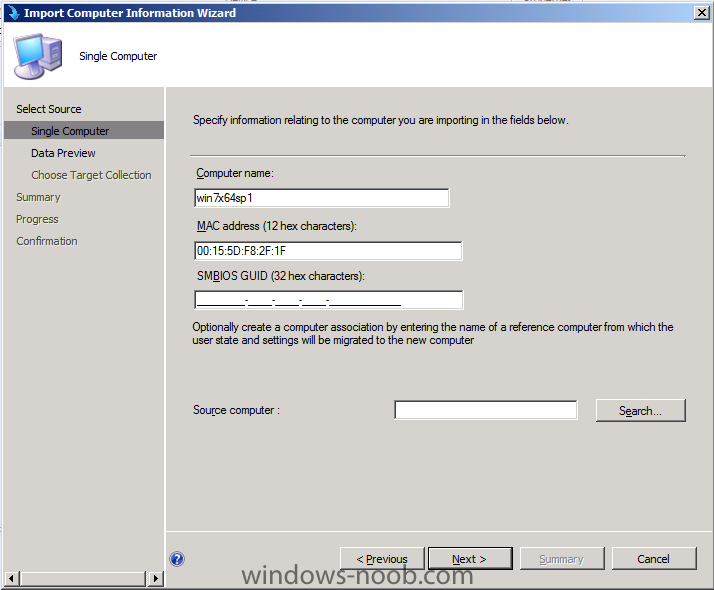
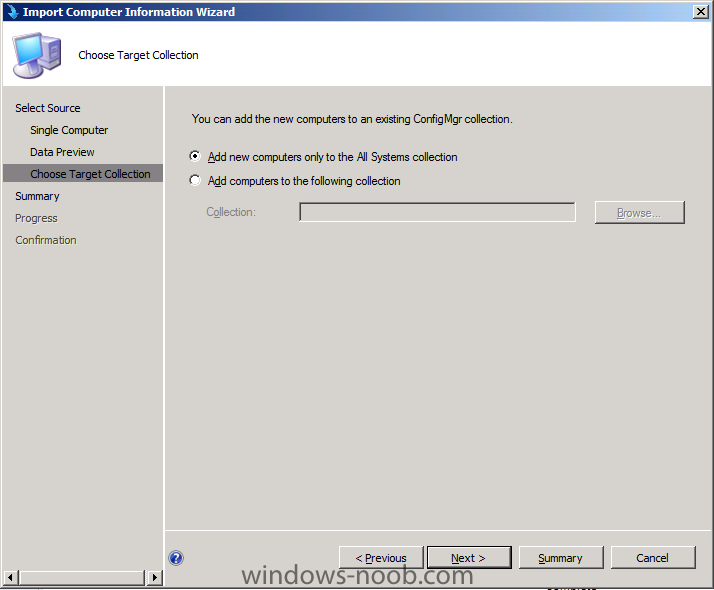
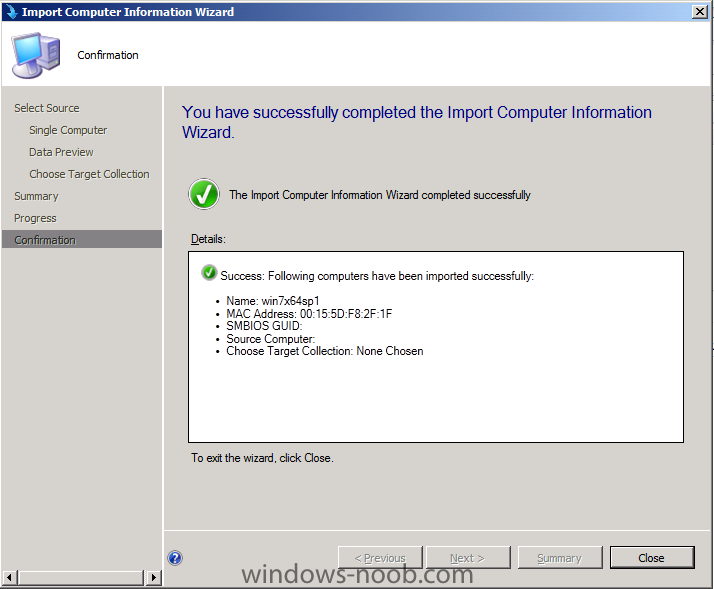
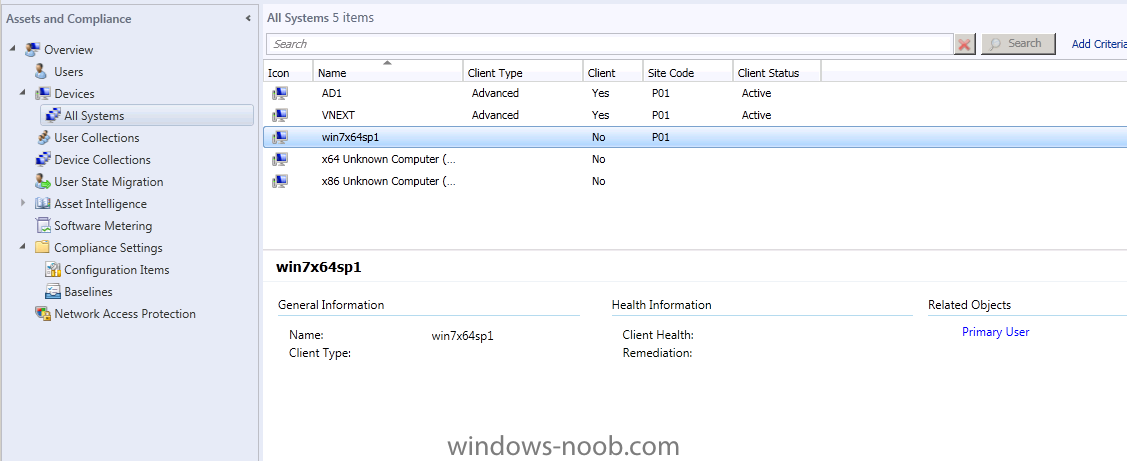
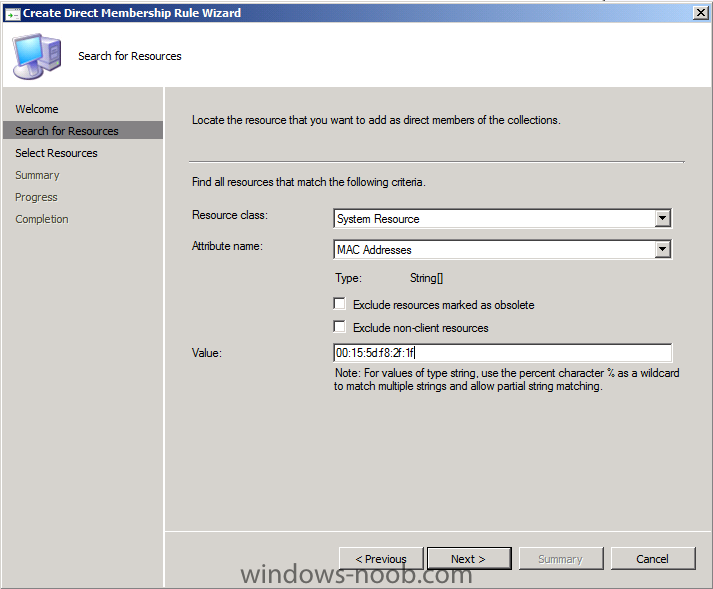
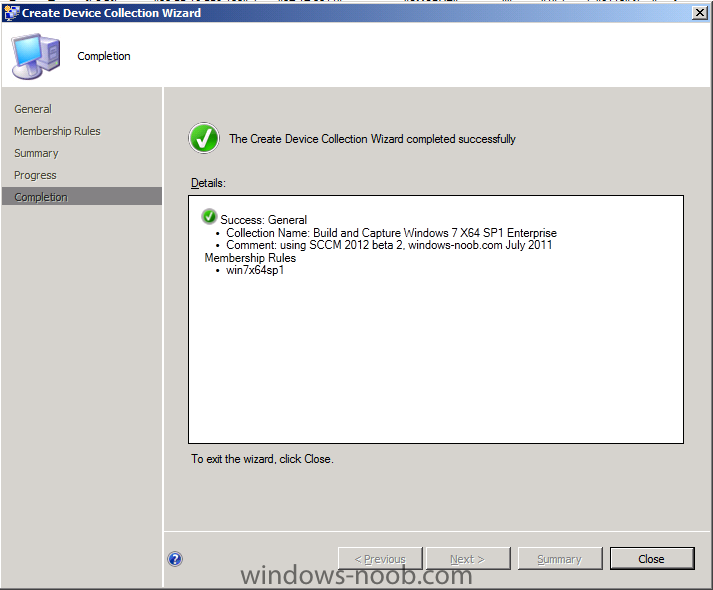
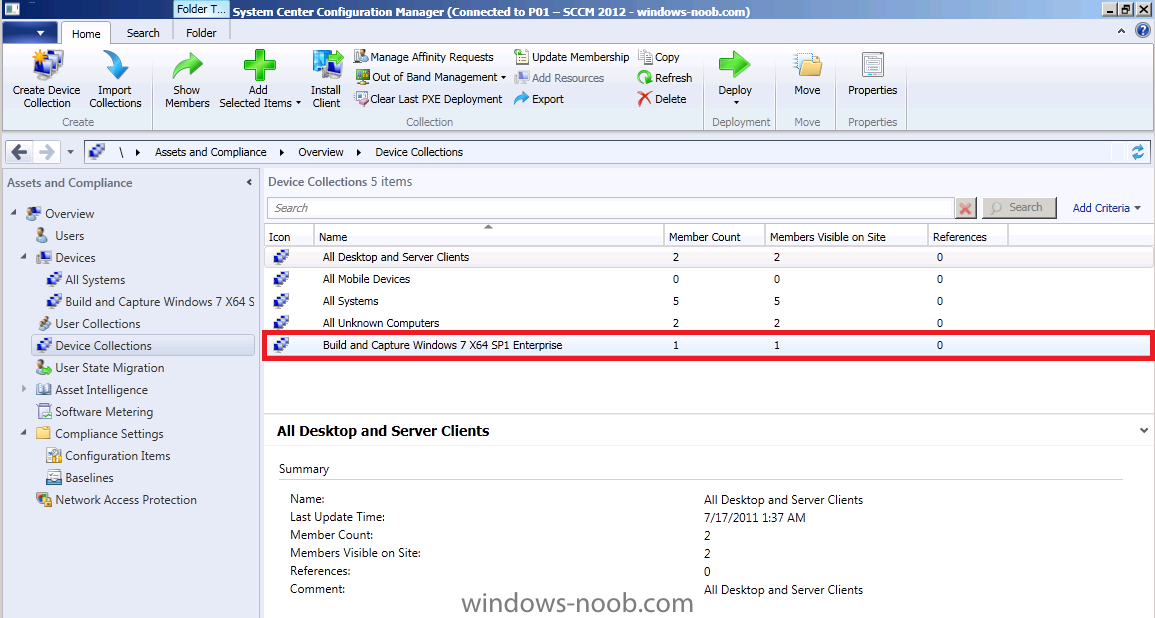
Step 2. Import Computer Information We need our Virtual Machine to be imported into SCCMs database before we can add it to our Build and Capture collection so lets do that. In the ConfigMgr console, click on Assets and Compliance, Devices, and in the Ribbon click on Import Computer Information. If you havn't already created a Virtual Machine do so now, we need one with 1 gig of Virtual Ram and we need to know it's MAC address. when the wizard appears choose import single computer fill in the computername (pick one !) and the MAC address click next, next and add the computer to the All Systems collection success ! you can check the All Systems collection (Update Membership and press F5 to refresh), your computer should appear.) Step 3. Create A Build and Capture Collection In the ConfigMgr console, click on Assets and Compliance, Device Collections, and in the Ribbon click on Create Device Collection fill in some details about the collection and click on Browse beside Limited Collection, select All Systems for Membership rules we will add the computer we imported above via a direct membership rule, click on New Rule, Direct Rule click next at the Create Direct Membership Rule Wizard, and select the following Resource Class: System Resource Attribute Name: MAC Address Value: 00:00:00:00:00:00 obviously fill in the MAC address of your Virtual Machine that you intend to use for the Build and Capture click next, you should see our imported computer, select it and click next after the Direct Membership rule wizard completed successfully screen...click close and then click Next (in the Create Collection Wizard) and next again Now that our collection is created, lets Deploy our Build and Capture Task Sequence to that collection


-
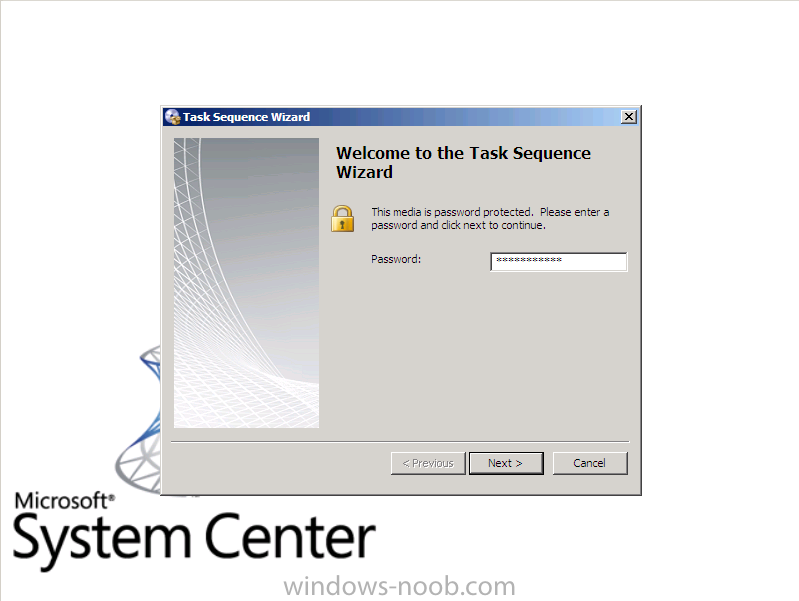
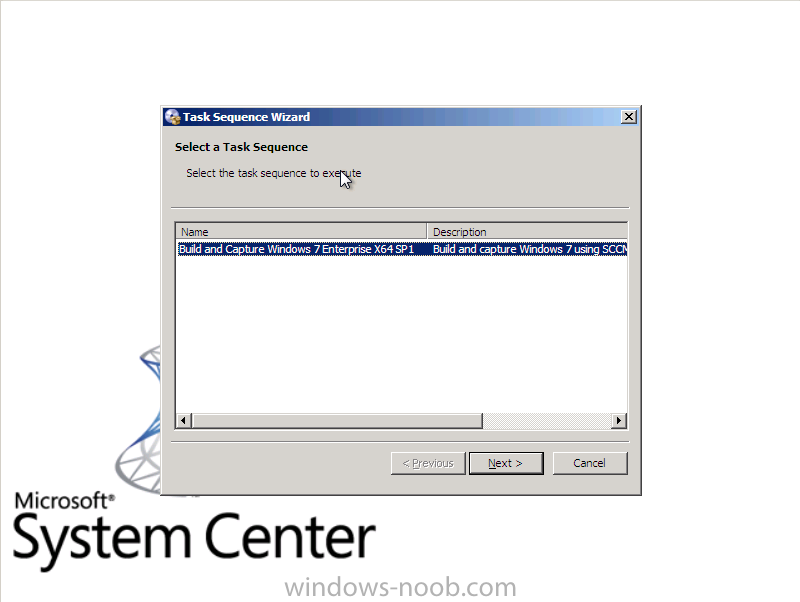
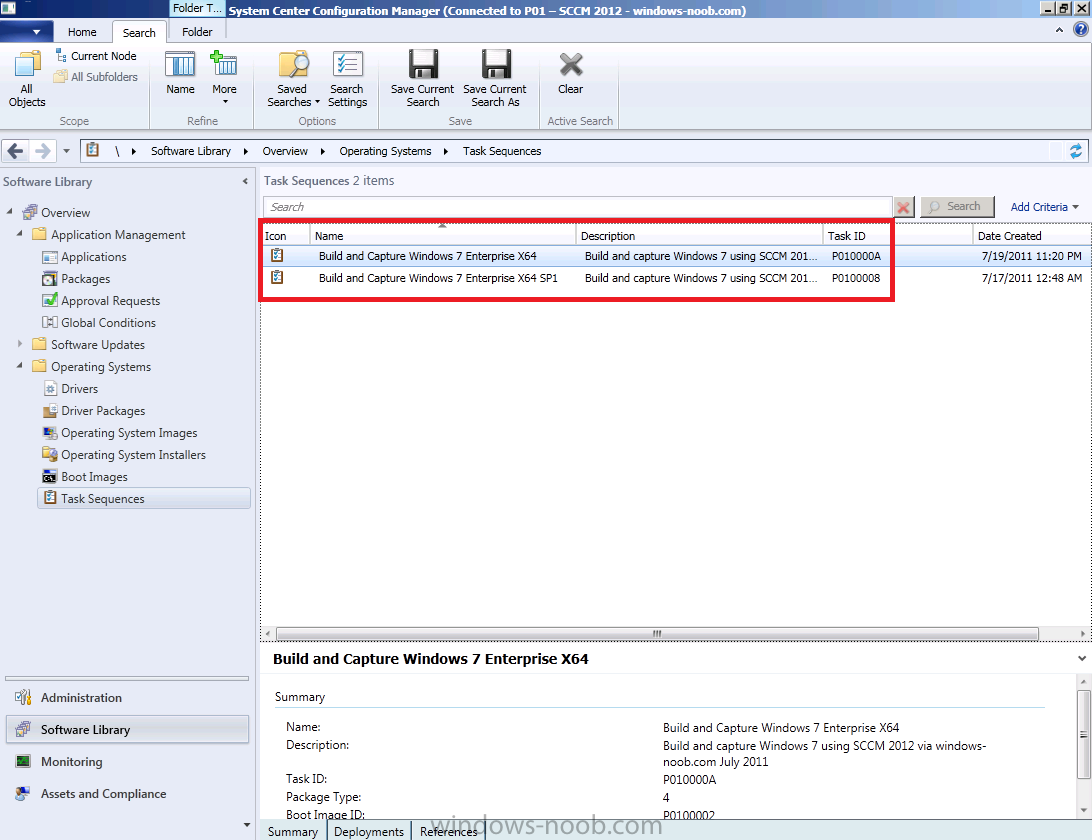
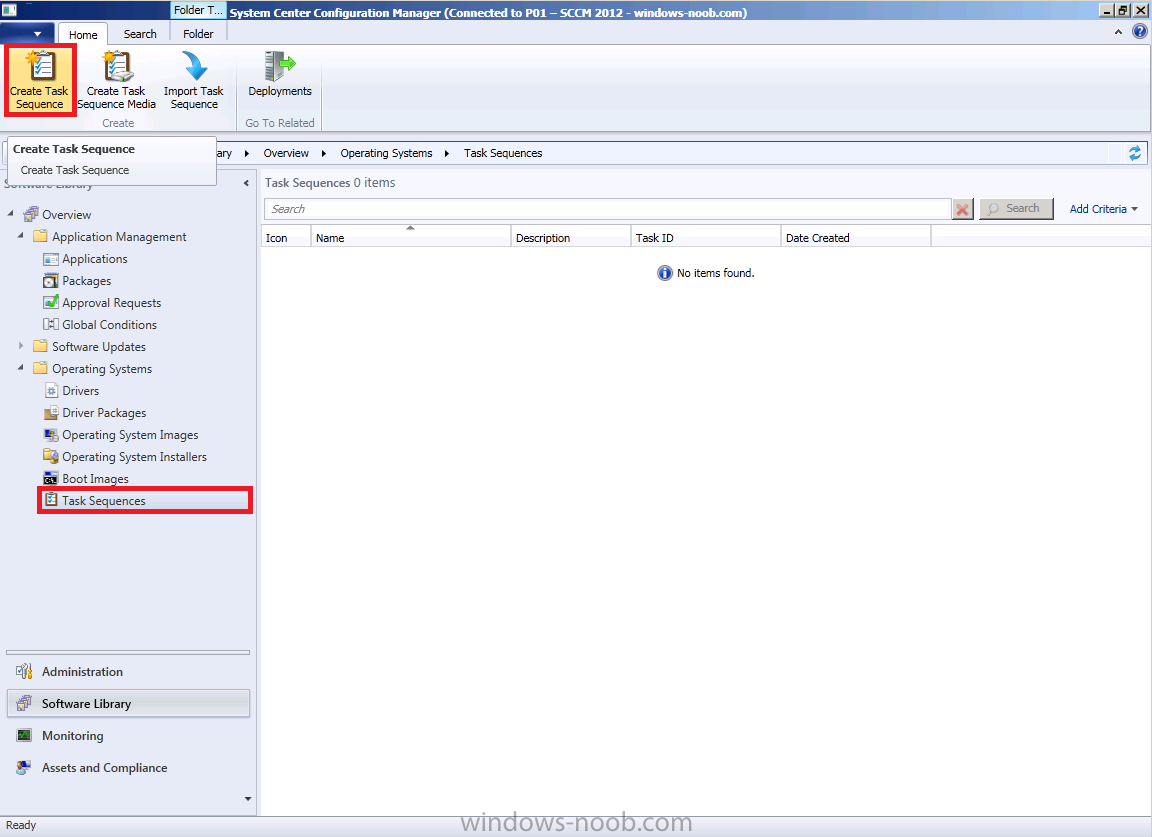
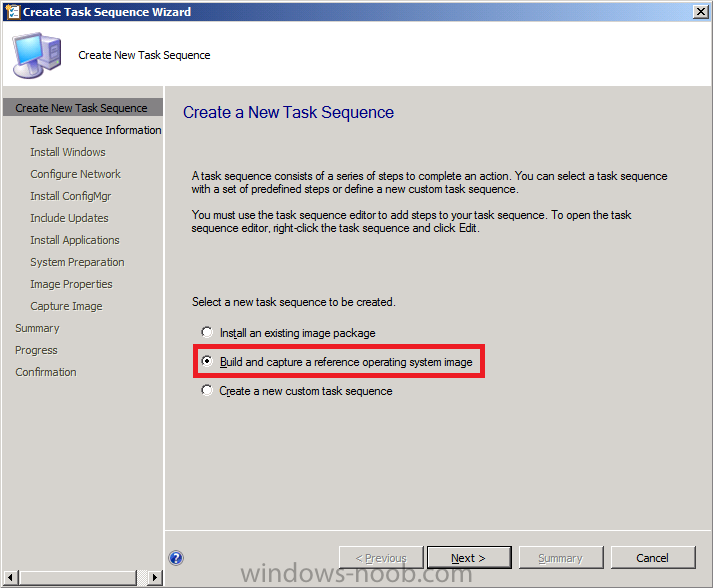
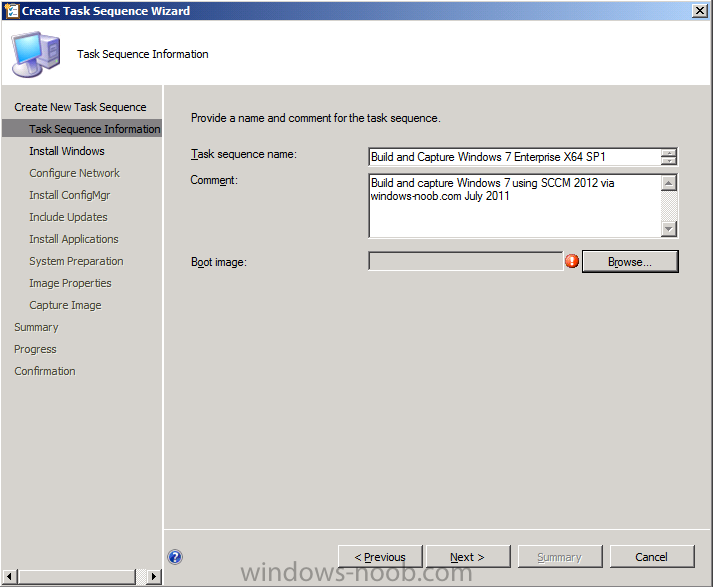
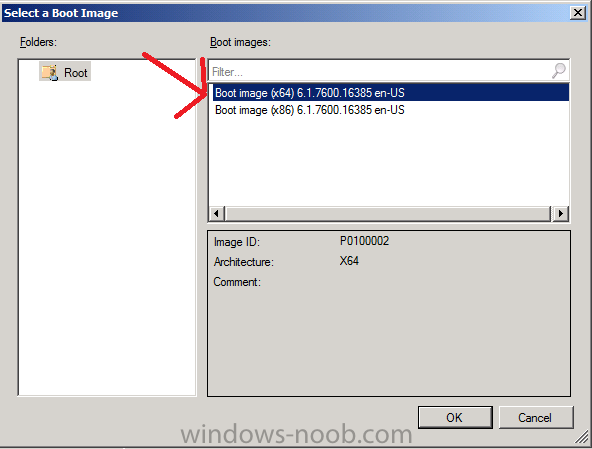
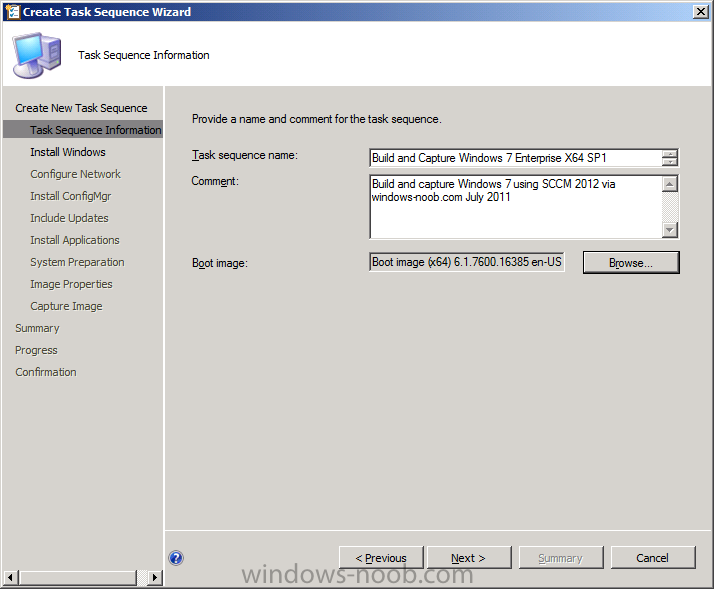
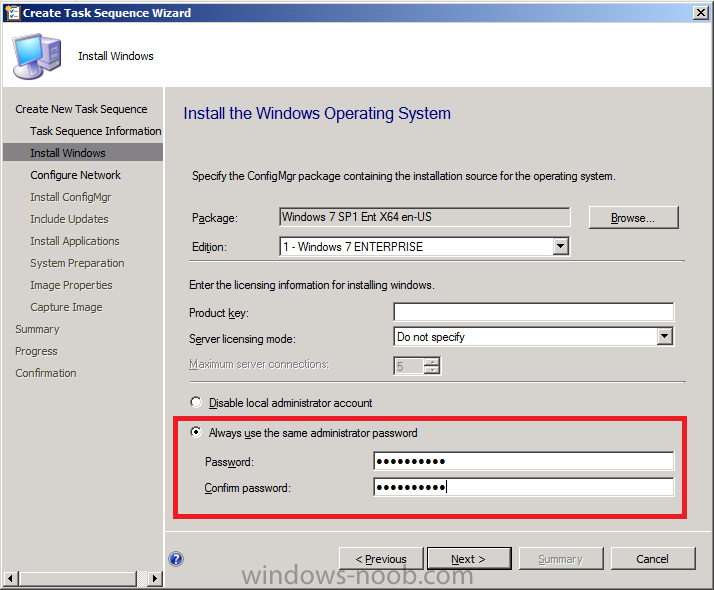
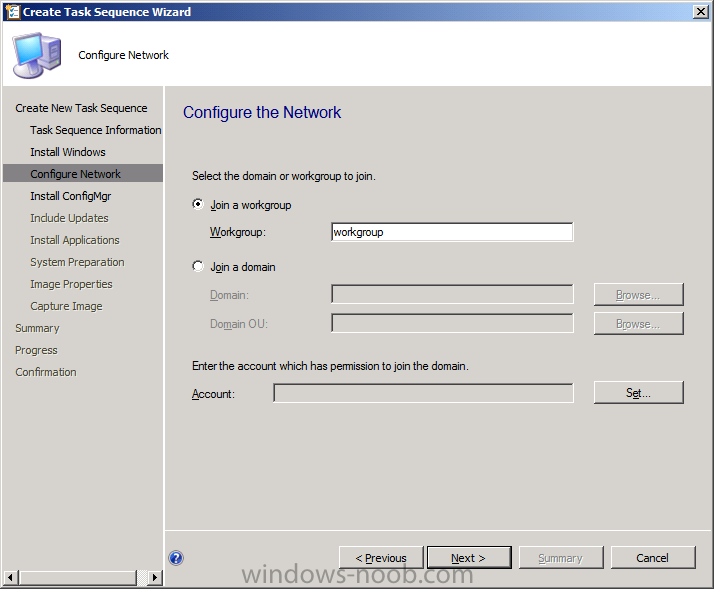
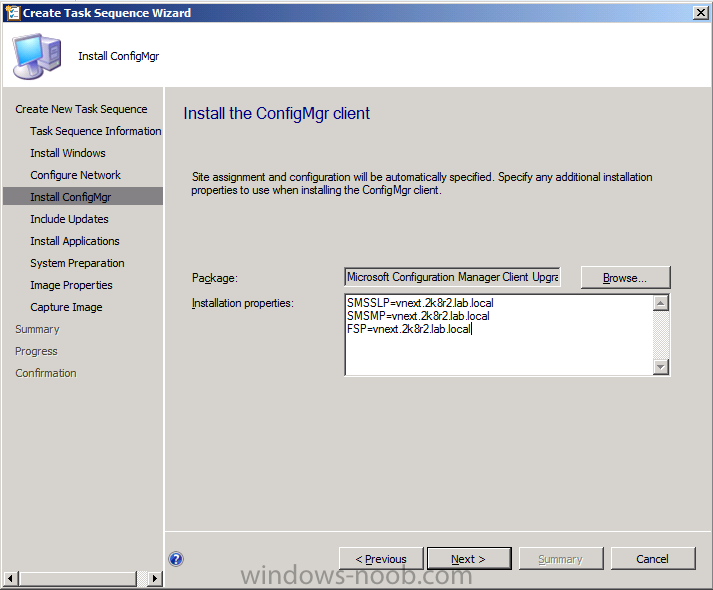
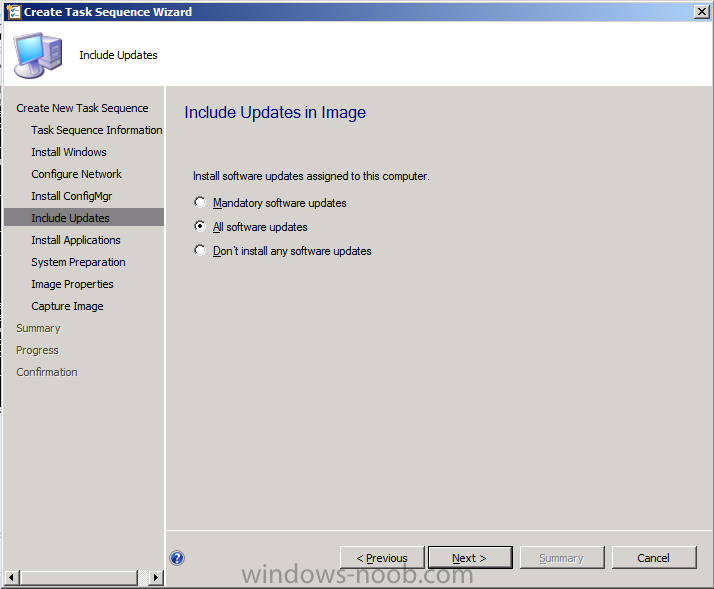
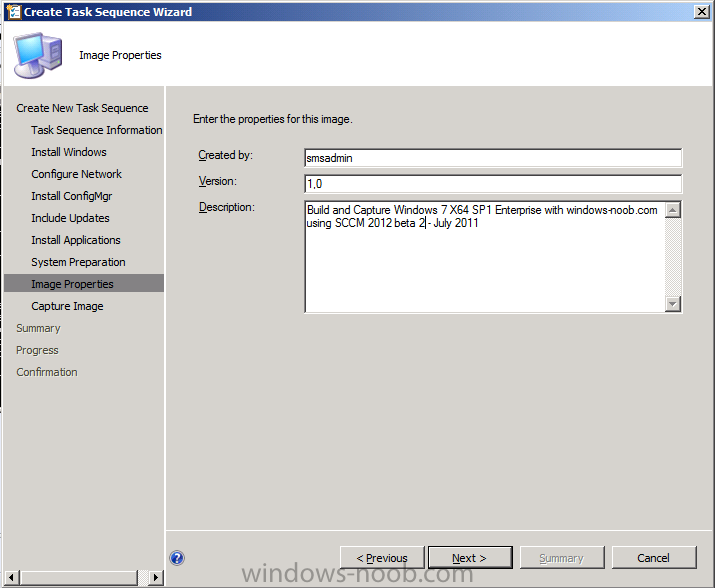
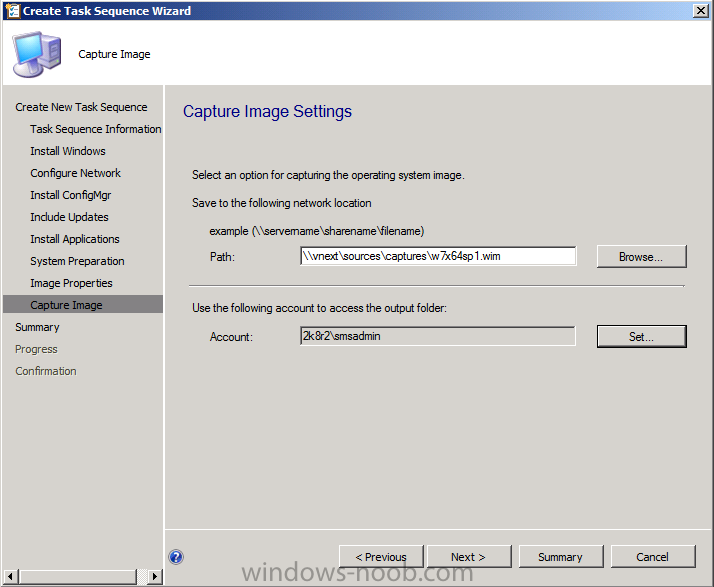
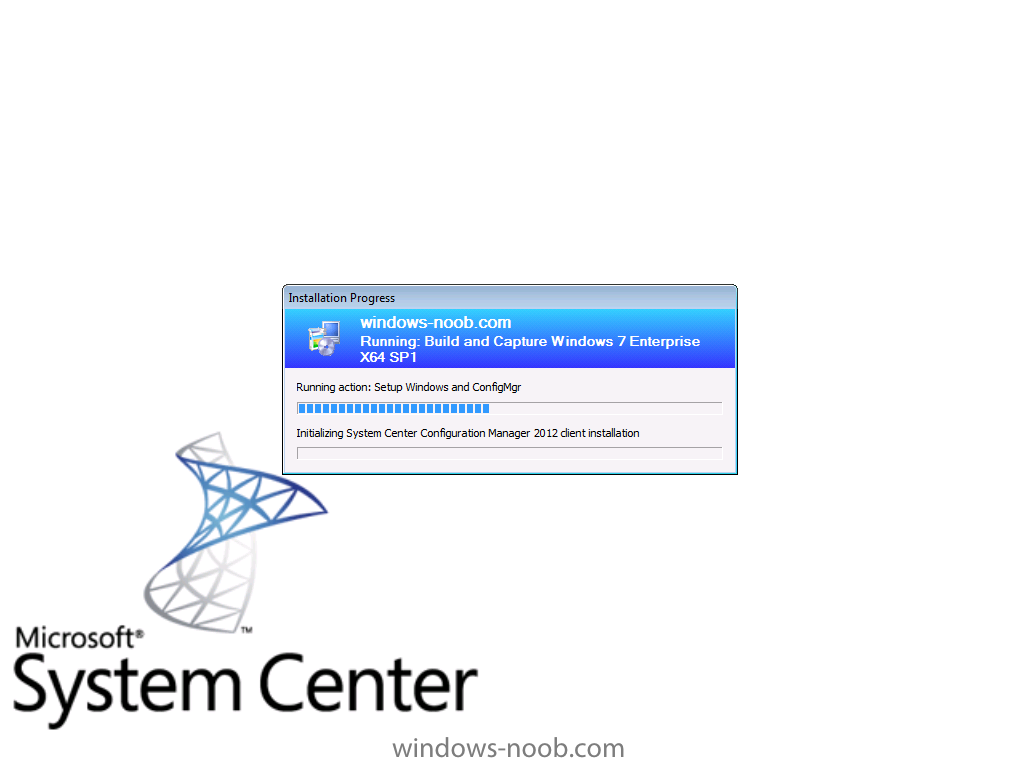
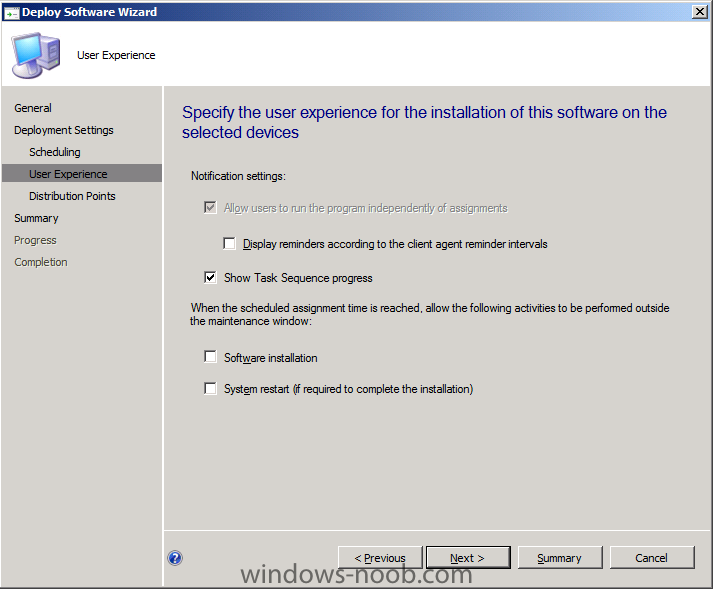
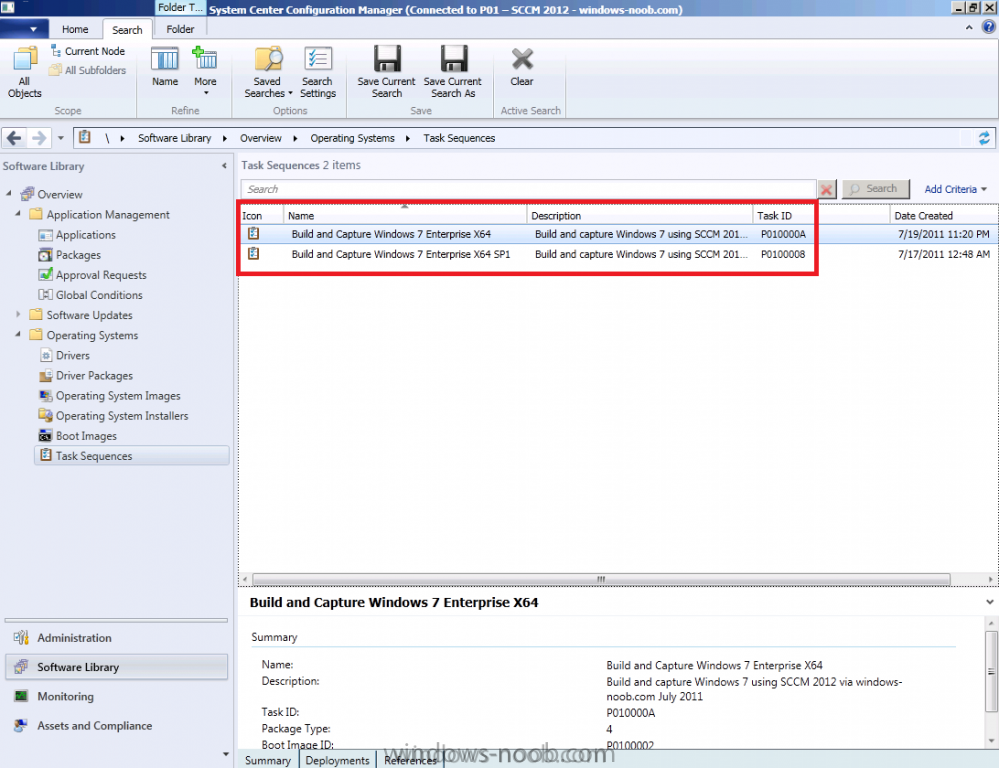
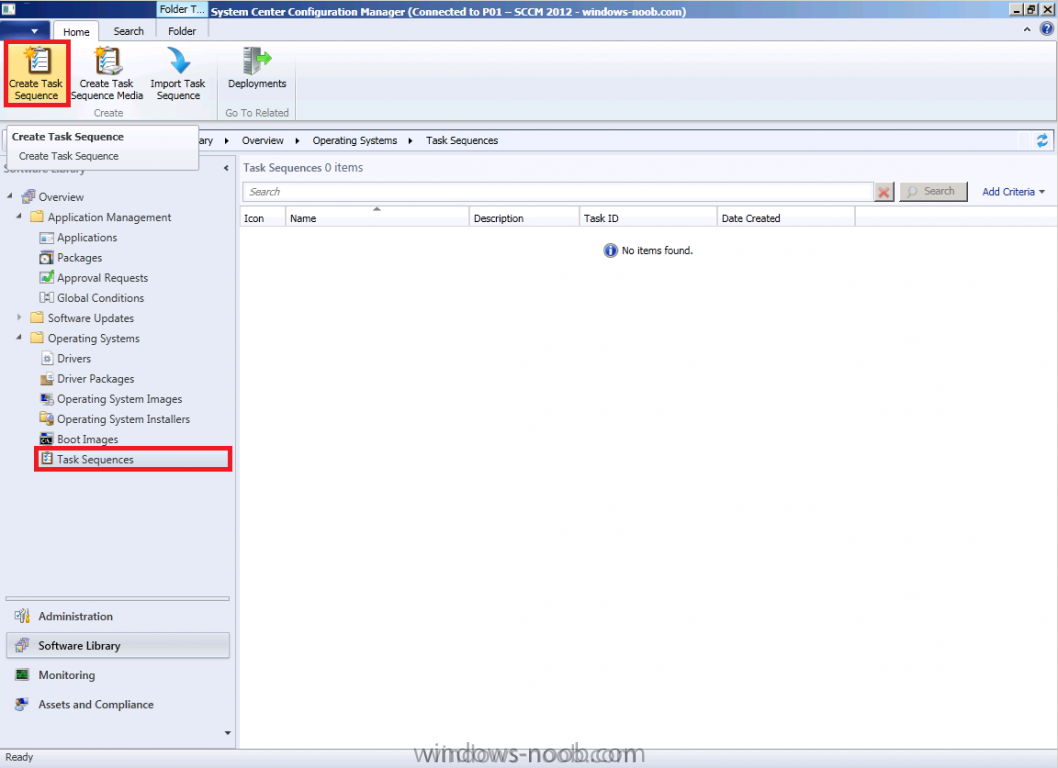
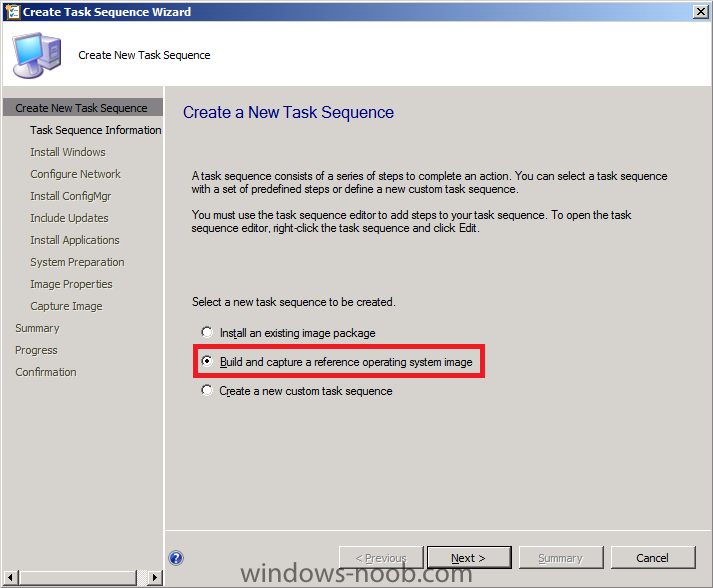
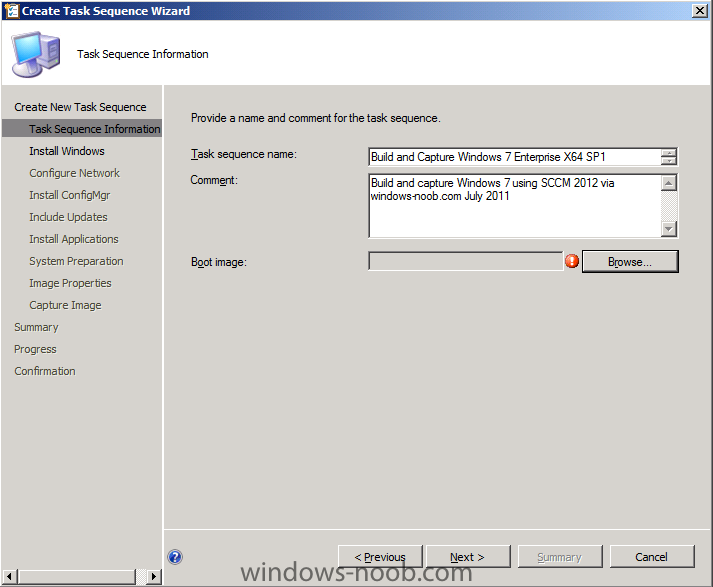
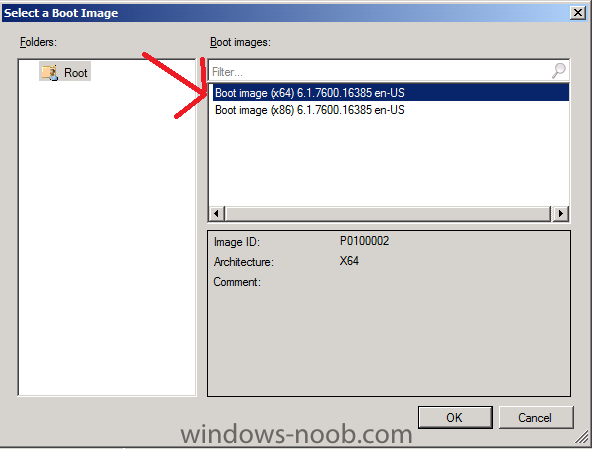
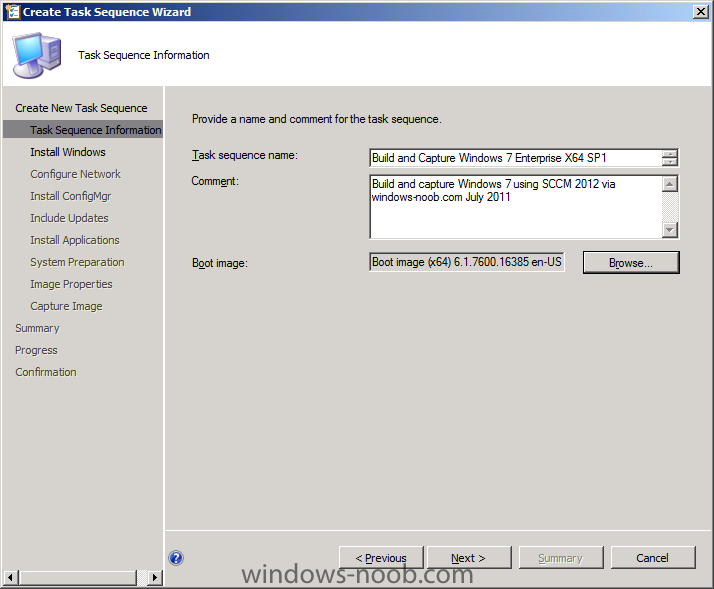
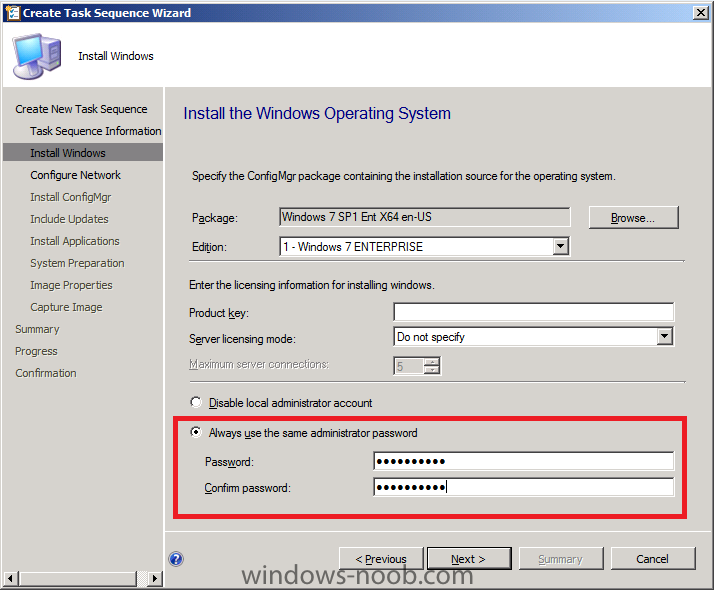
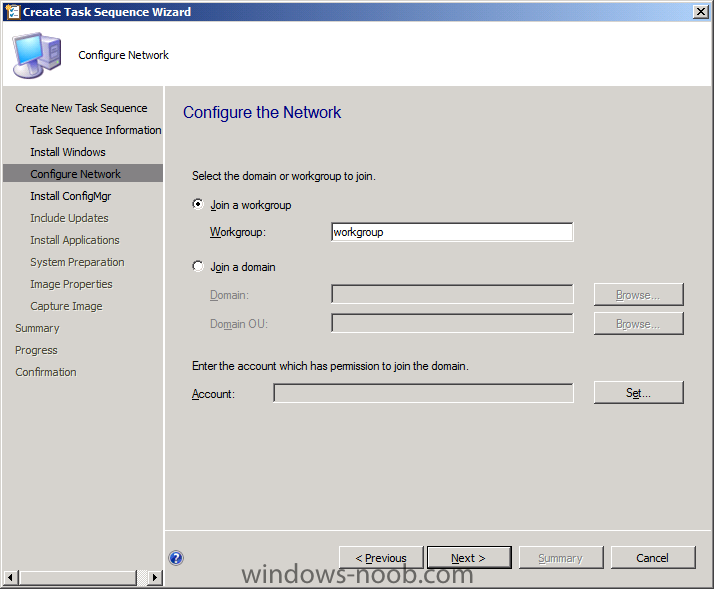
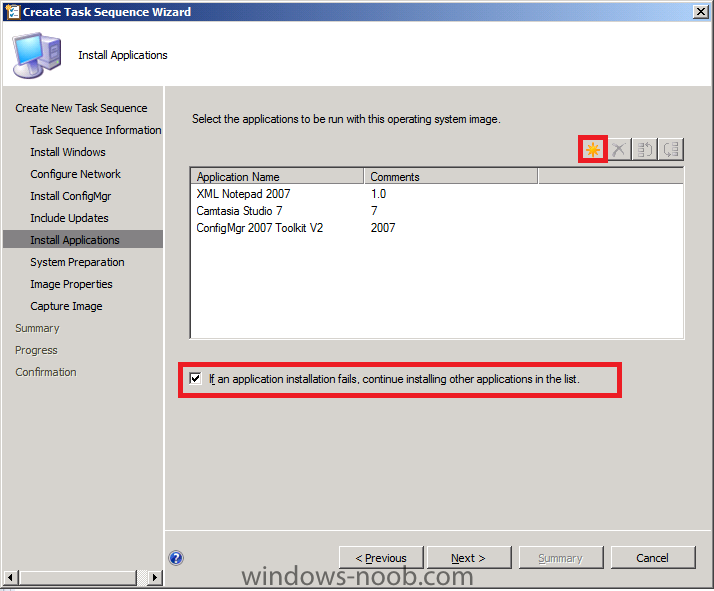
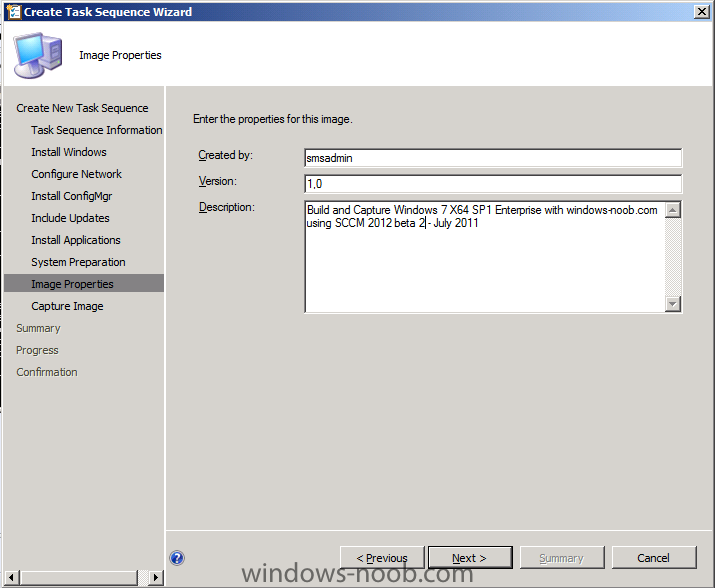
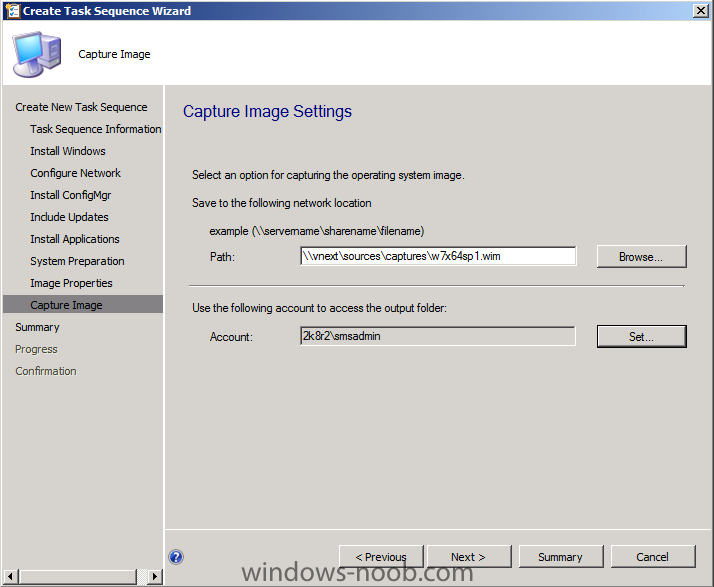
In Part 1. of this series we Installed SCCM 2012, in Part 2 we started to configure it. In Part 3, we configed Beta 2 some more by enabling Active Directory discovery methods, adding some site system roles, configuring the computer client agent and client push settings and finally doing a manual client installation to verify it all worked, in Part 4 we looked at installing an application using Application Management and the Software Catalog and the Software Center features of SCCM 2012, and in Part 5, we added the FSP, SLP, SMP, SUP. In Part 6 we got our SCCM 2012 server ready for Deploying Windows 7 Enterprise SP1 so that we can start deploying some Windows 7 clients to enhance our LAB, now we will create a Build and Capture Task Sequence. The Build and Capture Task Sequence A build and capture task sequence is used to create the Master (or Core) image. The image created in the build and capture task is the image to be used in the Deploy Task Sequence. You would typically add only FAT applications to the master image, such as Office 2010, ForeFront Antivirus SAP and so on. Windows updates are also important as we want our clients to be secure. Therefore you must use a Server Locator Point in the Setup Windows and ConfigMgr step in the Task sequence. That way the workgroup computer can find the windows updates correctly from the SUP. Do NOT join the master image computer to a domain, workgroup only. The captured image will contain the base Operating System, plus some key applications, plus windows updates and some patches/fixes. Advertise this task sequence to a Build and Capture Collection, add computers to that collection via direct membership or computer association. Do NOT join the computer to the domain, keep it clean, free of GPO’s and other domain changes (registry pollution…) Virtual machines are the best for creating Images, keep the image hardware agnostic, vmware or hyperV are recommended, hyperV doesn’t require nic drivers… Only add FAT applications, apps that change infrequently within the organisation, such as Office 2010. Software size should also be considered. Add windows updates by specifying SLP in the Setup Windows and ConfigMgr step. Step 1. Create the Task Sequence Perform the following on the vNext server as SMSadmin In the Configmgr Console click on Task Sequences under Software Library, Operating System Deployment. In the Ribbon click on Create Task Sequence when the wizard appears, choose build and capture a reference operating system image fill in the image details and click on browse to select the boot image as we are Build and Capturing a X64 image, we need to specify the X64 bit boot image so it now looks like this in the next screen we get to select our Operating System Installation source Image that we added in Part 6, in addition to this i'd recommend you DON'T enter the Product Key and that you DO enter an Administrator Password next we should join a workgroup, to keep the build and capture image clean (as explained above) and next we get to install the Configmgr Package from definition, select it and if you want windows updates installed (we havn't created any windows updates deployments yet.. we will soon) then specify your SLP settings as per this post for the software updates step select All Software Updates for the Install Applications step, select the Yellow Starburst and pick an application you've added previously do it again (click on the Yellow Starburst) and add some more apps, this is to see multiple apps getting installed in one step, place a checkmark in if an application installation fails, continue installing other applications in the list this is Windows 7 so click through the system preparation step, and fill in the Image Properties and fill in the capture image details (I created a folder called captures in \\vnext\sources\captures and added the 2k8r2\SMSADMIN account as the capture account, make sure you type the capture account details correctly otherwise you'll have a long wait until the next Build and Capture is done and you get to see if your capture actually succeeds or not due to a typo) click next at the summary and review the confirmation screen.


-
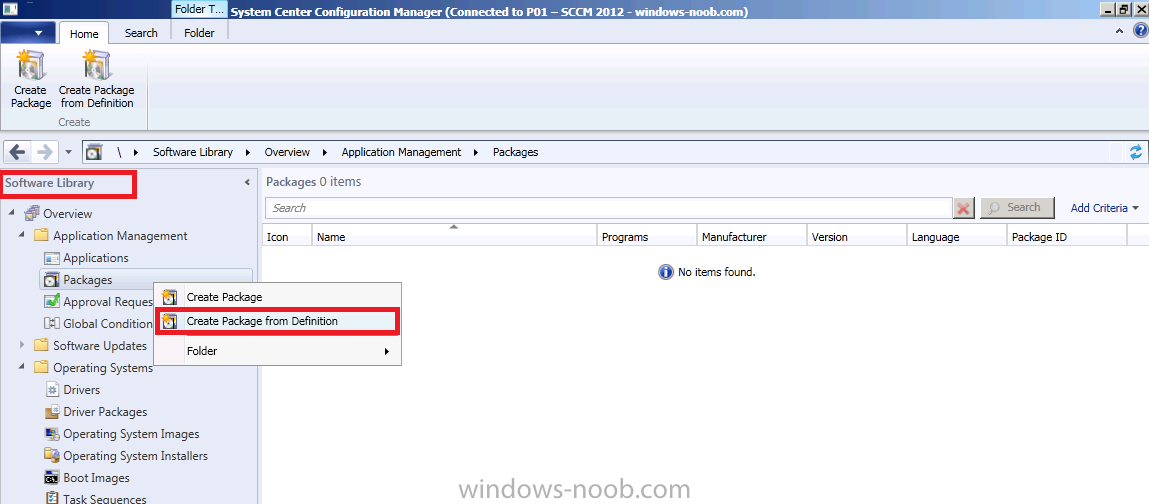
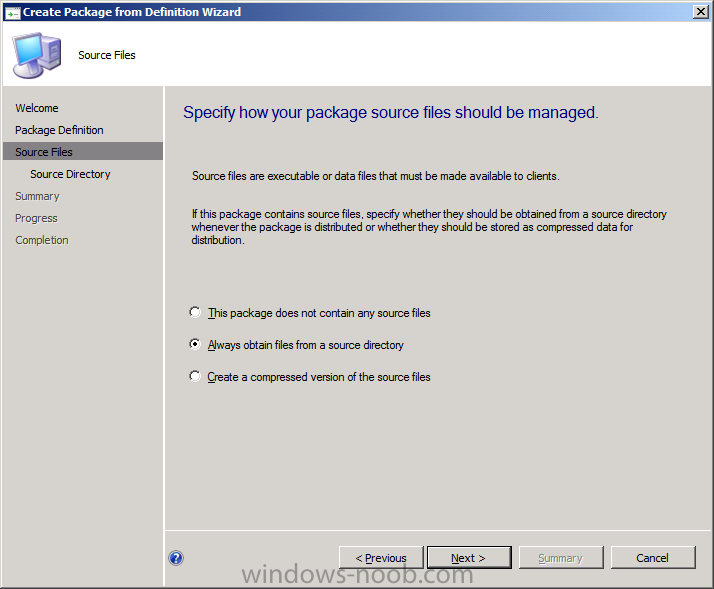
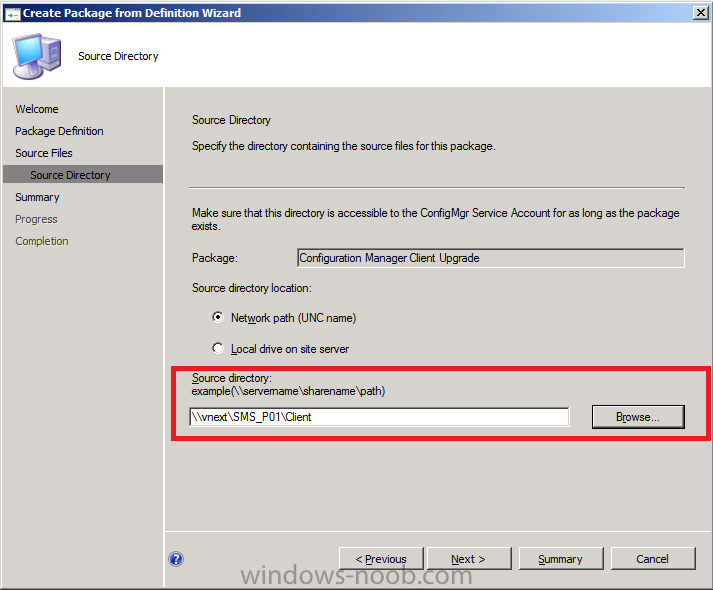
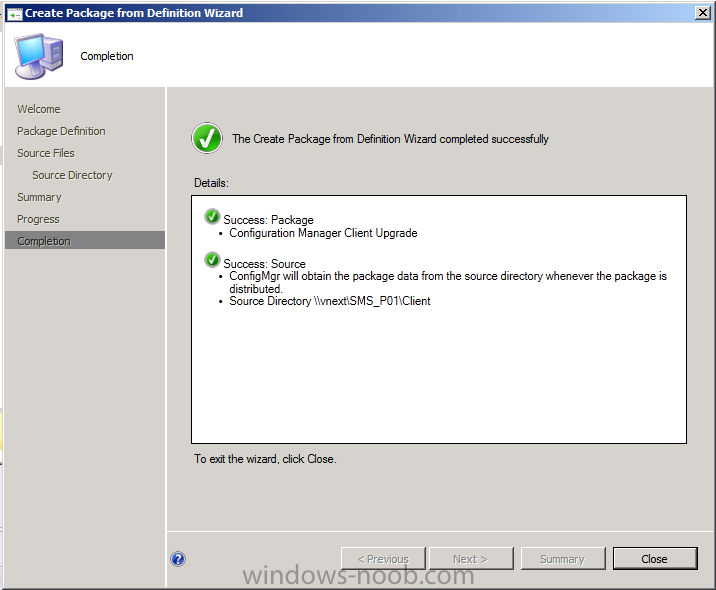
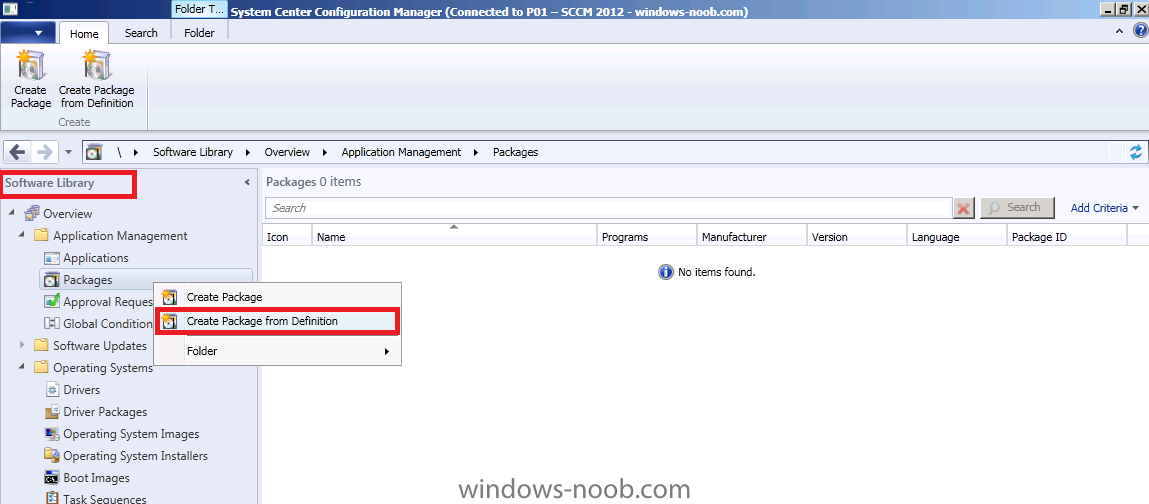
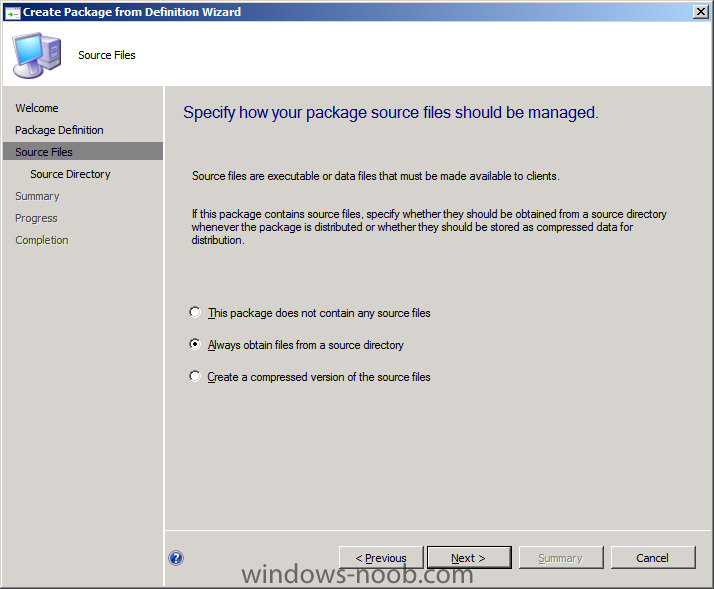
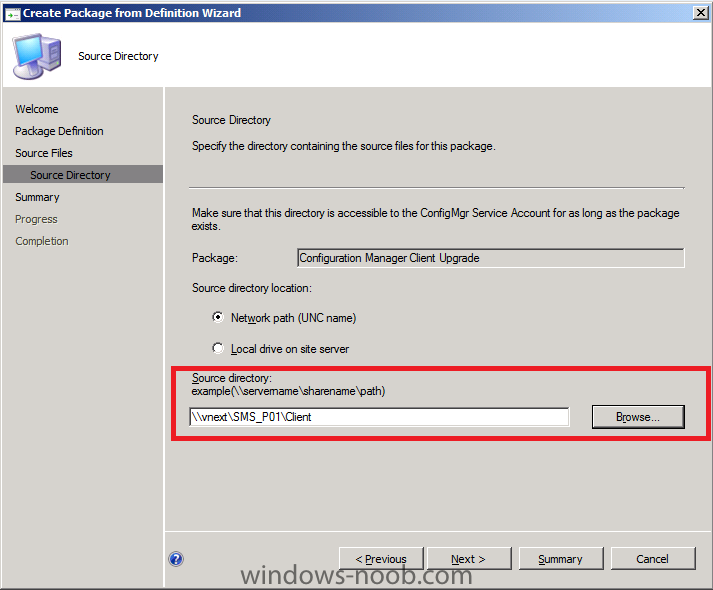
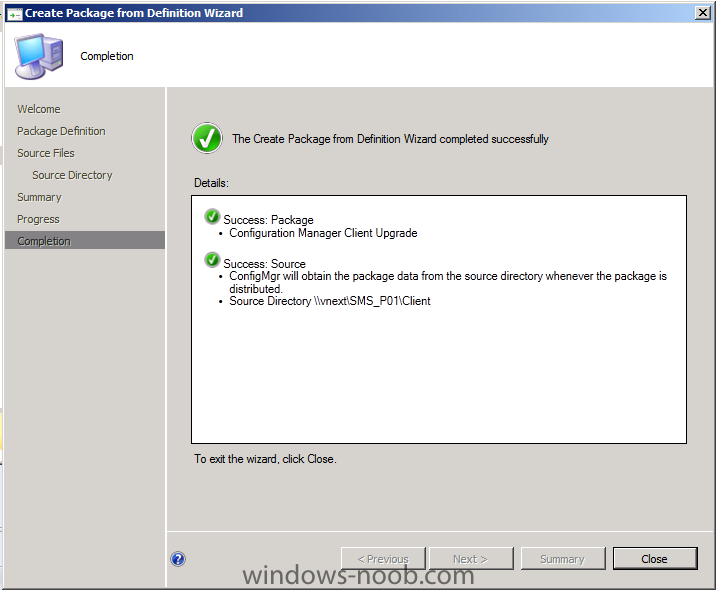
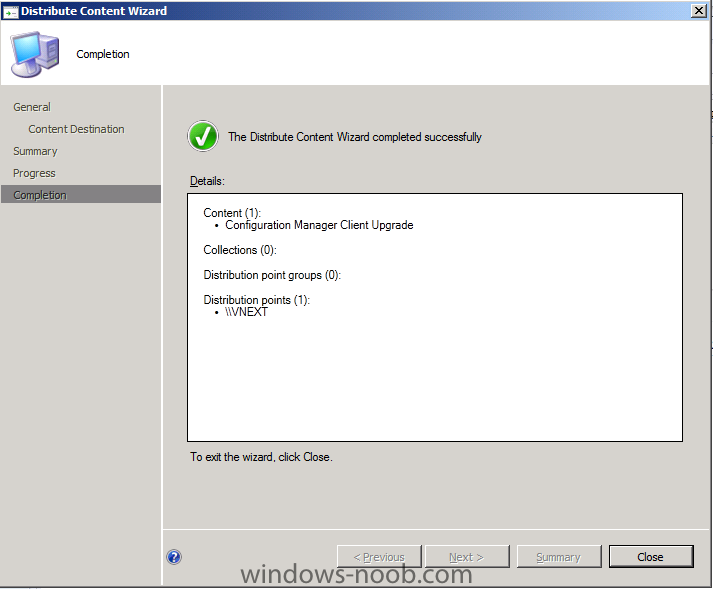
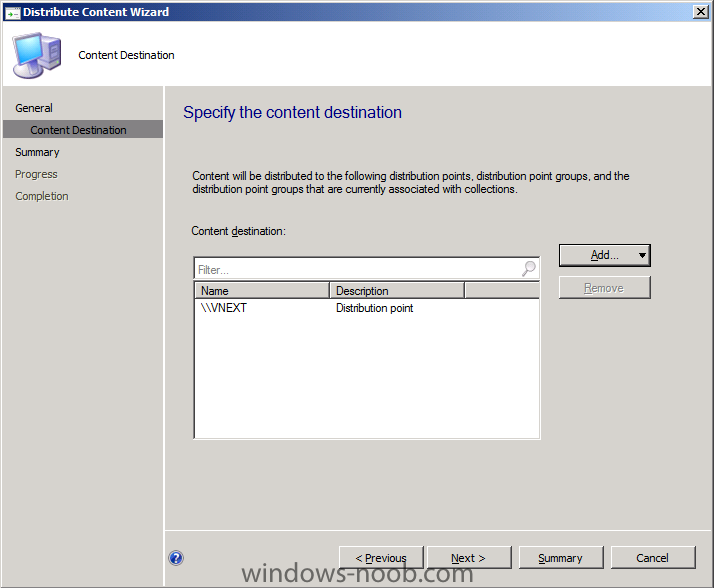
Step 7. Create the ConfigMgr Client Package from Definition In Software Library, right click on Packages and choose Create Package from Definition click next at the welcome to the wizard, and then select Configuration Manager Client Upgrade select Always obtain files from a source directory enter the UNC path to the Configmgr client directory of your site server typically \\server\sms_xxx\client where xxx is the sitecode, if you get access denied simply browse to the client directory in explorer and gain permission.. (most likely to be D:\Program Files\Microsoft Configuration Manager\Client) click next through the wizard to the end Step 8. Distribute the ConfigMgr Client to your DP's Right click your new package, and choose Distribute Content go through the familiar wizard until completion Now the hard work is done, in the next Part we'll create the build and capture task sequence and create a Deployment (advertise) to a collection.

-
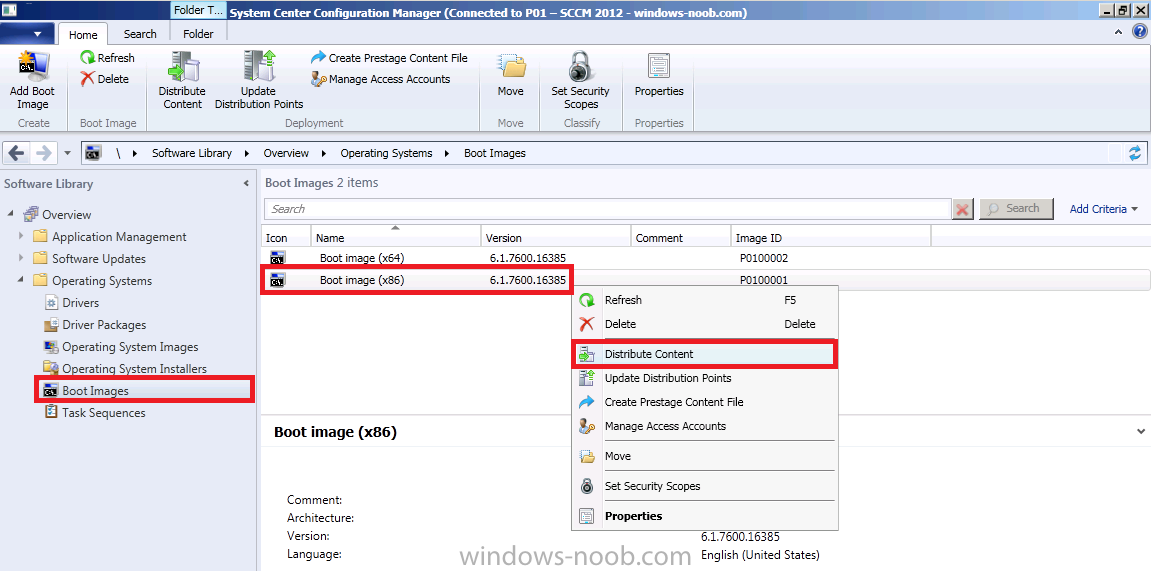
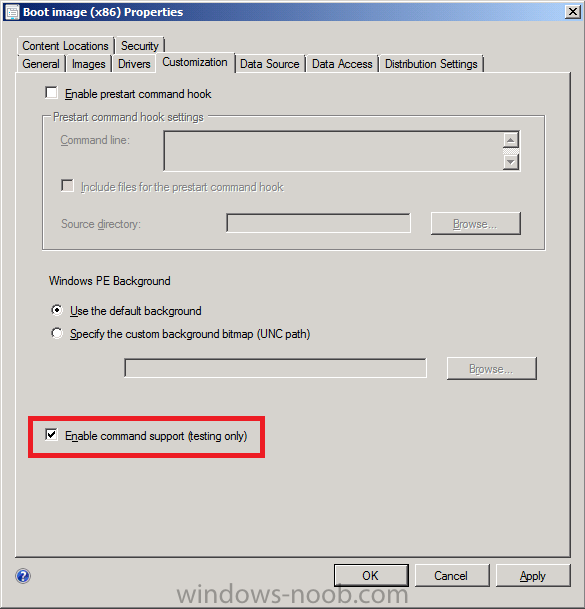
Step 5. Distribute the Boot images to DP's Select boot images in the left navigational pane, select the X86 boot image and on the right, right click on the Distribute Content. go through the wizard, click Add, choose Distribution Point, select the vnext server, and so on until it's all done for the X86 boot image ]] note that when you add the boot image to the distribution point that there is no longer a SMSPXEIMAGE$ dp listed. Please don't forget to repeat the above for the X64 boot image. Step 6. Configure Boot Image options Right click the X86 boot image and choose properties, click on the Customization tab and enable Command line support click on the Data Source tab, select Deploy this boot image from the PXE service point, failing to do this will mean you'll not be able to PXE boot, when prompted, go through the update DP's screens.. Note: Don't forget to Repeat the Above for the X64 Boot Image


-
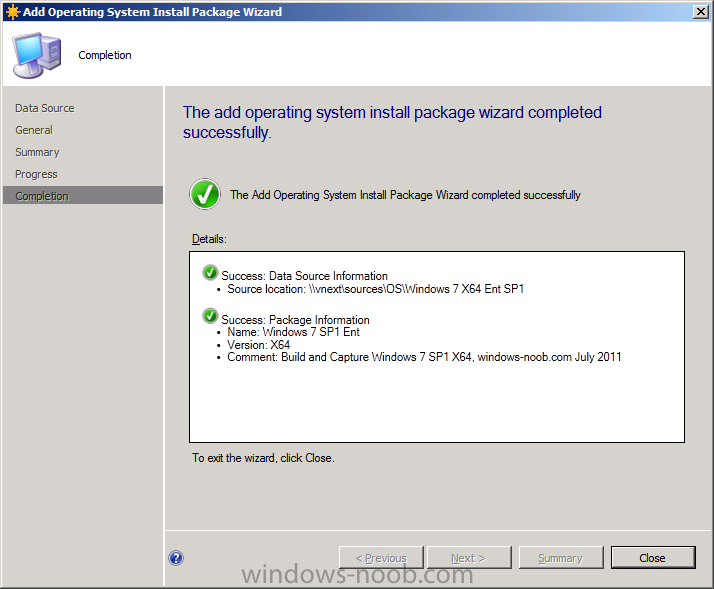
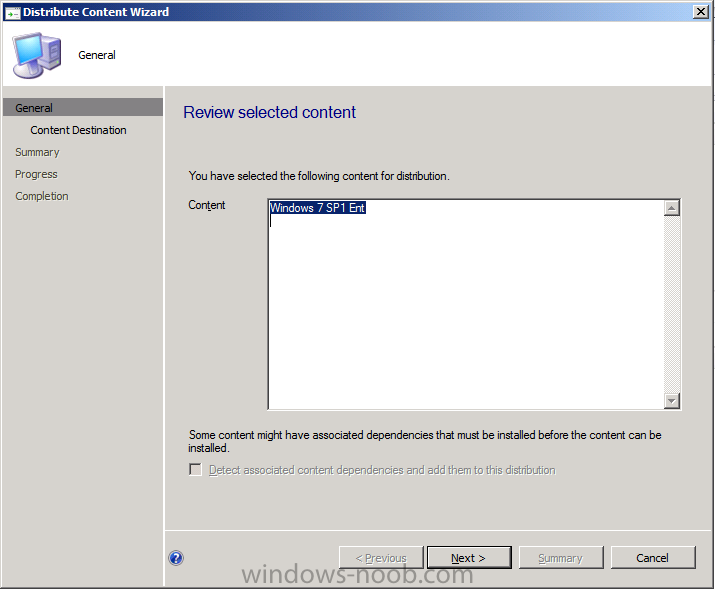
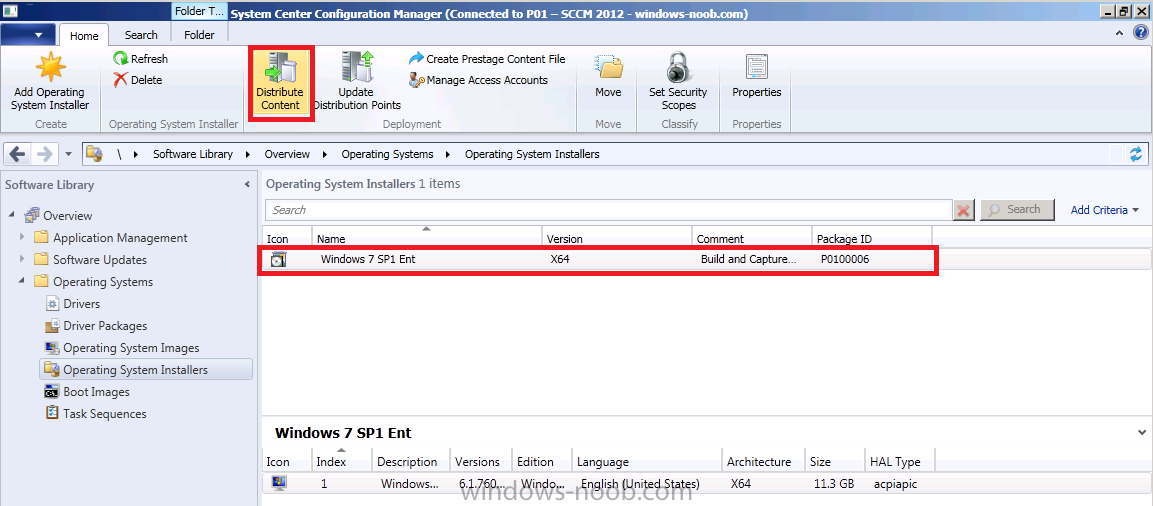
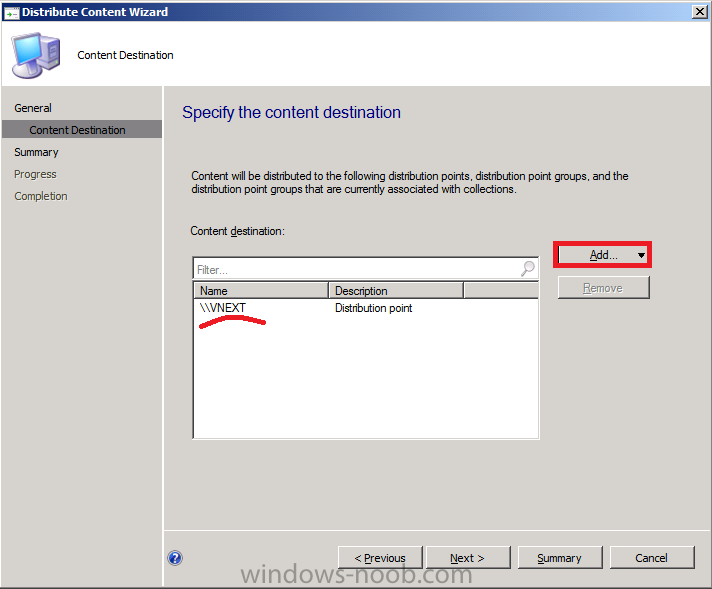
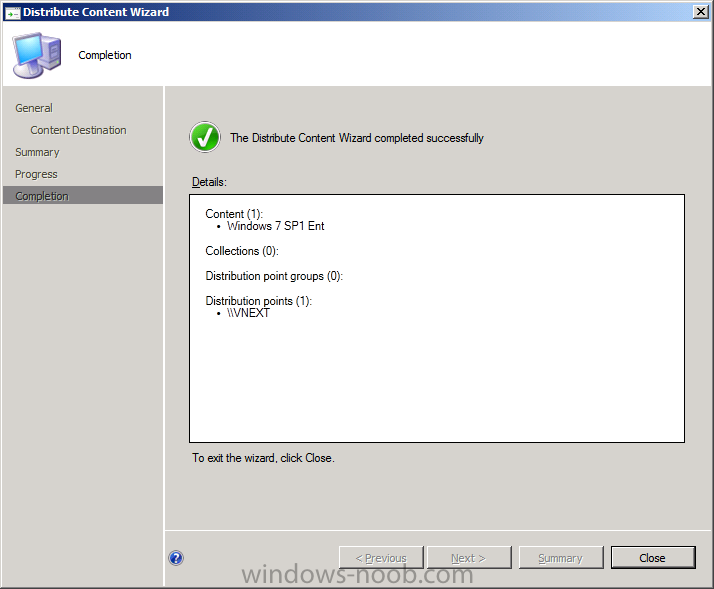
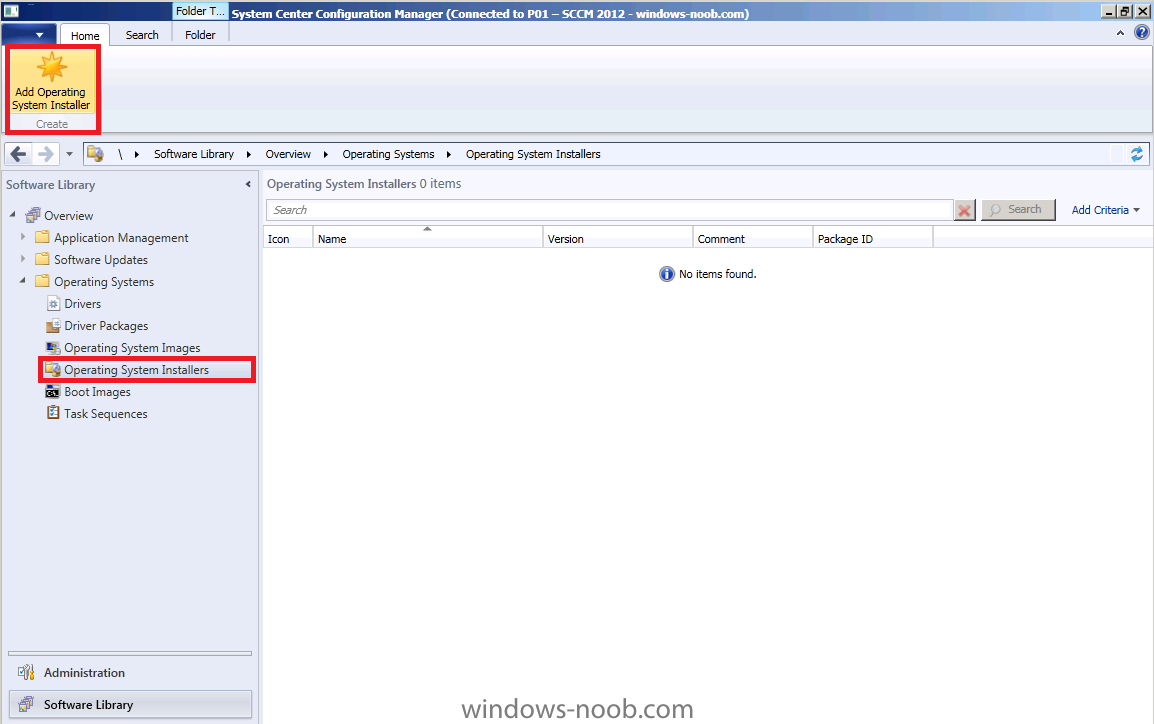
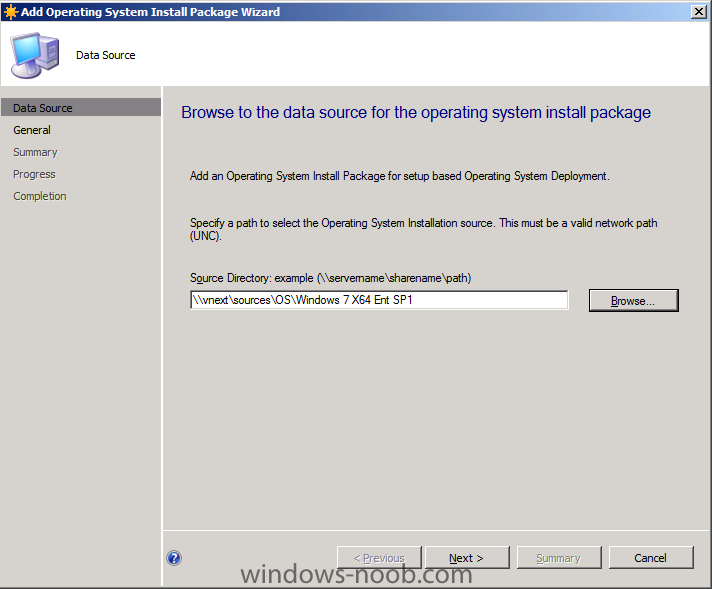
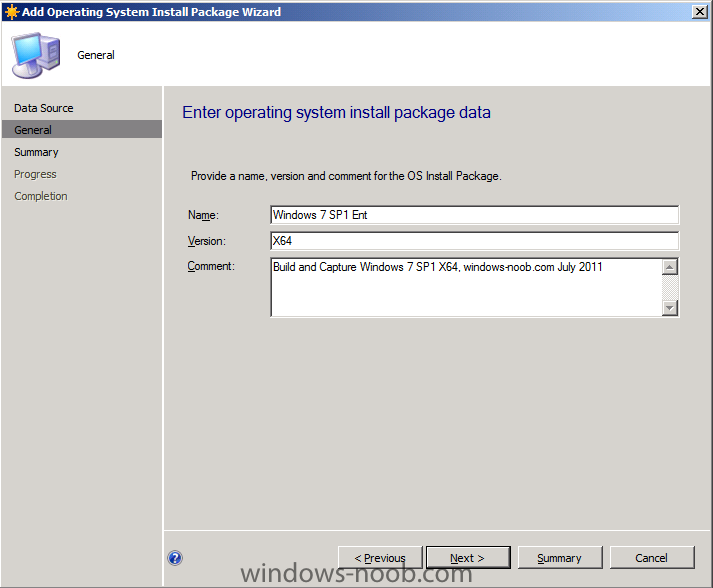
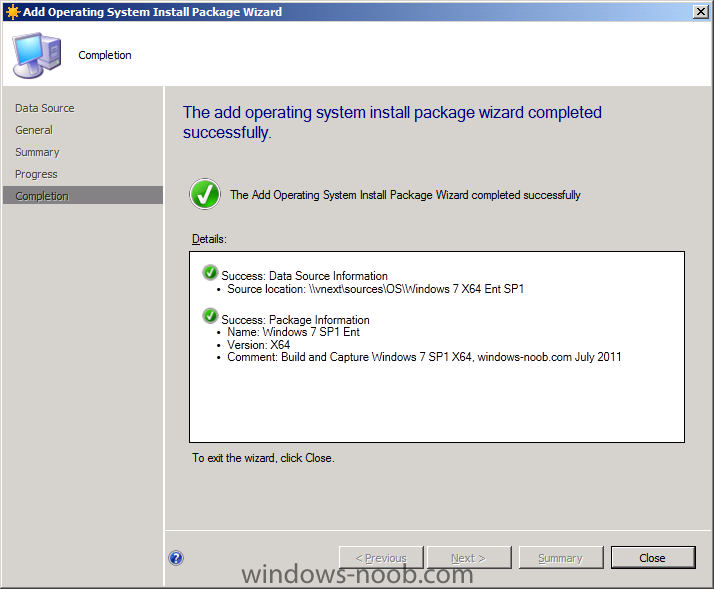
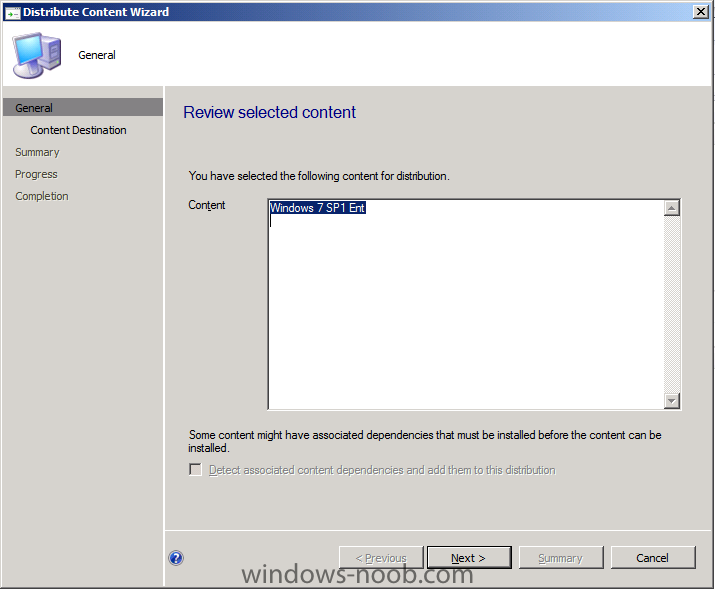
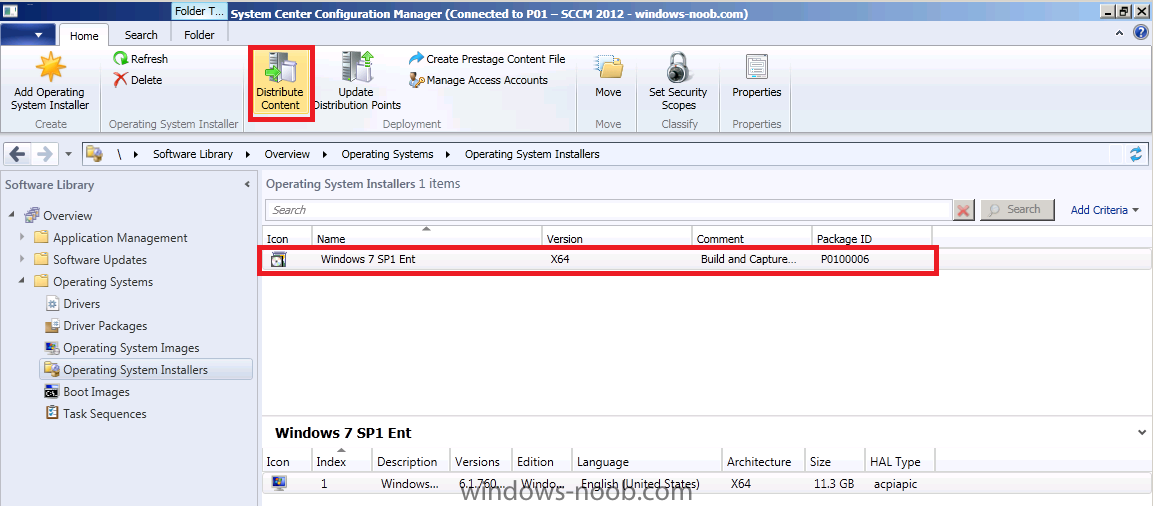
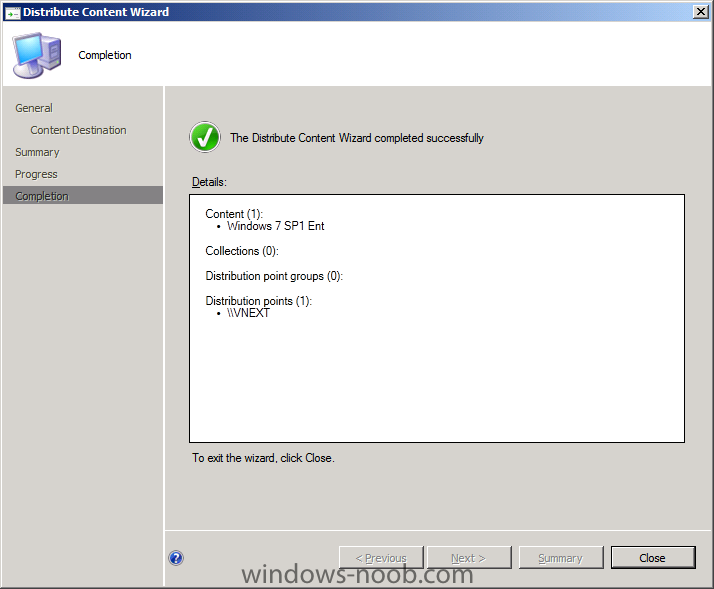
Step 3. Add the Windows 7 SP1 operating system image In the ConfigMgr console, select Software Library and expand Operating Systems, click on Operating System Installers and choose add operating system installer from the ribbon (alternatively right click to get the same option) browse to the UNC path where you have previously copied the extracted contents of your Windows 7 SP1 Enterprise ISO (I extracted mine and then copied it to \\vnext\sources\os\Windows 7 X64 Ent SP1 prior to this step.. Enter some general information click to the end of the wizard Step 4. Distribute the Operating System Now that we've added the image, let's distribute it to our DP. Click on the image we just added and in the ribbon click on Distribute Content the Distribute Content wizard appears click next, select Add, select Distribution Point, select our VNEXT server then ok click next, next.. and review the successful completion message

-
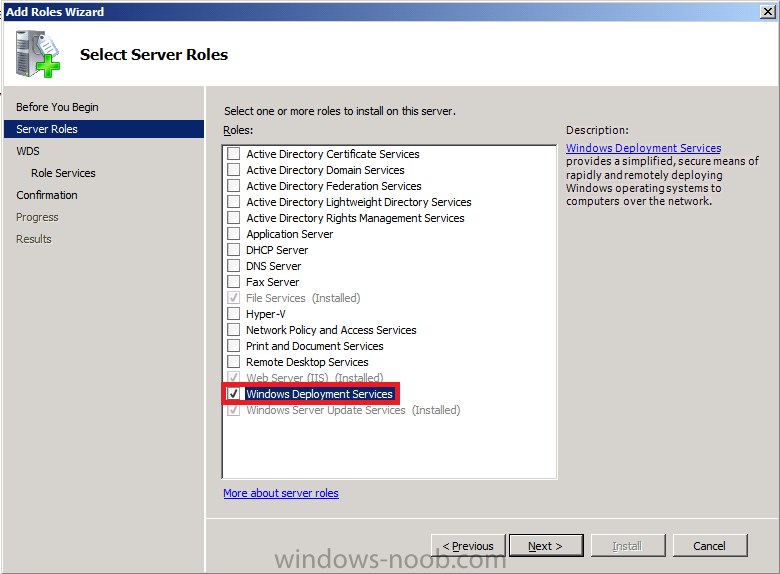
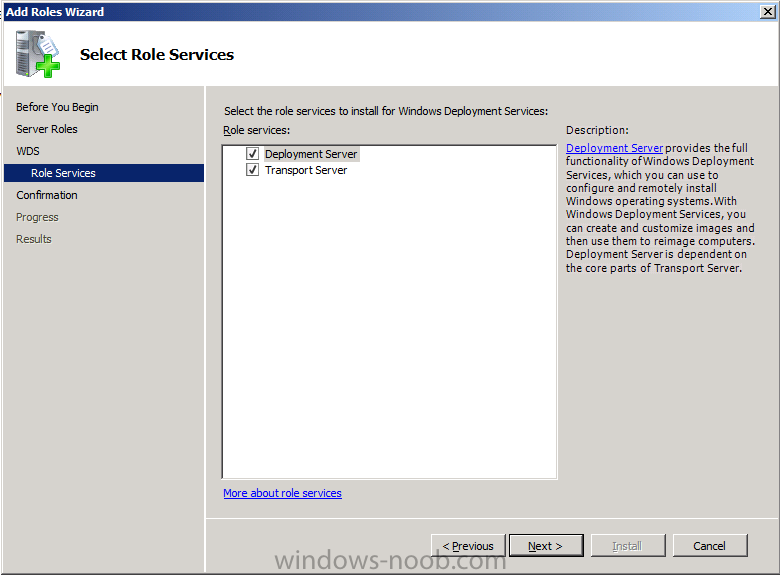
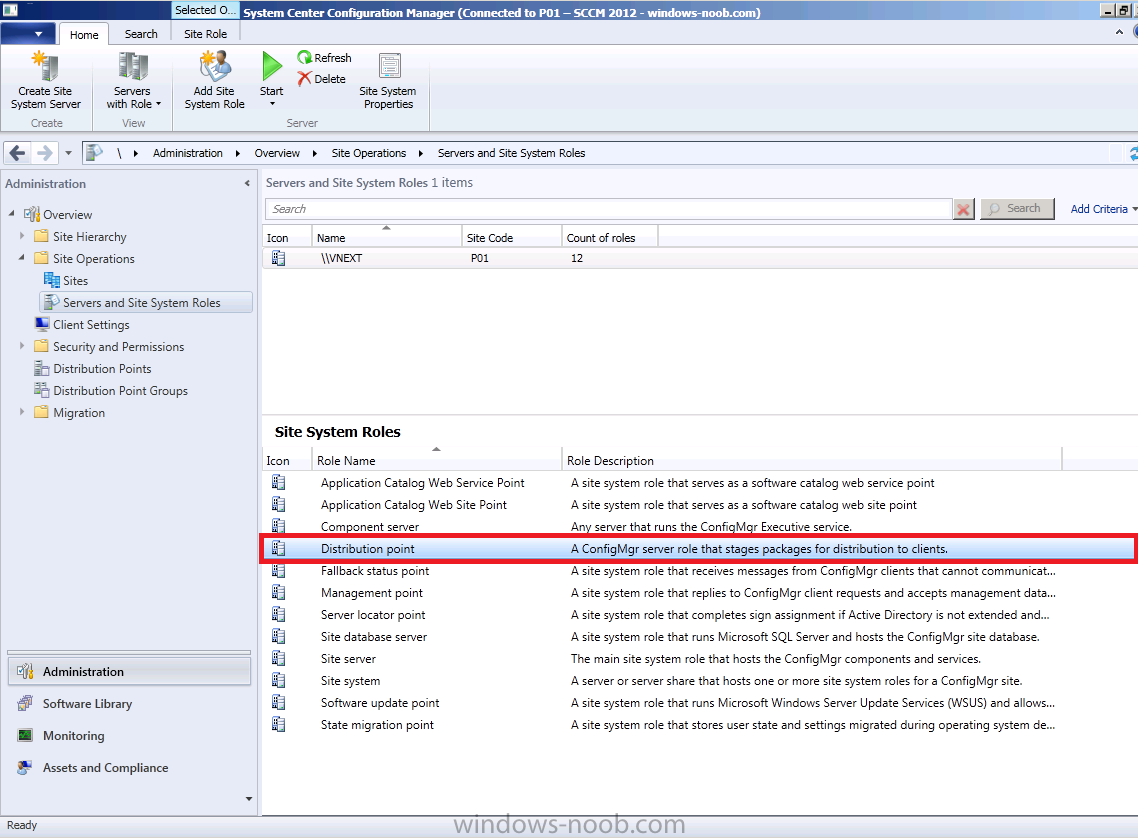
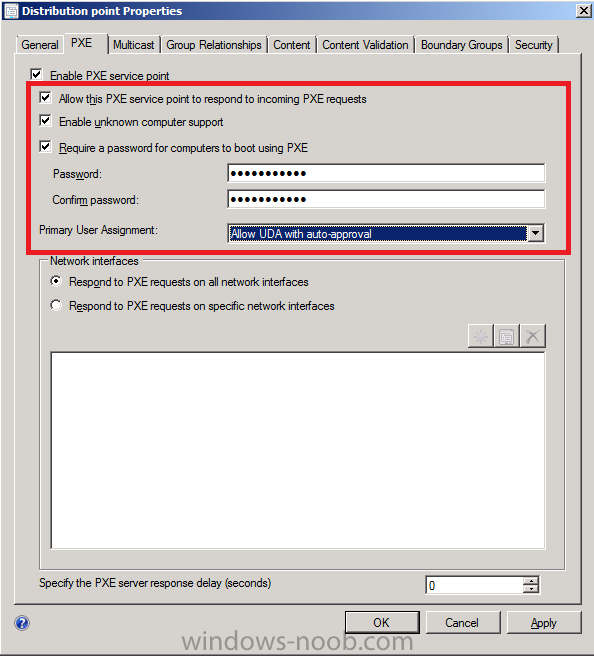
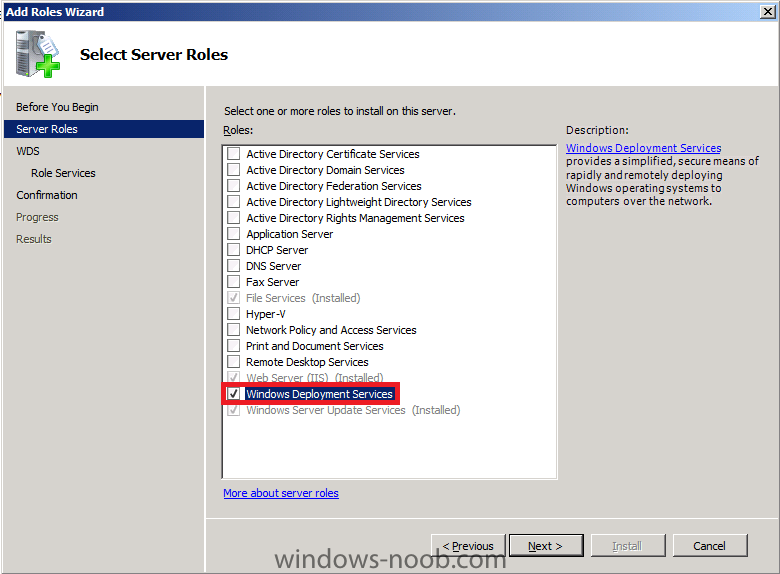
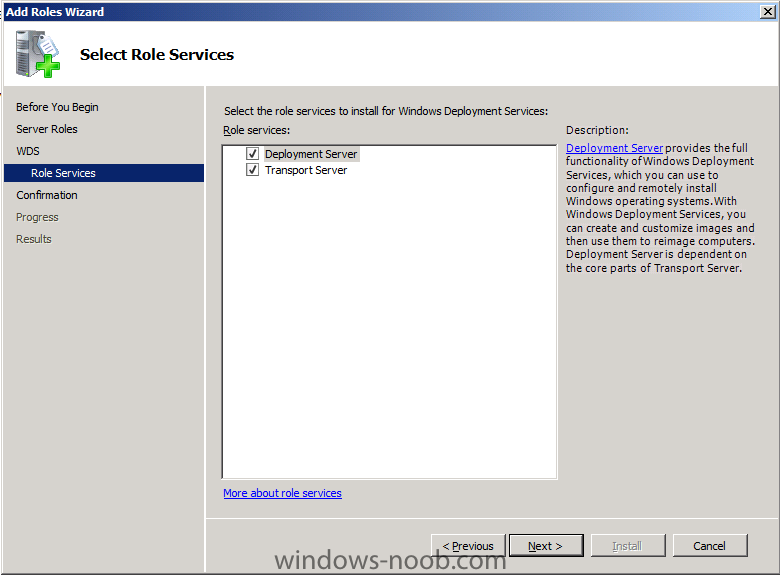
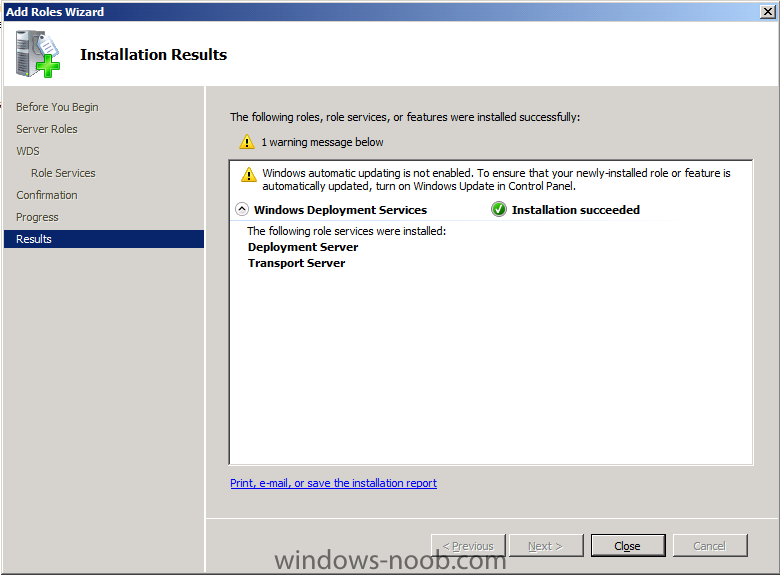
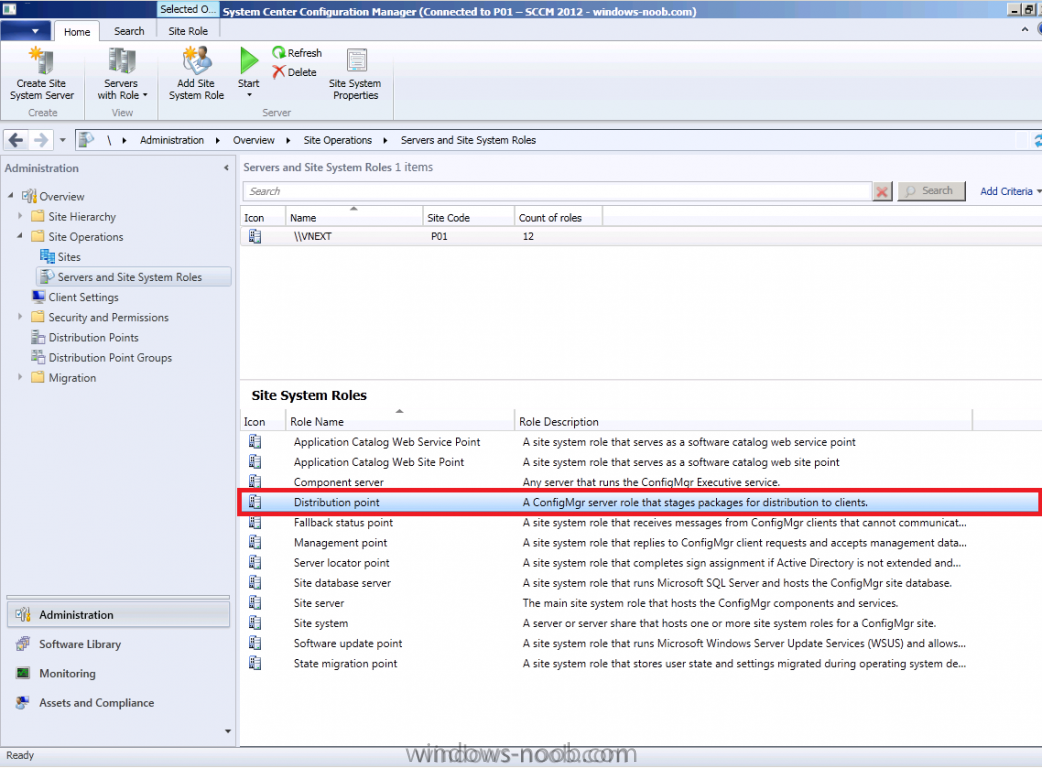
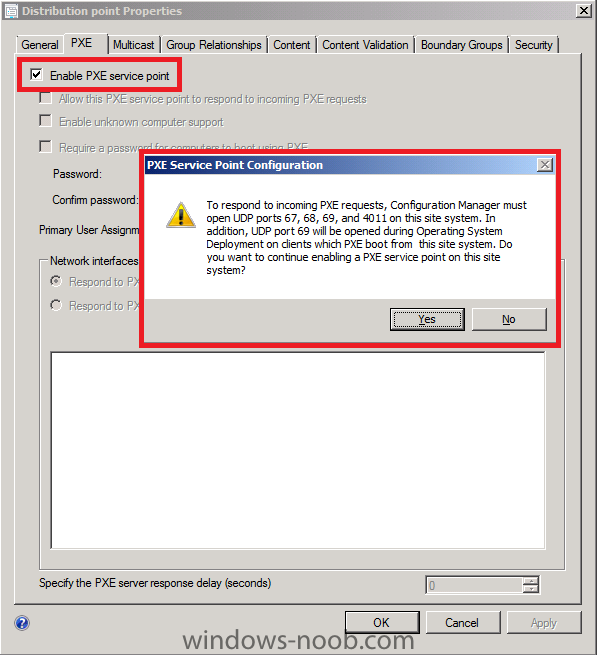
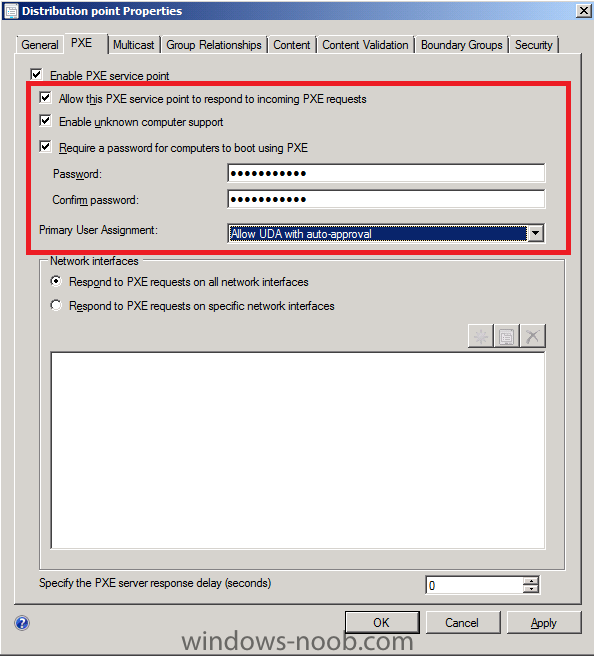
In Part 1. of this series we Installed vNext (or should we say SCCM 2012), in Part 2 we started to configure it. In Part 3, we configed Beta 2 some more by enabling Active Directory discovery methods, adding some site system roles, configuring the computer client agent and client push settings and finally doing a manual client installation to verify it all worked, in Part 4 we looked at installing an application using Application Management and the Software Catalog and the Software Center features of SCCM 2012, and in Part 5, we added the FSP, SLP, SMP, SUP. Now we will get our SCCM 2012 server ready for Deploying Windows 7 Enterprise SP1 so that we can start deploying some Windows 7 clients to enhance our LAB. Whats new in Configuration Manager 2012 for Operating System Deployment ? You can apply Windows Updates by using Component-Based Servicing (CBS) to update the Windows Imaging (.wim) file format images that are stored in the image node of the Software Library. The Task Sequence Media Wizard includes steps to add prestart command files (formerly pre-execution hooks) to prestaged media, bootable media, and stand-alone media. You can configure the Task Sequence Media Wizard to suppress the Configuration Manager Boot Media wizard during operating system installation. This configuration enables you to deploy operating systems without end user intervention. You can define a deployment in a prestart command that overrides existing deployments to the target computer. Use the SMSTSPreferredAdvertID task sequence variable to configure the task sequence to use the specific Offer ID that defines the conditions for the deployment. You can use the same task sequence media to deploy operating systems to computers anywhere in the hierarchy. The Capture User State task sequence action and the Restore User State task sequence action supports new features from the User State Migration Tool (USMT) version 4. You can use the Install Application task sequence action to deploy applications from the Software Library when you deploy an operating system. You can define user device affinity for a client computer during operating system deployment. The functionality of the PXE service point and its configuration is moved to the distribution point to increase scalability. Step 1. Add the WDS role Perform the following on the vNext server as SMSadmin Before we start to Build and Capture Windows 7 we will install the Windows Deployment Services Role as we will make use of PXE boot. Start Server Manager and click on Add Roles, select the Windows Deployment Services role and click next add the Deployment Server and Transport Server role services The WDS role is installed click next then click Install Step 2. Enable the PXE Service Point In the ConfigMgr console, click on Administration, Site Operations, Servers and Site System Roles, and double click on Distribution Point In Distribution Point properties, click on the PXE tab, select Enable PXE service point and when prompted about firewall ports (UDP ports 67, 68, 69 and 4011 ) answer yes. and while you are at it select Allow this PXE service point to respond to incoming PXE requests and Enable Unknown Computer support, add the PXE password and note that we can now select Primary User Assignment, click on that drop down menu and select Allow UDA with auto-approval, click on Apply then ok.
-
Microsoft officials showed off on July 12 at the company’s Worldwide Partner Conference a first public glimpse of its coming Windows Server 8 operating system. Windows Server 8, the server complement of Windows 8 client, is on the same development track and path as Windows 8 client. If we Microsoft watchers are right, both Windows 8 client and server should be out in 2012, possibly in the first half of the year. Microsoft is touting Windows Server 8 as a key private-cloud building block, which means virtualization will be critical to the next release. Microsoft demonstrated only one of what officials said would be several of more than 100 new features coming in the next version of Windows Server: The next version of its Hyper-V hypervisor. Specifically, the Softies showed off what they are calling Hyper-V Replica. In a demonstration from Jeff Woolsey, the Principal Program Manager Lead for Windows Server Virtualization, noted that Microsoft has heard from its customers that it needed to provide more virtual processor support. He said the new Hyper-V will support more than 16 virtual processors per machine. The coming Hyper-V Replica feature provides asynchronous virtual machine replication. All users will need is Hyper-V and a network connection. Users will be able to schedule replication to happen immediately or later. The new feature will allow users to do things such as replicate their mission-critical database to an offsite data vendor. Woolsey said that Microsoft will be vendor-agnostic with this and support multiple storage, datacenter and software/service providers. Microsoft also is going to allow Windows Server 8 users to replicate unlimitedly without charging additional fees per virtual machine. Microsoft is also believed to be providing the next version of its Hyper-V hypervisor in the Windows 8 client, as well, though Microsoft has yet to announce this officially. Microsoft is expected to share more about Windows Server 8 at its Build conference in mid-September. The same day that Microsoft showed off Hyper-V Replica, its archrival VMware announced VSphere 5. One of the new features in vSphere 5, which is due out in the third quarter of 2011, is its ability to support virtual machines “that are up to four times more powerful than previous versions with up to 1 terabyte of memory and 32 virtual CPUs.” VMware is touting the scalability and performance gains customers will get when they use these new VMs with the high-availability advances in the VMware platform. In other private-cloud news, Microsoft officials said today at the partner conference that Hewlett Packard is still on-board with plans to deliver Windows Azure Appliances before the end of this year. Microsoft announced its “cloud in a box” Azure Appliances last summer, with officials saying the first of those products would be available to customers at the end of 2010. Fujitsu committed to delivering its first Windows Azure Appliances starting in August 2011. There’s no word on when Dell, another of MIcrosoft’s announced Azure Appliance partners, will start offering Azure Appliances to their customers. via > http://www.zdnet.com/blog/microsoft/microsoft-shows-off-early-peek-at-windows-server-8/10002?tag=must-read
-
SCCM2012 installation problem "Any help"
anyweb replied to shamos's topic in Configuration Manager 2012
what version of sql server did you try ? -
Introducing the windows-noob.com FrontEnd HTA ver 1.0
anyweb replied to anyweb's question in Frontends, HTA's and Web Services
yup no problem the MDT 2010 update 1 files (and settings packages) are created once you create a MDT task sequence and go through the wizard, to do this right click on task sequences, choose create microsoft deployment task sequence, go through the wizard, it creates both needed packages during the wizard obviously you must have intergrated mdt 2010 update 1 with configmgr before trying that step. as regards runscanstate, yup you've got it, use wsim to create your own or use mine as long as it matches the architecture of your win7 image, the network location hotfix is just a step to install a patch in windows 7, see here, to save time you can leave it out also no worries ! -
Capturing an image error.
anyweb replied to clivebuckwheat's question in Troubleshooting, Tools, Hints and Tips
can you post the smsts.log please ? -
A new build for Microsoft's upcoming Windows 8 operating system could be released to developers as early as next week if a Twitter message from a previously reliable source has its facts straight. The Twitter page for "@MSFTtm" claims that Microsoft will release a Community Technical Preview (or CTP for short) for Windows 8 next week at Microsoft's Worldwide Partner Conference. The conference is scheduled to be held on July 11-14. While there's no concrete proof that Microsoft will indeed release a CTP build of Windows 8 next week, it's a pretty safe bet that Microsoft will be discussing at least some aspects of Windows 8 at the Worldwide Partner Conference. WinRumors.com reports via unnamed sources that the conference will have "substantially" more info about the next version of the operating system. Microsoft might also release a new Building Windows 8 video. The first such video was released on June 1 that showed off the operating system's user interface. There are also rumors that Microsoft will release a full fledged beta version of Windows 8 in the next couple of months. That is supposed to happen during the company's BUILD developer conference that will be held in September. Windows 8 is slated to be released in its final form sometime in 2012 and will run not just on PCs but also on tablets and other devices. While Intel and AMD based processors will still be supported Windows 8 will also run on but chips based on designs from the ARM company as well. via Neowin > http://www.neowin.net/news/rumor-new-windows-8-build-to-be-released-next-week
-
Microsoft CEO Steve Ballmer has claimed that the company’s next-generation of Windows “will be pretty important.” Ballmer made his remarks at an Imagine Cup 2011 event in New York on Friday. The software giant brought together some of the brainiest students to showcase their work and efforts to solve real world problems using technology. Ballmer praised the various groups of students who are participating in the event. Over 300,000 students registered for the Imagine Cup 2011 and the winners will be announced next week. Ballmer spoke briefly about Windows 8 and the future of what Microsoft is doing. “As we take a look over the next several years, we’re certainly excited about what we’re doing,” said Ballmer. “What’s Windows 8? How do we drive it? What do we make happen? What are the key phenomena? When do we get to release it? How do we make it better, and better and better? Yes, there are some other guys we compete with. Boom we’ve got to do better, and better, and better, and better, and better. It’s pretty exciting, pretty exciting stuff.” Ballmer also spoke about Microsoft’s Xbox plans and how the company’s excitement and innovation is driving the Xbox into living rooms worldwide. Microsoft is moving to the cloud according to Ballmer. “We’re moving to the cloud. Everything is moving to the cloud,” he said. Ballmer also said he was excited by the company’s Bing service. “Bing. Bing is a service that is probably amongst the things I’m most excited about at Microsoft, most excited.” Ballmer rounded his speech off with a brief mention of Windows 8 again. He claimed that Windows 8 “will be pretty important,” echoing previous comments at a Gartner conference in late 2010 where he revealed that the next version of Windows will be the company’s riskiest product bet. “Whether you consider yourself a businessperson looking at technology, or a technology person looking at technology, the opportunities for you are really going to be pretty fantastic. There’s a lot coming in our own case I think the news, the things that we have to talk to you as a group of technologists over the next few months, Windows 8 will be pretty important. You’ll hear more about that at our developer conference Build in September. But, you’re going to see a stream of things from us.” The full transcript of Ballmer’s speech is available here. via winrumors.com

-
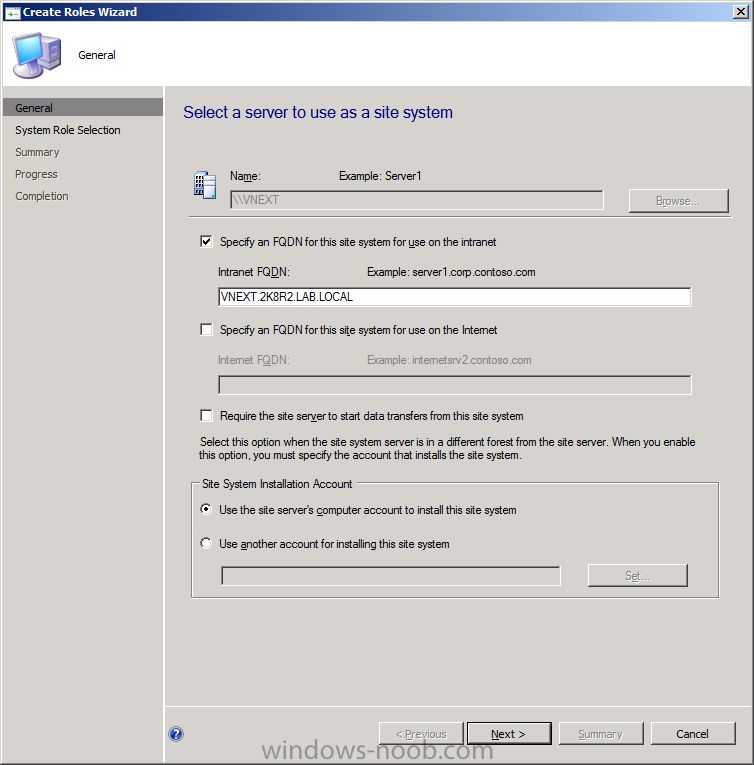
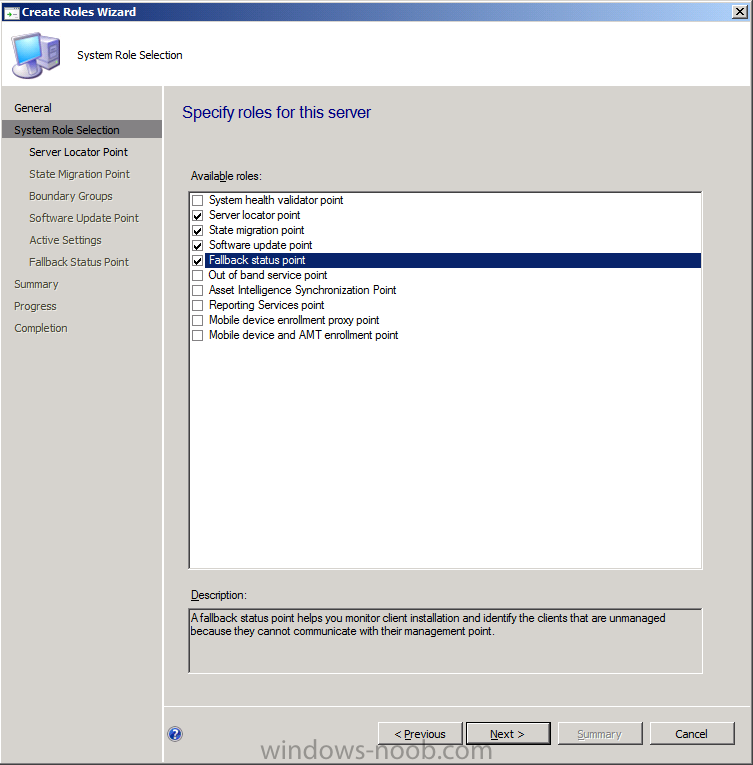
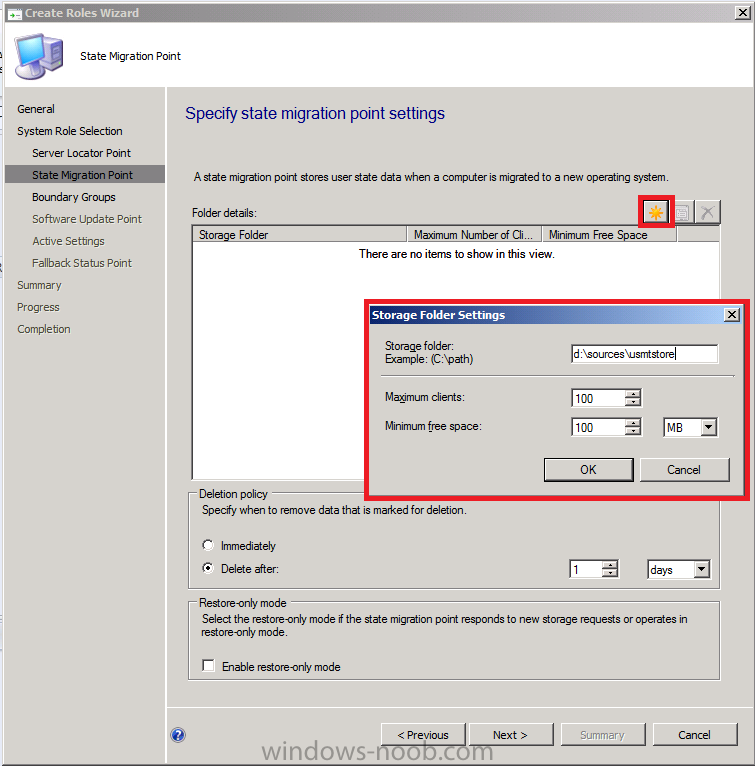
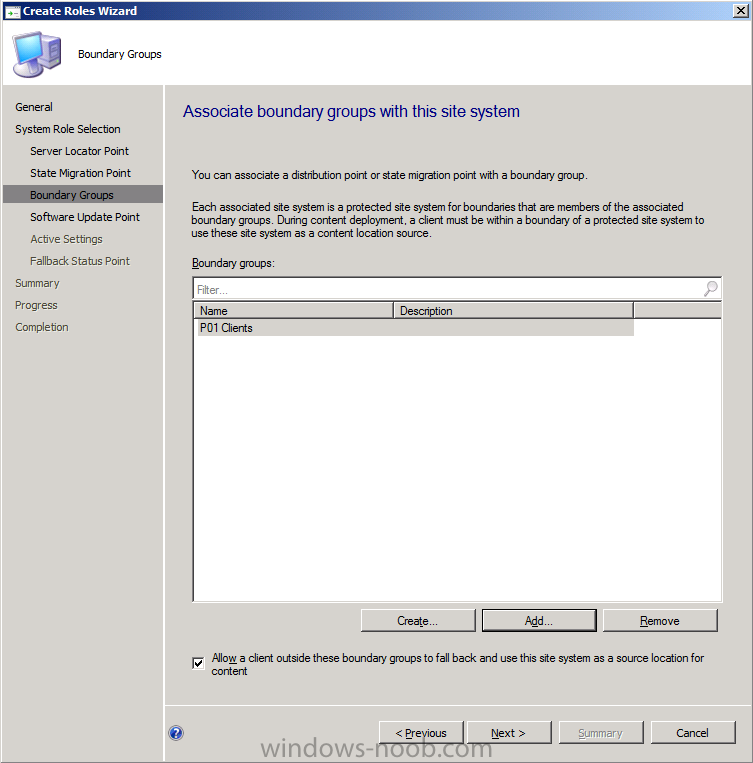
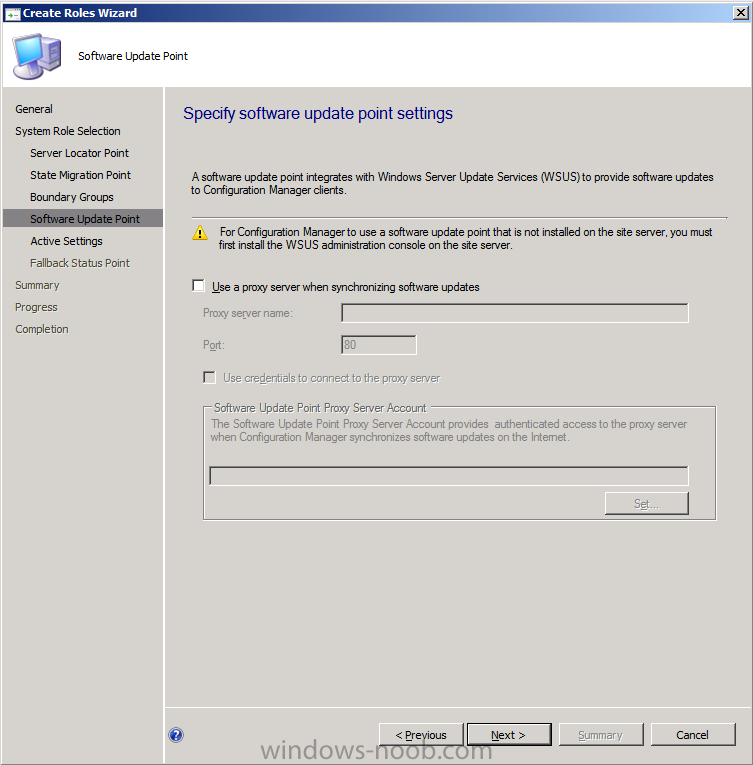
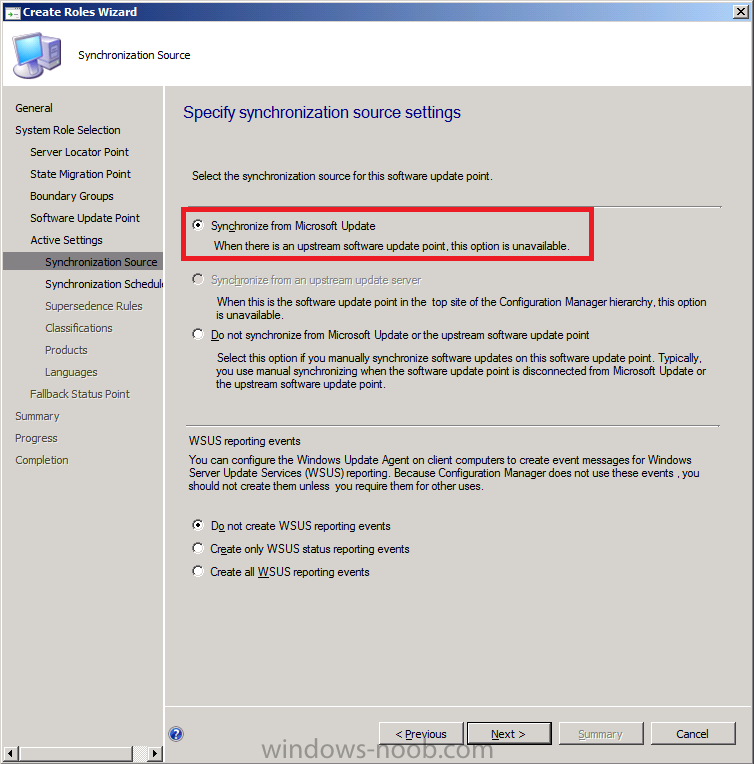
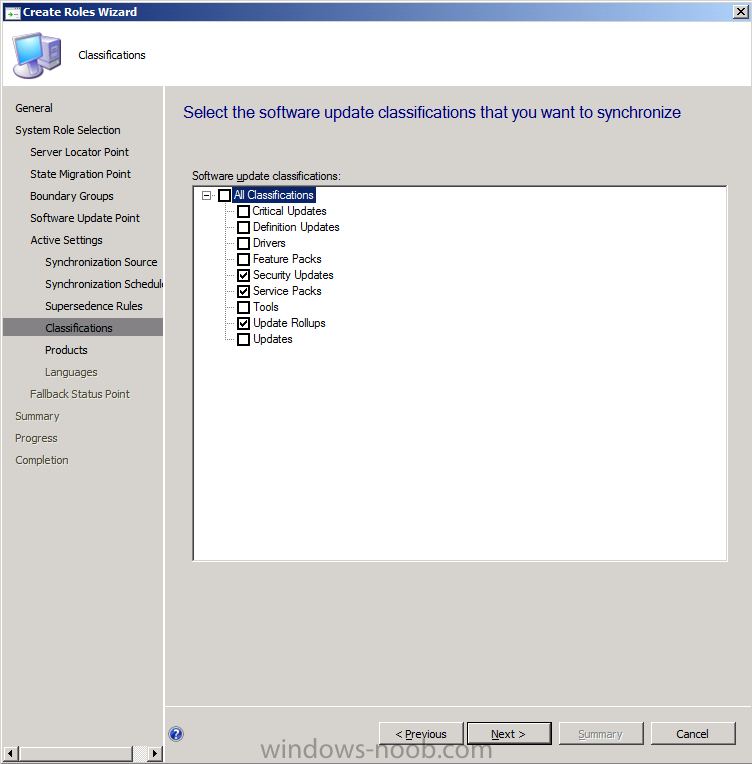
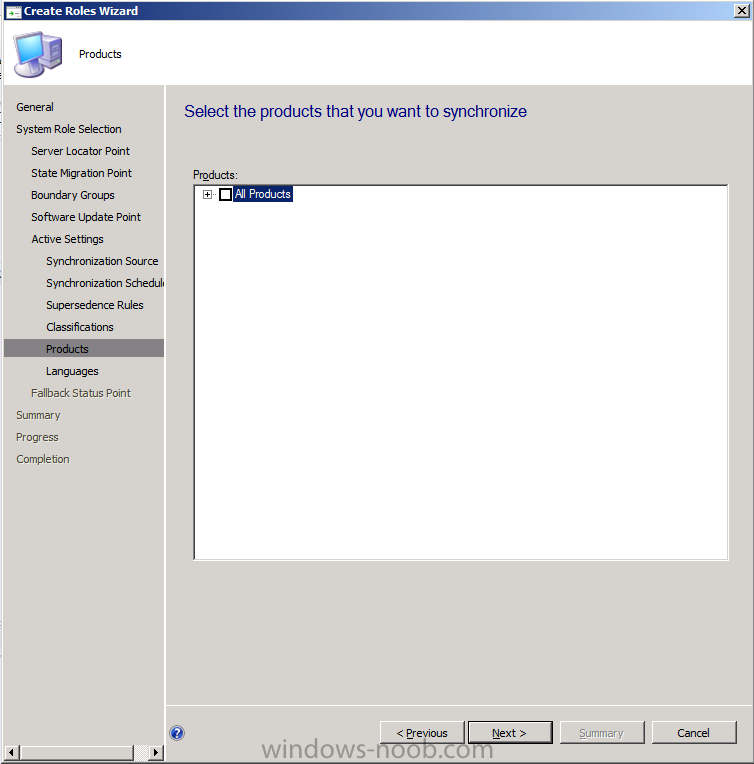
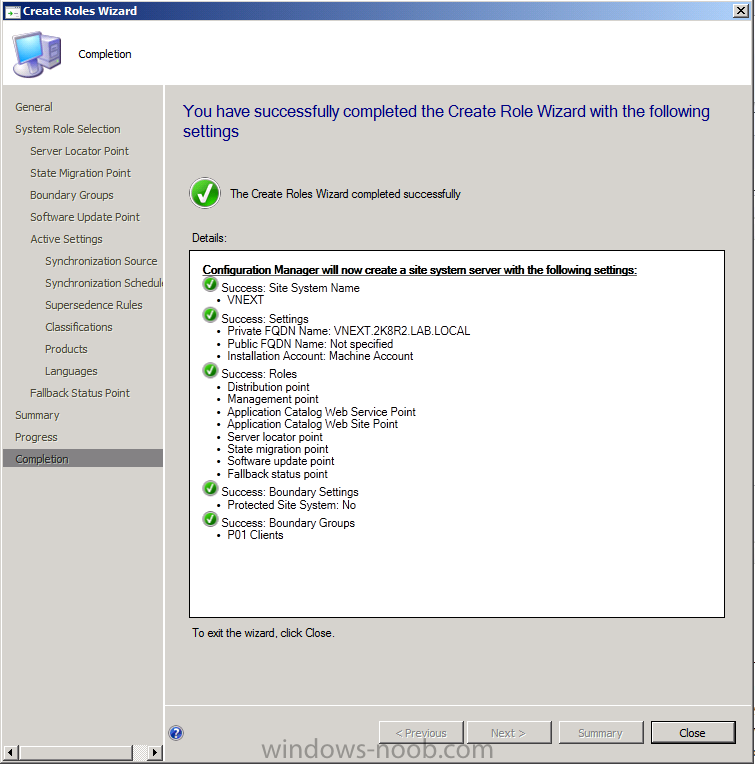
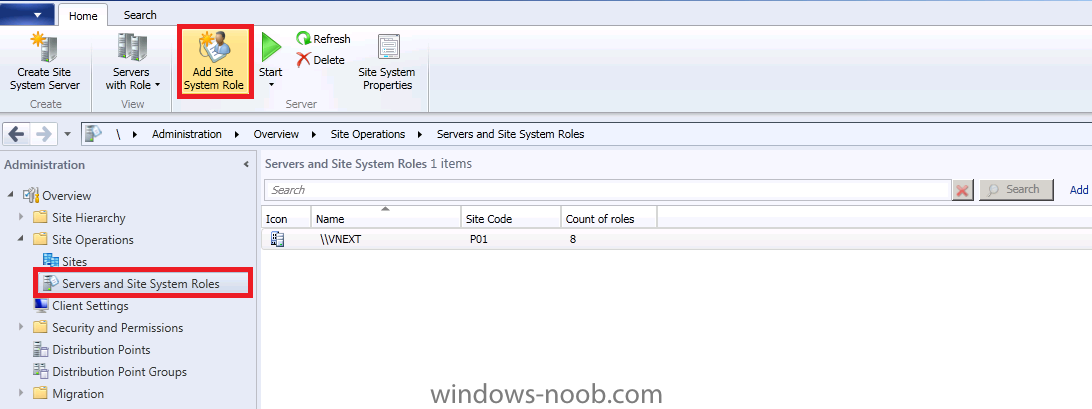
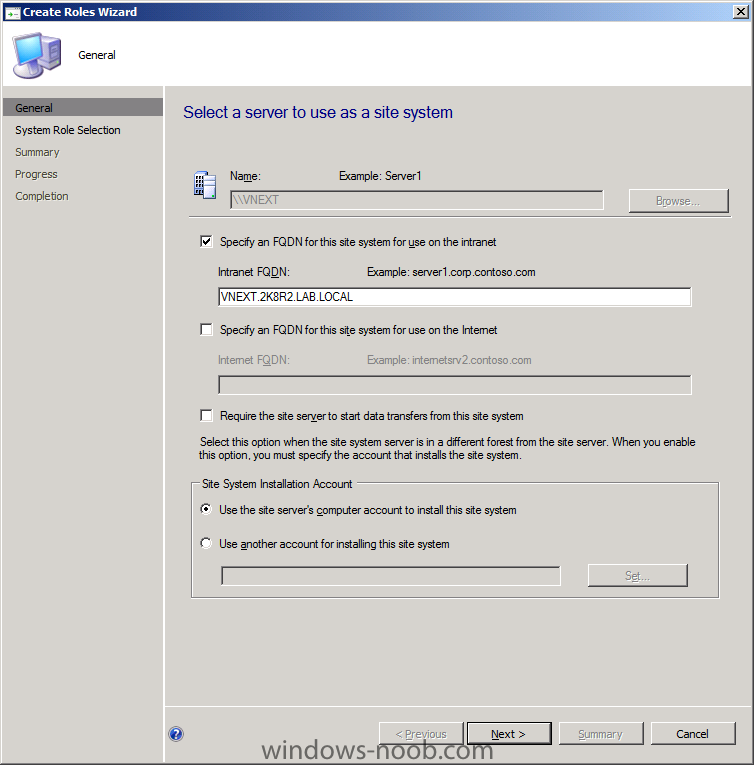
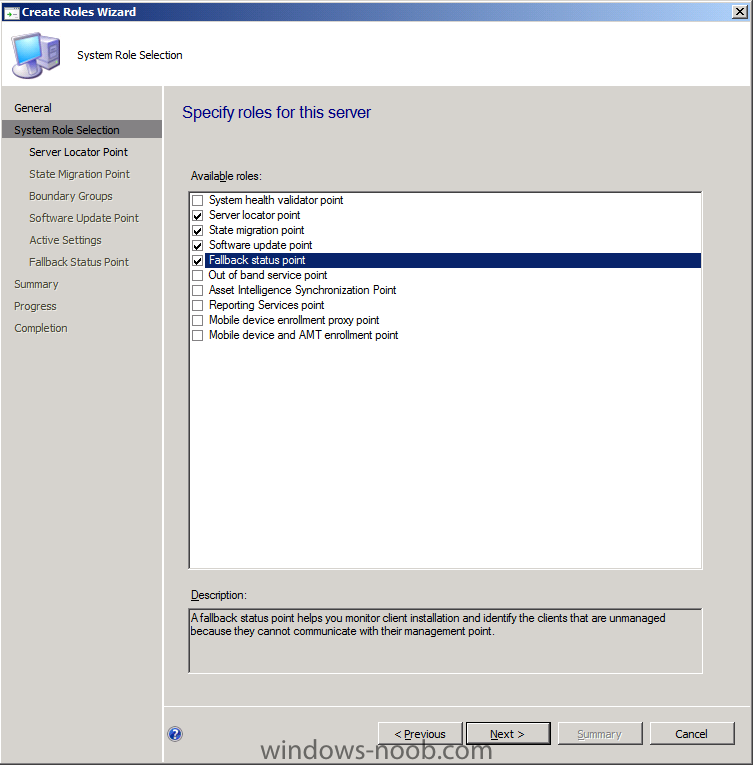
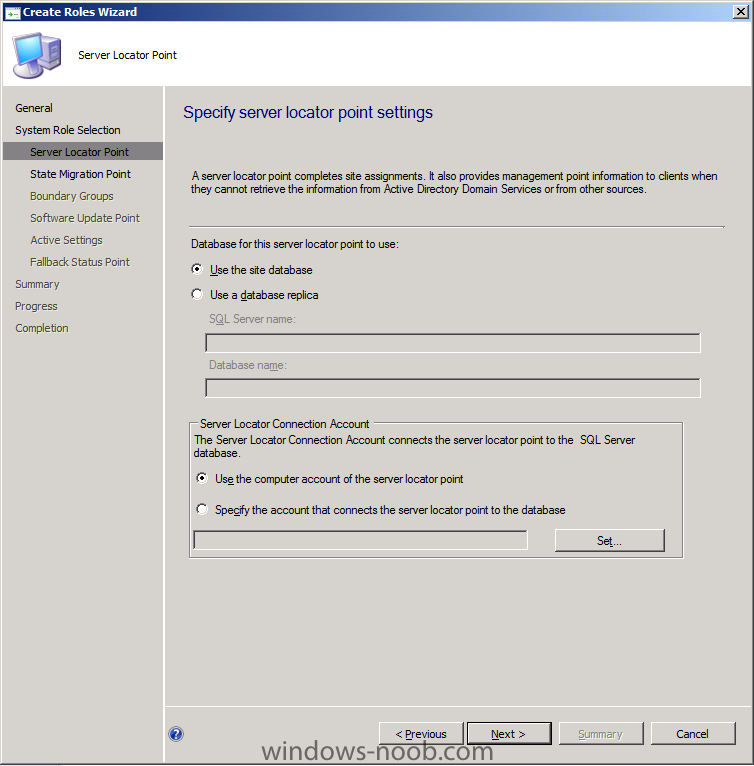
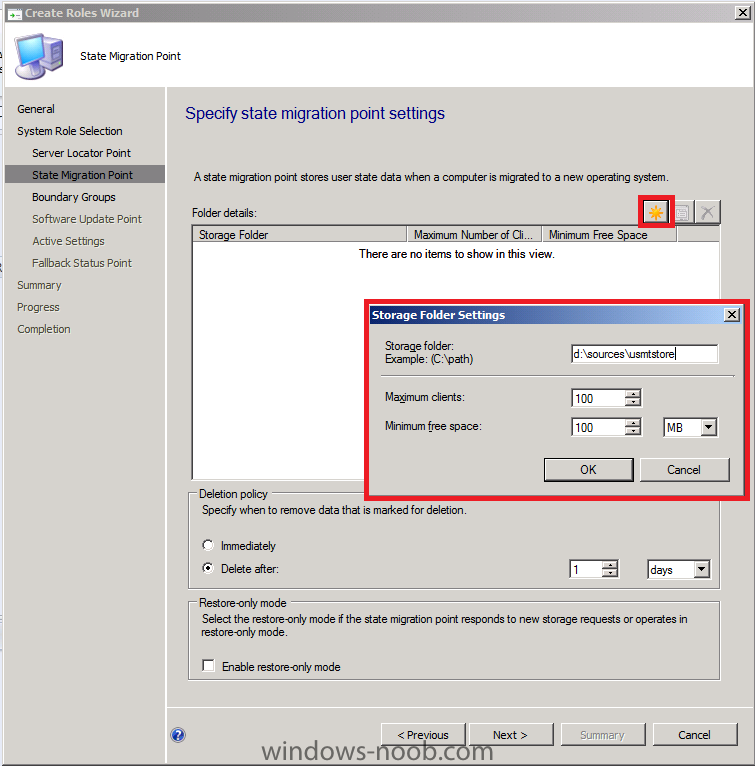
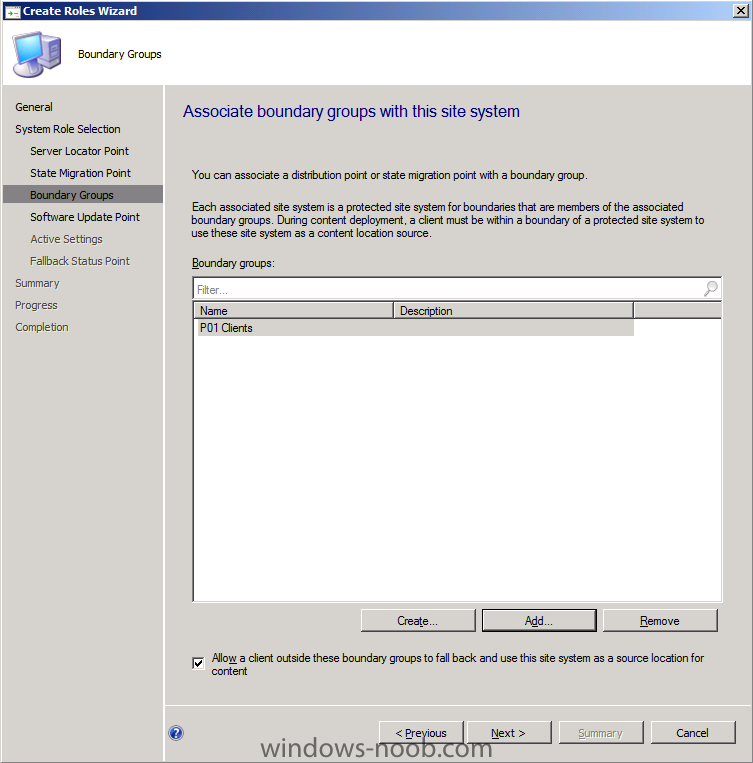
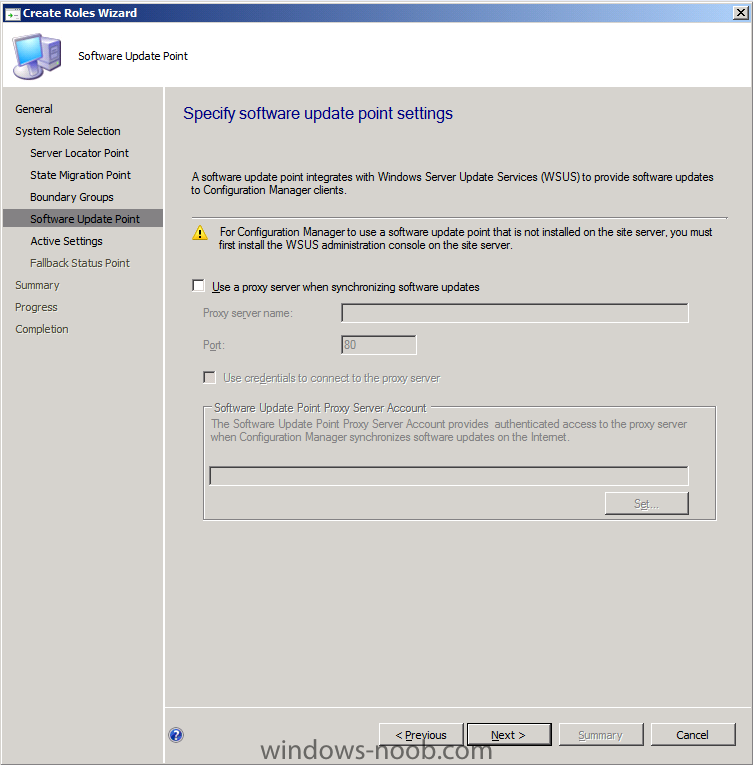
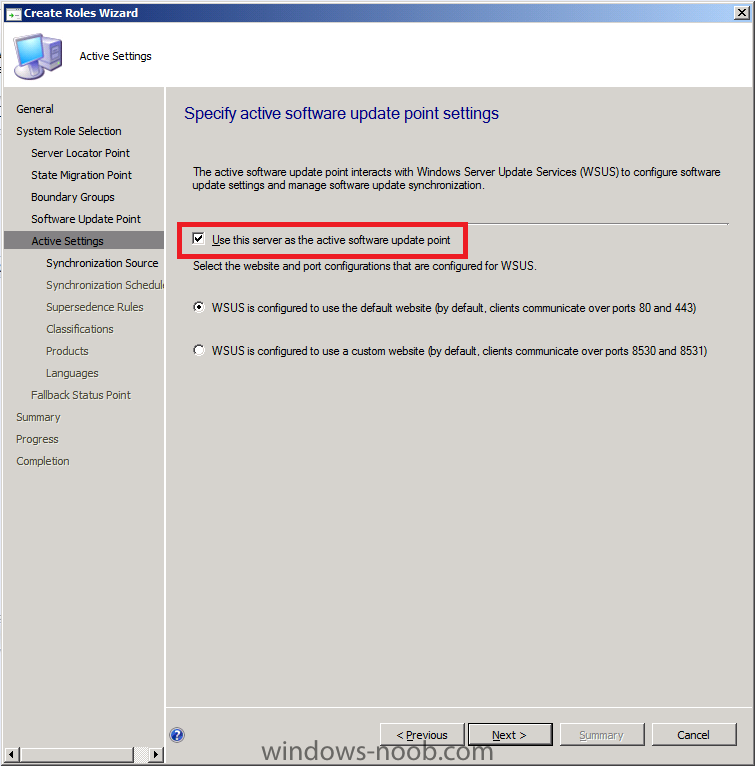
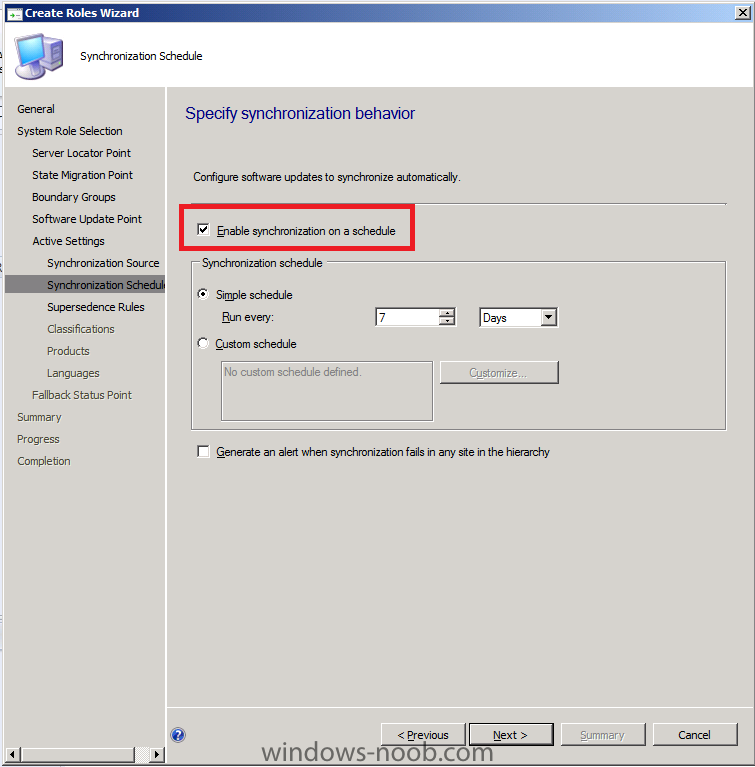
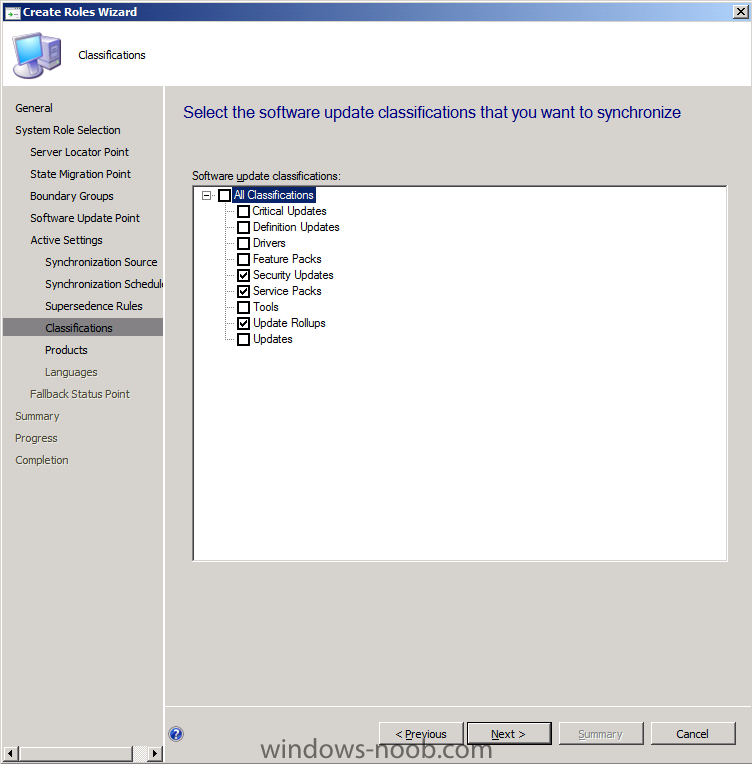
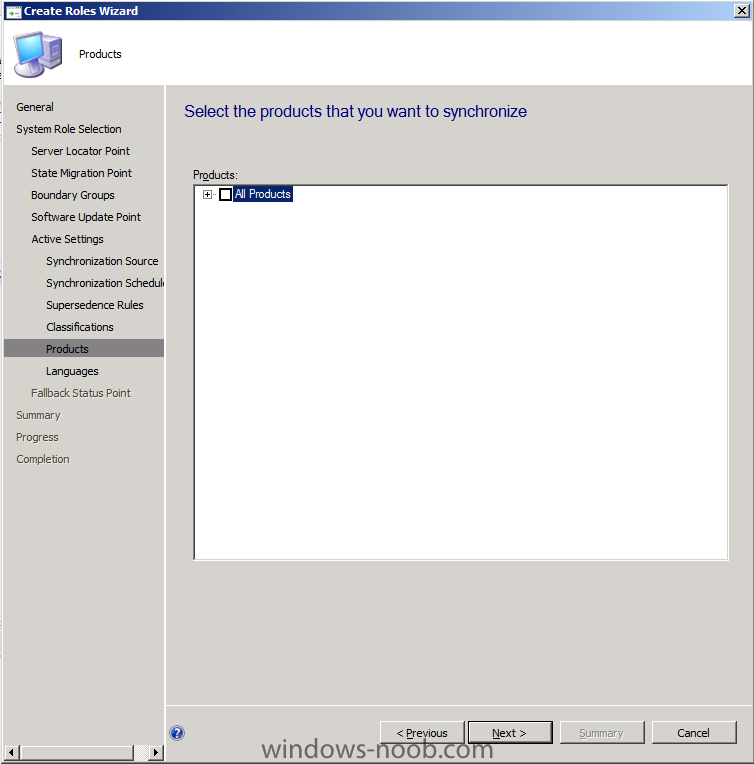
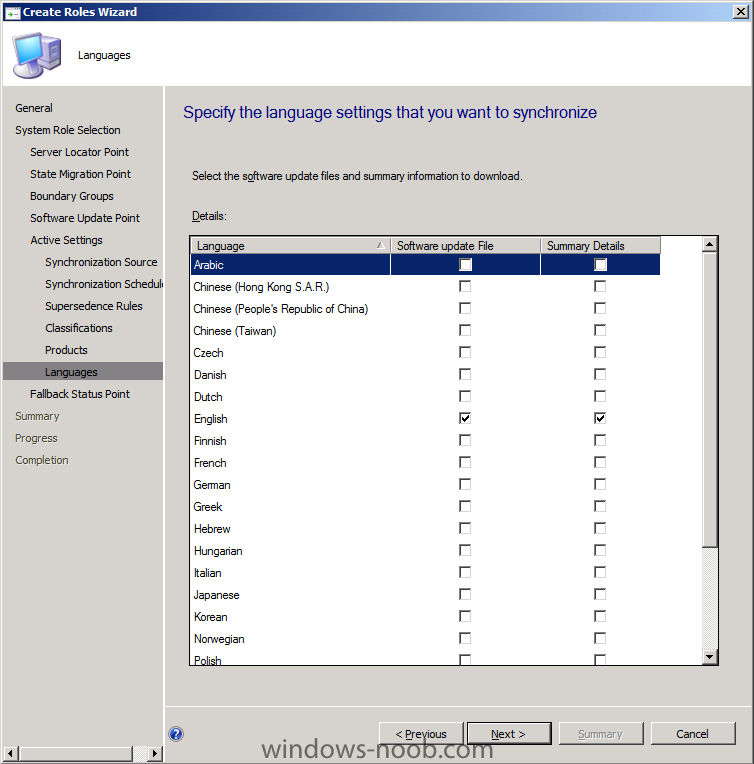
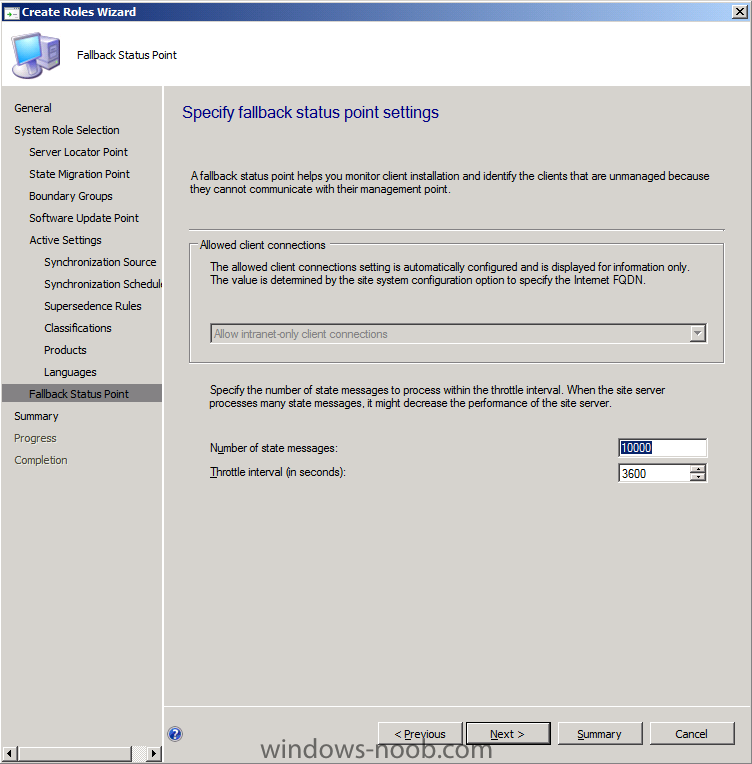
Step 2. Add the SLP, SMP, SUP and FSP roles We will be doing some DATA migration later and hope to install Windows Updates too, so as part of that let's add the following roles, Server Locator Point (SLP - to find the Site server when not joined to AD, eg: workgroup joined as in Build and Capture), State Migration Point (SMP, for storing our saved user data) and Software Update Point (SUP, software updates), Fallback status point (FSP). In Configmgr's console, click on Administration, Site Operations, Servers and Site System roles, in the Ribbon, click on Add Site System Role Click next on the Create Roles Wizard page select the 4 roles and click next and accept the settings for SLP for SMP, click on the yellow starburst and point the Storage folder to d:\sources\usmtstore, click ok and next when done our previously defined Boundary Group (P01 Clients) is listed, click next to continue, it's needed for the SMP click next at the specify software update point settings (we have no proxy) select this server as the active software update point and configure WSUS to listen on default website (ports 80 and 443) Synchronize from Microsoft Update enable Sync on a Schedule set it to Immediately Expire superseded updates leave classifications as it is, we'll come back to this later leave Products as it is, we'll come back to this later (after a sync...) and leave only English selected in Languages now that the SUP role questions are out of the way, for the FSP leave it as it is click next, next and review the successful completion That's it !


-
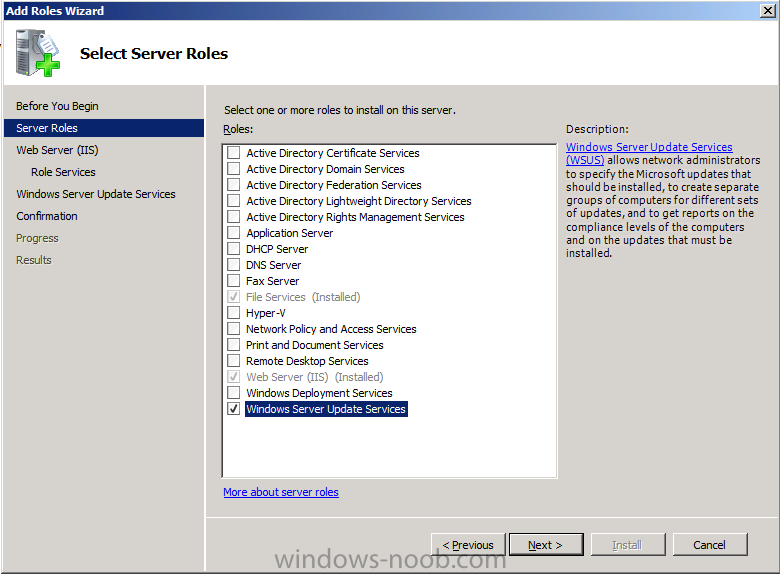
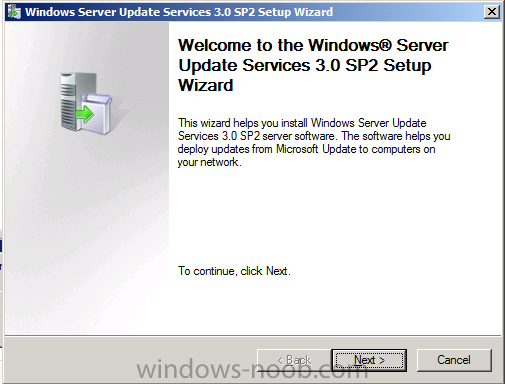
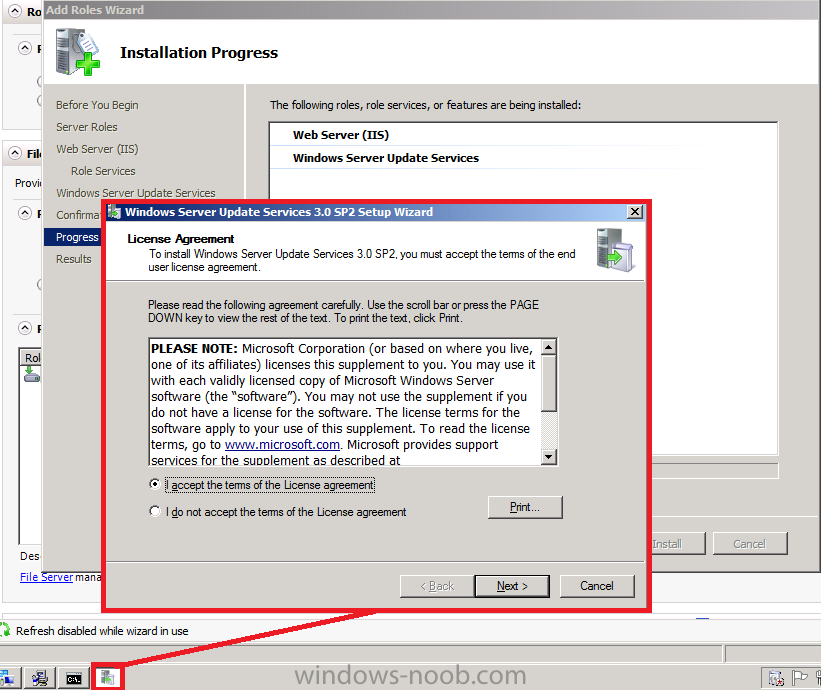
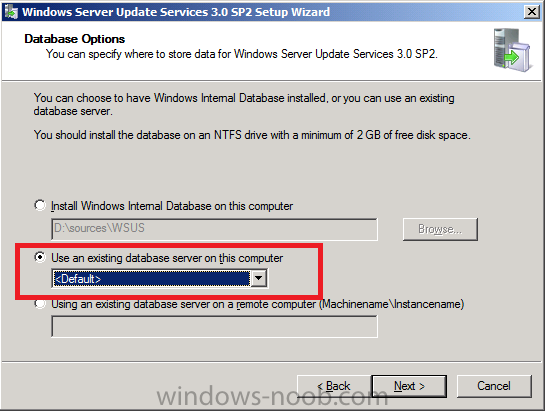
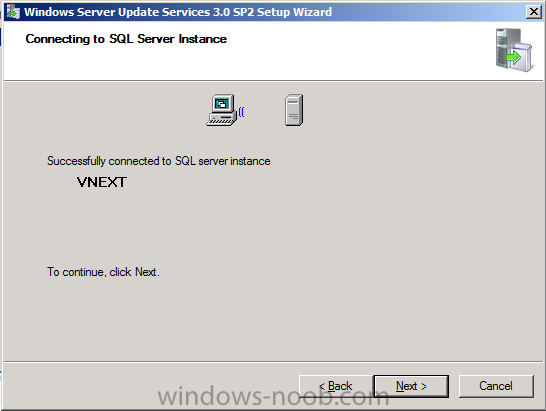
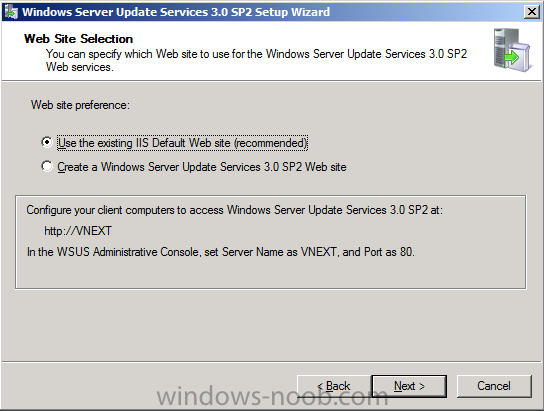
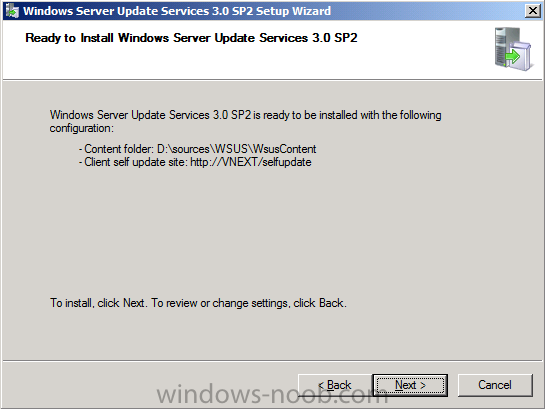
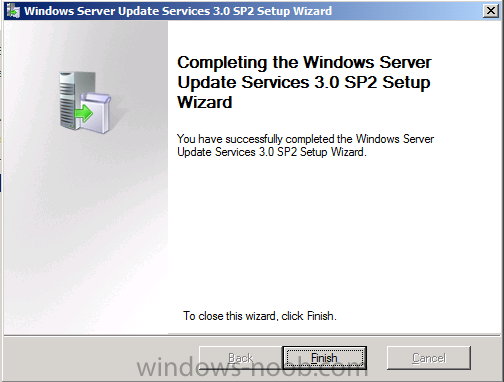
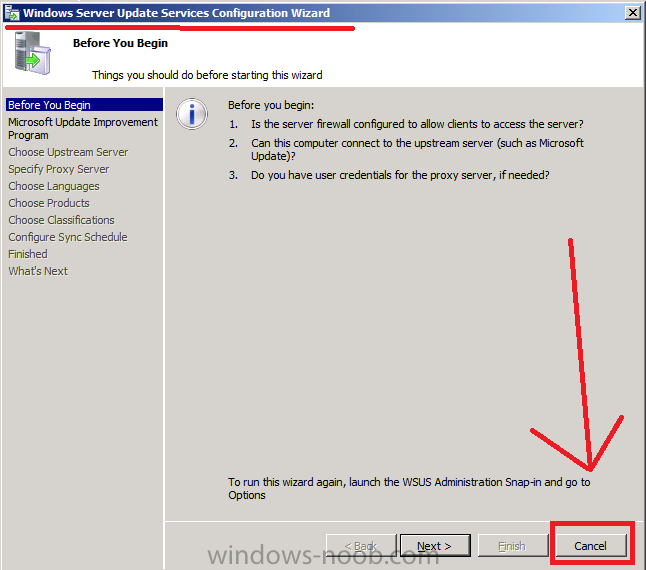
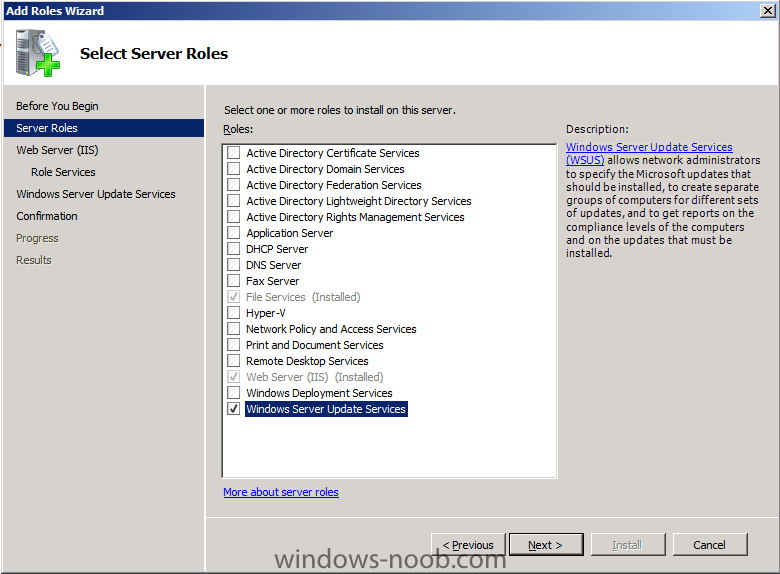
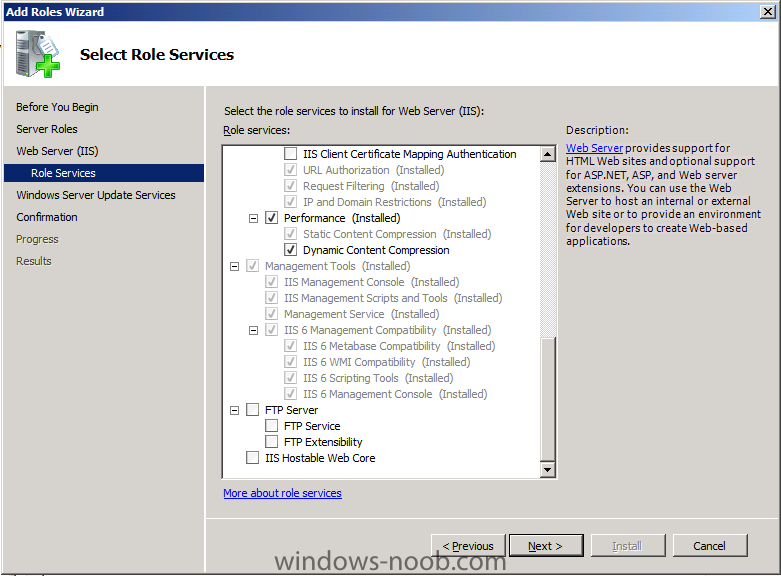
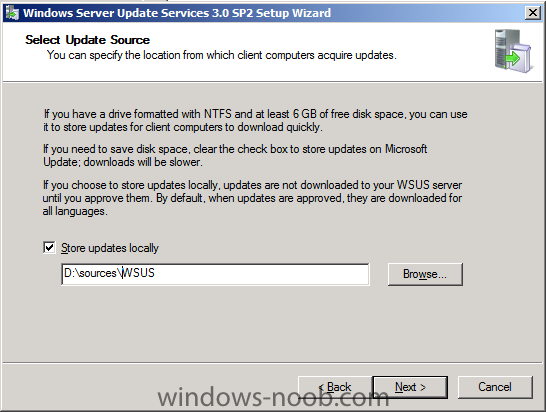
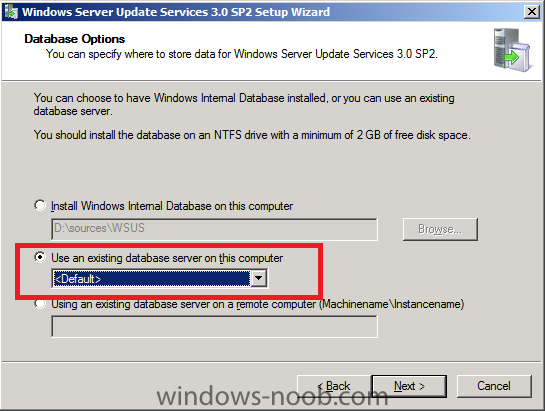
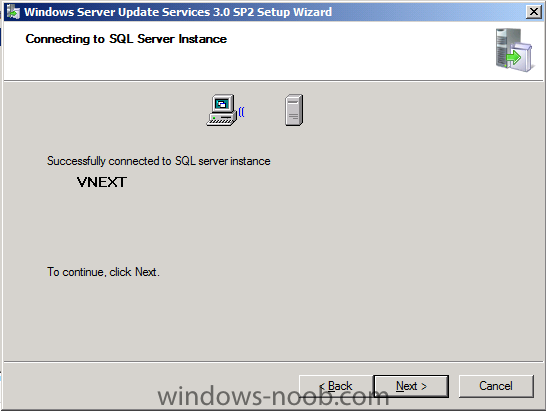
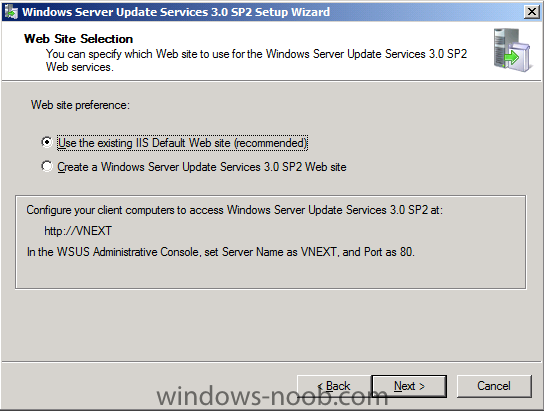
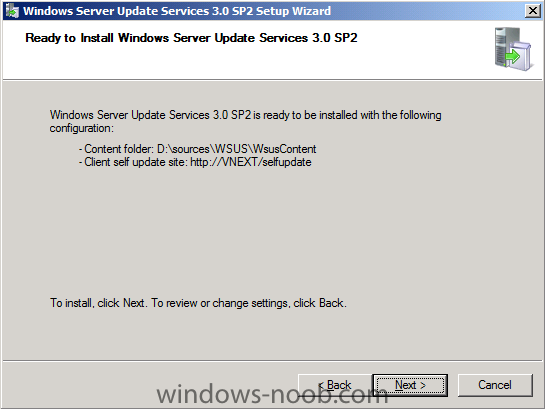
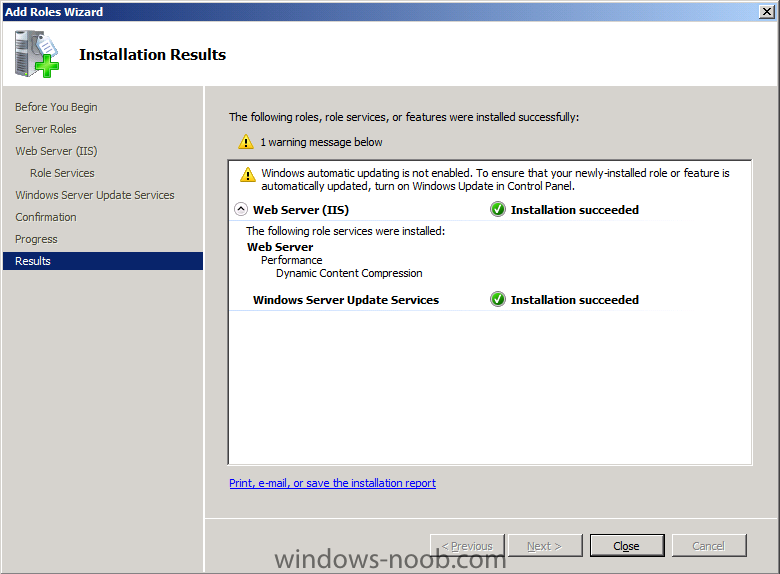
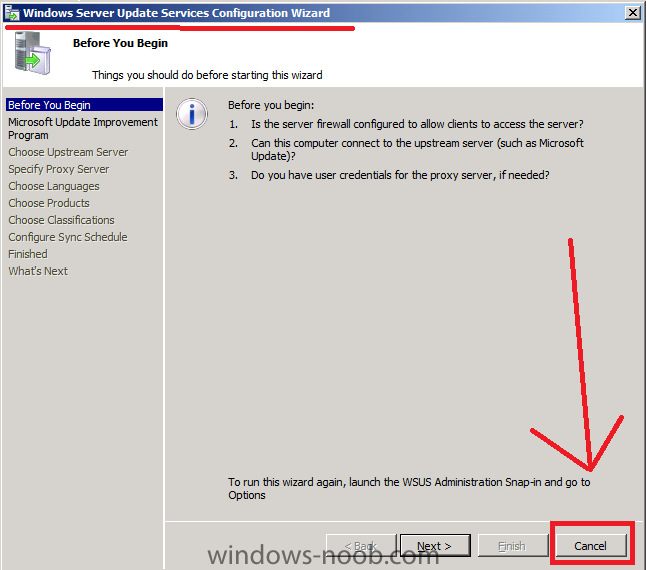
In Part 1. of this series we Installed vNext, in Part 2 we started to configure it. In Part 3, we configed Beta 2 some more by enabling Active Directory discovery methods, adding some site system roles, configuring the computer client agent and client push settings and finally doing a manual client installation to verify it all worked, in Part 4 we looked at installing an application using Application Management and the Software Catalog and Software Center features of SCCM 2012. Our next task is to add WSUS and then add some additional roles which we'll use later on in this series (Windows Updates and Data Migration in OSD). Perform the following on the vNext server as SMSadmin Step 1. Add the WSUS role We'll need the WSUS role installed as part of the Software Update Point role installation in the next step, so start Server Manager and click on Roles, Add Roles. Select Windows Server Update Services and a window will pop up asking to add role services required for Windows Server Update Services (IIS Dynamic Content compression), click Add Required Role Services click next through the wizard, you'll see the Select Role Services window appear, click next again at the confirmation click Install, the WSUS role will be downloaded and if you are on 3G like me that'll take a bit of time, so take a break and have a cup of coffee after a while you'll see the Welcome to Windows Server Update Services 3.0 SP2 setup wizard appear click next To install WSUS SP2 you must accept the terms of the EULA, which are probably hidden behind the active windows, so in your system tray find it and click on it to show the EULA otherwise you'll be twiddling your thumbs for a long time wondering whats going on... click accept and then choose where to store the updates locally, I selected D:\sources\WSUS for database options choose Use an existing database server on this computer, click next it will connect to your VNEXT sql server instance, click next accept the Use an existing Default website at the ready to install WSUS, click next click Finish when done. and close the Roles Wizard followed by Cancel you must cancel the Windows Server Update Services Configuration Wizard


- 1 reply
-
- 1
-

-
The software giant will unveil the SDK at the company’s Worldwide Partner Conference in Los Angeles next week. Microsoft’s latest Surface SDK will now run on WPF 4.0, XNA 4.0 and Windows 7. Surface developers will now be able to target physical Surface hardware and Windows 7 touch PCs with a single SDK. The Microsoft Surface team call this “write once – touch anywhere” and it may explain the company’s plans for Windows 8. Developers will be able to query the hardware capabilities of each device and design their applications accordingly. “We added a few APIs for you to query the capabilities of the hardware (maximum number of touches recognized by the hardware, whether the hardware can actually distinguish touches caused by fingers versus other touches, tag recognition support, tilt support, etc.),” explained Microsoft Surface team member Luis Cabrera in a blog post on Thursday. Microsoft’s Surface 2.0 SDK has been in private beta “for a few months” with some external partners according to the company. Cabrera briefly mentions that the company’s new visual style for Microsoft Surface is Metro design inspired. “It is consistent with other Microsoft Products such as Zune and Windows Phone,” says Cabrera. “The style is clean, simple yet elegant. Our goal was to create a visual style that would put Content first, a visual style that functional and was not distracting.” The same design is being adopted for Microsoft’s Windows 8 Start Screen, the replacement to the company’s long standing Start Menu. Judging by the fact Microsoft is positioning the Surface 2.0 SDK as a Windows Touch and Surface hardware combination, it should provide vital clues as to how developers can target Windows 8 touch tablets. Microsoft is also expected to further detail Windows 8 at its partner conference next week. The Surface 2.0 SDK timing lends weight to rumors that the company may release an early developer build of Windows 8 or detail some additional features of Windows 8. The Surface 2.0 SDK will be made available on July 12 at the company’s Surface Design and Development Center on MSDN.

-
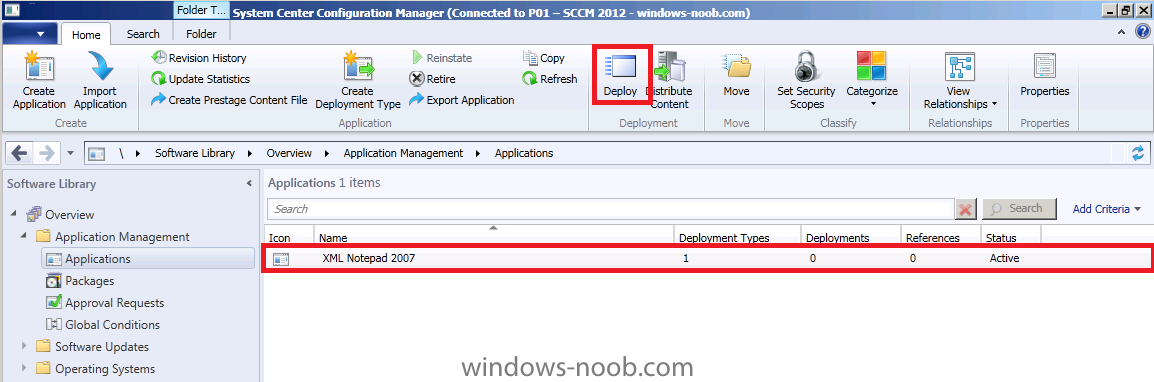
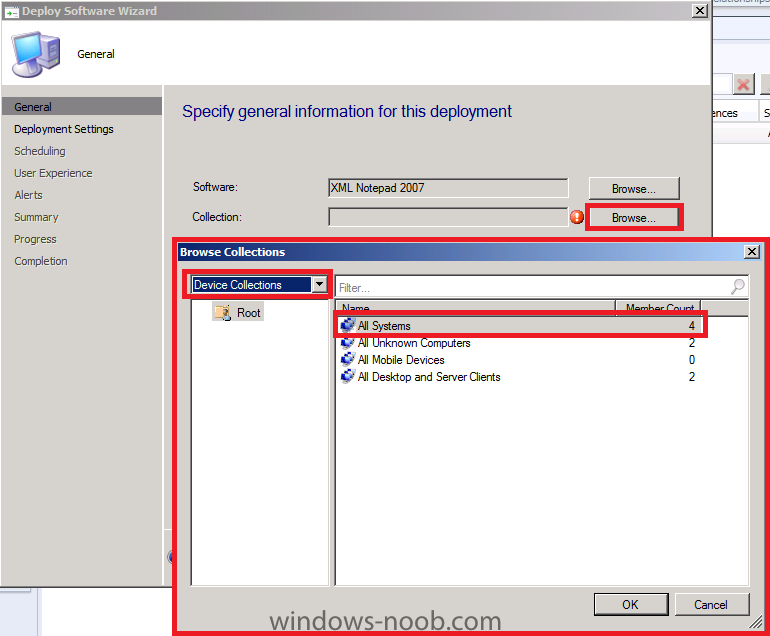
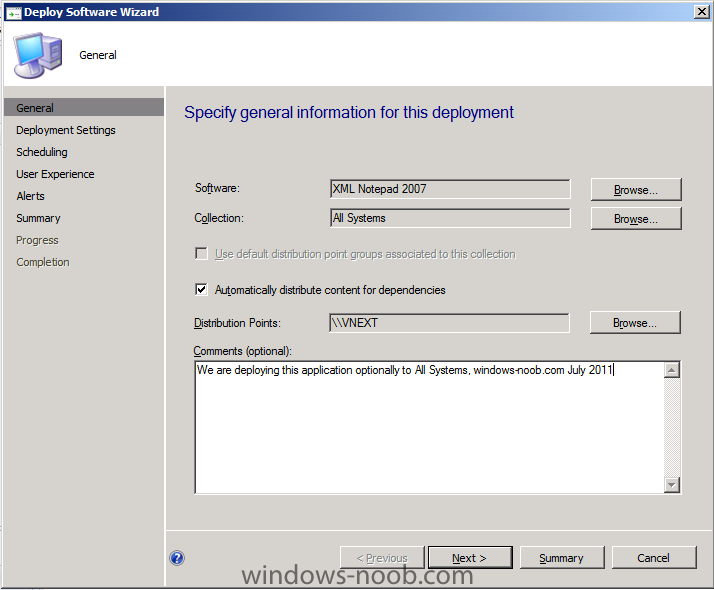
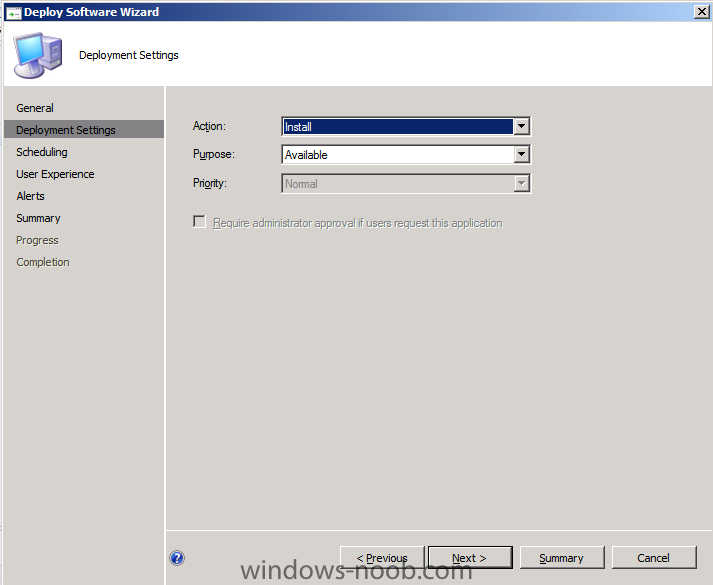
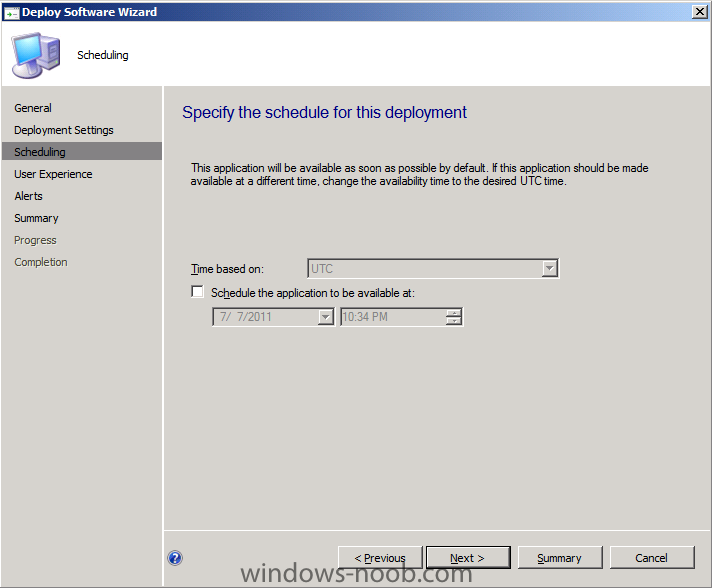
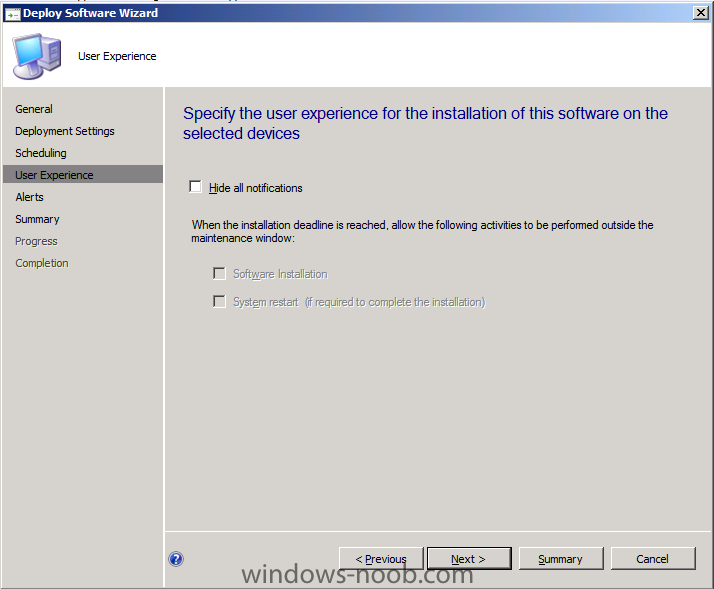
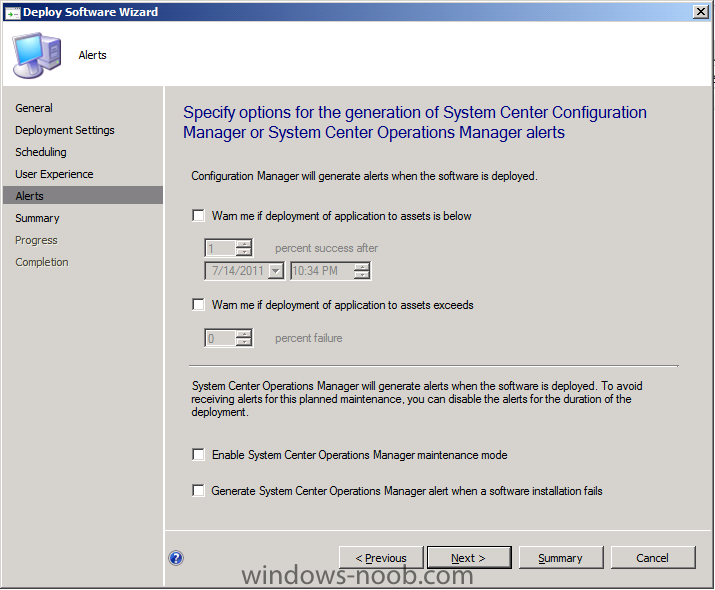
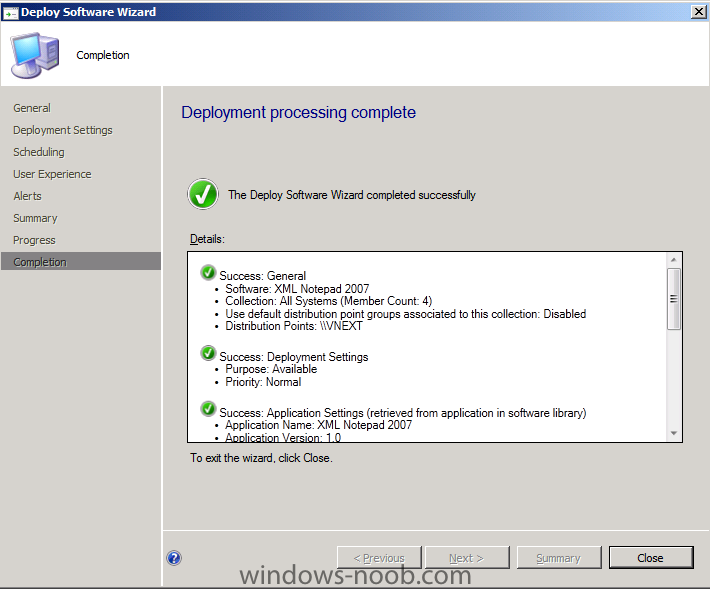
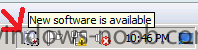
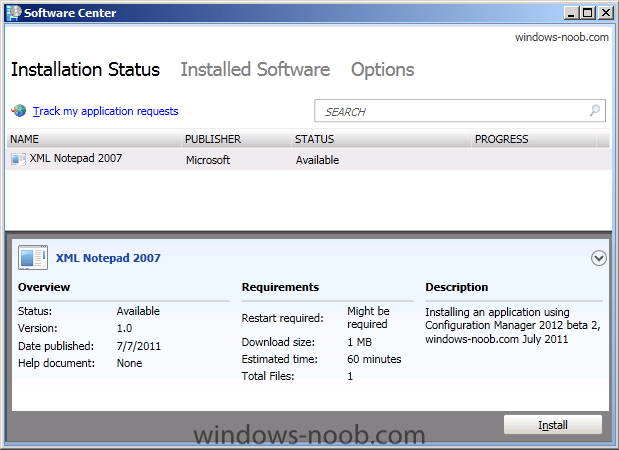
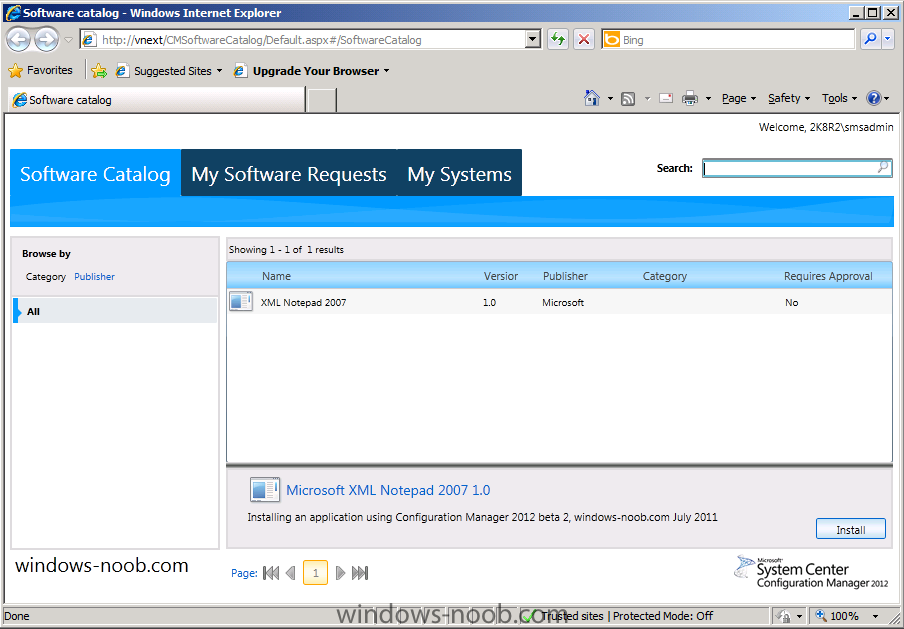
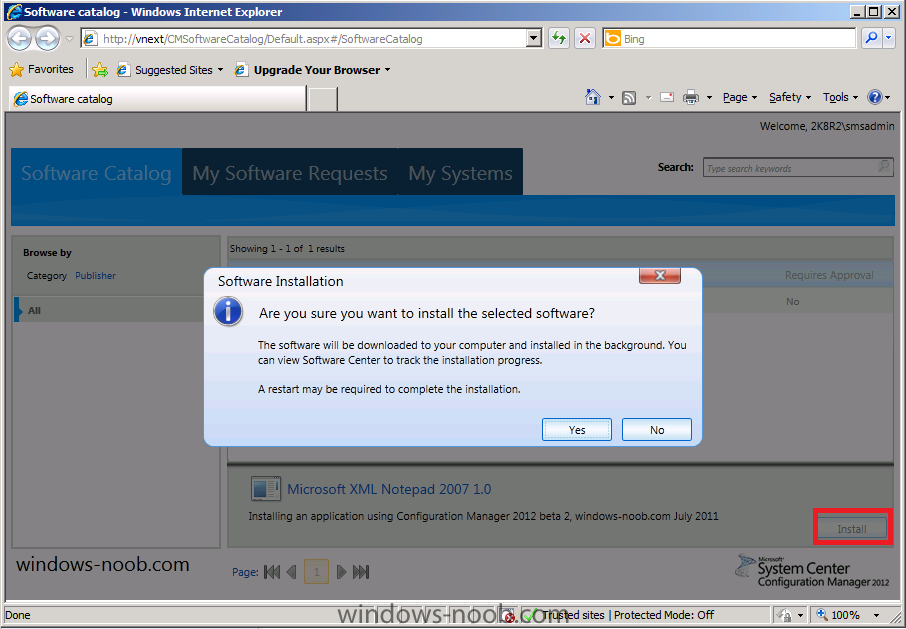
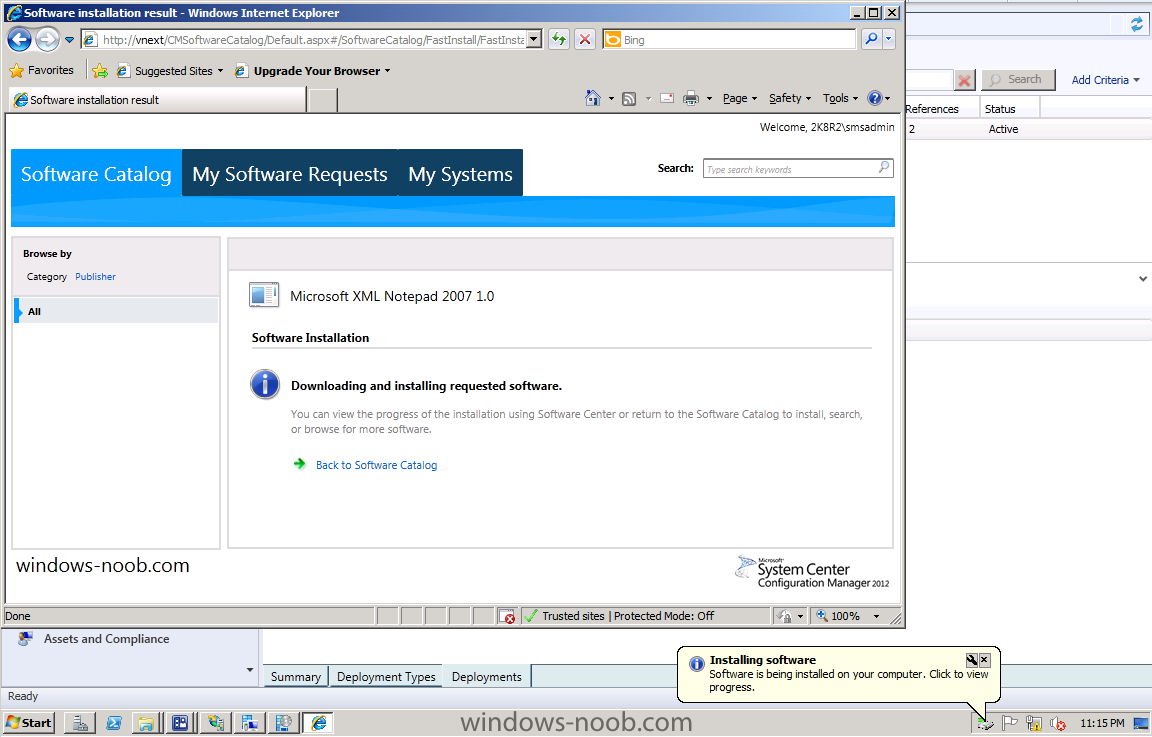
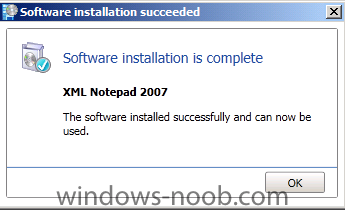
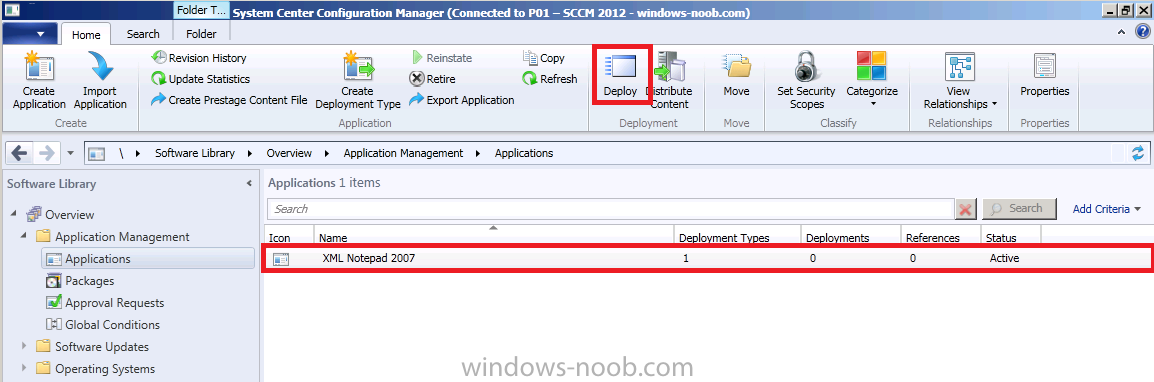
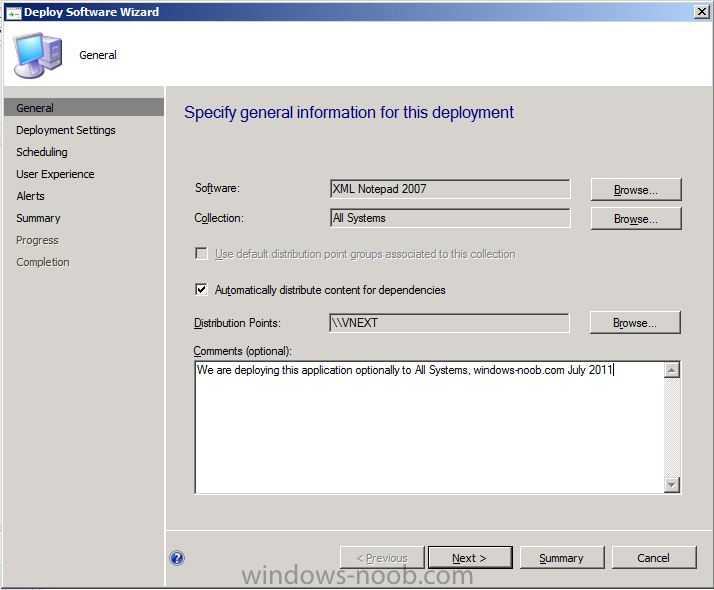
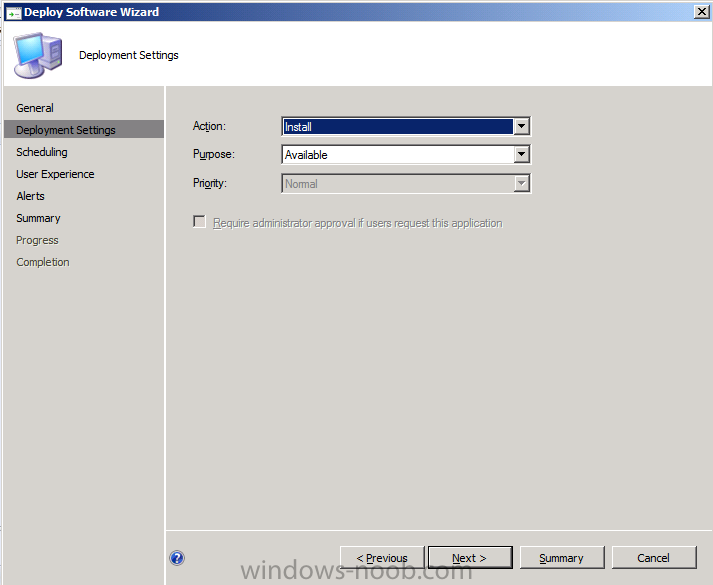
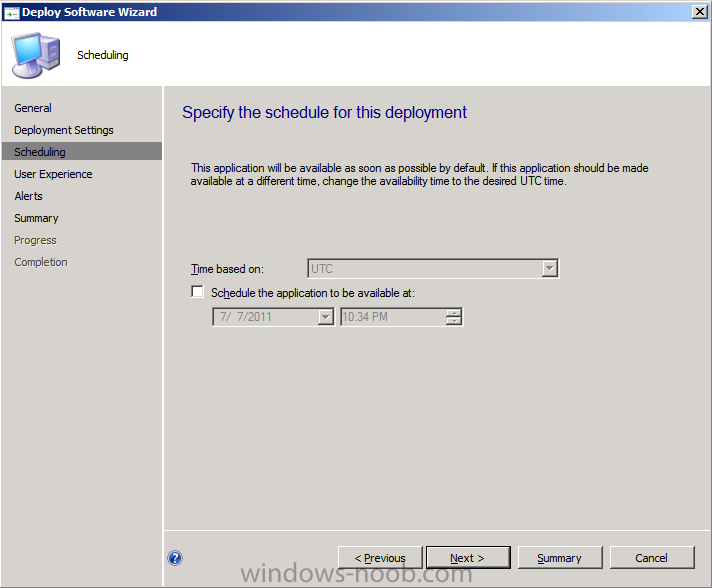
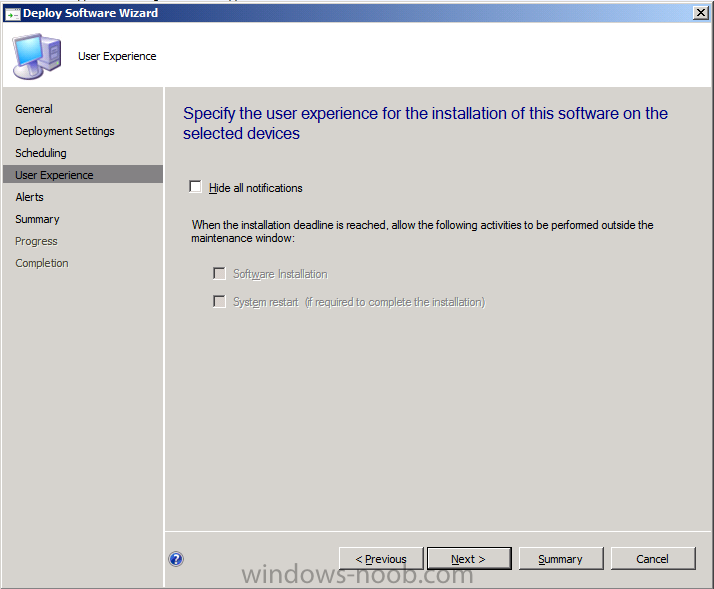
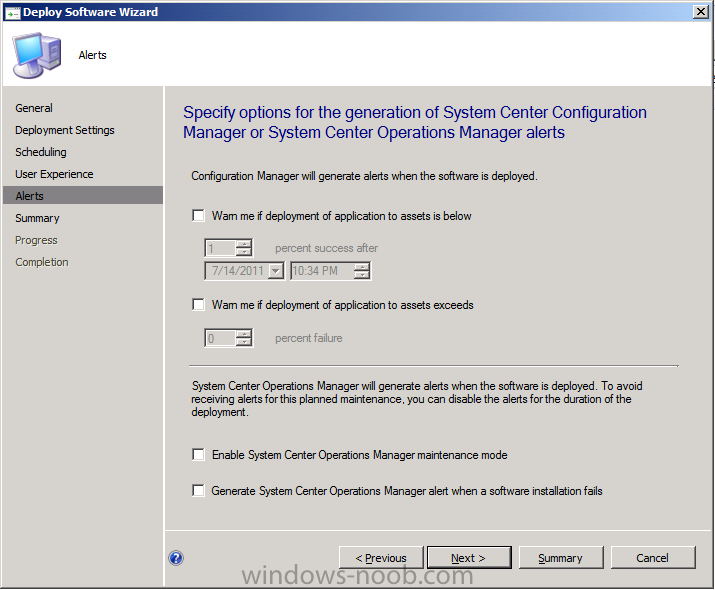
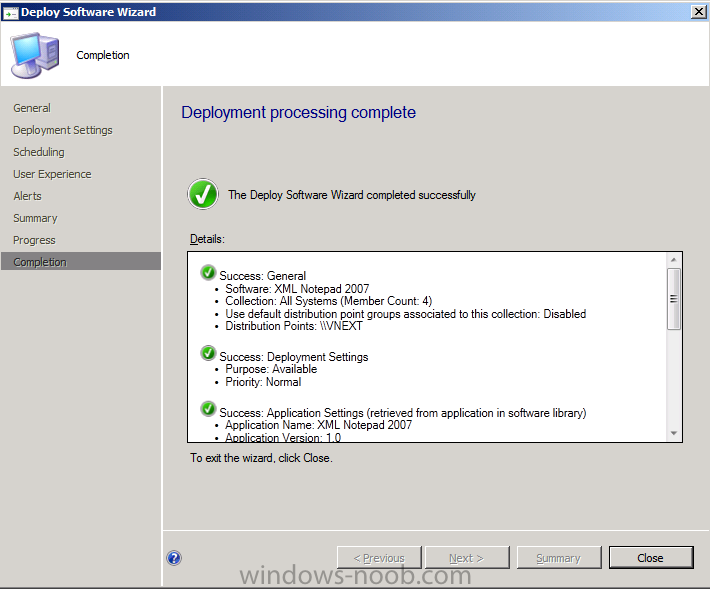
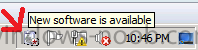
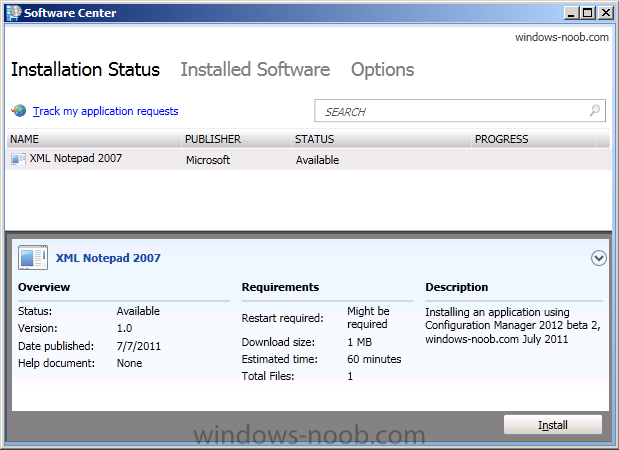
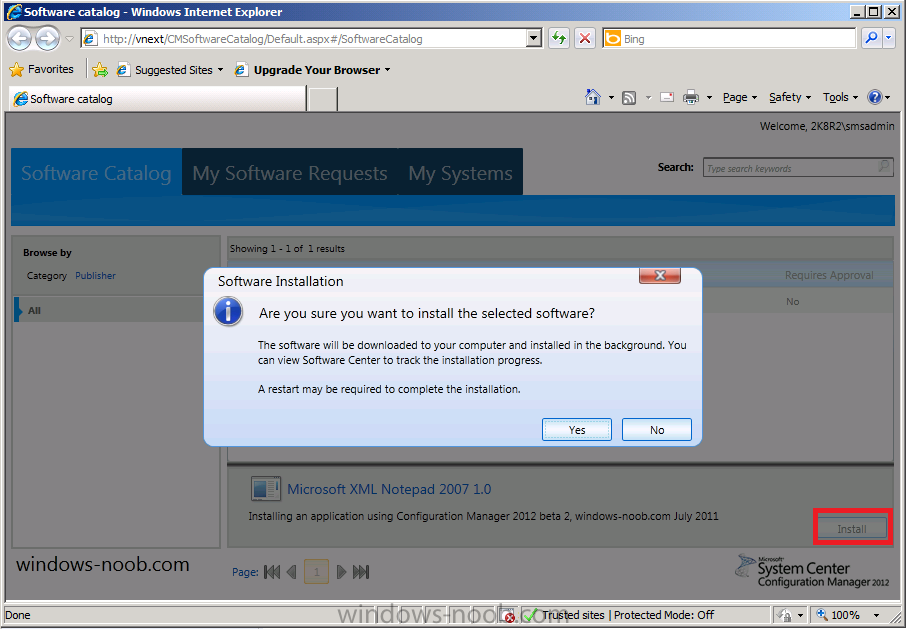
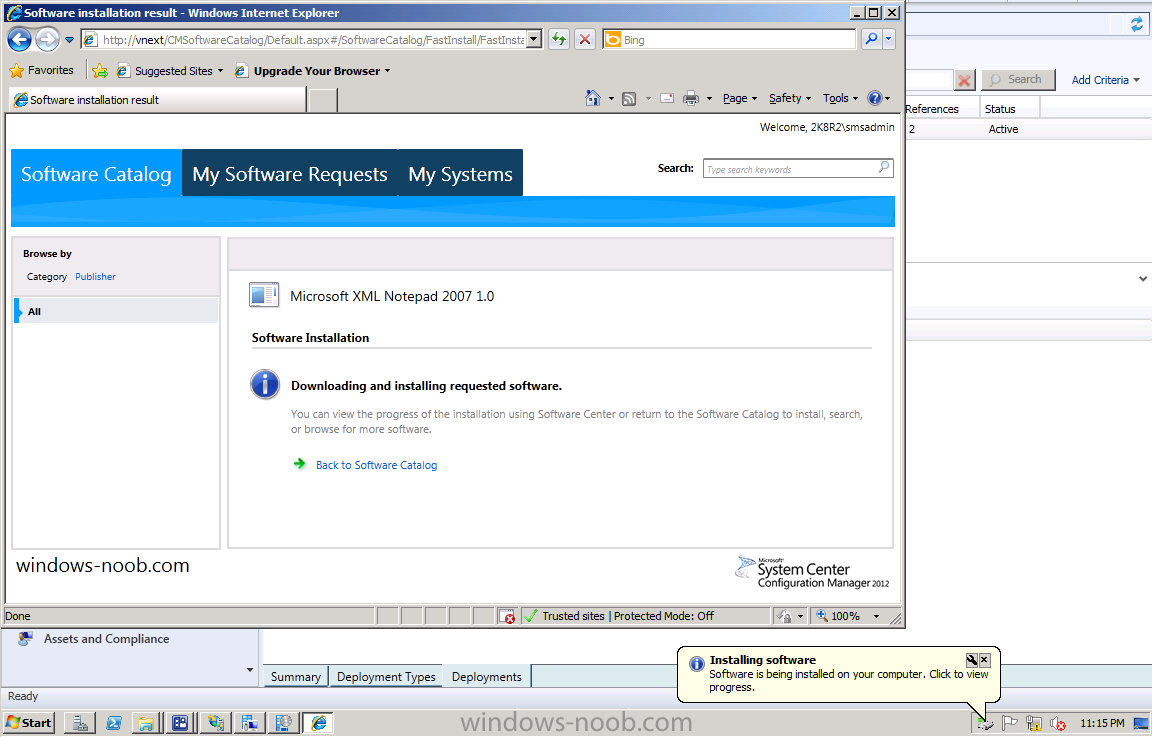
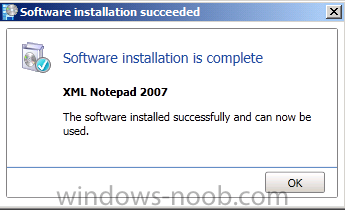
Step 3 Deploy your application Select your application and in the ribbon, click on Deploy when the wizard appears click on browse beside Collection, and choose Device Collections and then All Systems Note: We are doing this to show what works (in relation to applications showing up in the Software Catalog), and what doesn't. click ok and then click next (notice our distribution point we added above is listed) leave the Deployment Settings as they are (we want it to be optional so Available is the choice we need) leave all the remaining screens as they are (next), below is scheduling the User Experience you can configure alerts based on failure or success review the summary then proceed to the completion screen, click close. after a while you should see a new icon appear in the system tray, notifying you of new software available double click on it and it will open the Software Center, if you want a nice summary of what the software center does (it replaces RAP, remember RAP ?) then look here (thanks Trevor) If you open the Software Catalog, you will not see your application as we targetted it to All Systems (device collections). So let's create a new deployment using our guide above, except on the first step, lets choose User Collections and All Users as the target, click next to proceed through the wizard.. Open the Software Catalog, and refresh the page, notice anything Click on Install to install the application the software installs... job done ! Congratulations, you've installed your first application using SCCM 2012 beta 2 and the Software Catalog.