anyweb
-
Posts
9187 -
Joined
-
Last visited
-
Days Won
366
Everything posted by anyweb
-

Problems deploying languagepacks during PXE?
anyweb replied to wmmayms's question in Troubleshooting, Tools, Hints and Tips
good points all round Marcus, i'll make sure my post links to this -
and what's in your Start HTA step ? i see you are not using the mdt toolkit so how are you specifying the path to the actual hta file ?
-
where in the ts is it ? can we see a screenshot of the step in the ts
-
Memory issues when deploying win7 x64 with lang pack
anyweb replied to wmmayms's question in Troubleshooting, Tools, Hints and Tips
i guess the 64 bit version requires more ram, amazing but true interesting info Marcus how the testing going ? (contact me via mail about that) -
are you trying to launch the HTA in winPE or in Windows ?
-
Memory issues when deploying win7 x64 with lang pack
anyweb replied to wmmayms's question in Troubleshooting, Tools, Hints and Tips
yup, and the moral of the story is if you are using language packs, add lots of ram, i found 1gb works but that was with virtual machines was this a vm or real hardware Marcus ? -
Jason (ConfigMgr MVP) has very kindly put together a list of hotfixes for SCCM 2007 sp2, http://myitforum.com/cs2/blogs/jsandys/archive/2011/02/20/configmgr-2007-post-sp2-hotfixes.aspx and here's another one from another ConfigMgr MVP, Raphael - http://blog.dotnetwork.com.br/?page_id=2204 cheers niall
-
- 1
-

-
nice list of hotfixes required if you are installing SCOM 2007 http://blogs.technet.com/b/kevinholman/archive/2009/01/27/which-hotfixes-should-i-apply.aspx cheers niall
-
deploy OS without adding PC to collection?
anyweb replied to ket's question in Troubleshooting, Tools, Hints and Tips
if you use R2 or R3 it will give you the unknown computers collection, you can advertise task sequences to that and when you boot an unknown pc it will see the task sequence, does that help ? -
thanks for the kind words Paul, we do our best to help cheers niall
-
installing the language pack online takes place AFTER logging in for the first time and can only be done using Administrative permission, downside of this is that a gui pops up installing the language pack after the user logs on, and takes many minutes before completion, far better (in my opinion) to install the LP during the os installation, so that when the user does get to login that nothing delays their ability to use the computer straight away, here's a snippet from the MDT documentation If you want to install language packs online, you can use the MDT step in your task sequence or indeed add the Language specific code in your unattend.xml by clicking on Insert, choose Pass 7 oobeSystem And paste the following line in Lpksetup.exe /I %OSDUILanguage% /r /p C:\LangPacks\x86\%OSDUILanguage%\ The Lpksetup tool does not process language packs in any configuration pass other than auditUser and oobeSystem. After the installation of Windows 7 (right at the end after you login for the first time…) You’ll see – (if deploying Language Pack online and if you login as an administrator) long story short the following will end up in your unattend.xml if doing an language pack ONLINE installation cheers niall

-
deploy OS without adding PC to collection?
anyweb replied to ket's question in Troubleshooting, Tools, Hints and Tips
yes you can right click on the task sequence and choose create standalone media and make usb or dvd/cd media -
good point, we will try as much as possible to do this in the future !
-
you'd have to combine the logic of all three task sequences into one ts, and give the technician some choices in the beginning in order to start the right one, that can be achieved via MDT 2010 Update 1 udi or a front end HTA the task sequence will then have groups inside it to detect what variable you set via the choices in your front end and take appropriate action cheers niall
-
installing SCOM2007 R2 with SQL2008r2
anyweb replied to roelk's question in System Center Operations Manager
thanks for sharing -
Some of you probably noticed a new download showed up today: The Windows® Automated Installation Kit (AIK) for Windows® 7 SP1 http://www.microsoft.com/downloads/en/details.aspx?FamilyID=696dd665-9f76-4177-a811-39c26d3b3b34 Be sure to read the “readme” that goes along with this at: Windows Automated Installation Kit for Windows 7 Readme http://technet.microsoft.com/en-us/library/dd349350(WS.10).aspx A quick Q&A that I assembled from information in this readme and our own MDT testing: Q: Do I have to use this to deploy Windows 7 SP1 and Windows Server 2008 SP1? This supplement is optional. If you do not need to modify the SP1 boot.wim and winre.wim files, you can continue to use the Windows 7 RTM tools, including WinPE 3.0, without installing this supplement. (So MDT and ConfigMgr can deploy WIndows 7 SP1 just fine using Windows PE 3.0.) Q: How do I install this on a machine currently running the Windows 7 RTM version of Window AIK? There’s no installer provided with this. You need to extract the contents of the download and then XCOPY the files over the top of your existing Windows AIK installation. See the details in the readme. Q: What’s changed in this Windows AIK supplement? * The number in the Version registry value is 3.1 to reflect the new Windows PE version. * The Windows PE 3.1 base image contains Remote Network Driver Interface Specification (RNDIS) binaries. These binaries are also available for Windows PE 3.0 as a hotfix. For more information, see Knowledge Base Article ID: 979265 (http://go.microsoft.com/fwlink/?LinkId=206678). * Windows PE 3.1 includes 802.1x binaries as an optional component. The file name of this package is WinPE-Dot3Svc.cab. This optional component is also available for Windows PE 3.0 as a hotfix. For more information, see Knowledge Base Article ID 972831(http://go.microsoft.com/fwlink/?LinkId=206072). * The Windows PE 3.1 base image contains fixes that are related to 4k/512e drive support. These fixes are also available for Windows PE 3.0 as a hotfix. For more information, see Knowledge Base Article ID: 982018 (http://go.microsoft.com/fwlink/?LinkId=206679). * Windows PE 3.1 includes bug fixes that are related to the Windows PE version that is included with Windows 7 SP1. Q: Does Windows 7 SP1 and Windows PE 3.1 work with MDT 2010 Update 1? Yes, this is fully supported. (There is one small issue involving Windows 7 SP1, Windows PE 3.1, and having Windows RE included in your MDT-generated Lite Touch boot images, but if you don’t mind Windows RE not being there, you don’t need to worry about this.) Q: Does Configuration Manager 2007 SP2 support Windows 7 SP1 and Windows PE 3.1? The Configuration Manager team is still testing Windows 7 SP1 and Windows PE 3.1, so this is unsupported until that testing is completed. Q: Does this supplement include the recently-released USMT 4 update for Office 2010 support? No, you need to download and apply that one (http://blogs.technet.com/b/mniehaus/archive/2011/02/02/usmt-4-0-support-for-office-2010.aspx) separately. via > http://blogs.technet.com/b/mniehaus/archive/2011/02/17/windows-aik-for-windows-7-sp1-released.aspx
-
I would agree with Peter and Lucid, do Build and Capture from virtual machines, keep the image hardware agnostic, add all your drivers to the deploy task sequence based on wmi queries, much cleaner and less hassle that said, you could try bios updates and/or newer video drivers from the video card manufacturer..
-
it will get automatically deleted by default in 7 days, you can change that in Site Maintenance, Tasks, Delete Obsolete Client Discovery Data
-
hi did you create a Computer Association between source and destination pc's before capturing the data ?
-
Step By Step Guides - System Center Configuration Manager 2007
anyweb replied to anyweb's topic in Configuration Manager 2007
HTAs and Web Services Introducing the windows-noob.com FrontEnd HTA version 1.0 Multipurpose HTA Introducing the BitLocker FrontEnd HTA Multipurpose HTA with BitLocker Support for all three common scenarios, backup, reinstall, new computer [added Jan 2012] HTA frontends for SCCM 2007, HTA Utilities And Frontends What is a HTA ? , where can I get them etc... ? How can I create a boot image with HTA support using MDT Part 1. Create MDT boot image How can I display my HTA Part 2. Displaying the HTA in a Task Sequence How can I Set the Screen Resolution during OSD Using SETRES to set screen resolution Introduction To Web Services What is a Web Service ?, where can I get them etc ? How can I install some Web Services? Installing Web Services Adding values and testing your web service How can I add values and test my web service- 1 reply
-
- 2
-
-
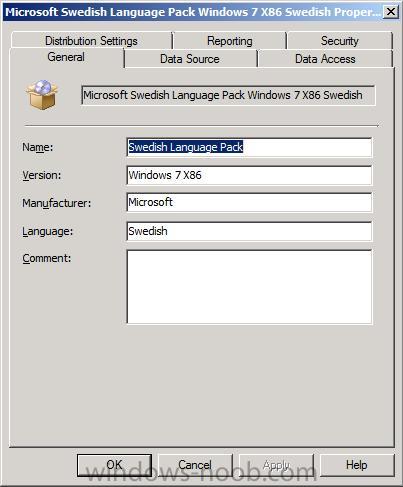
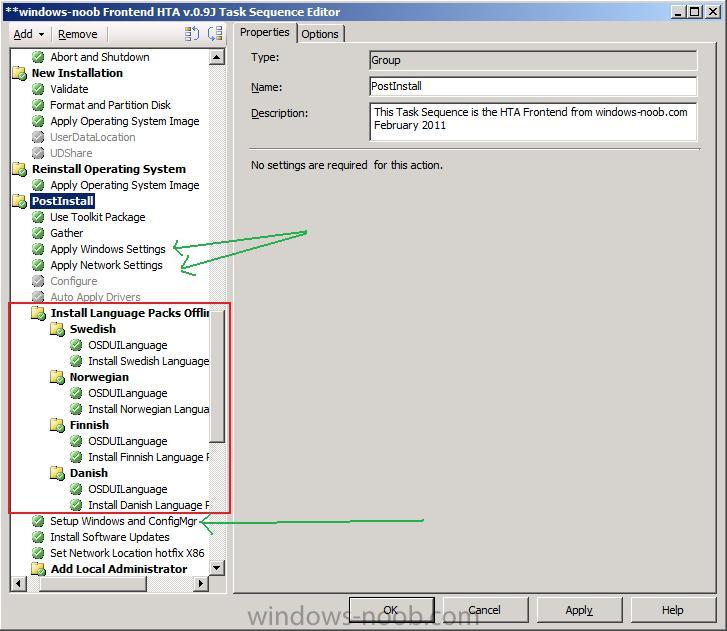
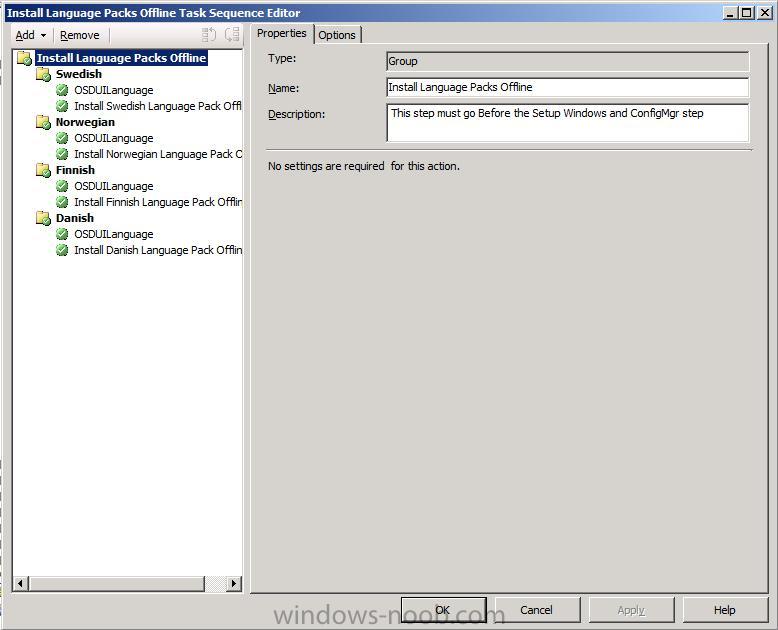
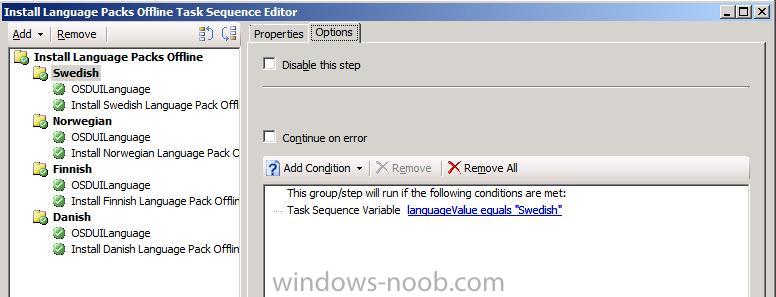
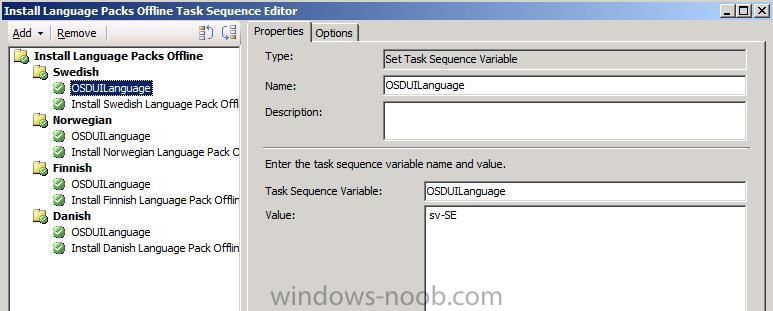
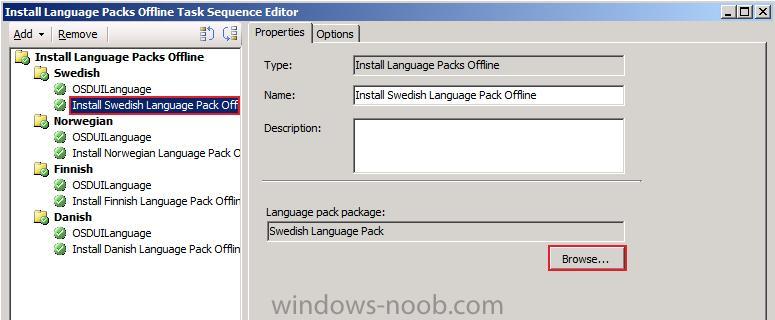
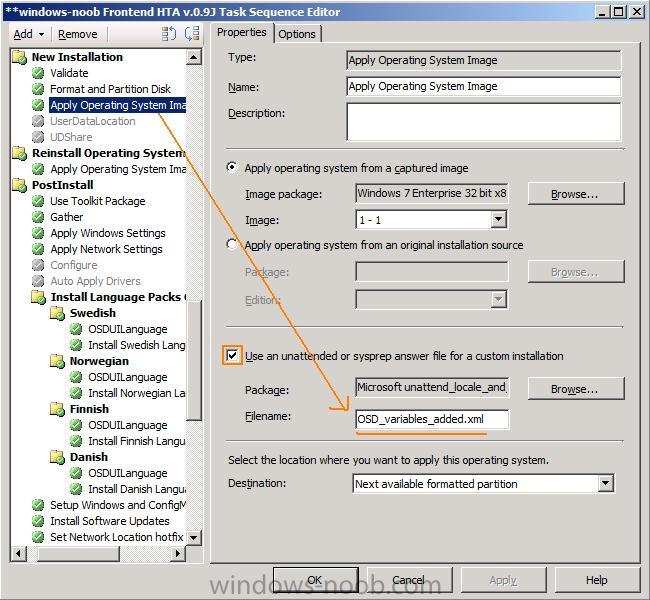
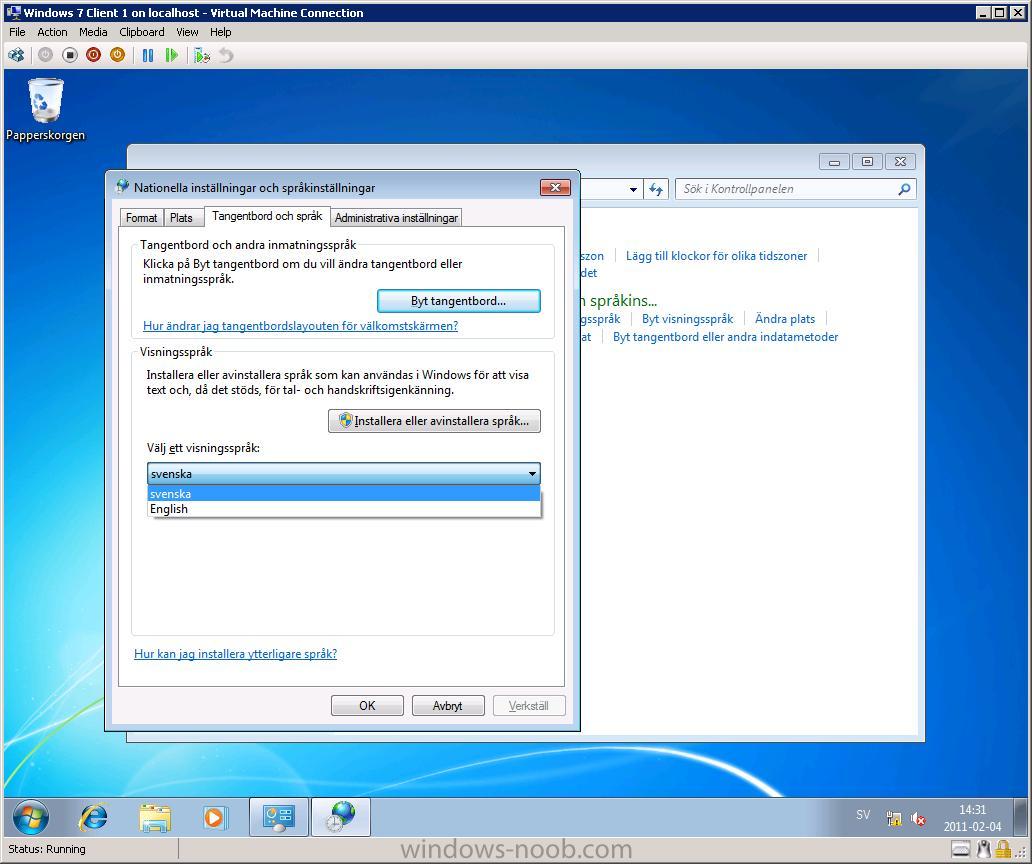
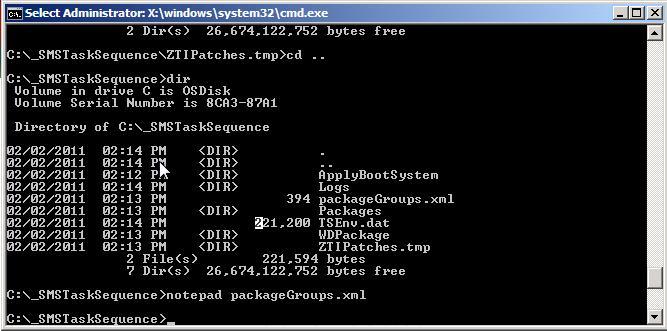
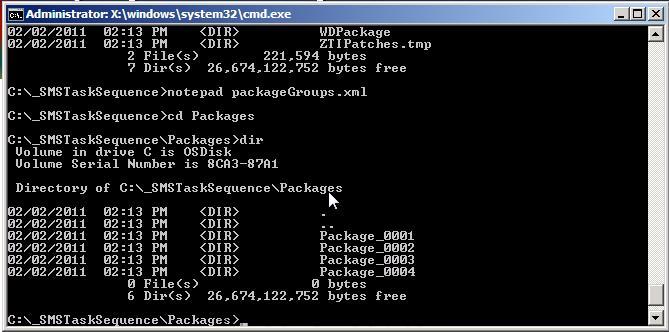
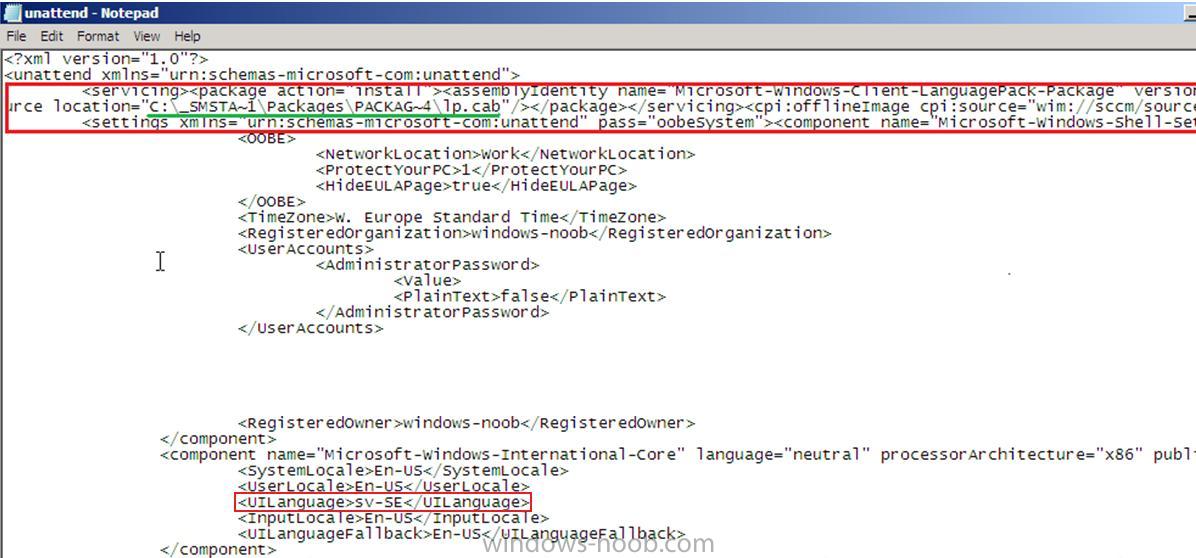
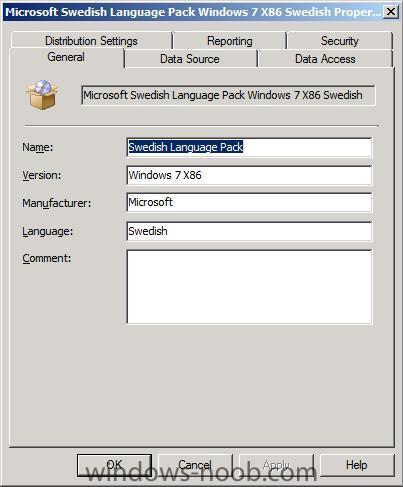
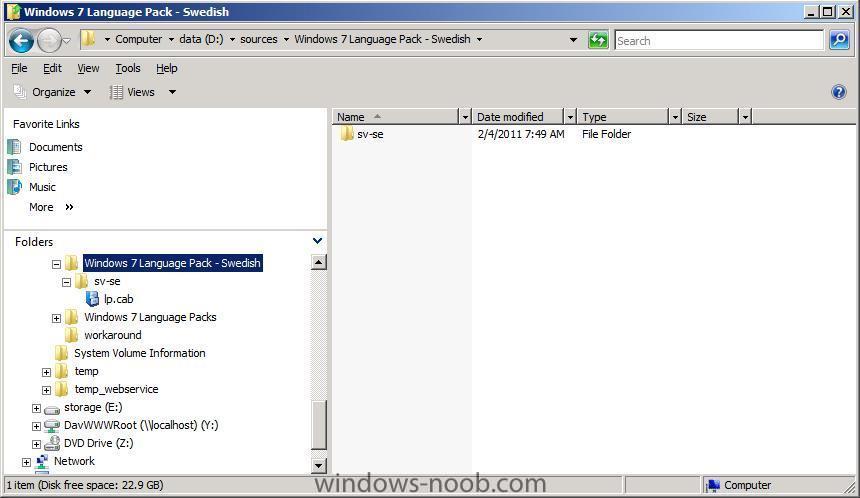
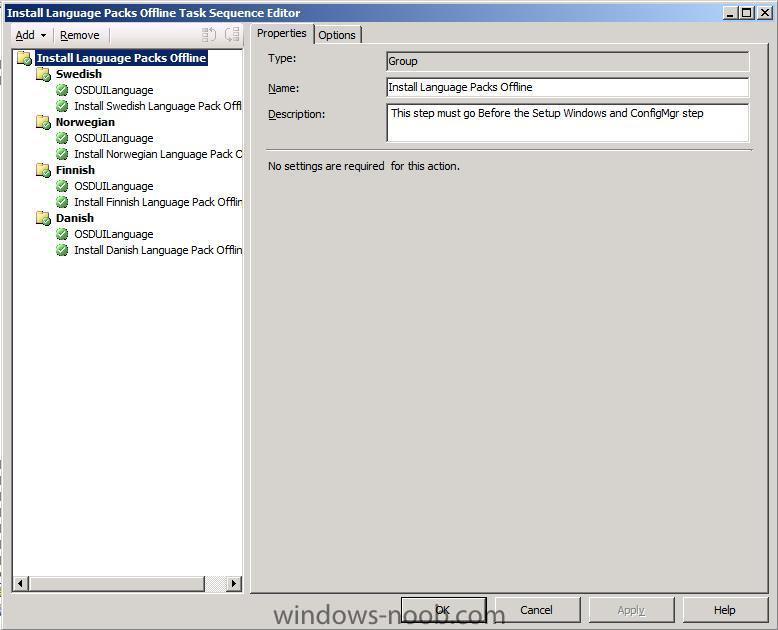
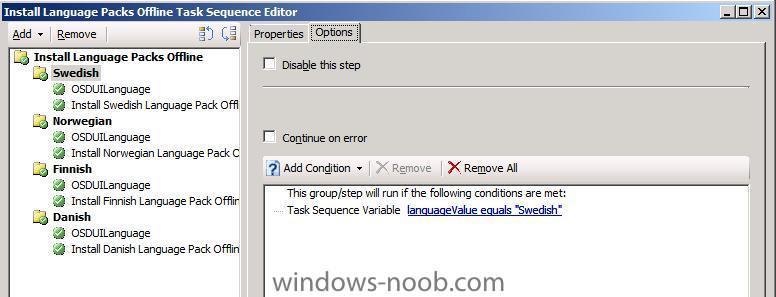
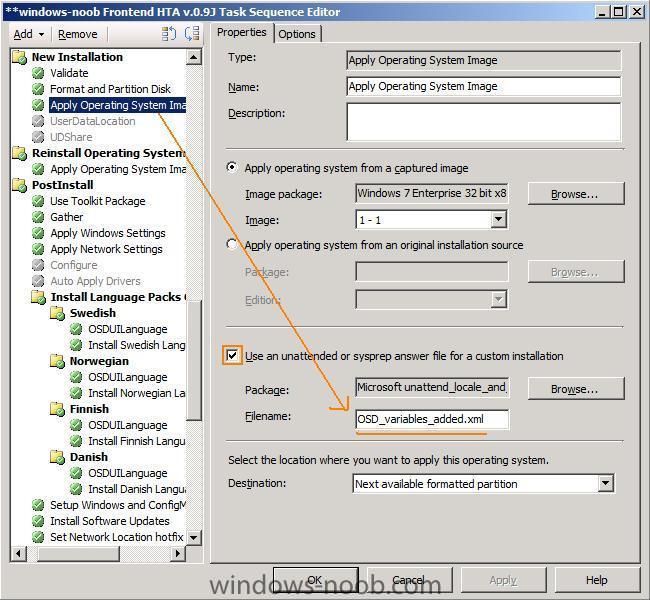
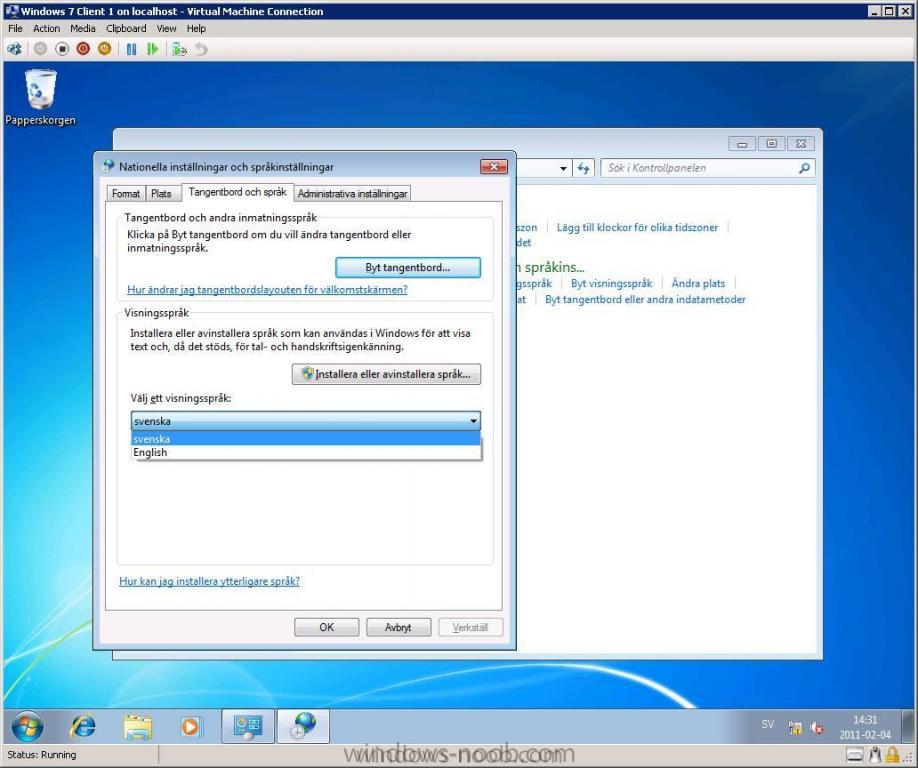
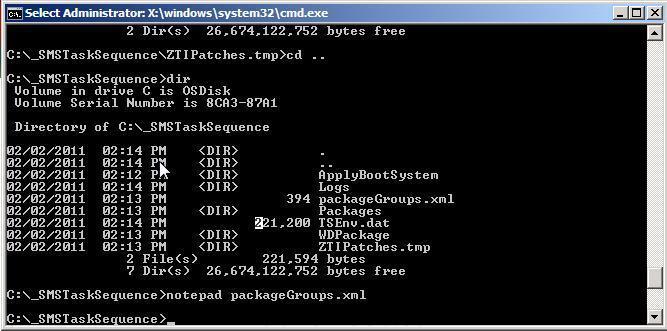
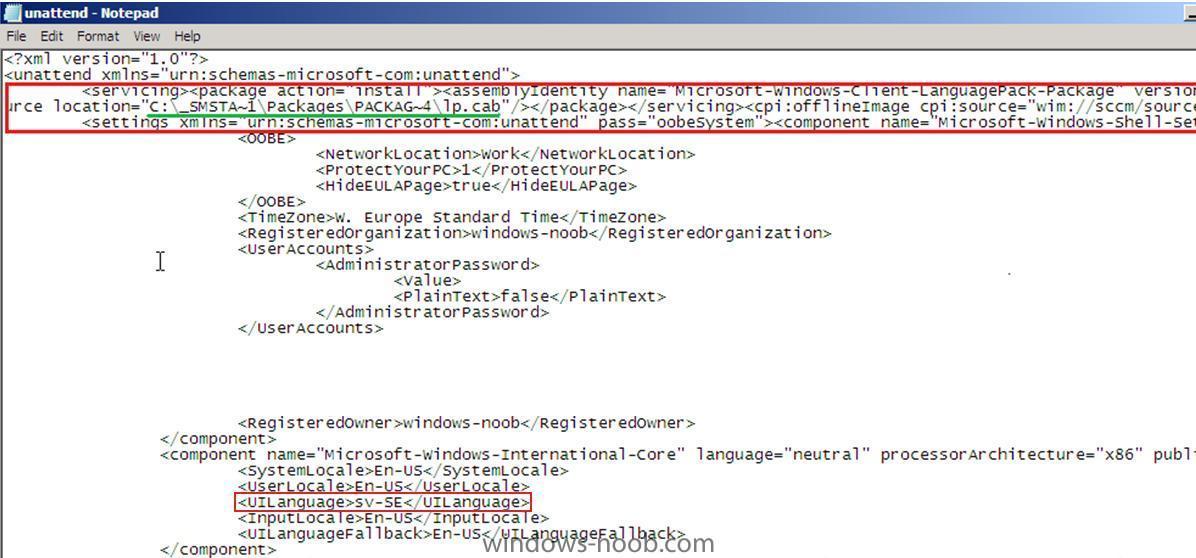
If you live in Europe you'll most likely need to deploy some additional languages on top of English Windows 7. To achieve this we can add them at the Build and Capture stage or indeed in our Deploy Windows 7 Enterprise task sequence. All installations of Windows® 7 contain at least one language pack and the language-neutral binaries that make up the core operating system. Licensing requirements state that Windows 7 can include only a single language, with the exception of the Windows 7 Ultimate and the Enterprise editions. These are referred to as single-language editions. However, the Windows 7 Ultimate and Enterprise editions can include multiple language packs. These are referred to as multilingual editions. To see which versions of Windows support Language Packs please review this post on MSDN and scroll down to the Windows 7 editions multilingual support summary. What do I need ? You will need some things in place to add the languages offline, namely MDT 2010 Update 1 integrated into ConfigMgr 2007 SP2 and you'll need to download the Language packs from MSDN. Where can I find Windows 7 Language Packs ? Download the language pack from MSDN which suits your architecture, choose a language other than English (eg: Swedish) then choose the Windows 7 operating system, in the downloads listed you’ll see these:- Windows 7 Language Pack (x64) - DVD (Multiple Languages) 8/6/2009 - 2,200 (MB) Windows 7 Language Pack (x86) - DVD (Multiple Languages) 8/6/2009 - 1,846 (MB) How can I Add Language Packs to ConfigMgr? Language packs are .cab files that you can add to System Center Configuration Manager packages either offline or online. Before adding language packs, however, create a System Center Configuration Manager package that contains one or more language packs. In our example here, we will add language packs using one language per package, so for the Swedish Langauge pack, our SCCM package looks like so:- the Data Source points to the share with our Swedish Language Pack eg:- \\sccm\sources\Windows 7 Language Pack - Swedish and that path contains the following, a sub dr (eg: sv-se) which contains the lp.cab file and nothing more. Note:- All language packs in the same System Center Configuration Manager package are deployed together. If you want to deploy different combinations of language packs, create multiple System Center Configuration Manager packages. Get the Task Sequence Download the following Task Sequence and import it into ConfigMgr. Install Language Pack Offline.XML Let's look closer at this task sequence, First you'll notice that the entire section is separated into a Group, this is to keep things organised and to help you in adding it to your Deploy Task Sequence. Important: This group must be placed in the PostInstall section of your Deploy Task Sequence, and preferably after that Apply Windows Settings and Apply Network Settings Steps, in addition this group must go before the Setup Windows and ConfigMgr steps otherwise the Install Language Pack offline step will fail. Ok let's look at the steps themselves and see what they do. The Swedish sub Group is responsible for installing the Swedish Language pack if a variable called languageValue=Swedish. How you set that variable is up to you, you can set it via a FrontEnd HTA (recommended) or by simply using a Set Task Sequence variable step (before this Group) such as this (not included in the sample task sequence):- Task Sequence Variable: languageValue Value: Swedish If languageValue is determined to = Swedish it then carries out two steps Sets a task sequence variable called OSDUILanguage = sv-SE and then calls the built-in MDT Step, Install Language Packs offline (which references the ZTIpatches.wsf script). This step points to our previously made Swedish Language Package. The actual step takes some minutes as it has to expand lots of files in the cab, and inject them offline (using DISM) into our Windows 7 image. How do we set OSDUILanguage in Windows You'll need to create an Unattend.xml file which specifically mentions the OSDUILanguage variable <UILanguage>%OSDUILanguage%</UILanguage> or use this one which I created earlier. OSD_Variables_added.xml This file must be referenced in the Apply Operating System Image step otherwise the Install Language Pack Offline step will fail as it won't know what variable to set. You can create this unattend.xml file yourself using Windows SIM or use the sample i provide, just remember that the architecture must match the image, and this sample is for 32bit Windows 7 Enterprise (X86). Ok I've done all the steps, now what ? Deploy Windows 7, set the language pack variable either in the Task Sequence or using a HTA, and the end result is that you get your language pack installed as the default language within Windows. The Setup Windows and ConfigMgr step actually inserts our value (sv-SE) in place of our variable in our unattend.xml file so that the following line <UILanguage>%OSDUILanguage%</UILanguage> becomes <UILanguage>sv-SE</UILanguage> which eventually means that your OS is in Swedish. Troubleshooting Notes * use the log files, in particular ztipatches.log which documents what happens when it trys to use DISM to inject the changes * Use at least 1gb ram in your virtual machines otherwise the step will fail to install any language packs (will run out of ram). (1gb for X86 and 1.28 gb for X64) * create the MDT toolkit package the proper way via a Create MDT Task Sequence wizard - why ? see this post After the Install Language Pack Offline step the following will be created in c:\_smstasksequence\ namely:- Packages<dir> ZTIPatches.tmp packageGroups.xml in the Packages directory you’ll have more subdirectories based on how many lp’s you included, one language pack, one dir, 4 language packs in your ConfigMgr Language Package, 4 dirs... you may also see a directory called _smstasksequence\SMSOSD\osdlogs and in there are three files including a log file called BDD_PKGMGR.LOG, analyse it if you are having issues deploying Language packs offline as it will reveal the success or failure of the DISM operations. Unattend.xml changes You can press F8 in WinPE and browse to the locations below and use notepad to examine the changes to the unattend.xml file. Note: The unattend.xml file and/or C:\Windows\Panther\Unattend folder may not appear in your image until directly after the Apply Operating System Image step and the contents of that file depends on whether or not an unattend.xml file was specified in that step. Before the Setup Windows and ConfigMgr step is complete you can monitor c:\windows\panther\unattend\unattend.xml to see what is happening in relation to your modifications taking place or not After the Setup Windows and ConfigMgr step is complete, you’ll see the following has been added to your c:\windows\panther\unattend.xml file. If it is not added or if there are no changes to the %OSD...% variables then something has failed and it's time to troubleshoot. Note: The above locations are during the Windows PE phase. After the Setup Windows and ConfigMgr step is complete it will reboot your computer (unless you have a command prompt open in WinPE), and after that reboot the unattend.xml file will have been removed (by the Setup Windows and ConfigMgr step...). the other values (keyboard layout and so on) are added via separate steps in the Task Sequence which I'll cover in another post. cheers ! niall.


-
hi all, I've added a new section in Deploying Operating Systems called FrontEnds and Web Services along with some new content to help you in creating your very own FrontEnd. enjoy cheers niall
-
How can I install a Web Service ?
anyweb replied to anyweb's question in Frontends, HTA's and Web Services
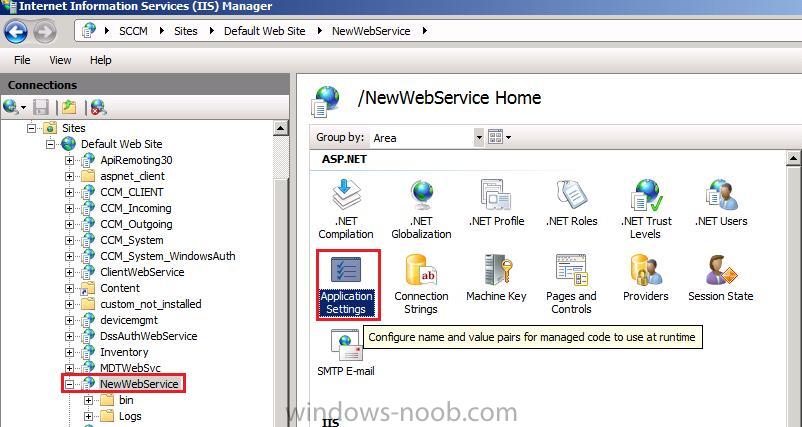
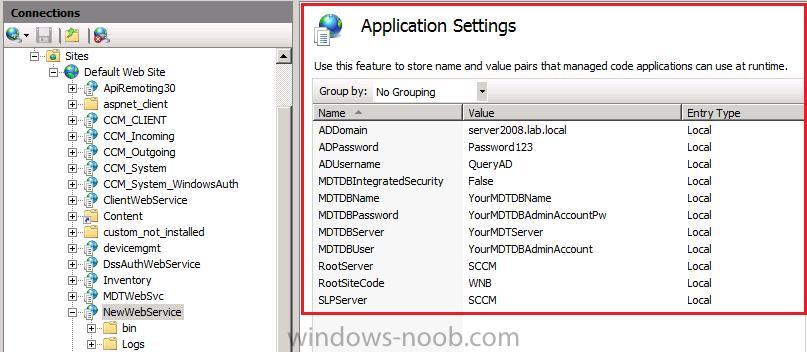
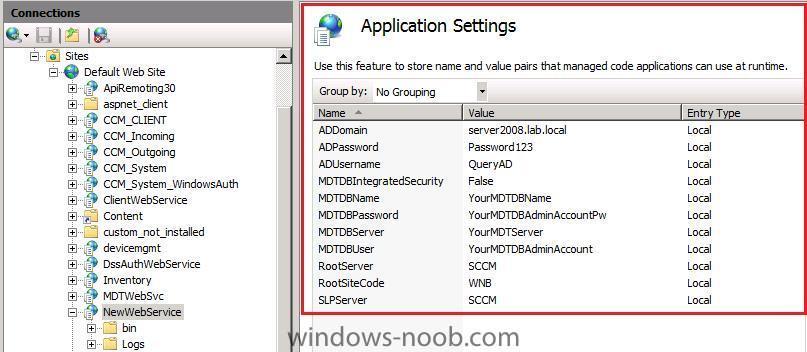
Step 10. Configure Application Settings Next we need to configure the application settings (Step by Step Guide) , failure to do so will mean the webservice cannot do anything. Open IIS Manager, expand the Webserver Node, expand the Sites Node, expand your Default Web Site, click on the Deployment Webservice Folder/Application (NewWebService) and then double click on the Application Settings Icon on the right side. And enter the appropriate details… The following are configurable:- By default, the webservice will use the configured application pool user for authentication. It requires only a couple of Application Settings to be set: RootServer - The SCCM Root Server SLPServer - One SCCM Server with the SLP Role RootSiteCode - The Root site code For Access to the MDT Database you need to configure at least MDTDBServer - The MDT Database server (with Instance if necessary) MDTDBName - The MDT Database name MDTDBIntegratedSecurity - Set to "True" if you want to use the application pool account for authentication. If set to "False" you need to supply the following two settings MDTDBUser - Username to access the MDT Database MDTDBPassword - Password to access the MDT Database For Active Directory access, you can optionally configure the following Application Settings. This is only necessary, if the application pool user account does not have enough permissions to do execute the required functions, and/or if you need to access a different domain as the application pool User is member of: ADDomain - Domain to query (use either "domain.com" or "DC=Domain,DC=COM" format) ADUsername - Username for authentication ADPassword - Password for authentication You will note i didn't configure any of the MDTDB settings as I'm not using them currently in my environment. Step 11. Test the New Web Service You should now be able to use the Webservice. To test the functionality just open your favourite Browser and point it to http://sccm/NewWebService/ad.asmx- For Active Directory related functions http://sccm/NewWebService/mdt.asmx- For MDT related functions http://sccm/NewWebService/sccm.asmx- for SCCM related functions. Troubleshooting To troubleshoot when things are not working, browse to the LOGS folder of where you installed the Web Service, and you should see Trace, Debug and Info logs, open them in CMTrace to review.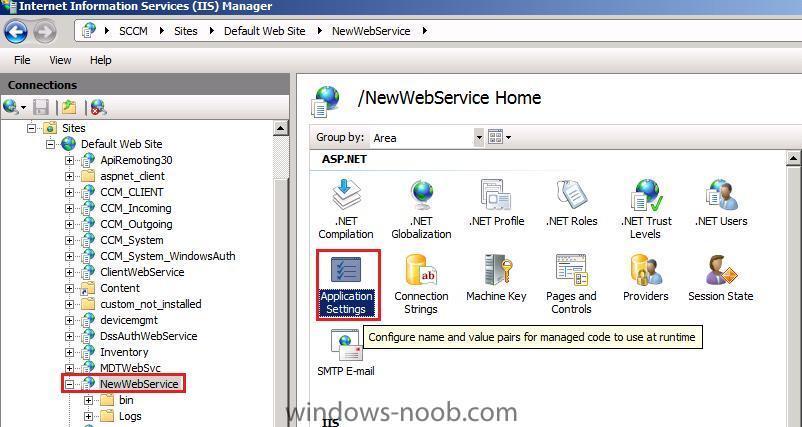

-
How can I install a Web Service ?
anyweb replied to anyweb's question in Frontends, HTA's and Web Services
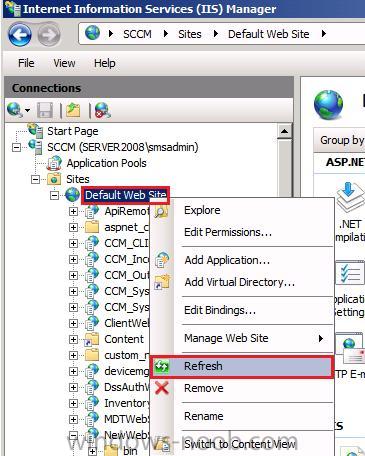
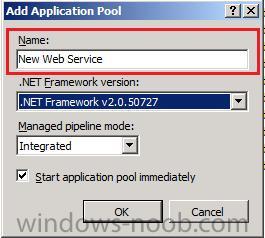
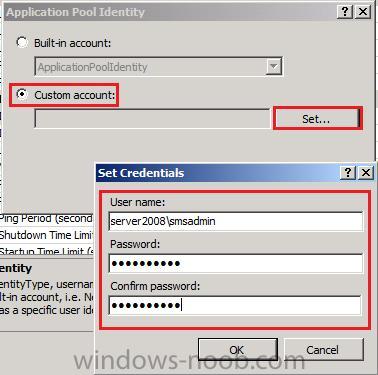
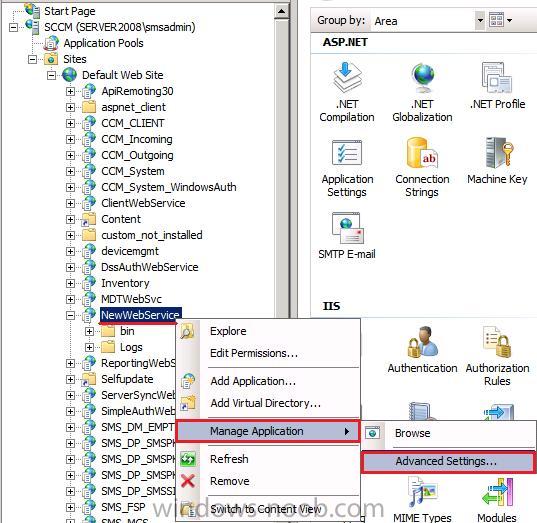
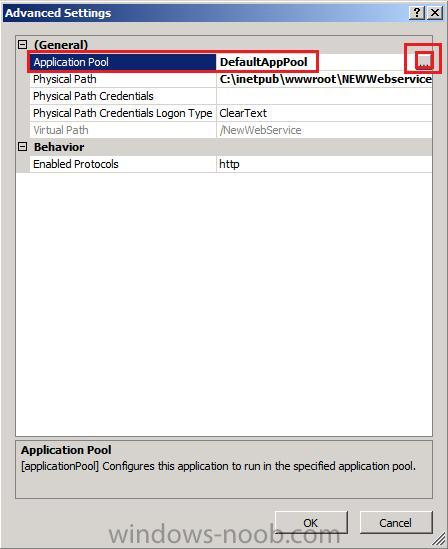
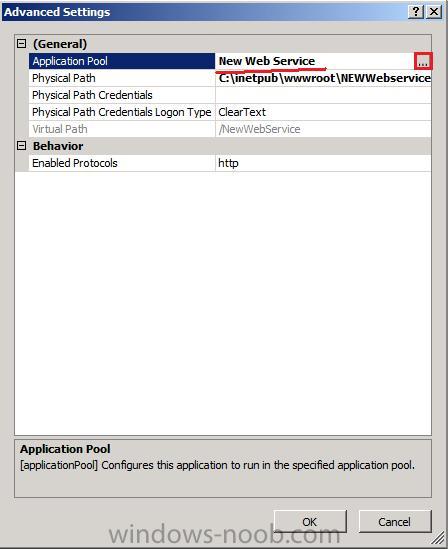
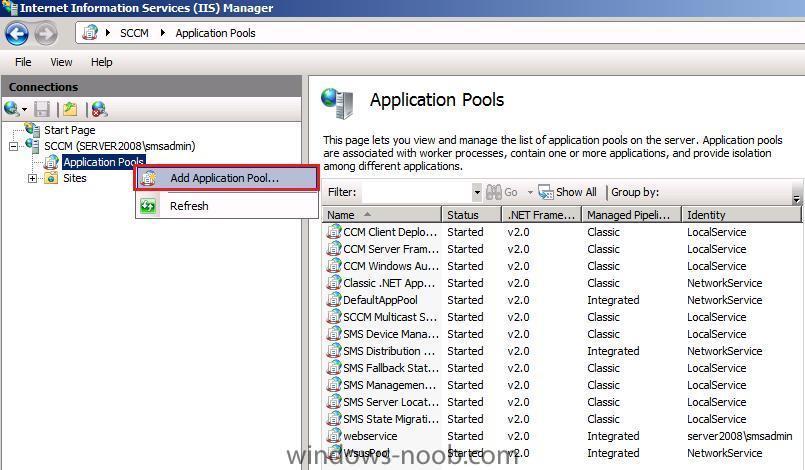
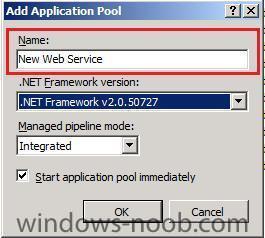
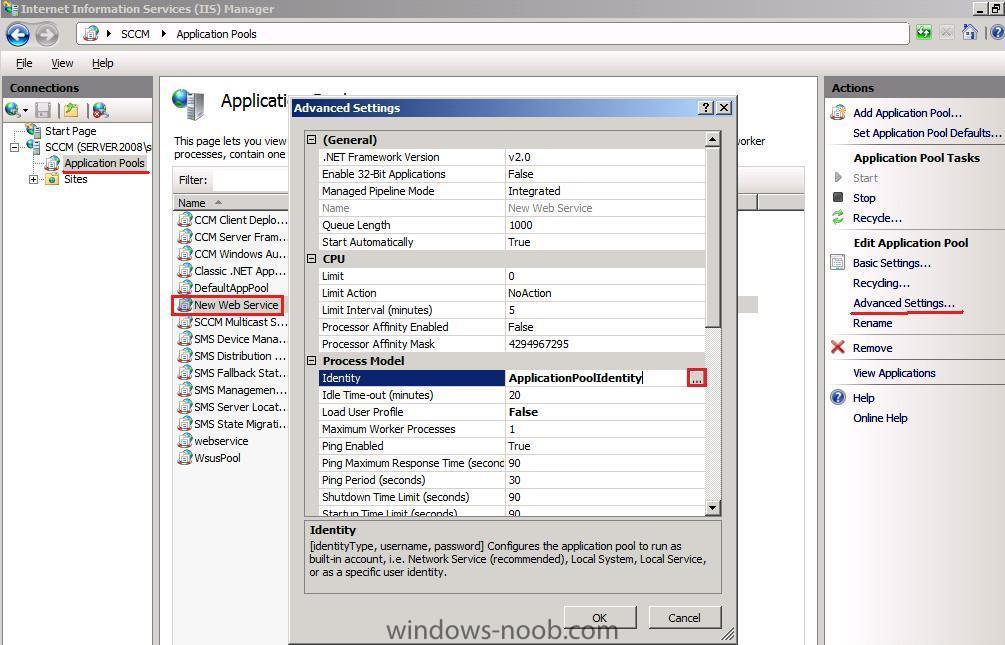
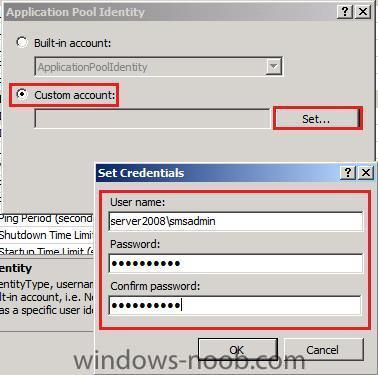
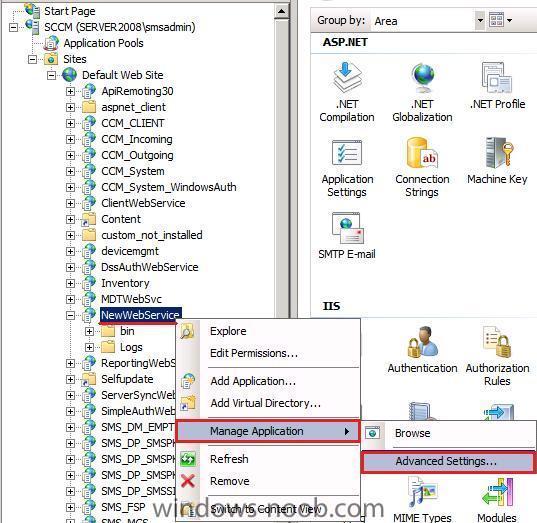
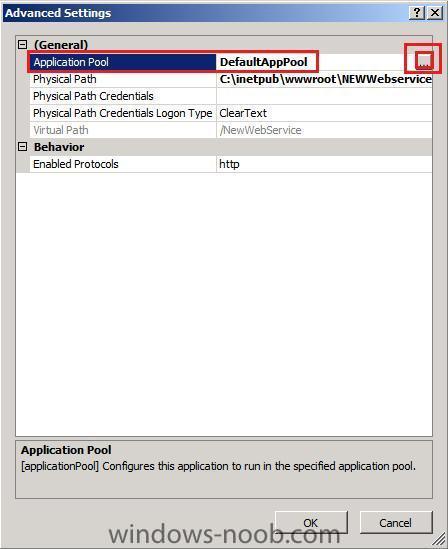
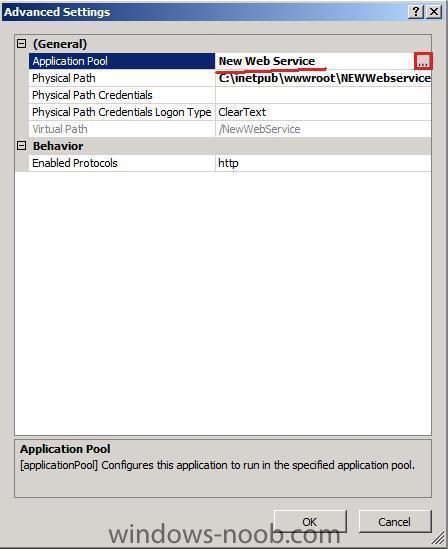
Step 6. Refresh Default Web Site Right click on Default Web Site, click Refresh (if you don’t do this the New web Service will still appear as a folder in IIS instead of as an Application. Step 7. Add Application Pool In IIS Manager, locate Application Pools, right click and choose Add Application Pool, give it a name such as New Web Service and click ok Step 8. Configure Application Pool Now you can configure this Application Pool to use a Different User Account for running your Webservice. To do this Open IIS Manager, expand your Webserver Node and click on Application Pools. Right click your Application Pool on the right side and choose Advanced Settings... In the Process Model area click in the Identity field and then click on the ... Button Choose Custom account and click on Set... Step 9. Configure the Webservice to use the application Pool Open IIS Manager, expand your Webserver node and Sites node, expand your Default Web Site node, Right click on the NewWebService folder and choose Manage Application - Advanced Settings... In the General area click into the Application Pool field and then click on the ... Button choose the appropiate Application Pool (called New Web Service) click OK, OK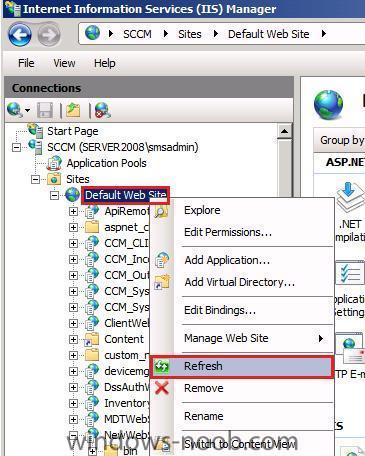
-
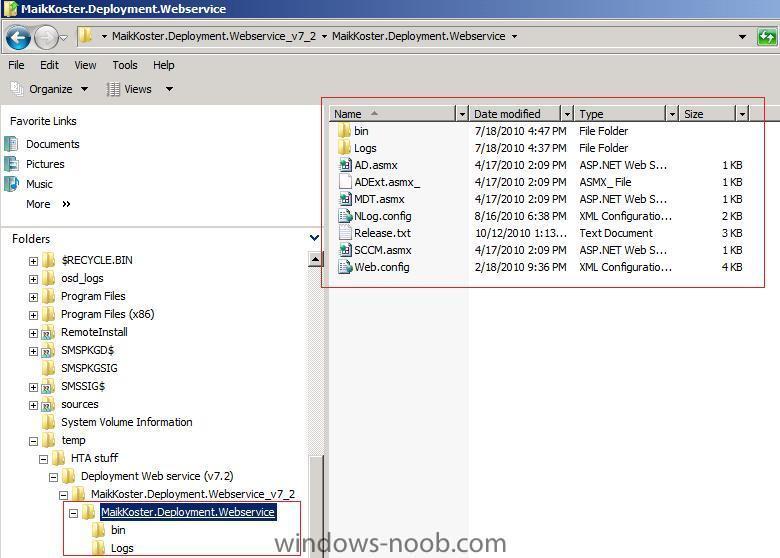
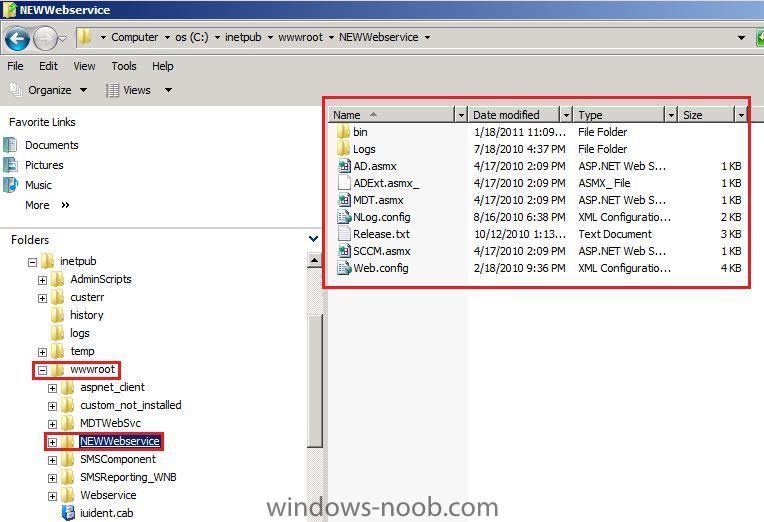
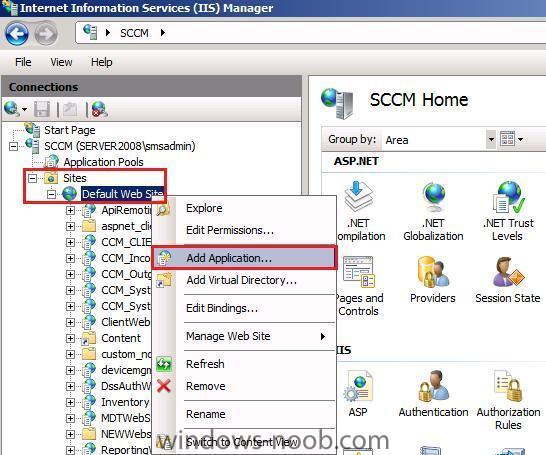
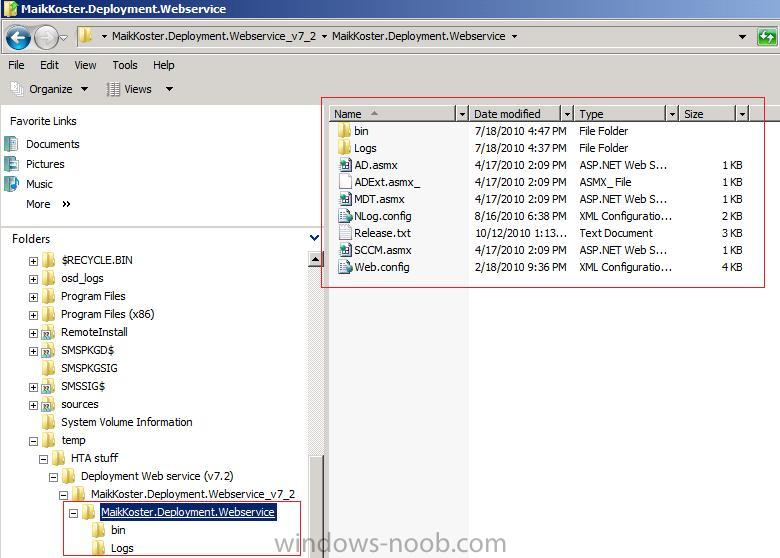
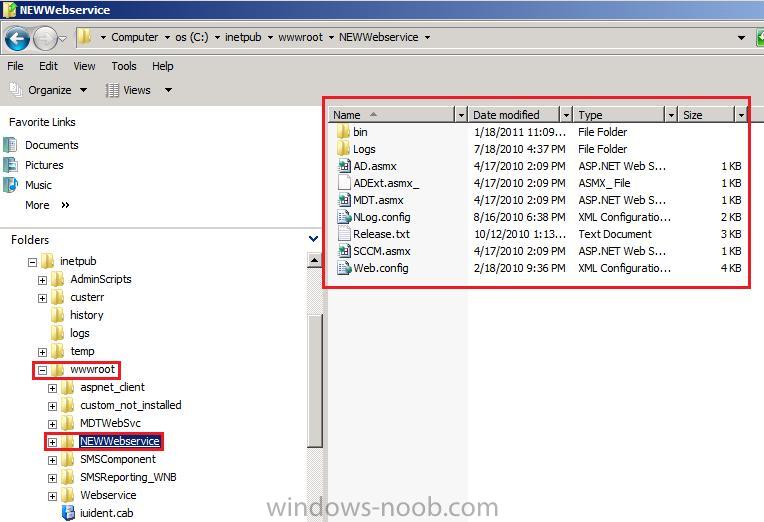
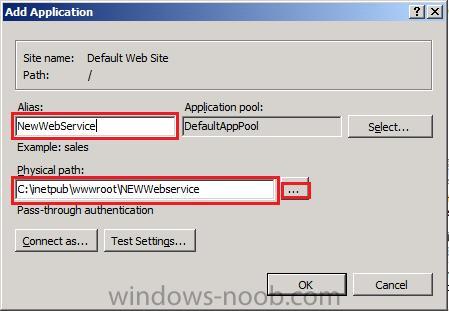
In this example we will install Maik Kosters excellent web services (7.2) on our SCCM server (which is already running IIS). Installing the Web Service Step 1. Download the files from this codeplex site Step 2. Extract the content of the zip file into a folder on your Webserver Step 3. Copy the contents to your webserver root, rename the folder to something like NEWWebservice Step 4. Add the folder as a new Application to IIS (Step by Step Guide IIS 6 | Step by Step Guide IIS 7), Start IIS manager, expand Sites, right click on Default Web Site and choose Add Application. Step 5. Specify an "Alias" (the name you would like to use to access the Webservice, lets call it NewWebService) and the physical path to the extracted content of the webservice eg: c:\inetpub\wwwroot\NEWWebService At this point the webservice is accesible (in internet explorer http://sccm/newwebservice/sccm.asmx ) but you cannot do anything with it (as it doesn’t know how to communicate with your SCCM site…) until you’ve done some final configuration…