anyweb
-
Posts
9175 -
Joined
-
Last visited
-
Days Won
366
Everything posted by anyweb
-
use a frontend HTA to set the required variables, that's how i do it, then your task sequence checks for the presence of same and carries out actions accordingly
-
 error 1 usually means 'incorrect function' can you post the log file of this install ? if the program installs in windows then it's user based and when being installed via osd it's being installed as SYSTEM (system context) that could be the cause of the failure, if so, you'll have to edit the script to take account of this,
 -
it will get far enough, if you see the sccm screen that is WinPe. you have to enable F8 command support in your boot wim, read the previous post to see how cheers niall
-
This hotfix addresses a known issue in v.Next Beta 1 (build 7470) which can cause SMSEXEC to crash while handling deployment of certain software updates. This crash will occur if there are more than 1100 references in a bundle / update list (this is the combination of direct and indirect references) targeted to collections. Installation Instructions: 1) Install the hotfix on CAS and primary site servers MSFT internal reference: SMS: 243539 SMSSE:6578 via > http://myitforum.com/cs2/blogs/brandonlinton/archive/2010/10/30/configmgr-v-next-beta-1-hotfix-kb2448871.aspx
-
Problem: The client agent cannot be published to the software update point for software update client deployment. Issue: When enabling software update based client deployment, Windows Server Update Services does not properly register the Configuration Manager client agent. Workaround: Download the software update from the MS Connect site for Configuration Manager and deploy the update to all software update point site system roles. Software Update-Based Client Installation Fails When you enable software update-based client deployment, the Configuration Manager client does not publish to the software update point. The following error is logged in WCM.log: ERROR: Failed to publish sms client to WSUS, error = 0x80131622 Workaround: Download the software update from the MS Connect site and install this software update on all software update point site system roles. https://connect.microsoft.com/ConfigurationManagervnext/Downloads/DownloadDetails.aspx?DownloadID=29497 via > http://myitforum.com/cs2/blogs/brandonlinton/archive/2010/10/30/configmgr-v-next-beta-1-hotfix-kb131665.aspx
-
sounds like network drivers are missing in your boot.wim., to test, when winPE starts, press F8 (after enabling command line mode) and type ipconfig do you get an ip address ?
-
hi back, did you want to say something about IT Jobs ?
-
here's how (thanks to Michael in Denmark) http://osdeploy.wordpress.com/2009/11/23/capture-none-syspreped-image-using-sccm-running-imagex-from-a-ts/
-
capture the WIM on a virtual machine (hyperv or vmware) then have a driver group which has steps in it, each step is based on a wmi query to detect for some hardware model, if found then an apply driver package is initiated, if not it's ignored see these posts for ideas how can I target applications (and drivers) to specific hardware? target hardware How can I create a driver package
-
Boot Media Creation Failure: No Management Point
anyweb replied to Sumixam's topic in Configuration Manager 2007
if the MP is on a child site, then you'll need to create the boot media on that site -
Boot Media Creation Failure: No Management Point
anyweb replied to Sumixam's topic in Configuration Manager 2007
on the site server that you are attempting to create boot media, is there a MP ? -
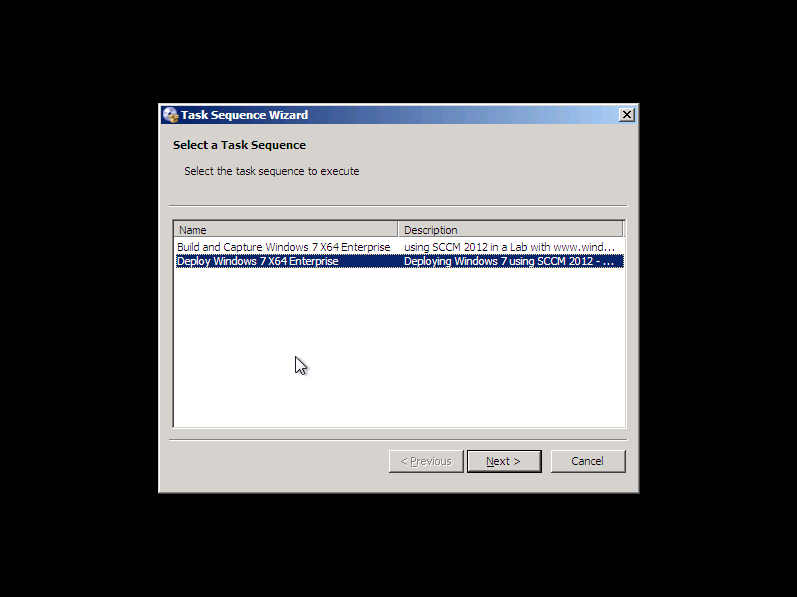
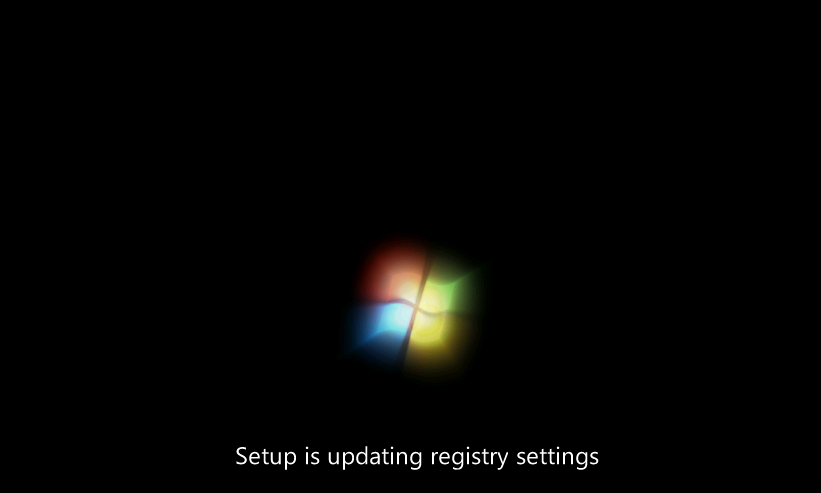
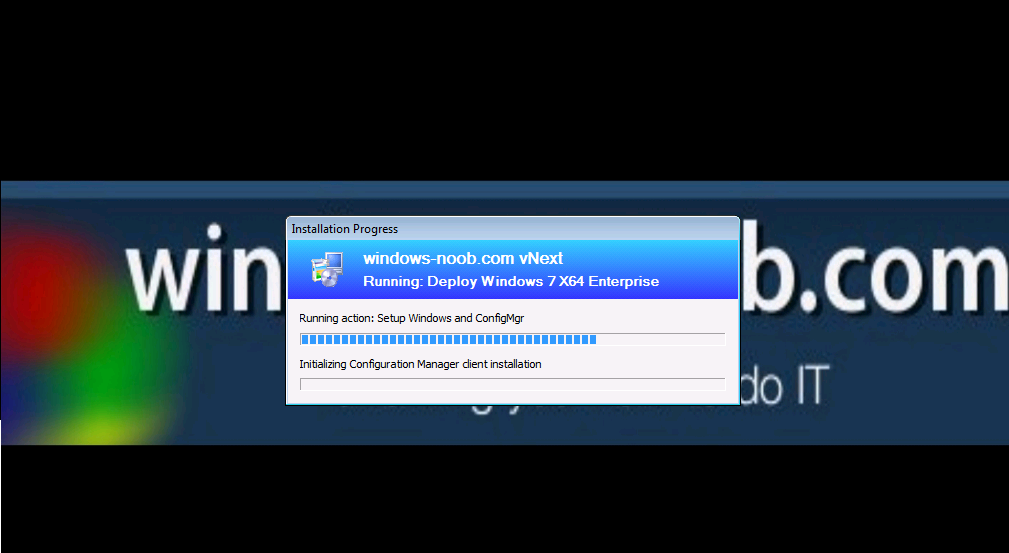
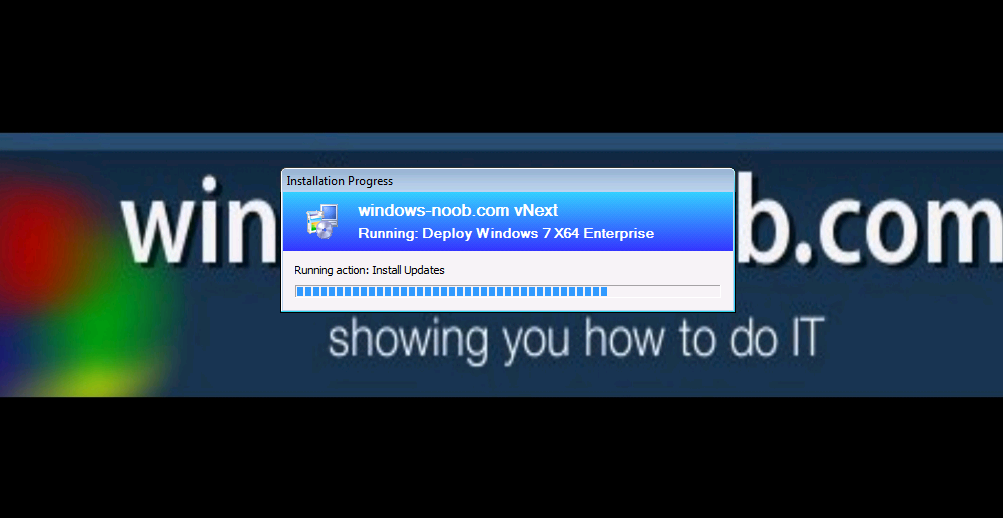
using vNext in a LAB - Part 10. Deploying Windows 7 Enterprise
anyweb replied to anyweb's topic in Configuration Manager 2012
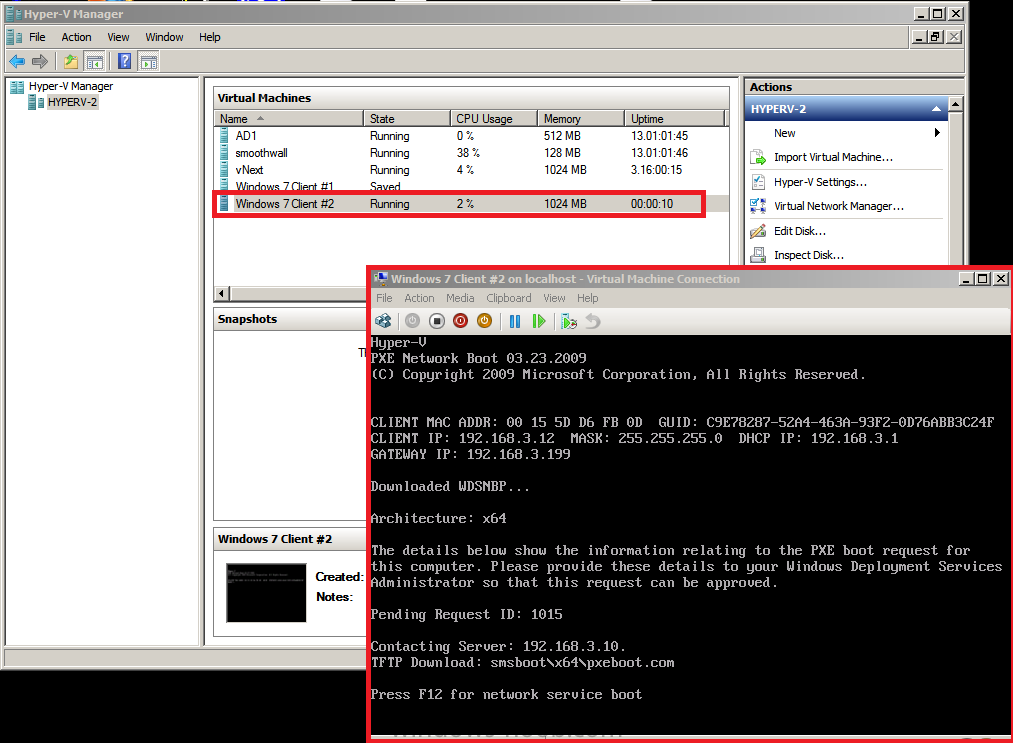
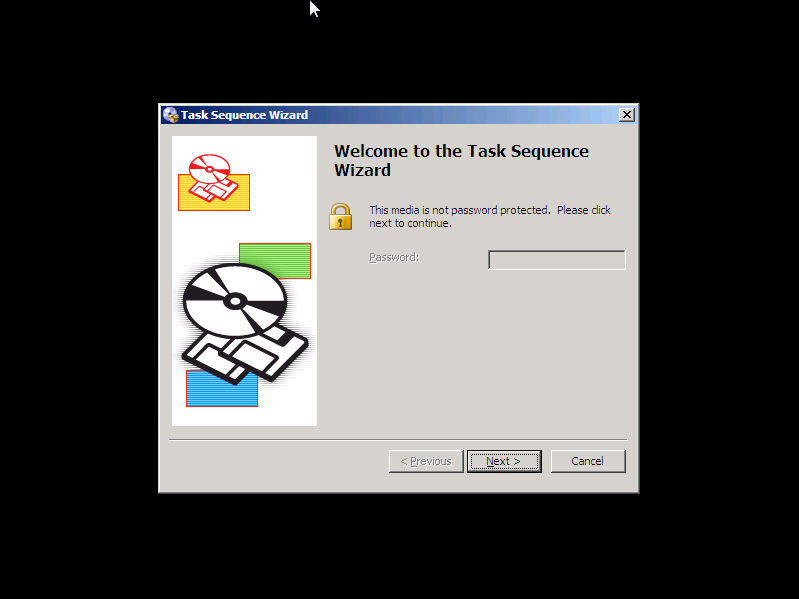
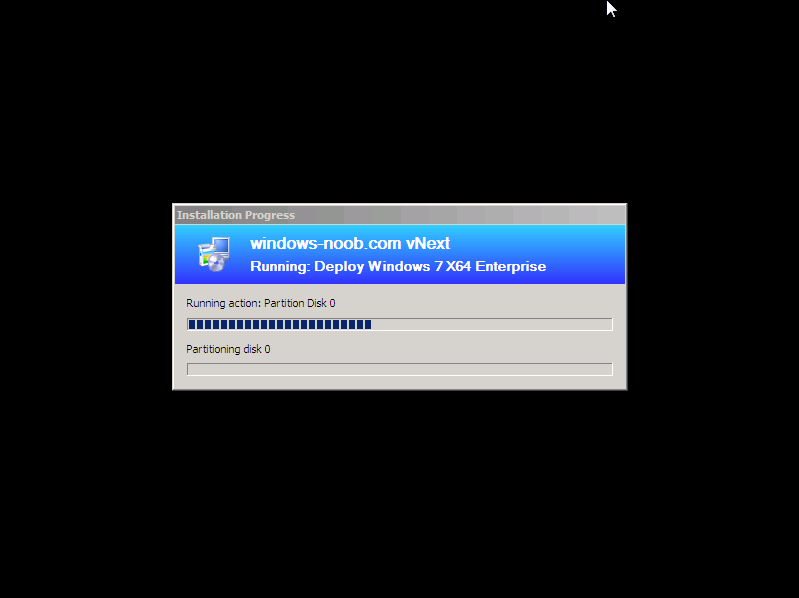
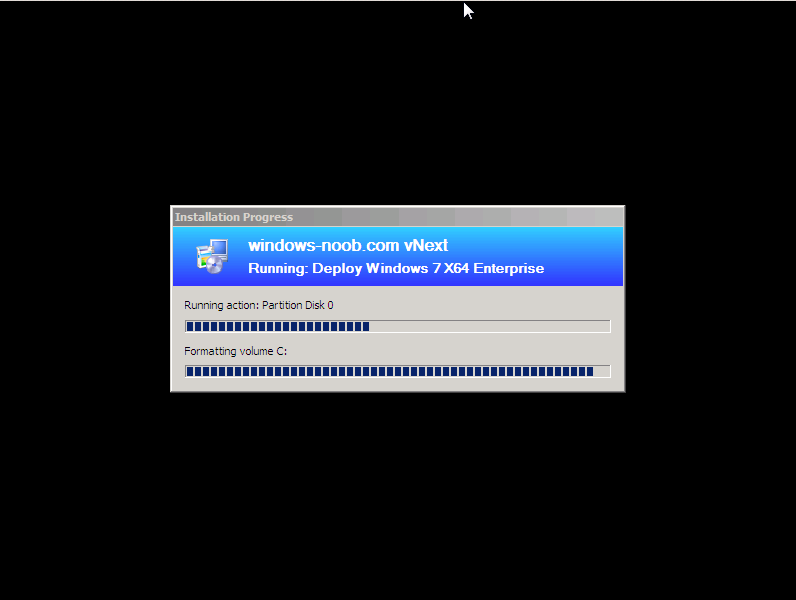
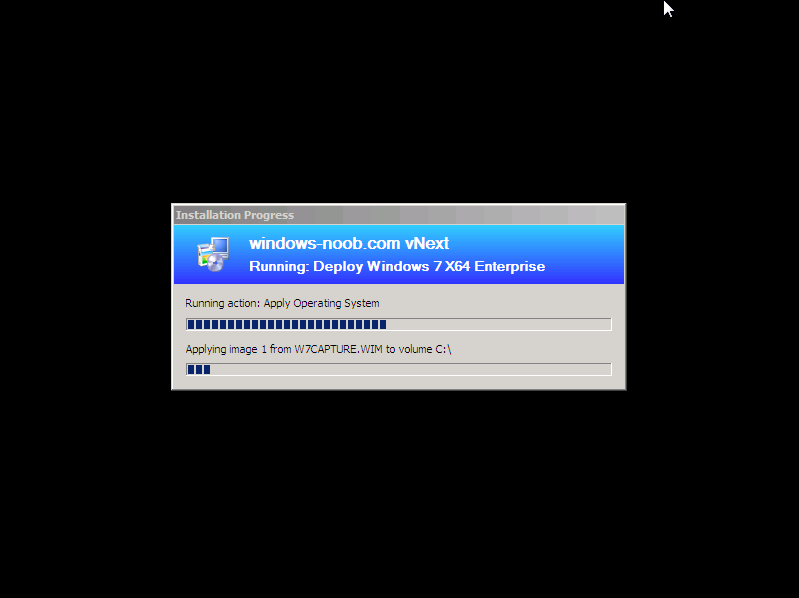
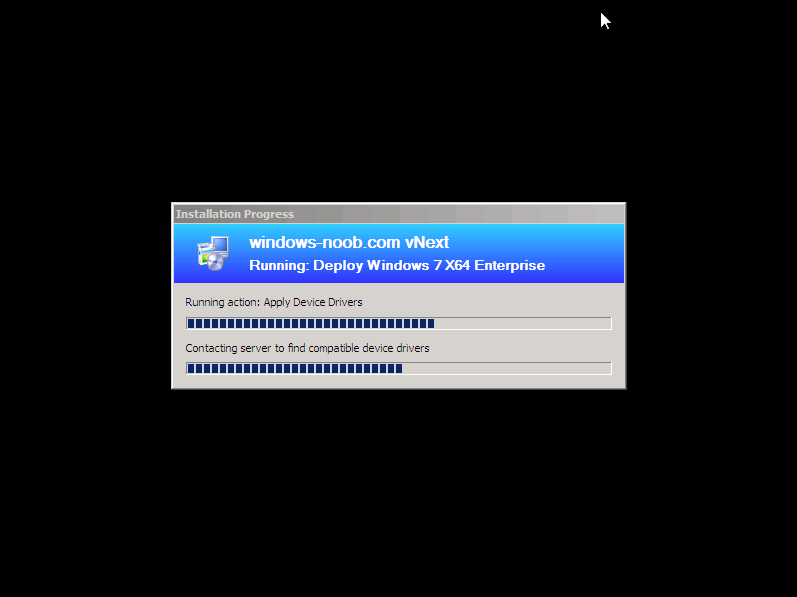
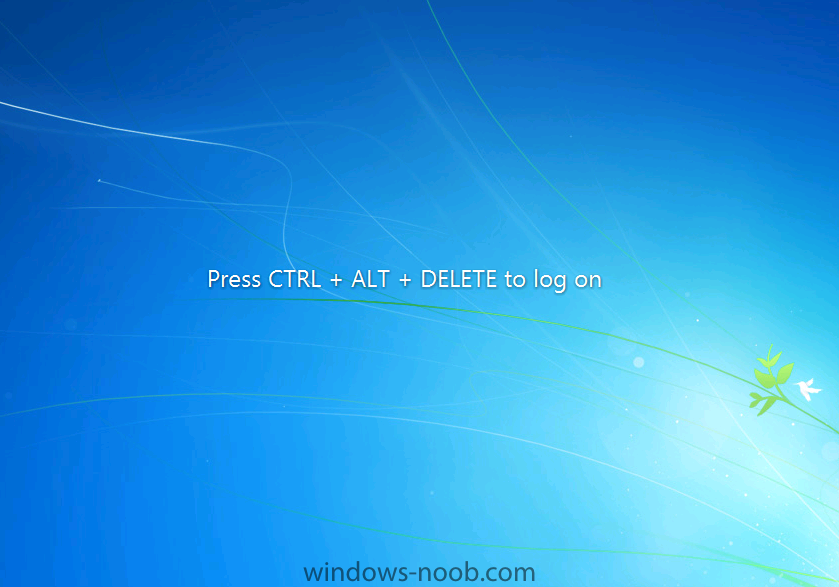
Step 6. Create a new hyperV virtual machine Follow these steps to create a new HyperV virtual machine, called Windows 7 Client #2. Once created, start the VM and PXE boot it at the welcome to Task Sequence wizard click next and select our Deploy Windows 7 X64 Enterprise Task Sequence from the menu and click next the deployment begins formatting the disc takes a while (we'll fix that later) and now we see our captured image is getting applied to our VM applies drivers then we see the setup windows and configmgr step (involves a reboot) and after the reboot Setup is updating ... after another reboot... the Setup and Windows and configmgr step continues and installs the configmgr client.. and now our Install Software Updates step takes over and then we are done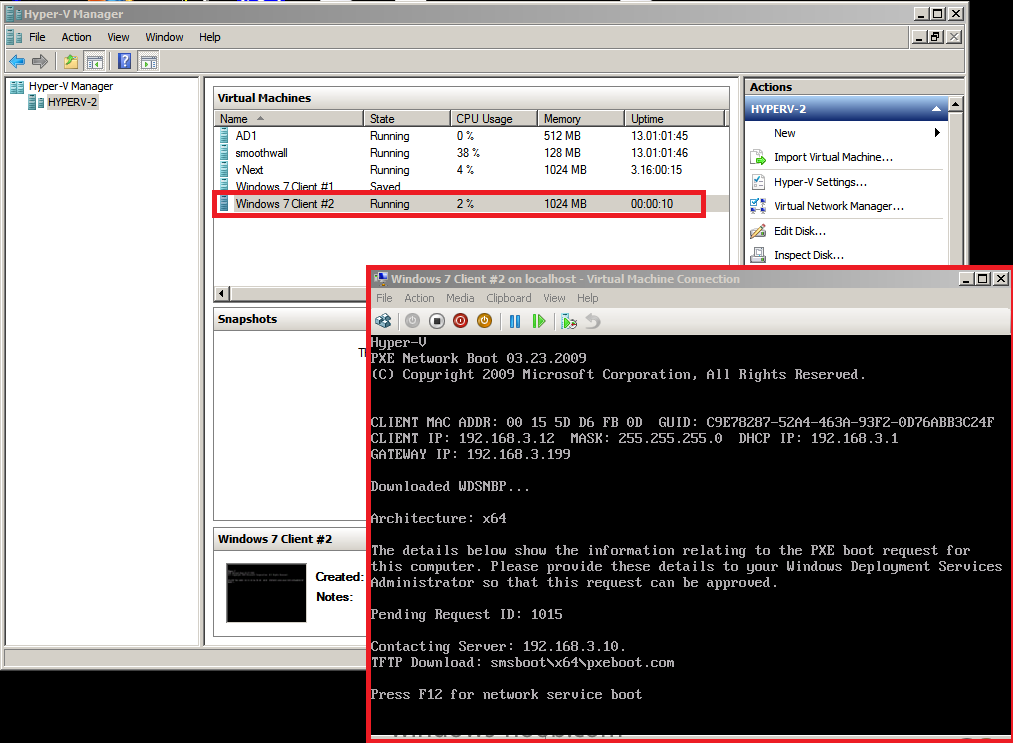


-
SCCM 2007 ZTI Windows 7 Deployment Trouble
anyweb replied to joshjohnson's question in Troubleshooting, Tools, Hints and Tips
did you look for the smsts.log on the client ? instructions to find it are here -
Configuring Detection Frequency
anyweb replied to Vancouverite's topic in Configuration Manager 2007
i wouldn't advise you to set such aggressive discovery times as the sql server will be inundated and never keep up with itself, instead, upgrade to R3 and utilise the delta discovery methods it has, or set more realistic expectations amongst your users (within 3 hours or so) for software -
it's a workflow to fix problems etc, for example using easy to use drag and drop you can create a sequence of events, such as if a file of version X exists in a folder then do some action, or whatever you want !
-
it sounds like he's using Computer Association to import the machines details into a collection. although why he's using 'blank for staging' is beyond me, as that's a BLANK collection where you never put computers into, to be used for the software update templates.... so perhaps Finamore can explain ?
-
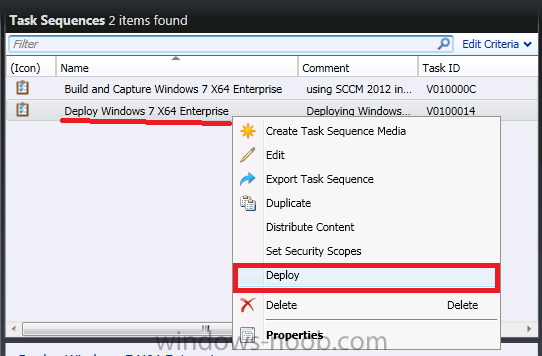
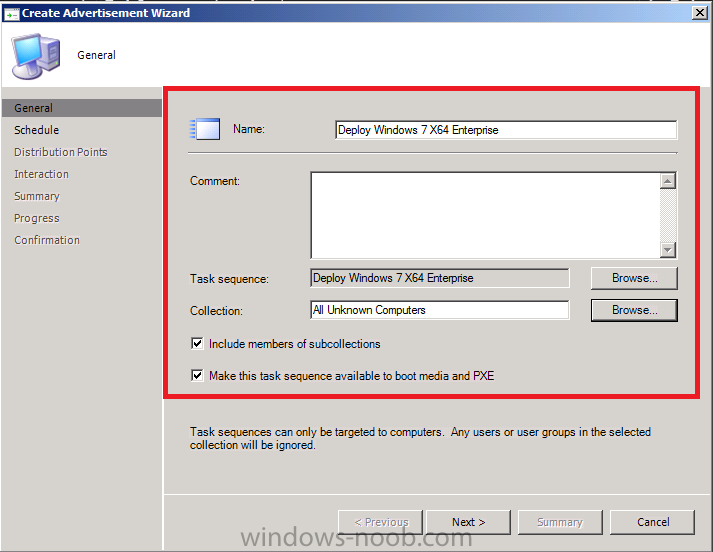
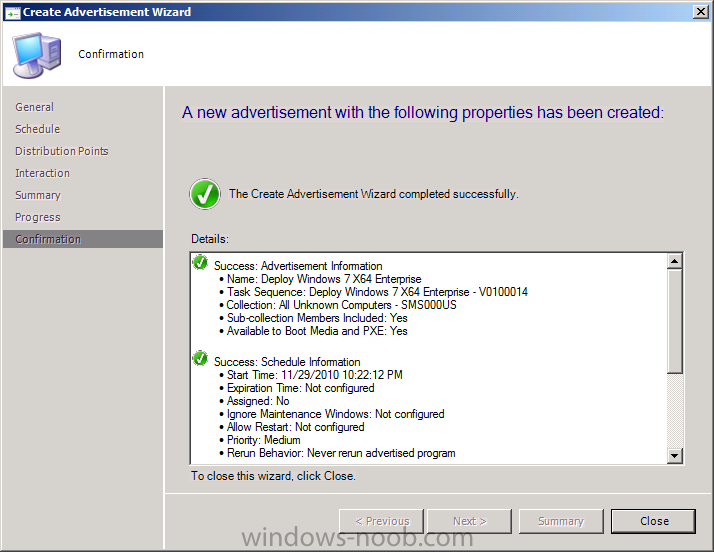
using vNext in a LAB - Part 10. Deploying Windows 7 Enterprise
anyweb replied to anyweb's topic in Configuration Manager 2012
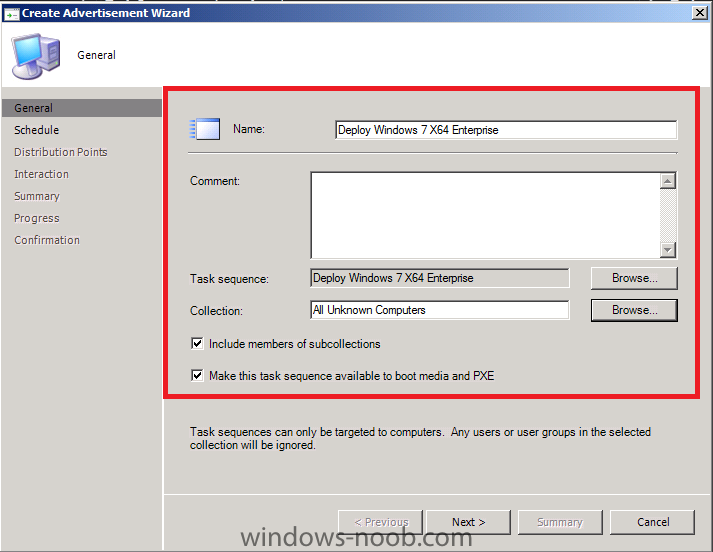
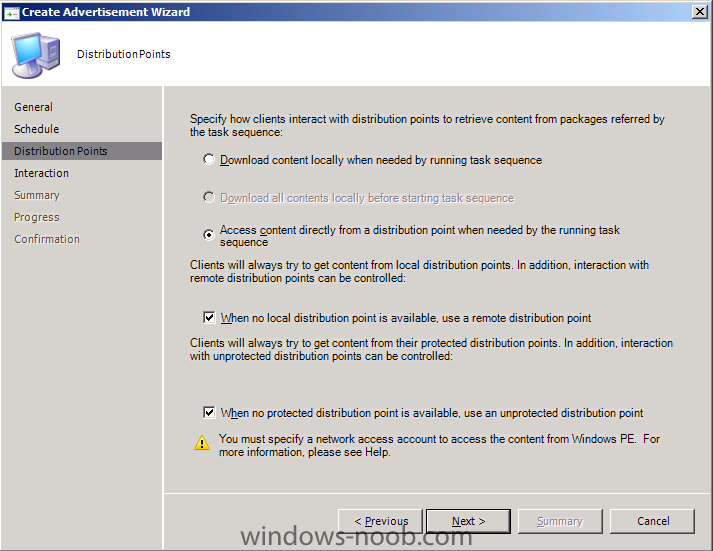
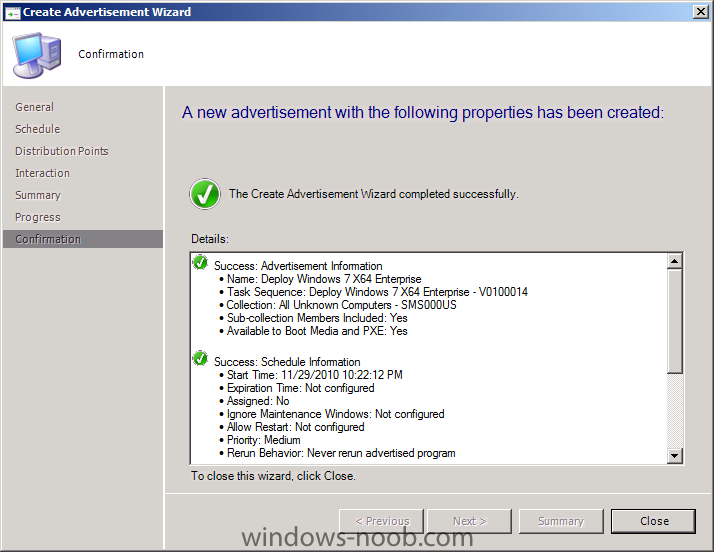
Step 5. Deploy (advertise) the Task Sequence to the Unknown Computers Collection Highlight our newly created Deploy task sequence, right click and choose Deploy when the wizard appears, browse for the All Unknown Computers collection, and make sure to place a checkmark in Make this task sequence available to boot media and PXE leave the schedule as it is (optional), click next, set the distribution point settings as follows click next through Interaction, Summary, review the progress and finally click close at the confirmation.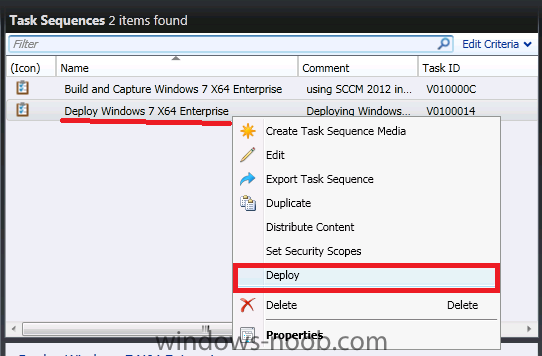
-
what does C:\WINDOWS\system32\ccmsetup\client.msi.log say ?
-
do you have an ip address when it fails ? open a command prompt (f8) and type ipconfig
-
using vNext in a LAB - Part 9. Configuring SUP
anyweb replied to anyweb's topic in Configuration Manager 2012
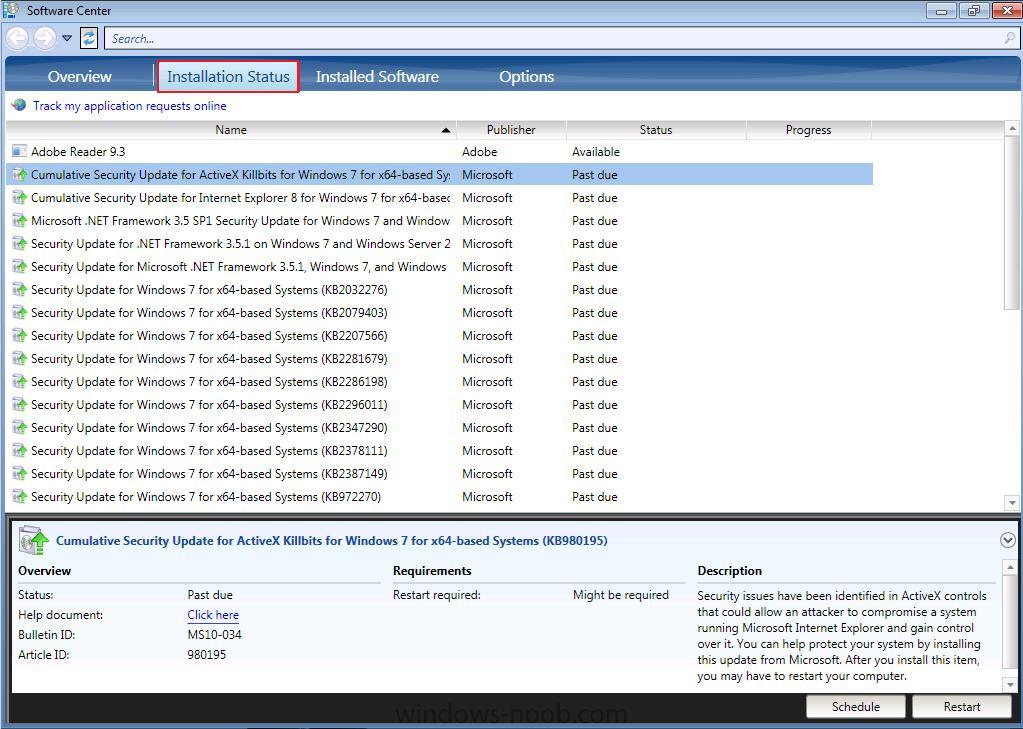
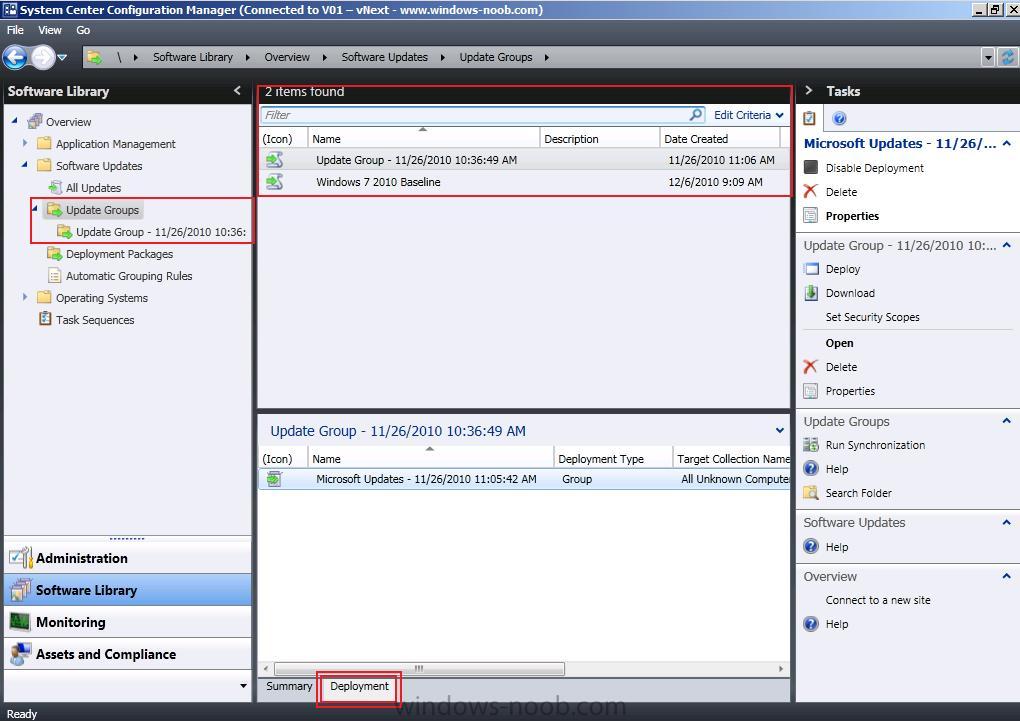
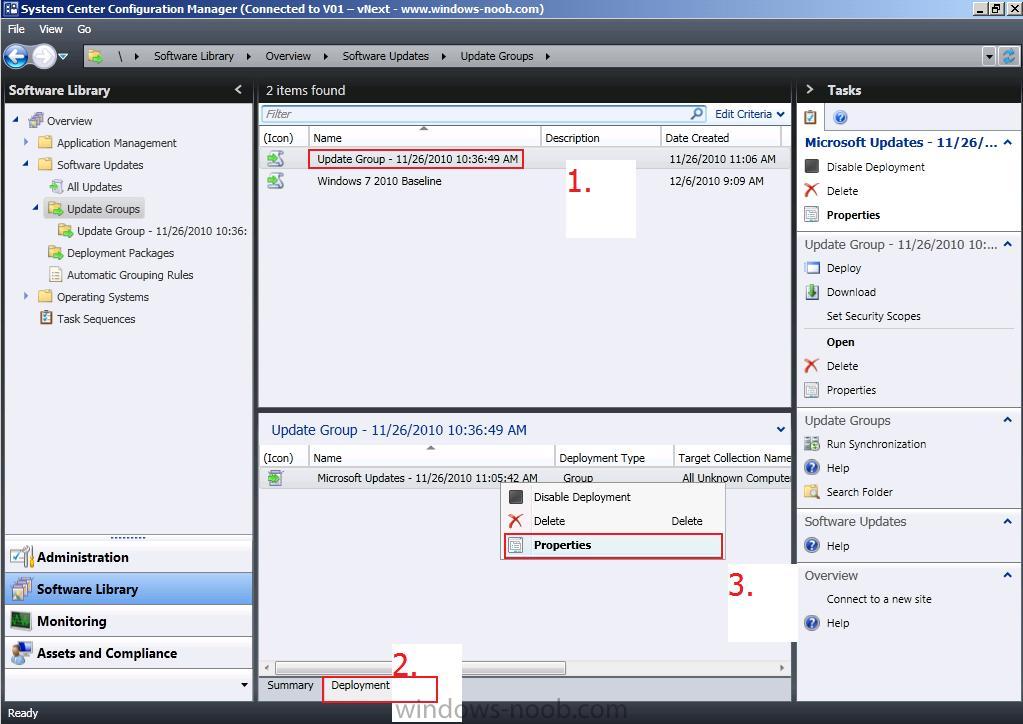
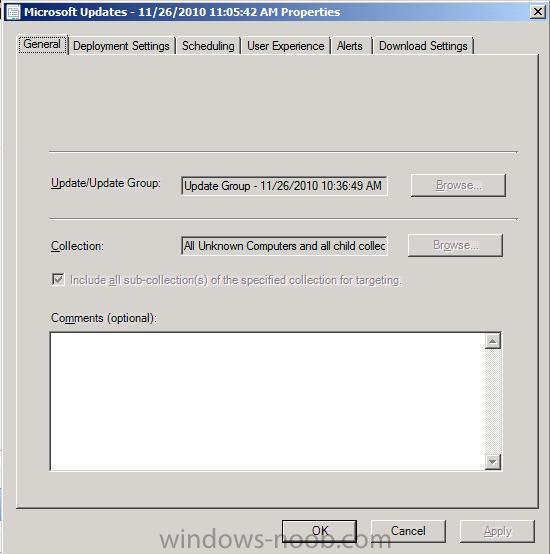
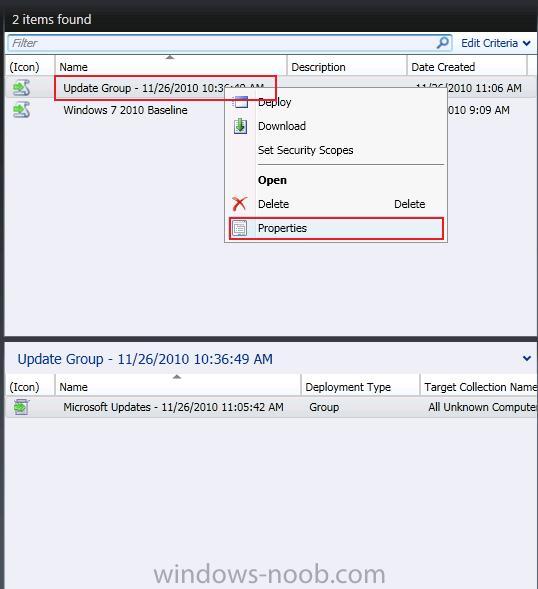
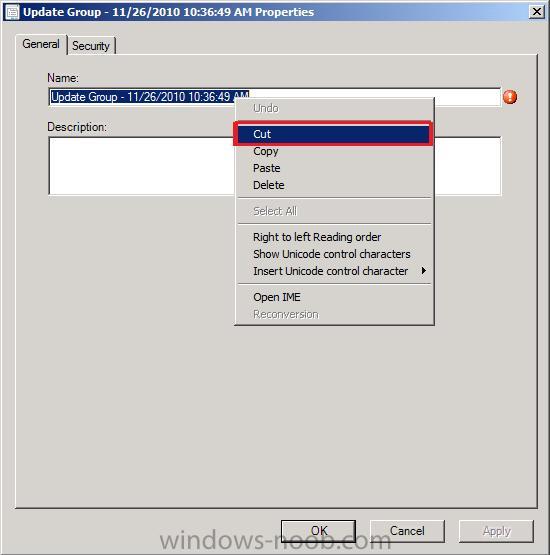
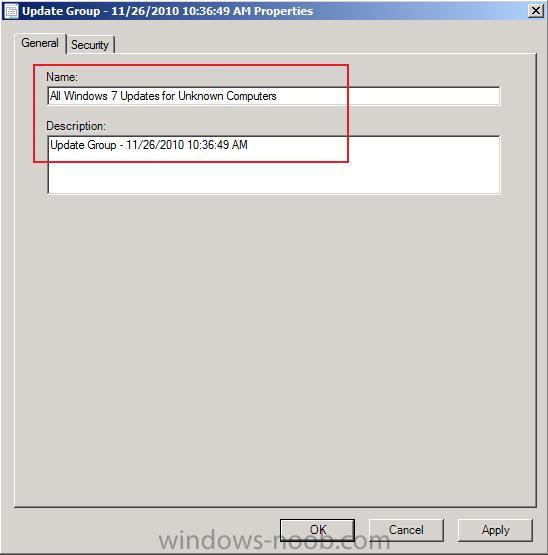
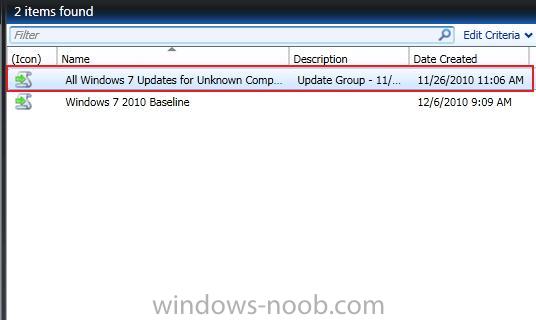
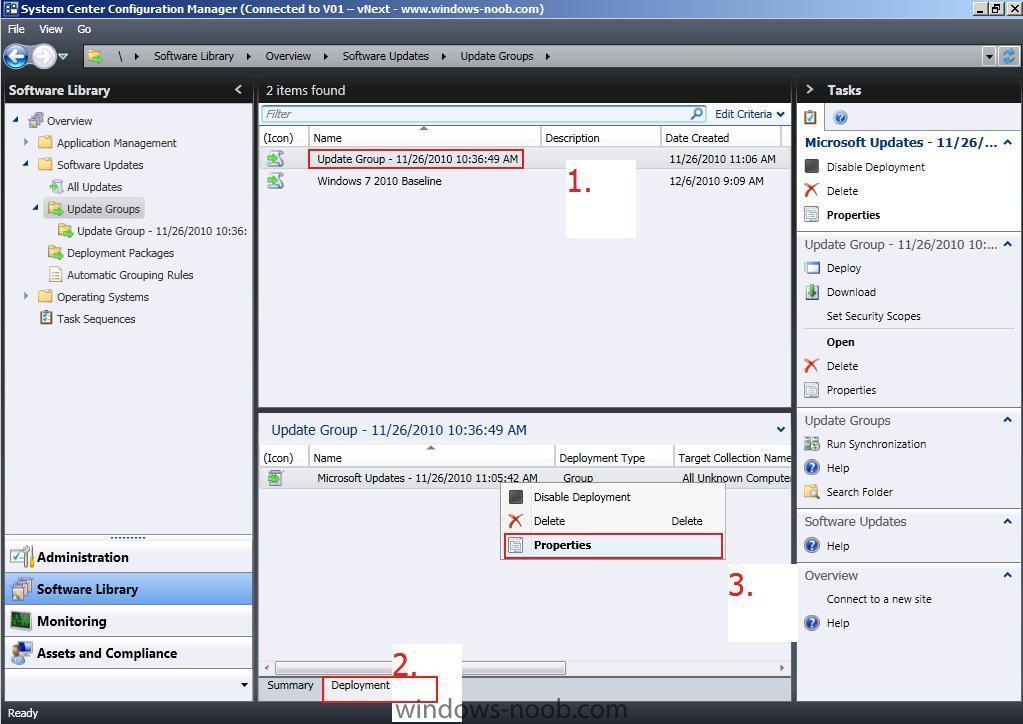
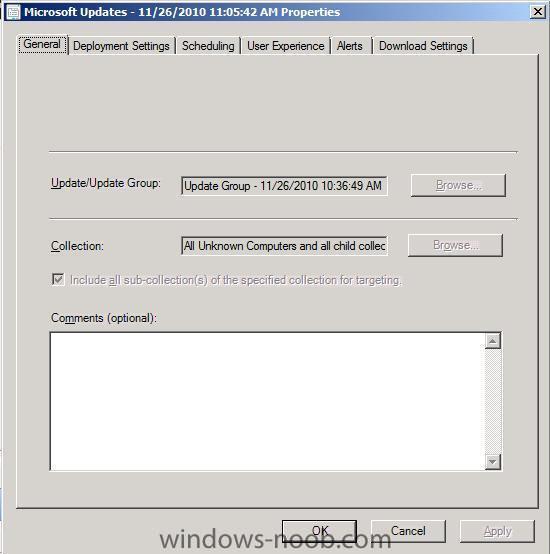
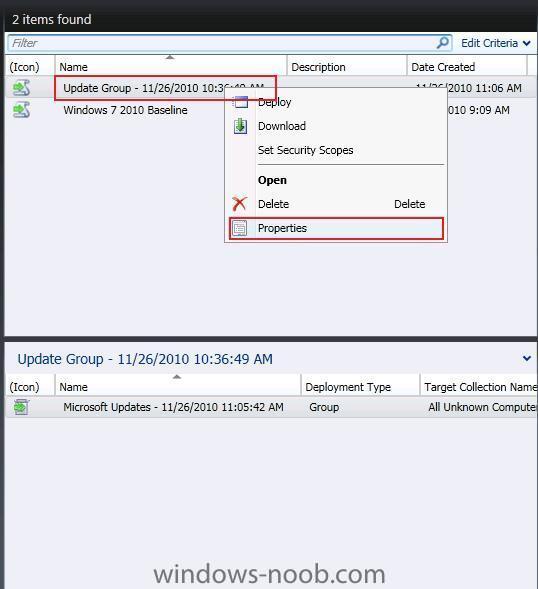
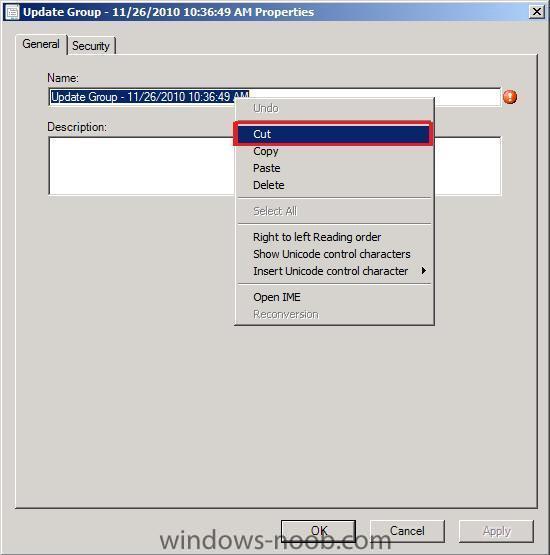
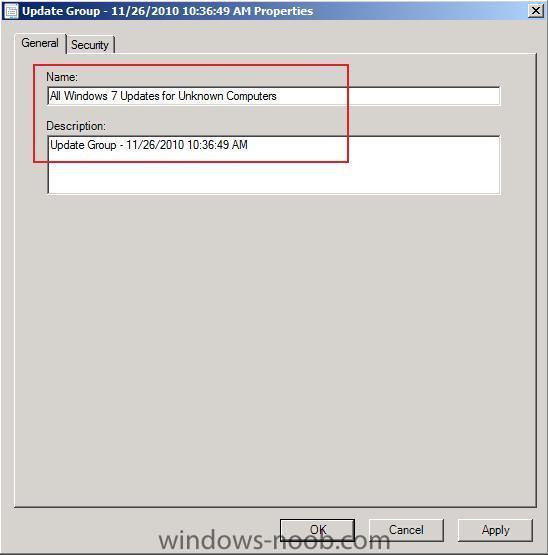
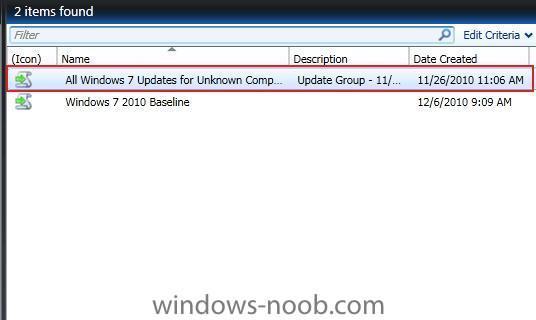
Step 6. Deploy the Windows 7 updates to our new collection repeat step 4 using the All Windows 7 collection we created above, except name the deployment Windows 7 2010 Baseline. Any Windows 7 client that you have running will now receive these new policies and the All Windows 7 targetted deployment will mean that these updates are deployed, you can review them being installed in the Installation Status tab of Software Center. To Summarise, we created Two Software Update deployments, one to the All Unknown Computers (this targets Windows 7 updates to computers getting deployed via OSD) and the other to All Windows 7 Computers. Step 7. Review our Deployment Settings. You can review these two Deployments (advertisements or Deployment Management Tasks if you are thinking the same way as before with SCCM 2007) by Selecting Update Groups if you select one Deployment (1.)and then click on the Deployment Tab (2.), Right click on Microsoft Updates below, and select Properties (3.). now you can review/change settings of the original Deployment by selecting the various tabs. click Cancel to exit. Step 8. Rename our Update Group Right click on our original Update Group Deployment called Update Group.... Choose Properties when the properties appear, Mark the Name, right click, choose Cut, Paste the information that you Cut above into the Description Field (so that you know when the Deployment was made) and give it a new, meaningful name like All Windows 7 Updates for Unknown Computers, click apply then ok. Notice how our Software Updates Deployments look now...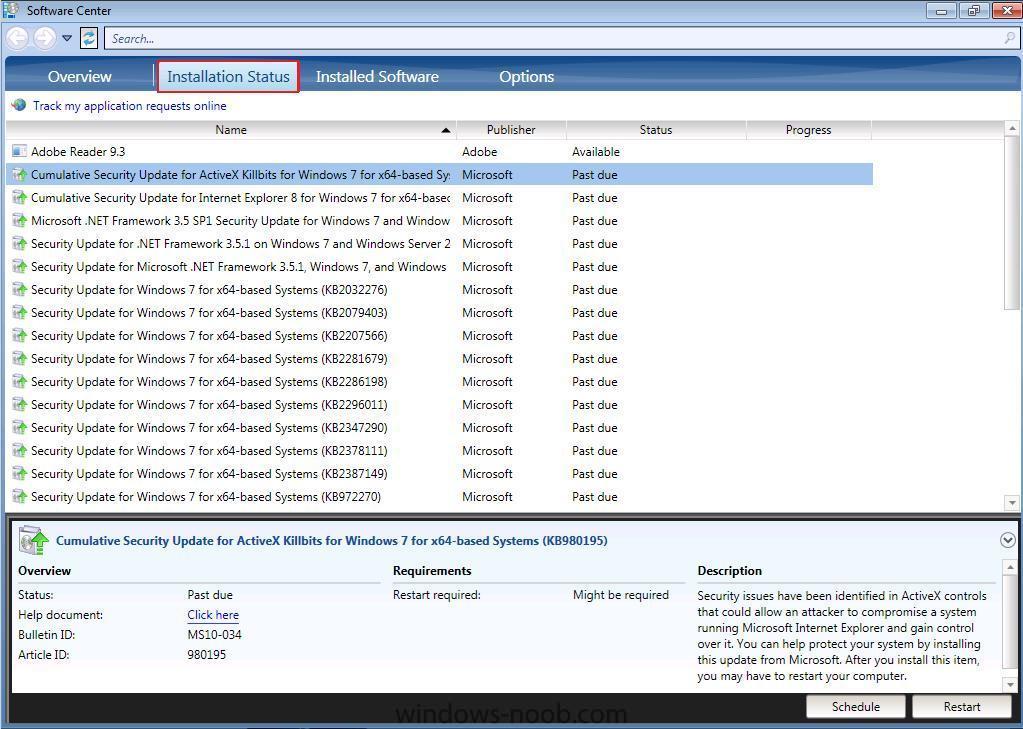

-
using vNext in a LAB - Part 9. Configuring SUP
anyweb replied to anyweb's topic in Configuration Manager 2012
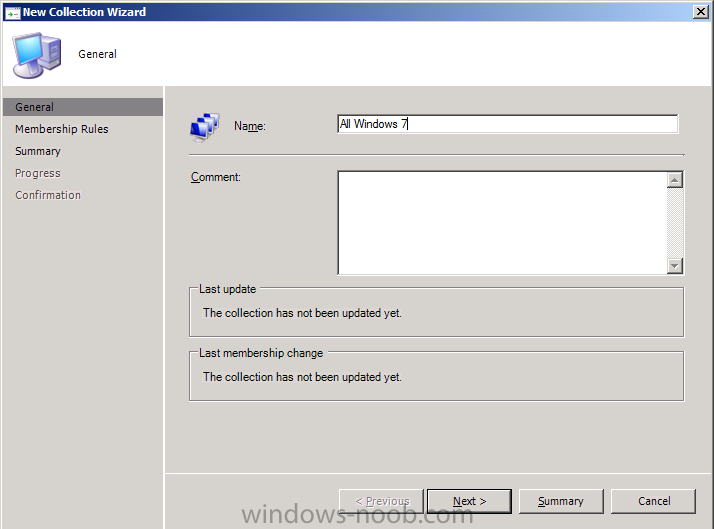
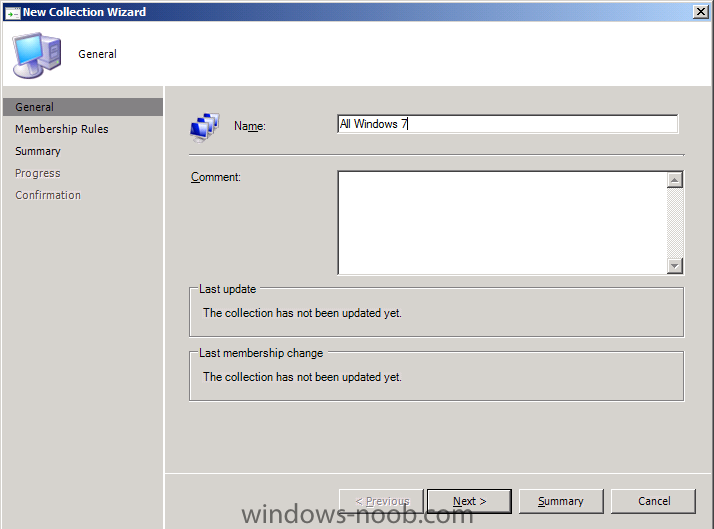
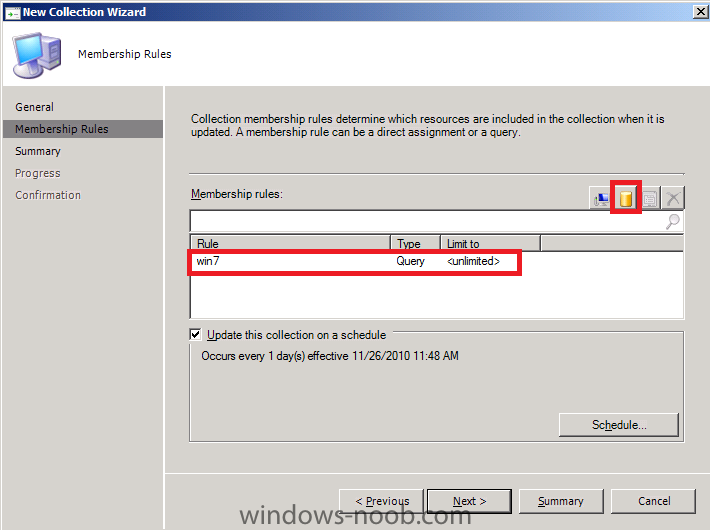
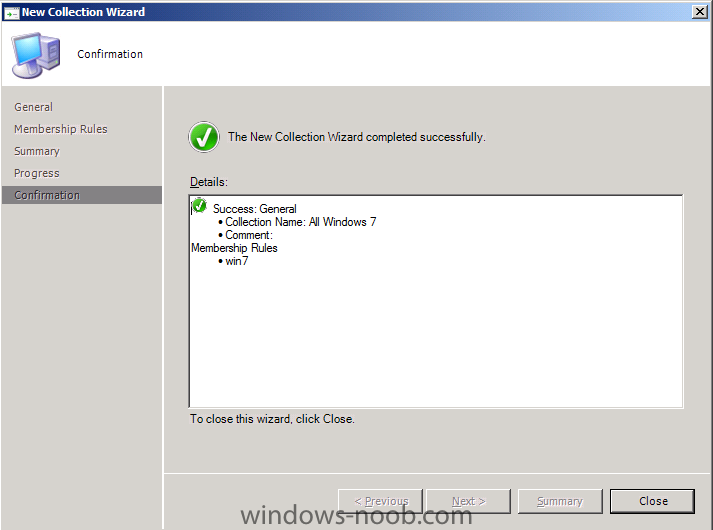
Step 5. Create All Windows 7 collection In the wunderbar click on Assets and compliance and select Device Collections, click on Create Collection in the Tasks Pane give the collection a name, All Windows 7 fill in the query with this select * from SMS_R_System where SMS_R_System.OperatingSystemNameandVersion like "%Workstation 6.1%" success !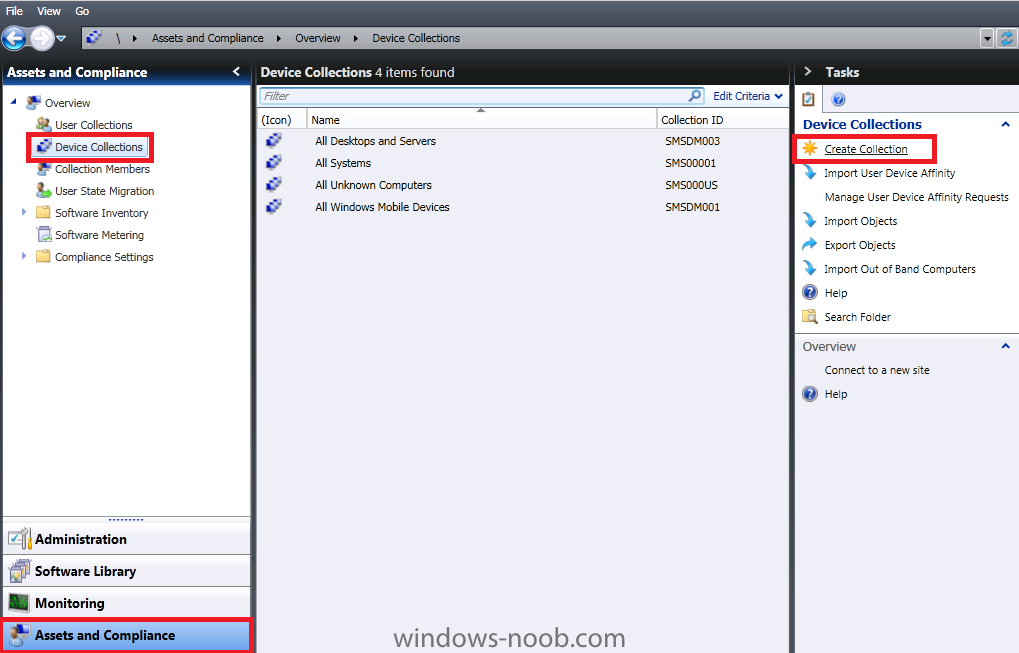
-
using vNext in a LAB - Part 9. Configuring SUP
anyweb replied to anyweb's topic in Configuration Manager 2012
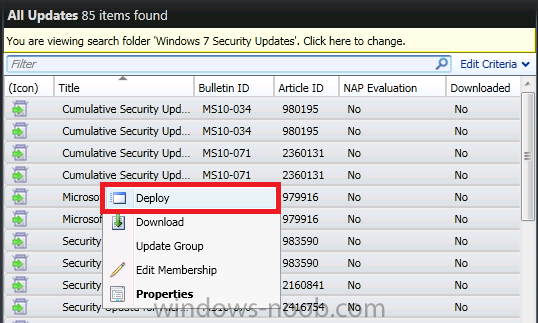
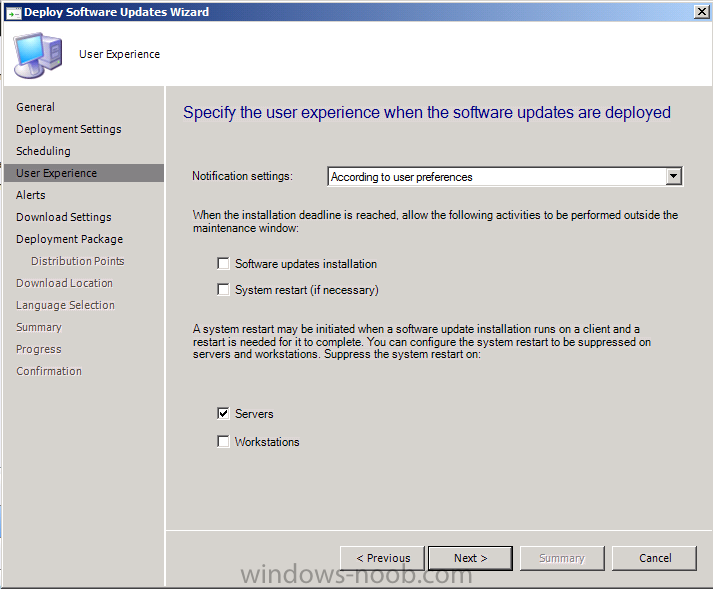
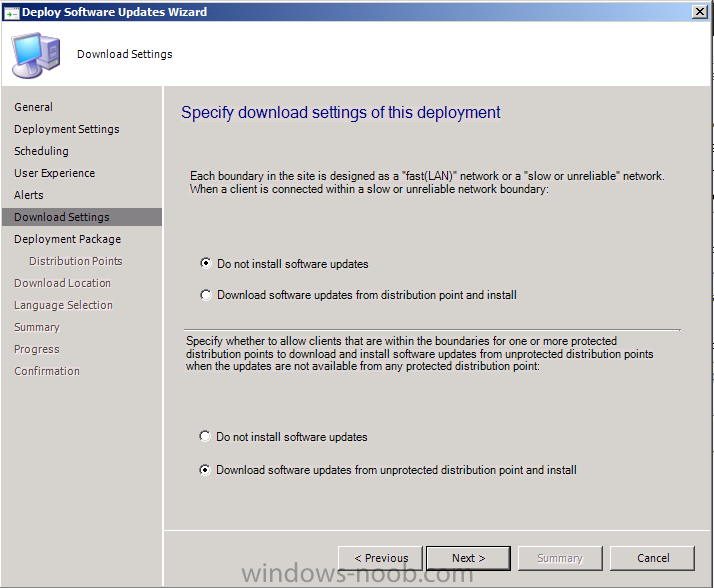
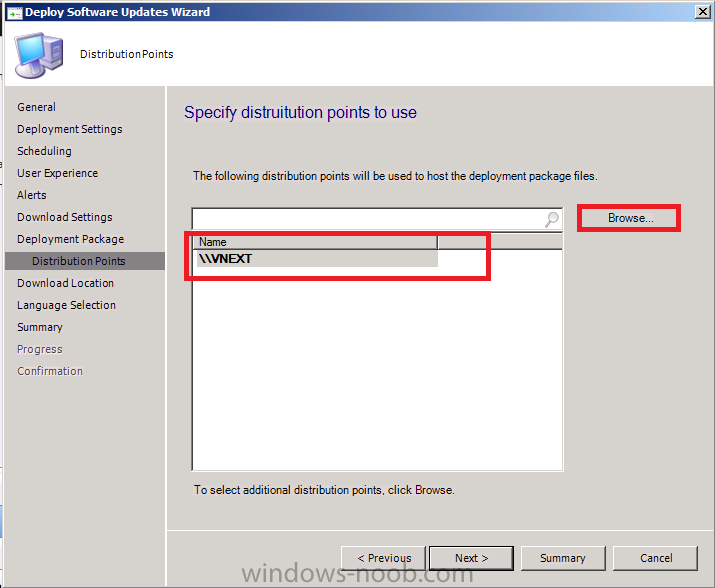
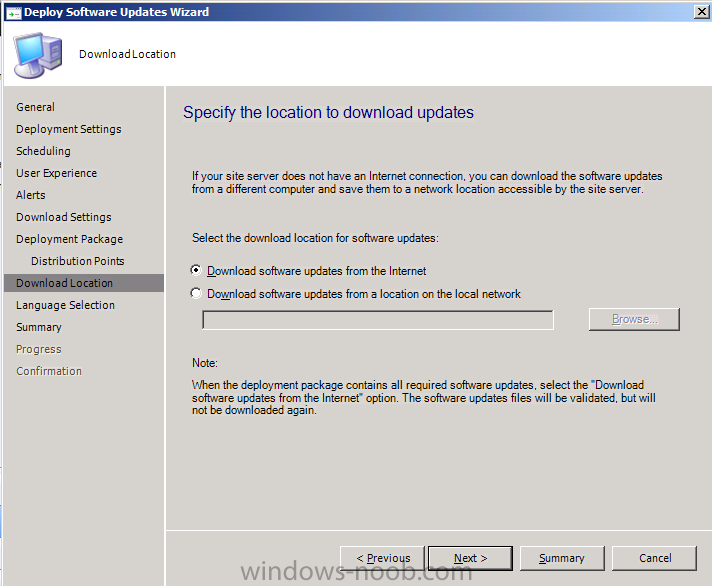
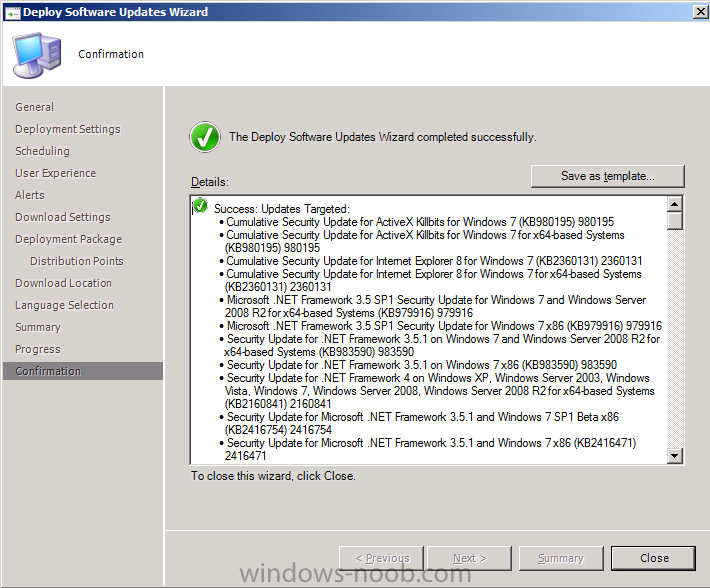
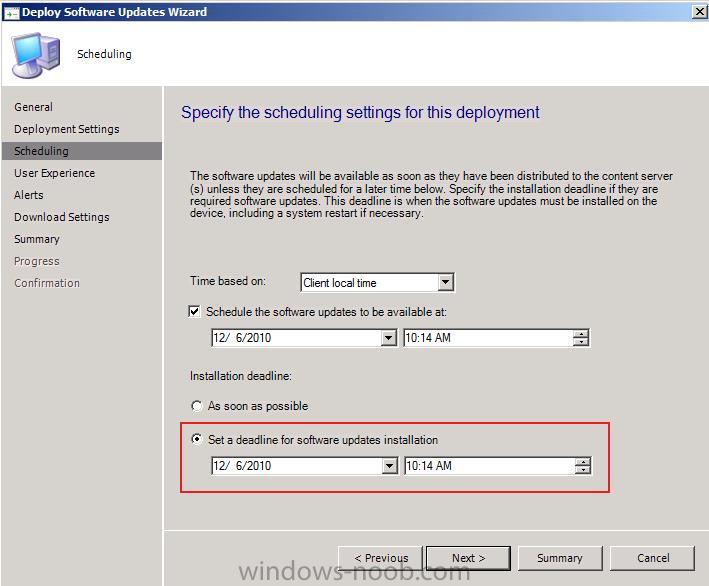
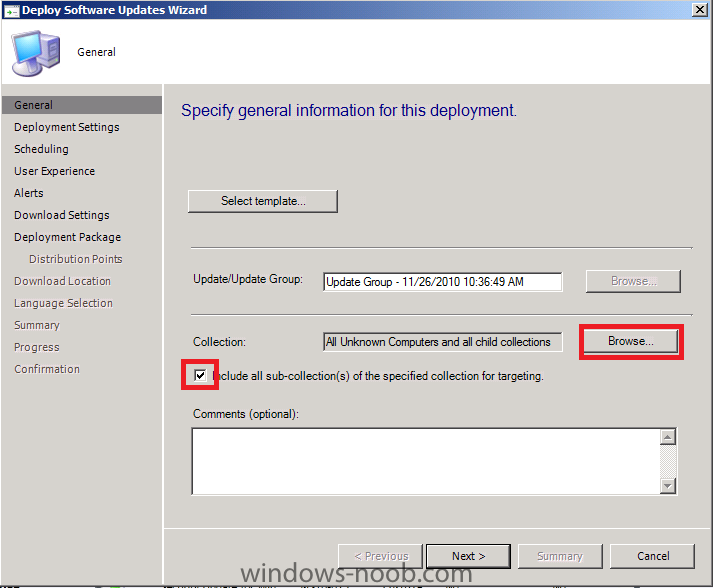
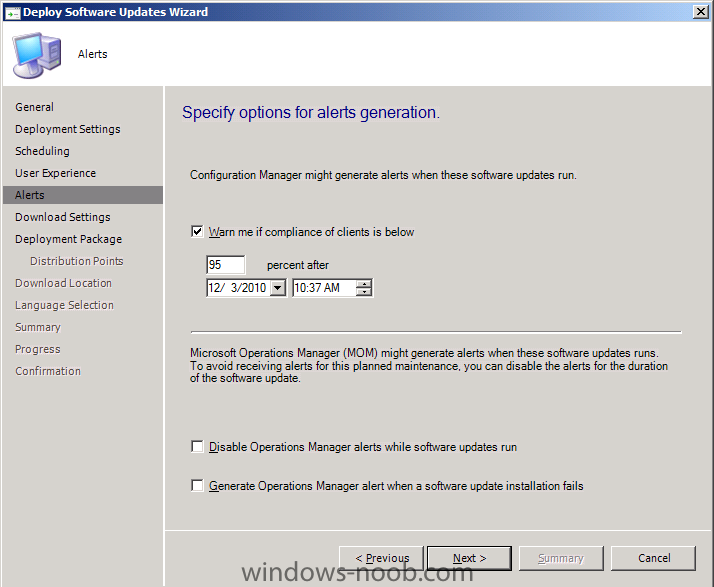
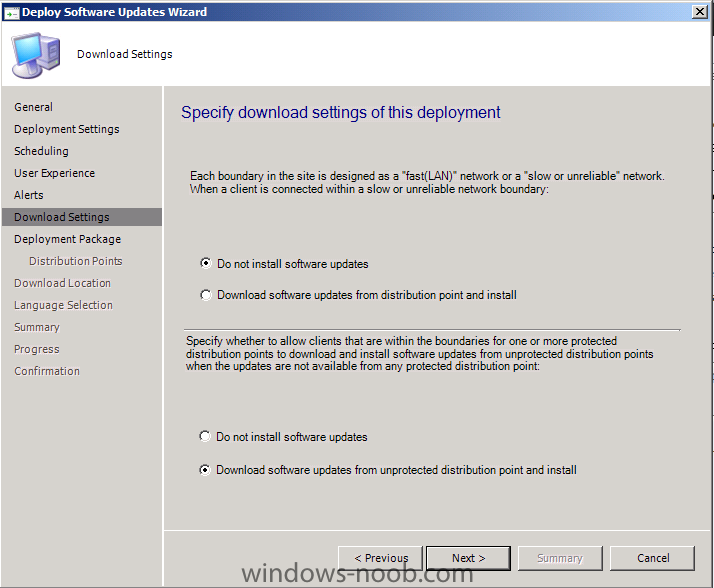
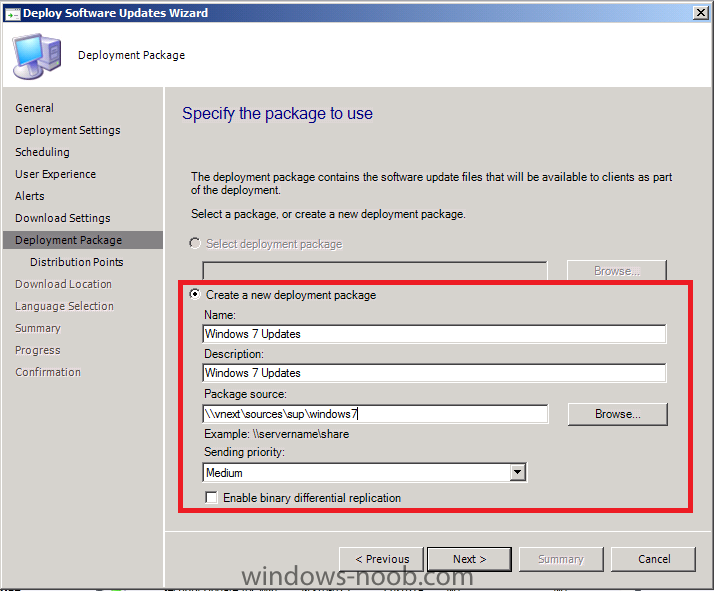
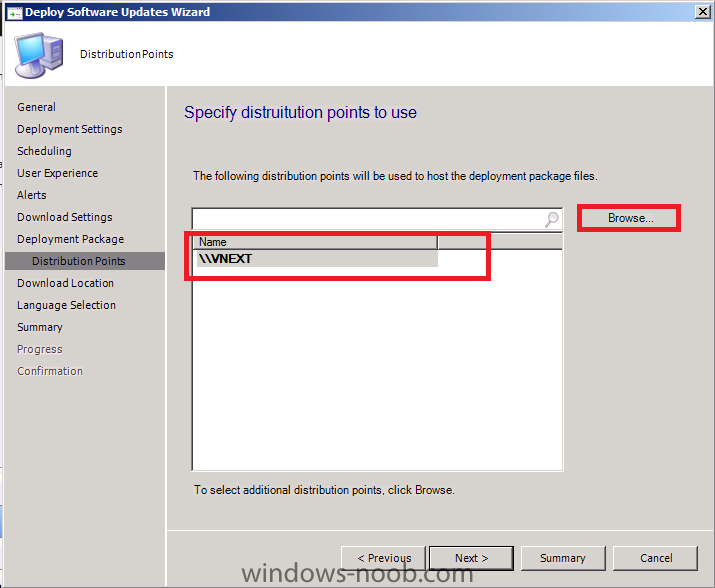
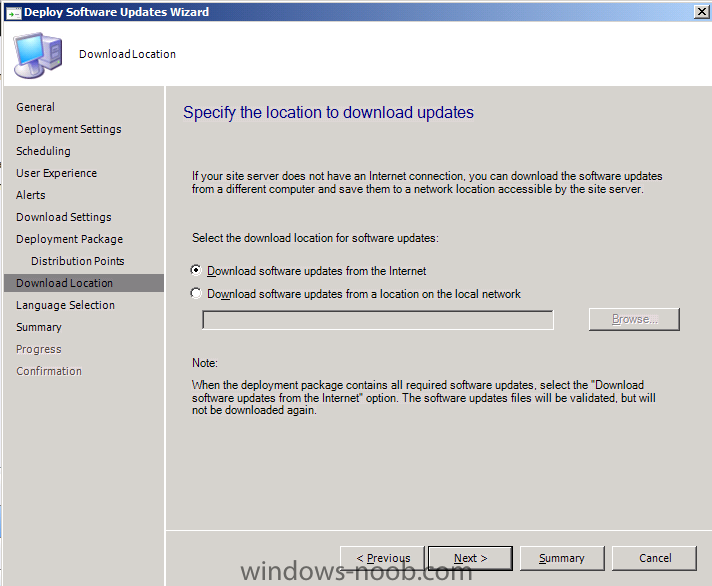
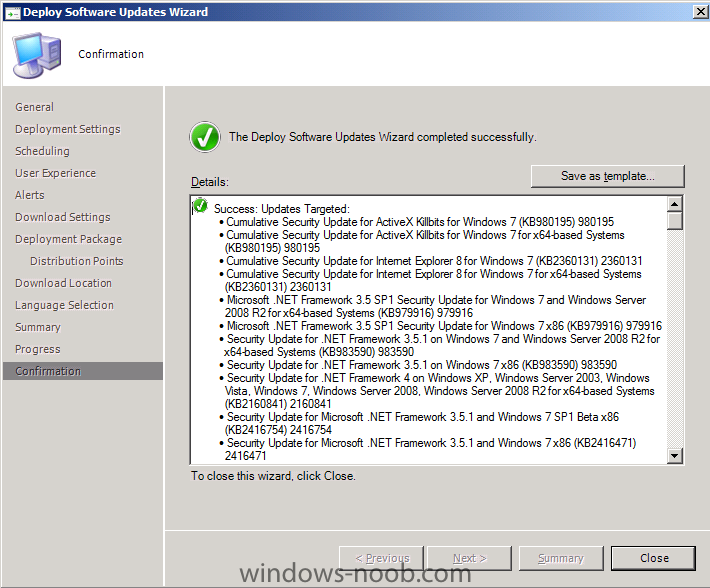
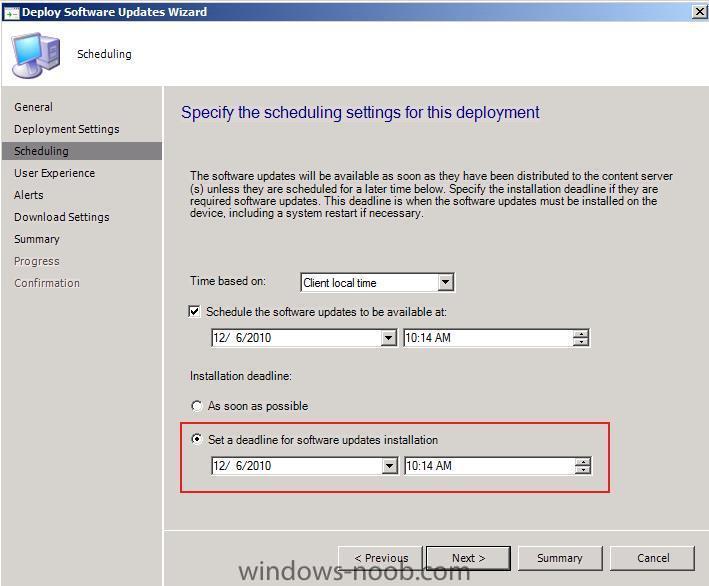
Step 4. Deploy our Windows 7 Updates We want our Windows 7 computers that are being deployed to get these new updates. So let's target both the Unknown Computers collection and All Windows 7 computers collection with these updates. Select the first update in the list, scroll down and select the last so that all are selected (you can press CTRL and A to select All). Notice that all items are now selected right click and choose Deploy on the General screen, select browse and browse to the All Unknown computers collection set the Intent to Required (this makes the deployment mandatory) set the Schedule, and make sure to choose Set A Deadline set your User Experience options set your Alert options, I entered 95% review your download settings (leave as default) for Specify the Package to use, enter the following details (it's a new deployment package) select our VNEXT dp by click on browse, Change to Distribution Points, vnext select the download from internet option select English as the language, click next at the summary, and review the confirmation done !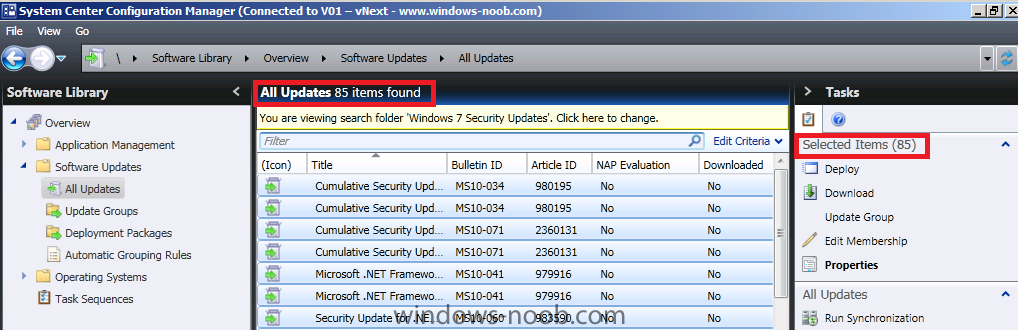


-
using vNext in a LAB - Part 9. Configuring SUP
anyweb replied to anyweb's topic in Configuration Manager 2012
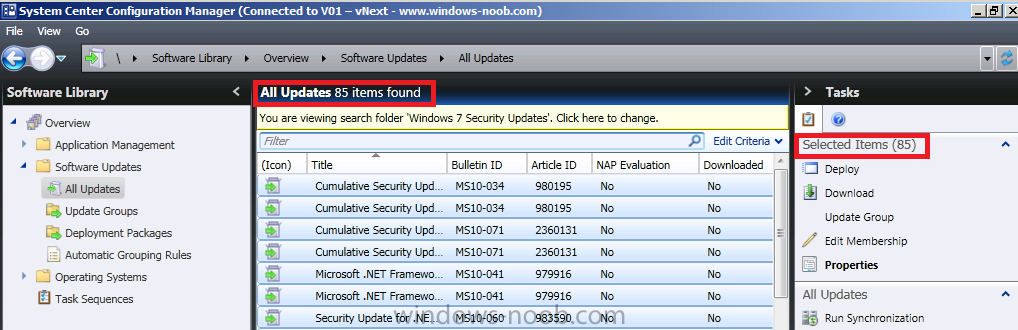
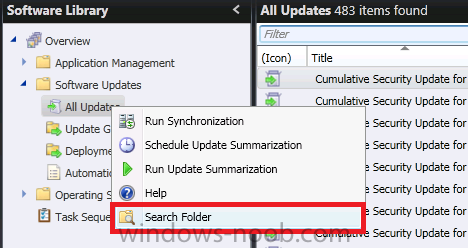
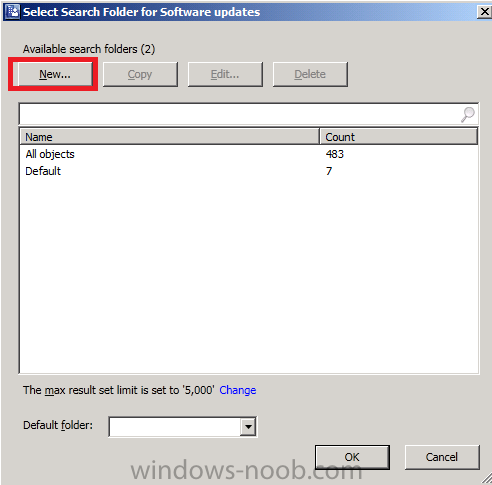
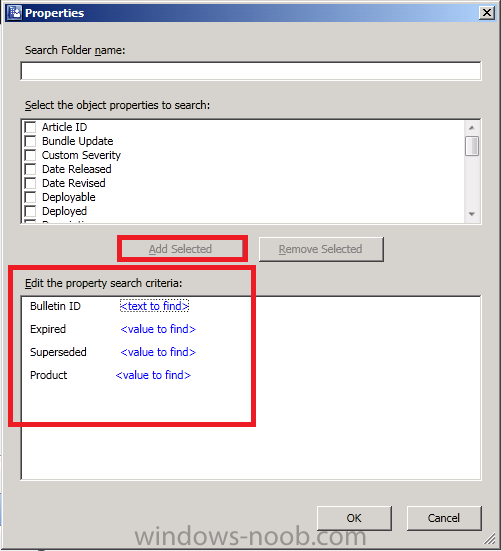
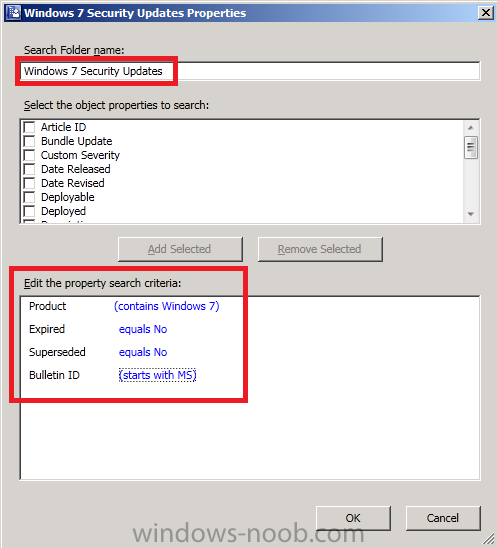
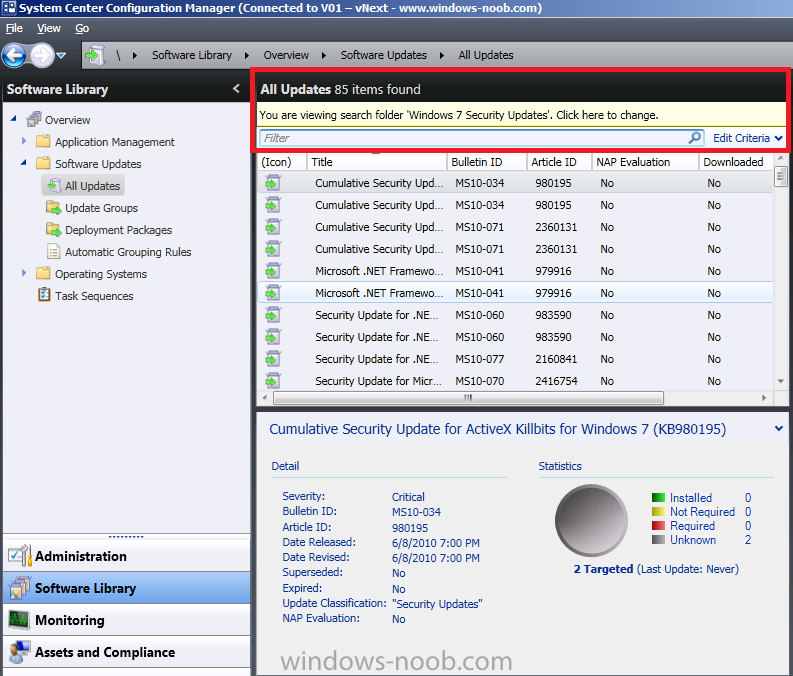
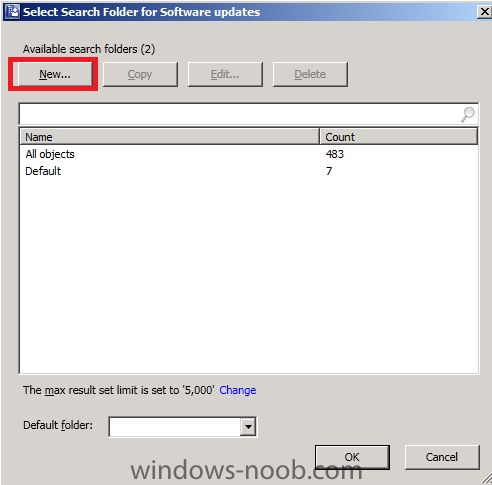
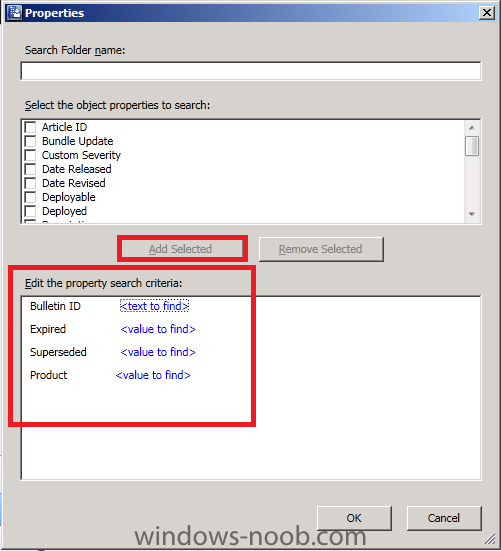
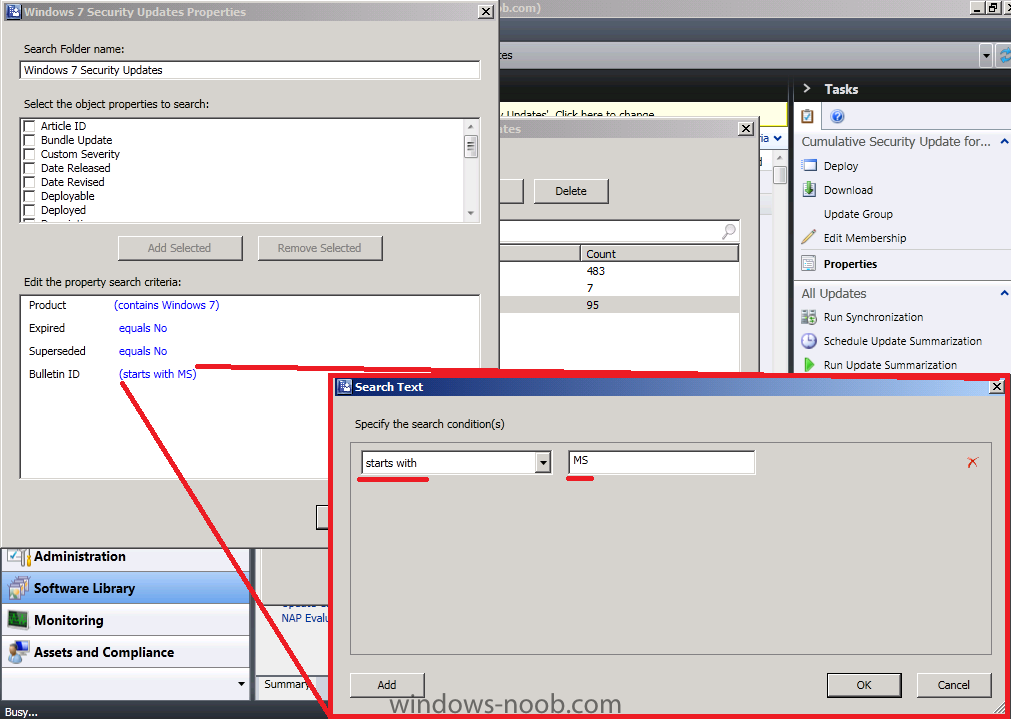
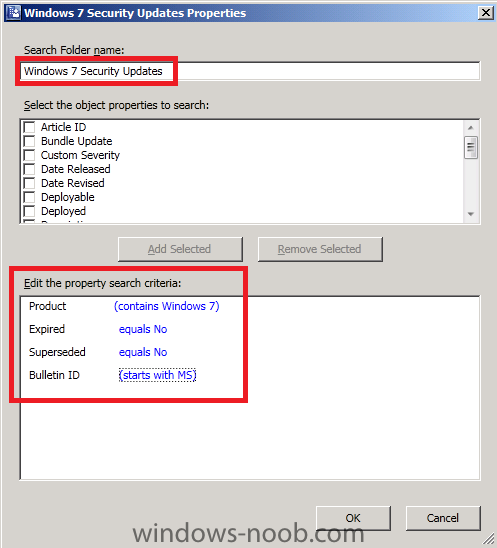
Step 3. Create a new Search Folder Right click on All Updates, choose Search Folder click on New select the following options Bulletin ID Expired Superseded Product click Add Selected when done Click on Bulletin ID, when the window appears, type in the value MS and change Equals to Starts With for Expired and Superseded, select No as the value, and for Product select Windows 7, give your search folder the name Windows 7 Security Updates click ok and ok again. Notice the number of updates changes to much less than above, as we have filtered them to only show Windows 7 Security Updates that are not expired or superseded. Now we have 85 updates (Windows 7 security Updates)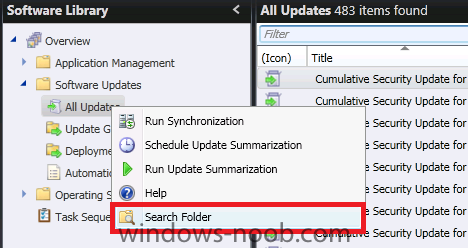

-
using vNext in a LAB - Part 9. Configuring SUP
anyweb replied to anyweb's topic in Configuration Manager 2012
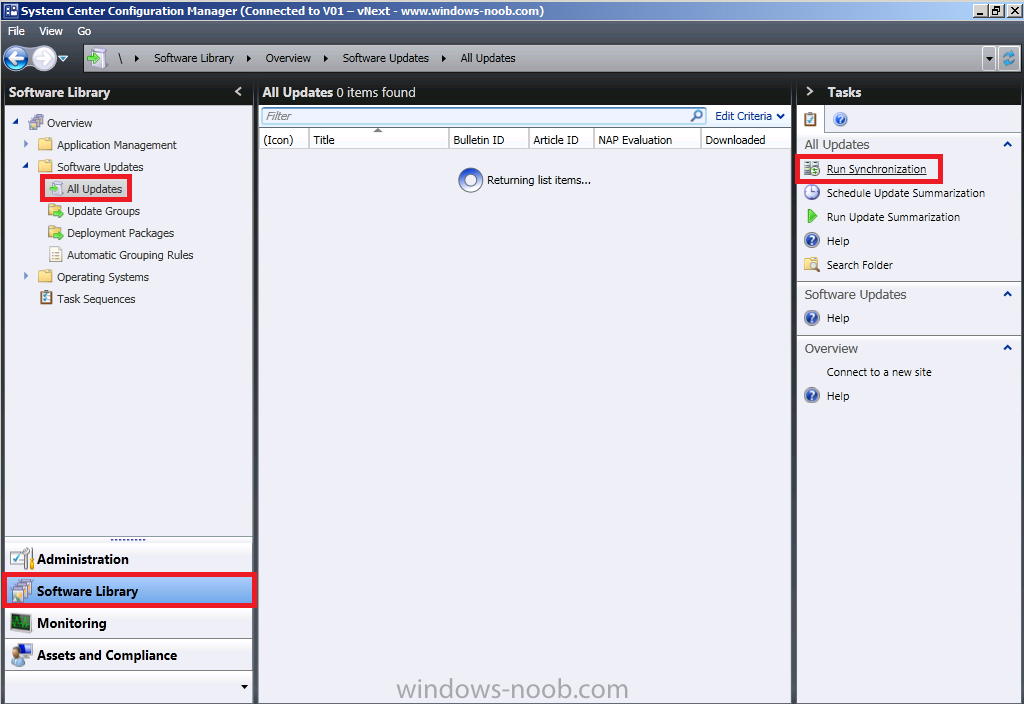
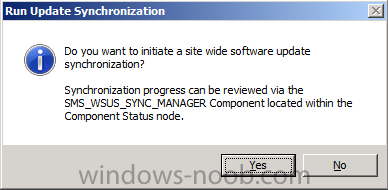
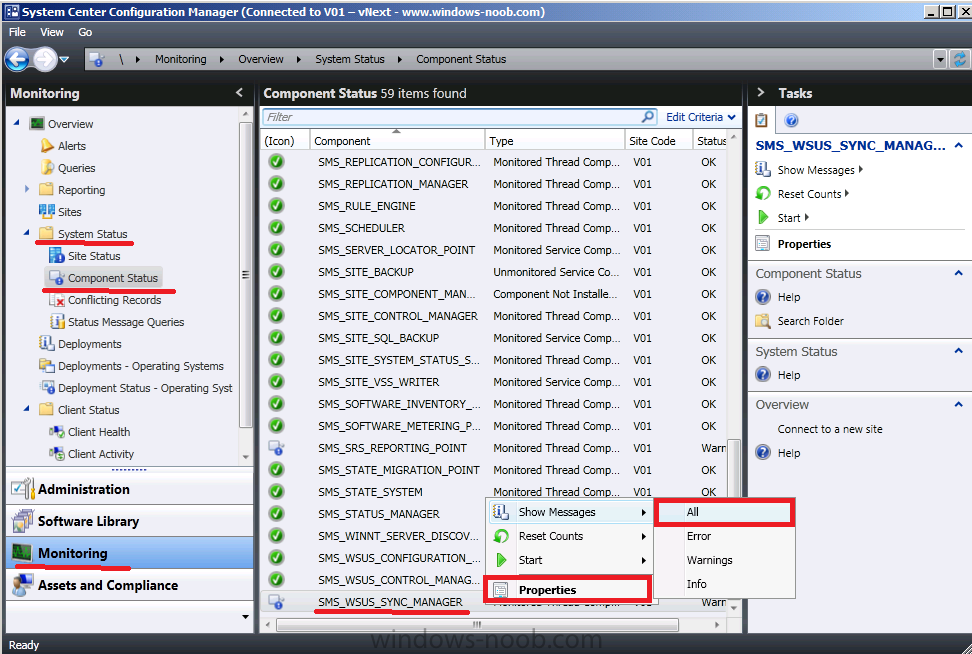
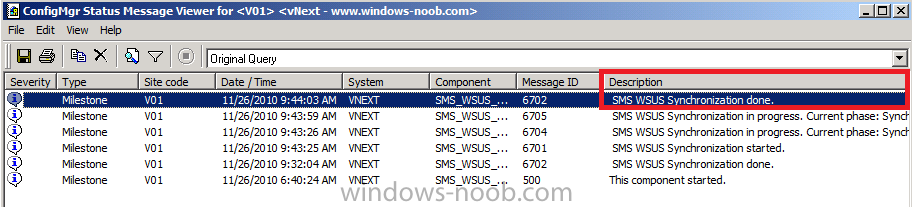
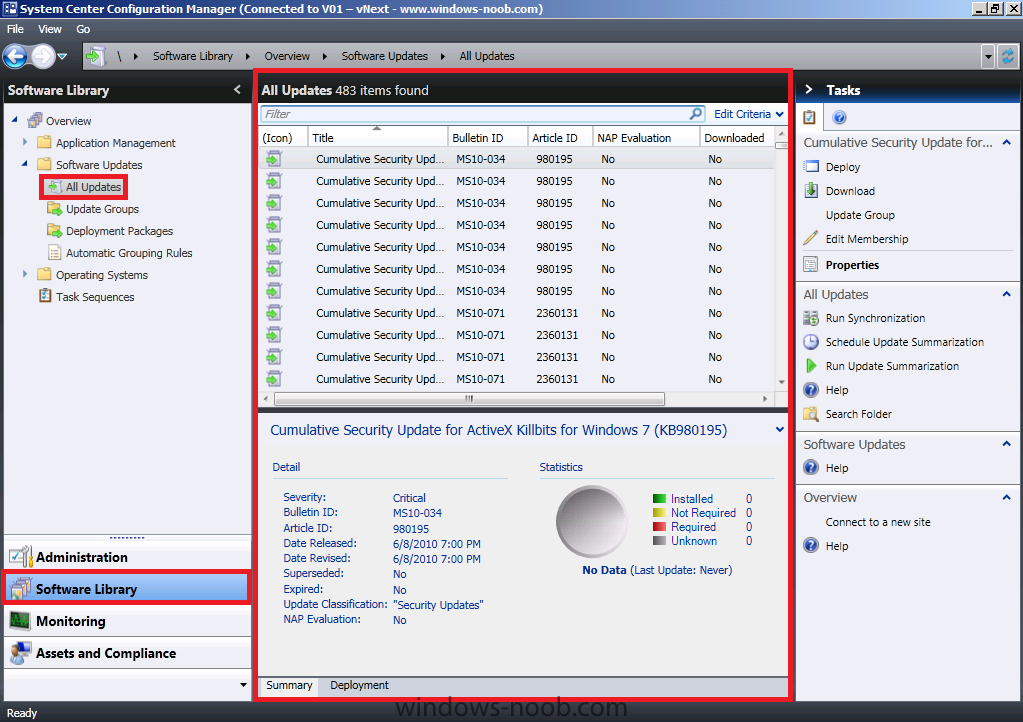
Step 2. Run a Synchronisation In the Wunderbar, click on Software Library, Select Software Updates, All Updates, note that 0 items appear, Click on Run Synchronization in the Tasks pane. You will be prompted to review the sms_wsus_sync_manager log to get confirmation, answer Yes. In the Wunderbar, click on Monitoring, system Status, Component Status, Select our SMS_WSUS_SYNC_MANAGER component, right click and choose Show Messages, All. Click Ok to the 1 day prompt. Look for the Message ID 6702 Sync Done message,press F5 to refresh while waiting... Once the Sync is done, and you've verified it in the logs, in the Wunderbar click on Software Library, Software Updates, All Updates. You should see hundreds of updates listed like so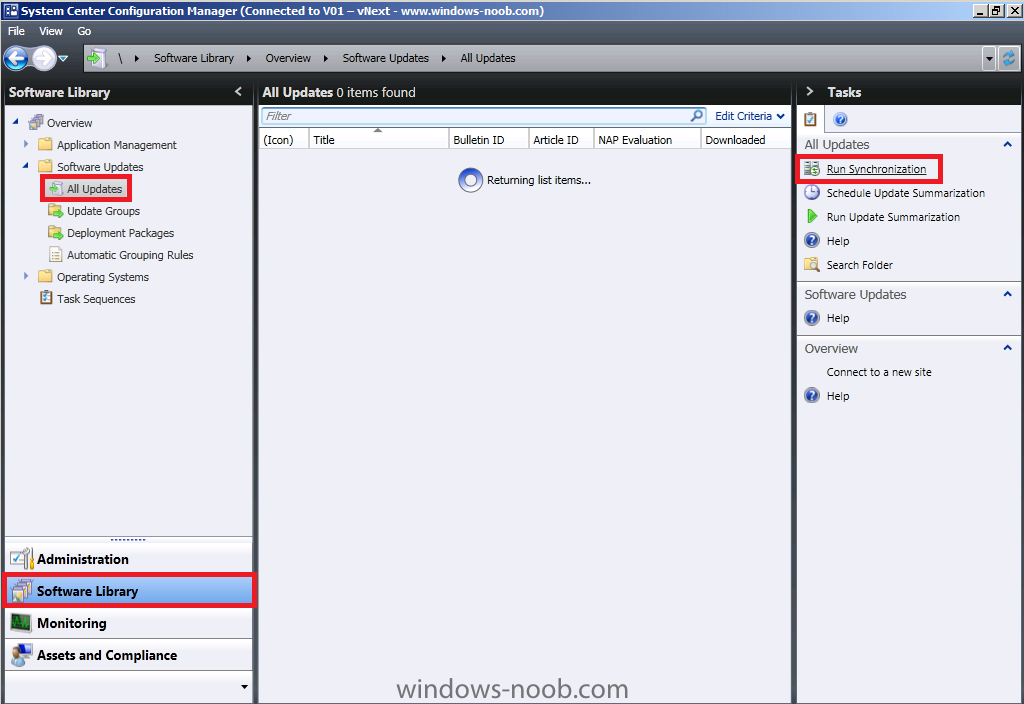


-
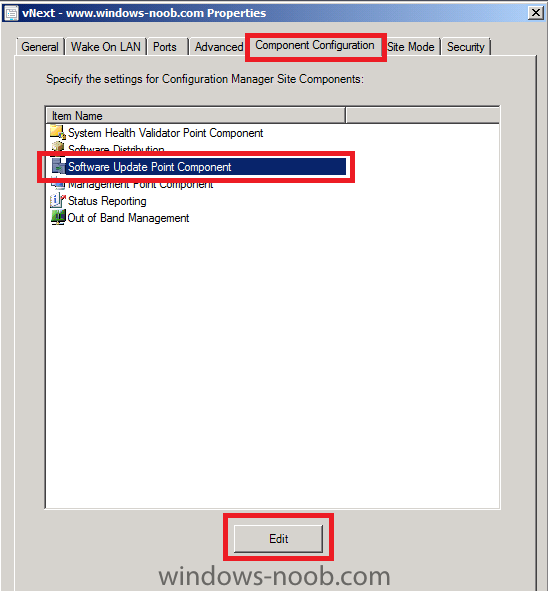
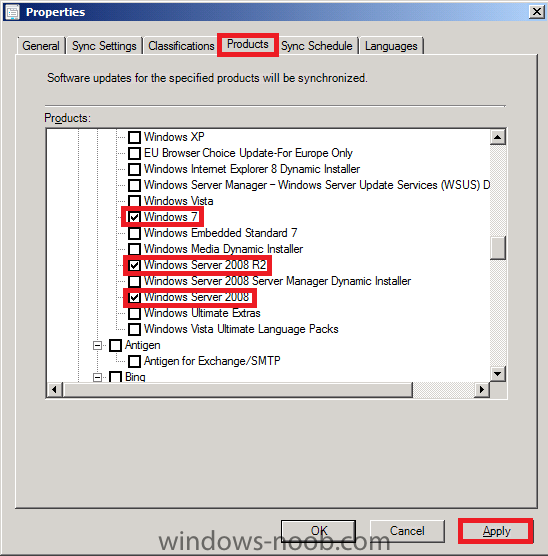
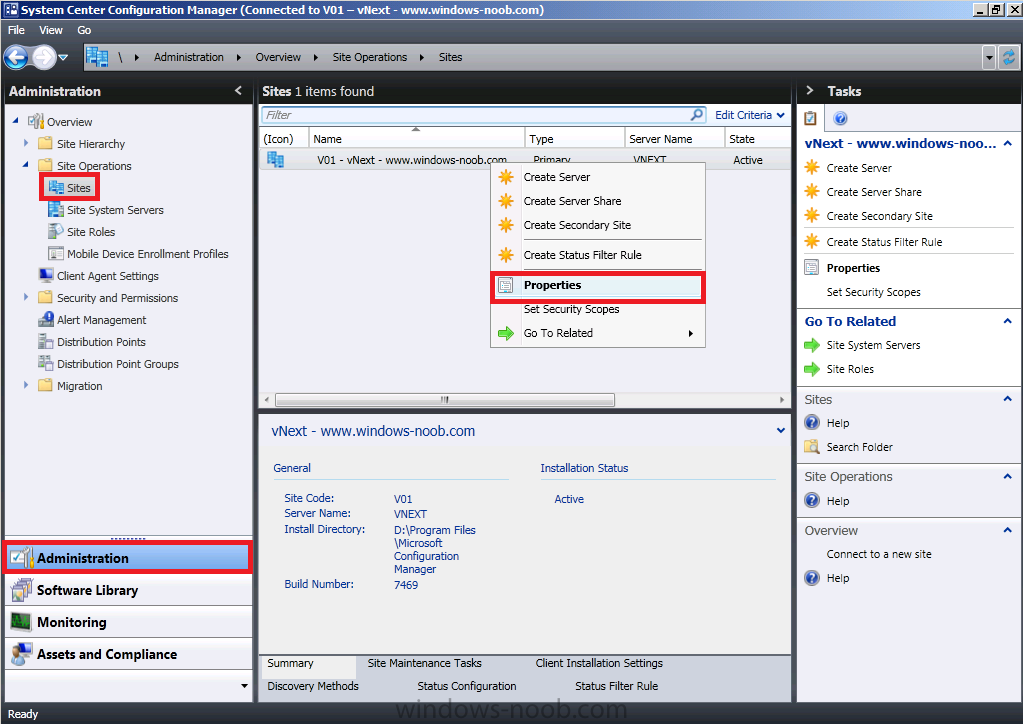
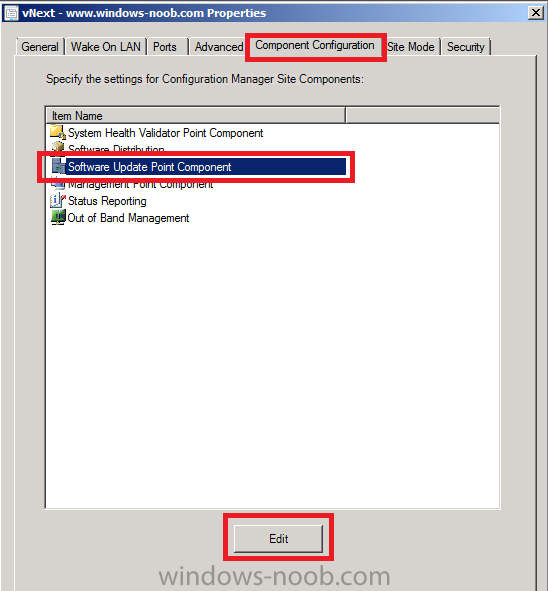
In Part 1. of this series we Installed vNext. In Part 2., we then Configured vNext to use the New AD Site as a boundary and Configured Discovery Methods in vNext. In Part 3, we installed the Reporting Point Role along with some additional roles and configured them. In Part 4 we configured the client Agents and deployed the vNext Client. In Part 5 we deployed an Application to All Users. In Part 6 we added Windows Deployment Services, added the PSP role, added the Windows 7 Enterprise image, and updated our boot image for Deploying Windows 7. In Part 7 we created our Build and Capture Task Sequence, enabled the Network Access Account, Advertised (Deployed) the Task Sequence, and created a new hyper-v virtual machine for capturing the wim on. In Part 8 we installed WSUS and then the SUP and SLP roles. Now we will configure add some products to get sync info about, and target some updates to collections. Step 1. Select some Products. In the Wunderbar click on Administration. Select Site Operations, Sites and then Right click our Site Server and click Properties. When the properties appear, select the Component Configuration Tab, Select Software Update Point and click on Edit. Click on the Products tab and scroll down, select the following products. Windows 7 Windows Server 2008 R2 Windows Server 2008 Click Apply when done. Then click Ok and Ok again.