anyweb
-
Posts
9175 -
Joined
-
Last visited
-
Days Won
366
Everything posted by anyweb
-

Windows 7 Image
anyweb replied to sothpaw's question in Deploying Windows 10, Windows 8.1, Windows 7 and more...
short answer, you don't. use the best practise method of Build and Capture Windows 7 to build (and then capture) a reference (gold) image containing the big apps (office 2010 etc) that you want in your image, once done you'll have a captured WIM file. Create another task sequence (deploy windows 7) to deploy this captured wim and this task sequence can install all your dynamic changes, customisations etc. this method will save you hours of time and is very repeatable, automatable, etc. in fact, it's the method described right here cheers niall -
using vNext in a LAB - Part 6. Deploying Windows 7 Enterprise
anyweb replied to anyweb's topic in Configuration Manager 2012
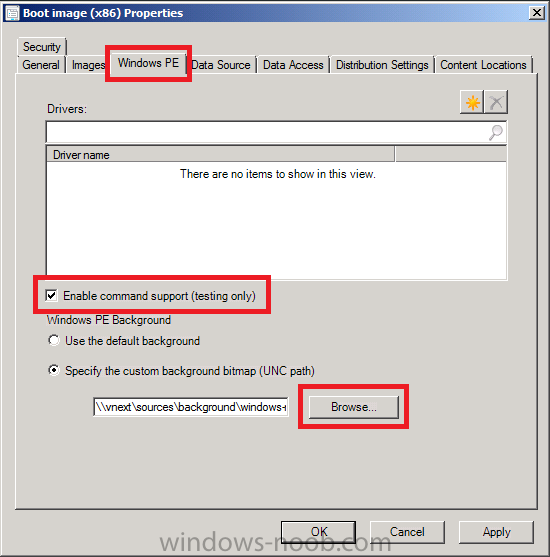
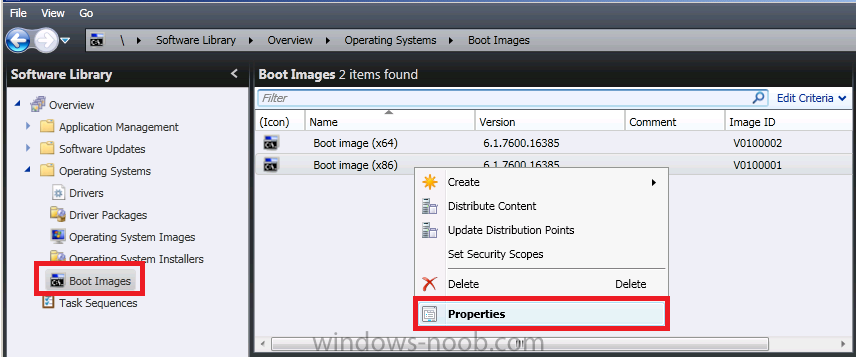
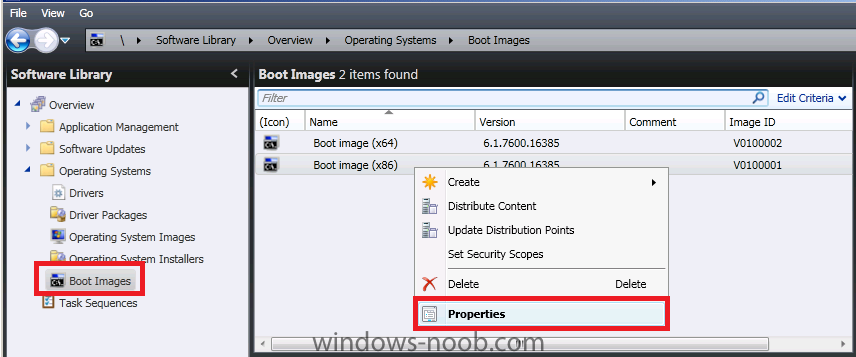
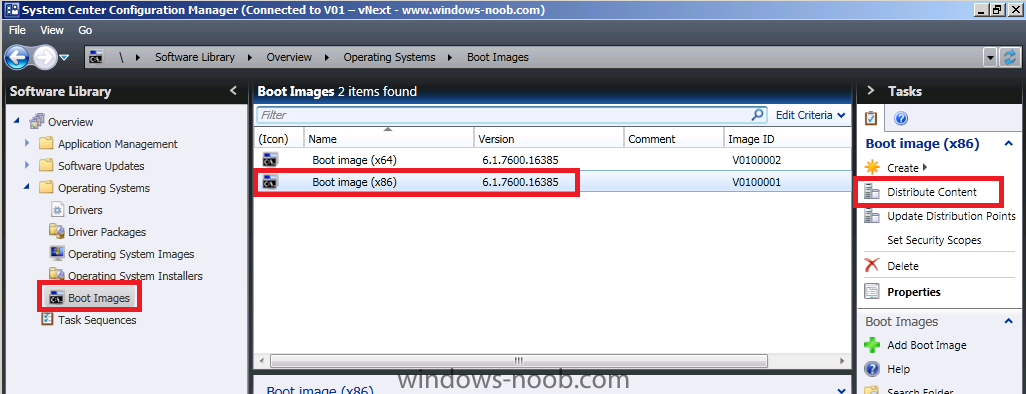
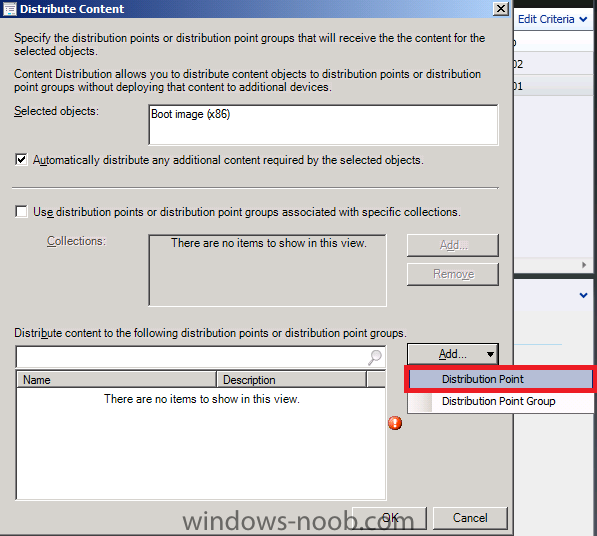
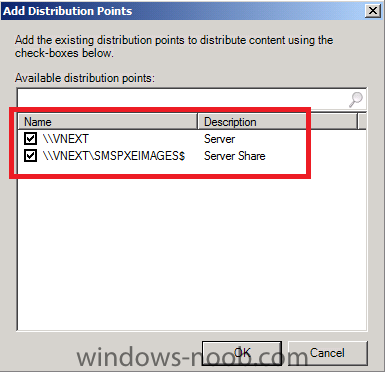
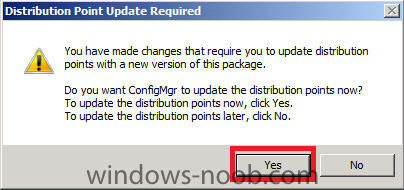
Step 5. Distribute the Boot image to DP's Select boot images in the left navigational pane, select the X86 boot image and on the right, right click on the Distribute Content. click on the Add drop down menu, select Distribution Point as this is a boot image, select both the normal and PXE dp's Click OK and OK again. Step 6. Update the Boot image with command support Select boot images in the left navigational pane, and on the right, right click on the X86 boot image and choose properties. click on the Windows PE tab and place a checkmark in Enable command support, and optionally select a background for your Windows PE boot image by browsing to a picture Click apply and answer Yes when prompted and continue through with the wizard until you are done Note: Repeat the above process for the X64 boot image otherwise you may get your PXE clients getting a Contacting Server: 192.168.3.10.... ...... problem later on. (check the SMSPXE.log file for errors after a PXE boot attempt - and you'll probably see Warning: Matching Processor Architecture boot image (6) not found)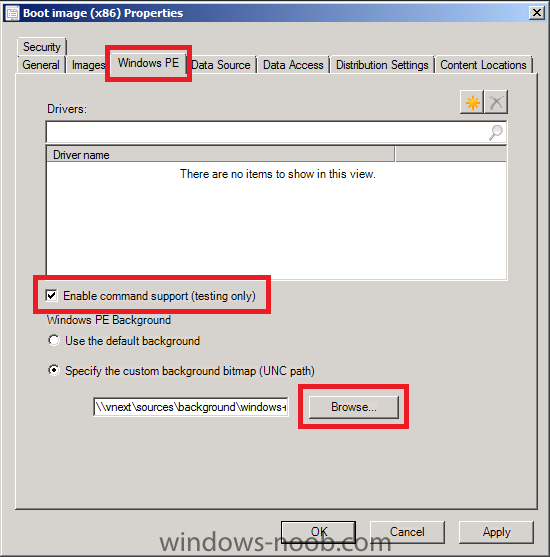

-
Task Sequence/Package Installation Problems
anyweb replied to Mike S's question in Troubleshooting, Tools, Hints and Tips
i'll take a look at my script tomorrow -
welcome to the forums ! and thanks for the kind words as regards the t-shirts i really need to do some more designs, I wear them regularly, today I wore my favorite, Catastrophic Failure if you do get one (or more) please post a photo of you (or whoever) in it, that would be excellent ! cheers niall
-
Task Sequence/Package Installation Problems
anyweb replied to Mike S's question in Troubleshooting, Tools, Hints and Tips
when i packaged visual studio 2008 in my current job, i wrapped the installer in a vbs script which installed all the prerequisites prior to installing the main application, are you doing something similar ? -
verify if Trend micro av software is installed on the server, if so disable it and try again - see here
-
using vNext in a LAB - Part 6. Deploying Windows 7 Enterprise
anyweb replied to anyweb's topic in Configuration Manager 2012
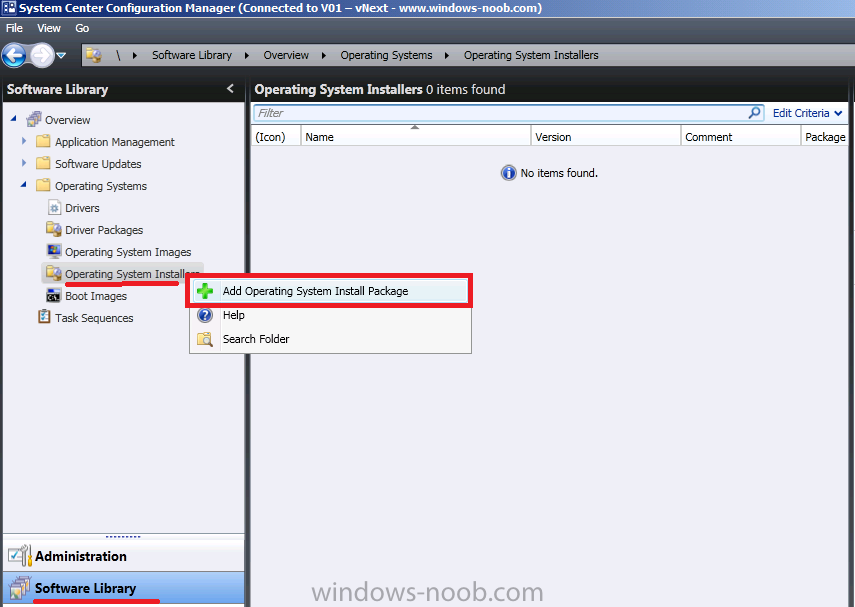
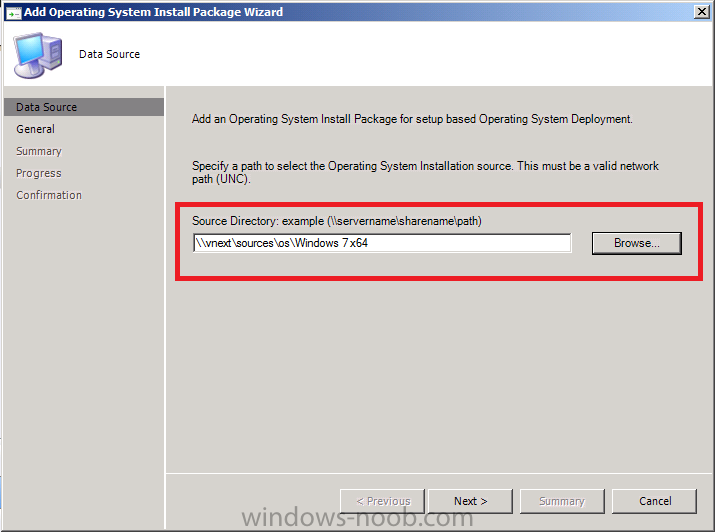
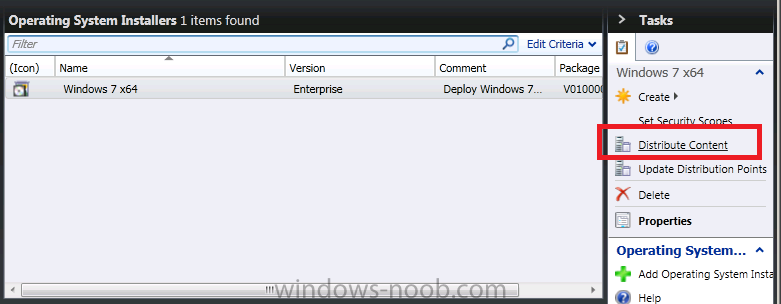
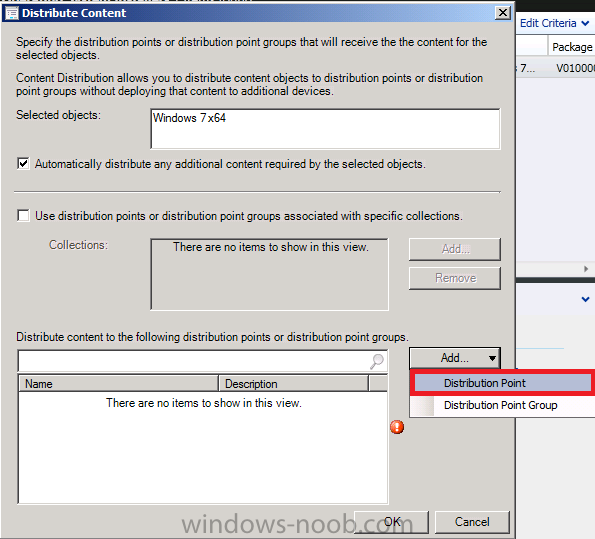
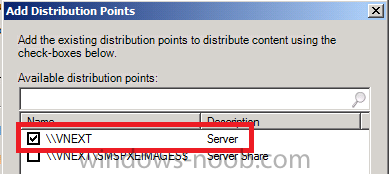
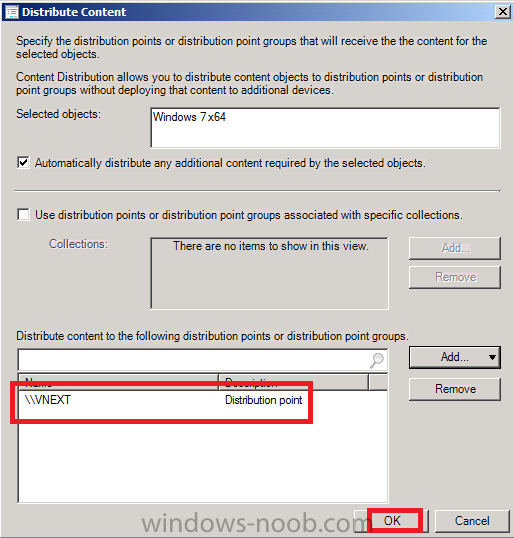
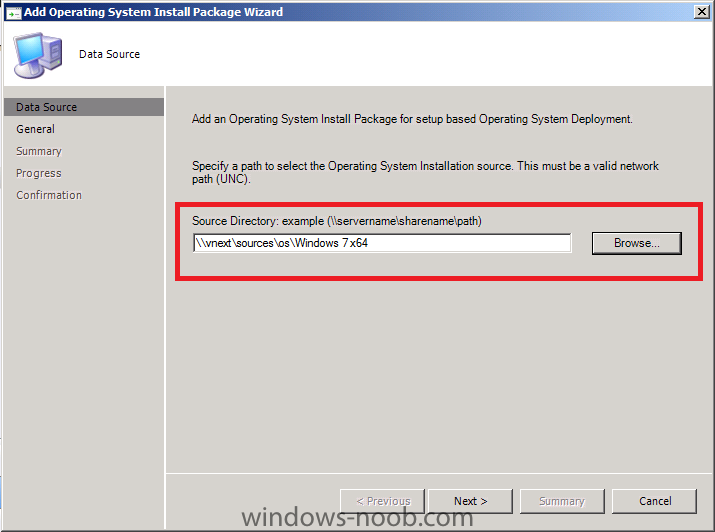
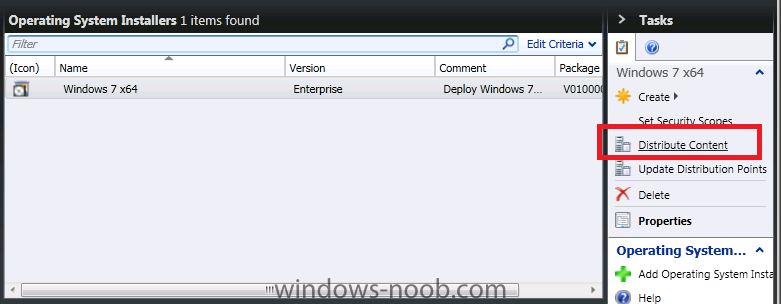
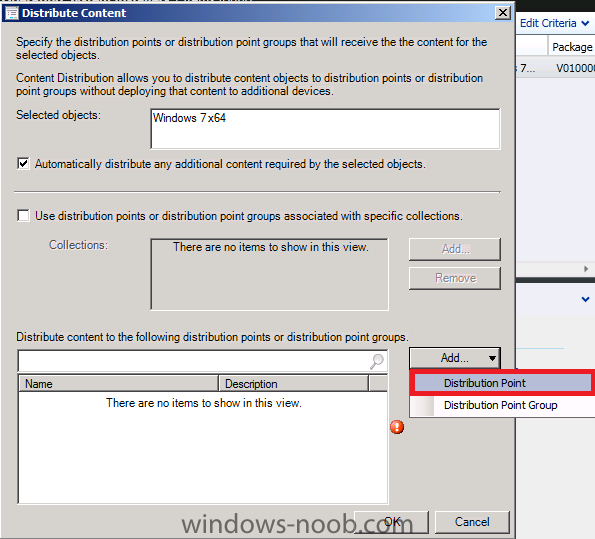
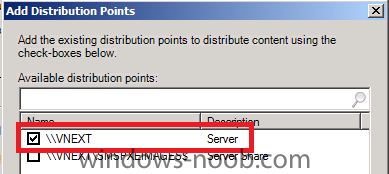
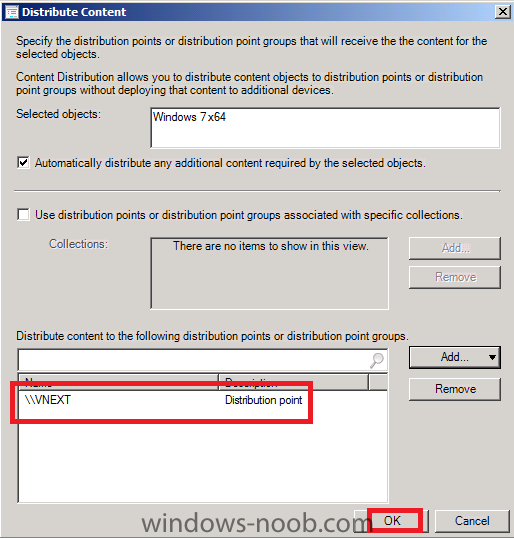
Step 4. Add the Windows 7 Enterprise Install Image In the Wunderbar, select Software Library and expand Operating Systems, right click Operating System Installers and choose add operating system install package browse to the network share we you have previosly copied the contents of the Windows 7 Enterprise DVD fill in some details about the image and click through to the confirmation screen Once completed we need to distribute the image to our DP's, so click on Distribute content in the Action pane Click on the drop down menu Add, then select distribution point select only the vnext dp as this is an image file (and not a boot image) click ok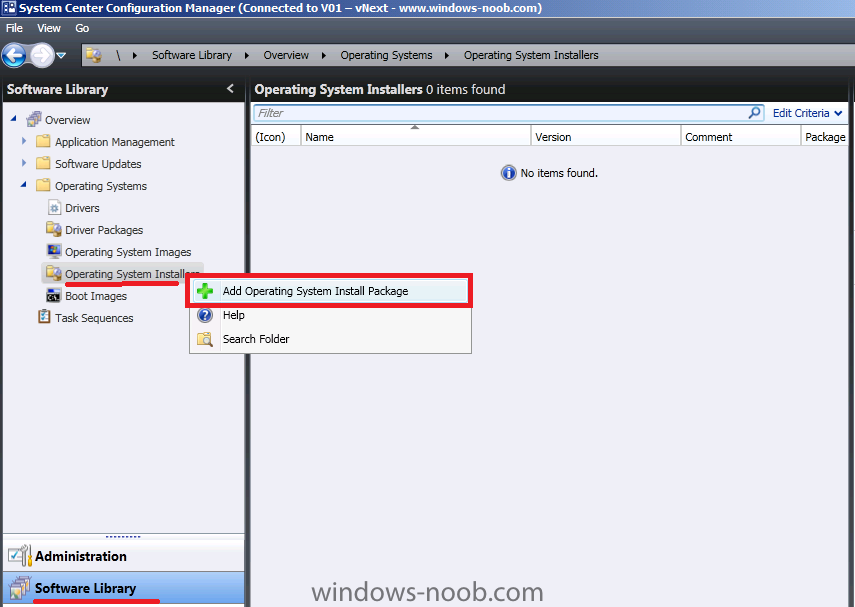


-
copy the batch file to a folder, in configmgr software distribution, select packages right click, choose new package, point to the folder, done. Distribute it to a dp. thats it
-
R3 requires SP2 & KB977384, can you confirm if both are installed prior to attempting to install R3 ? also is the sql db on these boxes or off ? are you only getting errors when trying to install the hotfix (prior to installing R3 ?)
-
you can use the supplied task sequence and download the supplied batch file (which will be used in a separate package) cheers niall
-
using vNext in a LAB - Part 6. Deploying Windows 7 Enterprise
anyweb replied to anyweb's topic in Configuration Manager 2012
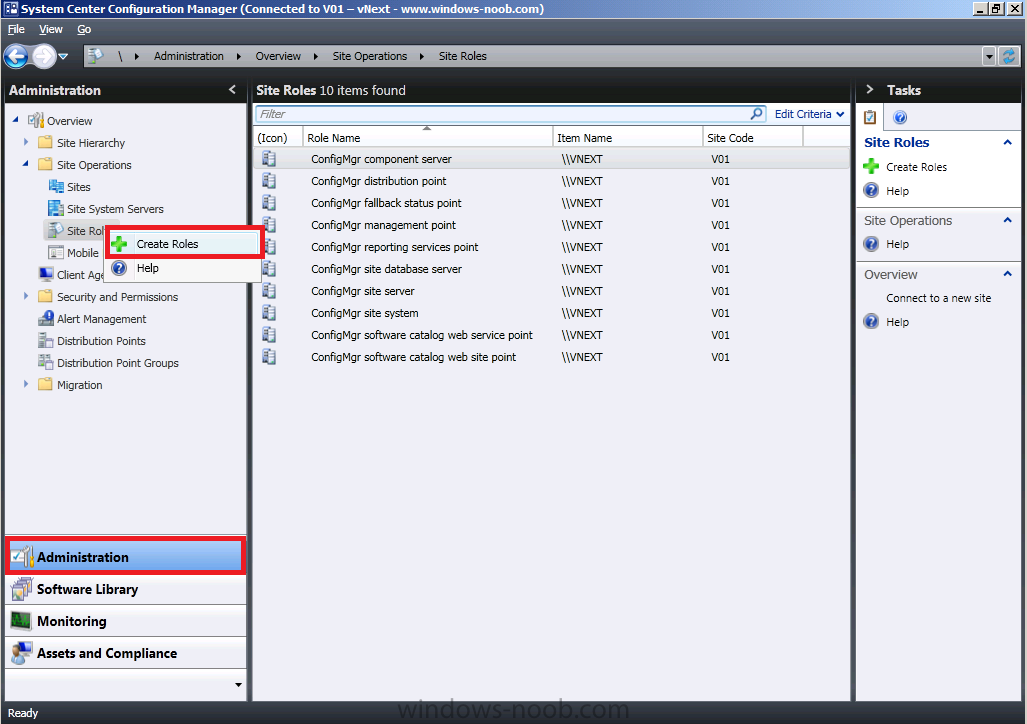
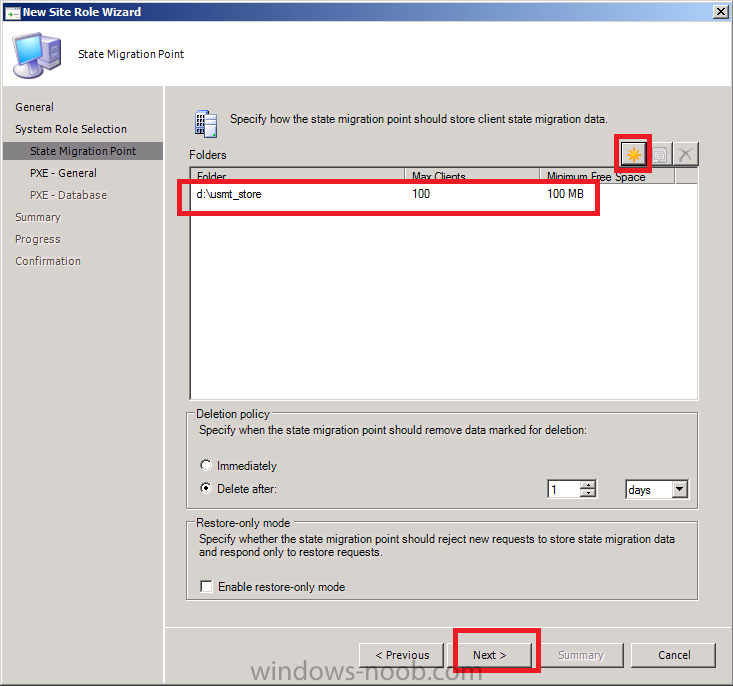
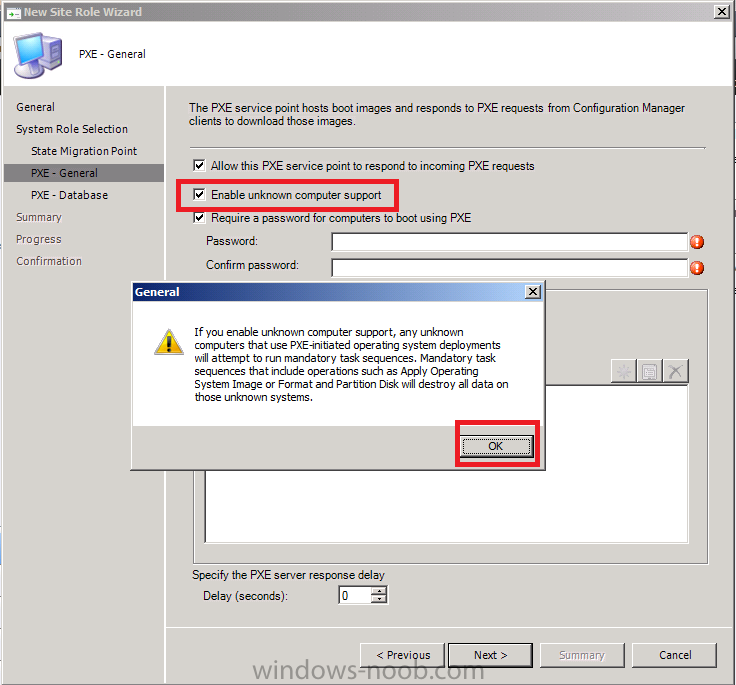
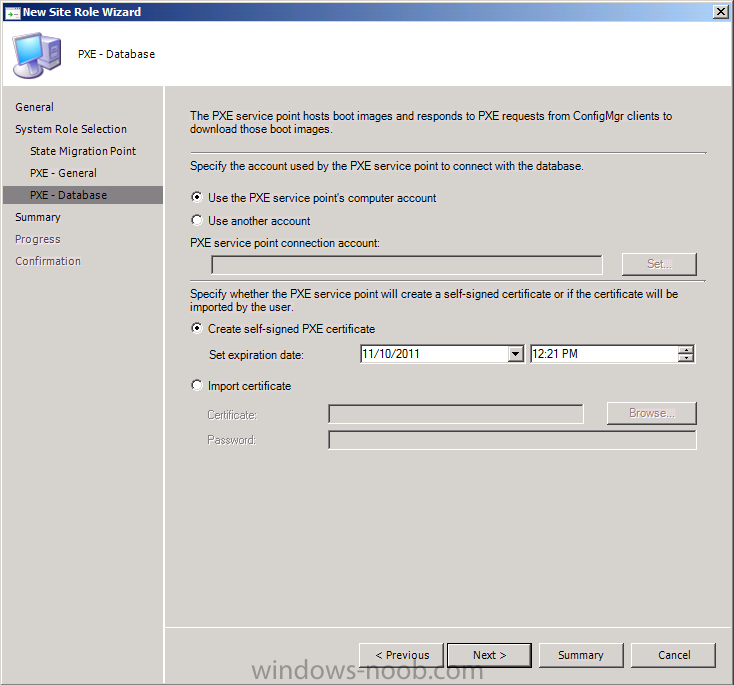
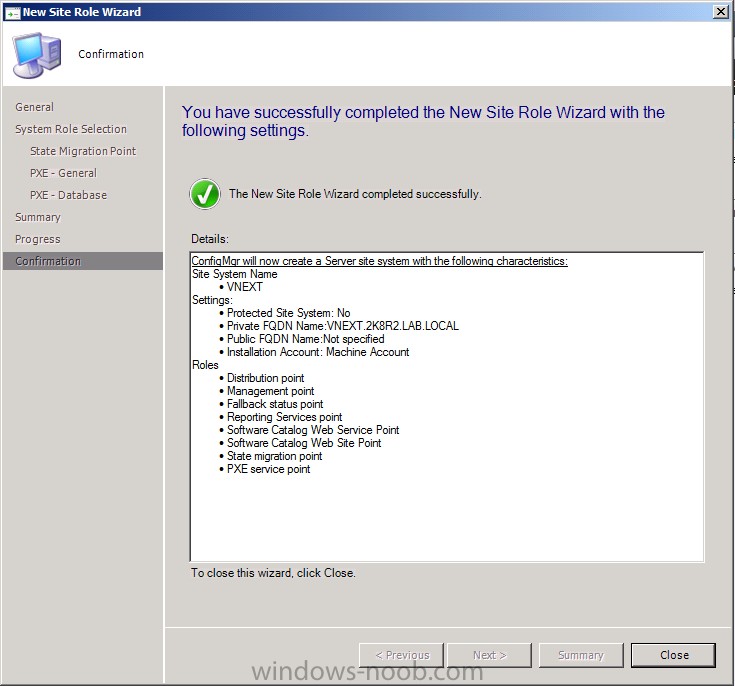
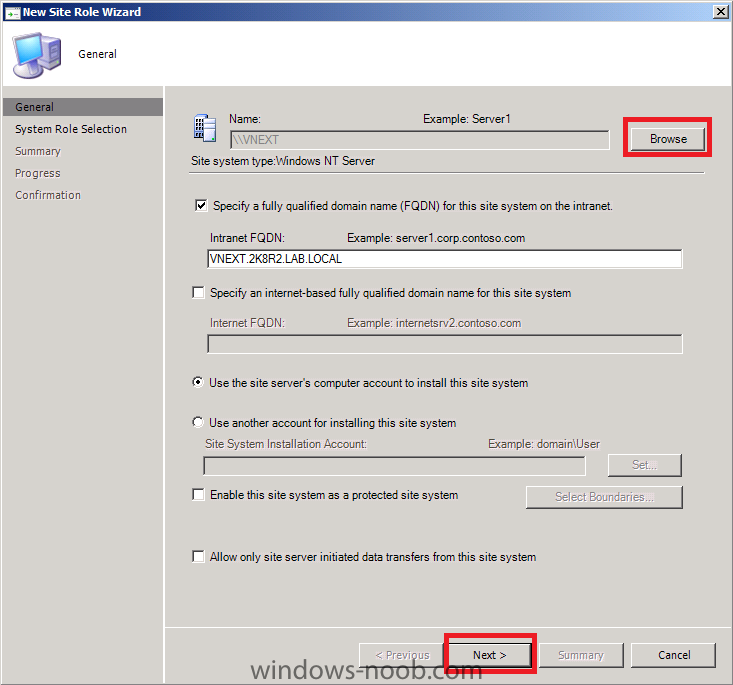
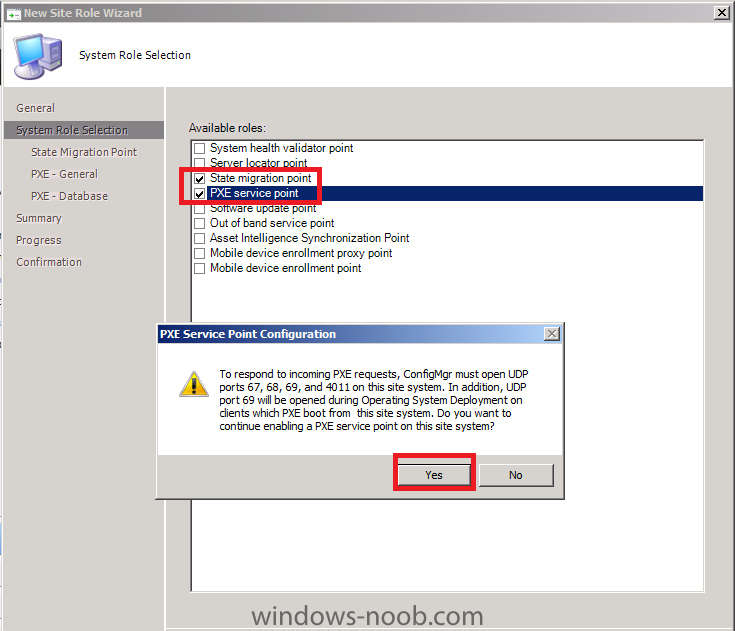
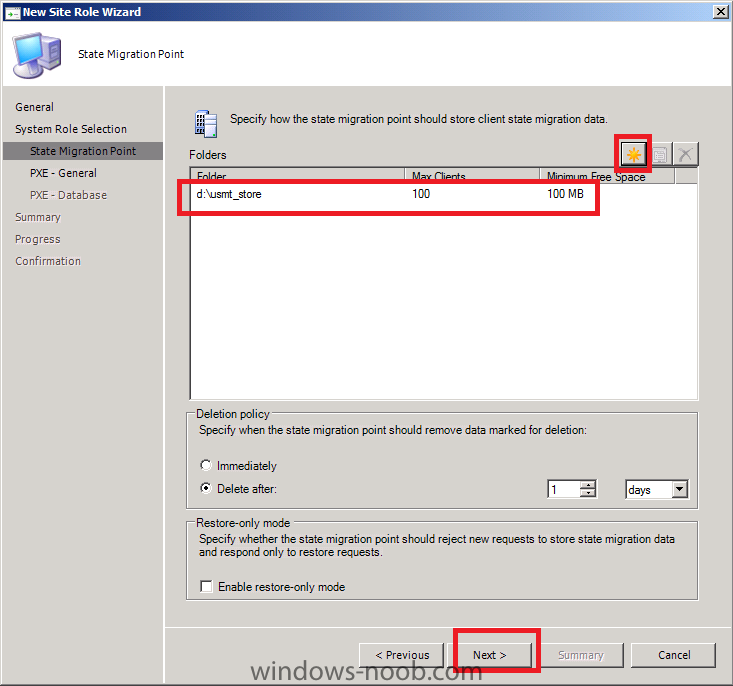
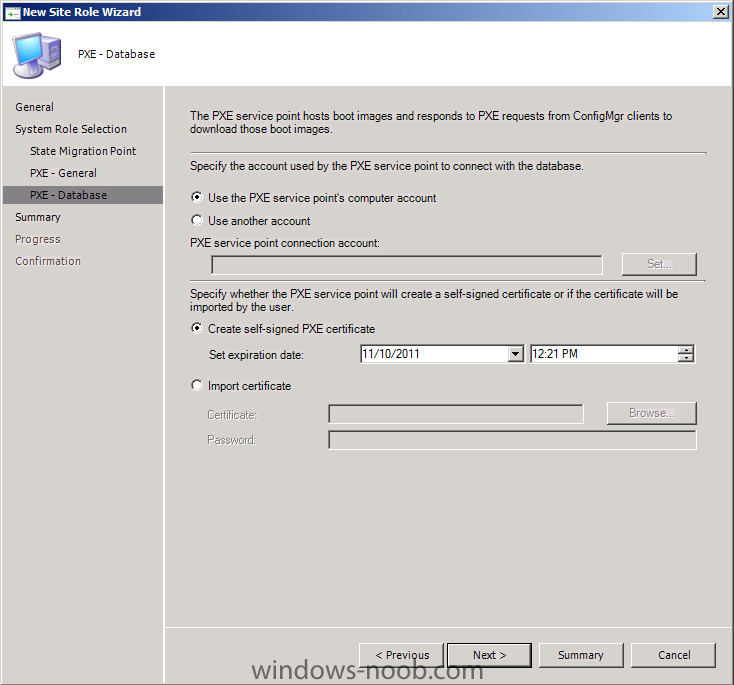
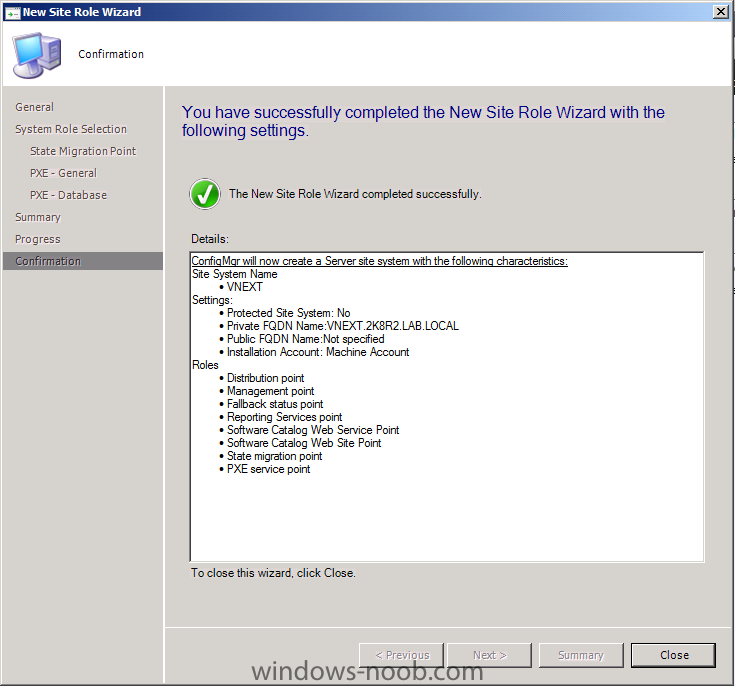
Step 3. Add the PXE Service Point Role In the Wunderbar, click on Administration and select Site Roles, right click it and choose Create Roles. When the New Site Role Wizard appears, click on Browse and select our vNext server, As we will use data migration at some point, select the State Migration Point role in addition to the PXE Service Point role, Answer yes when prompted configure the State Migration Point by clicking on the yellow starburst enable Unknown Computer Support and take note of the notice leave the PXE database settings as they are click next through the summary and review the confirmation once done

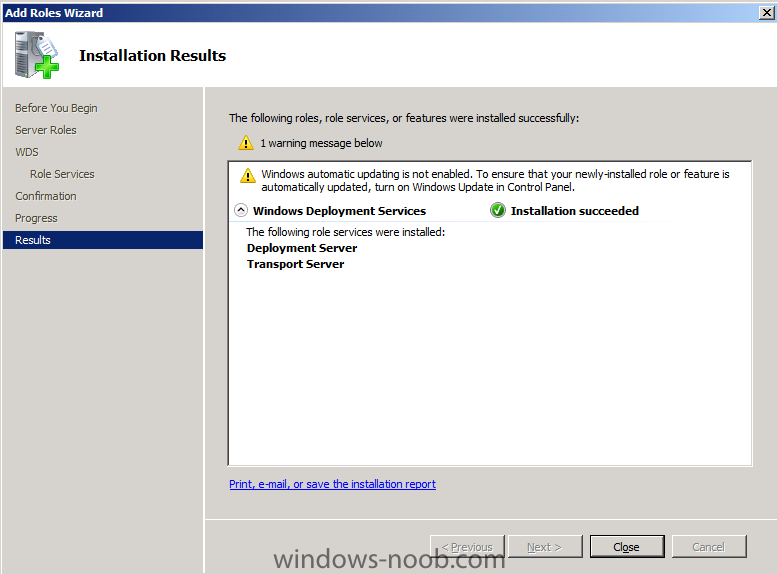
-
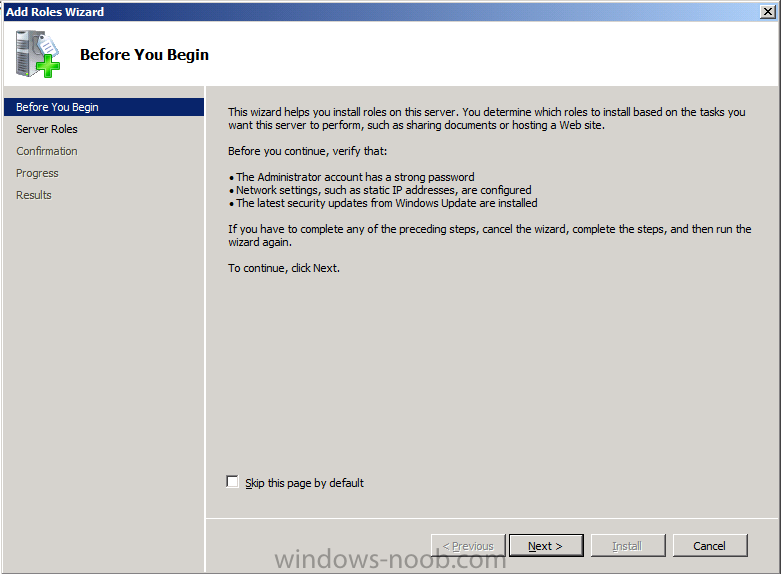
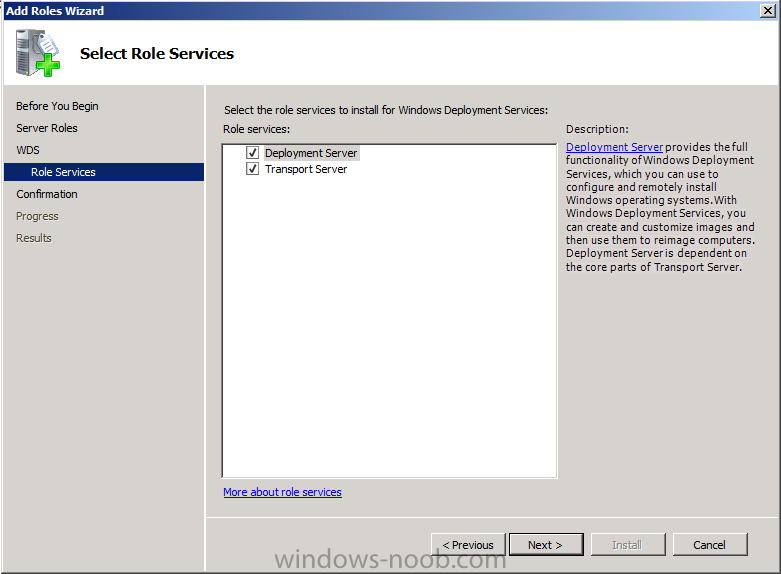
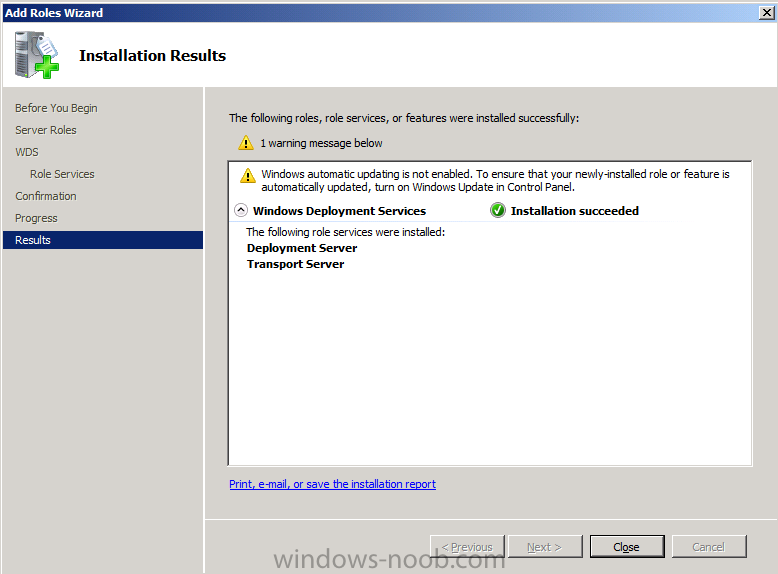
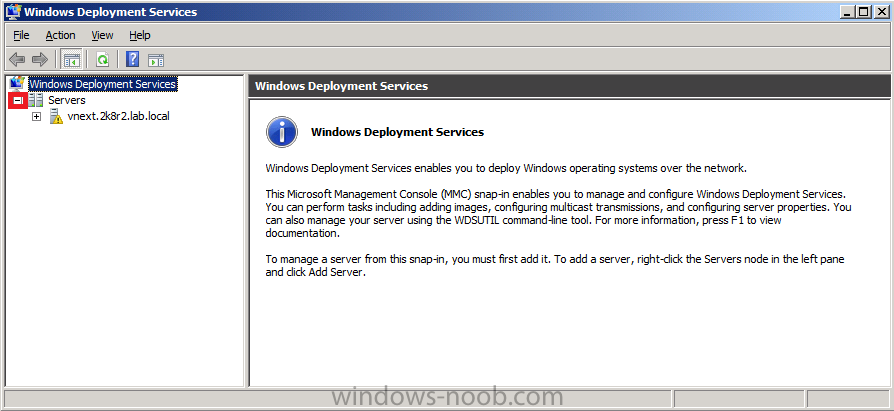
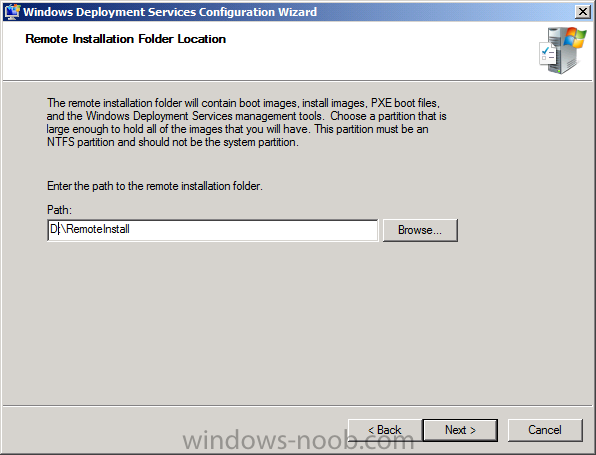
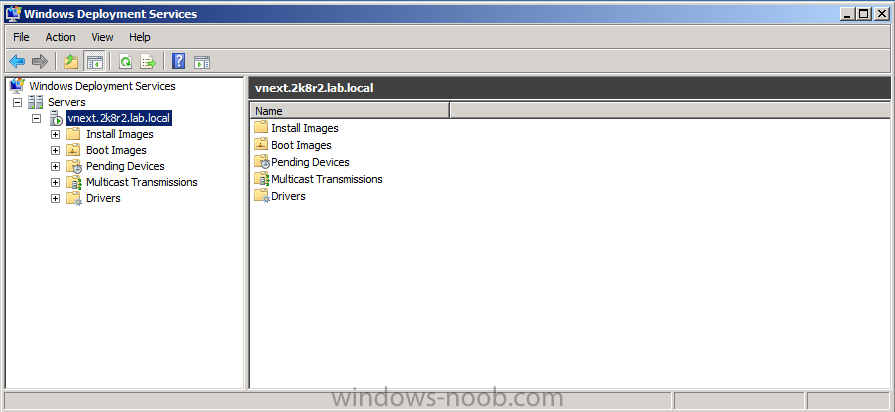
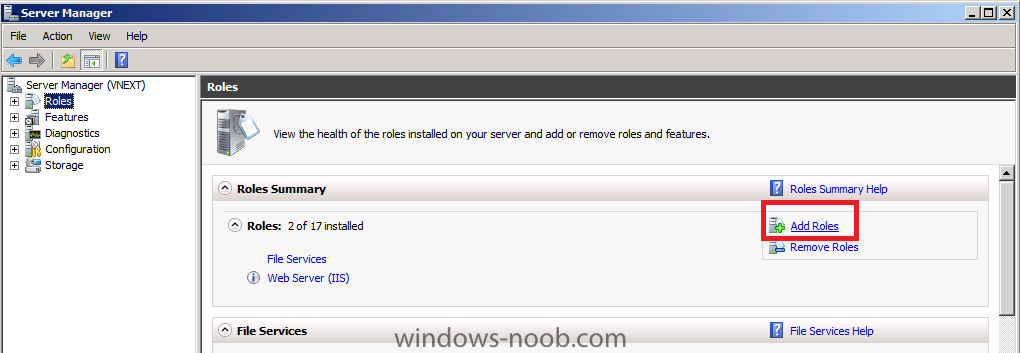
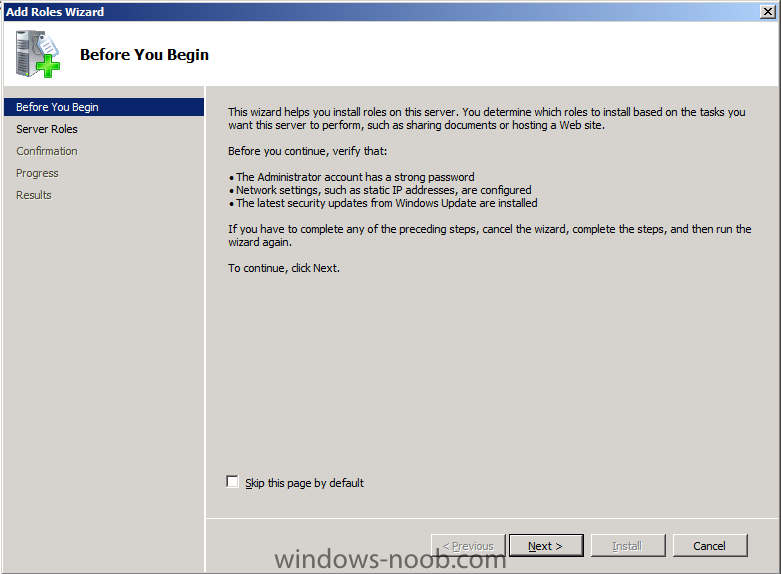
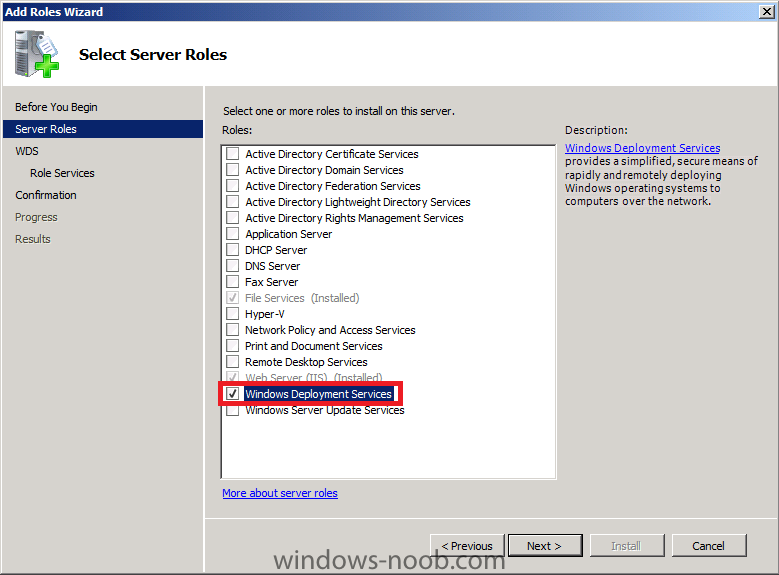
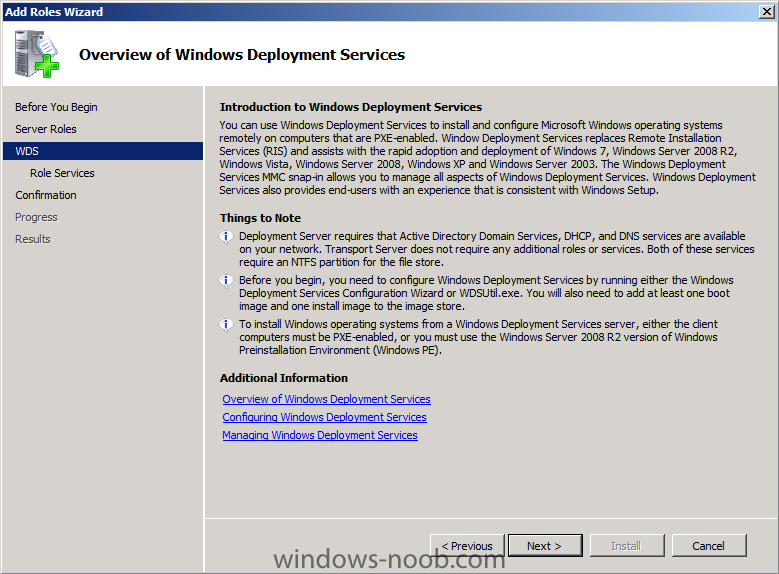
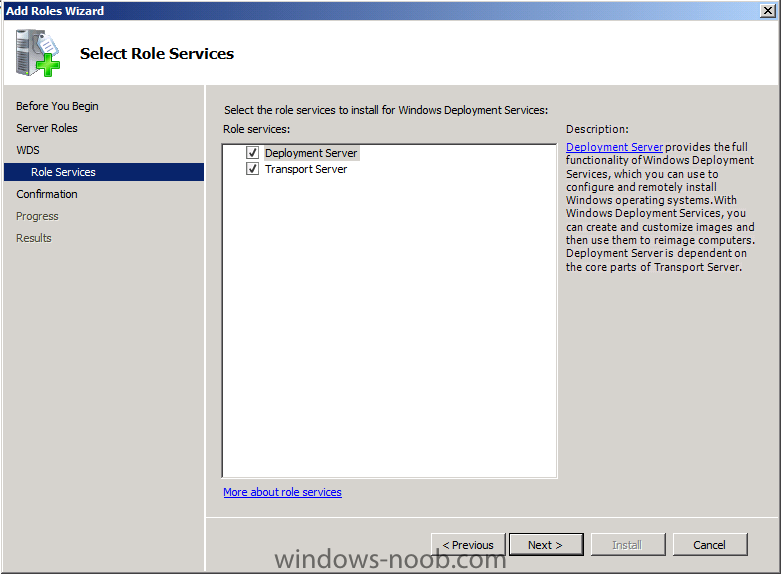
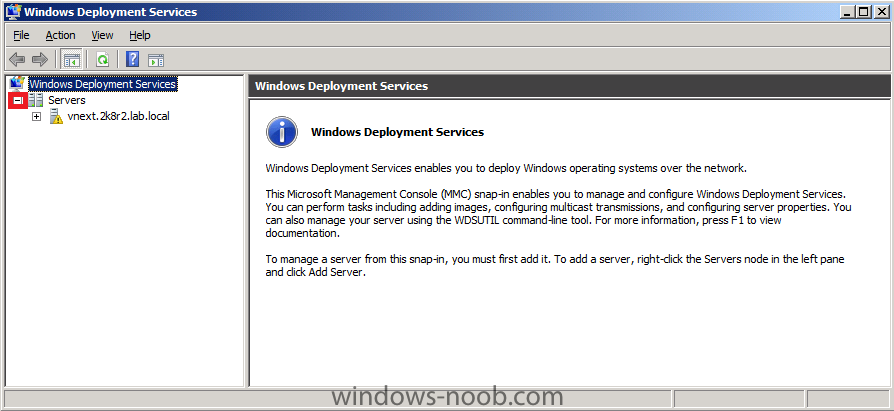
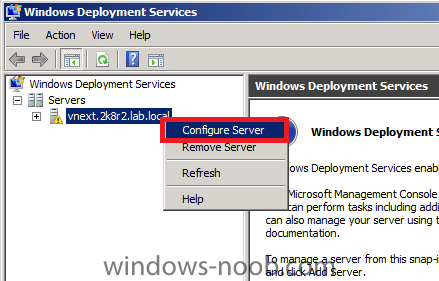
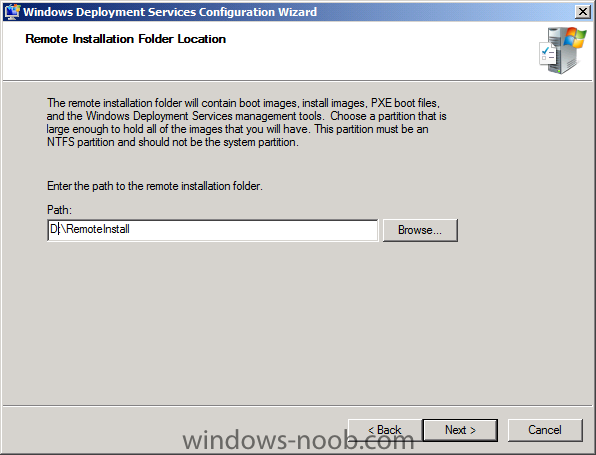
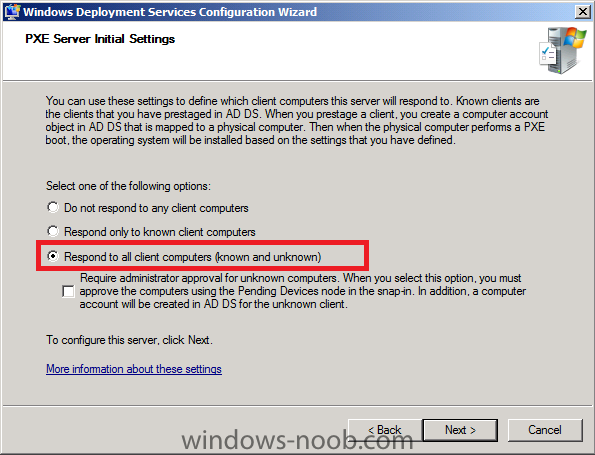
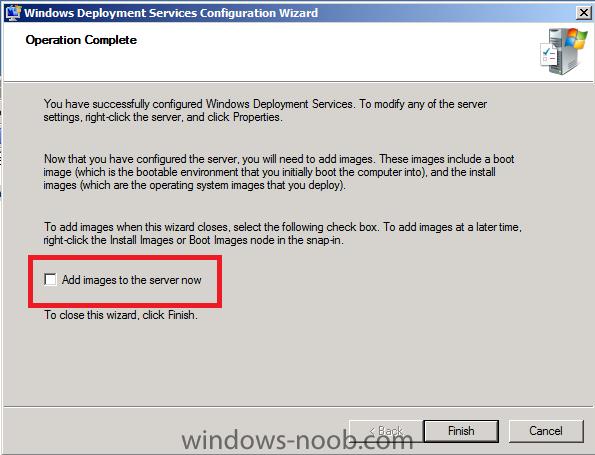
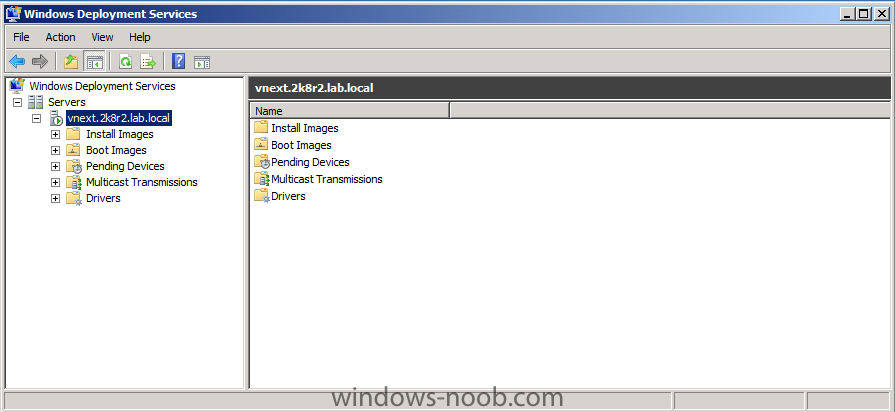
In Part 1. of this series we Installed vNext. In Part 2., we then Configured vNext to use the New AD Site as a boundary and Configured Discovery Methods in vNext. In Part 3, we installed the Reporting Point Role along with some additional roles and configured them. In Part 4 we configured the client Agents and deployed the vNext Client. In Part 5 we deployed an Application to All Users. Now we will learn how to Deploy Windows 7 Enterprise using vNext. As we will be using PXE boot, we need to get our server ready to support this, so we will add the Windows Deployment Service which is required. Step 1. Add and configure Windows Deployment Services Perform the following on the vNext server as SMSadmin Start Server Manager and click on Add Roles When the Add Roles wizard appears, click next Select Windows Deployment Services and click next click next at the overview accept the defaults for Role Services Click install at the confirmation screen and review the results click Close. Step 2. Configure Windows Deployment Services Click on Start, Administrative Tools, Windows Deployment Services to start the WDS console. Expand the + beside Servers. You will see a yellow exclamation mark meaning that the WDS service is not yet configured. right click on it and choose Configure Server click next and change the path of Remote Installation Folder Location to suit your environment eg: D:\RemoteInstall set the PXE response setting to Respond to All client computers... de-select Add images to the server now and click Finish. Windows Deployment Services is now configured
-
SCCM Error creating media
anyweb replied to Saud's question in Troubleshooting, Tools, Hints and Tips
can you post your CreateTSMedia.log file please -
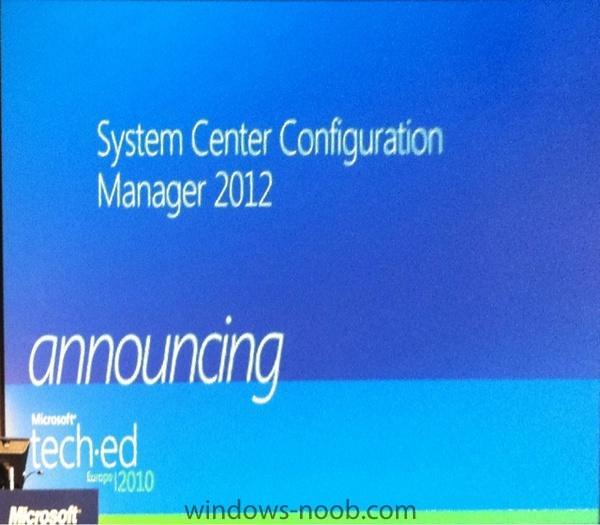
Users of Twitter will no doubt have noticed quite a few tweets about SCCM 2012 The new name for what we know as vNext has been released, System Center Configuration Manager 2012. This was announced today during the session MGT202 at TechEd:Europe in Berlin. So that's it, it's official, Microsoft have announced it at Teched. R.I.P vNext and welcome to System Center Configuration Manager 2012 Not only has the name been revealed but TAP nominations for beta 2 are underway. via > http://blogs.technet.com/b/systemcenter/archive/2010/11/09/announcing-configuration-manager-v-next-official-name.aspx?utm_source=twitterfeed&utm_medium=twitter
-
the error you are getting means that it is unsupported can you post your SMSTS.log file please ? and explain what is the step you are using to flash the bios (what hardware are you testing on)
-
thanks for sharing the info !
-
whats the last thing you see on the screen ? any error ?
-
using vNext in a LAB - Part 5. Deploying Applications
anyweb replied to anyweb's topic in Configuration Manager 2012
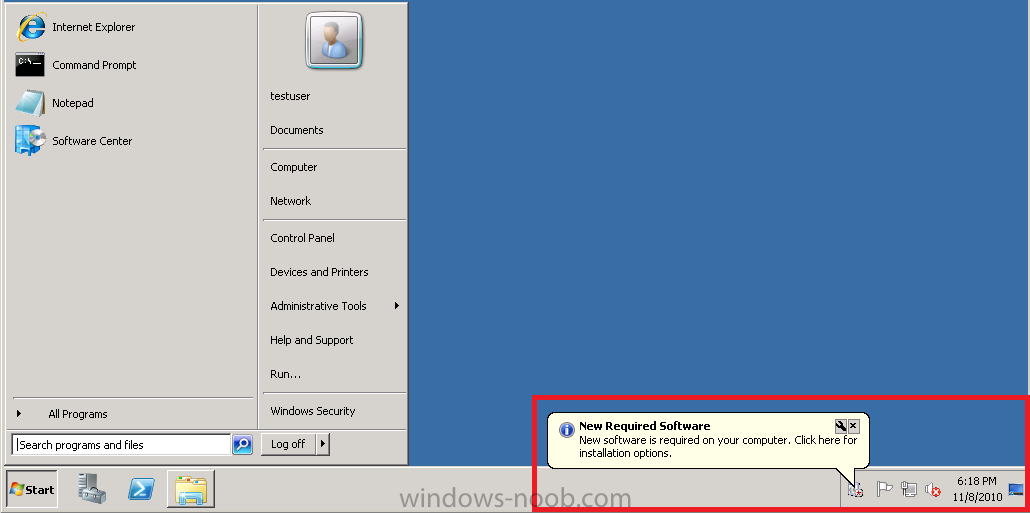
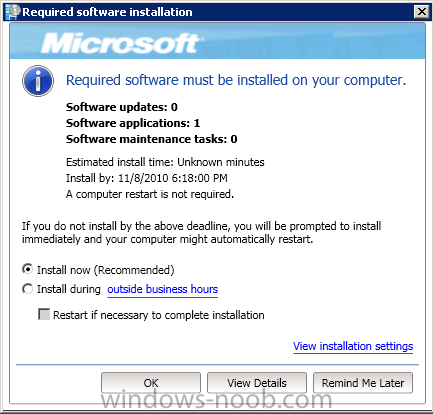
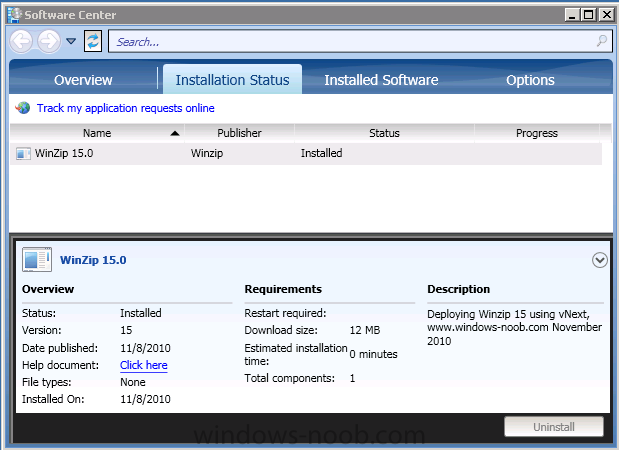
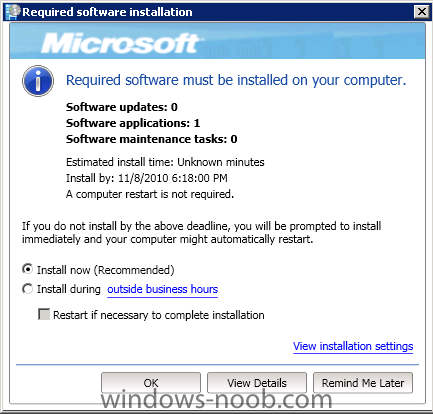
Step 5. Review the application being Deployed. On the vnext server itself, logout as SMSadmin and login as TestUser (we created this user in part one). After our appointed time, the application will be made available to the User and the user will be notified with a New Required Software notification click on the message to review the details and after a few moments the software will install itself silently In the next part of this series we will dig even further into Deploying Applications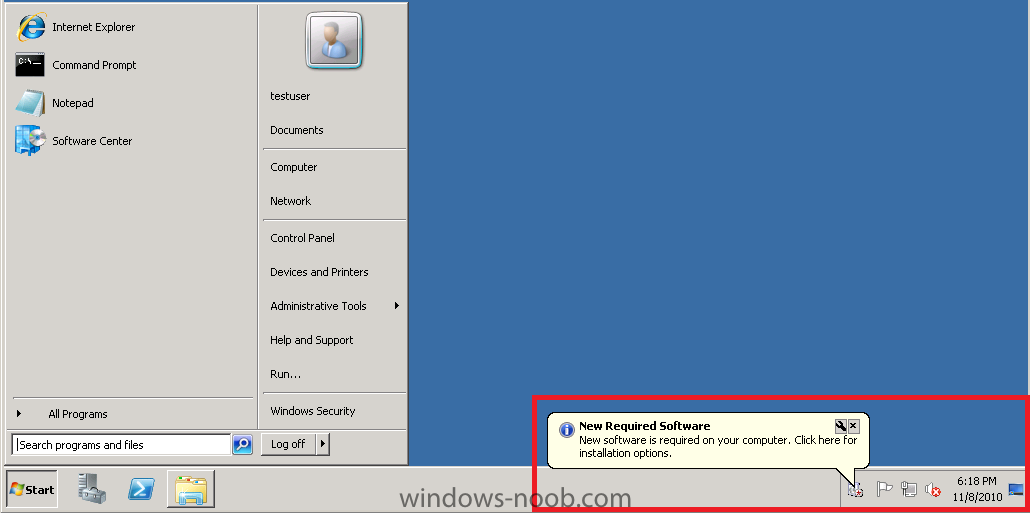

-
using vNext in a LAB - Part 5. Deploying Applications
anyweb replied to anyweb's topic in Configuration Manager 2012
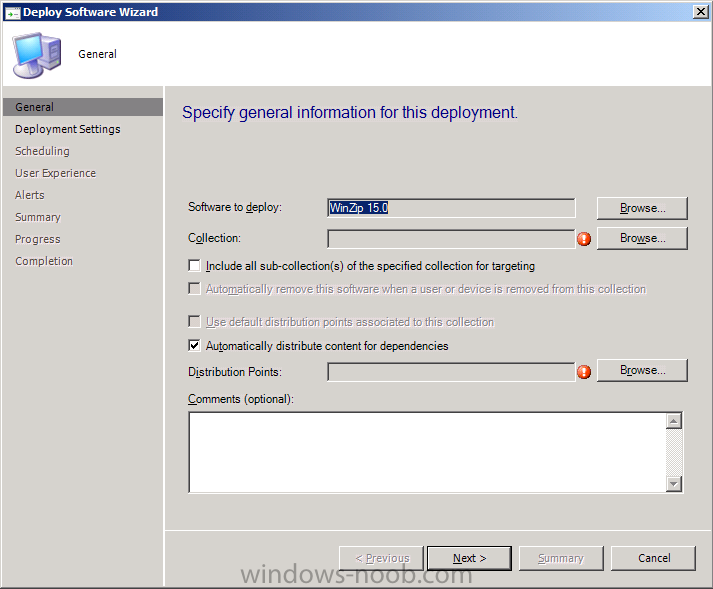
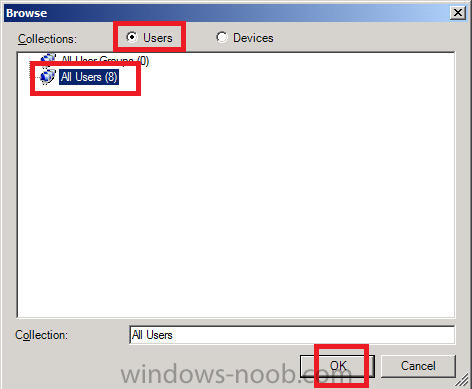
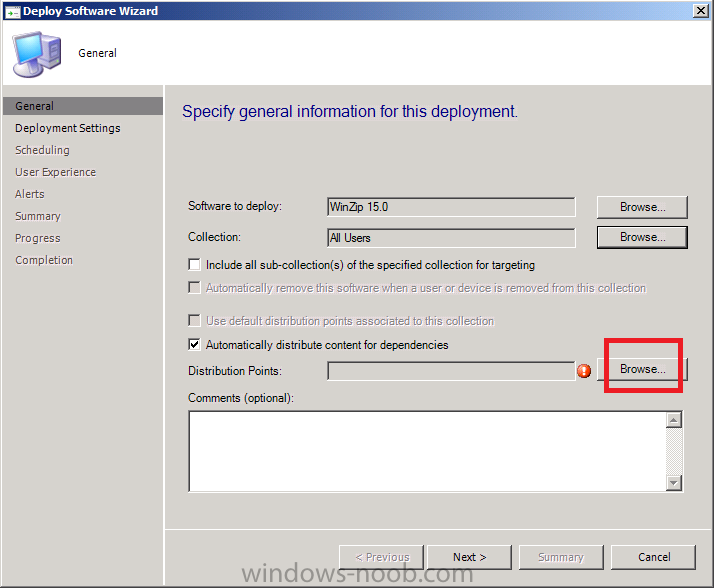
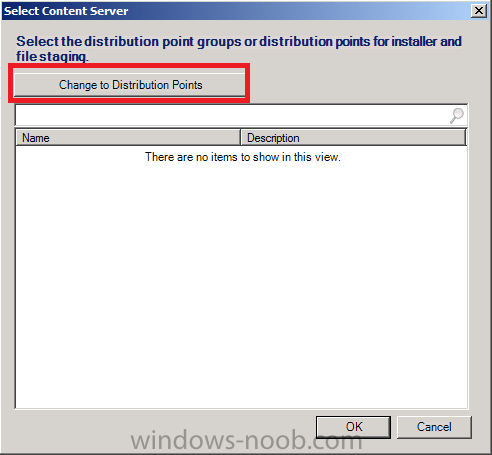
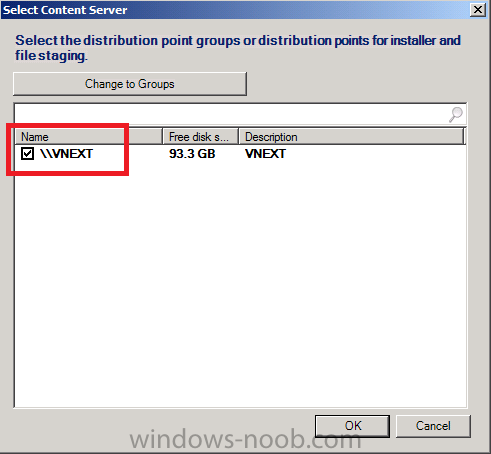
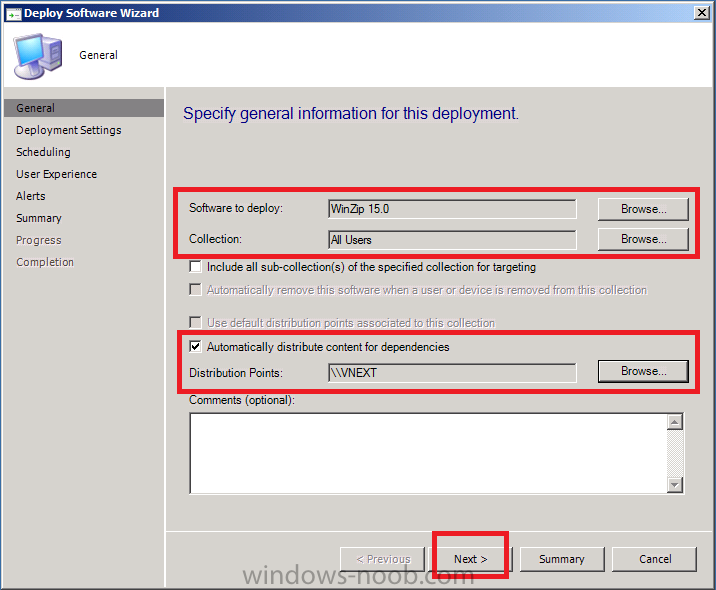
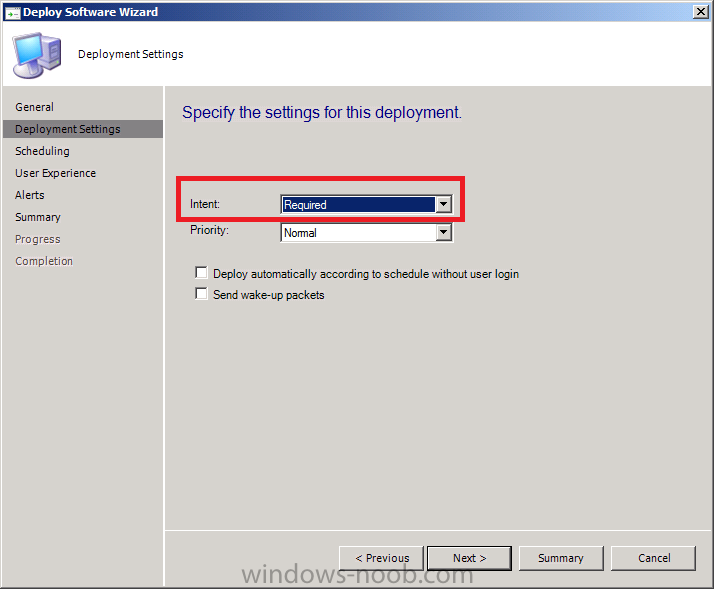
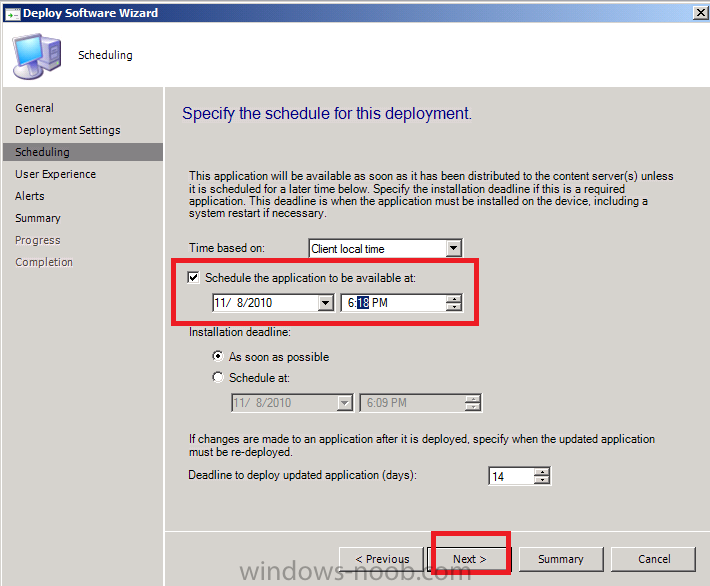
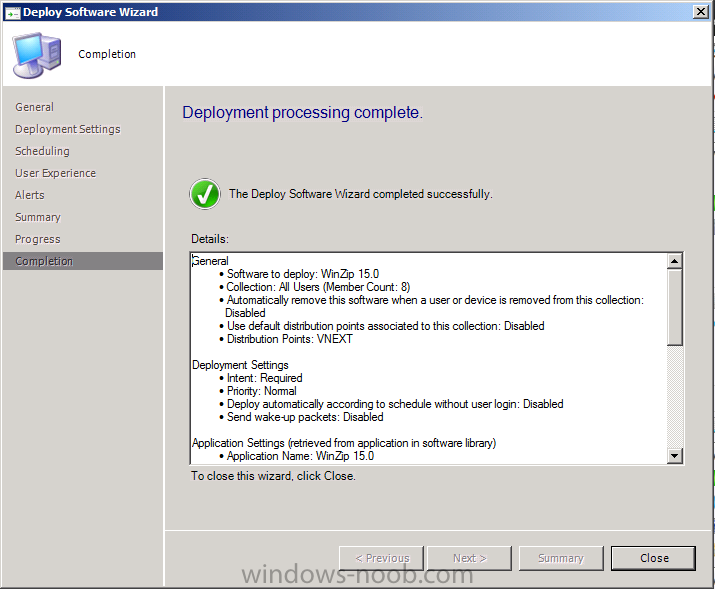
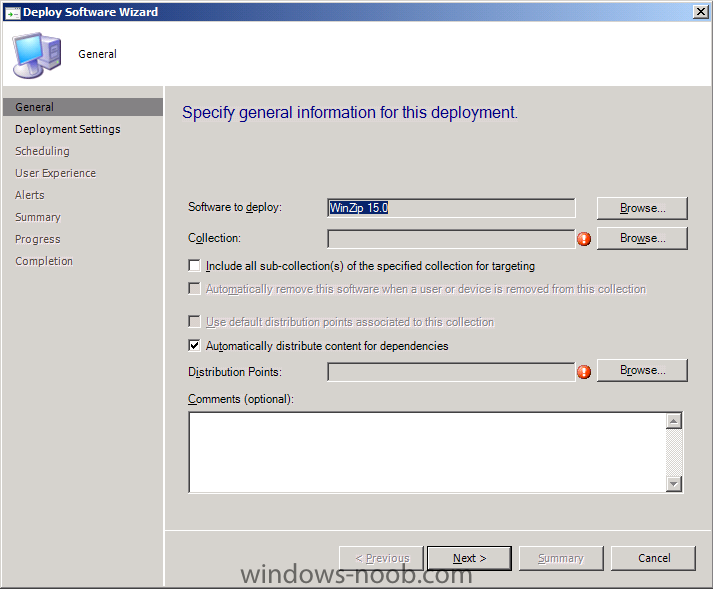
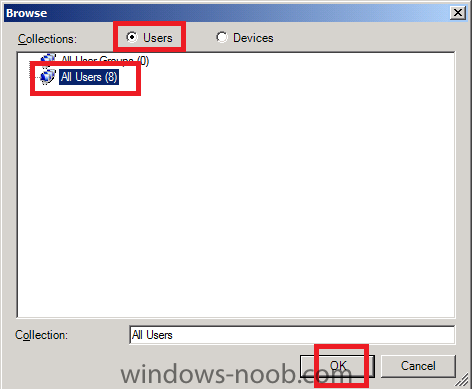
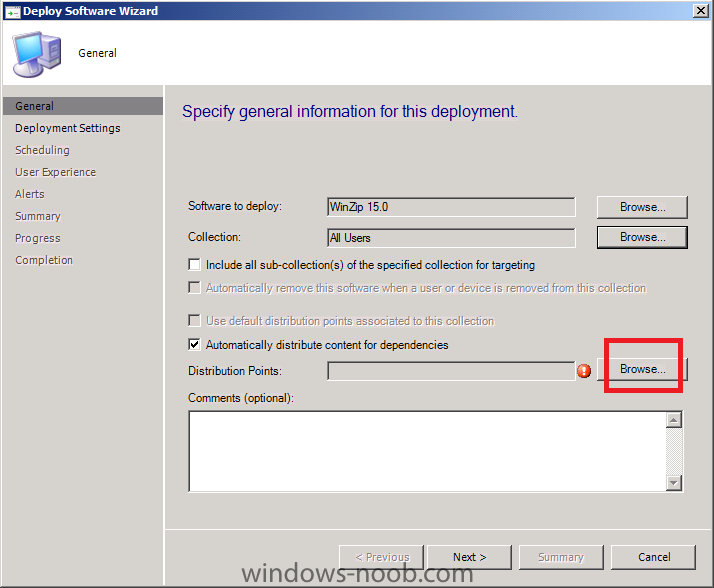
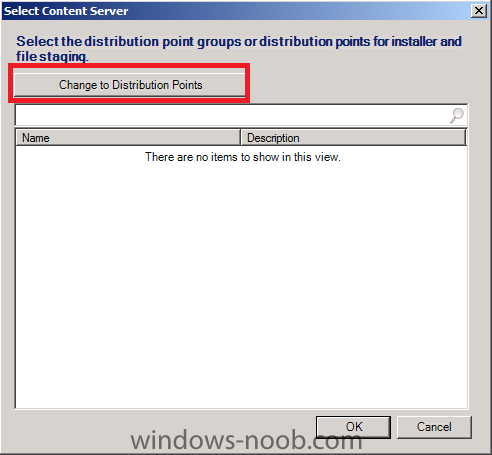
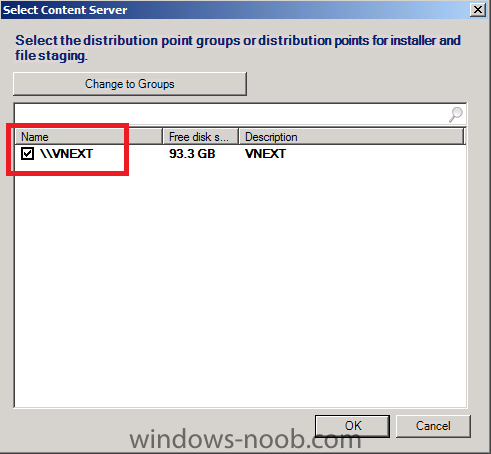
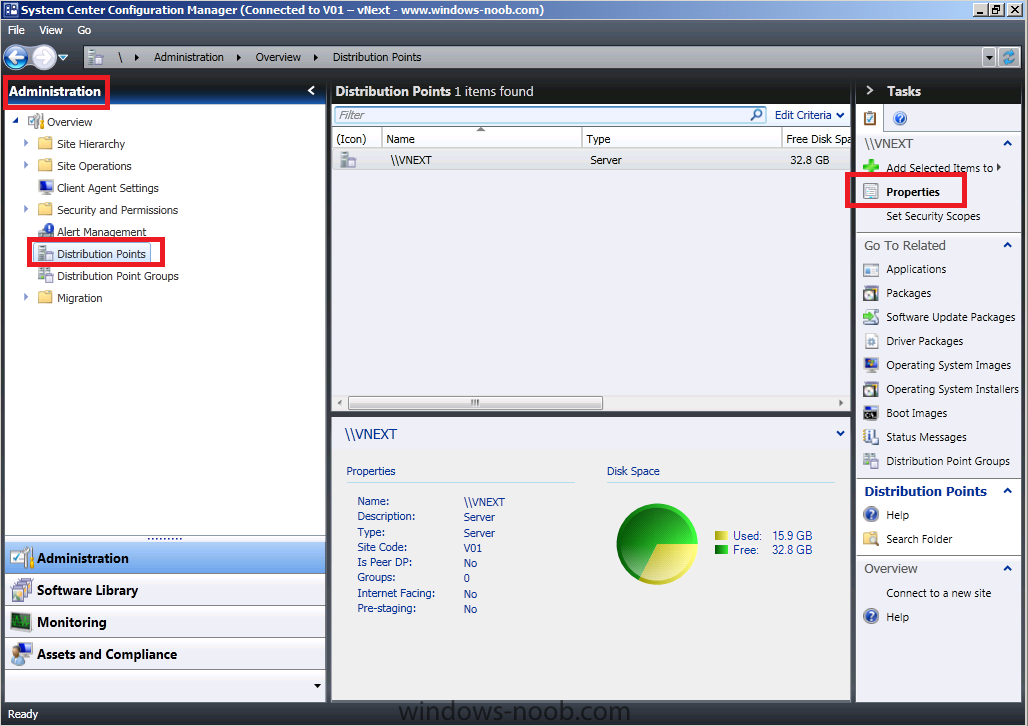
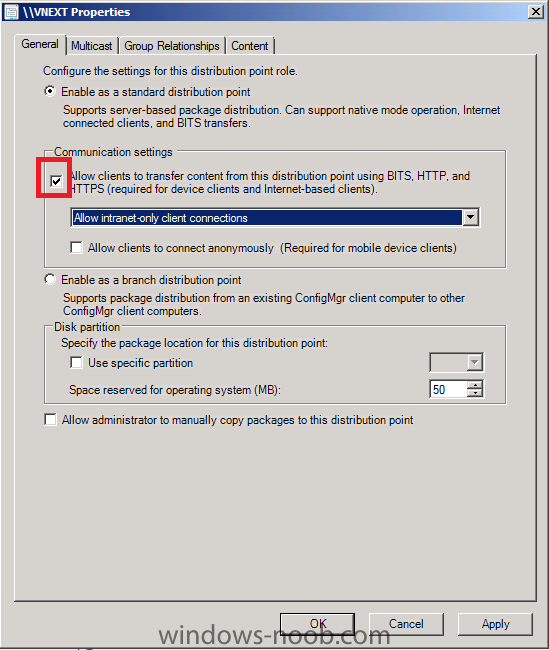
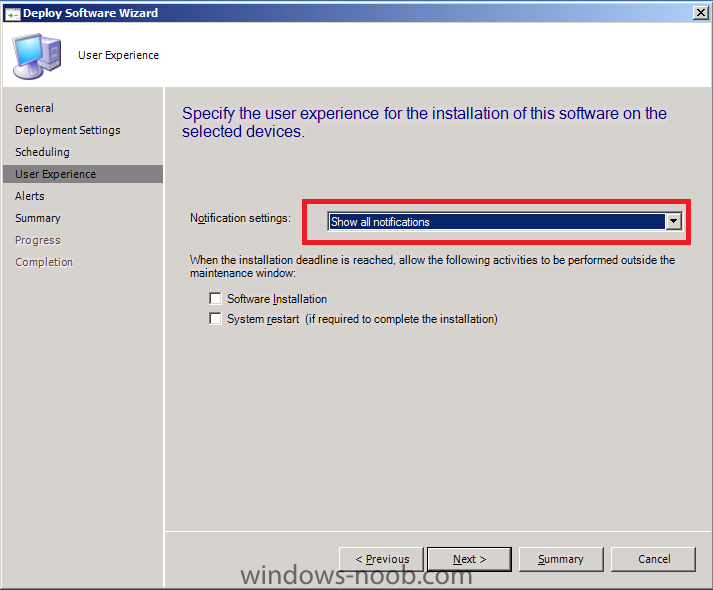
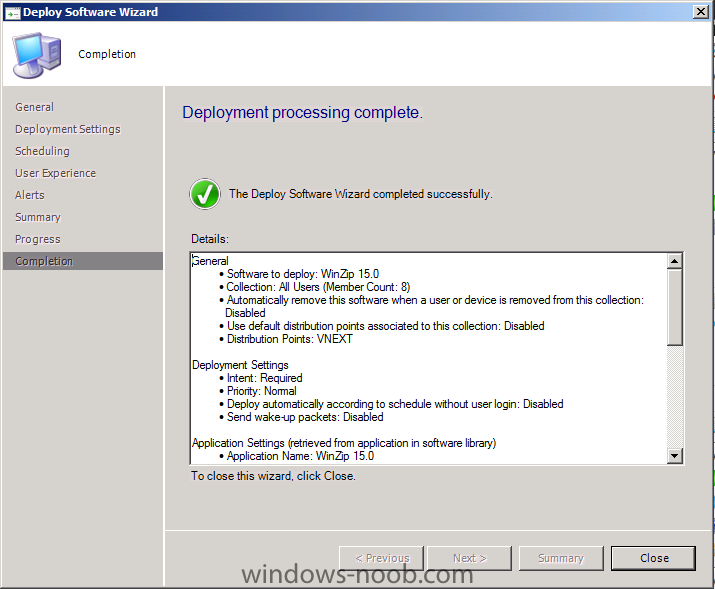
Step 3. Enable BITS on the Distribution Points Before we can deploy our software we need to enable BITS on our distribution point(s). In the Wunderbar, select Administration and select Distribution Points from the navigation menu. Select Properties Under Communication settings, place a checkmark in the Allow Clients to... section Click OK. Step 4. Deploying the Application to a User Now that we have created an application, and customised it somewhat, we want to Deploy it (think of it as creating the Advertisement). Select Software Library in the Wunderbar. Right click on our application, and select Deploy The Deploy Software Wizard appears to the right of collection, click browse At the top of the Collections screen select Users (Devices is selected by Default), then select the All Users Collection, click Ok when done Click Browse to the right of Distribution Points The Select Content Server dialog box appears allowing you to configure the distribution point(s) for our application, select Change to Distribution Points. select our vNext server from the list and click ok. click Next, on the next screen we get to choose between Available and Required for Intent (this is the equivalent of Optional and Mandatory), choose Required. we can choose the Schedule for this deployment, so set a schedule and click Next for User Experience click on the drop down menu and select Show All Notifications Leave the Alerts as default click next at the summary and review the progress and finally the confirmation screen (deployment processing complete). click Close to exit.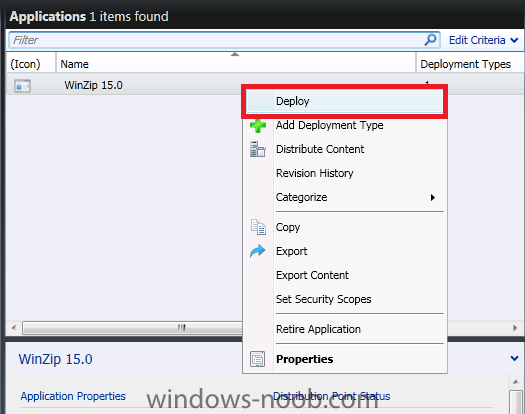


-
using vNext in a LAB - Part 5. Deploying Applications
anyweb replied to anyweb's topic in Configuration Manager 2012
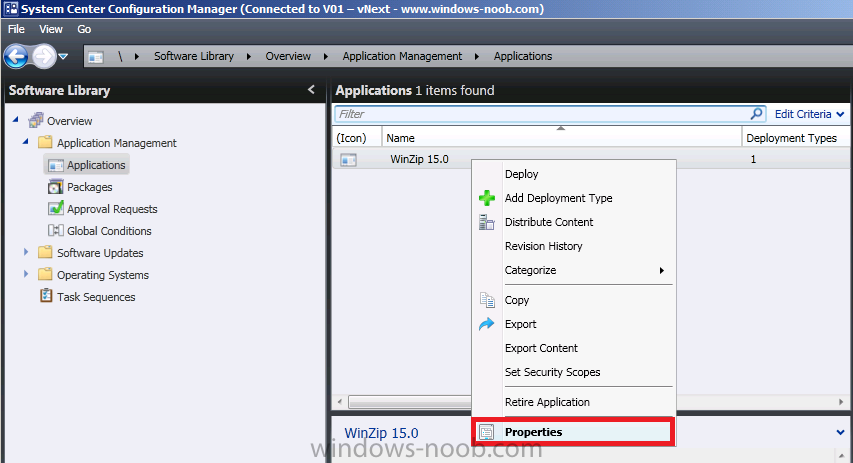
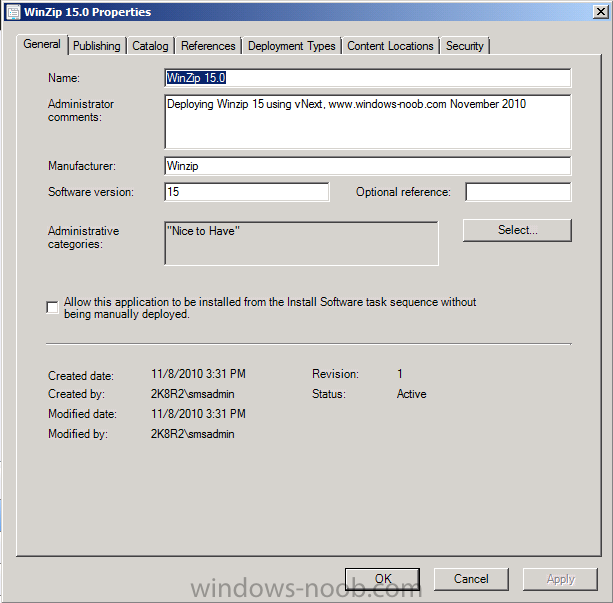
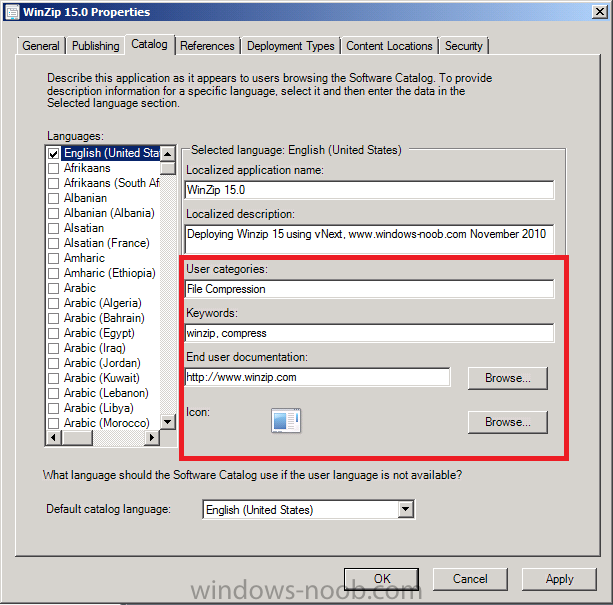
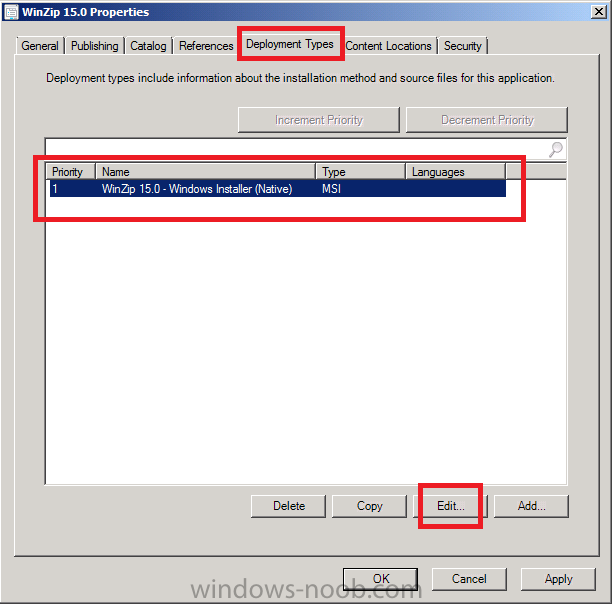
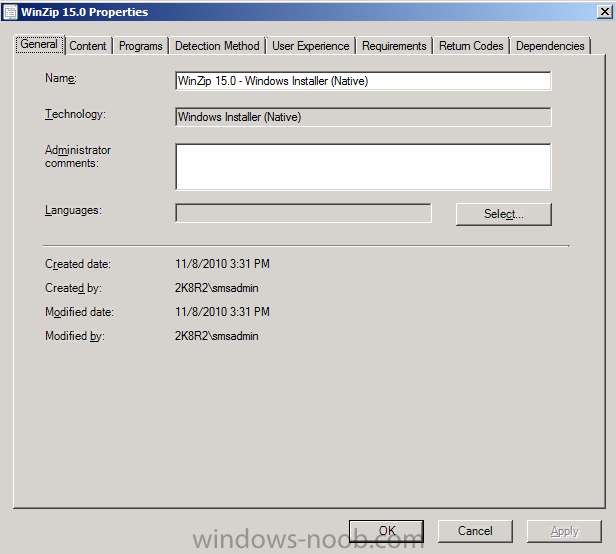
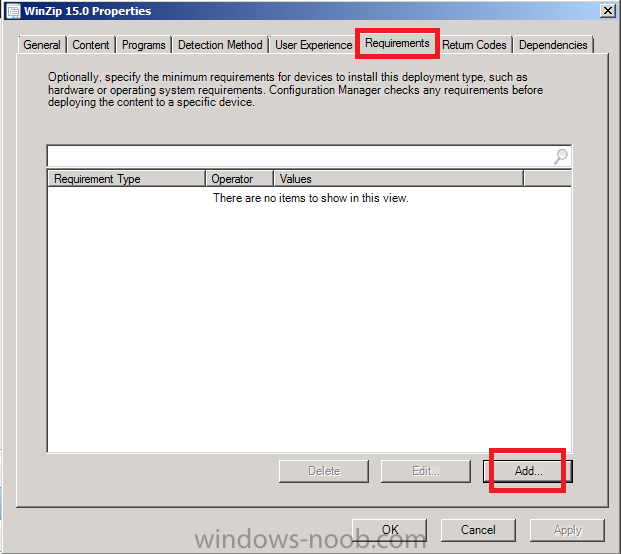
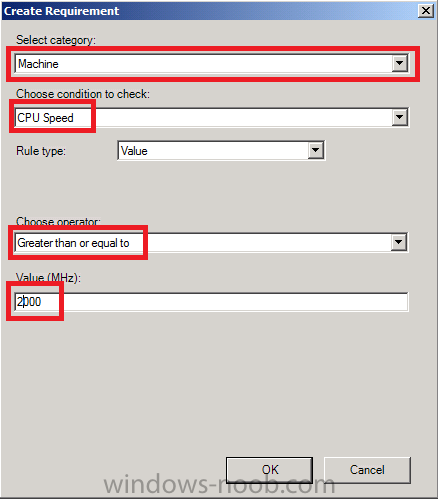
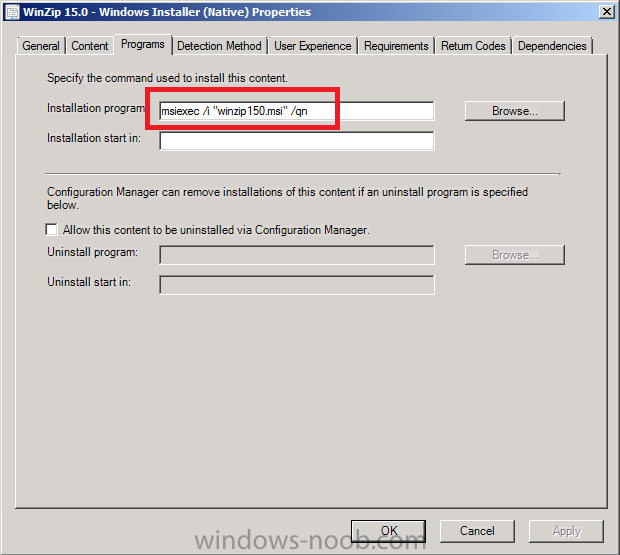
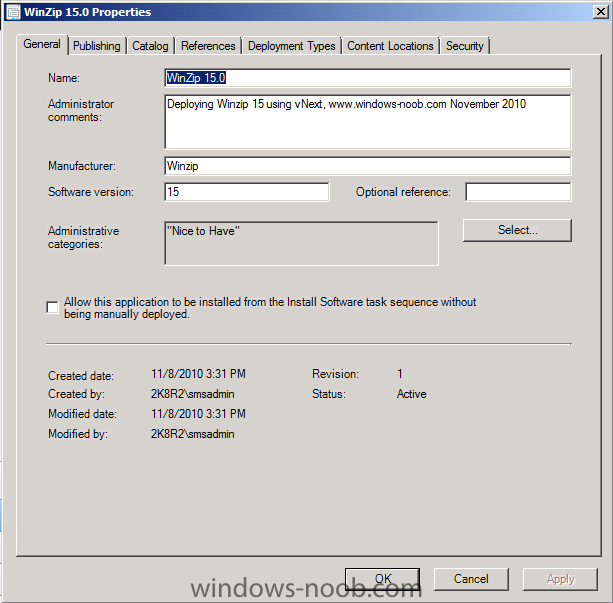
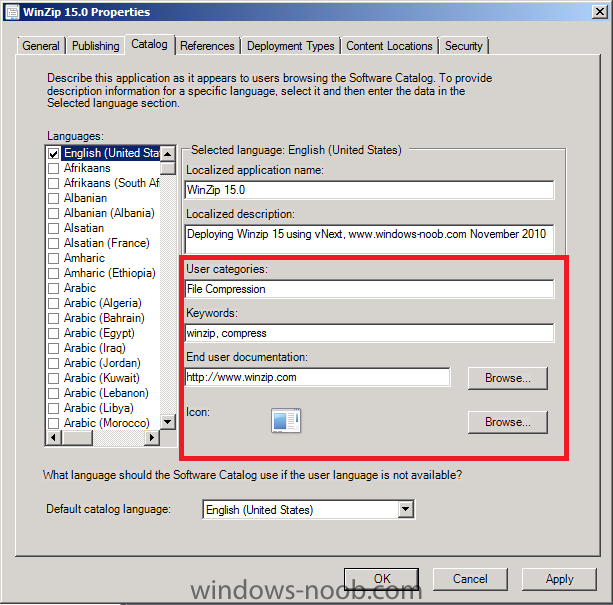
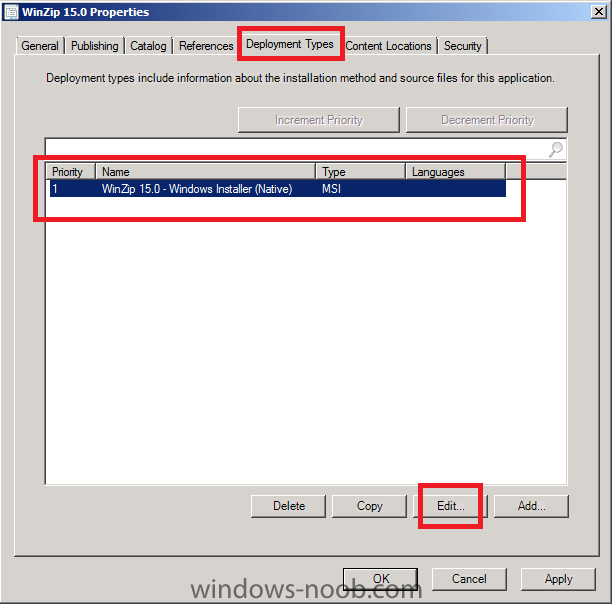
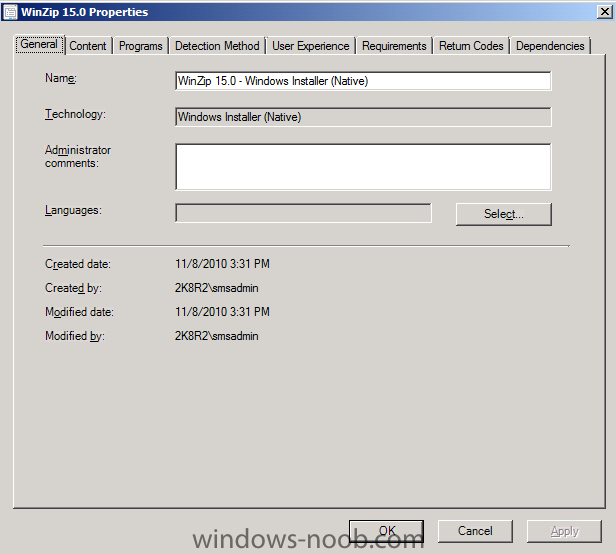
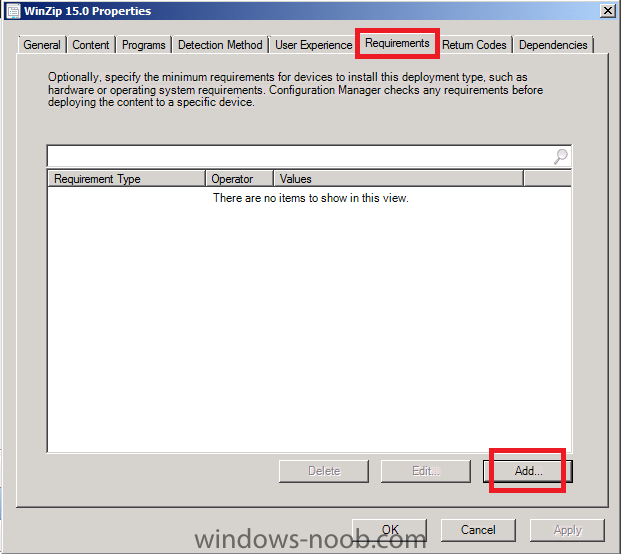
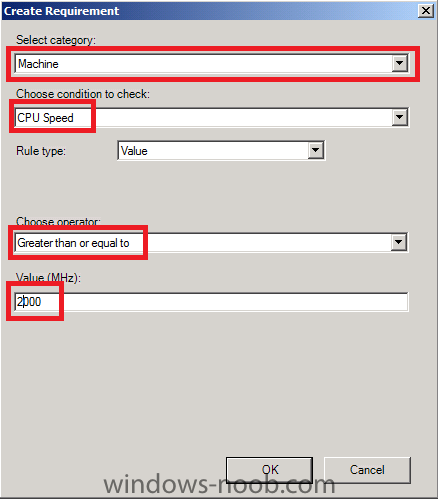
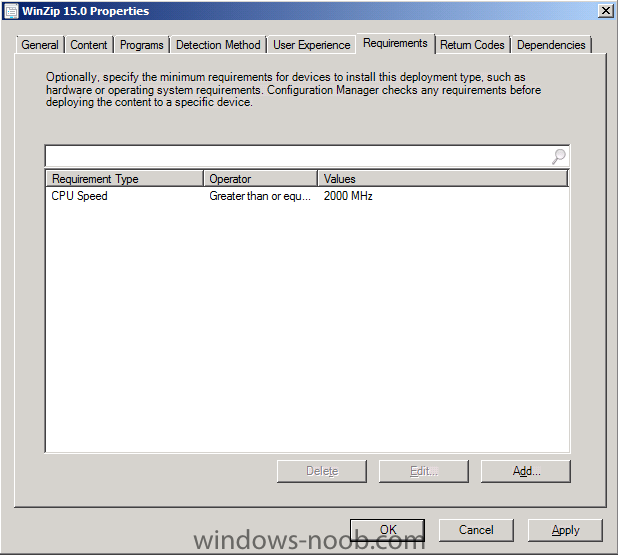
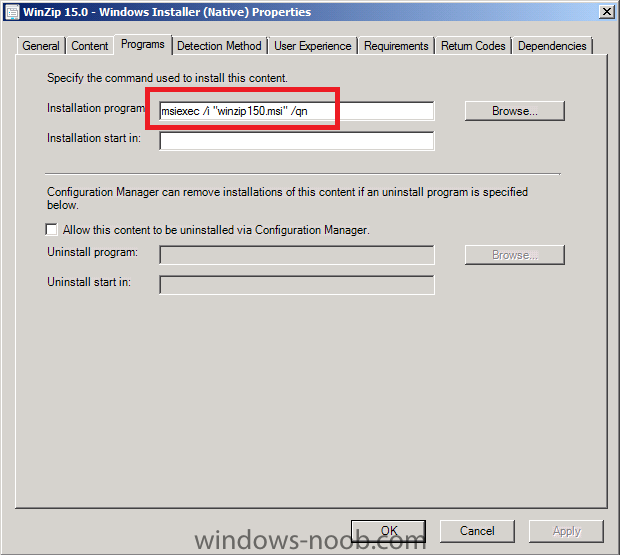
Step 2. Adding Advanced options to our Application Select our newly created application, right click it and choose Properties the Winzip Properties screen appears, select the Catalog tab and enter some details about the application Click on the Deployment Types tab, and select our application, click on Edit to view the applications deployment types properties, several options exist such as Content, Programs, Detection Method, User-Experience, Requirements, Return Codes and Dependencies. Click on Requirements then click on Add to add a requirement enter the following details, for category choose Machine, select CPU Speed, set the operator to Greater than or equal to and set a value that will work in your lab, eg: 2000 for 2 Ghz. review the requirements you created. Select the Programs Tab. add /qn to the installation switch to install the program silently and click Ok.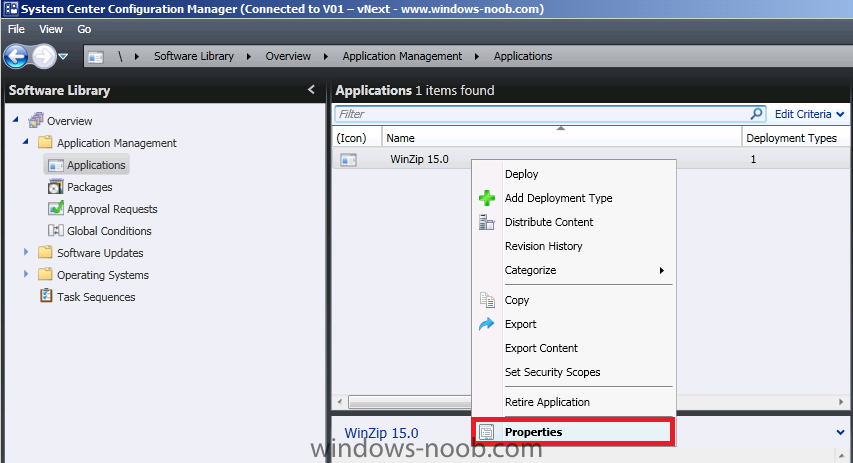
-
using vNext in a LAB - Part 2. Configuration
anyweb replied to anyweb's topic in Configuration Manager 2012
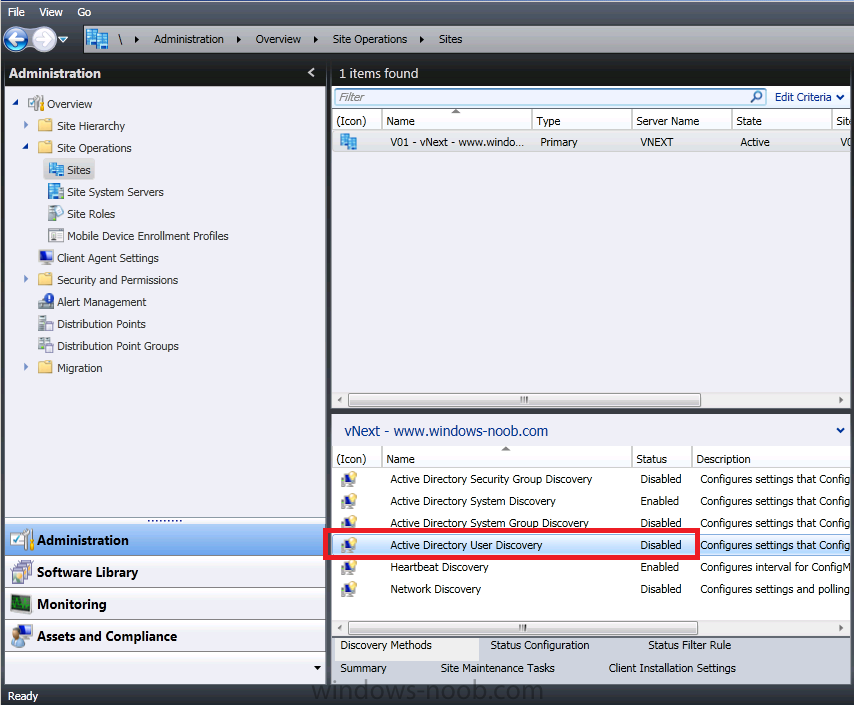
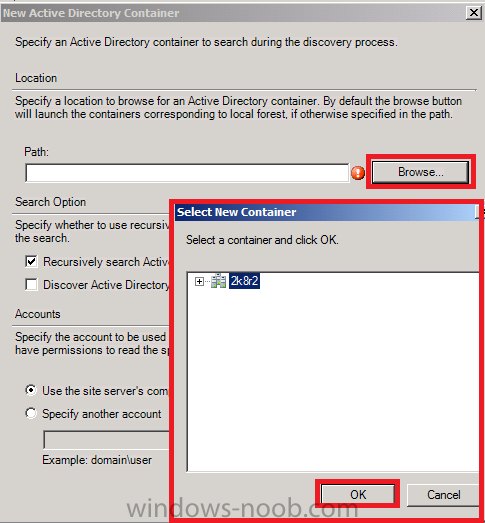
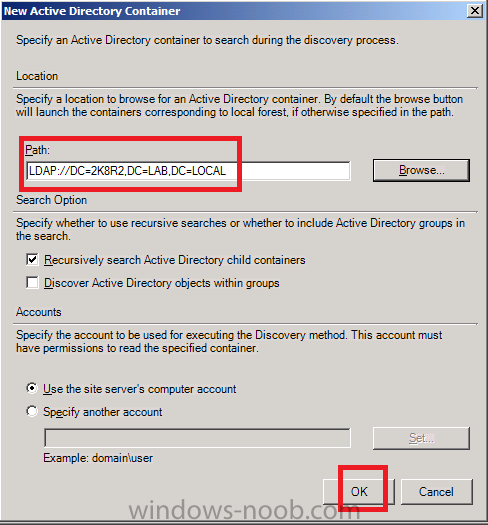
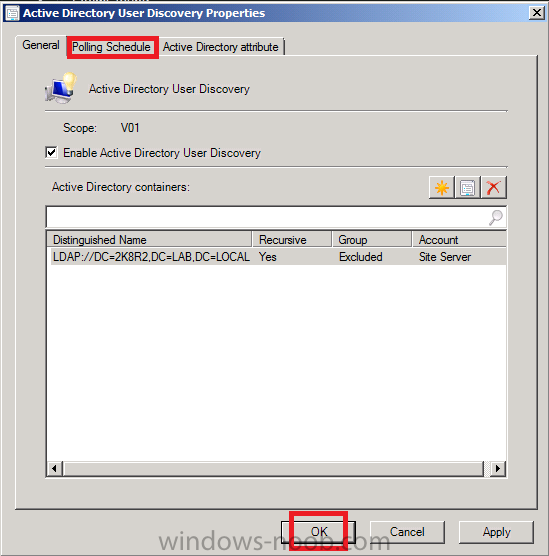
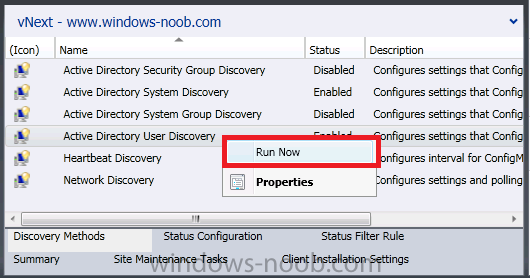
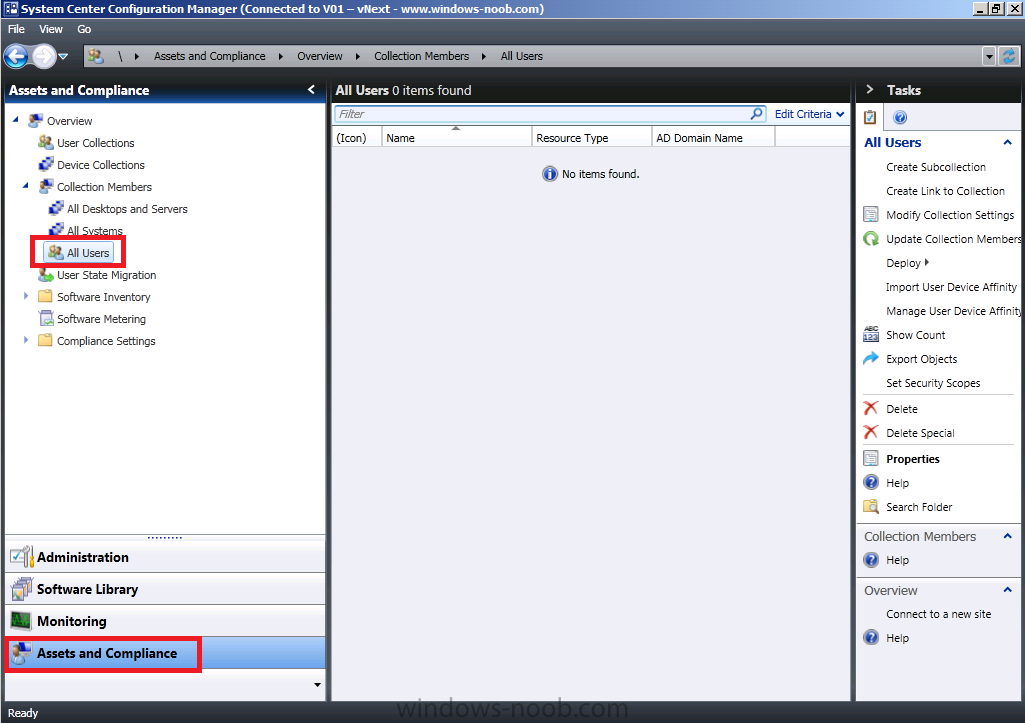
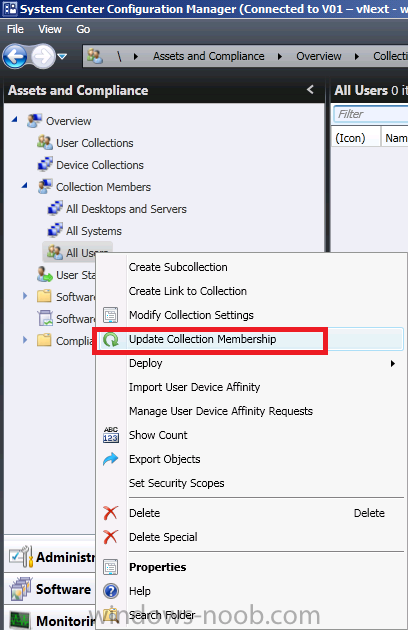
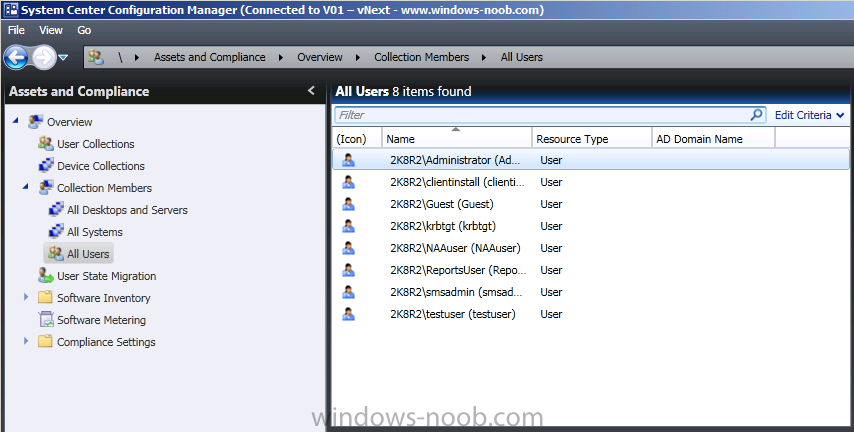
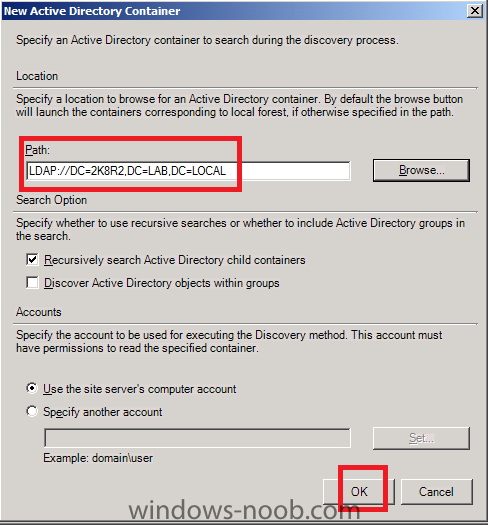
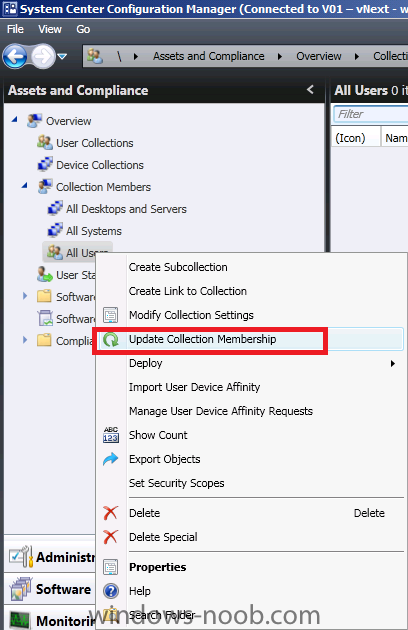
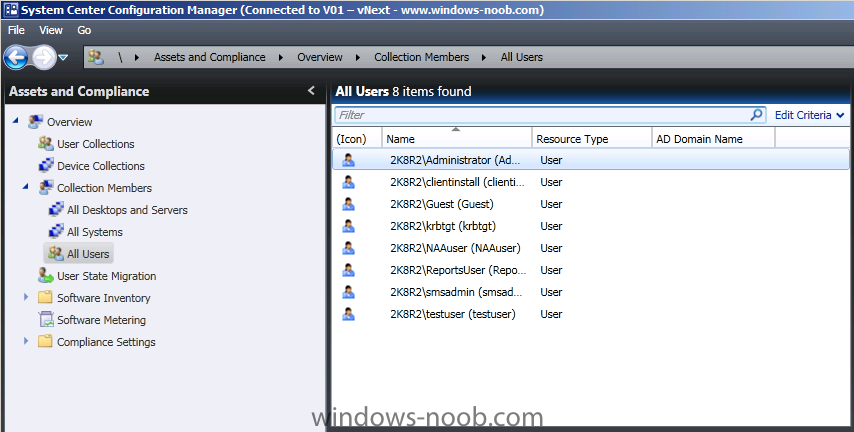
Step 4. Enable Active Directory User Discovery In Discovery Methods, select Active Directory User Discovery and double click on it place a checkmark in Enable Active Directory User Discovery and then click on the yellow starburst icon. the New Active Directory container window appears, click on browse and select the default container listed in the Select New Container window click ok and now you'll see the LDAP path is listed click ok again and if you want, adjust the polling schedule (by default it's every 7 days with a 5 minute delta discovery interval) or just leave it as is. Click Ok to close, and then right click on Active Directory User Discovery and choose Run Now to run the Active Directory User discovery now, answer Yes when prompted. In the Wunderbar, click on Assets and Compliance, select Collection Members, All Users in the navigation pane, as the discovery is probably not done yet it may say no items found. right click on All Users and select Update Collection Membership, when done press F5 to refresh and you should see it populated with Active Directory users Next Steps > Now that we have configured Discovery, we are ready for Additional Configuration in Part 3


-
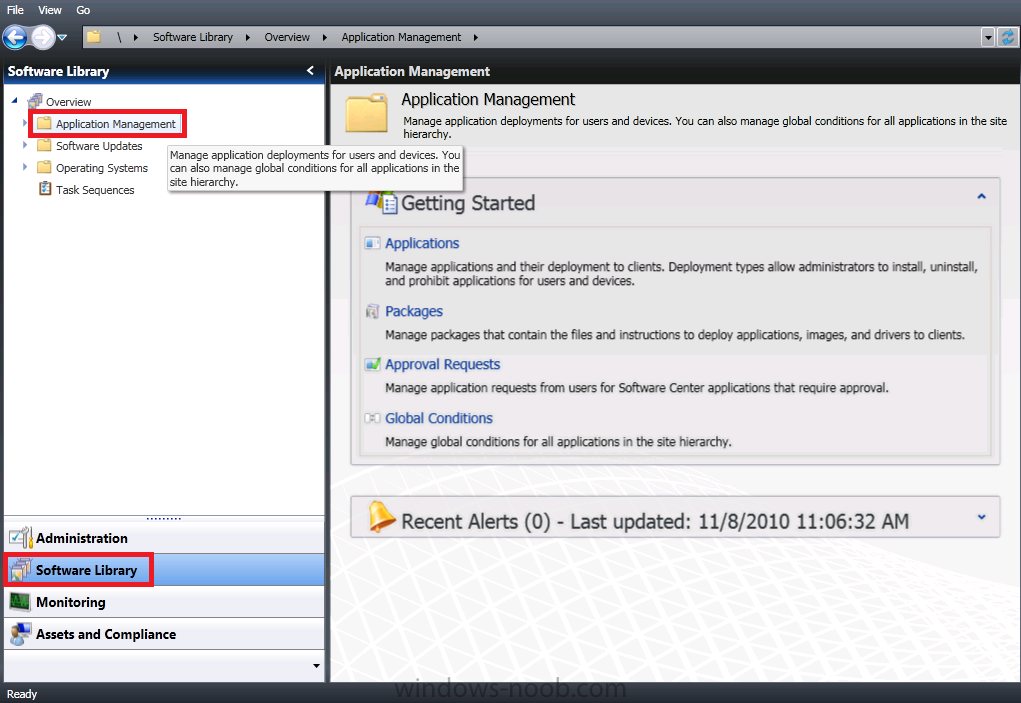
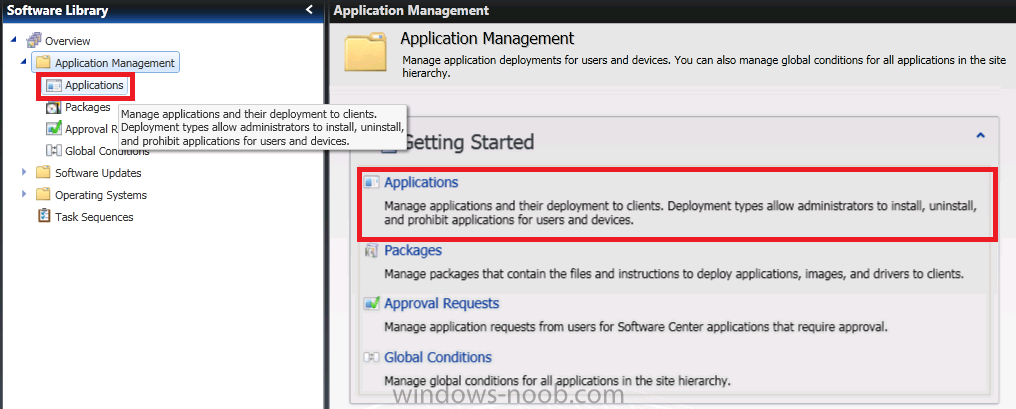
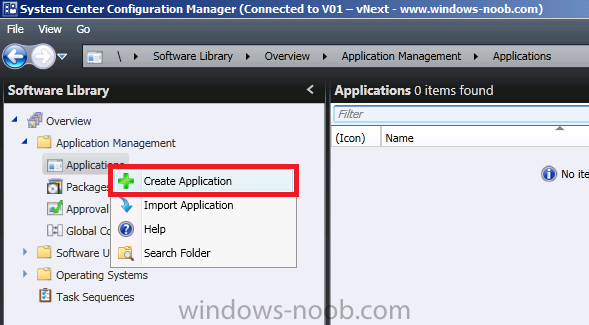
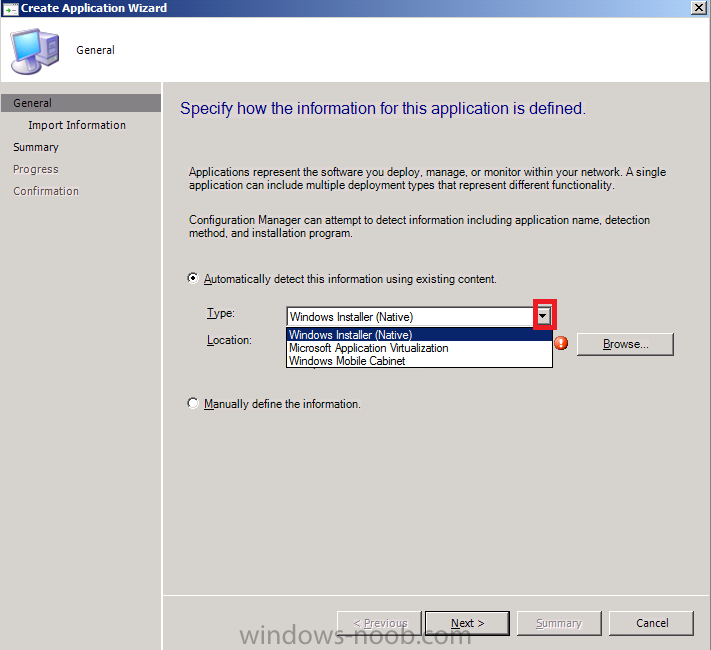
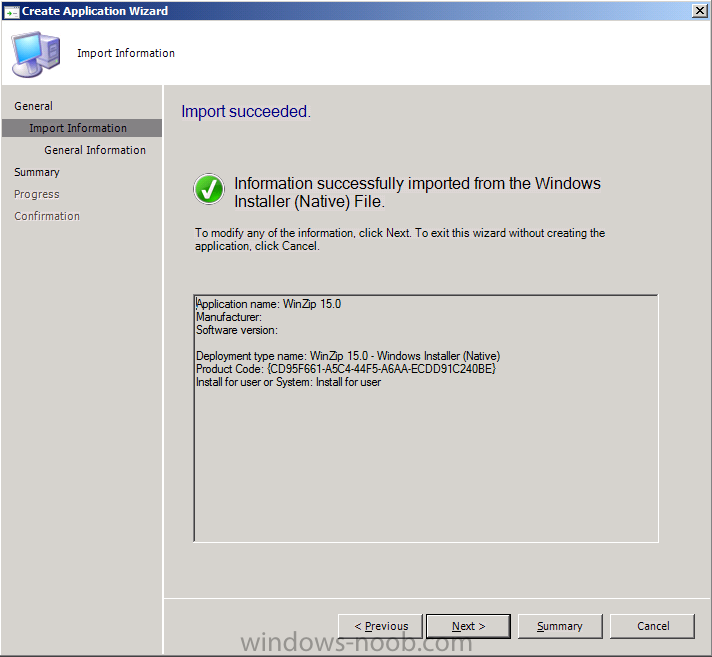
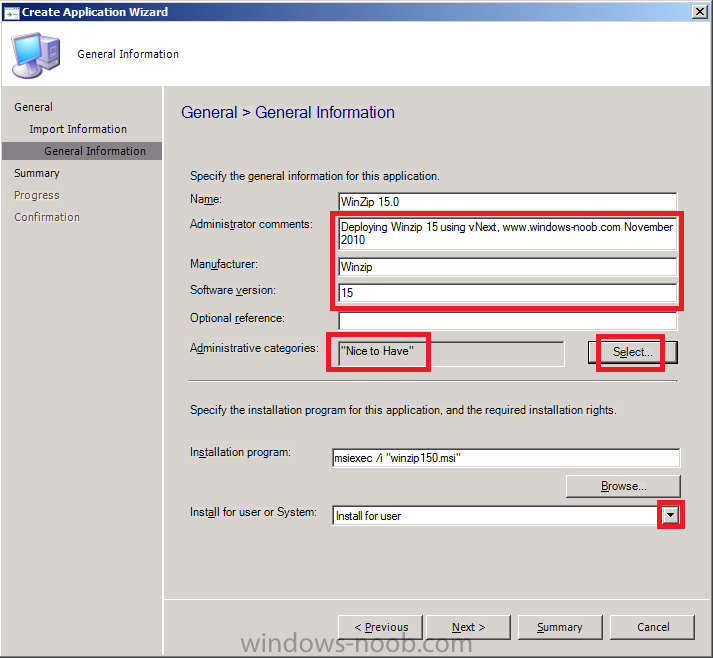
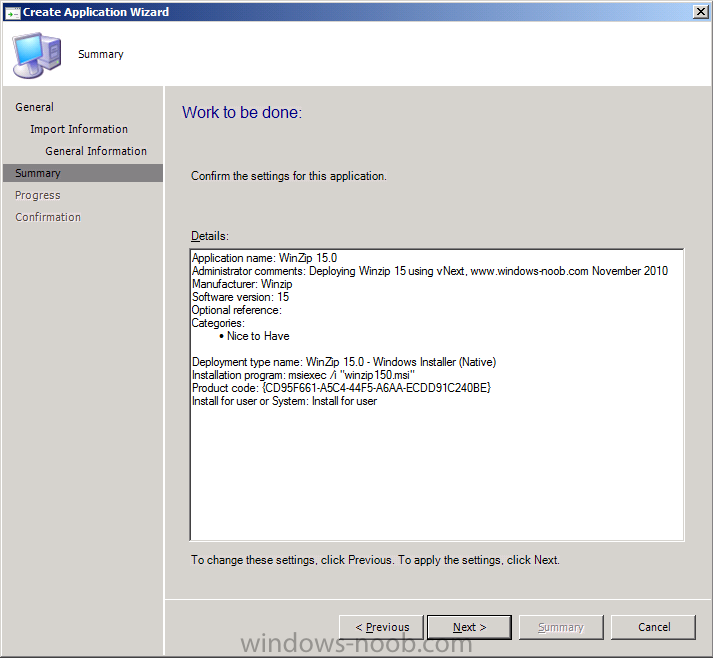
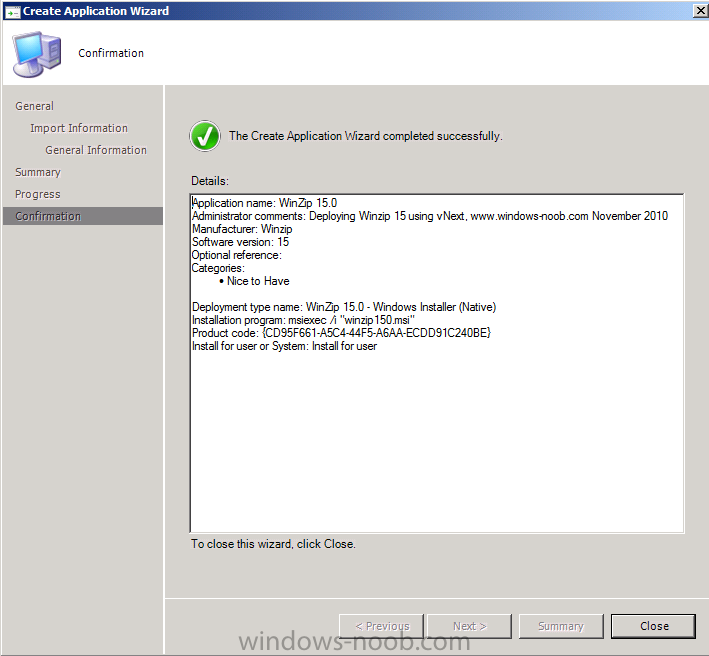
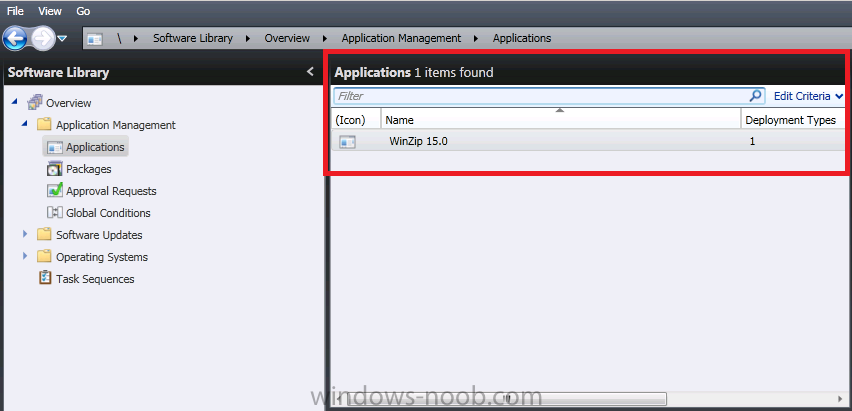
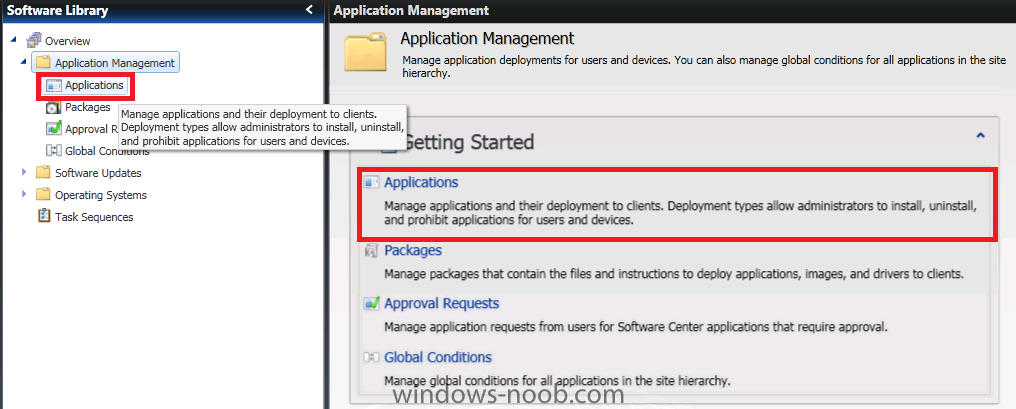
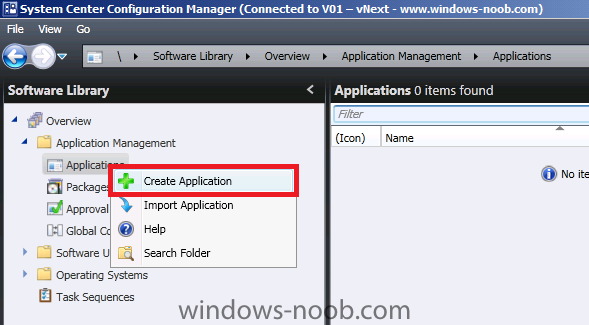
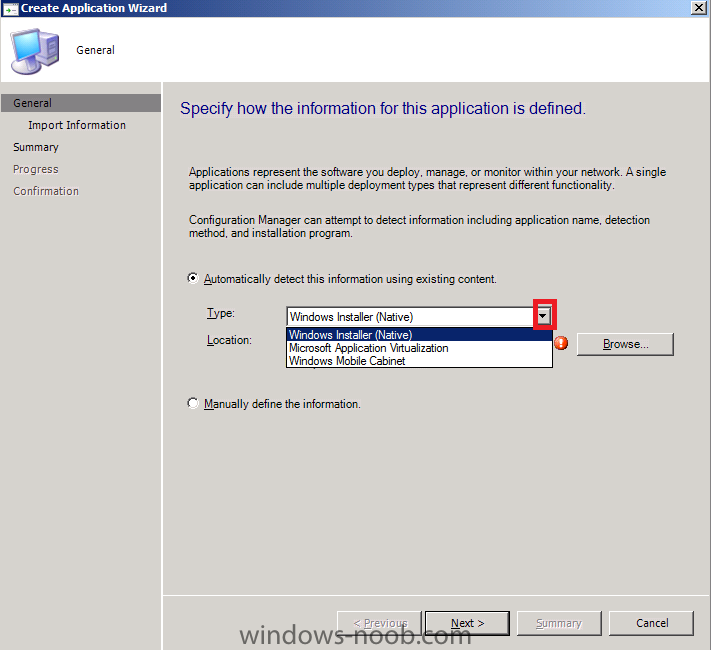
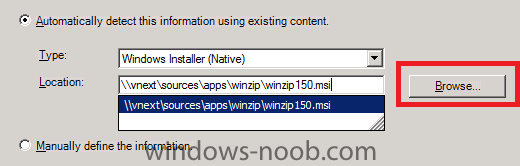
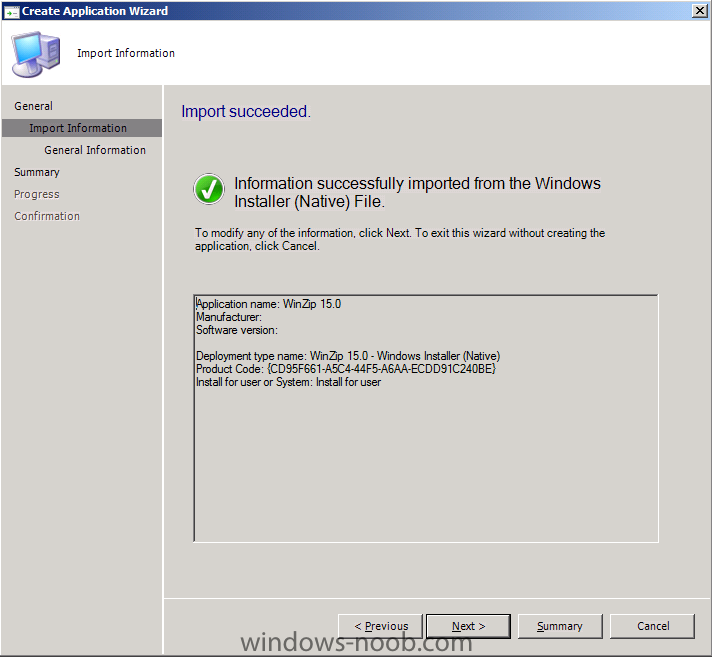
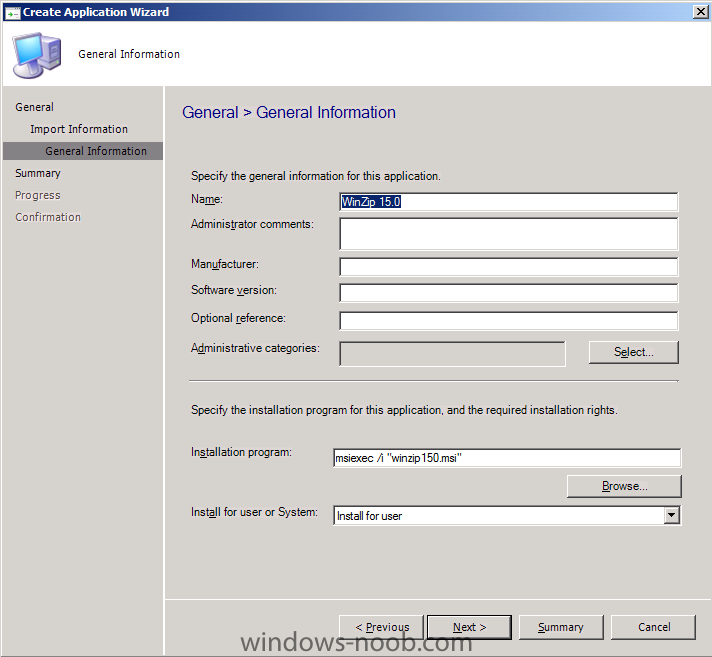
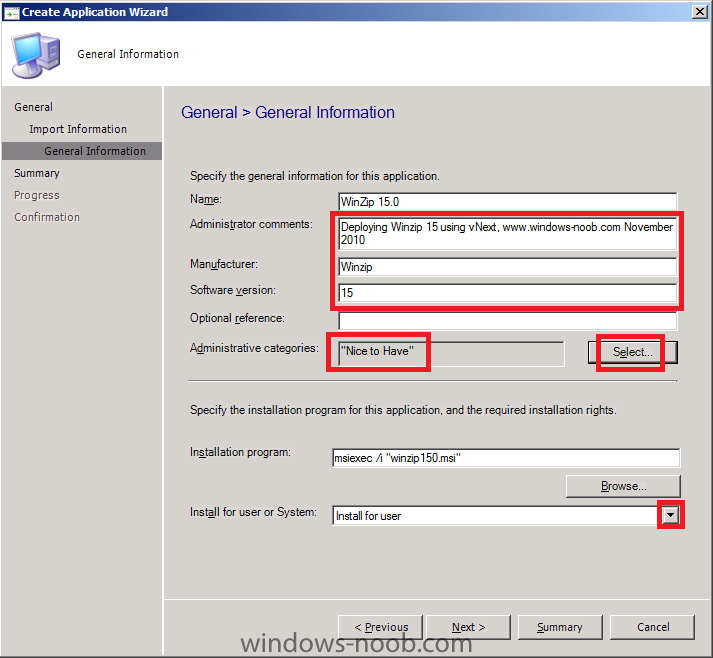
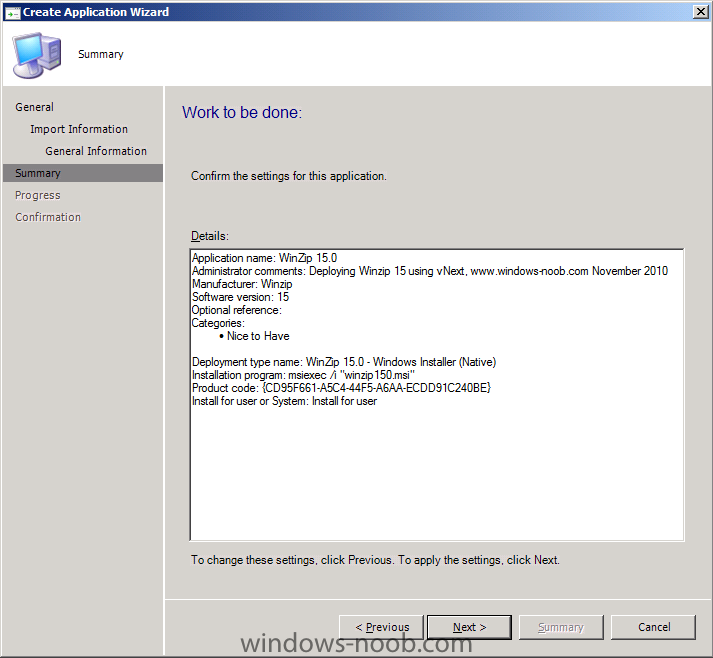
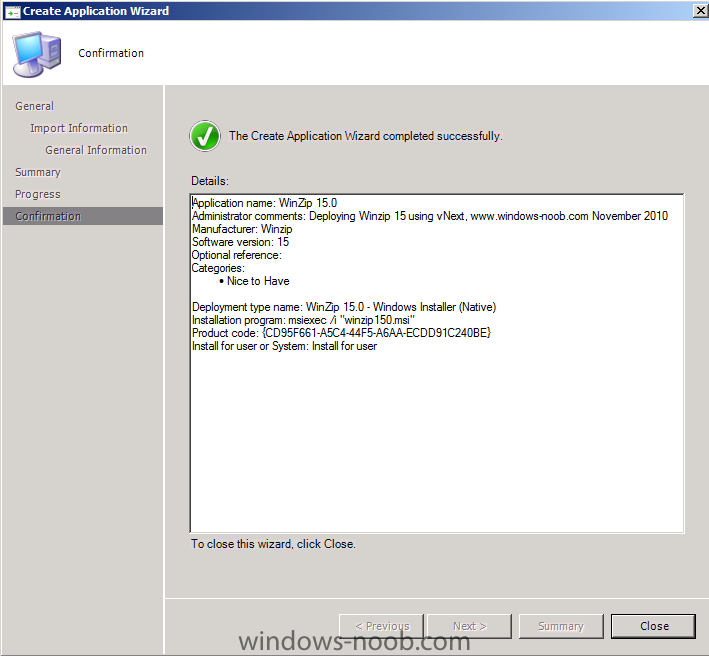
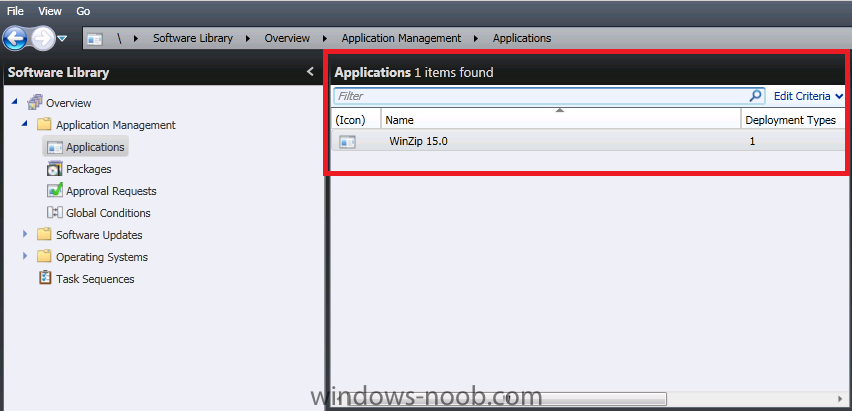
In Part 1. of this series we Installed vNext. In Part 2., we then Configured vNext to use the New AD Site as a boundary and Configured Discovery Methods in vNext. In Part 3, we installed the Reporting Point Role along with some additional roles and configured them. In Part 4 we configured the client Agents and deployed the vNext Client Now we will learn how to Deploy Applications using vNext. But before doing so we need to understand the differences between ConfigMgr 2007 and vNext. Software Distribution in vNext is very different to what we were used to in ConfigMgr 2007. In SCCM 2007, we would typically make a package, the package would contain one or more programs and we would then create an advertisement which targetted the software to a collection. The user would get the software in a variety of ways, silently (mandatory) or optional (via Run Advertised Programs and/or Add Remove Programs in Control Panel). In vNext, the Package and Program is replaced with Application and Deployment Types (Packages and Programs are still available for backwards compatability in vNext but it's considered basic software distribution and not advanced, and more importantly, not recommended.) What we knew as the Advertisement, is replaced with a state based Deployment via detection method, and now the Run Advertised Programs applet is replaced with Software Center. Ok then, let's see how it all works... we will deploy a simple application (in this case, WinZip 15, download the MSI from here), for this Lab, verify that you have enabled Active Directory User Discovery. Perform the following on the vNext server as SMSadmin Step 1. Create an Application In the Wunderbar, click on Software Library, and then click on Application Management in the navigation pane. Select Applications in the navigation pane (or on the right hand side pane), it will say 'no items found' as we have not added any applications yet. In the navigation pane (or in the action pane on the far right) right click on Application and choose Create Application The Create Application Wizard appears, you will notice that the default setting type is set to Windows Installer (Native), you could choose Microsoft Application Virtualization or Mobile CAB files but in this example we will stay with the default (MSI). Browse to the network path of where your MSI is stored (I created a network share on d:\ called sources, in their I created two more sub-directories called apps and winzip.) Include the MSI filename when you browse. eg: \\vnext\sources\apps\winzip\winzip150.msi click Next and you will be informed about the application import, in our case the import succeeded click Next and the General Information screen appears, we can enter some info about the application itself, by default vNext will have picked some values for us (like the install switches) Enter some details about the application, and click on select to create a new Administrative Category, in this example I created a category called Nice to Have, in the Install for User or System drop down menu, select Install for User. review the summary Note: If you get an error like this "Error: The ConfigMgr Provider reported an error connecting to the ConfigMgr site database service" then verify that you added the vNext computer account (vnext$) to the Administrators Group on the vNext server. Review the Confirmation screen and click Close. Our Winzip application should be listed.

-
Bringing a window forward
anyweb replied to RedDR's question in Deploy software, applications and drivers
and the solution was ... -
Deploy SNMP
anyweb replied to Haim Chibotero's question in Deploy software, applications and drivers
in your particular case no, but it will help you to figure out how to do it, obviously you'll need to edit the task sequence to ONLY install SNMP if that's what you want, but apart from that you are good to go -
Deploy SNMP
anyweb replied to Haim Chibotero's question in Deploy software, applications and drivers
yup, it's pretty much covered in this deploy server 2008 post http://www.windows-noob.com/forums/index.php?/topic/543-how-can-i-deploy-windows-server-2008-using-sccm-2007-sp1/ in the roles and features addition from MDT integration, you'll see SNMP is also listed, just select it, and it'll be installed as part of the task sequence cheers niall