anyweb
-
Posts
9278 -
Joined
-
Last visited
-
Days Won
371
Everything posted by anyweb
-
and are you sure it's not getting policy from Intune ? are any of the devices you are investigating showing up in your Edge deployments ? are your Edge logs on the client telling you anything ?

-
is it co-managed ?
-

Client Health Status sccm 2103
anyweb replied to Cliff's topic in System Center Configuration Manager (Current Branch)
hi and welcome, if you are new to ConfigMgr then please don't try deleting tables in SQL, that's a big no no even for those that are used to using it and it's not supported by Microsoft. Now that that's out of the way, you need to understand deeper why the clients are reporting the way they are, first things first, if your Primary is running version 2103 then are all your clients upgraded to the new client version ? do you know that yet ? -
Introduction I’m sure we are all familiar with a slow running machine, it can happen at that exact moment when you least want it to occur, for example just before a meeting is about to start or on first power up after the weekend on a Monday morning. When it happens, everything seems to crawl, or is non-responsive. In desperation you click on an icon to spring it to life but nothing happens, so you click it again, and again…but the computer seemingly just ignores your actions as it is overloaded, slow and clearly busy doing something. To add insult to injury, after a few moments of non-responsiveness, those icons you clicked on earlier suddenly spring to life, and open all at the same time. Ever experienced that ? Multiple copies of the same program opening one after the other… I know I have experienced it and sadly a little bit too often during my working week. If this also sounds familiar to you then you are not alone, this is a very common problem as you can see based on google search results. Non tech-savvy people might trust a bunch of the first hits generated by that search, and think that cleaning their registry or installing X software will solve all their problems, if it sounds too good to be true, chances are, it won’t help at all, or worse can cause additional issues. Some common advice given to resolve slow running computers are: Windows update Reboot computer Install X program So what do you do, take the advice of random hits on google, or find another way. How you or your users deal with slow computers is something that a lot of us want more control over. 20 minutes, more or less Rather than searching for more advice I’d recommend you spend 20 minutes watching this on-demand webinar series where you’ll get to learn from industry experts and Microsoft MVP’s about how and why they use tools to make things work better for your users, including how to deal with slow endpoints (computers) which is touched on in part 1. 1E has started a new webinar series about Digital Experience Monitoring (DEM) in 10 parts, which you can sign up for free here. This particular webinar ties in nicely with their recent announcement about unified experience management (UXM). “1E Challenges DEM Market to Deliver More, Launching New Unified eXperience Management Category.” One of the great things about these webinars is they cover just enough information about the topic to keep you interested and are limited to 20 minutes in length which gives you plenty of time to get on with your other daily tasks. The first webinar is all about the subject of slow running endpoints, how to identify them and more importantly how to fix them in a proactive way. Think about this, if a user creates a ticket about their slow PC performance they are already unhappy. And you want to avoid that. As an admin, you could take steps to proactively avoid these problems for your users by co-relating all the data available to you looking at the responsiveness impact of software installed in your estate using 1E’s very own Tachyon. “Tachyon experience …is a dashboard that gives you visibility across your entire digital landscape.” Using the dashboard you can easily visualize how recent changes made have impacted negatively, and use that info to dig deeper. If you haven’t heard of Tachyon, google it. You’ll probably get a bunch of posts about high speed particles, and that’s because Tachyon is fast, at least that’s what the 1E marketing blurb says. How fast is Tachyon ? Later on in this series of blog posts I will experiment with Tachyon and give you a brief tour. I’ll also give you my honest feedback about how well it performs (or doesn’t) for me. So stay tuned. In the meantime, sign up for the next DEM webinar (June 2nd, 2021), it’s free, and tell them Niall sent you. And for those of you who want to see previously published episodes please click here. DISCLAIMER: The contents of this article are the opinion of the author and have been written from an impartial standpoint; however, 1E may have reimbursed the author for time and expenses for undertaking the findings and conclusions detailed in the article.


-
so what errors are you seeing now, to be clear
-
How to get access to HD when you cannot disable bitlocker?
anyweb replied to Kingskawn's question in Windows 10
leave the disc in the machine and try and boot into recovery mode, you'll need the recovery key (available in AD or in CM/MBAM/Azure) otherwise you can't unlock it... 3 failed boots in a row should force it into recovery mode -
ok back to the first error, are you specifying the sql server instance correctly ? what is it and what are you entering ? on the server in question, logged on with that service account if you open device manager does it tell you you are a standard user ?
-
ok well something is not right, is SQL remote in this case ?
-
what about this ? ERROR: The current user does not have administrative rights on computer: <FQDN OF PRIMARY SITE SERVER>
-
quick question, did you follow this guide exactly, or are you just trying out co-management yourself ?
-
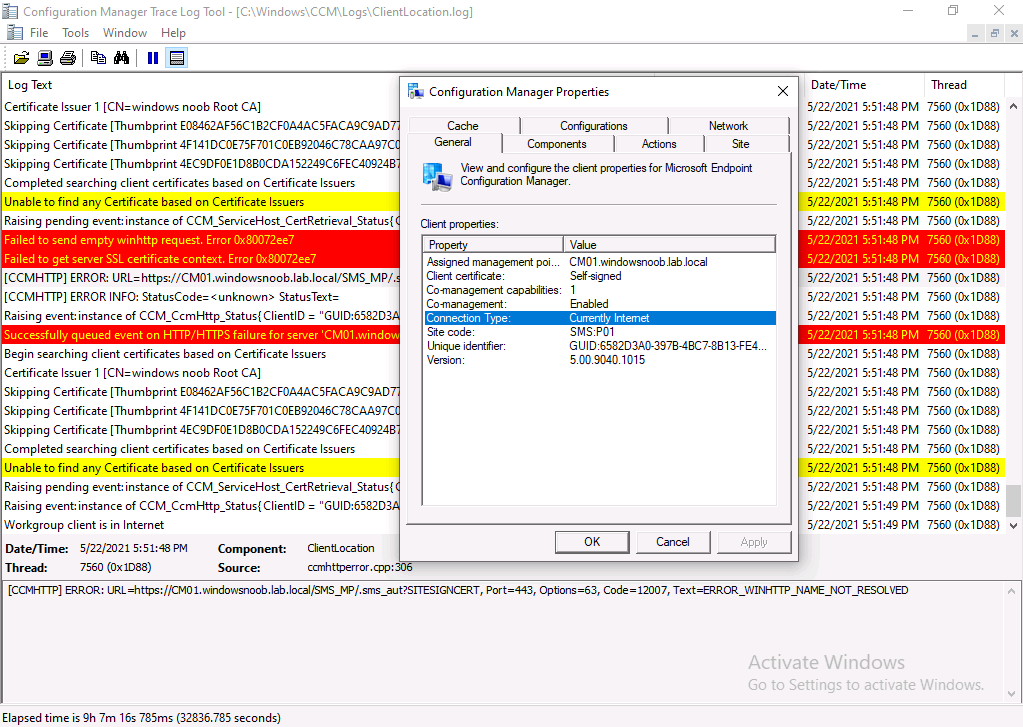
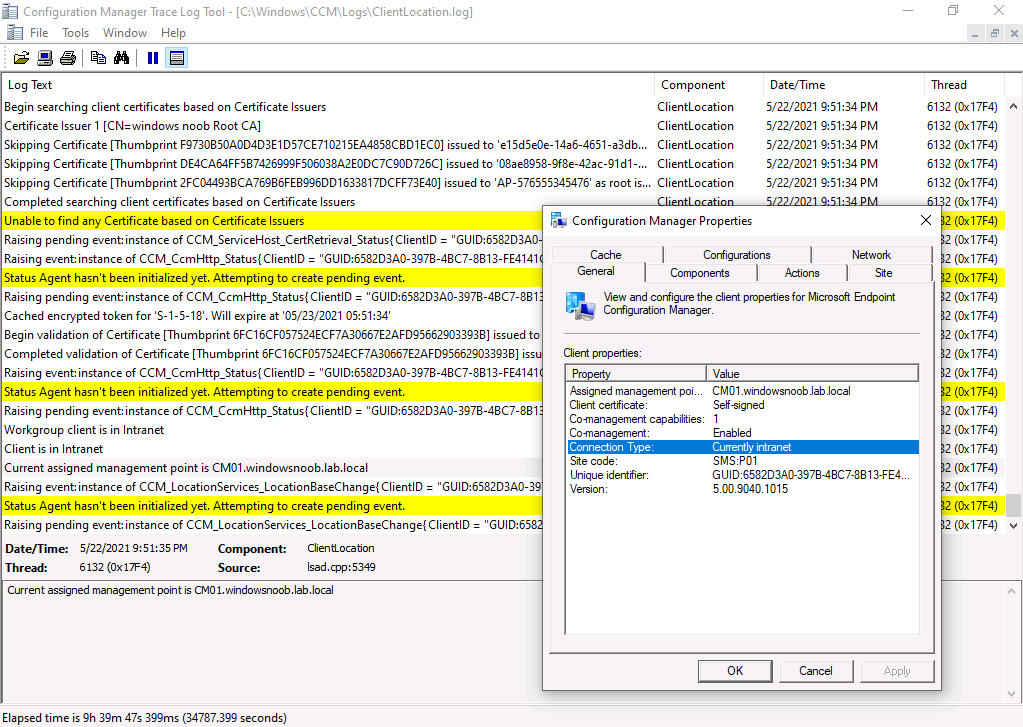
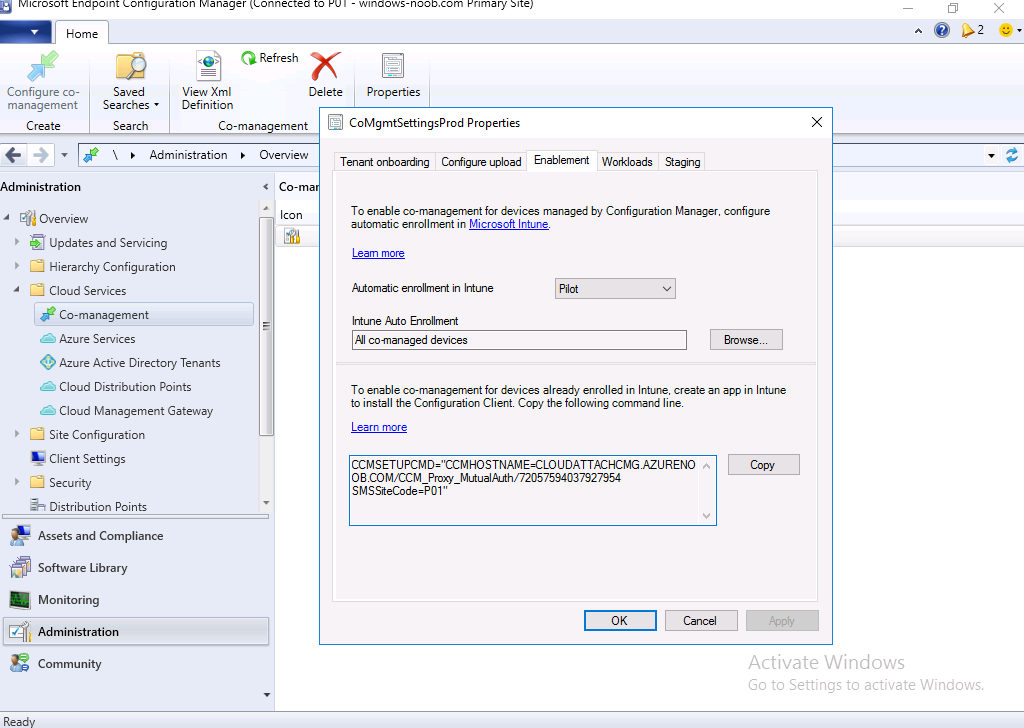
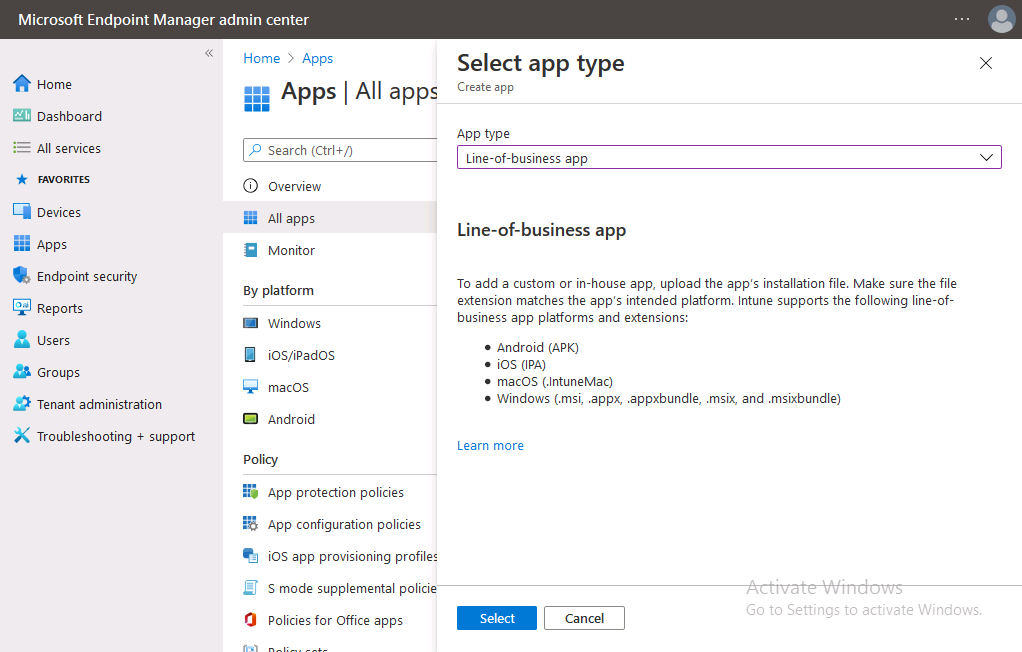
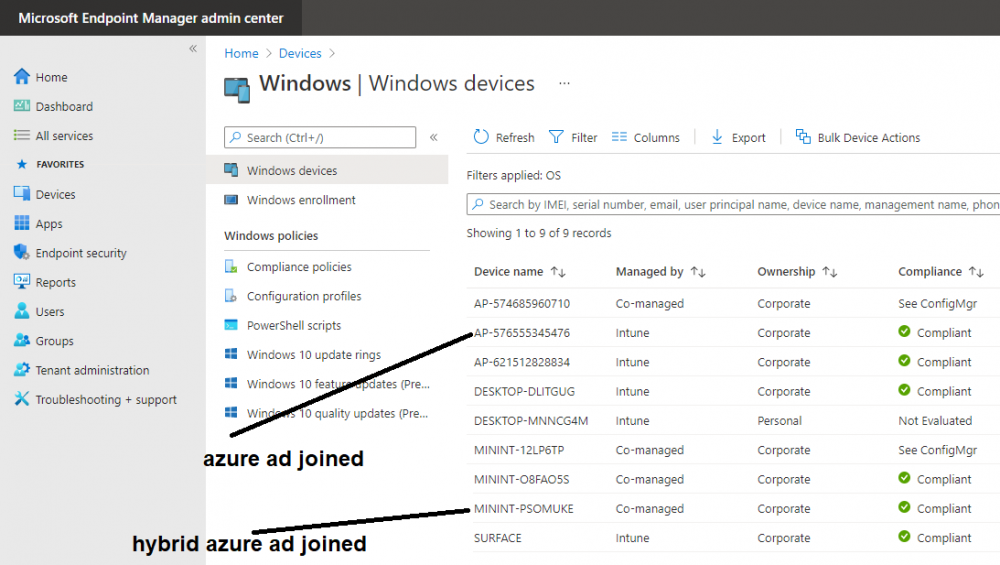
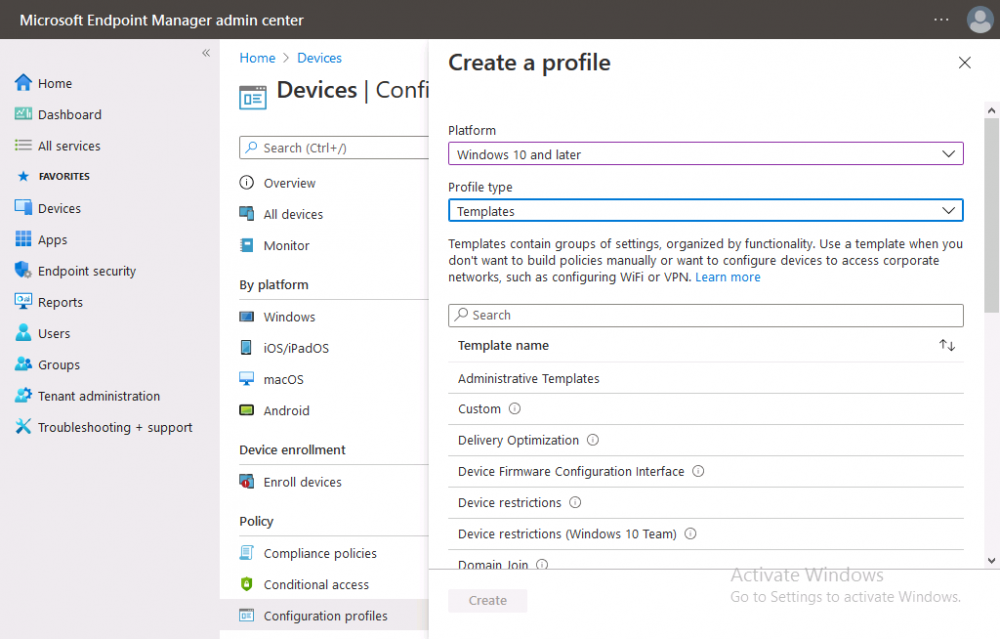
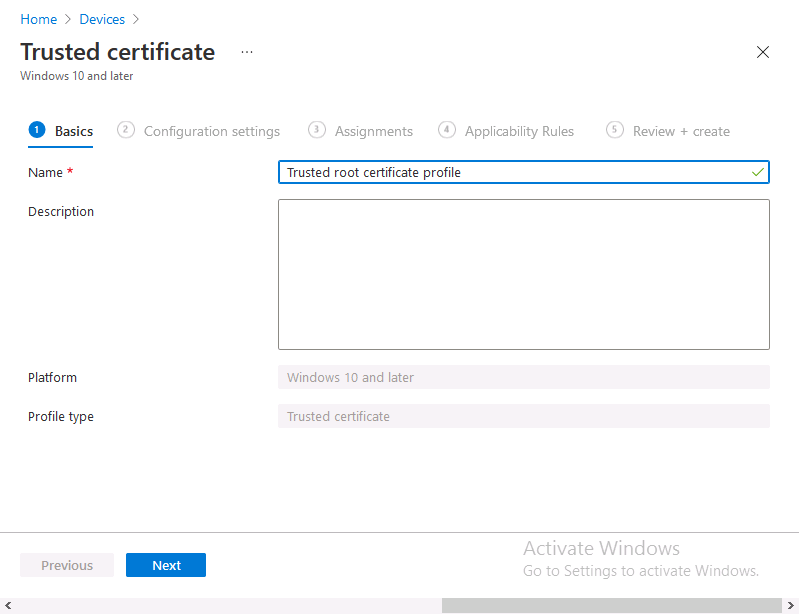
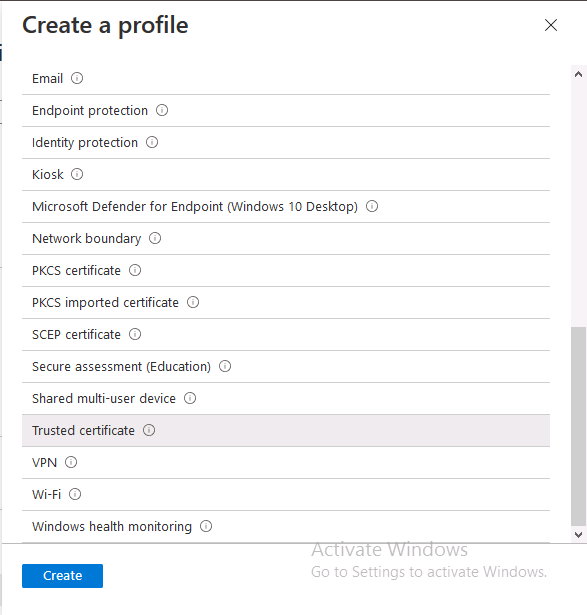
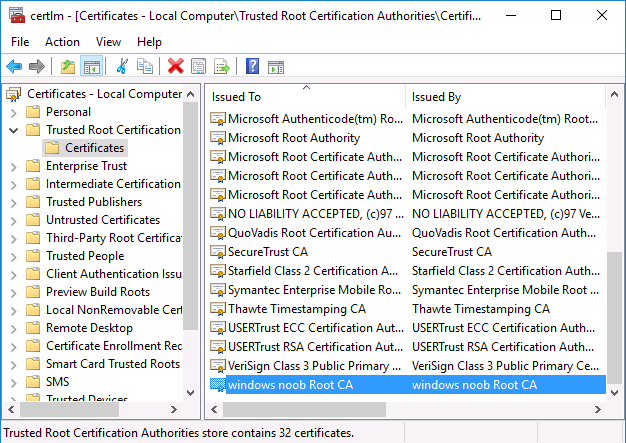
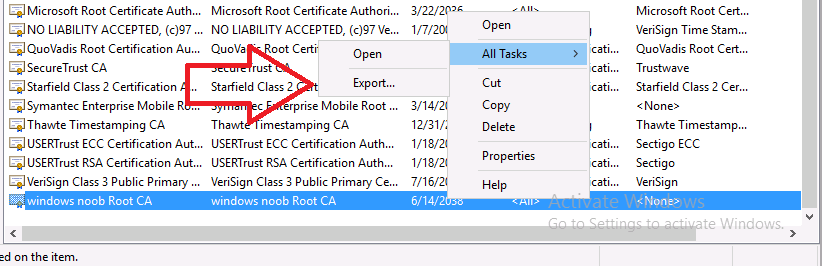
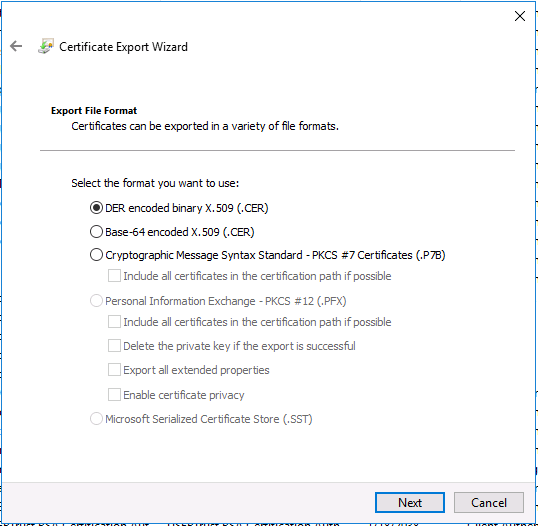
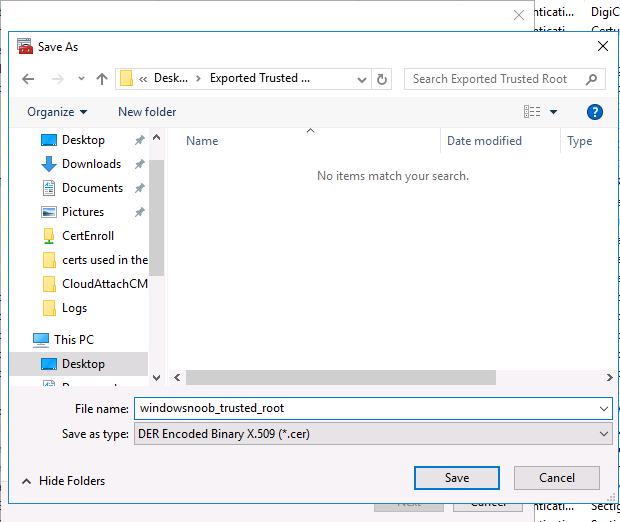
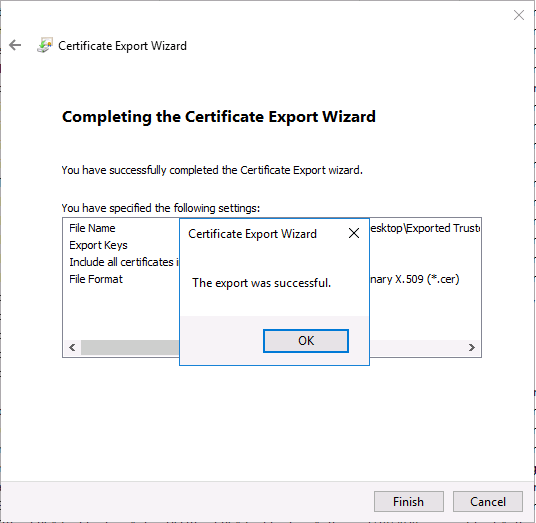
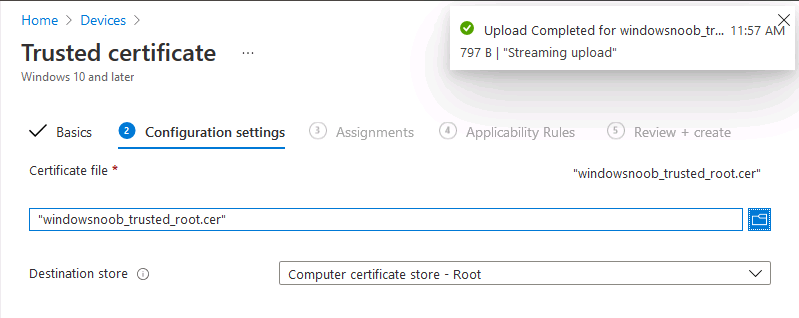
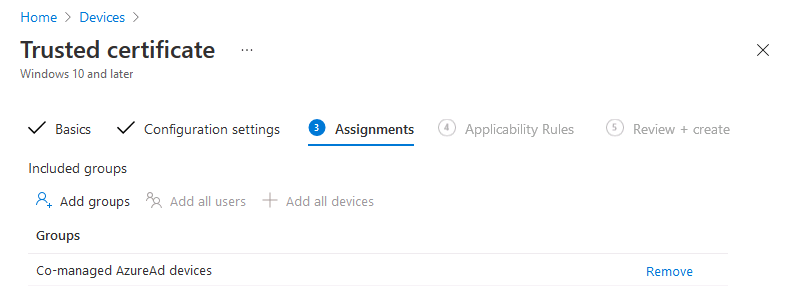
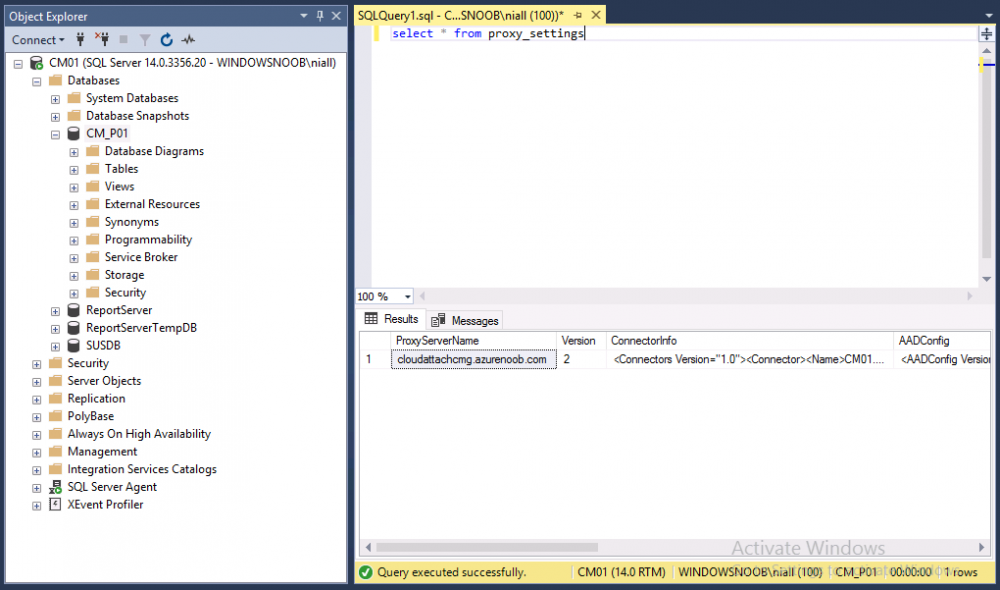
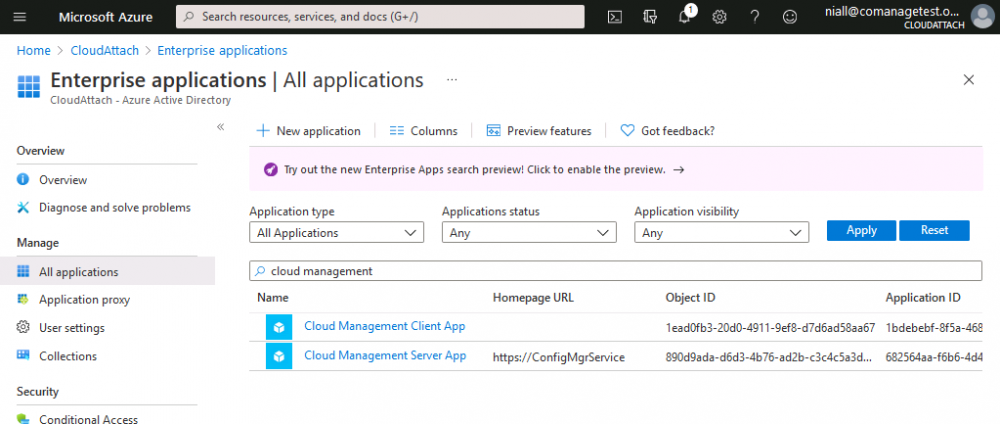
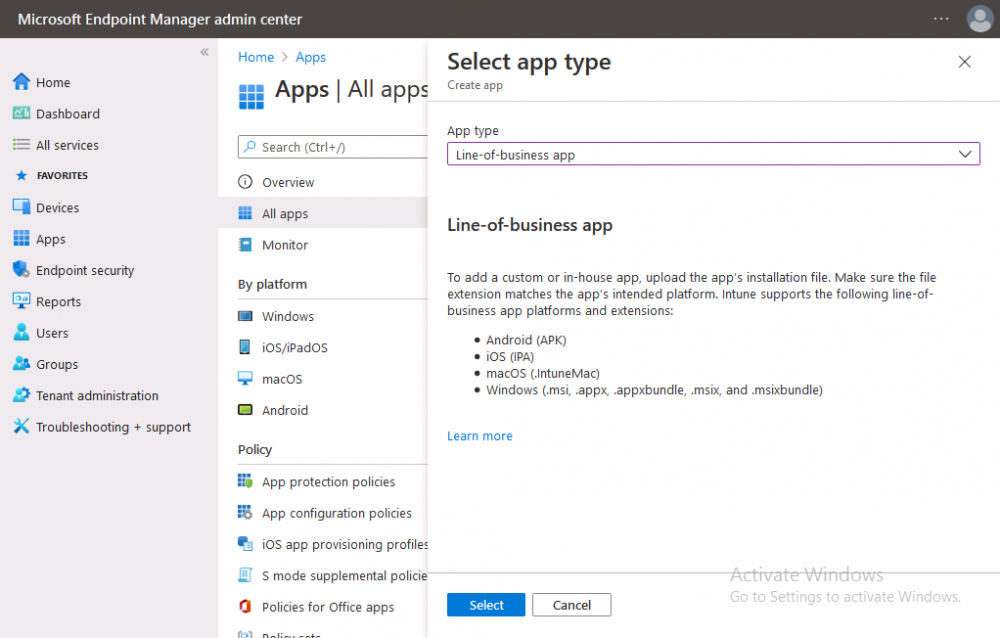
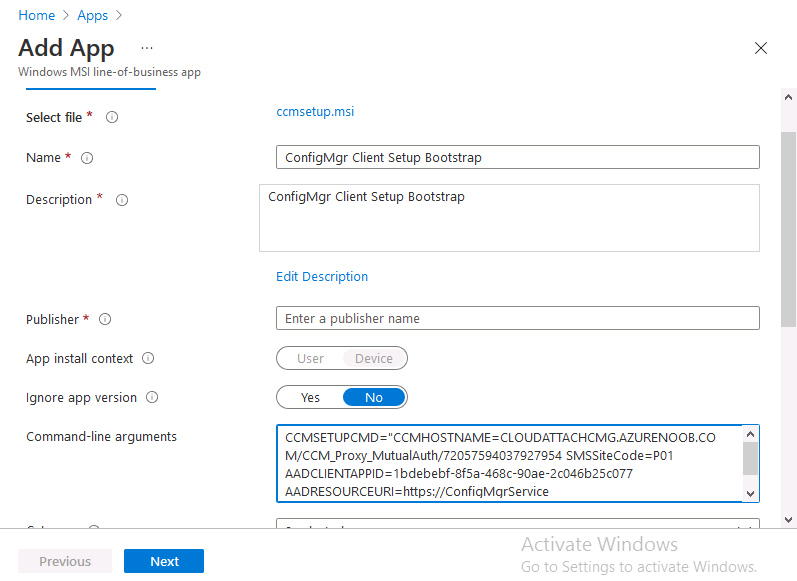
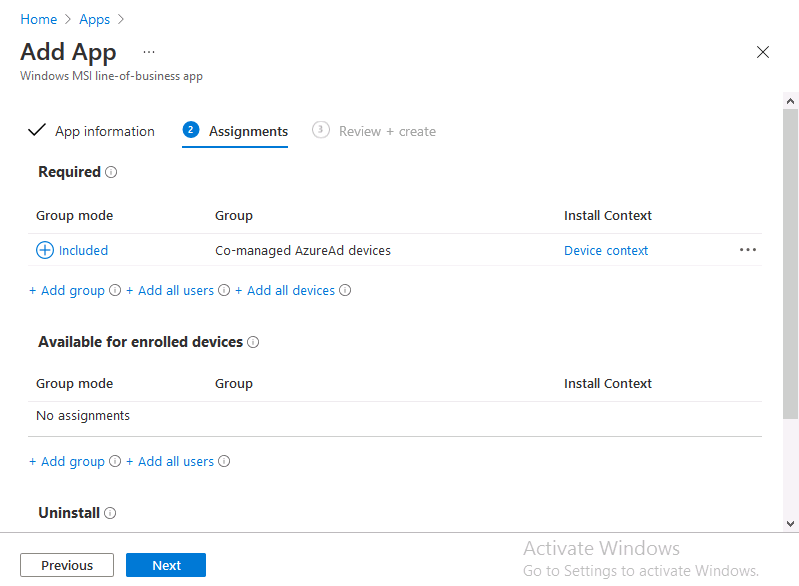
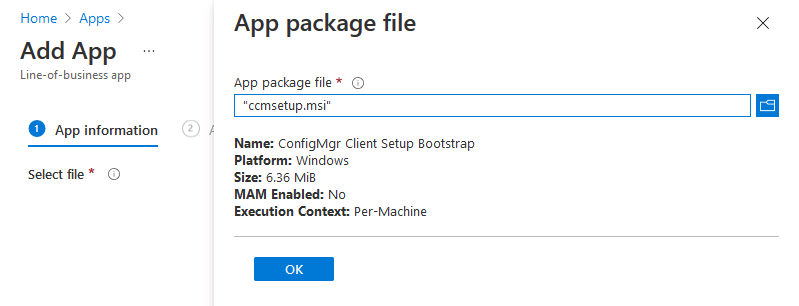
Introduction This is part 7 in a series of guides about cloud attach in Microsoft Endpoint Manager, with the aim of getting you up and running with all things cloud attach. This part will focus on enabling the compliance policies workload. This series is co-written by Niall & Paul, both of whom are Enterprise Mobility MVP’s with broad experience in the area of modern management. Paul is 4 times Enterprise Mobility MVP based in the UK and Niall is 10 times Enterprise Mobility MVP based in Sweden. In part 1 we configured Azure AD connect to sync accounts from the on premise infrastructure to the cloud. In part 2, we prepared Azure resources for the Cloud Management Gateway, in part 3 we created the cloud management gateway and verified that everything was running smoothly. In part 4 we enabled co-management. With co-management, you retain your existing processes for using Configuration Manager to manage PCs in your organization and you gain the additional advantage of being able to transfer workloads to the cloud via Endpoint Manager (Intune). In part 5 we enabled the compliance policies workload and reviewed how that affected a co-managed computer. In this part we will enable conditional access and see how that can be used to deny access to company resources. In part 6 we configured conditional access and used it to deny access to company resources unless the device was encrypted with BitLocker. In this part we'll show you that a device doesn't need to be hybrid Azure Ad joined in order to become co-managed and we'll show you one way to add an Azure AD joined device to co-management via a LOB (line of business) app. Microsoft recommends joining devices to Azure AD. Internet-based devices can use Azure AD modern authentication with Configuration Manager. It also enables both device and user scenarios whether the device is on the internet or connected to the internal network. Below you can find all parts in this series. Cloud attach - Endpoint Managers silver lining - part 1 Configuring Azure AD connect Cloud attach - Endpoint Managers silver lining - part 2 Prepare for a Cloud Management Gateway Cloud attach - Endpoint Managers silver lining - part 3 Creating a Cloud Management Gateway Cloud attach - Endpoint Managers silver lining - part 4 Enabling co-management Cloud attach - Endpoint Managers silver lining - part 5 Enabling compliance policies workload Cloud attach - Endpoint Managers silver lining - part 6 Enabling conditional access Cloud attach - Endpoint Managers silver lining - part 7 Co-managing Azure AD devices <- you are here Cloud attach - Endpoint Managers silver lining - part 8 Enabling tenant attach Cloud attach - Endpoint Managers silver lining - part 9 Renewing expiring certificates Cloud attach - Endpoint Managers silver lining - part 10 Using apps with tenant attach Step 1. Identify Azure ad joined devices To determine if a device is hybrid azure ad joined or azure ad joined let's take a look at the output of a command on two different computers, the following command will reveal this info. dsregcmd /status This reveals info containing lots of details, but we are mainly interested in the following properties of the device state. AzureADJoined DomainJoined On the left we have our hybrid azure ad joined device which is joined to an on-premises domain as well as joined to Azure AD. On the right, the equivalent output is shown from an azure ad joined device, as you can see the device on the right is only joined to Azure AD and that device is the target of today's blog post. We will show you how to co-manage this azure ad joined device and the steps needed to achieve that easily. If we look in Microsoft Endpoint Manager we can see those two devices, note that the hybrid azure ad joined device is already co-managed while the Azure AD joined device is not but it is enrolled into Intune. Step 2. Create an azure ad group Create an assigned Azure ad group called Co-managed AzureAd devices. We will use this group to target assigned devices with: Certificates used for communication to the on-premises infrastructure (when situated in that network) LOB app to deploy the Configuration Manager client Step 3. Add needed certificates Note: The on-premises infrastructure used for this series uses PKI (HTTPS) communication, so the client will communicate with on-premises client facing roles using HTTPS when on the same network, when it's not on the same network (or is on the internet), the CMG connection point does not need a client authentication certificate as the client uses Azure AD authentication. If we deploy the Trusted Root cert and Intermediate cert to our clients then when they roam into the on-premises network they'll flip over to 'currently intranet' in the ConfigMgr client properties, and be able to download content from the local distribution point rather than from the CMG. If you don't do this, they'll stay as 'currently internet' and download content from the CMG even when located on the same network as the on-premises Configuration Manager site servers (such as MP, SUP, DP). Below you can see how the client behaves when it is on the same network as your on-premises infrastructure when these certificates are not deployed to it. Note the errors in ClientLocation.log and how the Connection Type is set to Currently Internet. and below is the same client after having the Trusted Root Certificate and Intermediate Certificate installed. Note how the ClientLocation.log no longer complains about being able to talk to the local MP and the Connection Type is now set to Currently Intranet. To resolve this (for communicating with client facing roles in the on-premises network), simply deploy the certificate used in your certificate chain within your infrastructure, we use a 2-tier chain so that means the following certs need to be deployed. Trusted Root Certificate Intermediate Certificate To deploy the certs, you'll need to export them first on a client computer that has the certificates in its' certificate store. Exporting certificates To export the certificates you can do as follows. On a client computer that has the certificates installed, open CertLM.msc and select the Trusted Root Certification section, select Certificates and browse to your Trusted Root Certificate. Right click the chosen certificate and choose Export. The Certificate Export Wizard appears, click Next. For Export File Format, choose the default option DER encoded binary x.509 (.CER) and click Next. Next specify the name of the file to export, we recommend naming it after the actual certificate function and click Save. and click OK and then click Finish at the summary. Note: Repeat the above exercise for each certificate in your chain. Deploy the Certificates using MEM Open Microsoft Endpoint Manager and select Devices, select Configuration Profiles, select Windows 10 or later, and then select Templates. In Templates, scroll down to Trusted certificate. and click Create. Fill in some details about the certificate profile you are creating and then click Next. then point it to the related certificate file exported above and make sure to select the correct destination store for the certificate. Below is how the Trusted Root Certificate is deployed, note the destination store is Computer certificate store - Root Next, assign the profile to the Azure AD group created in Step 2, in this case it's the Co-managed AzureAD devices group. Continue through the wizard until completion. Note: Repeat the above exercise for each certificate in your chain. Below you can see both the Trusted root certificate and the Intermediate certificate are assigned. Step 4. Create a line of business application Next we'll deploy a line-of-business (LOB) application to install the ConfigMgr client agent on our Azure AD joined devices. A line-of-business (LOB) app is one that you add from an app installation file. This kind of app is typically written in-house. The following steps provide guidance to help you add a Windows LOB app to Microsoft Intune. Source Create the cmdline To do so however we'll first need to gather some info for our cmdline, the first part of that cmdline is already present in the Enablement tab of the Co-management node as shown here. Copy and paste that cmdline into notepad. CCMSETUPCMD="CCMHOSTNAME=CLOUDATTACHCMG.AZURENOOB.COM/CCM_Proxy_MutualAuth/72057594037927954 SMSSiteCode=P01" We do have to fill in some additional values however, as per the documentation, we are adding the SMSMP property as our clients will roam back to the intranet, if yours do not, then that property is not needed. so let's figure out the values for these properties AADCLIENTAPPID AADRESOURCEURI SMSMP To retrieve some of this data you can query SQL directly with the following command: select * from proxy_settings Some data will be returned. highlight the AADConfig Version column, right click and choose Copy. Paste the results into notepad, the following values can be retrieved from the data AADCLIENTAPPID AADRESOURCEURI You can even confirm the AADCLIENTAPPID in Enterprise Applications in Azure using the Application ID column. So now we have those values, the remaining value is for the following setting SMSMP, and that's easy to fill in, so in our case that would be SMSMP=https://cm01.windowsnoob.lab.local OK, now we've got all the properties populated, here is the finished cmdline CCMSETUPCMD="CCMHOSTNAME=CLOUDATTACHCMG.AZURENOOB.COM/CCM_Proxy_MutualAuth/72057594037927954 SMSSiteCode=P01 AADCLIENTAPPID=1bdebebf-8f5a-468c-90ae-2c046b25c077 AADRESOURCEURI=https://ConfigMgrService SMSMP=https://cm01.windowsnoob.lab.local" Deploy the LOB app In Microsoft Endpoint Manager, select Apps, select All apps, scroll down to Other and choose Create Line-of-business app. Click on Select. In the App information screen, point the App package file to the ccmsetup.msi file available in <ConfigMgr installation directory>\bin\i386 Fill in information as required and paste in the cmdline you've just created above. Click Next and assign the app to the Co-managed Azure AD devices group and that's it. Now all you need to do is deploy an Azure AD Joined device (an example of that could be a Windows Autopilot Intune managed device), then add that device to the co-managed Azure AD devices group and wait until it has received the policy, once done, you'll have a co-managed Azure AD joined device as shown below. Job done ! Please join us in the part 8 where we'll take a look at enabling Tenant Attach. Recommended reading How to prepare internet-based devices for co-management - https://docs.microsoft.com/en-us/mem/configmgr/comanage/how-to-prepare-win10 Configure client authentication for cloud management gateway - https://docs.microsoft.com/en-us/mem/configmgr/core/clients/manage/cmg/configure-authentication Configure client authentication for cloud management gateway - https://docs.microsoft.com/en-us/mem/configmgr/core/clients/manage/cmg/configure-authentication#bkmk_cmgcp


-
here are some pointers, this should get you started. to set a task sequence variable called detectedOU in an SCCM task sequence you can create a run command line step like so, it just requires you to set the powershell variable $detectedOU using either of the two detection methods i posted in an earlier post above powershell.exe -executionpolicy bypass -command "& {$tsenv = New-Object -COMObject Microsoft.SMS.TSEnvironment; $tsenv.Value('detectedOU') = $detectedOU}" once you've set the task sequence variable, you can then create additional run command line steps to take actions based on the %detectedOU% variable value I hope that explains it
-
anything is possible, with powershell you can find out the info as below For user: Get-ADOrganizationalUnit -Identity $(($adUser = Get-ADUser -Identity $env:USERNAME).DistinguishedName.SubString($adUser.DistinguishedName.IndexOf("OU="))) For computer: Get-ADOrganizationalUnit -Identity $(($adComputer = Get-ADComputer -Identity $env:COMPUTERNAME).DistinguishedName.SubString($adComputer.DistinguishedName.IndexOf("OU="))) once you have that data, you can assign it to a task sequence variable and do whatever you want based on that variable
-
you could separate individual commands, such as mkdir %userprofile%\DESKTOP\WMS and for the Options tab, only run if it that folders exists, therefore that step alone would only run if the folder doesn't exist, and it would create the desired folder... then do something similar for the other bits, that would be how i'd approach it
-
so let me get this straight, you currently have an MBAM infrastructure to manage recovery keys etc of your BitLockered computers, and these computers have the SCCM client on them also, you want to deploy and os upgrade via sccm to get them into Intune, is that what you want ? do you mean co-managed (as in configmgr client is installed and Configmgr handles some workloads, intune handles the rest) ? or do you want these devices/computers to be Intune only managed ? please explain....
-
can you go into some detail, include snippets of what you have now and what you'd like to achieve, otherwise we are just left wondering...
-
Deploy Office 365 Update SCCM 2010
anyweb replied to walid's topic in System Center Configuration Manager (Current Branch)
from the log and look at this, further down in the log so have you defined maintenance windows here ?
-
looks like you have the same problem as this guy, have you tried contacting Dell about it ?
-
from what I can see it looks like it's related to software updates that were approved but are no longer downloadable from Microsoft, hence the 404, so start looking in that direction
-
there are two reasons, if you deploy this as required to your autopilot devices then how will you know when to run it, when deployed to users you can look for the username and make sure it doesn't match defaultuser0 (the user account used by windows during autopilot oobe), to ignore that user and only do actions based on a valid user, you could probably use this method in your scenario but you'll need to get creative in adapting it, or start targeting users you could do it by verifying that the logged on user is NOT defaultuser0 and that there is a logged on user, sounds weird but that could do it
-
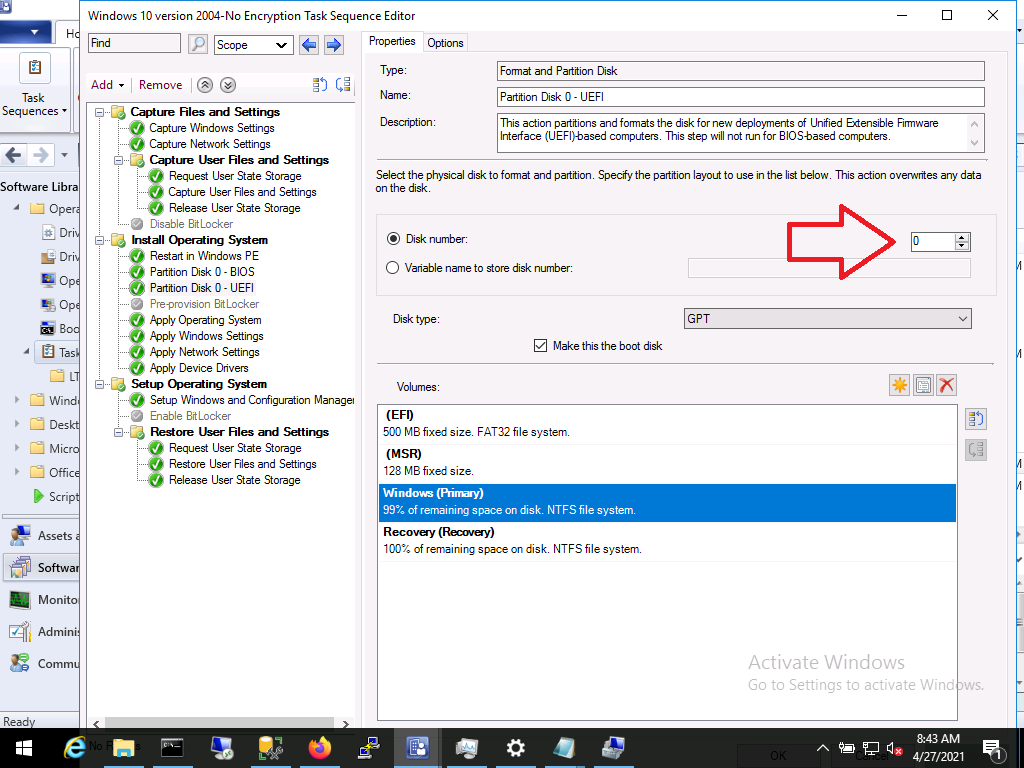
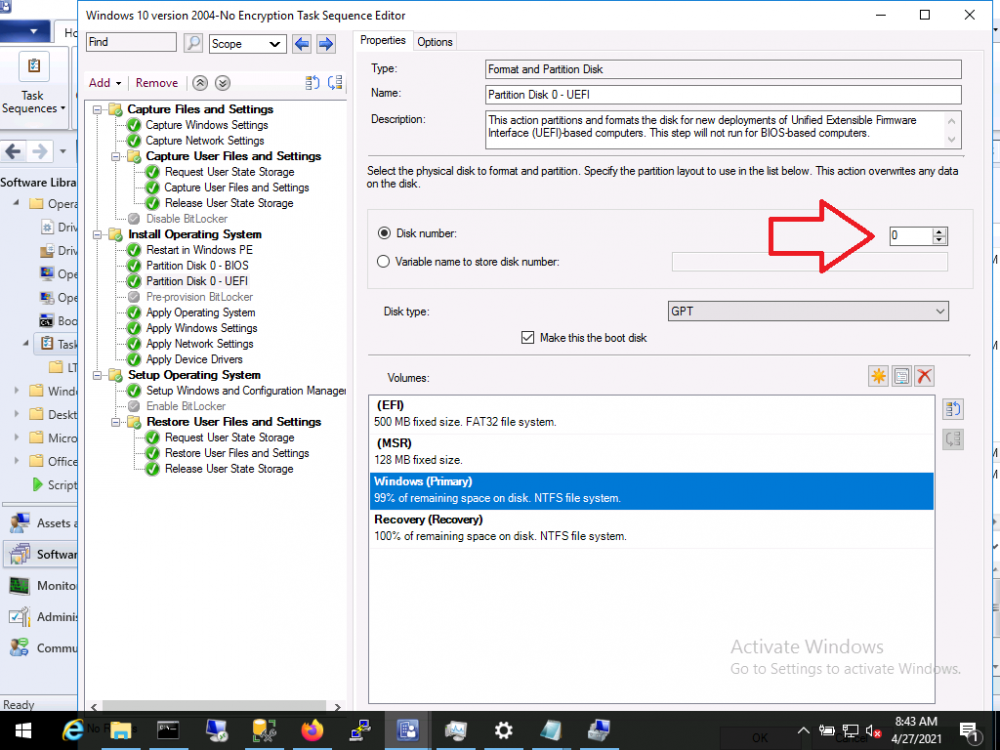
well you could create a powershell script to check the size of both discs and find out which is smaller, should be easy to do, and based on that set an sccm variable which will govern whether the partition disk step runs on that disk or not
-
i couldn't see it before I think the issue was on Microsoft's side, but it works now
-
3rd party updates
anyweb replied to jkjk12's topic in System Center Configuration Manager (Current Branch)
have you reviewed this video yet ? if not skip through it to see what you've missed, it's based on ConfigMgr 1910 but it'll give you some clues hopefully -
not great but you'll need to figure out what disk number each type of disk is normally reported as, if they are consistently the same across models then use that knowledge to modify the Format Partition steps to only target the disk you want (and not the other disk) if they are not consistent then you'll need to build a powershell script or clever WMI checks to determine what type of disk it is and whether to format it or not
-
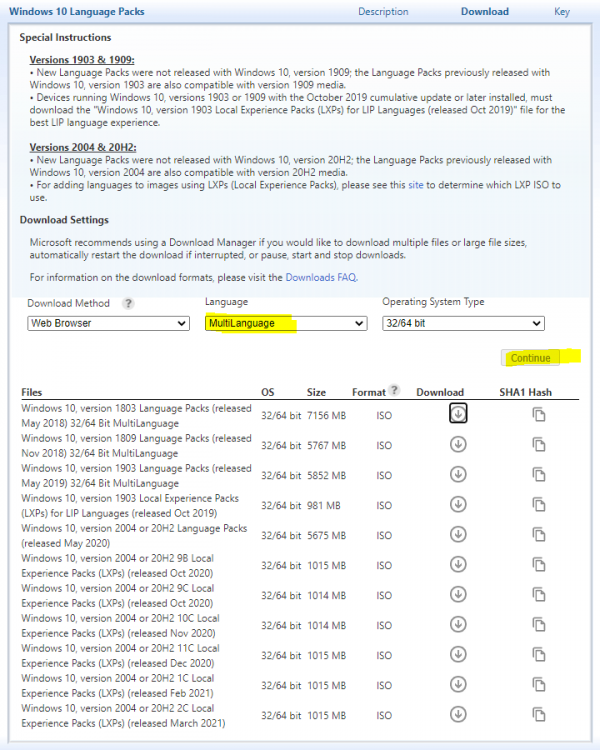
go back in vlsc, make sure to select Multilanguage as i have done here, then click continue, guess what you'll see then