anyweb
-
Posts
9271 -
Joined
-
Last visited
-
Days Won
371
Everything posted by anyweb
-

SCCM 2007 SP2 prerequisites download
anyweb replied to EngiNerd's topic in Configuration Manager 2007
so I found the original media (not the pre-reqs) is still on Microsoft Volume License Service Center, when you try to install it is it giving you errors on all the files or just some ? -
SCCM 2007 SP2 prerequisites download
anyweb replied to EngiNerd's topic in Configuration Manager 2007
ok i looked and sadly they are deleted... -
SCCM 2007 SP2 prerequisites download
anyweb replied to EngiNerd's topic in Configuration Manager 2007
ah I had those files but deleted them recently, i'll dig deeper and see can i find them... -
well you can't join a domain if you can't reach the domain, so problem solved, now you need to know why you have no ip, the usual reason is lack of network drivers, so add them to your boot image (if needed) or via the task sequence and things should improve
-
hi Mark, yes I'm planning on releasing an updated version just as soon as CM2022 is released.... time willing of course. cheers niall <-
-
did you verify that you have a valid network ip at this point ?
-
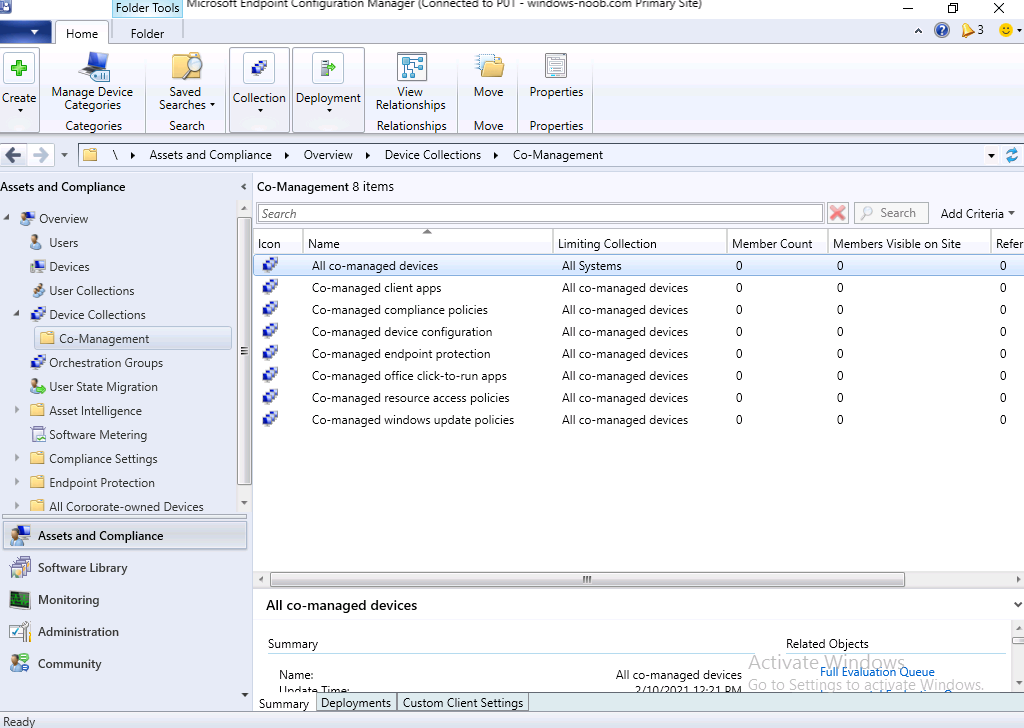
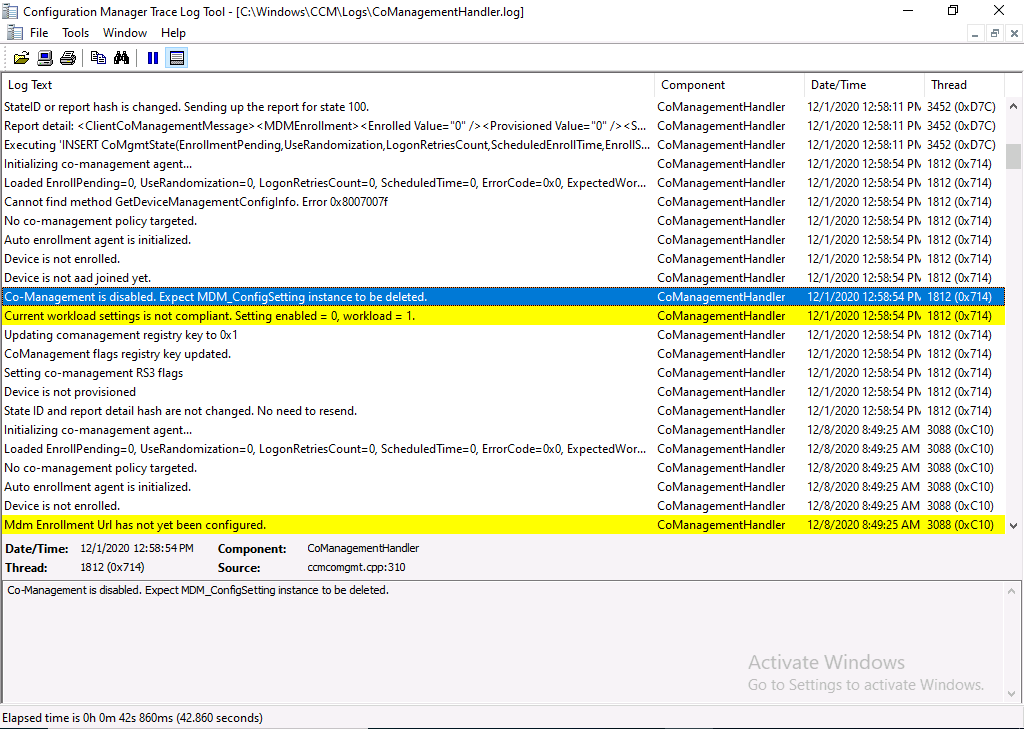
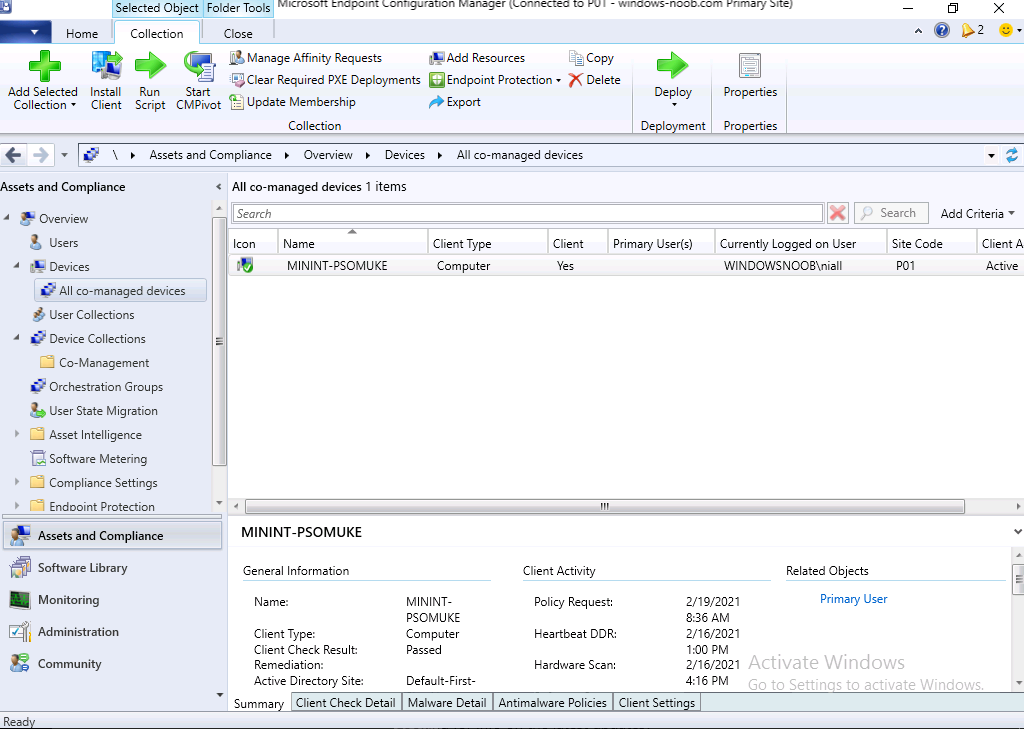
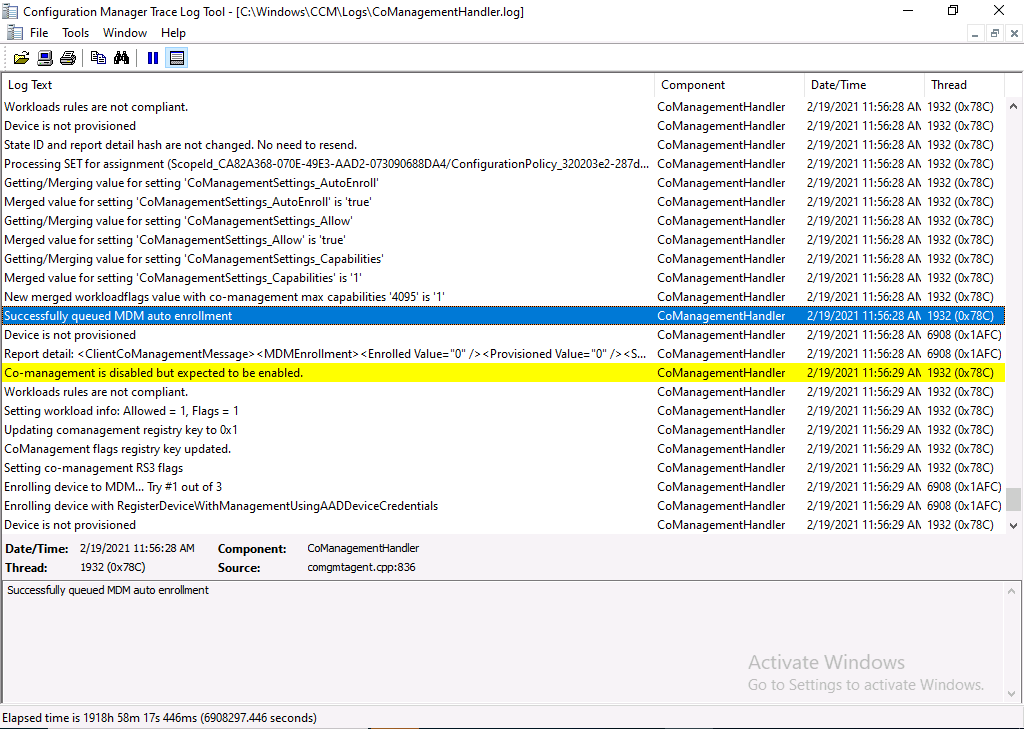
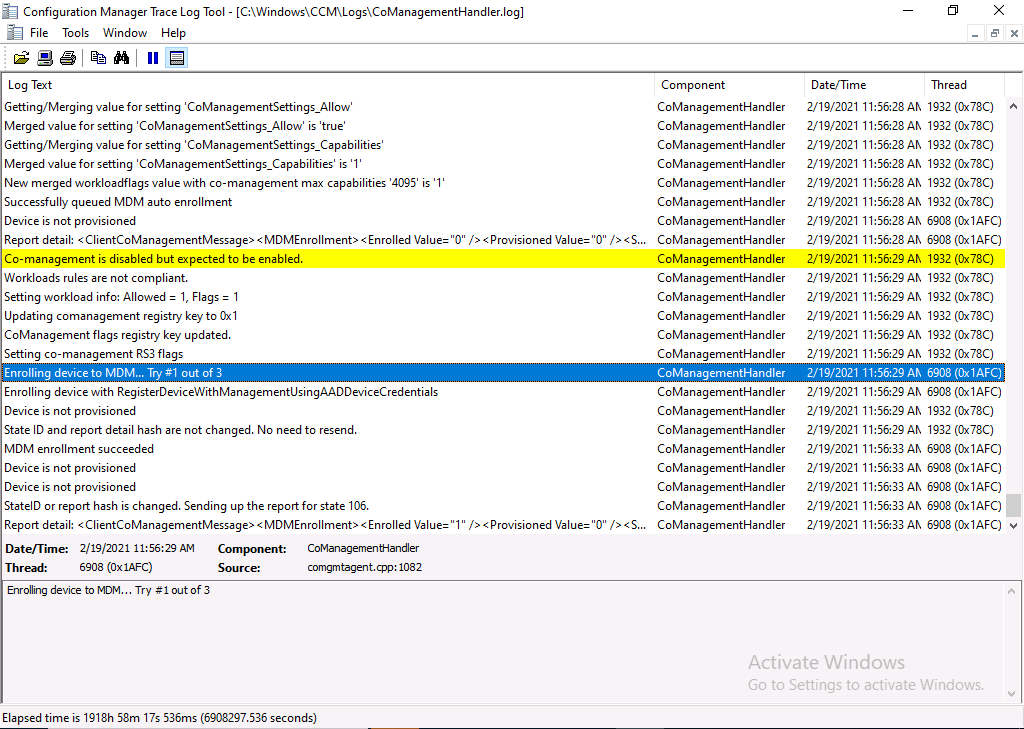
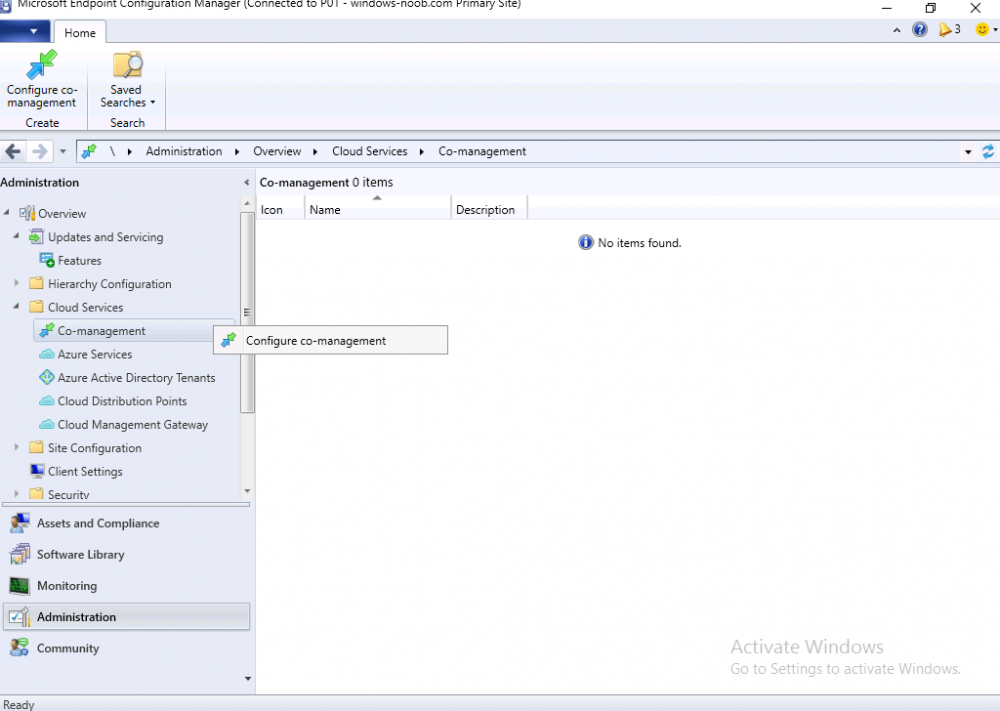
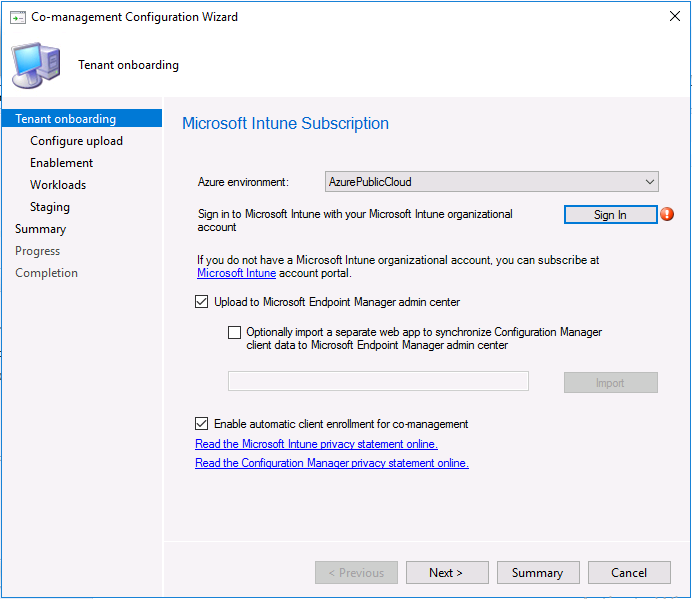
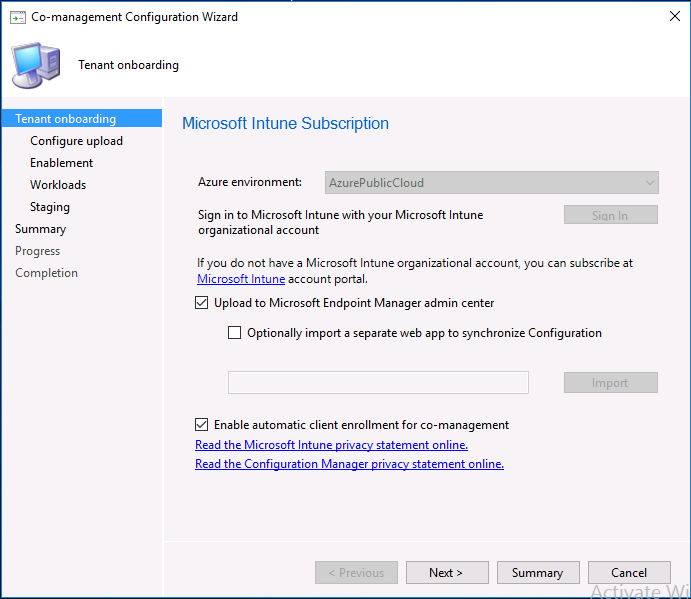
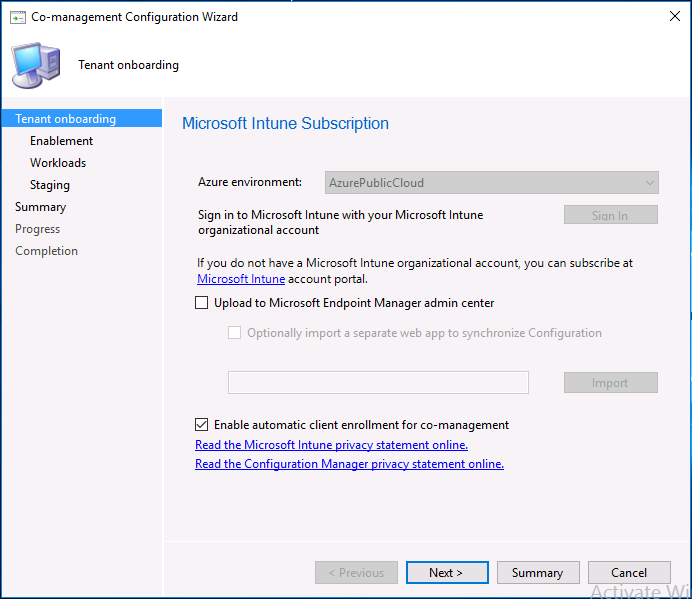
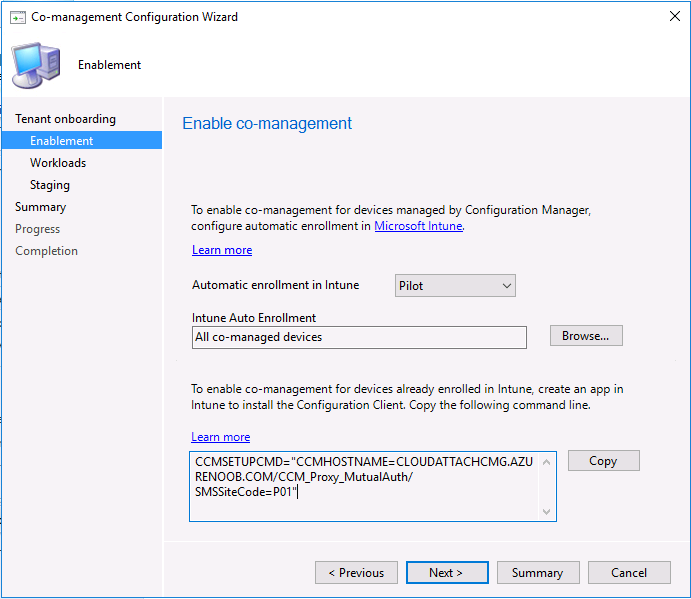
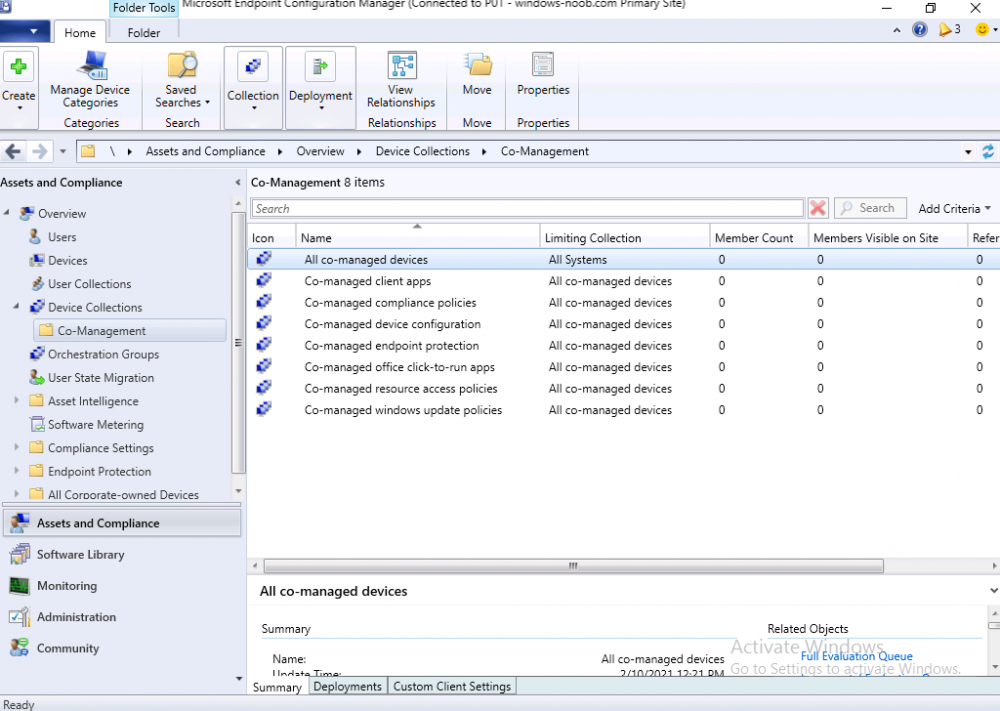
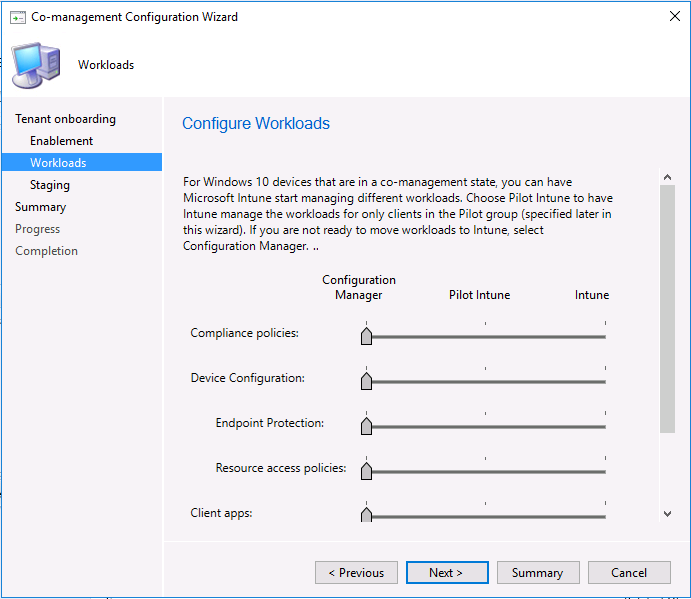
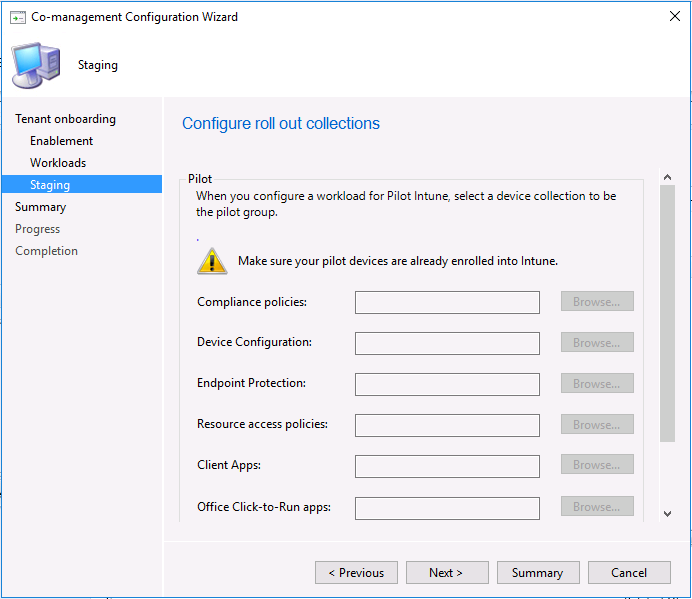
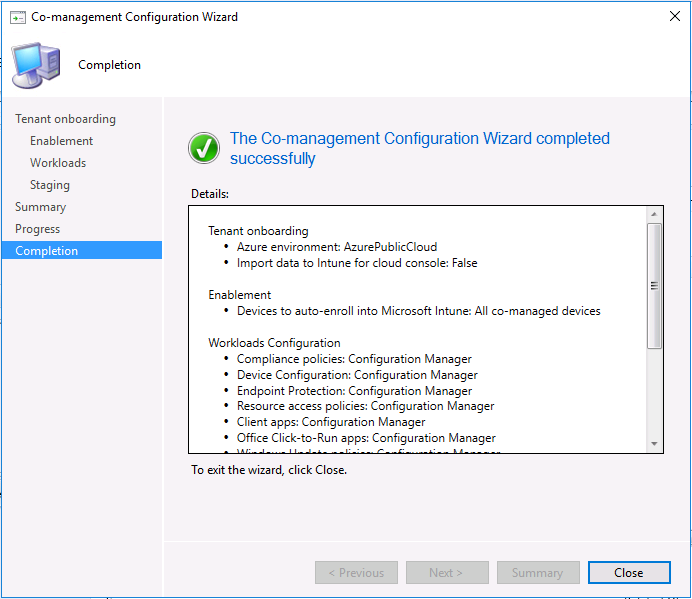
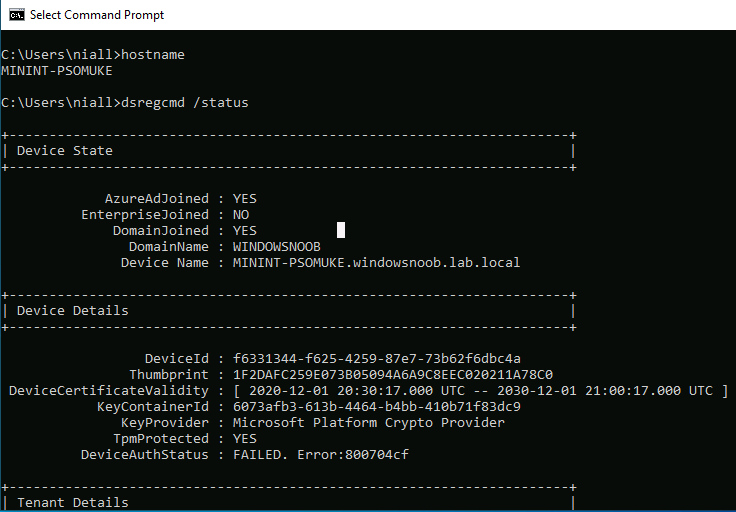
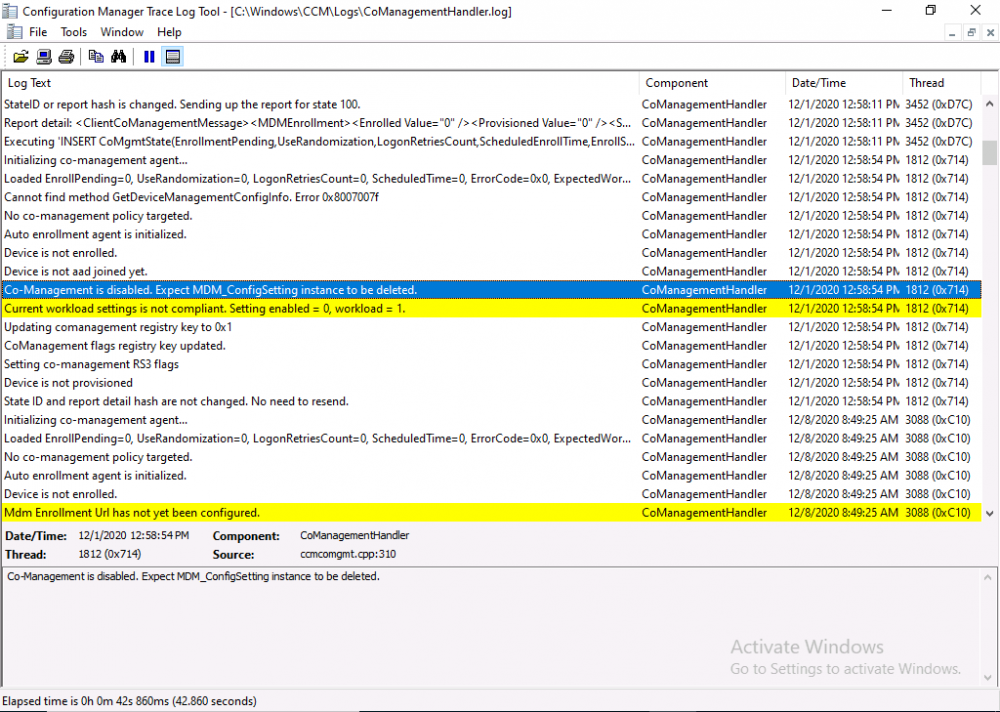
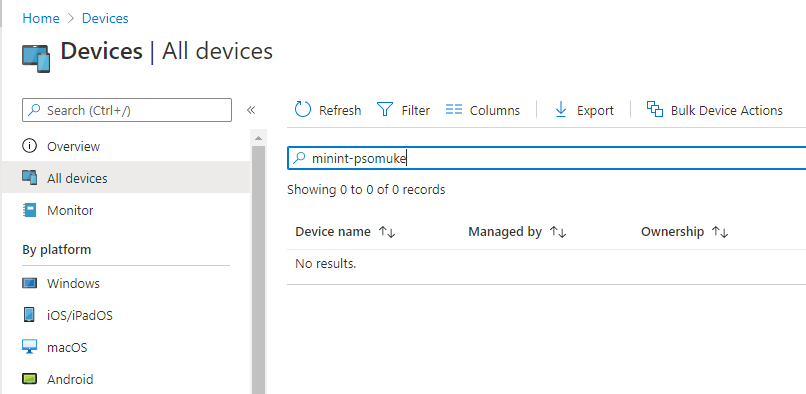
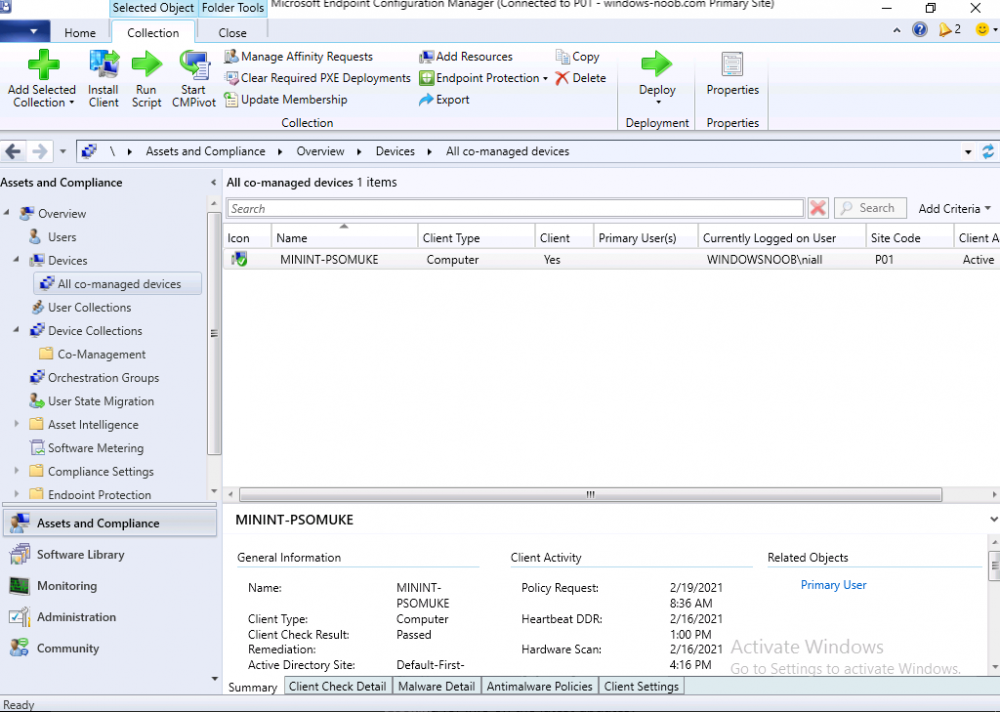
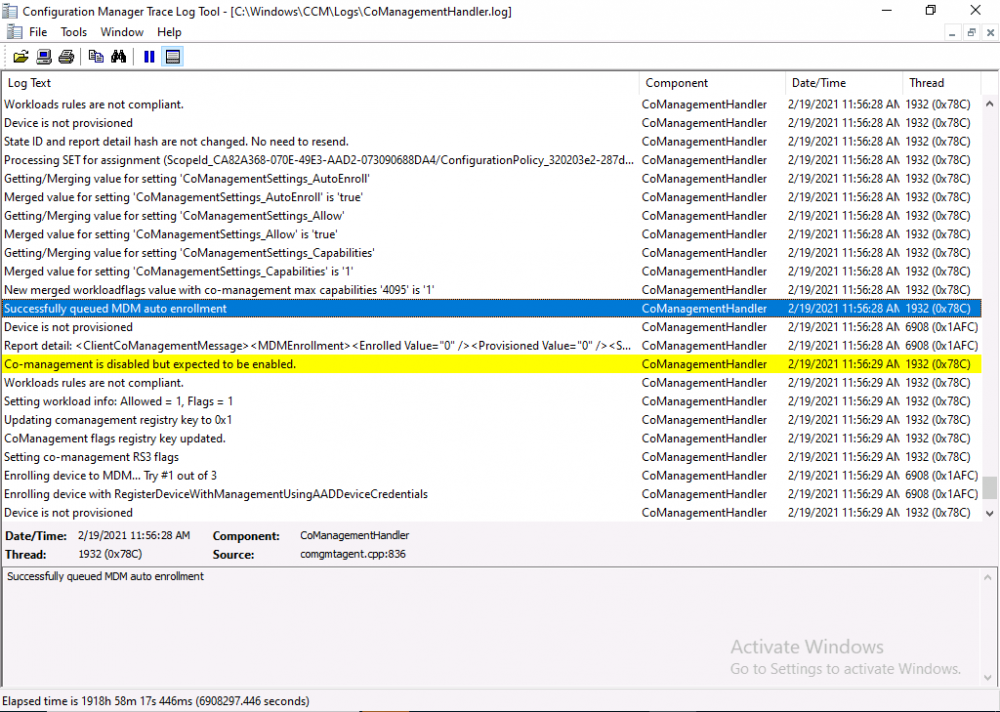
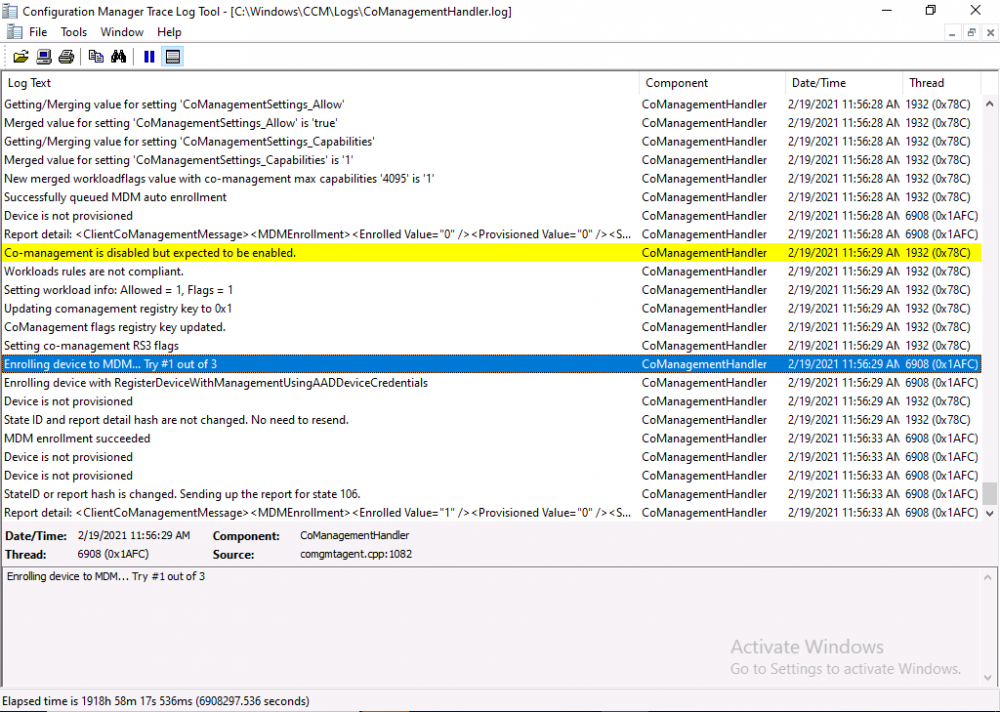
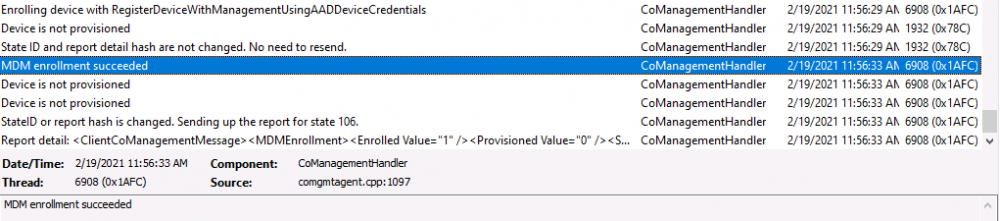
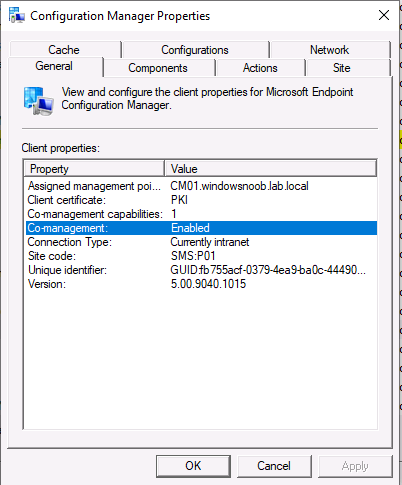
Introduction This is part 4 in a series of guides about cloud attach in Microsoft Endpoint Manager, with the aim of getting you up and running with all things cloud attach. This part will focus on enabling co-management. This series is co-written by Niall & Paul, both of whom are Enterprise Mobility MVP’s with broad experience in the area of modern management. Paul is 4 times Enterprise Mobility MVP based in the UK and Niall is 10 times Enterprise Mobility MVP based in Sweden. In part 1 we configured Azure AD connect to sync accounts from the on premise infrastructure to the cloud. In part 2, we prepared Azure resources for the Cloud Management Gateway, in part 3 we created the cloud management gateway and verified that everything was running smoothly. In this part we will enable co-management. With co-management, you retain your existing processes for using Configuration Manager to manage PCs in your organization and you gain the additional advantage of being able to transfer workloads to the cloud via Intune. Below you can find all parts in this series. Cloud attach - Endpoint Managers silver lining - part 1 Configuring Azure AD connect Cloud attach - Endpoint Managers silver lining - part 2 Prepare for a Cloud Management Gateway Cloud attach - Endpoint Managers silver lining - part 3 Creating a Cloud Management Gateway Cloud attach - Endpoint Managers silver lining - part 4 Enabling co-management <- you are here Cloud attach - Endpoint Managers silver lining - part 5 Enabling compliance policies workload Cloud attach - Endpoint Managers silver lining - part 6 Enabling conditional access Cloud attach - Endpoint Managers silver lining - part 7 Co-managing Azure AD devices Cloud attach - Endpoint Managers silver lining - part 8 Enabling tenant attach Cloud attach - Endpoint Managers silver lining - part 9 Renewing expiring certificates Cloud attach - Endpoint Managers silver lining - part 10 Using apps with tenant attach Step 1. Create some pilot collections In ConfigMgr, create some collections that we'll use for co-management, a suggestion is shown below. We've created an All co-managed devices collection which will contain all the devices we intend to co-manage. Create one collection for each corresponding co-management workload, and limit those collections to the All co-managed devices collection. The following workloads are currently available: Compliance policies Device configuration Endpoint Protection Resource access policies Client apps Office Click-to-Run apps Windows Update policies Step 2. Configure co-management In the Configuration Manager console, go to the Administration workspace, expand Cloud Services, and select the Co-management node. Right click and choose Configure co-management in the ribbon to open the Co-management Configuration Wizard. The co-management configuration wizard will appear, below screenshot is from ConfigMgr version 2010. On the Subscription page of the wizard, configure the following settings: • The Azure environment to use. For example, the Azure Public Cloud or the Azure US Government Cloud. • Select Sign In. Sign in as an Azure global administrator Note: By default, the option Upload to Microsoft Endpoint Manager admin center is enabled by default, this is part of tenant attach and we will deal with setting up tenant attach in a later blog post, for now, deselect this option for pure co-management. From the drop down select Pilot as we want to selectively target pilot (beta test) our co-managed devices. Browse to the All co-managed devices collection created in step 1. If you select All then all devices will be enabled for Intune Auto Enrollment and become co-managed. The text in the box below is used when deploying the configuration management client to devices already enrolled in Intune via a line of business app. This text is used as a command line parameter to onboard the targeted devices as co-managed. On the Configure workloads screen, keep all the workloads pointing to ConfigMgr for now. We will enroll a client into co-management and then verify the status of that client before and after moving a workload to Pilot. When a workload points to Pilot, you will have to pick a staging collection, use the corresponding collection (from step 1) for that particular workload. You can add one or more devices to that pilot collection in order to test how the workloads behave on those targeted clients. When you move the slider to Intune, this enables that workload for all of your co-managed devices that are present in your All co-managed devices collection. On the staging screen we are not able to select anything since we left all our workloads at ConfigMgr (for now). We will show you how to flip workloads in the next blog post. Click next through the Summary and verify you are happy with the choices before proceeding through to the completion of this wizard. Step 3. Adding devices to the All co-managed collection In this step we will review what happens on a client computer before and after it becomes co-managed. On a computer that is not co-managed, open the Configuration Manager client agent. If you look at the Co-management capabilities property it has a value of 1 as in the screenshot below. This means that the client is capable of co-management but no workloads are configured or targeted to this device. The Co-management property beneath that states Disabled and that is because co-management is not currently enabled on this client. On the same client, open the CoManagementHandler.log in C:\Windows\CCM\Logs and look for the following line. Co-Management is disabled. Expect MDM_ConfigSetting instance to be deleted. The workload=1 matches the co-management capabilities property in the ConfigMgr client agent. On the same device, open a command prompt and type dsregcmd /status This reveals that the client is AzureADjoined = yes. We configured this Azure AD connect to synchronize our devices into Azure in part 1 of this blog series. You can confirm that the device is in Azure AD by checking in https://portal.azure.com under Azure Active Directory devices as per the screenshot below. If you search for the device in the Endpoint Manager console it will not appear at this point as it is currently not enrolled (or managed) in Intune. The screenshot below shows devices in Endpoint In ConfigMgr, add this device to the All co-managed devices collection. Note about licenses. The user that signs on to the device needs to have an Intune license and an Azure Premium license. After triggering machine policy on the client the log file reveals the following. Processing SET for assignment (ScopeId_....) shortly followed by... Successfully queued MDM Auto enrollment And then you'll see the following text: Enrolling device to MDM... Try #1 out of 3 If it succeeds look for the following: MDM enrollment succeeded. If you close and then re-open the ConfigMgr client agent, you should now see that it has changed the Co-management property to Enabled. and if you open the Endpoint Manager console, you'll find your client and it's listed as Managed by with a value of Co-managed as per the screenshot below. and if you look at the device in Azure AD devices the MDM authority will show as System Center Configuration Manager. Related reading Microsoft have produced a bunch of blog posts and videos about Co-management called Cloud connecting with co-management here. You can read a FAQ about co-management here. That's it for this blog post, please join us in the next part where we will look at co-management workloads.


-
did you try repairing wmi on a client with the issue, did that make any difference ?
-
Sure, it’s not the most exciting aspect of an IT administrator’s job but having a reliable and secure backup and disaster recovery strategy could be the most important thing you do. I’m sure you’ve heard many data loss horror stories that have crippled organizations costing thousands, if not millions, of dollars. This free eBook from Altaro will make sure you’re not the next horror story victim. The Backup Bible Complete Edition, written by backup expert and Microsoft MVP Eric Siron, is comprised of 200+ pages of actionable content divided into 3 core parts, including 11 customizable templates enabling you to create your own personalized backup strategy. Part 1 and 2 are updated versions of previously released eBooks (Creating a Backup & Disaster Recovery Strategy and Backup Best Practices in Action) but Part 3 is a brand-new section on disaster recovery (Disaster Recovery & Business Continuity Blueprint) that includes tons of valuable insights into the process of gathering organizational information required to build a DR plan and how to carry it out in practical terms. One of the most useful features of The Backup Bible is the customizable templates and lists that enable the reader to put the theory into practice. These are found in the appendix but are linked in the text at the end of each relevant chapter. If you are going to read this book cover to cover it would be a good idea to fill out the templates and lists as you go through it, so by the time you’ve finished reading you’ll have a fully personalized backup action plan ready for you to carry out! The Backup Bible Complete Edition also works as a great reference guide for all IT admins and anyone with an interest in protecting organizational data. And the best thing of all: it’s free! What are you waiting for? Download your copy now!

-
i mean, did it succeed in installing SCCM, can you start it via the console icon ?
-
it's been a while since I wrote the script, it says installing SCCM, did it ?
-
for this particular series unfortunately I won't release part 8, however you can review this post about creating boundaries and hopefully time willing i'll produce a new series on ConfigMgr version 2103 later this year.
-
I think they are stuck in progress because they never continue, they've failed during/after the reboot, only digging into the smsts.log will you know for sure, but that should reveal the cause
-
welcome to the forums ! we are happy to help
-
it's not broken, you just need to be logged in as a member to download files from windows-noob.com now you are so please try again.
-
ah is there a child task sequence involved ? Run Task Sequence step is disabled. Not including child task sequence with package ID 'PRI004CA' into the sequence.
-
accidentally deleted task sequence
anyweb replied to CertisEU's topic in System Center Configuration Manager (Current Branch)
create a virtual machine machine the same setup as your primary, install SQL, and restore the db on that vm, that would be how i'd do it... -
you need the actual sql server 2017 ISO (the cd) in drive d:\ or whatever drive you are attaching it to... that is the installation media
-
what does the smsts.log tell you ?
-
how did you install sql ? that's where the sql accounts) are defined...
-
Folder SMSTSLog in C:\ drive
anyweb replied to as400ssw's question in Deploying Windows 10, Windows 8.1, Windows 7 and more...
no problem, I've reminded them that people are seeing it so hopefully a bug fix will come soon -
Folder SMSTSLog in C:\ drive
anyweb replied to as400ssw's question in Deploying Windows 10, Windows 8.1, Windows 7 and more...
it's a bug, the microsoft product group are aware of it, it doesn't happen for everyone, just some people cheers niall -
so again, what is causing it to be critical, what do the status messages say ?
-
I don't understand what you are saying...
-
and what is it complaining about ?