anyweb
-
Posts
9202 -
Joined
-
Last visited
-
Days Won
367
Everything posted by anyweb
-
 do you have any app*.log files you can zip up for me please also, what is the exact name of the Install Applications step ?
 -
i'll see if i can replicate this in my lab, was ConfigMgr integrated with MDT or not and if so which version ?
-
what steps are in the install software group, can you show a screenshot of the task sequence, what i can see from the log is it sets a reg key in that group and then restarts, that's about all.
-
please include your smsts.log and ccmsetup.log (attach as zip)
-
If CRL checks are disabled in your environment, then how is the CRL check setting in the properties of your CMG set to ?
-
Cloud Management Gateway ERROR
anyweb replied to speedloader's topic in System Center Configuration Manager (Current Branch)
is there any proxy/network blocking internet to the CMG ? it's hard to troubleshoot as your messages above are in french, can you run them through google translate and post them here please ? cheers niall -
thanks can you please confirm that you've done step 5 of this guide here ?
-
Remove Built in Apps from 20H2
anyweb replied to kesh's topic in System Center Configuration Manager (Current Branch)
have you tried any of the regular posh scripts for doing this in 20h2 ? if so what was the result ? -
not that i'm aware of, what version of ConfigMgr are you using and is it MDT integrated ?
-
The username and password is defined in the Configure Network Step, where you should have defined the domain\username in the Specify the account that has permission to join the domain section, you can click on set and test the username and password in there, did you try that ? have you double check that you don't have more than that step in the task sequence ? or that you are indeed editing the correct task sequence ?
-
Remove Built in Apps from 20H2
anyweb replied to kesh's topic in System Center Configuration Manager (Current Branch)
what built in apps are you interested in removing ? -
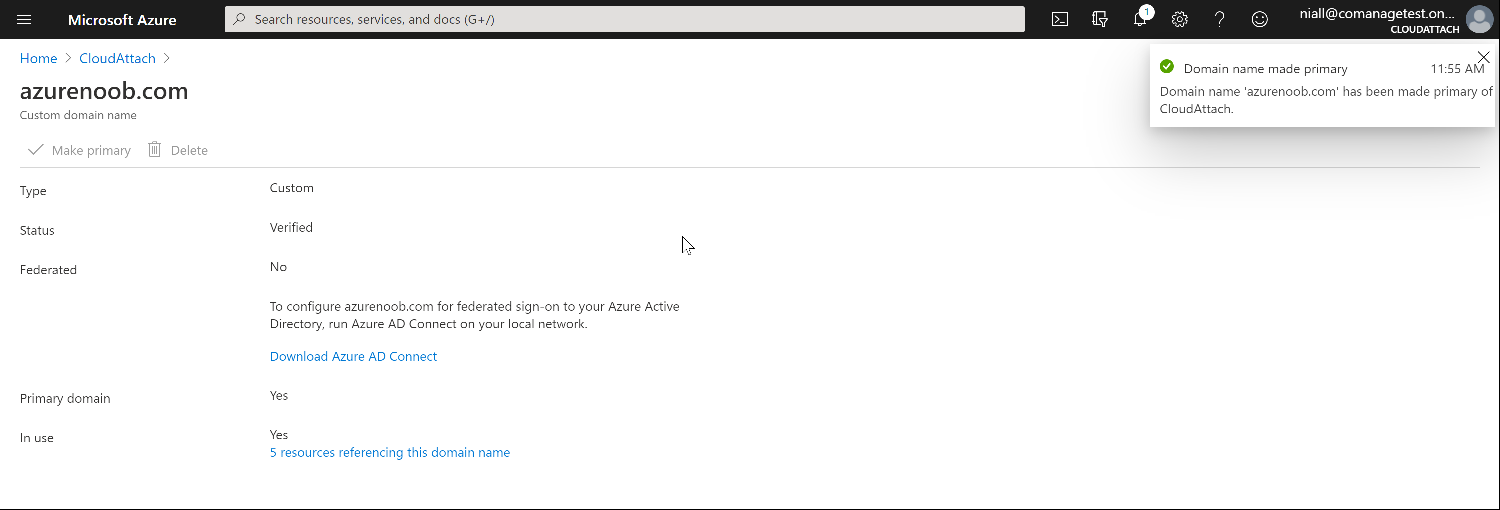
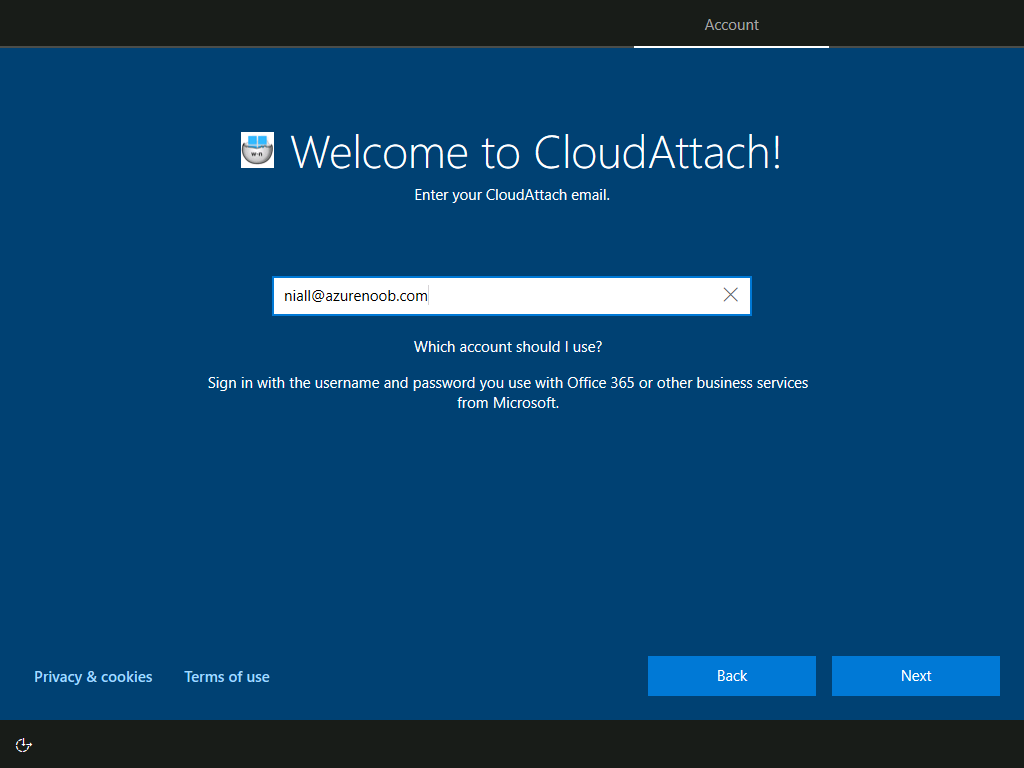
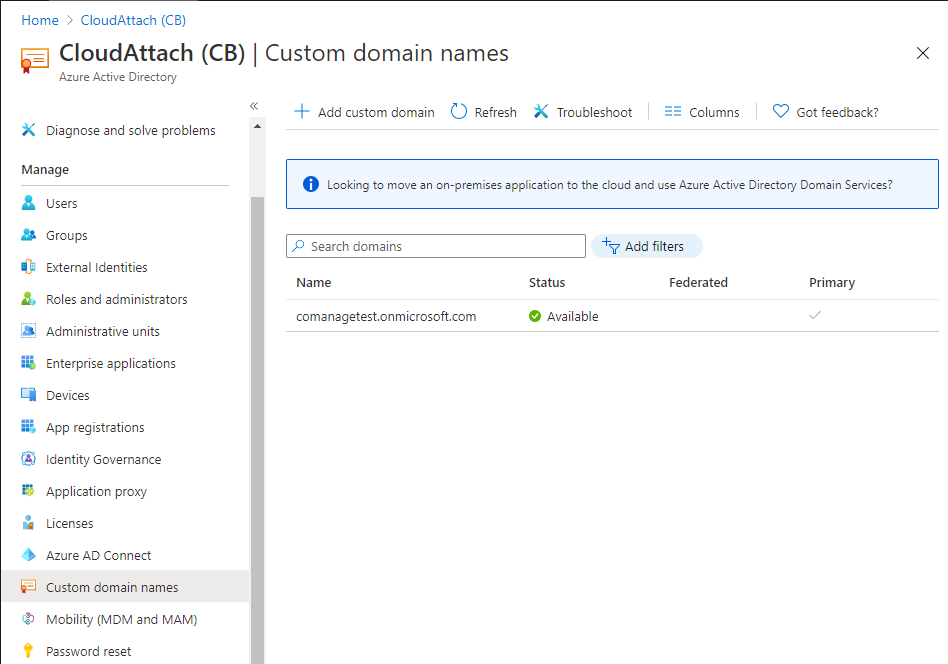
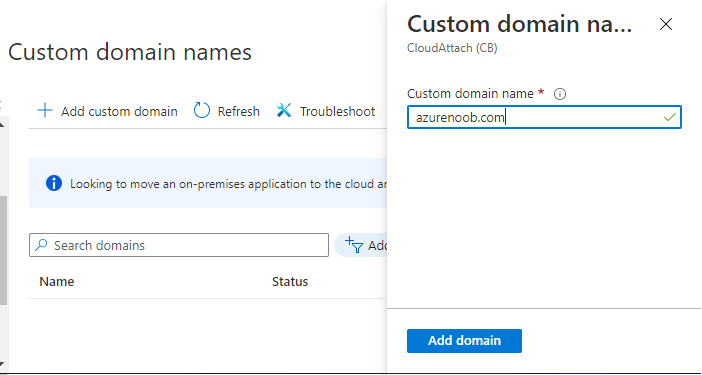
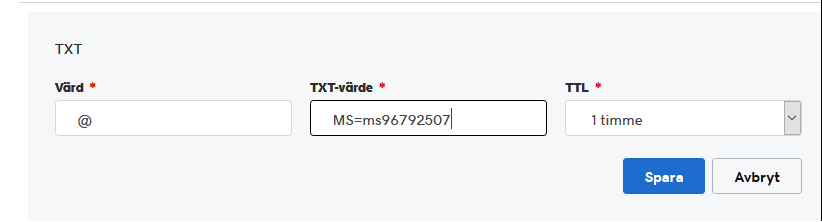
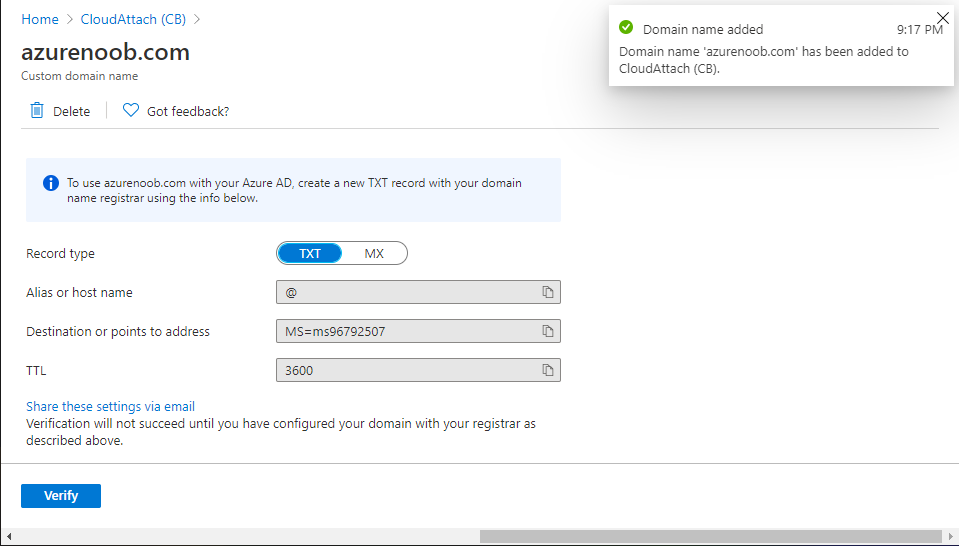
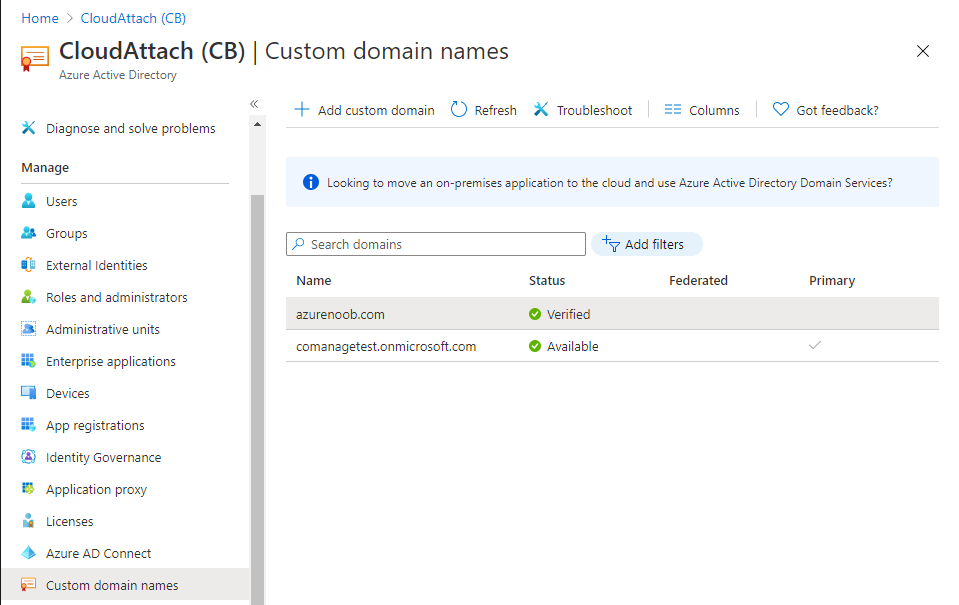
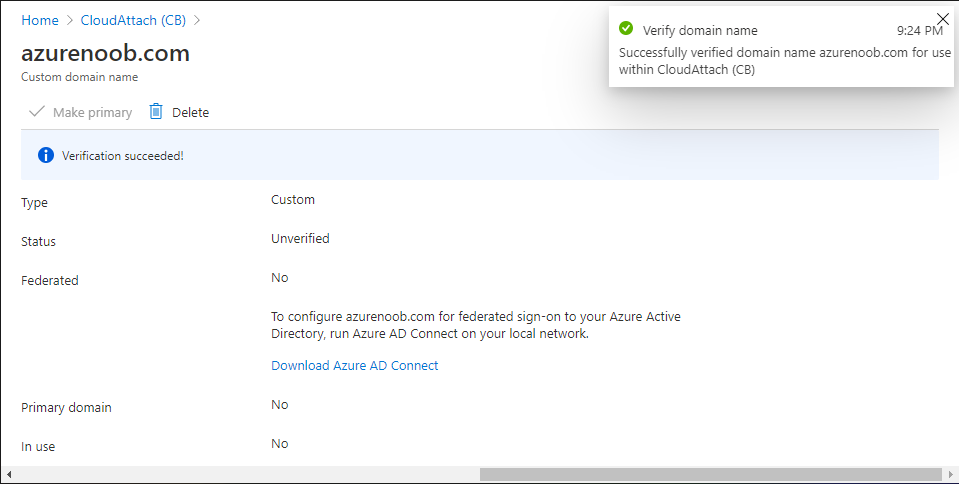
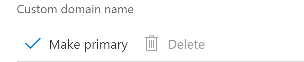
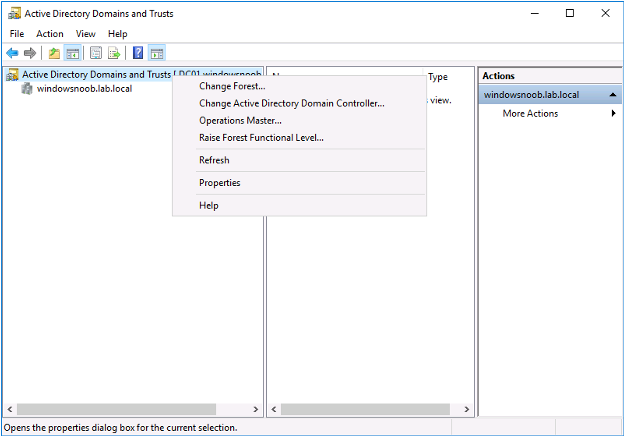
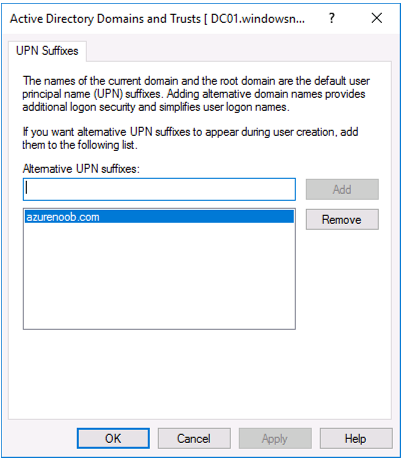
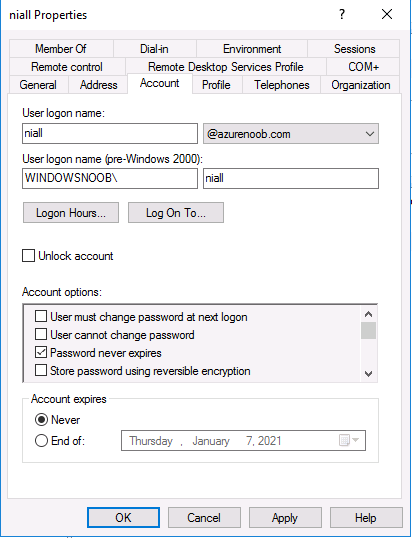
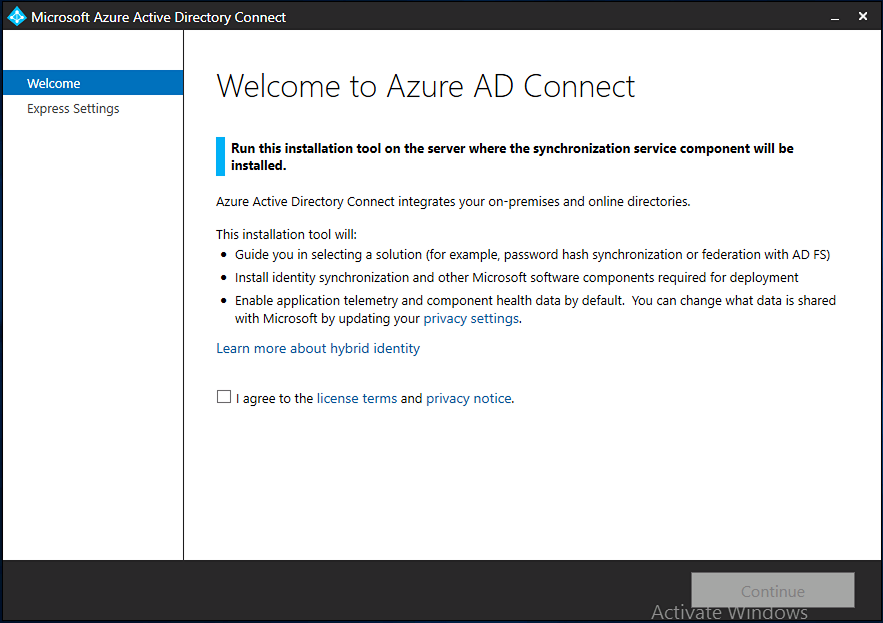
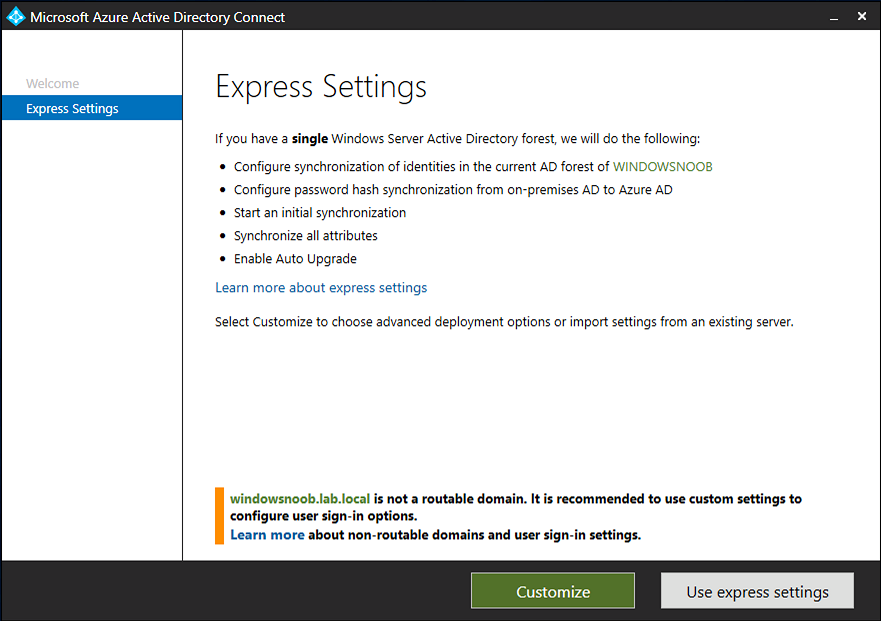
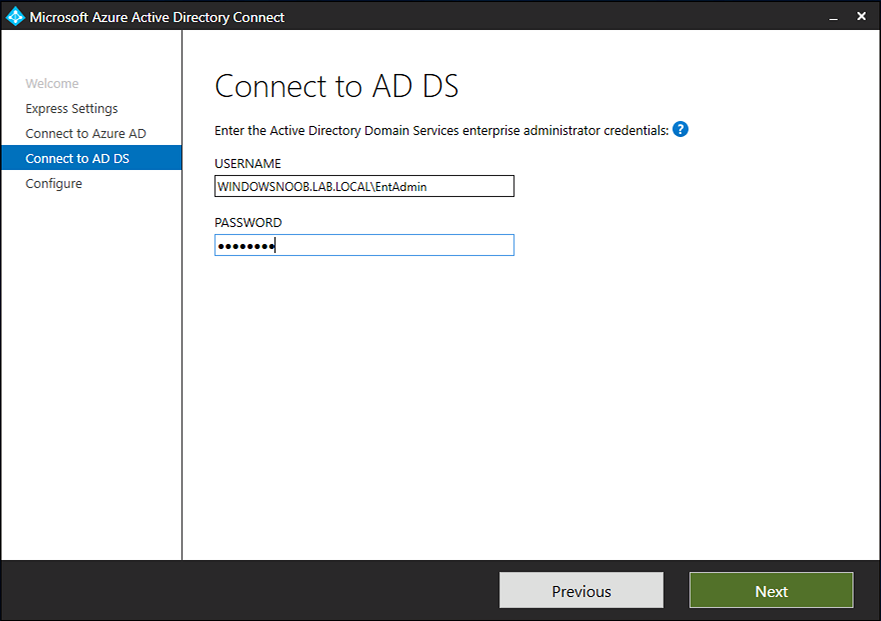
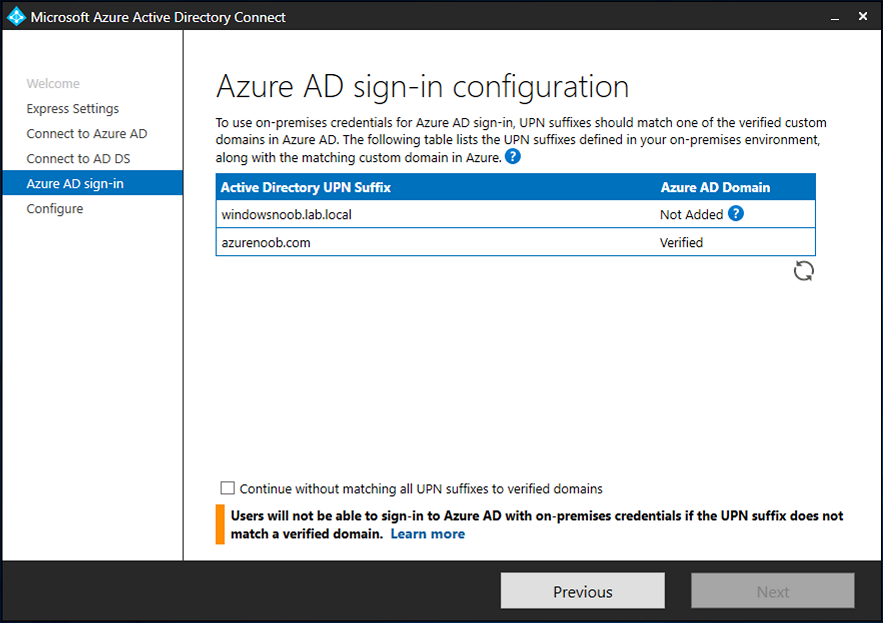
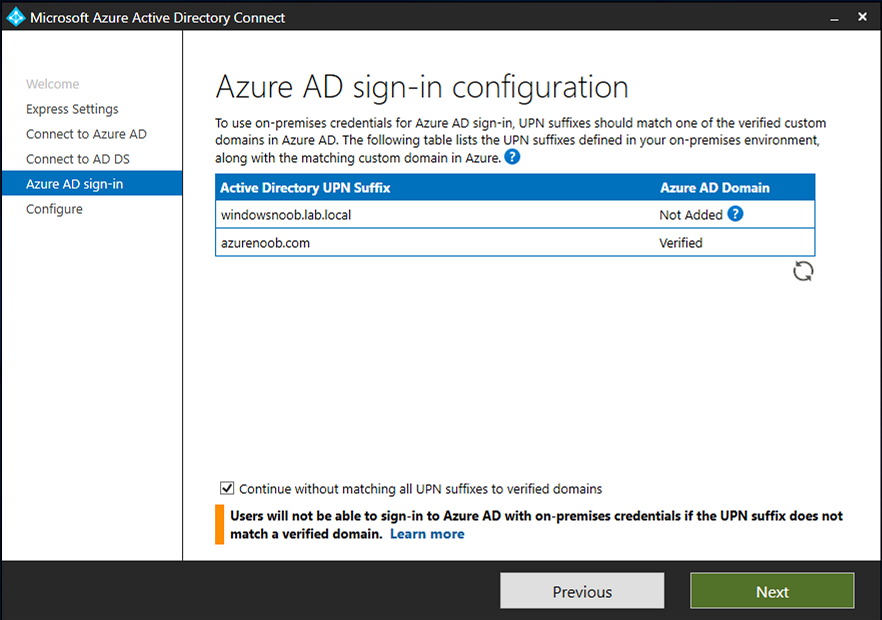
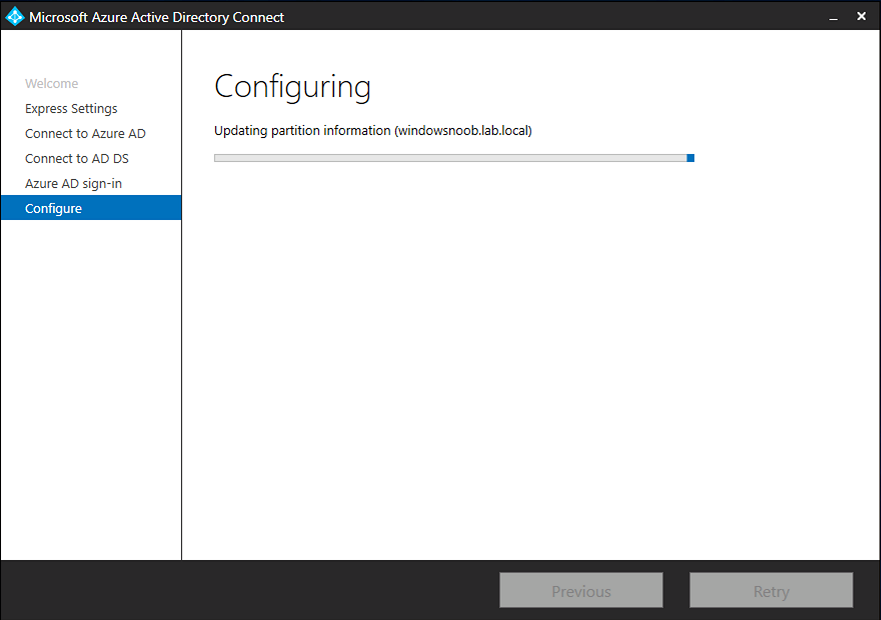
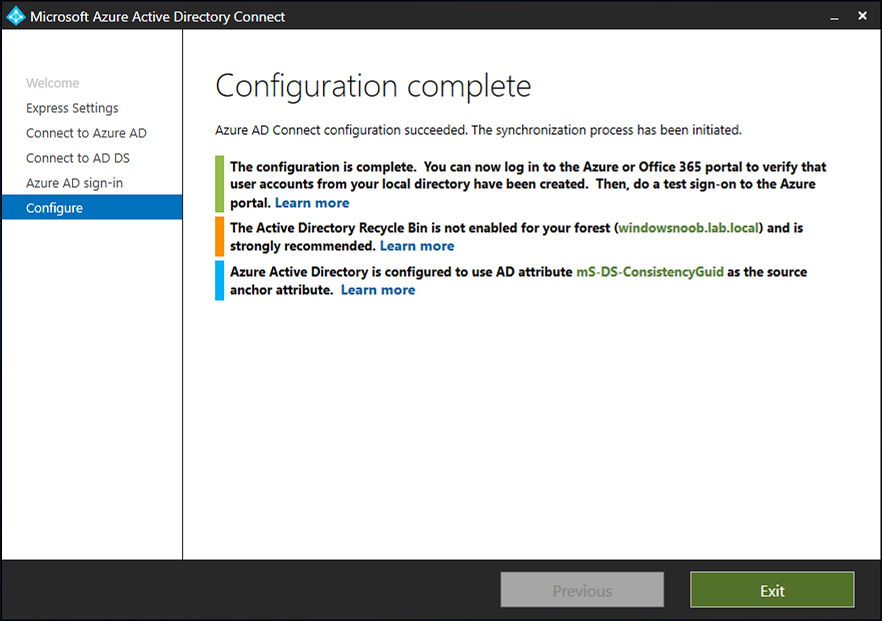
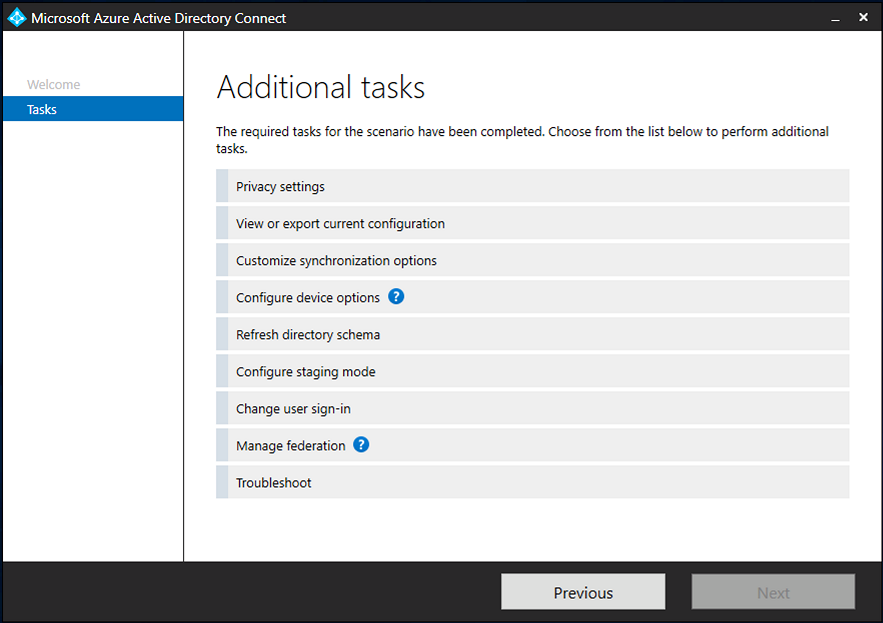
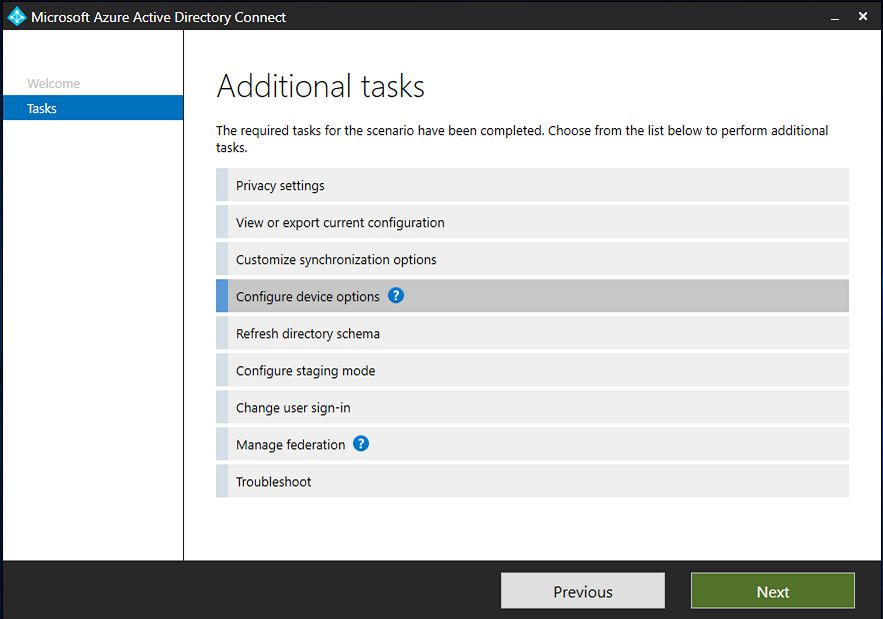
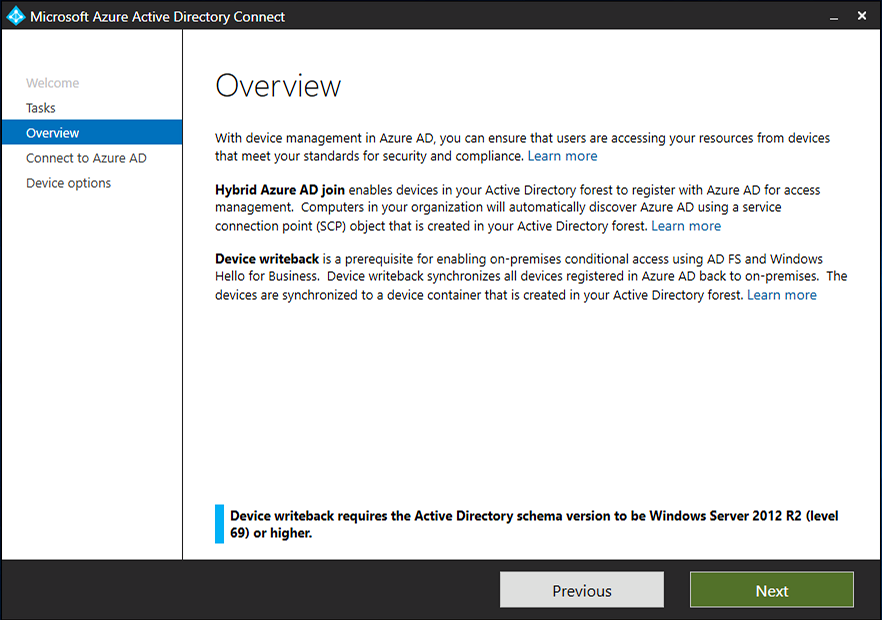
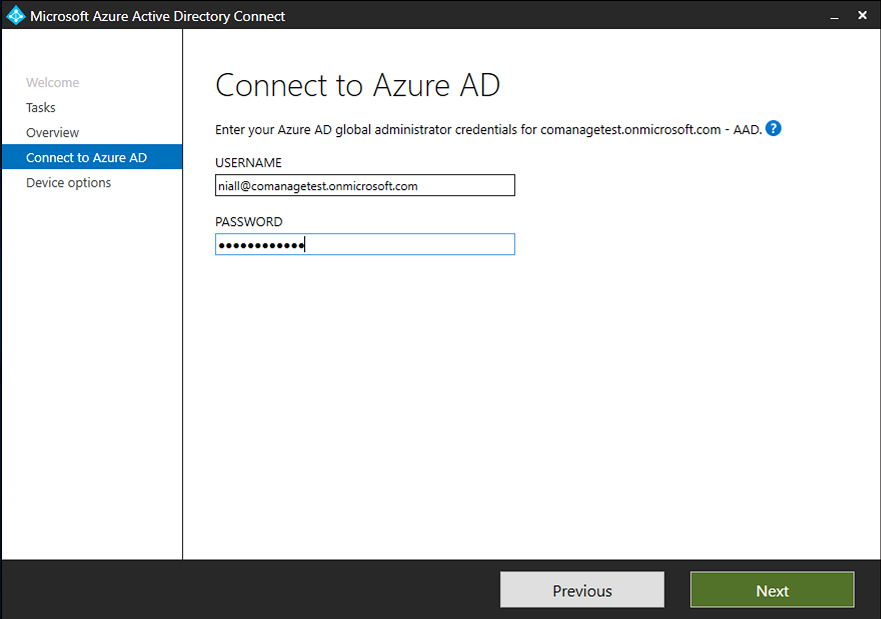
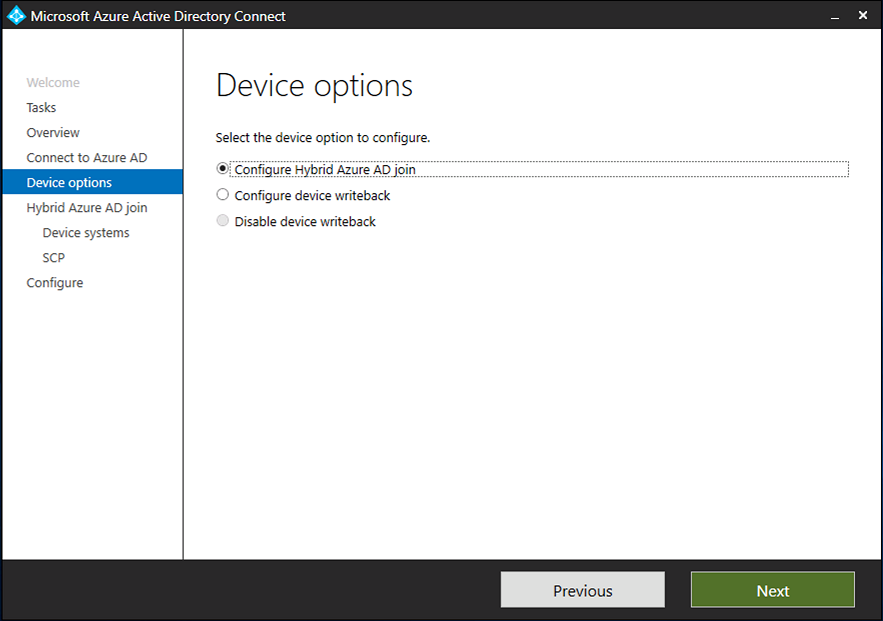
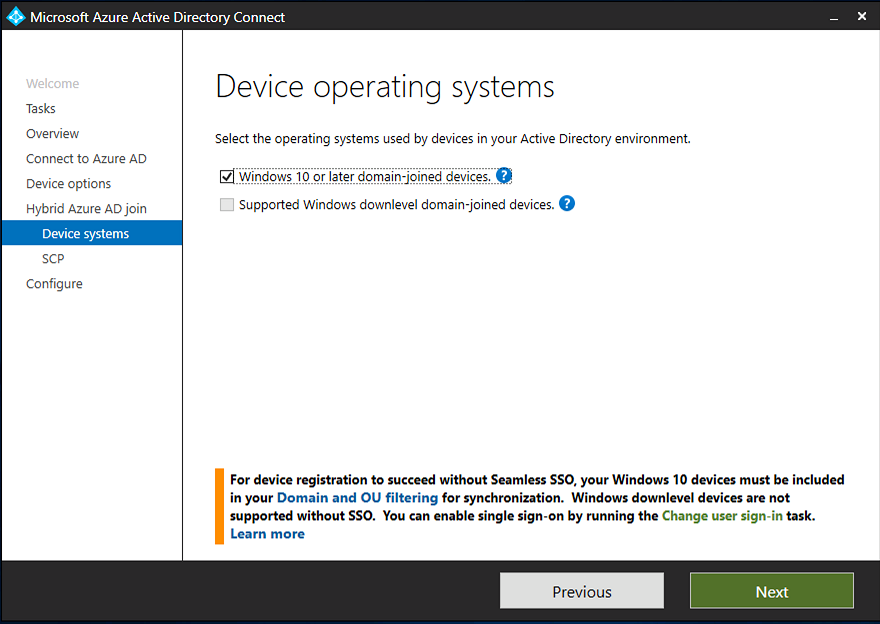
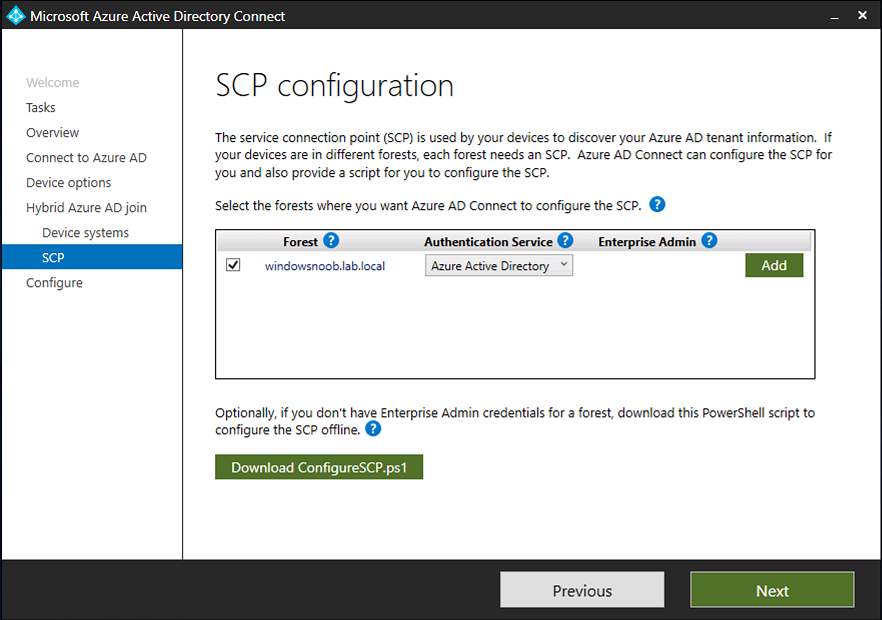
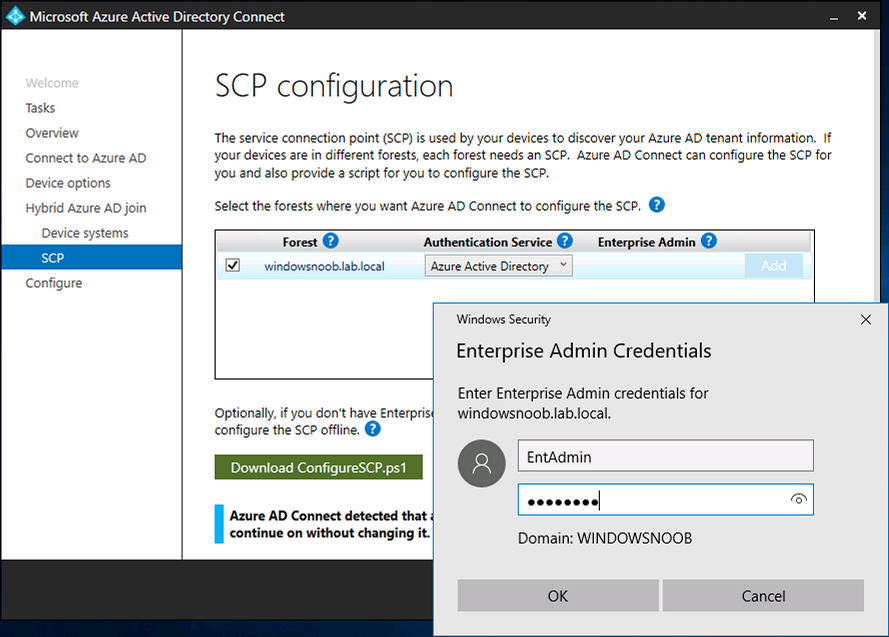
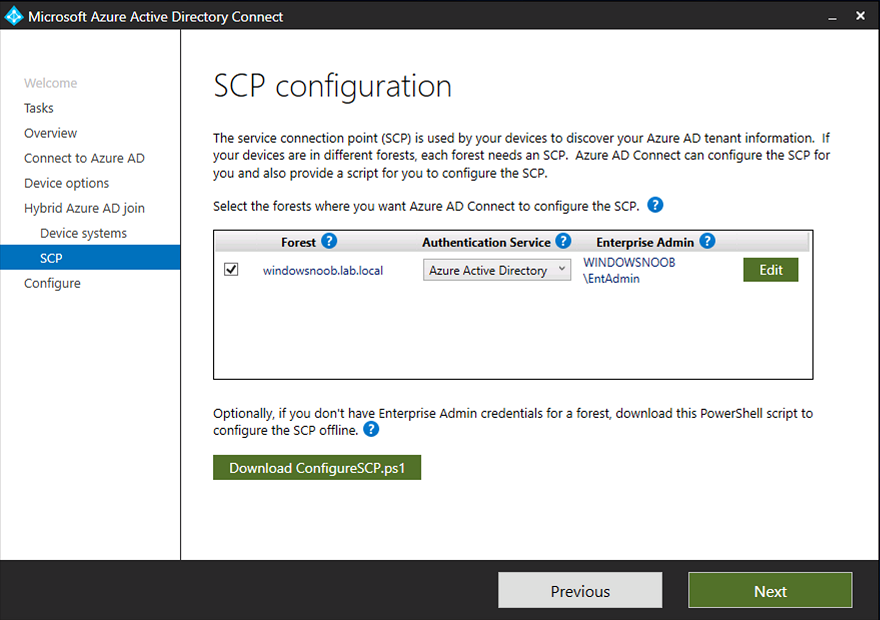
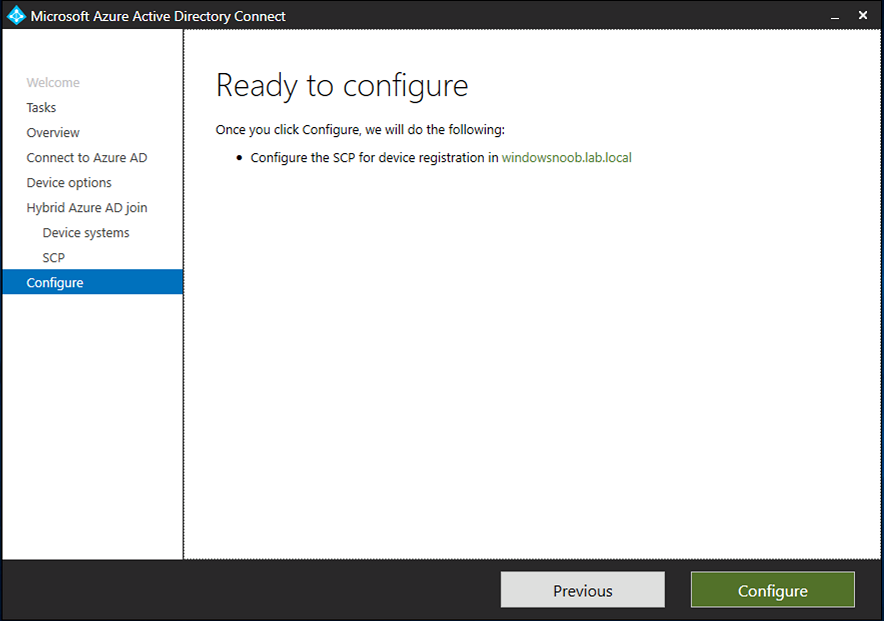
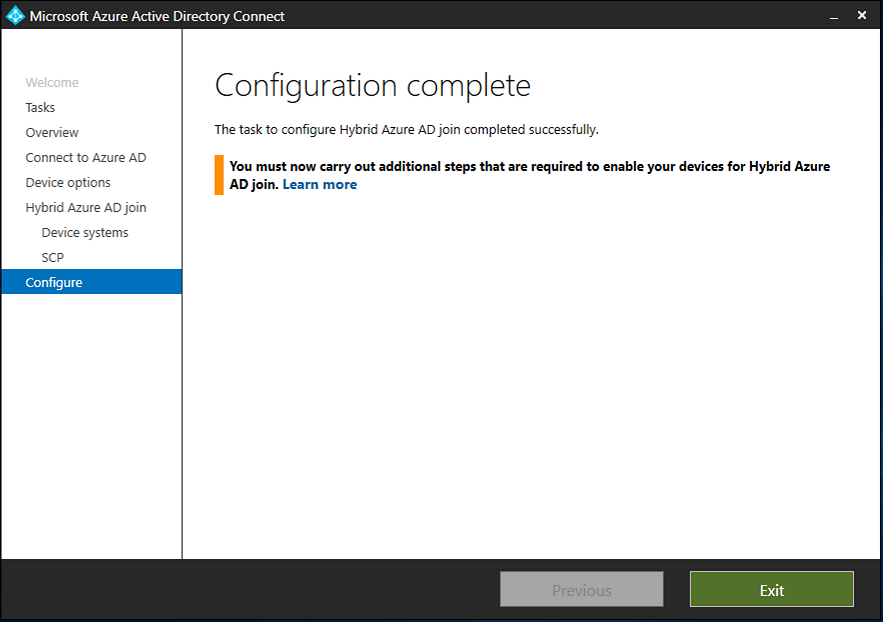
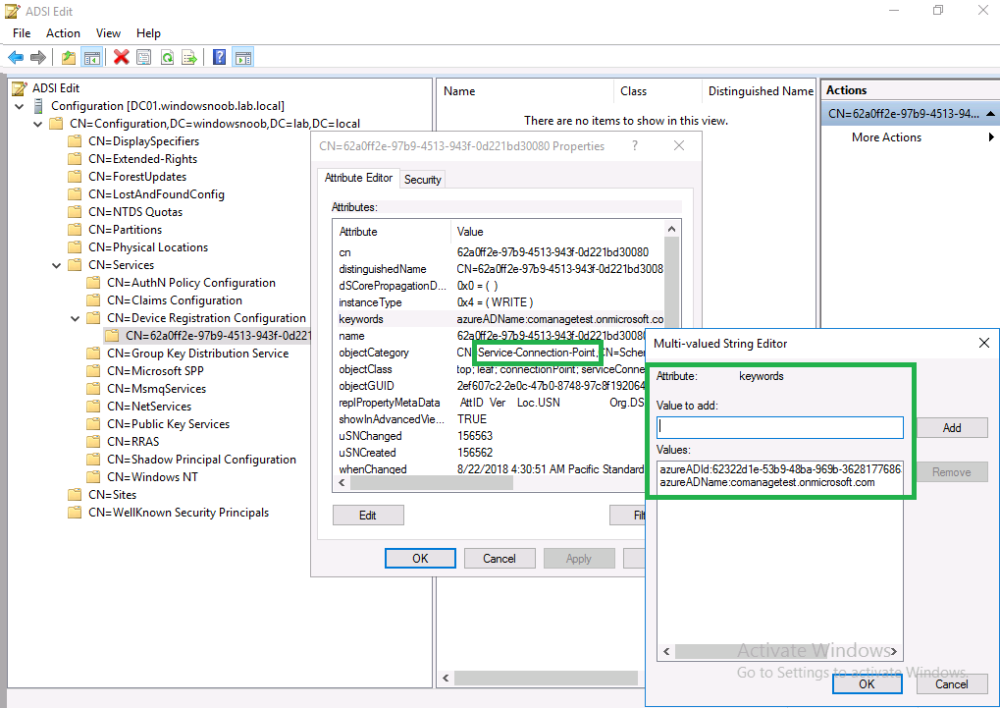
Introduction Microsoft released Windows Intune back in March 2011, this was their launch pad for the management of devices and users in the cloud. This was later renamed to Microsoft Intune and is now known as Microsoft Endpoint Manager. This cloud journey encompassed several new technologies and associated buzz words summarized below. Hybrid MDM – Depreciated, this was the first combination of ConfigMgr and Intune Co-management – The ability to manage devices via ConfigMgr and Intune Co-existence – Using a 3rd party MDM solution together with ConfigMgr Cloud Attach – Attaching cloud components to a ConfigMgr environment Tenant attach – Attaching ConfigMgr managed devices including servers to the cloud This part is the first part in a series of guides about cloud attach in Microsoft Endpoint Manager and the guides are co-written by Niall & Paul, both of whom are Enterprise Mobility MVP’s with broad experience in the area of modern management. Paul is 4 times Enterprise Mobility MVP based in the UK and Niall is 10 times Enterprise Mobility MVP based in Sweden. If you use Twitter and want to see content when we release it then please do follow us: @ncbrady @SCCMentor Why are we writing this? Both Paul and I have worked on multiple cloud-based lab scenarios together over the course of the last year keeping ourselves educated and involved during lock down. We focused on expanding our knowledge about these exciting new technologies that come with the enabling of cloud attach features. That includes advanced cloud capabilities offered via a Cloud Management Gateway (CMG), co-management and additional capabilities available via Tenant attach. This area of modern management is rapidly evolving, now more than ever as workers find themselves working remotely during COVID-19, therefore it’s important to keep up with what’s new and what is changing. Below you can find all parts in this series. Cloud attach - Endpoint Managers silver lining - part 1 Configuring Azure AD connect <- you are here Cloud attach - Endpoint Managers silver lining - part 2 Prepare for a Cloud Management Gateway Cloud attach - Endpoint Managers silver lining - part 3 Creating a Cloud Management Gateway Cloud attach - Endpoint Managers silver lining - part 4 Enabling co-management Cloud attach - Endpoint Managers silver lining - part 5 Enabling compliance policies workload Cloud attach - Endpoint Managers silver lining - part 6 Enabling conditional access Cloud attach - Endpoint Managers silver lining - part 7 Co-managing Azure AD devices Cloud attach - Endpoint Managers silver lining - part 8 Enabling tenant attach Cloud attach - Endpoint Managers silver lining - part 9 Renewing expiring certificates Cloud attach - Endpoint Managers silver lining - part 10 Using apps with tenant attach This multi part blog will focus on helping you get your organization cloud attached, and we will start by assuming that your environment has a few key aspects already setup: PKI enabled (guide) Intune Tenant created Azure Subscription (free trial) Licenses applied, you can grab a free trial of Enterprise Mobility plus Security which includes Intune and Azure AD Premium P2 here (free trial). In this part we will show you how to do the following: 1. Add a custom domain name to Azure 2. Set up a User Principal Name (UPN) for your on-premises Active Directory 3. Set up hybrid Azure AD Join using Azure AD Connect 4. Configure hybrid Azure AD join using Azure AD Connect So, let’s get started. Step 1. Add a Custom Domain Name to Azure Login to https://portal.azure.com select Azure Active Directory to add a custom domain name in Azure AD Directory. Select custom domain names in the left pane and then click the + Add custom domain link in the top ribbon. When presented with the Custom domain name window, enter the name of the domain you own and click the Add domain button. After adding the domain name, you’ll be shown a screen similar to the one below, you can choose to add a TXT or MX record on your DNS provider. In the example below we chose the TXT option. Enter the provided TXT record at your domain name provider. Below is example of the TXT record we entered at out providers DNS management portal. We’ve set the TTL to a low value to get this propagated quickly so that we can verify the domain. Tip: You can use a website such as dnschecker.org to see if the TXT record has propagated and can be queried, when this has happened go back to the Azure portal and click the Verify button to verify the domain. Once the domain is successfully verified, it will report as so in the Custom domain names blade. After the custom domain name is added, you can make it the Primary domain name. To do that do as follows. Select the custom domain name which you have verified above, and click on Make Primary. After doing that your custom domain name will be the new Primary domain name. Step 2. Set up a User Principal Name (UPN) for your on-premises Active Directory With the custom domain name added and set to primary we are going to add an alternative user principal name suffix into the on-premises Active Directory. This will match the domain name we have verified, so our example is azurenoob.com. This is fairly simple to set up, but once configured, we need to set this as the default for our users and we can use a PowerShell script to achieve this. Let us start off by setting the UPN, you will need to be a Domain Admin or Enterprise Admin to achieve this. Open Active Directory Domains and Trusts. Right click on Active Directory Domains and Trusts, and select Properties. Type in your new alternative name suffix into the Alternative UPN suffixes box, and click Add. Click OK. Below you can see we've added azurenoob.com. Now we need to set the alternative UPN as the default UPN for all our users. Thanks to the community we can use a PowerShell script which is already out there to achieve this, and we used a script from martinsblog.dk. You can be granular with this script, so that you only add in a specific OU for your users, or you could run it at the top level of the domain. Below is the properties of an user with the new UPN applied. Step 3. Set up hybrid Azure AD Join using Azure AD Connect You can use Azure AD Connect to integrate on-premises and online directories. It can synchronize computer, user and group objects and assist with single sign-on in both directories as well as password sync. When using the Azure AD Connect it’s recommended to download the latest release. You can obtain this from Microsoft Download Center. A minimum of version 1.1.819.0 is needed, but this is an old version, you would be better off downloading the latest and using the newer features available with that release. Download Azure AD Connect here. After downloading and installing the tool, launch it and Agree to the terms and conditions before clicking Continue. We have the choice of running an express installation or customizing the install. Microsoft recommends using the customize option if you have multiple forests or if you want to configure optional features, otherwise you can continue with the Use express settings option. In the steps below we run through the options you'll see when choosing Use Express Settings. Next, enter the Global Admin login details for your Azure Ad environment. Click Next and then enter the Enterprise Admin credentials for the on-prem Active Directory Domain Services. Note: The Azure AD sign-in configuration page only shows if you did not complete verify your domains in the prerequisites. If you see this page, then review every domain marked Not Added and Not Verified. Make sure those domains you use have been verified in Azure AD. Click the Refresh symbol when you have verified your domains. If you have domains marked as Not Added then see the next step. The azurenoob.com domain is Verified as we verified this domain in Azure AD. This also means we will be able to sign in with the same credentials in our on-premises Active Directory as we also added in the UPN. Select the checkbox to Continue without matching all UPN suffixes to verified domains if one of your UPN suffix values is not added, for example the windowsnoob.lab.local address is in the state Not Added. You will only have this checkbox available if you have a Not Added entry and you must check the box in order to continue. Click Install We have enabled the checkbox for Start the synchronization process when configuration completes as we want the synchronization process to start once we have completed the wizard. If you do not enable this, the sync will be configured but won’t run until you re-run the Azure AD Connect wizard. Click Install. After clicking Install the wizard will start configuring. And after a few minutes it’s complete. You can close the wizard by clicking on Exit. Step 4. Configure hybrid Azure AD join using Azure AD Connect With the express settings configured, we now need to configure Azure AD Connect for hybrid Azure AD join of our on-premises devices. Launch the Azure AD Connect wizard and click Configure to continue. On the Additional tasks page, select Configure device options, and then select Next. Select the option to Configure Device Options. On the next screenshot note that we are interested in Hybrid Azure Ad join and that Hybrid Azure AD join enables devices in your Active Directory forest to register with Azure AD for access management. Computers in your organization will automatically discover Azure AD using a service connection point (SCP) object that is created in your Active Directory forest. On the Overview page select Next. On the Connect to Azure ad page enter the credentials of your Global Admin. On the Device options screen, select Configure Hybrid Azure AD join to synchronize our on-premise devices and to configure them for Azure Ad join. The Service Connection Point (SCP) needs to be configured for each forest where you want to enable Hybrid Azure AD join. We only have the one forest. Click the Add button. Select Windows 10 or later domain-joined devices and then click Next. Select the check box beside your on premise domain and then click Add. Enter your Enterprise Admin Credentials when prompted. Click Next. And at the Ready to configure screen click Next. At the Configuration complete, click Exit. You can verify the success of the above by opening Adsiedit, selecting Services, expand Device Registration Configuration, as shown below in keywords and objectcategory. That's it for this part, join us in Part 2 where we will prepare your environment for a Cloud Management Gateway. Useful links Conditional Access mfa breaks azure ad connect synchronization - https://www.alitajran.com/conditional-access-mfa-breaks-azure-ad-connect-synchronization/ Cloud attach and Microsoft Endpoint Manager - https://techcommunity.microsoft.com/t5/business-continuity-and-disaster/cloud-attach-and-microsoft-endpoint-manager/m-p/1498577 Download Azure AD Connect - Download Microsoft Azure Active Directory Connect from Official Microsoft Download Center Azure AD connect prerequisites - https://docs.microsoft.com/en-us/azure/active-directory/hybrid/how-to-connect-install-prerequisites How to setup Azure AD Connect using express settings - https://docs.microsoft.com/en-us/azure/active-directory/hybrid/how-to-connect-install-express


-
- 1
-

-
awesome to hear it ! spread the word ?
-
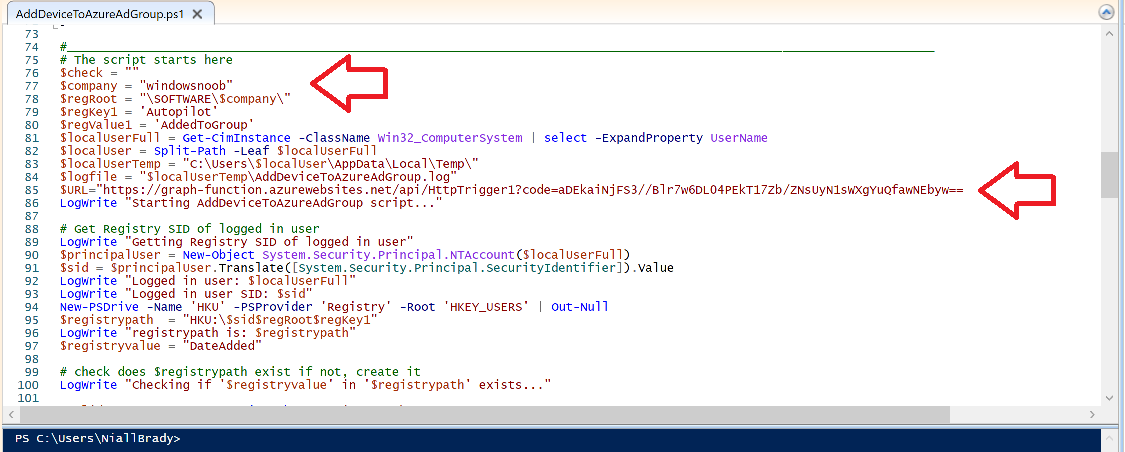
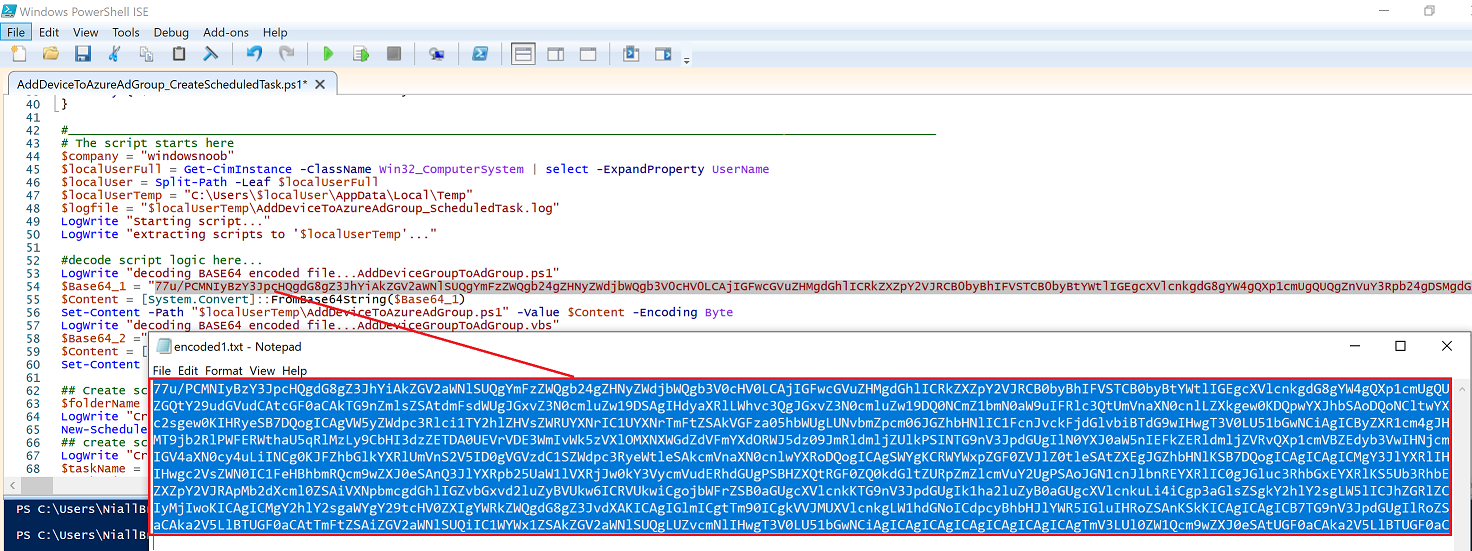
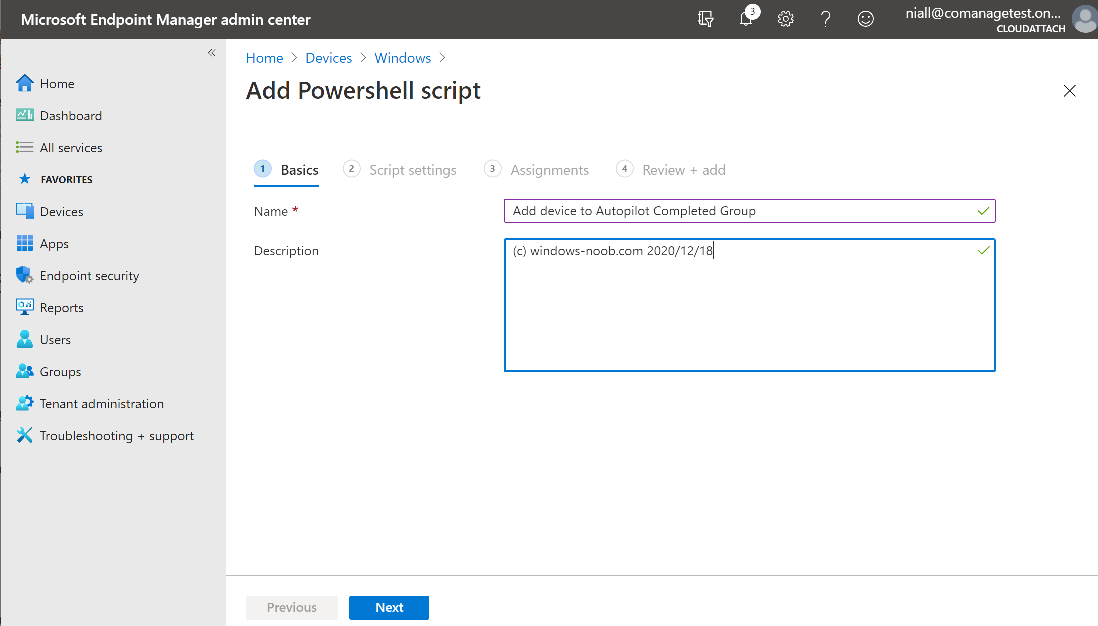
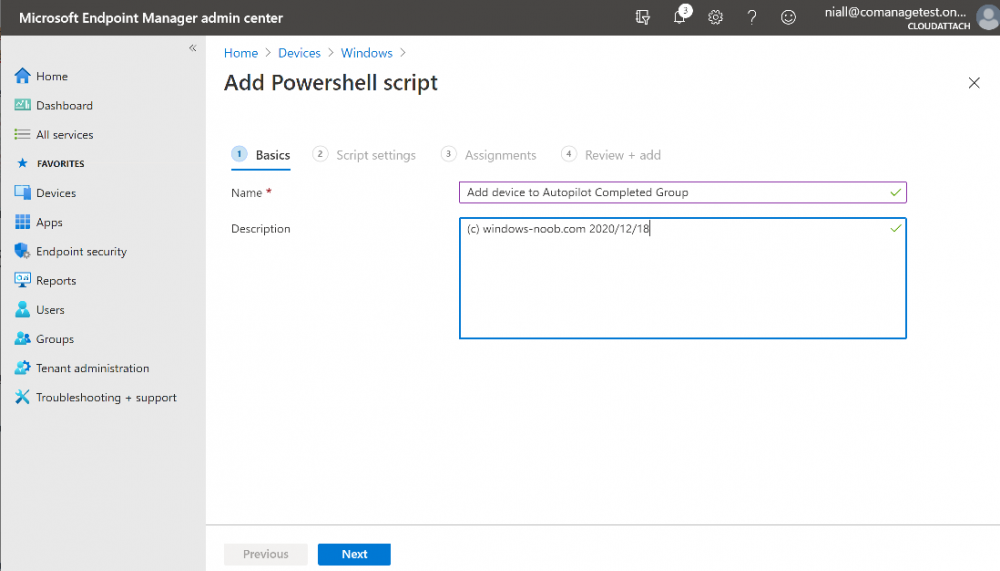
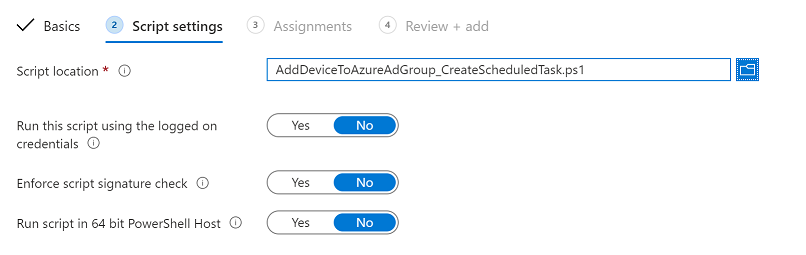
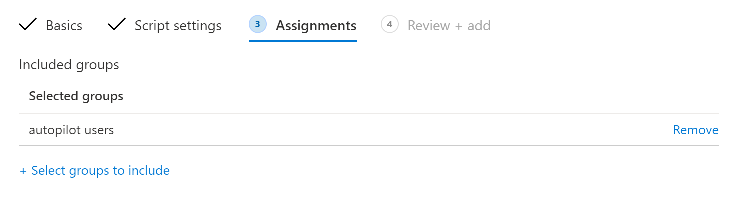
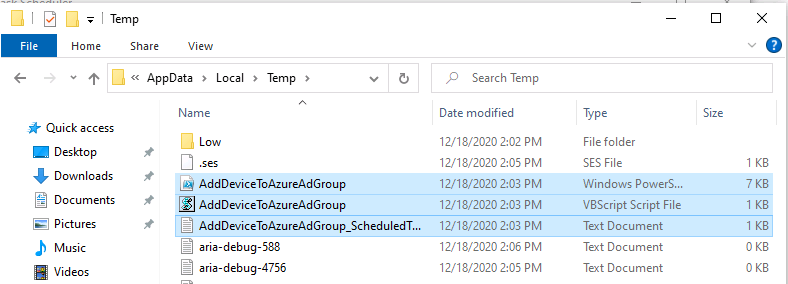
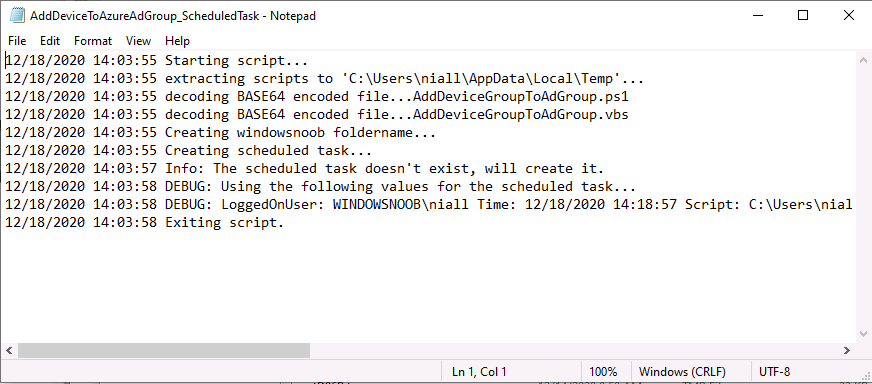
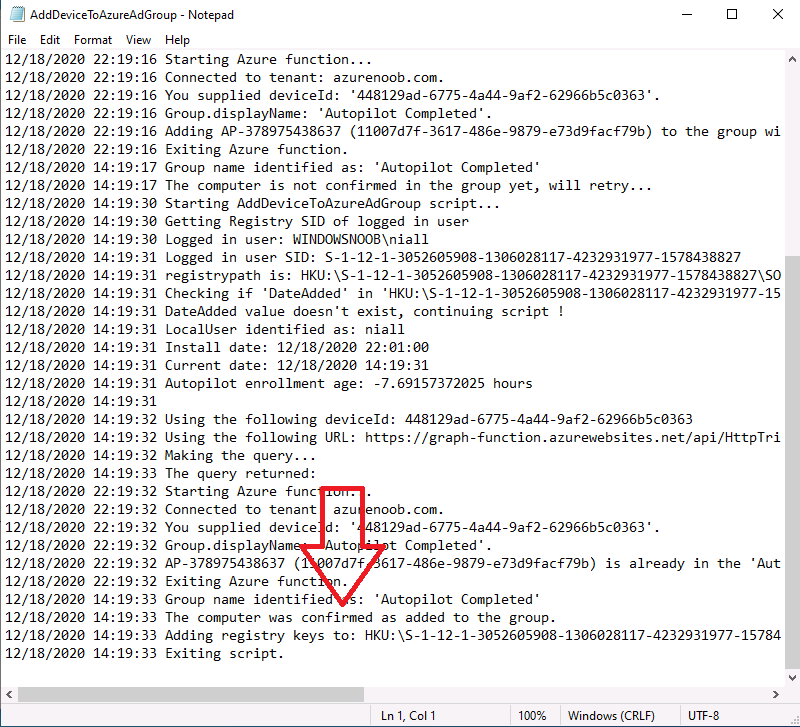
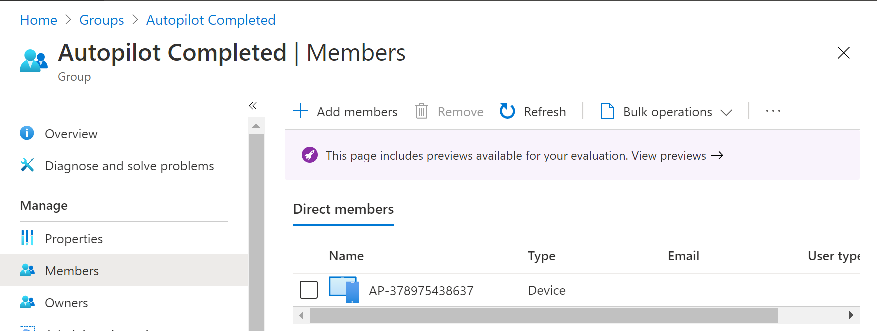
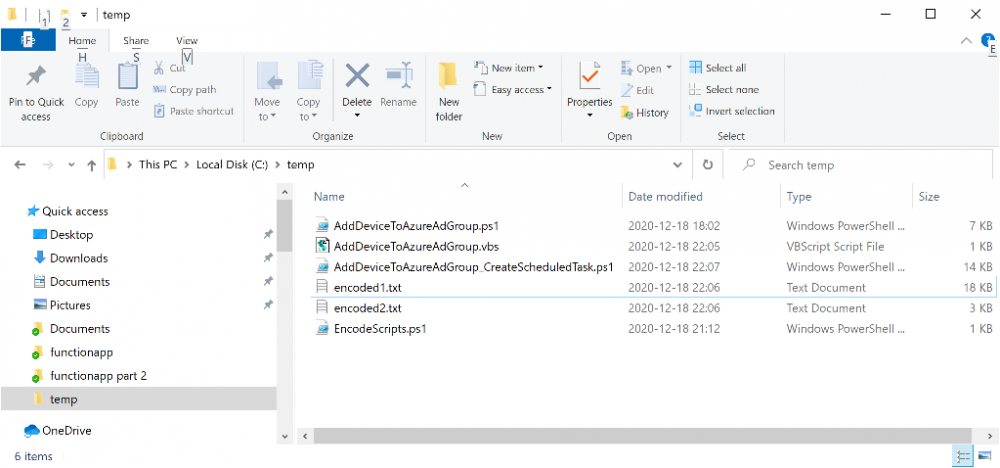
Introduction In part 1 you learned how to use Azure functions and a http trigger to add a device to an Azure Ad security group. In this part you'll see how it all fits together on the client side after Autopilot is complete. Step 1. Get the scripts Download the client side scripts here. Please read the note before trying. Note: To download the files here, please make sure you are logged on to this site otherwise you'll get an error. Download the following zip file here: temp.zip Step 2. Extract the files Extract the files to C:\temp Step 3. Edit AddDeviceToAzureAdGroup.ps1 Using Windows PowerShell ISE or notepad, open AddDeviceToAzureAdGroup.ps1, you need to edit the following two lines. Replace $company with your own company name, and for $URL you will need to login to your Azure resource group created in part 1 and copy the HttpTrigger1 url by clicking on Get Function URL and copying the url as shown below. Note: If you don't do this properly then it won't work ! Paste in the URL you copied from your HttpTrigger and append &deviceID= on the end as shown here. Step 4. Encode the scripts Open the EncodeScripts.ps1 script and run it. It will generate new encoded copies of the two scripts that will become embedded in the Step 5. Edit AddDeviceToAzureAdGroup_CreateScheduledTask.ps1 Open AddDeviceToAzureAdGroup_CreateScheduledTask.ps1 and scroll down to the $Base64_1 line. In notepad, open C:\temp\encoded1.txt, press CTRL+A and CTRL+C to copy everything in that file. Back in the PowerShell script, paste the copied content into the $Base64_1 variable in between the "" as shown below. repeat this exercise for the $Base64_2 variable but use the C:\temp\encoded2.txt file contents for that variable. Note: You have to repeat this process any time you edit either of the following two scripts. AddDeviceToAzureAdGroup.ps1 AddDeviceToAzureAdGroup.vbs After my edits it looks like this, your encoded variables will most likely have different values. Save the file. Step 6. Add the PowerShell script to Intune Create a new deployment to your Autopilot Users group using the AddDeviceToAzureAdGroup_CreateScheduledTask.ps1 PowerShell script. use the following settings Deploy it to your Autopilot Users group Step 7. Verify the end result Launch Autopilot After it's done, you'll login to the desktop. If you check scheduled tasks you should see this task is scheduled to run approx 15 minutes after you've logged on, if you see a different behavior then please modify the setting on line 79 of the AddDeviceToAzureAdGroup_CreateScheduledTask.ps1 script. The task that created that scheduled task extracted files to the users temp folder. As the task hasn't run yet we don't have a log file for adding the device to the azure ad group yet. The scheduled task log looks something like this however. After the scheduled task has run you'll have a new log file to look at called AddDeviceToAzureAdGroup.log available in the logged on users temp folder. The log file is very detailed and will show the actions of getting the deviceID, detecting the Group Name and the success of adding the device to the Azure Ad group. Below you can see that it has confirmed the addition of the device to the group. At which point you can check the group in the MEM portal. And there's your device ? The script also creates registry keys so that you can see when it added the device, to which group and using which deviceID. Job done ! I hope you found this useful, if you do, please give me feedback. cheers niall


-
you are welcome Octavio, I'm looking forward to seeing what you do with it
-
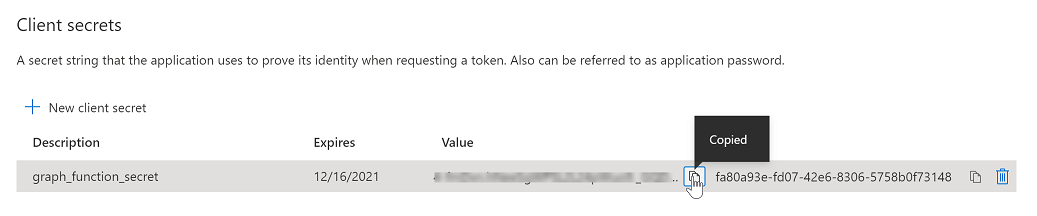
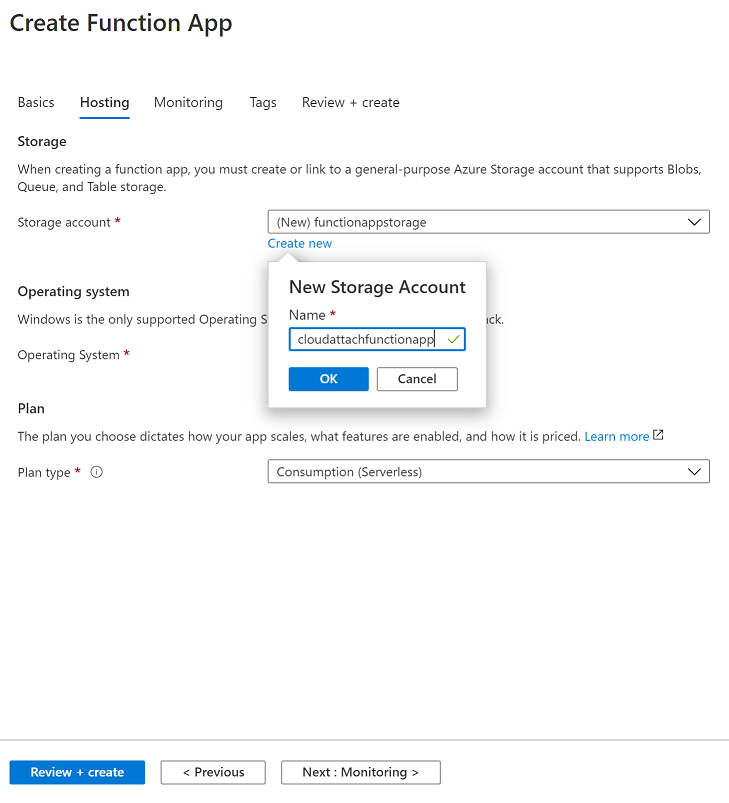
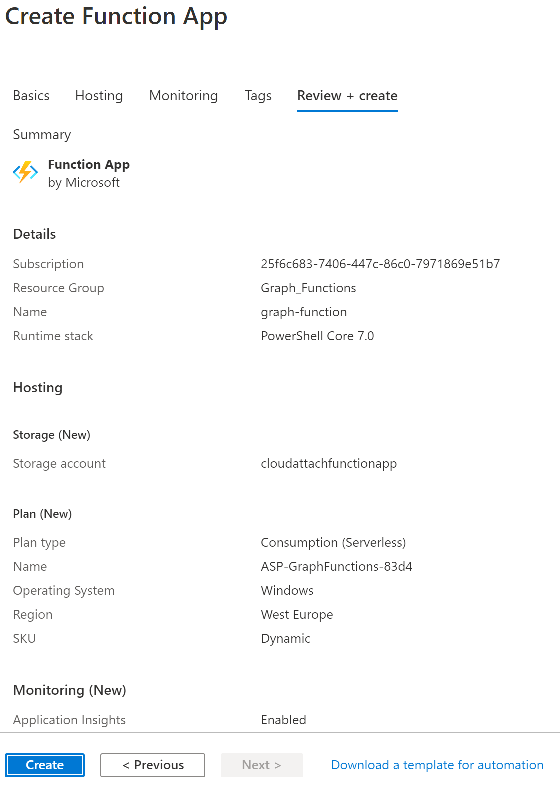
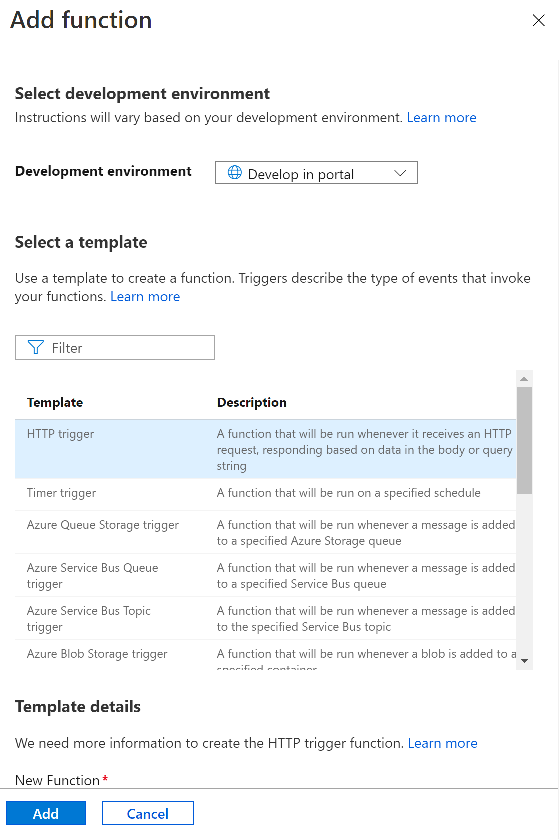
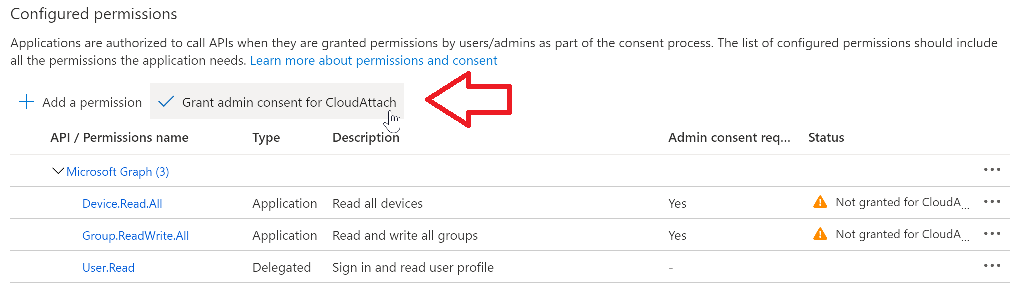
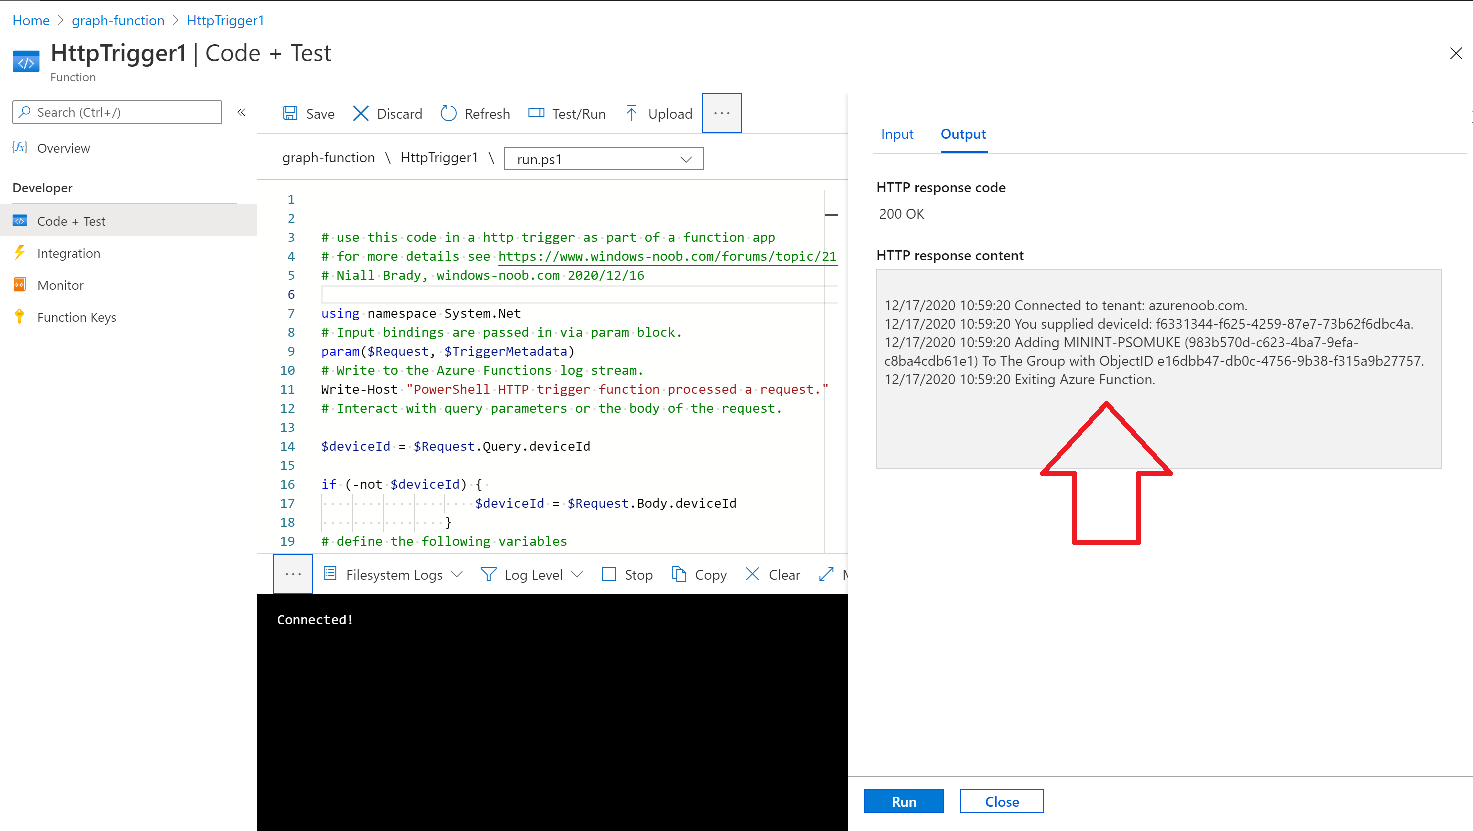
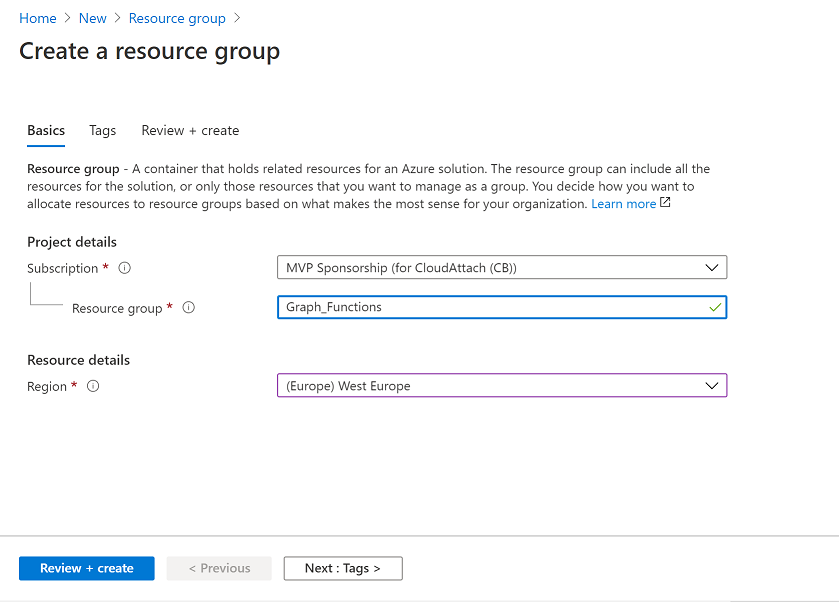
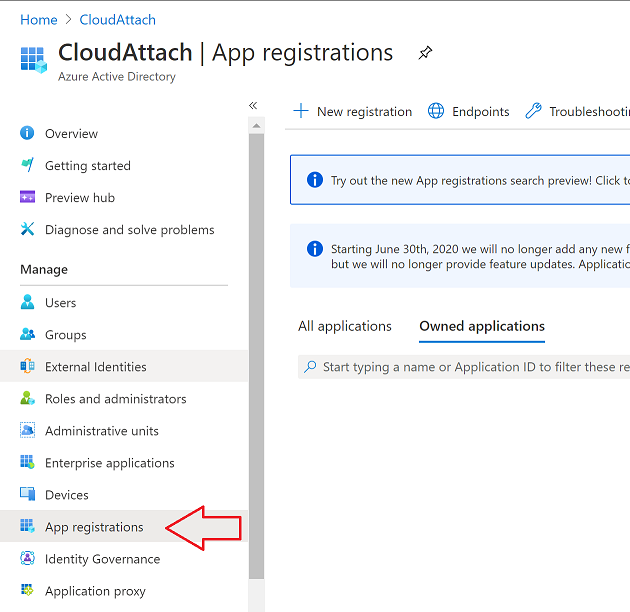
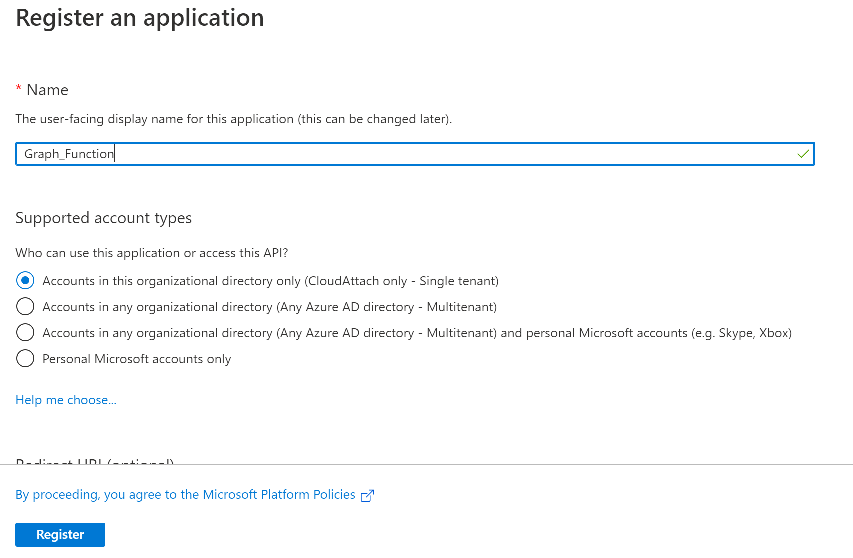
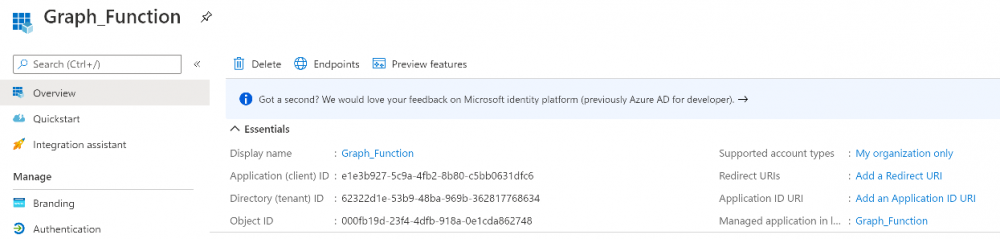
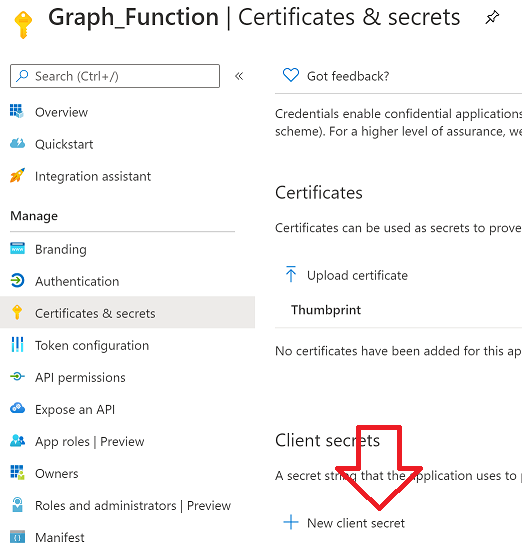
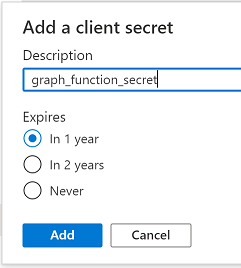
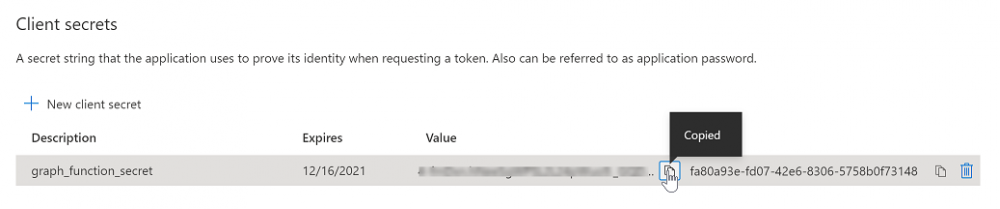
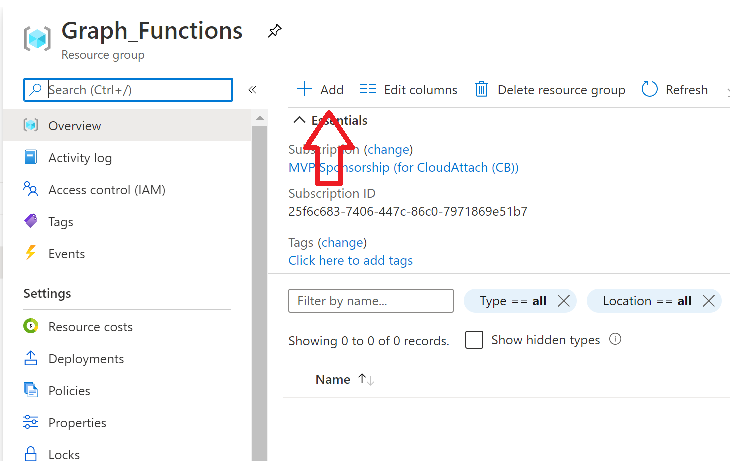
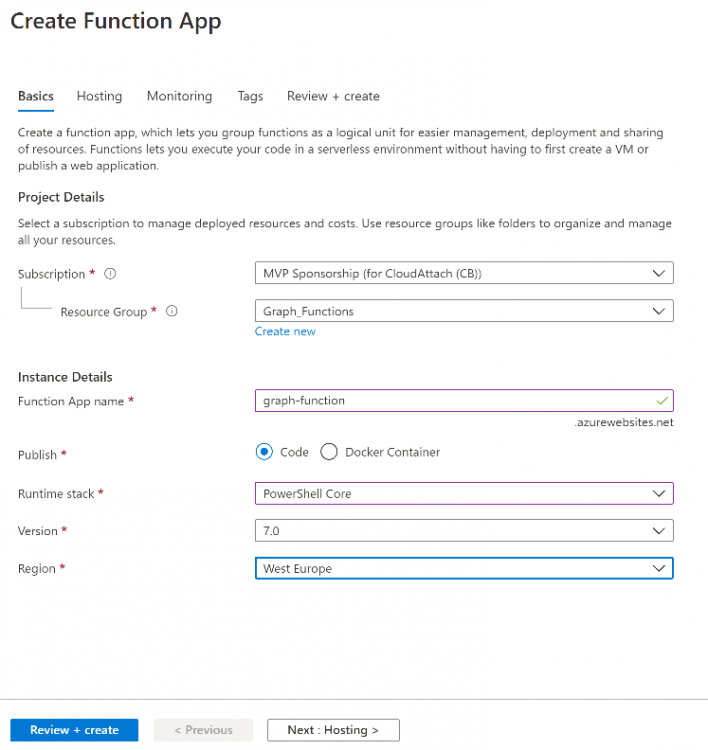
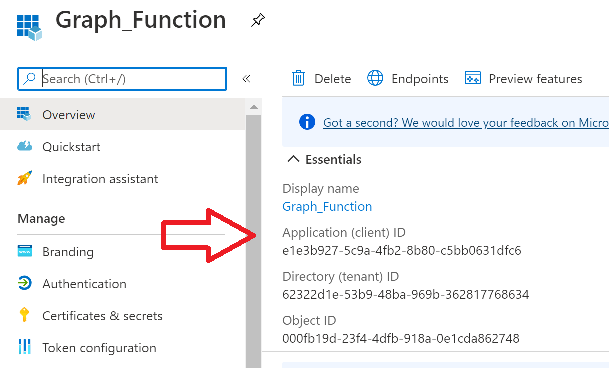
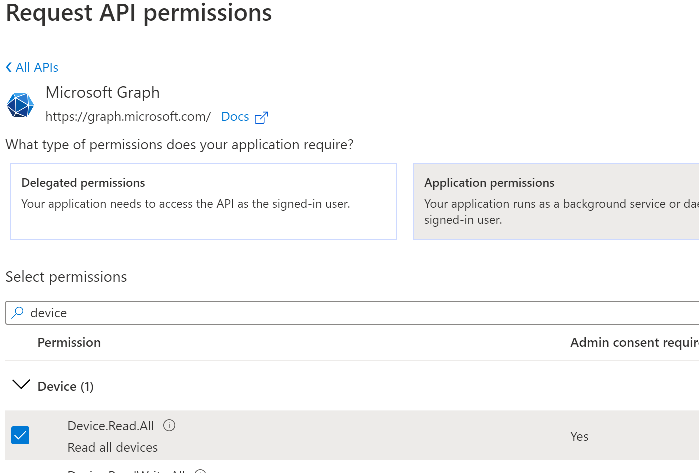
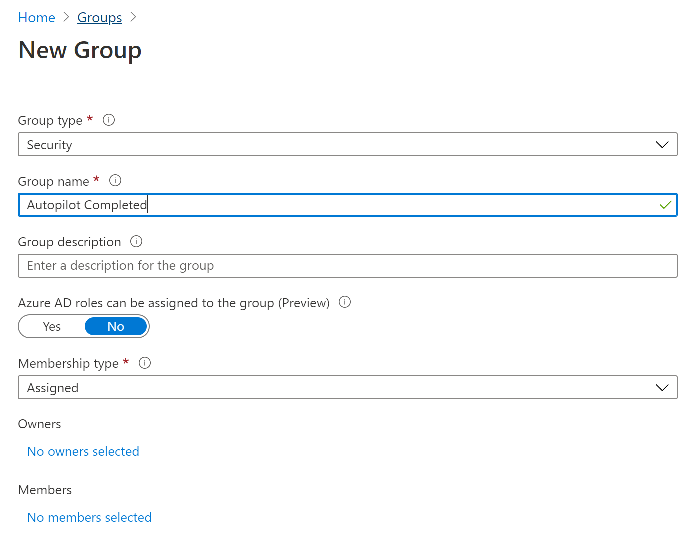
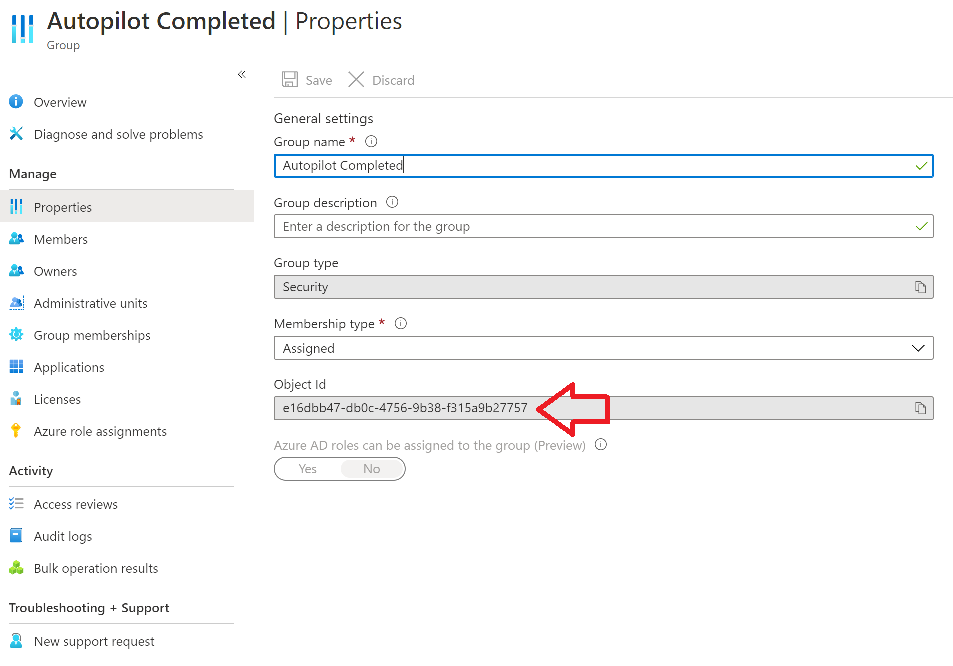
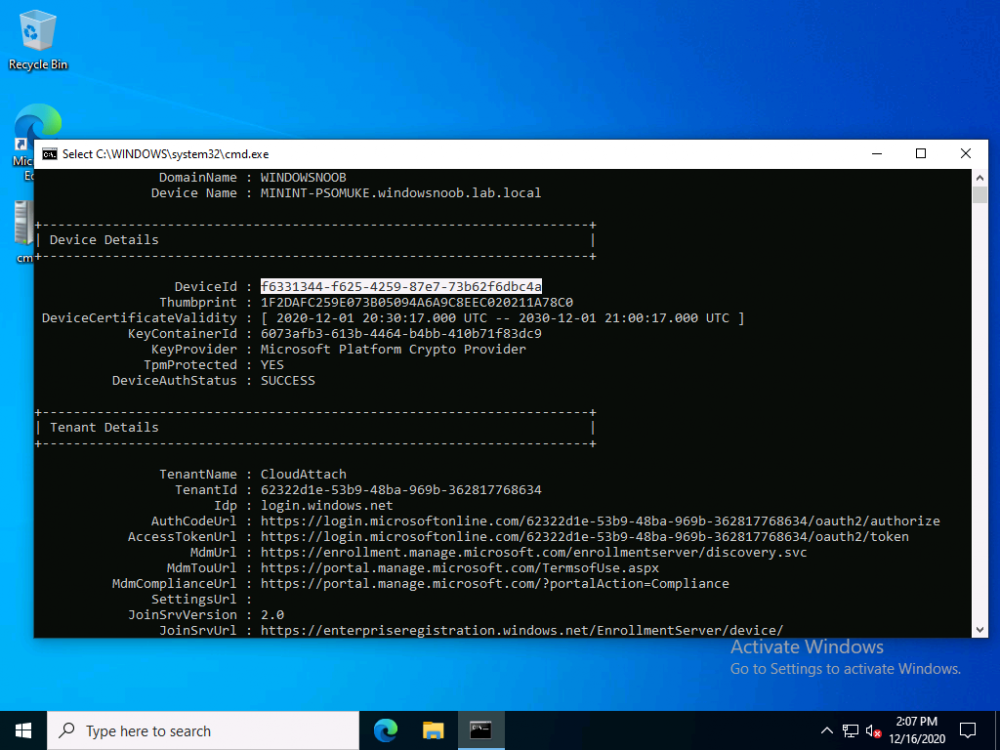
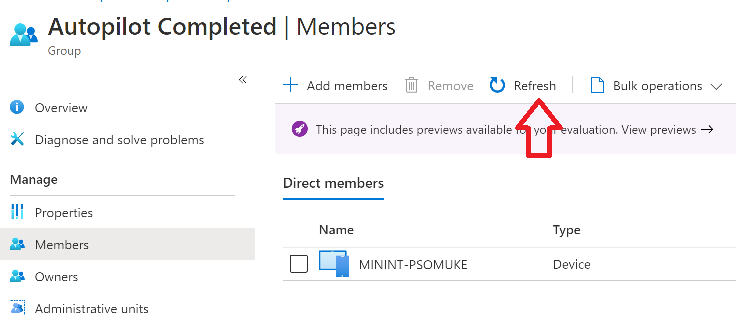
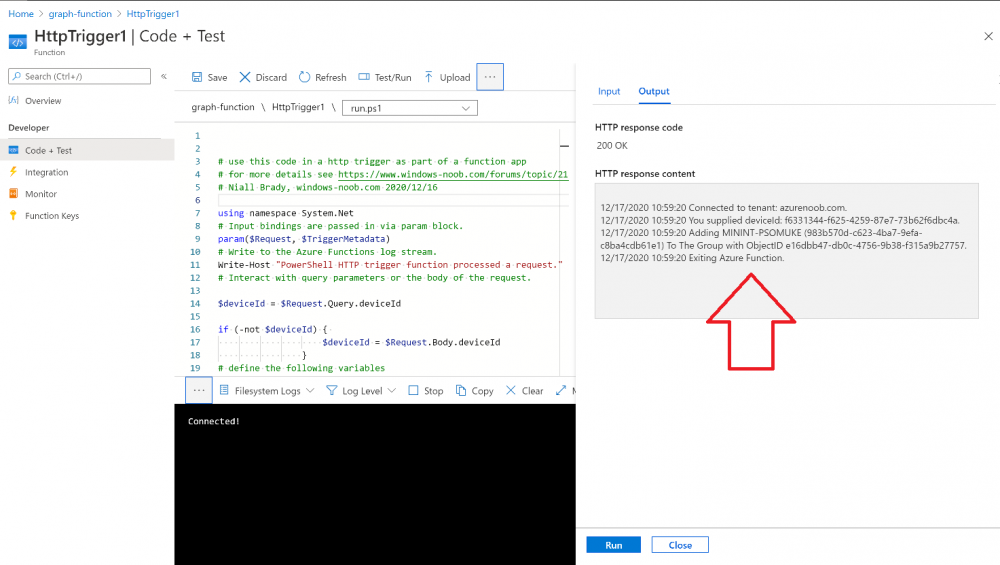
Introduction I've come across various problems during Windows Autopilot causing OOBE to fail that could be solved if only we could decide the order of when things were installed, and to resolve this in a nice way we wanted to dynamically populate an Azure AD group that could be targeted with a device configuration profile. That would mean that we could target sensitive policies to devices after enrollment instead of during enrollment allowing for a smoother, less error prone experience. Being able to apply a profile after Autopilot is finished requires knowing when Autopilot is actually complete, and I touched upon that subject in a previous blog post here. To expand upon that, we can run a scheduled task on login which runs a PowerShell script which in turn, only delivers the payload if certain things are in place such as. C:\ProgramData\Microsoft\IntuneManagementExtension was created within the last X hours The logged on user is not defaultuser0 We could do this using a PowerShell script which runs as a scheduled task after login but that would require storing sensitive credentials on the client. This blog post will show you the necessary steps taken to get to a stage where you can add devices to an Azure AD group using Azure Functions and Graph, and that is interesting because in conjunction with an app registration allows you to embed certificates or secrets within the function and thereby bypass the need for storing credentials in your PowerShell script which runs on the client. Note: In this blog, the app uses http triggers that use certificate secrets, this is fine in a lab, but in production you should use Azure Key Vault instead as it's more secure. If you'd like to understand how to set that up please read my blog post about Azure Key Vault here. There are other ways of doing this, but this is kind of neat. You need to do the following steps. Create a resource group Create an app registration Create a client secret Create a function app Add a HTTP trigger Get the application ID Create an azure ad group Add missing details Configure API permissions Test adding a client So now you have an idea of what this blog post is about, let's get started. Note: I've released an updated version of this concept which includes checking for device compliance here. Step 1. Create a resource group In Azure Active Directory, create an Azure Resource Group. To do that click on Create a Resource in https://portal.azure.com. In the page that appears, search for Resource Group. Select it and click on Create. Next, give it a useful name like Graph_Functions, and select the region applicable to you. And click on Review + create and after being presented with the summary, click Create. Step 2. Create an app registration In Azure Active Directory, create an create an APP Registration called graph_functions by clicking on App registrations in the left pane and clicking on + New registration. fill in the user-facing display name and then click on Register. The app registration is created. Step 3. Create a client secret In the Graph_Function app registration you just created, click on Certificates & Secrets, choose the option to create a + New client secret Give it a name like graph_function_secret Click Add After adding the client secret make sure to copy the secret and keep it safe. copy the secret value and id, you will need them later. Step 4. Create a function app Next, select your previously created resource group called Graph_Functions and create a function app in the graph_functions resource group by clicking on +Add Search for Function App and click Create. A wizard will appear, fill in your choices and select PowerShell core and your region. Create a new storage group or let the wizard create it's own, then click Review + Create. If it generates an error click on the error details, most likely the storage group name you tried to create is already taken. If so, pick another name. Finally, click on Create to create the function app. Step 5. add a HTTP trigger Select the function app created above and click on functions in the left pane. In the ribbon click on + Add. Select HTTP trigger and click on Add. Select Code + test and paste in the code below then save the results # use this code in a http trigger as part of a function app # for more details see https://www.windows-noob.com/forums/topic/21814-adding-devices-to-an-azure-ad-group-after-windows-autopilot-is-complete-part-1/ # Niall Brady, windows-noob.com 2020/12/18 v 0.3 using namespace System.Net # Input bindings are passed in via param block. param($Request, $TriggerMetadata) # Write to the Azure Functions log stream. Write-Host "PowerShell HTTP trigger function processed a request." # Interact with query parameters or the body of the request. $deviceId = $Request.Query.deviceId if (-not $deviceId) { $deviceId = $Request.Body.deviceId } # define the following variables $ApplicationID = "" # this is the id of the app you created in app registrations $TenantDomainName = "" # your tenant name, eg: windowsnoob.com $AccessSecret = "" # this is the secret of the app you create in app registrations $GroupID = "" # this is the ObjectID of the Azure AD group that we want to add devices to $Body = @{ Grant_Type = "client_credentials" Scope = "https://graph.microsoft.com/.default" client_Id = $ApplicationID Client_Secret = $AccessSecret } # make initial connection to Graph $ConnectGraph = Invoke-RestMethod -Uri "https://login.microsoftonline.com/$TenantDomainName/oauth2/v2.0/token" -Method POST -Body $Body #get the token $token = $ConnectGraph.access_token # to improve logging... $a = Get-Date $body = " `n" $body = $body + "$a Starting Azure function...`n" $body = $body + "$a Connected to tenant: $TenantDomainName.`n" # now do things... if ($deviceId) { $body = $body + "$a You supplied deviceId: '$deviceId'" + ".`n" # deviceID should be supplied to the function via the function url, # if you want to hard code it for testing un rem next line and supply the correct deviceId #$deviceID = "3a4f4d9d-c648-4ca2-966f-6c6c10acff35" #$InputDevice = "MININT-U7CQUG7" #$Devices = Invoke-RestMethod -Method Get -uri "https://graph.microsoft.com/v1.0/devices?`$filter=startswith(displayName,'$InputDevice')" -Headers @{Authorization = "Bearer $token"} | Select-Object -ExpandProperty Value | %{ $Group = Invoke-RestMethod -Method Get -uri "https://graph.microsoft.com/v1.0/groups?`$filter=Id eq '$GroupId'" -Headers @{Authorization = "Bearer $token"} | Select-Object -ExpandProperty Value $GroupName = $Group.displayName $body = $body +"$a Group.displayName: '$GroupName'" + ".`n" $GroupMembers = Invoke-RestMethod -Method Get -uri "https://graph.microsoft.com/v1.0/groups/$GroupID/members" -Headers @{Authorization = "Bearer $token"} | Select-Object -ExpandProperty Value $AddDevice = Invoke-RestMethod -Method Get -uri "https://graph.microsoft.com/v1.0/devices?`$filter=deviceId eq '$deviceId'" -Headers @{Authorization = "Bearer $token"} | Select-Object -ExpandProperty Value | %{ if ($GroupMembers.ID -contains $_.id) { Write-Host -ForegroundColor Yellow "$($_.DisplayName) ($($_.ID)) is in the group" $body = $body + "$a $($_.DisplayName) ($($_.ID)) is already in the '$GroupName' group, nothing to do.`n" } else { Write-Host -ForegroundColor Green "Adding $($_.DisplayName) ($($_.ID)) to the group" $body = $body + "$a Adding $($_.DisplayName) ($($_.ID)) to the group with ObjectID $GroupID.`n" $BodyContent = @{ "@odata.id"="https://graph.microsoft.com/v1.0/devices/$($_.id)" } | ConvertTo-Json Invoke-RestMethod -Method POST -uri "https://graph.microsoft.com/v1.0/groups/$GroupID/members/`$ref" -Headers @{Authorization = "Bearer $token"; 'Content-Type' = 'application/json'} -Body $BodyContent } } $body = $body + "$a Exiting Azure function." } # Associate values to output bindings by calling 'Push-OutputBinding'. Push-OutputBinding -Name Response -Value ([HttpResponseContext]@{ StatusCode = [HttpStatusCode]::OK Body = $body }) Step 6. Get the application ID Go back to app registrations, select the app called graph_functions and copy this field. Application (client) ID: copy the Application (client) ID somewhere. Step 7. Create an azure ad group In Microsoft Endpoint Manager create an azure ad group called Autopilot Completed Take note and copy the Object ID of this Azure Ad group. Step 8. Add missing details Now that you have the values you need (remember you copied the access secret earlier ?), go back into your function app and edit the code, fill in the values below for the following variables $ApplicationID $TenantDomainName $AccessSecret $GroupID like I've done here... but obviously use your own values. Save the code after making your edits. Step 9. configure API permissions Next you need to configure API Permissions for the app registration, don't forget to 'grant admin consent after doing so', please select the following permissions from those available. Click + Add a permission, click Microsoft Graph, select Application permissions Device.Read.All Application Read all devices Yes Granted for windowsnoob.com Group.ReadWrite.All Application Read and write all groups Yes Granted for windowsnoob.com In your lab environment it's ok to Grant admin consent, in Production, think more carefully about how you want to approach it. and once done they'll look like so. Step 10. Test adding a client Now you are ready to test this. On a client, open a cmd prompt and type dsregcmd /status look for the deviceID value highlighted below and copy it. Copy that value and on your http trigger function, use the following in your test window. Replace the deviceID listed below with one from your device. { "deviceID": "f6331344-f625-4259-87e7-73b62f6dbc4a" } Click Run and watch your function do it's thing ? If you followed my guide exactly you'll see something like this. And after a quick look in the members of your Azure Ad group, guess what, your client computer is present ! Awesome ! job done Useful links Graph explorer - https://developer.microsoft.com/en-us/graph/graph-explorer# Powershell modules in Azure functions - https://tech.nicolonsky.ch/azure-functions-powershell-modules/ Create first function in visual studio code - https://docs.microsoft.com/en-us/azure/azure-functions/create-first-function-vs-code-powershell Add devices to an Azure ad group using Graph- https://euc365.com/add-devices-to-an-azure-ad-group-using-the-microsoft-graph-api/ Using Graph in an Azure function - https://techcommunity.microsoft.com/t5/windows-dev-appconsult/using-microsoft-graph-in-an-azure-function/ba-p/317434 That's it for this part, please join me in Part 2 where we'll look into scripting things in an automated way on the client. cheers niall


-
this guide is about creating dynamic azure ad groups, is that what you are trying to do, or are you trying to do something else ? if it's something else please raise a new topic
-
I'd recommend you use smoothwall for that
-
Hi @Teffan Hawk thanks for the thanks, are you absolutely sure your content is on the CMG, in the above snippet it's the 12'th source version of the content that's missing cheers niall
-
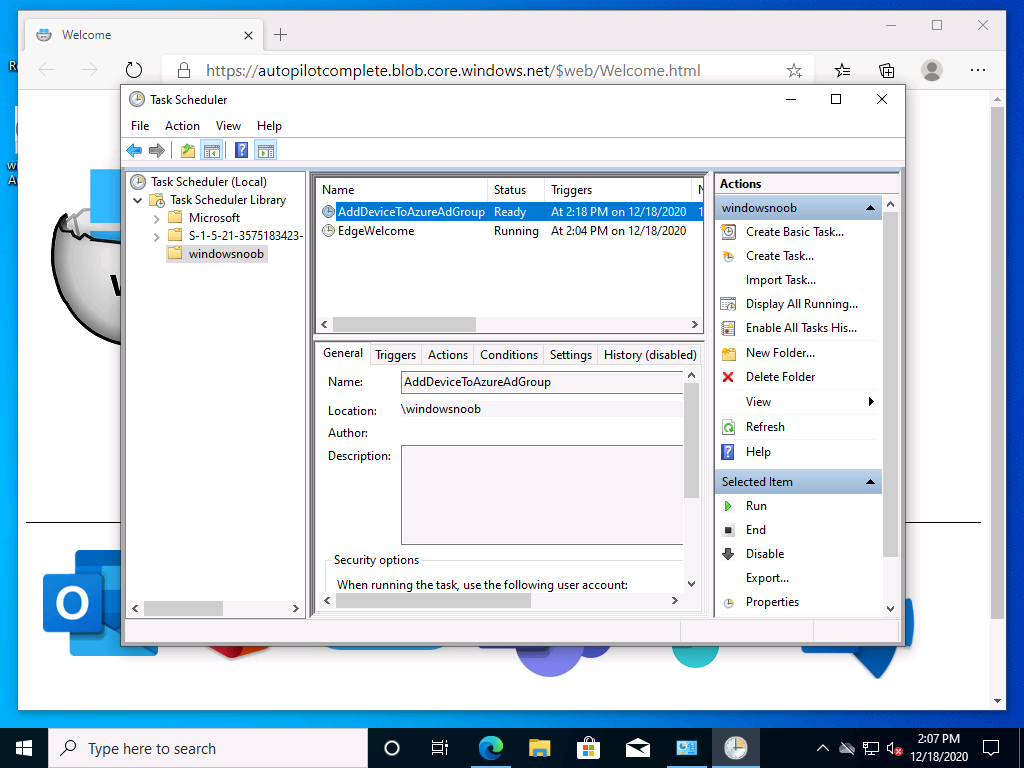
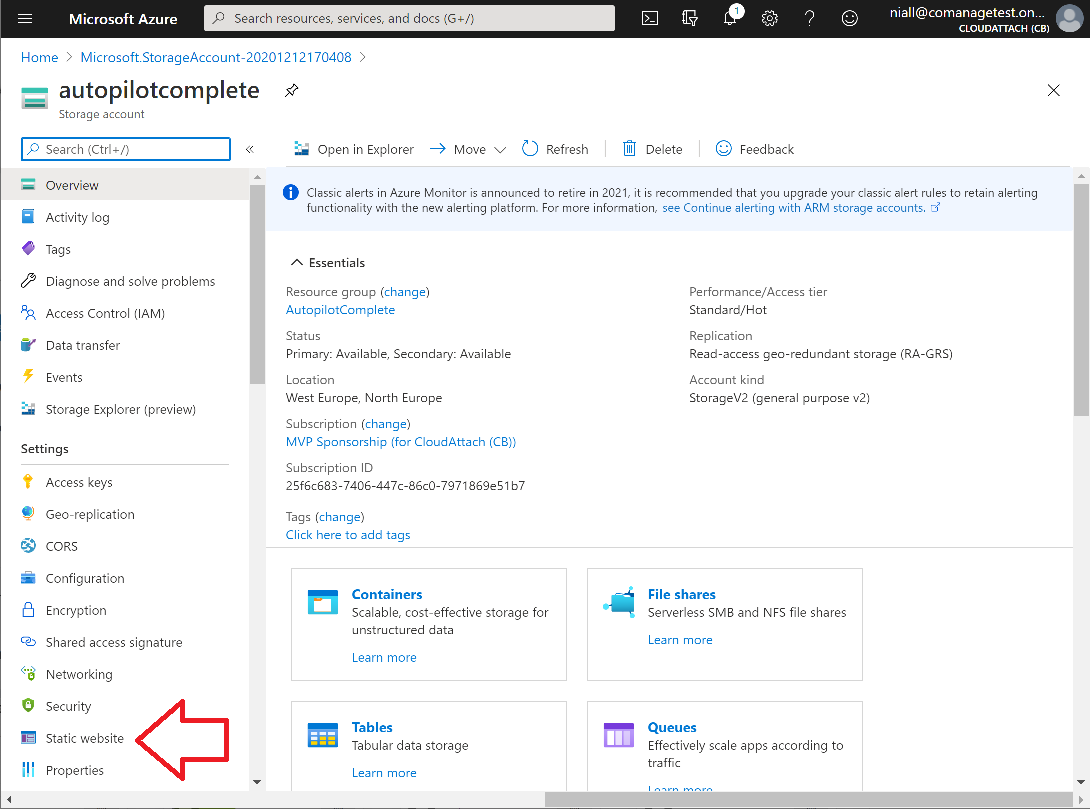
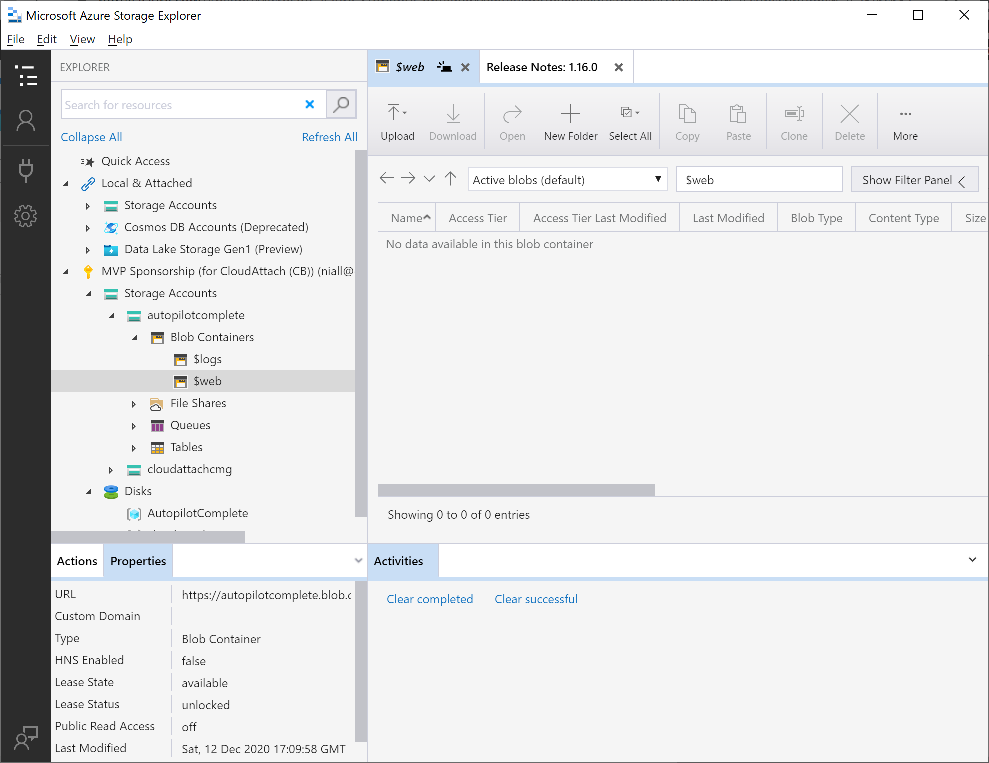
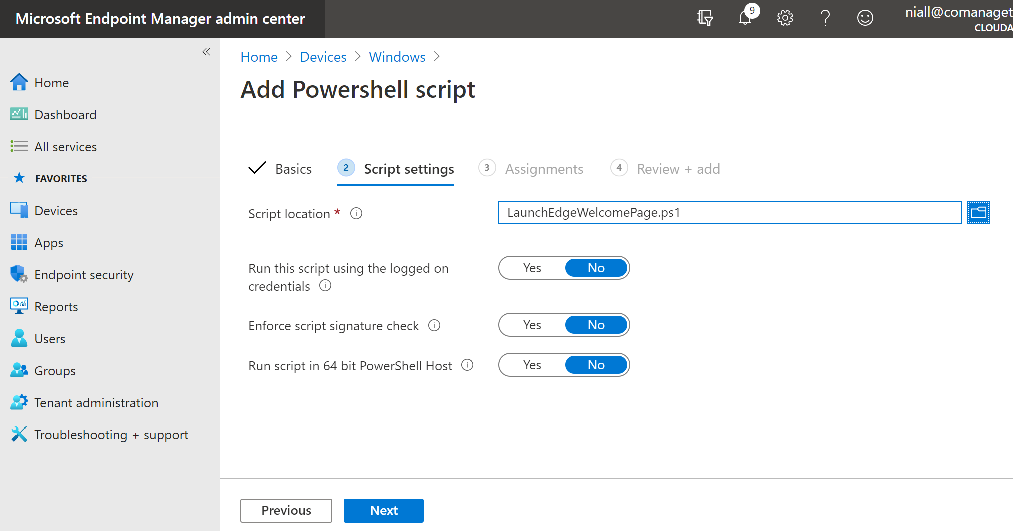
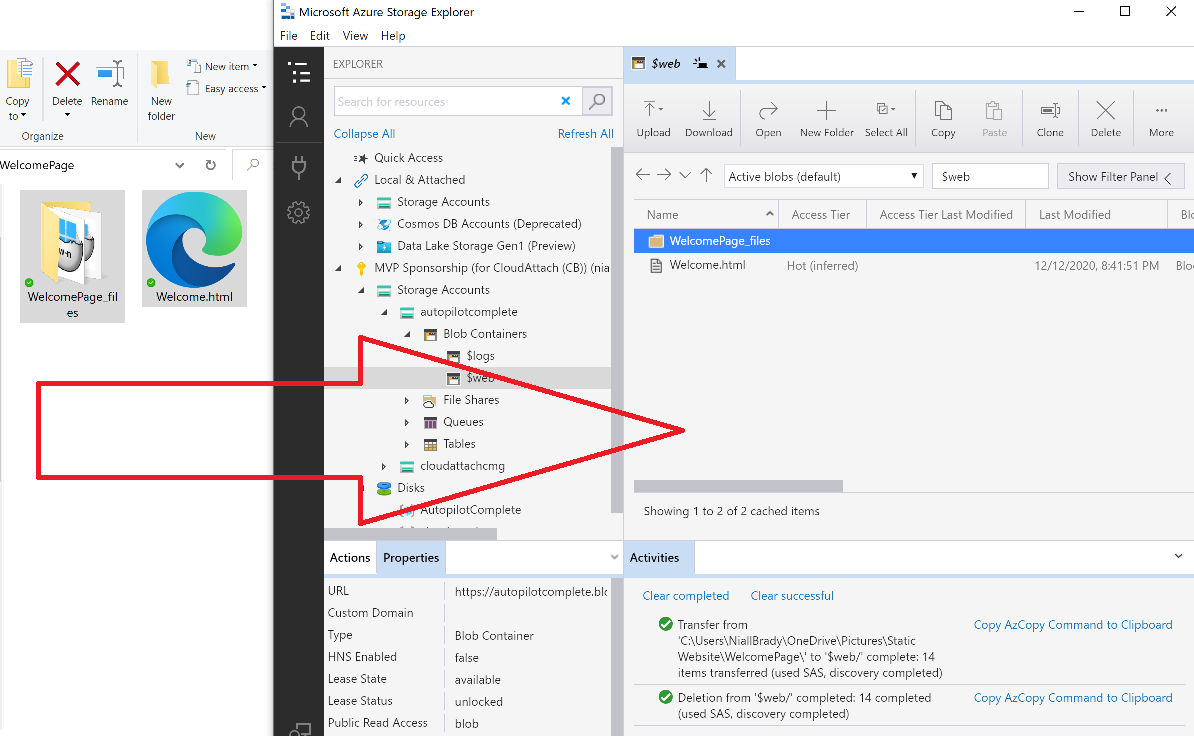
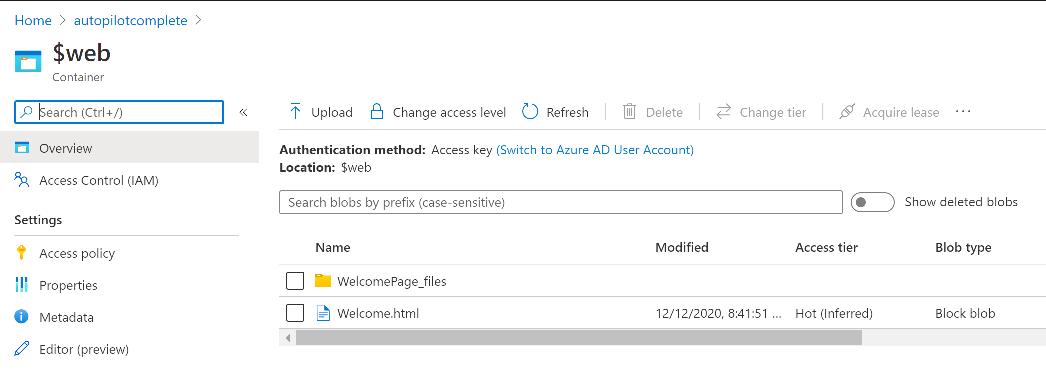
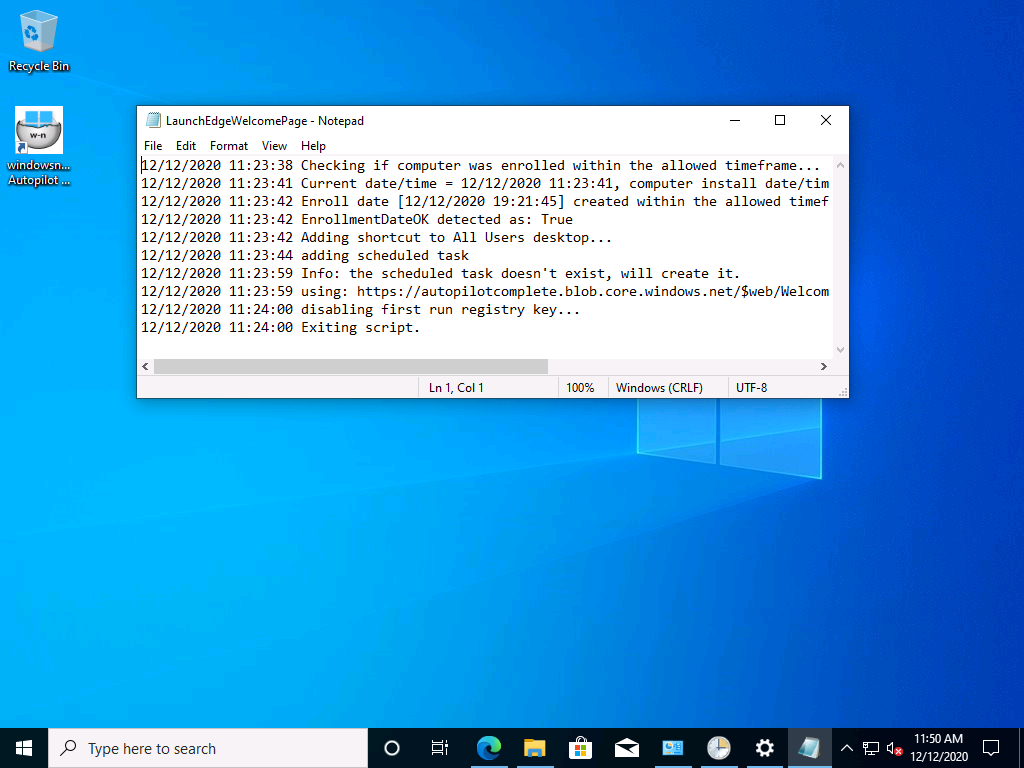
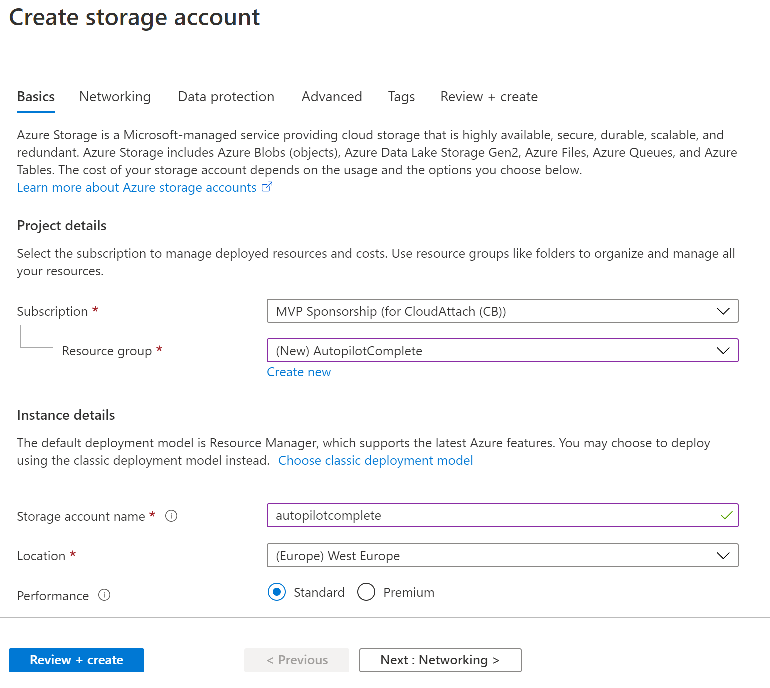
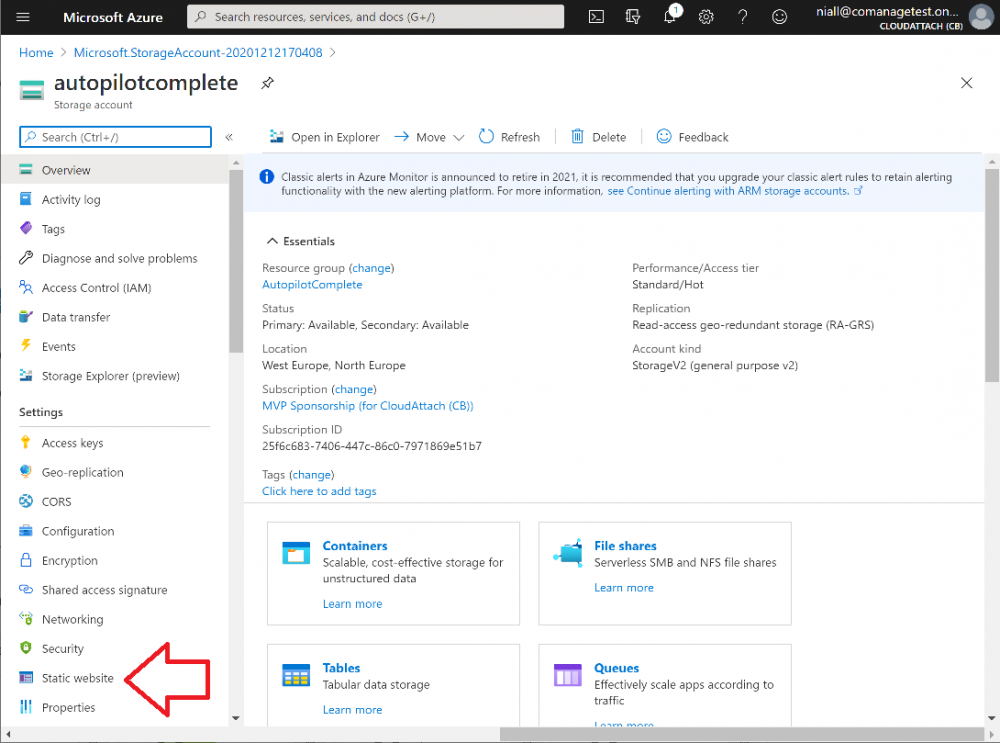
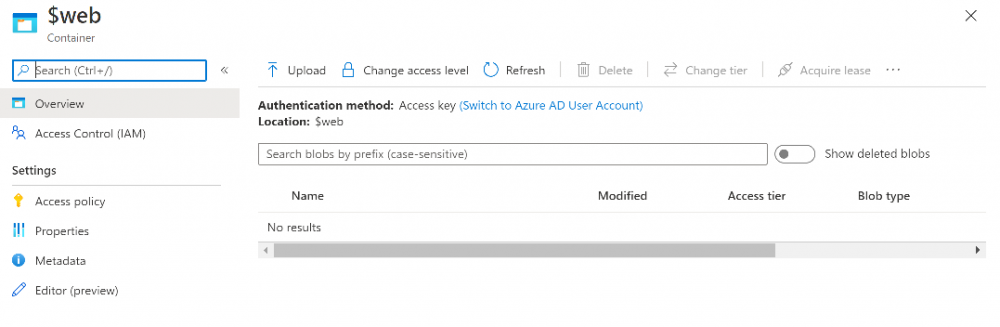
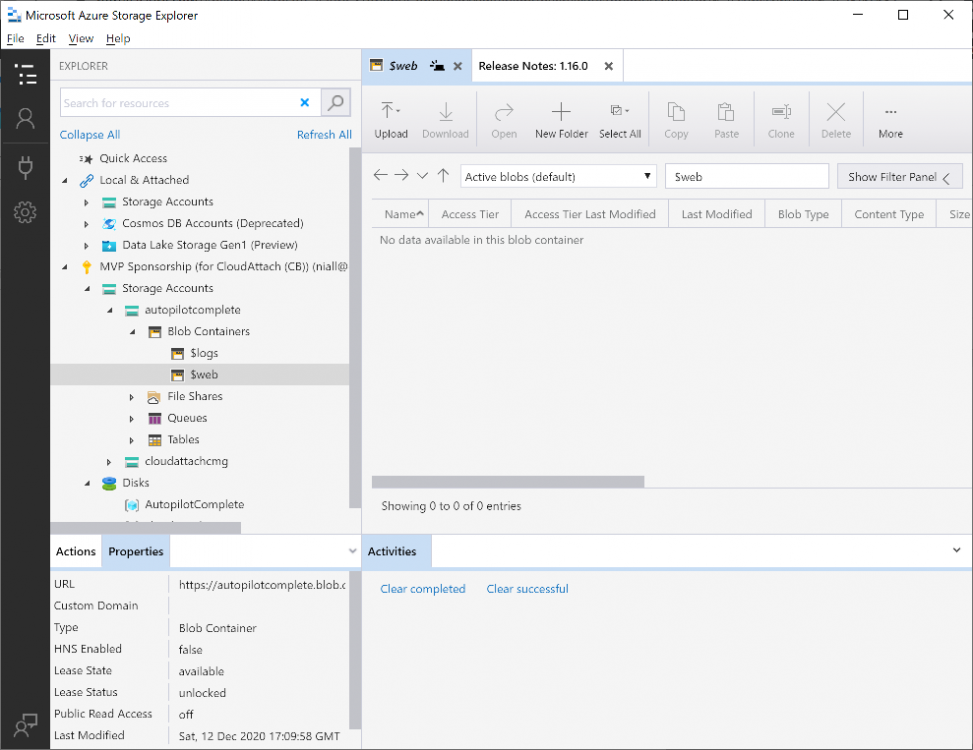
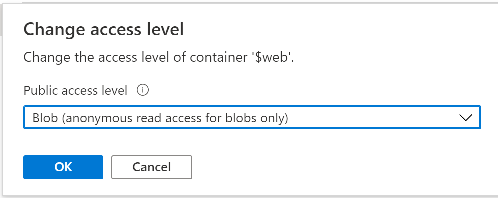
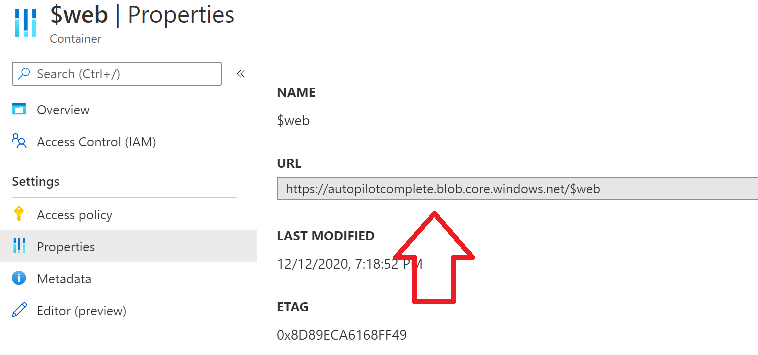
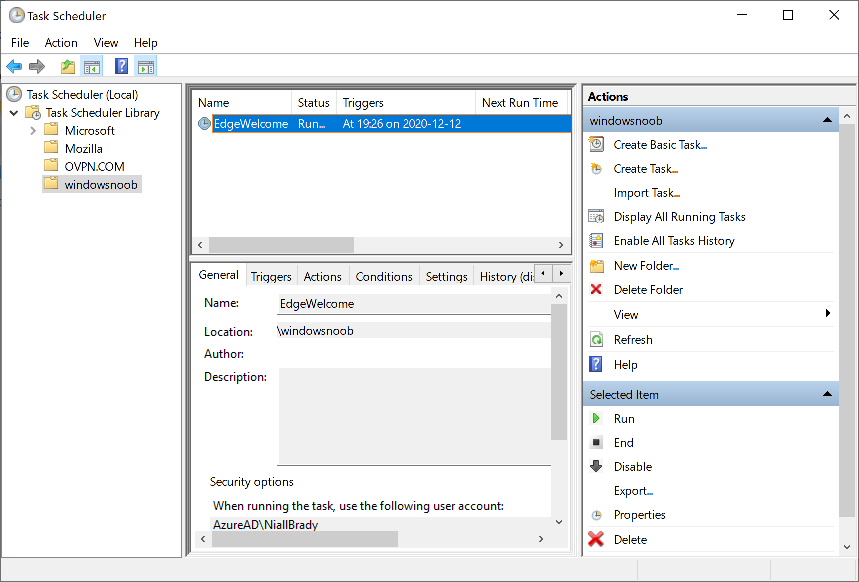
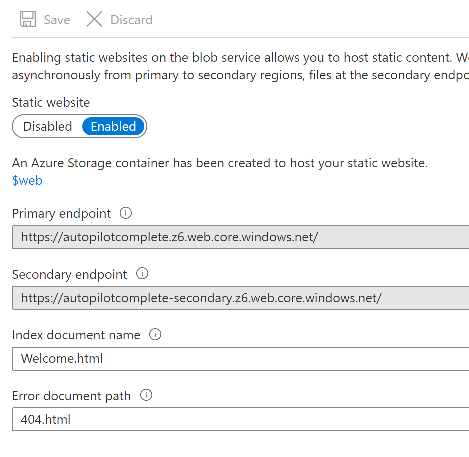
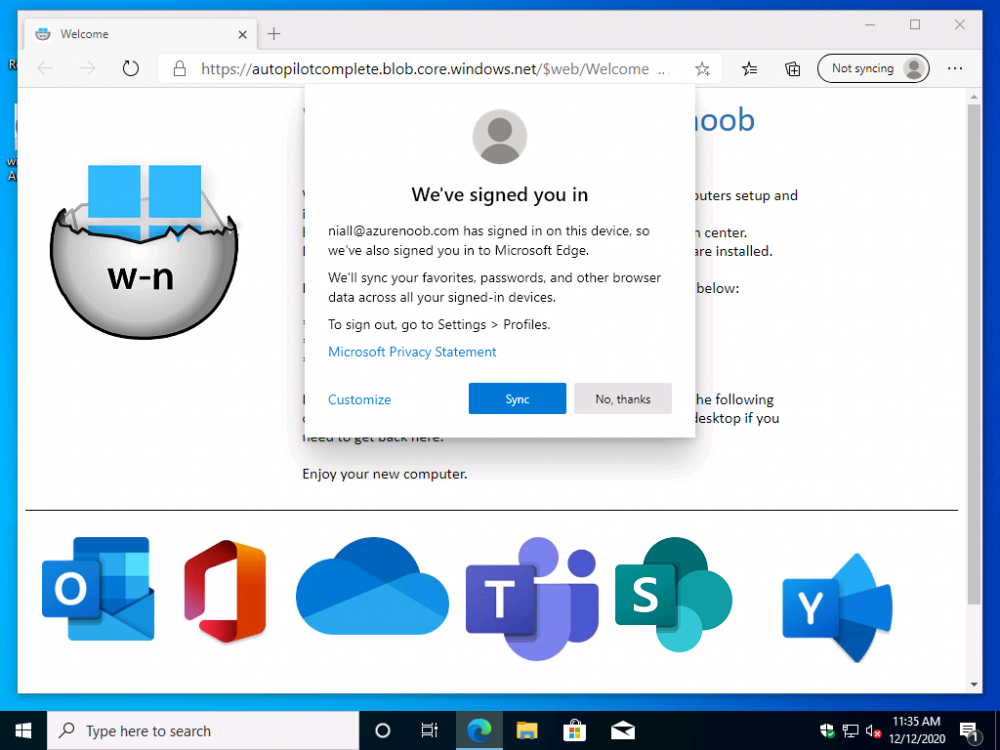
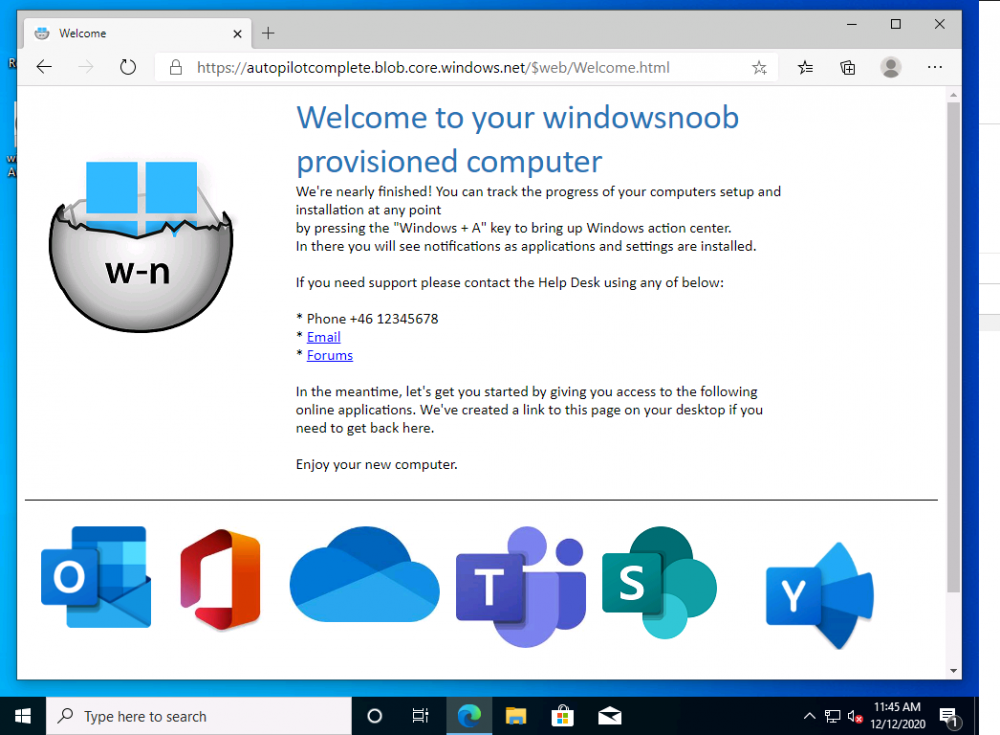
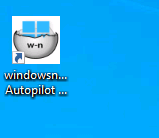
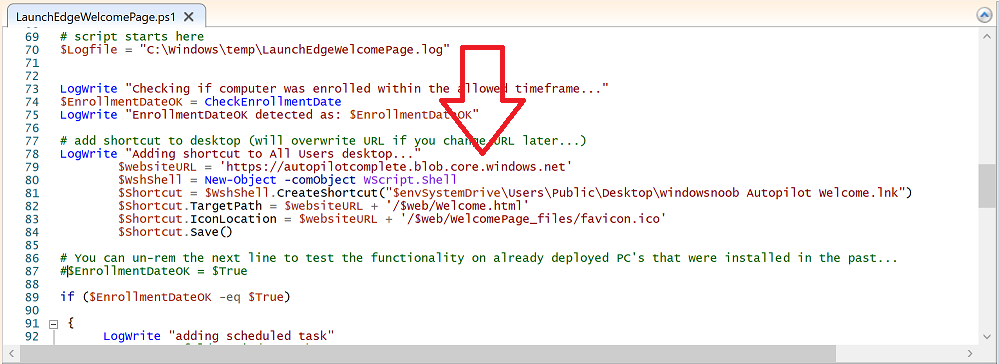
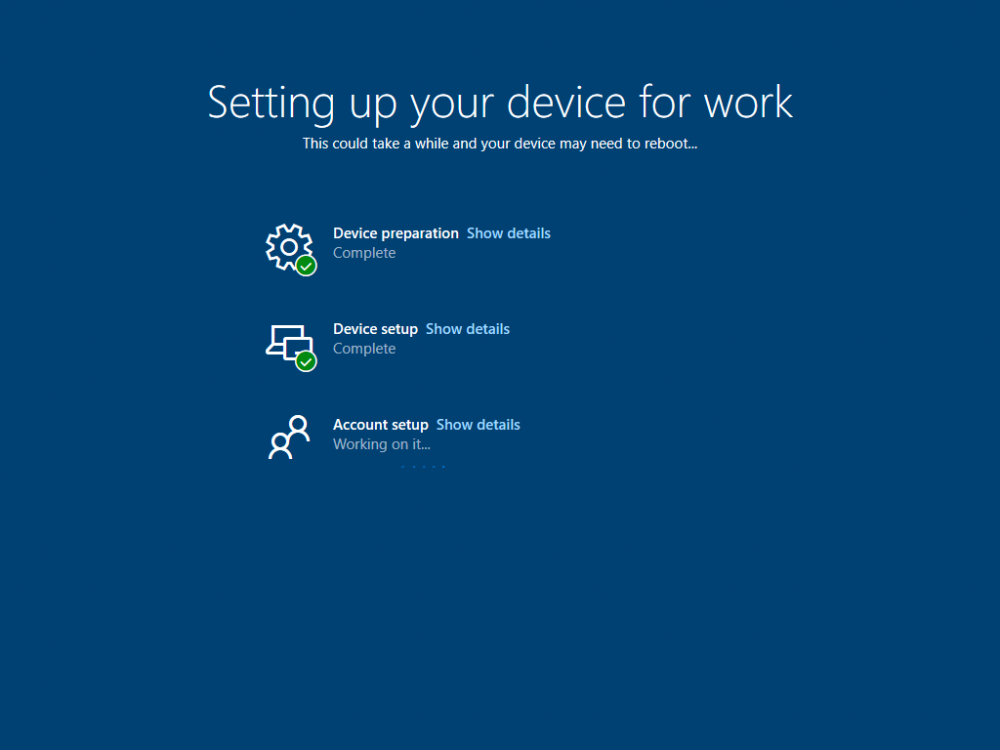
Introduction Understanding when Windows Autopilot is complete is an interesting topic. It would be great if there was a reg-key or file that was set when Windows Autopilot completed successfully, but there isn't, at least not now. Or if there is, I haven't seen any official documentation stating it. In the meantime let's use some other method of determining whether it's complete or not. To do that we'll rely on the creation date of the Microsoft Intune Device Management Extension folder as that gets created on the device if a PowerShell script or a Win32 app is targeted to the user or device, and I'm fairly confident that we all have at least one Win32 app or a PowerShell script deployed to our Autopilot devices during the Enrollment Status Page (ESP) phase of Autopilot. You can see how the enrollment date is calculated from the script here. Note: The script will only run based on the hours since enrollment detected and the detected logged on user. The script will not run if it detects that the current logged on user is defaultuser0. That user is used by Windows during the Enrollment Status Page (ESP) Device Setup phase. As the script runs again during the Account Setup phase of the ESP (the last phase), this time it will be running as a user that is not defaultuser0 and in fact is the actual user that will use the computer. Therefore it will create a scheduled task to run XX minutes after the date/time that it detects, and that usually is 15 minutes or so after the user enters their credentials. It's not perfect, but it's better than nothing. Please adjust it to suit your individual requirements. If you know a better way to do this, then let us know. Now that we have an idea of when Autopilot finished, we can deploy a PowerShell script to our Autopilot users to present a welcome page to the end user. At least that's the idea, and speaking of ideas, this great idea came from a friend of mine on Twitter, I just expanded upon it and fine tuned it for my needs, so please show your thanks to Chris Roberts for the great idea, and do him a favor and follow him on Twitter. The scheduled task will only show the web browser once (1 minute after login), during the time frame we've decided (first 48 hours after enrollment). This gives your users a nice warm fuzzy feeling that everything is completed, and let's them know that they can now use their computer. In order to achieve this we'll do the following. Create a static website in Azure Upload some files to the website Add a PowerShell script in Intune Note: This guide assumes you've already created an app for Microsoft Edge Chromium and deployed it to your Autopilot users. Step 1. Create Storage Account In Azure Active Directory create a storage account. To do that click on Create a Resource in https://portal.azure.com. In the page that appears, search for Storage Account. Select it and click on Create. You can attach it to an existing Resource Group or as in my case (to keep things clean) create a new Resource Group. Next, fill in a Storage account name and select the region and performance. And click on Review + create and after being presented with the summary, click Create. In the Storage Account, select Static Website from the options in the left pane. Set it to Enabled and provide the following file names Welcome.html and 404.html. Click Save when done. Next, click on $web, you will be presented with a simple interface for uploading files to your new static website. Step 2. Download files Download the Welcome page html files and the LaunchEdgeWelcomePage.ps1 PowerShell script here. Note: To download the files hosted on windows-noob.com, make sure you are logged on to the site first. Download the Welcome page files hereWelcomePage.zip Download the LaunchEdgeWelcomePage.ps1 hereLaunchEdgeWelcomePage.zip Download Microsoft Azure Storage Explorer Step3. Upload files After installing the Microsoft Azure Storage Explorer, browse to the $web folder of your storage account in the Blob Containers The easiest way to get the files and folders to the $web folder is to drag and drop from Windows File Explorer. Step 4. Change Access Level In the $Web container click refresh, you should see your files/folders. Click on Change access level to change the access level to these files. Set it to the access level you require, for example Blob access. To restrict access to this website and to block public see the following post. Step 5. Add the static website URL to the script In the $web container, click on properties. The static website URL is displayed, copy the url. Note: the returned URL is case sensitive. Edit the LaunchEdgeWelcomePage.ps1 PowerShell script and paste in your static website URL. Notice how I didn't copy over the /$web part of the url, it's added later. Save the changes. Step 6. Upload the PowerShell script to Intune In Endpoint Manager, select Devices, Windows Devices and choose PowerShell scripts. Add the edited LaunchEdgeWelcomePage.ps1 script. Don't forget to assign the Powershell script to your Windows Autopilot users. Step 7. Review the end result During Autopilot, you've probably enabled the ESP (Enrollment Status Page), if not it's a good idea to do so as it gives your users an indication that something is happening. After Windows Autopilot enrollment is complete, it should logon to the desktop, and Edge should launch with the welcome page. After the user selects the Sync option they'll see this (you can auto configure sync options). The user can click on any of the icons in the webpage to bring them to the online versions of those applications. In addition, an icon on the desktop links back to the welcome page. Step 8. Troubleshooting If it didn't go as planned, check for the presence of the scheduled task. Try running it manually, also look for the log file in C:\Windows\temp\LaunchEdgeWelcomePage.log The script creates a scheduled task to launch the welcome page one time (for each user that logs on to the computer within the allotted time frame of 48 hours) after Autopilot is complete. in In the example below I ran the script on my daily laptop and it wouldn't add the scheduled task as enrollment was many months ago. If you want to test it anyway, then temporarily remove the # on line 87 and try again. Make sure to add the # back before uploading the script to Intune. Note: If Edge Chromium doesn't install during the ESP for whatever reason, and yes, sadly it happens then this welcome page won't launch either. If that happens to you try plan b, which is to launch another browser (I picked Internet Explorer). Below is the section containing the workaround which is NOT in the main script, so it's here just in-case you want to use it. Replace the $action line with this # special workaround for cases where MS Edge Chromium failed to install during ESP LogWrite "checking if Edge Chromium is actually installed right now...." $EdgeChromiumPath = "C:\Program Files (x86)\Microsoft\Edge\Application\msedge.exe" if (!(Test-Path $EdgeChromiumPath)) { LogWrite "'$EdgeChromiumPath' is NOT present, will use plan b..." $action = New-ScheduledTaskAction -Execute '"C:\Program Files (x86)\Internet Explorer\iexplore.exe"' -Argument $websiteURL } else {LogWrite "$EdgeChromiumPath is present, good !" $action = New-ScheduledTaskAction -Execute $EdgeChromiumPath -Argument $websiteURL } # end workaround That's it ! Have fun and please let me know how you get on with this, if you modify the script or webpage then please show us your changes/ideas ! Useful links Favicon Generator Edge Chromium sync - https://docs.microsoft.com/en-us/deployedge/microsoft-edge-enterprise-sync Microsoft Azure Storage Explorer Intune device management extension Azure static website Azure Blob pricing cheers niall


-
MBAM portals cannot access
anyweb replied to hannah's topic in System Center Configuration Manager (Current Branch)
can you do a remote session with me so i can take a look ? teamviewer or microsoft quick assist -
here's the video ! https://www.niallbrady.com/2020/12/10/video-deploy-an-os-via-cmg-using-bootable-media/
-
'Tis the season to be caring – caring for your loved ones, for each other, and yes, even your data and mailboxes. The arrival of the Holiday Season is a great time to recognize all the challenges we’ve survived this year, to be thankful for all we have and to share. If you use Microsoft 365/Office 365, Hyper-V or VMware, celebrate with Altaro. All you have to do is sign up for a 30-day free trial of either Altaro VM Backup or Altaro Office 365 Backup – it's your choice! How does it work? · Trial Altaro VM Backup or Altaro Office 365 Backup · Get a guaranteed $10 Amazon voucher & a chance to win one of the Grand Prizes · Altaro will make a $10 donation to One Laptop per Child for every valid entry What are you waiting for? Sign up now!

-
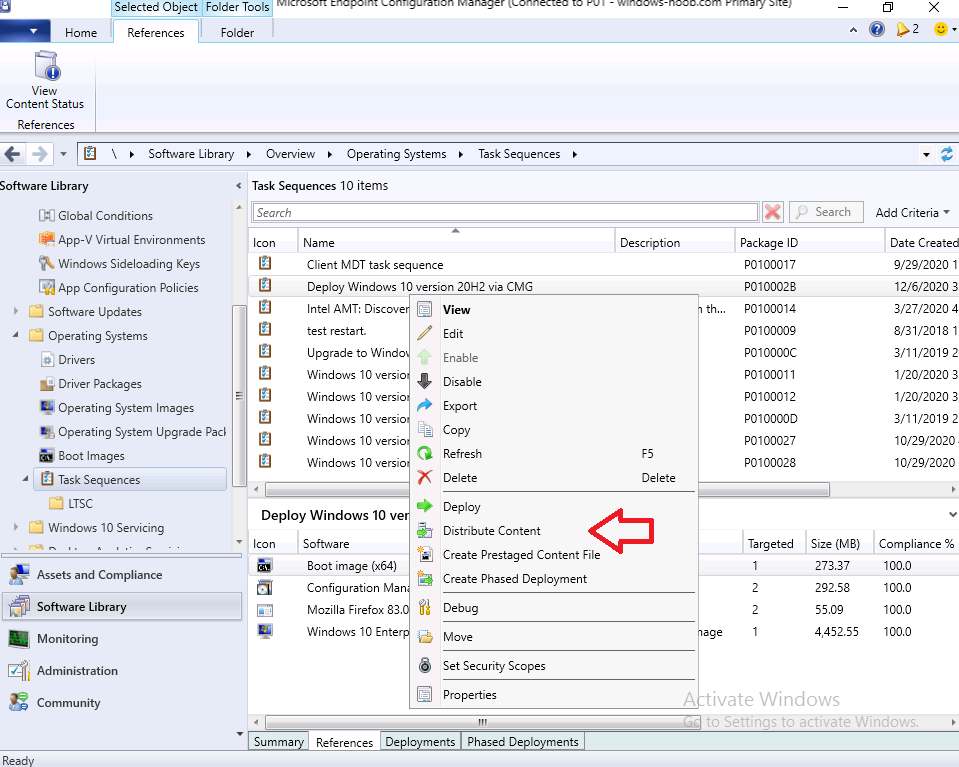
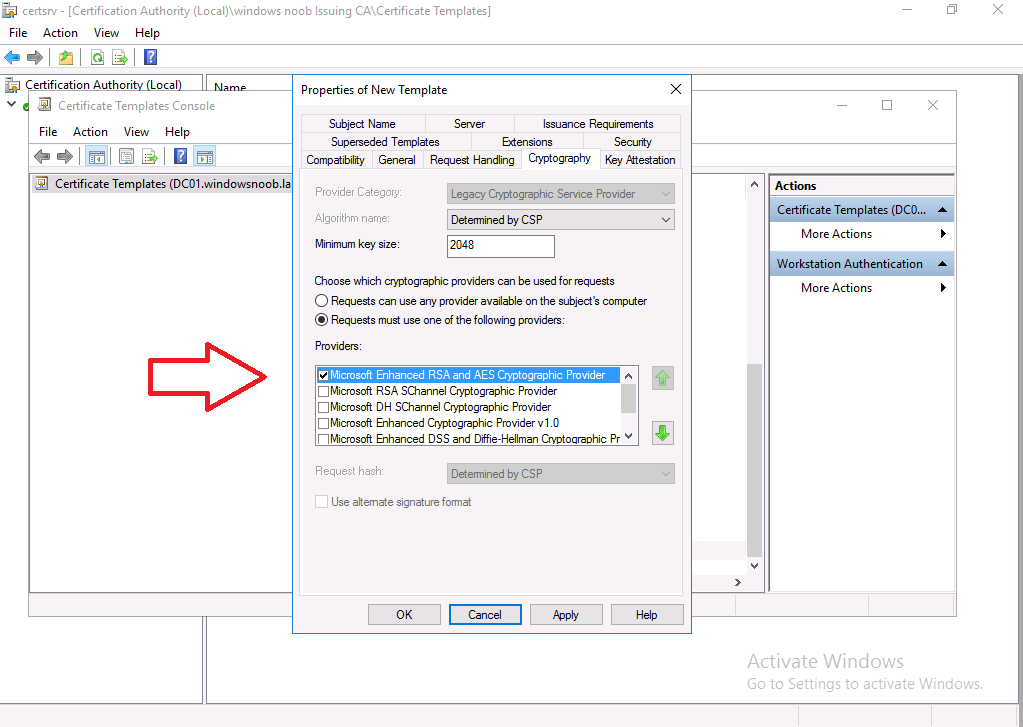
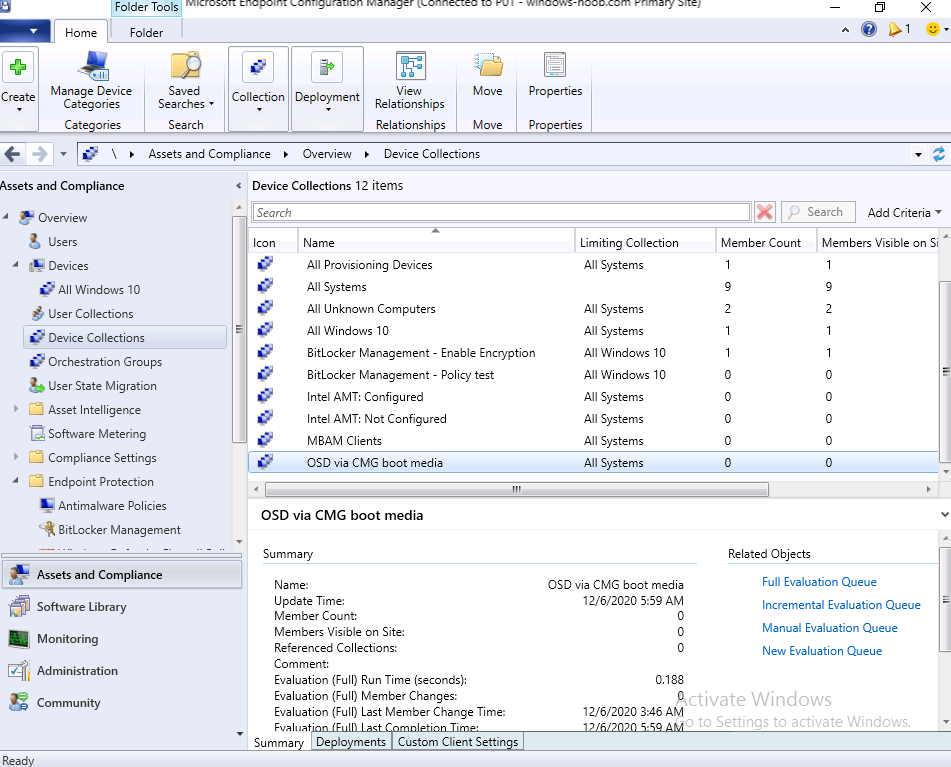
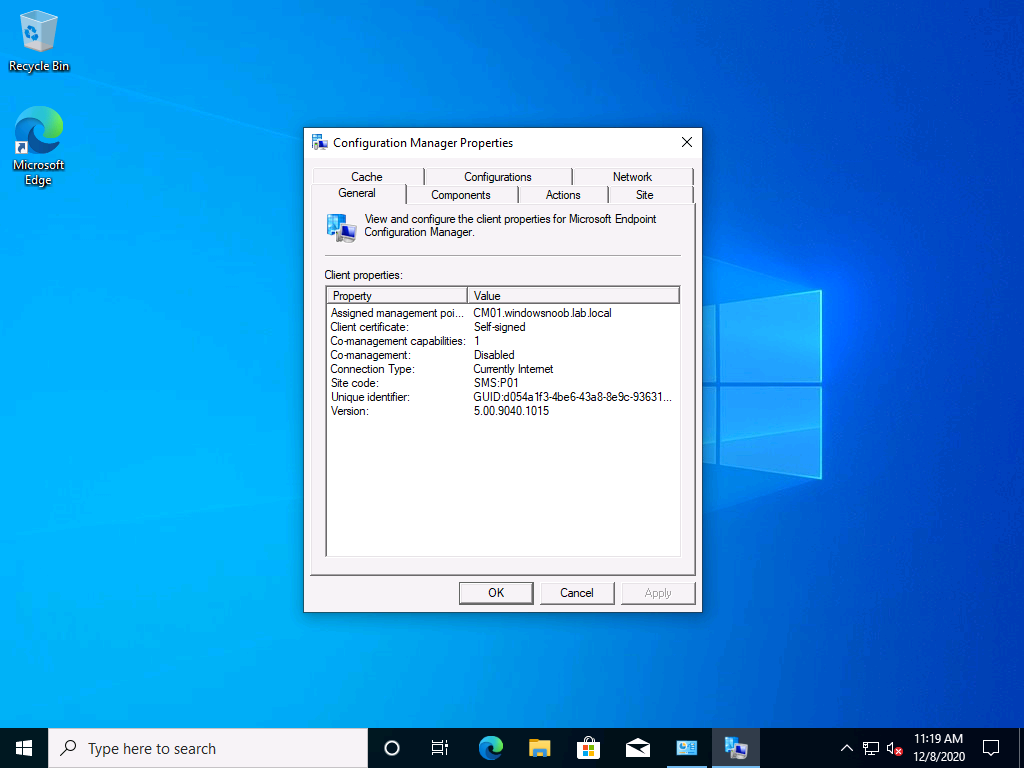
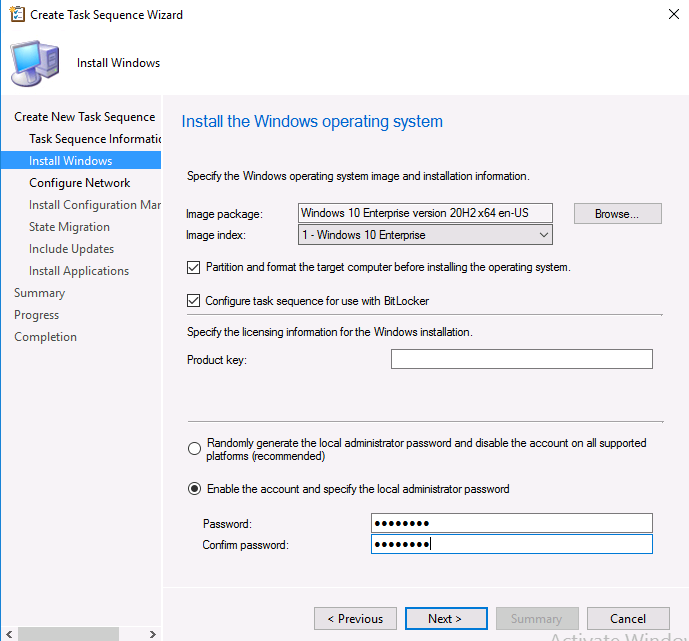
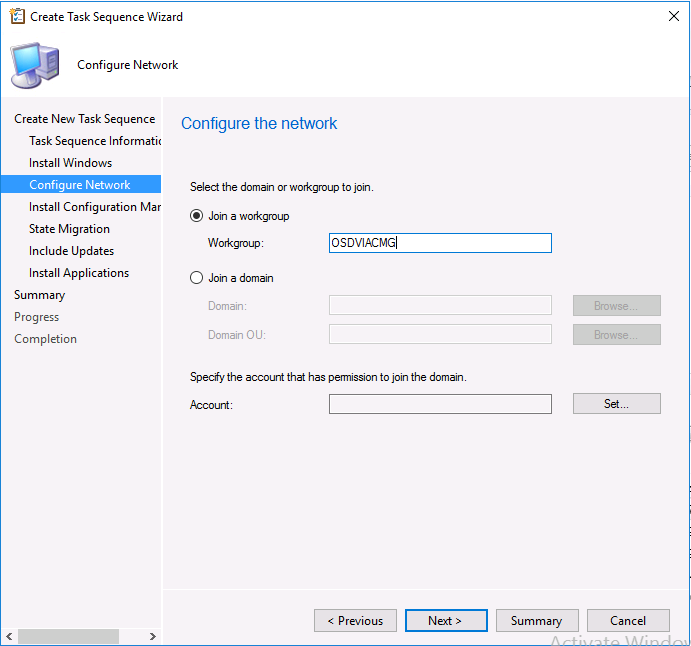
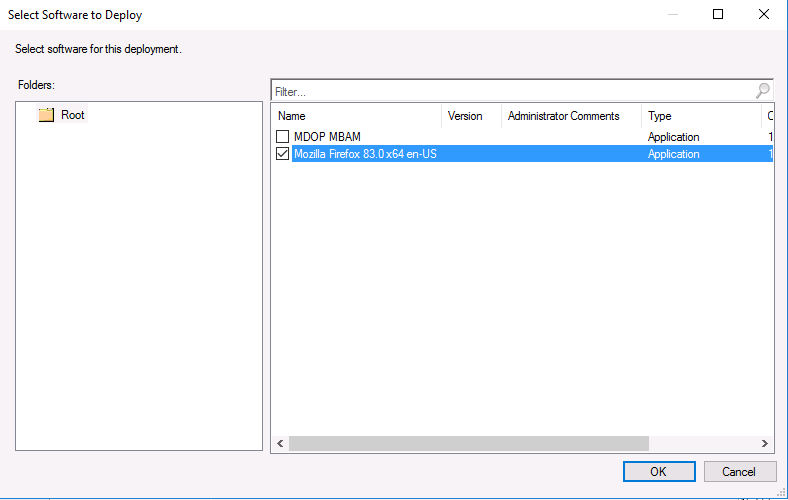
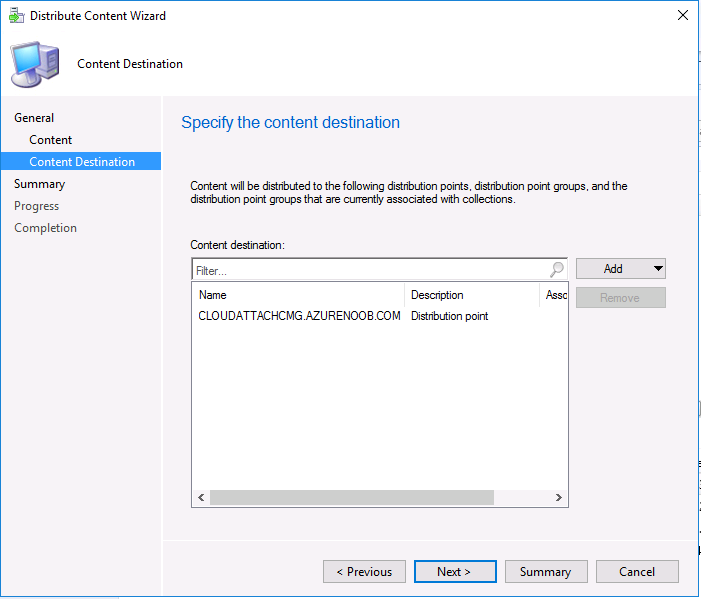
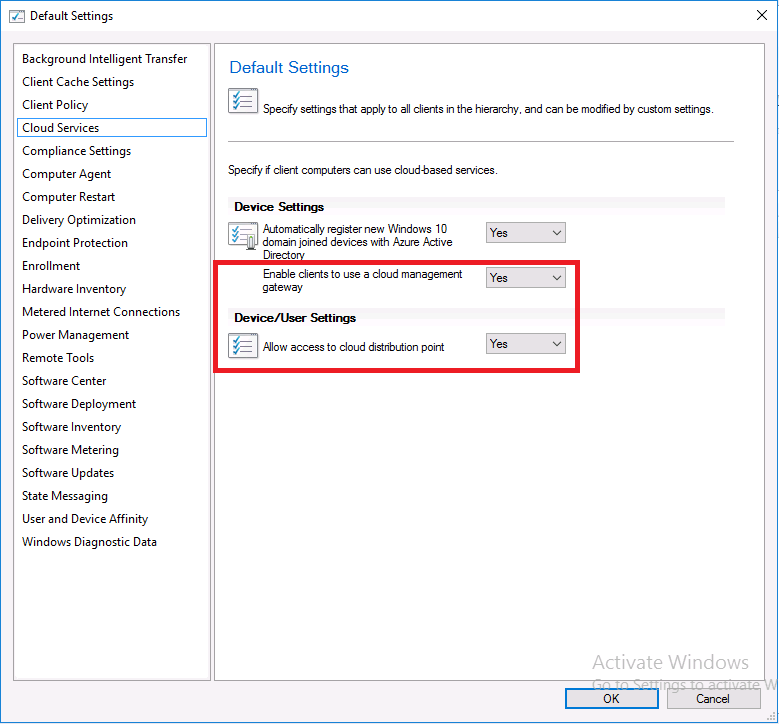
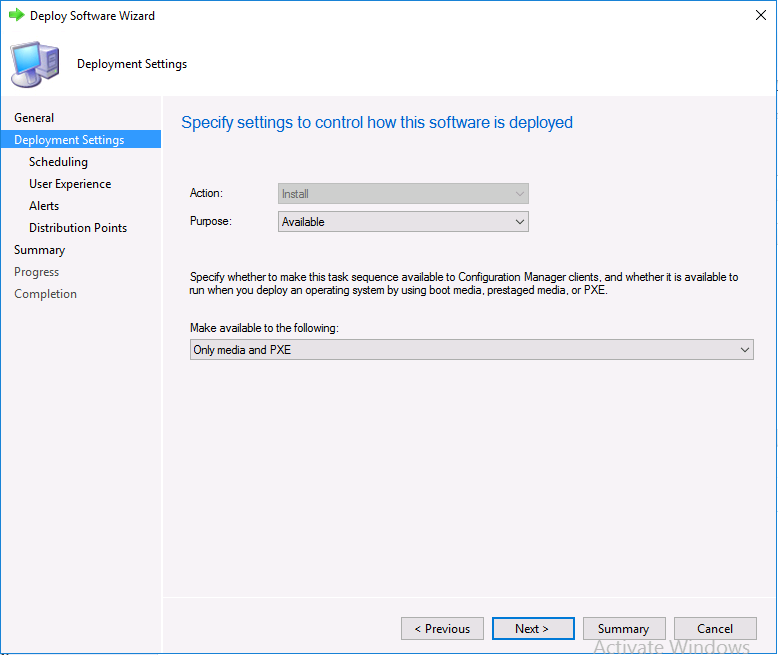
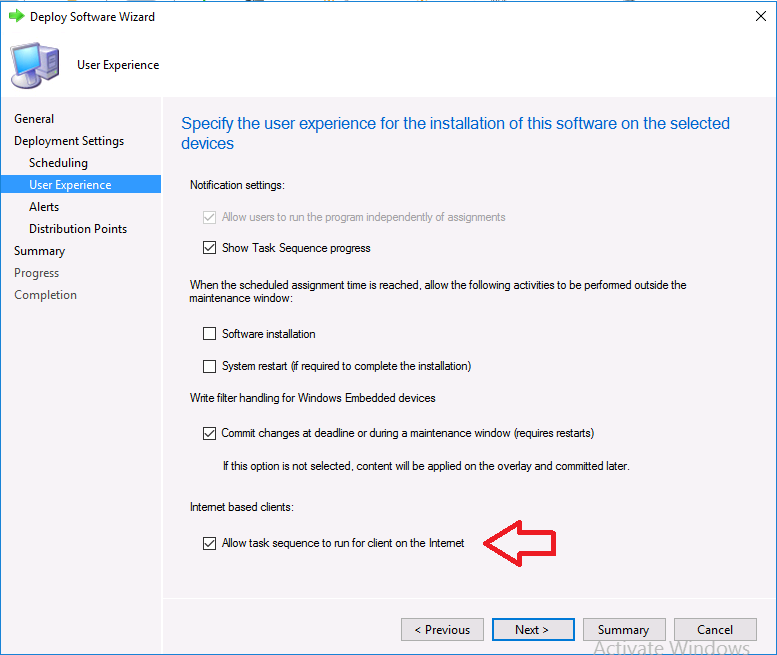
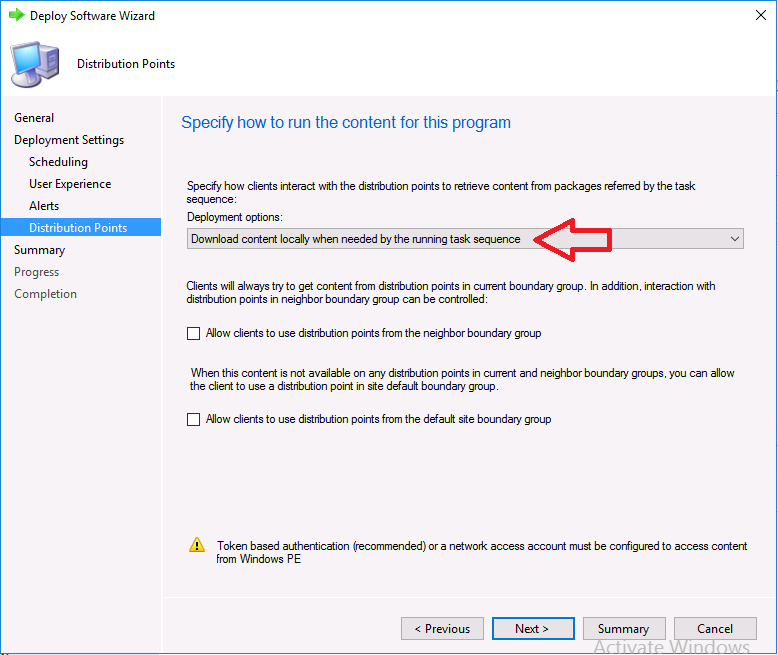
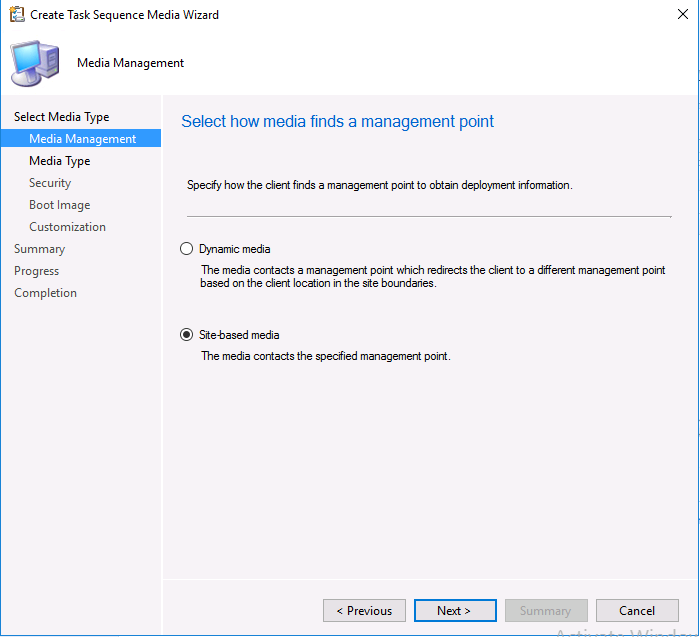
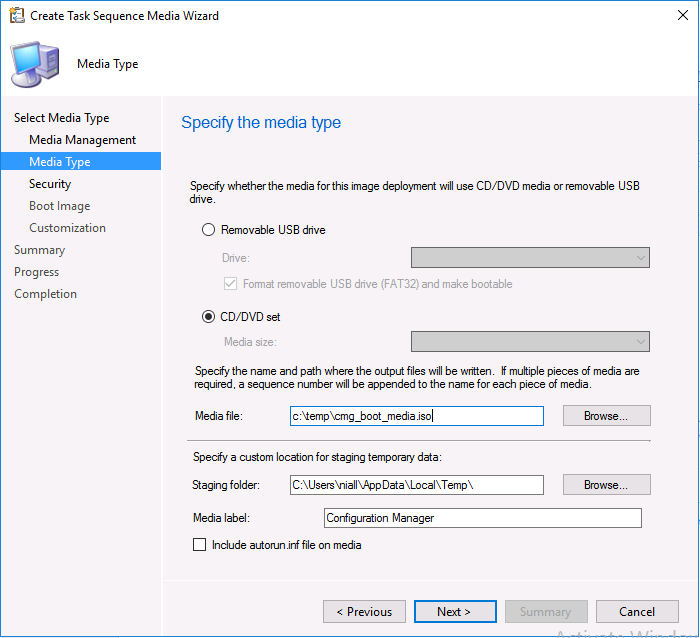
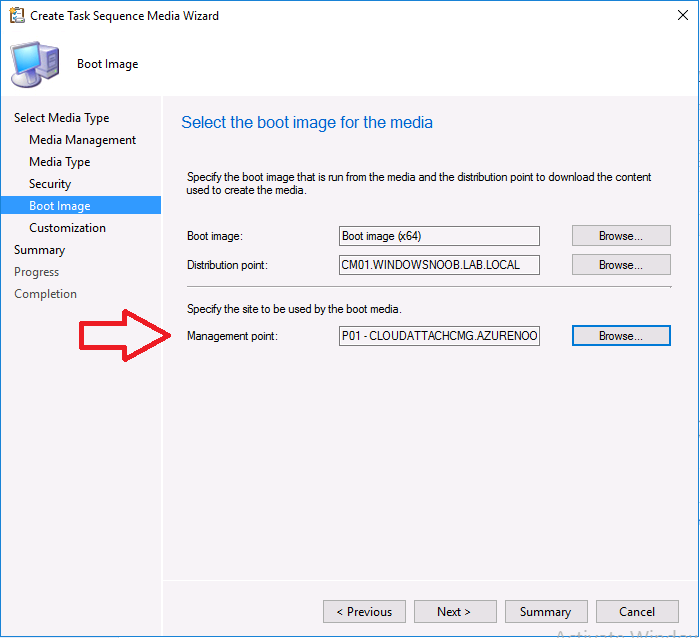
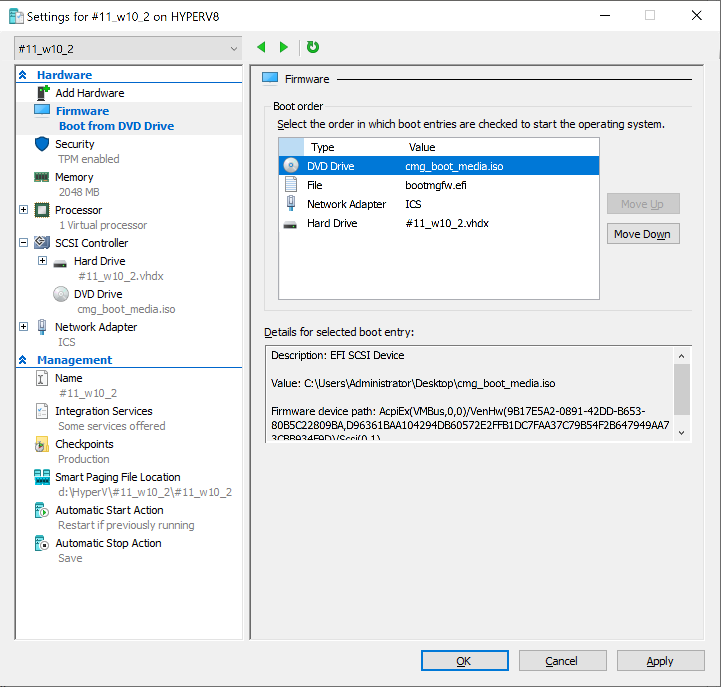
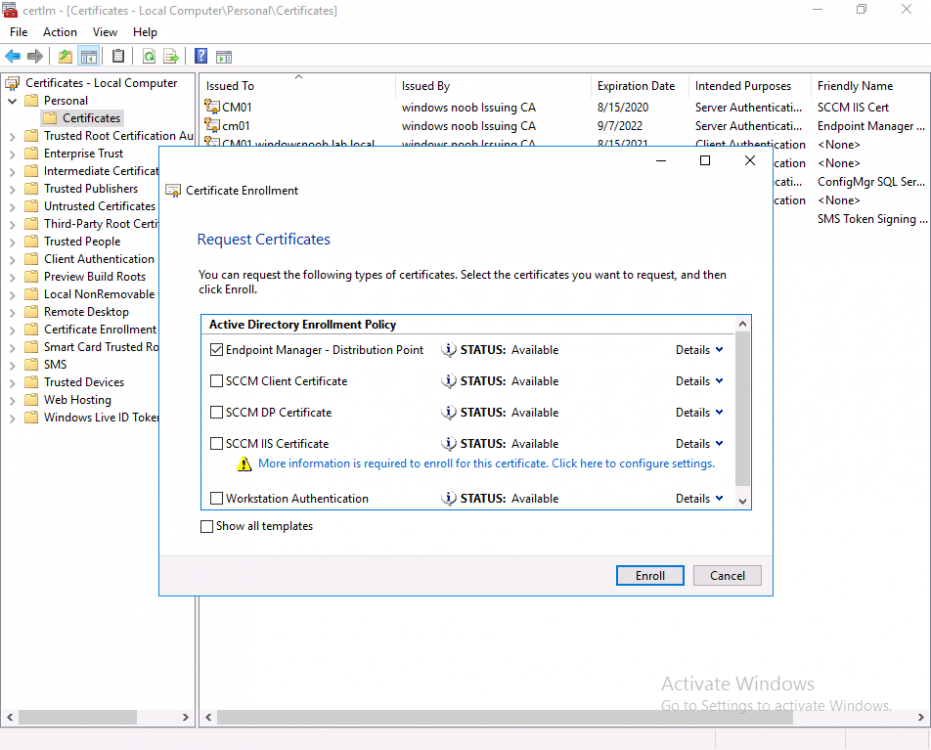
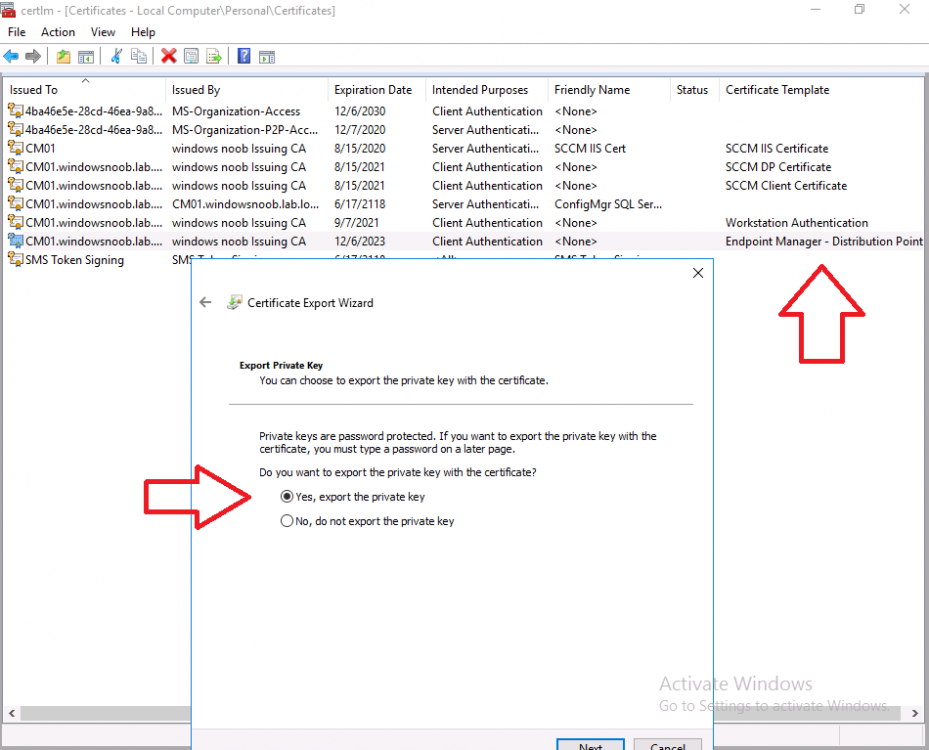
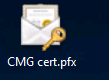
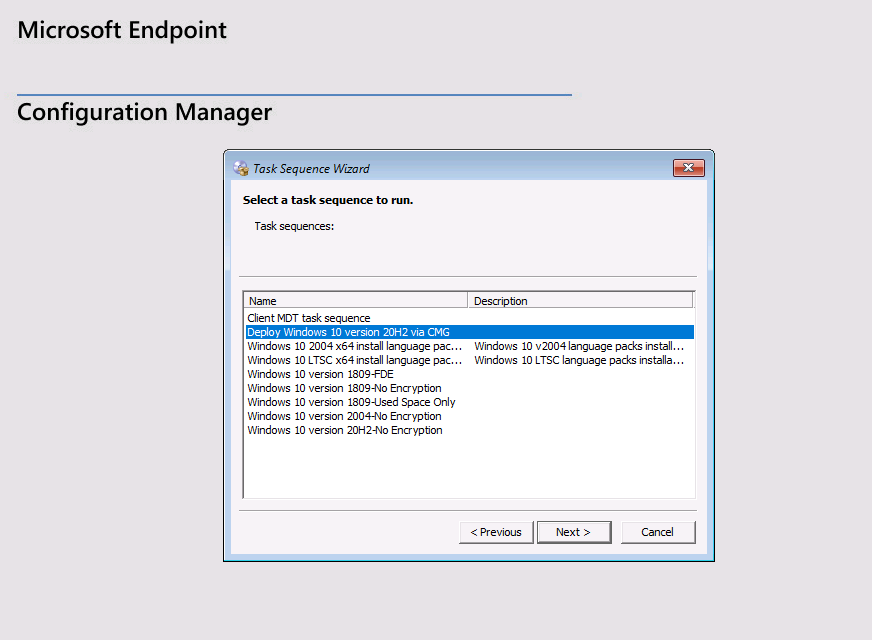
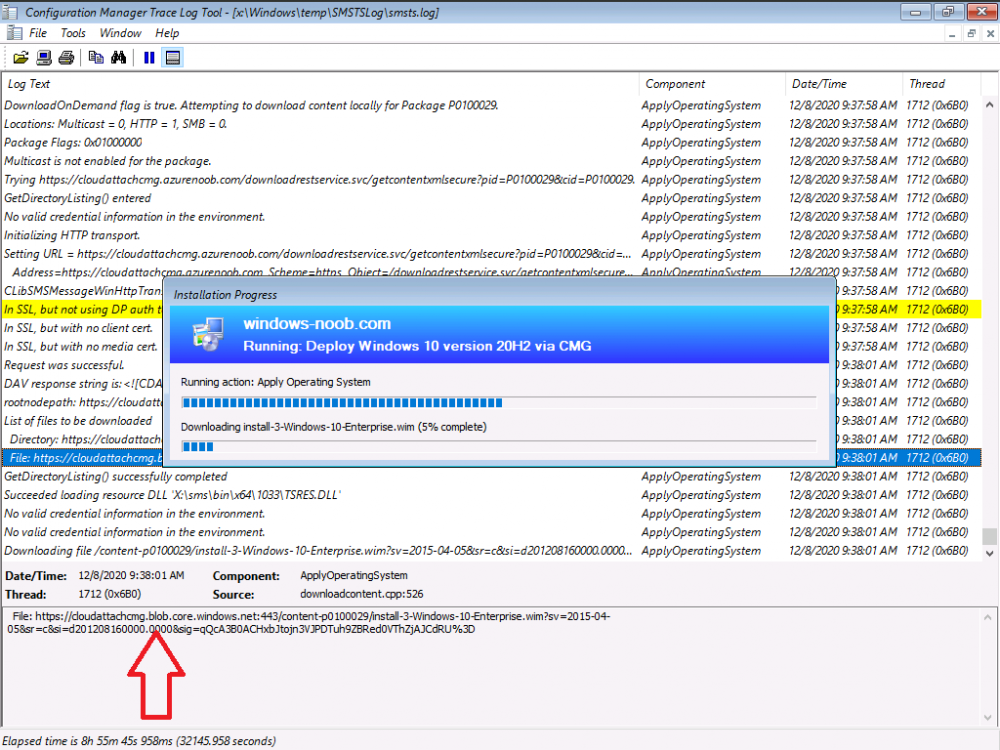
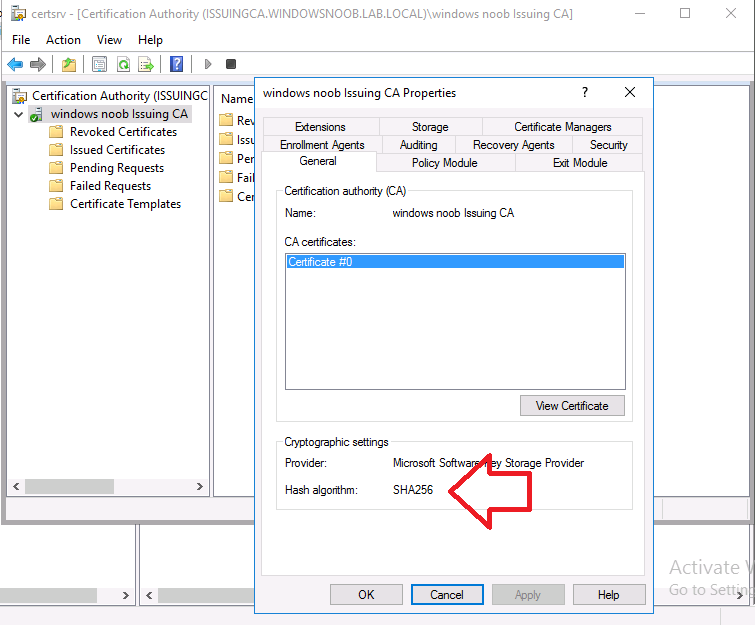
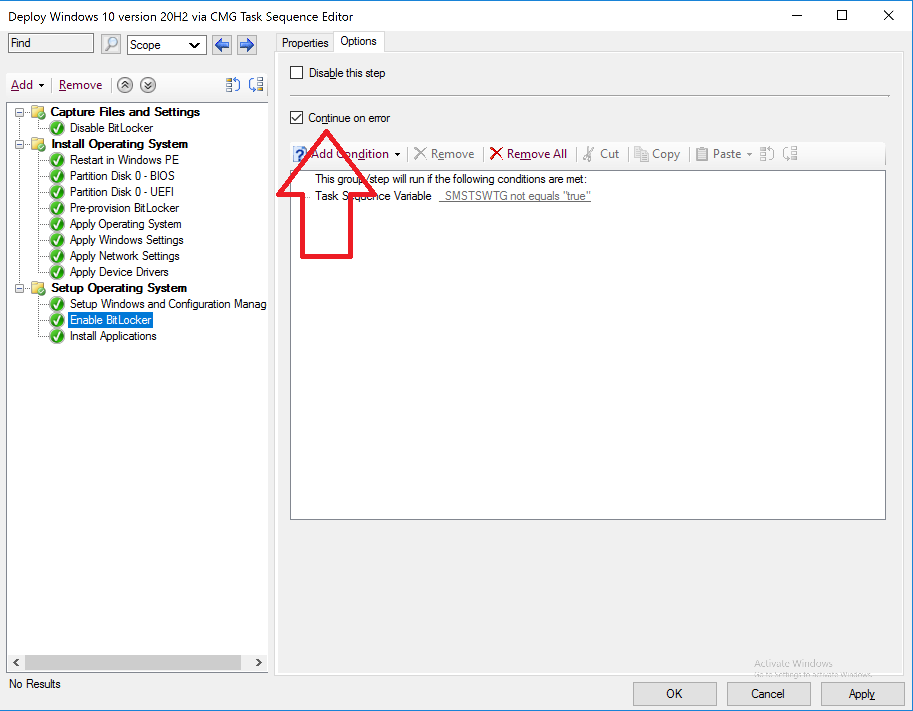
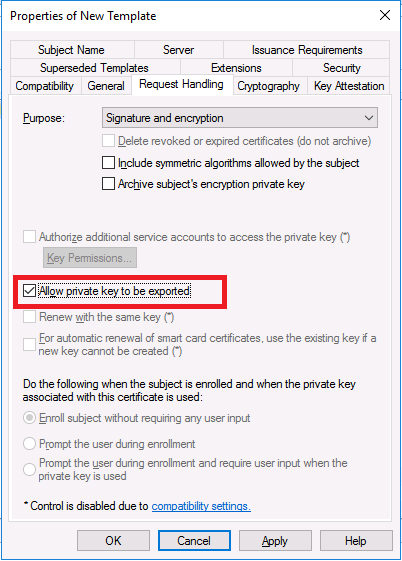
Introduction Microsoft released update 2010 on December 1st and one of the many new features was the ability to deploy an OS over CMG using bootable media. I tested out this ability when it first arrived in aTechnical Preview release back in Technical Preview version 2009, you can read about that here to see how it worked then, there are some changes to the overall process since then. This blog post assumes you've already setup a CMG as documented here. So let's try out the feature. Update: 2020/12/19 Please review the following hotfix for anyone who installed ConfigMgr update 2010 using the fast ring. Below is related to OSD via CMG. Step 1. Create a task sequence In the following step I'll create a simple task sequence, nothing special other than the following settings: On the Install Windows step, select Enable the account and specify the local administrator password and enter a local administrator password. Next, change the Configure Network settings step to Join a workgroup instead of joining a domain. Select applications... Close the wizard when done. After the task sequence is created, edit the Enable BitLocker step and disable it or set it to Continue on Error. This is because the step will fail as it won't have access to AD to escrow the recovery key. Step 2. Distribute content to the CMG Select the task sequence created in step 1, right click and choose Distribute Content. On the Content Destination screen, make sure to select your Cloud Management Gateway (CMG). Step 3. Verify the following settings In the Administration pane of ConfigMgr, select Client Settings, then select Default Client Settings (or create a new one) and right click and bring up the properties of the client settings, select the Cloud Services section. Verify that the following settings are configured to Yes. Allow access to cloud distribution point Enable clients to use a cloud management gateway as shown here. Step 4. Create a device collection In the next step, create a Device collection and limit it to something appropriate like CMG Clients. You can populate this collection with known computers that you intend to target with this task sequence, for example by importing the mac address and associating it with a computer name. Note: This is my lab so I'm using All Systems, don't do that in production though ! Step 5. Deploy the task sequence Right click the newly created task sequence and choose Deploy. Deploy it to the collection you just created. Make sure to configure the following settings when deploying the task sequence. Deployment settings page: Make available to an option that includes media, for example Only media and PXE. User experience page: Allow task sequence to run for client on the internet Distribution points page, deployment options: Download content locally when needed by the running task sequence. I deployed the task sequence to both known (OSD via CMG boot media collection) and unknown computers. Step 6. PKI certificate modifications Note: As per the documentation, if you use a PKI-based certificate for the boot media, configure it for SHA256 like so... And with the Microsoft Enhanced RSA and AES provider. In case that's not clear, you'll need to modify your certificate template used for boot images to include the Microsoft Enhanced RSA and AES Cryptographic Provider instead of the default Microsoft RSA SChannel Cryptographic Provider. I created a new template on my IssuingCA matching that requirement. Note: Under the Request Handling tab make sure that Allow private key to be exported is checked. After creating the new Certificate Template on the Issuing CA, you'll need to request it on the ConfigMgr site hosting your distribution point. Right click the newly imported certificate and choose All Tasks, then select Export. In the welcome to certificate export wizard click Next and choose to export the private key. Save it on your desktop with a memorable name like CMG Cert.pfx. Step 7. Create bootable media Now that you've done everything above, it's time to create your bootable media, that media can be a USB boot key or a standalone ISO. In the ConfigMgr console, in Software Library, Operating Systems, Task Sequences, choose Create Task Sequence Media from the options available in the Create section of the ribbon. Choose Bootable media from the options. On the Media Management page of the wizard, select the option for Site-based media. Choose USB or ISO As we limited the device collection to All Unknown Computers, make sure to select that option from those available, and specify your OSD certificate+password. Also, as is this bootable media, set a strong password. Make sure to point to the newly created CMG Cert.pfx file created earlier if your site mode is HTTPS Only (PKI). On the Boot Image page, select the Cloud management gateway for the management point settings. continue through the wizard until complete. Step 7. Boot a computer using boot media After completing all the steps above and verifying that your task sequence content is on the CMG, it's time to boot a target computer (with a LAN internet connection) from the media (ISO or USB). This computer does not need a connection back to the Active Directory domain controller or the on premise ConfigMgr infrastructure. But it does need full access to your CMG. As I'm using a virtual machine, here are the configured settings I'm using to boot from the ISO file. The computer should boot very quickly from the media and wait at the password screen, enter your strong PXE password configured earlier. Select the task sequence and off it goes. In this step, you can see it's downloading the content from the CMG when it's done, login as Administrator, and your computer is managed via Endpoint Manager, there's the client, and it's getting policy so you can deploy apps, and do all sorts of things to this newly deployed computer. You will of course note that this is not domain joined and that is because it does not have any contact with the on premise infrastructure throughout the entire process. You can use the ConfigMgr client to provide apps to domain join or install whatever you want after the user has logged on. After the task sequence runs, the client uses token-based authentication. What an incredible feature ! Troubleshooting If and when problems occur look at the smsts.log file on the client (in x:\windows\temp\smsts.log) and the CMGService.log on the CMG, that log file and related logs can be found be clicking here. I've observed problems such as "failed to retrieve reg token from media token 0x87d00215 ", that should be resolved with this hotfix. If you see "WINHTTP_CALLBACK_STATUS_FLAG_CERT_REV_FAILED" check the Verify Client Certificate Revocation check box on the settings tab of your CMG properties. Recommended reading How to estimate the cost of OSD via the CMG The right way to find logs from your CMG Deploy an OS over CMG using bootable media Update 2010 for Microsoft Endpoint Configuration Manager Current Branch Plan cloud management gateway Creating boot media How can I configure MEM in HTTPS mode - part 1 How can I configure MEM in HTTPS mode - part 2


-
MBAM portals cannot access
anyweb replied to hannah's topic in System Center Configuration Manager (Current Branch)
well when using that parameter it should uninstall the portal (first time you run it) on the second attempt, you should get a message stating there's nothing to uninstall (or similar), what are you seeing when you try to run it ?