anyweb
-
Posts
9278 -
Joined
-
Last visited
-
Days Won
371
Everything posted by anyweb
-
try disabling SATA mode operation in the BIOS of the dell, and reboot, does anything change ?
-
what hardware are you trying to deploy this on ? and to be clear are you saying you dont see Windows PE starting at all so no chance to get any Windows PE logs ??
-

problem deploying Vista with sccm 2007
anyweb replied to lucutus's question in Troubleshooting, Tools, Hints and Tips
here's where it's failing it cannot communicate with that package XVM00003 verify what that package is and make sure to 1. create a distribution point for it 2. update the distribution point cheers anyweb -
I'm sure you're all still (sadly) familiar with the recent 'debate' I had with InfoWorld's Randall Kennedy, which detailed a lot of silly things. The seed of that discussion was planted with Kennedy's first article which, among other things, claimed that Windows 7 performed similarly to Windows Vista (meaning, slower than XP). Leaving the thread count discussion behind, Kennedy did include a benchmark which showed that Windows 7 performed similar to Windows Vista. There's a new benchmark out now, comparing a slightly more recent build of Windows 7 to Vista RTM/SP1 and XP SP3, and in these tests, Windows 7 blows all of those out of the water. via osnews.com
-
hi and welcome i'm guessing that you are testing this in a vmware virtual environment, is that correct ? what Windows Server 2008 DVD did you copy the boot.wim file from ? and was it a real DVD or an ISO, if it was an ISO how did you mount the ISO cheers anyweb
-
problem deploying Vista with sccm 2007
anyweb replied to lucutus's question in Troubleshooting, Tools, Hints and Tips
are you sure thats all the log some of it seems missing have you added any network card support to your boot.wim file for the hardware (client) you are trying to install, when windows PE fails can you try pinging the server, does it work ? -
how can I troubleshoot Windows PE booting in SCCM
anyweb replied to anyweb's question in Troubleshooting, Tools, Hints and Tips
sorry, it's not clear what you did, so what did you do and what error are you getting ? also please raise it as a separate post in this section thanks. -
In late October, Microsoft announced the beta of the second service pack for Windows Vista and Server 2008. This beta was limited in audience, and today Microsoft has fixed that: it opened up the beta for MSDN and TechNet subscribers, and coming Thursday, it will be opened to the general public. The releases will be distributed via TechNet. via osnews.com
-
Windows Deployment Services Registry entries
anyweb posted a question in Windows Deployment Services (WDS)
Windows Deployment Services Registry Entries To modify any of these registry settings, use the management tools. Do not modify these registry keys directly. For instructions on how to modify them, see How to Perform Common Tasks (http://go.microsoft.com/fwlink/?LinkId=115268). Critical Providers for the WDSServer Service Critical providers for the WDSServer service are indicated by the following registry value: HKLM\System\CurrentControlSet\Services\WDSServer\Providers Name: IsCritical Type: REG_DWORD Value: 1 means critical, and 0 means not critical. Client Answer Policy Windows Deployment Services has a global on/off policy that controls whether or not client requests are answered. The policy is stored at HKLM\System\CurrentControlSet\Services\WDSSERVER\ProvidersWDSPXE\Providers\BINLSVC. Name: netbootAnswerRequests Type: REG_SZ Values: False means that client requests will not be answered, and True means that they will be answered. You can configure Windows Deployment Services to answer all incoming PXE requests or only those from prestaged clients (for example, WDSUTIL /Set-Server /AnswerClients:All). The policy is stored in the registry at HKLM\System\CurrentControlSet\Services\WDSSERVER\ProvidersWDSPXE\Providers\BINLSVC. Name: netbootAnswerOnlyValidClients Type: REG_SZ Values: False means that all client requests will be answered, and True means that only prestaged clientsss will be answered. Logging for the Windows Deployment Services Client The values for logging level are stored in the following keys of the Windows Deployment Services server: HKEY_LOCAL_MACHINE\System\CurrentControlSet\Services\WDSServer\Providers\WdsImgSrv\ClientLogging There are two keys: Name: Enabled Type: REG_DWORD Value: 0 or not set means not enabled (default), and 1 means enabled. Name: LogLevel Type: REG_DWORD Value: 0 or not set means OFF, 1 means ERRORS, 2 means WARNINGS, and 3 means INFO. DHCP DHCP Authorization DHCP Authorization Cache Configuring the PXE Server Not to Listen on UDP Port 67 Configuring the Server to Bind to UDP Port 67 DHCP Authorization The following registry keys for DHCP authorization are located under HKLM\System\CurrentControlSet\Services\WDSSERVER\Providers\WDSPXE: Name Description AuthRecheckTime Specifies the amount of time (in seconds) that the PXE server will wait before rechecking its authorization. This time is only used when a successful authorization process has been performed, irrespective of whether the server was previously authorized. Type: DWORD Default value: 3,600 seconds (one hour) AuthFailureRetryTime Specifies the amount of time (in seconds) that the PXE server will wait if any step of authorization fails. So, if the PXE server is unable to query AD DS successfully, this value is used to determine the time before trying AD DS again. Type: DWORD Default value: 30 seconds DisableRogueDetection Type: DWORD Default value: 0 means enabled, and 1 means disabled. DHCP Authorization Cache Whenever the PXE server successfully queries AD DS, the results are cached under HKLM\System\CurrentControlSet\Services\WDSSERVER\Providers\WDSPXE\AuthCache as follows: Name: <domainname> Value: 1 indicates that the last successful communication with AD DS authorized this server to act as the DHCP server. Type: DWORD The following table indicates that the last query to Localnetwork showed that the server was authorized, but Domain1 was denied. Registry key name Type Value Default REG_SZ Value not set Localnetwork REG_DWORD 0x00000001 (1) Domain1 REG_DWORD 0x00000000 (0) This cache is used whenever the PXE server receives an error while communicating with AD DS. The cached results are used to authorize or unauthorize DHCP, and then AuthFailureRetryTime is used to determine when to query AD DS again. Authorization of PXE servers occurs on the child objects of CN=NetServices, CN=Services, CN=Configuration, DC=Domain, and DC=com. Configuring the PXE Server Not to Listen on UDP Port 67 You can configure this so that port 67 can be used by the DHCP server. The following registry value controls this behavior: HKLM\System\CurrentControlSet\Services\WDSServer\Providers\WDSPXE Name: UseDHCPPorts Value: 1 means that the PXE server will listen on port 67. Use this setting in configurations where the PXE server and DHCP are on different physical computers. This is the default value for the setting. 0 means that the PXE server will not listen on port 67. Use this setting in configurations where Windows Deployment Services and DHCP are located on the same physical computer. Configuring the Server to Bind to UDP Port 67 There are some scenarios (particularly those that require running a DHCP server) that do not support adding custom DHCP option 60 on the same physical computer as the Windows Deployment Services server. In these circumstances, you can configure the server to bind to UDP Port 67 in nonexclusive mode by passing the SO_REUSEADDR option. For more information, see “Using SO_REUSEADDR and SO_EXCLUSIVEADDRUSE” (http://go.microsoft.com/fwlink/?LinkId=82387). The following is the registry key that contains the configuration required to have the server listen in nonexclusive mode by passing the SO_REUSEADDR flag: HKLM\System\CurrentControlSet\Services\WDSServer\Parameters Name: SharedPorts Type: REG_DWORD PXE Architecture Detection Response Delay Banned GUIDs Order of PXE Providers PXE Providers That Are Registered Bind Policy for Network Interfaces Location of TFTP Files Architecture Detection When you enable architecture detection, the following registry value is configured: HKLM\System\CurrentControlSet\Services\WDSServer\Providers\WDSPXE\Providers\BINLSVC Name: DisableArchDisc Type: REG_DWORD Value: 0 or not present means that the architecture discovery is enabled; 1 means that it is disabled (this is the default value). PXE Response Delay The following is the registry key that holds the PXE response delay: HKLM\System\CurrentControlSet\Services\WDSServer\Providers\WDSPXE\Providers\BINLSVC Name: ResponseDelay Type: REG_DWORD Value: <delay time, in seconds> Banned GUIDs The registry location of the banned GUIDs is as follows: HKEY_LOCAL_MACHINE\SYSTEM\CurrentControlSet\Services\WDSServer\Providers\WDSPXE Name: BannedGuids Type: REG_MULTI_SZ Value: GUID strings, with one string per line. The correct format is as follows: {1acbf4473993e543a92afadb5140f1c8}, which should match what you see when you perform a PXE boot on a client (without dashes). Order of PXE Providers A registering provider can select its order in the existing provider list. The provider order is maintained in the registry at the following location: HKLM\System\CurrentControlSet\Services\WDSServer\Providers\WDSPXE\ Name: ProvidersOrder Type: MULTI_SZ Value: Ordered list of providers PXE Providers That Are Registered PXE providers register with the server by doing the following: Creating a valid key (to represent their provider) in the following folder: HKLM\System\CurrentControlSet\Services\WDSServer\Providers\WDSPXE\Providers Creating a registry entry pointing to their .dll at the following location: HKLM\System\CurrentControlSet\Services\WDSServer\Providers\WDSPXE\Providers\<Custom Provider Name> Name: ProviderDLL Type: REG_SZ Value: The full path and file name of the provider .dll Designating the provider as critical by adding the IsCritical registry setting (optional) Specifying the entry point routine in the provider .dll Bind Policy for Network Interfaces There are various possible network adapter configurations that you can use, including the following: One network adapter with a single IP address One network adapter with multiple IP addresses bound to the single adapter Two or more network adapters, each with one IP address Two or more network adapters, with at least one having more than one IP address The first option listed is considered the standard server configuration, and all of the other cases are more advanced networking scenarios. To satisfy all four configurations, WDSPXE has the ability to listen only on particular network interfaces. These interfaces may be specified either by IP address or by MAC address. During installation, the PXE server is automatically configured to listen on all active (that is, nondisabled) interfaces. After installation, you can adjust the default behavior by using the settings for the registry keys listed in the following table. These settings are stored in the following folder: HKEY_LOCAL_MACHINE\System\CurrentControlSet\Services\WDSServer\Providers\WDSPXE Entry Data type Description and values BindPolicy REG_DWORD Specifies the default binding behavior and determines whether the PXE server binds to all IP addresses or to none. This can be either of the following values: 0 means exclude (this is the default value). That is, interfaces that are defined in BindInterfaces will be excluded. 1 means include. That is, only those interfaces that are defined in BindInterfaces will be included. Note Changes to BindPolicy are automatically picked up by the PXE server and do not require a service restart. BindInterfaces REG_MULTI_SZ Lists all interfaces that the PXE server should listen on or exclude, based on the setting of BindPolicy: If BindPolicy is set to 1 (include), set BindInterfaces to the IP addresses or MAC addresses for the interfaces that you want to exclude. If BindPolicy is set to 0 (exclude), set BindInterfaces to the IP addresses or MAC addresses for the interfaces that you want to include. The default value is blank (no interfaces are excluded or included). You can specify MAC addresses as a sequence of hexadecimal characters, and you can format them with uppercase or lowercase hexadecimal characters, raw, or separated by colons or dashes. IP addresses must use dotted notation (for example, MAC:ABCDEFABCDEForIP:10.10.2.2.). To add a MAC address to the BindInterfaces list, you can use the WDSUTIL command-line tool. To add an IP address, you must edit the registry value manually. Caution Make sure that the IP or MAC addresses you enter are correct. Otherwise, the service will start, log an event, and then stop. Location of TFTP Files The TFTP root is the parent folder that contains all files available for download by client computers. By default, the TFTP root is set to the RemoteInstall folder as specified in the following registry setting: HKLM\System\CurrentControlSet\Services\WDSServer\Providers\WDSTFTP\ Name: RootFolder Type: REG_SZ Data: <full path and folder name of the TFTP root> Unattended Installation Server Unattend Policy Per Architecture Unattend Policy Server Unattend Policy This policy is defined in the Windows Deployment Services server registry at the following location: HKLM\System\CurrentControlSet\Services\WDSServer\Providers\WDSPXE\Providers\WdsImgSrv\Unattend Name: Enabled Type: REG_DWORD Value: 0 or not set means disabled, and 1 means enabled. Per-Architecture Unattend Policy Unattend files are architecture specific, so you need a unique file for each architecture. These values are stored in the registry at the following location (where <arch> is either x86, x64, or ia64): HKLM\System\CurrentControlSet\Services\WDSServer\Providers\WDSPXE\Providers\WdsImgSrv\Unattend\<arch> Name: WDSUnattendFilePath Type: REG_SZ Value: The file path to the Windows Deployment Services client unattend file (for example, D:\RemoteInstall\WDSClientUnattend\WDSClientUnattend.xml). Network Boot Programs Per-Client NBP Unknown Clients Automatically PXE Boot .n12 NBP Resetting the NBP to the Default on the Next Boot Per-Client NBP Configuring a network boot program (NBP) for each server is the default method. You can override this method on a per-client basis. The NBP is defined by the following registry settings (where <arch> is either x86, x64, or IA64): HKLM\System\CurrentControlSet\Services\WDSServer\Providers\WDSPXE\Providers\BINLSVC\BootPrograms\<arch> There are two keys that define the NBP: Name: Default Type: REG_SZ Value: The relative path to the default NBP that all booting clients of this architecture should receive (for example, boot\x86\pxeboot.com). Name: .n12 Type: REG_SZ Value: The relative path to the NBP that will be sent by using the AllowN12ForNewClients setting (for example, boot\x86\pxeboot.n12). For more information, see Unknown Clients Automatically PXE Boot. Unknown Clients Automatically PXE Boot In some cases, it may be useful to further segment the server NBP so that the following are true: Known clients receive the per-server default (presumably a NBP that requires pressing the F12 key). Unknown clients receive a NBP that will cause them to perform a PXE boot automatically. This configuration is particularly useful in a lab environment where you want to immediately image new computers, but you want to ensure that existing computers are not sent through the imaging process by accidentally booting from the network. The policy setting for unknown clients to perform a PXE boot automatically is stored in the following registry key: HKLM\System\CurrentControlSet\Services\WDSServer\Providers\WDSPXE\Providers\BINLSVC\ Name: AllowN12ForNewClients Type: REG_DWORD Value: 0 or not set means not enabled 1 means that unknown clients are sent the .n12 NBP. .n12 NBP Windows Deployment Services sends the defined .n12 NBP according to the following registry settings (where <arch> is either x86, x64, or IA64): HKLM\System\CurrentControlSet\Services\WDSServer\Providers\WDSPXE\Providers\BINLSVC\BootPrograms\<arch> Name: .n12 Type: REG_SZ Value: The relative path to the NBP that will be sent according to the AllowN12ForNewClients setting (for example, boot\x86\pxeboot.n12). Note Although the setting implies that new and unknown clients will receive the .n12 NBP, you can also configure the any other combination by specifying an NBP other than.n12. Resetting the NBP to the Default on the Next Boot When implementing a fully automated experience of booting from the network, it is often necessary to do the following: Set the network as the first device in the client’s BIOS boot order. Send a specific client an .n12 NBP. If you combine these two configurations, the client will automatically boot from the network without requiring user intervention and the computer will end up in a circular loop (always booting from the network and never booting from the hard disk drive). The following registry key controls these settings: HKEY_LOCAL_MACHINE\System\CurrentControlSet\Services\WDSServer\Providers\WDSPXE\Providers\BINLSVC Name: ResetBootProgram Type: REG_DWORD Value: 0 or not set means no action. 1 means that during the imaging process, the value stored in the netbootMachineFilePath attribute in AD DS for the prestaged device will be cleared. The value for the referral server is also stored in the netbootMachineFilePath attribute. Therefore, when you specify 1 and this value is cleared, any server in the domain can answer the client the next time it reboots. Using this option ensures that on the next boot, the computer will receive the default server NBP (commonly the .com version). Therefore, the computer will try to boot from the network (because the network is listed first in the BIOS boot order), but the computer will be sent the .com NBP. After allowing sufficient time for the user to press the F12 key, this option will time out and the device will boot from the hard disk drive. The value is cleared after the image is applied, as one of the final actions performed by Windows Deployment Services. Auto-Add Devices Database If a computer requires approval before the installation will start, the computer will be in a pending state. One of the advantages of using the pending functionality is that at the time the device is approved, you can specify settings that control the client’s installation experience. These settings can be global, per architecture, or specified for each approved computer. Auto-Add Policy Message Displayed to a Pending User Time-Out Value Settings for Approved Client Computers Auto-Add Policy The following registry settings control the Auto-Add policy: HKLM\System\CurrentControlSet\Services\WDSServer\Providers\WDSPXE\Providers\BINLSVC\AutoApprove Name: Policy Type: DWORD Value: 0 or not present means no Auto-Add policy (no action); 1 means pending. Message Displayed to a Pending User The following registry key contains the text message that is displayed to the user by Wdsnbp.com when the device is in a pending state: HKLM\System\CurrentControlSet\Services\WDSServer\Providers\WDSPXE\Providers\BINLSVC\AutoApprove Name: PendingMessage Type: REG_SZ Value: Message shown to the user by Wdsnbp.com. The default setting is for this to be blank. Time-Out Value The client state is not maintained on the server. Rather, the Wdsnbp.com program polls the server for the settings in the following keys after it has paused the client’s boot. The values for these settings are sent to the client by the server in the DHCP options field of the DHCP acknowledge control packet (ACK). The default setting for these values is to poll the server every 10 seconds for 2,160 tries, bringing the total default time-out to six hours. HKLM\System\CurrentControlSet\Services\WDSServer\Providers\WDSPXE\Providers\BINLSVC\AutoApprove Name: PollInterval Type: DWORD Value: The amount of time (in seconds) between polls of the server Name: PollMaxRetry Type: DWORD Value: The number of times the server will be polled before a time-out occurs Settings for Approved Client Computers The following registry settings control additional properties that you can set on an approved pending device (where <arch> is either x86, x64, or ia64). These settings are defined per architecture, and they apply to all approved devices unless they are manually overridden when the device is approved. They are located at the following location: HKLM\System\CurrentControlSet\Services\WDSServer\Providers\WDSPXE\Providers\BINLSVC\AutoApprove\<arch> Configuration setting Registry value The name of the Windows Deployment Services server that the client should download the NBP from. Name: ReferralServer Type: REG_SZ Value: The name of the server to refer the client to. The default setting is for this value to be blank (no server name). The name of the NBP that the client should download. Name: BootProgramPath Type: REG_SZ Value: The partial path and NBP that the client should receive. The default setting is for this value to be blank (no path). The name of the boot image, which the client should receive. Setting this value means that the client will not see a boot menu because the specified boot image will be processed automatically. Name: BootImagePath Type: REG_SZ Value: The name of the boot image that the client should receive. The default setting is for this value to be blank (no boot image). The primary user associated with the generated computer account. This user will be granted JoinRights authorization, as defined later in this section. Name: User Type: REG_SZ Value: The owner of the computer account that was created. The default setting is the domain administrator. Specifies whether or not the device should be joined to the domain. Name: JoinDomain Type: REG_DWORD Value: 0 or not defined means that the computer should be joined to the domain. 1 means that the computer should not be joined to the domain. Specifies the type of rights to be assigned to the user. JoinOnly requires the administrator to reset the computer account before the user can join the computer to the domain. Full gives full permissions to the user (including the right to join the domain). Name: JoinRights Type: REG_DWORD Value: 0 or not defined means JoinOnly. 1 means Full. Domain Controllers and the Global Catalog Static Configuration Search Order Static Configuration In some circumstances, you may want to statically configure the domain controller and the global catalog that Windows Deployment Services will use. The settings for these options are as follows: HKLM\System\CurrentControlSet\Services\WDSServer\Providers\WDSPXE\Providers\BINLSVC Name: DefaultServer Type: REG_SZ Value: The name of domain controller that Windows Deployment Services should use. This can be either the NETBIOS name or the fully qualified domain name (FQDN). Note that you cannot use read-only domain controllers with Windows Deployment Services, so this value must be a writable domain controller. Name: DefaultGCServer Type: REG_SZ Value: The name of the global catalog that Windows Deployment Services should use. This can be either the NETBIOS name or the FQDN. Search Order The following registry key controls the preferred search order: HKLM\System\CurrentControlSet\Services\WDSServer\Providers\WDSPXE\Providers\BINLSVC Name: ADSearchOrder Type: REG_SZ Value: 0 or not set means that the global catalog will be searched first, and then the domain controller; 1 means that the domain controller will be searched first, and then the global catalog. Setting this value to 1 may lead to less efficient use of AD DS in a multidomain environment. If a prestaged device is not found in the local domain controller, Windows Deployment Services must perform an additional query against a global catalog because the domain controller is not guaranteed to have knowledge of all objects. Therefore, if this value is set to 1, Windows Deployment Services may have to perform two searches to find the prestaged computer object when it otherwise would have needed to do only one search. original article on Technet > http://technet.microsoft.com/en-us/library/cc733103.aspx -
this means your boot image doesn't have the correct network driver for your network card in it, to avoid it automatically rebooting and to verify this you need to enable F8 in Windows PE to aid in troubleshooting do that, press F8 when windows PE starts and a command prompt will appear, when the Task Sequence window disappears browse your drive for the SMSTS log files to read the error or just load the correct network driver in your boot.wim file cheers anyweb
-
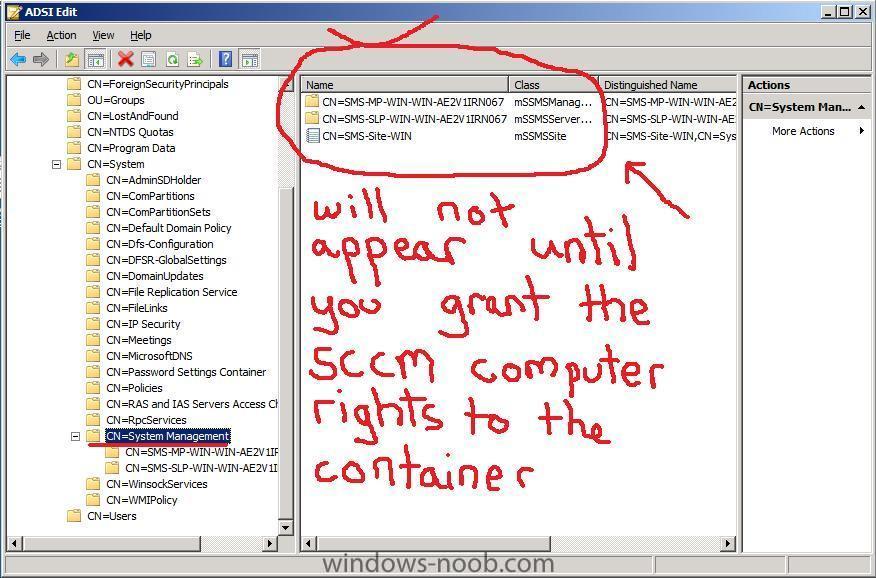
how can I create the System Management Container in Active Directory
anyweb posted a question in Active Directory
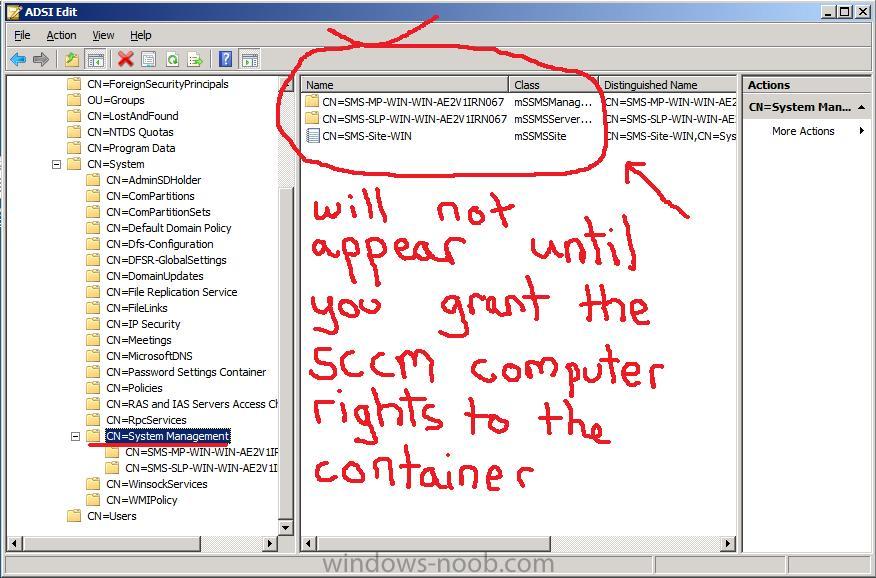
Using Adsiedit Create a container in AD, CN=System called System Management by right clicking on CN=System and choose New Object, scroll down to container from the list, click next, give it a value of System Management. In Active Directory Users and Computers expand the System container, and right click click on System Management choose delegate control, click next, click add, click object types, add computers, click ok, advanced, find now. highlight the SCCM servername and click ok. click OK again, click Next in the Delagation of control Wizard page, choose 'create a custom task to delegate' click next, make sure 'this folder, existing objects in this folder and creation of new objects in this folder is selected click next, select the 3 permissions General, Property-Specific and Creation-deletion of specific child objects are selected then place a check mark in FULL CONTROL and click next then Finish. Failure to do the above will mean that the System Management Container in AD will NOT POPULATE with SCCM specific info and you will see many errors in SCCM site status Once the permissions are granted correctly, it will look like this done !
-
how can I troubleshoot Windows PE booting in SCCM
anyweb replied to anyweb's question in Troubleshooting, Tools, Hints and Tips
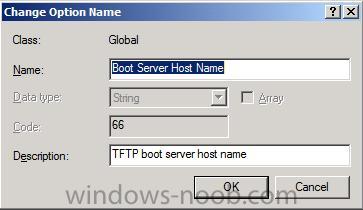
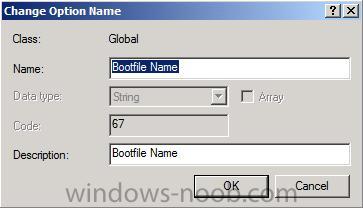
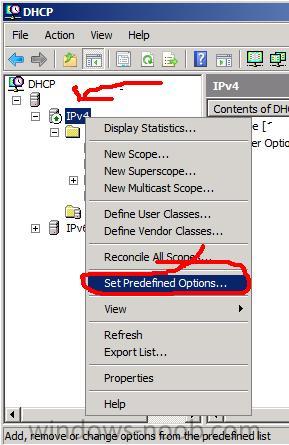
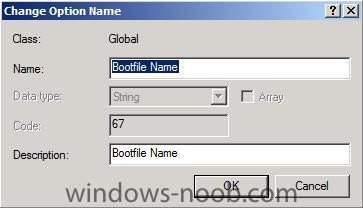
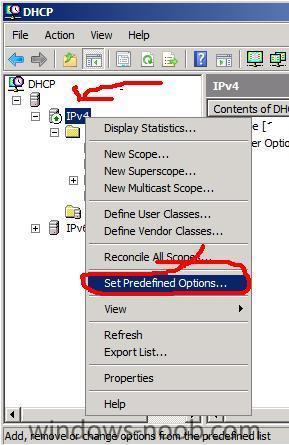
another one today, and really tough to resolve.... Installed Windows 2008 64 bit, SQL 2005sp2 (also 64bit), sccm 2007 sp1 (32bit) configured it as outlined in my own guides and attempted to pxe boot (done in a HyperV environment) the DHCP server was running on a separate DC so we first had to manually add DHCP scope options 66 and 67 (to add these options, right click on your scope and click on set predefined options... ) 66= Boot Server Host Name 67= Bootfile Name I had to set option 67 to point to REMINST/SMSBoot/x64/pxeboot.com The client booting got a PXE error which read as follows to cut a long story short what seemed to resolve this error was as follows * Stop the WDS service * delete all files within windows\temp * restart WDS service * redistribute the SCCM boot images and update distribution points refer to the following links for more info on the above error https://forums.microsoft.com/TechNet/ShowPo...17&pageid=0 http://forums.microsoft.com/TechNet/ShowPo...17&pageid=1 http://www.eggheadcafe.com/software/aspnet...-pxe-error.aspx https://forums.microsoft.com/TechNet/ShowPo...4&SiteID=17 Update, I've seen the same error on the same server since making this post and what I have noticed is the error appears when I havn't imported a computer yet (name+mac) into osd, once I import the computer using computer association, I no longer see the error above.....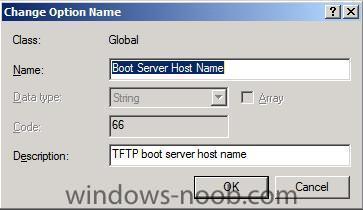
-
No SMS_SiteToSiteConnection_WIN found, but
anyweb replied to togeoff's topic in Configuration Manager 2007
ok this is how to do it (had the problem myself today !) this issue will occur when you install SCCM on a different computer to the domain controlller, in my guides I had SCCM setup and running on the DC, hence the differences... To resolve this: on the Domain Controller, login to Active Directory Users and Computers, enable advanced view click users right click and choose NEW, Group make a new 'domain local' security group called SMS_SiteSystemToSiteServerConnection_WIN and then make a new one for SMS_SiteToSiteConnection_WIN change WIN to your site code, the rest of the guide i wrote still applies (ie: add those accounts in AD to the local computer...) cheers anyweb -
i'll cover the R2 release when I get a chance and right now that's not likely as I'm very busy with a SCCM project... however here's some info for you about R2 from Technet http://technet.microsoft.com/en-us/library/cc431365.aspx cheers anyweb
-
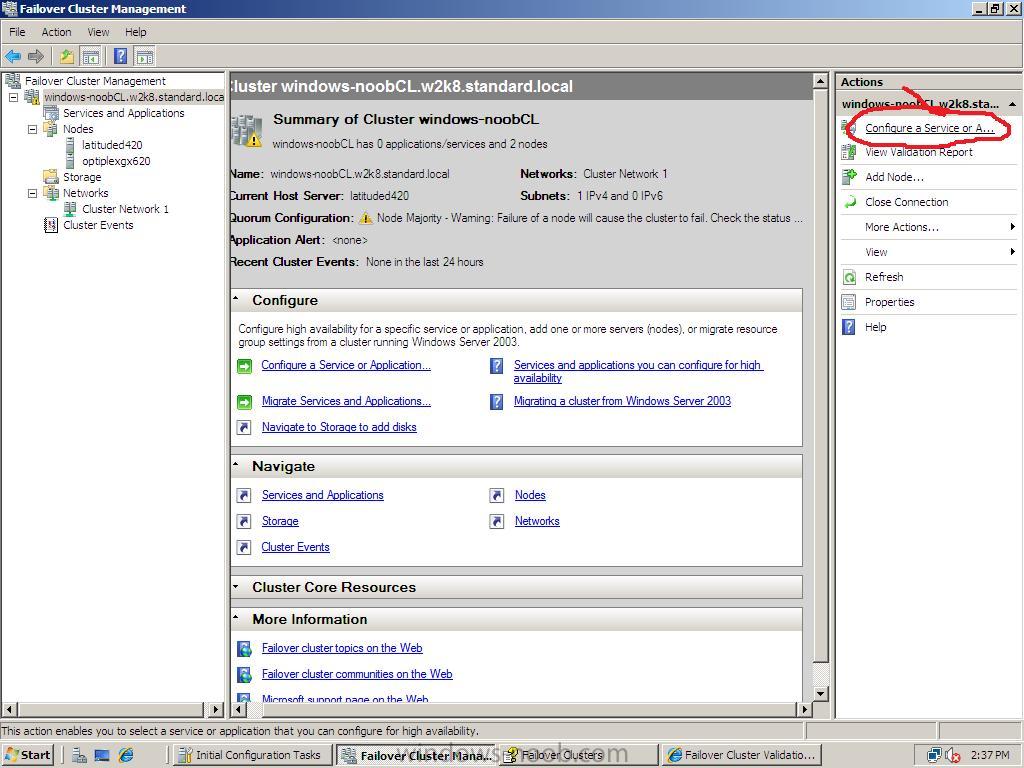
How can I setup and configure Failover clustering in Windows Server 2008
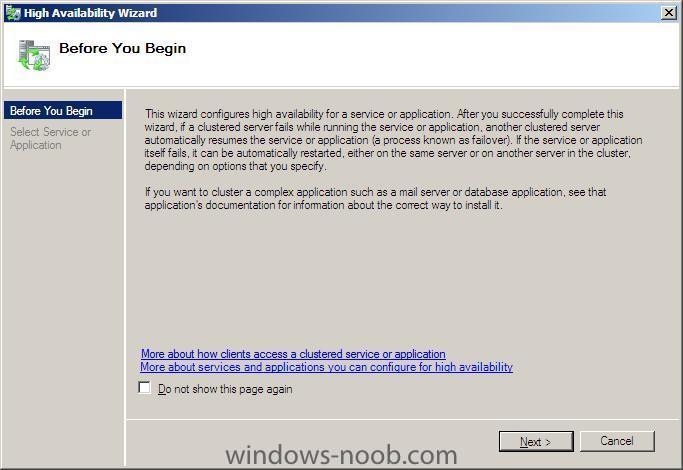
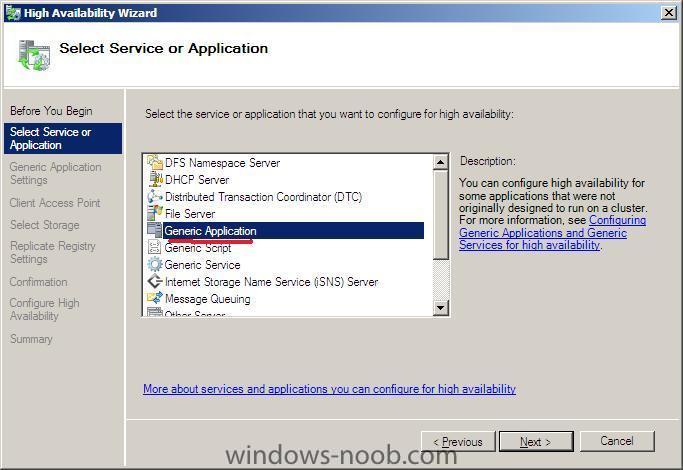
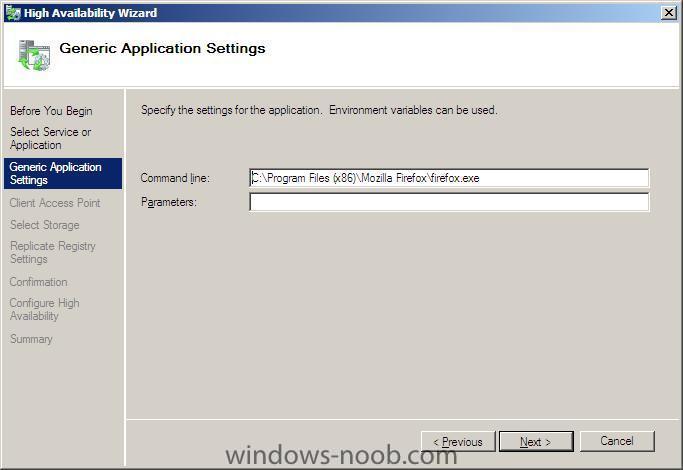
anyweb replied to anyweb's question in Failover Clustering
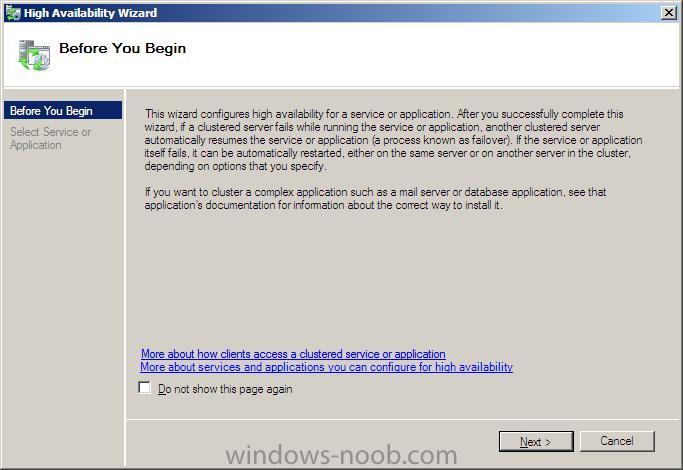
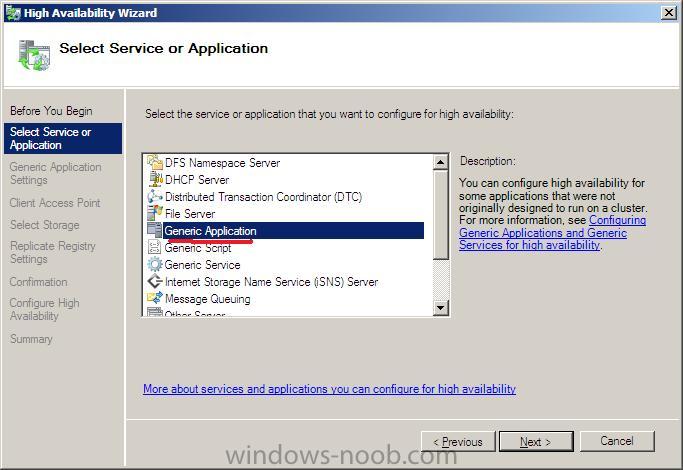
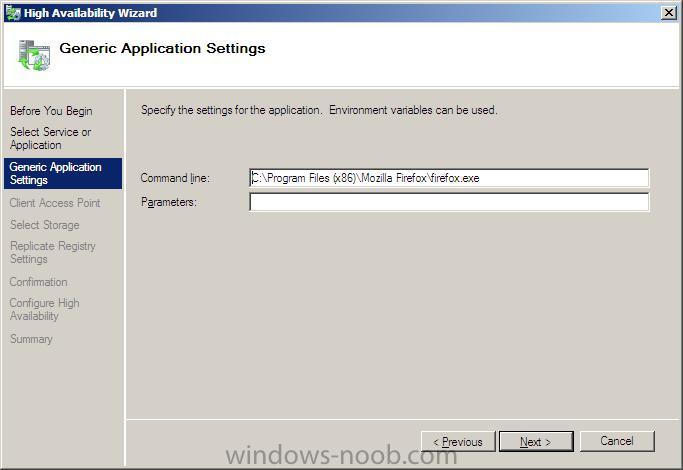
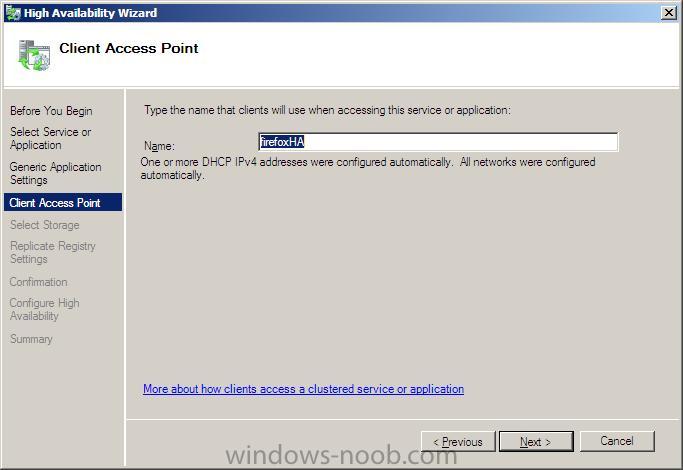
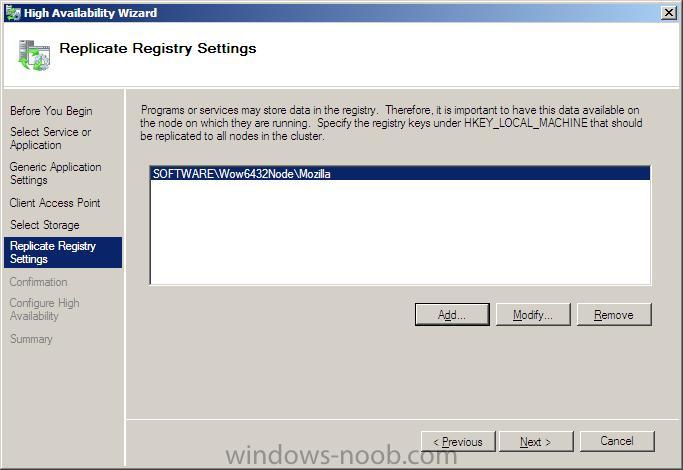
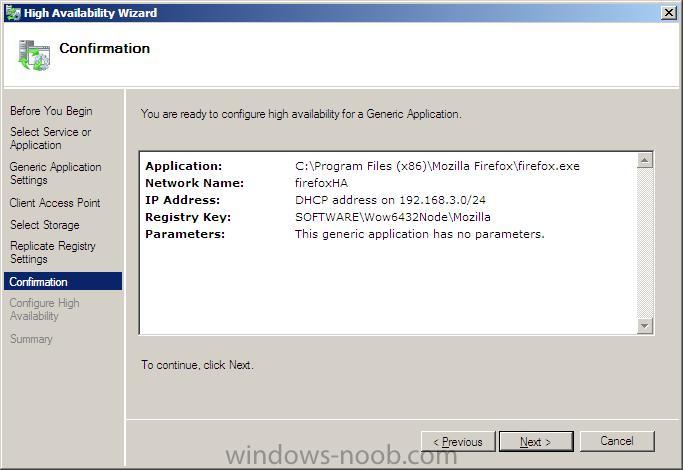
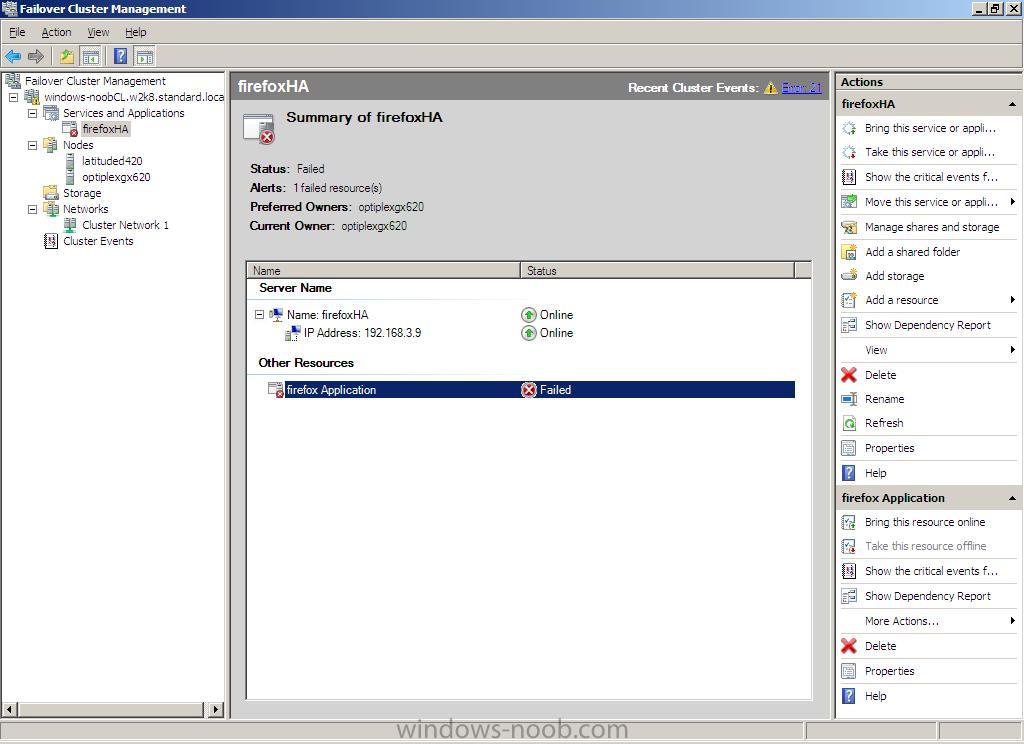
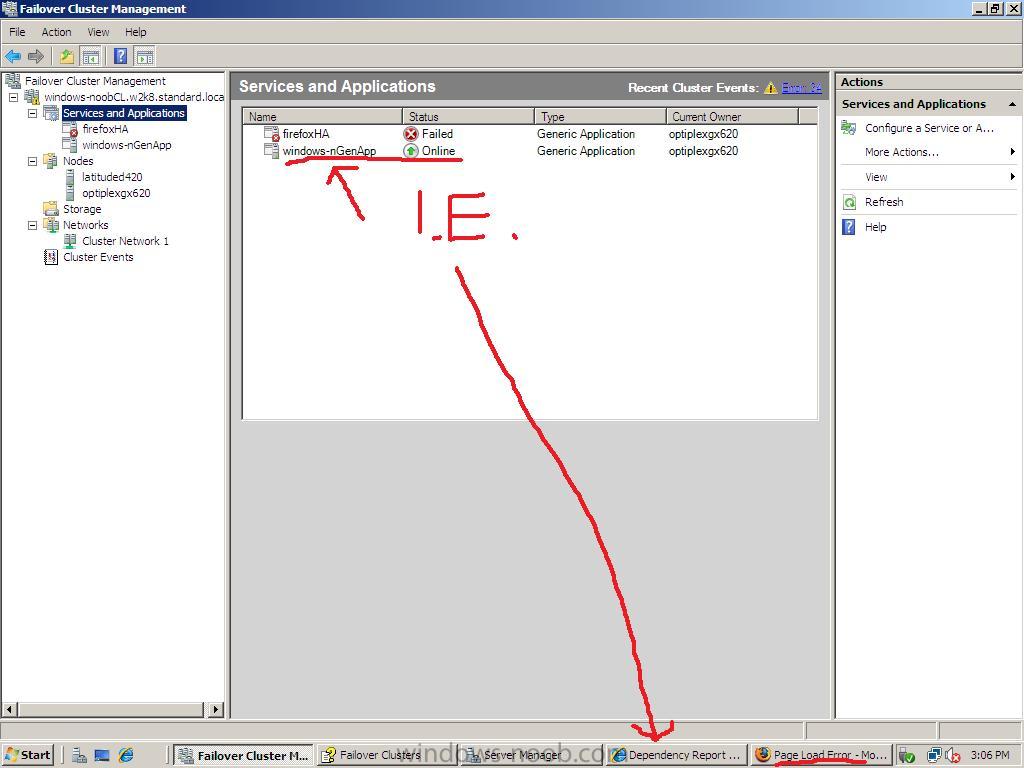
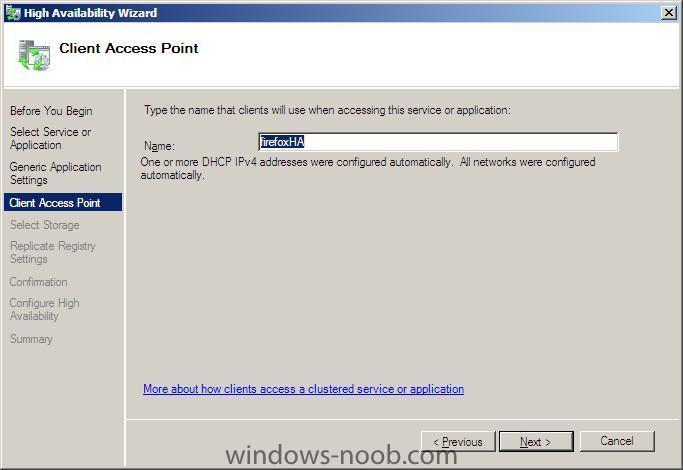
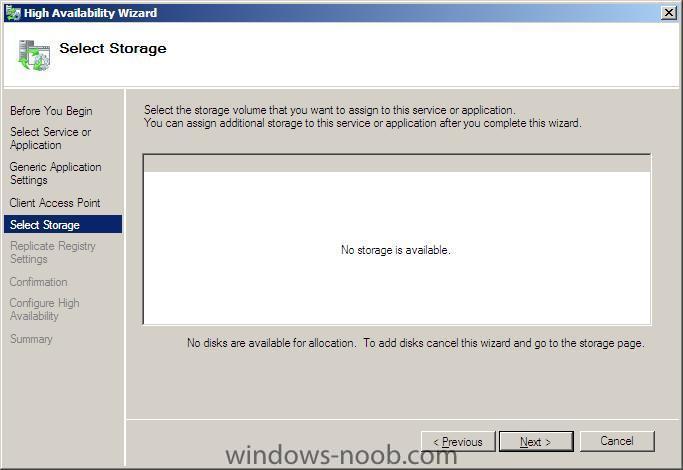
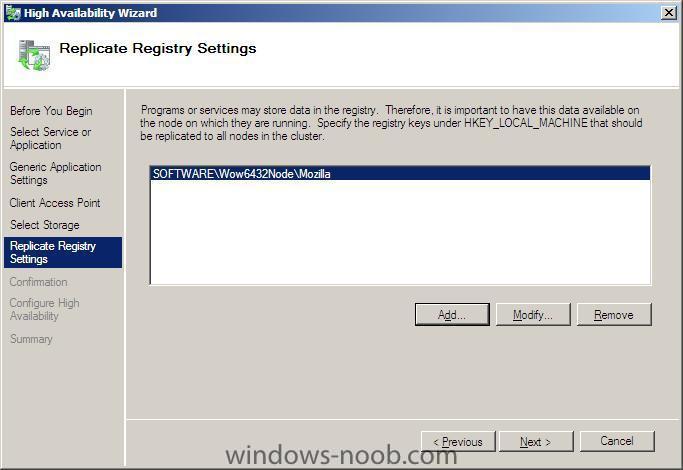
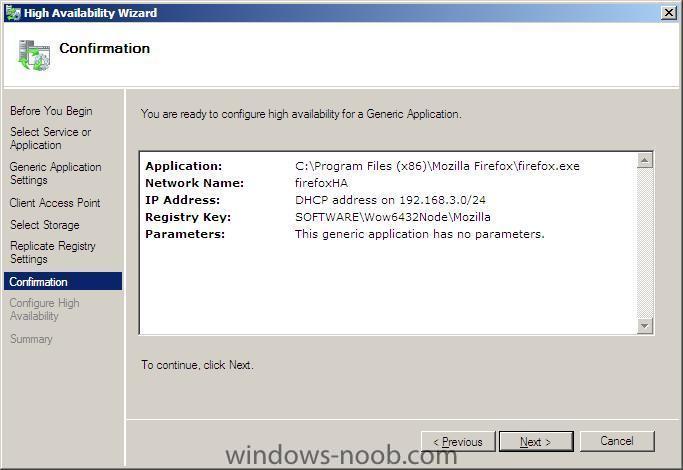
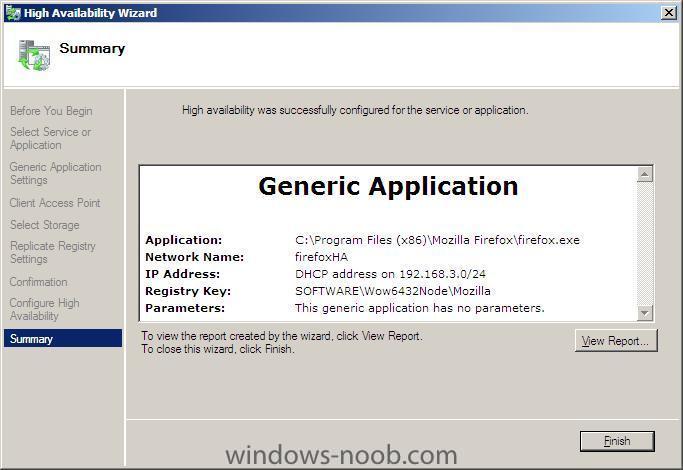
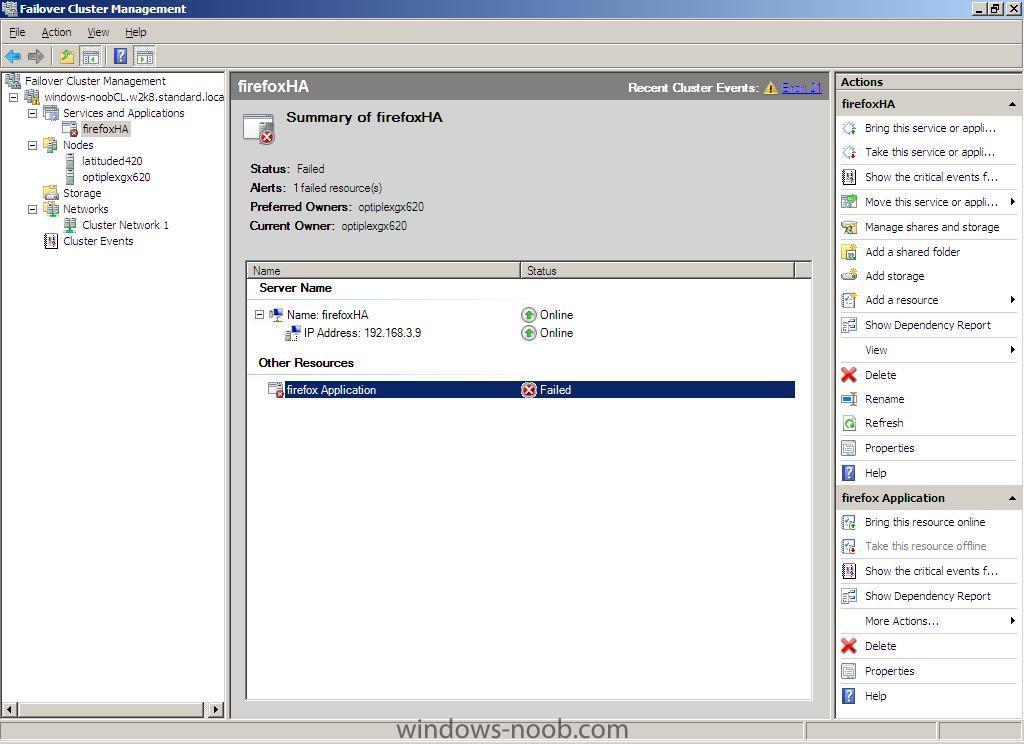
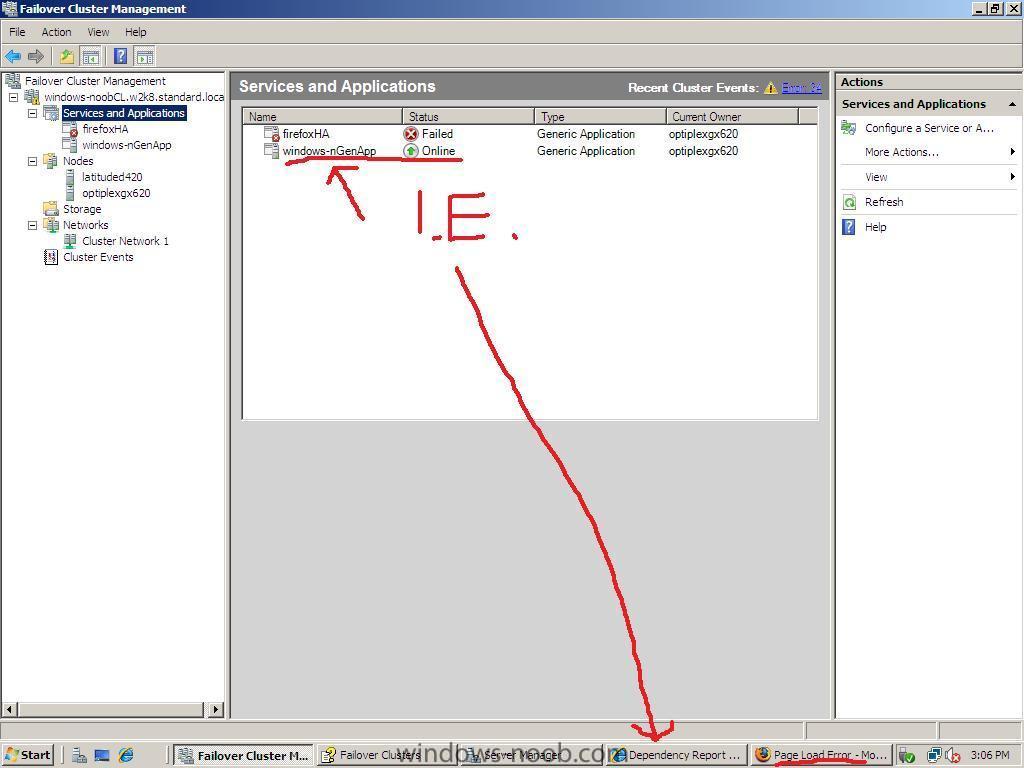
Step 4. Add High Availability Application or Service In the Failover cluster Management gui, click on Configure a Service or Application in the right pane review the Before you begin details in the High Availability wizard and click next... In this example the high availability application we will add is (wait for it) Firefox, of course you can choose whatever app/service you wish but to keep this howto simple, I am choosing Firefox as we know it is already installed on both nodes. choose Generic Application from the list in Select Service or Application window. click next and paste in the path to your Mozilla Firefox application eg: c:\Program Files (x86)\Mozilla Firefox\Firefox.exe click next and give the client access point a name for this service or application, I chose FirefoxHA for high availability... select your storage (san... i don't have one, if you want to donate one to Windows-noob.com i'll make sure your product gets named again and again.... ) add in your Registry settings for replication... review the confirmation click next and it will configure high availability review the summary and checkout the application itself in the Cluster Services and Applications node (offline at the moment, will fix soon) in addition to the above, I added another Generic Application for Internet Explorer.... and it worked first time see screenshot...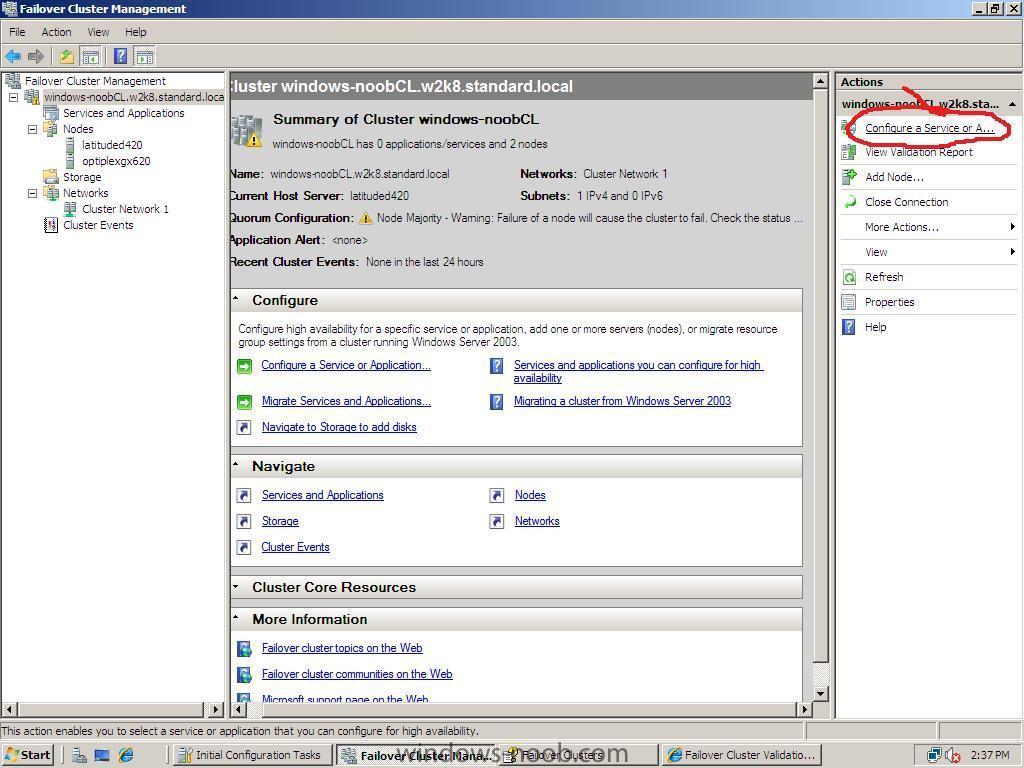
-
How can I setup and configure Failover clustering in Windows Server 2008
anyweb replied to anyweb's question in Failover Clustering
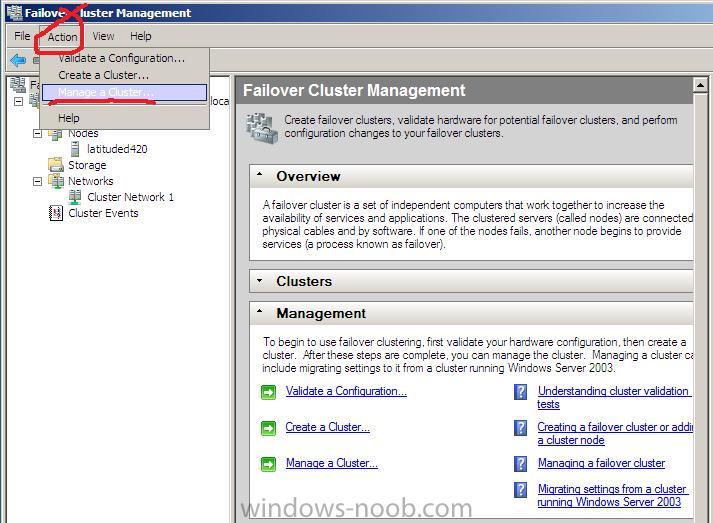
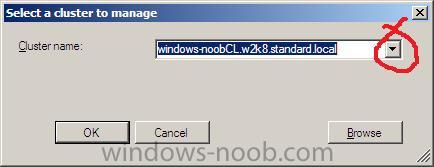
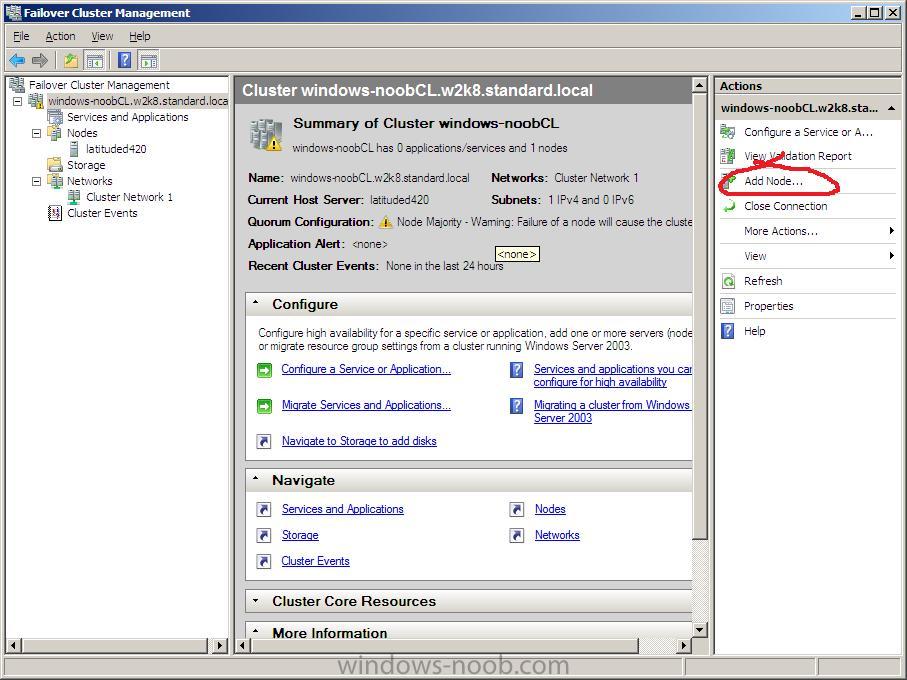
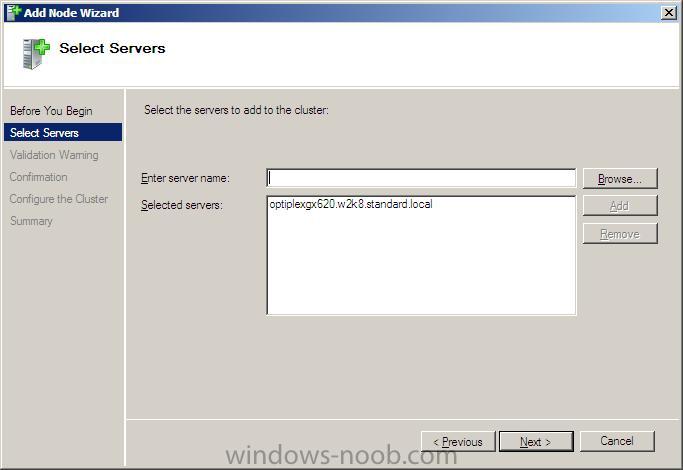
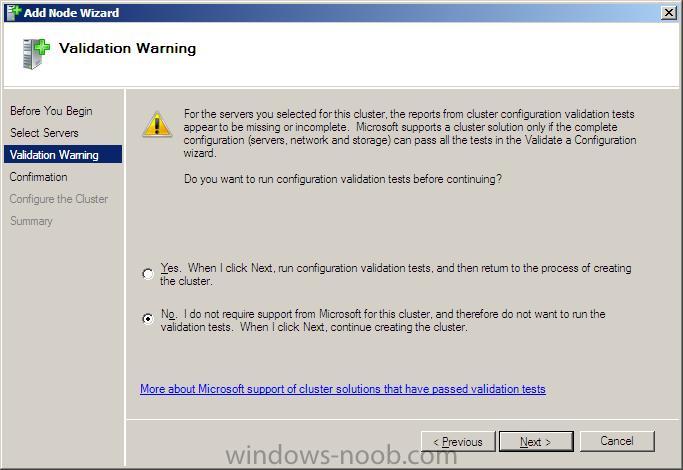
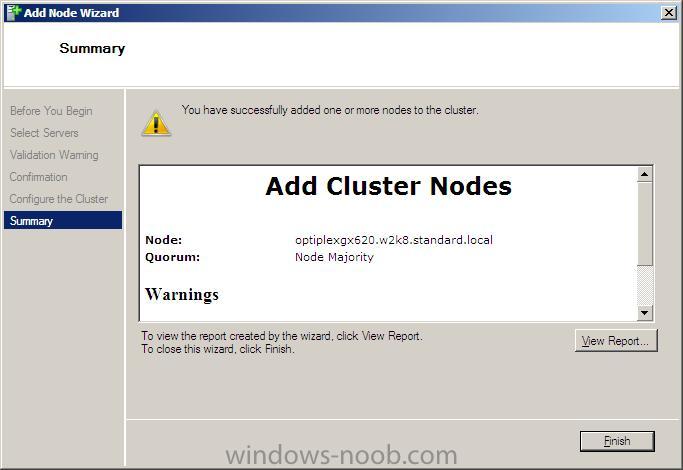
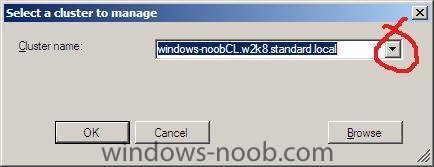
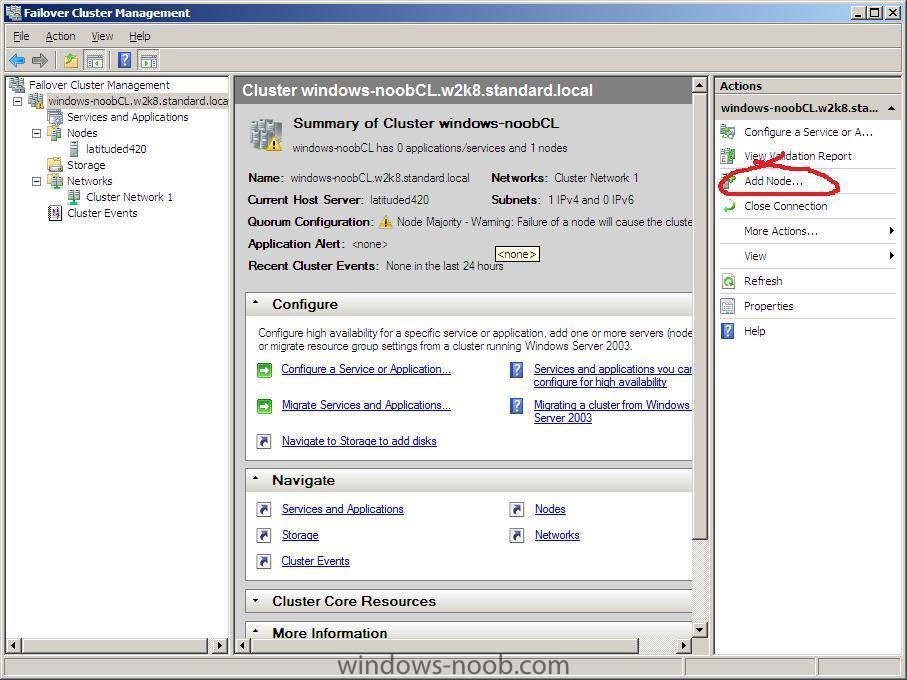
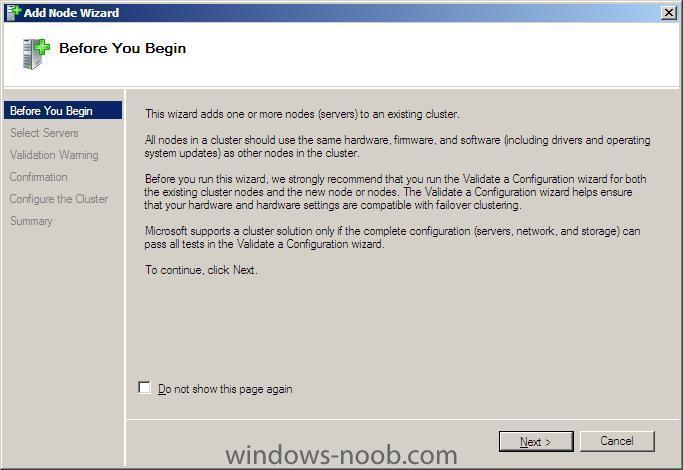
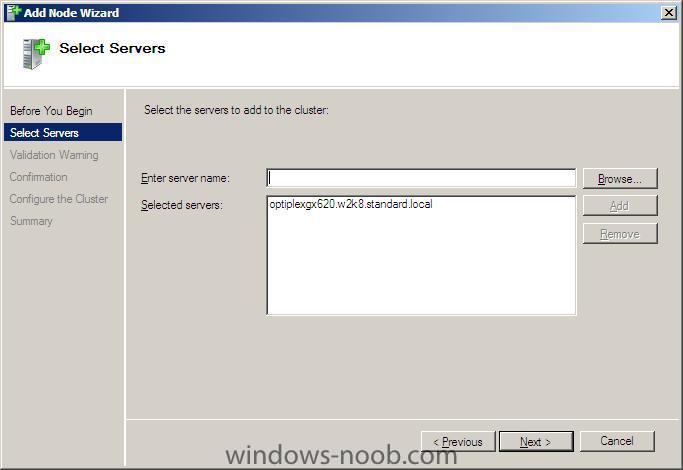
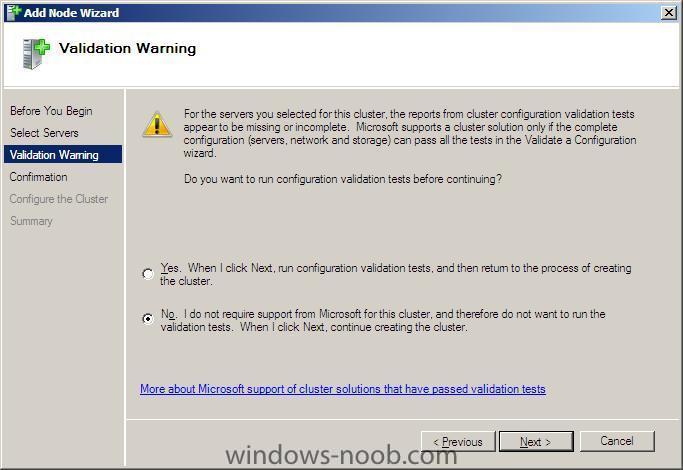
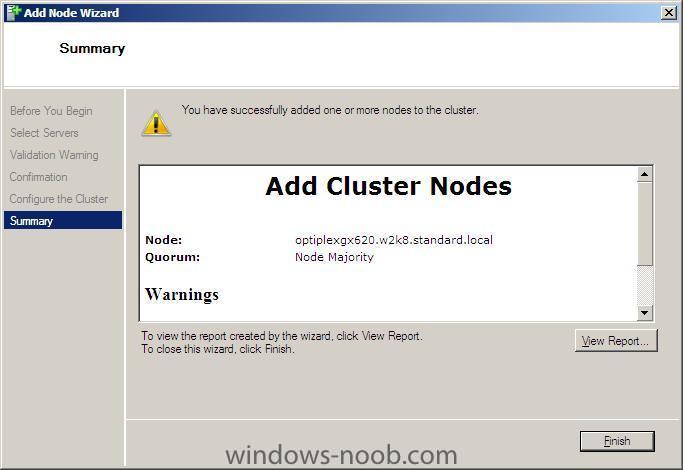
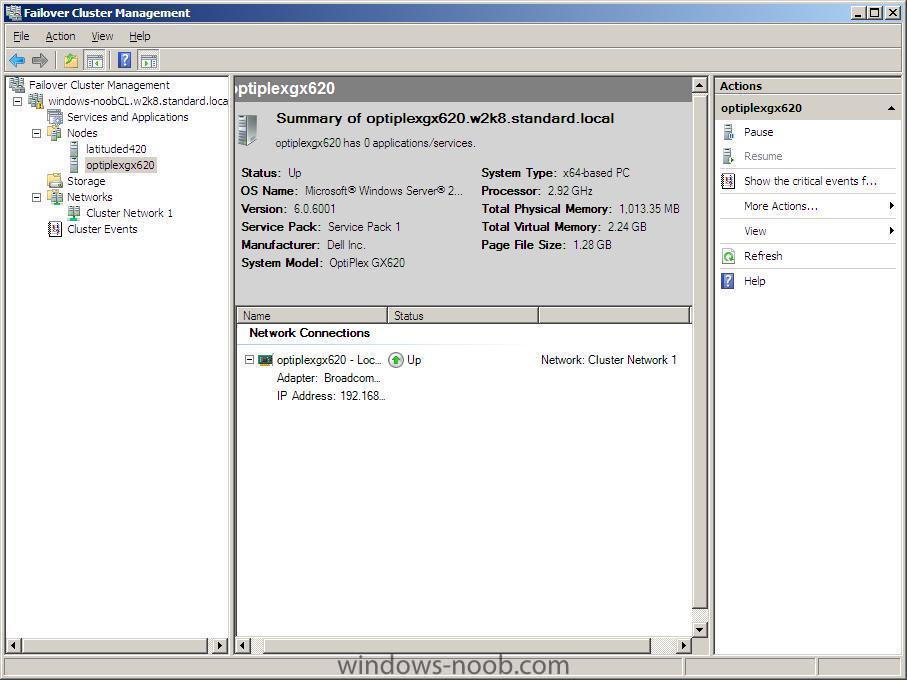
Step 3. Manage the Cluster In the Failover cluster Management gui, click on Action, then Manage a cluster In the drop down menu, select a cluster to manage, when the Failover cluster management cluster appears, click on Add Node in the right pane, when the Add node wizard appears, click next When the select server window appears, select the server name you are running this from by clicking on browse, advanced and then find now in this example i choose 'no' to run the validation tests, click on next to continue *you should click yes to the tests* review the confirmation click next... review the summary you can now click on the nodes section of Failover cluster management to review your two nodes in the cluster.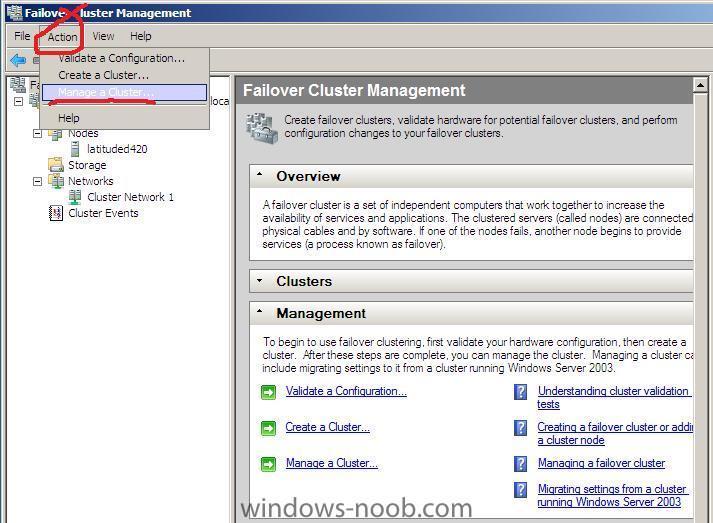

-
How can I setup and configure Failover clustering in Windows Server 2008
anyweb replied to anyweb's question in Failover Clustering
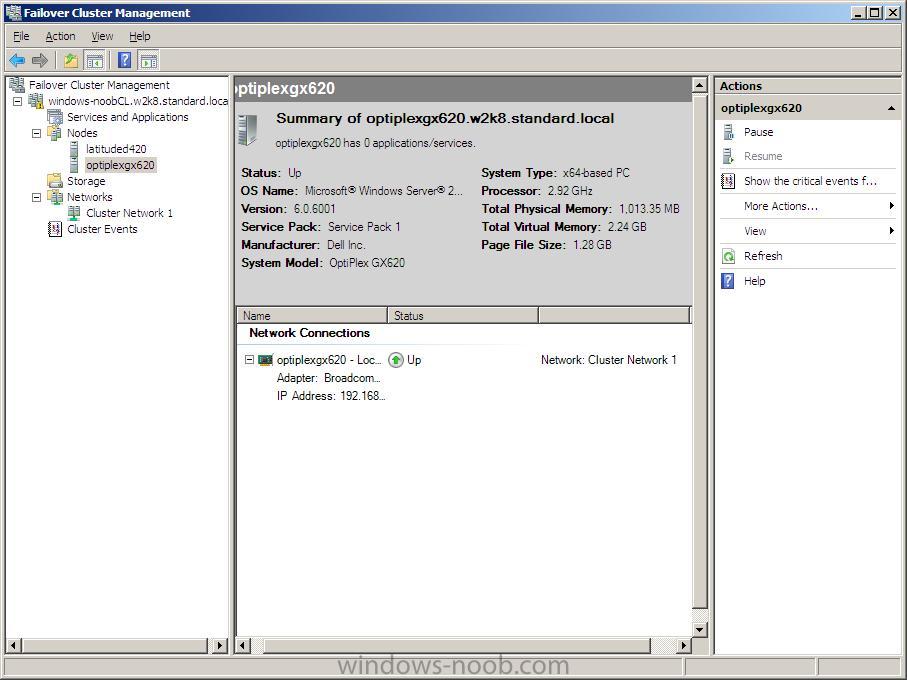
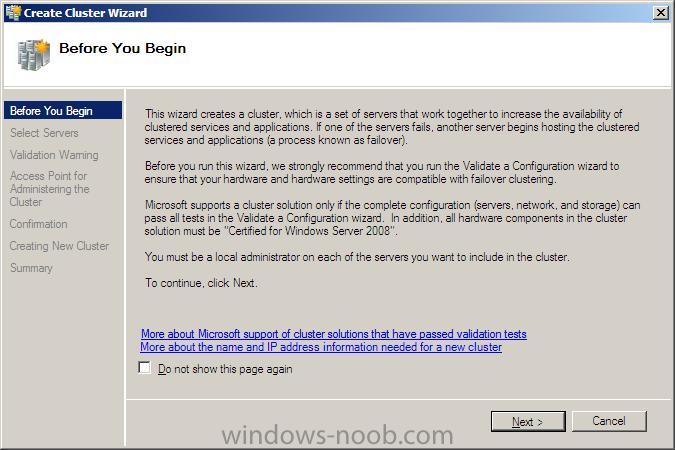
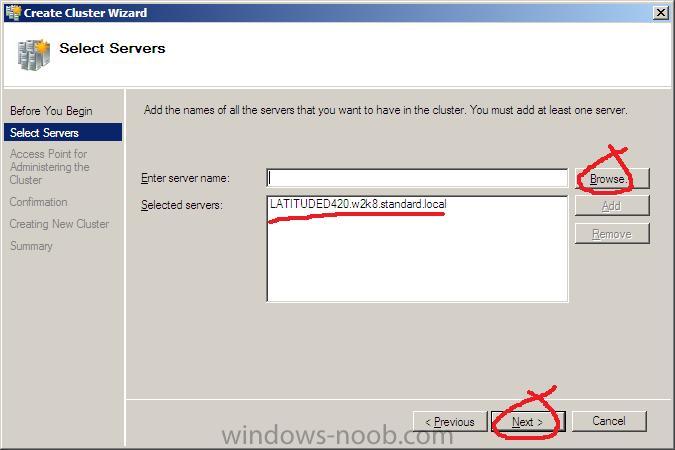
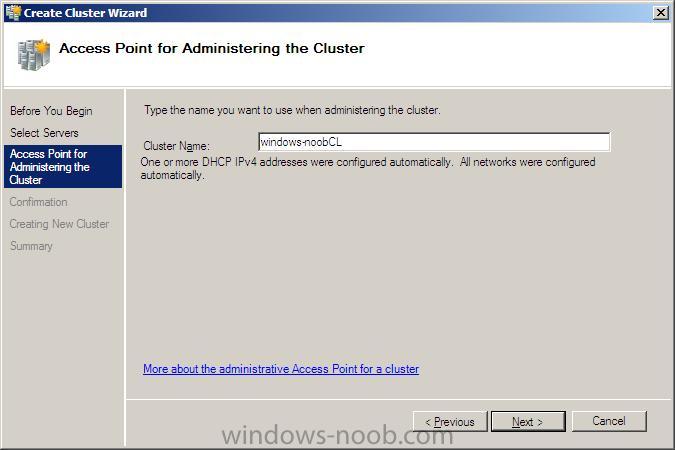
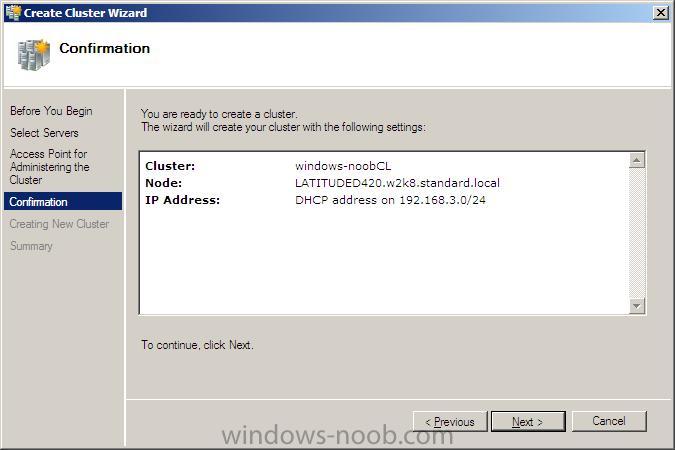
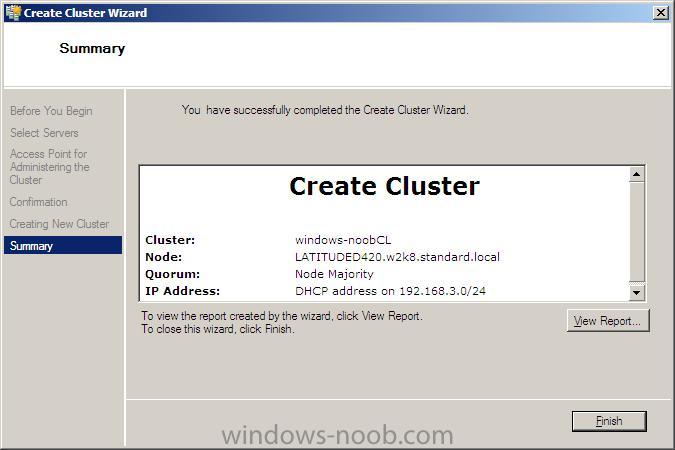
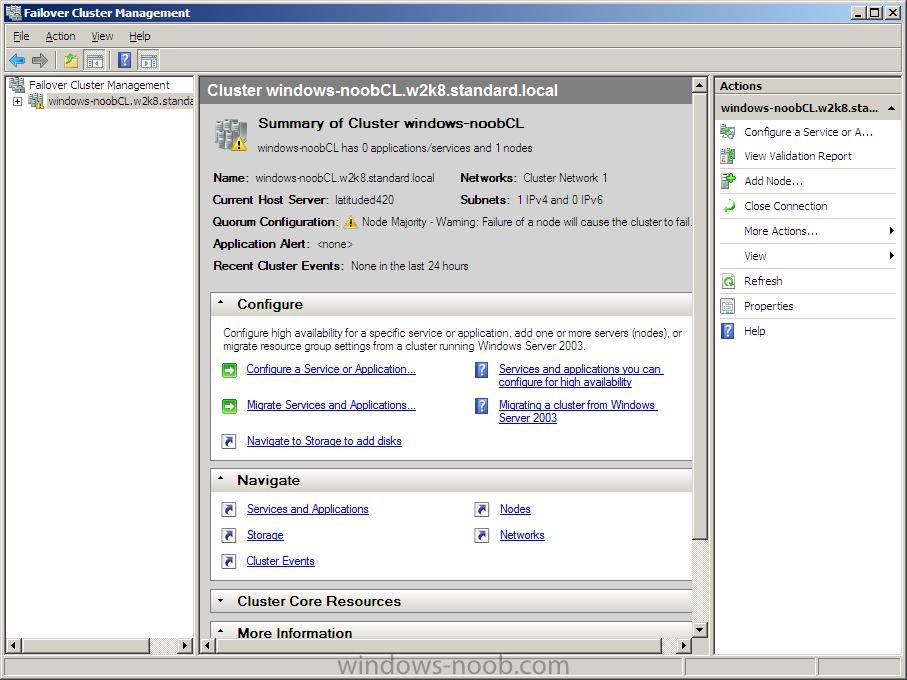
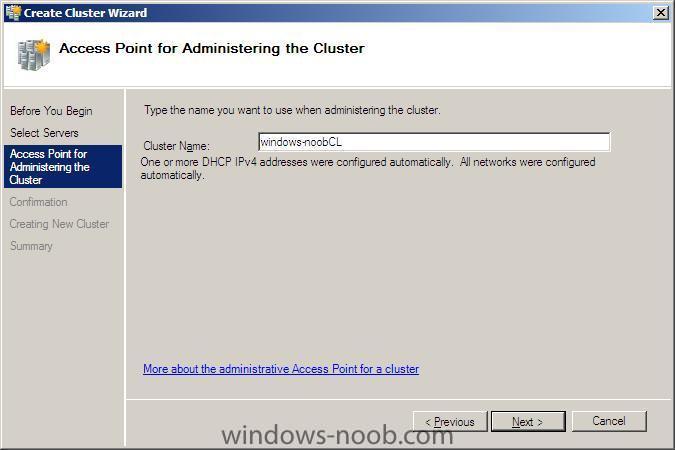
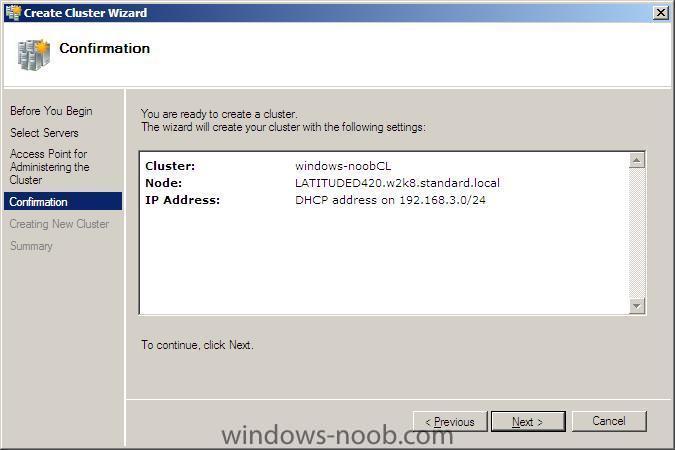
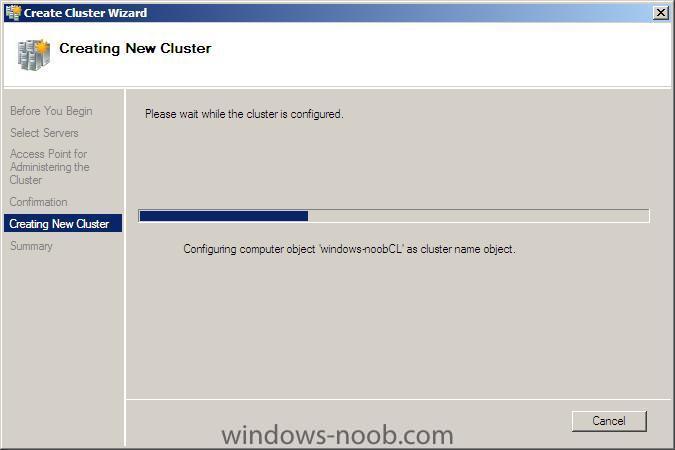
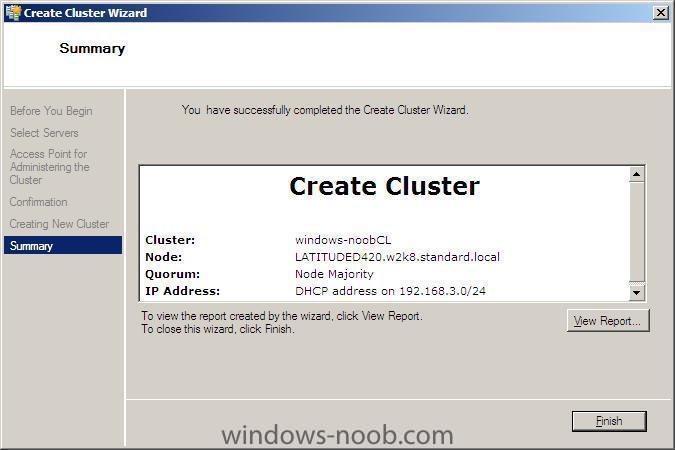
Step 2. Create Cluster In the Failover Cluster Management gui, click on Create a Cluster in the Management pane after reading the recommendations, click next and enter the name of a server to include in the cluster in the Select Servers window Type the name you want to use when administering the cluster (netbios name limited to 15 characters) you'll get a confirmation screen listing your details of the cluster and clicking next will create the new cluster once it is complete, you'll see a summary click finish. note that in my example, the Failover Cluster Management gui now has some warnings about the Node Majority.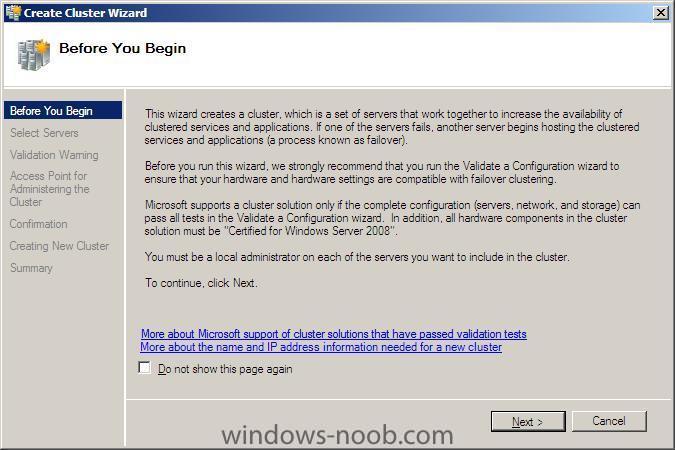

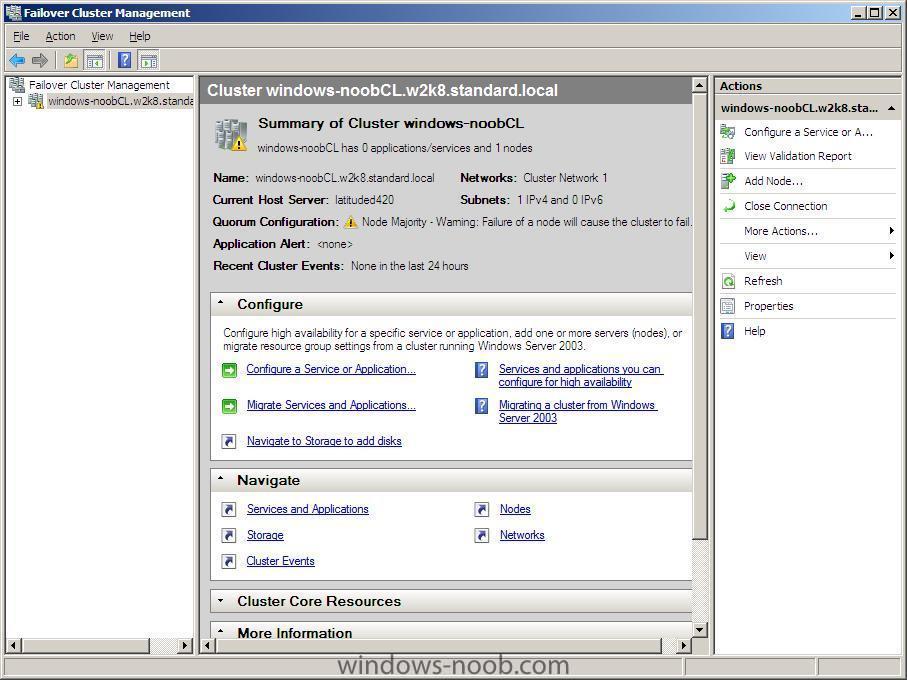
-
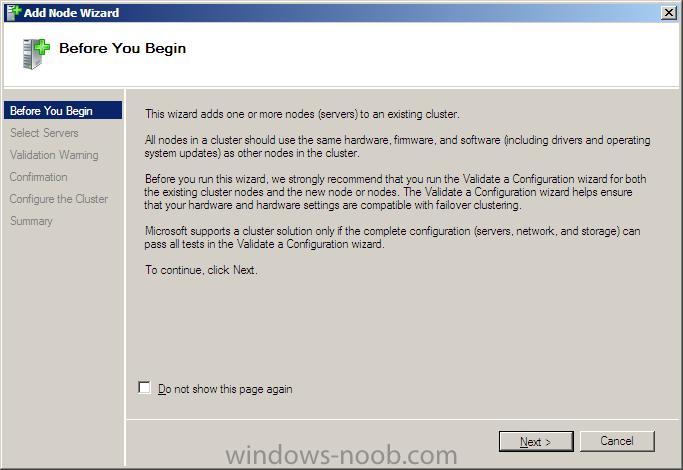
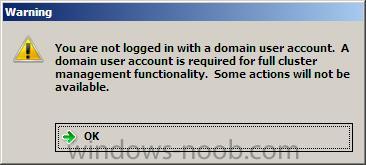
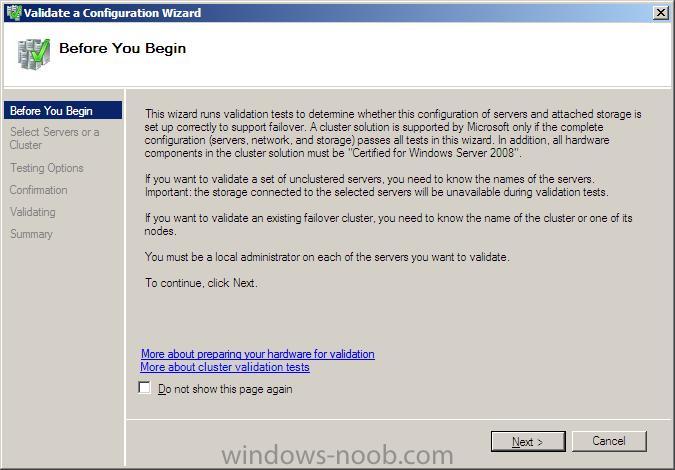
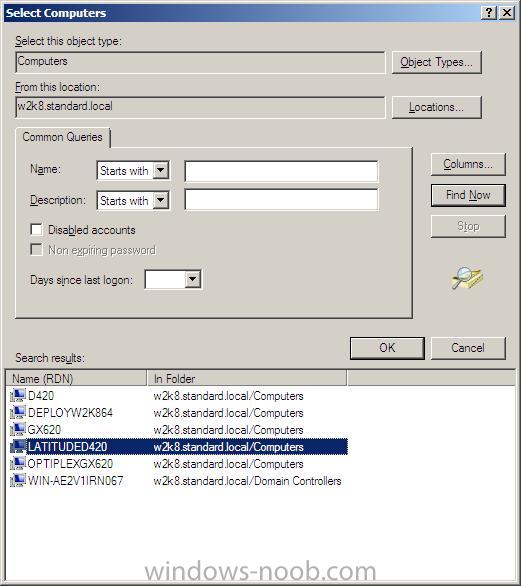
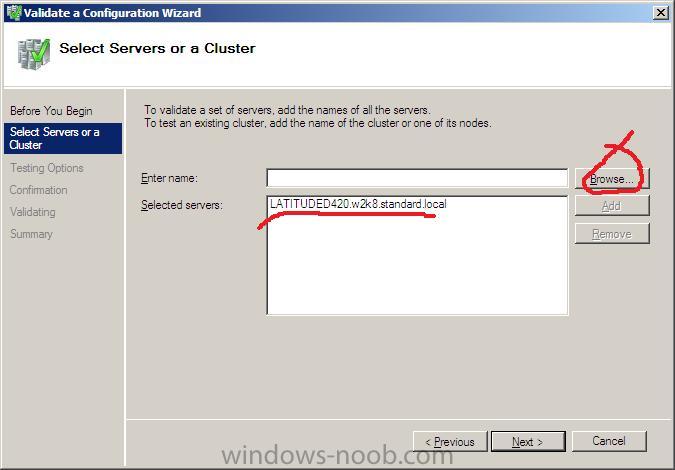
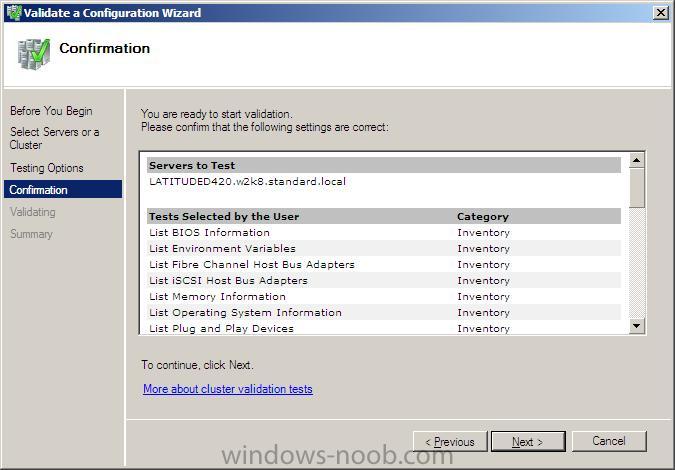
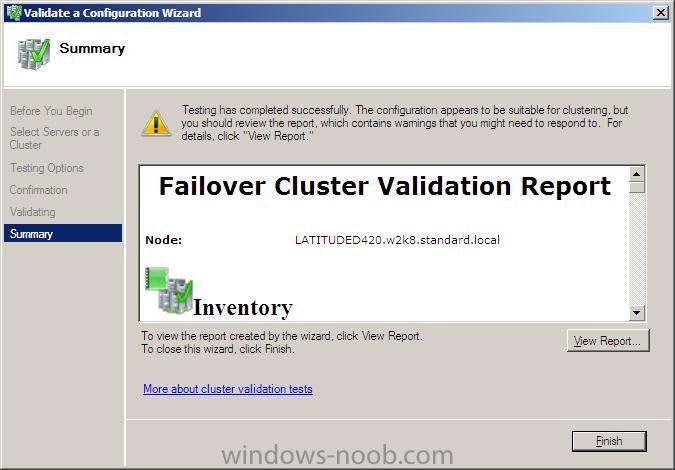
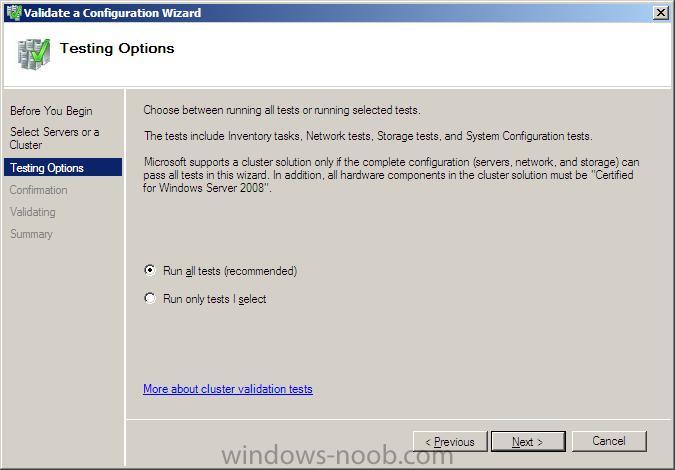
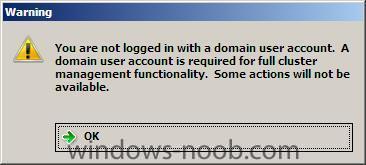
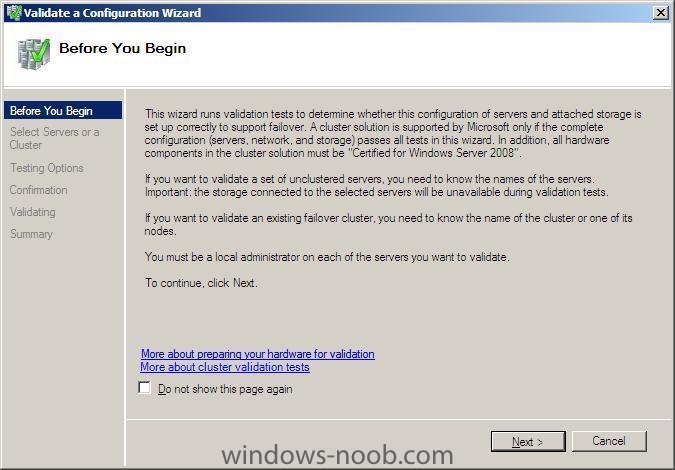
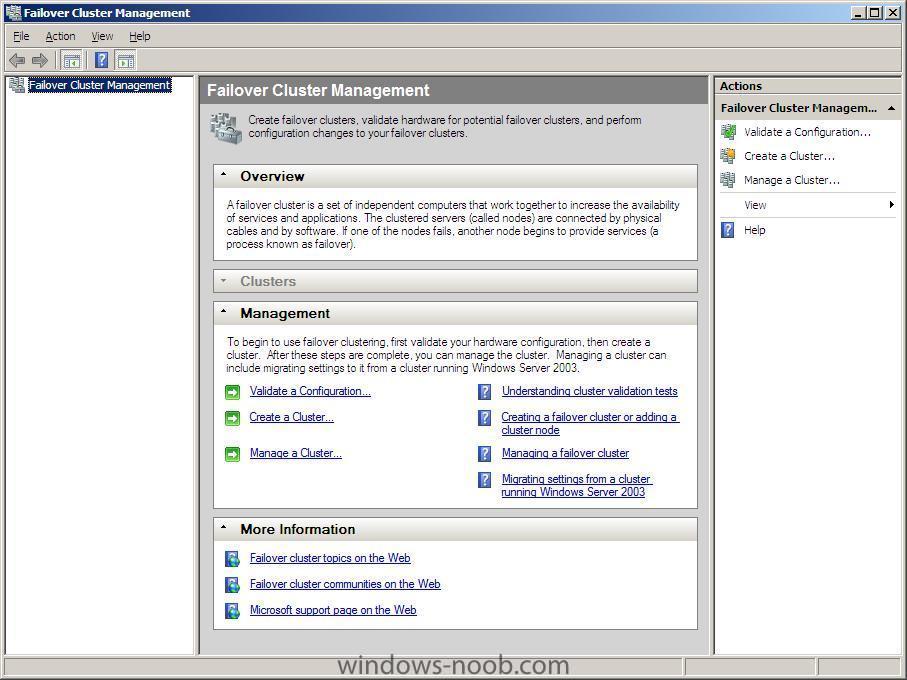
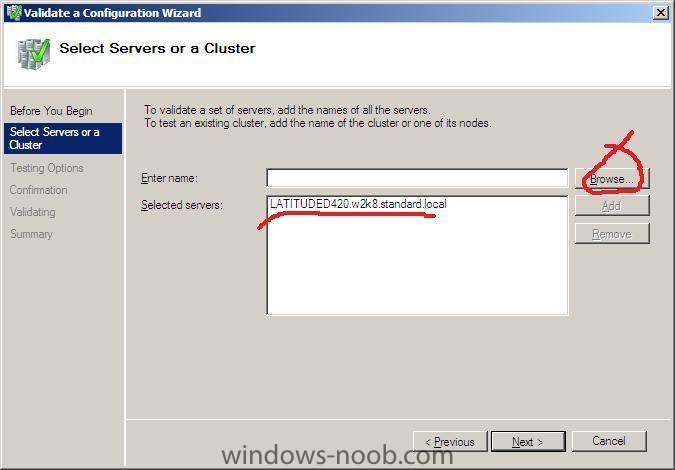
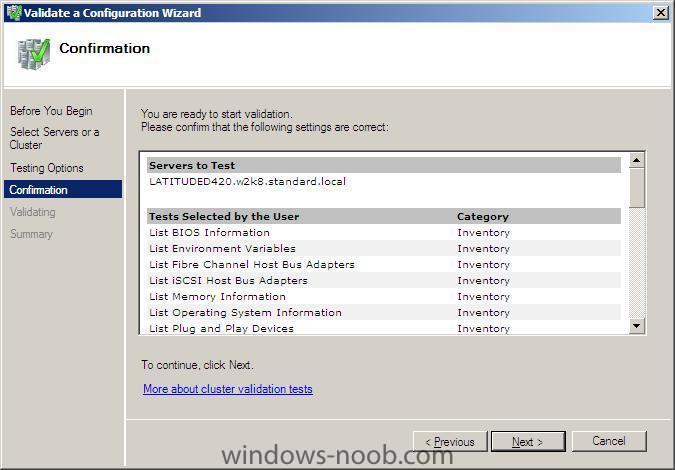
If you havn't already installed Failover Cluster Management Features, then do so now, you'll need to install the Failover Clustering Feature and the Failover Clustering tools (from Remote Server Administration tools). Once done you can access the Failover Cluster Management gui via Start/Administrative Tools, Failover Cluster Management Step 1. Validate You must login with a domain User account if you want the full functionality of the Failover Cluster Management, and if you forget you will be reminded. Login with a domain user account and start the Failover Cluster Management gui In the Management Pane, click on Validate a Configuration The validate a configuration Wizard will appear, click on Next. when the Select Servers or a cluster window appears, enter the Server name to validate or click browse and browse the network for the server click next when ready You will now be on the Testing Options window, click on Next to let the wizard run all tests, please note that the hardware being tested must be marked as 'Certified for Windows Server 2008'. You'll get a confirmation screen showing the options you chose, click next to run the tests... After a while, you'll get a Failover Cluster Validation report, click View Report to view the results and Finish to continue the report itself is rather lengthy so worth looking through (please note I ran this test on some standard desktop/laptop/hyper V hardware so as expected SAN info was nowhere to be seen and the hardware did not meet Microsoft's recommended configuration standards... Failover_Cluster_Validation_Report.mht


-
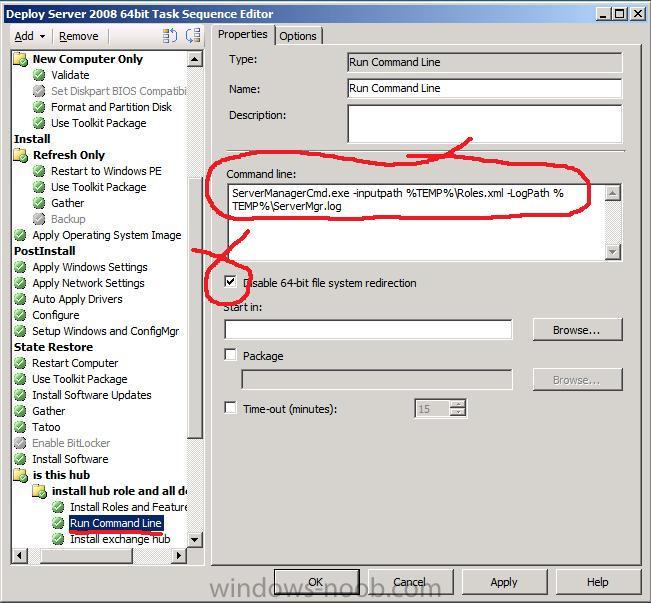
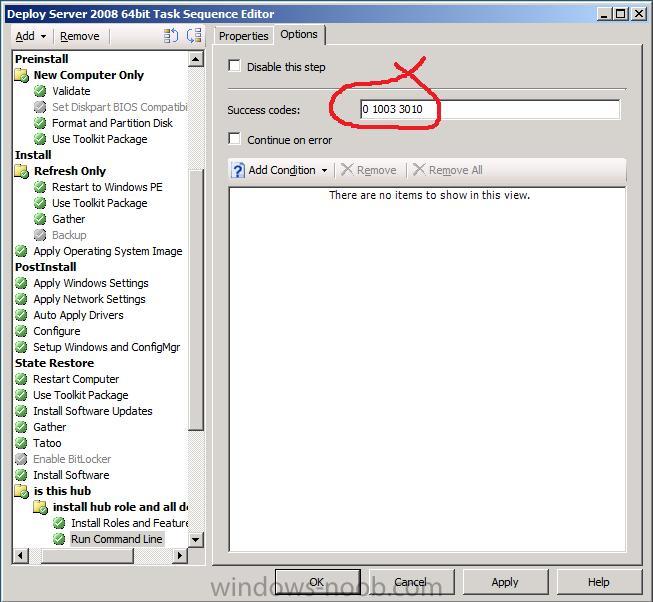
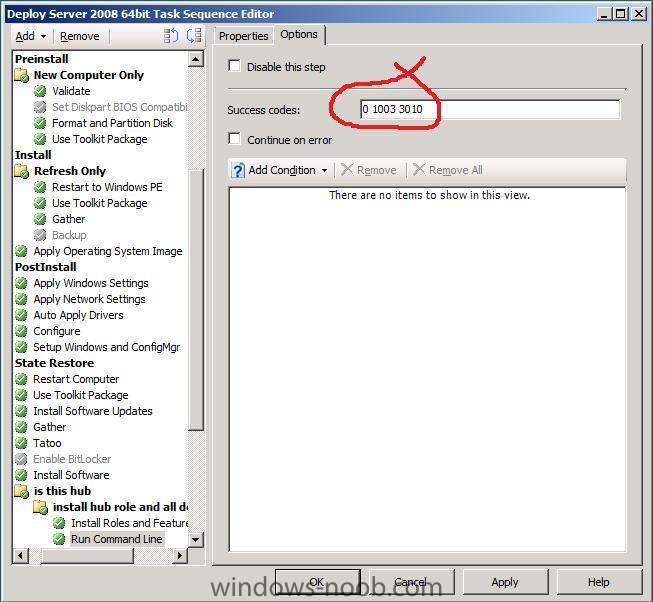
if you are deploying Windows Server 2008 X64 using System Center Configuration Manager 2007 SP1 with MDT integration, you may notice that the Install Roles and Features function gets completely ignored in your Task Sequence even though it works fine in Windows Server 2008 x86. The reason is a bug in MDT when adding roles and features to Windows Server 2008 64bit Here are the changes you need to make to get it to work and Here are the values that you need to place on the options tab You can get more (external) info about this problem here and here

-
heh
-
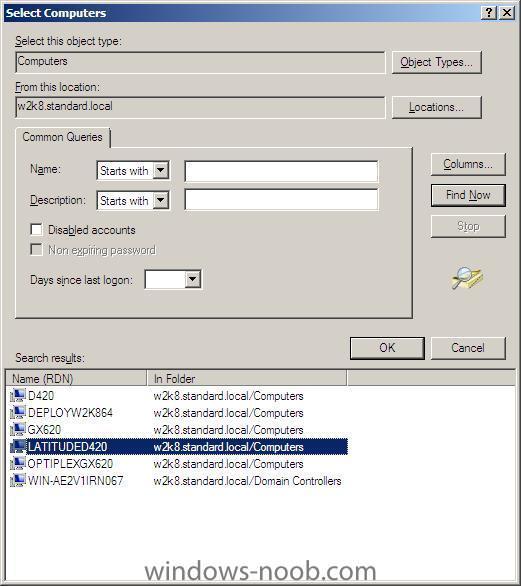
use computer association in the Operating System Deployment section as outlined here that will allow you to import a computer using its name and mac address or GUID into a collection of your choice, if you are going to deploy then make a collection called deploy XP or deploy Vista or whatever, and advertise your Task Sequence to THAT collection only, that way you only put computers into that collection when they need to be installed.... that database itself is stored on the SQL server you setup as part of the SCCM installation cheers anyweb
-
hi I havnt got access to an R2 server right now, but if i get time i'll do an install.... so I cannot comment about R2's support for unknown computers sorry. you'll need at least 512mb ram in the XP box otherwise you'll see problems during deployment (windows PE won't like less than 512) you can see how I created my task sequence for XP here
-
anything abortpxe related means no advertisement is targetted to the selected computer and in your second post kindof confirms that... so, have you advertised a Task Sequence to any collection ? if so what one ? and will this unknown computer be part of that collection ?
-
Silent F12 PXE boot prompt
anyweb replied to wells2050's question in Windows Deployment Services (WDS)
think outside the box ! what hardware are these pcs ? i know that dell's have a 'one time boot menu' which is operated by F12, and from there you can select what you want to boot to, perhaps your computer clients have a one time boot menu also, thereby leaving normal boot as the default (to c:) and one time boot menu when you press the correct Fxx key alternatively look at WDS pxe response settings, and set it to respond only to known client computers you'd need to prestage the computer in order for WDS to continute though more about that here cheers anyweb -
No SMS_SiteToSiteConnection_WIN found, but
anyweb replied to togeoff's topic in Configuration Manager 2007
shouldn't matter at all, when you instaslled SCCM, did you install it on a computer which is joined to this AD (joined to this domain) ?