anyweb
-
Posts
9277 -
Joined
-
Last visited
-
Days Won
371
Everything posted by anyweb
-
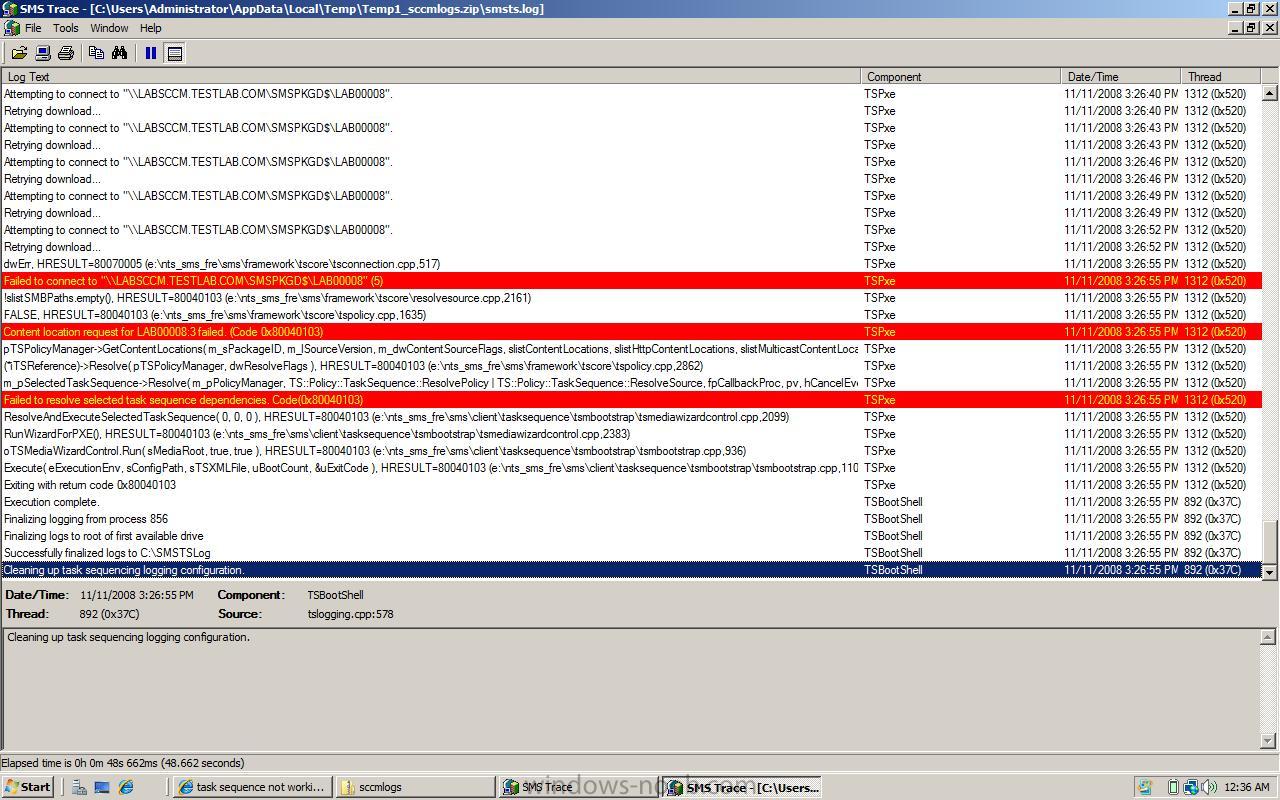
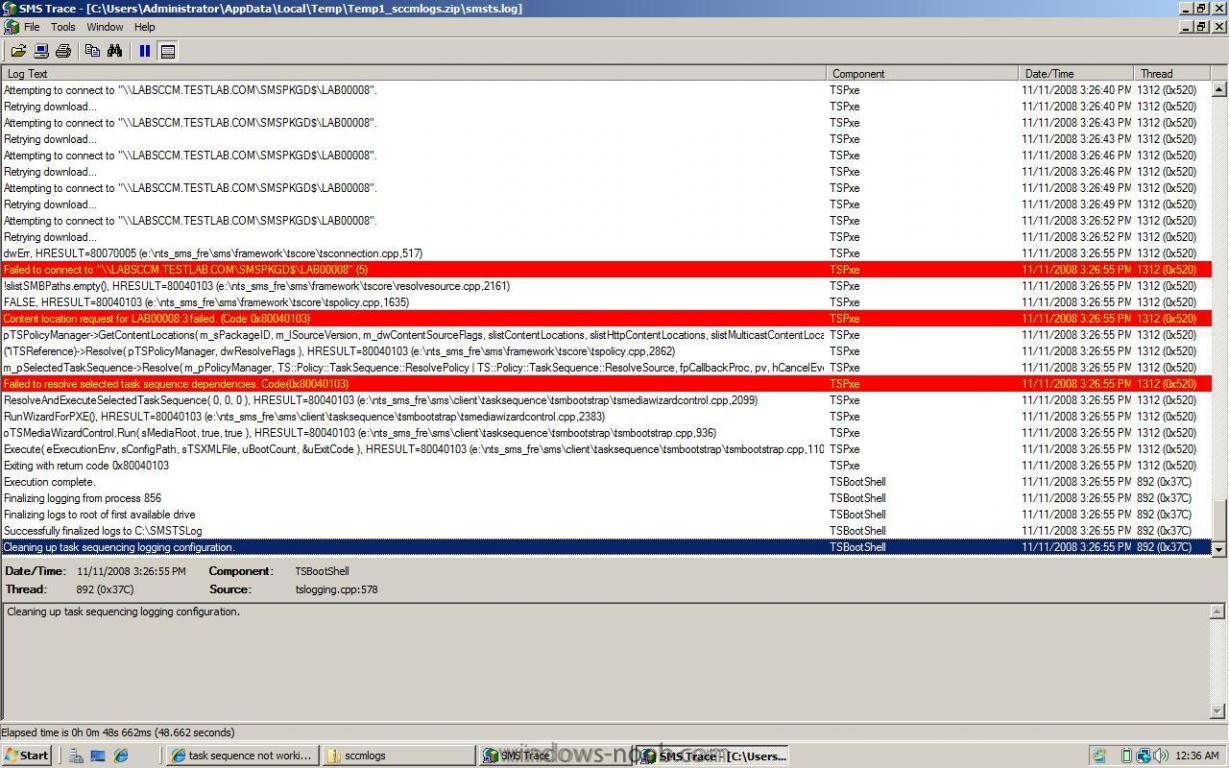
here is where you are having problems (the screenshot is of Trace32 part of the SCCM2007 toolkit, it highlights errors in logs in RED) the first error is so what is that package ? please verify that it is distributed to a distribution point (check the package status) the error above means it cannot find this packagepossible reasons are boot.wim has no network support for your nic or you havnt distributed the package properly (or need to do it again) this is where the Task Sequence aborts, it cannot continue because it cannot get some package(s) cheers anyweb
-
ok if its still failing just after starting windows PE with a reboot, then press F8 like i said, which will bring up a cmd prompt within windows PE copy any log files that are in there, zip them up and post them here, (The logs for SCCM (in this case) are stored in X:\Windows\Temp\SMSTSLog\ and C:\SMSTSLog and C:\_SMSTaskSequence) i need to see those logs to understand what is failing cheers anyweb
-
dont worry about that, i've also seen that when deploying clients, it doesnt matter as long as youve created boot.wims for both architecture (32 bit and 64bit) and that you have defined what operating system is being installed cheers anyweb
-
you must enable f8 funtionality within Windows PE to troubleshoot the issue learn how to do that here it's rebooting probably because you don'ät have the correct network drivers loaded in your boot.wim file cheers anyweb
-
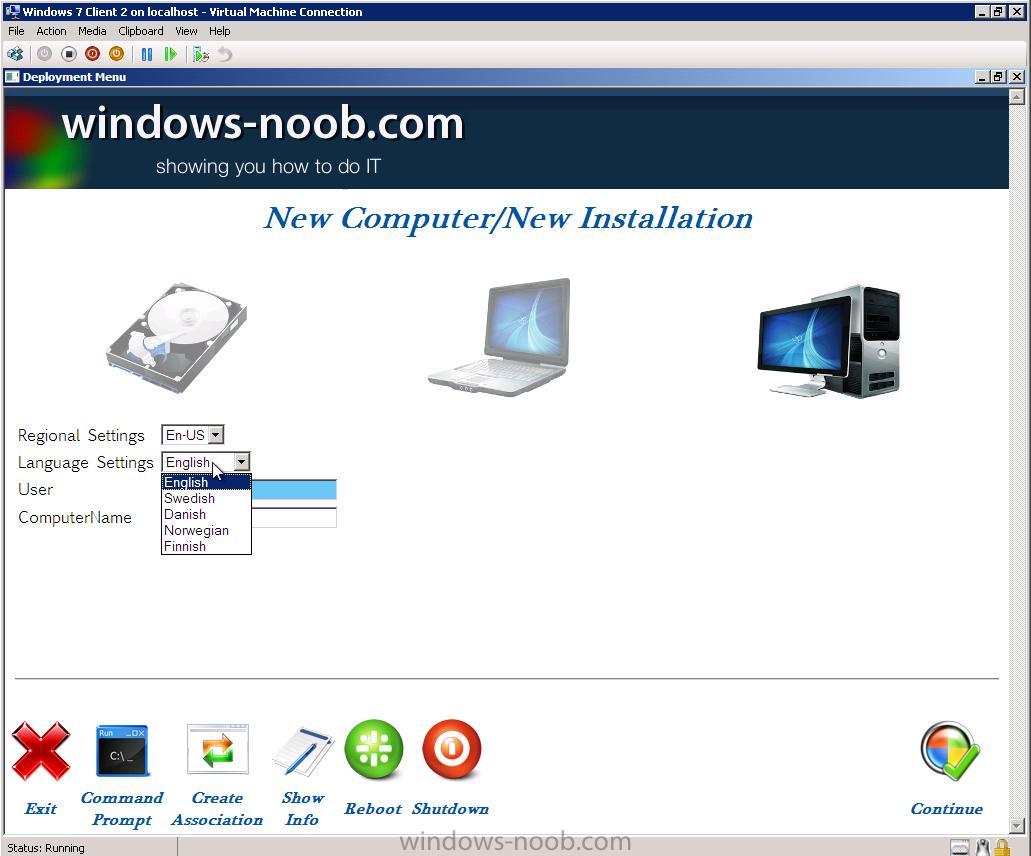
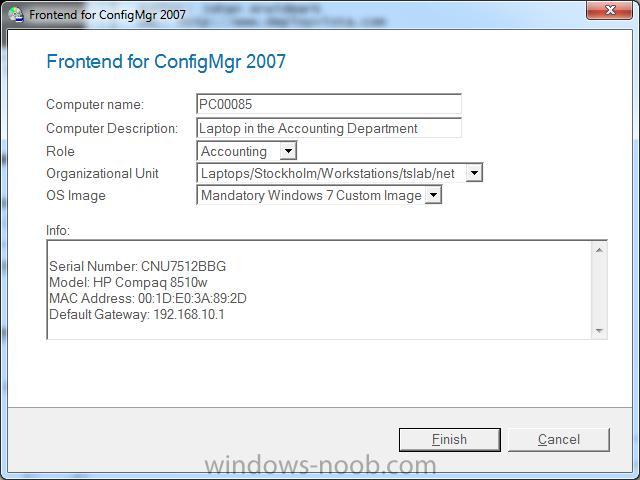
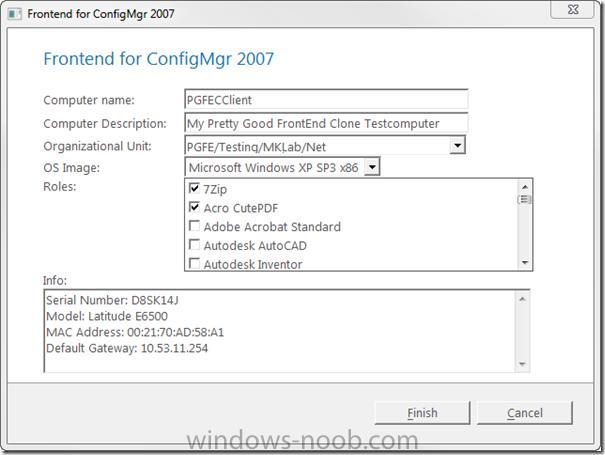
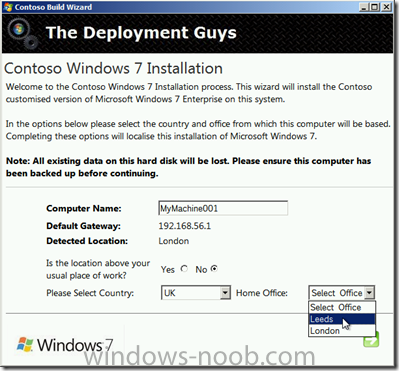
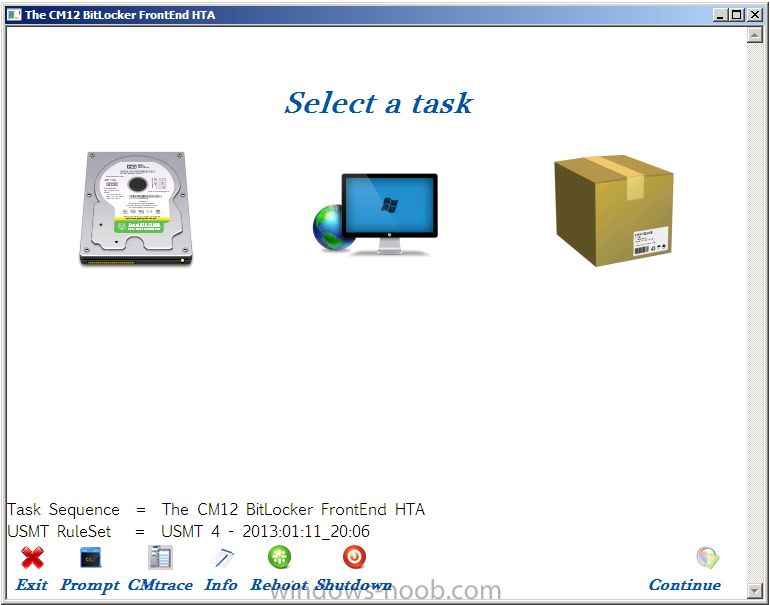
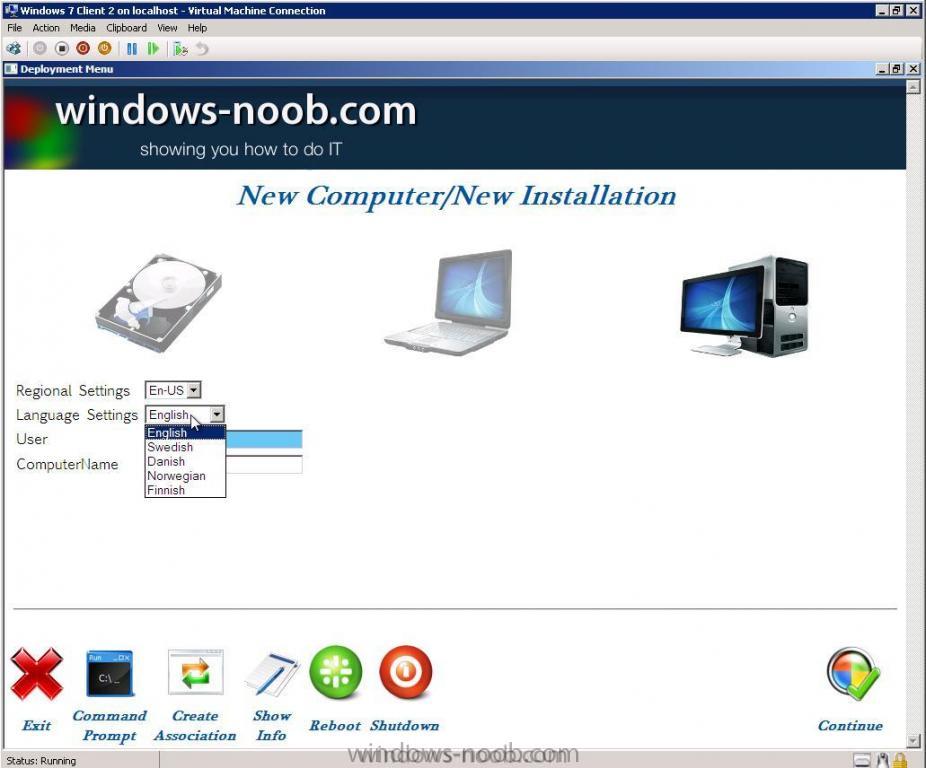
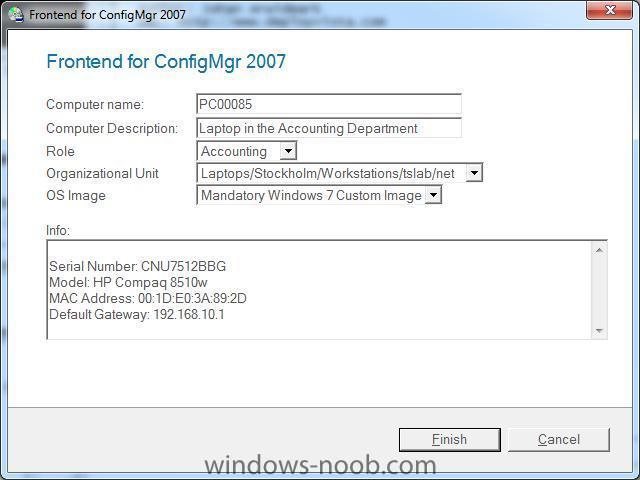
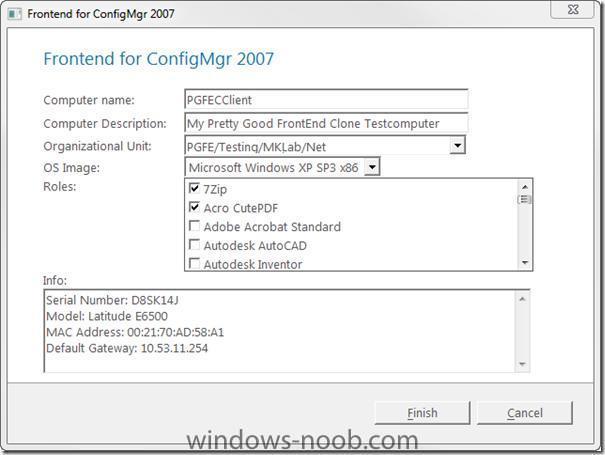
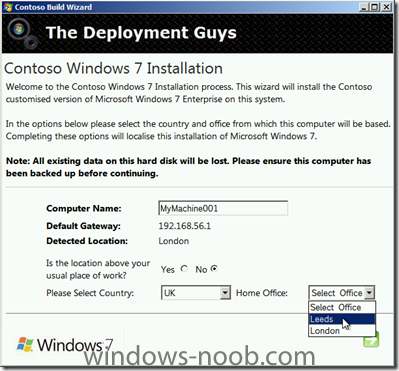
What is a HTA ? The term HTA is actually an acronym: it’s short for HTML Application. For our purposes an HTA is nothing more than a way to provide a graphical user interface for your scripts. As we’ve already noted, neither WSH nor VBScript provide much in the way of graphical user interface elements: no check boxes, no list boxes, no nothing. Internet Explorer, however, makes use of all of these elements - and more. Because an HTA leverages Internet Explorer, you can take advantage of all these graphical user interface elements when writing system administration scripts. (And, yes, we’re going to show you how to do just that.) How closely related are HTML files and HTAs? Well, take any HTML file and change the file extension from .htm (or .html) to .hta. Congratulations: you’ve just created your first HTA. Where Can I get some HTA’s ? check out the samples below:- The CM12 BitLocker HTA CM12 in a Lab -The CM12 BitLocker FrontEnd HTA - video CM12 in a Lab - The CM12 BitLocker FrontEnd HTA Introducing the BitLocker FrontEnd HTA Multipurpose HTA with BitLocker Support for all three common scenarios, backup, reinstall, new computer Windows-noob Front End right here ! SCCM Operating System Deployment – Front-end HTA -http://joshuasmueller.wordpress.com/2010/06/15/sccm-operating-system-deployment-front-end-hta/ Johan ArwidMarks' Pretty Good Frontend - http://prettygoodfro...d.codeplex.com/ hi Johan !! Maik Koster's Pretty Good Frontend Clone - http://myitforum.com...ntendclone.aspx Location Deployment wizard from the deployment guys here Resources here's a good resource on myitforum with hta files to make the deployment more user friendly http://www.myitforum...ew.asp?id=11652.


-

Updates for Workstation with SCCM 2007 ?!?!?
anyweb replied to TronixS's question in Software Update Point
hi again can you confirm is it only your Windows XP SP2 systems that are having problems ? -
how can I install drivers using windows SIM
anyweb posted a question in Windows System Image Manager (WSIM)
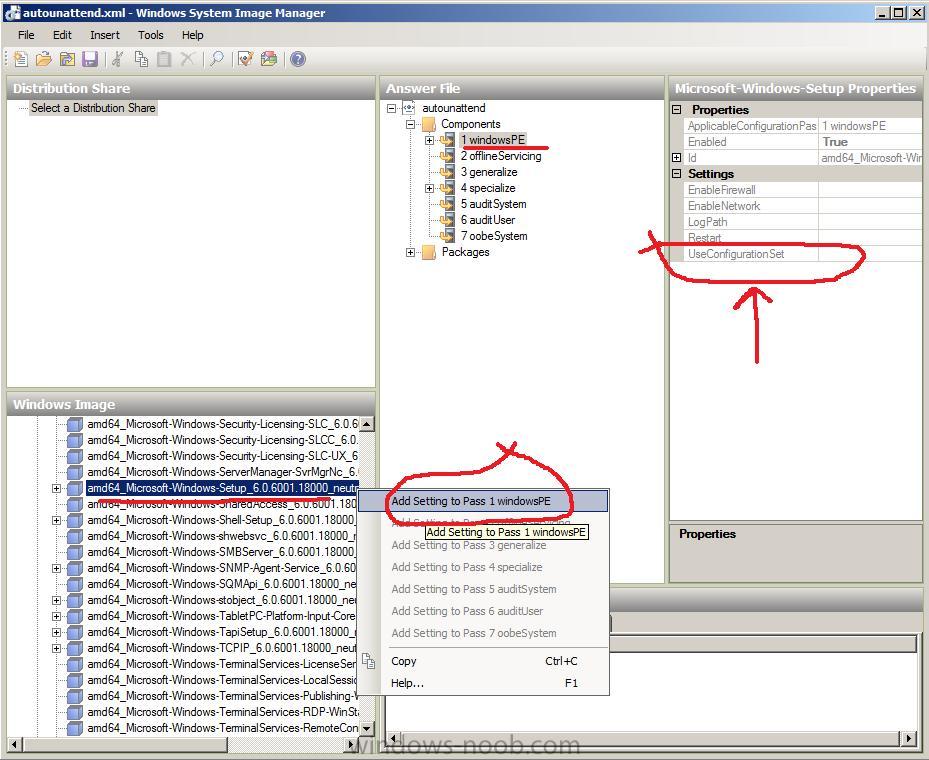
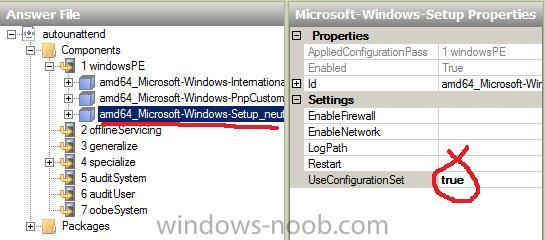
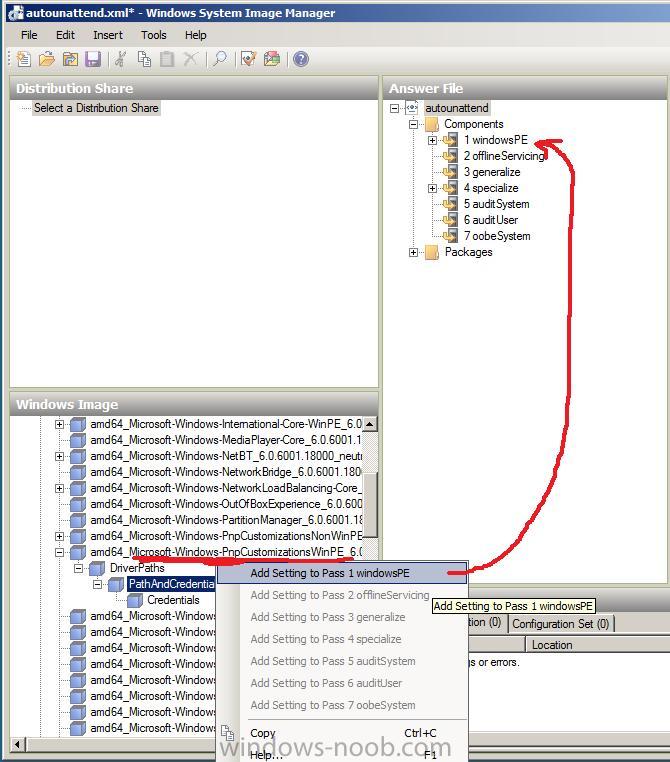
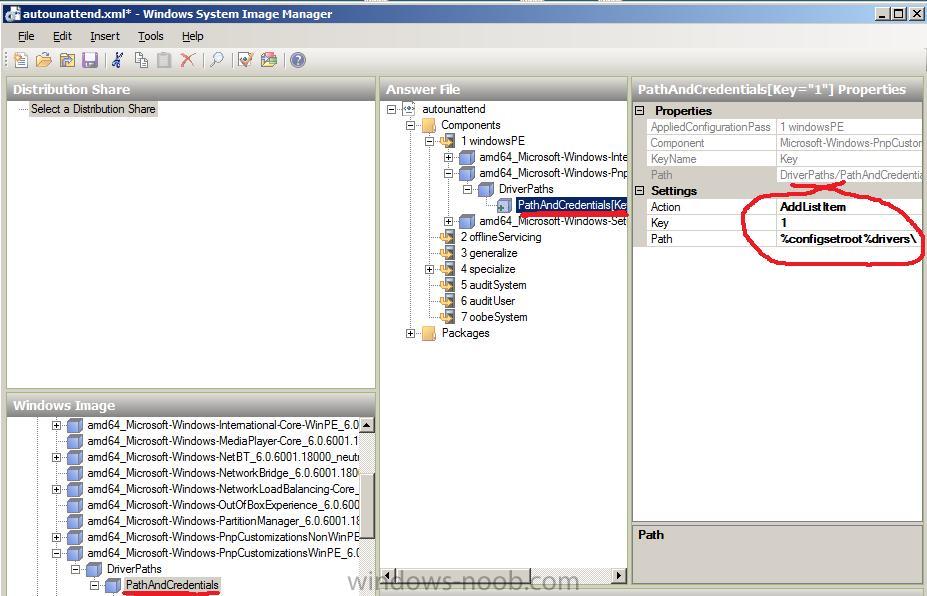
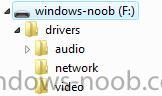
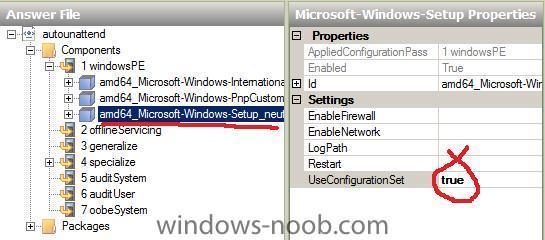
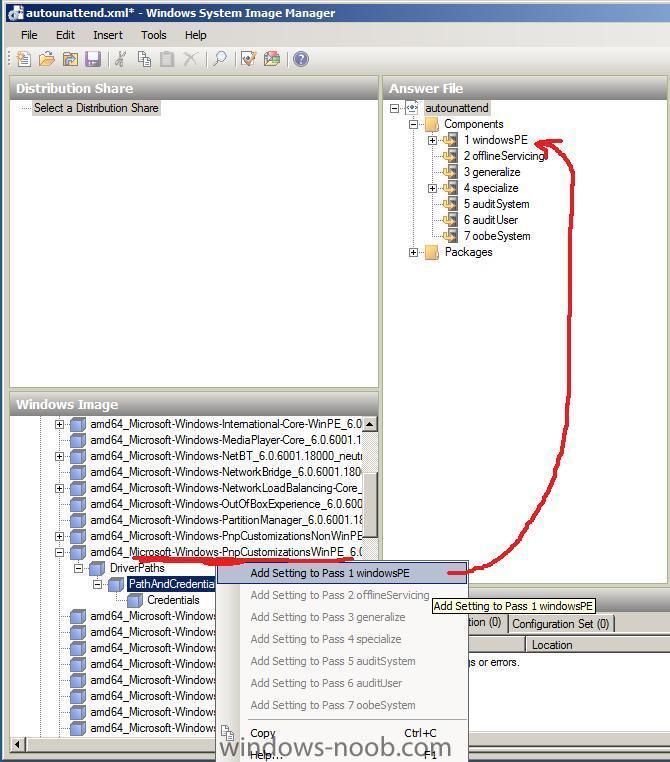
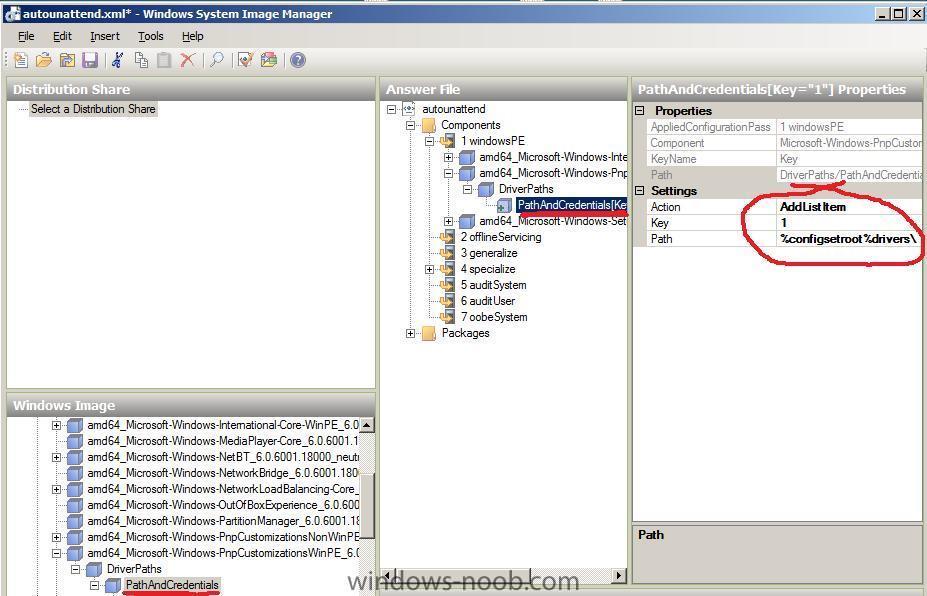
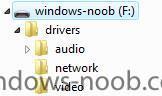
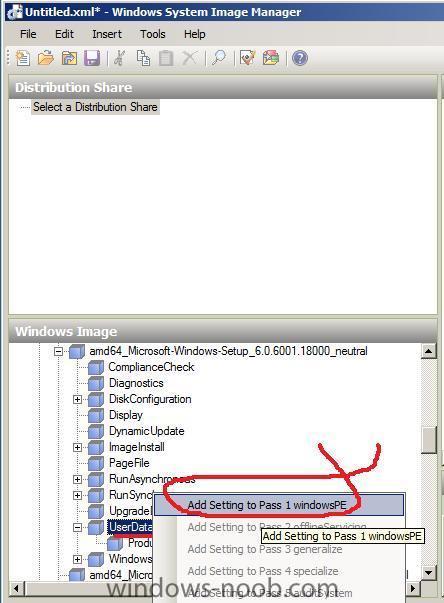
You can install device drivers during Windows Setup by creating an answer file using Windows SIM. In this answer file, you can specify the paths to device drivers on a network share (or a local path) by adding the Microsoft-Windows-PnpCustomizationsWinPE or Microsoft-Windows-PnpCustomizationNonWinPE components and specifying the configuration passes in which you intend to install them. You can install device drivers in the windowsPE, offlineServicing, auditUser or auditSystem configuration passes. By adding device drivers during the windowsPE or offlineServicing configuration passes, you can add out-of-box device drivers to the Windows image before the computer starts. This method can also be used to add boot-critical device drivers to a Windows image. Digitally signed device drivers can be added to an offline Windows image before Windows Setup or during Windows Setup. In our example here (local path) we are going to create a folder called drivers, that folder will have subfolders in it with our drivers neatly organised (audio/video/network/etc..) for easy management. eg: drivers/audio drivers/video drivers/network and so on Prepare the Answer file Startup Windows SIM and in the Windows Image pane, expand components. Select the component called Microsoft-Windows-Setup and add it to Pass 1 WindowsPE if it isn't already added. Set the UseConfigurationSet value to True using the drop down menu. Back in the components pane, select the Microsoft-Windows-PnpCustomizationsWinPE/DriverPaths/PathAndCredentials node and right click, choose add setting to Pass 1 windowsPE. Set the Key value to 1 and edit the Path value to read as follows:- %configsetroot%drivers\ Validate your answer file and save it as AutoUnattend.xml. Prepare the USB Key Format a USB key and copy the Autounattend.xml file to the root of the key, once done, copy the Drivers folder structure which you prepared earlier to the root of the key you are now ready to boot the client to test the unattended install. Below is a sample of the drivers code in AutoUnattend.xml for 64bit Server 2008 <component name="Microsoft-Windows-Setup" processorArchitecture="amd64" publicKeyToken="31bf3856ad364e35" language="neutral" versionScope="nonSxS" xmlns:wcm="http://schemas.microsoft.com/WMIConfig/2002/State" xmlns:xsi="http://www.w3.org/2001/XMLSchema-instance"> <UseConfigurationSet>true</UseConfigurationSet> </component> <component name="Microsoft-Windows-PnpCustomizationsWinPE" processorArchitecture="amd64" publicKeyToken="31bf3856ad364e35" language="neutral" versionScope="nonSxS" xmlns:wcm="http://schemas.microsoft.com/WMIConfig/2002/State" xmlns:xsi="http://www.w3.org/2001/XMLSchema-instance"> <DriverPaths> <PathAndCredentials wcm:action="add" wcm:keyValue="1"> <Path>%configsetroot%drivers\</Path> </PathAndCredentials> </DriverPaths> </component>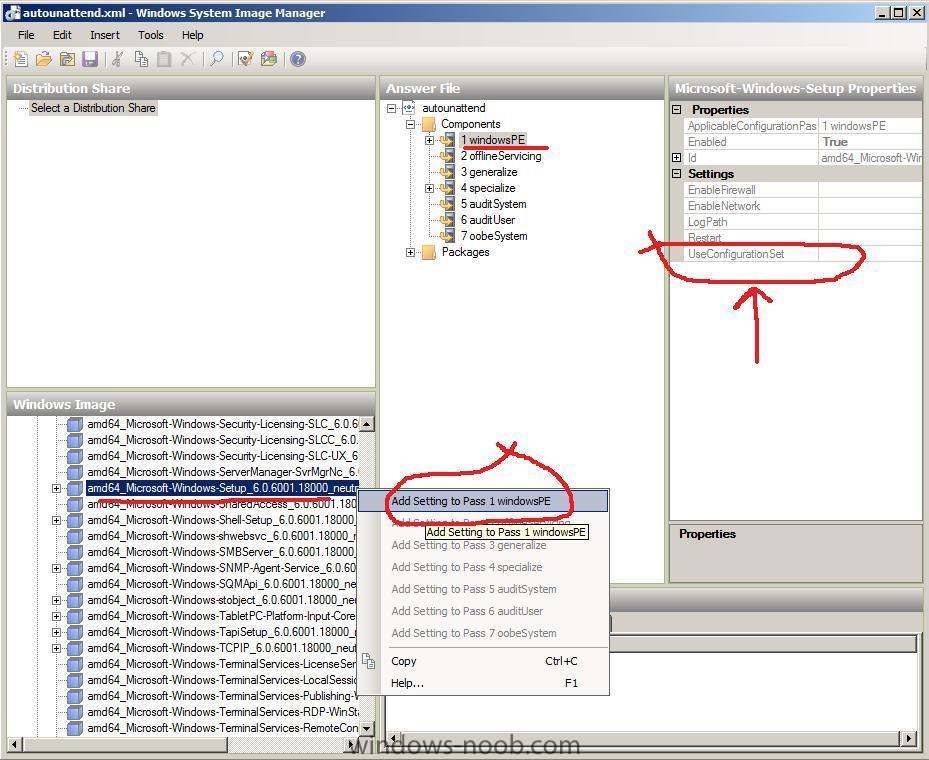
-
Updates for Workstation with SCCM 2007 ?!?!?
anyweb replied to TronixS's question in Software Update Point
you'll need to provide us with logs from a failing machine, do all the machines have the same version of the SCCM client installed ? are all the working machines in the same collection ? -
WDS Not Images available for installation
anyweb replied to wdspuzzled's question in Windows Deployment Services (WDS)
are the images all 64 bit or 32 bit or a mixture, same goes for the hardware you are trying with.... -
how can I change computername using Windows SIM
anyweb posted a question in Windows System Image Manager (WSIM)
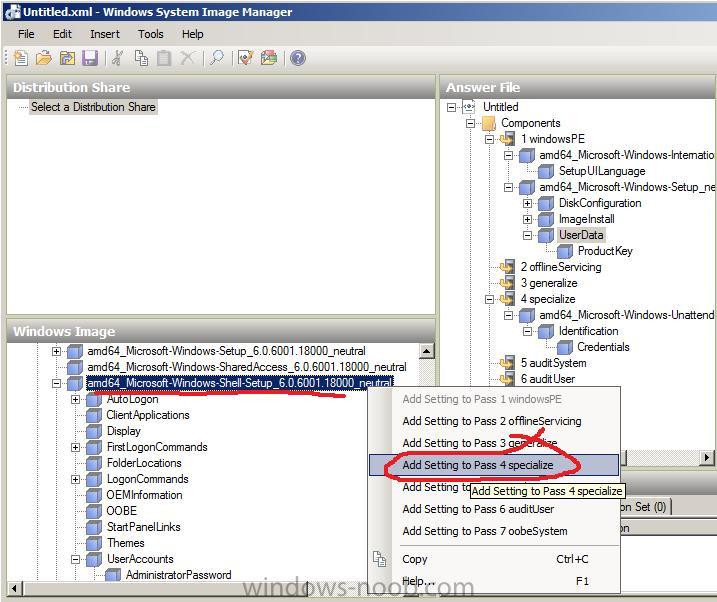
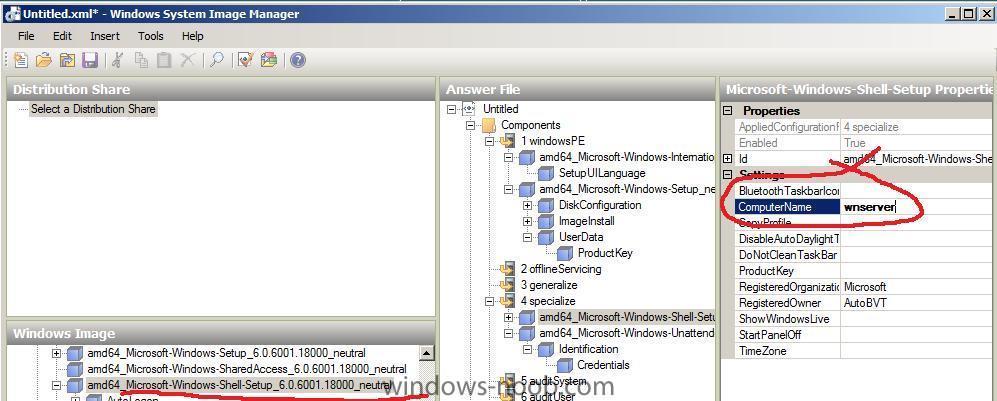
Startup Windows SIM and add the Microsoft-Windows-Shell-Setup component to the Pass 4 Specialize section of the answer file add a computername and then validate your answer file.
-
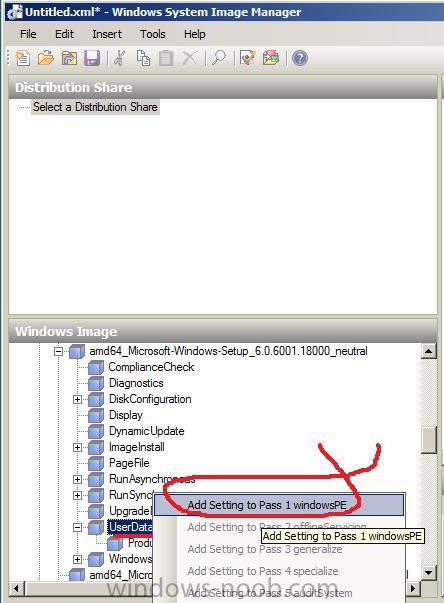
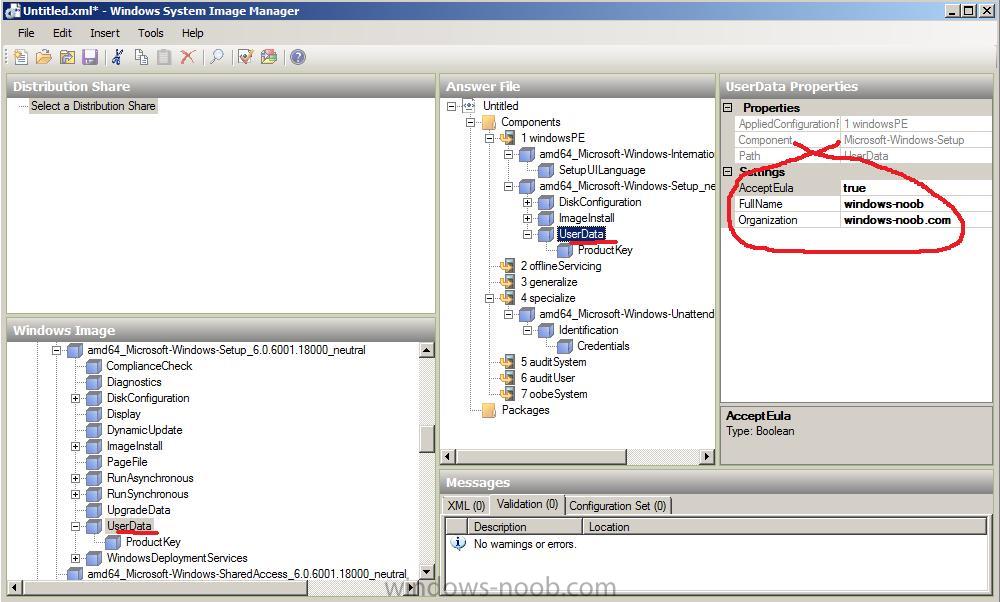
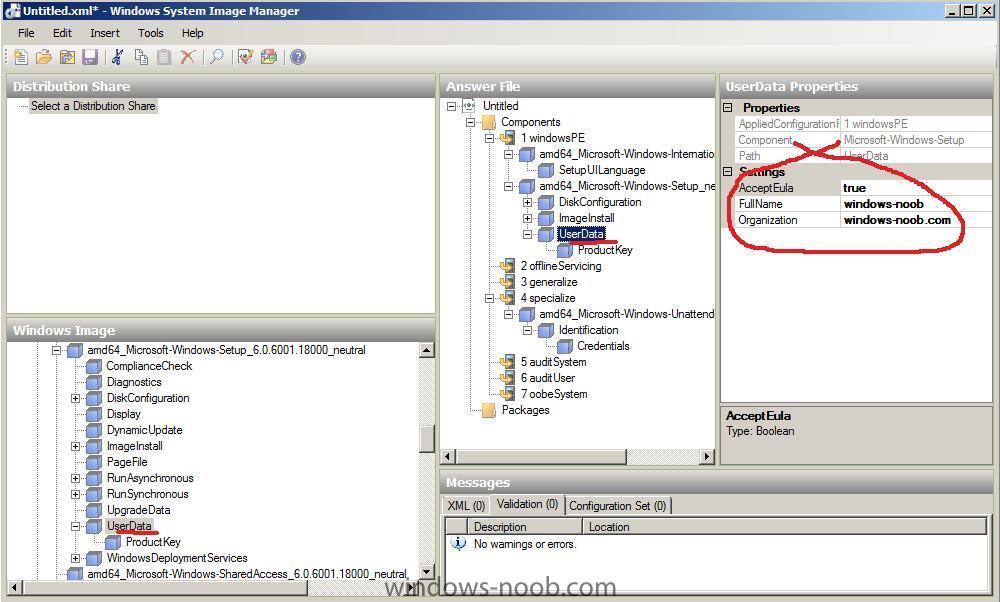
startup Windows SIM and add the Microsoft-Windows-Setup\UserData\ component to the Windows PE configuration pass. configure the AcceptEULA, Fullname and Organization name as follows: click on the Validate icon to check your answer file
-
how can I add the product key using Windows SIM
anyweb posted a question in Windows System Image Manager (WSIM)
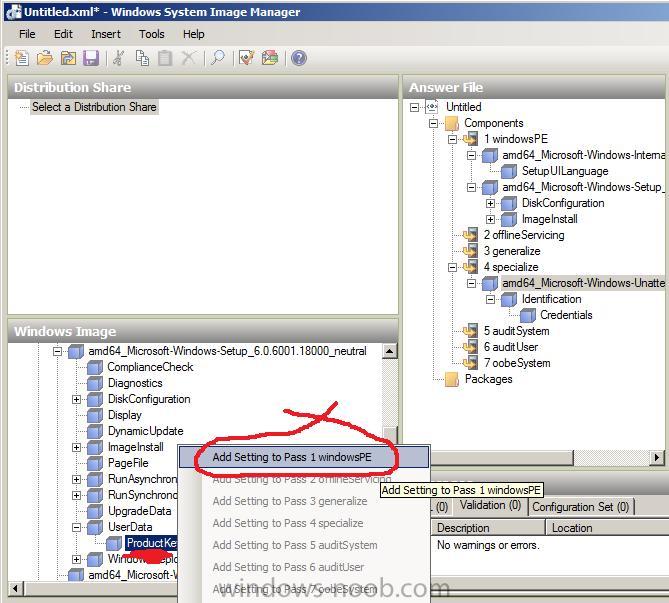
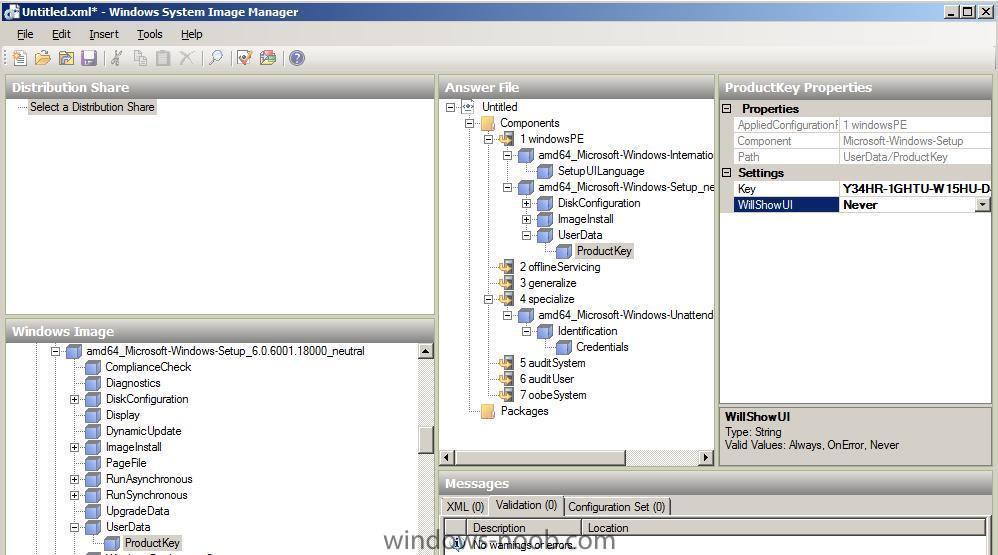
Startup Windows SIM and add the Microsoft-Windows-Setup\UserData\ProductKey to the WindowsPE configuration pass. Input your key including all the dashs eg: Y34HR-1GHTU-W15HU-D4MND-L4M3R set the WillShowUI value to Never click on Validate to check your answer file.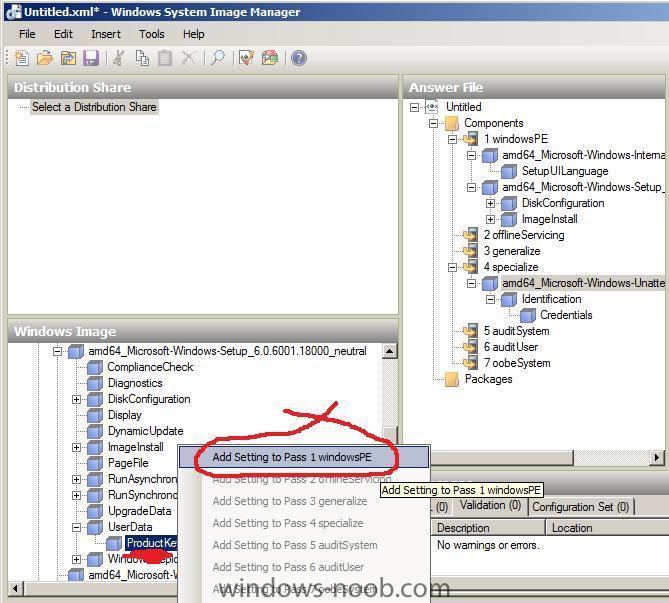
-
how can I configure the hard disc using Windows SIM
anyweb posted a question in Windows System Image Manager (WSIM)
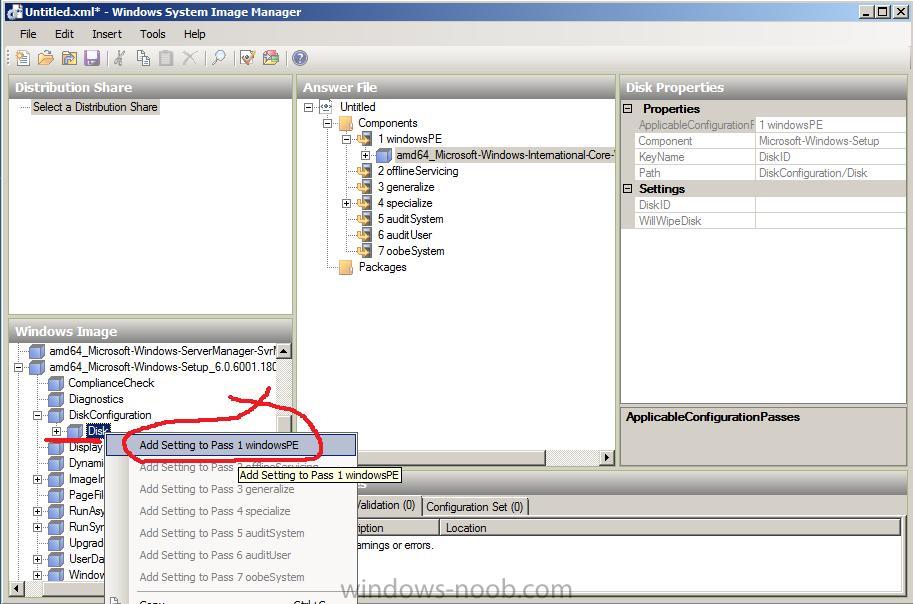
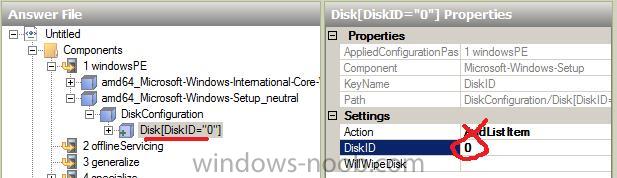
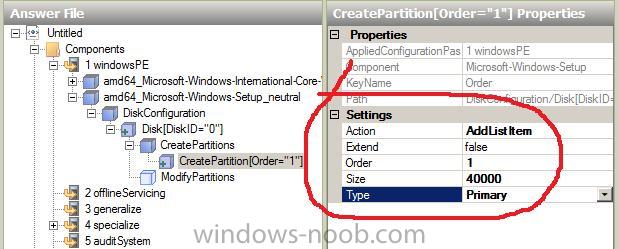
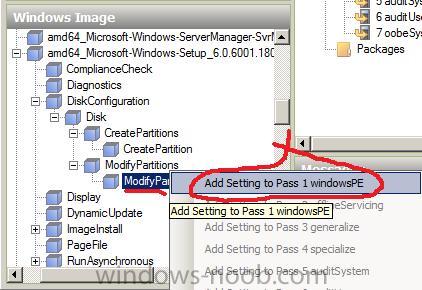
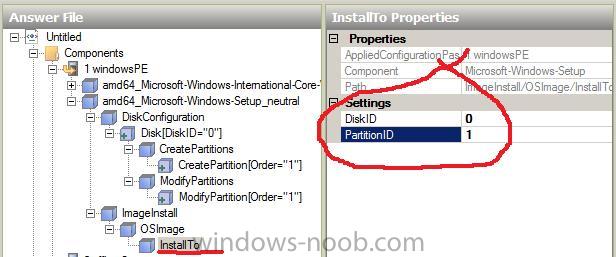
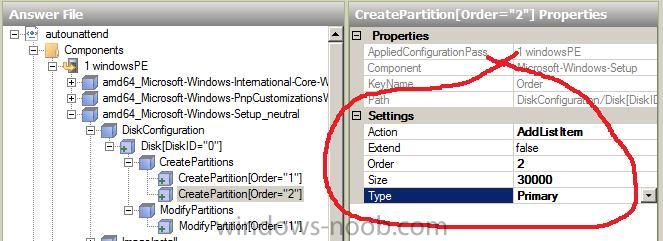
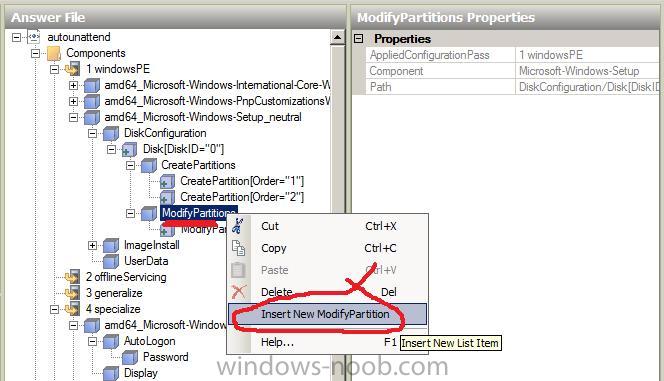
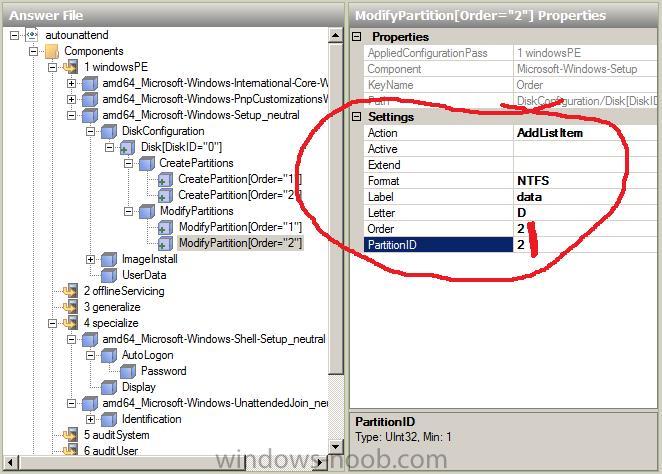
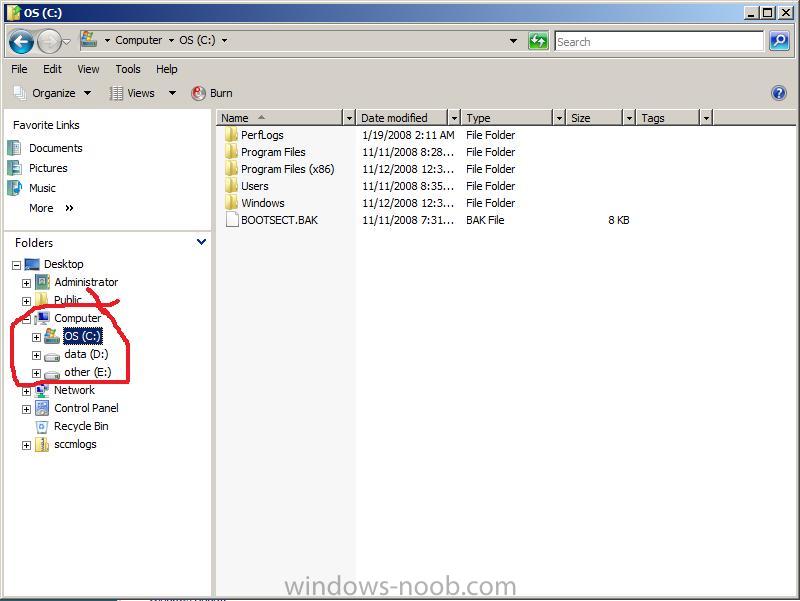
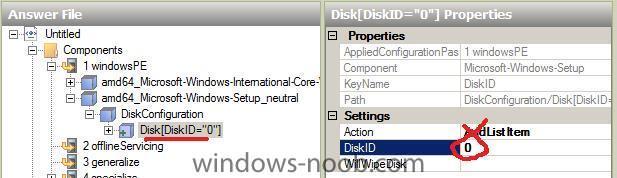
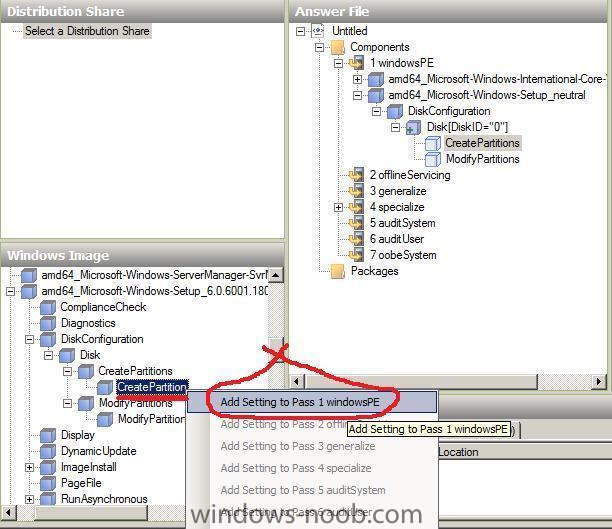
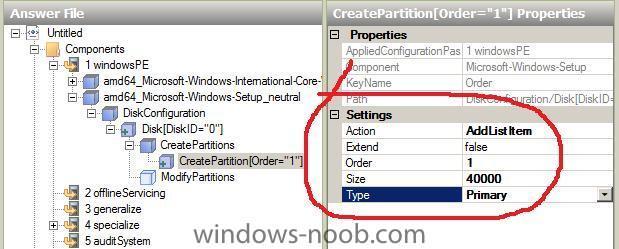
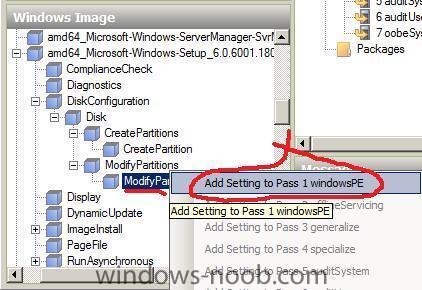
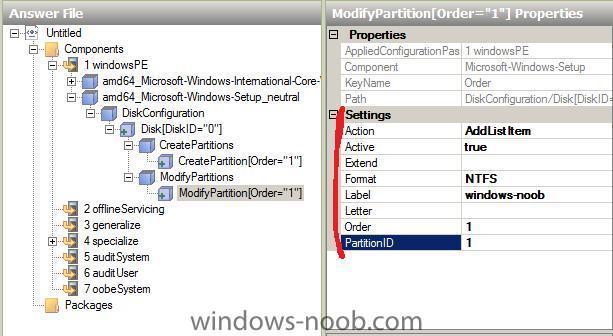
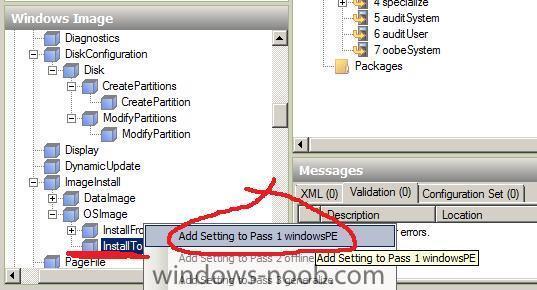
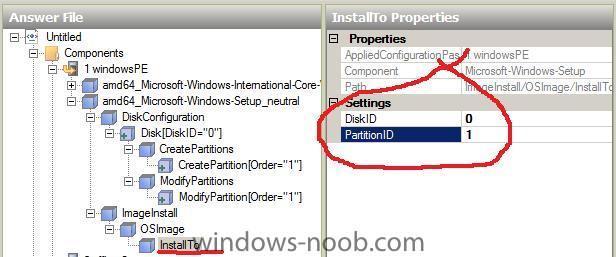
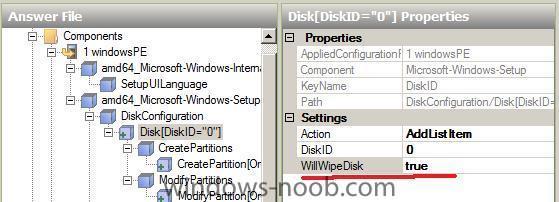
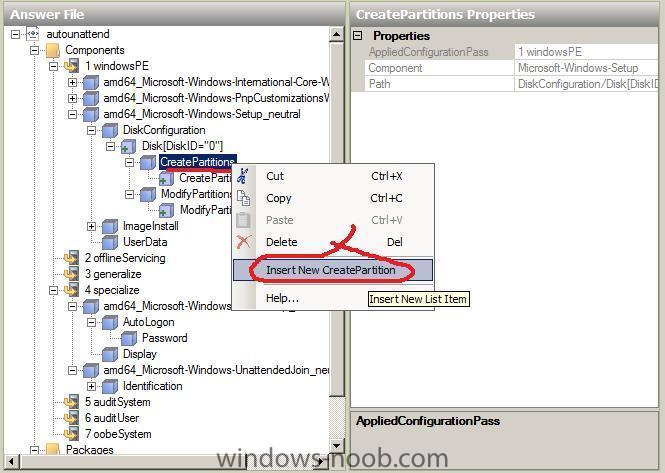
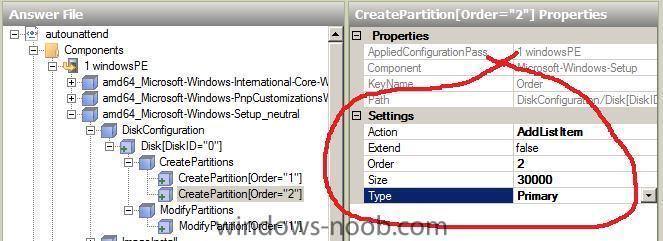
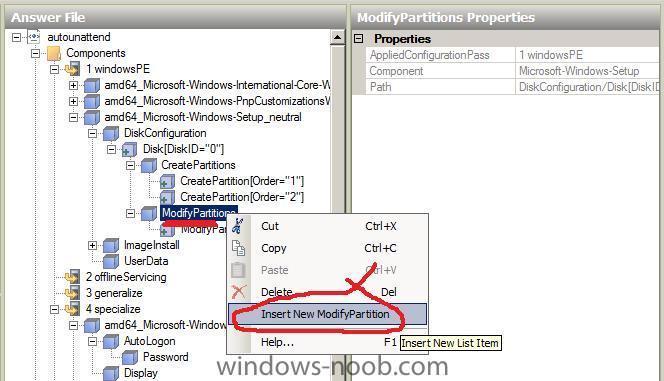
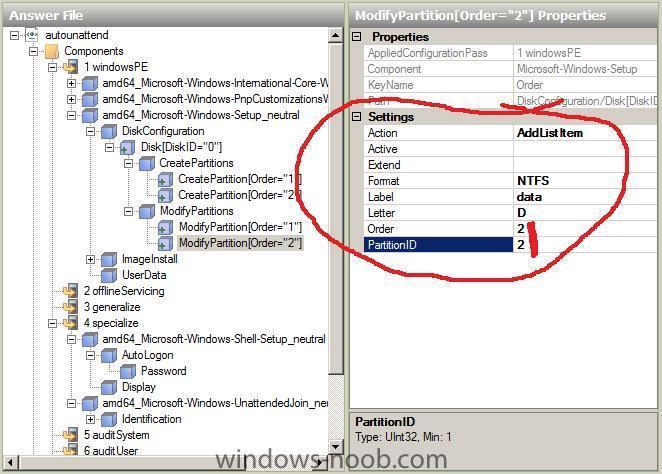
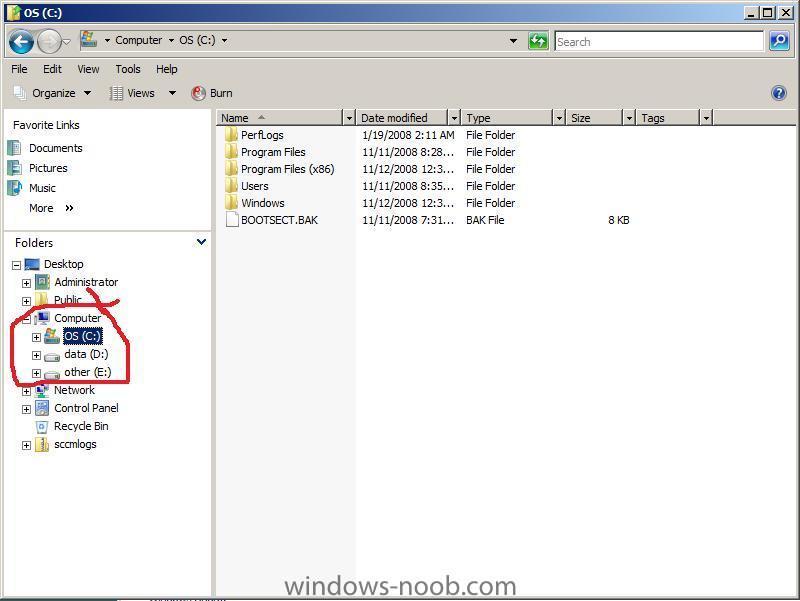
Add component to Answer File start up Windows SIM and select Microsoft-Windows-Setup from the choices in the Components section of Windows Image. Expand DiskConfiguration and then right-click on Disk and choose Add Setting to Pass 1 windowsPE set the DiskID to "0" in properties Note: if you try to deploy and get an error message stating Windows could not create a partition on disk 0. The error occurred while applying the unattend answer file's <DiskConfiguration> setting. Error Code:0x80004005 then set the WillWipeDisk to true Partition the hard disc Now we want to partition the hard disk to be 40GB in size so add the Microsoft-Windows-Setup\DiskConfiguration\Disk\CreatePartitions\CreatePartition component to the windowsPE pass. set the properties to order=1, size=40000 and type=primary Mark as active and format with NTFS Add the Microsoft-Windows-Setup\DiskConfiguration\Disk\ModifyPartitions\ModifyPartition node to the windowsPE pass edit your settings like this, make sure to set order and partition ID or this will not work... Tell Windows where to install to Now that we've got our hard disc sorted we need to tell Windows where to install to, so add the Microsoft-Windows-Setup\ImageInstall\OSImage\InstallTo node to the windowsPE configuration pass set the DiskID to 0 and PartitionID to 1 Add more partitions If you want to add more partitions you can do so as follows: Right-click on CreatePartitions and choose Insert New CreatePartition when the properties screen appears, fill in the values for Order, Size and Type (do not set Extend to True if Size is set to a value) Now that we have created our new partition, you need to modify it, so right click on ModifyPartitions and choose Insert New Modify Parition make your changes to the properties paying close attention to the Order and PartitionID values otherwise the deployment won't work validate your answer file by clicking on the validate button here's some sample (working) code from an XML file i've made, in this sample it makes 3 partitions, C, D, and E, C is for the Os, D for Data and E for other. <component name="Microsoft-Windows-Setup" processorArchitecture="amd64" publicKeyToken="31bf3856ad364e35" language="neutral" versionScope="nonSxS" xmlns:wcm="http://schemas.microsoft.com/WMIConfig/2002/State" xmlns:xsi="http://www.w3.org/2001/XMLSchema-instance"> <DiskConfiguration> <Disk wcm:action="add"> <ModifyPartitions> <ModifyPartition wcm:action="add"> <Active>true</Active> <Format>NTFS</Format> <Label>OS</Label> <Order>1</Order> <PartitionID>1</PartitionID> <Letter>C</Letter> </ModifyPartition> <ModifyPartition wcm:action="add"> <Format>NTFS</Format> <Label>data</Label> <Letter>D</Letter> <Order>2</Order> <PartitionID>2</PartitionID> </ModifyPartition> <ModifyPartition wcm:action="add"> <Format>NTFS</Format> <Label>other</Label> <Letter>E</Letter> <Order>3</Order> <PartitionID>3</PartitionID> </ModifyPartition> </ModifyPartitions> <DiskID>0</DiskID> <CreatePartitions> <CreatePartition wcm:action="add"> <Order>1</Order> <Size>40000</Size> <Type>Primary</Type> </CreatePartition> <CreatePartition wcm:action="add"> <Order>2</Order> <Size>30000</Size> <Type>Primary</Type> </CreatePartition> <CreatePartition wcm:action="add"> <Order>3</Order> <Size>100</Size> <Type>Primary</Type> </CreatePartition> </CreatePartitions> <WillWipeDisk>true</WillWipeDisk> </Disk> </DiskConfiguration> <ImageInstall> <OSImage> <InstallTo> <DiskID>0</DiskID> <PartitionID>1</PartitionID> </InstallTo> <InstallFrom> <MetaData wcm:action="add"> <Value>Windows Longhorn SERVERENTERPRISE</Value> <Key>/IMAGE/NAME</Key> </MetaData> </InstallFrom> </OSImage> </ImageInstall> <UserData> <AcceptEula>true</AcceptEula> <FullName>windows-noob</FullName> <Organization>windows-noob</Organization> </UserData> <UseConfigurationSet>true</UseConfigurationSet> </component> once the deployment is complete, you can see your partitions listed in Explorer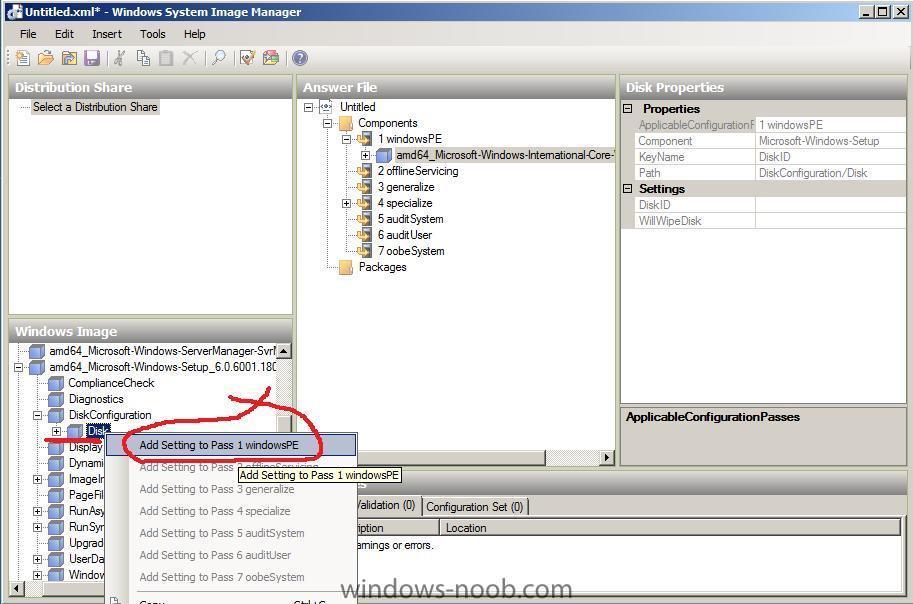
-
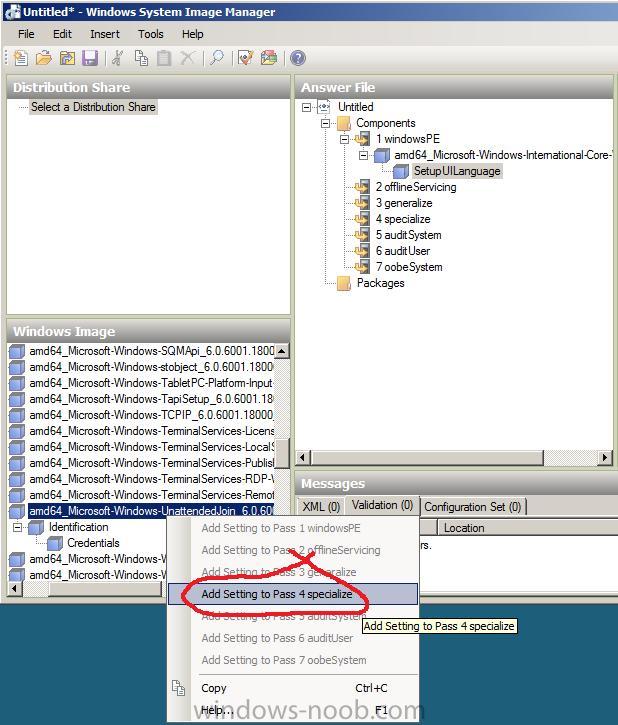
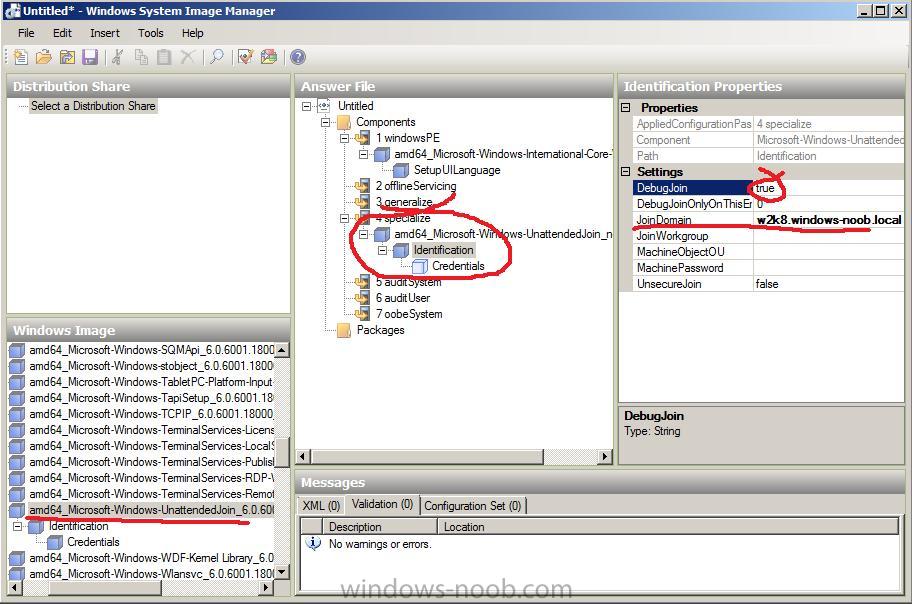
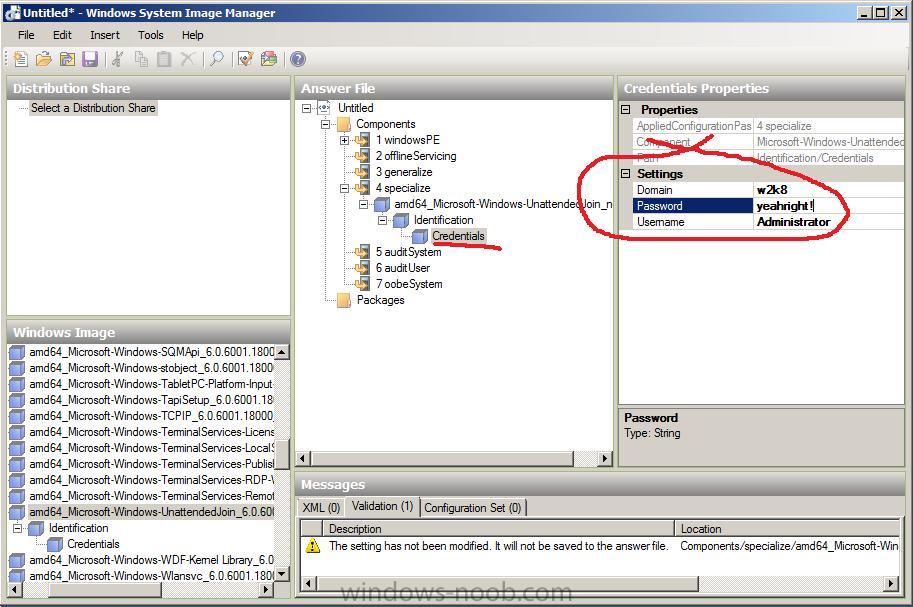
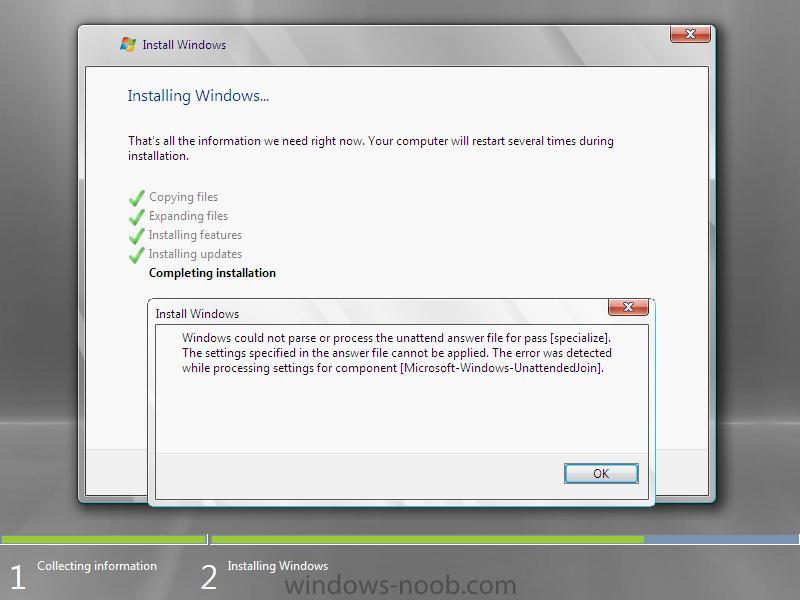
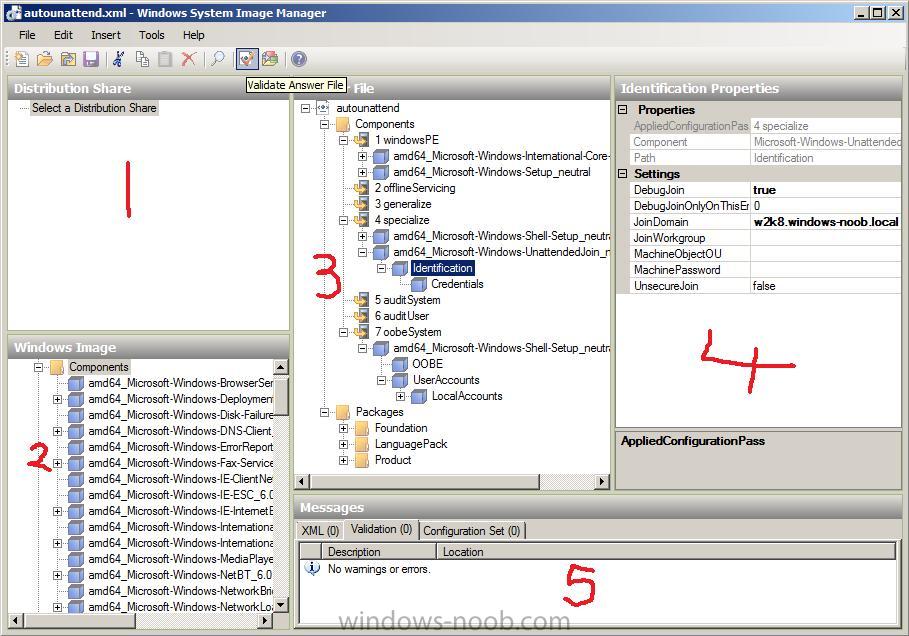
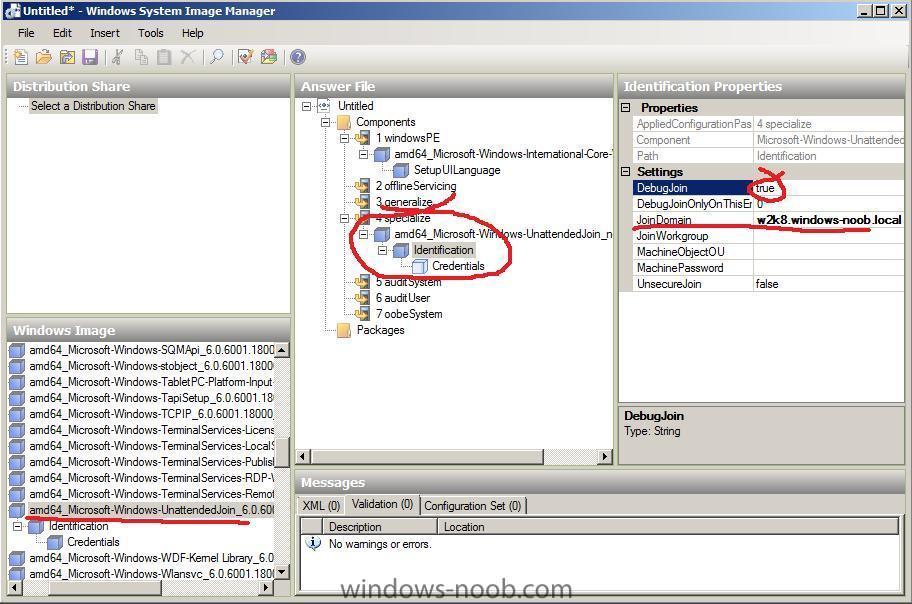
how can I join a Domain using Windows SIM
anyweb posted a question in Windows System Image Manager (WSIM)
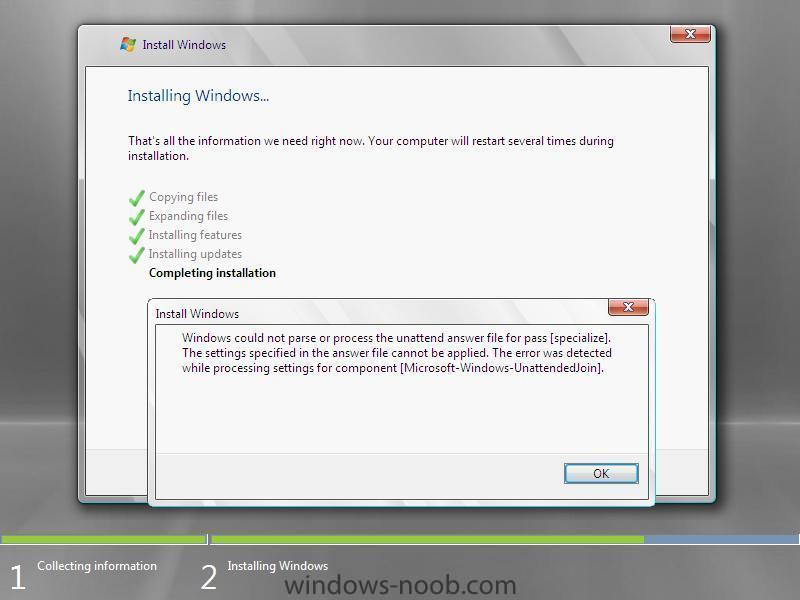
Start up Windows SIM and in the components section of Windows Image, expand the section called Microsoft-Windows-UnattendedJoin right-click it and choose Add Setting to Pass 4 Specialize in the Answer File pane, click on the newly added setting and expand it, select Identification and enter the Domain name in the JoinDomain value. In addition, if you want to log domain join failures (logs to c:\windows\panther\unattendGC\) then set the DebugJoin option from false to true f.y.i the error below is from a test deployment and actually happened when the computer failed to join the domain Browsing the log file mentioned above (setupact.log) showed me this:- repeated many times... then and the reason why it failed to join the domain ? wrong password specified in the XML file... click on Credentials under Identification, and enter your domain name/user/password for the account which will join this computer to the domain validate your answer file by clicking on the Validate icon, check the messages pane to ensure there are no warnings or errors.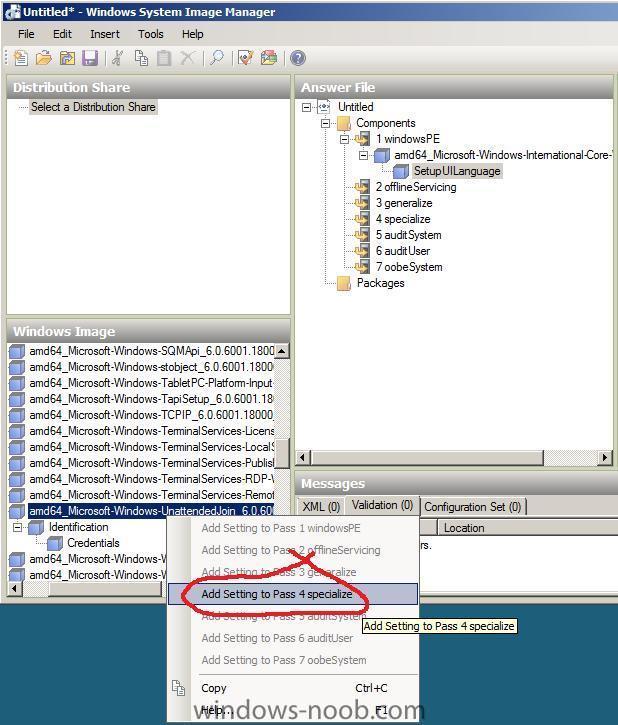

-
ok so your client was blue screening ? you didn't mention that... well i'm happy it's working now cheers anyweb
-
ok i've looked through your log file using Tracer32 and can't find anything odd apart from the disk being formatted after you've installed software (if that's how i'm reading it...) so... can you please take note of exactly WHERE in the task sequence it fails (what section, enabled F8 in boot.wim and press it at the start of the task sequence to STOP any reboot when it fails) i need you to tell me what is the error message (if any) you see on screen when it fails cheers anyweb
-
looks like its missing some, can you email it to me anyweb AT hotmail DOT com cheers anyweb
-
what is Windows SIM and how can I use it ?
anyweb posted a question in Windows System Image Manager (WSIM)
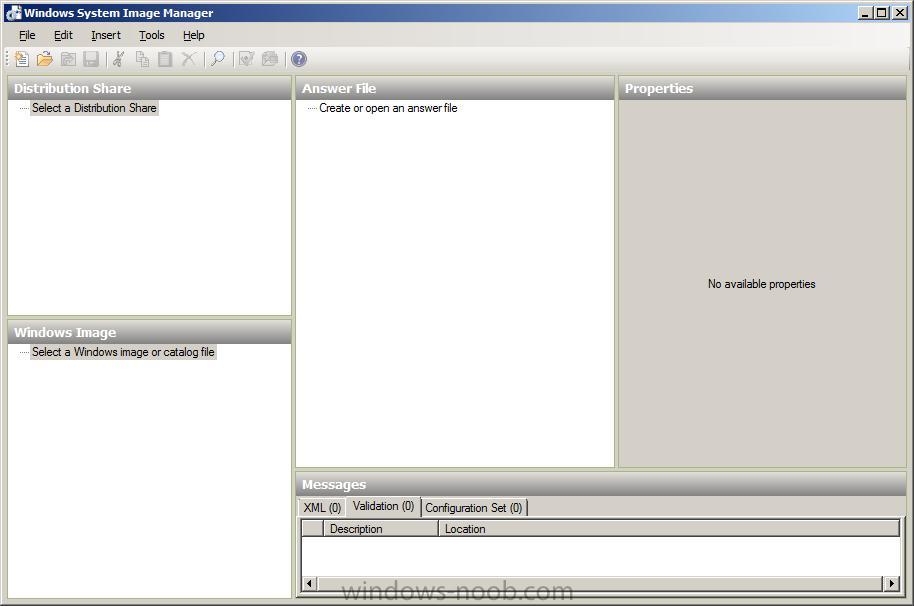
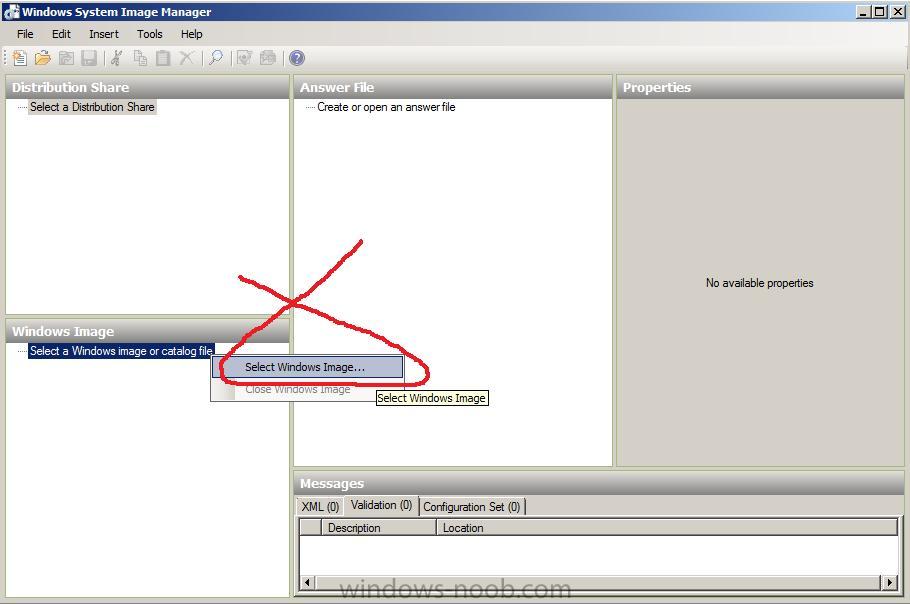
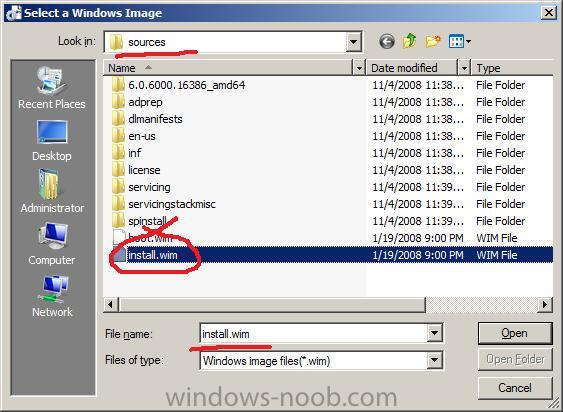
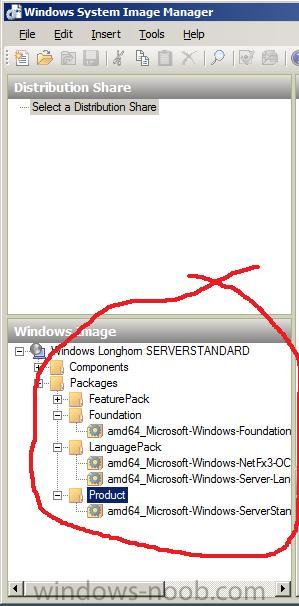
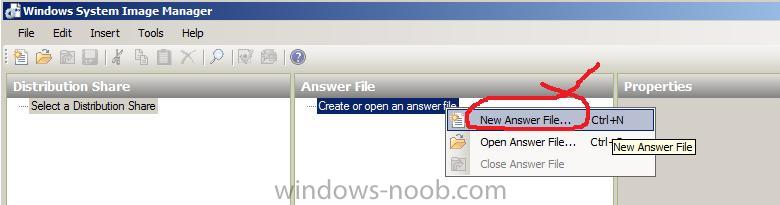
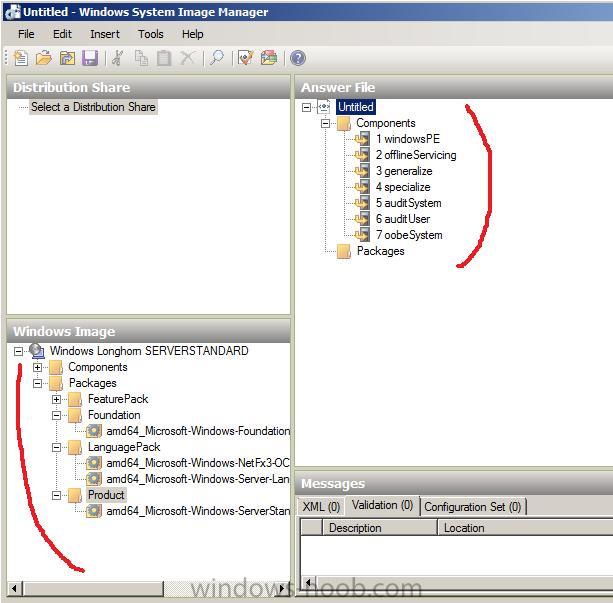
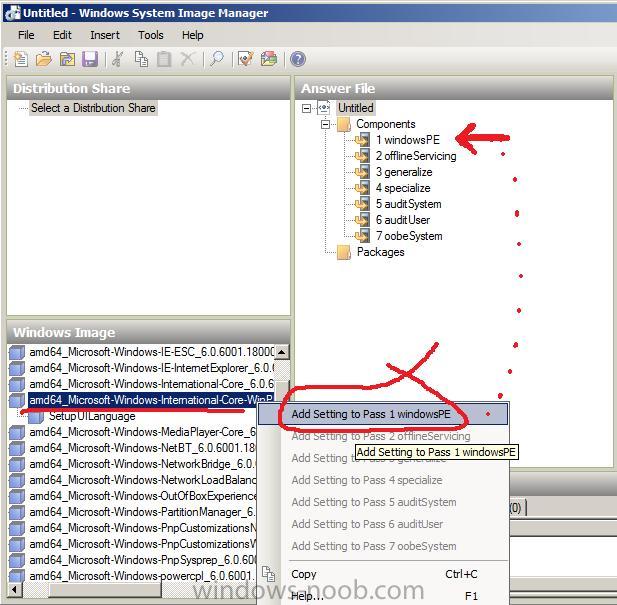
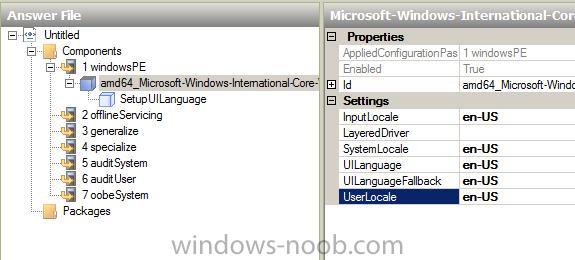
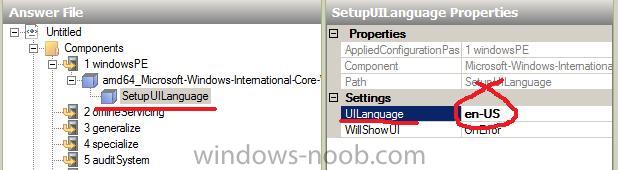
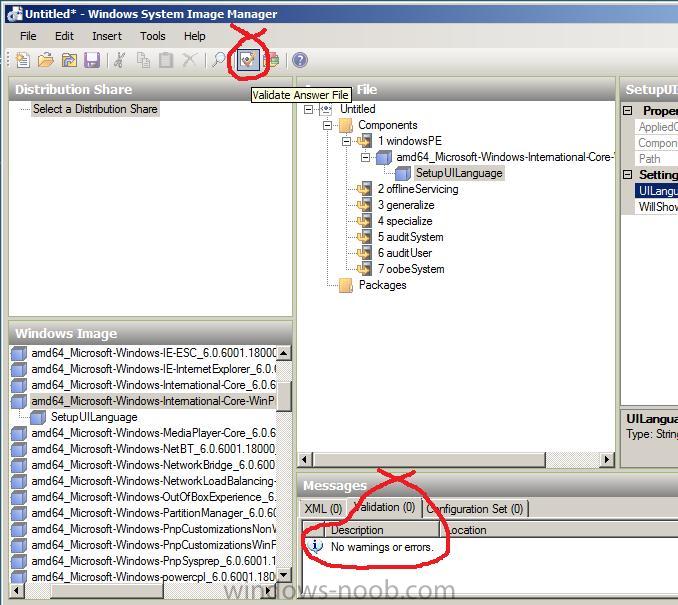
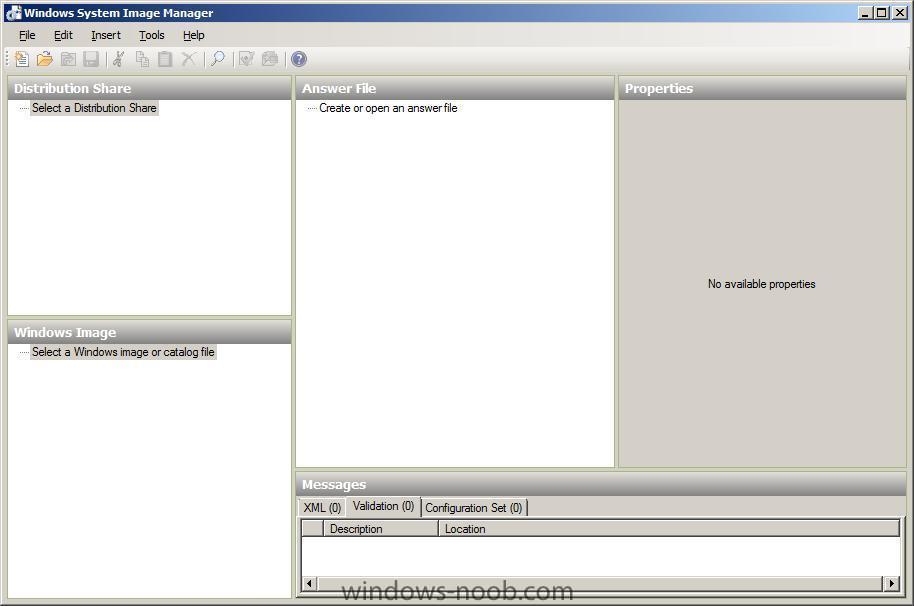
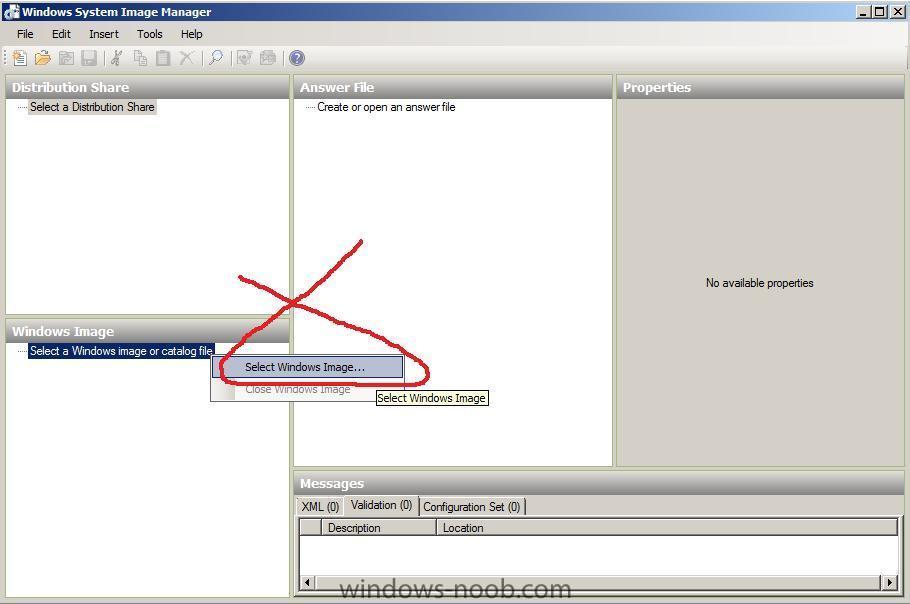
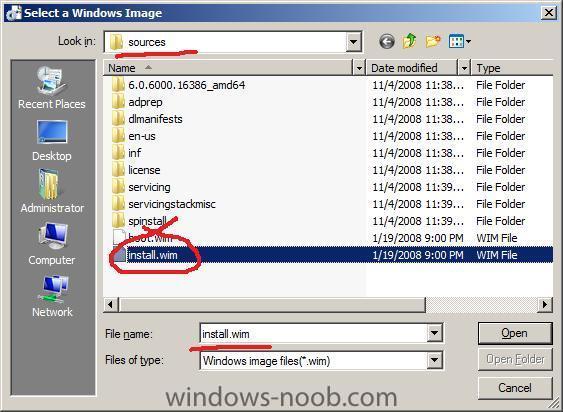
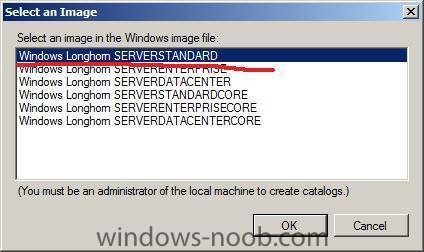
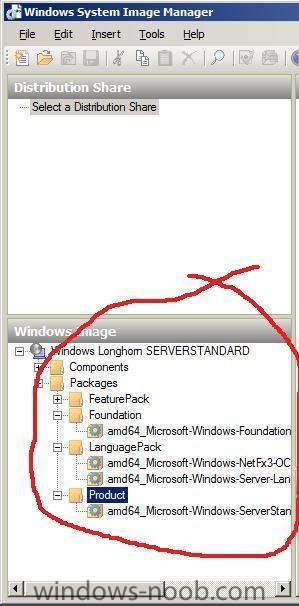
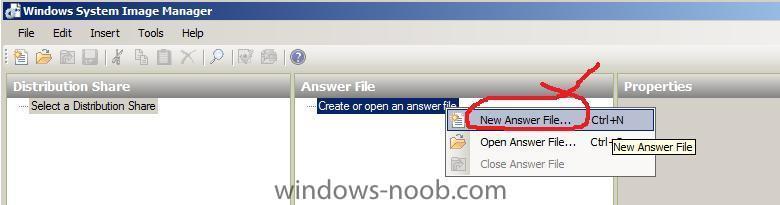
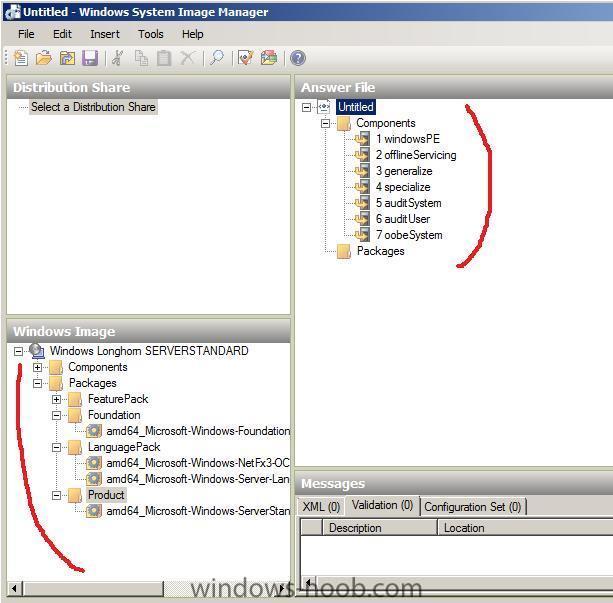
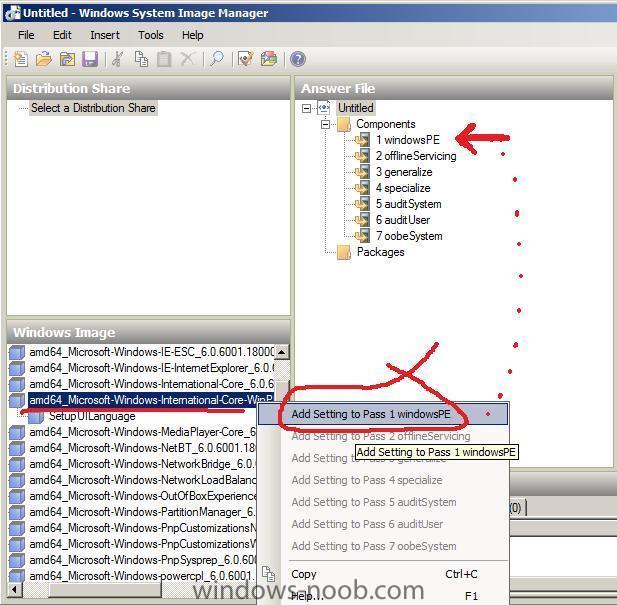
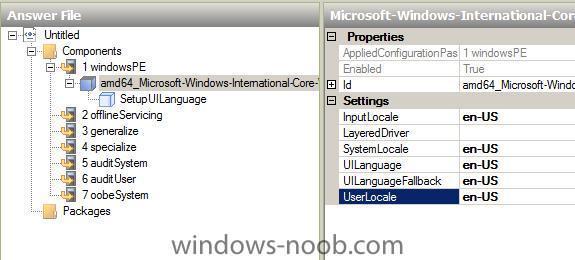
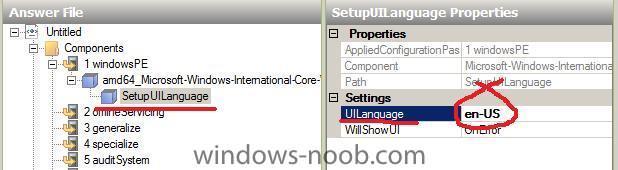
What is it ? Windows System Image Manager is a tool for editing XML files used in the deployment of Vista/Windows Server 2008. These XML files are sets of instructions telling Windows Setup how to proceed and install itself, in the past we would have edited such files (sysprep.inf, unattend.txt) using notepad, but now Windows has grown up and so has its' tools. You can use Windows SIM to create an answer file (autounattend.xml or unattend.xml) that partitions and formats a disk before installing Windows, you can create an XML file for an unattended install of Vista/Server 2008, and then automate the process by copying the finished AutoUnattend.xml file to either the root of a USB key or the root of a Windows Vista (or Server 2008) DVD. When Windows setup starts it will query these locations if present for the file and if it finds the file it will use the settings found within. Tip: If you create an unattend.xml file using Windows System Image Manager (SIM) and you want to allow users to install Windows Vista with no user interaction, you would need to rename the file to autounattend.xml and copy it to the root of a USB Flash Drive. How do I get it ? Windows SIM is part of the Windows Automated Installation Kit (WAIK) so if you want it then you'll need to install the WAIK first. Note: this guide is aimed at customising Windows Vista. If you want to use Windows SIM to customise Windows 7 deployments then you'll need The Windows® Automated Installation Kit (AIK) for Windows® 7 which you can download here. As you can see from the screenshot above, there are 5 main areas to Windows SIM, and they are as follows: 1. distribution share (may contain $OEM$ Folders, Out-of-Box Drivers or the Packages directories, requires at least one of these dirs to be recognised as a DS) 2. windows image 3. answer file 4. properties 5. messages When you start Windows SIM for the first time however, the above panes will all be blank as in the screenshot below How can I use it ? Before you can use Windows SIM you are going to need your Windows Vista DVD or your Windows Server 2008 DVD, so locate them and once done copy the contents of one of them to a folder locally. eg: c:\source\w2k8dvd Now that you have a local copy of the DVD, you can use that as your Windows source (we need to point number 2 above to the install.wim file on the local source). So let's do that, right click on Select a Windows Image and choose Select Windows Image browse to the Local directory which contains a copy of your Windows DVD and choose the sources directory within there, select the install.wim file select an Image from the DVD, in my case I'm using a Windows Server 2008 64bit source.... I select Longhorn ServerStandard from the choices available Once done, you may get prompted to create a Catalog file, answer Yes. The catalog file contains descriptions of what components and packages the image contains so may take a few minutes to generate. After the Catalog file is created, our Windows Image pane will list some new nodes called Components and Packages and you can expand them to see what lies within. create New Answer File Now that we have our Windows Image loaded, we will want to configure it so in the Answer File pane, right click and choose New Answer File Now that we have a new answer file we can start to configure it, and to do so we need to add components or packages from the Windows Image pane to our Answer file, and then we can make changes to the options we have chosen. Set Regional and Language options In the Windows Image pane, expand the Components node and select Microsoft-Windows-International-Core-WinPE, in my example I have a amd64_ infront of Microsoft-Windows-International-Core-WinPE because I am using a 64bit image. If you are using 32 bit, yours will say X86_Microsoft-Windows-International-Core-WinPE right click on the option and choose Add Setting to Pass 1 Windows PE In the Answer File section, expand the newly added setting and enter en-US as the value for Input Locale, System Locale,, UILanguge, UILanguageFallback and UserLocale expand the SetupUILanguage option beneath, and add the en-US value to the UILanguage option Validate our changes We have now created an answer file and configured our language and regional options, it is important to understand that you can easily make mistakes creating an answer file, and Windows SIM has a checking tool built in to verify your changes, so to do that click on Validate answer File and look in the Messages pane for any messages. In addition to the above you may want to do the following actions how can I join a Domain using Windows SIM how can I configure the hard disc using Windows SIM how can I install drivers using windows SIM how can I change computername using Windows SIM how can I add the product key using Windows SIM how can I edit the EULA, FullName and Organization settings using Windows SIM how can I decide which version of Windows get's installed using Windows SIM Troubleshooting Technet Resources > http://technet.microsoft.com/en-us/library/cc766073.aspx if something is not going as planned, you can browse the C:\Windows\ and C:\Windows\Panther folders for log files, in particular the setupact.log and setuperr.log files pressing left Shift and F10 together will bring up a command prompt during the Windows setup stage if you wish to view the files using notepad. Some errors you may encounter: this will happen at boot time and may occur after you have added new drivers to your USB key or DVD (or network share..), verify that the drivers are not causing a problem with network connectivity, for example if you've added a 3G modem driver and the error occurs, then you'll have to add that driver at a later stage of the installation. Additional Reading:- Document: Windows Automated Installation Kit for Windows 7 documentation (May 2010 Update) http://www.microsoft.com/downloads/en/details.aspx?FamilyID=f1bae135-4190-4d7c-b193-19123141edaa Video: How Do I: Unattended Answer Files Using Windows System Image http://technet.microsoft.com/en-us/windows/dd179859.aspx Podcast: How Do I: Get Ready for Windows 7 Deployment with the Windows Automated Installation Kit (WAIK) ? http://www.microsoft.com/events/podcasts/default.aspx?seriesID=Series-acd4d6bf-efe0-4f7e-a1f6-13eecb0b28d6.xml&pageId=x6865&source=Microsoft-Podcasts-about-Windows-7:-Increase-Productivity,-Improve-Security,-and-Streamline-PC-Management&WT.rss_ev=a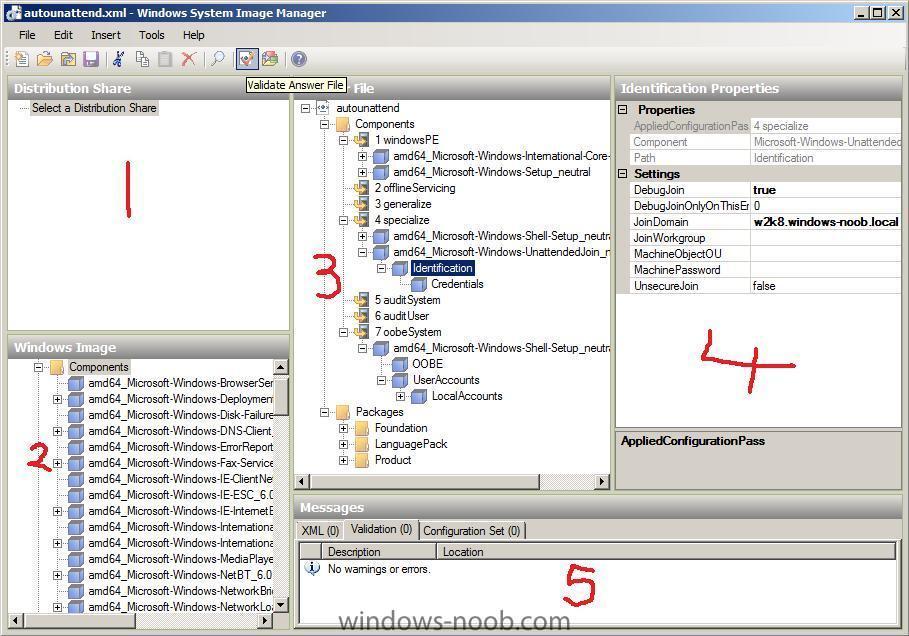

-
ok check C:\_SMSTaskSequence\ instead i need the SMSTS.log file (all of it) to see what is going wrong
-
Johan Arwidmark posted this .
-
can you post the SMSTS.log file which is most likely DATED in the filename look in c:\windows\system32\ccm\logs cheers anyweb
-
A long and detailed preview of Windows 7 appeared on ActiveWin. Many screenshots included. "It's safe to say I am overwhelmed, overjoyed and most of all excited about Windows 7", the author concludes. via osnews.com
-
sounds interesting ! I assume you've already made yourself familiar with the SMS/SCCM section here ? what do you mean by this > cheers anyweb
-
hi Jean and welcome ! i hope you can also contribute here in the near future :-) how are you testing sccm ? in a virtual lab or real ?