anyweb
-
Posts
9184 -
Joined
-
Last visited
-
Days Won
366
Everything posted by anyweb
-

Not able to reach WDS Server to capture image
anyweb replied to MrEclipseguy's question in Windows Deployment Services (WDS)
hi Mike I wonder could this be related to your issue > http://forums.microsoft.com/TechNet/ShowPo...2&SiteID=17 -
via > engadget
-
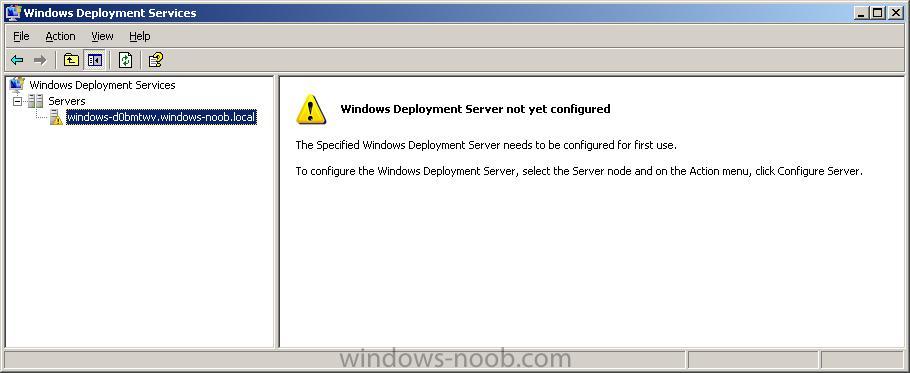
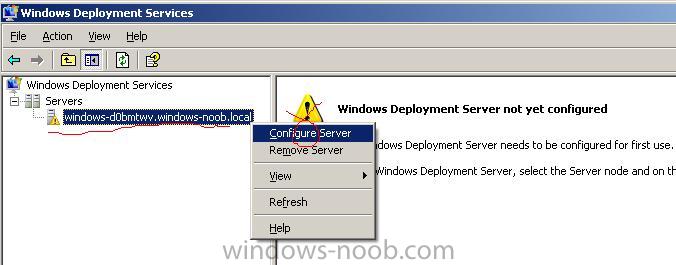
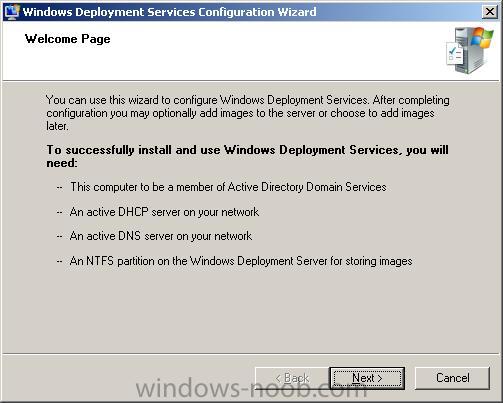
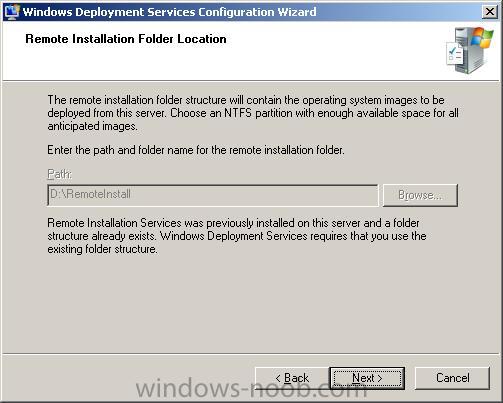
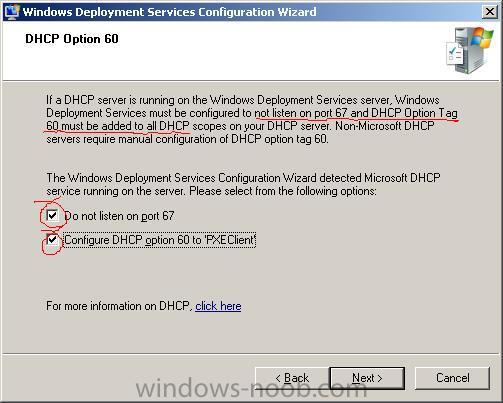
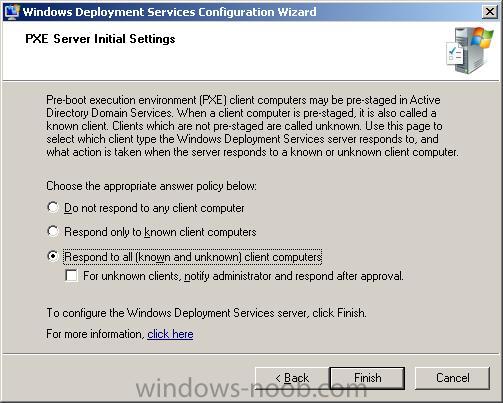
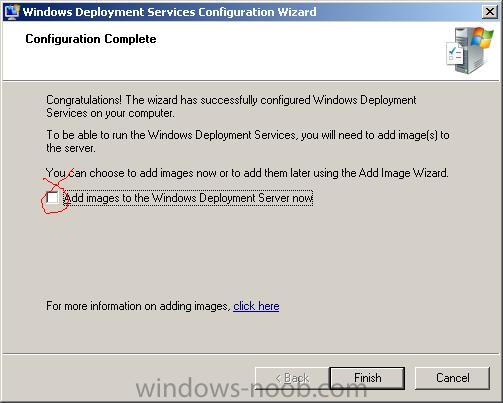
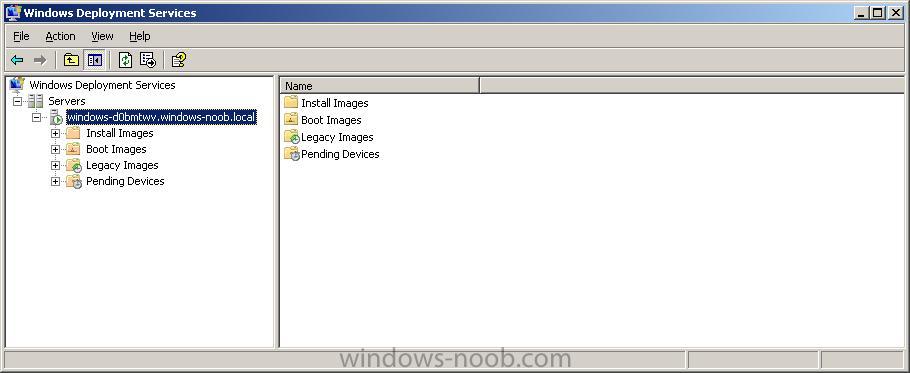
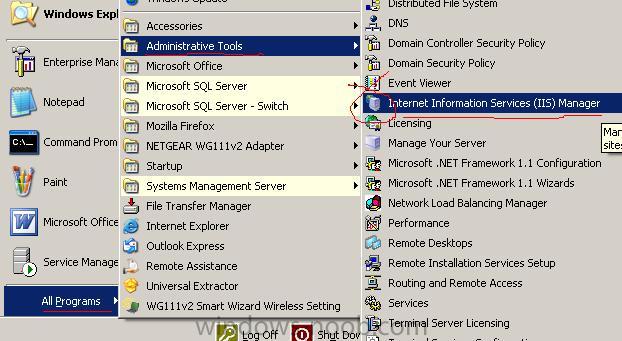
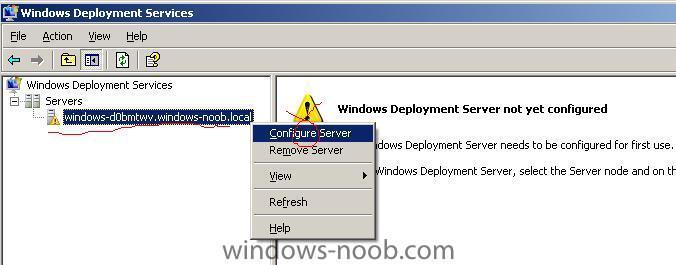
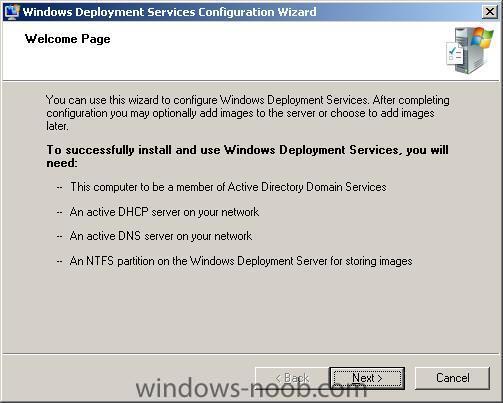
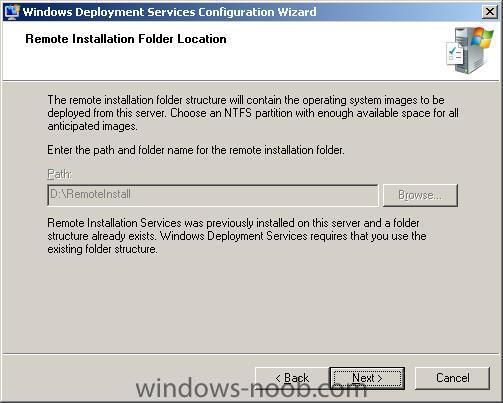
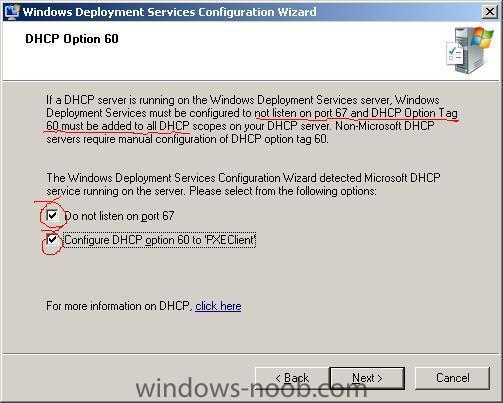
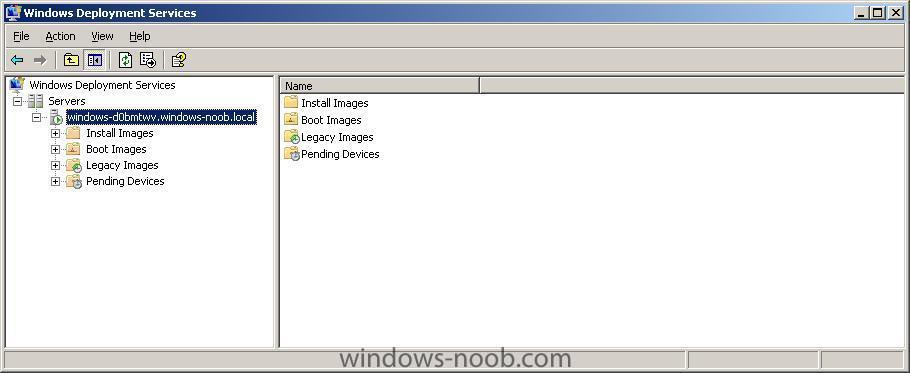
if you have just installed WDS via the WAIK then you will need to configure the WDS server. To do so you can click on Start/All Programs/Administrative Tools/Windows Deployment Services. You will most likely see the following screen To configure it using the wizard select your server in the left pane and right click it, choose configure server. a wizard will appear it may ask for the path of your RemoteInstall (previous RIS installation) The next screen is typically confusing, it says 'Windows Deployment Services must be configured to not listen on port 67 and DHCP option tag 60 (i've added bold)., so select the two unselected options before clicking next. Select your response type (I went with the default) and then click Finish. I then deselected 'add images' and clicked on finish again. once complete it should look like this (this is a mixed mode WDS server, running Windows 2003 sp1)


-
- 1
-

-
there are currently two main releases of the WAIK (Windows Automated Installation Kit) the first version was released in conjunction with Windows Vista to aid in its' deployment, and the WAIK is used for the following (source, microsoft) the file details for the first version are vista_6000.16386.061101-2205-LRMAIK_EN.img from 13/2/2007. A year or so later a newer version of the WAIK was released to support Windows Vista Service Pack 1 and Windows Server 2008, the file details for that release are 6001.18000.080118-1840-kb3aik_en.iso from 6/3/2008. If you are planning on deploying Windows Vista, use the first version if you already have it, or if you are deploying Windows Vista SP1 then use the second release. In addition, if you plan on deploying Windows Server 2008, you'll need the second release. Before installing the WAIK you'll need to install MSXML 6.0. MSXML 6.0 is available on the latest WAIK iso download (and the .NET 2.0 Framework is also included) cheers anyweb
-
Not able to reach WDS Server to capture image
anyweb replied to MrEclipseguy's question in Windows Deployment Services (WDS)
hi Mike i will setup a wds server today and see if i can figure out where you are going wrong, please be patient as I set it up cheers anyweb -
Not able to reach WDS Server to capture image
anyweb replied to MrEclipseguy's question in Windows Deployment Services (WDS)
good info, does the dell optiplex 745 still work using the process you have set up already ? ie: is the problem only affecting your new hardware ? -
welcome to the forums mike !
-
After months of development Windows Vista SP1 is finally available for download Windows Vista Service Pack 1 Five Language Standalone (KB936330) File Name: Windows6.0-KB936330-X86-wave0.exe Version: 936330 Knowledge Base (KB) Articles: KB936330 Date Published: 3/18/2008 Language: English Download Size: 434.5 MB
-
Microsoft Deployment Toolkit (MDT) 2008
anyweb posted a question in Microsoft Deployment Toolkit (MDT)
Microsoft Deployment Toolkit 2008 is the next version of Business Desktop Deployment (BDD) 2007. It is the recommended process and toolset to automate desktop and server deployment. This release includes updates to support Windows Vista SP1 and Windows Server 2008 in addition to previously supported platforms. You can download it here -
congratulations !!!!!!!!!!!!!!!!!!!!!!!!!!!
-
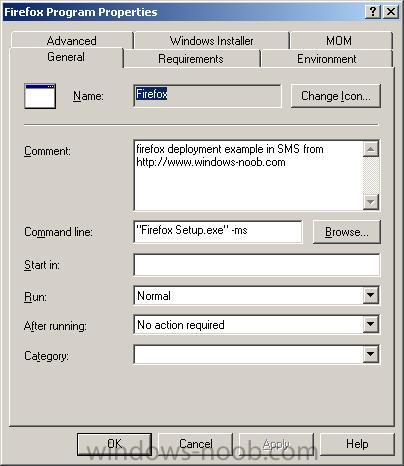
the -ms tells it to silently install, and the -ms is a SWITCH that only applies to firefox and no other program, to get a list of switches for common programs check out this section of msfn.org also, did you rename firefox setup 2.0.0.12.exe like i mentioned in the howto ?
-
first things first is the SMS client getting installed on your XP client ? check in the control panel to see if it's installed you should login as a domain USER in order for the SMS client to get installed.... cheers anyweb
-
Microsoft has admitted that SP1 for its Ultimate edition of Windows Vista will not be made available to everyone in mid-March as originally planned, because of a delay with 31 of its language packs. Vista product manager Nick White said in a blog post yesterday that Microsoft will now ship Vista Ultimate SP1 in two 'waves', with the second one coming 'later in 2008'. Customers running the 'premium' version of the operating system on their computers in English, French, German, Japanese and Spanish will be able to get the service pack shortly, according to White. But the remaining Vista Ultimate computers around the world will not receive the long-awaited update until the 31 language packs, that the software giant is presumably tweaking, are supported in SP1. via > http://osnews.com/story/19422/Windows_Vist...ate_SP1_Delayed more info > http://windowsvistablog.com/blogs/windowsv...-vista-sp1.aspx
-
Microsoft has released the first beta release of Internet Explorer 8 just a few moments ago. "Download Internet Explorer 8 Beta 1 and put the web at your service for you and your customers. This beta is aimed at web developers and designers to help them take advantage of new features in Internet Explorer 8 that will enhance their websites. Download the beta version of Internet Explorer 8. Internet Explorer 8 is currently available in English and will soon be available in German and Simplified Chinese. Please continue to monitor this page for updates and availability of other languages." more info >http://www.microsoft.com/windows/products/winfamily/ie/ie8/getitnow.mspx via osnews.com
-
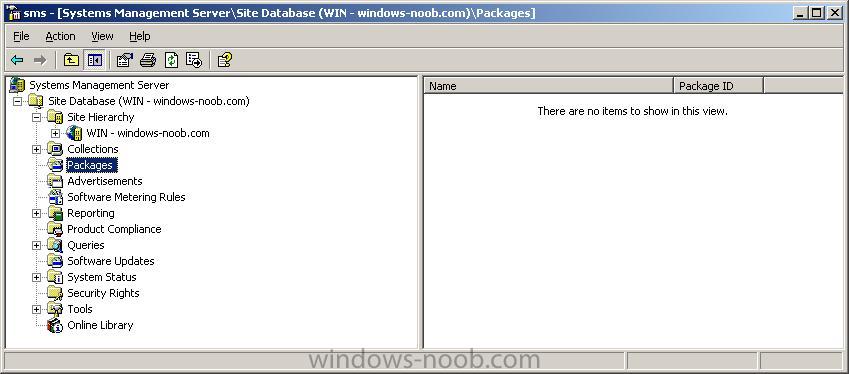
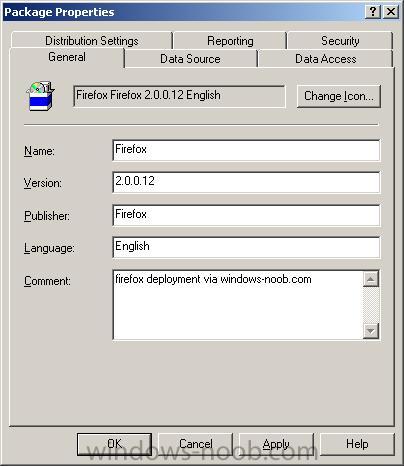
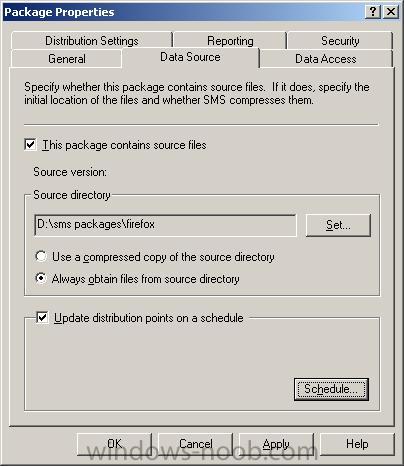
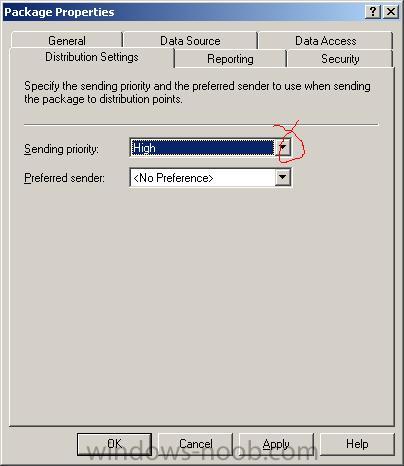
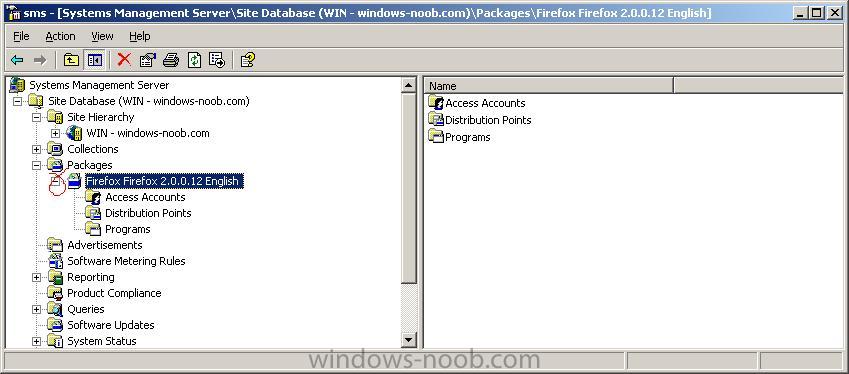
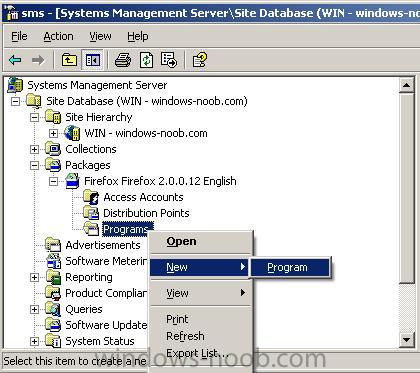
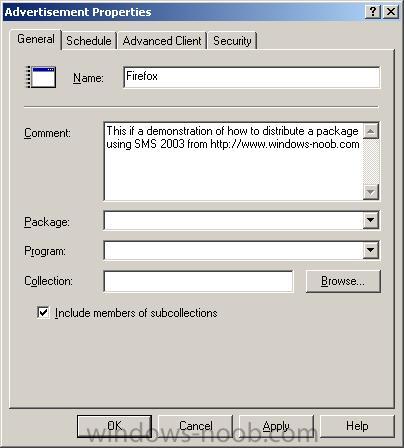
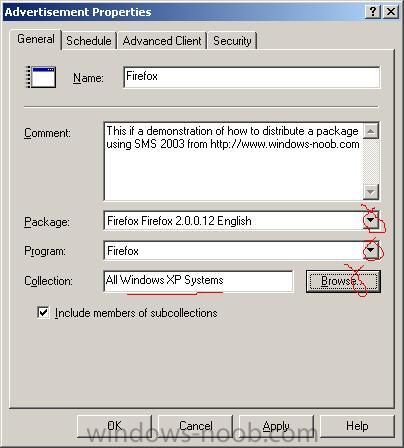
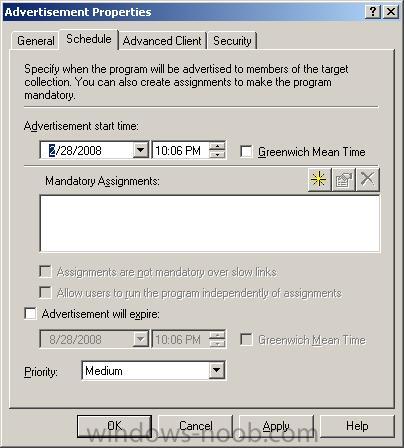
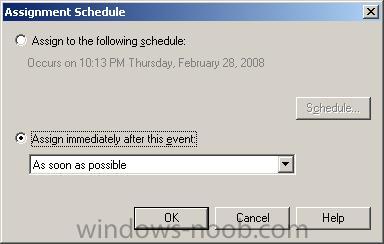
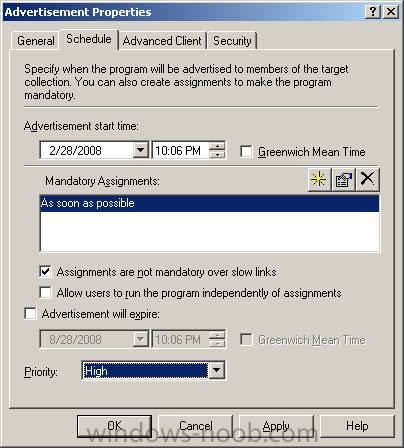
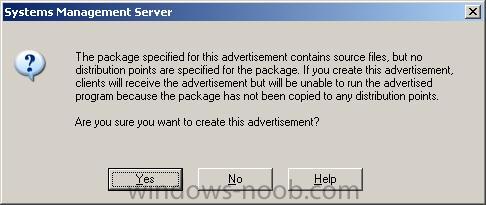
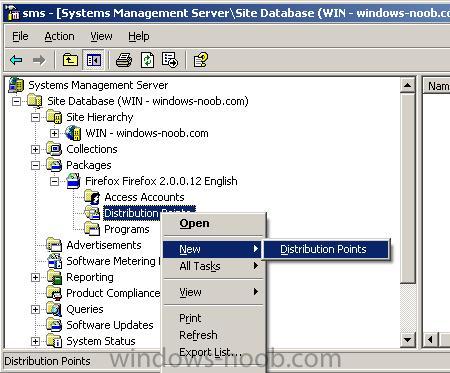
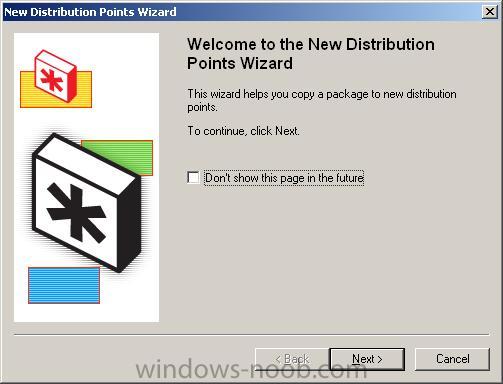
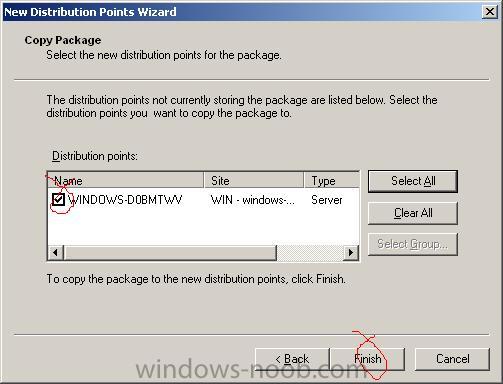
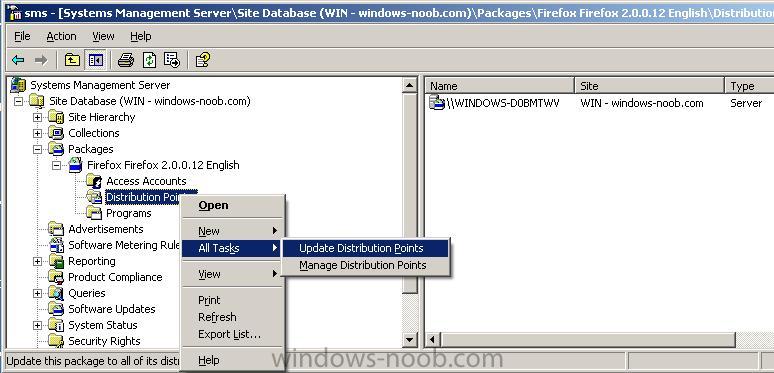
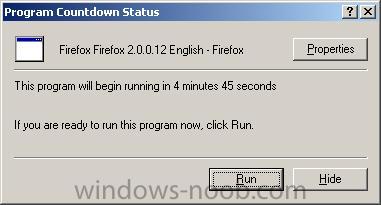
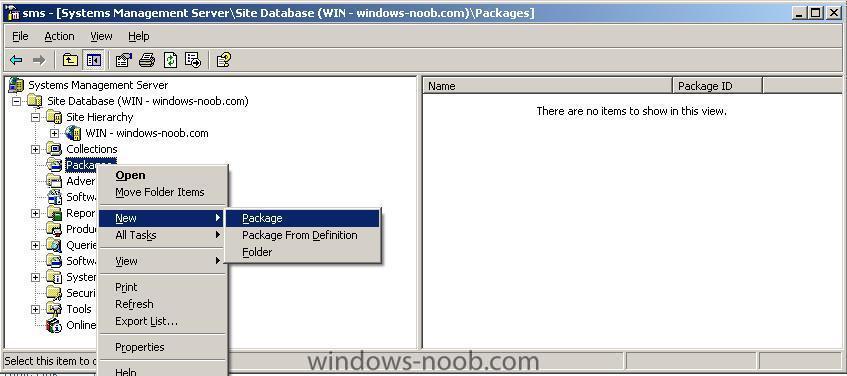
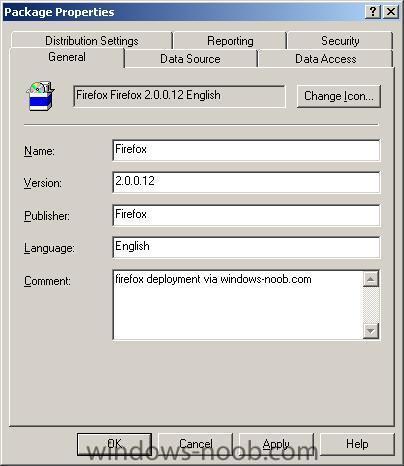
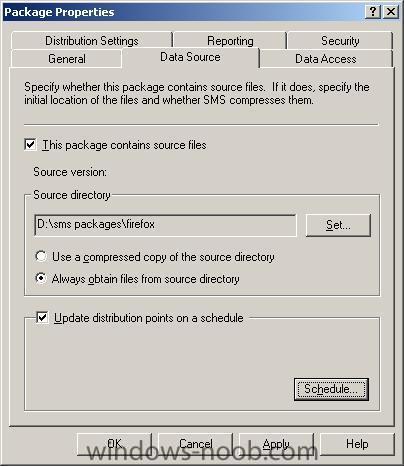
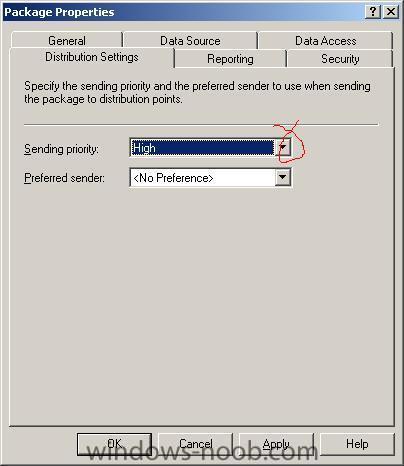
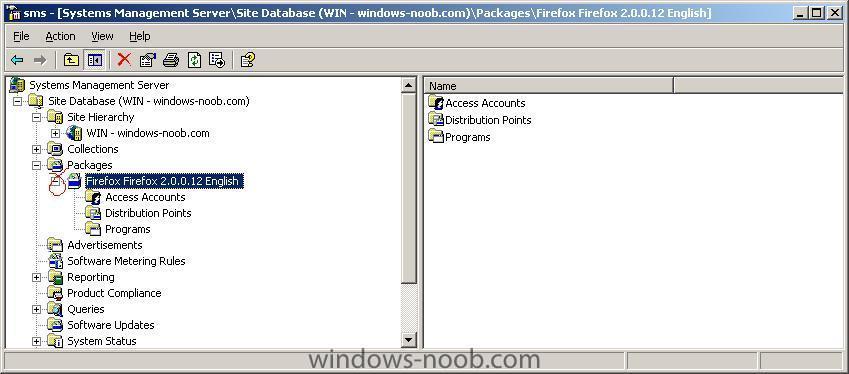
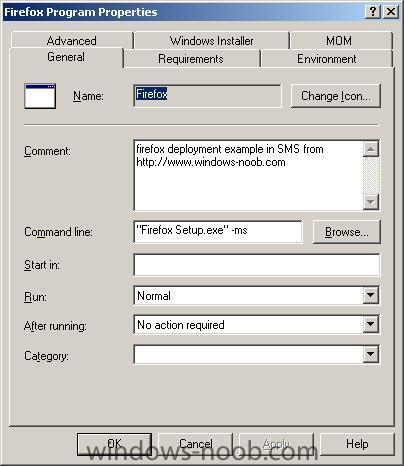
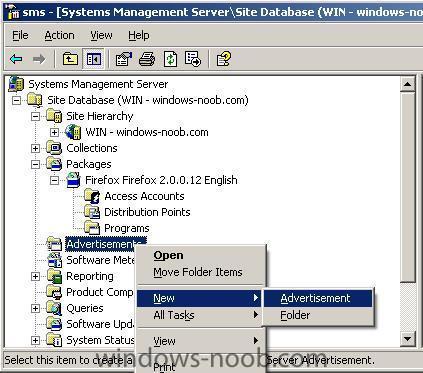
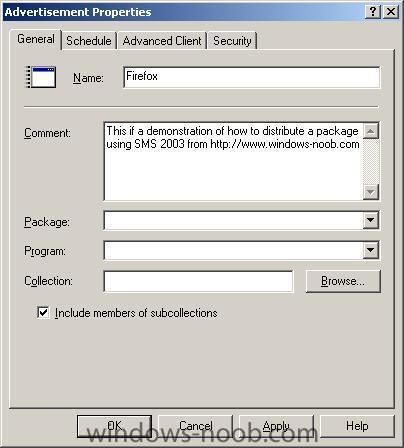
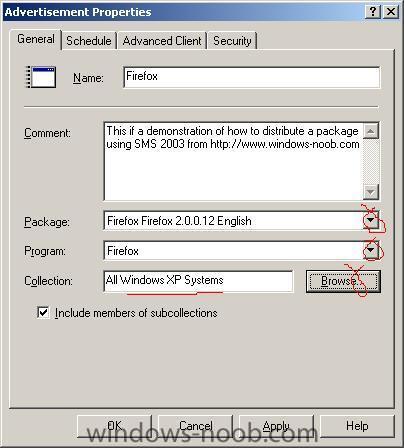
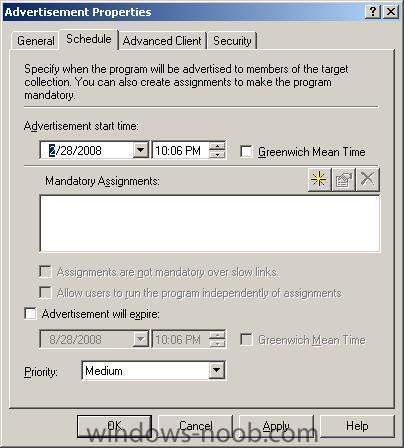
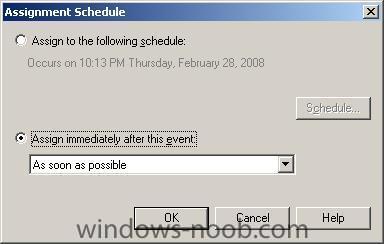
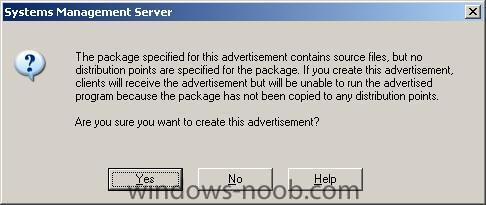
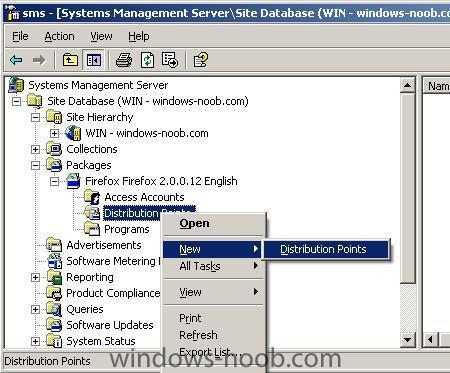
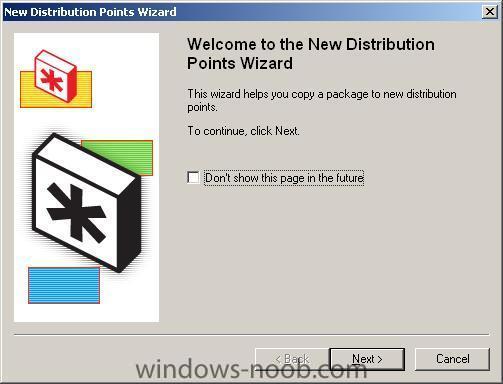
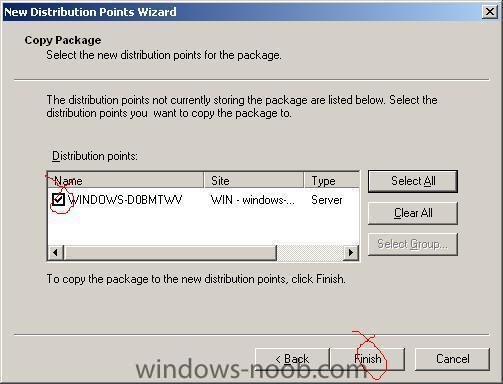
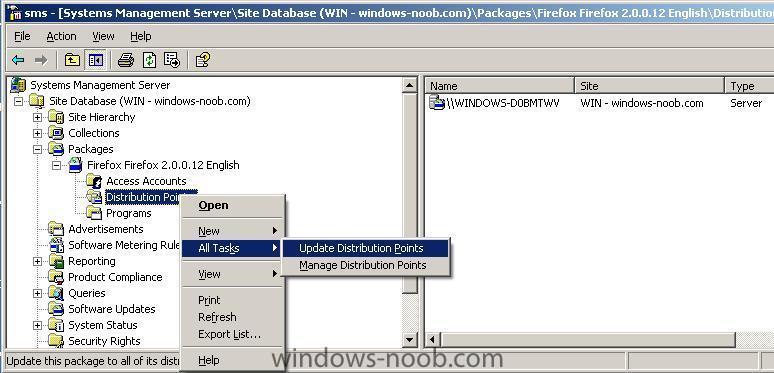
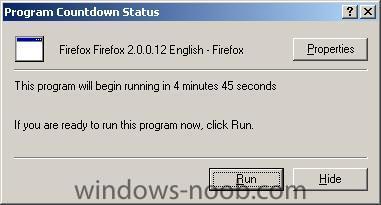
This guide assumes that you have first installed and configured IIS and then installed SMS as outlined here. In addition, you should have configured SMS and you should have completed the final configuration and naturally your clients should have the SMS client installed (that should happen automatically if you followed parts 1-3 correctly). Step 1. Create the package In this example we are going to deploy Firefox (Firefox Setup 2.0.0.12.exe). To make updating versions of Firefox easier we will rename the file from Firefox Setup 2.0.0.12.exe to Firefox Setup.exe. We then copy that file to d:\sms packages\firefox (your path may vary). Startup your SMS administration console (gui) and click on Packages in the left pane. right click on packages and choose New Package fill in the package properties as you wish in the General tab Next click the Data Source tab, and make sure to select This package contains source files. For source version click on Set and Set the source directory (local). In this example i've created a folder called d:\sms packages and within that another folder called firefox. I've also selected to update this on a schedule (every 1 day) to see if a new version of the Firefox package (file) is present. Next I set the Distribuition settings priority to high and clicked on Ok to continue. Step 2. Create a Program for the Package In the SMS administrator Console, expand packages and our newly create Firefox package so that we can see the sub heading beneath it right click on Programs and choose New Program In the Program Properties general tab, we will enter some details to install the file (see screenshot). The command line we use to install Firefox is "Firefox Setup.exe" -ms That's it, click ok. Step 3. Advertise the Package Right click on Advertisements and choose New Advertisement. Fill in your advertisement properties Note: the package and program properties are a drop down menu, click each on in turn to select our package/program In addition, the collections option is also a drop down menu. ('Collections' is a term that Microsoft gives to our TARGET group, in this example we choose All Windows XP computers) click on the schedule tab and click the yellow star to select a Mandatory assignment. choose as soon as possibleand click ok. set the priority to high and click ok to exit. answer yes to the are you sure you want to create this advertisement question (we will update this later) Step 4. Update Distribution point In the SMS administrator console, expand Packages, and then our Firefox package and then right click on Distribution Points and select New Distribution Points In the wizard that appears click next to continue and then select the distribution point by placing a checkmark in it and clicking finish. when done, right click on Distribution points, select all Tasks and select Update Distribution points answer Yes when prompted that's it you are done, now you will have to monitor your clients to see Firefox getting deployed, and if you followed this guide properly what you'll see is a notification in the systray telling you a program is about to run, if you click the notification you'll see this


-
Microsoft has sent an e-mail to a select number of its previous beta testers regarding the upcoming release of IE8 beta 1. "We are nearing the launch of Windows Internet Explorer 8 Beta 1 and we will be making it available for the general public to download and test. IE8 Beta 1 is focused on the developer community, with the goal of gaining valuable feedback to improve Internet Explorer 8 during the development process." linked via osnews.com
-
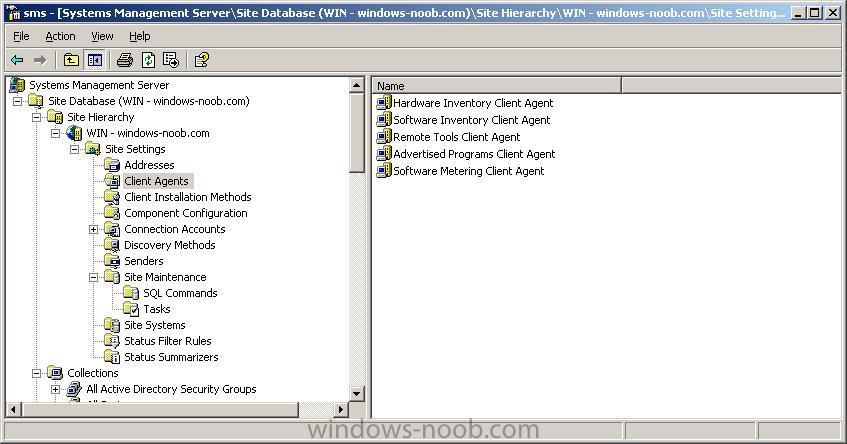
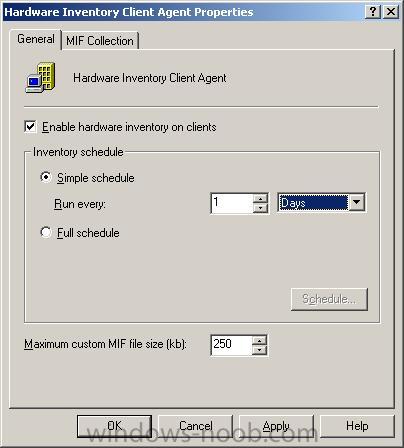
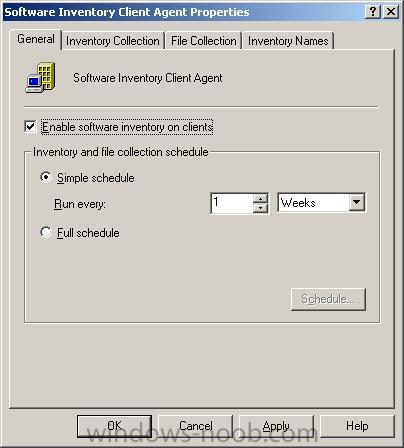
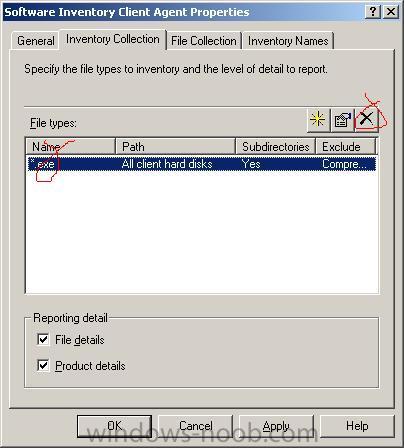
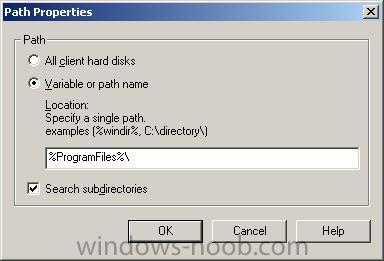
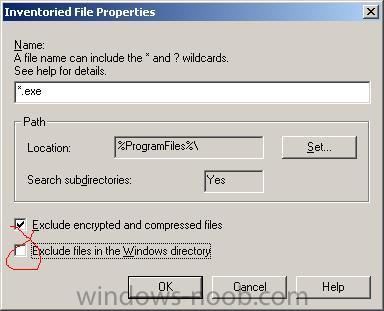
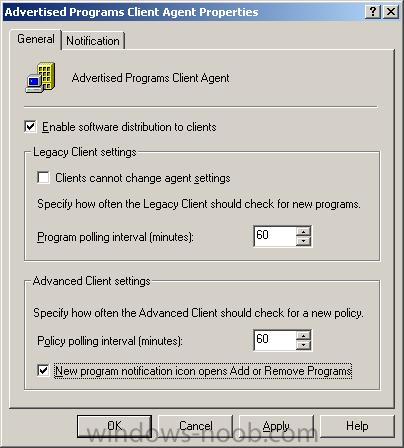
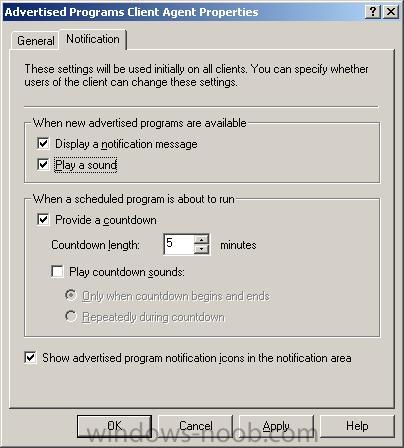
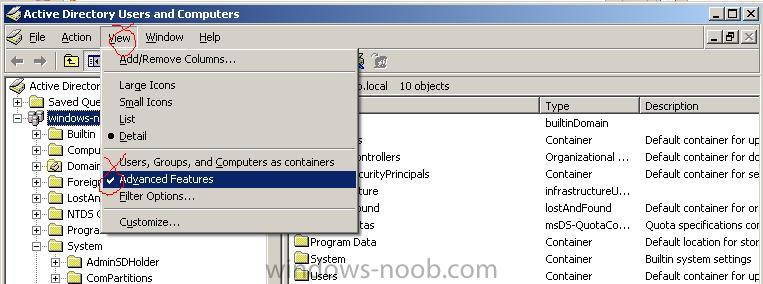
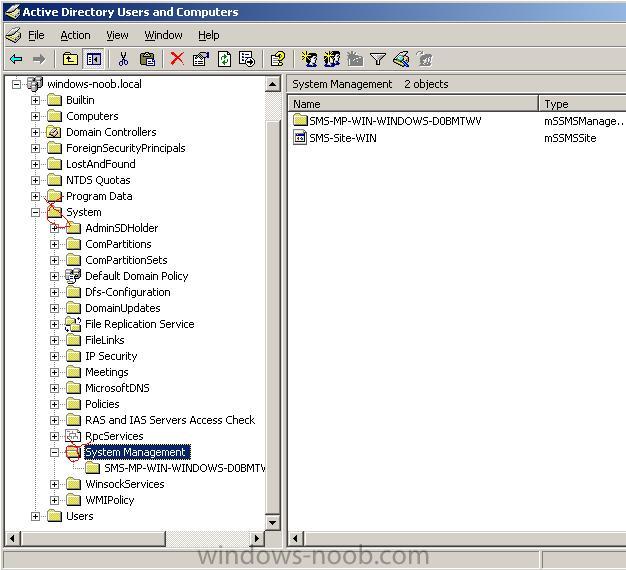
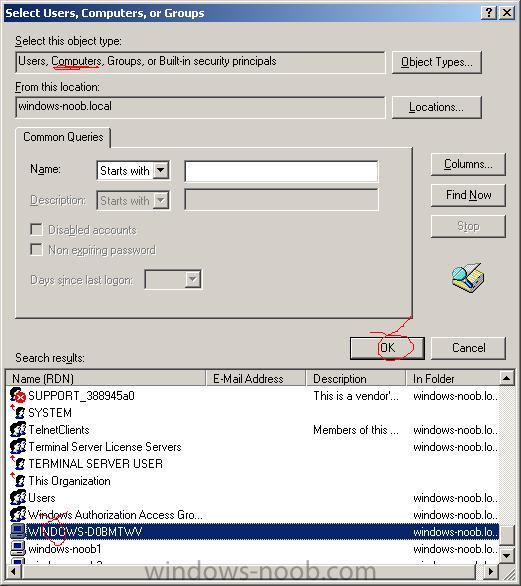
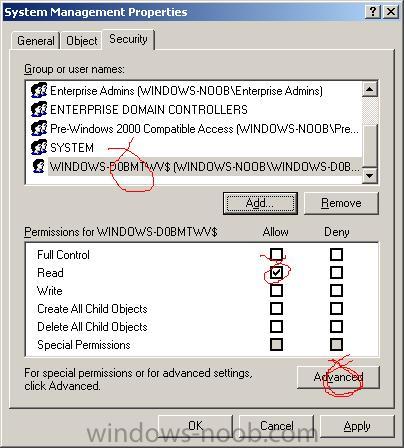
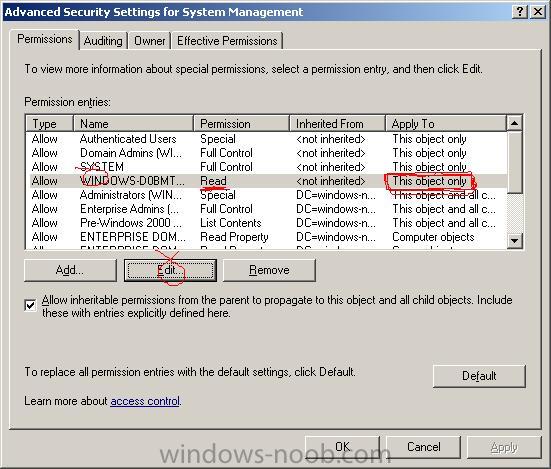
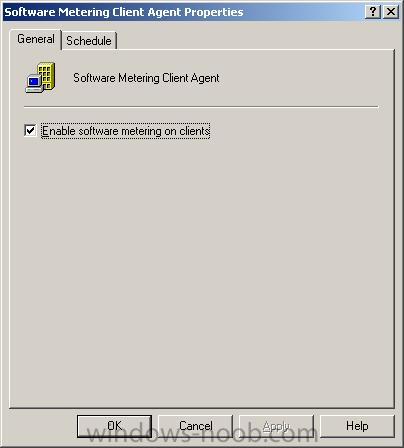
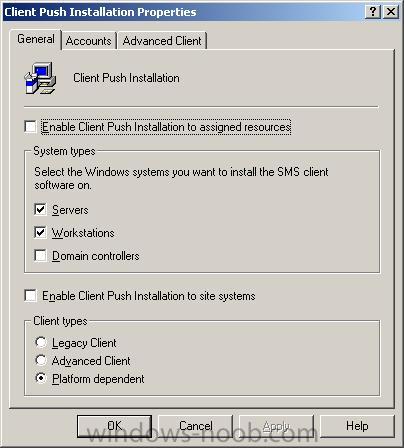
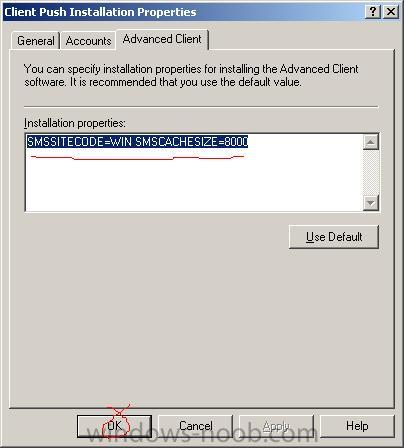
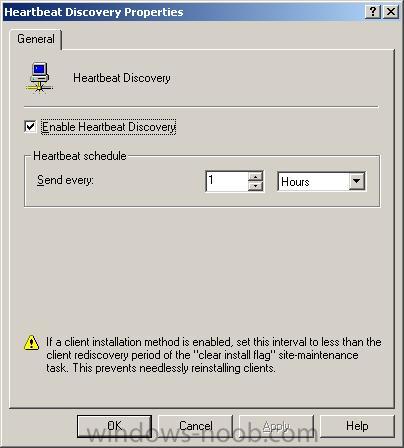
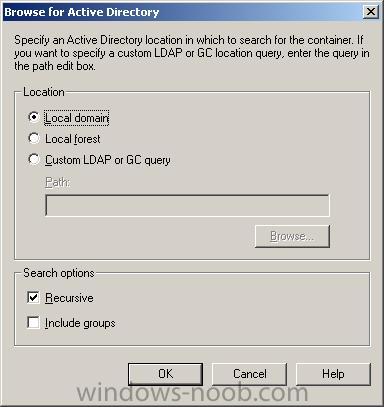
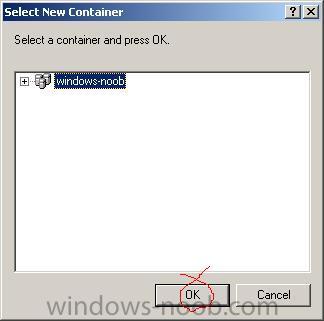
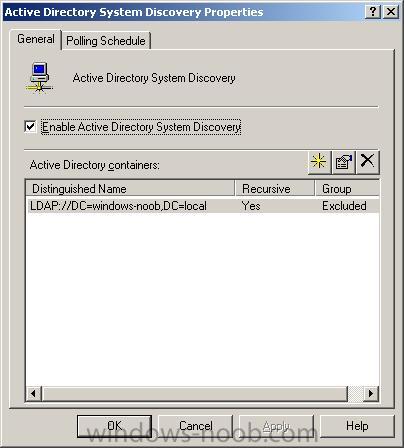
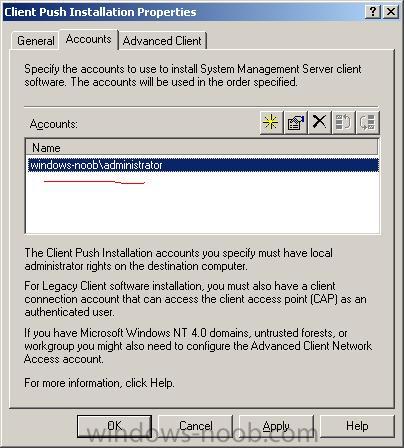
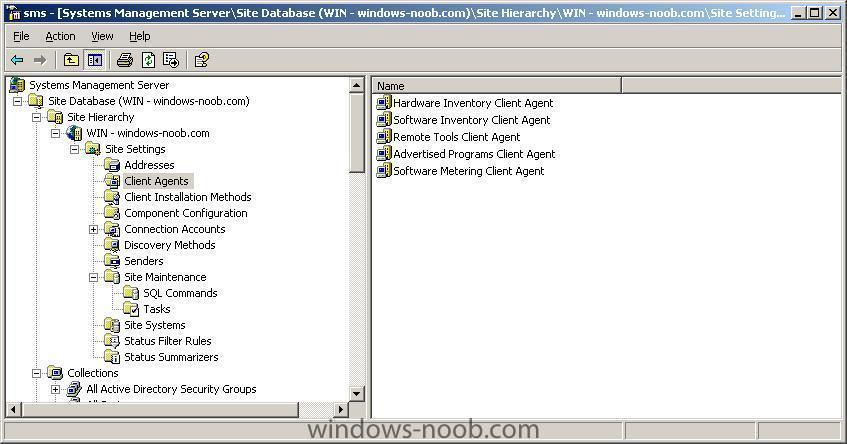
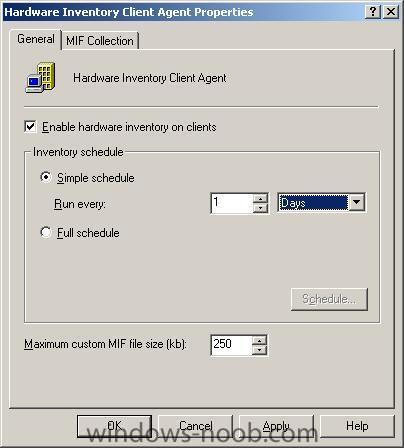
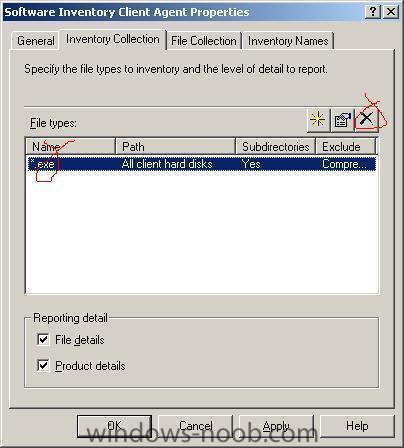
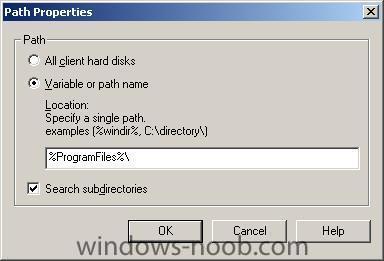
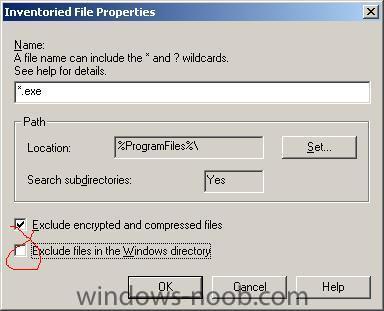
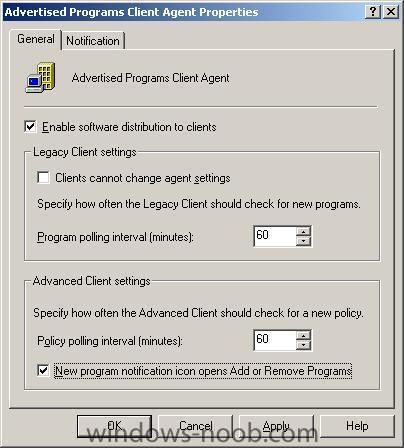
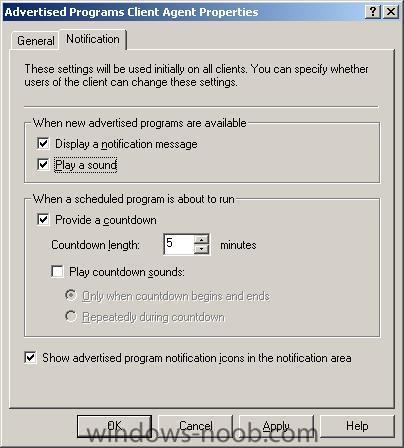
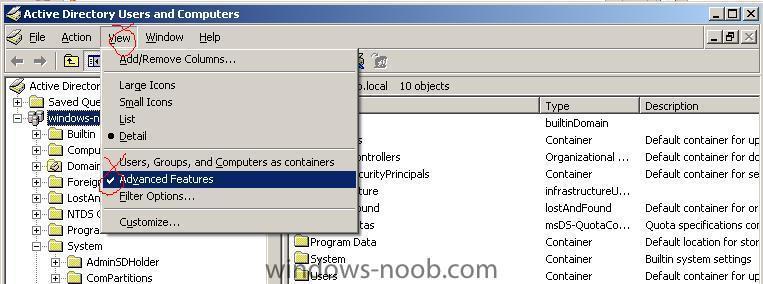
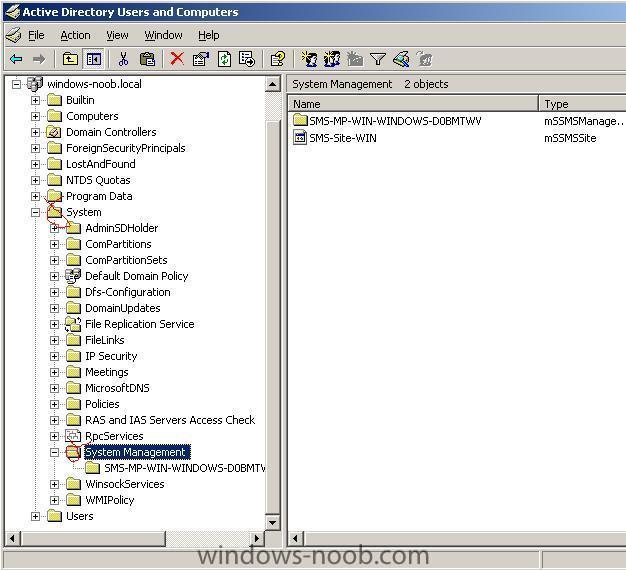
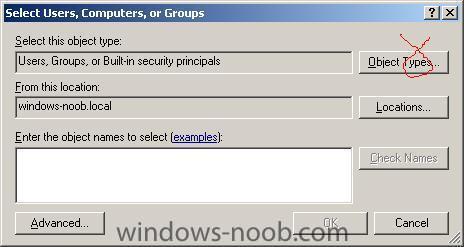
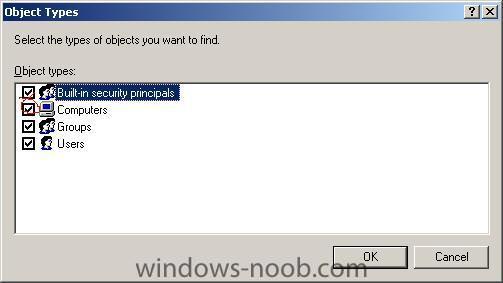
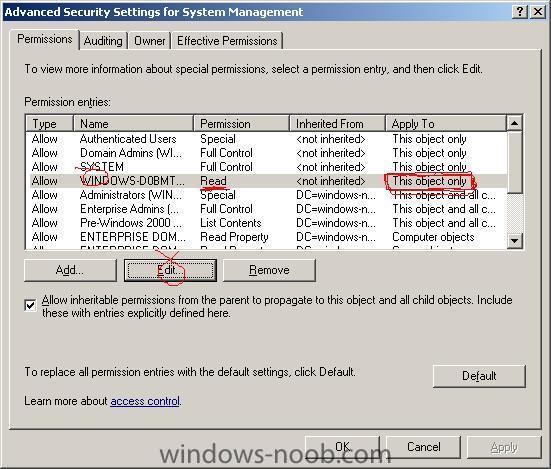
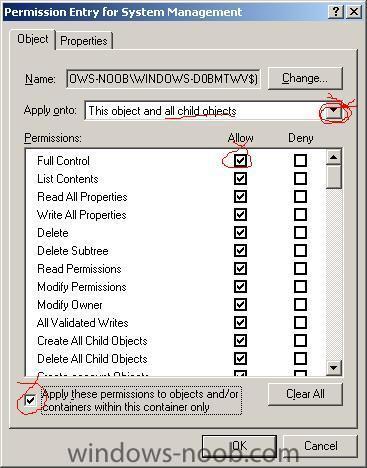
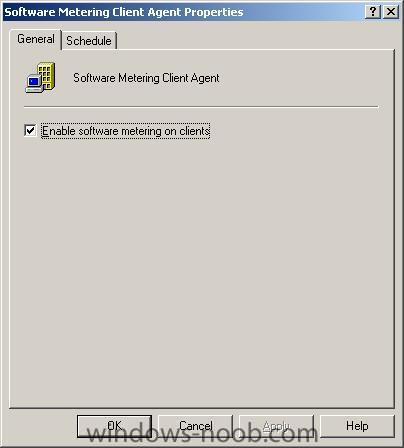
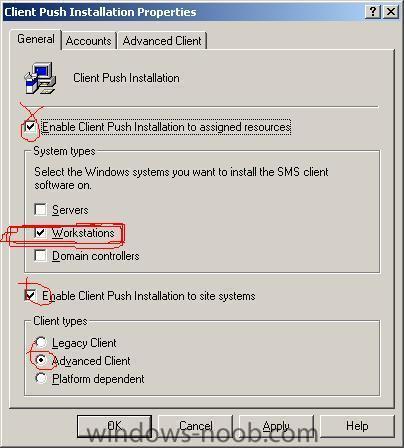
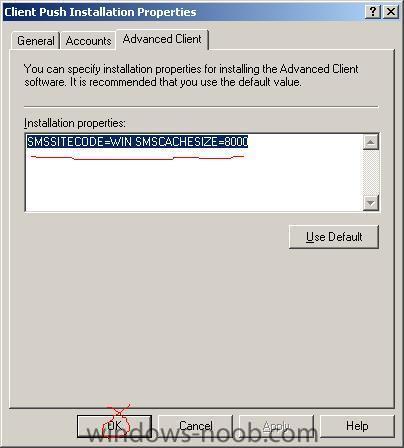
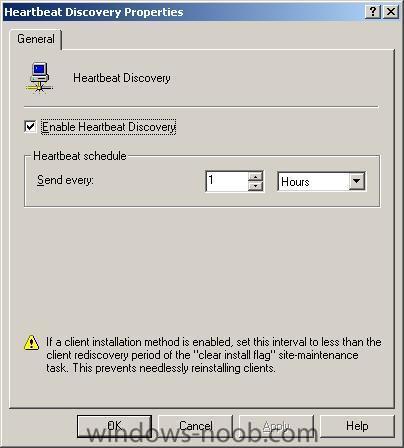
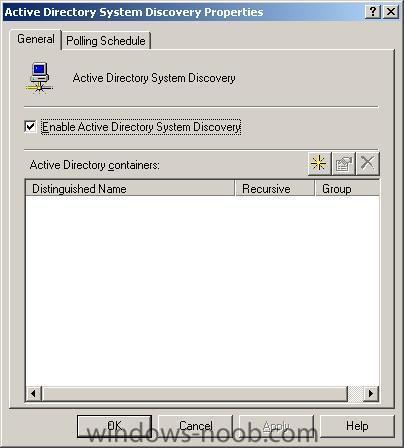
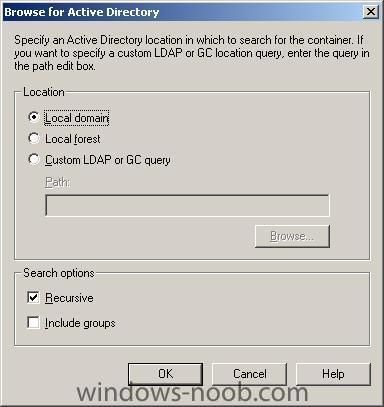
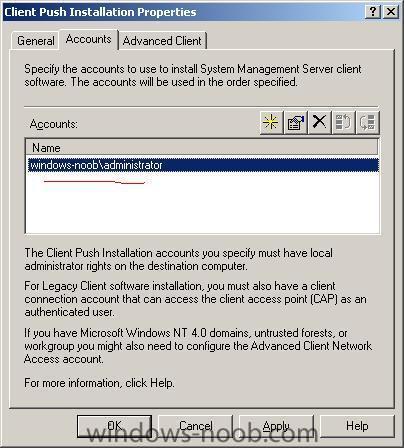
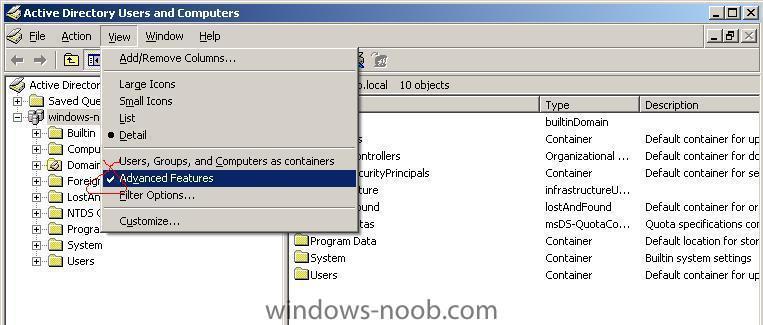
This guide assumes that you have first installed and configured IIS and then installed SMS as outlined here. In addition, you should have configured SMS as described here. Step 1. Make sure the System Management container in Active Directory has the correct permissions for SMS. In other words we will make sure the local computer (the server SMS is running on, in this case WINDOWS-DOBMTWV) has full access to this particular area in Active Directory. Normally we wouldn't grant Full Access but this is just for the purposes of getting SMS running. For more info on Creating and configuring the AD system management container For SMS see here. Start up the Active Directory Users and Computers console. Make sure that Advanced Features is selected under the View option. Once it is, in the left pane select System, and then scroll down to the System Management Container. Right-click it and choose properties, then select the Security tab (should be the third TAB in Windows 2003 Server SP1, it may be different in SP2.) Verify your SMS server computer account is listed ini the Group or user names, scroll down to check, if it is not there then add it by clicking on Add. Click on Object types as in the screenshot below then select computers (by default it's not selected). Click on OK and then click on Advanced to expand the view, then Find now. When you see your computer listed, highlight it and click OK. click ok again to add it to the Security tab. Now that we have added it, we need to edit it's security permissions to make sure that the permissions apply to both the Container and child objects. So let's click on Advanced. At this point you should see your computername listed but with read permissions that apply only to This object only. We are going to change that to Full access to This object and all Child objects. to do so highlight our computername and click on Edit. In the window that appears click the drop down menu called Apply onto: and select This object and all Child objects. Once done, click on Full Control for the Allow permissions plus select 'Apply these permissions to onjects and /or containers within this container only.' Click ok when done. In an enterprise, please verify the correct AD permissions for this container and set them accordingly, for advice on this please visit technet. Step 2. Configure Client Agents Now that we have attended to the 'gotcha' above, open the SMS administrator console and expand the site hierarchy/site name/site settings, then select the Client Agents as below: Double click on hardware Inventory client Agent on the right side and enable it. Set the inventory schedule to 1 day. Click ok to close. For Software Inventory agent, set the schedule to 1 week. Click on the inventory collection tab, and delete the default scan listed. Click on the yellow start and add files of type *.exe then click on Set beside location, and enter %ProgramFiles%\ as the location so that it only scans that area for EXE files. Make sure to remove the tick from the windows directory Next you can enable the Advertised programs client agent , and under the General tab, select Enable software distribution to clients and that the New Program notification icon opens Add or Remove Programs. Now click on the notification tab and set it accordingly Next we have the Software Metering Client agent, enable it if you wish and set your schedule. Step 3. Client Installation Methods In the left pane, select Client installation methods and double click on Client Push Installation Properties. Enable it and take note of the warning. adjust your settings removing Servers and domain controllers from your choice of installing onto... Set your accounts to install software, in this example i used the domain administrator, but you should really setup a separate account and give it the appropriate permissions for SMS in AD by creating a user in your domain called SMSInstall and adding it to the domain admins group, and then adding it to the accounts Tab in the screenshot below. Next click on the Advanced client tab and set your Installation Properties string to something like this SMSSITECODE=WIN SMSCACHESIZE=8000 the above sets our SMS site code to WIN and the SMS cache size on the client to approx 8GB. Step 4. Configure Discovery methods In the Discovery section, you'll see 8 possibilities, of which we only need to configure 5, the first 2 are NT related (not needed), we do however need the Heartbeat Discovery setup and enabled, the next option is also not needed (Network discovery). The final 4 options are all required (AD) so we'll set them accordingly. Set the discovery methods to the following values:- * Heartbeat Discovery every 1 hour * Active Directory System Discovery 1 hour * Active Directory User Discovery 1 hour * Active Directory Security Group Discovery 1 hour * Active Directory System Group Discovery 1 hour Note: You may want to set these values to 1 minute in a lab environment. We also need to tell SMS where to look for these computers and that is done in each of the 4 AD options above, So bring up the Active Directory System Discovery properties and click on the Yellow star to add an Active Directory container In the Browse for Active Directory window, make sure Local Domain is selected and click ok. when the Select New Container window comes up, click ok. now your container is selected click ok to exit and do the same actions for each of the 3 remaining AD discovery methods. that's it you are done, next we will create a package and advertise it to a collection and then distribute it ! cool !!


-
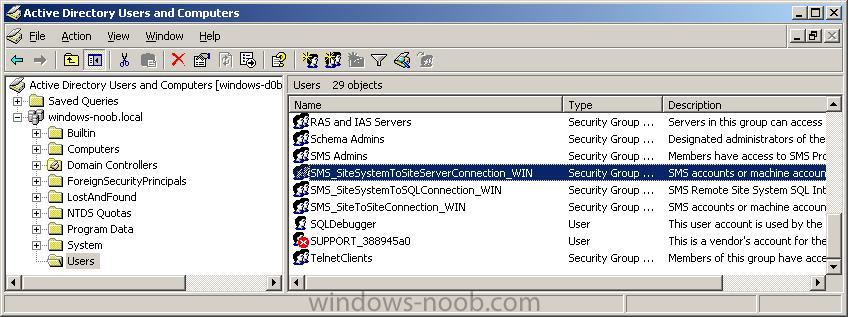
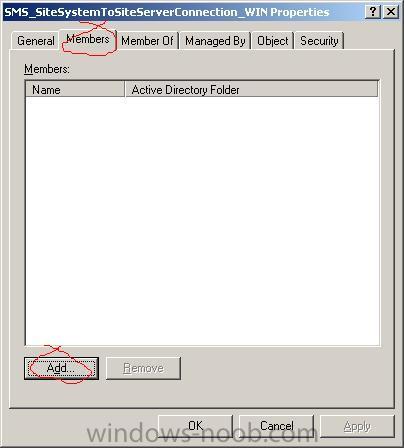
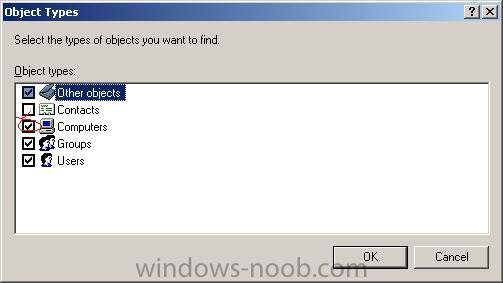
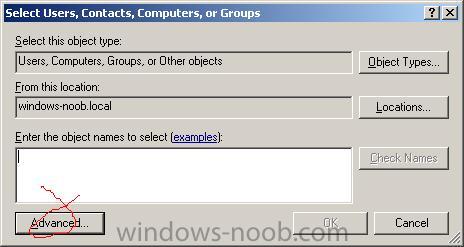
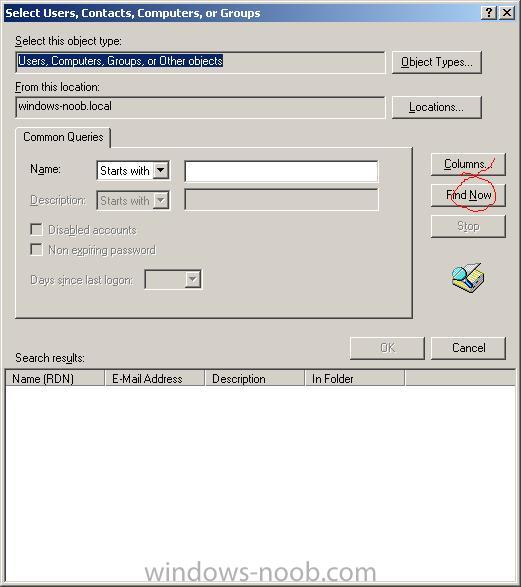
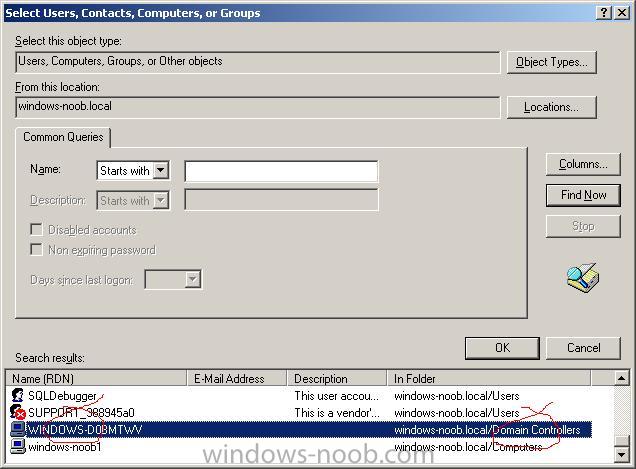
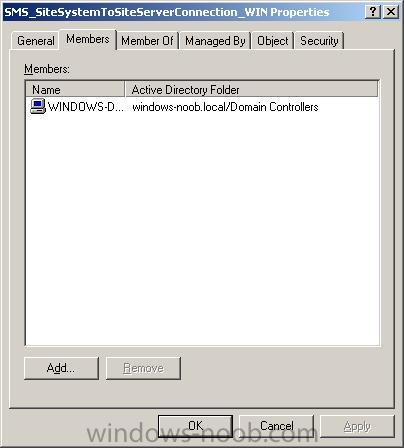
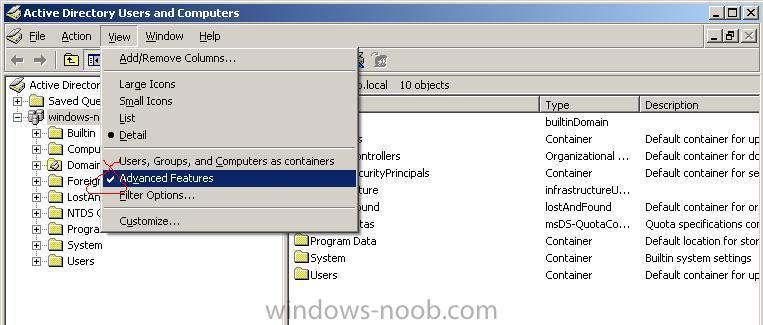
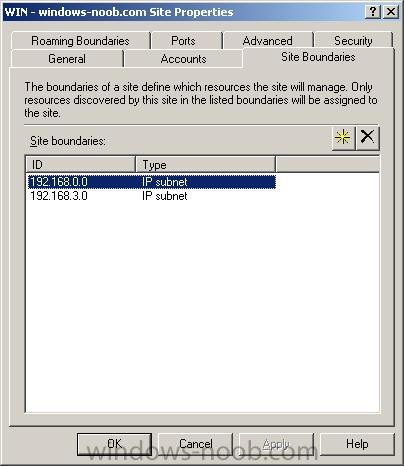
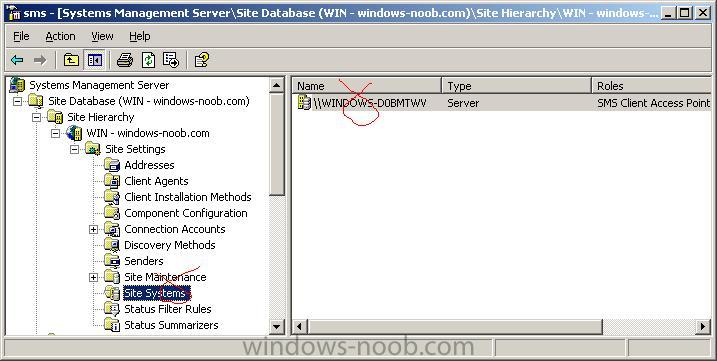
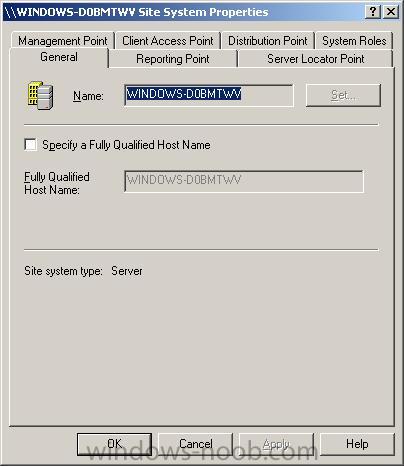
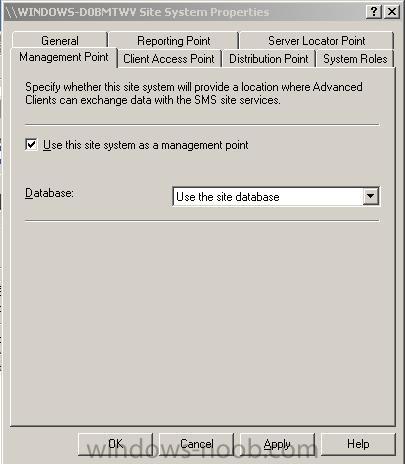
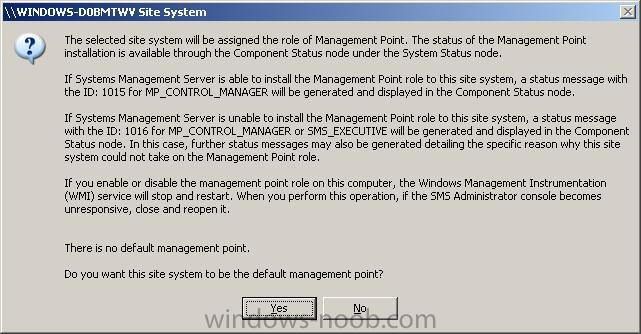
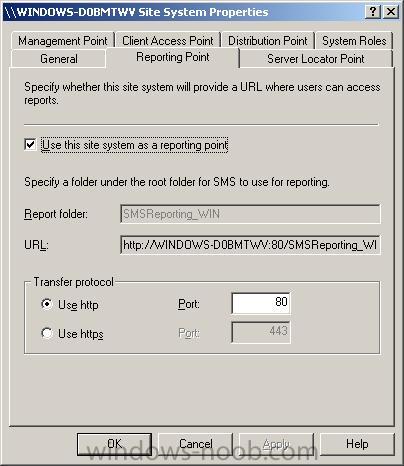
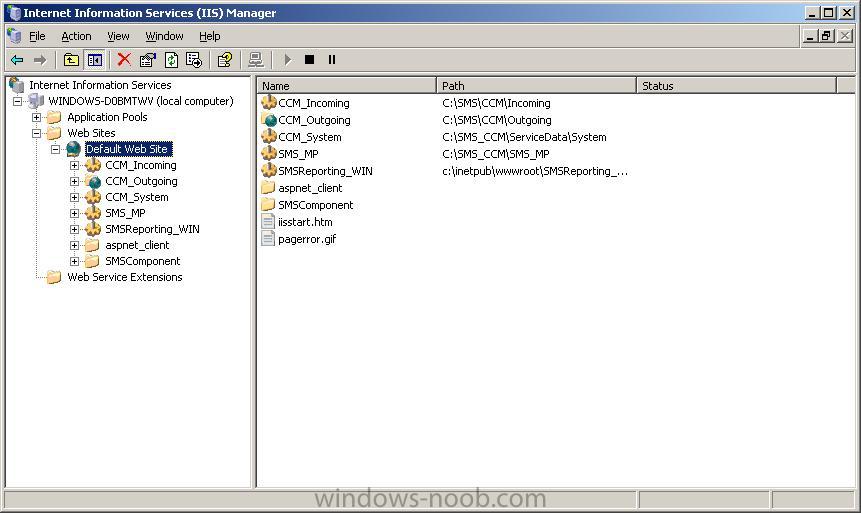
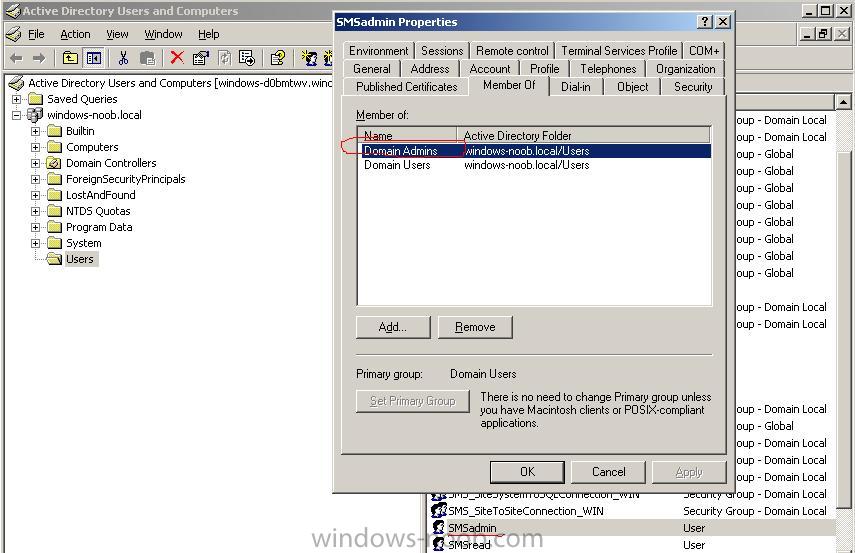
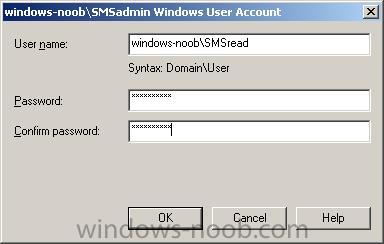
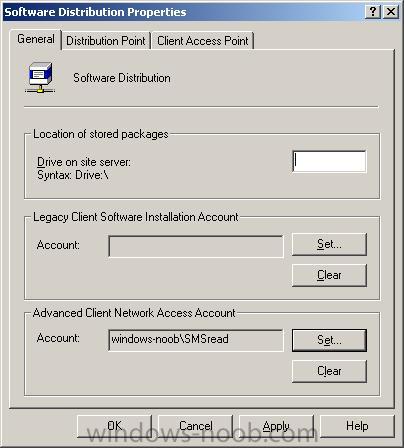
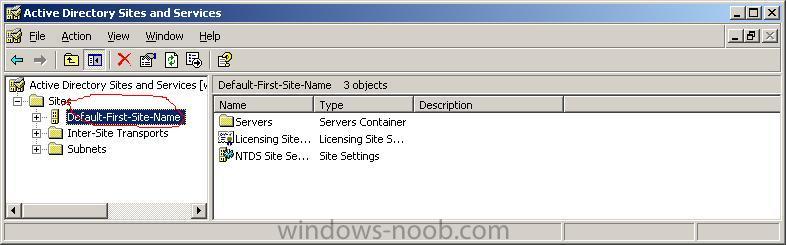
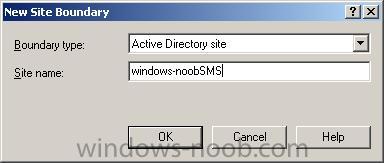
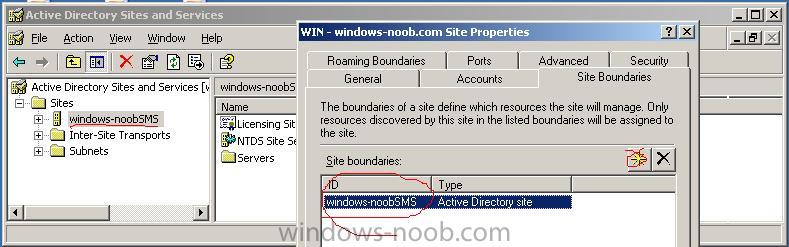
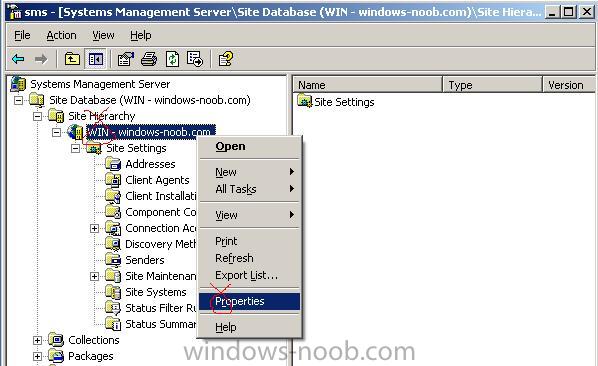
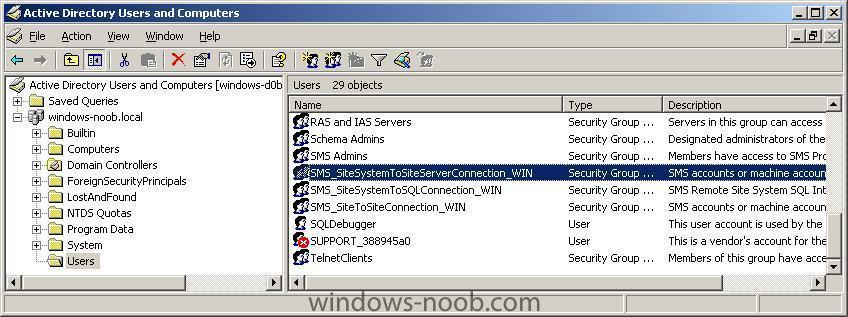
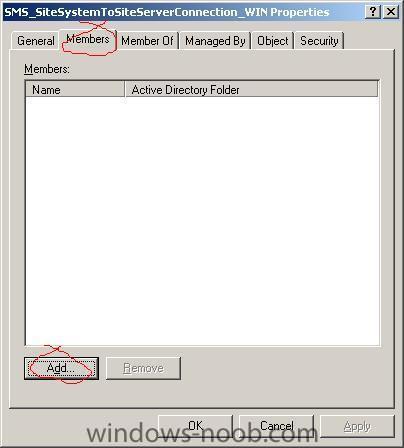
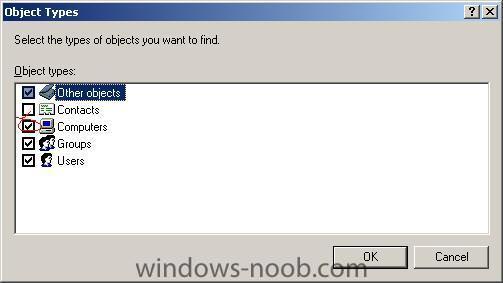
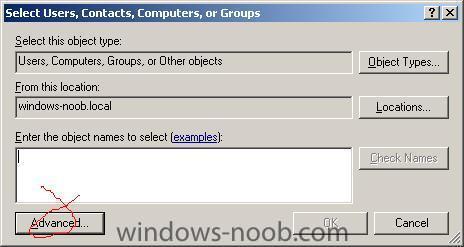
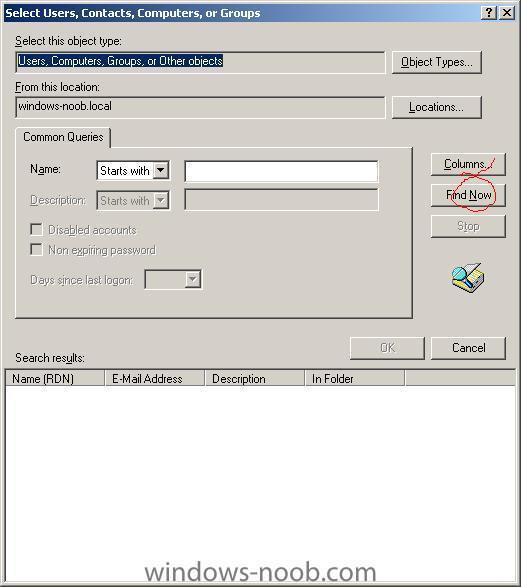
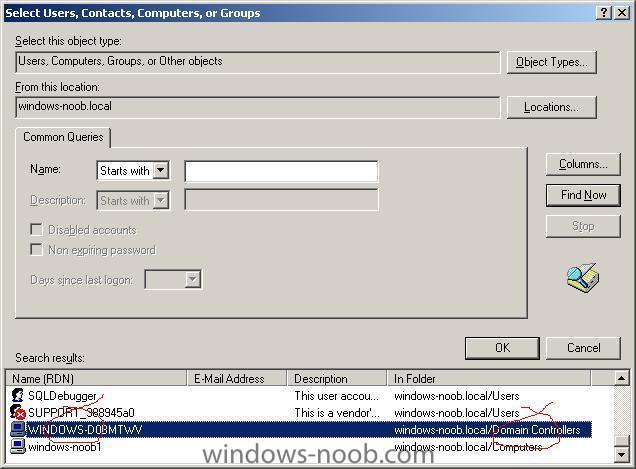
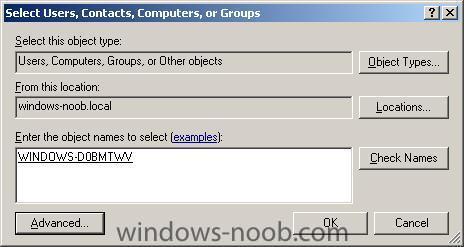
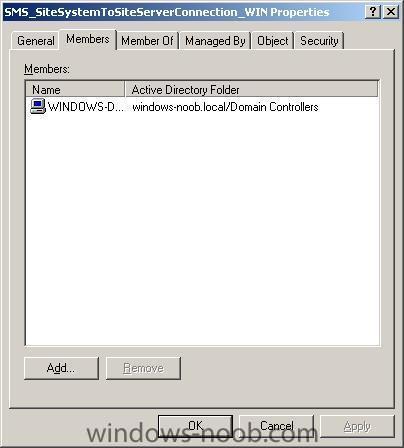
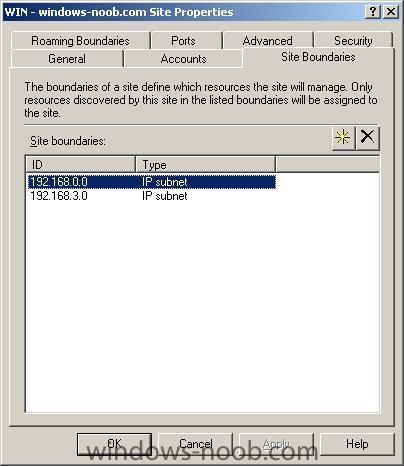
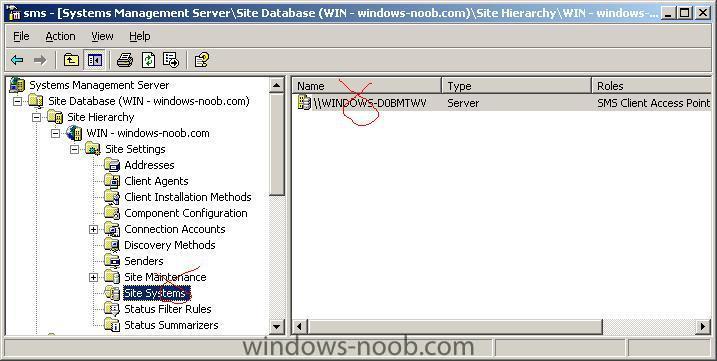
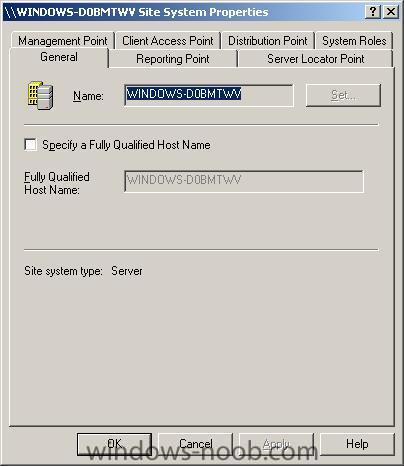
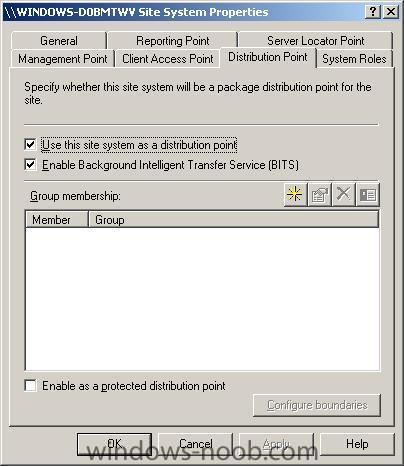
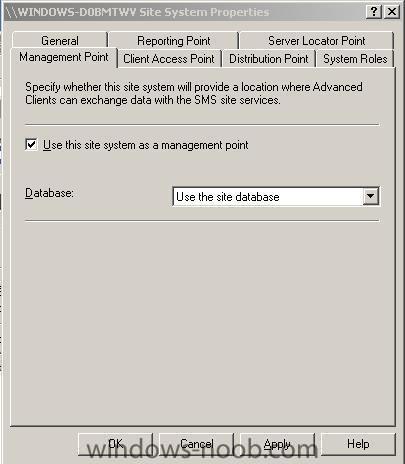
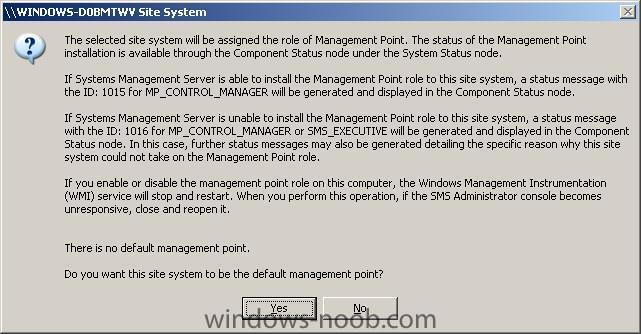
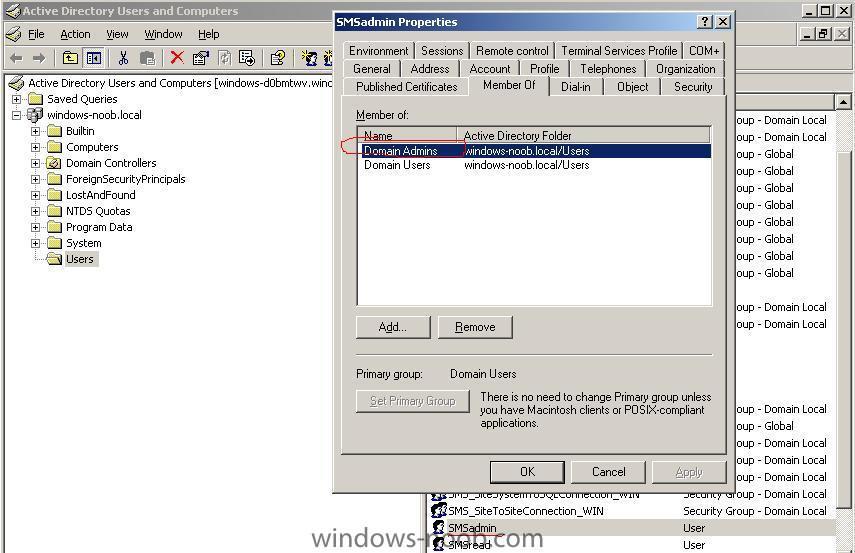
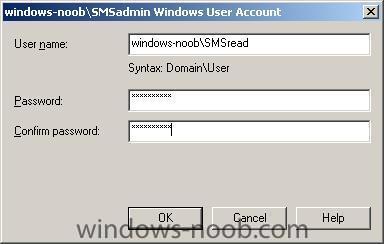
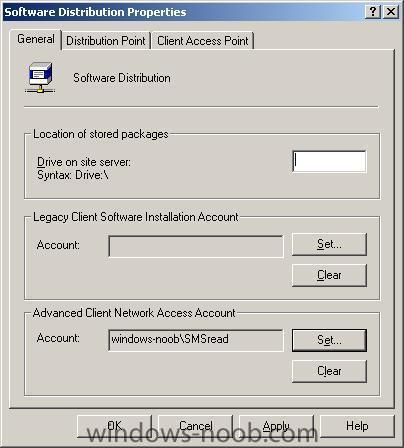
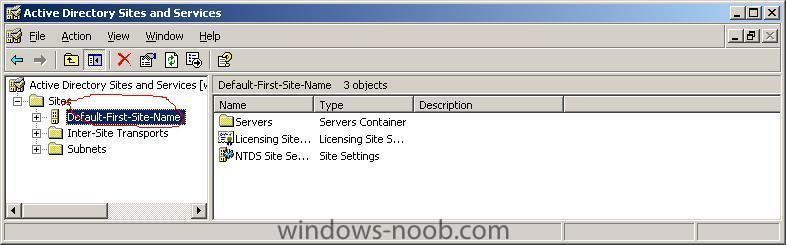
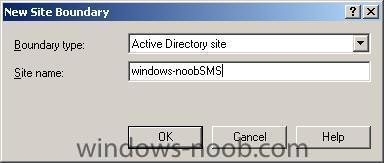
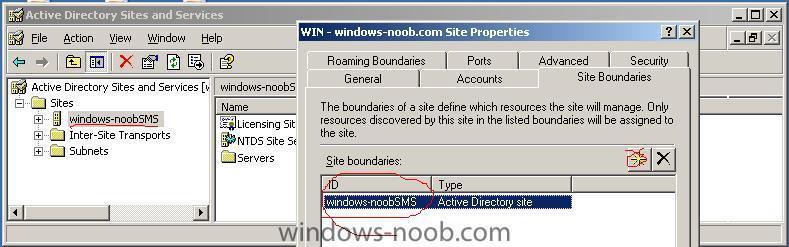
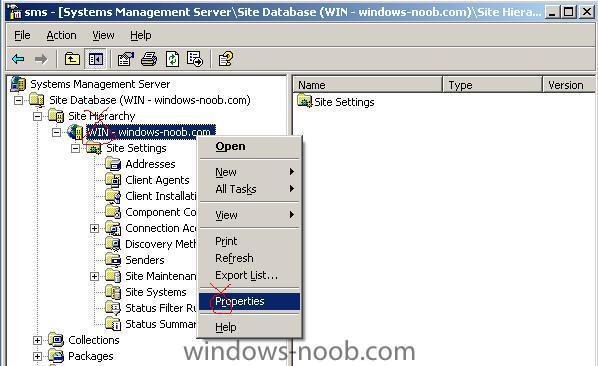
This guide assumes that you have first installed and configured IIS and then installed SMS as outlined here. We need to open up active directory and add the computer account to the SMS groups. Click on Start/All Programs/Administrative tools/Active Directory Users and Computers. Click on View and make sure that Advanced Features is selected. select the Users option in the left pane and in the right pane scroll down until you see the SMS groups listed. The two groups we will add the computer account to are SMS_SiteSystemToSiteServerConnection_WIN and SMS_SiteSystemToSQLConnection_WIN. (note: the _WIN extension may be different on your sms server if you used a different SMS site code). Double click on SMS_SiteSystemToSiteServerConnection_WIN and click on the Members tab. click on Add in the window that appears click on object types select 'Computers' click ok and then click on Advanced click on Find now scroll down until you see your SMS server name (the domain controller you set the SMS server up on) and select it click ok and it should be listed similar to this click ok then apply to complete this action Now repeat the above actions for SMS_SiteSystemToSQLConnection_WIN When you have completed the above, we now need to startup the SMS Administrator console and to check the site boundries and verify the the sms server site name is configured for active directory instead of the IP address (as it is by default). Startup the SMS administrator console and click on the + beside Site Hierarchy to expand that section. Underneath that you'll have your SMS Site Server name (in my case WIN), and underneath that we have the Sites settings. Right click on the SMS Site Server name and choose Properties. click on the Site Boundries tab and you'll probably see one or more IP address's listed. Note: You'll need to know your AD site name. The AD site name is by default called Default-First-Site-Name and you can change that in Active Directory sites and services just as long as the site name is the SAME in both AD and SMS site boundries. Here we have renamed the Default-First-Site-Name to windows-noobSMS in Active directory sites and services back to SMS > click on the Yellow star button to add our site name and to tell SMS to look for it in AD. in the new site boundary window that pops up, click on the down arrow to reveal Active Directory and then fill in the AD site name. next we want to remove the one (or two or more) IP address's that SMS has listed here, to do so, highlight each one in turn and press the X. finally we should have our Active directory Sites and services plus SMS site boundries configured so it looks like this, click apply and ok to finish. Next we need to configure the Management Point (MP), Distribution Point (DP) and Client Access Point (CAP). To do this we will click on site systems and then right click on our server listed on the right choose properties and you'll see the SMS site properties Click on the Distribution Point tab and enable the following choices:- * Use this site system as a distribution point * Enable Background Intelligent Transfer Service (BITS) click on Apply and then select the CAP tab, and verify that it is enabled (it will be), and finally click on the MP tab and enable it. you will most likely see the following, answer yes. click on OK to continue. You may also wish to select the Reporting point option. At this point I popped into Active Directory Users and Computers and created two new users SMSadmin and SMSread, I made SMSadmin a domain admin and SMSread a user. and then back to SMS Administrator Console, Site Database, Site Hierarchy, Site Settings, Component configuration, software distribution. I then added SMSread as a user for the Advanced Client Network Access account Please reboot to complete this part of the process. Once you have rebooted you can start up IIS and you'll notice some new SMS areas are added... and once we start to add SMS packages we will see this area expand some more. Now that you have got this far you'll want to complete the SMS final configuration.


-
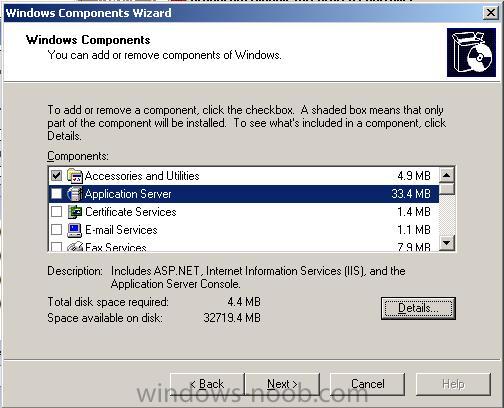
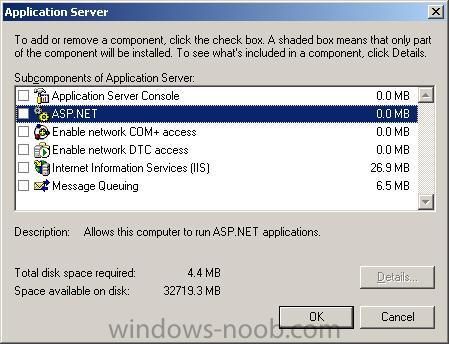
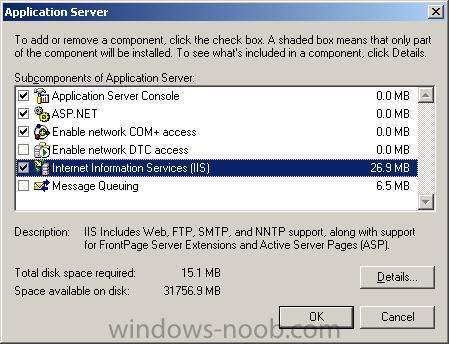
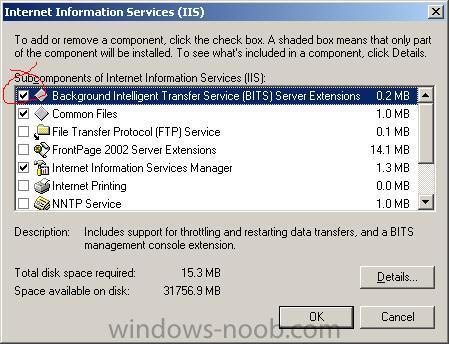
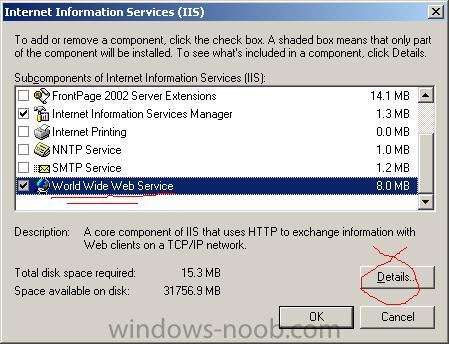
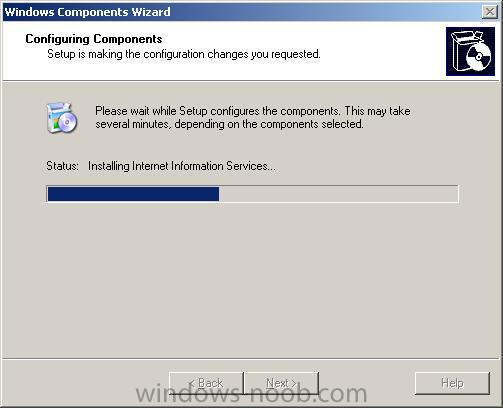
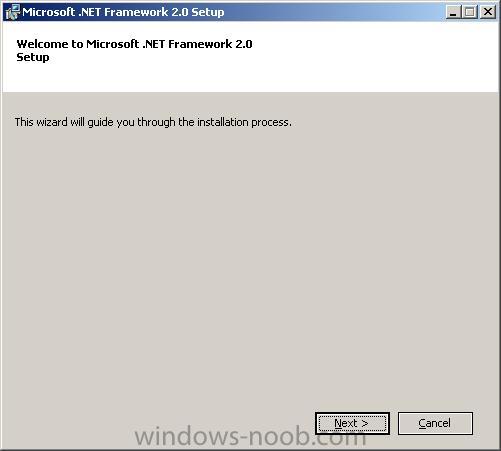
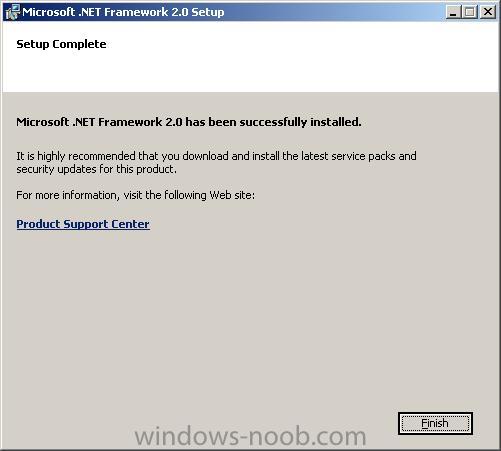
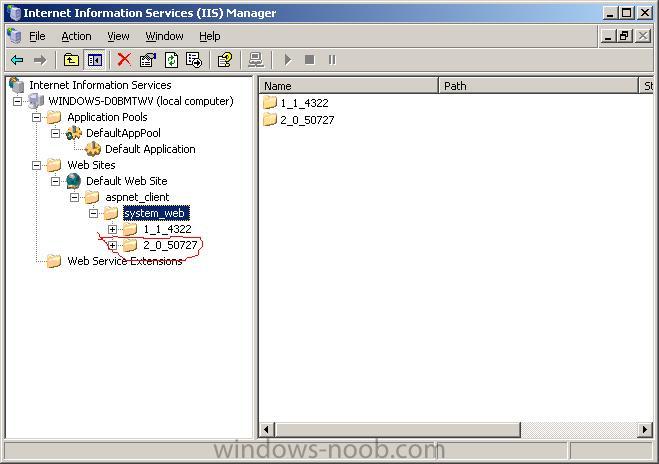
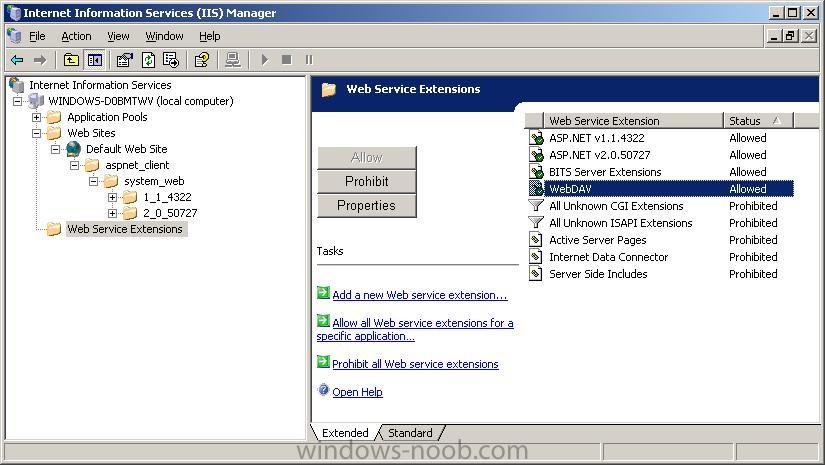
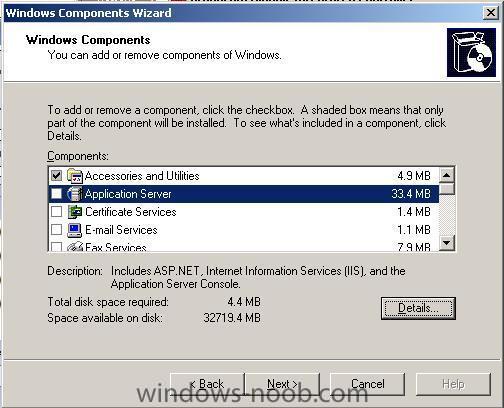
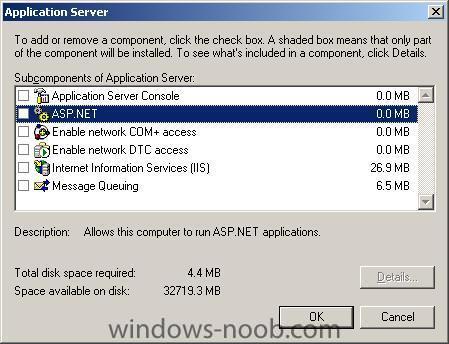
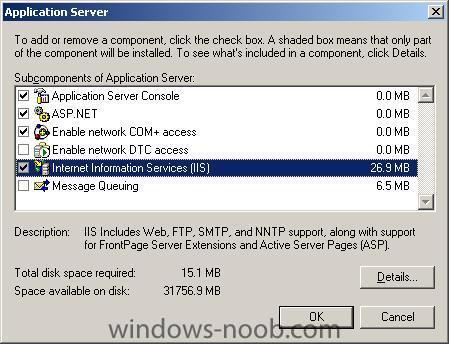
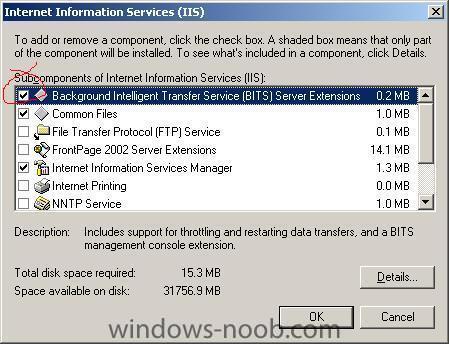
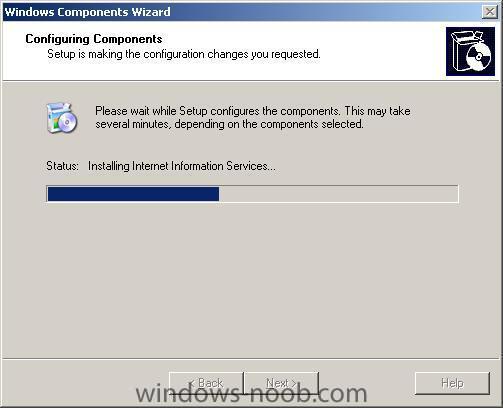
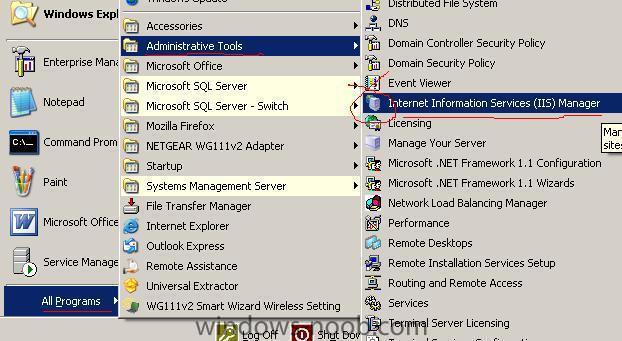
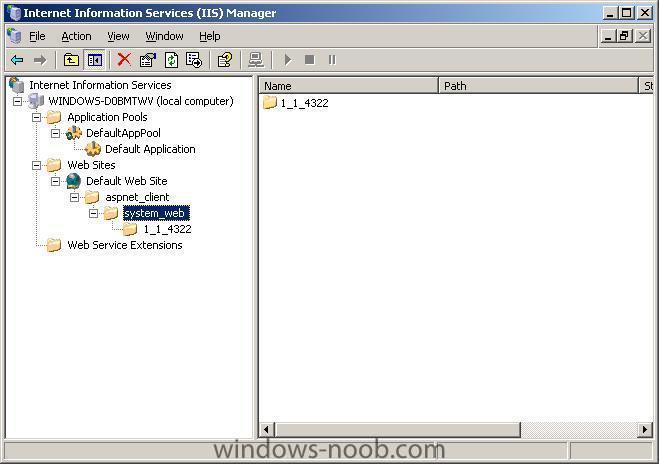
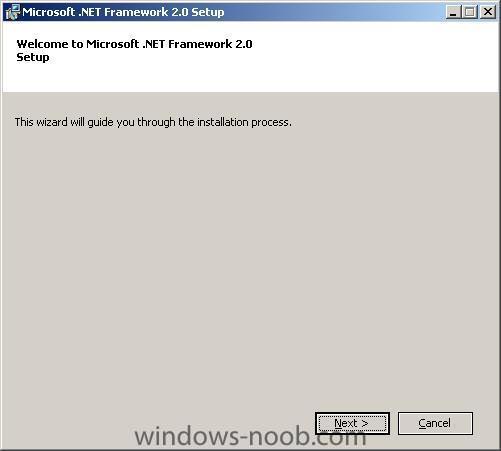
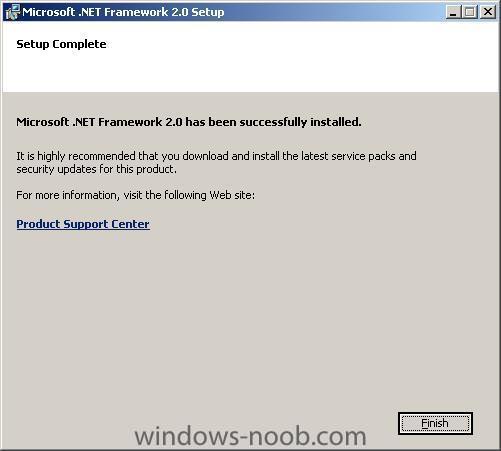
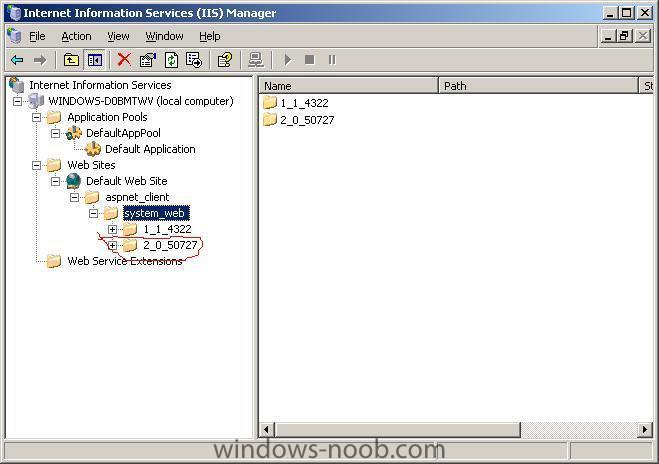
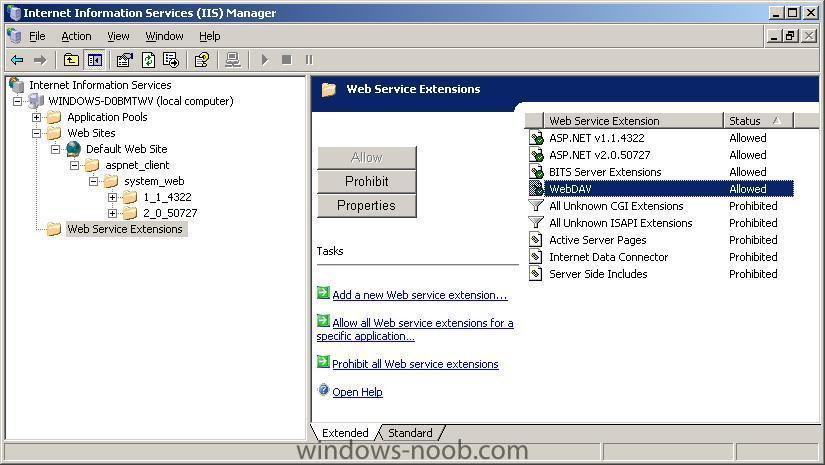
This guide assumes that you have installed Windows 2003 Server Sp1 (or later). Insert your Windows 2003 Server cd and click on Start/Control Panel/Add or Remove programs and then click on Add/Remove Windows components. Highlight Application Server by clicking on it, and then click on the Details button. this will bring the application server window up make sure the following items are selected: Application Server Console ASP.NET Enable network COM+ access Internet Information Services (IIS) when done click on Internet Information Services (IIS) to highlight it and then click on the details button, in the window that appears make sure to select the Background Intelligent Transfer Service (BITS) Server Extensions Then scroll down to World Wide Web Service and click on it to highlight it, then click on the details button make sure to select the WebDAV Publishing option and click on ok. click ok again, then ok, then next to start copying files from the cd. once done, click on Finish and that's it you are done. at this point you can start the IIS Manager (All Programs/Administrative tools/Internet Information Services (IIS) Manager as you can see here none of the SMS extensions are listed and also .NET v2 is also not installed. So let's download it and install it. Click here to download the Microsoft .NET Framework Version 2.0 Redistributable and once done, install it. accept the license aggreement to continue once .NET 2 is installed you can verify this by refreshing the IIS manager make sure your extensions are set to allow for the ones in the screenshot below:- ok now you are done you can now install SMS 2003 cheers anyweb


-
Microsoft SQL Server 2008, the next release of Microsoft SQL Server, provides a comprehensive data platform that is more secure, reliable, manageable and scalable for your mission critical applications, while enabling developers to create new applications that can store and consume any type of data on any device, and enabling all your users to make informed decisions with relevant insights. Download it here. via > http://blog.tiensivu.com/aaron/
-
how can I setup Zero Touch Installation ?
anyweb replied to anyweb's question in Zero Touch/ZTI, Lite Touch/LTi
i didn't use SQL server 2005 express in my example but here is a guide I put together for installing SMS 2003 sp2 This guide assumes that you have first installed and configured IIS and then installed SMS as outlined here. In addition, you should have configured SMS and you should have completed the final configuration and naturally your clients should have the SMS client installed (that should happen automatically if you followed parts 1-3 correctly). Finally to test your SMS 2003 installation you should test the deployment of an application like Firefox. SQL Express edition should be enough in a lab environment with a few machines. SQL Express edition does not support replication so if you develop an SMS structure with more than 1 site using SQL Express edition it will not work. cheers anyweb -
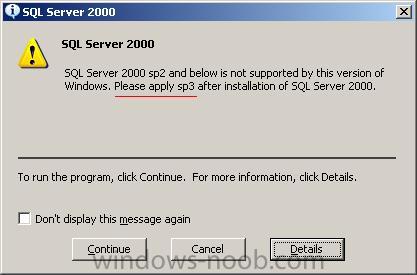
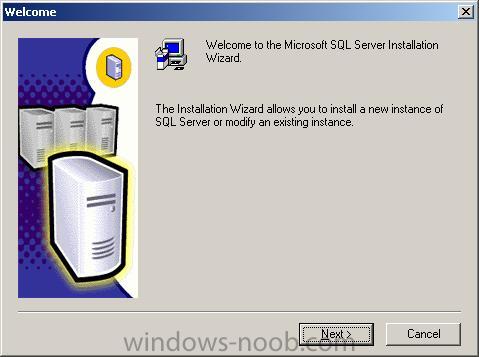
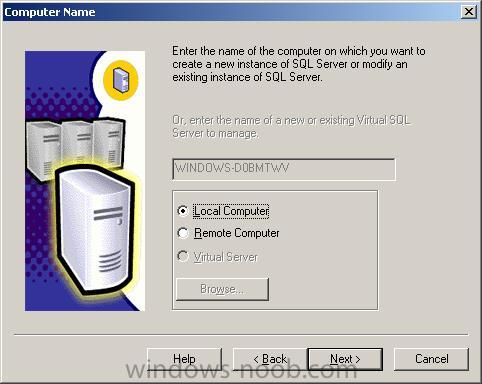
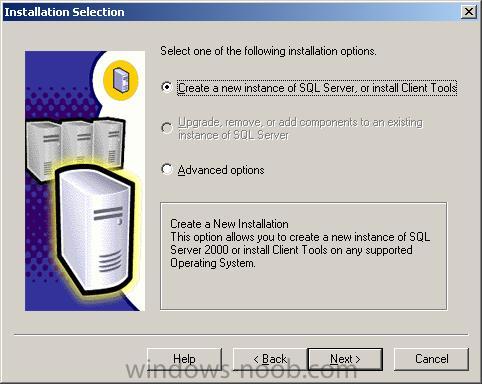
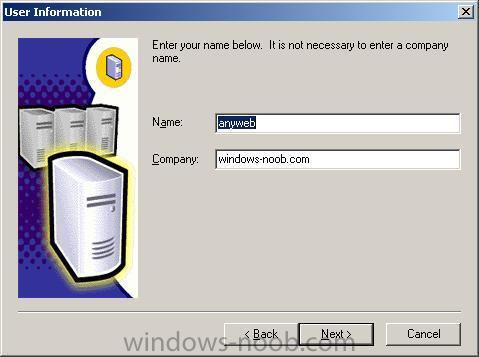
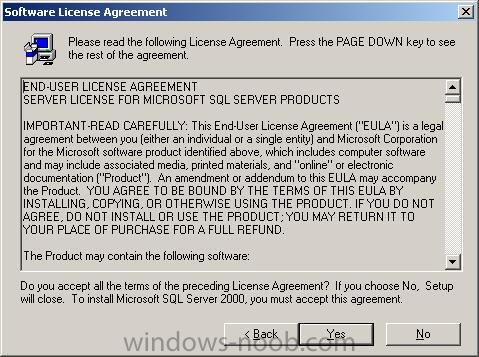
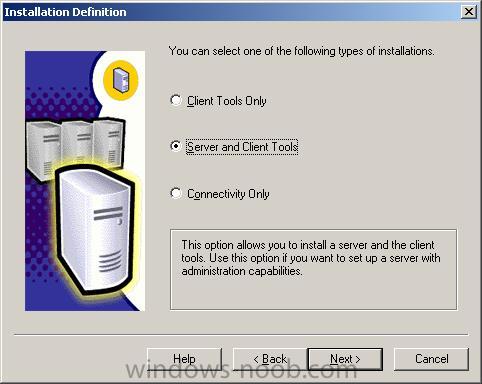
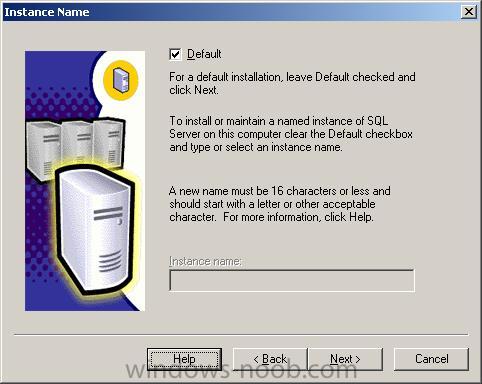
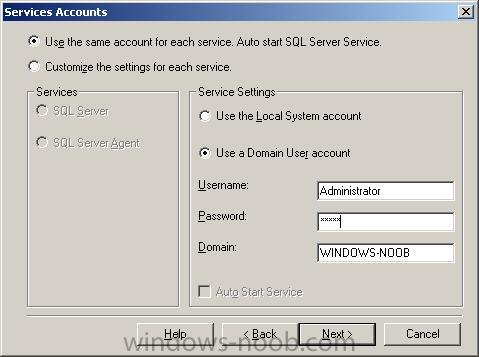
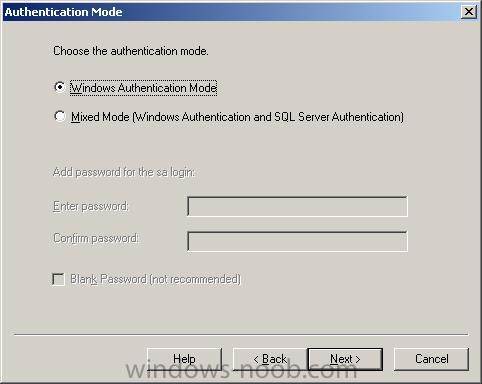
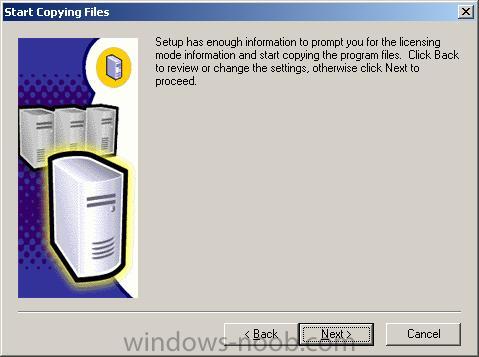
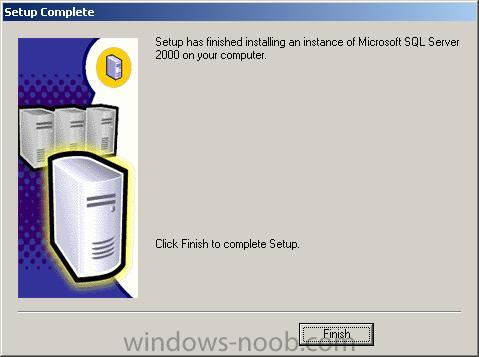
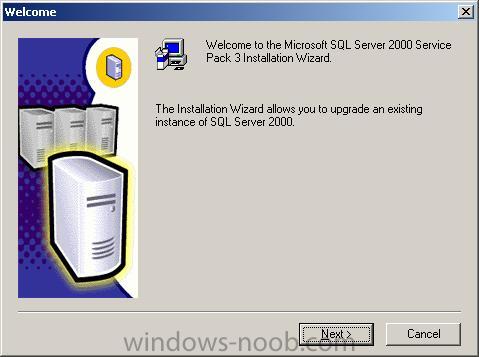
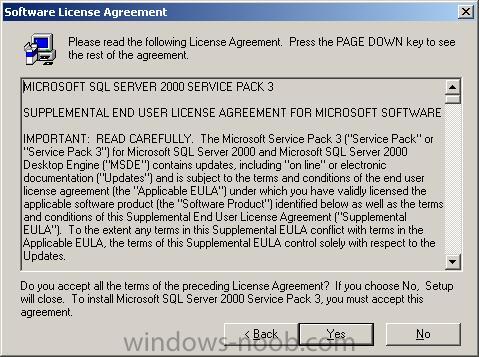
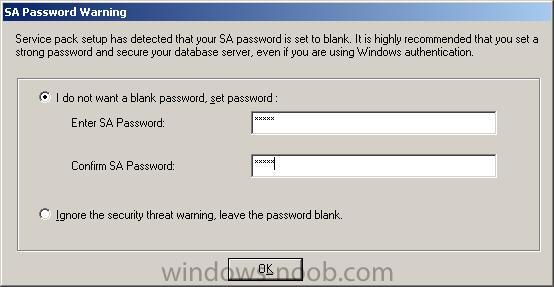
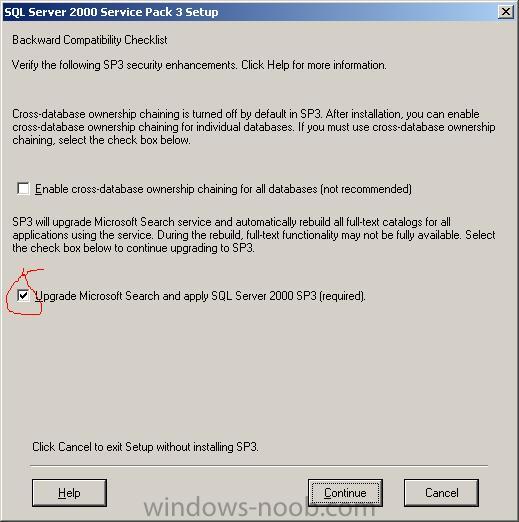
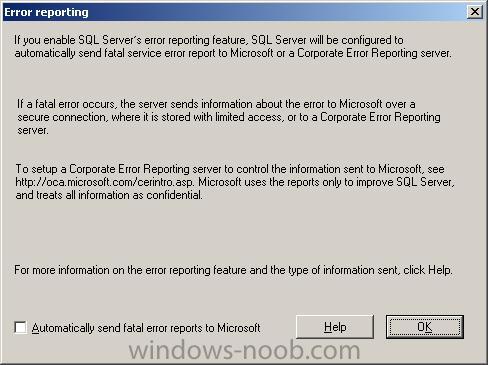
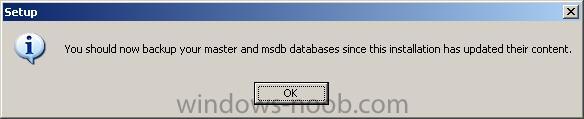
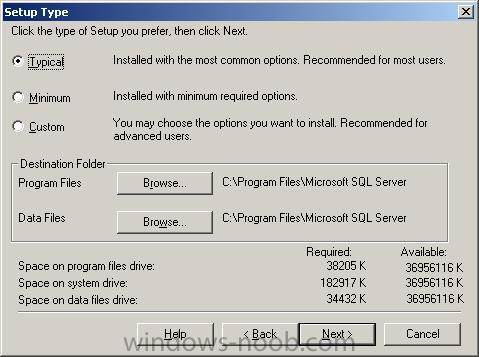
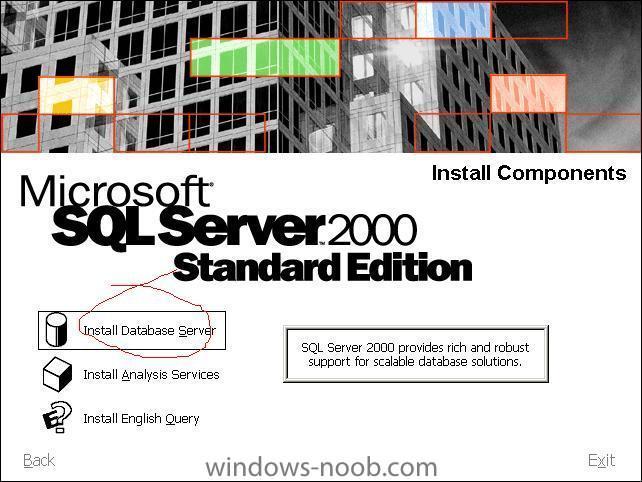
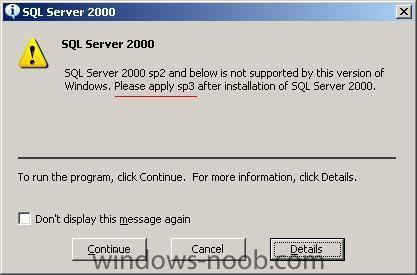
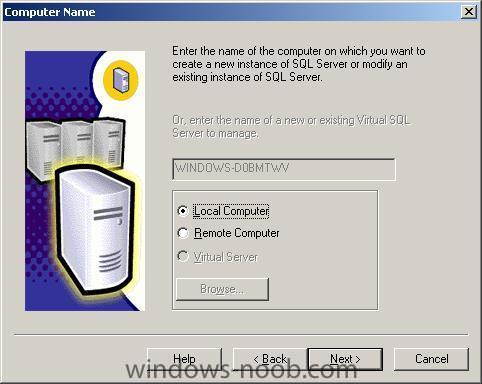
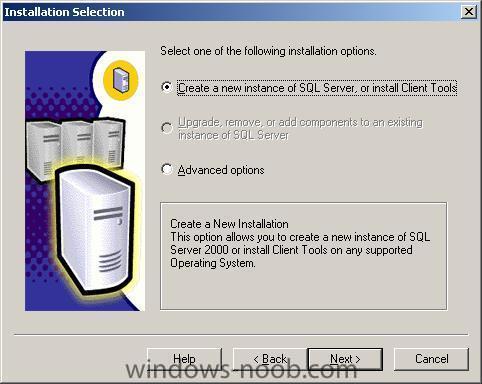
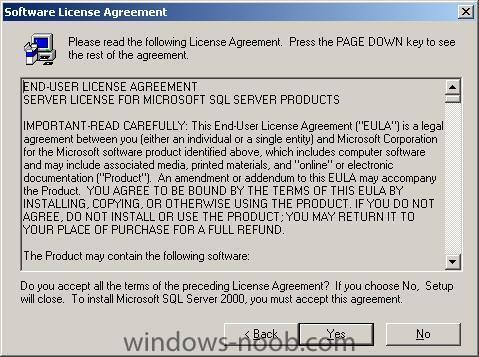
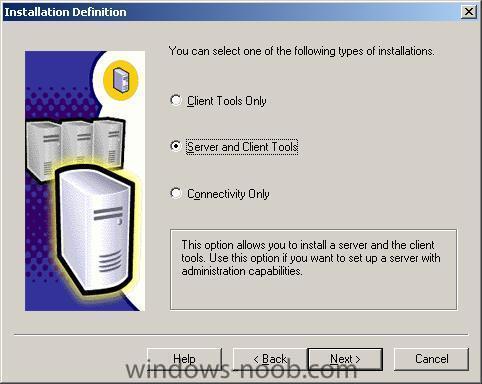
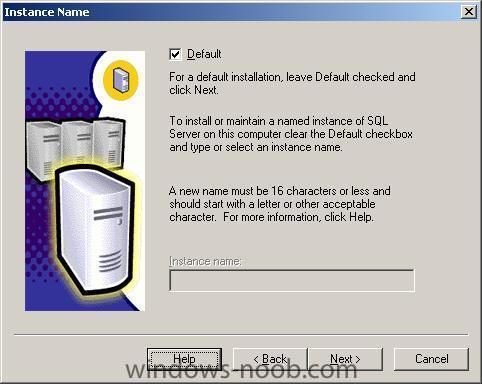
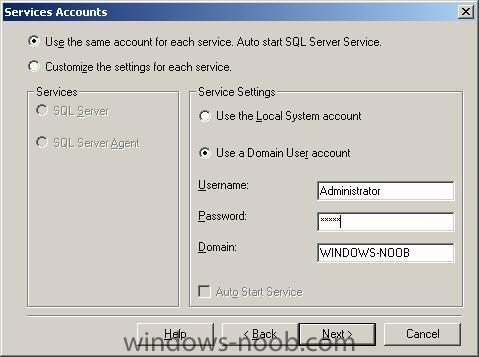
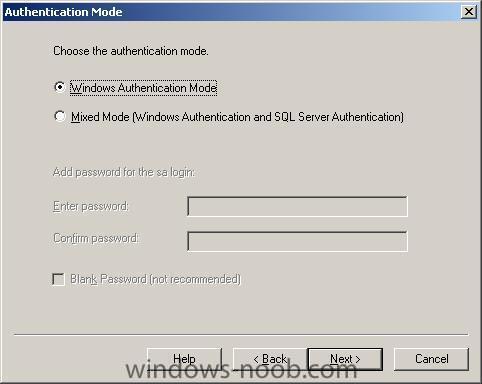
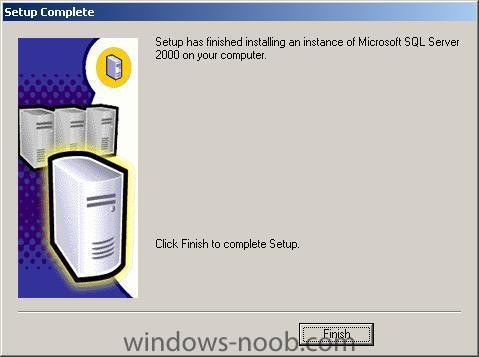
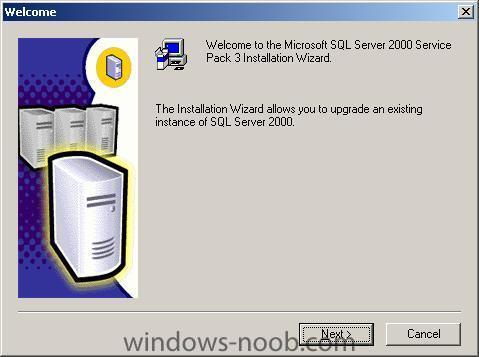
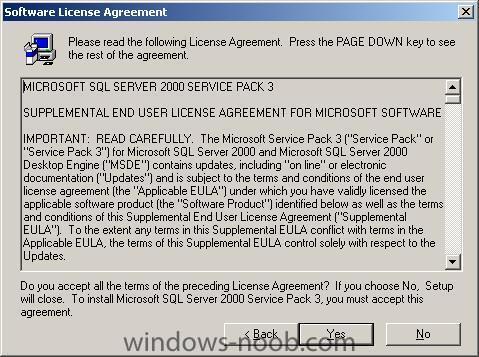
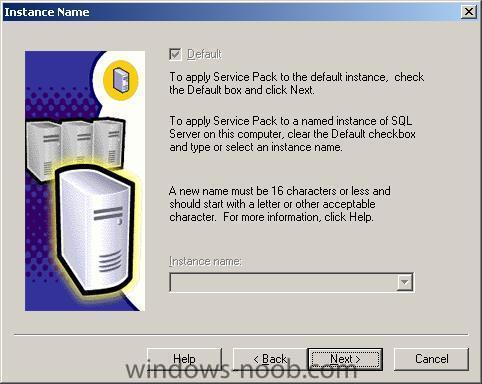
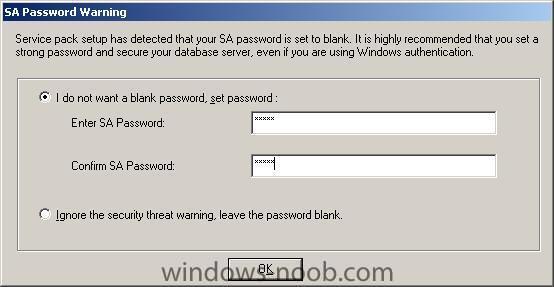
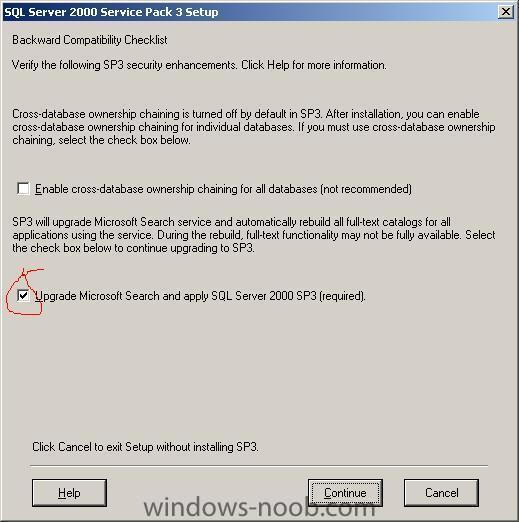
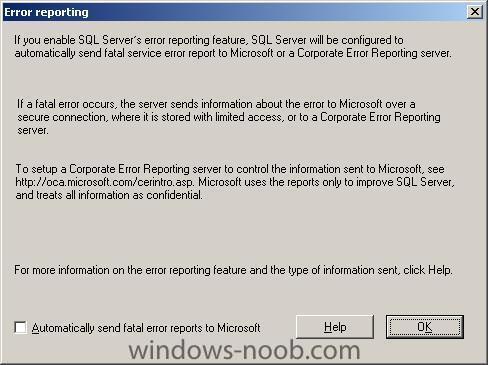
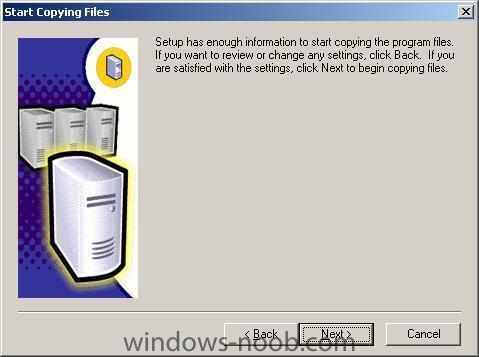
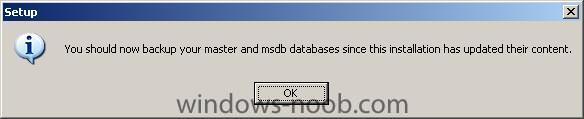
This guide assumes you have Windows 2003 Server Sp1 installed and configured, if you don't know how to do that you could follow this RIS installation guide, which while not specific to this guide is good enough to get a server setup and installed. Insert your SQL server 2000 standard edition cd (or download the ISO from MSDN) and mount it via daemon tools or similar, and click on SQL Server 2000 Components choose the first option which is to install a database server if you get a warning about the version of SQL you are using, make a note of what it says (we'll come back to that later) Click on continue and then next at the welcome wizard choose local computer as we are installing SQL server on this server... stick with the defaults and go with 'create a new instance of SQL server' edit the details if appropriate click yes to accept the license accept the default of server and client tools and click next next we get to choose the instance name of the SQL server, let's leave it as default and click next. when prompted for setup type, leave it as typical and click next enter the password for your administrator account as we are going to use the domain user account we leave the authentication mode as default and then we watch as it starts to copy files now you enter your licensing options..... in this example i chose 1000, you can click on help to find out more about your options. and then it goes off and installs SQL server after a while it's all done Install SP3 so now we have to install SP3 that it mentioned earlier.. so let's download it I chose sql2ksp3.exe from the list of 3 available options and once done, ran it, the file asked me where to install and i chose the default C:\sql2ksp3 once done, navigate to the folder and run setup.bat you should see the Service pack 3 wizard click next and yes to the license agreement accept the defaults and click next for the instance name which we setup earlier choose Windows Authentication on the next screen accept the default security optionand when prompted for SA Password warning enter a password select the upgrade microsoft search option and click continue choose your error reporting option and click ok to get things done. and then its ready to begin copying files for the sp3 upgrade you will eventually be informed that its time to backup your databases, but seeing as we didn't create any yet, there's no need. that's it, you've now installed SQL server 2000 and the required Service pack 3 a reboot at this point would be a nice idea to see your SQL server running in the system tray ;-) Service pack 4 is available so please download it and install it. cheers anyweb


-
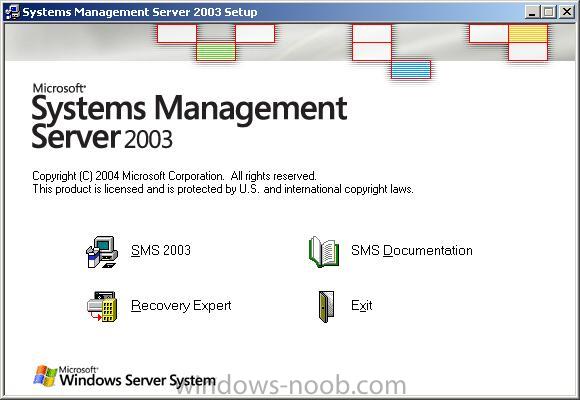
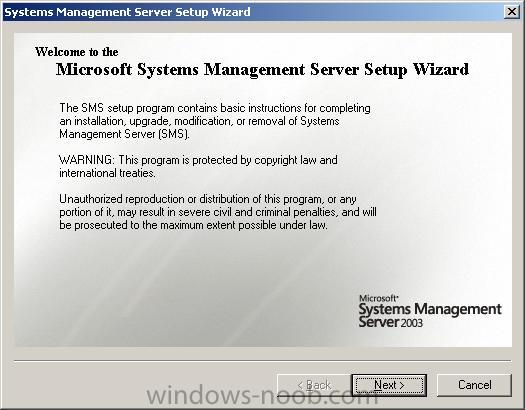
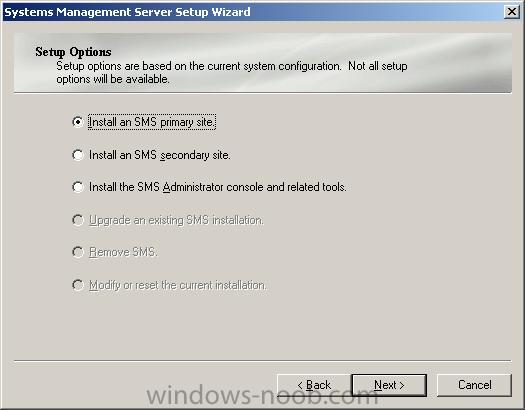
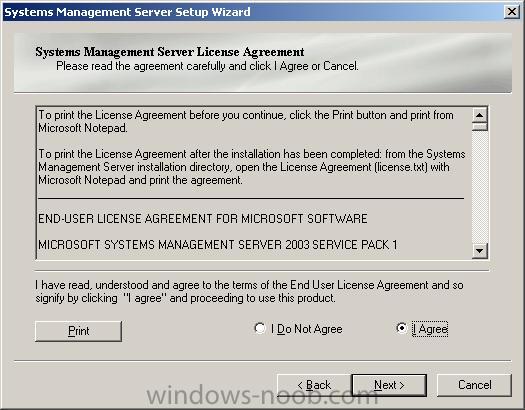
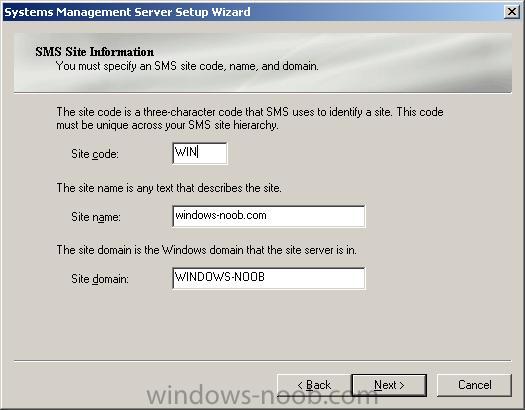
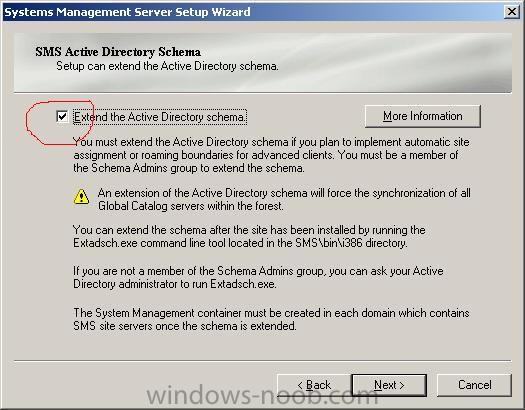
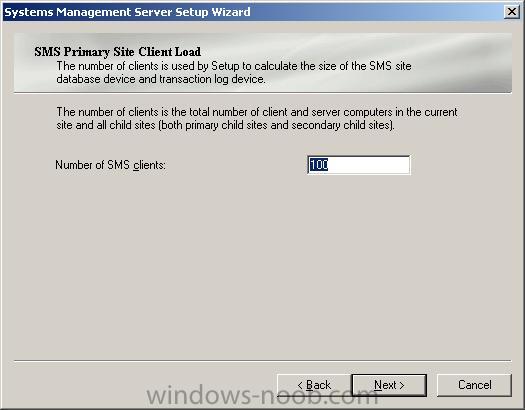
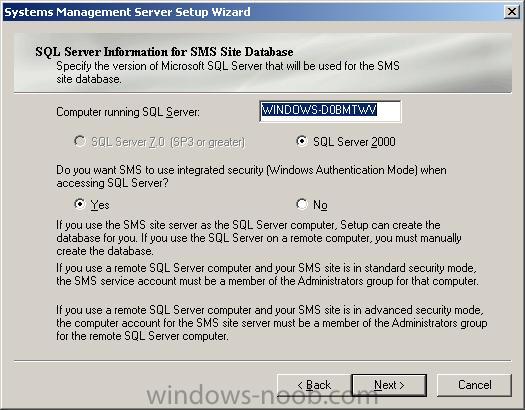
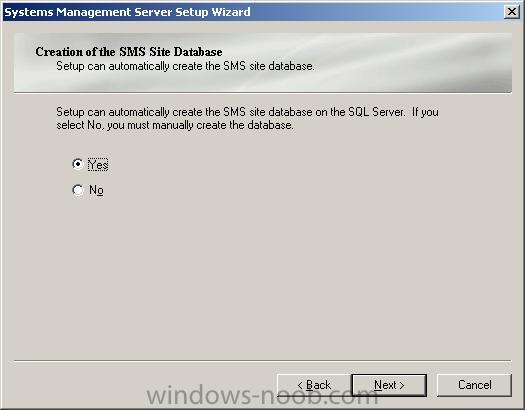
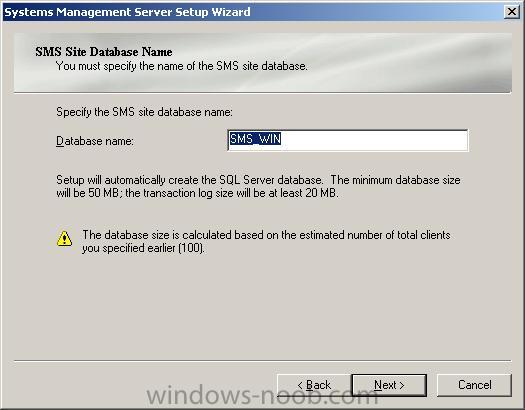
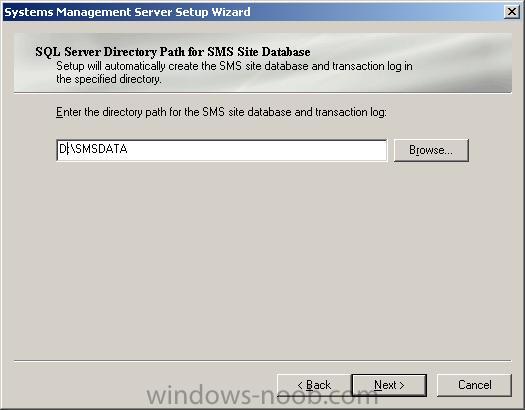
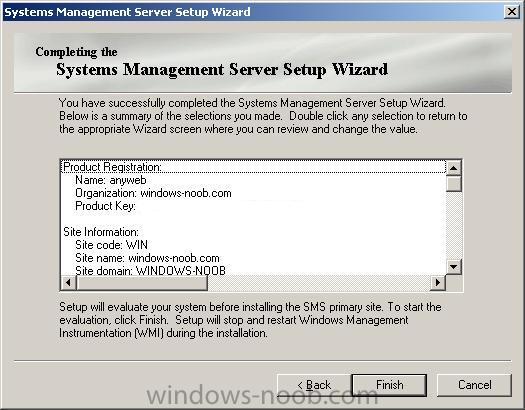
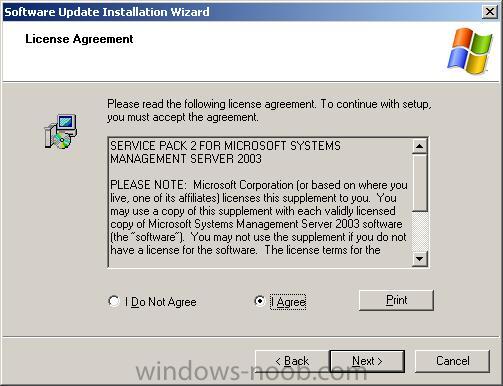
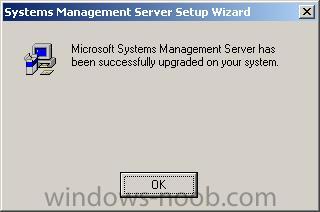
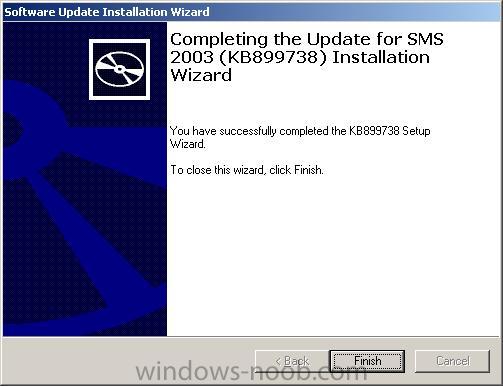
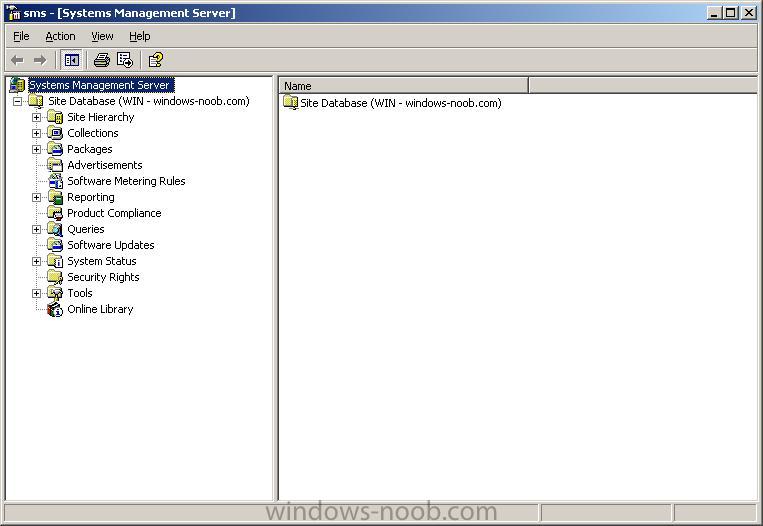
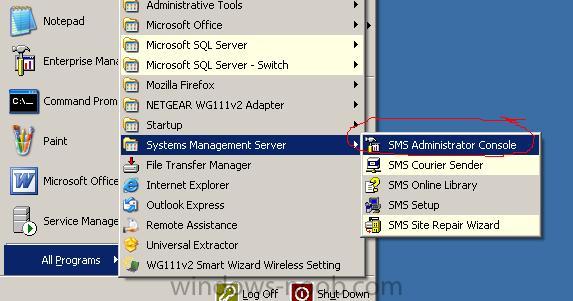
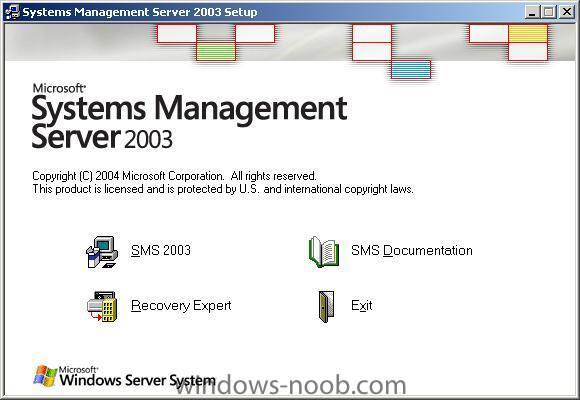
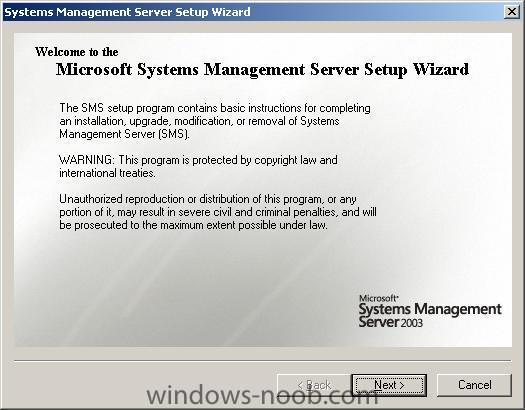
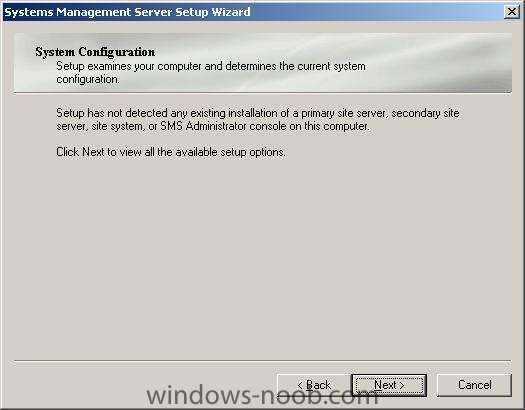
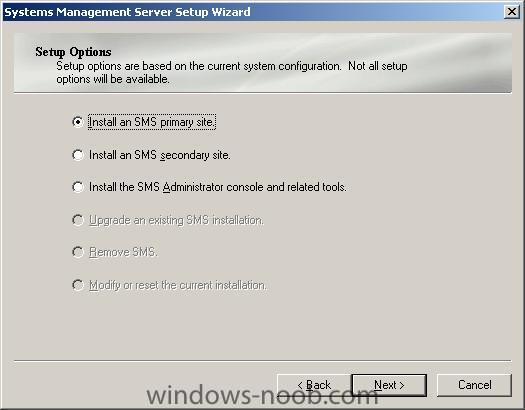
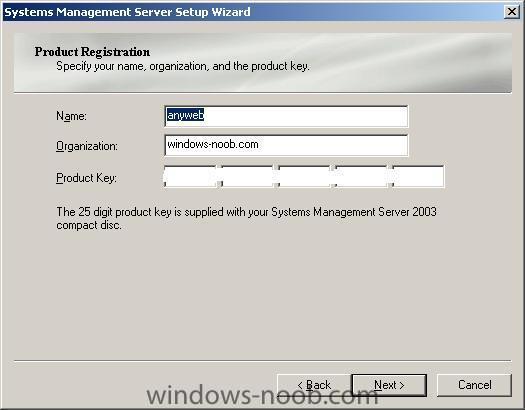
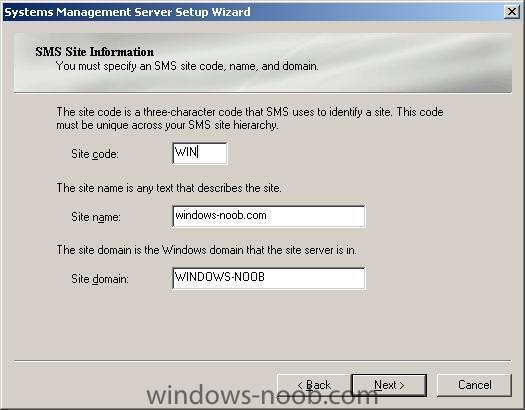
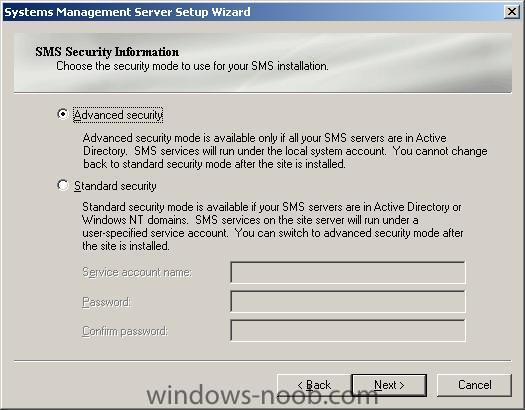
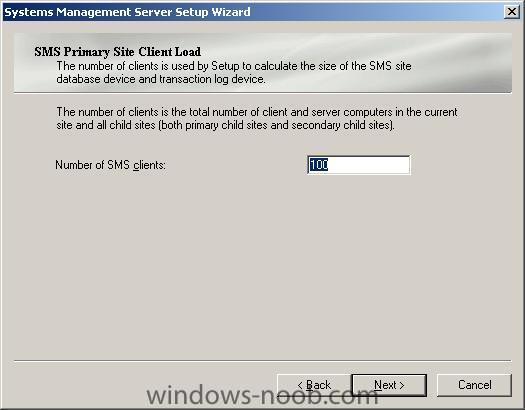
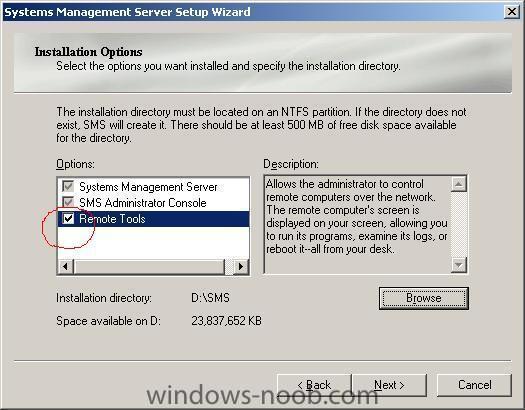
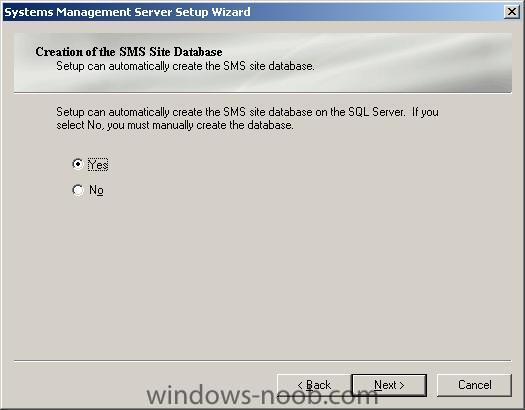
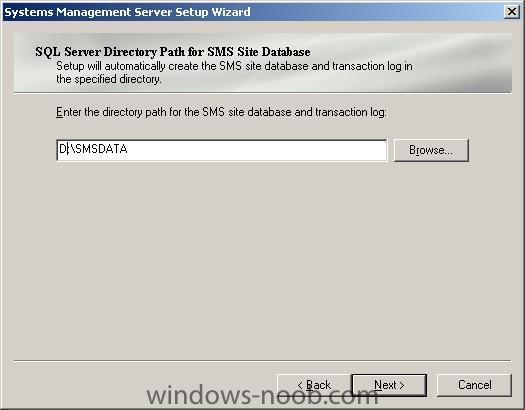
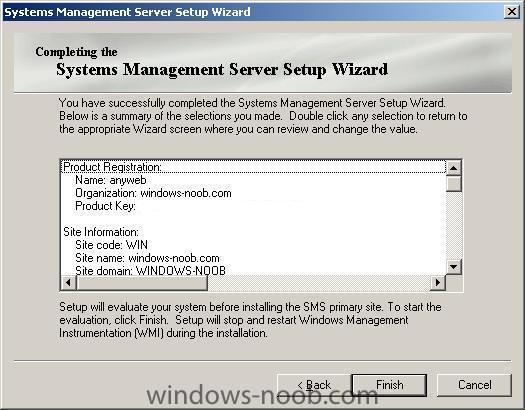
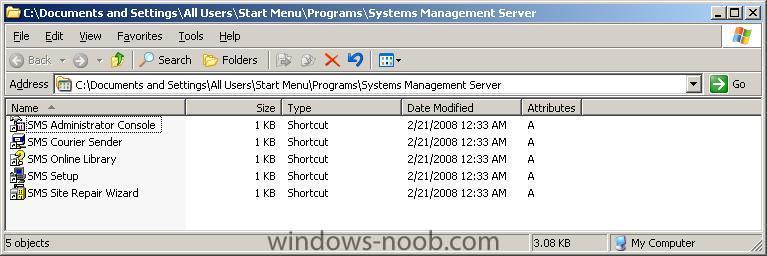
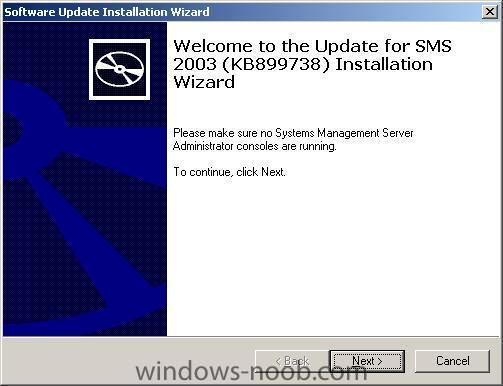
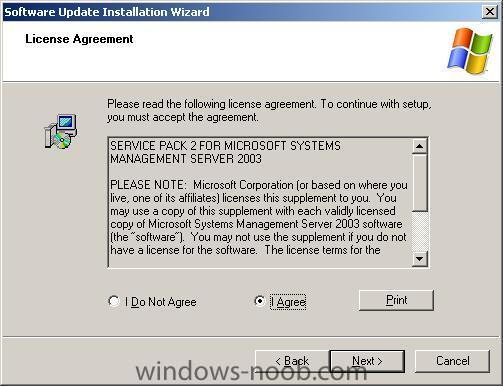
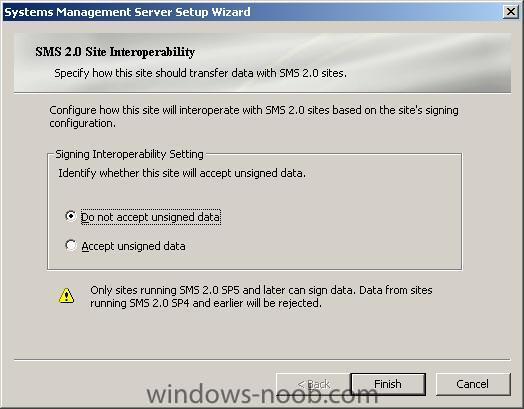
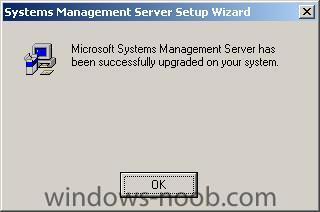
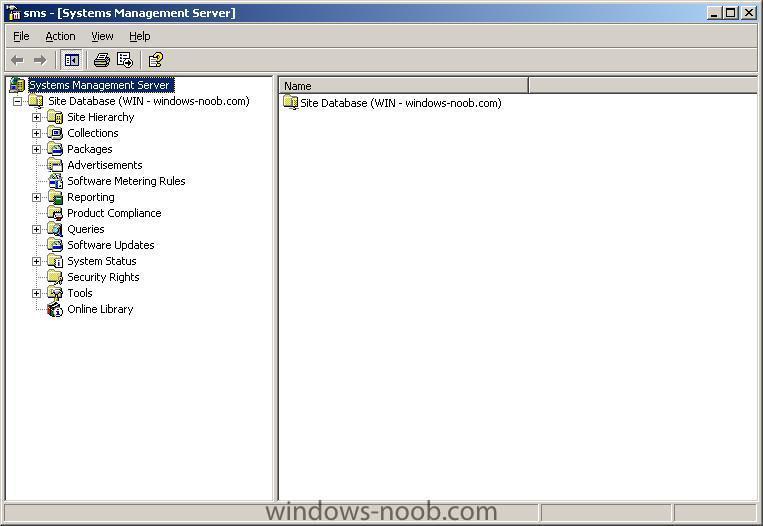
This Guide assumes you are installing Microsoft SMS 2003 Sp1. This ISO is available for download on MSDN. As part of this guide we will upgrade SMS 2003 sp1 to SMS 2003 sp2. Optionally, Service pack 3 for Microsoft SMS 2003 is available online so you can install that after this installation (if you want). This guide also assumes that you are setting it up on a Windows 2003 Server (sp1 or later) and that you have installed SQL server 2000 or later. SQL 2005 is the recommended database solution today for SMS 2003 however for the purposes of this article only SQL server 2000 sp4 is covered. Microsoft recommends the following server requirements:- � Internet Information Services (IIS) must be installed and enabled as part of the Windows Server installation for certain SMS site system roles. � Microsoft SQL Server� 7.0 with Service Pack 4 or later, SQL Server 2000 with Service Pack 4 or later, Microsoft SQL Server 2005, Microsoft SQL Server 2005 SP1, or Microsoft SQL Server 2005 SP2 is required for the SMS site database system role. Warning:- If you have not installed and configured IIS then do NOT start the SMS installation. IIS must be setup and configured first. click on the SMS 2003 icon to start the installation Wizard. click next to continue and depending on your configuration click next again to see the installation options. Next we get to make a choice, let's stick with the default which is Install an SMS primary Site. next you may get to choose a custom (default) or express setup, stick with the default and click next. Next we are asked to accept the license agreement, and next we can input the registration details (I've removed my product key from the below screenshot) next we get to choose the Site Code, it's a 3 character code so make sure to write it down or remember it... In the example here I use WIN as the site code Now we get to decide if we shall extend the , make sure to enable this choice before clicking next as it allows us to implement automatic site assignment or roaming boundries for advanced clients. For security settings leave the default (advanced) the next choice is for the number of clients on your SMS site, enter a number which corresponds to that amount Next we get to choose where to install SMS, in the example here, I installed it on my D:\ partition (d:\sms), in addition I selected the remote tools option. NOTE: this is considered a security risk and wouldn't be recommended normally. next you are prompted for the SQL server information. Accept the defaults and click next. let SMS create the database... make a note of it's name enter a path for the transaction log, I changed mine from the default (C: to D:) if you have a lot of windows Admins, then consider changing this otherwise leave as default (SMS consoles) finally you'll see the completing the wizard screen clicking next will complete the installation (will take some time so go get yourself a coffee) and then you can click on finish to end the wizard. Ok once done, let's upgrade it to Sp2 by downloading this and installing it (also available on MSDN) agree to to sp2 license and then choose to not accept... after quite some time you have installed SMS 2003 Sp2. If you want to upgrade it to Sp3 then go ahead. I stayed at Sp2 because that was all i needed. at this point i decided to reboot. after the reboot you can startup the SMS administrator console and your SMS server should look like this congrats you are done ! Ok, now that you have installed SMS you will want to configure it. cheers niall


-
Step 2. Capture a Vista image (wim)
anyweb replied to anyweb's question in Zero Touch/ZTI, Lite Touch/LTi
have you followed the steps above exactly as i've described them ? do you have a sms server setup ? what network path did you type in to connect ? what permissions have you got on the share ? what user are you connecting as ?> -
Japan's Toshiba Corp (6502.T: Quote, Profile, Research) said on Tuesday it would stop promoting its HD DVD format for the next-generation DVD after losing the support of key studios and retailers to the Blu-ray technology backed by Sony Corp (6758.T: Quote, Profile, Research). full story > http://www.reuters.com/article/technologyN...B00294420080219