anyweb
-
Posts
9277 -
Joined
-
Last visited
-
Days Won
371
Everything posted by anyweb
-
ok i've connected to your lab just now and fixed the internal issues, basically to summarize your internal lab was not following my lab setup, and you had DNS configured incorrectly, so your srv0001 server (dc01) was 192.168.3.1 or something, when it should have been 192.168.11.101 and so on, so when i pinged from the sccm server to the dc it replied back with 192.168.3.1 (or whatever ip it was, i forget), in addition, your webserver had ip address of 192.168.11.100 so it was not going to work, ive fixed dns by deleting the stale entries, and manually configuring the ip on the dc and on the sccm server and lastly disabled ipv6 on all 3 servers, rebooted them, and verified all could ping each other, that's the first thing you need to have working before trying anything else, don't reuse labs from something else, they will break, always build labs from scratch as per the offered guide, then it will work 100% lastly, i confirmed that your smoothwall was configured correctly, it looked ok, then i checked port 80 on your internet ip address with canyouseeme.org and it didn't work, that means that more than likely your internet provider or router/adsl/whatever is blocking port 80, so please check that
-
 ok well if you can zip up all logs starting with app*.log in your c:\windows\ccm\logs folder and attach them here i can take a look
 -
the difference (based on what you said) is that one of those two installations may have been in user context, as in the user clicked and ran the installer, so is your software dependent on a user being logged on ?
-
what does the *wrapper.log tell you ?
-
hi there worst case scenario while you are troubleshooting the problem you can create bootable media in ConfigMgr, to boot the laptops (usb or cd) and then image them as normal. But as regards your problem, are you sure that the task sequence deployed contains the new boot image ? and it's distributed to all dp's ?
-
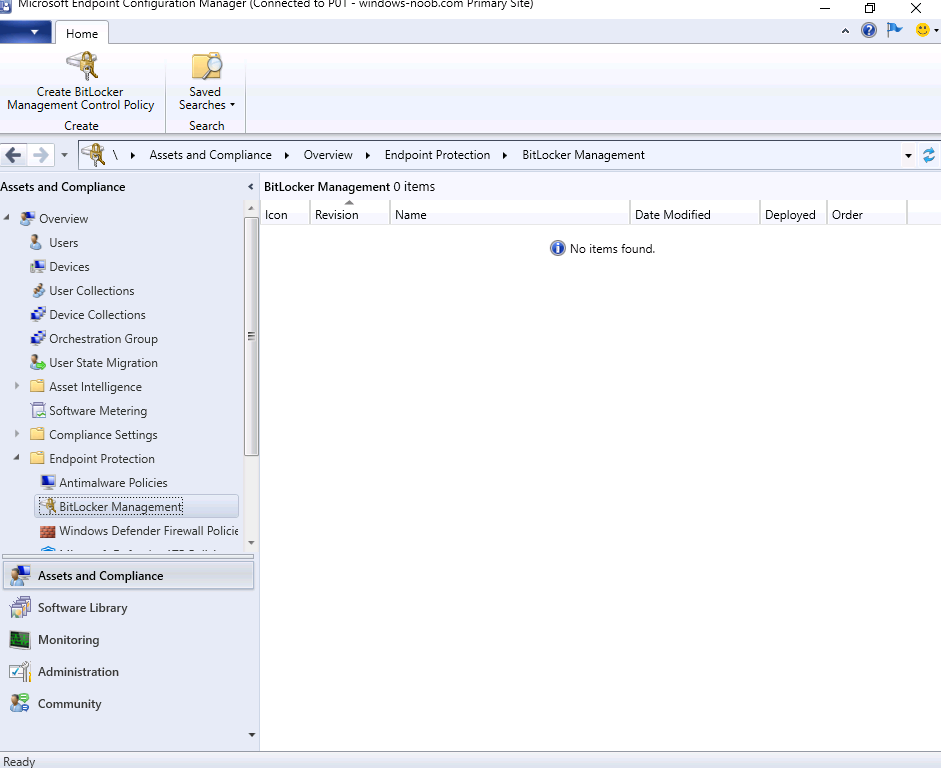
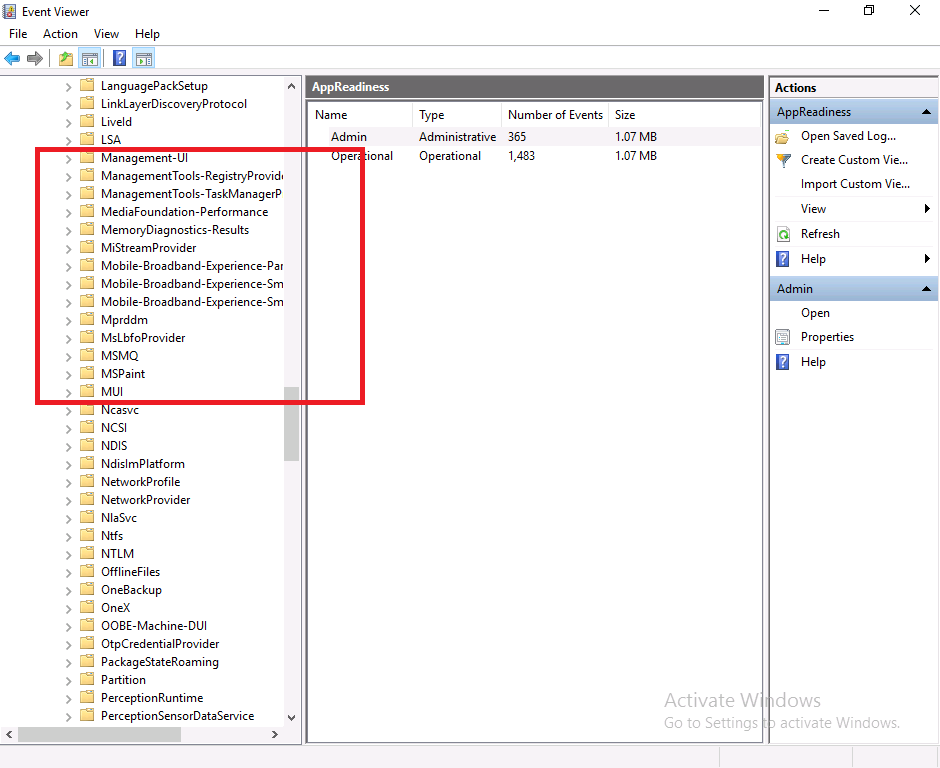
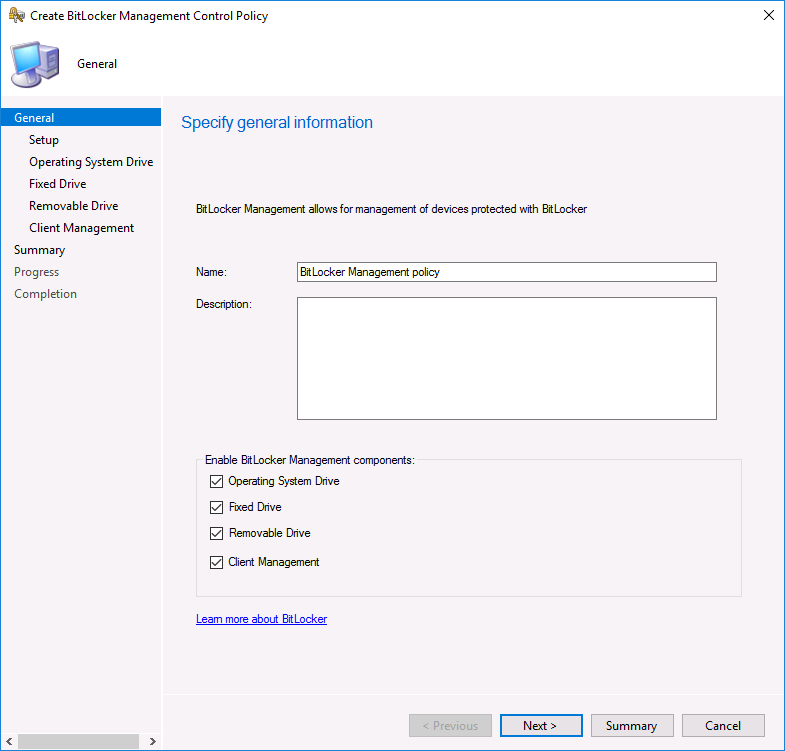
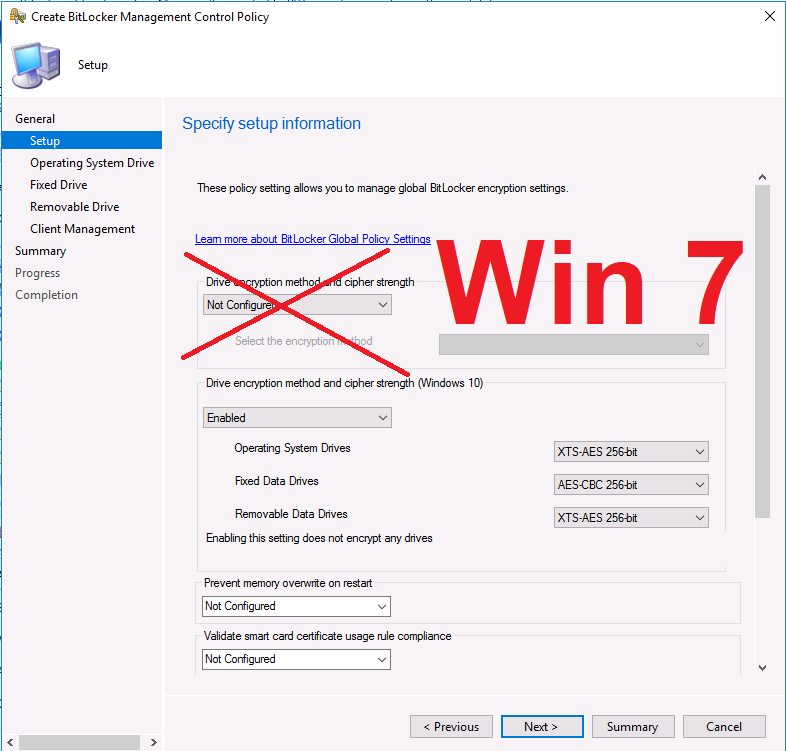
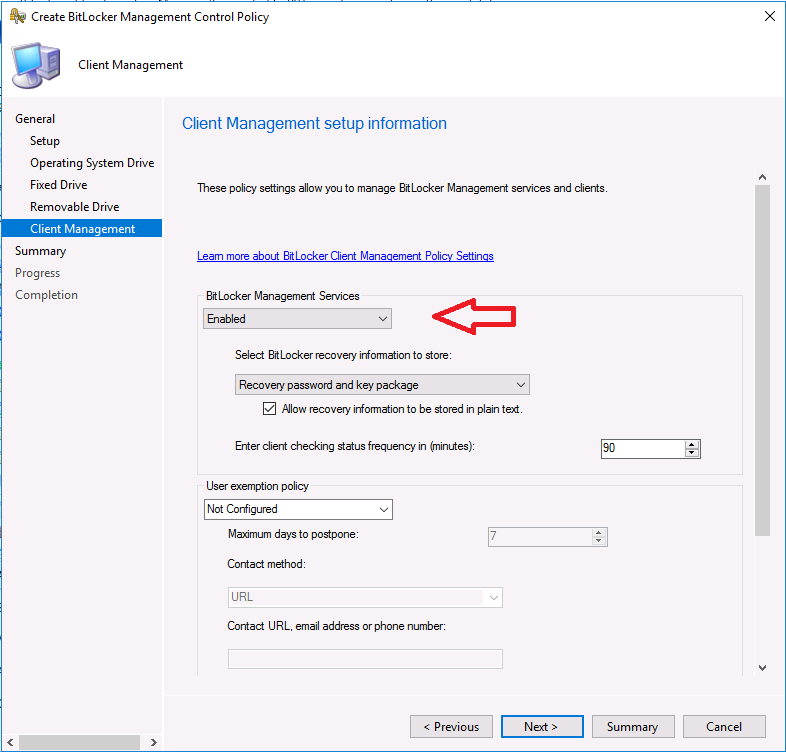
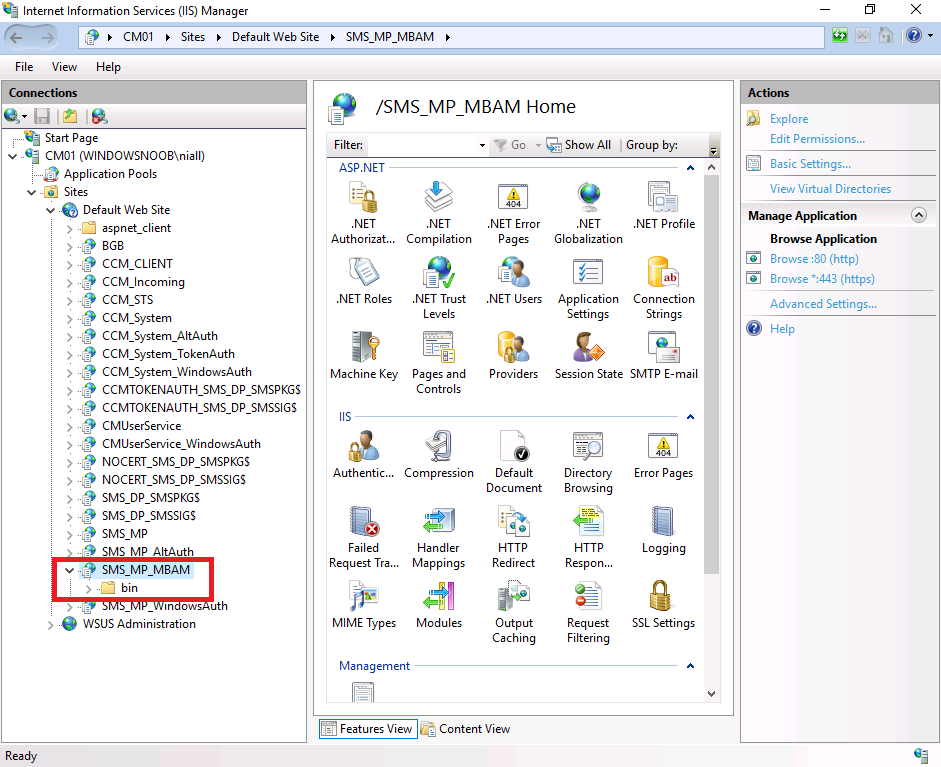
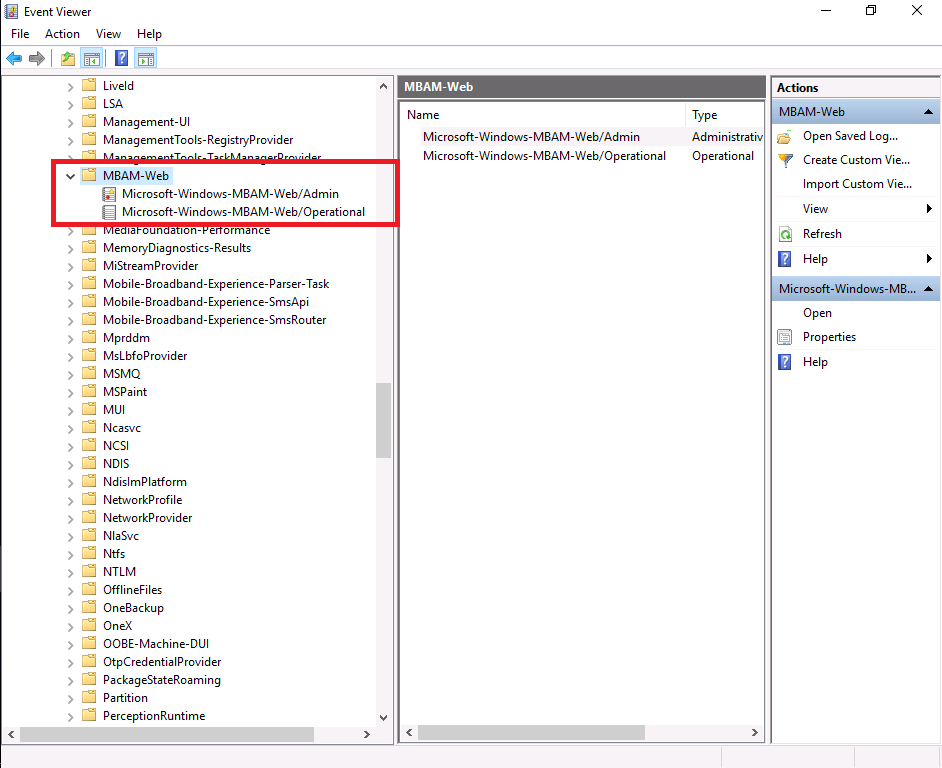
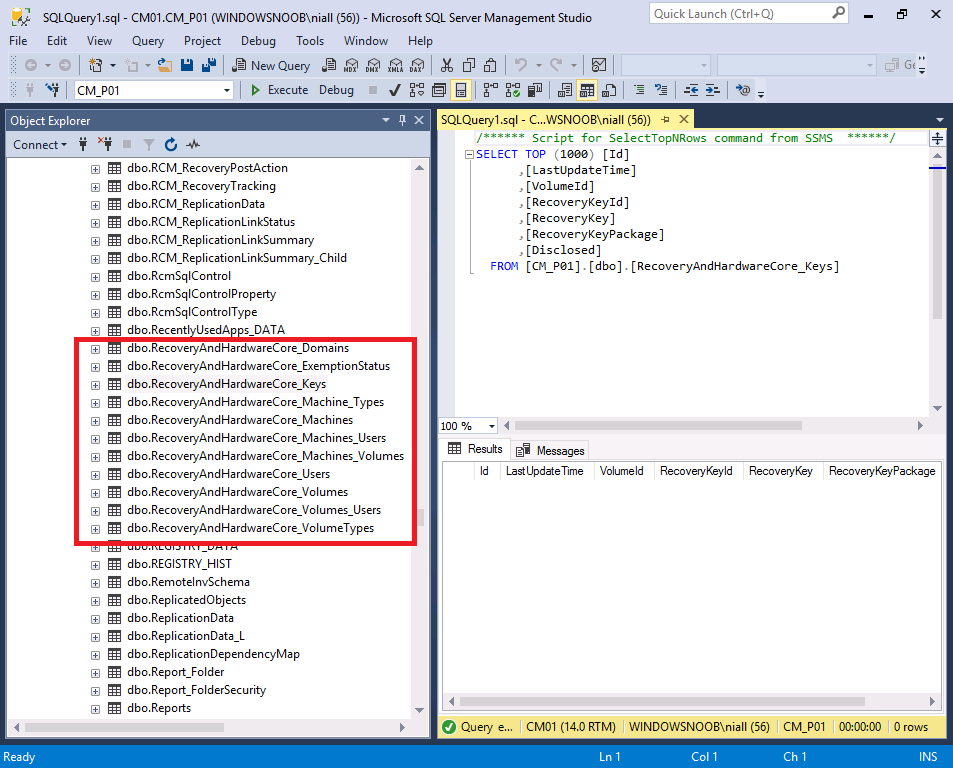
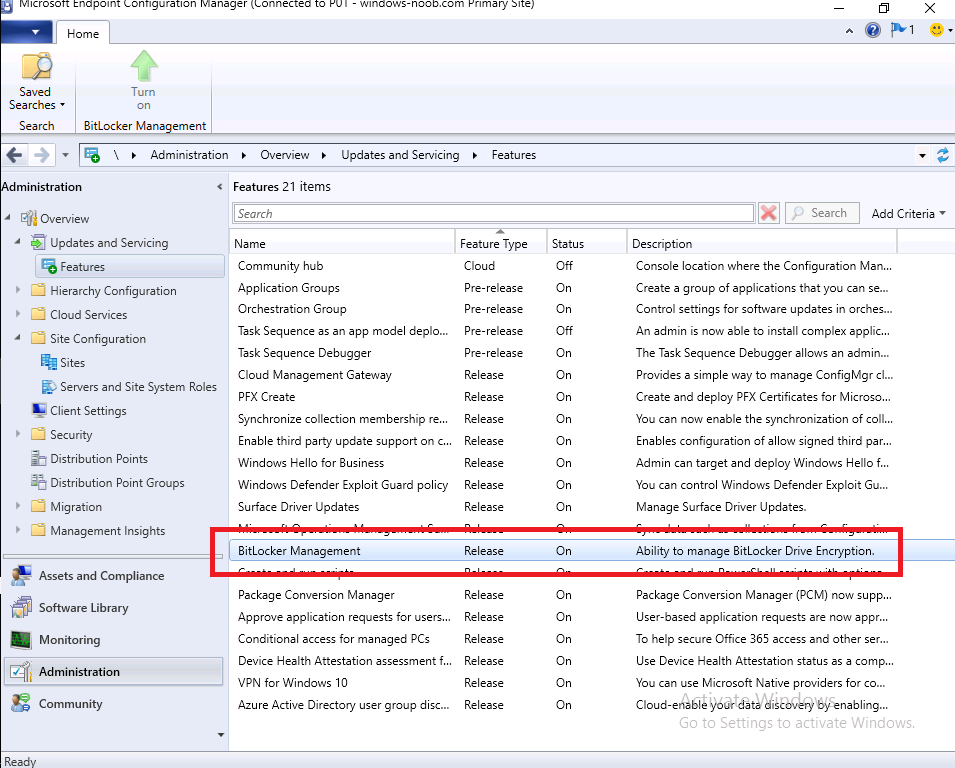
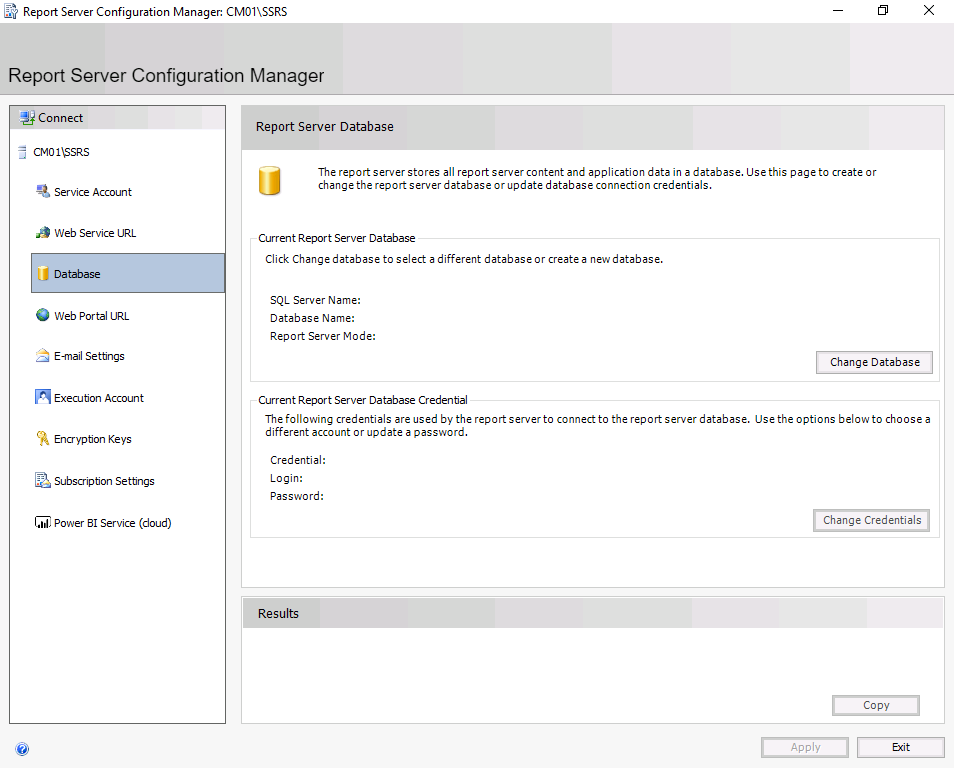
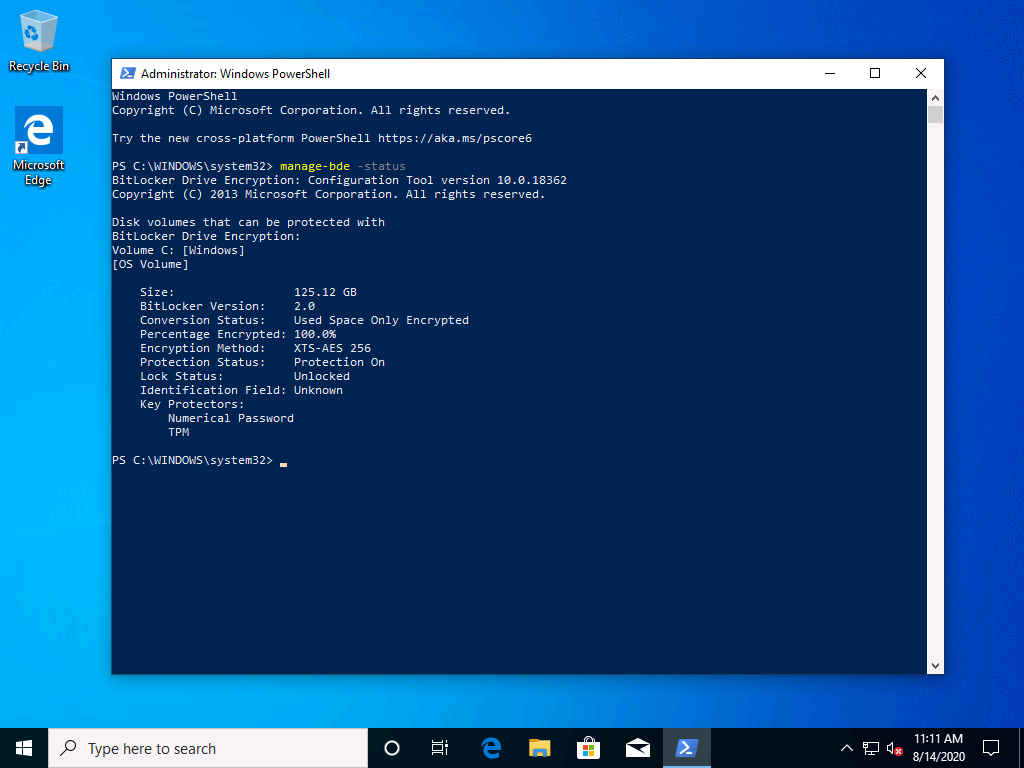
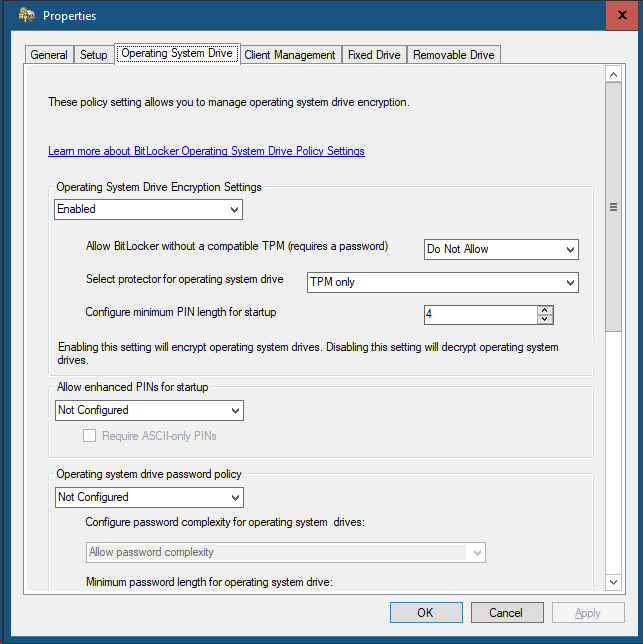
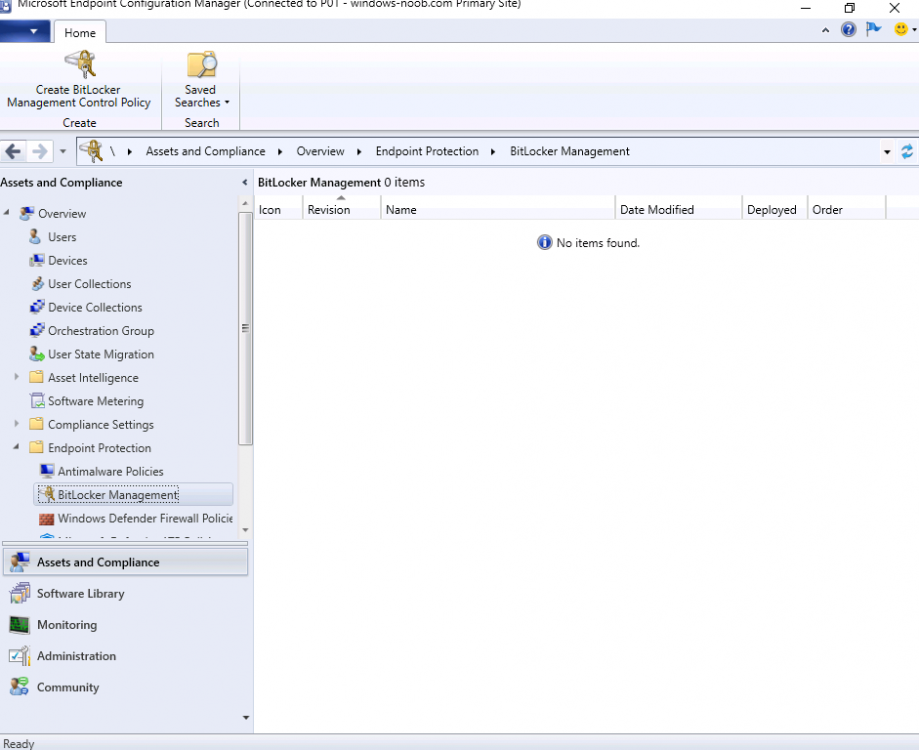
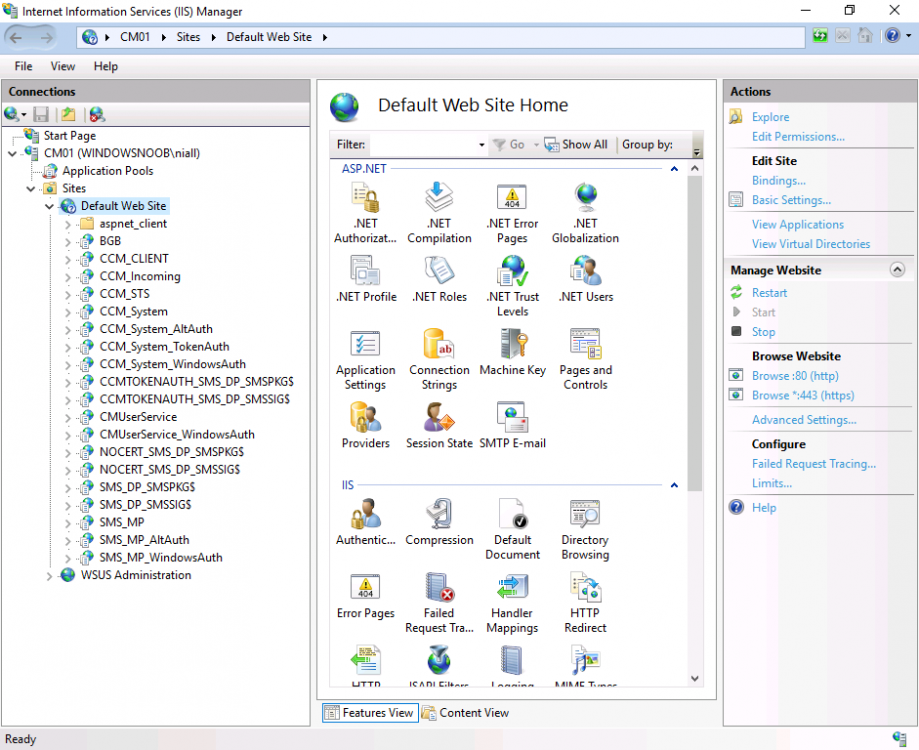
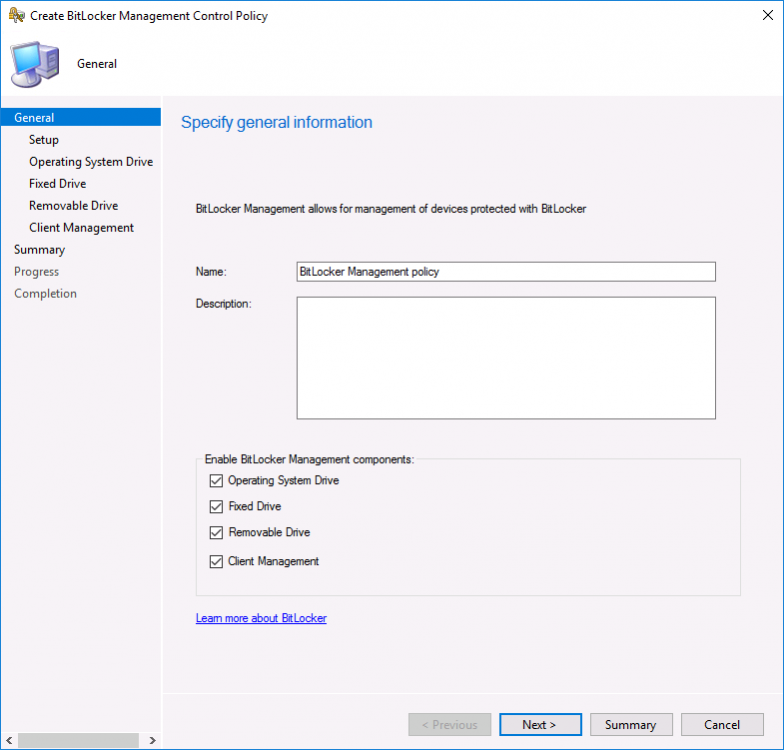
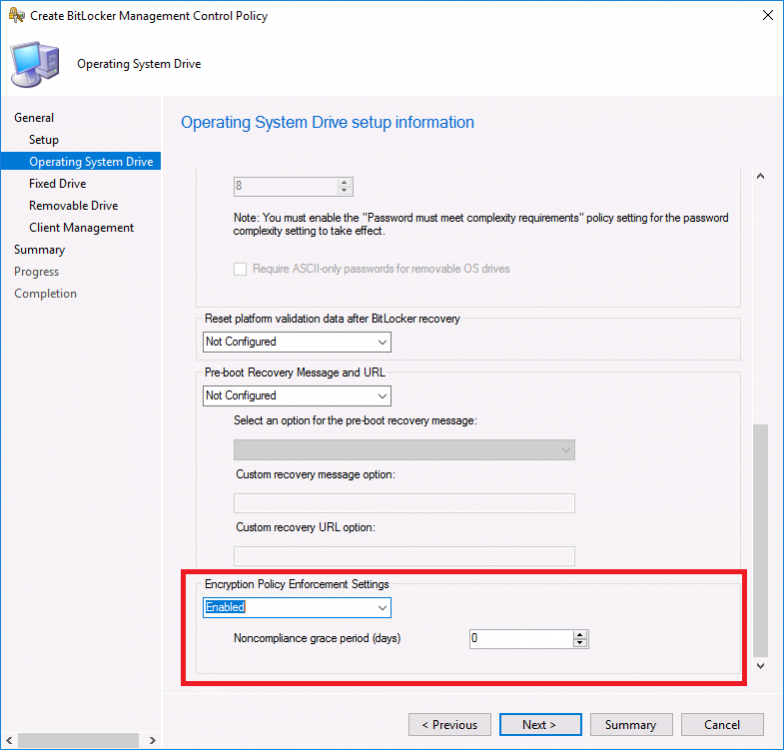
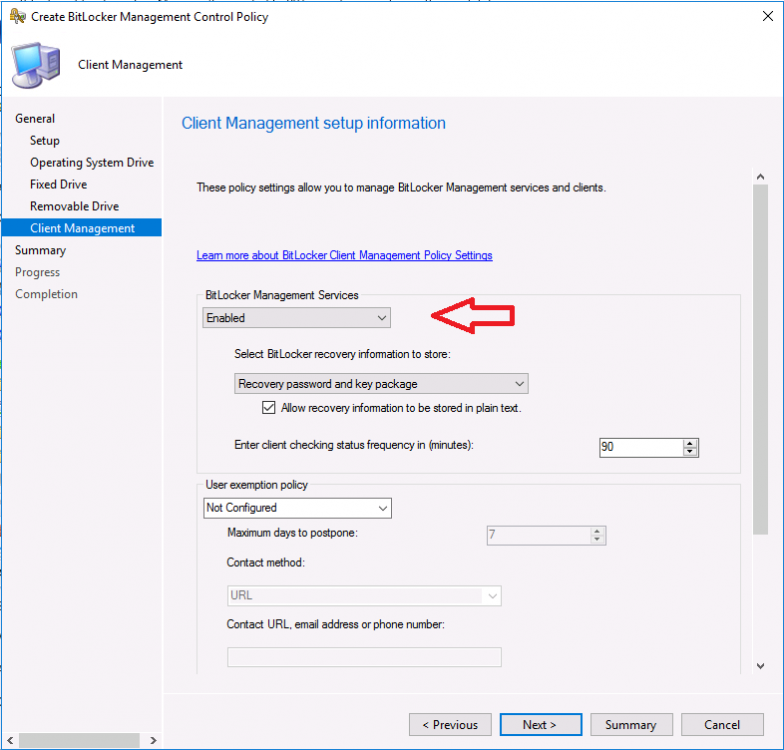
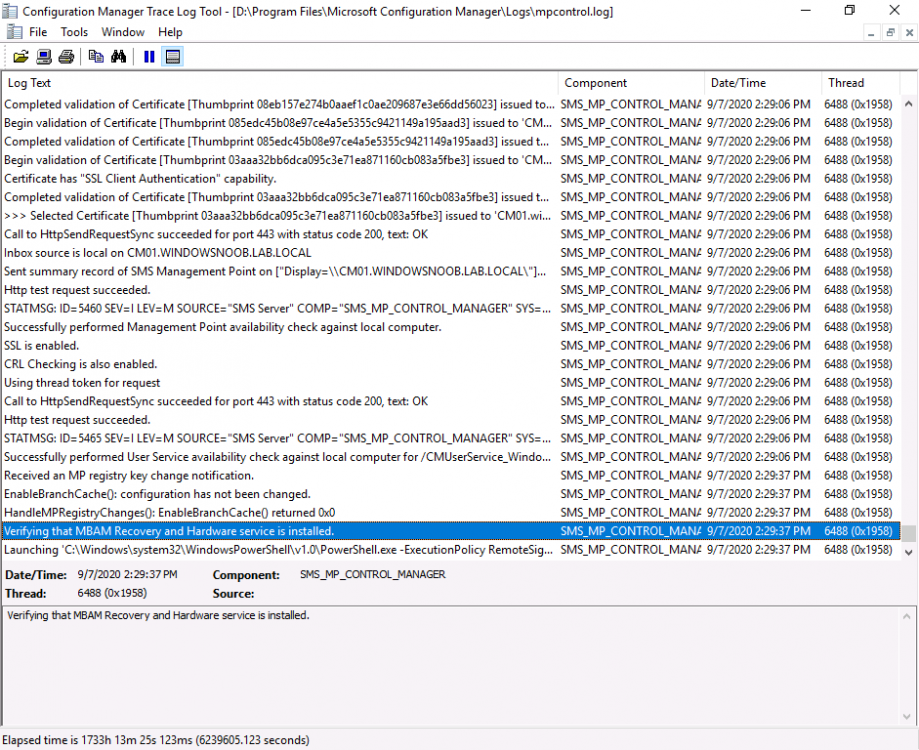
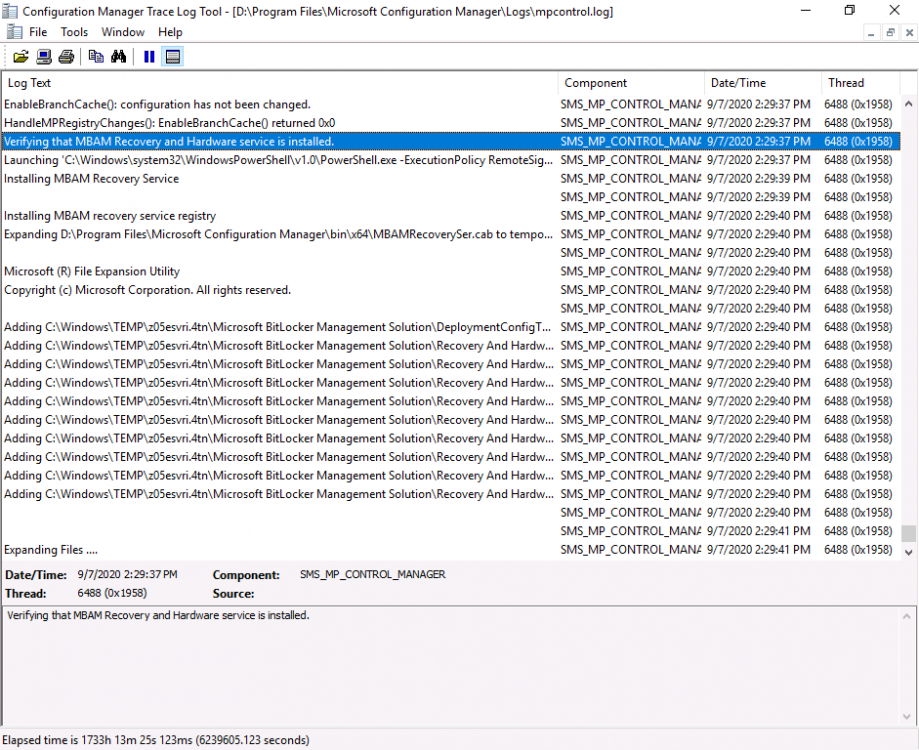
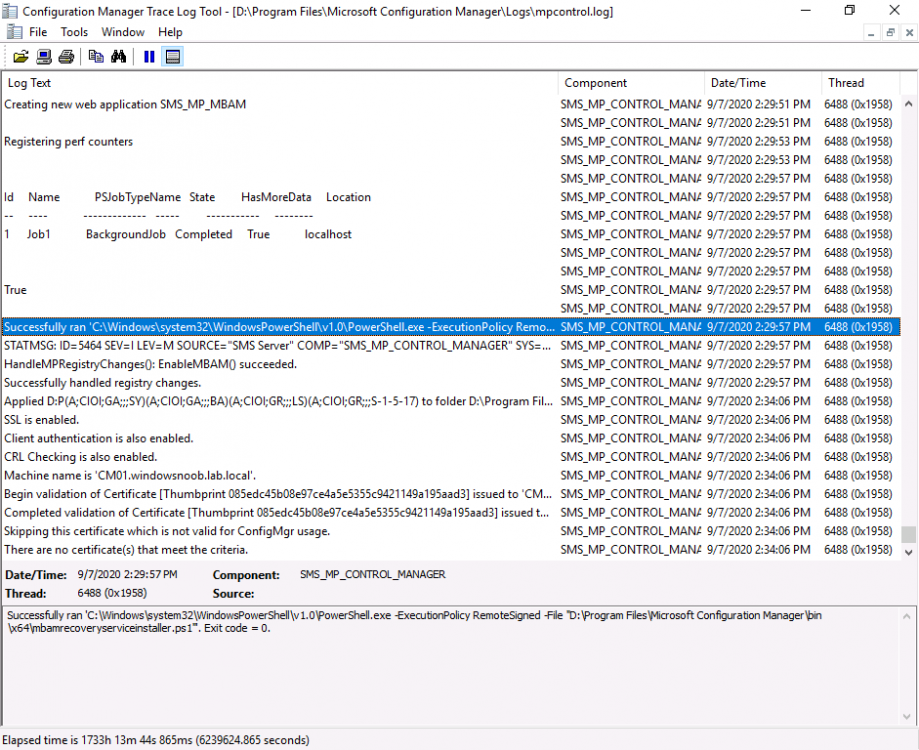
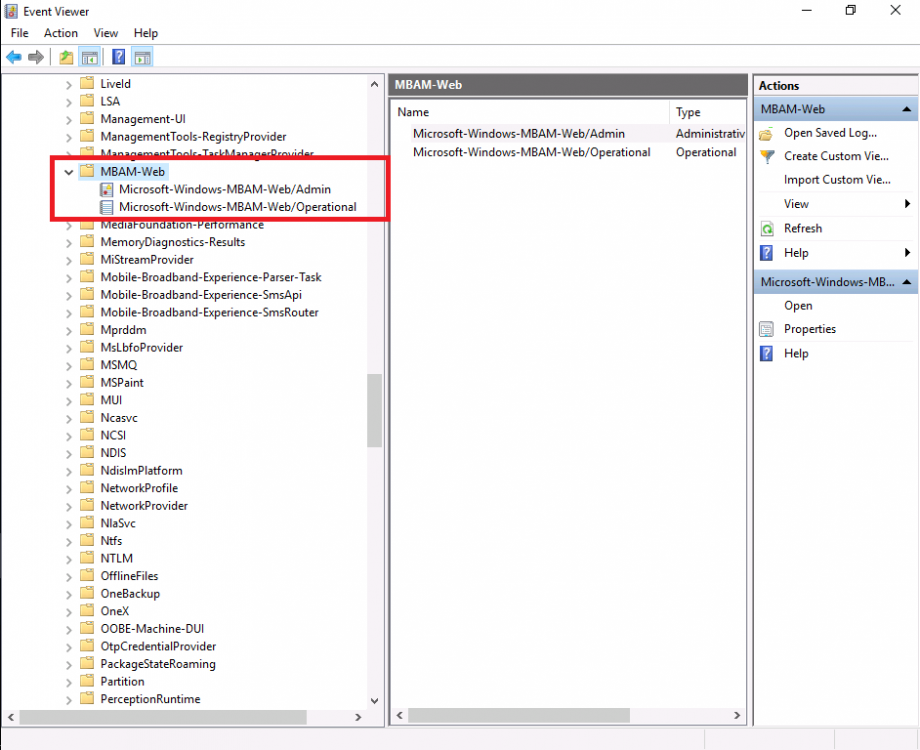
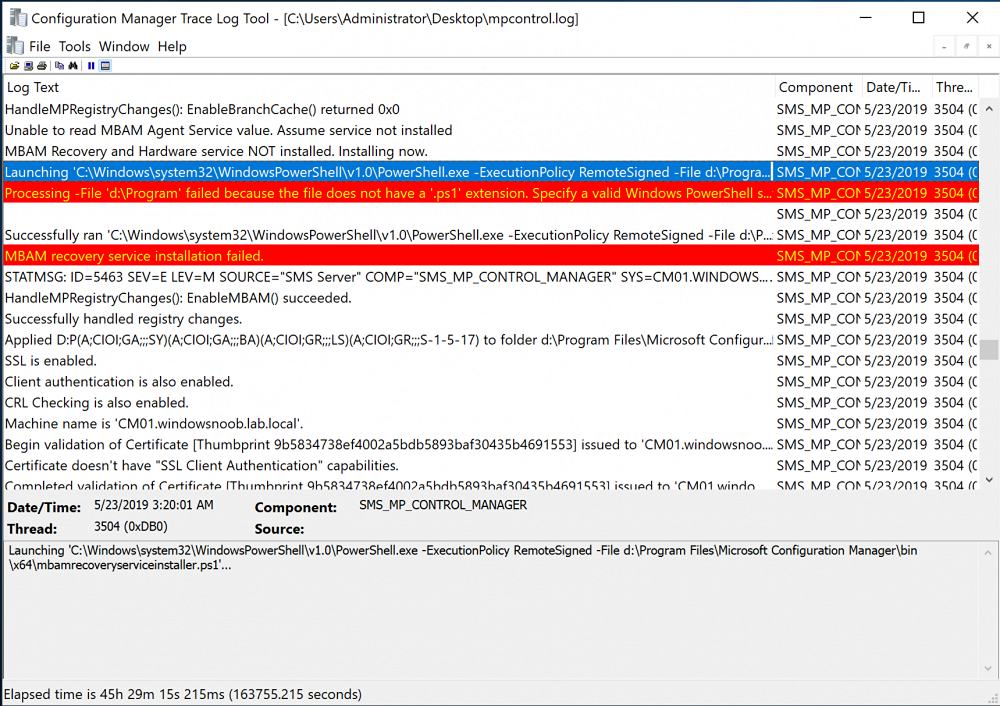
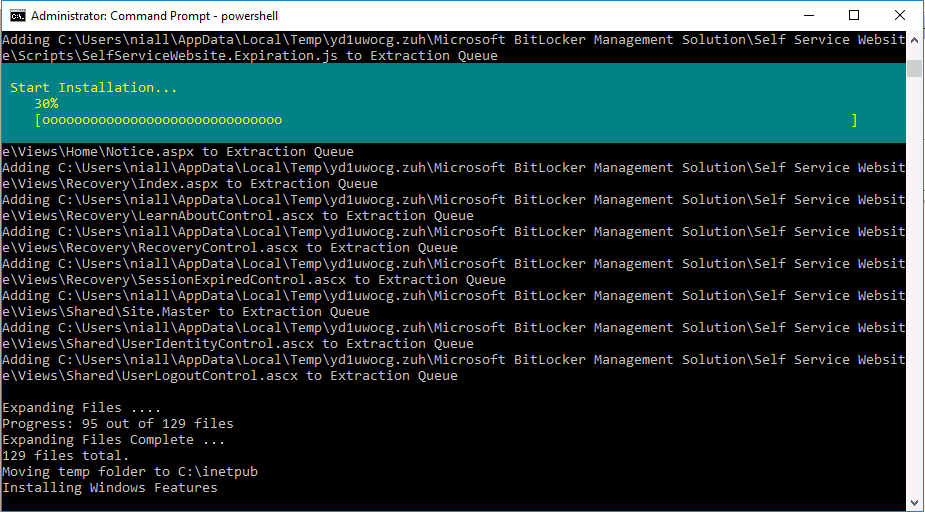
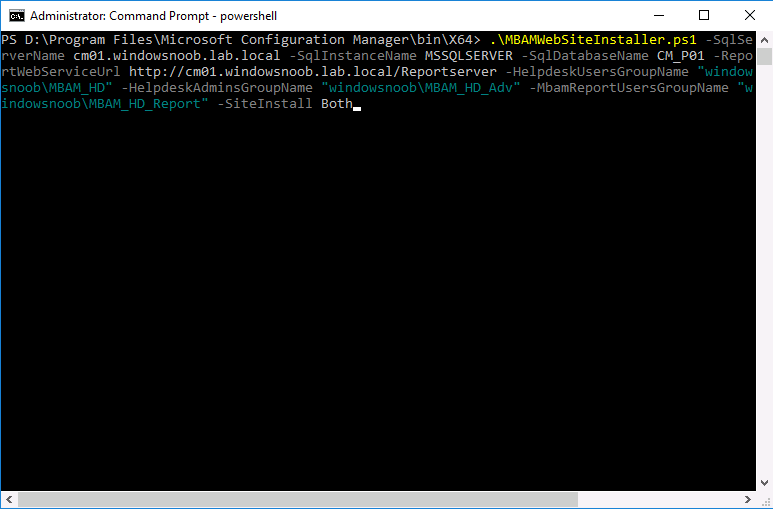
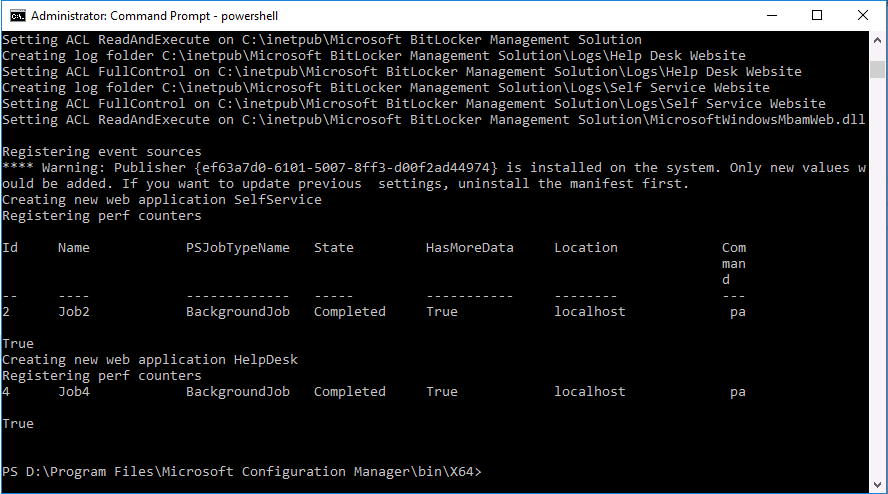
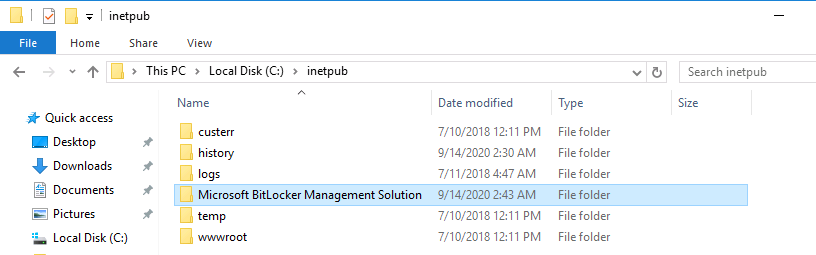
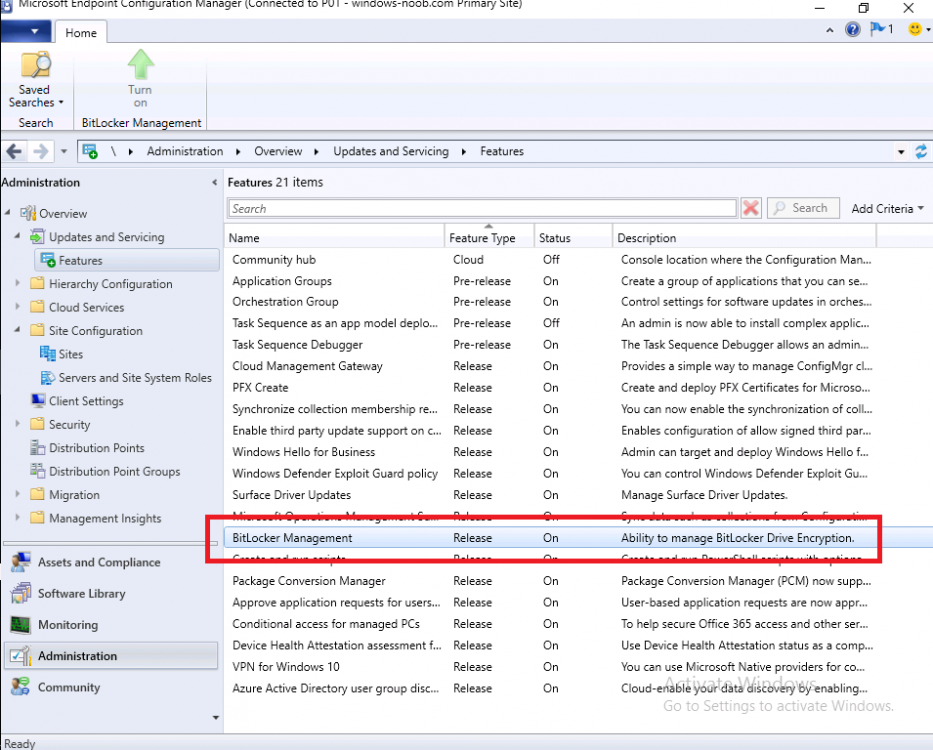
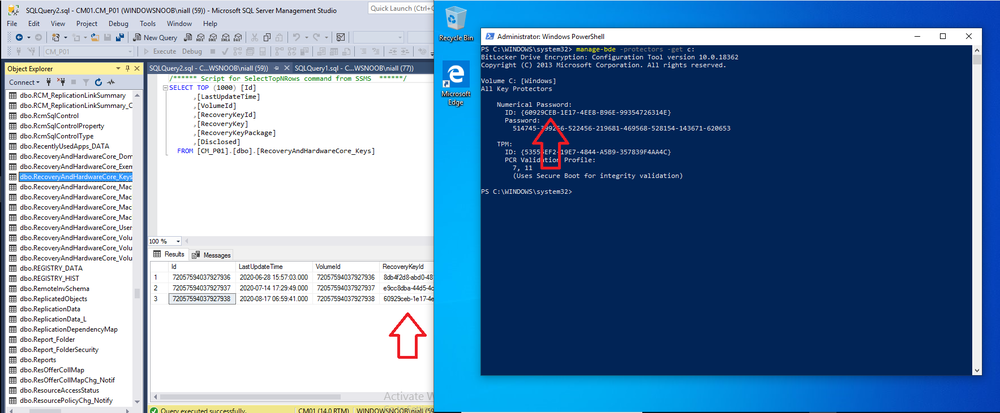
Introduction Microsoft blogged about Bitlocker Management capabilities back in May, 2019. They detailed how that would impact and evolve on the following three platforms. Cloud-based BitLocker management using Microsoft Intune On-premises BitLocker management using System Center Configuration Manager Microsoft BitLocker Administration and Monitoring (MBAM) And recently they've posted an updated blog post here where they go into detail about how BitLocker Management in Microsoft Endpoint Manager has evolved (both in Intune and ConfigMgr). This purpose of this mini series is to help you troubleshoot problems related to the installation, configuration and usage of the new BitLocker Management capabilities in ConfigMgr and will be broken down into the following 3 parts. Troubleshooting BitLocker Management in ConfigMgr - Part 1. Server side (this part) Troubleshooting BitLocker Management in ConfigMgr - Part 2. Client side Troubleshooting BitLocker Management in ConfigMgr - Part 3. Common issues But first let's take a quick trip down memory lane. Microsoft initially released Bitlocker Management capabilities in the 1905 version (Technical Preview) of Configuration Manager, and expanded upon the abilities up to the release of the BitLocker Management feature contained within Configuration Manager version 1910 (Current Branch). After 1910 was released they have continued to improve and add new features as you can see by checking out any of the newer Technical Preview releases from Technical Preview version 2002 on wards where many GPO settings were added to the Bitlocker management UI. In addition new capabilities came in TP2005 (set BitLocker Encryption type during the Enable BitLocker and Pre-Provision BitLocker steps in an OSD task sequence that later made their way into Configuration Manager Current Branch version 2006, so it pays to look at the technical preview releases every month. Note: The screenshot below is taken from Technical Preview version 2008 I have created many blog posts and videos on the subject, so if you are interested then please take a look at the videos linked below. Installation and troubleshooting on the server When you use the BitLocker Management feature in ConfigMgr 1910 or later you can create BitLocker Management policy and deploy that to your clients, they will get the policy and process it, and the MDOP client agent will get installed (if not already installed) and then it will take action based on the settings it finds in the registry and based on the policy settings and the client settings compliance will be set. But, it's important to understand the flow of how it all works together and to do that you need to understand that things will change based on whether you've created BitLocker Management policy or not. In this post I assume you've met the prereqs and enabled the BitLocker Management feature as shown here. Before creating policy First of all, let's look at a ConfigMgr 2002 Current Branch server where no BitLocker Policy has yet been created. You can think of this as a server that has been recently upgraded from 1910 or one where no one has configured anything related to Bitlocker Management yet. In this blog post the primary server in my lab is not using co-Management but if it was, you'd need to ensure that the Endpoint Protection workload was managed by ConfigMgr if you want ConfigMgr to manage BitLocker Management. The Configuration Manager client handler for BitLocker is co-management aware. If the device is co-managed, and you switch the Endpoint Protection workload to Intune, then the Configuration Manager client ignores its BitLocker policy. The device gets Windows encryption policy from Intune. When you switch encryption management authorities and the desired encryption algorithm also changes, you will need to plan for re-encryption . In the console, expand Endpoint Protection in Assets and Compliance and you'll see BitLocker Management. Select it, there will be no items found as no policy has yet been created. In addition, if you open Internet Information Services (IIS) Manager, you will not see any MBAM related applications in there. and there will be no MBAM related logs in Windows Event Viewer After creating policy When you create your first BitLocker Management policy you'll see MBAM related activity revealed in the mpcontrol.log on the ConfigMgr server. This is your first step to look in case of problems on your server. So let's create our first BitLocker Management policy. On the setup window, don't select the first option, it's only applicable to old operating systems such as Windows 7 and that's not supported any more. Instead, use the drop down underneath that for Windows 10. Configure your Operating System drive settings. And decide what Encryption enforcement you require. Setting it to zero will mean that the MDOP agent will not notify the end user and instead, will begin encryption silently (as long as everything is configured correctly and the client is not already encrypted). Don't forget to enable Client Management otherwise the registry keys necessary for the recovery service will never get populated on the client and as a result, BitLocker Management will not work. After creating policy After you've created the policy, open mpcontrol.log and look for a line which reads Verify that MBAM Recovery and Hardware service is installed. shortly after that it starts installing the MBAM Recovery Service And you should confirm that the PowerShell script (mbamrecoveryserviceinstaller.ps1) used to install the MBAM Recovery Service successfully completed. To see what a failed MBAM Recovery service installation looks like take a look at the mpcontrol.log below from an older lab. This is just for comparison purposes, notice how it states MBAM recovery service installation failed. After the script has run successfully, you can refresh Internet Information Services (IIS) Manager, and you should see the SMS_MP_MBAM application is now listed. In addition, in Event Viewer, you will now see MBAM specific logging areas added. These will populate with info if there are problems detected on your MBAM Recovery Service. Installation of the web portals The BitLocker Management web portals (helpdesk and self service) may or may not be installed on the same site server as the MBAM Recovery Service, in my lab, they will be installed on the same server (ConfigMgr Primary site). To install the portals you need to run a PowerShell script included with ConfigMgr version 1910 or later, it's in the bin\x64 folder of the installation source. Below is the command line I used to install the portals on my Primary. After pressing enter, it start's copying files, settings acl's and so forth. However mine bombed out with some red errors which hinted towards the problem being SSRS reporting related. This could be trued if you either have not installed or configured SSRS or SSRS itself has a problem. After some troubleshooting I determined that my SSRS instance had expired (it was evaluation media), so I fixed it by doing as follows. After resolving the SSRS issue, the web portals installed just fine. You can scroll back up to see all the text output to see if there was any problem reported. If you'd like to compare my successful output with yours then you can download the output here.web portals setup text.txt After you have successfully installed the web portals, you can browse to the InetPub root folder on your ConfigMgr server, and you'll see a new folder called Microsoft BitLocker Management Solution. This folder did not exist until you attempted to install the web portals. That folder in turn contains more folders, which have config files that can be edited as described in the blogs below. How can you use the Self Service feature when BitLocker Management is enabled within ConfigMgr ? How can you use the Help Desk feature when BitLocker Management is enabled within ConfigMgr ? What about log traces ? If you need to enable tracing on the server, use the SvcTraceViewer.exe tool to review those traces as described here. What about the database ? After successfully creating BitLocker Management policy, you'll notice new tables are present in ConfigMgr's database. Below you can see them in my lab, note that they are not yet populated as it's a new installation. Obviously if those tables are not present then you have a big problem. That's if for this part, join me in Part 2 where we'll look at the Client side troubleshooting. Recommended reading https://www.niallbrady.com/2019/11/13/want-to-learn-about-the-new-bitlocker-management-in-microsoft-endpoint-manager-configuration-manager/ Until next time, adios ! cheers niall


-
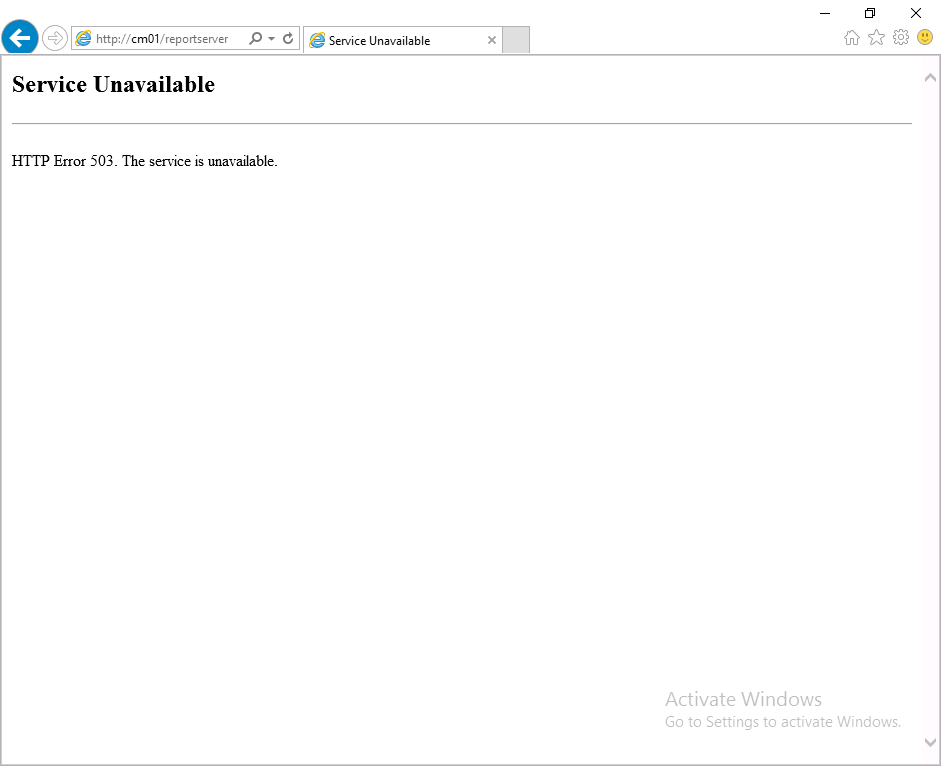
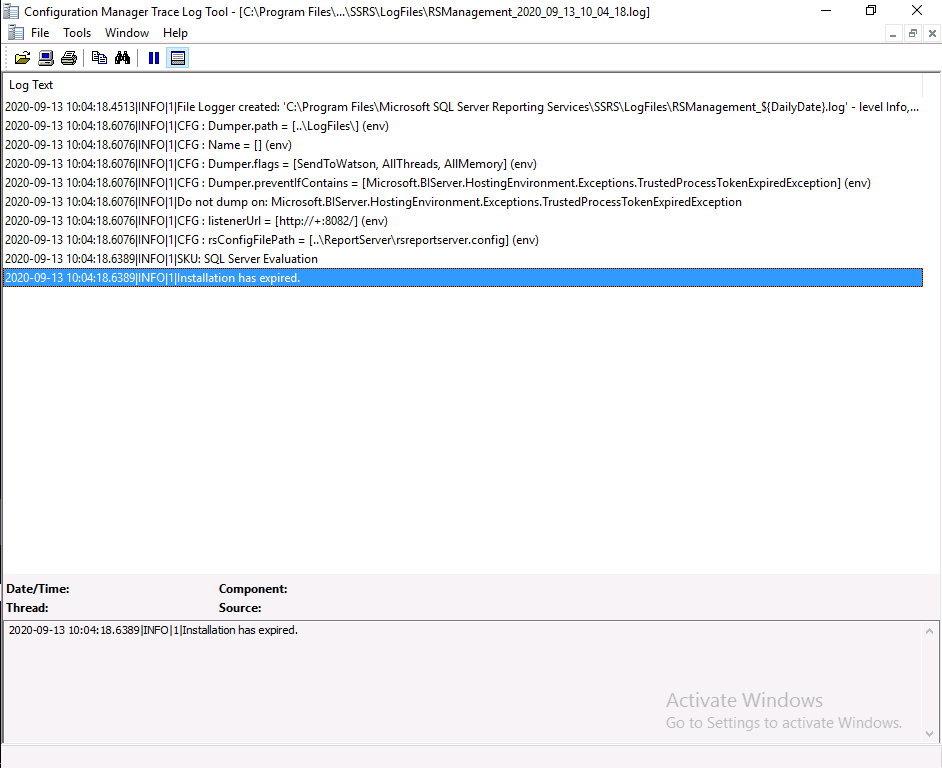
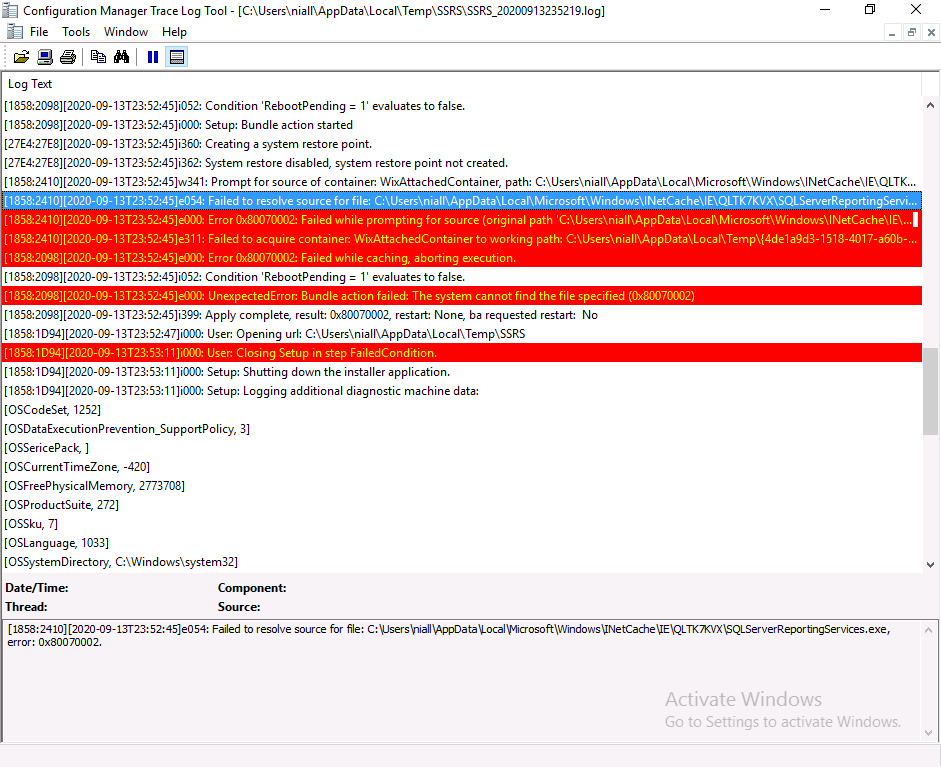
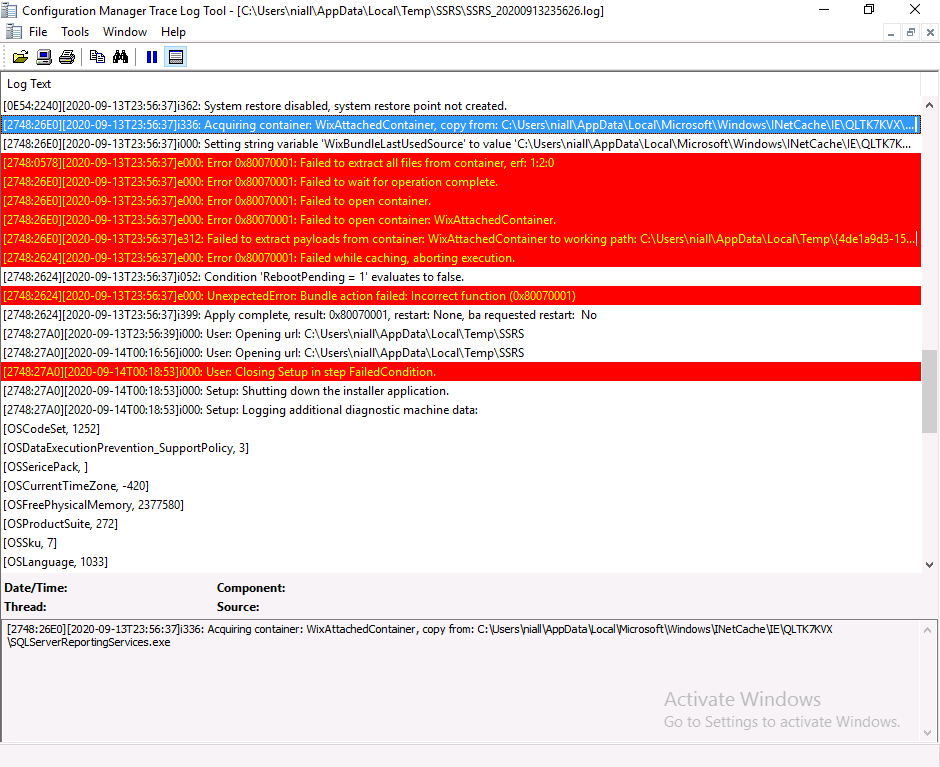
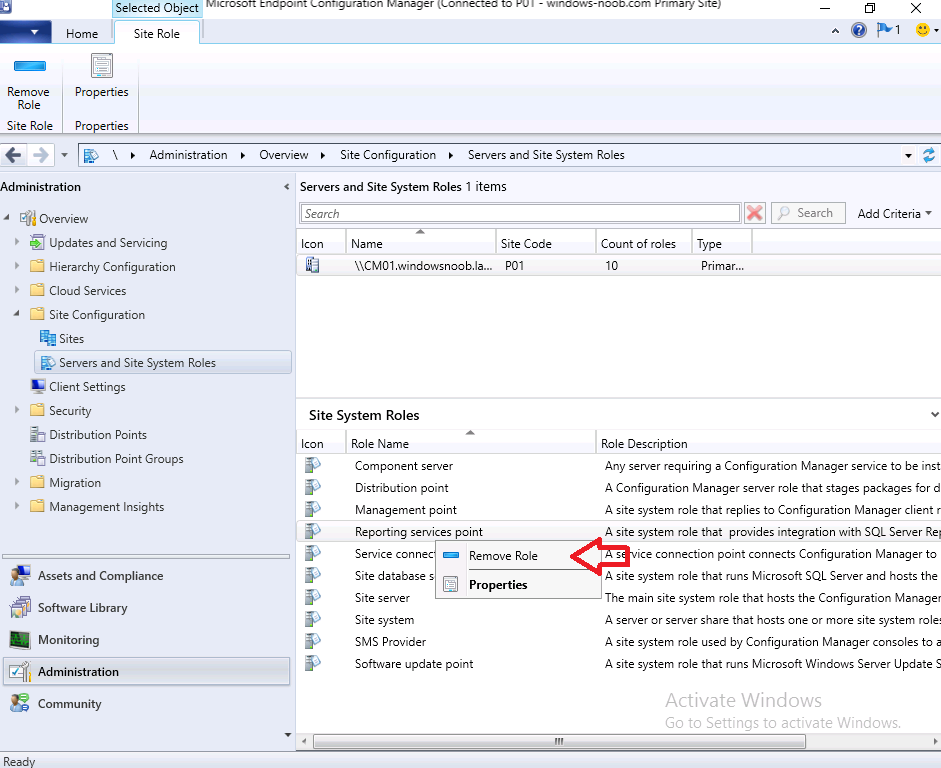
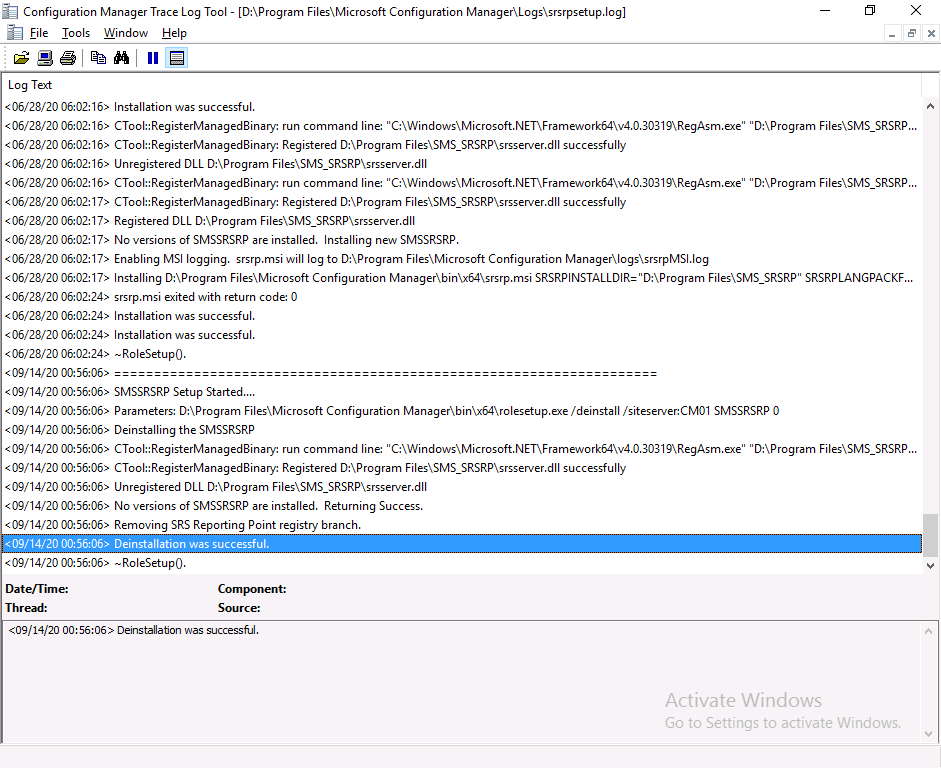
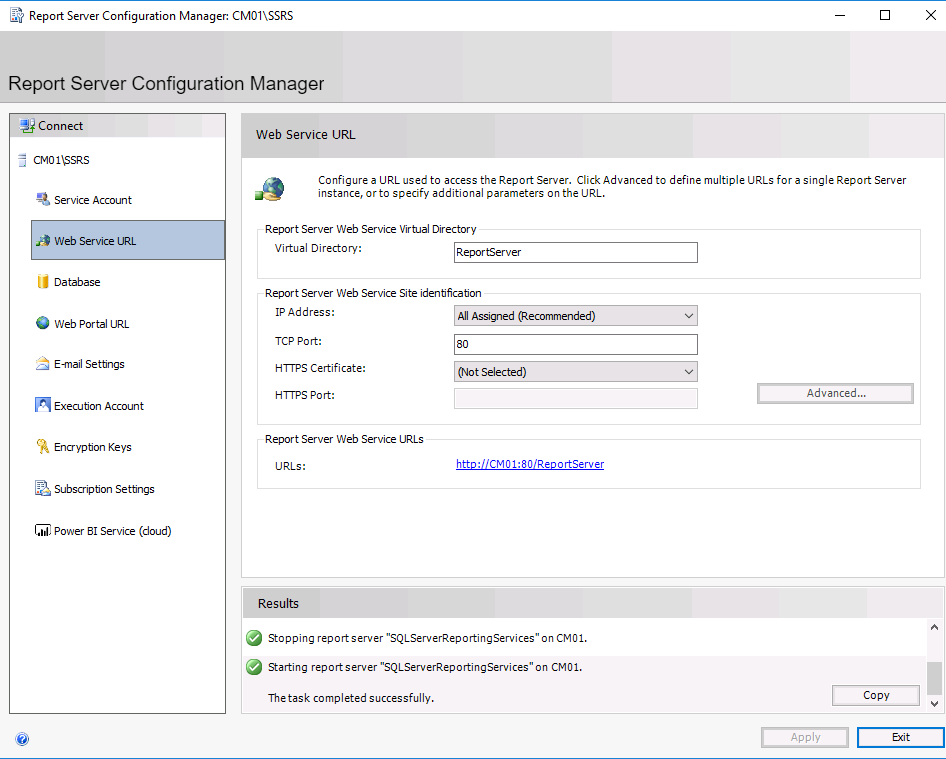
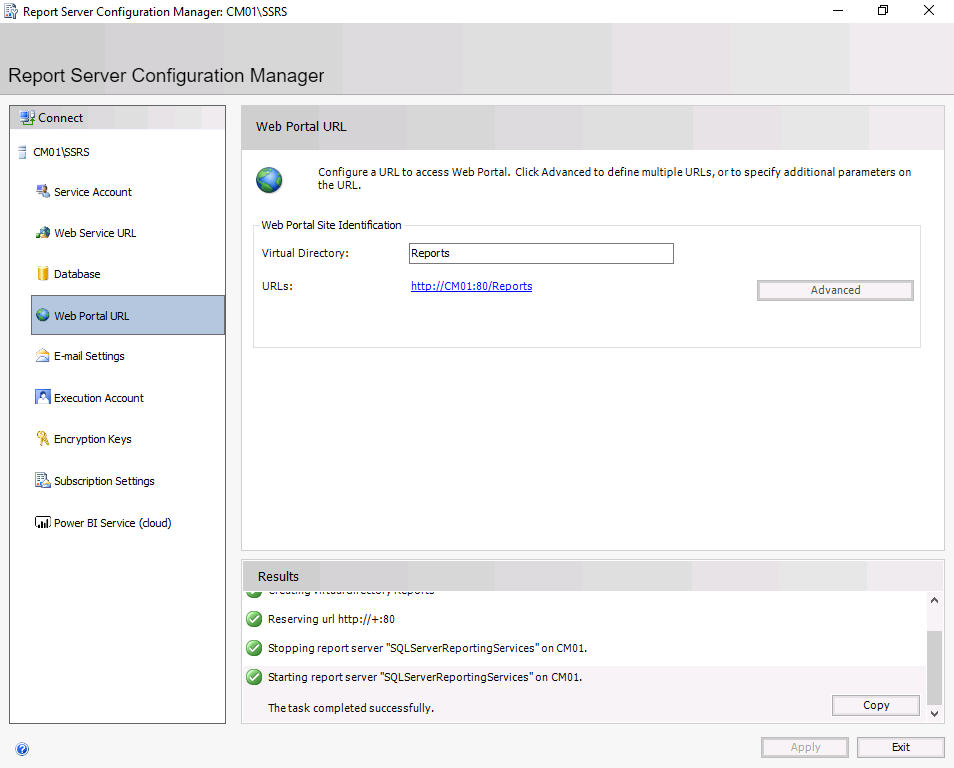
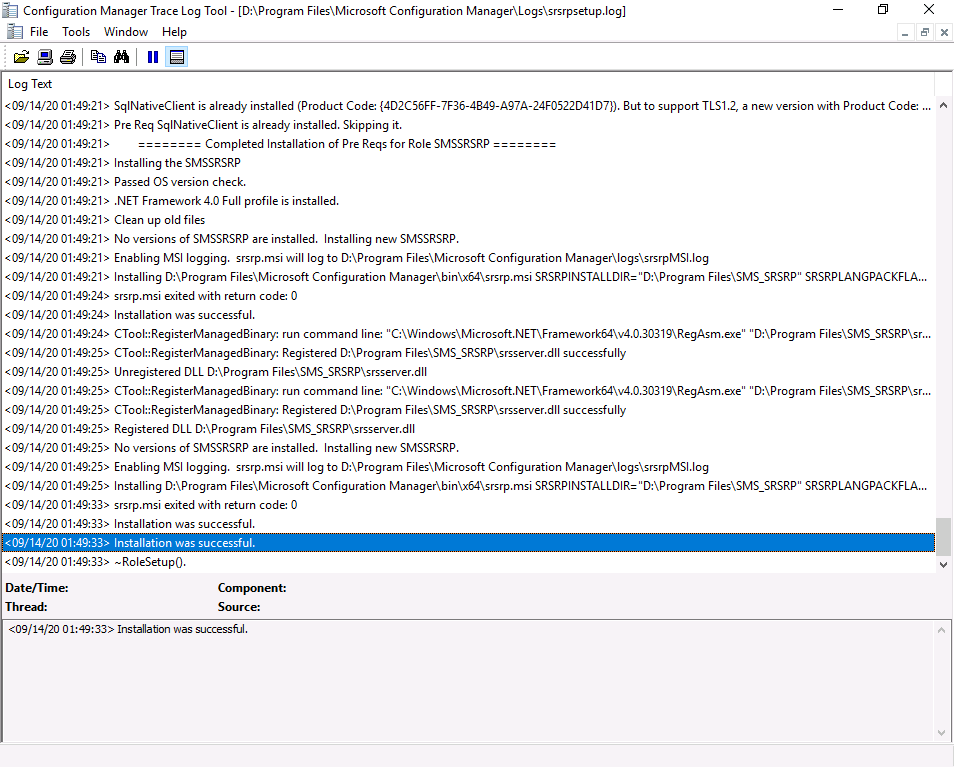
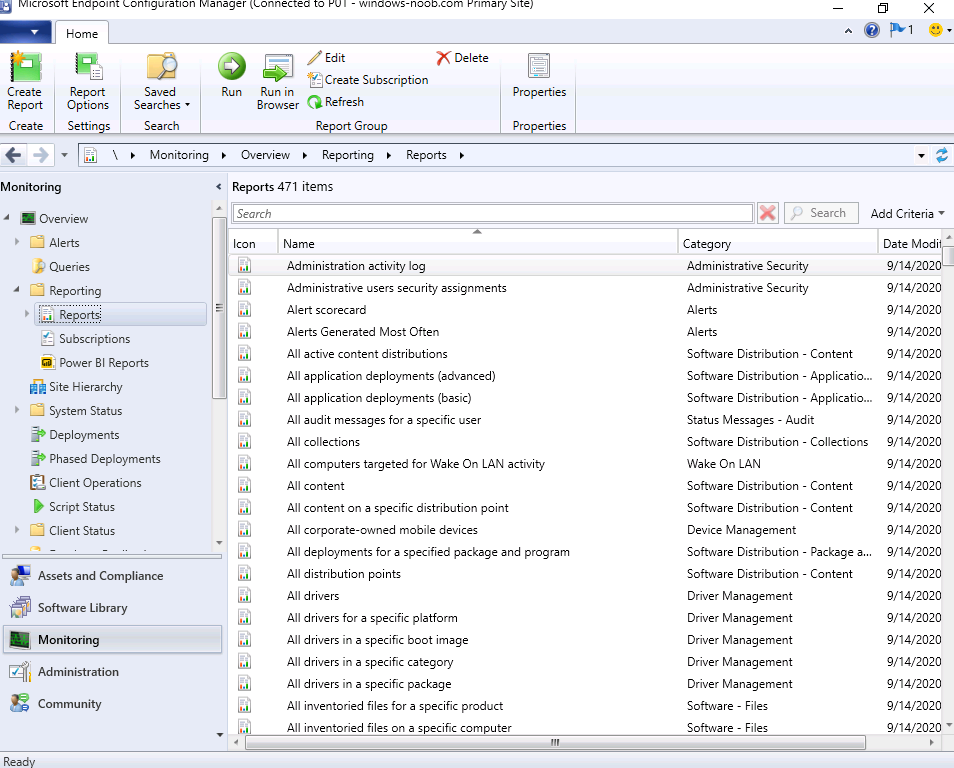
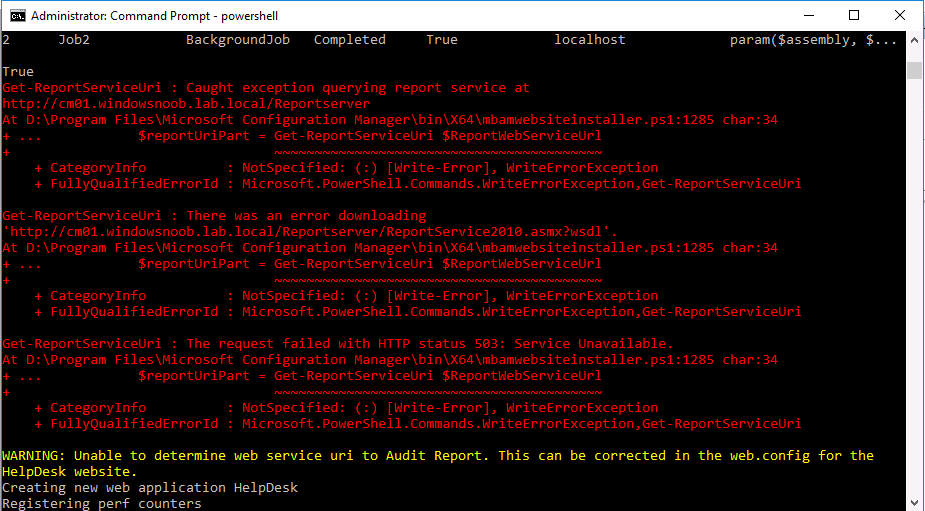
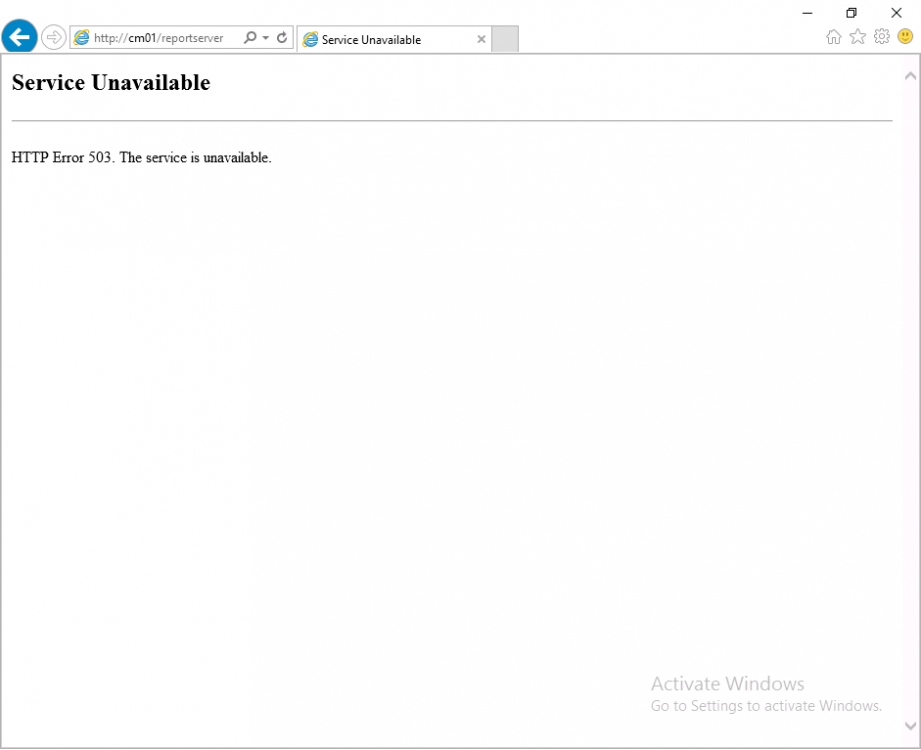
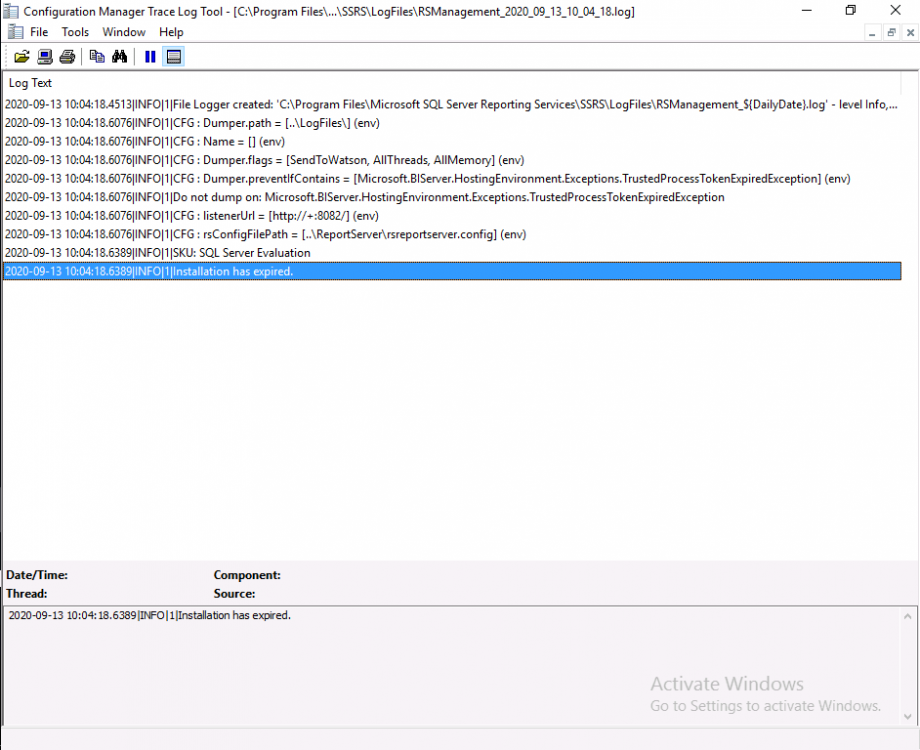
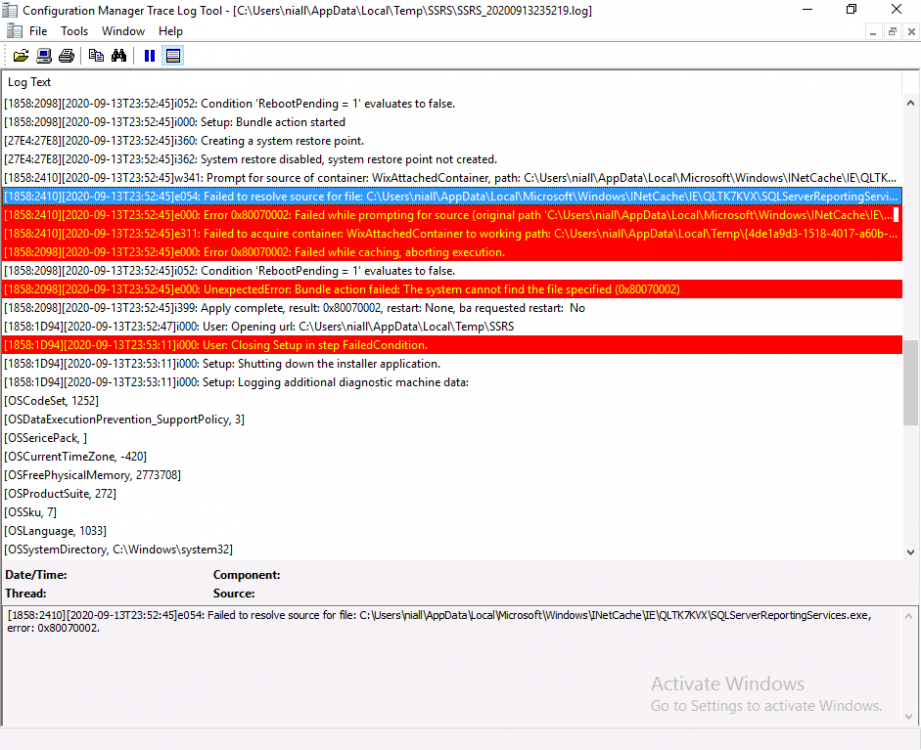
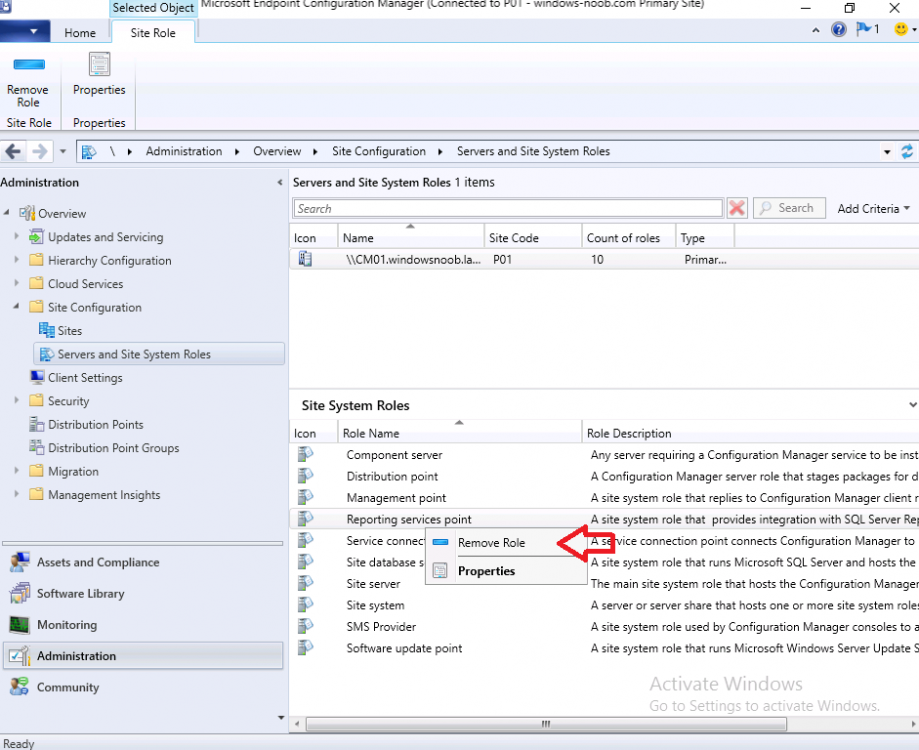
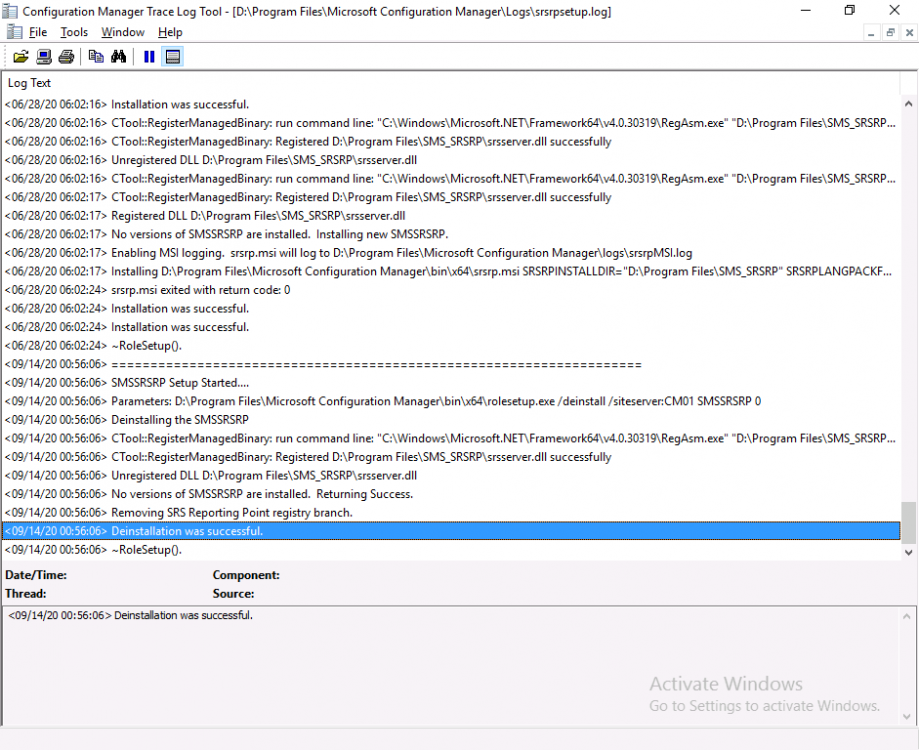
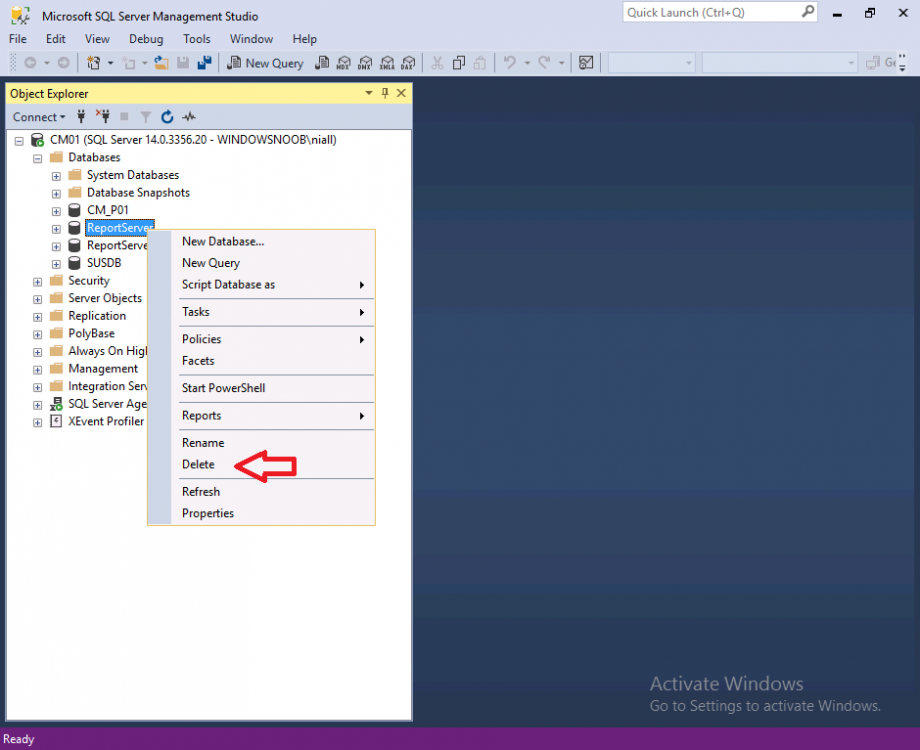
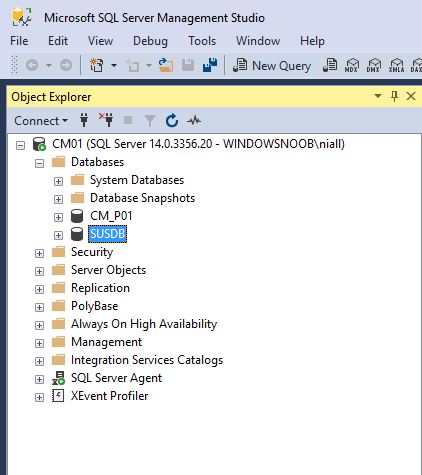
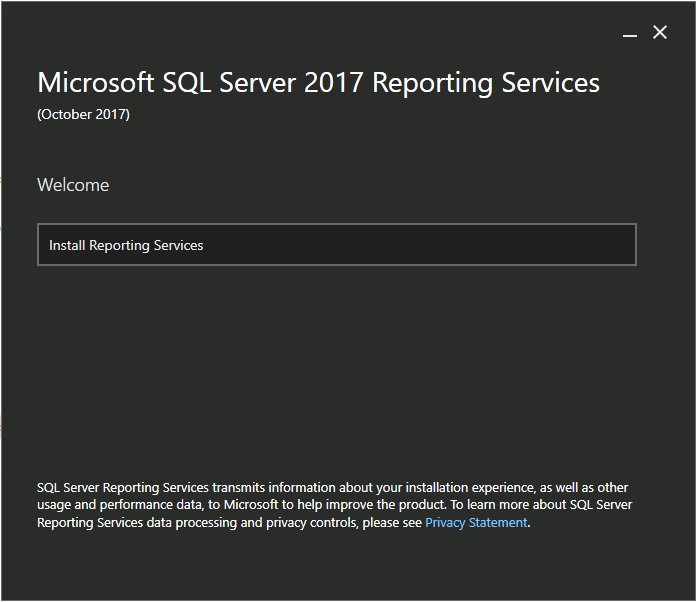
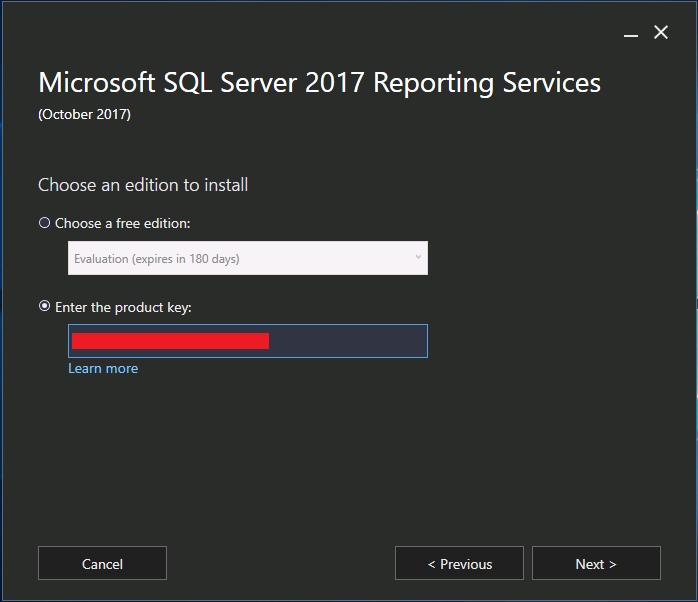
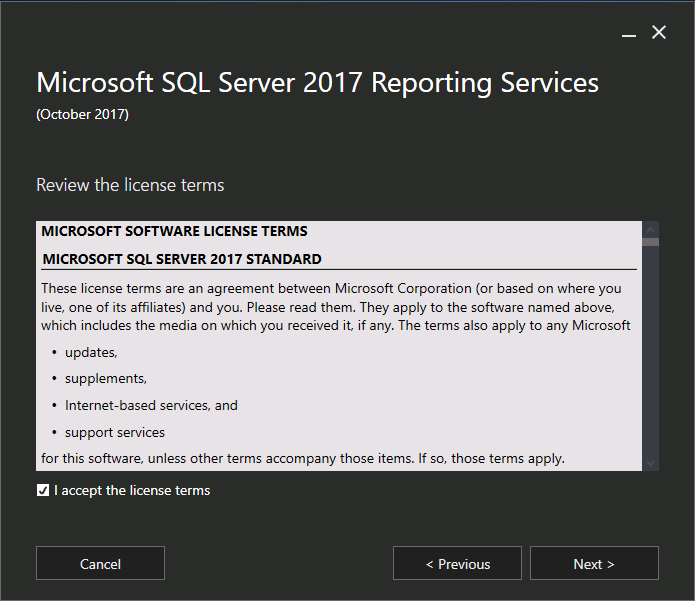
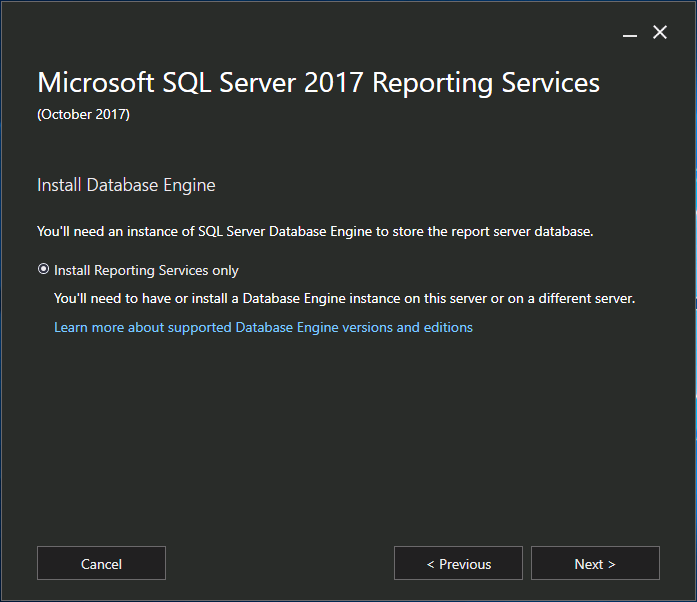
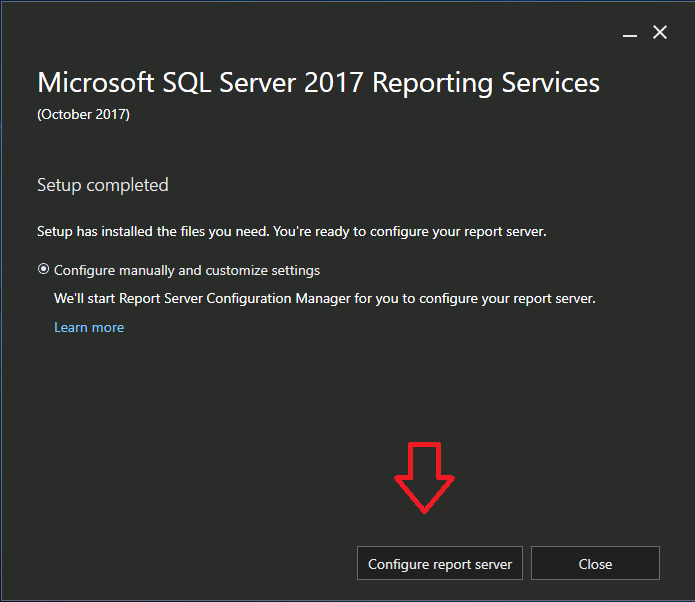
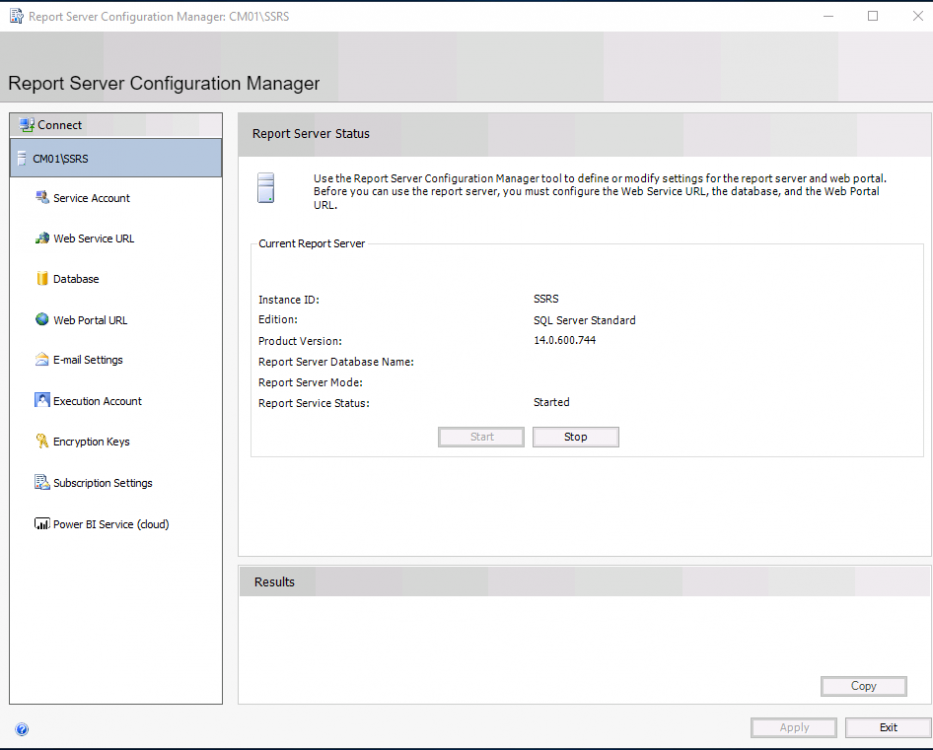
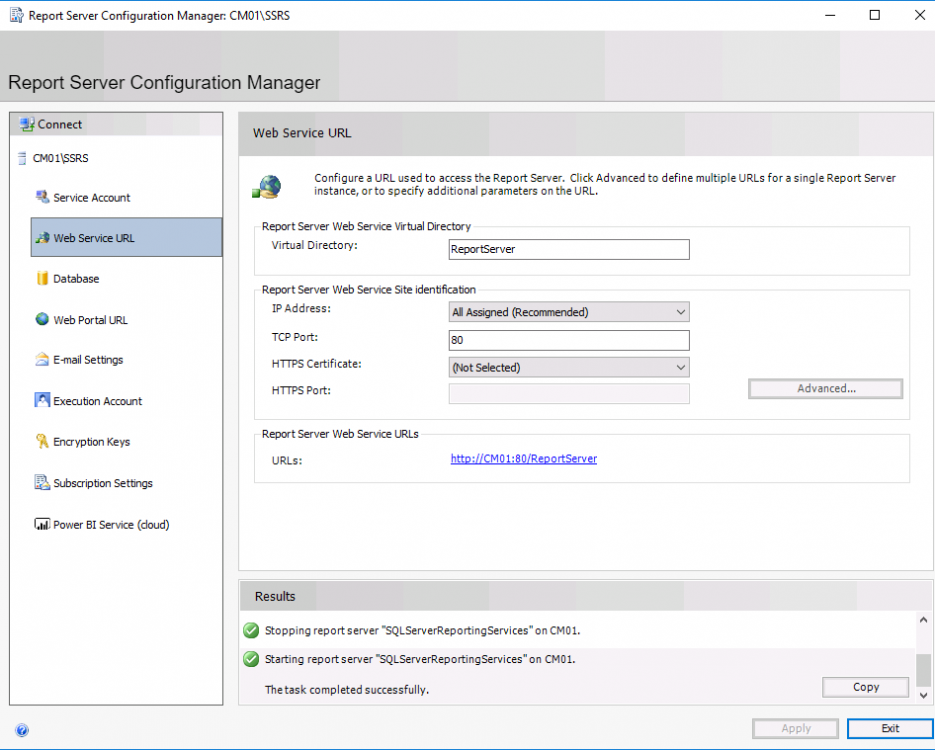
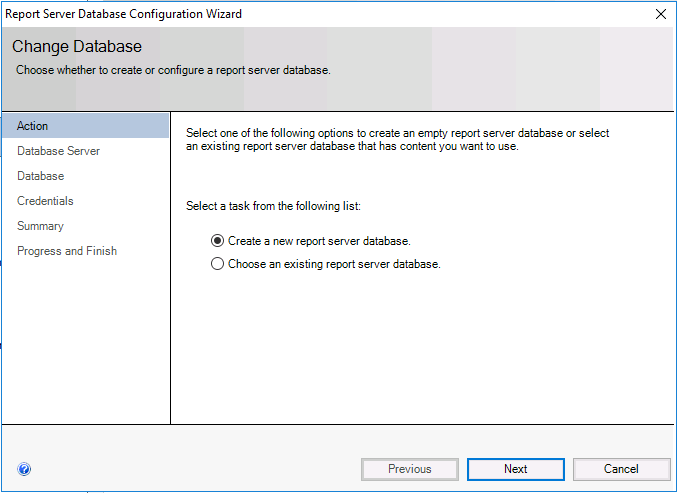
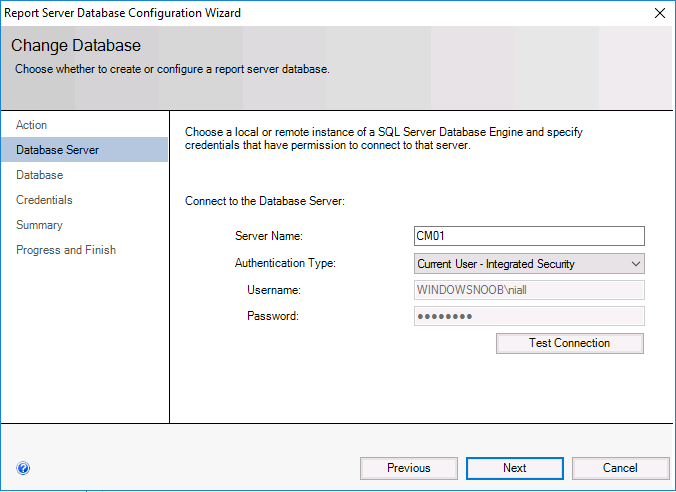
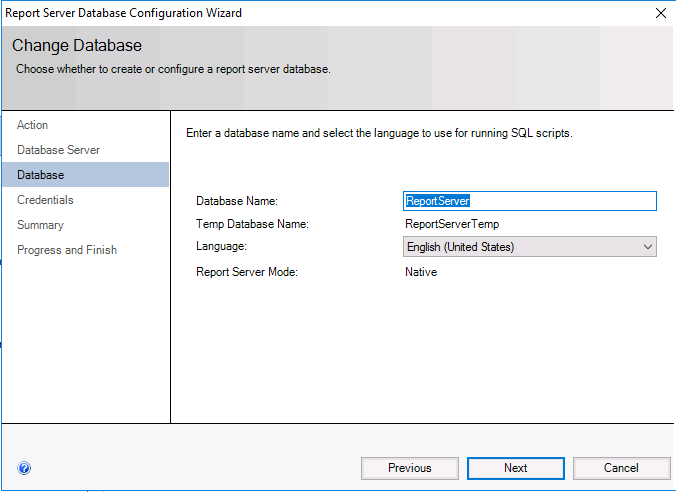
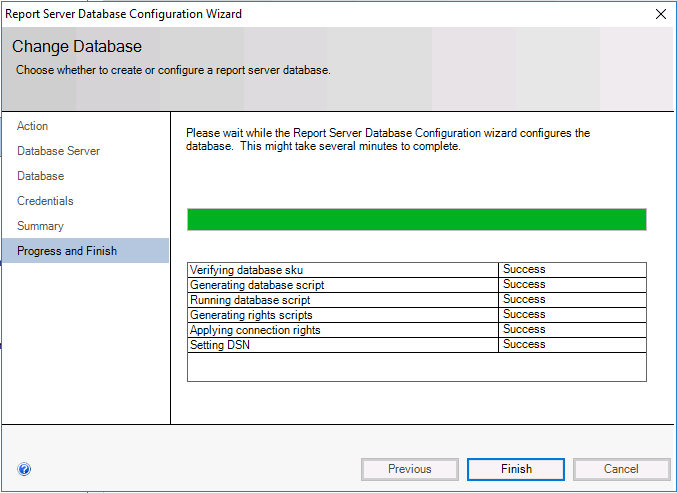
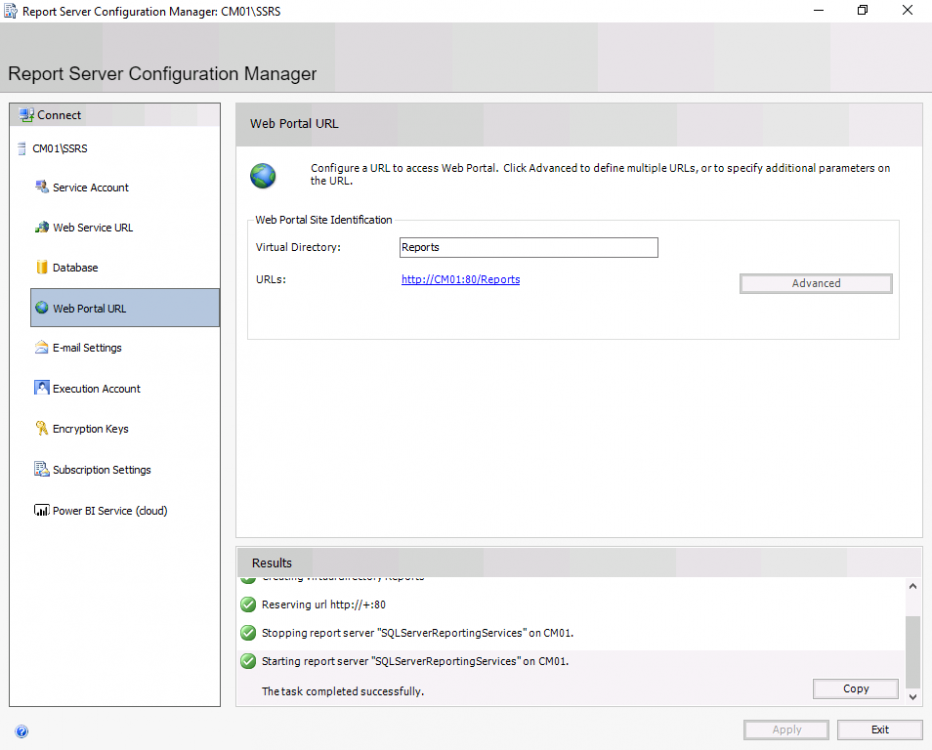
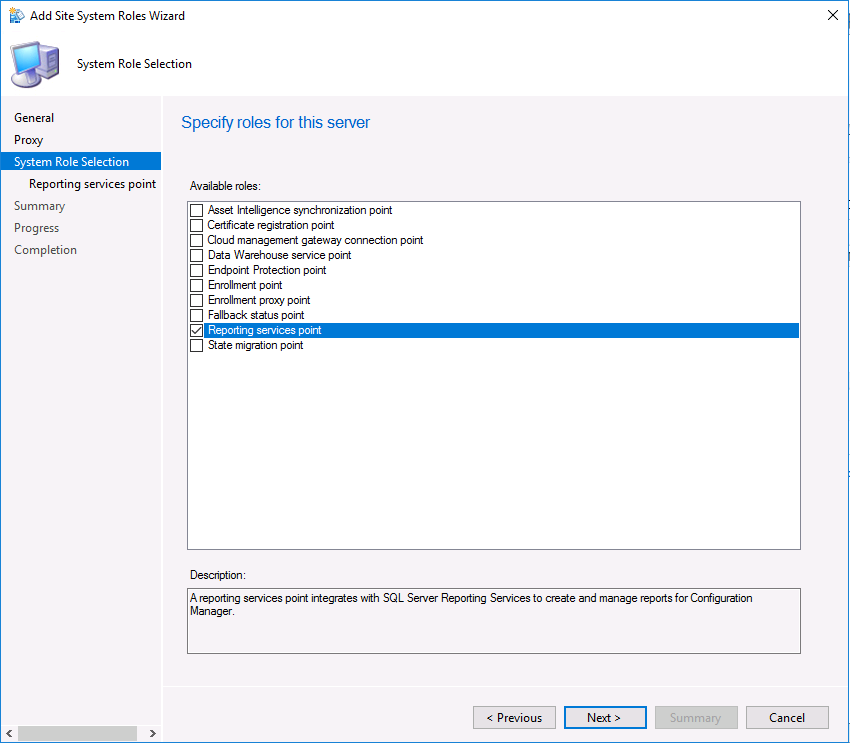
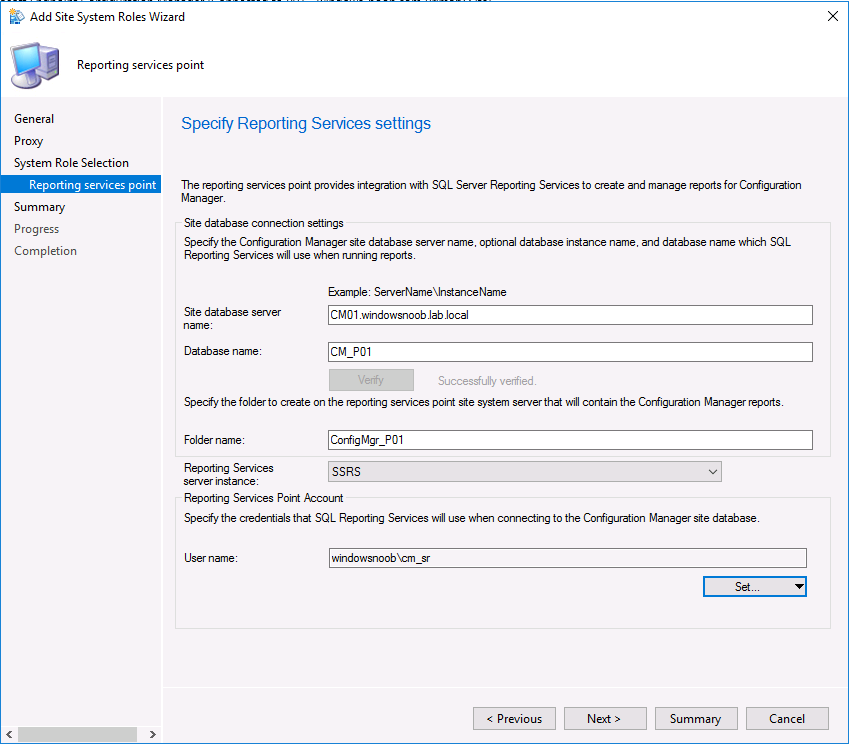
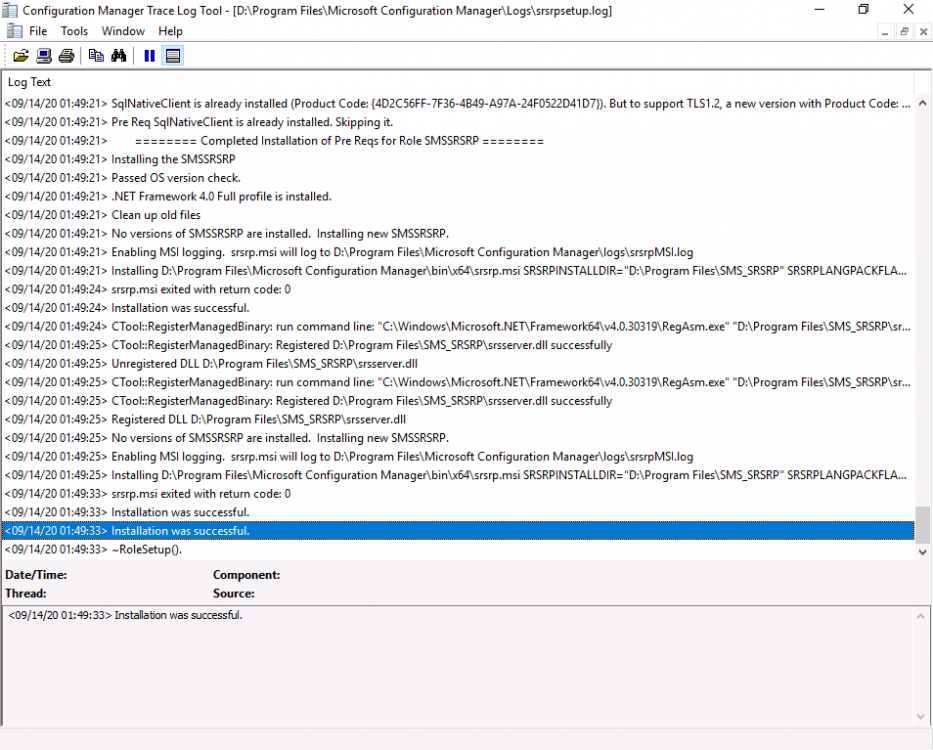
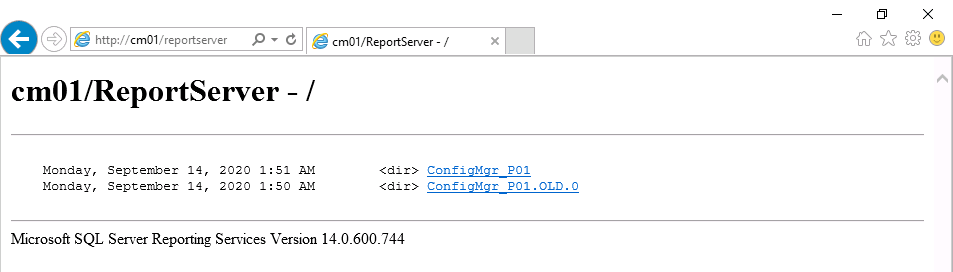
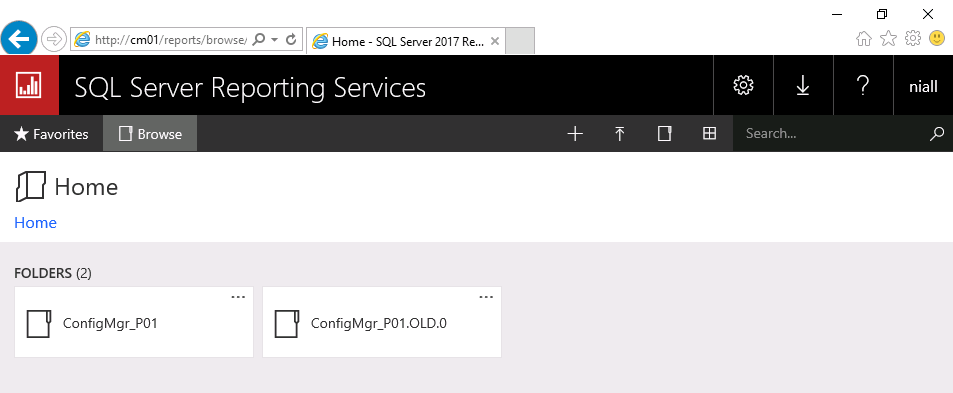
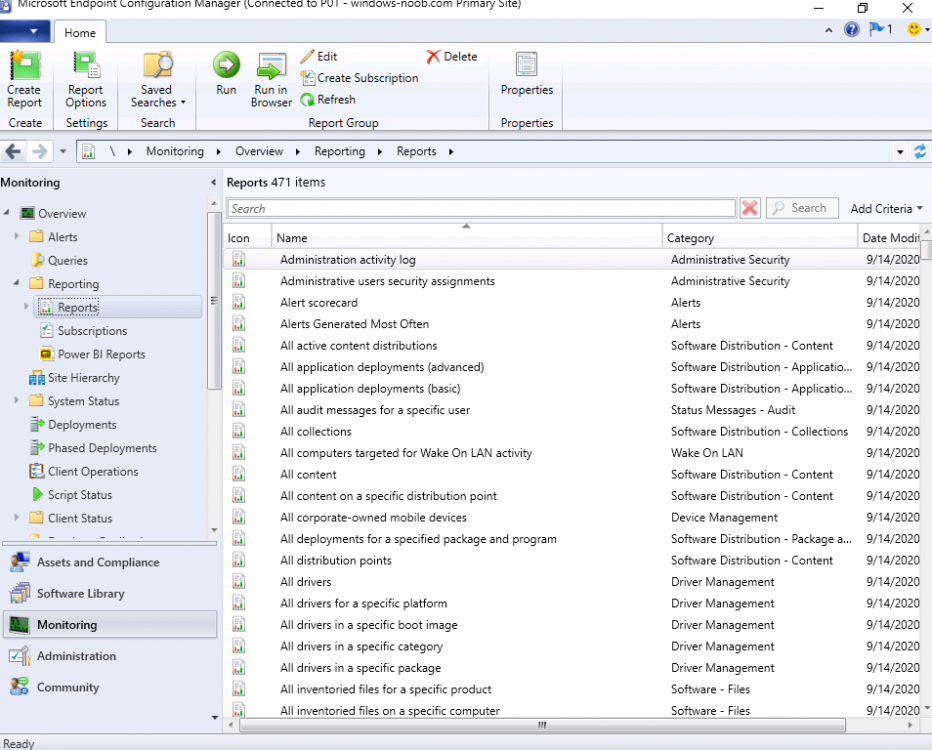
Introduction I was writing a blog post about Troubleshooting BitLocker Management in ConfigMgr 2002 Current Branch and one of the things I was trying to do was install the web portals, but I was seeing errors shown below. Get-ReportServiceUri : Caught exception querying report service at http://cm01.windowsnoob.lab.local/Reportserver I assumed this was because SSRS was not installed or configured but after checking the lab, I could see it was indeed installed and configured. However when I browsed the http://cm01.windowsnoob.lab.local/ReportServer URL in Internet Explorer it produced a HTTP Error 503. The Service is unavailable. A quick search gave some clues and things to try but in reality the reason it was not working was because: SSRS was installed in evaluation mode SSRS evaluation had expired This was revealed in the logs stored at C:\Program Files\Microsoft SQL Server Reporting Services\SSRS\Logfiles To upgrade the evaluation version you'd normally just need to upgrade the edition of SSRS from Evaluation to Production via change/uninstall in Control Panel, however the way this installation was packaged (WIX bundle) meant that it retained the original download link in a bundled file called state.rsm and that was looking in the IE cache as you can see in the SSRS installation log files That path no longer existed. Manually recreating that path and copying the SQLServerReportingServices.exe file to that path did not help, it reported another error. I could keep trying to hack my way around these errors or fix it once and for all. Fixing the evaluation version As this is just a lab I decided to rip SSRS out completely and then add it back. Note: If you are doing this in production then make sure to backup all your custom reports first and if necessary backup the reporting databases also. I decided to try the following: uninstall reporting from ConfigMgr delete the 2 reporting db's in SQL uninstall SQL Reporting Services in control panel restart server reinstall SSRS reconfigure SSRS Keep in mind that unless you want the same problem occurring in 180 days or so, you'll need the key that was used when installing SQL. If this process doesn't pick it up from your installed instance of SQL, you can find that key in the installation media. Using the product key from DefaultSetup.ini To find the product key in your installation media, you should know that the PID is more than likely contained within the DefaultSetup.ini file located under Root\X86 or Root\x64 folder. Open that file with notepad and copy the product key for later use. Let's get started. In ConfigMgr remove the SSRS role. Confirm that it's removed successfully via the SRSRPSetup.log. Next, in Sql Server Management studio, find the 2 reporting services databases and remove them, if you are doing this in Production, read my NOTE at the top of this section as deleting the two Reporting databases will result in the following: Reporting services will not work (it's broken already...), all your reports will have been lost (you did back them up didn't you ?), schedules, permissions, etc. And now they are gone. Next in Control Panel, locate SQL Server Reporting Services and uninstall it. Once uninstalled, close the wizard. restart the ConfigMgr server. After the server has restarted, reinstall SSRS by launching SQLServerReportingServices.exe available for download here for SQL Server 2017 or here for SQL Server 2019. After downloading it, copy it to a safe location outside of the browsers cache, eg: C:\SSRSSource. Run the executable and choose Install Reporting Services. Paste in your SQL License key from the SQL Server media, look in ..\x64\DefaultSetup.ini and your SQL license key will be in there. Accept the license terms Install the database engine. Pick the path and click next, after a while it's completed. Click on Configure Report Server. Select Connect when prompted. The report server configuration manager wizard will appear, notice how it states the version is Standard (and not evaluation). In Web Service URL, click Apply. Note: This is assuming you want to configure SSRS in HTTP mode, if you'd like to use HTTPS mode please review this blog post. For Database, choose Change Database. Choose create a new report server database from the options Decide if you are going to use the current logged on user or a SQL server account to setup this new database Select the database name. continue through that wizard until completion. Make sure it's all successful before clicking on Finish. Next, click on Web Portal, and choose Apply. And you can configure other options or simply select Exit. In the ConfigMgr console, add back the reporting services role Configure the account... And confirm that it was successfully installed in the SRSPSetup.log. At this point you can go back into your web browser and confirm that reporting is indeed responding without the initial error. Tada ! and via the Reports web portal. And finally, verify that the reports are present and working in the ConfigMgr console And that's it ! Once again I started one blog post only to hit an issue that threw me a wobbler. But thanks to that you have this blog post ?


-
first things first, have you seen the following 2 videos ? BitLocker management – Part 2 Deploy portals BitLocker management – Part 3 Customize portals
-
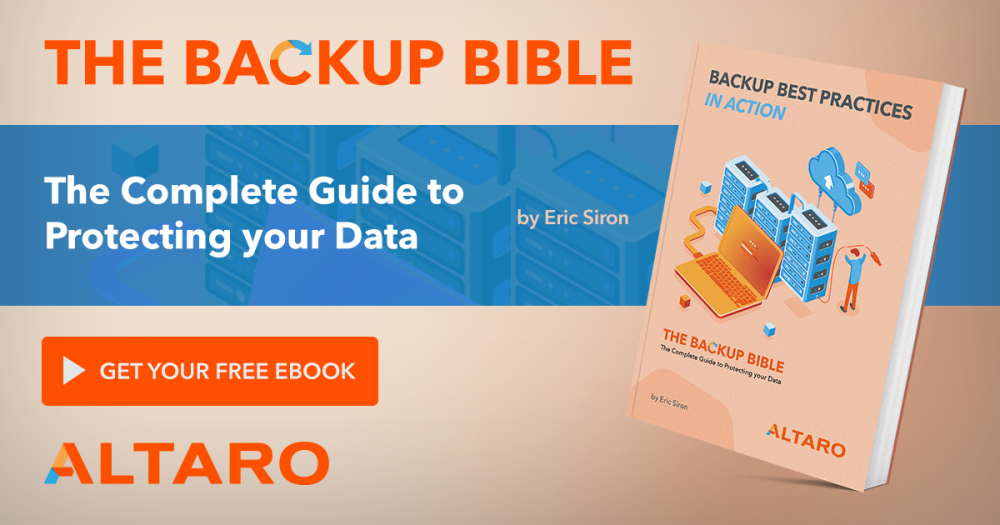
The Backup Bible is an ambitious project produced by Altaro and written by Microsoft MVP Eric Siron that aims to be the definite guide to backup and disaster recovery for companies of all sizes. The first eBook in the series was published earlier this year and focused on how to create a robust backup strategy including the key stakeholders you’ll need to deal with and the questions you’ll need to ask yourself to prepare yourself for a potential data loss event. Part 2 – Backup Best Practices in Action – follows on from this starting point explaining how to implement this strategy and showing the reader what secure backup looks like on a day- to-day basis. The eBook is focused on providing practical implementation using actionable steps in each section providing the reader with the knowledge to bring the theory to life. It covers: Choosing the Right Backup and Recovery Software Setting and Achieving Backup Storage Targets Securing and Protecting Backup Data Defining Backup Schedules Monitoring, Testing, and Maintaining Systems And More! The Backup Bible is an essential resource for anyone who manages data on a daily basis. For any business, data is your lifeline. A significant data loss can cause irreparable damage. Every company must ask itself - is our data properly protected? You can download both part 1 and part 2 for free right now! The final part of the series, on disaster recovery, will be released later this year. By accessing the available parts, you’ll automatically receive the final eBook direct to your inbox when it is released later this year! What are you waiting for? Get your eBook now!
-
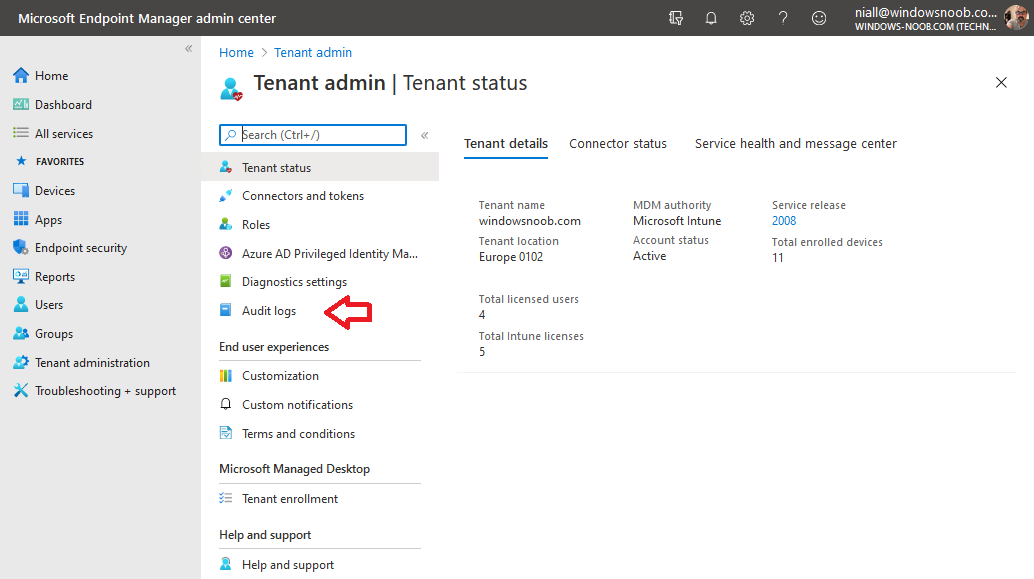
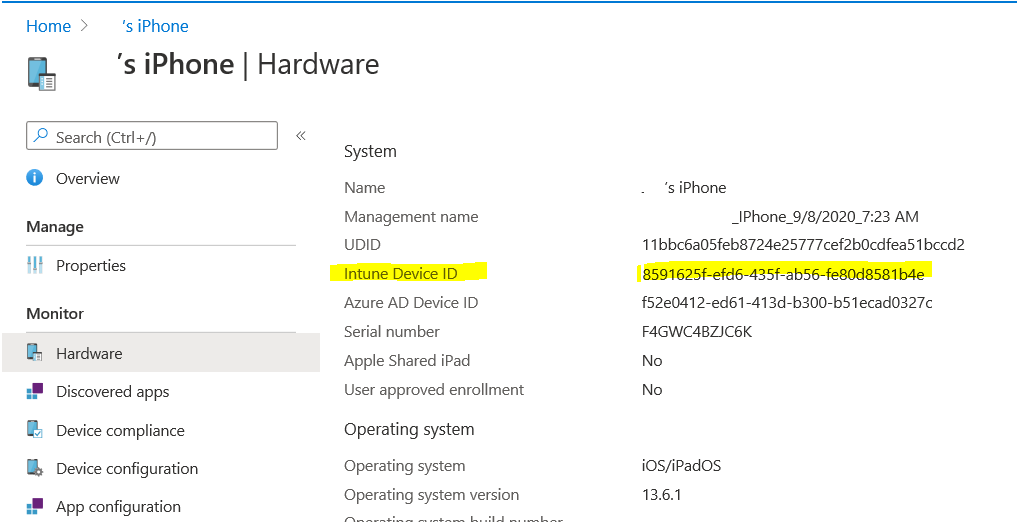
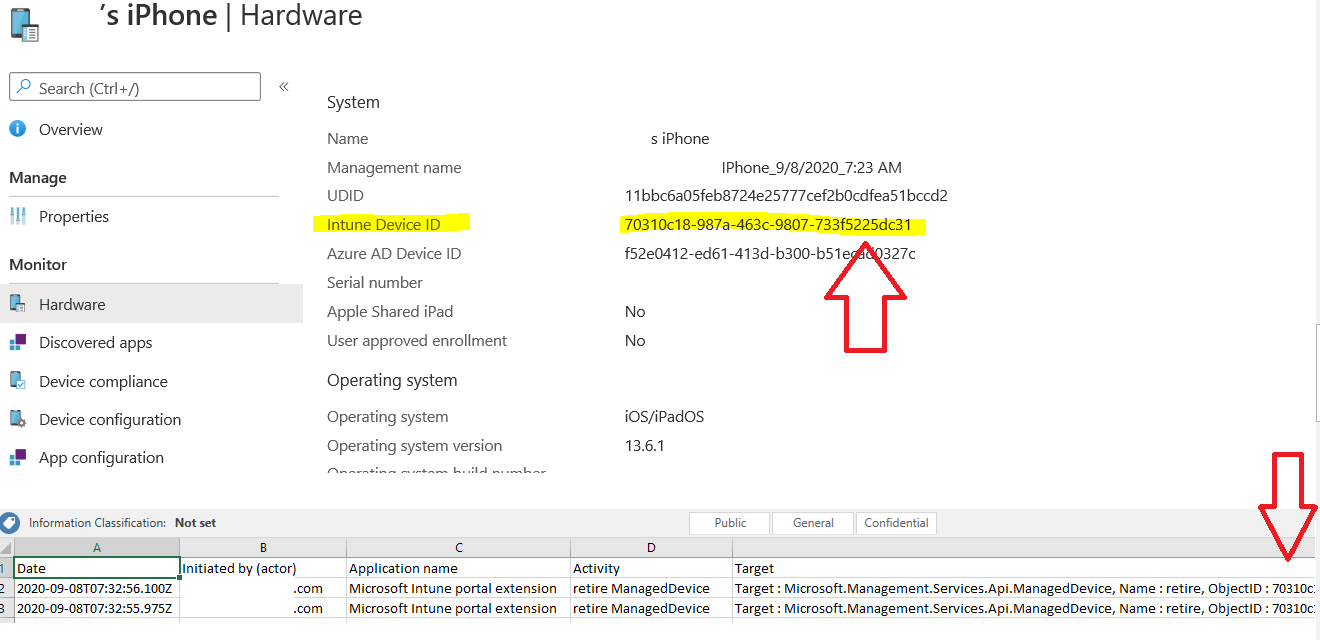
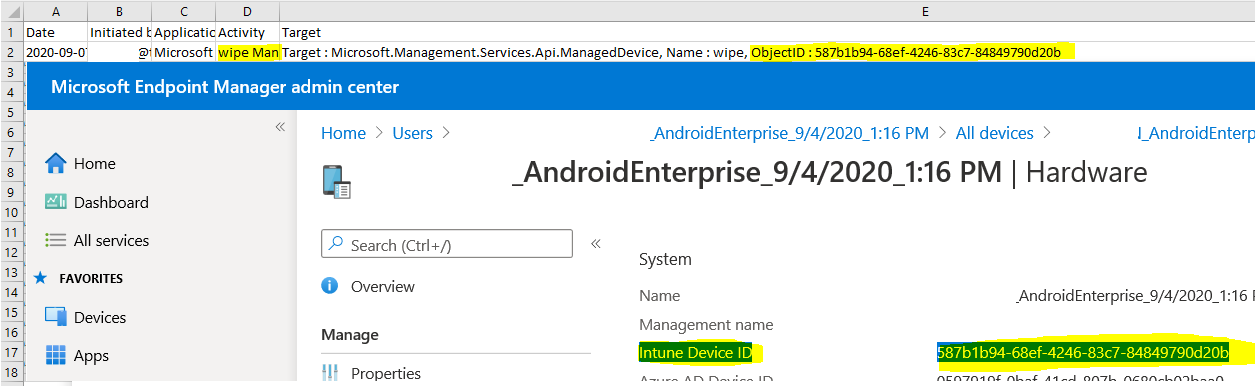
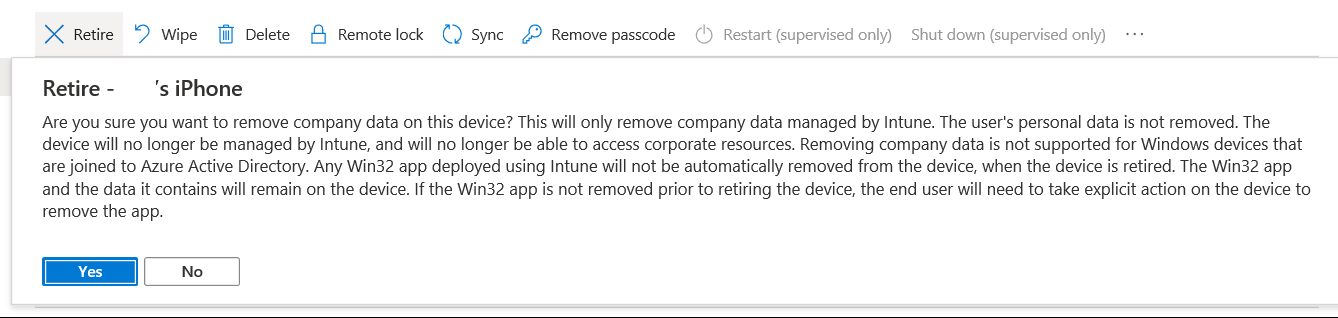
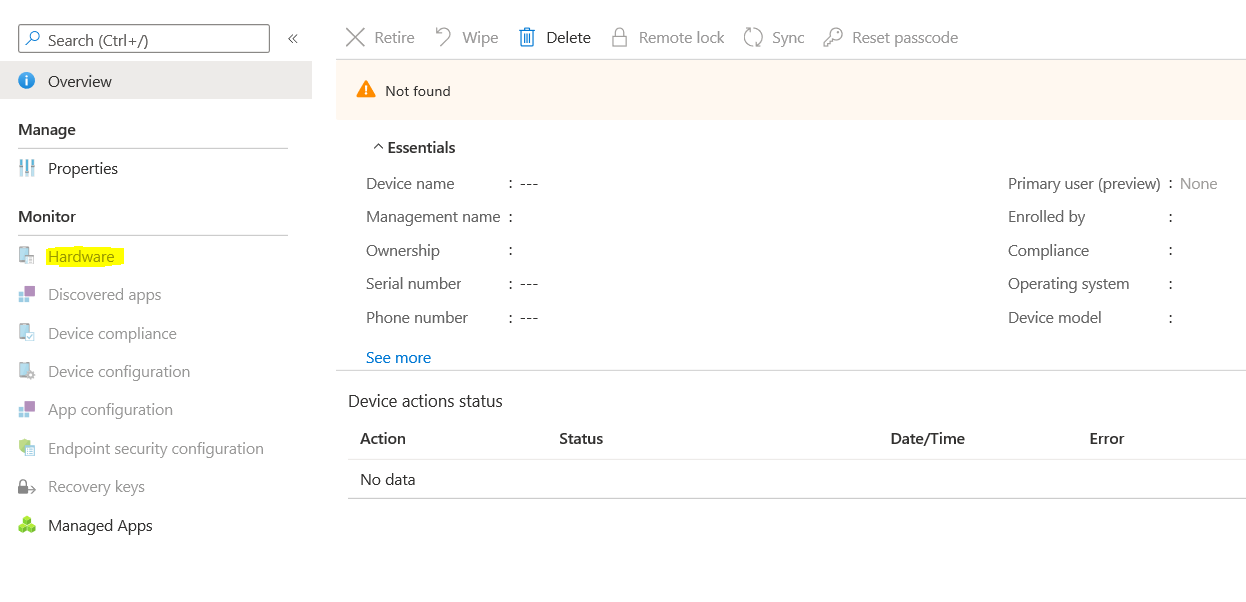
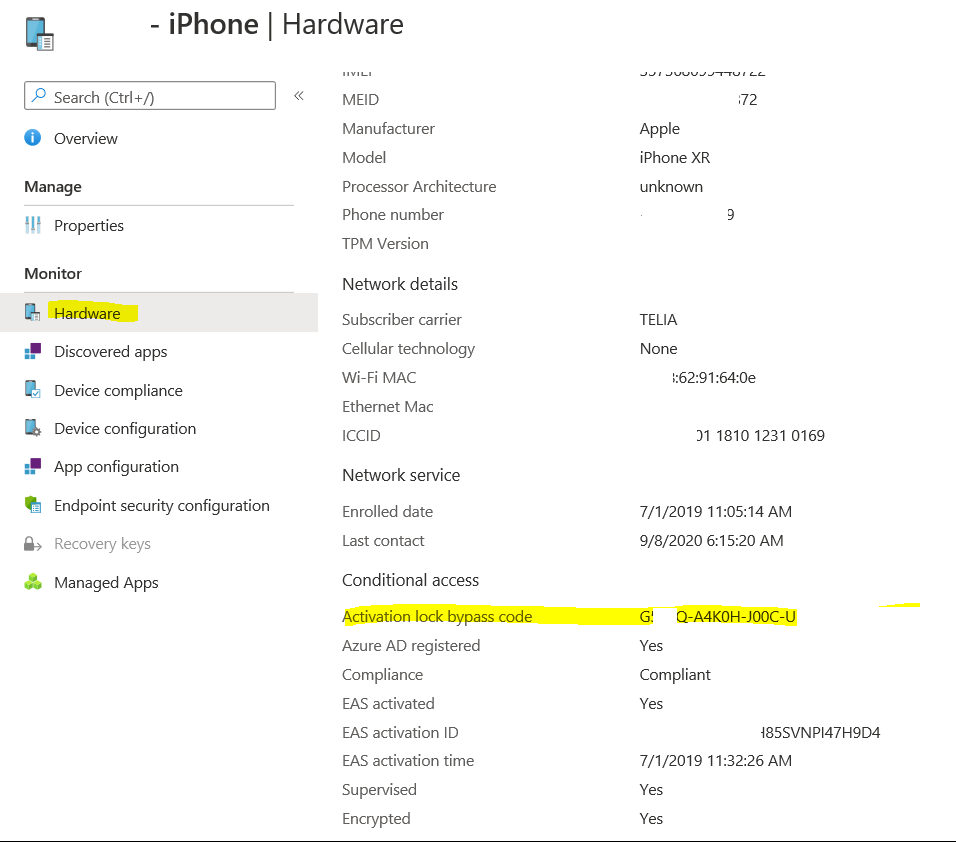
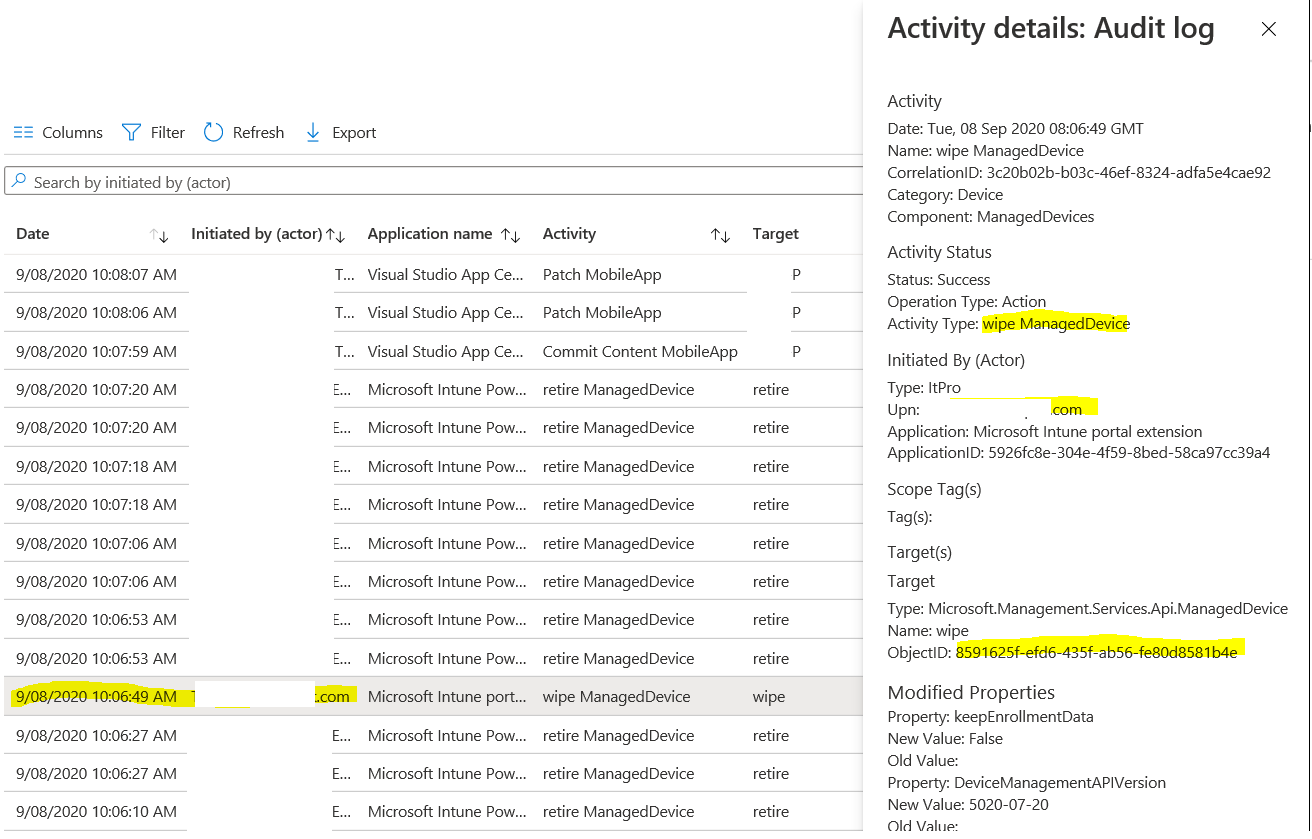
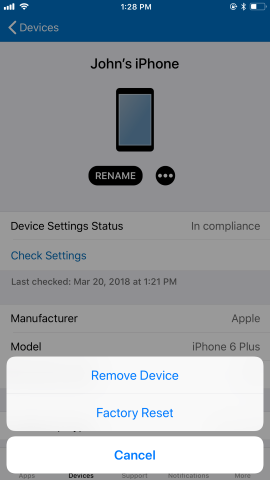
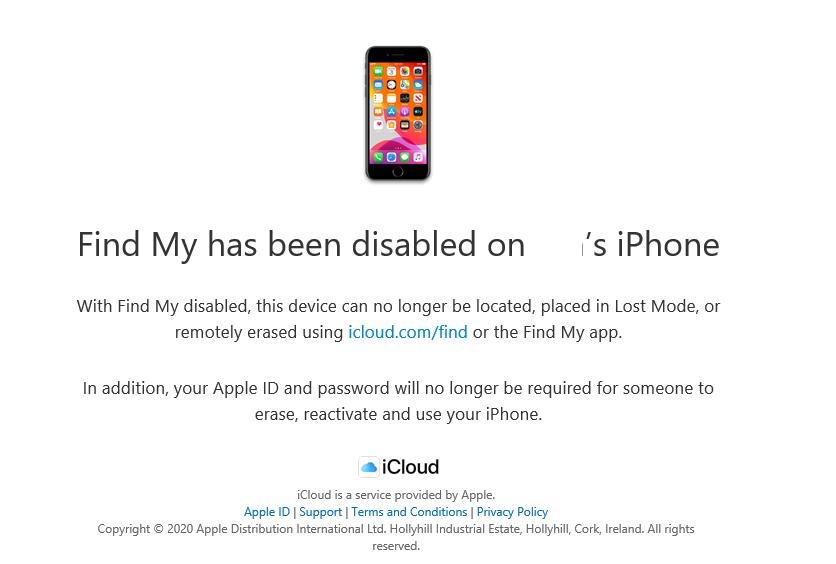
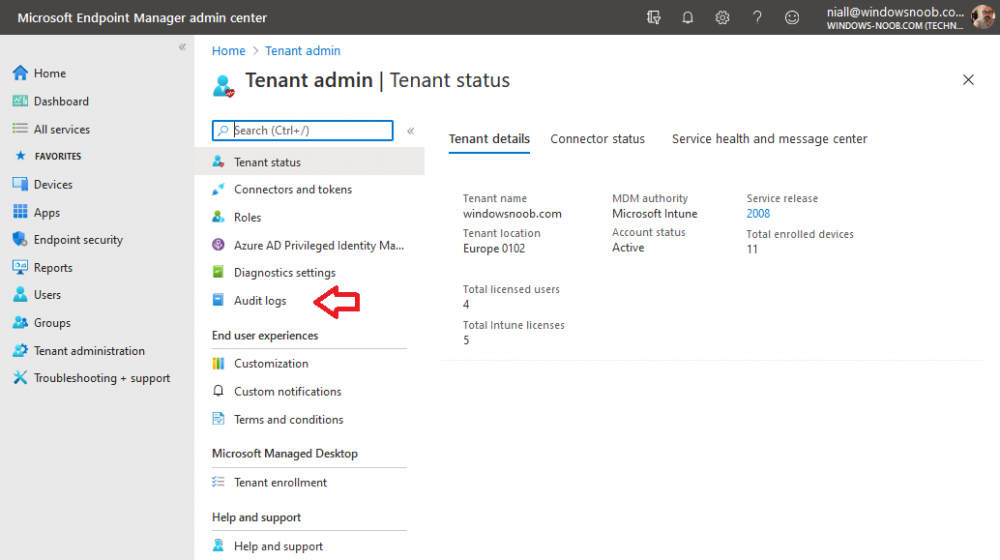
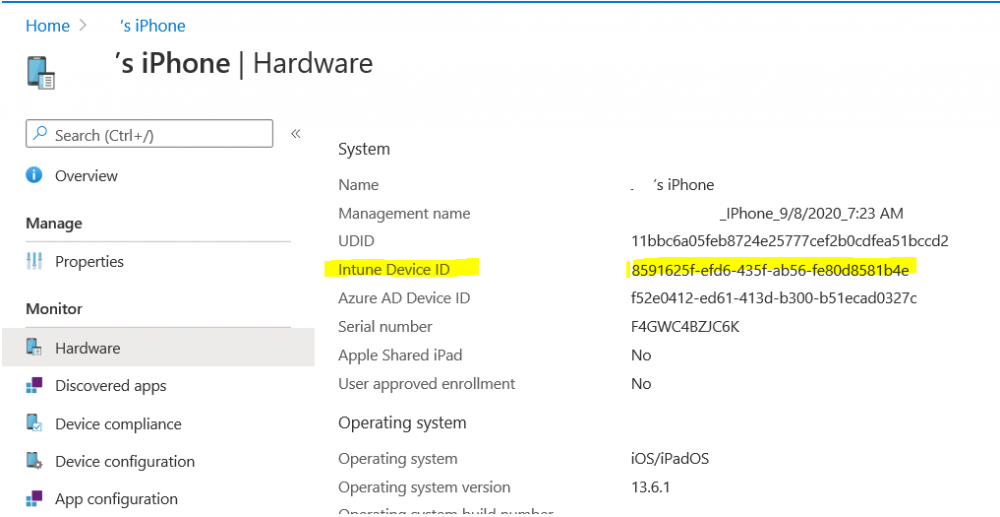
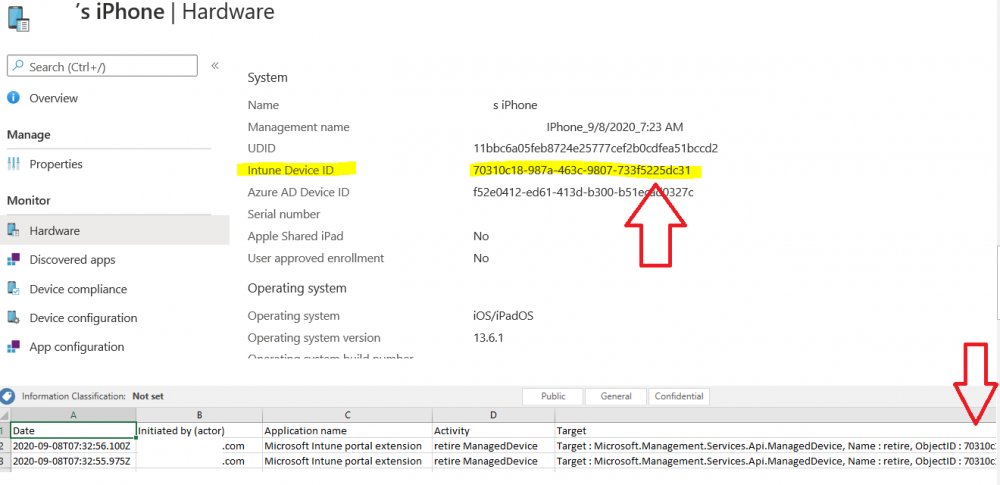
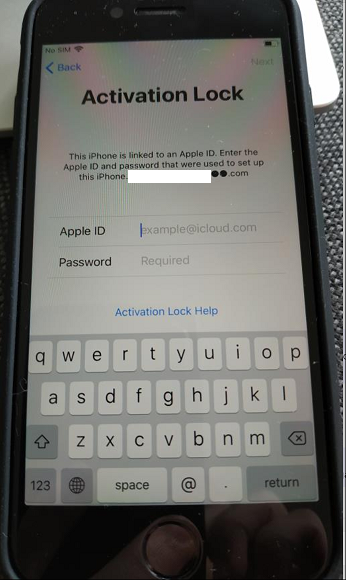
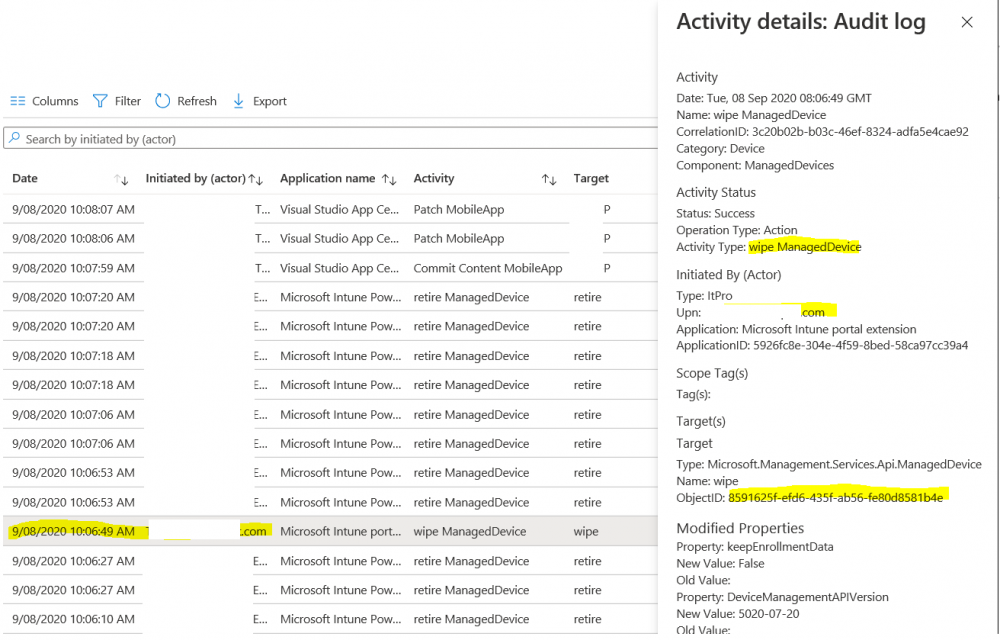
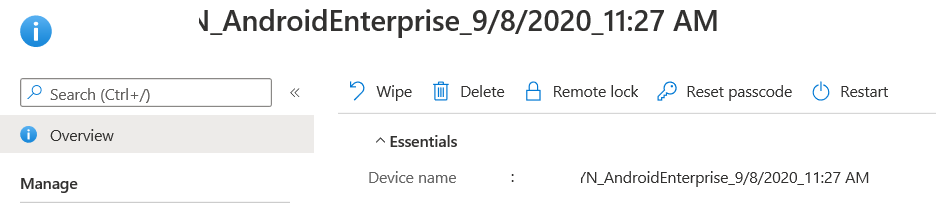
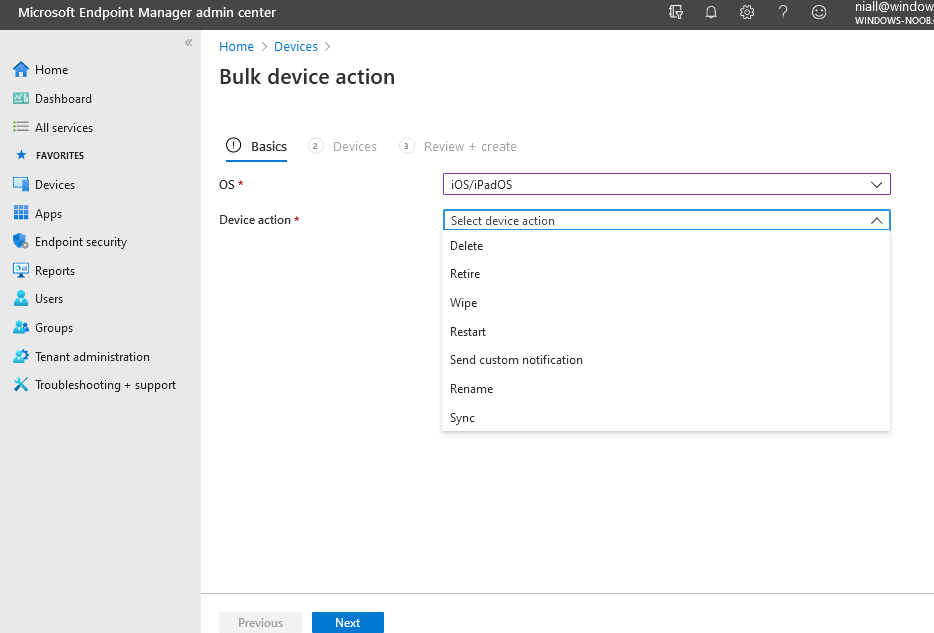
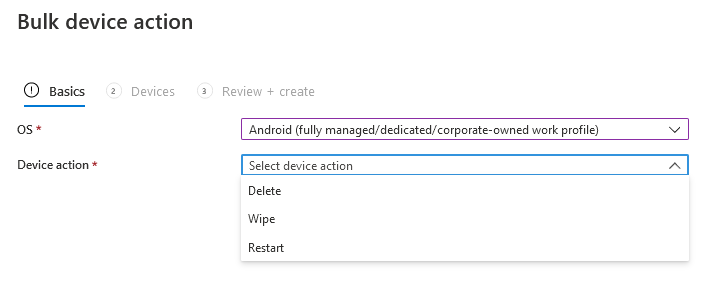
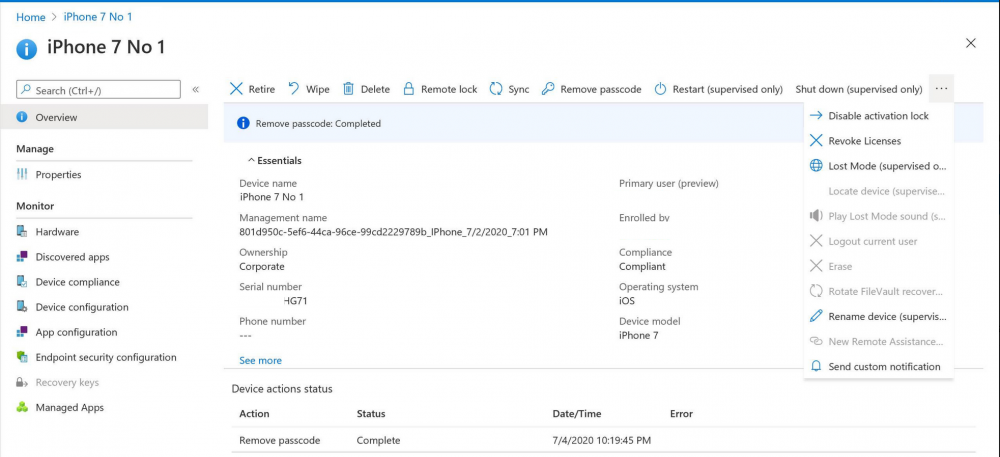
Introduction I wanted to better understand the options available for removing company data from phones enrolled within Endpoint Manager (formally known as Intune) so some research and testing was in order and that's exactly what me and my colleague did, additionally I wanted to get proof of the actions via the Auditing ability within Endpoint Manager. The phones involved in the testing were Company Owned iPhone and Android Fully Managed devices. There were a number of ways of removing company data shown below, and in this blog post I'll focus on the first two options, if you'd like to automate it with PowerShell then see my 2 links at the bottom of this blog post for information on how you can do that. User Actions on the phone itself Remote actions from within Endpoint Manager Remote actions using PowerShell via Graph User actions on the phone On the phone itself (iPhone) the user has a number of options available. They can open the Company Portal app, select the device from the list of devices and click on the 3 dots (elipse) to see actions available and those include Remove Device Factory Reset When you unenroll your device from Intune by selecting Remove Device, here's what happens: Your device won't appear in the Company Portal anymore. You can't install apps from the Company Portal anymore. Any settings that were changed on your device when you added it (for example, disabling the camera, or requiring a certain password length) will no longer apply. You might not have access to some company resources, such as file shares or internal web sites, on your device anymore. You can't use company apps and company data on your device anymore. You might not be able to connect to your company network using Wi-Fi or a virtual private network (VPN) anymore. Company email profiles are removed from the device. Devices that are configured for email only won't appear in the Company Portal app or website anymore. Apps are uninstalled. Company app data is removed. The process above is described here for iOS devices. https://docs.microsoft.com/en-us/mem/intune/user-help/unenroll-your-device-from-intune-ios Choosing the Factory Reset option prompts you to use the factory reset option within the iPhone settings app, and the result is that the phone is factory reset, company data is wiped, in fact everything is wiped including personal data, settings, etc, but the device is not immediately removed from Intune. Choosing this method should also prompt the end user for their icloud password to confirm that they were going to reset the phone, in addition they would receive an email from Apple indicating that 'find my' Iphone has been disabled. As regards Intune auditing of the events above, nothing was recorded as the phone was reset from the phone side and not via the Intune side (which reports on actions related to wipe, delete, retire performed via the console or via a PowerShell script). Removing the device management profile In addition, we tried removing device management, via Settings, General, Device Management and removed the MDM device management profile, this did not reset the phone but removed access to company resources and removed all apps associated with the company. The users personal data remained unchanged. The device (shortly after) showed as non-compliant in Intune/Endpoint Manager and could be automatically removed via the device cleanup ability. Using this method again did not record anything in Auditing. Note: Device cleanup rules aren't available for Android Enterprise scenarios like Fully Managed, Dedicated, and Corporate-Owned with Work Profile. Using actions from within the Endpoint Manager console In Microsoft Endpoint Manager, you have additional options to remove company data from enrolled phones, and these are as follows: Wipe Retire Delete Let's look at each action to see how it relates to the device in question. Wipe This option completely factory resets the phone, does NOT prompt for the users icloud password and all user data and company data is removed. The phone reboots as part of the process. Below is a typical display of what you'd see when you initiate the Wipe action from within Endpoint Manager. As this action took place from within Endpoint Manager, it will be recorded in the Audit Logs. You can find these logs in Tenant Administration, Audit Logs as shown below. After a Wipe is performed in Endpoint Manager, the action (and more details) are recorded in the Audit logs as shown here. You can click an individual action to get a details pane. In the screenshot above, the Activity details refers to an ObjectID and that is actually the Intune Device ID as shown here. So if you want to trace a phones removal from Endpoint Manager, then make sure you've a backup of this information so you can co-relate the Intune Device ID with the ObjectID listed in the audit log. Here you can see the same info relating to the Intune Device ID in the console and the Object ID in the exported CSV file for an Android phone when it's Wiped. You can export the audit log (up to a months data in the console or 1 year via PowerShell Graph) to a CSV file. Remember, take note of the Intune Device ID before you Wipe a phone as once it's wiped the data will also be removed from Intune. In the screenshot below you can see the details remaining for a phone that was just wiped, notice how it states 'not found' and the Hardware node is greyed out, in the hardware node you'd normally find the Intune Device ID but now that the device is wiped, the data is gone. Retire The Retire option removes company data, keeps personal data and does not reboot the device. Below is the prompt received when you select to Retire an iPhone. And below you can see how the Retire option is audited (via the exported CSV file), and again i'm pointing out the Intune Device ID in the console as it's the Object ID in the audit log. Interesting to note that the Intune Device ID (object ID in the audit log) changes every time you enroll the device. In the console itself the device is removed as soon as the next device check in occurs. Note: If you are using Fully Managed for your Android devices then you won't see a Retire option at all. Delete Selecting Delete will prompt the admin with something similar to below for iPhone. and the delete action is audited also. However when I did the Delete action for an Android Fully Managed device, it reset the phone (factory reset) which goes against the popup prior to the action. Bulk Device Actions There is one other way of doing this but it's more risky as it applies to all devices, and that is the ability to choose the available actions (thanks @JeffGilb ) which is available in Bulk Device Actions You can then select the type of device and the action available, here are the options available for iOS/iPadOS and below are the actions for Android (Fully Managed) Summary Deciding which path to take should be based on your security needs and the ultimate destination of the phones after they go EOL. If your company phones are all iPhone based, you may want to choose either Retire or Delete from the Endpoint Manager console (or using a PowerShell script to connect to Intune using the Graph API), as these actions will be logged in the Audit logs (which can be exported for up to one year), and both of these actions are least disruptive to the users phone, as the users data (photos/apps/etc) will remain on the phone but all company data will be removed. This would be suitable in a scenario such as where personnel are giving the option to buy back the company device after it's EOL. Take note however that the Delete option on Android Fully Managed phones also factory resets the device (all data personal and company is removed). That is not expected based on the popup shown to the admin. If for security reasons you want to remove all company data and all personal data AND remove corporate logon details then you should choose the Wipe option as this does a factory reset on both iphone and Android (fully managed) phones, and this will be audited in the audit logs. This method however will not prompt iphone end users to sign out of icloud meaning that after the reset, the phone will be locked to the apple ID of the previous user (as shown below). To resolve this problem you could ask the user to sign out of icloud prior to Wiping the phone (not ideal) or use Apple Business Manager (DEP) to manage the phone, that way you'll get an Activation Bypass lock code which you can use to bypass this activation lock. Below is how that code would appear for a device (obfuscated details) in Intune. Of course this also means that you'll need a script to pull the Activation lock bypass code from Intune regularly (scheduled task) so that you have the data before it gets removed from Intune. Speaking of ABM enabled iPhones, once they are added into ABM you'll see additional options displayed in Intune such as those shown here, the additional options include (and more depending on the device and capabilities): Disable activation lock Lost mode (supervisor only) Rename device (supervisor only) Restart (supervisor only) Finally, if you get your users to remove the device management or factory reset their phones using options available on the phone itself, then there will be no record of that action in Intune so you won't be able to report on it. I hope this helps you understand the options available today in Endpoint Manager for removing company data on enrolled phones. Recommended Reading https://docs.microsoft.com/en-us/mem/intune/user-help/unenroll-your-device-from-intune-ios https://docs.microsoft.com/en-us/mem/intune/remote-actions/devices-wipe https://support.apple.com/en-us/HT202804 https://www.niallbrady.com/2017/08/23/getting-started-with-microsoft-graph-and-using-powershell-to-automate-things-in-intune/ https://www.niallbrady.com/2018/10/10/learn-how-to-leverage-intune-support-for-microsoft-graph-and-powershell-to-enable-powerful-automation-and-it-security-my-notes/ cheers niall


-
hi @ChrisFromBavaria I have not tested this on Windows Server 2019 Core edition, only on the Desktop Experience edition. you can only use the Distribution Point role on Server 2019 Core Edition, so this probably explains why it's just not working. Server core installations The server core installation of the following server OS versions are supported for use as a distribution point: Windows Server 2019 (starting in Configuration Manager, version 1810) Windows Server, version 1809 (starting in Configuration Manager, version 1810) Windows Server, version 1803 (starting in Configuration Manager, version 1802) Windows Server, version 1709 (starting in Configuration Manager, version 1710) Windows Server 2016 Windows Server 2012 R2 Windows Server 2012 This support has the following limitation: Distribution points on this OS don't support PXE or multicast with the default Windows Deployment Services. Starting in version 1806, you can PXE-enable a distribution point on this OS with the option to Enable a PXE responder without Windows Deployment Service. For more information, see Install and configure distribution points.
-
returning to this, @tasmo I found the cause, you need to add cmd.exe /c in front of the reg add command when using the %date% or %time% variables in the task sequence
-
after 5pm today, CET
-
do you have teamviewer so i can remote in and take a look ? is 192.168.11.100 the local ip address of your webserver ?
-
whether it responds to ping or not doesn't really matter, what does matter is whether you can reach your pki.mydomain.com though, and clearly if it's not working for you, then your port forwarding via Vyos must be configured incorrectly, double check the settings and verify that it's forwarding port 80 to the local ip address of your webserver hosting the crl you can test this by using https://canyouseeme.org/ to verify if your port 80 is indeed open when testing browsing to the webserver url, you must disable WIFI on your phone and use your 3g connection
-
what is not working exactly ? be specific, I've gone through this lab multiple times and it works every single time.
-
@dreddric it's done now see >
-
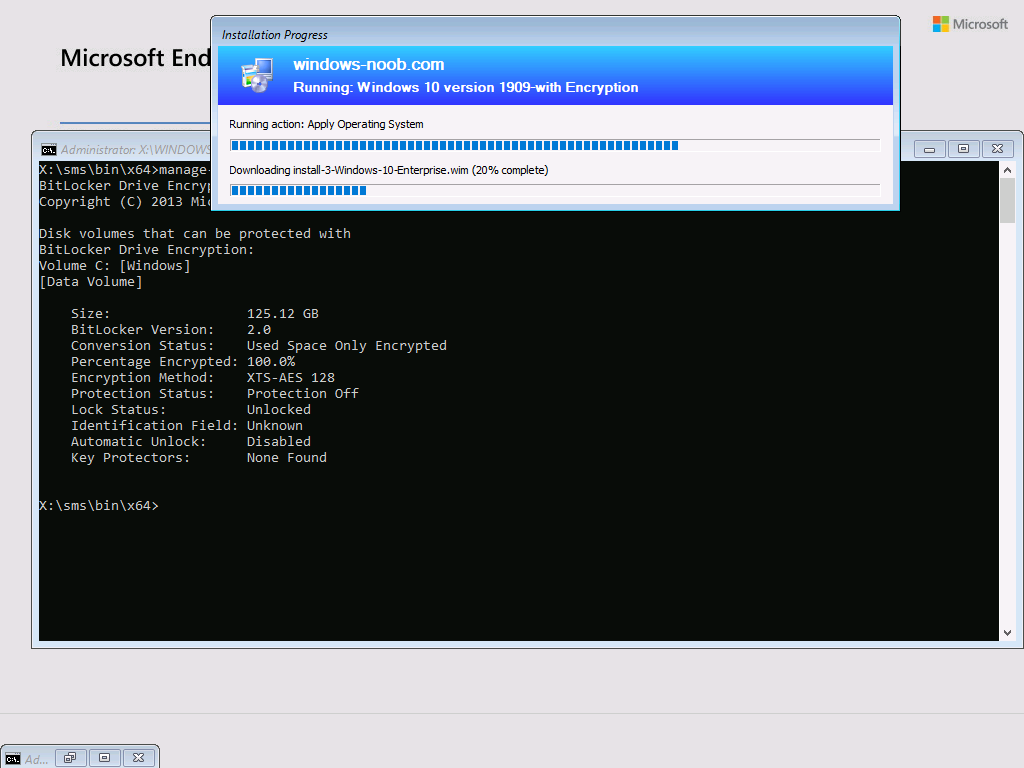
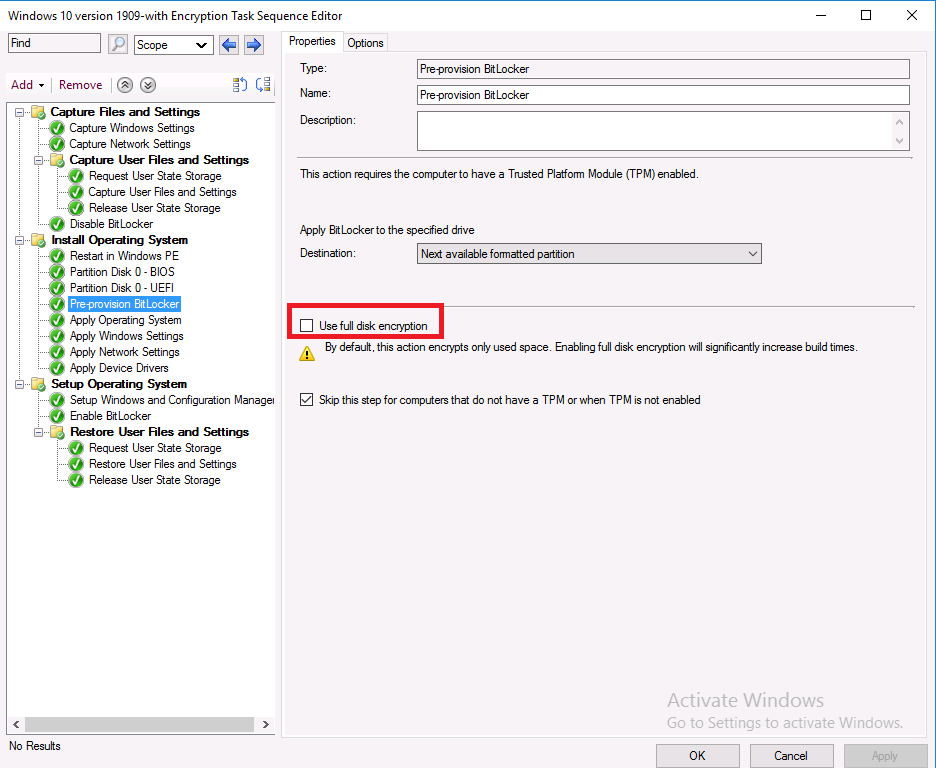
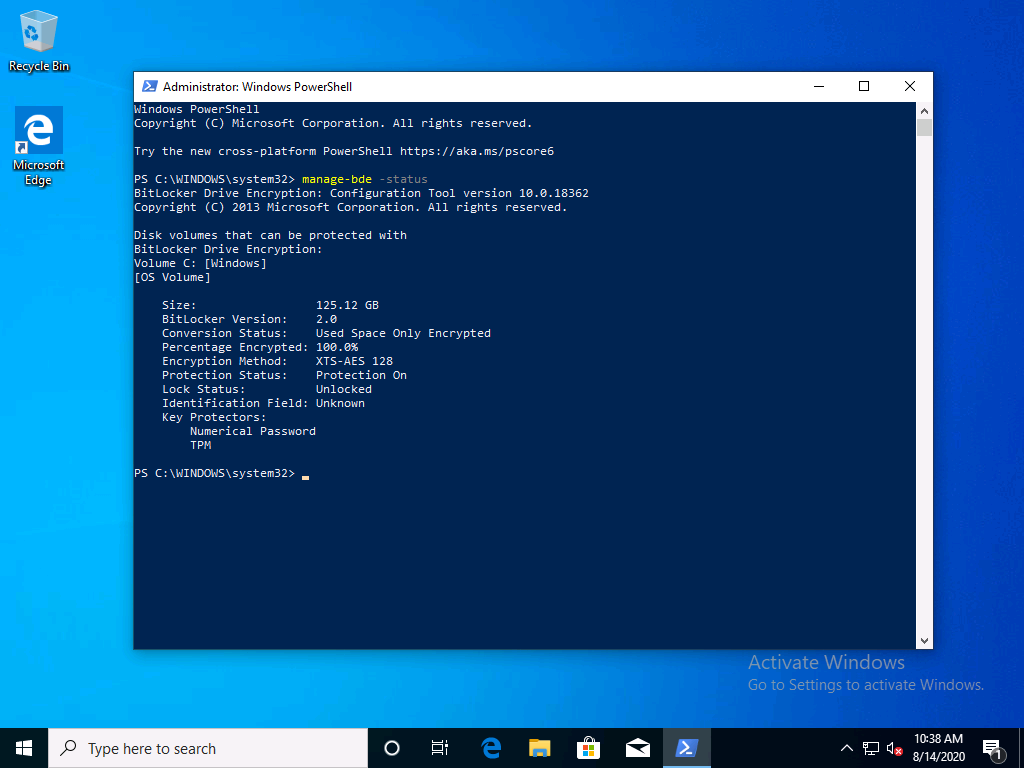
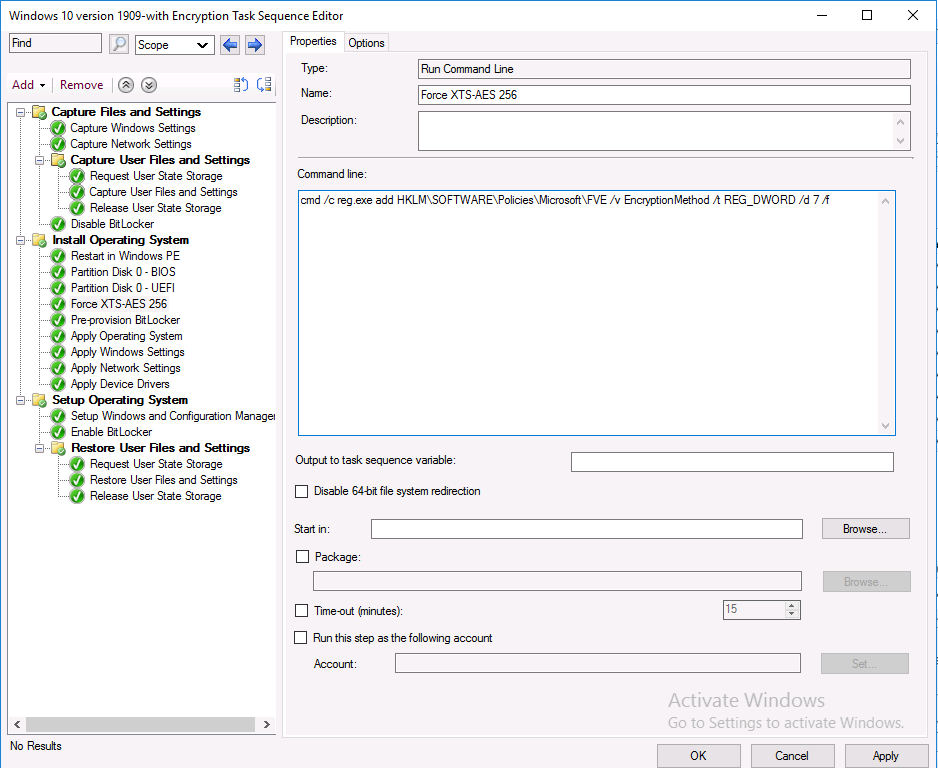
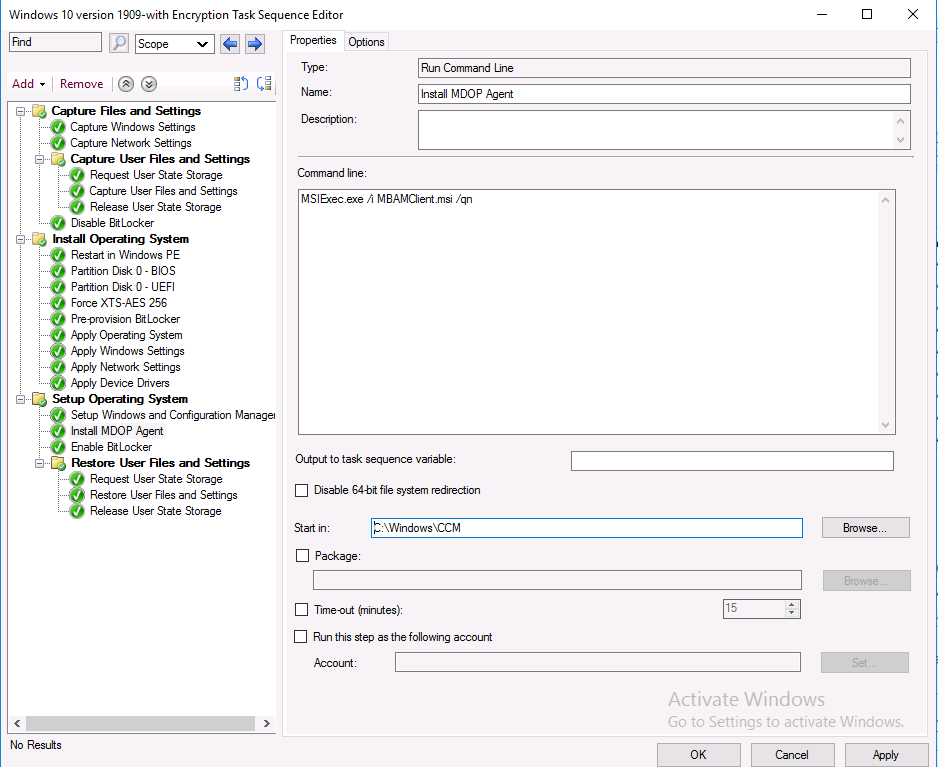
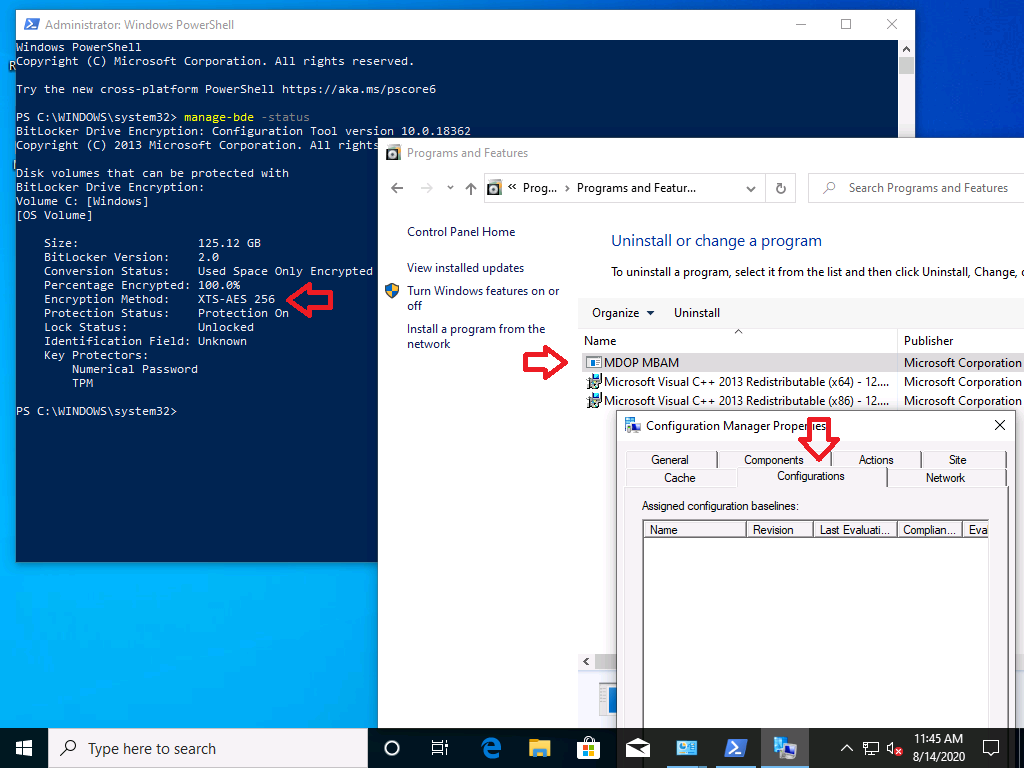
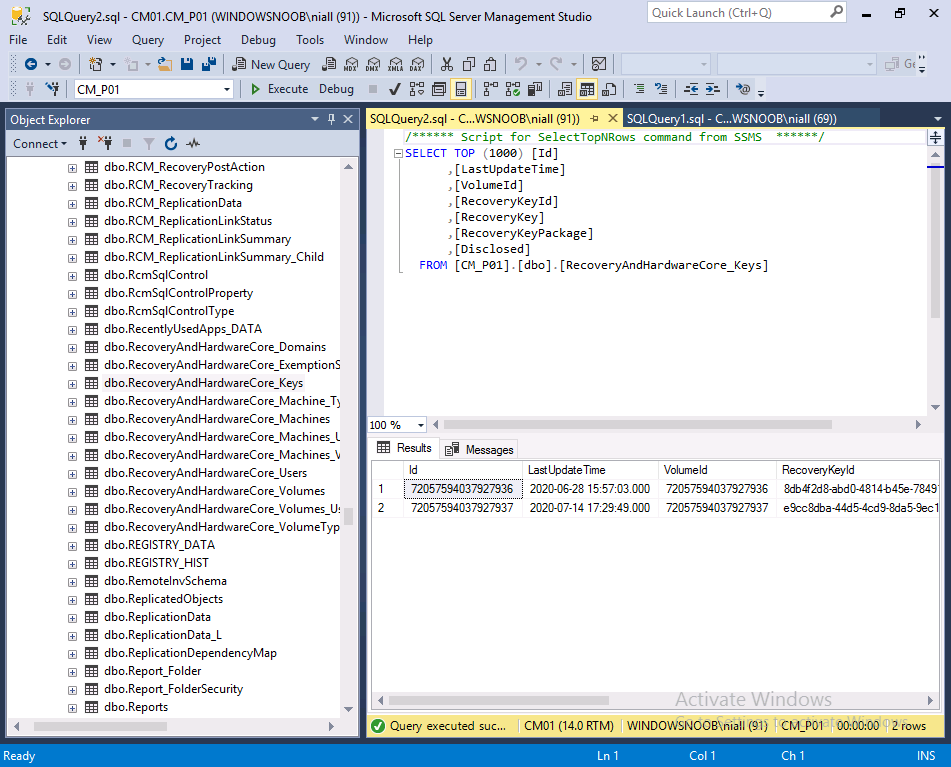
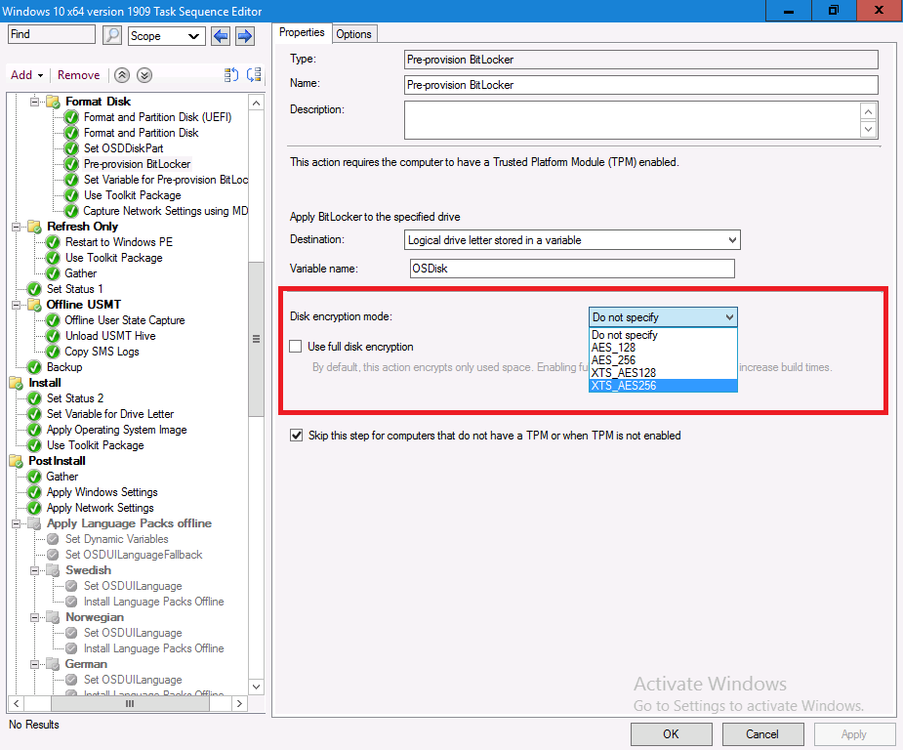
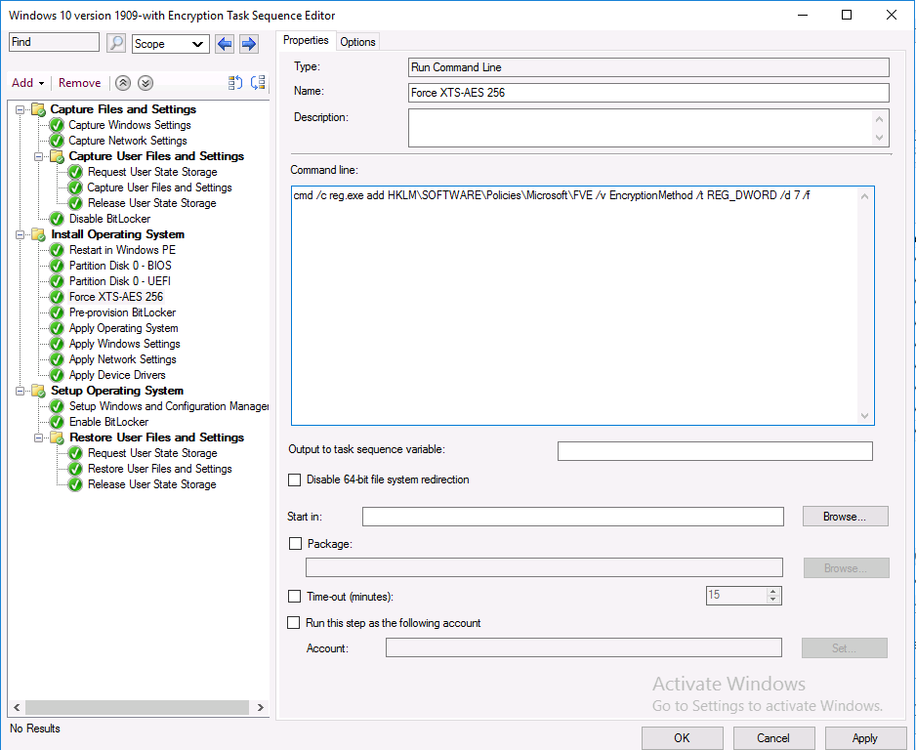
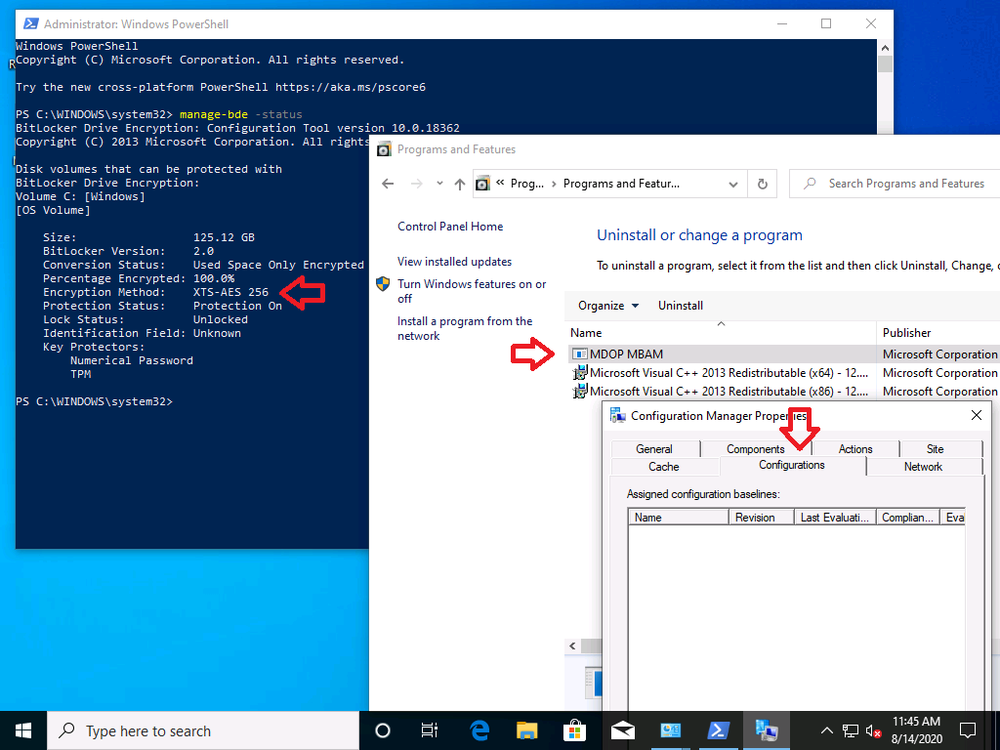
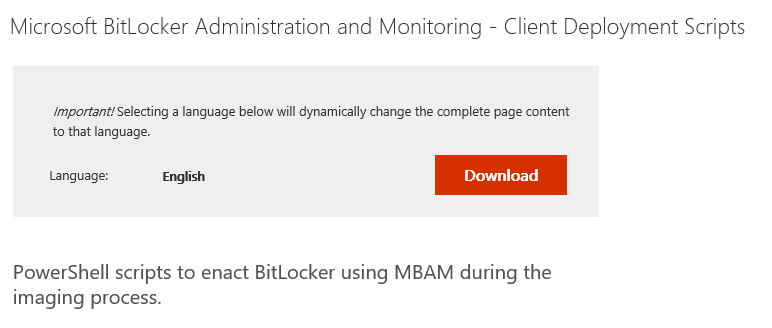
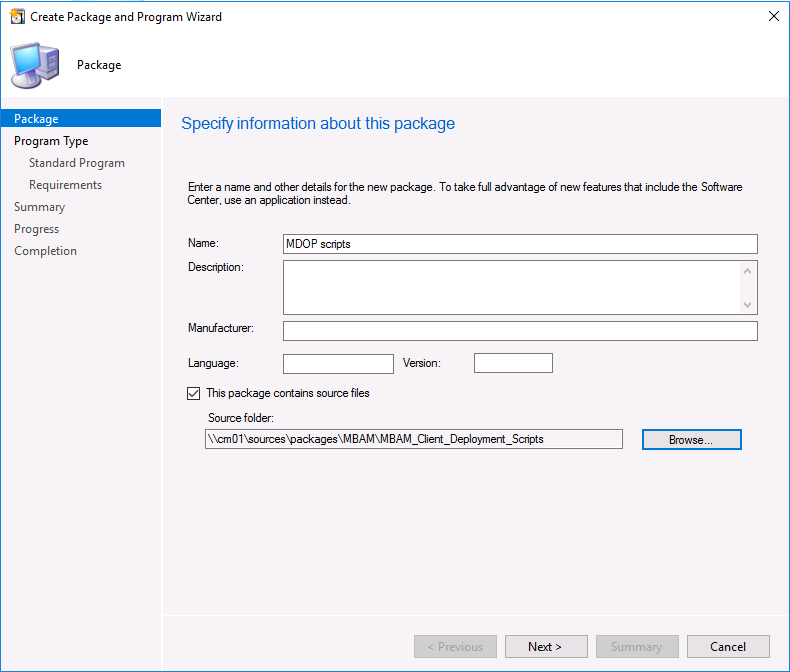
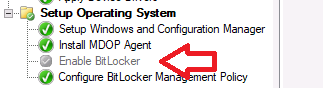
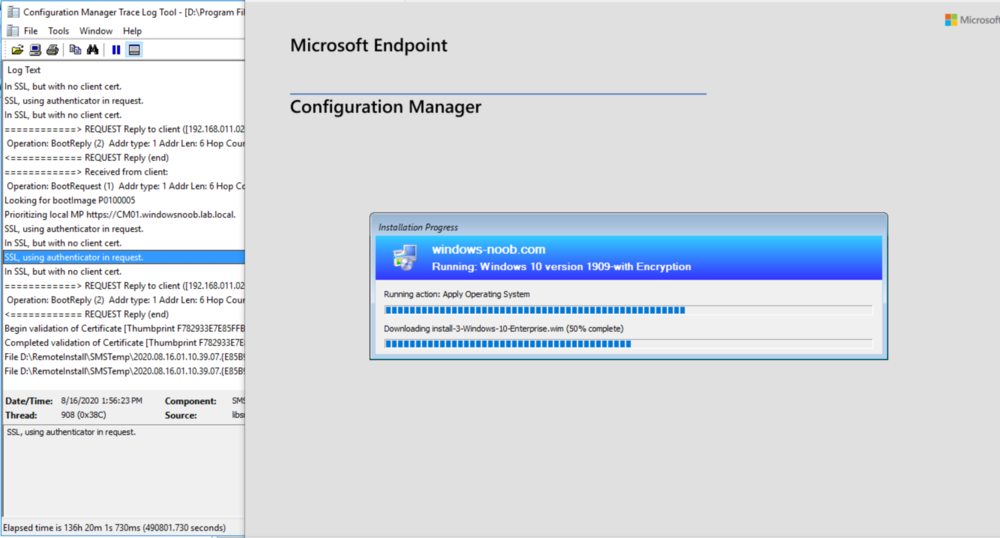
Introduction Update: March 2022. This is now resolved natively in ConfigMgr 2203 or later, please review this post for more info. NOTE: If you are using ConfigMgr 2103 or later do NOT use the Invoke-MbamClientDeployment.ps1 Powershell script as it will cause serious problems with your site. Read the following and scroll down for more info. see https://docs.microsoft.com/en-us/microsoft-desktop-optimization-pack/mbam-v25/how-to-enable-bitlocker-by-using-mbam-as-part-of-a-windows-deploymentmbam-25). I've had a lot of questions recently about people wanting to use the new BitLocker Management capabilities in Configuration Manager, and to make use of those abilities during OSD (Operating System Deployment). First things we need to keep in mind is that the BitLocker Management capabilities change quite a bit depending on the version of ConfigMgr you are using, the newer version it is, the more feature rich. With ConfigMgr 1910, the abilities are minimal and therefore you'll have to have manual steps to make up for it in the task sequence. A lot has changed since the early release of Bitlocker Management so in this blog post I will assume you are using either CM1910, CM2002 or CM2006. So what is our overall goal here? It's to better understand what the different versions of Configuration Manager (with BitLocker Management enabled and configured as per my previous guides) and to be able deploy an operating system (Windows 10 version 1909 or later) to a computer and have it secured from the outset with BitLocker, and to have BitLocker configured with the same encryption algorithm we defined in our BitLocker Management policy and for the recovery key information to be stored in ConfigMgr's database. Note: As the ConfigMgr agent is in provisioning mode during Operating System Deployment (OSD), it cannot process policy, therefore even if you add the computer to a collection targeted with BitLocker Management policy during OSD, it will not apply that policy until after the task sequence has successfully completed operations. Deploying a computer with default BitLocker steps using CM1910 or CM2002 In ConfigMgr if you create a standard Install operating system task sequence with BitLocker included, even with BitLocker Management enabled, it will add a few BitLocker Specific steps namely Disable BitLocker (Capture USMT state phase) PreProvision BitLocker Enable BitLocker These steps alone can enable a default configuration of Bitlocker but it may not be what you want, for example, the encryption algorithm will most likely not match your policy setting and will instead use the default value of XTS-AES 128 shown below. In addition, the conversion listed above is Used Space Only Encrypted, you can change that to Full Disk Encryption if that's what you prefer For more info on using the FDE options in the steps see the following blog post. https://www.niallbrady.com/2020/02/25/full-disk-encryption-a-closer-look-on-real-hardware/ If you leave everything in the default task sequence as default the end result will be a Bitlocker encrypted OS volume with XTS-AES128 using Used Space Only as shown here. The computer will not have any MDOP agent installed (unless you target it somehow) and will not have any BitLocker Management policy deployed (unless again, you somehow target it with that policy. Changing the default Encryption Algorithm To change the encryption algorithm in an OSD task sequence in Configuration Manager 1910 or 2002 you'll need to add steps (before the Pre Provision BitLocker step) to the task sequence to force that encryption algorithm. The possible settings are listed below as registry keys, the REG_DWORD value 7 below will force it to use XTS-256 AES which is recommended. cmd /c reg.exe add HKLM\SOFTWARE\Policies\Microsoft\FVE /v EncryptionMethod /t REG_DWORD /d 7 /f as shown here. The values you can use are listed below: Value 3, AES_128: The volume has been fully or partially encrypted with the Advanced Encryption Standard (AES) algorithm, using an AES key size of 128 bits. Value 4, AES_256: The volume has been fully or partially encrypted with the Advanced Encryption Standard (AES) algorithm, using an AES key size of 256 bits. Value 6, XTS_AES128: The volume has been fully or partially encrypted with the Advanced Encryption Standard (AES) algorithm, using an XTS-AES key size of 128 bits. – This is the default of Windows PE 10.0.586.0 (1511 Release) Value 7, XTS_AES256: The volume has been fully or partially encrypted with the Advanced Encryption Standard (AES) algorithm, using an XTS-AES key size of 256 bits. Setting these registry keys is not necessary in ConfigMgr version 2006 or later as you can explicitly set the encryption method in the Pre-provision BitLocker step as shown here. Ok now that we know how to force the algorithm, let's redeploy the computer to see the result. So that was successful, but still there is no MDOP client agent and no BitLocker Management policy. Adding the MDOP agent To add the MDOP agent is simple enough as the MSI file we need is included with the files installed when you install the Configuration Manager client agent, and located in C:\Windows\CCM. To install it during a task sequence, simply create a Run Command Line step after the Setup Windows and ConfigMgr step but before the Enable BitLocker step as shown below. So, now that we've configured the Encryption Algorithm and have added the MDOP Agent, let's redeploy our computer to see what happens. The end result, we have the right encryption algorithm settings, and the MDOP agent is installed, but there is still no BitLocker Management policy applied. Meaning that the MDOP agent won't know what to do with itself and therefore no new keys will be stored in ConfigMgr's database from this computer (until it get's BitLocker Management policy) as you can see below, note today is 2020/8/14 and the last key added in this lab was a month ago exactly. So what is our next option ? Manually forcing the BitLocker Management policy To 'tell' the MDOP agent where to send it's gathered data (keys, compliance and more), you can download some scripts from this link. You will use those files to create a package within ConfigMgr, and later add the package as another step in the task sequence. This can manually force the MDOP agent into reporting the data to your respective recovery service. Once done, distribute the package and add a new Run PowerShell Script step to the task sequence. Fill in the following details Package: MDOP Scripts Script name: "Invoke-MBamClientDeployment.ps1" Parameters: -RecoveryServiceEndpoint "https://<RECOVERYSERVICE>/SMS_MP_MBAM/CoreService.svc" -EncryptionMethod "XTSAES256" -EncryptAndEscrowDataVolume -IgnoreEscrowOwnerAuthFailure -IgnoreReportStatusFailure -WaitForEncryptionToComplete Replace <RECOVERYSERVICE> with the site hosting your configured BitLocker Management recovery service eg: https://CM01.windowsnoob.lab.local Note: This step requires the MDOP agent is installed, so make sure you added it in the previous step. Note: Once done, disable the built in Enable BitLocker step, however, keep in mind that doing so will stop the BitLocker recovery data from being stored in Active Directory. If you want the recovery data in AD, then don't disable this step. Ok, now that that's done, let's redeploy our computer again to see what happens. This time, in addition to our Encryption Algorithm being set, the recovery key is stored in ConfigMgr's database. So now the recovery information is stored in the database but still the configmgr client agent doesn't have any policy applied (unless you add that computer to a collection with the policy deployed to it). Summary To summarize, you've created manual steps in the task sequence to set the desired encryption algorithm settings, you've created a package and installed the MDOP agent and used a PowerShell script to store the recovery key information in ConfigMgr's database. You would however still need to add the deployed computer to a collection where BitLocker Management policy is deployed if you want to report on the compliance of your deployed computers. In other words, there is no real native support for BitLocker Management configured policy within an OSD task sequence currently, instead, you must manually specify those configured settings within your task sequence if you want your devices encrypted with the same settings as your configured policy. Lastly, if you are using CM2006 or later, things are a little bit easier and you no longer have to manually set the registry keys for encryption algorithim, instead in both the PreProvision BitLocker step and Enable BitLocker step you have a new drop down which you can use to set those values.


-
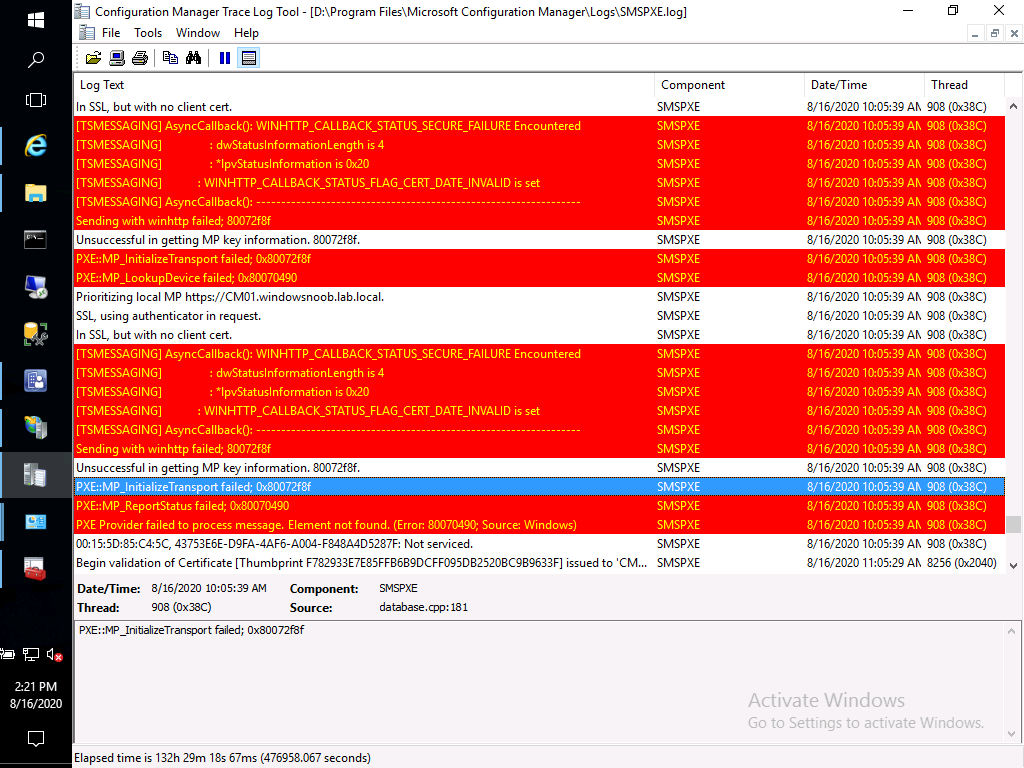
Introduction I was busy putting together another BitLocker Management OSD related blog post in one of my PKI enabled ConfigMgr labs (#11) when I noticed that PXE boot no longer worked. The virtual machine would attempt to PXE boot for a while and then time out and boot straight into the operating system. PXE boot worked just fine the day before and I was nearly done with my blog post, so what was the issue ? A quick look at the smspxe.log file revealed some details within a sea of red. The most interesting line was this one, it’s referring to WINHTTP (that would be IIS) and CERT_DATE_INVALID ! [TSMESSAGING] : WINHTTP_CALLBACK_STATUS_FLAG_CERT_DATE_INVALID is set Digging deeper So I guessed I had an expired certificate but a quick glance as pkiview.msc on the IssuingCA server, didn’t reveal any issues. Next, I checked certsrv.msc on the IssuingCA to list expired certificates, and I sorted by name so I could easily find my IIS certificate. According to this, it expired yesterday (today is 2020/8/16). And there you have it, the SCCM IIS Certificate which I deployed 2 years ago, with a lifetime of 2 years is now expired. To confirm this, I launched Internet Information Services (IIS) Manager on the ConfigMgr primary server (CM01), and selected Default Web Site, then selected Bindings. And then I clicked on https and then clicked on View. and there’s the proof, This certificate has expired or is not yet valid It expired yesterday right in the middle of another blog post I was putting together, and that caused me to lose focus as I had to figure out this new issue, so one day led to another.. and inevitable delays. So now we know what the problem is, how do we fix it. Requesting a new certificate Note: This environment is one of my labs, so your setup will differ. Use these steps as a guide to fixing your broken production environment On the ConfigMgr primary server hosting IIS where you verified that the certificate had expired, start certlm.msc. We will use this to request a new certificate to replace the old expired certificate. In Personal, Certificates, right click and choose All Tasks and then Request New Certificate. Click Next at the Before you begin screen, and verify that Active Directory Enrollment Policy is selected before clicking Next. Select the SCCM IIS Certificate from those listed. You’ll notice that for the SCCM IIS Certificate, more information is required to enroll, Click on the More information is required to enroll for this certificate message to enter this info. For Alternative Name, choose the DNS option and then click on Add to add both the hostname and the fully qualified domain name of your SCCM server (CM01 and CM01.windowsnoob.lab.local). Next Click on General, and give this cert a friendly name so we can distinguish it in IIS later when we bind it. click OK, then click Enroll. Click Finish when done. You can now see the new certificate listed, double click on it to bring up it’s details, as you can see it’s now got an additional 2 years before expiry and it has the new Friendly Name. Import the new certificate into IIS On the SCCM server (CM01), start Internet Information Services (IIS) Manager, expand Sites so that you can see the Default Web Site and the WSUS Administration websites listed. Select the Default Web Site, this web site is where the management point, distribution point and other SCCM roles such as Application Catalog can be found (if they are installed). Right click on the Default Web Site and choose Edit Bindings from the options available. In the window that appears, select the https section (port 443) and choose Edit. In the screen that appears, change the dropdown for certificate from SCCM IIS Certificate (the expired one) to the newly released certificate called Endpoint Manager Certificate. Click OK and then click Close. Test the changes Now that you’ve fixed the problem, PXE boot a computer again to verify the changes and as we can see, the SMSPXE.log is happy and PXE boot is working again, RESULT !

-
glad to hear it, and thank you for the thanks
-
not yet, maybe this weekend or tonight, i'll spin up the lab again, actually i've started writing a blogpost now and hopefully it'll be finished tonight.
-
so you did an inplace upgrade of the operating system, did you also restart all the SMS related services after the upgrade ? including post upgrade tasks such as those mentioned here ? https://byteben.com/bb/sccm-site-server-in-place-upgrade-from-windows-server-2012-r2-to-windows-server-2019/#4
-
I haven't tested constrained language mode with this, but according to this blog post paragraph, you can do as follows let me know how you get on
-
Introduction Microsoft released TP2008 yesterday, more details here, but I was busy building my deck so I didn’t blog anything, but I did the upgrade and waited until today to see what’s new. And as usual, it’s a list of loads of new additional features. So what is new and exciting in this technical preview release of ConfigMgr? Collection query preview When editing queries for collections you can now preview the results real time. So let’s try it. I created a new collection and added a query for Windows 10 version 1903. You can now click on the green triangle to see the results of your query. and it displays like so… Cool stuff ! This means you can test your queries while creating a collection. Analyze SetupDiag errors for feature updates With the release of Windows 10, version 2004, the SetupDiag diagnostic tool is included with Windows Setup (previously you’d have to download it if you wanted to review it’s data). If there’s an issue with the upgrade, SetupDiag automatically runs to determine the cause of the failure. Configuration Manager now gathers and summarizes SetupDiag results from feature update deployments with Windows 10 servicing. To see these errors, check the Windows 10 servicing dashboard in Software Library. Mine is currently blank, I guess I need to start upgrading existing devices to 2004 and see what data it gathers. Collection evaluation view Microsoft has integrated the functionality of Collection Evaluation Viewer into the Configuration Manager console. This change provides administrators a central location to view and troubleshoot the collection evaluation process. The console now displays the following information: Historic and live information for full and incremental collection evaluations The evaluation queue status The time for collection evaluations to complete Which collections are currently being evaluated The estimated time that a collection evaluation will start and complete I’m not sure why mine has no data yet but i’ll see if I can get it to populate. Delete Aged Collected Diagnostic Files task You now have a new maintenance task available for cleaning up collected diagnostic files. Delete Aged Collected Diagnostic Files uses a default value of 14 days when looking for diagnostic files to clean up and doesn’t affect regular collected files. The new maintenance task is enabled by default. See task sequence size in the console This is interesting, and will show you the size of your task sequence. It’s a new column which is enabled by default, I’m not sure why all my task sequences are reporting 0KB but I’ve asked Microsoft PG for comment. So it turns out if you edit any task sequence (add a comment in the description or whatever) then Apply the changes then it will display the task sequence size (thanks to Adam Gross for the tip). Monitor scenario health Configuration Manager is complicated to troubleshoot. It’s especially complex to understand system latency and the backlog between components. Cloud service-attached features increase that complexity. You can now use Configuration Manager to monitor the health of end-to-end scenarios. It simulates activities to expose performance metrics and failure points. These synthetic activities are similar to methods that Microsoft uses to monitor some components in its cloud services. Use this additional data to better understand timeframes for activities. If failures occur, it can help focus your investigation. There are more features, but these were the one’s I looked at, as always Microsoft is innovating ! cheers niall
-
Hi @Mayur ok then you are contradicting what you said earlier, oh well, if it is indeed returning the correct ip address then that means godaddy is working, the 'request timed out' could be because of your firewall solution blocking ping or windows firewall itself, and it's not the end of the world, you now need to verify that you can browse the IIS welcome page on your url by browsing on a phone (not connected to wifi, use 3g instead..) to the http://pki.windows-noob.com obviously use your own url for this testing. if that doesn't work, then your vyos firewall is not routing port 80 correctly to the local ip address of the webserver cheers Niall.