-
Posts
9208 -
Joined
-
Last visited
-
Days Won
367
Everything posted by anyweb
-

how can I CAPTURE an Image using WDS
anyweb replied to anyweb's question in Windows Deployment Services (WDS)
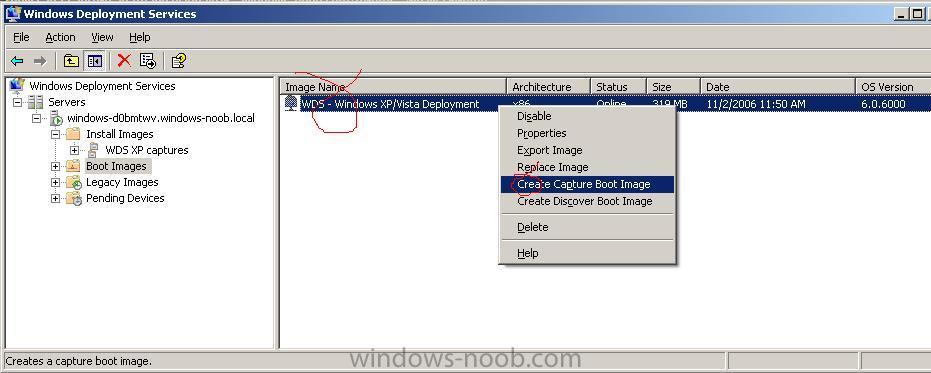
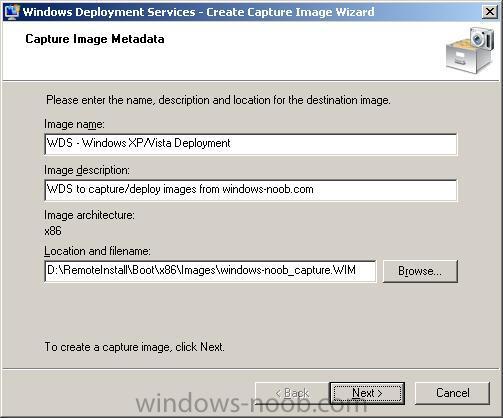
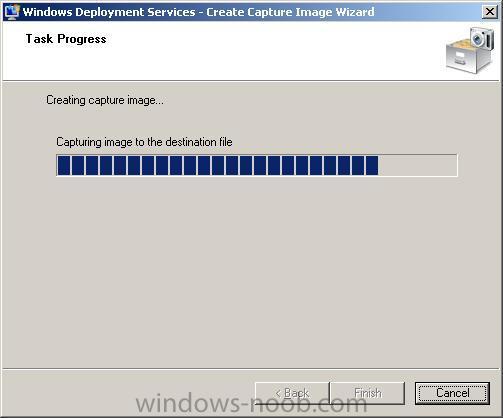
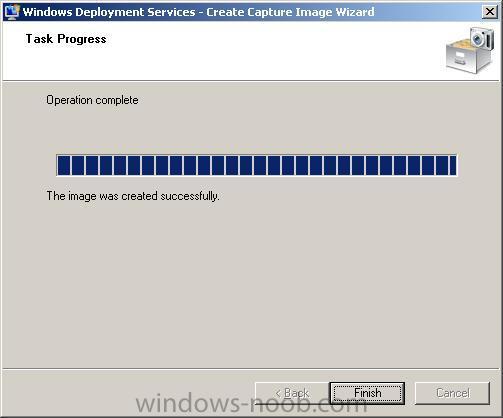
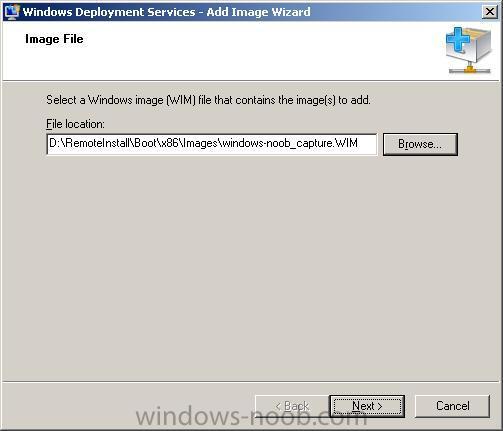
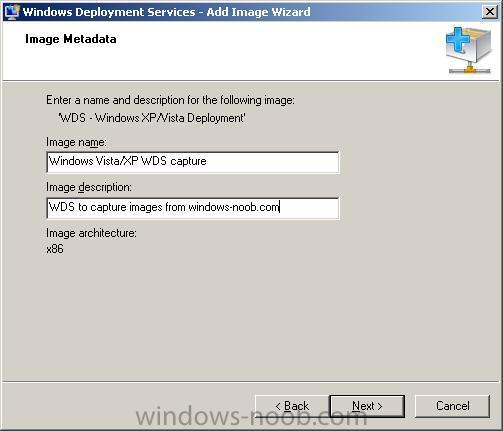
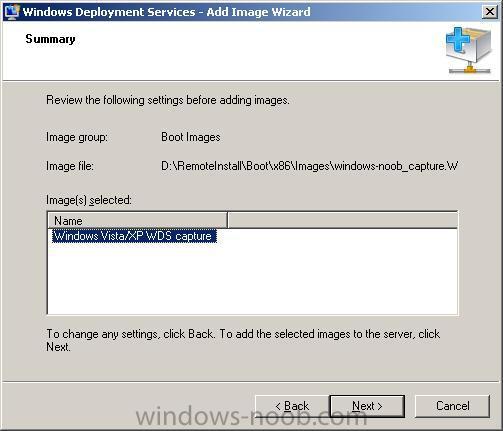
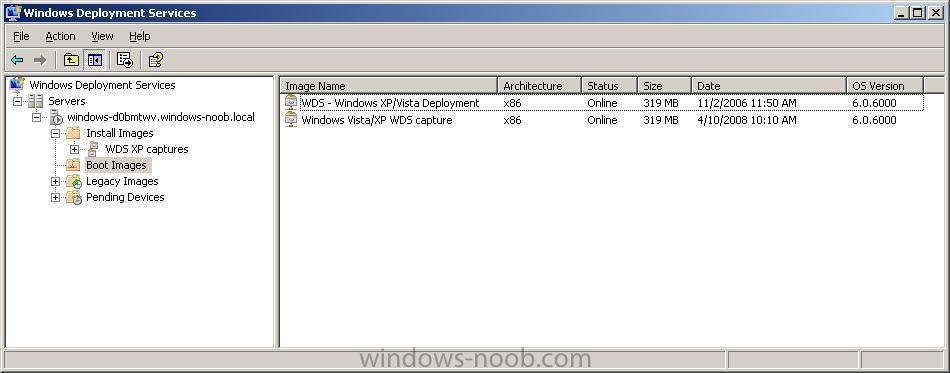
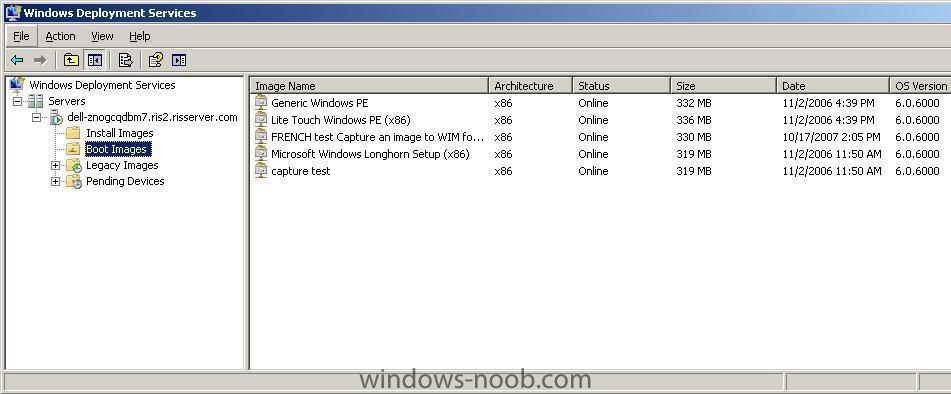
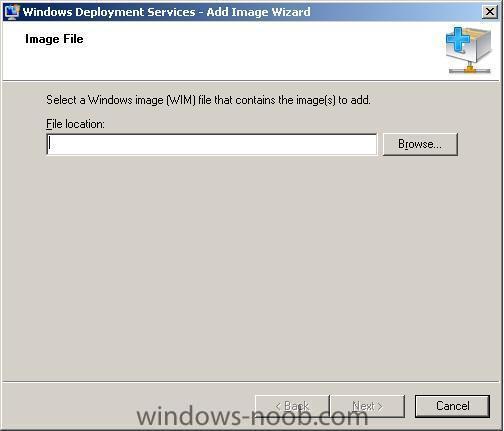
Part 2 - create Capture file Step 1. Highlight the 'WDS - Windows XP/Vista Deployment' image name in the right pane of the WDS gui (this is the image you just created in Part 1 above). Step 2. Right-click on it, and choose Create Capture Boot Image Step 3. In the next Windows (capture image metadata) leave the Image Name and Image Descriptions alone, and click on the Browse button. Step 4. Browse to the RemoteInstall\Boot\X86\Images folder (or X64 if using X64), this folder is part of the original WDS setup. Step 5. Give the filename you are about to create a name eg: RemoteInstall\Boot\X86\Images\windows-noob_capture and click open, then click next, the wizard will auto append .WIM to the filename. Step 6. The wizard will now start to extract the image from the source image file. Once it is complete, click Finish. Part 2a - add Capture file to WDS Step 1. In WDS, select Boot Images in the left pane. Step 2. in the Right Pane (in an empty area) right-click and choose Add Boot Image Step 3. In the add image file window, browse to RemoteInstall\Boot\X86\Images and select the capture file you created above, click open and then next. Step 4. set the Image name to 'Windows Vista/XP WDS capture' and the Image description to 'WDS to capture images from windows-noob.com', click next. Step 5. Review the choices and click next to add this capture boot image. once done WDS will look like this -
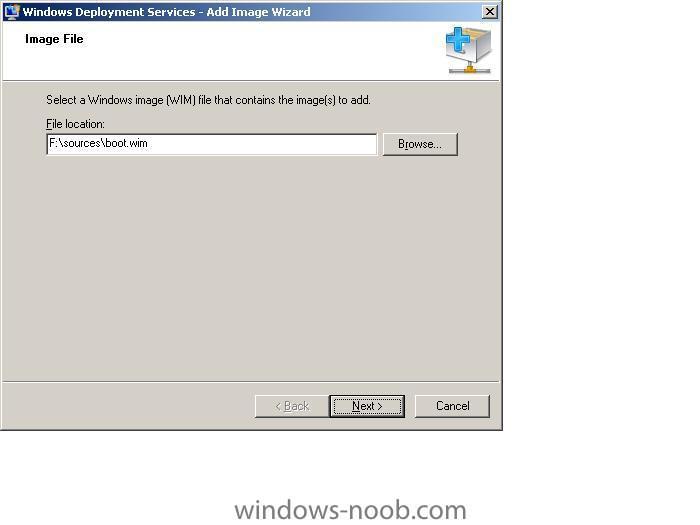
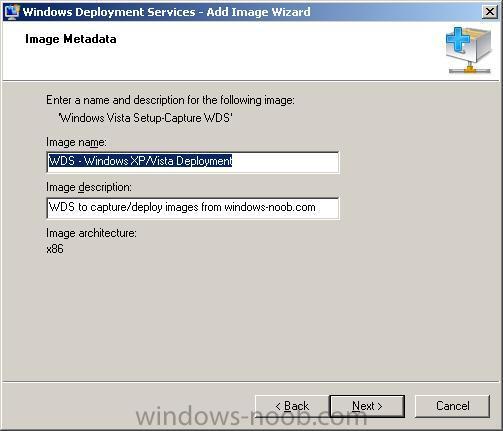
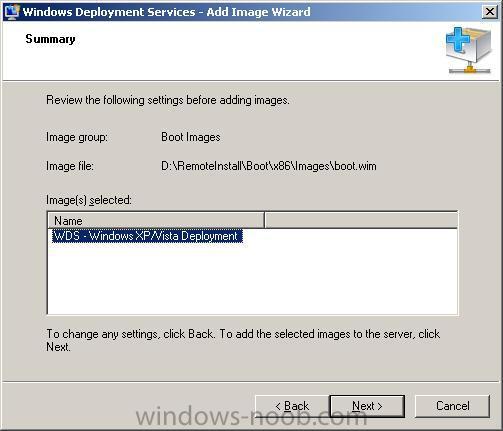
This guide assumes you have already setup WDS as described here Part 1 - add boot.wim to WDS Step 1. Get your Windows Vista DVD ready. Step 2. Insert the DVD and start WDS (windows deployment services) gui. Step 3. In the Left Pane of WDS, select boot images Step 4. In the Right Pane, right click the mouse and choose 'Add Boot Image'. Step 5. In the Add Image Wizard, click the Browse button and browse to the Sources folder on your Vista DVD that you inserted in Step 2. Step 6. Highlight the file called boot.wim and click Open, once done Click Next Step 7. In the next window, change the Image name from "Microsoft Windows Longhorn Setup (x86)" to 'WDS - Windows XP/Vista Deployment' Step 8. Change the image description to 'WDS to capture/deploy images from windows-noob.com' Step 9. Click next to review the settings, and next again to proceed. Step 10. After the file copying is complete click on Finish.
-
go here http://www.microsoft.com/windowsserver2008/audsel.mspx cheers
-
Microsoft has apologized for a Windows Server update that automatically installed the Windows Desktop Search tool on users' desktops without approval. The mistake happened because Microsoft reused the same update package for when WDS was first published in February as an optional update that was only applicable to systems with the search tool previously installed. via osnews.com
-
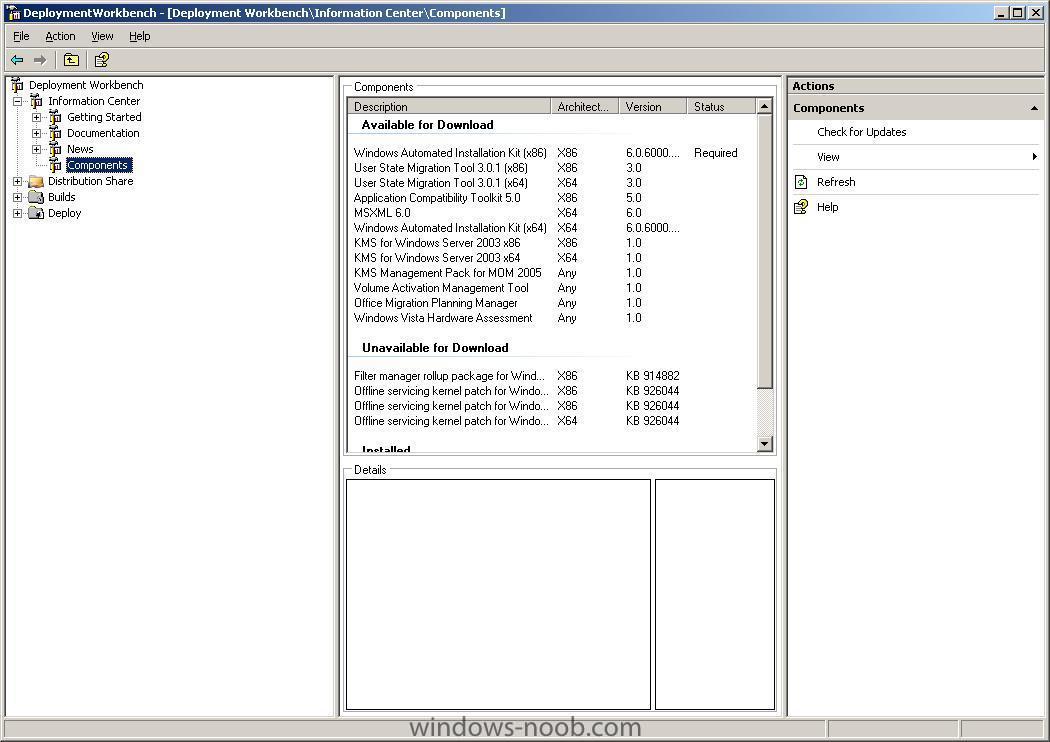
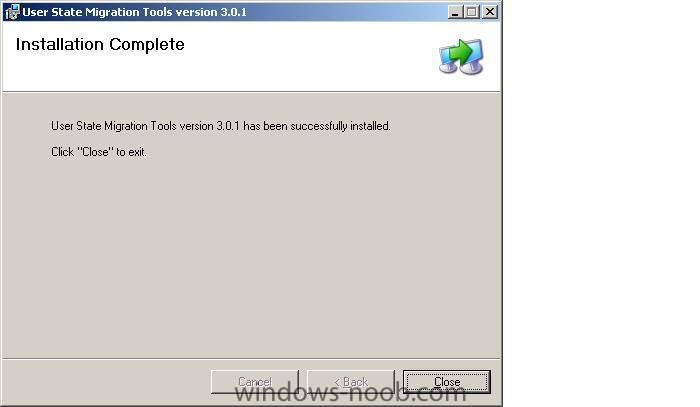
Microsoft® Windows® User State Migration Tool (USMT) version 3.0.1 migrates user files and settings during deployments of Microsoft Windows XP and Windows Vista™. USMT captures files and settings from the source computer and then migrates them to a new Windows installation. If you are only upgrading your operating system, USMT is not needed. This tool includes two command-line tools named ScanState and LoadState. ScanState creates an intermediate store that contains the user files and settings from the source computer. (backup) LoadState restores these files and settings to the destination computer. (restore) USMT 3.0.1 also has three default migration rule (.xml) files named MigApp.xml, MigUser.xml, and MigSys.xml. You can alter the default .xml files and you can also create customized .xml files. Depending on what you want to migrate, you can specify all or none of the default .xml files on the command line. The entire migration process is controlled by the .xml rules, which you can modify, and logic that is built into the tool. When using USMT for automated migration, in almost all cases, you should modify the migration .xml files for your unique situation. USMT 3.0.1 contains the following updates to USMT 3.0: 1. You can now install this tool on computers that are running non-English versions of Windows Vista. 2. In USMT 3.0, some settings for local accounts were not being migrated. This has been fixed in USMT 3.0.1. Where can I download it from ? From here In addition, you can use the download features elements in BDD 2007 (or MDT 2008) to download it, to do this, select the Information Center, then click on the Components Section. Highlight the USMT version (x86 or x64) that you want, and download it. Where can I get a detailed User guide for USMT ? From here Where can I see a list of USMT Error codes ? From the Deployment Guys Where can I read the USMT Team Blog ? From here Can I install USMT on Windows Server 2008 ? No, and for more details see here When should I use USMT? USMT is best used in automated deployment scenarios where a user is being migrated from one install of Windows to another (on the same computer) or when a user is being migrated from one computer to another (two different computers). USMT 3.0.1 currently supports migrating to and from the following operating systems: Windows 2000 to Windows XP, Windows Vista Windows XP to Windows XP, Windows Vista Windows Vista to Windows Vista cheers anyweb
-
The first officially-released build of Windows XP SP3 has surfaced, with 1073 patches/hotfixes and several new features. This build has been made available to testers as a part of the Windows Vista SP1 and Windows Server 2008 beta program and is available in English, German, and Japanese. vis osnews.com
-
"Responding to feedback from customers and third parties, Microsoft has extended the availability of Windows XP to both original equipment manufacturers and retail channels through to June 30, 2008. Originally slated to be pulled from retail shelves and OEMs on January 30, 2008 - only a year after Windows Vista's debut - customers requested more time to prepare for the upgrade to Vista." more info > http://arstechnica.com/news.ars/post/20070...-execution.html via osnews.com
-
Microsoft has lost its appeal against a record 497m euro (£343m; $690m) fine imposed by the European Commission in a long-running competition dispute. full story > http://news.bbc.co.uk/2/hi/business/6998272.stm
-
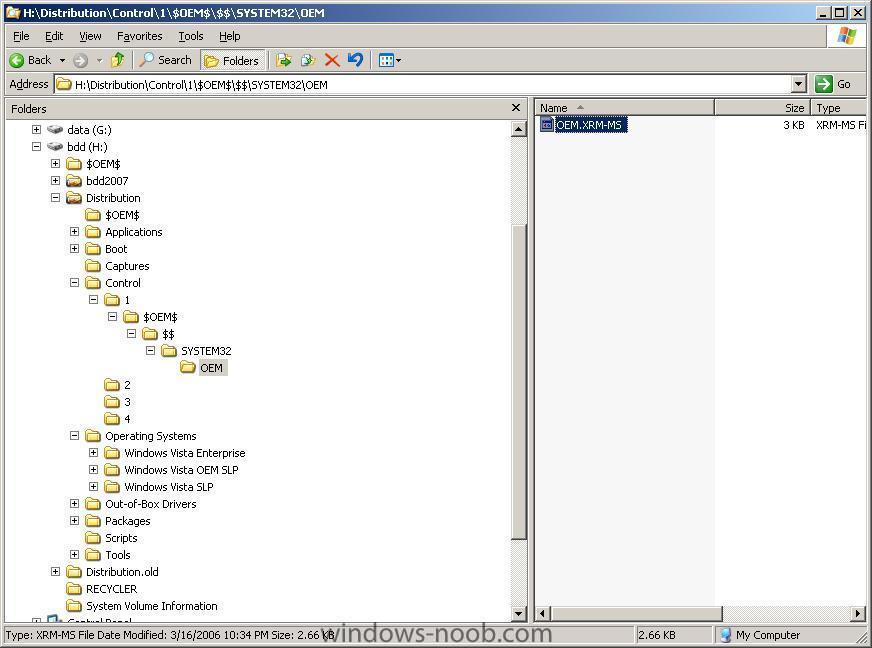
If you are deploying Windows Vista using SLP Media (from your OEM provider) then your OEM Vista capable pc's (SLIC table must be present in the bios), you can preactivate your Vista deployments by doing as follows:- using the deployment workbench create a new build and use the OEM Vista DVD you got with your OEM pc as the operating system source, Once all copying is complete, use windows explorer to navigate to your Distribution$ share and find the operating systems folder eg: H:\Distribution\Operating Systems\ in there, you'll have the os you just copied eg: H:\Distribution\Operating Systems\Windows Vista OEM SLP browse the contents of that folder and locate the $OEM$ folder (within the Sources directory) move this directory and all files in it outside of the Distribution$ share, and locate the OEM Vista certificate usually found in the following folder $OEM$\$$\SYSTEM32\OEM the file will have a name such as OEM.XRM-MS, where OEM is your Original Equipment Manufacturer. Copy ONLY that file plus it's folder structure to the build ID that you just specified in deployment workbench eg: copy to> H:\Distribution\Control\1 see screenshot now test a BDD deployment of this os, it should be pre-activated cheers anyweb
-
"Microsoft today released to the web Silverlight 1.0, a cross-browser, cross-platform plug-in for delivering richer user experiences on the Web. In addition, Microsoft will work with Novell to deliver Silverlight support for Linux, called Moonlight, and based on the project started on mono-project.com." via osnews.com
-

could not start remote installation service on local computer
anyweb replied to anyweb's question in Remote Installation Services (RIS)
what os are you installing on these computers ? more details please in order to determine the issue cheers niall -

could not start remote installation service on local computer
anyweb replied to anyweb's question in Remote Installation Services (RIS)
you cannot restart the RIS (remote installation service) service once you have got the WDS service installed, the WDS service REPLACES the RIS service, so you must disable the RIS service and enable the WDS service, once you have started the WDS service instead of the RIS service, all your normal RIS fucntions will work again, have you tested PXE booting to the ris server ? -
to find out what versions of Windows Vista are on your Vista DVD, simply insert it into your dvdrom drive and browse to the /sources/ folder, in there, locate the .CLG (catalog) files such as below from the above, we can determine that the DVD supports the installation (based on the product key) of Windows Vista Business, Business N, HomeBasic, HomeBasic N, HomePremium, Starter and Ultimate editions. cheers anyweb
-
If you try to install an application in BDD 2007 such as the one in this example and it fails to install, and in addition, you note that any autologin you added to unattend.xml or user accounts were not created then the reason could be down to the media you are using. If you are using an OEM Windows Vista DVD then it is SLP (system locked protection) media and contains some additional files/folders that are not found on the MSDN or VLK/Enterprise media. On an OEM DVD you'll find a folder called $OEM$ in the SOURCES folder, and it contains files and sub directories of it's own. When you initially copied the operating system to your BDD 2007 distribution operating systems share, it copies everything including the OEM specific files. And it's those files that cause BDD to fail to do what you want it to do. to resolve the problem, simply MOVE or CUT the contents of the $OEM$ folder to somewhere else (effectively removing them from the BDD distribution share. Once done, PXE boot to your BDD server again, and you'll now see a difference, the application(s) should install and your other unattend.xml settings should magically work. cheers anyweb
-
Microsoft has delayed the upcoming release of Windows Server 2008. "Windows Server 2008, which we have been saying would Release to Manufacturing by the end of the calendar year, is now slated to RTM in the first quarter of calendar year 2008. Why? Well, as you know, Microsoft's first priority is to deliver a great product to our customers and partners, and while we're very happy with the feedback we're getting and the overall quality of the latest product builds, we would rather spend a little more time to meet the high quality bar that our customers and partners deserve and expect." via osnews.com
-
Microsoft is finally talking about the much-anticipated first service pack for Windows Vista and will release the first beta to a select group of about 15,000 customer and partner testers within the next few weeks. The software maker will release the beta for Windows XP Service Pack 3 at the same time. Microsoft acknowledged Aug. 29 that it has already shared beta previews of Windows XP SP3 and Vista SP1 with small group of testers, a fact it refused to admit until recently despite numerous leaks on the Internet. via osnews.com
-
so which is better in your mind ? xp/vista/linux/mac or other ? let us know cheers anyweb
-

PXE-E32: TFTP open timeout
anyweb posted a question in Deploying Windows 10, Windows 8.1, Windows 7 and more...
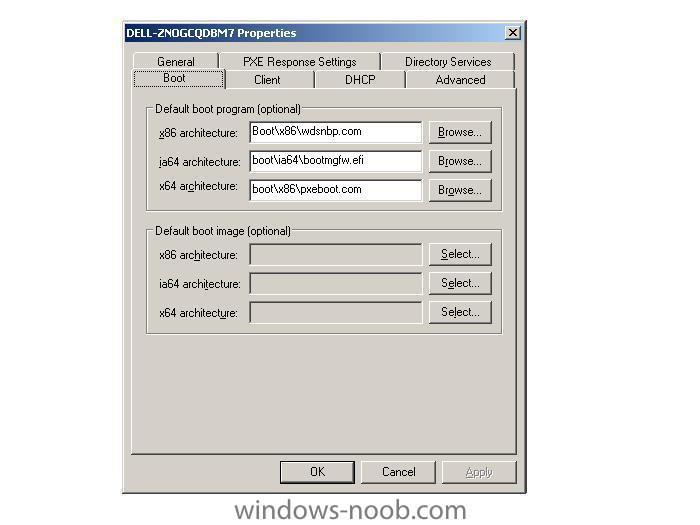
ok, you've already upgraded your Windows 2003 RIS server from Sp1 to Sp2., and all of a sudden pxe boot to the RIS server doesnt work anymore. No problem, read this post first. If you are now using WDS in mixed mode after doing the above, then you'll most likely need to configure it. To do that click on start/all programs/administrative tools/windows deployment services. Make sure to right click the server properties and choose the boot menu option, (screenshot below). By default it's set to pxeboot.com (which doesnt exist in that dir) click browse and insert wdsnbp.com instead. Once done, right click on 'boot images' in the wds mmc and choose 'add boot image'. Browse to your BDD 2007 distribution share, in there you'll find a boot folder, and in there you'll find your LiteTouchPE_x86.wim file (if you chose to 'update' your deployment in BDD 2007, read here for details about that.) Once you are finished, click finish and attempt to PXE boot the client again. You may need to run risetup -check to verify that the WDS service is started and there are no errors. In addition, if you now get a new PXE boot error, and you are only using x86, then simply change the pxeboot.com file for that to the x86 folder eg: change boot\x64\pxeboot.com to boot\x86\pxeboot.com apply your changes and now PXE test again, this time it should work and you should be presented with a mixed mode screen (remote installation services and lite touch windows pe) cheers anyweb -

What is BDD 2007 ?
anyweb replied to anyweb's question in Deploying Windows 10, Windows 8.1, Windows 7 and more...
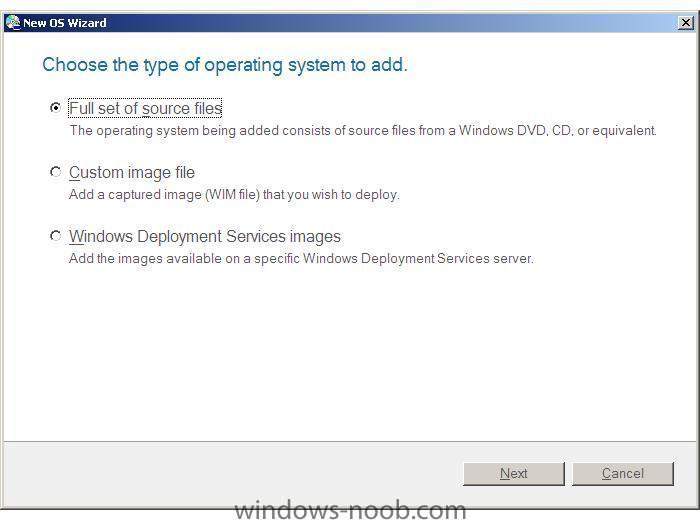
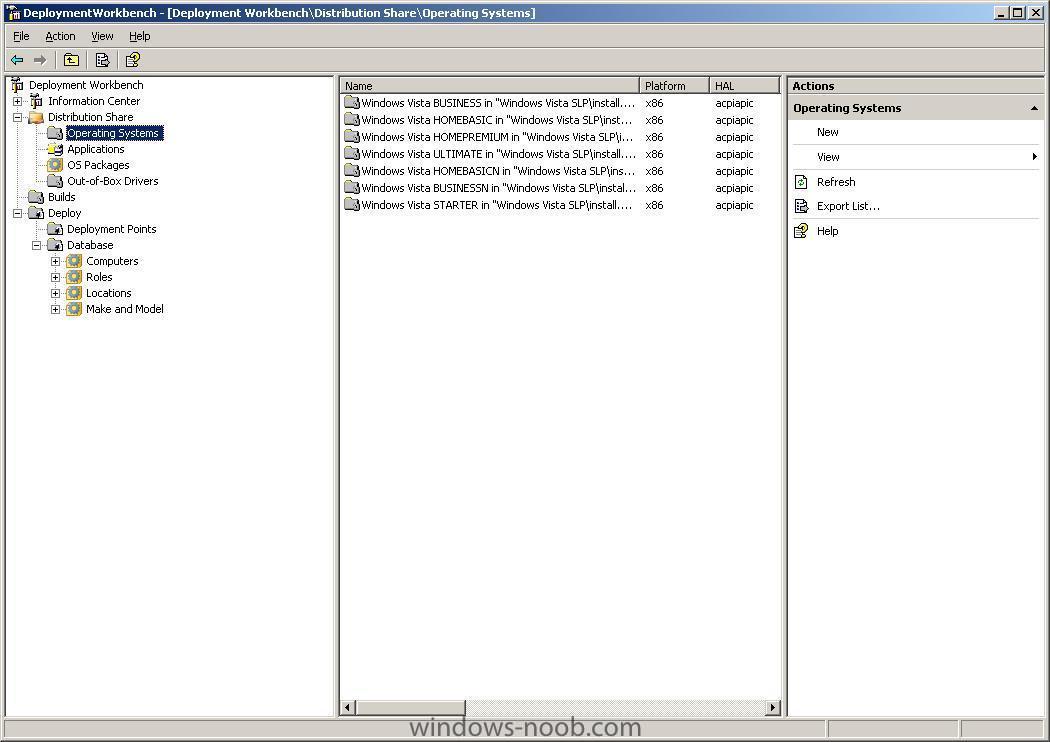
Now that you have BDD 2007 installed and WAIK installed, you are ready for the next steps, listed below:- Configure the distribution share. Expand the distribution share, and right click on Operating Systems. In this example, we are going to add Windows Vista Ultimate (from the DVD). Select 'New' and choose 'Full set of source files', click next and point the installer to where the source files are located, click next, you have the option of moving the files to the distribution point instead of copying them, choose whichever is appropriate to you. Once done, your OS(s) will appear in the column to the right as in the screenshot. Create a build. To create a new build, right-click Builds, and then click New to start the New Build Wizard. After creating a build, right-click it in the details pane, and then click Properties to configure it. The build will define what we want installed with an answer file. Create a Deployment Point Deployment points are methods for distributing and providing access to the distribution share’s source files and builds. To create a new deployment point, right-click Deployment Points and then click New to start the BDD Deployment wizard. Deployment Points is under Deploy. After creating a new deployment point, right-click it in the details pane, and then click Properties to configure it. Update the deployment Point Updating a deployment point generates boot image files (.wim and .iso) files that provide access to it. To update a deployment point, right-click it in the details pane, and then click Update. The boot image files for lab deployment points are in the \Boot folder of the distribution share. The boot image files for other deployment points are in the location specified in the BDD Deployment Wizard. To Add (network) drivers to a Vista image you do as follows: To allow the use of drivers that are not included in Windows Vista in your deployment using BDD, you would need to place them in the Out-of-Box Drivers folder in the Workbench. After creating the Deployment point, you would then need to right-click the Deployment point and select Properties. You would then need to check the checkbox beside "Include all Network Drivers" under Driver Injection on the Windows PE tab. To Customise a Windows PE image do as follows: You can customize a Windows PE image by adding custom scripts such as winpeshl.ini and startnet.cmd or using the unattend.xml answer file to customize Windows PE. winpeshl.ini startnet.cmd unattend.xml Winpeshl.ini is used to start custom applications, startnet.cmd is used to configure custom command-line scripts, and unattend.xml is used to configure settings and actions for Windows PE. For example if you want a custom message to display when a computer boots using Windows PE, you can create a HTML document and add it to the image. Using the PEIMG command add the following package to accomplish this: WinPE-HTA-Package Once this has been installed, you would then edit the startnet.cmd file to include a path to the HTML document. You can find the startnet.cmd file in the %systemroot%\System32 folder of your custom Windows PE image. -
let's say you need to pull values from the operating system WMI class, in XP you can do as follows:- open a command prompt and try this wmic.exe path win32_BaseBoard get /format:htable > win32_BaseBoard_test.html the above will pull all values for win32_BaseBoard and place the output in a html formatted table which you can view in Internet Explorer (will not display correctly in Firefox). attached is an example output of the above code. cheers anyweb win32_BaseBoard_test.html
-
You must have the Windows Automated Installation Kit (WAIK) installed first. Once done, Open a Command Prompt window and then change to the C:\Program Files\Windows AIK\Tools\x86 directory. To mount a WIM file use the following format:- ImageX /mountrw c:\somedir\someimage.wim 1 c:\somedir\mount That's it, you can now edit files in c:\somedir\mount and once done you'll have to commit those changes using the unmount switch in imageX to the WIM image using:- ImageX /unmount /commit c:\somedir\mount How To inject drivers into an offline WIM image First use the ImageX /mountrw command-line utility to mount the image file. Then use PKGMGR to inject the new driver into the Windows Image file by using the unattended answer file that you previously created in Windows SIM. Once done, use the ImageX /unmount /commit command to save the modifications that you have made to the offline image. fyi.. here is a post describing editing of a WIM file to inject drivers Note: Any modifications that you have made to the offline image will be disregarded unless you utilize the ImageX /unmount /commit command. Please note there is a Gui version of imagex available here cheers anyweb
- 1 reply
-
- 1
-

-
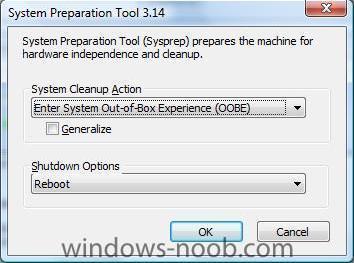
Sysprep is how you PREPare a SYStem for duplication, and in Windows Vista, it's quite different to the way things were in Windows XP. This post can always be found on www.windows-noob.com Note: If you are testing SYSPREP that you should limit the total number of syspreps to 3 times maximum otherwise you may experience unusual problems. To Sysprep a Vista Machine: Open a command prompt and enter the following command to prepare the machine for imaging. c:\windows\system32\sysprep\sysprep.exe /quiet /generalize /shutdown /oobe Note At this point SYSPREP.EXE will now prepare the machine for imaging and then shut it down when it has completed the process. The /generalize switch is used to remove the unique information from the machine. The /oobe switch is used to launch the mini-setup wizard the next time the machine reboots. If you want it to automatically reboot after running sysprep, then change the code to this c:\windows\system32\sysprep\sysprep.exe /quiet /generalize /reboot/oobe Sysprep can also be run in two predefined scenarios for system builders (cloning systems using imageX or Ghost or some other cloning software). Those two scenarios are called BTP (Build To Plan) and BTO (Build To Order). The BTP scenario allows you to create a sysprepped image to be used on identical hardware throughout a business/organisation, and to enable it do as follows:- Install Vista, install any drivers and applications, then sysprep using the following:- sysprep /oobe /generalize Once the computer shuts down, clone it using your favorite cloning software solution or use Microsoft's own imageX to create a wim file, or alternatively capture the image to your own WDS server using PXE boot or a boot CD. The BTO scenario allows you to customise an Vista image for one computer using a reference image (such as the one above). To use BTO simply get a Vista image installed on the box, then after it's installed run the following:- sysprep /audit /generalize /shutdown Once done, you can clone the image, and then test it. If you are happy with the applications/drivers/customisations then re-sysprep the image with sysprep /oobe /shutdown Note: If you install Windows images by using sysprep /generalize /oobe, be aware that the user experience will not be ideal. On the next reboot after running sysprep /generalize /oobe, Windows will run the specialize pass, Plug and Play, and other Setup tasks before launching Windows Welcome. This process can take additional time and can delay a customer's first logon. If you want to use the sysprep GUI, then click on start, and paste "c:\windows\system32\sysprep\sysprep.exe" into the Start Search input box. Unattended Windows Setup Answer File The unattended Windows Setup answer file, typically called Unattend.xml, is the answer file for Windows Setup that is created by using Windows System Image Manager (Windows SIM). The answer file enables the configuration of default Windows settings, as well as the addition of drivers, software updates, and other applications. The answer file enables OEMs and corporations to customize Windows Setup tasks, for example, specifying disk configuration, changing the default values for Internet Explorer, and installing additional drivers. Note: The single answer file replaces all the answer files that were used in previous versions of Windows (Unattend.txt, Winbom.ini, Oobeinfo.ini, and Sysprep.inf). Windows System Image Manager Windows System Image Manager (Windows SIM) provides you with the ability to customize Windows images. Windows SIM enables you to customize the settings in a Windows image. Based on your configurations, you can create an unattended Windows Setup answer file, typically called Unattend.xml. This answer file is used during Windows Setup to apply your configurations to Windows. In the answer file, you can specify changes to default operating system components and add additional software, such as out-of-box drivers or product updates. Limitations of Sysprep Sysprep has the following limitations: * You must use only the version of Sysprep that is installed with the Windows image that you intend to configure. Sysprep is installed with every version of Windows and must always be run from the %WINDIR%\system32\sysprep directory. * Sysprep must not be used on upgrade installation types. Run Sysprep only on clean installations. * If you plan to use the imagex /apply command to apply a Windows image to a computer, the partition layout on the reference and destination computers must be identical. For example, if you capture a customized Windows image on drive D, you must always deploy that image onto drive D of the destination computer. The following list describes the partition settings that must be identical across the reference and destination computers when you use the imagex /apply command. o The partition number where Windows Vista is installed must match. o The partition type (primary, extended, or logical) must match. o If the partition is set to active on the reference computer, the destination computer must also be set to active. o If you have another active partition for Bootmgr and BCD stores on the reference system, you must also capture this partition and apply it to the same partition on the destination computer. This limitation applies only to the imagex /apply command. If you run Setup and reinstall Windows, you can change the drive letters where Windows is installed. noteNote In some cases, customized applications that are installed before the Windows image is recaptured might require a consistent drive letter. Some applications store paths that include the drive letter of the system. Uninstallation, servicing, and repair scenarios might not function appropriately if the drive letter of the system does not match the drive letter specified in the application. Deploying customized Windows images to different drive letters is not supported. The recommended practice is, if you are installing customized applications, to deploy your Windows image to the same drive letter. * When you copy Windows images between computers, the reference and destination computers do not need to have compatible hardware abstraction layers (HALs). The /detecthal option in the Boot Configuration Data (BCD) will enable a system that has already run Sysprep to install the correct HAL. * The Plug and Play devices on the reference and destination computers, such as modems, sound cards, network adapters, and video cards, do not have to be from the same manufacturer. However, the drivers for these devices must be included in the installation. * You cannot automate the running of Sysprep by using a RunSynchronous command in auditUser configuration pass. You can automate the running of Sysprep only by using a FirstLogonCommand in the oobeSystem pass. * The clock for activation begins its countdown the first time Windows starts. You can use Sysprep for a maximum of three times to reset the clock for Windows Product Activation. After the third time you run Sysprep, the clock can no longer be reset. * ImageX, third-party disk-imaging software, or disk-duplicating hardware devices are required for image-based Setup. These products create binary images of a computer's hard disk and either duplicates the image to another hard disk or stores the image in a file on a separate disk. * Sysprep runs only if the computer is a member of a workgroup, not a domain. If the computer is joined to a domain, Sysprep removes the computer from the domain. * If you run Sysprep on an NTFS file system partition that contains encrypted files or folders, the data in those folders becomes completely unreadable and unrecoverable. * Sysprep converts the %COMPUTERNAME% environment variable to uppercase characters. However, the actual name of the computer does not change. * Running Sysprep will cause Windows Welcome to prompt you for a product key. You can use an answer file with Sysprep to prevent Windows Welcome from prompting you for a product key. If you specify a valid product key in the ProductKey setting of the Microsoft-Windows-Shell-Setup component during the specialize pass, then Windows Welcome will not prompt you for a product key. For more info about sysprep in Windows Vista please look here and for details about what is different between sysprep in Windows XP and Vista click here. Here's another good bit of info about sysprepping Vista. This post can always be found on www.windows-noob.com
-

ghosting windows 2003 server to increase hdd space
anyweb posted a question in Remote Installation Services (RIS)
I just ghosted my windows 2003 server (40GB) using ghost 8 using disc>disc to an 80GB target hdd, after completion, I then removed the 40gb and booted the 80GB hdd. At the login screen a popup error appeared stating:- Pressing OK and booting into directory services restore mode (press F8 at boot time and select it) boots Windows 2003 into safe mode, but as soon as you login, it logs out again. Very useful indeed (not). I guess I forgot to logon using the directory restore mode password, either way Microsoft recommends the following as a fix > http://support.microsoft.com/kb/258062 however, I found a much quicker and easier fix. Simply power off, insert the original hdd and boot up Ghost. In ghost options make sure to select the following option '-ID' copy entire disk including unpartitioned space' (image disk). I selected that option and ghosted disc>disc again, this time when all was done I could boot no problem into Windows 2003 with my new bigger hdd, and I now had a new unpartitioned 40gb of free space, marvellous. I chose to format that as another primary partition and will proceed to free up space on the other 3 partitions by moving data to the new partition. cheers anyweb -
via osnews.com
-
more info > http://www.betanews.com/article/Microsoft_...blic/1186593846 via osnews.com


