anyweb
-
Posts
9182 -
Joined
-
Last visited
-
Days Won
366
Everything posted by anyweb
-
you must be doing something different to my guide, as i've done the guide from start to finish over 6 times and every time it works 100% on both Server 2016 and Server 2019
-

Configuring BitLocker in Intune - Part 2. Automating Encryption
anyweb replied to anyweb's topic in Microsoft Intune
hi the msi attached to this blogpost is the latest i have available did you see my testing video here ? -
good point, thanks for sharing
-
ok well if you are not following my guide exactly then you may have issues, but at least you figured it out. I hope you understand that it's hard to support people when they don't follow my guide 100%.
-
where exactly are you seeing that is it being reset to it's default value, please explain. Are you following my guide 100% or are you doing your own thing ? if you are doing your own thing then I cannot guarantee your results. I've done this series 6 times using both Windows Server 2016 and Windows Server 2019 and have had zero issues with it.
-
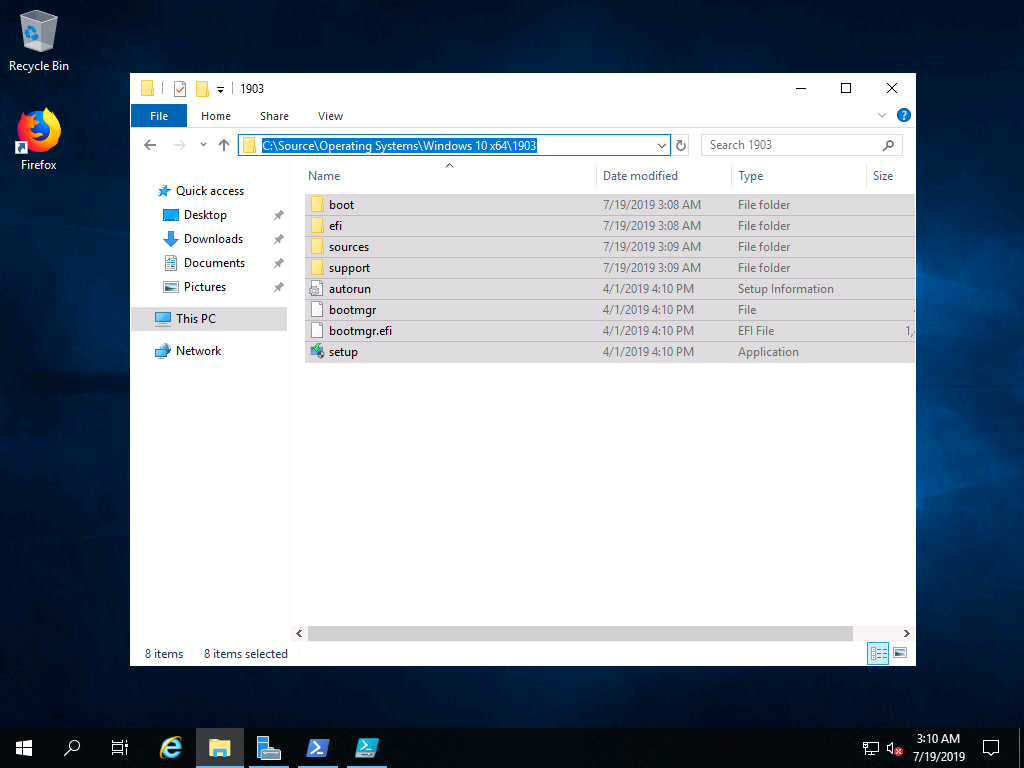
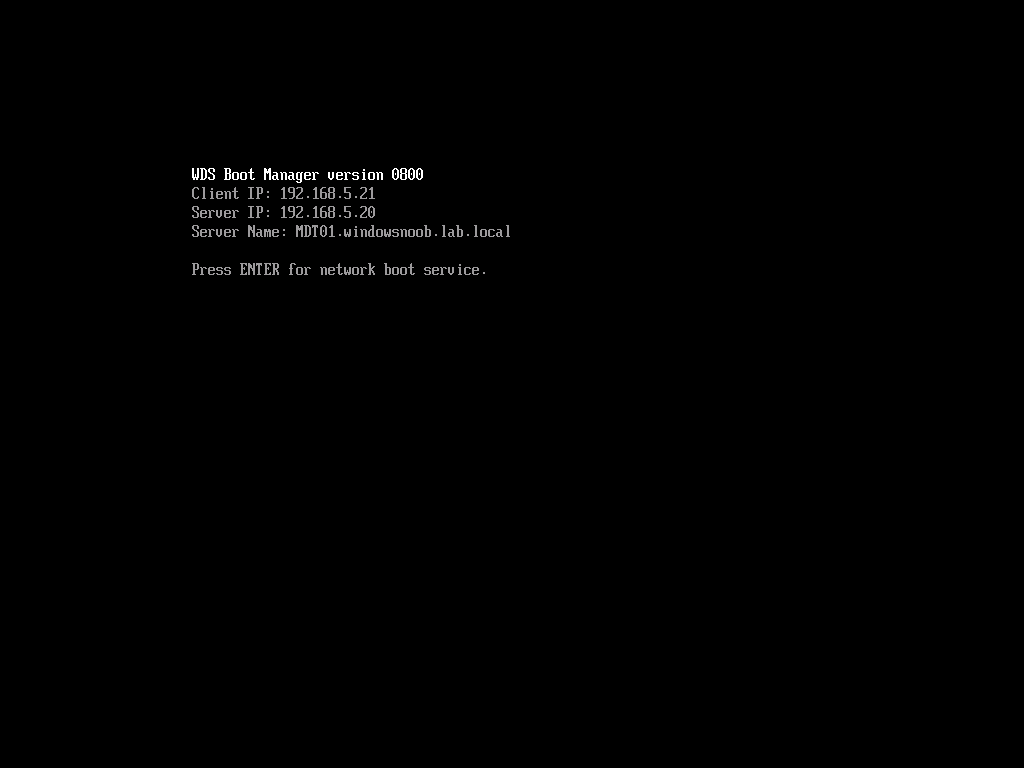
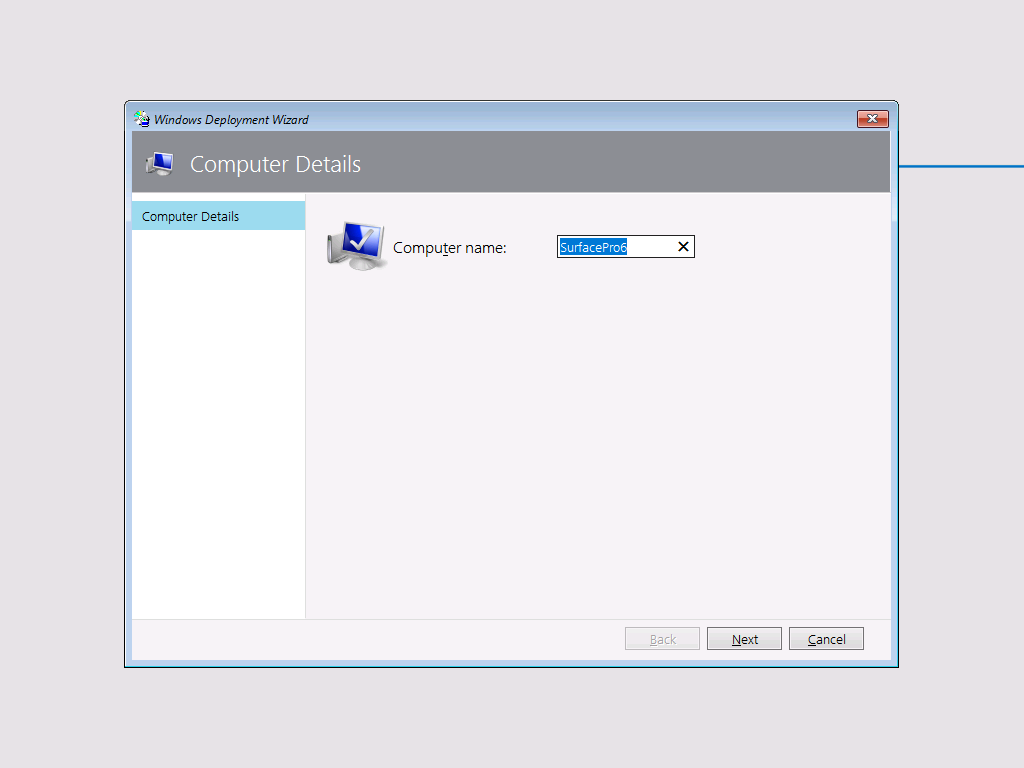
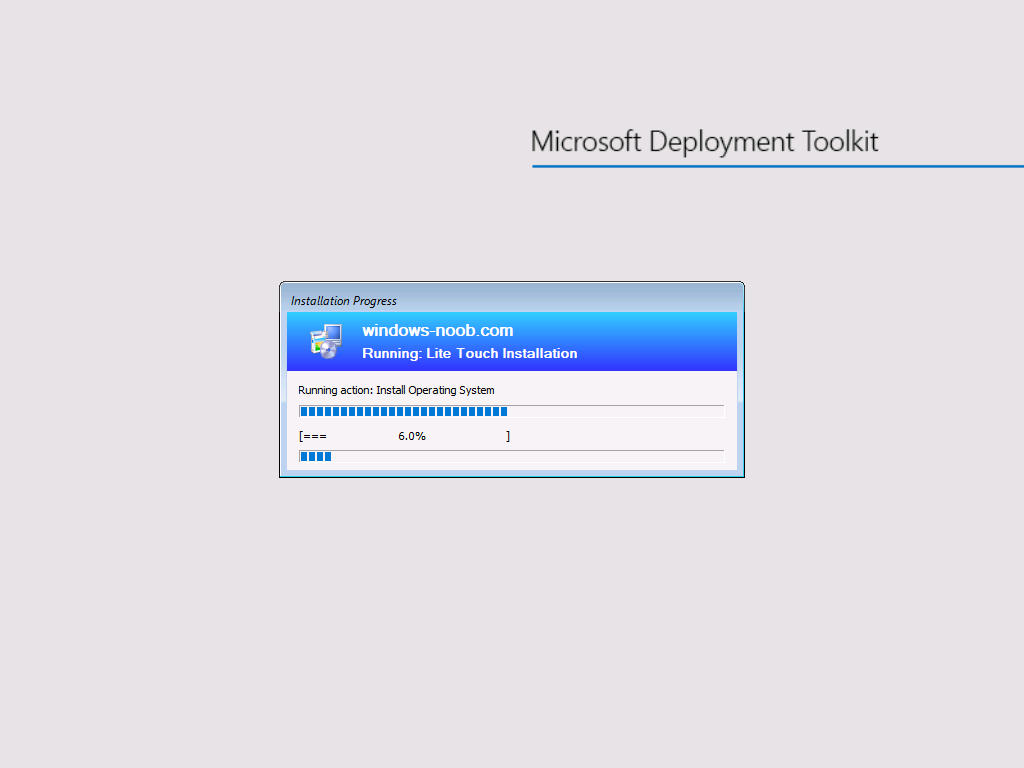
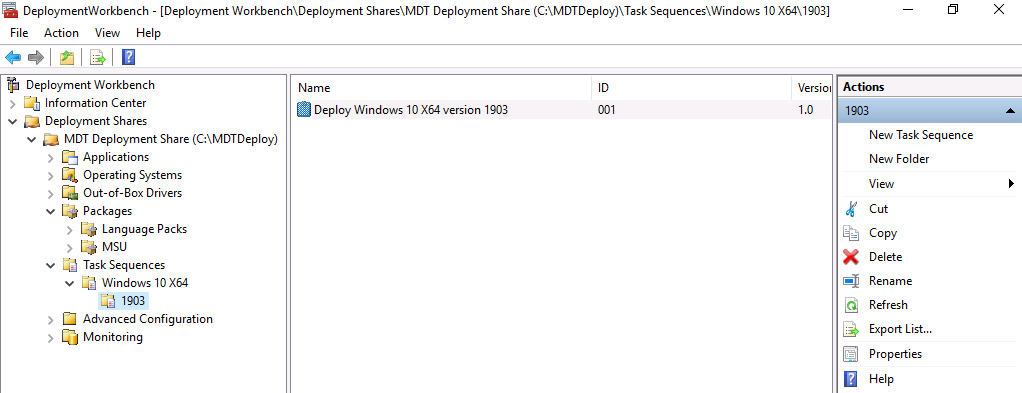
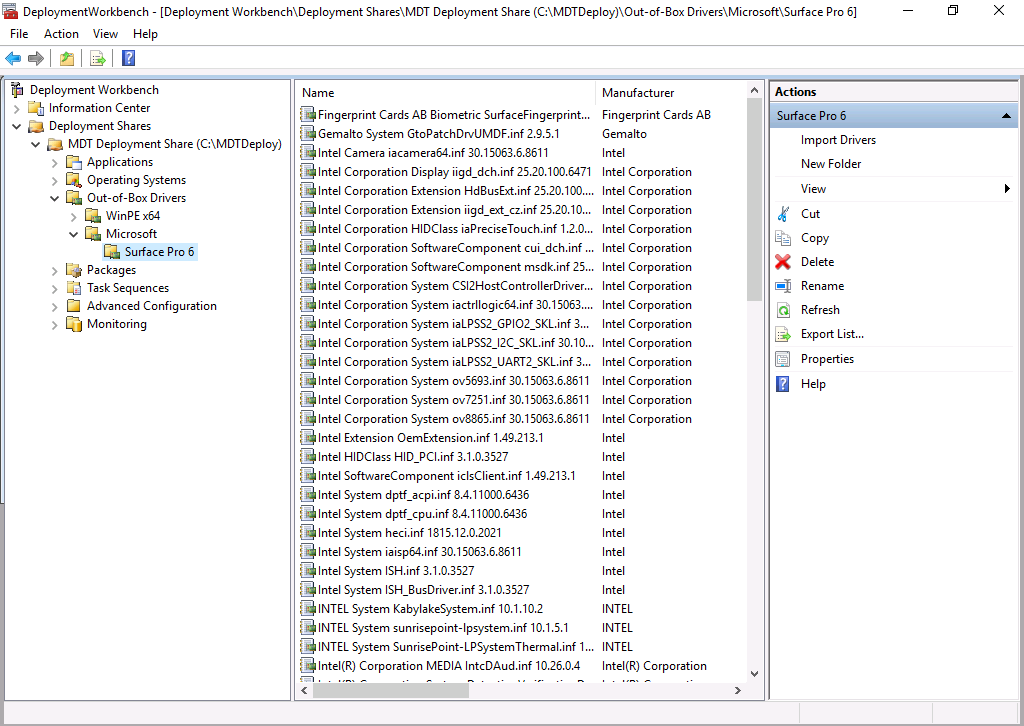
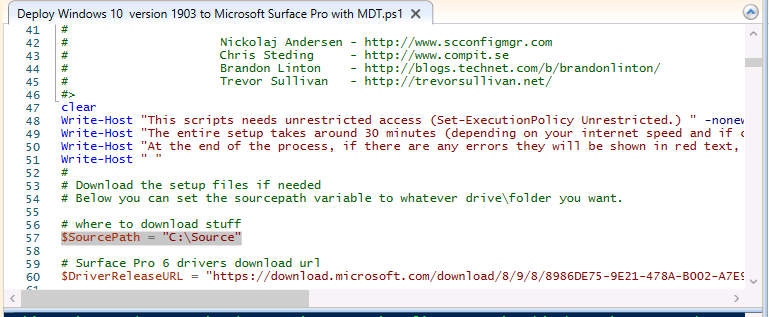
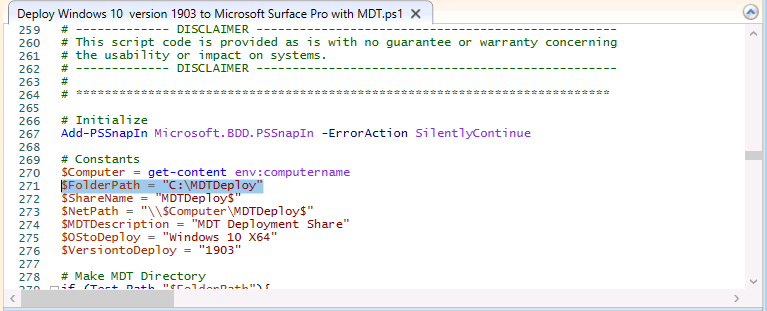
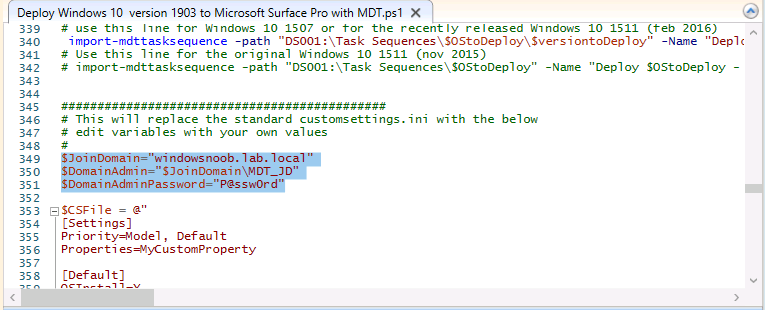
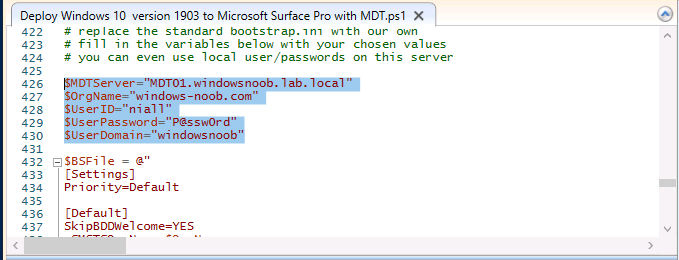
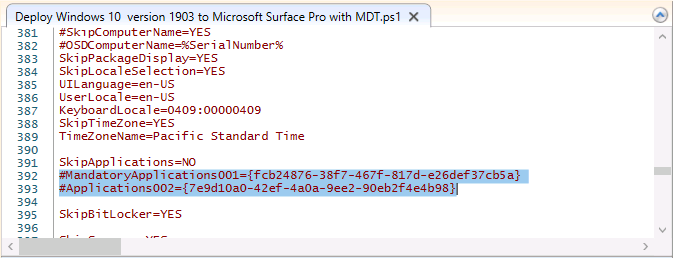
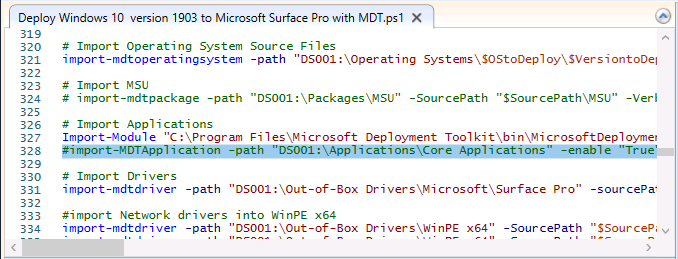
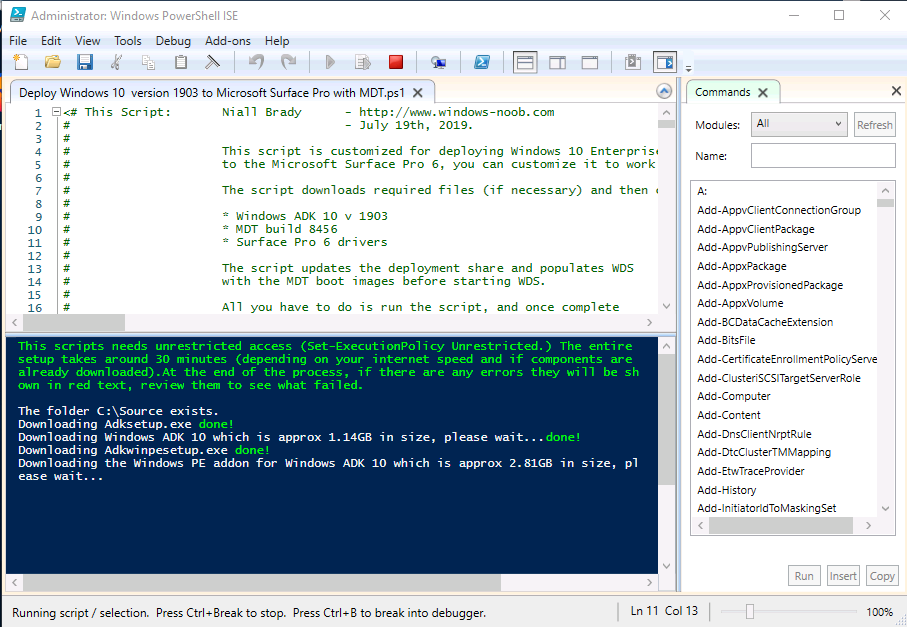
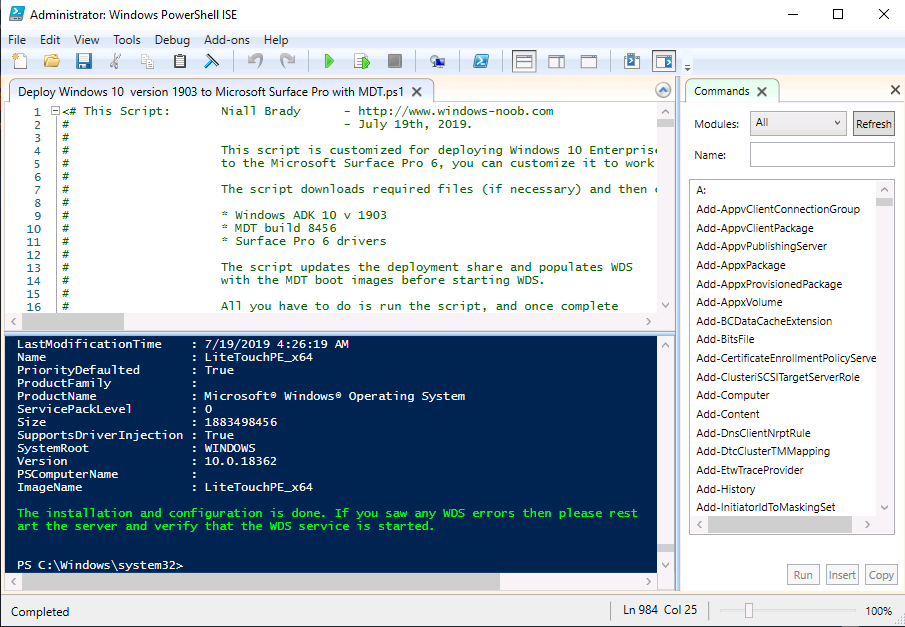
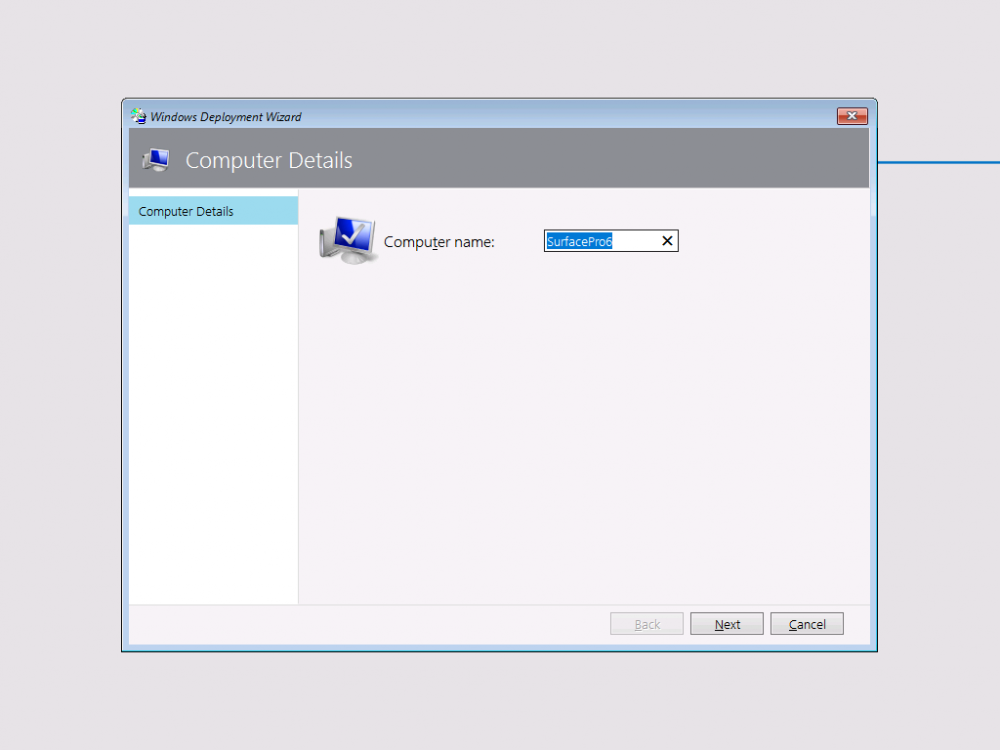
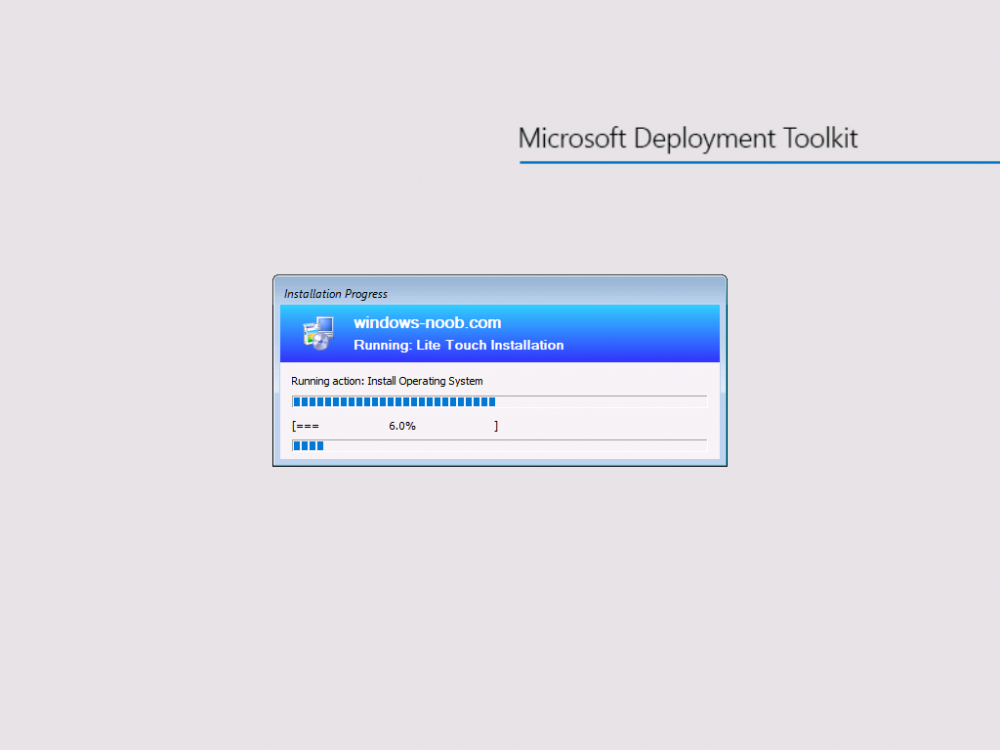
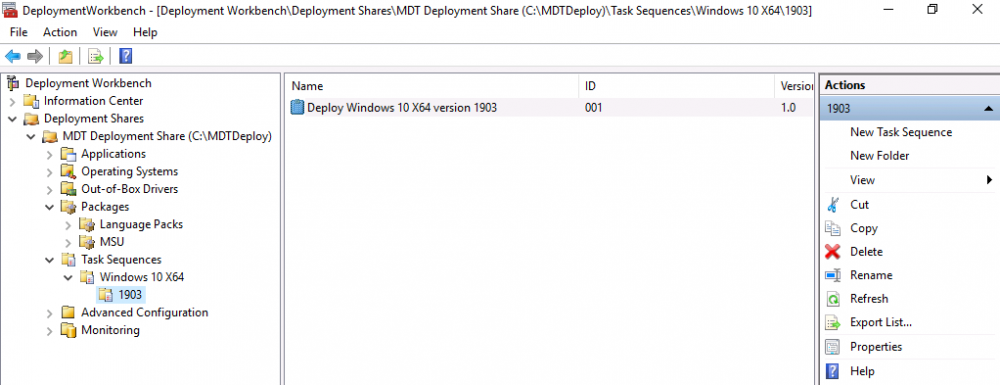
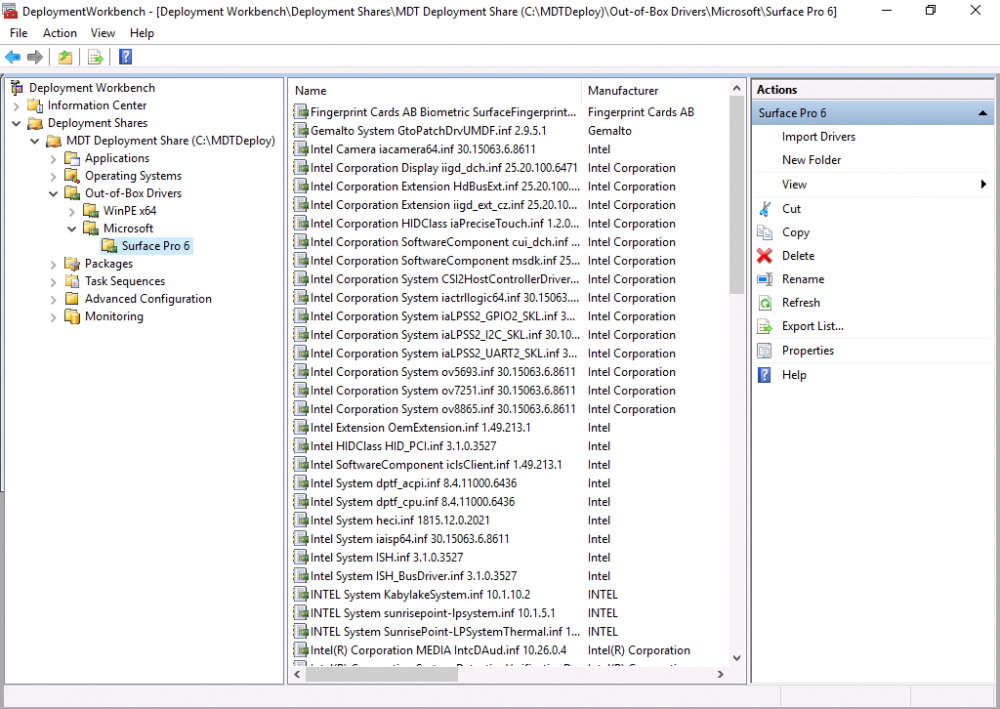
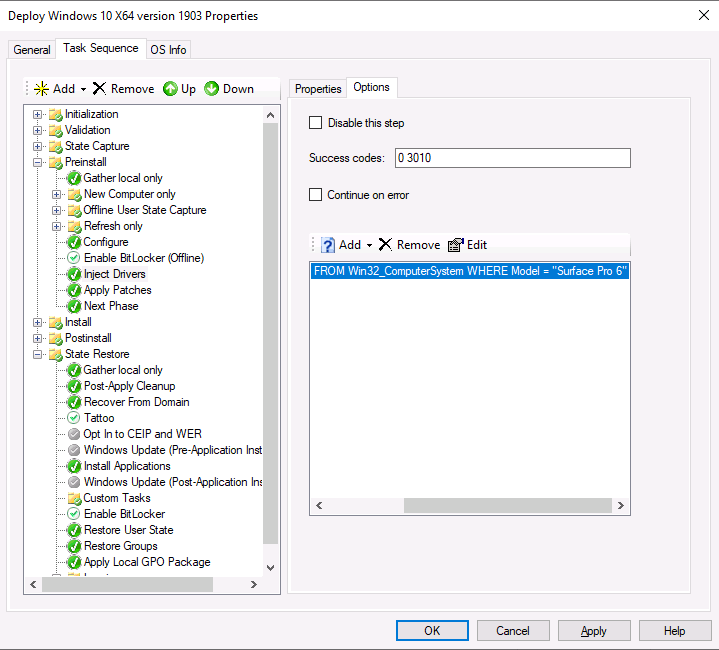
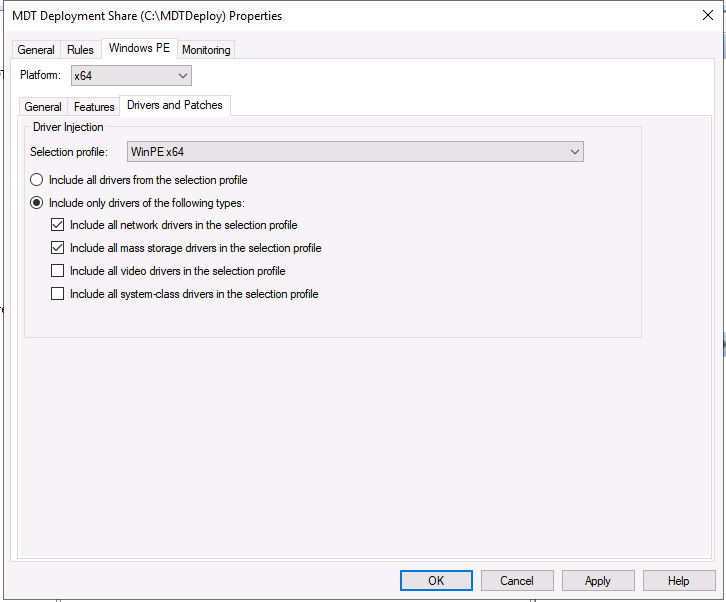
Introduction You are most likely familiar with the Microsoft Surface Pro 6 and the recently released version of Windows 10 version 1903 (May 2019 Update). Now you can automate the installation of Surface Pro 6 using PowerShell and MDT. This script has been written to allow you to automate the deployment Windows 10 version 1903 (May 2019 Update) using the latest available software including: Windows 10 x64 (version 1903) Microsoft Deployment Toolkit (MDT) build 8456 Latest available 2019 drivers for the Surface Pro 6 for Windows 10 version 1903 Windows 10 ADK (version 1903) Windows Server 2019 Note: This is fully automated, and as this does install a Windows Deployment Services server role hosting a boot image, you should modify the script accordingly and test it thoroughly in a lab first. This script is tailored for one thing only, deploying Windows 10 x64 version 1903 to the Microsoft Surface Pro 6 with all drivers loaded and MDT pre-configured. Download it and customize it to suit your needs for other hardware if you wish because what it does is pretty cool. This script performs the following actions:- Downloads and then Installs Windows ADK 10 (version 1903) if you have not done so already Downloads and then Installs MDT, if you have not done so already Downloads all required drivers for Microsoft Surface Pro6 if you have not done so already Imports the Windows 10 x64 (version 1903) operating system into MDT Imports the Microsoft Surface Pro drivers into MDT Creates Selection Profiles for Surface Pro 6 and WinPE x64 Creates a Deploy Windows 10 X64 version 1903 task sequence Edits the Deploy Windows 10 X64 version 1903 task sequence and adds an inject drivers step for Microsoft Surface Pro 6 Sets a WMI query for hardware detection for the Surface Pro 6 on the corresponding driver step Injects the Microsoft Surface Pro 6 network drivers into the LiteTouchPE_x64.wim Creates custom CustomSettings.ini and BootStrap.ini files Disables the X86 boot wim (as it is not needed for Surface Pro 6) Changes the Selection Profile for the X64 boot wim to use the WinPE x64 selection profile Installs the Windows Deployment Service role Configures the WDS role and adds the previously created LiteTouchPE_x64.wim Starts the WDS service so that you can PXE boot (UEFI network boot). All you have to do is provide a domain joined server (MDT01), then download the script below, modify some variables, then place certain files in the right place such as the Windows 10 x64 Enterprise (version 1903) media. Please ensure you have a working DHCP scope on your Active Directory domain controller, then PXE boot a Microsoft Surface Pro and sit back and enjoy the show. Step 1. Download the script The PowerShell script will do all the hard work for you, download it, unzip it and place it on the server that is designated to be the MDT server. Scripts.zip Step 2. Configure the variables in the script Once you have downloaded and extracted the script, you need to configure certain variables interspersed throughout the script. I'll highlight the ones you need to edit. The most important of them is the $SourcePath variable (line 57) as this decides where to get the content from and where to store it. This variable should point to a valid drive letter, the folder name will be created if it does not exist. The $FolderPath variable (line 271) specifies the MDT Deployment share root folder for example C:\MDTDeploy. There are other variables to configure, for joining the Domain (lines 349-351) and then you need to configure how you actually connect to the MDT server from WinPE (lines 426-430) Step 3. Copy the Windows 10 x64 (version 1903) operating system files Mount a Microsoft Windows 10 x64 Enterprise (version 1903) ISO and copy the contents to $SourcePath\Operating Systems\Windows 10 x64\1903 as shown below. Step 4. Optionally copy MDT, ADK 10, Surface Pro drivers This is an optional step. If you've already downloaded the above files then place them in the source folder, otherwise the script will automatically download them for you. Note: You do not have to do this as the script will download the content for you if it's not found. Step 5. Optionally copy your Applications to the respective folders This is an optional step. If you have apps like Office 365, copy them to their respective folders under Applications. If you do add any applications, you'll need to edit the corresponding section within the script for the CustomSettings.ini and replace the GUID for the App, these applications are remmed out with a #, as shown here (line 392-393) and in line 328 Step 6. Run the script On the server that will become your MDT server, start PowerShell ISE as Administrator. Click on the green triangle to run the script. This is how it looks while running... Below you can see the script has completed. Step 7. Deploy a Surface Pro 6 After the script is complete, you are ready to test deploying Windows 10 version 1903 (May 2019 Update) to a Microsoft Surface Pro 6. You can see that Windows Deployment Services is installed and that the ADK 1903 version of the MDT LiteTouch_X64 boot wim is already imported. This boot image also has the Surface Pro 6 network drivers added. After the Surface Pro 6 has PXE booted, you'll see the MDT computer Name screen, you can change that behavior in the UI itself (CustomSettings.ini on the Properties/Rules of the DeploymentShare) or automate it via the many methods available such as those that Mikael describes here. After clicking next the OS will get deployed. and after a while it's all complete. Step 8. Review the MDT Deployment Workbench After opening the Deployment Workbench, you can see the Deploy Windows 10 x64 version 1903 task sequence is created and in the task sequence you can see the inject drivers step that is customized with a wmi query for Surface Pro 6 drivers specific to the Surface Pro 6 are imported into MDT Surface Pro 6 specific selection profiles created drivers (network) are also added to the x64 boot image Troubleshooting If the script has issues starting WDS (and you see the error below) then restart the server, as you were asked to do at the end of the script ;-). If you cannot PXE boot, because WDS is not accepting connections (revealed by the PXE Response tab in WDS properties), then look for the following error in the scripts output: An error occurred while trying to execute the command. Error Code: 0x5 Error Description: Access is denied. If you see that error, then the user you are logged in as does not have sufficient permissions to configure WDS. To grant permissions to the Windows Deployment Server (MDT01) do as follows Open Active Directory Users and Computers. Right-click the OU where you are creating prestaged computer accounts, and then select Delegate Control. On the first screen of the wizard, click Next. Change the object type to include computers. Add the computer object of the Windows Deployment Services server, and then click Next. Select Create a Custom task to delegate. Select Only the following objects in the folder. Then select the Computer Objects check box, select Create selected objects in this folder, and click Next. In the Permissions box, select the Write all Properties check box, and click Finish. Next, open ADSIEdit.msc Browse to the Computer Account of the WDS Server. It will have a Child Object named something like "CN=MDT01-Remote-Installation-Services". The user that runs the the PowerShell script or the WDS Console needs Full Access permissions to this Child Object. Right click and choose Properties. Select the Security/Permissions tab and add the user/group in. Set them to have Full Permissions. Log out of the MDT Server and log back in again. AD replication may delay the result of this, but you should now no longer have Access Denied. Summary Automating the deployment of Windows 10 version 1903 (May 2019 Update) to the Microsoft Surface Pro 6 using PowerShell and MDT is easy when you know how.


- 1 reply
-
- 1
-

-
can you attach your ztigather.log and any other applicable log so i can take a look.
-
Calling all SysAdmins: WIN on Altaro’s 10th Anniversary! #SysAdminDay To celebrate their 10th anniversary & SysAdmin Day 2019, Altaro is giving SysAdmins and IT professionals the opportunity to share their best IT story and WIN fantastic prizes! Throughout our careers, we all gather daily stories worth telling, from tech situations to funny anecdotes, terrible mishaps or incidents with our colleagues. This year everyone is invited to share their best stories for a chance to win big prizes: an amazing Royal Gourmet BBQ Grill, a GPS Drone with Camera & Live Video 1080 HD FPV, a GoPro Hero5 Waterproof Camera & more. And here’s a tip: for any eligible subscription they give a guaranteed Amazon eGift voucher! So, if you are a Hyper-V or VMware user, download Altaro’s VM Backup and follow the instructions you will find over here to WIN these exciting prizes! Enter the competition & make it a year to remember by sharing your best IT story! Good luck!

-
what i meant was to browse the location on your pc where customsettings.ini was referenced, does the file indeed look correct, contenwise?
-
are you sure it's looking at the customsettings.ini that you created or another one..
-
awesome ! glad to see you using the SCCM labs and smoothwall too
-
you need to use legacy nic's for smoothwall, at least that's what i use
-
hmm odd, what type of vm did you create (gen1 or gen2) and are you using Legacy NICs ?
-
thanks for the thanks ! i've got to get back into it !
-
we've seen Windows 7 upgrades to Windows 10 fail when say trying 1809 or later, but with 1803 it seems to be better, so give it a go...
-
ah bummer, i missed that, ok back to the drawing board. What you could try is upgrade to a 'lesser' version that would work better with Windows 7, for example, try upgrading to Windows 10 1803 first, and if it suceeds then upgrade to 1903. can you give that a go ?
-
this would be a perfect candidate for running SetupDiag, read about it here https://docs.microsoft.com/en-us/windows/deployment/upgrade/setupdiag can you please run it on the failing machine and see what it advises you to do cheers niall
-
OSD issue with Lenovo
anyweb replied to Johnny_Eyebrows's topic in System Center Configuration Manager (Current Branch)
and after adding the drivers to the boot wim attached to your task sequence, make sure to distribute the boot image to all your distribution points. -
take a look at this topic, it should help...
-
Security is a major concern for IT admins and if you’re responsible for important workloads hosted in Azure, you need to know your security is as tight as possible. In this free webinar, presented by Thomas Maurer, Senior Cloud Advocate on the Microsoft Azure Engineering Team, and Microsoft MVP Andy Syrewicze, you will learn how to use Azure Security Center to ensure your cloud environment is fully protected. The webinar covers: · Azure Security Center introductions · Deployment and first steps · Best practices · Integration with other tools · And more! Being an Altaro-hosted webinar, expect this webinar to be packed full of actionable information presented via live demos so you can see the theory put into practice before your eyes. Also, Altaro put a heavy emphasis on interactivity, encouraging questions from attendees and using engaging polls to get instant feedback on the session. To ensure as many people as possible have this opportunity, Altaro present the webinar live twice so pick the best time for you and don’t be afraid to ask as many questions as you like! There are certain topics in the IT administration world which are optional, but security is not one of them. Ensuring your security knowledge if ahead of the curve is an absolute necessity and becoming increasingly important as we are all becoming exposed to more and more online threats every day. If you are responsible for important workloads hosted in Azure, this webinar is a must. Webinar: Azure Security Center: How to Protect Your Datacenter with Next Generation Security Date: Tuesday, 30th July Time: Webinar presented live twice on the day. Choose your preferred time: ● 2pm CEST / 5am PDT / 8am EDT ● 7pm CEST / 10am PDT / 1pm EDT Save your seat

-
great that you solved it Andi, cheers niall
-
thanks !
-
Today I got a fantastic email from Microsoft stating that I’ve once again been awarded MVP in Enterprise Mobility It’s my 9th time to be awarded so I’m humbled, honored and very pleased indeed and of course I’m extremely grateful to Microsoft for the honor. Thank you thank you thank you Microsoft ! and thank you to all the people who visit my blog (windows-noob.com) and of course this website. Last but not least, thanks to my family for putting up with me blogging and researching. To get an overview of what a Microsoft MVP is please read this and if you are interested in becoming an MVP yourself check out my blog post on the subject here. and here’s to the 10th title, I’ll work hard on producing lots of great content this year for that ! cheers niall
-
Mozilla addressed two zero-day vulnerabilities in Mozilla Firefox that were being used in targeted attacks in the wild. CVE-2019-11707 is a type confusion vulnerability in Mozilla Firefox that can result in an exploitable crash. CVE-2019-11708 is a sandbox escape vulnerability. Combining both CVE-2019-11708 and CVE-2019-11707, attackers can perform arbitrary code execution. Thunderbird is also affected but generally cannot be exploited since scripting is disabled when reading mail. It is recommended that these two vulnerabilities are patched as soon as possible. Following this, patches were also released to address vulnerabilities in Adobe, Apple, Google, and Mozilla. Here, we have the complete list of updates released: 24910 Update iCloud (7.12.0.14) fixes multiple vulnerabilities. 24911 Update Apple iTunes (12.9.5.7) fixes multiple vulnerabilities. 24912 Update Apple iTunes (X64) (12.9.5.7) fixes multiple vulnerabilities. 24976 CVE-2019-7845 is fixed in the Adobe Flash Player Plugin (32.0.0.207) 24977 CVE-2019-7845 is fixed in the Adobe Flash Player ActiveX (32.0.0.207) 24978 CVE-2019-7845 is fixed in the Adobe Flash Player PPAPI (32.0.0.207) 24997 iCloud 10.4 fixes multiple vulnerabilities in Windows 10 version 18362.145 or higher 24998 CVE-2019-5842 is fixed in Google Chrome (75.0.3770.90) 24999 CVE-2019-5842 is fixed in Google Chrome (x64) (75.0.3770.90) 25006 CVE-2019-11708 fixed in Mozilla Firefox (67.0.4) 25007 CVE-2019-11708 fixed in Mozilla Thunderbird (60.7.2) 25008 CVE-2019-11708 fixed in Mozilla Firefox ESR (60.7.2) 25009 CVE-2019-11708 fixed in Mozilla Firefox (x64) (67.0.4) 25010 CVE-2019-11708 fixed in Mozilla Firefox ESR (x64) (60.7.2) Kindly patch these vulnerabilities ASAP to keep your network secure from exploits. For patching third-party applications, you can use Patch Connect Plus which integrates with SCCM. You can also learn more and free trial the catalogs from here.
-
Service plans and windows updates
anyweb replied to Paramania96's topic in Configuration Manager 2012
you must have a conflict between wsus/sccm/group policy as the 0x87d00692 translates to Group policy conflict Source: System Center Configuration Manager ----- so start your troubleshooting with that in mind