


anyweb
-
Posts
9271 -
Joined
-
Last visited
-
Days Won
371
Everything posted by anyweb
-
you can only download the script if you are logged on as a member of this site, so please do try again now that you are one
-
 does the unattend.xml left in c:\windows\panther\unattend give any clues ?
 -
MMS-2016-Windows-10-UEFI-BitLocker-HTA Start error
anyweb replied to radish's question in Frontends, HTA's and Web Services
yes as long as there is a service called GenerateName -
MMS-2016-Windows-10-UEFI-BitLocker-HTA Start error
anyweb replied to radish's question in Frontends, HTA's and Web Services
which webservice are you using ? do the webservice url(s) match those in the ini file above, if not then you must amend it accordingly, the lines that have a ; in front of them are merely comments, they are not actually used -
you need to paste in YOUR OID which you created in step 4 into the file, so that it looks pretty much like what I've shown you, other than it will have YOUR OID and not MINE. you might want to change the pki cps url also to point to your url cheers niall
-
thanks the important bit is... " Once done, paste in the OID created in Step 4 and then save the file as C:\Windows\CAPolicy.inf. "
-
MMS-2016-Windows-10-UEFI-BitLocker-HTA Start error
anyweb replied to radish's question in Frontends, HTA's and Web Services
reinstall is not a backup, so you must be doing something wrong. If i have time tomorrow i'll take a look at the logs, sorry but i've had a really long day today... -
dont confuse the ConfigMgr client policy (default 60 minutes) with the MBAM client check policy (default 90 minutes). Full disk encryption always takes time, that's the way it is, the only 'fast' encryption is something called used space only, which you can do with OSD task sequences with a Pre-Provision BitLocker step during operating system deployment. And for laptops yes connect power so it doesn't power off during encryption.
-
MMS-2016-Windows-10-UEFI-BitLocker-HTA Start error
anyweb replied to radish's question in Frontends, HTA's and Web Services
you can download the xml file in the original blogpost here https://www.windows-noob.com/forums/applications/core/interface/file/attachment.php?id=14650 -
and what have you configured your client policy to refresh at ? the default is 60 minutes for configmgr client policy, and 90 minutes for the mbam policy checks triggering machine policy manually will check immediately
-
ok so on the real computer, i assume you are not RDP'ing to it during testing ? and secondly, what settings did you pick ? what type of computer is it ?
-
MMS-2016-Windows-10-UEFI-BitLocker-HTA Start error
anyweb replied to radish's question in Frontends, HTA's and Web Services
first problem is this <![LOG[Failed to run the action: xcopy viewlog. The system cannot open the file. (Error: 00000004; Source: Windows)]LOG]!><time="18:09:22.504-480" date="08-04-2019" component="TSManager" context="" type="3" thread="1884" file="instruction.cxx:942"> < make sure you follow the guide correctly otherwise it will fail. -
are you trying this in SCCM Technical Preview version 1905, 06 or 07 ? and did you look at my video ? are you trying this on a real client or a virtual client ?
-
C:\ drive Full
anyweb replied to nhottinger's topic in System Center Configuration Manager (Current Branch)
yes of course, do it and if it doesn't help choose the second shrink option and try again (it's a while since i did it) -
C:\ drive Full
anyweb replied to nhottinger's topic in System Center Configuration Manager (Current Branch)
there you go ! now you know why i use TreeFreeSize, the problem you have is as i guessed, the sql server transaction logs, look at my link above and you'll see how to compress them down to almost nothing -
C:\ drive Full
anyweb replied to nhottinger's topic in System Center Configuration Manager (Current Branch)
also run it as administrator -
C:\ drive Full
anyweb replied to nhottinger's topic in System Center Configuration Manager (Current Branch)
pls try it, those figure don't really add up at first glance... -
C:\ drive Full
anyweb replied to nhottinger's topic in System Center Configuration Manager (Current Branch)
and the remaining 90gb is ? i prefer treesizefree to be honest. -
C:\ drive Full
anyweb replied to nhottinger's topic in System Center Configuration Manager (Current Branch)
start looking at logs and temp files, use Treesizefree to get a graphical overview of the damage, probably sql logs hogging everything don't delete stuff without knowing what you are doing, SQL log files can be compacted, see here -
PXE Request Forwarding Possible
anyweb replied to YPCC's topic in System Center Configuration Manager (Current Branch)
try uninstalling the Management Point role, then reinstall it, then retest PXE on the dp. You've a lot of management point errors in that log RequestMPKeyInformation: Send() failed.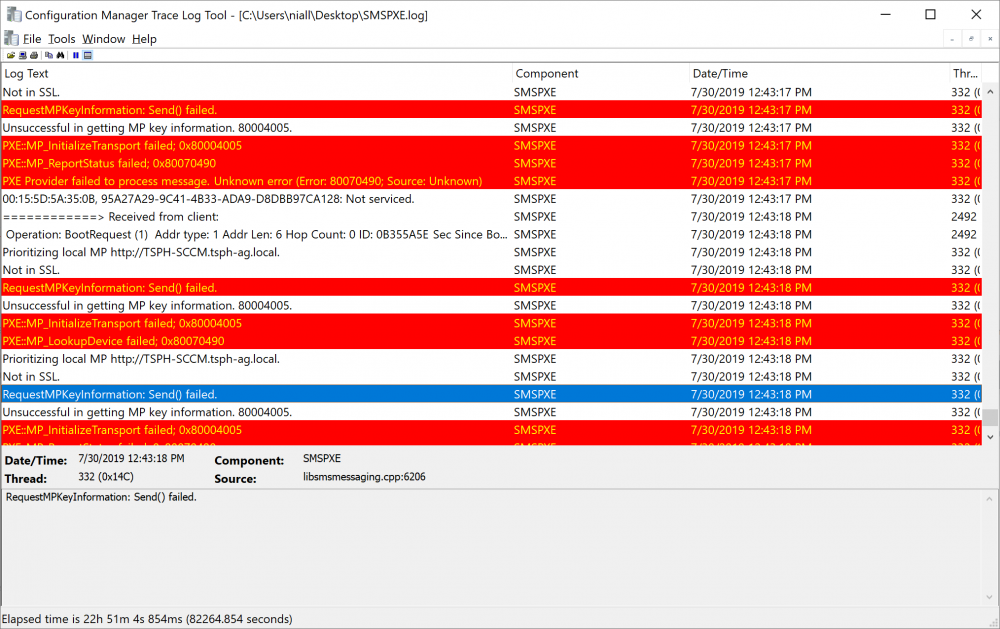
-
PXE Request Forwarding Possible
anyweb replied to YPCC's topic in System Center Configuration Manager (Current Branch)
how are you boundaries setup ? did you configure two separate boundaries for these 2 offices ? -
ok can you attach the smspxe.log here ? it's on the dp. Also, is the dp ip address actually the one that is listed when you pxe boot the client computer, or is WDS pointing to another ip ?
-
have you deployed any task sequence as Available (available purpose) to the All Unknown Computers collection ?

