Jump to content


anyweb

Root Admin
  • Posts

    9182
  • Joined

  • Last visited

  • Days Won

    366

Everything posted by anyweb

  1. how are you trying to install the SCCM Client agent on the test machine exactly ?
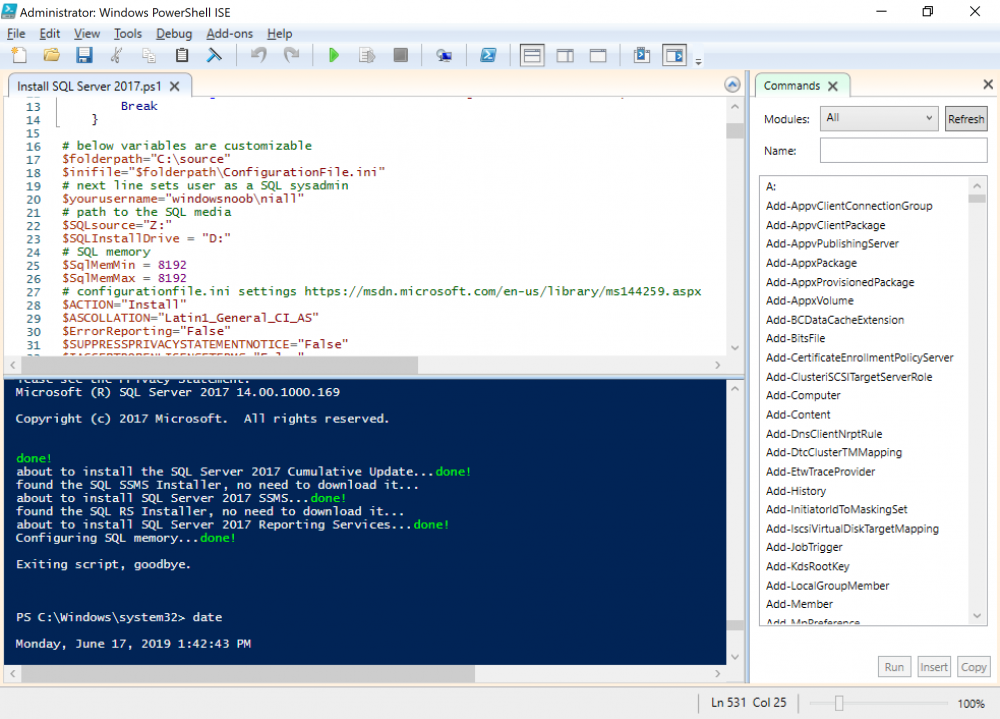
  2. Introduction This multi-part guide will show you how to install the latest baseline version of Configuration Manager from Microsoft. The latest available baseline version is System Center Configuration Manager (Current Branch) version 1902 as of April the 10th 2019. I blogged how to upgrade to 1902 here. This guide is aimed a new installations of SCCM. Baseline media is used to install new ConfigMgr sites or to upgrade from supported versions, for more information about baseline media please see my blog post here. Note: The SCCM 1902 Current Branch media is not yet available on MSDN or VLSC. When the new baseline media is released I'll update this note. This series is broken down into the following parts:- Part 1 - Get the lab ready, configure ADDS Part 2 - Join CM01 to Domain, add users, create the Systems Management container, delegate permission (this part) Part 3 - Role and Feature installation, installation of WDS and ADK Part 4 - Configure and install SQL Server 2017 Part 5 - Configure and install SCCM 1902 Current Branch Part 6 - Create device collections Part 7 - Configuring discovery Part 8 - Configuring boundaries You can use this multi-part guide to get a hierarchy up and running on Windows Server 2019 using SQL Server 2017. The concept behind this is to guide you through all the steps necessary to get a working Configuration Manager Primary site installed (for lab use) using manual methods or automated using PowerShell. This gives you the power to automate the bits that you want to automate, while allowing you to manually do other tasks when needed. You decide which path to take. PowerShell knowledge is desired and dare I say required if you are in any way serious about Configuration Manager. I will show you how to do most steps via two methods shown below, it's up to you to choose which method suits you best but I highly recommend automating everything that you can, using PowerShell. Method #1 - Do it manually Method #2 - Automate it with PowerShell Downloads The scripts used in this part of the guide are available for download here. Unzip to C:\Scripts. The scripts are placed in the corresponding folder (Part 1, Part 2 etc) and sorted into which server you should run the script on (DC01 or CM01). Scripts.zip Step 1. Join CM01 to the domain Note: Perform the following on the ConfigMgr server (CM01) as Local Administrator Method #1 - Do it manually To join the domain manually, login to CM01. Start Windows File Explorer. Right-click on This-PC and choose Properties. The System screen will appear.  Click on Change settings to the right of Computer name. For the option To rename this computer or change its domain or workgroup, click Change, click Change and for Member of select Domain, enter the Domain details used in Part 1 of this series and then click OK. and enter domain join credentials as appropriate when prompted. Once done you'll get notification that you've joined the domain. Click OK and click Restart Now when prompted. Method #2 - Automate it with PowerShell To join the domain automatically, use the joindomain.ps1 PowerShell script. 1. Copy the script to C:\Scripts on CM01 2. Edit the variables (lines 16-18) as desired before running.  3. Start Windows PowerShell ISE as Administrator and run the script by clicking on the green triangle. Step 2. Add Users to Active Directory Method #1 - Do it manually To create users manually, click on Start and choose Windows Administrative Tools and then select Active Directory Users and Computers. In Active Directory Users and Computers, add new users by expanding <domain name>, select Users and right click, choose New then select User. In the wizard that appears fill in the New Object user details enter the Password details using password P@ssw0rd and click Finish when done. Repeat the above process to add remaining users as appropriate for your environment Testuser, used for testing stuff CM_BA, used for building ConfigMgr created images CM_JD, used for joining computers to the domain CM_RS, used for reporting services. CM_CP, used when installing the Configuration Manager Client for Client Push. CM_NAA, (Network Access Account) used during OSD Keep in mind that if you create users manually, and if you don't run the PowerShell script to automatically create users and OU's, that you'll have to do that manually otherwise other steps may not make sense in later parts of this guide. For example, when configuring discovery the screenshots point to OU's created by this PowerShell script, so you'll either need to create those OU's manually or modify the discovery settings. Note: The PowerShell script creates users and in addition makes a user a local admin on the CM01 server. To facilitate the local administrator creation, you'll need to (optionally) create a GPO manually on AD01 called Allow Inbound File and Printer sharing exception which sets Windows Firewall: Allow inbound file and printer sharing exception to Enabled. To Create the GPO on AD01, click the Start menu and choose Windows Administrative Tools, then select Group Policy Management. Expand Group Policy Objects and Right click, choose New and give it a Name: Allow Inbound File and Printer Sharing Exception. In the GPO settings, expand Computer Configuration, Policies, Administrative Templates, then select Network, Network Connections, Windows Defender Firewall and select the Domain Profile. Locate the Windows Defender Firewall: Allow inbound file and printer sharing exception and set it to Enabled. Apply the changes. After creating the GPO, you'll want to limit it to only apply to your ConfigMgr server (or servers). To do that select the Delegation tab of the GPO, and click on Advanced button. Select the Authenticated Users security group and then scroll down to the Apply Group Policy permission and un-tick the Allow security setting. This denies authenticated users from applying this GPO setting Next, click on the Add button, for Select this object type make sure to select Computers from the Object Types and select the group or Computer object (eg: CM01$) that you want to have this policy apply to. Then select the group (e.g. ConfigMgr Servers) and scroll the permission list until you see the Apply group policy option and then tick the Allow permission. Finally, you need to Link the GPO, to do that, right click on your Domain (in this example it's windowsnoob.lab.local) and select Link an existing GPO. Note: Once the above is completed, please update Group Policy on CM01 using gpupdate /force prior to running the PowerShell script below. Method #2 - Automate it with PowerShell To create users automatically, use the Create Users Usergroups and OUs in AD.ps1 PowerShell script. Tip: You should edit the script and adjust the variables to your liking, for example if you want to change the default password. You may also want to rem out the MDT and MBAM user/groups that are created and change some of the user names within the script. To rem out a line place a # in front of it. 1. Copy the script to C:\scripts on AD01, see the notes above about the GPO creation. 2. Edit the variables [lines 79-100] as desired before running. 3. Start Windows PowerShell ISE as Administrator and run the script by clicking on the green triangle. Step 3. Create the System Management Container Note: Perform the following on the Active Directory Domain Controller server (DC01) as Local Administrator For details of why you are doing this see https://docs.microsoft.com/en-us/sccm/core/plan-design/network/extend-the-active-directory-schema Method #1 - Do it manually Open ADSI Edit, click on Action, then Connect To and click Ok, Double Click on Default Naming Context and the DC= that appears below it. Click on the > and scroll down to CN=System. Right Click on CN=System and choose New, Object choose Container from the options, click Next enter System Management as the value then click Next and then click Finish. The System Management container is created. Click OK and click Restart Now when prompted. Method #2 - Automate it with PowerShell To join the domain automatically, use the Create system management container.ps1 PowerShell script. 1. Copy the script to C:\Scripts on DC01 2. Edit the variables (lines 18-23) as desired before running.  3. Start Windows PowerShell ISE as Administrator and run the script by clicking on the green triangle. Step 4. Delegate Permission Note: Perform the following on the Active Directory Domain Controller server (DC01) as Local Administrator Method #1 - Do it manually Open Active Directory Users and Computers. Click on view, select Advanced Features. Select the System Management Container under System. Right click the System Management container that you just created, choose All Tasks and Delegate Control. When the Welcome to Delegation of Control Wizard appears click next, then click Add. click on Object Types, select Computers. Type in your Configuration Manager server name (CM01) and click on Check Names, it should resolve. Click Ok. Click Next then select Create a Custom Task to Delegate, click Next, make sure This folder, existing objects in this folder and creation of new objects in this folder is selected. Click next, select the 3 permissions General, Property-Specific and Creation-deletion of specific child objects are selected then place a check mark in Full Control. Click Next then click Finish. Tip: Repeat the above process for each site server that you install in a Hierarchy. Method #2 - Automate it with PowerShell To join the domain automatically, use the Delegate Permissions.ps1 PowerShell script. 1. Copy the script to C:\Scripts on DC01 2. Edit the variable (line 24) as desired before running.  3. Start Windows PowerShell ISE as Administrator and run the script by clicking on the green triangle. That's it for this part, please join me in Part 3 where we'll configure the ConfigMgr server with Roles and Features and get Windows ADK and WDS setup.
  3. have you verified that the non WDS PXE responder service is started ?
  4. Introduction This multi-part guide will show you how to install the latest baseline version of Configuration Manager from Microsoft. The latest available baseline version at the time of writing is System Center Configuration Manager (Current Branch) version 1902. SCCM 1902 is the latest baseline version and contains many bugfixes (and quality fixes) as detailed here. I blogged how to upgrade to 1902 here. Baseline media is used to install new ConfigMgr sites or to upgrade from supported versions. For more information about what baseline versions are and why you need them, I'd recommend you read my blog post here. This guide is aimed a new installations of SCCM. This lab is one of many hosted on my new hyper-v host, which is a very nice Lenovo P1 running Windows Server 2019 with data deduplication to make storage amazing. Note: The SCCM 1902 Current Branch media is available on MSDN or VLSC. If you don't have access to either of those you can download the baseline media ISO from the Microsoft evaluation site here. This is the same media that is on MSDN and VLSC. Once downloaded, extract the media to C:\Source\SCCM1902. This series is broken down into the following parts:- Part 1 - Get the lab ready, configure ADDS (this part) Part 2 - Join CM01 to Domain, add users, create the Systems Management container, delegate permission Part 3 - Role and Feature installation, installation of WDS and ADK Part 4 - Configure and install SQL Server 2017 Part 5 - Configure and install SCCM 1902 Current Branch Part 6 - Create device collections Part 7 - Configuring discovery Part 8 - Configuring boundaries You can use this multi-part guide to get a hierarchy up and running on Windows Server 2019 using SQL Server 2017. The concept behind this is to guide you through all the steps necessary to get a working Configuration Manager Primary site installed (for lab use) using manual methods or automated using PowerShell. This gives you the power to automate the bits that you want to automate, while allowing you to manually do other tasks when needed. You decide which path to take. PowerShell knowledge is desired and dare I say required if you are in any way serious about Configuration Manager. I will show you how to do most steps via two methods shown below, it's up to you to choose which method suits you best but I highly recommend automating everything that you can, using PowerShell. Method #1 - Do it manually Method #2 - Automate it with PowerShell Downloads The scripts used in this part of the guide are available for download here. Unzip to C:\Scripts. The scripts are placed in the corresponding folder (Part 1, Part 2 etc) and sorted into which server you should run the script on (DC01 or CM01). Scripts.zip Step 1. Get your lab ready In this guide I assume you have already installed two WorkGroup joined servers with Windows Server 2019 Standard (Desktop Experience) installed. You can install the operating system on those servers in whatever way you want. If you want a PowerShell script to help you create hyper-v virtual machines you can use this one. Please configure the servers used in this guide as listed below, the SmoothWall (Linux firewall) is optional. Server function: Domain Controller Server name: DC01 Server info: Workgroup joined IPv4 Address: 192.168.9.1 Subnet Mask: 255.255.255.0 Default Gateway: 192.168.9.199 DNS: 192.168.9.1 Server function: Configuration Manager Primary site Server Name: CM01 Server info: Workgroup joined IPv4 Address: 192.168.9.2 Subnet Mask: 255.255.255.0 Default Gateway: 192.168.9.199 DNS: 192.168.9.1 Server function: (optional) Linux firewall Server name: smoothwall Server info: Uses 2 legacy nics eth0: 192.168.9.199 eth1: x.x.x.x (internet facing ip) You will also need the following media. Windows Server 2019 Standard SQL Server 2017 System Center Configuration Manager 1902 Current Branch Step 2. Configure Active Directory Domain Services (ADDS) To setup Active Directory Domain Services you could manually click your way through the appropriate wizard in Server Manager or automate it using PowerShell. For your benefit I'll show you both methods below, all you have to do is choose which one suits you. Method #1 - Do it manually On the DC01, open Server Manager. Click on Add roles and features On the Before You Begin screen click Next. For Installation Type select Role-based or Feature-based installation For Server Selection select Select a server from the server pool and choose DC01 For Server Roles select Active Directory Domain Services, when prompted to add features that are required for Active Directory Domain Services select Add Features select DHCP Server,when prompted to add features that are required for DHCP Server, accept the changes by clicking on Add Features Select DNS Server, when prompted to add features that are required for DNS Server, accept the changes by clicking on Add Features Continue the the wizard by clicking Next On the Features screen click Next On the AD DS screen click Next On the DHCP server screen, click Next On the DNS Server screen click Next On the Confirmation screen click Install and then click on Close Configure Post Deployment Configuration After it's finished, perform the Post Deployment Configuration by clicking on Promote this server to a domain controller select the Add a new forest option, give it a root domain name such as windowsnoob.lab.local Next, depending on your requirements set the Forest functional level and Domain functional level, I've selected the default options below however you may want to configure it differently for your hierarchy, For the password field use P@ssw0rd, Click Next when ready, for DNS options, click Next, Next verify the NetBIOS name and click Next To specify the location of the AD DS database, log files and so forth, either accept the defaults, or change them to something that suits your hierarchy and click Next. Next you can review the options (clicking view script will save your actions to a PowerShell script for use later if you wish). Click Next when done. Next, click Install to begin Once it is complete making the changes it will automatically reboot the server After the reboot, open Server Manager again to do the Post-deployment Configuration for DHCP Server. Click on Complete DHCP Configuration use the defaults for DHCP Server Authorization Click on Commit, Click Close when done. That's how to configure ADDS and DHCP manually. Method #2 - Automate it with PowerShell To configure ADDS, DNS and DHCP automatically, use the ConfigureADDS.ps1 PowerShell script. Note: I'd recommend that you reboot the server before running the script in case any pending operations like Windows Update are in progress as it may effect the results of the script below - I have not (yet) added in any detection for pending operations. 1. Copy the script to C:\scripts on DC01 2. Edit the variables in lines 17-32 as desired before running. 3. Start Windows PowerShell ISE as Administrator and run the script by clicking on the green triangle. Once the script is run, it will automatically reboot the server, and after you logon, it will complete the DHCP server installation. Summary Using PowerShell to automate things is the proper way to do things as a server admin. Please join me in Part 2 of this multi-part guide where you will continue setting up your new Windows Server 2019 lab with SCCM 1902 Current Branch.
  5. well if it cannot connect to the network then how can it contact the management point to send status messages ? i'd suggest you first get OSD working 100% in a LAN connected state and then move on to trying other things, like OSD on wifi...
  6. Introduction I was upgrading my Technical Preview 1902.2 lab to 1903TP and all went well, except for the AdminConsole upgrade (which now takes place a couple of minutes after the upgrade is done). After the site server upgrade is complete, you'll see a new notification in the AdminConsole advising you to upgrade your console. A required component of the console is out of sync with your site. Install the new console version. After clicking on Install the new console version, the Admin Console automatically closes and an MSI kicks off, a few seconds later it fails with an odd error about lack of free disk space. There is not enough available disk space on to complete this operation. Installation requires at least 20MB free disk space. I double checked my server storage and sure enough I had lots of free space, well above the 20MB mentioned. To get details of why the Admin console was failing, I referred to the ConfigMgrAdminUISetup.log and ConfigMgrAdminUISetupVerbose.log logs located in the root of C:\ The following shows the error. The error occurs in the CcmCheckFreeDiskSpace check. And interestingly it's referring to a TARGETDIR on my D:\ drive. This is the target location for the AdminConsole. Resolution Close the ConfigMgr console and any MSI installation(s) that are in progress. Using Windows File Explorer. Next, rename the AdminConsole directory as specified via the TARGETDIR line in ConfigMgrAdminUISetupVerbose.log to AdminConsole.OLD as shown below. Before changing folder name. And here's the same folder after changing it to AdminConsole.old. Once done, search the ConfigMgrAdminUISetupVerbose.log log file for the following line CURRENTDIRECTORY = C:\Program Files (x86)\ConfigMgr10\AdminconsoleSetup\ Here's that line highlighted. Now that you know where the MSI installer is, browse to that folder using Windows File Explorer, answer Yes if prompted. and double click on the ConsoleSetup.exe file contained within. You will be prompted with the ConsoleSetup wizard, click your way through it to completion. And once done, you'll see the new upgraded console !
  7. Introduction In a previous set of guides you used PowerShell scripts to quickly install System Center Configuration Manager (Current Branch) version 1802 and then upgraded it using Updates and Servicing to System Center Configuration Manager (Current Branch) version 1810. Configuration Manager has a rich history that is nicely explained in the following graphic (from Twitter). Tip: You have rights to use System Center Configuration Manager (SCCM) to manage clients covered by the EMS license. Make sure you stay on #ConfigMgr current branch to receive benefits of Microsoft cloud, more info here. In case you are not already aware there are two main branches (of Configuration Manager) available: System Center Configuration Manager (Current Branch) System Center Configuration Manager (Technical Preview) System Center Configuration Manager (Current Branch) is designed for use in production environments, for managing anything from small to very large Enterprises, whereas System Center Configuration Manager (Technical Preview) is for lab testing environments only and is limited to 10 clients. The Technical Preview releases are released monthly, and contain the latest and greatest features being trialed in the product, and usually these new features are the result of feedback from uservoice. Current Branch releases on the other hand are released only a few times per year and contain stable, tested features that are mature enough to release into production environments. New baseline release Microsoft have released the latest Current Branch offering known as Update 1902 for Configuration Manager current branch so it's time to upgrade again. This release is the new baseline release (and will of course be uploaded to MSDN and VLSC soon). To understand what baseline releases are and why they are important see this post. Baseline releases media are used when doing New installs or upgrades from supported versions of SCCM. Checklist Before starting the upgrade, please verify that you have read the checklist from Microsoft here. Upgrading to 1902 When new Current Branch releases are made public, you have the choice of getting it immediately using a fast ring PowerShell script, or to wait a couple of weeks until it is made available to the slow ring (and then show up in the ConfigMgr console). To use the fast ring PowerShell script, download it, and run it to self-extract to C:\EnableFastRing1902. Once extracted, start a PowerShell cmd prompt in that folder and from there use the following command (where CM01 is the <SiteServer_Name | SiteServer_IP> of your CAS or standalone Primary site server). .\EnableFastUpdateRing1902.ps1 CM01 Tip: Some antivirus programs, particularly 3rd party (non Microsoft) antivirus programs can cause issues with the upgrade. If you have a 3rd party antivirus program installed on your site server, please disable (or temporarily uninstall) it prior to running the upgrade. To start the upgrade open the ConfigMgr console and find the Updates and servicing node as shown here. You can see that Configuration Manager 1810 Current Branch is already installed. Click on Check for Updates in the ribbon. And as instructed in the popup, open the DMPDownloader.log using CMTrace to monitor the process of checking for updates. Here you can see Generating state message: 6 which highlights that it’s found an applicable update. Once it's found if you refresh the console you'll see it listed. In the ConfigMgr console you’ll see it’s in a state of downloading or available to download, if it's not downloading yet, right click to download. Once it has completed downloading it will be listed as a state of Available. You need to click refresh in the ConfigMgr console to update the view. Installing the Update The state will change to Ready to Install once it has downloaded all the content. Right click on the update and choose Install Update Pack. when the Wizard appears, make your choice for pre-reqs and click next. Review the features included in this update pack and select those you want to use. Note: You may also notice Pre-Release features that are greyed out, to turn them on see the steps after upgrading the console the bottom of this guide. Continue through the wizard until completion at which point the update will be listed with a state of Installing. You can review the installation status by clicking on View Status. Monitor the installation At this point you can use CMTrace to open the CMUpdate.log file in <drv>\Program Files\Microsoft Configuration Manager\Logs (where drv is the drive letter you installed ConfigMgr on) to monitor the installation live. Note: The CMUpdate.log will take some time to start logging the installation of the update, so be patient if nothing appears to happen, it will. Look for a line similar to the one below to signal that the update has begun. Detected a change to the "E:\Program Files\Microsoft Configuration Manager\inboxes\cmupdate.box" directory. Keep monitoring the CMUpdate.log file to review details of what the update is doing. Once the update is complete, you should see a hman notification in the log . Note: If you don’t see this and see an upgrade failure message then scroll up in the CMUpdate.log file to determine what the failure reason was. You can always retry an upgrade (maybe not enough available ram for example). You can also verify the status in the monitoring node or click on Show Status in Updates and Servicing. This status will continue to update in the 5 states listed: Download Replication Prerequisite Check Installation Post Installation You can click on any state to get details of what is happening at that time (tip: hit refresh). After the update is complete, click refresh in the console and you'll be reminded to update the ConfigMgr Console via a popup. Make sure to update your console as you cannot use the new features until you do. Click OK to upgrade your ConfigMgr console, and after all is done you’ll see the 1902 version listed in the console. The new version of ConfigMgr is 5.00.8790.1000. After upgrading the site Tip: If you want to gain access to the Pre-Release features, then select Sites, Hierarchy Settings, and place a checkmark in Consent to use Pre-Release features. Then go to Overview, Updates and Servicing and expand Features as shown below, you can then turn on (or off) any of the Pre-Release features you want to test in Production. Related reading What's new in System Center Configuration Manager version 1902 - https://docs.microsoft.com/en-us/sccm/core/plan-design/changes/whats-new-in-version-1902 Release Notes - https://docs.microsoft.com/en-us/sccm/core/servers/deploy/install/release-notes
  8. hi Sanjay, i just tried and both downloads work fine, they do not work for non-registered users which may have been the case for you when you tried to download them, please retry, now that you are a member cheers niall
  9. pretty much all computers need drivers, what makes you think the Surface Pro does not ? have you tried deploying it yet ?
  10. just make sure your Apply Driver Package step references that, as shown here.
  11. without the accompanying smsts.log file we'd only be guessing what the issue is, if it's real hardware i'd guess that you might be missing storage drivers, attach the entire smsts.log file and we can take a look
  12. here's a quote from the original post: Tip: If you have rendering issues with the popup on different devices then edit the call ResizeWindow(425,335,500,375) values and ResizeWindow Function in UPGRADE.HTA to fit your specific needs, I don't have access to too much hardware to test this on. The popup is fixed, if you want the user to be able to move it change the line caption="no" to caption="yes". If you want to programmatically use it then add a Window.moveTo(x, y) line. cheers niall
  13. add a continue on error on your application install steps, then once done, attach the smsts*.log files here so we can troubleshoot.
  14. World Backup Day is something we’re used to mark as an event every year, as a reminder we need to take good care of our data. But this year Altaro challenges us to change our mindsets and start considering the value of a good backup solution not just once, but every day. On this occasion, they’re launching this contest where you might win an Oculus Rift & Touch Virtual Reality System! Let’s hope you’ll be the lucky winner, but if not, they’re giving free eGift Amazon cards as well for all the valid entries. So, for those who want to give it a try, this seems to be a good time to do it.To enter the contest, click here. Good luck and happy backup!
  15. first things first, i hope you snap shotted your labs after each part like i suggested at the start of these guides, secondly, if you look at step 4 part 4 here have you missed anything ? my CDP locations looks quite different to yours and don't point to the root ca at all, but instead it's on the IssuingCA, so how did you cdp end up on the rootca (if you followed my guides...)
  16. change the Upgrade Operating System step to include the %drivers01% variable, read my original blog post again from start to finish to see what you missed.
  17. well i don't know what your apply operating system step looks like, can you show us
  18. well you'll need to add some drivers for the chosen model, use WMI queries to determine which model it is
  19. ok well if it's restarting over and over it's probably missing drivers, did you apply any driver package for that model during the IPU task sequence ?
  20. I mean I scheduled updates and something broke. I checked everywhere on my primary site but i am not able to find it. Please guide me. is your post related to using an Upgrade Task Sequence in ConfigMgr or something else ? if it's something else then please raise a new topic.
  21. how can I make this TS lightweight, what steps can be disabled from screenshots attached? you could just create a new task sequence from scratch (non MDT integrated) and start learning what each step does Do I use DISM to capture a custom image with drivers and software on it or how can I do this? I don't capture images today any more, and instead just deploy the built in install.wim (thin image) and use the task sequence steps to customize it, however some people still like to capture thick images, and for that they tend to use MDT, or even SCCM using build and capture. Is it better to include the drivers with DISM or with this TS? never include drivers in a captured image, always inject drivers using steps in the task sequence which are based on wmi queries by make/model, or use modern driver management Would it be possible to customize start menu tiles and shortcuts to my preference? absolutely, i've a blog post here on that
×
×
  • Create New...

Important Information

We have placed cookies on your device to help make this website better. You can adjust your cookie settings, otherwise we'll assume you're okay to continue.