anyweb
-
Posts
9202 -
Joined
-
Last visited
-
Days Won
367
Everything posted by anyweb
-
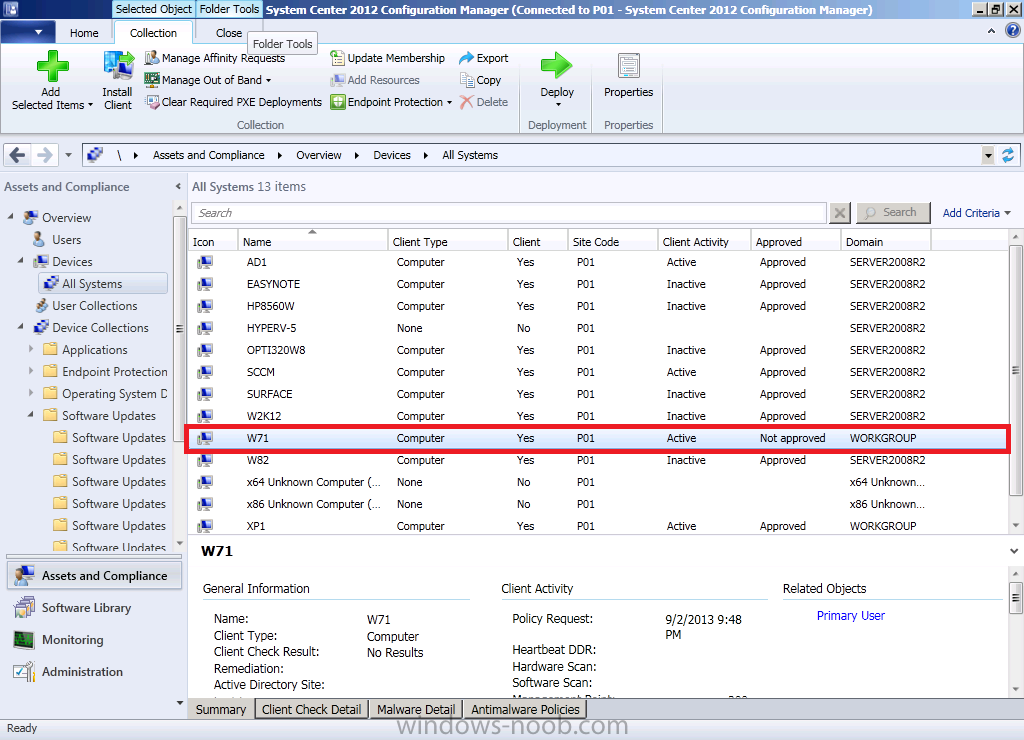
 Introduction In a previous blog post I discussed how you can disable (or enable) Microsoft’s new flagship service called Copilot. Copilot is a very hot topic today as it gives the power of AI to all users of Windows. As it’s going to be included with Windows 11 version 23H2 coming later in Q4 you need to start testing it now. To test it you’ll probably want to have two groups of users, those where you’ve disabled Copilot and a smaller subset where you enable it. Based on my own testing, in order to automate enabling Copilot you need to have some things in place in your environment right now, and those requirements are listed below. Windows 11 version 22H2 with KB5030310 installed Turn on the “Get the latest updates as soon as they are available” windows Update setting Locations needs to be North America, parts of Asia/South America regions only (for now) In this blog post I’ll focus on the second point above highlighted in red, and we’ll solve the problem by using the remediation scripts ability in Microsoft Intune. You can do this other ways, there’s a CSP listed here that probably does the same thing, I’ll test that and update here as appropriate. ./Device/Vendor/MSFT/Policy/Config/Update/AllowOptionalContent Keep in mind though the text below: This policy enables devices to get optional updates (including gradual feature rollouts (CFRs) – learn more by visiting aka.ms/AllowOptionalContent). This CSP contains some settings that are under development and only applicable for Windows Insider Preview builds. These settings are subject to change and may have dependencies on other features or services in preview. What we need to automate is flipping the switch shown below from Off to On. The switch is for: Get the latest updates as soon as they’re available so that it downloads things like Copilot preview bits from Windows Update. This actually sets a registry value to 1 when flipped to On and that’s how we’ll solve it. Note: Whether you set the toggle to Off or On, you’ll still get the regular security updates as usual. The toggle determines how quickly you get the additional non-security updates, fixes, feature updates, and improvements Download the scripts The scripts used in this blog post are available here, unzip before use. There are 2 scripts in the zip file, one for detection, and another for remediation. copilot ux registry key Create the remediation As an Intune admin, navigate to Devices, select Windows, select Scripts, ensure you are in Remediations and click on + Create to create a new remediation. Give the remediation a useful name such as Turn ON – Get the latest updates as soon as they’re available Click next and add the scripts in the highlighted sections here: so that it looks like so, make sure to select Yes for Run script in 64-bit PowerShell Click through the wizard and select an appropriate Assignment group and schedule. In the example below I previously created a dynamic Azure AD group called called All Windows 11 version 22H2 build 2361 based on OSVersion = Version 10.0.22621.2361. I also set the schedule to run hourly, but you can set it any way you wish. Note that this specific version of Windows 11 is only necessary to test Copilot today as this ability will be native to Windows 11 version 23H2 later in Q4. Click Create once done. Next you wait, and review the status after it’s reached your target devices. Monitor the remediation In the Device Status section of your newly created remediation, you should see the status of all devices targeted by the remediation. Note that it does take some time before this data flows back up to Intune. and afte running again it’ll change Detection status to Without issues. Verify on target devices On a device targeted with this policy, you can review the logs created by the remediation scripts for troubleshooting, they’ll be placed in the following folder: C:\ProgramData\IntuneRemediations\Copilot Next, verify that the Windows Update setting is indeed turned on: and finally, you can review the registry key that it enables, in HKLM\SOFTWARE\Microsoft\WindowsUpdate\UX\Settings IsContinuousInnovationOptedIn = 1 and of course after this setting is set it will auto download the Copilot bits So once the required KB’s are installed (KB5030310 + KB5030509) and after restarting the targeted device, Copilot is enabled ! job done ! Related reading Copilot released to GA How can I disable (or enable) Copilot Remediations | Microsoft Learn Get Windows Updates as soon as they are available see you in the next one cheers niall.
 -
by reimaging your devices you are removing the value of having them delivered with an image, have you not tried talking to the vendor that supplies your PC's to get a Windows image that you want preinstalled ?
-
why do you think you need to install Windows at all, surely the hardware vendor is installing Windows on your devices ?
-
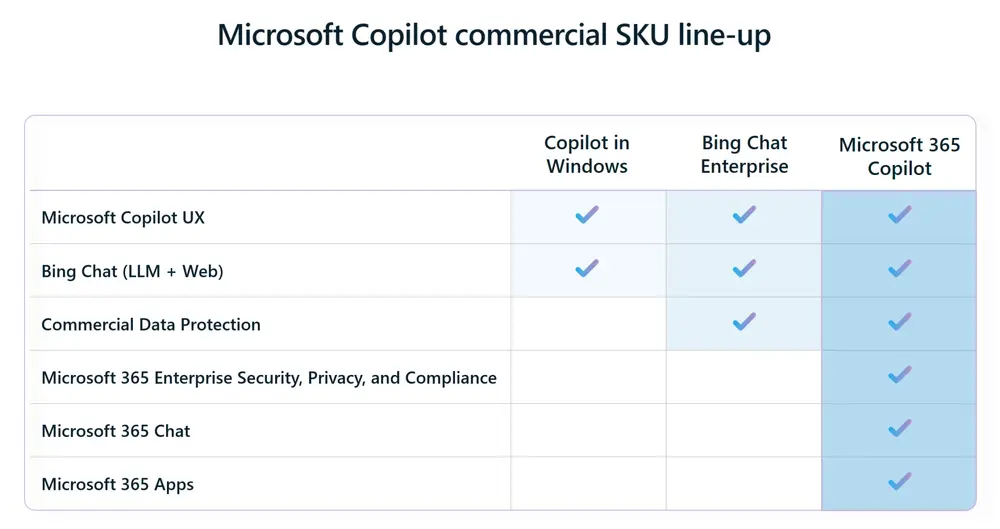
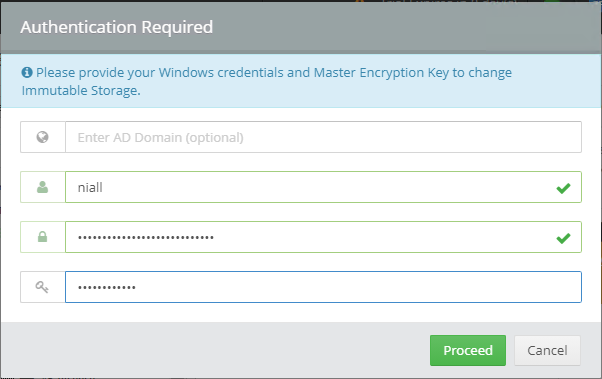
Introduction TLDR Available SKUS & Cost Copilot Availability Temporary enterprise feature control Creating policy in Intune Using Copilot Introduction Microsoft held an event last week where they talked a whole lot about Artificial Intelligence (AI) and Microsofts own service to connect with AI called Copilot. In this blog post I’ll describe what I’ve learned about Copilot since the announcement and show you how you can enable or disable it via Intune policy. Why would you want to disable Copilot ? There are lots of reasons such as data protection, security, and having control of what your users are doing with this new technology. Rolling it out to approved users to test at first would be a great way to start rather than this showing up on all applicable Windows 11 devices. TLDR If you didn’t know already, TLDR is slang for too long, didn’t read. So if you don’t want to read this entire article, read this summary instead. As long as Windows update policies are targeting your Windows 11 version 22H2 devices and as long as they are on build 2361 or later, and as long as they are in the US or other ‘enabled’ regions, Copilot will NOT be enabled on Windows 11 version 22H2. If however you have Windows 11 version 22H2 devices devices and are on build 2361 or later and they are EXCLUDED from Windows update policies then Copilot WILL be enabled unless you configure policies such as below. Lastly, if you upgrade these devices using the Annual Feature Update to 23H2 in Q4 2023, then Copilot will be enabled. Available SKUS & Cost Copilot will be available in 3 SKUs with costs ranging from free to $30 USD per user per month. Copilot in Windows – Free Bing Chat Enterprise – $5 standalone, included in Microsoft E3/E5 Microsoft 365 Copilot – $30 The breakdown of those 3 SKUs are listed below: Copilot Availability The interesting news in the Windows event blog post was that Copilot would be rolled out to some customers (more of that later) starting Tuesday September 26th for Windows 11 version 22H2 and more broadly as time goes by. It will also be included with Windows 11 version 23H2 when that releases later this fall (Q4 timeframe). Microsoft Copilot in Windows will be available on September 26. It will empower you to create faster and complete tasks with ease and lessen your cognitive load—making once-complicated tasks simple. We’ve made accessing the power of Copilot seamless as it’s always right there for you on the taskbar or with the Win+C keyboard shortcut, providing assistance alongside all your apps. Copilot in Windows will feature the new Copilot icon, the new Copilot user experience, Bing Chat, and will be available to commercial customers for free. The detail about which customers it would be rolled out to is in the sub notes of another blog post here. Thanks go to Steven here for that nugget of info. Copilot in Windows will start to release in preview to select global markets as part of our latest update to Windows 11. The initial markets for the Copilot in Windows preview include North America and parts of Asia and South America. It is our intention to add additional markets over time. So now we know what’s coming, we need to know what we need in place to see it on production ready Windows 11 devices today. In summary, that should be the following: Windows 11 version 22H2 with KB5030310 installed North America, parts of Asia/South America regions only (for now) September 26th was the release date for this new capability to the general public as long as you are located in the regions mentioned above and it comes in an update listed here. This update has already started rolling out globally but if you don’t see it yet on your Windows 11 22H2 devices then you can manually install the update from the Microsoft Update Catalog here. Temporary enterprise feature control According to this docs site, all Windows 11 version 22H2 releases should be using Temporary Enterprise feature control, meaning that “Features behind temporary enterprise control are automatically disabled for devices that have their Windows updates managed by policies.” Ok, so if that’s the case then any managed Intune devices with Windows updates managed by policies shouldn’t need any further action prior to the release of Windows 11 23H2. Right ? and once 23H2 is released those same devices will get Copilot enabled by default. However, the same article shows the following info. To verify if the docs above are indeed correct I deployed a new Windows 11 22H2 virtual machine, patched it to the required 2361 build and made sure that it was NOT targeted with policy to either enable (or disable) Copilot. Note: This device (below) was not targeted by any Windows Update policy from Intune. The result ? Copilot was ENABLED. Next I did the exact same test on a device that had Windows Update policies deployed to it via Intune, and after updating to build 2361, there was no Copilot enabled. This test has confirmed that the temporary enterprise control feature is working as per the Microsoft docs. Creating policy in Intune Now that you know what you need in place to test Copilot, it’s time to take a look at policy creation in Intune. Why would you want to do that ? so that you can have fine control over who can use Copilot and who cannot. Note: The currently available CSP was released for Windows Insider Preview and therefore may change, if it does I’ll update this blog post. In Intune create a new device configuration profile and select templates, custom as shown here. Give the policy a suitable name and fill in the following custom URI, use the following settings: Name TurnOffWindowsCopilot Description OMA-URI ./User/Vendor/MSFT/Policy/Config/WindowsAI/TurnOffWindowsCopilot Data type Integer Value 1 as shown here Note: If you want to Enable Copilot replace the 1 with 0 Assign the policy to two groups, one where you want to disable the ability and another for excluding this policy. Next, you can optionally set an Applicability rule for OSversion = 10.0.22621.2361 to 10.0.22621.9999 which should cover all versions of Windows 11 version 22H2 for the coming while. Note: If you want to disable Copilot for Windows 11 23H2 when it releases then adjust the OSVersion accordingly. Monitoring the policy Once you’ve deployed the policy you’ll see devices reporting back different results based on your applicability rules, and based on whether the devices meet the requirements for Copilot or not. If you did not specify OSVersion 10.0.22621.2361 as the minimum release then any Windows 11 22H2 devices that get this policy that have not yet updated to build 2361 will report an error (remediation failed). Not Applicable is for versions of Windows that this does not apply to, for example Windows 10 and Success means the policy was successfully applied. On the devices targeted with the policy that are running the correct version of Windows 11 22h2 (build 2361) you should now see the following registry keys. Using Copilot The screenshot below is from my Windows Insider preview release, where I enabled Copilot Preview. I asked Copilot to tell me about Niall Brady. The technology is definitely very cool and I’m looking forward to seeing where it goes! That’s all for this blog post, happy Copiloting and thanks to all that responded to this thread on Twitter (yeah I’m still calling it that). Related reading https://blogs.windows.com/windowsexperience/2023/09/26/the-most-personal-windows-11-experience-begins-rolling-out-today/ https://www.microsoft.com/en-us/microsoft-365/blog/2023/09/21/announcing-microsoft-365-copilot-general-availability-and-microsoft-365-chat/ https://learn.microsoft.com/en-us/windows/whats-new/temporary-enterprise-feature-control#windows-11-features-with-permanent-enterprise-feature-control https://support.microsoft.com/en-us/topic/september-26-2023-kb5030310-os-build-22621-2361-preview-363ac1ae-6ea8-41b3-b3cc-22a2a5682faf https://learn.microsoft.com/en-us/bing-chat-enterprise/manage#turn-off--enterprise
-
take a look at this https://techcommunity.microsoft.com/t5/ask-the-directory-services-team/implementing-an-ocsp-responder-part-v-high-availability/ba-p/396882
-
are you sure that that fqdn was pingable before this step, could the system have dropped the ip address or gone asleep ?
-
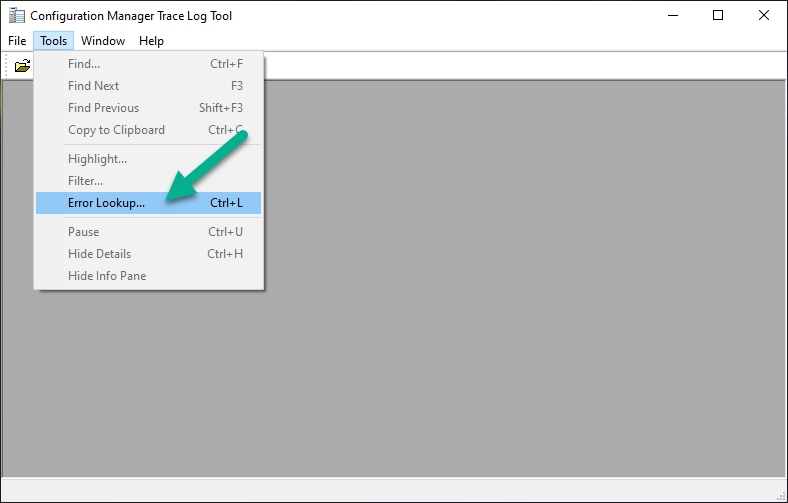
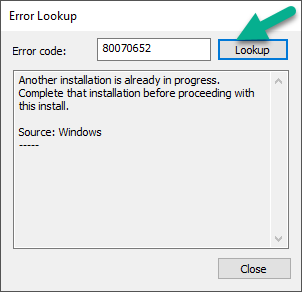
well spotted, and here's a tip for everyone to help you find out what these codes mean, start CMTrace.exe (available in the C:\Windows\CCM folder), click on Tools and select Error Lookup in the window that appears, paste in your error code and click on Lookup this helps to reveal the reason why something is failing
-
what happens just before the error ? what server version is it ? which ADK is installed ? is it pure WDS or WDS plus some other functionality ?
-
@xerxes2985 great ! I'm glad to hear it !
-
then something is not right, if you enable f8 command support then it should work, if it is not then you are working on the wrong boot image to the one in the console
-
if you have enabled it on the boot image, then redistribute it to the distribution point(s) and try again
-
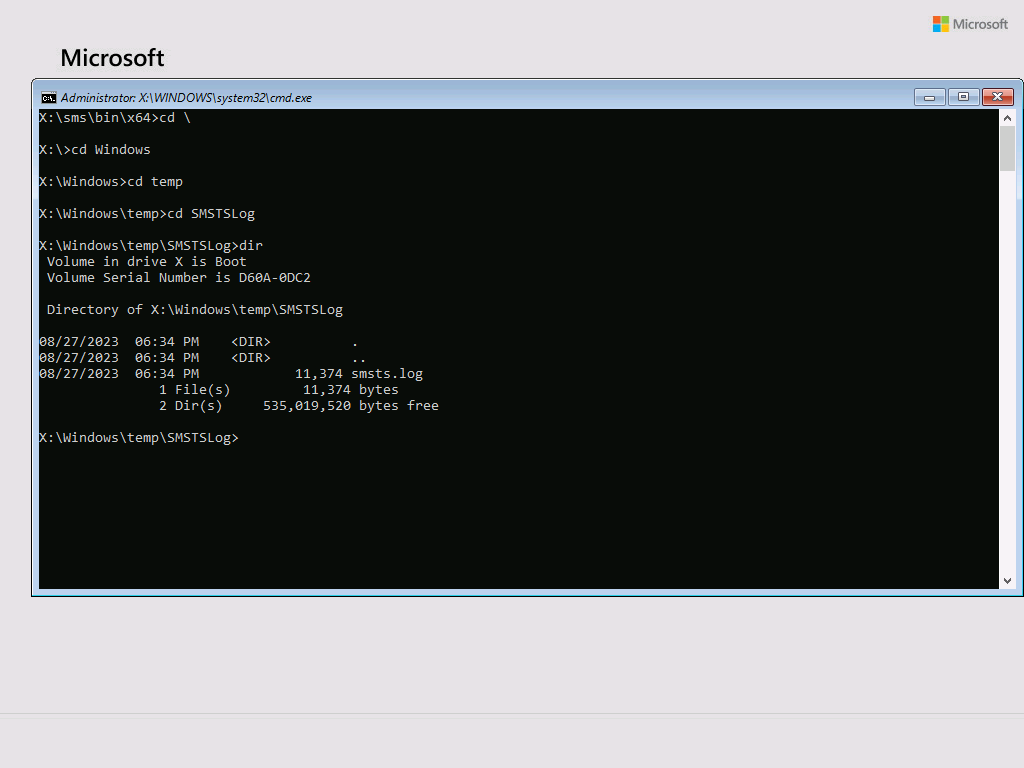
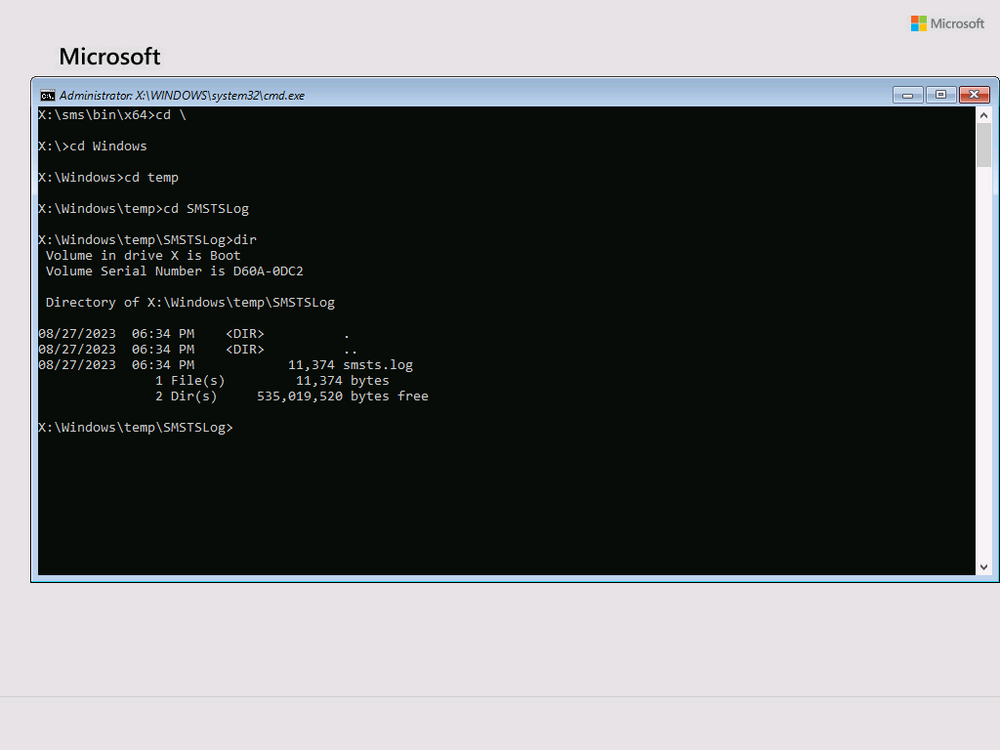
on the client, press f8 to bring up a cmd prompt, then click on your available task sequence, browse to x:\windows\temp\smstslog and find and download/attach the smsts.log file here please
-
the reason for the reboot is it either can't see a task sequence or missing drivers, but we are not seeing that in this log, is there anything further logged in smsts.log ?
-
great job, and thanks for posting your resolution to the problem
-
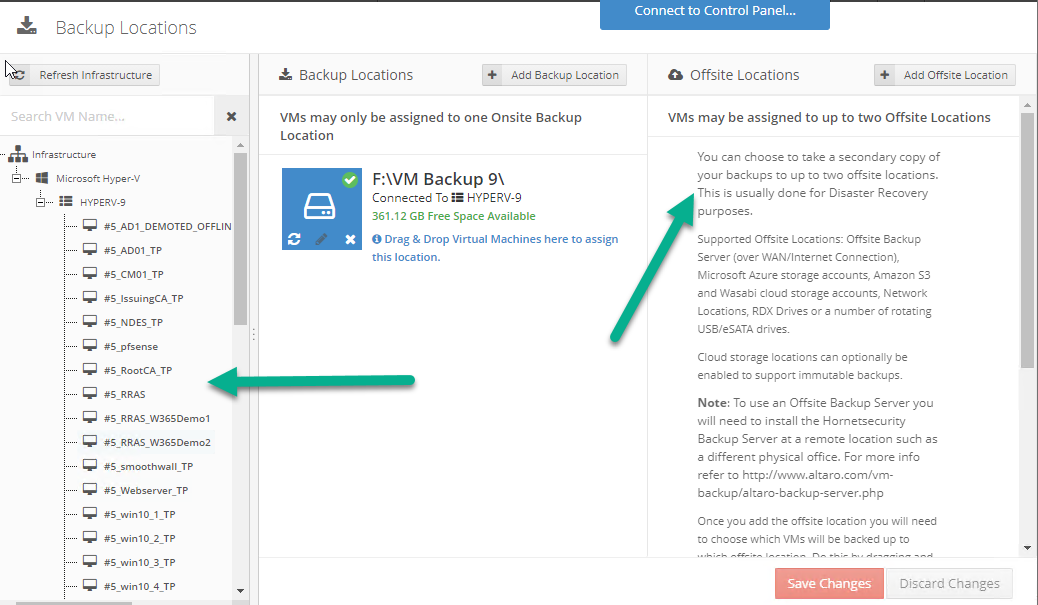
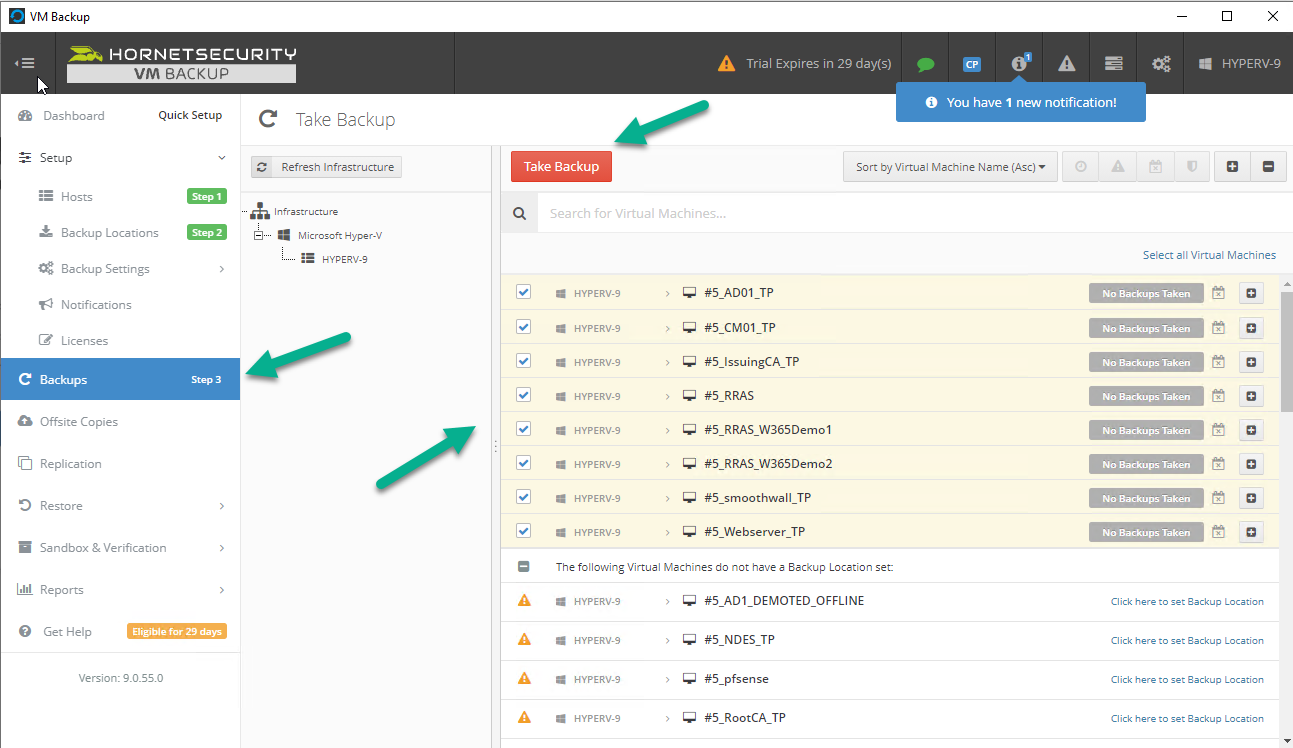
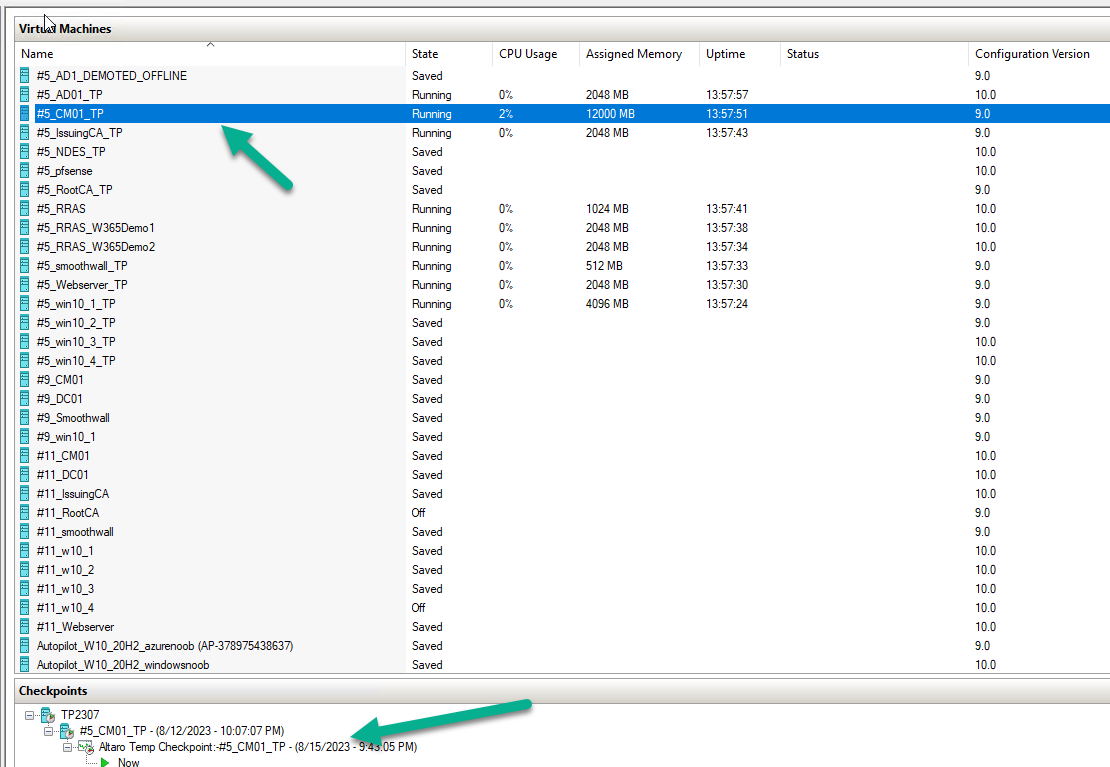
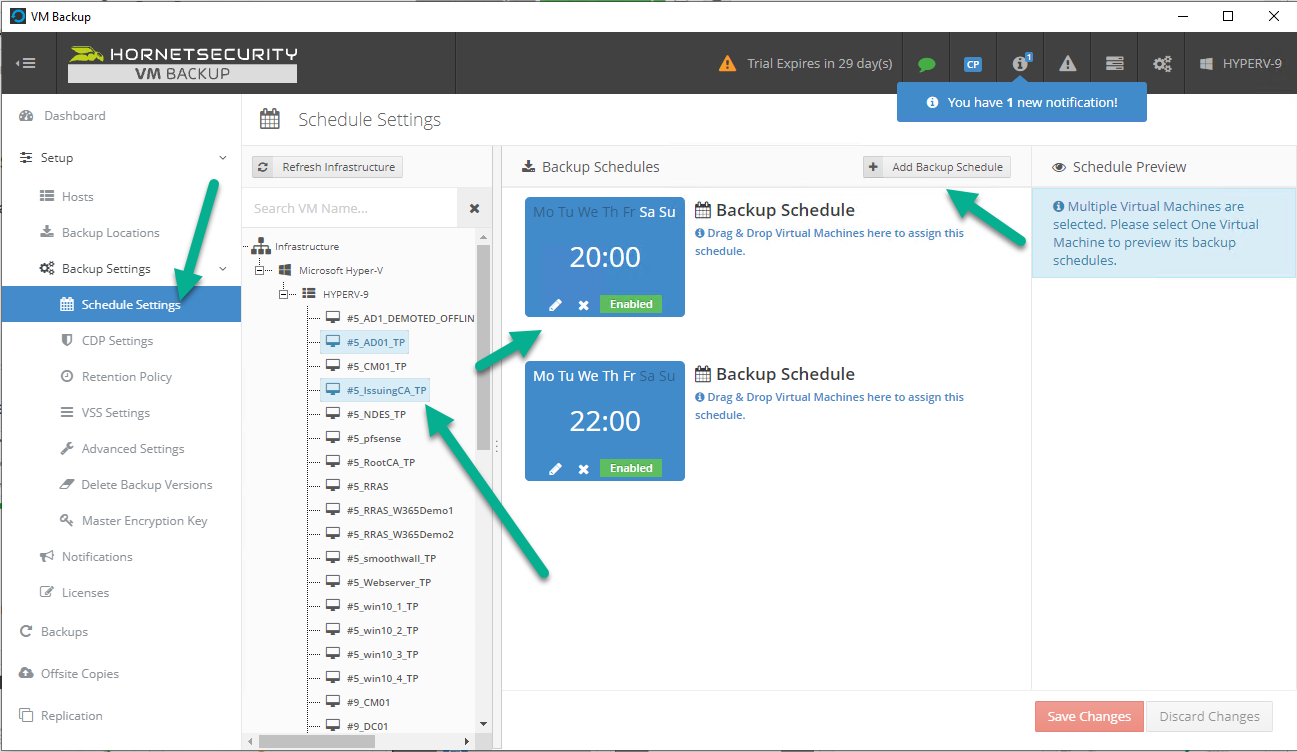
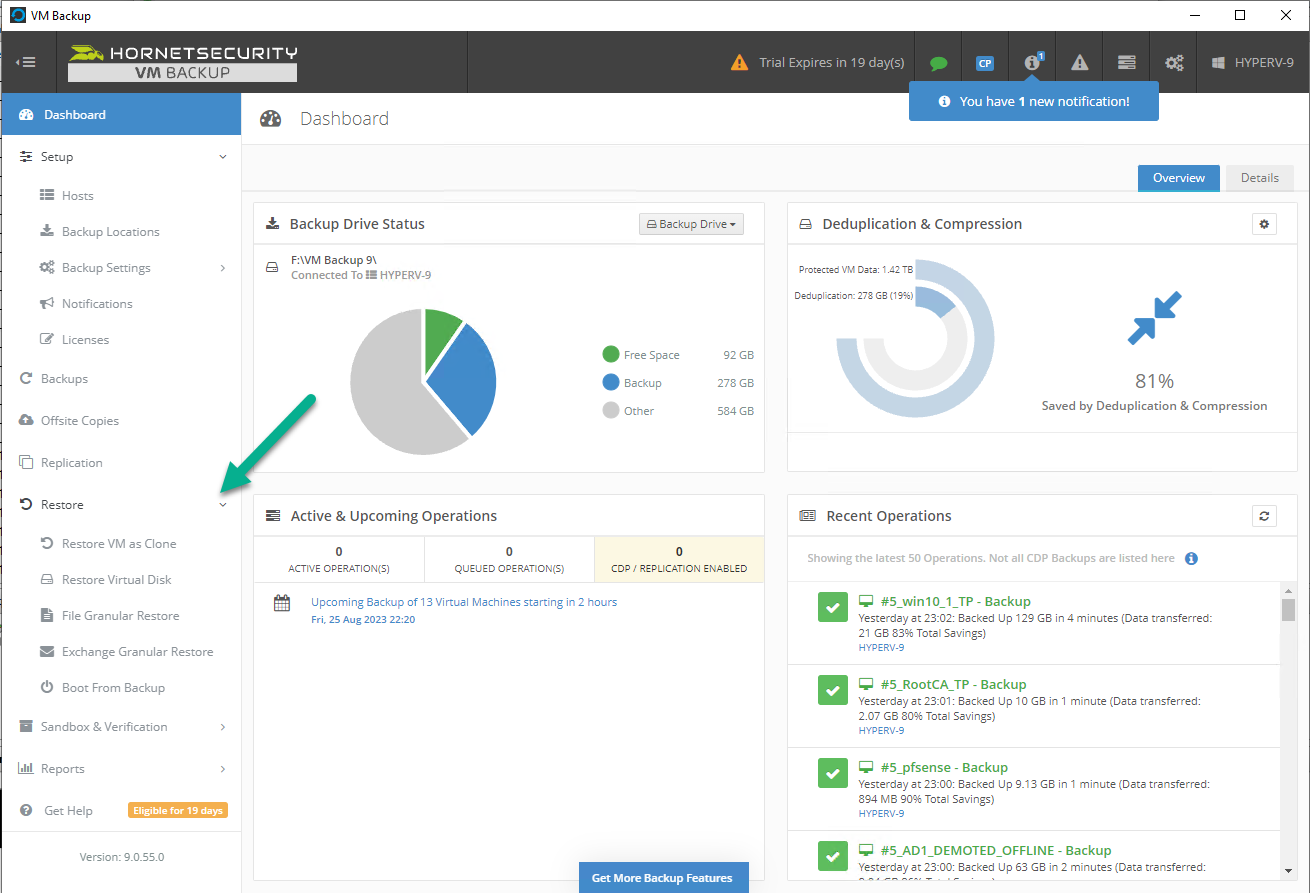
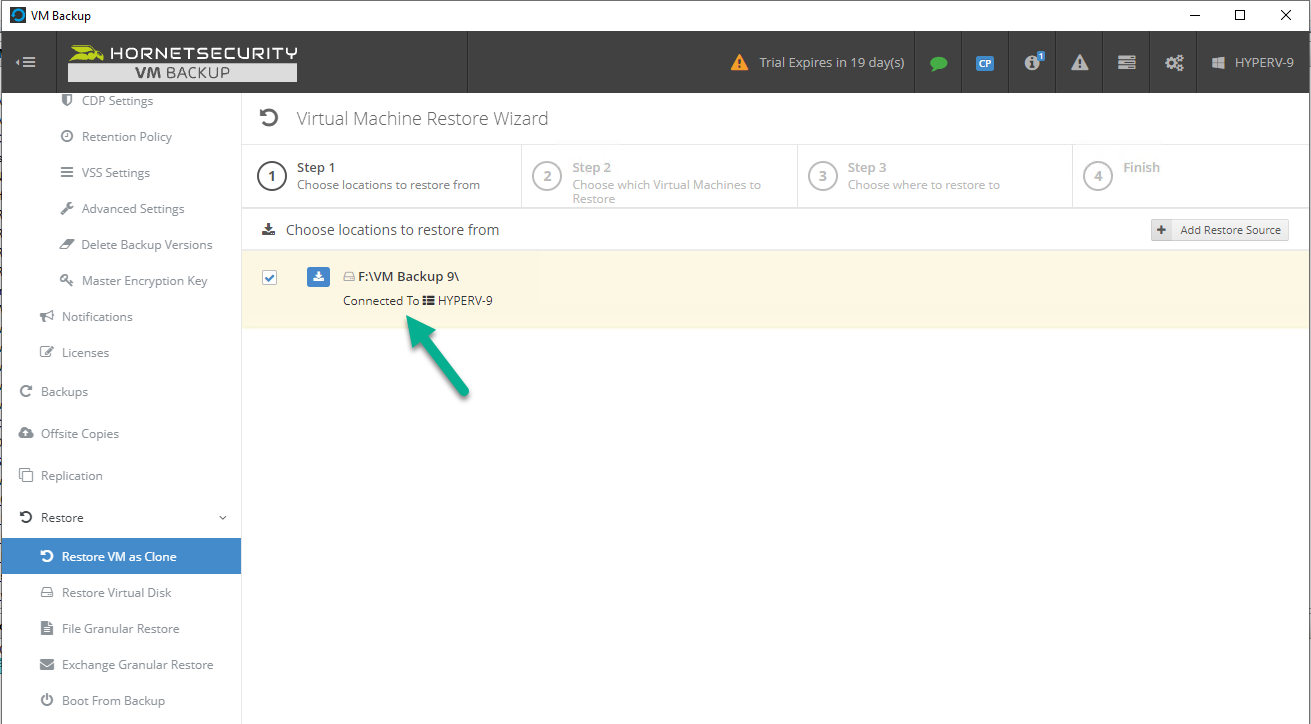
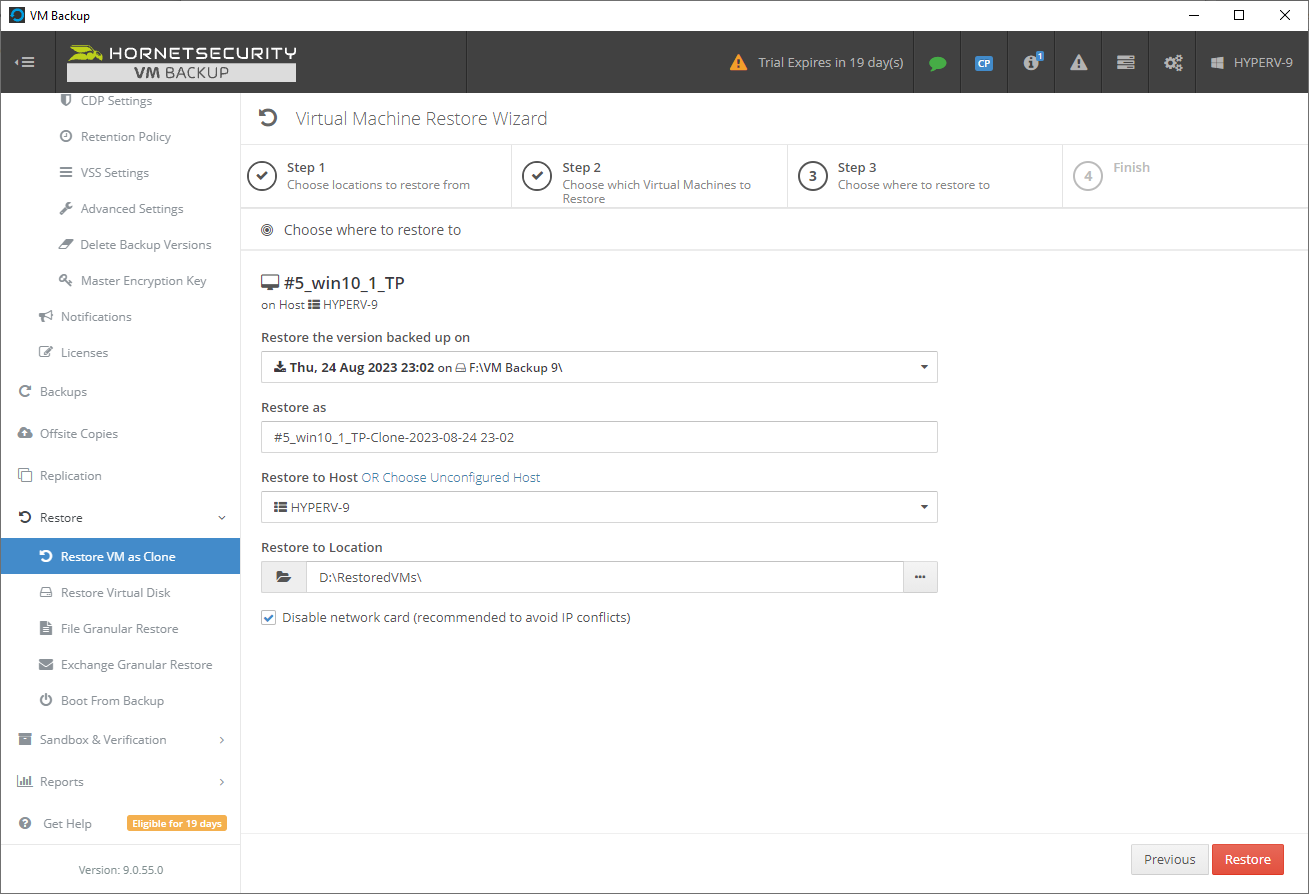
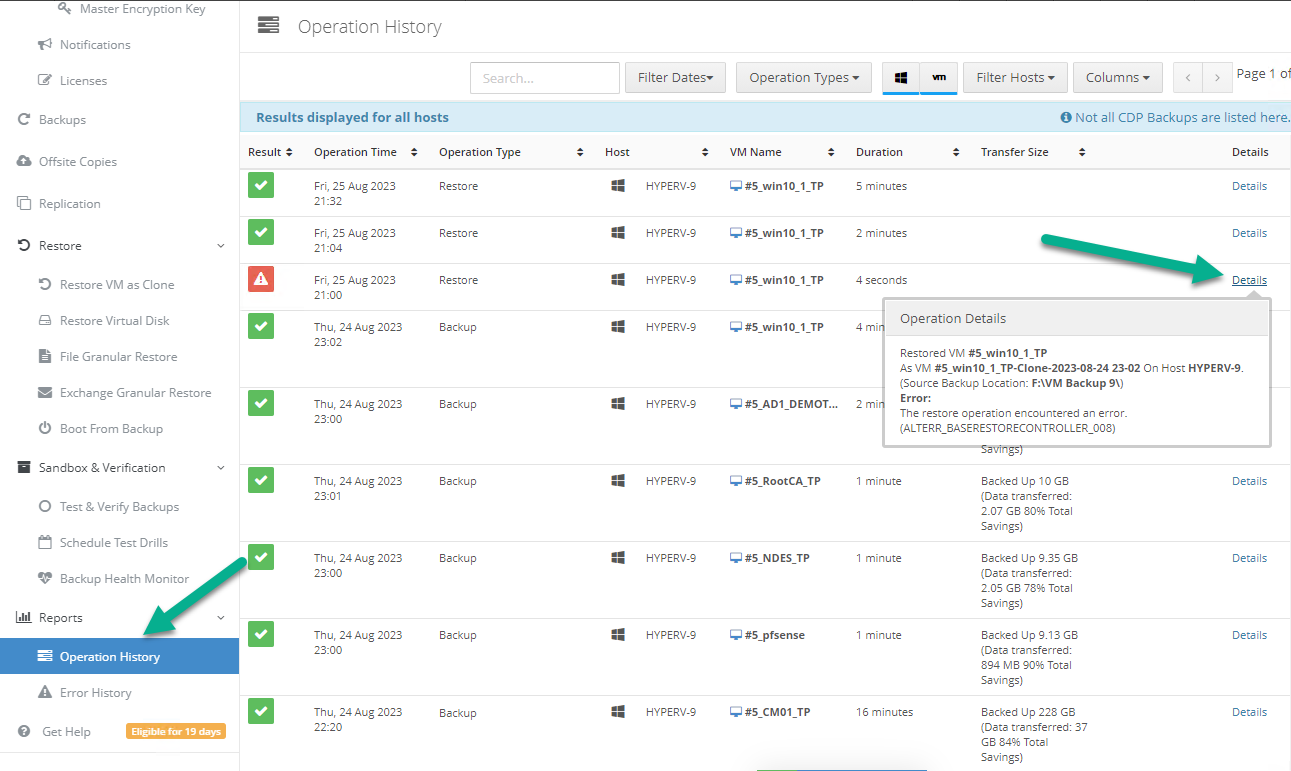
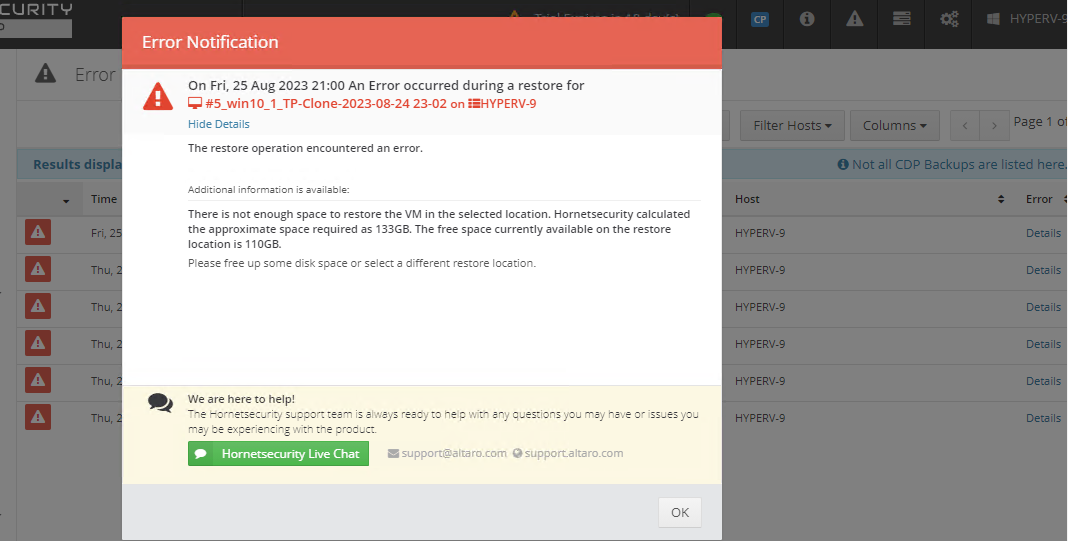
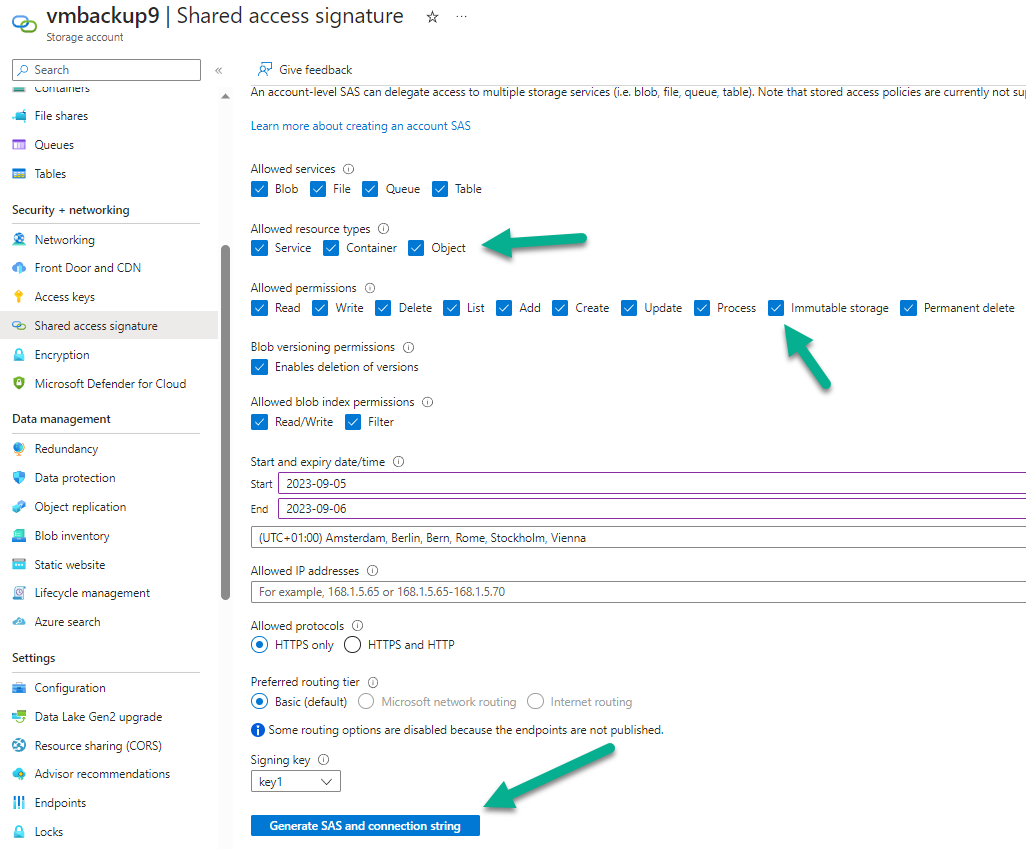
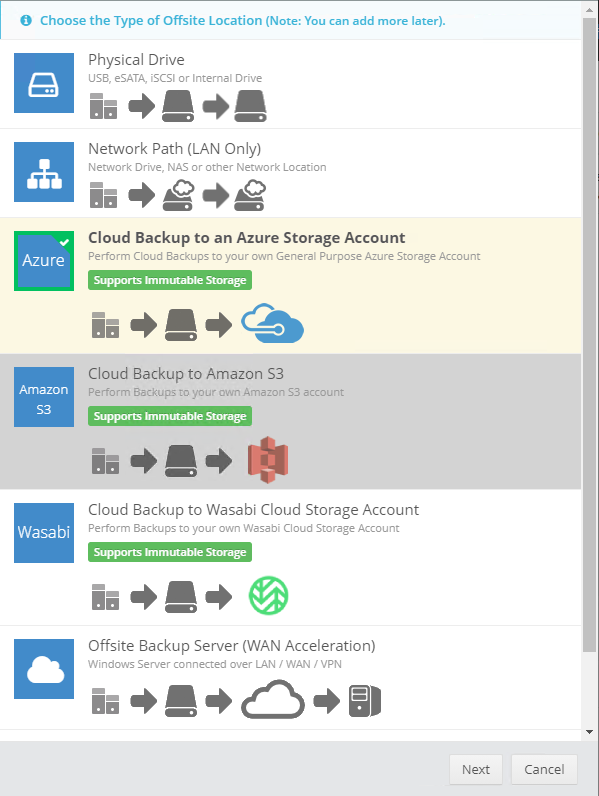
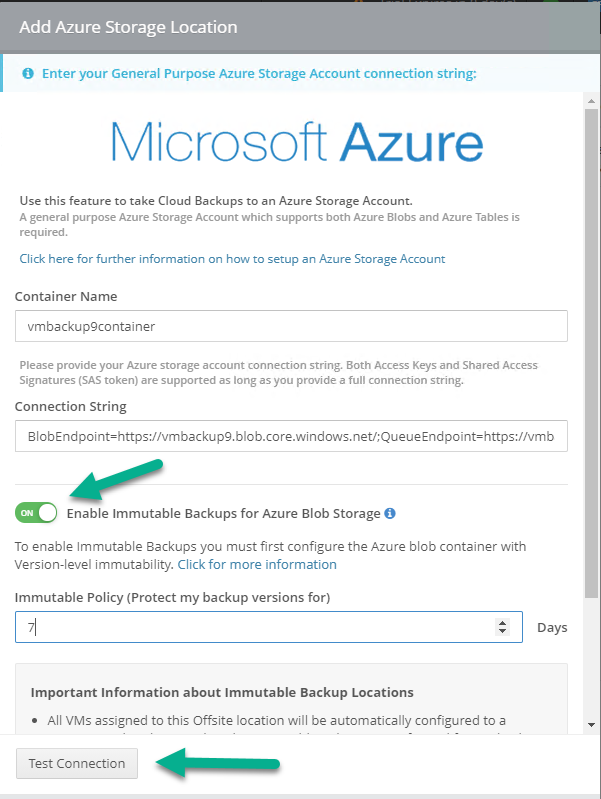
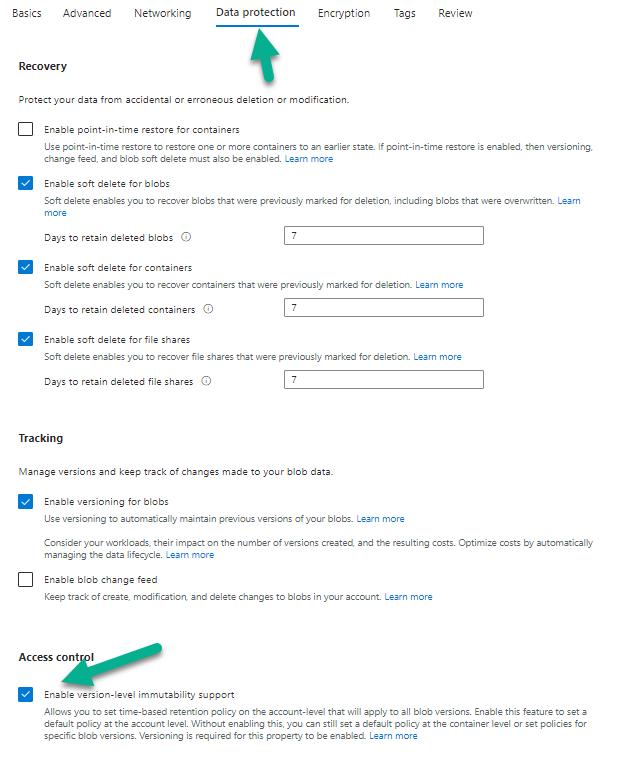
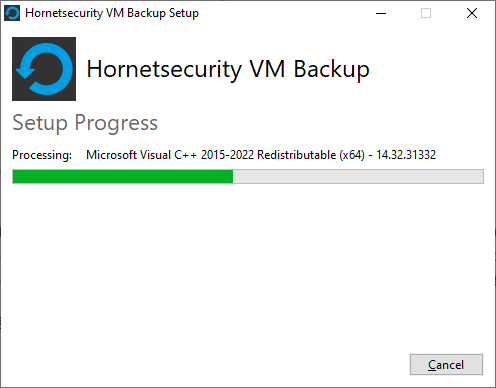
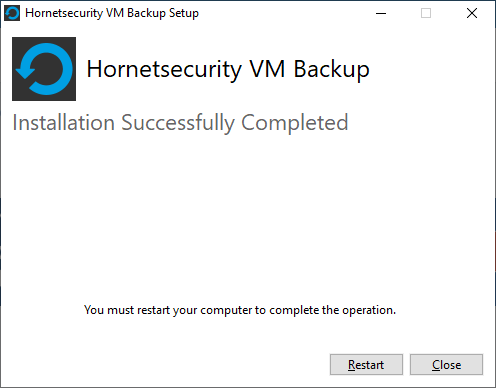
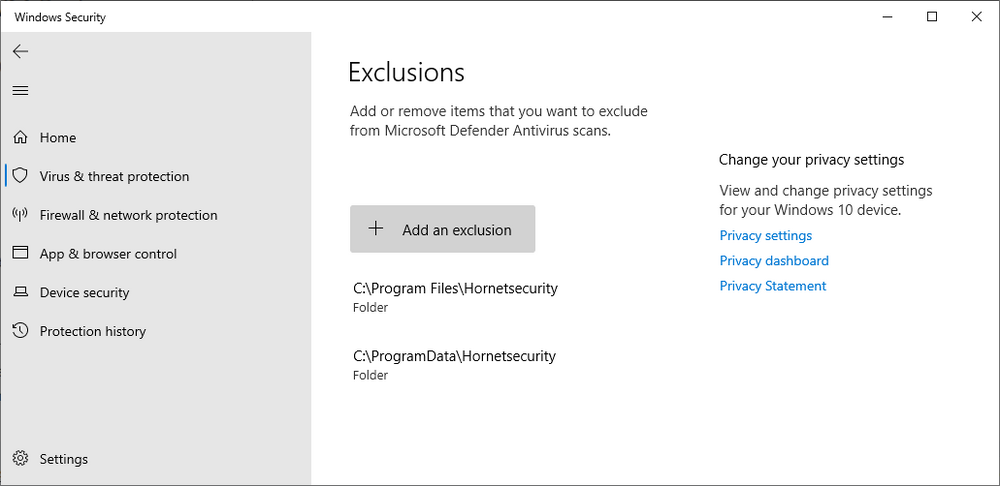
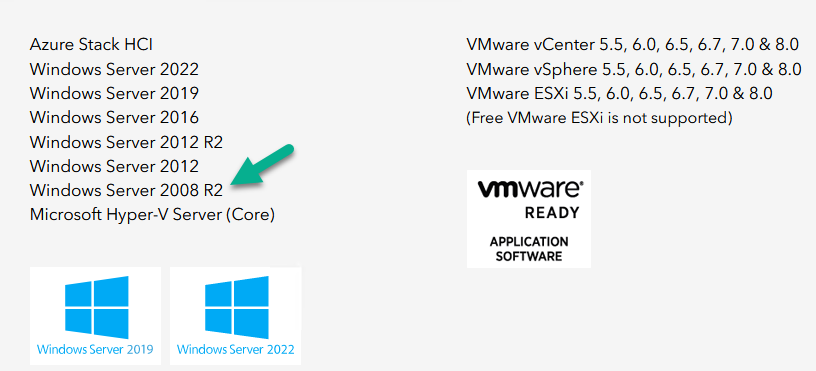
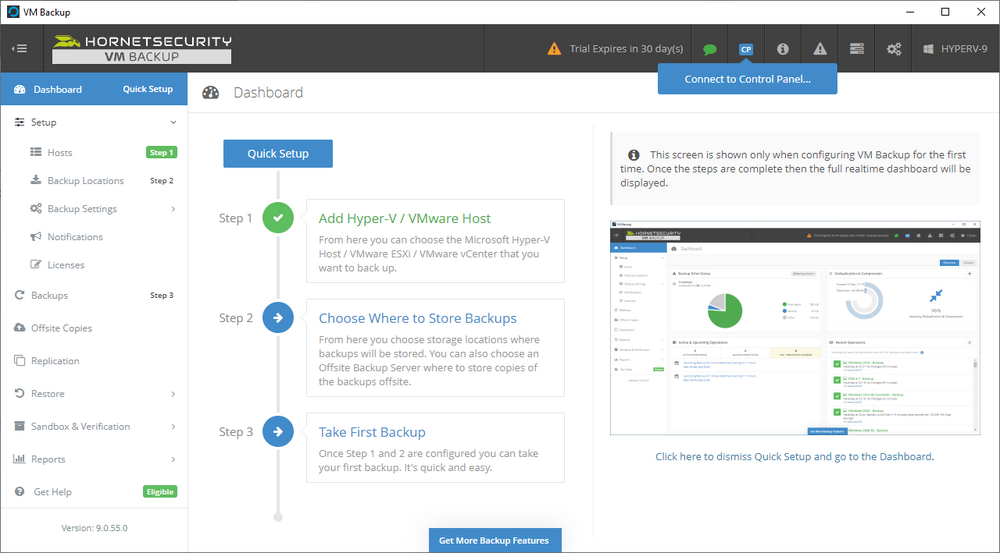
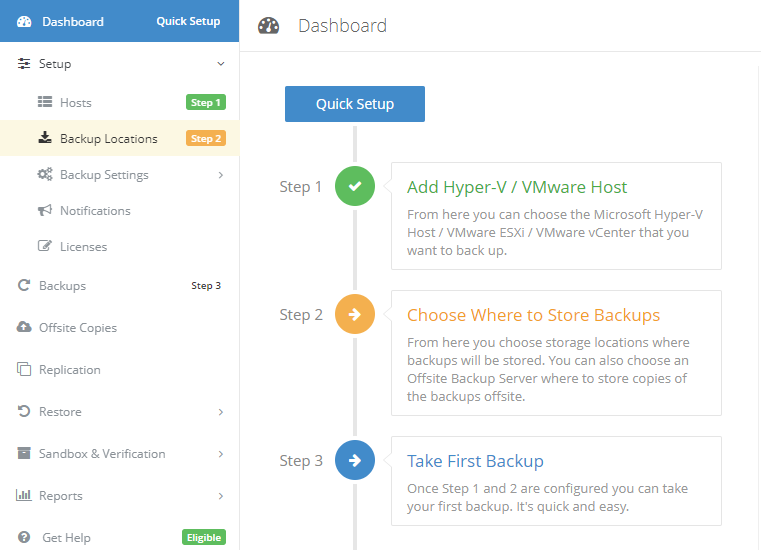
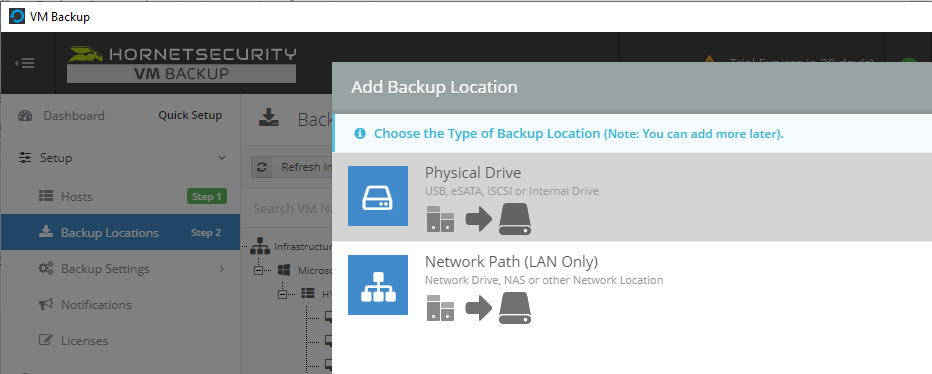
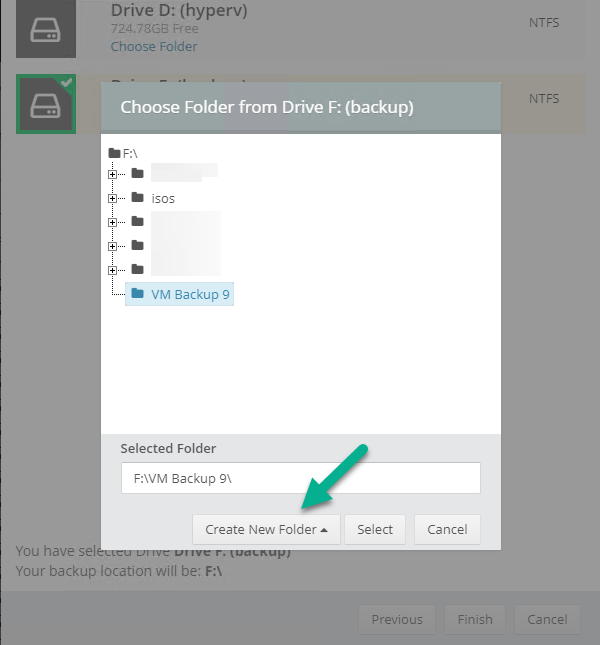
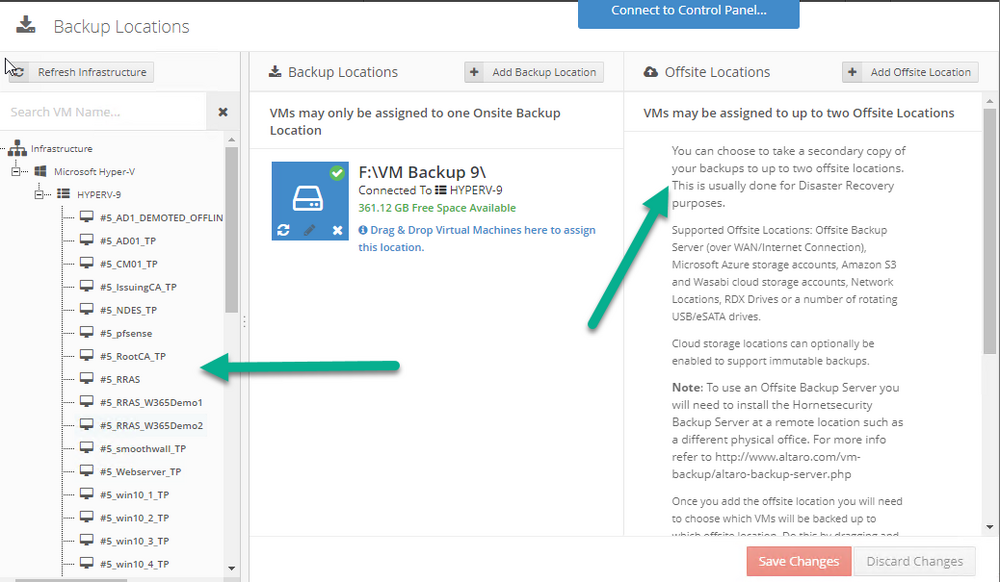
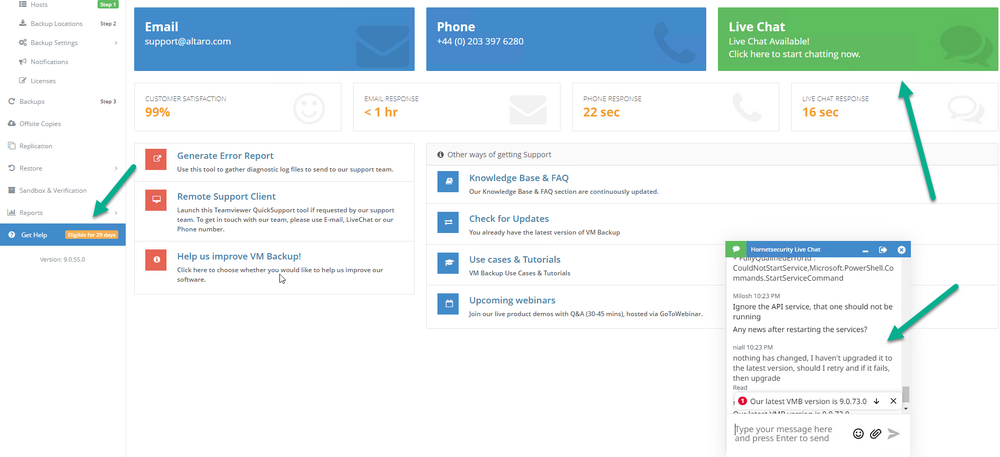
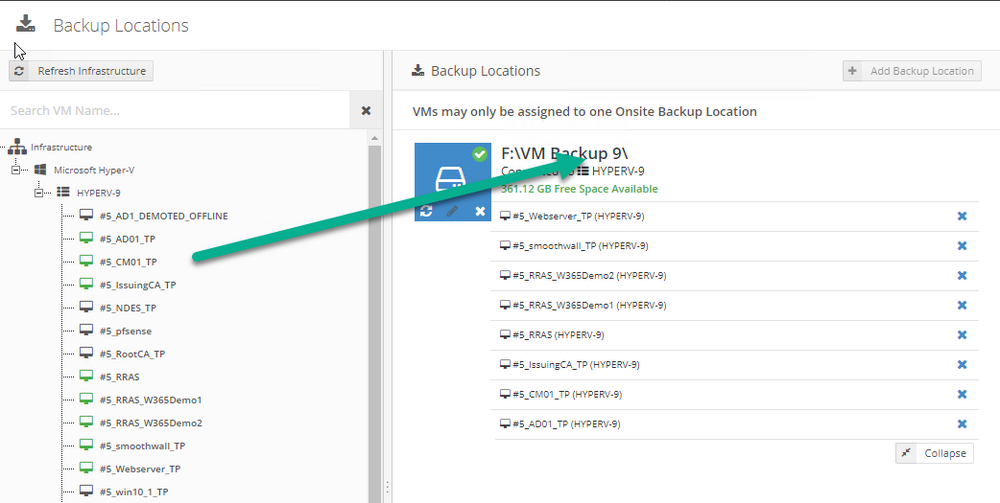
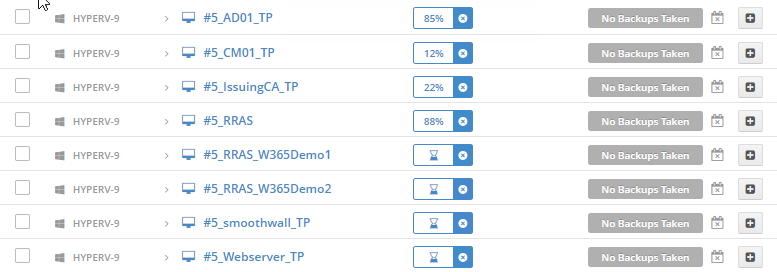
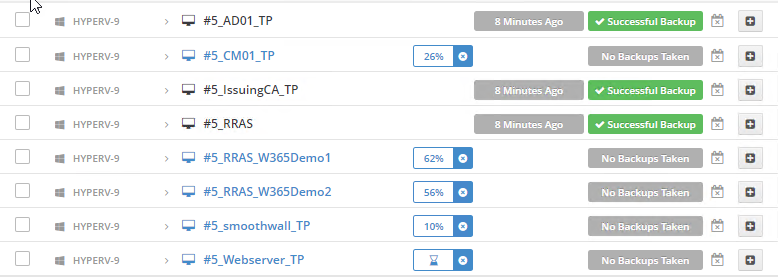
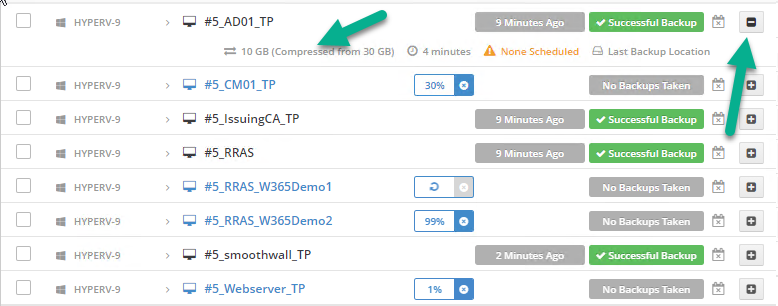
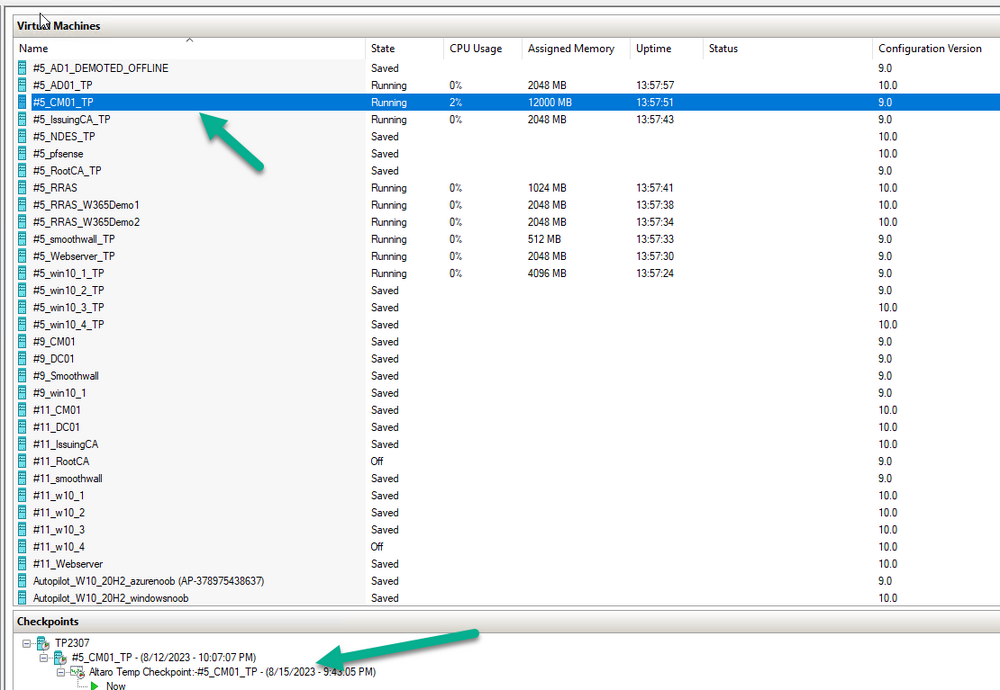
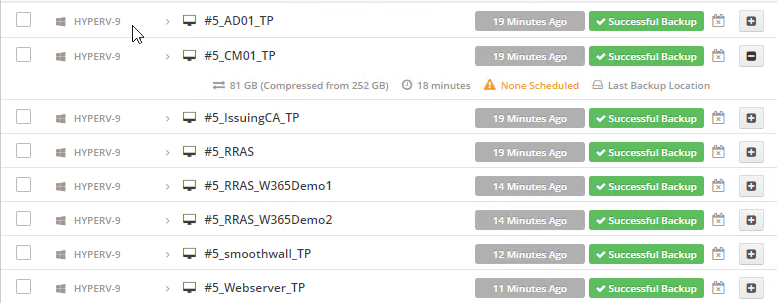
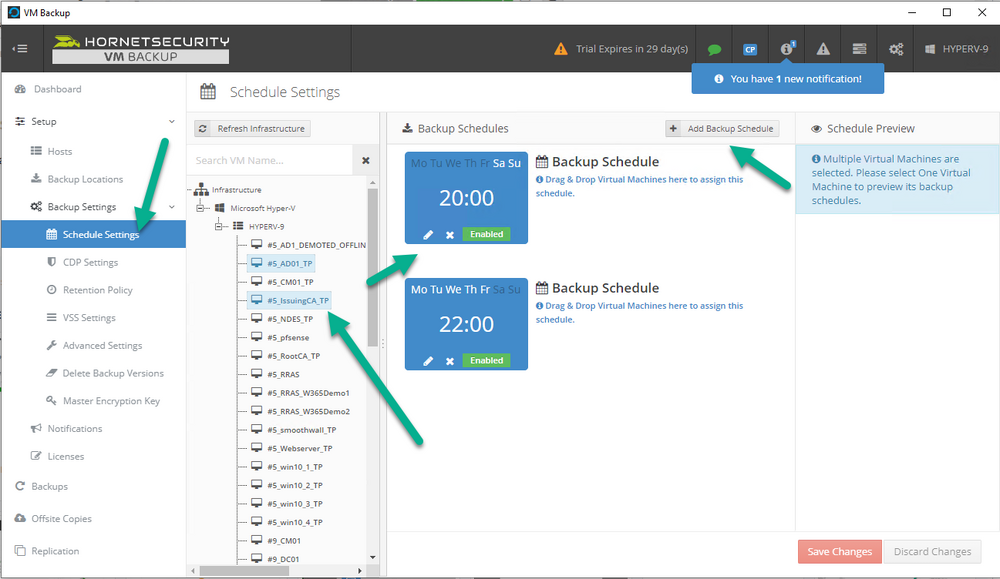
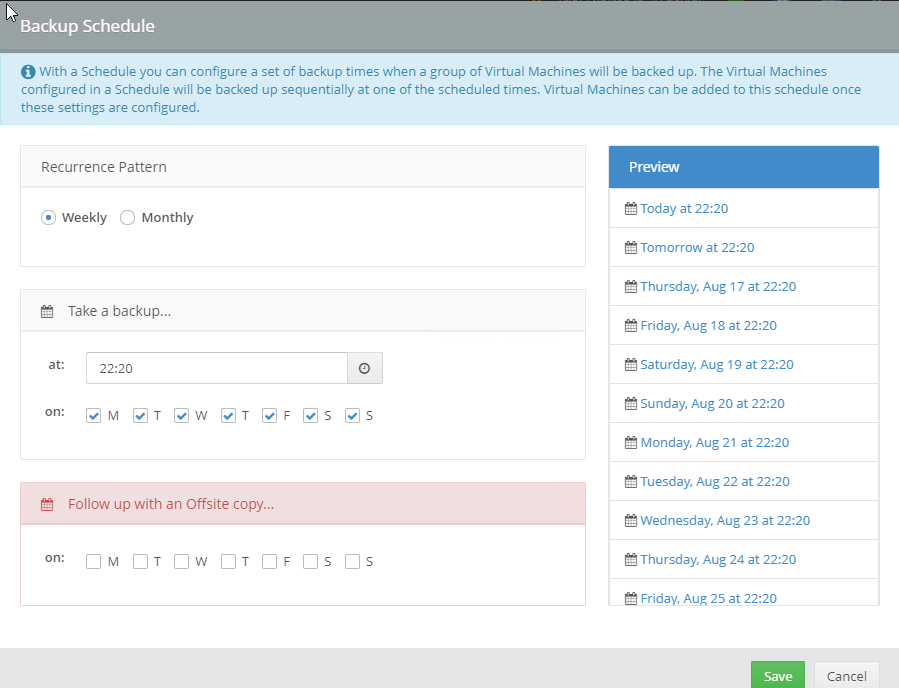
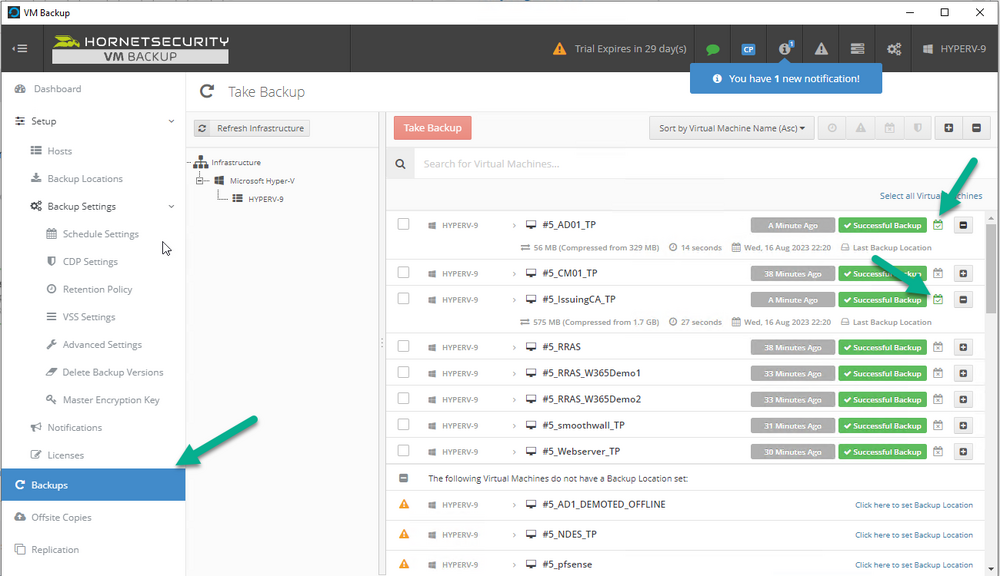
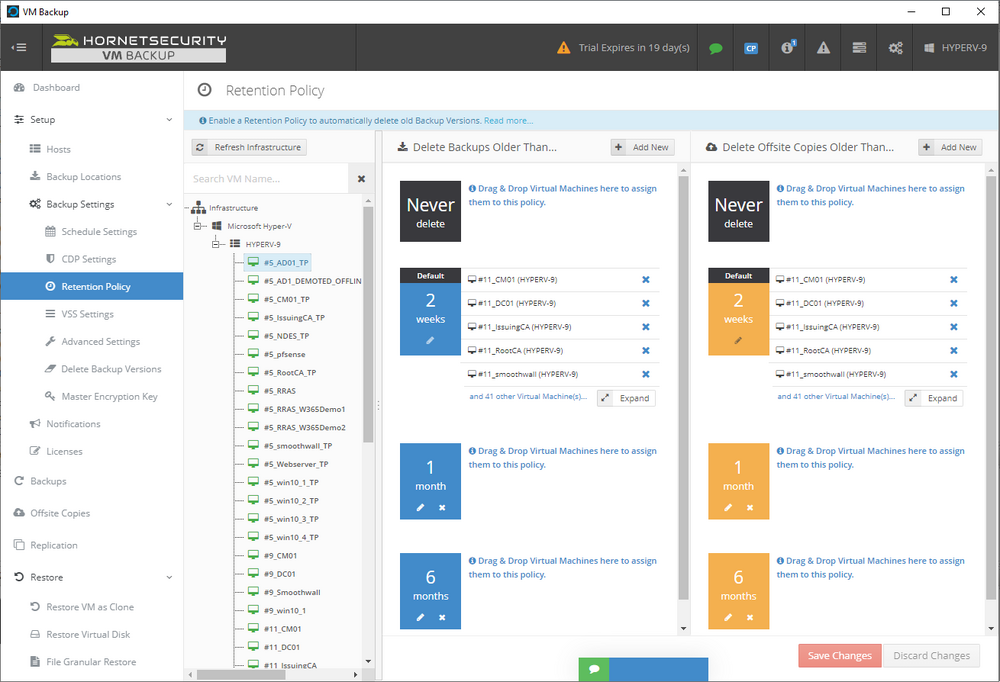
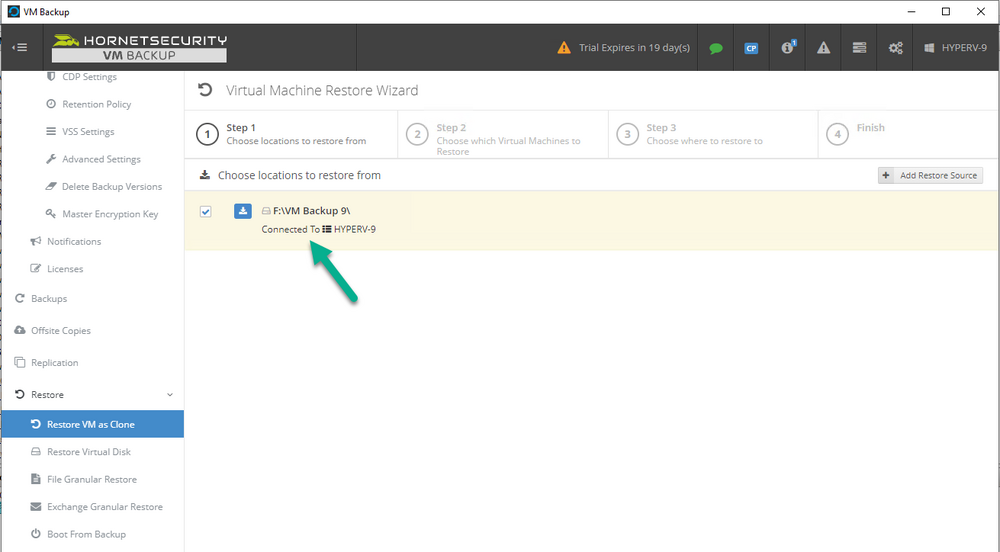
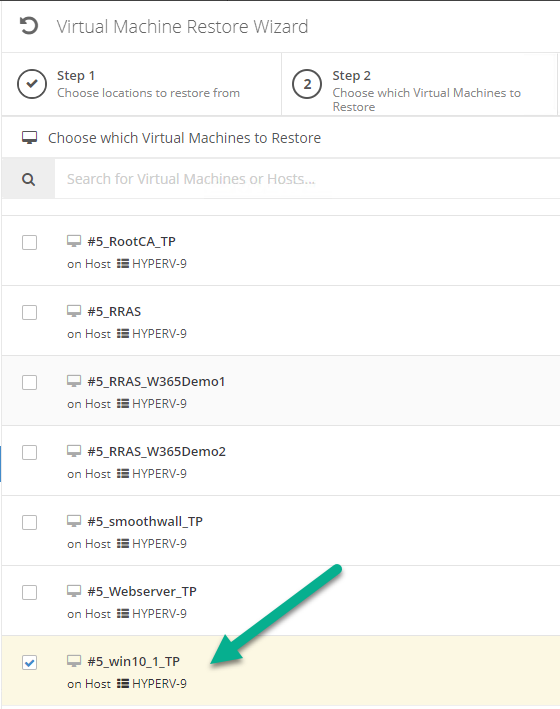
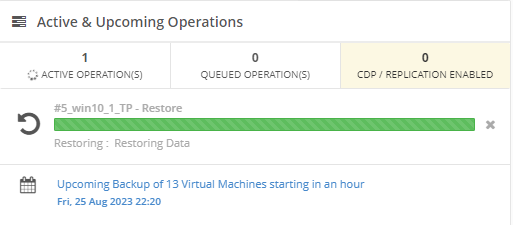
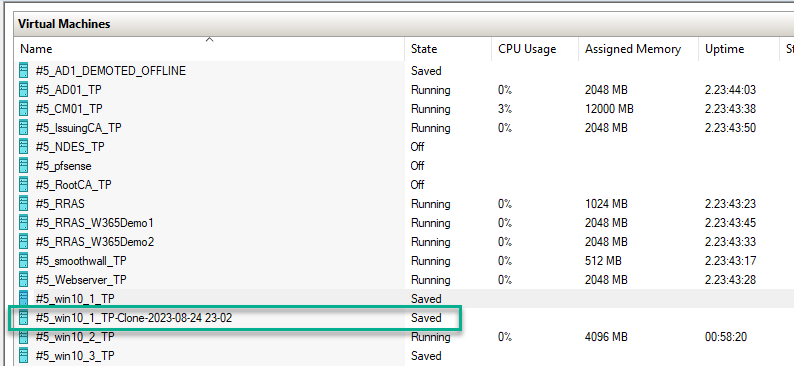
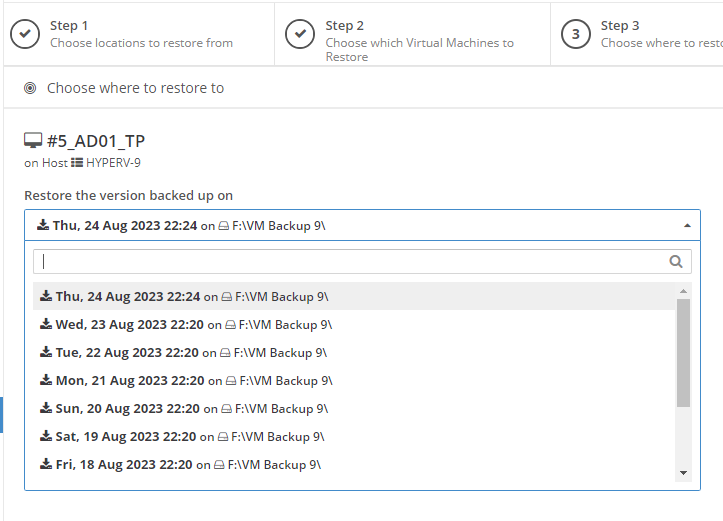
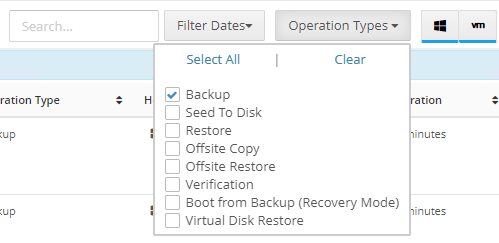
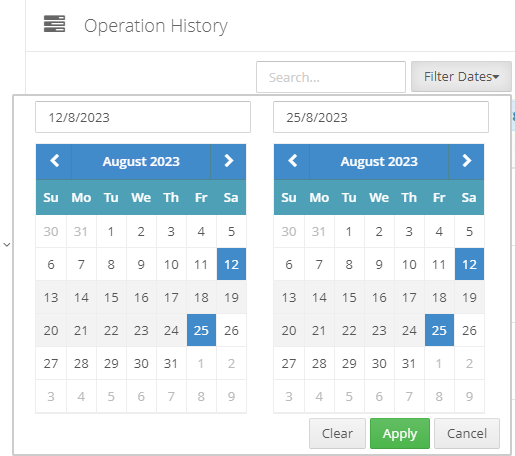
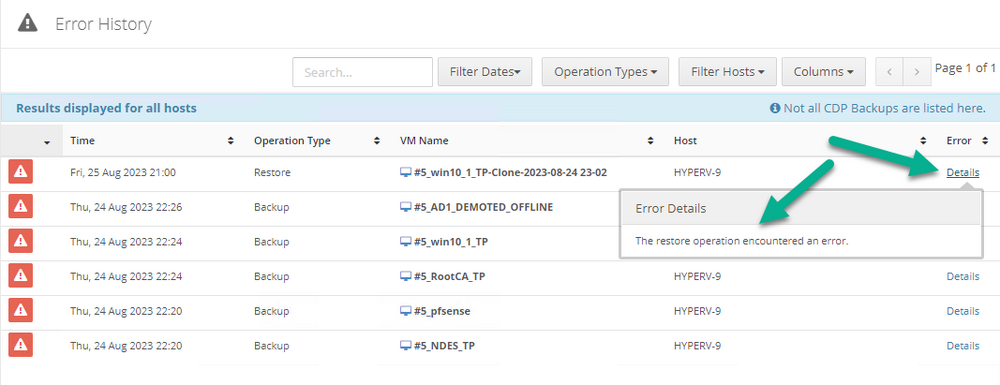
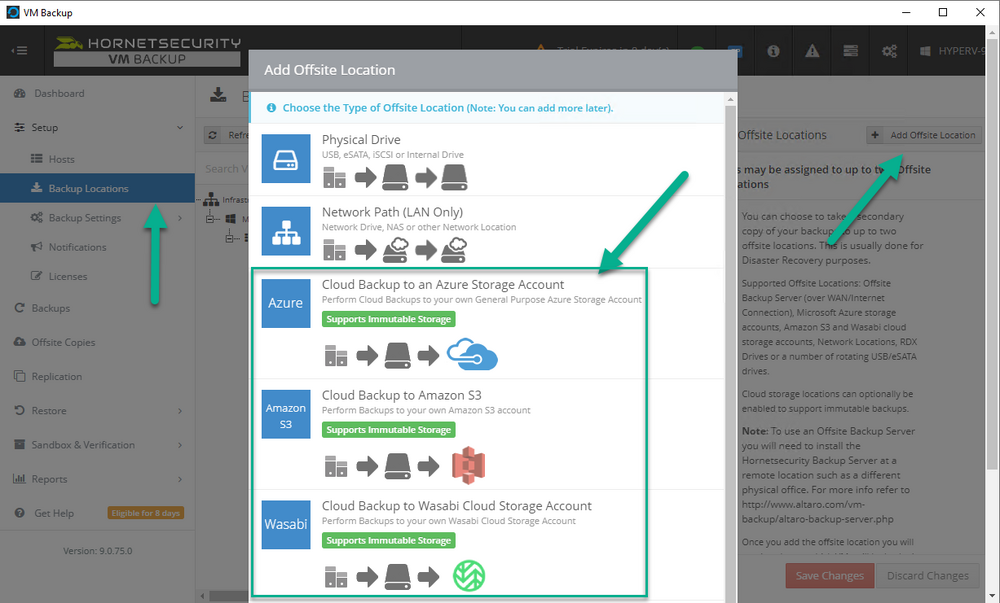
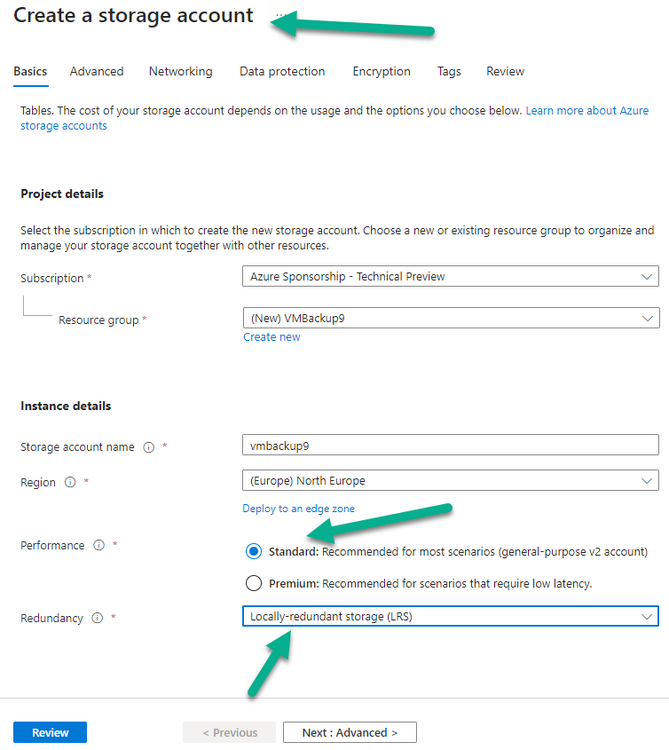
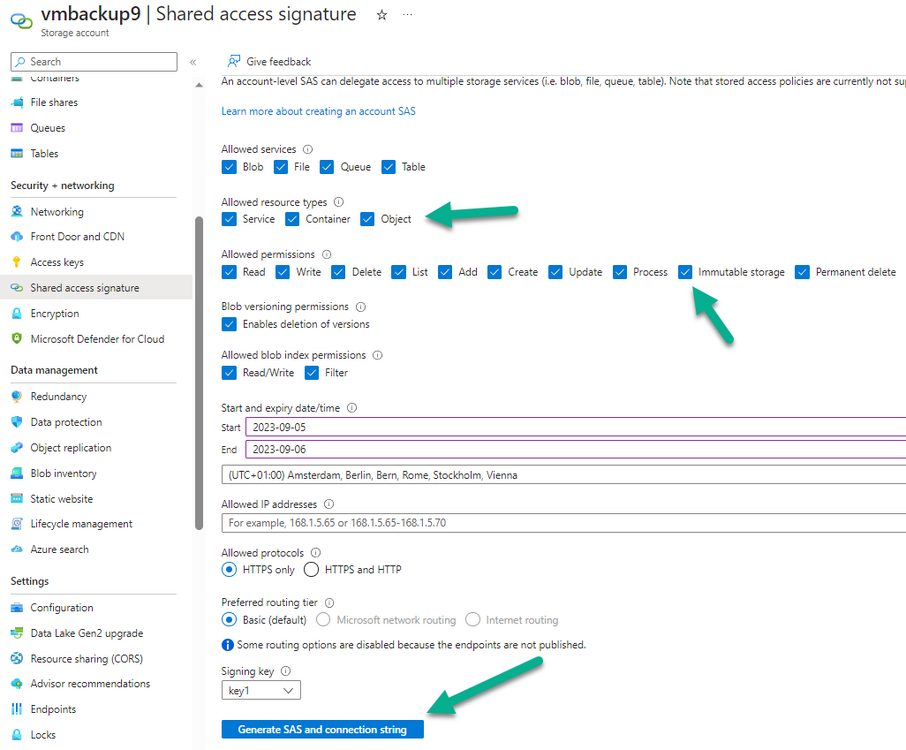
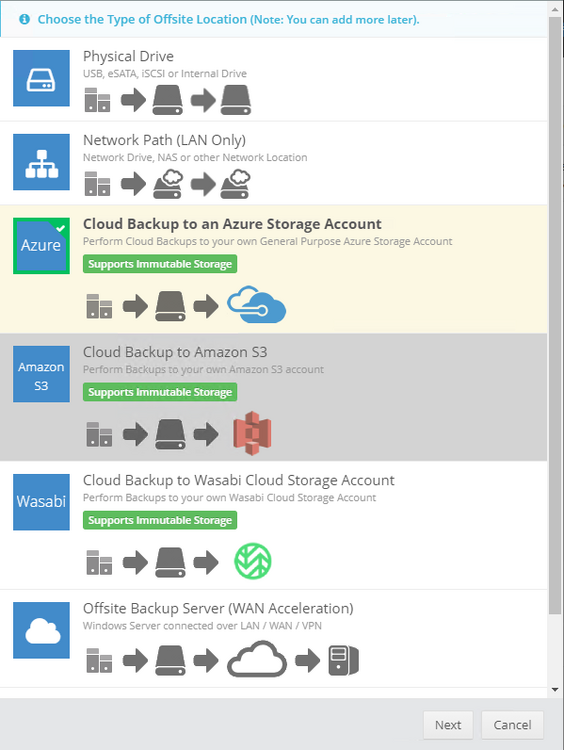
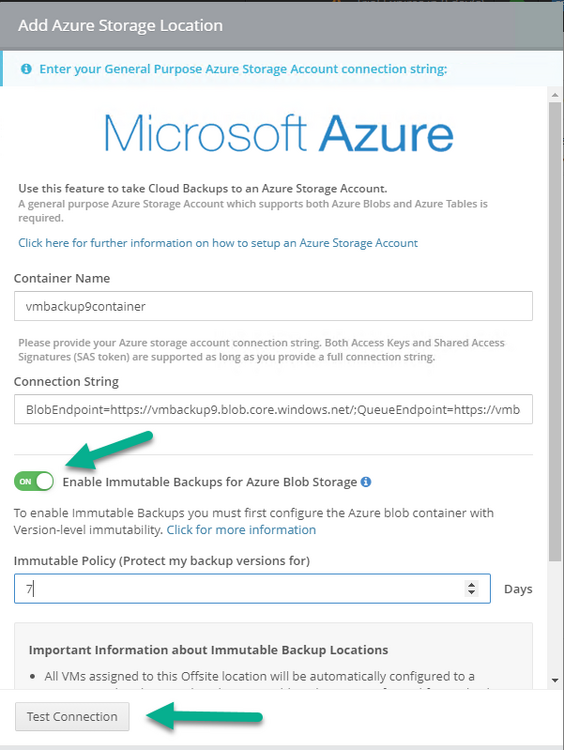
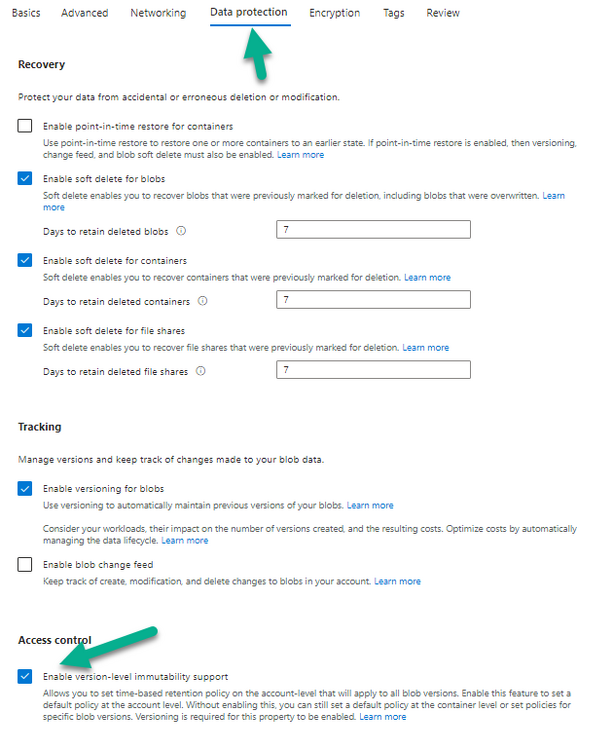
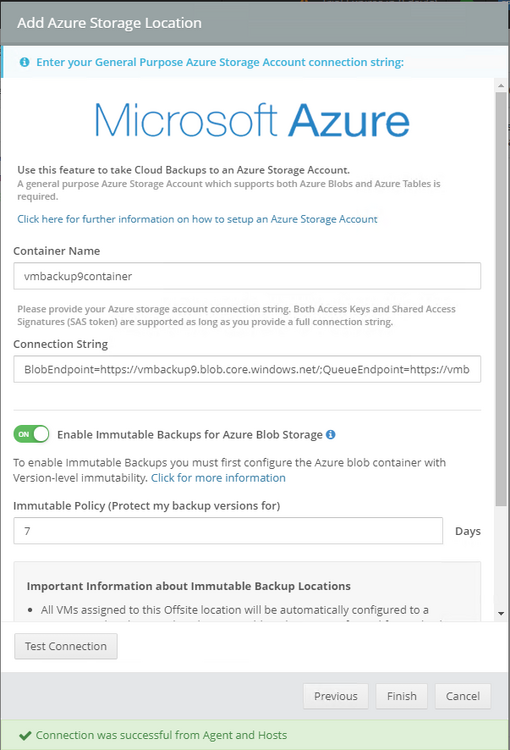
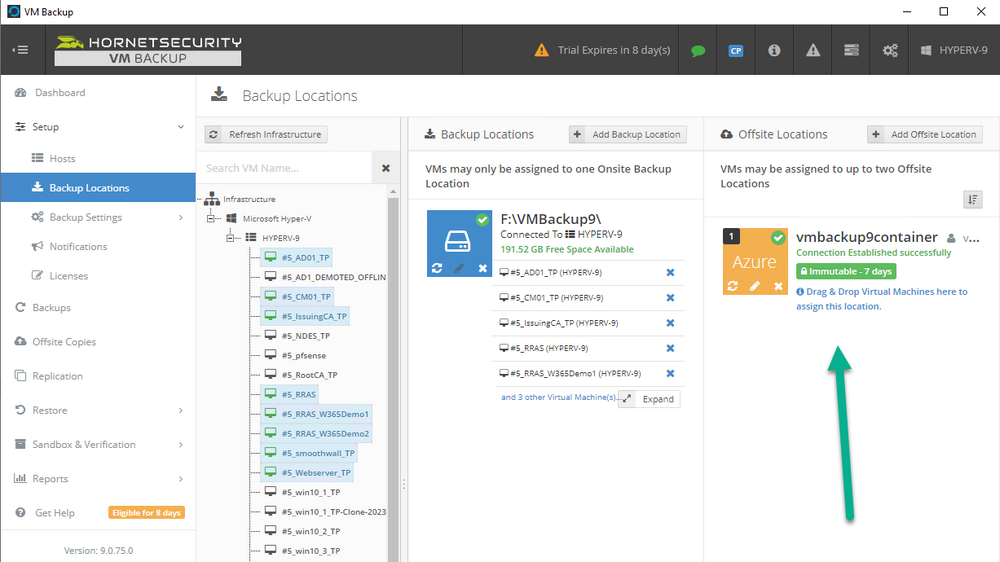
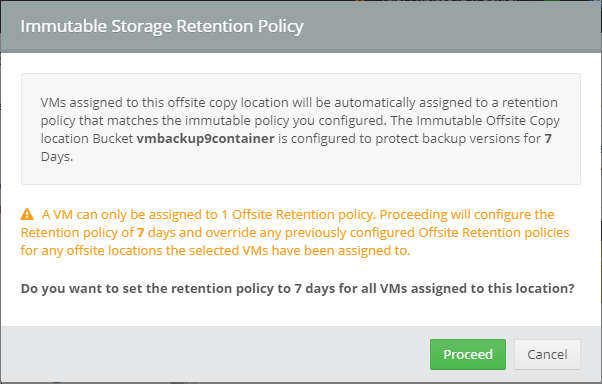
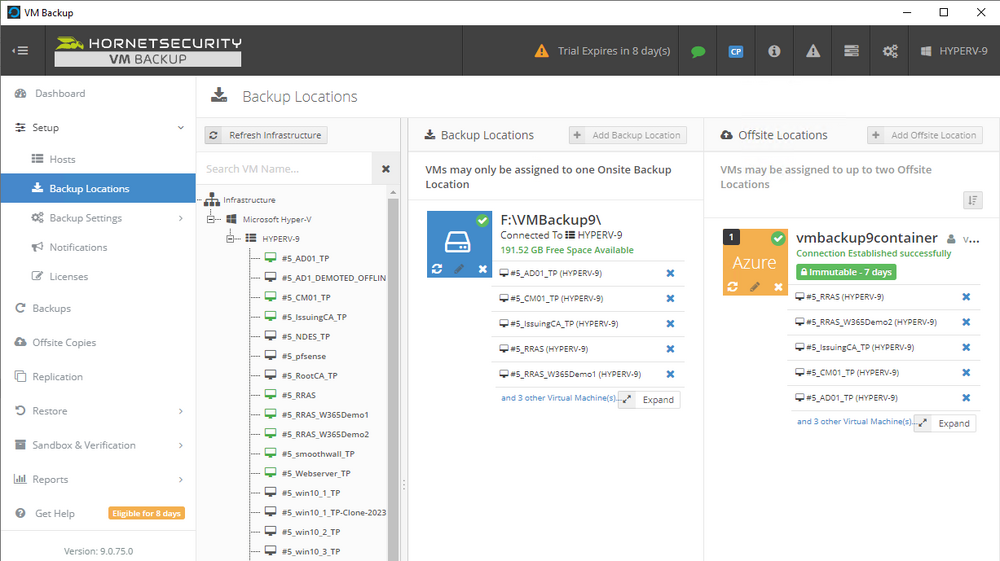
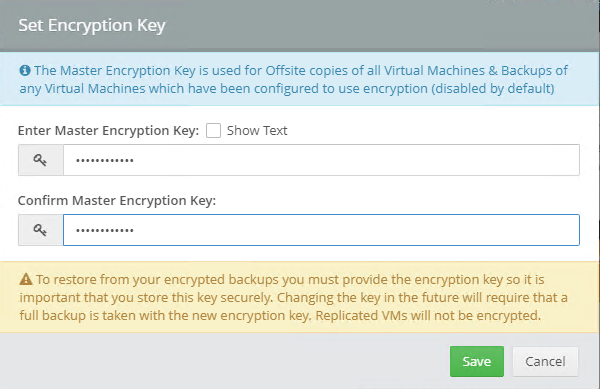
Introduction I use Hyper-V in my home and work labs to test a wide variety of things including PKI, SCCM, Intune mangement, Windows Autopilot, Windows 365 Cloud PC and more. My current home lab is in need of a backup solution that I can rely on, because I normally backup manually to an external USB hard disc, and that takes time, and I have to remember to do it. I felt it was time to take a look at VM Backup 9 from Hornetsecurity. I wanted to put it through its paces to see what's changed when I last reviewed the product back in 2018. So, what's new and improved since version 8? The most important new feature is immutability. And if you don't know what immutable is, don't feel too bad, neither did I until I looked it up. Long story short, this is applicable to Ransomware attacks as it keeps your offsite (cloud) backup in an untouched/unchanged state, meaning you have something to restore from in case everything on-premises is encrypted by the Ransomware. This one feature alone is a very very good reason to upgrade (or purchase) this version of VM Backup. Don't believe me? Take a look at this recent case of a company in the Nordics called CloudNordics, which had all their data (and customers data) encrypted for extortion. If they had used VM Backup 9 and used the offsite immutable features, they'd have saved themselves a lot of time and money and better yet, they would have lived up to their self-proclaimed "Nordic Cloud Experts" title. Below are the different parts in the blog post Introduction Download the free trial Installing the software Configuring VM Backup 9 Selecting backup location Select VM's to backup Using Live Chat Taking an on-demand backup Taking a scheduled backup retention policy Restoring a backup Configuring immutable backups Prepare the Storage Account Configure Offsite Location Reports Exporting report data Should you buy it ? Recommended reading Conclusion Download the free trial Signing up for a trial was easy to do, just browse to here and click on the Download your free trial button, within minutes I received clear instructions for getting started, could it really be so easy. I chose the full featured 30-day trial of VM Backup - Unlimited Plus Edition and my goal was to install it and use it for backing up one or more of my virtual machines in my Windows Server 2022 Hyper-V host machine. Interestingly the software still supports Windows Server operating systems back to Windows Server 2008R2, but I really hope no one is still using those unsupported Server operating systems anymore, and for the VMWare fans there is support for those platforms too (except for free VMWARE ESXi). After downloading I got emails informing me how to get started. Step 1: Install and activate your trial right away. Download the installer again here if needed. Step 2: After installing, select your hosts and VMs to be backed up. Step 3: Select Backup destination and start your first backup job. Done. Easy! So, let's see is it really that easy. Installing the software I located the download and double clicked, after accepting the license terms off it went. One thing to note, after installing the software you need to restart your Hyper-V or VMWare ESXi or VMWare vCenter host. When the host restarted I took a look at the copious online help, including preparation documents which listed things like what ports to use for Offsite Backup Server and Antivirus Exclusions. I added the exclusions to my Hyper-V host Antivirus solution (built in Windows Security) Configuring VM Backup 9 Next, I launched the VM Backup, and by default it's pretty plain until you've configured the software. The first thing it wanted me to do was to enter credentials to connect to a VM Backup instance. After doing that and clicking the green Connect button, I was presented with a more feature rich dashboard, and it reminded me that my trial would expire in 30 days. Remember those initial 3 steps in the welcome email? well if you look closely in the left (and more obviously in the middle) node of the dashboard they are highlighted. I've already configured step 1, so let's choose where to store the backups (step 2). These quick steps are designed to get you up and running quickly but if you want more advanced features click on the Get More Backup Features button in the bottom of the dashboard. I like the colour scheme in the dashboard as it's clear what is completed (in green), what is not yet completed (in blue) and what is currently highlighted (in orange). Whoever programmed this user interface was thinking about making everything as clear as possible, well done. Next, I chose step 2 and for my first test backup, I would backup to an external USB NVMe drive, so I selected Physical Drive from the choices available (you can add more later). scrolling down and clicking Next, I chose the external USB based NVMe drive, created a folder and was done. My new backup location was now confirmed by clicking on Finish. Next, in addition to adding my VM's by dragging and dropping them to the backup location, I could see that the user interface was giving me good advice about being able to store backups at up to two more offsite locations for disaster recovery purposes and those backup locations support a variety of WAN/Internet based solutions such as: Microsoft Azure storage accounts Amazon S3 Wasabi cloud storage We'll cover offsite backups further down in this blog. I selected a few virtual machines for my first test and clicked Save Changes. But initially the VM's I selected and dragged to the white space location under my backup location didn't do anything. Using Live Chat After talking with the 24/7 live chat (impressive feature) It was clear why, I was dragging the VM's to the clear white space under the backup location, instead of dragging them on top of the backup location. Once I had realized that I need to drag the VM's I wanted to backup directly onto the backup location listed, I was able to continue successfully, I also learned that the version of the free trial was not the latest version and I could download an update from https://www.altaro.com/vm-backup/download_update.php Side note: I wish all free trial software from all companies had this 30-day live chat built in, it was very impressive, very instant. Super. One small feedback though, was I was initially advised to do some PowerShell commands to basically stop the all the Hornet services and then restart them 60 seconds later, all good except that once those services were stopped that also closed the dashboard including the live chat. Taking an on-demand backup Now everything was in place for taking the first backup. You can do scheduled backups or on-demand backups. To do an on-demand backup, you simply click on Backups (Step 3) and then select the virtual machines that you wish to backup from your selection and finally click on Take Backup. The current backup status will be shown in percentage for each VM that it's backing up. and after some time, you can see if the backup was successful or not on each VM. for more info about completed backups, click the + symbol to the right of that backup and you'll get info about when it was taken, and the compression used. While waiting for the backup to complete (and I have to say it was WAY faster than I expected, by a long shot), I noticed a temp checkpoint taken on the current VM being backed up. within approximately 20 minutes, my entire ConfigMgr Technical Preview lab (hundreds of gigabytes) was completed. Unbelievably fast! and way faster than the manual backup method I normally use (selecting the VM's in hyper-v and then right click, export). I'm impressed! Not only that, it saves on space big time using great compression. Look at the compression of this 252GB VM, compressed down to 81GB. Impressive! Taking a scheduled backup To schedule backups you can do it in a variety of ways. You can do it directly from the Backups settings drop down and select schedule settings. From there you can select VM's to backup and either drop them into the pre-defined backup schedules or click Add Backup Schedule to create a new schedule. Doing that gives you the flexibility to set your own settings. then drag your VMs to that new schedule and save settings, done! To review the scheduled backup status, go back to Backups and expand the details of the vm's you selected to backup on a schedule. delightfully simple to use! Retention Policy You can decide how long you want your backups to be retained via the Retention Policy option. It's very flexible as you can see here, and the default retention policy is 2 weeks. If you want something else, use the provided options or create your own. Restoring a backup Restoring a backup is usually something needed when you have a major problem with an existing virtual machine that either cannot be fixed, or you want to restore to a previous state. To access the Restore functionality, click on Restore in the left side menu, it'll reveal all available restore options. You can restore a VM as a clone, restore its virtual disk, restore files from the backup, exchange granular restore or even boot from the backup. That's a great selection of restore options! I chose to Restore VM as Clone, selected the location to restore from: Next, choose which virtual machines you want to restore. I chose to restore the clone to a directory I created called D:\RestoredVMs. And after clicking Restore I was informed that I could view the restore process via the dashboard. and after a few minutes the VM was listed in Hyper-V. Easy! One thing I did notice was that the clone did not contain any of the checkpoints (snapshots) that were present in the original VM. I chatted with Live Chat support about this, and they said this is normal, when the backup is taken it takes a temporary snapshot of the VM and that is used for the backup, so that when you restore, you are restoring that point in time. If you want to go further back in time, use previous backups based on your retention policy as per the drop down below (default was 2 weeks of backups). Taking immutable backups The killer feature in VM Backup 9 is the ability to take backups to immutable storage to protect your data from ransomware. To take offsite backups using immutable storage you first need to configure your Cloud providers storage account, enable it for immutable storage and then configure offsite locations in VM Backup 9. Prepare the Storage Account In this blog post I'll cover the steps needed to configure an Azure storage account for immutable storage in VM Backup 9. Using an account that has permissions needed, sign in to the Azure portal at https://portal.azure.com and search for Storage Account, click Create, make sure to select Standard Performance from the options selected. Be aware of Azure storage pricing when choosing your redundancy options, you can review them here. In the example below we've selected Locally-redundant storage (LRS) as it's the lowest cost option. In production environments, you may want to upscale that to use Geo-redundancy but at a higher cost. Next and very importantly, you need to select Enable Version-level immutability support in the Data Protection tab of the wizard. This will also select Enable versioning for blobs. If you fail to do this then you'll have to start over (ask me how I know ;-)). Once done, click through the remainder of the wizard and select Create. Once the resource is created and finished deploying, select Containers from within the Storage Account. Next click on + Container to create a new container in your Storage Account. I selected the default option of Private (no anonymous access) and gave it a name of vmbackup9container which we'll need later. After creating the new container, take note of the Access key or Shared Access Signature (SAS) depending on your preference. The more secure option is Shared Access Signature (SAS). To generate the Shared Access Signature (SAS) select all options as shown below and click on Generate SAS and Connection String. Take note of the Connection String and SAS Token. Configure Offsite Location After configuring your Cloud Providers storage account above, you'll need to configure an offsite backup location in VM Backup 9. To add an offsite backup location capable of immutable storage, click on Backup locations, click on Add offsite Location and then select the provider of your choice (three are offered, Azure, Amazon and Wasabi). I've highlighted them below in the green box. As we've already configured our Azure Storage Account for this, select the Cloud Backup to an Azure Storage Account option. Next, enter your Container name, paste in the Connection string, flip the Enable Immutable Backups for Azure Blob Storage option and select the number of days to protect those backups. Finally, click on Test Connection to verify it's all working. If you did all the steps listed above correctly (hint: check the Data Protection tab) then it should connect successfully. After clicking Finish you'll see your immutable storage option listed. As with other backup locations, you need to drag and drop virtual machines to that location in order for them to be backed up safely. After dragging some virtual machines to the offsite location, you'll see a popup similar to this. Click Proceed to continue or edit your configured storage options in Azure. Once done, you'll see your selected virtual machines listed in that offsite (and immutable) location. Fantastic ! Once done, click on Save Changes and you'll be prompted to enter a Master Encryption Key. Enter a Master Encryption Key and click Save. You'll then be prompted to re-authenticate including entering the Master Encryption Key. Reports The reports in VM Backup 9 are based around two operational states. Operation history Errors history Using those reports you can fine tune the type of data you are interested in. and the time frame. You can also click on details about a specific historical event. The error history will of course show errors occurring during Backup/Restore operations, but I found the details of what the error was, lacking in just that, details. But... if you click on the VM Name listed in that column, you get the actual details of the problem. This is not intuitive to me, it should be the other way around, clicking on Details should tell me everything about the problem or link to the additional details. Note, you can schedule reports to be emailed in the Notifications tab. Exporting report data The built in reports provide historical information about operations, but if you want to export data using Powershell follow the advice here, which will allow you to export data in TXT format for use elsewhere. $VMBackupEvents = get-winevent -FilterHashtable @{Logname='Application';ID=5000, 5001, 5002, 5003, 5004, 5005, 5007} -MaxEvents 1000 | Format-List $VMBackupEvents > C:\AllVMBackupEvents.txt Should you buy it ? VM Backup 9 is available to buy in a variety of different options. You can choose a subscription model or perpetual. The pricing page helps you figure out which option is best for you and when I looked at it the prices seem fairly reasonable for what you get. To answer the question though, should you buy it ? well, if you are in any way worried about Ransomware and how it can affect your data, then you should buy this product and use it's immutable storage backup options, it could save you from the same embarrassment that CloudNordics went through. Related reading VM Backup 9 - https://www.altaro.com/vm-backup/ Download your free trial - https://www.altaro.com/vm-backup/download.php How to setup offsite copies to an Azure Storage Account - https://help.altaro.com/hc/en-us/articles/4416905929617 Hornetsecurity VM Backup v9 with Immutable Cloud Storage - https://nolabnoparty.com/en/hornetsecurity-vm-backup-v9-with-immutable-cloud-storage/?utm_source=twitter&utm_medium=social&utm_campaign=ReviveOldPost Ransomware affects CloudNordic, wipes all servers and customer data - https://www.theregister.com/2023/08/23/ransomware_wipes_cloudnordic/ Conclusion VM Backup 9 is a user friendly, yet powerful tool to backup your Hyper-V and VMware based host VM's to various locations, be it on-premises or offsite in the cloud. If you are afraid of Ransomware (you should be) and you have virtual machines hosting business critical software, then you should seriously consider this backup solution as a viable option. The recent fiascos 2 cloud-based companies went through should make you wake up and pay attention. Simply having backups today is not enough, you must also have immutable backups! Using the backup/restore functionality was easy to use, this really is very nicely thought-out software, designed for the end user/admin in mind and not a rocket scientist. You are initially exposed to the basic functionality but it's quite easy to expand your options and add more abilities/customization to your backups/restores. The only thing I missed was the ability to capture a VM's checkpoints, that's something that Hyper-V can do via an export so why can't we also have that option in VM Backup ? The Support provided with this software is second to none. I cannot fault the 24/7 Live Chat, it's the best I've seen from any company anywhere, and you get through to real humans (not AI BOTS!) instantly. That in itself is an awesome feature! Thanks for reading, Cheers niall


-
I can revisit this, please give me some time to retest, what version of ConfigMgr are you testing with ?
-
ok, what version of SCCM is this ?
-
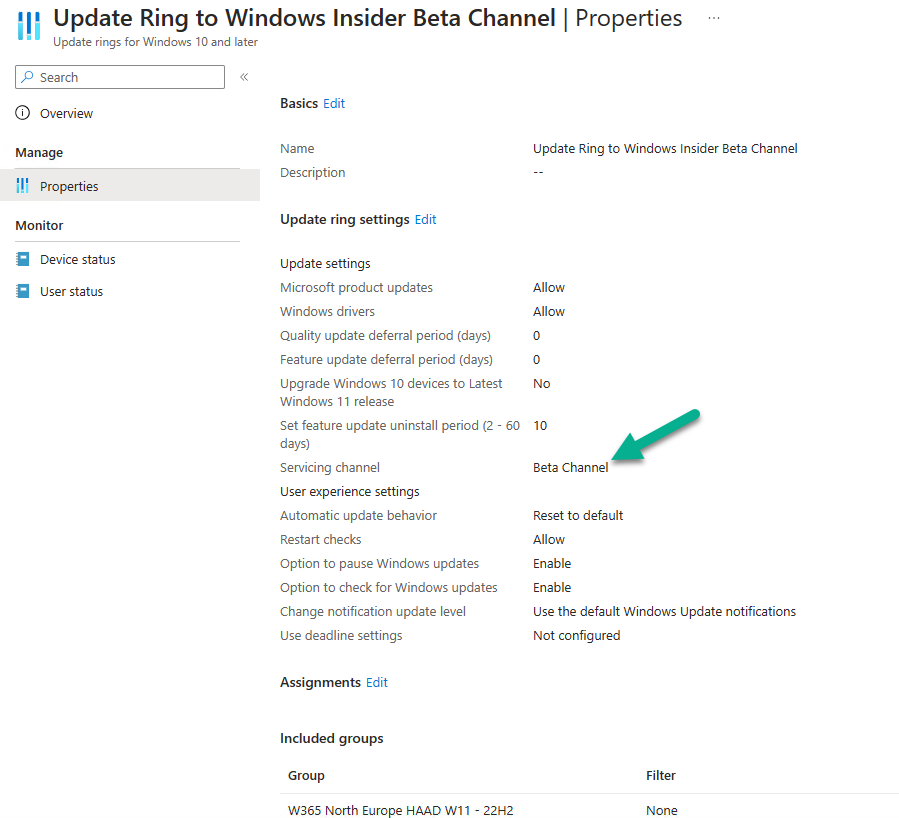
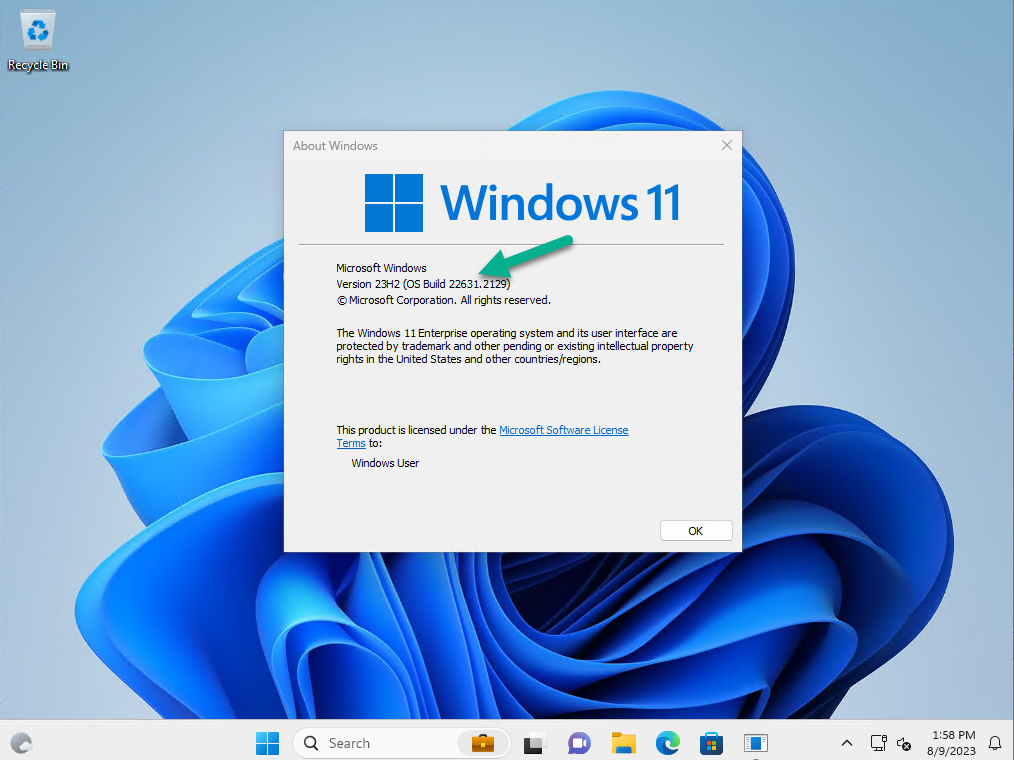
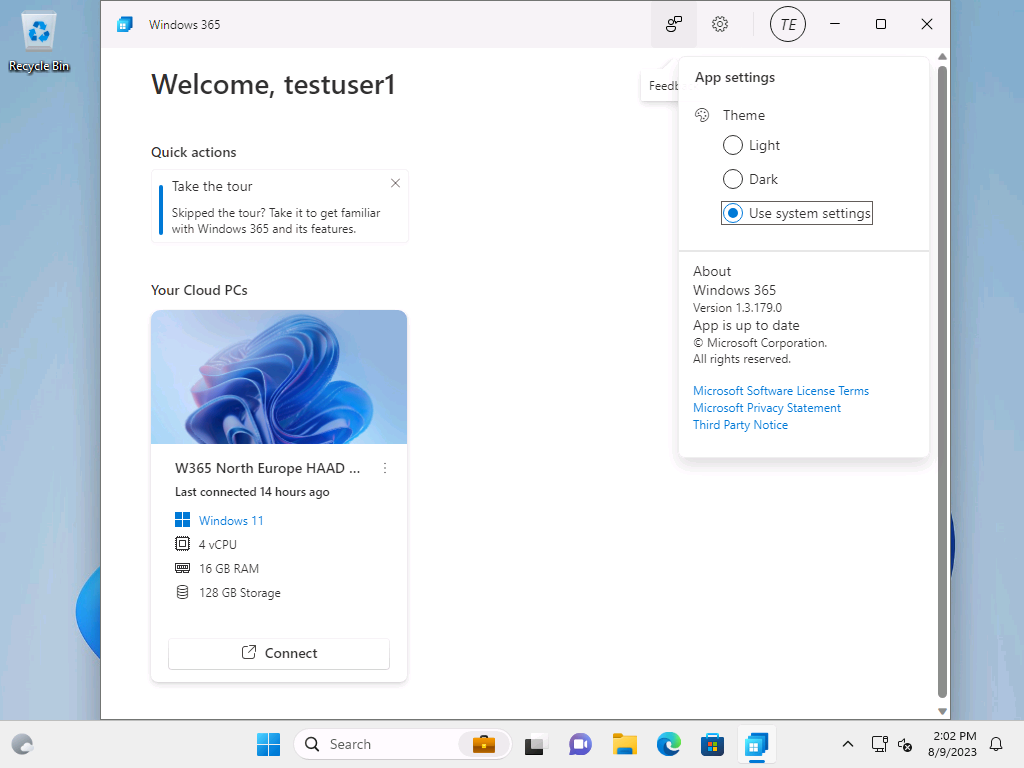
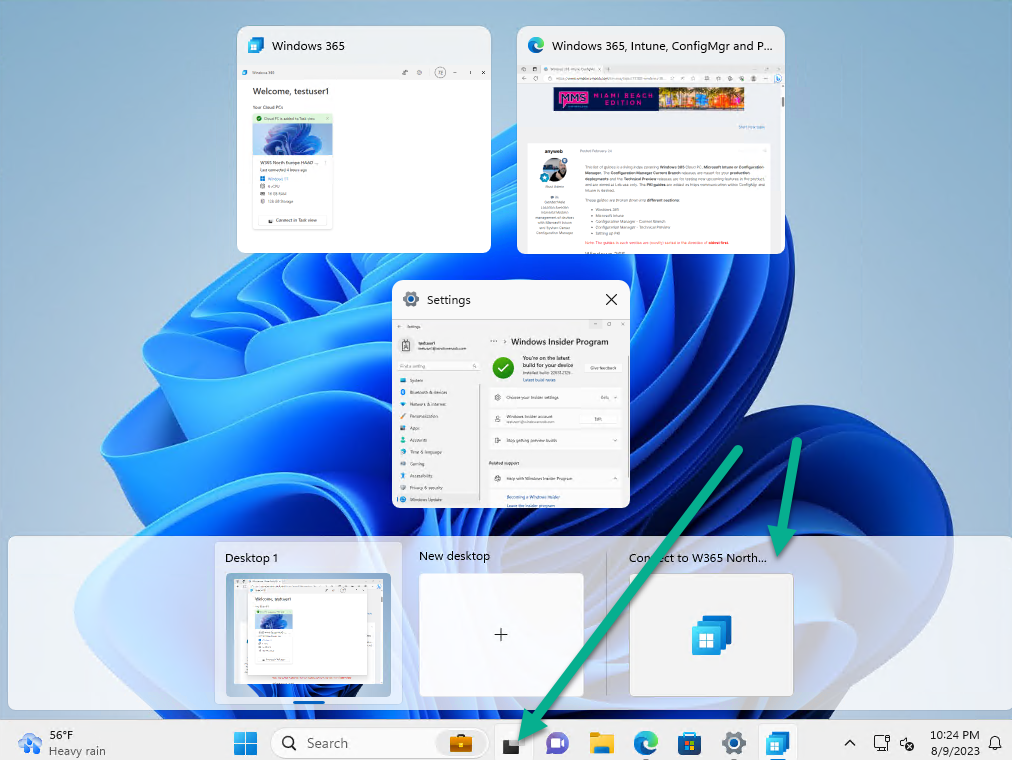
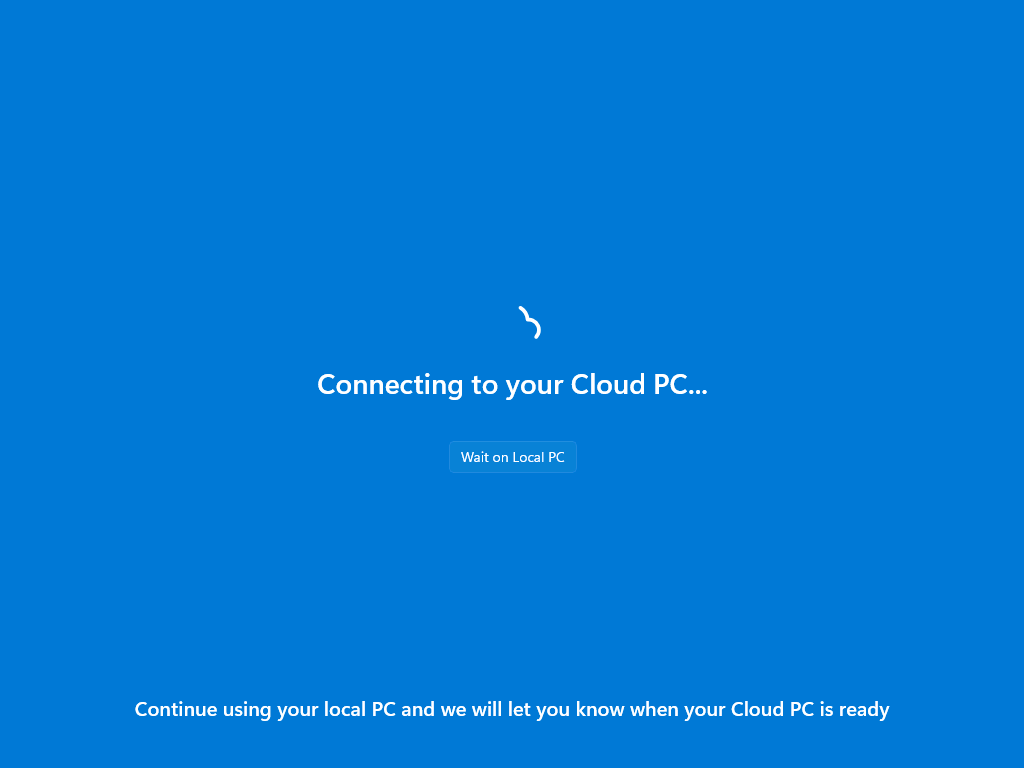
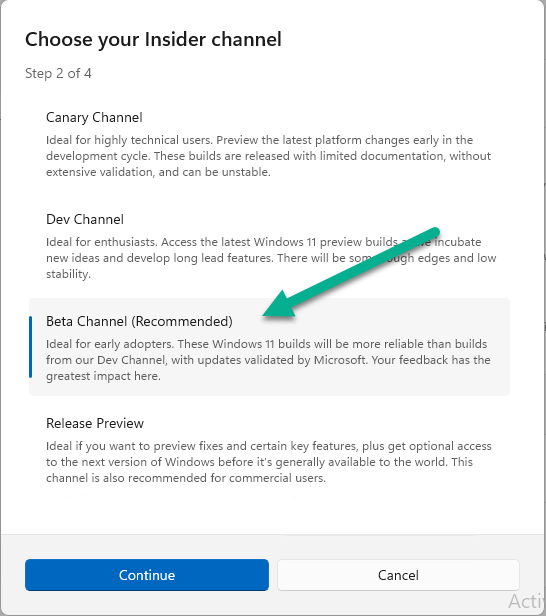
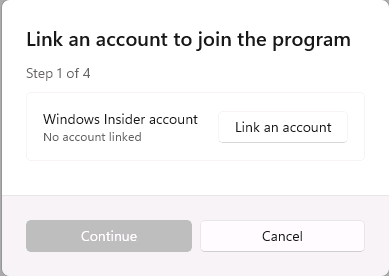
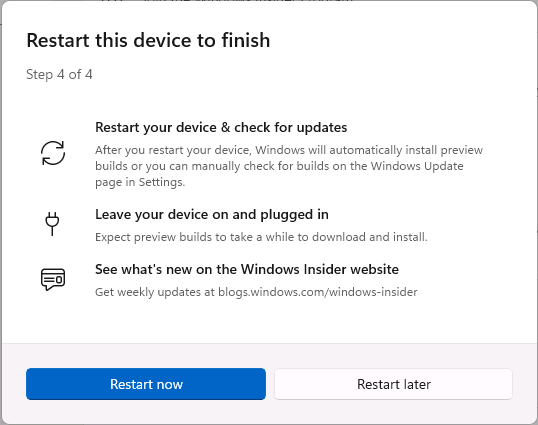
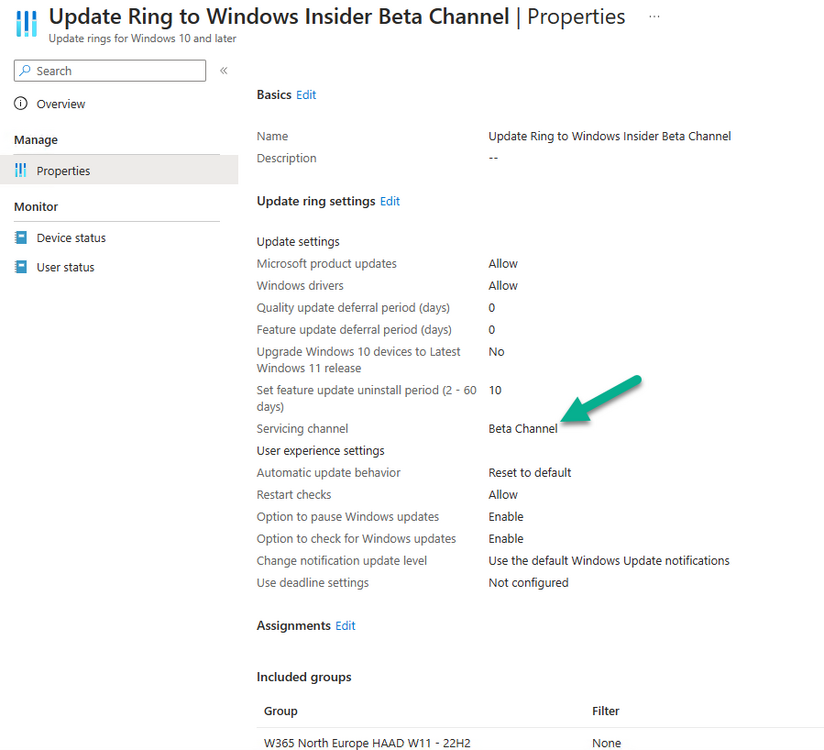
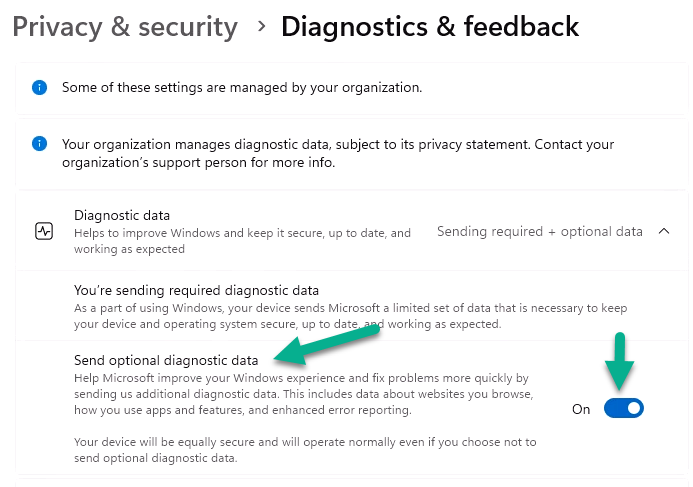
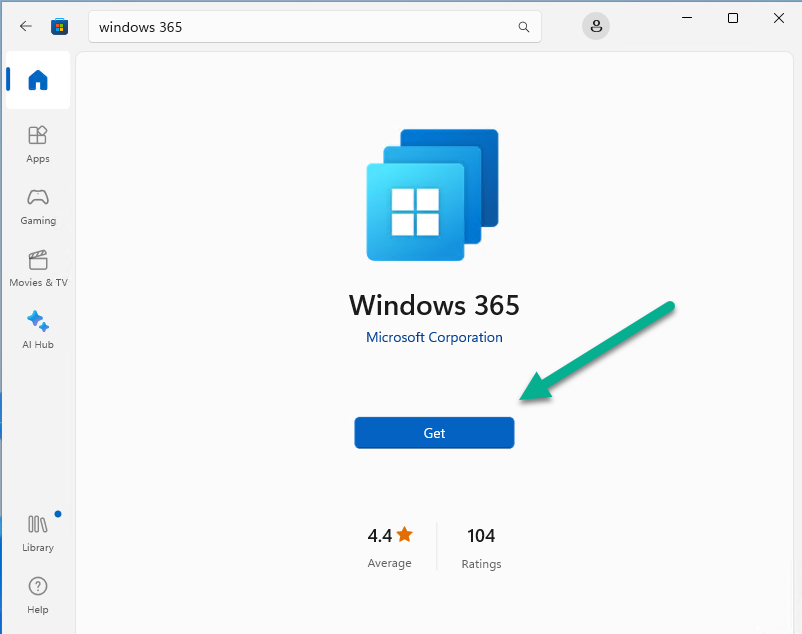
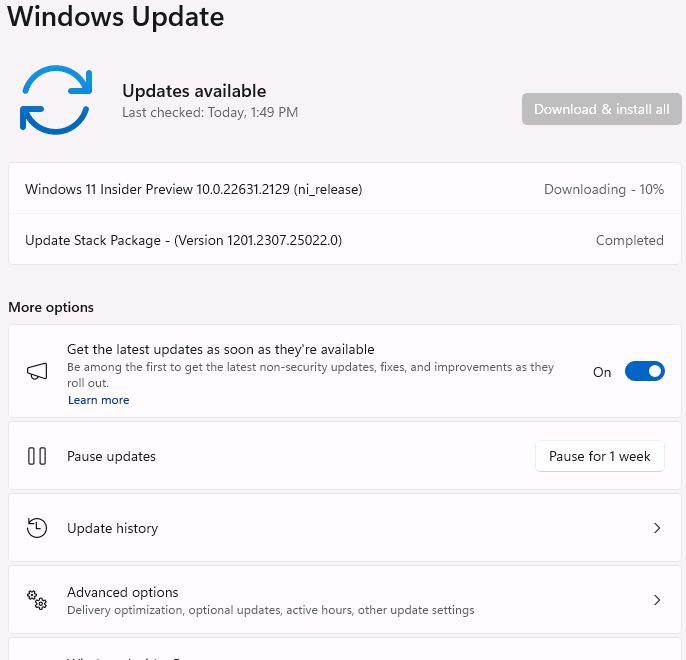
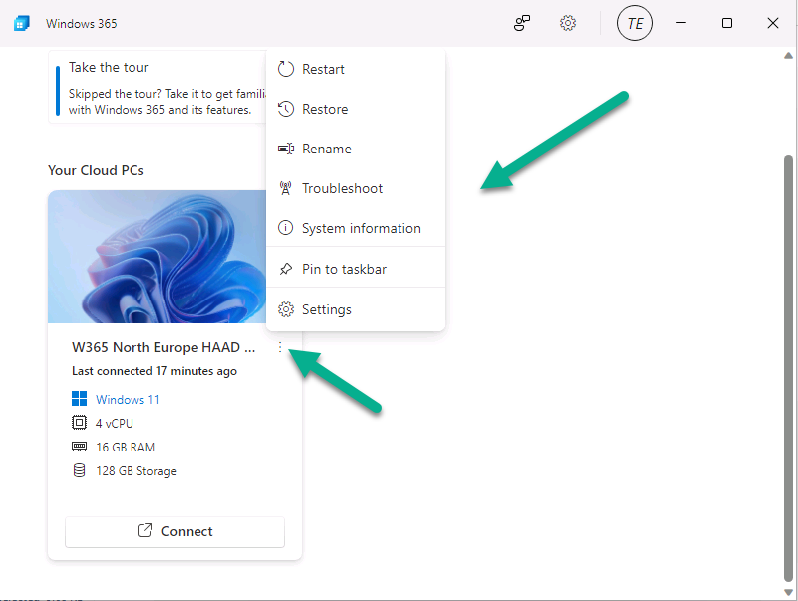
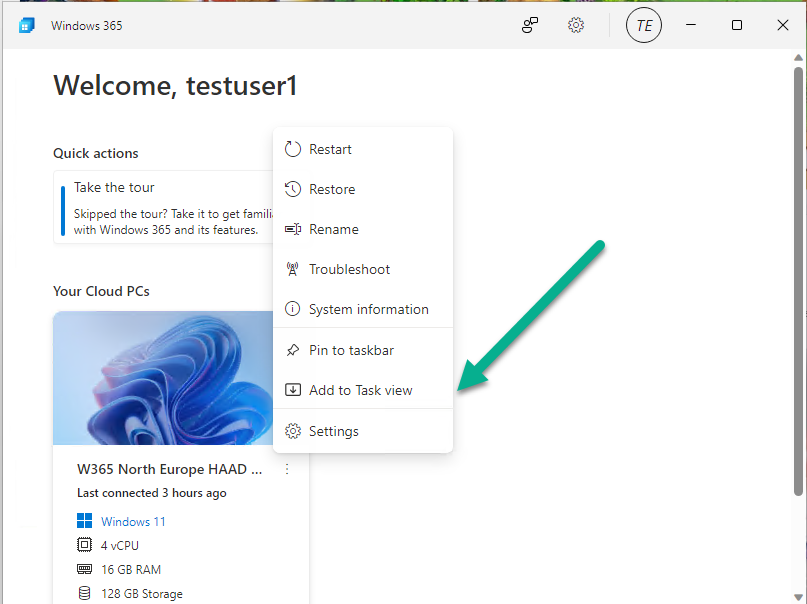
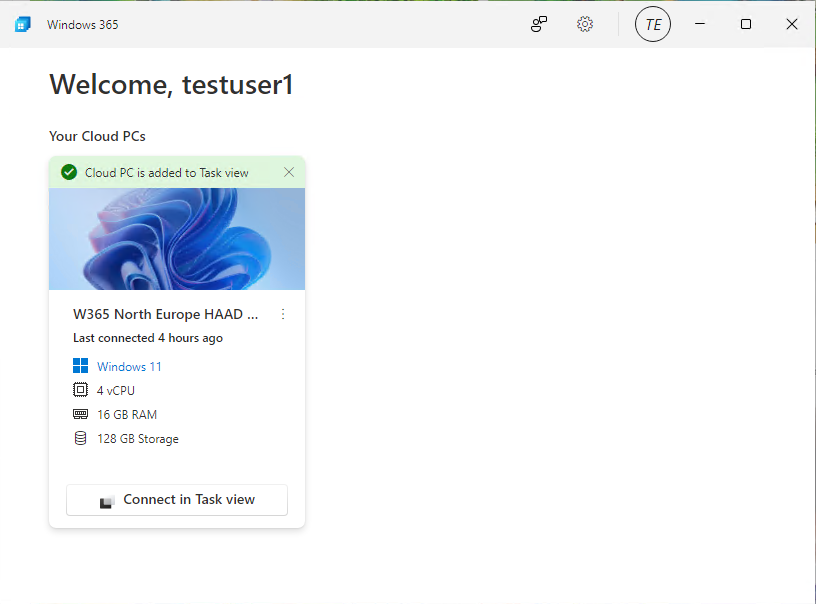
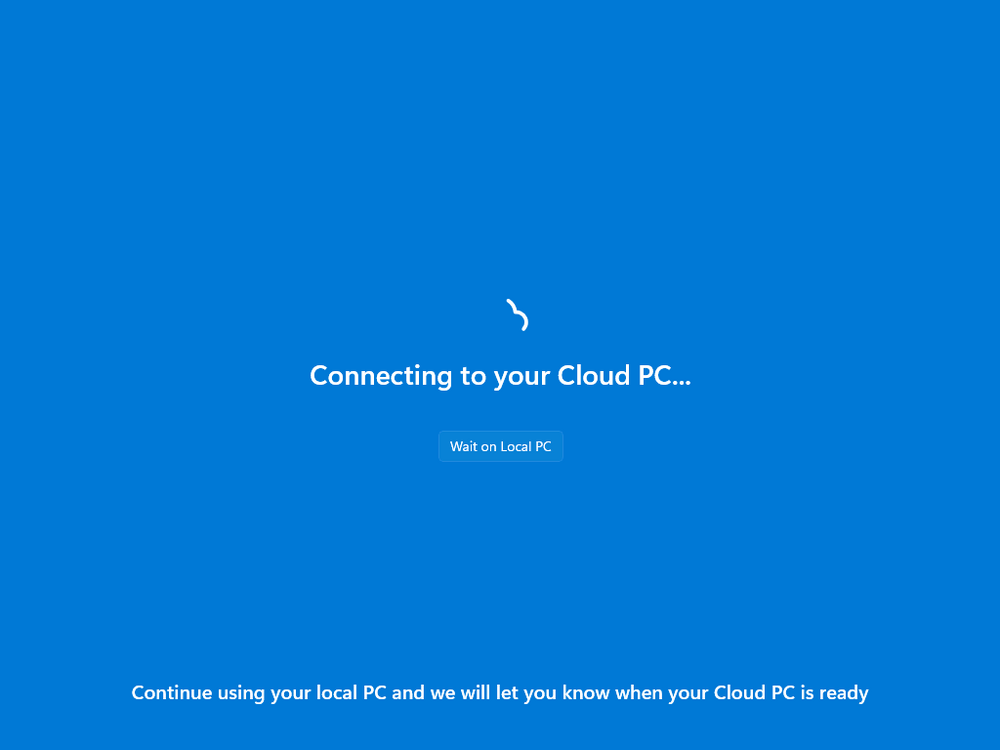
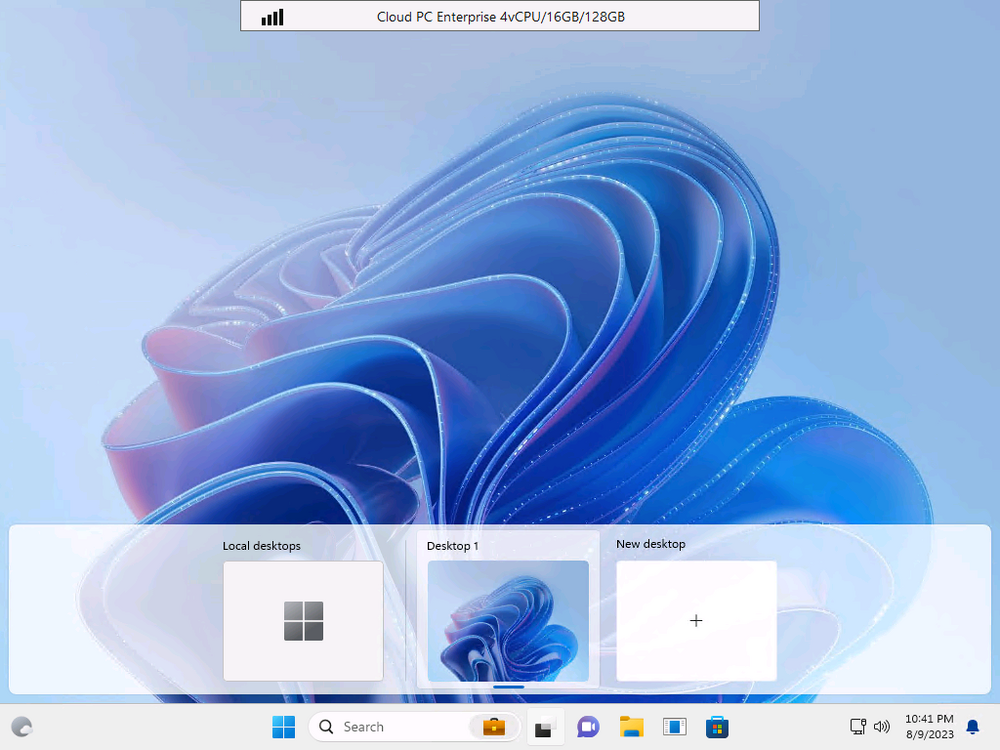
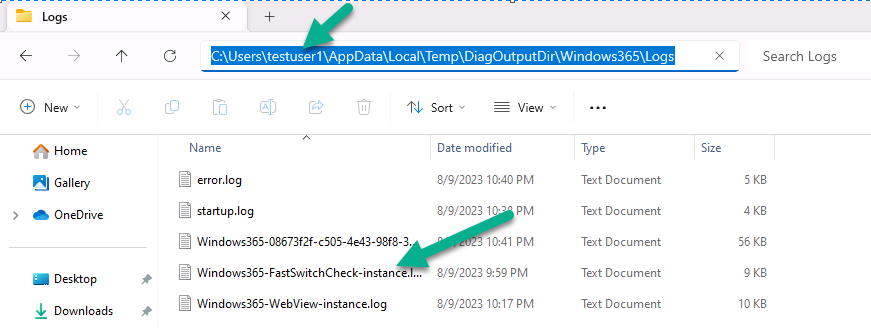
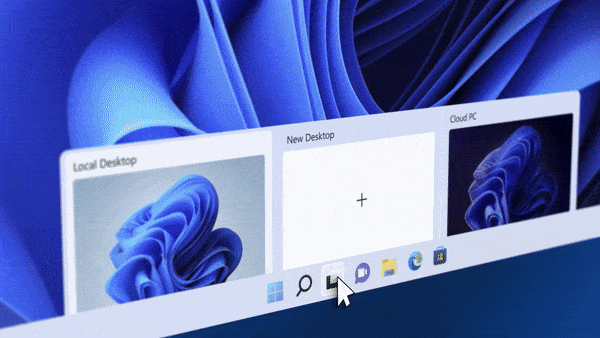
Introduction This is Part 9 in a new series of guides about getting started with Windows 365. This series of guides will help you to learn all about Windows 365 in a clear and insightful way. This series is co-written by Niall & Paul, both of whom are Microsoft Enterprise Mobility MVP’s with broad experience in the area of modern management. At the time of writing, Paul is a 7 times Enterprise Mobility MVP based in the UK and Niall is a 13 times Enterprise Mobility MVP & a Windows and Devices for IT MVP based in Sweden. In this series we aim to cover everything we learn about Windows 365 and share it with you to help you to deploy it safely and securely within your own organization. In Part 1 we introduced you to Windows 365, selecting the right edition with the level of management that you need, choosing the plan that suits your users needs at a cost you can afford, or modifying the configuration to make it more suited to your individual needs, purchasing licenses and saving money for your organization via the Windows Hybrid Benefit. In Part 2 you learned how to provision an Azure Ad joined Cloud PC and take a look at the different network options available when provisioning an Azure Ad joined Cloud PC. In Part 3 you learned about the steps needed to successfully provision a Hybrid Azure Ad Joined Cloud PC. In Part 4 you saw the many different ways you can connect to your Cloud PC from many device be it Android, Mac, Windows, Linux or iPhone and you learned that not all connection options have the same abilities. In Part 5 we covered the management capabilities of your Cloud PCs and explained the different options available depending on which version (Business versus Enterprise) that you purchase. In Part 6 we looked at the built in configurable backup technology in Windows 365 which is known as Point-in-time restore, which gives the admin (or user) the ability to restore Cloud PC's to an earlier time before a problem such as a Ransomware incident occurred. In Part 7 we looked at the ability to use Windows Autopatch to patch your Cloud PC's with ease and covered how to allow access to admins without licenses, enrolling into Windows Autopatch, the Readiness assessment tool, device registration and moving devices between deployment rings. Finally we looked at Windows Autopatch reports and the overall User Experience. In Part 8 we looked at the long awaited Windows 365 Boot feature and showed you how to configure and use it. In this part we'll look at another new feature, which is finally in public preview, called Windows 365 switch. Below you can find all parts in this series: Getting started with Windows 365 - Part 1. Introduction Getting started with Windows 365 - Part 2. Provisioning an Azure Ad Joined Cloud PC Getting started with Windows 365 - Part 3. Provisioning a Hybrid Azure Ad Joined Cloud PC Getting started with Windows 365 - Part 4. Connecting to your Cloud PC Getting started with Windows 365 - Part 5. Managing your Cloud PC Getting started with Windows 365 - Part 6. Point in time restore Getting started with Windows 365 - Part 7. Patching your Cloud PCs with Windows Autopatch Getting started with Windows 365 - Part 8. Windows 365 boot Getting started with Windows 365 - Part 9. Windows 365 switch <- you are here Getting started with Windows 365 - Part 10. Windows 365 offline In this part we'll cover the following: Introduction to Windows 365 switch Prerequisites Enabling Windows 365 switch Using Windows 365 switch Recommended reading Windows 365 switch in action Troubleshooting Summary Introduction to Windows 365 Switch Windows 365 switch was released to public preview August 8th, 2023. Windows 365 switch provides a new way of quickly flipping between a Local PC and your Cloud PC by simply clicking on the task view icon without the need to use https://windows365.microsoft.com or the Windows 365 app, this is great for bring-your-own device (BYOD) scenarios when you connect from your own Windows device to a secure company owned Cloud PC Update: Windows 365 Boot and Switch became Generally Available 26th September, 2023, so as long as you are using Windows 11 22H2 with build 2361 or later (or natively in Windows 11 23H2 later in Q4), then there should be no need to use the Windows Insider Preview steps mentioned below. Prerequisites Windows 365 switch has the following prerequisites, these may change when it becomes Globally Available later this year. Windows 11 (Enterprise or Professional) on the local and Cloud PC Enroll into the Windows Insider Program (beta or dev channel) - Windows 11 Build 22631.2129 (or higher) on both the local and Cloud PC Windows 365 Cloud PC license Most likely these the second requirement will be dropped once Windows 11 23H2 ships (we are guessing here). Enabling Windows 365 Switch 1. Join the Insider beta channel on your Cloud PC. You can do this manually or automated. Manual Method In Windows Settings, select Windows Update, and select the Windows Insider Program. Click Get started to start a 4 step wizard. In there, connect using a live account and select the Beta Channel (dev works too, but beta is recommended). Once done, you'll need to restart the device to enable the Windows Insider Preview. After the restart, use Windows Update to update the device, this might take a few downloads, so verify exactly which build is being downloaded... so that the build version is greater than or equal to Windows 11 Build 22631.2129 Automated method Another option for this is to create an update ring in Intune, to forcefully update your Cloud PC and Local PC to the Insider Preview Beta Channel. Keep in mind that you'll need to also to configure sending optional diagnostics data to On. 2. Install a local PC using the Insider beta channel Repeat everything in the above step on your Local PC to get it into Windows Insider Preview and on to the correct build. Please Note: Make sure to login to that Local PC using the same user who is licensed to connect to the Cloud PC. 3. Download and install the latest version of the Windows 365 app On your Local PC, download the Windows 365 app from the store. open the Windows 365 app and make sure you have version 1.3.177.0 or newer, you can see the version number by clicking on the settings icon in the Windows 365 app as shown below. Once installed, we need to wait, that's right wait a few hours until the Windows 365 app is ready for Switch. How will you know it's ready ? well it will list more (or less) options in the Windows 365 app. Below are the options you'll see when Windows 365 Switch is NOT available yet and below are the options you'll see when Windows 365 Switch is available, a new option Add to Task view is now available. Using Windows 365 Switch Once the option shows up in your Windows 365 app, you can pin the app to the taskbar or add to task view. After adding it to task view you can use Windows 365 Switch in a variety of different ways. First, by clicking on the task view button directly. It will show you current desktop and your Cloud PC. When you click on your Cloud PC, it will switch to your Cloud PC instantly, however.... the first time it connects will take a few moments. after entering your credentials (for haadj) To get back to your local PC, click on task view in the Cloud PC and select Local Desktops... Windows 365 switch in action Here's a video of Windows 365 Switch in action Keystrokes You can also use key strokes either on your touch enabled monitor or touch pad (three finger swipe from the base of the screen or base of the touchpad) or using the following key combinations. Switch to Cloud PC CTRL + Windows key + right cursor key Switch to Local PC CTRL + Windows key + left cursor key Recommended reading Windows 365 switch public preview release - https://techcommunity.microsoft.com/t5/windows-it-pro-blog/windows-365-switch-now-available-in-public-preview/ba-p/3891857 Windows 365 switch documentation - https://learn.microsoft.com/en-us/windows-365/enterprise/windows-365-switch-overview Windows 365 switch known issues - https://learn.microsoft.com/en-us/windows-365/enterprise/windows-365-switch-known-issues Windows 365 switch AMA - https://techcommunity.microsoft.com/t5/windows-events/windows-in-the-cloud-learn-everything-about-windows-365-switch/ec-p/3888084#M3121 Windows Insider Preview builds - https://www.msn.com/en-us/news/technology/announcing-windows-11-insider-preview-build-226212129-and-226312129/ar-AA1eHoo Learn Everything you wanted to know about Windows 365 switch - Troubleshooting On the Local PC, in the logged on users profile look at their temp folder, it's hidden in the appdata but you'll find it. Summary Windows 365 switch provides yet another way of quickly accessing your Cloud PC in a way that is quick and easy (once everything is in place). At the time of writing this was in public preview so some caveats were in place like needing to use the Windows Insider Preview releases and other drawbacks such as only being able to access one of your Cloud PC's. Once you have it working however, it's quick and painless and the attraction is easy to see. We did have some issues however, including enrolling an Autopilot PC as User A (BYOD user) and then connecting to the Cloud PC via the Windows 365 app as user user B (licensed user). The connection worked, but the Windows 365 Switch part did not. We have raised this point with the Product Group, let's see what they say. Also, the 'wait for some hours' thing is not something we want to see in production (Global Availability). Consultants cost money and waiting for a feature to appear is not an option. Let's hope that is also fixed.


-
to rule out your workgroup computers being part of the problem, have you tried joining a computer to the domain and seeing if it works when using that Secondary site ?
-
ok... can you please double check that the device is approved (or not) using the Approved column as shown below...

-
did you verify the deployment(s) ?
-
did you APPROVE the workgroup computers ? more info here in Step 4. >
-
hi and welcome, what does the smsts.log file tell you ?
-
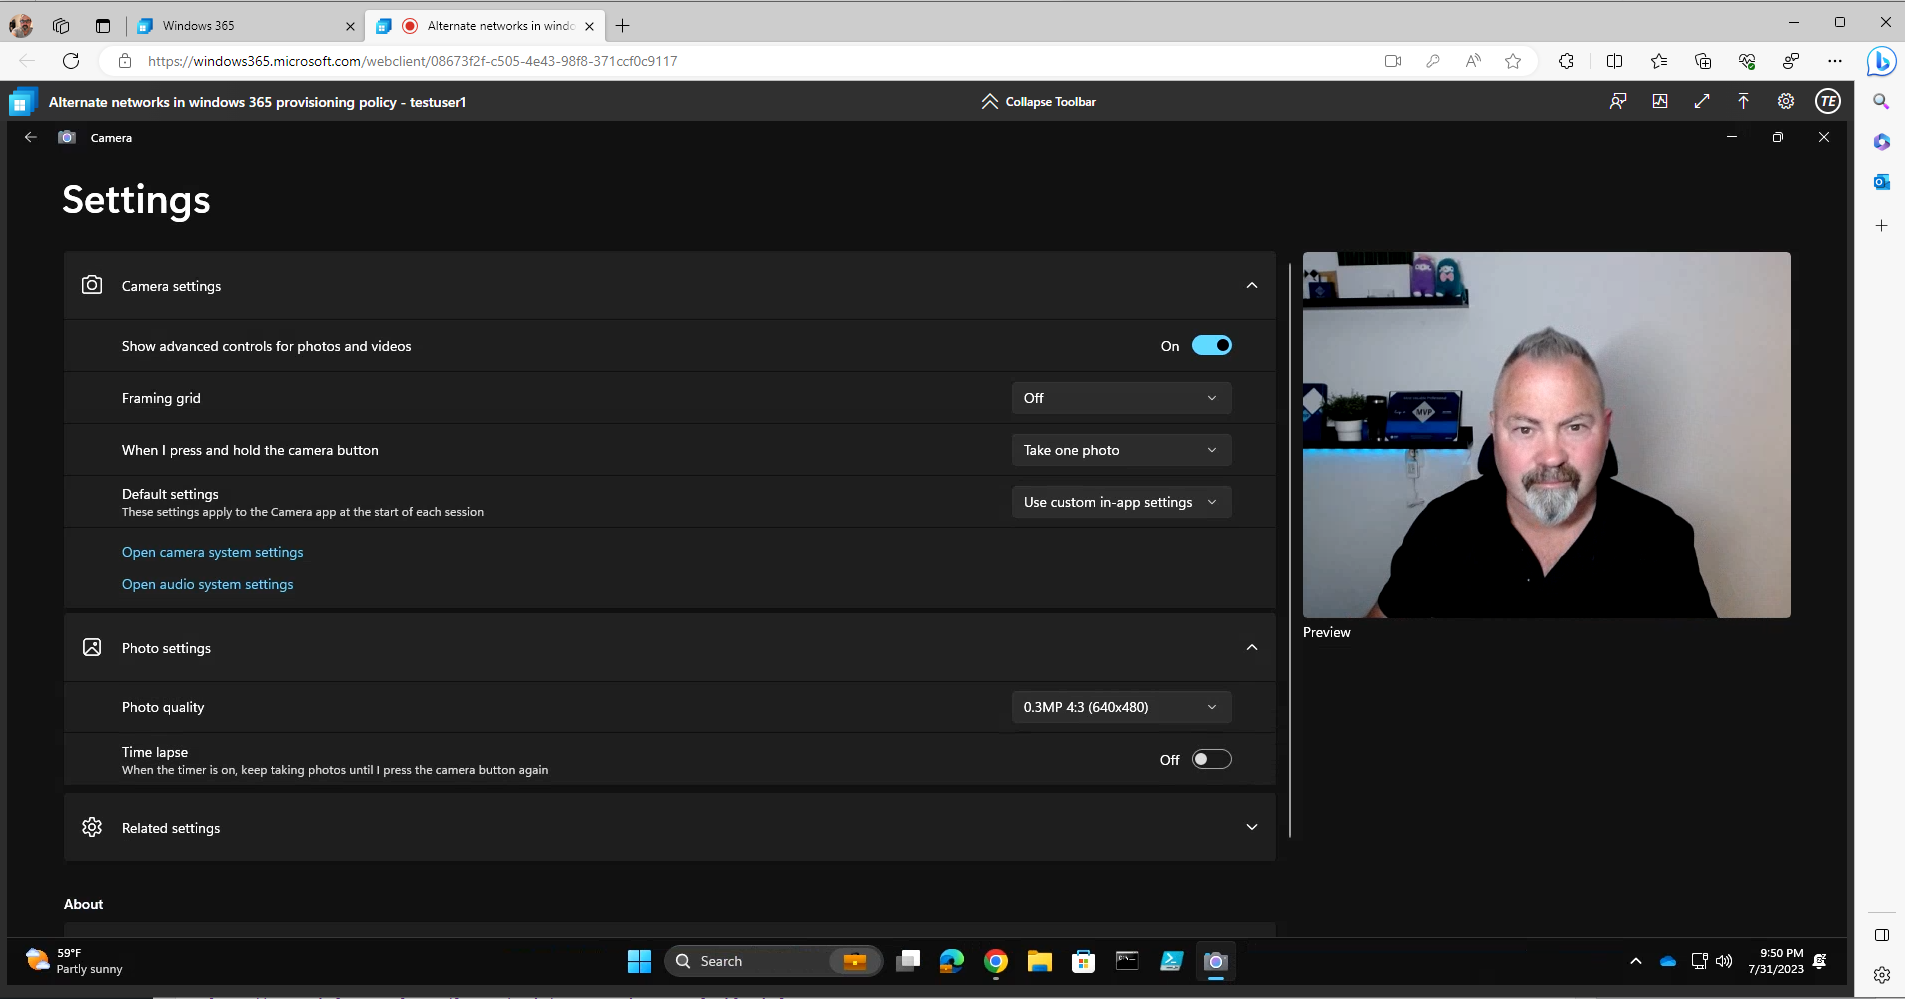
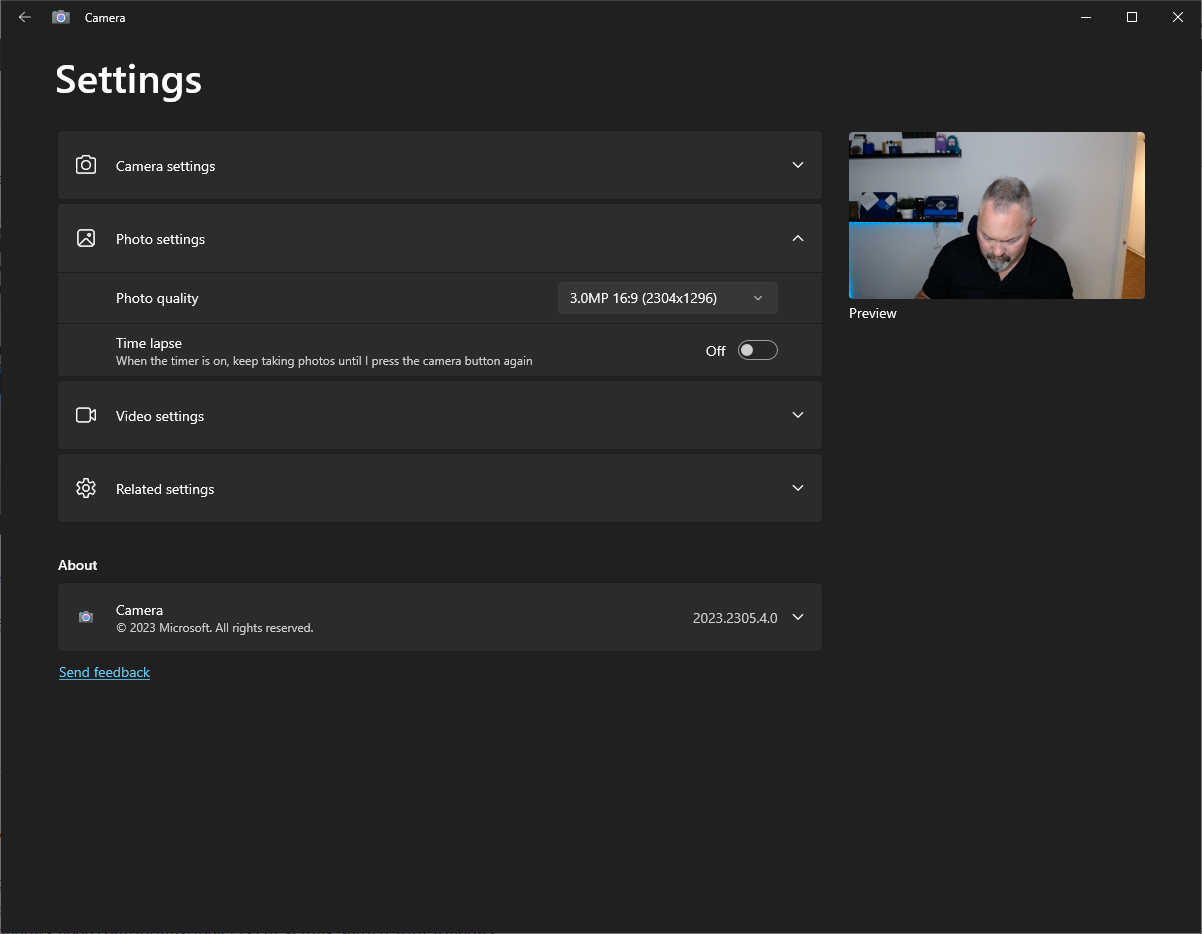
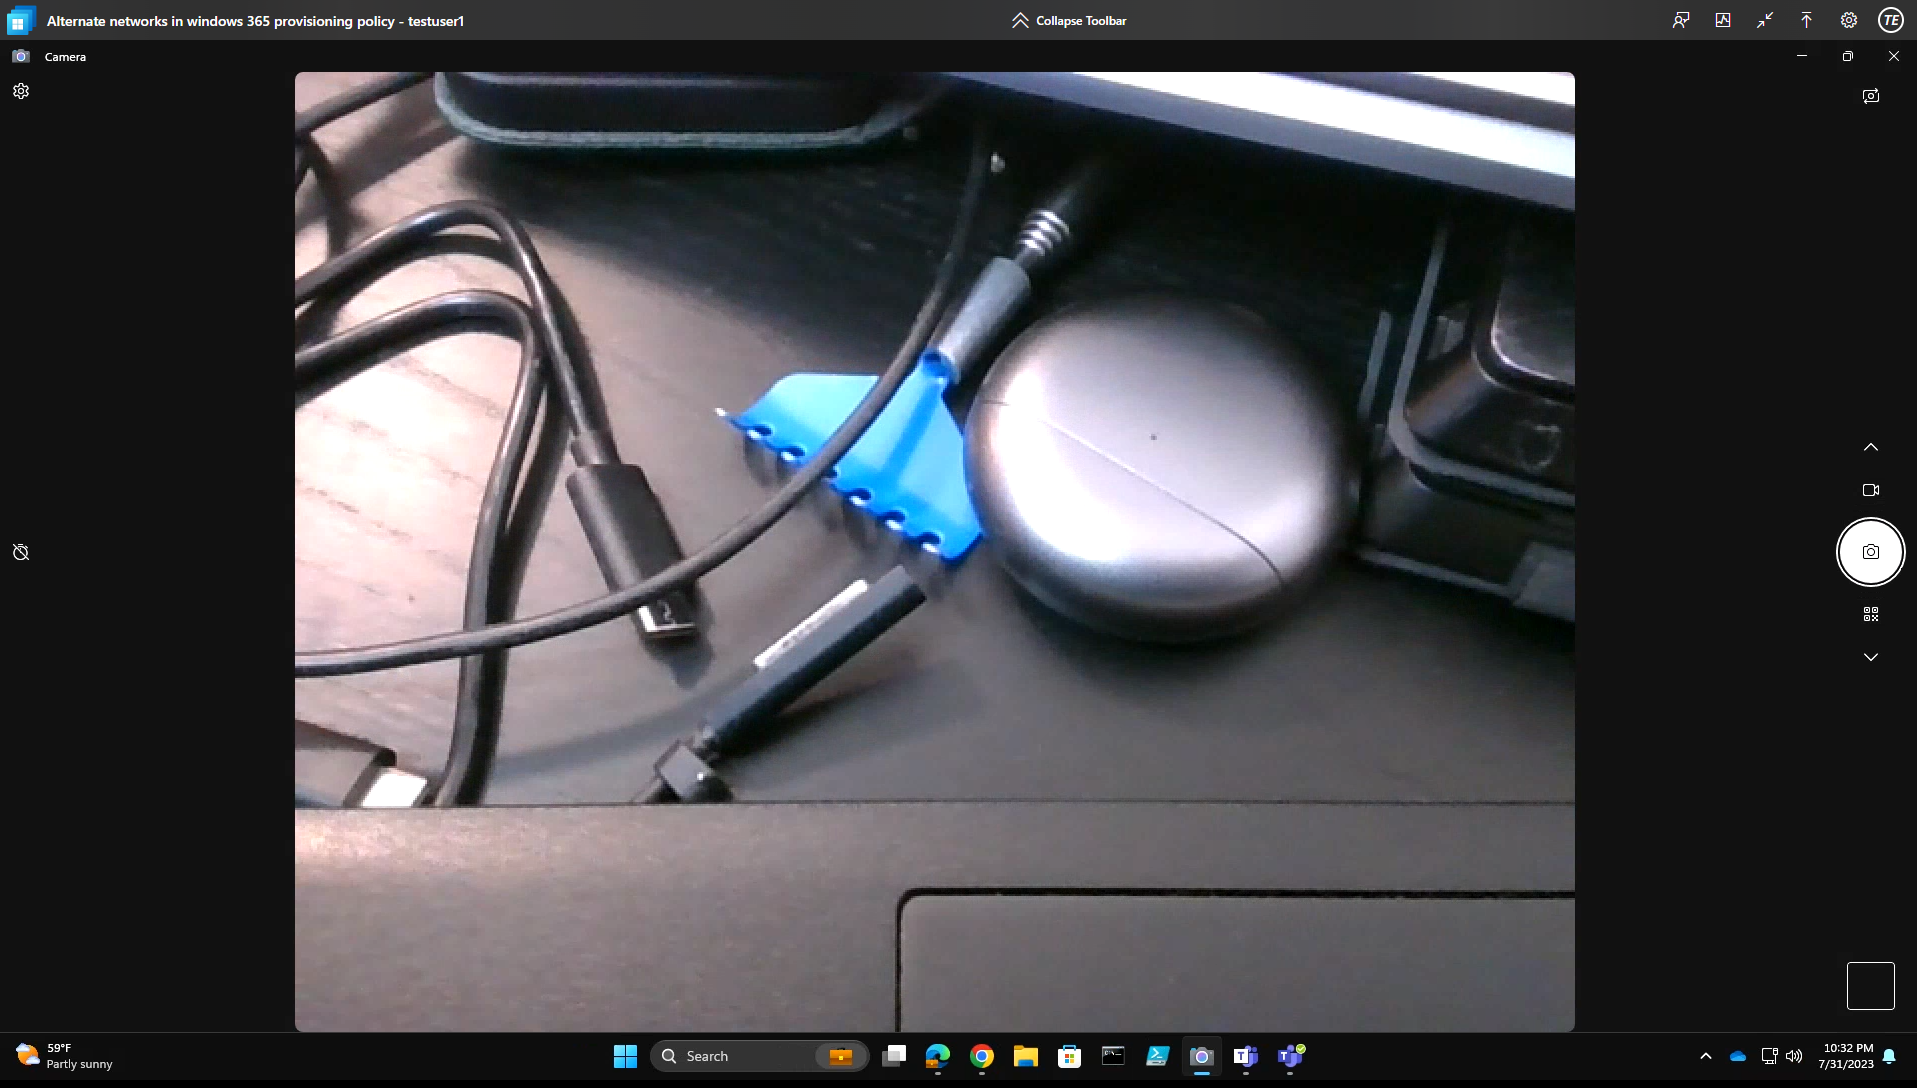
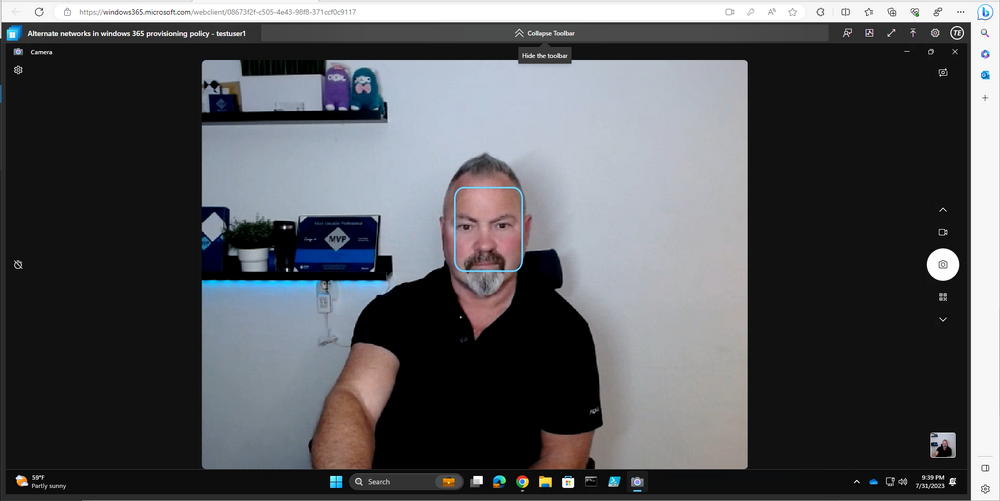
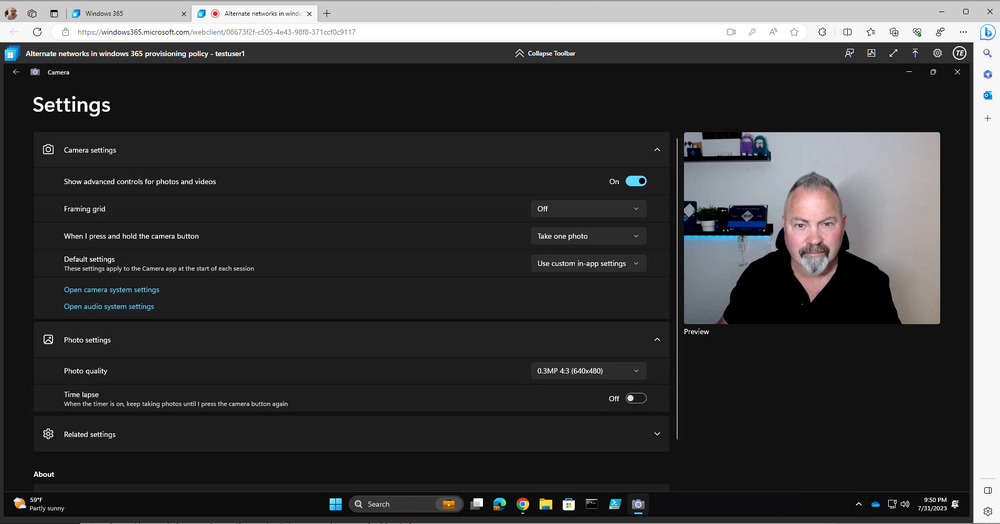
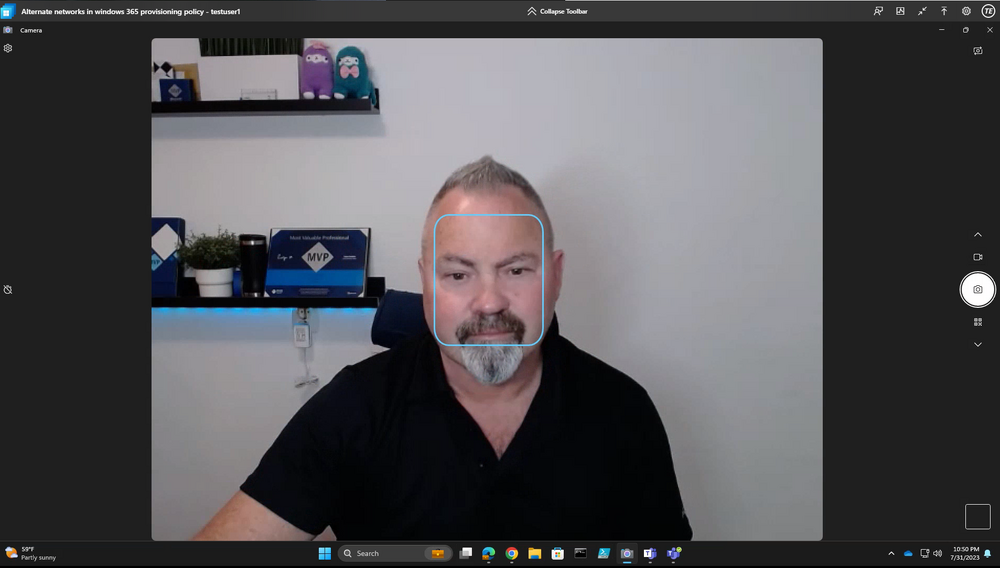
Introduction In the latest Windows 365 update from Microsoft, they’ve added a long awaited and desired feature, the ability to use the local PC’s web camera in your Cloud PC via the web client. The web client is another way of saying the web browser that you use to connect to your Windows 365 Cloud PC. While this preview feature was released the week of July 17th, it may not show up for you yet, take note of the note in the graphic below where it states that each monthly update may roll out over several weeks and might not be immediately available to all customers. How does it work ? To use the web client simply use a web browser of your choice and browse to windows365.microsoft.com and enter the credentials (when prompted) of a user that is assigned a Windows 365 license. Once done you’ll see a screen similar to this showing the Windows 365 Cloud PC’s assigned to that user. Click on the Open in browser button. you should see a bunch of options such as below, if you don’t see Camera (Preview) yet, then wait and try again, it should be available globally by July 31st, 2023. If you do see it then continue ! You should see a popup in the top left of the browser asking you to Allow (or block) the Camera. Click Allow and continue. To test the camera, I used the built in camera app. Once launched I could see it was working ! Great ? Next, I launched Teams and configured the settings in there to use the camera, it worked ! but the quality again, was at the minimum level, which no chance to change focus or brightness. Next I tested flipping from the external camera to the inbuilt camera, that worked but as with the Logitech camera I couldn’t control focus/brightness or quality. Finally, I tried using another browser (the above was using Edge) and this time I used Chrome. The results seemed slightly better (better focus/resolution) even though the settings of the Camera app still revealed the same resolution, so I don’t know what’s going on there… While this new feature is great there are some downsides which I’ll mention below. You cannot control fine tune settings that are normally present on my Logitech HD Pro C920 such as: Brightness Focus Resolution The resolution seems adequate but not up to the quality I expect for my camera. For example, when looking at the quality on the Windows 365 Cloud PC redirected it’s set to a bare minimum (and I cannot see how to change it) 0.3 MP at 640 x 480 resolution. Yes, there is a drop down menu at the 0.3 MP at 640 x 480 resolution but it only shows that resolution and nothing else. But looking at the same camera on the local host PC I get a full 3.0 MP at 2304 x 1296 resolution, and the results are quite different. That’s quite a difference! Summary I understand this is still in preview but it would be nice to have control over the cameras true functionality to provide a better end user experience. That said, well done to the Microsoft Product Group for listening to our earlier complaints about the lack of this functionality, I’m impressed that it’s finally here and I look forward to it improving before GA. cheers niall Related reading https://learn.microsoft.com/en-us/windows-365/enterprise/whats-new#windows-365-web-client-camera-support-preview https://www.windows-noob.com/forums/topic/23124-getting-started-with-windows-365-part-4-connecting-to-your-cloud-pc/


-
Introduction The Windows 365 product group keep on listening to customer feedback and adding new features. One recent example of this is the following new setting, when browsing to https://windows365.microsoft.com you can now open in browser or open in desktop app. Let's take a look at this new open in desktop app feature. How does it work ? To use the web client simply browse to https://windows365.microsoft.com and enter the credentials (when prompted) of a user that is assigned a Windows 365 license. Once done you'll see a screen similar to this showing the Windows 365 Cloud PC's assigned to that user. Normally the end user would click on Open in browser and continue their Windows 365 session right there (in the browser), but now there's an additional option in the drop down, called Open in desktop app. Note: Opening your Windows 365 Cloud PC using the Windows 365 App provides the best experience as more features are available. If the user selects Open in desktop app they'll see the following user interface (UI). There are actually an additional 2 options provided. Yes, I want to open in Windows 365 Yes, I want to open in Remote Desktop Selecting the Windows 365 app option The default option is to open using the Windows 365 app, however you can also select to use the Remote Desktop client agent (AVD). Selecting the default may show the following on the first run (for Windows 10 devices with the Windows 365 App installed), I tested this using Edge in InPrivate mode on Windows 10: on a Windows 11 device using Chrome in Incognito mode, I saw this, note how it correctly knows that you have the Windows 365 app installed already: You can place a check mark in the box provided to avoid answering the question again. Next you may see a prompt similar to the following, I saw it on my Windows 10 laptop with the Windows 365 App installed, however this did not show up on the Windows 11 laptop when using Chrome or when using Edge). Opinion: While it's not exactly hard to figure out, I think it would be better to connect the latest version of the Windows 365 app installed on the device with the 'open in desktop app' choice. I've submitted this feedback to the product group, and this does seem to be related to the operating system you are running on the host, namely Windows 10. Selecting the first Windows 365 app, and clicking OK starts the Windows 365 app and that prompts for credentials which once entered opens the Windows 365 Cloud PC as expected. Selecting the Remote desktop option Once you select the second option and click on Continue, you'll see the following the first time you try. Which isn't exactly the same as Remote Desktop, but let's ignore that. Once you click Open it does indeed launch that app as shown here. and after entering your credentials your Windows 365 Cloud PC is usable as before. well that's a look at this new feature, and it's great that the Product Group are continuously developing new features for customers, what do you think of this change, does it help or confuse your users? cheers niall