anyweb
-
Posts
9271 -
Joined
-
Last visited
-
Days Won
371
Everything posted by anyweb
-
 Daniel shows you an example of how to do that here http://www.danielclasson.com/powershell-script-for-configuring-configuration-manager-2012-collection-update-settings/ cheers niall
 -
UPGRADE SEQUENCE 1709 WINDOWS 10
anyweb replied to kcumbie8's question in Deploying Windows 10, Windows 8.1, Windows 7 and more...
the upgrades from 1703 to 1709 for me (in testing) have gone without a hitch, however... after the upgrade is done and after one or two reboots we've witnessed a white spinning circle of dots which never completes, it just stays there, we've seen this on Surface Pro 4 and HP X360 g2 and as of yet have not identified the cause, once we figure it out i'll post an update here. -
hi and Welcome ! the first thing to fix is your SMS_MP_CONTROL_MANAGER, you need to find out what is wrong with the management point (MP) as that is how your clients communicate back to SCCM, so right click on the component, show messages, all, and see what it tells you, those errors need to be fixed first and then we'll move on towards the other issues, feel free to post the errors here and we'll do what we can to help cheers niall
-
good point, I'm not authenticating against the proxy in this example (was not needed) but if you need to use the following in addition to the above reg add "HKCU\Software\Microsoft\Windows\CurrentVersion\Internet Settings" /v ProxyUser /t REG_SZ /d username reg add "HKCU\Software\Microsoft\Windows\CurrentVersion\Internet Settings" /v ProxyPass /t REG_SZ /d password
-
can you post your entire smsts.log as an attachment so I can take a look ?
-
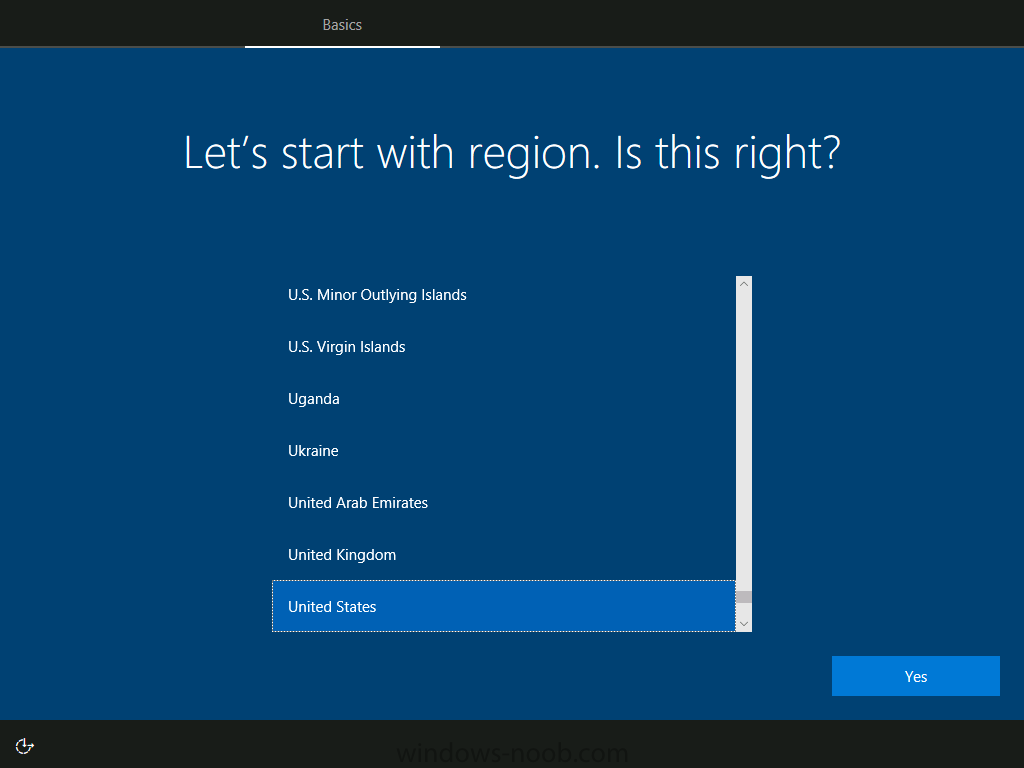
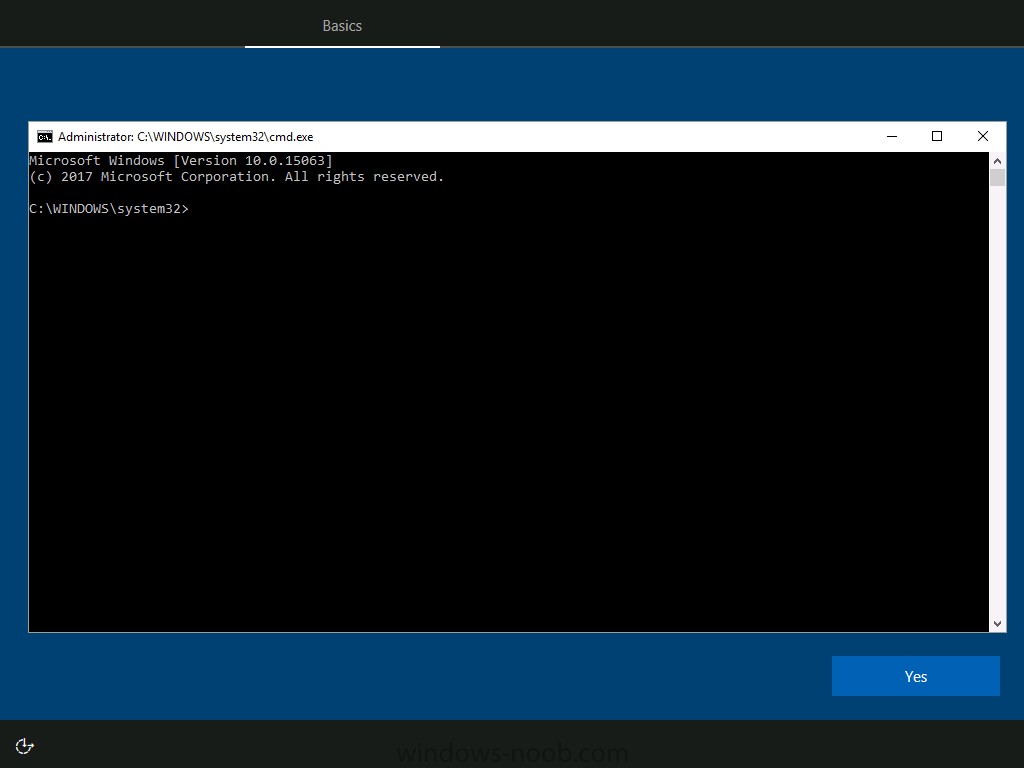
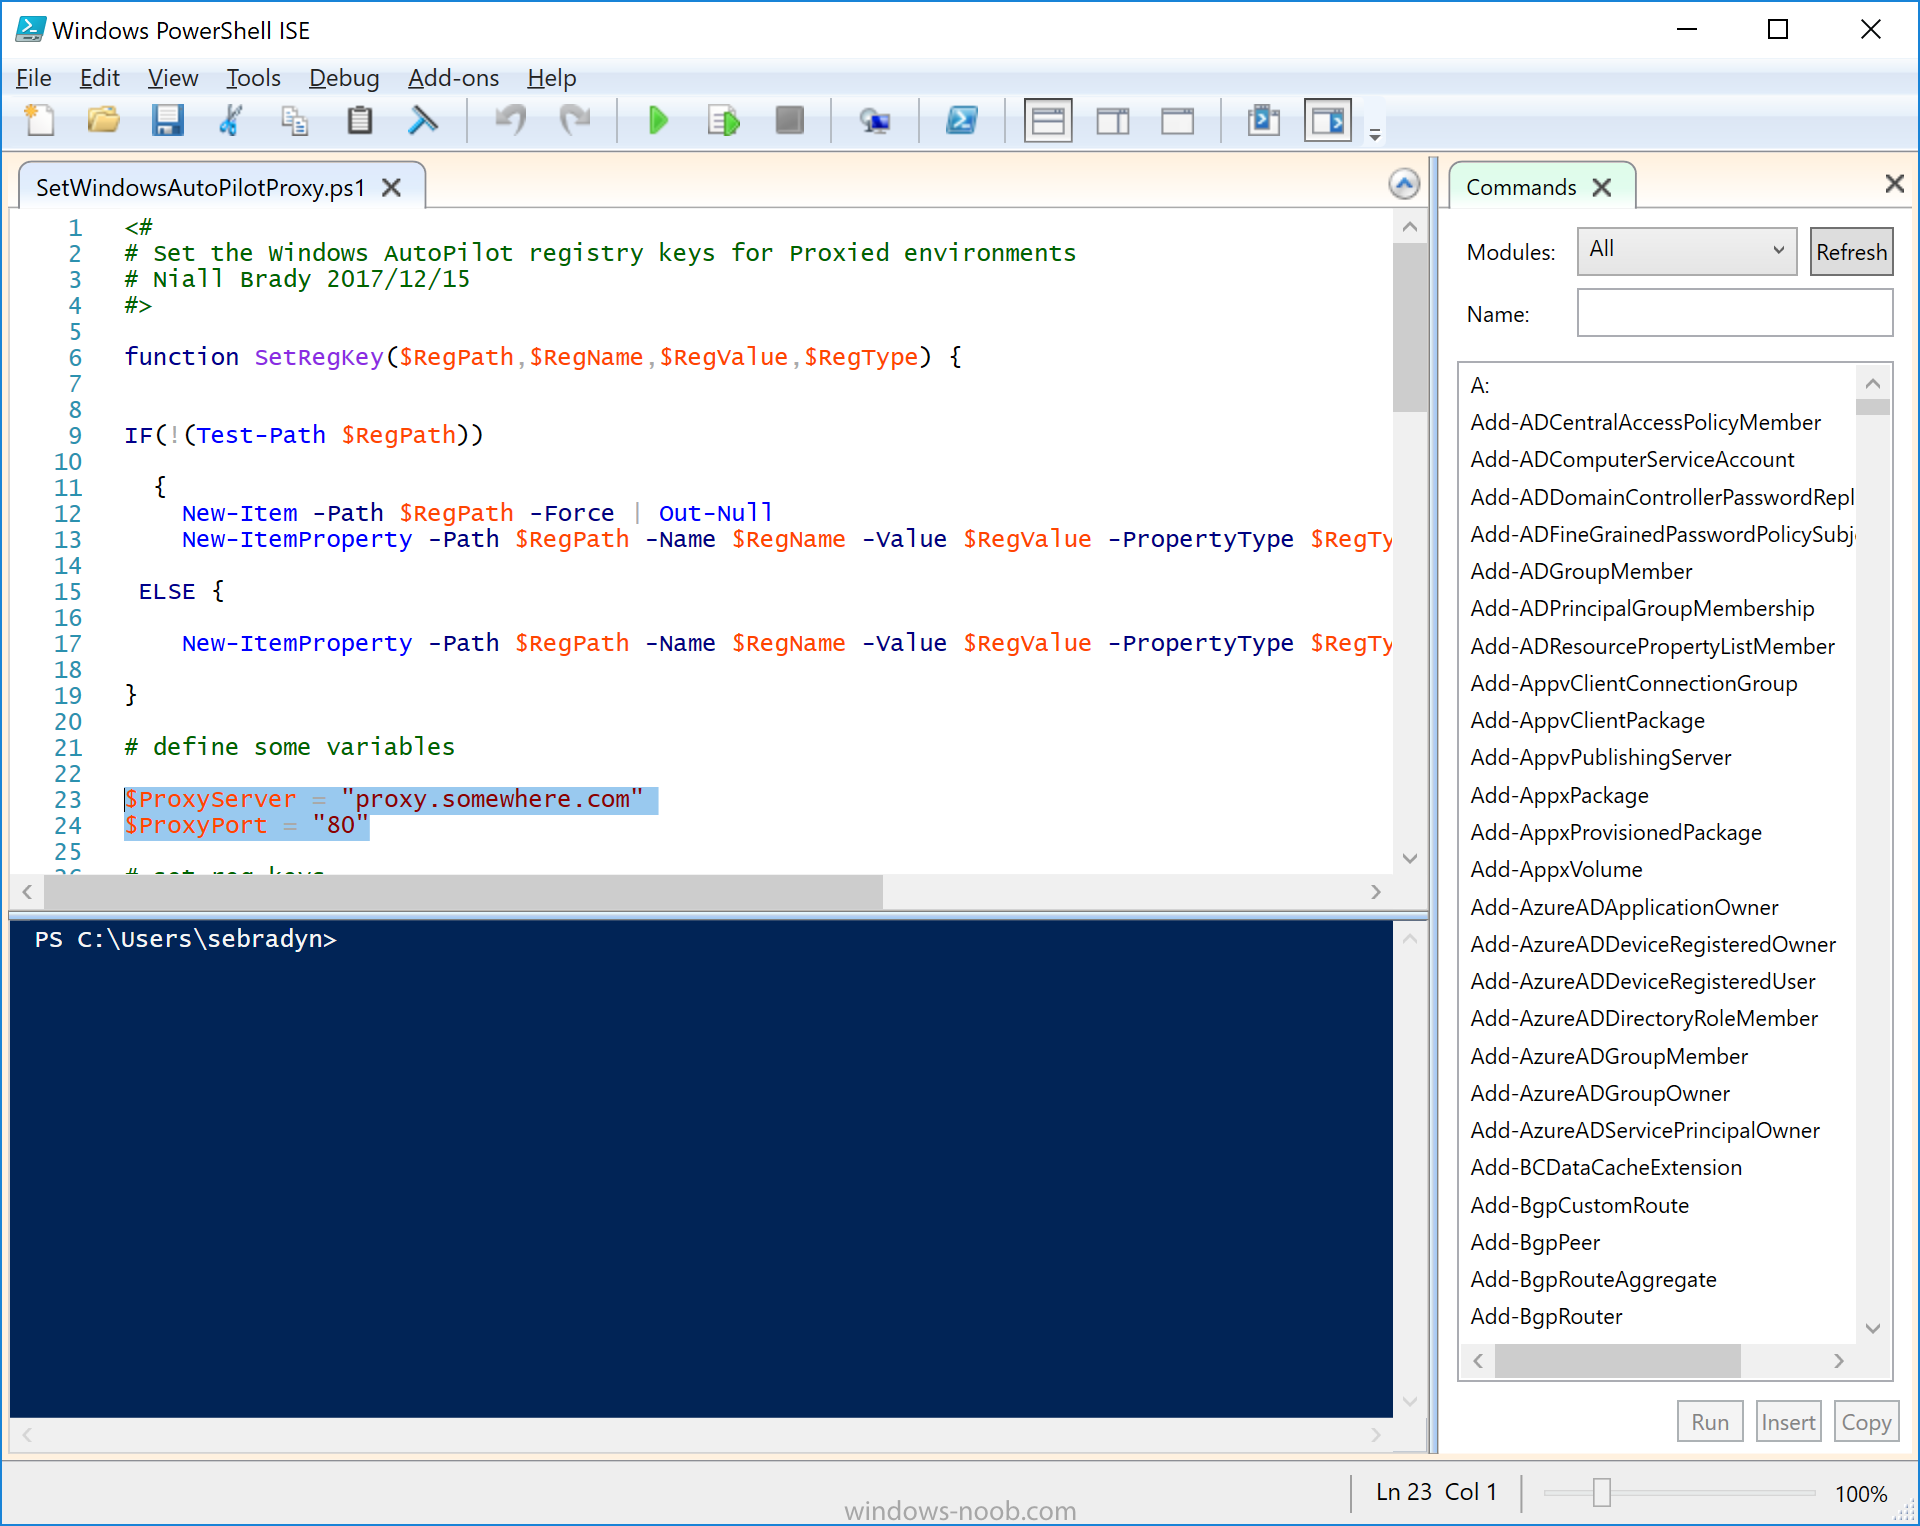
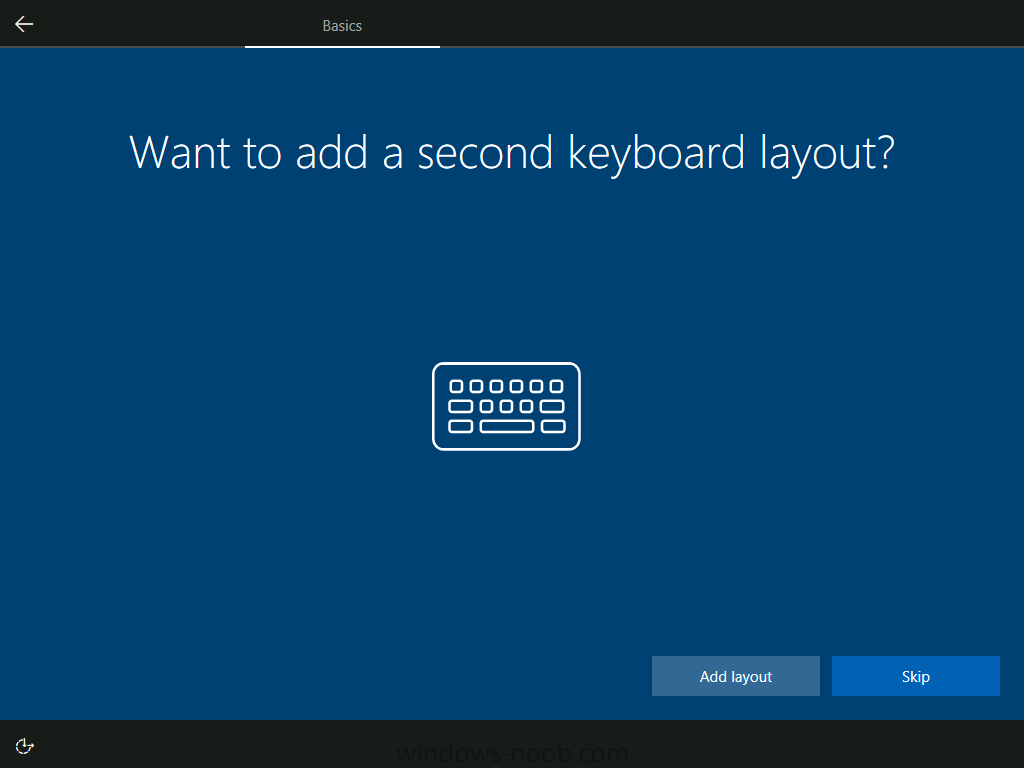
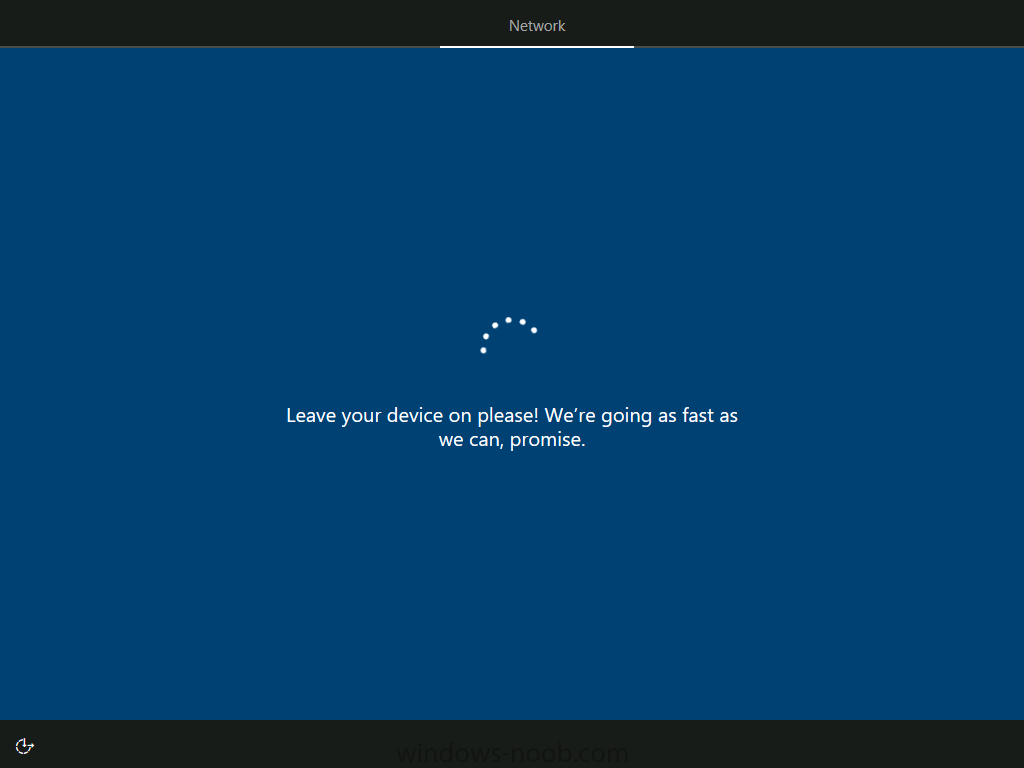
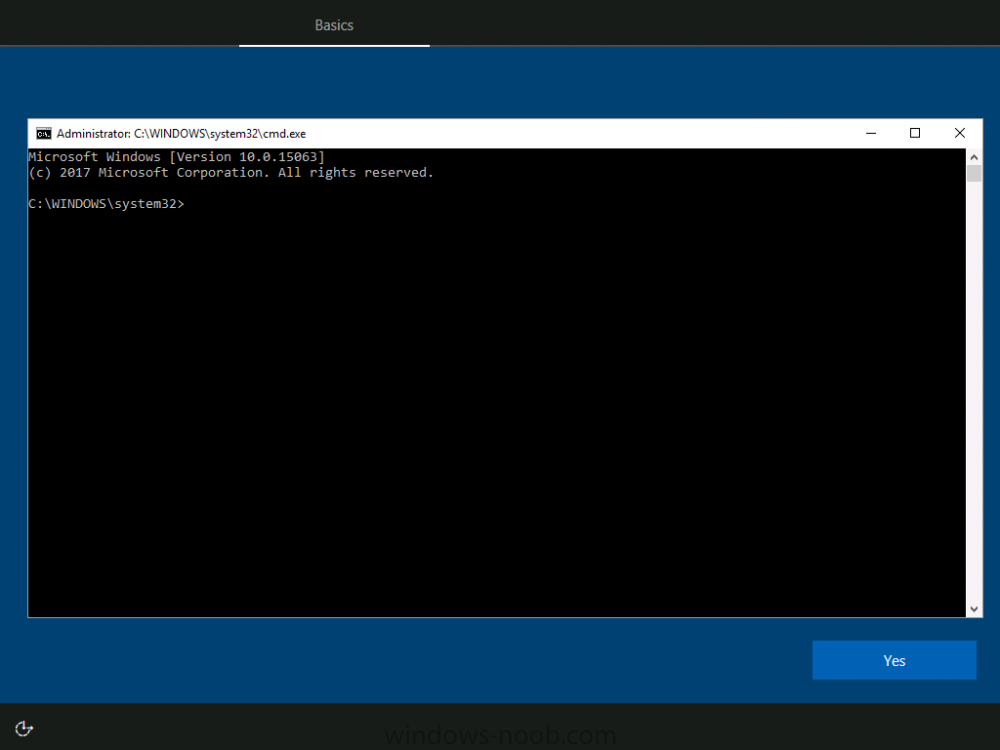
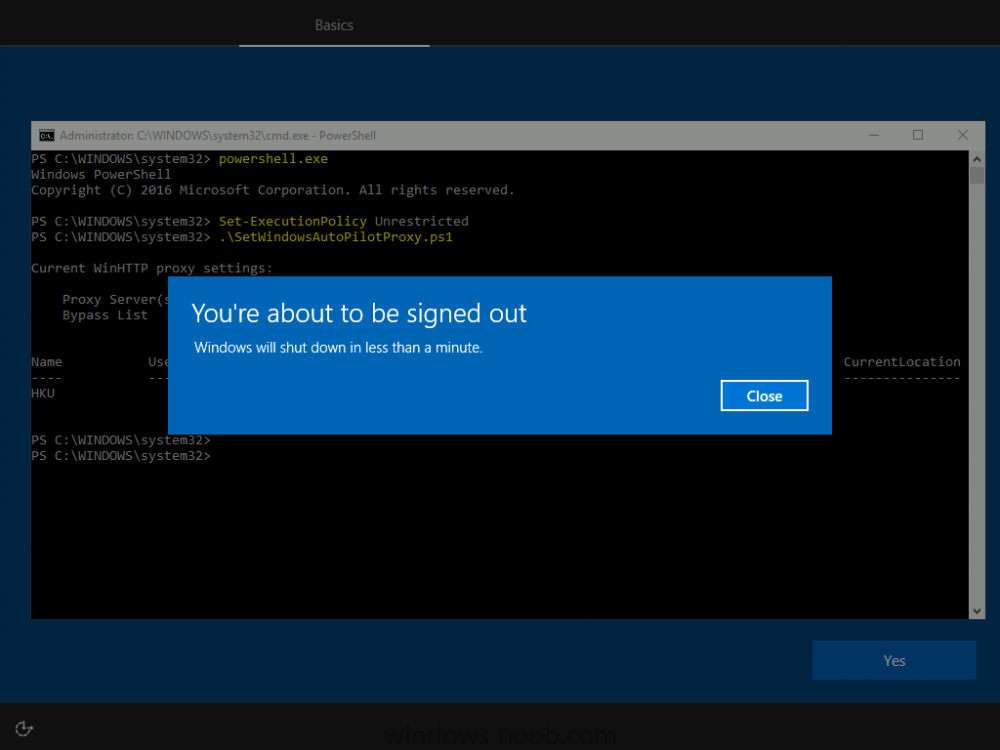
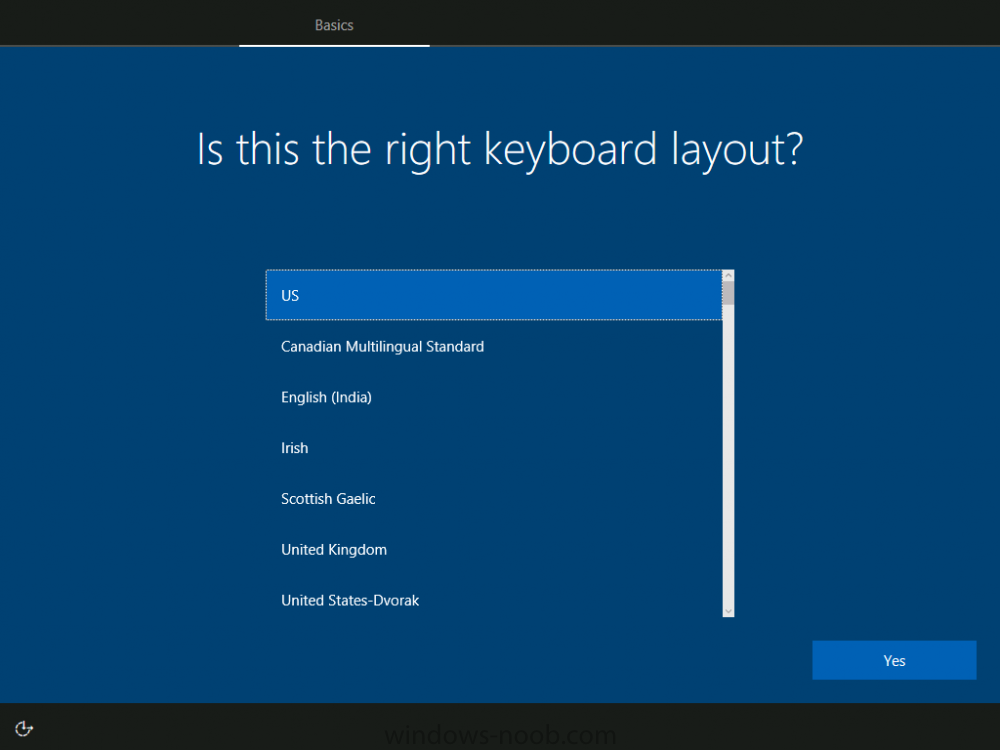
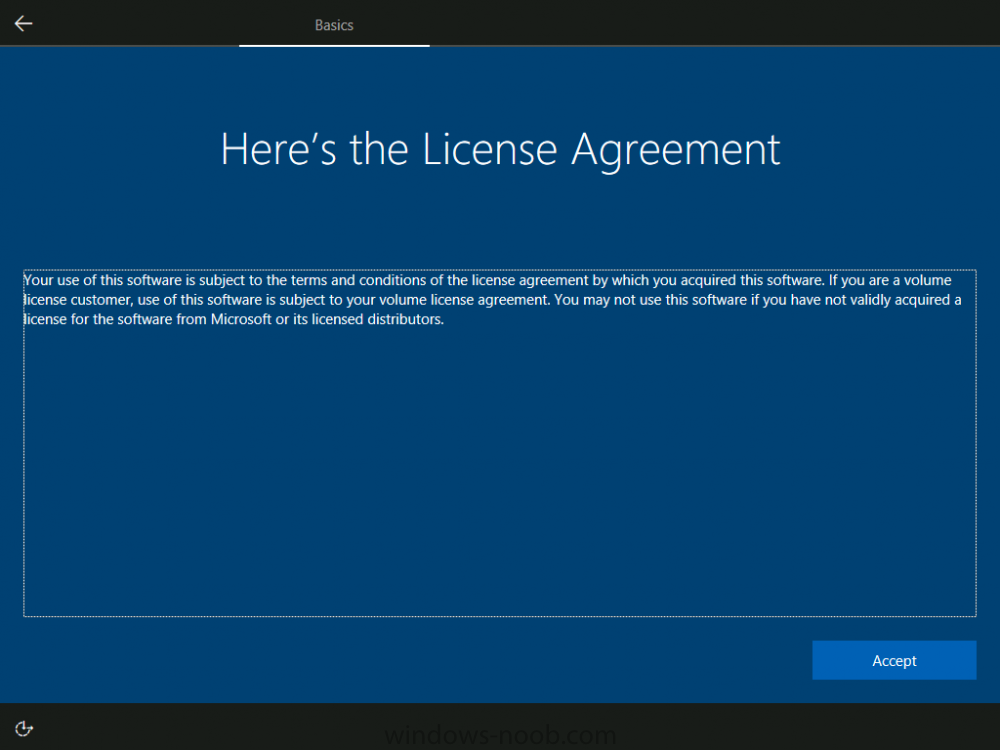
Introduction Microsoft describes Windows AutoPilot as “Windows AutoPilot is a suite of capabilities designed to simplify and modernize the deployment and management of new Windows 10 PCs”. That roughly translates to a cloud based method of deploying new Windows 10 devices. To use Windows AutoPilot you'll need to fulfill some requirements namely: Devices must be registered to the organization Company branding needs to be configured Devices have to be pre-installed with Windows 10 Professional, Enterprise or Education, of version 1703 or later Devices must have access to the internet Azure AD Premium P1 or P2 Microsoft Intune or other MDM services to manage your devices Windows 7 is not going to gain access to this new technology and new devices are the target (from the OEM for example). There is a way to re-provision existing Windows 10 devices via a Windows Reset but I’ll cover that in another blog post. This post will explain how you can get around one obstacle that currently exists (29th of November 2017) with Windows AutoPilot, and that is the ability to connect to the Internet across a Proxy. Windows AutoPilot needs to be able to connect to the internet to do it's magic, and proxies can throw a spanner in that. In this post I assume you have already enrolled a Windows 10 device into Windows AutoPilot and that you plan on connecting the new Windows 10 device to the internet via a Proxy. All screenshots are from a Windows 10 version 1709 computer (Fall Creators Update). Windows AutoPilot default behavior (with direct connection to Internet) During OOBE (Out of Box Experience) on a Windows AutoPilot enrolled device, the following should be observed in the order listed below: 1. Vocal Intro from Cortana (unless it's a Hyper-v VM) 2. Let’s start with this region. Is this right? [United States] <Yes> 3. Is this the right keyboard layout? [US] <Yes> 4. Want to add a second keyboard layout? <Skip> 5. Now we can go look for updates…(takes some time to download things and do magic) 6. Welcome to [Tenant Name] <Next> Windows AutoPilot default behavior (with a proxy) When a Windows AutoPilot enrolled device is booted behind a Proxy, it goes through these steps in OOBE: 1. Vocal Intro from Cortana (unless it's a Hyper-v VM) 2. Let’s start with this region. Is this right? [United States] <Yes> 3. Is this the right keyboard layout? [US] <Yes> 4. Want to add a second keyboard layout? <Skip> 5. Let's connect you to a Network. In the above scenario, the Windows AutoPilot magic that should occur cannot take place due to a lack of direct Internet connectivity and therefore the following things will not happen: Automatically join devices to Azure Active Directory (Azure AD) Auto-enroll devices into MDM services, such as Microsoft Intune (Requires an Azure AD Premium subscription) Restrict the Administrator account creation Create and auto-assign devices to configuration groups based on a device’s profile Customize OOBE content specific to the organization In other words, Windows AutoPilot can't configure the device and you'll need to do those actions manually. Solution Before starting this step, download the following PowerShell script SetWindowsAutoPilotProxy.ps1 edit the highlighted variables below and replace them with your proxy details copy the edited script to your target Windows AutoPilot device. Next, boot the Windows 10 device that is enrolled into Windows AutoPilot, once OOBE starts it will take you to the Let's start with region question. Press Left shift and F10 keys together, a command prompt should appear. In the cmd prompt that appears type the following PowerShell then type the following Set-ExecutionPolicy UnRestricted Next, run the script by typing .\SetWindowsAutoPilotProxy.ps1 and press Enter. The script will run quickly and you'll see a reboot prompt, you can ignore it, if you look carefully you can see your proxy settings in the PowerShell output. This will gracefully reboot the computer with the Proxy settings in place and it will start the OOBE again except this time with a direct connection to the internet (via the Proxy). The OOBE experience after configuring proxy settings After the reboot you'll get prompted with the usual OOBE screens, followed by Is this the right keyboard layout ? and whether you Want to add a second keyboard layout ? and the License Agreement screen and now that the proxy settings are set, it will check directly with the Internet to verify for updates, after accepting the EULA you'll get to the Windows AutoPilot specific part of the process. You’ll know when that happens because your tenant name (and branding if configured) will appear. After entering your credentials Windows setup will configure your profile and depending on your settings, you may have to confirm Microsoft Verification for Windows Hello for Business (setup PIN) Enter and confirm your PIN after confirming the PIN you’ll see the Enrollment Status Screen (if configured in Windows Enrollment options in Intune), note that this is a Windows 10 version 1709 capability.. Once you click on Got it, Windows is ready to use and Intune policies are applied (such as Applications, start menu and more.) That’s it, job done. cheers niall


-
thanks for confirming !
-
the custom client settings are deployed to a collection, right ?. what collection is that, and is this computer with the problem in that collection
-
have you verified that your computer(s) are in a collection targeted by the client setting above ?
-
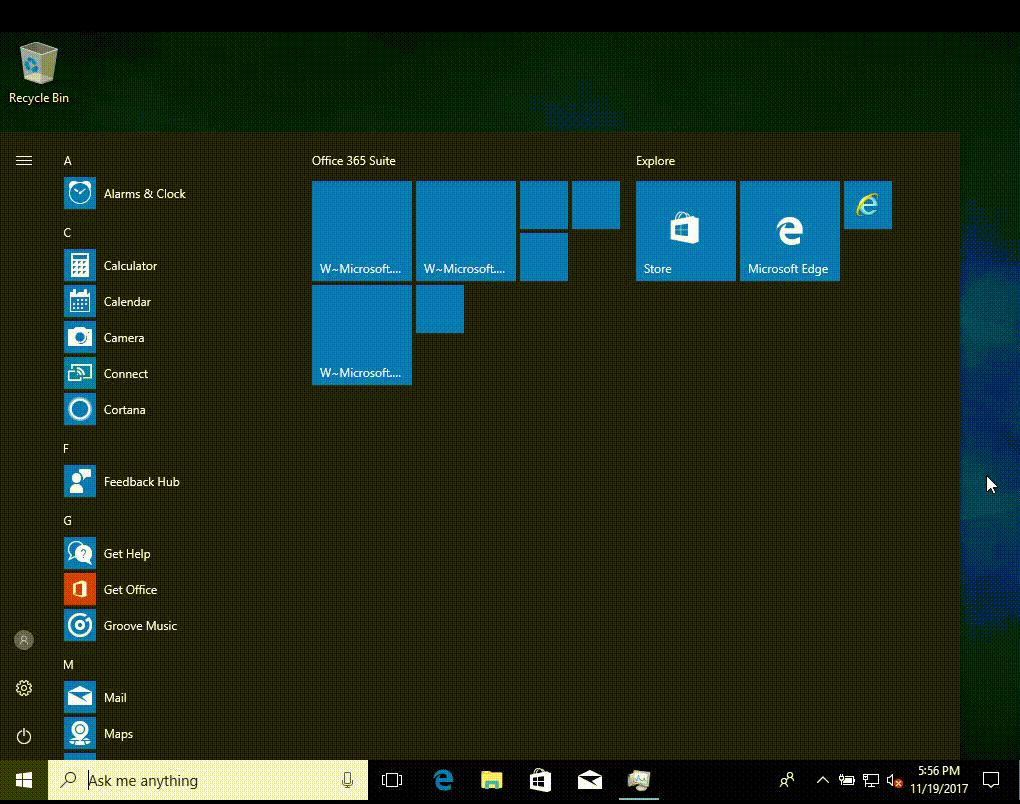
How can I customize the start menu in Windows 10 using Intune
anyweb replied to anyweb's topic in Microsoft Intune
ok in my guide i'm using 32 bit.... (the default) -
HI - Excellent notes. Thanks for sharing the scripts. thanks! i've tested the xml file on a server with a different name and it worked fine, please do a quick test on a VM with a different computername than CM01 and post your result here
-
i'll check with the product group and reply back when they do
-
hi John, first of all there is no SCCM 2016, it's just called System Center Configuration Manager (Current Branch) version 1702. Secondly, how are your Software Updates targeted to the workstations ? using a regular deployment or an ADR ? what are your system restart settings for that deployment ? as regards BitLocker, are you seeing it prompt for something after applying an update ? what are you seeing exactly ?
-
can you attach the smsts.log on the duplicate ts please so i can see what's happening. feel free to remove your company name(s) from the log.... by search/replace in notepad first
-
if you select the duplicate, what does the smsts.log file tell you ? maybe someone duplicated the actual ts, moved it elsewhere in the console, and deployed it...
-
and what client version are you installing ?
-
How can I customize the start menu in Windows 10 using Intune
anyweb replied to anyweb's topic in Microsoft Intune
and are you following my guide 100% or are you deviating from it.... which version of the Office 365 Suite did you pick (x64 or x86) ? from your error it looks like the Intune service is not available, did you try again ? -
How can I customize the start menu in Windows 10 using Intune
anyweb replied to anyweb's topic in Microsoft Intune
Ronni ? most people get my name wrong but Ronni is a first :-/ but as regards your xml not applying, did you follow all the steps in my guide or did you do something differently -
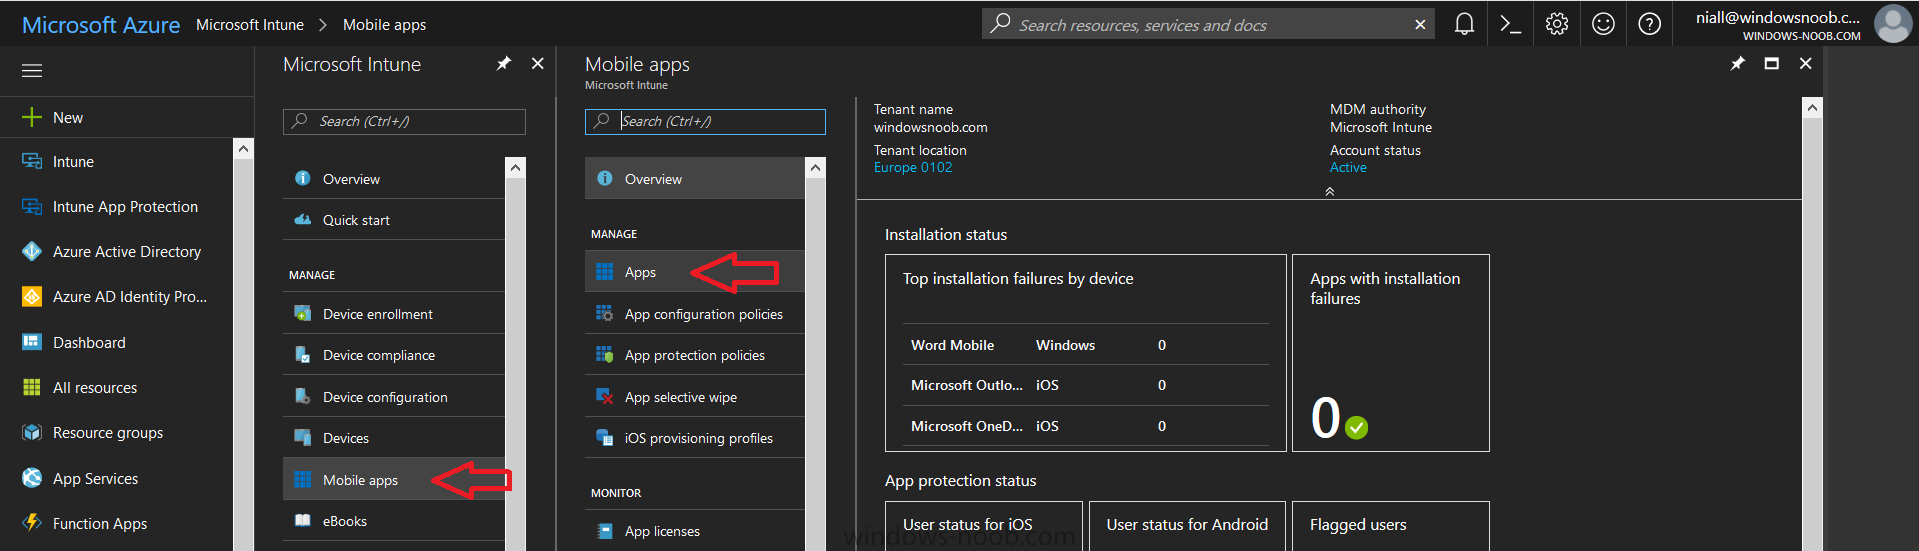
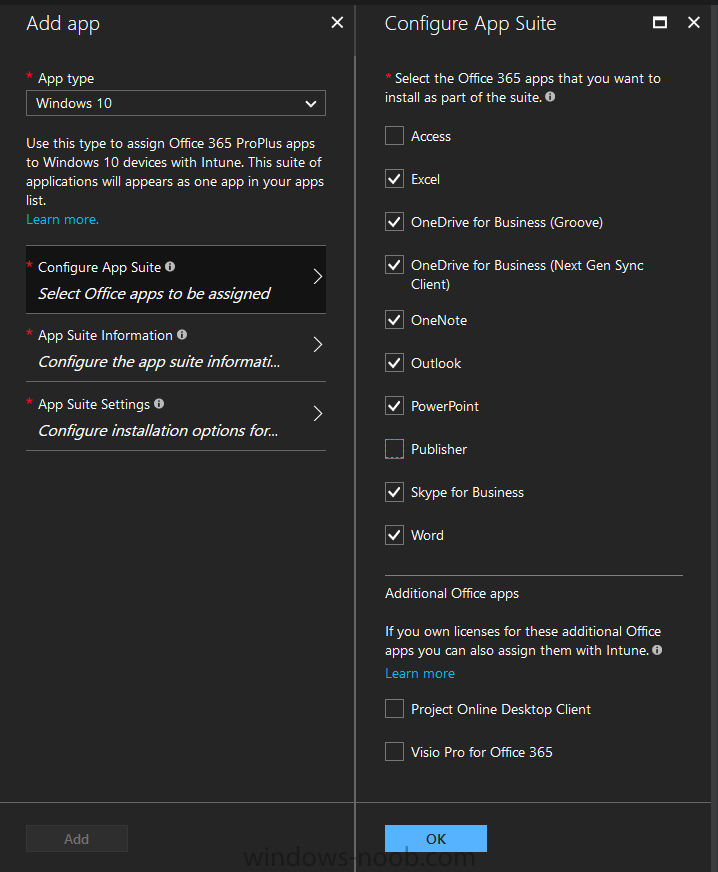
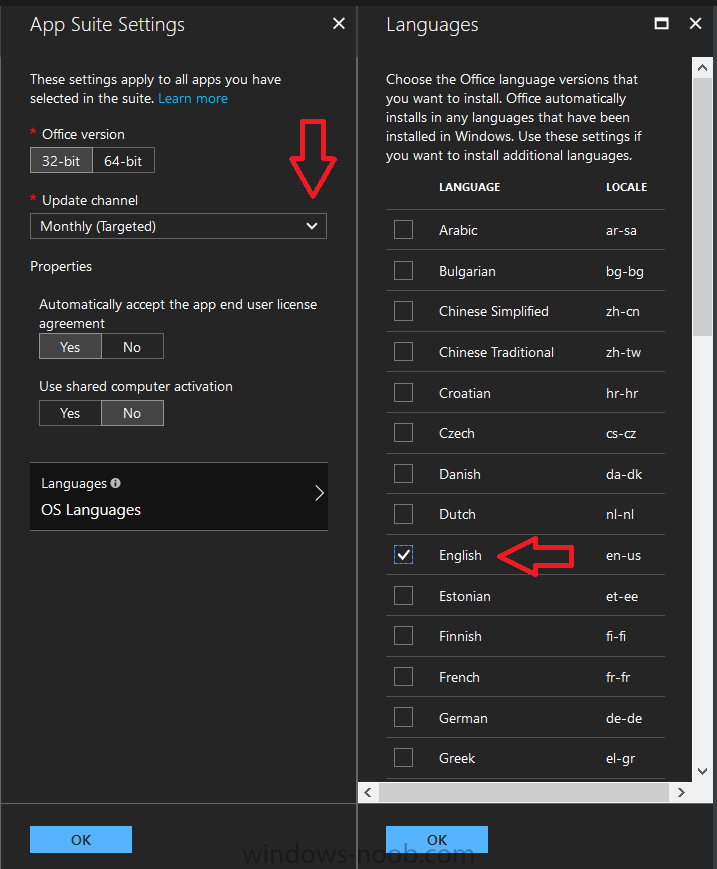
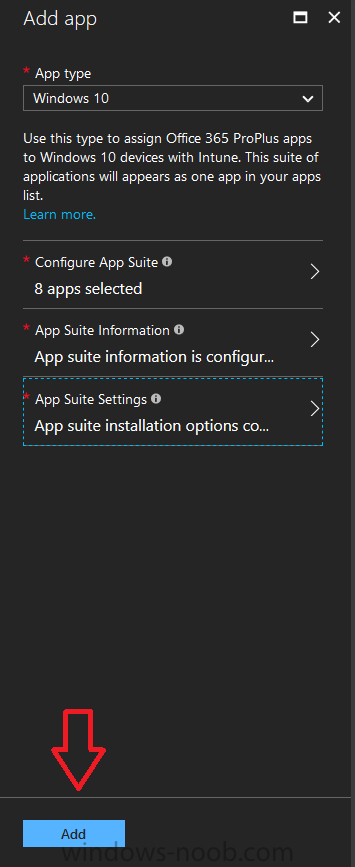
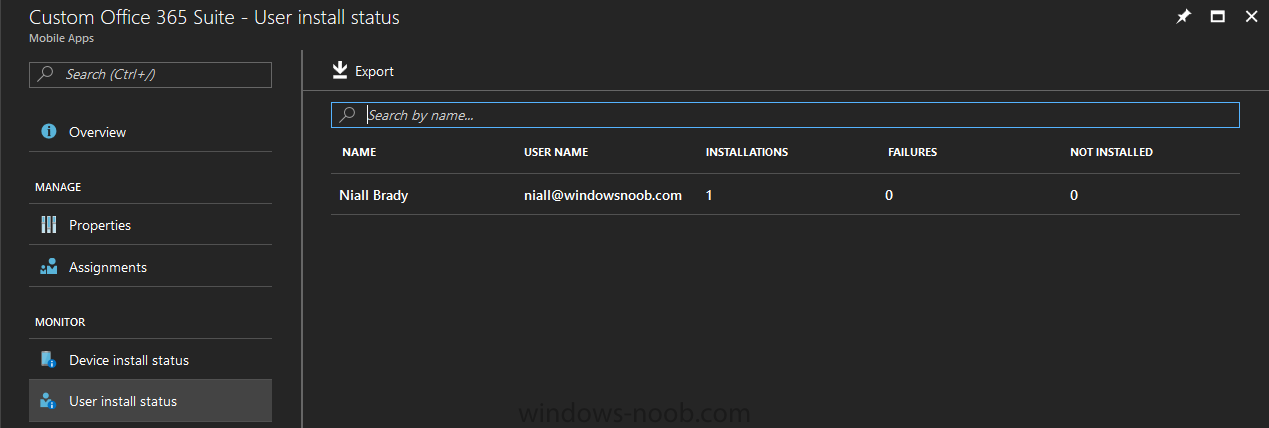
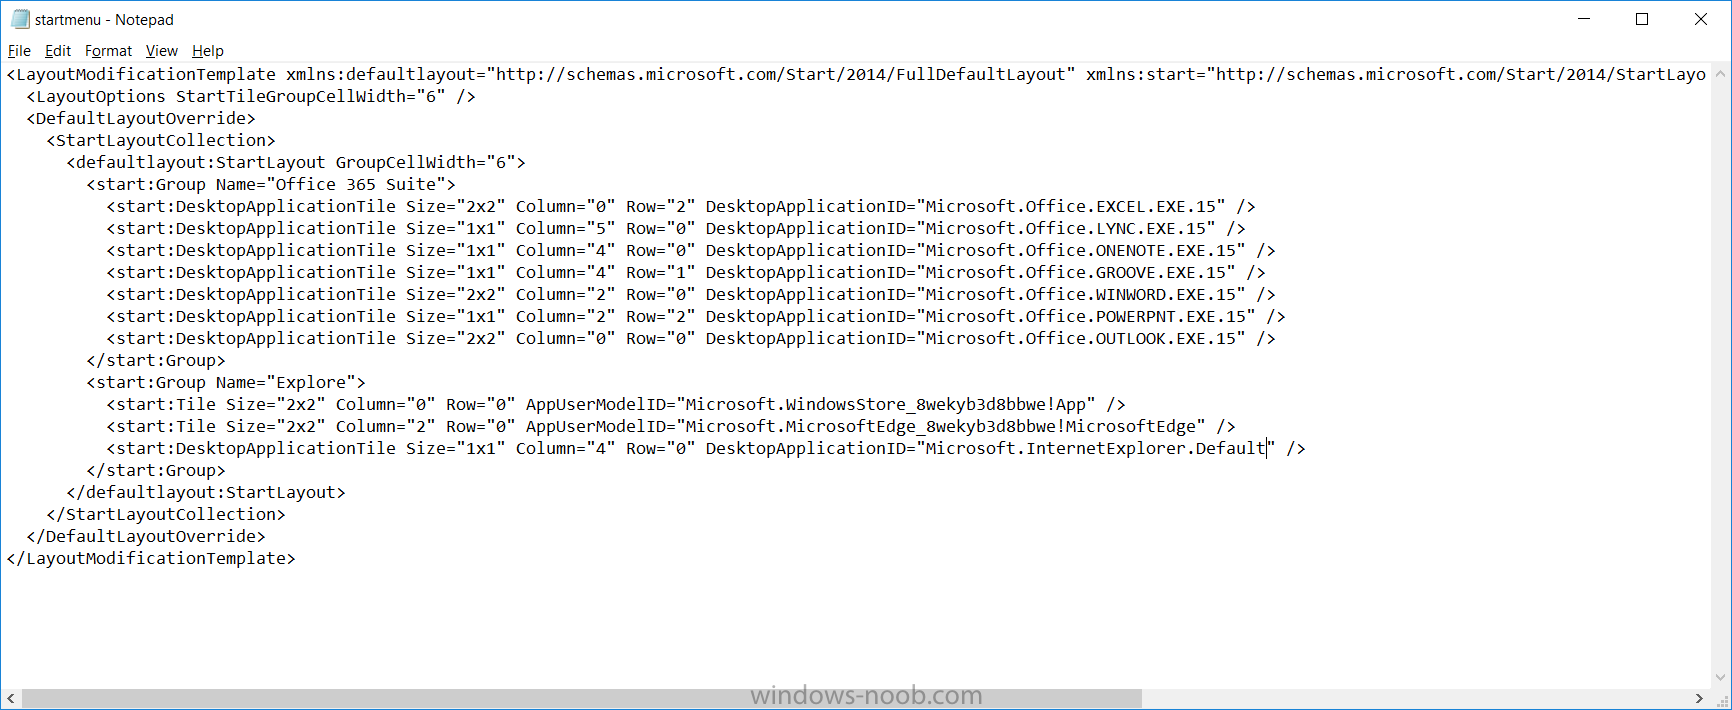
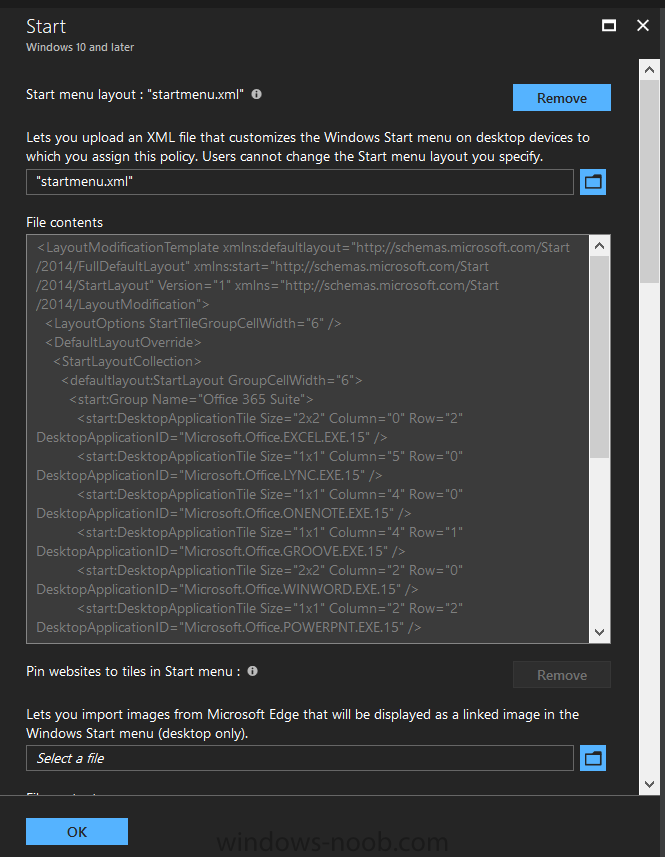
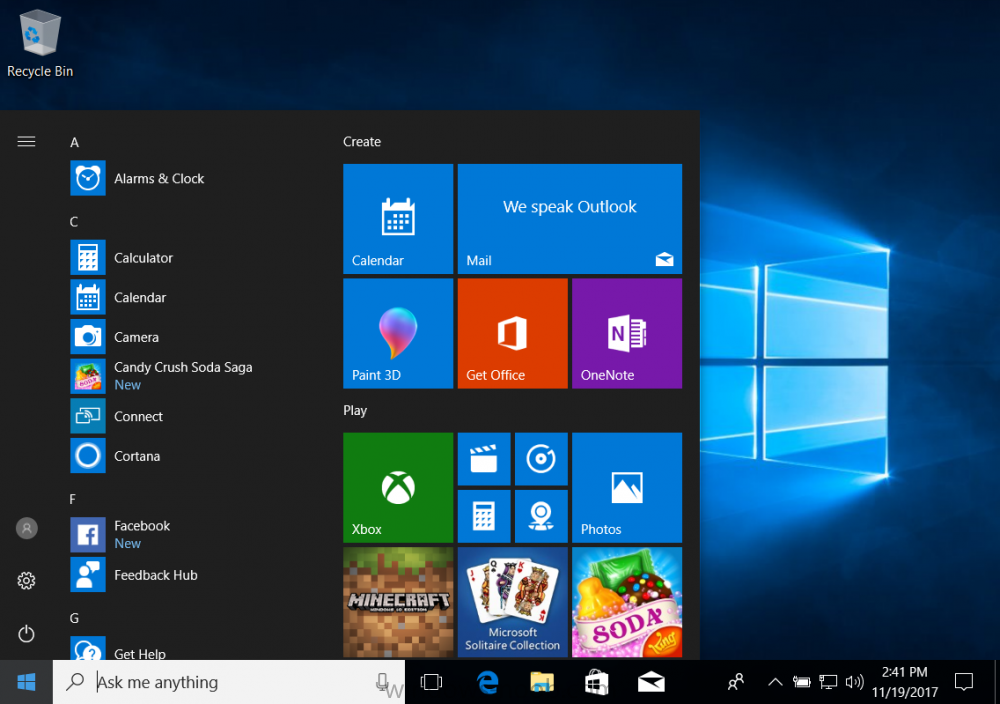
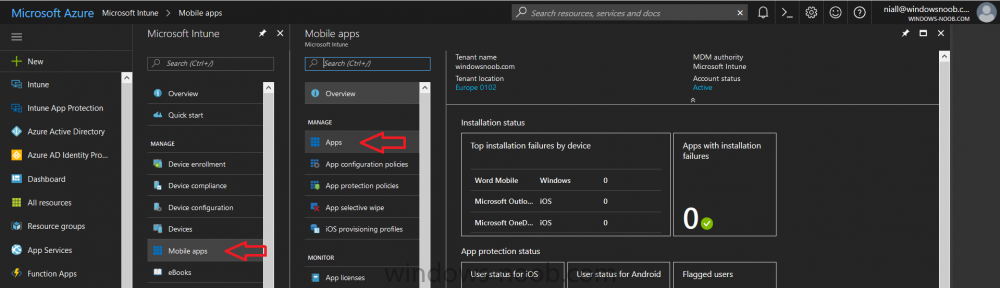
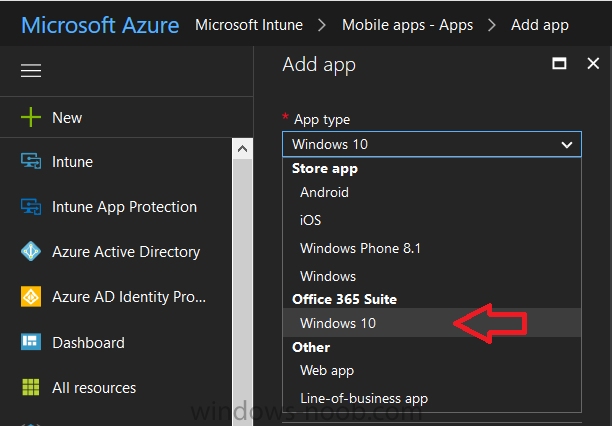
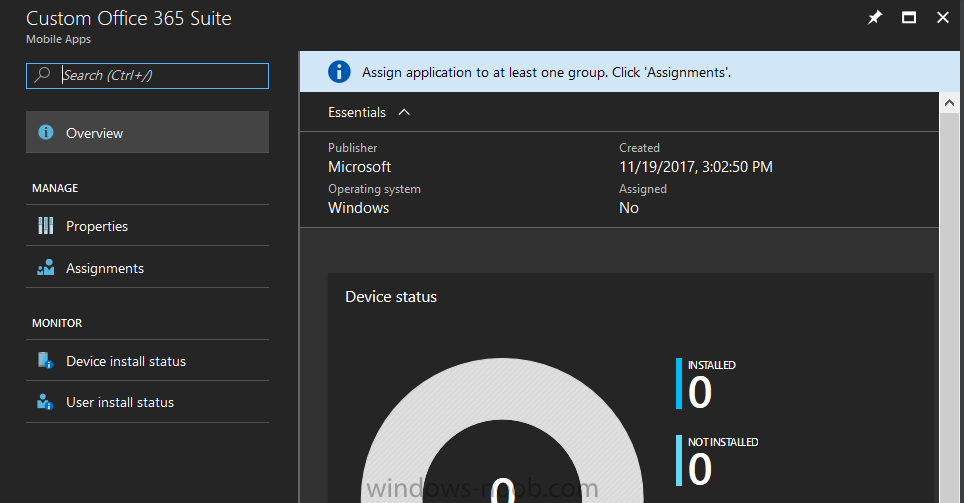
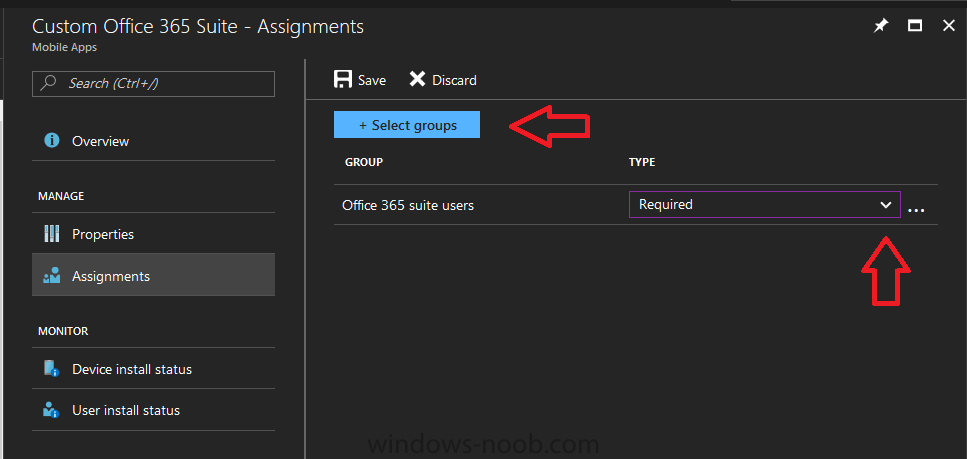
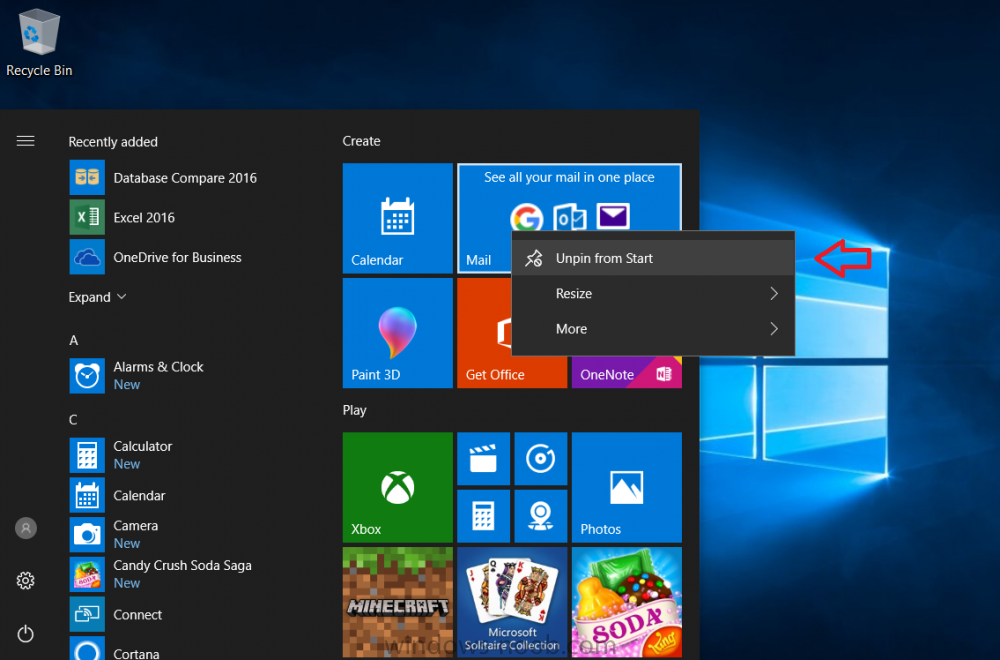
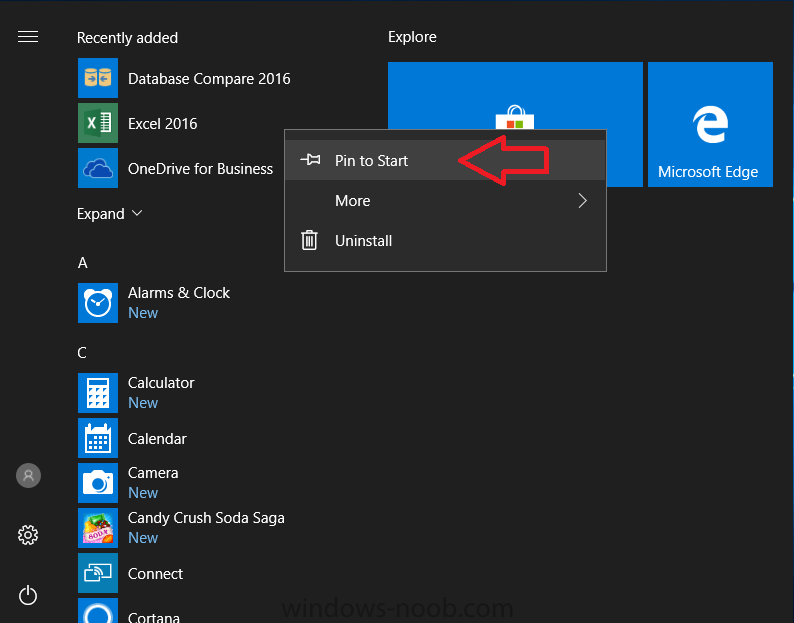
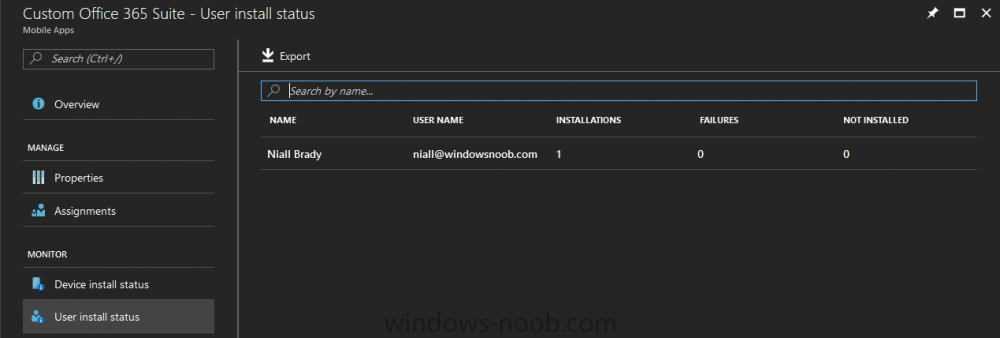
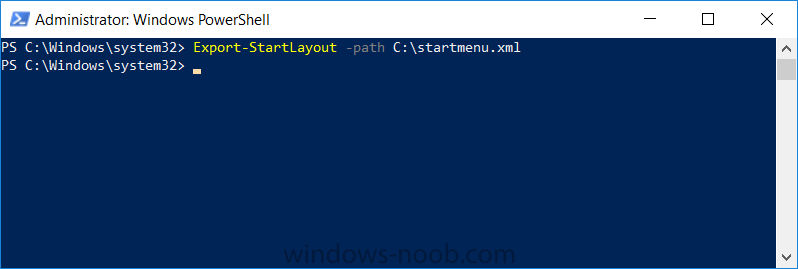
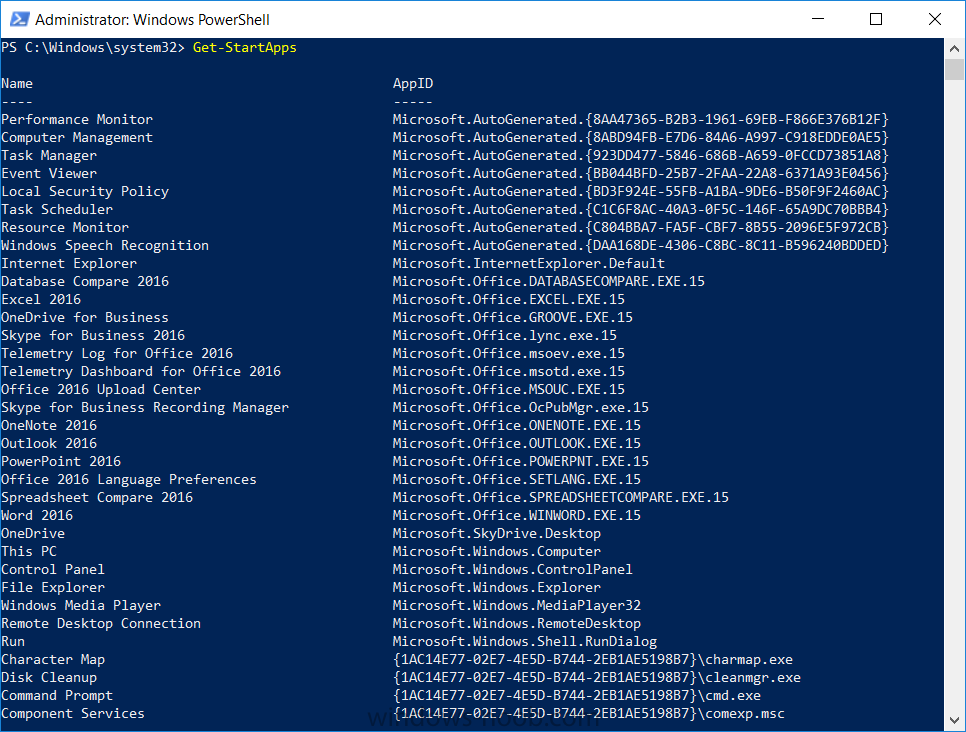
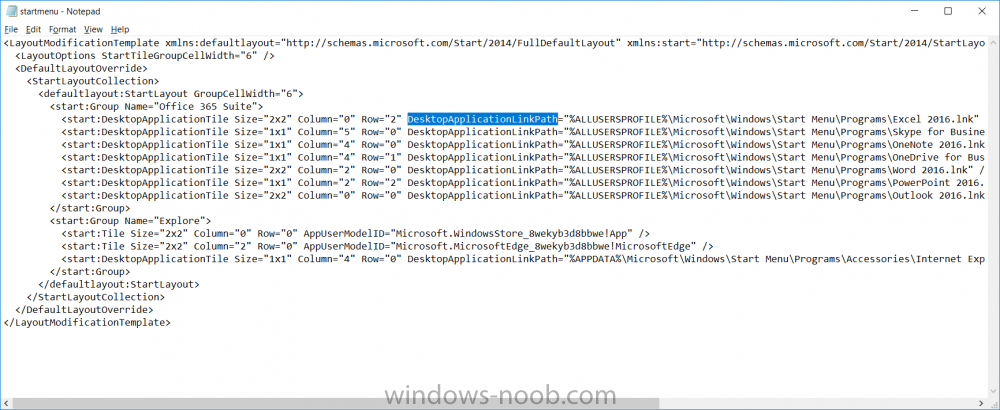
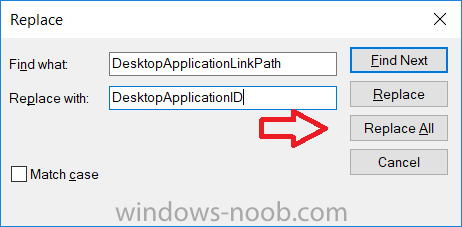
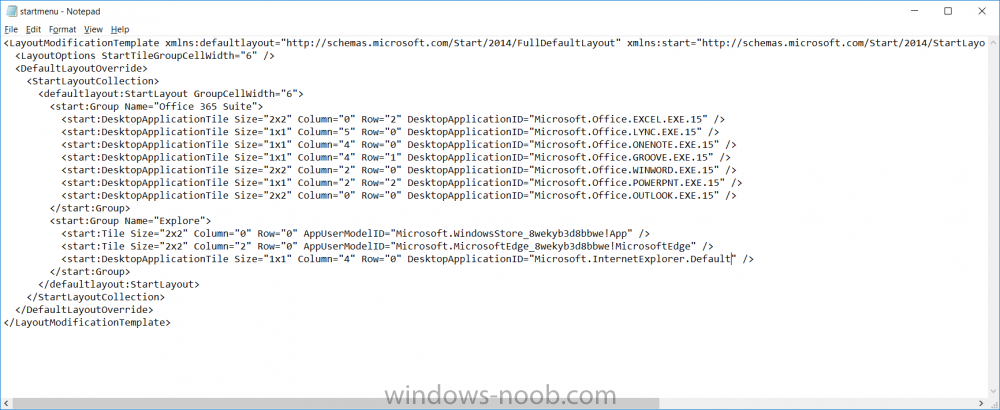
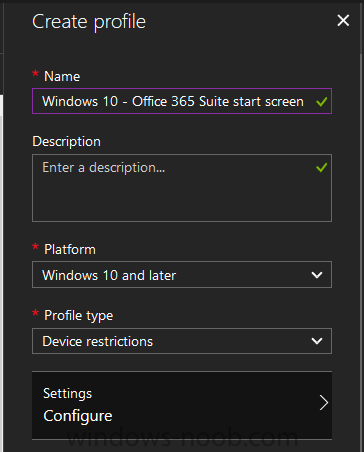
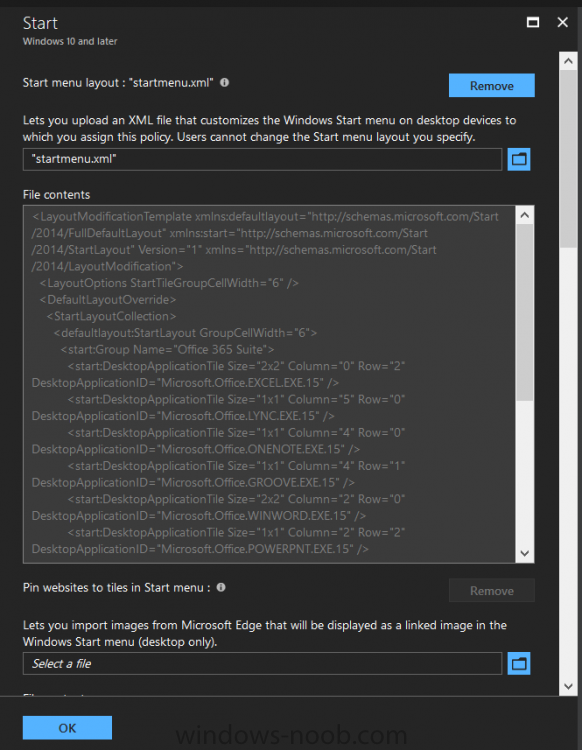
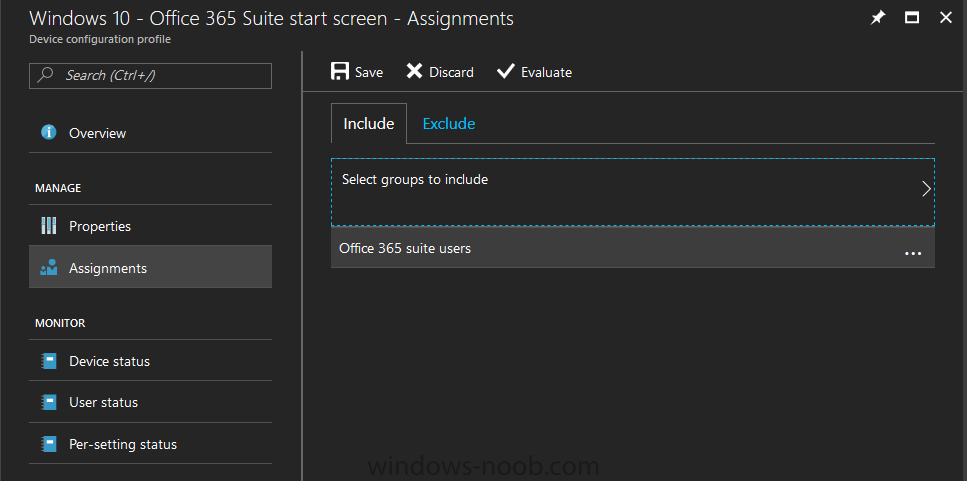
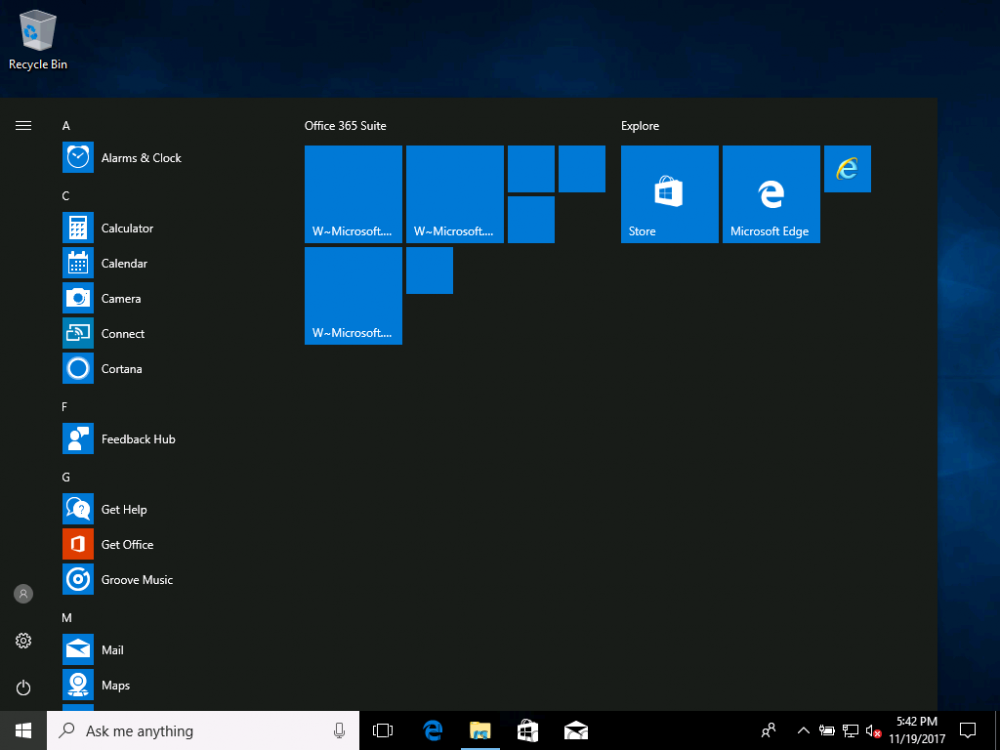
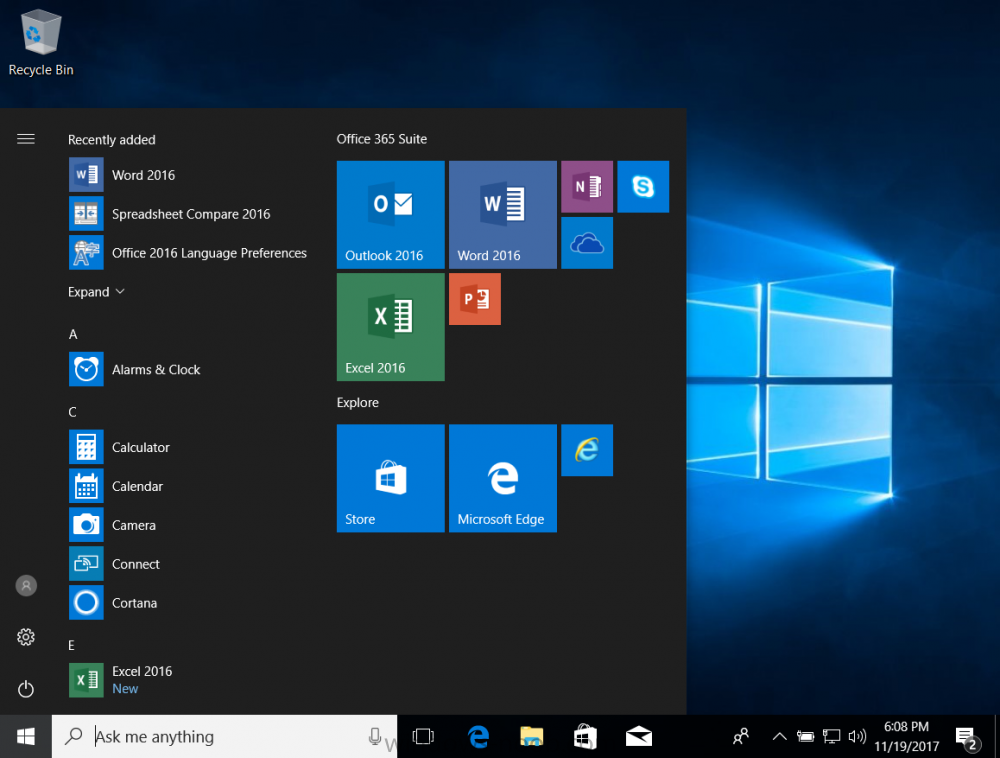
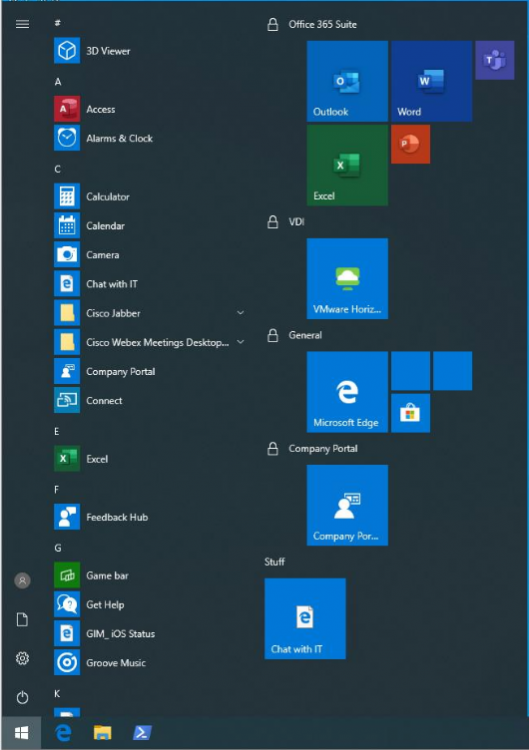
Introduction I've been doing a lot of testing with Windows AutoPilot recently (blog post coming soon), and as part of that testing, I wanted my Windows 10 version 1709 (Fall Creators update) devices to have a customized start screen (or start menu as people often refer to it) with some Office applications and device configuration profiles installed. The ability to customize the start menu in Windows 10 is nothing new but I ran into some issues with the process, as I was using a 32 bit version of the Office Suite so I thought I'd document the fix here. The issue I observed was that after creating the XML file, importing it into Intune and deploying it out to Windows 10 devices, instead of getting the Office icons in the start screen, they got blank boxes, and those boxes never populated with icons even after Office was installed. Some internet searching and digging found the answer but it wasn't that clear what you had to do, hence this guide. A newly installed Windows 10 version 1709 start menu can look quite a consumer oriented mess, such as the one shown below. This is definitely not what you want to see in your Enterprise. In this post you will deploy the Office 365 suite to Windows 10 version 1709 devices and then customize the start menu before capturing it to an XML file, editing the XML file and then deploying it using Intune. Note: When a full Start layout is applied with this method, the users cannot pin, unpin, or uninstall apps from Start. Users can view and open all apps in the All Apps view, but they cannot pin any apps to Start. When a partial Start layout is applied, the contents of the specified tile groups cannot be changed, but users can move those groups, and can also create and customize their own groups. Step 1. Configure the Office 365 suite in Intune (optional) Customizing a start menu makes sense in an Office environment particularly when your users expect their Office apps are easy to reach. But before you can do that you'll configure Office to install on some Windows 10 devices. In the Intune service in Azure, click on Mobile Apps, and then select Apps. Click on + Add and then select Office 365 Suite and Windows 10. Click on Configure App Suite, make your selections and click OK Next click on App Suite Information, fill in the information and click ok. and next click on App Suite Settings, make your choices for Servicing (Office Updates) and Language options and click on OK then OK again. As I like to use WIP I have selected Monthly (targeted) to get the latest versions of office quickly. Note: When choosing whether you want to assign the 32-bit, or 64-bit version of Office. You can install the 32-bit version on both 32-bit, and 64-bit devices, but you can only install the 64-bit version on 64-bit devices. When done configuring click on Add. Next you need to Assign (deploy) the Office Suite to a group of users by clicking on Assignments. After clicking on Assignments, select a Group of users, then select the type of assignment, in this case I choose Required so that it is automatically installed. Click on Save when done. For more info on Configuring the Office 365 Suite in Intune see https://docs.microsoft.com/en-us/intune/apps-add-office365 Step 2. Customize the start menu on a Windows 10 device On an enrolled Windows 10 device, login as a user that is targeted with the Office 365 Suite assignment created in Step 1, and wait until the Office 365 suite has deployed. You can verify this in Intune using the App install status for the user (or device) by selecting the app in Monitor, App Install Status. Once the Office 365 Suite is installed, start customizing the Start menu by unpinning unwanted apps by right clicking on an app you want to remove, and choosing Unpin from Start. After you've unpinned all the apps you want removed, it's time to pin your Office apps, to do that, highlight an Office app, right click and choose Pin to Start. repeat the above until you have all the apps you want to appear on the start screen, in the size and location of your choice. Give the Office group a name by typing text above it. After you are done you'll have a finished start screen something like this one. Step 3. Export the start screen Start PowerShell as Administrator on the device with the customized start screen. Export the start screen using the following command Export-StartLayout -path C:\startmenu.xml Note: If the Start layout that you export contains tiles for desktop (Win32) apps or .url links, Export-StartLayout will use DesktopApplicationLinkPath in the resulting file. Use a text or XML editor to change DesktopApplicationLinkPath to DesktopApplicationID. See Specify Start tiles for details on using the app ID in place of the link path. As you selected Office 365 Suite with 32 bit architecture, you'll need to modify the XML file otherwise no Icons will appear on the users start screen. But before doing that you'll need to identify the DesktopApplicationID for each Office App in the start screen. To do that, list the start apps using Get-StartApps cmdlet. Now that you have the info needed, you can modify the XML file. Using notepad or an XML editor, open the file C:\StartMenu.xml Replace all instances of DesktopApplicationLinkPath with DesktopApplicationID. Next, replace the DesktopApplicationLinkPath text eg: "%ALLUSERSPROFILE%\Microsoft\Windows\Start Menu\Programs\Excel 2016.lnk" for each office app, with the correspoonding AppID from the Get-StartApps cmdlet eg: "Microsoft.Office.EXCEL.EXE.15" Here you can see the modified xml file. Save the modified file to your Desktop. Here is a copy of the modified file for your information. startmenu.xml Step 4. Create a device configuration profile in Intune In Intune in Azure, click on Device Configuration, click on Profiles and then click on + Create Profile. In the Create Profile blade, give it a suitable name such as Windows 10 - Office 365 suite start screen (so you can easily search for it later) and choose Windows 10 and later as the platform and then select Device restrictions. For Settings, click on Start (from the options available, scroll down) and then select the previously created XML file. There are many more settings which you can configure in the Start settings, but for now, this is all you will configure. Click on OK when done, then click OK again, and finally click Create. Next, you need to Assign the device restriction, so click on Assignments and assign it to the User Group that you deployed Office to, in this case, the Office 365 suite users group. Click on Save when done. Step 5. Review the end result On a Windows 10 version 1709 device sign in with credentials of a user that is in the Office 365 Suite users Group. If you login immediately after enrolling, then the Office 365 suite will not yet be installed, but it will have pulled down the policies including the custom start screen, it will look like so... This is expected behavior and all the user has to do is wait until Office 365 get's installed (12 minutes or so). The icons will automatically appear as soon as each app is installed. And here it is, job done ! Note: This method leaves a custom start menu but the user cannot change the tiles or add to the start menu, if you want them to have that ability then change <DefaultLayoutOverride> to <DefaultLayoutOverride LayoutCustomizationRestrictionType="OnlySpecifiedGroups"> Notice how the pinned items that you've defined will have a lock on them but the user can add/remove other items. Recommended reading https://docs.microsoft.com/en-us/intune/apps-add-office365 https://docs.microsoft.com/en-us/windows/configuration/customize-windows-10-start-screens-by-using-mobile-device-management https://docs.microsoft.com/en-us/windows/configuration/customize-and-export-start-layout#customize-the-start-screen-on-your-test-computer https://docs.microsoft.com/en-us/windows/configuration/start-layout-xml-desktop#specify-start-tiles https://www.windows-noob.com/forums/topic/15773-how-can-i-enable-mdm-auto-enrollment-for-microsoft-intune-in-azure/


-
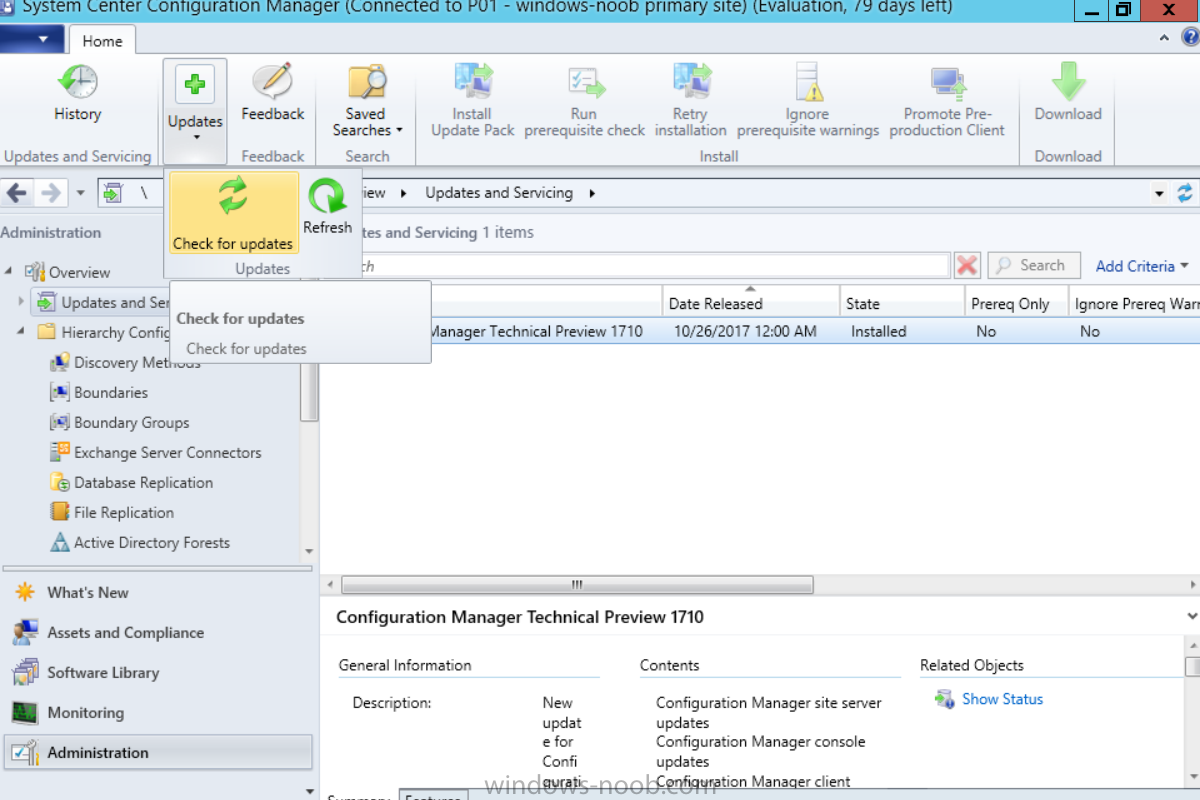
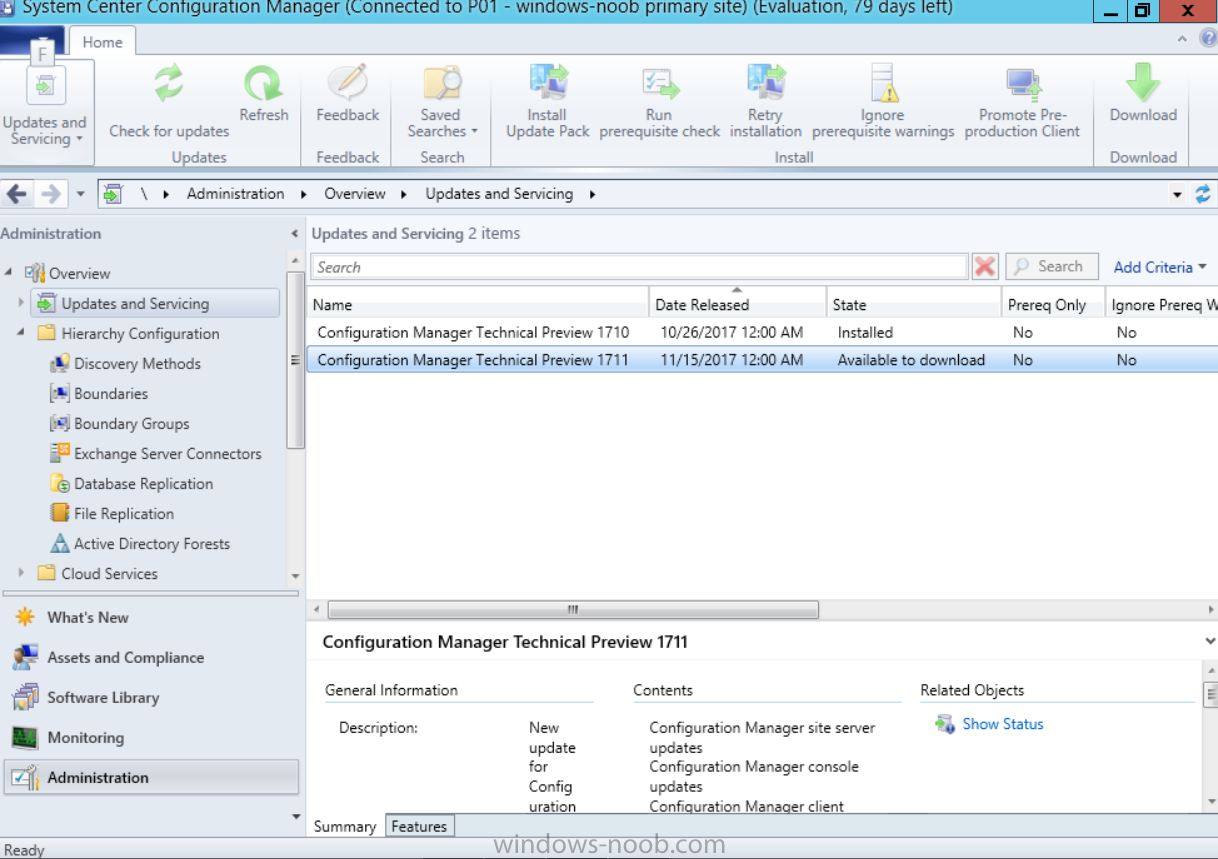
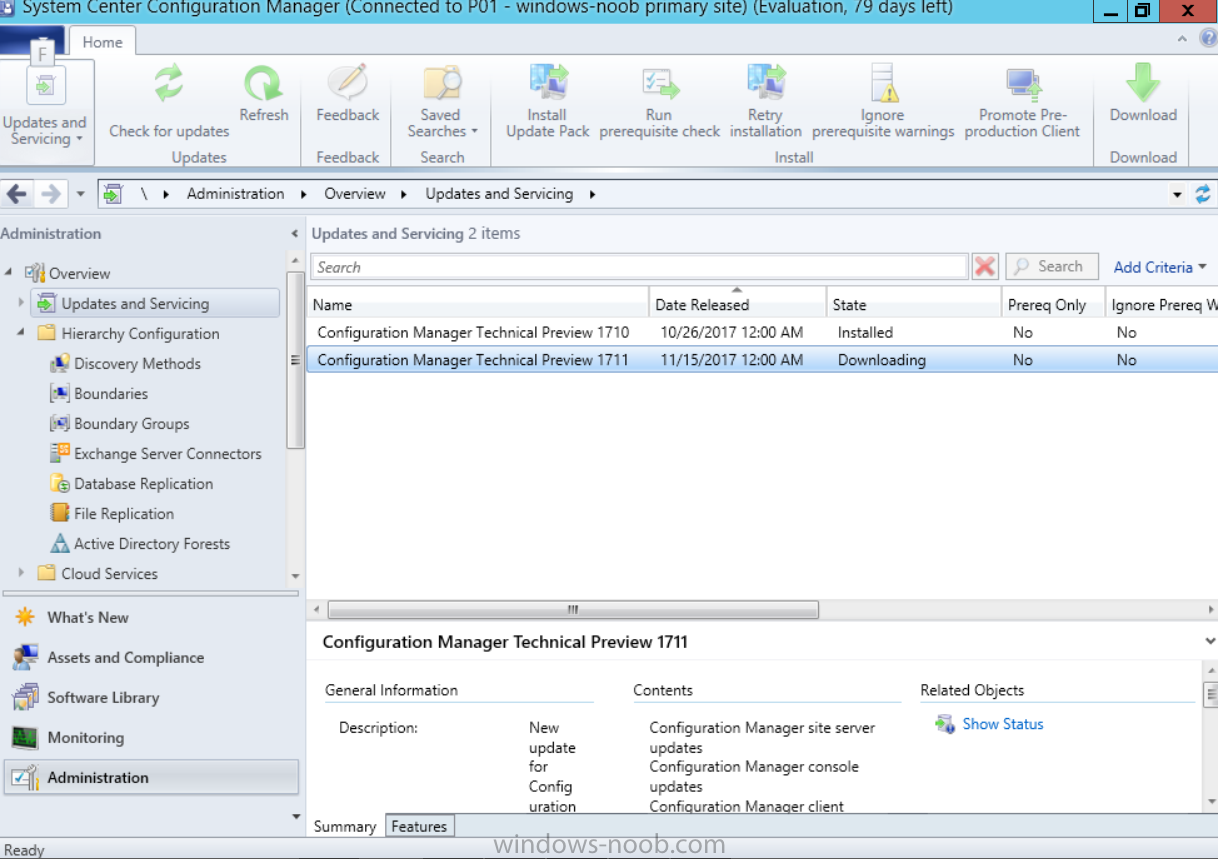
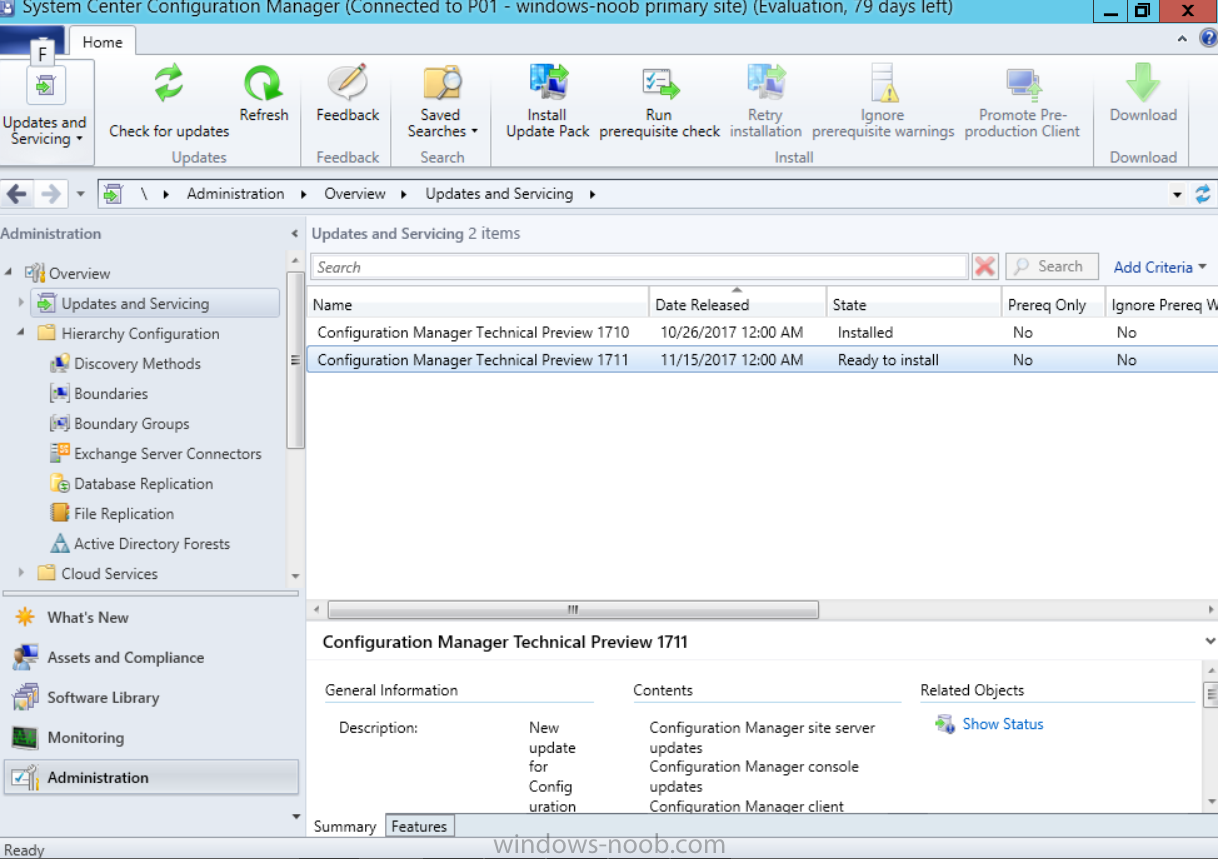
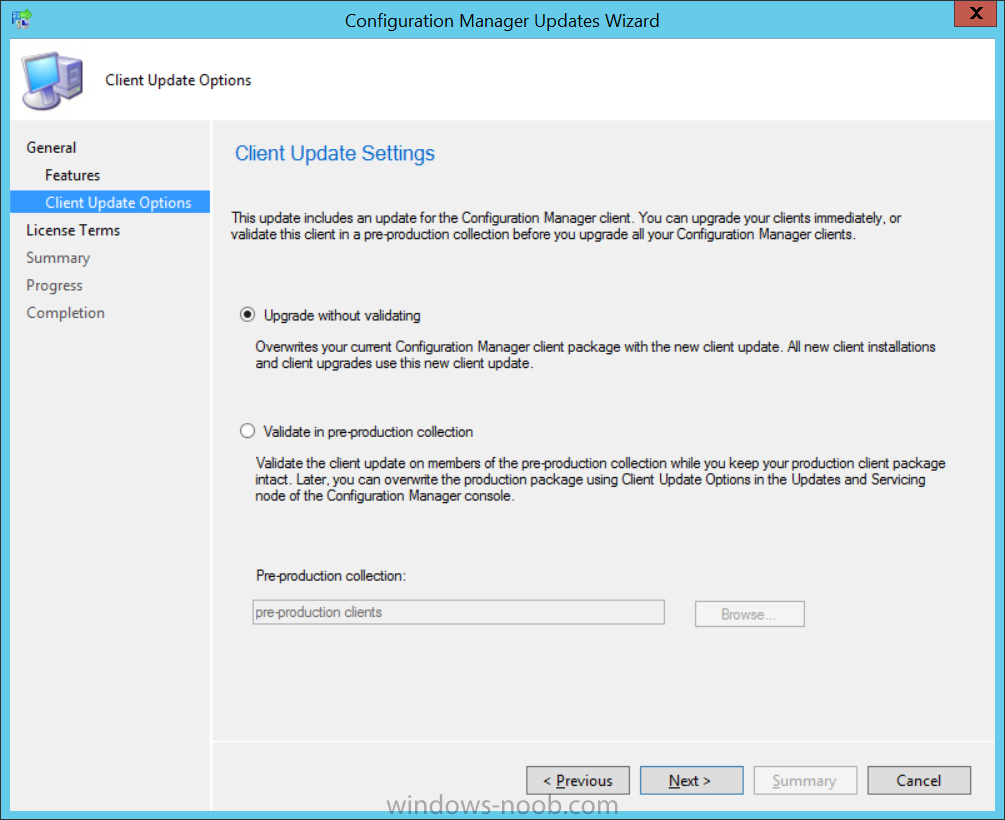
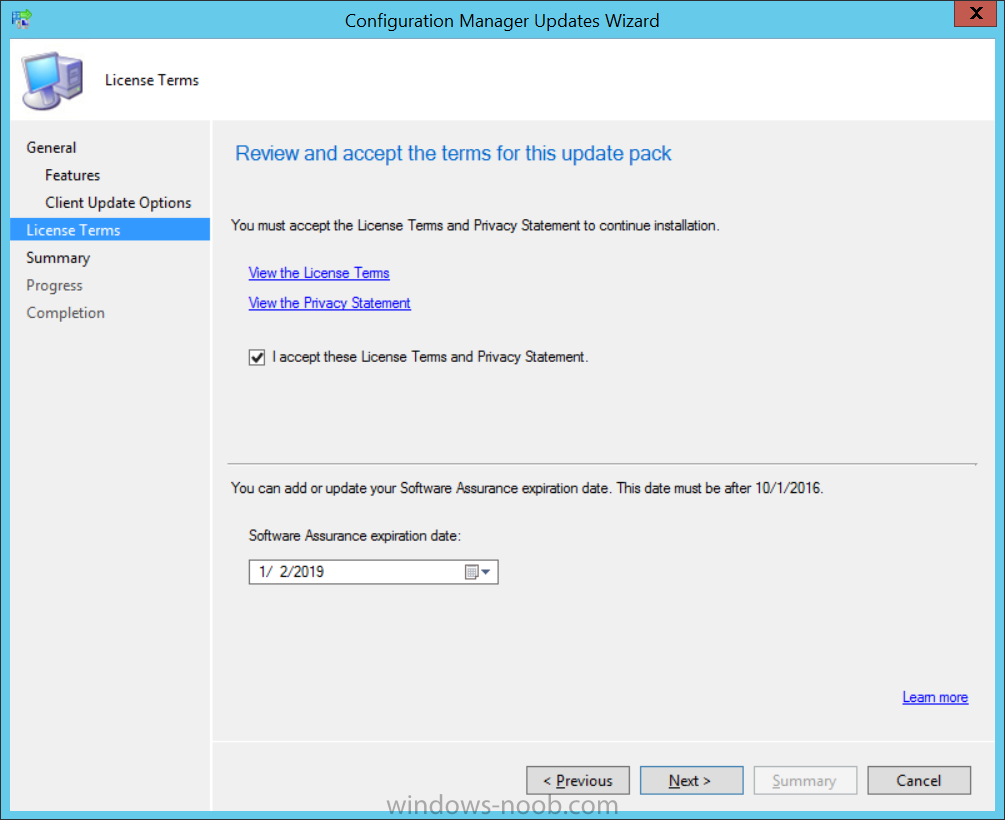
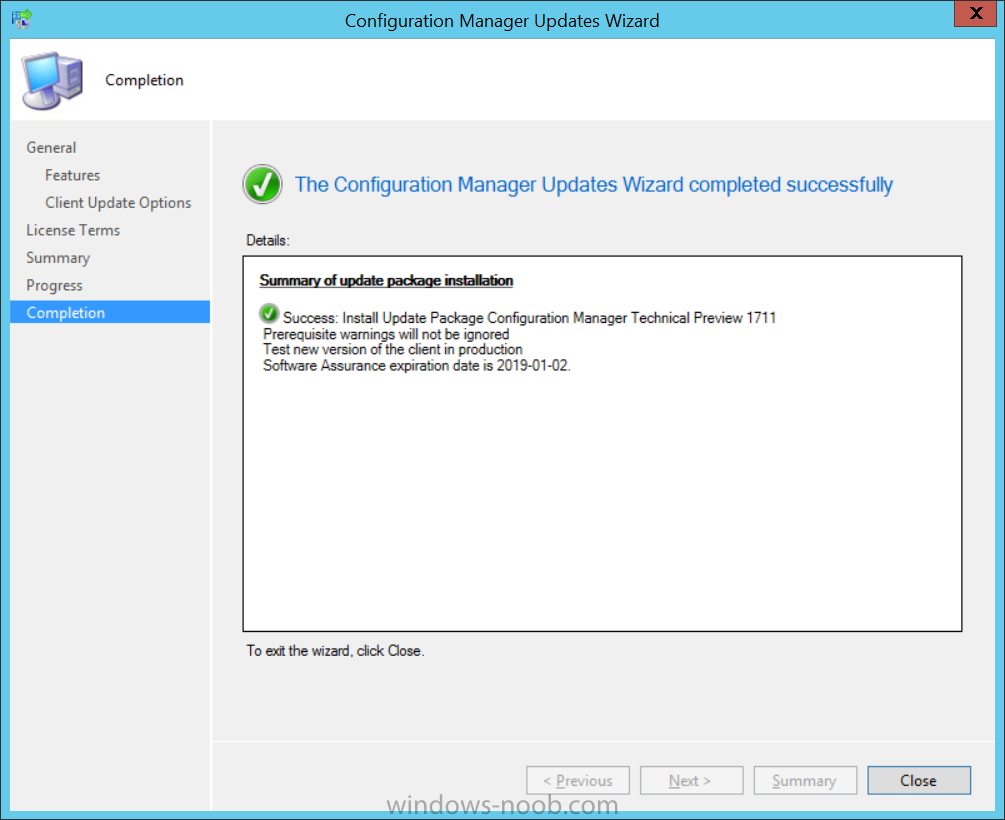
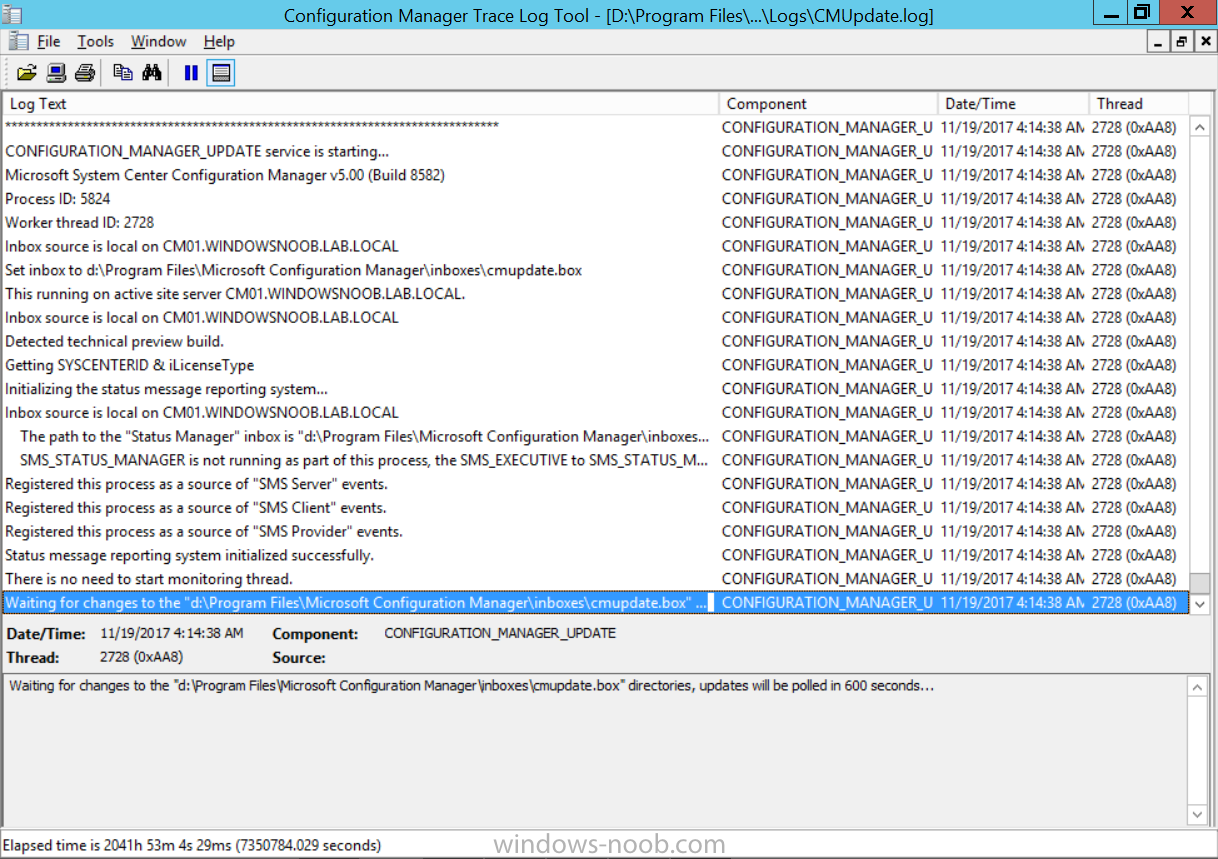
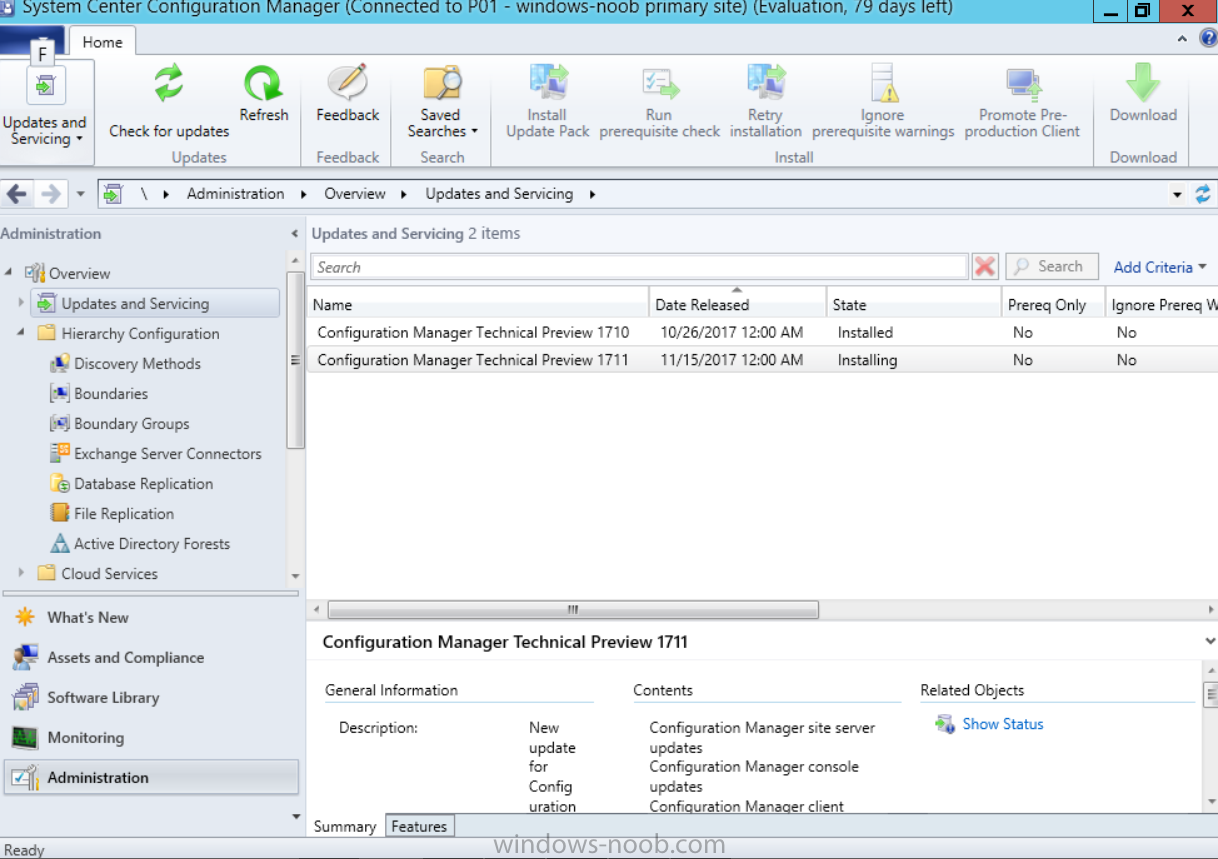
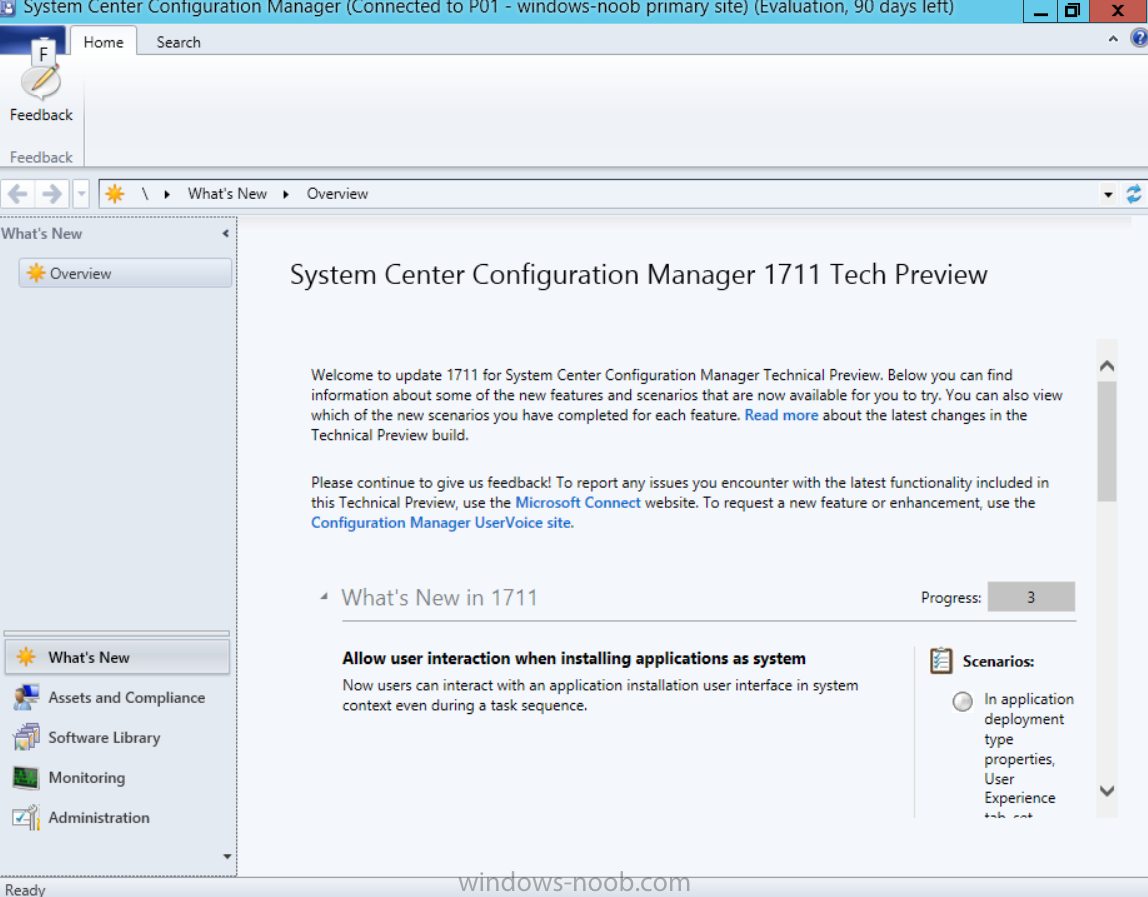
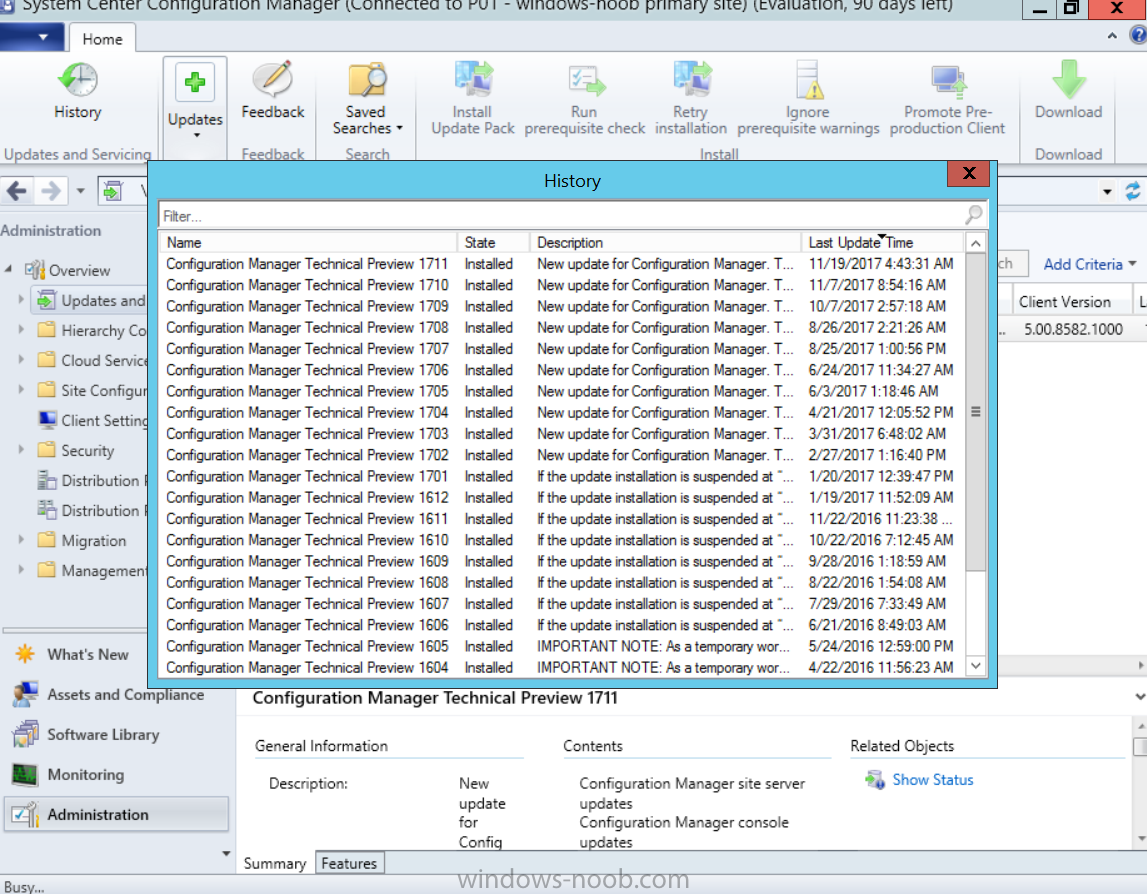
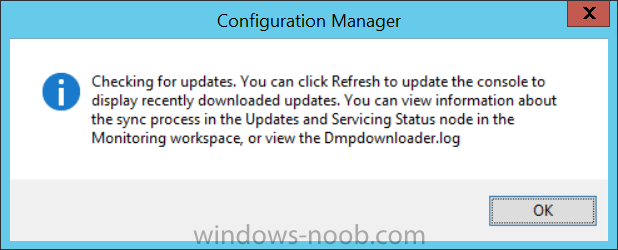
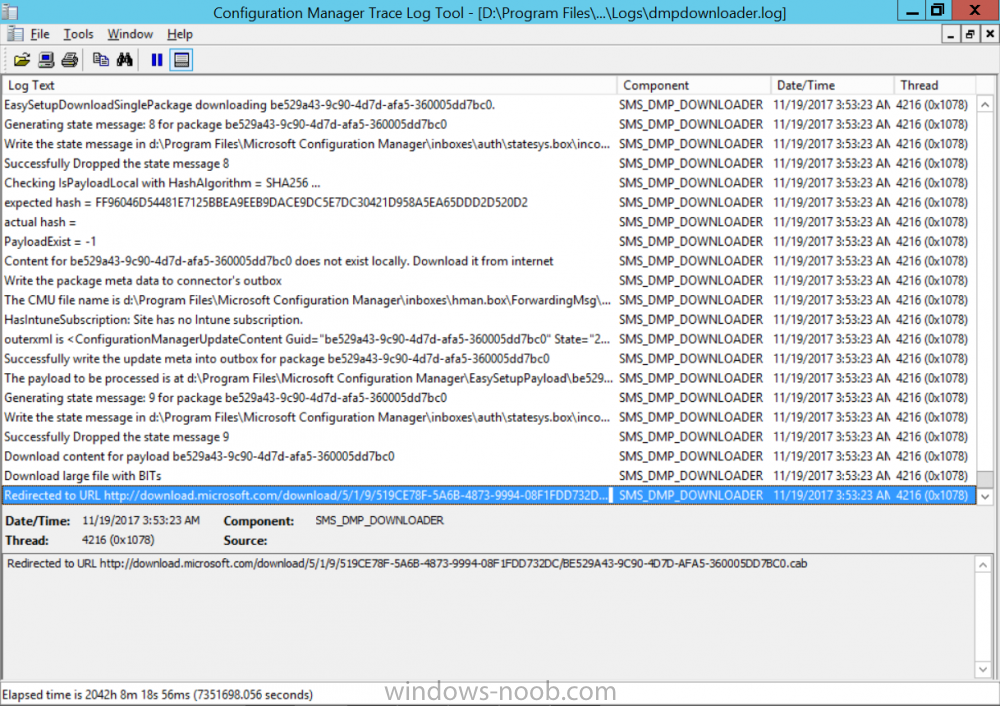
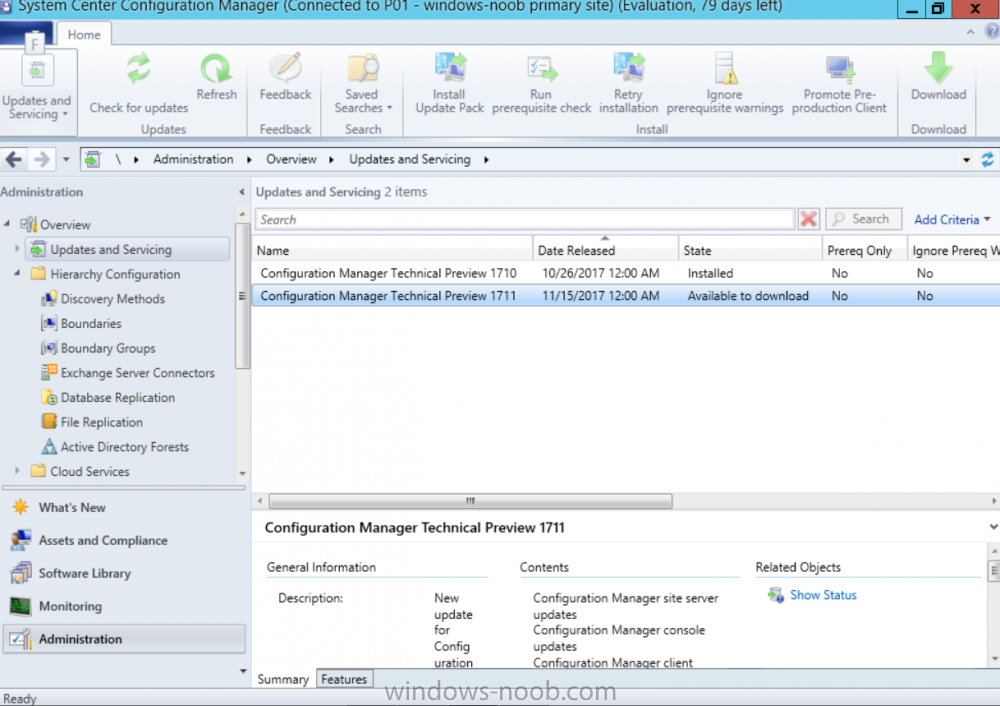
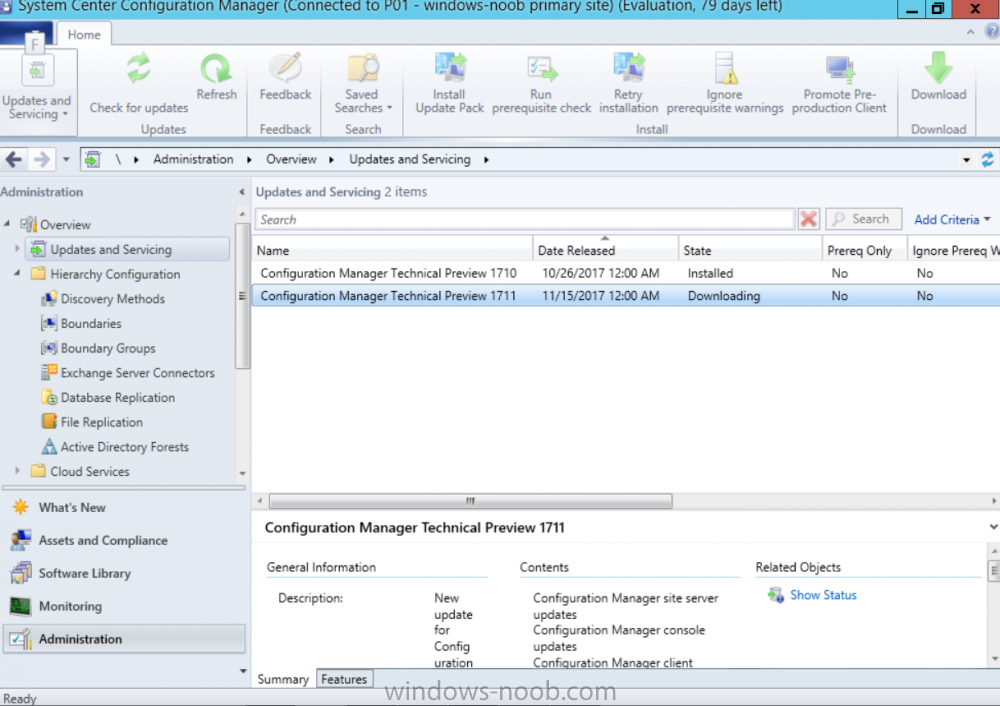
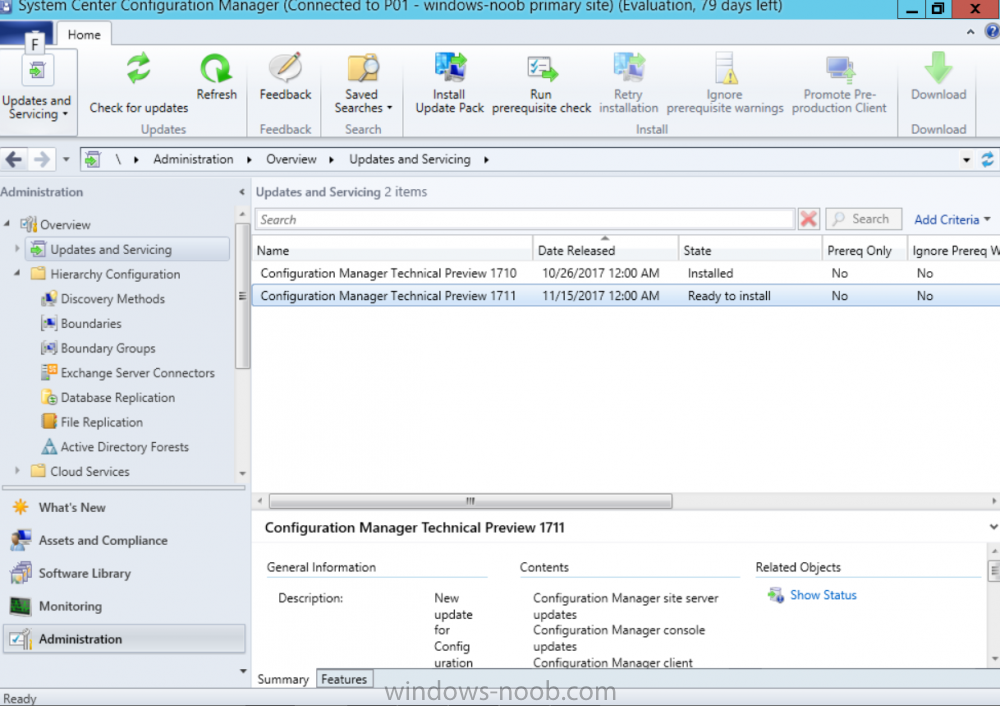
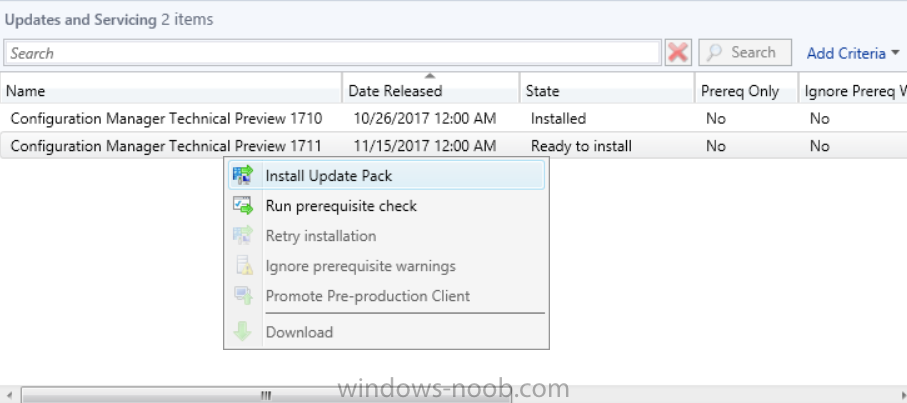
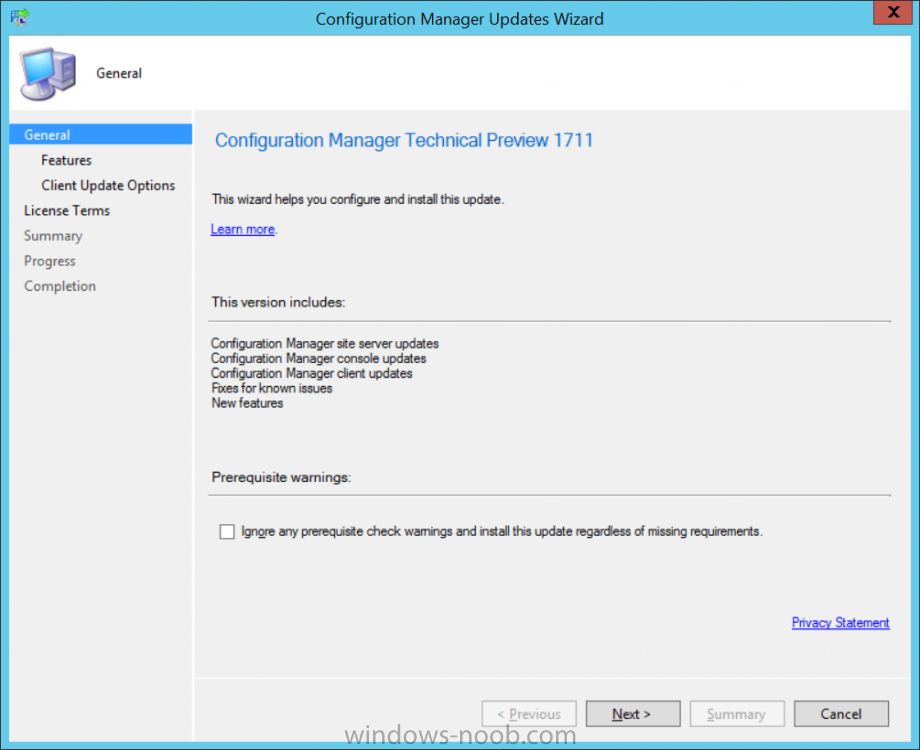
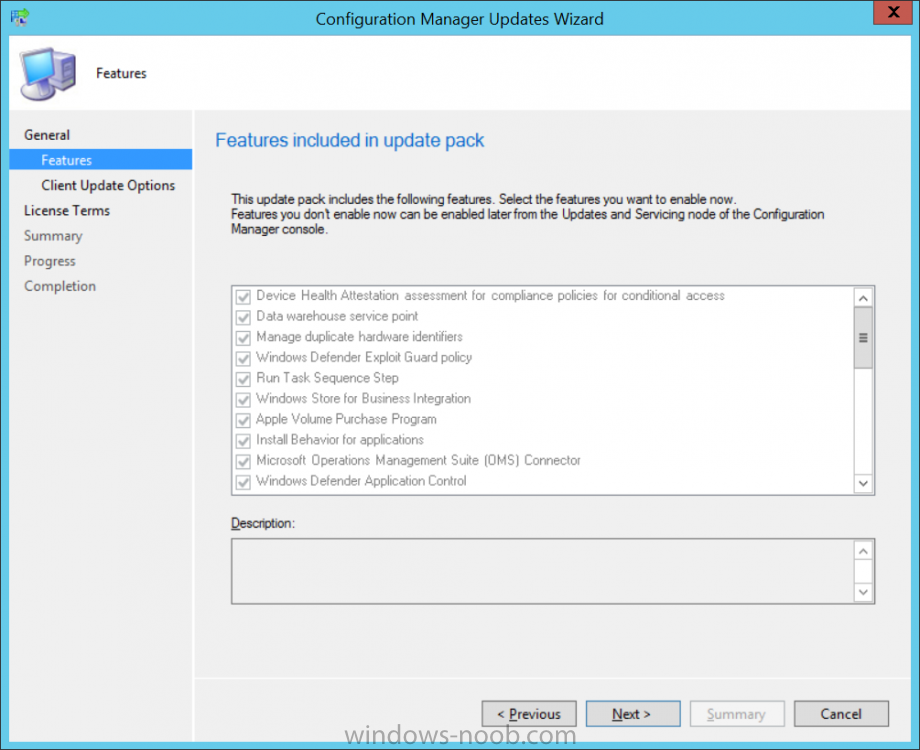
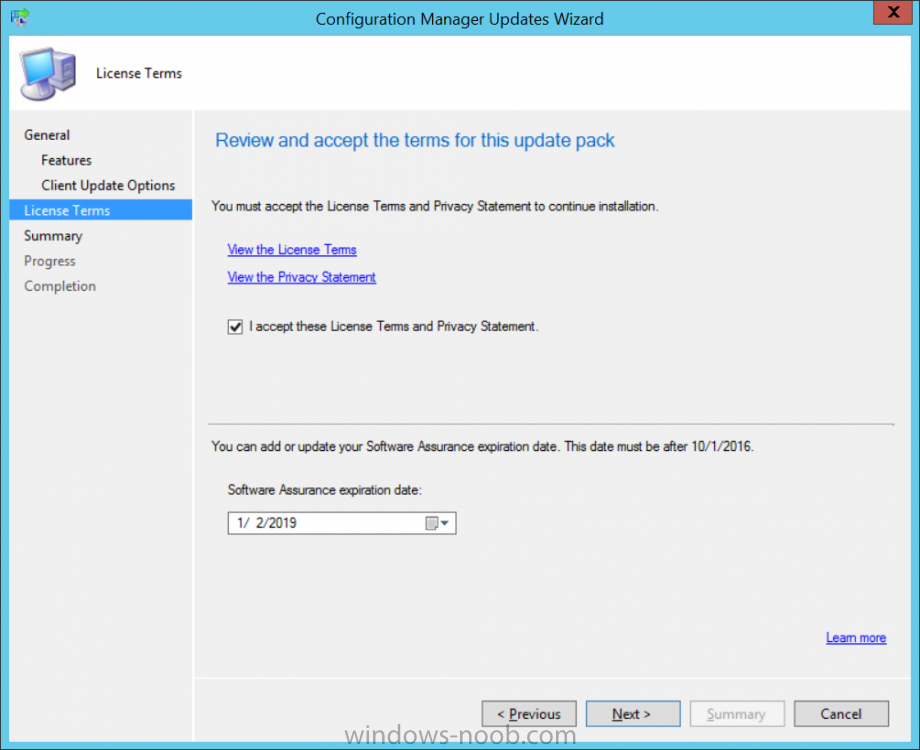
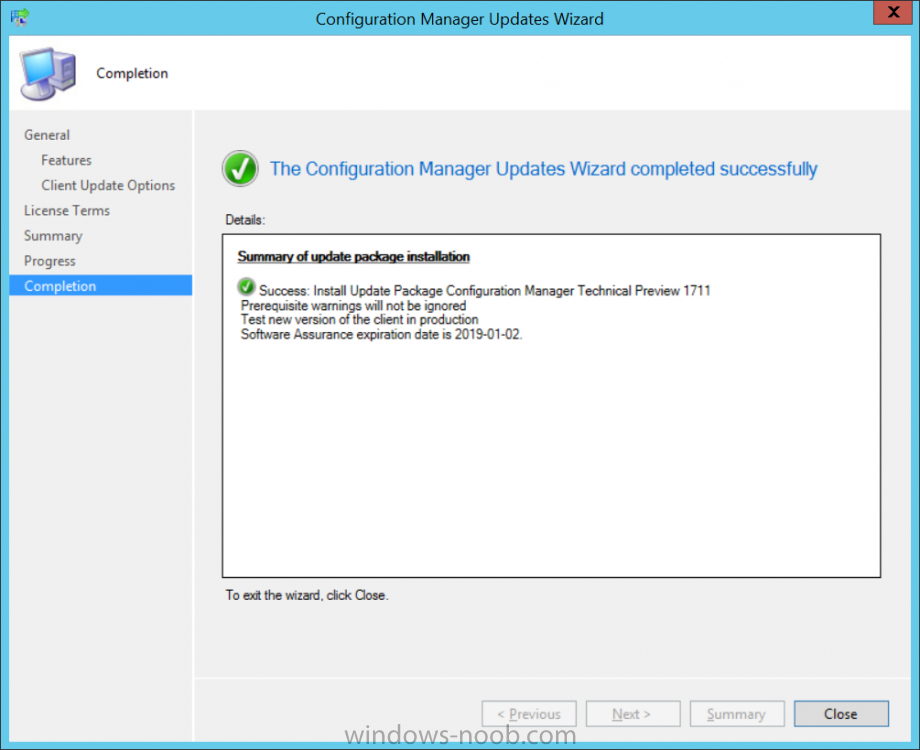
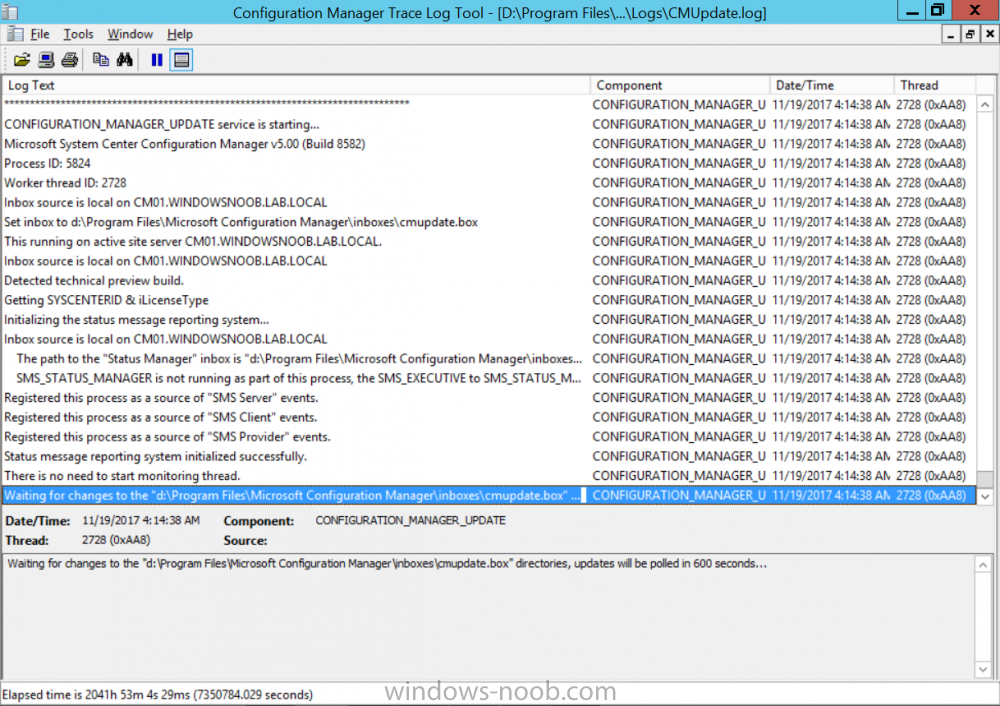
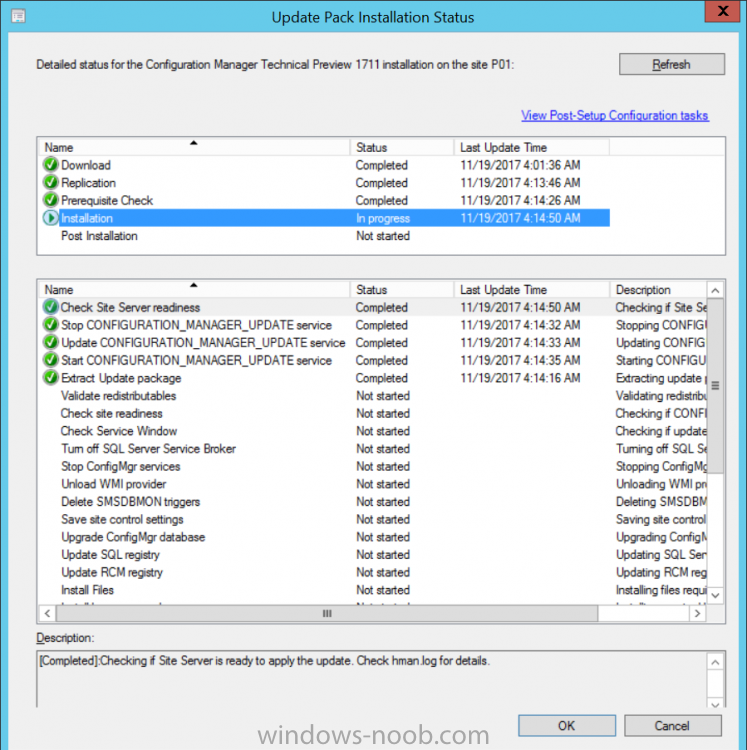
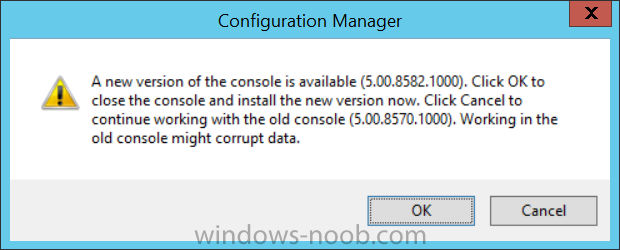
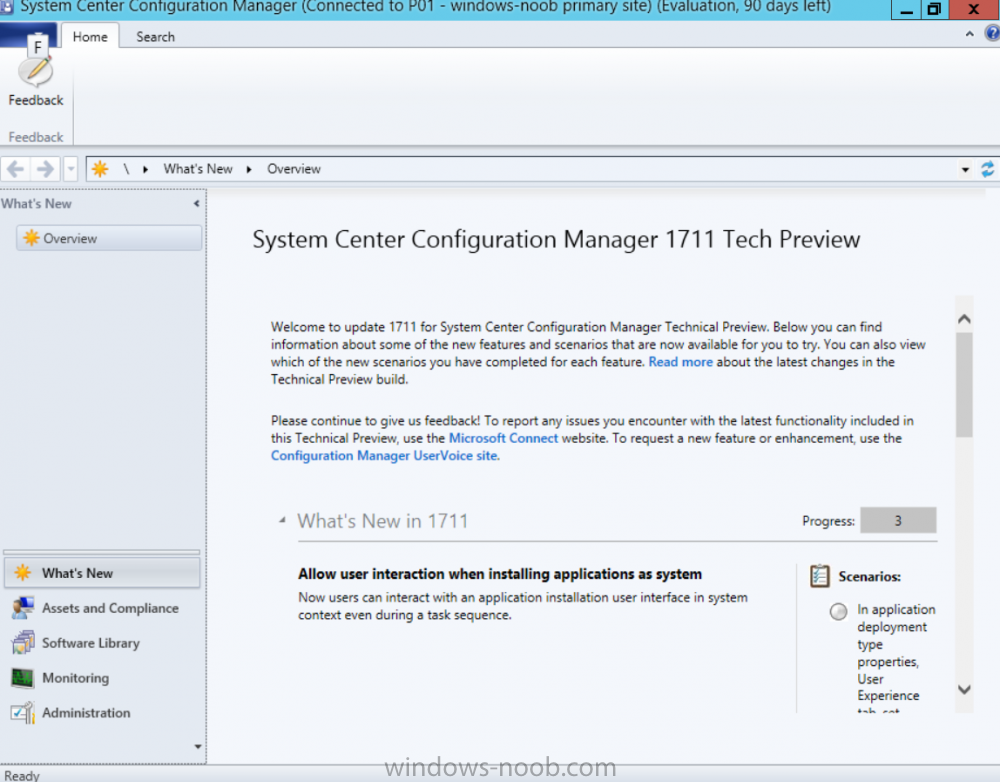
Introduction Microsoft (together with a bunch of Microsoft MVP's in Seattle) have released the latest Technical Preview release of System Center Configuration Manager namely System Center Configuration Manager Technical Preview 1711. There are two main versions (of Configuration Manager) available: System Center Configuration Manager (Current Branch) System Center Configuration Manager (Technical Preview) System Center Configuration Manager (Current Branch) is designed for use in production, for managing anything from small to very large Enterprises whereas System Center Configuration Manager (Technical Preview) is for lab environments only and is limited to 10 clients. The Technical Preview releases are released monthly, and contain the latest and greatest features being trialed in the product, and usually these new features are the result of feedback from uservoice. Current Branch releases on the other hand are released only a few times per year and contain stable, tested features that are mature enough to release into production environments. System Center Configuration Manager Technical Preview 1711 is now available. This release offers the following new features: Run Task Sequence step – This release includes improvements to the new Run Task Sequence step, which runs another task sequence creating a parent-child relationship between task sequences. See the online documentation for more details about the improvements. This is currently the feature with the third highest number of votes on UserVoice Allow user interaction when installing applications as system – Now users can interact with an application installation user interface in system context even during a task sequence. This feature is a popular request on UserVoice. This release also includes the following improvement for customers using System Center Configuration Manager connected with Microsoft Intune to manage mobile devices: New options for compliance policies – You can now configure new options for compliance policies for Windows 10 devices. The new settings include policies for Firewall, User Account Control, Windows Defender Antivirus, and OS build versioning. Installing this release So how do you get Technical Preview installed ? There are two methods: Upgrade from a previous installation of Technical Preview (as shown in this guide). Do a clean install of Technical Preview 1703 (the latest TP baseline) by using the following guide and replace the base version in that guide with the TP1703 release and then upgrade. Upgrading to this release Once you have a Technical Preview release installed, in the Configuration Manager console browse to Administration, Overview, Updates and Servicing as shown below. Click on Check for Updates (in the ribbon) Next, click on the OK button. After refreshing the console, you can see the update is available. As instructed, if you want more details about what’s happening, you can read the DMPDownloader.log available in <drvletter>:\Program Files\Microsoft Configuration Manager\Logs, you can use CMTrace to do so. And refresh the console by clicking on the Refresh icon in the ribbon, you should see the update pack is downloading, and once it is downloaded the state will change to Ready to Install. Installing the update Right click the update and choose Install update pack. A wizard appears. Click Next. the Features included in the update pack will be listed. Select your client update settings and click Next accept the EULA and configure the software assurance expiration date and click through to the completion Monitoring the Upgrade At this point you should monitor the CMUpdate.log available in <drvletter>:\Program Files\Microsoft Configuration Manager\Logs, you can use CMTrace to do so. This log will detail the installation of the update pack. You should also pay attention to the following log files present in the root of C:\. CompMgrProv.Log ConfigMgrPrereq.log ConfigMgrSetup.log and after refreshing the console, the state of the update pack will change to Installing. Clicking on Show Status will give you detailed info about the state the Installation is in, it is broken down into 5 distinct phases in the top pane: Download Replication Prerequisite Check Installation Post Installation Selecting a phase will highlight what state the update is in, including what (if any) problems it has. And after a while it should progress through to the Post Installation phase, And after refreshing the console you’ll be informed that a new version is available namely version 5.00.8582.1000. and after a while the new console is installed. After Installing this version, you can check your Upgrade history by navigating to the Updates and Servicing node, and clicking on History in the ribbon. Related reading https://docs.microsoft.com/en-us/sccm/core/get-started/capabilities-in-technical-preview-1711 https://cloudblogs.microsoft.com/enterprisemobility/2017/11/17/update-1711-for-configuration-manager-technical-preview-branch-available-now/


-
should be no problem with SCCM current branch, have you tried that ?
-
The CM12 UEFI BitLocker Frontend HTA - Part 1. The features.
anyweb replied to anyweb's question in Frontends, HTA's and Web Services
hi, all you have to do is mount the boot wim with DISM, inject the file (copy it) and then unmount the boot wim, i'll post an example if you need -
you might also want to checkout this post, for the next time
-
I'd go with one server, it's much easier to manage, but refer to the following link before deciding what is appropriate for your organisation https://docs.microsoft.com/en-us/microsoft-desktop-optimization-pack/mbam-v25/mbam-25-planning-checklist
-
and as regards your new error it could be related to anything, for example what version of the ConfigMgr client are you installing ? stick with it, you'll get it working the error you are seeing ( Failed to create an instance of COM progress UI object. Error code 0x80040154 means... Class not registered Source: Windows ----- why, I do not know... but check your ConfigMgr client agent version for starters...