anyweb
-
Posts
9266 -
Joined
-
Last visited
-
Days Won
371
Everything posted by anyweb
-
 there's two way's to look at Intune, standalone (cloud based) or hybrid (mixture of SCCM on premise and cloud based backend) so for your needs you can do both, there are free trials available just sign up !
 -
works fine for me, what happens when you click on it ?
-
Now... i'm sometimes using a standalone image, using the same boot image, is there a way in the script to detect it (or prestaged media) and bypass the network detection in this case? can you expand on this please ?
-
so you are setting this up in Server 2016 or ? where are the upgrades missing exactly, in WSUS or in the SUP ?
-
hi Alv2005 can you email me your cmupdate.log and any additional details and i'll see what i can find out cheers niall
-
well Windows 10 WSUS requirements are listed here https://docs.microsoft.com/en-us/windows/deployment/update/waas-manage-updates-wsus Requirements for Windows 10 servicing with WSUS To be able to use WSUS to manage and deploy Windows 10 feature updates, you must have WSUS 4.0, which is available in the Windows Server 2012 R2 and Windows Server 2012 operating systems. In addition to WSUS 4.0, you must install the KB3095113 and KB3159706 patches on the WSUS server. so have you fulfilled those requirements ?
-
what version of WSUS have you installed and what operating system ?
-
New SCCM 1702 Setup Issue
anyweb replied to day79's topic in System Center Configuration Manager (Current Branch)
this is the first failure [15:26:59] Removing IIS Virtual Directory 'SMS_MP_WindowsAuth' [15:26:59] Method 'DeleteExtensionFileRecord' failed with 80020009 and that error means Exception occurred. Source: Windows ----- does that help ? -
New SCCM 1702 Setup Issue
anyweb replied to day79's topic in System Center Configuration Manager (Current Branch)
what does mpMSI.log say ? -
so just to be clear, are you using my guide above or are you doing this your own way, if so, please raise a separate topic thanks
-
SCCM 1702 bug to be aware of
anyweb replied to Config Mangler's topic in System Center Configuration Manager (Current Branch)
i'm not sure if this weekends hotfix will fix this problem but check your Updates and Servicing node.... -
heh, interesting observation, but to be honest, this is in the interest of protection your details, your info, your account, so you should understand that it's important that your password is a decent one, security today, is very important as the recent ransomware news made all to clear
-
the basic troubleshooting steps would be to start reading the logs on the site server and check component status.
-
Deployment for computers with no monitors
anyweb replied to Glowbeard's question in Windows Deployment Services (WDS)
id personally use MDT (with WDS) to install those machines easily, and then the machines themselves would be hyperv VM's, there's a bunch of guides right here to start setting that up, such as this one. -
here's what I found http://lmgtfy.com/?q=troubleshooting+document+for+sccm+primary+site but seriously, your request is vague, if you have an actual issue, then post detailed info about the problem, what you've tried to do to fix it and i'm sure someone will help if they can cheers niall
-
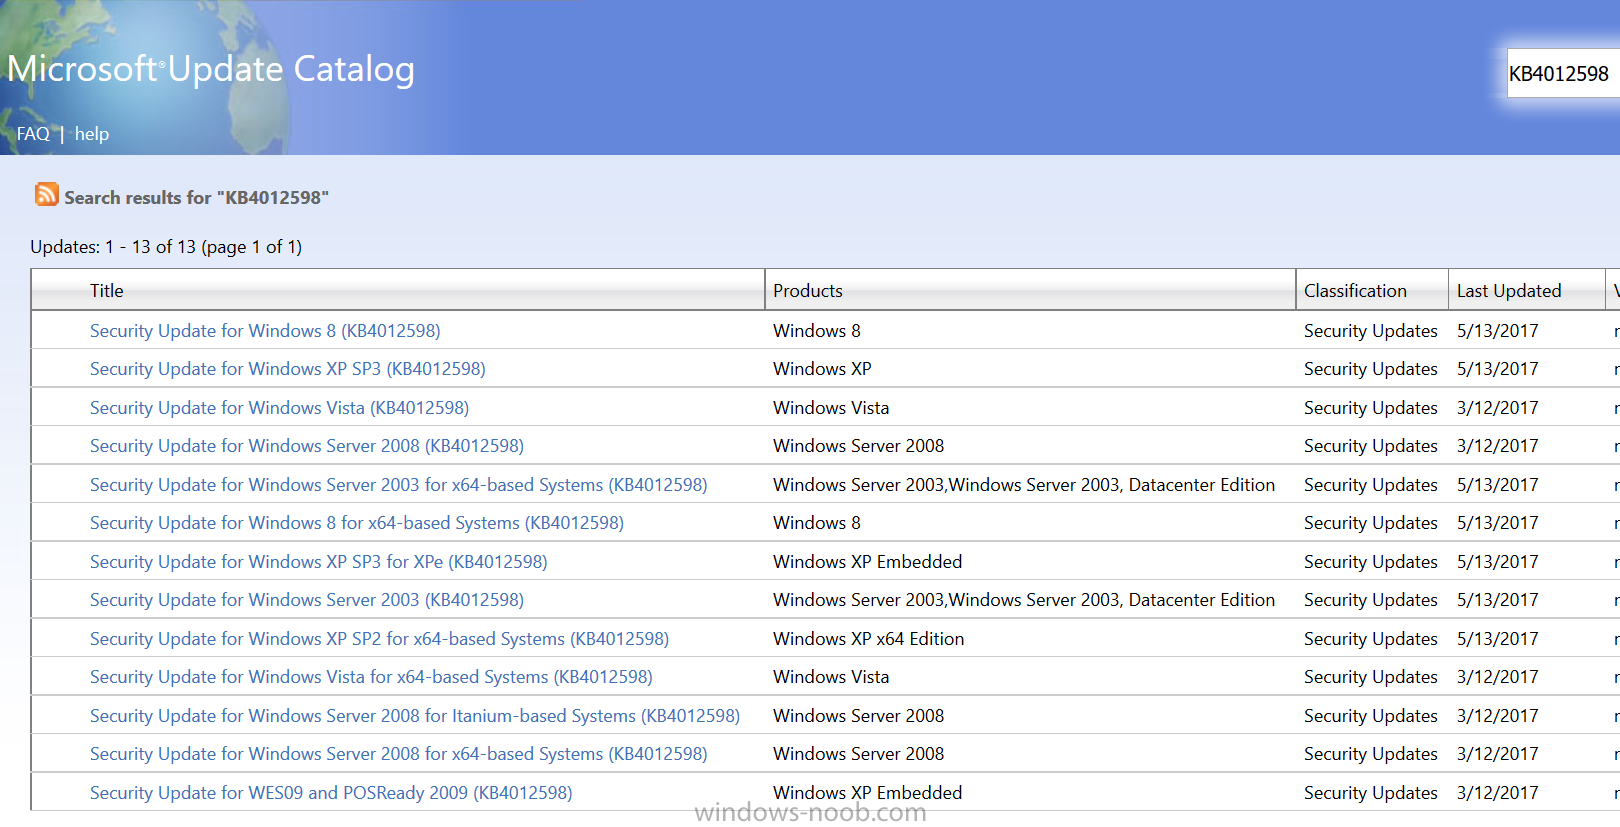
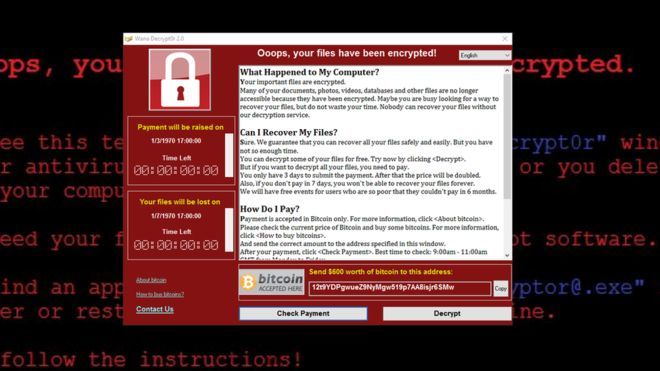
Ransomware has been around for a few years now but up until yesterday, it wasn't that well known about. This latest RansomWare called WannaCry has changed that for ever. Ransomware encrypted data on at least 75,000 systems in 99 countries on Friday. Payments were demanded for access to be restored. European countries, including Russia, were among the worst hit. Companies around Europe were hit and investigations are underway to see who was responsible. This was such a big attack that Microsoft released patches for unsupported operating systems (such as Windows XP) to allow those businesses still running them, a chance to protect themselves. Guidance available In addition to making patches available, Microsoft has published guidance to explain what is necessary in protecting yourself against this Ransomware and any others based on the same vulnerabilities (SMBv1). These vulnerabilities were patched by Microsoft in March of this year, but of course there were no patches (at that time) for unsupported operating systems such as Windows XP. Download Patches for unsupported Operating Systems To patch your unsupported operating systems, get over to this url and download the available patches. WannaCry has multiple vectors, but you should remove one vector, SMBv1. Do as follows 1. Block 445 inbound 2. Install MS17-010 3. Remove SMB1
-
Client Install Issues
anyweb replied to Jordanwaller's topic in System Center Configuration Manager (Current Branch)
what does the ccm.log tell you (on the server), attach it here if you want us to look at it -
hi Eric, what does your execmgr.log reveal ? also, if you find tsagent.log does that have errors ? can you also attach the 3 logs generated by the script in C:\ProgramData
- 242 replies
-
- 1
-

-
- 1702
- forced upgrade
- (and 2 more)
-
SCCM Content Library Cleanup
anyweb replied to Scottpowers82's topic in System Center Configuration Manager (Current Branch)
if you create a log file using this switch does it reveal anything ? /log <log file directory> (optional) — the directory to place log files in. Can be a network share. If not specified, the temp folder is used. https://www.niallbrady.com/2017/01/24/what-is-the-contentlibrarycleanup-tool-and-how-can-i-use-it/ -
SCCM 1702 bug to be aware of
anyweb replied to Config Mangler's topic in System Center Configuration Manager (Current Branch)
does the problem only occur when importing Via PowerShell ? if so what's the problem, it will be fixed.. I've pinged Adam to ask when the rollup is coming.... -
so disable it in your lab, does the problem go away in the lab ?
-
if you disable the gpo does the problem go away ?
-
if you have teamviewer i can take a look