


Jump to content


anyweb

Root Admin
  • Posts

    9277
  • Joined

  • Last visited

  • Days Won

    371

Everything posted by anyweb

  1. don't forget windows-noob.com's guide here
  2. here :), no i'm kidding, i don't think it's necessarily documented anywhere but it's based on actually having seen the problem in production, what we did to get around it is what I've mentioned above, try it and see does it improve for you
  3. if you are NOT using eval (as in my example) then you need to add this section to the configuration.ini file [SABranchOptions] SAActive=1 CurrentBranch=1
  4. don't use copyprofile it breaks more things than it fixes, to configure the taskbar or start menu you need to decide which is more important as it's one or the other (at least it was when i last tested it), here's how to customize the start menu
  5. well that's up to you to test and verify, you can add pauses that timeout and continue by simply (for example) pinging localhost a certain number of times C:\Windows\System32\ping.exe -n 61 127.0.0.1
  6. It's not supported, so don't bother trying. If you want to deploy Windows 10 then you really need to consider moving to SCCM Current Branch, you can deploy Windows 10 up to version 1511 with SCCM 2012 R2 SP1 but that's it, to deploy any later versions (such as Windows 10 LTSB version 2016) you'll need Configuration Manager Current Branch, version 1606 or later
  7. for the next release of this guide (for SCCM 1702 or whichever release becomes the next baseline), i'll update the code then, thanks and feel free to add your contribs here or elsewhere in windows-noob, that's what it's all about
  8. this might be enough, please test Uninstall-WindowsFeature -Name Windows-Internal-Database -Restart
  9. WID is required, see the screenshot. You can try manually removing it and scripting that yourself but why worry you are not using it, wsus is using SQL for the DB
  10. mystery solved, when generating the XML i add WSUS via the server manager, and as part of that process it automatically adds required features including WID, see here
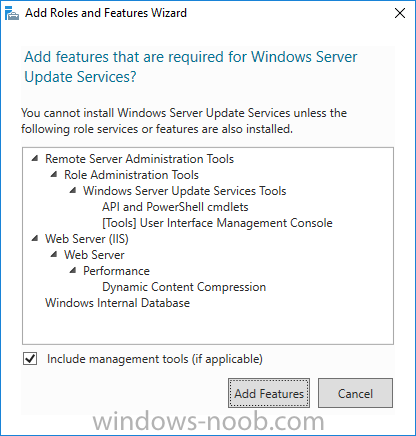
  11. good point, i see a reference to it in the wsus xml file but it still uses the SQL DB, and in my lab the wid services are not even running are they running on yours ? i'll see what i can find out in my lab...
  12. Introduction Microsoft have yet again released a new update, this time it's System Center Configuration Manager 1703 (Technical Preview). This is a quick post to highlight a detailed video I've just created and uploaded to youtube. The video shows the entire process from start to finish including Initiating the Upgrade Using CMTrace to review log files Checking status in the console Which logfiles to review Where the content is downloaded Determining the package GUID Upgrading the console Tips advice and more. Please take a look and tell me what you think.
  13. i havn't done this but you could add a pause before the step for those older computers to allow them time to get ready for the apply network settings, what error do you get when those old ones fail ?
  14. if you switch back the normal drive is it ok ? could be the drive is not compatible with this hardware and/or it's faulty or lastly it may need drivers (or firmware)
  15. ask dell which usb nic they provide is pxe bootable on that product, start there
  16. by the way if your boot image is 10240 then they are based on the 1507 ADK, which was the first release of Windows 10, if you are on SCCM CB you should be on ADK 1607 at least
  17. do these devices have usb ports, if so maybe you can connect a usb nic and pxe boot off that ? that said you'll need to ask Dell what nic they offer can do that, not all will be supported by the hardware bios for pxe boot, so contact Dell
  18. ok so add a Set task variable step before this called set OSDBitLockerMode and set the value to TPM then try again
  19. you can enable bitlocker on hyperv i blogged it here. aside from that here's your error again in more detail, it looks like you are not setting the variable properly, can you please show you the options tab on your enable bitlocker step and the enable bitlocker step itself.
  20. when you tested this did you test on a vm ? or actual hardware

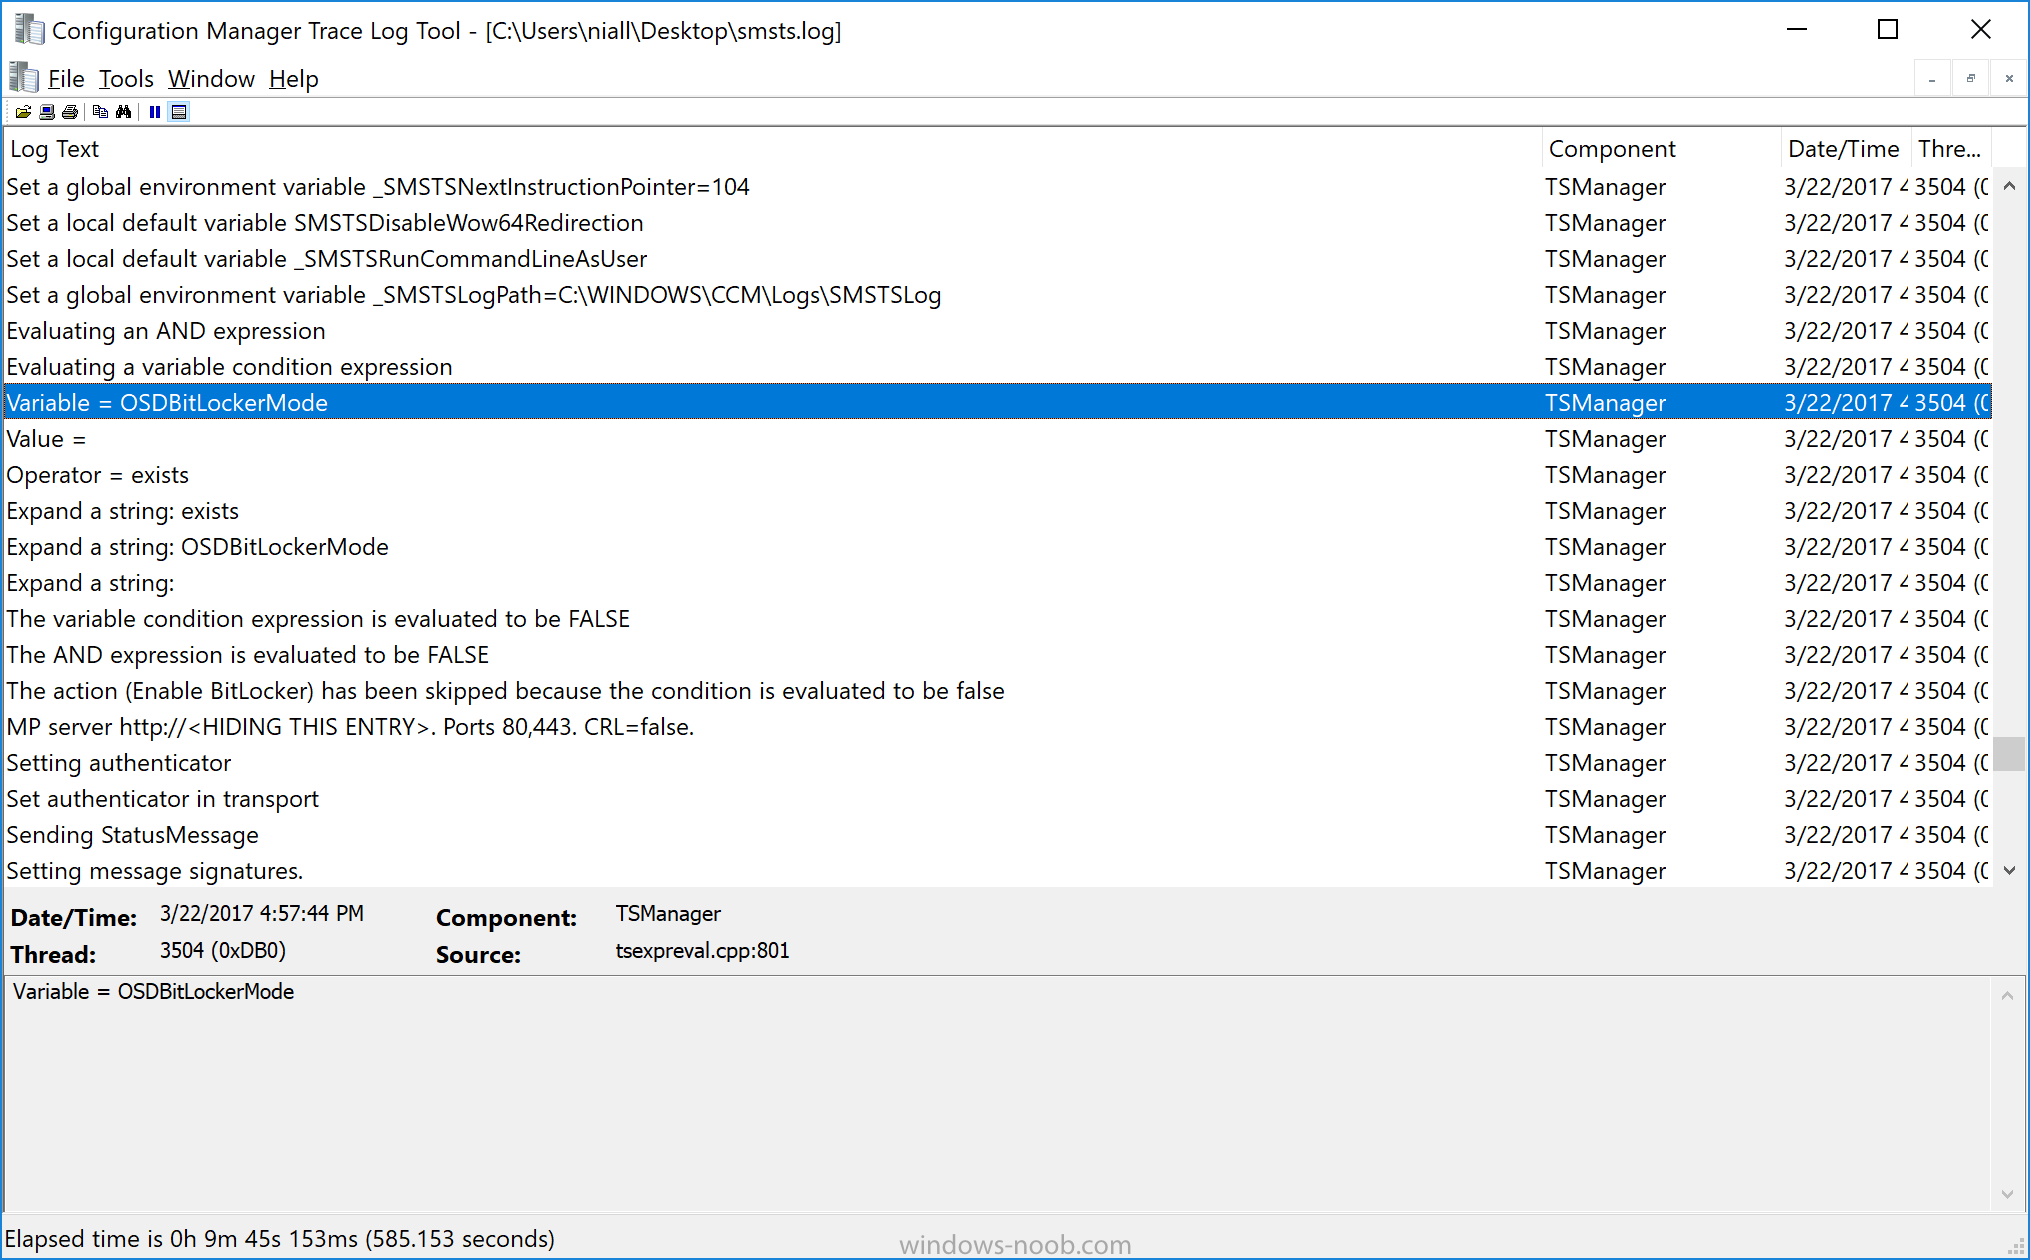
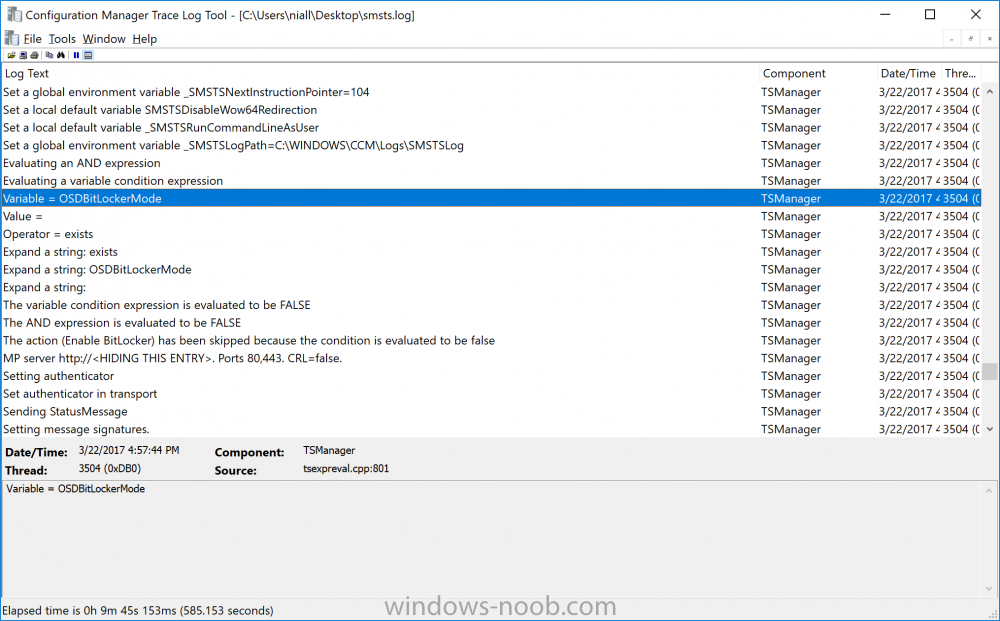
  21. yeah here <![LOG[The action (Enable BitLocker) has been skipped because the condition is evaluated to be false]LOG]!><time="16:57:44.601+300" date="03-22-2017" component="TSManager" context="" type="1" thread="3504" file="instruction.cxx:688"> have you set a variable called OSDBitLockerMode ? it's skipping on that, can you show me the options set on your Enable BitLocker step
  22. hmm i'm pretty sure it works here on Surface Pro 3, haven't tried Surface 3 though, what boot image are you using (from what ADK)
  23. Note: I've upgraded the wrapper to PowerShell 2019/01/06 as explained here. Introduction This blog post is all about upgrading to Windows 10, either from Windows 7 or from an earlier release of Windows 10 to the latest release of Windows 10. Windows 10 is probably one of the fastest developing operating systems from Microsoft yet, and was initially released in July 2015 as Windows 10 version 1507. The version 1507 nomenclature equates to (YYMM) or year year, month month so you'll always know when a version was released to manufacturing (declared RTM). So far we've seen the following Windows 10 mainstream versions (not including LTSB/LTSC) Windows 10 version 1507 Windows 10 version 1511 Windows 10 version 1607 Windows 10 version 1703 Windows 10 version 1709 Windows 10 version 1803 Windows 10 version 1809 As each new version of Windows 10 is released, the new features it contains ensure that it is desirable to some and it's just a matter of time before people want to upgrade to that version given the chance, but even with all the latest and greatest features, some users just won't upgrade if given the choice for whatever reason. There is however another element to consider and that how long Microsoft will release security updates for any given release of Windows 10 (i.e. how long is that release supported by Microsoft). Michael Niehaus discusses simplifying Windows As A Service (WAAS) here but in a nutshell there is an 18-month servicing timeline for each release however, Microsoft have added an additional 6 months to ease your pain, for now. Update: In September 2018, Microsoft blogged the following after years of listening to customers complaining about the WAAS support lifecycle. In a nutshell, there are two main releases of Windows 10 for the Enterprise to think about going forward, the 03 releases (18 month support) and the 09 releases (30 months support). Based on that statement alone, Enterprises will most likely opt for the 09 releases to avoid disruption to business and to their end users. This leads you to deal with the security support ability in a couple of ways, you can make the new upgrade available in Software center and hope your users will upgrade (seriously do you think they will ?), or you can get tough and decide when and where they will upgrade. To do that you have two options: servicing plans task sequences I've discussed servicing plans here so I won't go over that subject again, they are a valid option for many but are not very dynamic. With task sequences you have far greater control over how to deal with things that can break servicing plans (such as incompatible AntiVirus software or Windows Language packs). Assuming that you've made the choice to use task sequences to forcefully upgrade your computers to the next version of Windows the next problem is how do you force the upgrade. The answer is defined by the purpose of the task sequence deployment, namely Required (or mandatory). Just mentioning the words Required and Task Sequence is usually enough to make any seasoned ConfigMgr admin shiver. Why ? well there are many cases of people who've had career changing events in relation to required task sequences, therefore using them must come with a big fat warning, so here it is. WARNING! Using required task sequences is risky! Use them with extreme care and always test thoroughly. Disclaimer: if you choose this method and it all goes wrong, I'm sorry, I cannot accept liability. In this guide I show you how to set it up in a safe way and I include a 'get out of jail free' in case you make a mistake. It's up to you to test what works in your organization and what doesn't. My advice is that you test this thoroughly in a lab and once you are happy with the results, recreate it in production and continue to test it thoroughly. Also, be very careful about how you add computers to the required collection especially if it involves queries. Note: The Get out of Jail free step will help to secure your environment towards any accidental upgrades. Now that that is out of the way, let's get on with it. In this post I'll show you one way of forcefully upgrading your computers from a soon to be unsupported version of Windows 10 to the latest and greatest, and I'll include steps and advice to help you 'protect' yourself from disaster. In this guide we'll be forcing our source Windows 10 version 1511 computers to upgrade to the target Windows 10 version 1607. Note: you can always change the target Windows 10 version to whatever build you want (using the TargetBuild variable) as described in the Troubleshooting section at the end of this guide. Notifying users There is one other thing to consider about required task sequences, they are normally for all intents and purposes zero touch meaning no user interaction. That is fine for simple quick changes such as upgrading applications but if your users are going to have one or two hours downtime due to a forced Windows upgrade, you'll want to notify them and give them options to defer for a limited time period to a time that makes sense for them. In this guide I assume that the client setting Show notifications for new deployments in Computer Agent is set to No, that is a common client setting in organizations as it means less annoyances for the end user and of course there are other ways to notify a user about mandatory actions (PowerShell Application Deployment Toolkit for example). The recently released System Center Configuration Manager (Current Branch) version 1702 contains a great ability to edit the user notification message shown to users but it's limited in ability and it depends on your configured notification settings. So how do we solve that problem in a nice way. ConfigMgr allows us to chain programs before the task sequence begins and that's the key to this solution. Step 1a. Get out of jail free (recommended) The wrapper will not allow the HTA to display if a file called DO_NOT_UPGRADE.txt is present in C:\ProgramData. If you are paranoid about accidental upgrades (and you should be if using required task sequences) then do as follows. 1. Create a package (with no content) with a program to deploy a text file to all computers that are at risk of accidental deployment. Run the package daily. The program is simply a one liner as follows: cmd.exe /c echo "Windows 10 Required Upgrade" > C:\ProgramData\DO_NOT_UPGRADE.txt 2. Target the OSD Servicing Required Deployment collection with another package/program that will remove the Do_NOT_Upgrade.txt file. Run the package every 2 hours. The program is again a one-liner, as follows: cmd.exe /c echo "Y" | del C:\ProgramData\Do_Not_Upgrade.txt The above actions should protect your computers from accidentally being targeted by the task sequence. Any computer that has the Do_NOT_Upgrade.txt file present, will not show the popup (HTA) and will not run the task sequence and thus, will not upgrade until you are ready to do so. Step 1b. Create some collections (optional) This step is optional but recommended as it will give you a base of collections to manage your deployments. To complete this step download the CreateWindows10DeviceCollections.ps1 PowerShell script in the downloads section and run it as Administrator in PowerShell ISE as shown below. This script not only creates collections to make your job of finding different versions of Windows 10 easier, but it adds queries, include and exclude rules as necessary. and below is a subset of the collections created (there are 18 in total). The OSD Servicing Required Deployment collection is limited to Windows 10 version 1511 as that is our target for the required upgrade. This does not mean that it will use all computers in that collection it just means it will only use computers added to the OSD Servicing Required Deployment collection provided that they are also present in All Windows 10 version 1511. This ensures that you are targeting the correct version of Windows 10 for the required upgrade. Step 2. Create a Package/Program In this step you'll add a simple package/program that contains a few scripts. These scripts have error checking, logging and more built in so that you can trace what was done and when. These scripts will be chained to the required task sequence meaning that they must run successfully (with an exit code of 0) before the actual task sequence can start. User actions such as Defer in the popup will force an exit code 99 and the task sequence cannot start. Download the scripts in the downloads section and extract somewhere useful. Copy the Required Windows 10 Upgrade folder to your source folder on your ConfigMgr server. In the ConfigMgr console, select Application Management, Packages and Create Package. Give the new package a suitable name such as Required Upgrade to Windows 10 and point it to the source folder. For Program Type, choose Standard Program. In the Specify information about this standard program screen fill in the following details, Note: keep in mind that if you set Program can run Only when a user is logged on that that becomes a requirement, i.e. that a user must be logged on in order for this to run. You may want to get even tougher and set the Program can run option to Whether or not a user is logged on. If you do set it to Whether or not a user is logged on, and if the user is not logged on, the scripts will write to HKEY_USERS\.DEFAULT\Software\windowsnoob and you may need to update the scripts to detect this change. Name: start-upgrade.ps1 Command line: Powershell.exe -Executionpolicy bypass ".\Start-Upgrade.ps1" Startup folder: Run: Hidden Program can run: Only when a user is logged on Run mode: Run with user's rights Drive Mode: Runs with UNC name Note: If your target computers are running Windows 7, then place a check mark in the All Windows 7 (64 bit) box also. in the Specify the requirements for this standard program screen use the following values This Program can run on only on specified platforms: All Windows 10 (64 bit) Estimated disk space: 10 MB Maximum allowed time (minutes): 250 click next through to completion. Step 3. Modify the package On the newly created package, right click and choose Properties, click the Data Access tab. Select Copy the content in this package to a package share on distribution points Click Apply and OK. Step 4. Distribute the package to your distribution points Right click the package and choose Distribute Content select your distribution points and continue through the wizard until completion Step 5. Modify an existing Windows 10 Required Upgrade task sequence In this step I'll assume you've already created your Windows 10 Required Upgrade task sequence. If you haven't already then take a look at this post to see how. Locate the task sequence in the ConfigMgr console, right click and choose Properties, in the Advanced tab place a check mark in Run another program first and select the Windows 10 Required Upgrade program. In the Run only on the specified client platforms screen select All Windows 10 (64 bit). Note: Make sure that Always run this program first is checked. Note: If your target computers are running Windows 7, then place a check mark in the All Windows 7 (64 bit) box also. Next, edit the task sequence and add a new Set Task Sequence Variable step as the first step in the task sequence, name it Is upgrade allowed to run. Fill in the following values Task Sequence Variable: Upgrade_Forced Value: True Click on the options tab and add the following options: If ALL the conditions are true: File C:\ProgramData\Upgrade_Forced.txt exists If None of the conditions is true: WMI Query: select * from Win32_OperatingSystem where VERSION = "10.0.15063" If None the conditions are true: File C:\ProgramData\DO_NOT_UPGRADE.txt exists These three checks allow us to halt the task sequence on computers that don't meet our upgrade criteria. Note: You'll need to decide what build is deemed 'the latest version' of Windows 10 in your organization and change accordingly. In this post I'm assuming that is Windows 10 version 1703 (build 10.0.15063). On the Upgrade Operating System step, edit the Options and include the following Task Sequence Variable: Upgrade_Forced=True Note: This will ensure that the required upgrade only occurs if the Upgrade_Forced.txt file was present in C:\ProgramData. Next in the Post-Processing group add a new Run Command Line step called Add Windows 10 Required Upgrade reg key with the following command line: cmd.exe /c reg add "HKEY_LOCAL_MACHINE\SOFTWARE\windowsnoob" /v RequiredUpgrade /t REG_SZ /d "%date%" /f This will allow you to run reports on when computers were upgraded using this method. Close the task sequence. Next create a new Run command line step called Remove Upgrade_Forced.txt with a cmd line of cmd.exe /c echo Y | del C:\ProgramData\Upgrade_Forced.txt Step 6. Deploy the task sequence In this step we deploy the task sequence with a purpose of required. Note: I'd strongly advise you to test this thoroughly in your lab and make sure to pick your collections correctly and to populate them very carefully. Right click on the task sequence and choose Deploy For collection choose OSD Servicing Required Deployment, and ignore the popup telling you it's empty, you can add computers to that collection later. Change the Purpose to Required For Scheduling click on New, then choose Schedule, then change it to run daily at 11am. For rerun, choose Always rerun program as you will update the limiting collection (All Windows 10 version 1511) membership daily @ 1pm and upgraded computers will fall out of the collection. In case they don't (for whatever reason) the wrapper checks for the targetbuild and if the computer matches that build, it will abort and not start the upgrade. Note: The above schedule will run our popup daily at 11am for 6 days prior to forcing the upgrade to Windows 10. You should change the schedule according to your preferences. Continue through the wizard until completion. Note: If you want to test run the Task Sequence from the Software Center or if you want your users to do this, then enable the Allow users to run the program independently of assignments checkbox on the User Experience tab. Step 7. Adjust Windows 10 limiting collections membership schedule Below you can see the membership rules update frequency on the limiting collection, it's set to run two hours after our Upgrade, adjust as necessary for your organization and your agreed schedule. Step 8. Add test computers to the OSD Servicing Required Deployment collection Note: Before doing this step, carefully read the Warning and Disclaimer at the top of this guide! Right click on the collection and choose Add Resources (or use your own chosen method to add computers) to add one or more test computer to the OSD Servicing Required Deployment collection. As this collection now has a live required task sequence deployed to it, do this step very very carefully, if in doubt stop what you are doing, go and have a coffee and try again when your nerves are calm. and add your test computers as you see fit.. Step 8. Monitor the experience on test computers Login to a test computer, do a machine policy update in the ConfigMgr client actions and wait for the popup or kick it off via software center. After the computer receives the policy and the scheduled time is reached a popup is shown offering the user to Defer the upgrade or Upgrade now by selecting the appropriate checkbox and then clicking on Upgrade Now. Note: The clickable link goes to a non-existant url, you need to point it to whatever documentation you want your users to read in preparation for the upgrade. As each day passes (or based on your custom schedule) the counter reduces by 1 every time the popup appears. When there are no more deferrals left, a 4 hour countdown starts and when it reaches 00:00:00 the Windows 10 Required Upgrade will start. If the user closes the popup, the timer will resume where it left off when it is restarted. Alternatively, if the user doesn't want to defer, and they want to run the upgrade right now, they can place a checkmark in the 'My files are synced in OneDrive...' and then click Upgrade Now to start the task sequence. Either way, regardless of what your user clicks on, (based on the schedule in this guide) the computer will start the upgrade within 7 days (or earlier or later if you adjust the schedule). Once the Upgrade Now button is clicked on, or once the Timer reaches 00:00:00 the task sequence will automatically start (assuming that the DO_NOT_UPGRADE.txt is not present). Branding Simply replace the banner.png file included with one matching your Company Name, edit the upgrade.hta and locate the 'windowsnoob' name in the text field (line 347) and replace it with your own Company Name. Troubleshooting The popup creates 3 log files to troubleshoot the process, they are located in C:\ProgramData and named Windows10RequiredUpgradeHTA.log Windows10RequiredUpgradeWrapper.log Windows10RequiredUpgradeStartUpgrade.log The wrapper writes to the registry in HKCU\Software\windowsnoob Note: The collections, scripts and task sequence assume you are upgrading from Windows 10 version 1511 to Windows 10 version 1607, you'll need to edit the WMI Query in the task sequence to change Windows 10 build version when you move to creators update and for later versions of Windows, and you'll need to edit the TargetBuild variable in the wrapper.vbs script accordingly. Once done, you should change the Limiting Collection for the OSD Servicing Required Deployment collection to match the n-1 version of Windows 10 you want to migrate from. Tip: If you have rendering issues with the popup on different devices then edit the call ResizeWindow(425,335,500,375) values and ResizeWindow Function to fit your specific needs, I don't have access to too much hardware to test this on. The popup is fixed, if you want the user to be able to move it change the line caption="no" to caption="yes". If you want to programmatically use it then add a Window.moveTo(x, y) line. Downloads You can download the scripts used above in the following zip files: windowsnoob Required Upgrade HTA.zip CreateDeviceCollectionsWindows10.zip Summary Forcefully upgrading computers is a tricky area but hopefully this method gives you one more option to consider.
×
×
  • Create New...

Important Information

We have placed cookies on your device to help make this website better. You can adjust your cookie settings, otherwise we'll assume you're okay to continue.