


anyweb
-
Posts
9273 -
Joined
-
Last visited
-
Days Won
371
Everything posted by anyweb
-
try entering the eval key in the apply operating system step, does it help ? if so then it's the media (and key) that's the issue,, Volume License media or MSDN media would be better for testing.
-

SCCM Image Deployment - Massive Delay in Applying WIM
anyweb replied to Tefty's topic in Configuration Manager 2012
odd, have you tried changing the PowerCFG settings using this method, it just might help. -
why would you be building images that are time constrained to 180 days anyway ? worst case scenario try the Enterprise version and use the correct eval key, did you try that ?
-
I assume your current primary is running Server 2008R2 ? As you are already on 1602, you can do an in-place upgrade of the OS from Server 2008R2 -> 2012R2. This requires uninstall of 2008R2 WSUS, upgrade the OS then install latest WSUS. You must have 2012R2 & latest WSUS on the site server to even talk to a remote SUP – so the site server has to be upgraded to 2012R2 in order to service Win10. Does that answer your question ?
-
firstly when did you deploy the task sequences exactly ? and have you distributed both the x86 and x64 boot images to your dp's and made them pxe capable ?
-
hi, you can't use that folder to update another site, it is not supported. You need to either upgrade the other site (separate site ?) via offline or online servicing. cheers niall
-
you should use Volume License media instead, that way you won't need to enter a key, do you have access to it ?
-
did you enter a valid Windows 7 Professional key in the task sequence apply operating system step ?
-
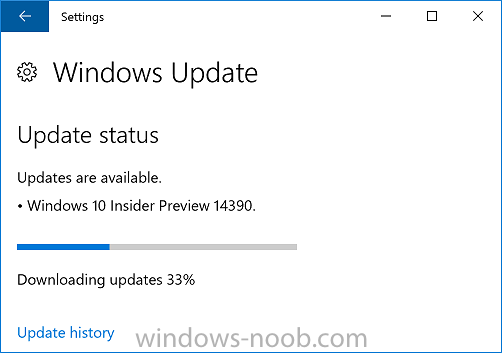
another week, another Insider Preview release, this time build 14390 The Microsoft Edge Team has a new extension to tell you about that many of you have been waiting for: Amazon Assistant: Amazon’s official browser extension is now available for Microsoft Edge! Amazon Assistant helps you make better decisions wherever you shop online by giving you access to Deal of the Day, Product Comparison, Wish List and Shortcuts to your favorite Amazon destinations. Check out all of the available extensions by launching Microsoft Edge, opening the “…”menu, selecting “Extensions” and then clicking “Get extensions from the Store”.”Improvements and fixes for PCYou should no longer see the error code 0x80004005 when enabling Developer Mode on the “For Developers” Settings page if your PC is using a non-EN-US language.Known issues for PCAWARENESS: A recent fix went into place for the Hyper-V firmware that will that affect the ability to boot Windows Server 2016 Tech Preview 5 VMs with Secure Boot enabled. A fix for TP5 builds has been developed however, due to release schedules, the Insider Preview build changes will be released before the TP5 fix is released. During that time, if you try to boot a new TP5 VM with Secure Boot enabled, it will fail. The workaround is to disable Secure Boot during this period. more info > https://blogs.windows.com/windowsexperience/2016/07/15/announcing-windows-10-insider-preview-build-14390-for-pc-and-mobile/
-
Reading & Writing Task Sequence Variables in PowerShell
anyweb replied to BzowK's topic in Configuration Manager 2012
can you give some examples of what your Distinguished Name looks like ? also, dont use TRUE or FALSE in PowerShell, use $true or $false instead -
actually this frontend deals with the new encryption methods also, fyi https://www.niallbrady.com/2016/05/17/introducing-the-windows-10-uefi-bitlocker-frontend-for-system-center-configuration-manager-current-branch/
-
that's not the recommended way today, what we do recommend is you create your reference image on virtual hardware (hyperv, vmware) and add as much apps or as few, plus customizations to that image before capturing it, you then deploy that captured image via a task sequence that contains multiple apply driver package steps which use WMI to determine the hardware it is on and apply the correct driver pack, whether you use MDT to create the reference image or ConfigMgr it's up to you, cheers niall
-
so you are running SCCM Current Branch version 1511 ?
-
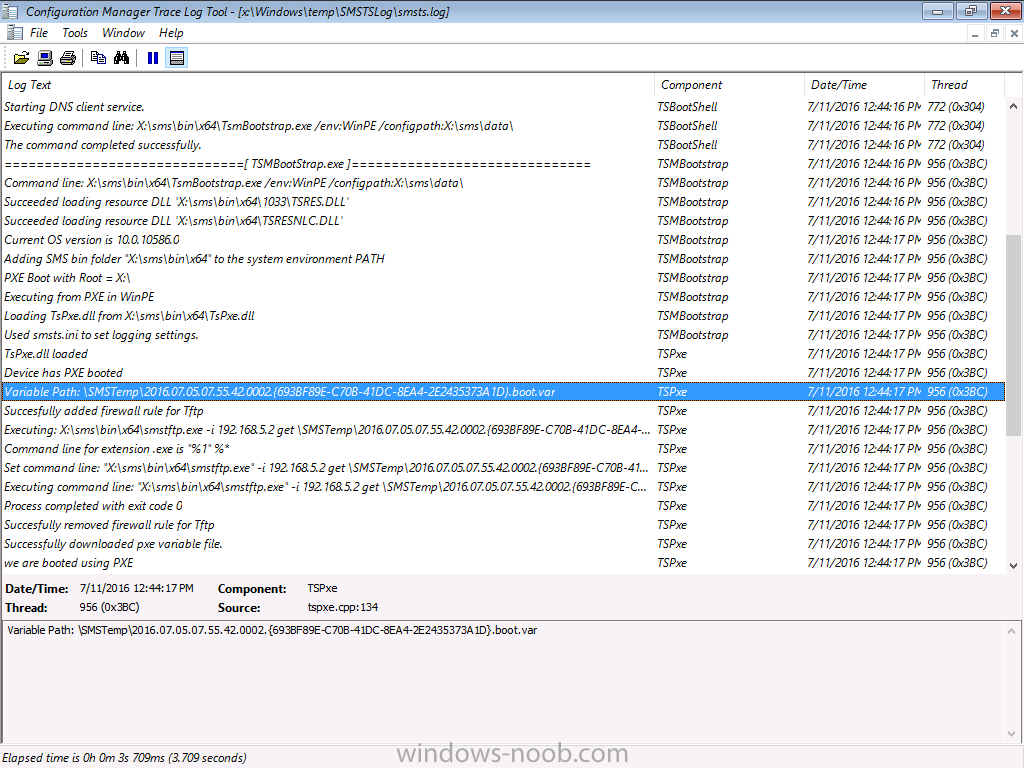
great it's fixed and i should have asked that question, i normally always do and people usually always respond yes.. but great ! it would be nice to see what your smsts.log file says now (before you enter the PXE password) in relation to the variables.dat, just to compare them
-
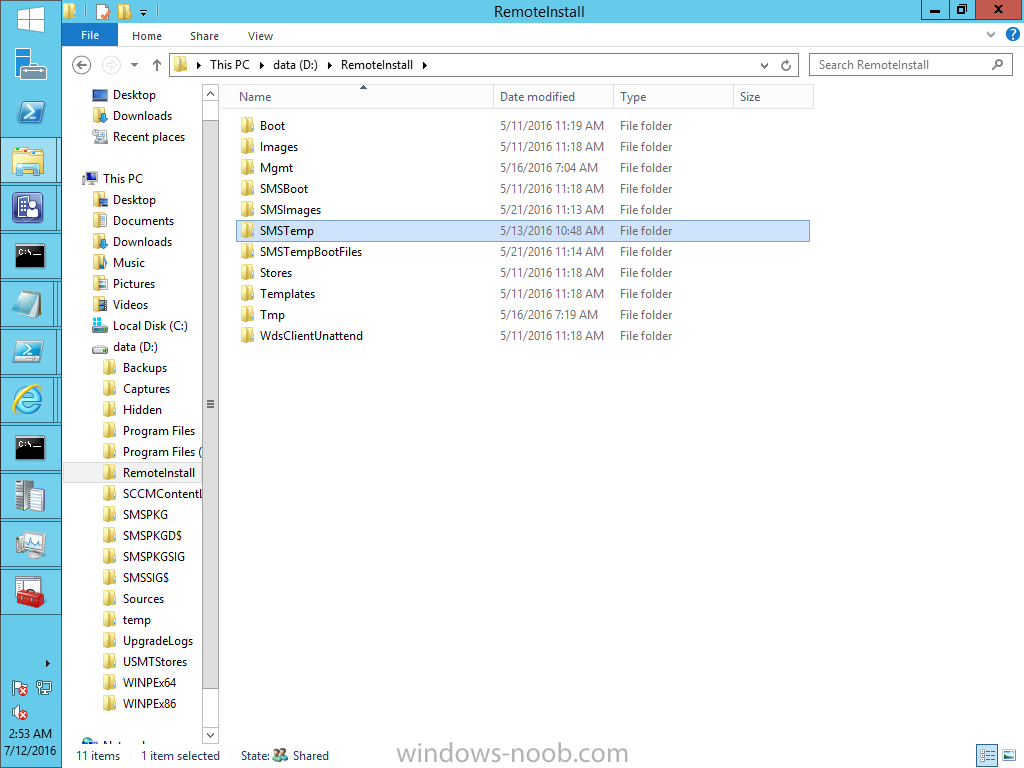
well something is clearly wrong as in my screenshot you can see that the variables path is defined prior to trying to 'get' it via tftp however in your log file that does not happen, and therefore it tries to get it but without the path from your log: Executing: X:\sms\bin\x64\smstftp.exe -i 10.10.10.179 get X:\sms\data\variables.dat from my log: Executing: X:\sms\bin\x64\smstftp.exe -i 192.168.5.2 get \SMSTemp\2016.07.05.07.55.42.0002.{693BF89E-C70B-41DC-8EA4-2E2435373A1D}.boot.var X:\sms\data\variables.dat the SMSTemp folder it's referring to is contained within the RemoteInstall folder (from WDS) have you tried updating the boot image to the dp, does it work after that ?
-
did you add any certs to this boot image, you did mention your env was HTTPS
-
you don't add them to WDS configmgr does that for you, you shouldn't configure wds at all, you should only have one version of ADK installed, Windows ADK 10, so why do you mention two versions ? can you please attach the SMSTS.log file from a client that fails to PXE boot
-
you havn't really given us much information about your environment or how you configured it, specifically what version of SCCM it is and what version of the Windows ADK you are using, can you share that info next, did you deploy windows 10, if so, what boot image (and winpe version) is attached to that task sequence, is the boot image distributied to all distribution points, and is it enabled for PXE ?
-
if you can't find what you are looking for in this link then do let me know https://www.windows-noob.com/forums/topic/4045-step-by-step-guides-system-center-2012-r2-configuration-manager/
-
Hello my Windows Insiders! Surprise! Today we are releasing Build 14385 for both PC and Mobile to Windows Insiders in the Fast ring. But wait – it’s the weekend!? We’re churning out builds like crazy and this one has a few hundred bug fixes we wanted to get out to Insiders as quickly as possible to help validate scenarios to make sure we are together building the best possible product. Improvements and fixes for PC You should no longer see a notification pop-up once a day saying that your Windows evaluation copy expires on 7/15/2016. I know this has caused a lot of you some angst so thank you for being patient. We have improved battery life for Surface devices. We fixed an issue resulting in Spotify sometimes crashing while playing music. We fixed an issue resulting in the Google Chrome window being clipped on the top when maximized. We fixed an issue with Mobile Hotspot that could result the host device bug-checking (bluescreen) and rebooting if it was sharing on a 5GHz band and the connected device browsed to certain websites. We fixed an issue where the pin prompt shown when connecting to certain VPNs would display behind the other open windows. We fixed an issue resulting in LastPass and AdBlock extensions for Microsoft Edge not showing the expected context menu items or status information in subsequently opened Edge windows. We also fixed an issue where the current tab in Edge might hang after exiting Web Notes. Projecting to a PC auto-discoverability is off by default. To have your PC beacon so it can be discovered and you can project to it through the Connect quick action from a Continuum enabled phone or another PC, go to Settings > System > Projecting to this PC and set “Windows PCs and phones can project to this PC when you say it’s OK” to “Available everywhere” or “Available everywhere on secure networks”. You can also set other settings on this page to your preference. Read more at https://blogs.windows.com/windowsexperience/2016/07/09/announcing-windows-10-insider-preview-build-14385-for-pc-and-mobile/#windows-noob.com
-
Error 0x80070057 sccm 2012 apply operating system on SP4
anyweb replied to amakusa007's topic in Configuration Manager 2012
we'd need to see the rest of your smsts.log attach it here. -
post your smsts.log file so that we can figure out what is wrong.
-
I agree with YPCC, stop using copyprofile and start using Virtual Machines for image building
-
Microsoft has announced the next major update to Windows 10 – the Windows 10 Anniversary Update – is coming on August 2. This new release of Windows 10 includes features that bring Windows Ink and Cortana to the mainstream; a faster, more accessible and more power-efficient Microsoft Edge browser; advanced security features for consumers and enterprises; new gaming experiences and new tools for the modern classroom. Everyone running Windows 10 will get these new features for free. more info > https://blogs.windows.com/windowsexperience/2016/06/29/windows-10-anniversary-update-available-august-2/
-
what license do you have currently ? (type of license) ?