anyweb
-
Posts
9271 -
Joined
-
Last visited
-
Days Won
371
Everything posted by anyweb
-
 what version of SCCM did you use when creating capture media ?
 -
so load the driver package but don't select that option, it's only valid for pre vista operating systems such as Windows XP.
-
that version of WSUS is not supported as your SUP for Windows 10 servicing, didn't you get any warning messages about that during your upgrade ? WSUS 3.0 SP2 and unpatched WSUS 4.0 servers will be able to offer Windows 10 security updates but not the feature upgrades (i.e. the Windows 10 Servicing).... you need to be running your Software update point role using WSUS 4.0 on Server 2012 or later to get proper support for Windows 10 servicing. See step 10 here
-
that's only for earlier than Windows vista operating installs, what os are you installing ?
-
no problem if you run into any issues let me know
-
well you shouldn't be deploying Windows 10 with that version of the ADK or with those boot images, there are ways of doing it but they are all workarounds, you need to uninstall ADK 8.1, then reboot, install Windows ADK 1511, and update your boot images after that, then try the task sequence again... here's how to do that https://www.windows-noob.com/forums/topic/12852-how-can-i-upgrade-to-system-center-2012-r2-sp1-with-mdt-2013-update-1-integrated/
-
see your first error cannot find path 'DS001:\Operating Systems\Windows 10\Windows 10 Enterprise in Windows 10 Enterprise x64 install.wim' because it does not exist."
-
ok your failure is shown below and is repeated a few times in the log, basically dism can't inject any drivers... <![LOG[Executing command line: "X:\WINDOWS\system32\dism.exe" /image:"C:" /windir:"WINDOWS" /apply-unattend:"C:\_SMSTaskSequence\PkgMgrTemp\drivers.xml" /logpath:"C:\_SMSTaskSequence\PkgMgrTemp\dism.log"]LOG]!><time="12:45:52.993-120" date="07-01-2016" component="OSDDriverClient" context="" type="1" thread="1764" file="commandline.cpp:828"> <![LOG[Process completed with exit code 50]LOG]!><time="12:45:53.072-120" date="07-01-2016" component="OSDDriverClient" context="" type="1" thread="1764" file="commandline.cpp:1124"> <![LOG[uExitCode == 0, HRESULT=80070032 (e:\nts_sccm_release\sms\client\osdeployment\osddriverclient\sysprepdriverinstaller.cpp,548)]LOG]!><time="12:45:53.087-120" date="07-01-2016" component="OSDDriverClient" context="" type="0" thread="1764" file="sysprepdriverinstaller.cpp:548"> <![LOG[Dism failed with return code 50]LOG]!><time="12:45:53.087-120" date="07-01-2016" component="OSDDriverClient" context="" type="3" thread="1764" file="sysprepdriverinstaller.cpp:548"> <![LOG[AddPnPDriverToStore( pszSource, sTargetSystemDrive, sTargetSystemRoot, wProcessorArchitecture), HRESULT=80070032 (e:\nts_sccm_release\sms\client\osdeployment\osddriverclient\sysprepdriverinstaller.cpp,658)]LOG]!><time="12:45:53.087-120" date="07-01-2016" component="OSDDriverClient" context="" type="0" thread="1764" file="sysprepdriverinstaller.cpp:658"> <![LOG[Failed to add driver to driver store. Code 0x80070032 it looks like you are using an unsupported combination of boot media/dism and that's why it's failing to install drivers what version of SCCM is this ? what version of the ADK have you got installed ? and what version of boot wim are you using in this task sequence ? (press f8 and do ver)
-
that remains to be seen, where did you post the new log ?
-
can you press f8 before the failure, and then capture the log after the apply drivers package step, i don't see that step referenced in your log. Also it looks like you have no network or DNS issues Error. Received 0x80072ee7 from WinHttpSendRequest.]LOG]!><time="13:17:45.470-120" date="07-01-2016" component="TSManager" context="" type="1" thread="1132" file="libsmsmessaging.cpp:9044"> <![LOG[unknown host (gethostbyname failed)]LOG] so when you press F8, wait for the failure, then do an ipconfig, do you have an ip or not ?
-
SCCM Current Branch Questions
anyweb replied to fad632's topic in System Center Configuration Manager (Current Branch)
as regards your questions let's take them one by one correct, Jorgen blogged the process here Upgrading to 1511 is a no brainer, there were some issues listed here. Why wait with the upgrade to 1602, i'd recommend you upgrade to 1511, and then to 1602. yes you can still deploy Windows 7 even with SCCM 1602, the ADK supports it. yes i'd do that, as i've stated above, the only thing to be careful with is after updating to 1602 there's an update rollup for 1602, so be aware of issues with the client upgrade option discussed here. -
disable javascript and macros and read this https://nakedsecurity.sophos.com/2016/06/20/ransomware-thats-100-pure-javascript-no-download-required/ http://arstechnica.com/security/2016/06/meet-jigsaw-the-ransomware-that-taunts-victims-and-offers-live-support/
-
if you update machine policy a few times does it work ? what does execmgr.log reveal ? the error translates to
-
it's required if you care about deploying this task sequence to computers that don't meet the criteria (servers, low ram, low disk space...) of course if your collection queries do this then you can remove it.
-
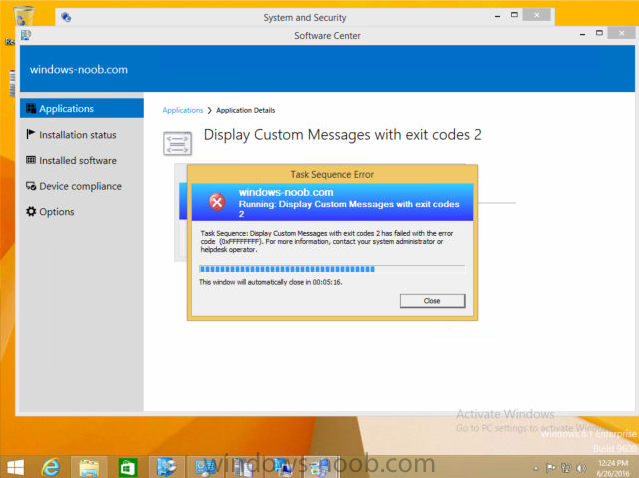
that error still shows up, i set the timeout for 1 minute and waited. Fyi.
-
i can test and come back to you !
-
Looking to Implement DR Live solution in a Single Domain
anyweb replied to sahil848's question in How do I ?
wouldn't it be better to have a good backup strategy in place for your current infrastructure, and if/when a problem occurs recover your site and restore the data, some links to get you started... How can I backup System Center 2012 Configuration Manager ? Restoring Backups - https://blogs.techne...or-restoration/ Backup and Recovery in Configuration Manager - http://technet.micro...BKMK_SiteBackup Support Tip: A Backup Site Server maintenance task may fail to run in ConfigMgr 2012 - http://blogs.technet...igmgr-2012.aspx How to recover a Configuration Manager 2012 site using a restored database - http://stevethompson...-a-restored-db/ SQL Server backup recommendations for Configuration Manager - http://stevethompson...ration-manager/ -
task sequence error 80072efd
anyweb replied to thrqureshi's question in Troubleshooting, Tools, Hints and Tips
<![LOG[Error. Received 0x80072efd from WinHttpSendRequest.]LOG]!><time="19:20:49.336+480" date="06-25-2016" component="TSPxe" context="" type="1" thread="1104" file="libsmsmessaging.cpp:9044"> <![LOG[connect (sock, (struct sockaddr *) &SockAddrIn, sizeof (struct sockaddr_in)) == 0, HRESULT=8007274d (e:\nts_sccm_release\sms\framework\osdmessaging\libsmsmessaging.cpp,812)]LOG]!><time="19:20:50.355+480" date="06-25-2016" component="TSPxe" context="" type="0" thread="1104" file="libsmsmessaging.cpp:812"> <![LOG[socket 'connect' failed; 8007274d]LOG]!><time="19:20:50.355+480" date="06-25-2016" component="TSPxe" context="" type="3" thread="1104" file="libsmsmessaging.cpp:812"> <![LOG[hr, HRESULT=80072efd (e:\nts_sccm_release\sms\framework\osdmessaging\libsmsmessaging.cpp,9093)]LOG]!><time="19:20:50.355+480" date="06-25-2016" component="TSPxe" context="" type="0" thread="1104" file="libsmsmessaging.cpp:9093"> <![LOG[sending with winhttp failed; 80072efd] you have DNS and/or networking issues, when it fails can you press F8 and type ipconfig, do you get a valid ip address ? can you ping the FQDN of your management point ? -
Prioritizing local MP http://CSD10.csd.local. SMSPXE 6/23/2016 8:33:10 AM 3404 (0x0D4C) RequestMPKeyInformation: Send() failed. SMSPXE 6/23/2016 8:33:10 AM 3404 (0x0D4C) still having issues contacting the Management point, take a look at this post to see does it help you resolve your problem https://www.windows-noob.com/forums/topic/7281-management-point-pxe-boot-error-80004005-after-sp1-upgrade/
-
so are both architecture boot images distributed, and enabled for PXE and attached to the task sequence you are testing ?
-
have you tried reinstalling the Management Point role ?
-
fail to run task sequence
anyweb replied to yash's question in Troubleshooting, Tools, Hints and Tips
how did you create the media ? what version of SCCM are you using ? what version of Windows 10 are you deploying ? what boot image are you using and can you attach the smsts.log ? -
Skip SCCM Client install task sequence
anyweb replied to xzile609's topic in Configuration Manager 2012
if the computers are installed with MDT then why would you create task sequence in Configmgr ? you can always install an MDT created image using Configmgr, then after the image is laid down you can run another script or package to uninstall the configmgr client agent and all associated things (such as certificates), the question is why do you want to do this ? -
can you attach the entire smsts.log so we can see what additional actions occur during the ts.
-
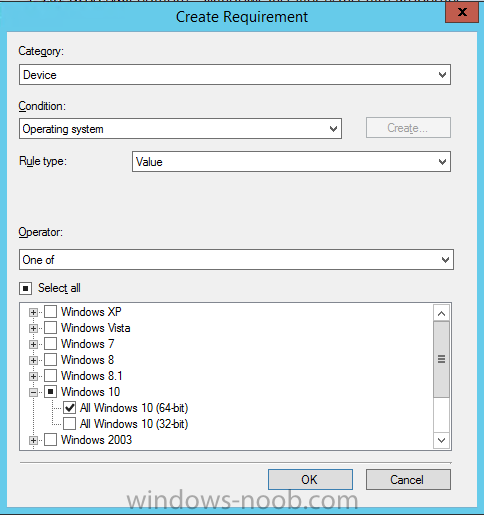
thank you for buying the book i hope you like it ! so do you want to separate apps by architecture in order to target operating systems with different architecture ? you can use deployment types to define what software gets installed on what architecture, look at the Requirements tab and select an os with a specific architecture, that way the software will only install if the requirements are met (eg: is x64) you can of course then target (deploy) that app to a specific collection containing only the architecture matching the requirement,.