-
Posts
40 -
Joined
-
Last visited
Everything posted by The Bronx Bull
-

Why is Sysprep disabling the built in Administrator account?
The Bronx Bull posted a question in Deploy 7
Per here: http://technet.microsoft.com/en-us/library/cc766343%28WS.10%29.aspx, it basically says that if the AutoLogon is configured within the unattend.xml file, that the Administrator account will be enabled. For whatever reason, after Sysprepping, it's switching it back to disabled in gpedit.msc. Can anyone tell me why? Here is my Unattend file: <?xml version="1.0" encoding="utf-8"?> <unattend xmlns="urn:schemas-microsoft-com:unattend"> <settings pass="specialize"> <component name="Microsoft-Windows-Shell-Setup" processorArchitecture="x86" publicKeyToken="31bf3856ad364e35" language="neutral" versionScope="nonSxS" xmlns:wcm="http://schemas.microsoft.com/WMIConfig/2002/State" xmlns:xsi="http://www.w3.org/2001/XMLSchema-instance"> <RegisteredOrganization>xxxxxxxxxx</RegisteredOrganization> <ShowWindowsLive>false</ShowWindowsLive> <TimeZone>Eastern Standard Time </TimeZone> <DisableAutoDaylightTimeSet>false</DisableAutoDaylightTimeSet> <RegisteredOwner>xxxxxxxx</RegisteredOwner> <ComputerName>%Please input a computer name%</ComputerName> <CopyProfile>true</CopyProfile> </component> <component name="Microsoft-Windows-International-Core" processorArchitecture="x86" publicKeyToken="31bf3856ad364e35" language="neutral" versionScope="nonSxS" xmlns:wcm="http://schemas.microsoft.com/WMIConfig/2002/State" xmlns:xsi="http://www.w3.org/2001/XMLSchema-instance"> <InputLocale>en-us</InputLocale> <SystemLocale>en-us</SystemLocale> <UILanguage>en-us</UILanguage> <UserLocale>en-us</UserLocale> </component> <component name="Microsoft-Windows-IE-InternetExplorer" processorArchitecture="x86" publicKeyToken="31bf3856ad364e35" language="neutral" versionScope="nonSxS" xmlns:wcm="http://schemas.microsoft.com/WMIConfig/2002/State" xmlns:xsi="http://www.w3.org/2001/XMLSchema-instance"> <DisableAccelerators>true</DisableAccelerators> <DisableFirstRunWizard>true</DisableFirstRunWizard> <DisableOOBAccelerators>true</DisableOOBAccelerators> <FavoritesDelete>true</FavoritesDelete> <Home_Page>intradot</Home_Page> <NoDial>true</NoDial> <SuggestedSitesEnabled>false</SuggestedSitesEnabled> </component> <component name="Microsoft-Windows-Deployment" processorArchitecture="x86" publicKeyToken="31bf3856ad364e35" language="neutral" versionScope="nonSxS" xmlns:wcm="http://schemas.microsoft.com/WMIConfig/2002/State" xmlns:xsi="http://www.w3.org/2001/XMLSchema-instance"> <RunSynchronous> <RunSynchronousCommand wcm:action="add"> <Order>1</Order> <Path>net user Administrator /active:yes</Path> </RunSynchronousCommand> </RunSynchronous> </component> <component name="Microsoft-Windows-UnattendedJoin" processorArchitecture="x86" publicKeyToken="31bf3856ad364e35" language="neutral" versionScope="nonSxS" xmlns:wcm="http://schemas.microsoft.com/WMIConfig/2002/State" xmlns:xsi="http://www.w3.org/2001/XMLSchema-instance"> <Identification> <Credentials> <Domain>xxxxxxxxx</Domain> <Username>%Please input username%</Username> <Password>%[password]Please input password%</Password> </Credentials> <JoinDomain>xxxxxxxxxxxx</JoinDomain> </Identification> </component> </settings> <settings pass="windowsPE"> <component name="Microsoft-Windows-Setup" processorArchitecture="x86" publicKeyToken="31bf3856ad364e35" language="neutral" versionScope="nonSxS" xmlns:wcm="http://schemas.microsoft.com/WMIConfig/2002/State" xmlns:xsi="http://www.w3.org/2001/XMLSchema-instance"> <UserData> <AcceptEula>true</AcceptEula> <FullName>xxxxxxxxxx</FullName> <Organization>xxxxxxxxxx</Organization> </UserData> </component> </settings> <settings pass="oobeSystem"> <component name="Microsoft-Windows-International-Core" processorArchitecture="x86" publicKeyToken="31bf3856ad364e35" language="neutral" versionScope="nonSxS" xmlns:wcm="http://schemas.microsoft.com/WMIConfig/2002/State" xmlns:xsi="http://www.w3.org/2001/XMLSchema-instance"> <InputLocale>en-us</InputLocale> <SystemLocale>en-us</SystemLocale> <UILanguage>en-us</UILanguage> <UserLocale>en-us</UserLocale> </component> <component name="Microsoft-Windows-Shell-Setup" processorArchitecture="x86" publicKeyToken="31bf3856ad364e35" language="neutral" versionScope="nonSxS" xmlns:wcm="http://schemas.microsoft.com/WMIConfig/2002/State" xmlns:xsi="http://www.w3.org/2001/XMLSchema-instance"> <AutoLogon> <Enabled>true</Enabled> <LogonCount>1</LogonCount> <Username>Administrator</Username> <Password> <Value>xxxxxxxxxx</Value> <PlainText>true</PlainText> </Password> </AutoLogon> <UserAccounts> <AdministratorPassword> <Value>xxxxxxxxxx</Value> <PlainText>true</PlainText> </AdministratorPassword> </UserAccounts> <OOBE> <HideEULAPage>true</HideEULAPage> <NetworkLocation>Work</NetworkLocation> <HideWirelessSetupInOOBE>true</HideWirelessSetupInOOBE> <ProtectYourPC>3</ProtectYourPC> <SkipUserOOBE>true</SkipUserOOBE> </OOBE> <TimeZone>Eastern Standard Time</TimeZone> <DisableAutoDaylightTimeSet>true</DisableAutoDaylightTimeSet> <RegisteredOrganization>xxxxxxxxxx</RegisteredOrganization> <RegisteredOwner /> <Display> <HorizontalResolution>1280</HorizontalResolution> <VerticalResolution>1024</VerticalResolution> </Display> </component> </settings> </unattend> -
I believe you need a space between the nocompress and hardlink switches? /nocompress /hardlink
-
Is this only happening with one client? Have you tried uninstalling/reinstalling the ConfigMgr client?
-
Not that I've found - the screenshot above is from a freshly imaged PC using a Windows 7 Base Image task sequence. The reference operating system was from a Build and Capture (which integrates the sysprep/oobe process) and an unattend.xml config file was referenced in the deployment as well.
-
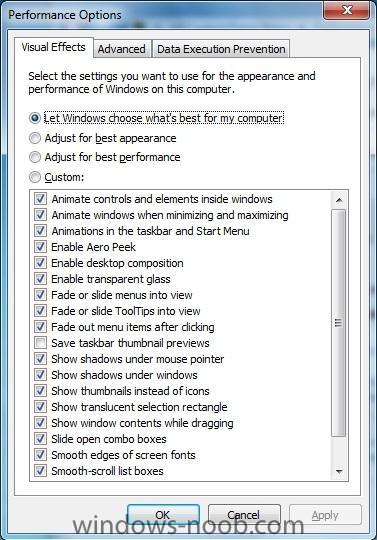
What is the "best practice" for deploying Windows 7 with restricted visual effects within the OS, so as to optimize performance on older hardware? Is this done through GPO, or do the changes have to be made on the image?
-

Deploy Windows XP - not finishing the Task Sequence
The Bronx Bull replied to rwle's question in Deploying Operating Systems
See here: http://support.microsoft.com/kb/302577 You need to either sysprep the image properly and then capture only, or you can simply do a build and capture in an SCCM task sequence, which syspreps it for you. If you're having trouble integrating the image into SCCM, then simply get it working with the ImageX tool before you move onto a task sequence. -
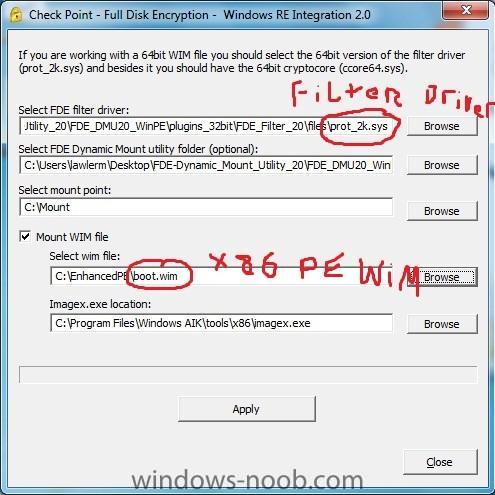
Attch 1: PSWinRE Utility (mounts and injects drivers) Attch 2: Filter Driver Location If you do this, I wouldn't overwrite your base x86 WinPE boot.wim - snatch a fresh boot.wim from the WAIK Program Files to test with, and then import your "Checkpoint boot.wim" into SCCM, update the task sequence to use the newer boot image, etc.
-
When deploying Windows 7, I'm a bit confused with regards to the Administrator account creation from a TS from within SCCM. That confusion probably stems from the "Randomly generate the administrator account and disable the account on all supported platforms (recommended)" option from within the "Apply Windows Settings" of my task sequence. Why would that be recommended? I have yet to work within an Enterprise environment that ONLY uses domain accounts and has no backup/local admin account. My goal is this: Immediately after OSD, I want ONE local administrator account on the PC, I want it to be called "lionadmin", and for the password to be specified in the task sequence. That's it. I realize you can create accounts within the Unattend.xml file, but if I do so there, what should I choose in the "Apply Windows Settings" step of the task sequence? The way I have it set up now, it seems to be creating my "lionadmin" account properly, but there is an additional "Administrator" account that is disabled by default.. if I choose "Randomly generate the administrator account..", and for whatever reason the PC fails to join the domain, then I'm locked out for good.
-

Deploy Windows XP - not finishing the Task Sequence
The Bronx Bull replied to rwle's question in Deploying Operating Systems
Ok - this definitely looks like a network driver issue. I see you have a step in your task sequence to "Install Network Driver;" what is the purpose of that step? All drivers should be located in the driver pool, and the Apply Device Drivers step should take care of the rest. After the task sequence is finished, do you have network connectivity? Are all drivers installed in device manager? When you say the image is sysprepped, do you mean that sysprep.exe was run from the C:\Sysprep folder without a sysprep.inf file? Or did you perform a build and capture from SCCM? You've got a lot of variables going on here - and I definitely think it's a conflict of interest in perhaps the XP sysprep trying to install drivers conflicting with the SCCM TS. One XP log file that I used to use to troubleshoot driver installations was "setupapi.log", which is located in C:\Windows I believe. I'm not sure if it'll even be there, however, since you're using the SCCM portion to install the drivers. What I would do is disable a bunch of steps from your task sequence, and narrow down which step is halting it. The smsts.log file will help tremendously in this area, and is by far the best way to troubleshoot a TS. Also, read this thoroughly and see if you're missing anything: http://scug.be/blogs...-sccm-2007.aspx As for the smsts.log, use this list to locate it: • WindowsPE, before HDD format: x:\windows\temp\smstslog\smsts.log • WindowsPE, after HDD format: x:\smstslog\smsts.log and copied to c:\_SMSTaskSequence\Logs\Smstslog\smsts.log • Full version windows, before SCCM agent installed: c:\_SMSTaskSequence\Logs\Smstslog\smsts.log • Full version windows, after SCCM agent installed: c:\windows\system32\ccm\logs\Smstslog\smsts.log • Full version x64 windows, after SCCM agent installed: c:\windows\sysWOW64\ccm\logs\Smstslog\smsts.log • After Task Sequence has finished running c:\windows\system32\ccm\logs\smsts.log • After Task Sequence has finished running(x64) c:\windows\sysWOW64\ccm\logs\smsts -
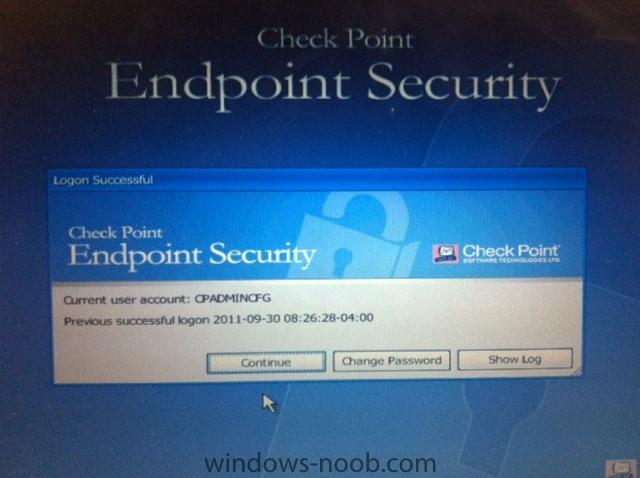
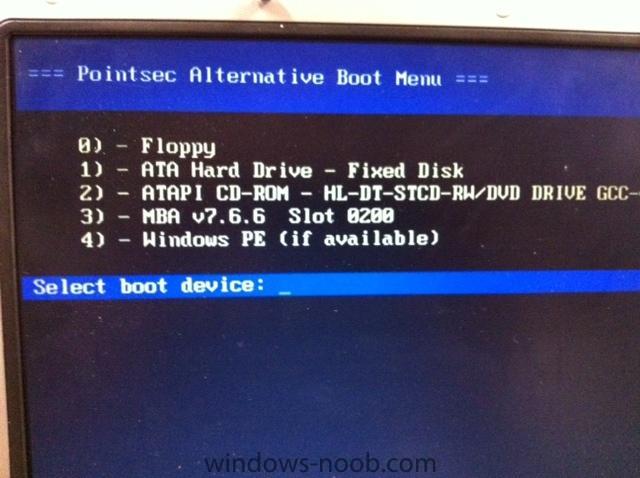
Ok here's what I think you have to do - and once again, I'm no expert on this, just trying to help. I assume you're using Checkpoint Pre-Boot Authentication. Just as normal, execute the task sequence from the Windows OS. Once it reboots, enter the Checkpoint credentials at the login screen, which will bring you to the first attachment below. At this screen, hit "CTRL+F10" (you will get no visual indicators that you have done so), then hit continue... Checkpoint's Alternative Boot Menu will load, looking like the second attachment. From here, I *think* you're going to boot to the hard drive (to continue to the next step in the TS), but your boot image has to have those Checkpoint upper filter drivers installed.. you can also try fiddling with PXE booting from the ABM.. The drivers can be located in their Dynamic Mount Utility pack. And good luck getting support from Checkpoint on this issue! (Ha!) I can tell you this: in order to see and read data from the drive while in WinPE, you need two things: 1) your WinPE boot WIM has to have the Checkpoint filter drivers injected, and 2) you have to boot from the ABM. Once you do those two things, you can see the encrypted drive just fine, since you've "authenticated."
-

Deploy Windows XP - not finishing the Task Sequence
The Bronx Bull replied to rwle's question in Deploying Operating Systems
You're going to have to attach your task sequence xml file; it doesn't seem to import when it's all fragmented. And more importantly, do you have the smsts.log? It should be at C:\Windows\System32\CCM\logs\smstslog. -
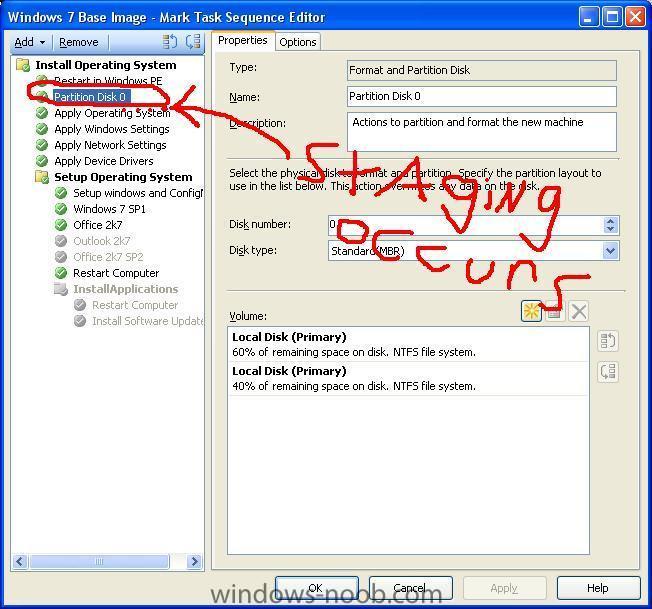
Hmmmm... there might be a way to set a task sequence variable just prior to the diskpart that keeps _SMSTaskSequence and wipes around it... but that's a long shot. In my hardlinks' task sequence, the "OSDStateStore" variable is set, and the drive is wiped around that particular folder. One thing though - it doesn't sound like the USMT is the problem? Since the scanstate is running successfully and the user's data is being stored securely on a network share, shouldn't the first step of your TS be to partition and format the drive? See the attached screenshot - this task sequence of mine runs the partition step first and immediately after execution (without needing any TS files, then reboots, *then* stages the boot WIM and other TS config files.. I do not believe the boot WIM is staged the first time around when PXE booting or from boot media? Then you would simply need to integrate a loadstate into the tail end of your TS - or is there something I'm missing? It definitely sounds like you have your hands full though!
-
Most definitely. I'm "The Bronx Bull" - primarily playing Team Deathmatch!
-
Thanks! I'm going to rebuild a base image using the Windows 7 installation files with SP1 pre-integrated. I don't see a point in keeping an entire service pack outside of the WIM. Do you play Gears of War 3?
-
I'm no expert on this, but in order for Windows PE to even see the encrypted file system to use the staged TS config files, don't you have to either boot to PE using Checkpoint's Alternative Boot Menu, or utilize their Dynamic Mount Utility? You cannot access the encrypted drive without authenticating into it first. Things to try: 1) Instead of staging the config files on the local hard disk, you could set the packages and the boot image to be accessed directly from the network, instead of downloading them locally (not 100% on this). 2) As far as the Checkpoint authentication into the drive, I think you're going to need to need to create an additional boot image that has the Prot_Sys upper filter drivers installed (look for a utility called "pswinre" in your checkpoint files; this utility can inject them into your boot WIM). 3) Also, as you stated, you can most definitely perform a diskpart format in Windows PE on an encrypted drive. Have you tried making the first step of the task sequence a "run command line" step that references a diskpart script? You simply need to find a way to execute this step prior to the staging of the TS files. i.e. diskpart.txt select disk 0 select volume 1 format fs=NTFS quick override exit [continue with TS] You need the override command to perform the format because while encrypted with Pointsec, the disk is technically in use. Sorry I couldn't be of more help. I do have experience in making WinPE boot media that is accessible to encrypted drives, but anything beyond that, I have no yet explored.
-
Has anyone successfully packaged and deployed the Windows 7 Service Pack 1 MSI with SCCM? I packaged the MSI file, created a program, and used the following command: Windows_Win7SP1.msi /unattend /norestart When integrating this package into a task sequence, however, it does nothing but halt the TS and "Waiting for status on job."
-

Deploy Windows XP - not finishing the Task Sequence
The Bronx Bull replied to rwle's question in Deploying Operating Systems
SMSTS.log file please, as well as a screenshot of your task sequence. Are you using the network service account to join to the domain? Are you asking the TS to join the domain via the task sequence "Apply Network Settings" step? Is the image sysprepped and are you integrating a sysprep.inf file in the "Apply Operating System" step? -
Apparently MigSys.xml is a config file that is only relevant to USMT 3.0 and earlier... you do not need it with 4.0. Remove it from your scanstate/loadstate command line..
-
We need the smsts and scanstate log files! Where are you running these task sequences from?
-
I'm all set, thanks! 1) Why can I not do a "cd c:\" within the Windows PE command prompt? Why does it open up defaulting to X:\Windows\System32 (probably because that's where the cmd.exe is launching from - but I've seen screenshots of people using the F8 command support from a TS and getting a prompt that defaults to C). In order to perform a change directory from the Windows PE command prompt, which defaults to the X drive, you simply need to type "C:" to change drives; using "cd c:\" will not work. 2) What more is there to know about the /offline switch? Do I need to add to it? The offline switch needs to be run based on this syntax: /offlinewindir:c:\windows 3) Each time a boot image is modified within SCCM, does new boot media need to be created to go with it? Yes, each time a boot image is modified, the boot media needs to be updated, since it references the boot image upon creation.
-
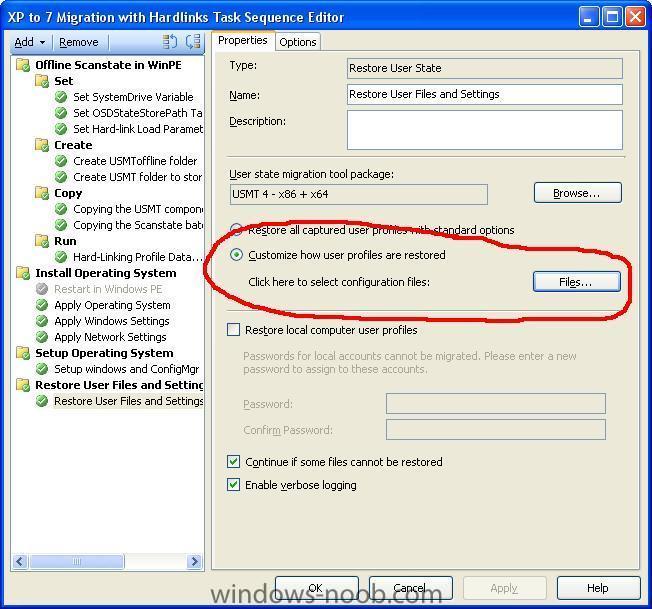
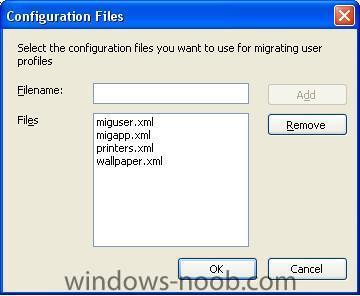
It's looking for the "MigSys.xml" config file that is not copied to the DP. Check your scanstate command-line syntax in the "Capture User State" step of the TS - if the "MigSys.xml" file isn't referenced in the command line, then check the SCCM GUI reference to the scanstate/loadstate config files (see below). Make sure that in "Capture User Files and Settings" and in "Restore User Files and Settings" that your config files match in each step. I had a similar issue where I mis-typed "MigApp.xml" as "MigCpp.xml," and it was bombing the loadstate each time.
-
Good thinking - except we're deploying a TS to multiple different hardware models among several different manufacturers - have you successfully integrated this into a "universal" application? I would surmise that there has to be some sort of hardware detection step.
-
Well, your task sequence looks good to me. Can you provide us with the smsts.log file? Have you configured the network service account? In the scanstate steps, are you specifying which config xml files to use? And lastly, if you're looking to copy only domain profiles, you'll need to add an additional task sequence variable with applicable scanstate syntax; that being said, I've not had much luck with SCCM's built in USMT task sequence steps.
-

OSD Issues Help required please...
The Bronx Bull replied to IT-Paul's question in Deploying Operating Systems
1) What does your OSDComputerName VBScript consist of? I've found that the easiest way to prompt for a computer name just prior to OS deployment is using a task sequence variable that is specified for a certain collection. Right click on the collection you want to assign the variable to, select Modify Collection Settings, Task Sequence Variables tab, and add OSDComputerName as a variable. Then, henceforth, each time you want to execute a task sequence from WinPE, you can modify the computer name just prior to firing off the TS. 2) Where are you running the TS from? As specified in the log, the "Apply Windows Settings" step has to be run from WinPE and not in FullOS mode; thus, you'll need to create a WinPE boot media. It would also help if we could see a screenshot of your task sequence and how the steps are integrated. 3) Have you created an SCCM network service account? I'm going to assume you're asking it to join the domain via the "Apply Network Settings" step of the TS... my guess is since the "Apply Windows Settings" step failed, the "Apply Network Settings" step also failed as a result of running the TS outside of WinPE. 4) That's because your "Apply Windows Settings" was never completed, and therefore the administrator account is locked. (this is the step of the TS where you specify whether you want to change the local admin password). Are you using an unattend.xml config file for the operating system image? Where are you executing the task sequence from? Have you tried creating WinPE boot media and running the task sequence outside of the full OS?- 1 reply
-
- SCCM 2007 R2
- Windows 7
-
(and 1 more)
Tagged with:


